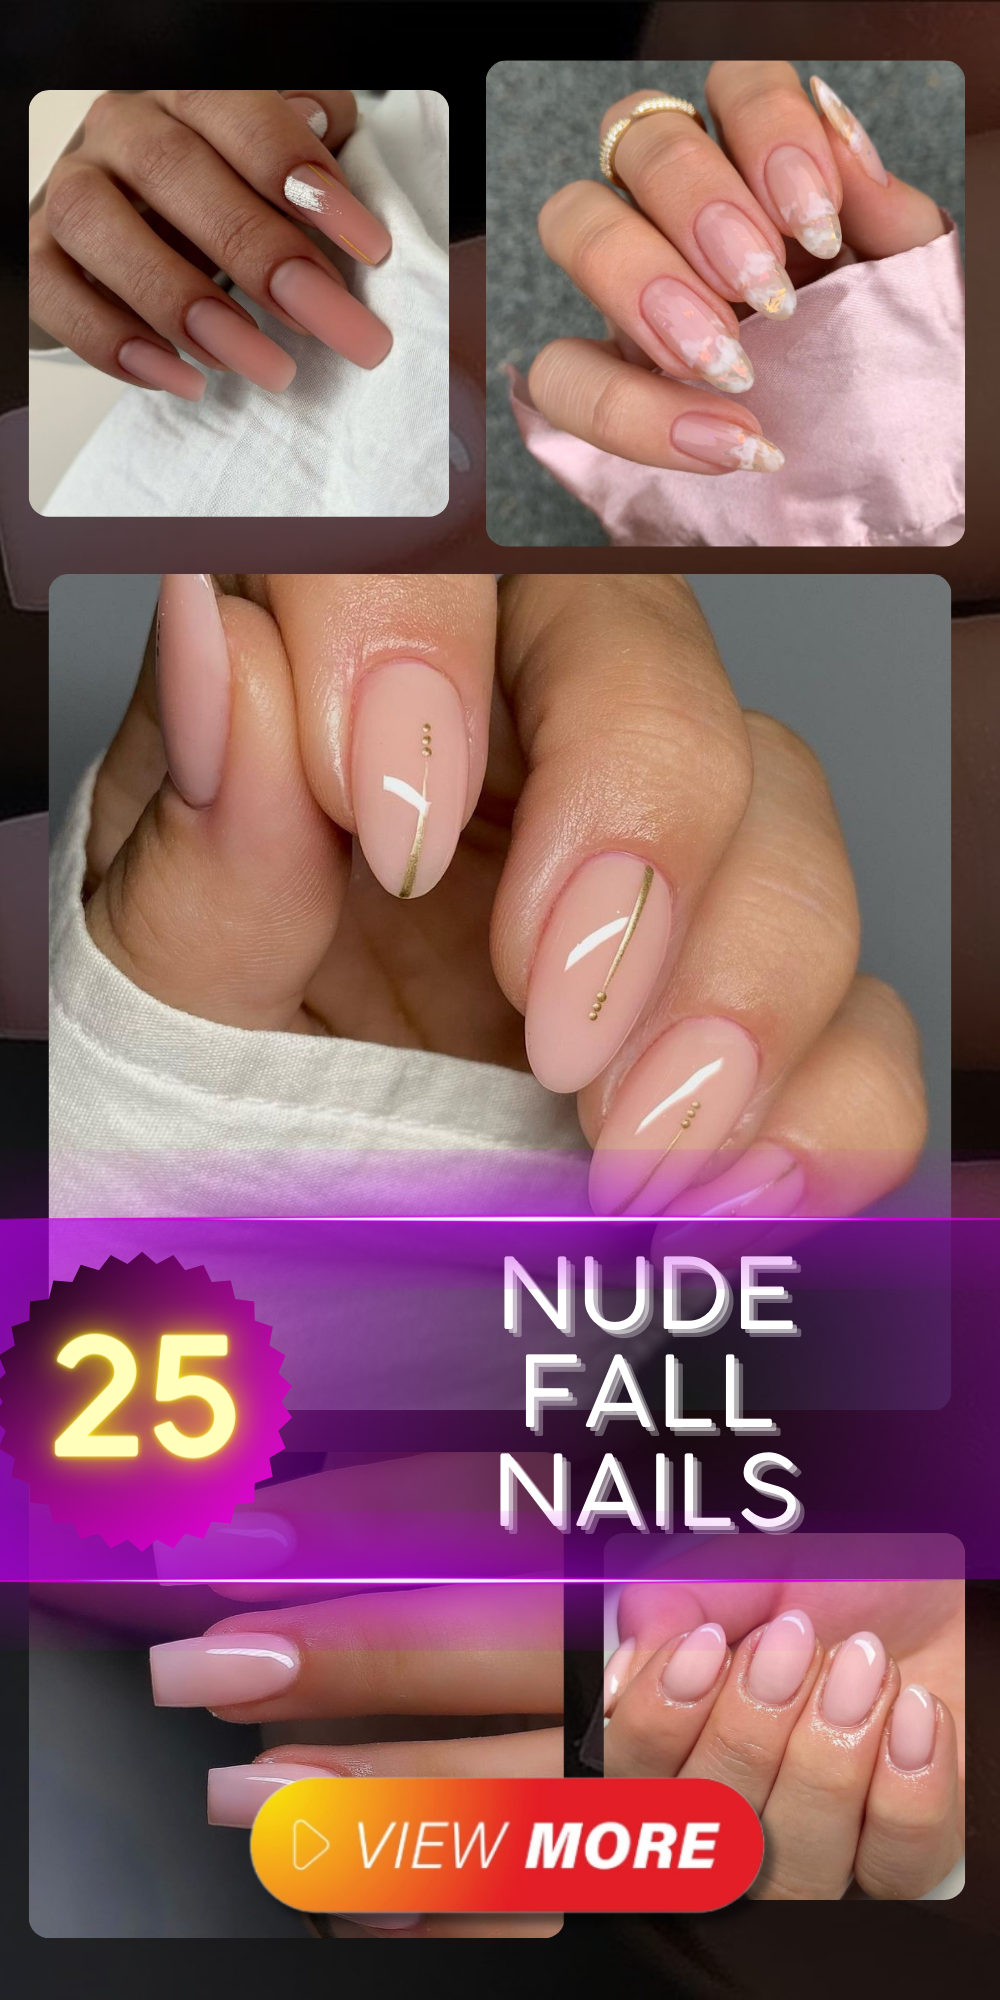
Fall is the perfect time to switch up your nail game, and what better way to do it than with elegant and classy nude fall nails? Whether you’re into short, gel, or trendy designs, there’s something for everyone. In this article, we’ll explore various nude nail designs that are perfect for the autumn season. From milky finishes to glittery accents, these ideas will inspire your next manicure. Ready to find your next nail inspiration? Let’s dive in!
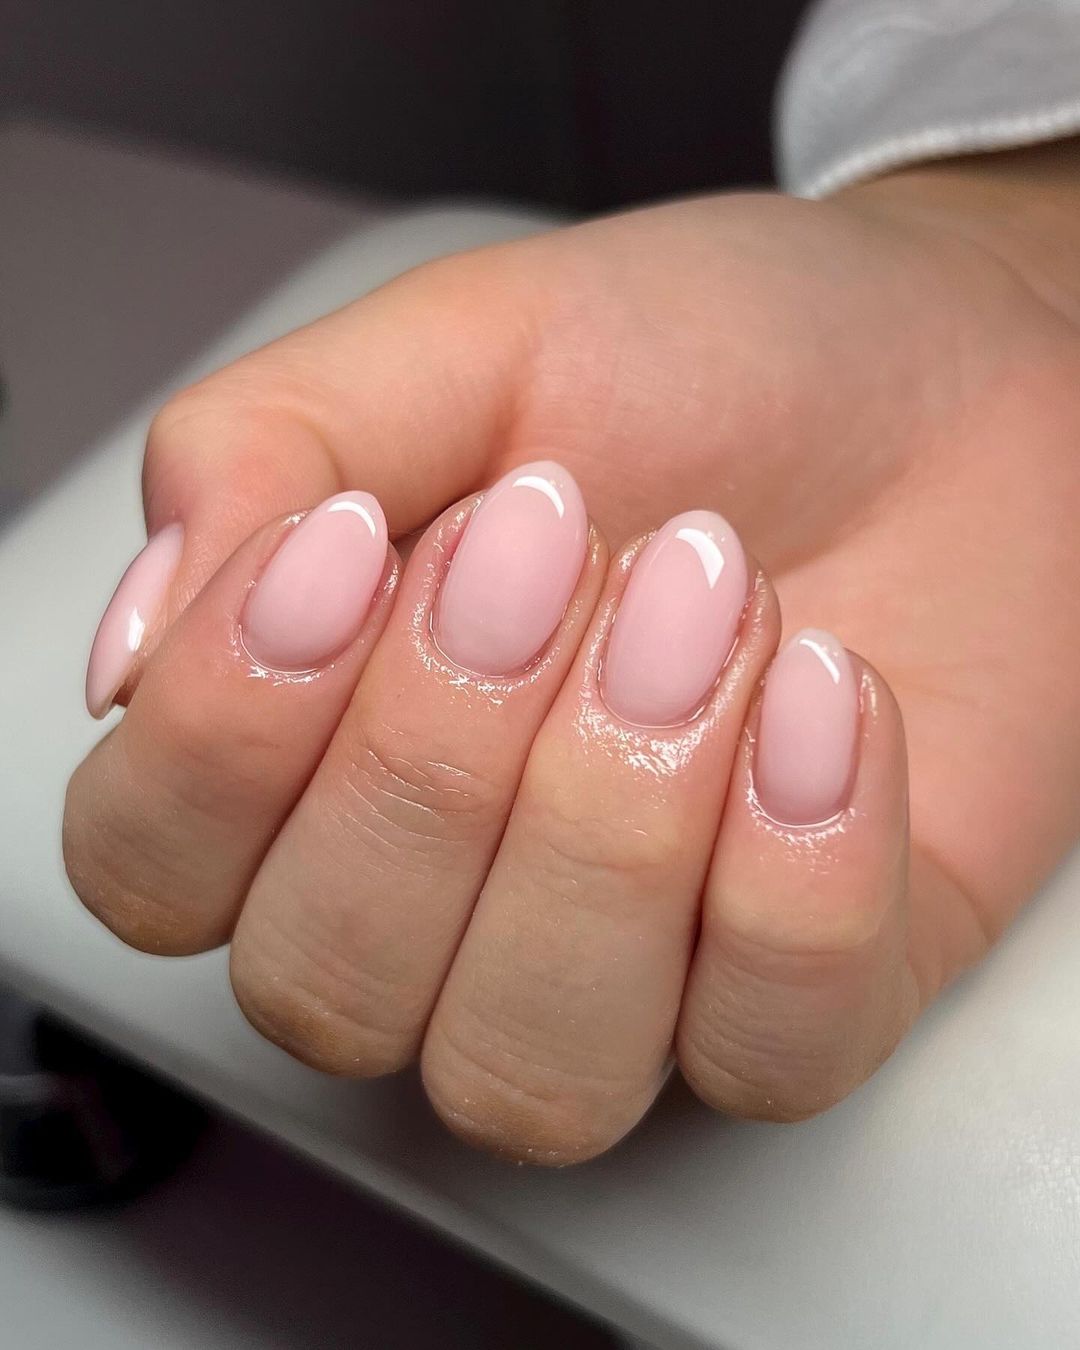
Sophisticated Almond Nails
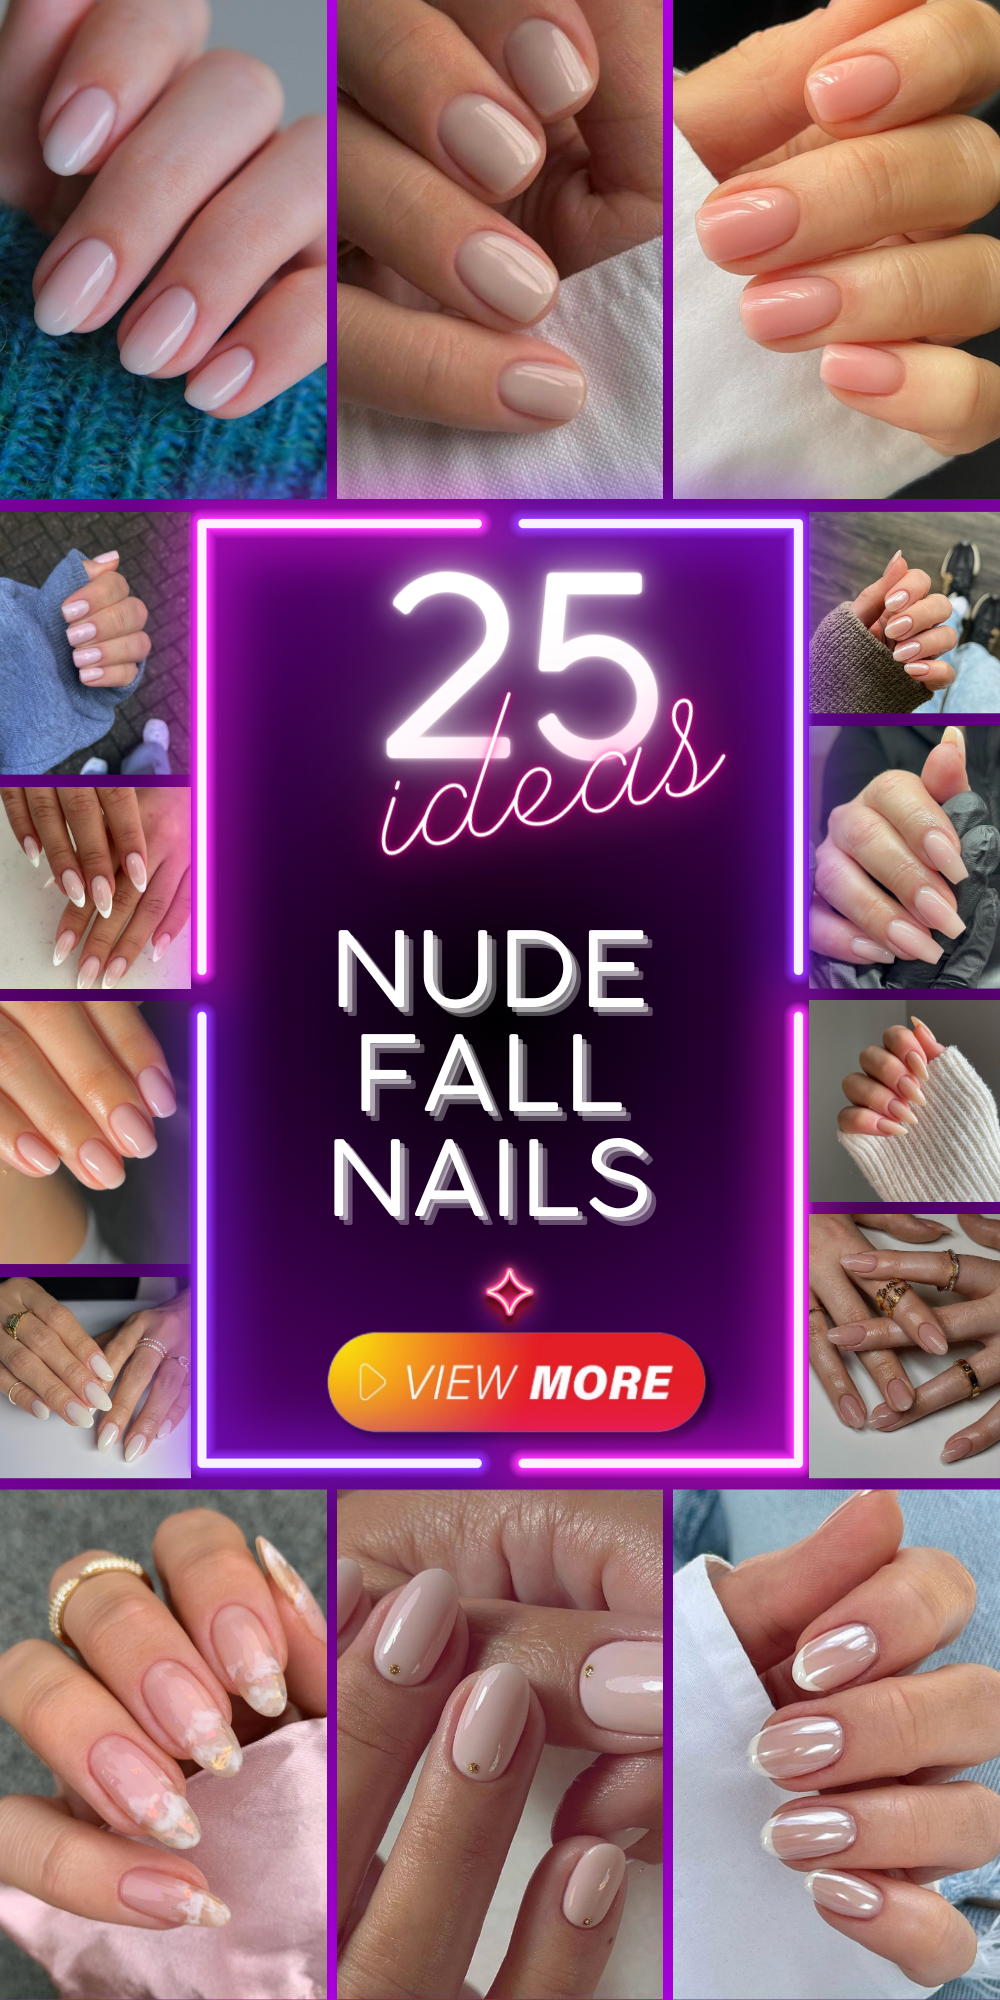
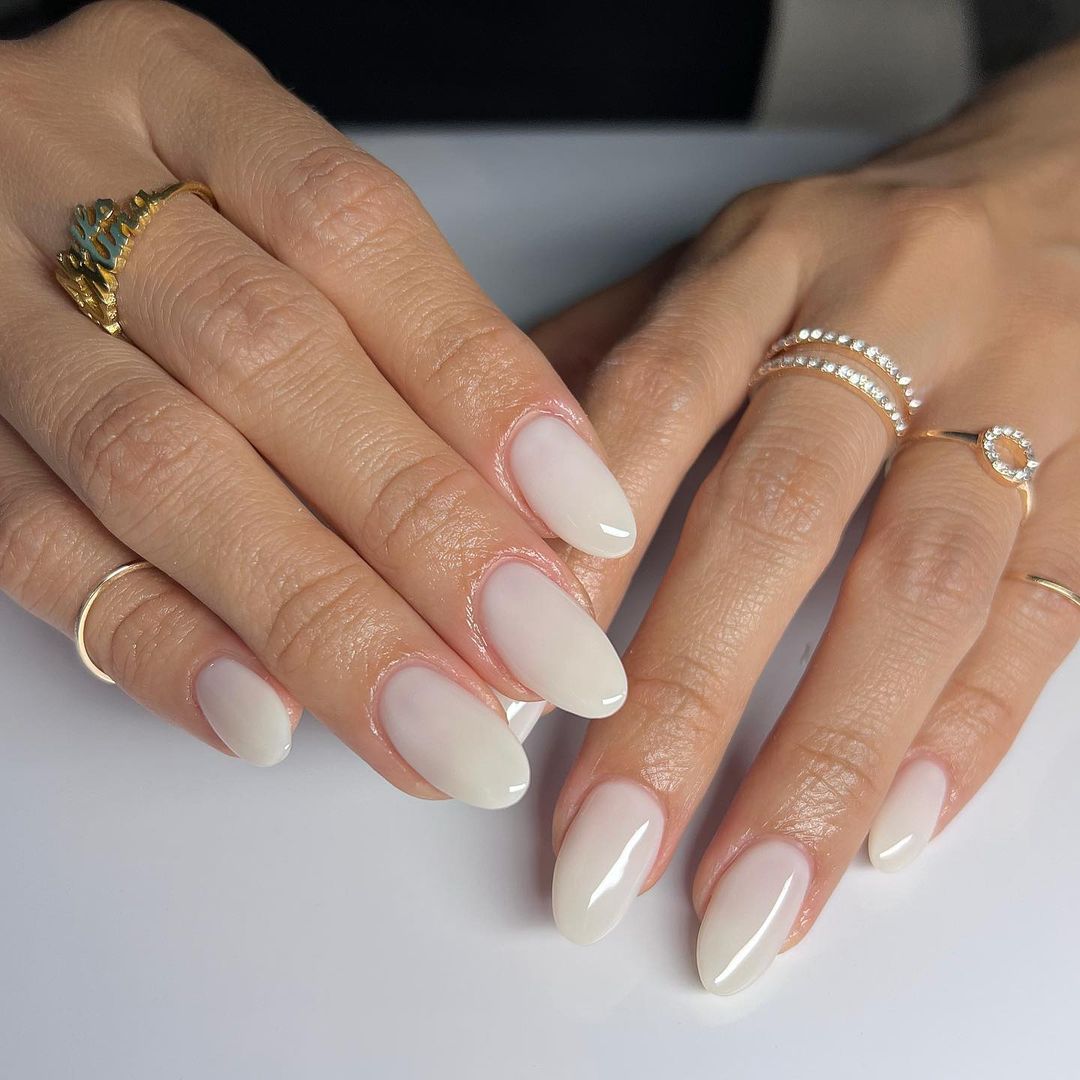
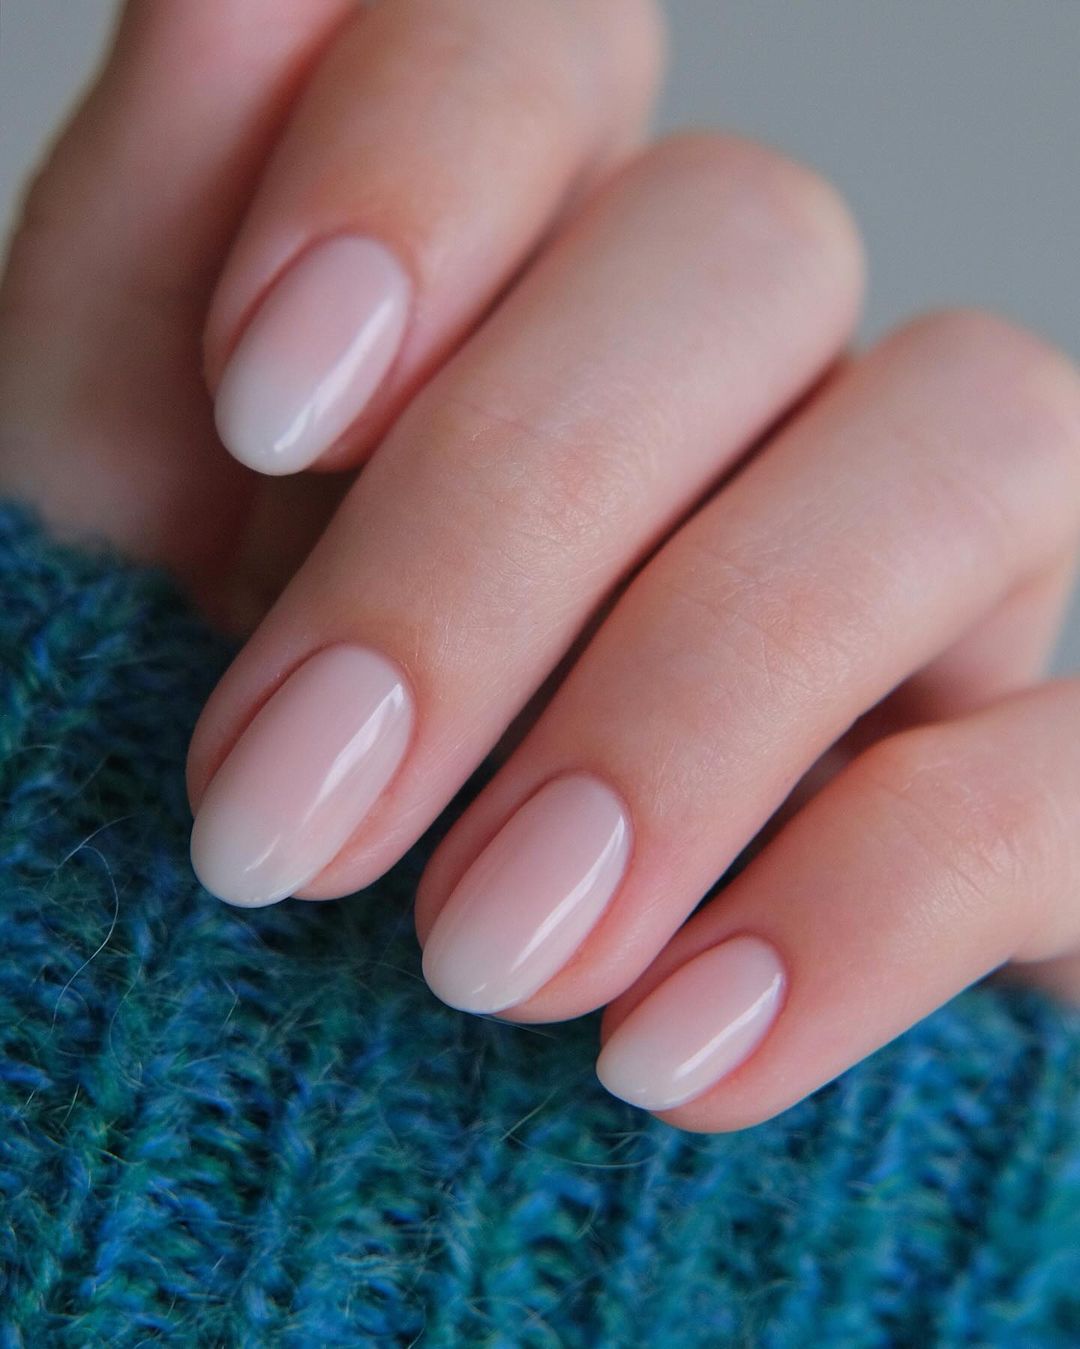
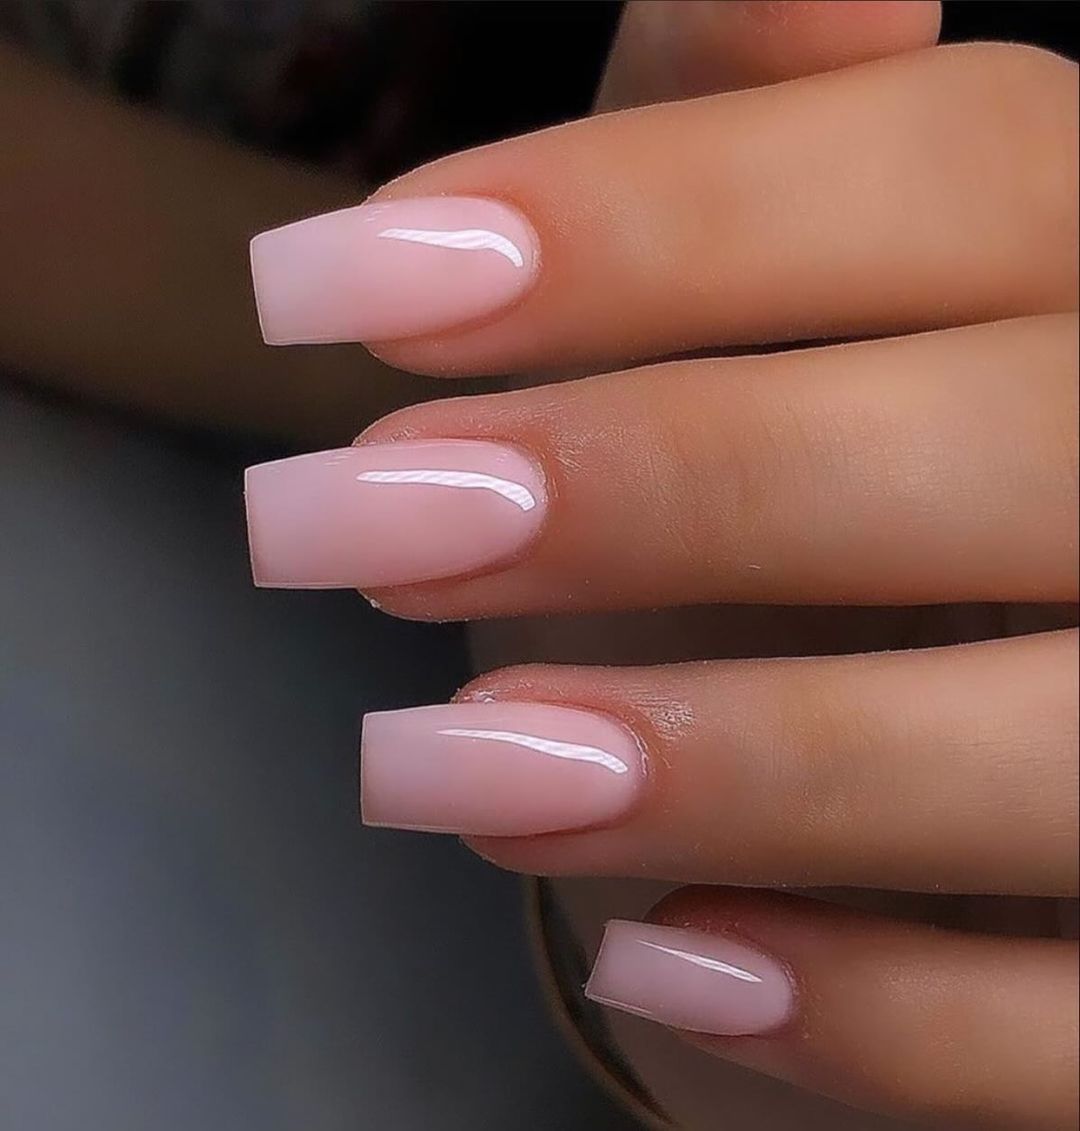
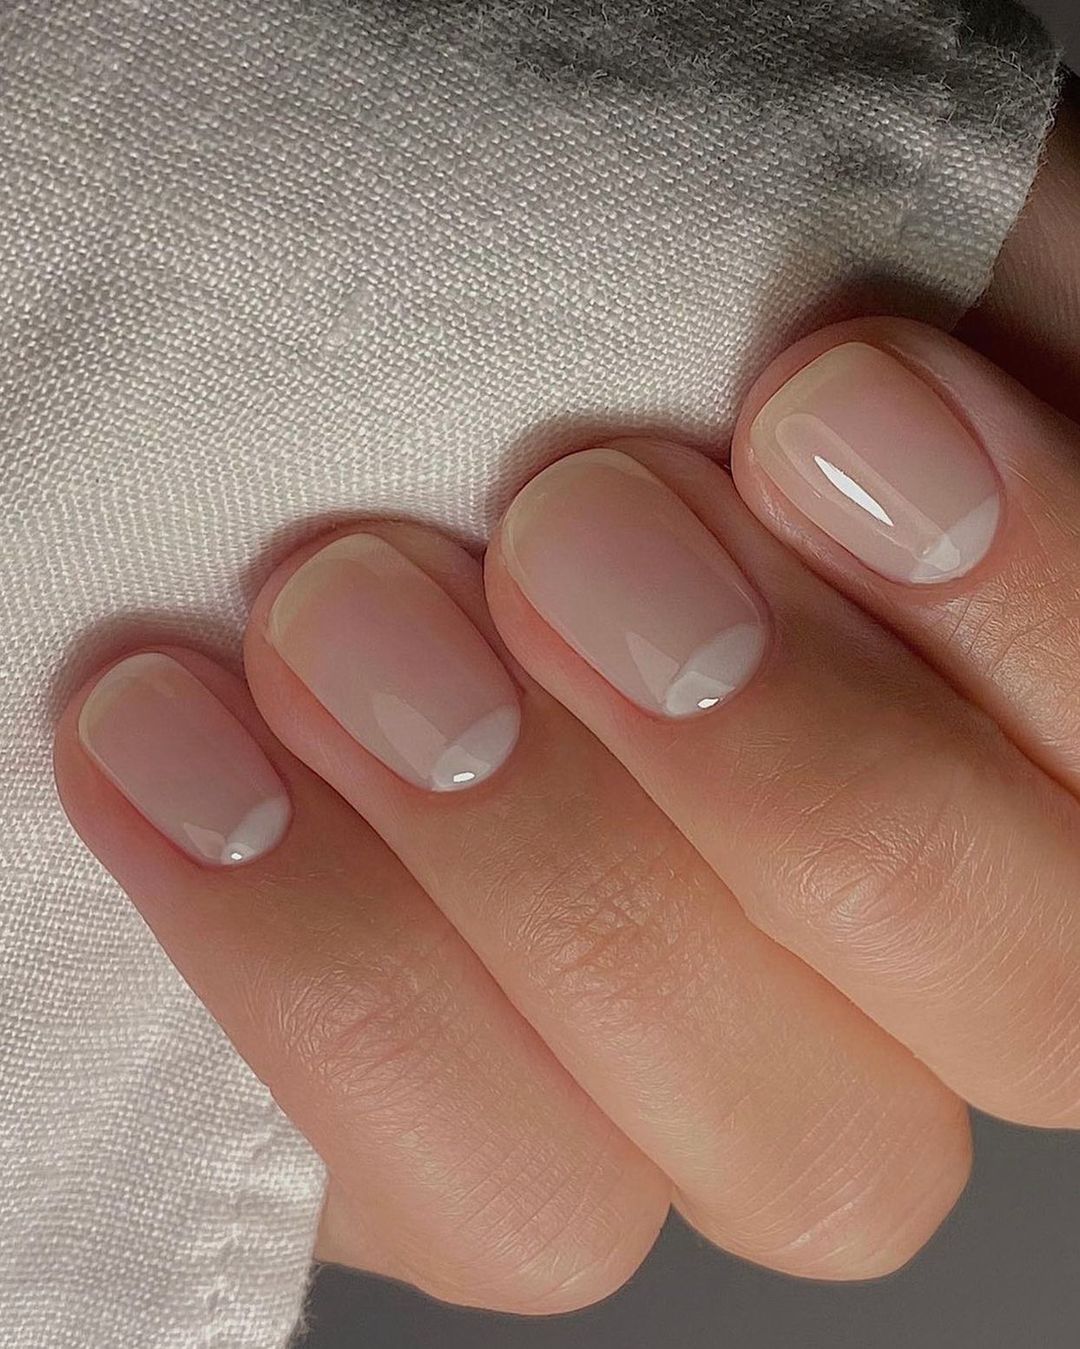
When it comes to nude fall nails, nothing beats the sophistication of almond-shaped nails with a milky finish. This design exudes elegance and can be worn with any outfit, making it a versatile choice for the season. The subtle pinky hue adds a touch of softness, while the glossy finish gives it a polished look.
-
- Milky nude gel polish (e.g., OPI’s “Funny Bunny”)
- Base coat and top coat (e.g., CND Shellac)
- UV or LED lamp
- Almond nail tips (optional)
- Nail file and buffer
How to Achieve This Look at Home:
-
- Start with clean, shaped nails. Apply a base coat and cure under a UV lamp.
- Apply two coats of milky nude gel polish, curing each layer.
- Finish with a top coat and cure once more. Buff for a smooth finish if necessary.
- Ensure cuticles are moisturized for that perfect salon look.
Short and Trendy Nails
For those who prefer short nails, this design is both trendy and practical. The soft pink glow gives a youthful vibe, perfect for the fall season. It’s an elegant choice for everyday wear and pairs beautifully with neutral outfits.
-
- Soft pink gel polish (e.g., Essie’s “Ballet Slippers”)
- Base coat and top coat (e.g., Seche Vite)
- UV or LED lamp
- Nail file and buffer
How to Achieve This Look at Home:
-
- Begin with well-shaped nails and apply a base coat, curing it under the lamp.
- Apply two layers of soft pink gel polish, curing each layer.
- Finish with a top coat and cure. Buff the nails for an extra smooth finish.
- Keep cuticles neat and moisturized for a clean look.
Glittery Almond Nails
Nothing says fun like a bit of glitter. These almond nails with a glittery finish are perfect for adding some sparkle to your fall wardrobe. The neutral beige base with glitter accents creates a classy yet eye-catching look.
-
- Beige gel polish (e.g., Sally Hansen’s “Bare Dare”)
- Fine glitter polish (e.g., Deborah Lippmann’s “Glitter and Be Gay”)
- Base coat and top coat (e.g., Gelish)
- UV or LED lamp
- Almond nail tips (optional)
- Nail file and buffer
How to Achieve This Look at Home:
-
- Prepare nails by filing and applying a base coat, curing under the lamp.
- Apply two coats of beige gel polish, curing each layer.
- Add a layer of fine glitter polish and cure.
- Seal with a top coat, cure, and buff for smoothness.
- Ensure cuticles are neat and moisturized.
Milky White Elegance
Milky white nails are a timeless and classy choice for any season, but they truly shine in the fall. This design features a soft, milky white gel that enhances the natural beauty of your nails, giving them a sophisticated yet understated look. The almond shape adds an element of elegance, perfect for both casual and formal settings.
-
- Milky white gel polish (e.g., OPI’s “Funny Bunny”)
- Base coat and top coat (e.g., CND Shellac)
- UV or LED lamp
- Almond nail tips (optional)
- Nail file and buffer
How to Achieve This Look at Home:
-
- Start with clean, shaped nails. Apply a base coat and cure under a UV lamp.
- Apply two coats of milky white gel polish, curing each layer.
- Finish with a top coat and cure once more. Buff for a smooth finish if necessary.
- Ensure cuticles are moisturized for that perfect salon look.
Save Pin
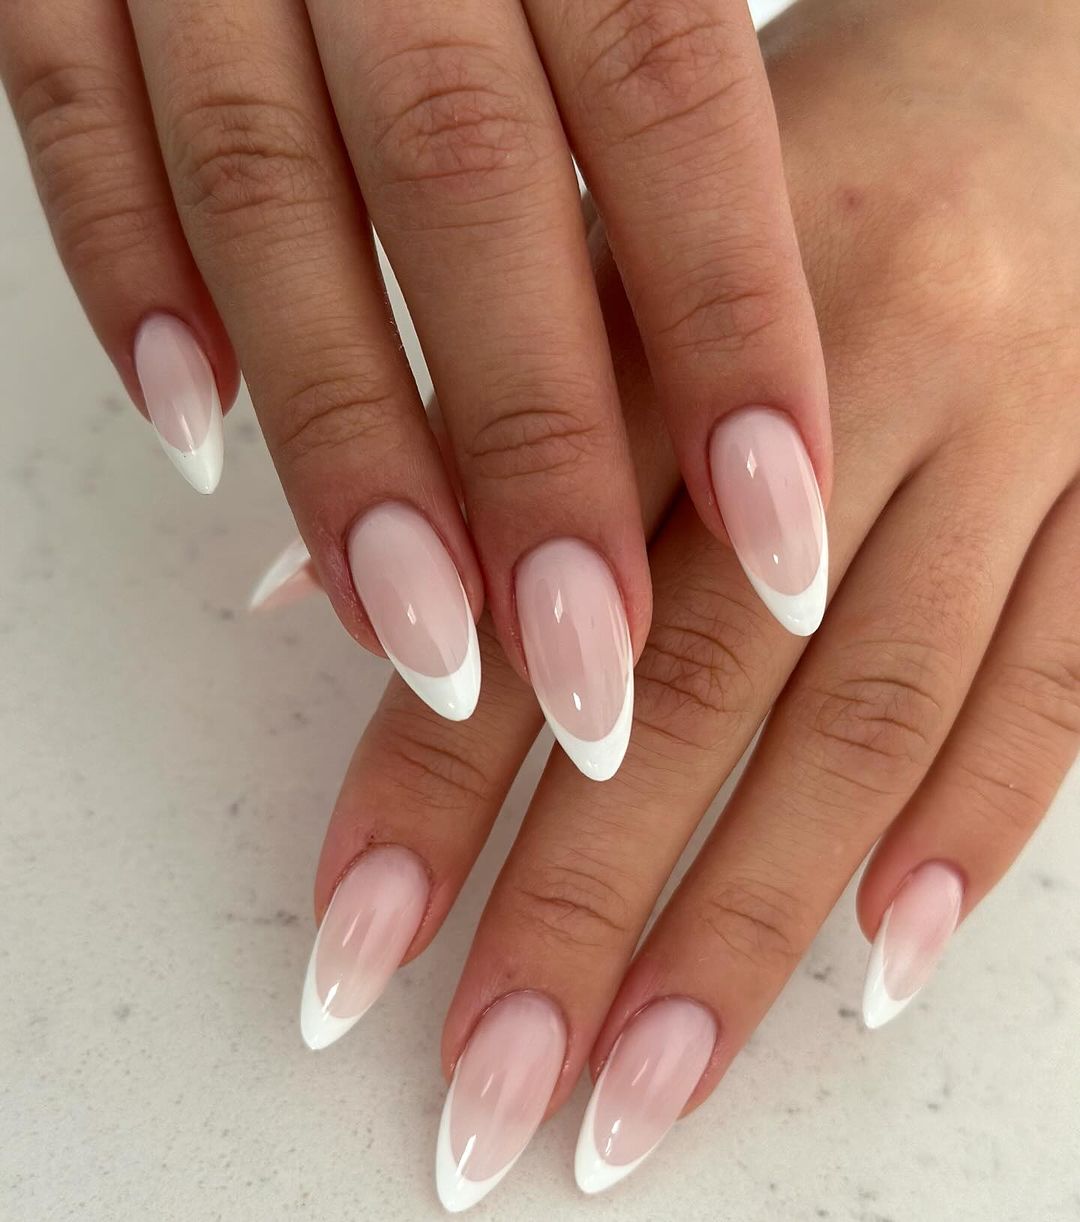
Classic French Tips with a Modern Twist
French tips are a classic design that never goes out of style. This modern twist on the traditional French manicure features a subtle gradient from a soft pink base to crisp white tips. The almond shape elongates the fingers, adding a touch of sophistication to the overall look. This design is versatile and can be worn for any occasion, from a day at the office to a night out.
-
- Soft pink gel polish (e.g., Essie’s “Ballet Slippers”)
- White gel polish (e.g., Sally Hansen’s “White On”)
- Base coat and top coat (e.g., Gelish)
- UV or LED lamp
- Almond nail tips (optional)
- Nail file and buffer
How to Achieve This Look at Home:
-
- Prepare nails by filing and applying a base coat, curing under the lamp.
- Apply two coats of soft pink gel polish, curing each layer.
- Carefully paint the white tips, curing each nail as you go.
- Seal with a top coat, cure, and buff for smoothness.
- Keep cuticles neat and moisturized for a clean look.
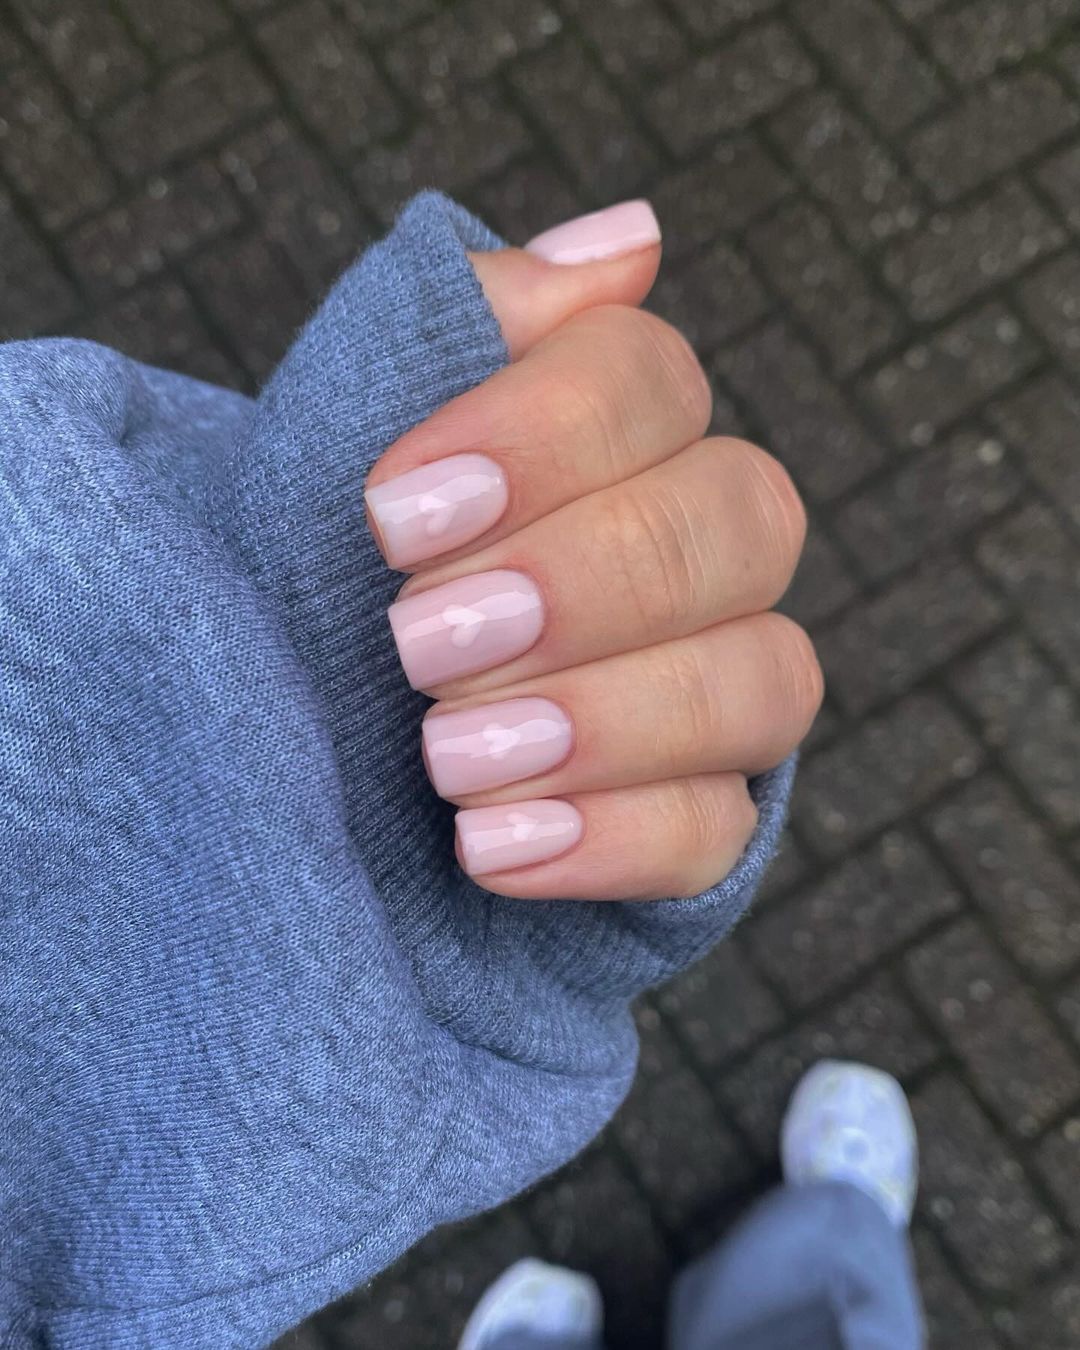
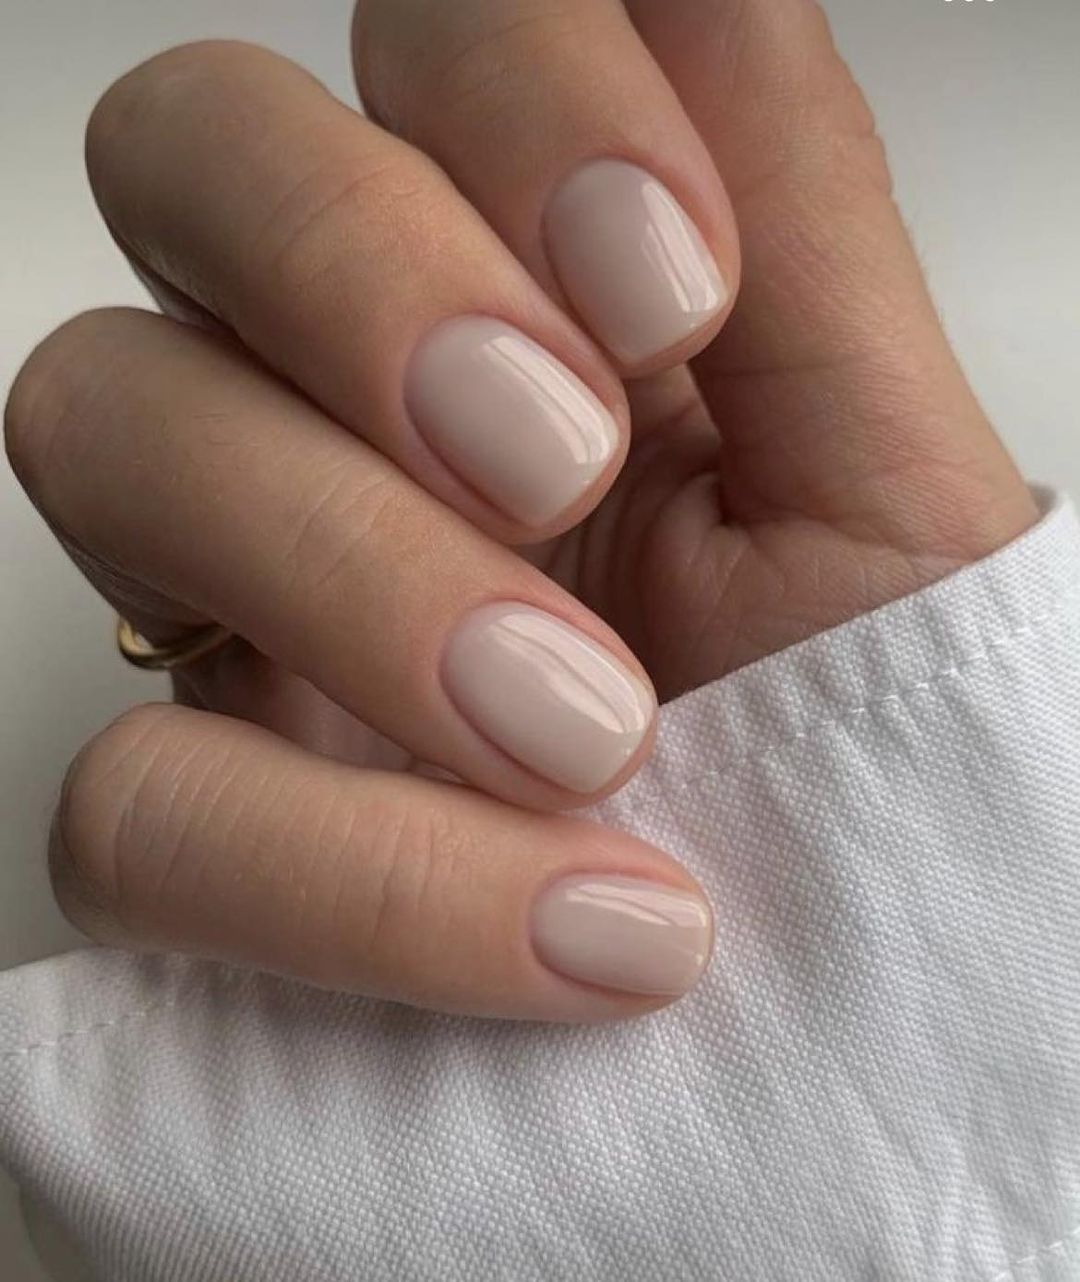
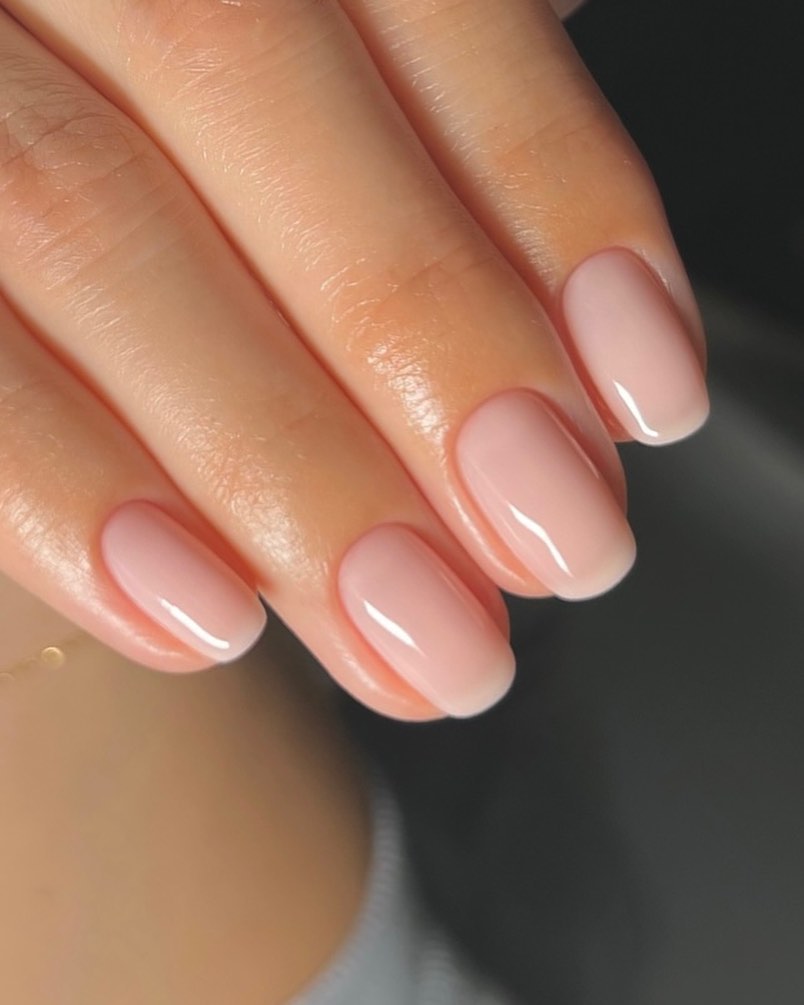
Soft Pink Short Nails
For those who prefer a more subtle and natural look, soft pink short nails are a perfect choice. This design uses a gentle pink polish that adds just a hint of color, making your nails look healthy and well-groomed. The short square shape is practical and easy to maintain, ideal for those with an active lifestyle. This look is both elegant and understated, making it suitable for everyday wear.
-
- Soft pink gel polish (e.g., OPI’s “Bubble Bath”)
- Base coat and top coat (e.g., Seche Vite)
- UV or LED lamp
- Nail file and buffer
How to Achieve This Look at Home:
-
- Begin with well-shaped nails and apply a base coat, curing it under the lamp.
- Apply two layers of soft pink gel polish, curing each layer.
- Finish with a top coat and cure. Buff the nails for an extra smooth finish.
- Keep cuticles neat and moisturized for a clean look.
Soft Gradient Oval Nails
These nails feature a soft gradient from a delicate pink to a milky white, creating an elegant and classy look. The oval shape adds a touch of sophistication, making this design perfect for any occasion. The smooth transition of colors makes it a versatile choice for both everyday wear and special events.
-
- Soft pink gel polish (e.g., Essie’s “Mademoiselle”)
- Milky white gel polish (e.g., OPI’s “Funny Bunny”)
- Base coat and top coat (e.g., Gelish)
- UV or LED lamp
- Nail file and buffer
How to Achieve This Look at Home:
-
- Start with clean, shaped nails. Apply a base coat and cure under a UV lamp.
- Apply a thin layer of soft pink gel polish, curing it under the lamp.
- Add a layer of milky white gel polish on the tips, blending it gently with the pink for a gradient effect, then cure.
- Finish with a top coat and cure once more. Buff for a smooth finish if necessary.
- Keep cuticles moisturized for a polished look.
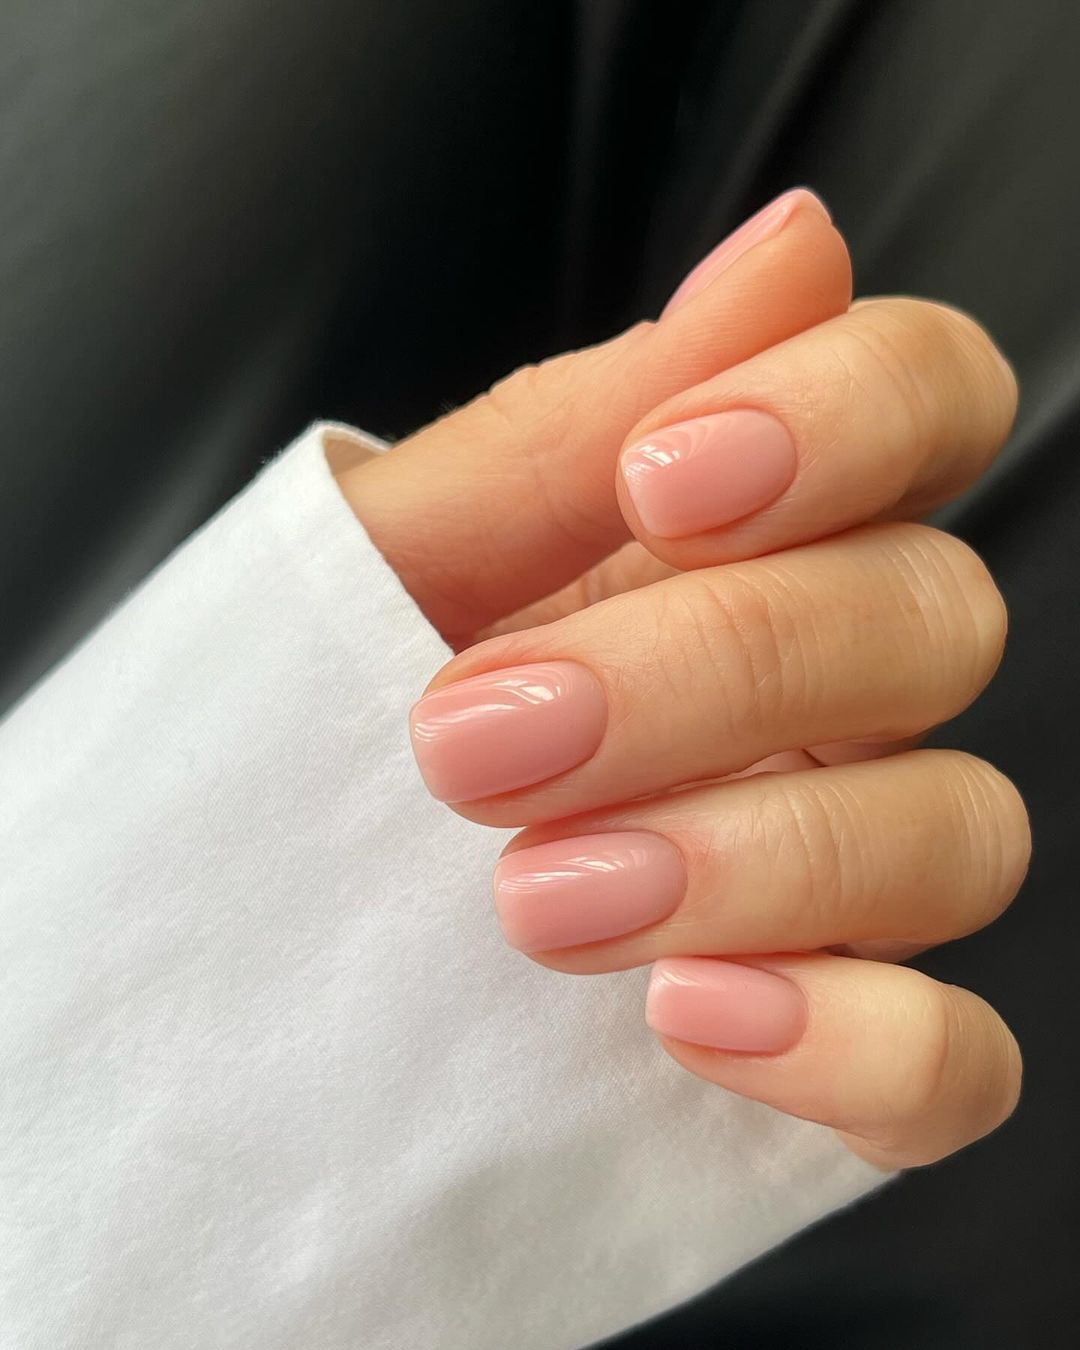
Peachy Short Gel Nails
These nails feature a delightful peachy color, perfect for a subtle yet stylish look. The short length and round shape are practical for daily activities while still maintaining a chic appearance. This design is ideal for those who prefer a natural and understated manicure.
-
- Peachy pink gel polish (e.g., OPI’s “Passion”)
- Base coat and top coat (e.g., Seche Vite)
- UV or LED lamp
- Nail file and buffer
How to Achieve This Look at Home:
-
- Prepare nails by filing and applying a base coat, curing under the lamp.
- Apply two coats of peachy pink gel polish, curing each layer.
- Finish with a top coat and cure. Buff the nails for an extra smooth finish.
- Keep cuticles neat and moisturized for a clean look.
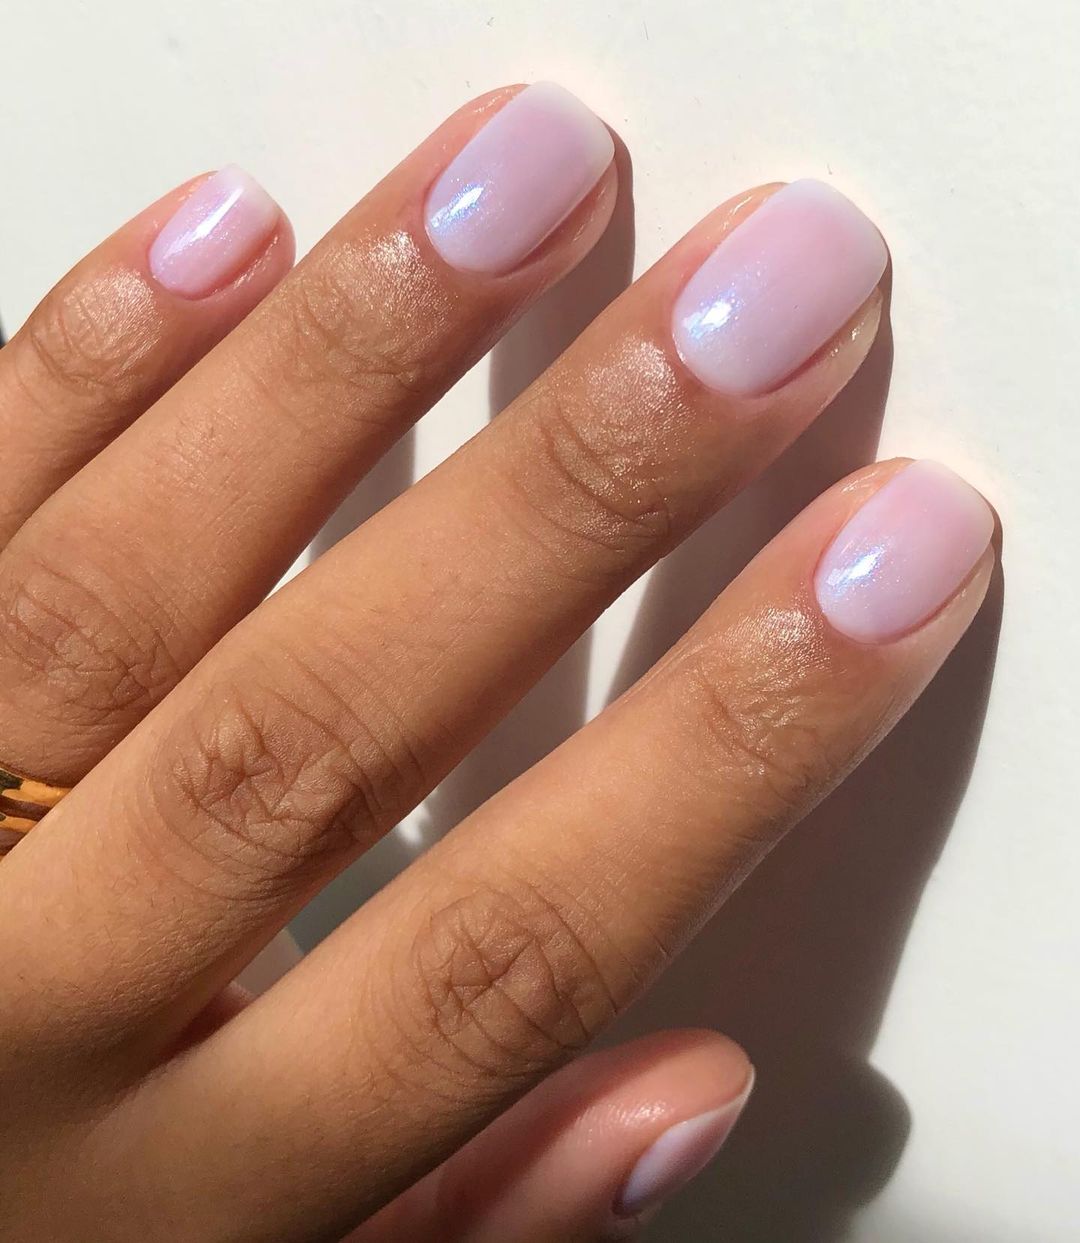
Iridescent Short Square Nails
These nails feature a beautiful iridescent polish that catches the light, creating a stunning effect. The short square shape is both trendy and practical, making it a great choice for those with an active lifestyle. The subtle shimmer adds a touch of glamour without being overwhelming.
-
- Iridescent gel polish (e.g., ILNP’s “Juliette”)
- Base coat and top coat (e.g., CND Shellac)
- UV or LED lamp
- Nail file and buffer
How to Achieve This Look at Home:
-
- Start with clean, shaped nails. Apply a base coat and cure under a UV lamp.
- Apply two coats of iridescent gel polish, curing each layer.
- Finish with a top coat and cure. Buff for a smooth finish if necessary.
- Keep cuticles moisturized for a polished look.
Save Pin
Pinkish Long Coffin Nails
These nails showcase a pinkish hue that is both delicate and eye-catching. The long coffin shape adds drama and elegance, making this design perfect for those who love to make a statement with their nails. The glossy finish enhances the overall look, making it a standout choice for any event.
-
- Pinkish gel polish (e.g., OPI’s “Bubble Bath”)
- Base coat and top coat (e.g., Gelish)
- UV or LED lamp
- Coffin nail tips (optional)
- Nail file and buffer
How to Achieve This Look at Home:
-
- Prepare nails by filing and applying a base coat, curing under the lamp.
- Apply two coats of pinkish gel polish, curing each layer.
- Finish with a top coat and cure. Buff the nails for an extra smooth finish.
- Keep cuticles neat and moisturized for a polished look.
Beige Short Nails
These nails feature a neutral beige color, perfect for a subtle and sophisticated look. The short length and rounded shape are practical for everyday activities while maintaining a chic appearance. This design is ideal for those who prefer a natural and understated manicure.
-
- Beige gel polish (e.g., Essie’s “Clothing Optional”)
- Base coat and top coat (e.g., Seche Vite)
- UV or LED lamp
- Nail file and buffer
How to Achieve This Look at Home:
-
- Start with clean, shaped nails. Apply a base coat and cure under a UV lamp.
- Apply two coats of beige gel polish, curing each layer.
- Finish with a top coat and cure. Buff for a smooth finish if necessary.
- Keep cuticles moisturized for a polished look.
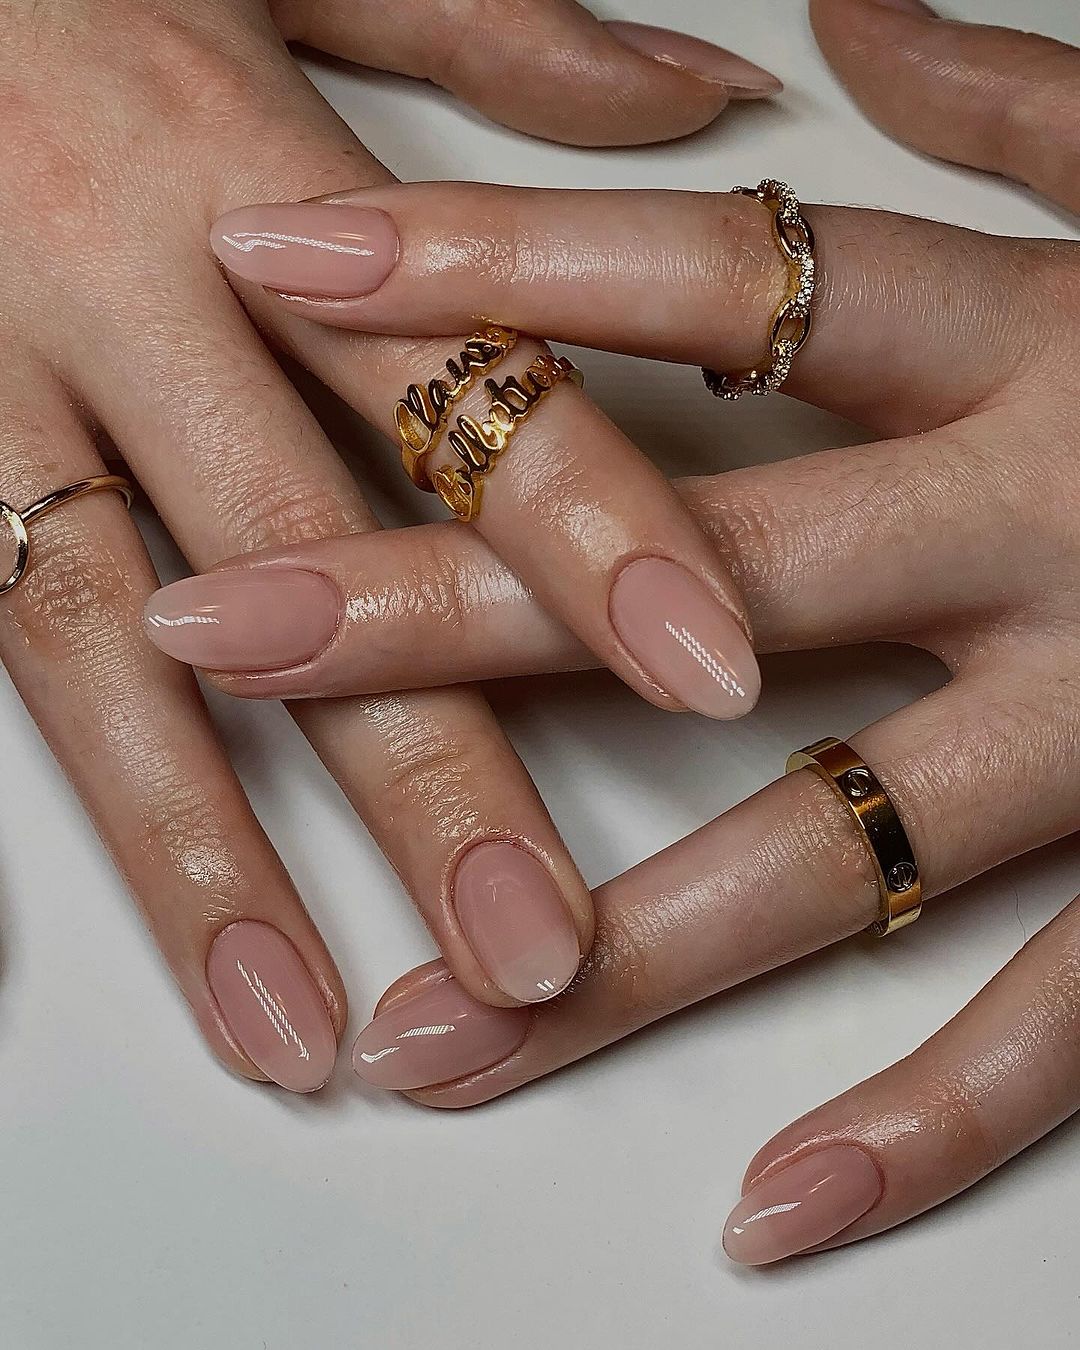
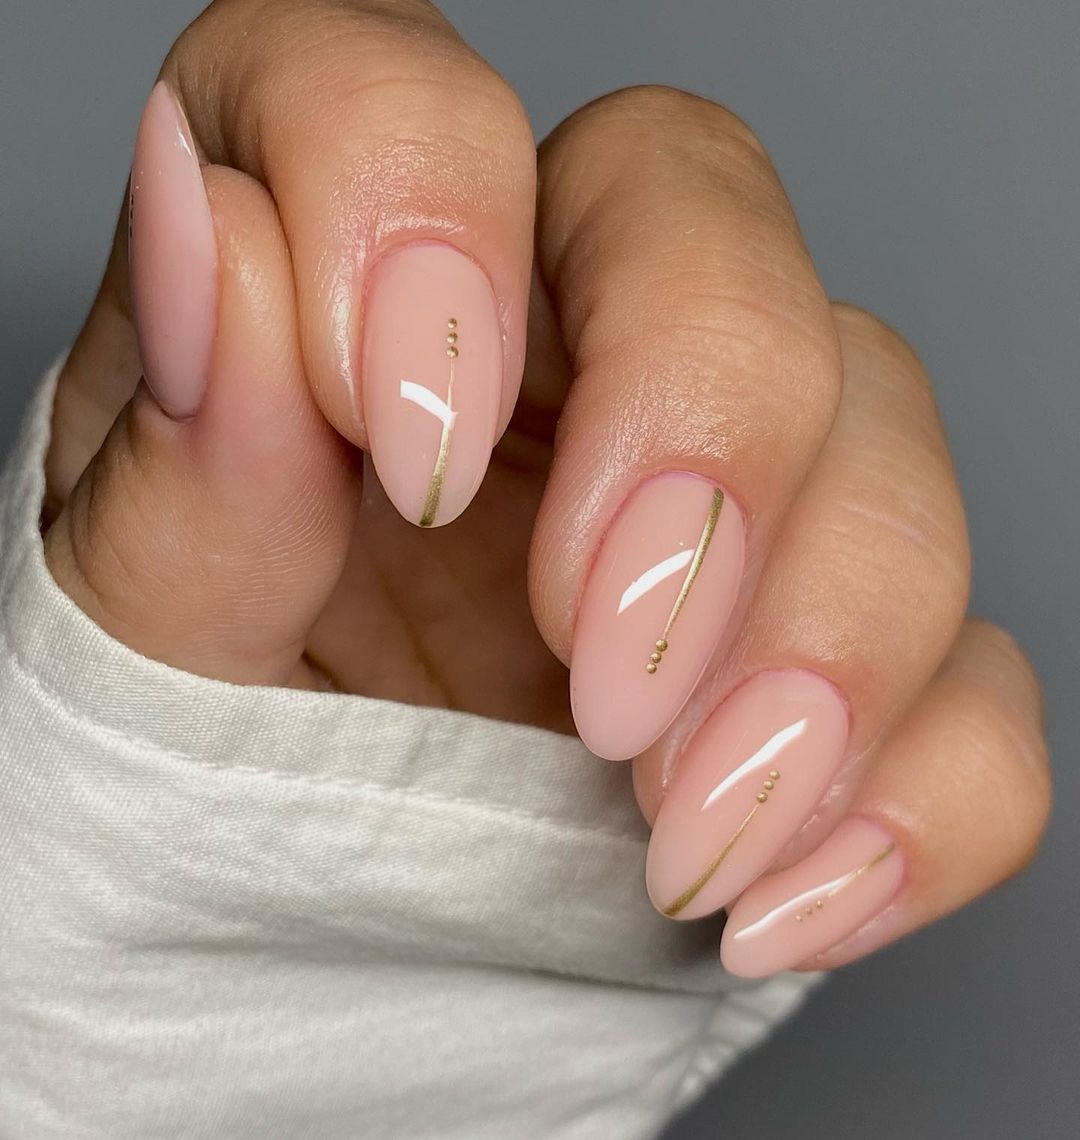
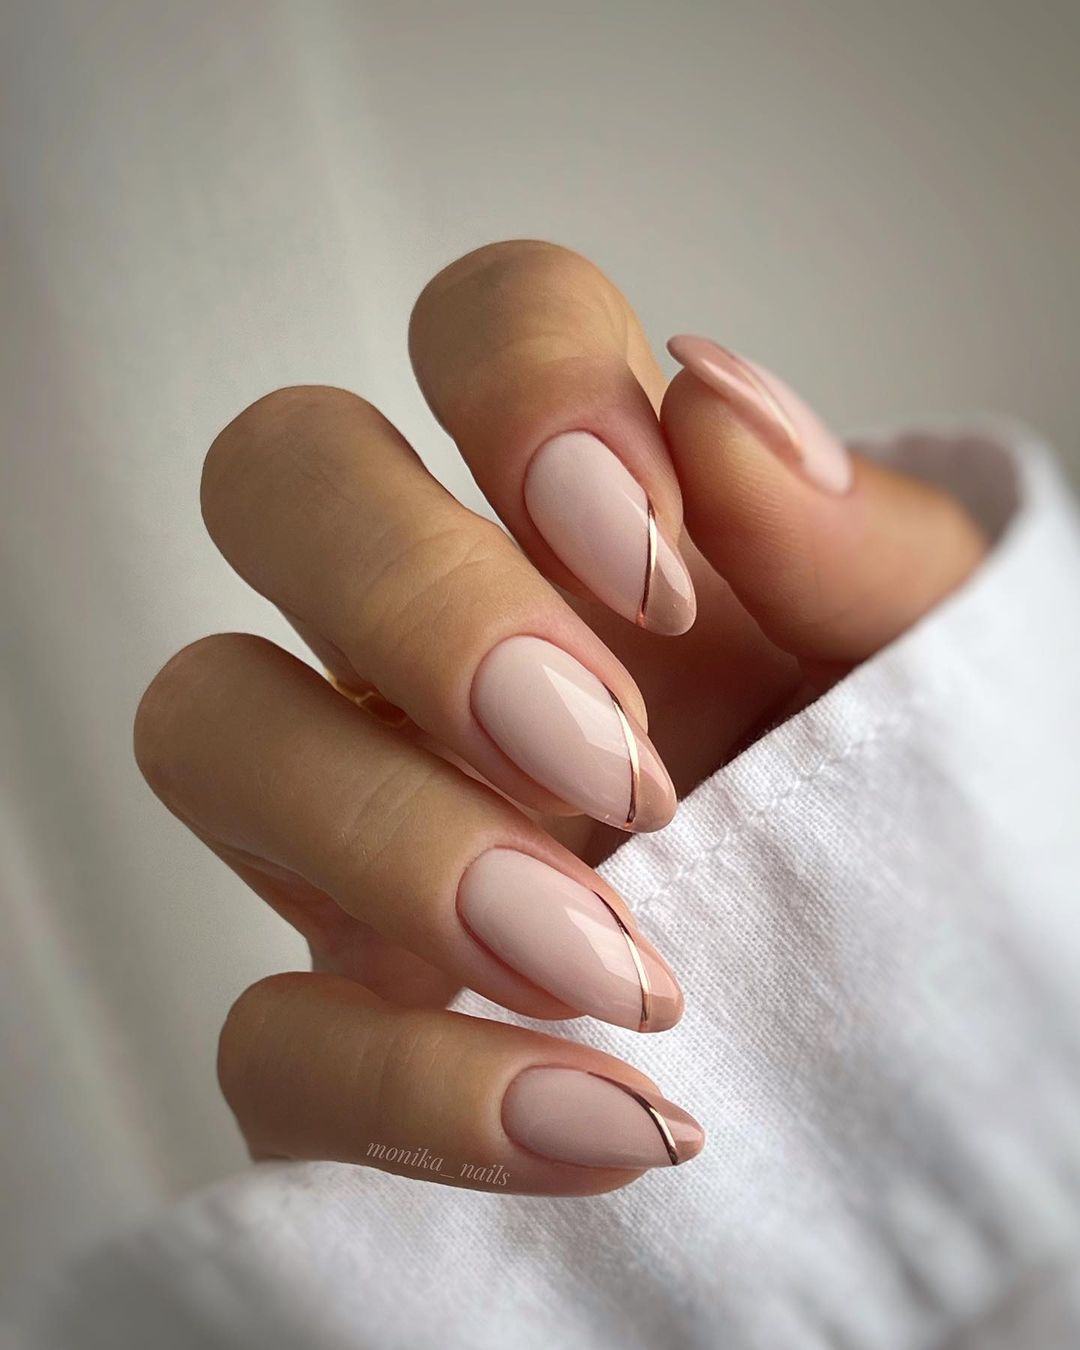
Elegant Almond Nails with Gold Accents
These nails feature a soft pink base with delicate gold accents, adding a touch of luxury to the classic almond shape. The minimalist design is both trendy and elegant, making it a perfect choice for any occasion. The gold lines and dots create a chic and sophisticated look that is sure to impress.
-
- Soft pink gel polish (e.g., OPI’s “Passion”)
- Gold nail art tape or polish (e.g., Sally Hansen’s “Golden-I”)
- Base coat and top coat (e.g., Gelish)
- UV or LED lamp
- Almond nail tips (optional)
- Nail file and buffer
How to Achieve This Look at Home:
-
- Prepare nails by filing and applying a base coat, curing under the lamp.
- Apply two coats of soft pink gel polish, curing each layer.
- Add gold accents using nail art tape or polish, then cure.
- Seal with a top coat, cure, and buff for smoothness.
- Keep cuticles neat and moisturized for a polished look.
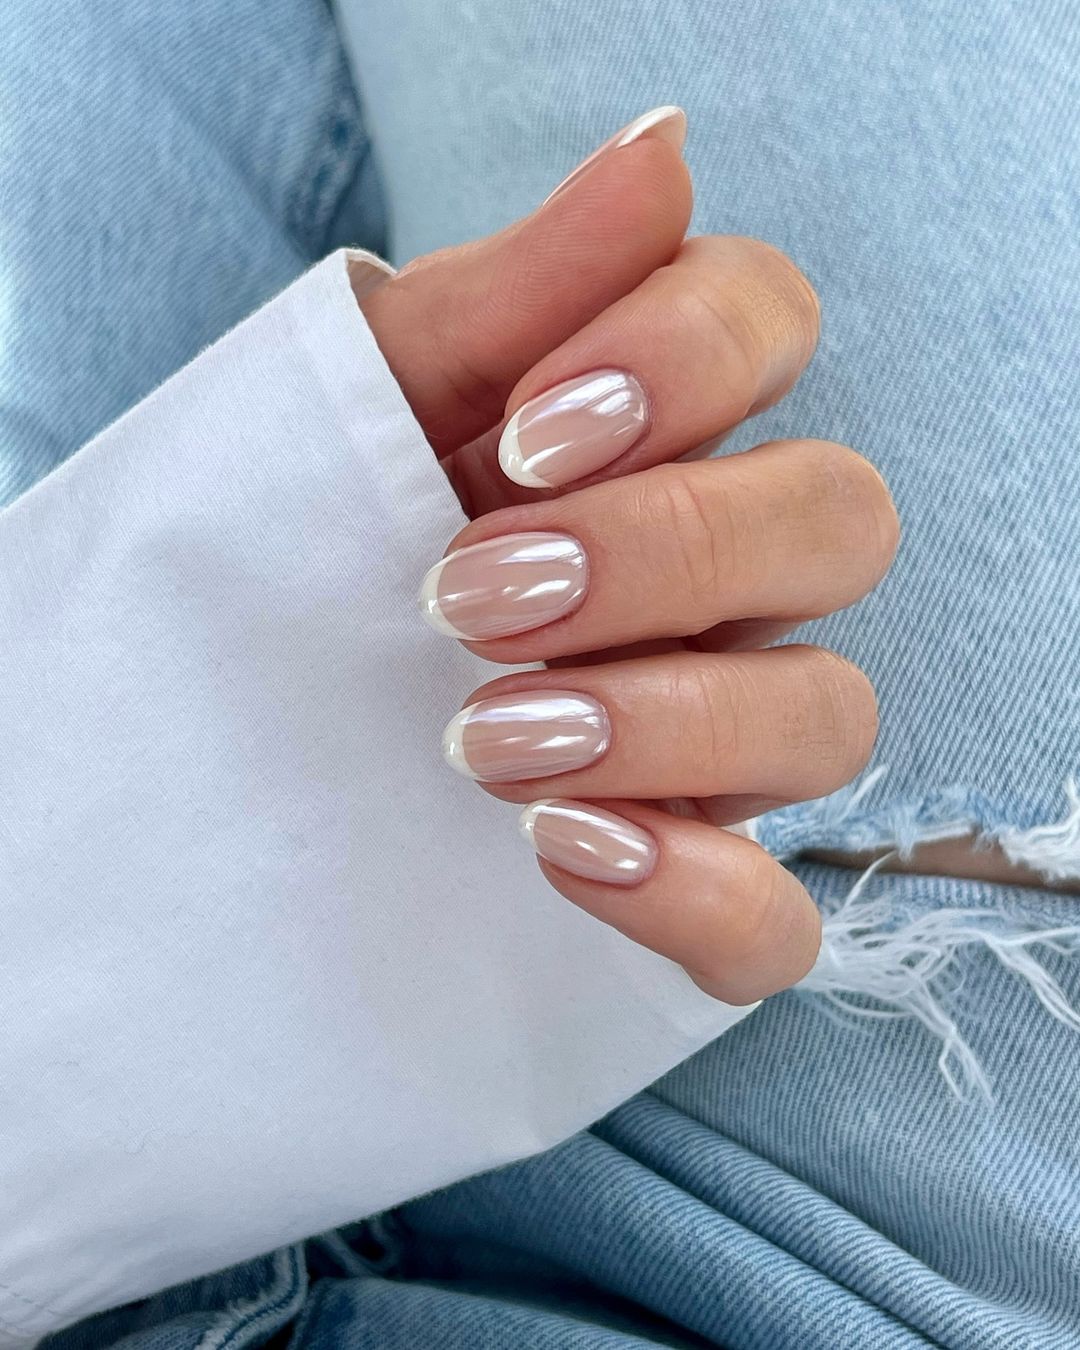
Elegant French Tips
This timeless French tip design adds a modern twist to the classic look with a subtle sheen and a rounded finish. The combination of clear, glossy nails with delicate white tips exudes a sense of understated elegance. Perfect for both casual and formal settings, this design is versatile and chic.
-
- Clear gel polish (e.g., OPI’s “Bubble Bath”)
- White gel polish (e.g., Sally Hansen’s “White On”)
- Base coat and top coat (e.g., CND Shellac)
- UV or LED lamp
- Nail file and buffer
How to Achieve This Look at Home:
-
- Start with clean, shaped nails. Apply a base coat and cure under a UV lamp.
- Apply a thin layer of clear gel polish and cure.
- Carefully paint the white tips and cure each nail as you go.
- Finish with a top coat and cure. Buff for a smooth finish if necessary.
- Keep cuticles moisturized for a polished look.
Soft Pink Oval Nails
These soft pink nails are both trendy and classy, featuring a high-gloss finish that enhances their natural beauty. The oval shape adds a touch of sophistication, making them perfect for any occasion. This look is ideal for those who prefer a simple yet elegant manicure.
-
- Soft pink gel polish (e.g., Essie’s “Ballet Slippers”)
- Base coat and top coat (e.g., Gelish)
- UV or LED lamp
- Nail file and buffer
How to Achieve This Look at Home:
-
- Begin with clean, shaped nails. Apply a base coat and cure under a UV lamp.
- Apply two coats of soft pink gel polish, curing each layer.
- Finish with a top coat and cure. Buff the nails for an extra smooth finish.
- Keep cuticles neat and moisturized for a clean look.
Marbled Almond Nails
This marbled design brings a touch of artistic flair to your nails. The almond shape is accentuated with swirls of white and pink, creating a unique and sophisticated look. This design is perfect for those who love to add a bit of fun to their manicures while keeping it elegant.
-
- Pink gel polish (e.g., OPI’s “Pink-ing of You”)
- White gel polish (e.g., Sally Hansen’s “White On”)
- Base coat and top coat (e.g., CND Shellac)
- UV or LED lamp
- Nail file and buffer
How to Achieve This Look at Home:
-
- Start with clean, shaped nails. Apply a base coat and cure under a UV lamp.
- Apply a layer of pink gel polish and cure.
- Use a fine brush to create marbled swirls with white gel polish, then cure.
- Finish with a top coat and cure. Buff for a smooth finish if necessary.
- Keep cuticles moisturized for a polished look.
Nude Nails with Gold Accent
These nude nails are elevated with a sleek gold line accent, adding a touch of luxury to a simple design. The almond shape complements the nude base, making it an elegant choice for any occasion. The gold accent provides just the right amount of sparkle to keep the look interesting.
-
- Nude gel polish (e.g., Essie’s “Topless & Barefoot”)
- Gold nail art tape or polish (e.g., Sally Hansen’s “Golden-I”)
- Base coat and top coat (e.g., Gelish)
- UV or LED lamp
- Nail file and buffer
How to Achieve This Look at Home:
-
- Prepare nails by filing and applying a base coat, curing under the lamp.
- Apply two coats of nude gel polish, curing each layer.
- Add a gold line accent using nail art tape or polish, then cure.
- Seal with a top coat, cure, and buff for smoothness.
- Keep cuticles neat and moisturized for a polished look.
Pink Ombre Short Nails
These short nails feature a beautiful pink ombre effect, transitioning from a soft pink at the cuticle to a slightly darker pink at the tips. The round shape and glossy finish make this design both practical and stylish, perfect for everyday wear.
-
- Light pink gel polish (e.g., OPI’s “Bubble Bath”)
- Darker pink gel polish (e.g., Essie’s “Mademoiselle”)
- Base coat and top coat (e.g., Seche Vite)
- UV or LED lamp
- Nail file and buffer
How to Achieve This Look at Home:
-
- Start with clean, shaped nails. Apply a base coat and cure under a UV lamp.
- Apply a layer of light pink gel polish and cure.
- Using a sponge, dab the darker pink polish on the tips to create an ombre effect, then cure.
- Finish with a top coat and cure. Buff for a smooth finish if necessary.
- Keep cuticles moisturized for a polished look.
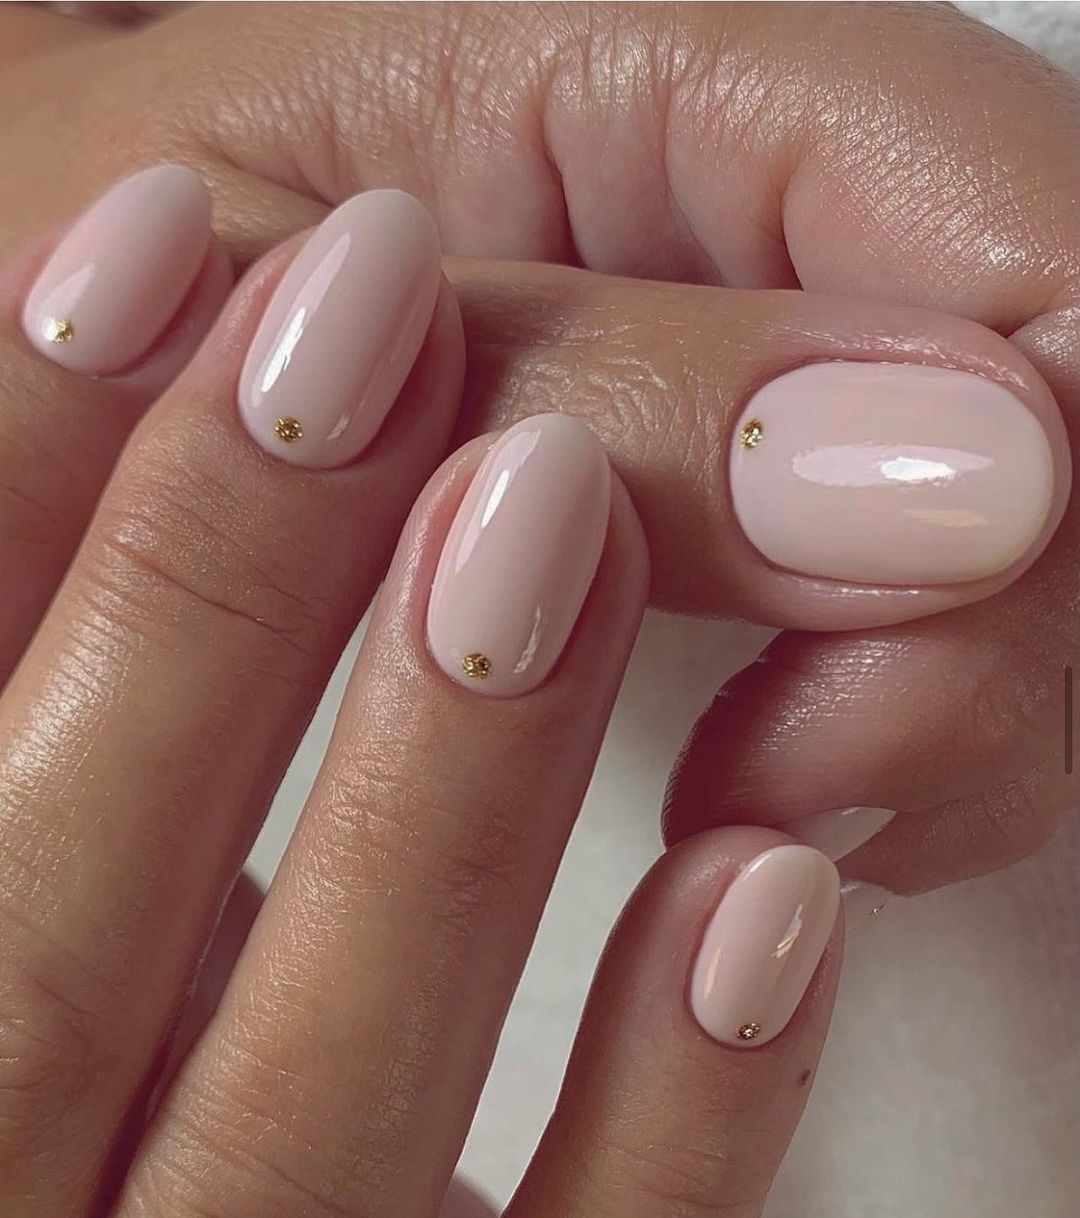
Nude Nails with Gold Studs
These nude nails are given a glamorous touch with the addition of tiny gold studs. The short, round shape keeps the design practical and elegant, while the gold accents add a bit of sparkle and sophistication. This look is perfect for those who like to keep their nails simple yet stylish.
-
- Nude gel polish (e.g., OPI’s “Samoan Sand”)
- Gold nail studs (e.g., Born Pretty Store)
- Base coat and top coat (e.g., CND Shellac)
- UV or LED lamp
- Nail file and buffer
How to Achieve This Look at Home:
-
- Prepare nails by filing and applying a base coat, curing under the lamp.
- Apply two coats of nude gel polish, curing each layer.
- Place the gold studs on each nail while the polish is still tacky, then cure.
- Seal with a top coat, cure, and buff for smoothness.
- Keep cuticles neat and moisturized for a polished look.
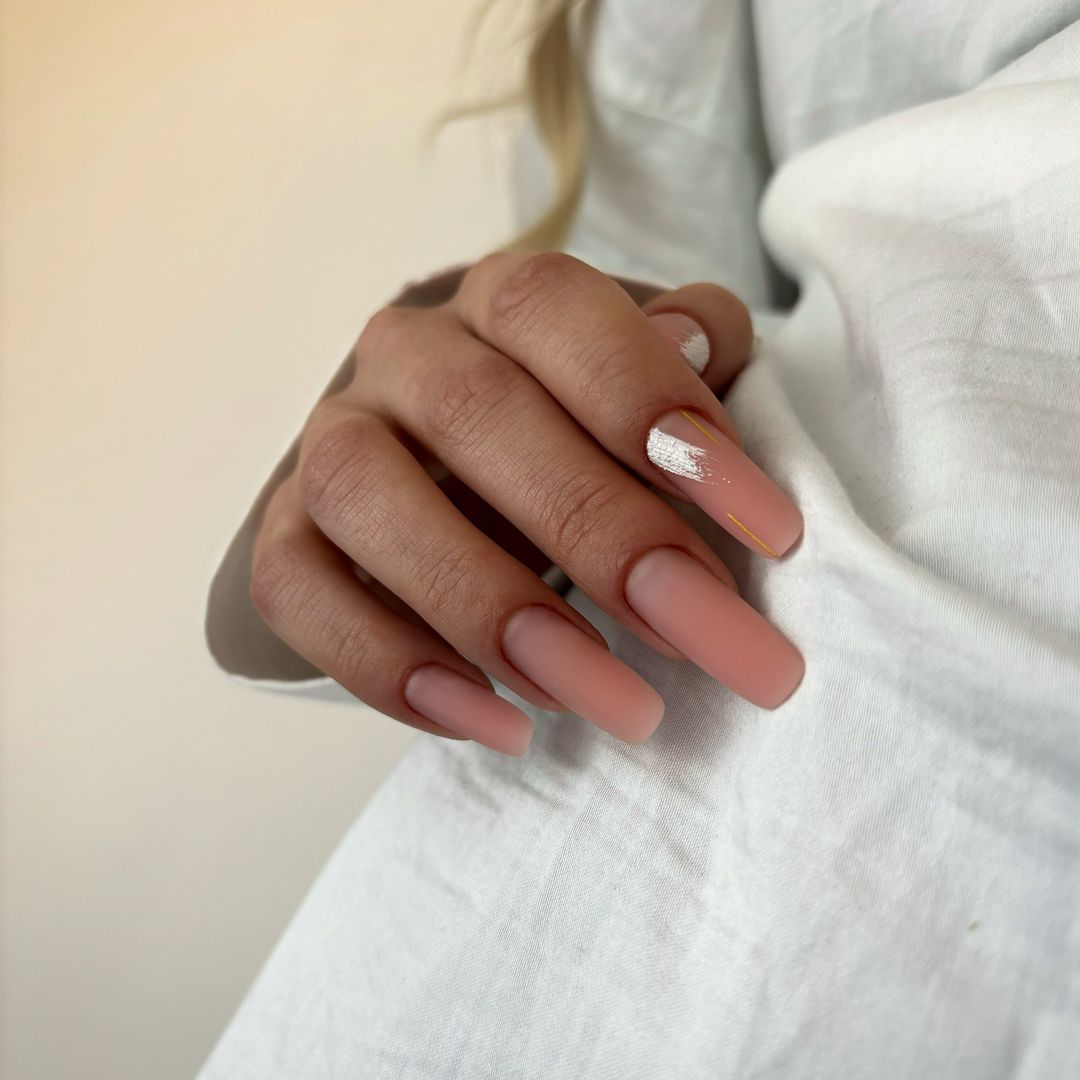
Matte Nude Coffin Nails with White Accent
These nails feature a stunning matte nude base with a white accent nail that adds a modern twist. The long coffin shape elongates the fingers, making them appear more elegant. The matte finish provides a sophisticated touch, while the white accent with a gold stripe and brushstroke detail makes the design trendy and unique.
-
- Nude matte gel polish (e.g., OPI’s “Matte Top Coat” over “Samoan Sand”)
- White gel polish (e.g., Essie’s “Blanc”)
- Gold nail art tape or polish (e.g., Sally Hansen’s “Golden-I”)
- Base coat and matte top coat (e.g., Gelish)
- UV or LED lamp
- Nail file and buffer
How to Achieve This Look at Home:
-
- Start with clean, shaped nails. Apply a base coat and cure under a UV lamp.
- Apply two coats of nude gel polish, curing each layer.
- Add a matte top coat to the nude nails and cure.
- On the accent nail, apply white gel polish and add a gold stripe with a brushstroke detail, then cure.
- Finish the accent nail with a top coat and cure. Buff for a smooth finish if necessary.
- Keep cuticles moisturized for a polished look.
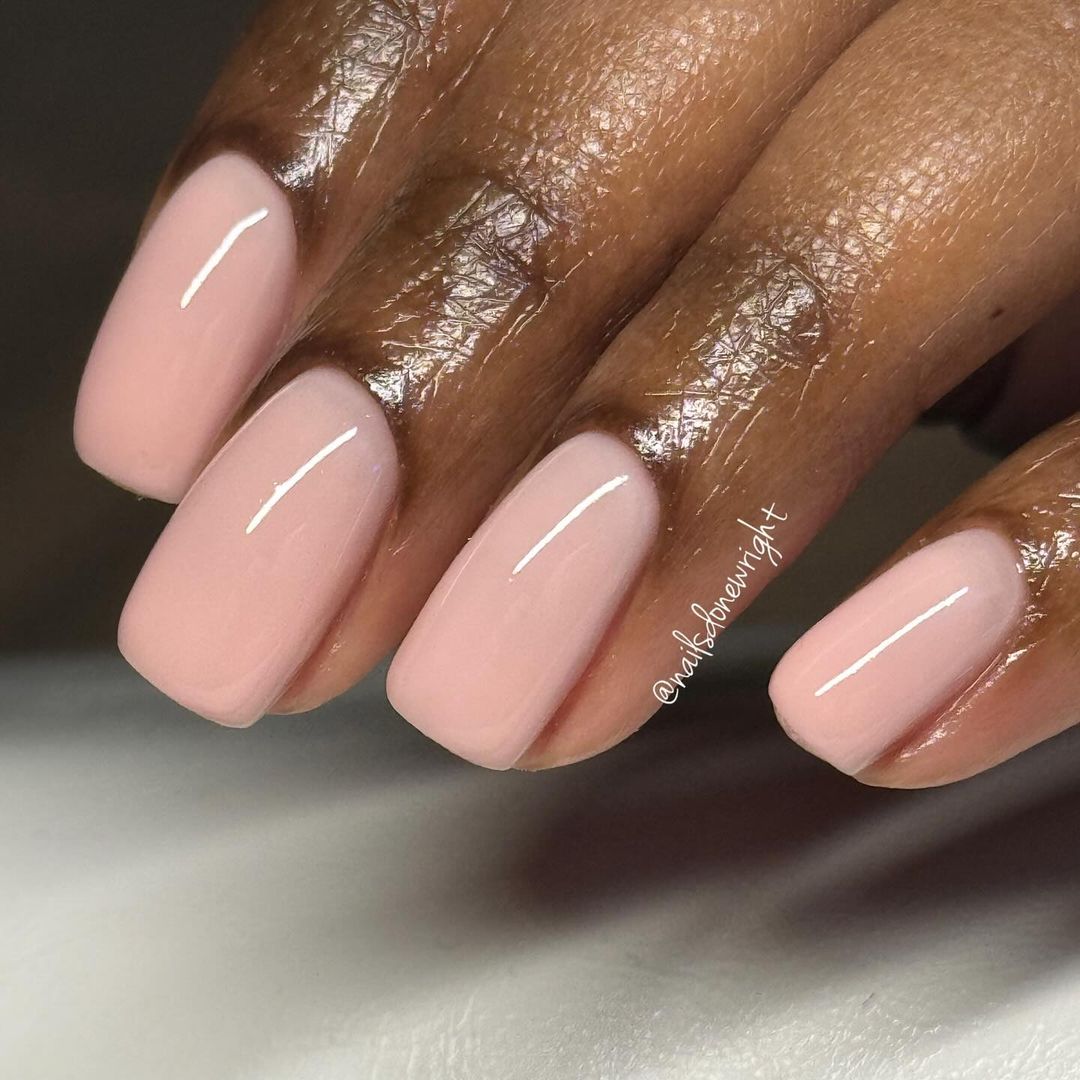
Classic Nude Square Nails
These classic nude nails in a square shape are both elegant and timeless. The glossy finish enhances the natural beauty of the nails, making them perfect for any occasion. This design is versatile and easy to maintain, ideal for those who prefer a sophisticated and understated look.

-
- Nude gel polish (e.g., Essie’s “Topless & Barefoot”)
- Base coat and top coat (e.g., CND Shellac)
- UV or LED lamp
- Nail file and buffer
How to Achieve This Look at Home:
-
- Prepare nails by filing and applying a base coat, curing under the lamp.
- Apply two coats of nude gel polish, curing each layer.
- Finish with a top coat and cure. Buff the nails for an extra smooth finish.
- Keep cuticles neat and moisturized for a clean look.
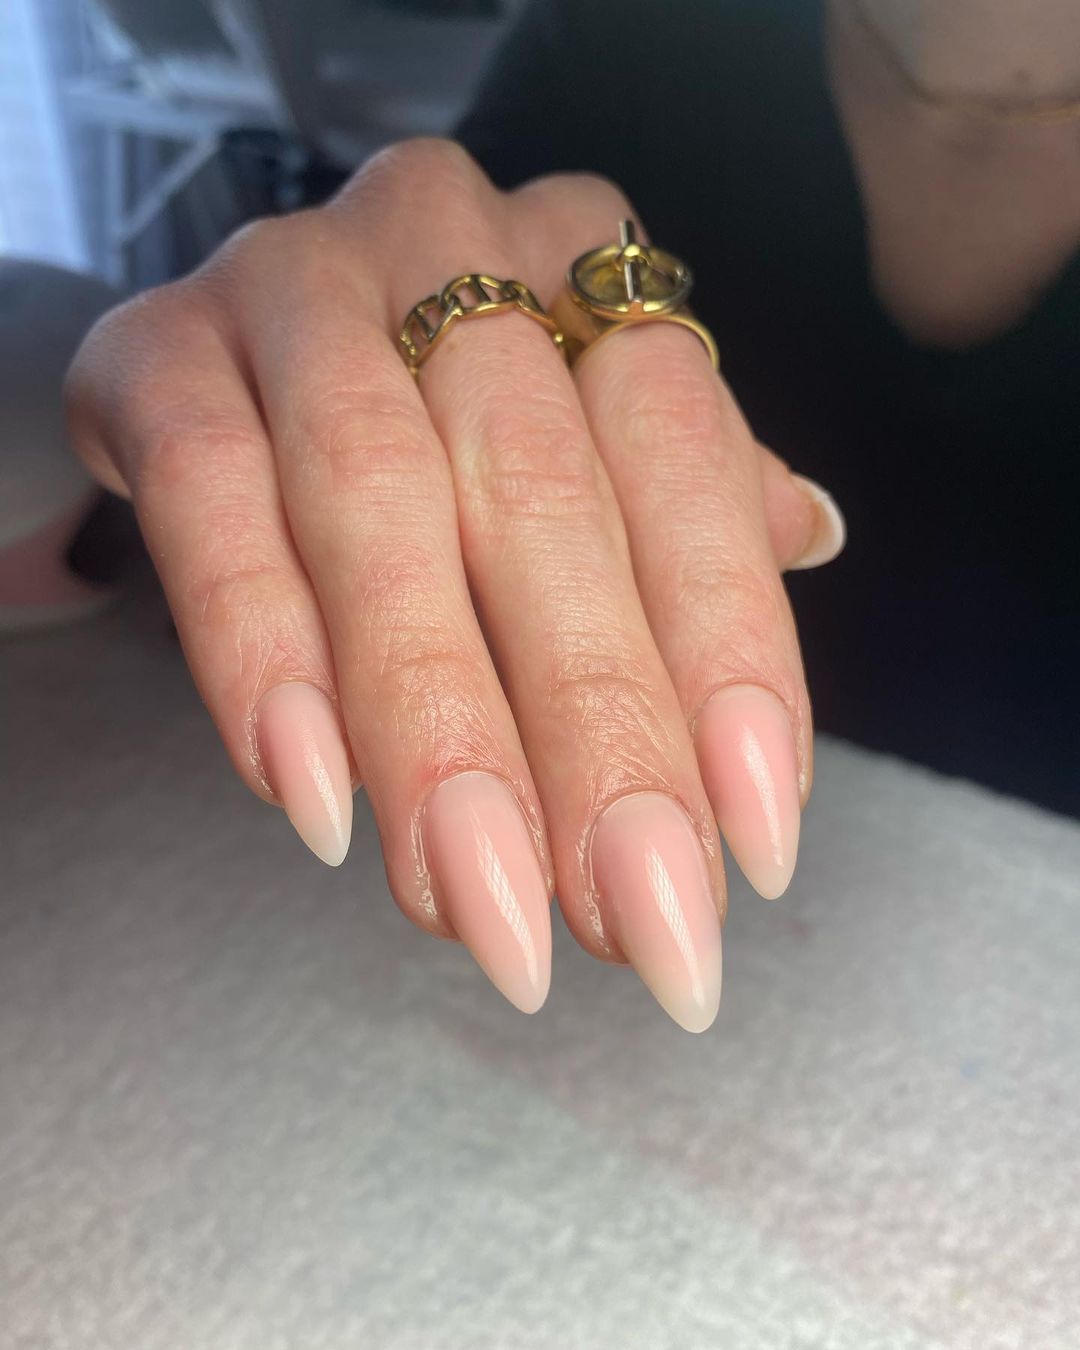
Almond Nude Nails
These almond-shaped nails feature a soft nude color, perfect for a chic and sophisticated look. The glossy finish adds a touch of elegance, making this design suitable for both casual and formal occasions. This look is ideal for those who prefer a simple yet stylish manicure.
-
- Nude gel polish (e.g., OPI’s “Samoan Sand”)
- Base coat and top coat (e.g., Gelish)
- UV or LED lamp
- Nail file and buffer
How to Achieve This Look at Home:
-
- Start with clean, shaped nails. Apply a base coat and cure under a UV lamp.
- Apply two coats of nude gel polish, curing each layer.
- Finish with a top coat and cure. Buff for a smooth finish if necessary.
- Keep cuticles moisturized for a polished look.
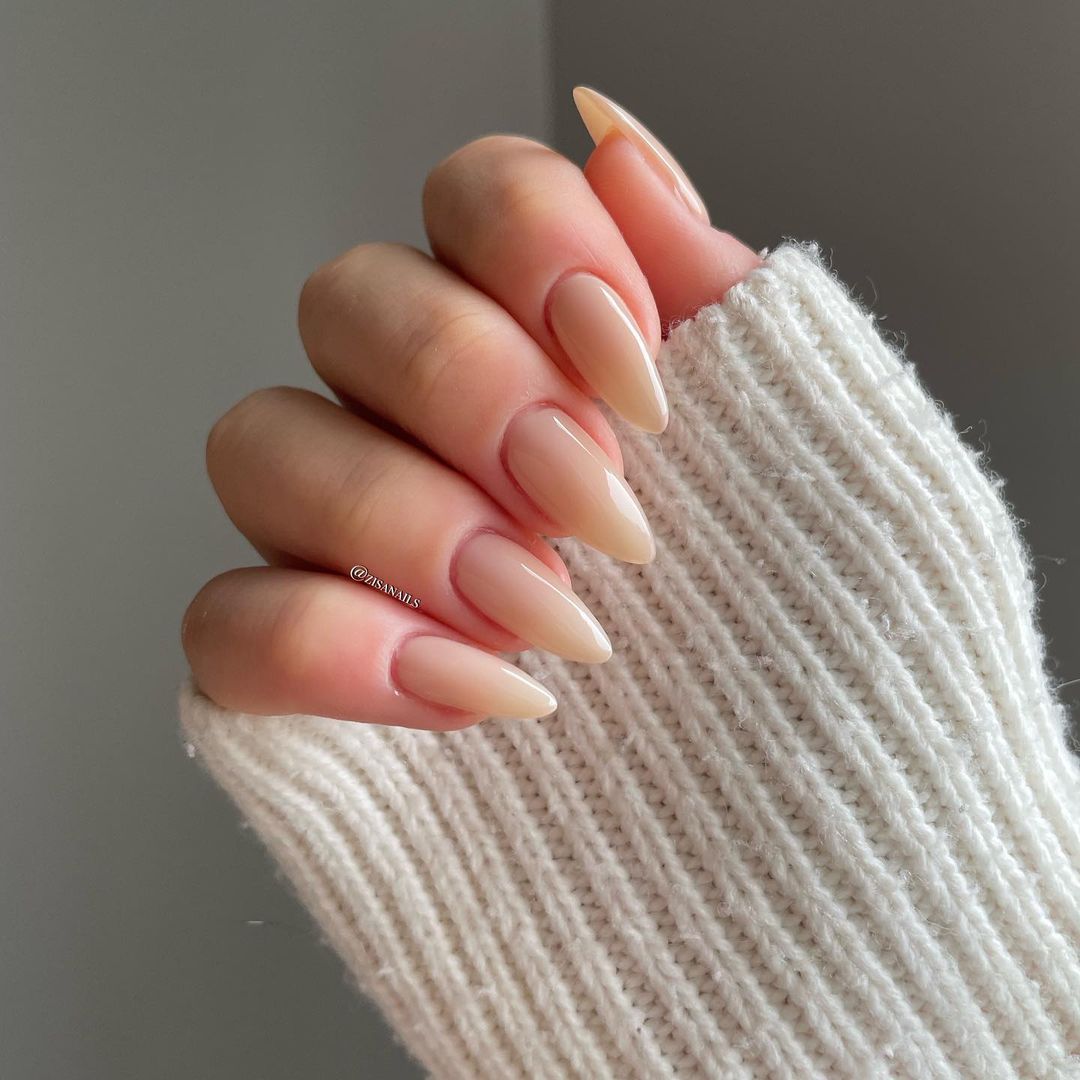
Sheer Nude Oval Nails
These sheer nude nails offer a natural and elegant look, perfect for those who prefer a minimalist manicure. The oval shape adds a touch of sophistication, making this design versatile for any occasion. The sheer finish provides a subtle hint of color while maintaining a natural appearance.

-
- Sheer nude gel polish (e.g., Essie’s “Mademoiselle”)
- Base coat and top coat (e.g., Seche Vite)
- UV or LED lamp
- Nail file and buffer
How to Achieve This Look at Home:
-
- Prepare nails by filing and applying a base coat, curing under the lamp.
- Apply two coats of sheer nude gel polish, curing each layer.
- Finish with a top coat and cure. Buff the nails for an extra smooth finish.
- Keep cuticles neat and moisturized for a clean look.
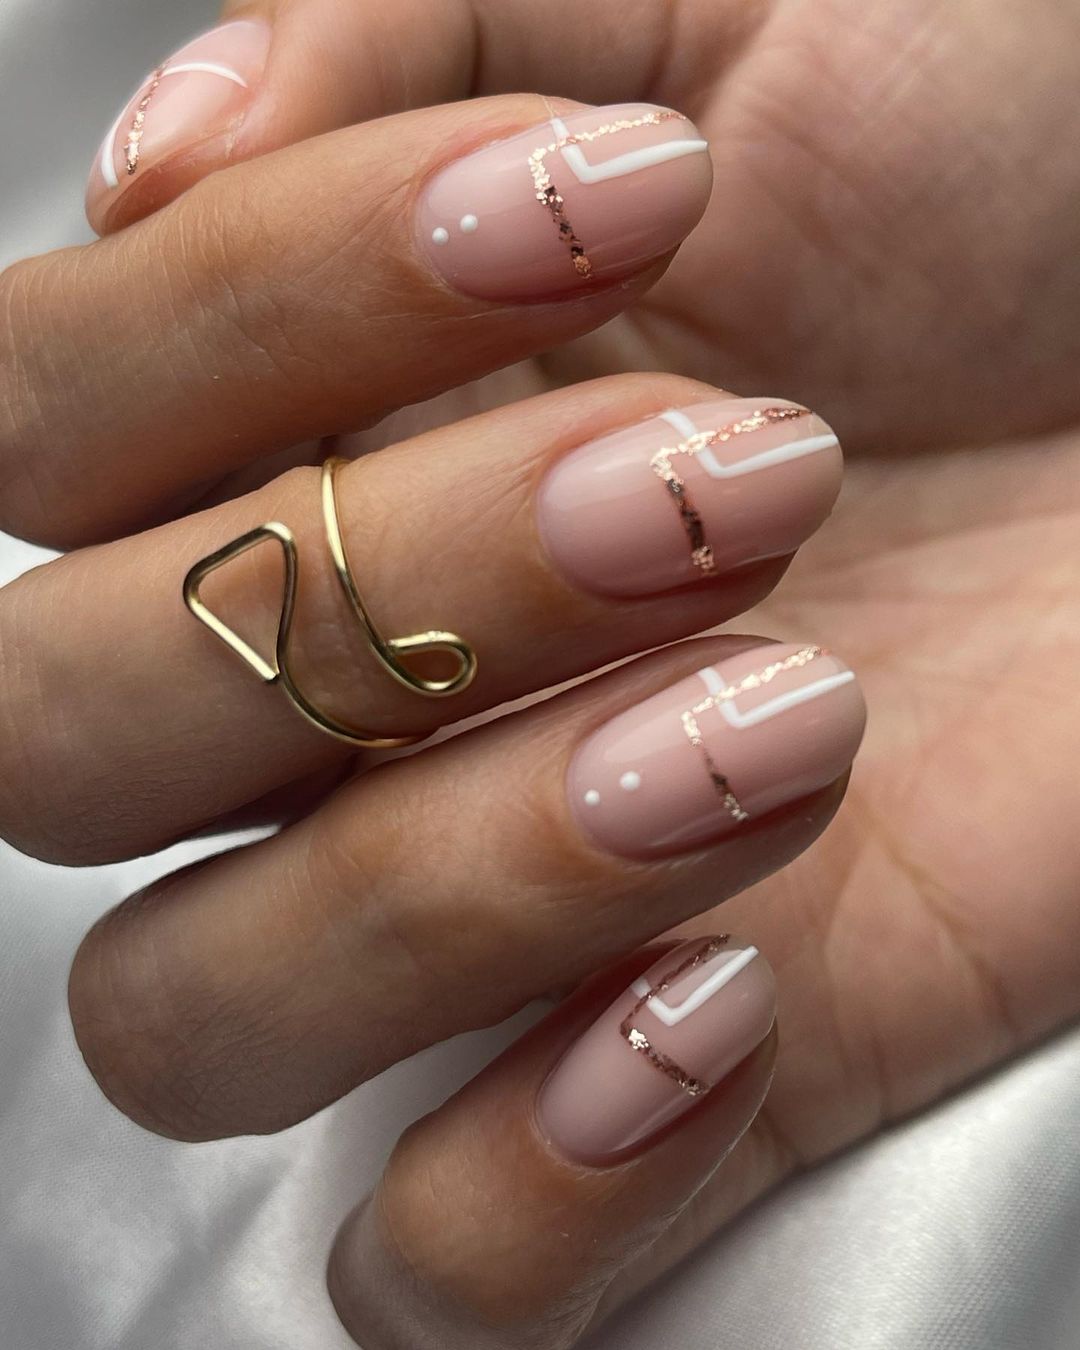
Geometric Nude Nails
These nude nails are elevated with geometric accents, adding a modern and stylish twist to the classic look. The design features clean lines and subtle gold and white accents, making it both trendy and elegant. The short length and square shape are practical for daily wear, while the geometric details keep the look interesting.
-
- Nude gel polish (e.g., OPI’s “Samoan Sand”)
- White gel polish (e.g., Essie’s “Blanc”)
- Gold nail art tape or polish (e.g., Sally Hansen’s “Golden-I”)
- Base coat and top coat (e.g., CND Shellac)
- UV or LED lamp
- Nail file and buffer
How to Achieve This Look at Home:
-
- Start with clean, shaped nails. Apply a base coat and cure under a UV lamp.
- Apply two coats of nude gel polish, curing each layer.
- Use nail art tape or a fine brush to create geometric patterns with white and gold polish, then cure.
- Finish with a top coat and cure. Buff for a smooth finish if necessary.
- Keep cuticles moisturized for a polished look.
Minimalist Nude Nails
These nails feature a minimalist design with a glossy nude base and tiny gold accents. The short, round shape keeps the look practical and elegant, while the gold studs add a touch of glamour. This design is perfect for those who like to keep their nails simple yet stylish.
-
- Nude gel polish (e.g., Essie’s “Topless & Barefoot”)
- Gold nail studs (e.g., Born Pretty Store)
- Base coat and top coat (e.g., Gelish)
- UV or LED lamp
- Nail file and buffer
How to Achieve This Look at Home:
-
- Prepare nails by filing and applying a base coat, curing under the lamp.
- Apply two coats of nude gel polish, curing each layer.
- Place the gold studs on each nail while the polish is still tacky, then cure.
- Seal with a top coat, cure, and buff for smoothness.
- Keep cuticles neat and moisturized for a polished look.
Pink Nude Square Nails
These square nails feature a pinkish nude color, providing a fresh and natural look. The glossy finish enhances the overall appearance, making them perfect for any occasion. The short length is practical and easy to maintain, ideal for those who prefer a simple yet elegant manicure.
-
- Pinkish nude gel polish (e.g., OPI’s “Bubble Bath”)
- Base coat and top coat (e.g., Seche Vite)
- UV or LED lamp
- Nail file and buffer
How to Achieve This Look at Home:
-
- Start with clean, shaped nails. Apply a base coat and cure under a UV lamp.
- Apply two coats of pinkish nude gel polish, curing each layer.
- Finish with a top coat and cure. Buff for a smooth finish if necessary.
- Keep cuticles moisturized for a polished look.
FAQ
Q: How can I make my gel manicure last longer? A: Ensure your nails are clean and free of oils before applying gel polish. Use a high-quality base and top coat, and avoid exposing your nails to water for extended periods.
Q: What’s the best way to remove gel polish without damaging my nails? A: Soak a cotton ball in acetone, place it on your nail, and wrap it in foil. Leave it for 10-15 minutes, then gently push the polish off with an orange stick.
Q: Are there any health concerns with using UV lamps for curing gel nails? A: UV exposure from nail lamps is minimal, but you can use sunscreen on your hands or choose an LED lamp for curing as a safer alternative.
By following these tips and trying out these designs, you’ll have the perfect nude fall nails that are both trendy and classy. Whether you prefer short, gel, or glittery finishes, there’s something here to inspire your next manicure. Happy painting!
Save Pin