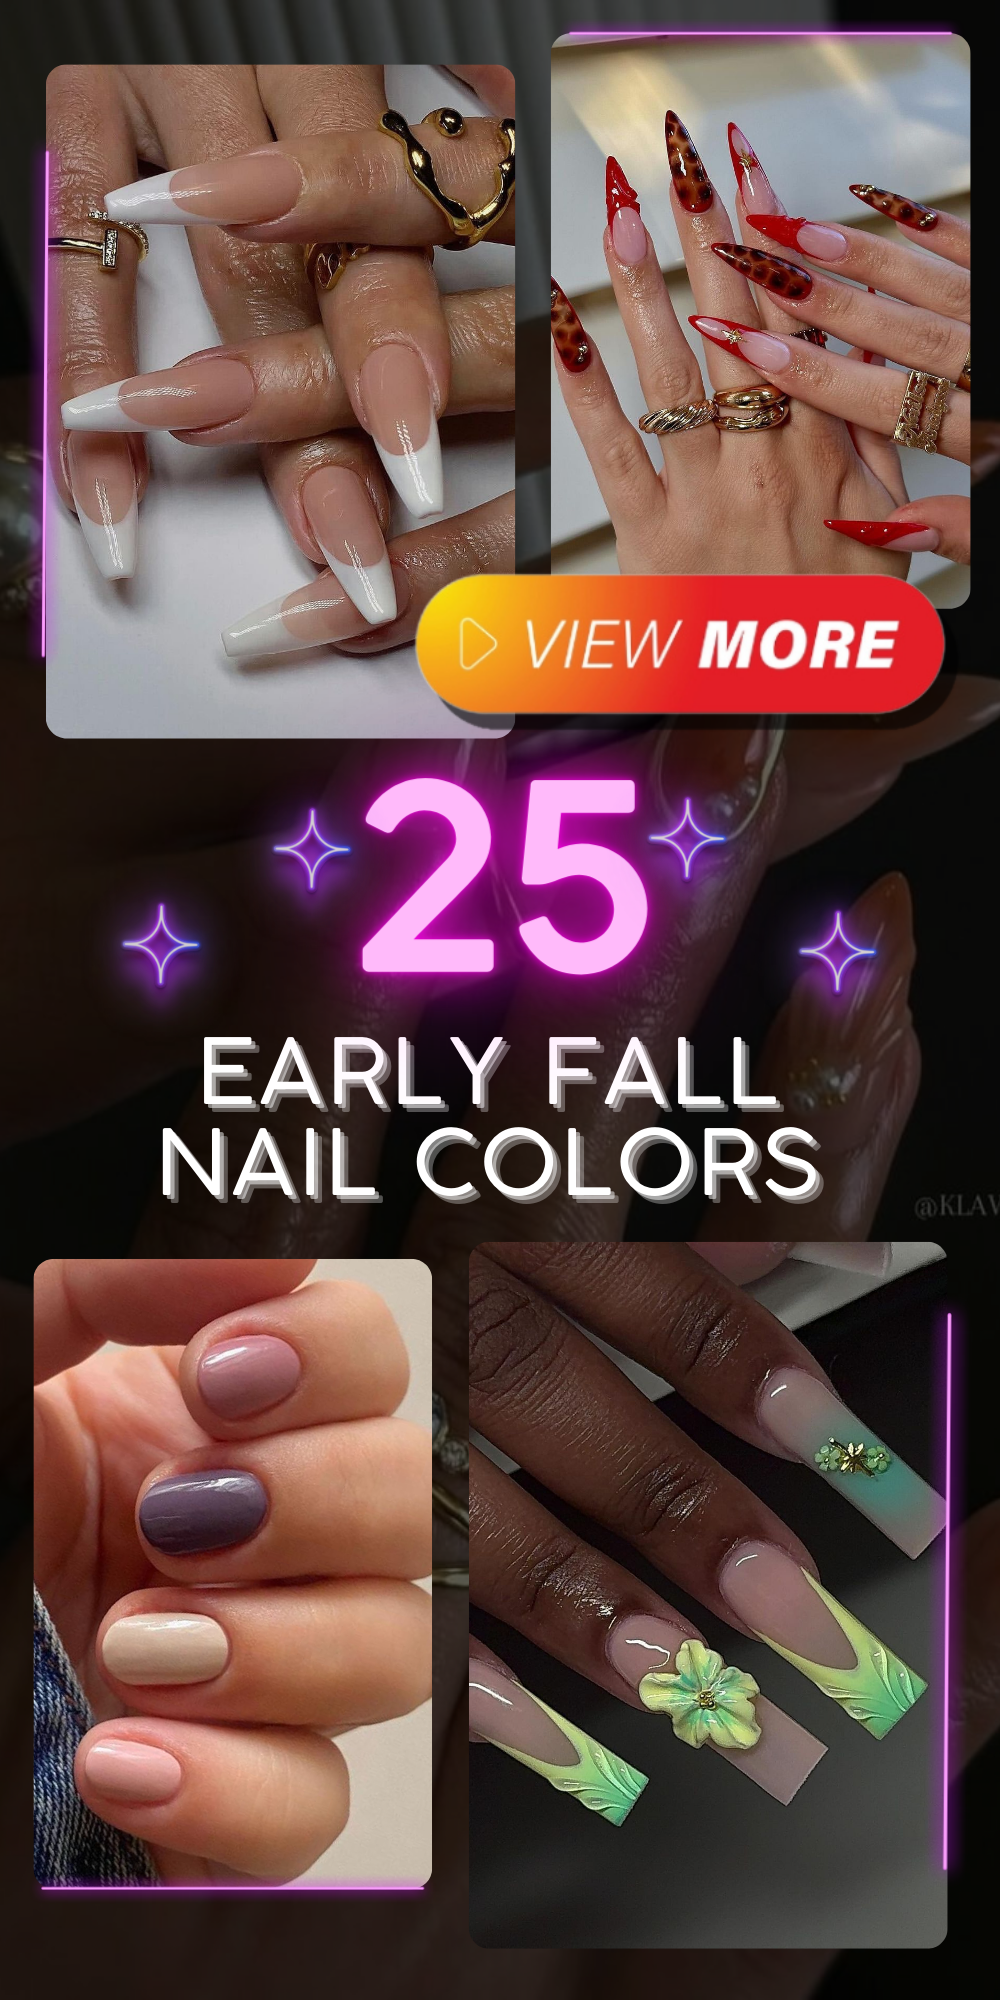
As the warm days of summer begin to fade, the early fall season brings a fresh palette of nail colors and designs that are perfect for transitioning into the cooler months. From bold and dark shades to soft neutrals, there’s a style for everyone. In this article, we’ll explore the best early fall nail colors and designs, providing professional insights and practical tips for recreating these looks at home.
Elegant Neutrals and Subtle Hues
In this design, the nails are painted with a beautiful combination of neutral tones, perfect for early fall. The soft pinks, muted purples, and creamy whites create a sophisticated and understated look that’s both versatile and chic. This style is perfect for those who prefer a more natural and refined appearance, making it ideal for both casual and formal occasions.

-
- OPI Nail Lacquer in “Tickle My France-y”
- Essie Nail Polish in “Ballet Slippers”
- DND Gel Polish in “Lavender Dreams”
- OPI Top Coat
- Nail file and buffer
Professional Tips:
-
- Start by shaping your nails into a round or oval shape, which complements the soft color palette.
- Apply a base coat to protect your natural nails.
- Paint each nail with two coats of your chosen colors, allowing each coat to dry completely.
- Finish with a high-quality top coat for added shine and longevity.
Bold and Playful Abstract Design
This nail art features a vibrant and fun abstract design with a mix of yellow, nude, and pastel shades. The playful swirls and accents make this design stand out, perfect for those looking to make a statement as summer transitions to fall. It’s a great example of how to incorporate early fall nail colors into a trendy and eye-catching look.
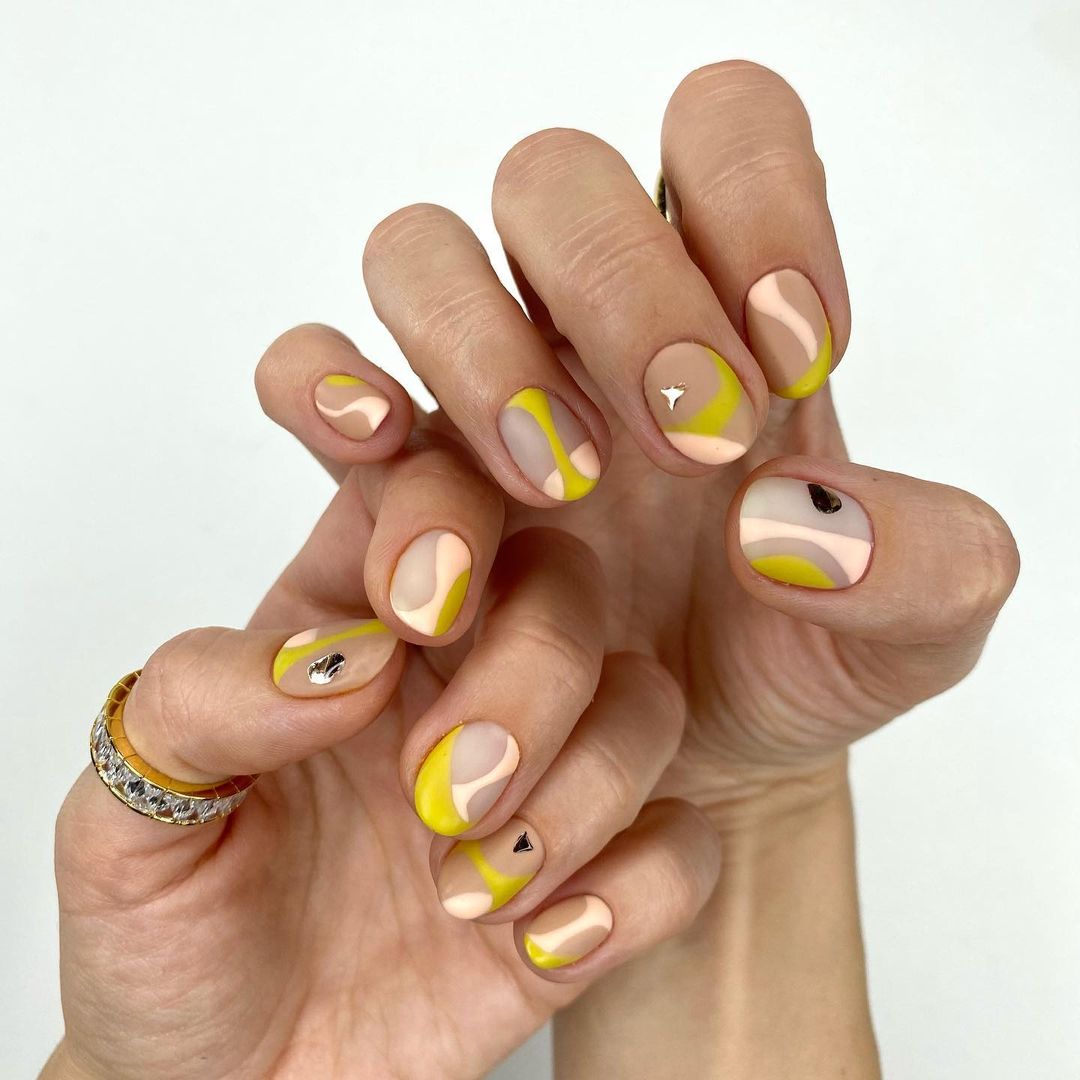
-
- OPI GelColor in “Sun, Sea, and Sand in My Pants”
- Essie Nail Polish in “Blanc”
- DND Gel Polish in “Pastel Pink”
- Detail nail art brushes
- Nail decals or small jewels
Professional Tips:
-
- Begin by applying a base coat and let it dry completely.
- Use a detail brush to create abstract shapes and swirls with the different colors.
- Add small decals or jewels for an extra touch of glam.
- Seal your design with a top coat to ensure it lasts.
Sophisticated Glitter and Ombre
This design showcases a stunning ombre effect with glitter accents, perfect for adding a touch of elegance to your fall look. The gradual transition from soft pink to glittery silver creates a mesmerizing effect that’s sure to turn heads. This style is ideal for special occasions or when you want to add a bit of sparkle to your day.
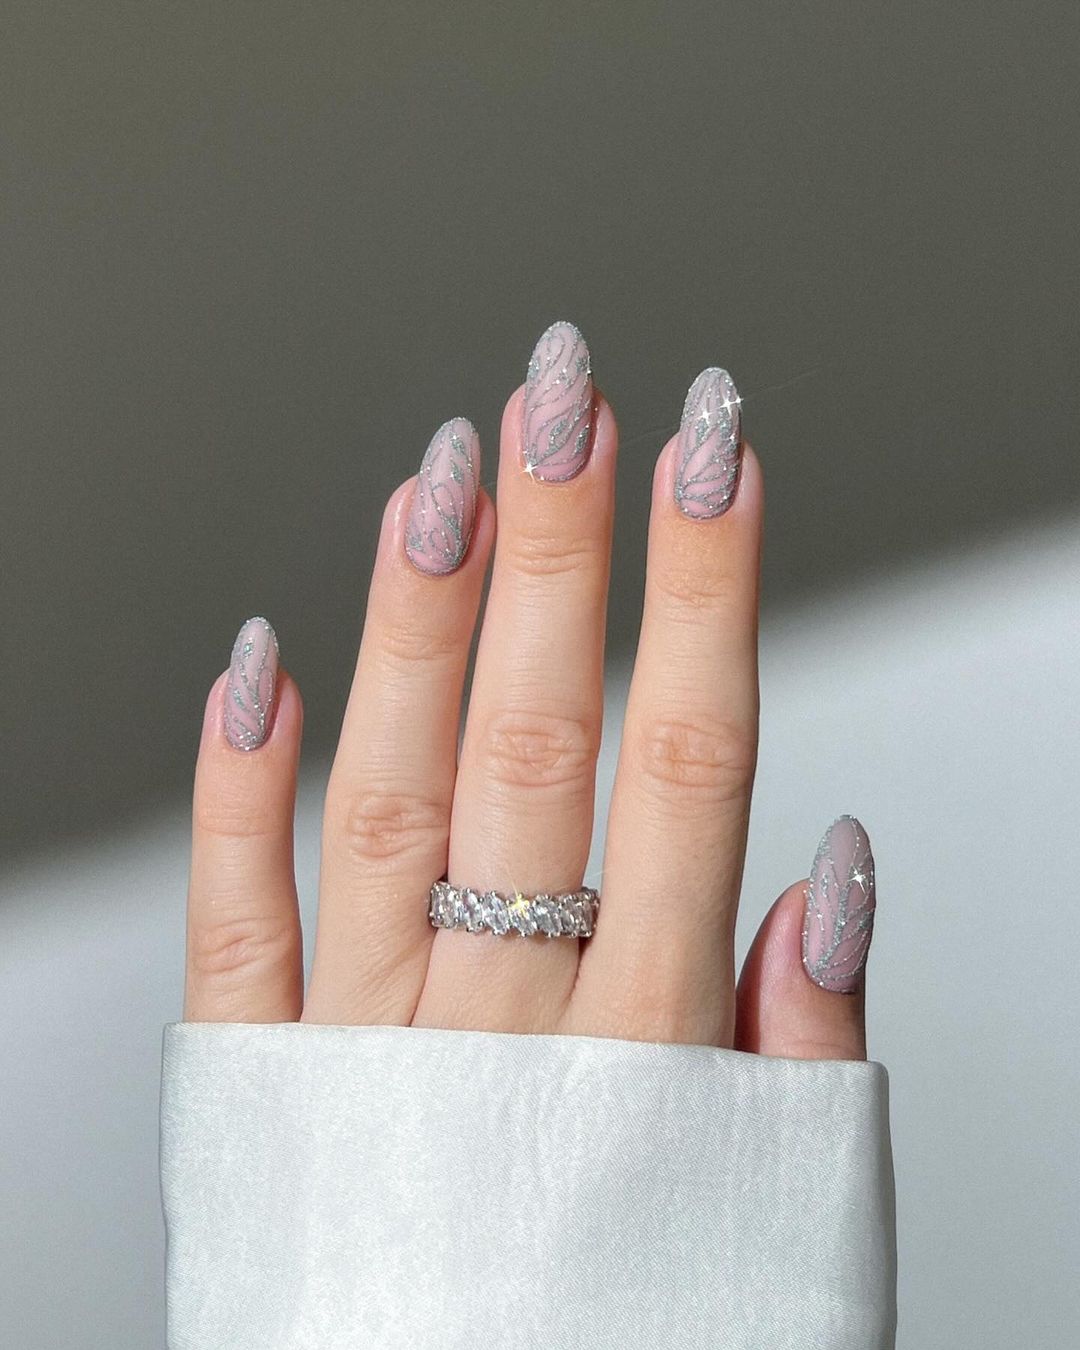
-
- OPI GelColor in “Bubble Bath”
- Essie Glitter Polish in “Set in Stones”
- Makeup sponge
- OPI Top Coat
- Nail file and buffer
Professional Tips:
-
- Shape your nails into an almond or stiletto shape for a more dramatic look.
- Apply the base color and let it dry.
- Use a makeup sponge to dab on the glitter polish, starting from the tip and blending downwards for a gradient effect.
- Finish with a top coat to smooth out any rough edges and add shine.
Vibrant Pink French Tips
This vibrant pink French tip manicure is a modern twist on a classic design. The bright, neon pink edges add a playful and trendy touch to the otherwise natural-looking nails. The subtle gradient effect from the nail bed to the tips adds depth and dimension, making this design perfect for those who love bold yet elegant nail art.
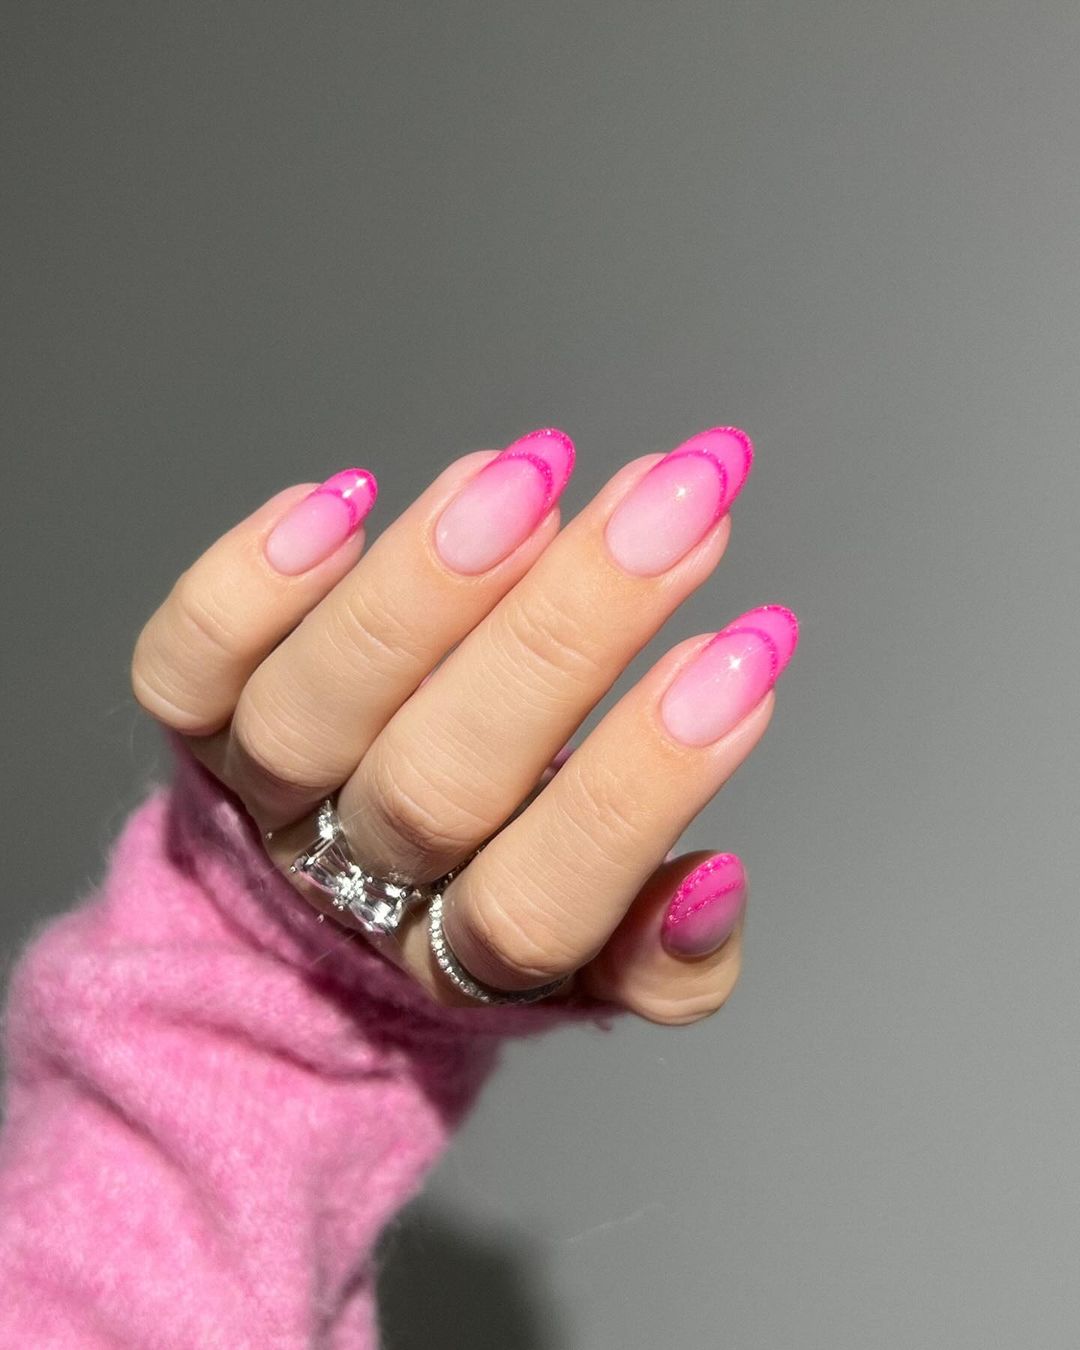
-
- OPI GelColor in “Hotter than You Pink”
- Essie Nail Polish in “Mademoiselle”
- Nail art brush
- OPI Top Coat
- UV/LED nail lamp
Professional Tips:
-
- Begin by shaping your nails into a rounded or almond shape to complement the French tips.
- Apply a base coat to protect your natural nails.
- Use a nail art brush to carefully paint the neon pink tips, creating a clean and precise line.
- For a gradient effect, blend the pink color slightly downward towards the nail bed.
- Cure the nails under a UV/LED lamp and finish with a top coat for a glossy finish.
Save Pin
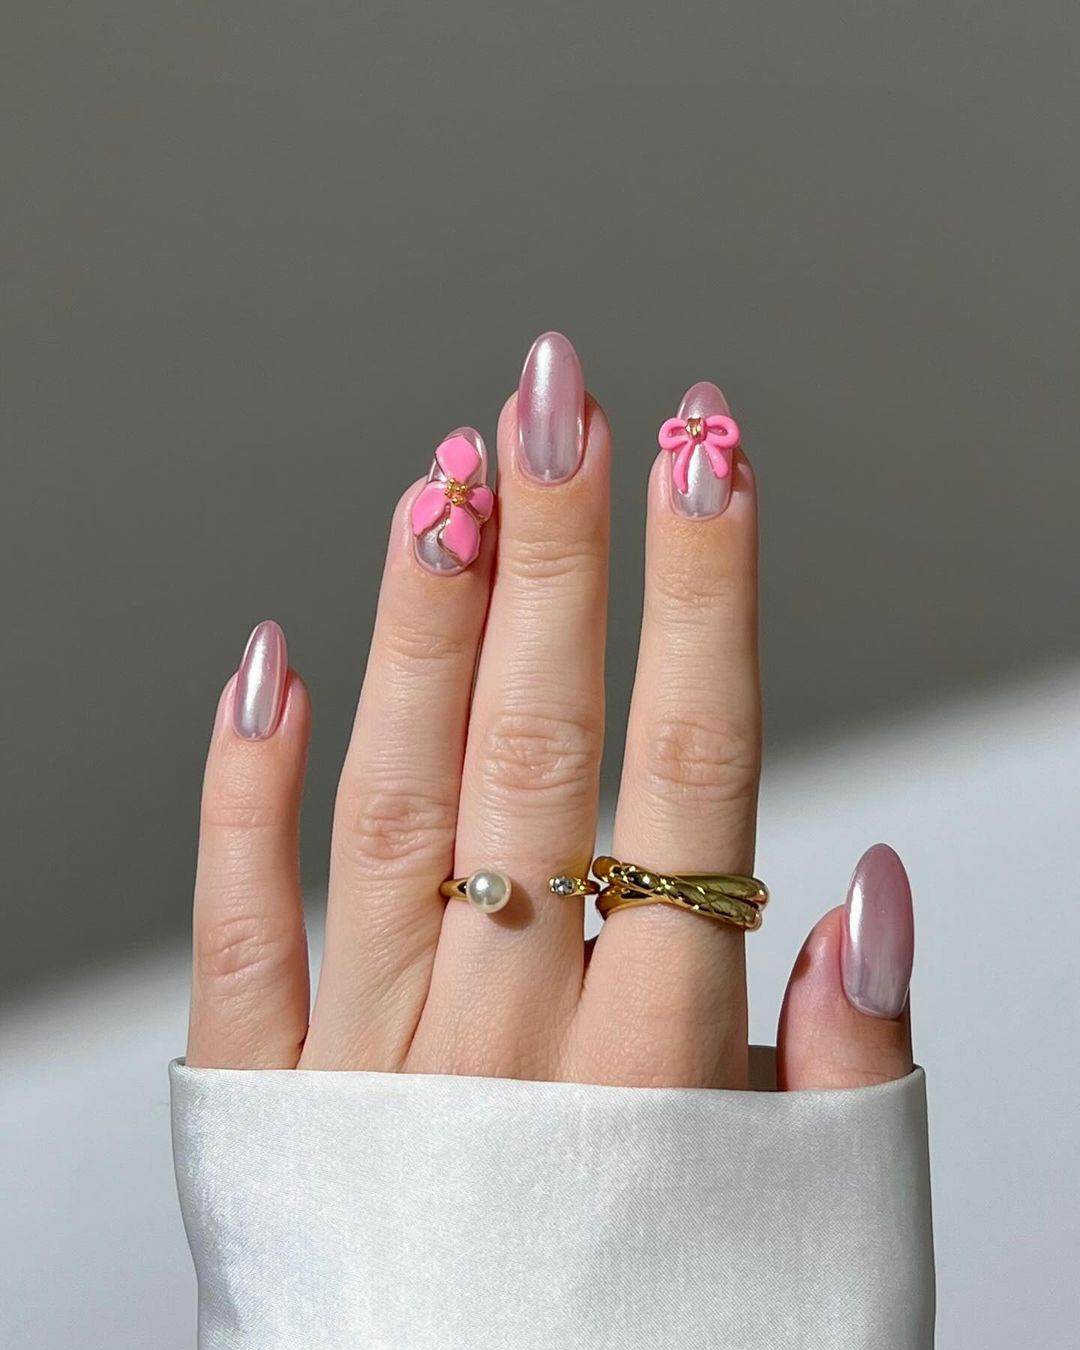
Metallic Shine with Floral Accents
This manicure features a stunning metallic base with intricate 3D floral accents, combining elegance and creativity. The metallic shine adds a futuristic touch, while the pink flowers bring a feminine and playful element to the design. This look is perfect for those who want to stand out and make a fashion statement with their nails.
-
- OPI GelColor in “Chrome Silver”
- DND Gel Polish in “Pink Peony”
- 3D nail art flowers
- Nail glue
- OPI Top Coat
- UV/LED nail lamp
Professional Tips:
-
- Shape your nails into an almond shape for a sleek and elegant appearance.
- Apply a base coat and cure it under a UV/LED lamp.
- Paint the nails with the metallic silver polish and cure each layer.
- Carefully attach the 3D floral accents using nail glue, ensuring they are securely placed.
- Finish with a top coat to seal the design and add extra shine.
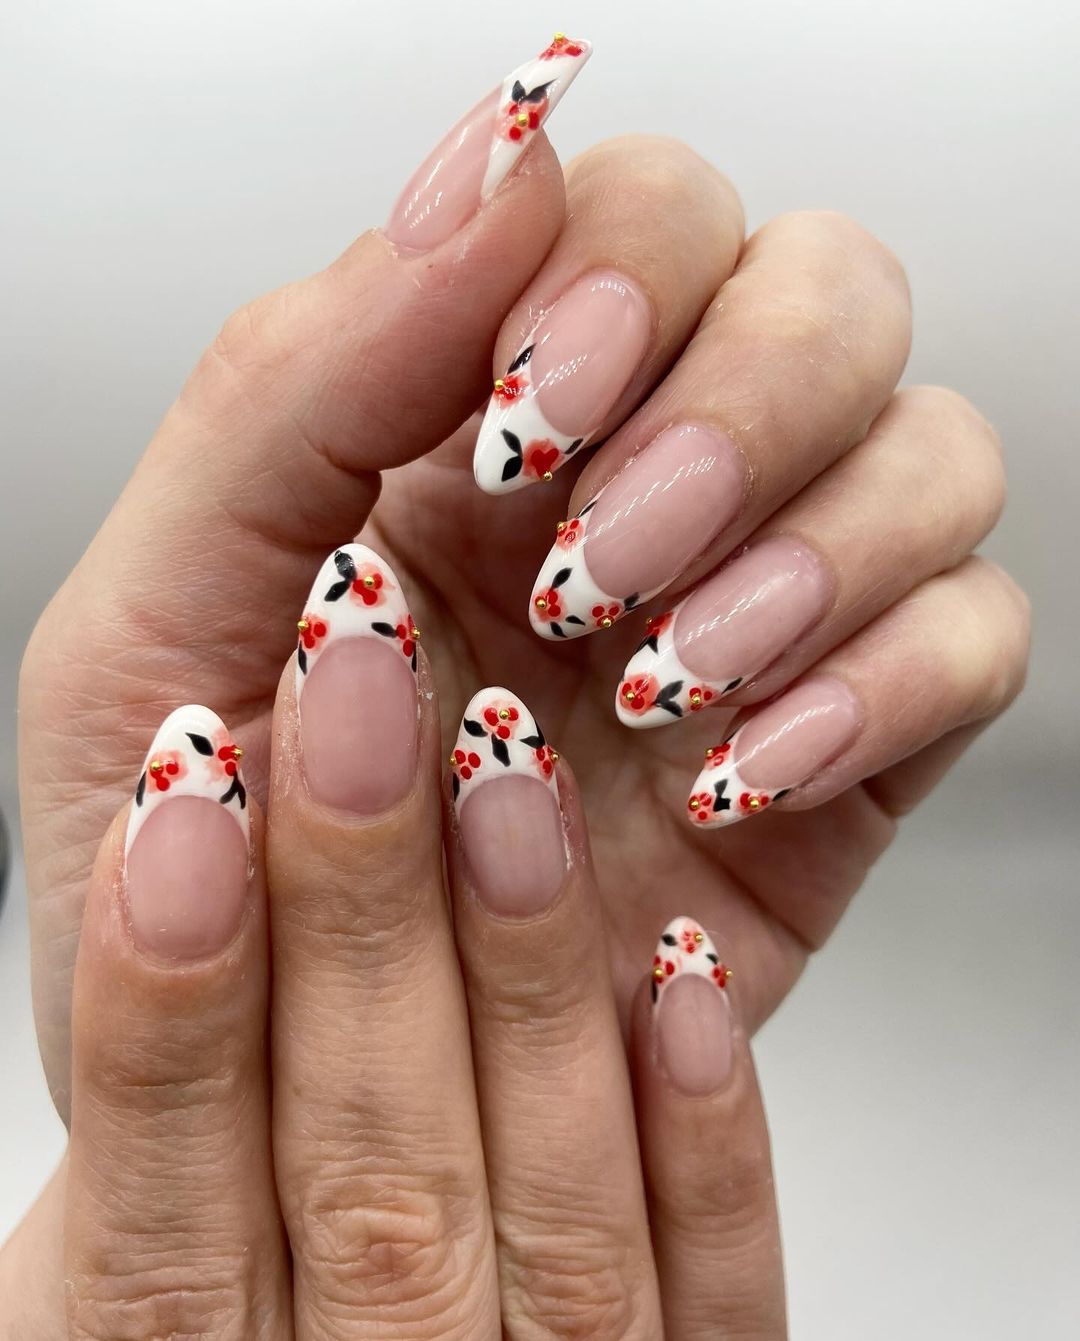
Cherry Blossom French Tips
This delicate and charming design features cherry blossom-inspired French tips, perfect for adding a touch of nature to your nails. The white tips are adorned with tiny red flowers and black leaves, creating a beautiful contrast against the natural nail bed. This look is ideal for those who love floral designs and want to celebrate the beauty of early fall.
-
- OPI Nail Lacquer in “Alpine Snow”
- Essie Nail Polish in “Cherry on Top”
- Black nail art pen
- Detail nail art brush
- OPI Top Coat
Professional Tips:
-
- Shape your nails into a stiletto or almond shape to enhance the floral design.
- Apply a base coat to protect your nails and ensure smooth application.
- Use the white polish to create French tips, then paint small red flowers and black leaves using a detail brush.
- For a precise look, use a black nail art pen for the leaves.
- Finish with a top coat to protect the design and add a glossy finish.
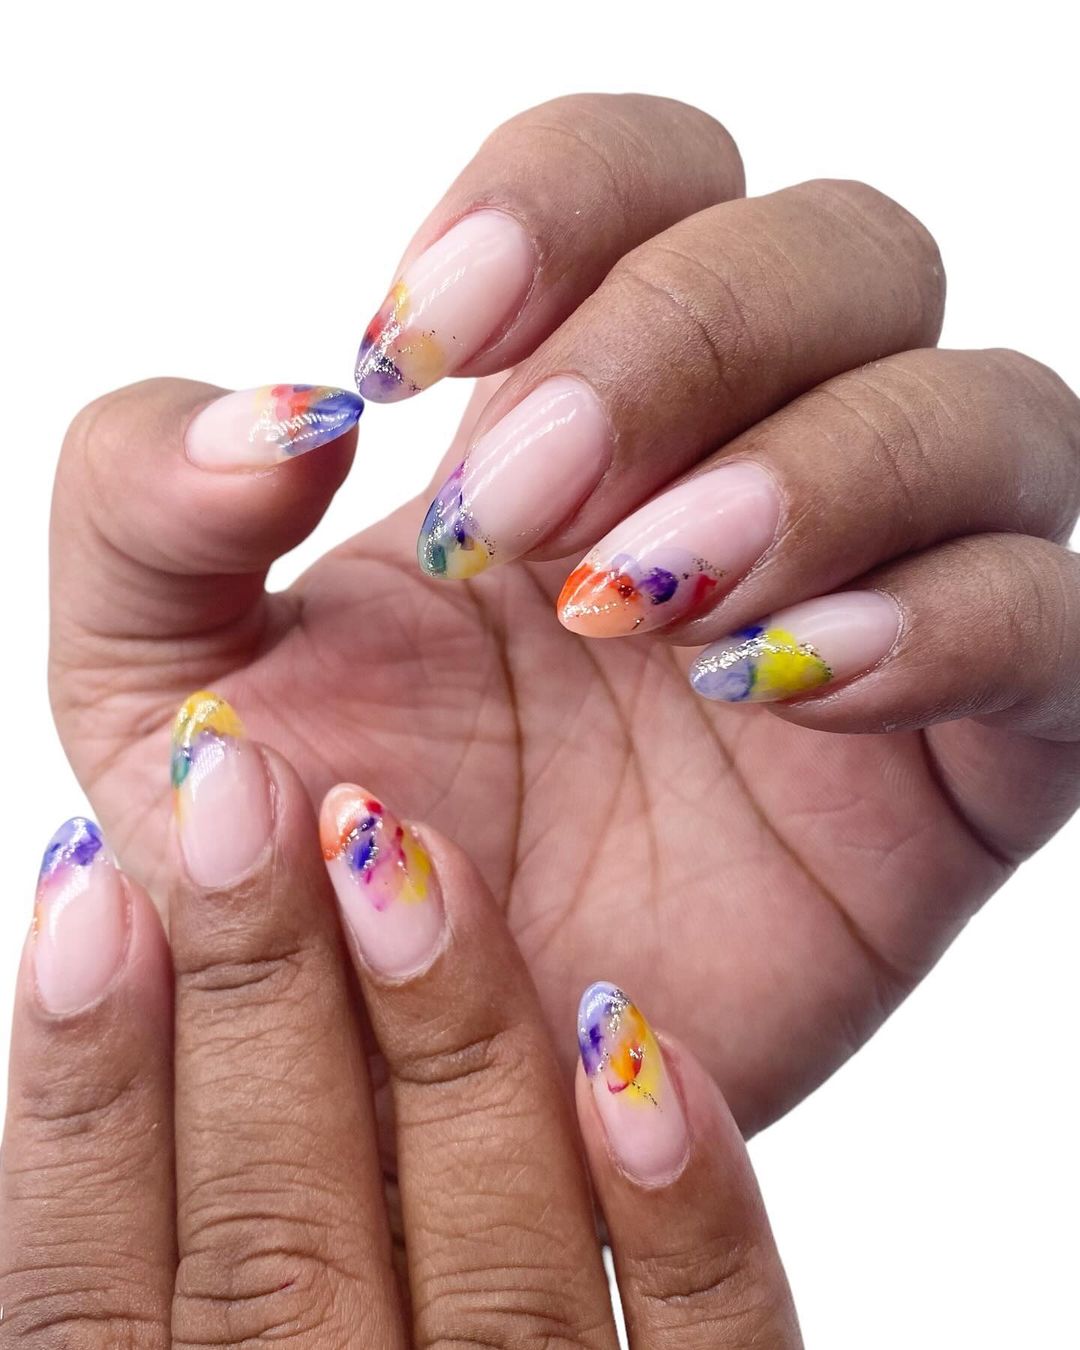
Colorful Abstract French Tips
This vibrant nail design features a playful twist on the classic French tip, with colorful abstract splashes at the tips. The mix of orange, purple, yellow, and red creates a lively and artistic look that’s perfect for adding a pop of color to your early fall style. This design is ideal for those who enjoy bold and creative nail art.
-
- OPI Nail Lacquer in “Cajun Shrimp”
- Essie Nail Polish in “Play Date”
- DND Gel Polish in “Sunshine Yellow”
- Nail art brushes
- OPI Top Coat
Professional Tips:
-
- Shape your nails into an almond or oval shape to enhance the abstract design.
- Apply a base coat to protect your nails.
- Use a thin nail art brush to create the colorful splashes at the tips, blending the colors slightly for a more artistic effect.
- Finish with a top coat to seal the design and add shine.
Botanical Elegance
This nail design brings a touch of nature to your manicure with delicate dried flowers embedded in a clear gel base. The subtle and elegant look is perfect for those who love a natural and earthy style, making it an excellent choice for early fall.
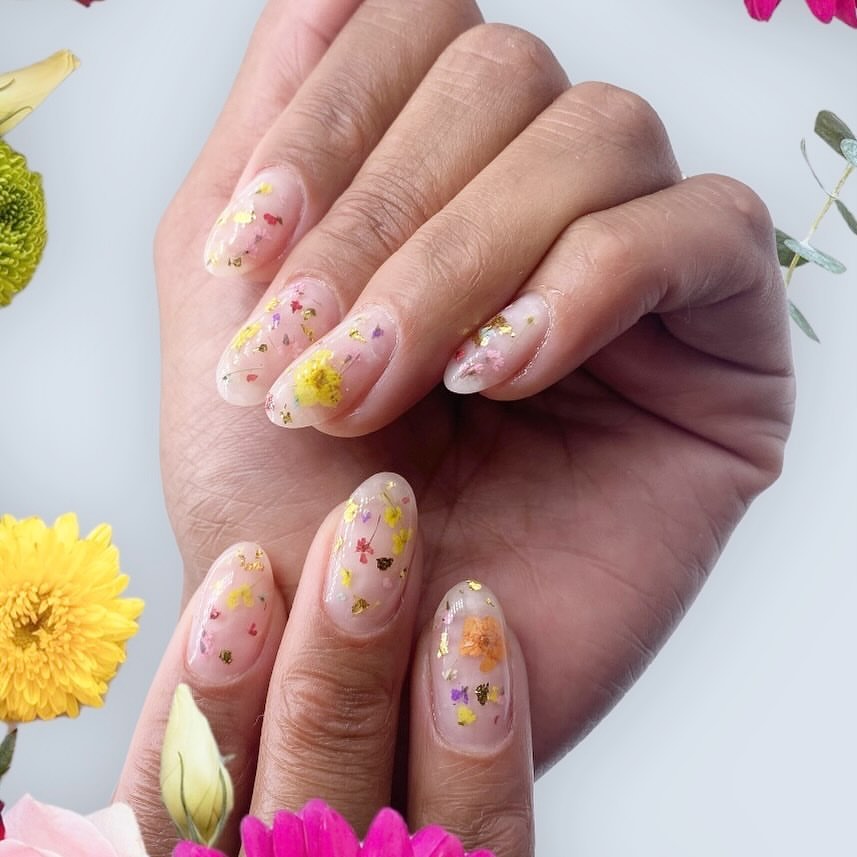
-
- DND Gel Polish in “Clear”
- Assorted dried flowers
- Nail tweezers
- OPI Top Coat
- UV/LED nail lamp
Professional Tips:
-
- Shape your nails into a round or almond shape for a softer look.
- Apply a clear base coat and cure under a UV/LED lamp.
- Use tweezers to carefully place the dried flowers on the nails, arranging them to your liking.
- Apply another layer of clear gel polish to encapsulate the flowers and cure again.
- Finish with a top coat for a smooth and glossy finish.
Royal Jewel Tones
This luxurious nail design features rich jewel tones and metallic accents, creating a regal and sophisticated look. The combination of deep blues, greens, and golds with intricate gem-like details makes this design perfect for special occasions or when you want to add a touch of opulence to your manicure.

-
- OPI GelColor in “Russian Navy”
- Essie Nail Polish in “Good as Gold”
- DND Gel Polish in “Emerald Green”
- Nail jewels and beads
- Nail glue
Professional Tips:
-
- Shape your nails into a stiletto or almond shape for a dramatic effect.
- Apply a base coat and let it dry.
- Paint each nail with the chosen jewel tone colors, and cure each layer under a UV/LED lamp.
- Attach the nail jewels and beads using nail glue, arranging them to create a cohesive design.
- Finish with a top coat to secure the jewels and add a glossy finish.
Save Pin
Intricate Floral Embossing
This unique nail design features intricate embossed floral patterns on a matte nude base, creating a textured and sophisticated look. The detailed embossing adds depth and dimension, making this design perfect for those who appreciate subtle yet artistic nail art.
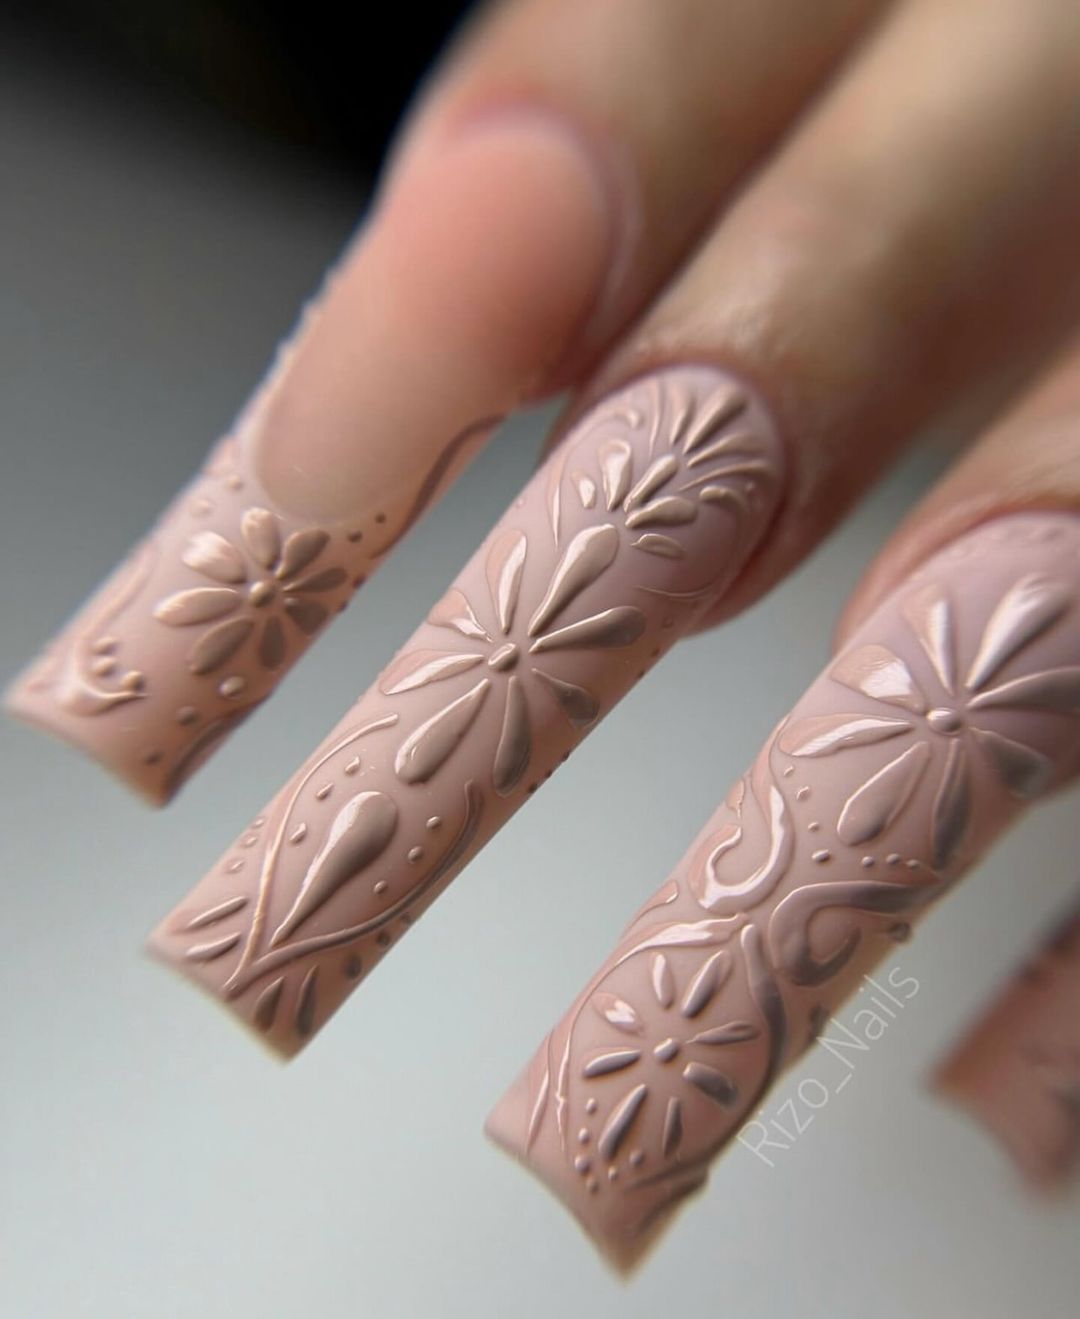
-
- OPI Nail Lacquer in “Bare My Soul”
- Matte top coat
- Embossing gel
- Nail art brush
Professional Tips:
-
- Shape your nails into a coffin or square shape to maximize the embossed design.
- Apply a nude base coat and let it dry.
- Use an embossing gel and a fine nail art brush to create the floral patterns on each nail.
- Cure the embossing gel under a UV/LED lamp.
- Finish with a matte top coat to enhance the embossed effect.
Fiery Orange Tips
This bold nail design features fiery orange tips with a clear base, creating a striking contrast that’s perfect for the transition from summer to fall. The vibrant orange color adds a touch of warmth and energy, making it a trendy choice for early fall.
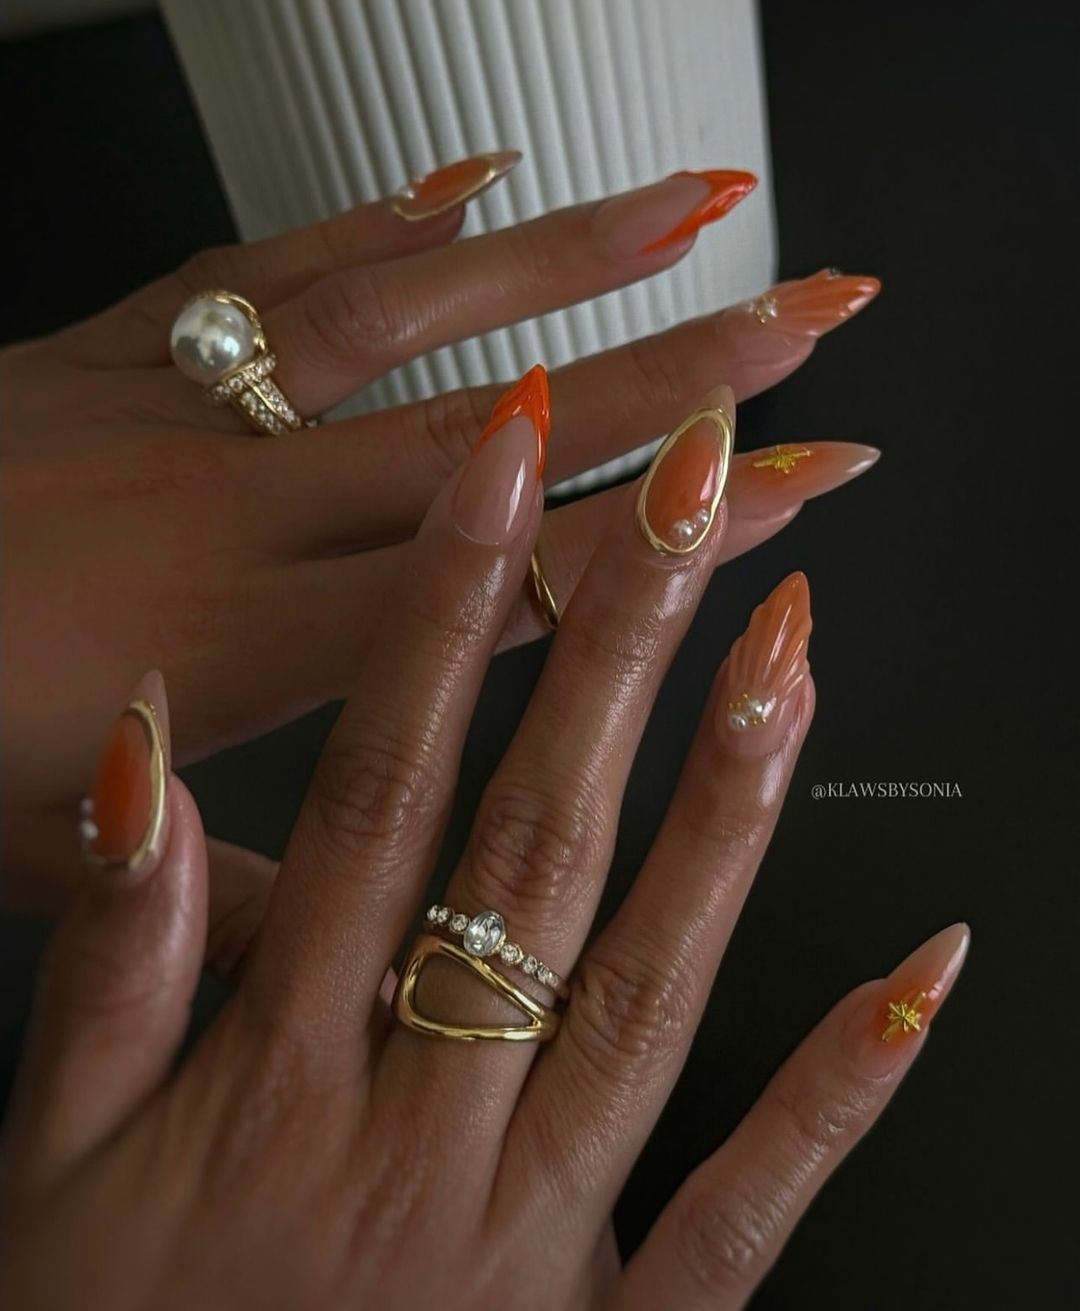
-
- OPI Nail Lacquer in “A Good Man-darin is Hard to Find”
- Essie Nail Polish in “Sugar Daddy”
- Nail art brush
- OPI Top Coat
Professional Tips:
-
- Shape your nails into an almond or stiletto shape to highlight the orange tips.
- Apply a clear base coat and let it dry.
- Use a nail art brush to carefully paint the orange tips, ensuring clean and precise lines.
- Finish with a top coat to add shine and protect the design.
Neon Floral Accents
This eye-catching nail design combines neon colors with floral accents, creating a vibrant and playful look. The neon green and yellow hues paired with 3D floral decorations make this design perfect for those who love bold and unique nail art.
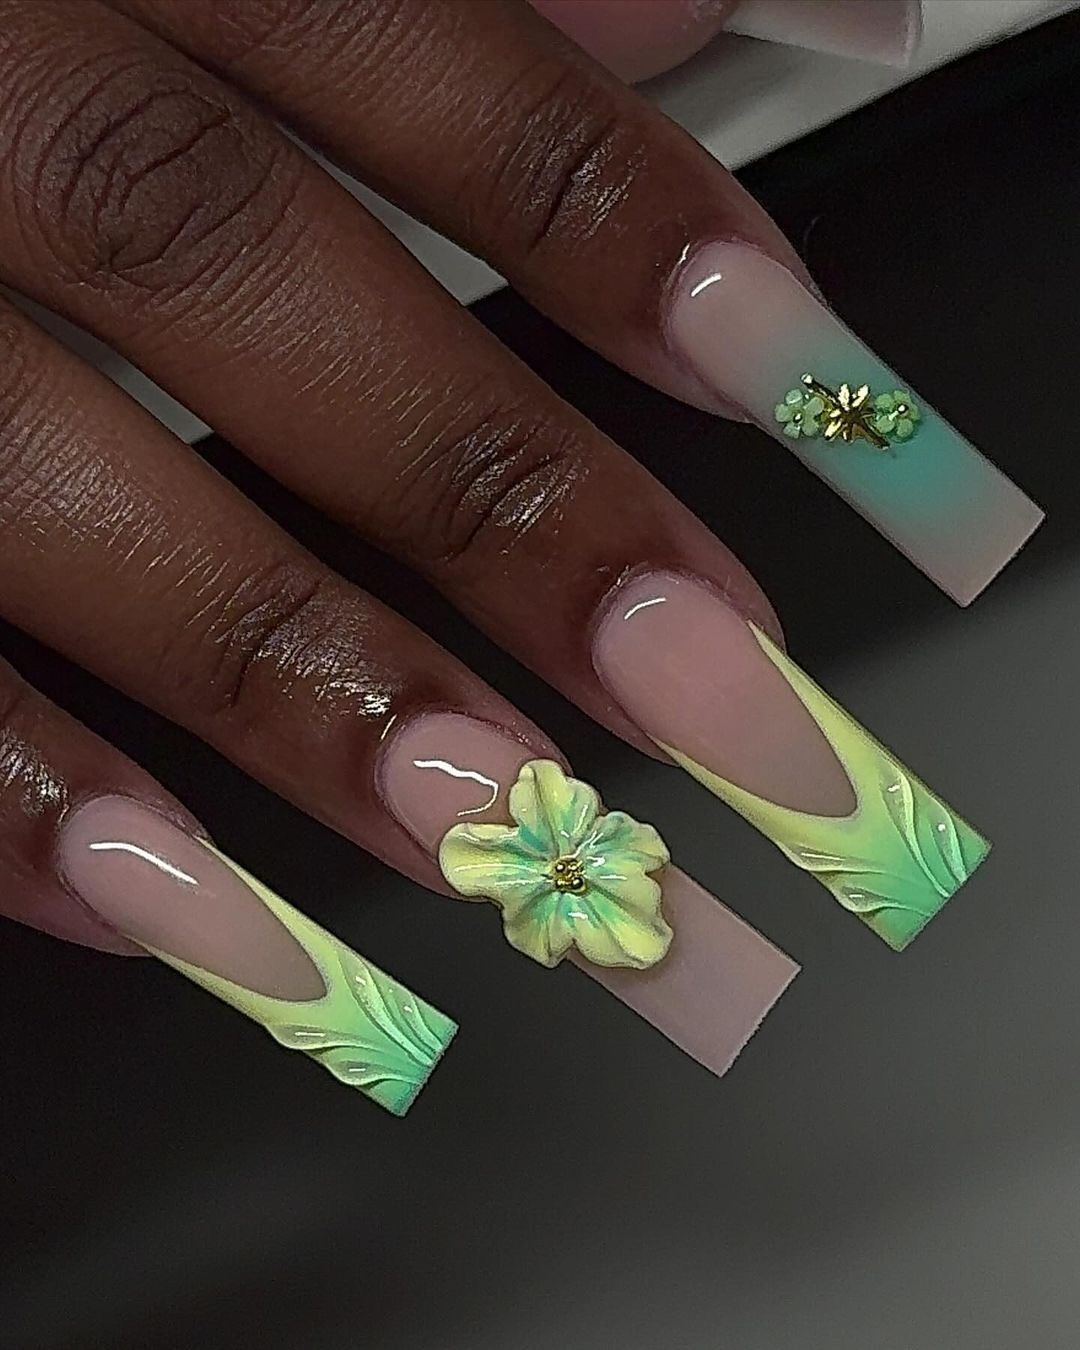
-
- OPI GelColor in “I Just Can’t Cope-acabana”
- DND Gel Polish in “Neon Green”
- 3D floral nail decorations
- Nail glue
- OPI Top Coat
Professional Tips:
-
- Shape your nails into a coffin or square shape to enhance the neon colors.
- Apply a base coat and let it dry.
- Paint each nail with the neon colors, and cure each layer under a UV/LED lamp.
- Attach the 3D floral decorations using nail glue, ensuring they are securely placed.
- Finish with a top coat to protect the design and add a glossy finish.
Bold Jewel Embellishments
This stunning nail design showcases an array of jewel embellishments on a pastel base, creating a luxurious and eye-catching look. The combination of colorful gems and gold accents against a clear or nude background adds a touch of glamour, making this design perfect for special occasions or when you want to feel extra fabulous.

-
- OPI GelColor in “Bubble Bath”
- Assorted nail jewels and studs
- Nail glue
- OPI Top Coat
- UV/LED nail lamp
Professional Tips:
-
- Shape your nails into a stiletto or almond shape for a bold appearance.
- Apply a base coat and cure under a UV/LED lamp.
- Arrange the nail jewels and studs on the nails, securing them with nail glue.
- Cure the nails again to ensure the jewels are firmly in place.
- Finish with a top coat to seal the design and add extra shine.
Elegant White Swirls
This sophisticated design features elegant white swirls on a nude base, creating a modern and chic look. The intricate white patterns add a touch of refinement, making this design ideal for formal events or when you want a polished and stylish manicure.
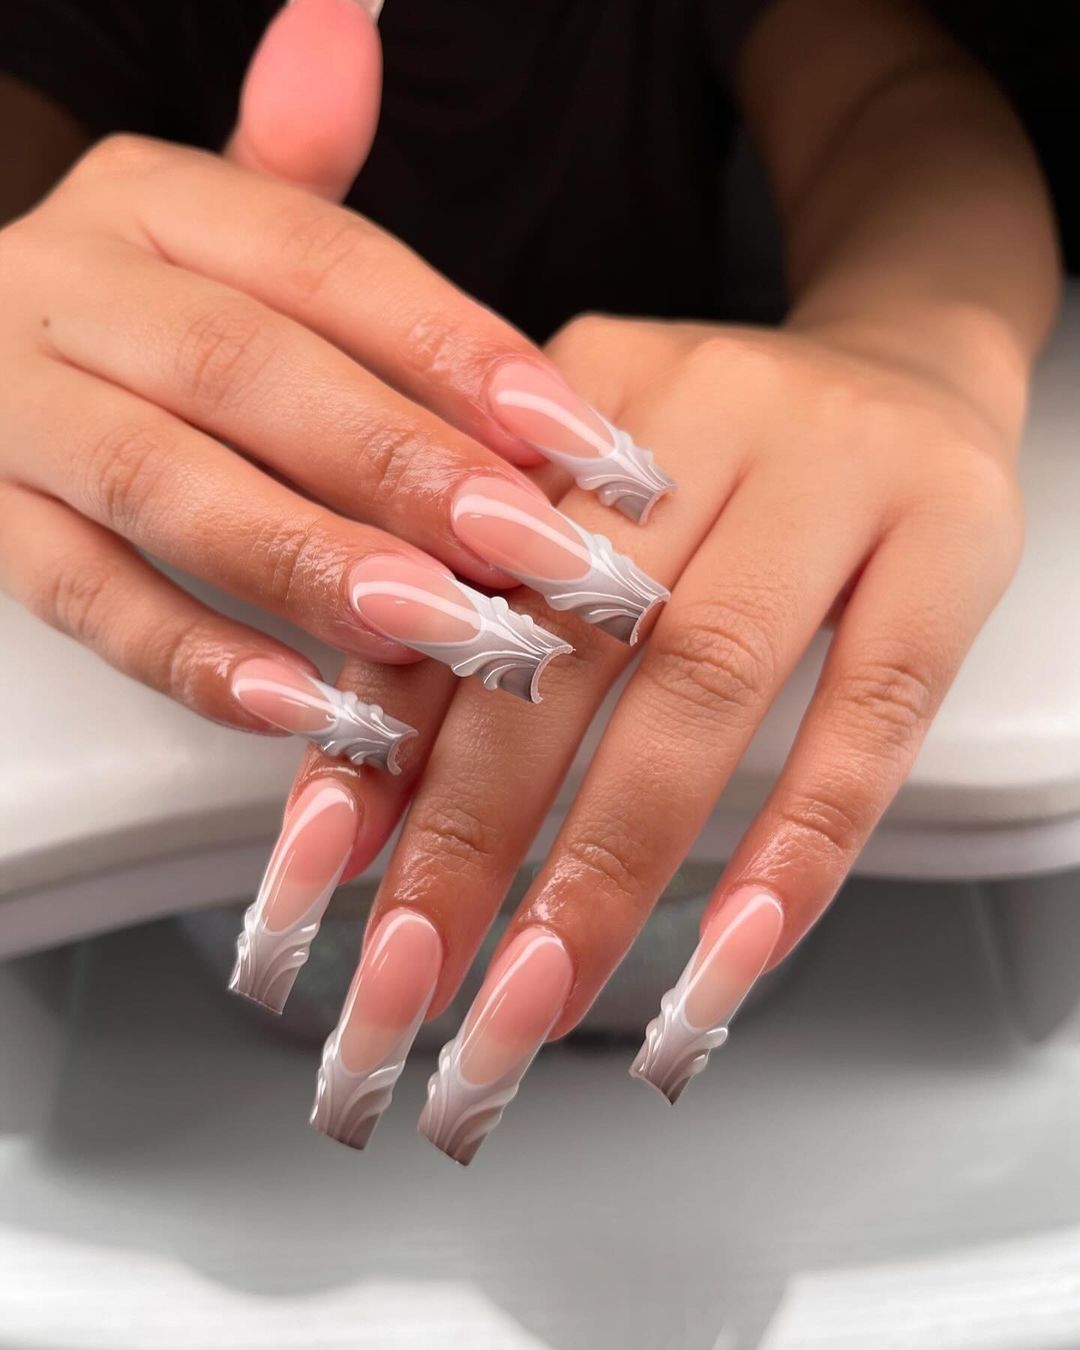
-
- OPI Nail Lacquer in “Bubble Bath”
- White nail art gel
- Nail art brush
- OPI Top Coat
- UV/LED nail lamp
Professional Tips:
-
- Shape your nails into a coffin or square shape to enhance the swirling patterns.
- Apply a base coat and cure under a UV/LED lamp.
- Use a fine nail art brush to create the white swirls on each nail.
- Cure the nails again to set the design.
- Finish with a top coat for a glossy finish.
Colorful Floral Accents
This playful nail design features colorful floral accents on a clear or nude base, creating a fun and lively look. The bright flowers add a touch of whimsy and are perfect for those who love vibrant and cheerful nail art.
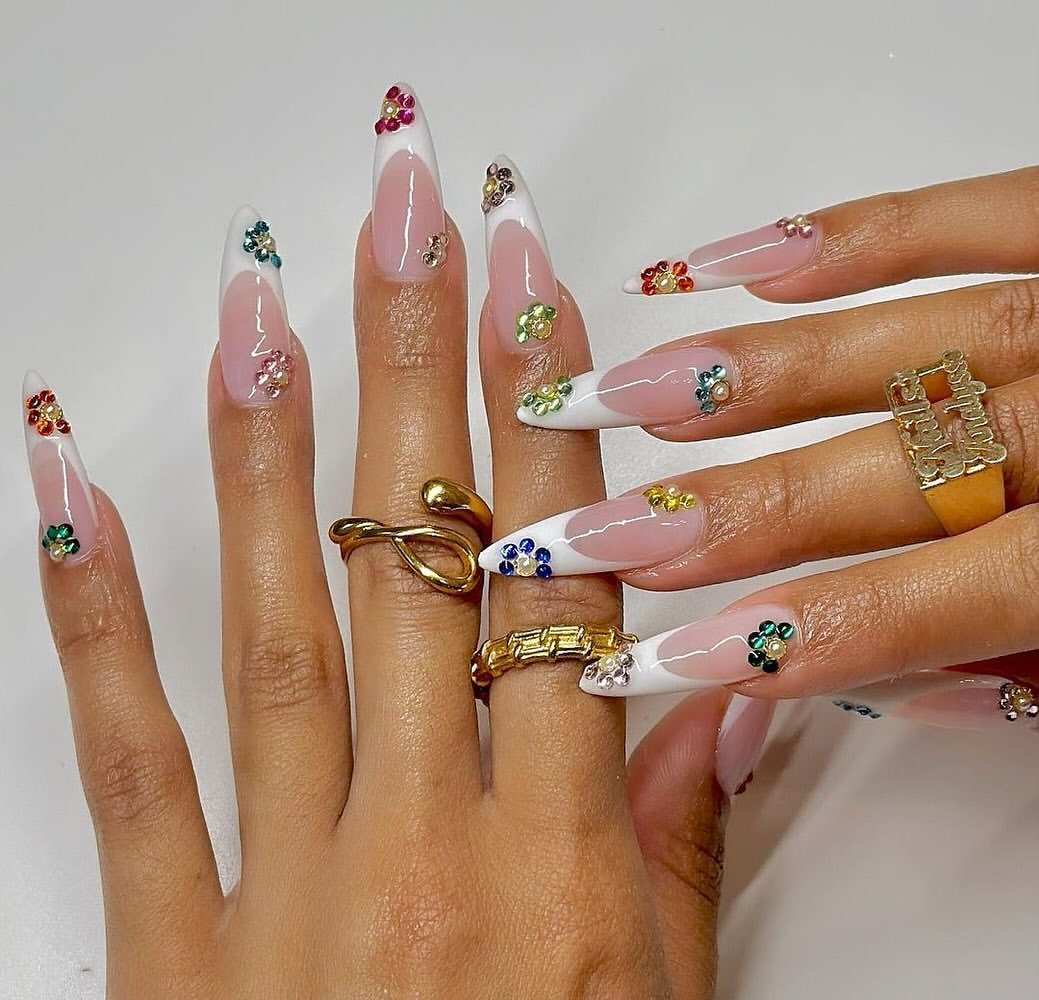
-
- OPI GelColor in “Passion”
- Assorted colorful nail flowers
- Nail glue
- OPI Top Coat
- UV/LED nail lamp
Professional Tips:
-
- Shape your nails into an almond or stiletto shape for a dynamic appearance.
- Apply a base coat and cure under a UV/LED lamp.
- Attach the colorful floral accents using nail glue, arranging them to your liking.
- Cure the nails again to secure the flowers.
- Finish with a top coat to protect the design and add shine.
Red and Tortoiseshell Combination
This bold design combines striking red tips with tortoiseshell accents, creating a fierce and trendy look. The mix of patterns and colors adds a unique flair, making this design perfect for those who love to stand out.
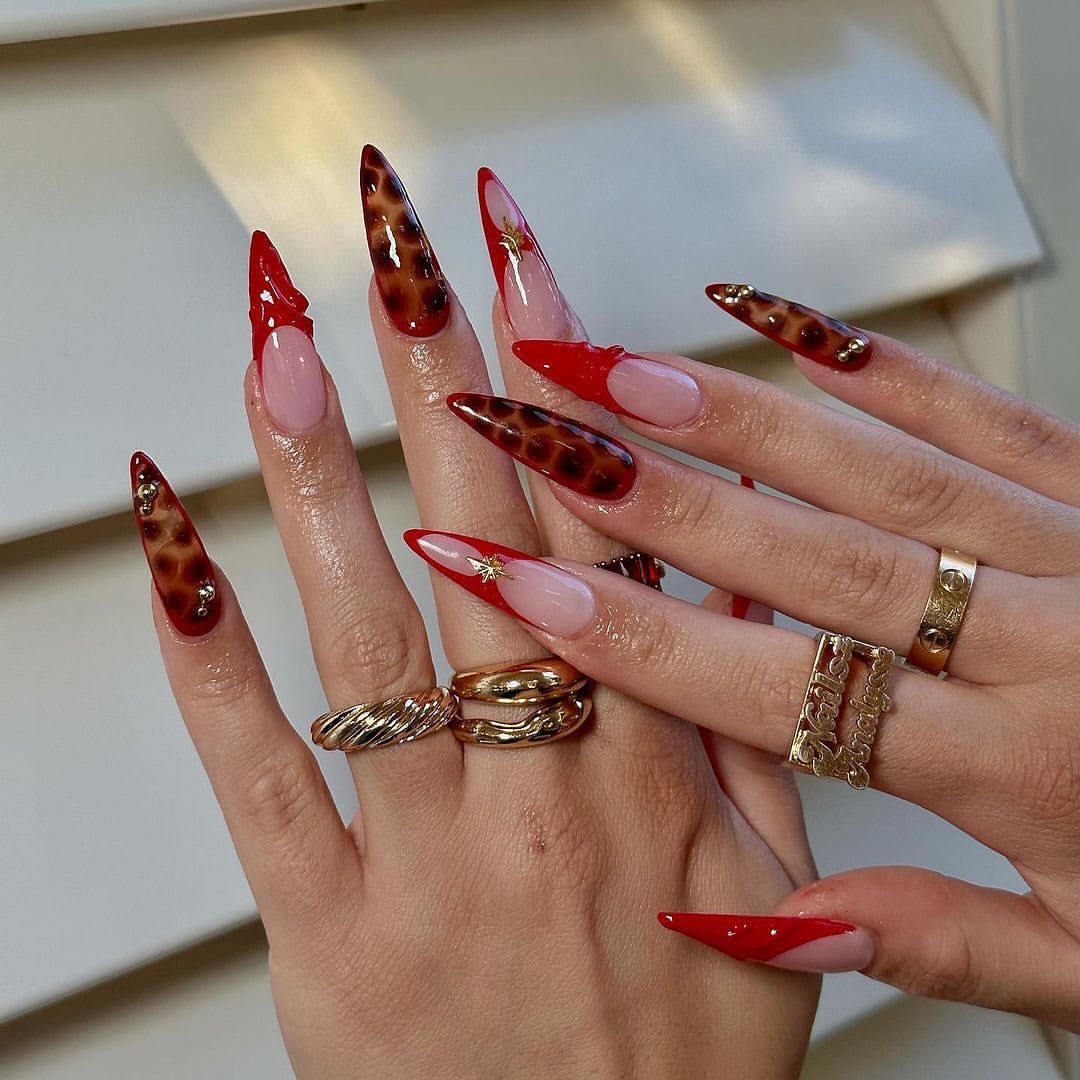
-
- OPI GelColor in “Big Apple Red”
- Essie Nail Polish in “Mochacino”
- Nail art brushes
- OPI Top Coat
- UV/LED nail lamp
Professional Tips:
-
- Shape your nails into a stiletto shape for a dramatic effect.
- Apply a base coat and cure under a UV/LED lamp.
- Use a nail art brush to create the tortoiseshell pattern and red tips.
- Cure the nails again to set the design.
- Finish with a top coat for a glossy finish.
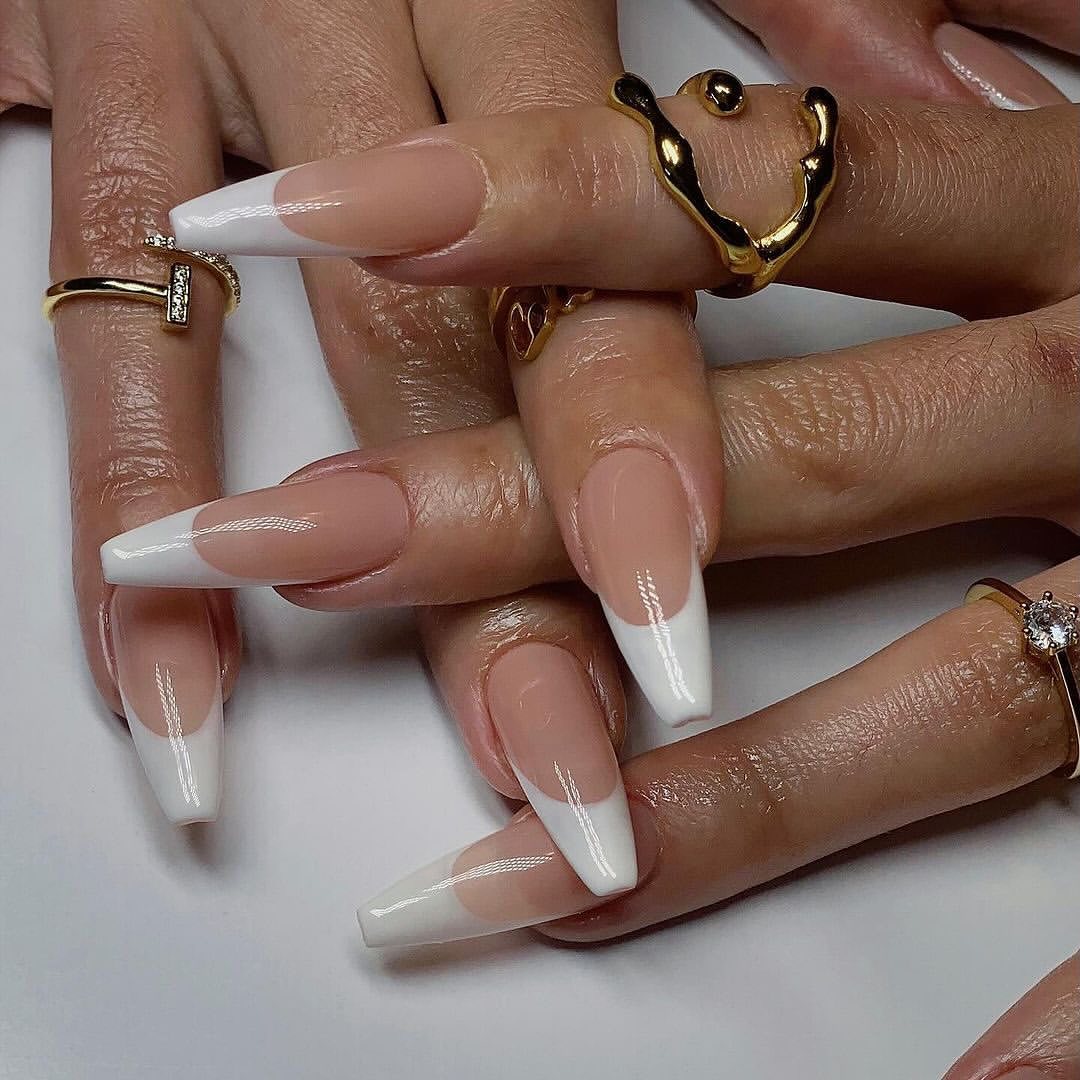
Classic French Tips
This timeless design features classic French tips on a nude base, creating an elegant and versatile look. The clean white tips add a touch of sophistication, making this design perfect for any occasion.
-
- OPI GelColor in “Samoan Sand”
- White nail polish
- Nail art brush
- OPI Top Coat
- UV/LED nail lamp
Professional Tips:
-
- Shape your nails into a coffin or square shape for a modern twist on the classic French tip.
- Apply a base coat and cure under a UV/LED lamp.
- Use a nail art brush to paint the white tips, ensuring clean and precise lines.
- Cure the nails again to set the design.
- Finish with a top coat for a glossy finish.
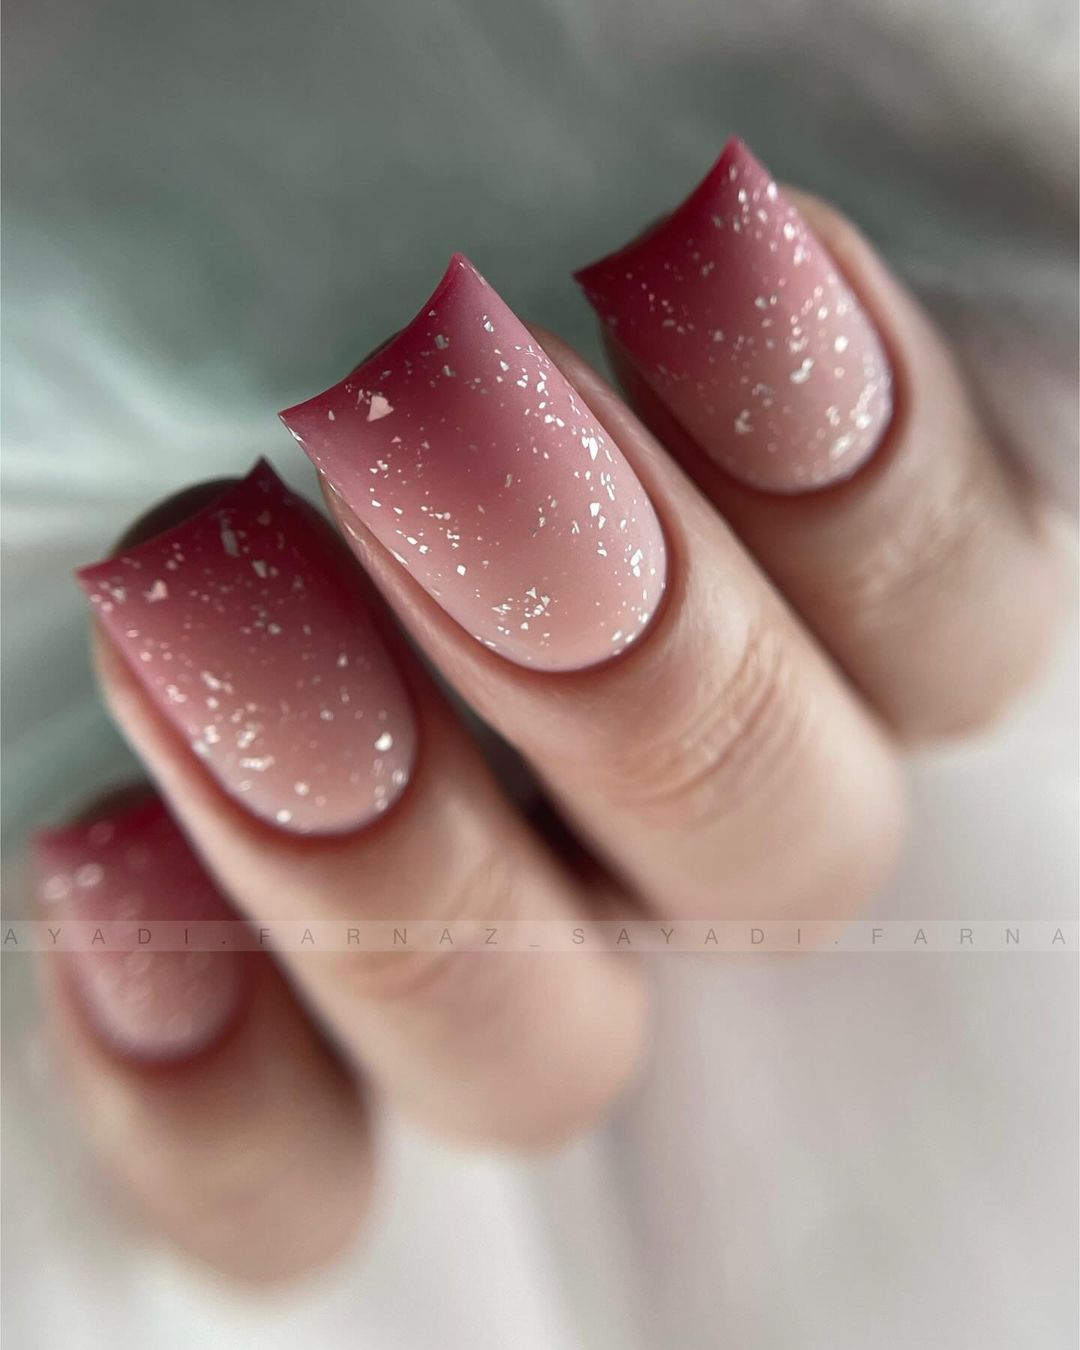
Gradient Glitter Ombre
This gorgeous design features a gradient glitter ombre effect, transitioning from a deep burgundy to a soft nude with sparkling accents. The blend of colors and glitter adds depth and glamour, making this design perfect for the fall season.
-
- OPI GelColor in “Malaga Wine”
- Essie Nail Polish in “Ballet Slippers”
- Fine glitter powder
- Makeup sponge
- OPI Top Coat
- UV/LED nail lamp
Professional Tips:
-
- Shape your nails into a square or coffin shape to enhance the gradient effect.
- Apply a base coat and cure under a UV/LED lamp.
- Use a makeup sponge to apply the glitter powder, creating a gradient effect from the tip to the base.
- Cure the nails again to set the design.
- Finish with a top coat to seal the glitter and add extra shine.
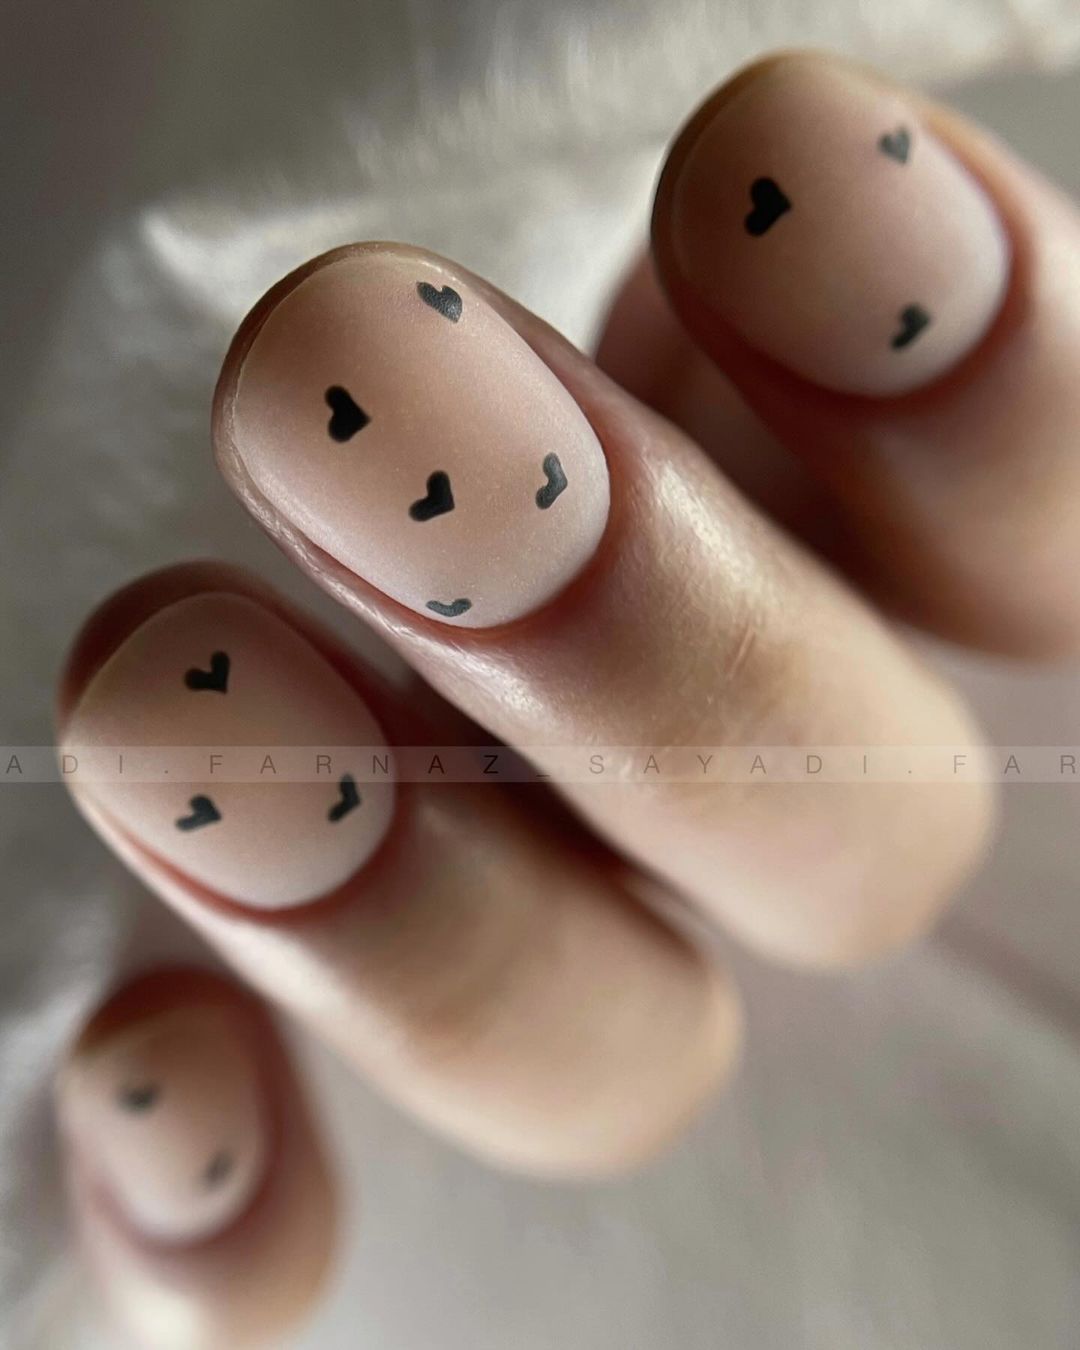
Minimalistic Heart Accents
This adorable nail design features minimalistic black heart accents on a matte nude base, creating a cute and simple look that’s perfect for everyday wear. The tiny hearts add a touch of charm and elegance, making this design versatile and suitable for any occasion.
-
- OPI Nail Lacquer in “Samoan Sand”
- Matte top coat
- Black nail art pen or brush
- OPI Top Coat
Professional Tips:
-
- Shape your nails into a short almond or oval shape for a neat appearance.
- Apply a base coat and let it dry.
- Use a black nail art pen or a fine brush to draw tiny hearts on each nail.
- Finish with a matte top coat to seal the design and add a sophisticated touch.
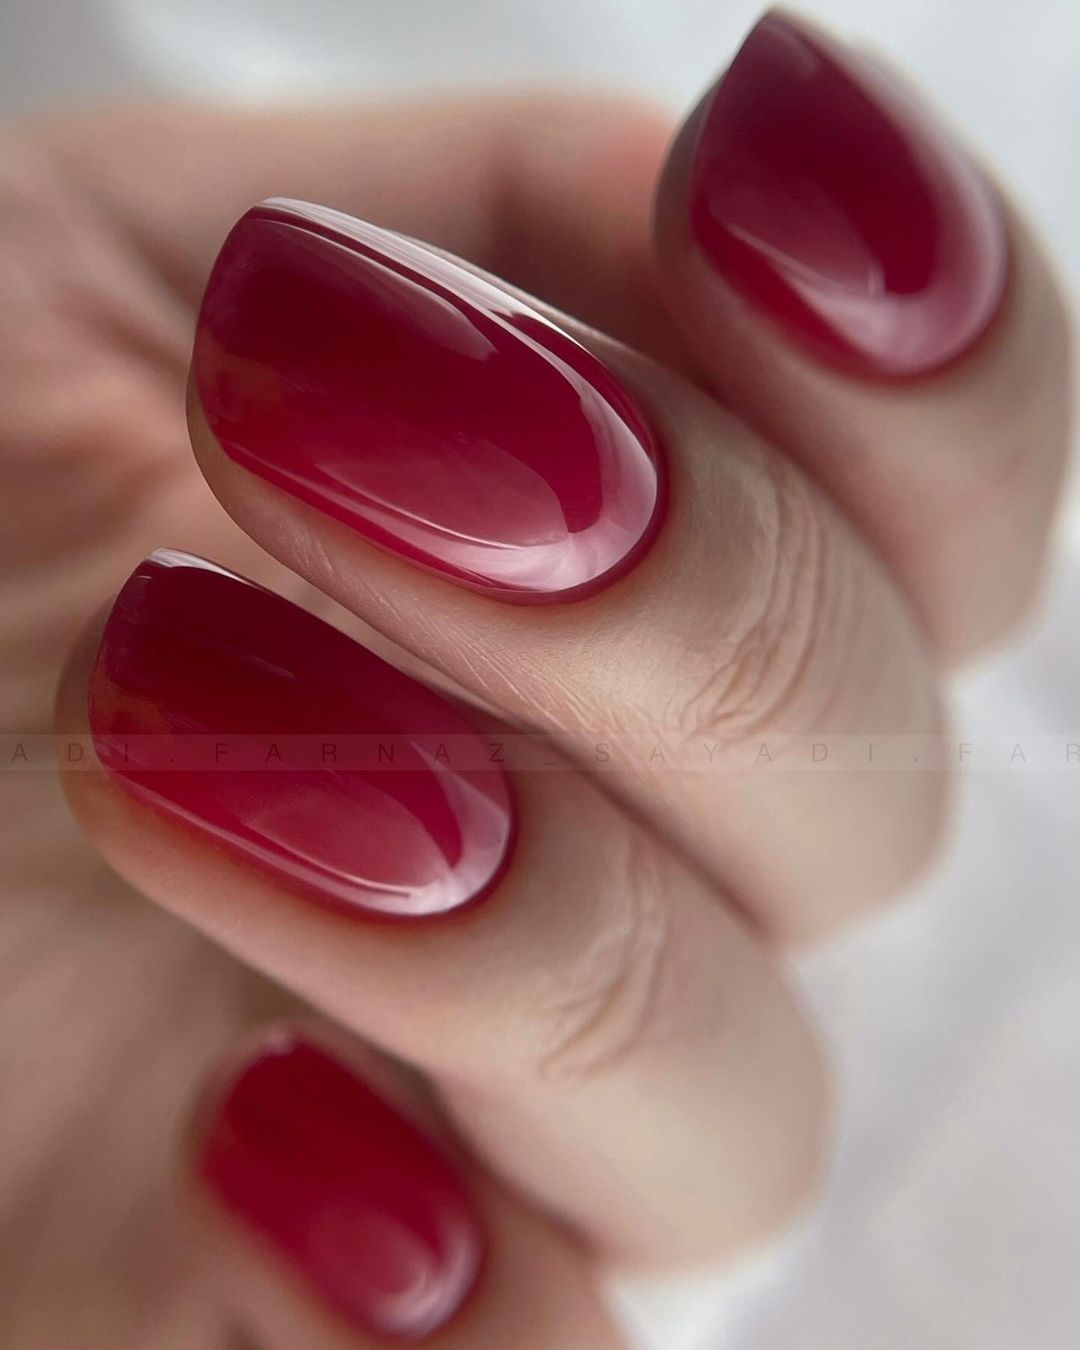
Classic Red Gloss
This timeless nail design features a rich, glossy red that’s perfect for making a bold statement. The deep red color exudes confidence and elegance, making it an ideal choice for both everyday wear and special occasions.
-
- OPI GelColor in “Big Apple Red”
- OPI Top Coat
- UV/LED nail lamp
Professional Tips:
-
- Shape your nails into a round or square shape to highlight the classic red color.
- Apply a base coat and cure under a UV/LED lamp.
- Paint each nail with two coats of the red polish, curing between each layer.
- Finish with a top coat to add a glossy finish and ensure the color lasts longer.
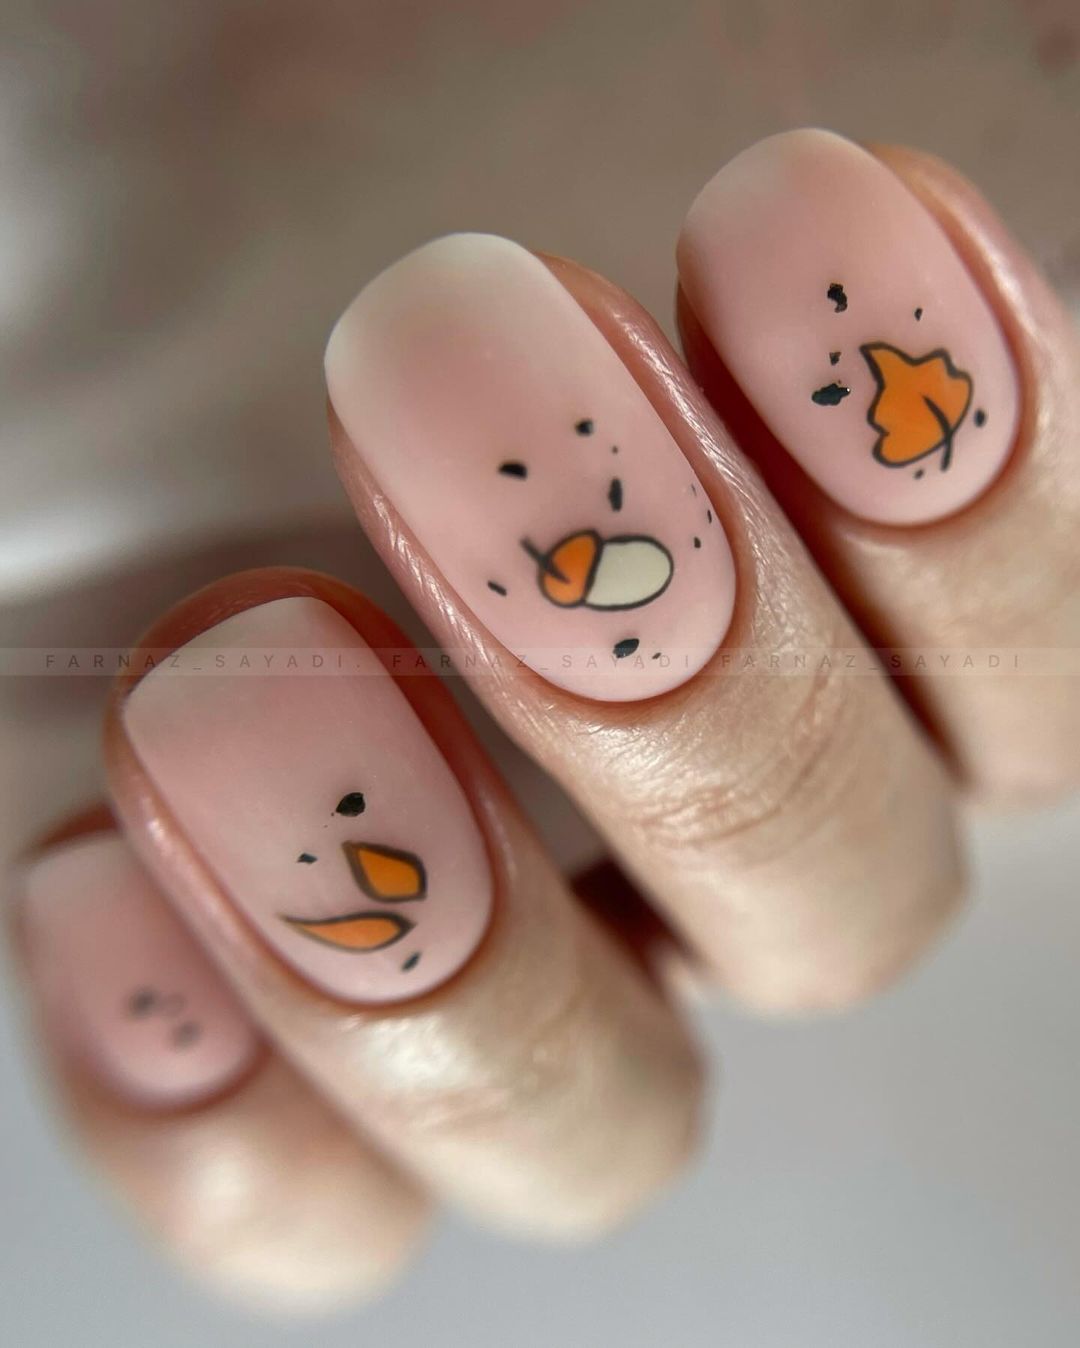
Autumn Leaves
This nail design features charming autumn leaves on a nude matte base, capturing the essence of the fall season. The detailed leaves in orange and yellow hues add a touch of seasonal beauty, making this design perfect for embracing the fall spirit.
-
- OPI Nail Lacquer in “Samoan Sand”
- Matte top coat
- Orange and yellow nail art pens or brushes
- OPI Top Coat
Professional Tips:
-
- Shape your nails into a short square or oval shape for a modern look.
- Apply a base coat and let it dry.
- Use nail art pens or brushes to draw small leaves on each nail, adding black accents for detail.
- Finish with a matte top coat to seal the design and add a sophisticated finish.
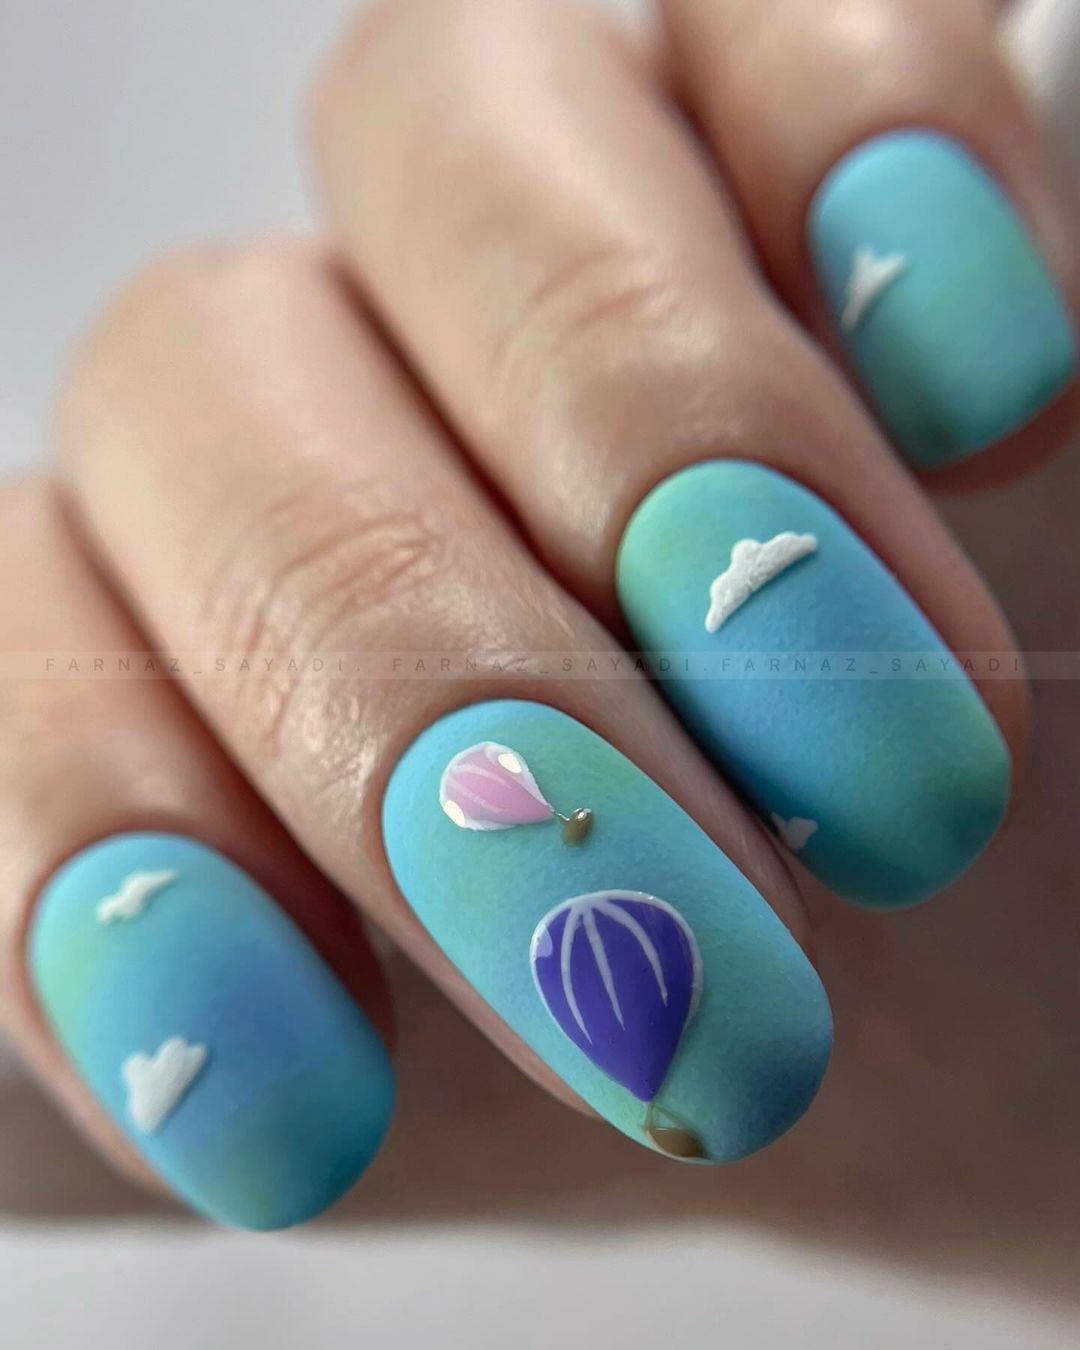
Sky Blue Hot Air Balloons
This whimsical nail design features pastel blue skies with hot air balloon accents, creating a dreamy and playful look. The soft colors and delicate details make this design perfect for adding a touch of fun to your manicure.
-
- OPI GelColor in “It’s a Boy!”
- White and pastel nail art pens or brushes
- OPI Top Coat
- UV/LED nail lamp
Professional Tips:
-
- Shape your nails into a short almond or oval shape for a neat appearance.
- Apply a base coat and cure under a UV/LED lamp.
- Use nail art pens or brushes to draw hot air balloons and clouds on each nail.
- Finish with a top coat to protect the design and add a glossy finish.
Gold Flake Gradient
This elegant nail design features a gradient of gold flakes on a nude base, creating a luxurious and eye-catching look. The subtle sparkle adds a touch of glamour, making this design perfect for both everyday wear and special occasions.

-
- OPI GelColor in “Samoan Sand”
- Gold flake nail art
- OPI Top Coat
- UV/LED nail lamp
Professional Tips:
-
- Shape your nails into an almond or oval shape to enhance the gradient effect.
- Apply a base coat and cure under a UV/LED lamp.
- Use a fine brush to apply gold flakes, concentrating them more heavily at the tips.
- Finish with a top coat to seal the design and add a glossy finish.
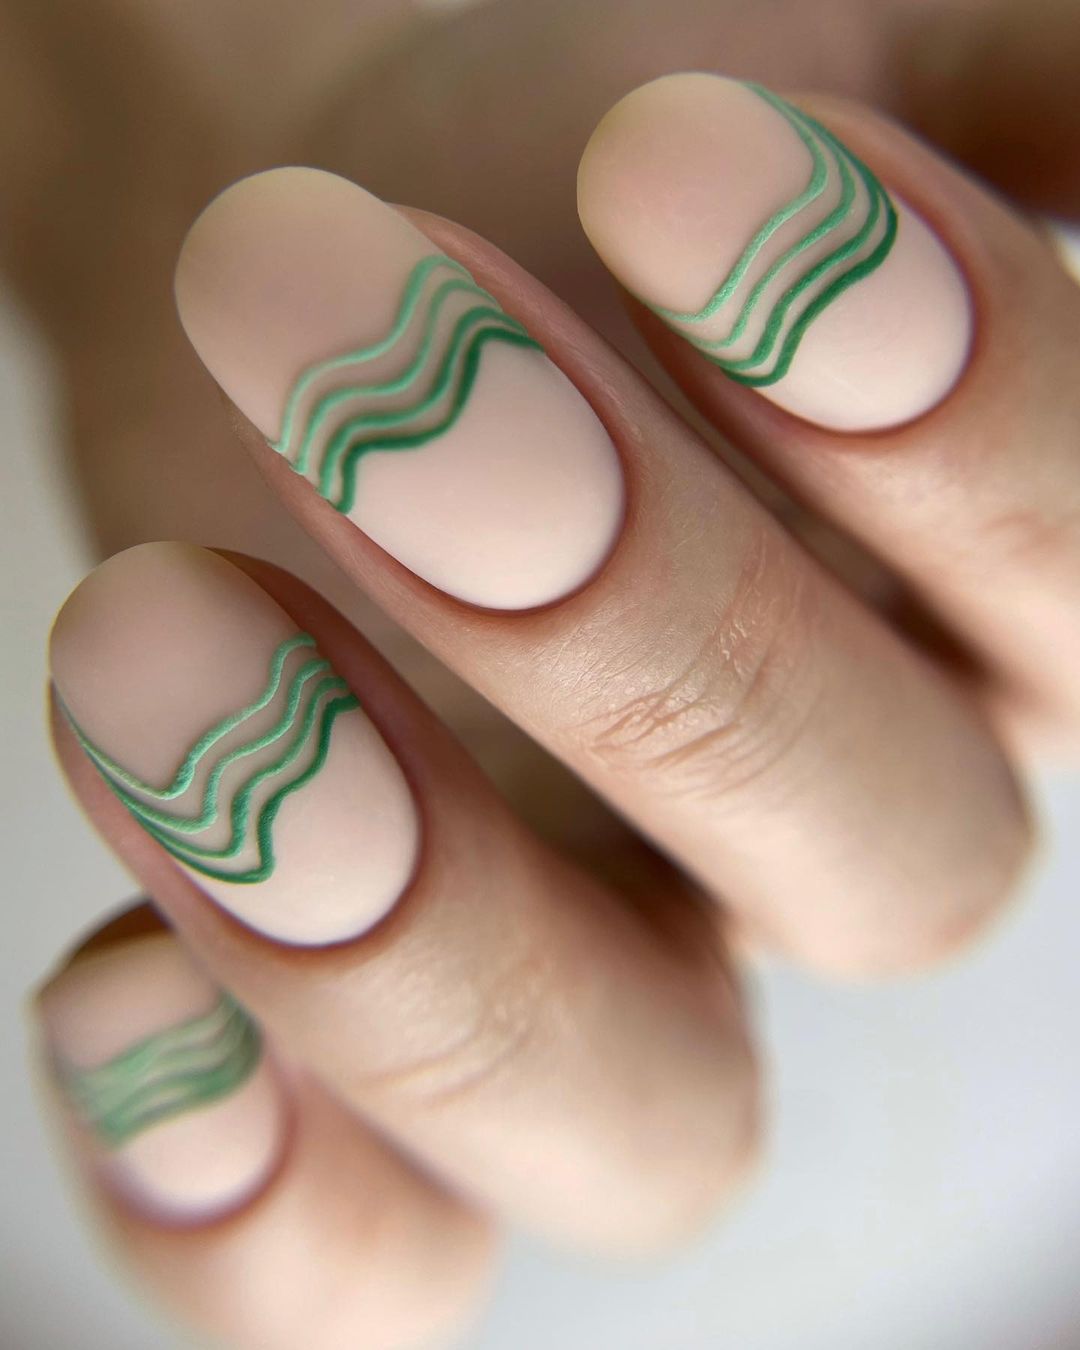
Green Wavy Lines
This modern nail design features green wavy lines on a matte nude base, creating a stylish and contemporary look. The minimalist waves add a touch of sophistication, making this design perfect for those who love clean and simple nail art.
-
- OPI Nail Lacquer in “Samoan Sand”
- Matte top coat
- Green nail art pen or brush
- OPI Top Coat
Professional Tips:
-
- Shape your nails into a short almond or oval shape for a sleek appearance.
- Apply a base coat and let it dry.
- Use a green nail art pen or brush to draw wavy lines on each nail.
- Finish with a matte top coat to seal the design and add a sophisticated touch.
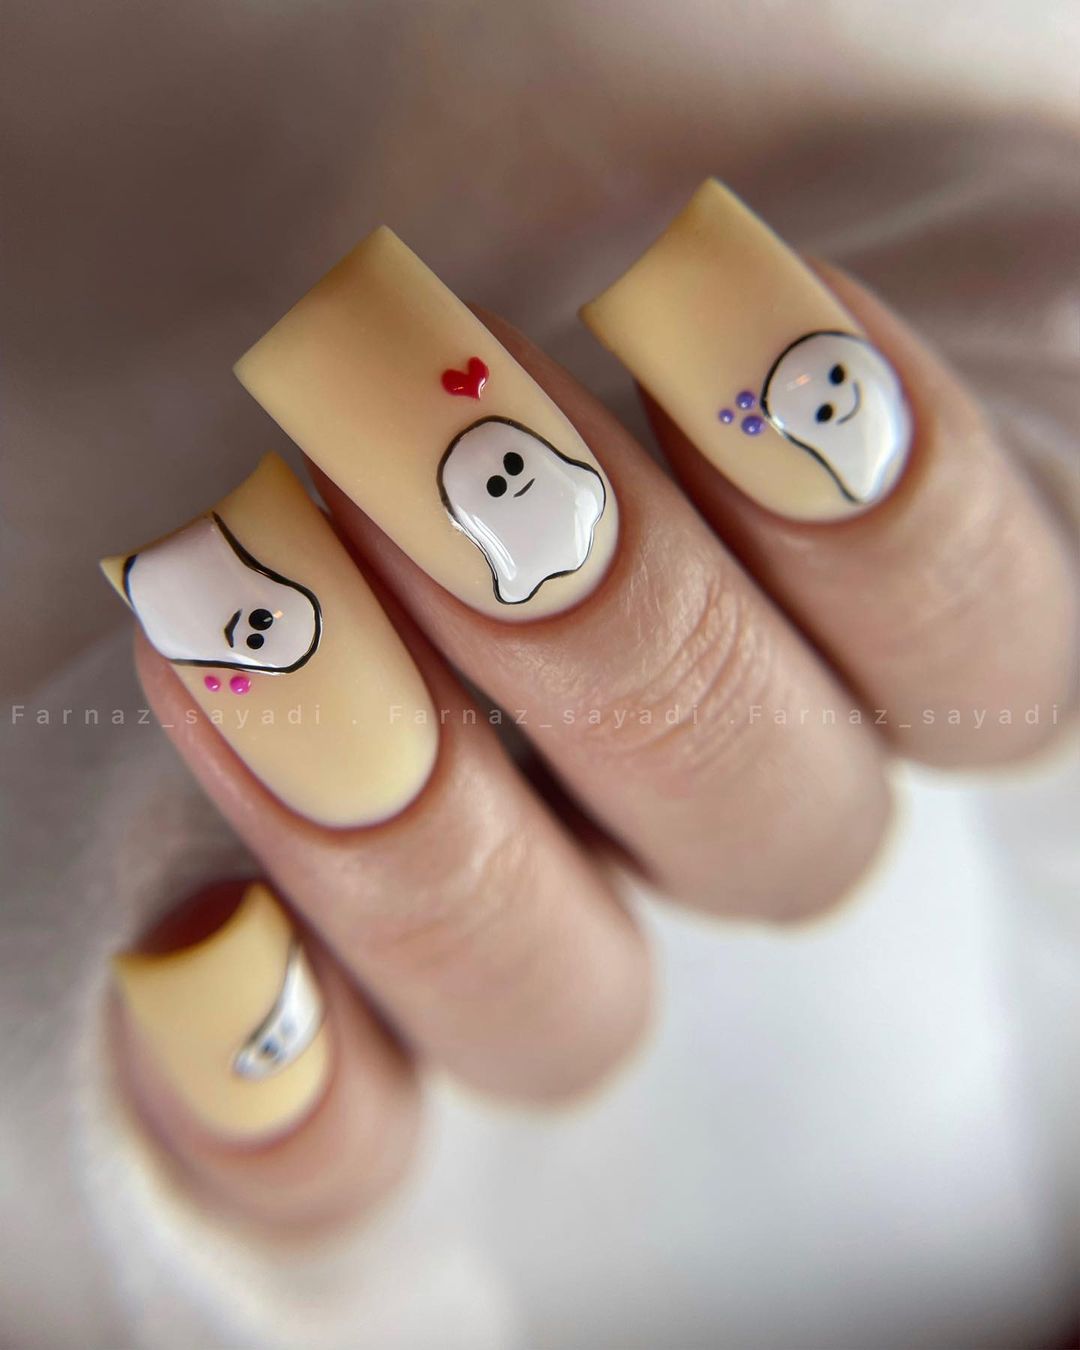
Cute Ghosts
This fun and festive nail design features adorable ghost figures on a light yellow base, perfect for the Halloween season. The playful ghosts add a touch of whimsy and are sure to bring a smile to anyone who sees them.
-
- OPI GelColor in “Never a Dulles Moment”
- White and black nail art pens or brushes
- OPI Top Coat
- UV/LED nail lamp
Professional Tips:
-
- Shape your nails into a short square or round shape for a neat look.
- Apply a base coat and cure under a UV/LED lamp.
- Use nail art pens or brushes to draw cute ghost figures on each nail, adding small heart accents for detail.
- Finish with a top coat to protect the design and add a glossy finish.
FAQ
Q: What are the best early fall nail colors? A: The best early fall nail colors include rich neutrals, muted pastels, and bold shades like dark purple and deep red. These colors transition beautifully from late summer into the cooler months.
Q: How can I make my nail polish last longer? A: To extend the life of your manicure, always use a base coat, apply thin layers of polish, and finish with a high-quality top coat. Avoid exposing your nails to harsh chemicals and wear gloves when doing household chores.
Q: Can I achieve salon-quality nails at home? A: Yes, with the right tools and products, you can achieve salon-quality nails at home. Invest in good quality nail polishes, files, buffers, and follow professional tips for application and maintenance.
Save Pin