25 Ideas for Fall Cat Eye Nails 2024
Are you ready to level up your nail game this fall? With fall cat eye nails 2024 making waves in the beauty industry, there’s no better time to explore the stunning array of designs that have taken center stage. From almond to stiletto, and from dark green to baby blue, the possibilities are endless. But how do you choose the perfect look that captures the essence of autumn while staying on trend? Let’s explore the latest and greatest design ideas for fall cat eye nails 2024 that are guaranteed to turn heads.
Captivating Green Cat Eye for Fall
This fall cat eye nail design is an absolute showstopper. The deep green color, accented with a chrome finish, brings a rich, mysterious vibe that’s perfect for autumn. The almond shape enhances the elegance of the design, while the cat eye effect adds a mesmerizing depth, almost as if you’re gazing into a lush, enchanted forest. The gel polish gives a glossy finish, making the nails look sleek and polished, ideal for anyone looking to make a bold statement this season.

Consumables and Recommendations:
- Gel Polish: I recommend using Born Pretty Cat Eye Gel Polish in shade 15 for that deep, rich green.
- Magnetic Wand: To achieve the cat eye effect, a strong magnetic wand is crucial. UR Sugar Magnetic Wand works beautifully.
- Top Coat: For a lasting shine, go for Gelish Top It Off.
- Base Coat: Don’t skip the base! OPI GelColor Base Coat ensures a smooth application and long-lasting wear.
How to Create This Look at Home:
- Start with a clean, prepped nail, and apply a thin layer of base coat.
- Once cured, apply the first layer of the Born Pretty Cat Eye Gel Polish. Cure under a UV lamp.
- Apply the second layer of gel polish, and immediately hold the magnetic wand over the nail to create the cat eye effect. Cure again.
- Finish with a generous layer of Gelish Top It Off and cure.
- For added durability, gently buff the nails and apply a final coat of top coat.
Iridescent Chrome Cat Eye Perfection
This stunning chrome cat eye manicure plays with light and shadow to create a multi-dimensional effect that’s both futuristic and elegant. The silver base combined with iridescent tones gives off a holographic vibe, making it perfect for someone who loves to push the boundaries of traditional nail art. The subtle gold accents around the edges add a touch of luxury without overpowering the overall design.

Consumables and Recommendations:
- Gel Polish: Holo Taco Multichrome Gel Polish in shade Wicked for that iridescent glow.
- Gold Nail Art Tape: To create the delicate gold accents, use Whats Up Nails Ultra Gold Nail Tape.
- Top Coat: Seche Vite Dry Fast Top Coat for a quick finish.
- Base Coat: CND Stickey Anchoring Base Coat to ensure long-lasting wear.
How to Create This Look at Home:
- Begin by applying a thin layer of CND Stickey Anchoring Base Coat and cure.
- Apply a layer of Holo Taco Multichrome Gel Polish, cure, and then apply a second layer.
- While the second layer is still wet, use a fine brush to apply the gold nail art tape around the edges. Cure.
- Seal everything with Seche Vite Dry Fast Top Coat and cure one final time.
Soft Pink Elegance with Silver Cat Eye Accent
For those who prefer a more subtle look, this soft pink cat eye manicure is the perfect blend of elegance and simplicity. The almond shape complements the natural tones, while the silver cat eye effect adds just the right amount of shine. This design is versatile and works well for both everyday wear and special occasions, offering a refined, polished look without being overly flashy.

Consumables and Recommendations:
- Gel Polish: Madam Glam Gel Polish in Blush Pink for the base color.
- Cat Eye Gel Polish: Makartt Cat Eye Gel Polish in Silver.
- Magnetic Wand: Makartt Dual Headed Cat Eye Magnetic Stick for precision.
- Top Coat: Gelish Top It Off for a glossy finish.
- Base Coat: IBD Powerbond Base Coat for strong adhesion.
How to Create This Look at Home:
- Apply IBD Powerbond Base Coat to clean nails and cure.
- Apply two layers of Madam Glam Blush Pink Gel Polish, curing after each layer.
- Add a layer of Makartt Cat Eye Gel Polish and use the Makartt Magnetic Stick to create the silver cat eye effect. Cure.
- Finish with Gelish Top It Off and cure to lock in the design.
Elegant Neutral Cat Eye Nails
This design features a neutral-toned cat eye effect, perfect for those who prefer a subtle yet sophisticated look. The soft, beige-brown hue is ideal for any occasion, blending seamlessly with a variety of outfits. The round shape of the nails complements the understated color, making the nails appear natural yet polished. The cat eye effect adds a touch of depth and interest, catching the light and drawing attention to the beautiful simplicity of the design.

Consumables and Recommendations:
- Gel Polish: Essie Gel Couture in Buttoned & Buffed for that neutral base.
- Cat Eye Gel Polish: Makartt Cat Eye Gel Polish in Champagne.
- Top Coat: Sally Hansen Miracle Gel Top Coat for a long-lasting shine.
- Base Coat: Zoya Anchor Base Coat to protect the natural nails and ensure durability.
How to Create This Look at Home:
- Begin with clean, shaped nails and apply a thin layer of Zoya Anchor Base Coat. Cure under a UV lamp.
- Apply two layers of Essie Gel Couture in Buttoned & Buffed, curing after each layer.
- Add a layer of Makartt Cat Eye Gel Polish and use a magnetic wand to create the cat eye effect. Cure under the UV lamp.
- Seal with Sally Hansen Miracle Gel Top Coat and cure for a high-gloss finish.
Save Pin

Deep Burgundy Cat Eye with a Touch of Sparkle
This manicure features a rich burgundy cat eye effect with a hint of sparkle, ideal for making a bold statement this fall. The deep maroon color is both dramatic and elegant, perfect for evening events or a night out. The coffin shape adds to the overall drama, elongating the fingers and enhancing the impact of the dark, shimmering polish. The cat eye effect, combined with the glitter, creates a multidimensional look that is sure to turn heads.

Consumables and Recommendations:
- Gel Polish: OPI GelColor in Malaga Wine for that deep maroon base.
- Cat Eye Gel Polish: Born Pretty Cat Eye Gel Polish in Ruby Red.
- Top Coat: Gelish Top It Off for a long-lasting, high-shine finish.
- Base Coat: CND Stickey Base Coat to ensure a smooth and even application.
How to Create This Look at Home:
- Start by applying a layer of CND Stickey Base Coat to clean, shaped nails, and cure under a UV lamp.
- Apply two coats of OPI GelColor in Malaga Wine, curing each layer under the UV lamp.
- Add a layer of Born Pretty Cat Eye Gel Polish and use a magnetic wand to create the cat eye effect, then cure.
- Finish with Gelish Top It Off to seal the design and add a brilliant shine. Cure for the final time.
Subtle Glitter Cat Eye with a Nude Base
This design is a beautiful blend of nude tones with a delicate cat eye glitter effect, perfect for a chic and understated look. The almond shape nails are softened by the nude base, while the glitter cat eye effect adds just the right amount of sparkle. This manicure is ideal for those who prefer a more neutral palette but still want a touch of glamour. The gradient glitter from the tips adds a subtle yet sophisticated twist to the classic nude nails.

Consumables and Recommendations:
- Gel Polish: Madam Glam Gel Polish in Nude Mood for the base color.
- Cat Eye Gel Polish: Makartt Cat Eye Gel Polish in Silver Glitter.
- Top Coat: Essie Gel Couture Top Coat for a durable, glossy finish.
- Base Coat: Orly Bonder Base Coat to protect the nails and improve polish adhesion.
How to Create This Look at Home:
- Start with a layer of Orly Bonder Base Coat on clean, almond-shaped nails, then cure.
- Apply two layers of Madam Glam Nude Mood Gel Polish, curing each layer under a UV lamp.
- Add a layer of Makartt Cat Eye Gel Polish in Silver Glitter, and use a magnetic wand to create the gradient cat eye effect. Cure under the UV lamp.
- Seal the design with Essie Gel Couture Top Coat for a glossy, long-lasting finish, and cure one last time.
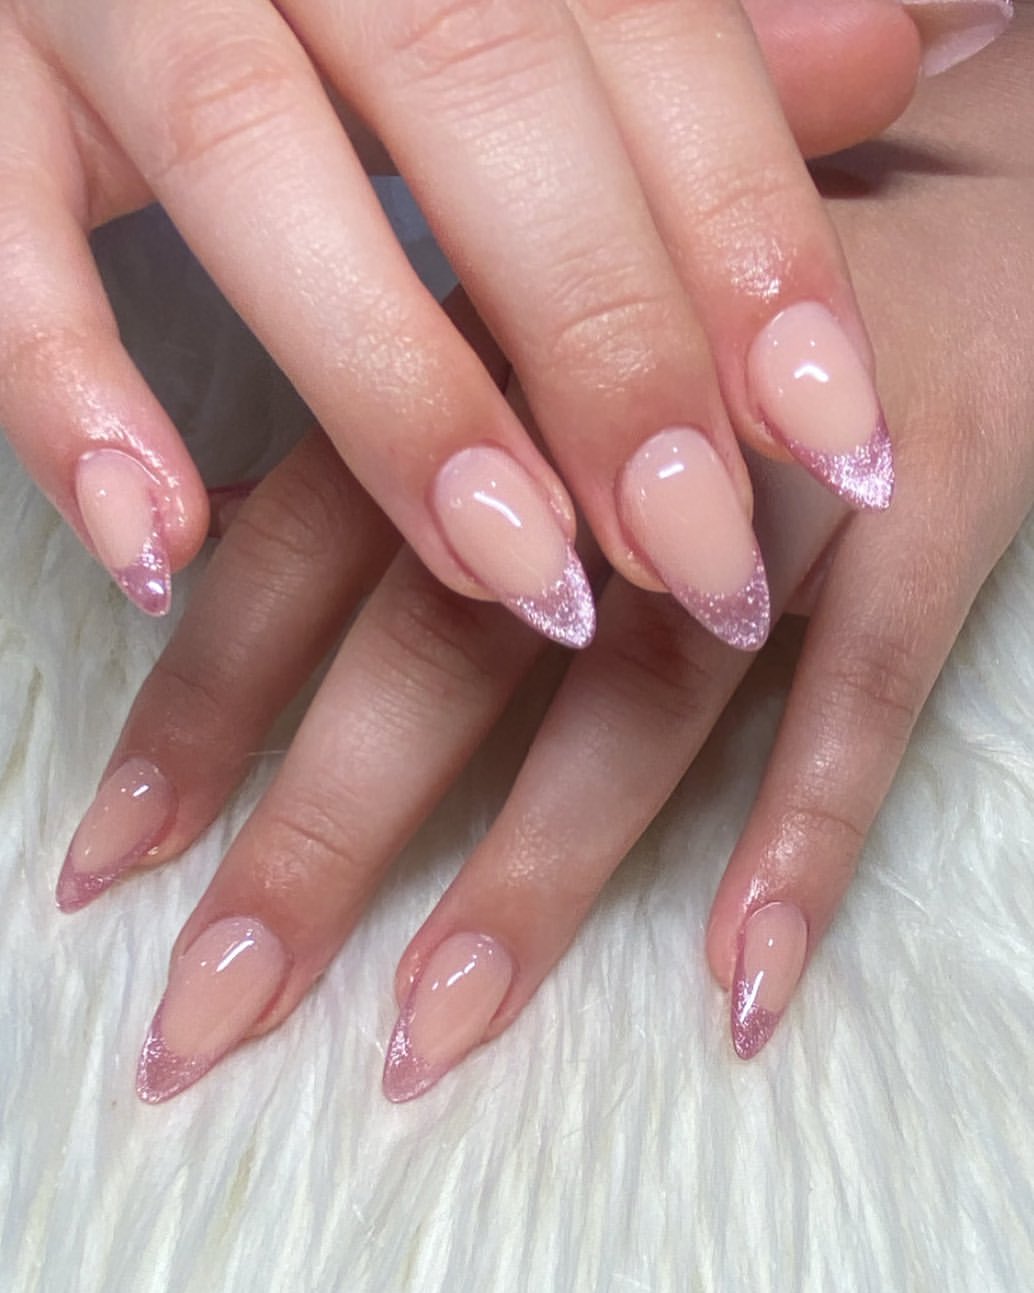
Soft Pink Glitter Tips
This manicure embodies a delicate and feminine approach with its soft pink glitter tips. The nude base provides a subtle foundation, while the glitter tips add a touch of sparkle that’s both understated and chic. The almond shape of the nails enhances the overall elegance, making this design perfect for anyone who prefers a refined look with just a hint of glamour. The glitter is finely applied, ensuring that the design remains sophisticated and not overly flashy, ideal for day-to-day wear or special occasions.
Consumables and Recommendations:
- Gel Polish: OPI GelColor in Bubble Bath for the nude base.
- Glitter Polish: CND Shellac in Ice Vapor for the glitter tips.
- Top Coat: Seche Vite Dry Fast Top Coat to seal the glitter and add a glossy finish.
- Base Coat: Zoya Anchor Base Coat for strong adhesion and protection.
How to Create This Look at Home:
- Start by applying a layer of Zoya Anchor Base Coat on clean, shaped nails, and cure.
- Apply two layers of OPI GelColor in Bubble Bath, curing each layer under a UV lamp.
- Using a fine brush, apply CND Shellac in Ice Vapor to the tips of the nails, creating a smooth gradient effect. Cure under the UV lamp.
- Finish with Seche Vite Dry Fast Top Coat to seal the design and provide a long-lasting, glossy finish.
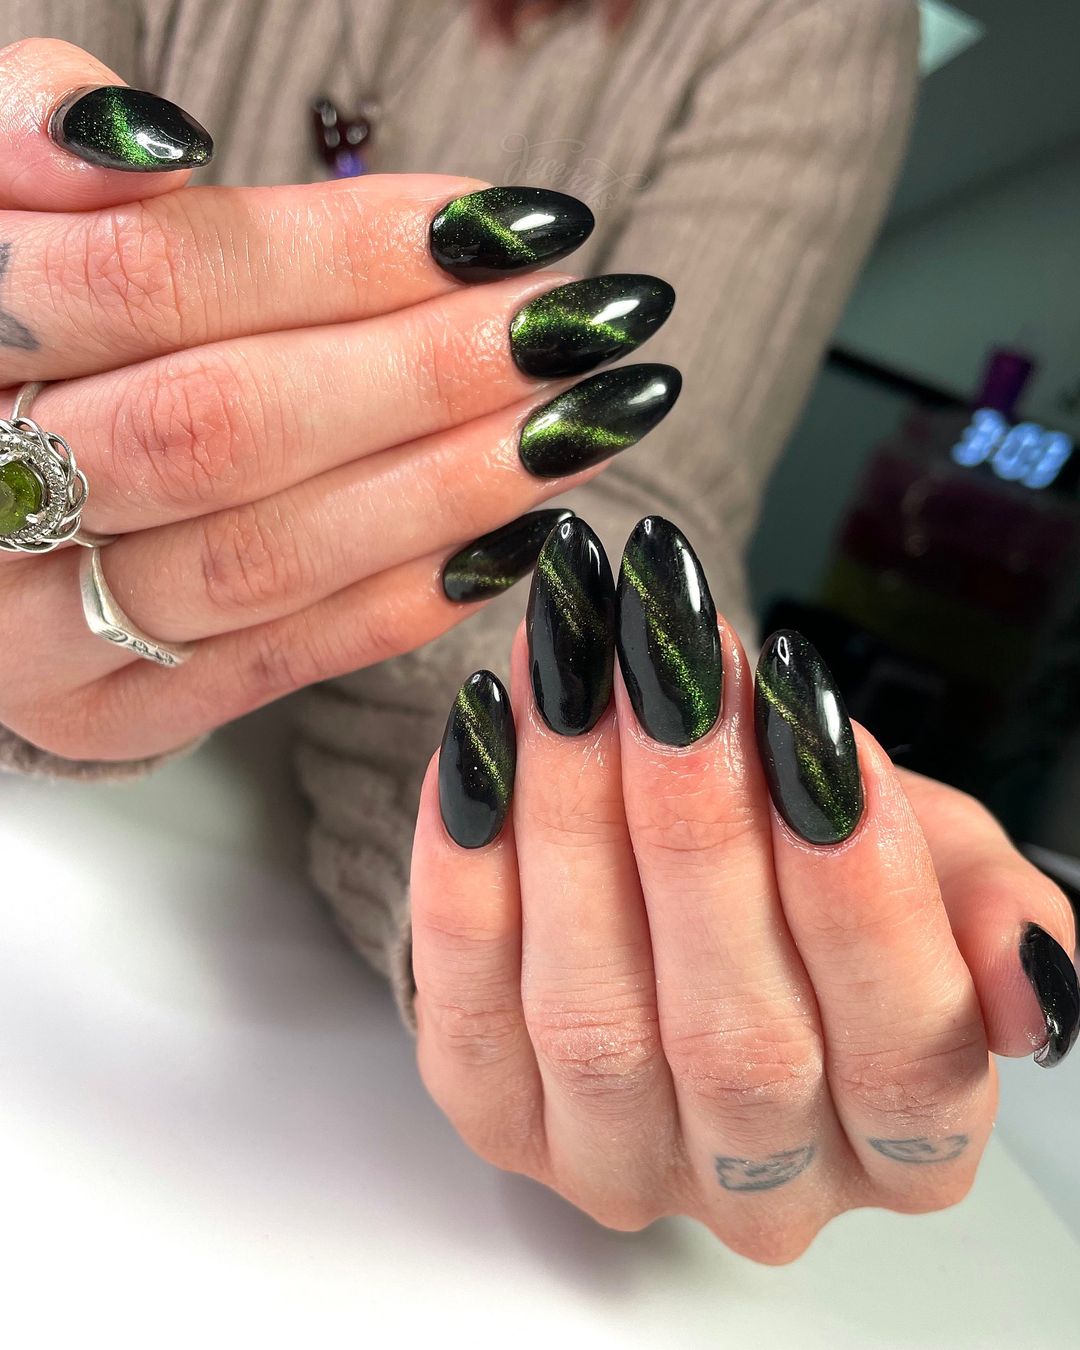
Mystical Green Cat Eye Nails
This striking manicure features a mystical green cat eye effect, making it the ultimate choice for those who want to stand out. The deep black base creates a dramatic backdrop, allowing the shimmering green cat eye effect to truly shine. The almond shape adds a touch of elegance, elongating the fingers and enhancing the overall impact of the design. The contrast between the dark base and the vibrant green gives the nails a mysterious, almost otherworldly allure, perfect for those looking to make a bold statement.
Consumables and Recommendations:
- Gel Polish: Gelish Black Shadow for the black base.
- Cat Eye Gel Polish: Born Pretty Cat Eye Gel Polish in Green Lantern.
- Top Coat: Gelish Top It Off for a lasting shine.
- Base Coat: IBD Powerbond Base Coat to protect the natural nails.
How to Create This Look at Home:
- Begin by applying a layer of IBD Powerbond Base Coat to clean, shaped nails, and cure under a UV lamp.
- Apply two coats of Gelish Black Shadow, curing each layer.
- Add a layer of Born Pretty Cat Eye Gel Polish in Green Lantern, and use a magnetic wand to create the cat eye effect. Cure under the UV lamp.
- Seal with Gelish Top It Off to ensure the design lasts, and cure for a final glossy finish.
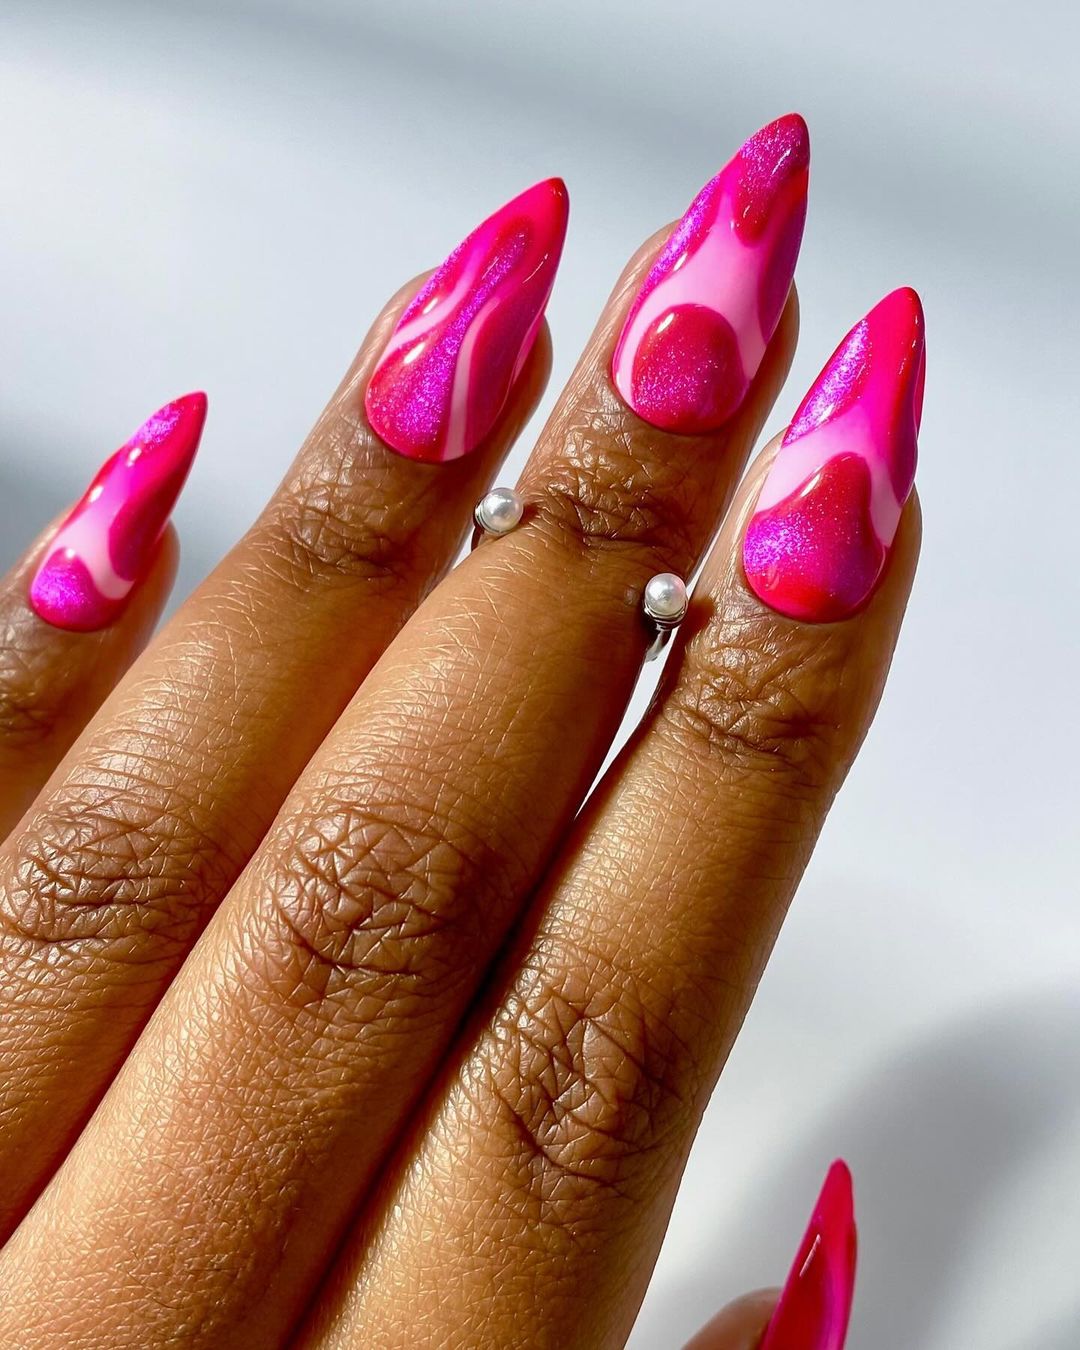
Bold and Playful Pink Swirls
This bold pink swirl design is playful and eye-catching, making it the perfect choice for someone who loves vibrant, artistic nails. The hot pink base is complemented by swirls of lighter pink and white, creating a dynamic and lively look. The stiletto shape adds an extra layer of drama, accentuating the bold colors and intricate design. This manicure is all about making a statement, perfect for those who aren’t afraid to showcase their unique style.
Consumables and Recommendations:
- Gel Polish: Essie Gel Couture in Style Stunner for the hot pink base.
- White Gel Polish: OPI GelColor in Alpine Snow for the swirl details.
- Top Coat: CND Shellac Top Coat for a durable finish.
- Base Coat: Orly Bonder Base Coat to ensure the polish adheres properly.
How to Create This Look at Home:
- Apply a layer of Orly Bonder Base Coat to clean, shaped nails, and cure under a UV lamp.
- Apply two coats of Essie Gel Couture in Style Stunner, curing each layer.
- Use a fine detail brush to apply swirls of OPI GelColor in Alpine Snow over the hot pink base, creating dynamic patterns. Cure under the UV lamp.
- Finish with CND Shellac Top Coat to lock in the design and add shine. Cure for a final, glossy finish.
Save Pin

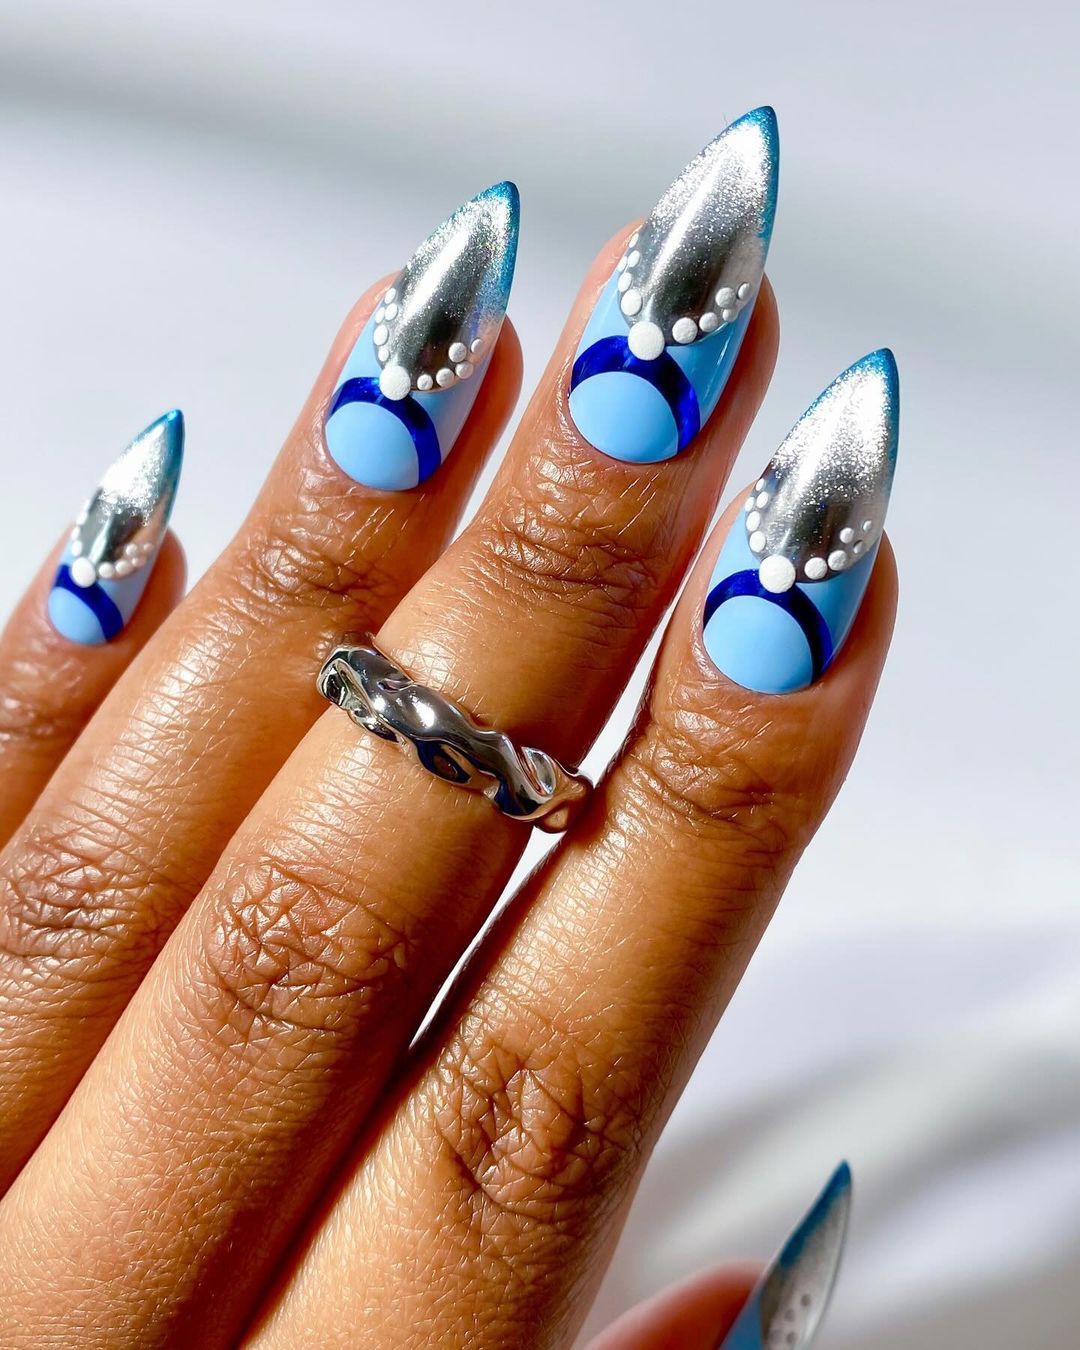
Futuristic Silver and Blue Accents
This design combines futuristic silver with striking blue accents to create a manicure that’s both modern and artistic. The stiletto shape of the nails adds an edgy element, while the cool tones of silver and blue create a sleek, polished look. The addition of white dots adds a playful touch, making this design perfect for someone who loves to experiment with bold, innovative styles. The overall effect is both eye-catching and sophisticated, making it suitable for a variety of occasions.
Consumables and Recommendations:
- Gel Polish: Sally Hansen Miracle Gel in Silver Stiletto for the silver base.
- Blue Gel Polish: Essie Gel Couture in Caviar Bar for the blue accents.
- White Gel Polish: CND Vinylux in Cream Puff for the dot details.
- Top Coat: Sally Hansen Miracle Gel Top Coat for a high-shine finish.
- Base Coat: Orly Bonder Base Coat to protect and prepare the nails.
How to Create This Look at Home:
- Start by applying a layer of Orly Bonder Base Coat to clean, stiletto-shaped nails, and cure under a UV lamp.
- Apply two coats of Sally Hansen Miracle Gel in Silver Stiletto, curing each layer.
- Use a fine brush to apply Essie Gel Couture in Caviar Bar for the blue accents, and CND Vinylux in Cream Puff for the white dots. Cure under a UV lamp.
- Seal the design with Sally Hansen Miracle Gel Top Coat and cure for a durable, glossy finish.
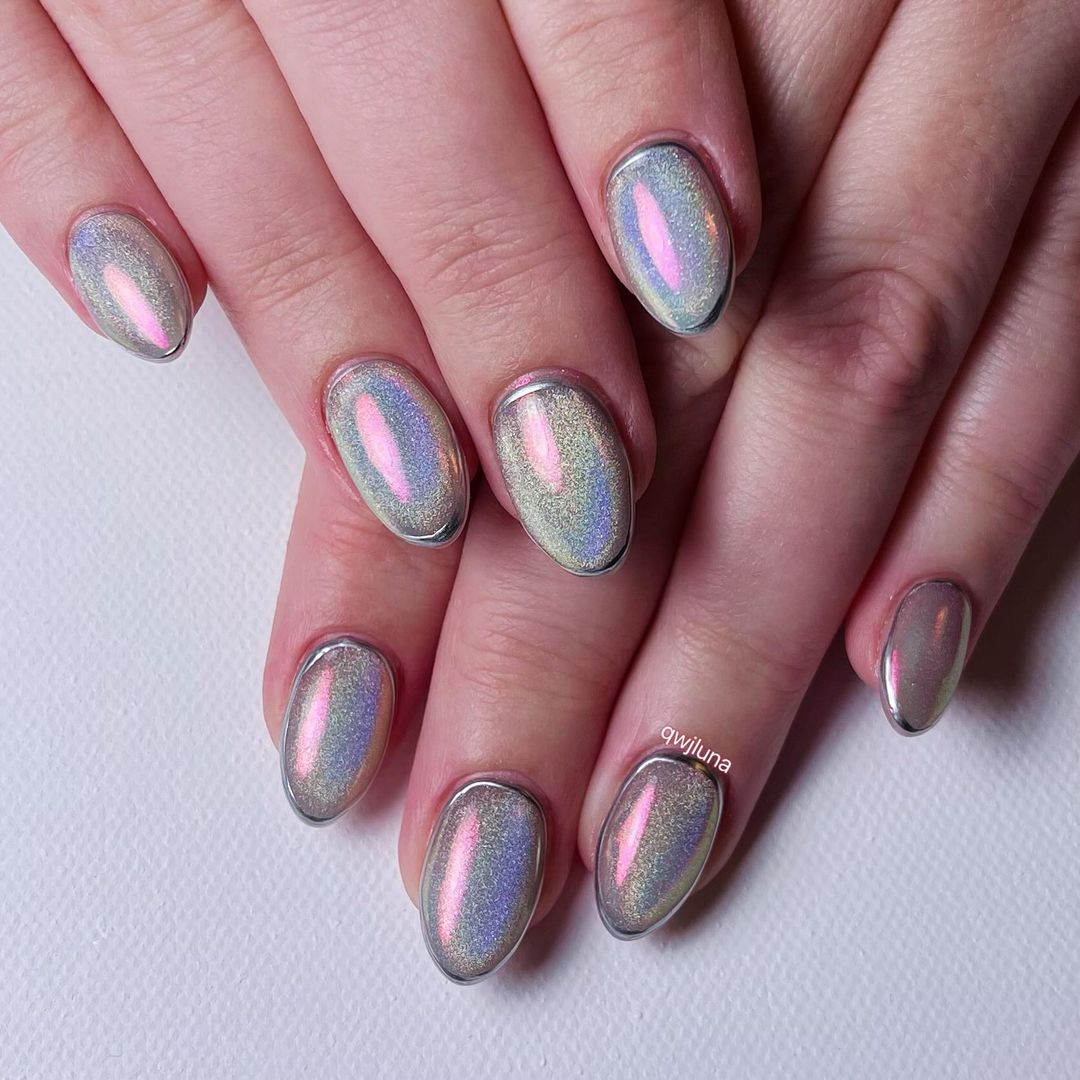
Iridescent Silver Holographic Nails
This iridescent silver holographic design is a mesmerizing display of light and color, perfect for those who love to shine. The oval shape of the nails enhances the reflective qualities of the holographic polish, creating a dynamic and ever-changing look as the nails catch the light. The subtle silver undertones add depth, while the holographic finish brings a futuristic and luxurious vibe. This manicure is ideal for someone looking to add a touch of glamour to their look without going over the top.
Consumables and Recommendations:
- Gel Polish: ILNP Mega H for the holographic base.
- Top Coat: Gelish Top It Off to enhance the shine and longevity of the holographic effect.
- Base Coat: Zoya Anchor Base Coat to ensure a smooth application.
How to Create This Look at Home:
- Apply a layer of Zoya Anchor Base Coat on clean, oval-shaped nails, and cure under a UV lamp.
- Apply two layers of ILNP Mega H for the holographic effect, curing each layer under the UV lamp.
- Finish with Gelish Top It Off to lock in the design and add a high-gloss finish, then cure for a final time.
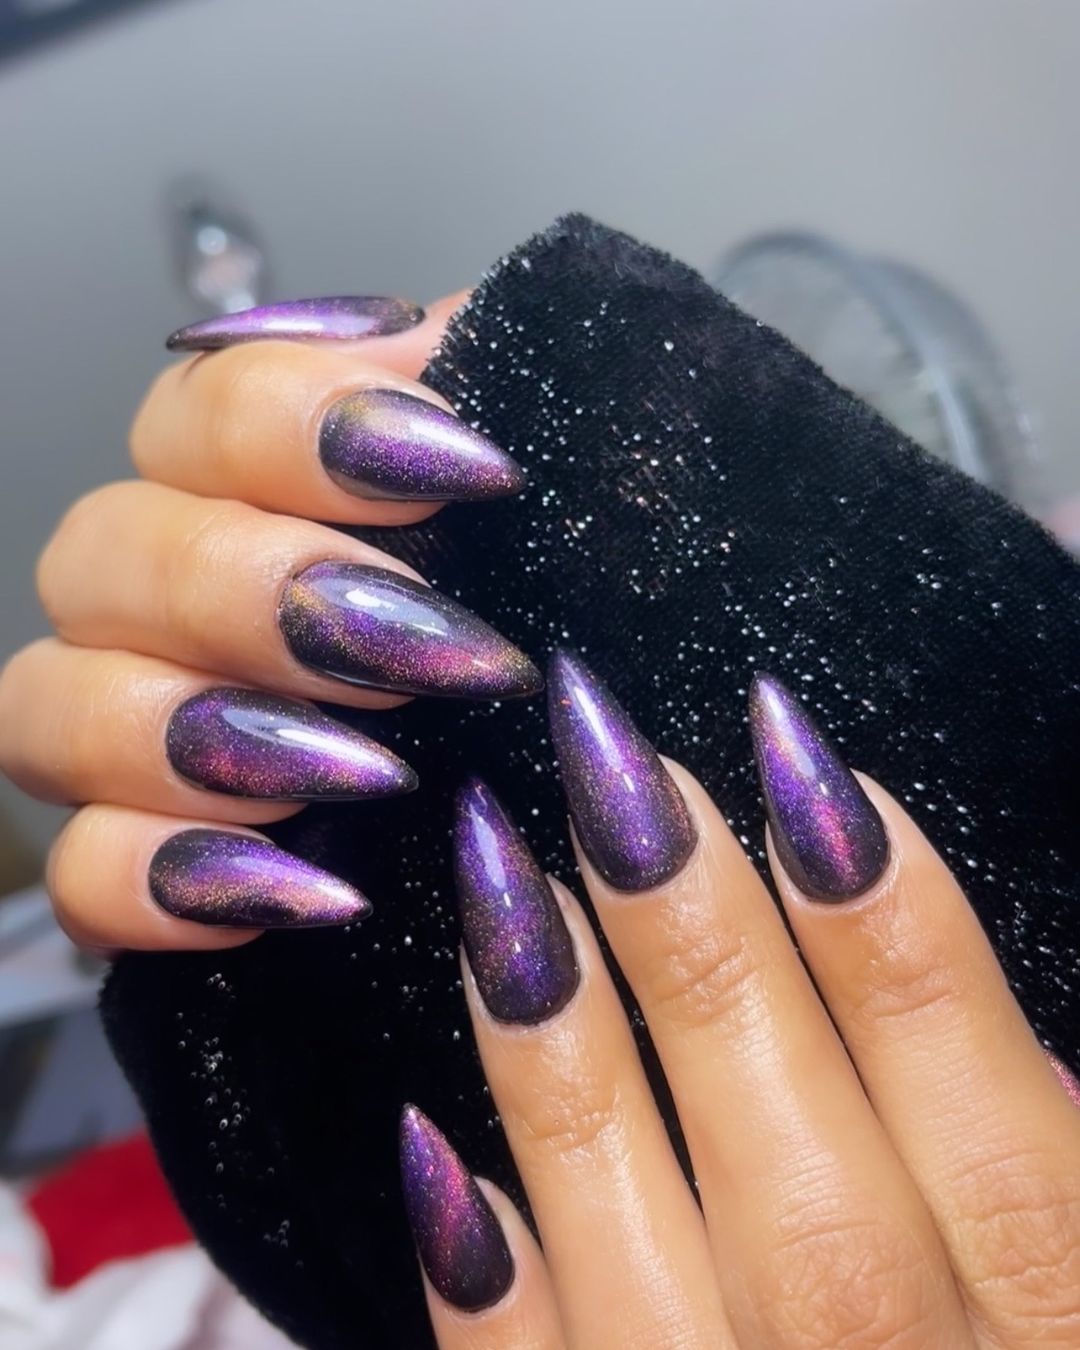
Midnight Purple Cat Eye Nails
This midnight purple cat eye design is both mysterious and captivating, perfect for those who love dark, moody colors. The deep purple base is accentuated by the shimmering cat eye effect, which creates a sense of depth and movement. The stiletto shape adds to the drama, making this manicure ideal for evening events or when you want to add a touch of elegance to your look. The cat eye effect is particularly striking in low light, where the shimmer truly comes to life.
Consumables and Recommendations:
- Gel Polish: OPI GelColor in Lincoln Park After Dark for the deep purple base.
- Cat Eye Gel Polish: Born Pretty Cat Eye Gel Polish in Purple Haze.
- Top Coat: CND Shellac Top Coat for a durable finish.
- Base Coat: Orly Bonder Base Coat for long-lasting wear.
How to Create This Look at Home:
- Start with a layer of Orly Bonder Base Coat on clean, stiletto-shaped nails, and cure under a UV lamp.
- Apply two layers of OPI GelColor in Lincoln Park After Dark, curing each layer.
- Add a layer of Born Pretty Cat Eye Gel Polish in Purple Haze and use a magnetic wand to create the cat eye effect. Cure under the UV lamp.
- Seal the design with CND Shellac Top Coat for a glossy, long-lasting finish, and cure one final time.
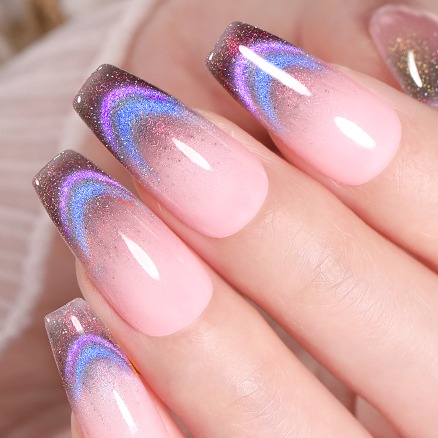
Rainbow Gradient Cat Eye Nails
This stunning design features a rainbow gradient effect combined with a cat eye finish, creating a magical and mesmerizing look. The nails transition seamlessly from a soft pink base to vibrant hues of blue and purple, with a touch of glitter that adds sparkle and depth. The square shape enhances the sharpness of the gradient, making each color pop while still maintaining a harmonious flow. This manicure is ideal for those who love bold, colorful designs with a unique twist.
Consumables and Recommendations:
- Gel Polish: CND Shellac in Negligee for the base.
- Cat Eye Gel Polish: Born Pretty Cat Eye Gel Polish in Aurora Borealis.
- Top Coat: Gelish Top It Off for a glossy finish.
- Base Coat: IBD Powerbond Base Coat for strong adhesion.
How to Create This Look at Home:
- Begin with a layer of IBD Powerbond Base Coat on clean, square-shaped nails, and cure under a UV lamp.
- Apply two layers of CND Shellac in Negligee, curing each layer.
- Apply Born Pretty Cat Eye Gel Polish in Aurora Borealis, using a magnetic wand to create the rainbow gradient cat eye effect. Cure under the UV lamp.
- Finish with Gelish Top It Off to lock in the design and add a high-gloss shine.
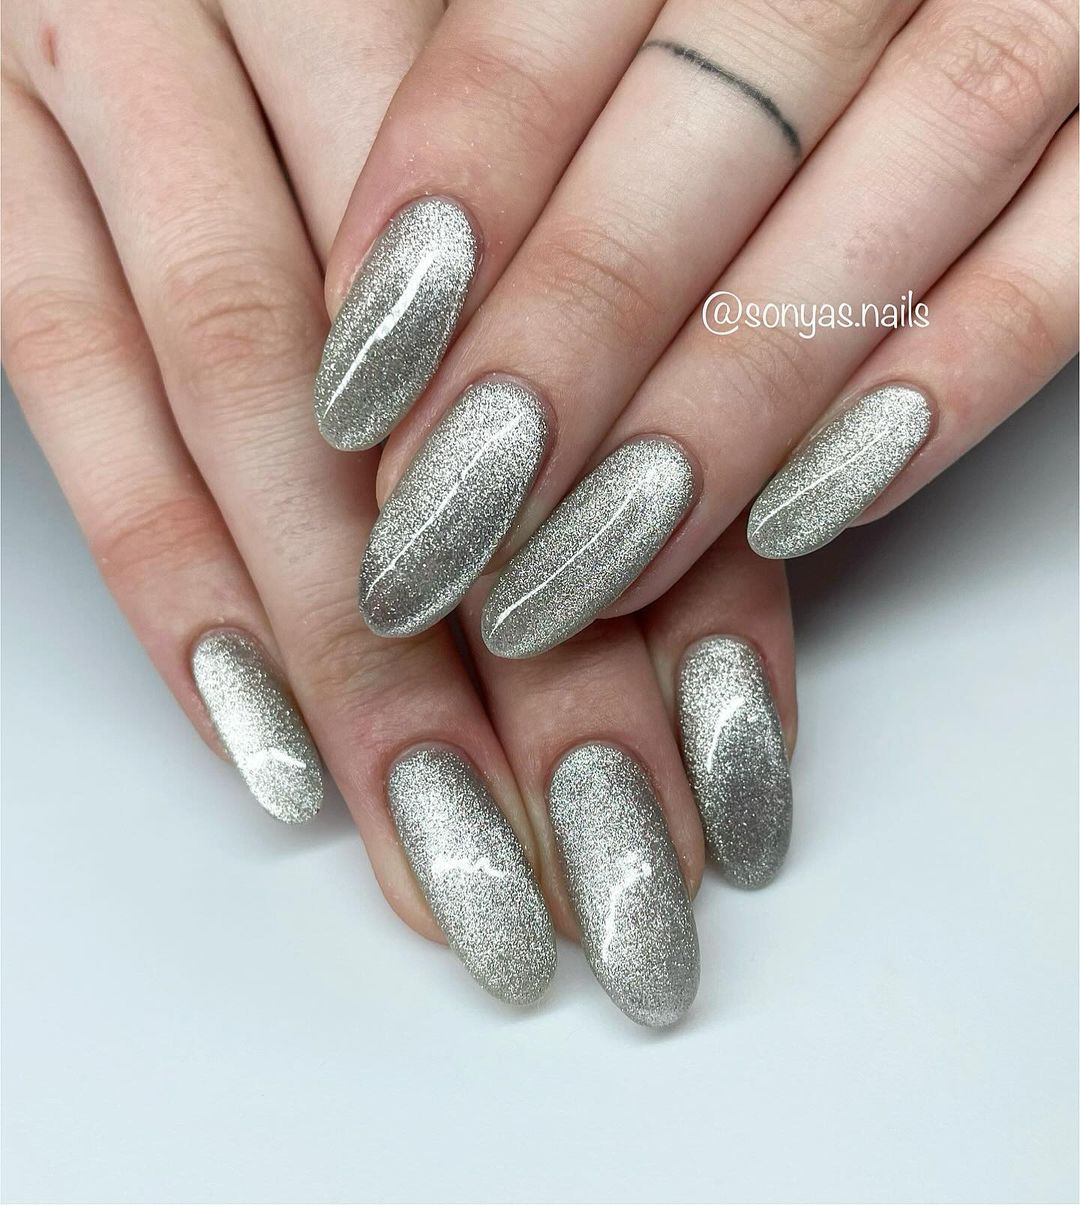
Silver Stardust Nails
This manicure features a dazzling silver stardust effect that is both chic and sophisticated. The oval shape of the nails adds a soft, elegant touch, while the metallic shimmer gives a glamorous, high-fashion vibe. The fine glitter catches the light beautifully, making these nails perfect for both everyday wear and special occasions. The overall look is luxurious yet understated, ideal for anyone looking to add a bit of sparkle to their fall manicure.
Consumables and Recommendations:
- Gel Polish: OPI GelColor in Kyoto Pearl for the base.
- Glitter Polish: Essie Gel Couture in Glitz & Glam for the stardust effect.
- Top Coat: Sally Hansen Miracle Gel Top Coat for durability.
- Base Coat: Zoya Anchor Base Coat for a smooth application.
How to Create This Look at Home:
- Apply a layer of Zoya Anchor Base Coat on clean, oval-shaped nails, and cure under a UV lamp.
- Apply two coats of OPI GelColor in Kyoto Pearl, curing each layer.
- Apply Essie Gel Couture in Glitz & Glam for the stardust effect, ensuring even coverage. Cure under the UV lamp.
- Seal with Sally Hansen Miracle Gel Top Coat for a lasting, high-shine finish, and cure for the final time.
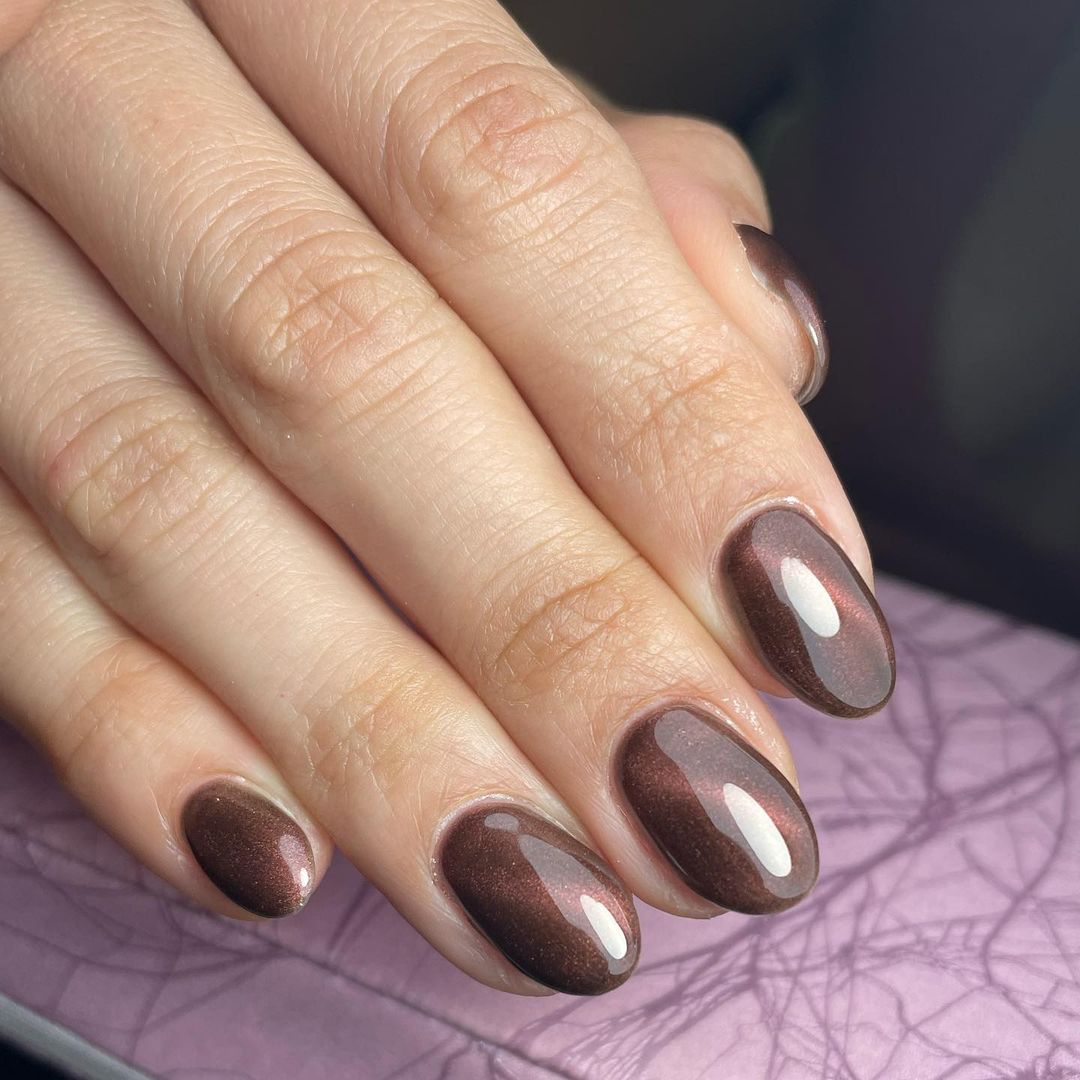
Rich Chocolate Brown Cat Eye Nails
This design features a rich chocolate brown cat eye effect that is warm and sophisticated, making it perfect for the fall season. The round shape enhances the natural elegance of the nails, while the cat eye shimmer adds depth and a subtle glow. The dark brown shade is both versatile and stylish, offering a refined look that works well for both casual and formal settings. This manicure is ideal for those who prefer a classic yet modern nail design with a touch of luxury.
Consumables and Recommendations:
- Gel Polish: Madam Glam Gel Polish in Coffee Break for the base.
- Cat Eye Gel Polish: Makartt Cat Eye Gel Polish in Mocha Latte.
- Top Coat: CND Shellac Top Coat for a glossy finish.
- Base Coat: Orly Bonder Base Coat for strong adhesion.
How to Create This Look at Home:
- Begin by applying Orly Bonder Base Coat on clean, round-shaped nails, and cure under a UV lamp.
- Apply two layers of Madam Glam Gel Polish in Coffee Break, curing each layer.
- Add a layer of Makartt Cat Eye Gel Polish in Mocha Latte, using a magnetic wand to create the cat eye effect. Cure under the UV lamp.
- Finish with CND Shellac Top Coat to seal the design and provide a high-gloss finish, curing one final time.
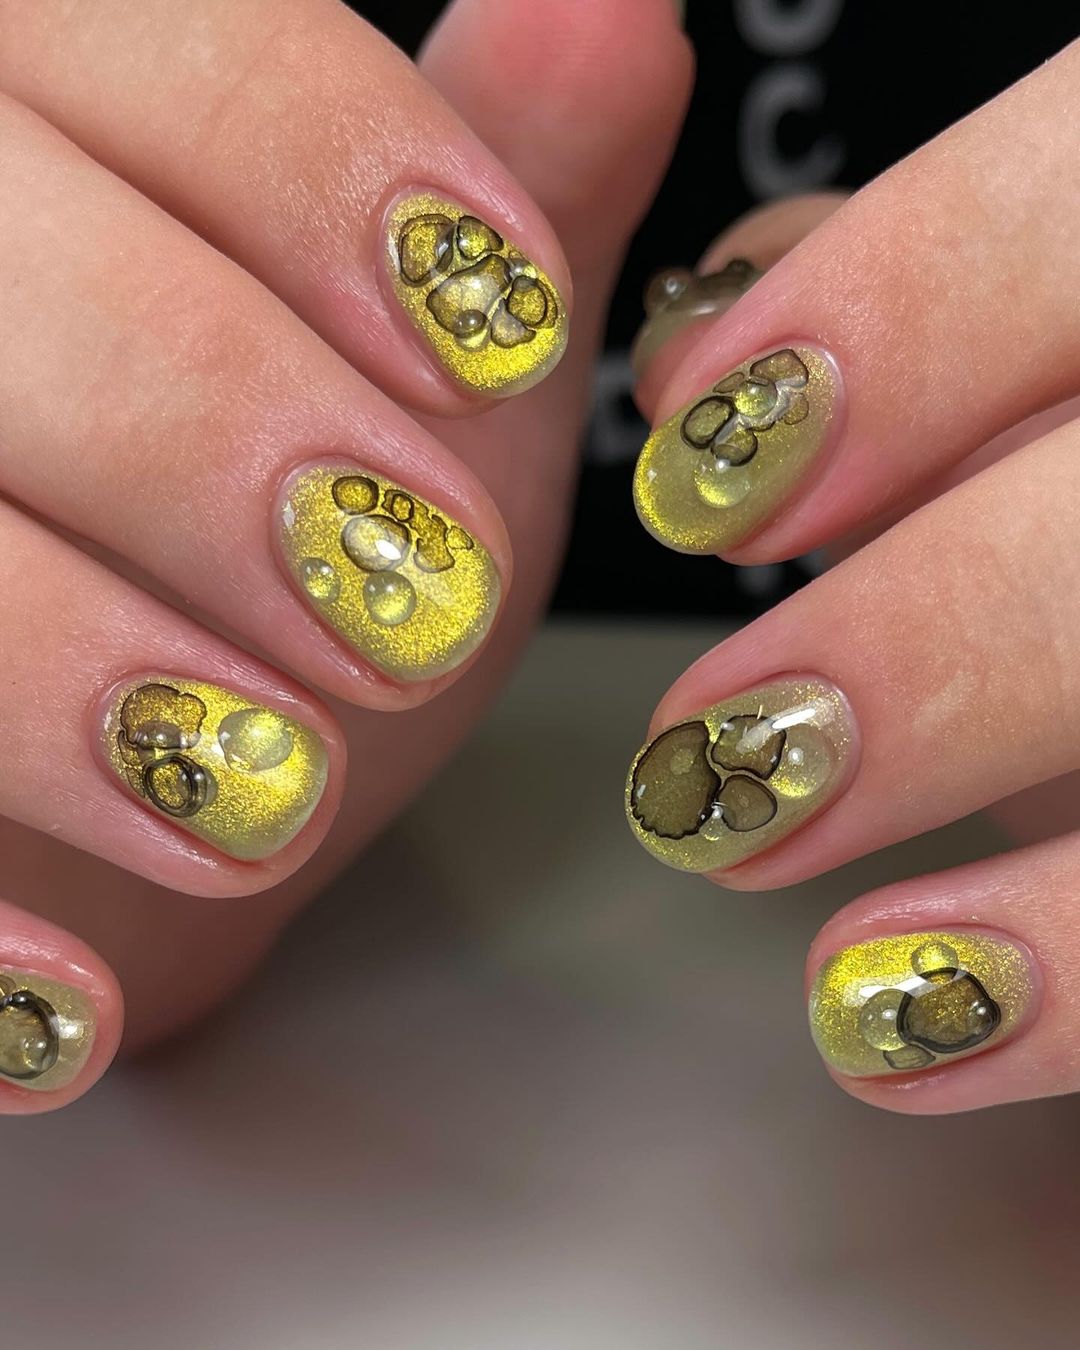
Bold Yellow and Brown Abstract Nails
This unique manicure combines bold yellow with brown abstract details, creating a playful yet artistic look. The short, rounded nails provide a perfect canvas for the vibrant yellow base, while the brown accents add depth and interest. The abstract design is reminiscent of modern art, making these nails a standout choice for someone who loves to experiment with color and pattern. This manicure is perfect for making a statement, whether it’s for a special occasion or just to add some fun to your everyday look.
Consumables and Recommendations:
- Gel Polish: Essie Gel Couture in Avant-Garde for the yellow base.
- Brown Gel Polish: OPI GelColor in Chocolate Moose for the abstract details.
- Top Coat: Seche Vite Dry Fast Top Coat for a glossy finish.
- Base Coat: CND Stickey Base Coat for long-lasting wear.
How to Create This Look at Home:
- Start by applying a layer of CND Stickey Base Coat on clean, short, rounded nails, and cure under a UV lamp.
- Apply two layers of Essie Gel Couture in Avant-Garde, curing each layer.
- Use a fine brush to apply OPI GelColor in Chocolate Moose for the abstract brown details. Cure under the UV lamp.
- Seal the design with Seche Vite Dry Fast Top Coat and cure for a final, glossy finish.
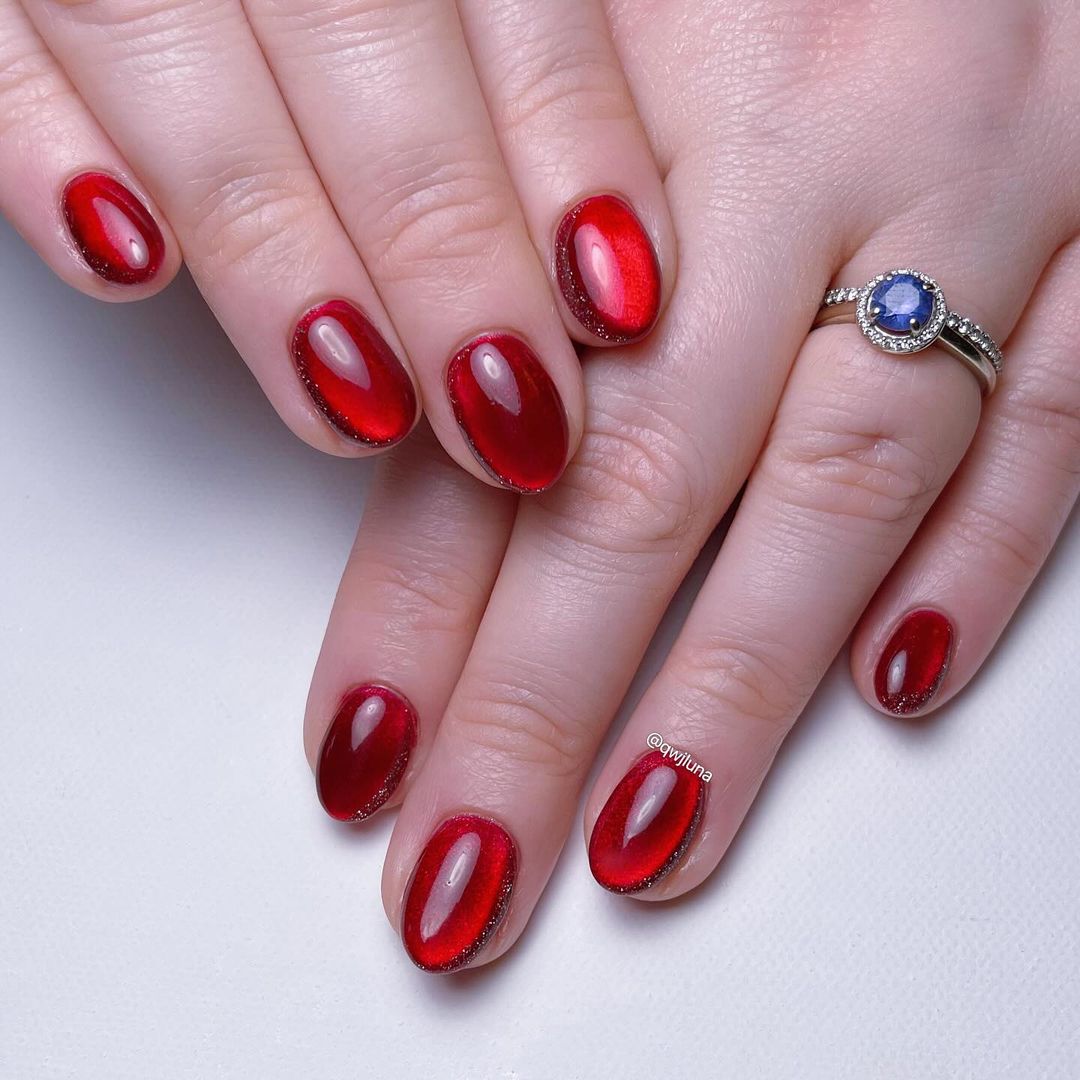
Classic Red Ombre Cat Eye Nails
This manicure showcases a classic red ombre cat eye effect that is both bold and elegant. The short, oval nails are perfect for this design, allowing the rich red gradient to take center stage. The cat eye shimmer adds a touch of glamour, making these nails ideal for a sophisticated yet striking look. This manicure is perfect for the fall season, offering a timeless style with a modern twist.
Consumables and Recommendations:
- Gel Polish: Gelish Gel Polish in Red Roses for the base.
- Cat Eye Gel Polish: Born Pretty Cat Eye Gel Polish in Ruby Red.
- Top Coat: Sally Hansen Miracle Gel Top Coat for a glossy finish.
- Base Coat: IBD Powerbond Base Coat for strong adhesion.
How to Create This Look at Home:
- Apply a layer of IBD Powerbond Base Coat on clean, short, oval-shaped nails, and cure under a UV lamp.
- Apply two layers of Gelish Gel Polish in Red Roses, curing each layer.
- Add a layer of Born Pretty Cat Eye Gel Polish in Ruby Red, using a magnetic wand to create the ombre cat eye effect. Cure under the UV lamp.
- Finish with Sally Hansen Miracle Gel Top Coat to seal the design and add a high-gloss shine, curing one final time.
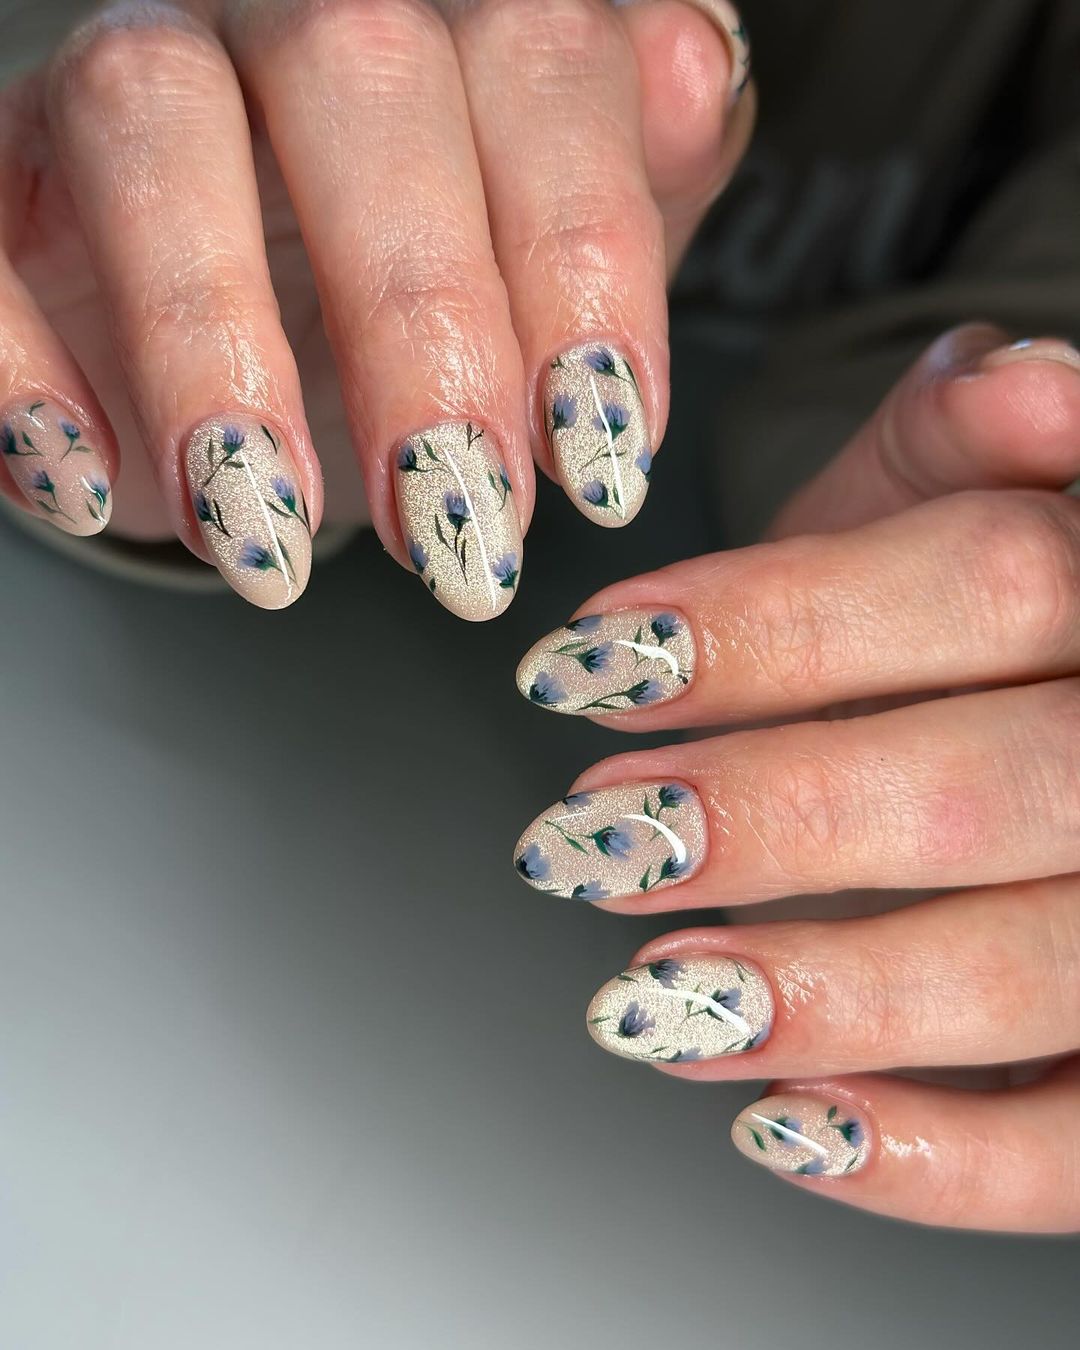
Floral Nail Art on a Shimmering Nude Base
This delicate design features intricate floral nail art on a shimmering nude base, creating a soft and feminine look. The almond-shaped nails provide the perfect backdrop for the detailed floral patterns, which are both subtle and elegant. The nude base has a slight shimmer, adding a touch of glamour without overpowering the delicate flowers. This manicure is ideal for those who appreciate intricate designs and a more refined, understated look.
Consumables and Recommendations:
- Gel Polish: OPI GelColor in Bubble Bath for the nude base.
- Shimmer Gel Polish: Essie Gel Couture in Spun Sugar for the shimmer.
- Nail Art Polish: Maniology Nail Art Polish in Bluebell for the floral details.
- Top Coat: CND Shellac Top Coat for a glossy finish.
- Base Coat: Zoya Anchor Base Coat to ensure smooth application.
How to Create This Look at Home:
- Start with a layer of Zoya Anchor Base Coat on clean, almond-shaped nails, and cure under a UV lamp.
- Apply two layers of OPI GelColor in Bubble Bath, curing each layer.
- Add a layer of Essie Gel Couture in Spun Sugar for the shimmer, and cure.
- Use a fine brush to paint the floral designs with Maniology Nail Art Polish in Bluebell. Cure under the UV lamp.
- Finish with CND Shellac Top Coat to seal the design and add a glossy finish, curing one final time.
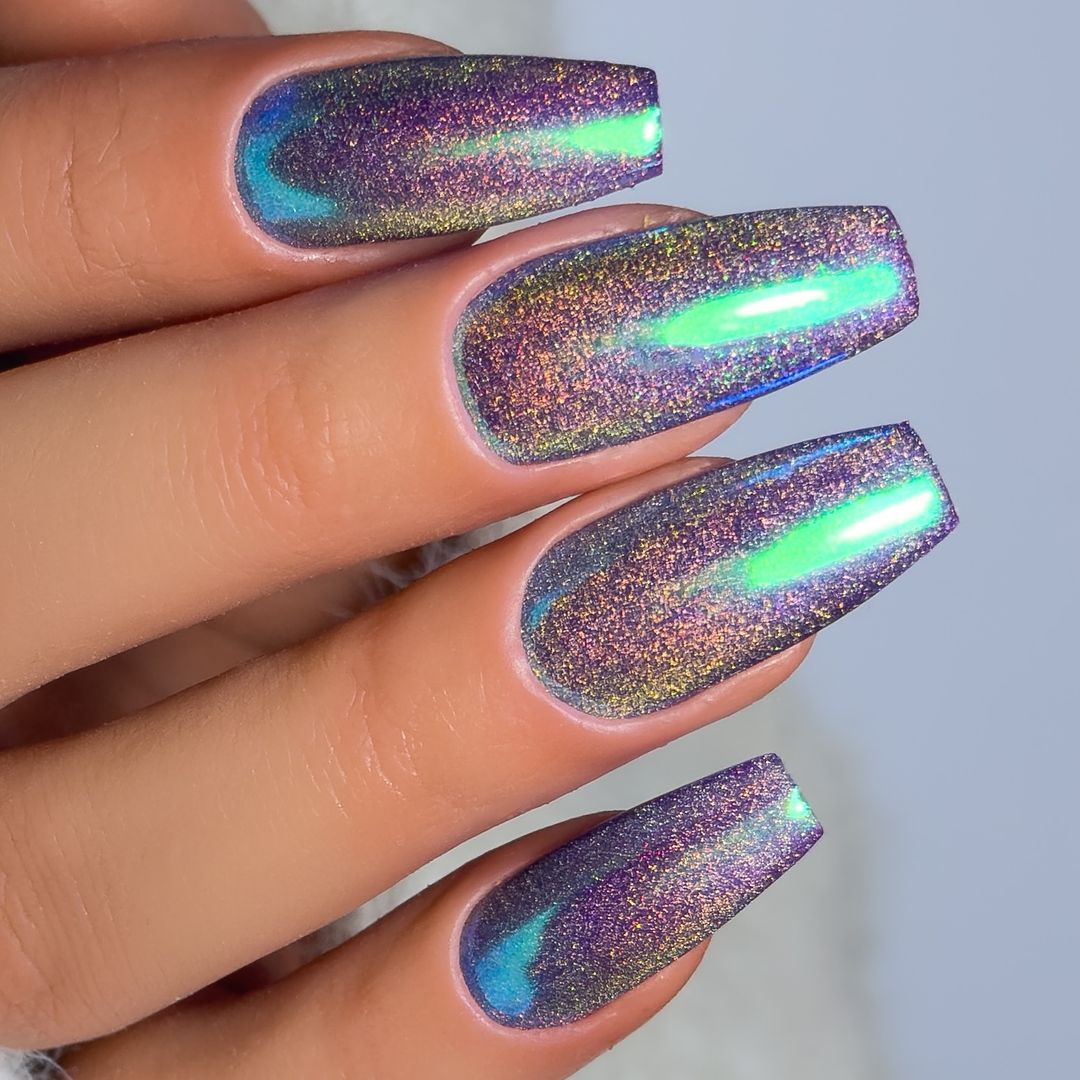
Holographic Multicolor Cat Eye Nails
This manicure showcases a stunning holographic multicolor cat eye effect that radiates with every movement. The square shape of the nails perfectly complements the vibrant, shifting hues of purple, blue, and green, creating a dynamic look that’s full of life. The holographic shimmer adds depth and dimension, making these nails a true work of art. This design is perfect for those who love to make a statement with bold, eye-catching colors and reflective finishes.
Consumables and Recommendations:
- Gel Polish: ILNP Ultra Holographic in Cygnus Loop for the base.
- Cat Eye Gel Polish: Born Pretty Cat Eye Gel Polish in Multicolor.
- Top Coat: Seche Vite Dry Fast Top Coat for a long-lasting shine.
- Base Coat: Zoya Anchor Base Coat for strong adhesion.
How to Create This Look at Home:
- Start with a layer of Zoya Anchor Base Coat on clean, square-shaped nails, and cure under a UV lamp.
- Apply two layers of ILNP Ultra Holographic in Cygnus Loop, curing each layer.
- Add a layer of Born Pretty Cat Eye Gel Polish in Multicolor, using a magnetic wand to create the cat eye effect. Cure under the UV lamp.
- Finish with Seche Vite Dry Fast Top Coat to lock in the design and provide a high-gloss finish, curing one final time.
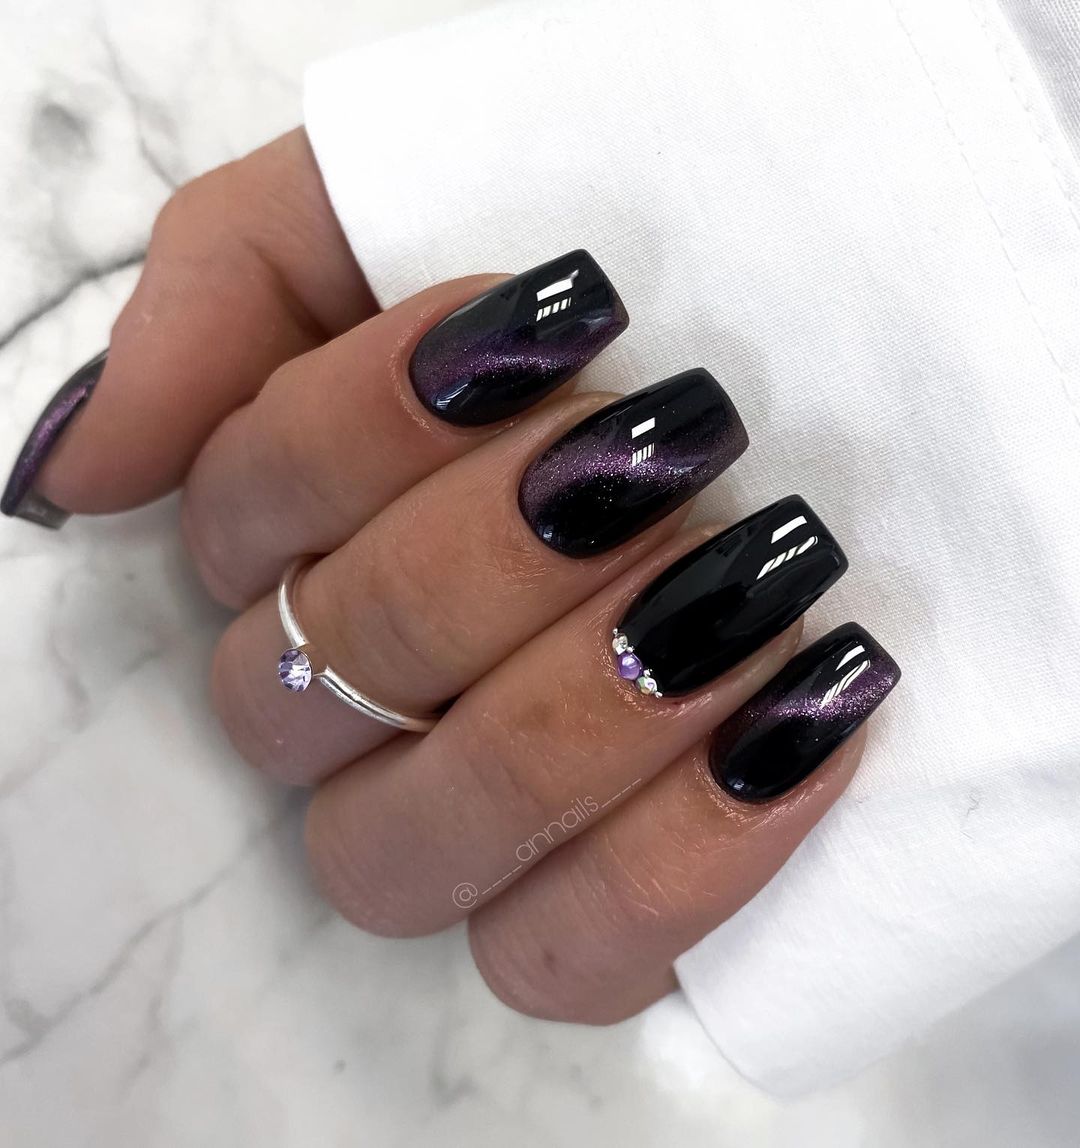
Midnight Purple Cat Eye with Rhinestones
This elegant manicure features a midnight purple cat eye effect combined with a touch of glamour, thanks to the subtle addition of rhinestones. The square nails create a modern silhouette that enhances the deep, rich tones of the purple polish. The rhinestones add just the right amount of sparkle without overpowering the overall design, making this manicure perfect for evening events or when you want to add a bit of luxury to your look.
Consumables and Recommendations:
- Gel Polish: Gelish Gel Polish in Night Reflection for the base.
- Cat Eye Gel Polish: Makartt Cat Eye Gel Polish in Amethyst.
- Rhinestones: Swarovski Crystals in small sizes for accent.
- Top Coat: Gelish Top It Off for durability and shine.
- Base Coat: CND Stickey Base Coat for strong adhesion.
How to Create This Look at Home:
- Begin with a layer of CND Stickey Base Coat on clean, square-shaped nails, and cure under a UV lamp.
- Apply two layers of Gelish Gel Polish in Night Reflection, curing each layer.
- Add a layer of Makartt Cat Eye Gel Polish in Amethyst, using a magnetic wand to create the cat eye effect. Cure under the UV lamp.
- Carefully place the Swarovski Crystals at the base of the nail while the top coat is still tacky, then cure.
- Finish with Gelish Top It Off to seal the rhinestones and add a high-gloss shine, curing for a final time.
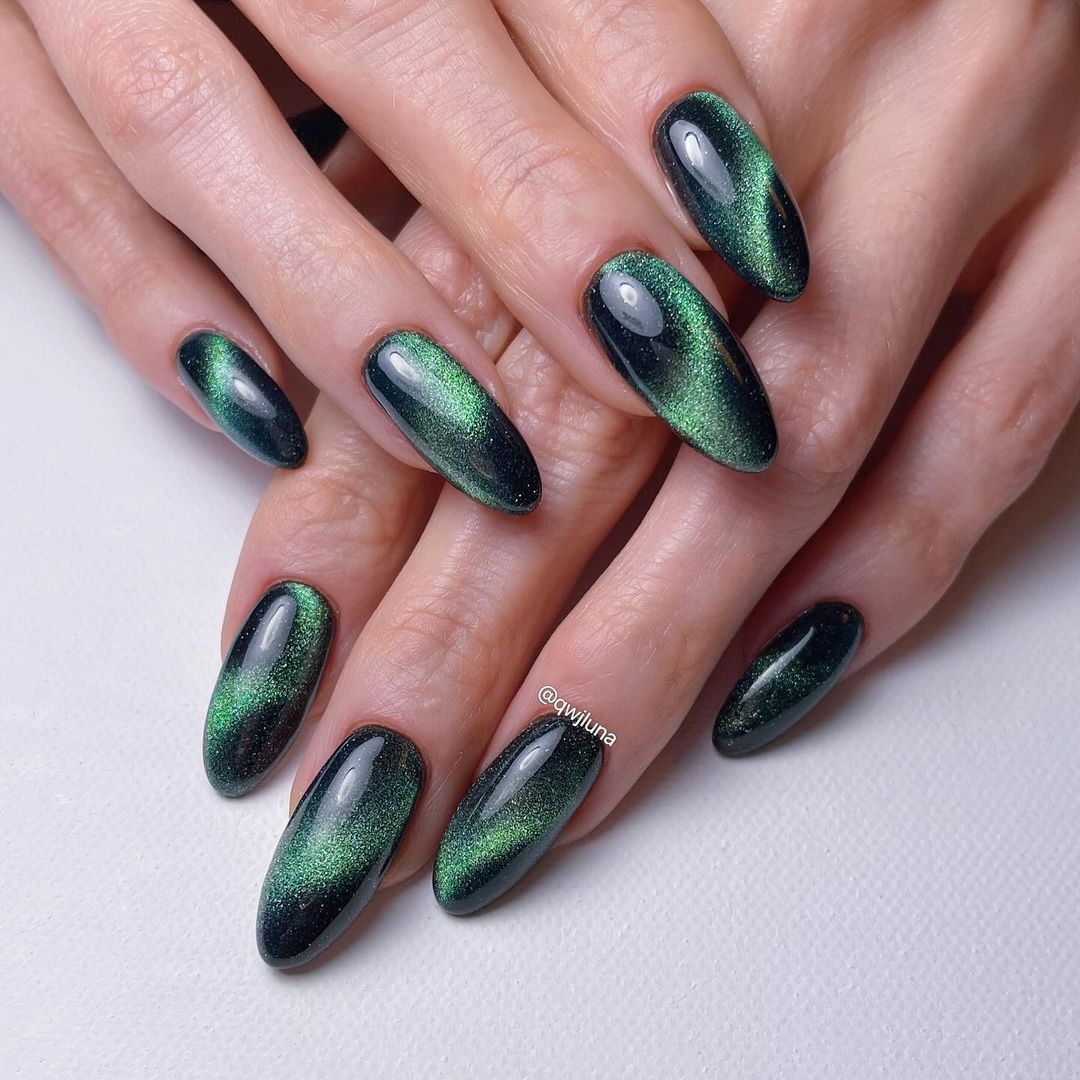
Enchanted Forest Green Cat Eye Nails
This manicure brings the beauty of an enchanted forest to your fingertips with its deep green cat eye effect. The oval shape of the nails adds elegance and elongates the fingers, while the cat eye effect creates a mesmerizing, multidimensional look that shifts with the light. The rich green shade is perfect for the fall season, offering a mysterious and captivating style that is both unique and versatile.
Consumables and Recommendations:
- Gel Polish: OPI GelColor in Amazon Amazoff for the base.
- Cat Eye Gel Polish: Born Pretty Cat Eye Gel Polish in Green Galaxy.
- Top Coat: CND Shellac Top Coat for a glossy finish.
- Base Coat: Orly Bonder Base Coat for strong adhesion.
How to Create This Look at Home:
- Start by applying a layer of Orly Bonder Base Coat on clean, oval-shaped nails, and cure under a UV lamp.
- Apply two layers of OPI GelColor in Amazon Amazoff, curing each layer.
- Add a layer of Born Pretty Cat Eye Gel Polish in Green Galaxy, using a magnetic wand to create the cat eye effect. Cure under the UV lamp.
- Finish with CND Shellac Top Coat to seal the design and add a high-gloss shine, curing for the final time.
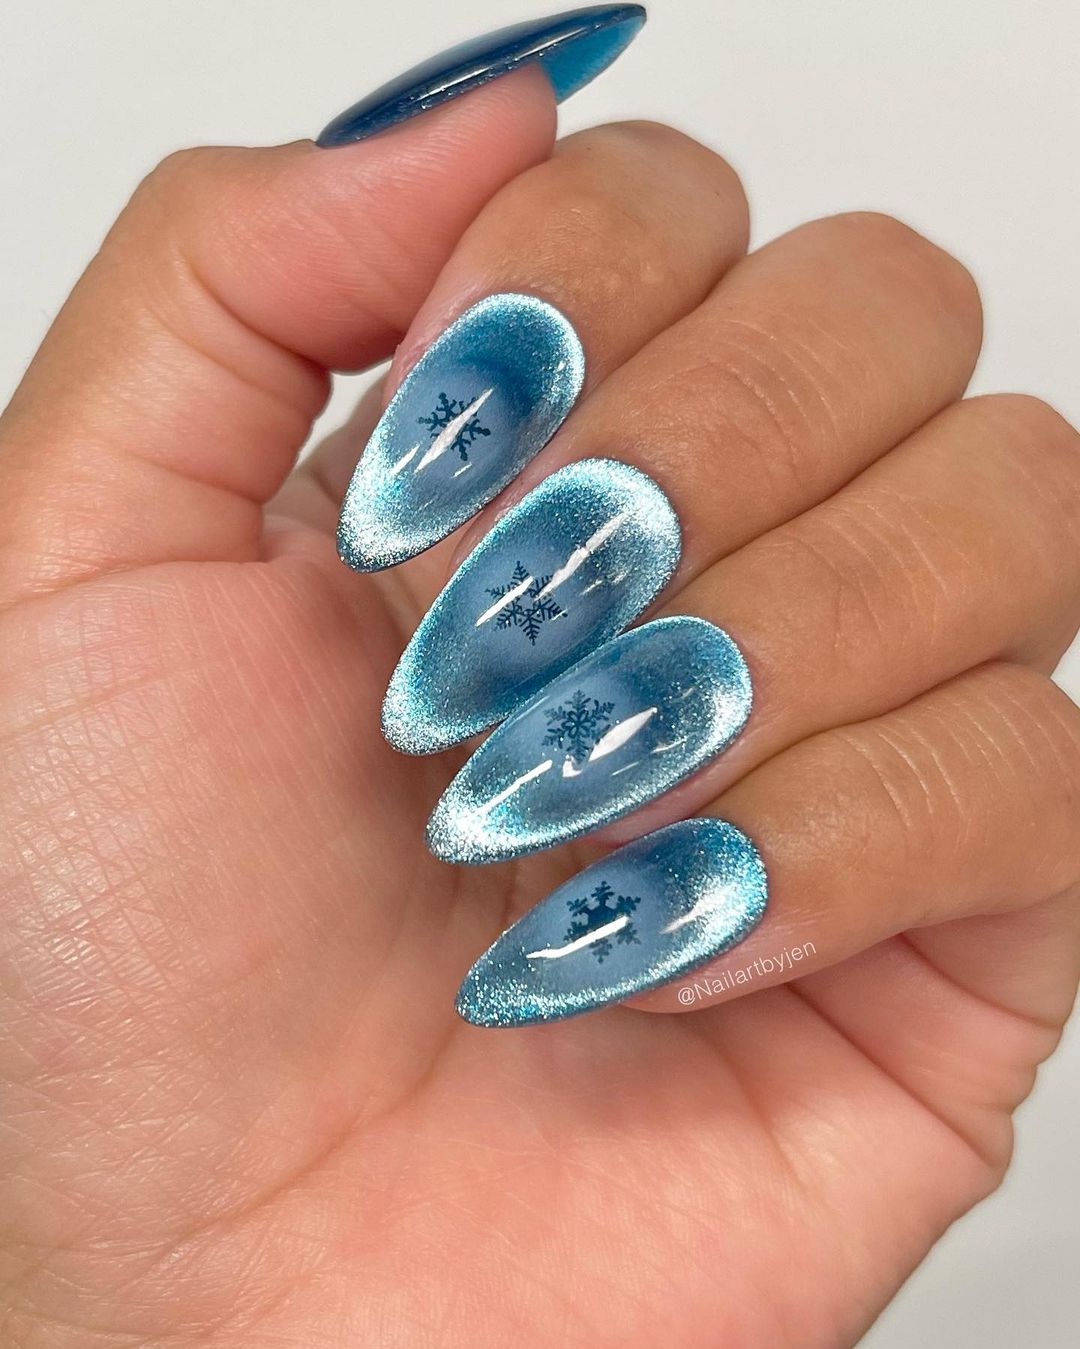
Frosted Blue Cat Eye Nails with Snowflake Accents
This winter-inspired design features frosted blue cat eye nails with delicate snowflake accents. The almond shape enhances the cool, icy tones of the blue polish, while the cat eye effect adds depth and a frosty shimmer. The snowflake details are subtle yet striking, making this manicure ideal for the holiday season or any winter occasion. The overall effect is both festive and elegant, perfect for embracing the beauty of winter.
Consumables and Recommendations:
- Gel Polish: Essie Gel Couture in First View for the base.
- Cat Eye Gel Polish: Born Pretty Cat Eye Gel Polish in Frozen Blue.
- Nail Art Decals: Snowflake Stickers for the accents.
- Top Coat: Gelish Top It Off for durability.
- Base Coat: IBD Powerbond Base Coat for strong adhesion.
How to Create This Look at Home:
- Apply a layer of IBD Powerbond Base Coat on clean, almond-shaped nails, and cure under a UV lamp.
- Apply two layers of Essie Gel Couture in First View, curing each layer.
- Add a layer of Born Pretty Cat Eye Gel Polish in Frozen Blue, using a magnetic wand to create the cat eye effect. Cure under the UV lamp.
- Carefully apply the Snowflake Stickers on the nail, then finish with Gelish Top It Off to seal the design and add a glossy finish. Cure for a final time.
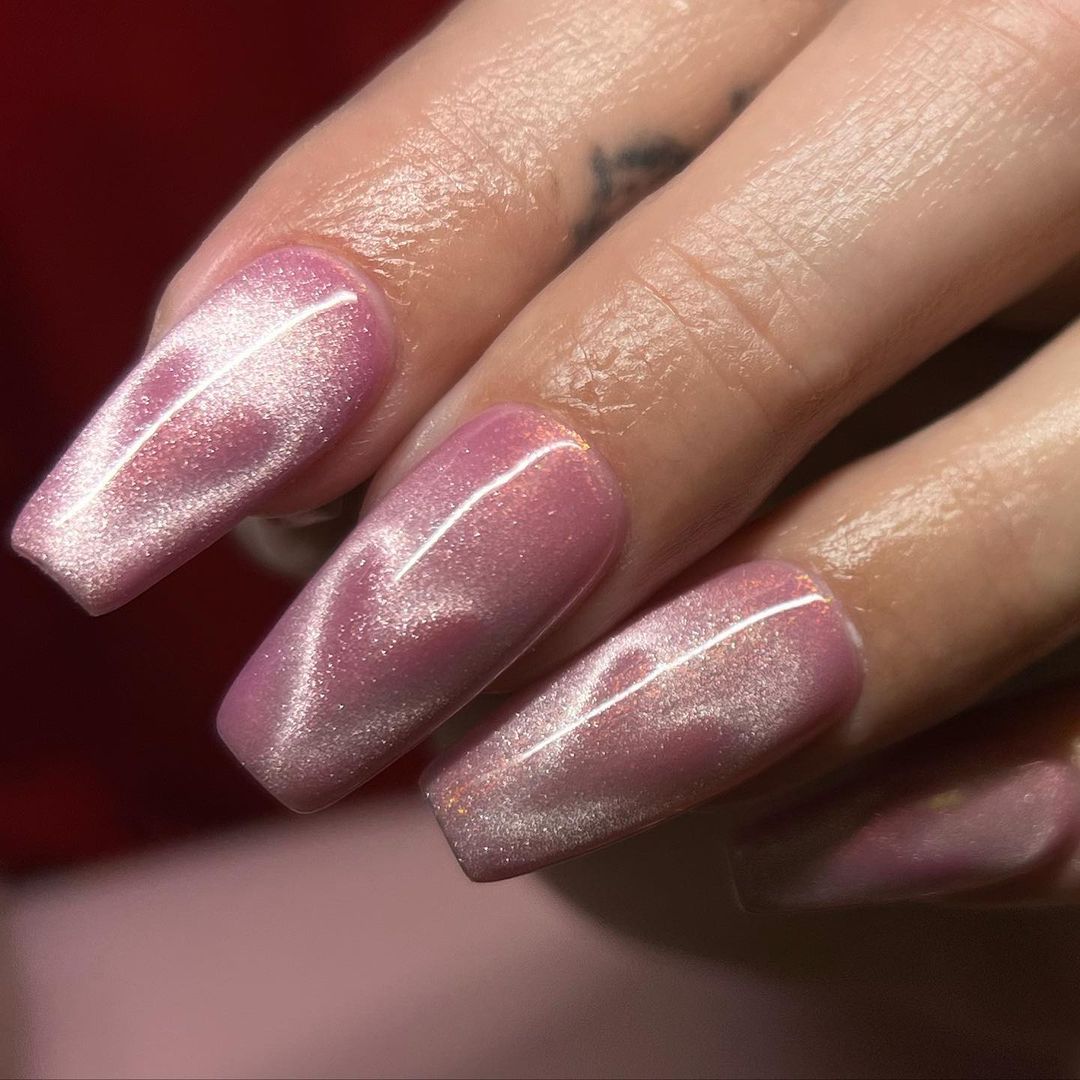
Soft Pink Cat Eye Nails
This soft and delicate manicure features a soft pink cat eye effect that is both feminine and elegant. The square shape of the nails adds a modern touch, while the subtle cat eye shimmer gives the nails a unique and sophisticated look. The soft pink color is perfect for those who prefer a more understated manicure, offering a timeless style with a hint of glamour. This design is ideal for both everyday wear and special occasions.
Consumables and Recommendations:
- Gel Polish: Madam Glam Gel Polish in Blush Babe for the base.
- Cat Eye Gel Polish: Makartt Cat Eye Gel Polish in Pink Pearl.
- Top Coat: CND Shellac Top Coat for a glossy finish.
- Base Coat: Orly Bonder Base Coat for strong adhesion.
How to Create This Look at Home:
- Begin with a layer of Orly Bonder Base Coat on clean, square-shaped nails, and cure under a UV lamp.
- Apply two layers of Madam Glam Gel Polish in Blush Babe, curing each layer.
- Add a layer of Makartt Cat Eye Gel Polish in Pink Pearl, using a magnetic wand to create the cat eye effect. Cure under the UV lamp.
- Finish with CND Shellac Top Coat to seal the design and add a high-gloss finish, curing one final time.
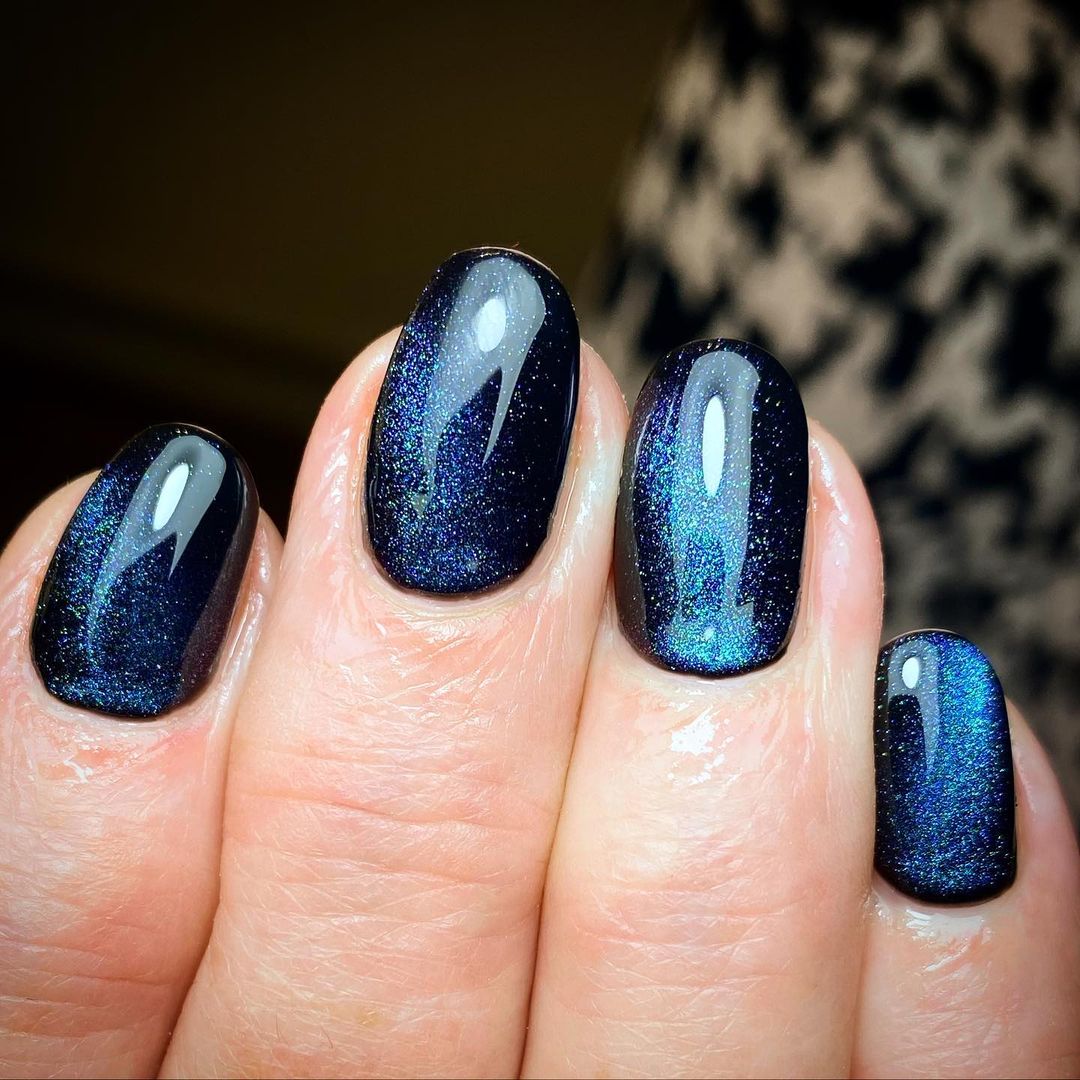
Midnight Galaxy Cat Eye Nails
This striking manicure captures the essence of a midnight galaxy with its deep blue cat eye effect. The round shape adds a classic touch, while the shimmering blue polish creates a sense of depth and mystery. The cat eye effect adds movement to the design, making it look like the stars are swirling in the night sky. This manicure is perfect for anyone who loves dark, dramatic nails with a touch of cosmic beauty.
Consumables and Recommendations:
- Gel Polish: OPI GelColor in Russian Navy for the base.
- Cat Eye Gel Polish: Born Pretty Cat Eye Gel Polish in Galaxy Blue.
- Top Coat: Sally Hansen Miracle Gel Top Coat for a long-lasting finish.
- Base Coat: CND Stickey Base Coat for strong adhesion.
How to Create This Look at Home:
- Apply a layer of CND Stickey Base Coat on clean, round-shaped nails, and cure under a UV lamp.
- Apply two layers of OPI GelColor in Russian Navy, curing each layer.
- Add a layer of Born Pretty Cat Eye Gel Polish in Galaxy Blue, using a magnetic wand to create the cat eye effect. Cure under the UV lamp.
- Finish with Sally Hansen Miracle Gel Top Coat to seal the design and add a high-gloss finish, curing for the final time.
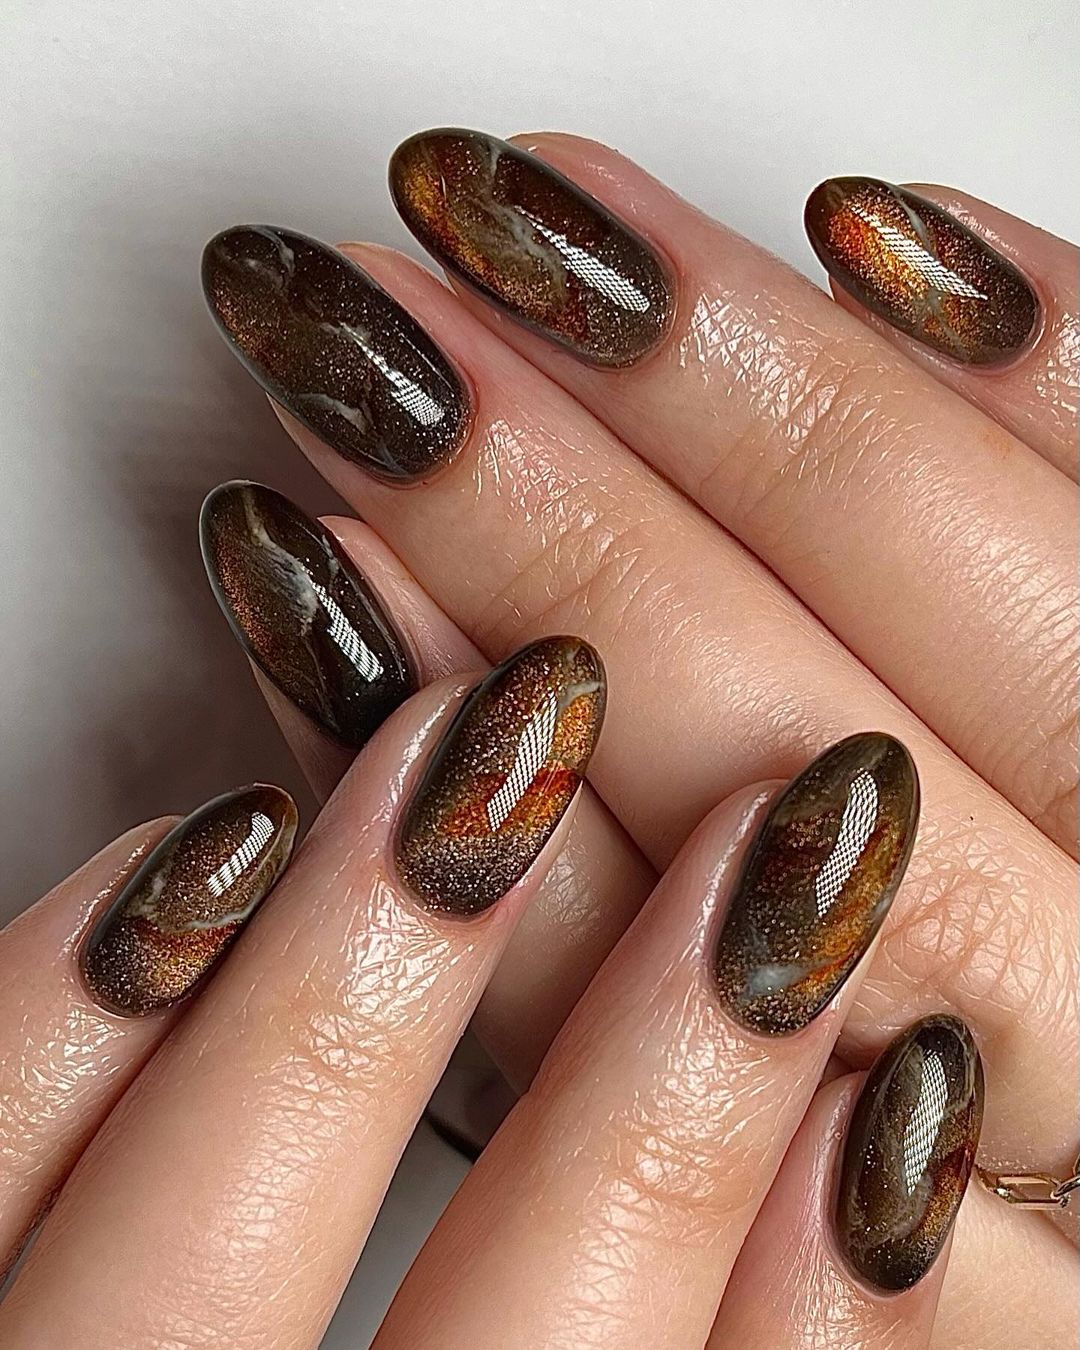
Earthy Brown Cat Eye Nails
This unique manicure features an earthy brown cat eye effect that brings the warmth of autumn to your fingertips. The oval shape of the nails enhances the natural look, while the cat eye shimmer adds depth and a subtle glow. The rich brown tones are perfect for the fall season, offering a sophisticated and versatile style that pairs well with any wardrobe. This manicure is ideal for those who love a natural, yet polished look with a touch of elegance.
Consumables and Recommendations:
- Gel Polish: Essie Gel Couture in Take It Outside for the base.
- Cat Eye Gel Polish: Makartt Cat Eye Gel Polish in Espresso.
- Top Coat: Gelish Top It Off for durability and shine.
- Base Coat: Zoya Anchor Base Coat for strong adhesion.
How to Create This Look at Home:
- Begin with a layer of Zoya Anchor Base Coat on clean, oval-shaped nails, and cure under a UV lamp.
- Apply two layers of Essie Gel Couture in Take It Outside, curing each layer.
- Add a layer of Makartt Cat Eye Gel Polish in Espresso, using a magnetic wand to create the cat eye effect. Cure under the UV lamp.
- Finish with Gelish Top It Off to lock in the design and add a high-gloss finish, curing one final time.
FAQ Section
How do I maintain my cat eye gel nails to make them last longer?
To keep your fall cat eye nails 2024 looking fresh, apply a top coat every few days to maintain the shine and protect the design from chipping. Avoid using your nails as tools and moisturize your cuticles daily.
Can I achieve these designs on short nails?
Absolutely! The cat eye effect can be just as stunning on short nails, especially when combined with bold colors like black or dark red. Just adjust the intensity of the effect to suit the length.
What’s the best way to remove gel polish without damaging my nails?
Soak a cotton pad in acetone, place it on your nail, and wrap it with foil. Let it sit for about 15 minutes, then gently push off the gel with a cuticle pusher. Always finish with a nourishing cuticle oil.
Save Pin

