25 Ideas for Fall Tree Nail Art 2024
Fall is the perfect season to experiment with rich colors and intricate designs on your nails. The beauty of autumn can be captured through various nail art techniques that reflect the vibrant colors and textures of the season. Let’s explore some stunning nail designs that will make your nails the talk of the town this fall.
Rich Autumn Hues with Delicate Leaf Patterns
This design combines deep earthy tones with delicate leaf patterns to create a sophisticated autumn look. The use of colors like dark green, mustard yellow, and earthy browns, accented with intricate leaf designs, brings the beauty of fall trees to your nails. The addition of white dot accents adds a touch of whimsy and lightness to the overall design.

Consumables:
- Dark green nail polish (e.g., OPI “Stay Off the Lawn”)
- Mustard yellow nail polish (e.g., Essie “Hay There”)
- Earthy brown nail polish (e.g., Zoya “Spencer”)
- White nail polish for dots (e.g., Sally Hansen “White On”)
- Fine detailing brush for leaf patterns
- Top coat for sealing the design (e.g., Seche Vite Top Coat)
DIY Instructions:
- Prepare Your Nails: Start with clean, filed nails. Apply a base coat to protect your natural nails.
- Apply Base Colors: Paint each nail with your chosen base colors. Use dark green, mustard yellow, and earthy brown for different nails.
- Create Leaf Patterns: Using a fine detailing brush, draw delicate leaf patterns with the white polish on each nail. Add white dots around the leaves for an extra touch.
- Seal the Design: Once the patterns are dry, apply a top coat to seal and protect your design.
Elegant Green and Tortoiseshell Combo with 3D Accents
This elegant nail design features a combination of olive green and tortoiseshell patterns, accented with 3D white leaves. The mixture of glossy and matte finishes adds depth and interest to the nails, making them stand out as a sophisticated fall manicure choice.

Consumables:
- Olive green nail polish (e.g., Essie “Sew Psyched”)
- Tortoiseshell nail polish (e.g., Sally Hansen “Tiger’s Eye”)
- 3D white leaf nail art pieces
- Clear nail polish for attaching 3D pieces
- Fine detailing brush for precise application
- Top coat for a long-lasting finish (e.g., Essie Gel Couture Top Coat)
DIY Instructions:
- Prepare Your Nails: Clean and shape your nails, then apply a base coat.
- Apply Base Colors: Paint your nails with olive green polish and tortoiseshell polish on alternate nails.
- Add 3D Accents: Using clear nail polish, attach the 3D white leaf pieces to the desired nails.
- Seal and Finish: Apply a top coat to all nails to seal the design and ensure longevity.
Bright and Bold Autumn Leaves on Matte Finish
This vibrant design features bright yellow and coral nails with striking black leaf patterns. The matte finish gives a modern twist to the traditional fall colors, making the design pop even more. It’s a bold and trendy choice for those who love to make a statement with their nails.

Consumables:
- Bright yellow nail polish (e.g., OPI “Sun, Sea, and Sand in My Pants”)
- Coral nail polish (e.g., Essie “Cute as a Button”)
- Black nail polish for leaf patterns (e.g., China Glaze “Liquid Leather”)
- Matte top coat (e.g., OPI Matte Top Coat)
- Fine detailing brush for creating leaf patterns
DIY Instructions:
- Prepare Your Nails: Start with clean nails and apply a base coat.
- Apply Base Colors: Paint your nails with bright yellow and coral polish, alternating colors on each nail.
- Create Leaf Patterns: Using a fine detailing brush and black polish, draw bold leaf patterns on the nails.
- Finish with Matte: Once dry, apply a matte top coat to give your nails a chic, modern look.
Delicate Blossom on a Light Pink Base
This elegant nail design showcases delicate blossoms in shades of pink and burgundy on a soft, translucent pink base. The floral patterns are intricately detailed, giving the nails a sophisticated and feminine look. The sheer base color allows the natural nail to show through, adding an element of subtlety to the overall design. This manicure is perfect for women who appreciate understated yet intricate nail art.

Consumables:
- Light pink translucent nail polish (e.g., Essie “Ballet Slippers”)
- Burgundy nail polish for the flowers (e.g., OPI “Malaga Wine”)
- Fine detailing brush for creating floral patterns
- Top coat for a glossy finish (e.g., Seche Vite Top Coat)
DIY Instructions:
- Prepare Your Nails: Start with clean, filed nails and apply a base coat.
- Apply Base Color: Paint your nails with the light pink translucent polish, allowing the natural nail to show through.
- Create Floral Patterns: Using a fine detailing brush and burgundy polish, draw delicate blossoms on each nail. Vary the size and placement of the flowers for a more natural look.
- Seal the Design: Once the flowers are dry, apply a top coat to add shine and protect your manicure.
Save Pin

Bold Red and Black Leaf Patterns
This striking design features bold red nails with contrasting black leaf patterns. The matte finish of the red polish adds a modern and edgy touch, while the black leaf accents create a sophisticated contrast. This manicure is ideal for those who want to make a statement with their nails, combining bold colors with intricate designs.

Consumables:
- Bright red nail polish (e.g., OPI “Big Apple Red”)
- Black nail polish for leaf patterns (e.g., Essie “Licorice”)
- Matte top coat (e.g., OPI Matte Top Coat)
- Fine detailing brush for creating leaf patterns
DIY Instructions:
- Prepare Your Nails: Clean and shape your nails, then apply a base coat.
- Apply Base Color: Paint your nails with the bright red polish and let it dry completely.
- Create Leaf Patterns: Using a fine detailing brush and black polish, draw leaf patterns on the nails. Be creative with the placement and size of the leaves.
- Finish with Matte: Apply a matte top coat to achieve a modern, sophisticated finish.
Playful Animal Prints and Textures
This fun and playful nail design combines various animal prints and textures, creating a unique and eye-catching look. The mix of leopard spots, crocodile scales, and a cute teddy bear accent adds a whimsical touch to the manicure. The use of gold accents and 3D elements enhances the overall design, making it perfect for those who love bold and creative nail art.

Consumables:
- Nude and white nail polishes for the base (e.g., Essie “Sand Tropez” and “Blanc”)
- Black nail polish for animal prints (e.g., OPI “Black Onyx”)
- Gold nail polish for accents (e.g., Essie “Good as Gold”)
- 3D teddy bear nail art piece
- Fine detailing brush for creating patterns
- Top coat for sealing the design (e.g., Seche Vite Top Coat)
DIY Instructions:
- Prepare Your Nails: Start with clean, filed nails and apply a base coat.
- Apply Base Colors: Paint your nails with nude and white polishes, alternating colors on each nail.
- Create Animal Prints: Using a fine detailing brush and black polish, draw various animal prints on the nails. Add gold accents to enhance the design.
- Add 3D Elements: Attach the 3D teddy bear piece to the desired nail using clear polish.
- Seal the Design: Apply a top coat to all nails to protect your manicure and add shine.
Pumpkin and Maple Leaf Magic
This autumn-inspired nail design features a delightful combination of pumpkins, maple leaves, and other fall elements against a soft, nude base. The mix of orange, white, and black creates a striking contrast, making each detail pop. This manicure captures the essence of the fall season, making it perfect for anyone looking to celebrate autumn with a trendy and artistic touch.

Consumables:
- Nude nail polish (e.g., OPI “Bubble Bath”)
- Orange nail polish (e.g., Essie “Playing Koi”)
- White nail polish (e.g., Sally Hansen “White On”)
- Black nail polish for details (e.g., China Glaze “Liquid Leather”)
- Fine detailing brush for creating pumpkins and leaves
- Top coat for a glossy finish (e.g., Seche Vite Top Coat)
DIY Instructions:
- Prepare Your Nails: Start with clean, filed nails and apply a base coat.
- Apply Base Color: Paint your nails with the nude polish to create a soft, neutral background.
- Add Fall Details: Using a fine detailing brush, draw pumpkins, maple leaves, and other fall elements with the orange, white, and black polishes.
- Seal the Design: Once the details are dry, apply a top coat to protect your manicure and add shine.
Earthy Tones and Leafy Accents
This nail design combines rich earthy tones with leafy accents to create a natural, autumn-inspired look. The mix of brown, beige, and burgundy colors, along with black leaf patterns, makes for a sophisticated and seasonal manicure. The textured elements add depth and interest, perfect for those who appreciate detailed and artistic nail art.

Consumables:
- Brown nail polish (e.g., Zoya “Spencer”)
- Beige nail polish (e.g., OPI “Samoan Sand”)
- Burgundy nail polish (e.g., Essie “Maki Me Happy”)
- Black nail polish for leaf patterns (e.g., OPI “Black Onyx”)
- Fine detailing brush for creating leaf patterns
- Textured nail polish or top coat for added dimension (e.g., Essie “Texture”)
DIY Instructions:
- Prepare Your Nails: Clean and shape your nails, then apply a base coat.
- Apply Base Colors: Paint your nails with the brown, beige, and burgundy polishes, alternating colors for a varied look.
- Create Leaf Patterns: Using a fine detailing brush and black polish, draw leaf patterns on the nails. Add textured elements for extra dimension.
- Seal and Finish: Apply a top coat to all nails to protect your manicure and add a glossy finish.
Green and Gold Elegance
This elegant nail design features green and gold leaves on a crisp white base. The combination of matte and glossy finishes adds depth and sophistication to the nails. The use of gold foil accents gives the manicure a luxurious touch, perfect for those who love a refined and trendy look.

Consumables:
- White nail polish (e.g., Essie “Blanc”)
- Green nail polish (e.g., OPI “Stay Off the Lawn”)
- Gold foil for accents
- Matte top coat (e.g., OPI Matte Top Coat)
- Fine detailing brush for creating leaf patterns
DIY Instructions:
- Prepare Your Nails: Start with clean, filed nails and apply a base coat.
- Apply Base Color: Paint your nails with the white polish for a clean and crisp background.
- Add Green and Gold Details: Using a fine detailing brush, draw green leaves on the nails. Apply gold foil accents for an elegant touch.
- Finish with Matte: Apply a matte top coat to give your nails a sophisticated finish.
Save Pin

Gradient Sunset with Black Leaves
This stunning design features a gradient of pink and purple shades, reminiscent of a beautiful sunset. The addition of black leaf patterns creates a striking contrast, making the design stand out. The matte finish of the gradient adds a modern touch, making it perfect for a trendy and eye-catching fall manicure.

Consumables:
- Pink nail polish (e.g., OPI “Pink Flamenco”)
- Purple nail polish (e.g., Essie “Play Date”)
- Black nail polish for leaf patterns (e.g., China Glaze “Liquid Leather”)
- Matte top coat (e.g., OPI Matte Top Coat)
- Fine detailing brush for creating leaf patterns
- Sponge for gradient effect
DIY Instructions:
- Prepare Your Nails: Clean and shape your nails, then apply a base coat.
- Create Gradient Base: Using a sponge, apply the pink and purple polishes to create a gradient effect. Let it dry completely.
- Add Leaf Patterns: Using a fine detailing brush and black polish, draw leaf patterns on the nails.
- Finish with Matte: Apply a matte top coat to achieve a modern, matte finish.
Playful Polka Dots and Leaves
This fun and vibrant nail design combines playful polka dots with delicate leaf patterns. The mix of bright colors like pink, blue, and green against a white base makes for a cheerful and eye-catching manicure. This design is perfect for those who love a playful and trendy look.

Consumables:
- White nail polish (e.g., Sally Hansen “White On”)
- Pink nail polish (e.g., Essie “Madison Ave-Hue”)
- Blue nail polish (e.g., OPI “No Room for the Blues”)
- Green nail polish (e.g., Essie “Mojito Madness”)
- Black nail polish for leaf patterns (e.g., OPI “Black Onyx”)
- Fine detailing brush for creating leaf patterns and polka dots
- Top coat for a glossy finish (e.g., Seche Vite Top Coat)
DIY Instructions:
- Prepare Your Nails: Start with clean, filed nails and apply a base coat.
- Apply Base Color: Paint your nails with the white polish to create a bright background.
- Add Polka Dots and Leaves: Using a fine detailing brush, draw polka dots and leaf patterns with the pink, blue, green, and black polishes.
- Seal the Design: Once the details are dry, apply a top coat to protect your manicure and add shine.
Vibrant Neon with Leaf Accents
This bold and vibrant nail design features neon orange nails with striking leaf accents. The neon color makes a statement, while the black and multicolored leaf patterns add an artistic touch. This design is perfect for those who love bold and trendy nail art that stands out.

Consumables:
- Neon orange nail polish (e.g., China Glaze “Orange Knockout”)
- White nail polish for base (e.g., OPI “Alpine Snow”)
- Black nail polish for leaf patterns (e.g., Essie “Licorice”)
- Multicolored nail polish for additional leaf accents
- Fine detailing brush for creating leaf patterns
- Top coat for a glossy finish (e.g., Seche Vite Top Coat)
DIY Instructions:
- Prepare Your Nails: Clean and shape your nails, then apply a base coat.
- Apply Base Colors: Paint most of your nails with neon orange polish and one or two nails with white polish for accent.
- Add Leaf Patterns: Using a fine detailing brush, draw black and multicolored leaf patterns on the accent nails.
- Seal the Design: Apply a top coat to all nails to protect your manicure and add a glossy finish.
Spooky Halloween Silhouettes
This nail design is perfect for Halloween enthusiasts. The nails feature eerie silhouettes of haunted houses, bare trees, and spooky cats against a gradient background of dark, smoky hues. The intricate details of bats, spiders, and cobwebs add to the Halloween vibe, making this a standout design for the spooky season.

Consumables:
- Black nail polish (e.g., OPI “Black Onyx”)
- Dark green nail polish (e.g., Essie “Stylenomics”)
- Orange nail polish (e.g., China Glaze “Breakin'”)
- White nail polish for highlights (e.g., Sally Hansen “White On”)
- Fine detailing brush for creating intricate designs
- Top coat for a glossy finish (e.g., Seche Vite Top Coat)
DIY Instructions:
- Prepare Your Nails: Start with clean, filed nails and apply a base coat.
- Create Gradient Base: Apply a gradient background using dark green, orange, and black polishes. Blend the colors smoothly.
- Add Halloween Silhouettes: Using a fine detailing brush, draw haunted houses, bare trees, bats, spiders, and cobwebs with black and white polishes for highlights.
- Seal the Design: Once the details are dry, apply a top coat to protect your manicure and add shine.
Elegant Pomegranate Art
This nail design features elegant pomegranate artwork on a white base. The pomegranates are beautifully detailed with red and green shades, creating a natural and sophisticated look. The addition of gold accents and small white dots enhances the design, making it perfect for those who appreciate intricate and artistic nail art.

Consumables:
- White nail polish (e.g., Essie “Blanc”)
- Red nail polish for pomegranates (e.g., OPI “Big Apple Red”)
- Green nail polish for leaves (e.g., Essie “Mojito Madness”)
- Gold nail polish for accents (e.g., Essie “Good as Gold”)
- Fine detailing brush for creating pomegranate designs
- Top coat for a glossy finish (e.g., Seche Vite Top Coat)
DIY Instructions:
- Prepare Your Nails: Clean and shape your nails, then apply a base coat.
- Apply Base Color: Paint your nails with the white polish to create a clean background.
- Add Pomegranate Designs: Using a fine detailing brush, draw pomegranates and leaves with red and green polishes. Add gold accents and small white dots for extra detail.
- Seal the Design: Apply a top coat to protect your manicure and add a glossy finish.
Vibrant Red Berry Designs
This nail design features vibrant red berry artwork on a creamy beige base. The berries are detailed with various shades of red and green, creating a realistic and eye-catching look. The addition of gold accents and subtle text elements adds a unique touch, making this design perfect for those who love natural and artistic nail art.

Consumables:
- Beige nail polish (e.g., OPI “Samoan Sand”)
- Red nail polish for berries (e.g., Essie “Forever Yummy”)
- Green nail polish for leaves (e.g., OPI “Stay Off the Lawn”)
- Gold nail polish for accents (e.g., China Glaze “Gold Mind”)
- Fine detailing brush for creating berry designs
- Top coat for a glossy finish (e.g., Seche Vite Top Coat)
DIY Instructions:
- Prepare Your Nails: Start with clean, filed nails and apply a base coat.
- Apply Base Color: Paint your nails with the beige polish for a neutral background.
- Add Berry Designs: Using a fine detailing brush, draw berries and leaves with red and green polishes. Add gold accents and text elements for extra detail.
- Seal the Design: Once the details are dry, apply a top coat to protect your manicure and add shine.
Purple Autumn Leaves
This nail design features beautiful purple autumn leaves on a gradient background of soft, creamy beige to vibrant purple. The detailed leaves and subtle water droplets give the nails a fresh, dewy look, making them perfect for the fall season.
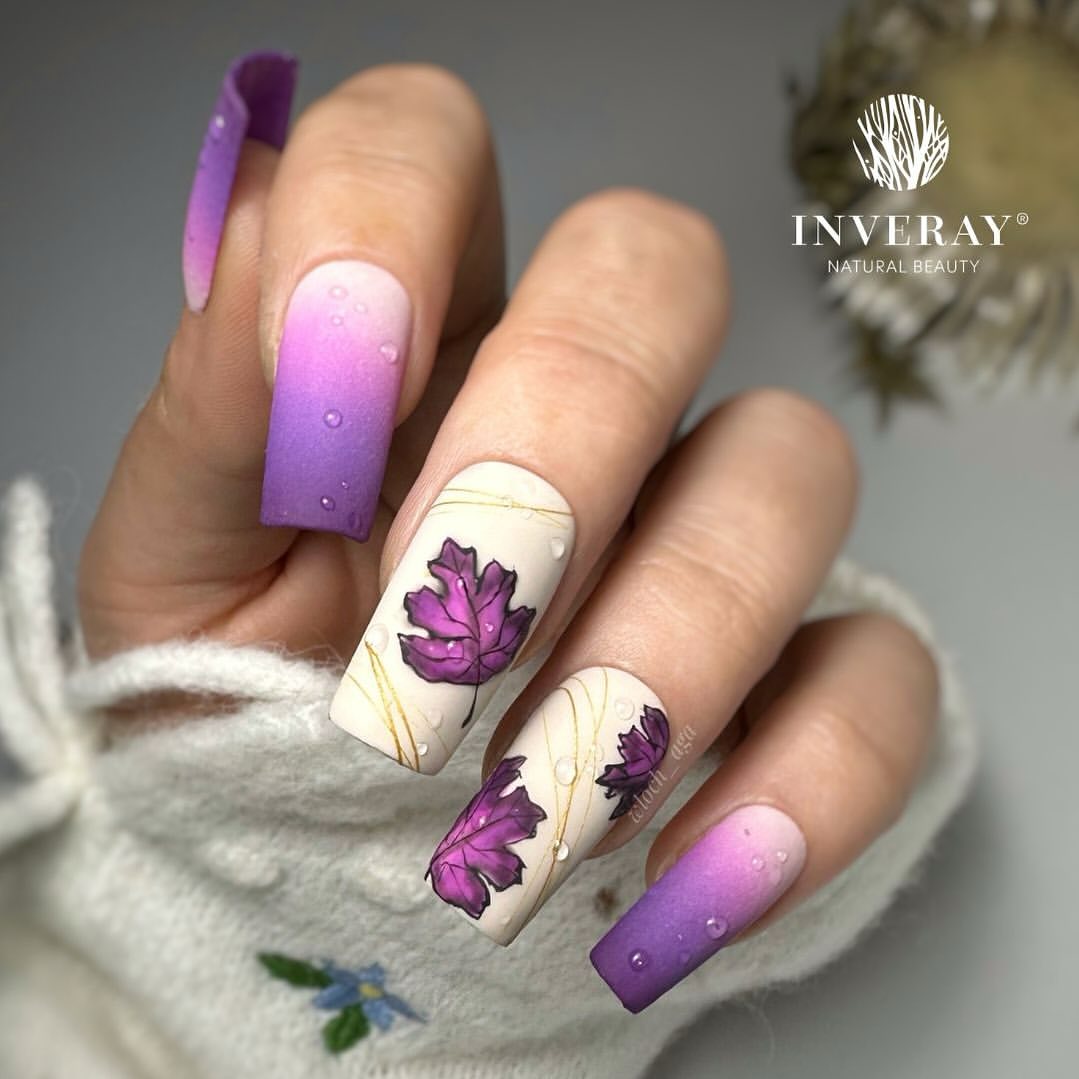
Consumables:
- Beige nail polish (e.g., Essie “Sand Tropez”)
- Purple nail polish (e.g., OPI “Do You Lilac It?”)
- Fine detailing brush for creating leaf designs
- Matte top coat (e.g., OPI Matte Top Coat)
- Top coat for a glossy finish (e.g., Seche Vite Top Coat)
DIY Instructions:
- Prepare Your Nails: Clean and shape your nails, then apply a base coat.
- Create Gradient Base: Apply a gradient background using beige and purple polishes, blending the colors smoothly.
- Add Leaf Designs: Using a fine detailing brush, draw detailed purple leaves. Add subtle water droplets for a fresh look.
- Finish with Matte and Gloss: Apply a matte top coat to some nails and a glossy top coat to others for a varied finish.
Ghostly Autumn Fun
This playful nail design features cute ghost and autumn leaf artwork on a creamy beige and white base. The mix of playful elements and fall colors makes this design perfect for a fun and festive look during the autumn season.
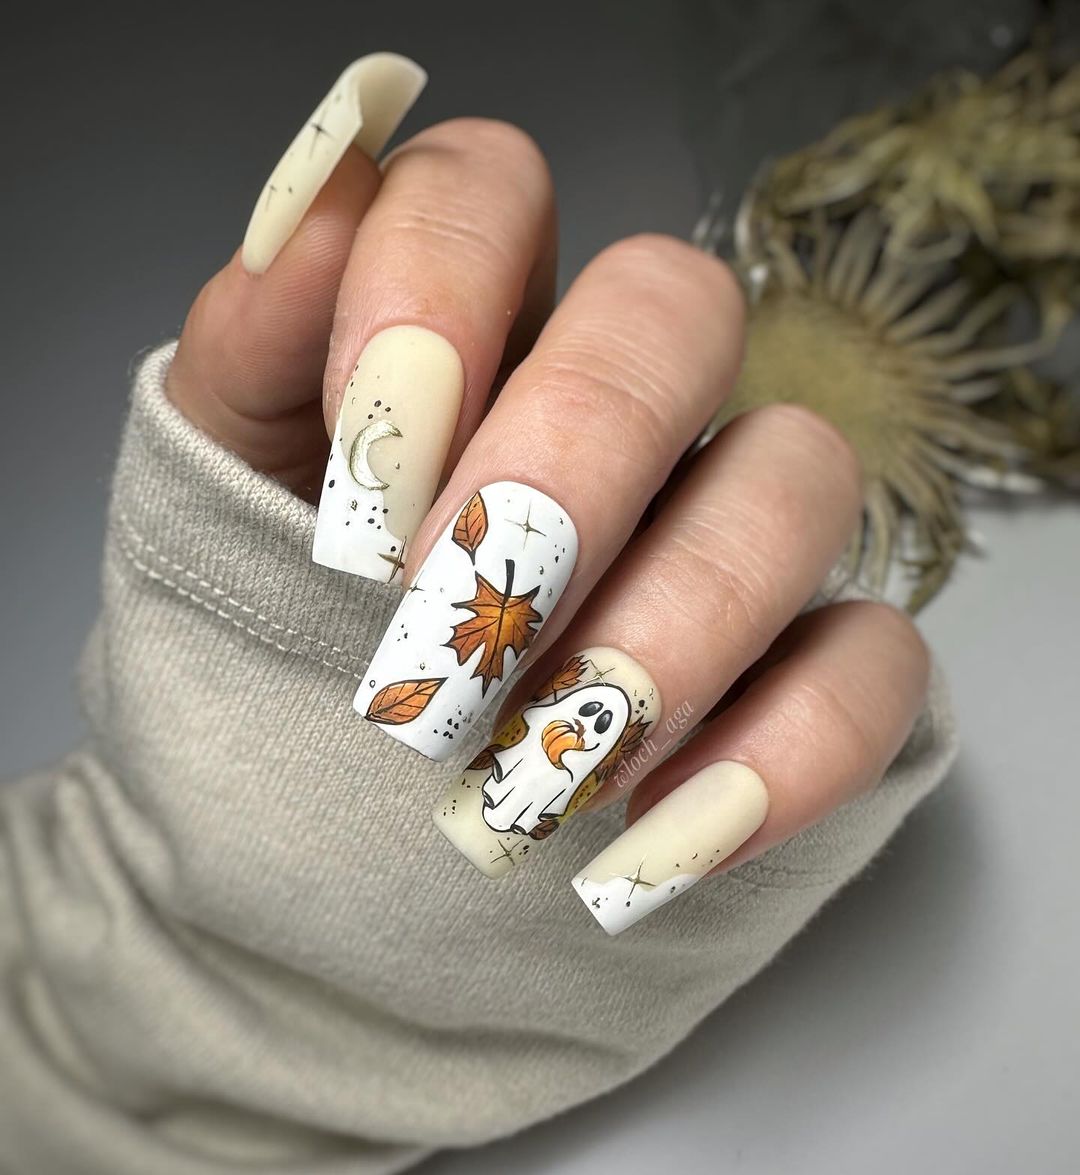
Consumables:
- Beige nail polish (e.g., OPI “Be There in a Prosecco”)
- White nail polish (e.g., Essie “Blanc”)
- Orange nail polish for leaves (e.g., China Glaze “Orange Knockout”)
- Black nail polish for ghost details (e.g., OPI “Black Onyx”)
- Fine detailing brush for creating ghost and leaf designs
- Top coat for a glossy finish (e.g., Seche Vite Top Coat)
DIY Instructions:
- Prepare Your Nails: Start with clean, filed nails and apply a base coat.
- Apply Base Colors: Paint your nails with beige and white polishes, alternating colors for a varied look.
- Add Ghost and Leaf Designs: Using a fine detailing brush, draw cute ghosts and autumn leaves with orange and black polishes.
- Seal the Design: Apply a top coat to protect your manicure and add shine.
Sage Green Elegance
This elegant nail design features a soft sage green base with intricate marble and gold leaf accents. The combination of matte and glossy finishes adds depth and sophistication, making this design perfect for those who love subtle yet detailed nail art.
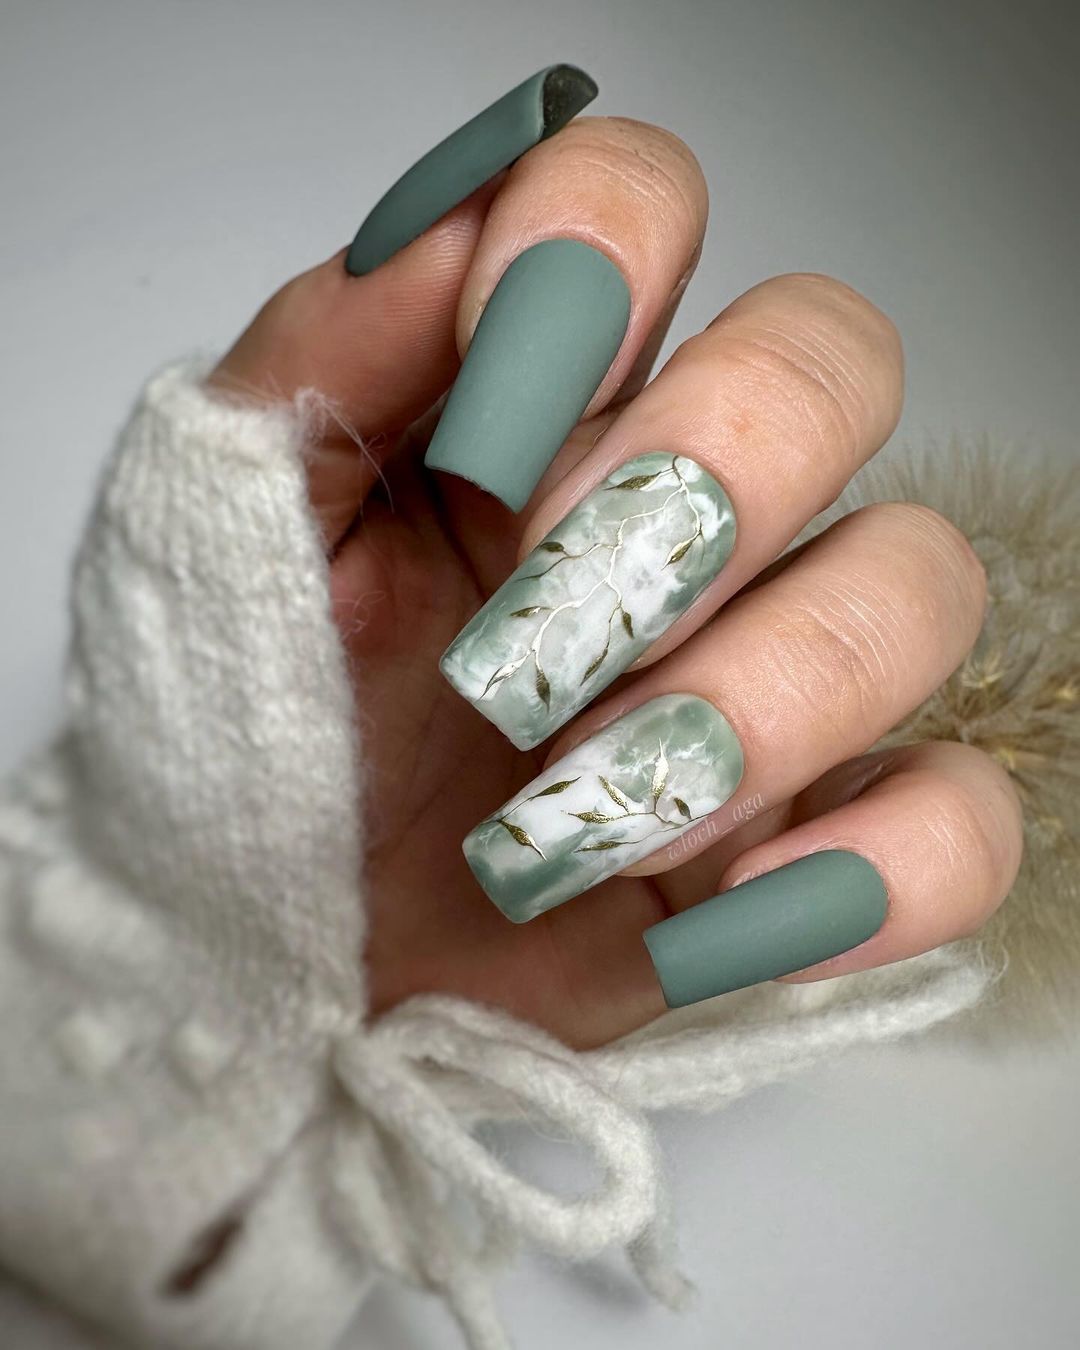
Consumables:
- Sage green nail polish (e.g., Essie “Sage You Love Me”)
- White nail polish for marble effect (e.g., OPI “Alpine Snow”)
- Gold leaf for accents
- Matte top coat (e.g., OPI Matte Top Coat)
- Top coat for a glossy finish (e.g., Seche Vite Top Coat)
DIY Instructions:
- Prepare Your Nails: Clean and shape your nails, then apply a base coat.
- Apply Base Color: Paint your nails with the sage green polish for a soft, elegant background.
- Create Marble Effect: Using white polish and a fine detailing brush, create a marble effect on some nails. Add gold leaf accents for a luxurious touch.
- Finish with Matte and Gloss: Apply a matte top coat to some nails and a glossy top coat to others for a varied finish.
Golden Leaf Elegance
This nail design combines a soft yellow base with striking metallic green accents and delicate leaf patterns. The leaves are detailed with gold foil, adding a touch of luxury and sophistication. The combination of matte and metallic finishes creates a dynamic look perfect for those who love elegant and trendy nail art.
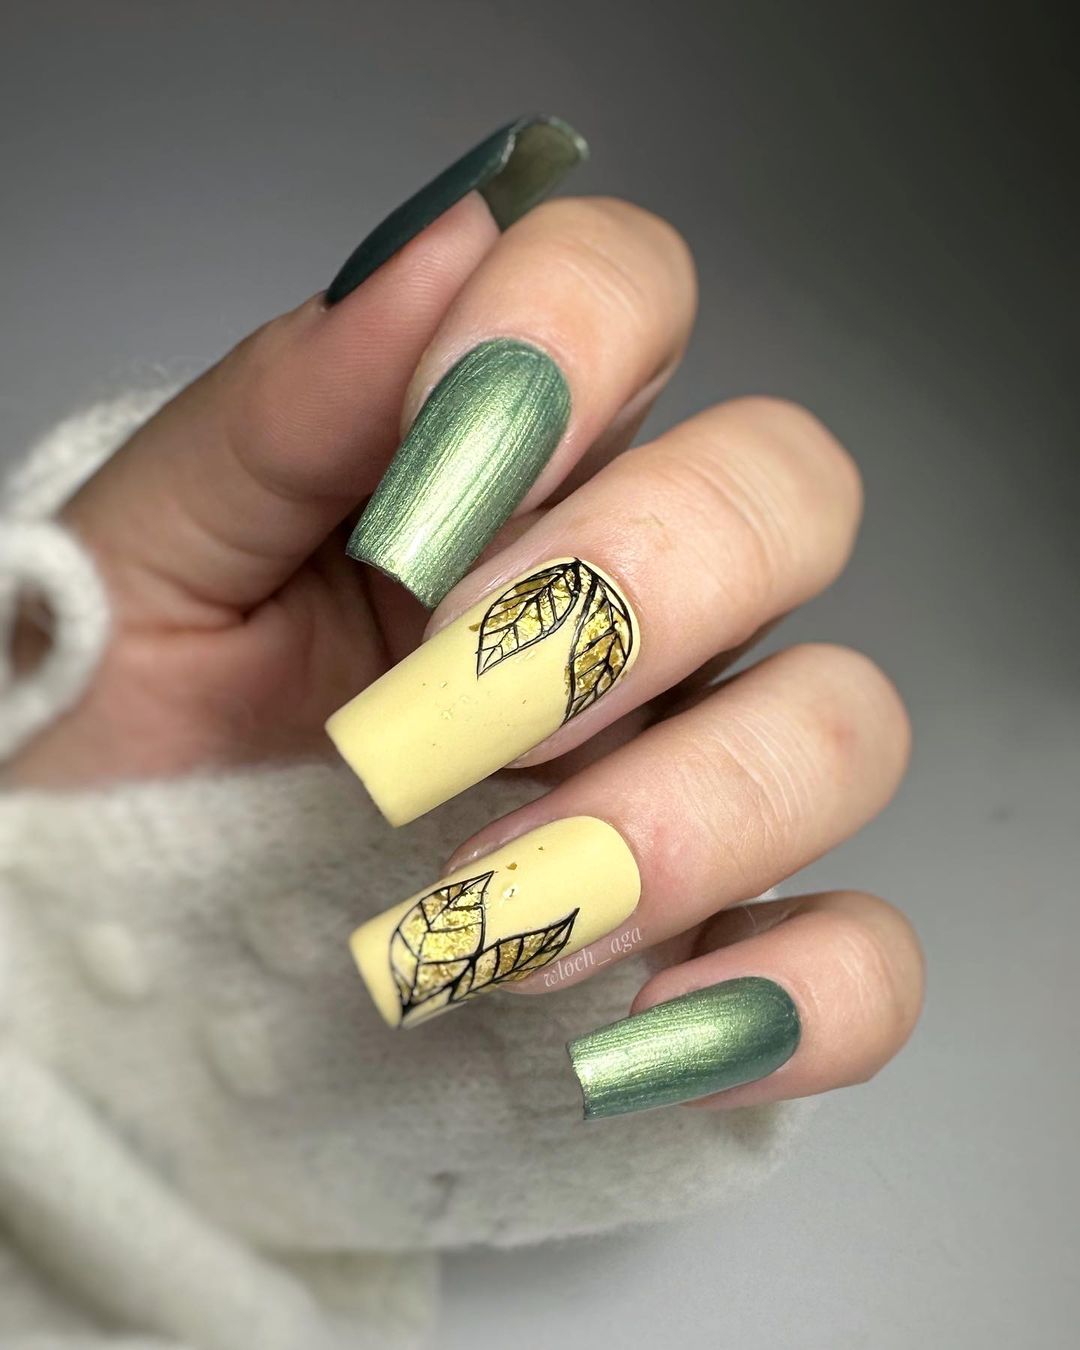
Consumables:
- Soft yellow nail polish (e.g., OPI “I Just Can’t Cope-Acabana”)
- Metallic green nail polish (e.g., Essie “For the Twill of It”)
- Gold foil for leaf accents
- Fine detailing brush for creating leaf patterns
- Top coat for a glossy finish (e.g., Seche Vite Top Coat)
DIY Instructions:
- Prepare Your Nails: Start with clean, filed nails and apply a base coat.
- Apply Base Colors: Paint some nails with the soft yellow polish and others with the metallic green polish.
- Add Leaf Designs: Using a fine detailing brush, draw leaf patterns on the yellow nails and accent them with gold foil.
- Seal the Design: Apply a top coat to protect your manicure and add shine.
Forest Landscape Art
This nail design features a serene forest landscape painted with fine details in green and yellow hues. The scene captures the tranquility of a forest at sunrise, making it a perfect choice for nature lovers. The intricate detailing of trees and foliage brings the design to life, creating a miniature work of art on each nail.
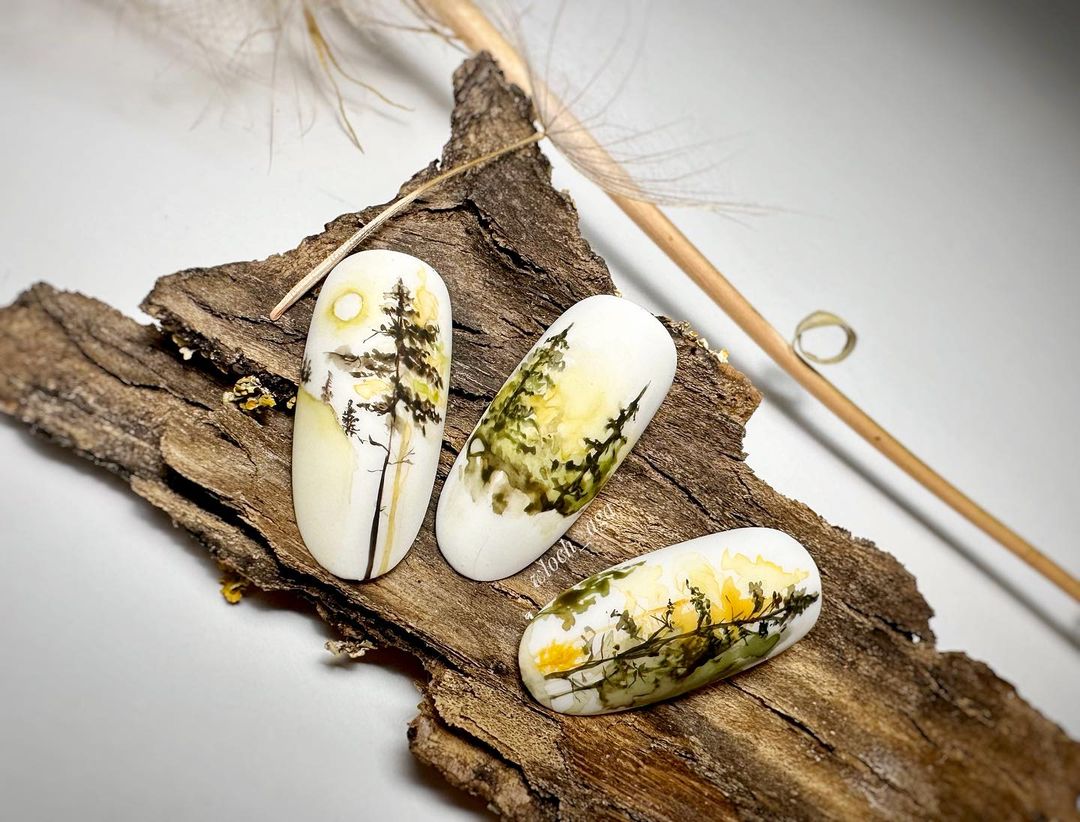
Consumables:
- White nail polish (e.g., Essie “Blanc”)
- Green nail polish for trees (e.g., OPI “Stay Off the Lawn”)
- Yellow nail polish for sunlight (e.g., Essie “Hay There”)
- Fine detailing brush for painting the landscape
- Top coat for a glossy finish (e.g., Seche Vite Top Coat)
DIY Instructions:
- Prepare Your Nails: Clean and shape your nails, then apply a base coat.
- Apply Base Color: Paint your nails with the white polish to create a blank canvas.
- Paint the Landscape: Using a fine detailing brush, paint a forest landscape with green and yellow polishes. Add details of trees and foliage to bring the scene to life.
- Seal the Design: Apply a top coat to protect your artwork and add shine.
Autumn Rust Glam
This nail design features a rich rust-colored base with intricate autumn foliage artwork. The nails capture the essence of fall with warm tones and delicate leaf patterns. The glossy finish enhances the depth and richness of the colors, making this design perfect for the autumn season.
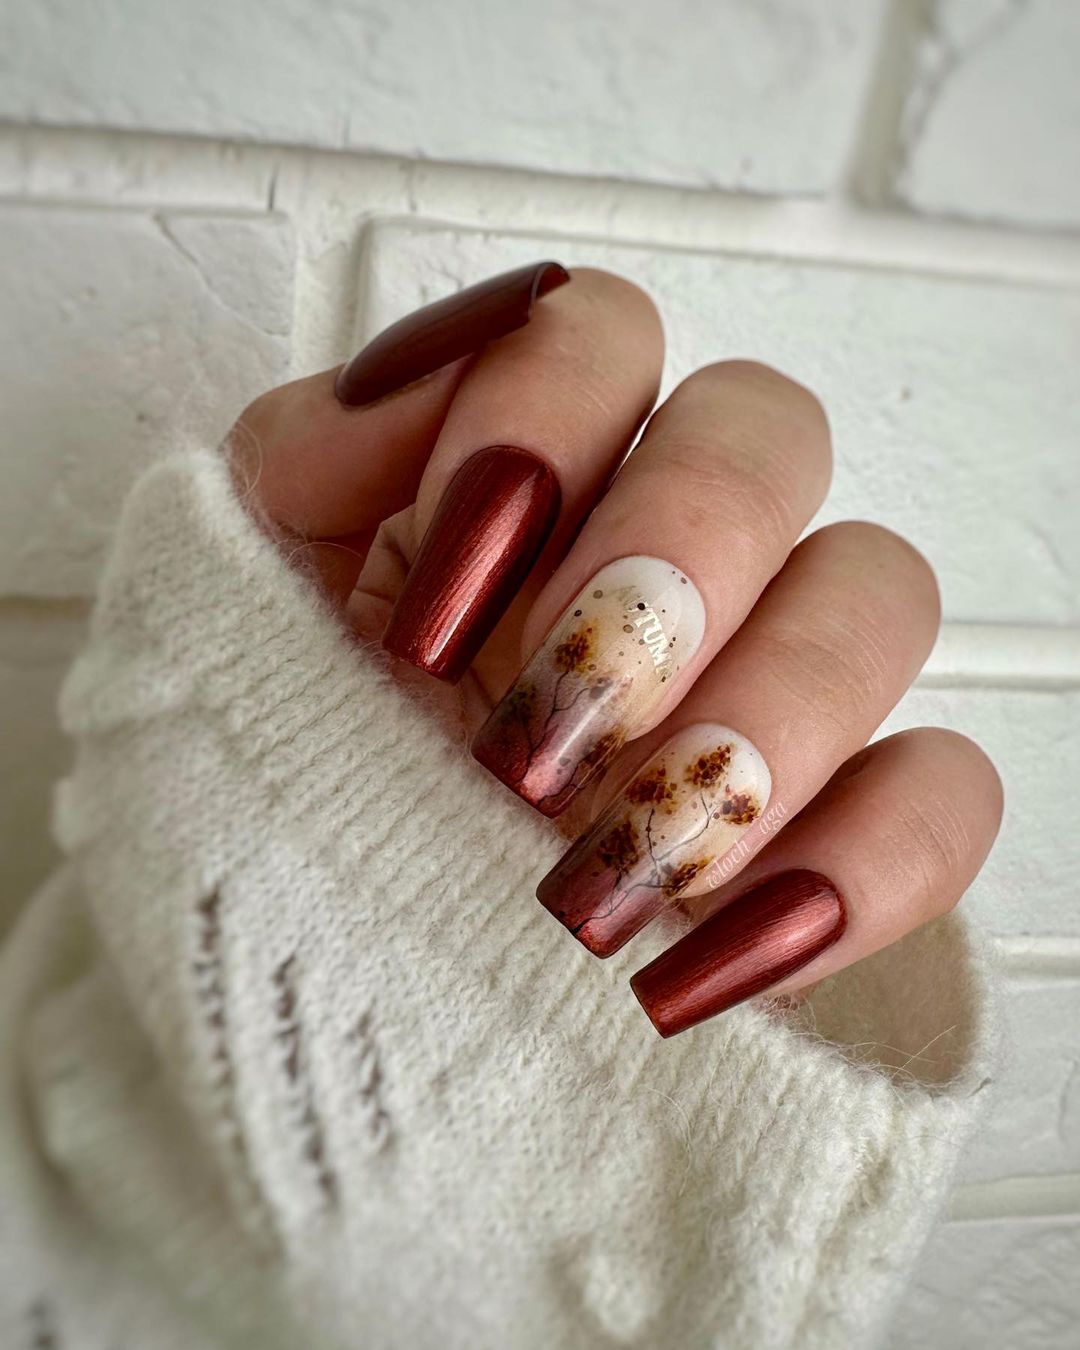
Consumables:
- Rust-colored nail polish (e.g., Essie “Playing Koi”)
- White nail polish for background (e.g., OPI “Alpine Snow”)
- Various shades of yellow and brown polishes for leaves
- Fine detailing brush for creating leaf patterns
- Top coat for a glossy finish (e.g., Seche Vite Top Coat)
DIY Instructions:
- Prepare Your Nails: Start with clean, filed nails and apply a base coat.
- Apply Base Colors: Paint some nails with the rust-colored polish and others with the white polish.
- Add Leaf Designs: Using a fine detailing brush, draw autumn leaves with yellow and brown polishes on the white nails.
- Seal the Design: Apply a top coat to protect your manicure and add a glossy finish.
Soft Pink Floral Delight
This charming nail design features a soft pink base with delicate floral and leaf patterns. The design combines a subtle gradient with intricate black and green details, creating a fresh and feminine look. Perfect for spring or summer, this manicure adds a touch of elegance to any outfit.
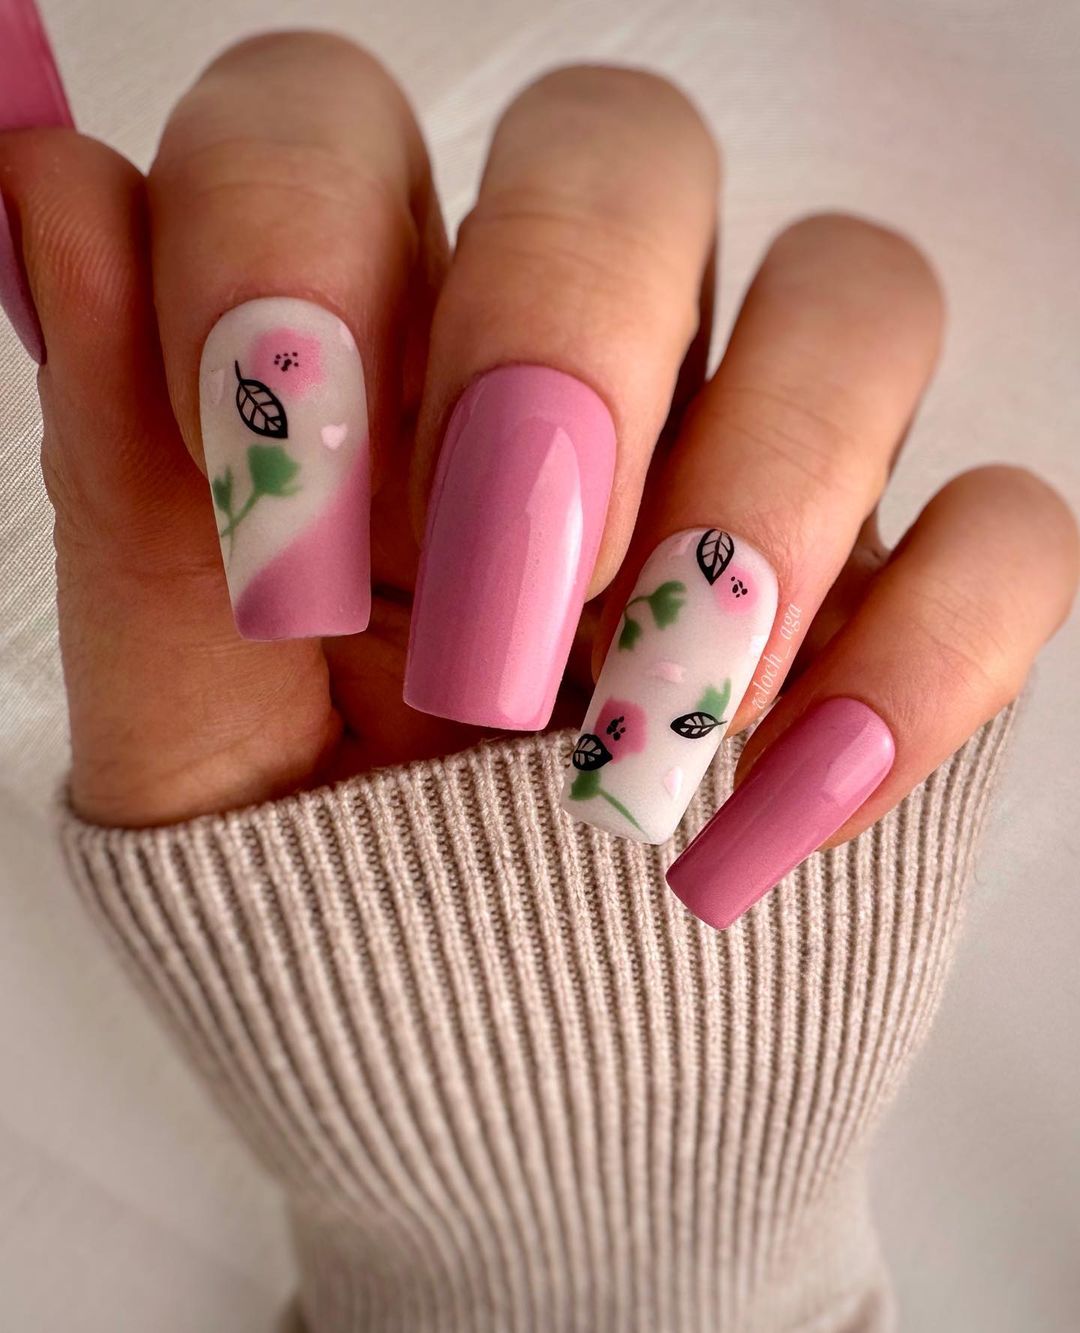
Consumables:
- Soft pink nail polish (e.g., OPI “Mod About You”)
- White nail polish for the gradient (e.g., Essie “Blanc”)
- Black nail polish for details (e.g., China Glaze “Liquid Leather”)
- Green nail polish for leaves (e.g., OPI “Stay Off the Lawn”)
- Fine detailing brush for creating floral patterns
- Top coat for a glossy finish (e.g., Seche Vite Top Coat)
DIY Instructions:
- Prepare Your Nails: Clean and shape your nails, then apply a base coat.
- Create Gradient Base: Apply a gradient of soft pink and white polish on some nails.
- Add Floral Designs: Using a fine detailing brush, draw delicate flowers and leaves with black and green polishes.
- Seal the Design: Apply a top coat to protect your manicure and add a glossy finish.
Autumn Forest Scenery
This nail design features a picturesque autumn forest scene, painted with vibrant colors of fall foliage. The detailed artwork captures the beauty of nature with shades of orange, yellow, green, and brown. Each nail depicts a unique part of the forest, creating a cohesive and stunning look perfect for autumn.
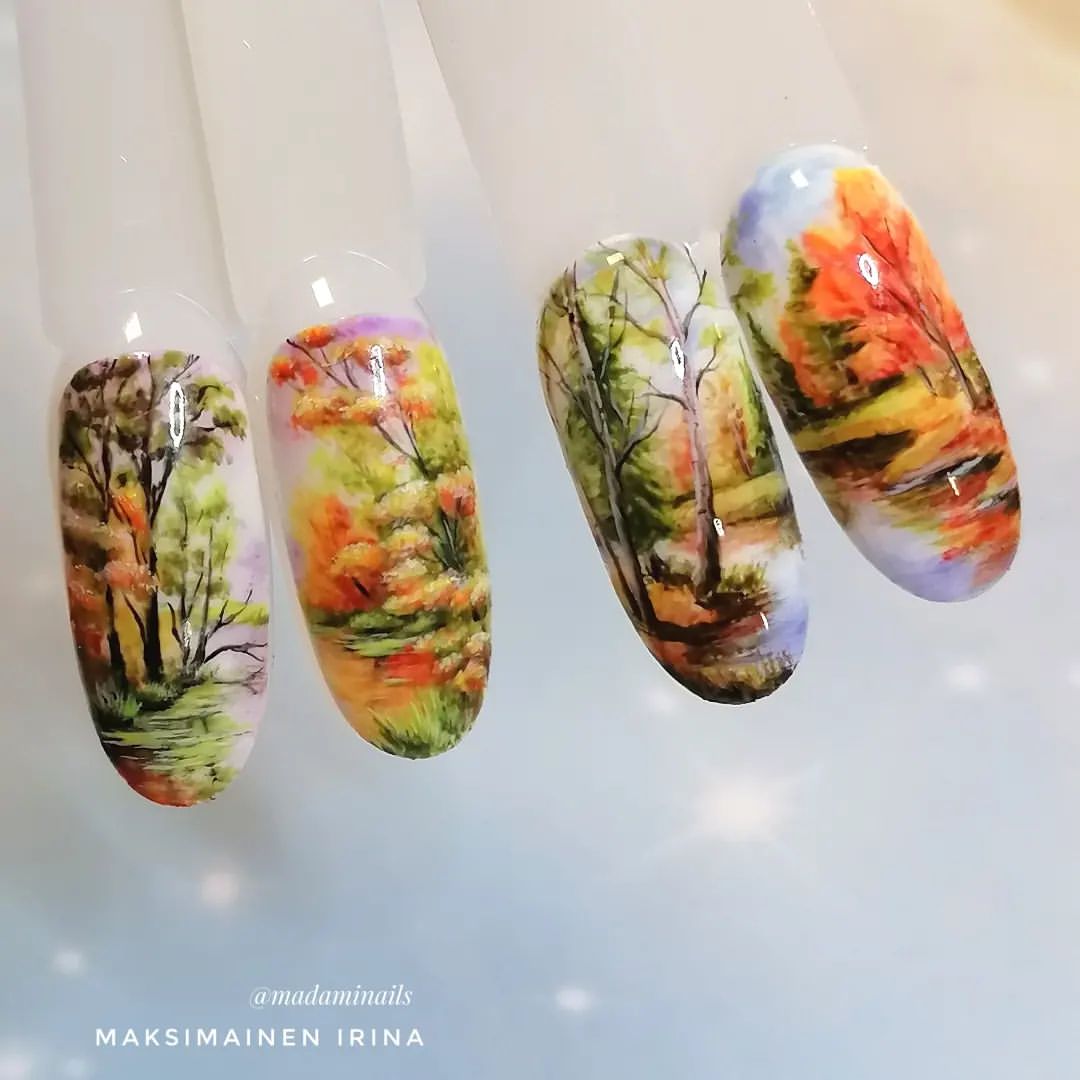
Consumables:
- White nail polish (e.g., Essie “Blanc”)
- Various shades of orange, yellow, green, and brown polishes for foliage
- Fine detailing brush for painting the forest scenery
- Top coat for a glossy finish (e.g., Seche Vite Top Coat)
DIY Instructions:
- Prepare Your Nails: Start with clean, filed nails and apply a base coat.
- Apply Base Color: Paint your nails with the white polish to create a blank canvas.
- Paint the Forest Scene: Using a fine detailing brush, paint a forest scenery with various autumn colors. Add details of trees and foliage to bring the scene to life.
- Seal the Design: Apply a top coat to protect your artwork and add shine.
Bold Autumn Leaves
This striking nail design features bold autumn leaves in vibrant shades of orange and yellow against a deep red base. The detailed leaf patterns are accentuated with a glossy finish, making them stand out beautifully. This design is perfect for those who want to embrace the fall season with a bold and colorful manicure.
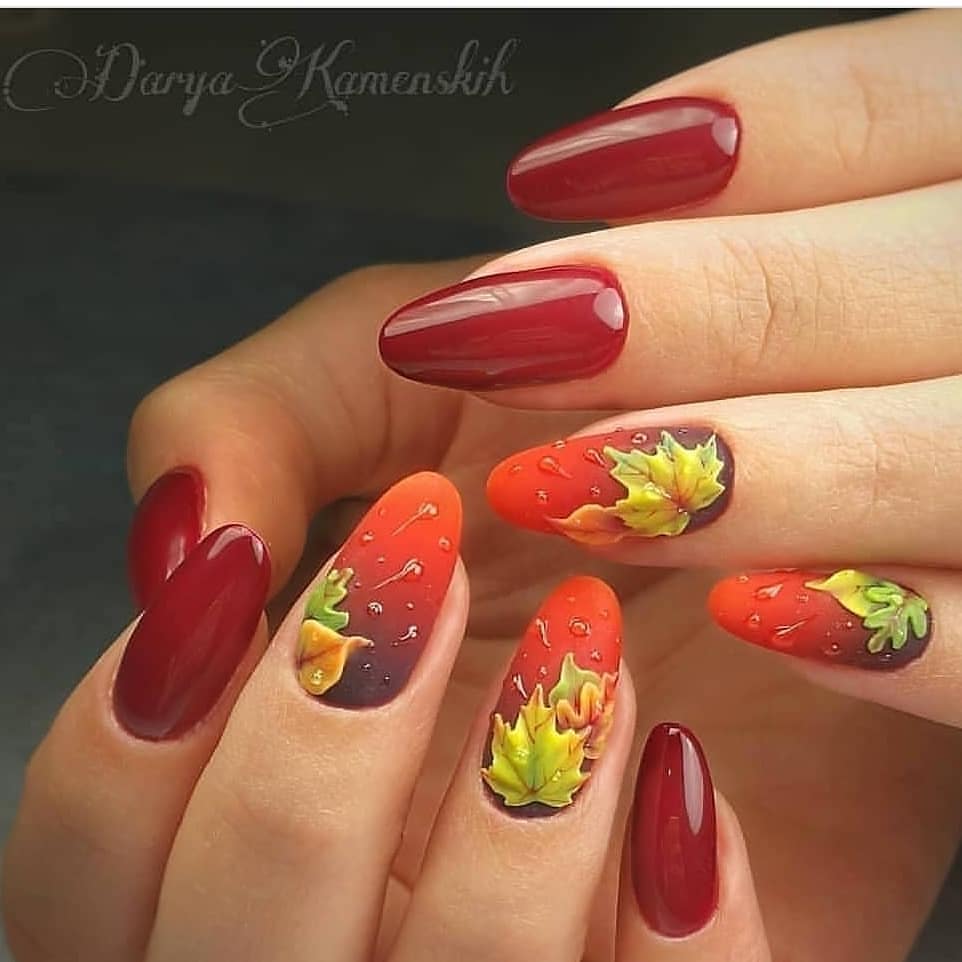
Consumables:
- Deep red nail polish (e.g., OPI “Malaga Wine”)
- Orange and yellow nail polishes for leaves (e.g., Essie “Playing Koi” and “Hay There”)
- Fine detailing brush for creating leaf patterns
- Top coat for a glossy finish (e.g., Seche Vite Top Coat)
DIY Instructions:
- Prepare Your Nails: Clean and shape your nails, then apply a base coat.
- Apply Base Color: Paint your nails with the deep red polish.
- Add Leaf Designs: Using a fine detailing brush, draw bold autumn leaves with orange and yellow polishes.
- Seal the Design: Apply a top coat to protect your manicure and add a glossy finish.
Gradient Autumn Leaves
This nail design showcases a beautiful gradient background in warm autumn shades, with delicate leaf and butterfly patterns. The mix of orange, green, and yellow hues captures the essence of fall, while the intricate details add a touch of elegance. This design is perfect for those who love seasonal nail art with a sophisticated twist.
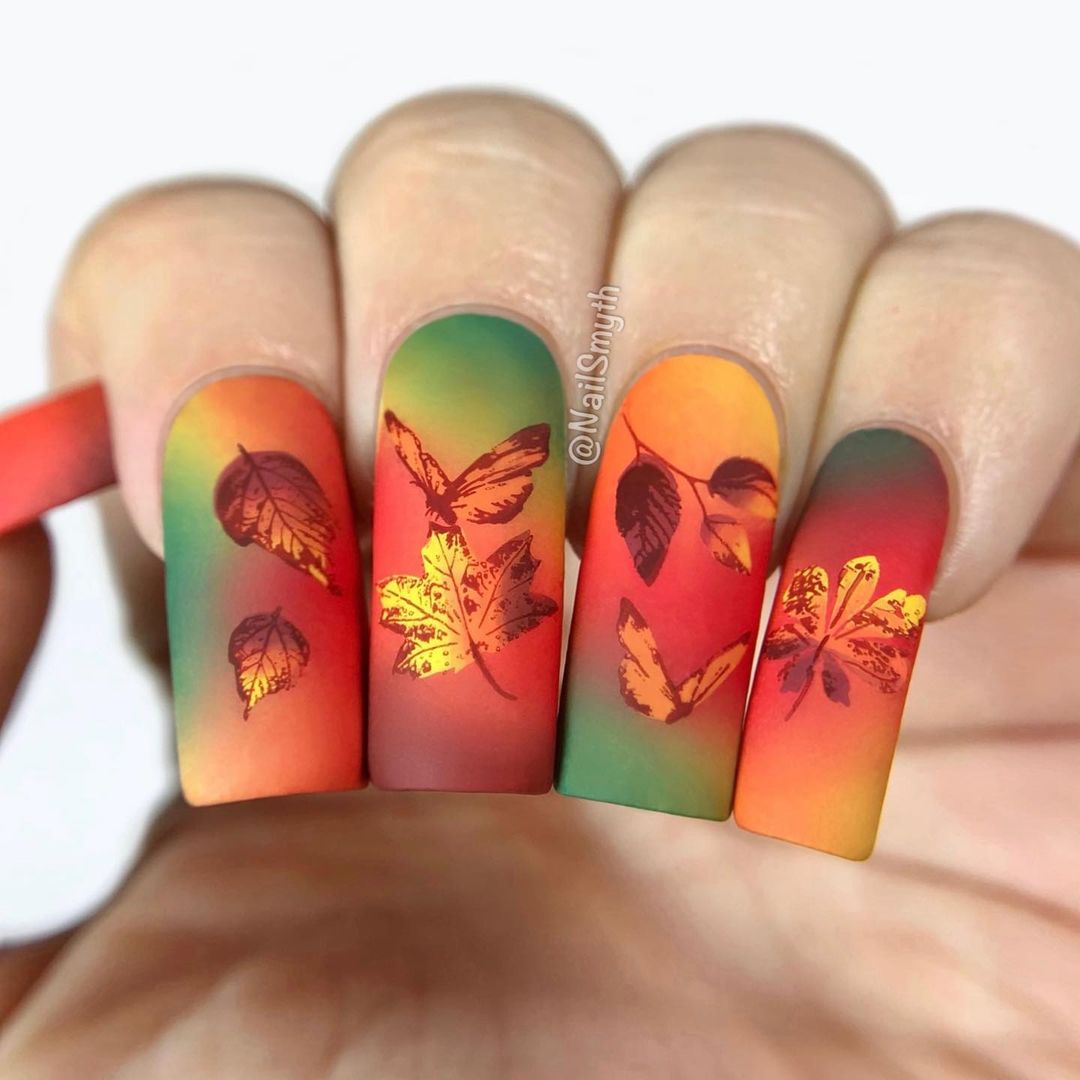
Consumables:
- Gradient colors: orange, green, and yellow nail polishes (e.g., OPI “A Good Man-darin is Hard to Find,” Essie “Mojito Madness,” and OPI “Need Sunglasses?”)
- Black nail polish for details (e.g., China Glaze “Liquid Leather”)
- Fine detailing brush for creating leaf and butterfly patterns
- Top coat for a glossy finish (e.g., Seche Vite Top Coat)
DIY Instructions:
- Prepare Your Nails: Start with clean, filed nails and apply a base coat.
- Create Gradient Base: Apply a gradient of orange, green, and yellow polishes on your nails.
- Add Leaf and Butterfly Designs: Using a fine detailing brush, draw delicate leaves and butterflies with black polish.
- Seal the Design: Apply a top coat to protect your manicure and add shine.
FAQ
Q: How long will these nail designs last? A: With proper care and a good top coat, these nail designs can last up to two weeks.
Q: Can I use gel polish for these designs? A: Yes, gel polish can be used for a longer-lasting manicure. Just make sure to cure each layer under a UV lamp.
Q: What if I don’t have a steady hand for the detailed work? A: You can use nail stencils or stamps to achieve precise patterns without the need for a steady hand.
With these stunning fall tree nail art designs, your nails will be the perfect accessory to celebrate the beauty of the autumn season. Whether you prefer bold and bright or elegant and subtle, there’s a design here to suit every style. Happy painting!
Save Pin

