25 Ideas for Short Fall Acrylic Nails 2024
Fall 2024 is all about embracing rich colors, cozy vibes, and chic nail designs that can make any outfit pop. Whether you’re into classic shapes or looking to experiment with something bold and new, there’s a fall nail design out there for you. Ready to dive into some of the top short fall acrylic nails 2024 trends? Let’s explore some stunning options that will leave you feeling inspired and ready to flaunt your nails this season!
Cozy Autumn Leaves Nail Design
The first design is a perfect blend of simplicity and elegance, featuring a neutral base that allows the delicate green and orange leaf accents to stand out. The minimalist approach with small, precise designs makes this a versatile look suitable for both everyday wear and special occasions. The use of autumn-inspired colors ties the design beautifully to the season, while the glossy finish adds just the right amount of shine.

- Base coat: OPI Nail Envy Strengthener
- Neutral polish: Essie “Ballet Slippers”
- Green and orange nail art polish: Sally Hansen Insta-Dri in “Leaf Me Be” and “Orange Zest”
- Top coat: Seche Vite Dry Fast Top Coat
- Detailing brush for precise leaf designs
Instructions:
- Start with a base coat to protect your natural nails.
- Apply two coats of the neutral polish and let it dry completely.
- Using a detailing brush, paint small leaf designs on the accent nails with the green and orange polishes.
- Finish with a top coat to seal in the design and add a glossy shine.
Chic Marbleized Fall Manicure
This design is a chic take on the classic French manicure, with a twist of modern autumn colors. The soft gray nails combined with an accent of pale yellow and marbleized effect create a sophisticated yet playful look. The almond shape adds elegance, while the matte finish of the gray polish contrasts beautifully with the glossy marbled accent nail, making it perfect for anyone looking to merge simplicity with a touch of art.

- Base coat: CND Stickey Base Coat
- Gray polish: OPI “I Cannoli Wear OPI”
- Pale yellow polish: Zoya “Bee”
- Top coat: Essie Matte About You Top Coat
- Marble effect tool: A small sponge or marble tool
Instructions:
- Apply a base coat to each nail.
- Paint your nails with two coats of the gray polish, leaving the ring finger bare.
- For the accent nail, apply the pale yellow polish and use a sponge or marble tool to dab on gray polish, creating a marbleized effect.
- Seal the design with a matte top coat for the gray nails and a glossy top coat for the accent nail.
Rustic Mustard and Leaf Nail Design
This design features a warm, earthy palette perfect for fall. The mustard yellow and black leaf detailing on an almond-shaped nail create a rustic yet modern look. The combination of glossy finishes and simple, elegant art makes this design both versatile and stylish for autumn. The earthy tones reflect the changing leaves of the season, making it a perfect choice for those who love nature-inspired designs.

- Base coat: Orly Bonder Rubberized Basecoat
- Mustard yellow polish: China Glaze “Mustard the Courage”
- Black nail art polish: Sally Hansen Insta-Dri in “Black to Black”
- Top coat: Essie Good to Go Top Coat
- Thin nail art brush for detailed work
Instructions:
- Begin with a base coat to prep your nails.
- Apply two coats of mustard yellow polish, letting it dry between coats.
- Use a thin nail art brush to create the black leaf designs on the accent nails.
- Finish with a top coat to protect the design and add shine.
Vibrant Autumn Splatter Design
This striking nail design is a bold celebration of autumn’s vivid colors. The combination of deep green, bright orange, and splashes of yellow creates a dynamic, almost abstract art piece on your nails. The short, square shape enhances the overall look by keeping it modern and manageable while allowing the bold colors to take center stage. The glossy finish adds a polished feel, perfect for those who love making a statement with their nails.

- Base coat: Essie First Base Coat
- Green polish: OPI “Stay Off the Lawn!”
- Orange polish: China Glaze “Orange Knockout”
- Yellow polish: Sally Hansen Insta-Dri “Lightening”
- Top coat: OPI Top Coat
- Nail art brush or sponge for the splatter effect
Instructions:
- Start with a base coat to protect your nails and ensure the polish lasts longer.
- Apply two coats of the green and orange polishes, leaving some nails ready for the splatter effect.
- Use a nail art brush or sponge to apply the yellow polish in a random, splattered pattern over the green base.
- Finish with a glossy top coat to seal the design and give it a brilliant shine.
Save Pin

Classic Red with Autumn Leaf Accent
This design brings a timeless elegance with its classic red polish, elevated by a subtle autumn leaf accent. The deep red shade is perfect for fall, complementing the season’s warm tones. The short, square nails keep the look sophisticated and versatile, while the leaf design adds just a touch of seasonal flair. The high-shine finish gives it a luxurious feel, making it a perfect choice for both casual and formal occasions.

- Base coat: Sally Hansen Hard As Nails
- Red polish: Essie “Really Red”
- Leaf accent polish: OPI “Samoan Sand”
- Detailing brush for the leaf design
- Top coat: Seche Vite Dry Fast Top Coat
Instructions:
- Apply a base coat to each nail to create a smooth canvas.
- Paint all nails with two coats of the rich red polish, allowing each layer to dry fully.
- For the accent nail, use a detailing brush to carefully draw a small autumn leaf using the neutral polish.
- Seal the design with a top coat to protect the artwork and add a glossy finish.
Sparkling Black with Autumn Leaf Accent
This edgy nail design combines the mystery of black polish with the sparkle of glitter and a touch of autumn charm. The shimmering black base is both bold and glamorous, while the delicate leaf accent brings in the fall theme without overpowering the design. The short, square nails make this look practical yet stylish, ideal for those who want a seasonal design with a bit of an edge.

- Base coat: Orly Bonder Rubberized Basecoat
- Black glitter polish: China Glaze “Smoke and Ashes”
- Leaf accent polish: Zoya “Jace”
- Detailing brush for the leaf design
- Top coat: Essie Gel Couture Top Coat
Instructions:
- Begin with a base coat to help the polish adhere better and last longer.
- Apply two coats of the black glitter polish to all nails, letting each coat dry completely.
- Use a detailing brush to create a small leaf accent on one nail, using the green polish for a subtle contrast.
- Finish with a top coat to enhance the glitter and protect the design.
Bold Black and Gold Elegance
This stunning nail design is a luxurious blend of sleek black and shimmering gold, perfect for making a statement this fall. The almond shape elongates the fingers, adding an elegant touch, while the bold contrast between the dark and light colors creates a striking visual impact. The addition of a subtle, thin black stripe on the accent nail adds a modern twist to the overall design, balancing sophistication with a trendy edge.

- Base coat: Essie Here to Stay Base Coat
- Black polish: OPI “Black Onyx”
- Gold polish: Zoya “Ziv”
- Thin nail art brush for the stripe detail
- Top coat: Seche Vite Dry Fast Top Coat
Instructions:
- Start with a base coat to protect your nails and enhance the longevity of the polish.
- Apply two coats of black polish to all nails except the accent nail.
- Paint the accent nail with the gold polish and allow it to dry completely.
- Use a thin nail art brush to draw a sleek black stripe across the accent nail.
- Finish with a top coat to seal in the design and add a glossy shine.
Autumn Forest Silhouette
This intricate nail design captures the essence of a serene autumn forest with its delicate tree and leaf silhouettes against a soft, matte background. The warm, earthy tones of orange and beige create a calming, seasonal palette, while the detailed black tree branches add a touch of mystery and elegance. The combination of the almond shape and matte finish gives this look a modern and sophisticated feel, making it perfect for those who appreciate nature-inspired art.

- Base coat: Orly Bonder Basecoat
- Beige polish: Essie “Sand Tropez”
- Orange polish: OPI “A Good Man-darin is Hard to Find”
- Black polish: Sally Hansen Insta-Dri in “Black to Black”
- Detailing brush for the tree and leaf designs
- Matte top coat: Essie Matte About You
Instructions:
- Apply a base coat to your nails to ensure the polish adheres well and lasts longer.
- Paint your nails with two coats of the beige polish, leaving one nail for the orange accent.
- Use a detailing brush to carefully paint the tree and leaf designs using the black polish.
- Apply a matte top coat to give the design a soft, muted finish.
Colorful Autumn Abstract
This playful nail design is a mix of bold autumn colors and abstract patterns, perfect for adding a pop of fun to your look. The combination of bright yellow, deep black, and vivid orange captures the lively spirit of fall, while the abstract patterns add a contemporary twist. The short, oval shape keeps the design chic and wearable, making it a versatile choice for any occasion.

- Base coat: Sally Hansen Double Duty Base & Top Coat
- Yellow polish: China Glaze “Sunshine Pop”
- Black polish: OPI “Black Cherry Chutney”
- Orange polish: Zoya “Tilda”
- Detailing brush for the abstract patterns
- Top coat: Essie Good to Go Top Coat
Instructions:
- Begin by applying a base coat to all nails to protect them and ensure a smooth application of polish.
- Apply two coats of the yellow, black, and orange polishes to different nails, creating a vibrant mix.
- Use a detailing brush to paint abstract patterns on selected nails, mixing and matching the colors.
- Finish with a top coat to seal the design and add a glossy finish.
Save Pin

Minimalist Coffee Love
This simple yet charming nail design is perfect for coffee lovers who enjoy a minimalist aesthetic. The soft, neutral tones combined with a tiny coffee cup graphic create a cozy and inviting look. The short, square shape keeps the design clean and understated, making it a great choice for everyday wear. The glossy finish adds just the right amount of shine to this subtle and stylish design.

- Base coat: Essie First Base Coat
- White polish: OPI “Alpine Snow”
- Brown polish: Essie “Mink Muffs”
- Detailing brush for the coffee cup design
- Top coat: Sally Hansen Miracle Gel Top Coat
Instructions:
- Start with a base coat to protect your nails and provide a smooth surface for the polish.
- Apply two coats of white polish to all nails, letting each layer dry thoroughly.
- Use a detailing brush to carefully paint a small coffee cup design on the accent nail with the brown polish.
- Finish with a top coat to add shine and protect the design from chipping.
Classic Nude Elegance
This timeless nail design features a classic nude polish, perfect for those who appreciate a clean and polished look. The short, oval shape complements the soft, neutral tone, making it suitable for any occasion, whether casual or formal. The high-shine finish enhances the natural beauty of the nails, giving them a sophisticated and refined appearance.

- Base coat: Orly Bonder Rubberized Basecoat
- Nude polish: Essie “Ballet Slippers”
- Top coat: Seche Vite Dry Fast Top Coat
Instructions:
- Apply a base coat to your nails to create a smooth foundation for the polish.
- Paint your nails with two coats of nude polish, allowing each coat to dry completely.
- Finish with a top coat to seal the polish and add a glossy, long-lasting finish.
Pastel Speckled Delight
This delightful nail design is a fun and playful take on pastel colors, with a speckled finish that adds a whimsical touch. The soft pastel shades of green, blue, and purple create a gentle and soothing palette, while the speckles give the design a trendy, modern twist. The short, oval shape keeps the look sweet and simple, making it perfect for those who love understated yet stylish nail art.

- Base coat: CND Stickey Base Coat
- Pastel green polish: OPI “This Cost Me a Mint”
- Pastel blue polish: Essie “Blue La La”
- Pastel purple polish: Zoya “Malia”
- Speckle effect polish or tool
- Top coat: Essie Speed Setter Top Coat
Instructions:
- Start with a base coat to protect your nails and help the polish adhere better.
- Apply two coats of the pastel polishes to different nails, creating a soft, colorful mix.
- Add a speckle effect using a speckle polish or tool for a playful finish.
- Finish with a top coat to protect the design and add a subtle shine.
Cozy Brown Tones with Cartoon Accent
This nail design combines warm brown tones with a playful cartoon accent, creating a cozy yet fun look. The short, oval shape adds to the overall softness of the design, while the gradient of brown shades provides a subtle contrast. The cartoon character on the accent nail brings a unique and whimsical element, making this design perfect for those who love a touch of humor in their style.
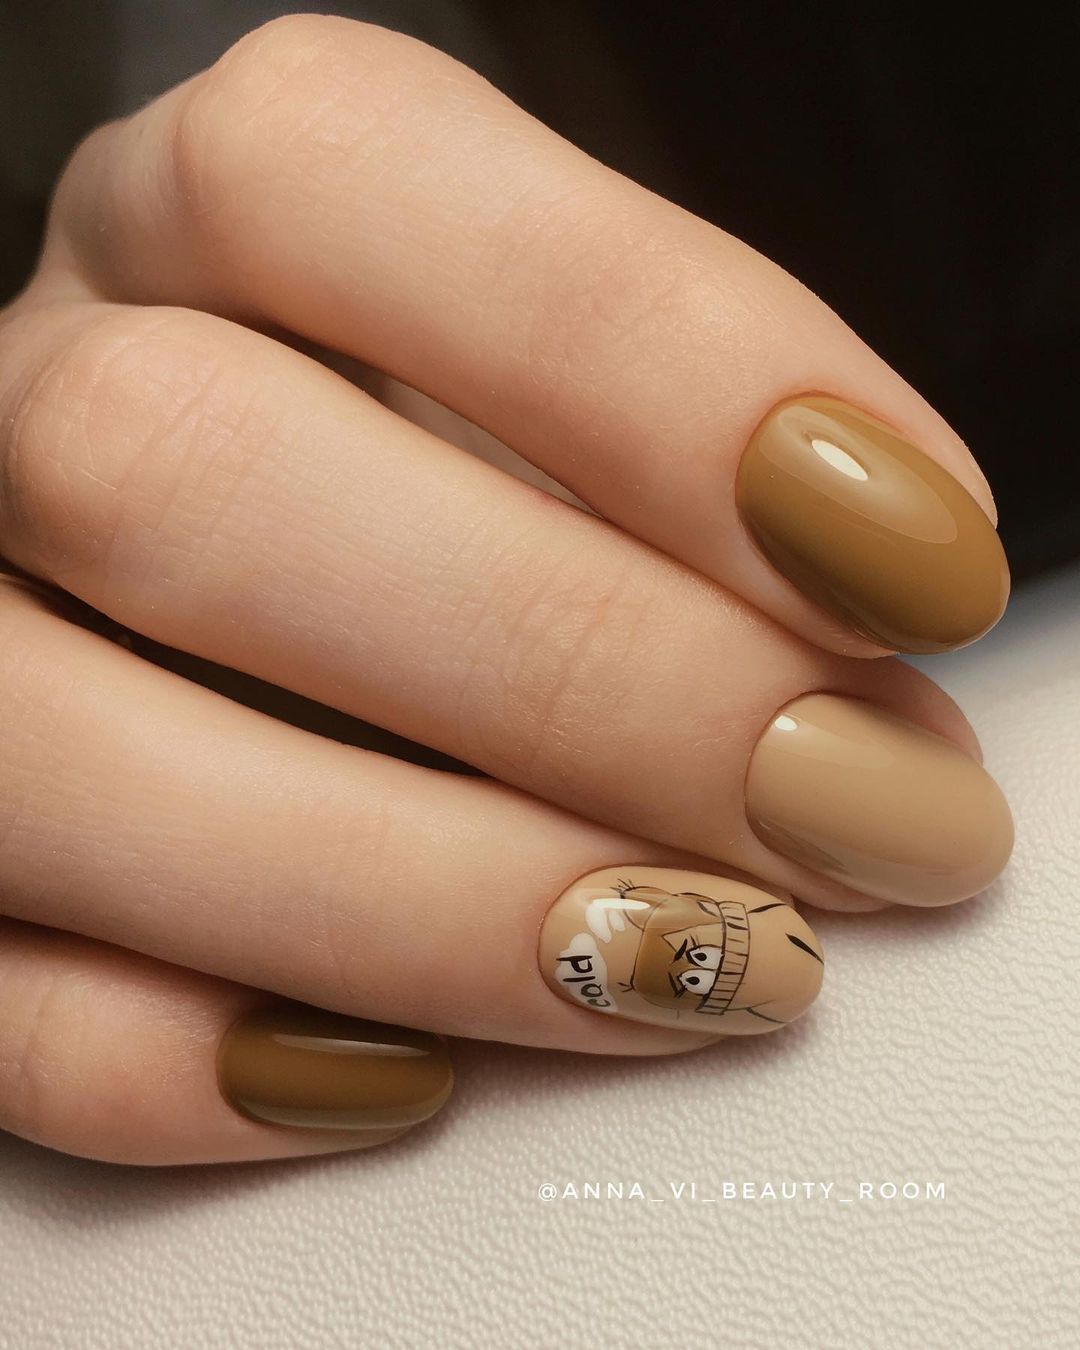
- Base coat: OPI Natural Nail Base Coat
- Brown polishes: Essie “Fierce, No Fear” and OPI “Chocolate Moose”
- Detailing brush for the cartoon design
- Top coat: Seche Vite Dry Fast Top Coat
Instructions:
- Apply a base coat to all nails to ensure a smooth application and long-lasting wear.
- Paint each nail with different shades of brown, blending from light to dark.
- Use a detailing brush to carefully paint the cartoon design on the accent nail.
- Seal the design with a top coat to protect it and add a glossy finish.
Minimalist Matte with Leaf Accent
This minimalist matte nail design is both elegant and understated, featuring a simple leaf accent that adds a touch of nature-inspired beauty. The matte finish enhances the earthy, natural tones, creating a sophisticated and clean look. The short, square shape keeps the design practical yet chic, making it suitable for any occasion.
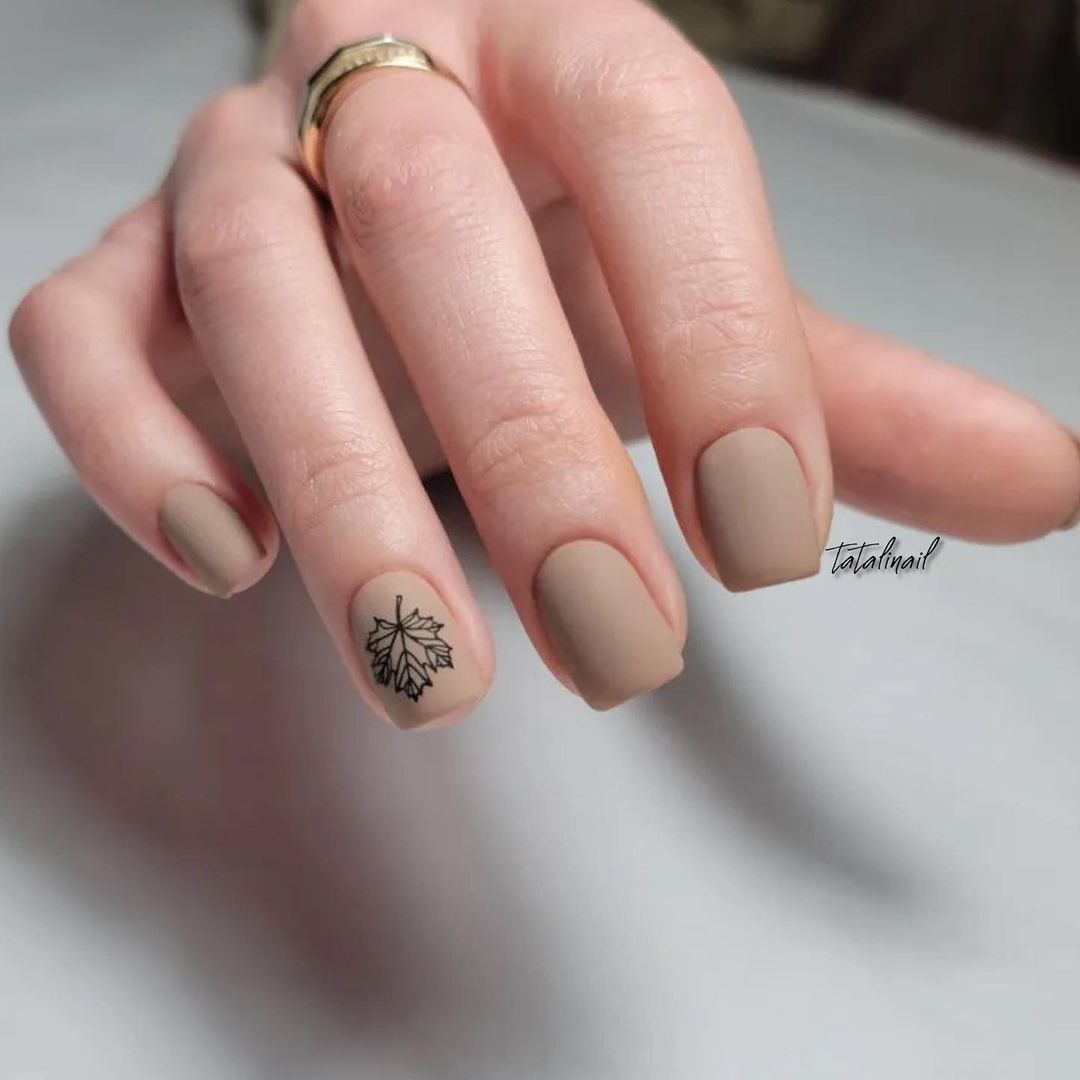
- Base coat: Orly Bonder Basecoat
- Matte beige polish: Essie “Wild Nude”
- Black polish: Sally Hansen Insta-Dri “Black to Black”
- Detailing brush for the leaf design
- Matte top coat: OPI Matte Top Coat
Instructions:
- Start with a base coat to protect your nails and provide a smooth surface for the polish.
- Apply two coats of the matte beige polish to all nails, letting each coat dry completely.
- Use a detailing brush to draw a simple black leaf design on the accent nail.
- Finish with a matte top coat to maintain the soft, muted look.
Playful Textured Hearts
This playful nail design features textured heart shapes in vibrant yellow and blue, adding a pop of color and a fun, tactile element to your nails. The clear base enhances the brightness of the hearts, making them stand out beautifully. The short, rounded shape is perfect for everyday wear, while the 3D effect adds a unique twist to a simple design.
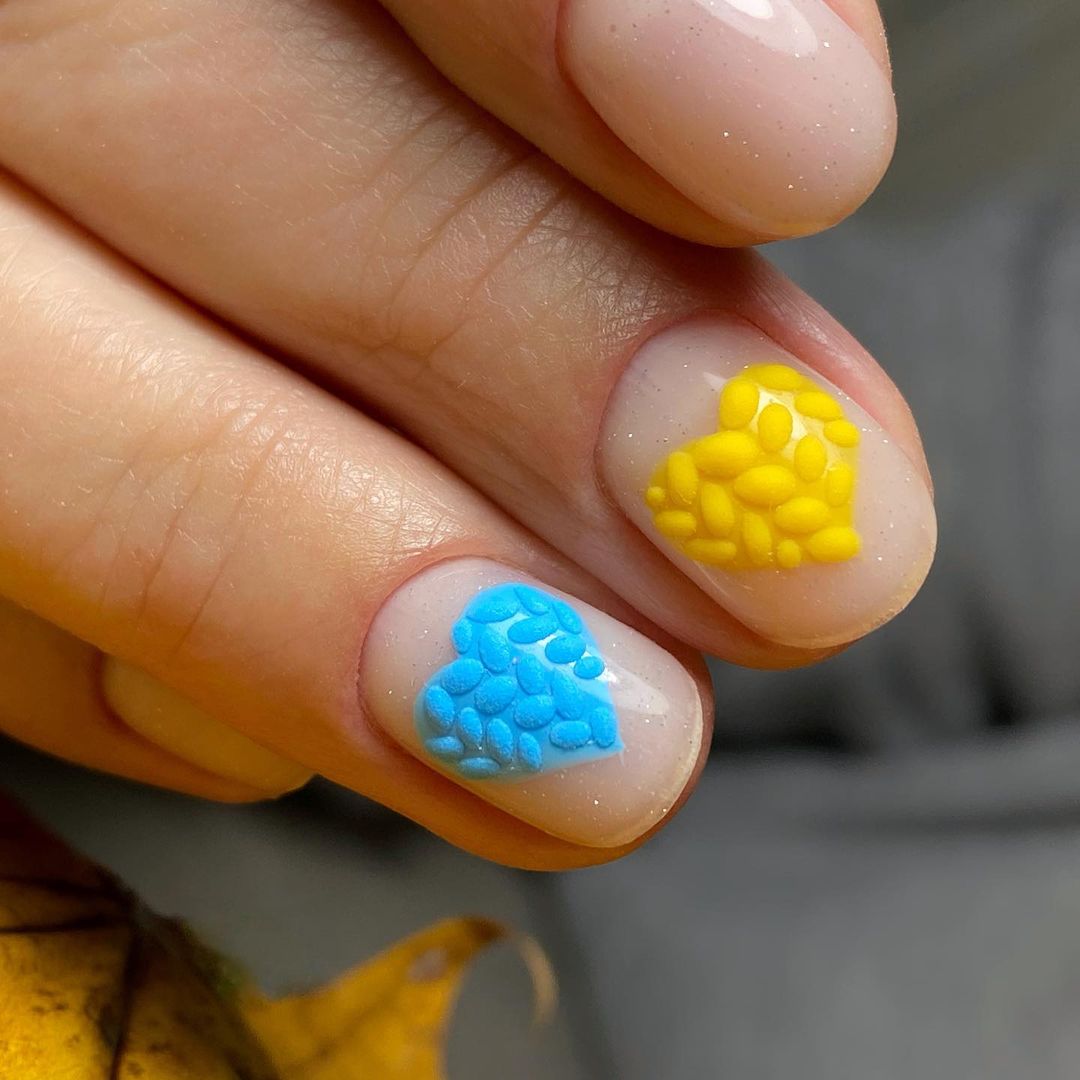
- Base coat: Essie Ridge Filling Base Coat
- Textured gel polishes: Gelish “Yellow Mellow” and “Blueberry Cream”
- Dotting tool for creating the heart shapes
- Top coat: Essie Gel Couture Top Coat
Instructions:
- Apply a base coat to prep your nails and create a smooth surface.
- Use a dotting tool to create the textured hearts with the gel polishes on selected nails.
- Cure the gel under a UV lamp, then apply a top coat to seal the design.
Earthy Swirls in Muted Tones
This nail design is an artistic take on earthy tones, featuring swirls of burgundy, beige, and taupe on a neutral base. The design’s fluid lines create a sense of movement, adding a dynamic element to the overall look. The short, rounded shape is practical yet stylish, making this design versatile and easy to wear for any occasion.
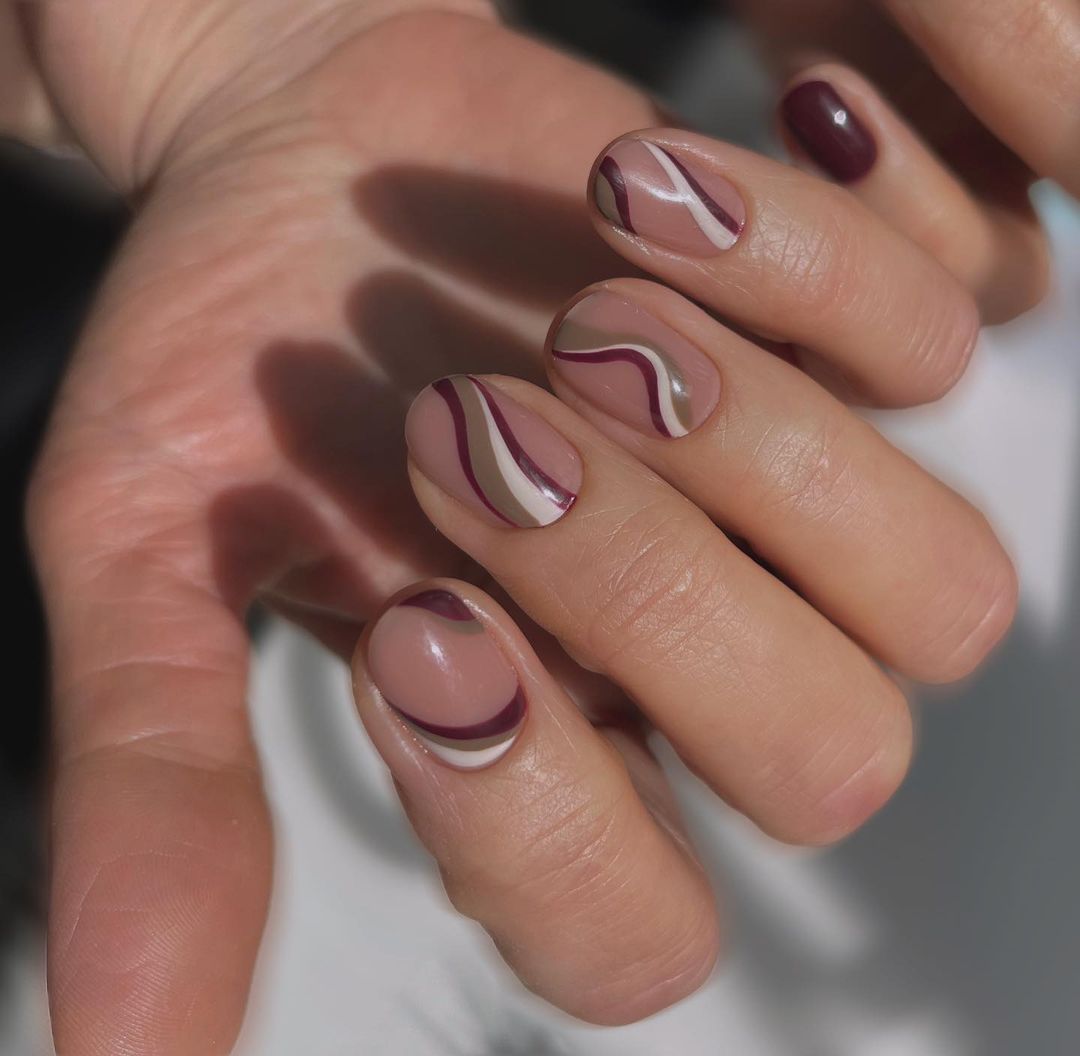
- Base coat: CND Stickey Base Coat
- Burgundy polish: OPI “Malaga Wine”
- Beige polish: Zoya “Cho”
- Taupe polish: Essie “Clothing Optional”
- Detailing brush for the swirl patterns
- Top coat: Seche Vite Dry Fast Top Coat
Instructions:
- Begin by applying a base coat to all nails to protect and prime them.
- Use a detailing brush to create the swirl patterns with the selected colors on a neutral base.
- Finish with a top coat to seal the design and add a glossy finish.
Festive Red and Gold with Leaf Accents
This festive nail design combines classic red and gold shades with delicate leaf accents, perfect for the holiday season. The short, almond shape adds elegance to the look, while the mix of glossy and metallic finishes creates a striking contrast. The leaf accents bring in a natural, organic element, balancing the bold colors with a touch of subtlety.
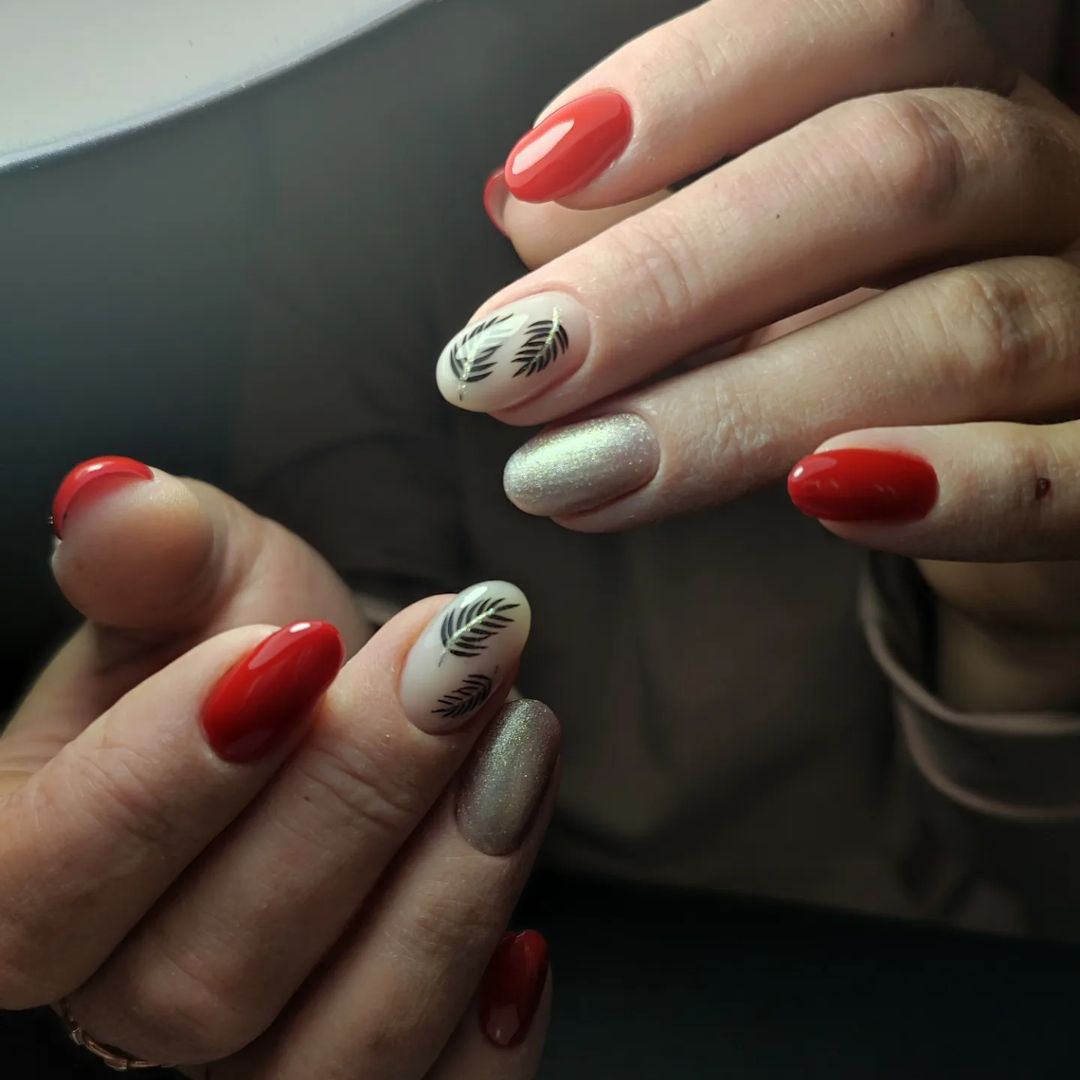
- Base coat: Sally Hansen Miracle Cure
- Red polish: Essie “Forever Yummy”
- Gold polish: OPI “Glitzerland”
- Black polish: Essie “Licorice” for the leaf design
- Detailing brush for the leaf design
- Top coat: Sally Hansen Insta-Dri Top Coat
Instructions:
- Apply a base coat to your nails to create a smooth foundation for the polish.
- Paint the nails with two coats of red and gold polishes, allowing each coat to dry thoroughly.
- Use a detailing brush to add the black leaf design on the accent nails.
- Seal the look with a top coat for a lasting shine and protection.
Delicate Taupe with Gold Leaf Accents
This elegant nail design features a soft taupe base adorned with intricate gold leaf accents, creating a delicate and refined look. The almond shape enhances the overall femininity of the design, while the glossy finish adds a luxurious touch. This design is perfect for those who appreciate understated elegance with a hint of glam.
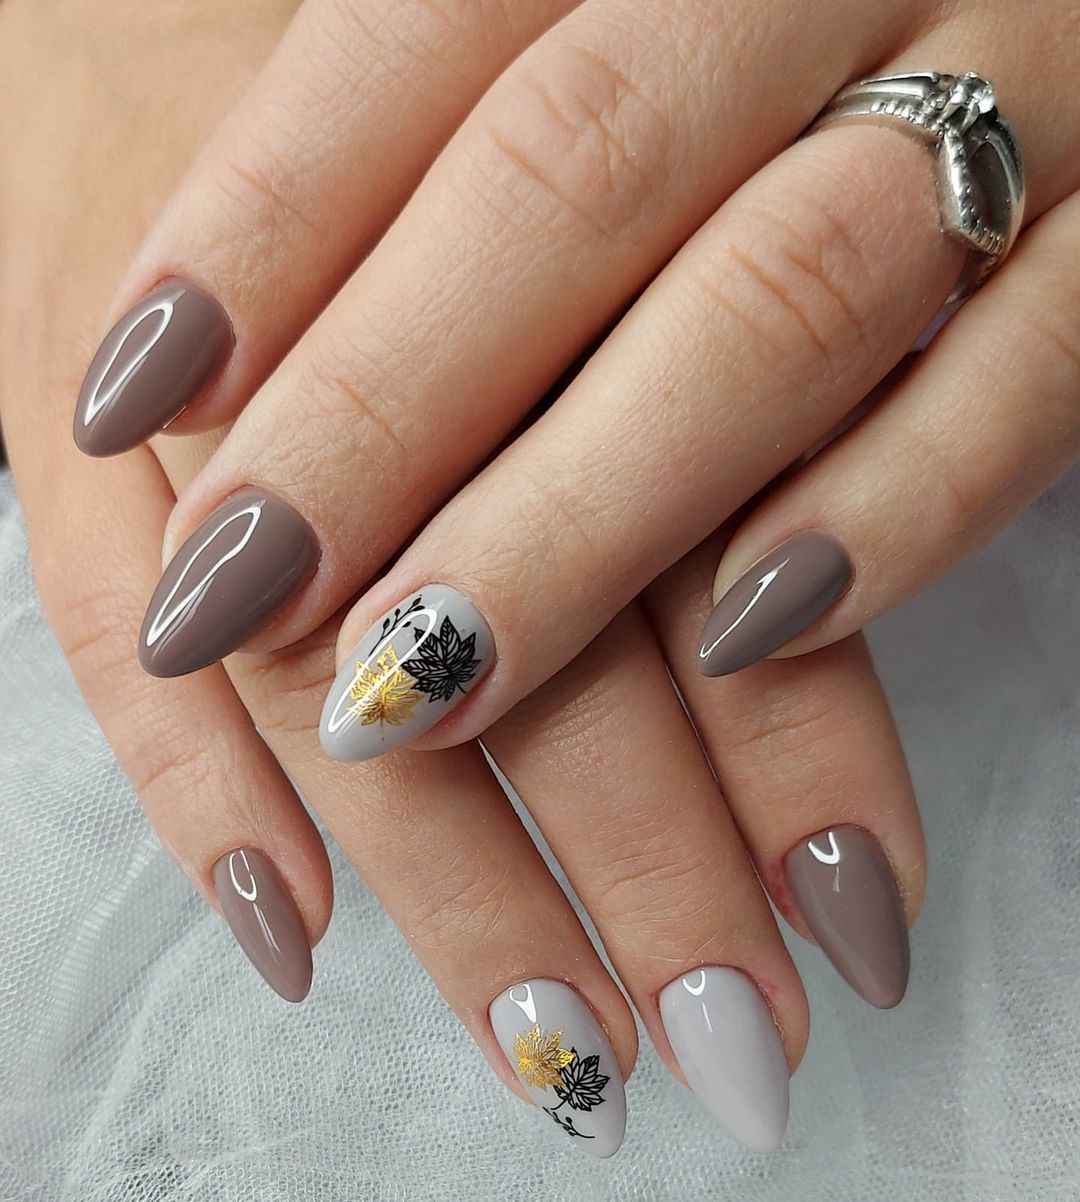
- Base coat: Essie All In One Base Coat
- Taupe polish: OPI “Taupe-less Beach”
- Gold leaf stickers or gold foil for the accents
- Top coat: Essie Speed Setter Top Coat
Instructions:
- Start by applying a base coat to all nails to protect them and ensure the polish lasts longer.
- Paint your nails with two coats of taupe polish, letting each coat dry completely.
- Carefully apply the gold leaf stickers or foil to the accent nails.
- Finish with a top coat to secure the gold accents and add a glossy finish.
Autumn Leaves with Vibrant Yellow
This nail design captures the essence of fall with its vibrant yellow base and delicate black leaf accents. The short, almond shape adds elegance to the bold color, making it both eye-catching and sophisticated. The leaves create a beautiful contrast against the bright background, while the small black dots add a playful element to the overall design, making it perfect for anyone looking to embrace the autumn season with style.
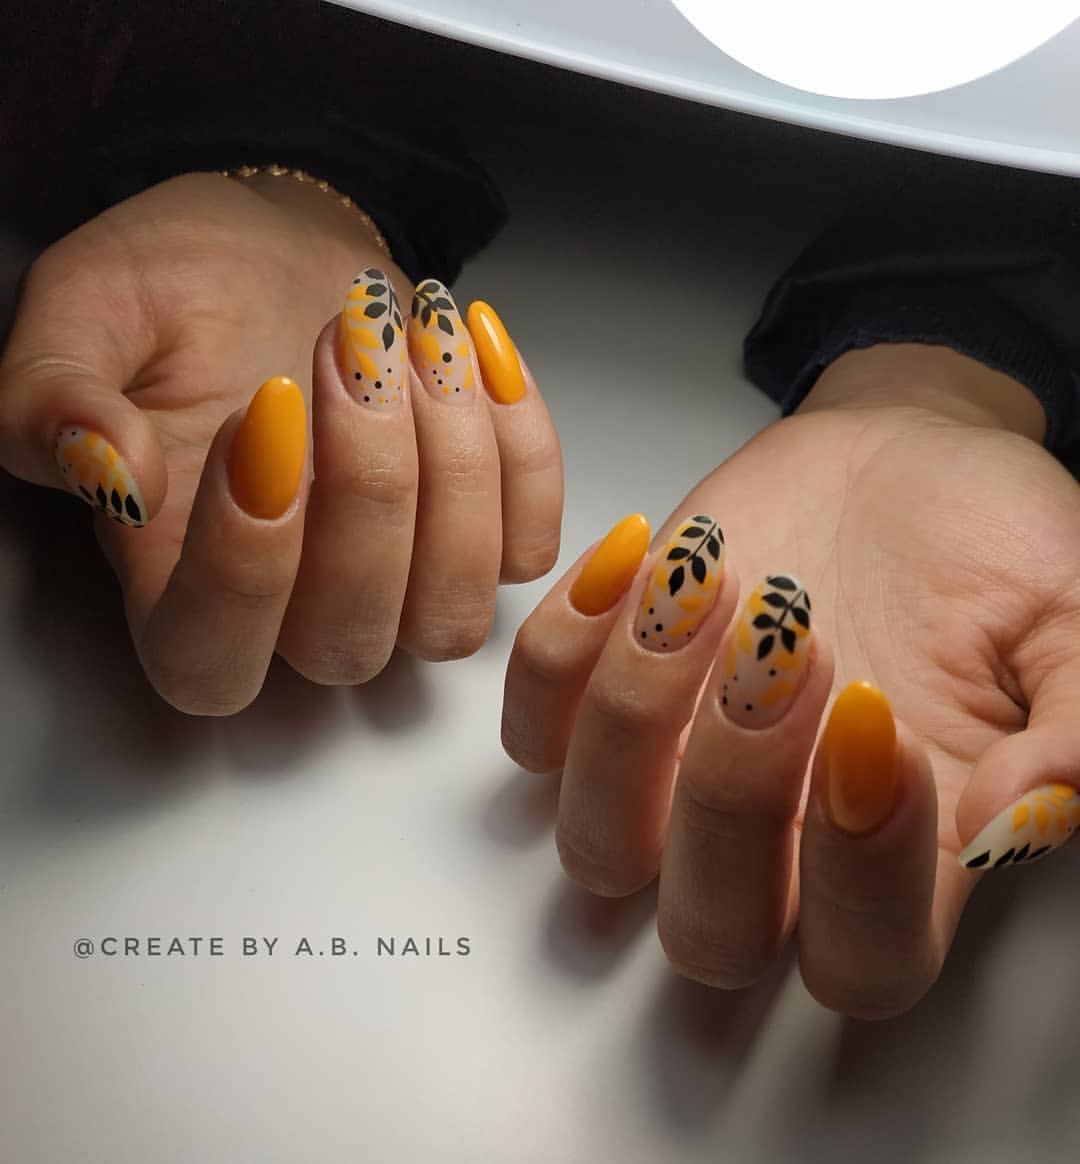
- Base coat: Essie First Base Coat
- Yellow polish: OPI “Sun, Sea, and Sand in My Pants”
- Black polish: Sally Hansen Insta-Dri “Black to Black”
- Detailing brush for the leaf design
- Top coat: Seche Vite Dry Fast Top Coat
Instructions:
- Apply a base coat to protect your nails and enhance the longevity of the polish.
- Paint all nails with two coats of yellow polish, allowing each layer to dry thoroughly.
- Use a detailing brush to draw the black leaf designs on selected nails, and add small dots for extra detail.
- Finish with a top coat to seal the design and add a glossy shine.
Nude Elegance with Delicate Floral Accents
This elegant nail design features a nude base adorned with delicate floral accents in subtle shades of blue and brown. The short, oval shape keeps the look clean and sophisticated, making it perfect for both casual and formal settings. The floral design adds a touch of femininity and softness, while the glossy finish enhances the overall elegance of the nails.
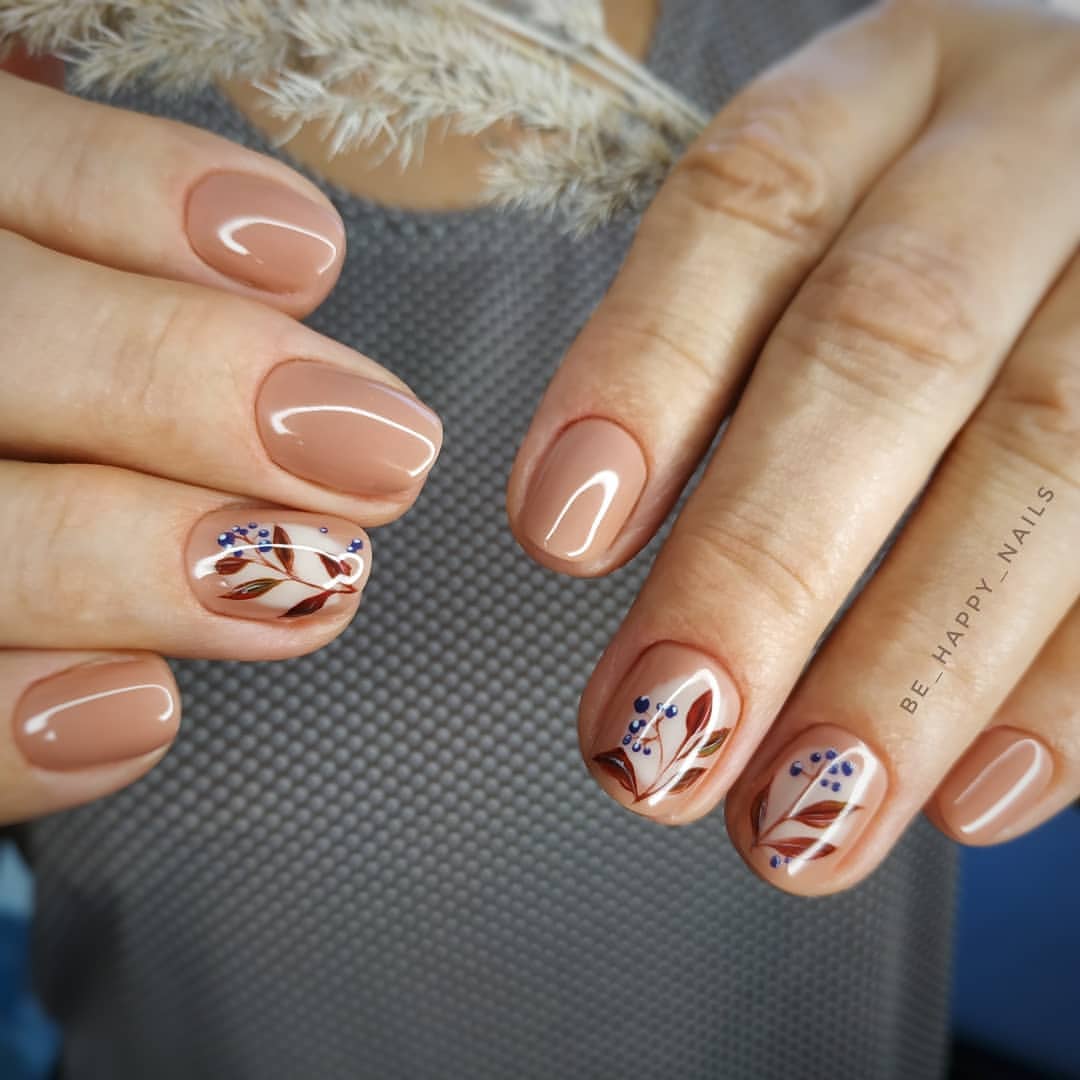
- Base coat: OPI Natural Nail Base Coat
- Nude polish: Essie “Ballet Slippers”
- Blue and brown polishes for the floral accents: Essie “Butler Please” and OPI “Espresso Your Style”
- Detailing brush for the floral design
- Top coat: Essie Gel Couture Top Coat
Instructions:
- Begin with a base coat to protect your nails and provide a smooth surface for the polish.
- Apply two coats of nude polish to all nails, letting each coat dry completely.
- Use a detailing brush to create delicate floral designs with the blue and brown polishes.
- Finish with a top coat to add shine and protect the design from chipping.
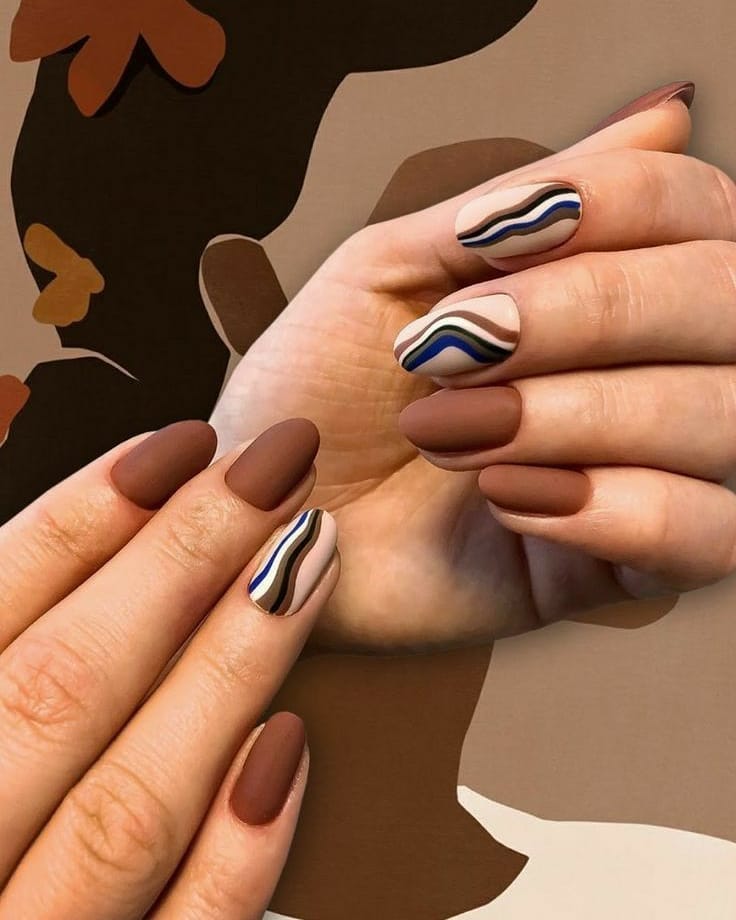
Earthy Waves in Muted Tones
This modern nail design combines earthy tones with a minimalist wave pattern, creating a chic and contemporary look. The mix of matte and glossy finishes adds dimension and interest, while the neutral colors keep the design versatile and wearable. The short, almond shape adds a touch of elegance, making it suitable for any occasion, from work to weekend outings.
- Base coat: CND Stickey Base Coat
- Matte brown polish: Zoya “Farrow”
- Glossy beige polish: OPI “Samoan Sand”
- Blue polish for the wave pattern: Essie “Aruba Blue”
- Detailing brush for the wave design
- Top coat: Essie Matte About You and Seche Vite Dry Fast Top Coat
Instructions:
- Apply a base coat to ensure the polish adheres well and lasts longer.
- Paint your nails with two coats of the matte brown polish, leaving one nail for the wave accent.
- Use a detailing brush to create the wave pattern with the blue polish on the accent nail, then apply a glossy beige polish to the rest.
- Finish with a matte top coat on the brown nails and a glossy top coat on the accent nail for a dynamic look.
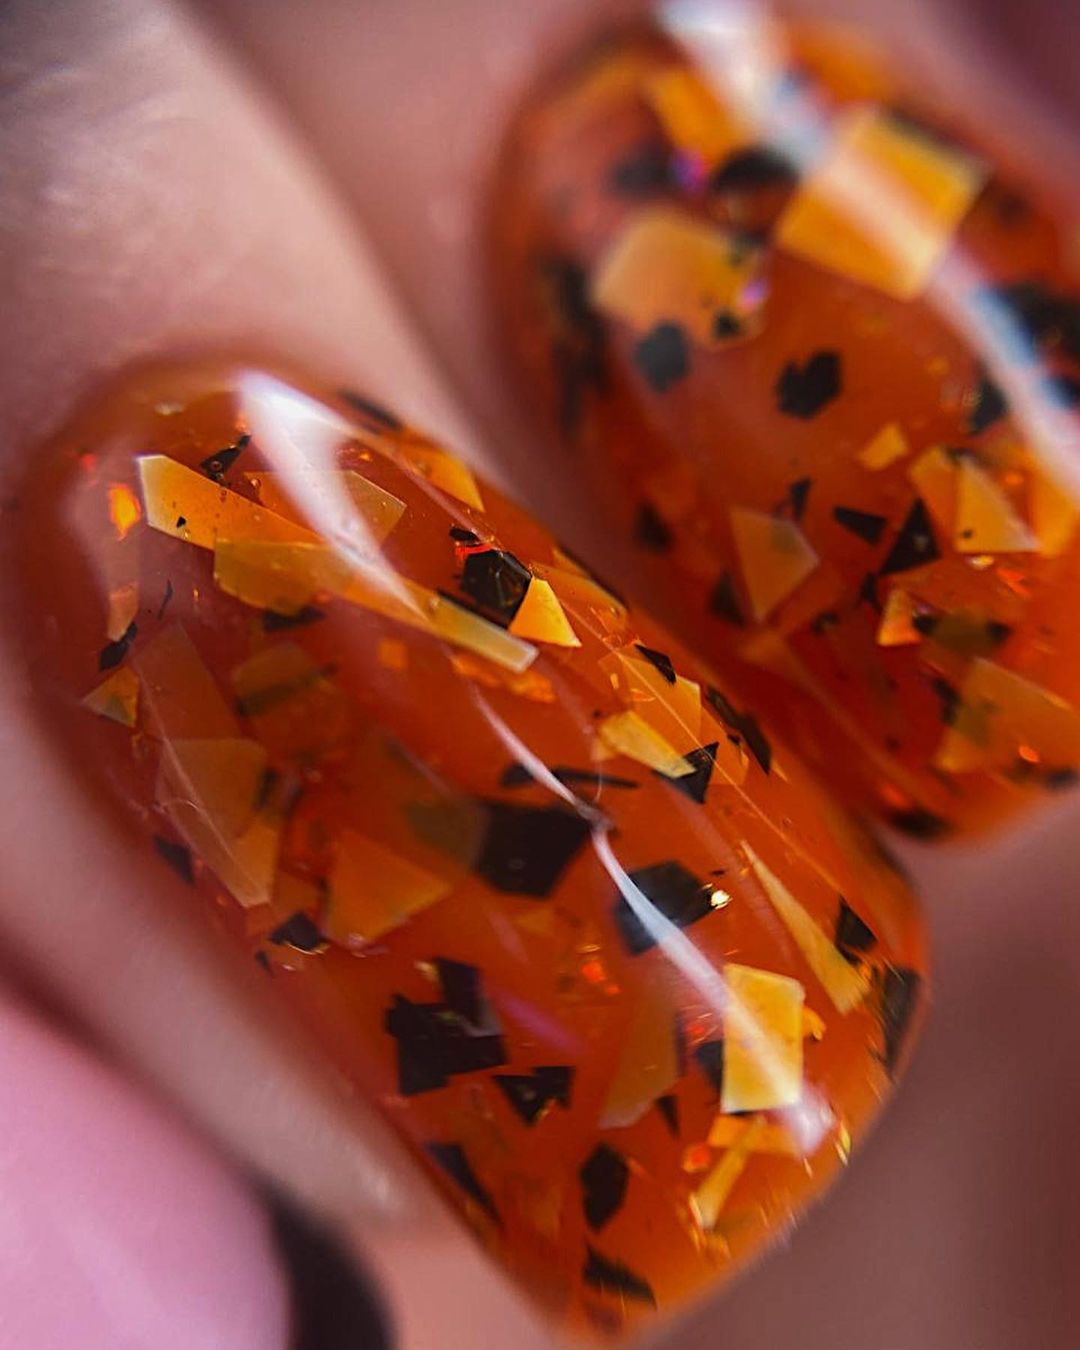
Sparkling Autumn Flakes
This sparkling nail design is a celebration of autumn’s rich colors, featuring a deep orange base with flecks of gold and black. The short, square shape keeps the look balanced and wearable, while the shimmering flakes add a festive and glamorous touch. This design is perfect for anyone who loves a bit of sparkle in their fall manicure.
- Base coat: Essie Ridge Filling Base Coat
- Orange polish: OPI “It’s a Piazza Cake”
- Flake top coat: ILNP “Flakie Topper”
- Top coat: Seche Vite Dry Fast Top Coat
Instructions:
- Start with a base coat to create a smooth canvas for the polish.
- Apply two coats of the orange polish, letting each coat dry completely.
- Add a layer of flake top coat to create a shimmering effect.
- Seal the design with a top coat to enhance the sparkle and ensure long-lasting wear.
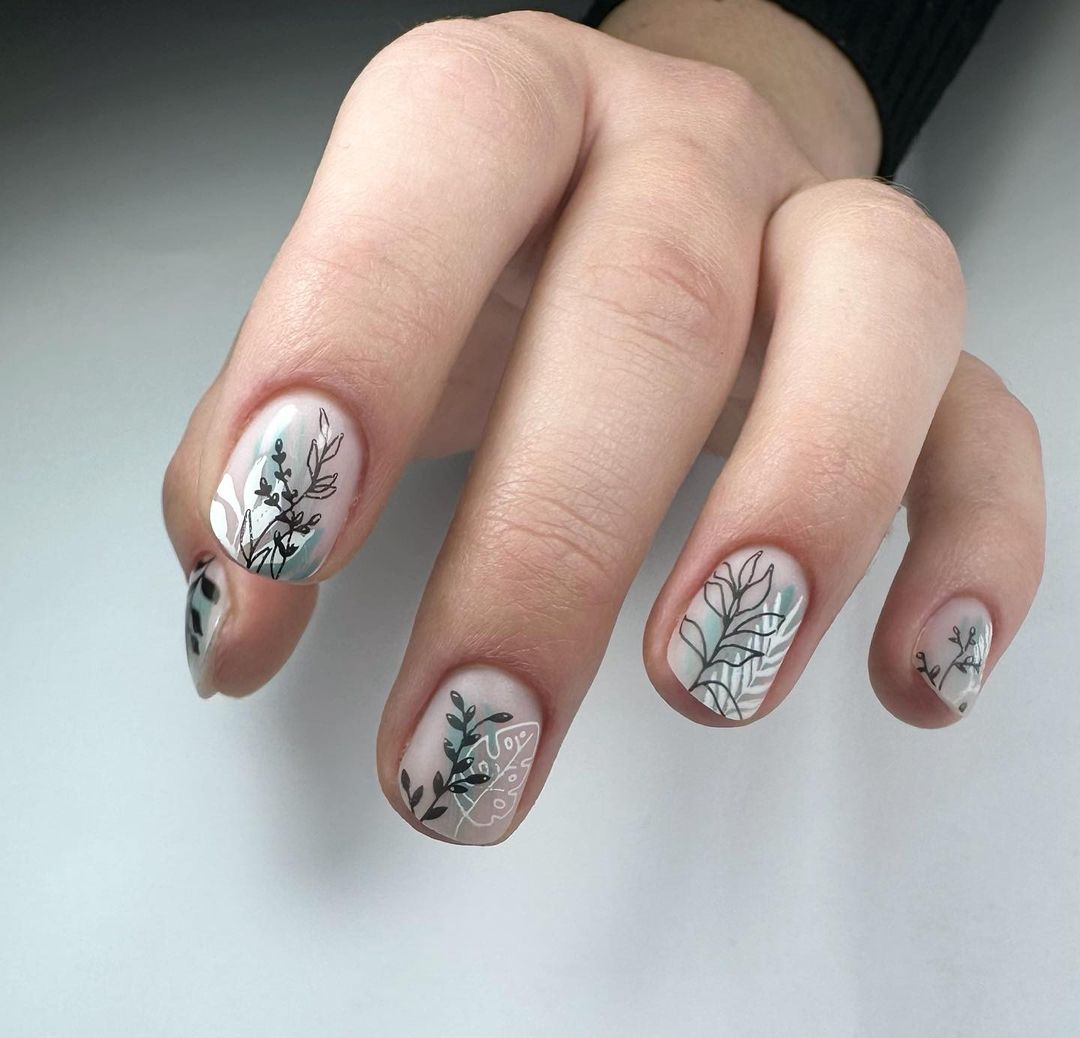
Subtle Botanical Design on White Base
This subtle and sophisticated nail design features a clean white base with delicate botanical accents in soft shades of green and black. The short, rounded shape keeps the design practical and elegant, making it perfect for those who appreciate understated beauty. The botanical design adds a natural and organic touch, bringing a sense of calm and serenity to the nails.
- Base coat: Orly Bonder Rubberized Basecoat
- White polish: Essie “Blanc”
- Green and black polishes for the botanical accents: Zoya “Hunter” and Sally Hansen Insta-Dri “Black to Black”
- Detailing brush for the botanical design
- Top coat: Essie Speed Setter Top Coat
Instructions:
- Apply a base coat to all nails to protect them and ensure the polish lasts longer.
- Paint your nails with two coats of white polish, letting each coat dry completely.
- Use a detailing brush to create delicate botanical designs with the green and black polishes.
- Finish with a top coat to add a glossy finish and protect the design.
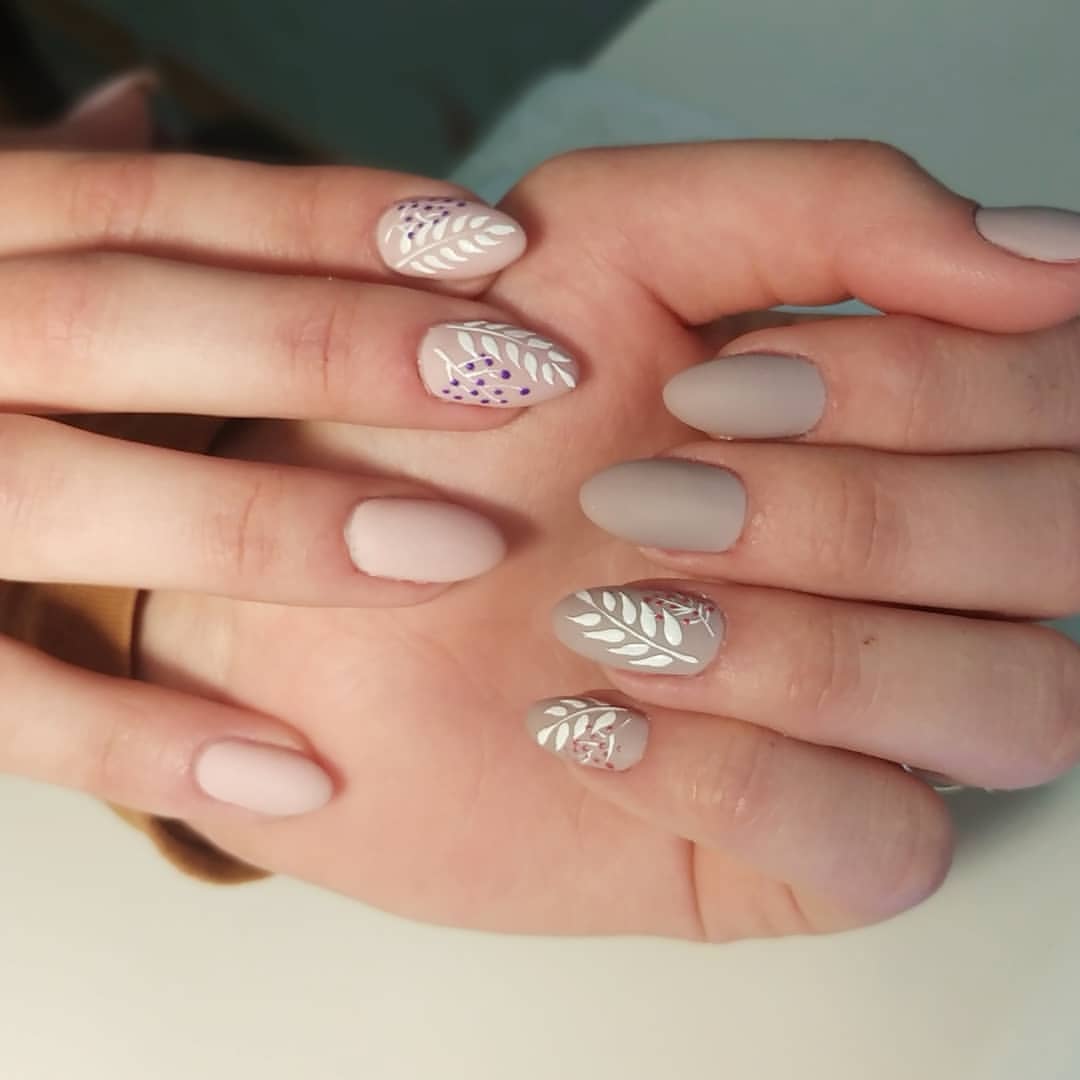
Soft Neutrals with Leaf Accents
This soft and neutral nail design combines a muted beige base with intricate white leaf accents, creating a calming and elegant look. The short, almond shape adds a touch of femininity, while the matte finish keeps the design modern and understated. This design is ideal for those who prefer subtle, sophisticated nail art that can be worn on any occasion.
- Base coat: OPI Natural Nail Base Coat
- Matte beige polish: Essie “Urban Jungle”
- White polish for the leaf design: OPI “Alpine Snow”
- Detailing brush for the leaf design
- Matte top coat: Essie Matte About You
Instructions:
- Begin with a base coat to ensure a smooth application and long-lasting wear.
- Apply two coats of matte beige polish to all nails, allowing each layer to dry fully.
- Use a detailing brush to draw the white leaf designs on selected nails.
- Finish with a matte top coat to maintain the soft, muted look.
Autumnal Color Block with Leaf Accent
This autumn-inspired nail design features a bold color block pattern in warm shades of mustard and rust, accented with a simple leaf motif. The short, square shape adds to the design’s modernity, while the glossy finish enhances the rich, seasonal colors. The leaf accent adds a touch of nature, tying the design beautifully to the fall season.
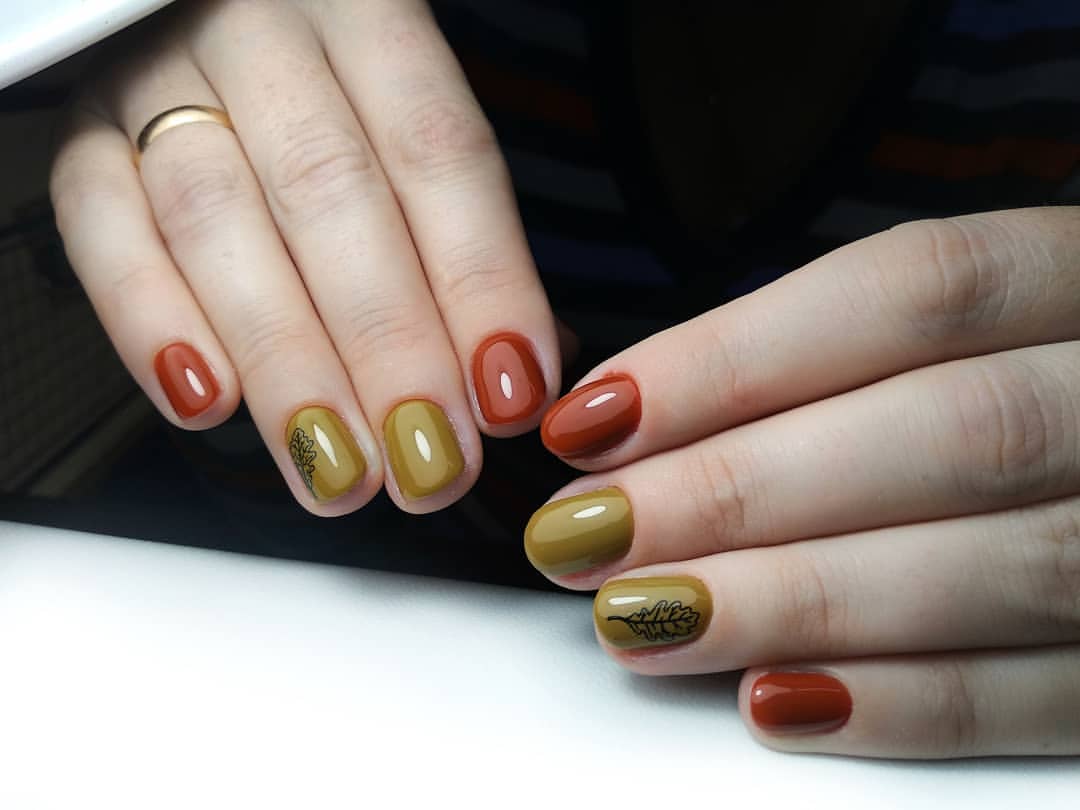
- Base coat: Sally Hansen Hard As Nails
- Mustard yellow polish: China Glaze “Mustard the Courage”
- Rust red polish: Essie “Playing Koi”
- Black polish for the leaf design: OPI “Black Onyx”
- Detailing brush for the leaf design
- Top coat: Seche Vite Dry Fast Top Coat
Instructions:
- Start with a base coat to protect your nails and enhance the longevity of the polish.
- Paint each nail with alternating mustard yellow and rust red polishes, allowing each coat to dry thoroughly.
- Use a detailing brush to add a simple black leaf design to one or two accent nails.
- Finish with a top coat to seal the design and add a glossy shine.
FAQ
Q: Can I use regular nail polish for these designs instead of acrylic? A: Yes, you can use regular nail polish for these designs, but acrylic nails tend to last longer and are more durable, especially if you’re aiming for a design that you want to keep for a couple of weeks.
Q: How can I make my nail designs last longer? A: To make your nail designs last longer, always use a high-quality base coat and top coat. Avoid exposing your nails to harsh chemicals and wear gloves when doing household chores.
Q: Can I recreate these designs on natural nails? A: Absolutely! While these designs look great on acrylic nails, they can also be recreated on natural nails. Just ensure your nails are in good shape and use a strengthening base coat to protect them.
These designs are just a glimpse into the exciting world of short fall acrylic nails 2024. With the right tools and a bit of creativity, you can easily recreate these looks at home. So why not experiment and bring some of that autumn magic to your fingertips?
Save Pin

