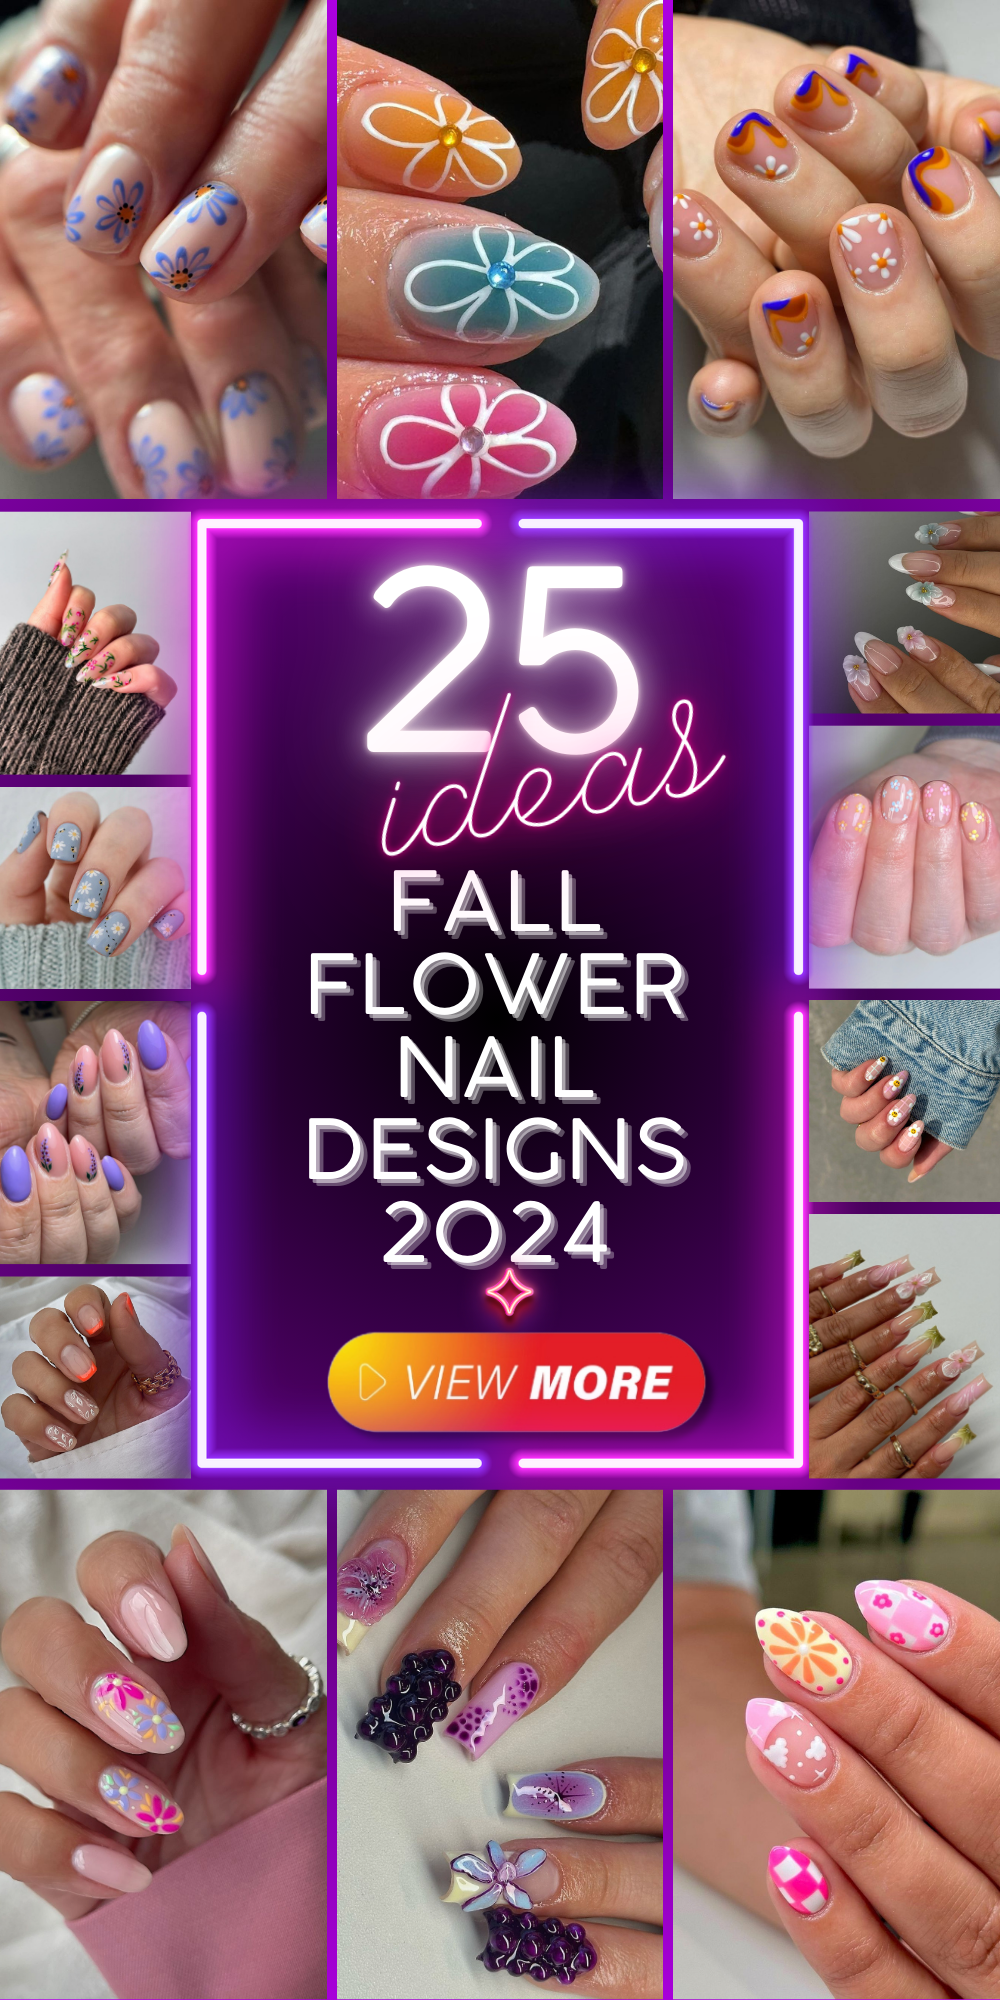
25 Trendy Fall Flower Nail Designs for 2024 to Inspire Your Next Manicure
When it comes to nail art, the change of seasons brings with it a whole new palette of possibilities, and fall 2024 is no exception. This year, the focus is on blending bold colors with intricate floral designs, allowing your nails to become a canvas for self-expression. Whether you’re a fan of minimalist elegance or love to experiment with vibrant and playful patterns, there’s a floral nail design to match every personality and occasion. From delicate blossoms on nude bases to retro-inspired florals with a modern twist, the options are endless.
Nurturing Elegance with 3D Floral Art
When it comes to fall 2024, fall flower nail designs are taking center stage, blending the beauty of nature with the artistry of manicures. This particular design is a stunning representation of how 3D floral art can elevate your nail game. The nails are sculpted with a mix of soft, pastel pinks and creamy whites, making them perfect for those who love a touch of elegance with a creative twist. The standout feature here is the meticulously crafted 3D flowers on each nail, which adds a layer of depth and sophistication. The delicate petals, paired with subtle gold accents, create a look that is both luxurious and understated.

- Gel Polish: OPI GelColor in “Bare My Soul” for the base.
- 3D Sculpting Gel: Christrio 3D Gel in White for the flowers.
- Gold Leaf Flakes: For adding a hint of luxury to the design.
- Detailing Brush: To carefully craft the petals and apply the gold accents.
- UV/LED Lamp: Essential for curing the gel polish and 3D gel.
How to Create This Look at Home:
- Start by prepping your nails with a base coat and applying a nude or soft pink gel polish.
- Cure the base color under a UV/LED lamp.
- Use a detailing brush to apply the 3D sculpting gel and carefully mold the flower petals.
- Add the gold leaf flakes sparingly, placing them in the center of the flowers for a touch of elegance.
- Finish with a top coat to seal in the design and cure once more.
A Classic Twist: French Tips with 3D Florals
For those who prefer a more classic look with a modern twist, this fall flower nail design incorporates the timeless white French tips with delicate 3D flowers. The gel almond shape of the nails adds a chic, elongated look to your fingers, making them appear slender and elegant. The floral accents are placed strategically on the nails, creating a balanced and eye-catching design. The use of soft blue and purple hues in the flowers brings a fresh and trendy vibe to the traditional French manicure.

- Gel Polish: OPI GelColor in “Funny Bunny” for the base and tips.
- 3D Sculpting Gel: Light Elegance 3D Gel in Blue and Purple.
- Detailing Brush: For precision in creating the flower designs.
- UV/LED Lamp: For curing each layer of gel polish and 3D gel.
How to Create This Look at Home:
- Begin by shaping your nails into an almond shape and applying a base coat.
- Use a white gel polish to create the French tips, then cure under a UV/LED lamp.
- With a detailing brush, apply the 3D sculpting gel in soft blue and purple hues to form the flowers on the nails.
- Cure each flower under the lamp to set the design.
- Apply a top coat to add shine and protection to your manicure.
Minimalist Daisy Delight on Short Nails
For a fun and minimal approach to fall flower nails, this design features tiny daisy patterns scattered across a soft, nude base. The short nail length makes this design ideal for those who prefer a more practical yet stylish look. The cute and simple design is perfect for everyday wear, adding a touch of personality without overwhelming the nails. The pastel colors used for the flowers, including blue, yellow, and pink, make this manicure a versatile choice for any outfit or occasion.

- Gel Polish: Essie Gel Couture in “Sheer Fantasy” for the base.
- Detailing Brush: To create the small daisy patterns.
- Gel Paint: Various colors like blue, yellow, and pink for the daisies.
- Dotting Tool: For creating the flower centers.
- UV/LED Lamp: To cure the base and design layers.
How to Create This Look at Home:
- Apply a nude gel polish to your short nails and cure under a UV/LED lamp.
- Use a detailing brush and gel paints to create the tiny daisy patterns, scattering them across the nails.
- Cure the design under the lamp, ensuring that each layer is properly set.
- Finish with a top coat to seal in the design and add a glossy finish.
Playful Plaid and Daisies with a Twist
This nail design blends playful elements with a trendy plaid pattern, making it a standout choice for fall flower nail designs. The nails are shaped into a gel almond form, offering a chic canvas for the design. The plaid background, painted in soft pastel tones of pink and blue, contrasts beautifully with the large, cheerful daisies adorned with smiley faces. This combination brings a sense of whimsy and fun, making it a perfect design for someone who loves to experiment with trendy and cute art styles. The 3D flowers add texture and depth, while the smiley faces introduce a unique twist to the classic floral design.

- Gel Polish: OPI GelColor in “Mod About You” for the pink base, “It’s a Boy!” for the blue.
- Detailing Brush: For painting the plaid pattern and the daisy details.
- 3D Sculpting Gel: Used to create the raised daisy petals.
- Smile Face Stickers: Optional, or can be hand-painted using yellow and black gel polish.
- UV/LED Lamp: For curing the gel polish and setting the design.
How to Create This Look at Home:
- Shape your nails into an almond form and apply a base coat.
- Paint the plaid pattern on each nail using a fine detailing brush and cure under a UV/LED lamp.
- Use 3D sculpting gel to create the daisy petals, adding the smiley faces as the center detail.
- Cure each layer under the lamp to set the design.
- Apply a glossy top coat to seal everything in and add a polished finish.
Save Pin

Lavender Dreams with Floral Accents
This design exudes elegance and calm, perfect for those who prefer a more refined and understated look. The nails are shaped into a smooth gel short almond form, creating a sophisticated silhouette. The primary color palette consists of soft lavender and nude tones, with delicate floral accents on select nails. The small flowers, painted in a deeper lavender hue with tiny green leaves, add just the right amount of detail without overwhelming the overall look. This design is a perfect example of how minimalistic art can be both trendy and timeless.
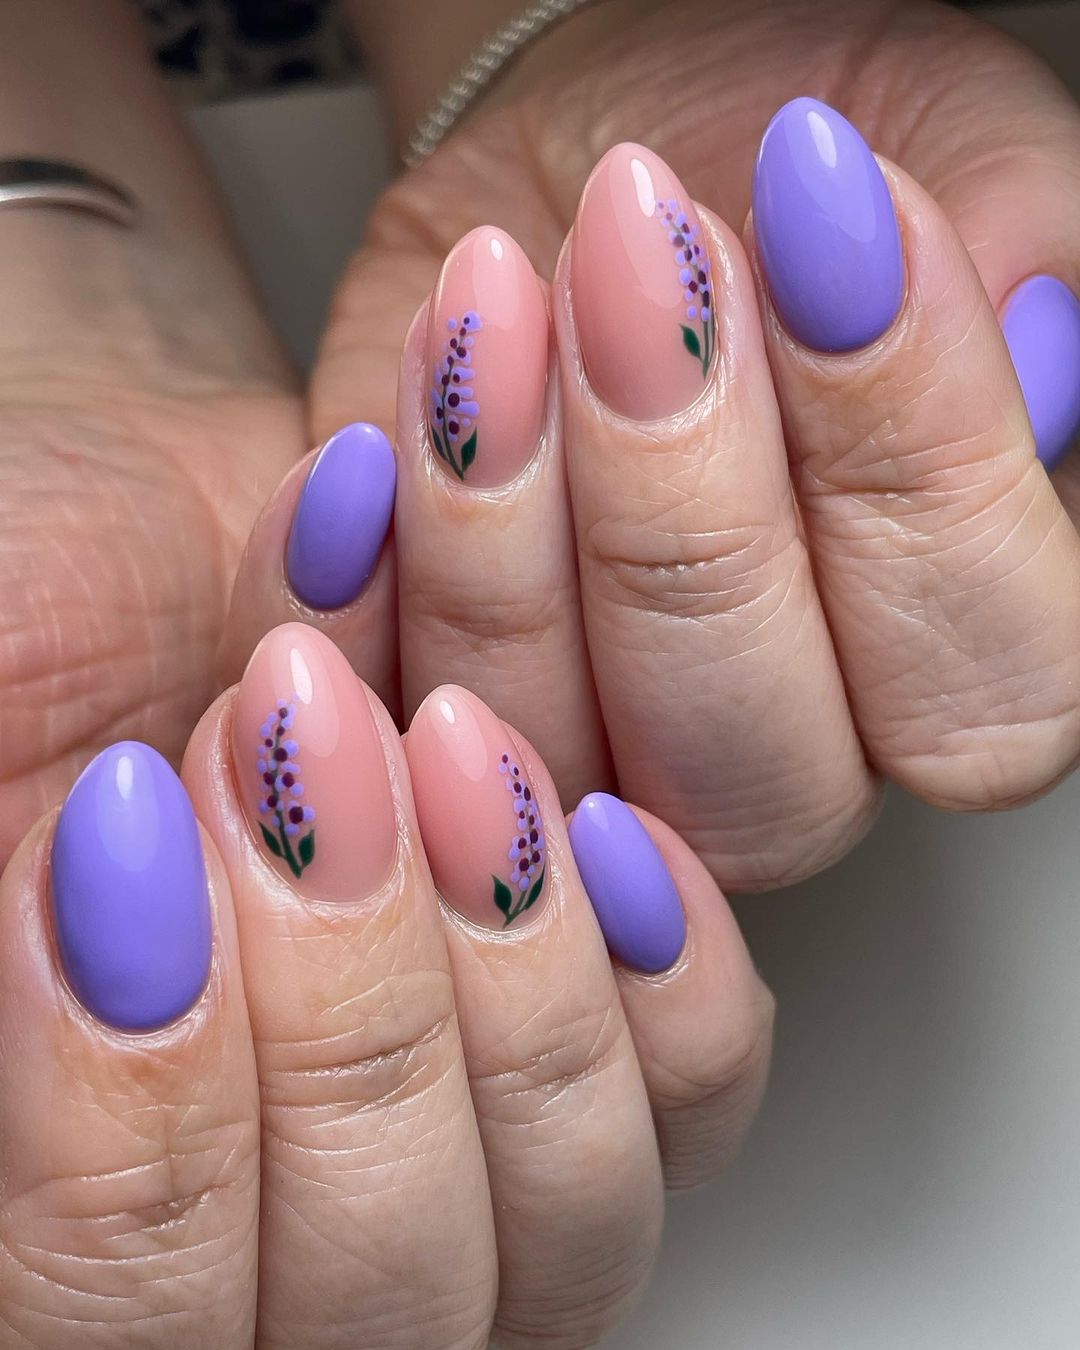
- Gel Polish: Essie Gel Couture in “Satin Slipper” for the nude base and “Bubbles Only” for the lavender.
- Detailing Brush: For painting the floral accents and leaves.
- Dotting Tool: To create the small flower petals.
- UV/LED Lamp: Necessary for curing the gel polish and ensuring the design lasts.
How to Create This Look at Home:
- After shaping your nails into a short almond form, apply a nude gel polish to all nails and cure under a UV/LED lamp.
- Use the detailing brush to paint the floral accents on the selected nails, focusing on precision to keep the design clean and elegant.
- Cure each nail under the lamp after adding the floral details to ensure they set properly.
- Finish with a top coat to protect the design and give the nails a glossy finish.
Whimsical Daisies on a Soft Blue Canvas
This nail design captures the essence of simplicity and charm, making it a delightful choice for fall. The nails are kept short and square, offering a practical yet stylish look. The soft blue base color provides a serene background for the tiny white daisies scattered across the nails. Each daisy is meticulously detailed with yellow centers, and the addition of tiny bees buzzing around the flowers adds a playful touch. This design is perfect for those who appreciate minimal and cute nail art that still makes a statement.

- Gel Polish: OPI GelColor in “Gelato on My Mind” for the blue base.
- Detailing Brush: For painting the daisies and bee details.
- Dotting Tool: To create the daisy centers and the bees’ bodies.
- UV/LED Lamp: For curing the gel polish and setting the design.
How to Create This Look at Home:
- Shape your nails into a square form and apply a soft blue gel polish as the base, then cure under a UV/LED lamp.
- Use the detailing brush to paint the tiny daisies, adding the yellow centers with a dotting tool.
- Add the bee details, ensuring each one is carefully placed for a balanced design.
- Cure the design under the lamp, then apply a top coat to seal in the artwork and give it a shiny finish.
Blooming Garden on Almond Nails
This nail design is a perfect embodiment of delicate beauty, showcasing intricate floral art on almond-shaped nails. The clear base enhances the natural beauty of the nails, while the vibrant pink and green hues of the flowers and leaves create a refreshing and elegant look. The fine detailing of each flower, combined with the natural flow of the greenery, gives the nails a hand-painted, almost garden-like quality. This design is ideal for those who appreciate intricate art that still feels organic and subtle.
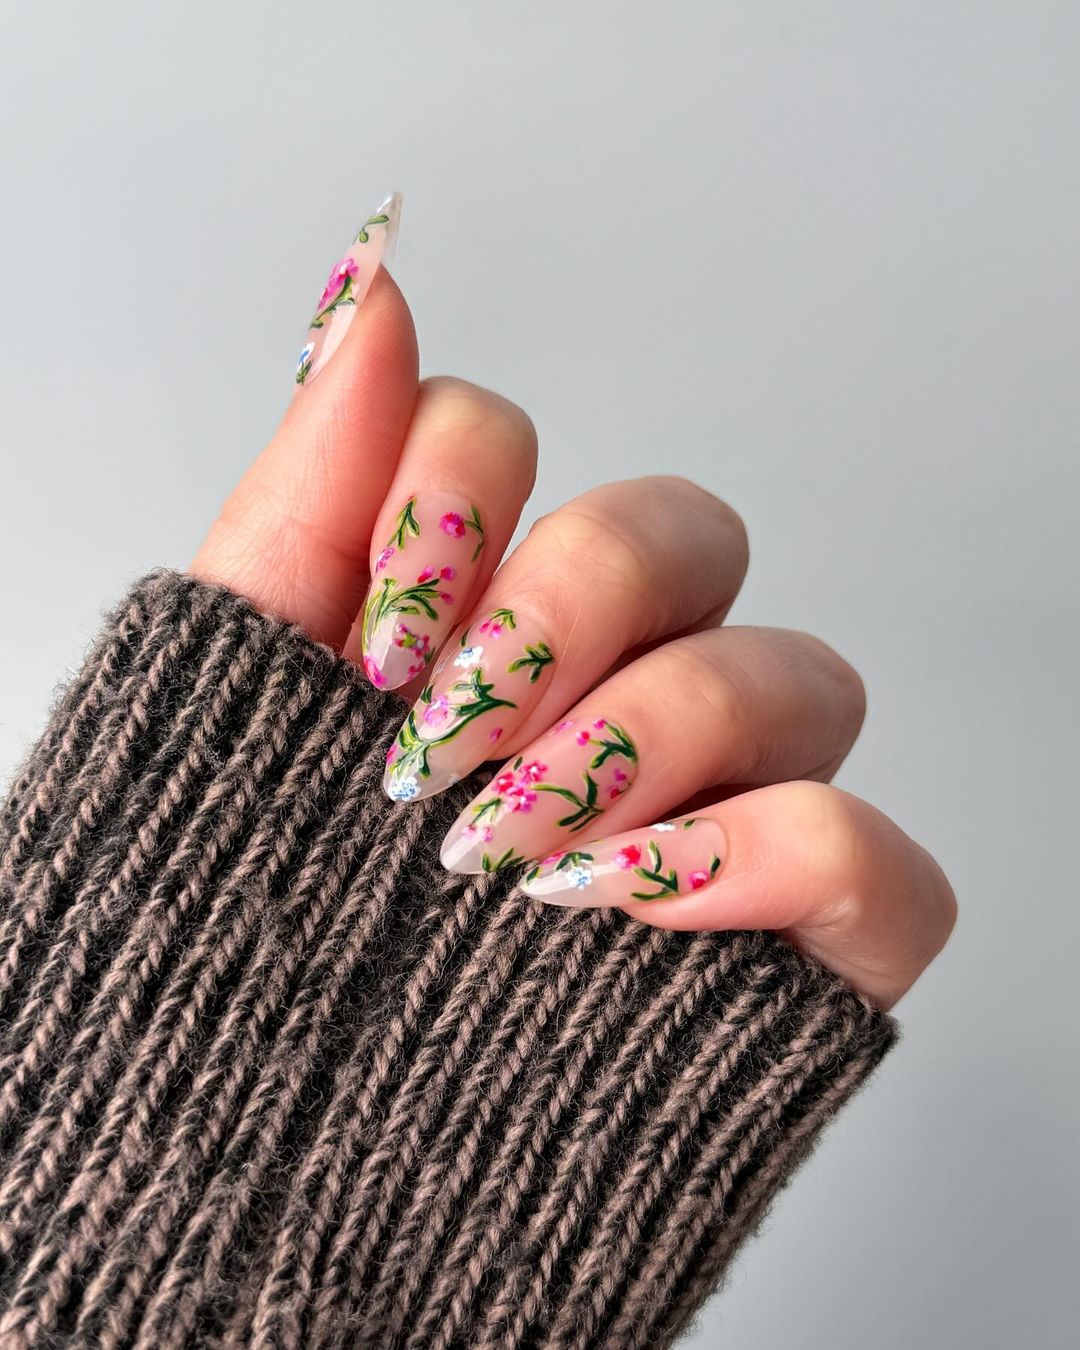
- Gel Polish: OPI GelColor in “Alpine Snow” for the base.
- Detailing Brush: For the intricate floral details.
- Gel Paint: Pink and green shades for the flowers and leaves.
- UV/LED Lamp: To cure each layer and ensure longevity.
- Top Coat: For a glossy finish and protection of the design.
How to Create This Look at Home:
- Begin by applying a clear or nude base coat and curing it under a UV/LED lamp.
- Use a fine detailing brush to paint the flowers and leaves with gel paint, ensuring each stroke is delicate and precise.
- Cure each nail under the lamp to set the design, then finish with a top coat to seal in the artwork and add shine.
Neon Daisies on Pastel Pink
This lively and playful design features large, vibrant daisies in neon colors against a soft pastel pink base. The contrast between the bold flower colors and the muted background creates a striking visual that is both modern and fun. The daisies, with their oversized petals and varied colors, make a statement, perfect for those who want their nails to be a conversation starter. The simplicity of the design, combined with the bright colors, makes it a trendy choice for anyone looking to embrace bold floral patterns.
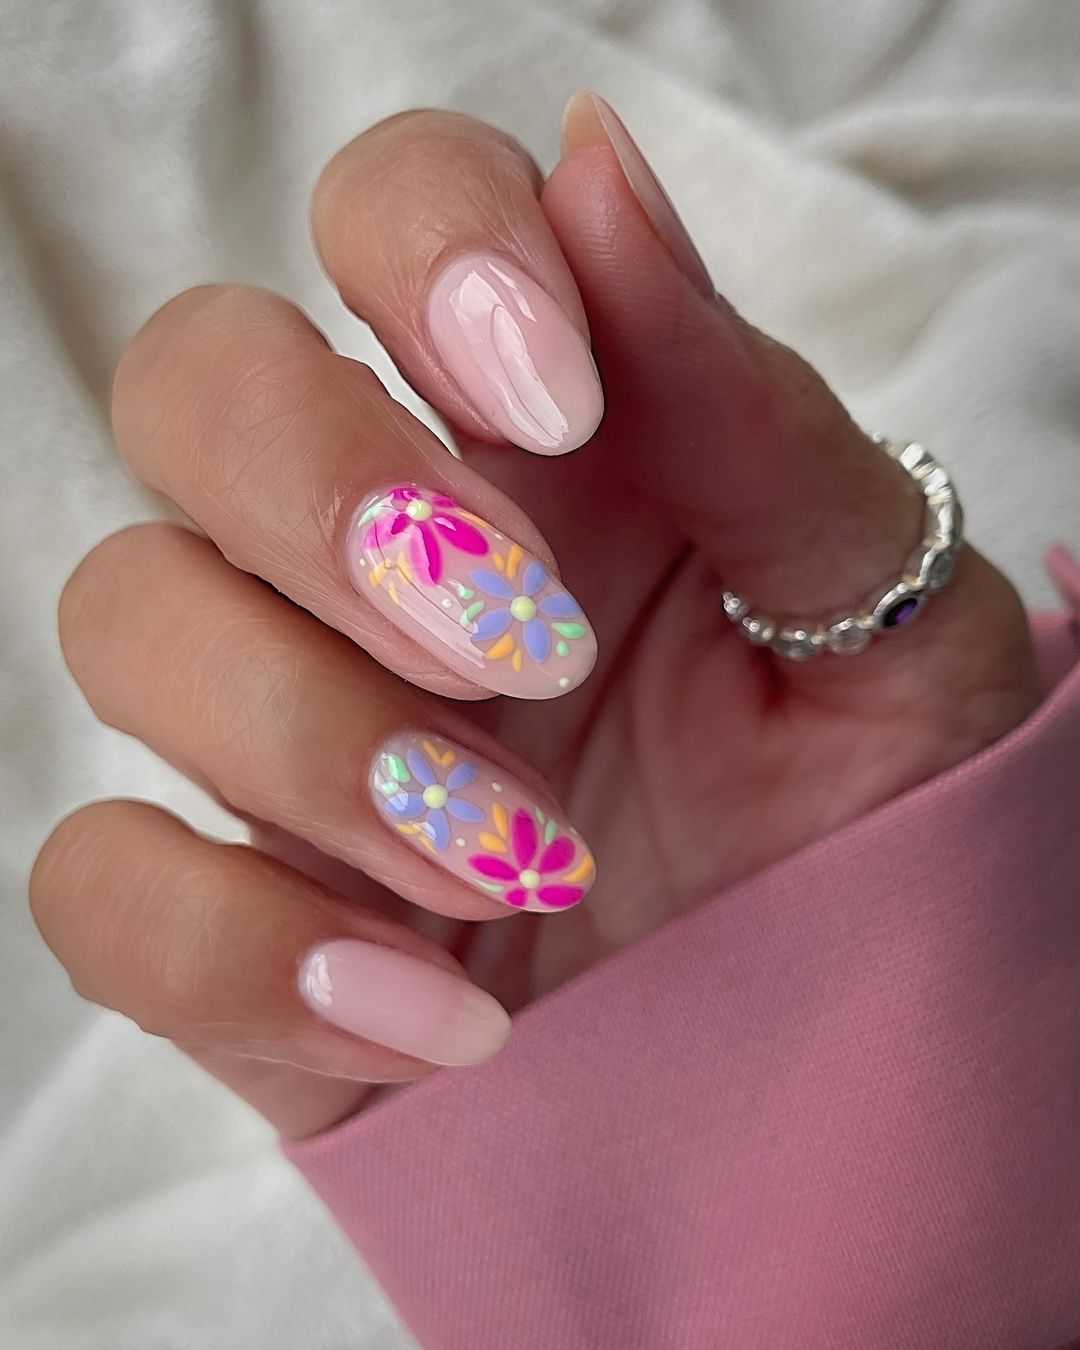
- Gel Polish: Essie Gel Couture in “Fairy Tailor” for the base.
- Detailing Brush: To paint the large daisies.
- Neon Gel Paint: For the colorful daisy petals.
- Dotting Tool: To create the centers of the daisies.
- UV/LED Lamp: For curing each layer of polish and paint.
- Top Coat: To protect the design and add a high-gloss finish.
How to Create This Look at Home:
- Start with a pastel pink gel polish as your base and cure under a UV/LED lamp.
- Using a detailing brush, paint large daisies with neon gel paints, varying the colors for each petal.
- Cure each nail under the lamp, then use a dotting tool to create the daisy centers.
- Finish with a top coat to add shine and durability to the design.
Retro-Inspired Floral Patchwork
This nail design is a delightful mix of retro patterns and floral accents, creating a fun and unique patchwork effect. The almond-shaped nails provide a perfect canvas for the various designs, including checkered patterns, flowers, and clouds, all in a harmonious pink and orange color scheme. The variety in patterns on each nail adds a playful, eclectic vibe that feels both nostalgic and fresh. This design is perfect for those who love to experiment with trendy and artistic nail designs that stand out from the crowd.
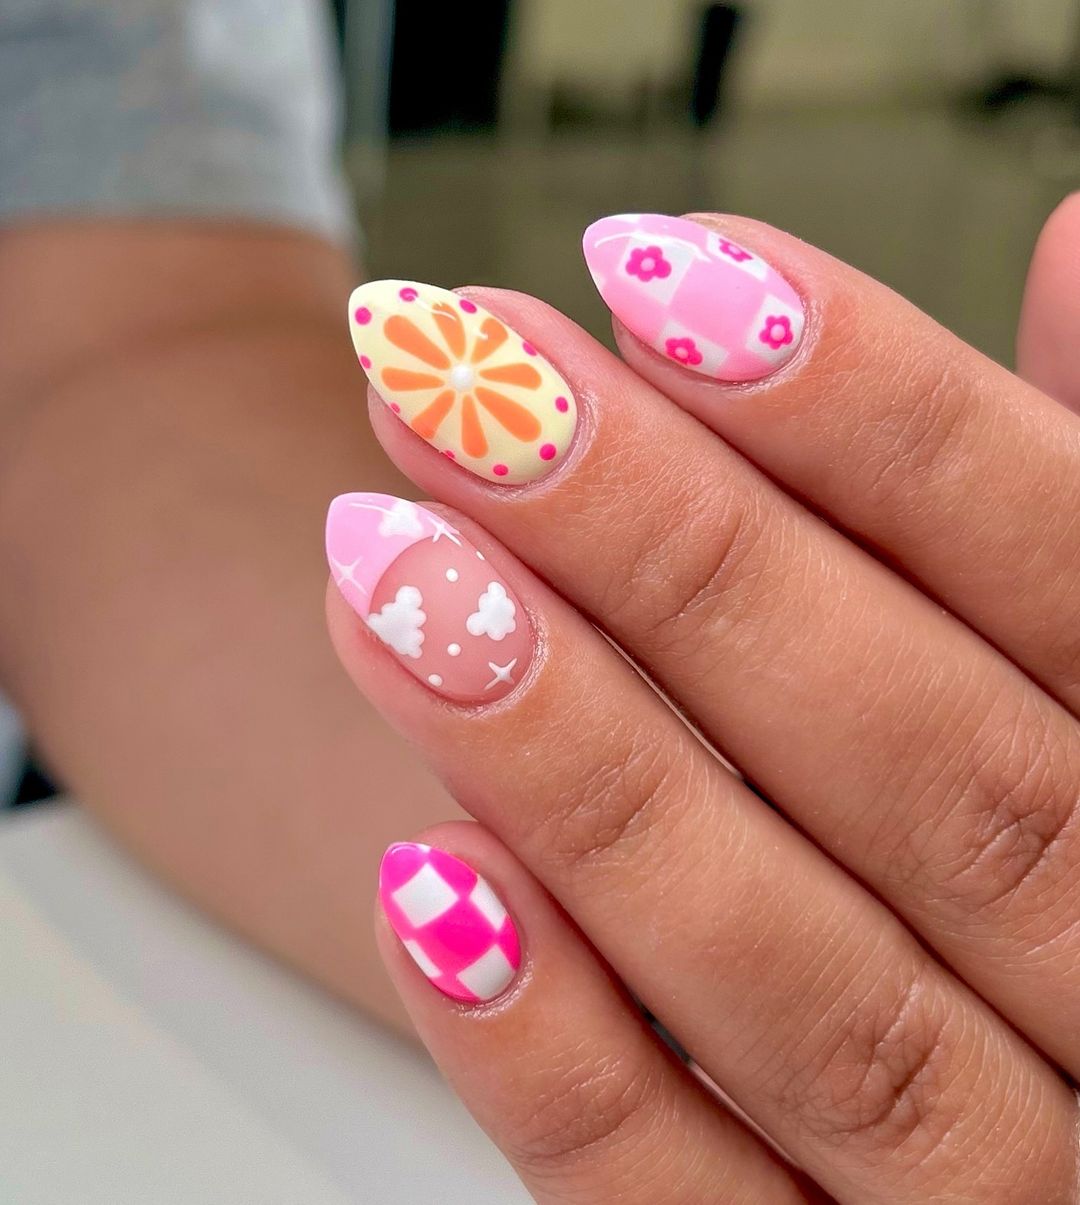
- Gel Polish: OPI GelColor in “Put it in Neutral” for the base.
- Detailing Brush: For painting the intricate patterns.
- Gel Paint: Various shades of pink, orange, and white for the designs.
- Dotting Tool: For creating small details like polka dots and clouds.
- UV/LED Lamp: To cure the layers of polish and paint.
- Top Coat: To ensure the design stays intact and glossy.
How to Create This Look at Home:
- Apply a neutral base coat and cure it under a UV/LED lamp.
- Use a detailing brush to create the different patterns on each nail, such as checkered designs, flowers, and clouds, using gel paints in complementary colors.
- Cure the designs under the lamp, then finish with a top coat to add a glossy finish and protect the artwork.
Save Pin

Purple and Pink 3D Floral Masterpiece
This bold and artistic nail design features a striking combination of purple and pink tones with 3D floral accents. The nails are shaped into a coffin style, providing ample space to showcase the detailed 3D work and layered textures. The deep purple grape-like clusters add a touch of drama, while the soft pink flowers provide a beautiful contrast, creating a look that is both edgy and elegant. This design is perfect for someone who loves acrylic 3D art and isn’t afraid to make a bold statement with their nails.
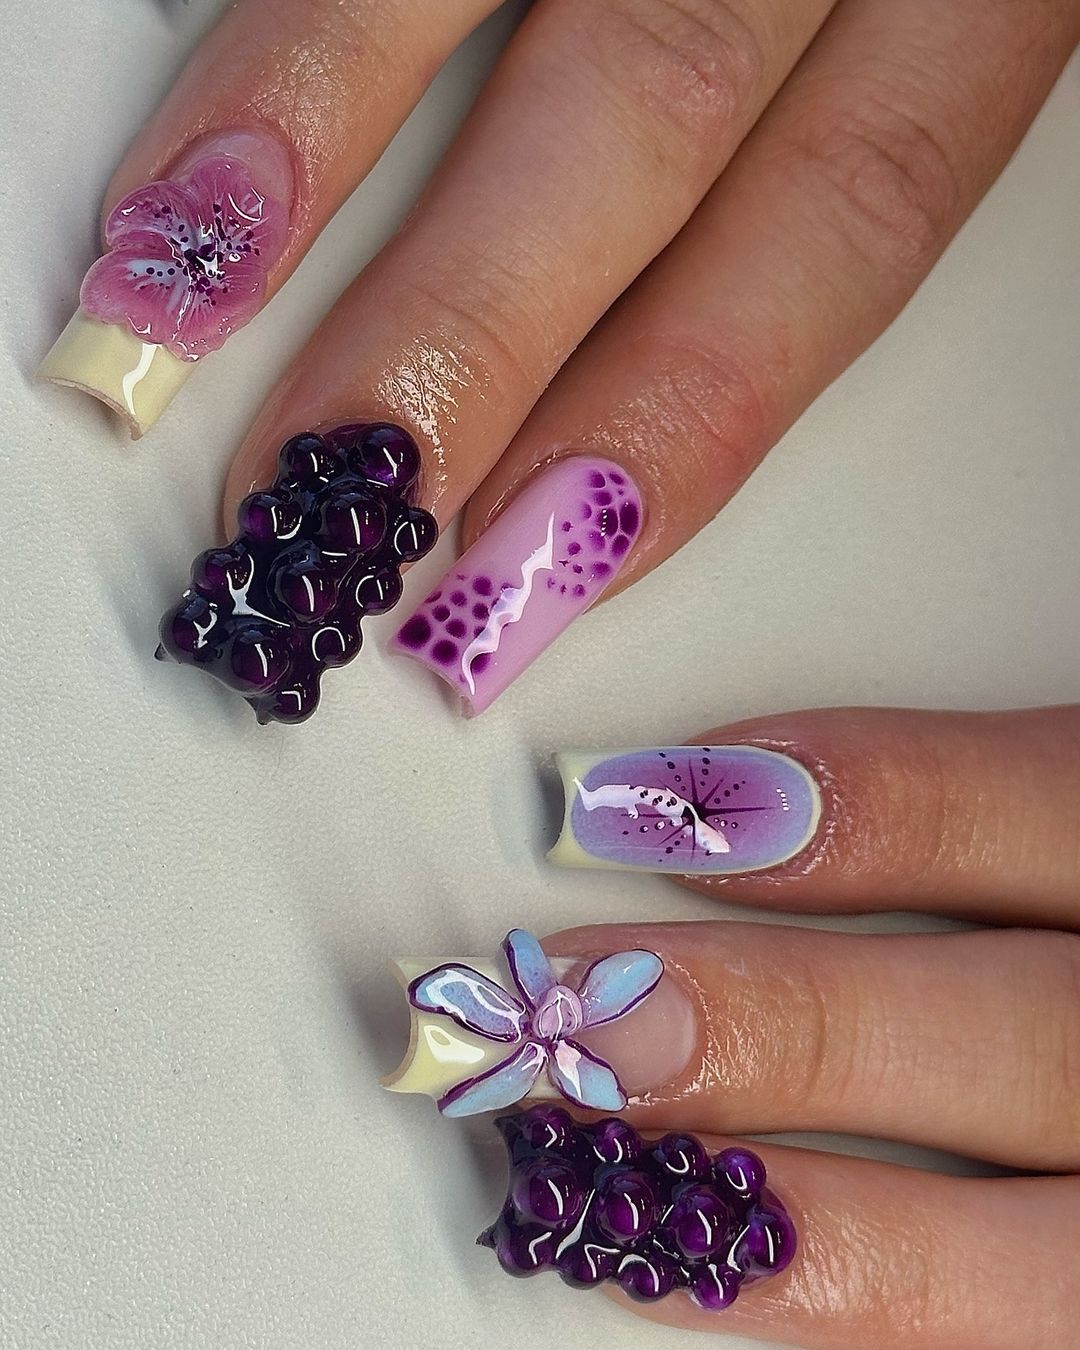
- Acrylic Powder: In purple and pink shades for the 3D elements.
- 3D Sculpting Brush: To mold the flowers and grape clusters.
- UV/LED Lamp: For curing the base layers and setting the 3D designs.
- Gel Polish: In complementary pink and purple tones for the background.
- Top Coat: To seal in the design and add a high-shine finish.
How to Create This Look at Home:
- Shape your nails into a coffin style and apply a base coat, curing it under a UV/LED lamp.
- Use acrylic powder and a 3D sculpting brush to create the grape clusters and floral accents, ensuring each piece is securely attached.
- Cure the nails under the lamp, then finish with a top coat to protect the 3D design and add a glossy finish.
Jungle Green Fantasy with Animal Prints
This nail design takes inspiration from the jungle, combining deep greens with bold animal prints and floral accents. The long, stiletto-shaped nails provide the perfect base for this dramatic and exotic look. The green gradient on each nail mimics the lush foliage of a jungle, while the animal prints add an element of wildness. The large floral accent, done in a muted green with black spots, ties the whole design together, making it a perfect choice for someone who loves nature-inspired, trendy nails with a bit of an edge.
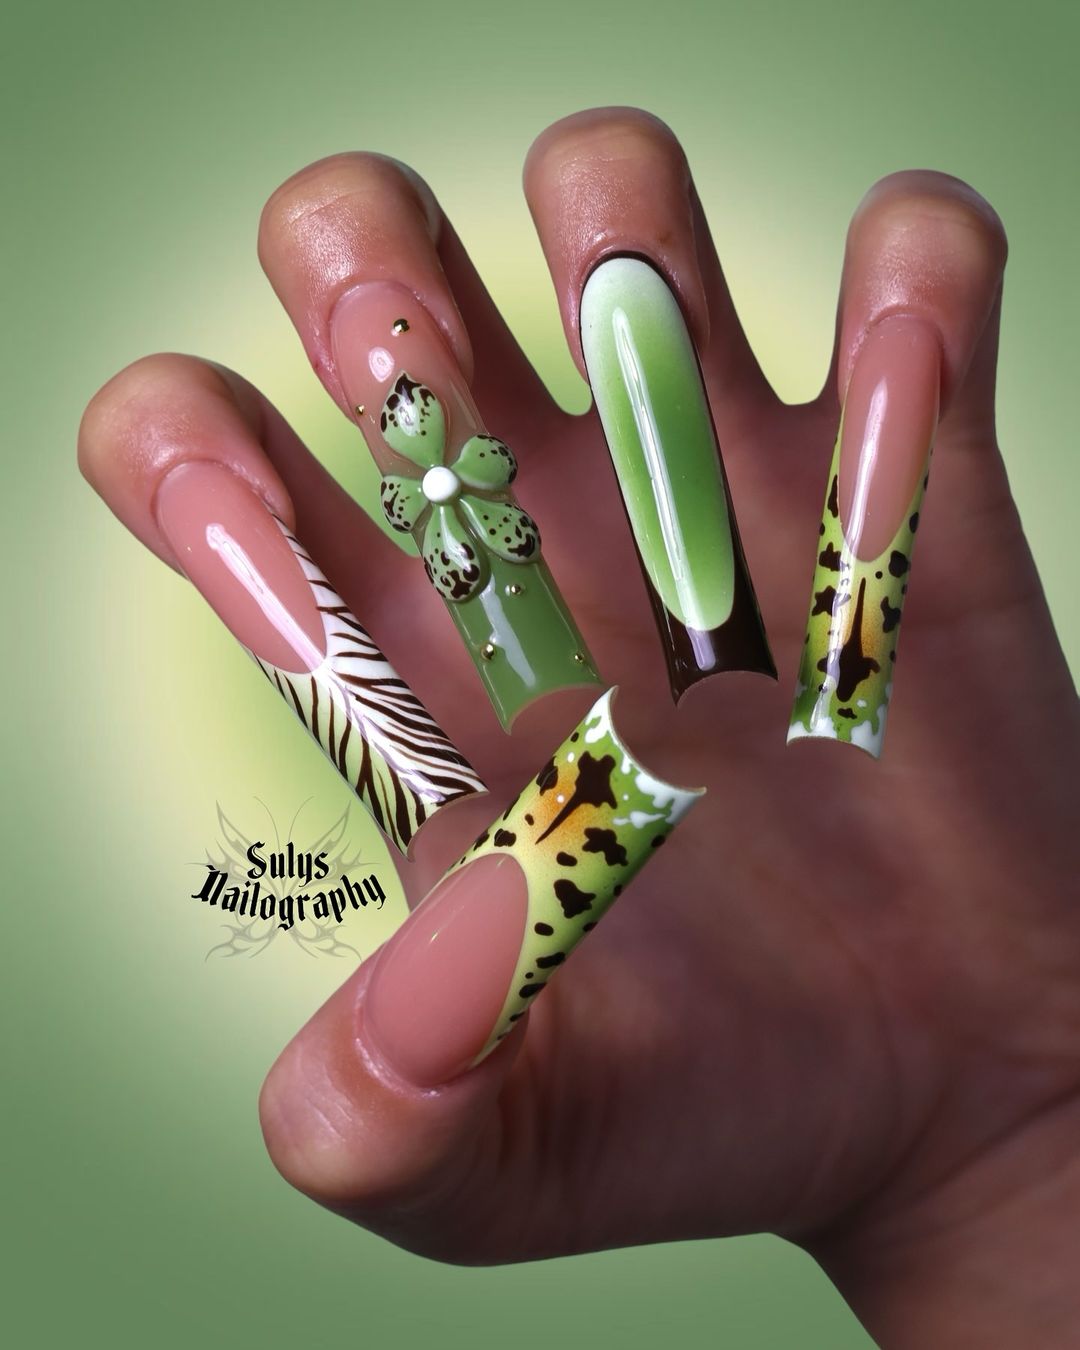
- Gel Polish: OPI GelColor in various green shades for the gradient.
- Detailing Brush: For the animal print and floral accents.
- Gel Paint: Black and white for the animal prints.
- UV/LED Lamp: To cure each layer and set the designs.
- Top Coat: For a glossy finish and protection.
How to Create This Look at Home:
- Apply a gradient of green gel polish on each nail, curing each layer under a UV/LED lamp.
- Use a detailing brush to add the animal prints and the large floral accent, ensuring each detail is sharp and clear.
- Cure the design under the lamp, then finish with a top coat to add shine and protect the artwork.
Peachy Ombre with 3D Floral Elegance
This sophisticated design features a soft peach ombre base with intricate 3D floral accents. The long, coffin-shaped nails are perfect for showcasing the smooth gradient from nude to peach, which serves as a subtle backdrop for the delicate flowers. The 3D flowers, done in matching peach tones, add a layer of texture and depth to the design, making it a beautiful choice for someone who loves elegant, minimal art with a touch of luxury.
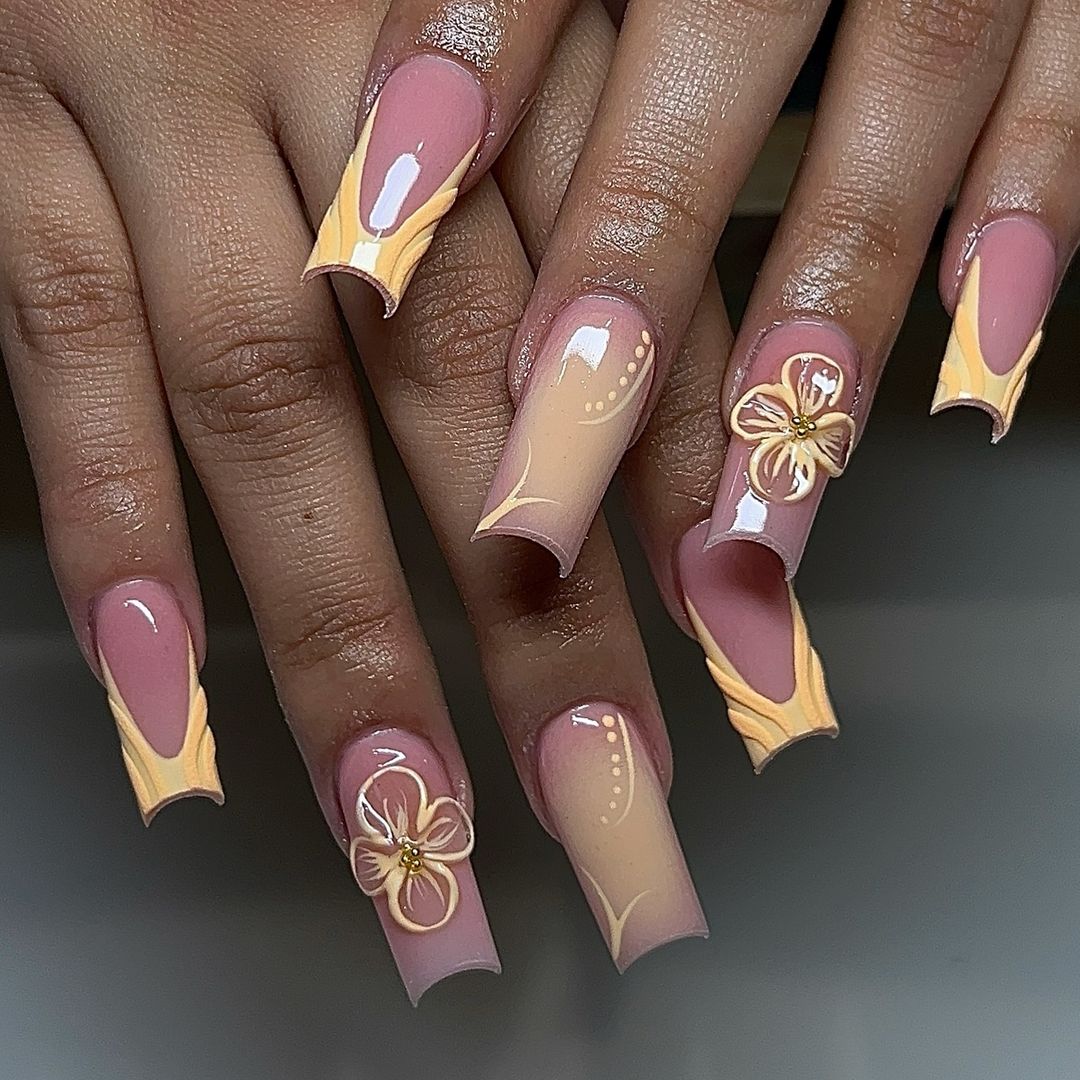
- Gel Polish: In nude and peach tones for the ombre effect.
- 3D Sculpting Gel: In a matching peach color for the flowers.
- Detailing Brush: For creating the flower details.
- UV/LED Lamp: To cure the ombre base and set the 3D elements.
- Top Coat: To protect the design and add a glossy finish.
How to Create This Look at Home:
- Create an ombre effect using nude and peach gel polishes, blending them seamlessly and curing under a UV/LED lamp.
- Sculpt the 3D flowers using sculpting gel and a detailing brush, placing them strategically on the nails.
- Cure the design under the lamp, then finish with a top coat to seal in the artwork and add a high-shine finish.
Neon French Tips with Delicate Leaf Patterns
This design brings a fresh twist to the classic French manicure by incorporating a vibrant neon orange tip with delicate white leaf patterns. The nails are shaped into a natural short square, making the neon pop against the nude base. The addition of the intricate leaf designs on a couple of nails adds a sophisticated contrast, blending modern and natural elements. This look is perfect for those who love a bold yet refined manicure that’s both trendy and elegant.
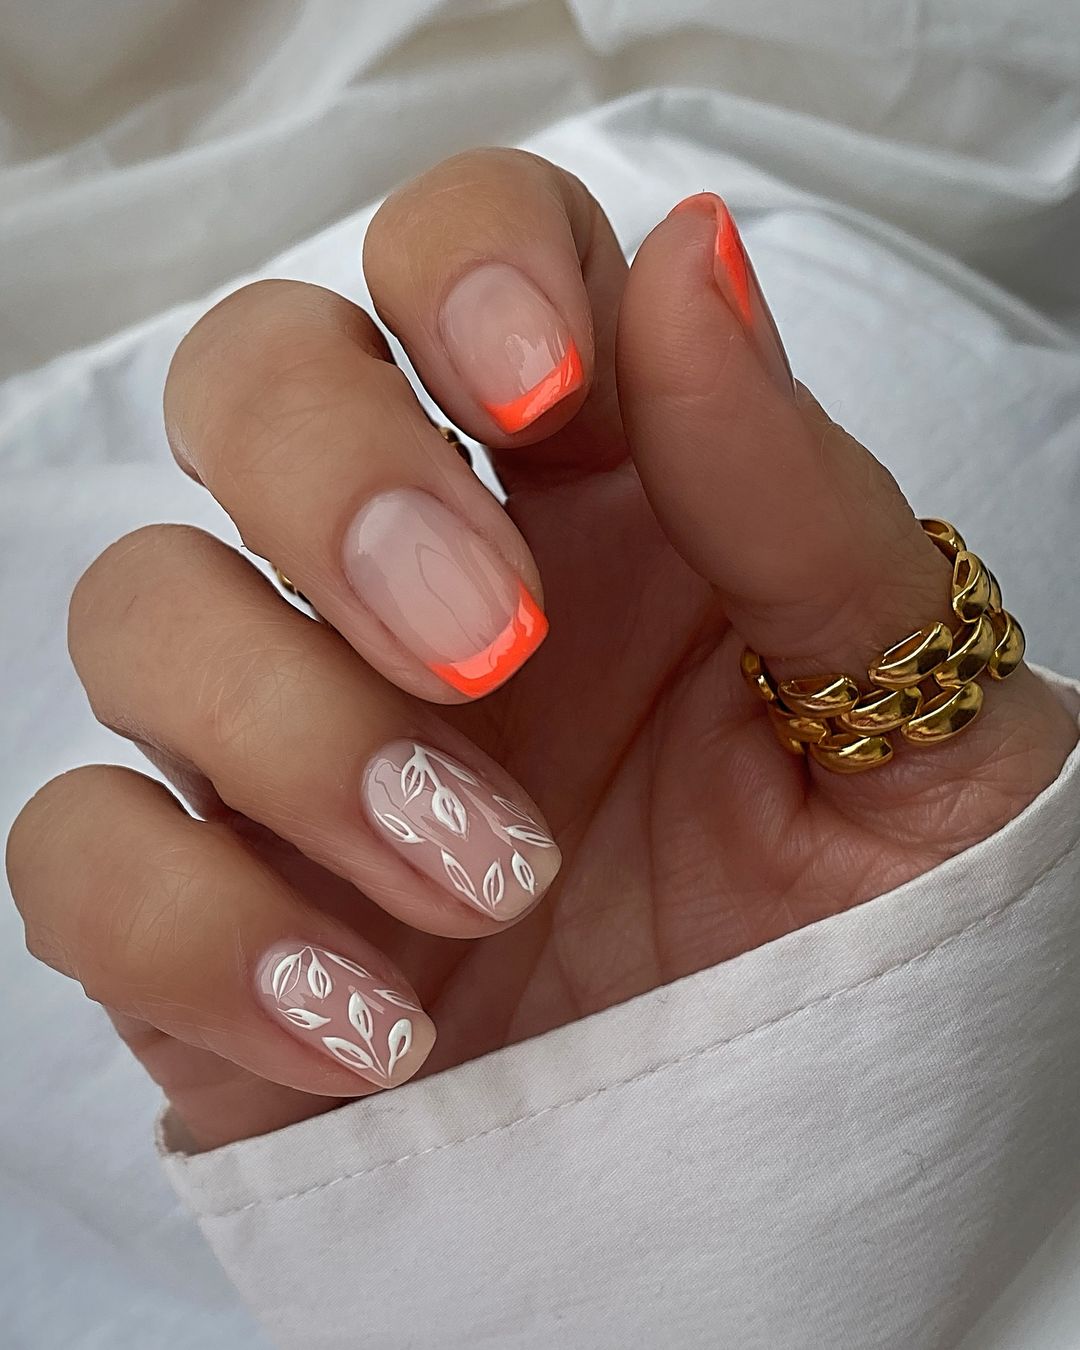
- Gel Polish: OPI GelColor in “Passion” for the nude base, and “Orange You Fantastic” for the tips.
- Detailing Brush: To create the white leaf patterns.
- UV/LED Lamp: For curing each layer of gel polish.
- Top Coat: To seal the design and provide a glossy finish.
How to Create This Look at Home:
- Shape your nails into a short square form and apply a nude base coat, curing it under a UV/LED lamp.
- Using the neon orange gel polish, carefully paint the French tips and cure under the lamp.
- Add the white leaf patterns on selected nails using a fine detailing brush, then cure again.
- Finish with a top coat to protect the design and add shine.
Retro Waves and Daisy Accents
This playful design combines retro waves in bold orange and blue hues with cute daisy accents on a natural nude base. The short, rounded nails make this design both practical and stylish, ideal for those who love a bit of nostalgia in their nail art. The contrast between the vibrant colors and the delicate white daisies creates a dynamic and eye-catching look, perfect for those who want their nails to make a statement.
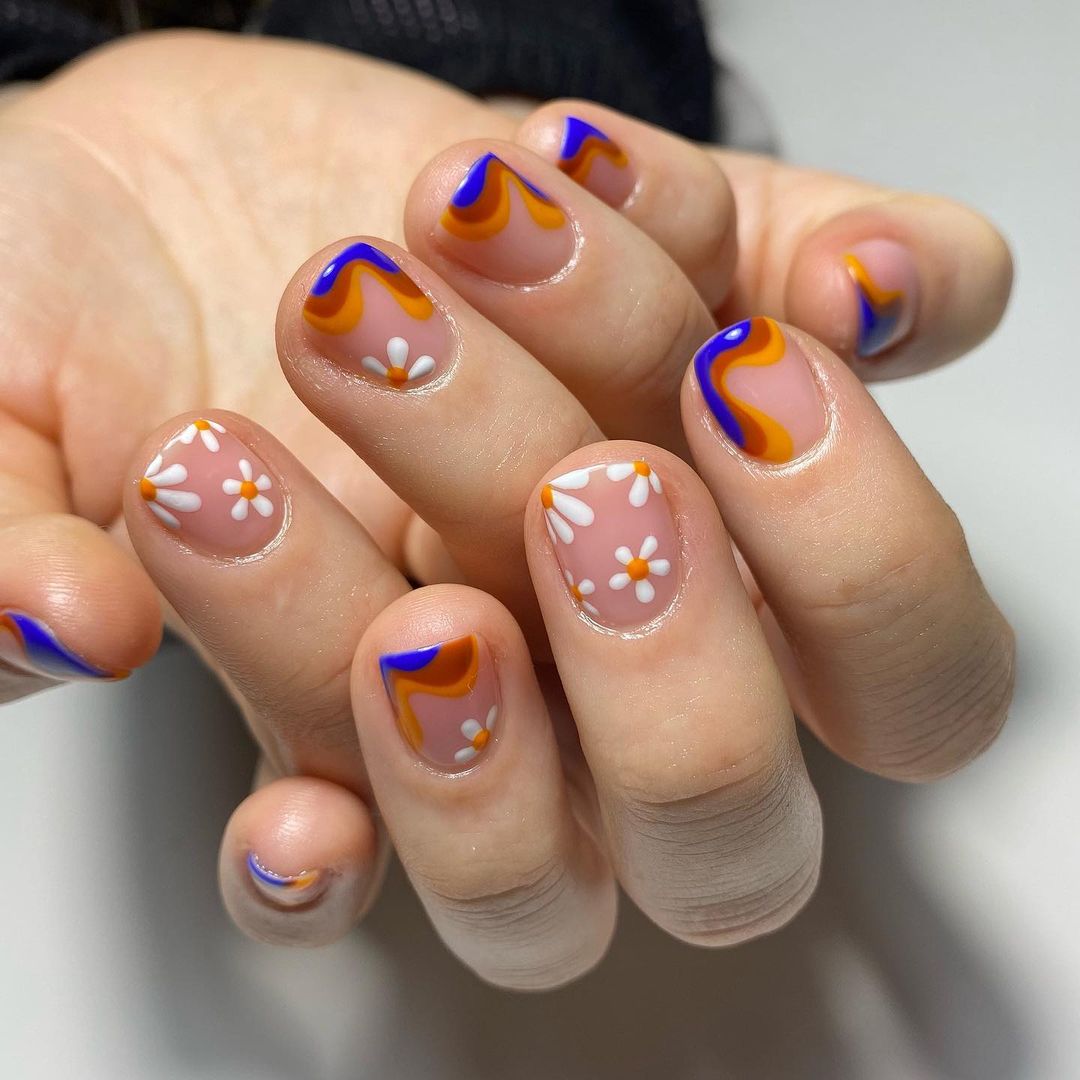
- Gel Polish: Essie Gel Couture in “Pre-Show Jitters” for the nude base, and vibrant orange and blue for the waves.
- Detailing Brush: For painting the wavy lines and daisies.
- Dotting Tool: To create the centers of the daisies.
- UV/LED Lamp: For curing the layers of polish.
- Top Coat: To ensure the design stays glossy and intact.
How to Create This Look at Home:
- Begin with a nude base coat on your short, rounded nails and cure under a UV/LED lamp.
- Use a detailing brush to paint the retro wavy lines in orange and blue, curing each layer.
- Add the daisy accents using a detailing brush for the petals and a dotting tool for the centers, then cure once more.
- Apply a top coat to seal in the design and add a glossy finish.
Multicolored Floral Blooms on Short Nails
This charming design features an array of multicolored floral blooms scattered across a nude base. The short, rounded nails make this look both practical and playful, perfect for everyday wear. The vibrant flowers, in shades of pink, purple, and orange, stand out against the neutral background, making this a cheerful and versatile design. It’s ideal for those who love a cute and easy manicure that still feels creative and fresh.
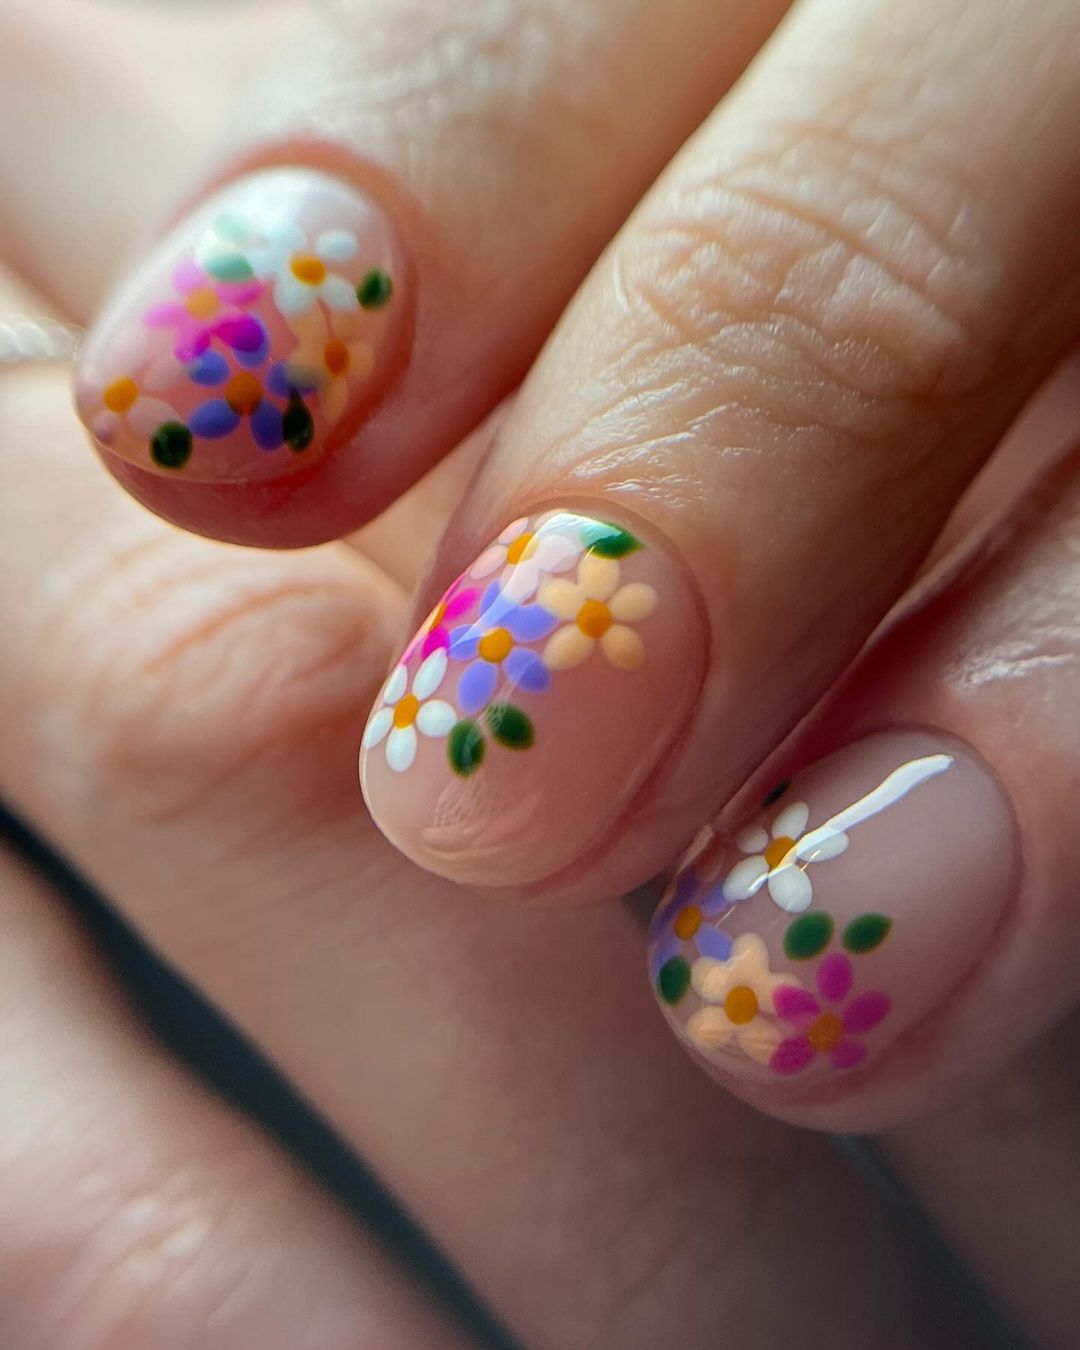
- Gel Polish: OPI GelColor in “Bubble Bath” for the nude base.
- Detailing Brush: To paint the tiny flowers in various colors.
- Dotting Tool: For the flower centers and small details.
- UV/LED Lamp: To cure the layers of gel polish.
- Top Coat: To add shine and protect the design.
How to Create This Look at Home:
- Start by applying a nude gel polish base and curing it under a UV/LED lamp.
- Use a detailing brush to paint the small flowers in different colors across each nail.
- Cure the design under the lamp, then finish with a top coat for a glossy and durable finish.
Classic French with a Pop of Orange Blossom
This design elevates the timeless French manicure by adding a vibrant orange blossom accent. The nails are shaped into a soft almond, providing a flattering and elegant silhouette. The bright orange flowers contrast beautifully against the classic white tips, adding a fresh and modern twist to a traditional look. This design is perfect for those who love the minimal elegance of a French manicure but want to incorporate a bit of bold color into their style.
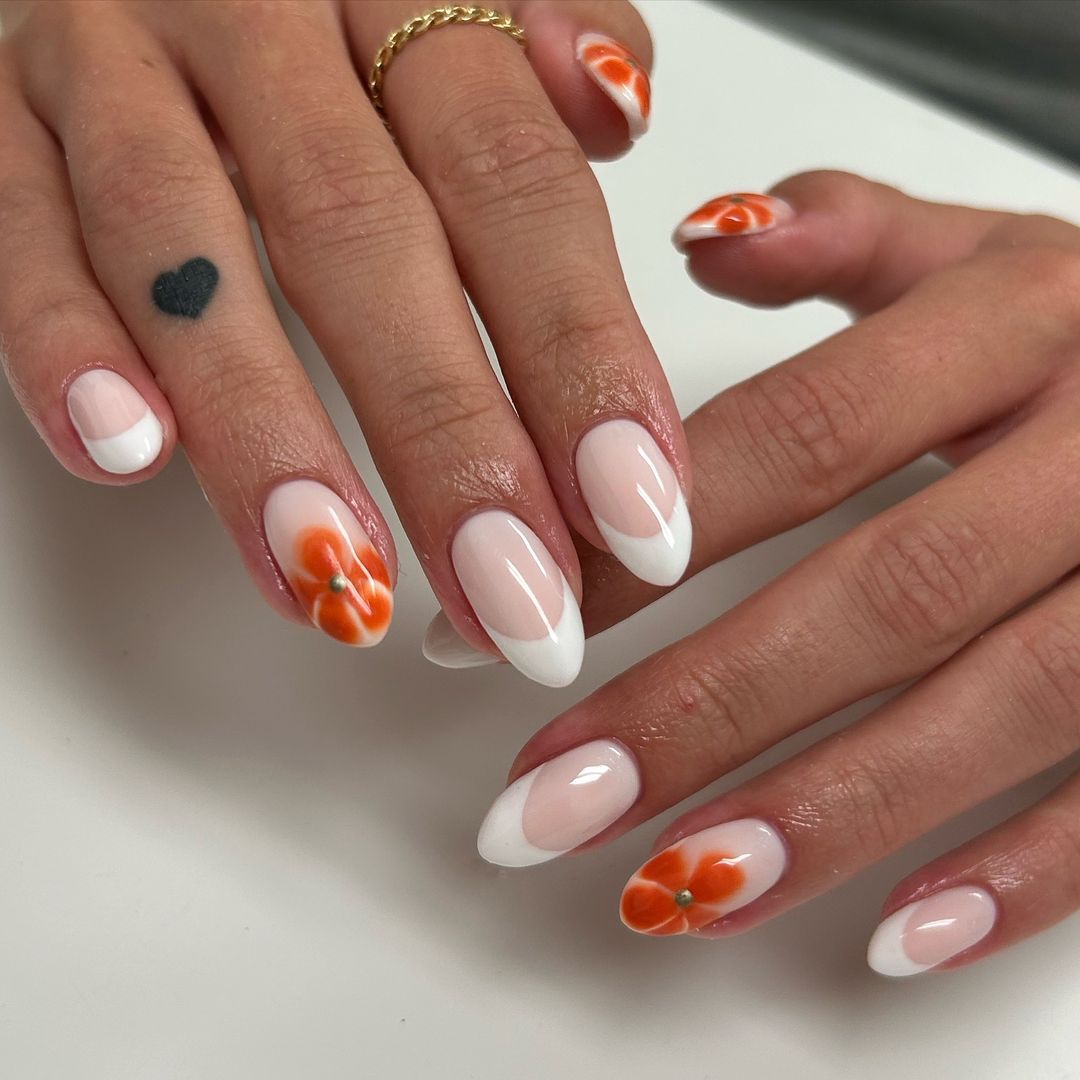
- Gel Polish: Essie Gel Couture in “Blanc” for the French tips, and “Tangerine Tease” for the flower accents.
- Detailing Brush: To paint the orange blossoms.
- UV/LED Lamp: For curing the base and design layers.
- Top Coat: To protect the design and add shine.
How to Create This Look at Home:
- Shape your nails into a soft almond form and apply a base coat, curing it under a UV/LED lamp.
- Paint the classic French tips using a white gel polish, then cure under the lamp.
- Add the orange blossom accents using a detailing brush, focusing on precision for the petals and centers, and cure again.
- Finish with a top coat to seal the design and add a glossy finish.
Blue Daisies on Nude
This adorable design features bright blue daisies scattered across a nude base, creating a simple yet striking look. The short, rounded nails make this design practical for everyday wear, while the vibrant blue flowers add a playful pop of color. This manicure is perfect for someone who loves cute and trendy designs that are easy to achieve but still make a bold statement.
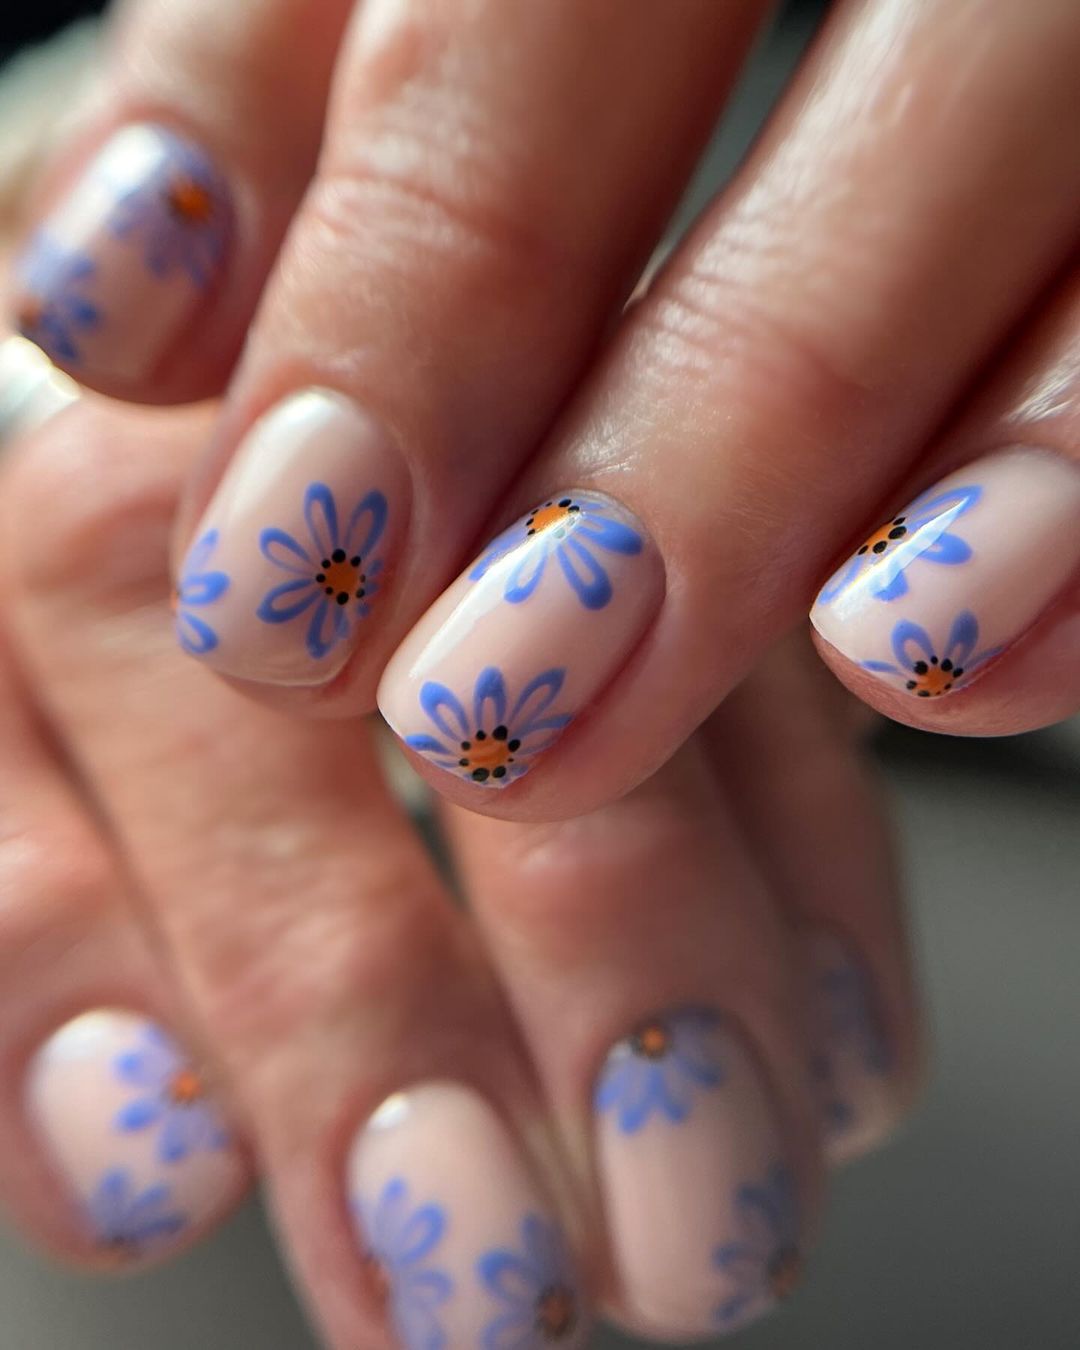
- Gel Polish: OPI GelColor in “Bare My Soul” for the nude base, and “Blue My Mind” for the daisies.
- Detailing Brush: To paint the daisy petals.
- Dotting Tool: For the daisy centers.
- UV/LED Lamp: To cure the layers of polish.
- Top Coat: To ensure the design remains glossy and durable.
How to Create This Look at Home:
- Apply a nude gel polish base and cure under a UV/LED lamp.
- Use a detailing brush to paint the daisy petals in bright blue, then cure.
- Add the centers of the daisies using a dotting tool, followed by curing the design.
- Finish with a top coat to protect the design and add a glossy shine.
Blue and White Floral Accents
This sophisticated design features intricate blue and white floral accents on a nude base. The nails are shaped into a short almond, providing a sleek and elegant canvas for the detailed patterns. The blue floral designs, combined with subtle white accents, create a look that is both classic and trendy, perfect for someone who appreciates detailed artistry in their manicure.
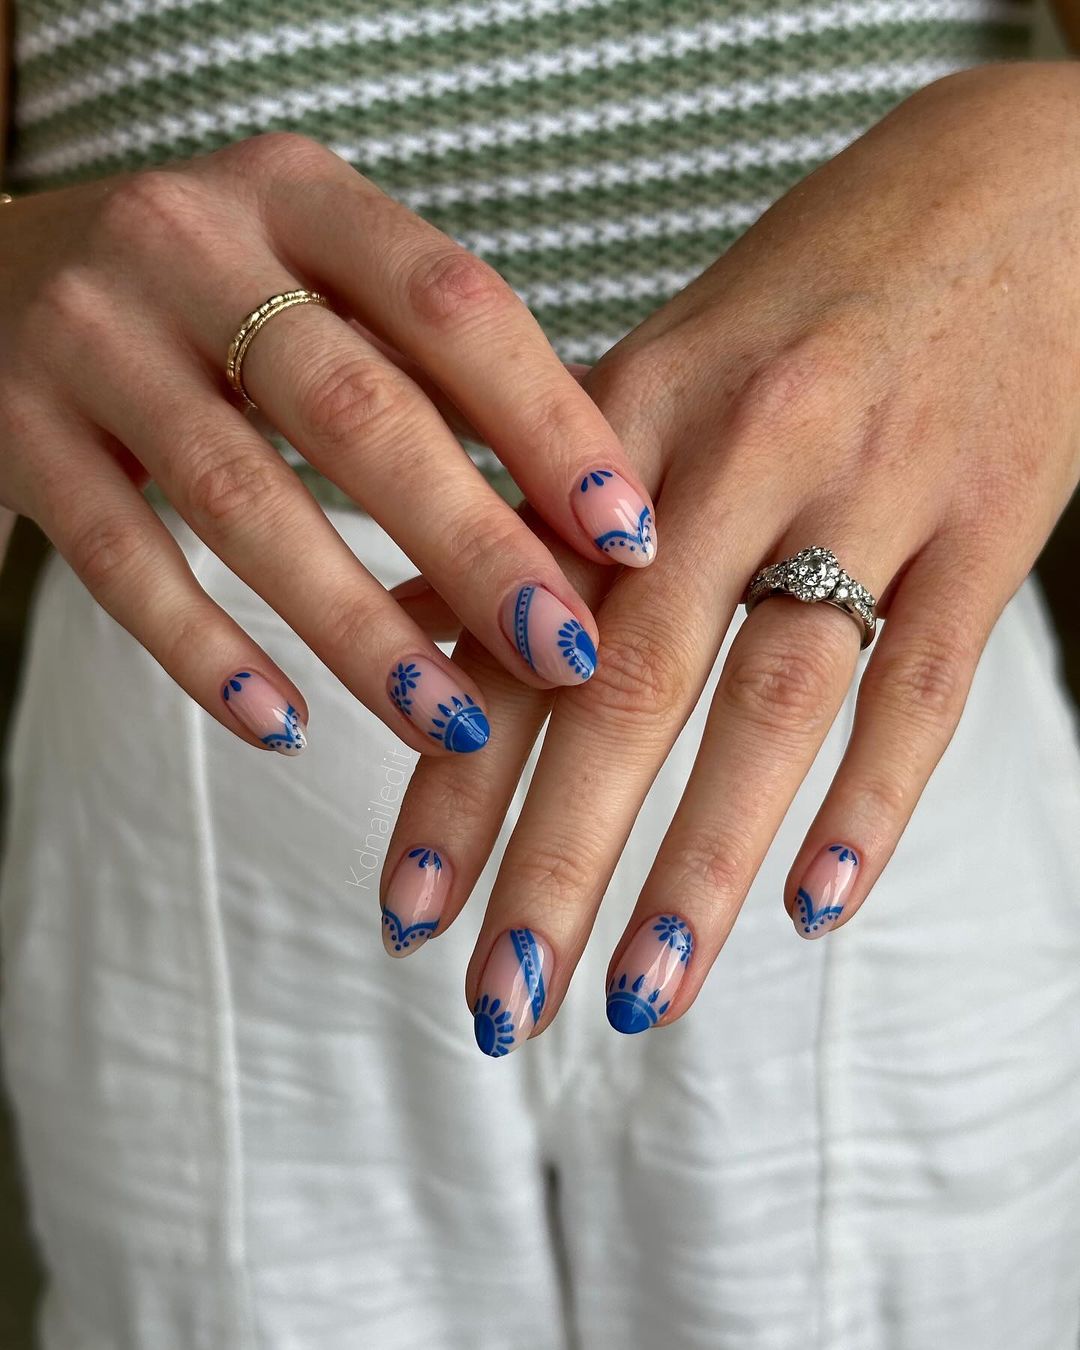
- Gel Polish: OPI GelColor in “Samoan Sand” for the base, and “Russian Navy” for the floral designs.
- Detailing Brush: For painting the intricate floral patterns.
- UV/LED Lamp: For curing each layer of gel polish.
- Top Coat: To add shine and durability to the design.
How to Create This Look at Home:
- Start by applying a nude base coat and curing it under a UV/LED lamp.
- Use a detailing brush to paint the intricate blue and white floral designs, curing each nail as you go.
- Finish with a top coat to seal in the design and add a glossy finish.
Dual-Toned Floral Delight
This nail design is a beautiful blend of vibrant pink and blue florals on a nude base, creating a cheerful and lively look. The short, rounded nails provide the perfect canvas for the scattered flowers, each one detailed with a combination of small and larger blooms. The mix of colors adds depth and interest to the design, making it a versatile option for both everyday wear and special occasions. This style is ideal for those who love delicate, yet impactful nail art that is both playful and elegant.
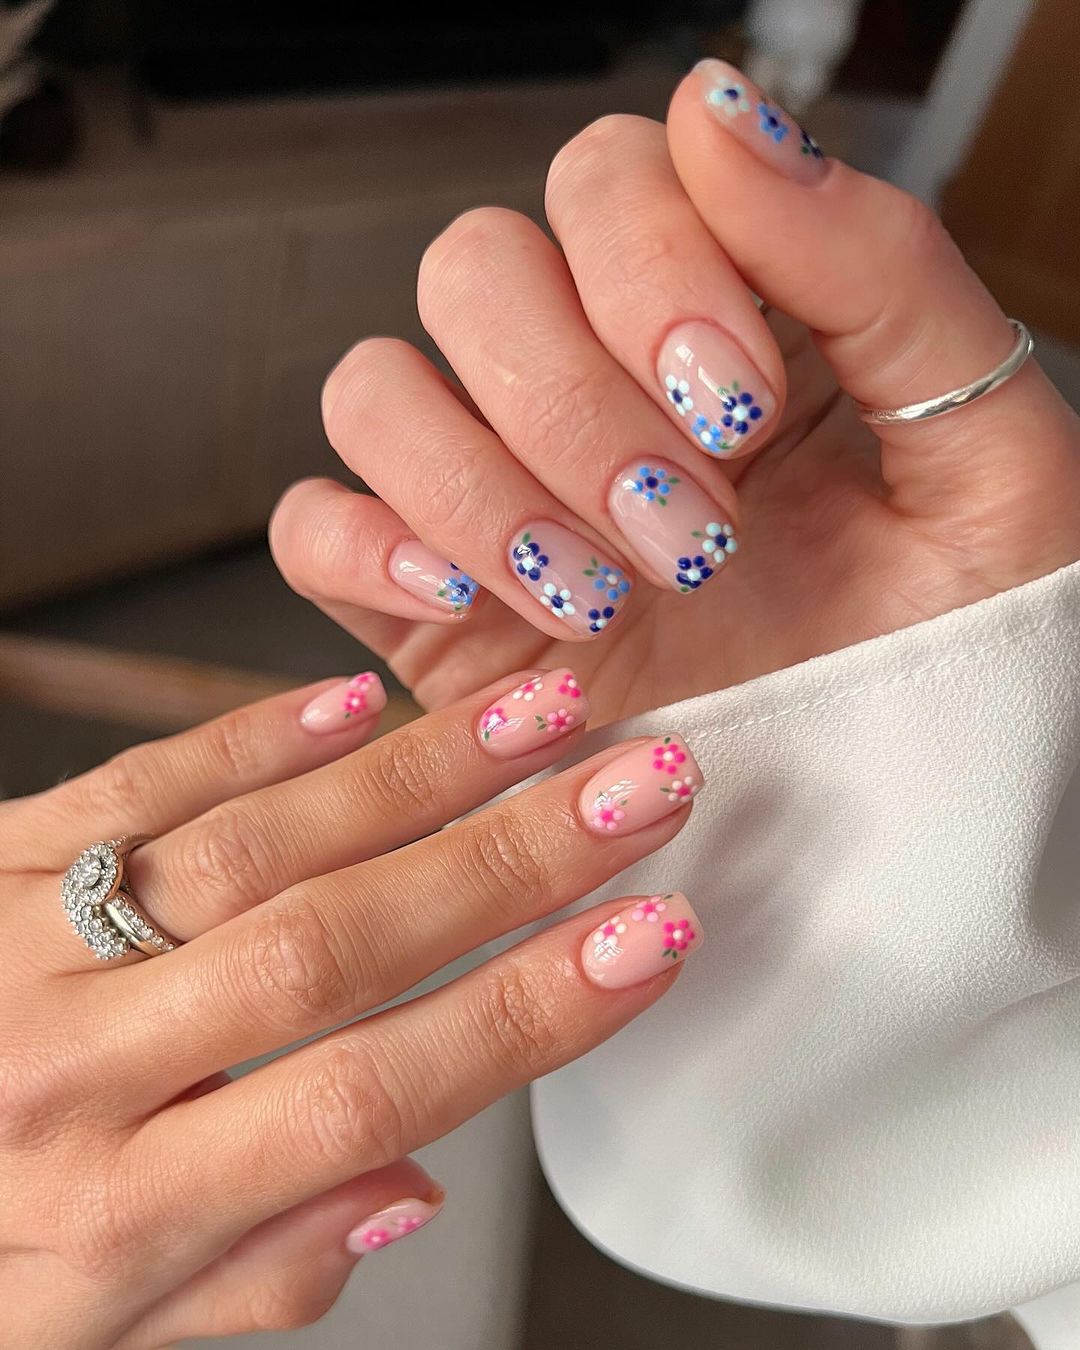
- Gel Polish: OPI GelColor in “Bubble Bath” for the nude base.
- Detailing Brush: For painting the pink and blue flowers.
- Dotting Tool: To create the centers of the flowers.
- UV/LED Lamp: To cure the layers of gel polish.
- Top Coat: To seal the design and add a glossy finish.
How to Create This Look at Home:
- Apply a nude base coat to your nails and cure it under a UV/LED lamp.
- Use a detailing brush to paint the pink and blue flowers on different parts of each nail.
- Cure the design under the lamp, then finish with a top coat to protect the design and add shine.
Bold Retro Florals with Gem Accents
This design brings a retro vibe to the forefront with oversized white flowers outlined against bold, colorful backgrounds. Each nail features a different base color, ranging from soft oranges to cool blues, with each flower centered by a small gem, adding a touch of sparkle. The almond shape of the nails enhances the retro aesthetic, making this a perfect design for those who love to experiment with trendy and bold looks that stand out.
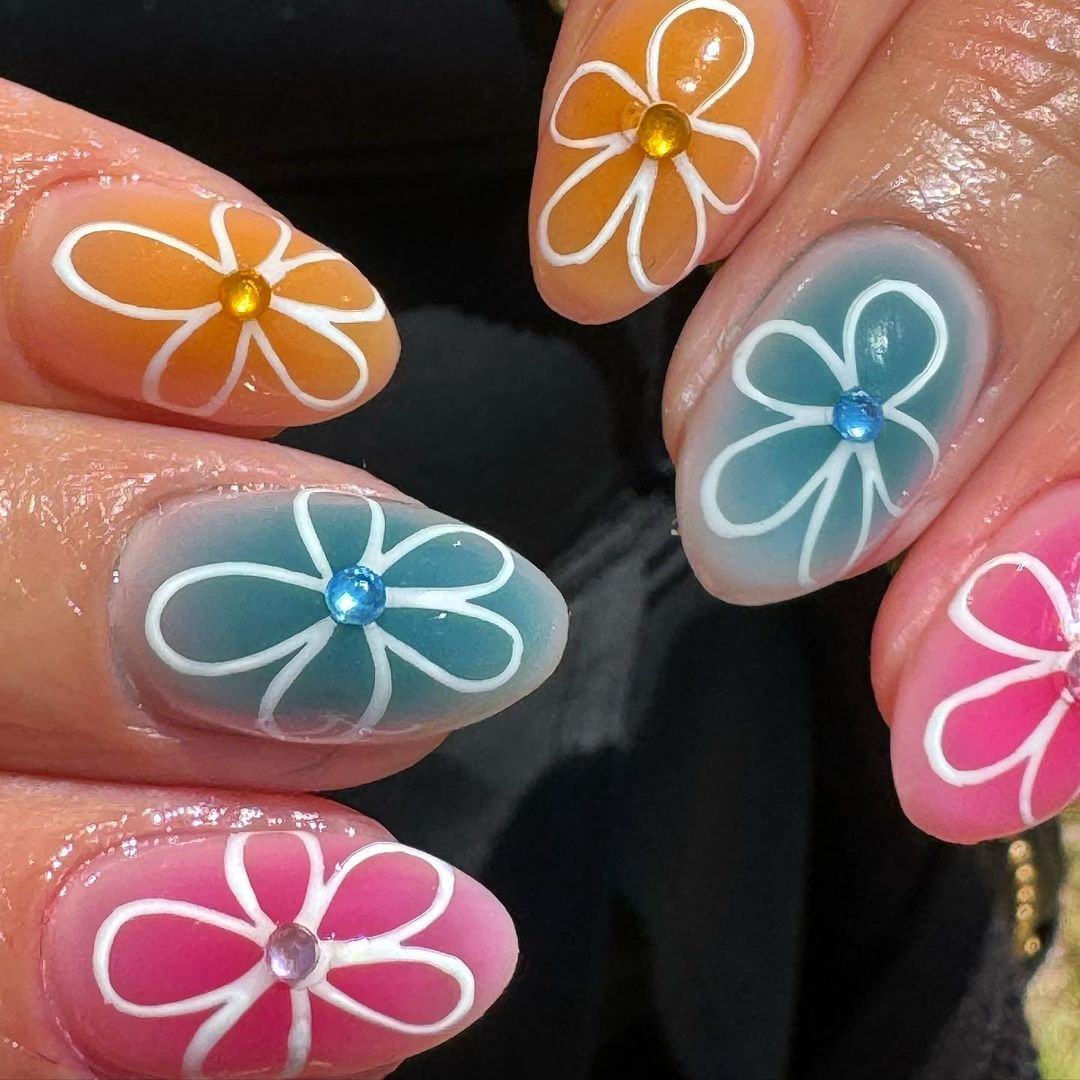
- Gel Polish: OPI GelColor in various shades for the background (orange, pink, blue).
- Detailing Brush: To outline the white flowers.
- Rhinestones: Small gems for the flower centers.
- UV/LED Lamp: For curing each layer of gel polish.
- Top Coat: To secure the rhinestones and add a glossy finish.
How to Create This Look at Home:
- Begin by applying different colored gel polish bases to each nail, curing them under a UV/LED lamp.
- Use a detailing brush to outline the large white flowers on each nail, then cure.
- Add the rhinestones to the center of each flower, securing them with a top coat.
- Cure once more and apply a final top coat for a glossy, durable finish.
Soft Pink Blossom Garden
This nail design is a dreamy and feminine floral creation, featuring soft pink blossoms delicately painted across a nude base. The almond-shaped nails add elegance to the design, which is filled with small, detailed flowers and subtle greenery. The overall effect is one of sophistication and grace, making it an ideal choice for those who prefer a more understated, yet beautifully detailed manicure.
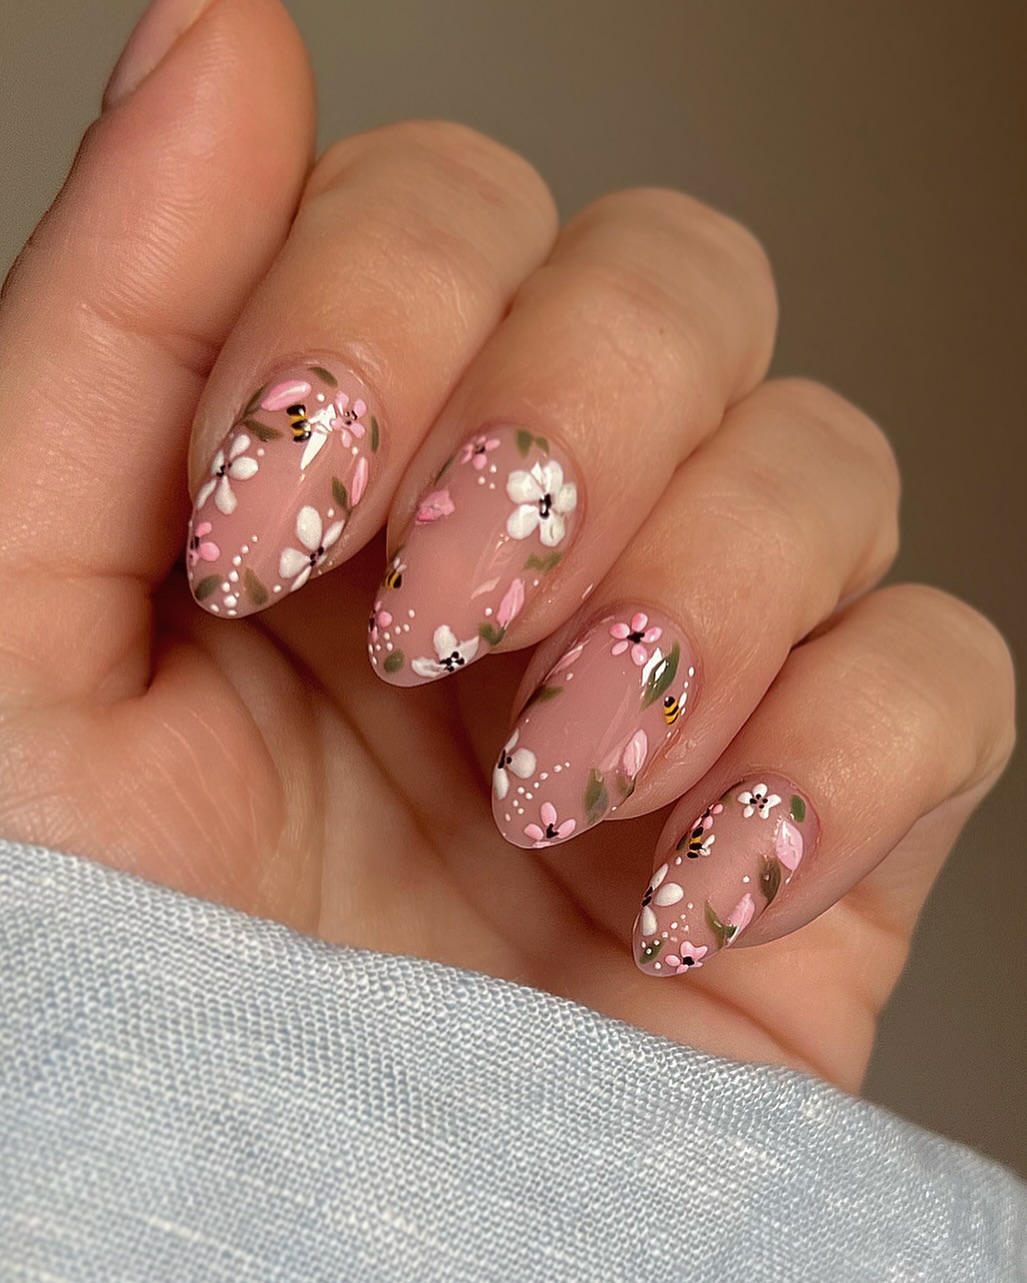
- Gel Polish: Essie Gel Couture in “Pre-Show Jitters” for the base.
- Detailing Brush: For painting the soft pink flowers and green leaves.
- Dotting Tool: To add tiny details and flower centers.
- UV/LED Lamp: For curing the gel polish and designs.
- Top Coat: To protect the design and give it a glossy finish.
How to Create This Look at Home:
- Start by applying a nude gel polish base and curing it under a UV/LED lamp.
- Use a detailing brush to carefully paint the flowers and leaves across each nail, focusing on precision.
- Cure the design under the lamp, then finish with a top coat to seal the artwork and add shine.
Aqua and White Swirls with Daisy Accents
This unique design combines swirling aqua and white patterns with tiny daisy accents, creating a fresh and whimsical look. The short, squared nails are the perfect length to showcase the intricate swirls, while the daisies add a touch of playfulness to the overall design. The combination of colors and patterns makes this manicure both modern and fun, perfect for those who enjoy artistic and trendy nail designs.
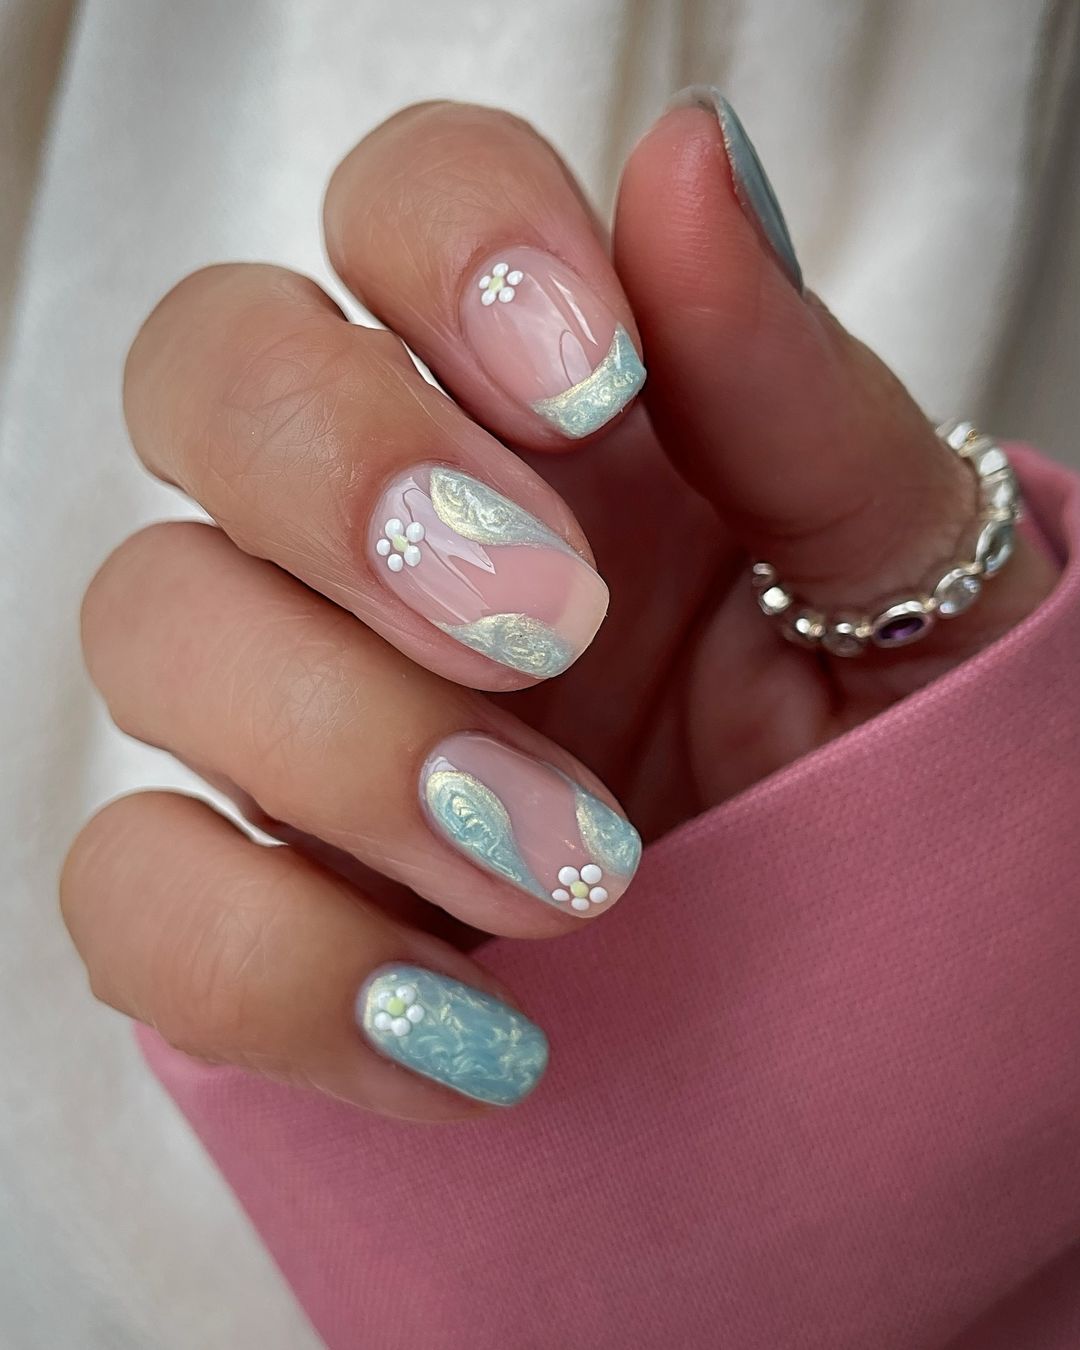
- Gel Polish: OPI GelColor in “Passion” for the base, and “Aqua Blue” for the swirls.
- Detailing Brush: For creating the swirls and painting the daisies.
- Dotting Tool: To add the centers of the daisies.
- UV/LED Lamp: To cure the layers of gel polish.
- Top Coat: To give the design a glossy, long-lasting finish.
How to Create This Look at Home:
- Apply a nude base coat and cure it under a UV/LED lamp.
- Use a detailing brush to create the aqua and white swirls on each nail, curing them as you go.
- Add the daisy accents with the detailing brush, then cure the design.
- Finish with a top coat to protect the design and add a glossy shine.
Vintage Floral with Gold Accents
This nail design exudes vintage charm with its soft, pastel floral patterns paired with delicate gold accents. The short, rounded nails provide a classic base for the intricate floral details, which are painted in soft shades of pink and green. The addition of gold leaf accents adds a touch of luxury, elevating the design to something truly special. This look is perfect for those who appreciate a timeless and elegant manicure with a hint of glamour.
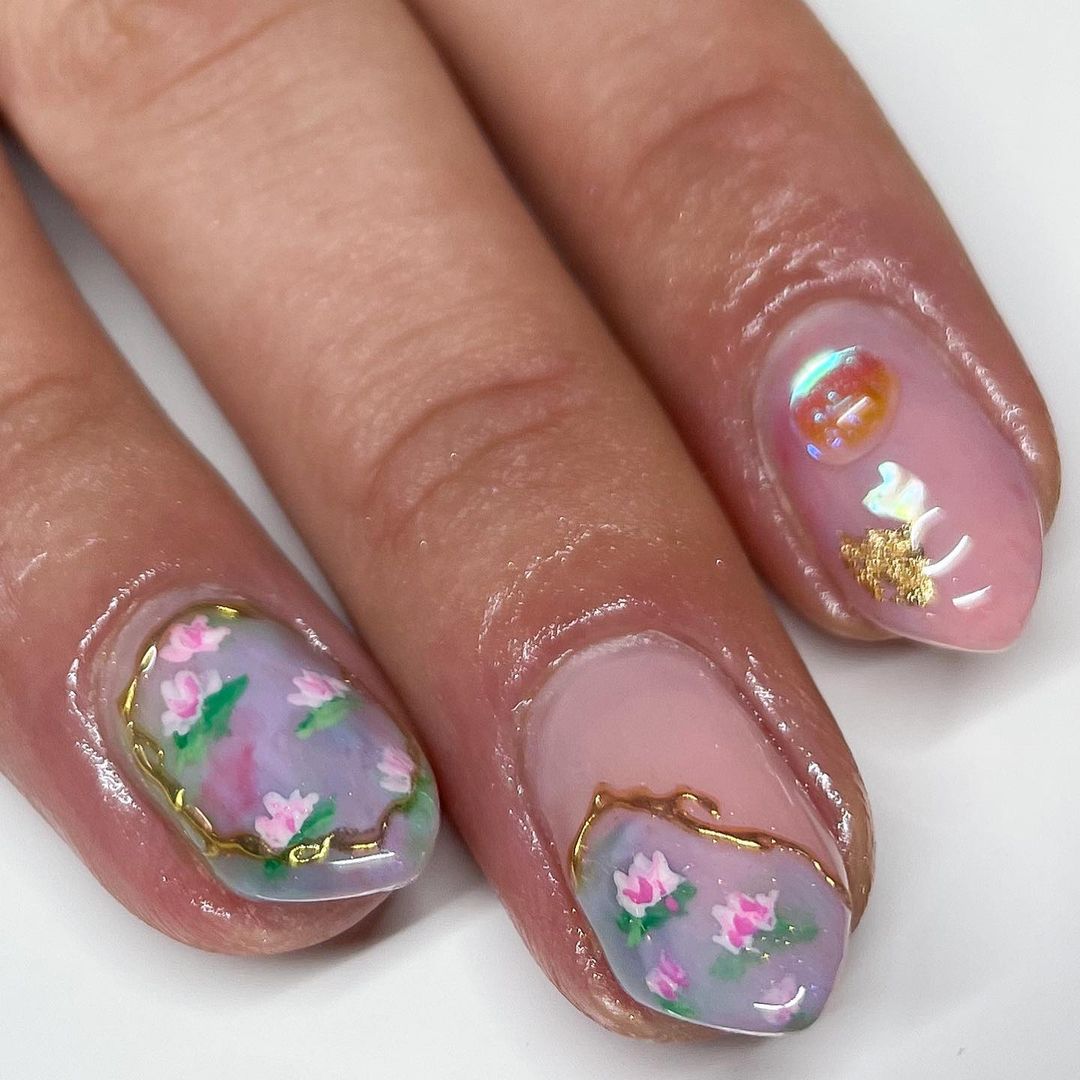
- Gel Polish: Essie Gel Couture in “Satin Slipper” for the base.
- Detailing Brush: For painting the vintage floral patterns.
- Gold Leaf: For adding the gold accents.
- UV/LED Lamp: To cure the layers of polish and secure the gold leaf.
- Top Coat: To seal the design and add a high-shine finish.
How to Create This Look at Home:
- Begin with a nude gel polish base, curing it under a UV/LED lamp.
- Paint the floral patterns using a detailing brush, then cure the design.
- Add the gold leaf accents, pressing them gently onto the nail, and cure once more.
- Finish with a top coat to protect the design and add a glossy finish.
Dark Petals on Nude French
This elegant design features dark green petals against a nude French base, creating a striking contrast that is both modern and sophisticated. The almond-shaped nails elongate the fingers, while the dark petals add depth and interest to the design. This manicure is ideal for those who prefer a minimalist yet impactful look, blending classic French tips with bold, nature-inspired art.
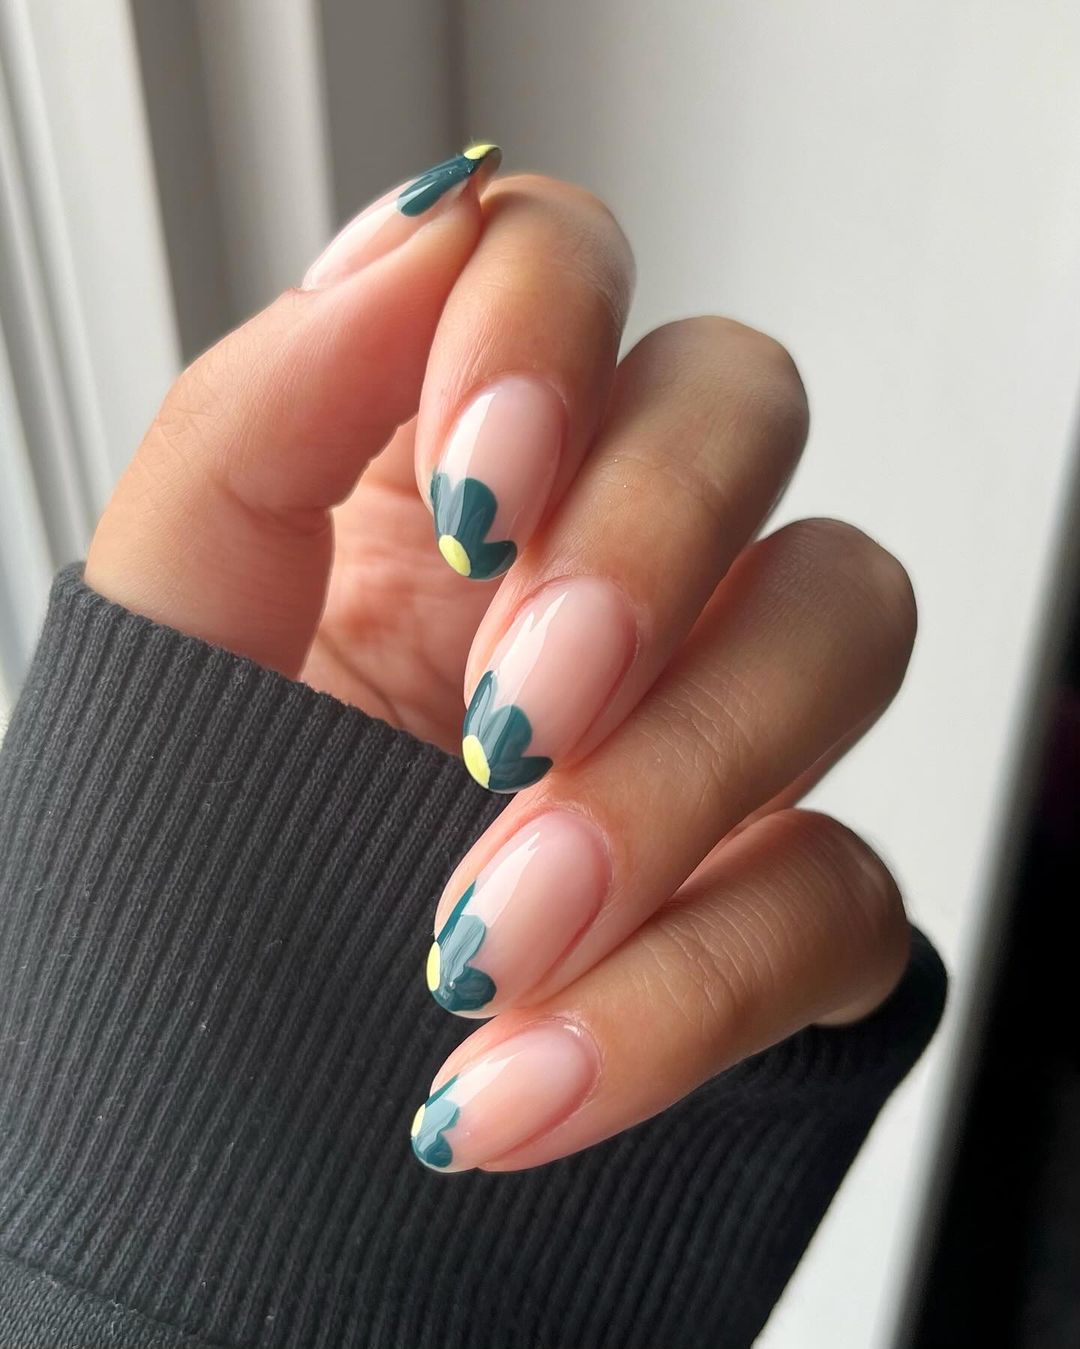
- Gel Polish: OPI GelColor in “Put it in Neutral” for the base, and dark green for the petals.
- Detailing Brush: To paint the dark green petals.
- UV/LED Lamp: To cure the layers of gel polish.
- Top Coat: To seal the design and add a glossy finish.
How to Create This Look at Home:
- Apply a nude base coat and cure it under a UV/LED lamp.
- Paint the dark green petals using a detailing brush, ensuring each petal is perfectly shaped.
- Cure the design under the lamp, then finish with a top coat to add shine and protect the artwork.
Multi-Colored Floral French Tips
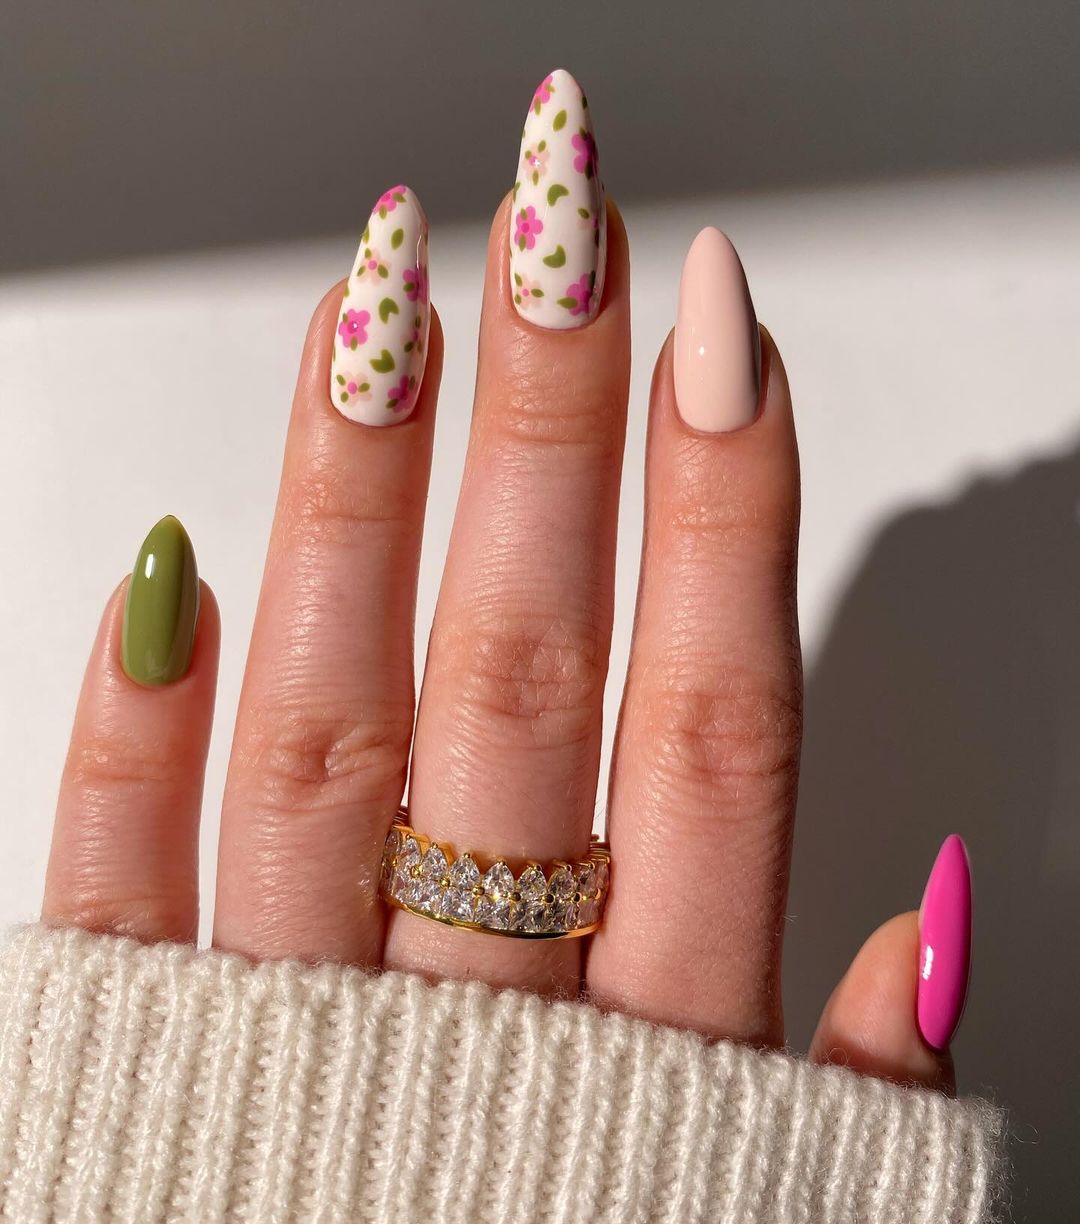
This fun and colorful design takes the classic French tip and adds a floral twist, with each nail featuring different colored flowers on a white tip. The almond-shaped nails are the perfect canvas for this playful and trendy design, making it a great choice for those who love bright, bold nails with a touch of whimsy. The mix of colors and patterns adds a cheerful vibe, perfect for any occasion.
- Gel Polish: OPI GelColor in “Alpine Snow” for the white tips, and various colors for the flowers.
- Detailing Brush: To paint the floral patterns.
- Dotting Tool: To add centers to the flowers.
- UV/LED Lamp: To cure the layers of polish.
- Top Coat: To give the design a glossy finish and ensure it lasts.
How to Create This Look at Home:
- Start with a white French tip on each nail and cure under a UV/LED lamp.
- Use a detailing brush to paint the floral patterns in different colors on each tip.
- Cure the design under the lamp, then finish with a top coat for a glossy, long-lasting finish.
FAQ
Q: How long does a 3D flower nail design last?
A: With proper care, 3D flower nails can last up to 3 weeks. It’s important to avoid activities that could damage the 3D elements, such as heavy cleaning or manual labor.
Q: Can I create 3D flowers on short nails?
A: Absolutely! 3D flowers can be created on nails of any length, though the design may need to be adjusted for shorter nails to ensure it fits proportionately.
Q: What is the best way to remove 3D flower nails?
A: The best way to remove 3D flower nails is to soak them in acetone for 10-15 minutes, then gently use a cuticle pusher to lift the design off your nails.
Save Pin
