Fall is here, and with it comes a new wave of nail art trends that perfectly capture the essence of the season. If you’re a fan of green hues, you’re in for a treat. From simple designs to intricate art, there’s something for everyone. In this article, we’ll explore various fall green nails ideas, providing you with detailed descriptions and professional tips. Let’s dive into the vibrant world of green nails for autumn!
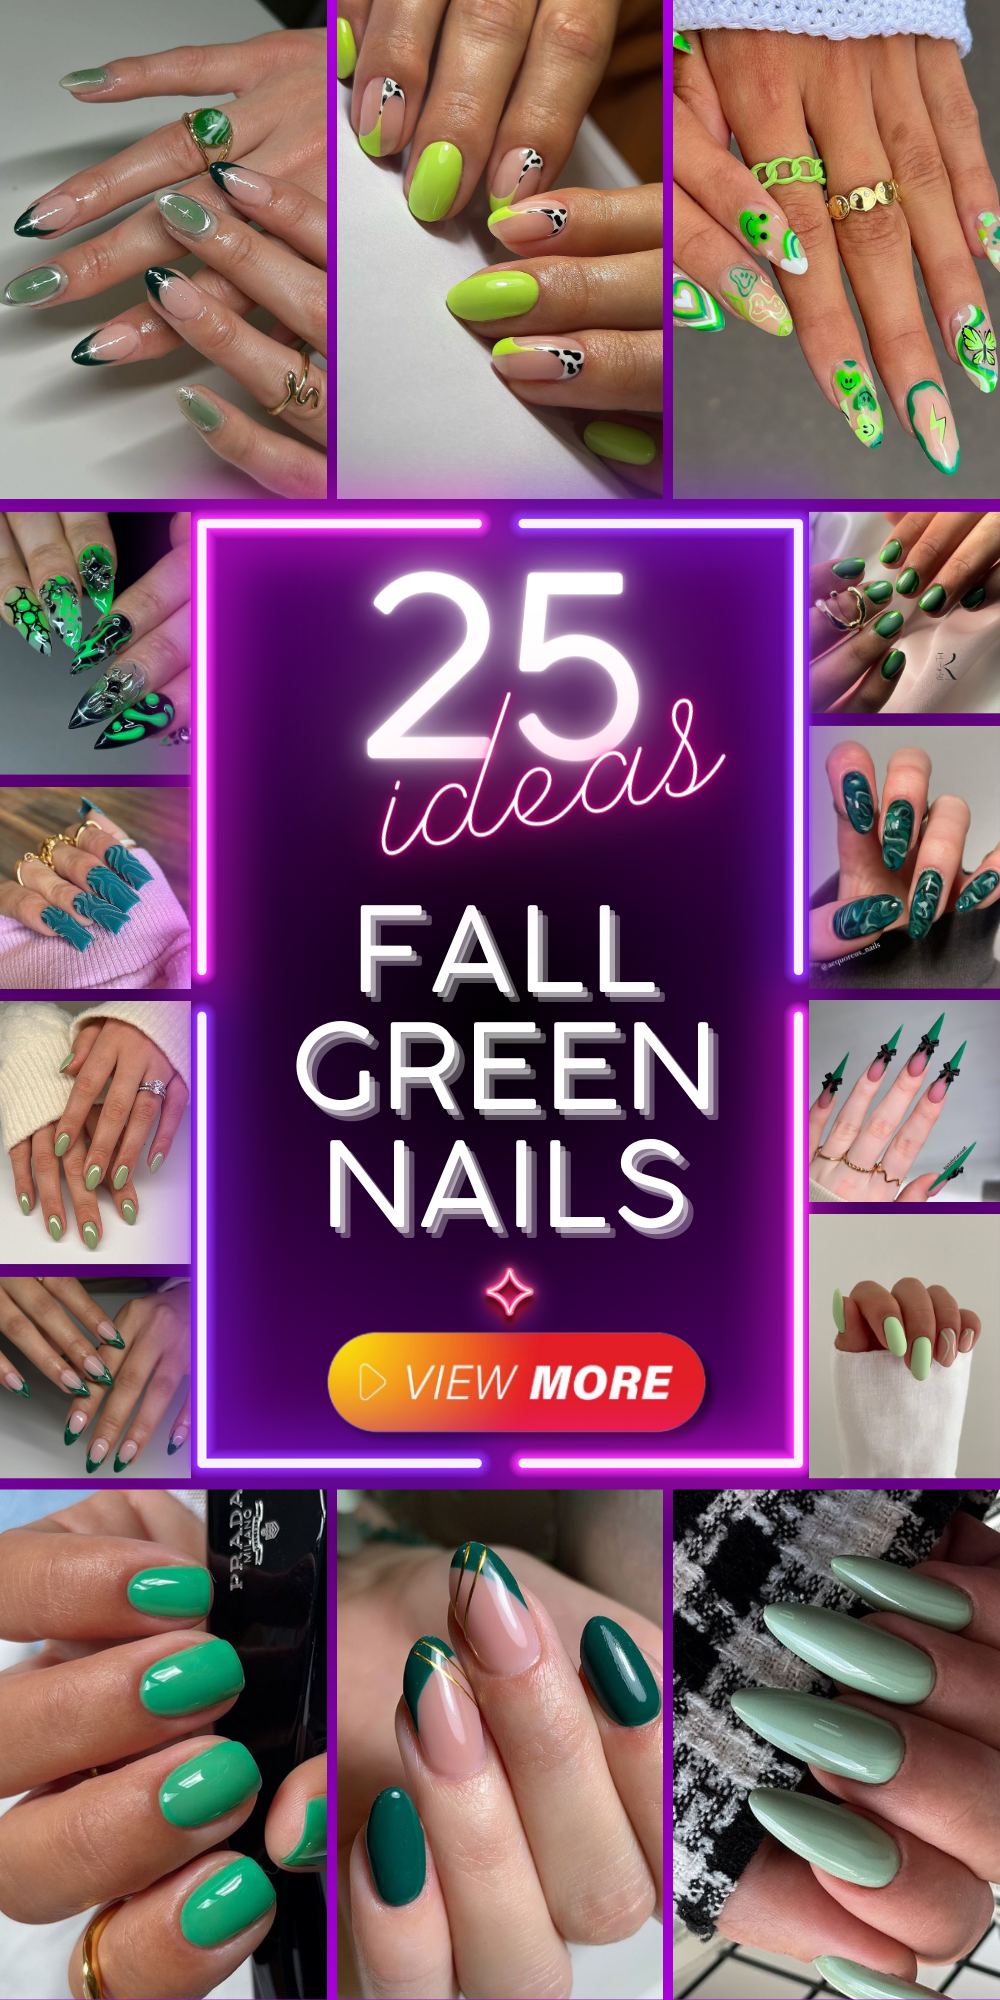
Lime Green French Tip with Cow Print Accents
This nail design combines the vibrant energy of lime green with the playful nature of cow print accents. The French tip style is given a modern twist, making it a standout design for fall. The lime green polish pops against the natural nail base, while the cow print adds a fun, whimsical touch. This look is perfect for those who want to embrace bold colors and unique patterns this season.
-
- Lime green polish (e.g., OPI Nail Lacquer in “Life Gave Me Lemons”)
- Black and white polish for cow print (e.g., OPI Nail Lacquer in “Alpine Snow” and “Black Onyx”)
- Thin nail art brush
- Clear top coat (e.g., OPI Top Coat)
Instructions to Create at Home
- Start with clean, filed nails and apply a base coat.
- Paint the tips of your nails with the lime green polish.
- Using a thin nail art brush, create cow print patterns with the black and white polishes.
- Seal the design with a clear top coat for a glossy finish.
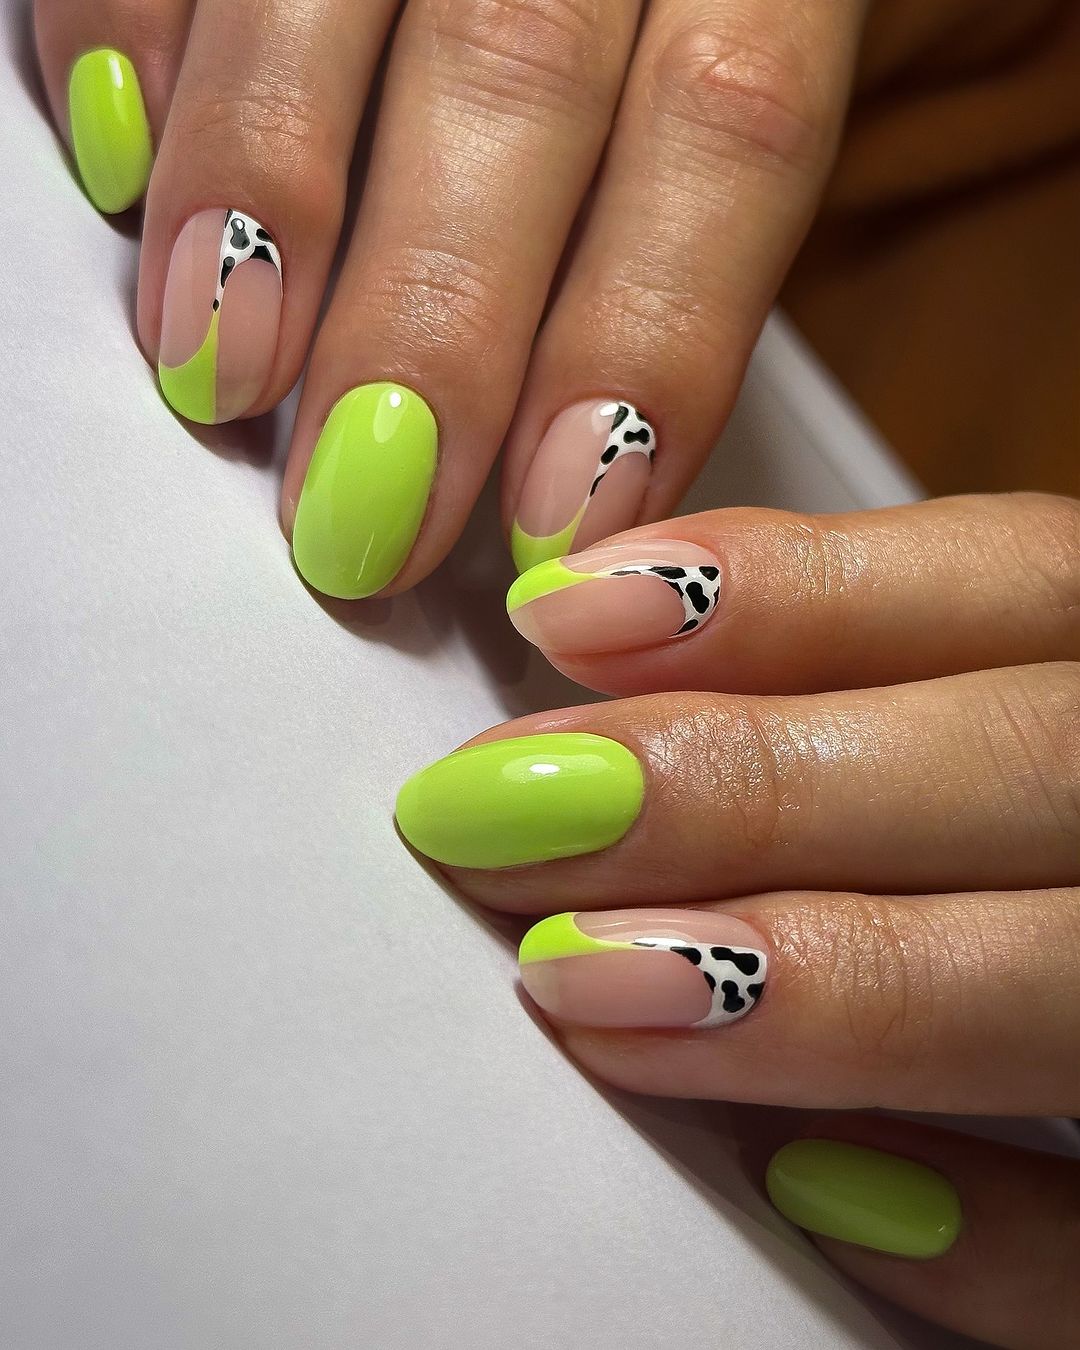
Psychedelic Green Patterns
Dive into the retro vibe with these psychedelic green patterns. This design features a mix of green shades and abstract patterns, including hearts, smiley faces, and wavy lines. The playful and eclectic mix of designs makes this manicure a fun choice for those who love to experiment with nail art.
-
- Various shades of green polish (e.g., OPI Nail Lacquer in “Envy the Adventure” and “Don’t Tell a Sol”)
- Nail art brushes and dotting tools
- Clear top coat (e.g., OPI Top Coat)
Instructions to Create at Home
- Apply a base coat to your nails.
- Paint each nail with a different shade of green as a base.
- Use nail art brushes and dotting tools to create various patterns and designs on each nail.
- Finish with a clear top coat to protect the design.
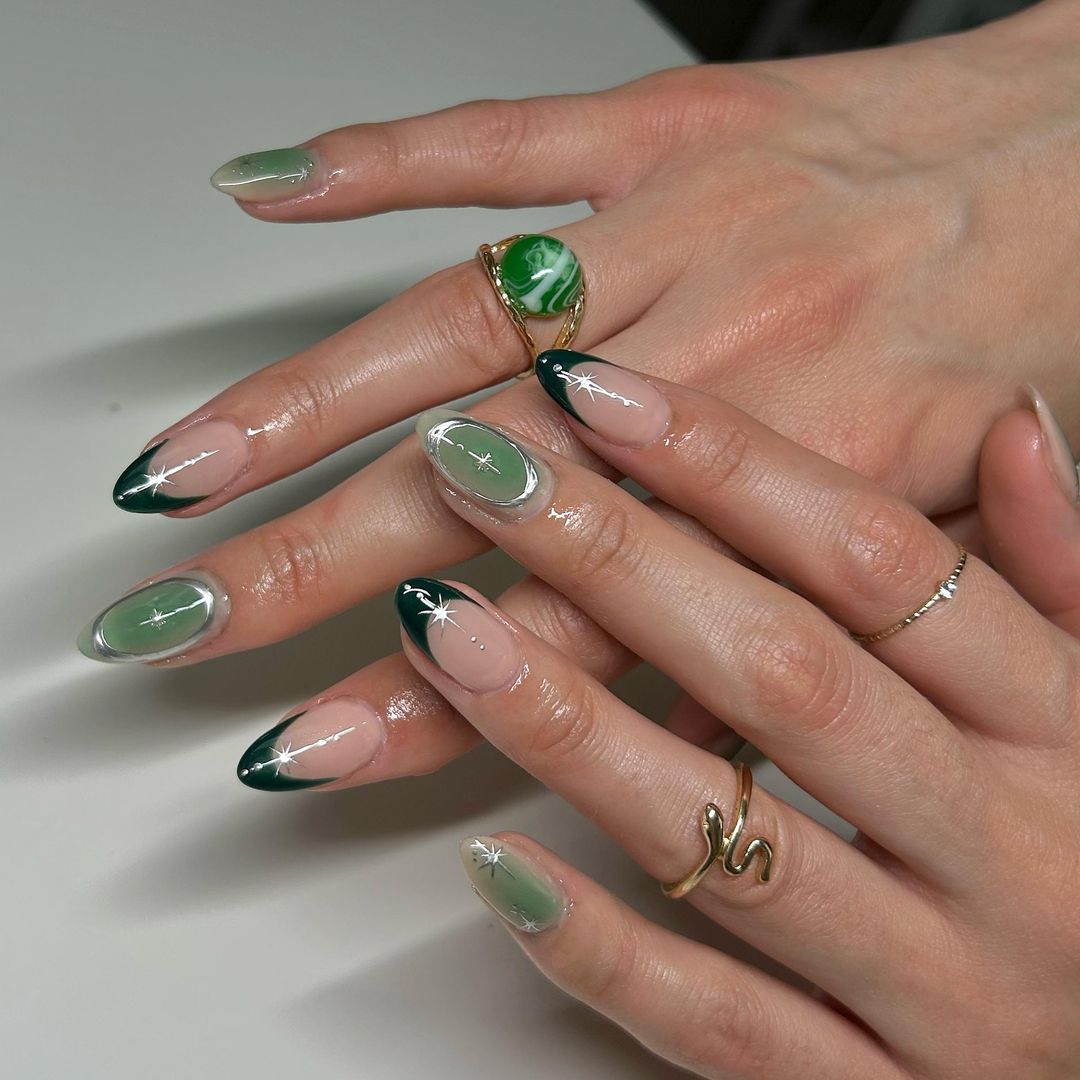
Elegant Dark Green with Star Accents
This elegant design features dark green nails with delicate star accents. The contrast between the dark green polish and the white star details creates a sophisticated look that’s perfect for autumn. This manicure is ideal for those who prefer a more subtle yet stylish nail design.
-
- Dark green polish (e.g., OPI Nail Lacquer in “Stay Off the Lawn”)
- White polish for star accents (e.g., OPI Nail Lacquer in “Alpine Snow”)
- Thin nail art brush
- Clear top coat (e.g., OPI Top Coat)
Instructions to Create at Home
- Start with clean, filed nails and apply a base coat.
- Paint your nails with the dark green polish.
- Using a thin nail art brush, add small star accents with the white polish.
- Seal the design with a clear top coat for a polished finish.
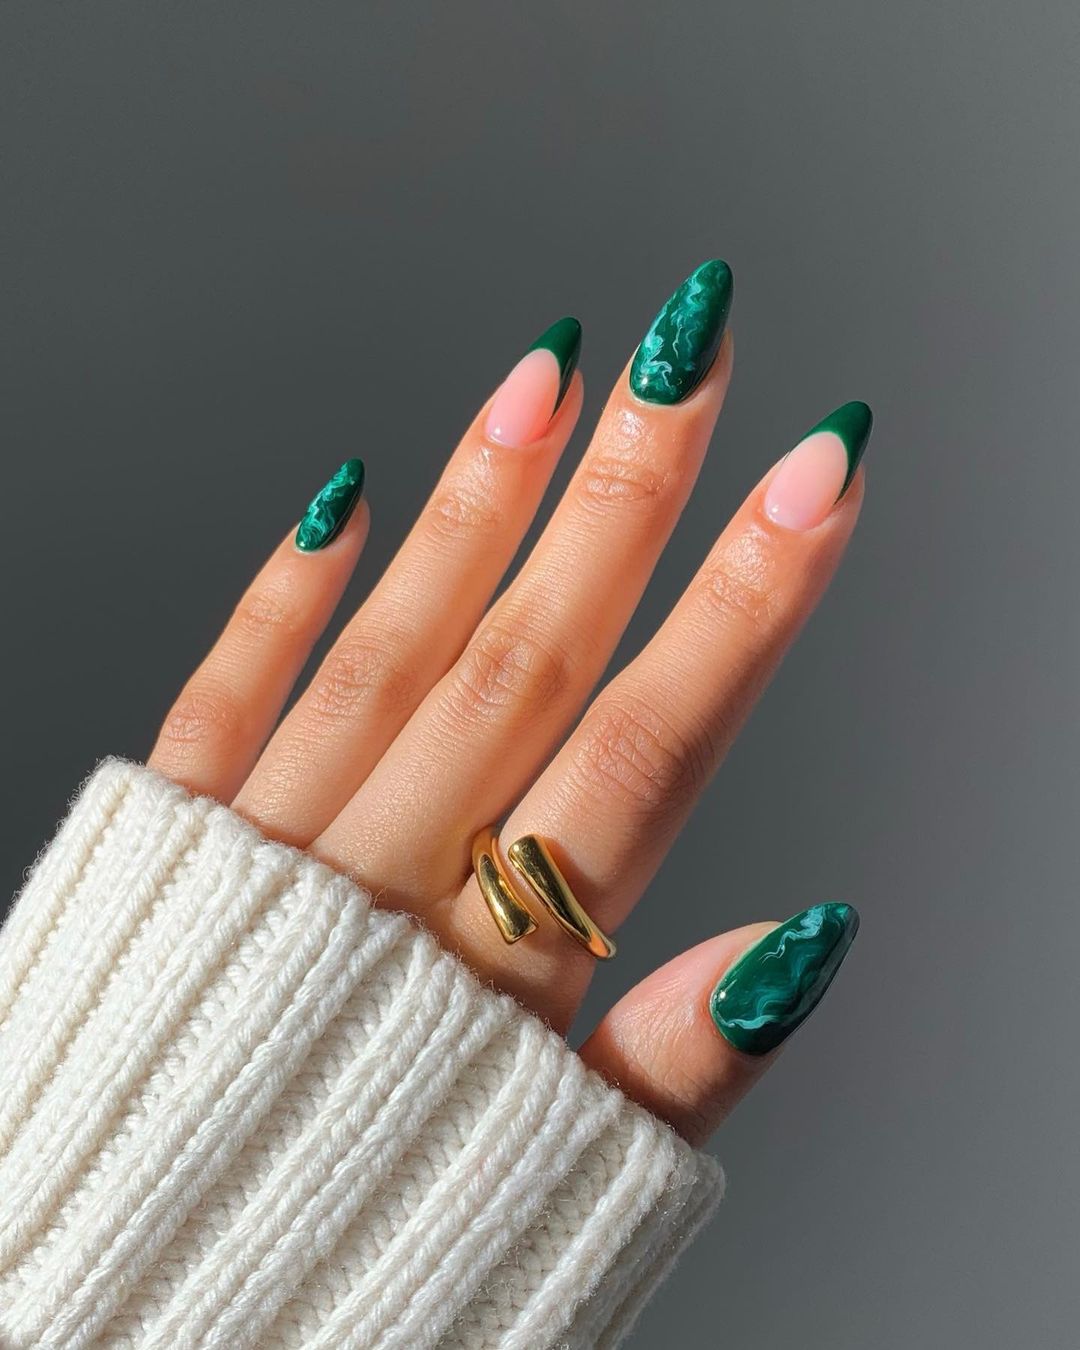
Marble Green Almond Nails
This design is a stunning combination of dark green and marble effect, creating a sophisticated and eye-catching look. The nails feature a deep green base with marbled accents on select nails, providing a luxurious and artistic vibe. The almond shape adds elegance and elongates the fingers, making this manicure perfect for those who appreciate detailed and unique nail art.
-
- Dark green polish (e.g., OPI Nail Lacquer in “Stay Off the Lawn”)
- White polish for marbling effect (e.g., OPI Nail Lacquer in “Alpine Snow”)
- Thin nail art brush
- Marble effect tool or a fine detail brush
- Clear top coat (e.g., OPI Top Coat)
Instructions to Create at Home
- Begin with clean, shaped nails and apply a base coat.
- Paint all nails with the dark green polish.
- For the marble effect, dab small amounts of white polish onto the nail and use the marble effect tool or fine detail brush to swirl the colors together.
- Allow the design to dry and finish with a clear top coat to protect and add shine to your nails.
Save Pin
Sage Green Stiletto Nails
Sage green is a perfect color for fall, offering a muted yet striking look. These stiletto nails are painted with a solid sage green polish, creating a sleek and modern appearance. The long, pointed shape of the nails adds a dramatic flair, making this design ideal for those who want to make a bold statement with their manicure.
-
- Sage green polish (e.g., OPI Nail Lacquer in “Sage Is the Rage”)
- Base coat
- Clear top coat (e.g., OPI Top Coat)
Instructions to Create at Home
- Prep your nails by filing them into a stiletto shape and applying a base coat.
- Apply two coats of sage green polish, allowing each coat to dry completely.
- Seal the look with a clear top coat to ensure longevity and add a glossy finish.
Bright Green Short Nails
For a pop of color that’s both fun and fresh, these bright green short nails are the way to go. The vibrant green polish stands out beautifully on short nails, making them look chic and playful. This design is perfect for those who prefer a more manageable nail length but still want a striking color.
-
- Bright green polish (e.g., OPI Nail Lacquer in “I’m Sooo Swamped!”)
- Base coat
- Clear top coat (e.g., OPI Top Coat)
Instructions to Create at Home
- Start with clean, trimmed nails and apply a base coat.
- Paint your nails with two coats of bright green polish, letting each coat dry thoroughly.
- Finish with a clear top coat to give your nails a shiny, protective layer.
Dark Green and Gold Stripes
This sophisticated design features a dark green polish complemented by delicate gold stripes on some nails. The combination of solid green nails with nails featuring a nude base and gold stripe accents creates a chic and elegant look. The almond shape adds to the overall sophistication, making it a perfect choice for a classy yet trendy fall manicure.

-
- Dark green polish (e.g., OPI Nail Lacquer in “Stay Off the Lawn”)
- Nude polish (e.g., OPI Nail Lacquer in “Bubble Bath”)
- Gold striping tape or gold nail art brush
- Clear top coat (e.g., OPI Top Coat)
Instructions to Create at Home
- Start by applying a base coat to clean, filed nails.
- Paint some nails with the dark green polish and others with the nude polish.
- Once the nude polish is dry, use gold striping tape or a gold nail art brush to create thin stripes.
- Finish with a clear top coat to seal and protect the design.
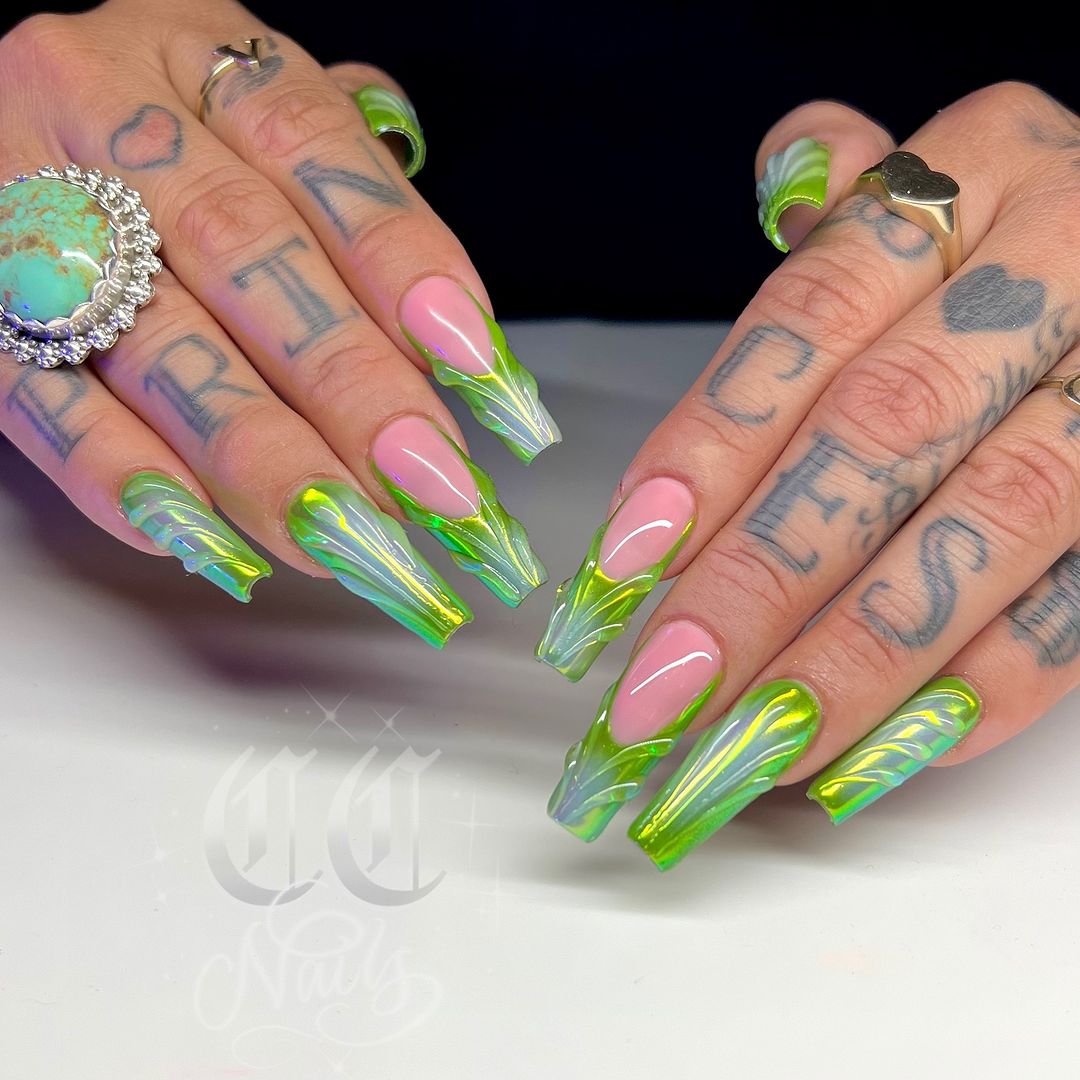
Neon Green 3D Art
This bold design features neon green with striking 3D art, creating a dramatic and edgy look. The intricate 3D details are perfect for making a statement and showcasing your creativity. This design is ideal for those who love to experiment with textures and standout nail art.
-
- Neon green polish (e.g., OPI Nail Lacquer in “Green Come True”)
- Clear pink polish for base
- 3D nail art gel or sculpting gel
- UV/LED lamp
- Clear top coat (e.g., OPI Top Coat)
Instructions to Create at Home
- Apply a base coat and paint your nails with the clear pink polish.
- Use 3D nail art gel or sculpting gel to create the raised designs on the nails.
- Cure the 3D designs under a UV/LED lamp as per the product instructions.
- Paint over the 3D designs with the neon green polish.
- Seal everything with a clear top coat for added shine and protection.
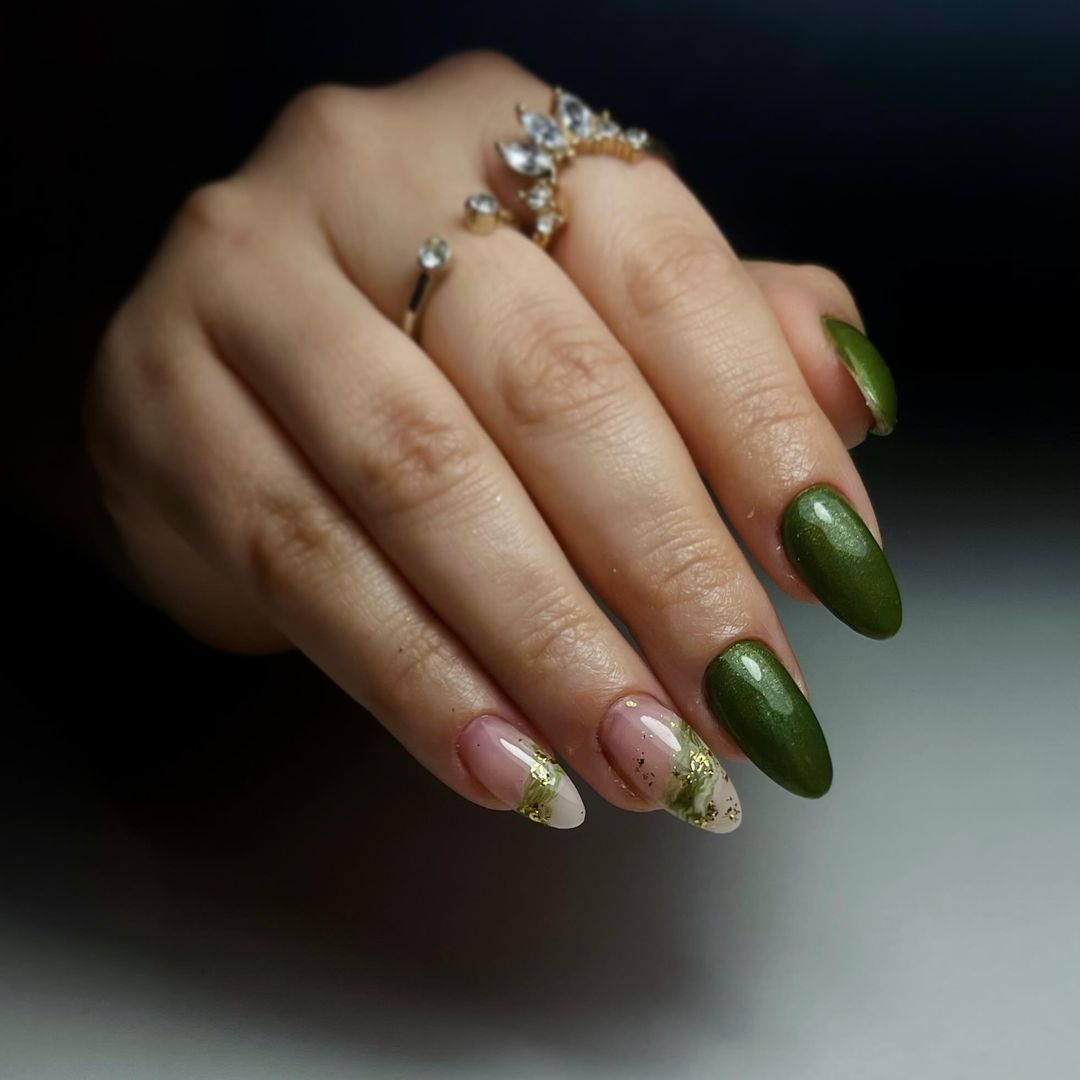
Olive Green with Gold Foil
This elegant design features an olive green polish paired with gold foil accents. The combination of the earthy green and shiny gold creates a sophisticated and luxurious look. The almond shape adds to the elegance, making it perfect for a refined autumn style.
-
- Olive green polish (e.g., OPI Nail Lacquer in “Olive for Green”)
- Nude polish (e.g., OPI Nail Lacquer in “Be There in a Prosecco”)
- Gold foil
- Clear top coat (e.g., OPI Top Coat)
Instructions to Create at Home
- Start with a base coat on clean, shaped nails.
- Apply olive green polish on some nails and nude polish on others.
- Once the nude polish is dry, gently press gold foil onto the nails.
- Seal with a clear top coat to ensure the foil stays in place and adds shine.
Save Pin
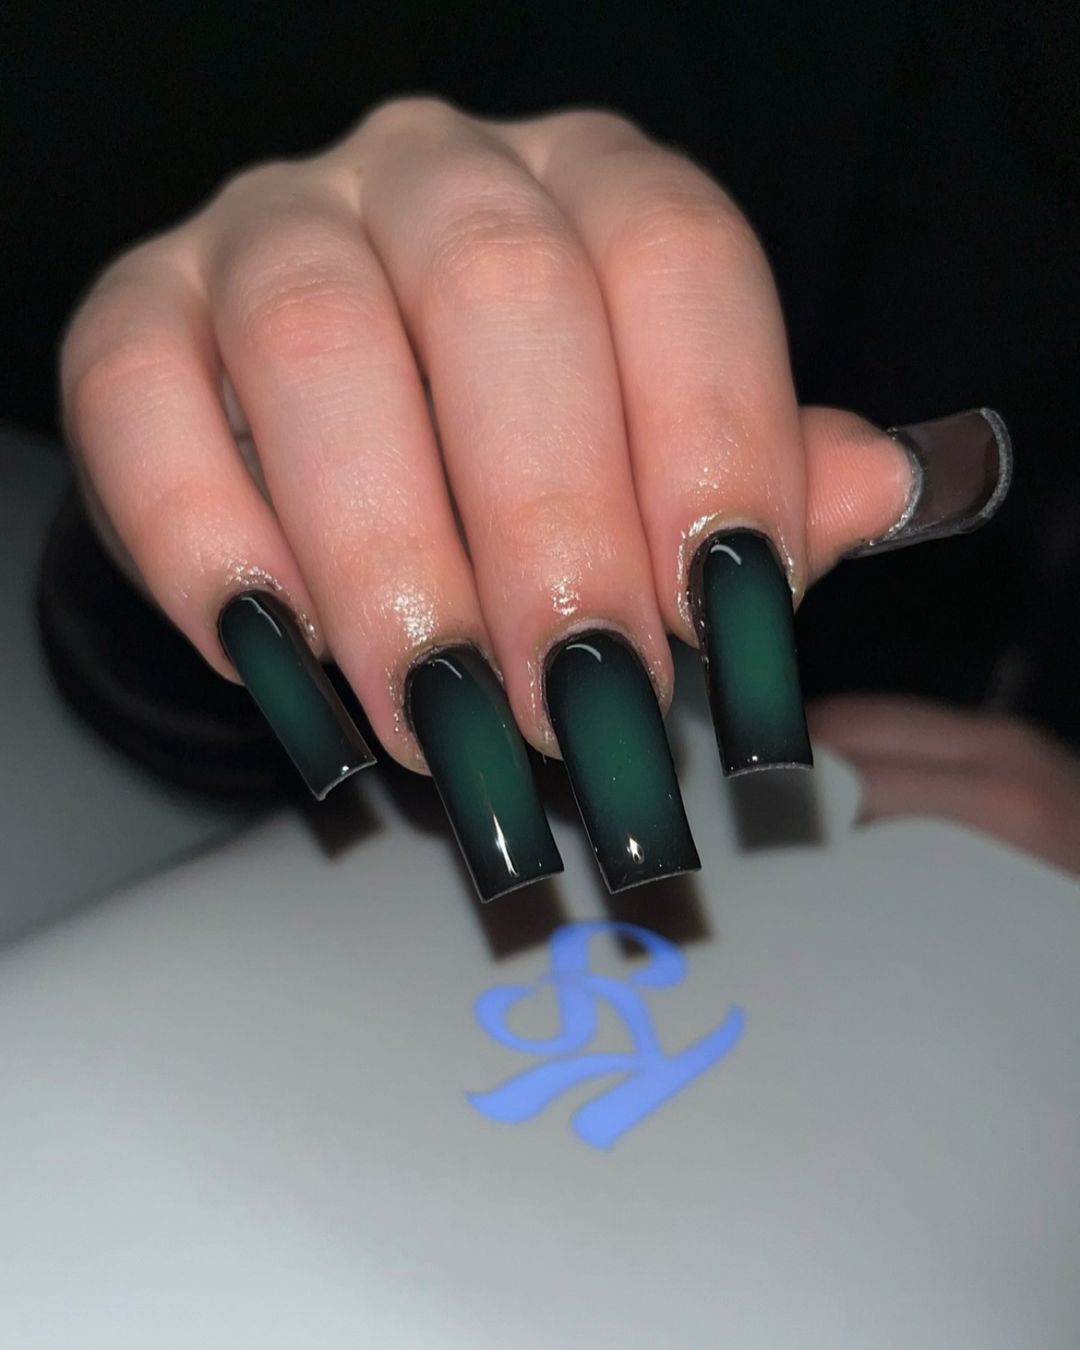
Dark Green Gradient Coffin Nails
This dramatic look features dark green gradient nails in a coffin shape. The gradient effect, transitioning from black to dark green, creates a mysterious and elegant vibe. This design is perfect for those who want a bold and striking manicure.
-
- Black polish (e.g., OPI Nail Lacquer in “Black Onyx”)
- Dark green polish (e.g., OPI Nail Lacquer in “Stay Off the Lawn”)
- Makeup sponge
- Clear top coat (e.g., OPI Top Coat)
Instructions to Create at Home
- Apply a base coat to your nails.
- Paint a stripe of black and a stripe of dark green polish next to each other on a makeup sponge.
- Dab the sponge onto your nails to create the gradient effect.
- Repeat until you achieve the desired opacity.
- Finish with a clear top coat to blend the colors and add a glossy finish.
Cute Skull French Tips
This playful design features cute skulls and green French tips. The skulls add a fun and spooky touch, perfect for the fall season. The glitter green tips add a bit of sparkle and playfulness to the design.
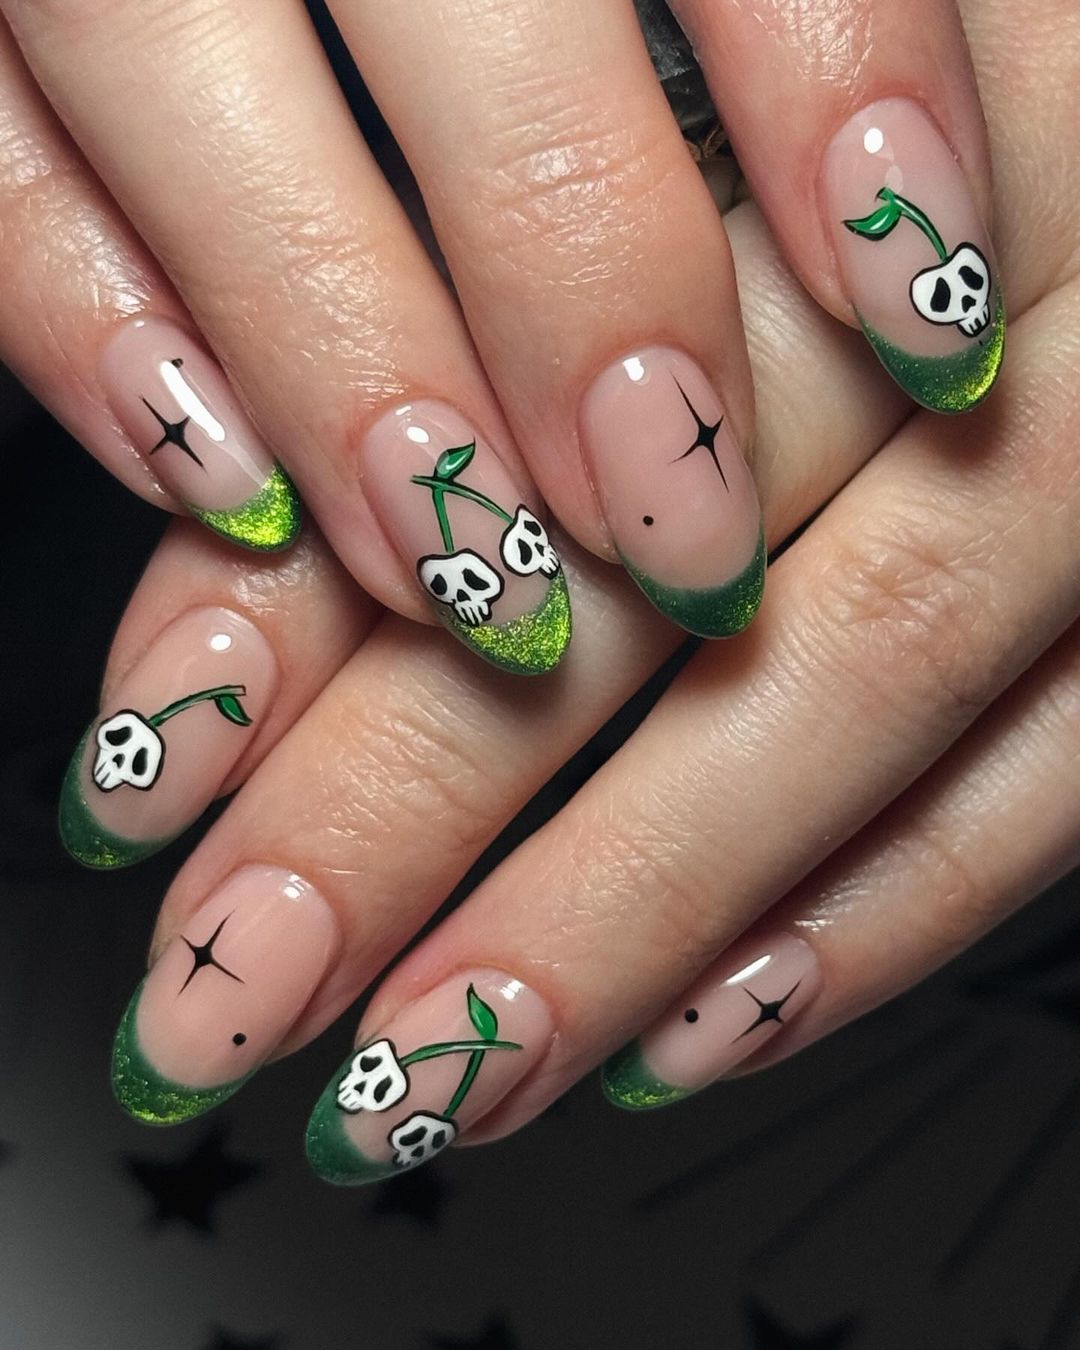
-
- Green glitter polish (e.g., OPI Nail Lacquer in “Spark de Triomphe”)
- Nude polish (e.g., OPI Nail Lacquer in “Bubble Bath”)
- Black and white polish for skulls (e.g., OPI Nail Lacquer in “Alpine Snow” and “Black Onyx”)
- Thin nail art brush
- Clear top coat (e.g., OPI Top Coat)
Instructions to Create at Home
- Start with a base coat and apply nude polish to your nails.
- Paint the tips of your nails with green glitter polish.
- Use a thin nail art brush to draw small skulls with the black and white polish.
- Seal the design with a clear top coat.
Lightning Bolt Nail Art
This electrifying design features green lightning bolts against a black background. The bold contrast and sharp lines make this manicure truly eye-catching. The stiletto shape adds to the edgy and daring look.

-
- Black polish (e.g., OPI Nail Lacquer in “Black Onyx”)
- Green polish for lightning bolts (e.g., OPI Nail Lacquer in “I’m Sooo Swamped!”)
- Thin nail art brush
- Clear top coat (e.g., OPI Top Coat)
Instructions to Create at Home
- Apply a base coat and paint your nails with black polish.
- Use a thin nail art brush to paint green lightning bolts on each nail.
- Finish with a clear top coat to add shine and protect the design.
Green Abstract Patterns
This intricate design features various shades of green with abstract patterns and details. The mix of dark and light green hues, combined with wavy and dotted lines, creates a dynamic and modern look. This manicure is perfect for those who appreciate art-inspired nails that are both unique and stylish.
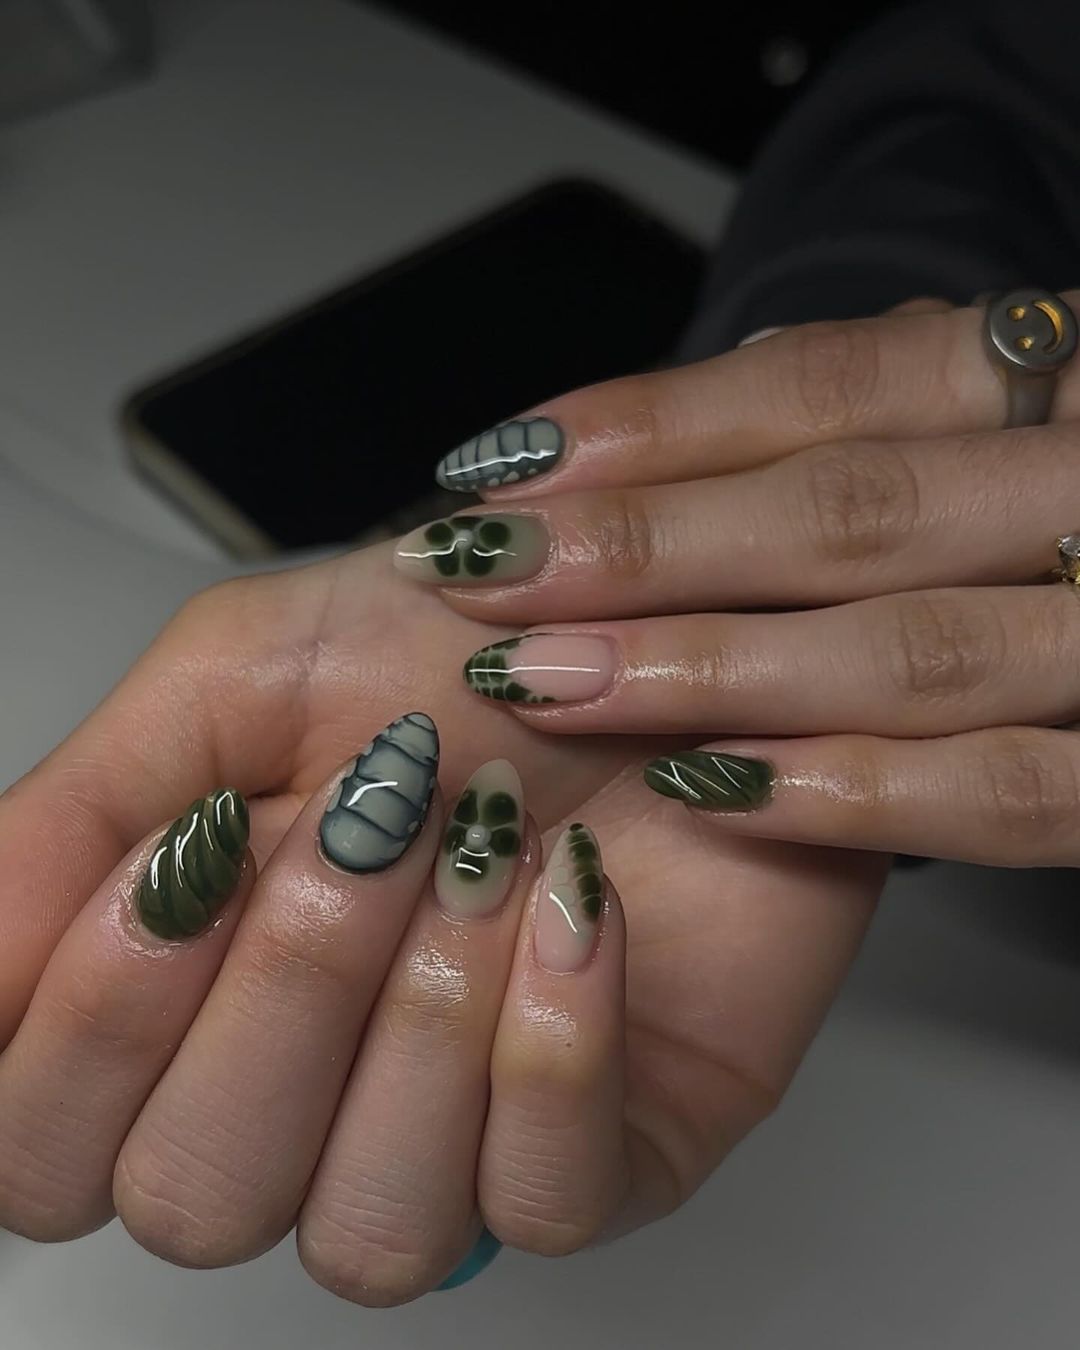
-
- Dark green polish (e.g., OPI Nail Lacquer in “Stay Off the Lawn”)
- Light green polish (e.g., OPI Nail Lacquer in “How Does Your Zen Garden Grow?”)
- Black polish for detailing (e.g., OPI Nail Lacquer in “Black Onyx”)
- Thin nail art brushes
- Clear top coat (e.g., OPI Top Coat)
Instructions to Create at Home
- Apply a base coat and paint your nails with a mix of dark and light green polishes.
- Using thin nail art brushes, create abstract patterns with the black polish.
- Add dots, lines, and waves for a dynamic effect.
- Seal with a clear top coat to protect your design.
Green Glitter and Floral Accents
This design combines soft green shades with glitter and pressed floral accents. The coffin shape adds elegance, while the combination of glitter and floral elements creates a fresh and feminine look. This manicure is ideal for those who love nature-inspired designs with a touch of sparkle.
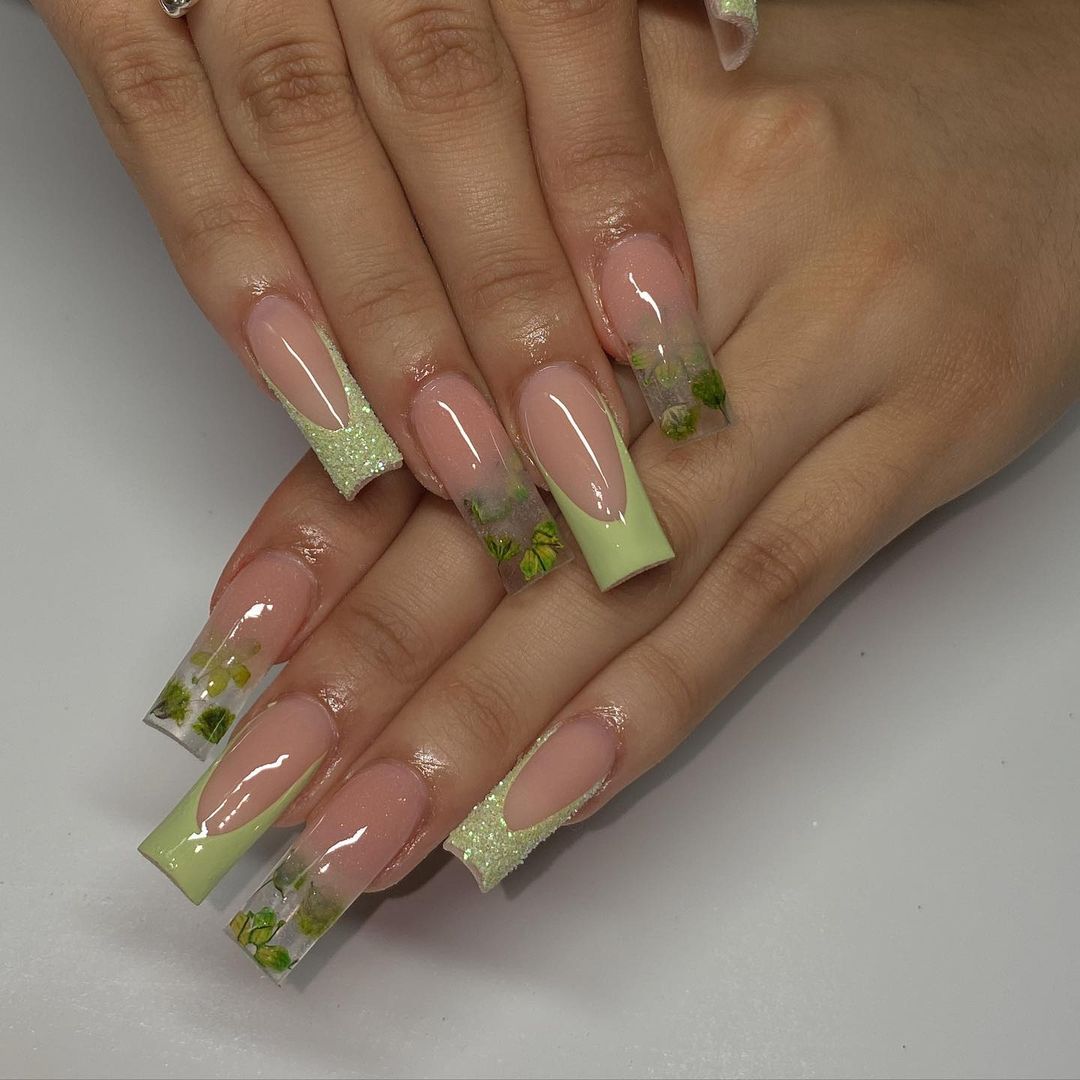
-
- Soft green polish (e.g., OPI Nail Lacquer in “This Isn’t Greenland”)
- Clear polish for base
- Green glitter polish (e.g., OPI Nail Lacquer in “Fresh Frog of Bel Air”)
- Pressed floral elements
- Clear top coat (e.g., OPI Top Coat)
Instructions to Create at Home
- Apply a base coat and paint your nails with clear polish.
- Add the green glitter polish to some nails for a sparkly effect.
- Apply the pressed floral elements onto the clear base while it’s still tacky.
- Seal with a clear top coat to ensure the elements stay in place and add shine.
Olive and Dark Green Geometric
This sophisticated design features a combination of olive and dark green shades with geometric accents. The almond shape adds elegance, while the contrasting colors and sharp lines create a striking and modern look. This manicure is perfect for those who appreciate a stylish and refined design.
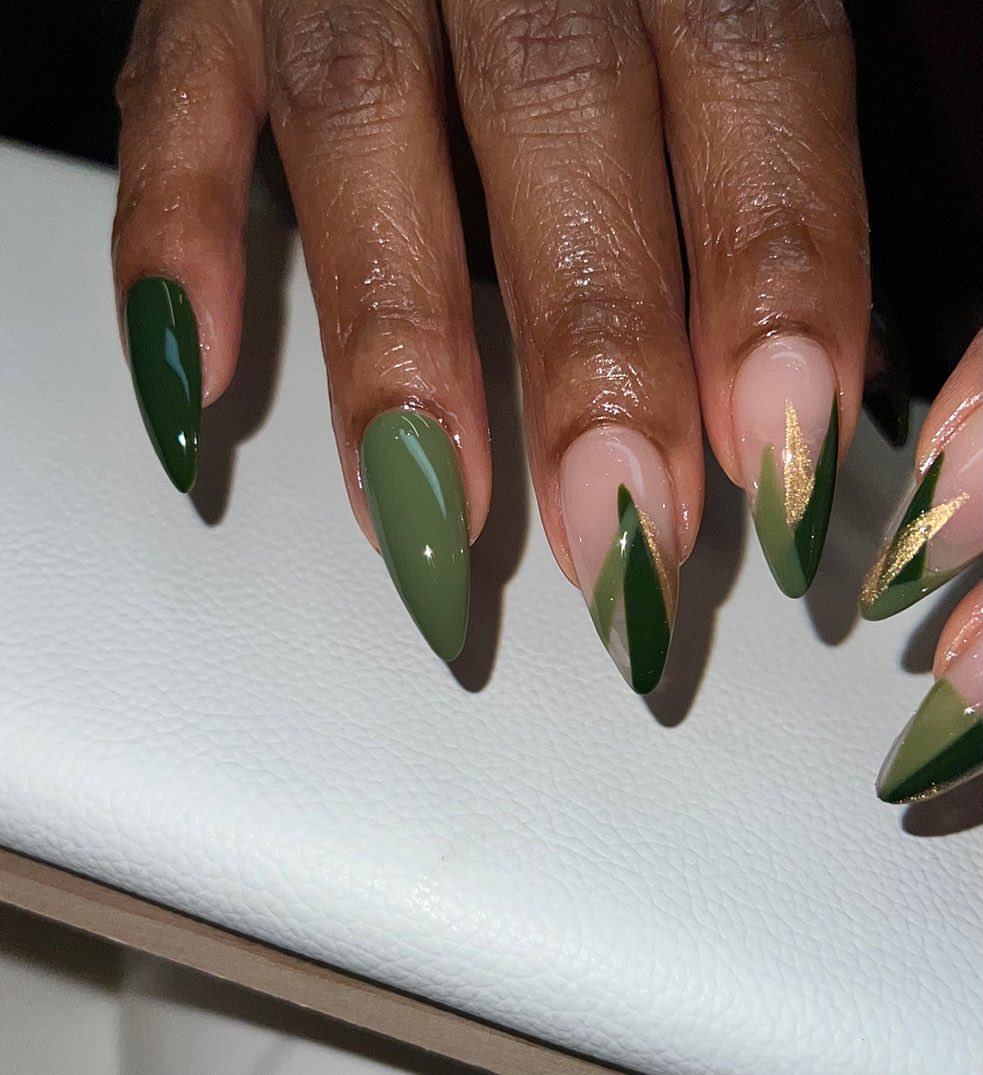
-
- Olive green polish (e.g., OPI Nail Lacquer in “Suzi – The First Lady of Nails”)
- Dark green polish (e.g., OPI Nail Lacquer in “Stay Off the Lawn”)
- Nude polish (e.g., OPI Nail Lacquer in “Be There in a Prosecco”)
- Thin nail art brushes
- Clear top coat (e.g., OPI Top Coat)
Instructions to Create at Home
- Apply a base coat and paint your nails with a mix of nude and olive green polishes.
- Use a thin nail art brush to create dark green geometric shapes on the nails.
- Add accents with gold polish for a luxurious touch.
- Finish with a clear top coat to protect the design and add a glossy finish.
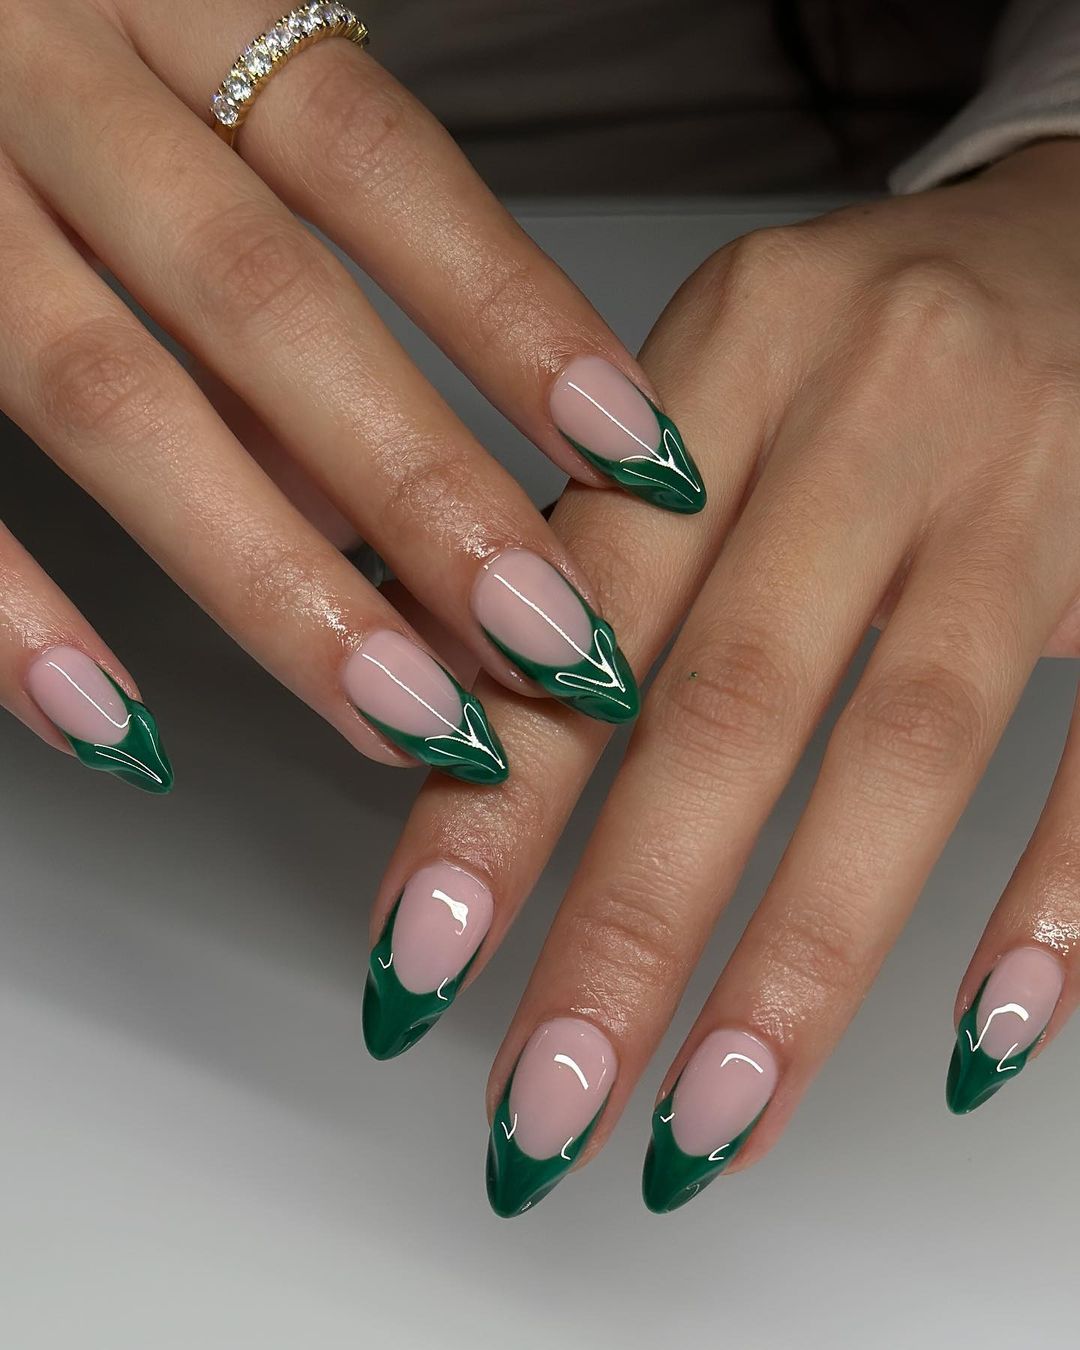
Emerald and White Nail Art
This bold and dramatic design features long, coffin-shaped nails adorned with emerald green and white accents. The detailed patterns and gemstone-like decorations create a luxurious and eye-catching look. This manicure is perfect for those who want to make a statement with their nails.

-
- Emerald green polish (e.g., OPI Nail Lacquer in “Green on the Runway”)
- White polish (e.g., OPI Nail Lacquer in “Alpine Snow”)
- Gemstone decorations
- Clear top coat (e.g., OPI Top Coat)
Instructions to Create at Home
- Start with a base coat and paint your nails with nude polish.
- Use the emerald green polish to create intricate patterns on the nails.
- Add white accents for contrast and place gemstone decorations for added bling.
- Seal with a clear top coat to protect the design and add shine.
Green Heart Tips
This elegant and playful design features green heart-shaped tips on nude nails. The almond shape adds a feminine touch, while the heart tips provide a cute and unique twist to the classic French manicure. This design is perfect for those who love a blend of sophistication and fun.
-
- Green polish (e.g., OPI Nail Lacquer in “I’m Sooo Swamped!”)
- Nude polish (e.g., OPI Nail Lacquer in “Bubble Bath”)
- Thin nail art brushes
- Clear top coat (e.g., OPI Top Coat)
Instructions to Create at Home
- Apply a base coat and paint your nails with nude polish.
- Use a thin nail art brush to create green heart-shaped tips on each nail.
- Ensure the hearts are symmetrical and aligned with the tips of your nails.
- Finish with a clear top coat to protect the design and add a glossy finish.
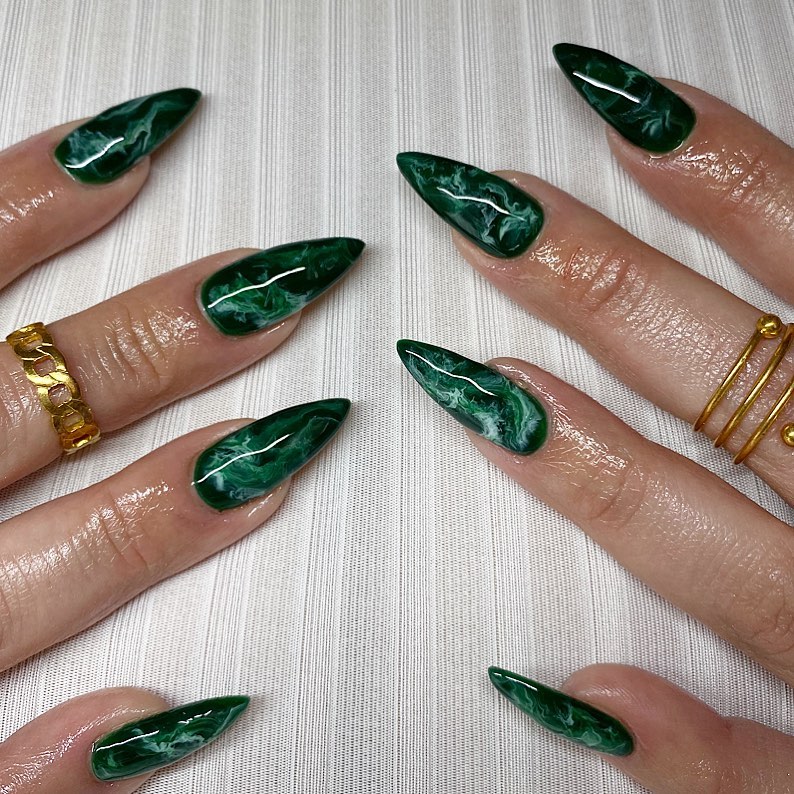
Green Marble Nails
This luxurious design features green marble patterns on long, almond-shaped nails. The marble effect creates a sophisticated and high-end look, making this manicure perfect for those who love elegant and detailed nail art. The deep green color adds a touch of mystery and allure.
-
- Dark green polish (e.g., OPI Nail Lacquer in “Stay Off the Lawn”)
- White polish for marbling effect (e.g., OPI Nail Lacquer in “Alpine Snow”)
- Thin nail art brushes
- Clear top coat (e.g., OPI Top Coat)
Instructions to Create at Home
- Apply a base coat and paint your nails with dark green polish.
- Use a thin nail art brush to create marble patterns with white polish on each nail.
- Swirl the white polish to mimic natural marble veins.
- Seal with a clear top coat to protect your design and add shine.
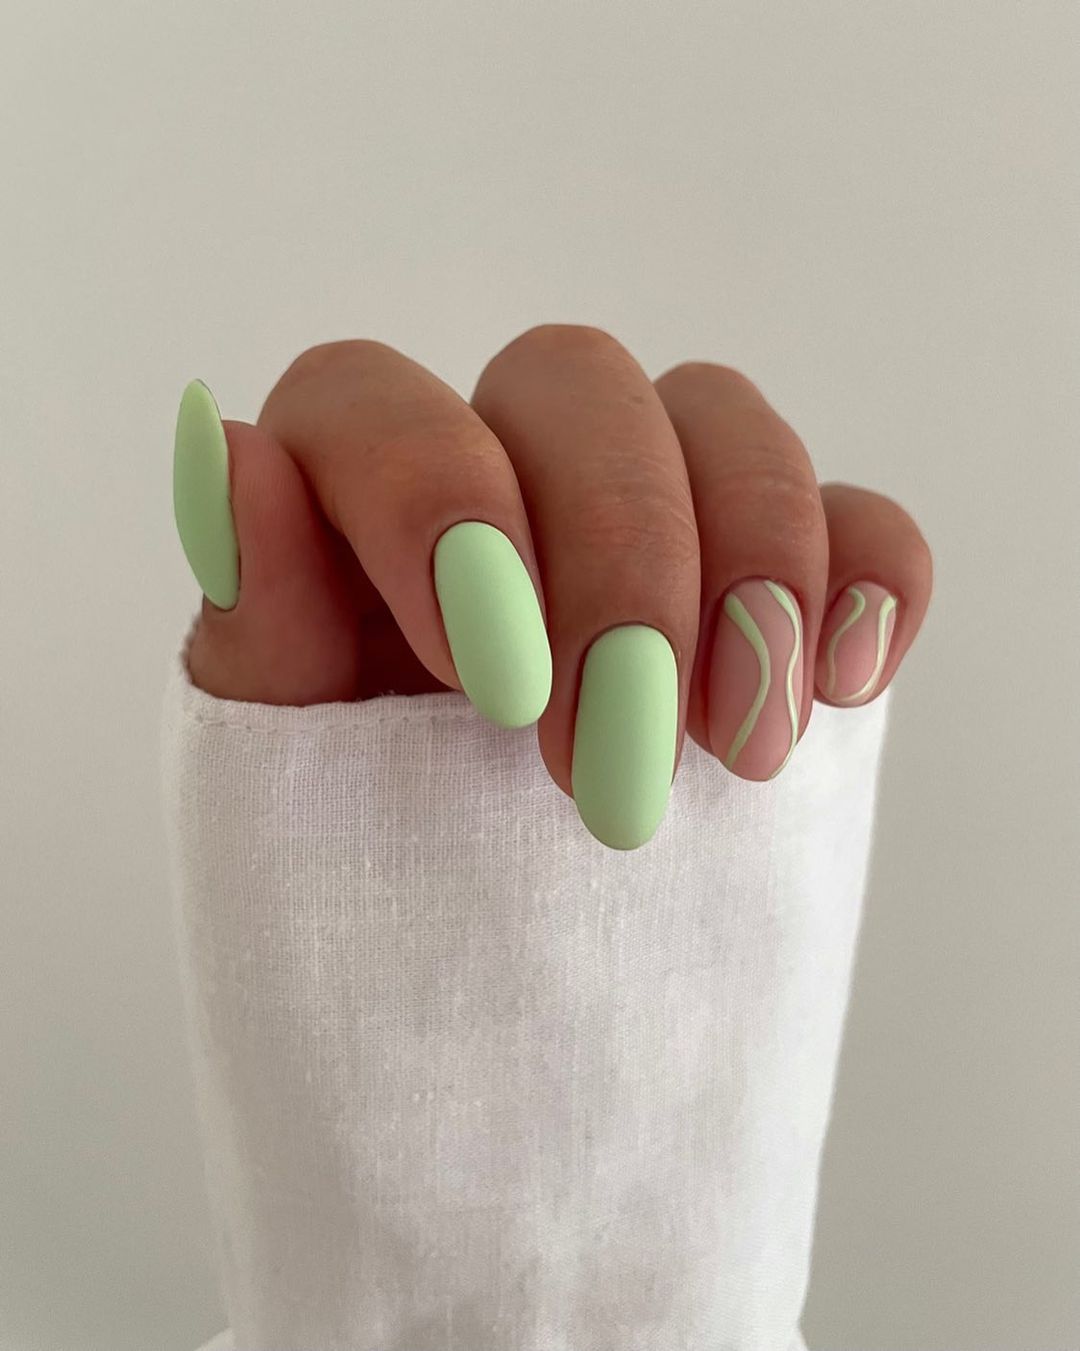
Matte Mint Green Nails
This design features a soft, matte mint green polish with subtle wavy lines on a couple of accent nails. The matte finish gives a sophisticated and modern touch, while the wavy lines add a bit of playful detail. This manicure is perfect for those who love minimalist yet stylish designs.
-
- Mint green matte polish (e.g., OPI Nail Lacquer in “Gargantuan Green Grape” Matte)
- White polish for the wavy lines (e.g., OPI Nail Lacquer in “Alpine Snow”)
- Thin nail art brush
- Matte top coat (e.g., OPI Matte Top Coat)
Instructions to Create at Home
- Apply a base coat and paint all nails with the mint green matte polish.
- Use a thin nail art brush to paint wavy lines on the accent nails with the white polish.
- Seal with a matte top coat to maintain the matte finish and protect the design.
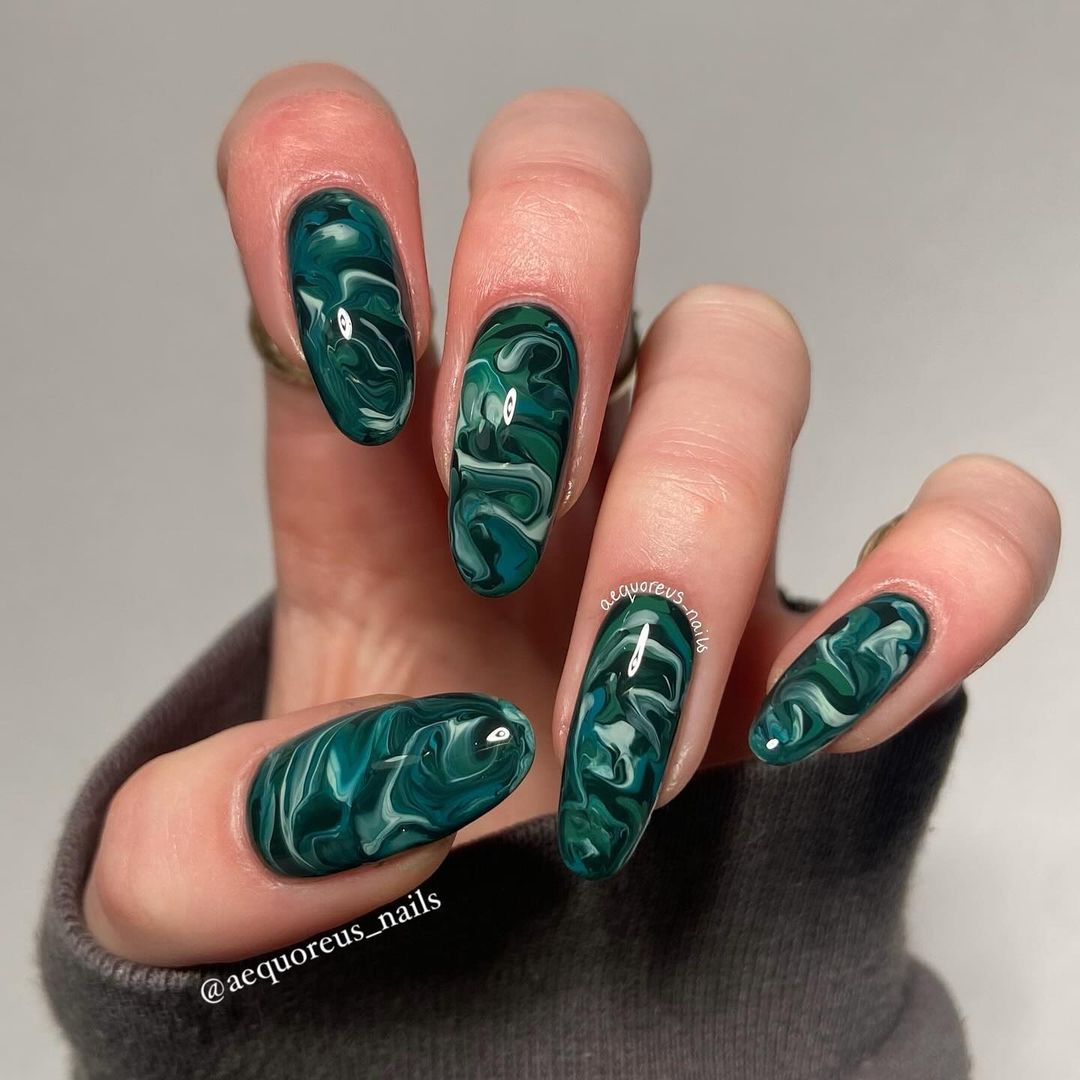
Deep Teal Marble Nails
This stunning design features a deep teal base with a marble effect, creating a rich and luxurious look. The swirling patterns mimic the appearance of real marble, making this design both elegant and sophisticated. It’s perfect for those who want a high-end, art-inspired manicure.
-
- Deep teal polish (e.g., OPI Nail Lacquer in “Teal the Cows Come Home”)
- White polish for marbling effect (e.g., OPI Nail Lacquer in “Alpine Snow”)
- Thin nail art brush or marbling tool
- Clear top coat (e.g., OPI Top Coat)
Instructions to Create at Home
- Start with a base coat and apply the deep teal polish to all nails.
- Use a thin nail art brush or marbling tool to create marble patterns with the white polish.
- Swirl the white polish gently to create the marble effect.
- Finish with a clear top coat to add shine and protect the design.
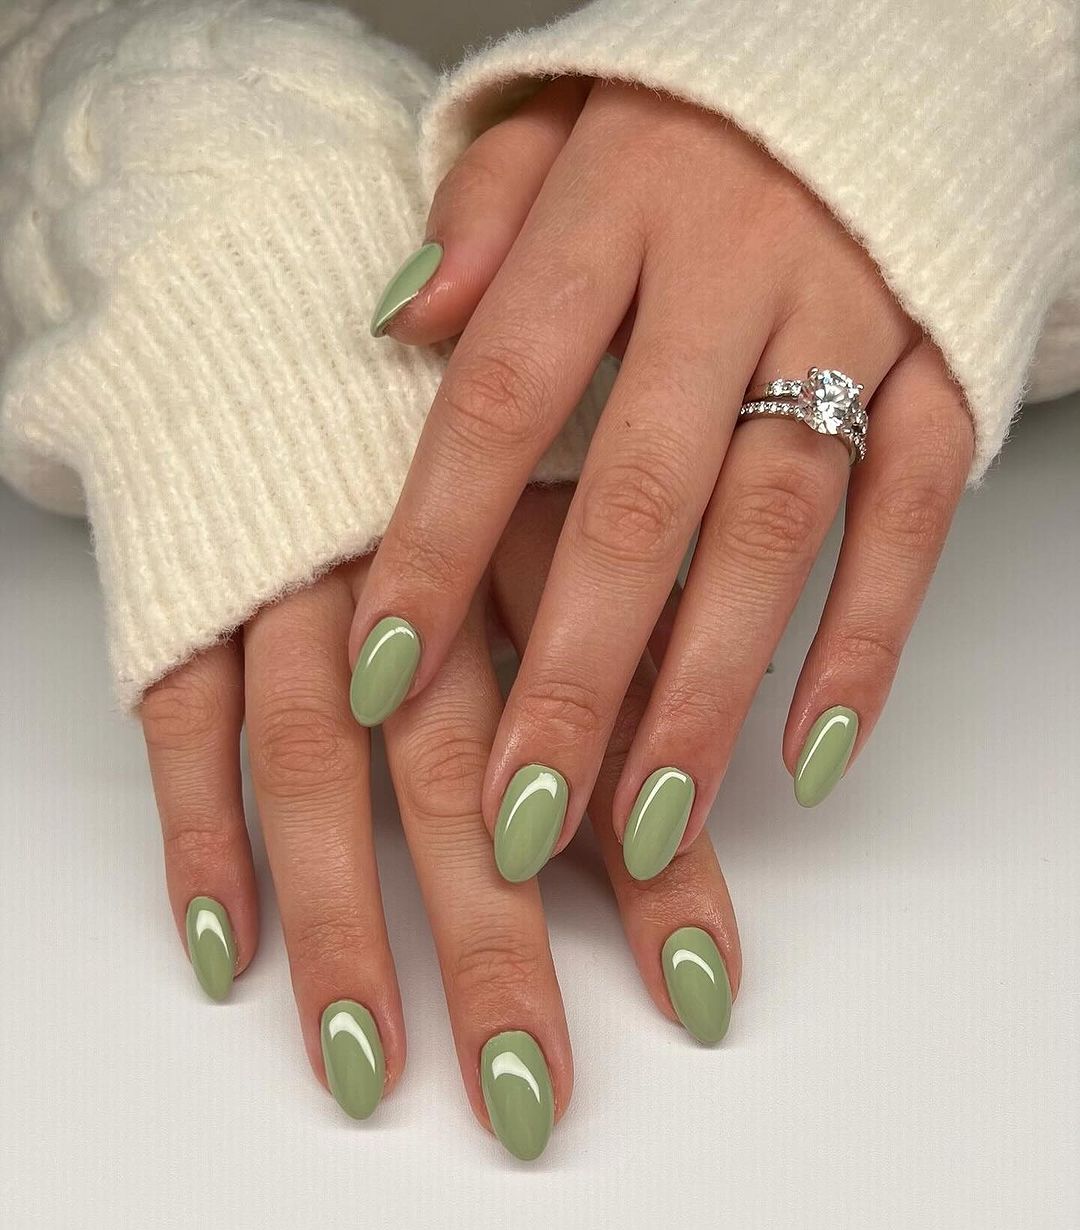
Sage Green Oval Nails
This simple yet elegant design features a sage green polish on oval-shaped nails. The soft green hue is perfect for fall, offering a calm and sophisticated look. This manicure is ideal for those who prefer a classic and understated style.
-
- Sage green polish (e.g., OPI Nail Lacquer in “This Isn’t Greenland”)
- Clear top coat (e.g., OPI Top Coat)
Instructions to Create at Home
- Apply a base coat and paint all nails with the sage green polish.
- Allow the polish to dry completely.
- Finish with a clear top coat to add a glossy finish and protect the nails.
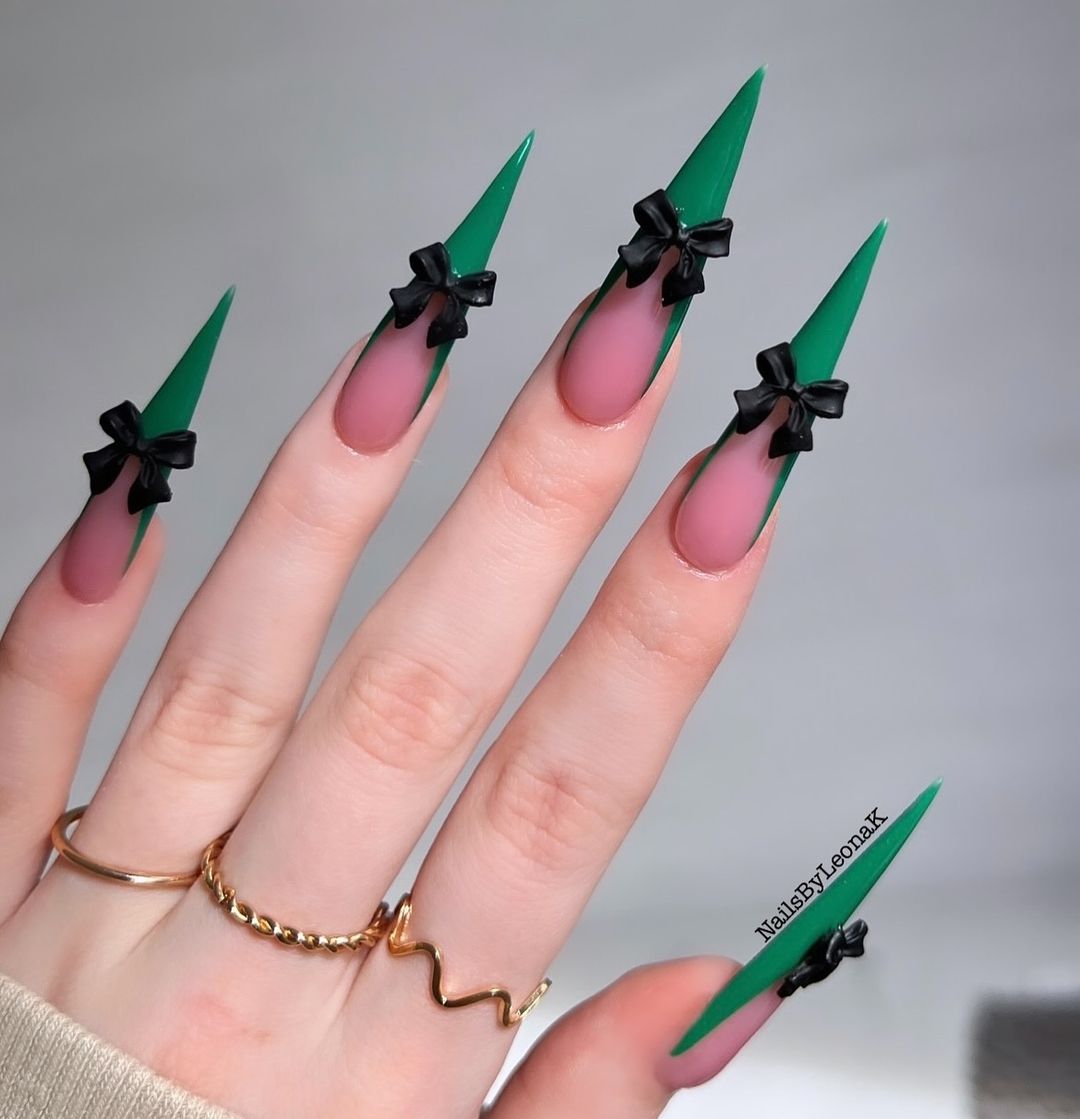
Green and Black Bow Nails
This dramatic design features long, stiletto-shaped nails painted in a green and nude gradient, adorned with tiny black bows. The combination of the sharp nail shape and delicate bows creates a striking and unique look. It’s perfect for those who love to make a bold statement with their nails.
-
- Green polish (e.g., OPI Nail Lacquer in “I’m Sooo Swamped!”)
- Nude polish (e.g., OPI Nail Lacquer in “Bubble Bath”)
- Tiny black bow decorations
- Nail glue
- Clear top coat (e.g., OPI Top Coat)
Instructions to Create at Home
- Apply a base coat and create a green to nude gradient on each nail.
- Once dry, use nail glue to attach the tiny black bow decorations.
- Seal with a clear top coat to secure the bows and add shine.
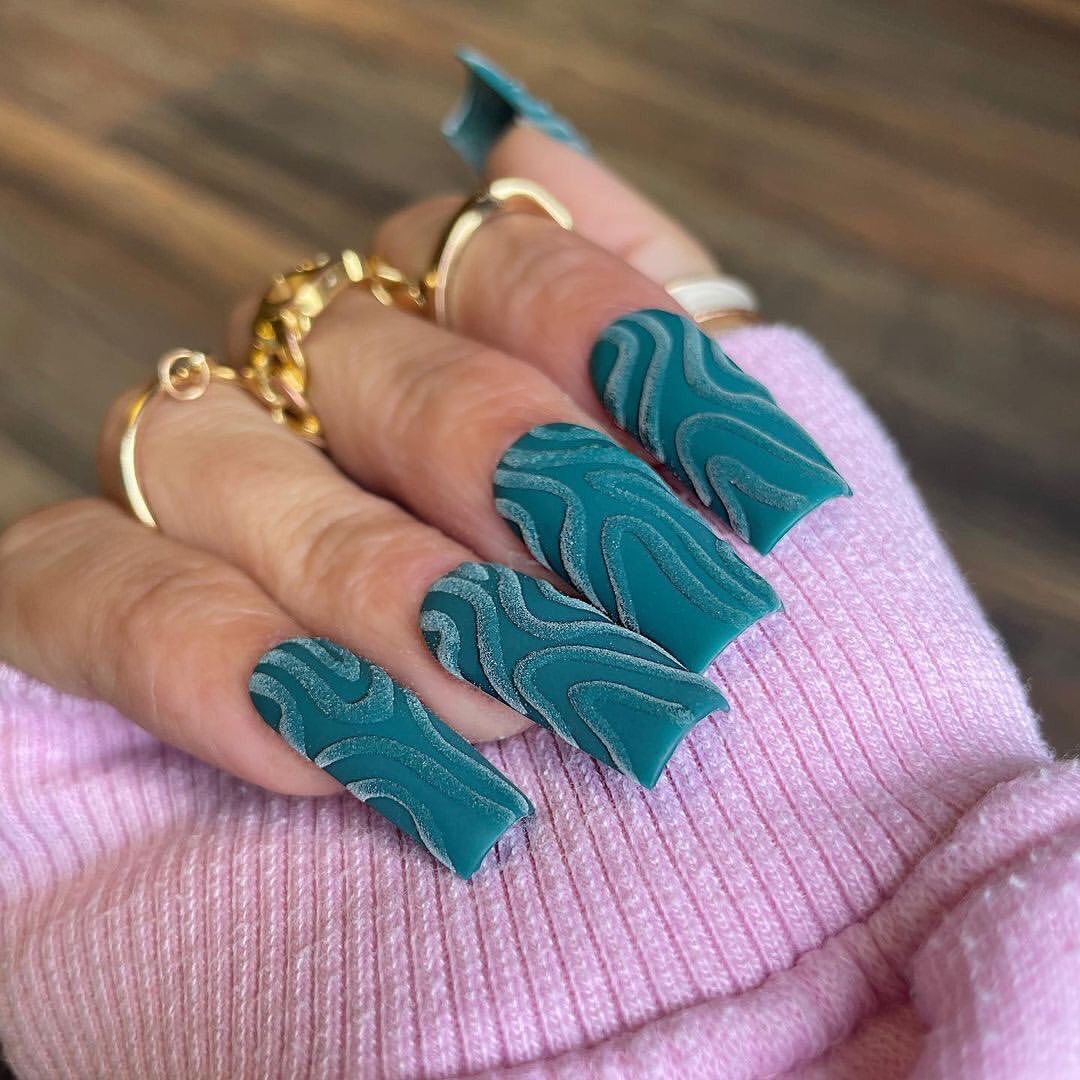
Textured Teal Wave Nails
This design features a rich teal polish with textured wave patterns, creating a dynamic and tactile look. The waves add depth and interest, making this manicure perfect for those who love unique and artistic nail designs.
-
- Teal polish (e.g., OPI Nail Lacquer in “Teal the Cows Come Home”)
- Textured polish or top coat (e.g., OPI Texture Coat)
- Clear top coat (e.g., OPI Top Coat)
Instructions to Create at Home
- Apply a base coat and paint all nails with the teal polish.
- Use a textured polish or create wave patterns with a thin nail art brush.
- Seal with a clear top coat to protect the design and add durability.
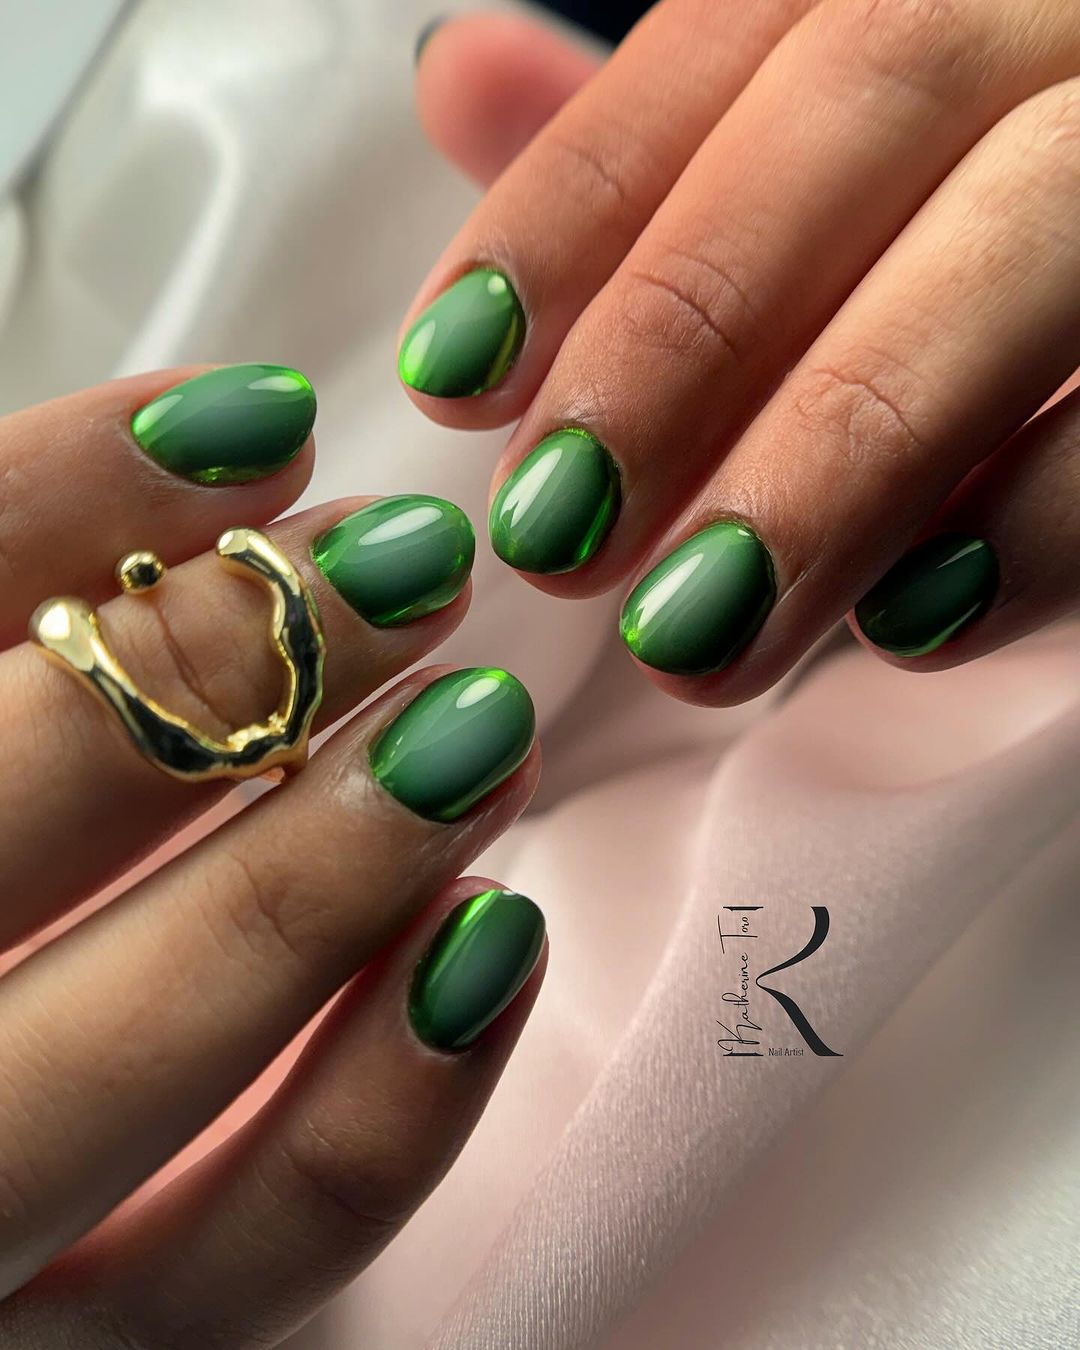
Cat Eye Green Nails
This mesmerizing design features a cat eye effect with a rich green polish. The magnetic polish creates a stunning reflective pattern that shifts with the light, giving the nails a dynamic and captivating look. This manicure is perfect for those who want a sophisticated yet eye-catching design.
-
- Cat eye green polish (e.g., OPI Nail Lacquer in “Cat’s Meow”)
- Magnetic wand
- Clear top coat (e.g., OPI Top Coat)
Instructions to Create at Home
- Apply a base coat and paint all nails with the cat eye green polish.
- While the polish is still wet, hold the magnetic wand over each nail to create the cat eye effect.
- Finish with a clear top coat to enhance the shine and protect the design.
Neon Green and Black Stiletto Nails
This bold and edgy design features neon green and black polish with intricate patterns and metallic accents. The stiletto shape adds drama, while the combination of colors and textures creates a striking and avant-garde look. This manicure is perfect for those who love daring and unconventional nail art.
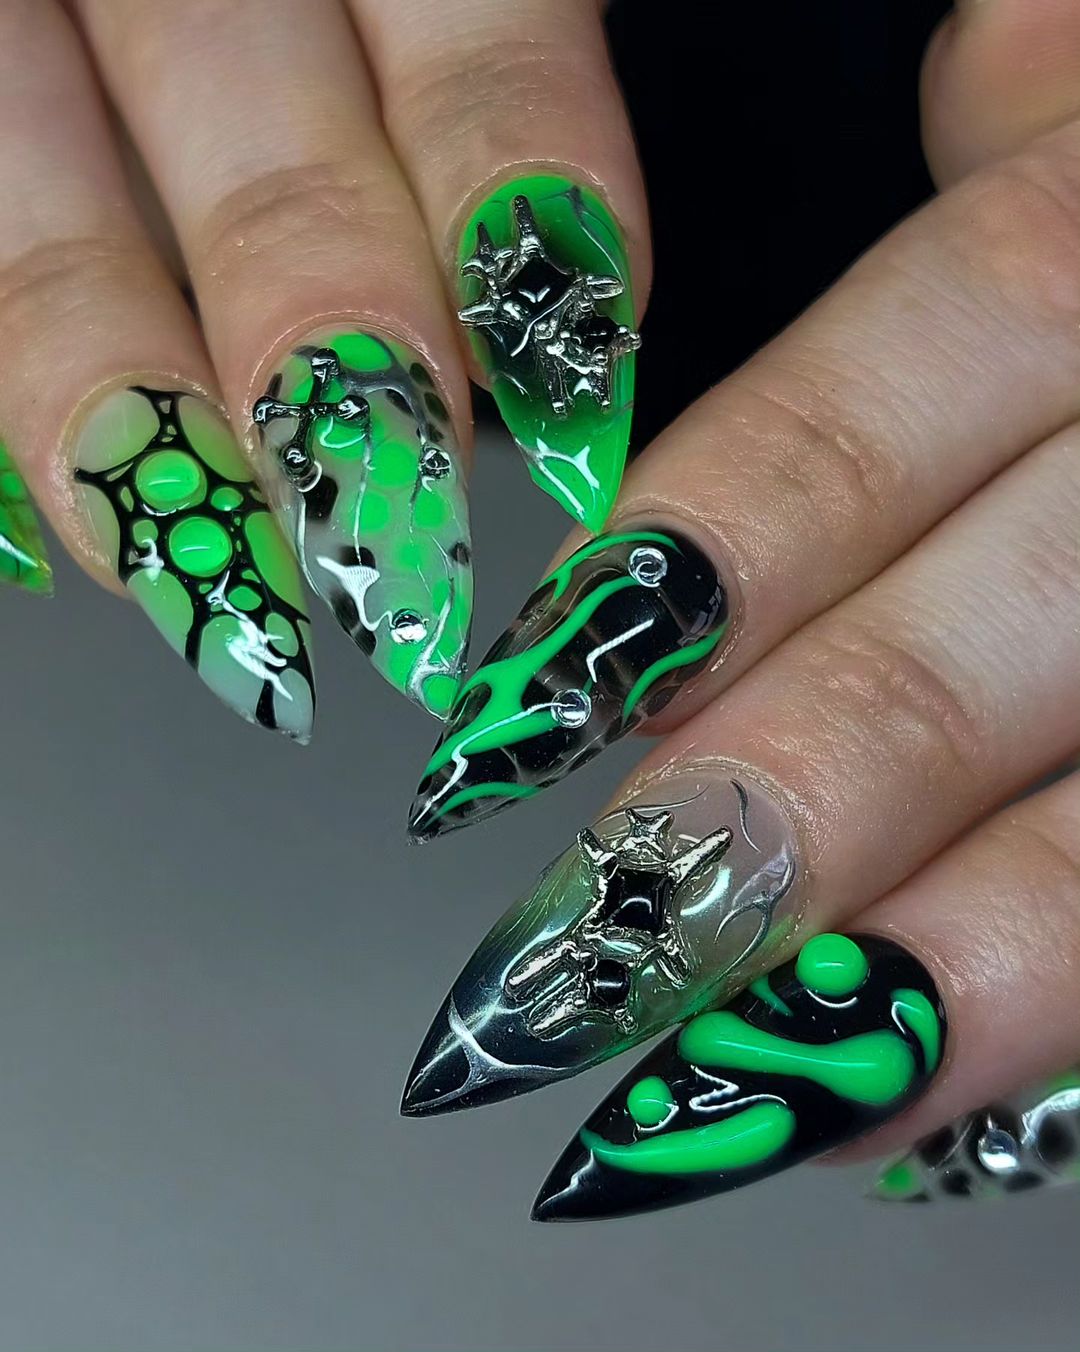
-
- Neon green polish (e.g., OPI Nail Lacquer in “Green Come True”)
- Black polish (e.g., OPI Nail Lacquer in “Black Onyx”)
- Metallic studs and decorations
- Nail glue
- Clear top coat (e.g., OPI Top Coat)
Instructions to Create at Home
- Apply a base coat and paint your nails with a mix of neon green and black polish.
- Use nail glue to attach metallic studs and decorations.
- Seal with a clear top coat to secure the decorations and add shine.
FAQ
Q: What are some trendy green nail designs for fall? A: Some trendy green nail designs for fall include lime green French tips with cow print accents, psychedelic green patterns, and elegant dark green with star accents.
Q: Can I create these nail designs at home? A: Yes, with the right tools and a bit of practice, you can create these nail designs at home. Follow the detailed instructions provided for each design.
Q: What brands of nail polish are recommended for these designs? A: OPI is highly recommended for its wide range of colors and high-quality finish. Specific shades and products have been mentioned in the consumables list for each design.
Q: How can I make my nail design last longer? A: To make your nail design last longer, ensure you apply a base coat, use high-quality nail polish, and finish with a clear top coat. Avoid activities that may chip your nails and reapply the top coat every few days for added protection.
Q: Are these designs suitable for all nail lengths? A: Yes, these designs can be adapted for various nail lengths, from short to long. Adjust the complexity of the design based on your nail length and shape for the best results.
Save Pin