Fall is the perfect time to get creative with your nails, and what better way to do so than with fall leaves nail art? Whether you prefer simple designs or more intricate 3D styles, there’s something for everyone. In this article, I’ll guide you through some of the best nail art ideas for the season, complete with detailed descriptions, tutorials, and tips for achieving these looks at home.
Autumn Elegance
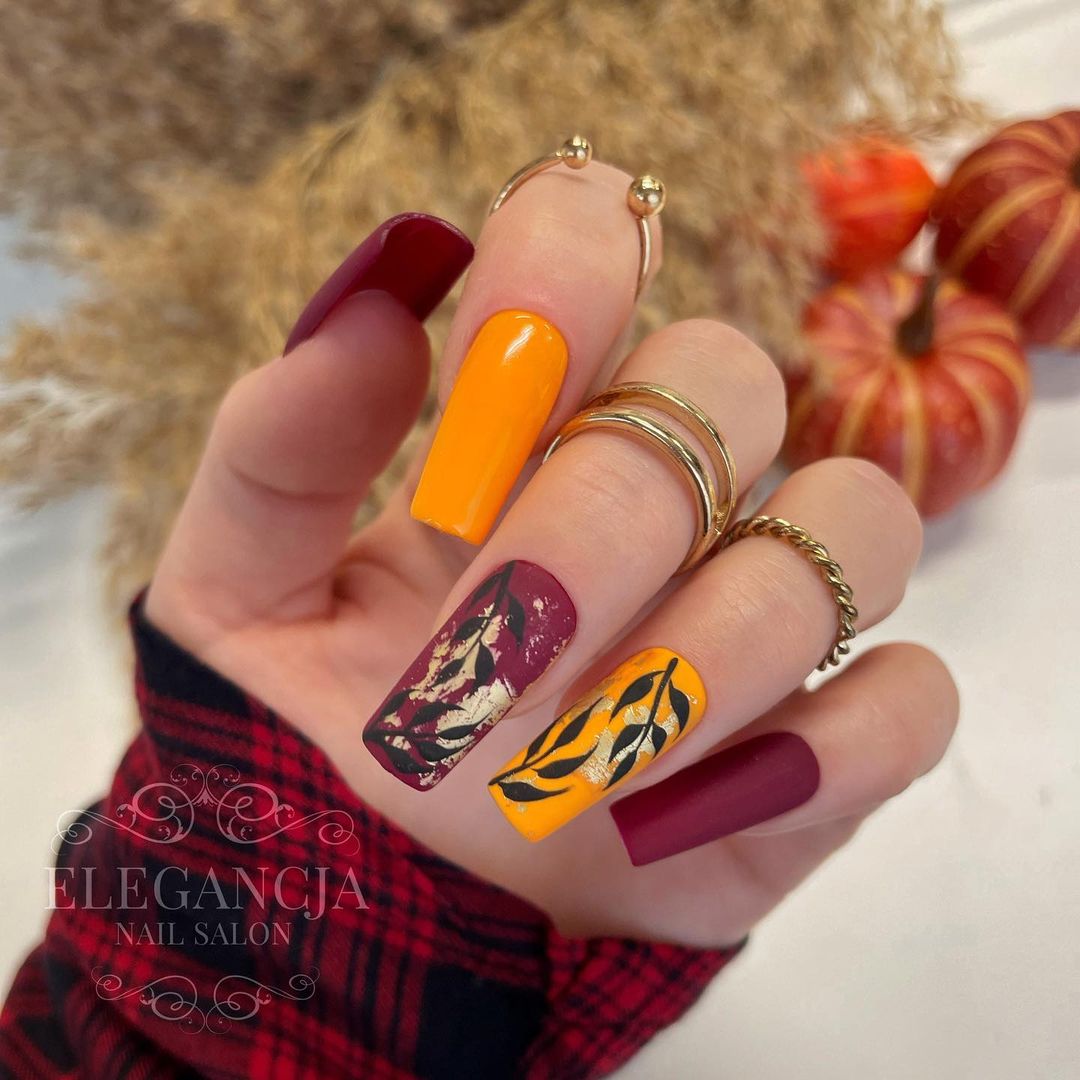
As a professional manicurist, I can tell you that autumn nails are all about rich, warm colors and intricate designs. In this design, we see a beautiful combination of burgundy, gold, and yellow shades. The accent nails feature fall leaves in a mix of matte and glossy finishes, creating a stunning visual contrast. The combination of matte burgundy and bright yellow is particularly striking, making this design perfect for anyone looking to make a statement.
-
- OPI Nail Lacquer in “Malaga Wine” (burgundy)
- Essie Nail Polish in “Hay There” (yellow)
- Sally Hansen Miracle Gel in “Game of Chromes” (gold)
- Matte top coat by Zoya
- Nail art brushes and dotting tools
- Leaf nail stickers or stencils
Tutorial:
-
- Start with a base coat to protect your natural nails.
- Apply two coats of burgundy polish to all nails except the ring and middle fingers.
- Paint the ring finger yellow and the middle finger gold.
- Once dry, use a fine brush to create leaf patterns on the accent nails with the opposite colors.
- Seal the design with a matte top coat on the burgundy nails and a glossy top coat on the yellow and gold nails.
Subtle Autumn Leaves
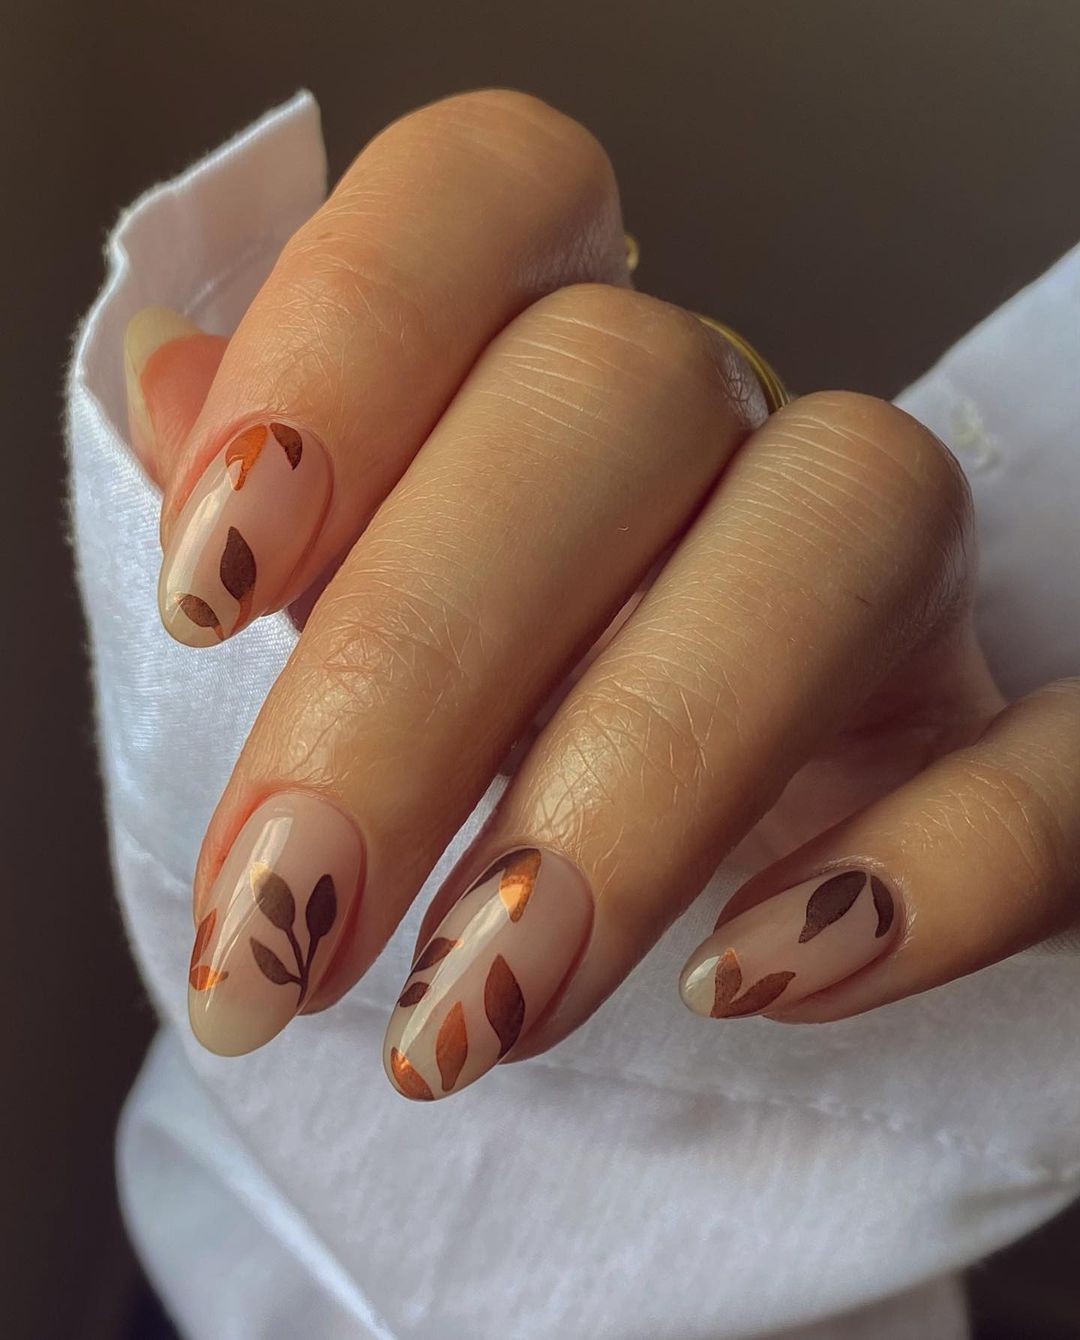
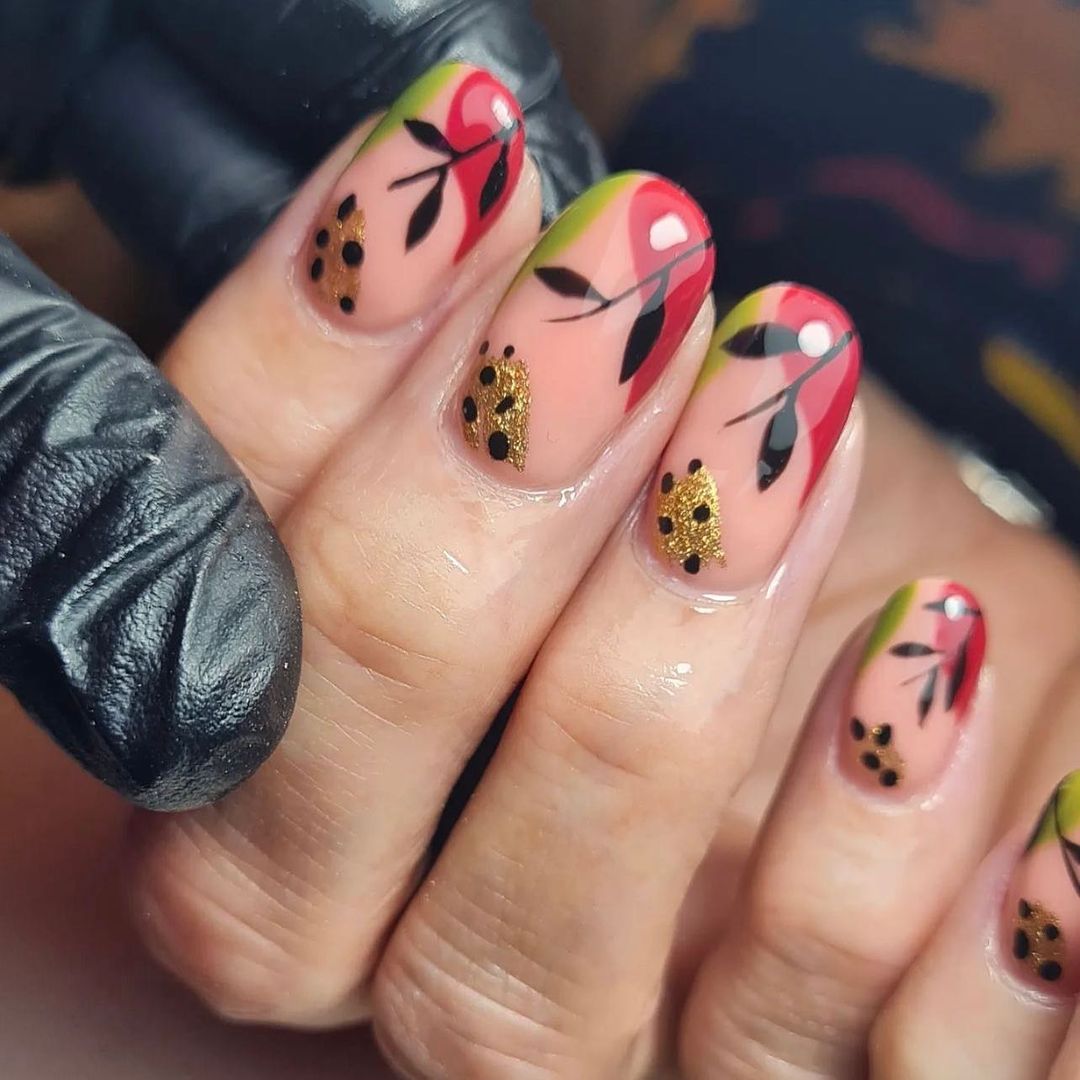
This design is perfect for those who prefer a more understated look. The nude base color is complemented by delicate leaf patterns in brown, gold, and black. The minimalist design makes it suitable for everyday wear while still embracing the fall theme.
-
- Essie Nail Polish in “Topless & Barefoot” (nude)
- China Glaze Nail Lacquer in “Liquid Leather” (black)
- OPI Nail Lacquer in “Coca-Cola Red” (brown)
- Gold leaf flakes
- Nail art brushes
Tutorial:
-
- Apply a nude base coat to all nails.
- Using a fine brush, draw leaf shapes with black, brown, and gold polishes.
- For added sparkle, gently press gold leaf flakes onto the wet polish.
- Finish with a clear top coat to protect the design.
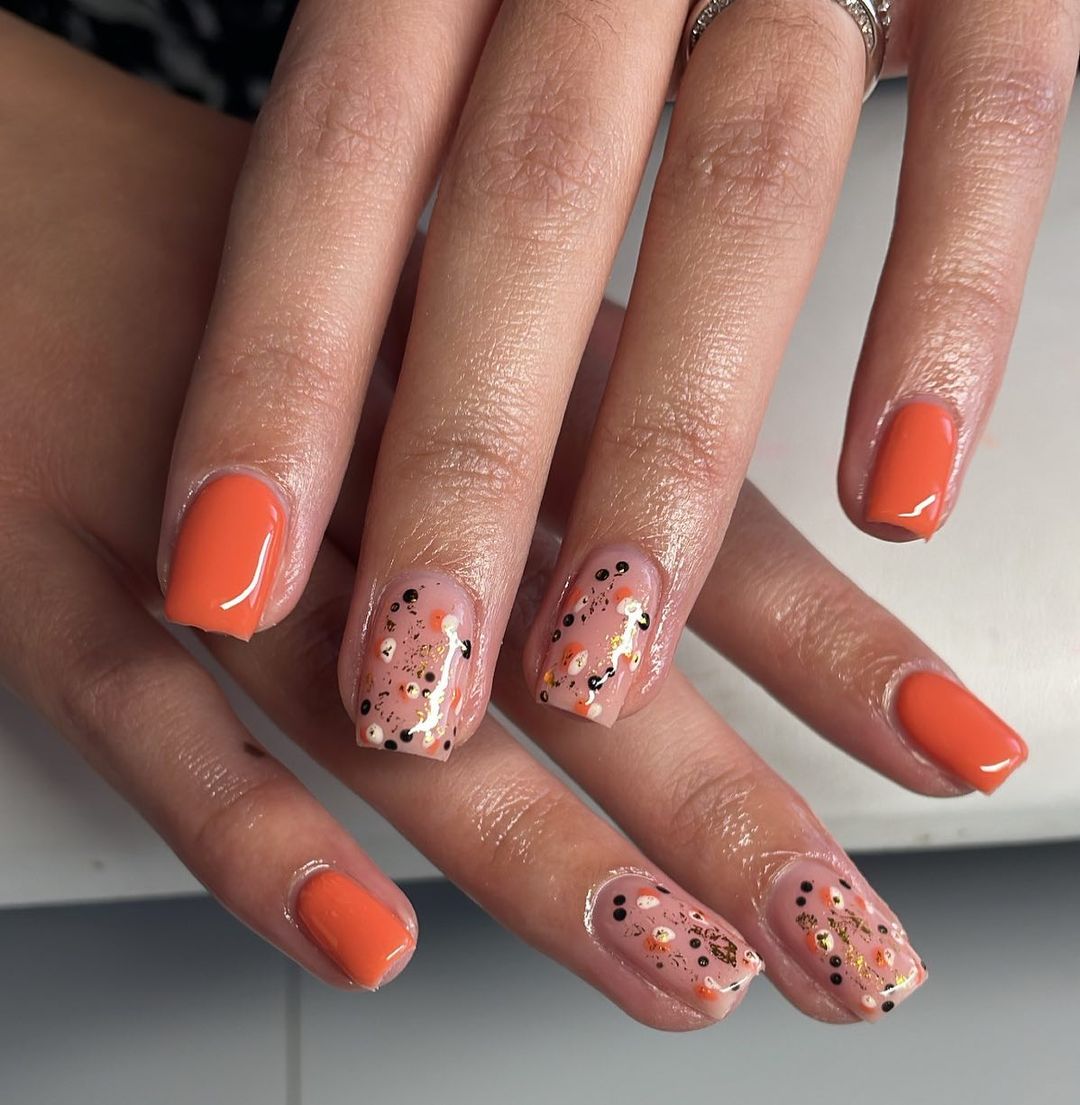
Fun and Festive Fall
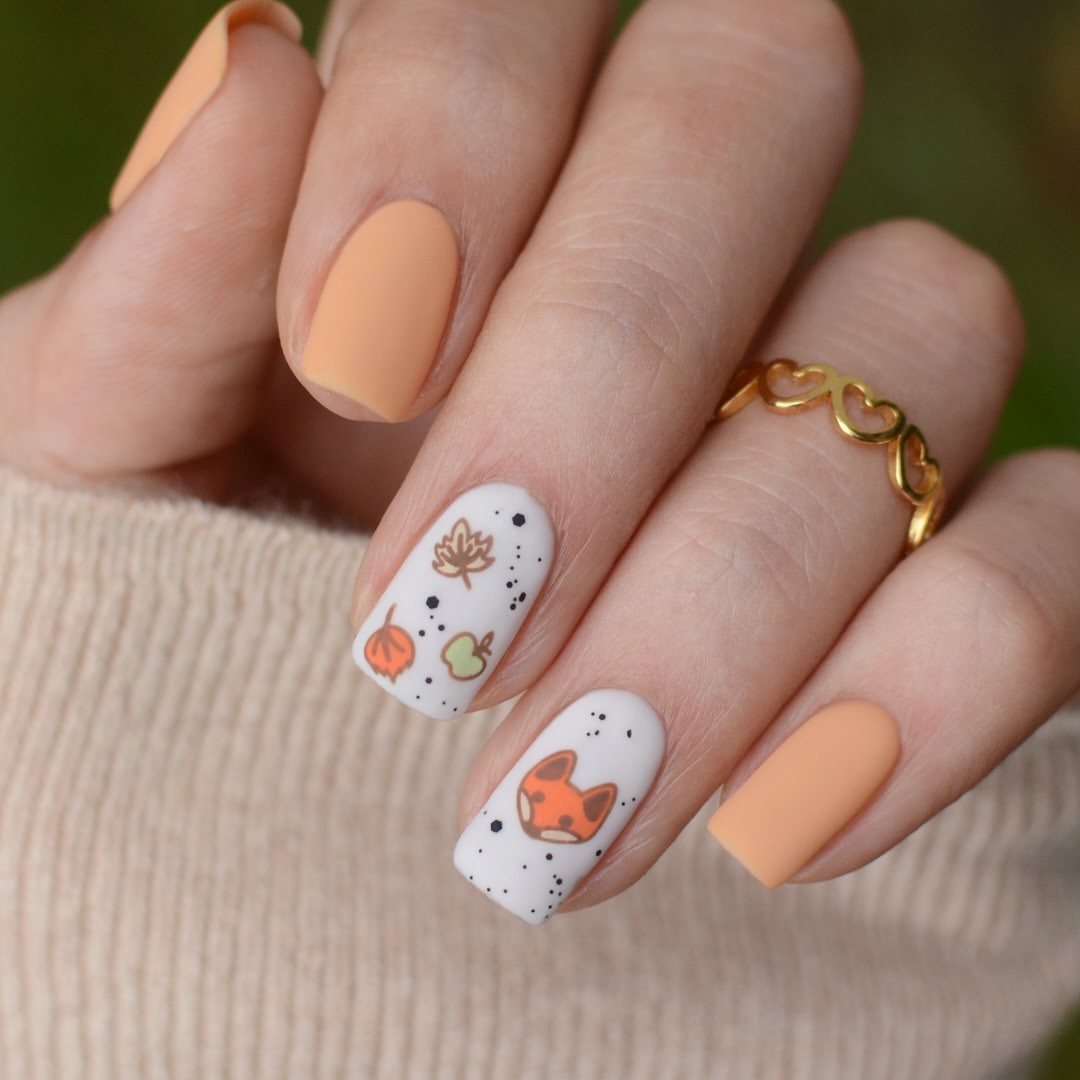
For those who love a playful look, this design incorporates cute fall-themed elements like leaves, acorns, and even a little fox. The combination of matte peach and white nails with colorful accents makes this design fun and eye-catching.
-
- Essie Nail Polish in “Peach Side Babe” (peach)
- OPI Nail Lacquer in “Alpine Snow” (white)
- Various nail art pens for drawing details (orange, green, brown)
- Matte top coat by Revlon
Tutorial:
-
- Apply a peach base coat to all nails except the middle and ring fingers, which should be painted white.
- Use nail art pens to draw small fall-themed designs on the white nails.
- Apply a matte top coat to the peach nails and a glossy top coat to the white nails.
Burgundy and Floral Delight
This manicure combines the elegance of burgundy with the playful touch of floral designs. The deep burgundy color on the thumb, index, and pinky nails provides a rich base that contrasts beautifully with the intricate floral patterns on the middle and ring fingers. The flowers, painted in shades of orange, red, and yellow, are complemented by delicate white accents, adding a touch of lightness to the overall design. This look is perfect for those who want to embrace the warmth of fall while keeping their nails chic and stylish.

-
- OPI Nail Lacquer in “Bogotá Blackberry” (burgundy)
- Essie Nail Polish in “Geranium” (orange)
- Sally Hansen Xtreme Wear in “Mellow Yellow” (yellow)
- White nail art pen
- Dotting tools and fine nail art brushes
Tutorial:
-
- Start with a base coat to protect your natural nails.
- Apply two coats of burgundy polish to the thumb, index, and pinky nails.
- Paint the middle and ring fingers with a nude base color.
- Using a fine brush, draw flowers and leaves in orange, red, and yellow on the nude nails.
- Add white accents to the flowers using a nail art pen.
- Seal the design with a glossy top coat to ensure longevity.
Save Pin
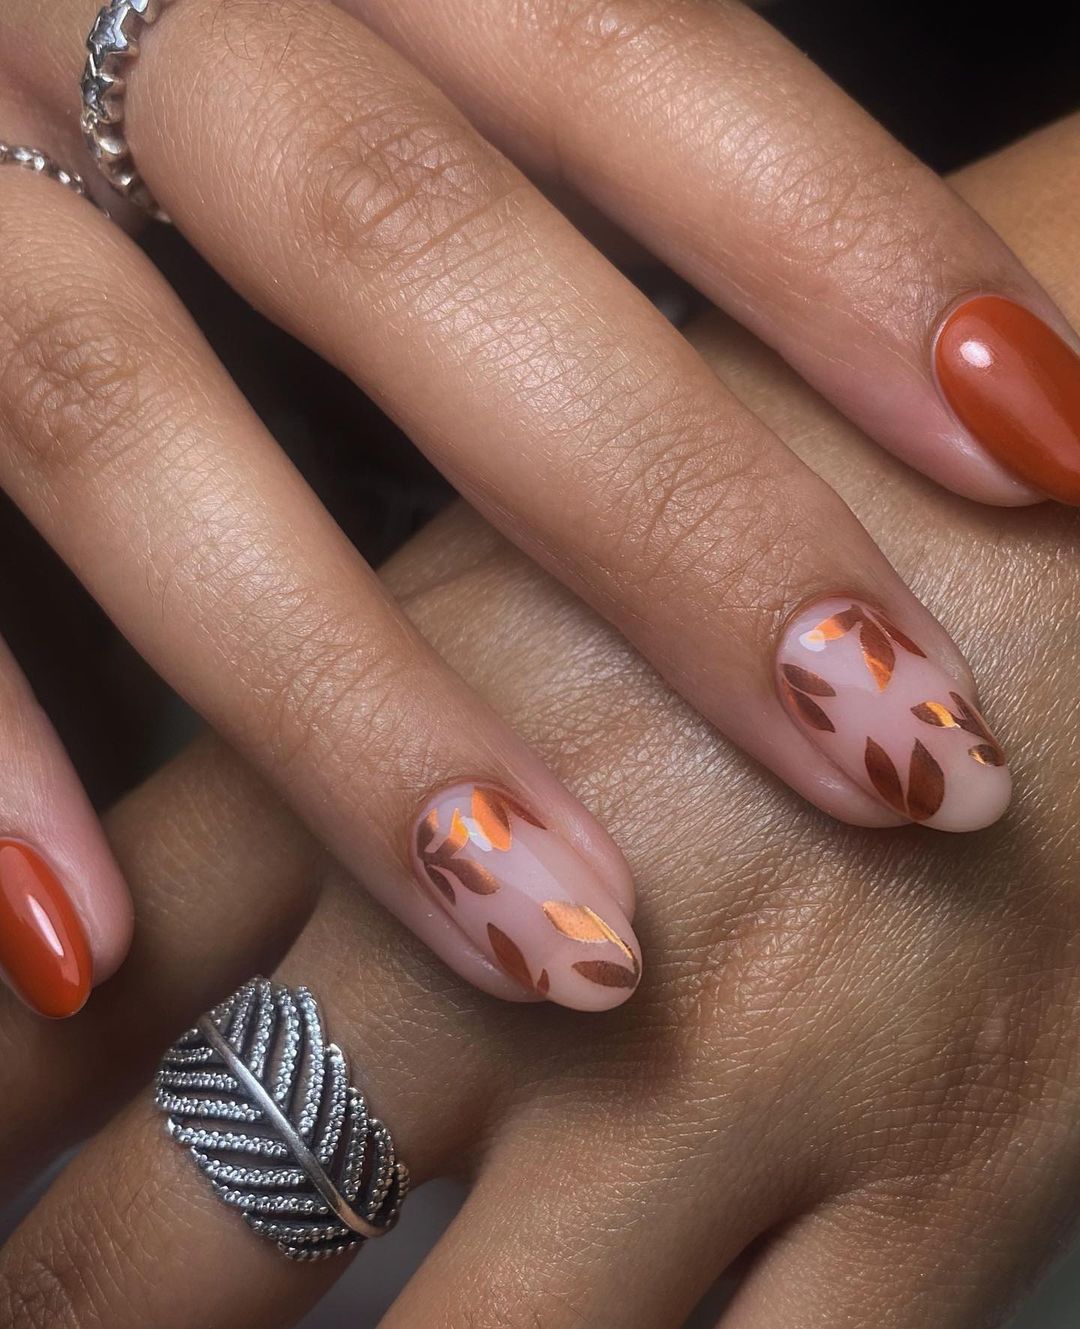
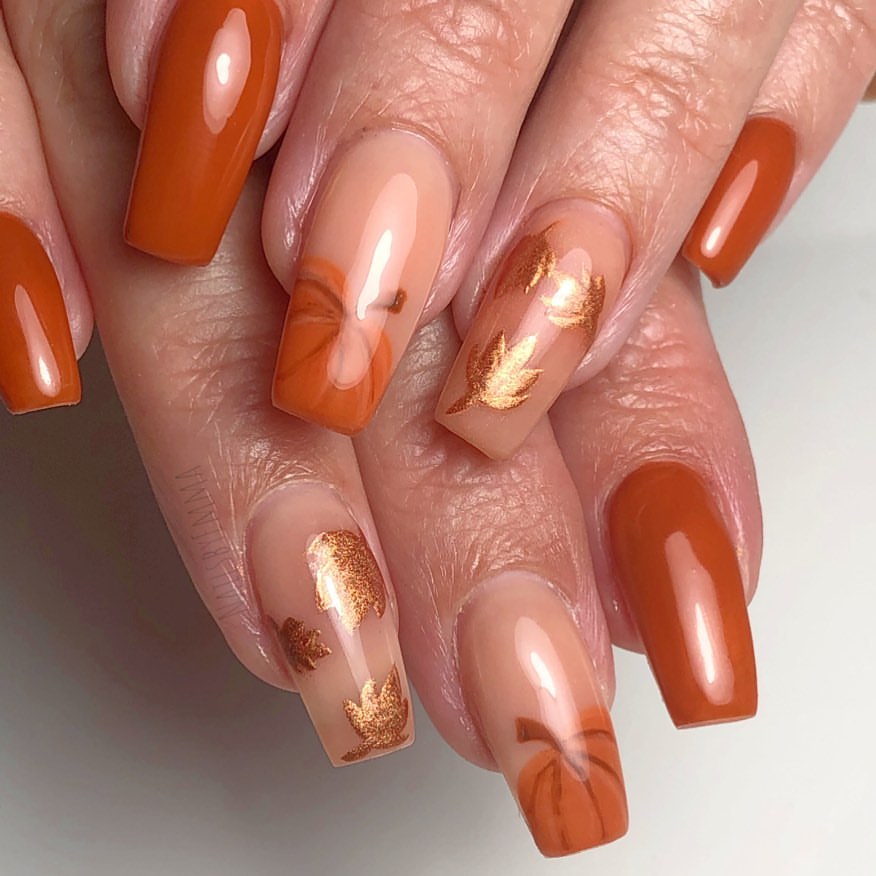
Copper Leaves on Nude Base
This design features a nude base with copper leaf accents, creating a sophisticated and understated look. The combination of the neutral background with the metallic copper leaves gives the nails a polished and elegant appearance, perfect for any occasion. The use of copper adds a warm, autumnal touch, making this design ideal for fall.
-
- Essie Nail Polish in “Topless & Barefoot” (nude)
- OPI Nail Lacquer in “Worth a Pretty Penne” (copper)
- Nail art stickers or stencils in leaf shapes
- Fine nail art brushes
Tutorial:
-
- Apply a nude base coat to all nails.
- Using a fine brush or stencil, create leaf shapes with copper polish on the nude background.
- For added dimension, layer the copper leaves with a second coat once the first has dried.
- Finish with a clear top coat to protect the design and add shine.
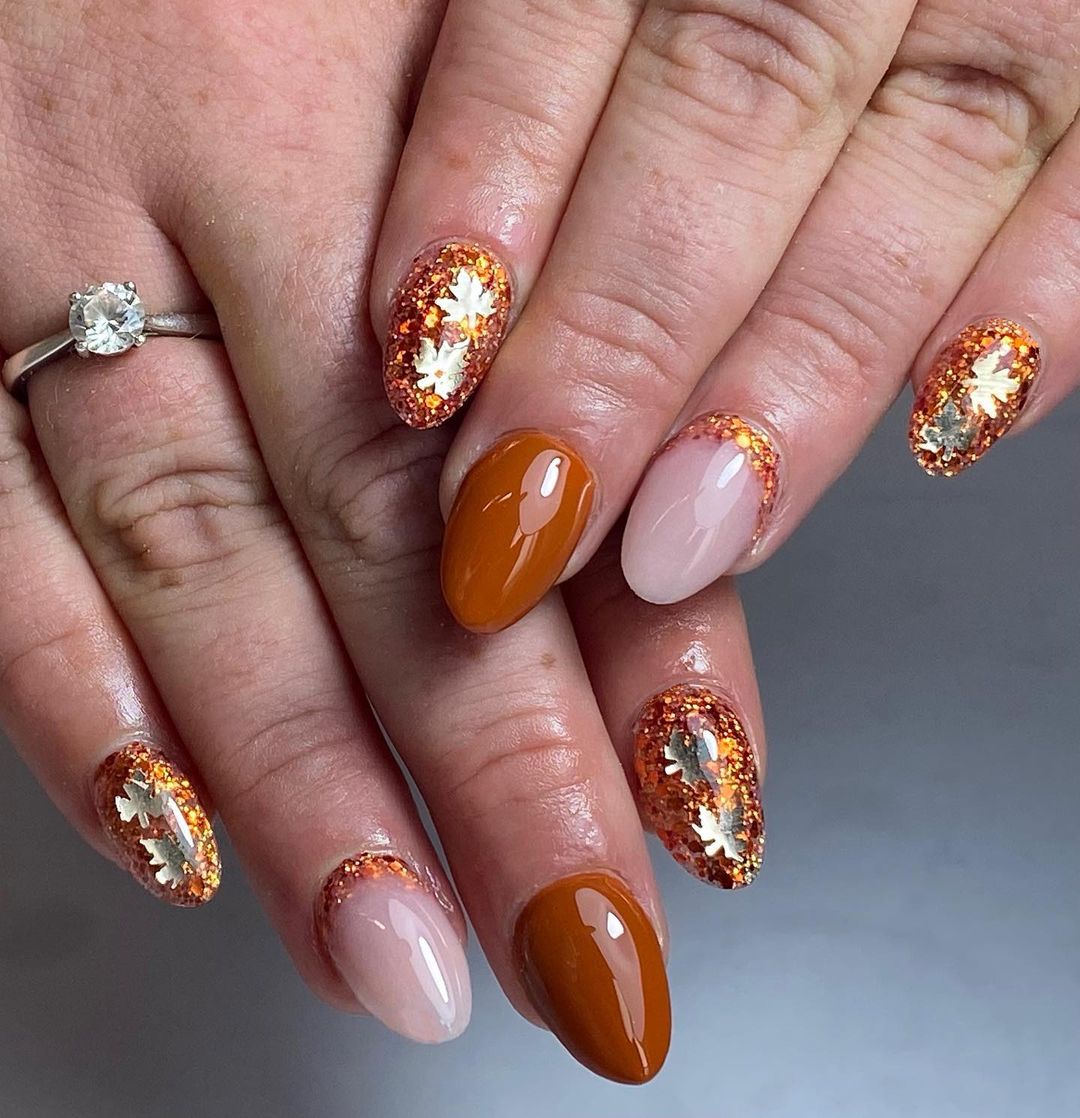
Glittering Autumn Leaves
This vibrant nail design combines the sparkle of glitter with the warmth of autumn colors. The nails alternate between a solid orange and a glittery, leaf-adorned design. The use of glitter and tiny leaf shapes embedded in the polish gives this manicure a festive and dynamic look, perfect for fall celebrations or simply adding some sparkle to your everyday life.
-
- Essie Nail Polish in “Playing Koi” (orange)
- Glitter nail polish in copper and gold
- Small leaf-shaped nail art confetti
- Clear top coat
Tutorial:
-
- Start with a base coat to protect your natural nails.
- Apply two coats of orange polish to alternate nails.
- On the remaining nails, apply a base color and then layer with glitter polish.
- While the glitter polish is still wet, place small leaf confetti onto the nails.
- Finish with a clear top coat to seal the design and add extra shine.
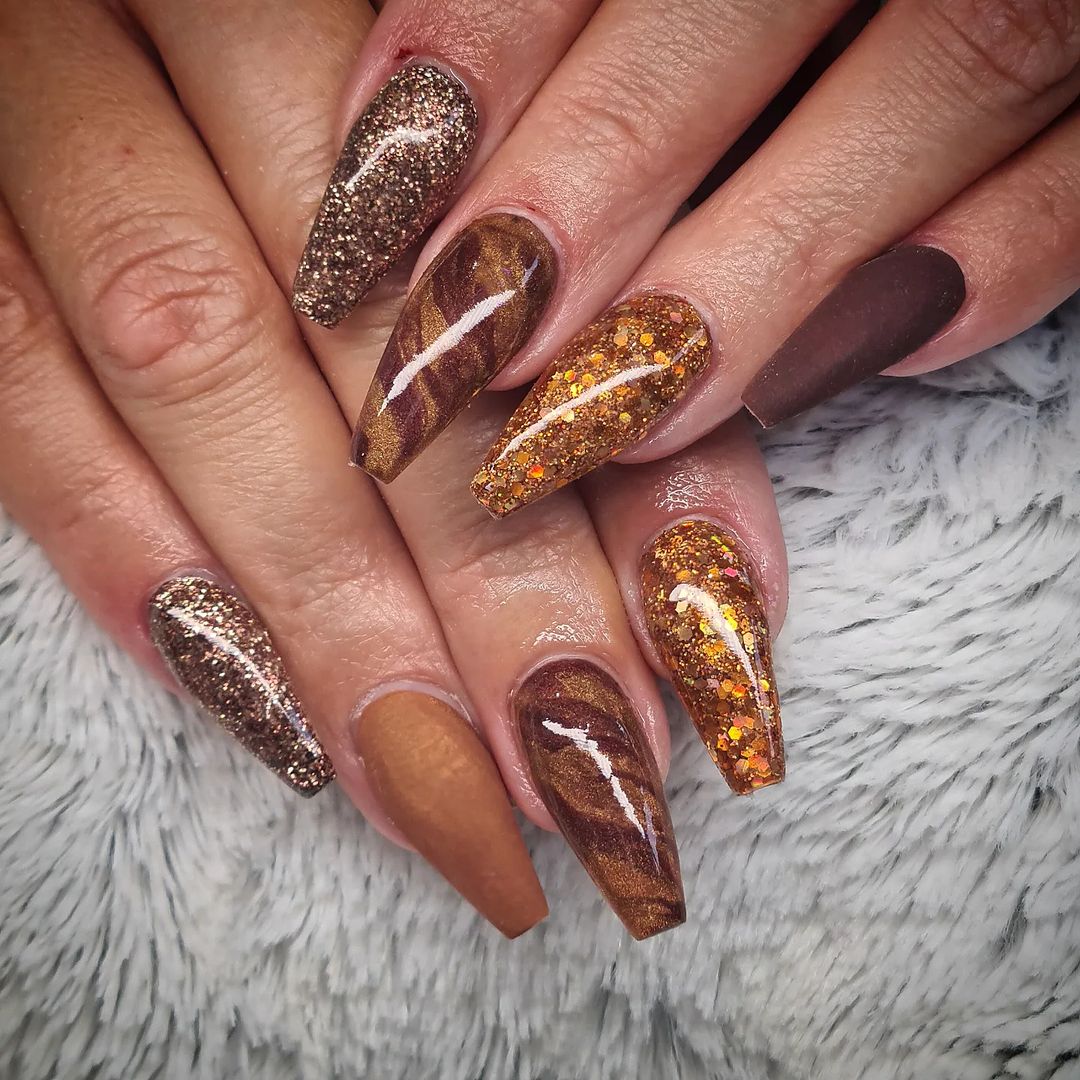
Golden Glitter and Brown Elegance
This nail design combines various shades of brown and glitter to create a rich, autumn-inspired look. The mixture of solid brown, marbled patterns, and glittery accents gives the nails depth and texture, making them perfect for those who love a bit of sparkle with their fall style. The use of different finishes and shades creates a dynamic and eye-catching effect that is both elegant and festive.
-
- Essie Nail Polish in “Playing Koi” (burnt orange)
- OPI Nail Lacquer in “Espresso Your Inner Self” (dark brown)
- Glitter polish in gold and copper
- Marbling tools
- Matte top coat by Sally Hansen
Tutorial:
-
- Apply a base coat to all nails.
- Paint each nail with different shades of brown, leaving some nails for glitter and marbling.
- For the marbled effect, use a marbling tool to swirl two shades of brown while the polish is still wet.
- Apply glitter polish to the chosen nails.
- Finish with a matte top coat on the solid brown nails and a glossy top coat on the glitter and marbled nails.
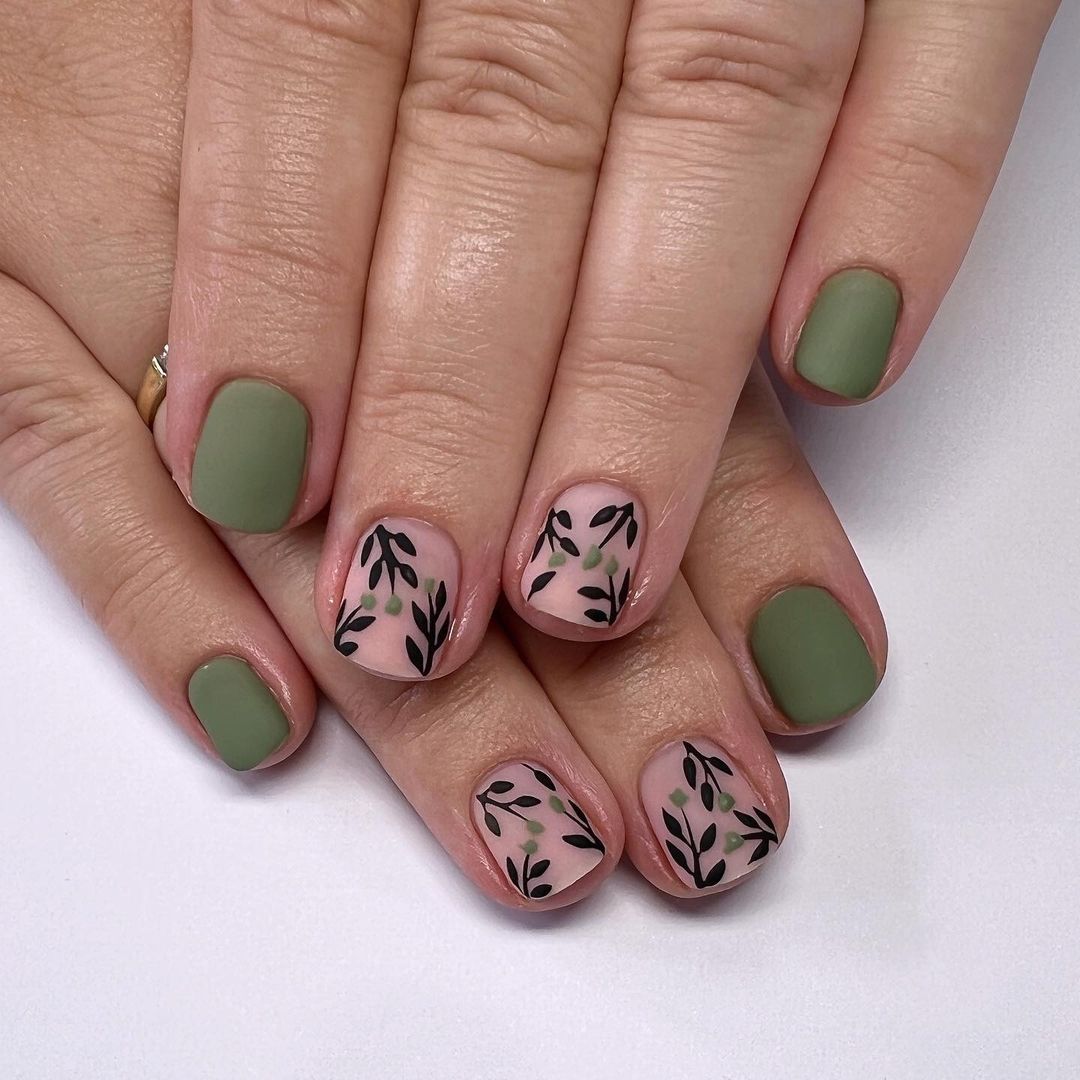
Green and Black Leaf Art
This design features a sophisticated matte green paired with a nude base and black leaf patterns. The combination of the earthy green with the delicate black leaves creates a serene and natural look, perfect for fall. This design is great for those who prefer a minimalist yet stylish approach to their nail art.
-
- OPI Nail Lacquer in “Suzi – The First Lady of Nails” (green)
- Essie Nail Polish in “Topless & Barefoot” (nude)
- Black nail art pen
- Matte top coat
Tutorial:
-
- Start with a base coat.
- Apply the green polish to all nails except the ring and middle fingers, which should be painted nude.
- Using a black nail art pen, draw delicate leaf patterns on the nude nails.
- Finish with a matte top coat on the green nails and a glossy top coat on the patterned nails.
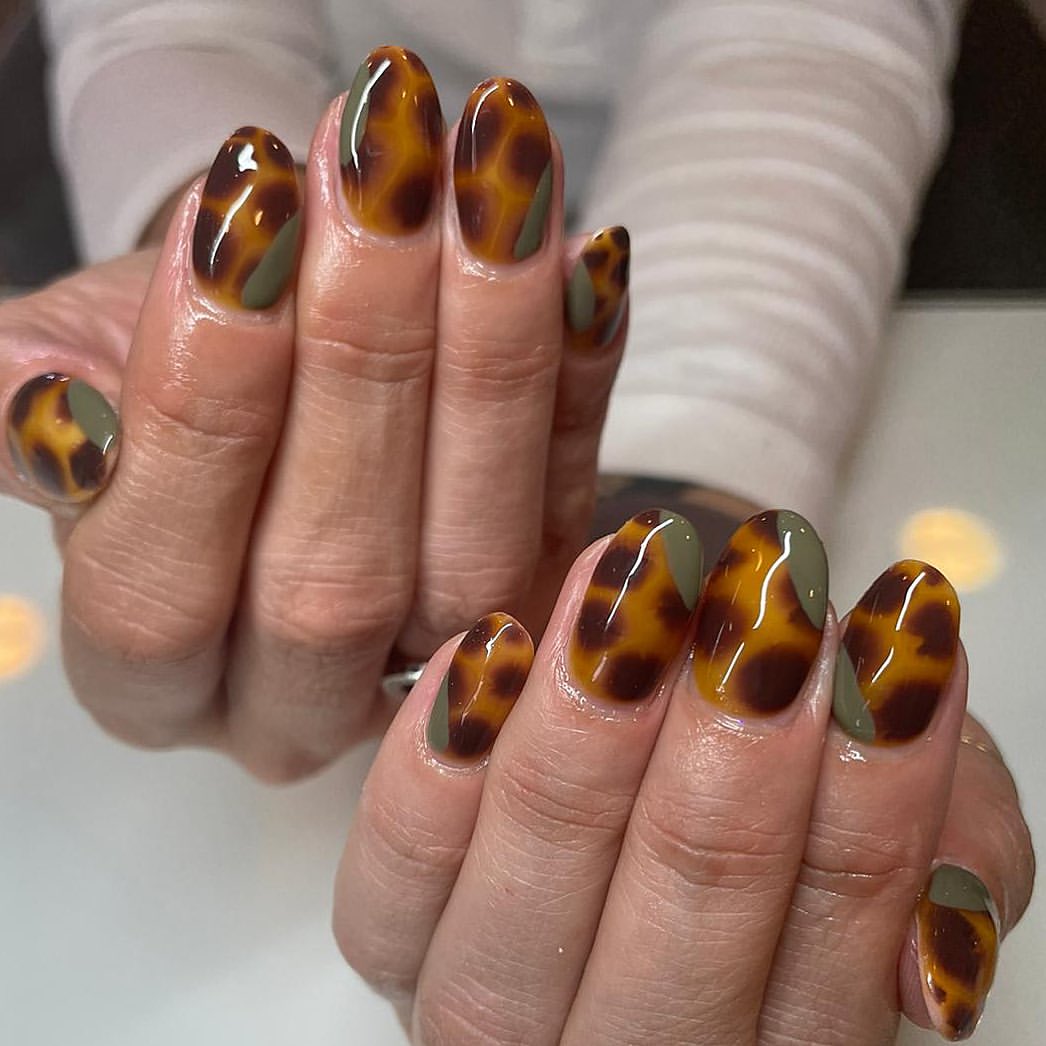
Tortoiseshell and Green Nails
The tortoiseshell design is a timeless classic, and pairing it with a unique green accent takes it to the next level. The rich, amber hues of the tortoiseshell pattern blend beautifully with the muted green, creating a look that is both trendy and sophisticated. This design is perfect for those who love to experiment with different textures and colors.
-
- OPI Nail Lacquer in “Susie – The First Lady of Nails” (green)
- Brown and amber polishes for the tortoiseshell effect
- Nail art brushes for creating the tortoiseshell pattern
- Clear top coat
Tutorial:
-
- Apply a base coat to all nails.
- Paint the nails with a green base.
- Create the tortoiseshell pattern using a combination of brown and amber polishes, layering and blending to achieve the desired effect.
- Seal the design with a clear top coat for a glossy finish.
Save Pin
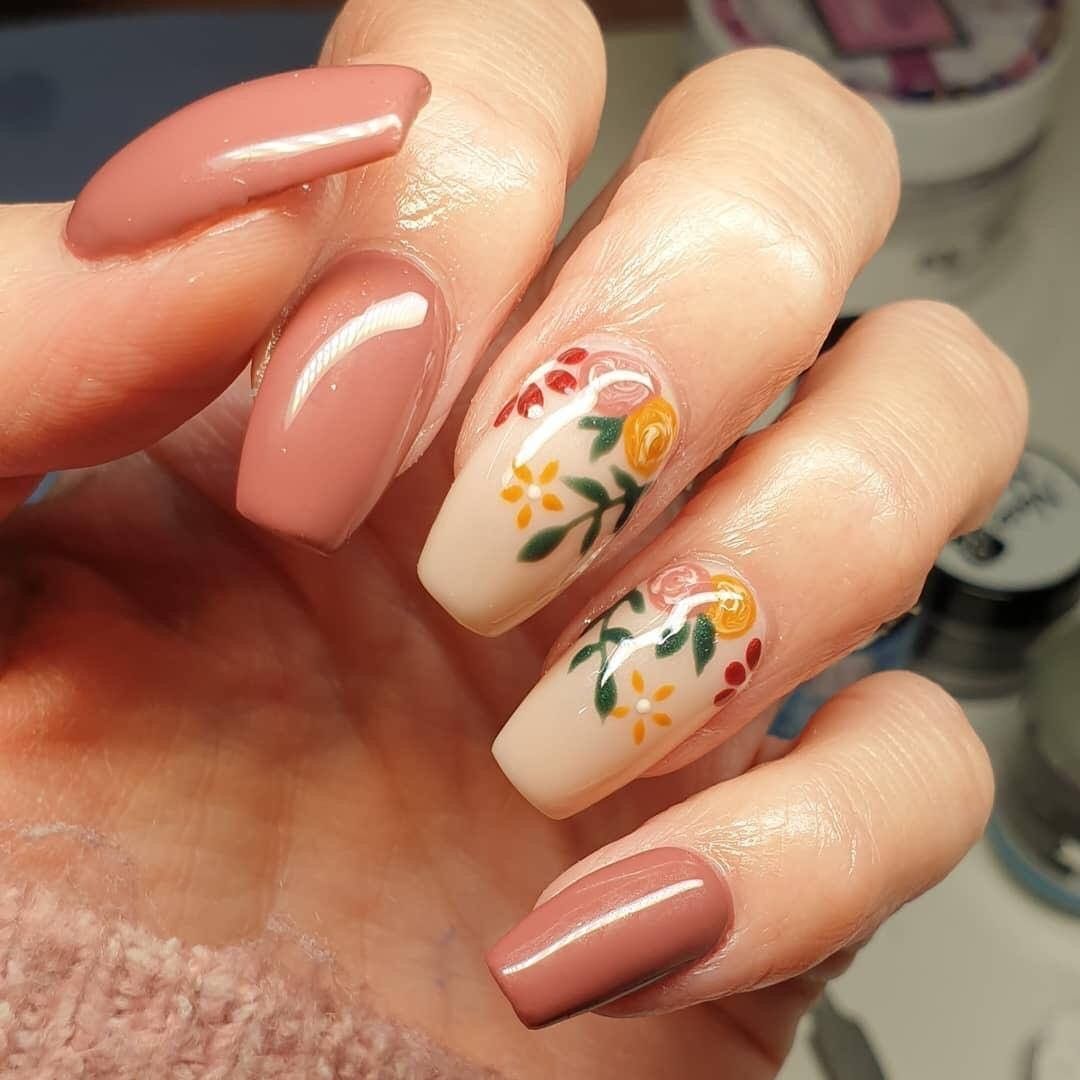
Floral and Neutral Elegance
This design combines soft, neutral tones with delicate floral patterns. The contrast between the solid color nails and the intricate floral designs creates a balanced and sophisticated look. The muted palette is perfect for any season, while the floral accents add a touch of femininity and charm.
-
- OPI Nail Lacquer in “Dulce de Leche” (neutral pink)
- Essie Nail Polish in “Ballet Slippers” (light pink)
- Nail art brushes for floral designs
- Assorted colors for flowers (green, red, yellow)
- Clear top coat
Tutorial:
-
- Apply a base coat.
- Paint the nails with a neutral pink base.
- Use fine nail art brushes to paint delicate floral designs on the accent nails.
- Finish with a clear top coat to protect the artwork and add shine.
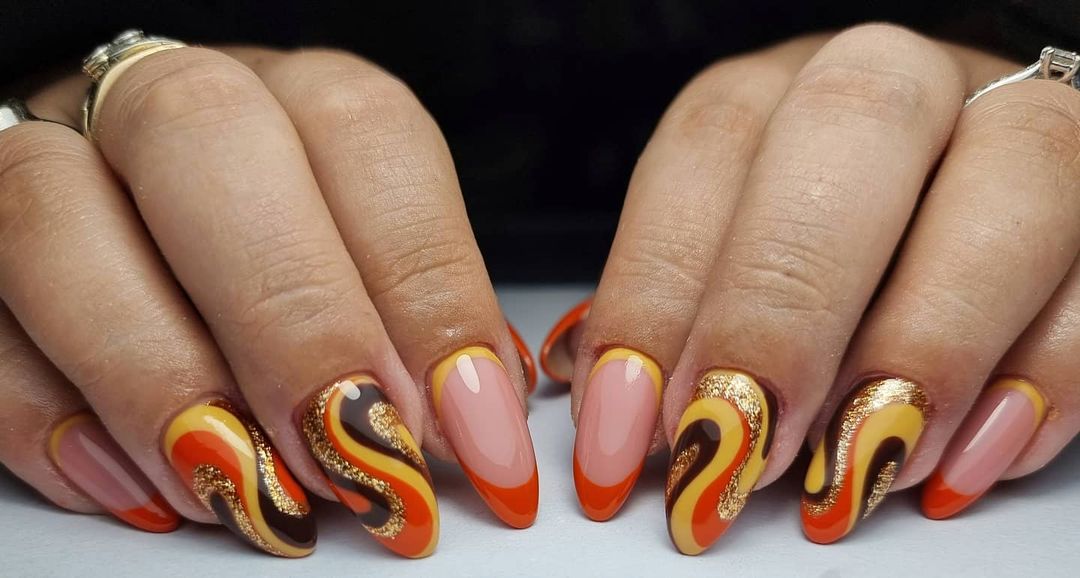
Retro Fall Swirls
This retro-inspired nail design features bold swirls of yellow, orange, and brown, accented with a touch of gold glitter. The combination of bright and earthy tones creates a vibrant and eye-catching look that is perfect for embracing the spirit of fall. The swirled pattern adds a fun and dynamic element to the design.
-
- OPI Nail Lacquer in “Sun, Sea, and Sand in My Pants” (yellow)
- Essie Nail Polish in “Playing Koi” (orange)
- Brown nail polish
- Gold glitter polish
- Nail art brushes for creating swirls
- Clear top coat
Tutorial:
-
- Apply a base coat.
- Paint the nails with a yellow base color.
- Use nail art brushes to create swirling patterns with orange and brown polishes.
- Add gold glitter accents to the swirls for extra sparkle.
- Seal with a clear top coat.
Autumn Leaves and Copper Tones
This design features a warm, coppery orange base with gold leaf accents. The combination of the copper tones and the golden leaves creates a rich, autumnal look that is both elegant and festive. The subtle use of gold adds a touch of luxury, making this design perfect for special occasions.
-
- Essie Nail Polish in “Playing Koi” (copper orange)
- Gold leaf flakes
- Clear nail polish for applying gold leaves
- Clear top coat
Tutorial:
-
- Apply a base coat.
- Paint the nails with a copper orange base color.
- While the polish is still tacky, place gold leaf flakes onto the nails.
- Seal the design with a clear top coat to ensure the gold leaves stay in place and to add shine.
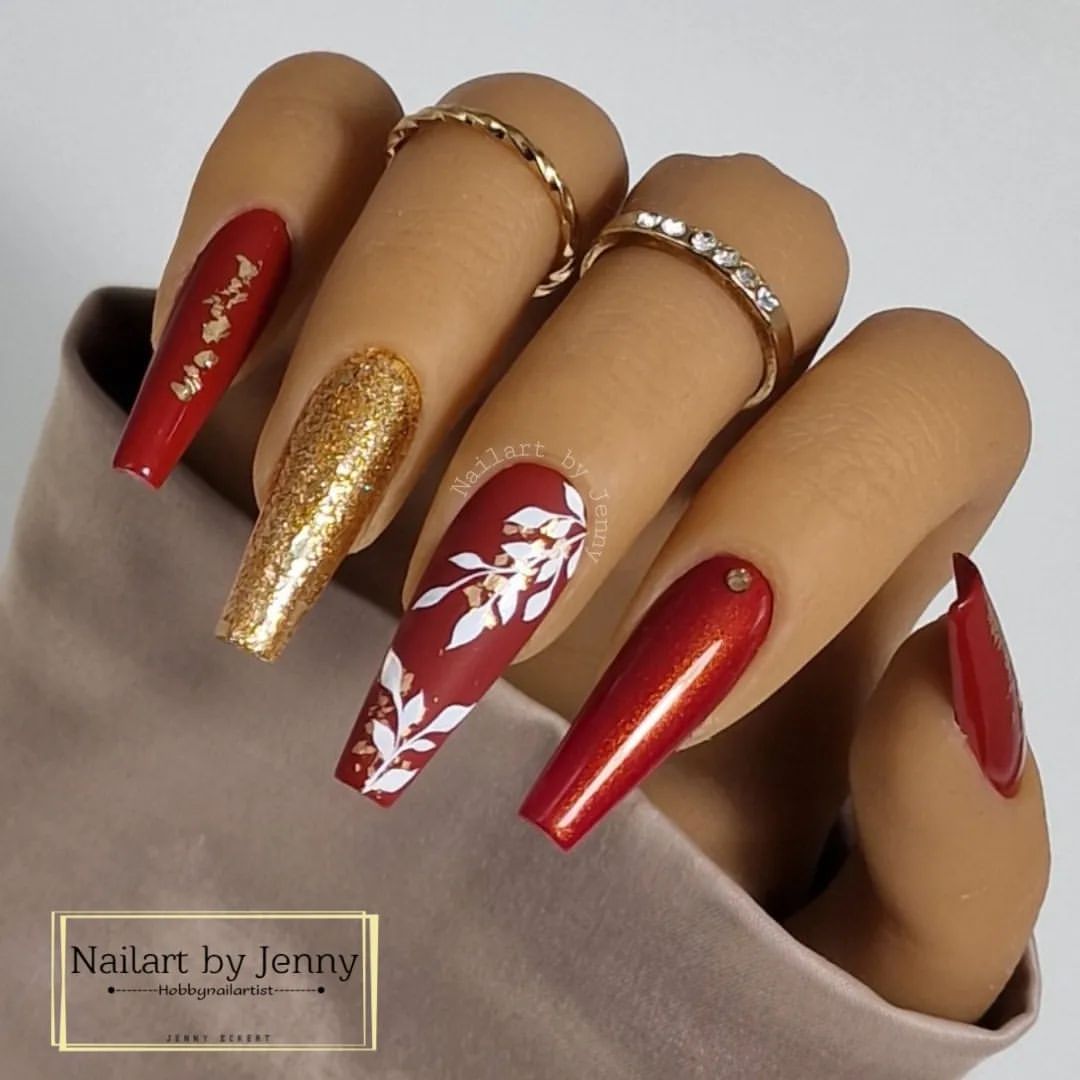
Glamorous Red and Gold
This manicure combines rich red tones with luxurious gold accents for a striking and glamorous look. The deep red base color is complemented by gold glitter and delicate white leaf patterns, making these nails perfect for a festive occasion or a night out. The gold glitter adds a touch of sparkle, while the white leaf designs provide a subtle yet elegant detail.
-
- OPI Nail Lacquer in “Big Apple Red” (red)
- Essie Nail Polish in “Summit of Style” (gold glitter)
- White nail art pen or brush
- Clear top coat
Tutorial:
-
- Apply a base coat to all nails.
- Paint the nails with two coats of red polish.
- Apply gold glitter polish to the ring finger.
- Use a white nail art pen or brush to draw leaf patterns on the middle finger.
- Finish with a clear top coat to protect the design and add shine.
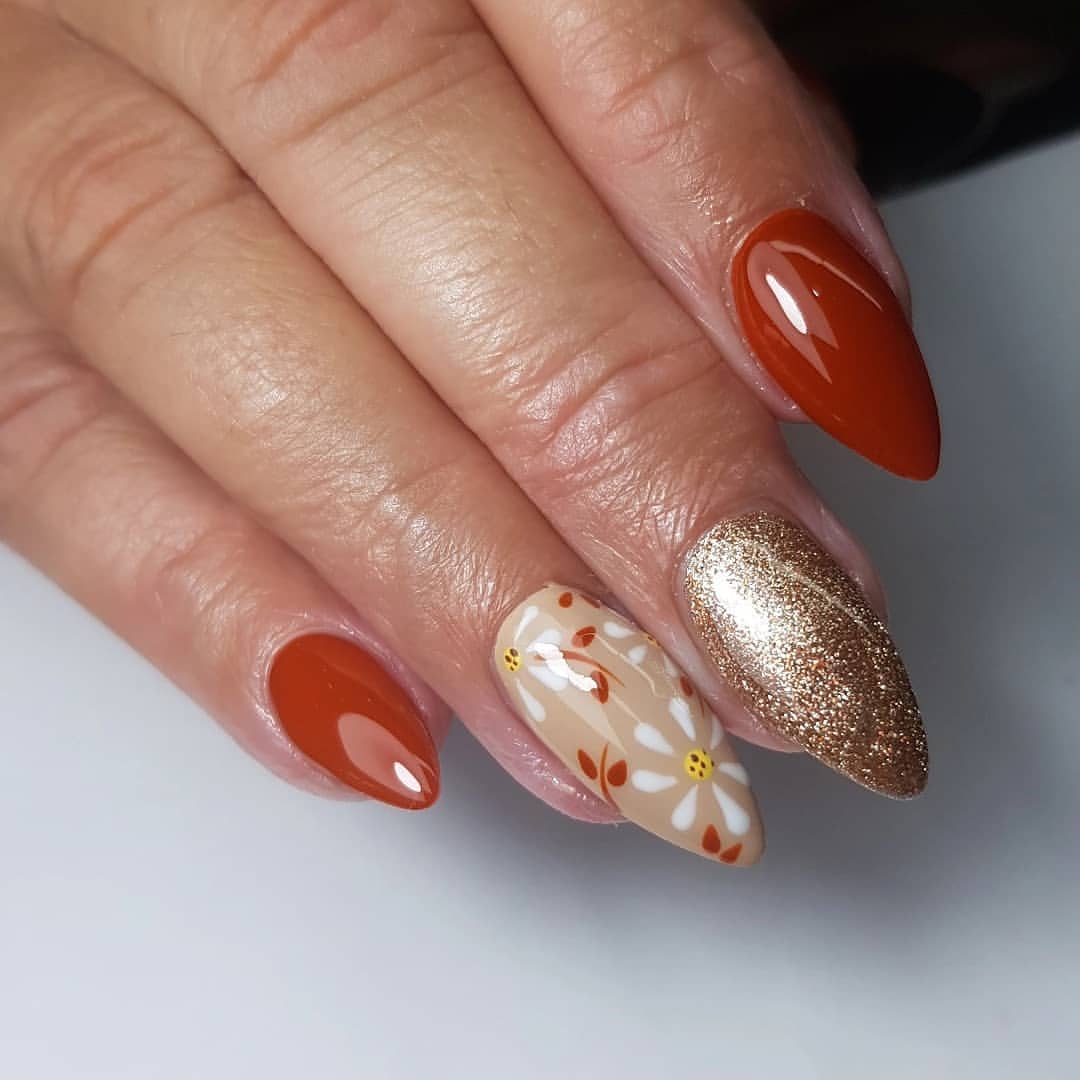
Autumn Floral with Glitter Accent
This design features a beautiful blend of earthy orange tones and delicate floral patterns, highlighted with a glittery accent nail. The combination of warm orange and neutral beige creates a cozy autumnal feel, while the gold glitter adds a touch of glamour. The floral designs are simple yet elegant, making this manicure perfect for any fall occasion.
-
- Essie Nail Polish in “Playing Koi” (orange)
- OPI Nail Lacquer in “Samoan Sand” (beige)
- Gold glitter polish
- Nail art brushes for floral designs
- Clear top coat
Tutorial:
-
- Apply a base coat to all nails.
- Paint the nails with orange polish, leaving the middle finger for the beige base.
- Apply gold glitter polish to the ring finger.
- Use fine nail art brushes to paint simple floral designs on the middle finger.
- Seal the design with a clear top coat.
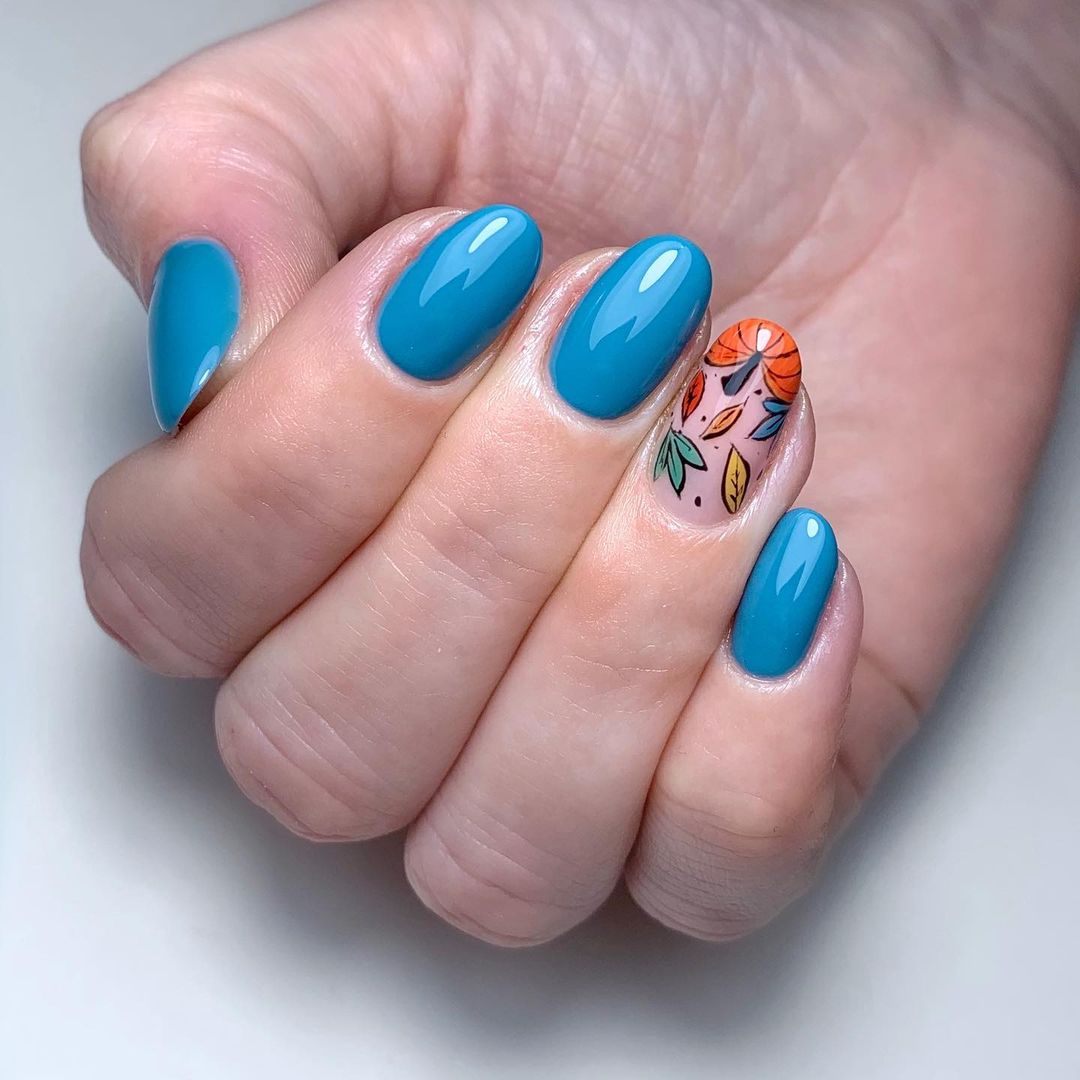
Vibrant Blue with Fall Leaves
This nail design features a bold blue base with an accent nail decorated with colorful fall leaves. The bright blue contrasts beautifully with the warm tones of the leaves, creating a vibrant and eye-catching look. This design is perfect for those who want to add a pop of color to their fall wardrobe.
-
- OPI Nail Lacquer in “Tile Art to Warm Your Heart” (blue)
- Essie Nail Polish in “Playing Koi” (orange)
- Assorted colors for leaves (yellow, green, red)
- Clear top coat
Tutorial:
-
- Apply a base coat to all nails.
- Paint the nails with blue polish, leaving the ring finger for the leaf design.
- Use fine nail art brushes to draw fall leaves on the ring finger with assorted colors.
- Seal the design with a clear top coat for a glossy finish.
Coral and Gold Confetti
This fun and playful nail design combines a coral base with gold confetti accents. The vibrant coral color is perfect for adding a pop of brightness to your fall look, while the gold confetti adds a touch of sparkle and whimsy. This design is great for those who love a bit of fun and color in their manicure.
-
- Essie Nail Polish in “Tart Deco” (coral)
- Gold confetti polish
- Clear top coat
Tutorial:
-
- Apply a base coat to all nails.
- Paint the nails with coral polish, leaving the ring and middle fingers for the confetti design.
- Apply gold confetti polish to the ring and middle fingers.
- Finish with a clear top coat to protect the design and add shine.
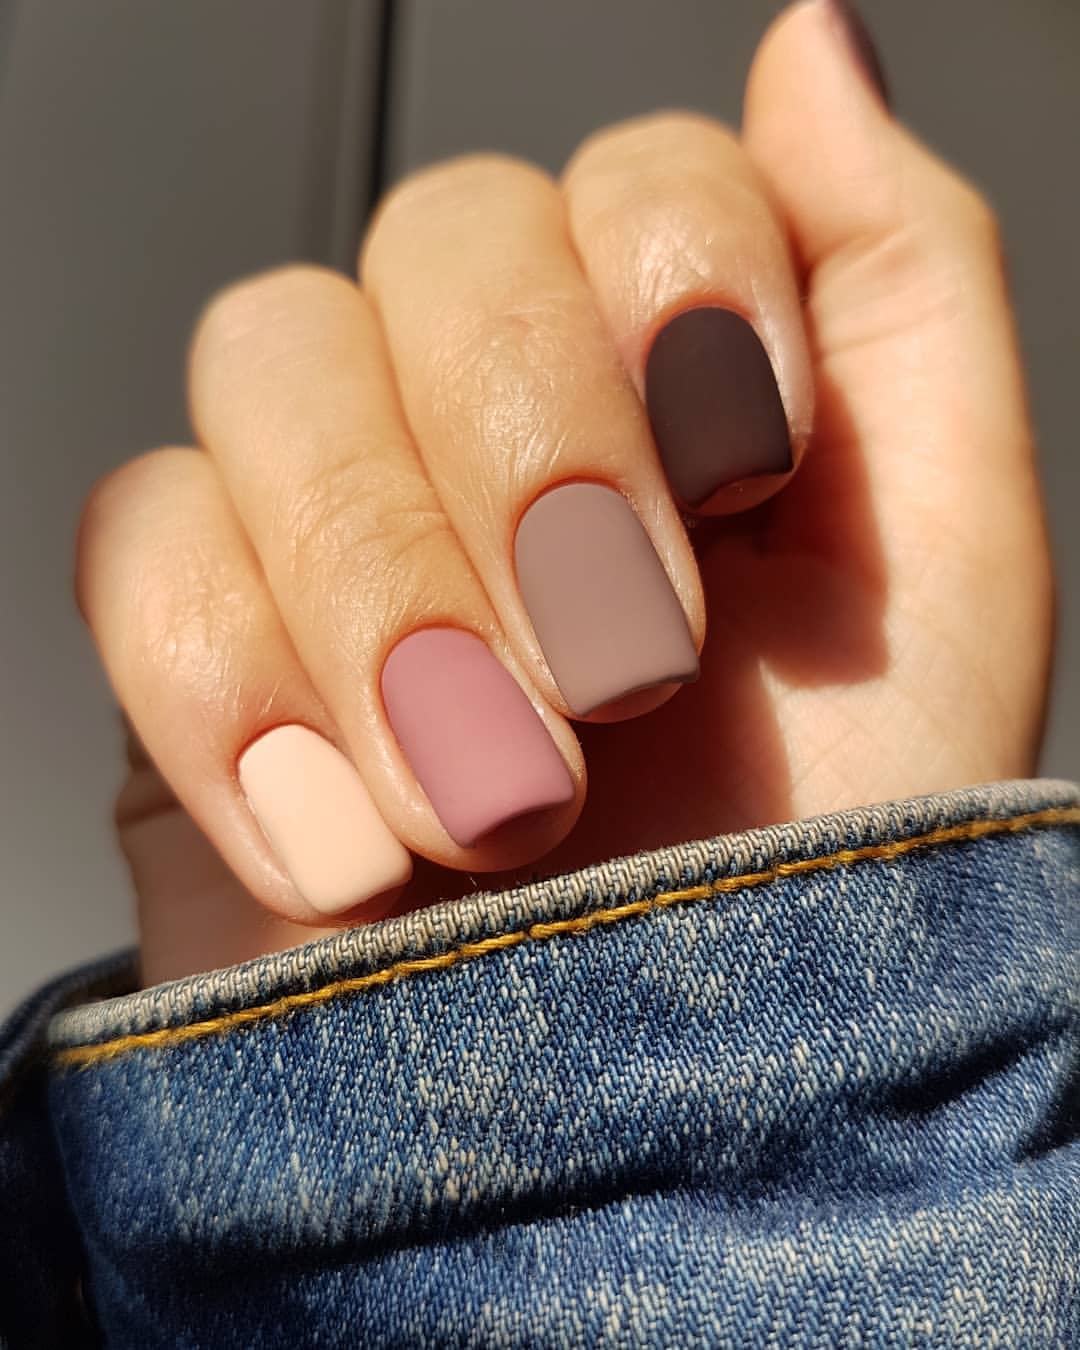
Matte Neutrals
This sophisticated nail design features a range of neutral shades in a matte finish. The combination of soft beige, pink, and brown tones creates a subtle yet elegant look that is perfect for any occasion. The matte finish adds a modern twist to this classic color palette.
-
- OPI Nail Lacquer in “Dulce de Leche” (beige)
- Essie Nail Polish in “Angora Cardi” (pink)
- China Glaze Nail Lacquer in “Foie Gras” (brown)
- Matte top coat
Tutorial:
-
- Apply a base coat to all nails.
- Paint each nail with a different neutral shade.
- Apply a matte top coat to achieve the desired finish.
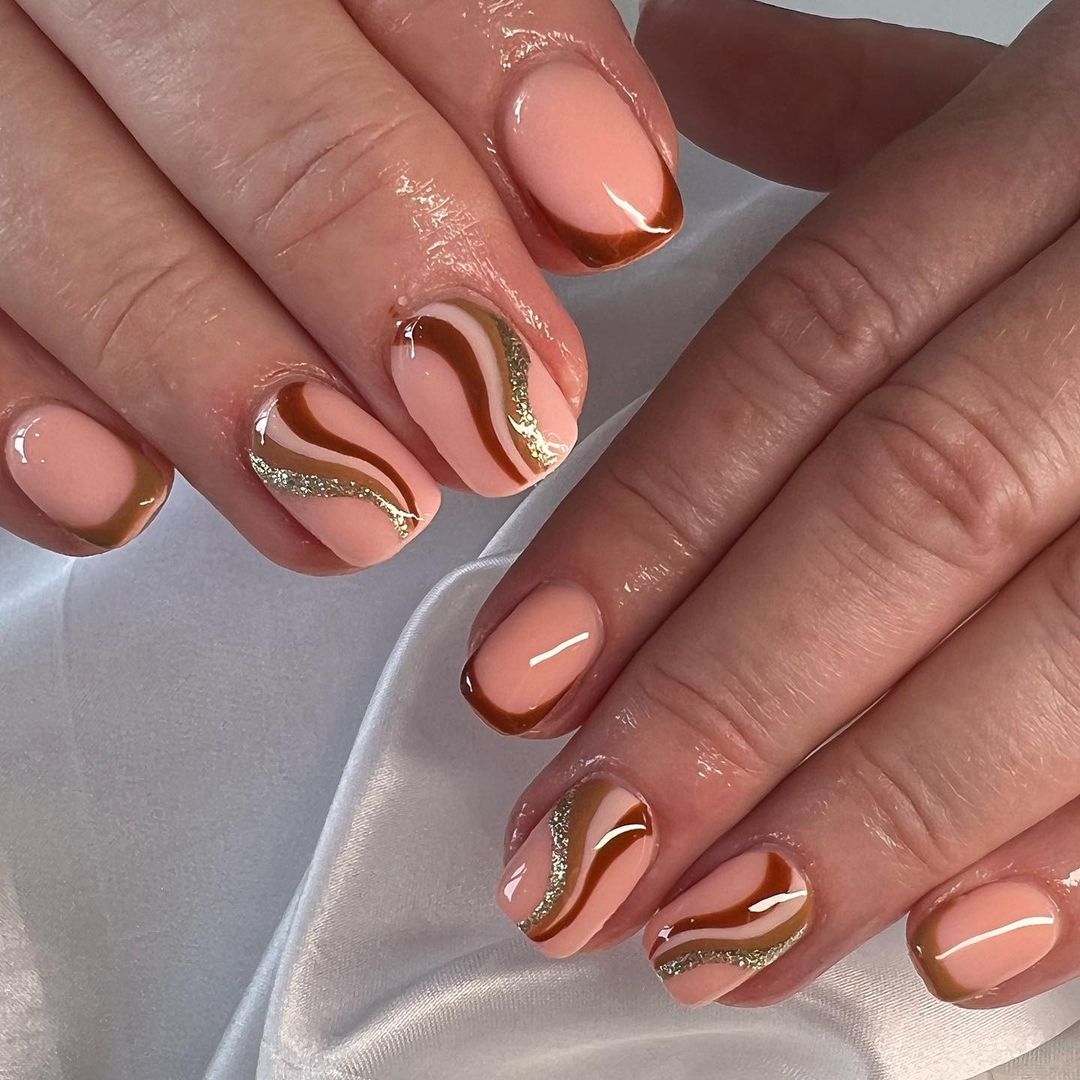
Earthy Tones with Gold Swirls
This nail design combines earthy brown tones with gold swirl accents for a chic and sophisticated look. The neutral base colors are perfect for fall, while the gold swirls add a touch of elegance and glamour. This design is great for those who want a refined yet stylish manicure.
-
- Essie Nail Polish in “Sand Tropez” (neutral)
- OPI Nail Lacquer in “Chocolate Moose” (brown)
- Gold nail art pen or brush
- Clear top coat
Tutorial:
-
- Apply a base coat to all nails.
- Paint the nails with a neutral base color.
- Use a gold nail art pen or brush to draw swirl patterns on the nails.
- Finish with a clear top coat to protect the design and add shine.
Earthy Abstract Swirls
This nail design features a harmonious blend of earthy tones, including browns, oranges, and whites, swirled together to create a fluid abstract pattern. The combination of these warm colors evokes the essence of fall, making it a perfect choice for the season. The long, square-shaped nails provide a perfect canvas for the intricate swirls, creating a stunning and unique look.

-
- OPI Nail Lacquer in “Cinnamon Sweet” (brown)
- Essie Nail Polish in “Playing Koi” (orange)
- White nail polish
- Fine nail art brushes
- Clear top coat
Tutorial:
-
- Apply a base coat to all nails.
- Paint the nails with a nude base color.
- Use fine brushes to create swirls with brown, orange, and white polishes.
- Blend the colors slightly while still wet to achieve a fluid effect.
- Seal the design with a clear top coat for a glossy finish.
Gradient Brown Hues with Accent Studs
This minimalist design features a gradient of brown hues, transitioning from light to dark across the nails. Each nail is adorned with a small accent stud near the cuticle, adding a touch of elegance and sophistication. The sleek, almond-shaped nails enhance the modern and stylish look, making it suitable for any occasion.

-
- Essie Nail Polish in “Cliff Hanger” (light brown)
- OPI Nail Lacquer in “Chocolate Moose” (medium brown)
- Sally Hansen Hard as Nails in “Bittersweet” (dark brown)
- Small gold or black nail studs
- Clear top coat
Tutorial:
-
- Apply a base coat to all nails.
- Paint each nail with a different shade of brown, creating a gradient effect.
- Place a small stud near the cuticle of each nail while the polish is still wet.
- Finish with a clear top coat to secure the studs and add shine.
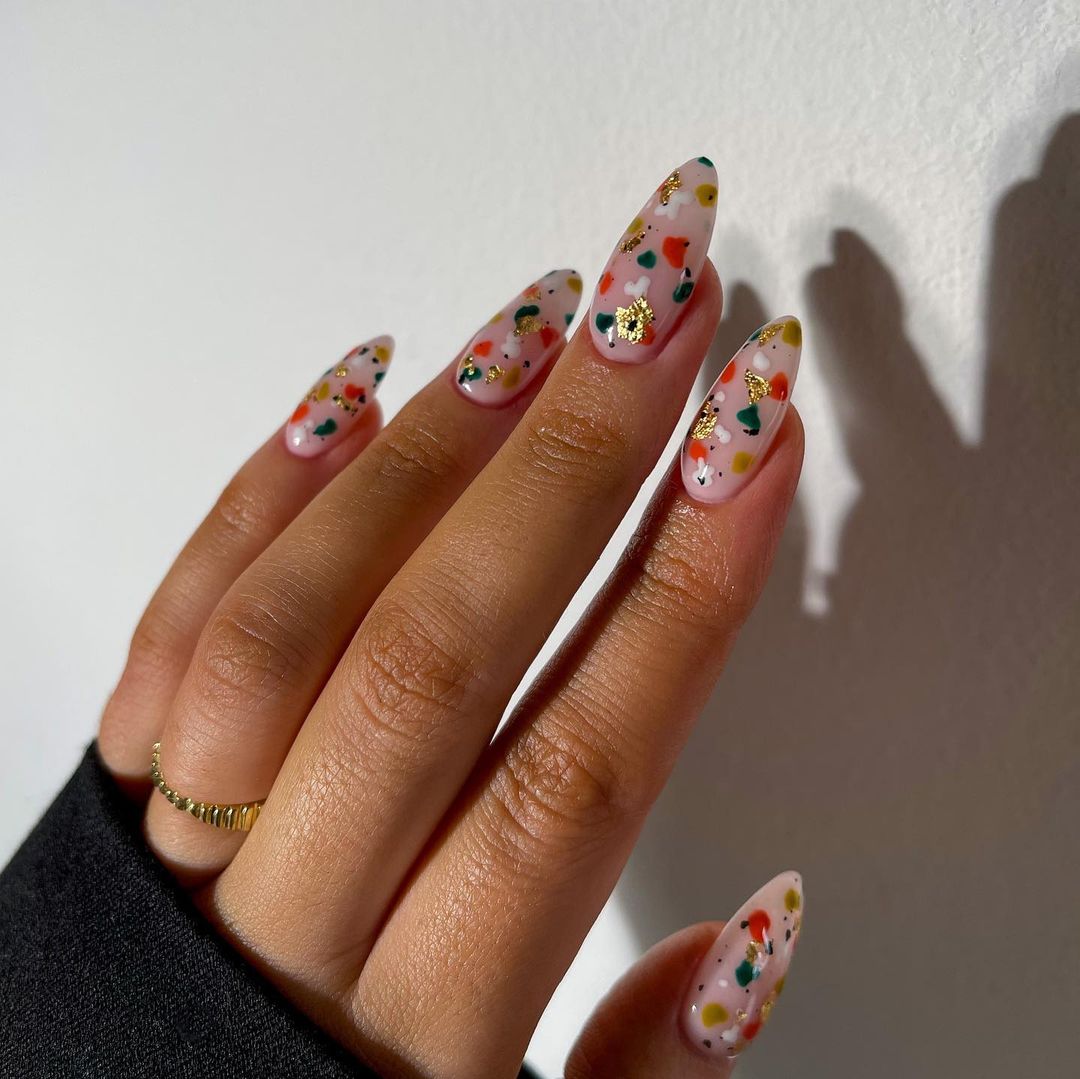
Confetti and Gold Flakes
This playful nail design features a nude base with colorful confetti and gold flakes scattered across the nails. The vibrant mix of colors and the shimmering gold add a fun and festive touch, perfect for adding some excitement to your fall manicure. The almond shape of the nails adds to the overall elegance of the design.
-
- OPI Nail Lacquer in “Bubble Bath” (nude)
- Multi-colored confetti nail polish
- Gold leaf flakes
- Clear top coat
Tutorial:
-
- Apply a base coat to all nails.
- Paint the nails with a nude base color.
- Apply the multi-colored confetti polish randomly across the nails.
- While the confetti polish is still wet, place gold leaf flakes on the nails.
- Seal the design with a clear top coat.
Fall Foliage Glitter
This vibrant nail design combines glitter and holographic foils to create a striking fall foliage effect. The mix of warm colors, including orange, red, and gold, captures the beauty of autumn leaves. The stiletto shape of the nails enhances the dramatic and eye-catching look.

-
- Essie Nail Polish in “Spice It Up” (orange)
- OPI Nail Lacquer in “I’m Not Really a Waitress” (red)
- Gold glitter polish
- Holographic foil pieces
- Clear top coat
Tutorial:
-
- Apply a base coat to all nails.
- Paint the nails with alternating orange and red polish.
- Apply gold glitter polish to the tips.
- Place holographic foil pieces randomly on the nails.
- Finish with a clear top coat to secure the foils and add shine.
Bold Green and Black Accents
This striking nail design features a combination of bold green and black accents on a nude base. The use of black branches and gold dots adds a touch of elegance and sophistication, while the vibrant green tips provide a bold and modern look. This design is perfect for those who want to make a statement with their fall manicure.
-
- Essie Nail Polish in “Bare With Me” (nude)
- OPI Nail Lacquer in “Suzi – The First Lady of Nails” (green)
- Black nail art pen
- Gold glitter polish
- Clear top coat
Tutorial:
-
- Apply a base coat to all nails.
- Paint the nails with a nude base color.
- Use a black nail art pen to draw branches and dots on the nails.
- Paint the tips of the nails with green polish.
- Add gold dots to the branches.
- Seal the design with a clear top coat.
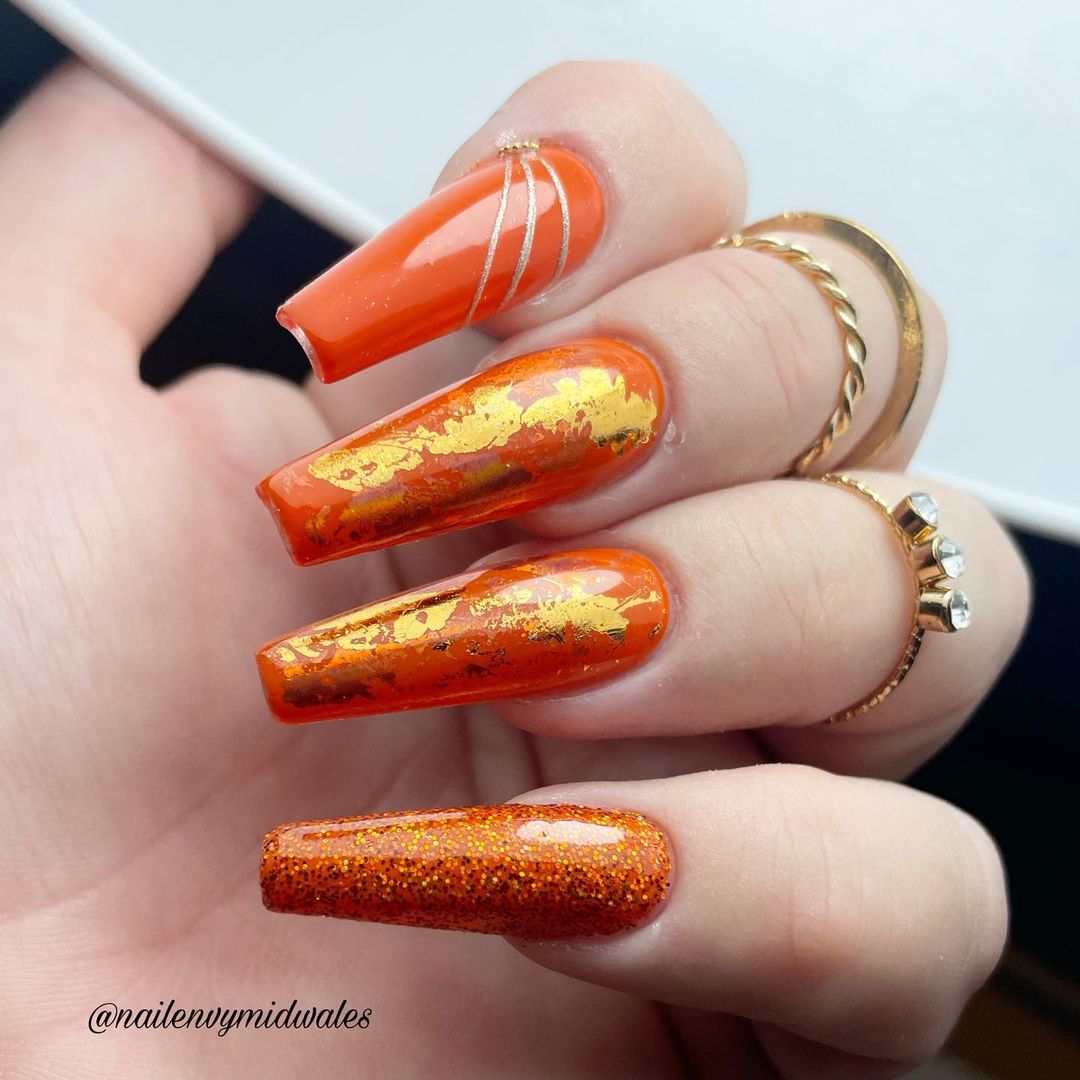
Orange and Gold Elegance
This elegant nail design features a rich orange base with gold leaf accents. The combination of vibrant orange and shimmering gold creates a luxurious and eye-catching look. The long, coffin-shaped nails enhance the overall sophistication of the design, making it perfect for special occasions or a stylish fall look.
-
- OPI Nail Lacquer in “A Good Man-darin is Hard to Find” (orange)
- Gold leaf flakes
- Clear top coat
Tutorial:
-
- Apply a base coat to all nails.
- Paint the nails with two coats of orange polish.
- While the polish is still tacky, place gold leaf flakes on the nails.
- Seal the design with a clear top coat to secure the gold flakes and add shine.
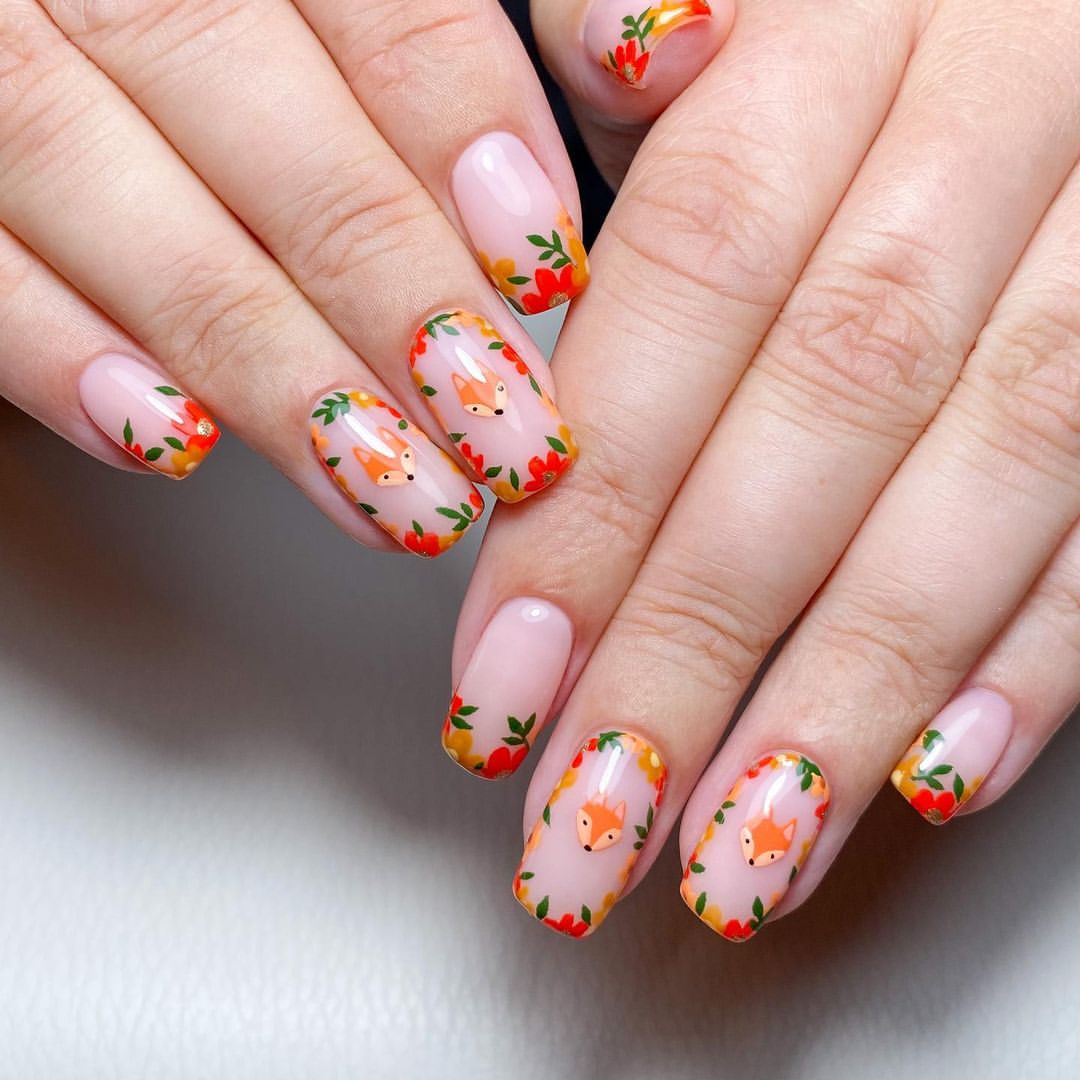
Adorable Fox and Floral Design
This cute nail design features tiny fox faces surrounded by colorful floral patterns on a nude base. The playful and detailed artwork adds a touch of whimsy and fun to your manicure, perfect for those who love nature and animals. The combination of green leaves and orange-red flowers complements the little foxes, creating a cohesive and adorable look.
-
- OPI Nail Lacquer in “Bubble Bath” (nude)
- Essie Nail Polish in “Tangerine Tease” (orange)
- Green nail polish for leaves
- Black and white nail art pens for detailing the fox faces
- Clear top coat
Tutorial:
-
- Apply a base coat to all nails.
- Paint the nails with a nude base color.
- Use a fine nail art brush to paint small fox faces in the center of each nail with orange polish.
- Add details to the fox faces using black and white nail art pens.
- Paint flowers and leaves around the foxes with orange and green polishes.
- Seal the design with a clear top coat to protect the artwork.
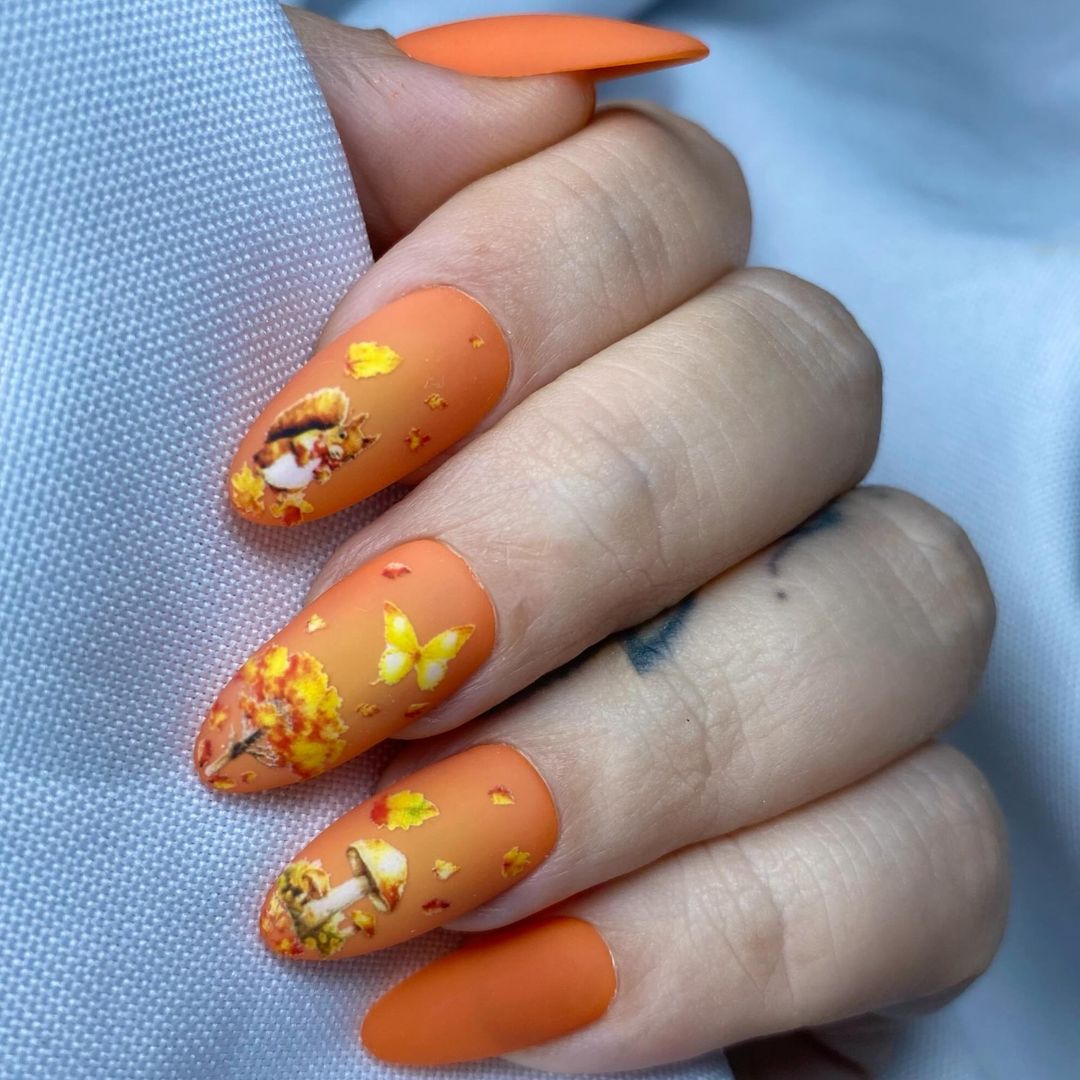
Autumn Wonderland
This nail design captures the essence of autumn with its matte orange base and intricate designs of fall leaves, mushrooms, and butterflies. The detailed artwork evokes a woodland wonderland, perfect for those who love the fall season and its natural beauty. The matte finish adds a modern twist to the traditional autumn palette.
-
- Essie Nail Polish in “Playing Koi” (orange)
- Matte top coat
- Nail art stickers or decals featuring leaves, mushrooms, and butterflies
- Clear top coat
Tutorial:
-
- Apply a base coat to all nails.
- Paint the nails with a matte orange polish.
- Use nail art stickers or decals to apply the designs of leaves, mushrooms, and butterflies.
- Press the stickers or decals firmly to ensure they stick well.
- Seal the design with a matte top coat to maintain the finish and protect the artwork.
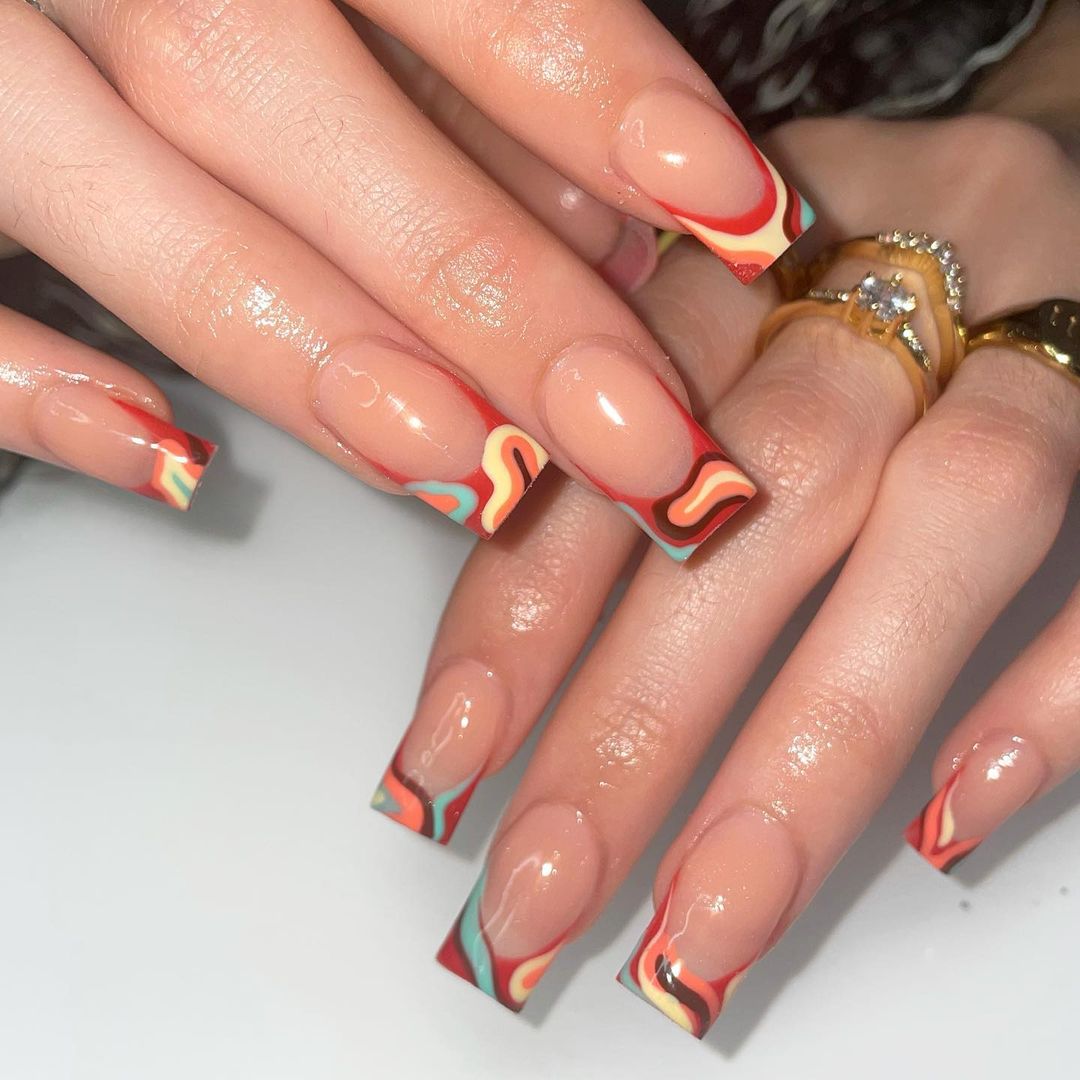
Retro Swirls French Tips
This chic and modern nail design features colorful retro swirls on French tips. The combination of bright colors such as red, orange, yellow, and turquoise creates a bold and playful look. The swirls add a dynamic and trendy touch to the classic French manicure, making it perfect for those who want to stand out.
-
- OPI Nail Lacquer in “Alpine Snow” (white base)
- Red, orange, yellow, and turquoise nail polishes
- Fine nail art brushes for creating swirls
- Clear top coat
Tutorial:
-
- Apply a base coat to all nails.
- Paint the tips of the nails with white polish to create the base for the French manicure.
- Use fine nail art brushes to create swirls on the tips with red, orange, yellow, and turquoise polishes.
- Blend the colors slightly while still wet to achieve a seamless swirl effect.
- Seal the design with a clear top coat to protect the artwork and add shine.
FAQ
Q: How do I make my fall leaves nail art last longer?
A: Ensure you use a good quality base coat and top coat. Reapply the top coat every few days to maintain the shine and protect the design.
Q: Can I achieve these designs with short nails?
A: Absolutely! Many fall nail designs look great on short nails. You might need to adjust the size of the designs, but the overall effect will still be stunning.
Q: What if I’m not good at freehand nail art?
A: Use nail stickers or stencils for intricate designs. They are easy to apply and give a professional finish without the need for a steady hand.
Q: How can I make my own 3D nail art at home?
A: You can use acrylic powder and liquid to create 3D elements. Follow a step by step tutorial for best results and practice to perfect your technique.
I hope this guide inspires you to try out some fall leaves nail art. With the right tools and a bit of practice, you can achieve salon-quality nails at home. Happy painting!
Save Pin