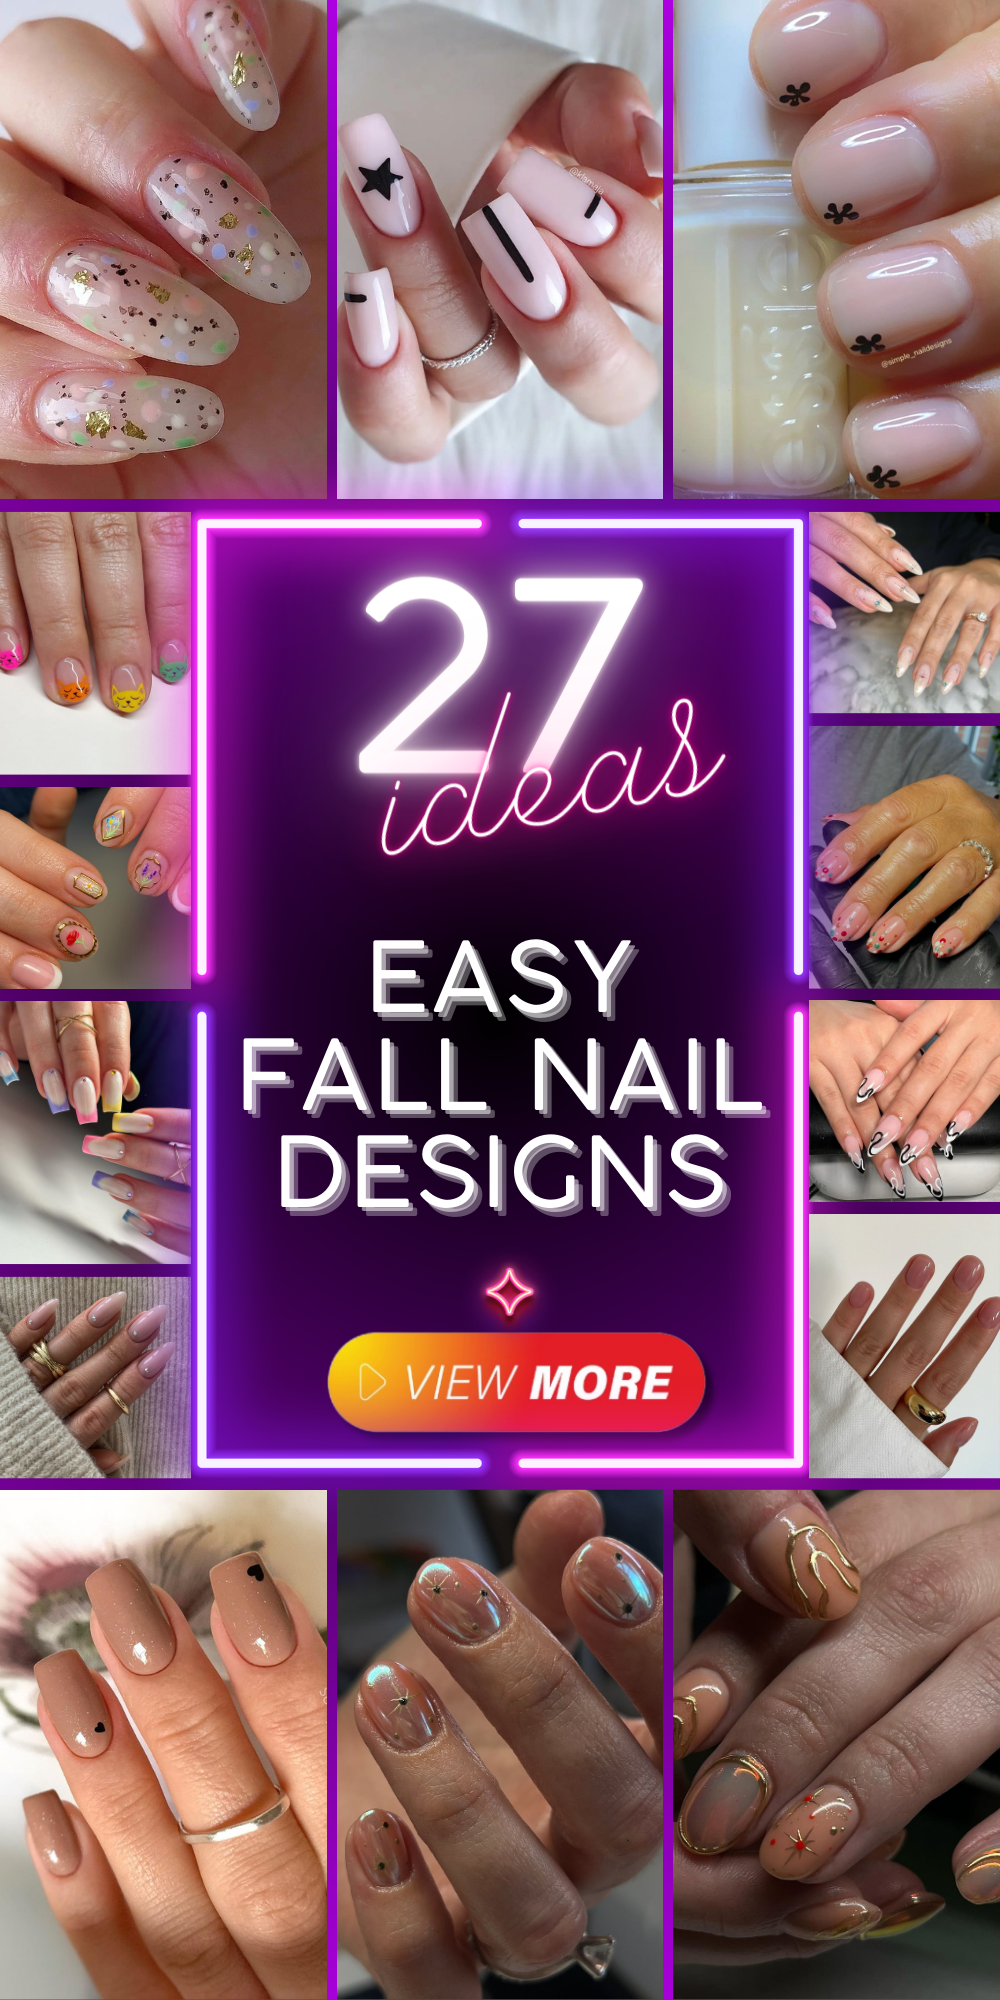
As the leaves change colors and the air turns crisp, it’s the perfect time to update your nail designs to reflect the beauty of Autumn. Whether you’re a beginner looking for simple styles or a seasoned nail enthusiast, there are plenty of easy fall nail designs to explore. Let’s dive into some cute, super, and trendy options that you can try this season.
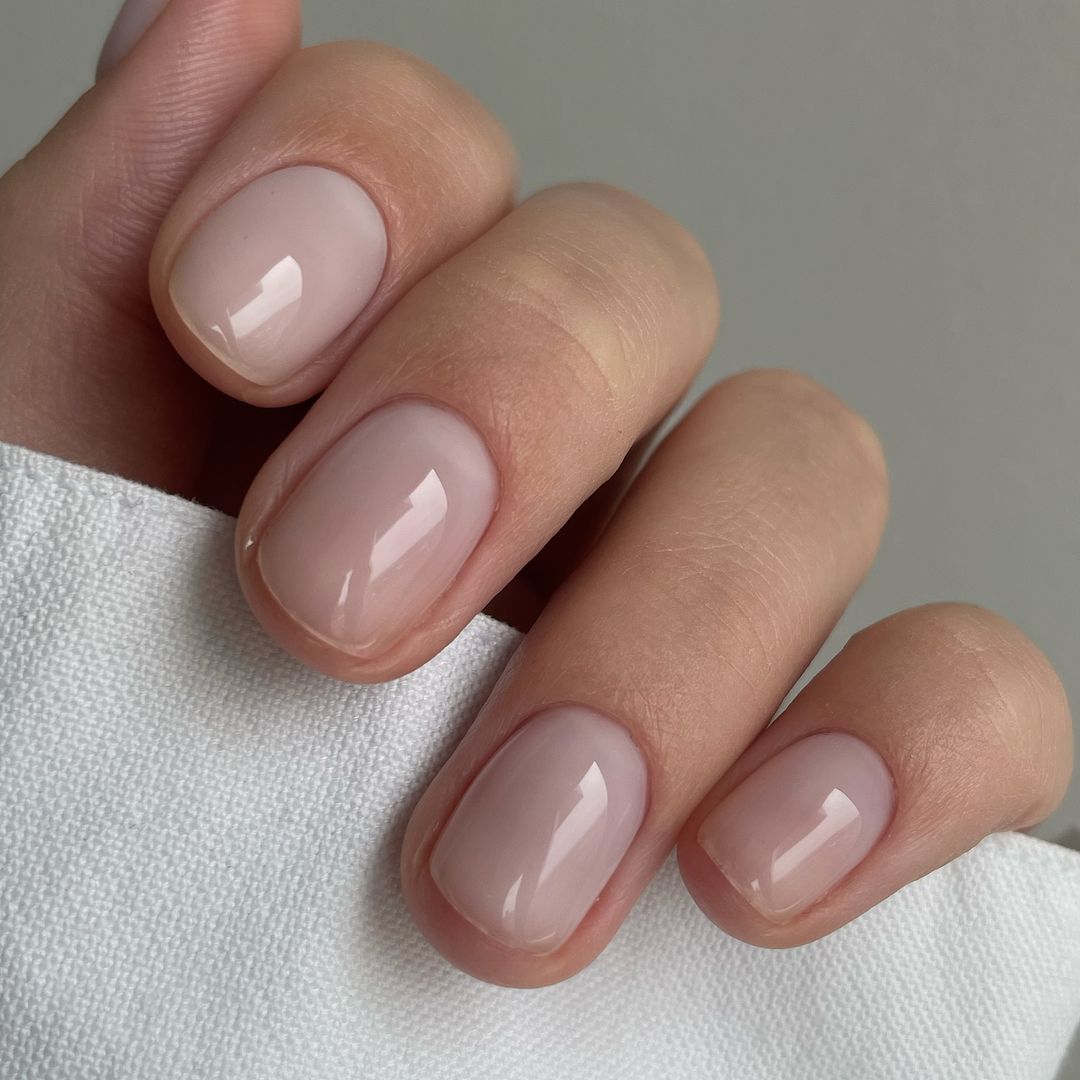
Short and Glossy Neutrals
Short and glossy neutral nails are timeless and elegant, perfect for the autumn season. This design features a subtle nude polish that complements any outfit. The short length makes it practical for everyday activities, and the glossy finish adds a touch of sophistication. This design is ideal for those who prefer a minimalist look but still want to keep their nails polished and neat.
-
- Nude nail polish (e.g., Essie Ballet Slippers)
- Glossy top coat (e.g., Seche Vite Dry Fast Top Coat)
- Base coat (e.g., OPI Natural Nail Base Coat)
Instructions:
- Start by applying a base coat to protect your natural nails.
- Apply two coats of the nude polish, allowing each layer to dry completely.
- Finish with a glossy top coat for a long-lasting shine.
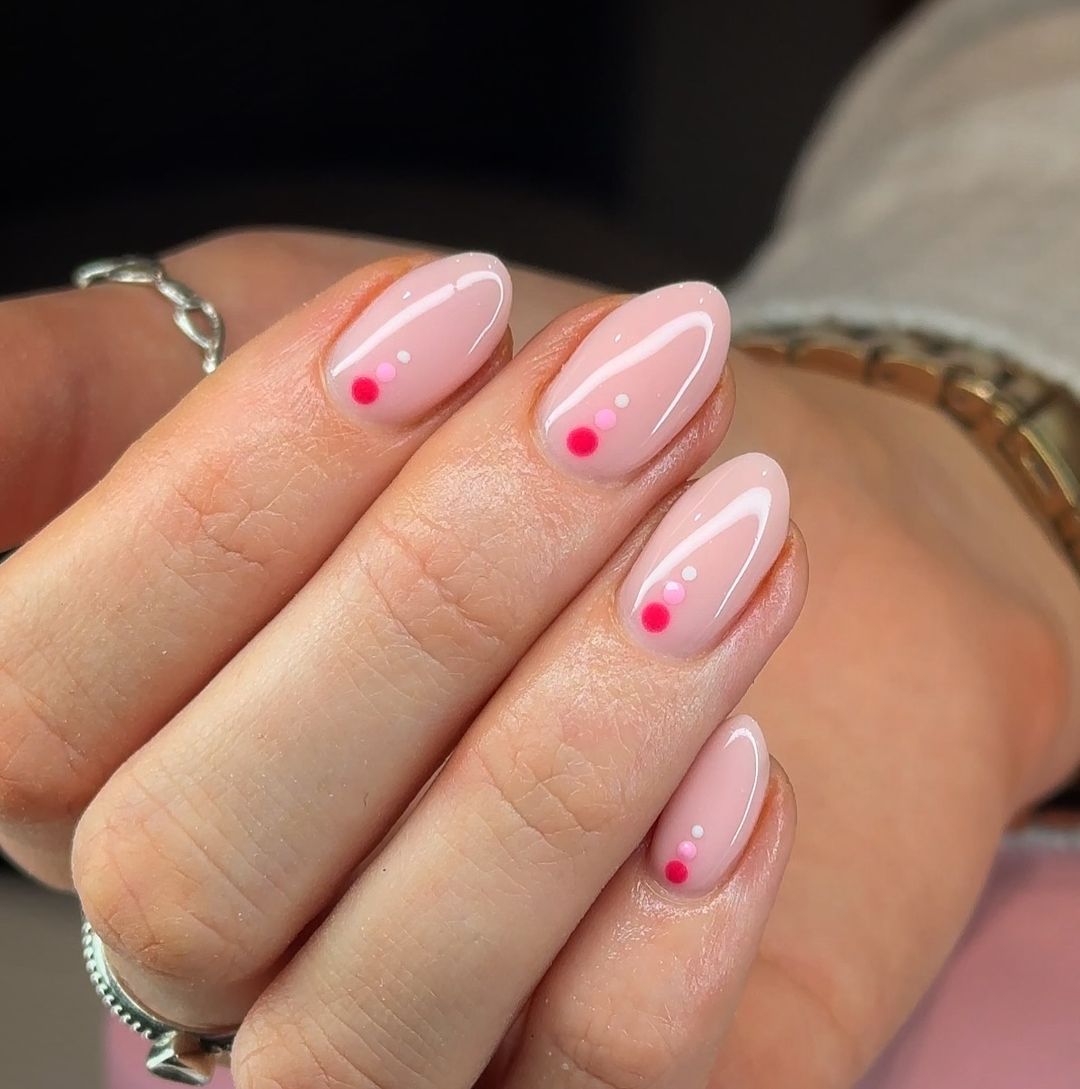
Playful Pink Dots
Adding a playful twist to your nails with pink dots can make them stand out. This design features a soft pink base with vibrant pink and white dots strategically placed to create a fun and eye-catching look. It’s perfect for beginners who want to experiment with nail art without committing to something too intricate.
-
- Light pink nail polish (e.g., OPI Bubble Bath)
- Dark pink nail polish (e.g., OPI Mod About You)
- White nail polish (e.g., Essie Blanc)
- Dotting tool
Instructions:
- Apply a base coat.
- Paint your nails with two coats of light pink polish.
- Use a dotting tool to create dots with the dark pink and white polishes.
- Seal with a top coat.
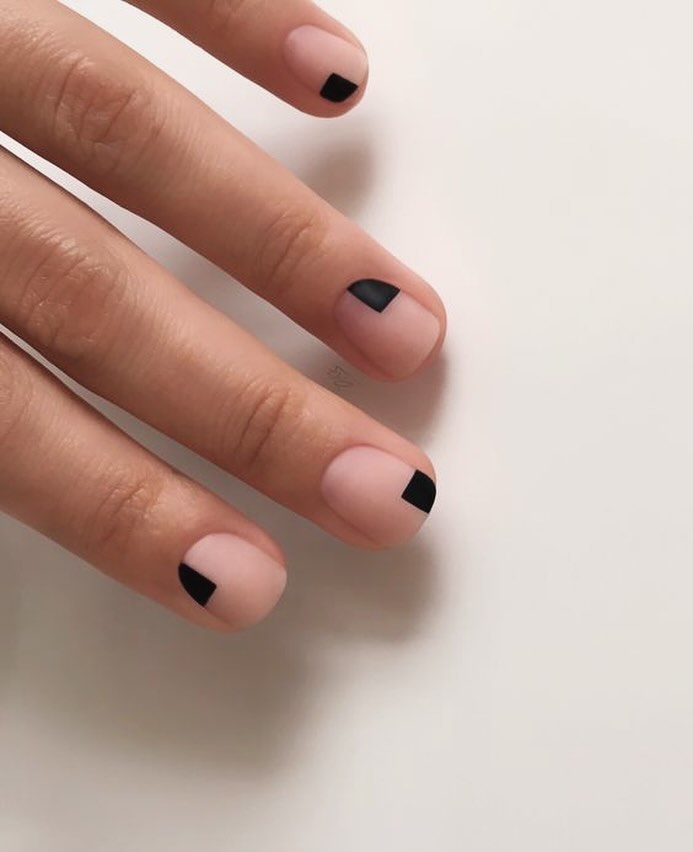
Chic Black Accents
For a chic and modern look, black accents on a neutral base are perfect. This design features a matte nude base with small black geometric shapes. It’s a stylish choice for those who want something sophisticated yet bold. The contrast between the nude and black makes this design a standout for Autumn.
-
- Matte nude nail polish (e.g., Zoya Satin Naked)
- Black nail polish (e.g., Essie Licorice)
- Nail art brush
Instructions:
- Start with a base coat.
- Apply two coats of matte nude polish.
- Use a nail art brush to paint small black shapes on each nail.
- Finish with a matte top coat.
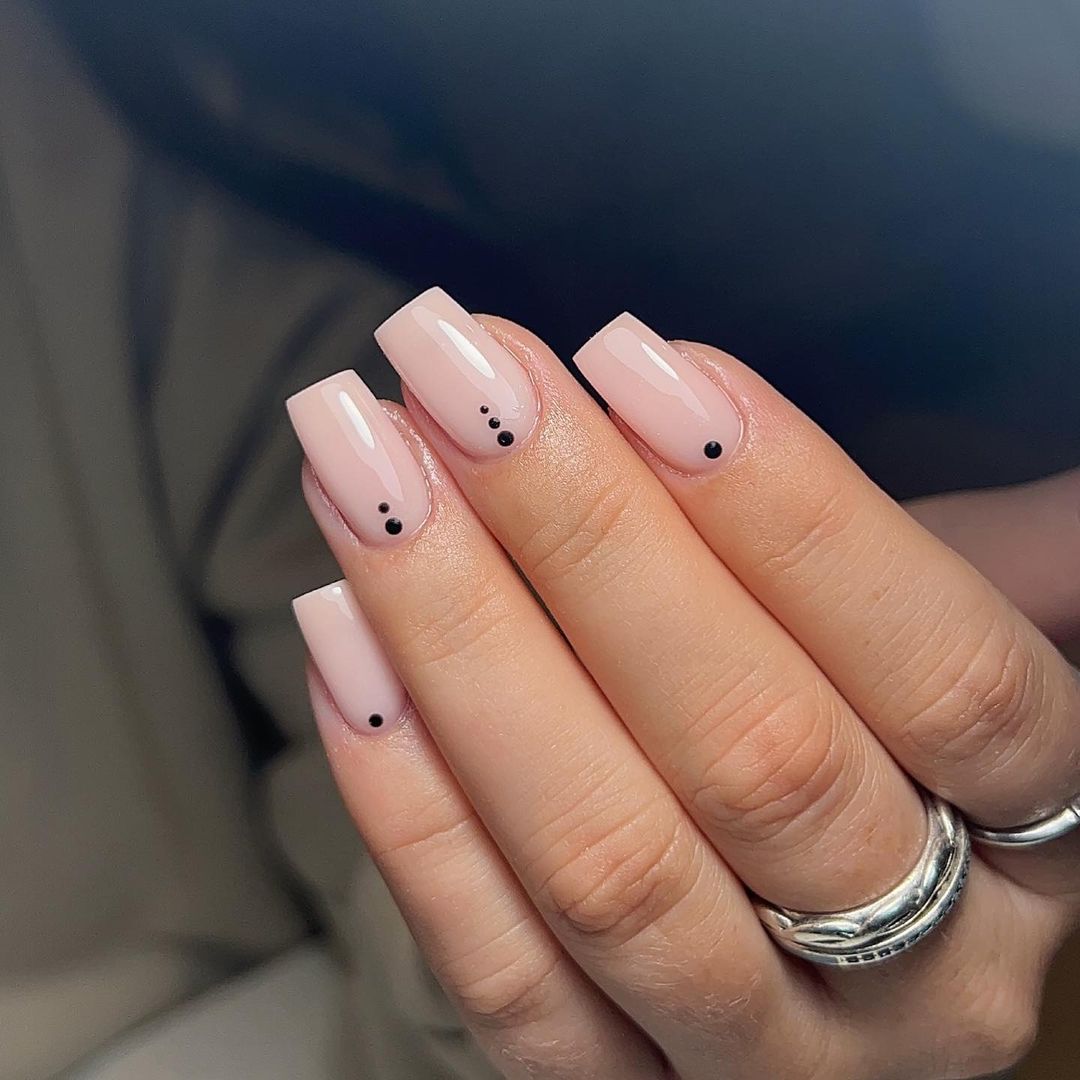
Elegant Black Dots on Square Nails
Square nails with a delicate nude base and tiny black dots create an elegant and refined look, perfect for the autumn season. The simplicity of the design, combined with the chic square shape, makes it ideal for those who want a sophisticated yet subtle manicure. The glossy finish adds a touch of luxury, making these nails suitable for both everyday wear and special occasions.
-
- Nude nail polish (e.g., Essie Ballet Slippers)
- Black nail polish (e.g., OPI Black Onyx)
- Dotting tool
- Glossy top coat (e.g., Seche Vite Dry Fast Top Coat)
Instructions:
- Begin with a base coat to protect your nails.
- Apply two layers of nude polish, ensuring each coat dries completely.
- Use a dotting tool to add black dots near the cuticle of each nail.
- Finish with a glossy top coat to seal and protect your design.
Save Pin
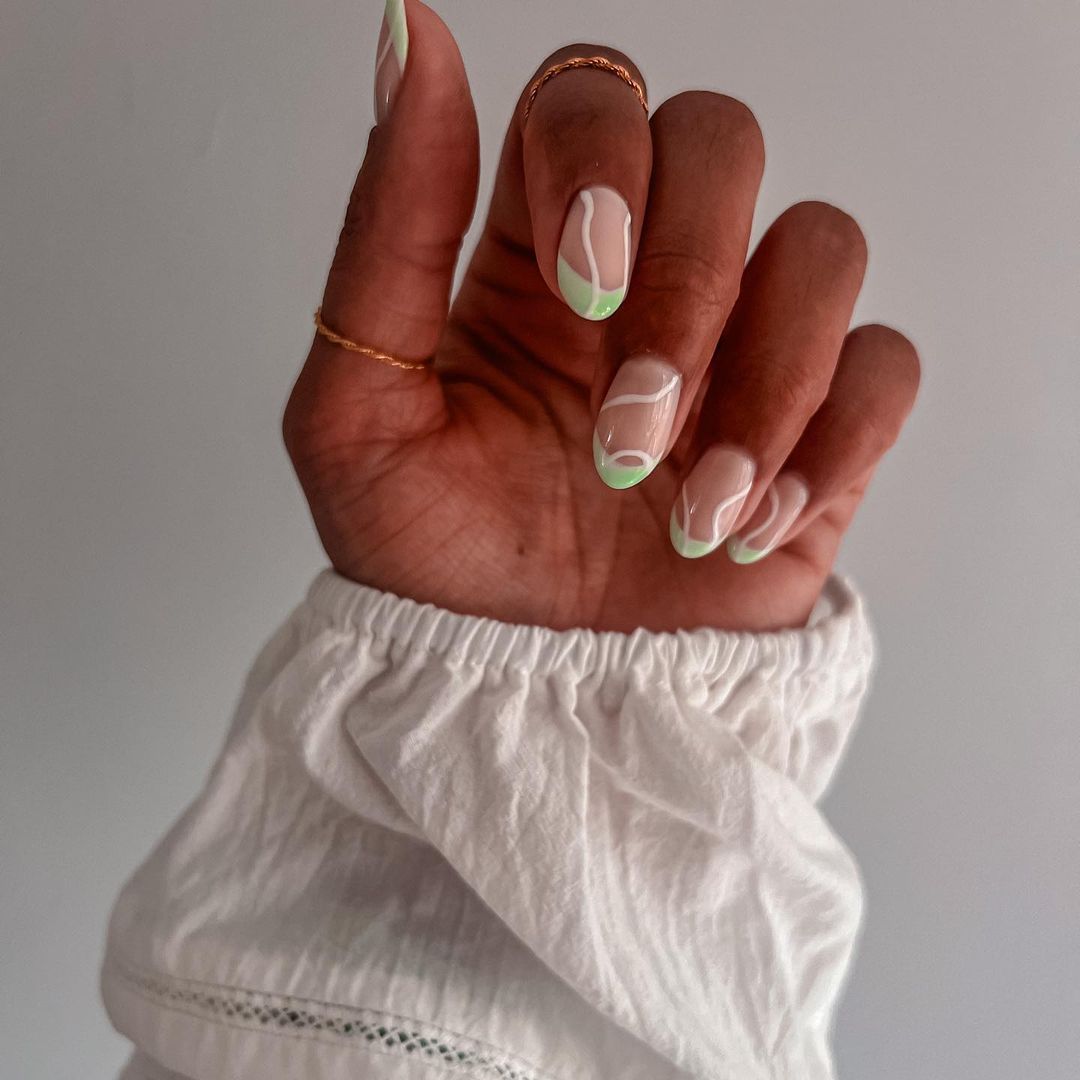
Fresh Green Tips with White Swirls
This nail design combines fresh green tips with intricate white swirls, creating a playful and modern look. The combination of colors is perfect for autumn, evoking the freshness of the season. The almond shape enhances the elegance of the design, making it ideal for those who want a trendy and stylish manicure.
-
- Light pink base polish (e.g., OPI Bubble Bath)
- Green nail polish (e.g., Essie Mojito Madness)
- White nail polish (e.g., Sally Hansen White On)
- Nail art brush
- Top coat (e.g., Seche Vite Dry Fast Top Coat)
Instructions:
- Apply a base coat to your nails.
- Paint your nails with a light pink base color.
- Use a nail art brush to create green tips on each nail.
- Add white swirls over the green tips using a fine brush.
- Seal the design with a top coat for a long-lasting finish.
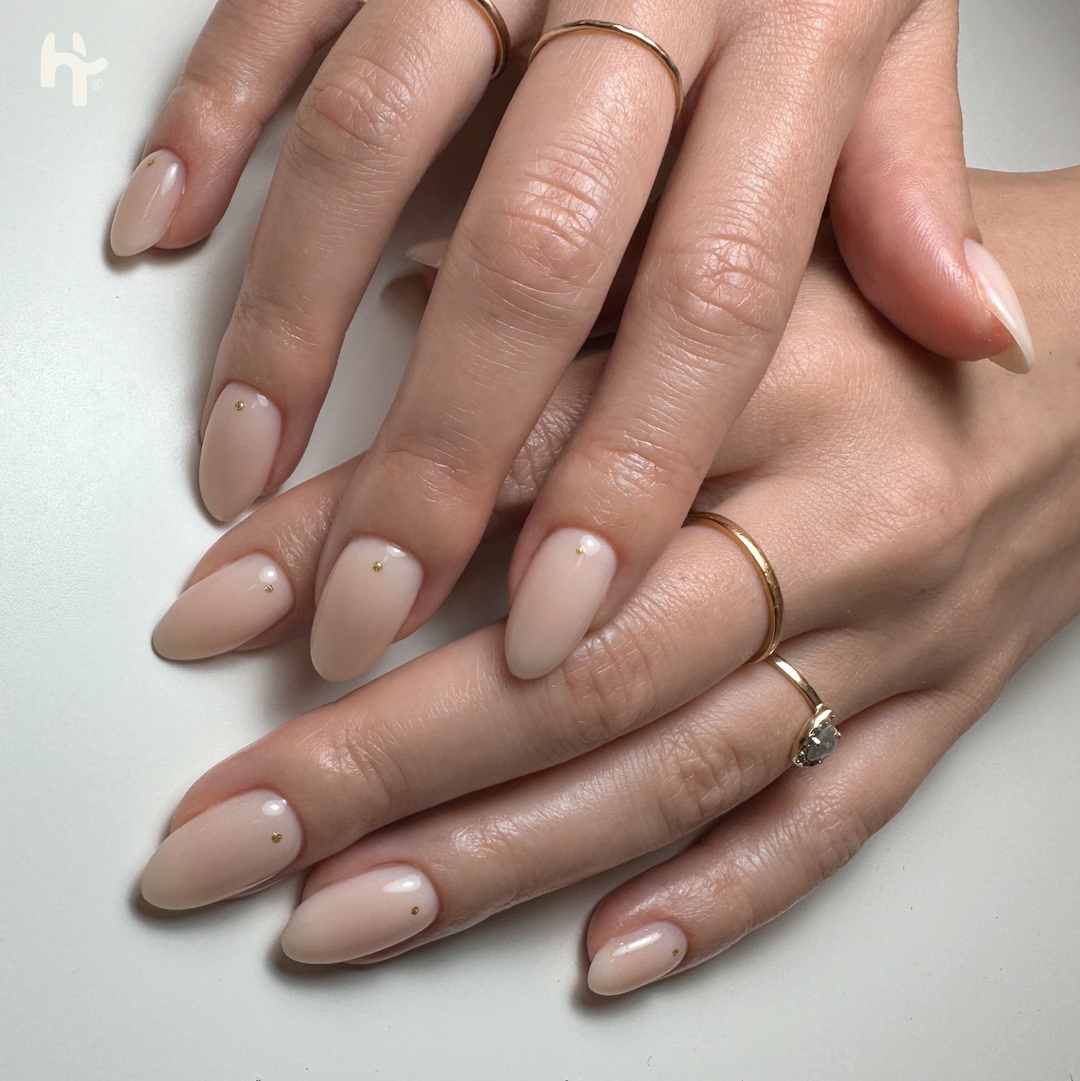
Minimalist Nude Almond Nails with Gold Accents
For a minimalist yet sophisticated look, these nude almond nails with tiny gold accents are perfect. The almond shape is flattering and elongates the fingers, while the nude polish provides a clean and polished base. The small gold accents add a touch of glamour without being overpowering, making this design suitable for any occasion.
-
- Nude nail polish (e.g., Zoya Avery)
- Gold nail polish or gold studs (e.g., CND Vinylux Brass Buttons)
- Top coat (e.g., Seche Vite Dry Fast Top Coat)
Instructions:
- Start with a base coat.
- Apply two coats of nude polish, allowing each coat to dry completely.
- Add a small gold accent near the cuticle of each nail using a nail art brush or by placing gold studs.
- Finish with a top coat to secure the gold accents and add shine.
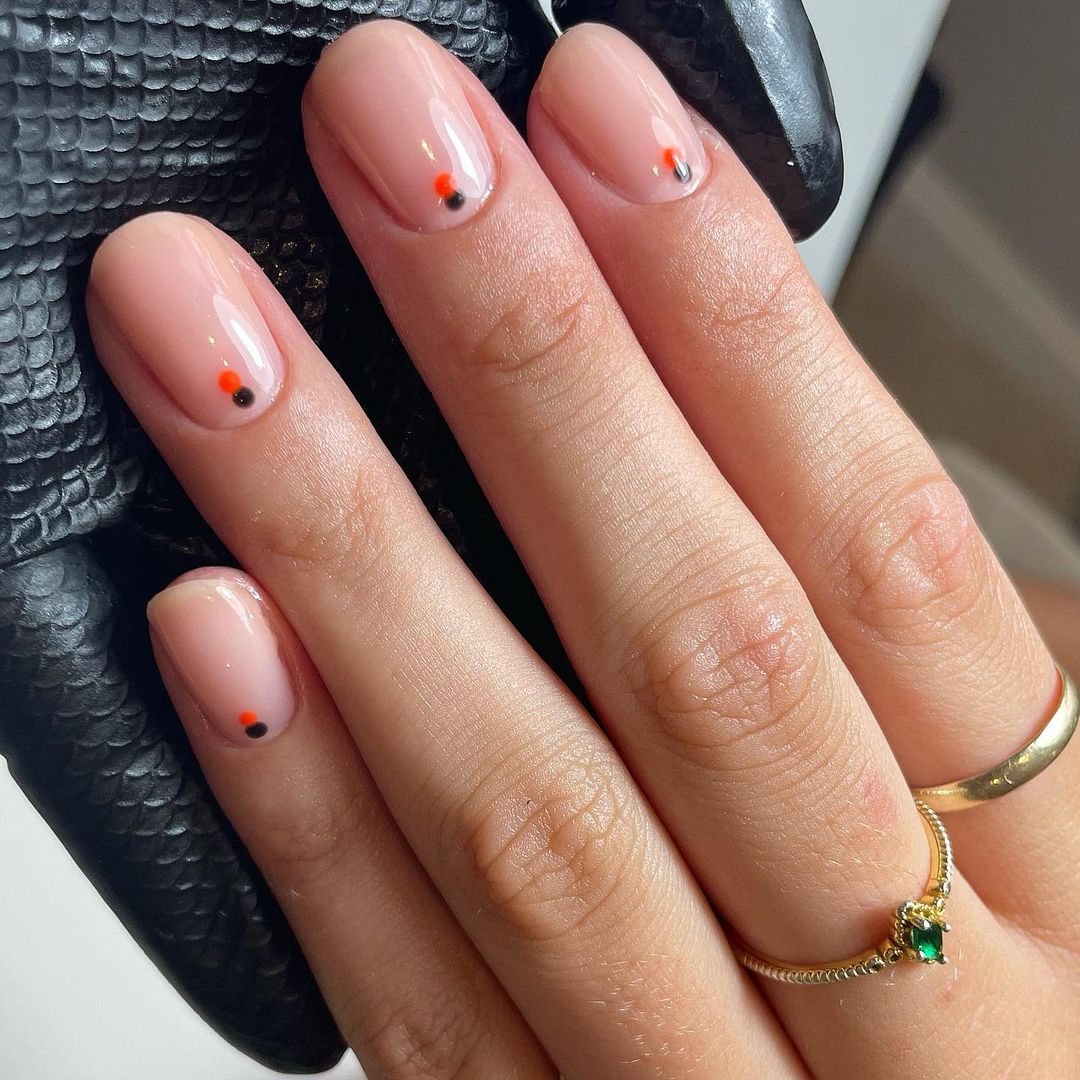
Vibrant Dots on Nude Nails
This design features a nude base with vibrant red and black dots, creating a playful and modern look. The combination of the neutral background with bright accents makes these nails perfect for autumn. The dots add a fun and quirky element, making it ideal for those who love easy fall nail designs.
-
- Nude nail polish (e.g., Essie Ballet Slippers)
- Red nail polish (e.g., OPI Big Apple Red)
- Black nail polish (e.g., Essie Licorice)
- Dotting tool
- Top coat (e.g., Seche Vite Dry Fast Top Coat)
Instructions:
- Apply a base coat to protect your nails.
- Paint your nails with two coats of nude polish.
- Use a dotting tool to apply small red and black dots near the cuticle.
- Finish with a top coat to seal the design and add shine.
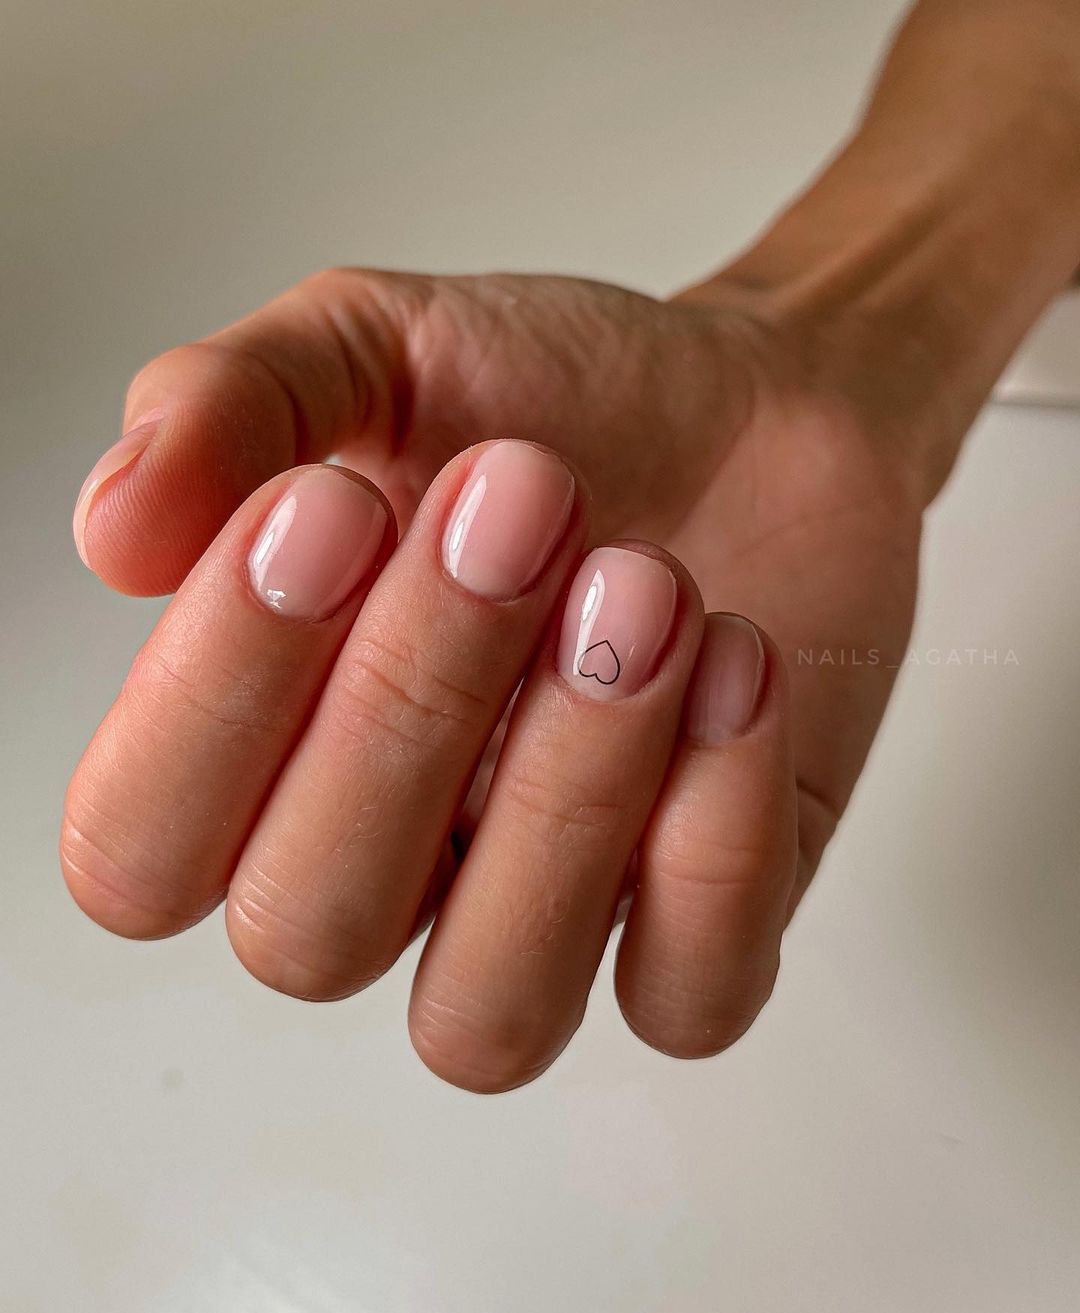
Minimalist Heart Accent
A simple yet charming design, this manicure features a delicate nude base with a tiny black heart accent on one nail. This look is perfect for those who prefer a minimalist style with a touch of whimsy. The heart accent adds a personal and sweet touch, making these nails ideal for any occasion.
-
- Nude nail polish (e.g., Zoya Avery)
- Black nail polish (e.g., OPI Black Onyx)
- Fine nail art brush or pen
- Top coat (e.g., Essie Good to Go)
Instructions:
- Start with a base coat.
- Apply two coats of nude polish and let dry.
- Use a fine nail art brush or pen to draw a small heart on one nail.
- Seal with a top coat for a glossy finish.
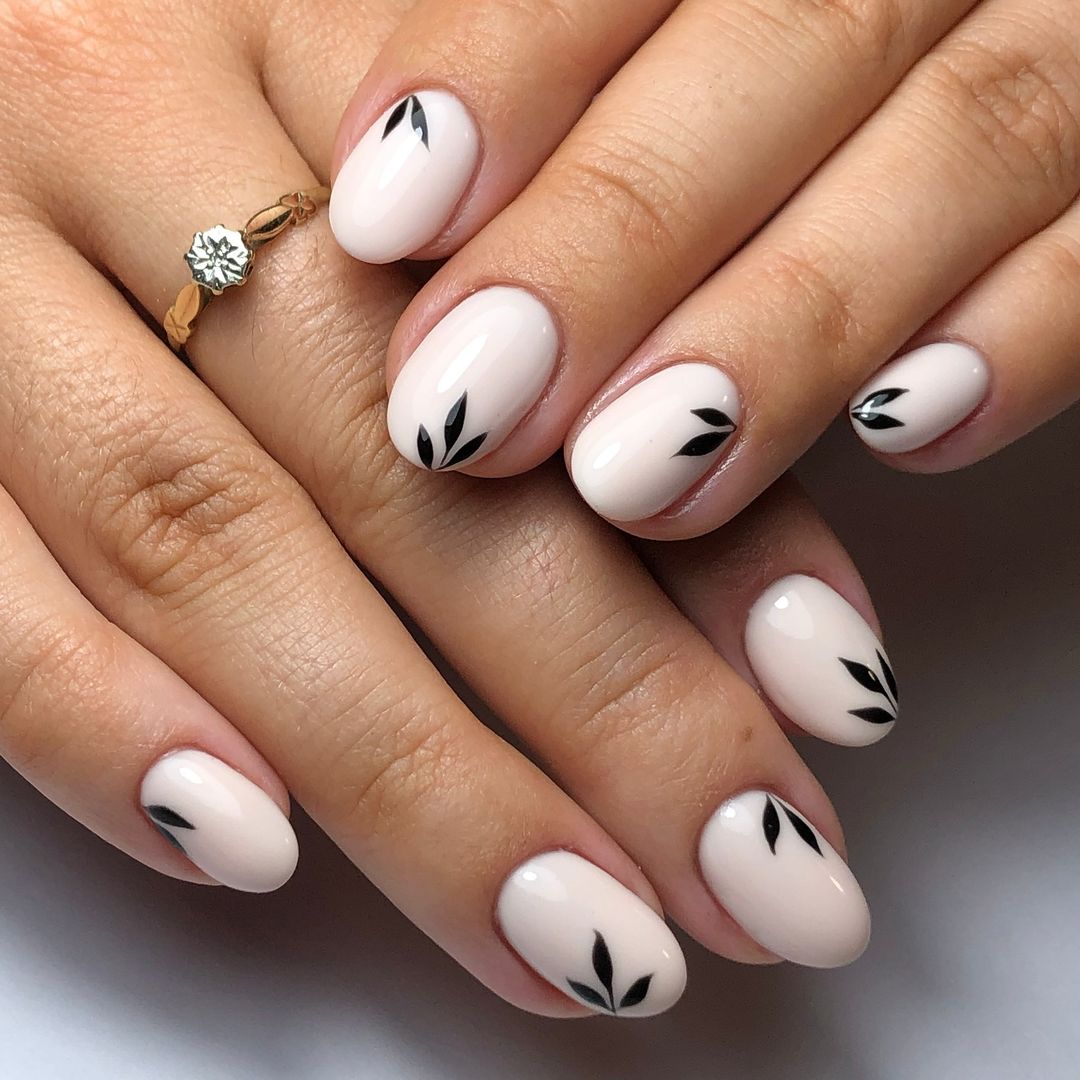
Leaf Accents on Nude Base
This design features a nude base with black leaf accents, creating a sophisticated and elegant look. The simplicity of the nude background combined with the delicate leaf designs makes these nails perfect for both casual and formal settings. This look is ideal for those who want a stylish yet understated manicure for autumn.
-
- Nude nail polish (e.g., Essie Ballet Slippers)
- Black nail polish (e.g., Essie Licorice)
- Nail art brush
- Top coat (e.g., Seche Vite Dry Fast Top Coat)
Instructions:
- Apply a base coat to your nails.
- Paint your nails with two coats of nude polish.
- Use a nail art brush to create black leaf accents on each nail.
- Finish with a top coat to protect the design and add shine.
Save Pin
Vibrant Chevron Design
For a bold and vibrant look, this chevron design features a nude base with bright orange and pink chevrons. The combination of colors and the geometric pattern make these nails stand out, perfect for those who love experimenting with trendy designs. The chevron pattern adds a dynamic and fun element to the nails.
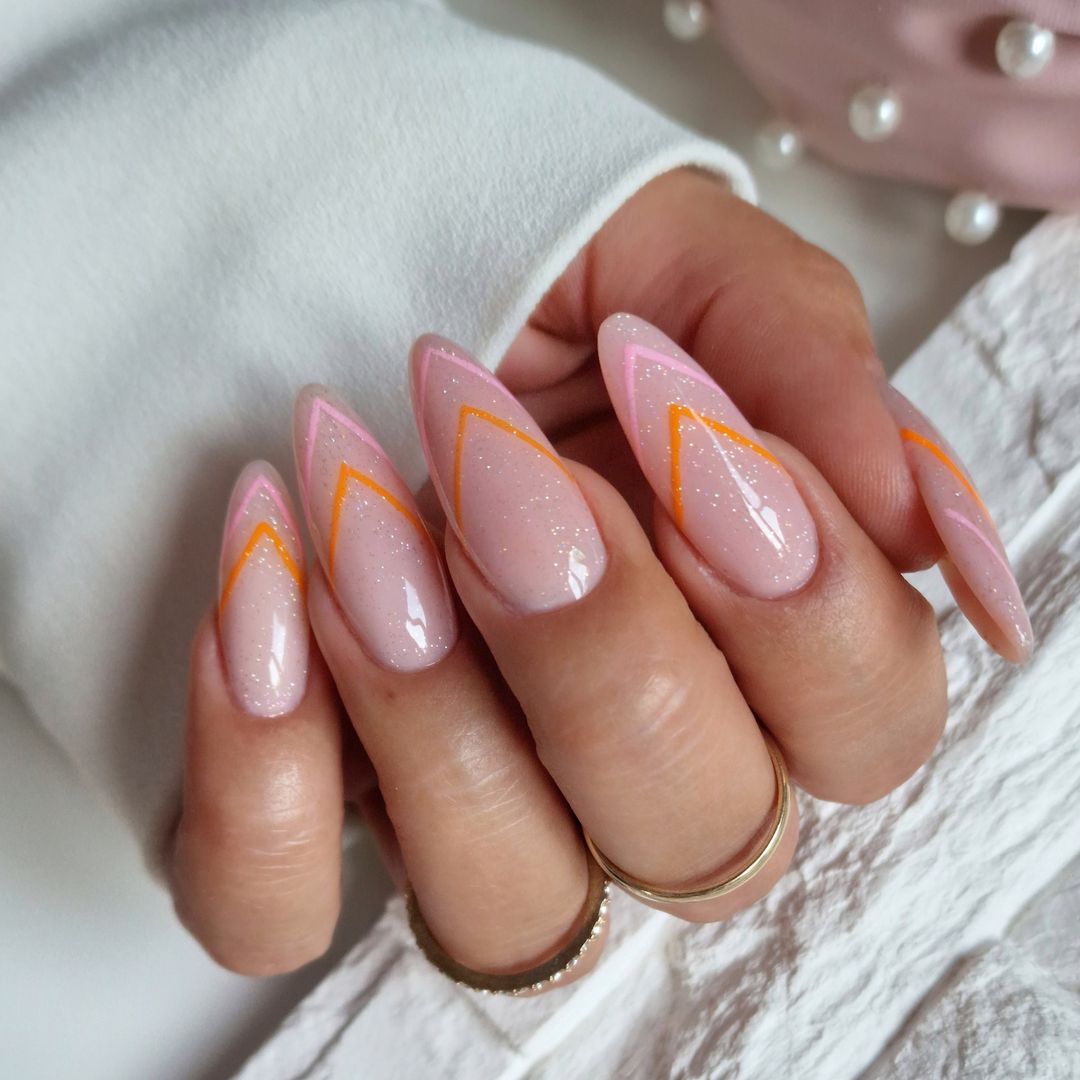
-
- Nude nail polish (e.g., OPI Bubble Bath)
- Orange nail polish (e.g., Essie Tart Deco)
- Pink nail polish (e.g., OPI Mod About You)
- Nail art brush or tape
- Top coat (e.g., Seche Vite Dry Fast Top Coat)
Instructions:
- Start with a base coat.
- Apply two coats of nude polish.
- Use a nail art brush or tape to create chevron patterns with the orange and pink polishes.
- Seal with a top coat for a long-lasting finish.
Subtle Rhinestone Accents
This elegant nail design features a nude base with subtle rhinestone accents, adding a touch of sparkle without being overwhelming. The rhinestones are strategically placed to enhance the overall look, making these nails perfect for special occasions or everyday wear. The nude base keeps the design classy and sophisticated.
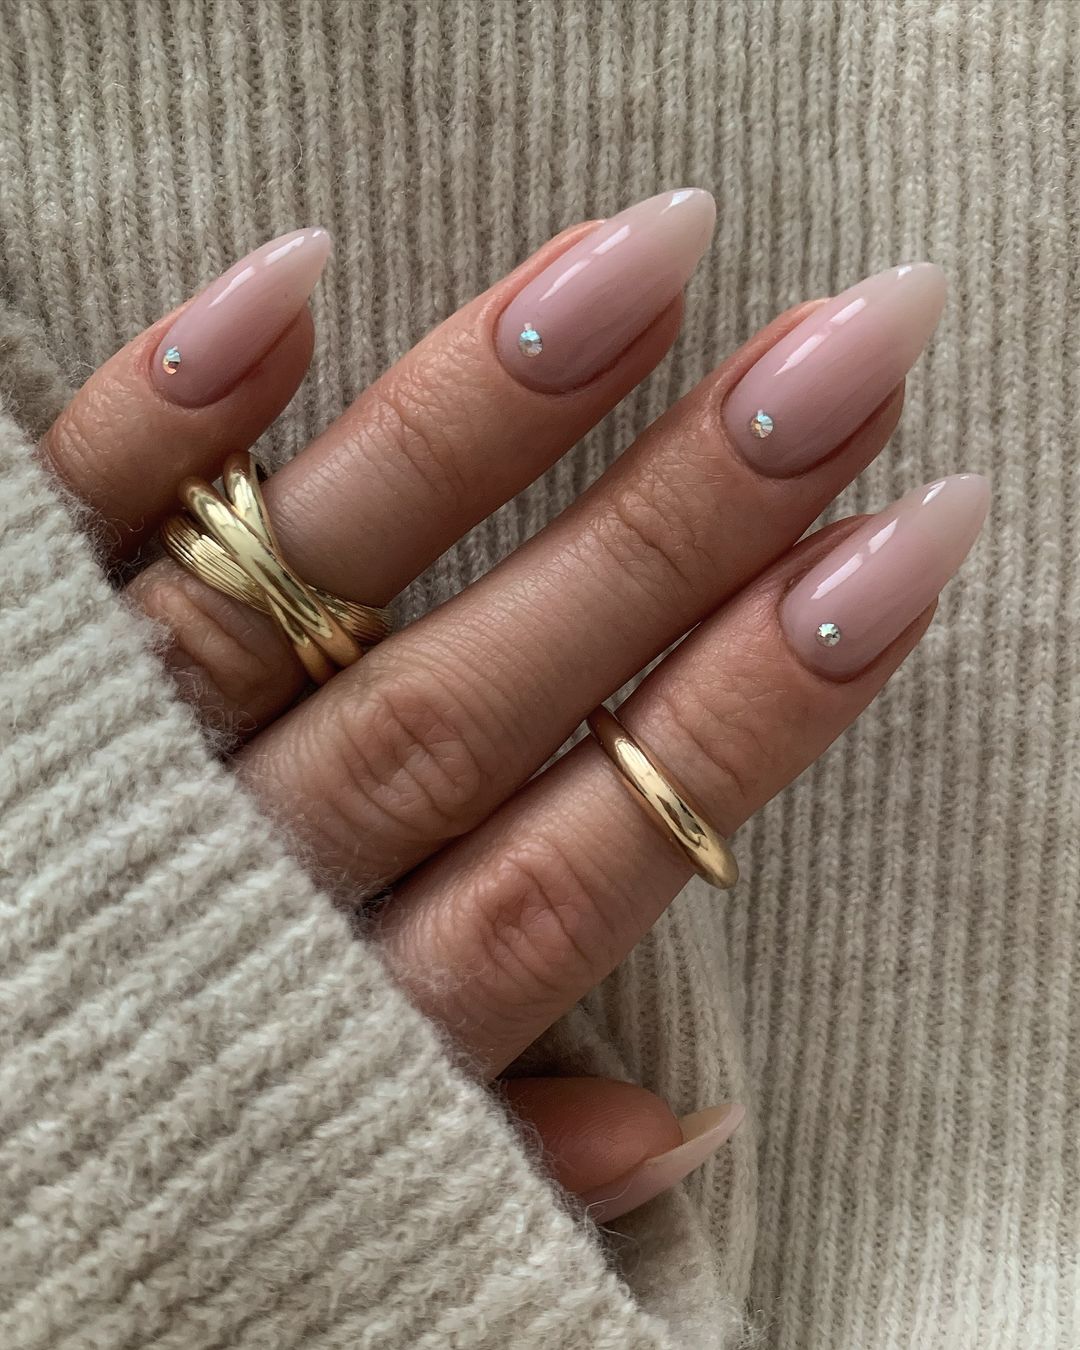
-
- Nude nail polish (e.g., Essie Ballet Slippers)
- Small rhinestones
- Nail glue
- Top coat (e.g., Seche Vite Dry Fast Top Coat)
Instructions:
- Apply a base coat.
- Paint your nails with two coats of nude polish.
- Use nail glue to attach small rhinestones to each nail.
- Finish with a top coat to secure the rhinestones and add shine.
Classic Nude Gel Nails
This classic design features a nude gel polish, providing a clean and polished look that is both timeless and versatile. The gel polish ensures a long-lasting finish, making these nails perfect for those who want a low-maintenance yet stylish manicure. The nude color complements any outfit, making it suitable for all occasions.
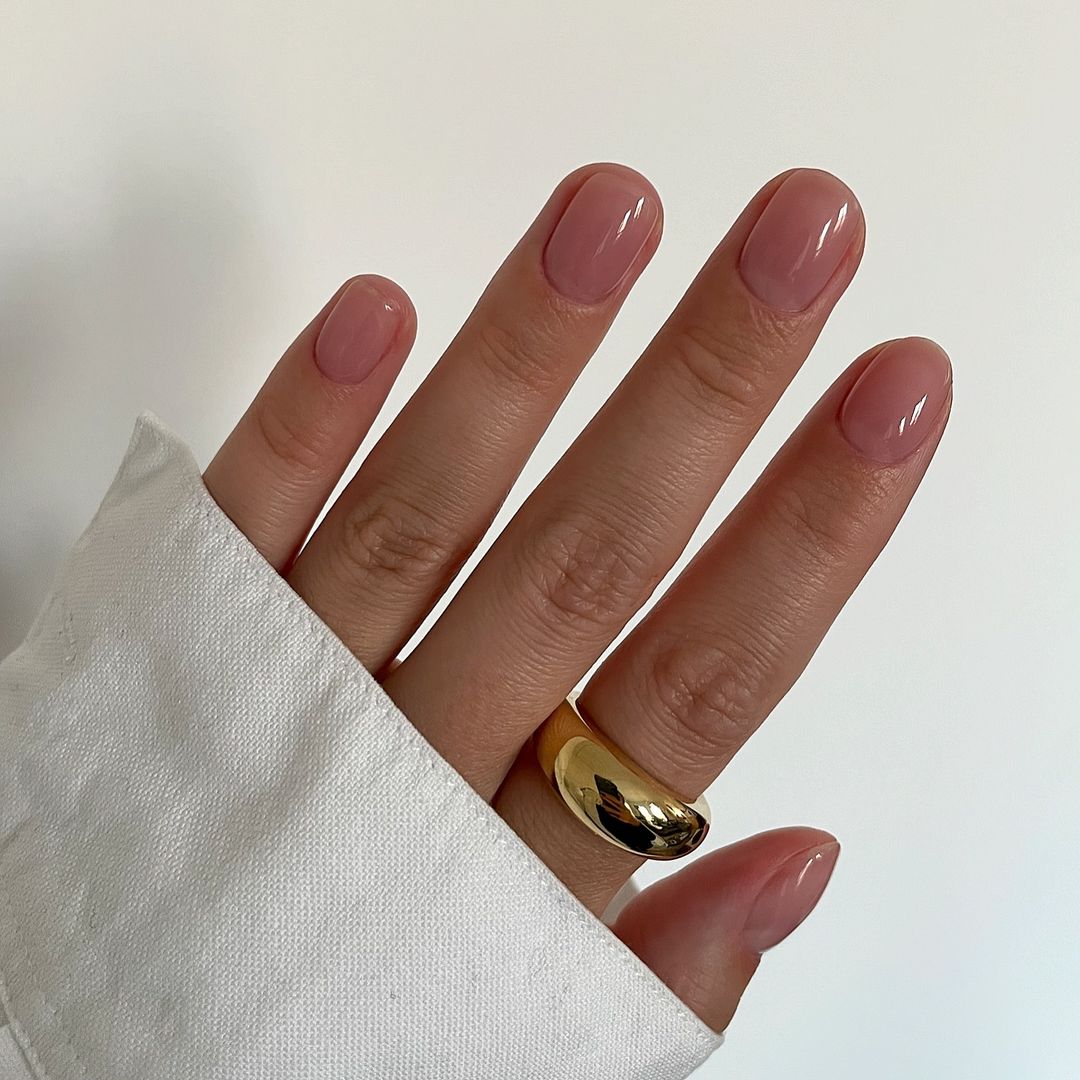
-
- Nude gel polish (e.g., Gelish Simple Sheer)
- Gel base coat
- Gel top coat
- UV/LED lamp
Instructions:
- Apply a gel base coat and cure under a UV/LED lamp.
- Apply two coats of nude gel polish, curing each layer under the lamp.
- Finish with a gel top coat and cure once more for a durable and glossy finish.
Bold Black and White Flames
This bold design features a striking combination of black and white flames on a nude base. The dramatic almond shape enhances the edgy look, making it perfect for those who love to make a statement with their nails. The flames are intricately detailed, adding a unique and artistic touch to the manicure.
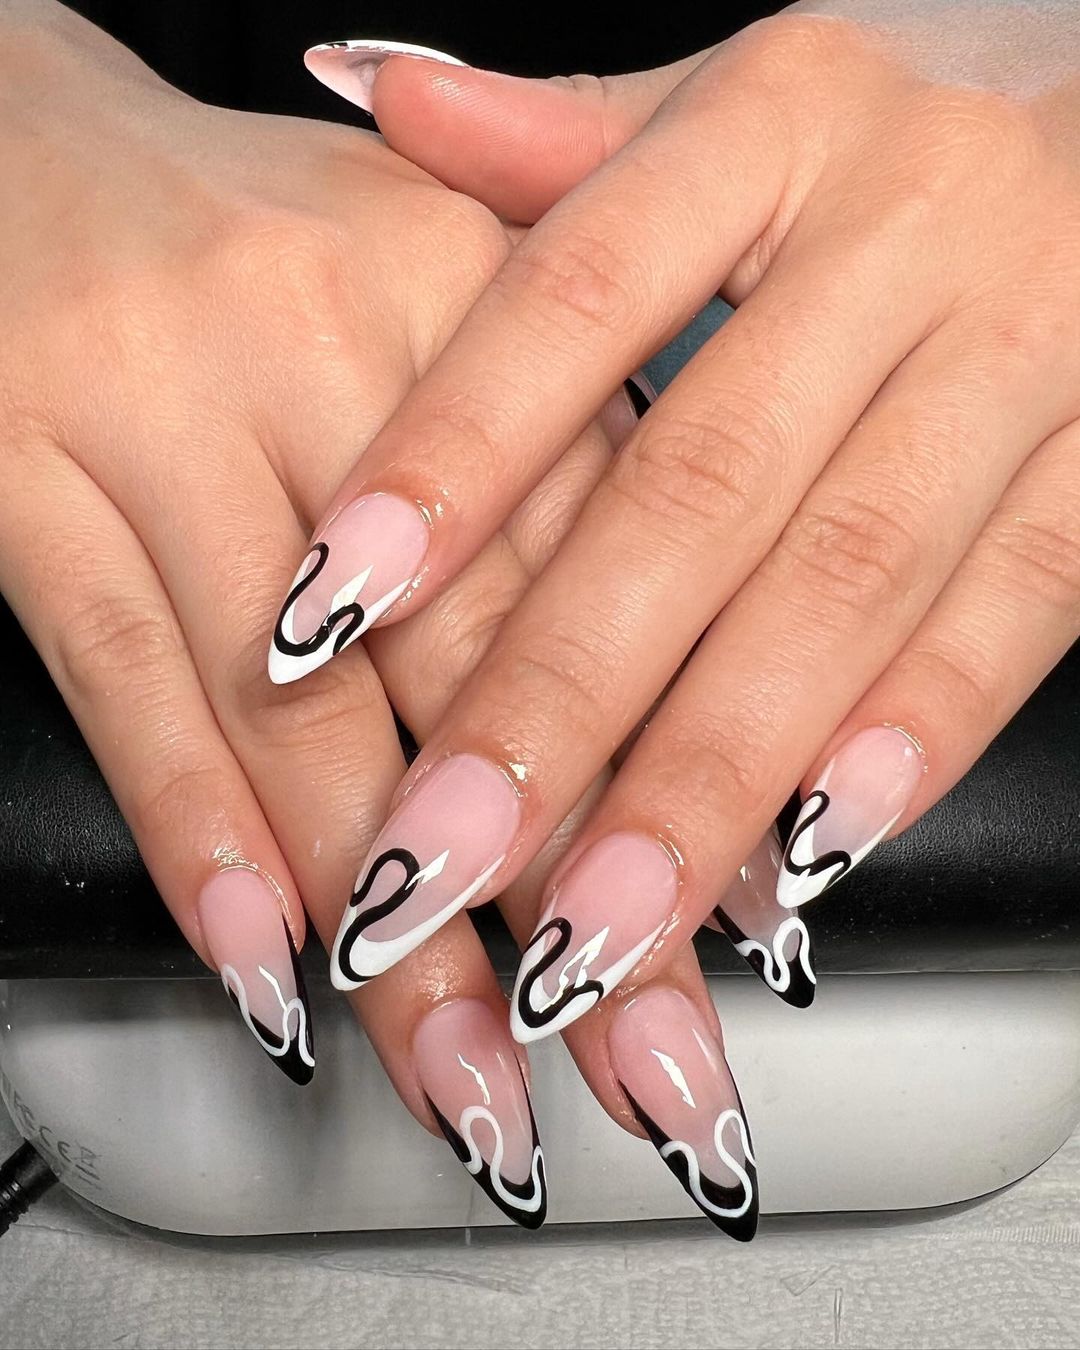
-
- Nude nail polish (e.g., Essie Ballet Slippers)
- Black nail polish (e.g., OPI Black Onyx)
- White nail polish (e.g., Essie Blanc)
- Nail art brushes
- Top coat (e.g., Seche Vite Dry Fast Top Coat)
Instructions:
- Start with a base coat.
- Apply two coats of nude polish.
- Use nail art brushes to paint black and white flames on each nail.
- Seal with a top coat for a glossy finish.
Soft Nude with White Lines
A soft and elegant design, this manicure features a nude base with delicate white lines. The simplicity of the design makes it perfect for any occasion, providing a clean and sophisticated look. The oval shape complements the gentle lines, adding to the overall elegance.
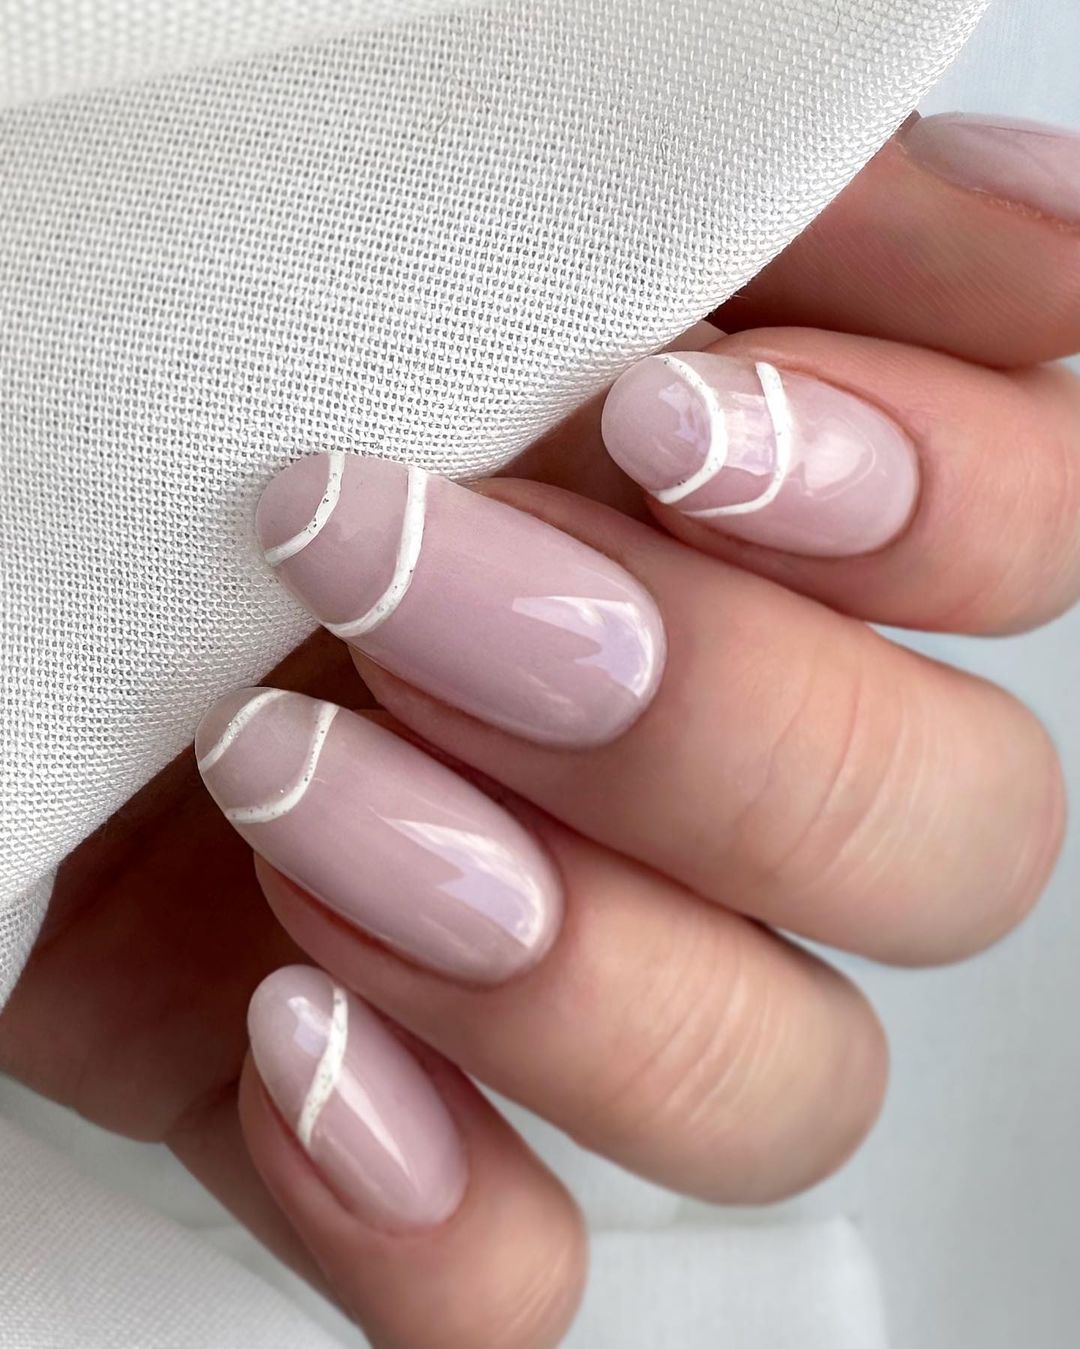
-
- Nude nail polish (e.g., Zoya Avery)
- White nail polish (e.g., Sally Hansen White On)
- Fine nail art brush
- Top coat (e.g., Essie Good to Go)
Instructions:
- Apply a base coat to protect your nails.
- Paint your nails with two coats of nude polish.
- Use a fine nail art brush to draw delicate white lines.
- Finish with a top coat to protect the design.
Festive Dots and Glitter
This festive nail design features a nude base with an array of colorful dots and glitter, perfect for the holiday season. The playful and vibrant dots add a touch of fun and celebration to the nails, making it ideal for festive occasions. The glitter adds a sparkling finish, enhancing the overall look.
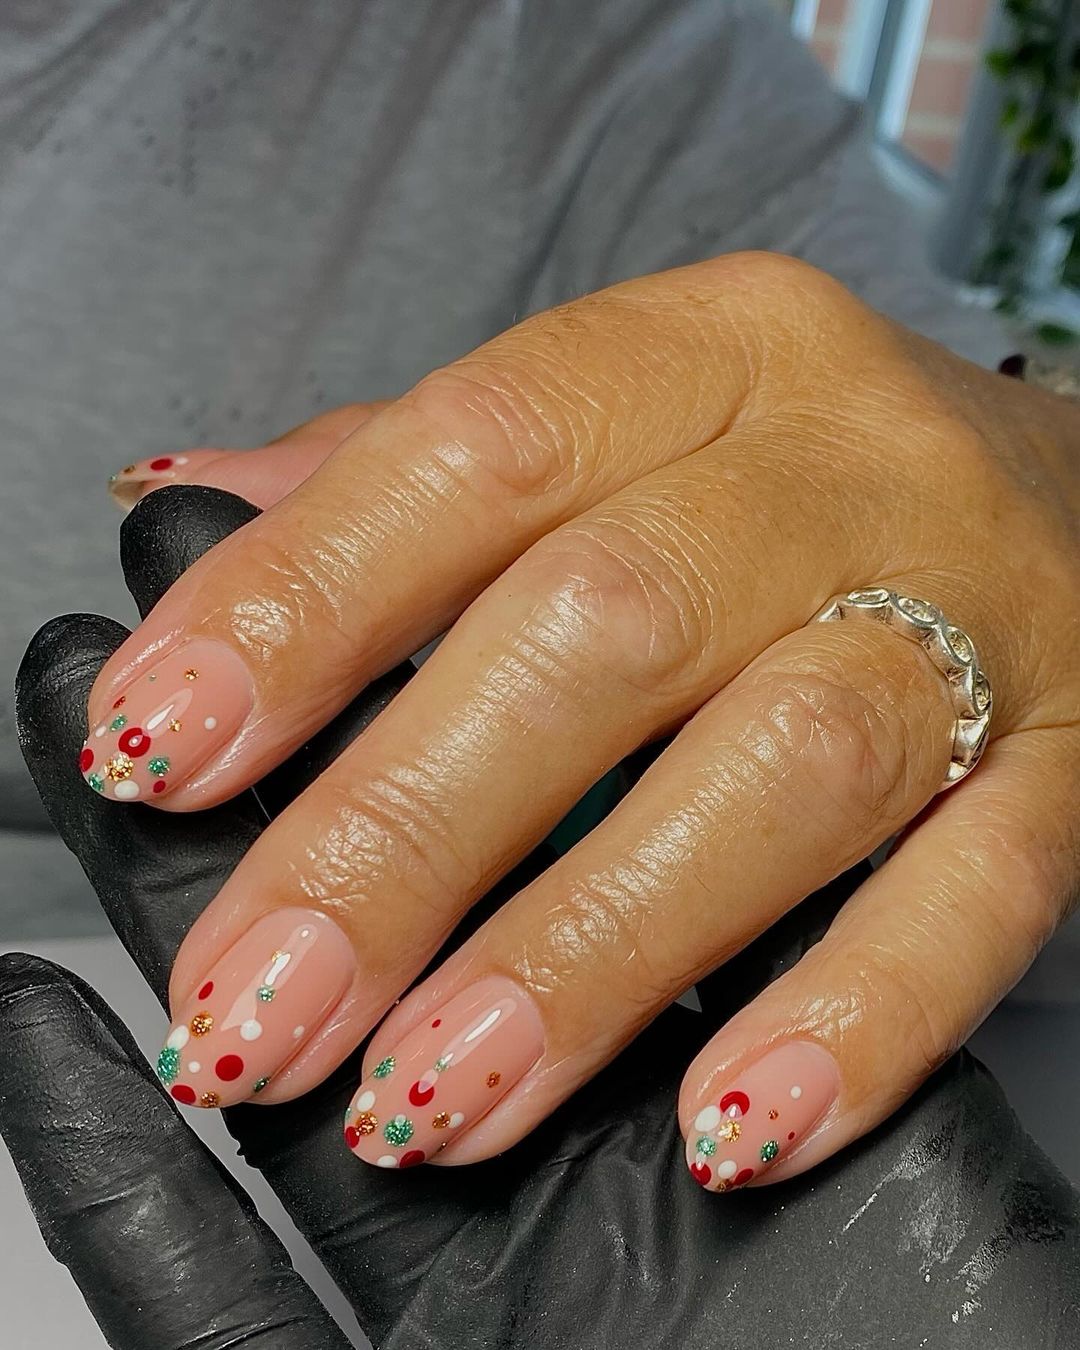
-
- Nude nail polish (e.g., OPI Bubble Bath)
- Red, green, and gold nail polishes (e.g., Essie Scarlett O’Hara, Essie Going Incognito, Essie Penny Talk)
- Glitter polish (e.g., China Glaze Fairy Dust)
- Dotting tool
- Top coat (e.g., Seche Vite Dry Fast Top Coat)
Instructions:
- Start with a base coat.
- Apply two coats of nude polish.
- Use a dotting tool to add colorful dots.
- Apply glitter polish for extra sparkle.
- Seal with a top coat.
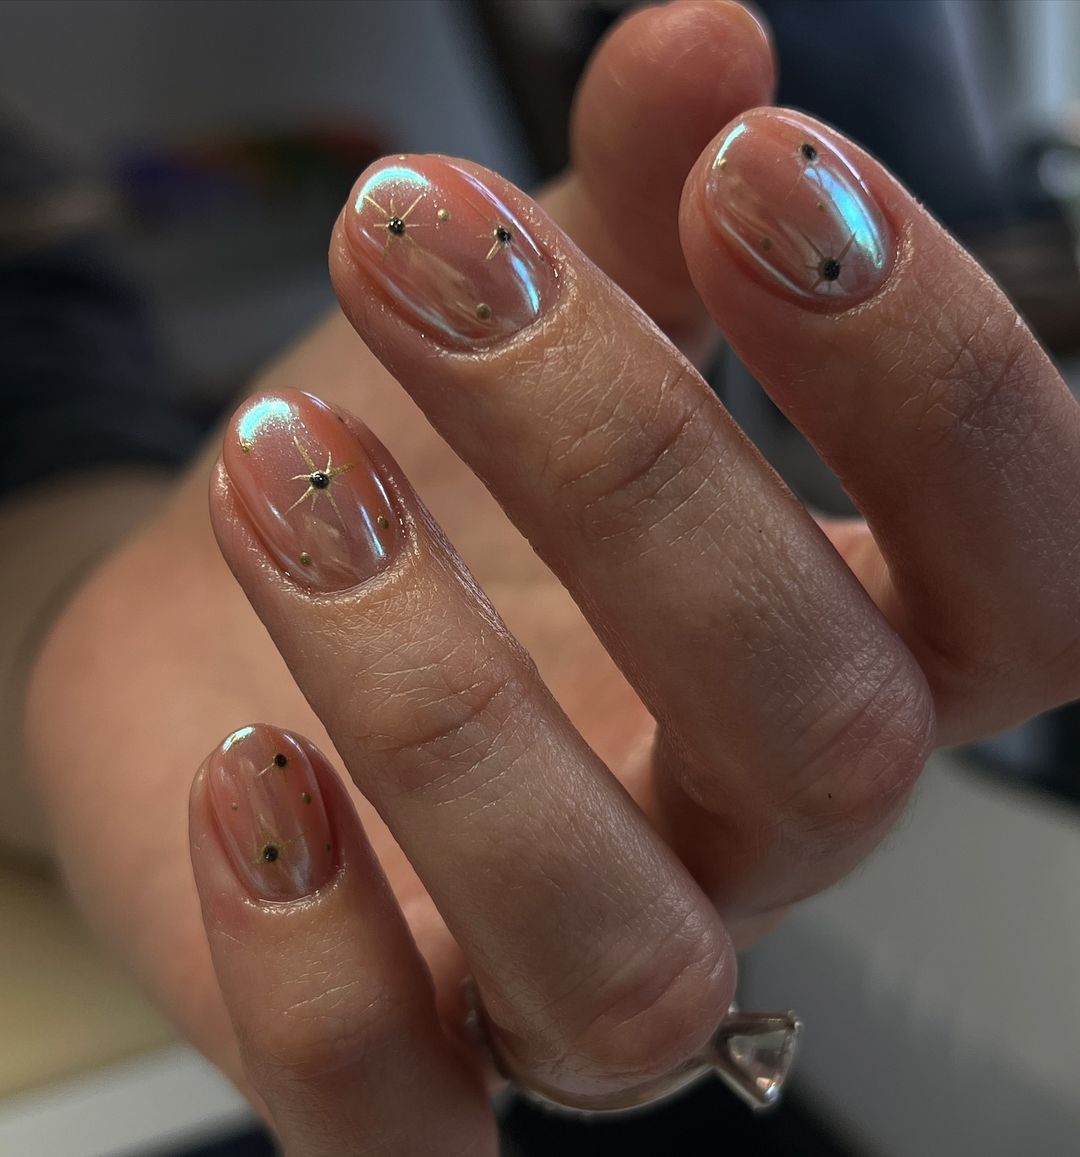
Subtle Stars on Almond Nails
This elegant design features a nude base with delicate star accents, creating a celestial and dreamy look. The almond shape adds to the sophistication, making these nails perfect for both everyday wear and special occasions. The subtle stars add a whimsical touch without being too flashy.
-
- Nude nail polish (e.g., Essie Ballet Slippers)
- White nail polish (e.g., OPI Alpine Snow)
- Star stickers or nail art brush
- Top coat (e.g., Seche Vite Dry Fast Top Coat)
Instructions:
- Apply a base coat.
- Paint your nails with two coats of nude polish.
- Use star stickers or a nail art brush to add star accents.
- Finish with a top coat to secure the stars.
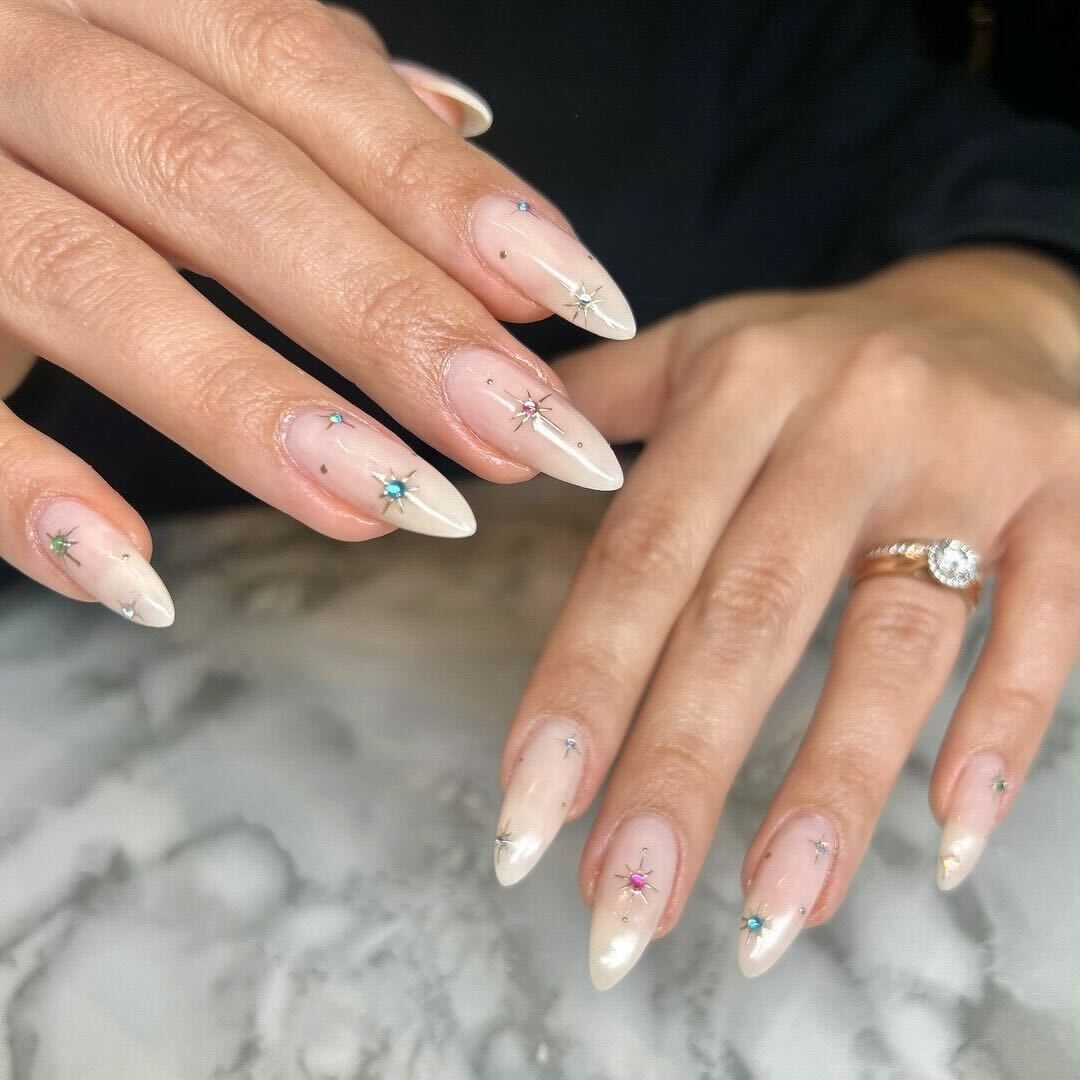
Transparent Nails with Golden Stars
This unique design features transparent nails with golden star accents, creating a delicate and ethereal look. The simplicity of the transparent base combined with the elegant gold stars makes this design perfect for those who love a minimalist yet glamorous style. The short, round shape adds to the subtle elegance.
-
- Clear base coat (e.g., OPI Natural Nail Base Coat)
- Golden star stickers or nail art brush with gold polish
- Top coat (e.g., Seche Vite Dry Fast Top Coat)
Instructions:
- Apply a clear base coat.
- Place golden star stickers on each nail or use a nail art brush to paint small gold stars.
- Finish with a top coat to secure the design.
Colorful Ombre Tips
This fun and vibrant design features colorful ombre tips on a nude base. The combination of pastel colors adds a playful and fresh look, perfect for those who love experimenting with their nails. The square shape enhances the modern and trendy style of this design.
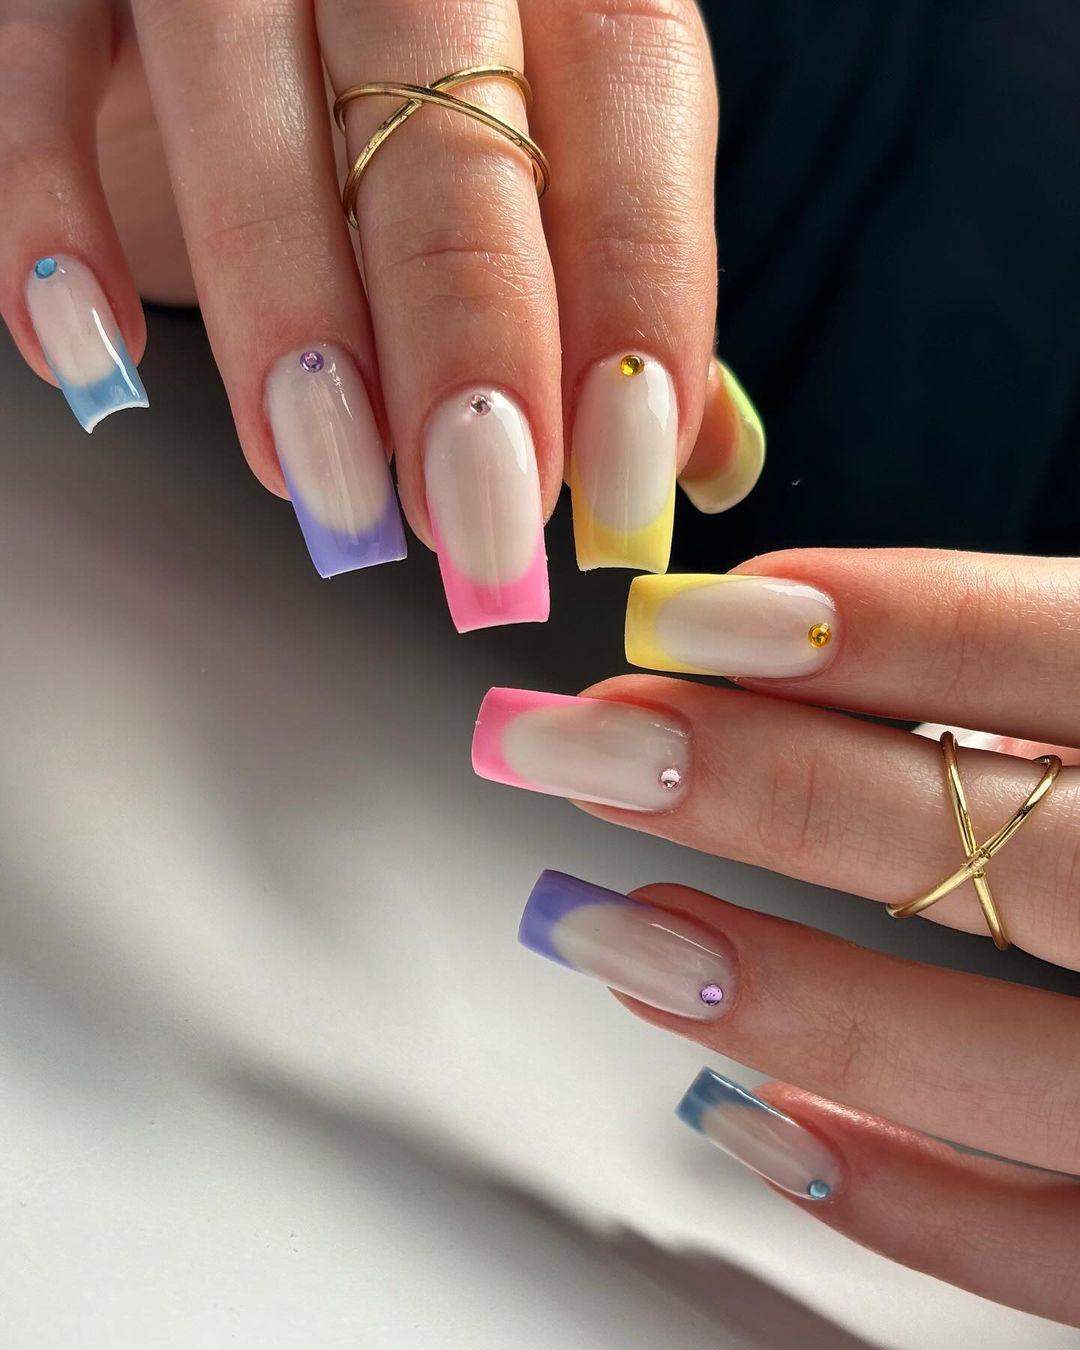
-
- Nude nail polish (e.g., Essie Ballet Slippers)
- Pastel nail polishes in various colors (e.g., Essie Mint Candy Apple, Essie Fiji, Essie Lilacism)
- Sponge for ombre effect
- Top coat (e.g., Seche Vite Dry Fast Top Coat)
Instructions:
- Apply a base coat.
- Paint your nails with two coats of nude polish.
- Use a sponge to create an ombre effect with pastel colors on the tips.
- Seal with a top coat for a glossy finish.
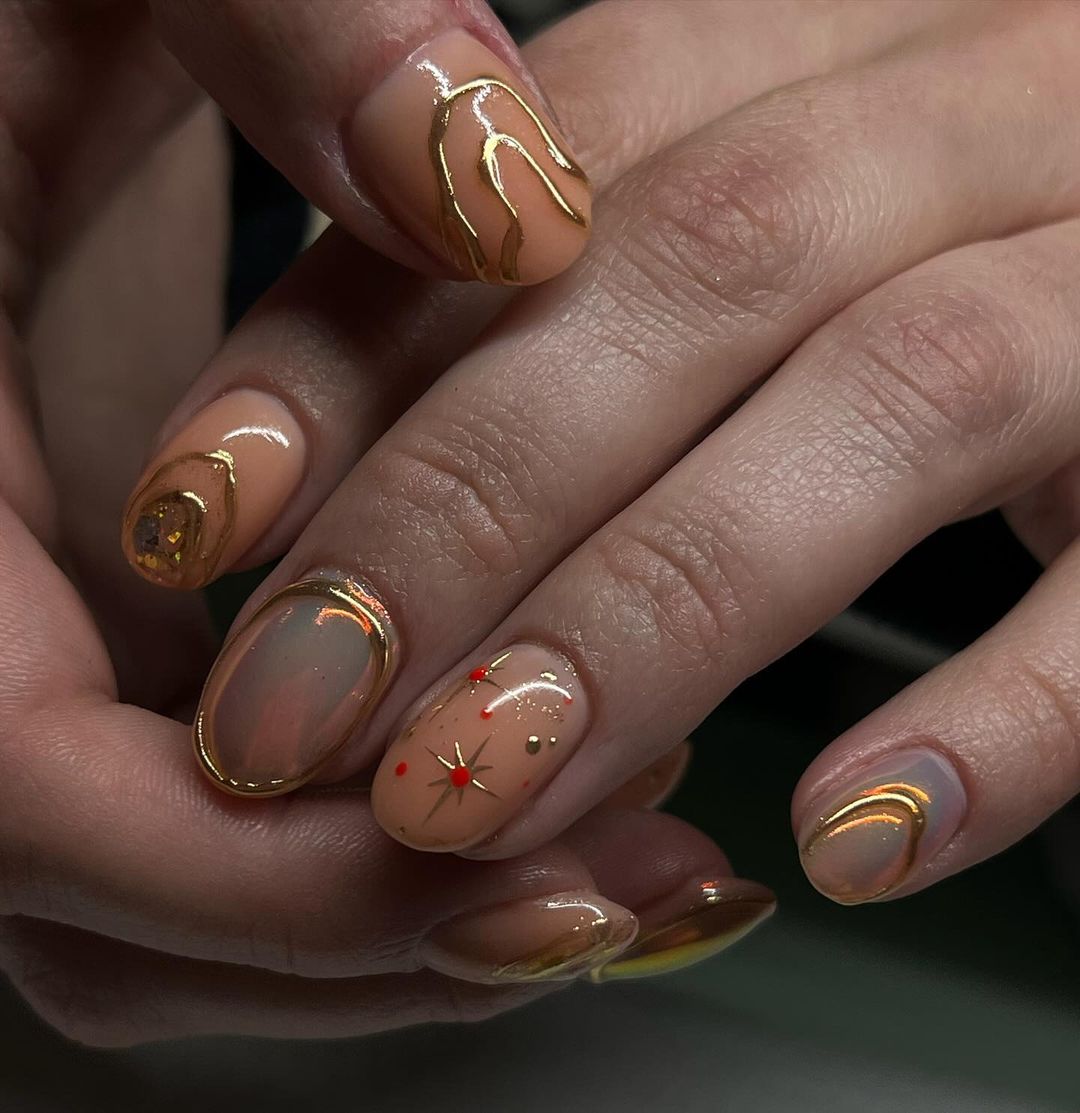
Delicate Floral Frames
This elegant design features delicate floral patterns framed in gold on a clear base. The intricate details of the flowers and the sophistication of the gold frames make this manicure perfect for those who appreciate fine art on their nails. The mix of different floral designs adds variety and charm to the overall look.
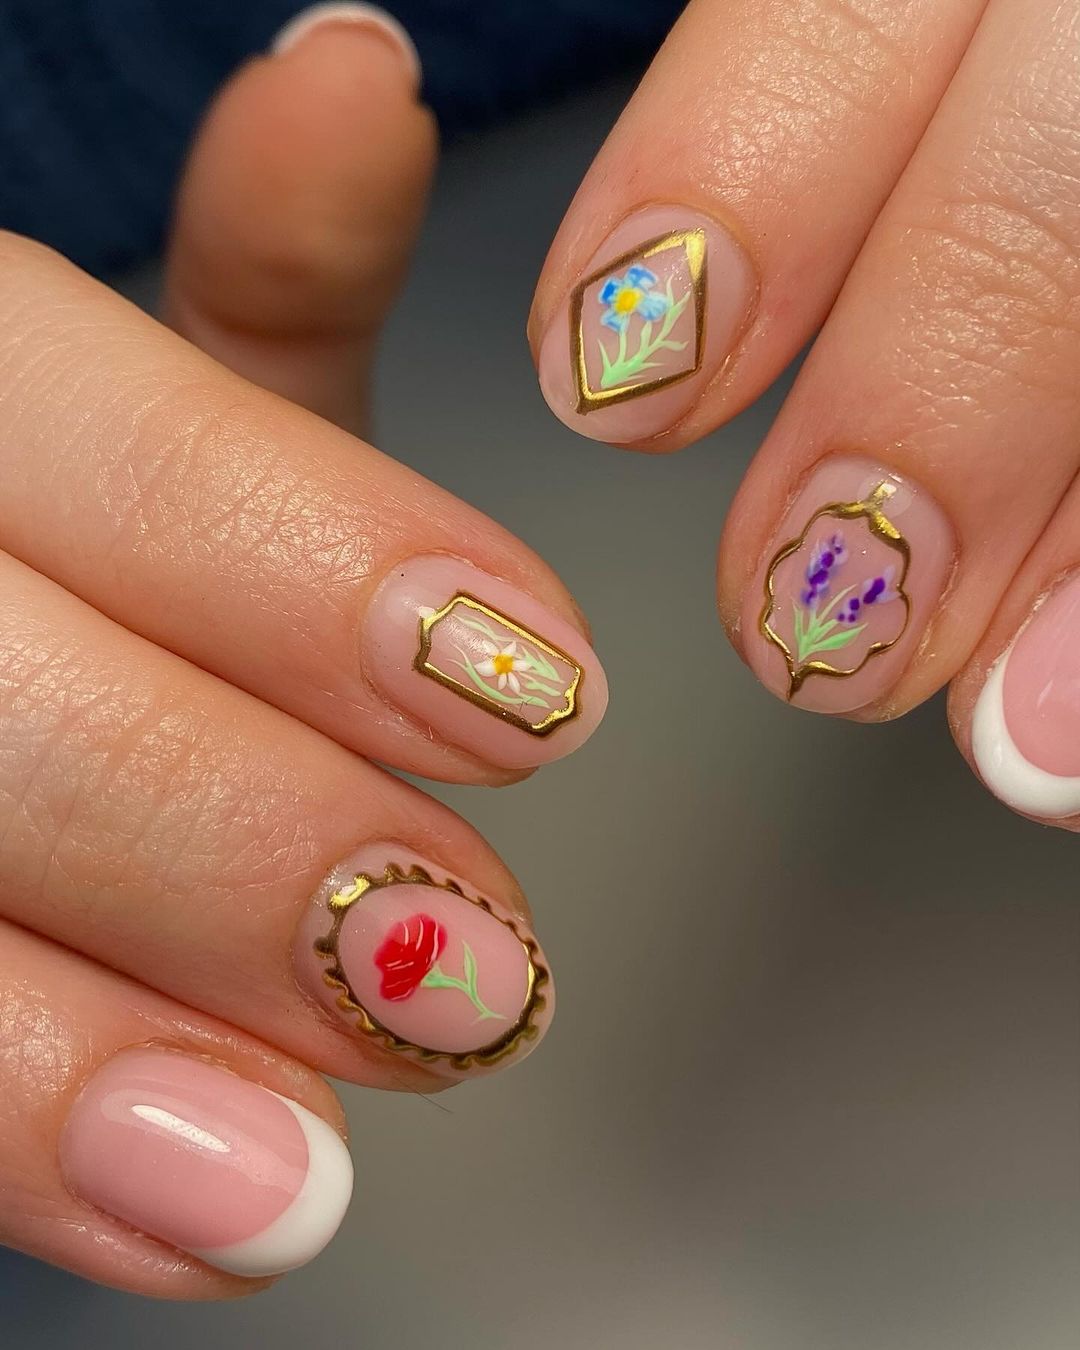
-
- Clear base coat (e.g., OPI Natural Nail Base Coat)
- Gold nail polish or foil (e.g., Essie Good as Gold)
- Nail art brushes
- Floral nail stickers or decals
- Top coat (e.g., Seche Vite Dry Fast Top Coat)
Instructions:
- Apply a clear base coat.
- Use gold polish or foil to create frames on the nails.
- Place floral stickers or use a brush to paint floral designs within the frames.
- Seal with a top coat to protect the design.
Cute Neon Cats
This playful design features cute cat faces in neon colors on a clear base. The vibrant colors and adorable cat motifs make this manicure fun and eye-catching, perfect for those who love a bit of whimsy in their nail art. The simplicity of the design makes it easy to recreate at home.
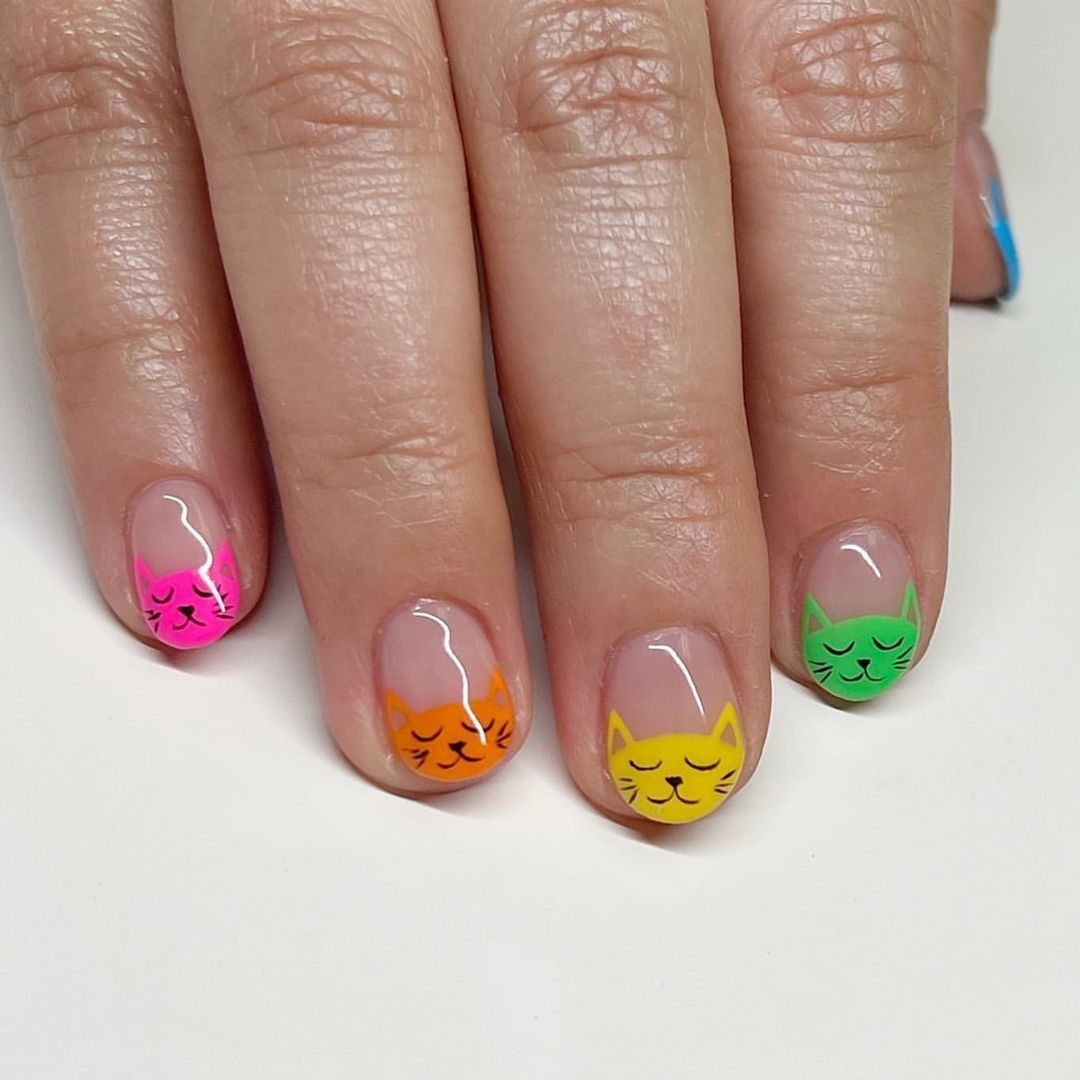
-
- Clear base coat (e.g., Essie Here to Stay Base Coat)
- Neon nail polishes in various colors (e.g., China Glaze Neon & On & On, Orly Glowstick)
- Fine nail art brush
- Top coat (e.g., Seche Vite Dry Fast Top Coat)
Instructions:
- Apply a clear base coat.
- Use neon polishes to paint cat faces on each nail.
- Use a fine brush to add details like eyes, noses, and whiskers.
- Finish with a top coat.
Minimalist Black Flowers
This minimalist design features tiny black flowers on a nude base. The simplicity and elegance of the small floral accents make this manicure versatile and suitable for any occasion. The nude background keeps the design understated, while the black flowers add a touch of sophistication.
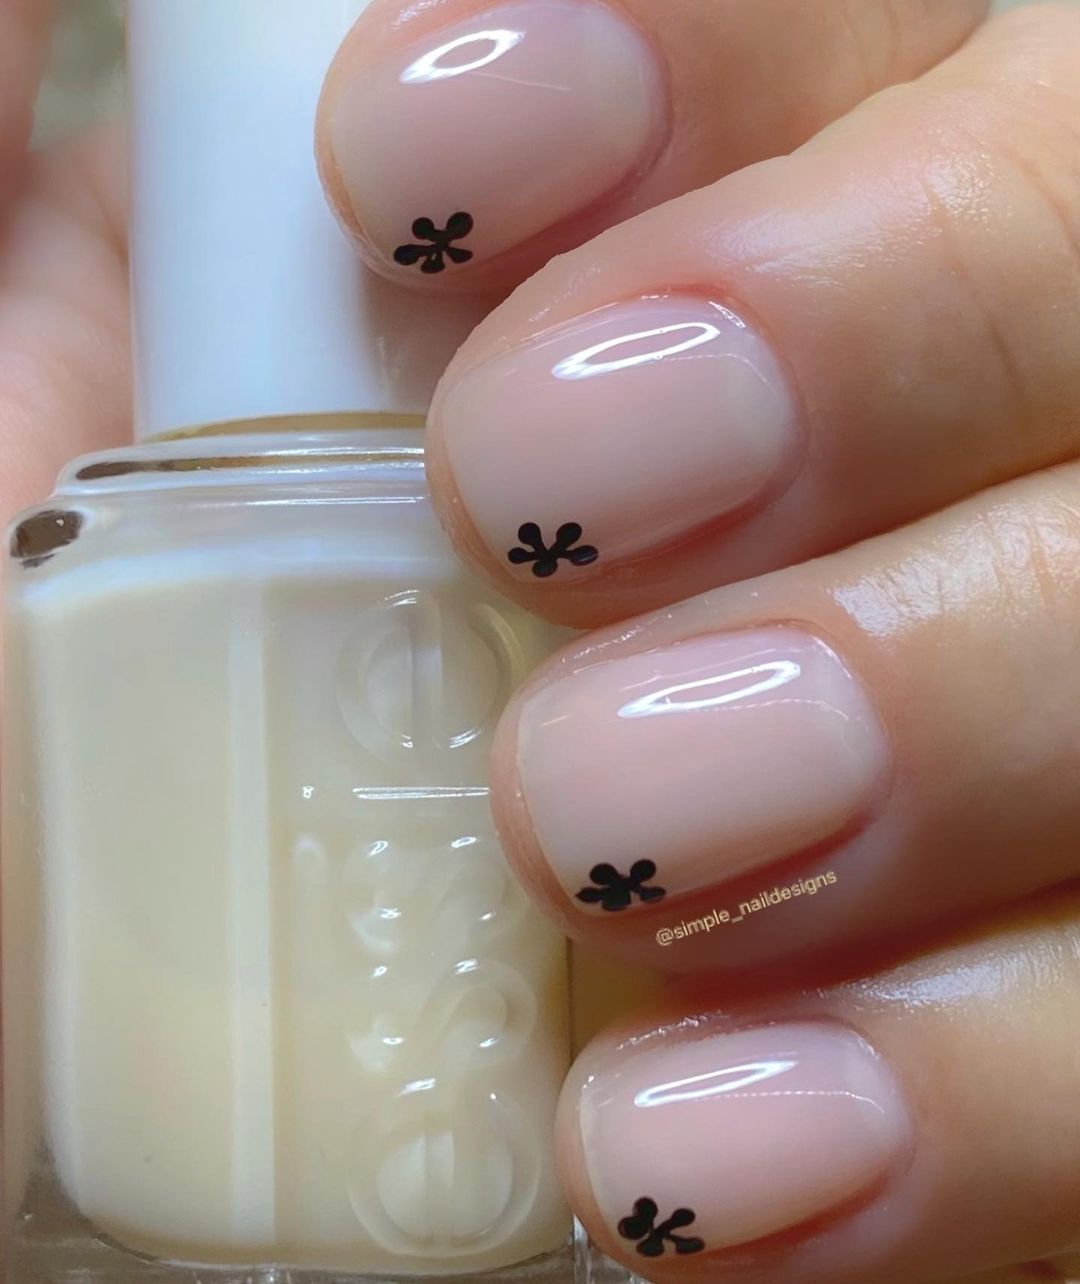
-
- Nude nail polish (e.g., Essie Ballet Slippers)
- Black nail polish (e.g., OPI Black Onyx)
- Dotting tool or fine nail art brush
- Top coat (e.g., Essie Good to Go)
Instructions:
- Apply a base coat.
- Paint your nails with two coats of nude polish.
- Use a dotting tool or brush to create small black flowers on each nail.
- Seal with a top coat.
Chocolate Brown with Black Hearts
This chic design features a rich chocolate brown base with tiny black hearts. The dark brown polish is perfect for autumn, while the black hearts add a subtle and cute accent. This design is ideal for those who love dark, sophisticated colors with a playful touch.
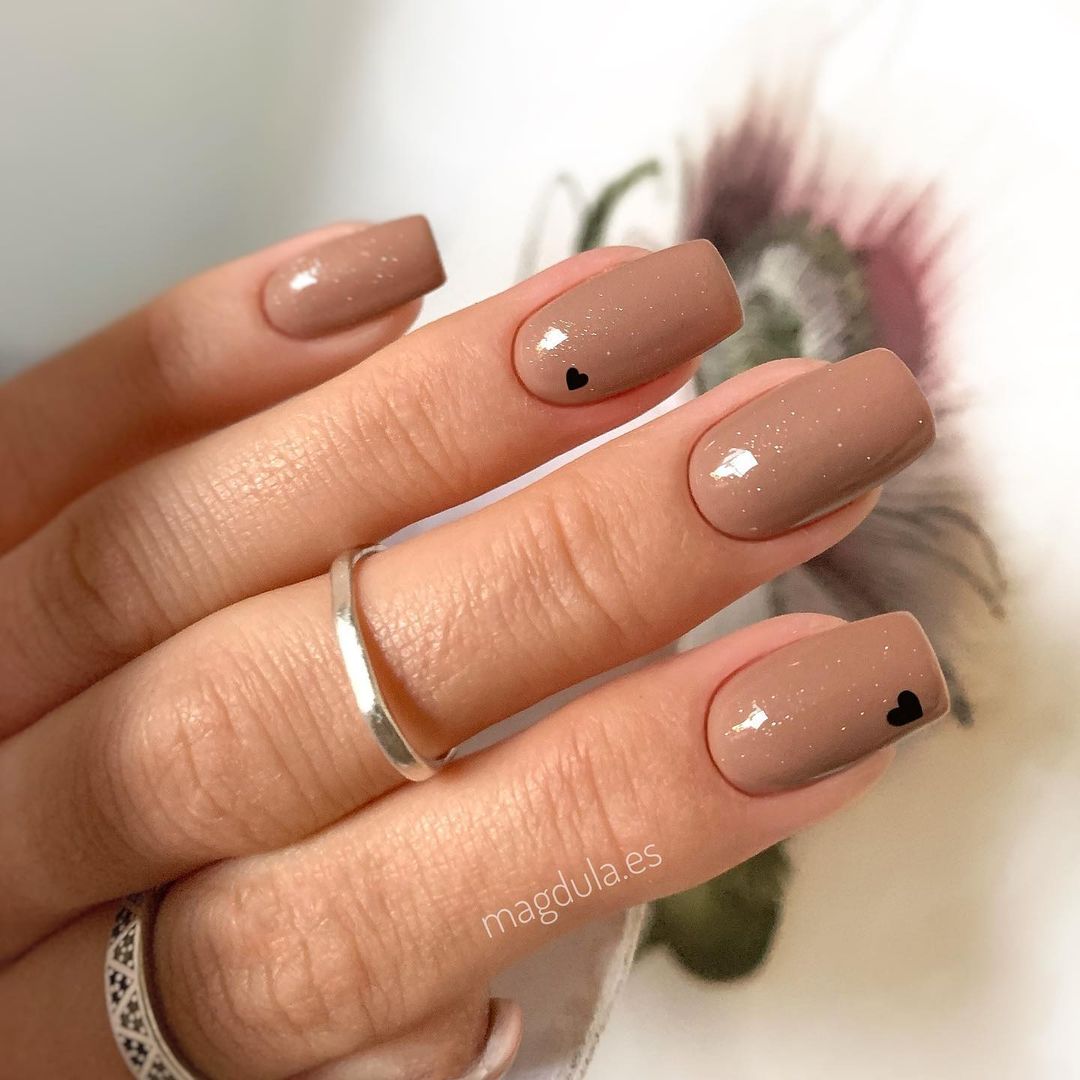
-
- Chocolate brown nail polish (e.g., Essie Hot Cocoa)
- Black nail polish (e.g., OPI Black Onyx)
- Fine nail art brush or dotting tool
- Top coat (e.g., Seche Vite Dry Fast Top Coat)
Instructions:
- Apply a base coat.
- Paint your nails with two coats of chocolate brown polish.
- Use a brush or dotting tool to add small black hearts to each nail.
- Finish with a top coat.
Neon Green French Tips
This modern twist on the classic French manicure features neon green tips on a nude base. The bright green tips add a pop of color, making the nails look fresh and trendy. This design is perfect for those who want to update the traditional French manicure with a fun, contemporary edge.
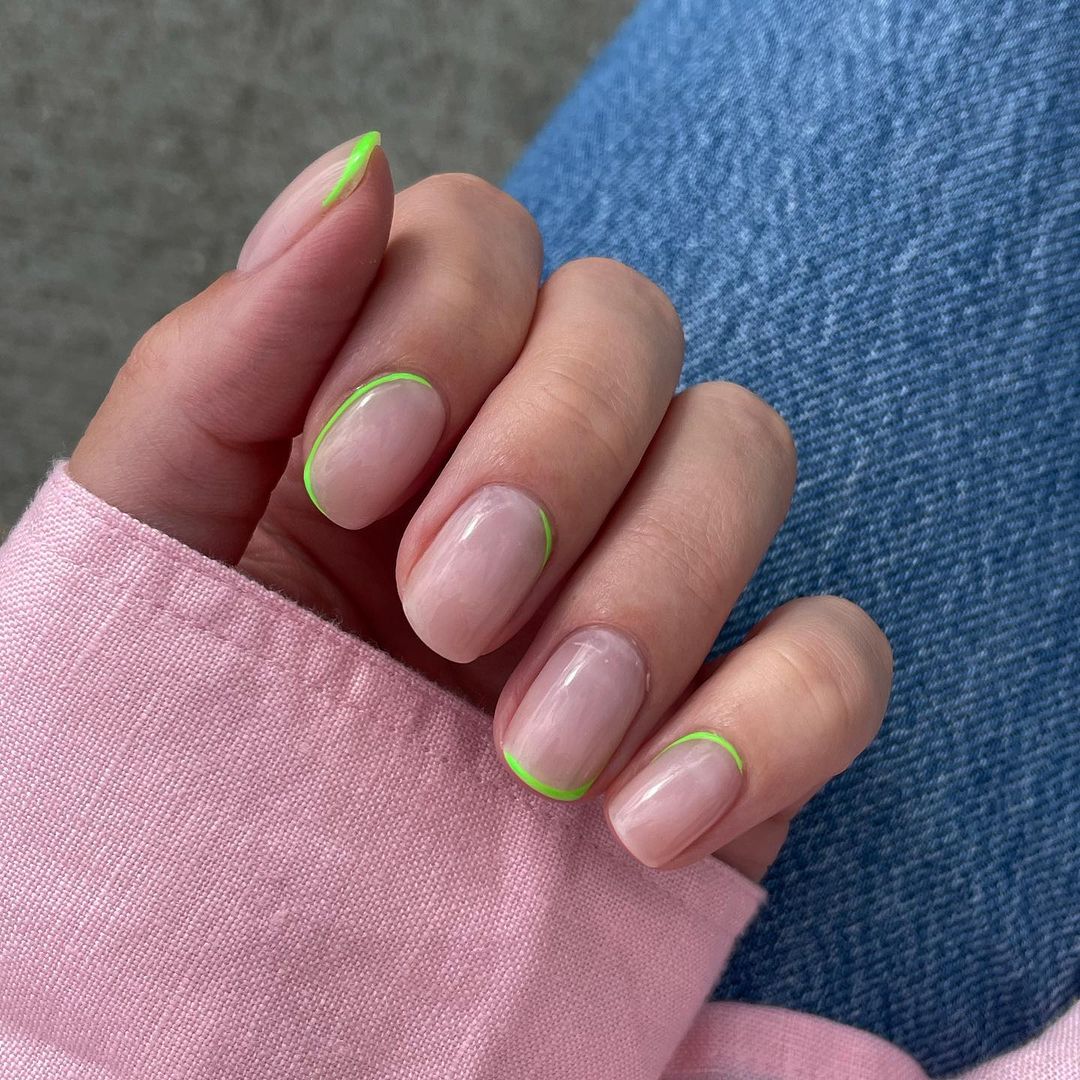
-
- Nude nail polish (e.g., Essie Ballet Slippers)
- Neon green nail polish (e.g., China Glaze Kiwi Cool-Ada)
- French manicure guides or tape
- Top coat (e.g., Seche Vite Dry Fast Top Coat)
Instructions:
- Apply a base coat.
- Paint your nails with two coats of nude polish.
- Use guides or tape to create clean lines for the neon green tips.
- Paint the tips with neon green polish.
- Finish with a top coat.
Golden Swirls and Stars
This luxurious design features golden swirls and star accents on a nude base. The combination of gold and nude creates an elegant and glamorous look, perfect for special occasions. The intricate swirls and stars add a touch of magic to the nails, making them stand out.
-
- Nude nail polish (e.g., Essie Ballet Slippers)
- Gold nail polish (e.g., Essie Good as Gold)
- Fine nail art brush
- Star stickers or nail art brush for stars
- Top coat (e.g., Seche Vite Dry Fast Top Coat)
Instructions:
- Apply a base coat.
- Paint your nails with two coats of nude polish.
- Use a fine brush to paint golden swirls and stars on each nail.
- Apply star stickers if using.
- Seal with a top coat to protect the design.
Confetti and Gold Flakes
This whimsical nail design features a clear base adorned with multi-colored confetti and gold flakes. The combination of pastel colors and metallic accents creates a fun and festive look, perfect for any celebratory occasion. The almond shape of the nails enhances the playful and elegant aesthetic.
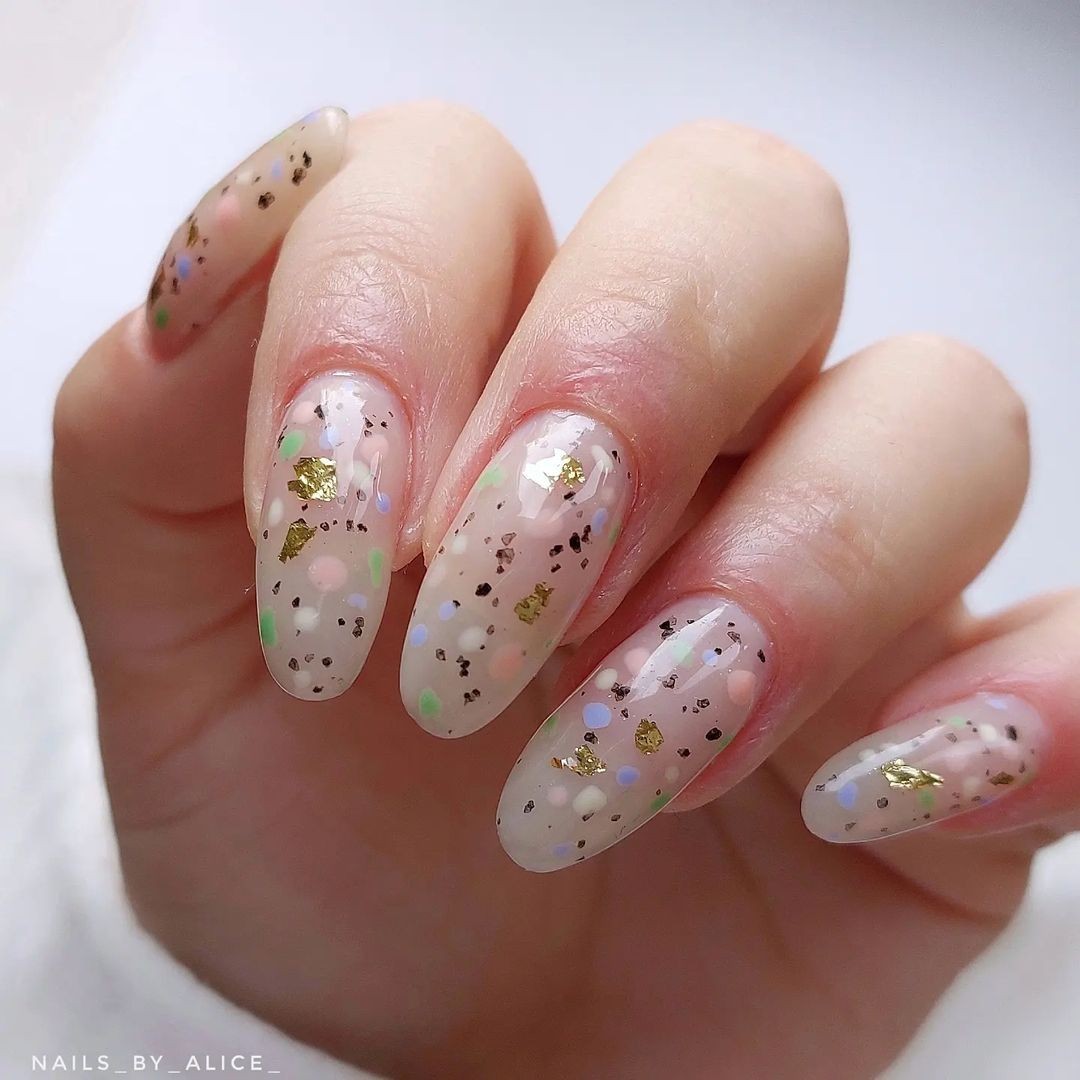
-
- Clear base coat (e.g., OPI Natural Nail Base Coat)
- Confetti nail polish (e.g., China Glaze Poptastic)
- Gold flakes or gold foil (e.g., Born Pretty Gold Foil)
- Top coat (e.g., Seche Vite Dry Fast Top Coat)
Instructions:
- Apply a clear base coat.
- Use a confetti nail polish to apply a layer of colorful specks.
- Add gold flakes or foil pieces on top for added sparkle.
- Finish with a top coat to secure the design.
Abstract Geometric Art
This modern and artistic nail design features abstract geometric shapes in muted tones on a nude base. The combination of lines, dots, and shapes creates a unique and stylish look that is perfect for art enthusiasts. The design is subtle yet eye-catching, making it suitable for both casual and formal settings.
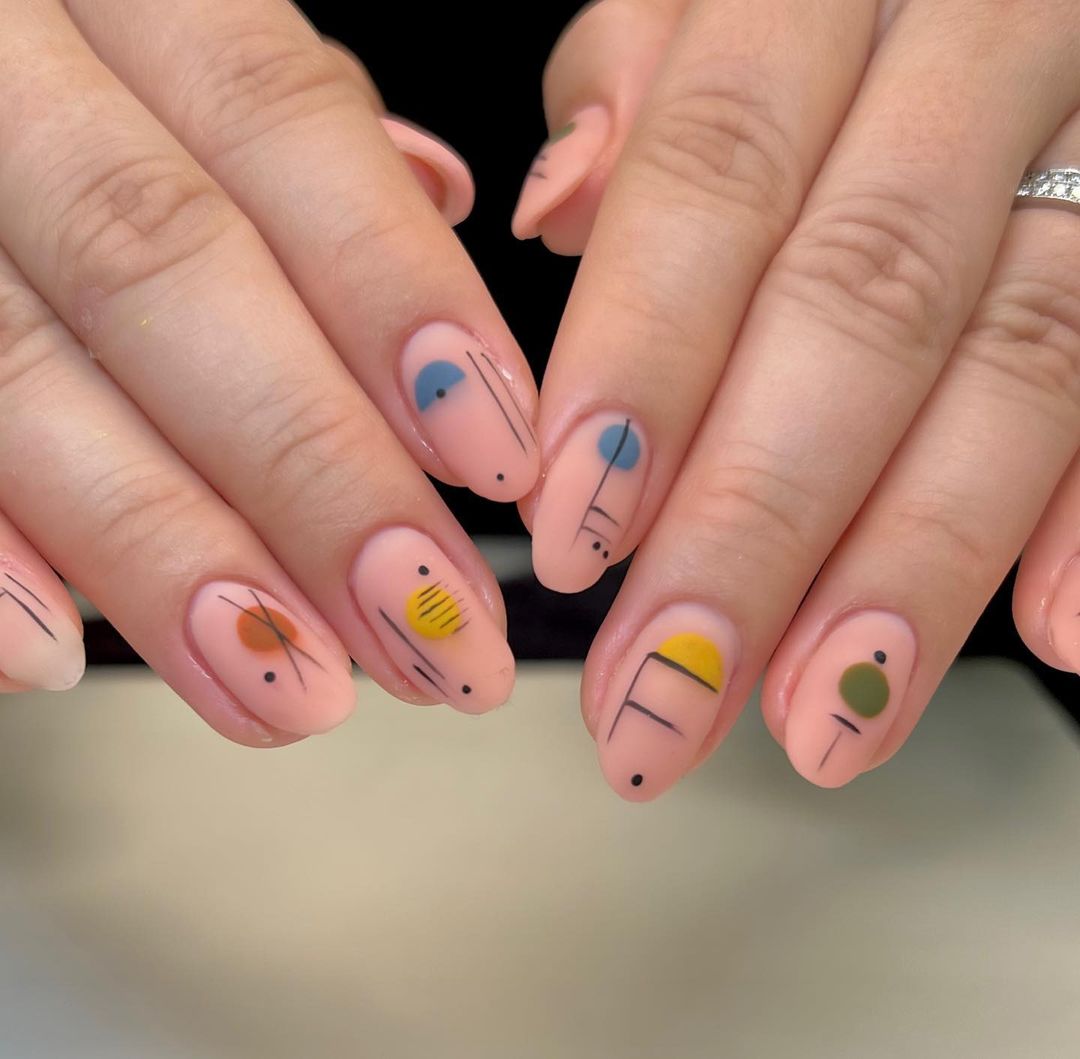
-
- Nude nail polish (e.g., Essie Ballet Slippers)
- Muted tone polishes (e.g., OPI Suzi Takes the Wheel, OPI Never a Dulles Moment)
- Black nail polish (e.g., Essie Licorice)
- Fine nail art brush
- Top coat (e.g., Seche Vite Dry Fast Top Coat)
Instructions:
- Apply a base coat.
- Paint your nails with two coats of nude polish.
- Use a fine nail art brush to create abstract geometric shapes and lines with the muted tone and black polishes.
- Seal with a top coat.
Minimalist Black Accents
This minimalist design features a light pink base with simple black accents, including stars and lines. The stark contrast between the pink and black creates a chic and modern look, perfect for those who prefer clean and understated nail art. The square shape adds a sharp and trendy edge to the design.
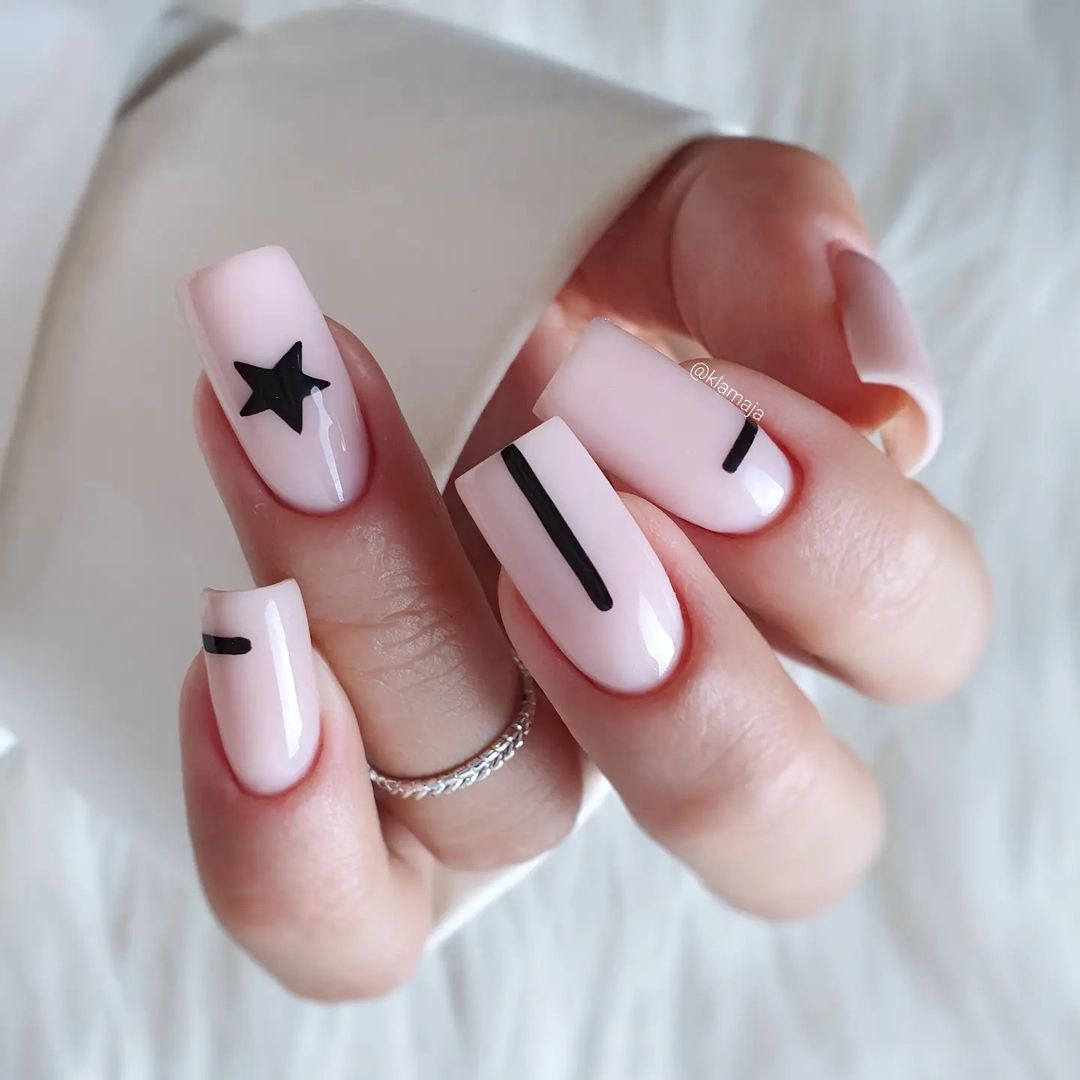
-
- Light pink nail polish (e.g., OPI Bubble Bath)
- Black nail polish (e.g., Essie Licorice)
- Fine nail art brush or stickers
- Top coat (e.g., Seche Vite Dry Fast Top Coat)
Instructions:
- Apply a base coat.
- Paint your nails with two coats of light pink polish.
- Use a fine nail art brush to add black stars and lines, or apply black stickers.
- Finish with a top coat to protect the design.
FAQ
Q: Can I use regular polish instead of gel for these designs? A: Absolutely! Regular polish works just as well for these designs, though it might not last as long as gel.
Q: How can I make my manicure last longer? A: Use a good quality base and top coat, and avoid activities that can chip your nails.
Q: Are these designs suitable for short nails? A: Yes, all these designs are perfect for short and even very short nails.
Save Pin