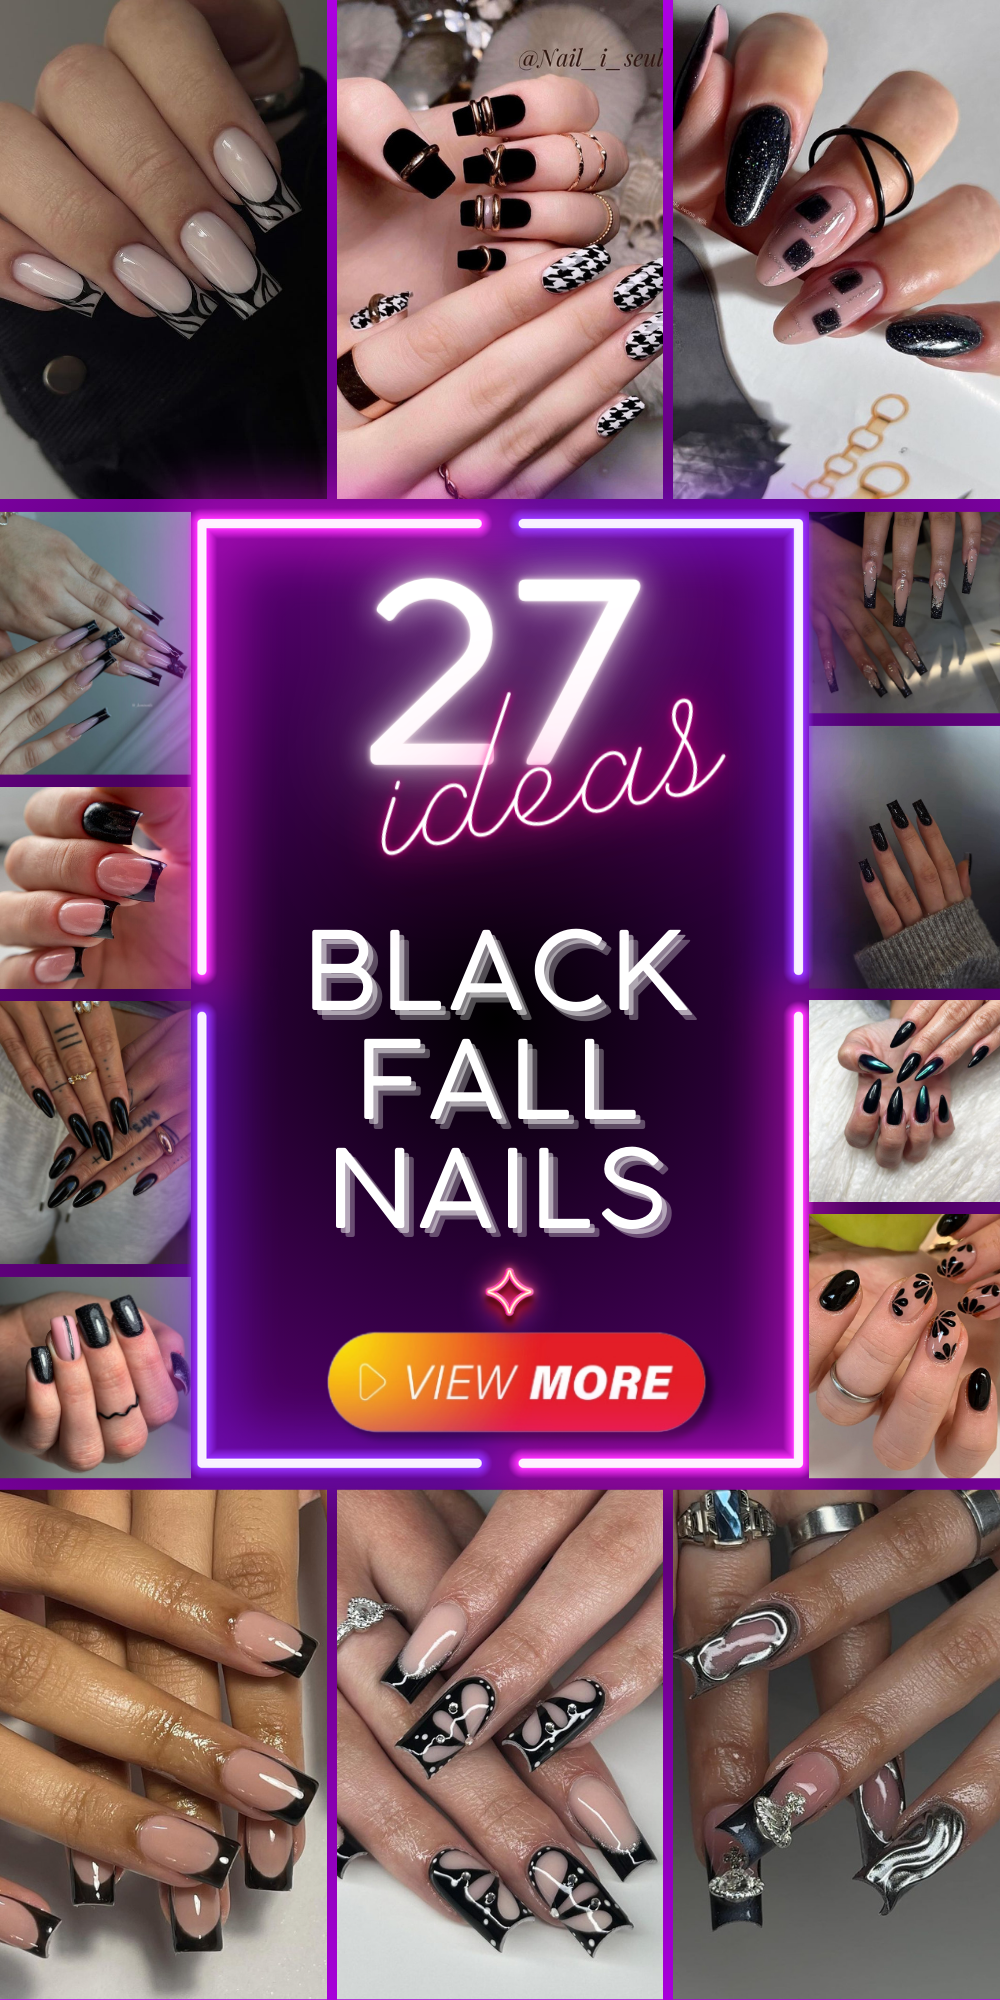
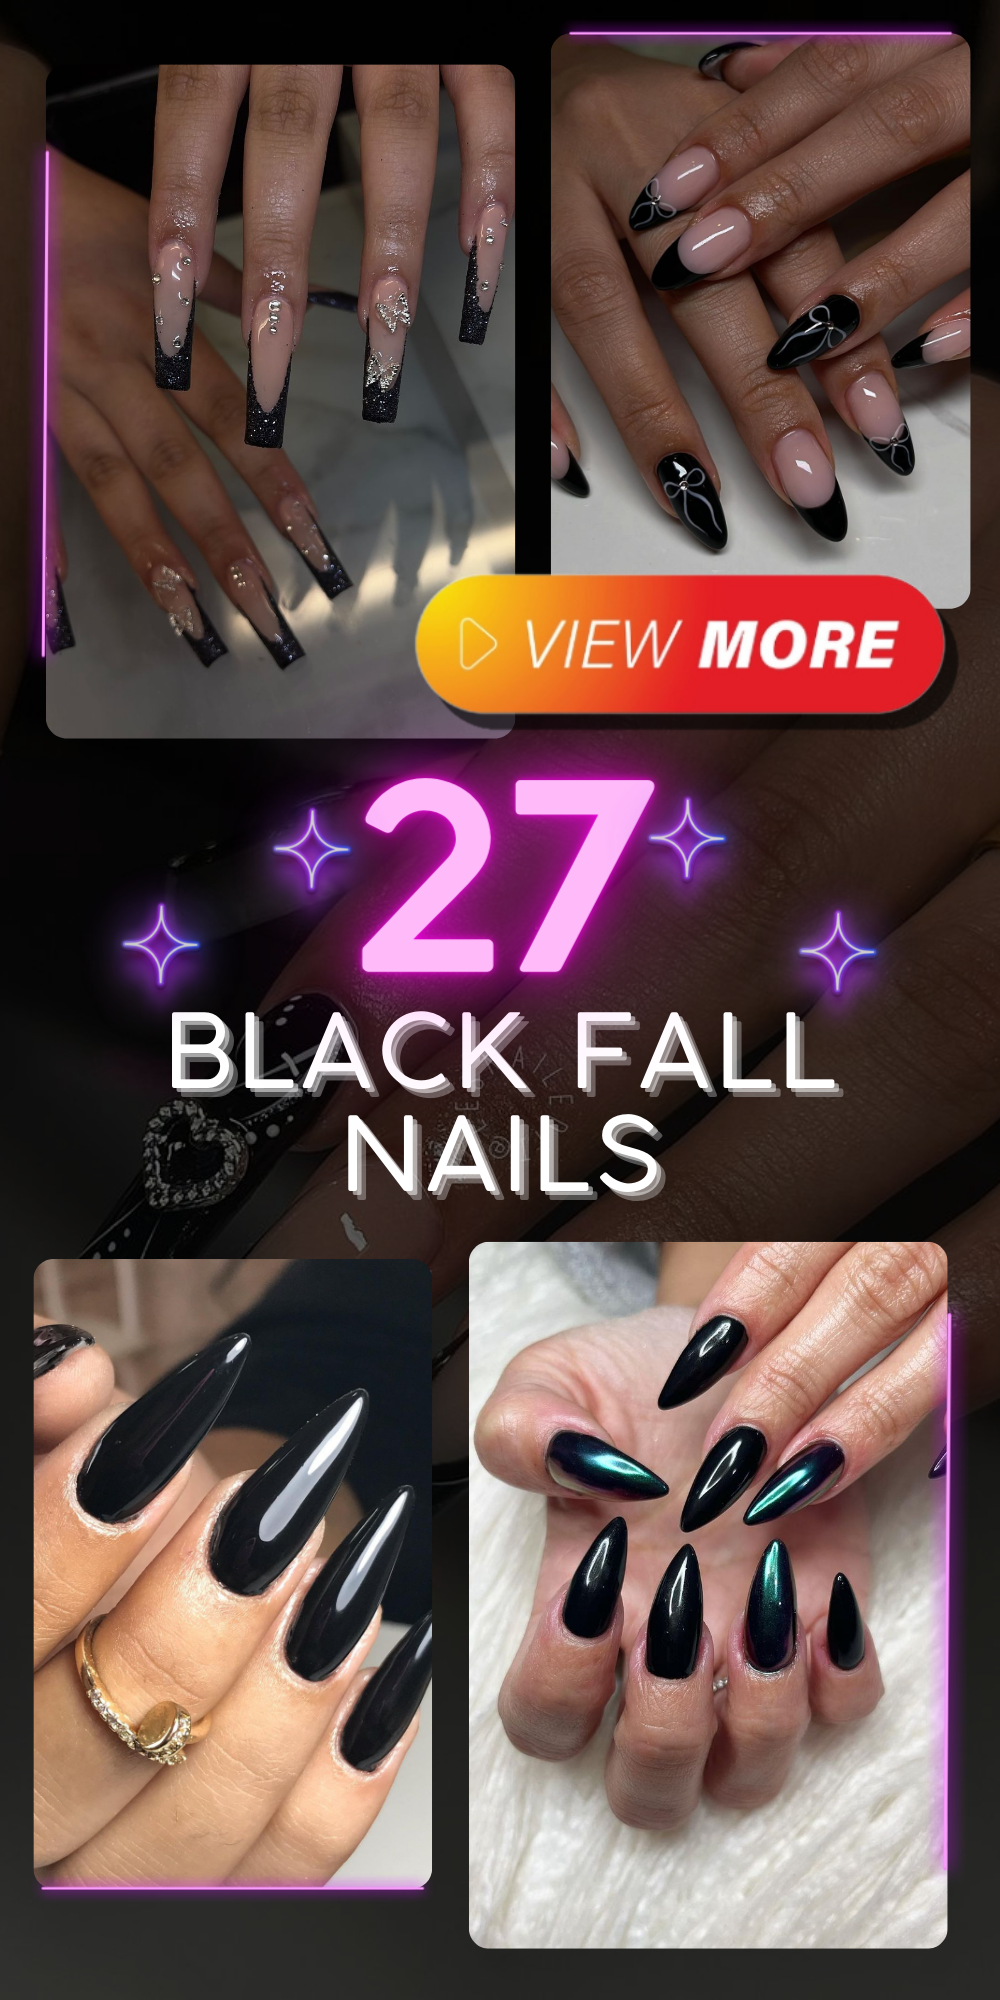
When fall rolls around, it’s time to rethink your nail game. Whether you’re into black fall nails or want to mix in some bold colors, the options are endless. This season is all about experimenting with textures, shapes, and unique designs. In this article, we’ll explore some stunning black nail designs, detailing each look with the photos provided. We’ll dive into the materials needed, the steps to create these looks at home, and some pro tips along the way. Ready to transform your nails? Let’s dive in!
Elegant Leafy Accents
For a sophisticated yet nature-inspired look, these nails feature a delicate blend of black leafy accents on a soft pink base. The addition of gold flakes adds a touch of elegance, making these nails perfect for any occasion.

-
- Soft pink base polish (e.g., OPI Bubble Bath)
- Black nail art pen or brush (e.g., Sally Hansen I Heart Nail Art Pen)
- Gold leaf foil (e.g., Daily Charme Gold Leaf)
- Top coat (e.g., Seche Vite Dry Fast Top Coat)
Instructions:
-
- Apply a base coat to protect your nails.
- Paint two coats of the soft pink polish and let it dry completely.
- Using the black nail art pen, draw delicate leaf patterns on each nail.
- Apply the gold leaf foil in random spots, pressing gently to adhere.
- Seal the design with a top coat to ensure longevity.
Bold Black and Gold Glam
Step up your nail game with these bold, black nails adorned with intricate white designs and gold embellishments. Perfect for a night out, these nails are both edgy and glamorous.
-
- Black gel polish (e.g., Gelish Black Shadow)
- White nail art pen (e.g., Arte Clavo White Gel Pen)
- Gold embellishments (e.g., Swarovski Crystals)
- Gel top coat (e.g., Gelish Top It Off)
Instructions:
-
- Start with a base coat and cure under a UV lamp.
- Apply two coats of black gel polish, curing between each layer.
- Use the white nail art pen to create intricate designs on the nails.
- Place gold embellishments strategically and cure.
- Finish with a gel top coat for a glossy, durable finish.
Classic Black Stilettos
Nothing says fierce like a classic black stiletto manicure. These long, pointed nails are sleek and sophisticated, perfect for making a statement this fall.
-
- Black polish (e.g., Essie Licorice)
- Base coat (e.g., OPI Nail Envy)
- Top coat (e.g., Seche Vite Dry Fast Top Coat)
Instructions:
-
- Apply a base coat to your nails.
- Paint two coats of black polish, allowing each layer to dry.
- Shape your nails into a stiletto point using a nail file.
- Finish with a top coat for a high-shine effect.
Floral Elegance in Black
This design features a sophisticated black French tip with intricate black floral accents, making it an ideal choice for those looking to add a touch of elegance to their manicure. The contrast between the nude base and the black elements creates a visually stunning effect that is perfect for fall.
-
- Nude base polish (e.g., Essie Ballet Slippers)
- Black nail polish (e.g., OPI Black Onyx)
- Black nail art brush or pen (e.g., Sally Hansen I Heart Nail Art Pen)
- Top coat (e.g., Seche Vite Dry Fast Top Coat)
Instructions:
-
- Begin with a clear base coat to protect your nails.
- Apply two coats of the nude polish and let them dry completely.
- Using the black polish and nail art brush, create the French tips on each nail.
- Draw the floral accents with the black nail art pen, allowing the design to dry.
- Seal the design with a top coat to add shine and protect your art.
Save Pin
Chic Pink and Black Contrast
This chic design combines a glossy pink base with black French tips and an accent nail adorned with a row of tiny black pearls. It’s a classy yet playful look that effortlessly blends sophistication with a touch of whimsy.

-
- Pink base polish (e.g., OPI Mod About You)
- Black polish (e.g., Essie Licorice)
- Tiny black pearls (e.g., Daily Charme Black Pearls)
- Top coat (e.g., Sally Hansen Miracle Gel Top Coat)
Instructions:
-
- Start with a clear base coat to protect your nails.
- Apply two coats of the pink polish, letting each coat dry thoroughly.
- Paint the tips of your nails with the black polish to create the French tip effect.
- On the accent nail, apply a row of tiny black pearls while the polish is still tacky.
- Finish with a top coat to ensure the design lasts and adds a glossy finish.
Glittering Black Coffin Nails
For those who love a bit of sparkle, these black coffin nails are a must-try. The glitter polish adds a festive touch, making these nails perfect for the fall season and beyond.
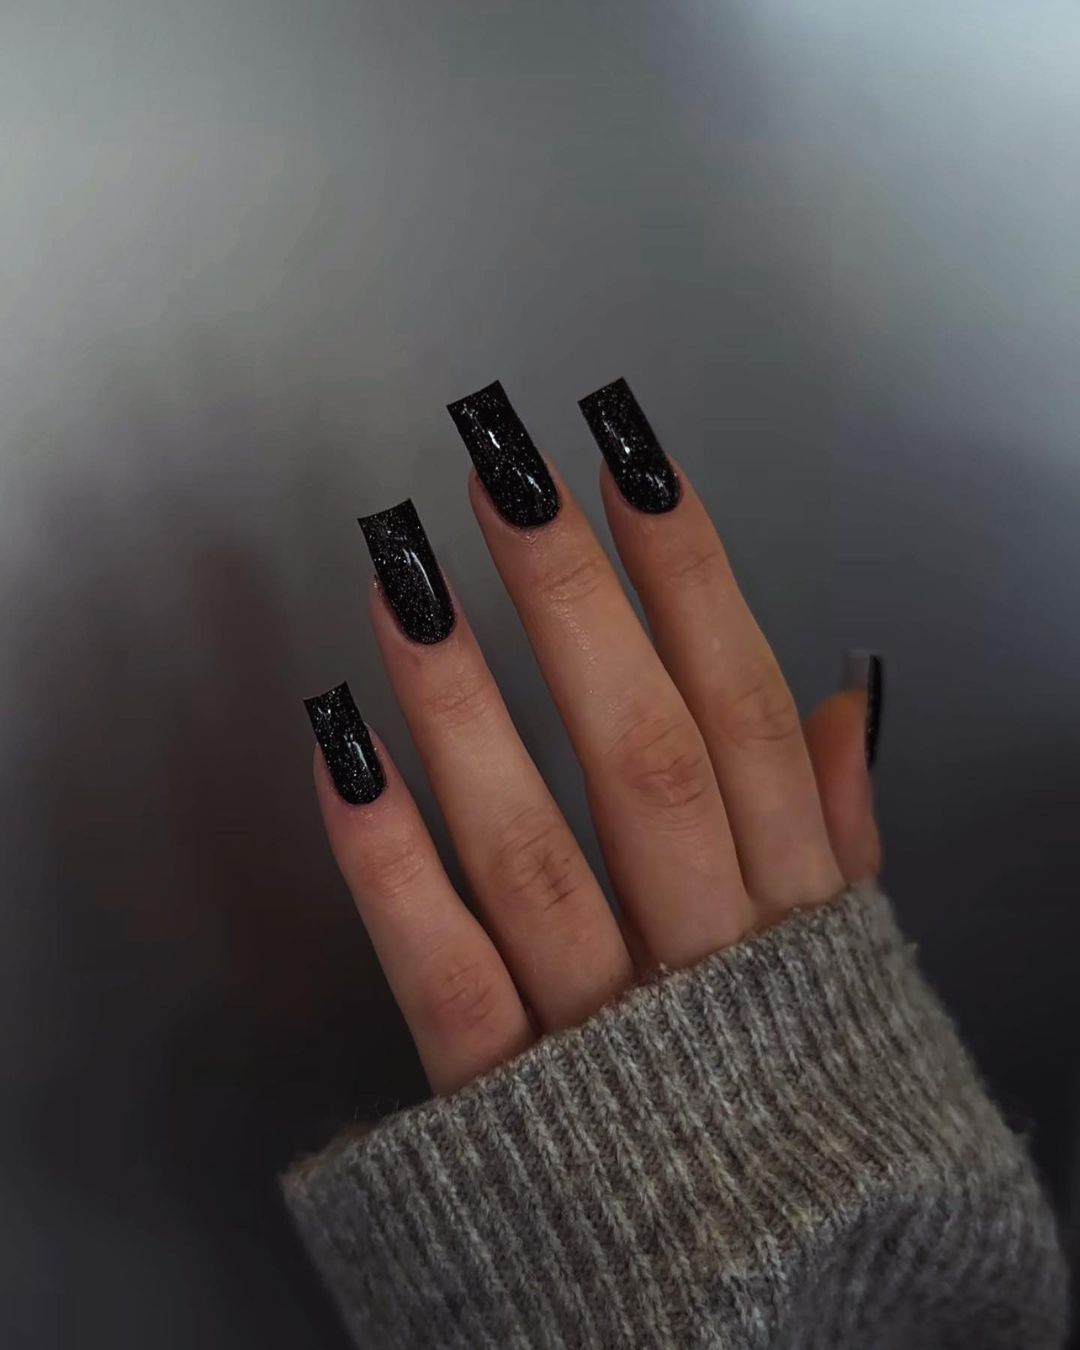
-
- Black glitter polish (e.g., China Glaze Tinsel Town)
- Base coat (e.g., OPI Nail Envy)
- Top coat (e.g., Essie Gel Setter Top Coat)
Instructions:
-
- Apply a base coat to each nail to prepare them for the polish.
- Paint two coats of the black glitter polish, allowing each layer to dry thoroughly.
- Shape your nails into a coffin shape using a nail file.
- Apply a top coat to seal the glitter and give your nails a shiny finish.
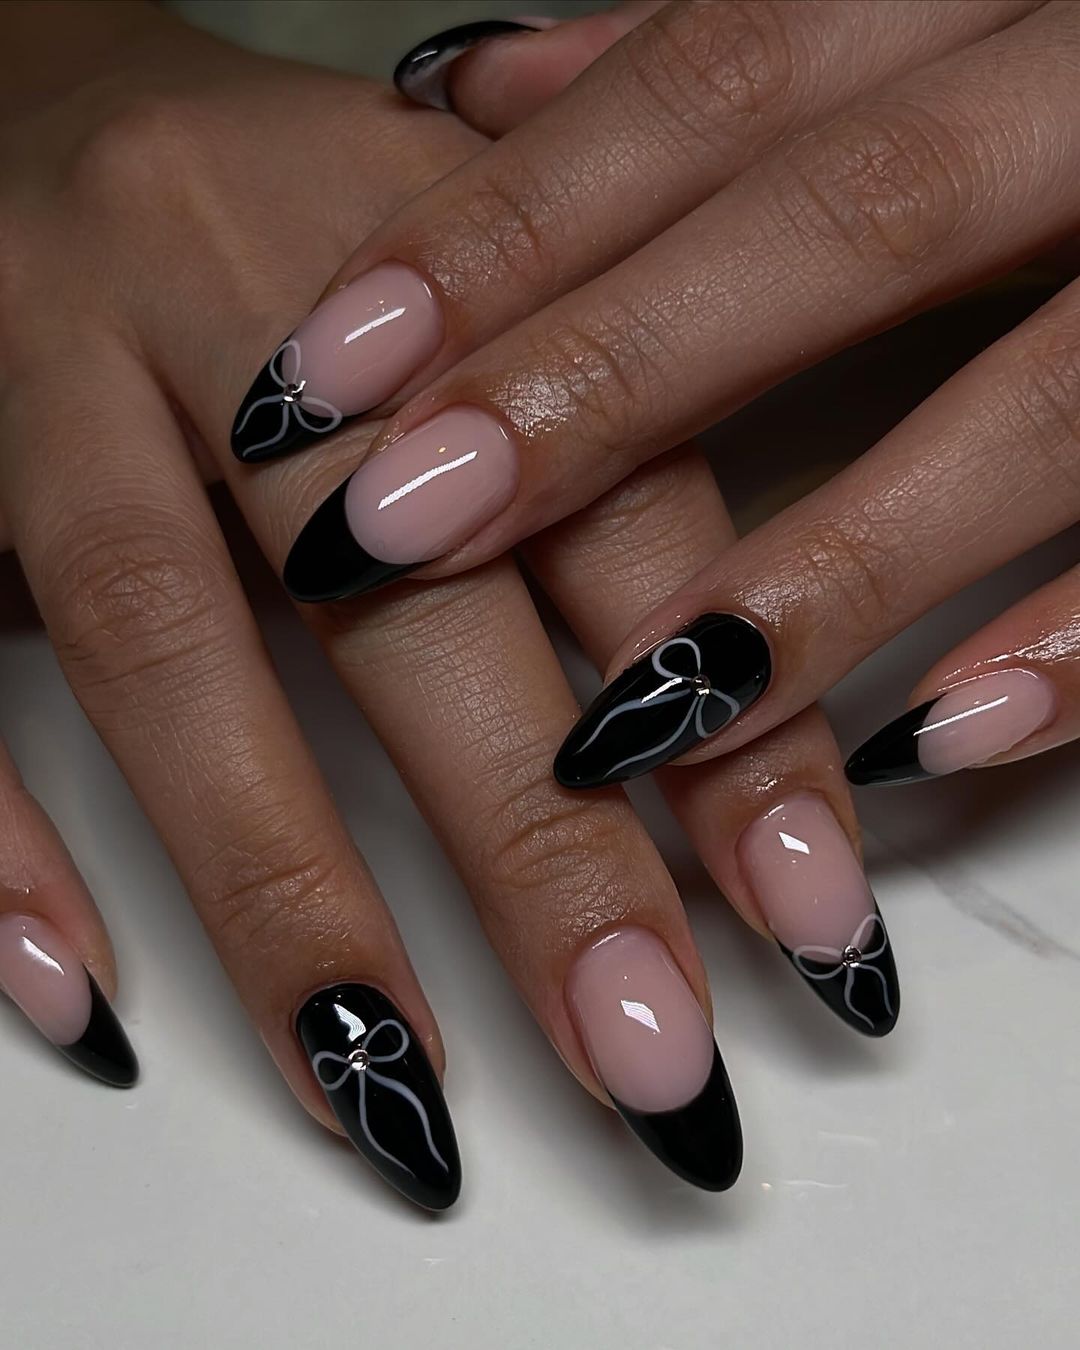
Stylish Black Bows
This elegant design features black French tips on a nude base, adorned with delicate white bows. The minimalist yet sophisticated look is perfect for adding a touch of charm to your fall manicure.
-
- Nude base polish (e.g., OPI Bubble Bath)
- Black polish (e.g., Essie Licorice)
- White nail art pen or brush (e.g., Sally Hansen I Heart Nail Art Pen)
- Top coat (e.g., Seche Vite Dry Fast Top Coat)
Instructions:
-
- Apply a base coat to protect your nails.
- Paint two coats of the nude polish and let it dry completely.
- Create the black French tips using the black polish.
- Draw delicate white bows on the accent nails using the nail art pen.
- Seal the design with a top coat to add shine and protect the artwork.
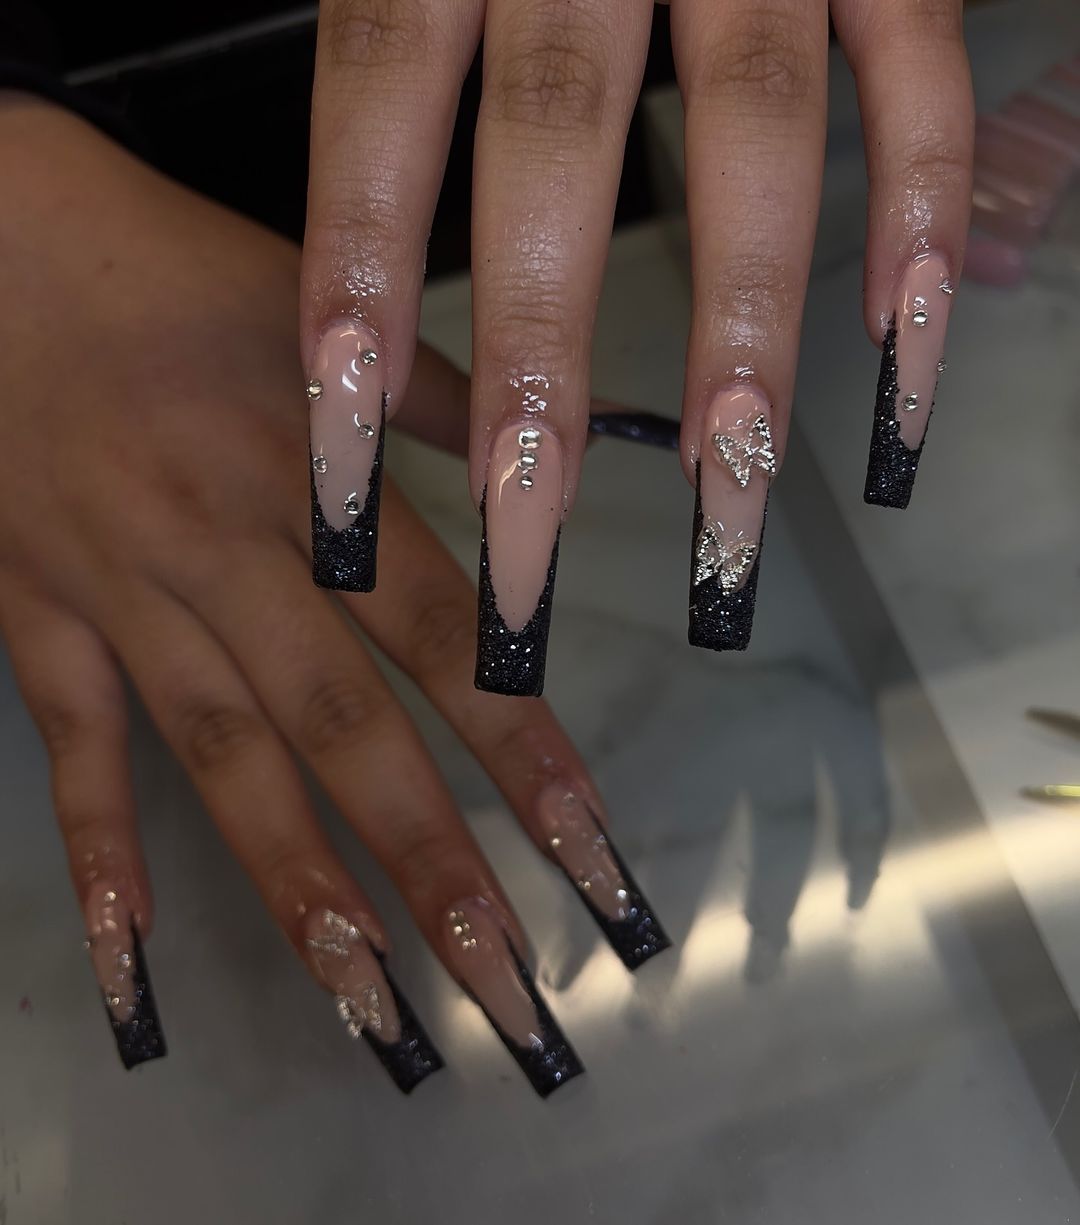
Glitter and Butterfly Accents
These nails combine a nude base with black glitter tips and silver butterfly accents, creating a whimsical and eye-catching design. The addition of rhinestones adds a touch of sparkle, making this manicure perfect for any special occasion.
-
- Nude base polish (e.g., OPI Samoan Sand)
- Black glitter polish (e.g., China Glaze Tinsel Town)
- Silver butterfly decals (e.g., Daily Charme Silver Butterfly Decals)
- Rhinestones (e.g., Swarovski Crystals)
- Top coat (e.g., Essie Gel Setter Top Coat)
Instructions:
-
- Apply a base coat to each nail.
- Paint two coats of the nude polish and allow it to dry.
- Apply the black glitter polish to the tips of the nails.
- Place the silver butterfly decals and rhinestones on the nails while the polish is still tacky.
- Finish with a top coat to seal and protect the design.
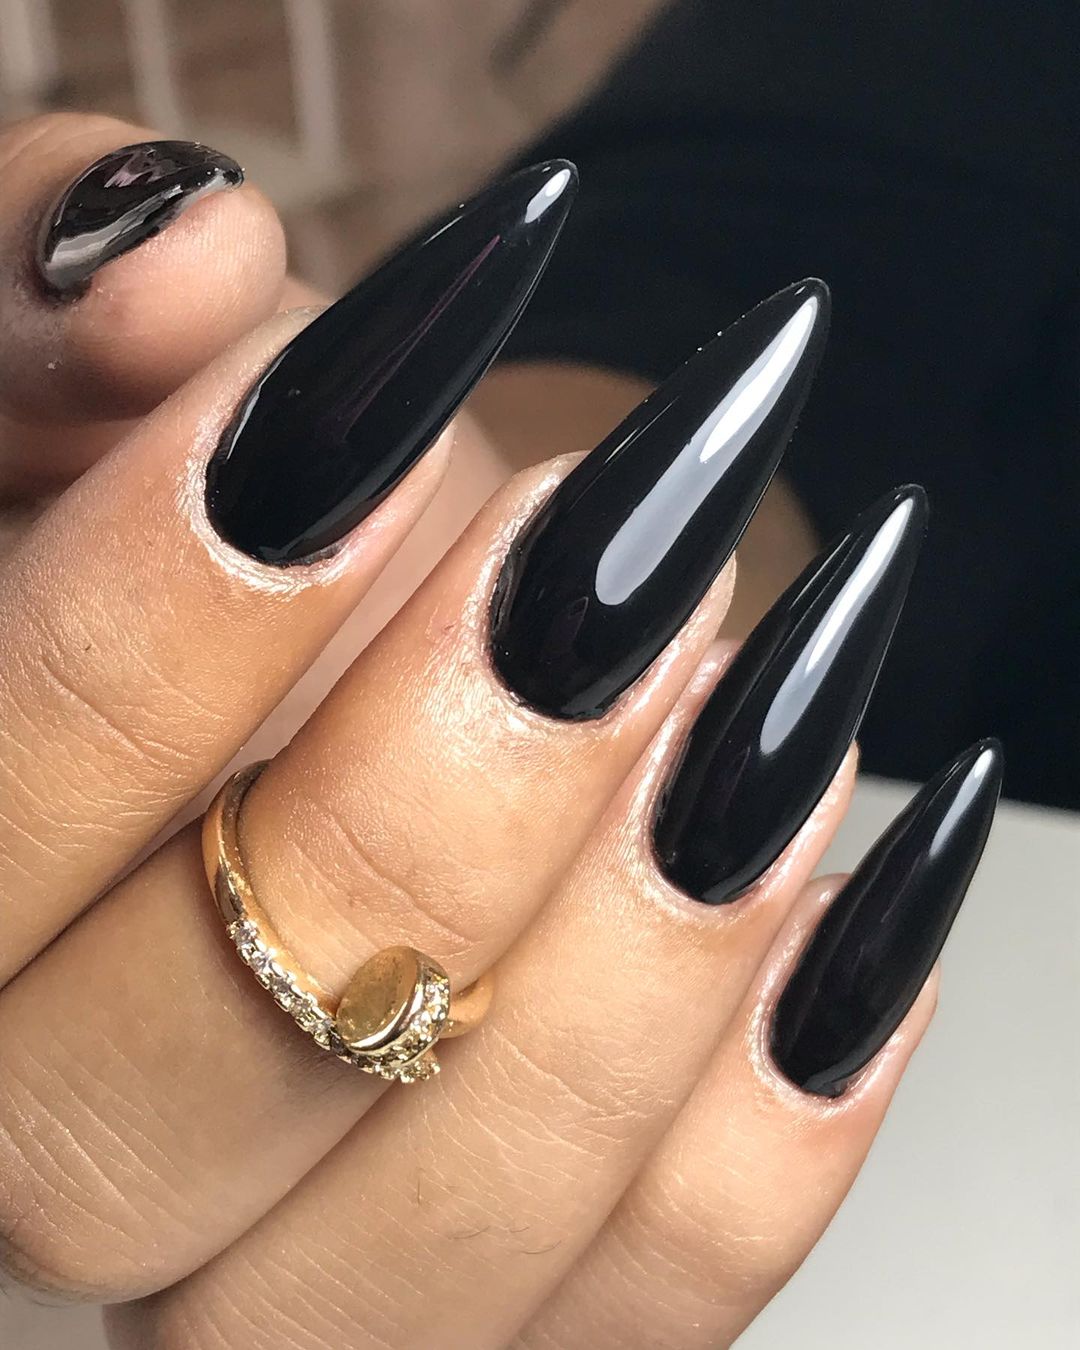
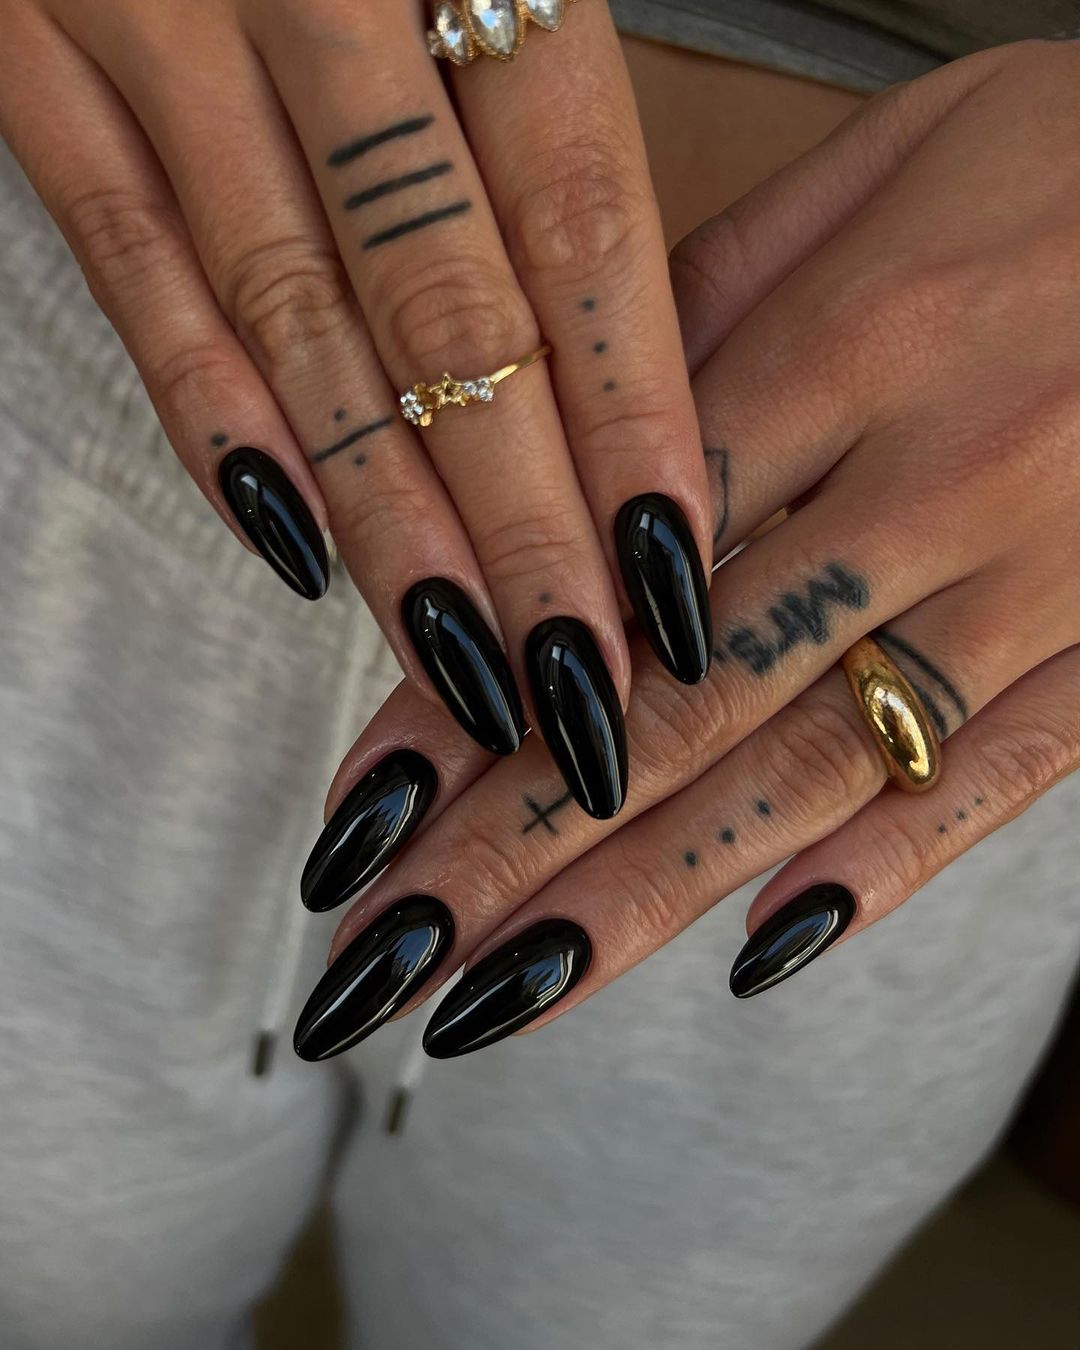
Glossy Black Almond Nails
For a sleek and sophisticated look, these glossy black almond-shaped nails are a must-try. The high-shine finish makes these nails stand out, perfect for any occasion from casual to formal.
-
- Black polish (e.g., OPI Black Onyx)
- Base coat (e.g., OPI Nail Envy)
- Top coat (e.g., Seche Vite Dry Fast Top Coat)
Instructions:
-
- Start with a base coat to protect your nails.
- Apply two coats of the black polish, allowing each coat to dry thoroughly.
- Shape your nails into an almond shape using a nail file.
- Finish with a top coat for a high-shine, long-lasting finish.
Save Pin
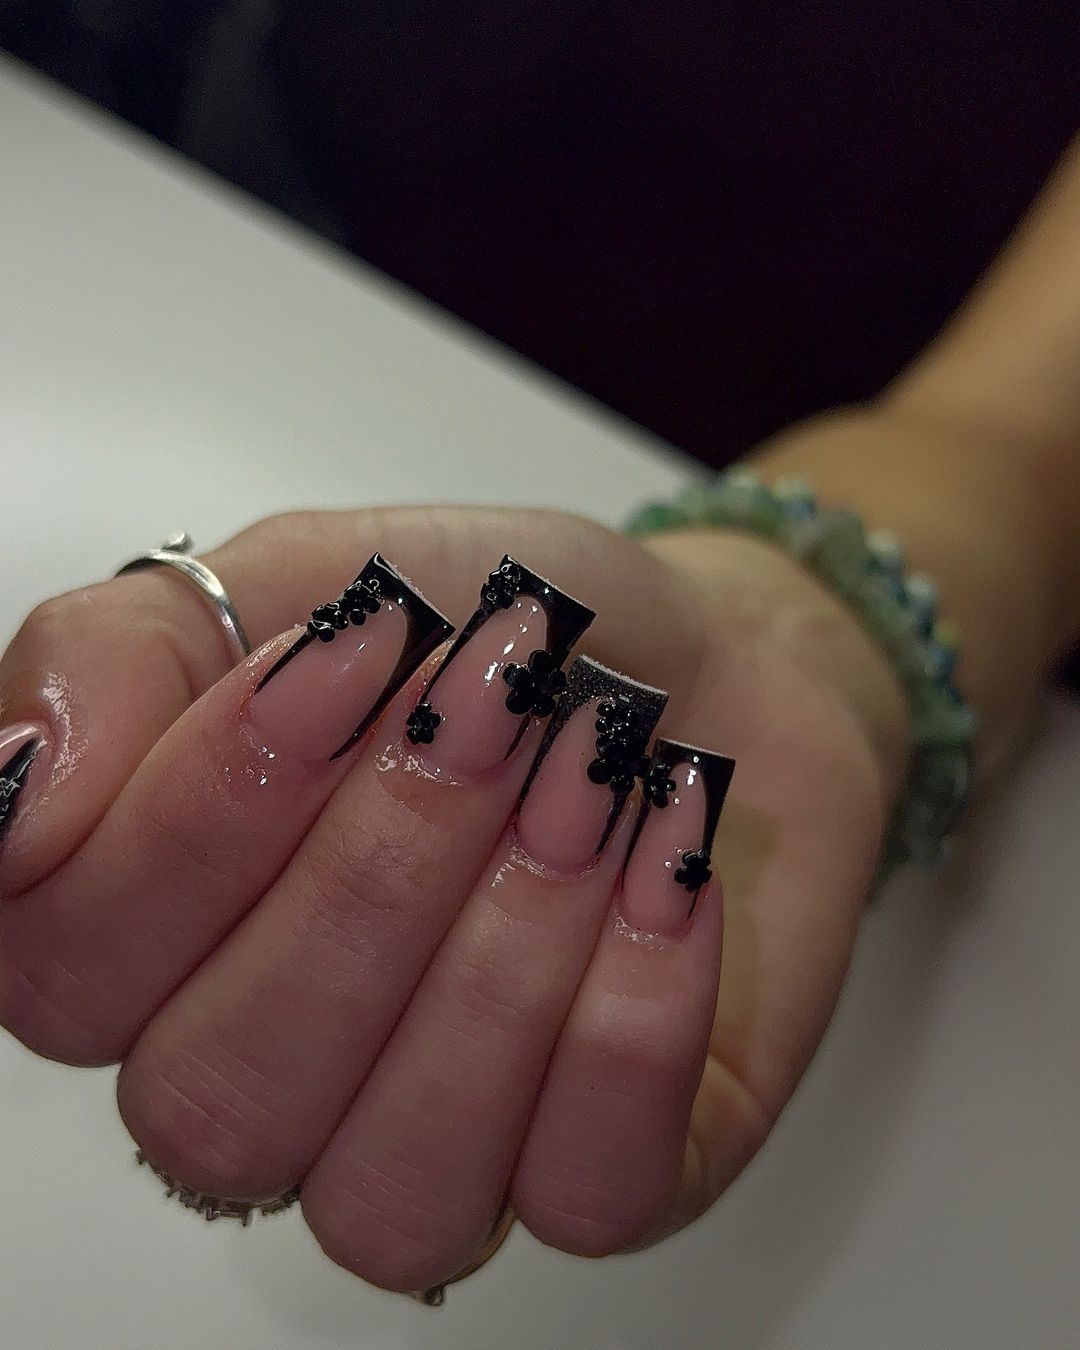
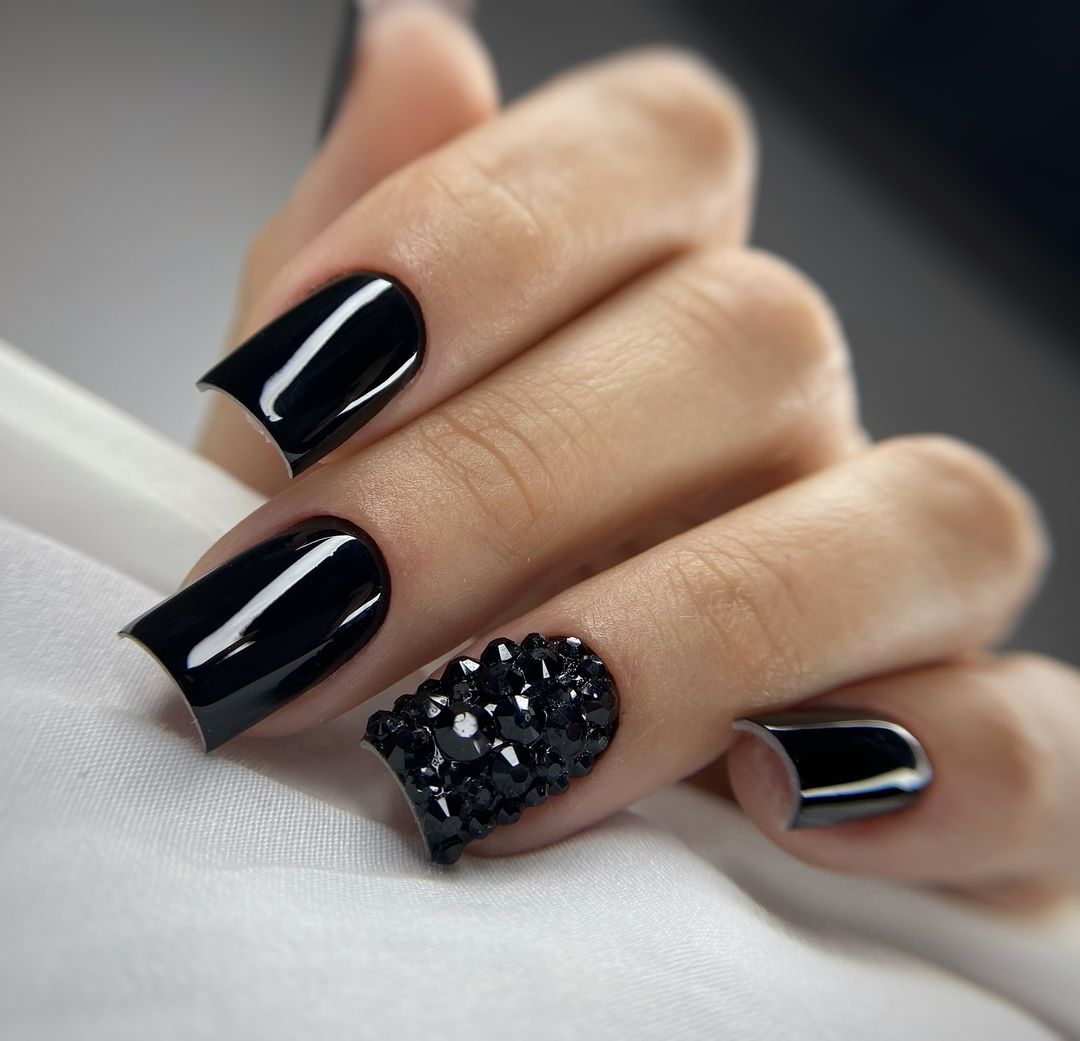
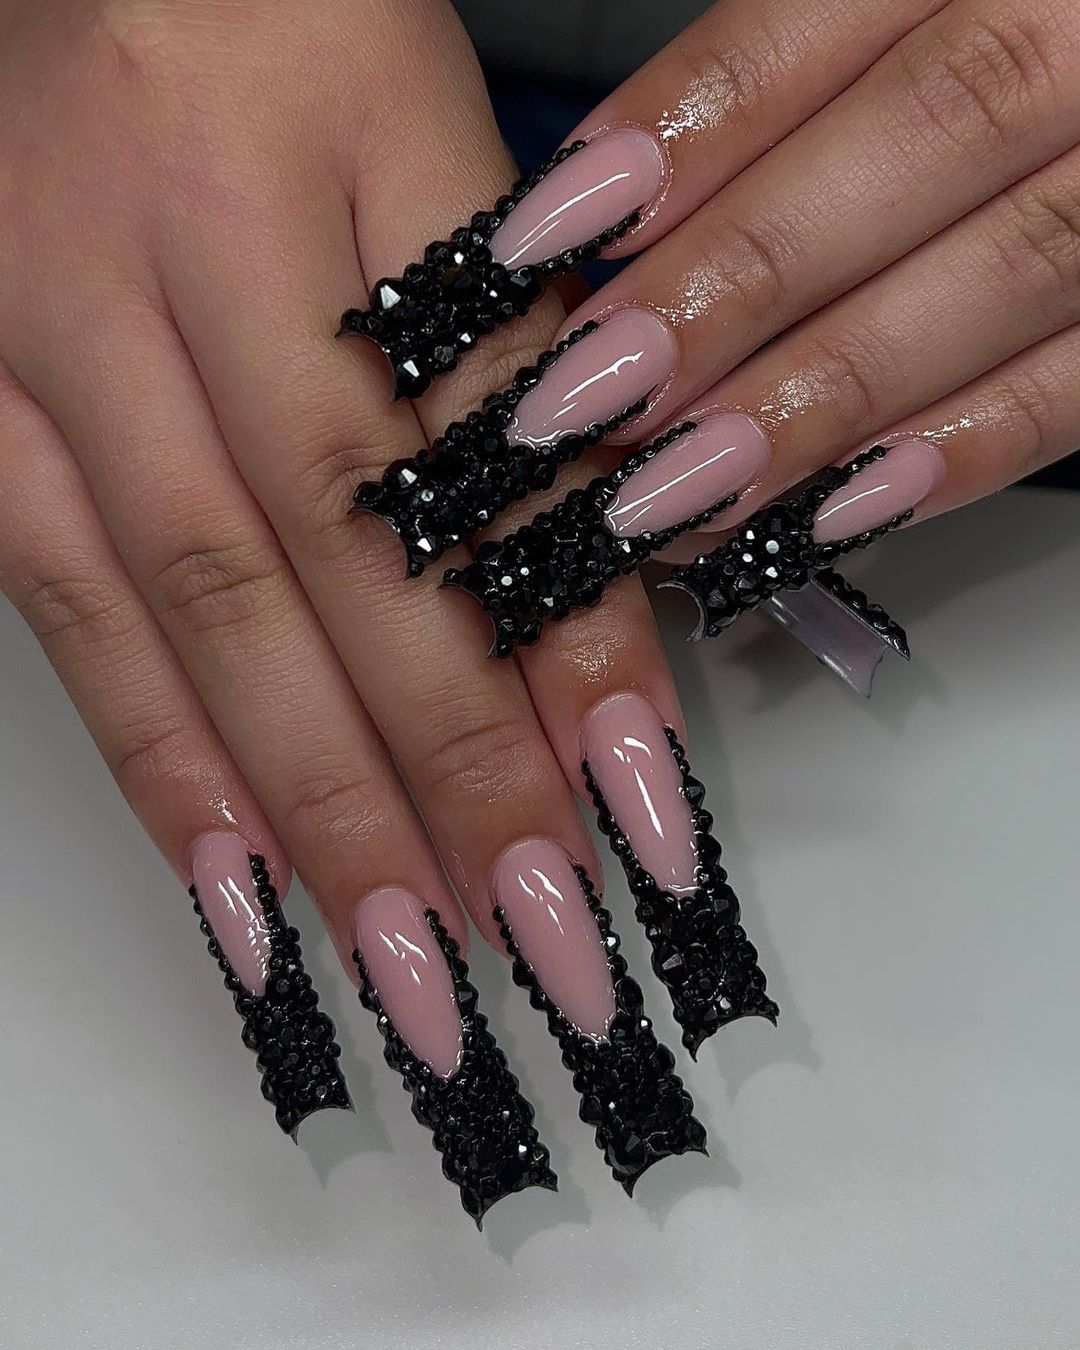
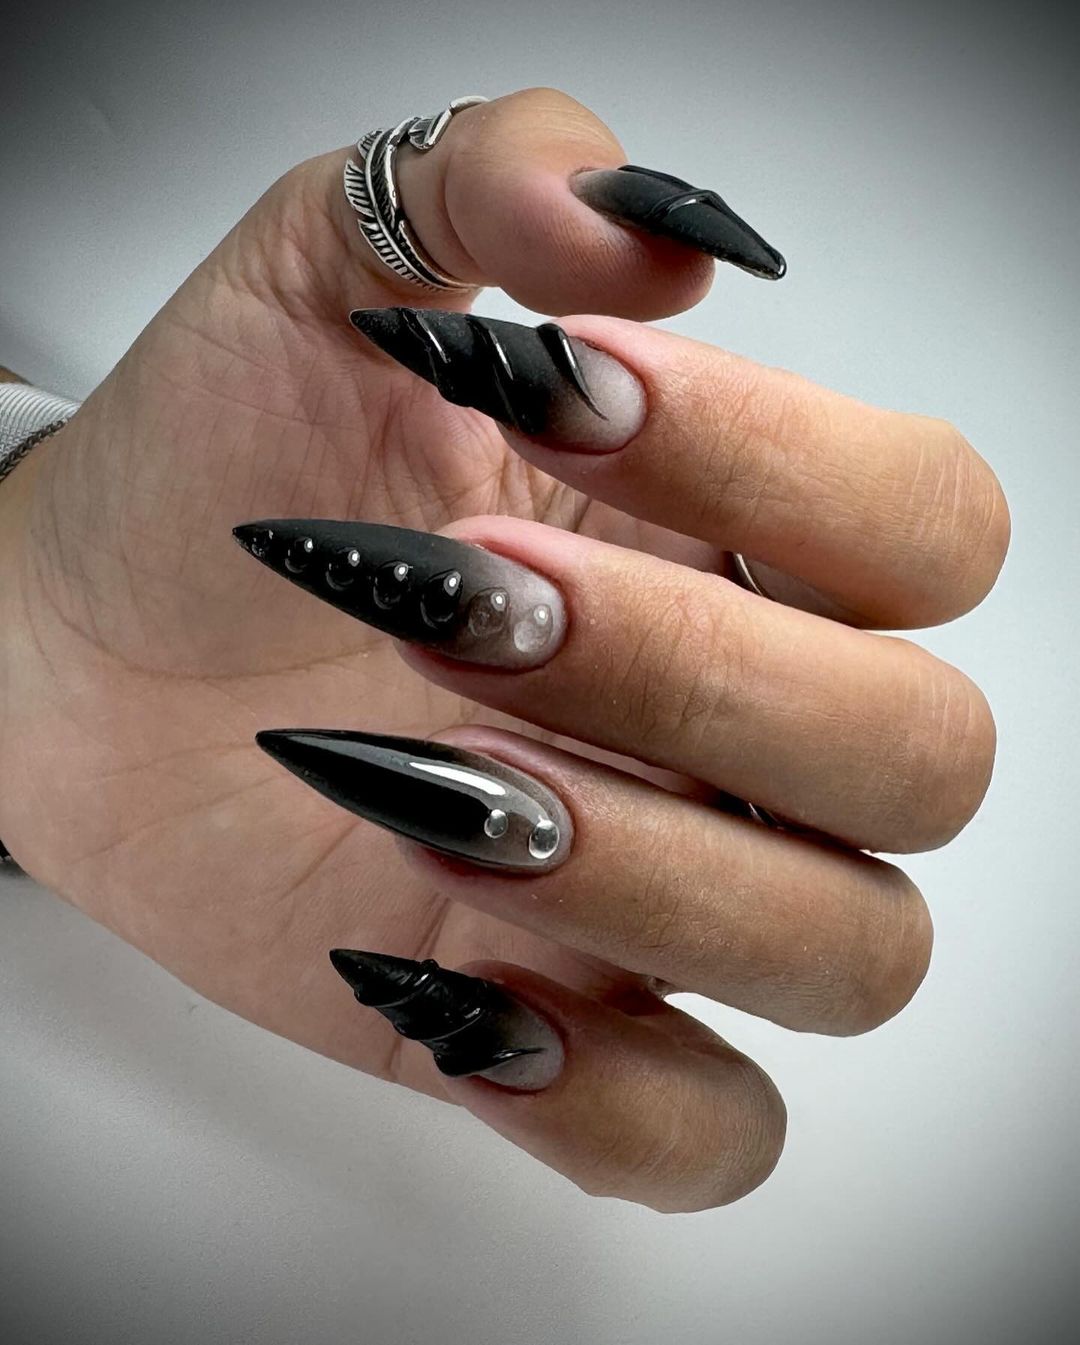
Black and Beaded Glam
This glamorous design features a black base with one accent nail covered in black beads. The combination of smooth, glossy nails with the textured accent creates a stunning and unique look.
-
- Black polish (e.g., Essie Licorice)
- Black beads (e.g., Daily Charme Black Caviar Beads)
- Top coat (e.g., Sally Hansen Miracle Gel Top Coat)
Instructions:
-
- Apply a base coat to protect your nails.
- Paint two coats of the black polish, allowing each layer to dry.
- On the accent nail, apply a layer of top coat and place the black beads while it is still wet.
- Seal the design with another layer of top coat to ensure the beads stay in place.
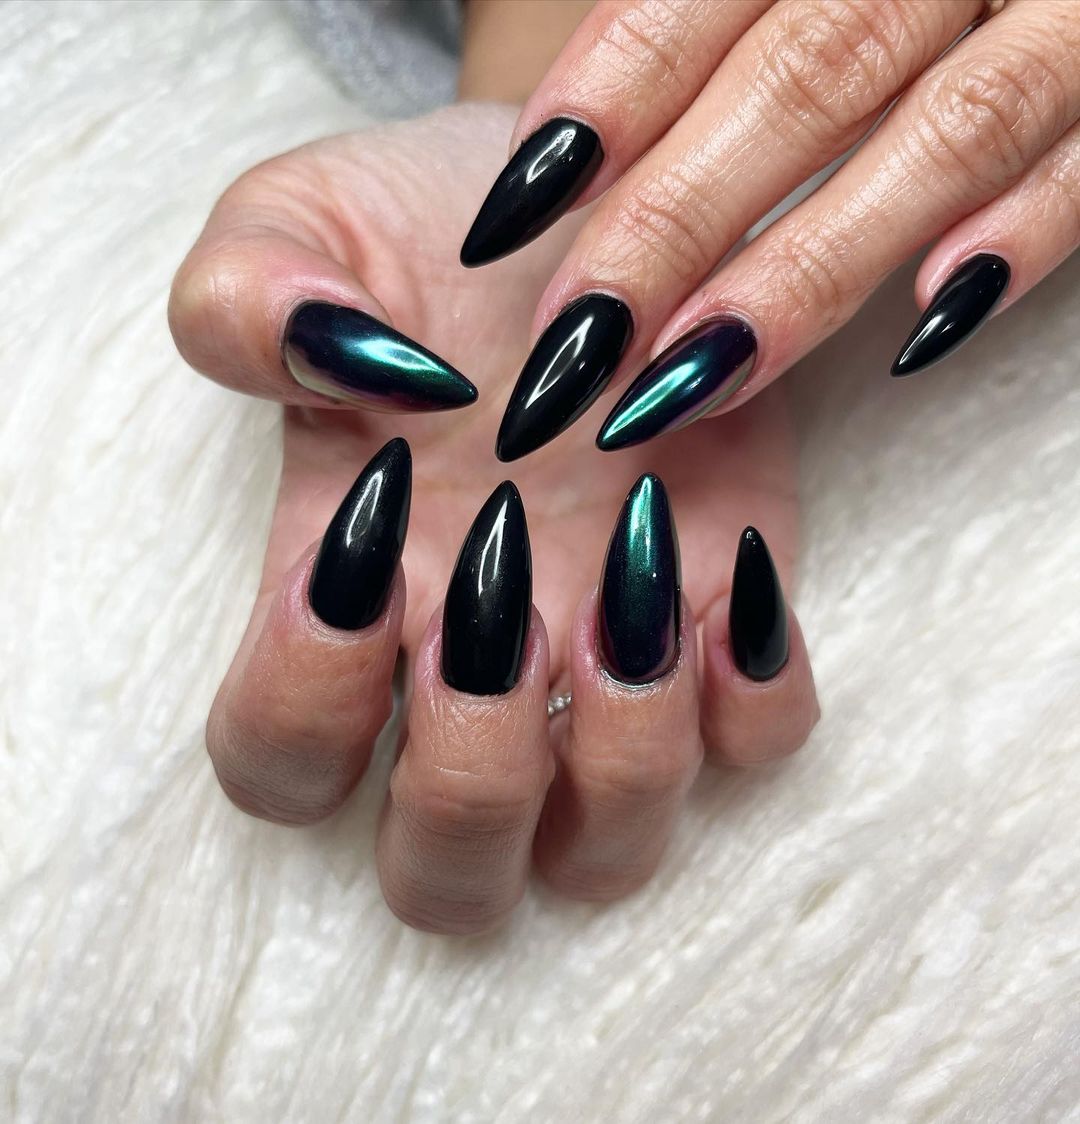
Green and Black Shimmer
These striking nails feature a black base with green shimmer, creating a stunning, iridescent effect. The almond shape adds a touch of elegance to this bold design, making it perfect for fall.
-
- Black polish (e.g., OPI Black Onyx)
- Green shimmer powder (e.g., Daily Charme Unicorn Chrome Powder)
- Base coat (e.g., OPI Nail Envy)
- Top coat (e.g., Seche Vite Dry Fast Top Coat)
Instructions:
-
- Apply a base coat to each nail.
- Paint two coats of black polish, allowing each coat to dry.
- Rub the green shimmer powder onto the black polish using a makeup sponge.
- Finish with a top coat to seal in the shimmer and add shine.
Textured Black Glam
This bold design features a nude base with black textured accents, creating a dramatic and eye-catching look. The combination of smooth and textured finishes makes this design truly unique and perfect for those looking to make a statement.
-
- Nude base polish (e.g., OPI Samoan Sand)
- Black textured polish (e.g., Zoya PixieDust in Dahlia)
- Top coat (e.g., Essie Gel Setter Top Coat)
Instructions:
-
- Start with a base coat to protect your nails.
- Apply two coats of the nude polish and allow it to dry.
- Using the black textured polish, create the desired pattern on each nail.
- Finish with a top coat to ensure the design stays in place and adds a glossy finish.
Artistic Black French Tips
This manicure features a delicate nude base with black French tips adorned with artistic, swirling designs. The combination of simplicity and intricate art makes this look stand out, perfect for those who appreciate minimalistic elegance with a twist.
-
- Nude base polish (e.g., OPI Samoan Sand)
- Black nail art pen or brush (e.g., Sally Hansen I Heart Nail Art Pen)
- Top coat (e.g., Seche Vite Dry Fast Top Coat)
Instructions:
-
- Start with a base coat to protect your nails.
- Apply two coats of the nude polish and allow each coat to dry completely.
- Use the black nail art pen to create the French tips and add swirling designs.
- Finish with a top coat to seal and protect the design.
Glitter and Checkered Design
Combining the glitz of glitter with a modern checkered pattern, this nail design is both trendy and fun. The black glitter polish adds a glamorous touch, while the checkered accent nails provide a contemporary twist.
-
- Nude base polish (e.g., OPI Bubble Bath)
- Black glitter polish (e.g., China Glaze Tinsel Town)
- Black nail art pen or brush (e.g., Sally Hansen I Heart Nail Art Pen)
- Top coat (e.g., Essie Gel Setter Top Coat)
Instructions:
-
- Apply a base coat to each nail.
- Paint two coats of the nude polish on all nails.
- On selected nails, apply the black glitter polish.
- Use the nail art pen to create checkered patterns on the accent nails.
- Seal the design with a top coat to ensure longevity.
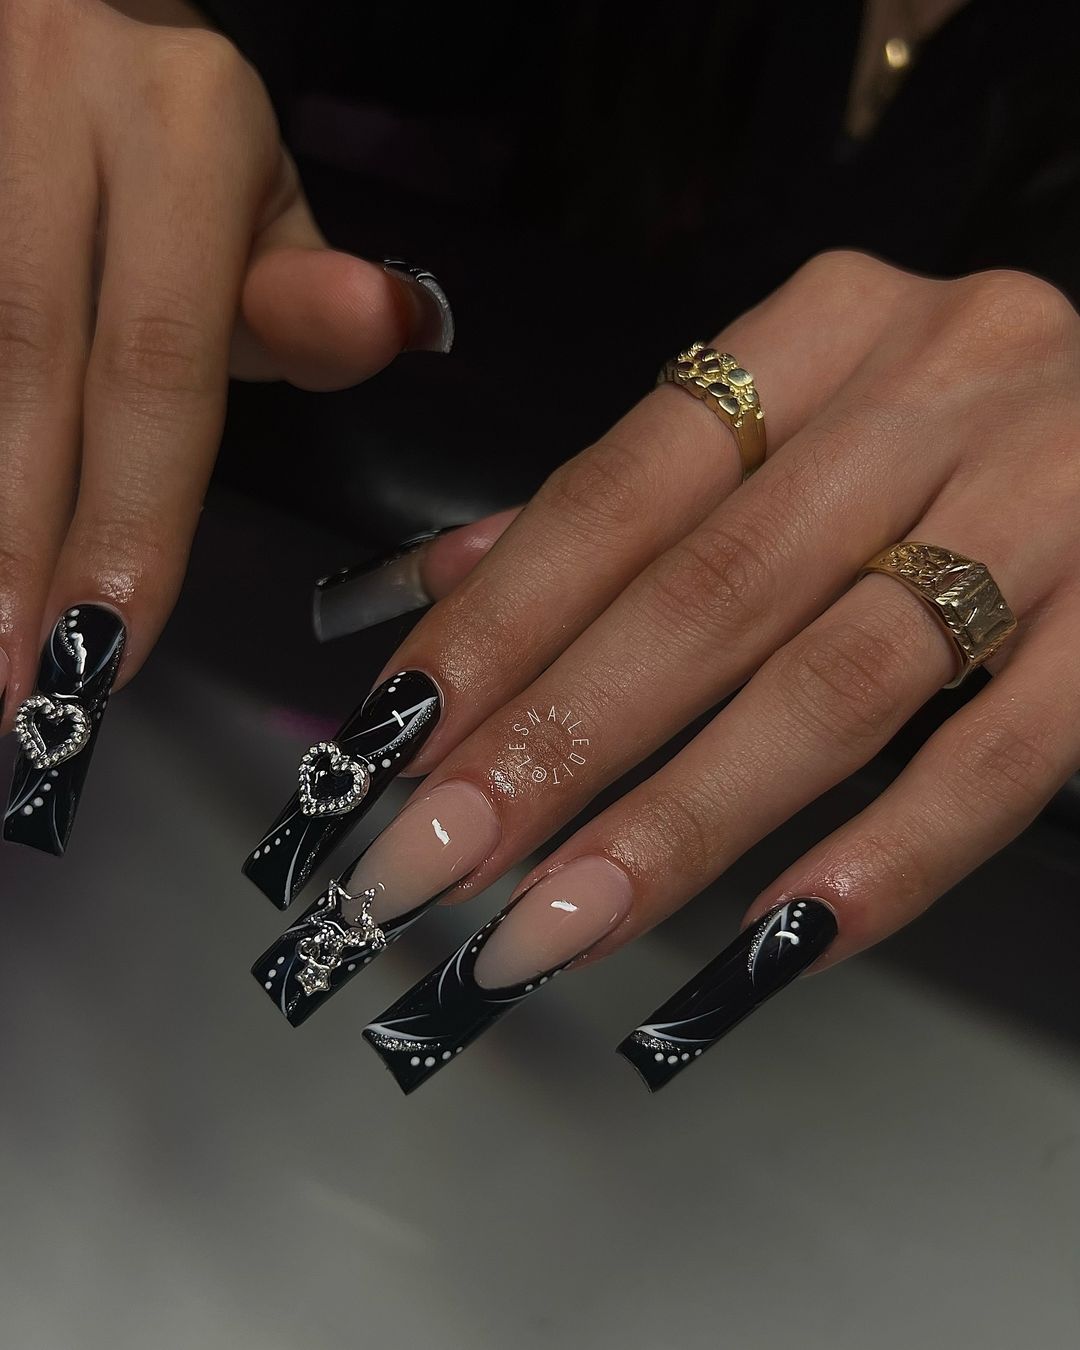
3D Black Bows
This manicure features a nude base with bold black French tips and 3D black bow accents. The three-dimensional bows add a playful and unique element to the design, making it ideal for special occasions.
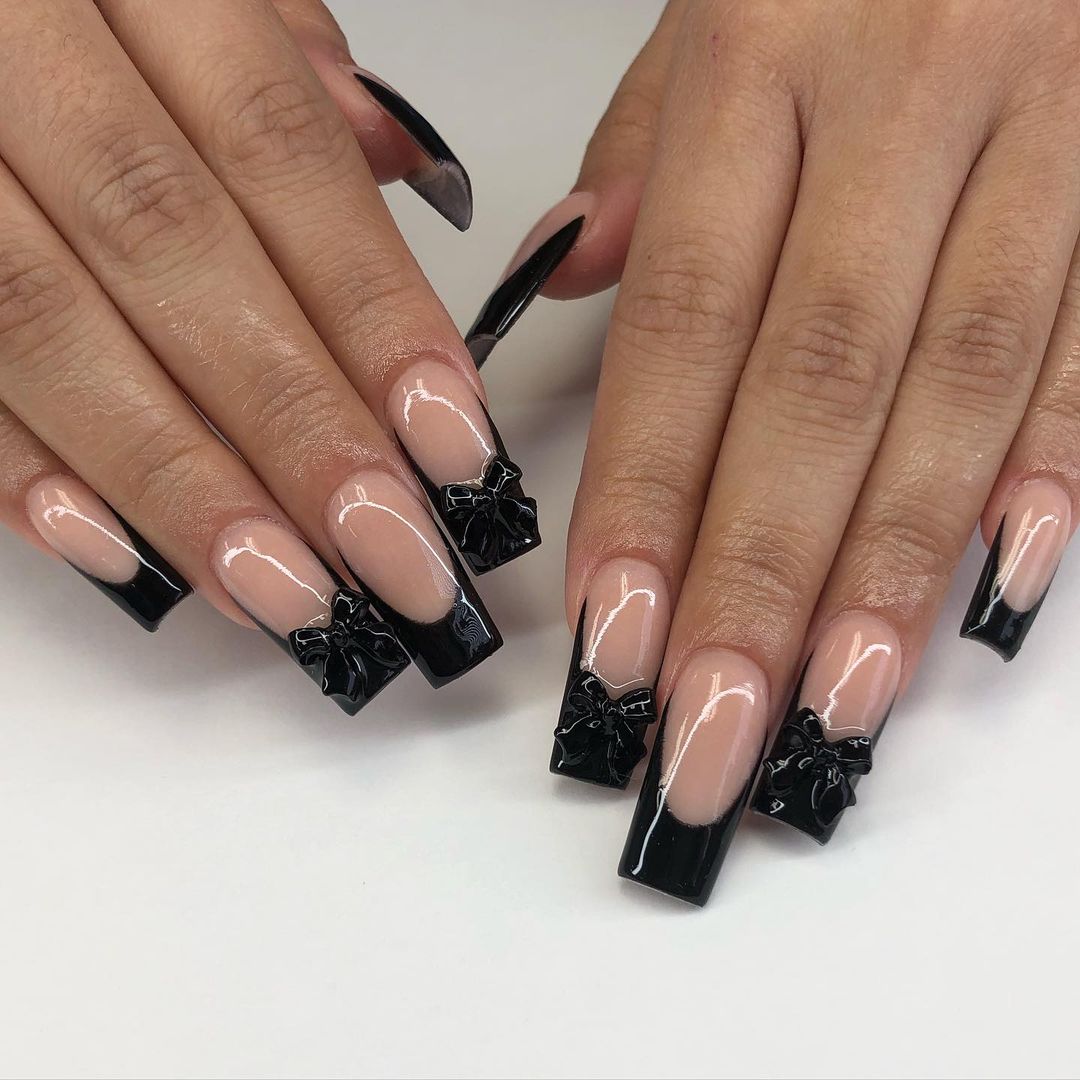
-
- Nude base polish (e.g., OPI Samoan Sand)
- Black polish (e.g., Essie Licorice)
- 3D black bow accents (e.g., Daily Charme Black Bow Charms)
- Nail glue (e.g., Kiss Precision Nail Glue)
- Top coat (e.g., Seche Vite Dry Fast Top Coat)
Instructions:
-
- Begin with a base coat to protect your nails.
- Apply two coats of the nude polish and let them dry completely.
- Create black French tips using the black polish.
- Attach the 3D bow accents with nail glue.
- Seal the design with a top coat to secure the bows in place.
Matte Black and Houndstooth Pattern
This striking design combines matte black nails with a classic black and white houndstooth pattern. The contrast between the matte and glossy finishes adds a sophisticated touch to the design.
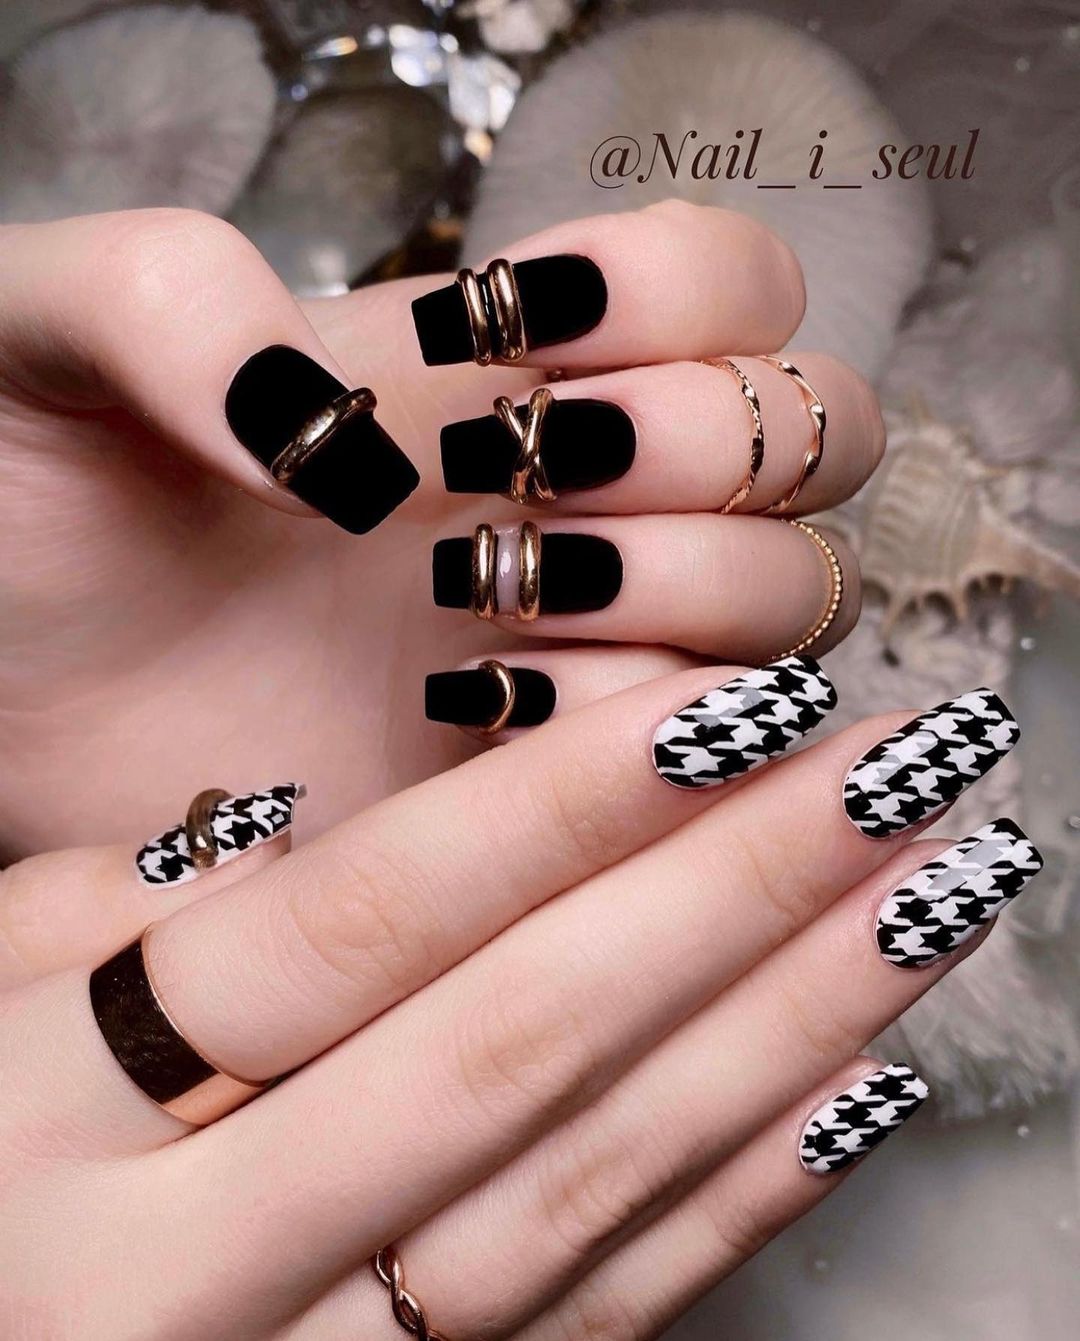
-
- Matte black polish (e.g., OPI Matte Top Coat)
- White polish (e.g., Essie Blanc)
- Black nail art pen or brush (e.g., Sally Hansen I Heart Nail Art Pen)
- Top coat (e.g., Seche Vite Dry Fast Top Coat)
Instructions:
-
- Apply a base coat to protect your nails.
- Paint some nails with matte black polish and others with white polish.
- Use the black nail art pen to create the houndstooth pattern on the white nails.
- Seal with a matte top coat to maintain the matte effect.
Black and Silver Gradient
This chic design features a gradient from nude to black with a touch of silver. The smooth transition and the added metallic accents make this manicure both modern and stylish.
-
- Nude base polish (e.g., OPI Bubble Bath)
- Black polish (e.g., Essie Licorice)
- Silver glitter polish (e.g., China Glaze Tinsel Town)
- Top coat (e.g., Seche Vite Dry Fast Top Coat)
Instructions:
-
- Start with a base coat to protect your nails.
- Apply two coats of the nude polish and let it dry.
- Create a gradient effect by sponging the black polish onto the tips.
- Add silver glitter polish to the gradient for a sparkling touch.
- Seal with a top coat to protect the design.
Sleek Black Square Nails
These sleek black square nails are simple yet stunning. The glossy finish and the sharp square shape create a bold look that is perfect for any occasion.
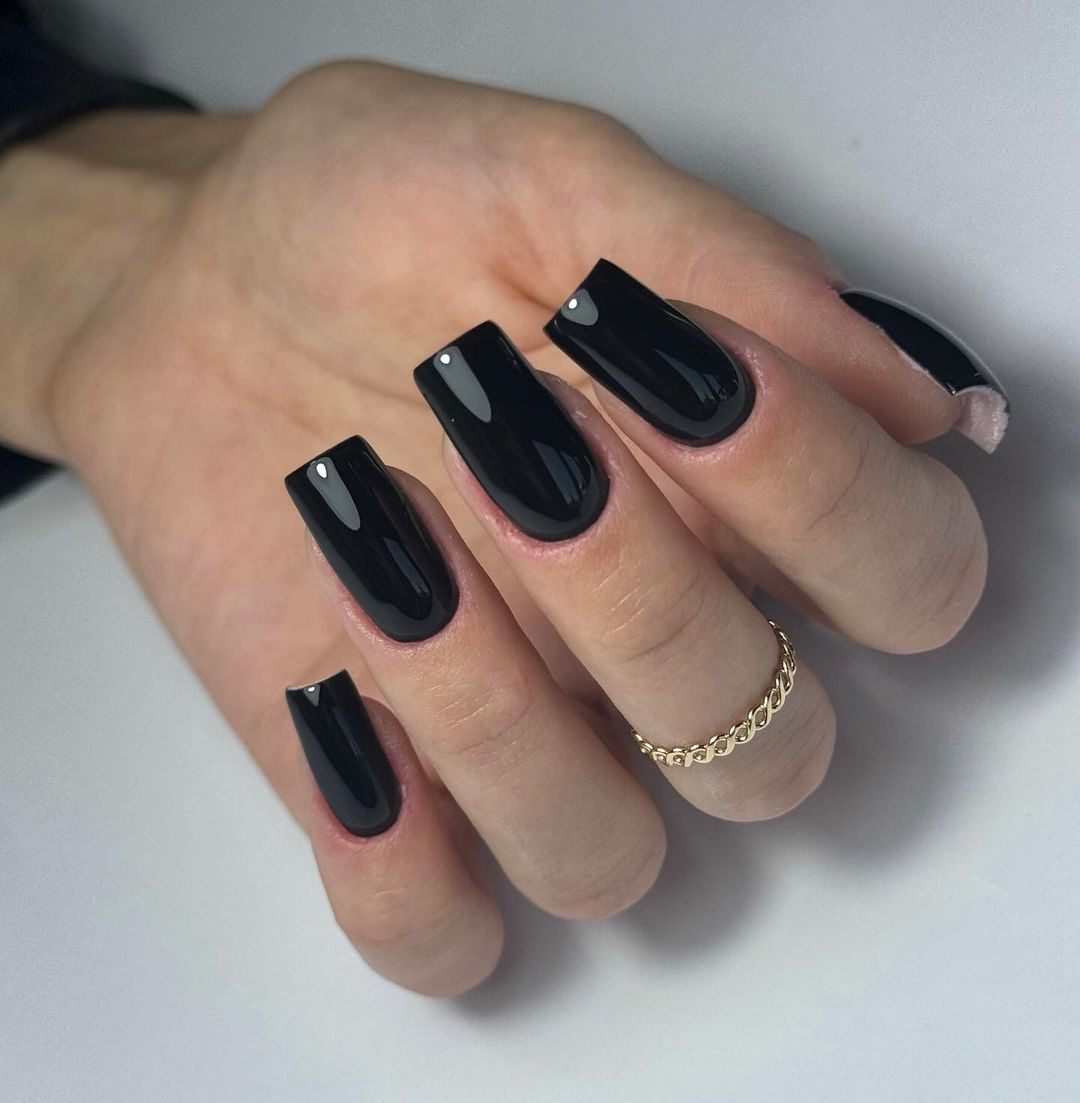
-
- Black polish (e.g., OPI Black Onyx)
- Base coat (e.g., OPI Nail Envy)
- Top coat (e.g., Seche Vite Dry Fast Top Coat)
Instructions:
-
- Apply a base coat to each nail.
- Paint two coats of black polish, allowing each coat to dry thoroughly.
- Shape your nails into a square using a nail file.
- Finish with a top coat to achieve a high-shine finish.
Floral Black Art
This manicure showcases a beautiful combination of a nude base with black floral accents. The sleek and delicate floral designs make these nails perfect for anyone looking for an elegant and sophisticated look this fall.
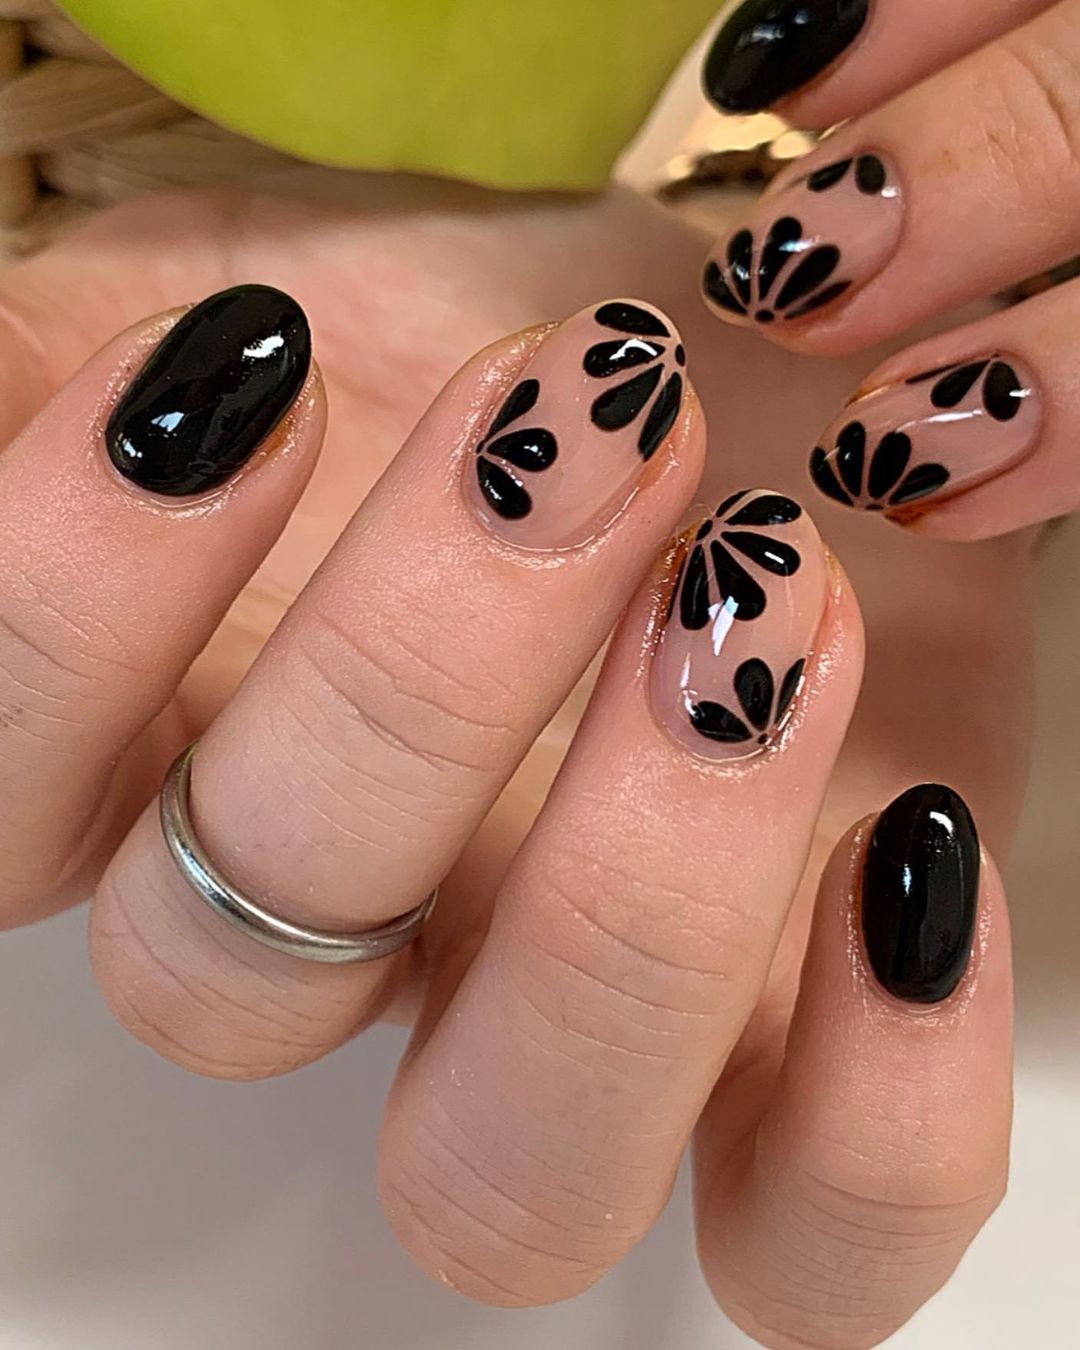
-
- Nude base polish (e.g., Essie Ballet Slippers)
- Black nail art pen or brush (e.g., Sally Hansen I Heart Nail Art Pen)
- Top coat (e.g., Seche Vite Dry Fast Top Coat)
Instructions:
-
- Begin with a base coat to protect your nails.
- Apply two coats of the nude polish and let them dry completely.
- Use the black nail art pen to create floral designs on each nail.
- Seal the design with a top coat to add shine and protect the artwork.
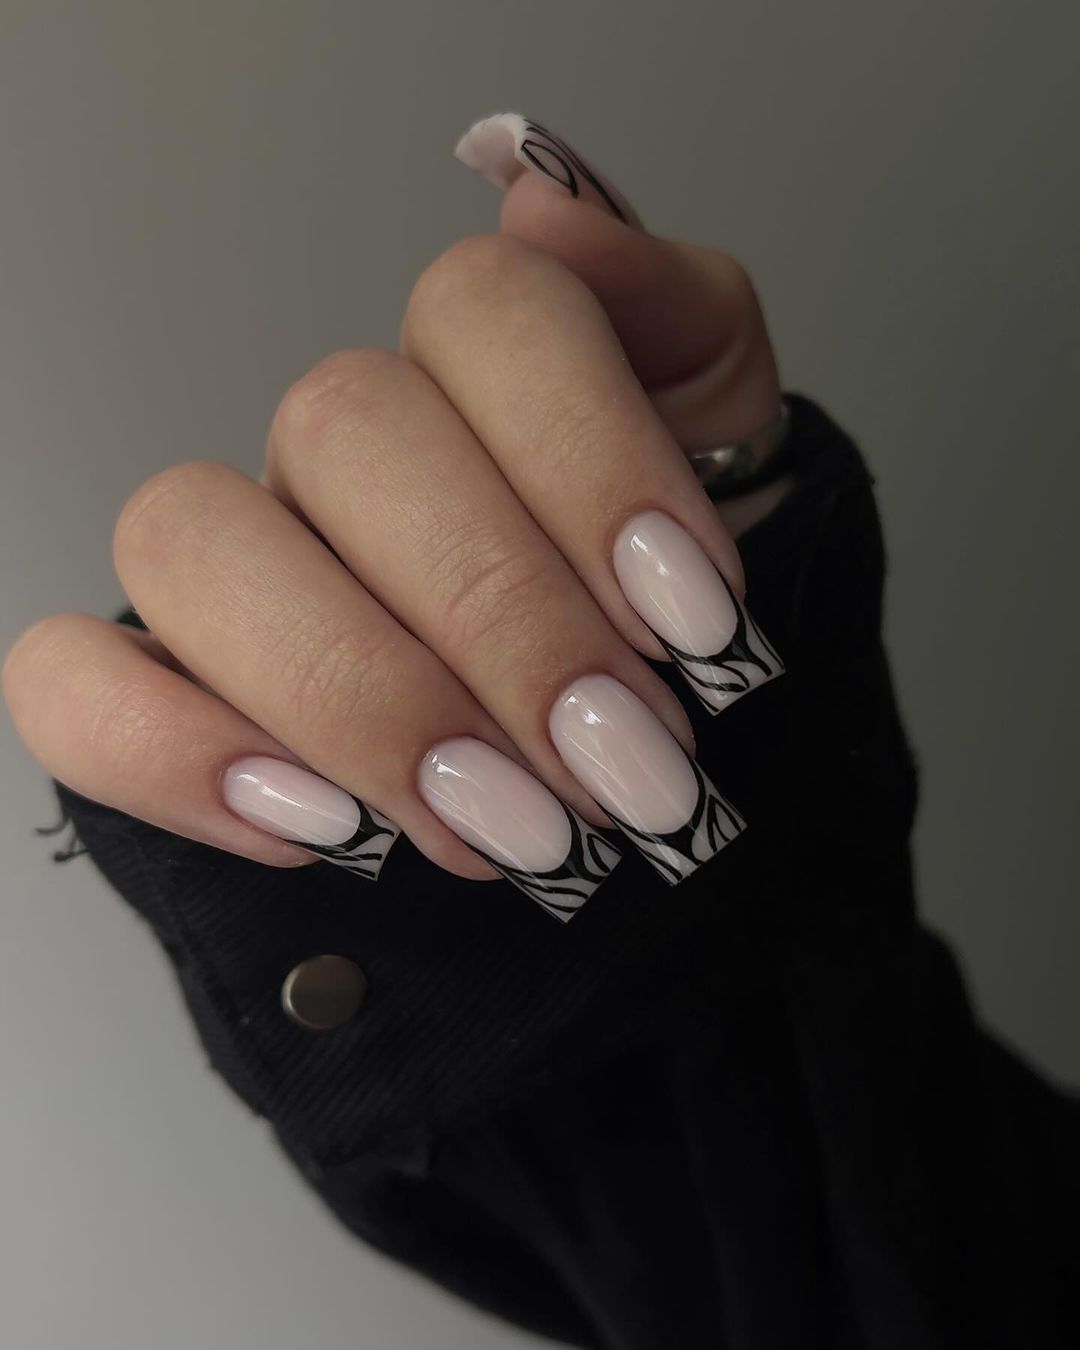
Intricate Black and White Design
This stunning design features intricate black and white patterns over a nude base with black tips. The delicate lines and the use of negative space make this look exceptionally elegant and detailed.
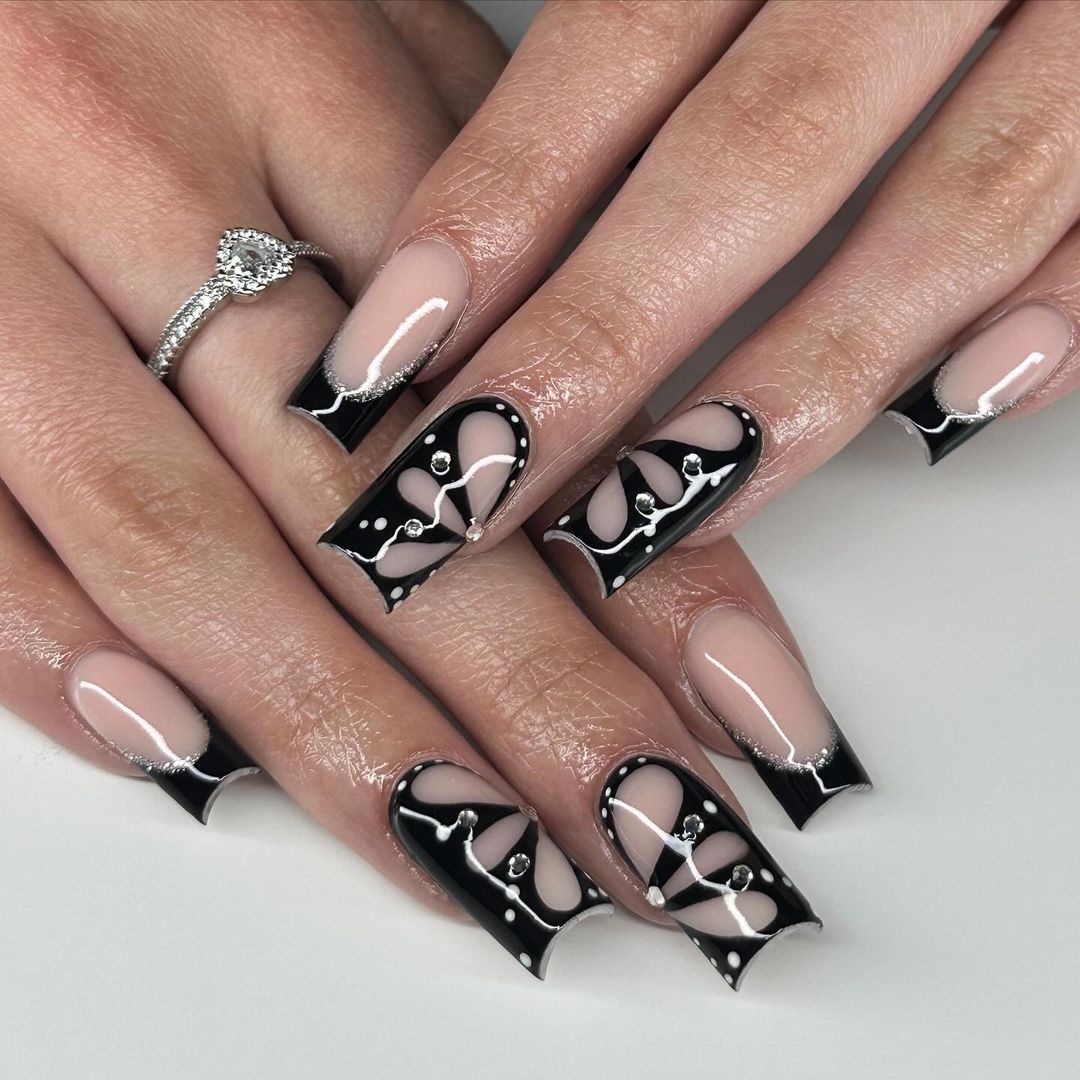
-
- Nude base polish (e.g., OPI Bubble Bath)
- Black polish (e.g., Essie Licorice)
- White nail art pen or brush (e.g., Sally Hansen I Heart Nail Art Pen)
- Top coat (e.g., Seche Vite Dry Fast Top Coat)
Instructions:
-
- Apply a base coat to each nail.
- Paint two coats of the nude polish and let them dry.
- Create black tips using the black polish.
- Use the white nail art pen to draw intricate patterns over the black tips.
- Seal the design with a top coat to ensure durability.
Elegant Black Waves
This chic design features a nude base with elegant black waves and a touch of rhinestones for added glam. The flowing black lines add a sense of movement and sophistication to the look.
-
- Nude base polish (e.g., OPI Samoan Sand)
- Black polish (e.g., Essie Licorice)
- Rhinestones (e.g., Swarovski Crystals)
- Top coat (e.g., Essie Gel Setter Top Coat)
Instructions:
-
- Start with a base coat to protect your nails.
- Apply two coats of the nude polish and allow each coat to dry thoroughly.
- Use the black polish to create wave patterns on each nail.
- Place rhinestones strategically while the polish is still wet.
- Finish with a top coat to seal the design and add shine.
Classic Black French Tips
These nails feature a timeless design with black French tips on a nude base. The simplicity and elegance of this look make it suitable for any occasion, from casual to formal.
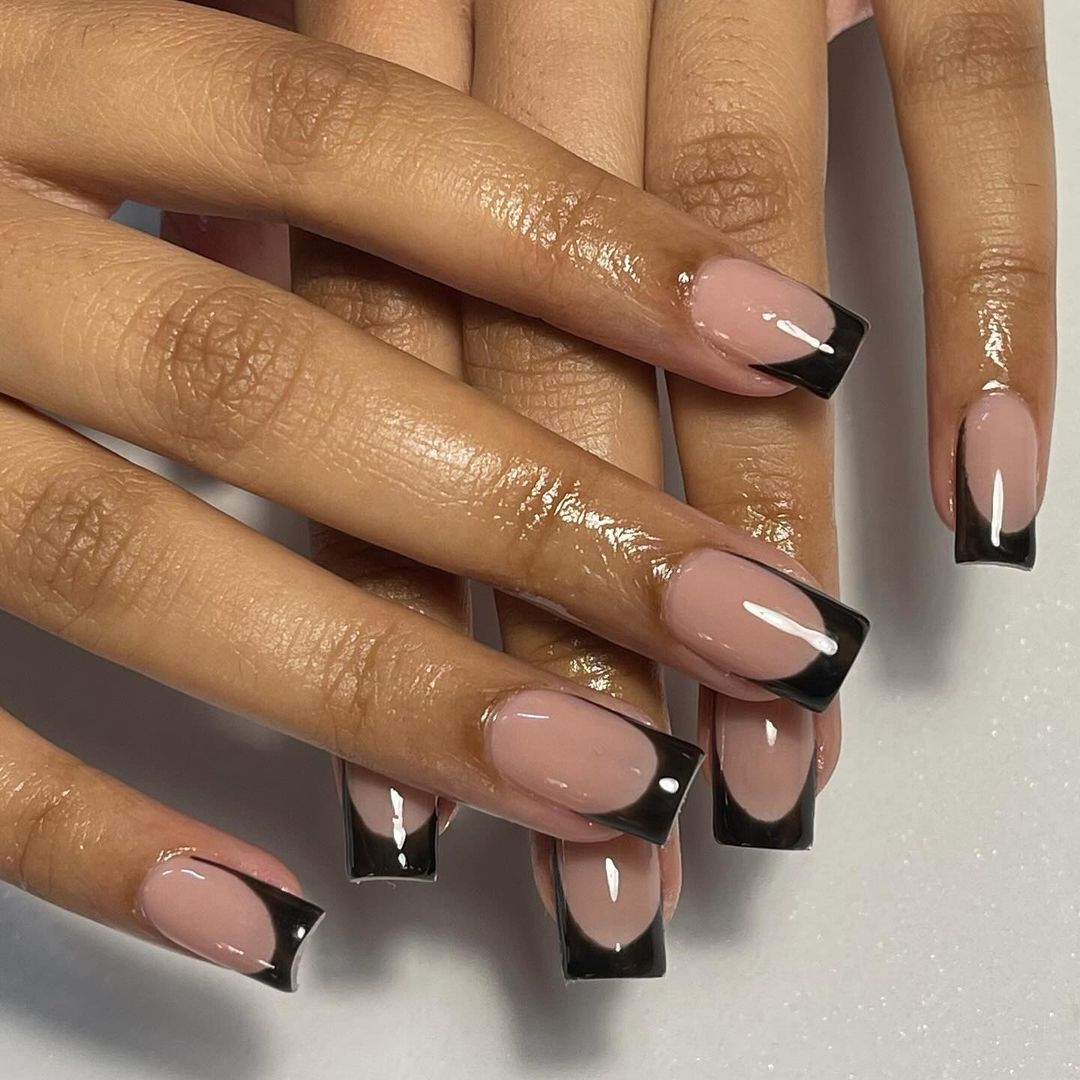
-
- Nude base polish (e.g., Essie Ballet Slippers)
- Black polish (e.g., OPI Black Onyx)
- Top coat (e.g., Seche Vite Dry Fast Top Coat)
Instructions:
-
- Apply a base coat to each nail.
- Paint two coats of the nude polish and allow each coat to dry.
- Create black French tips using the black polish.
- Finish with a top coat to ensure a glossy finish.
Silver and Black Waves
This striking design features a combination of nude, black, and silver, creating a dramatic and artistic look. The metallic waves add a unique and modern touch to the nails.
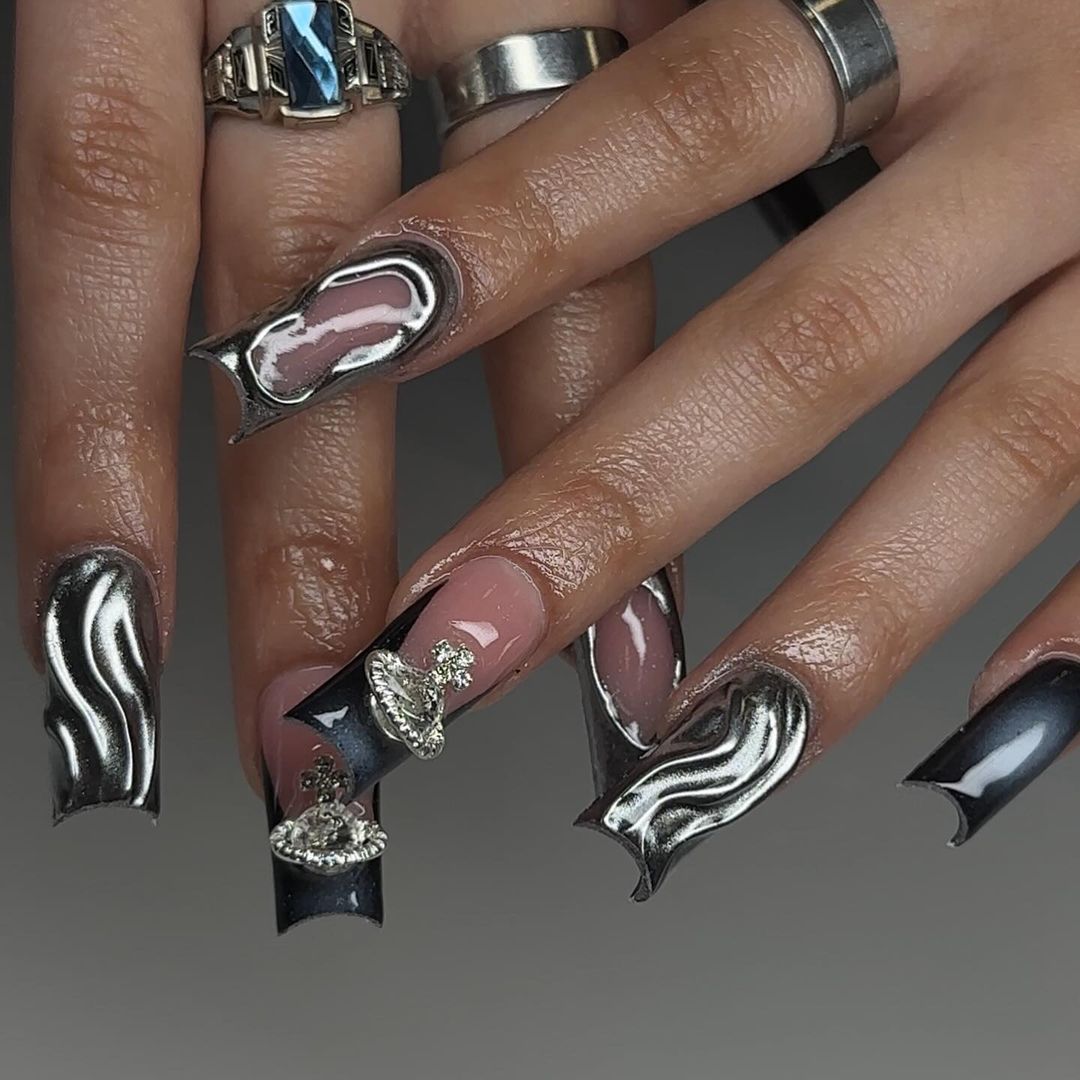
-
- Nude base polish (e.g., OPI Samoan Sand)
- Black polish (e.g., Essie Licorice)
- Silver metallic polish (e.g., China Glaze Silver Lining)
- Top coat (e.g., Seche Vite Dry Fast Top Coat)
Instructions:
-
- Apply a base coat to protect your nails.
- Paint two coats of the nude polish and let it dry.
- Use black polish to create wave patterns on each nail.
- Add silver metallic polish for a contrasting effect.
- Seal the design with a top coat for a glossy finish.
Textured Black and Silver Accents
This edgy design features matte black nails with textured and metallic silver accents. The combination of different textures and finishes creates a bold and unique look, perfect for those who want to make a statement.
-
- Matte black polish (e.g., OPI Matte Top Coat)
- Silver metallic polish (e.g., Essie No Place Like Chrome)
- Black textured polish (e.g., Zoya PixieDust in Dahlia)
- Top coat (e.g., Essie Gel Setter Top Coat)
Instructions:
-
- Apply a base coat to each nail.
- Paint some nails with matte black polish and others with silver metallic polish.
- Use black textured polish to create accents on the matte black nails.
- Finish with a top coat to seal the design and ensure longevity.
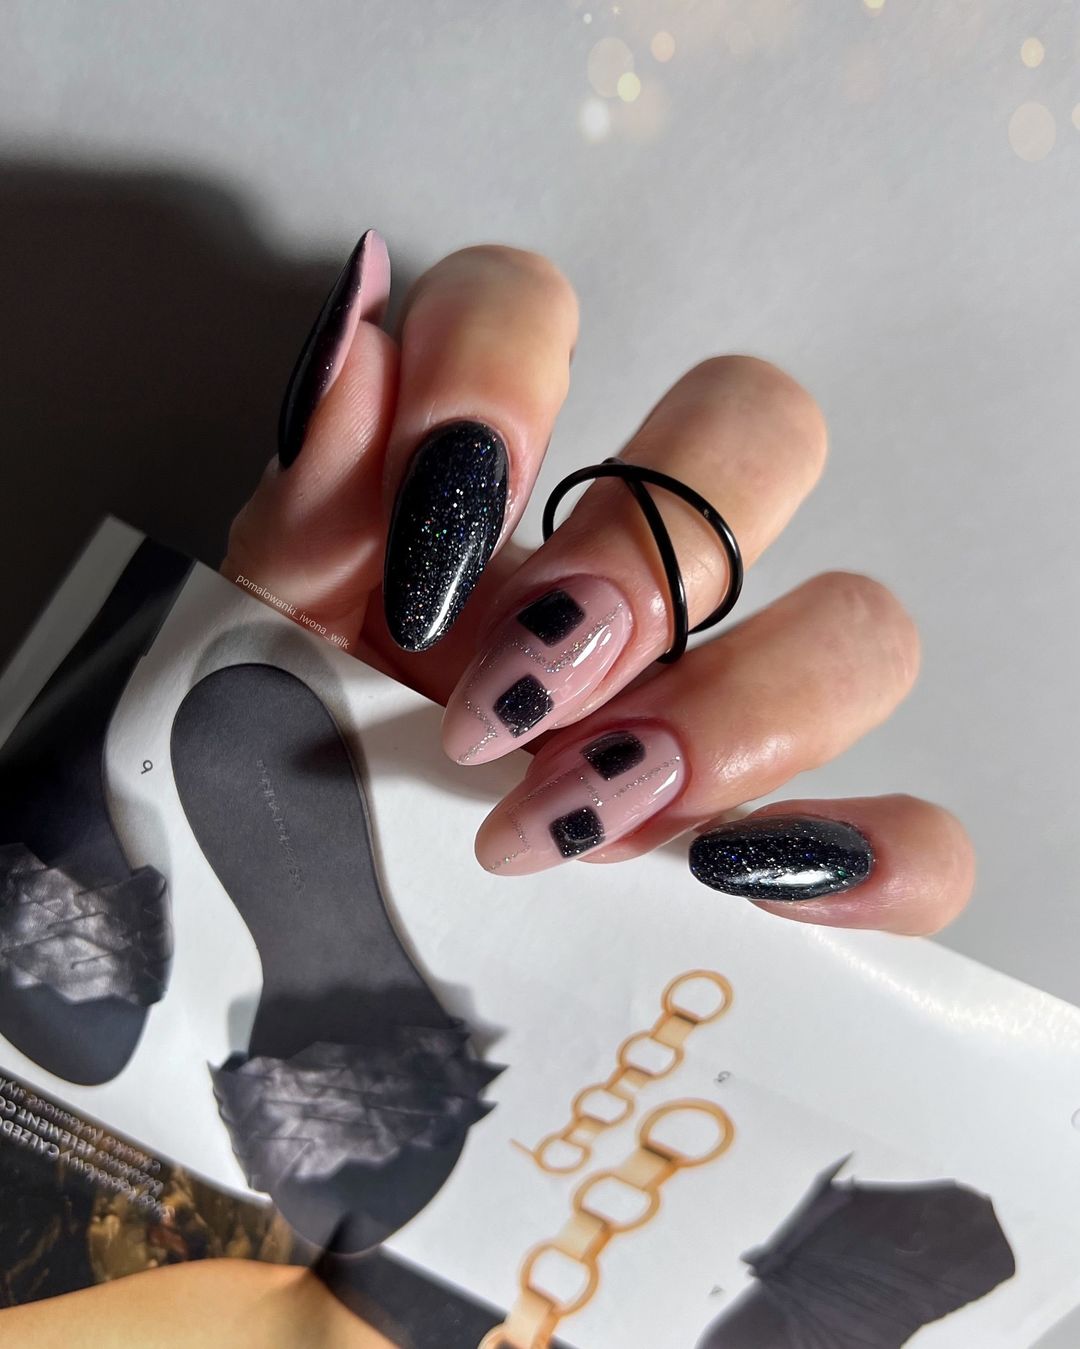
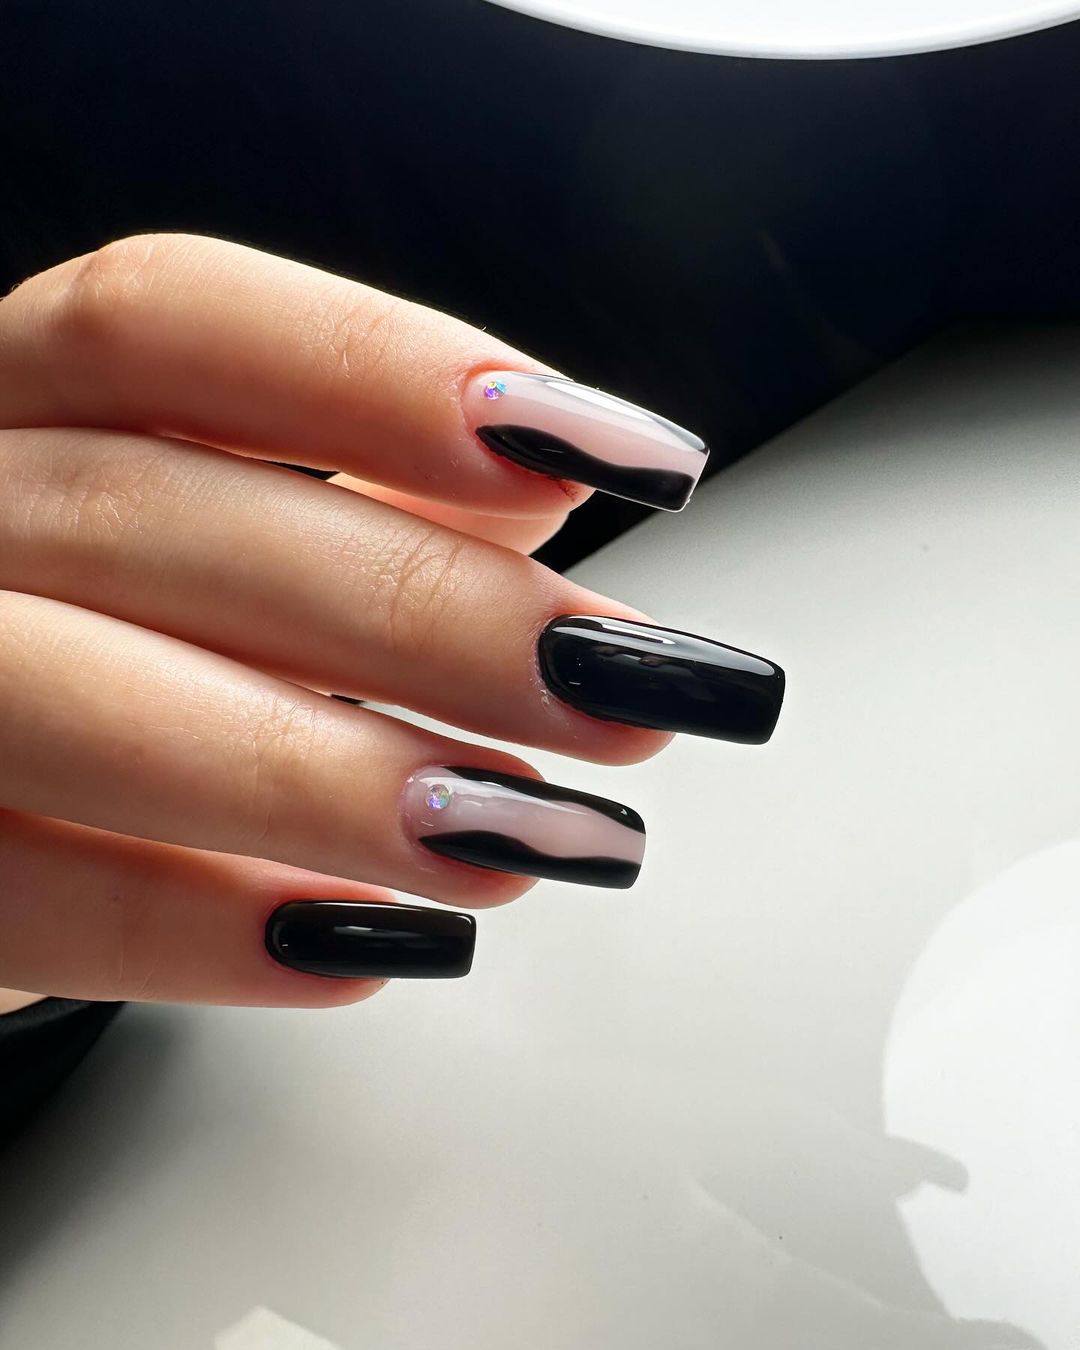
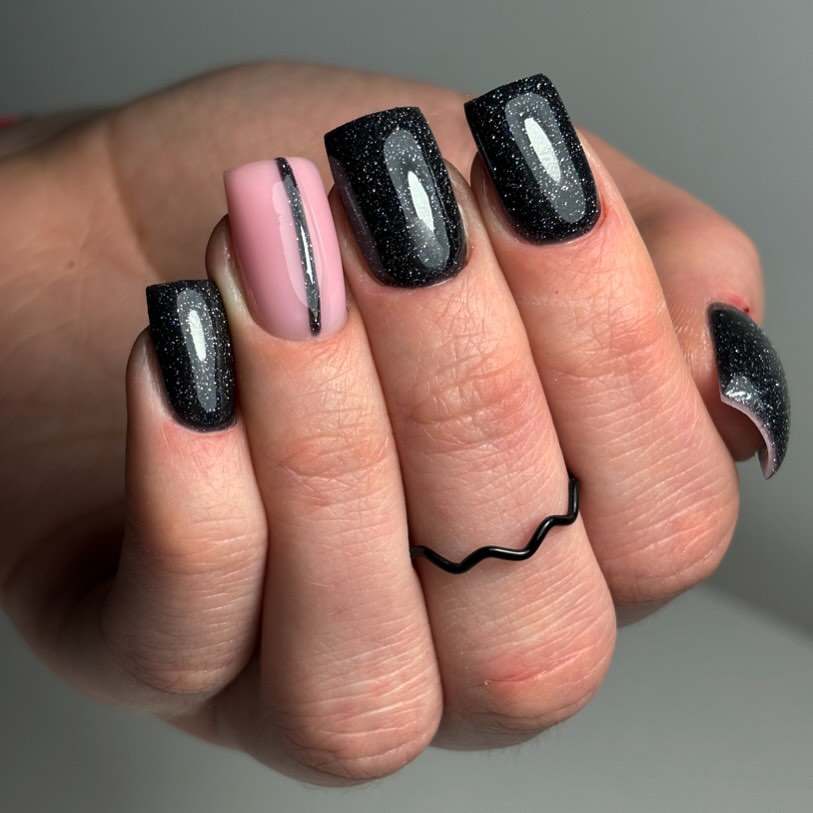
Black and Pink Glitter Elegance
This sophisticated design features a combination of black glitter nails and a soft pink accent nail with a black stripe down the center. The mix of colors and textures creates a modern and elegant look perfect for any occasion.
-
- Black glitter polish (e.g., China Glaze Tinsel Town)
- Soft pink polish (e.g., OPI Mod About You)
- Black nail art pen or brush (e.g., Sally Hansen I Heart Nail Art Pen)
- Top coat (e.g., Essie Gel Setter Top Coat)
Instructions:
-
- Apply a base coat to each nail.
- Paint two nails with the black glitter polish and one nail with the soft pink polish.
- Once dry, use the black nail art pen to draw a straight line down the center of the pink nail.
- Seal the design with a top coat to add shine and protect your manicure.
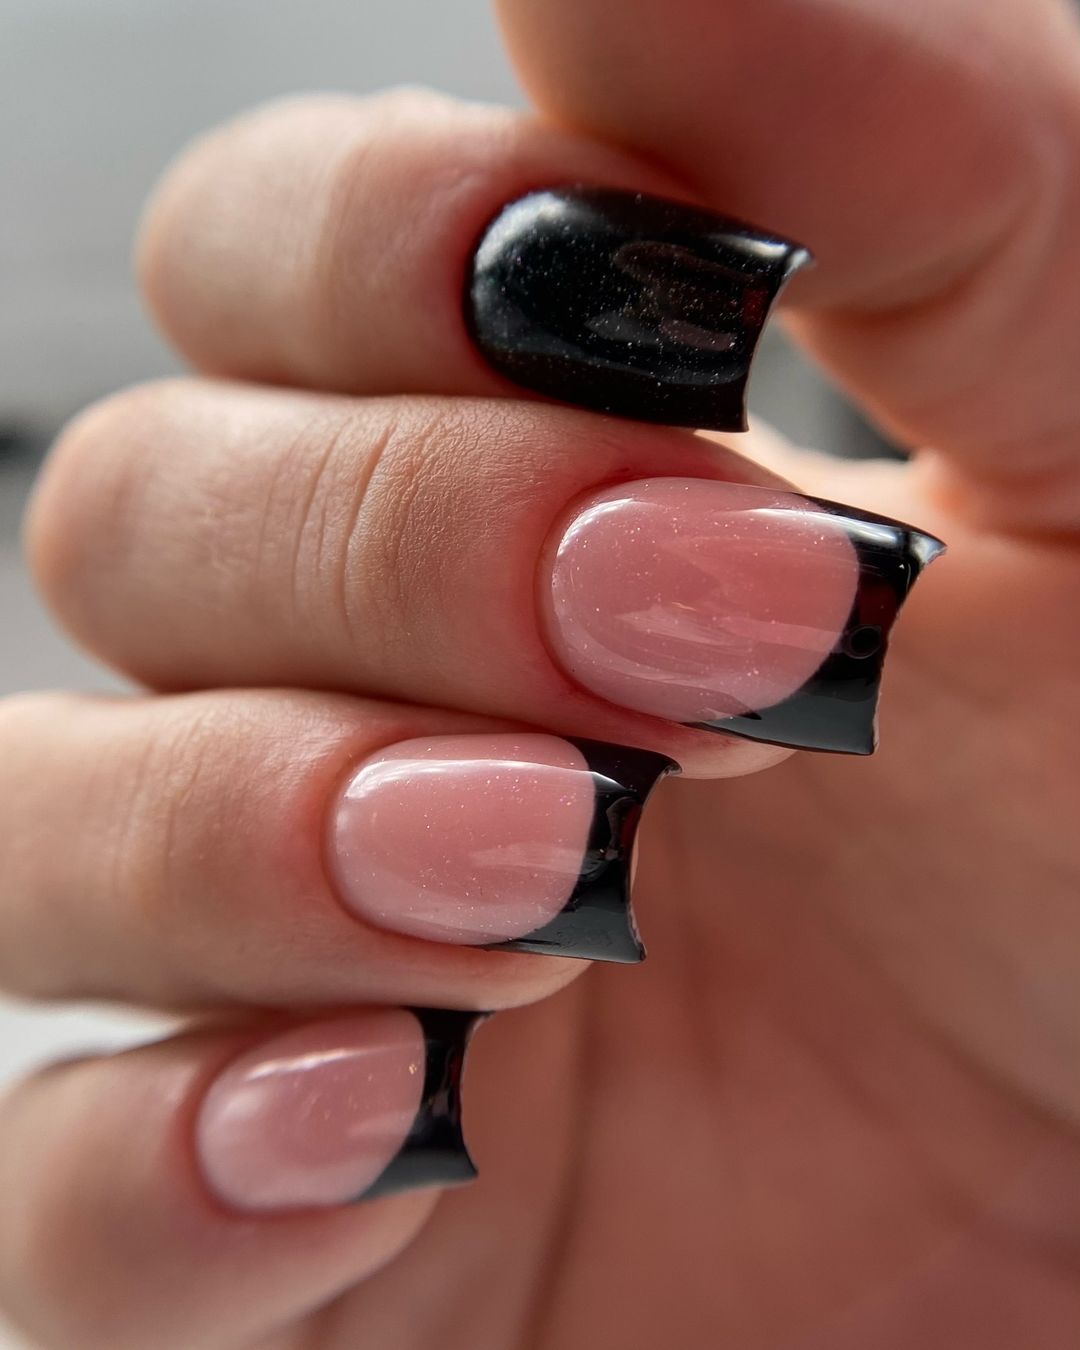
Subtle Black French Tips
These nails feature a classic design with a twist: a nude base with subtle black French tips. This look is simple yet stylish, making it a perfect choice for everyday wear or a sophisticated event.
-
- Nude base polish (e.g., Essie Ballet Slippers)
- Black polish (e.g., OPI Black Onyx)
- Top coat (e.g., Seche Vite Dry Fast Top Coat)
Instructions:
-
- Apply a base coat to each nail.
- Paint two coats of the nude polish and allow each coat to dry completely.
- Create the black French tips using the black polish and a steady hand or French tip guides.
- Finish with a top coat to ensure a glossy, long-lasting finish.
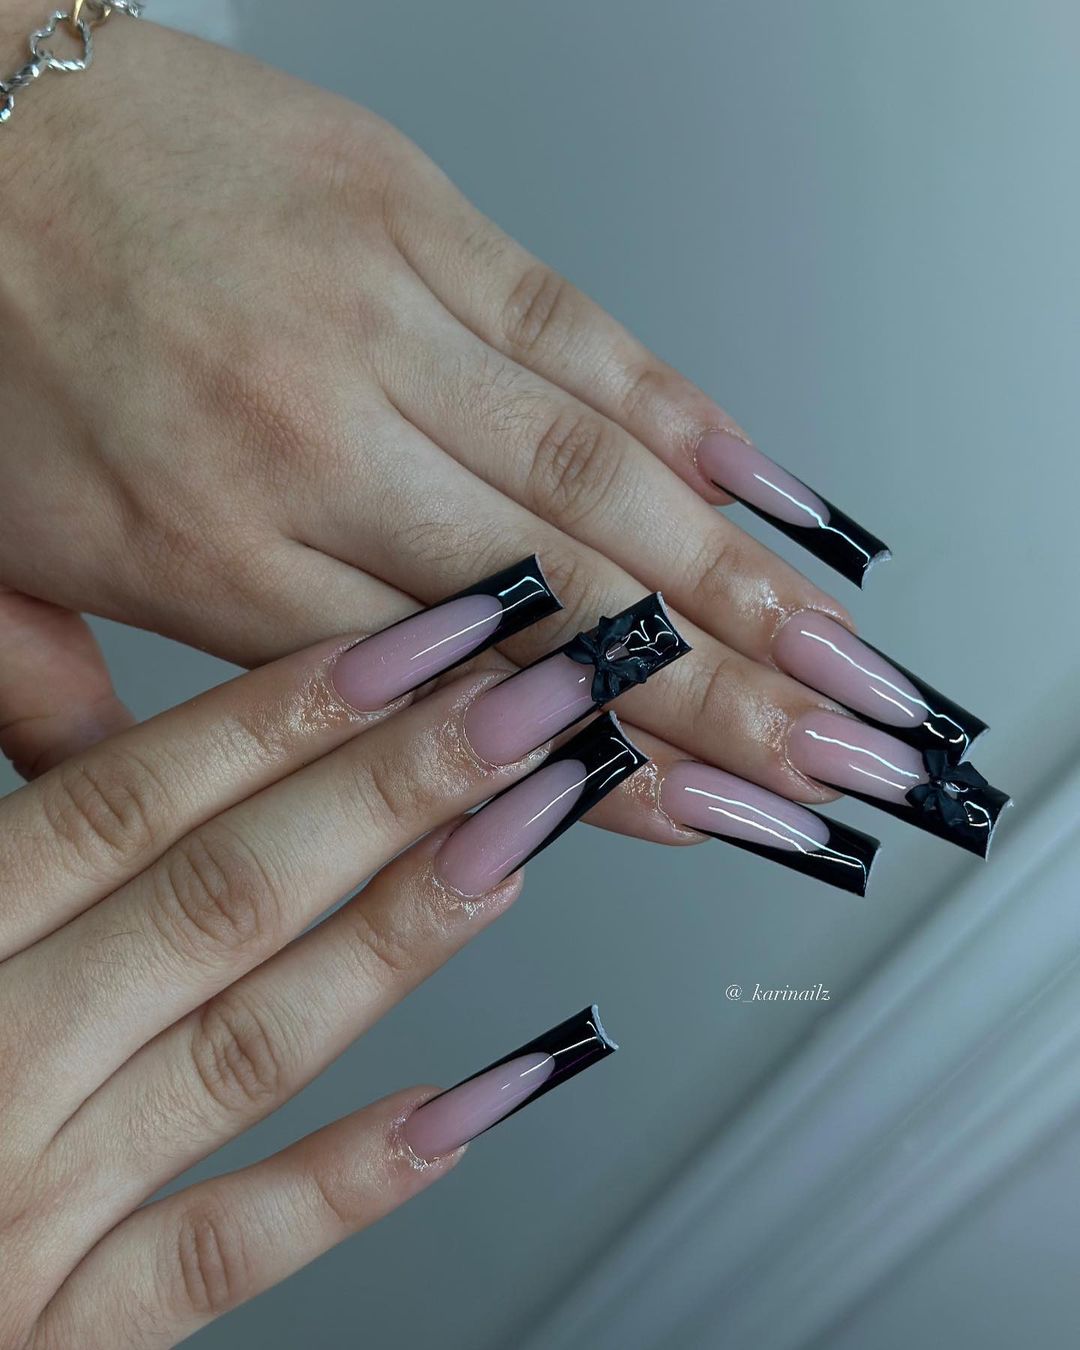
Black Bows on French Tips
This elegant manicure features a nude base with black French tips adorned with delicate black bows. The 3D bow accents add a playful and unique element to the classic French tip design.
-
- Nude base polish (e.g., OPI Samoan Sand)
- Black polish (e.g., Essie Licorice)
- 3D black bow accents (e.g., Daily Charme Black Bow Charms)
- Nail glue (e.g., Kiss Precision Nail Glue)
- Top coat (e.g., Seche Vite Dry Fast Top Coat)
Instructions:
-
- Begin with a base coat to protect your nails.
- Apply two coats of the nude polish and let them dry completely.
- Create black French tips using the black polish and a steady hand or French tip guides.
- Attach the 3D bow accents with nail glue on the French tips.
- Seal the design with a top coat to secure the bows and add a glossy finish.
FAQ
Q: How can I make my black fall nails last longer? A: Use a quality base and top coat, avoid soaking your nails in water for long periods, and wear gloves when doing household chores.
Q: What is the best way to remove gel polish at home? A: Soak a cotton ball in acetone, place it on your nail, and wrap it with foil. Leave it on for 10-15 minutes, then gently scrape off the polish with a cuticle pusher.
Q: Can I mix different nail art techniques in one manicure? A: Absolutely! Mixing techniques like matte finishes, glossy tips, and embellishments can create a unique and personalized look.
Q: Are black nails suitable for all occasions? A: Yes, black nails are versatile and can be styled to suit any occasion, from casual outings to formal events.
Save Pin