27 Ideas for Disney Fall Nails 2024
As we step into the crisp embrace of fall, there’s no better time to channel your inner Disney magic onto your nails. Whether you’re a fan of subtle designs or bold art, Disney-themed nails are the perfect way to celebrate the season while keeping your manicure game strong. But how can you bring a touch of Disney enchantment to your nails this fall? Let’s explore some Disney fall nails 2024 ideas that will inspire you to get creative with your next manicure.
Classic Minnie Mouse Vibes with a Modern Twist
When it comes to classic Disney nail designs, nothing says Minnie Mouse quite like bold red hues paired with her signature polka dots and adorable bow accents. This nail design beautifully combines a simple and cute look with a short and square nail shape, making it perfect for those who prefer subtle yet charming designs. The contrast between the red and the soft pink base adds a playful touch, while the minimalist art gives it a modern twist that fits right into the 2024 fall trends.

- Base coat (e.g., OPI Natural Nail Base Coat)
- Red nail polish (e.g., Essie Forever Yummy)
- Soft pink nail polish (e.g., Essie Ballet Slippers)
- Black nail polish (e.g., Sally Hansen Hard as Nails Black Heart)
- Dotting tool for polka dots
- Nail art brush for creating bows and Mickey heads
- Top coat (e.g., Seche Vite Dry Fast Top Coat)
How to Create This Look at Home:
- Start by applying a base coat to protect your nails.
- Paint your nails with two coats of soft pink polish.
- Use a dotting tool dipped in red polish to create the polka dots on selected nails.
- With a nail art brush, carefully paint Minnie’s bow and Mickey heads using black polish. If you’re new to nail art, consider using stencils or stickers for a cleaner look.
- Finish with a top coat to seal in the design and add shine.
Playful Polka Dots and Red French Tips
This design blends classic polka dots with a modern French tip, bringing a classy and aesthetic flair to your nails. The use of red for the tips and the black and white accents makes this design stand out while keeping it easy to replicate. Perfect for both adults and kids, this design is versatile enough to be worn for any occasion this fall.

- Base coat (e.g., Deborah Lippmann Gel Lab Pro Base Coat)
- Red nail polish (e.g., Zoya Sooki)
- Black nail polish (e.g., CND Vinylux Black Pool)
- White nail polish (e.g., OPI Alpine Snow)
- Fine-tipped nail art brush
- Top coat (e.g., Essie Gel Couture Top Coat)
How to Create This Look at Home:
- Apply a base coat to your nails.
- Paint the tips of your nails with red polish, mimicking the classic French tip but with a bold color.
- Use a fine-tipped brush to add black polka dots on the red tips and white dots on the base of some nails.
- Seal the design with a top coat for long-lasting wear.
Disney Characters in Red and Black: A Fall Favorite
This design is perfect for Disney lovers who want to go all out. Featuring Minnie Mouse and other iconic Disney elements, this manicure combines gel and acrylic techniques for a flawless finish. The art is detailed and precise, with round and oval nail shapes that provide a perfect canvas for the intricate designs. The use of gel almond techniques adds durability, making it ideal for the entire fall season.

- Base coat (e.g., Orly Bonder)
- Red gel polish (e.g., Gelish Hot Rod Red)
- Black gel polish (e.g., Gelish Black Shadow)
- Nail art stickers or decals for Disney characters
- Nail art brush for detailing
- UV or LED lamp for curing gel polish
- Top coat (e.g., Gelish Top It Off)
How to Create This Look at Home:
- Begin with a base coat and cure it under a UV/LED lamp.
- Apply the red gel polish on selected nails and cure under the lamp.
- Use a fine-tipped brush to paint the Disney characters or apply stickers/decals for a more polished look.
- Cure the designs under the lamp and finish with a top coat for a high-shine finish.
Whimsical Rainbow and Mickey Accents
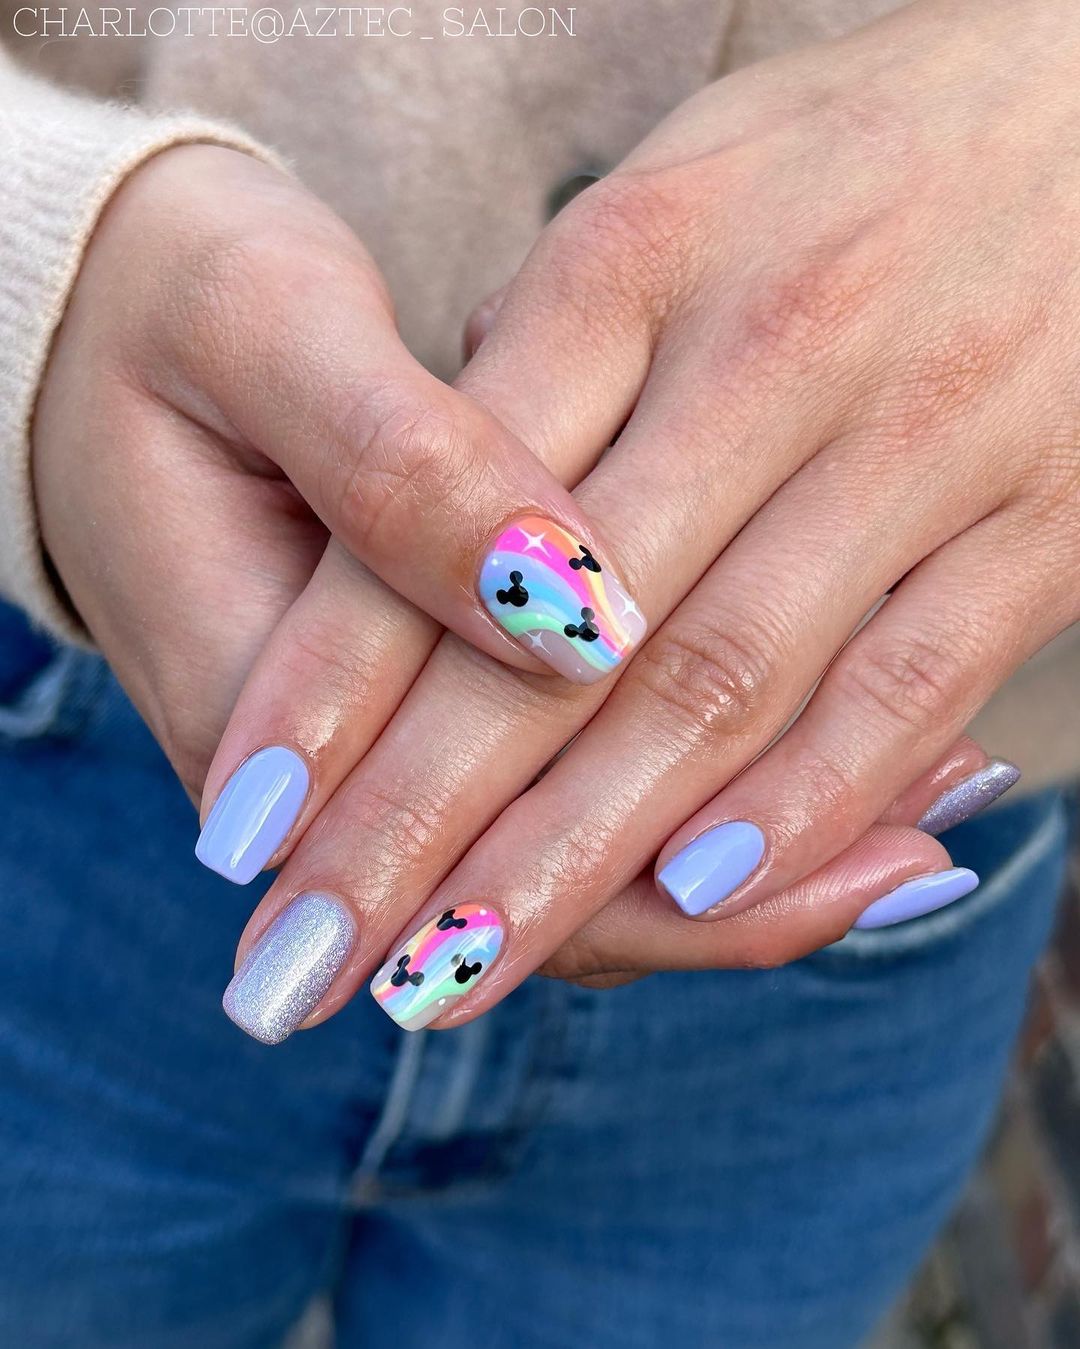
This design is a delightful blend of vibrant colors and subtle Mickey Mouse accents that perfectly captures the essence of Disney magic. The base is a soft lavender with a hint of shimmer, creating a dreamy background that complements the pastel rainbow across the accent nail. The black Mickey heads stand out beautifully against the rainbow, adding a playful touch without overwhelming the design. This look is perfect for those who love a subtle yet cute art that still makes a statement.
- Base coat (e.g., OPI Natural Nail Base Coat)
- Lavender nail polish (e.g., Essie Lilacism)
- Rainbow-colored nail polishes for the accent nail (e.g., OPI Neon Collection)
- Black nail polish (e.g., China Glaze Liquid Leather)
- Fine nail art brush for detailing the Mickey heads
- Top coat (e.g., Seche Vite Dry Fast Top Coat)
How to Create This Look at Home:
- Start by applying a base coat to protect your nails.
- Paint all nails except the accent nail with the lavender polish.
- On the accent nail, use a thin brush to create a rainbow stripe effect with your chosen colors.
- Once dry, use a fine brush to paint small Mickey heads on the accent nail with black polish.
- Finish with a top coat to seal the design and add shine.
Save Pin

Glittery Glam and Mickey Sparkle
This design combines the elegance of glitter with the playful charm of Mickey Mouse. The nails are painted in a nude base with a gradient of gold glitter that adds a touch of sparkle. The glitter is paired with tiny black Mickey heads, giving the design a classy yet cute aesthetic. This look is ideal for those who want something glamorous yet fun for the fall season, making it perfect for both kids and adults alike.

- Base coat (e.g., Deborah Lippmann Gel Lab Pro Base Coat)
- Nude nail polish (e.g., Zoya Naked Manicure Buff Perfector)
- Gold glitter nail polish (e.g., China Glaze Golden Enchantment)
- Black nail polish (e.g., OPI Black Onyx)
- Dotting tool for Mickey heads
- Top coat (e.g., Essie Gel Couture Top Coat)
How to Create This Look at Home:
- Begin with a base coat and let it dry.
- Apply two coats of nude polish to all nails.
- Using a sponge, dab gold glitter polish starting from the tips of your nails and blending it downwards to create a gradient effect.
- Once the glitter is dry, use a dotting tool to create small Mickey heads with black polish.
- Seal the design with a top coat for a long-lasting finish.
Pastel Perfection with Mickey and Glitter Accents
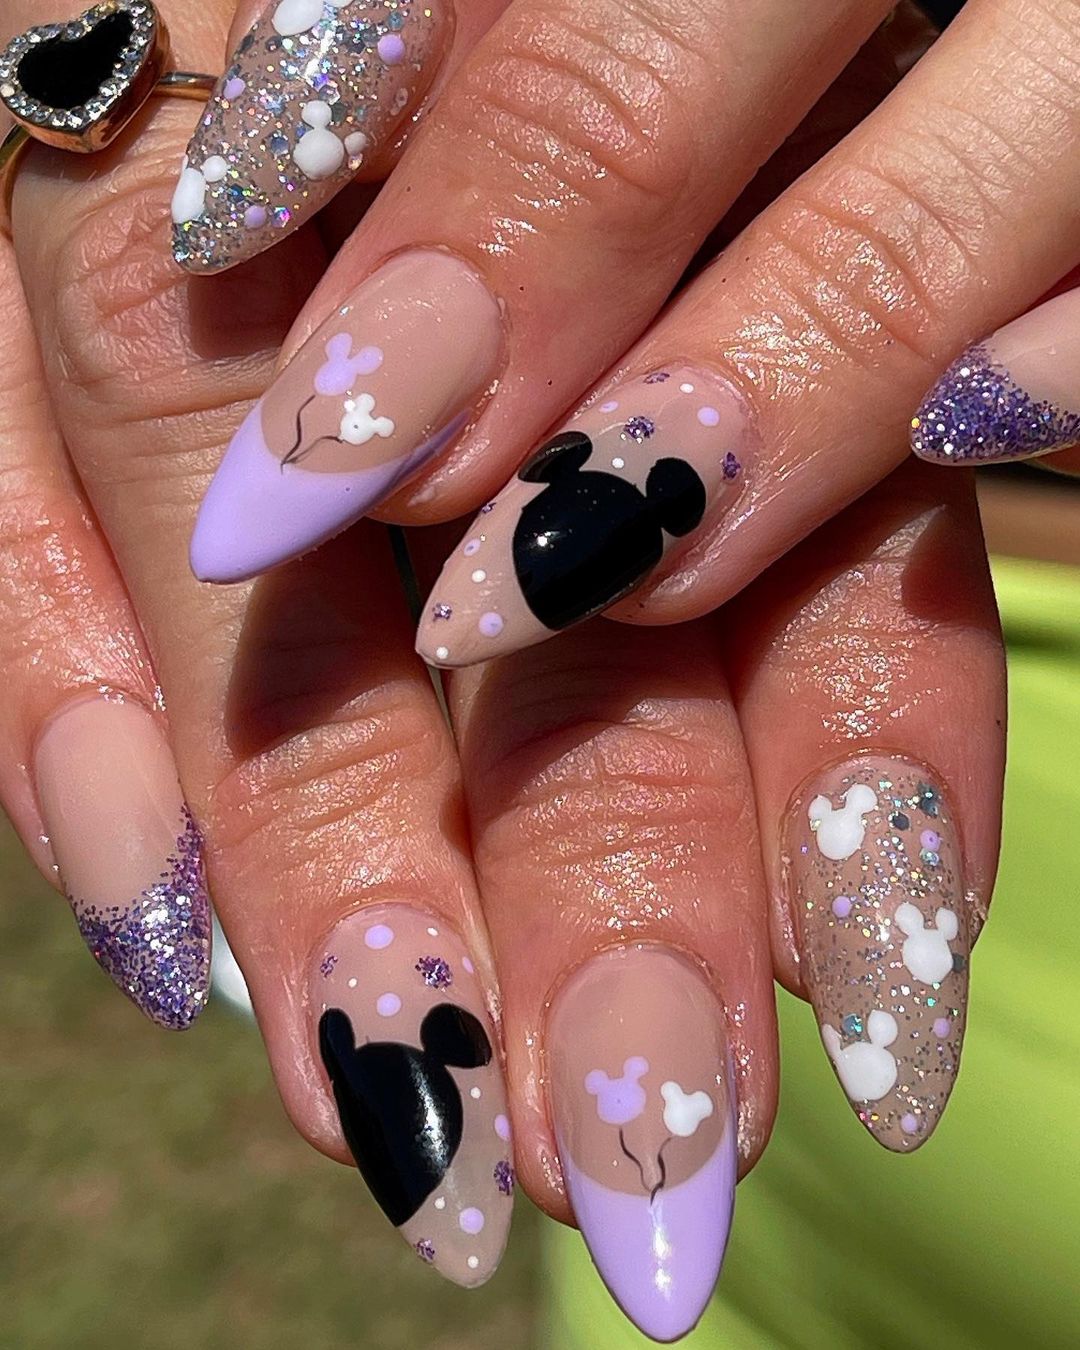
This design features a pastel palette with playful Mickey Mouse accents and glitter for a touch of sparkle. The base is a soft nude with a lavender French tip that adds a delicate touch. The nails are adorned with black Mickey heads and white and lavender polka dots, creating a cohesive and aesthetic look. The addition of glitter on some nails adds just the right amount of glam to make this design stand out. It’s an excellent choice for those who love subtle art with a bit of sparkle.
- Base coat (e.g., Orly Bonder)
- Nude nail polish (e.g., OPI Bare My Soul)
- Lavender nail polish (e.g., Zoya Abby)
- Black nail polish (e.g., Essie Licorice)
- White nail polish (e.g., Sally Hansen White On)
- Glitter polish (e.g., Deborah Lippmann Glitter and Be Gay)
- Fine-tipped nail art brush
- Top coat (e.g., Gelish Top It Off)
How to Create This Look at Home:
- Apply a base coat and allow it to dry.
- Paint all nails with the nude polish.
- Create a lavender French tip on selected nails using a fine brush.
- Add black Mickey heads and polka dots using a fine-tipped brush or dotting tool.
- Apply glitter polish to accent nails and finish with a top coat to secure the design and add shine.
Pastel Mickey Mouse Magic
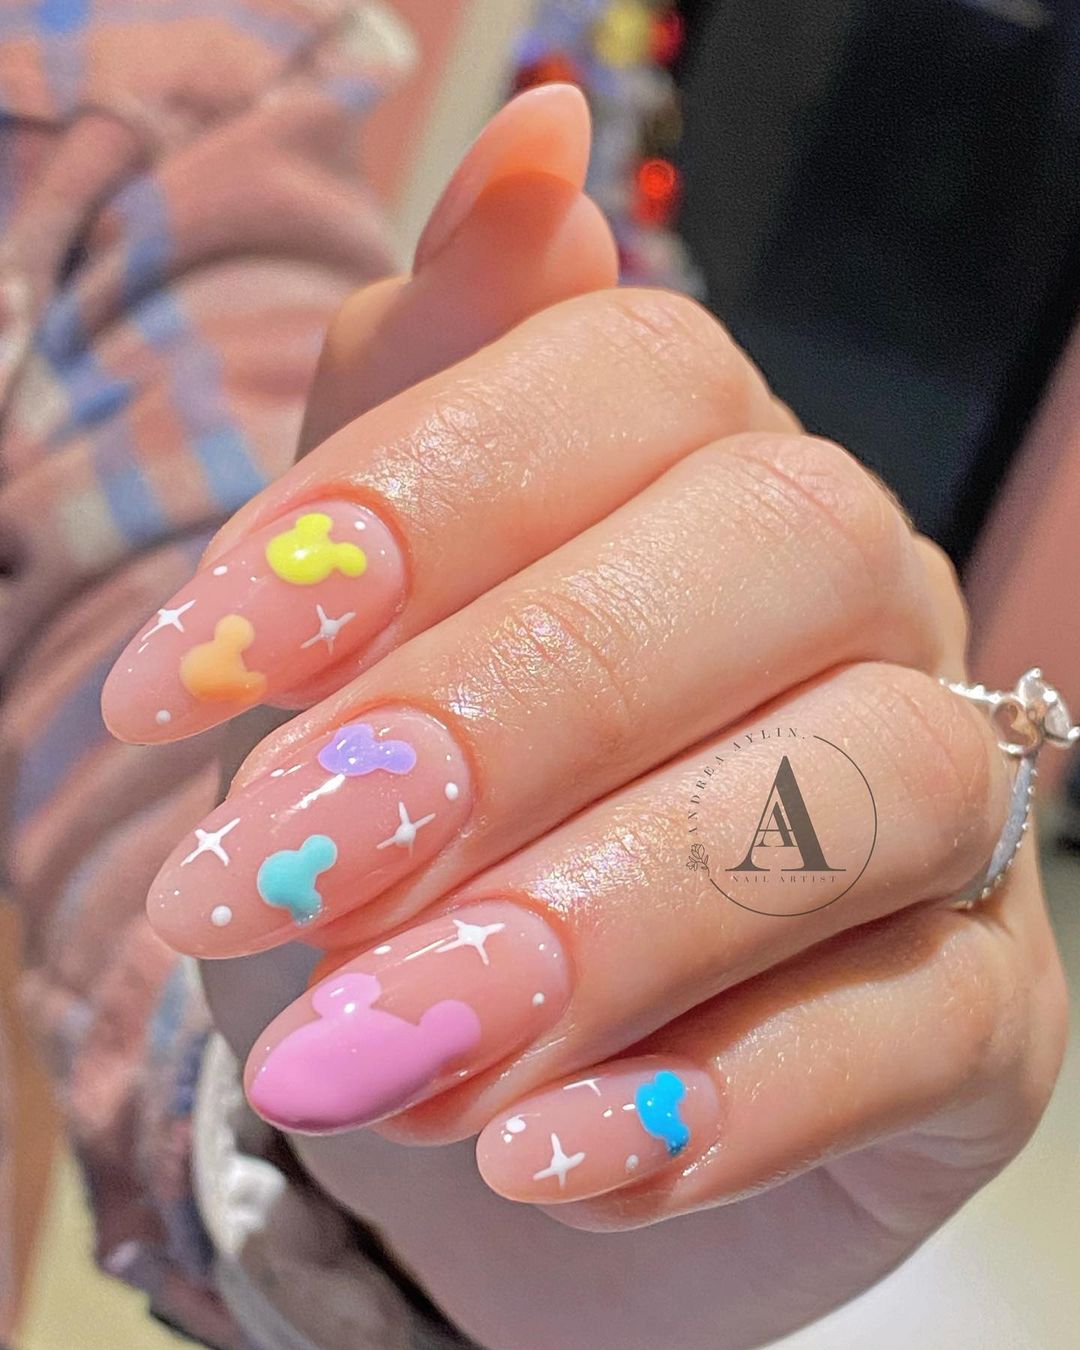
This enchanting nail design is all about playful pastel colors and a touch of Disney magic. The nails are painted in a soft, transparent pink base, providing a perfect backdrop for the bright, colorful Mickey Mouse heads scattered across the nails. The design is further elevated by tiny white star accents, giving the manicure a dreamy, whimsical feel. The almond shape adds elegance, making it a versatile choice for anyone who loves a blend of fun and sophistication.
- Base coat (e.g., OPI Natural Nail Base Coat)
- Transparent pink nail polish (e.g., Essie Sheer Fantasy)
- Pastel-colored nail polishes for Mickey heads (e.g., Essie Play Date, Bikini So Teeny, Peach Side Babe, Mint Candy Apple)
- White nail polish (e.g., OPI Alpine Snow)
- Fine nail art brush for detailing
- Top coat (e.g., Seche Vite Dry Fast Top Coat)
How to Create This Look at Home:
- Start with a base coat to protect your nails.
- Apply two coats of the transparent pink polish for a subtle, sheer base.
- Use the fine brush to paint Mickey heads in different pastel colors on each nail.
- Add small white stars around the Mickey heads for a magical touch.
- Seal the design with a top coat to ensure longevity and shine.
Colorful French Tip with Mickey Accents
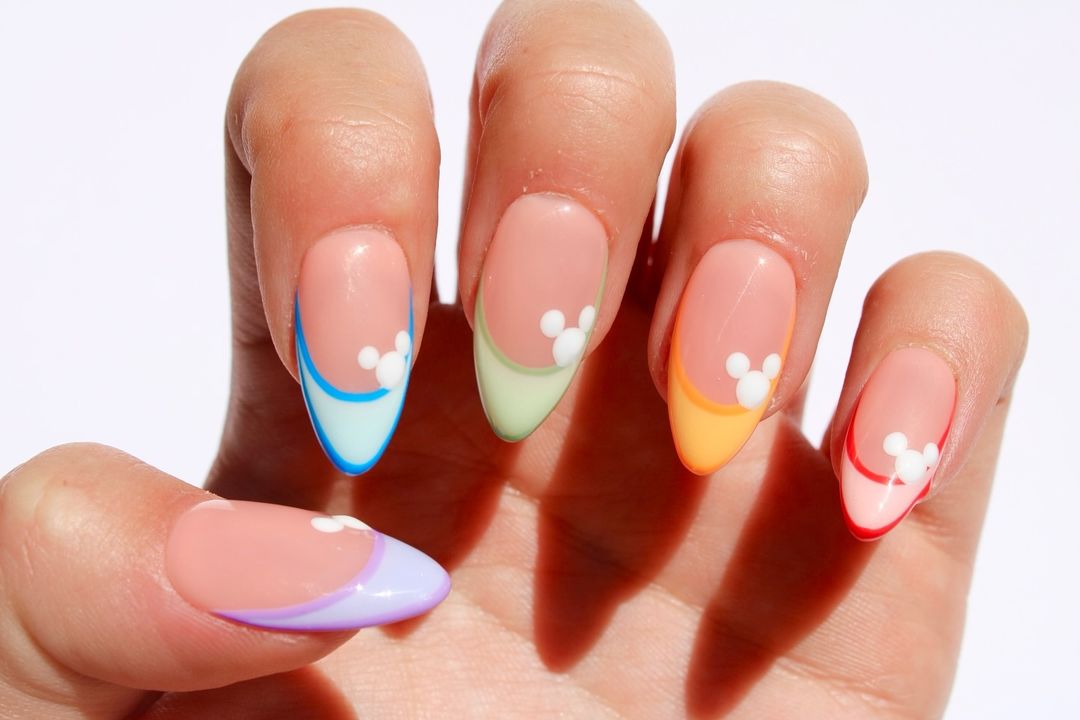
This playful take on the classic French tip features a colorful twist, perfect for those who love to mix tradition with creativity. Each nail is topped with a different vibrant color, creating a rainbow effect across the nails. The delicate white Mickey Mouse accents add a touch of whimsy without overpowering the simplicity of the design. The almond shape of the nails elongates the fingers, making this a flattering option for all hand shapes.
- Base coat (e.g., Deborah Lippmann Gel Lab Pro Base Coat)
- Transparent nude nail polish (e.g., Zoya Naked Manicure Perfector)
- Assorted bright-colored nail polishes for tips (e.g., OPI Gelato on My Mind, Cajun Shrimp, Towel Me About It, Suzi Needs a Loch-smith)
- White nail polish (e.g., China Glaze White on White)
- Fine nail art brush for Mickey accents
- Top coat (e.g., Essie Gel Couture Top Coat)
How to Create This Look at Home:
- Begin with a base coat and allow it to dry.
- Paint a French tip on each nail with a different color, creating a rainbow effect.
- Using a fine brush, add small white Mickey Mouse heads on the base of each French tip.
- Finish with a top coat to protect your design and add a glossy finish.
Starry Night Mickey
This glamorous design is a sophisticated take on Disney nail art, featuring a starry night theme with black Mickey Mouse silhouettes. The nude base is accented with delicate golden stars and glitter, creating a celestial look that’s perfect for fall. The combination of black and gold gives this design a chic and classy feel, making it ideal for special occasions or when you simply want to add a bit of sparkle to your everyday style.
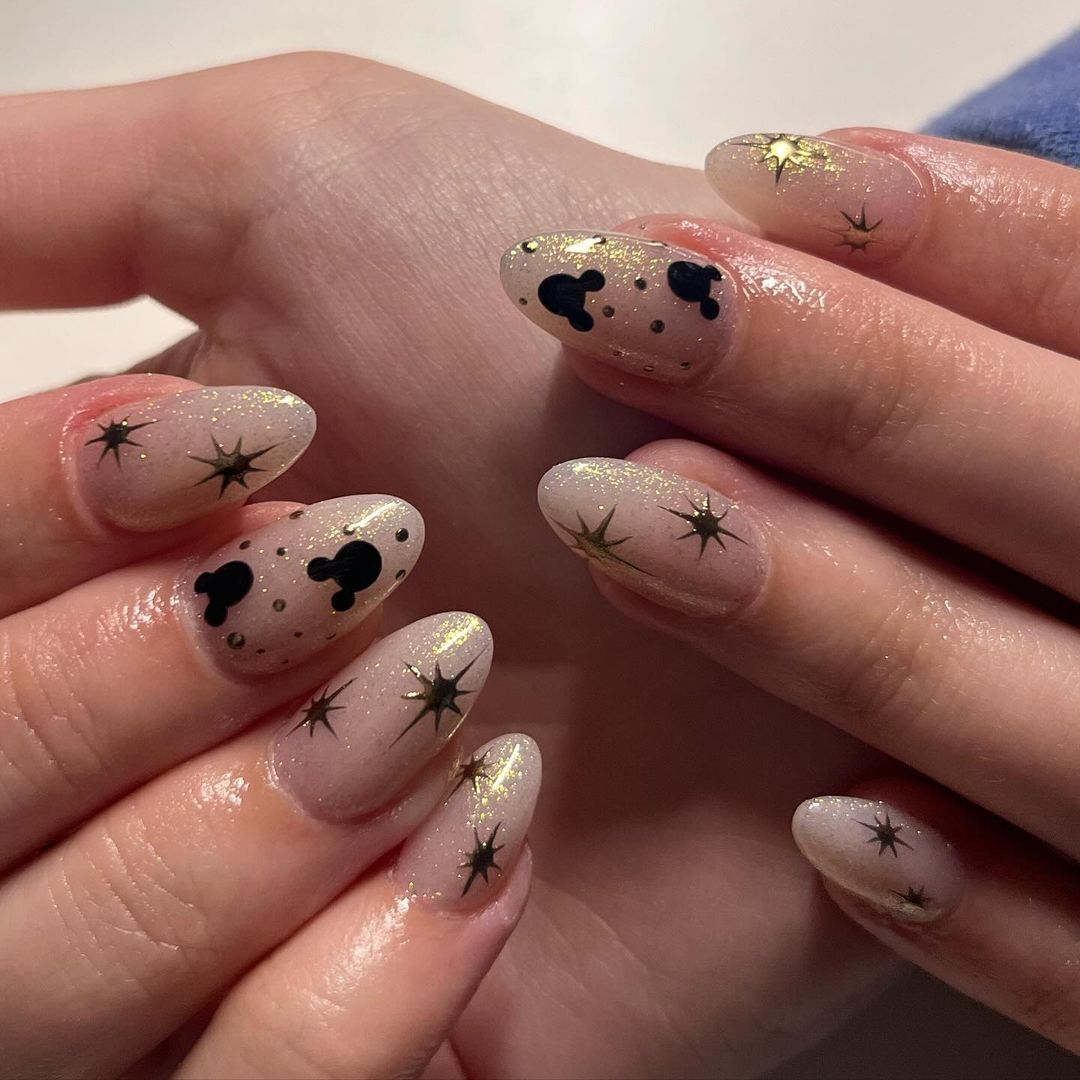
- Base coat (e.g., Orly Bonder)
- Nude nail polish (e.g., OPI Put It In Neutral)
- Black nail polish (e.g., Essie Licorice)
- Gold glitter polish (e.g., China Glaze Fairy Dust)
- Gold star decals or stickers
- Fine nail art brush for detailing
- Top coat (e.g., Gelish Top It Off)
How to Create This Look at Home:
- Apply a base coat and let it dry completely.
- Paint all nails with two coats of nude polish.
- Apply gold glitter polish lightly to create a sparkling background.
- Use a fine brush to paint black Mickey Mouse silhouettes on selected nails.
- Add gold star decals to enhance the celestial theme.
- Seal everything with a top coat for a long-lasting, glossy finish.
Save Pin

Minimalist White Mickeys with French Tips
This design is perfect for those who prefer a minimalist and elegant look with a touch of Disney charm. The nails feature classic French tips with a twist, incorporating small white Mickey Mouse shapes on the accent nails. The nude base keeps the design sophisticated, while the almond shape adds a modern edge. This subtle and classy look is ideal for both everyday wear and special occasions.
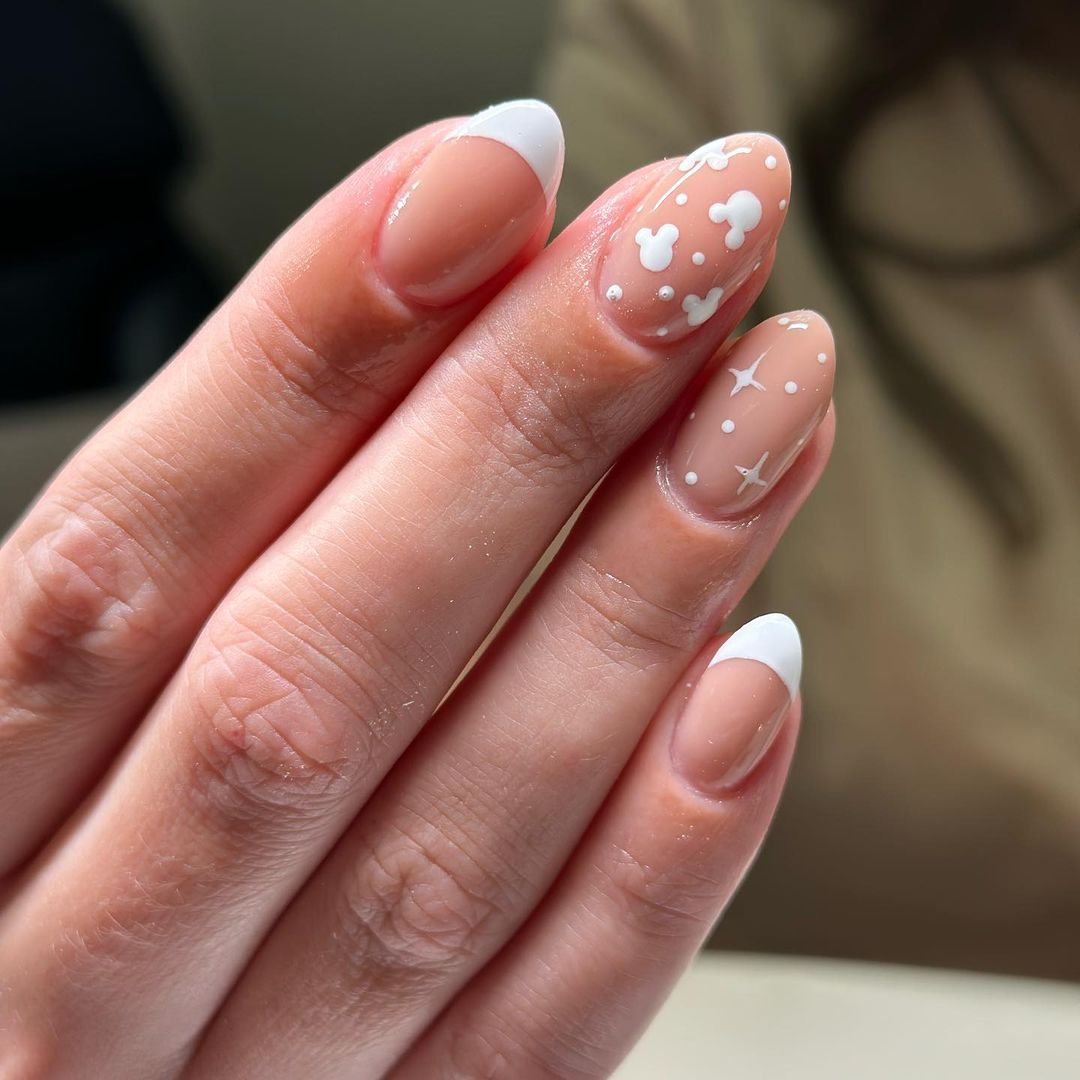
- Base coat (e.g., Essie First Base Base Coat)
- Nude nail polish (e.g., Butter London Sheer Wisdom)
- White nail polish (e.g., Sally Hansen White On)
- Fine nail art brush for Mickey details
- Top coat (e.g., Seche Vite Dry Fast Top Coat)
How to Create This Look at Home:
- Start by applying a base coat.
- Paint the nails with nude polish and let them dry.
- Create French tips on all nails using the white polish.
- On the accent nails, use a fine brush to add small white Mickey Mouse shapes above the French tip.
- Finish with a top coat to ensure durability and shine.
Halloween Mickey and Pumpkins
This playful Halloween-themed design combines the spookiness of the season with Disney’s signature charm. The nude base is adorned with tiny pumpkins, ghosts, and Mickey Mouse shapes, all in a Halloween color palette of orange, black, and white. The whimsical elements make this design fun and festive, perfect for those who want to celebrate Halloween in a unique way while still keeping it cute and playful.
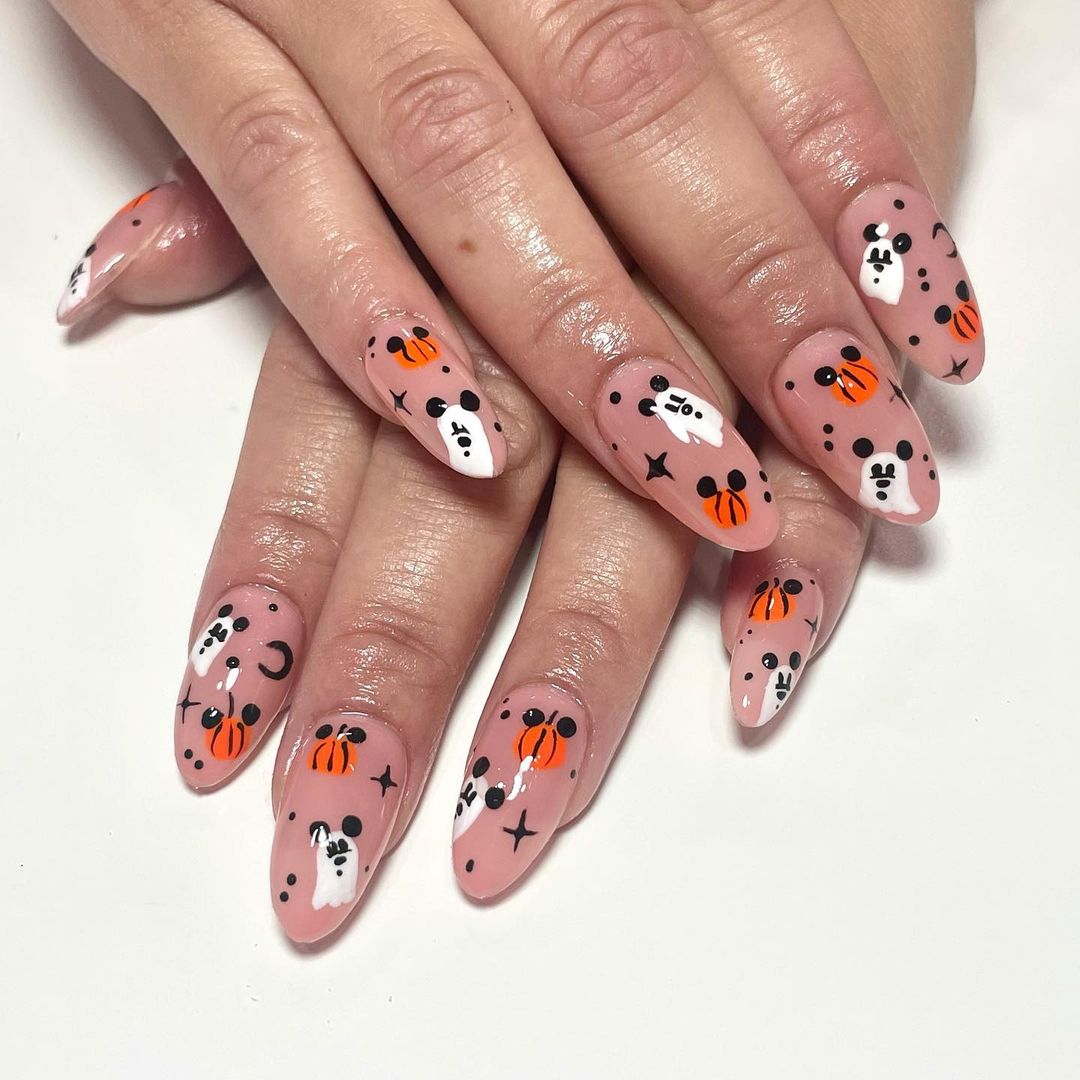
- Base coat (e.g., OPI Natural Nail Base Coat)
- Nude nail polish (e.g., Essie Bare With Me)
- Orange nail polish (e.g., Zoya Arizona)
- Black nail polish (e.g., China Glaze Liquid Leather)
- White nail polish (e.g., OPI Alpine Snow)
- Fine nail art brush for detailed work
- Top coat (e.g., Essie Gel Couture Top Coat)
How to Create This Look at Home:
- Begin with a base coat to protect your nails.
- Apply two coats of nude polish for a neutral base.
- Use a fine brush to paint small pumpkins, ghosts, and Mickey Mouse shapes in orange, black, and white.
- Finish with a top coat to lock in the design and add a glossy finish.
Winnie the Pooh and Friends
This adorable design is perfect for fans of Winnie the Pooh. The nails are painted in soft shades of pink and yellow, with each nail featuring a different design inspired by the beloved characters. From honey drips to buzzing bees, this manicure is all about celebrating the sweet and simple joys of the Hundred Acre Wood. The square shape of the nails adds a modern touch, making this a fun yet sophisticated choice.
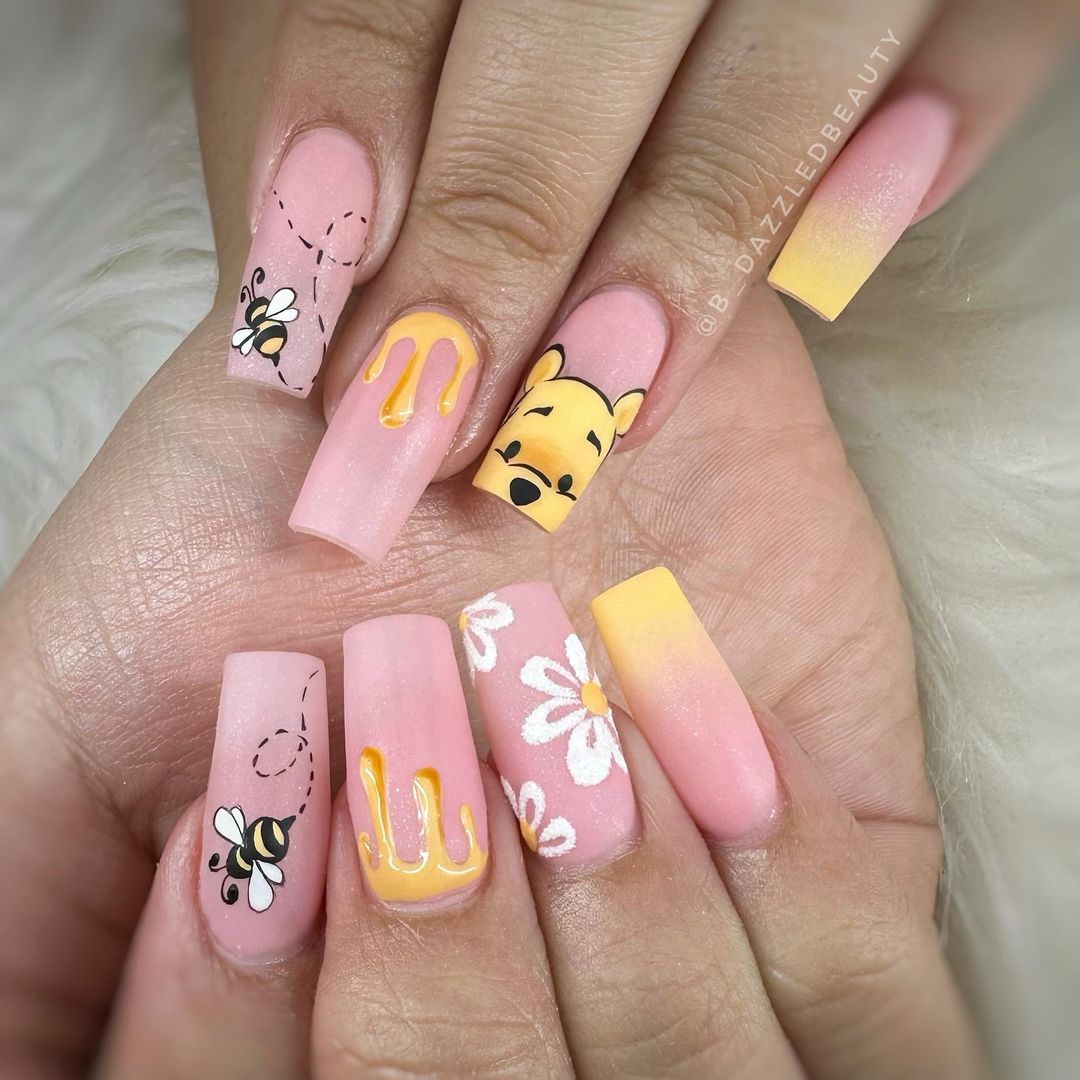
- Base coat (e.g., Deborah Lippmann Gel Lab Pro Base Coat)
- Soft pink nail polish (e.g., Essie Ballet Slippers)
- Yellow nail polish (e.g., OPI Sun, Sea, and Sand in My Pants)
- White nail polish (e.g., Zoya Purity)
- Black nail polish (e.g., China Glaze Liquid Leather)
- Fine nail art brush for detailing
- Top coat (e.g., Seche Vite Dry Fast Top Coat)
How to Create This Look at Home:
- Apply a base coat and let it dry.
- Paint the nails with soft pink and yellow polishes as needed.
- Use a fine brush to create honey drips, bees, and Winnie the Pooh’s face on different nails.
- Seal with a top coat to protect the design and ensure a shiny finish.
Chic Mickey with Gold and Pink Accents
This design is a beautiful fusion of elegance and playfulness, featuring translucent nails adorned with delicate Mickey Mouse shapes in pink and white. The gold detailing adds a luxurious touch, while the combination of bright pink and soft white on the tips creates a striking contrast. The stiletto shape of the nails elongates the fingers, making this design perfect for those who want a bold yet sophisticated Disney-inspired look.
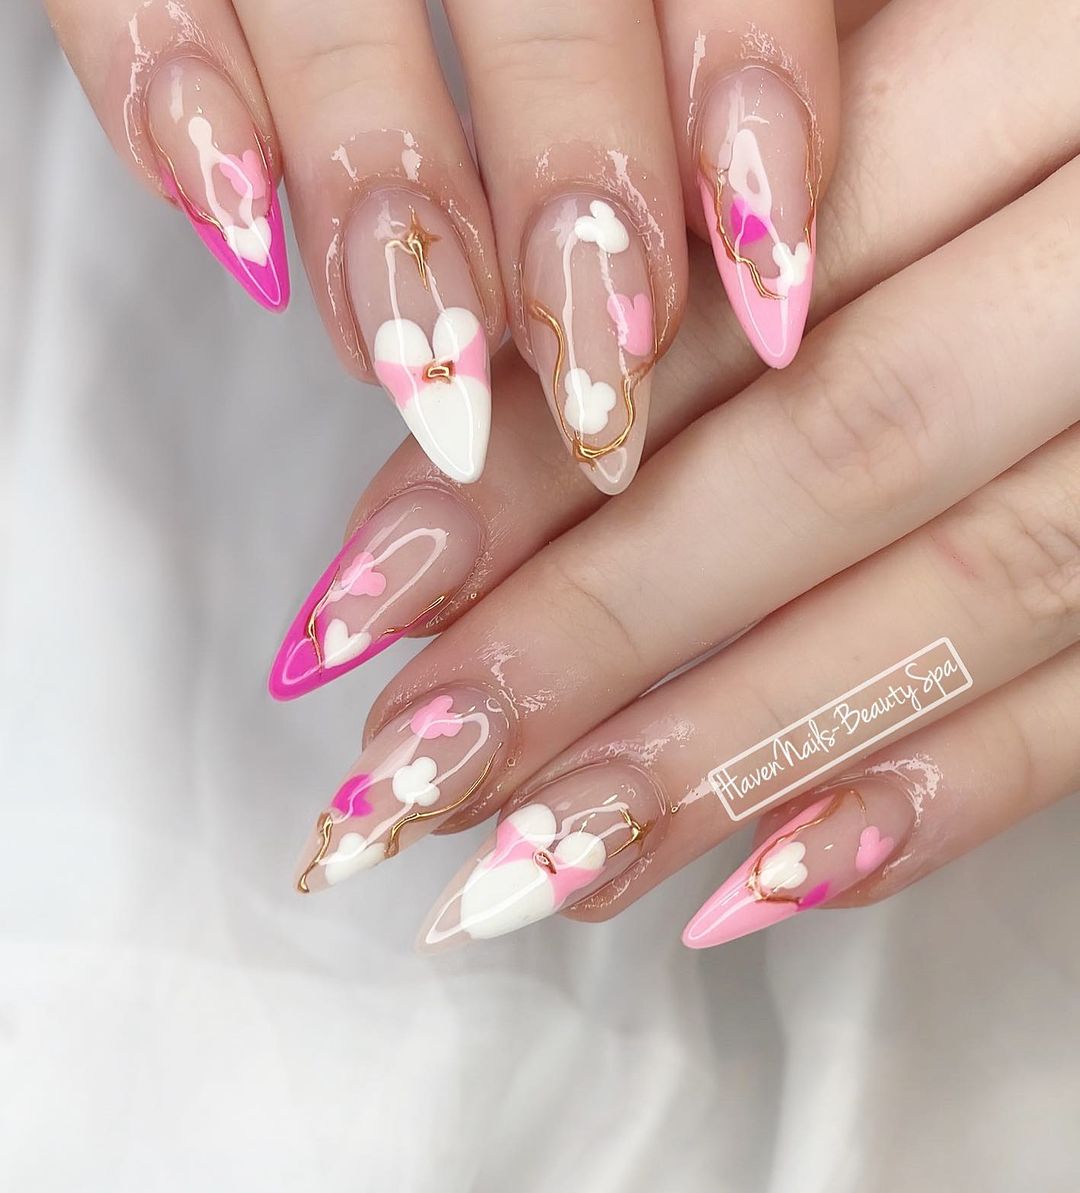
- Base coat (e.g., OPI Natural Nail Base Coat)
- Transparent pink nude polish (e.g., Zoya Naked Manicure Perfector)
- Pink and white nail polishes (e.g., Essie Mod Square, OPI Alpine Snow)
- Gold nail art tape or gold polish for detailing
- Fine-tipped nail art brush for precision work
- Top coat (e.g., Essie Gel Couture Top Coat)
How to Create This Look at Home:
- Begin with a base coat to protect the nails.
- Apply a transparent nude polish to all nails for a clean base.
- Use a fine brush to add pink and white Mickey shapes along with gold detailing.
- Create bright pink tips on some nails for contrast, and finish with a top coat to seal the design.
Classic Minnie Red with Polka Dots
This timeless design pays homage to Minnie Mouse with vibrant red nails and classic white polka dots. The accent nail features a small black Mickey silhouette, adding a playful touch to this otherwise simple and chic design. The oval shape softens the bold red color, making it an elegant choice for those who love to keep their Disney fandom subtle yet stylish.
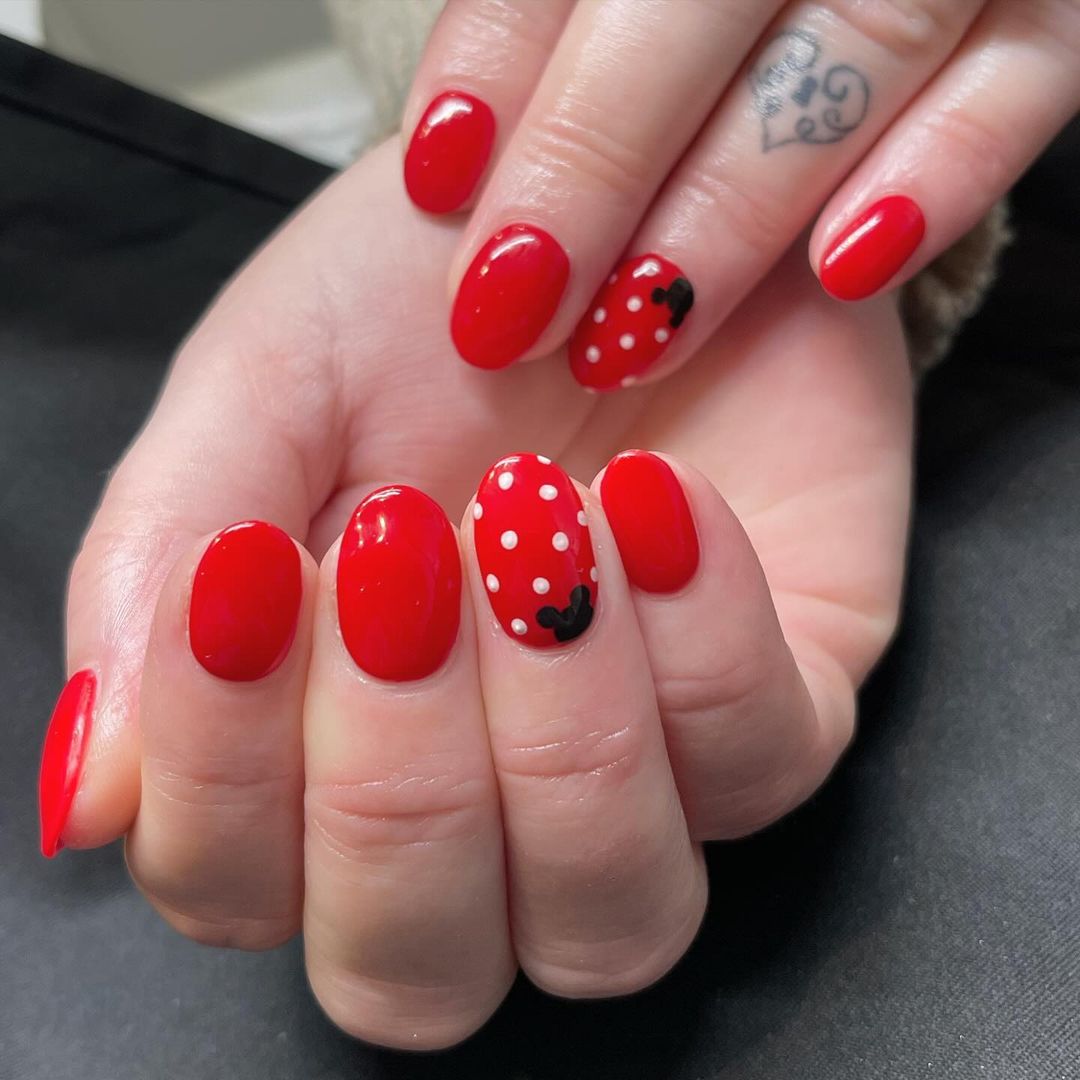
- Base coat (e.g., Deborah Lippmann Gel Lab Pro Base Coat)
- Bright red nail polish (e.g., Essie Really Red)
- White nail polish (e.g., Sally Hansen White On)
- Black nail polish (e.g., OPI Black Onyx)
- Dotting tool for creating polka dots
- Fine-tipped brush for the Mickey silhouette
- Top coat (e.g., Seche Vite Dry Fast Top Coat)
How to Create This Look at Home:
- Apply a base coat to protect your nails.
- Paint all nails with bright red polish.
- Use a dotting tool to create white polka dots on an accent nail.
- Add a small black Mickey silhouette on one of the dotted nails.
- Seal with a top coat for a glossy, long-lasting finish.
Rainbow Disney Dream
This vibrant design is perfect for anyone who loves color and creativity. The nails feature a rainbow of colors with a mix of Mickey Mouse shapes and stripes, all done in bright, happy shades. The almond shape adds a modern twist to this fun design, making it ideal for both everyday wear and special occasions where you want your nails to stand out.
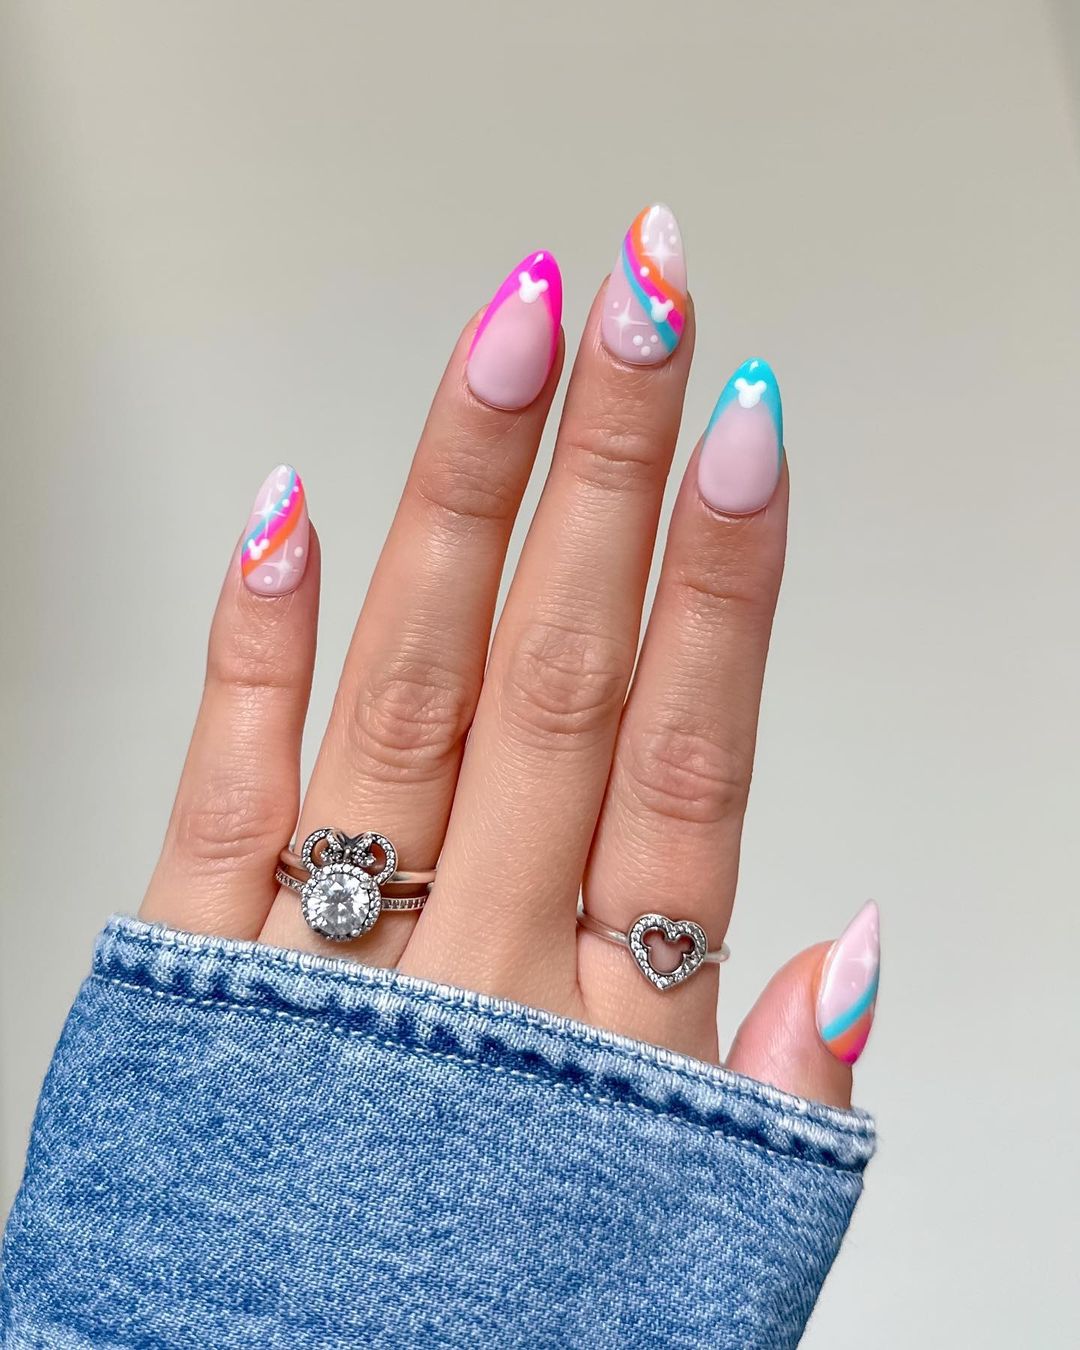
- Base coat (e.g., Orly Bonder)
- Assorted bright nail polishes (e.g., OPI Gelato On My Mind, Cajun Shrimp, Towel Me About It)
- White nail polish (e.g., China Glaze White on White)
- Fine-tipped nail art brush for detailing
- Top coat (e.g., Essie Gel Couture Top Coat)
How to Create This Look at Home:
- Begin with a base coat to protect the nails.
- Paint each nail with a different color from your bright nail polish collection.
- Use a fine brush to add Mickey Mouse shapes and stripes in white.
- Finish with a top coat to lock in the design and add shine.
Spooky Mickey Halloween
This design combines spooky Halloween elements with Disney magic, featuring ghostly Mickeys, bats, and cobwebs on a soft pink base. The black and white color scheme keeps the look chic, while the playful pink tips add a fun contrast. Perfect for the Halloween season, this design is both festive and fashionable.
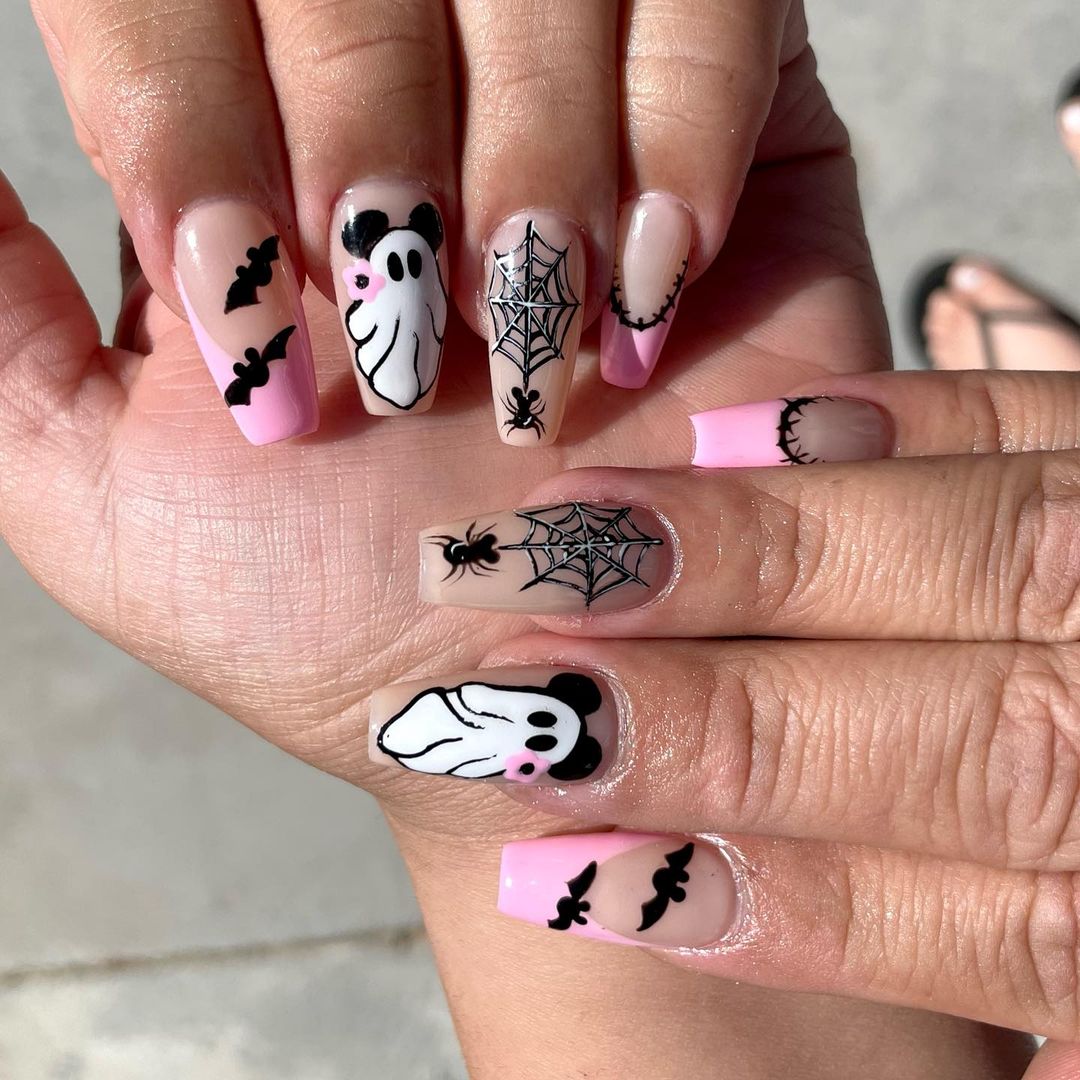
- Base coat (e.g., OPI Natural Nail Base Coat)
- Soft pink nail polish (e.g., Essie Ballet Slippers)
- Black nail polish (e.g., China Glaze Liquid Leather)
- White nail polish (e.g., OPI Alpine Snow)
- Fine nail art brush for detailing
- Top coat (e.g., Seche Vite Dry Fast Top Coat)
How to Create This Look at Home:
- Start with a base coat to protect your nails.
- Apply a soft pink polish to all nails.
- Use a fine brush to create ghostly Mickey shapes, bats, and cobwebs in black and white.
- Add pink tips for a playful contrast, and finish with a top coat to seal the design.
Halloween Fun with Mickey
This festive nail design features classic Halloween symbols like pumpkins and ghosts, all with a Disney twist. The nude base keeps the design subtle, while the bold orange and black accents make it stand out. Perfect for those who want to celebrate Halloween with a touch of Disney, this design is both fun and eye-catching.
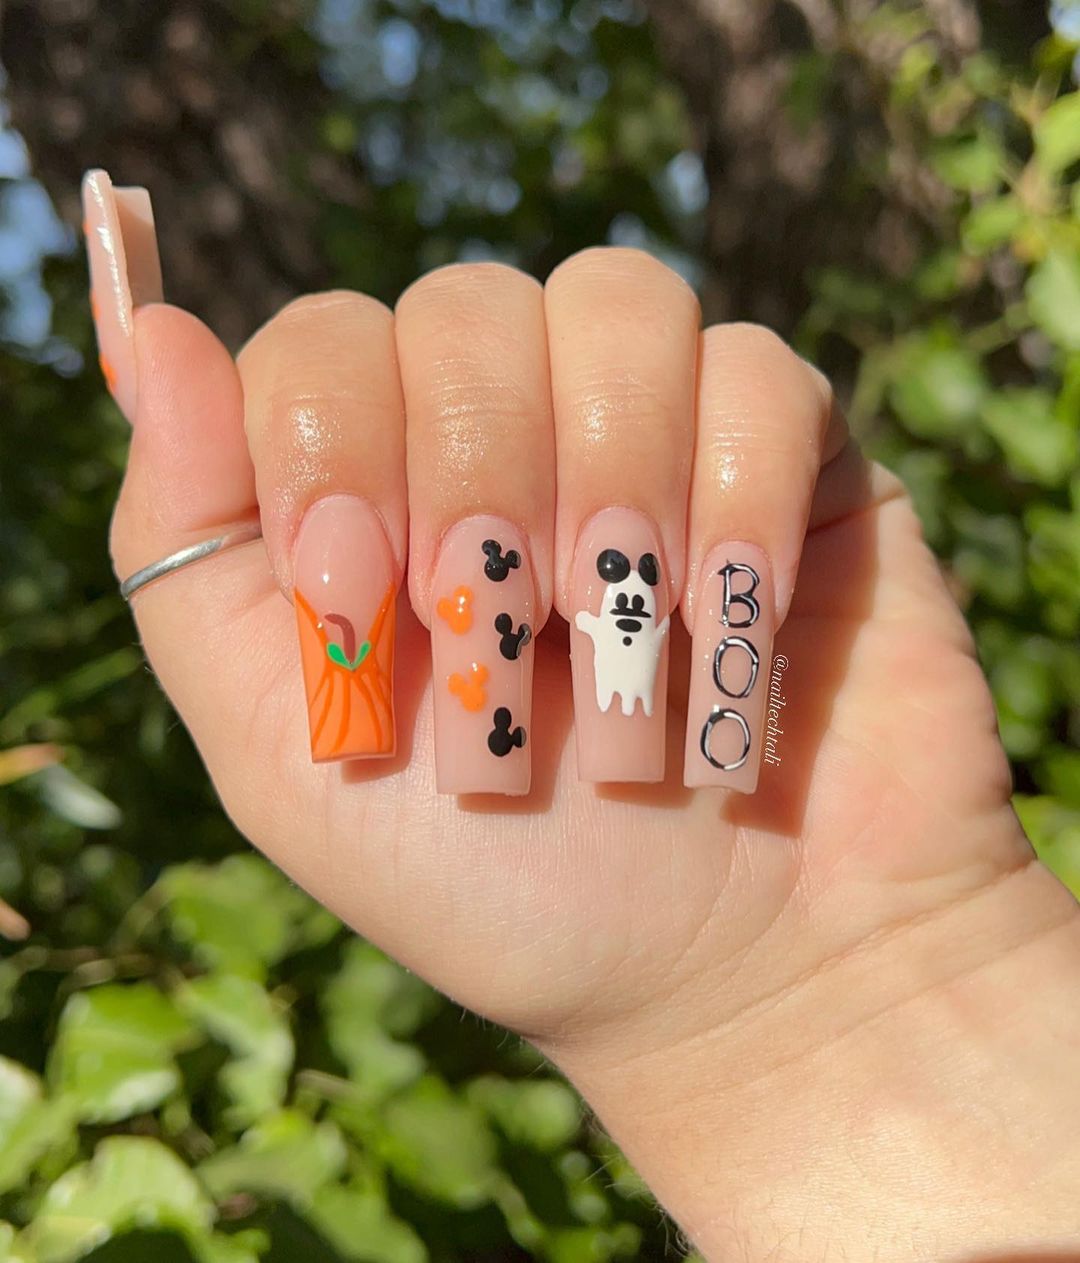
- Base coat (e.g., Deborah Lippmann Gel Lab Pro Base Coat)
- Nude nail polish (e.g., Zoya Naked Manicure Perfector)
- Orange nail polish (e.g., OPI A Good Man-Darin Is Hard to Find)
- Black and white nail polishes (e.g., OPI Black Onyx, Alpine Snow)
- Fine-tipped nail art brush for detailed work
- Top coat (e.g., Seche Vite Dry Fast Top Coat)
How to Create This Look at Home:
- Apply a base coat to all nails.
- Paint a nude base on all nails and let it dry.
- Use a fine brush to create pumpkins, ghosts, and Mickey heads in orange, black, and white.
- Finish with a top coat to protect the design and add shine.
Elegant Mickey with Black and Nude Tones
This elegant design pairs nude nails with black Mickey Mouse shapes and delicate star accents, creating a chic and minimalist look. The black detailing adds a touch of sophistication, while the nude base keeps the design understated and versatile. Ideal for those who prefer subtlety with a hint of Disney magic, this look is perfect for any occasion.
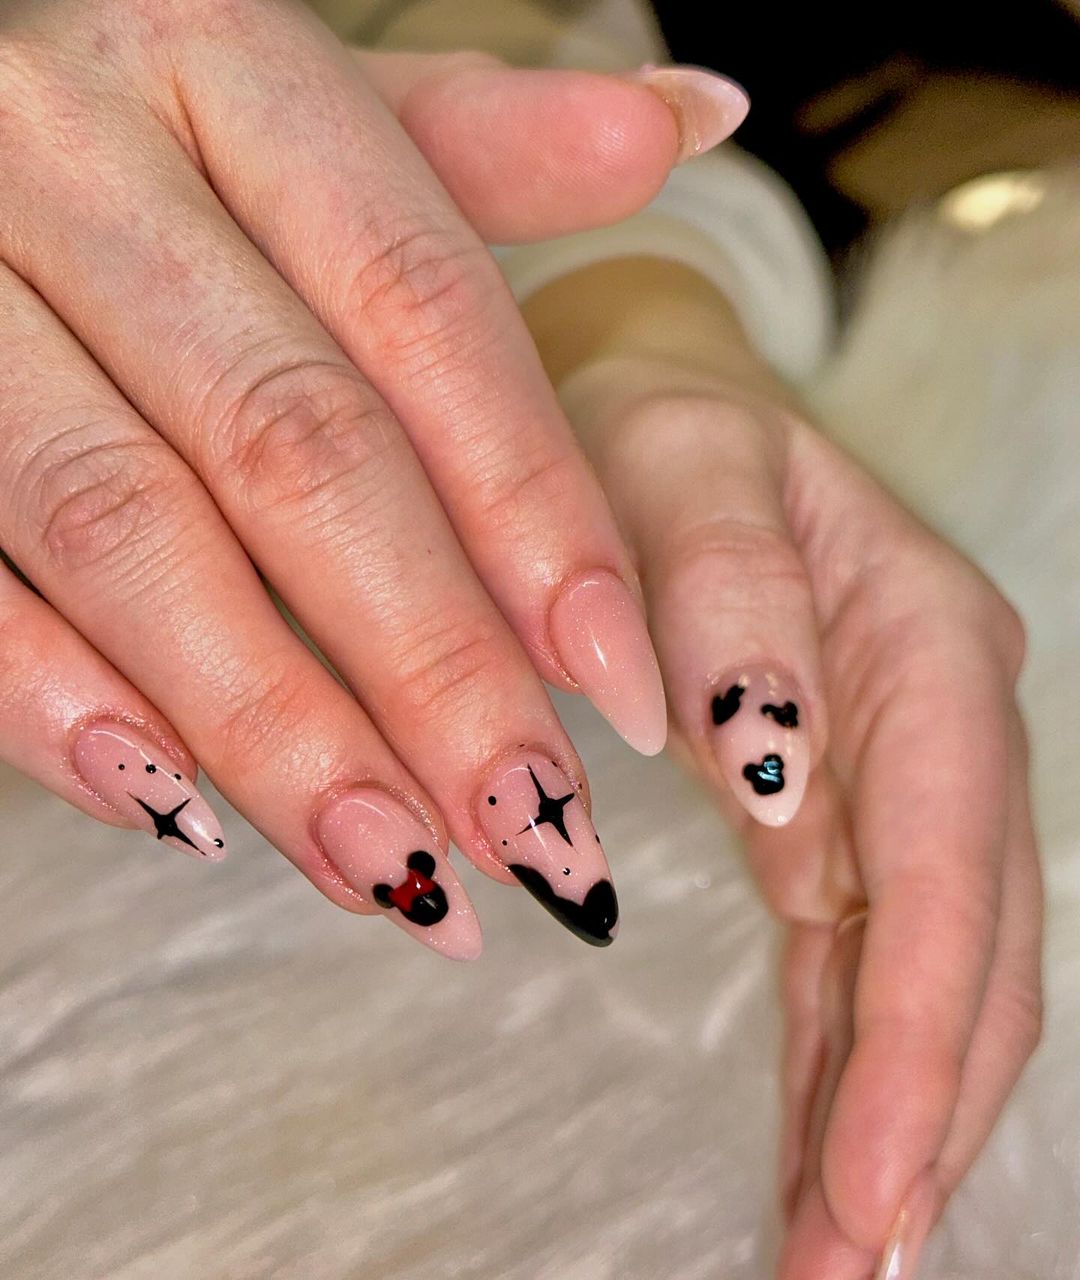
- Base coat (e.g., Orly Bonder)
- Nude nail polish (e.g., Essie Topless & Barefoot)
- Black nail polish (e.g., China Glaze Liquid Leather)
- Fine nail art brush for Mickey shapes and stars
- Top coat (e.g., Essie Gel Couture Top Coat)
How to Create This Look at Home:
- Start with a base coat to protect your nails.
- Apply a nude polish to all nails and let it dry.
- Use a fine brush to paint small black Mickey shapes and stars on selected nails.
- Seal the design with a top coat for a glossy finish.
Minnie Mouse Glam with Rhinestones
This design is a glamorous take on the classic Minnie Mouse theme, featuring intricate hand-painted images of Minnie, her signature polka dots, and a sparkling rhinestone bow. The pink base serves as a perfect backdrop for the detailed artwork, while the added rhinestones bring a touch of luxury to the look. The square shape of the nails further enhances the bold design, making this a standout choice for anyone who loves to mix elegance with a bit of Disney magic.
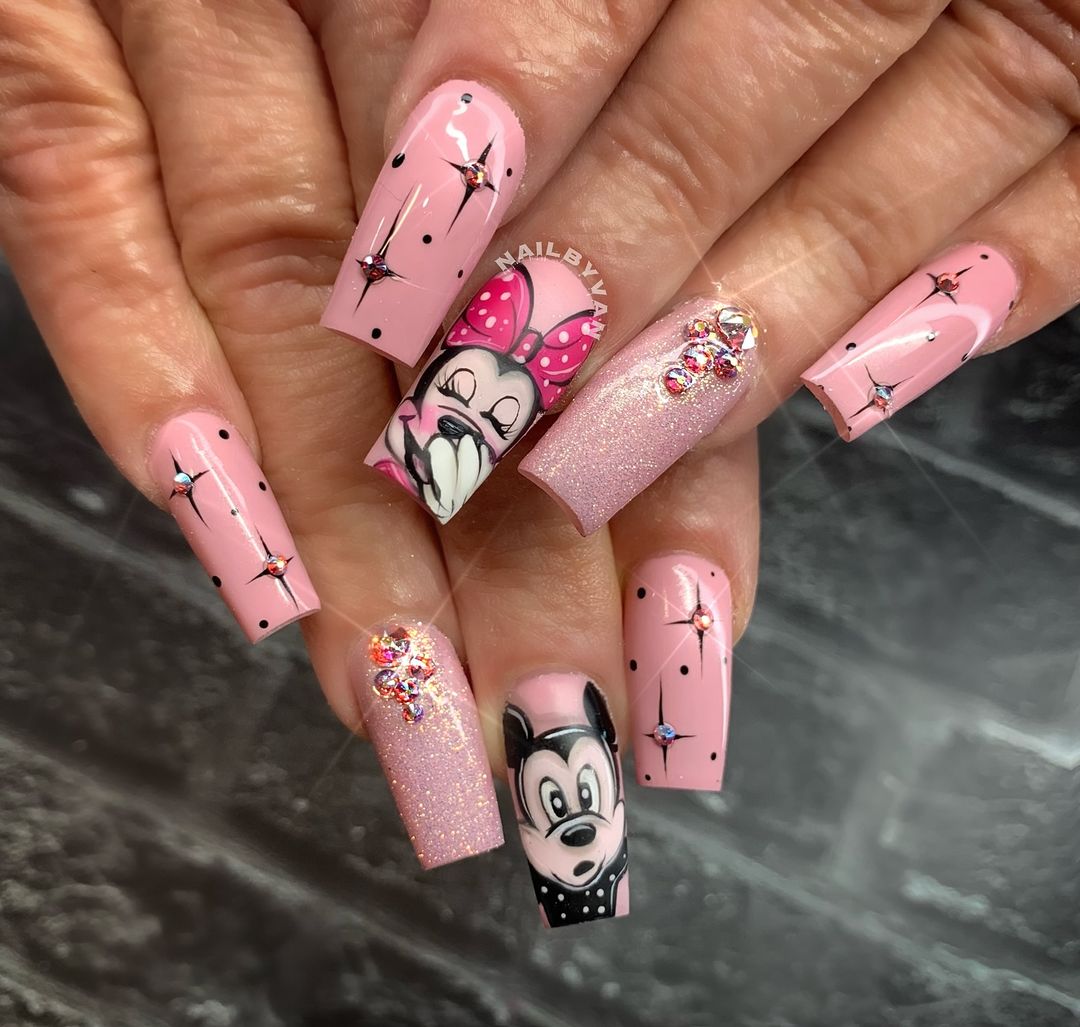
- Base coat (e.g., OPI Natural Nail Base Coat)
- Pink nail polish (e.g., Essie Fiji)
- Black and white nail polishes for detailing (e.g., OPI Black Onyx, Alpine Snow)
- Rhinestones and nail glue for the bow
- Fine-tipped nail art brush for precision work
- Top coat (e.g., Seche Vite Dry Fast Top Coat)
How to Create This Look at Home:
- Start with a base coat to protect your nails.
- Apply the pink polish as the base color on all nails.
- Use a fine brush to paint Minnie’s face and polka dots in black and white.
- Attach rhinestones to create the bow and add extra sparkle.
- Finish with a top coat to seal the design and ensure long-lasting wear.
Classic Disney Elegance with Red and Black
This design channels classic Disney vibes with its bold use of red, black, and white. The nails are decorated with Minnie’s iconic polka dots, bows, and even a bit of glitter for extra flair. The mix of matte and shiny finishes, along with the use of rhinestones, gives this manicure a modern twist while still honoring the timeless Disney aesthetic. The square shape of the nails makes this design perfect for anyone who loves a classic look with a little bit of extra glamour.
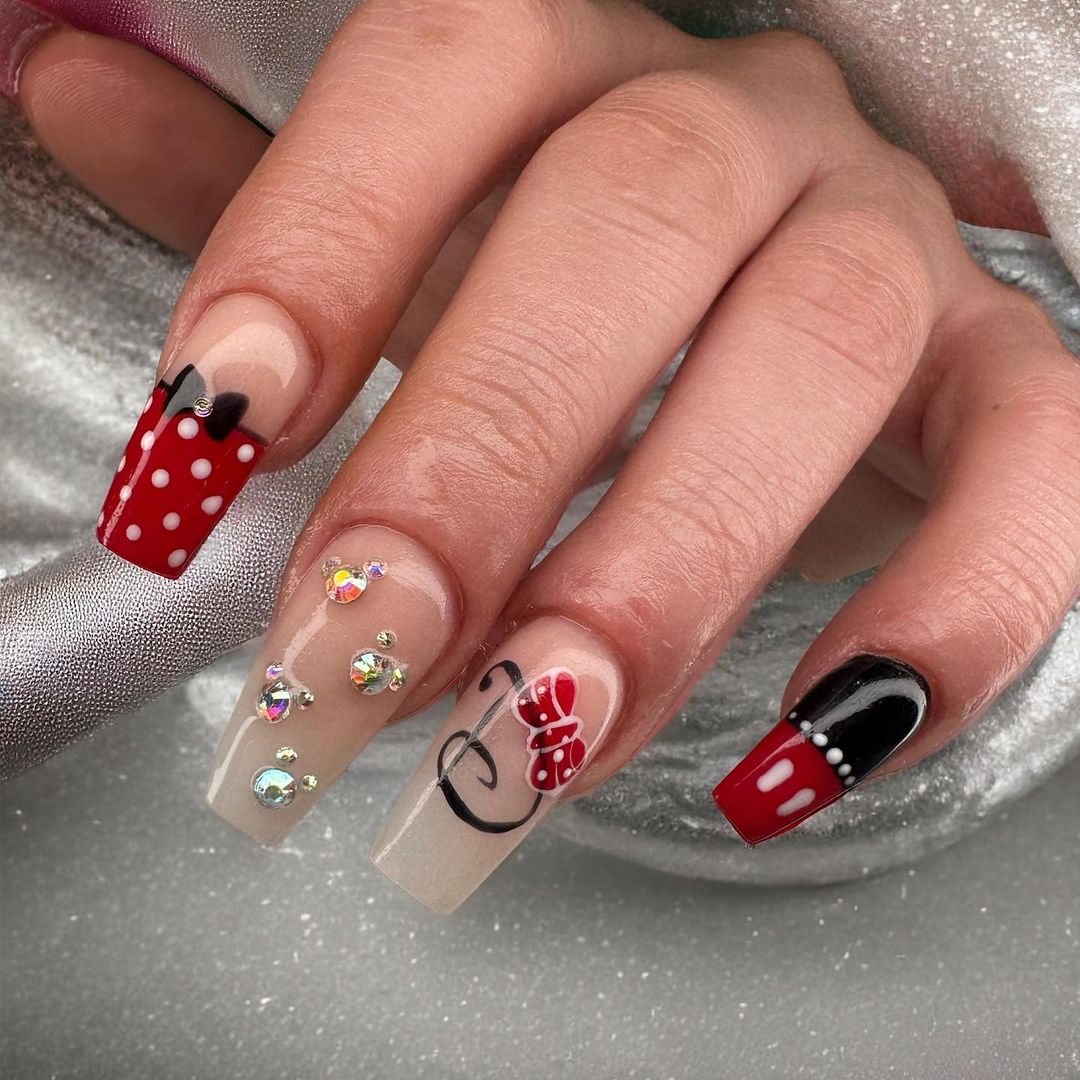
- Base coat (e.g., Orly Bonder)
- Red nail polish (e.g., Essie Really Red)
- Black and white nail polishes (e.g., Sally Hansen Black Out, White On)
- Rhinestones and nail glue for added sparkle
- Dotting tool for creating polka dots
- Fine-tipped nail art brush for detailed work
- Top coat (e.g., Essie Gel Couture Top Coat)
How to Create This Look at Home:
- Apply a base coat to all nails.
- Paint selected nails in red, black, or nude as the base.
- Use a dotting tool to create white polka dots on the red nails.
- Add black and red bows using a fine-tipped brush.
- Attach rhinestones for added glamour, then seal with a top coat.
Fall-Inspired Mickey Nail Art
This nail design is a fun, fall-inspired take on Disney nail art. With warm autumn colors like orange, yellow, and cream, the nails feature Mickey Mouse shapes, stars, and polka dots in a scattered pattern that evokes the playful spirit of the season. The almond shape of the nails adds a feminine touch, making this design both festive and elegant.
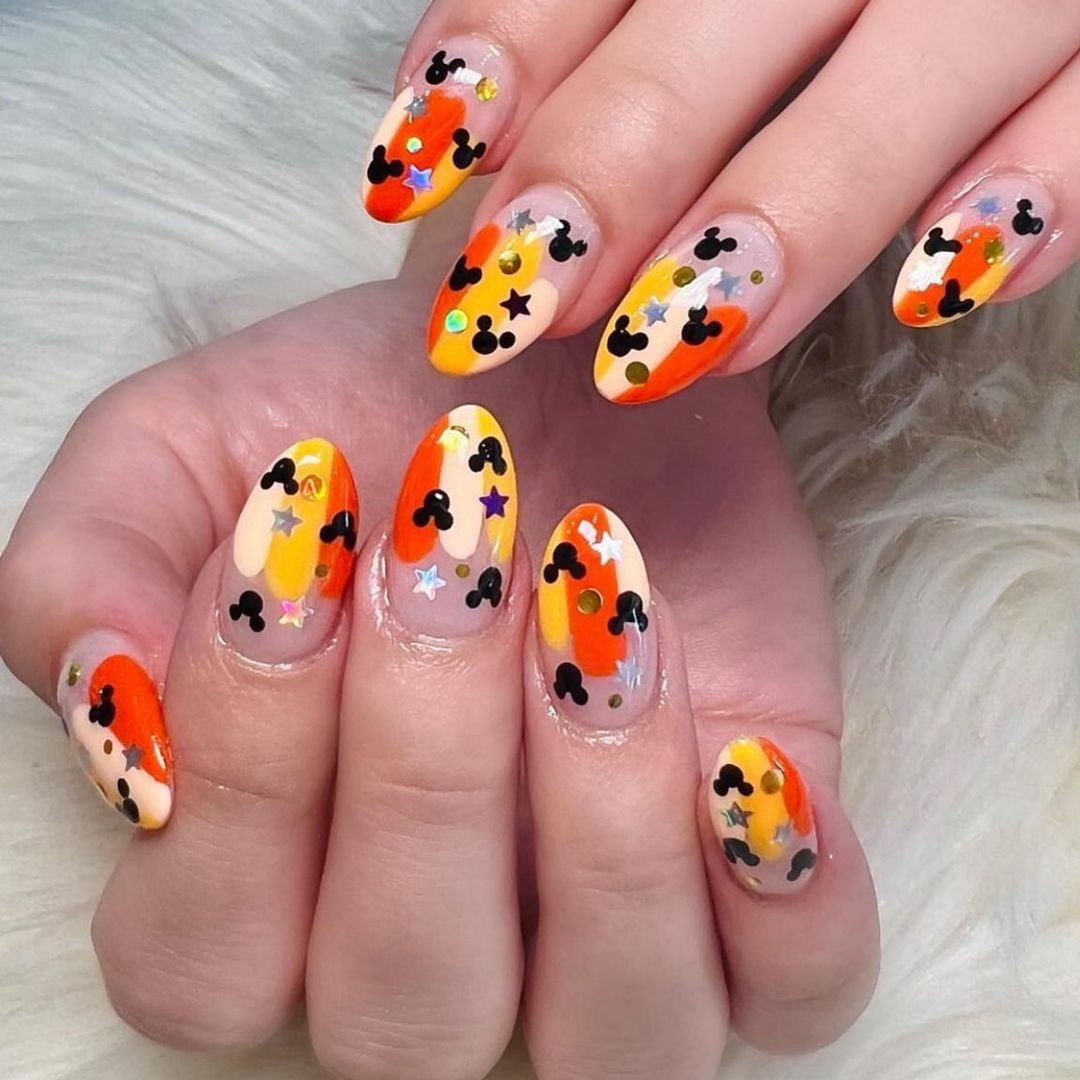
- Base coat (e.g., Deborah Lippmann Gel Lab Pro Base Coat)
- Autumn-colored nail polishes (e.g., OPI A Good Man-Darin Is Hard to Find, Zoya Darcy, Essie Marshmallow)
- Black nail polish for Mickey shapes (e.g., China Glaze Liquid Leather)
- Star decals or nail stickers
- Dotting tool for creating polka dots
- Top coat (e.g., Seche Vite Dry Fast Top Coat)
How to Create This Look at Home:
- Begin with a base coat to protect your nails.
- Apply autumn-colored polishes in a random pattern on each nail.
- Use a dotting tool and a fine brush to add Mickey shapes and polka dots.
- Add star decals for extra detail, then finish with a top coat.
Rose Gold and White Elegance
This design is all about understated elegance with a hint of Disney charm. The nails are painted in a crisp white with accents of rose gold glitter and delicate Mickey Mouse shapes. The combination of white and rose gold gives the manicure a chic and modern feel, while the short, square shape keeps it versatile and suitable for any occasion.
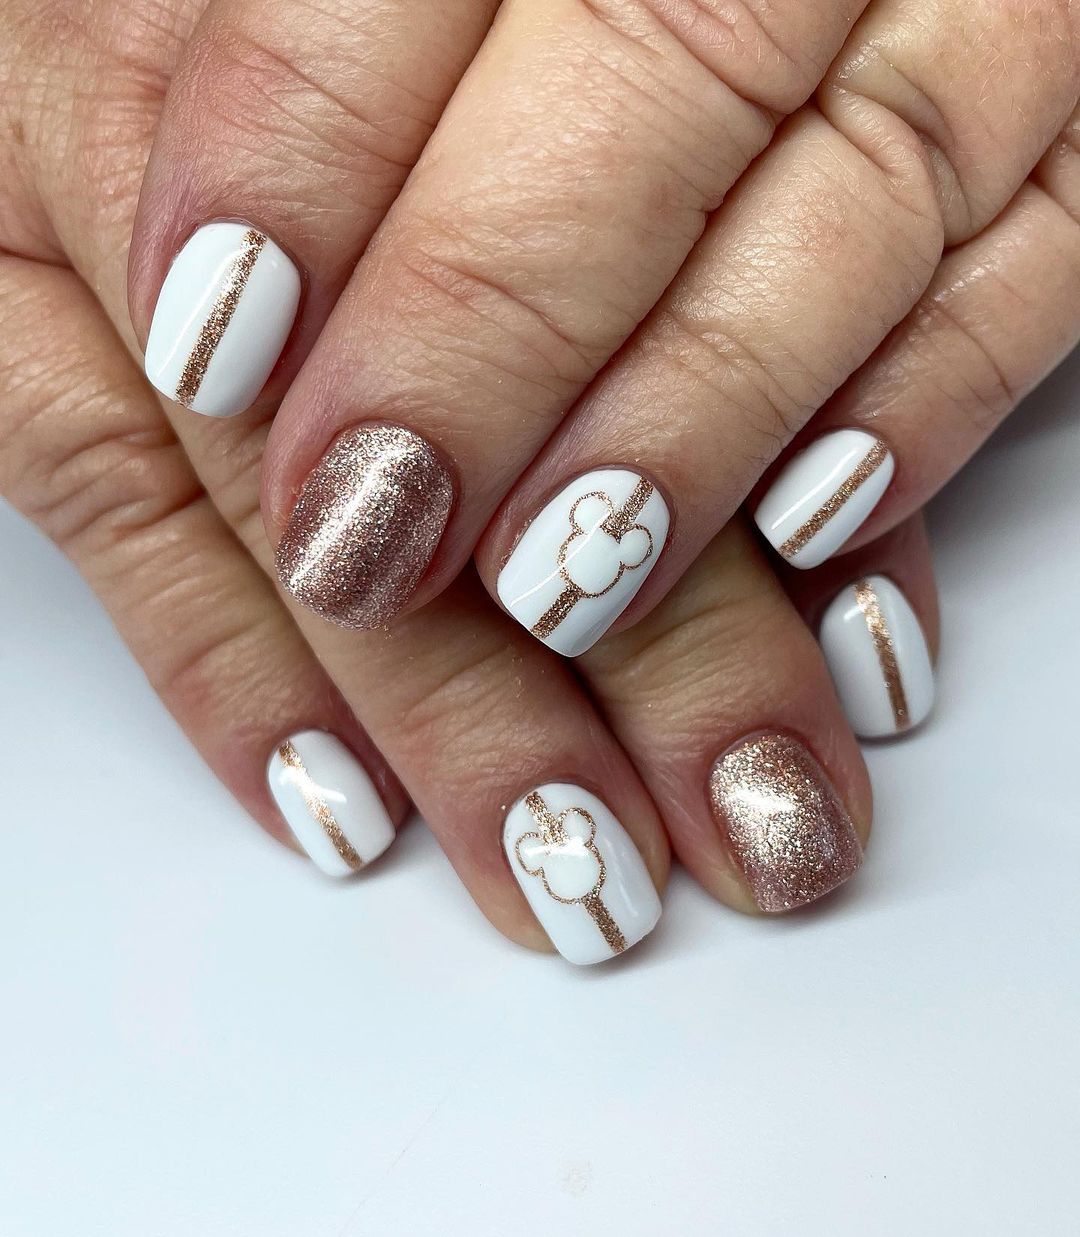
- Base coat (e.g., OPI Natural Nail Base Coat)
- White nail polish (e.g., Essie Blanc)
- Rose gold glitter polish (e.g., Zoya Trixie)
- Fine-tipped nail art brush for detailing
- Top coat (e.g., Seche Vite Dry Fast Top Coat)
How to Create This Look at Home:
- Apply a base coat to all nails.
- Paint most nails with white polish and select one or two for the rose gold glitter.
- Use a fine brush to add small Mickey shapes in rose gold.
- Finish with a top coat to protect the design and add a glossy shine.
Pastel Mickey Magic at the Castle
This design is inspired by the magic of Disney nights at the castle, featuring pastel Mickey Mouse shapes and a hint of sparkle. The nails are done in a soft, transparent pink with rainbow accents and star details, creating a whimsical look perfect for any Disney fan. The long coffin shape adds to the drama of the design, making this manicure ideal for special occasions.
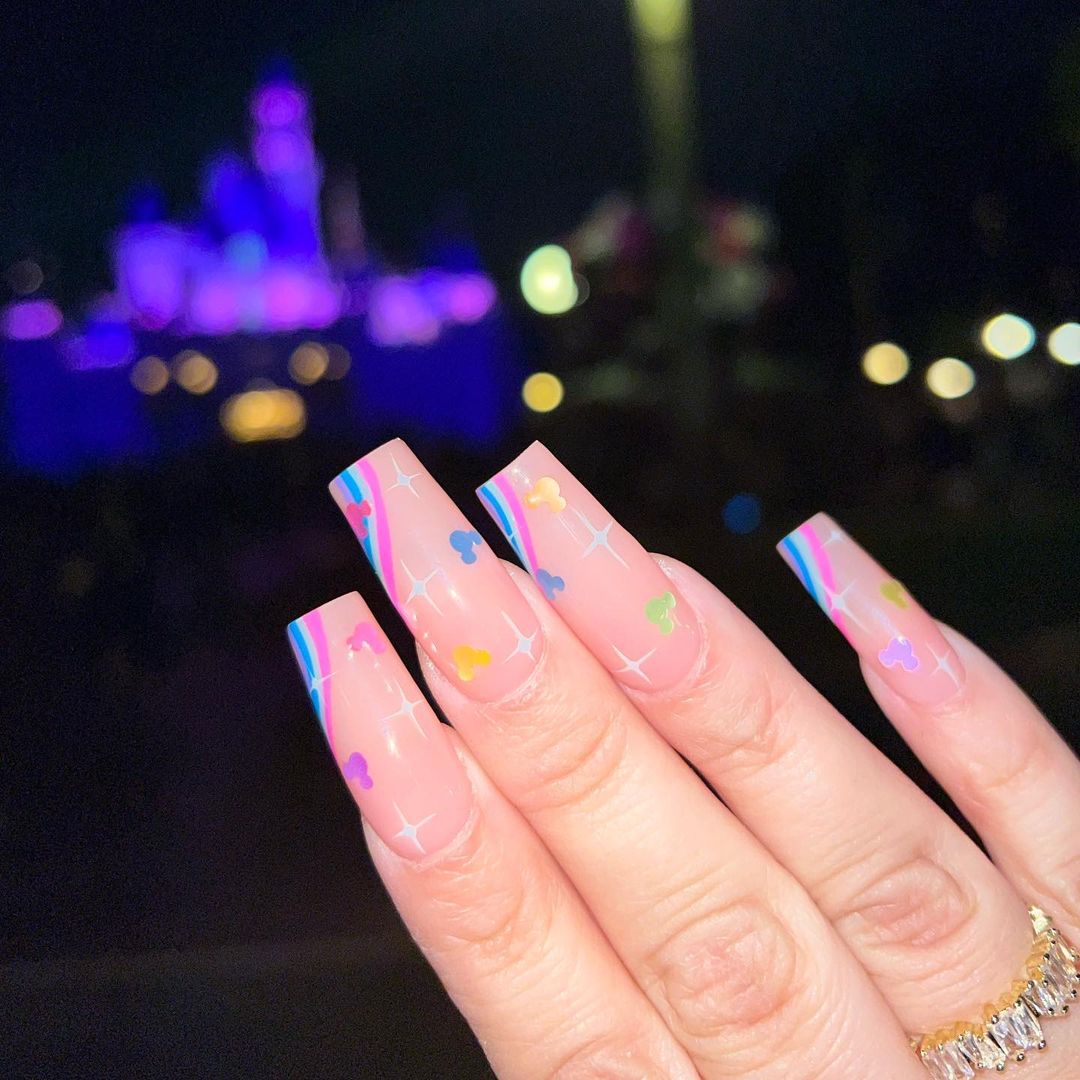
- Base coat (e.g., Essie First Base Base Coat)
- Transparent pink nude polish (e.g., Zoya Naked Manicure Perfector)
- Assorted pastel nail polishes for Mickey shapes (e.g., Essie Play Date, Bikini So Teeny, Mint Candy Apple)
- Fine-tipped nail art brush for detailing
- Top coat (e.g., Essie Gel Couture Top Coat)
How to Create This Look at Home:
- Start with a base coat to protect your nails.
- Apply a transparent pink polish to all nails.
- Use a fine brush to paint Mickey shapes in various pastel colors.
- Add star details and finish with a top coat for a glossy finish.
Halloween Fun with Mickey and Friends
This Halloween-themed design features playful ghosts, pumpkins, and bats alongside Mickey Mouse shapes. The nails are painted in soft nude tones with black dripping tips, giving a spooky yet stylish look. Perfect for celebrating Halloween, this design is both fun and festive while still maintaining a touch of Disney magic.
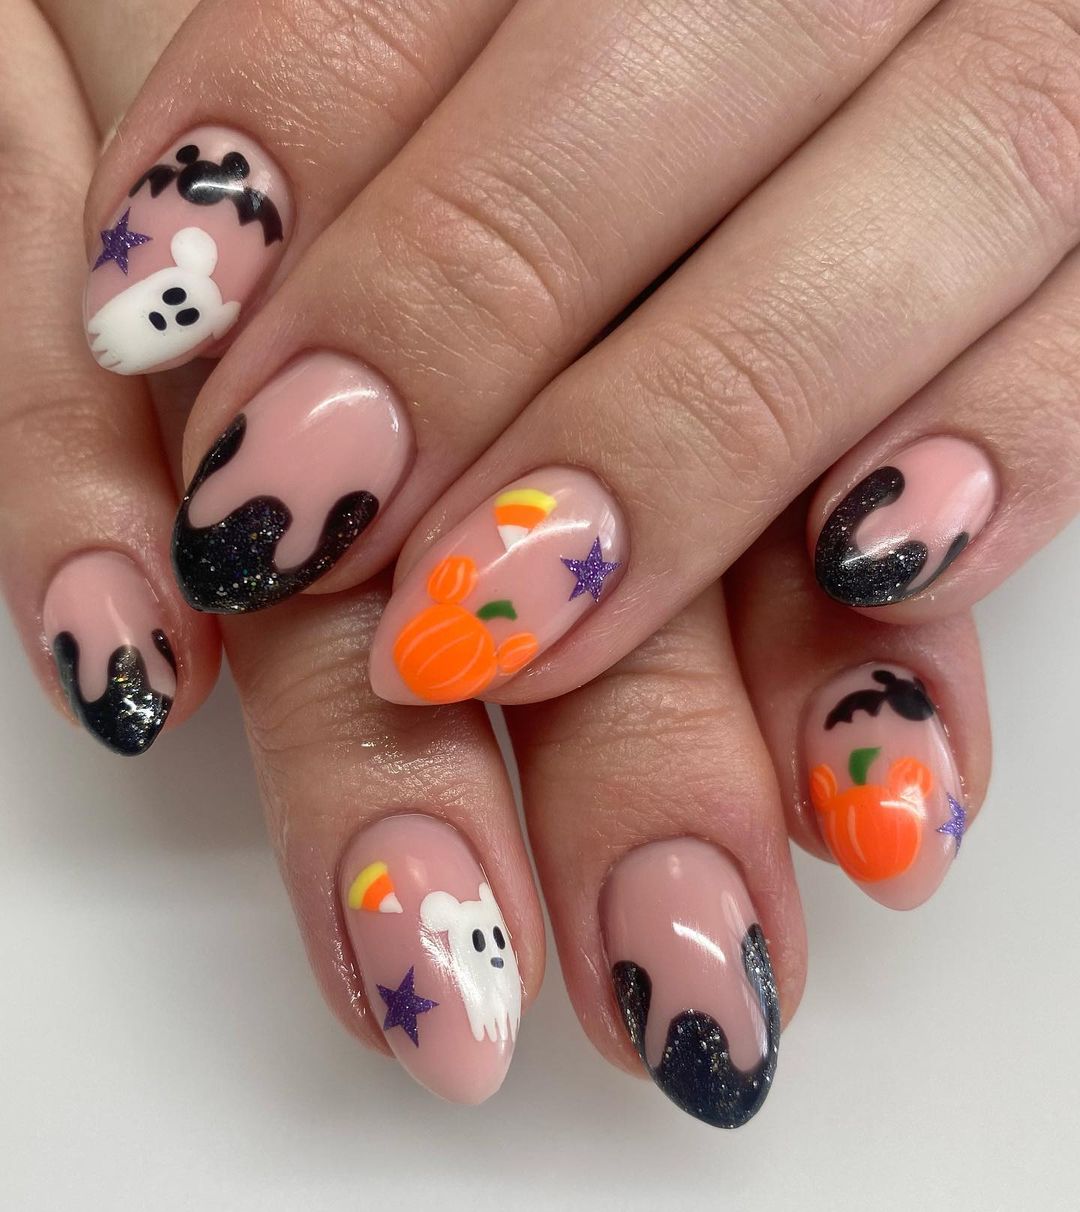
- Base coat (e.g., Deborah Lippmann Gel Lab Pro Base Coat)
- Nude nail polish (e.g., Essie Topless & Barefoot)
- Black and orange nail polishes (e.g., OPI Black Onyx, Zoya Arizona)
- White nail polish (e.g., China Glaze White on White)
- Fine-tipped nail art brush for detailing
- Top coat (e.g., Seche Vite Dry Fast Top Coat)
How to Create This Look at Home:
- Start with a base coat on all nails.
- Apply a nude polish as the base color.
- Use a fine brush to paint black dripping tips, then add ghosts, pumpkins, and Mickey shapes in black, white, and orange.
- Finish with a top coat to protect your design and add shine.
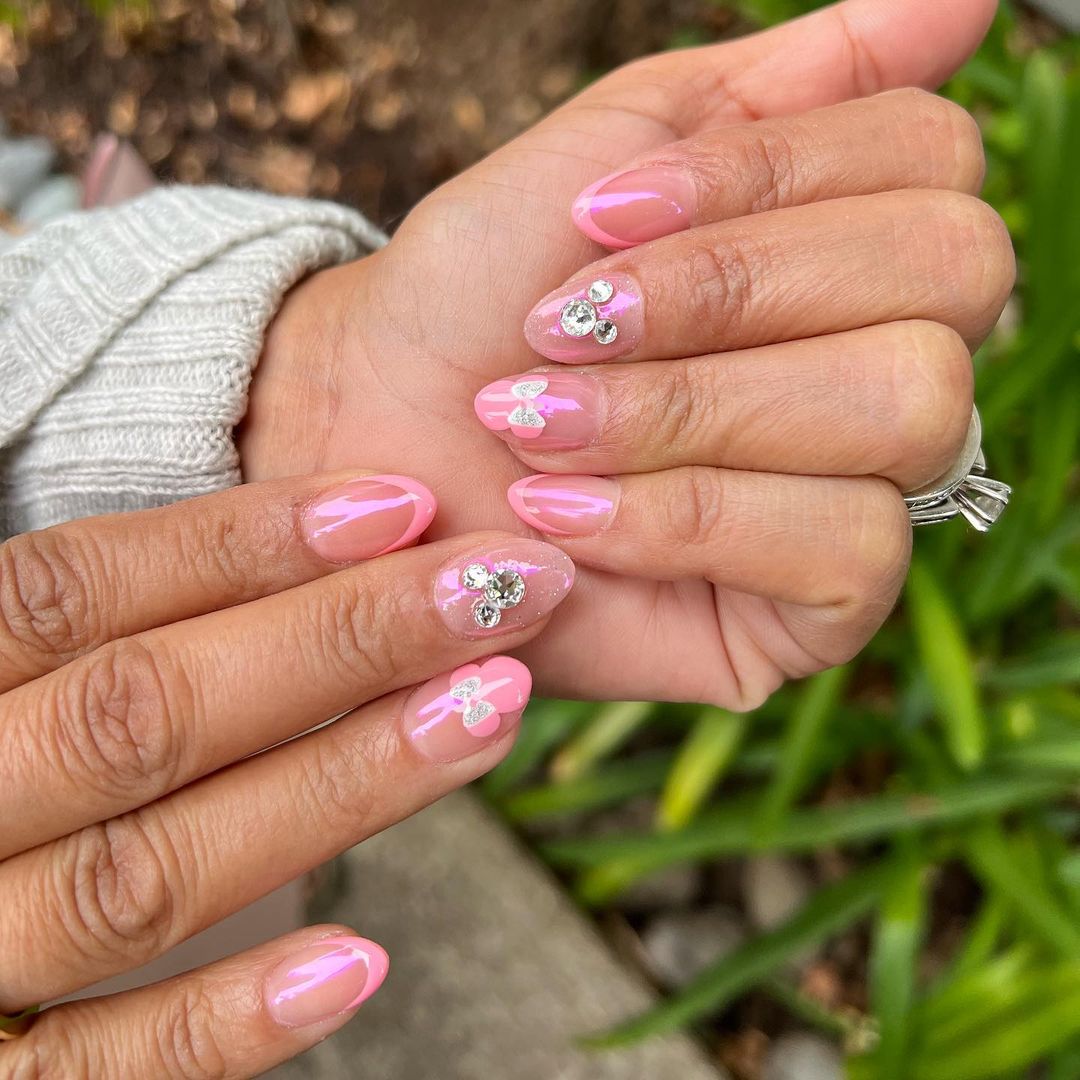
Pink Perfection with Rhinestones
This design is a delicate and feminine take on Disney-inspired nail art. The soft pink base is complemented by subtle Mickey Mouse silhouettes, each adorned with sparkling rhinestones. The almond shape of the nails adds to the overall elegance, making this design ideal for those who prefer a more understated yet glamorous look. The combination of soft pink and glittery accents creates a harmonious balance that is both eye-catching and sophisticated.
- Base coat (e.g., OPI Natural Nail Base Coat)
- Soft pink nail polish (e.g., Essie Fiji)
- Clear glitter polish for added sparkle (e.g., China Glaze Fairy Dust)
- Rhinestones and nail glue for Mickey silhouettes
- Fine-tipped nail art brush for precise application
- Top coat (e.g., Seche Vite Dry Fast Top Coat)
How to Create This Look at Home:
- Begin with a base coat to protect your nails.
- Apply soft pink polish to all nails and let it dry.
- Add a layer of clear glitter polish to selected nails for extra shine.
- Attach rhinestones in the shape of Mickey Mouse heads using nail glue.
- Seal the design with a top coat for long-lasting wear and a glossy finish.
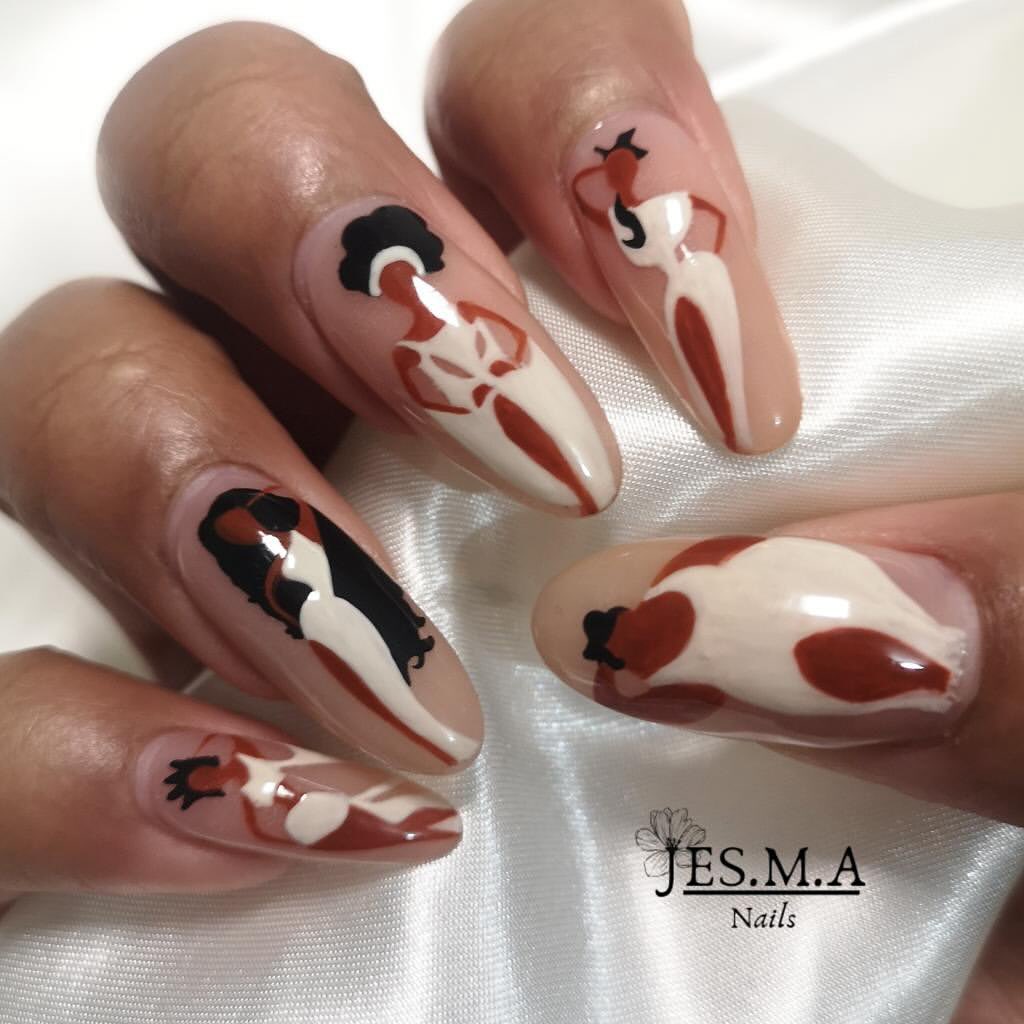
Artistic Tribute to Diversity
This nail design is a unique and artistic tribute to the beauty of diversity. Featuring silhouettes of women in various skin tones, the design is both empowering and stylish. The nude and brown color palette is chic and modern, while the hand-painted figures add a personal touch. This design is perfect for those who want to make a bold statement with their nails while celebrating diversity and inclusion.
- Base coat (e.g., Orly Bonder)
- Nude and brown nail polishes in various shades (e.g., Zoya Flynn, Essie Mamba)
- Black and white nail polishes for detailing (e.g., OPI Black Onyx, Alpine Snow)
- Fine-tipped nail art brush for intricate work
- Top coat (e.g., Essie Gel Couture Top Coat)
How to Create This Look at Home:
- Start with a base coat to protect your nails.
- Apply a nude polish as the base color on all nails.
- Use a fine-tipped brush to paint the silhouettes of women in various shades of brown and black.
- Add details like hair and clothing using contrasting colors.
- Finish with a top coat to protect the design and add a glossy finish.
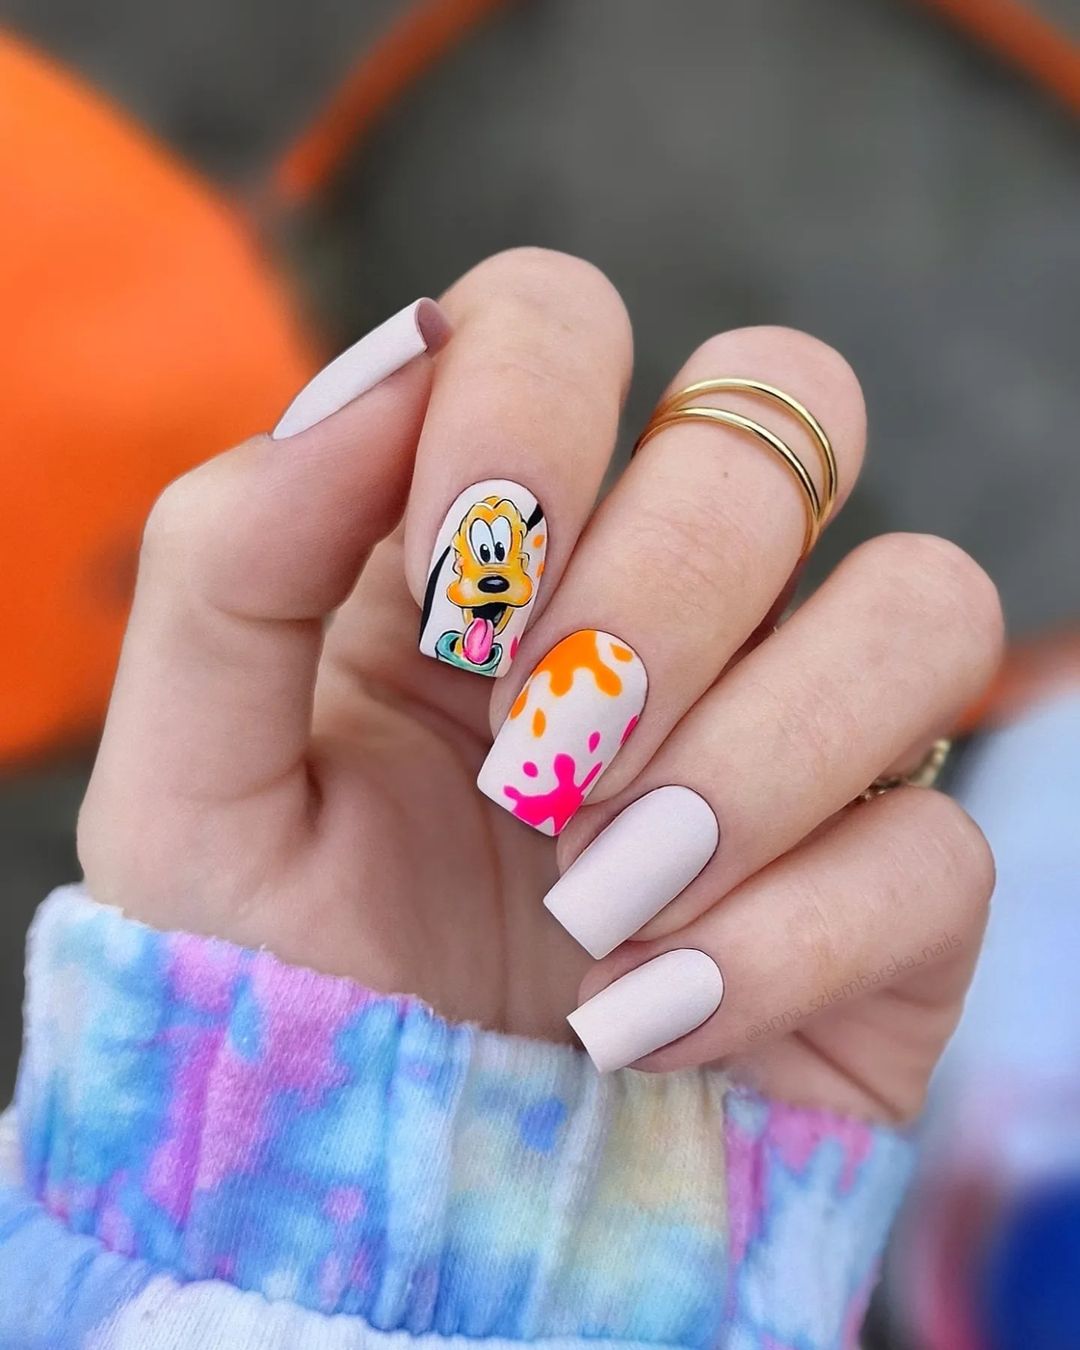
Pluto’s Playful Colors
This playful design features a vibrant tribute to Pluto, complete with bright colors and a fun, cartoonish vibe. The matte finish adds a modern twist, while the dripping paint effect on one nail gives the design an artistic flair. The square shape of the nails keeps the look clean and structured, making it a great choice for those who love Disney characters but prefer a more contemporary style.
- Base coat (e.g., Deborah Lippmann Gel Lab Pro Base Coat)
- Matte nude nail polish (e.g., Zoya Leigh)
- Bright colored nail polishes for the dripping effect (e.g., OPI Hot & Spicy, Zoya Pippa)
- Fine-tipped nail art brush for detailed work
- Top coat (matte finish, e.g., Essie Matte About You)
How to Create This Look at Home:
- Apply a base coat to all nails.
- Paint most nails with a matte nude polish.
- Use a fine brush to add a dripping paint effect in bright colors on one or two nails.
- Hand-paint Pluto’s face on an accent nail using a fine-tipped brush.
- Finish with a matte top coat to protect the design and maintain the modern look.
FAQ: Common Questions About Disney Fall Nail Designs 2024
Q: Can I achieve these designs on short nails? A: Absolutely! Many of these designs are perfect for short or medium nail lengths. Just ensure that your nail technician scales the art to fit your nail size.
Q: What’s the best way to make these designs last longer? A: Using a gel base and top coat will give your manicure extra durability. Additionally, avoid exposing your nails to harsh chemicals, and use gloves when cleaning.
Q: How can I remove gel or acrylic nails without damaging my natural nails? A: The best approach is to soak your nails in acetone for about 15-20 minutes, then gently scrape off the polish using a cuticle pusher. Moisturize your nails afterward to keep them healthy.
Save Pin

