Fall is here, and it’s the perfect time to switch up your nail game. Whether you’re a fan of bold colors or subtle designs, there’s something for everyone this season. In this article, we’ll explore some of the cutest and trendiest fall gel nail designs for short nails. From autumnal hues to festive Halloween motifs, you’ll find plenty of inspiration to keep your nails looking fabulous. Let’s dive in!
Autumn Leaf Accents
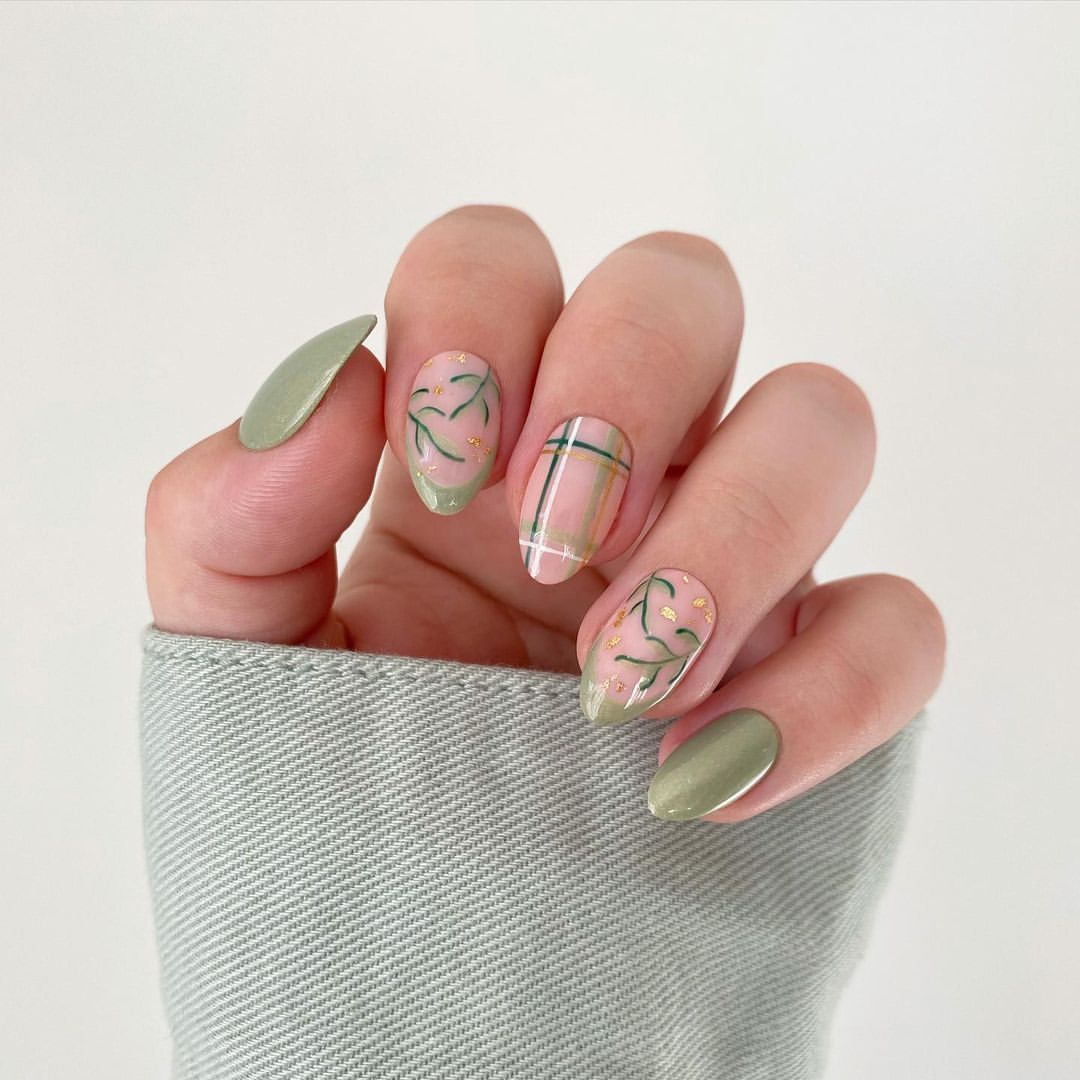
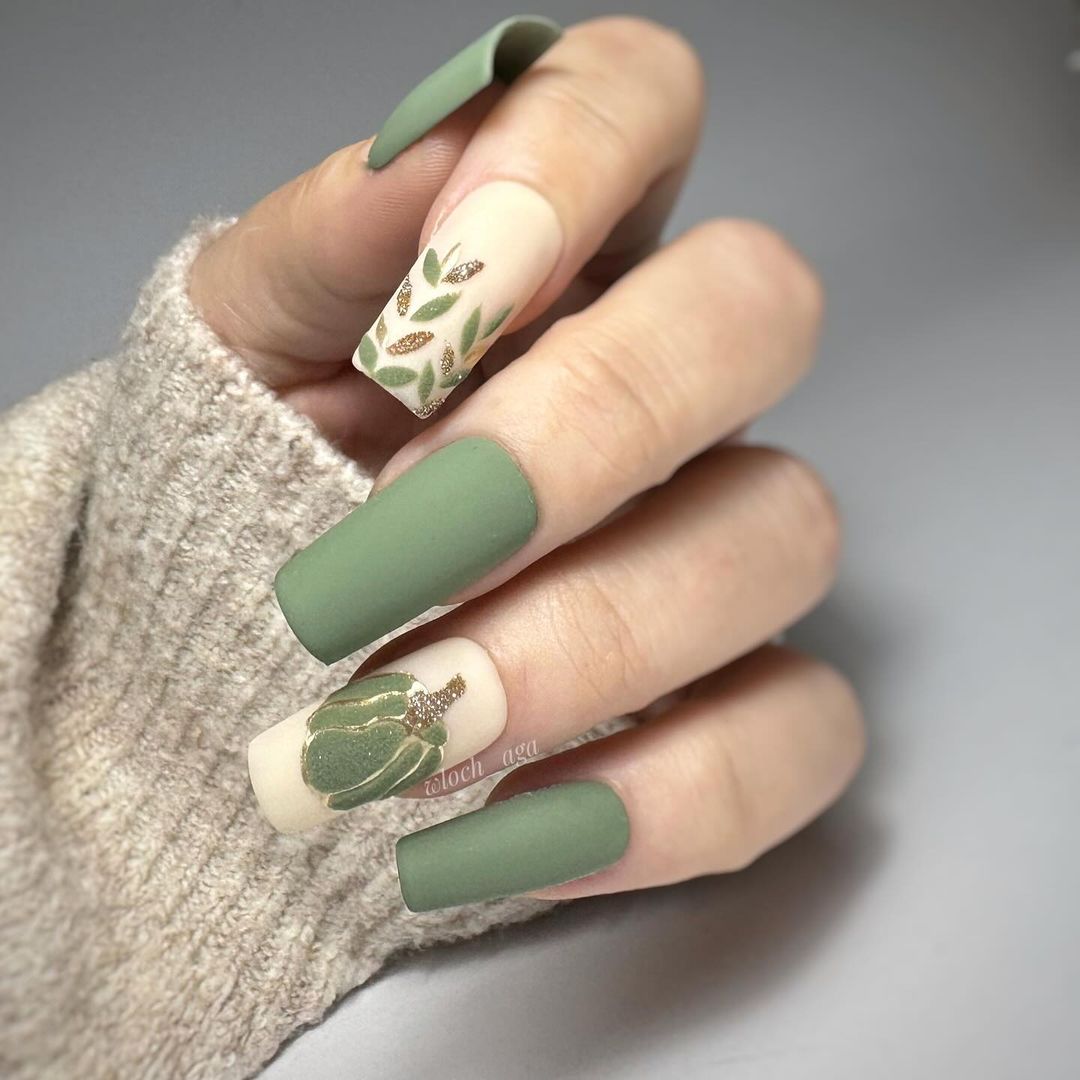
One of my favorite looks for fall is this elegant combination of muted greens and delicate leaf accents. The design features a soft, sage green as the base color with intricate leaf patterns on a few nails. The touch of gold flakes adds a subtle sparkle that captures the essence of fall. This look is perfect for those who want to embrace autumn without going overboard on bold colors.
Consumables:
-
- Base coat: OPI Natural Nail Base Coat
- Sage green polish: Essie “Sage You Love Me”
- Gold flakes: Born Pretty Gold Foil
- Top coat: Seche Vite Dry Fast Top Coat
- Nail art brush: Winstonia Fine Detailing Brush
Creating the Look:
-
- Start with a base coat to protect your nails.
- Apply two coats of the sage green polish.
- Using a fine detailing brush, paint the leaf patterns with a darker green polish.
- Apply gold flakes to the nails as desired.
- Finish with a top coat to seal in the design and add shine.
Glittering Brown Elegance
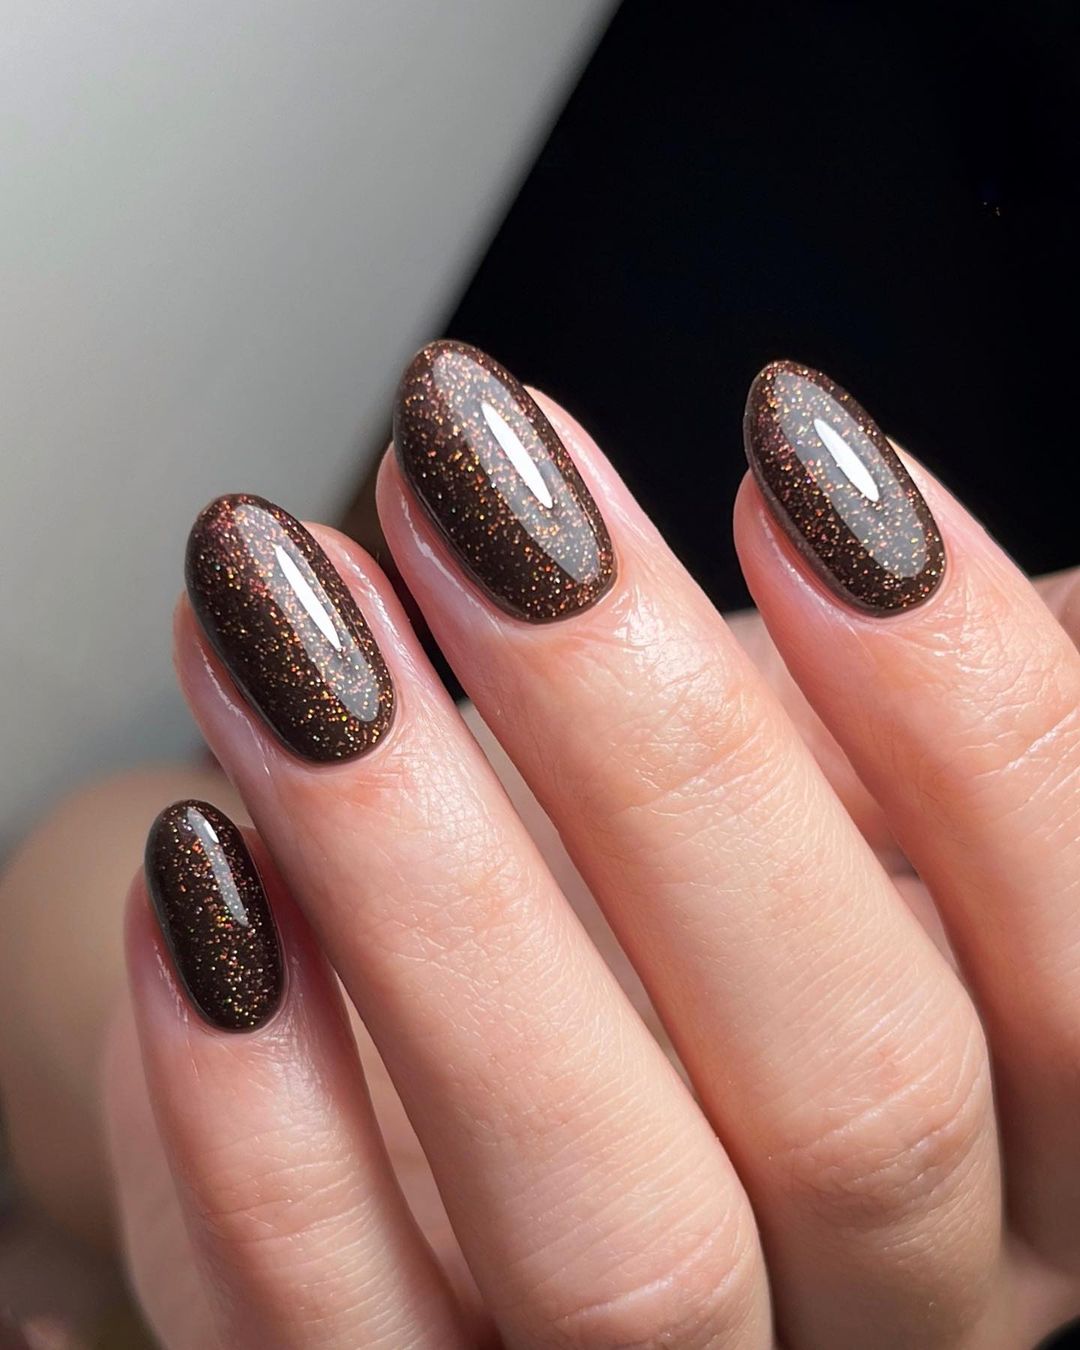
For a sophisticated and eye-catching look, try these glittering brown nails. The deep brown base is enriched with fine gold glitter, creating a glamorous yet subtle effect. This design is perfect for any autumn occasion, from a cozy day at home to a night out.
Consumables:
-
- Base coat: Sally Hansen Hard as Nails
- Brown polish: Zoya “Louise”
- Gold glitter: CND Additives “Gold Sparkle”
- Top coat: Essie Gel Couture Top Coat
Creating the Look:
-
- Apply a base coat to all nails.
- Paint two layers of the brown polish.
- While the polish is still wet, sprinkle the gold glitter over the nails.
- Once dry, apply a top coat to lock in the glitter and add a glossy finish.
Autumn Green and Speckled Accent
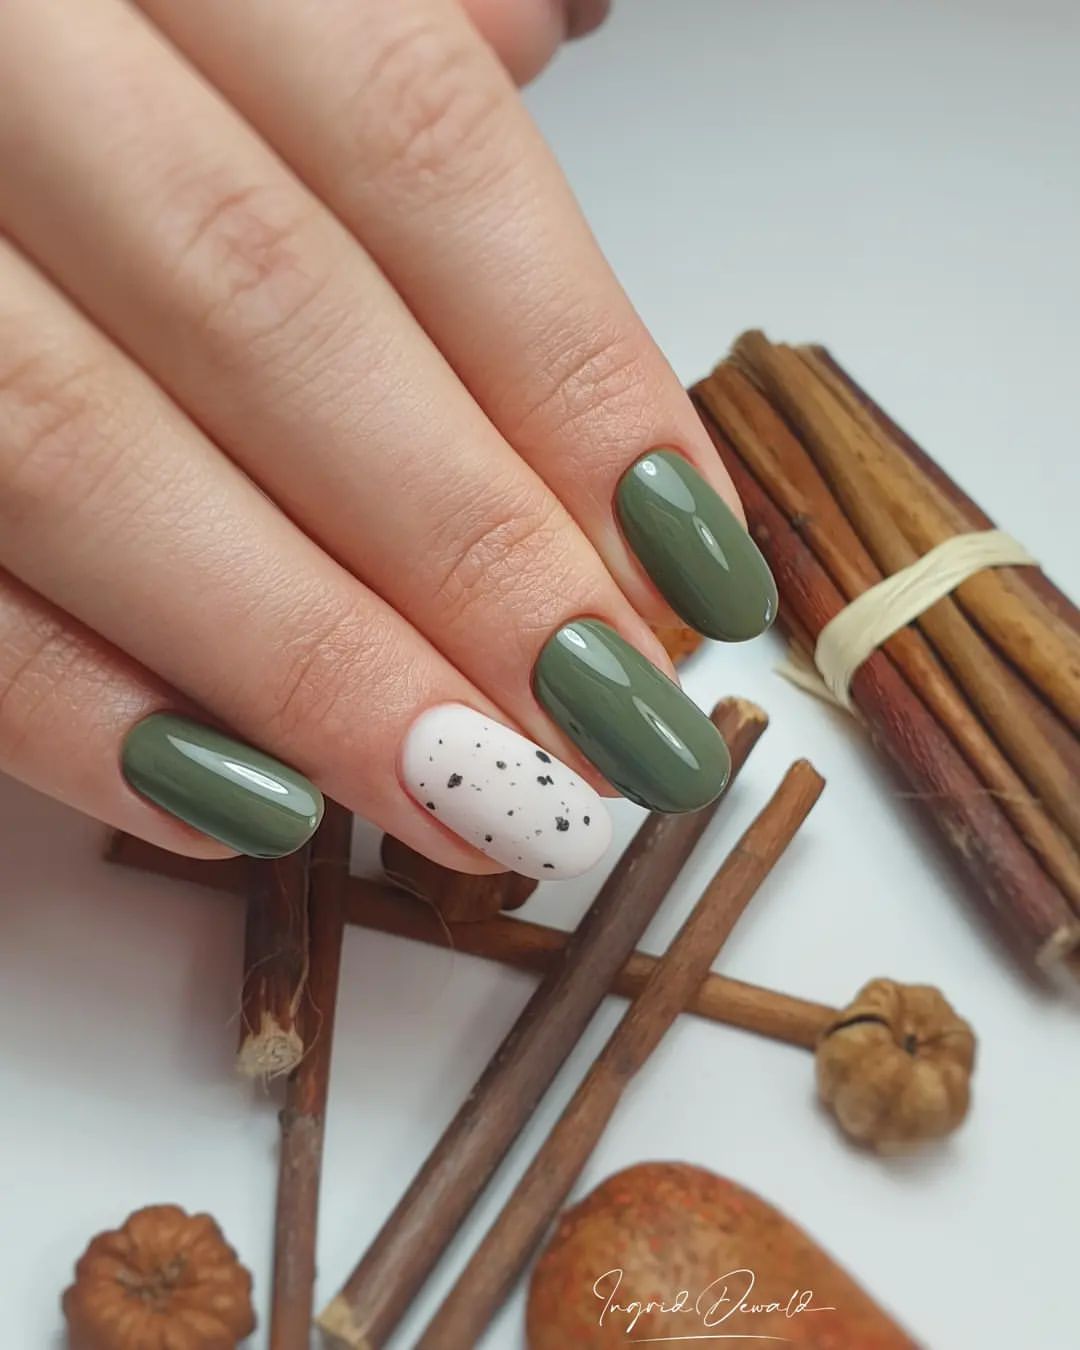
This design features a striking combination of rich green and a speckled accent nail. The contrast between the solid color and the speckled design makes for a unique and trendy look. It’s simple yet stylish, perfect for anyone looking to make a statement this fall.
Consumables:
-
- Base coat: Deborah Lippmann Gel Lab Base Coat
- Green polish: OPI “Suzi – The First Lady of Nails”
- White polish: China Glaze “White on White”
- Black speckles: INM Northern Lights Hologram Top Coat
- Top coat: Revlon Quick Dry Top Coat
Creating the Look:
-
- Apply a base coat to all nails.
- Paint most nails with the green polish, leaving one accent nail.
- Paint the accent nail with two coats of white polish.
- Apply the black speckles over the white nail for a speckled effect.
- Finish with a top coat to add shine and protect the design.
Playful Fox and Autumn Leaves
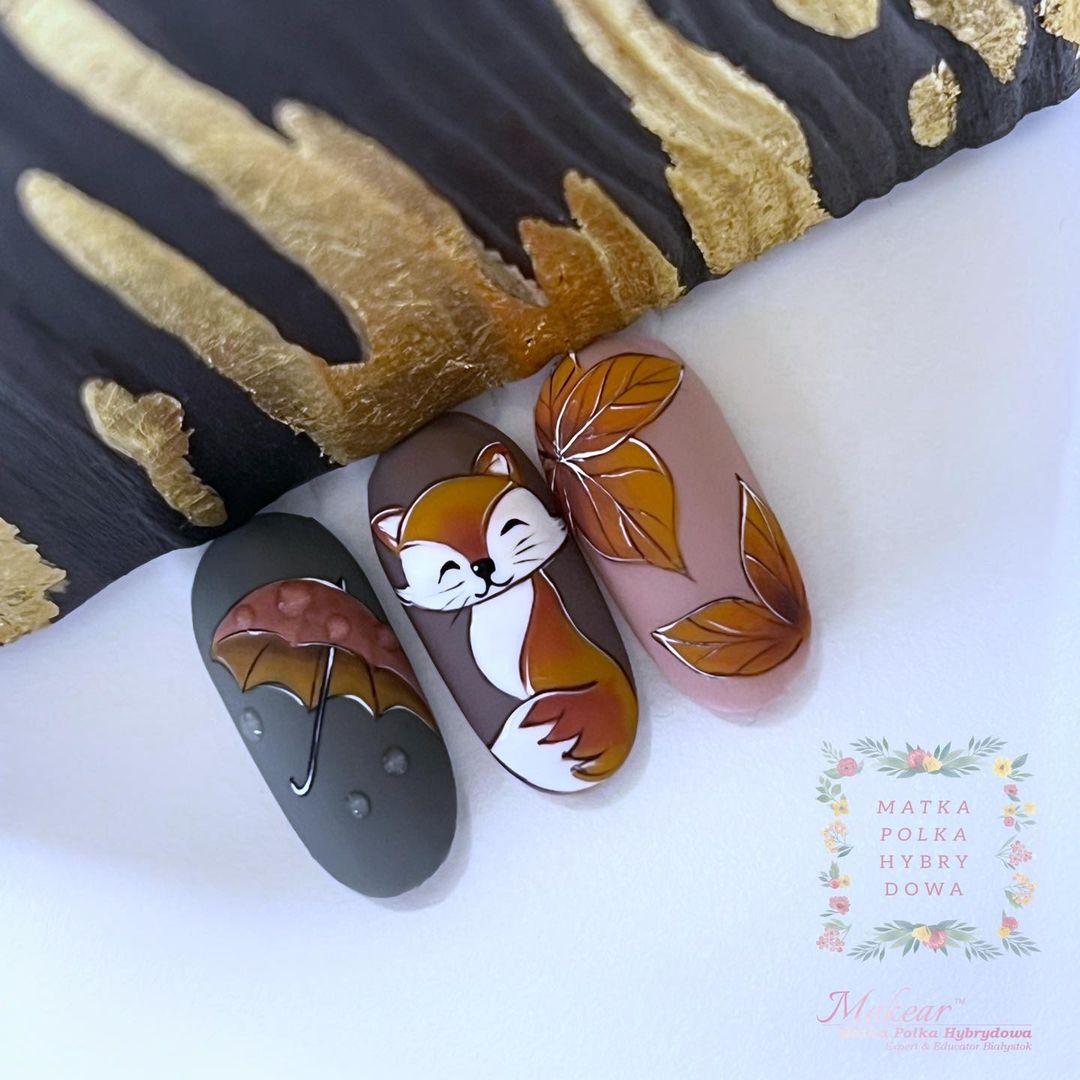
This adorable nail art design captures the whimsical essence of autumn with a cute fox, umbrella, and falling leaves. The base colors of muted grey and earthy browns provide a perfect canvas for the detailed artwork. The fox, with its charming expression, is the highlight, complemented by the intricately painted leaves and umbrella that add to the seasonal theme. This playful and artistic design is perfect for those who want to showcase their fun side while embracing the fall spirit.
Consumables:
-
- Base coat: OPI Natural Nail Base Coat
- Grey polish: Essie “Now and Zen”
- Brown polish: Zoya “Sable”
- White and orange polish for fox: China Glaze “White on White” and “Orange Knockout”
- Nail art brushes: Winstonia Fine Detailing Brush Set
- Gold foil: Born Pretty Gold Foil
- Top coat: Seche Vite Dry Fast Top Coat
Creating the Look:
-
- Apply a base coat to all nails to protect them.
- Paint the nails with two coats of grey and brown polish, alternating as desired.
- Use fine detailing brushes to paint the fox, leaves, and umbrella with white, orange, and brown polishes.
- Add gold foil accents to the leaves for a touch of sparkle.
- Seal the design with a top coat to ensure longevity and shine.
Save Pin

Rich Chocolate Brown
This classic yet sophisticated nail design features a rich chocolate brown color that exudes elegance and warmth. The glossy finish enhances the deep, luxurious shade, making it perfect for both casual and formal occasions. This timeless look is ideal for those who prefer a minimalist approach but still want to make a statement with their nails.
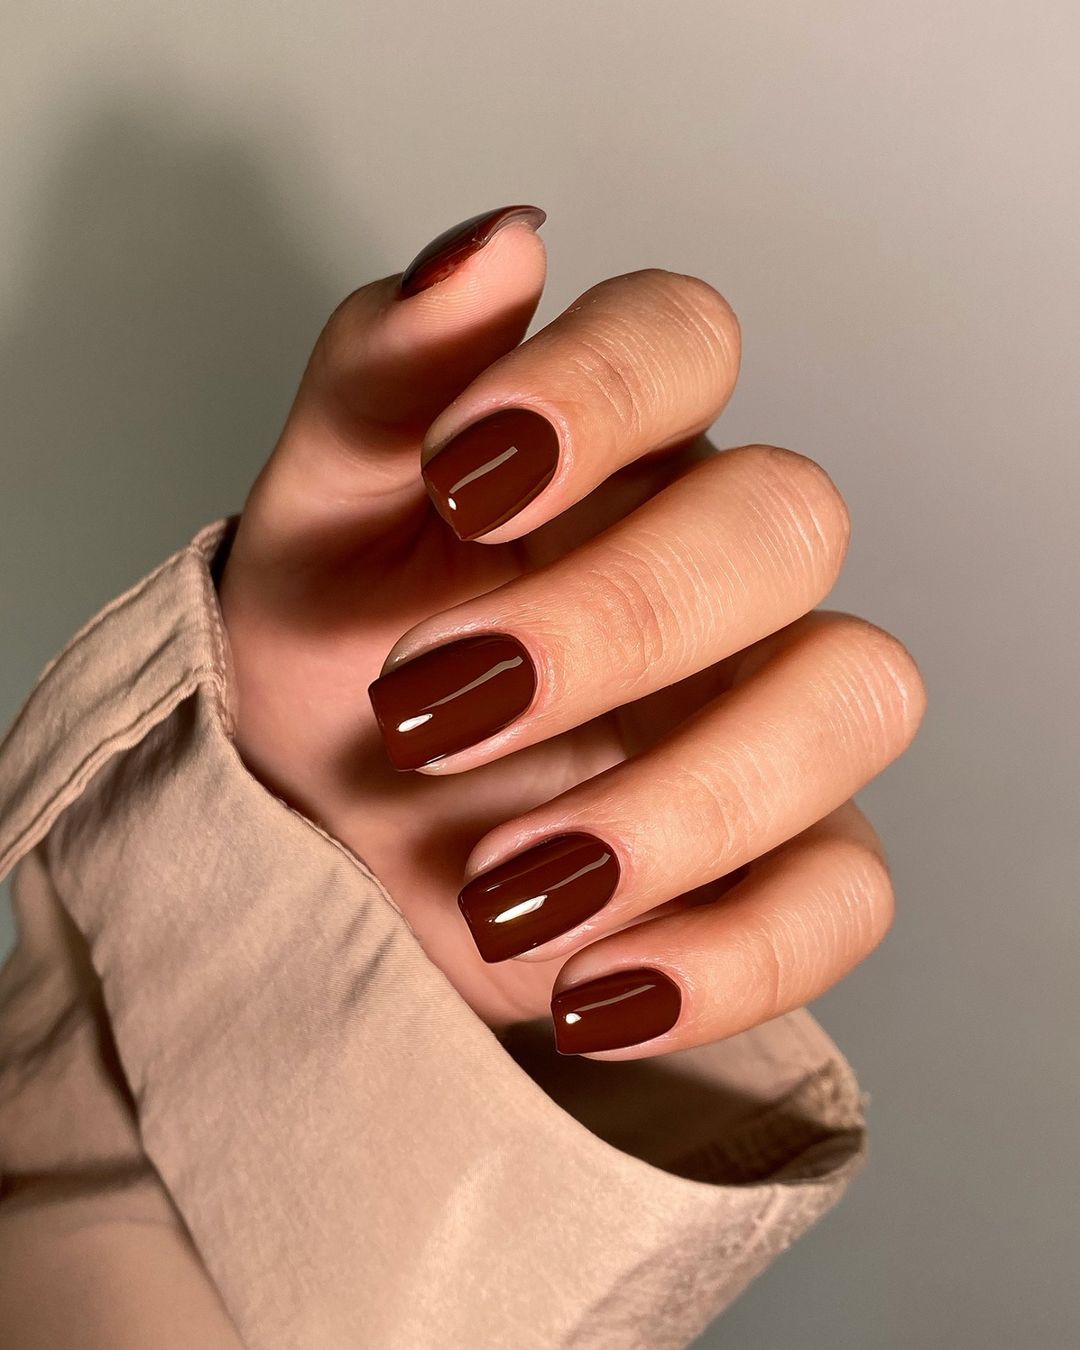
Consumables:
-
- Base coat: Sally Hansen Hard as Nails
- Brown polish: OPI “Lincoln Park After Dark”
- Top coat: Essie Gel Couture Top Coat
Creating the Look:
-
- Begin with a base coat to protect your nails and ensure the polish adheres smoothly.
- Apply two coats of the chocolate brown polish, allowing each coat to dry thoroughly.
- Finish with a glossy top coat to add shine and protect the color from chipping.
Autumn Floral Elegance
This stunning nail art design features a palette of autumnal colors with delicate floral accents. Each nail showcases a different color and floral design, ranging from muted taupe to vibrant orange, blue, and red. The gold foil detailing adds a touch of elegance and sophistication to the overall look. This design is perfect for those who love to experiment with colors and patterns while embracing the beauty of fall.
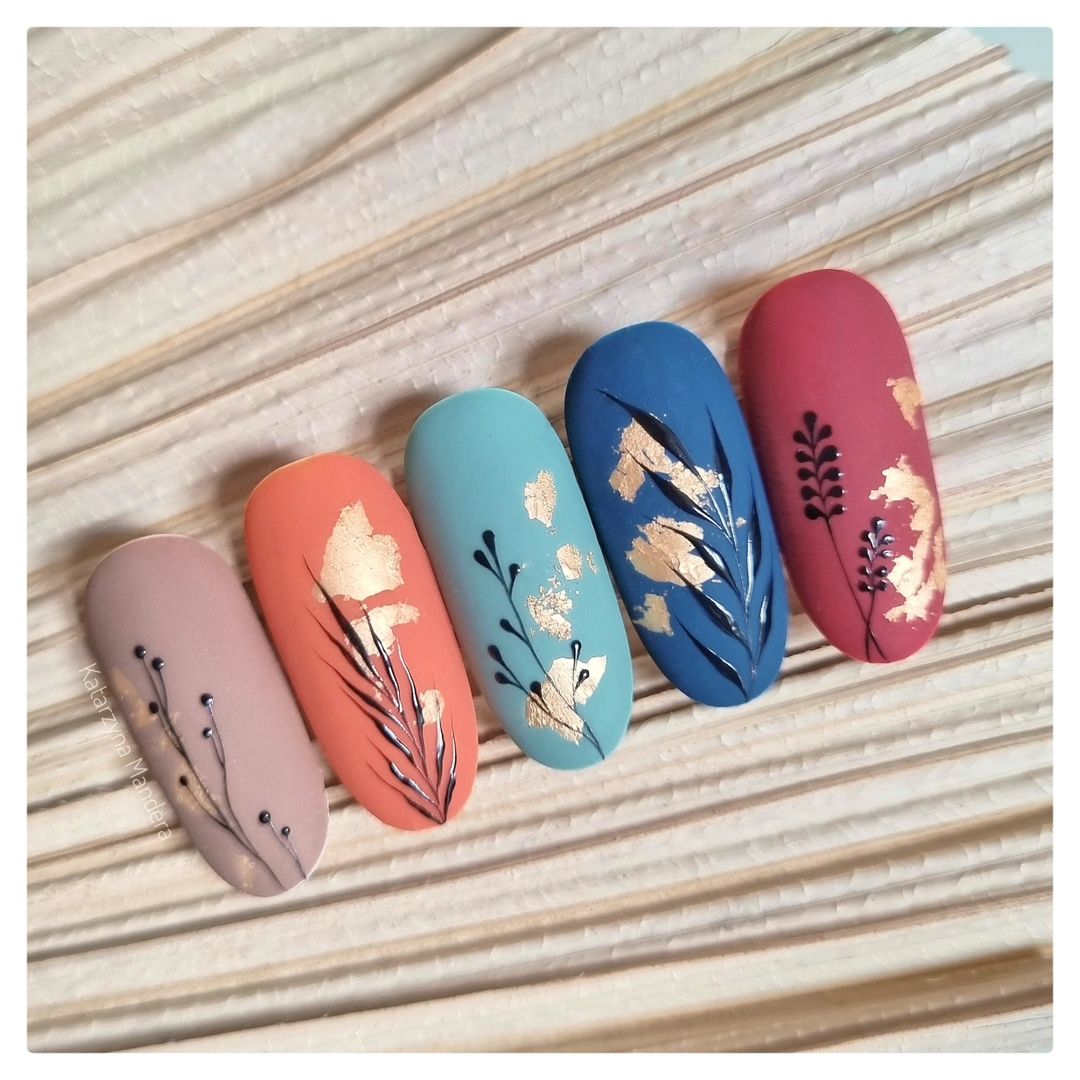
Consumables:
-
- Base coat: Deborah Lippmann Gel Lab Base Coat
- Polishes: OPI “Taupe-less Beach,” Essie “Playing Koi,” Zoya “Sia,” China Glaze “Scarlet”
- Gold foil: INM Northern Lights Hologram Top Coat
- Nail art brushes: Winstonia Fine Detailing Brush Set
- Top coat: Revlon Quick Dry Top Coat
Creating the Look:
-
- Apply a base coat to all nails to ensure a smooth application and protect your nails.
- Paint each nail with a different color, applying two coats for full coverage.
- Use fine detailing brushes to paint delicate floral patterns on each nail with black polish.
- Add gold foil accents to the floral designs for a touch of glamour.
- Finish with a top coat to seal the design and add a glossy finish.
Royal Matte Burgundy with Gold Foil
This stunning nail design features a rich, matte burgundy base adorned with luxurious gold foil accents. The combination of deep, velvety burgundy and the glimmering gold foil creates an opulent and sophisticated look perfect for the fall season. The sharp, stiletto shape adds an edgy touch, making this design ideal for those who want to make a bold statement with their nails.
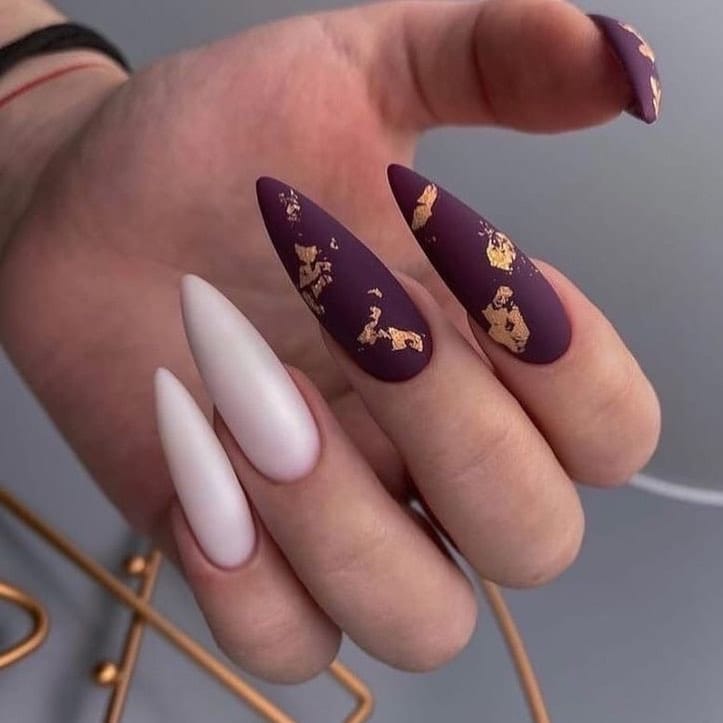
Consumables:
-
- Base coat: OPI Matte Nail Envy
- Burgundy polish: Essie “Bahama Mama”
- Gold foil: Born Pretty Gold Foil
- Top coat: Essie Matte About You Matte Finisher
- Nail art tweezers: Tweezerman Nail Art Tweezers
Creating the Look:
-
- Apply a matte base coat to all nails.
- Paint the nails with two coats of burgundy polish, allowing each coat to dry thoroughly.
- Use tweezers to apply gold foil accents to the desired areas on the nails.
- Finish with a matte top coat to seal the design and maintain the matte finish.
Warm Mustard Yellow with Leaf Accents
Embrace the warmth of fall with this vibrant mustard yellow nail design. The rich yellow shade is complemented by delicate leaf accents on a few nails, adding a touch of nature-inspired elegance. This design is perfect for autumn, capturing the essence of falling leaves and golden hues.
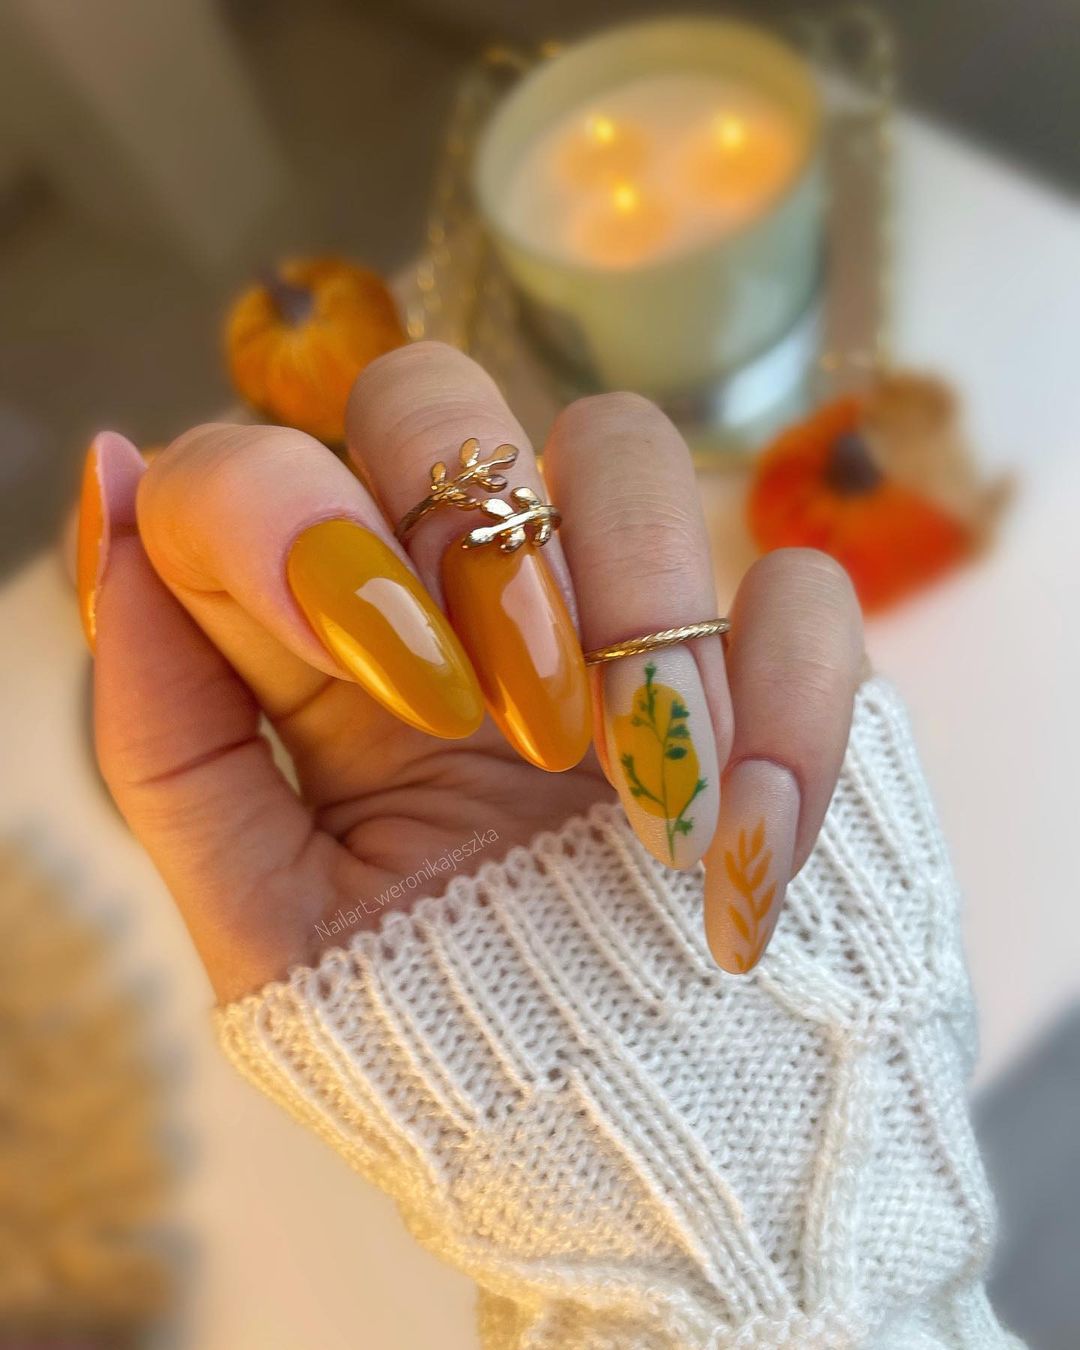
Consumables:
-
- Base coat: Sally Hansen Hard as Nails
- Mustard yellow polish: OPI “Sun, Sea, and Sand in My Pants”
- White polish: Essie “Blanc”
- Nail art pens: Sally Hansen I Heart Nail Art Pens
- Top coat: Revlon Quick Dry Top Coat
Creating the Look:
-
- Start with a base coat to protect your nails.
- Apply two coats of mustard yellow polish on most nails, and paint the accent nails with white polish.
- Use nail art pens to draw leaf patterns on the accent nails.
- Finish with a top coat to seal the design and add a glossy finish.
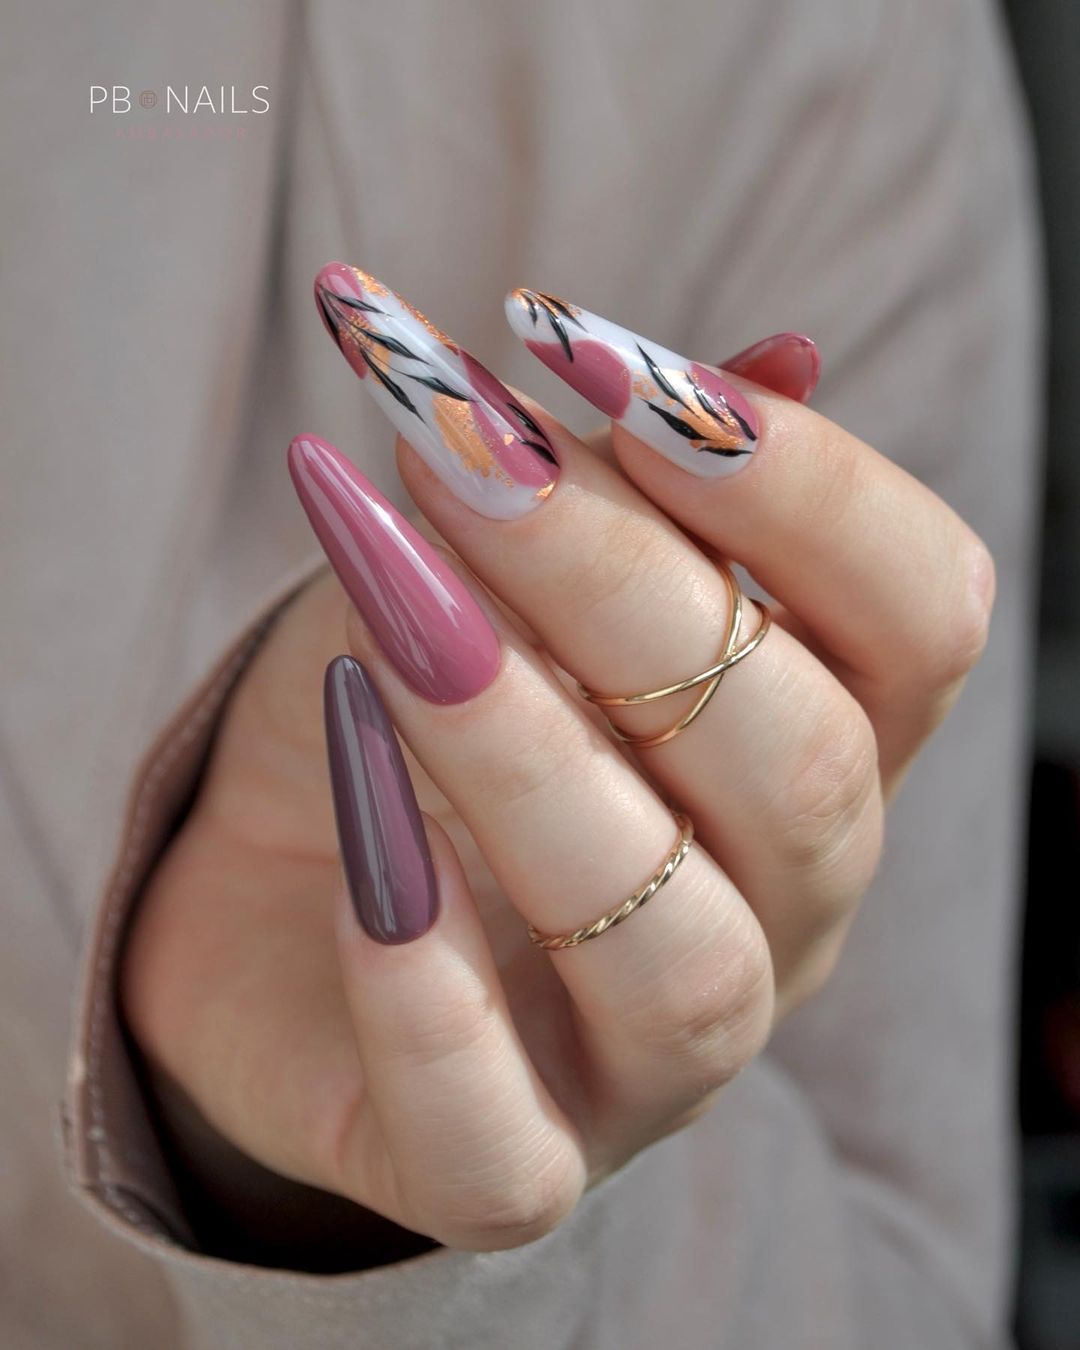
Mauve and Rose Gold Elegance
This chic nail design combines various shades of mauve and rose gold accents to create a sophisticated and trendy look. The gradient effect and delicate gold detailing make this design stand out, perfect for adding a touch of elegance to your fall style.
Consumables:
-
- Base coat: Deborah Lippmann Gel Lab Base Coat
- Mauve polish: Zoya “Rue”
- Rose gold foil: INM Northern Lights Hologram Top Coat
- Nail art brushes: Winstonia Fine Detailing Brush Set
- Top coat: Seche Vite Dry Fast Top Coat
Creating the Look:
-
- Apply a base coat to all nails.
- Paint the nails with two coats of mauve polish, varying the shades on different nails.
- Use fine detailing brushes to apply rose gold foil accents.
- Finish with a top coat to seal the design and add shine.
Save Pin

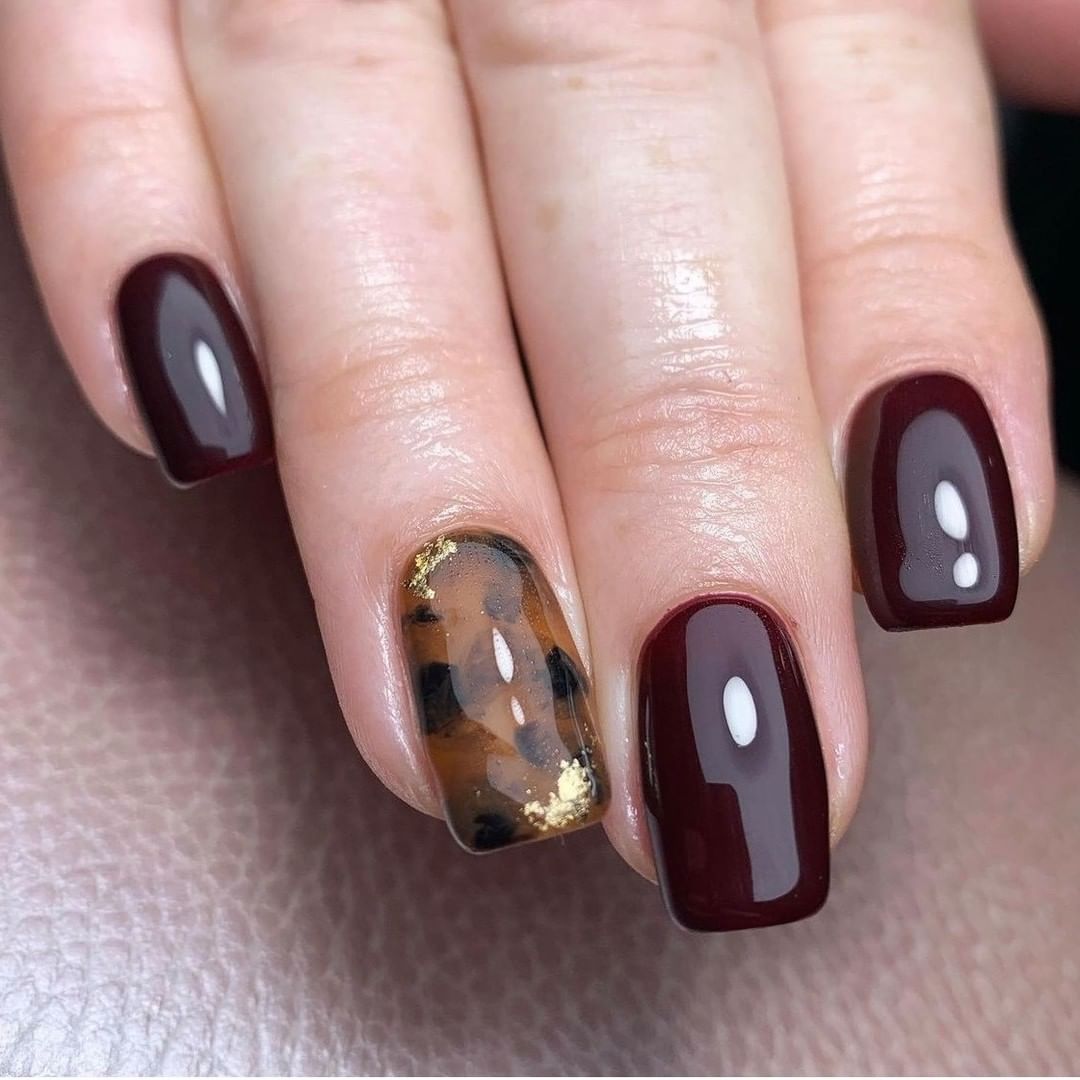
Burgundy with Tortoiseshell Accent
This classic nail design features a deep burgundy base with a striking tortoiseshell accent nail. The combination of rich color and intricate pattern creates a sophisticated and timeless look, perfect for any autumn occasion.
Consumables:
-
- Base coat: OPI Natural Nail Base Coat
- Burgundy polish: Essie “Bordeaux”
- Tortoiseshell polish: Sally Hansen Insta-Dri “Toasted Almond”
- Nail art brush: Winstonia Fine Detailing Brush
- Top coat: Revlon Quick Dry Top Coat
Creating the Look:
-
- Apply a base coat to all nails.
- Paint the nails with two coats of burgundy polish, leaving one accent nail.
- Use the tortoiseshell polish to create the pattern on the accent nail, using a fine detailing brush.
- Finish with a top coat to seal the design and add a glossy finish.
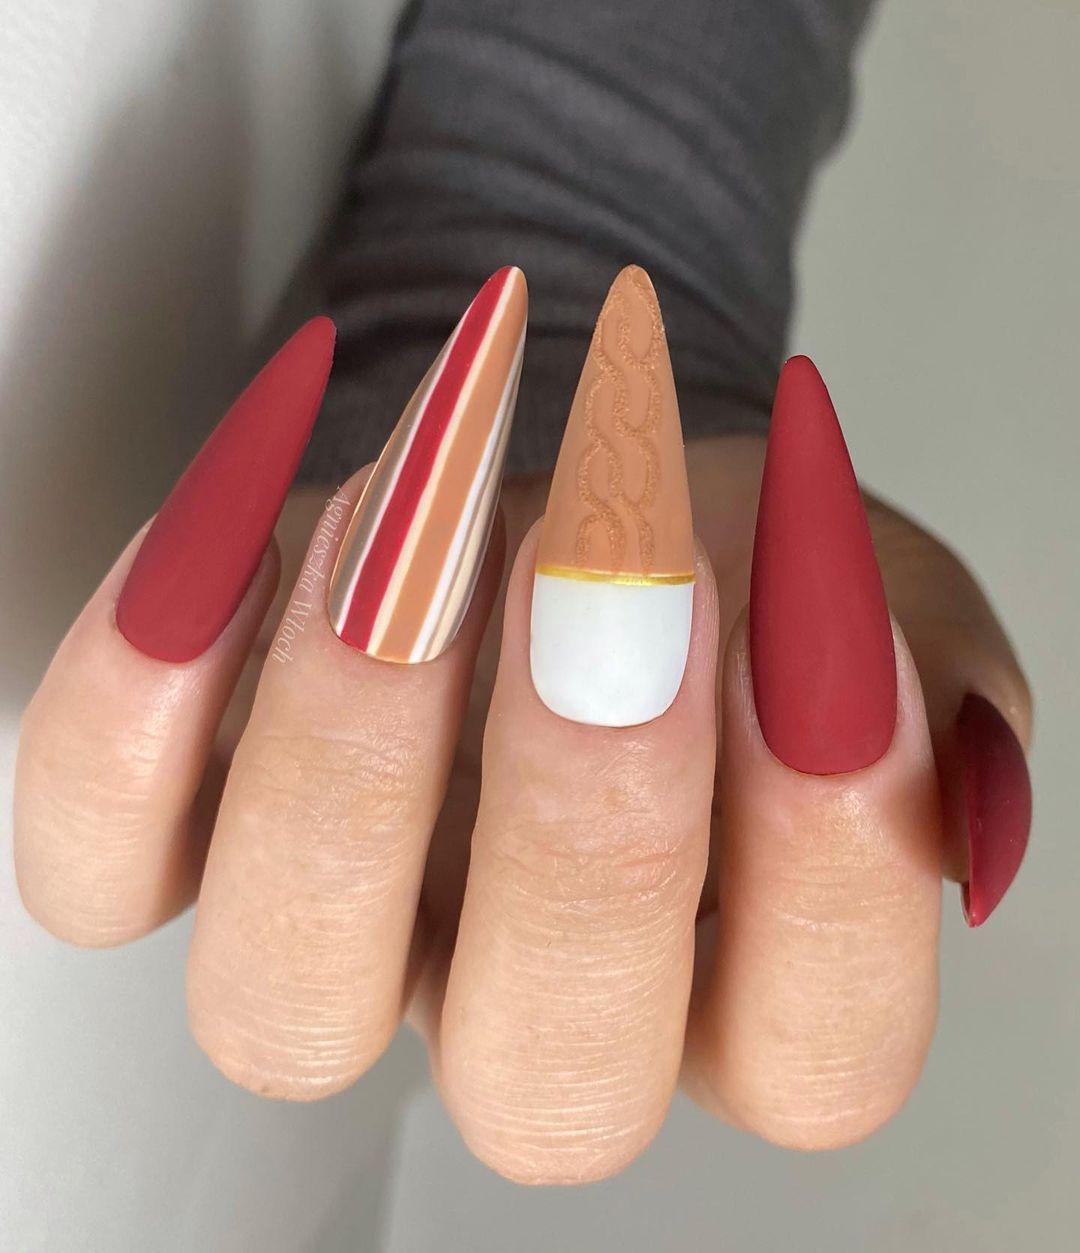
Cozy Sweater Nail Art
This cozy and stylish nail design mimics the texture and warmth of a knitted sweater. The combination of warm red and orange hues with intricate patterns creates a perfect fall look that is both trendy and comforting.
Consumables:
-
- Base coat: Sally Hansen Hard as Nails
- Red polish: OPI “Big Apple Red”
- Orange polish: Essie “Playing Koi”
- White polish: China Glaze “White on White”
- Nail art brushes: Winstonia Fine Detailing Brush Set
- Top coat: Essie Matte About You Matte Finisher
Creating the Look:
-
- Apply a base coat to all nails.
- Paint the nails with two coats of red and orange polish, alternating as desired.
- Use fine detailing brushes to paint the sweater patterns with white polish.
- Finish with a matte top coat to achieve a cozy, fabric-like finish.
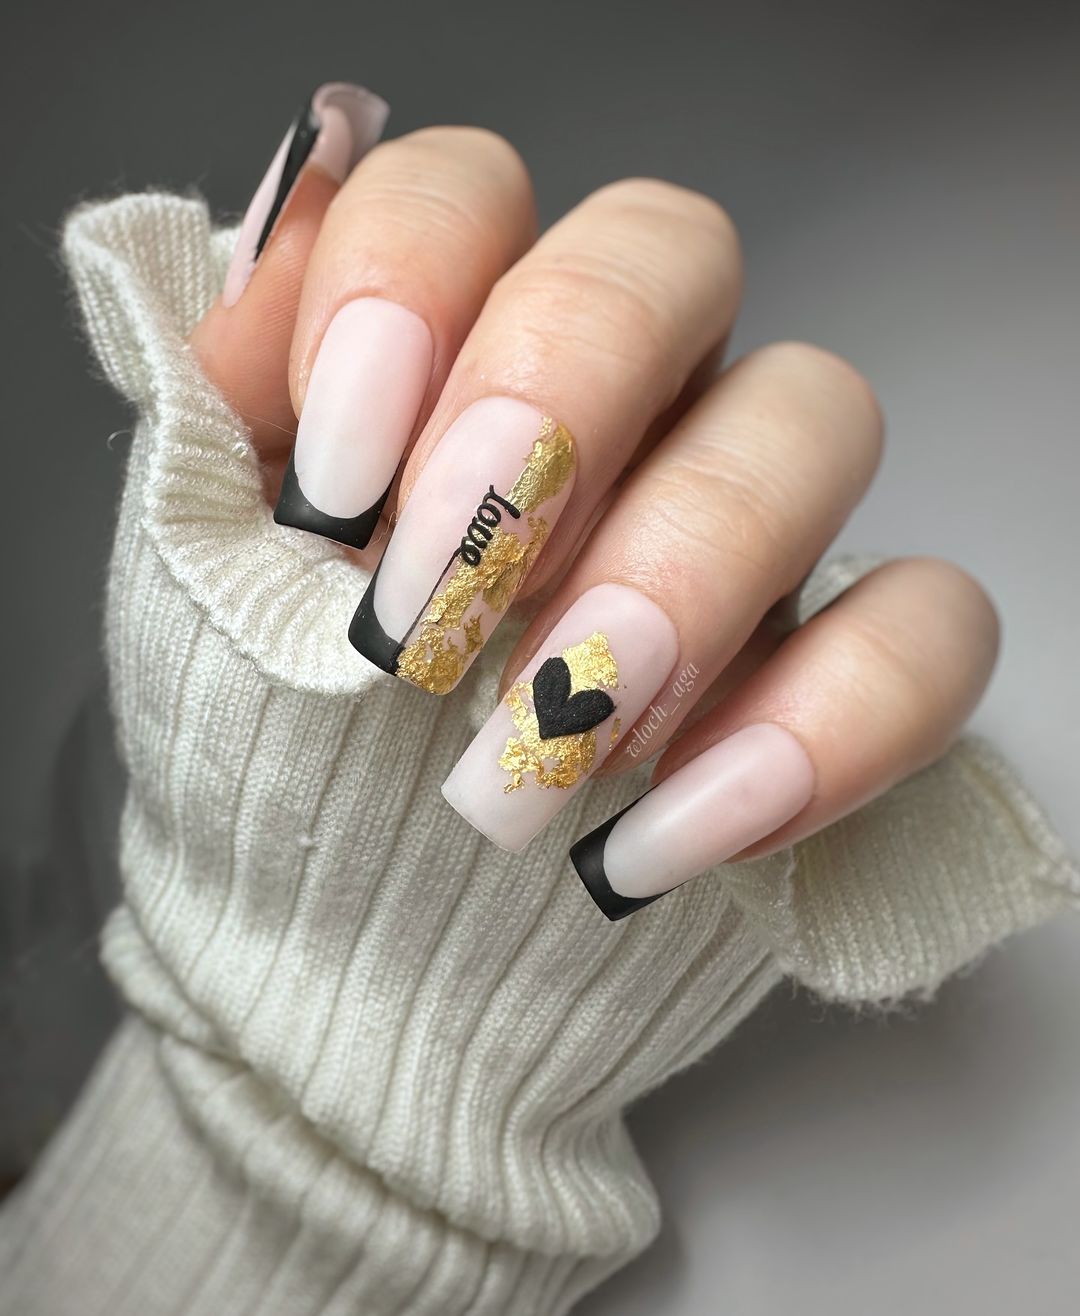
Black and Gold French Tips
This elegant nail design features classic French tips with a modern twist. The black tips and gold foil accents create a sophisticated and luxurious look, perfect for adding a touch of glamour to your fall style.
Consumables:
-
- Base coat: OPI Natural Nail Base Coat
- Black polish: Essie “Licorice”
- Gold foil: Born Pretty Gold Foil
- Nail art brush: Winstonia Fine Detailing Brush
- Top coat: Seche Vite Dry Fast Top Coat
Creating the Look:
-
- Apply a base coat to all nails.
- Paint the tips of the nails with black polish, creating a French tip effect.
- Apply gold foil accents to the nails for a touch of luxury.
- Finish with a top coat to seal the design and add shine.
Pastel Purple Floral Sweater Nails
This delightful design features a pastel purple base with intricate floral and sweater patterns. The combination of delicate flowers and cozy sweater textures creates a charming and whimsical look, perfect for the transition from summer to fall. The mix of textures and patterns adds depth and interest, making this design a standout.
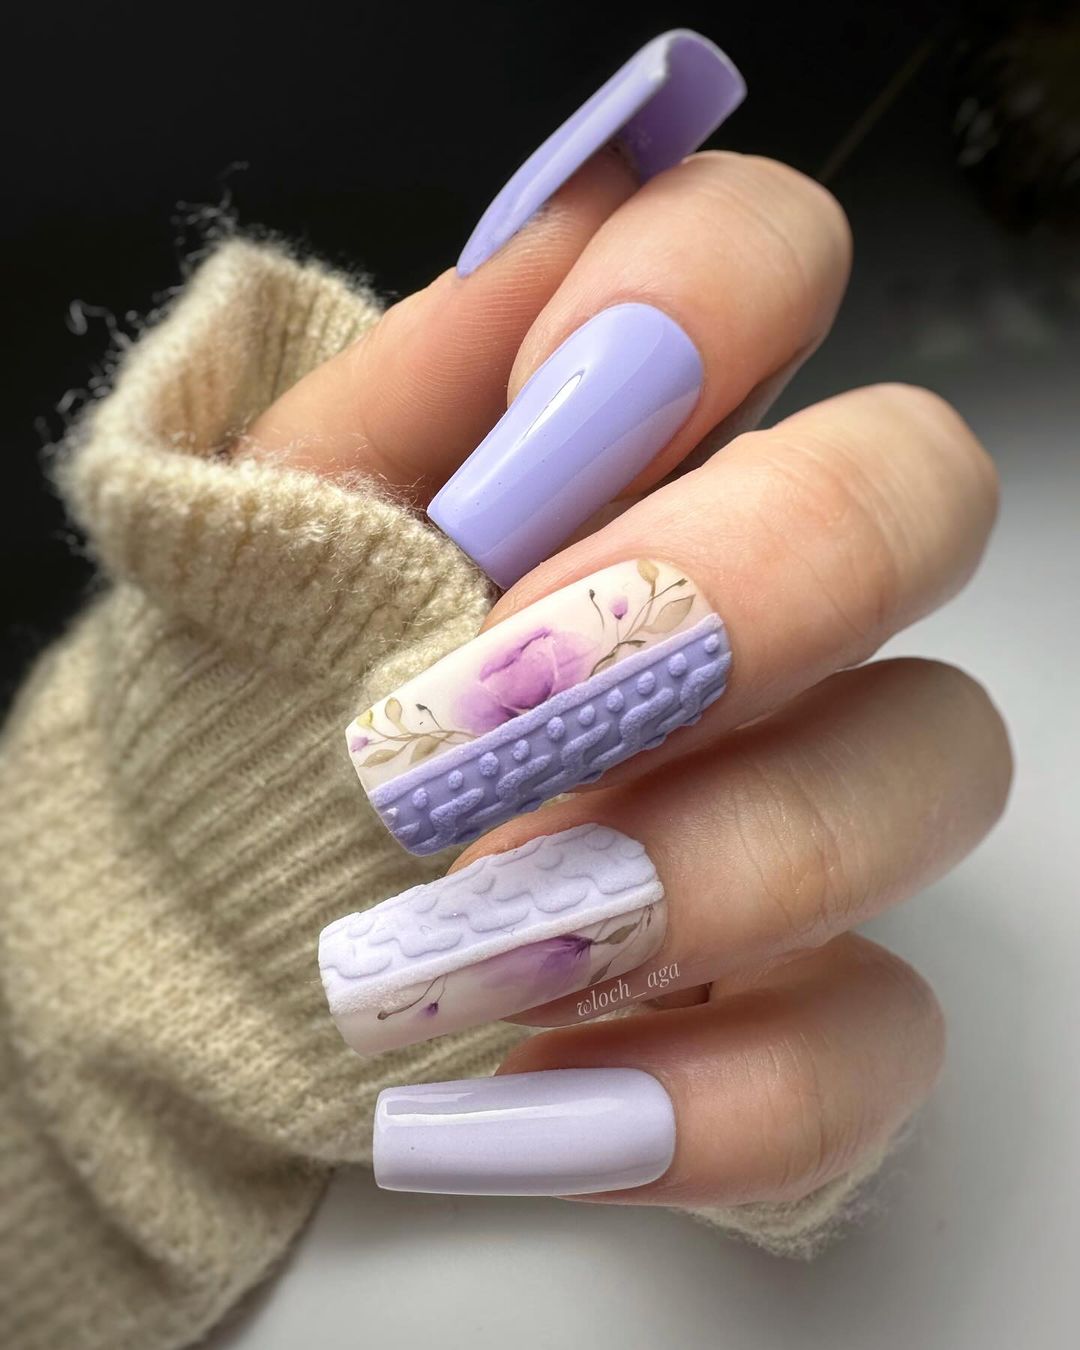
Consumables:
-
- Base coat: OPI Natural Nail Base Coat
- Pastel purple polish: Essie “Lilacism”
- White polish: China Glaze “White on White”
- Nail art brushes: Winstonia Fine Detailing Brush Set
- Sweater texture powder: Young Nails Acrylic Powder
- Top coat: Seche Vite Dry Fast Top Coat
Creating the Look:
-
- Apply a base coat to all nails.
- Paint the nails with two coats of pastel purple polish.
- Use fine detailing brushes to paint the floral patterns with white polish.
- For the sweater texture, apply acrylic powder on top of the wet polish to create a 3D effect.
- Finish with a top coat to seal the design and add shine.
Halloween Ghost and Spider Web Nails
Embrace the spooky season with this fun and festive Halloween nail design. Featuring a cute ghost, spider webs, and stitched patterns, this look is perfect for celebrating Halloween. The gradient orange and black colors add a dramatic flair, making this design both playful and eerie.
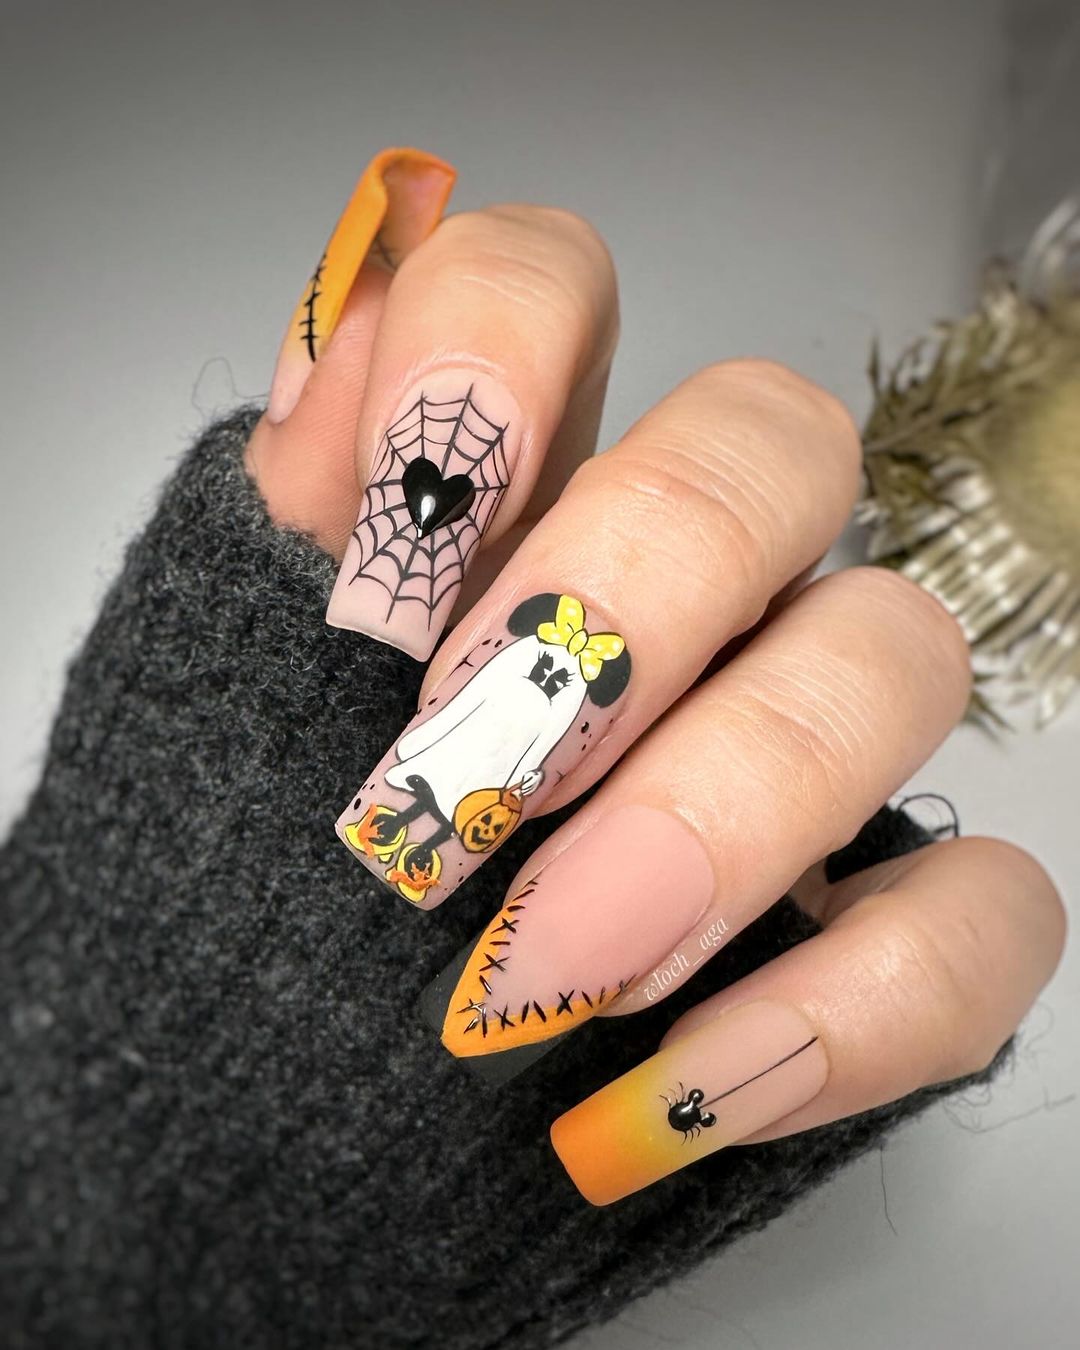
Consumables:
-
- Base coat: Sally Hansen Hard as Nails
- Orange polish: OPI “A Good Man-darin is Hard to Find”
- Black polish: Essie “Licorice”
- White polish: China Glaze “White on White”
- Nail art pens: Sally Hansen I Heart Nail Art Pens
- Top coat: Revlon Quick Dry Top Coat
Creating the Look:
-
- Start with a base coat to protect your nails.
- Apply two coats of orange polish on most nails, and use black polish for the spider web nail.
- Use nail art pens to draw the ghost, spider webs, and stitched patterns.
- Finish with a top coat to seal the design and add a glossy finish.
Mystical Moth and Moon Nails
This enchanting design features mystical moths, a crescent moon, and a dreamy night sky theme. The muted beige base color provides a perfect canvas for the intricate black and gold details. This design is perfect for those who love a touch of magic and mystery in their nail art.
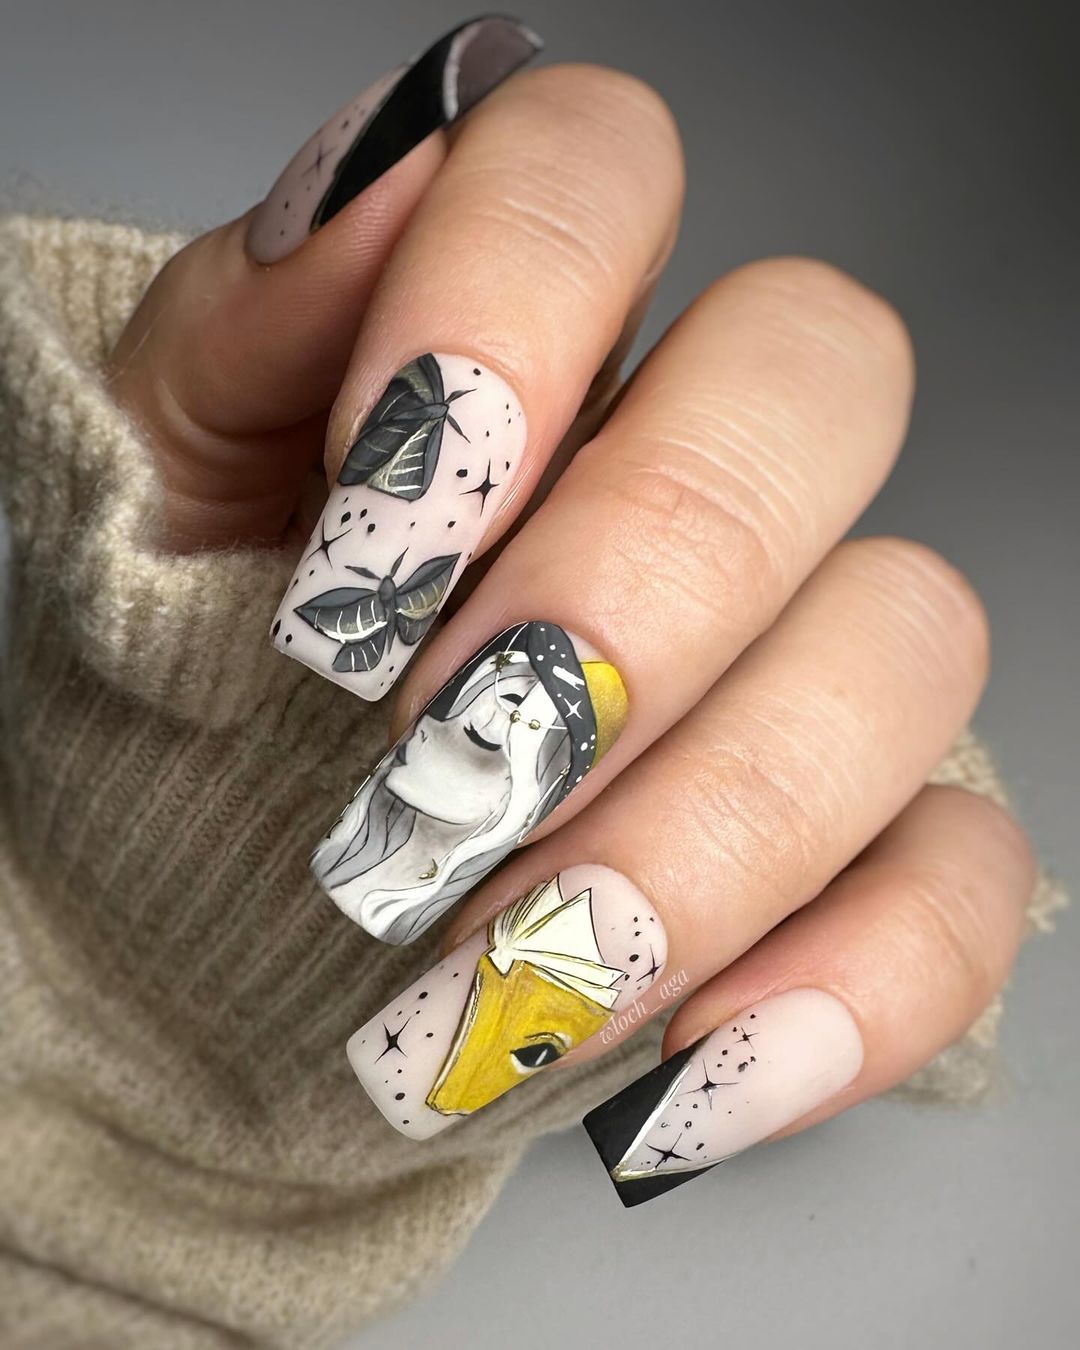
Consumables:
-
- Base coat: Deborah Lippmann Gel Lab Base Coat
- Beige polish: Zoya “Chantal”
- Black polish: Essie “Licorice”
- Gold polish: OPI “Glitzerland”
- Nail art brushes: Winstonia Fine Detailing Brush Set
- Top coat: Seche Vite Dry Fast Top Coat
Creating the Look:
-
- Apply a base coat to all nails.
- Paint the nails with two coats of beige polish.
- Use fine detailing brushes to paint the moths, moon, and night sky patterns with black and gold polishes.
- Finish with a top coat to seal the design and add shine.
Cute Ghost and Bat Halloween Nails
Celebrate Halloween with this adorable ghost and bat nail design. The nude base color makes the black and red details pop, creating a fun and festive look. The mix of cute and spooky elements makes this design perfect for Halloween parties or simply getting into the holiday spirit.
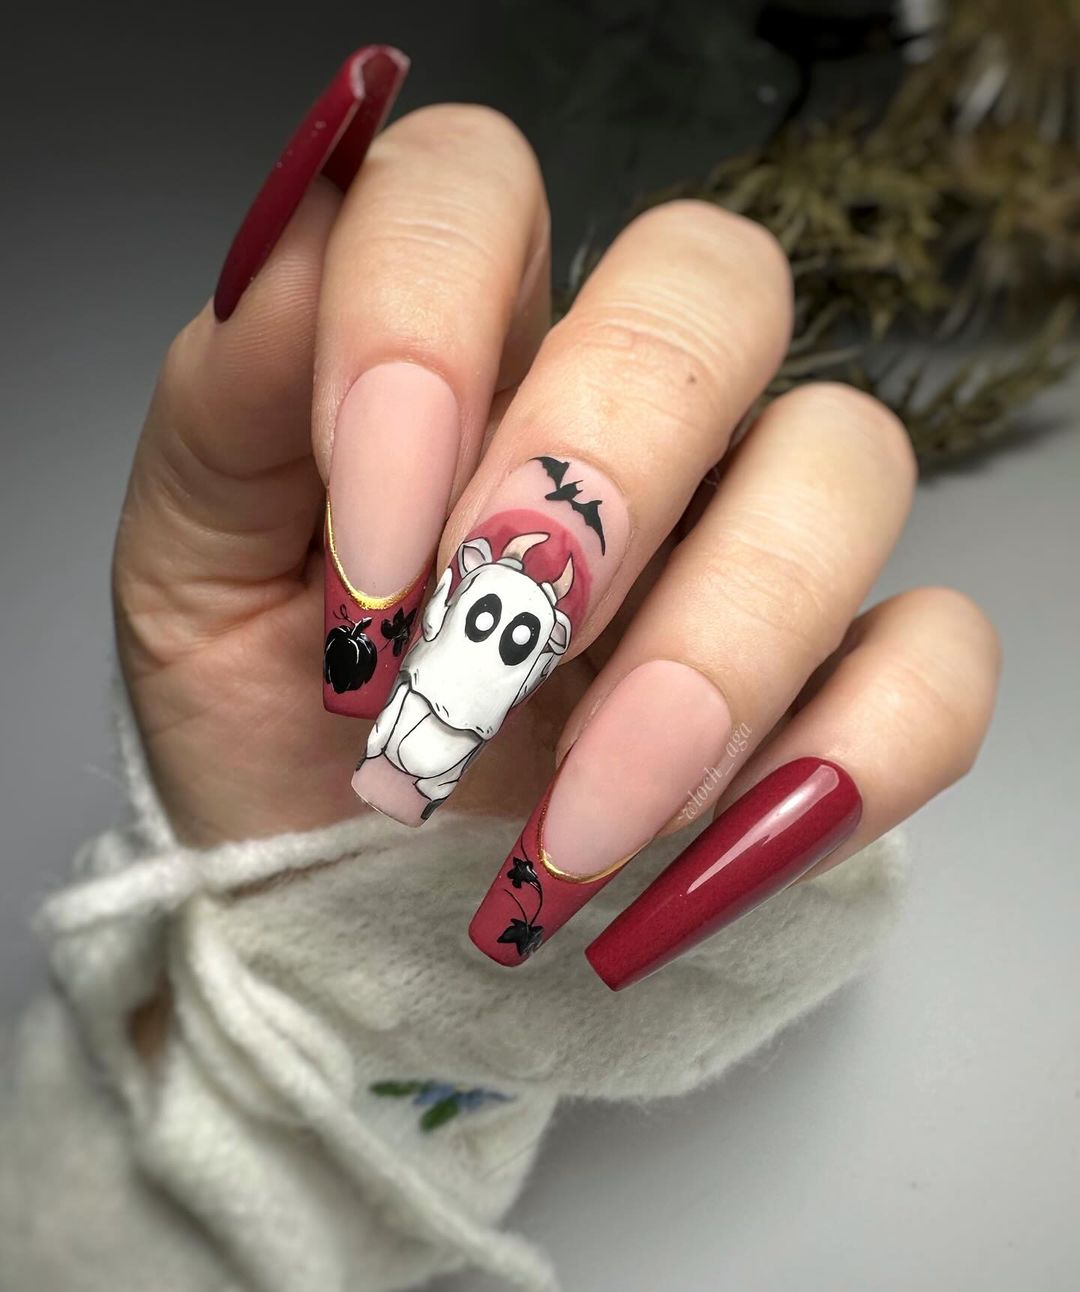
Consumables:
-
- Base coat: OPI Natural Nail Base Coat
- Nude polish: Essie “Ballet Slippers”
- Black polish: China Glaze “Liquid Leather”
- Red polish: OPI “Big Apple Red”
- Nail art brushes: Winstonia Fine Detailing Brush Set
- Top coat: Revlon Quick Dry Top Coat
Creating the Look:
-
- Apply a base coat to all nails.
- Paint the nails with two coats of nude polish.
- Use fine detailing brushes to paint the ghost, bats, and other Halloween motifs with black and red polishes.
- Finish with a top coat to seal the design and add a glossy finish.
Purple Ombre with Autumn Leaves
This stunning design features a gradient purple ombre with intricate autumn leaf patterns. The combination of soft purple tones and detailed leaf motifs creates a beautiful and elegant fall look. The addition of water droplets adds a touch of realism and depth to the design.
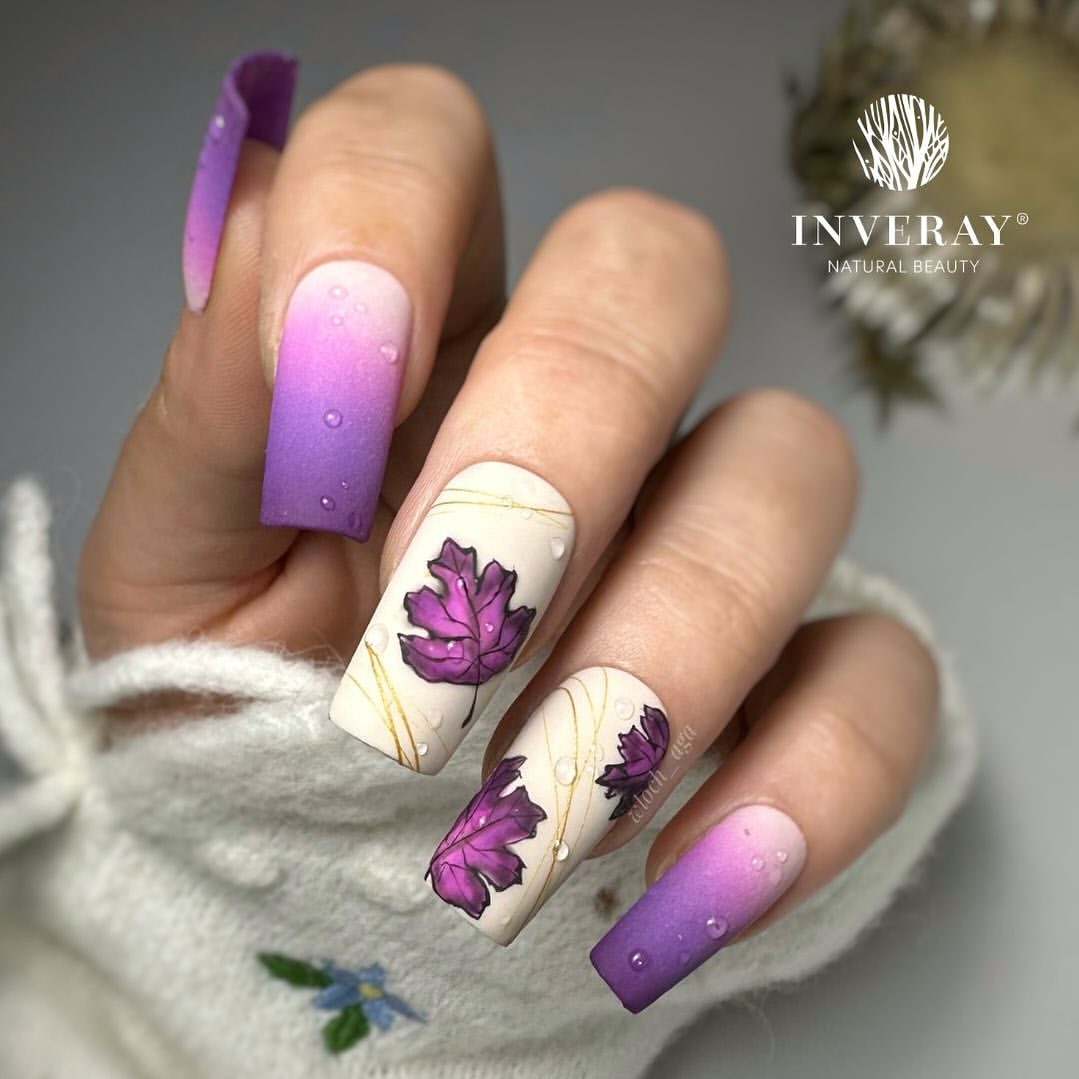
Consumables:
-
- Base coat: Sally Hansen Hard as Nails
- Purple polish: OPI “Do You Lilac It?”
- White polish: China Glaze “White on White”
- Nail art brushes: Winstonia Fine Detailing Brush Set
- Top coat: Essie Gel Couture Top Coat
Creating the Look:
-
- Apply a base coat to all nails.
- Create a gradient effect by blending purple polish from the cuticle to the tip.
- Use fine detailing brushes to paint the autumn leaf patterns with white polish.
- Add water droplet details using clear top coat for a 3D effect.
- Finish with a top coat to seal the design and add shine.
Creamy Halloween Ghost Nails
This creamy Halloween nail design features cute ghosts, autumn leaves, and a crescent moon on a soft cream base. The delicate black and gold details add a touch of elegance, making this design perfect for those who want a more subtle yet festive Halloween look.
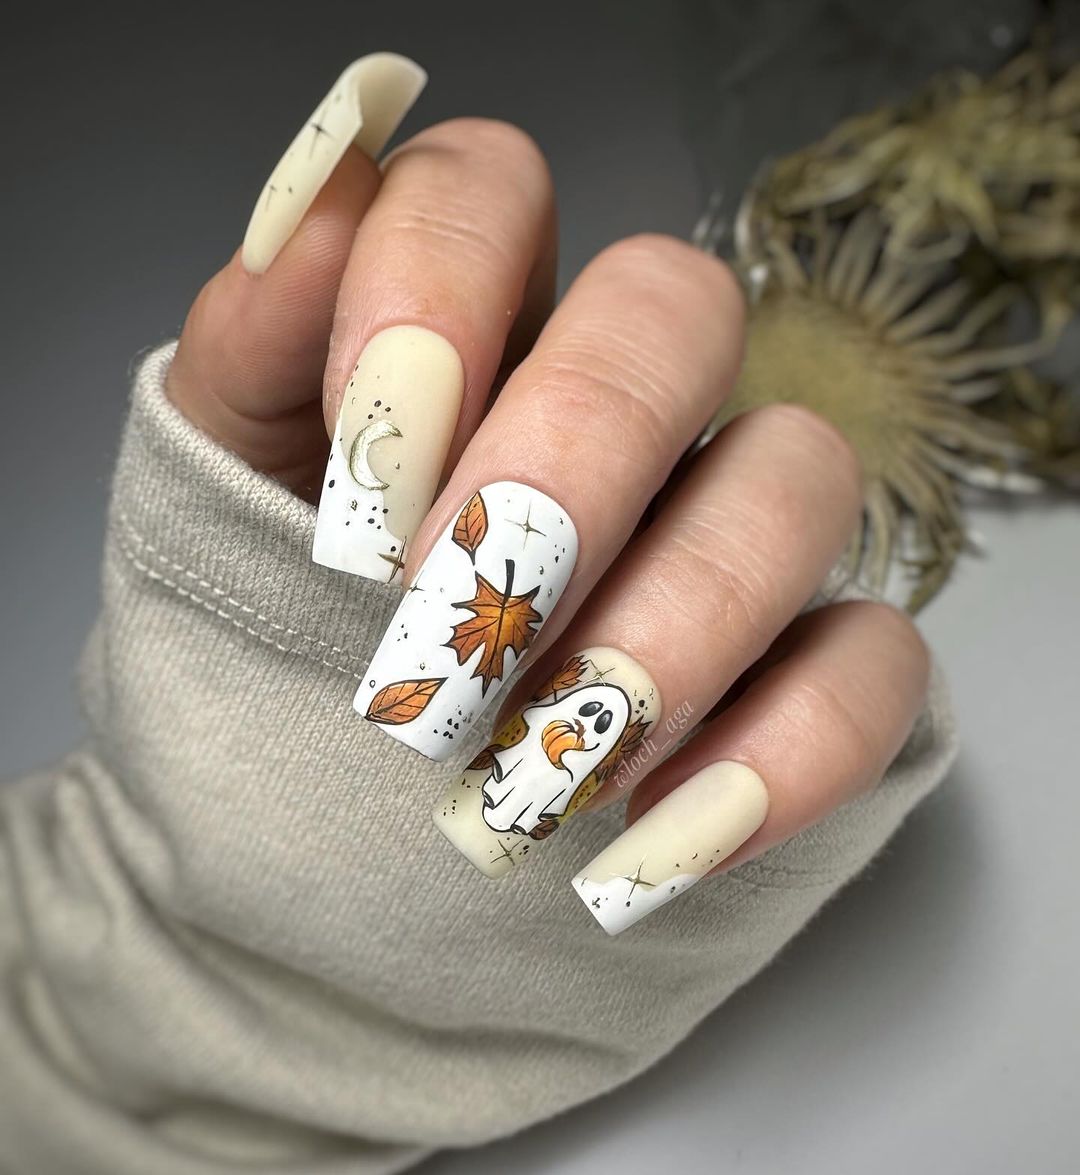
Consumables:
-
- Base coat: Deborah Lippmann Gel Lab Base Coat
- Cream polish: OPI “My Vampire is Buff”
- Black polish: Essie “Licorice”
- Gold polish: OPI “Glitzerland”
- Nail art brushes: Winstonia Fine Detailing Brush Set
- Top coat: Seche Vite Dry Fast Top Coat
Creating the Look:
-
- Apply a base coat to all nails.
- Paint the nails with two coats of cream polish.
- Use fine detailing brushes to paint the ghosts, leaves, and moon with black and gold polishes.
- Finish with a top coat to seal the design and add shine.
Spooky Yellow Halloween Nails
This playful yet eerie design features a yellow base with a spooky face and flying bats. The contrasting black details create a striking look perfect for Halloween. The gradient effect on some nails adds depth, making this design both fun and sophisticated for the spooky season.
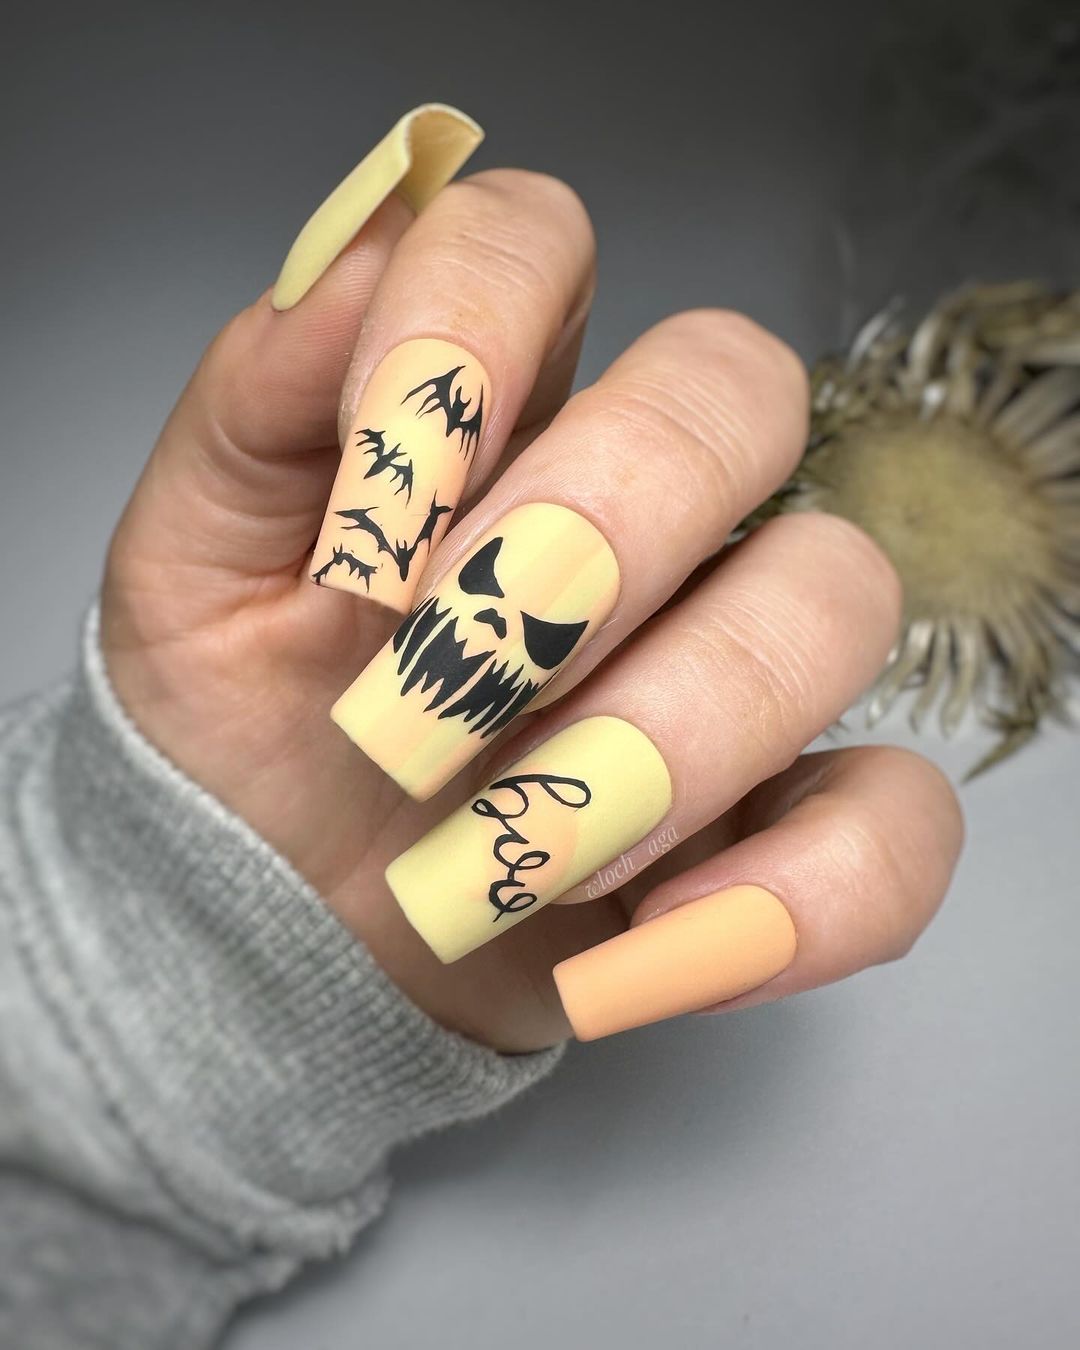
Consumables:
-
- Base coat: OPI Natural Nail Base Coat
- Yellow polish: Essie “Sunny Business”
- Black polish: China Glaze “Liquid Leather”
- Nail art pens: Sally Hansen I Heart Nail Art Pens
- Top coat: Seche Vite Dry Fast Top Coat
Creating the Look:
-
- Apply a base coat to protect your nails.
- Paint the nails with two coats of yellow polish.
- Use nail art pens to draw the spooky face and bats.
- Finish with a top coat to seal the design and add a glossy finish.
Elegant Leopard Print Nails
This sophisticated design combines a nude base with chic leopard print accents. The addition of gold foil adds a touch of luxury, while the minimalist approach keeps the design elegant and wearable for any occasion.
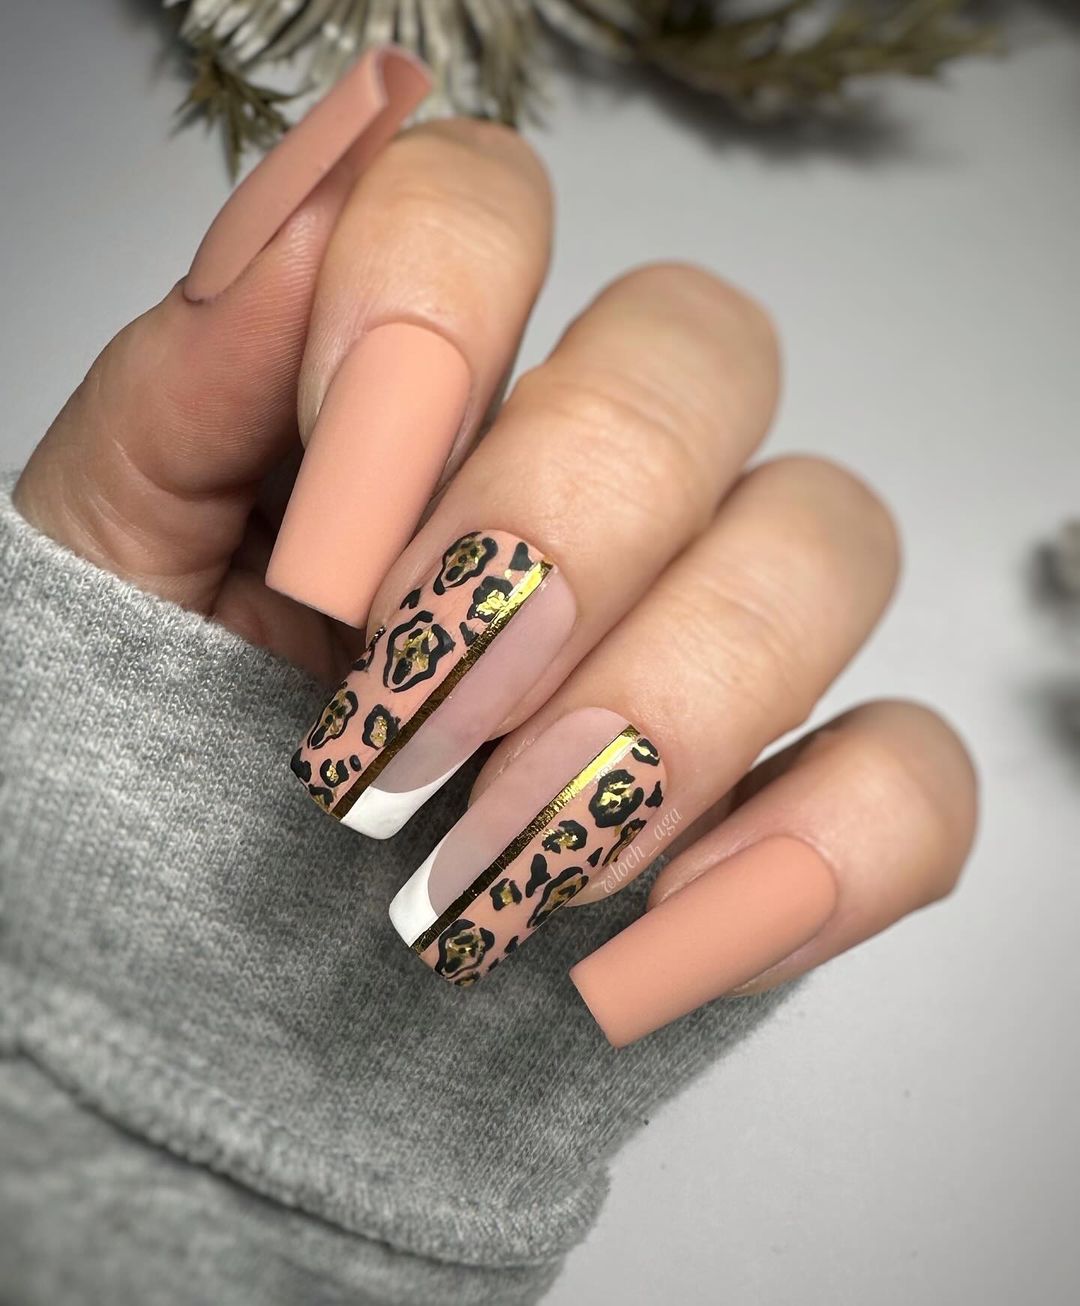
Consumables:
-
- Base coat: Deborah Lippmann Gel Lab Base Coat
- Nude polish: OPI “Dulce de Leche”
- Black polish: Essie “Licorice”
- Gold foil: Born Pretty Gold Foil
- Top coat: Revlon Quick Dry Top Coat
Creating the Look:
-
- Apply a base coat to all nails.
- Paint the nails with two coats of nude polish.
- Use fine detailing brushes to create the leopard print with black polish and add gold foil accents.
- Finish with a top coat to seal the design and add shine.
Sage Green Autumn Leaves Nails
This calming design features a sage green base with delicate leaf accents. The soft, matte finish gives a natural and earthy vibe, perfect for embracing the autumn season. The detailed leaf patterns add a touch of elegance and sophistication to the look.
Consumables:
-
- Base coat: Sally Hansen Hard as Nails
- Sage green polish: Essie “Sew Psyched”
- White polish: China Glaze “White on White”
- Nail art pens: Sally Hansen I Heart Nail Art Pens
- Top coat: Essie Matte About You Matte Finisher
Creating the Look:
-
- Apply a base coat to all nails.
- Paint the nails with two coats of sage green polish.
- Use nail art pens to draw the leaf patterns.
- Finish with a matte top coat to achieve a natural, earthy finish.
Marble Green and Gold Nails
This luxurious design features a marble effect with green and gold accents. The combination of rich green and shimmering gold creates an opulent look, perfect for those who love a touch of elegance in their nail art. The matte finish adds a modern twist to this classic design.

Consumables:
-
- Base coat: OPI Natural Nail Base Coat
- Green polish: Zoya “Gemma”
- White polish: Essie “Blanc”
- Gold polish: OPI “Glitzerland”
- Nail art brushes: Winstonia Fine Detailing Brush Set
- Top coat: Essie Matte About You Matte Finisher
Creating the Look:
-
- Apply a base coat to all nails.
- Create a marble effect by blending green, white, and gold polishes on a palette and applying them with a brush.
- Use fine detailing brushes to enhance the marble effect with gold polish.
- Finish with a matte top coat to seal the design and add a sophisticated finish.
Yellow and Green Autumn Leaves Nails
This vibrant design features a combination of yellow and green polishes with detailed leaf patterns. The contrast between the bright yellow and deep green creates a striking look, perfect for showcasing the beauty of fall foliage on your nails.
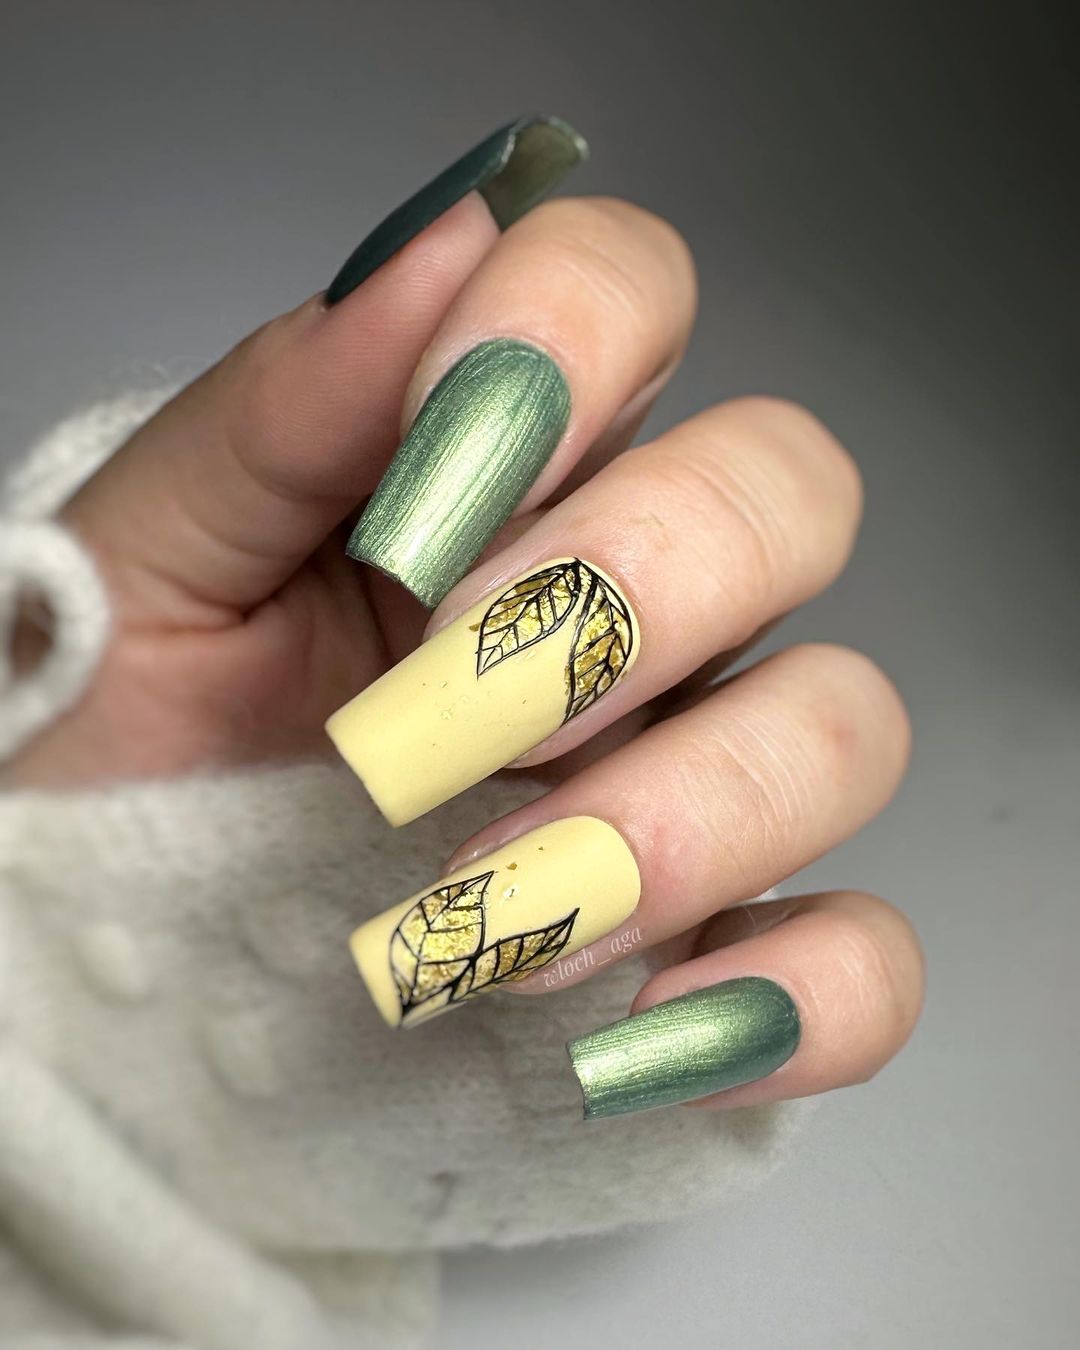
Consumables:
-
- Base coat: Deborah Lippmann Gel Lab Base Coat
- Yellow polish: OPI “Sun, Sea, and Sand in My Pants”
- Green polish: Zoya “Tilda”
- Black polish: Essie “Licorice”
- Gold foil: Born Pretty Gold Foil
- Nail art brushes: Winstonia Fine Detailing Brush Set
- Top coat: Seche Vite Dry Fast Top Coat
Creating the Look:
-
- Apply a base coat to all nails.
- Paint the nails with two coats of yellow and green polishes, alternating as desired.
- Use fine detailing brushes to paint the leaf patterns with black polish and add gold foil accents.
- Finish with a top coat to seal the design and add shine.
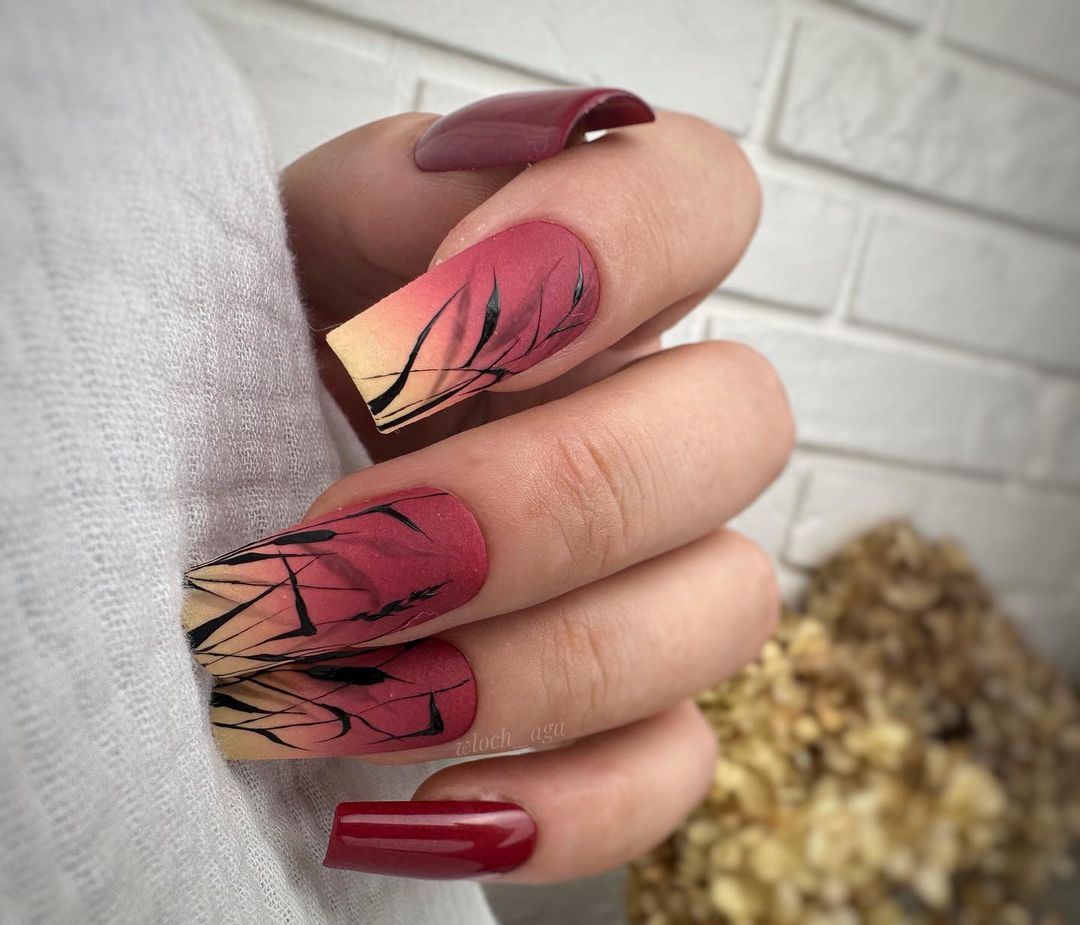
Deep Red and White Feather Nails
This elegant design features deep red nails with a single white accent nail adorned with a delicate feather pattern. The combination of bold red and soft white creates a stunning contrast, making this design perfect for those who love a sophisticated and artistic look.
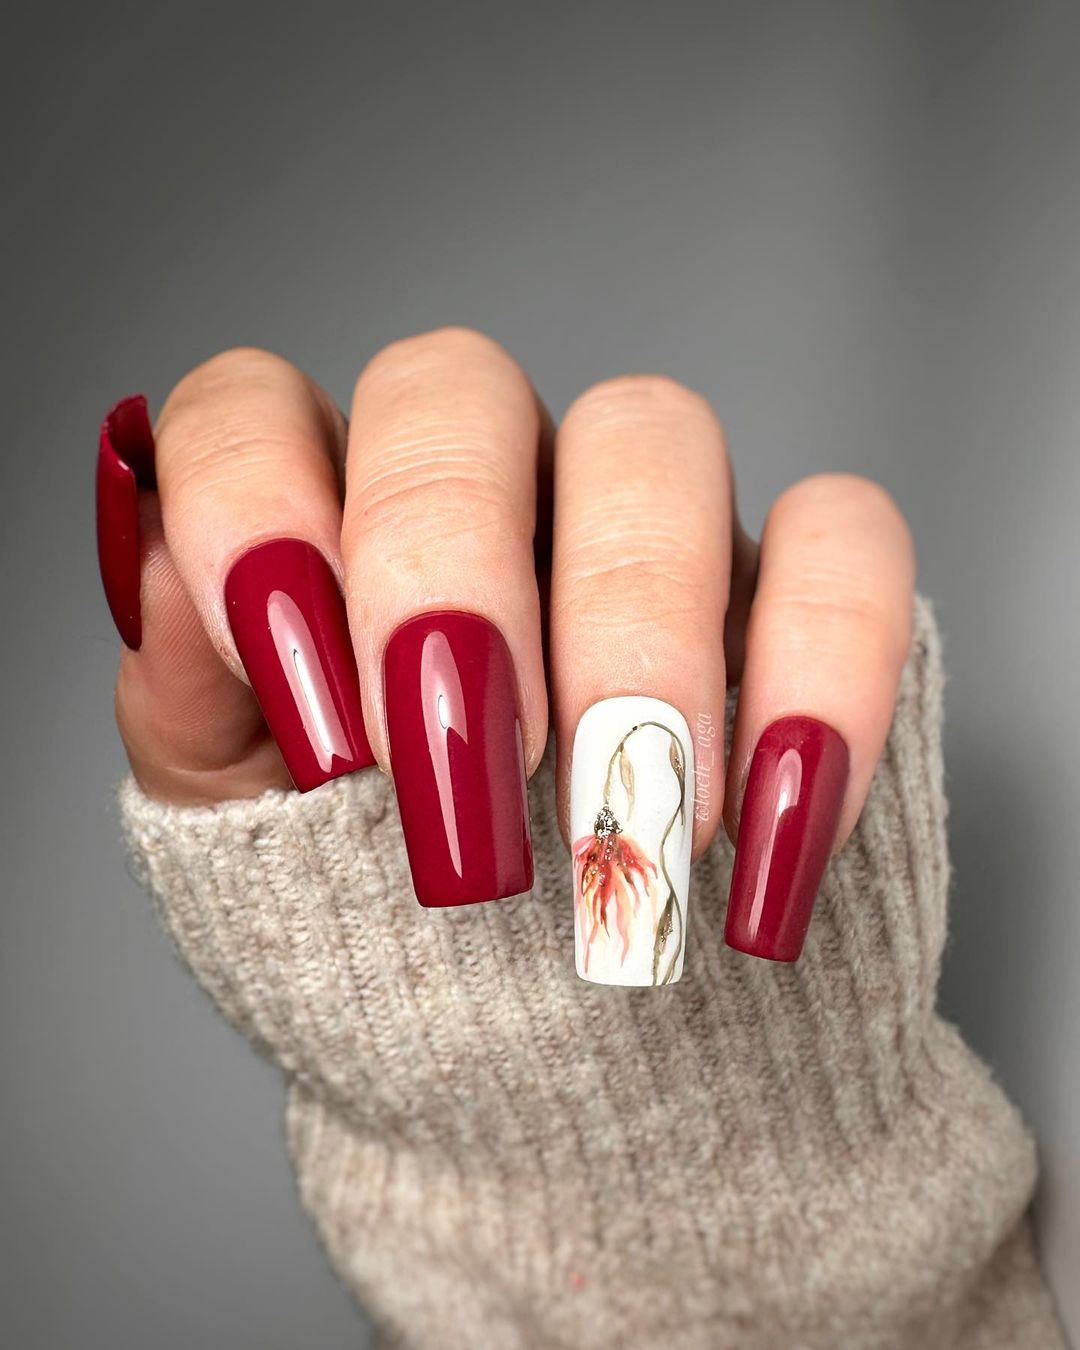
Consumables:
-
- Base coat: Sally Hansen Hard as Nails
- Red polish: OPI “Malaga Wine”
- White polish: China Glaze “White on White”
- Nail art brushes: Winstonia Fine Detailing Brush Set
- Top coat: Revlon Quick Dry Top Coat
Creating the Look:
-
- Apply a base coat to all nails.
- Paint the nails with two coats of red polish, leaving one accent nail.
- Paint the accent nail with two coats of white polish.
- Use fine detailing brushes to paint the feather pattern on the accent nail.
- Finish with a top coat to seal the design and add shine.
Sleek Black Lace Nails
This sophisticated design combines a matte black base with intricate lace patterns, creating a luxurious and edgy look. The subtle sheen of the lace against the matte background adds depth and texture, making this design perfect for a chic and mysterious style.
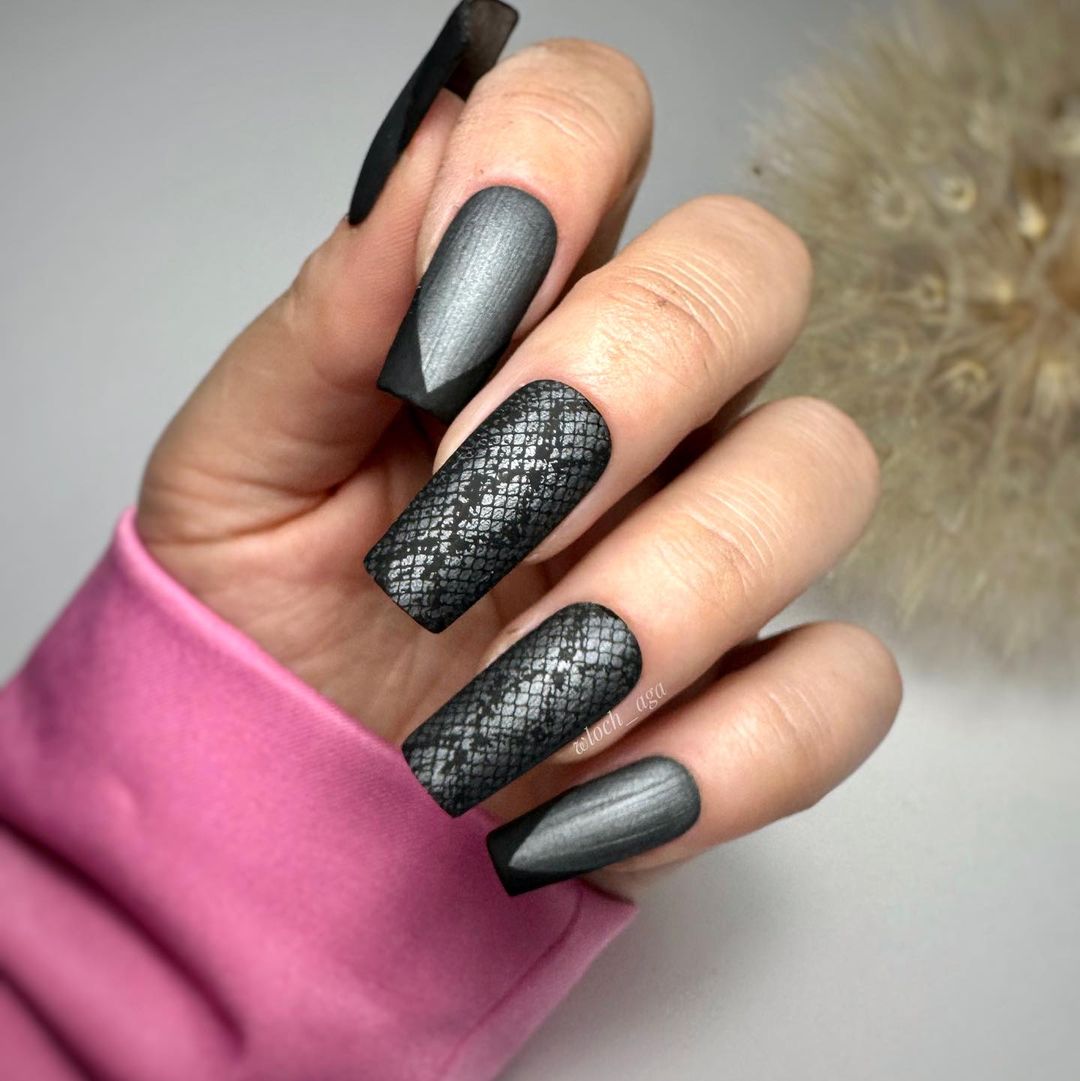
Consumables:
-
- Base coat: OPI Natural Nail Base Coat
- Black polish: Essie “Licorice”
- Matte top coat: Essie Matte About You Matte Finisher
- Lace stamping plate: Born Pretty Lace Nail Stamping Plate
- Stamping polish: Konad Stamping Polish Black
- Top coat: Seche Vite Dry Fast Top Coat
Creating the Look:
-
- Apply a base coat to all nails.
- Paint the nails with two coats of black polish.
- Apply a matte top coat for a smooth finish.
- Use the lace stamping plate and stamping polish to create the lace patterns on selected nails.
- Finish with a top coat to seal the design and add a slight sheen to the lace patterns.
Gradient Autumn Leaves Nails
This beautiful design captures the essence of autumn with a gradient of warm colors and delicate leaf patterns. The transition from deep red to soft beige creates a stunning ombre effect, while the black leaf accents add a touch of elegance and natural beauty.
Consumables:
-
- Base coat: Sally Hansen Hard as Nails
- Red polish: OPI “Malaga Wine”
- Beige polish: Essie “Sand Tropez”
- Black polish: China Glaze “Liquid Leather”
- Nail art brushes: Winstonia Fine Detailing Brush Set
- Sponge for gradient: Makeup Sponge
- Top coat: Revlon Quick Dry Top Coat
Creating the Look:
-
- Apply a base coat to protect your nails.
- Create a gradient effect by applying red and beige polish on a sponge and dabbing it onto the nails.
- Use fine detailing brushes to paint the leaf patterns with black polish.
- Finish with a top coat to seal the design and add a glossy finish.
Elegant French Manicure with Gold Accents
This classic French manicure is elevated with the addition of gold accents and delicate rhinestones. The nude base and white tips create a timeless look, while the gold detailing and sparkle add a touch of glamour and sophistication.
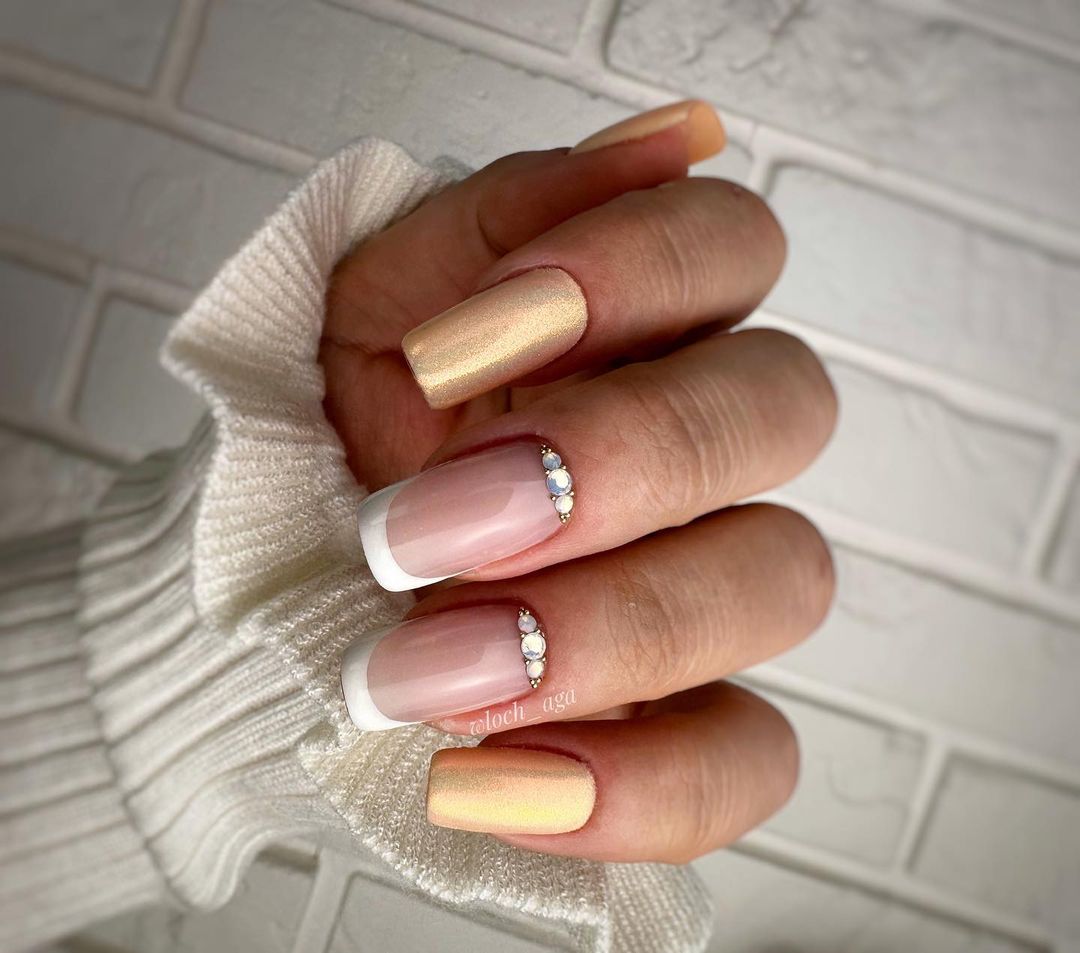
Consumables:
-
- Base coat: Deborah Lippmann Gel Lab Base Coat
- Nude polish: Essie “Ballet Slippers”
- White polish: OPI “Alpine Snow”
- Gold polish: OPI “Glitzerland”
- Rhinestones: Swarovski Nail Art Rhinestones
- Top coat: Seche Vite Dry Fast Top Coat
Creating the Look:
-
- Apply a base coat to all nails.
- Paint the nails with two coats of nude polish.
- Create the French tips using white polish.
- Add gold accents and rhinestones for a touch of luxury.
- Finish with a top coat to seal the design and add shine.
FAQ
Q: How can I make my fall gel nail designs last longer? A: Ensure you properly prep your nails by cleaning and buffing them before applying the base coat. Also, using a high-quality top coat will help protect the design and extend its lifespan.
Q: Can I achieve these designs with regular nail polish instead of gel? A: Yes, you can use regular nail polish, but the designs may not last as long. Gel polish is more durable and provides a shinier finish.
Q: What are some easy fall gel nail designs for beginners? A: Simple designs like a single autumn color with a glitter accent or basic leaf patterns are great for beginners. These designs are easy to achieve and still look fabulous.
Q: How do I remove gel polish without damaging my nails? A: Soak a cotton ball in acetone, place it on your nail, and wrap it with aluminum foil. Let it sit for 10-15 minutes, then gently push off the gel with a cuticle pusher. Always moisturize your nails and cuticles after removing gel polish.
Creating stunning fall nail designs doesn’t have to be complicated. With these tips and ideas, you’ll have your nails looking autumn-ready in no time. Happy nail designing!
Save Pin