27 Ideas for Fall Nail Colors 2024
Are you ready to elevate your nail game this fall season? As we transition into the cooler months, it’s time to explore the hottest nail trends that will dominate 2024. What shades will make a statement? How can you achieve salon-quality nails at home? Let’s dive into the latest trends and get your nails ready for the early fall.
Lavender Dream Nails
Lavender dream nails are perfect for anyone looking to add a touch of whimsy to their fall look. This design features a soft gradient of lavender hues with delicate white line accents, creating a dreamy, ethereal effect. The smooth transition of colors gives the nails a sophisticated yet playful vibe, ideal for early fall gatherings and events.

Consumables:
- Base Coat: Essie Here to Stay Base Coat
- Lavender Polish: OPI GelColor in “Do You Lilac It?”
- White Polish: DND Gel in “White 001”
- Top Coat: Seche Vite Dry Fast Top Nail Coat
- Nail Art Brush: Beetles Nail Art Brushes
Creating the Look:
- Prep Your Nails: Start with clean, trimmed nails. Apply the Essie base coat to protect your natural nails.
- Apply Lavender Base: Use OPI GelColor in “Do You Lilac It?” and apply two coats for an even, opaque finish. Cure under a UV lamp after each coat.
- Add White Accents: Using the DND Gel in “White 001” and a fine nail art brush, draw delicate lines across the nails to create a whimsical pattern. Cure under a UV lamp.
- Seal the Design: Finish with Seche Vite top coat to add shine and protect your design. Cure under a UV lamp for a long-lasting finish.
Golden Lace Elegance
Golden lace elegance nails bring a touch of luxury to your fall palette. This design features a combination of matte and glossy finishes, adorned with intricate golden lace patterns and a stunning gemstone accent. The use of soft pinks and bold golds makes this manicure perfect for special occasions.

Consumables:
- Base Coat: OPI Nail Envy Nail Strengthener
- Pink Polish: Essie Gel Couture in “Fairy Tailor”
- Gold Polish: DND Gel in “Gold 607”
- Gemstone Accent: Swarovski Crystals
- Top Coat: Sally Hansen Miracle Gel Top Coat
- Nail Art Tools: Maniology Stamping Kit
Creating the Look:
- Base Application: Apply OPI Nail Envy as a base coat to strengthen your nails.
- Pink Base: Apply Essie Gel Couture in “Fairy Tailor” and cure under a UV lamp.
- Golden Lace: Use DND Gel in “Gold 607” with a stamping kit to create the intricate lace pattern. Cure under a UV lamp.
- Add Gemstones: Carefully place Swarovski crystals on the accent nail using nail glue.
- Seal the Deal: Finish with Sally Hansen Miracle Gel Top Coat to secure the design and add a glossy finish. Cure under a UV lamp.
Pearlized Perfection
Pearlized perfection nails offer a chic and modern twist on the classic French manicure. This design uses a soft nude base with pearl white accents and delicate 3D pearls, making it perfect for both everyday wear and formal events.

Consumables:
- Base Coat: OPI GelColor Base Coat
- Nude Polish: Essie Gel Couture in “Sheer Fantasy”
- Pearl White Polish: DND Gel in “Pearl White 800”
- 3D Pearls: Pearl Nail Art Beads
- Top Coat: Seche Vive Instant Gel Effect Top Coat
- Nail Art Tools: Dotting Tool
Creating the Look:
- Base Layer: Start with the OPI GelColor base coat to protect your nails.
- Nude Base: Apply two coats of Essie Gel Couture in “Sheer Fantasy” and cure under a UV lamp.
- Pearl White Tips: Use DND Gel in “Pearl White 800” to create French tips. Cure under a UV lamp.
- Add 3D Pearls: Place pearl nail art beads along the cuticle line using a dotting tool and nail glue.
- Top Coat: Seal the design with Seche Vive Instant Gel Effect Top Coat for a high-gloss finish. Cure under a UV lamp.
Pretty in Pink
Pretty in Pink nails are perfect for those who prefer a subtle yet sophisticated look. This design features a soft pink base with a delicate silver accent on the ring finger, adding a touch of elegance without being too flashy. The overall effect is both understated and chic, making it ideal for both everyday wear and special occasions.

Consumables:
- Base Coat: OPI GelColor Base Coat
- Pink Polish: Essie Gel Couture in “Ballet Slippers”
- Silver Accent Polish: OPI Nail Lacquer in “Silver on Ice”
- Top Coat: Seche Vite Dry Fast Top Nail Coat
- Nail Art Brush: Beetles Nail Art Brushes
Creating the Look:
- Prep Your Nails: Start with clean, trimmed nails. Apply the OPI base coat to protect your natural nails.
- Apply Pink Base: Use Essie Gel Couture in “Ballet Slippers” and apply two coats for an even, opaque finish. Cure under a UV lamp after each coat.
- Add Silver Accent: Using OPI Nail Lacquer in “Silver on Ice” and a fine nail art brush, create a delicate silver pattern on the ring finger. Cure under a UV lamp.
- Seal the Design: Finish with Seche Vite top coat to add shine and protect your design. Cure under a UV lamp for a long-lasting finish.
Save Pin

Turquoise Dream
Turquoise Dream nails are perfect for those looking to make a bold statement. This design features a gradient of turquoise and blue shades with a 3D butterfly accent on the ring finger, adding a fun and whimsical touch. The vibrant colors and unique design make this manicure stand out, perfect for someone who loves experimenting with their nails.

Consumables:
- Base Coat: DND Gel Base Coat
- Turquoise Polish: Essie Gel Couture in “Surfer Boyz Blazer”
- Blue Polish: OPI GelColor in “Rich Girls & Po-Boys”
- 3D Butterfly Accent: Rhinestones and nail glue
- Top Coat: Sally Hansen Miracle Gel Top Coat
- Nail Art Tools: Dotting Tool and Nail Art Brushes
Creating the Look:
- Base Application: Apply DND Gel Base Coat to strengthen your nails.
- Turquoise Gradient: Apply Essie Gel Couture in “Surfer Boyz Blazer” at the base of your nails and blend into OPI GelColor in “Rich Girls & Po-Boys” towards the tips. Cure under a UV lamp.
- Add Butterfly Accent: Carefully place rhinestones on the ring finger to create a butterfly shape using nail glue. Cure under a UV lamp.
- Top Coat: Seal the design with Sally Hansen Miracle Gel Top Coat to secure the design and add a glossy finish. Cure under a UV lamp.
Neon Wave
Neon Wave nails are a striking combination of bold colors and abstract designs. This manicure features a nude base with neon orange and white wavy lines, creating a modern and eye-catching look. The simplicity of the nude base combined with the vibrant lines makes this design versatile and trendy, perfect for someone who wants to make a statement with their nails.

Consumables:
- Base Coat: OPI Nail Envy Nail Strengthener
- Nude Polish: Essie Gel Couture in “Fairy Tailor”
- Neon Orange Polish: DND Gel in “Neon Orange 512”
- White Polish: Essie Gel Couture in “Blanc”
- Top Coat: Seche Vive Instant Gel Effect Top Coat
- Nail Art Tools: Nail Art Brushes
Creating the Look:
- Base Layer: Start with the OPI Nail Envy base coat to protect your nails.
- Nude Base: Apply two coats of Essie Gel Couture in “Fairy Tailor” and cure under a UV lamp.
- Add Neon Waves: Using DND Gel in “Neon Orange 512” and Essie Gel Couture in “Blanc” with a fine nail art brush, draw wavy lines across the nails. Cure under a UV lamp.
- Top Coat: Seal the design with Seche Vive Instant Gel Effect Top Coat for a high-gloss finish. Cure under a UV lamp.
Peachy Ombre Delight
Peachy Ombre Delight nails are a stunning choice for those who love soft, warm tones. This design features a gradient of peach shades, transitioning from a pale peach to a vibrant orange. The accent nail with a glittery finish adds a touch of sparkle, making this manicure perfect for both casual and formal settings.

Consumables:
- Base Coat: OPI GelColor Base Coat
- Peach Polishes: Essie Gel Couture in “Peach Side Babe” and “Tart Deco”
- Glitter Polish: OPI Nail Lacquer in “Coral-ing Your Spirit Animal”
- Top Coat: Seche Vite Dry Fast Top Nail Coat
- Nail Art Sponge: Triangle Makeup Sponge
Creating the Look:
- Prep Your Nails: Start with clean, trimmed nails. Apply the OPI base coat to protect your natural nails.
- Apply Peach Gradient: Use Essie Gel Couture in “Peach Side Babe” at the base of your nails and blend into “Tart Deco” towards the tips using a sponge for a smooth gradient. Cure under a UV lamp after each coat.
- Add Glitter Accent: Apply OPI Nail Lacquer in “Coral-ing Your Spirit Animal” to the accent nail for a glittery finish. Cure under a UV lamp.
- Seal the Design: Finish with Seche Vite top coat to add shine and protect your design. Cure under a UV lamp for a long-lasting finish.
Neon Swirl Fun
Neon Swirl Fun nails are perfect for those who want to make a bold statement. This design features a mix of neon orange and pink swirls on a nude base, accented with delicate gold lines. The combination of bright colors and intricate patterns makes this manicure eye-catching and trendy.

Consumables:
- Base Coat: OPI Nail Envy Nail Strengthener
- Nude Polish: Essie Gel Couture in “Fairy Tailor”
- Neon Polishes: DND Gel in “Neon Orange 512” and “Neon Pink 511”
- Gold Accent Polish: OPI Nail Lacquer in “Gold on the Go”
- Top Coat: Seche Vive Instant Gel Effect Top Coat
- Nail Art Brushes: Fine Detail Brush
Creating the Look:
- Base Layer: Start with the OPI Nail Envy base coat to protect your nails.
- Nude Base: Apply two coats of Essie Gel Couture in “Fairy Tailor” and cure under a UV lamp.
- Add Neon Swirls: Using DND Gel in “Neon Orange 512” and “Neon Pink 511” with a fine nail art brush, draw swirls across the nails. Cure under a UV lamp.
- Gold Lines: Add delicate gold lines using OPI Nail Lacquer in “Gold on the Go” for an elegant touch. Cure under a UV lamp.
- Top Coat: Seal the design with Seche Vive Instant Gel Effect Top Coat for a high-gloss finish. Cure under a UV lamp.
Autumn Leaf Elegance
Autumn Leaf Elegance nails are a sophisticated choice for the fall season. This design features a warm orange base with black leaf accents, creating a perfect representation of autumn foliage. The combination of colors and patterns makes this manicure ideal for the fall season.

Consumables:
- Base Coat: OPI GelColor Base Coat
- Orange Polish: Essie Gel Couture in “Playing Koi”
- Black Polish: OPI Nail Lacquer in “Black Onyx”
- Top Coat: Sally Hansen Miracle Gel Top Coat
- Nail Art Brushes: Fine Detail Brush
Creating the Look:
- Prep Your Nails: Start with clean, trimmed nails. Apply the OPI base coat to protect your natural nails.
- Apply Orange Base: Use Essie Gel Couture in “Playing Koi” and apply two coats for an even, opaque finish. Cure under a UV lamp after each coat.
- Add Black Leaf Accents: Using OPI Nail Lacquer in “Black Onyx” and a fine nail art brush, draw delicate leaf patterns on the nails. Cure under a UV lamp.
- Seal the Design: Finish with Sally Hansen Miracle Gel Top Coat to add shine and protect your design. Cure under a UV lamp for a long-lasting finish.
Save Pin

Sunset Glow
Sunset Glow nails are a beautiful representation of a warm, glowing sunset. This design features a gradient of orange and coral shades, with a hint of gold glitter at the tips for added sparkle. The soft transition of colors makes this manicure both elegant and eye-catching.

Consumables:
- Base Coat: OPI GelColor Base Coat
- Orange Polish: Essie Gel Couture in “Tangerine Tease”
- Coral Polish: OPI Nail Lacquer in “Living on the Bula-vard!”
- Gold Glitter Polish: Essie Gel Couture in “Gilty Party”
- Top Coat: Seche Vite Dry Fast Top Nail Coat
- Nail Art Sponge: Triangle Makeup Sponge
Creating the Look:
- Prep Your Nails: Start with clean, trimmed nails. Apply the OPI base coat to protect your natural nails.
- Apply Gradient Base: Use Essie Gel Couture in “Tangerine Tease” at the base of your nails and blend into OPI Nail Lacquer in “Living on the Bula-vard!” towards the tips using a sponge for a smooth gradient. Cure under a UV lamp after each coat.
- Add Gold Glitter: Apply Essie Gel Couture in “Gilty Party” to the tips for a sparkling effect. Cure under a UV lamp.
- Seal the Design: Finish with Seche Vite top coat to add shine and protect your design. Cure under a UV lamp for a long-lasting finish.
Pink Heart Delight
Pink Heart Delight nails are perfect for those who love a sweet and romantic look. This design features a soft pink base with textured heart accents and tiny rhinestones, adding a touch of charm and elegance to the manicure. The delicate details make this design ideal for special occasions or everyday wear.

Consumables:
- Base Coat: OPI GelColor Base Coat
- Pink Polish: Essie Gel Couture in “Muchi Muchi”
- Heart Accent Polish: DND Gel in “Pink Hearts”
- Rhinestones: Small Nail Rhinestones
- Top Coat: Sally Hansen Miracle Gel Top Coat
- Nail Art Brushes: Dotting Tool
Creating the Look:
- Prep Your Nails: Start with clean, trimmed nails. Apply the OPI base coat to protect your natural nails.
- Apply Pink Base: Use Essie Gel Couture in “Muchi Muchi” and apply two coats for an even, opaque finish. Cure under a UV lamp after each coat.
- Add Heart Accents: Using DND Gel in “Pink Hearts” and a dotting tool, create textured heart shapes on the nails. Place small rhinestones around the hearts for added detail. Cure under a UV lamp.
- Seal the Design: Finish with Sally Hansen Miracle Gel Top Coat to add shine and protect your design. Cure under a UV lamp for a long-lasting finish.
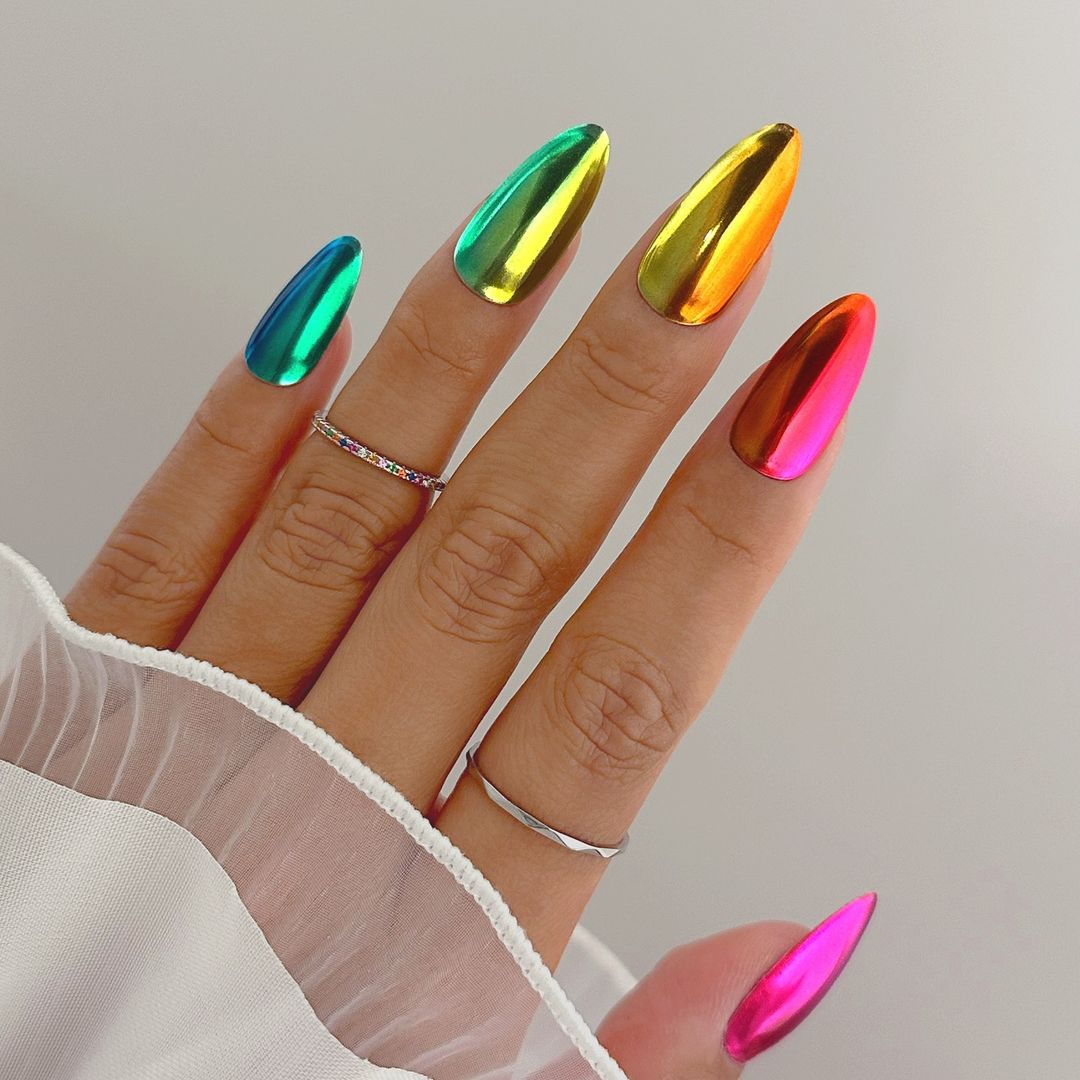
Rainbow Chrome
Rainbow Chrome nails are perfect for those who love to stand out. This design features a stunning chrome finish with a spectrum of vibrant colors, creating a bold and eye-catching look. The reflective surface and bright hues make this manicure perfect for parties or special events.
Consumables:
- Base Coat: OPI GelColor Base Coat
- Chrome Polishes: Holo Taco Multichrome Collection
- Top Coat: Seche Vite Dry Fast Top Nail Coat
- Nail Art Brushes: Applicator Brush
Creating the Look:
- Prep Your Nails: Start with clean, trimmed nails. Apply the OPI base coat to protect your natural nails.
- Apply Chrome Base: Use Holo Taco Multichrome Collection to apply the chrome polish in different shades on each nail. Cure under a UV lamp after each coat.
- Smooth Application: Use an applicator brush to smooth the chrome finish for a flawless look. Cure under a UV lamp.
- Seal the Design: Finish with Seche Vite top coat to add shine and protect your design. Cure under a UV lamp for a long-lasting finish.
Celestial Charm
Celestial Charm nails capture the mystical allure of the night sky with intricate designs of suns, moons, and stars. The nude base highlights the metallic accents, creating a sophisticated and enchanting look perfect for those who love a touch of whimsy.

Consumables:
- Base Coat: OPI GelColor Base Coat
- Nude Polish: Essie Gel Couture in “Fairy Tailor”
- Metallic Polishes: OPI Nail Lacquer in “Silver On Ice” and “Gold on the Go”
- Top Coat: Seche Vite Dry Fast Top Nail Coat
- Nail Art Tools: Fine Detail Brush, Dotting Tool
Creating the Look:
- Prep Your Nails: Start with clean, trimmed nails. Apply the OPI base coat to protect your natural nails.
- Apply Nude Base: Use Essie Gel Couture in “Fairy Tailor” and apply two coats for an even, opaque finish. Cure under a UV lamp after each coat.
- Add Celestial Designs: Using OPI Nail Lacquer in “Silver On Ice” and “Gold on the Go” with a fine detail brush, draw suns, moons, and stars on each nail. Cure under a UV lamp.
- Seal the Design: Finish with Seche Vite top coat to add shine and protect your design. Cure under a UV lamp for a long-lasting finish.
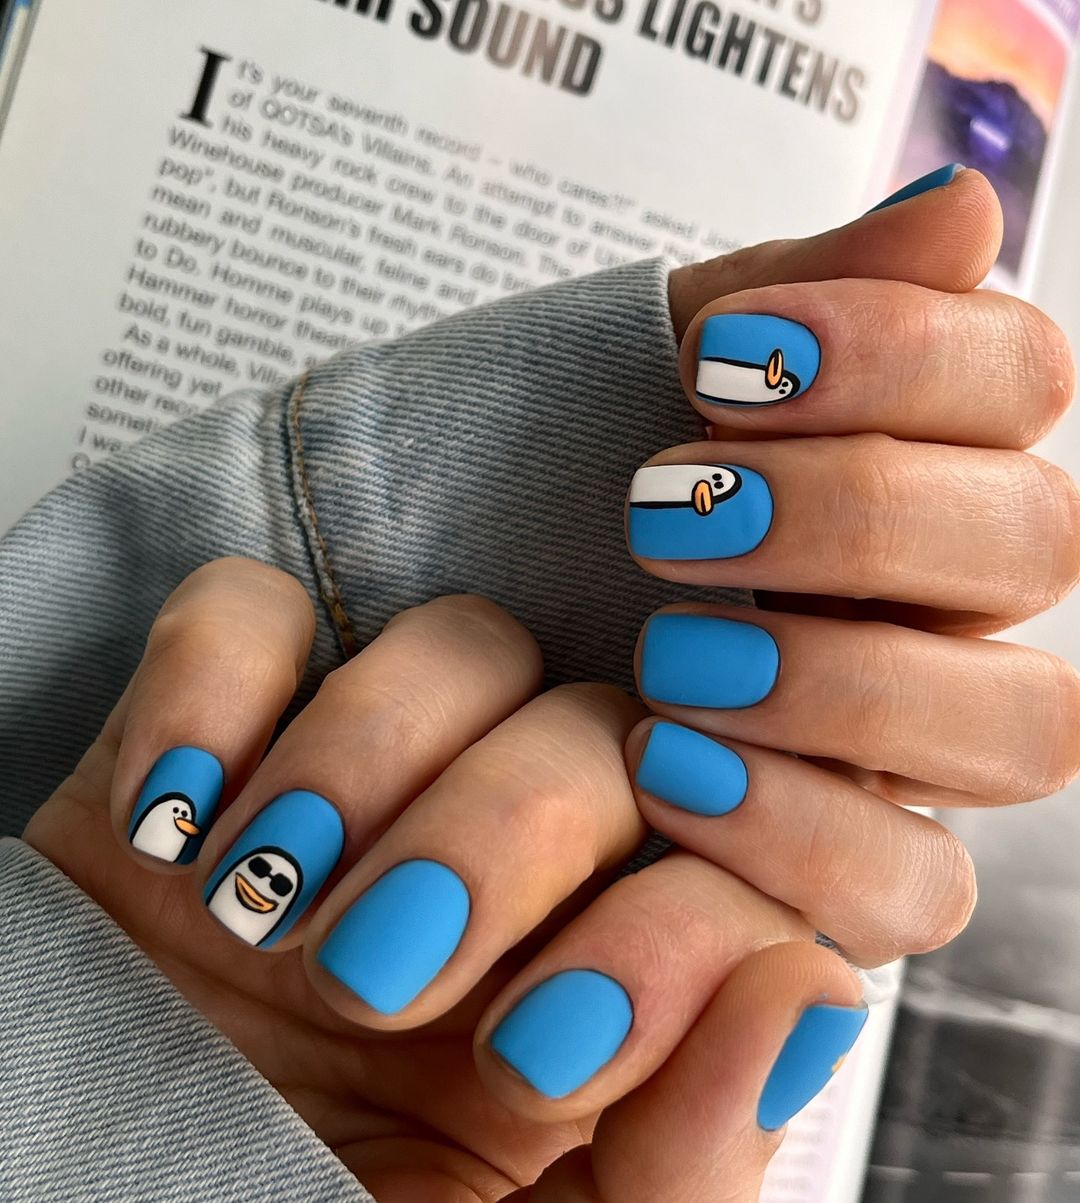
Playful Penguins
Playful Penguins nails bring a fun and quirky vibe to your manicure. The vibrant blue background contrasts beautifully with the cute penguin designs, making it a perfect choice for those who love playful and unique nail art.
Consumables:
- Base Coat: OPI Nail Envy Nail Strengthener
- Blue Polish: Essie Gel Couture in “Butler Please”
- White and Black Polishes: OPI Nail Lacquer in “Alpine Snow” and “Black Onyx”
- Top Coat: Seche Vive Instant Gel Effect Top Coat
- Nail Art Brushes: Fine Detail Brush, Dotting Tool
Creating the Look:
- Base Layer: Start with the OPI Nail Envy base coat to protect your nails.
- Apply Blue Base: Apply two coats of Essie Gel Couture in “Butler Please” and cure under a UV lamp.
- Add Penguin Designs: Using OPI Nail Lacquer in “Alpine Snow” and “Black Onyx” with a fine detail brush, create cute penguin designs on each nail. Cure under a UV lamp.
- Top Coat: Seal the design with Seche Vive Instant Gel Effect Top Coat for a high-gloss finish. Cure under a UV lamp.
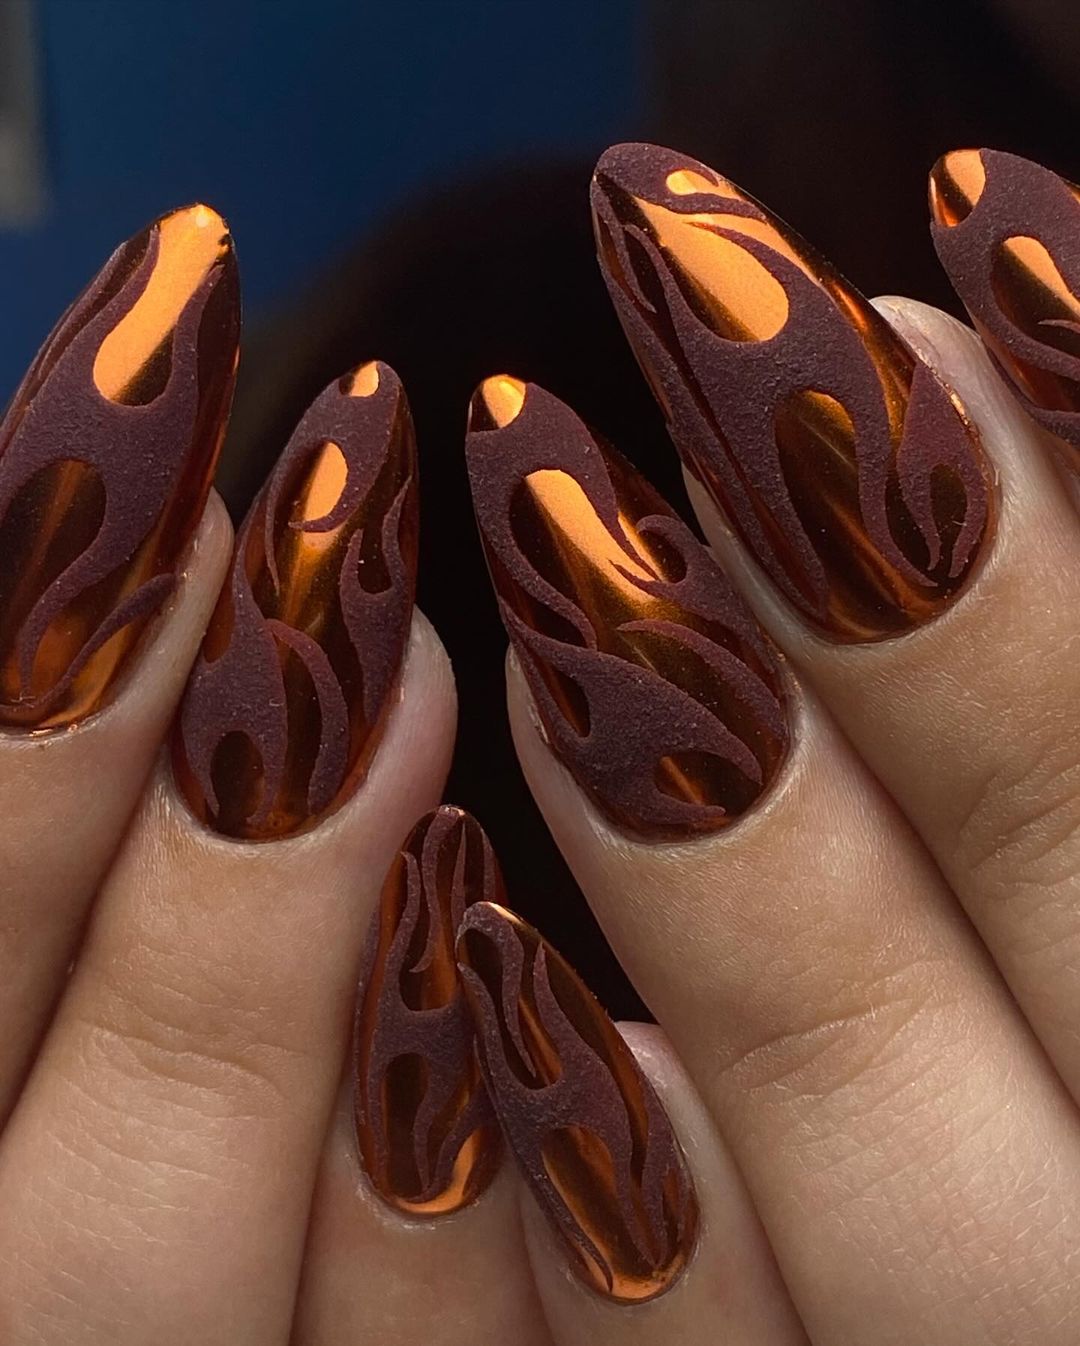
Fiery Flames
Fiery Flames nails are perfect for those who love bold and dramatic designs. This manicure features a metallic copper base with black flame accents, creating a striking and edgy look that’s sure to turn heads.
Consumables:
- Base Coat: OPI GelColor Base Coat
- Copper Polish: Essie Gel Couture in “Copper and Bold”
- Black Polish: OPI Nail Lacquer in “Black Onyx”
- Top Coat: Seche Vite Dry Fast Top Nail Coat
- Nail Art Tools: Fine Detail Brush
Creating the Look:
- Prep Your Nails: Start with clean, trimmed nails. Apply the OPI base coat to protect your natural nails.
- Apply Copper Base: Use Essie Gel Couture in “Copper and Bold” and apply two coats for an even, opaque finish. Cure under a UV lamp after each coat.
- Add Flame Accents: Using OPI Nail Lacquer in “Black Onyx” and a fine detail brush, draw flame patterns on each nail. Cure under a UV lamp.
- Seal the Design: Finish with Seche Vite top coat to add shine and protect your design. Cure under a UV lamp for a long-lasting finish.
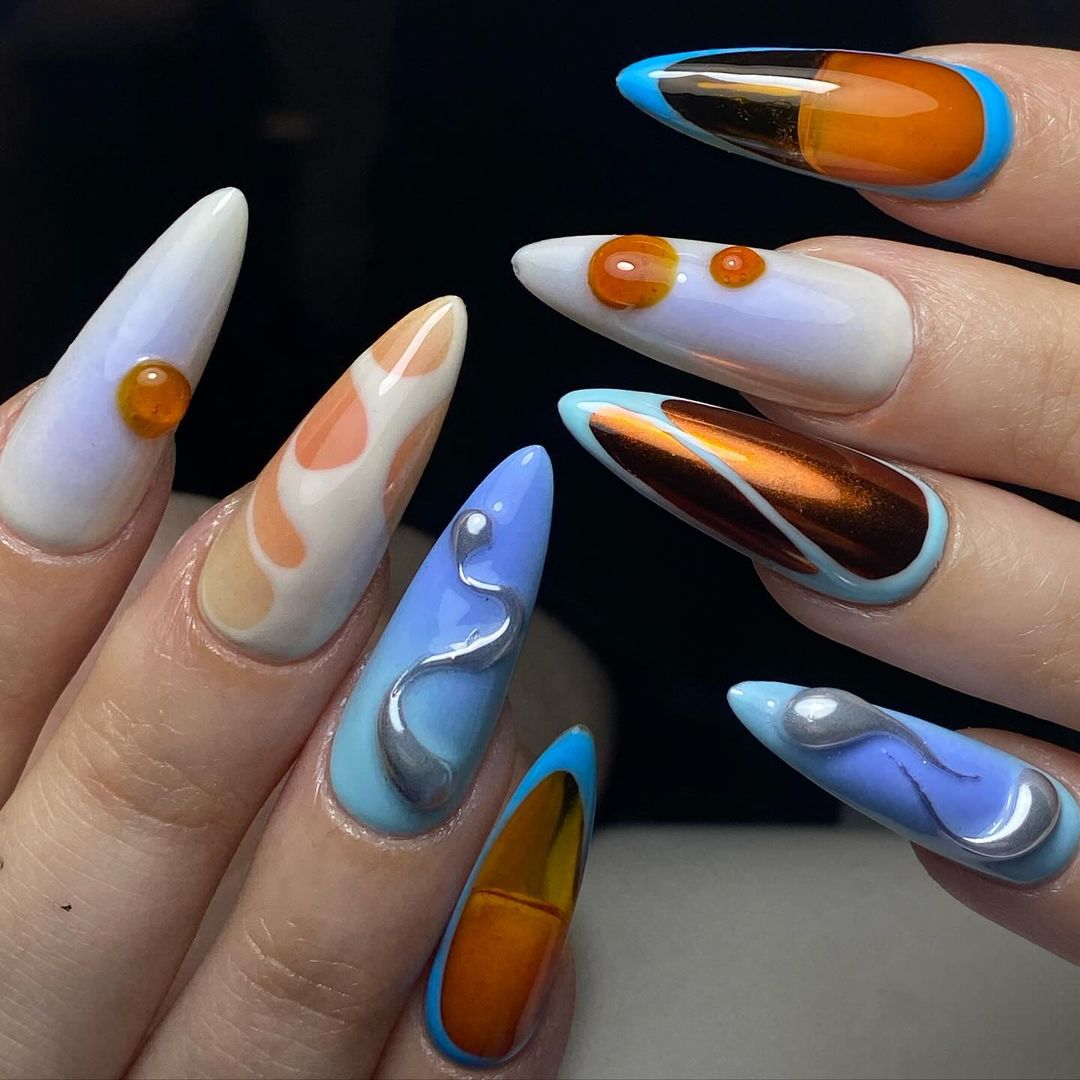
Modern Abstract
Modern Abstract nails feature a blend of vibrant colors and metallic accents, creating a contemporary and artistic look. The combination of blue, white, and copper shades with abstract patterns makes this manicure a true statement piece.
Consumables:
- Base Coat: OPI GelColor Base Coat
- Blue and White Polishes: Essie Gel Couture in “Butler Please” and “Blanc”
- Copper Polish: OPI Nail Lacquer in “Worth a Pretty Penne”
- Metallic Polishes: OPI Nail Lacquer in “Silver on Ice”
- Top Coat: Sally Hansen Miracle Gel Top Coat
- Nail Art Tools: Fine Detail Brush, Dotting Tool
Creating the Look:
- Prep Your Nails: Start with clean, trimmed nails. Apply the OPI base coat to protect your natural nails.
- Apply Base Colors: Use Essie Gel Couture in “Butler Please” and “Blanc” for the base colors and cure under a UV lamp after each coat.
- Add Abstract Patterns: Using OPI Nail Lacquer in “Worth a Pretty Penne” and “Silver on Ice” with a fine detail brush, create abstract designs on each nail. Cure under a UV lamp.
- Seal the Design: Finish with Sally Hansen Miracle Gel Top Coat to add shine and protect your design. Cure under a UV lamp for a long-lasting finish.
Leopard Chic
Leopard Chic nails are a glamorous and fierce choice for those who love animal print. This design features a classic leopard pattern with gold accents, creating a luxurious and stylish look perfect for any occasion.
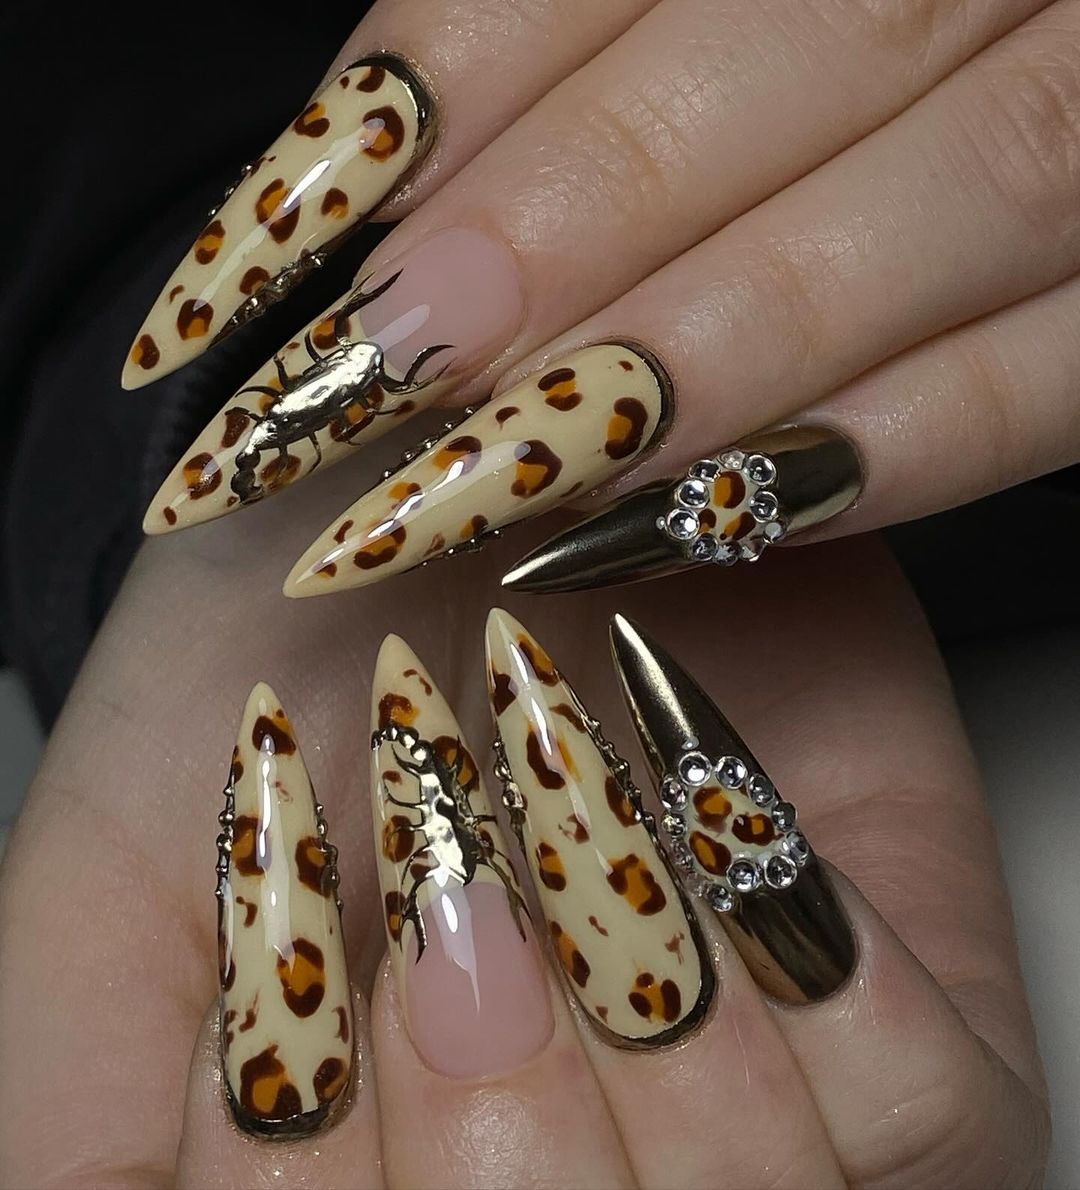
Consumables:
- Base Coat: OPI GelColor Base Coat
- Nude Polish: Essie Gel Couture in “Fairy Tailor”
- Brown and Black Polishes: OPI Nail Lacquer in “Espresso Your Inner Self” and “Black Onyx”
- Gold Accent Polish: OPI Nail Lacquer in “Gold on the Go”
- Top Coat: Seche Vite Dry Fast Top Nail Coat
- Nail Art Brushes: Fine Detail Brush, Dotting Tool
Creating the Look:
- Prep Your Nails: Start with clean, trimmed nails. Apply the OPI base coat to protect your natural nails.
- Apply Nude Base: Use Essie Gel Couture in “Fairy Tailor” and apply two coats for an even, opaque finish. Cure under a UV lamp after each coat.
- Add Leopard Print: Using OPI Nail Lacquer in “Espresso Your Inner Self” and “Black Onyx” with a fine detail brush, create the leopard print pattern on each nail. Add gold accents using “Gold on the Go”. Cure under a UV lamp.
- Seal the Design: Finish with Seche Vite top coat to add shine and protect your design. Cure under a UV lamp for a long-lasting finish.
Pastel Pink Leopard
Pastel Pink Leopard nails combine the softness of pastel pink with the boldness of leopard print. This design features a light pink base with black leopard spots, creating a chic and playful look that’s perfect for any occasion.
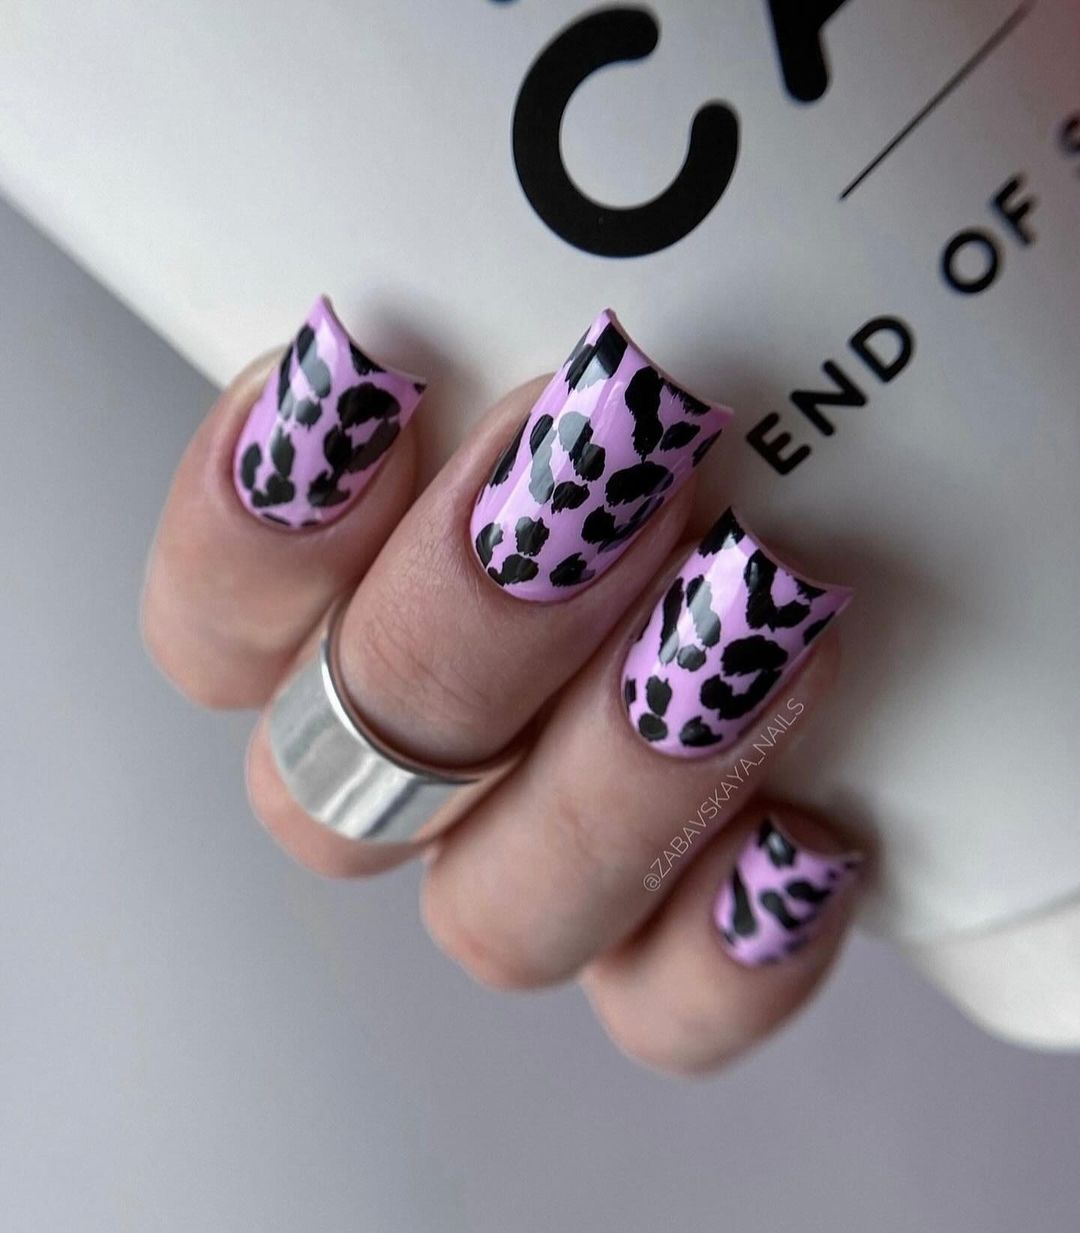
Consumables:
- Base Coat: OPI GelColor Base Coat
- Pink Polish: Essie Gel Couture in “Muchi Muchi”
- Black Polish: OPI Nail Lacquer in “Black Onyx”
- Top Coat: Sally Hansen Miracle Gel Top Coat
- Nail Art Brushes: Fine Detail Brush, Dotting Tool
Creating the Look:
- Prep Your Nails: Start with clean, trimmed nails. Apply the OPI base coat to protect your natural nails.
- Apply Pink Base: Use Essie Gel Couture in “Muchi Muchi” and apply two coats for an even, opaque finish. Cure under a UV lamp after each coat.
- Add Leopard Spots: Using OPI Nail Lacquer in “Black Onyx” and a fine detail brush, create the leopard spots on each nail. Cure under a UV lamp.
- Seal the Design: Finish with Sally Hansen Miracle Gel Top Coat to add shine and protect your design. Cure under a UV lamp for a long-lasting finish.
Nude Elegance
Nude Elegance nails are the epitome of understated sophistication. This design features a classic nude base with silver embellishments on the ring finger, adding a touch of glamour without overwhelming the simplicity of the nude polish. This look is perfect for both everyday wear and special occasions.
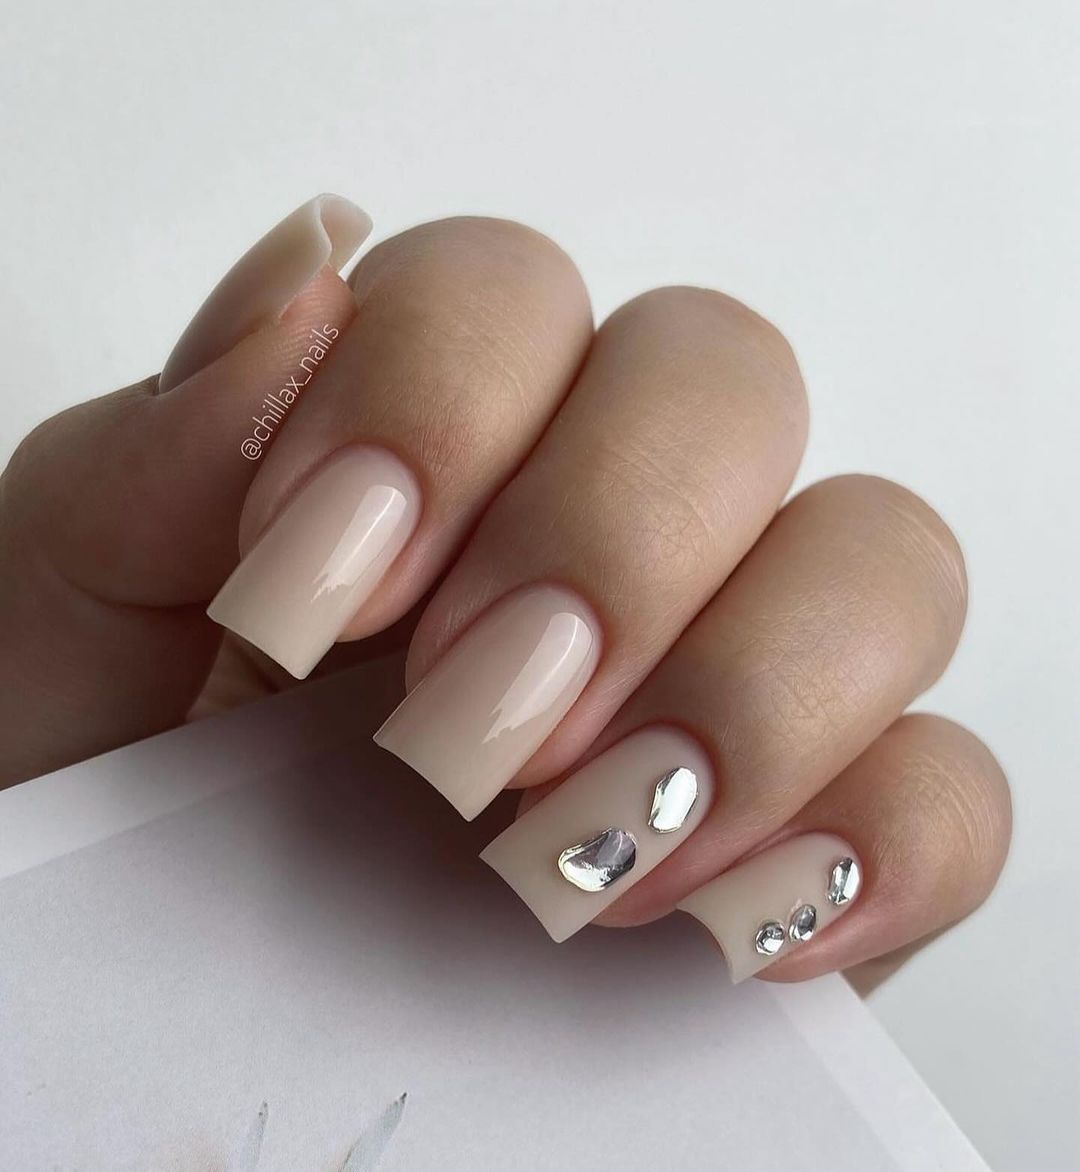
Consumables:
- Base Coat: OPI GelColor Base Coat
- Nude Polish: Essie Gel Couture in “Fairy Tailor”
- Silver Embellishments: Silver Nail Studs and Rhinestones
- Top Coat: Seche Vite Dry Fast Top Nail Coat
- Nail Art Tools: Dotting Tool, Tweezers
Creating the Look:
- Prep Your Nails: Start with clean, trimmed nails. Apply the OPI base coat to protect your natural nails.
- Apply Nude Base: Use Essie Gel Couture in “Fairy Tailor” and apply two coats for an even, opaque finish. Cure under a UV lamp after each coat.
- Add Silver Embellishments: Using a dotting tool and tweezers, place the silver studs and rhinestones on the ring finger. Cure under a UV lamp.
- Seal the Design: Finish with Seche Vite top coat to add shine and protect your design. Cure under a UV lamp for a long-lasting finish.
Bold Typography
Bold Typography nails are a modern and edgy design that combines bright orange and white with striking black text. This look features a unique mix of colors and patterns, perfect for those who love to make a bold statement with their nails.
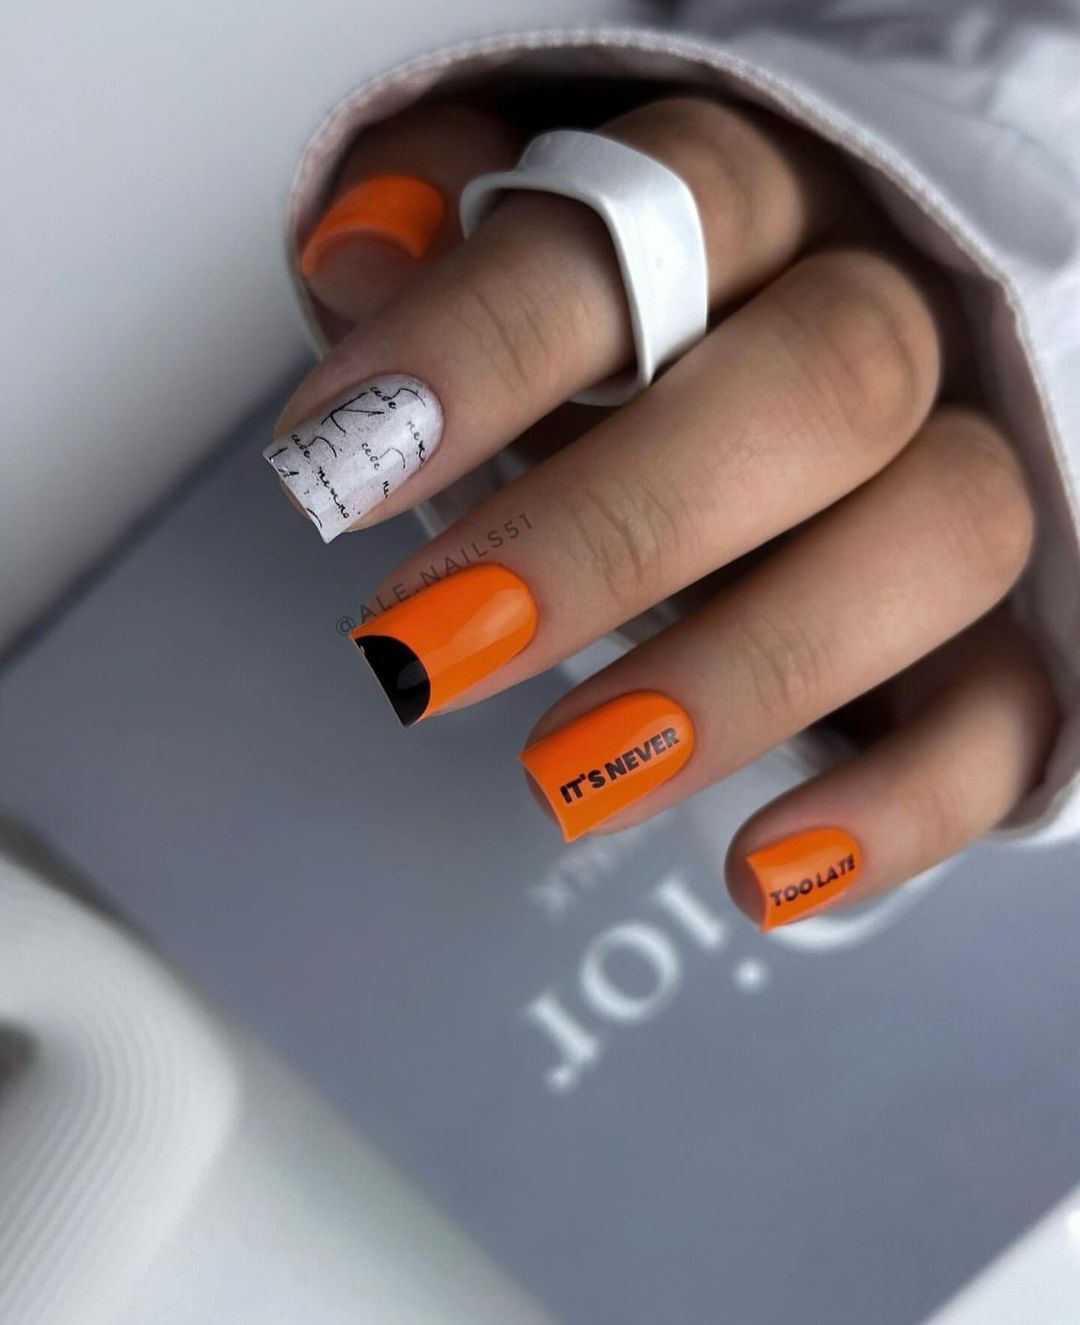
Consumables:
- Base Coat: OPI Nail Envy Nail Strengthener
- Orange Polish: Essie Gel Couture in “Tangerine Tease”
- White Polish: OPI Nail Lacquer in “Alpine Snow”
- Black Polish: OPI Nail Lacquer in “Black Onyx”
- Top Coat: Seche Vive Instant Gel Effect Top Coat
- Nail Art Tools: Fine Detail Brush, Nail Stamping Kit
Creating the Look:
- Base Layer: Start with the OPI Nail Envy base coat to protect your nails.
- Apply Base Colors: Use Essie Gel Couture in “Tangerine Tease” for the orange nails and OPI Nail Lacquer in “Alpine Snow” for the white nails. Cure under a UV lamp after each coat.
- Add Typography and Design: Using OPI Nail Lacquer in “Black Onyx” and a nail stamping kit, add the black text and design elements. Cure under a UV lamp.
- Top Coat: Seal the design with Seche Vive Instant Gel Effect Top Coat for a high-gloss finish. Cure under a UV lamp.
Lunar Mystique
Lunar Mystique nails bring a celestial vibe with a mix of soft blues and silver accents. This design features a gradient effect with moon and star embellishments, creating a magical and serene look perfect for stargazers and dreamers.
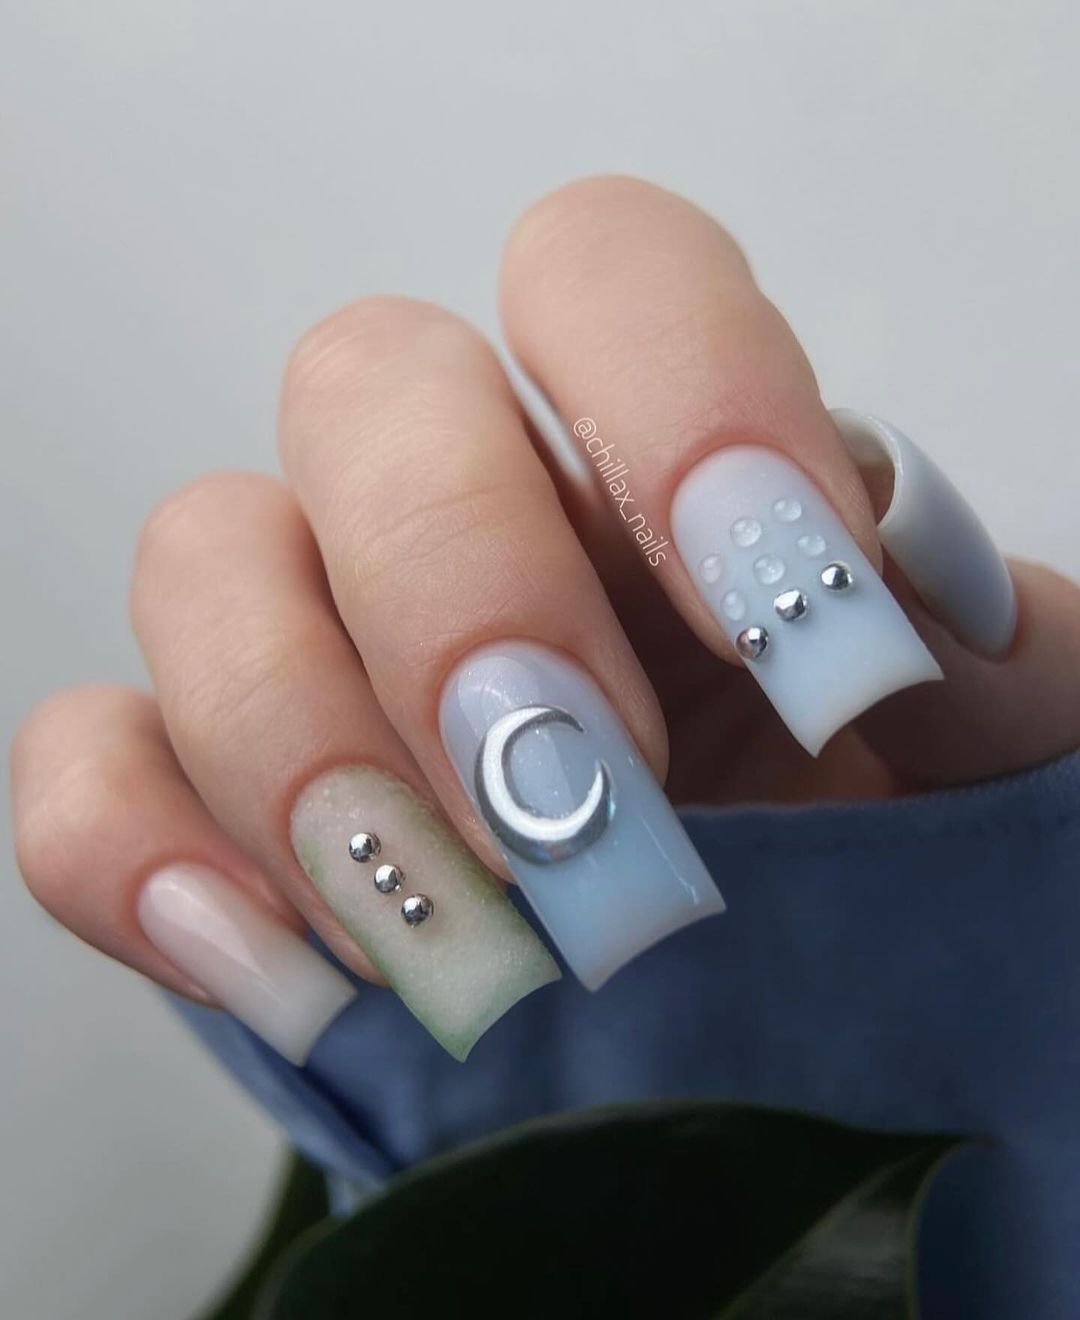
Consumables:
- Base Coat: OPI GelColor Base Coat
- Blue Polishes: Essie Gel Couture in “Mint Candy Apple” and “Bikini So Teeny”
- Silver Embellishments: Moon and Star Nail Charms, Silver Rhinestones
- Top Coat: Seche Vite Dry Fast Top Nail Coat
- Nail Art Tools: Dotting Tool, Tweezers, Sponge
Creating the Look:
- Prep Your Nails: Start with clean, trimmed nails. Apply the OPI base coat to protect your natural nails.
- Apply Gradient Base: Use Essie Gel Couture in “Mint Candy Apple” and “Bikini So Teeny” to create a gradient effect using a sponge. Cure under a UV lamp after each coat.
- Add Silver Embellishments: Place moon and star charms, along with silver rhinestones, on the nails using tweezers and a dotting tool. Cure under a UV lamp.
- Seal the Design: Finish with Seche Vite top coat to add shine and protect your design. Cure under a UV lamp for a long-lasting finish.
Blue Kiss
Blue Kiss nails are a bold and playful design that features a matte blue base with black and white kiss prints. This look is perfect for those who love a fun and unique manicure that stands out.
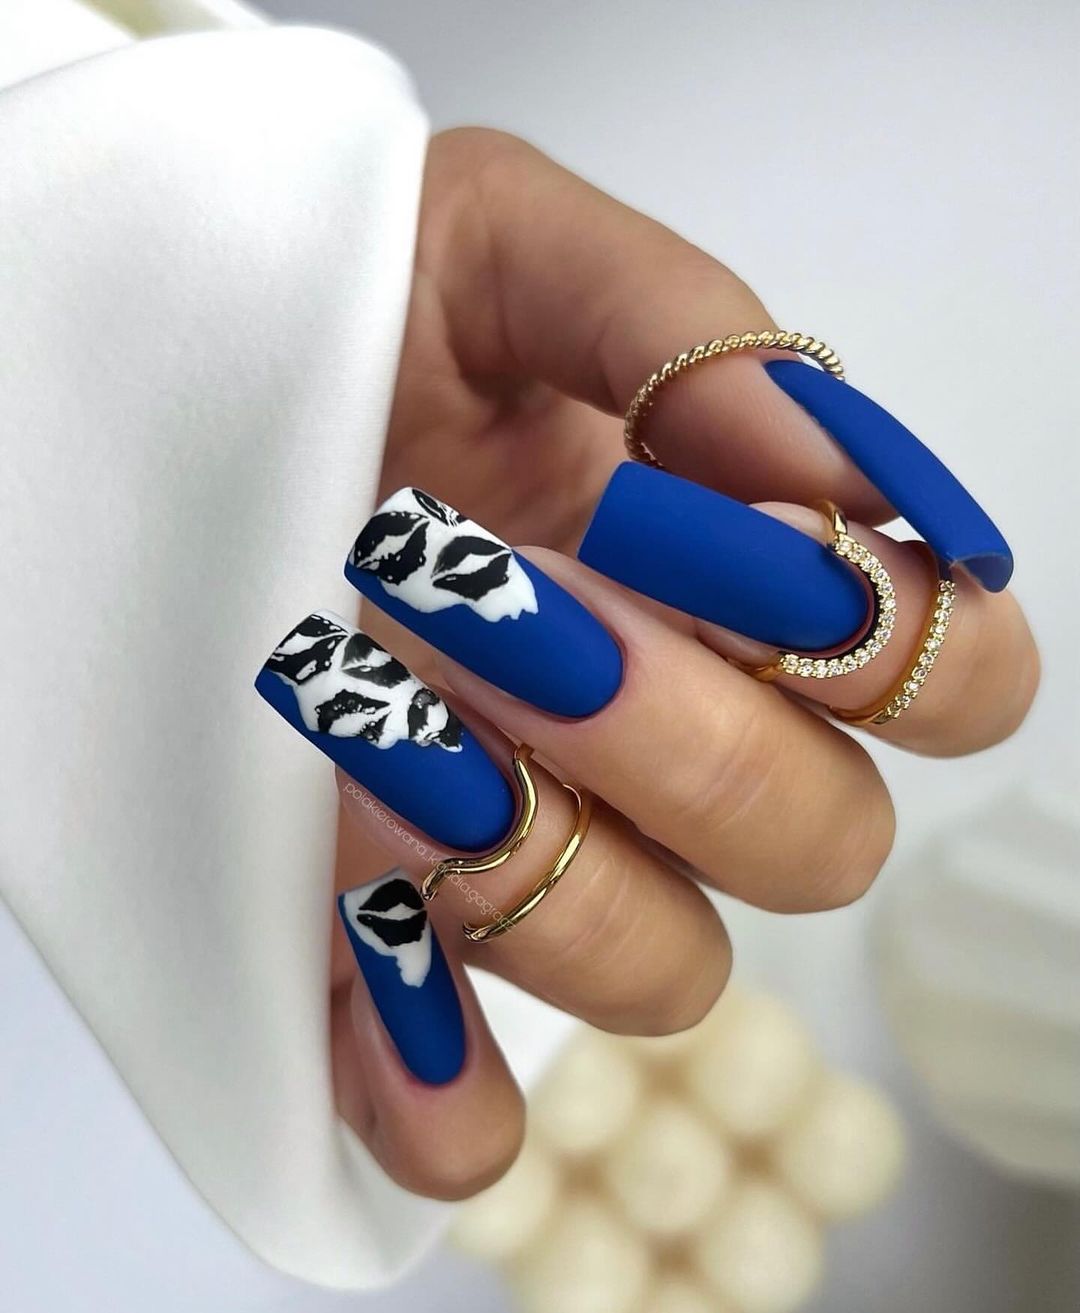
Consumables:
- Base Coat: OPI GelColor Base Coat
- Blue Polish: Essie Gel Couture in “Butler Please”
- Black and White Polishes: OPI Nail Lacquer in “Black Onyx” and “Alpine Snow”
- Top Coat: Sally Hansen Miracle Gel Top Coat
- Nail Art Tools: Fine Detail Brush, Nail Stamping Kit
Creating the Look:
- Prep Your Nails: Start with clean, trimmed nails. Apply the OPI base coat to protect your natural nails.
- Apply Blue Base: Use Essie Gel Couture in “Butler Please” and apply two coats for an even, opaque finish. Cure under a UV lamp after each coat.
- Add Kiss Prints: Using OPI Nail Lacquer in “Black Onyx” and “Alpine Snow” with a nail stamping kit, create kiss prints on each nail. Cure under a UV lamp.
- Seal the Design: Finish with Sally Hansen Miracle Gel Top Coat to add shine and protect your design. Cure under a UV lamp for a long-lasting finish.
Pastel Polka Dots
Pastel Polka Dots nails are a cute and whimsical design that features a gradient of pastel colors with white polka dots. This look is perfect for those who love playful and colorful nail art.
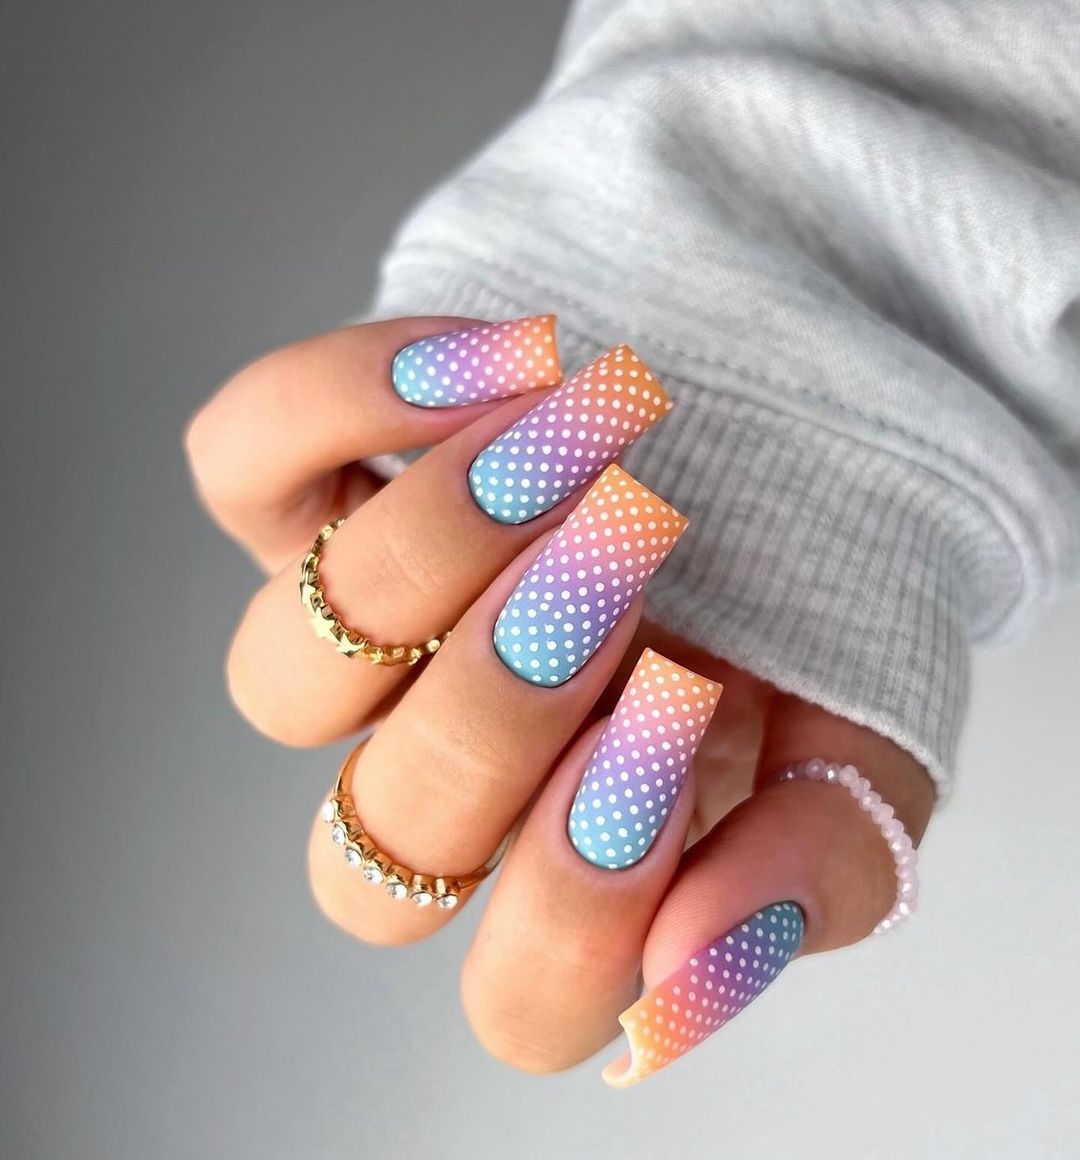
Consumables:
- Base Coat: OPI GelColor Base Coat
- Pastel Polishes: Essie Gel Couture in “Vanity Fairest”, “Fiji”, and “Lilacism”
- White Polish: OPI Nail Lacquer in “Alpine Snow”
- Top Coat: Seche Vite Dry Fast Top Nail Coat
- Nail Art Tools: Dotting Tool, Sponge
Creating the Look:
- Prep Your Nails: Start with clean, trimmed nails. Apply the OPI base coat to protect your natural nails.
- Apply Gradient Base: Use Essie Gel Couture in “Vanity Fairest”, “Fiji”, and “Lilacism” to create a gradient effect using a sponge. Cure under a UV lamp after each coat.
- Add Polka Dots: Using OPI Nail Lacquer in “Alpine Snow” and a dotting tool, create white polka dots on each nail. Cure under a UV lamp.
- Seal the Design: Finish with Seche Vite top coat to add shine and protect your design. Cure under a UV lamp for a long-lasting finish.
Ocean Gradient
Ocean Gradient nails capture the beauty of the sea with a stunning blue-to-green gradient. This design is perfect for those who love the calming and refreshing look of ocean colors on their nails.
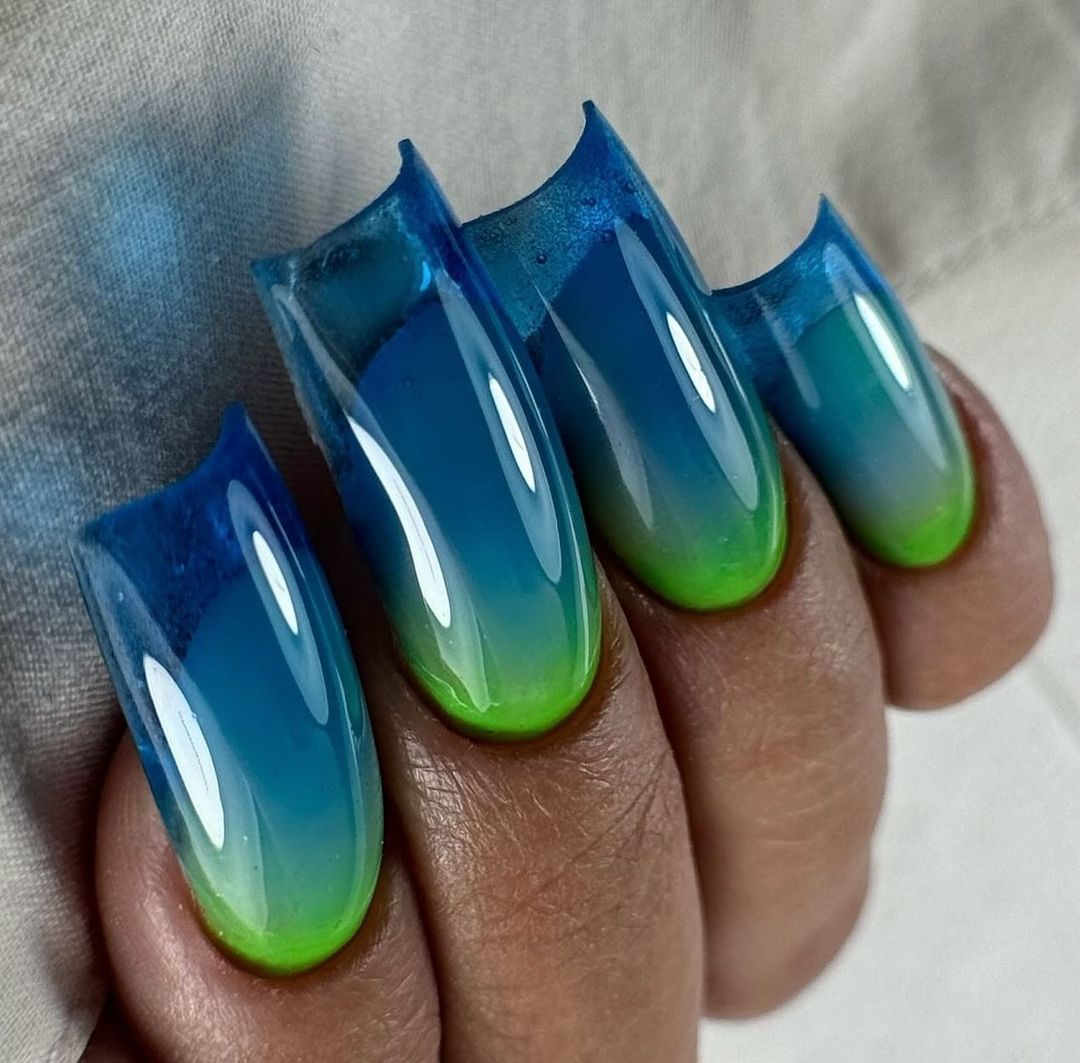
Consumables:
- Base Coat: OPI GelColor Base Coat
- Blue and Green Polishes: Essie Gel Couture in “Butler Please” and “Mint Candy Apple”
- Top Coat: Seche Vite Dry Fast Top Nail Coat
- Nail Art Tools: Sponge
Creating the Look:
- Prep Your Nails: Start with clean, trimmed nails. Apply the OPI base coat to protect your natural nails.
- Apply Gradient Base: Use Essie Gel Couture in “Butler Please” and “Mint Candy Apple” to create a gradient effect using a sponge. Cure under a UV lamp after each coat.
- Smooth the Gradient: Apply another layer of the gradient using a sponge to ensure a smooth transition between colors. Cure under a UV lamp.
- Seal the Design: Finish with Seche Vite top coat to add shine and protect your design. Cure under a UV lamp for a long-lasting finish.
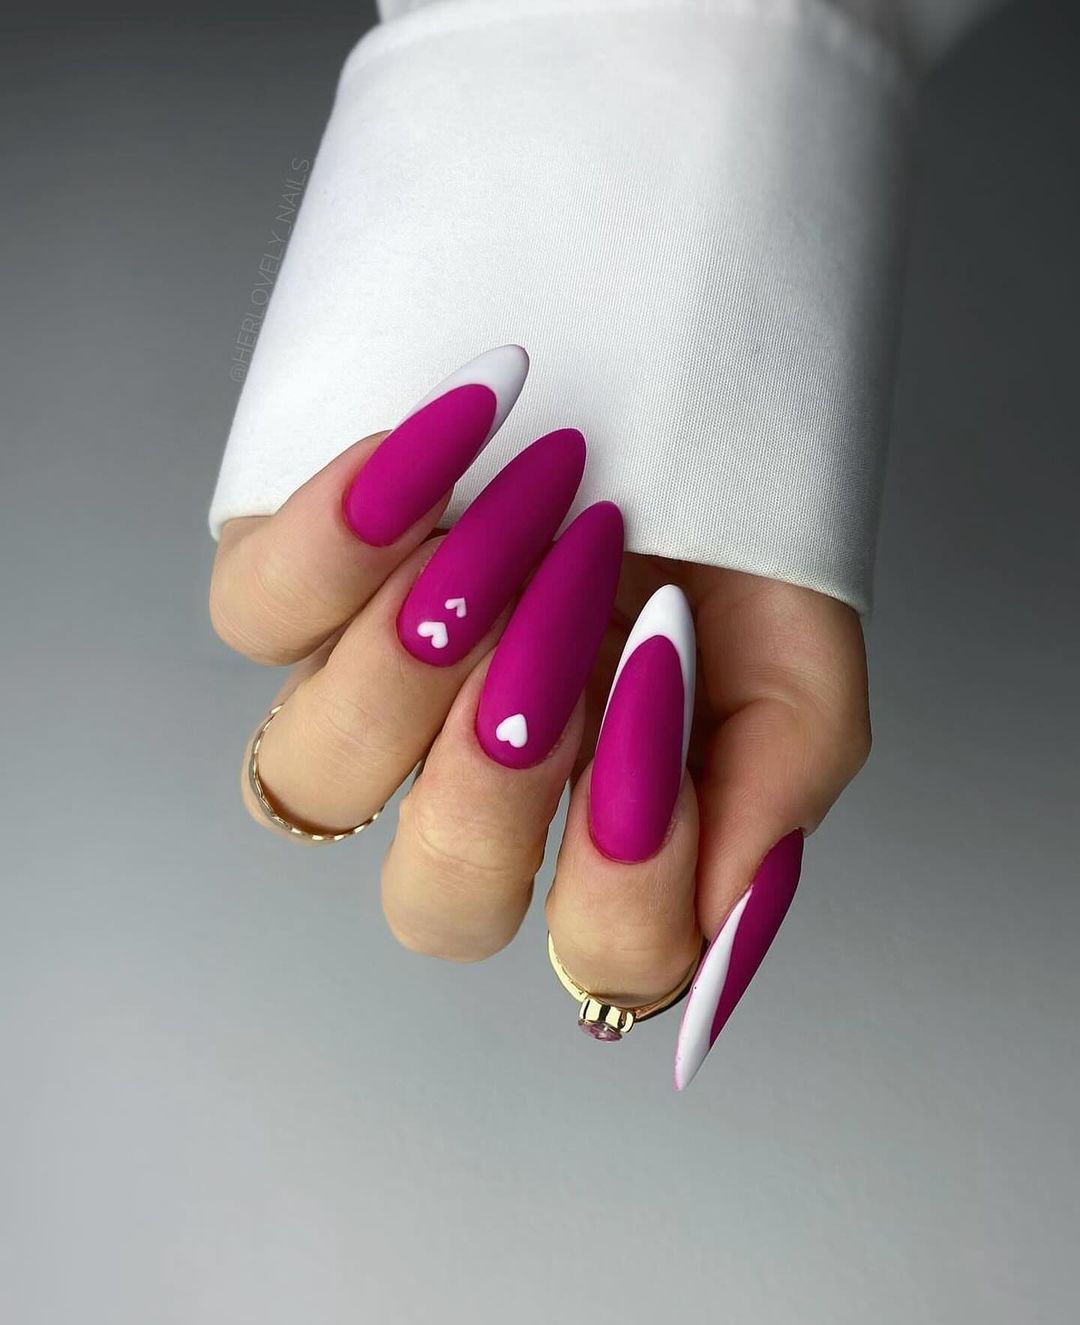
Fuchsia French
Fuchsia French nails offer a modern twist on the classic French manicure with a bold, vibrant fuchsia base and contrasting white tips. The accent nails feature tiny white hearts, adding a sweet and playful touch to the design. This look is perfect for those who love to combine classic elements with bold colors.
Consumables:
- Base Coat: OPI GelColor Base Coat
- Fuchsia Polish: Essie Gel Couture in “The It Factor”
- White Polish: OPI Nail Lacquer in “Alpine Snow”
- Top Coat: Seche Vite Dry Fast Top Nail Coat
- Nail Art Tools: Fine Detail Brush, Dotting Tool
Creating the Look:
- Prep Your Nails: Start with clean, trimmed nails. Apply the OPI base coat to protect your natural nails.
- Apply Fuchsia Base: Use Essie Gel Couture in “The It Factor” and apply two coats for an even, opaque finish. Cure under a UV lamp after each coat.
- Add White Tips and Hearts: Using OPI Nail Lacquer in “Alpine Snow” and a fine detail brush, create the French tips. Use a dotting tool to add the small white hearts on the accent nails. Cure under a UV lamp.
- Seal the Design: Finish with Seche Vite top coat to add shine and protect your design. Cure under a UV lamp for a long-lasting finish.
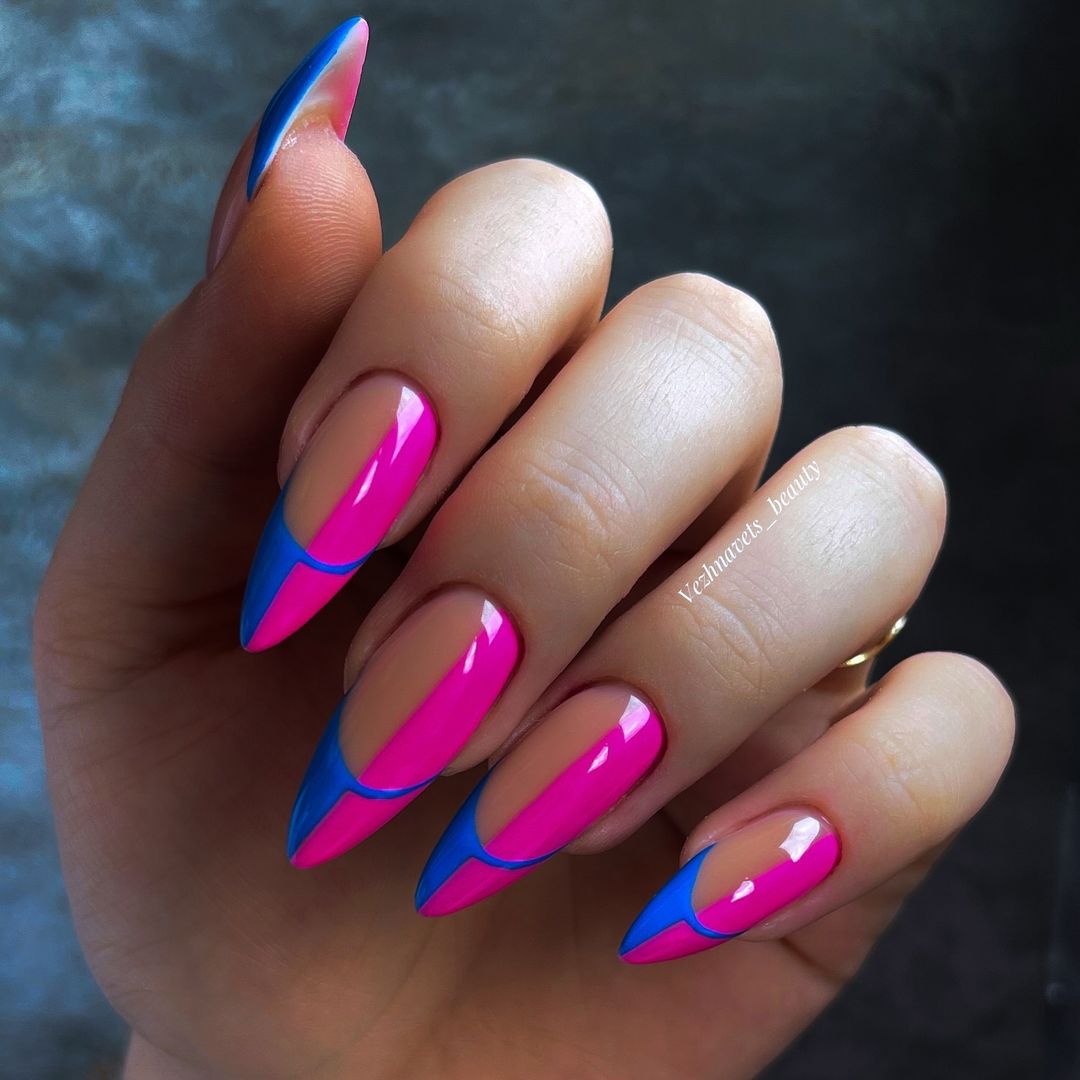
Neon Duo
Neon Duo nails combine bright pink and blue in a striking and dynamic design. This look features a nude base with geometric patterns in neon pink and blue, creating a vibrant and eye-catching effect. Ideal for those who want to make a bold fashion statement.
Consumables:
- Base Coat: OPI GelColor Base Coat
- Pink Polish: Essie Gel Couture in “Model Citizen”
- Blue Polish: Essie Gel Couture in “Butler Please”
- Top Coat: Seche Vite Dry Fast Top Nail Coat
- Nail Art Tools: Fine Detail Brush, Striping Tape
Creating the Look:
- Prep Your Nails: Start with clean, trimmed nails. Apply the OPI base coat to protect your natural nails.
- Apply Nude Base: Use a nude polish like OPI Nail Lacquer in “Samoan Sand” and apply two coats. Cure under a UV lamp after each coat.
- Add Neon Patterns: Using Essie Gel Couture in “Model Citizen” and “Butler Please” with a fine detail brush and striping tape, create geometric patterns on each nail. Cure under a UV lamp.
- Seal the Design: Finish with Seche Vite top coat to add shine and protect your design. Cure under a UV lamp for a long-lasting finish.
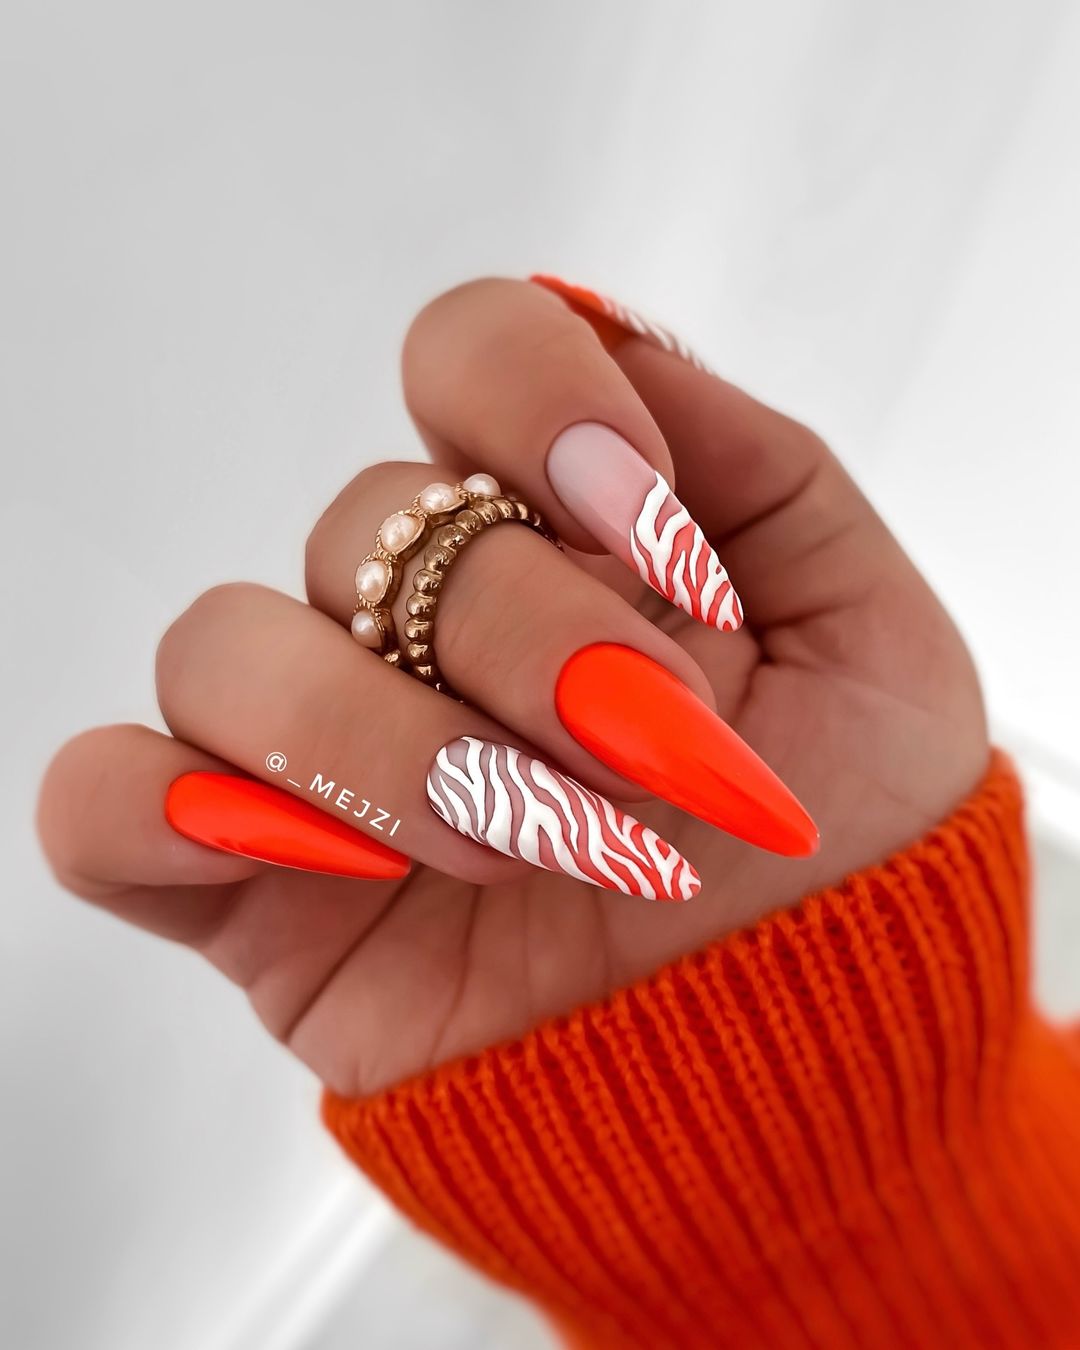
Vibrant Zebra
Vibrant Zebra nails combine a bold orange base with striking white zebra stripes. This design is perfect for those who love animal prints and want to add a pop of color to their look. The combination of bright orange and the intricate zebra pattern makes this manicure truly unique.
Consumables:
- Base Coat: OPI GelColor Base Coat
- Orange Polish: Essie Gel Couture in “Tangerine Tease”
- White Polish: OPI Nail Lacquer in “Alpine Snow”
- Top Coat: Seche Vite Dry Fast Top Nail Coat
- Nail Art Tools: Fine Detail Brush, Nail Stamping Kit
Creating the Look:
- Prep Your Nails: Start with clean, trimmed nails. Apply the OPI base coat to protect your natural nails.
- Apply Orange Base: Use Essie Gel Couture in “Tangerine Tease” and apply two coats for an even, opaque finish. Cure under a UV lamp after each coat.
- Add Zebra Stripes: Using OPI Nail Lacquer in “Alpine Snow” and a nail stamping kit, create zebra stripes on the accent nails. Cure under a UV lamp.
- Seal the Design: Finish with Seche Vite top coat to add shine and protect your design. Cure under a UV lamp for a long-lasting finish.
FAQ
Q: What are the best fall nail colors for 2024? A: The best fall nail colors for 2024 include deep purples, rich browns, and warm golds. These colors are perfect for the fall season and can be incorporated into various designs.
Q: How can I make my manicure last longer? A: To make your manicure last longer, use a high-quality base coat and top coat, avoid exposing your nails to harsh chemicals, and wear gloves when doing household chores.
Q: What are some simple nail designs for beginners? A: Simple nail designs for beginners include single-color manicures, French tips, and polka dots. These designs are easy to create and look stylish.
Embrace the upcoming fall season with these stunning nail designs. Whether you prefer bold, intricate patterns or subtle, elegant accents, there’s a perfect look for everyone. Experiment with these ideas, and don’t forget to have fun with your nails!
Save Pin

