27 Ideas for Goth Fall Nails 2024
Fall 2024 is all about embracing the darker, more mysterious side of beauty, and what better way to do that than with goth fall nails? From intricate designs to bold color palettes, goth nails are making a striking comeback this season. Whether you’re into subtle gothic art or full-on grunge inspo, this guide will walk you through the best nail designs to try. We’ve curated a collection of nail ideas that blend goth aesthetics with the season’s hottest trends. Let’s dive in!
Dark Starry Nights
This nail design channels the mystique of a dark, starry night, with a black base adorned with silver star embellishments. The stiletto shape adds an edge, while the high-gloss finish keeps it sleek and polished. The black background contrasts sharply with the metallic details, creating a look that’s both goth and glam. Perfect for anyone looking to make a bold statement this fall.

Black gel polish: I recommend using OPI’s Black Onyx for a smooth, even finish.
Silver star embellishments: Daily Charme’s Star Dust is perfect for this look.
Top coat: Seche Vite Dry Fast will give that ultra-glossy finish.
Nail glue: IBD Brush-On Glue is ideal for securely attaching the embellishments.
Start with a base coat to protect your natural nails. Apply two coats of black gel polish, curing between each coat. Use a fine nail glue to place the silver star embellishments on each nail. Seal with a high-gloss top coat and cure under a UV lamp for that glassy shine.
Gothic Stained Glass
For a more intricate design, this gothic-inspired nail art takes its cue from stained glass windows. The black and white pattern is carefully etched to mimic the look of gothic architecture, making it a perfect choice for those who love detailed nail art. The almond shape adds a touch of elegance, balancing the bold design with a softer edge.

White gel polish: Try Gelish’s Arctic Freeze for a crisp white base.
Black nail art pen: The Fine Line Pen by Orly is great for precise details.
Matte top coat: Use Zoya’s Matte Velvet Top Coat to give that stained glass effect.
Fine brush: Winstonia’s Detailer Brush will help with intricate designs.
After applying your base coat, apply two coats of white gel polish and cure. Use the black nail art pen or a fine brush dipped in black polish to carefully draw the intricate patterns. Cure the design, then finish with a matte top coat to enhance the stained glass effect.
Spiderweb Goth
Nothing says goth quite like a spiderweb design, and this manicure takes it to the next level with a mix of black and white gradients, spiderwebs, and even a 3D spider charm. The long stiletto shape adds drama, while the black and white tones keep it classic. It’s a perfect blend of grunge and goth with a hint of artistic flair.

Black and white gradient polish: Cirque Colors’ Duochrome Collection offers a perfect gradient effect.
Spiderweb stencils: Whats Up Nails has easy-to-use stencils for precision.
3D spider charm: Daily Charme’s Spider Charms add the perfect finishing touch.
Nail piercing kit: For those who want to add real piercings, Keiby Citom Nail Art Kit works well.
Apply a gradient base using black and white polishes, blending them seamlessly. Use spiderweb stencils or a detail brush to create the web patterns. Add the 3D spider charm with nail glue, or create a piercing if desired. Seal the design with a glossy top coat to lock in the look.
Blood and Web Gothic Nails
This design blends the macabre with elegance, featuring deep red and black tones highlighted by intricate spiderweb details and blood drip effects. The coffin shape enhances the dramatic impact, while the addition of ruby-red gems and metal charms adds a luxurious touch. The contrast between the dark base and the bright red elements creates a striking and bold look, perfect for those who want to embrace the full gothic aesthetic.

Red and black gel polish: CND Shellac in Black Pool and OPI in Big Apple Red are ideal for achieving the rich base colors.
Blood drip nail stickers: Whats Up Nails offers high-quality stickers that can replicate the dripping blood effect with ease.
Ruby gems and metal charms: Swarovski Flatback Crystals in red and Born Pretty Metal Nail Charms provide the right amount of sparkle and edge.
Spiderweb stencils: Twinkled T has precise stencils that help create the detailed web patterns.
Apply two coats of red and black gel polish, curing between each layer. Use the spiderweb stencils and white gel polish to create the web design on select nails, and add the blood drip stickers for a chilling effect. Carefully place the ruby gems and metal charms with nail glue, focusing on accent nails to avoid overwhelming the design. Finish with a glossy top coat to seal in the details and add an extra shine.
Save Pin

Silver Star Embellished Gradient
This stiletto nail design features a seamless gradient from black to gray, adorned with silver star embellishments. The monochromatic palette gives it a sleek, modern vibe, while the stars add a touch of celestial charm. This look is both chic and gothic, making it versatile for various occasions, whether you’re going for something more understated or a full-on gothic glamour.

Black, gray, and white gel polish: Gelish in Black Shadow, OPI in Icelandic for This, and Essie in Blanc create the perfect gradient base.
Silver star embellishments: Daily Charme’s Celestial Stars are ideal for adding that touch of shine.
Fine detail brush: Kupa Nail Art Brush helps with creating smooth transitions in the gradient.
Start with a base coat and then apply the gradient, blending the black, gray, and white gel polishes seamlessly. Once the gradient is fully cured, carefully place the silver star embellishments using nail glue. Seal the design with a high-gloss top coat, ensuring the stars stay secure and the gradient shines through.
Minimalist Gothic Elegance
This almond-shaped nail design is a minimalist take on gothic elegance, featuring nude bases with black tips and delicate silver accents. The simplicity of the design, paired with the small details like the silver stars and minimalistic black art, gives it a sophisticated yet edgy feel. This look is perfect for those who want to channel gothic vibes without going overboard.
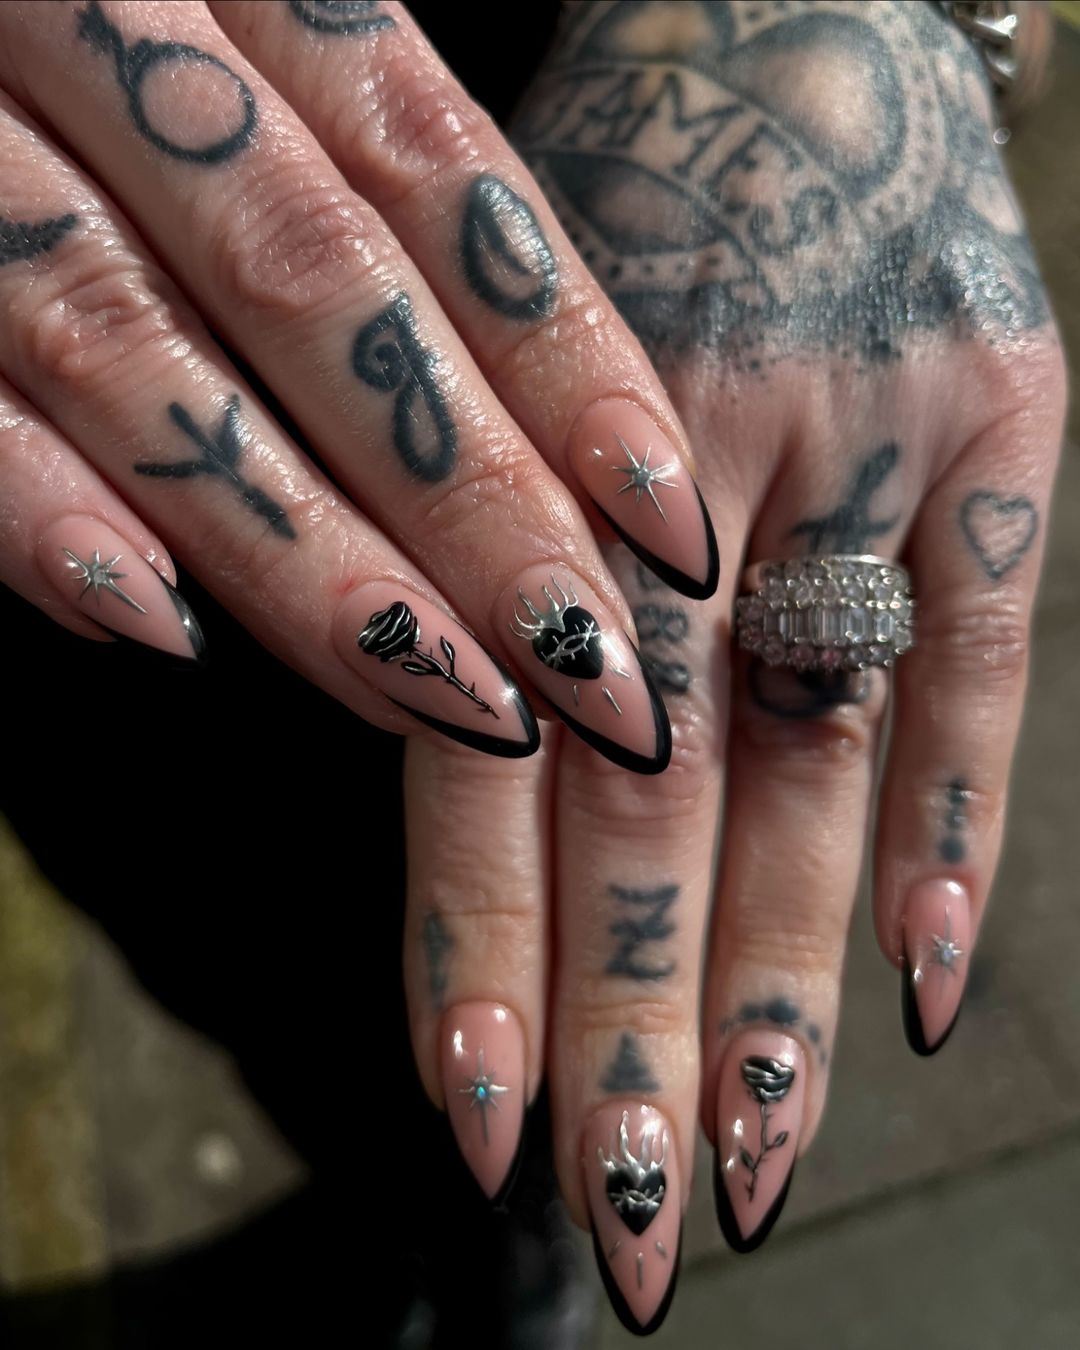
Nude gel polish: Butter London in Yummy Mummy provides a perfect neutral base.
Black gel polish: Essie’s Licorice for the sleek black tips.
Silver star decals: Kiss Nail Art Stickers are easy to apply and add just the right amount of shine.
Fine liner brush: Winstonia Fine Liner is excellent for creating the thin black lines and intricate details.
Begin by applying the nude gel polish as your base and cure. Using the fine liner brush, create precise black tips on each nail, then add the silver star decals. Finish with a clear top coat to protect the design and give it a polished look.
Gory Gothic Sculpted Nails
This nail design pushes the boundaries of gothic art with its grotesque and horror-inspired 3D elements. The stiletto shape serves as the perfect canvas for a macabre display of blood, flesh, and bone-like textures. The details are disturbingly realistic, with the use of dark red and black tones to create a chilling, almost cinematic effect. This design is not for the faint of heart but is a true statement of gothic excess and creativity.
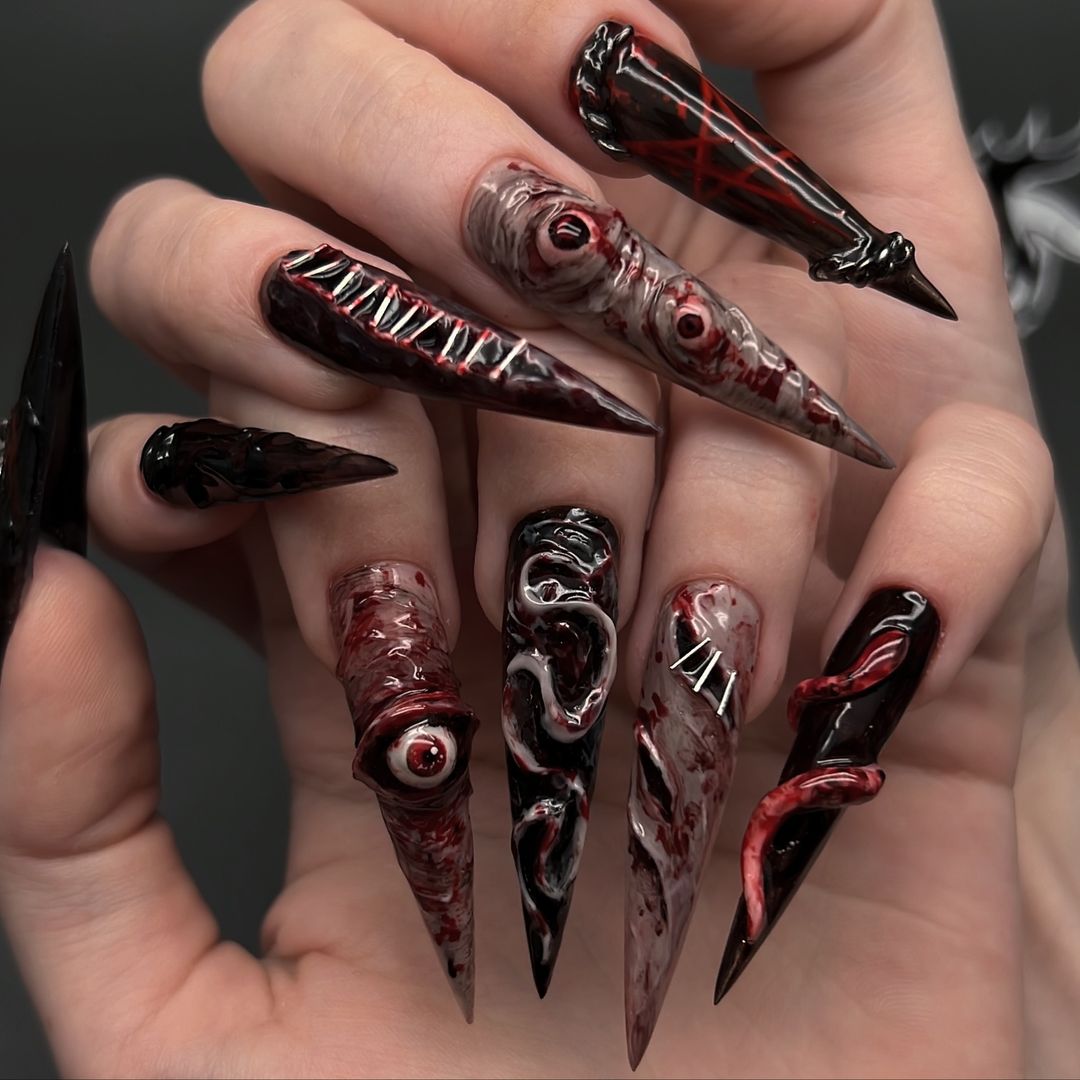
Red and black 3D gel polish: Young Nails’ Synergy Gel in Black and Crystal Nails’ Royal Gel in Deep Red are ideal for sculpting these intricate details.
3D sculpting tools: Crystal Nails’ 3D Master Gel Tool is essential for creating the textured elements like the exposed “flesh” and “bone.”
High-gloss top coat: Bio Seaweed Gel No-Wipe Top Coat adds the necessary shine to give the elements a realistic, wet look.
Start by sculpting the base of each nail with black and red 3D gel, creating raised, organic shapes that mimic flesh and bone. Use fine sculpting tools to add details like the eye, sinews, and blood vessels, layering different colors for depth. Cure each layer under a UV lamp, then finish with a high-gloss top coat to seal and enhance the realism of the design.
Gothic Heartbeat
This almond-shaped design is a gothic take on the classic French manicure, with black tips that resemble dripping blood. The addition of small, blood-red star gems adds a subtle but striking contrast to the otherwise minimalistic design. This look is perfect for those who want a gothic style that’s both elegant and slightly sinister, with a focus on clean lines and sharp contrasts.
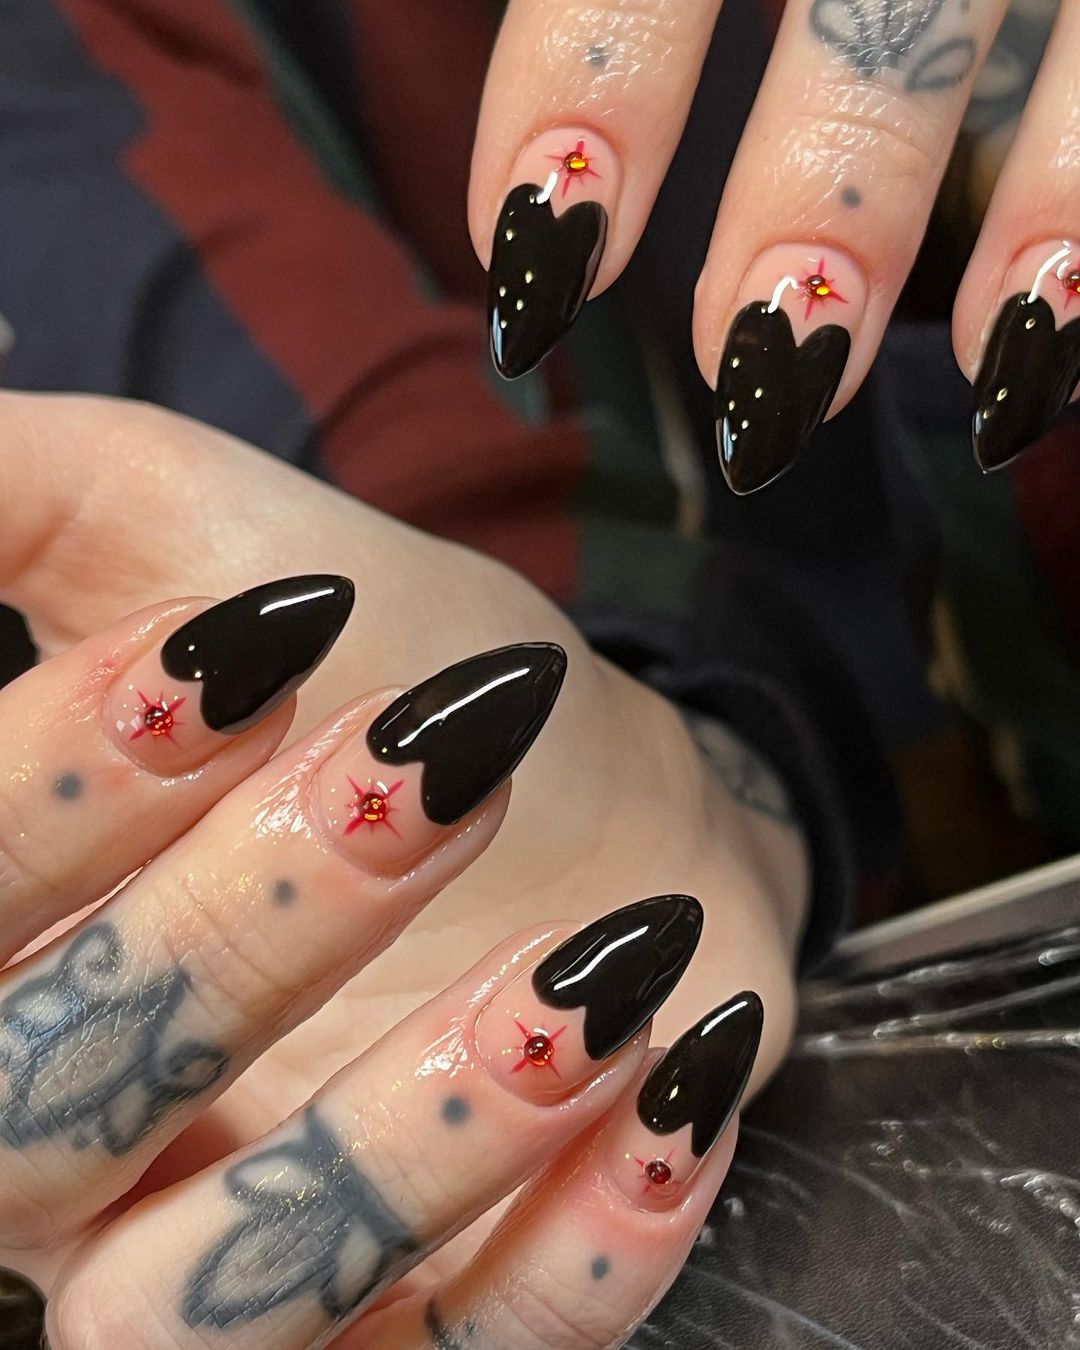
Black gel polish: Essie’s Licorice provides the deep, glossy black needed for the tips.
Red star gems: Swarovski Flatback Crystals in red are perfect for the tiny accent details.
Nail art brush: Winstonia Fine Liner Brush helps achieve the precise lines and sharp edges.
Apply a nude base coat and allow it to cure completely. Using a fine brush, create sharp, heart-like tips in black, curing after each nail. Carefully place the red star gems just above the tips, using a small dab of nail glue for secure placement, then seal with a glossy top coat.
Spooky Florals
This short square nail design combines playful and eerie elements with black as the base and bright green floral skull motifs. The contrast between the dark base and the vibrant green gives the design an unexpected pop, making it both spooky and cute. This look is great for those who want to incorporate gothic elements into a more playful and approachable design.
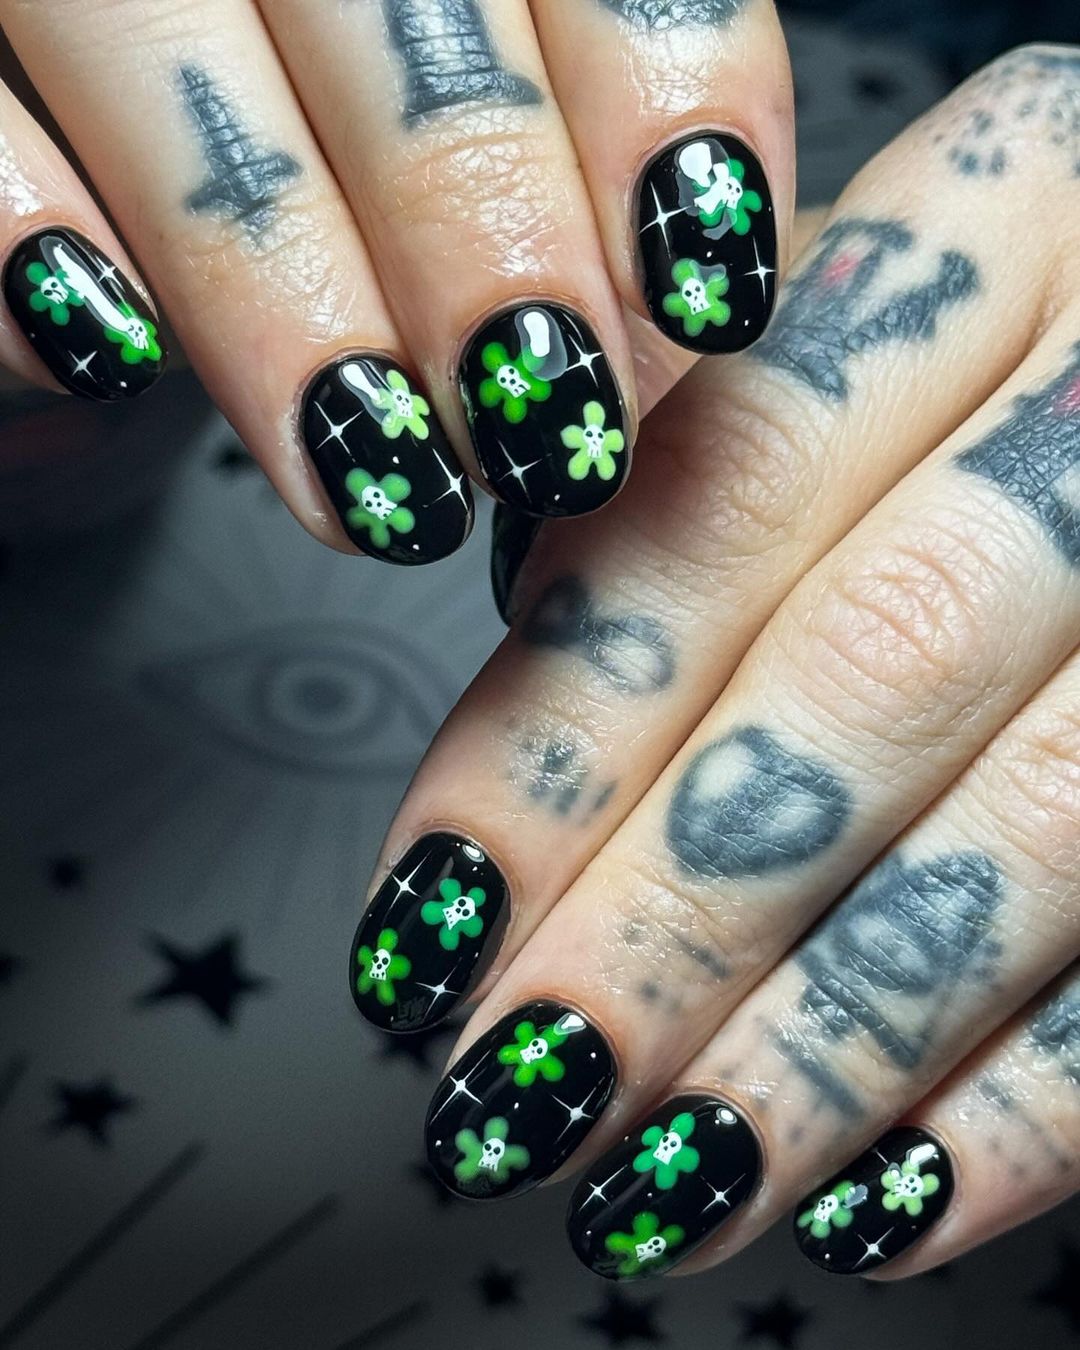
Black gel polish: Gelish Black Shadow provides the ideal dark base.
Green nail art pen: The Fine Line Pen by Orly is perfect for drawing the detailed floral skulls.
Matte top coat: OPI Matte Top Coat can be used to give the design a softer, more muted finish if desired.
Start with a solid black base, curing after each layer. Use a green nail art pen or fine brush to draw the small floral skulls on each nail. For a different effect, you can finish with a matte top coat, or keep it glossy with a clear top coat.
Save Pin

Webbed Gothic Fade
This oval-shaped design features a delicate fade from pink to black, overlaid with fine spiderweb details. The gradient gives the design a soft, almost ethereal quality, while the web patterns add a touch of gothic intrigue. This look is ideal for those who prefer their gothic style to be more on the subtle and sophisticated side.
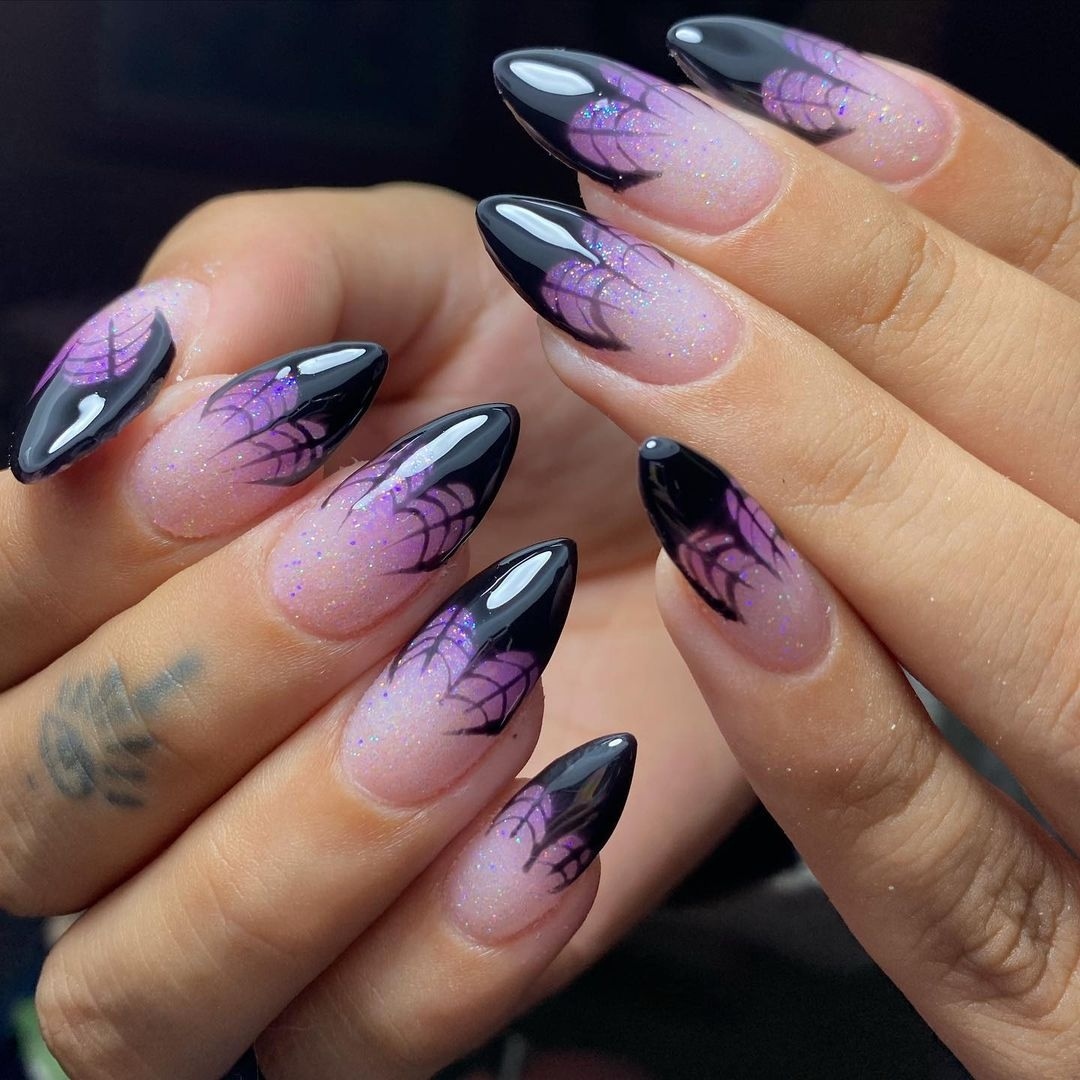
Pink and black gel polish: Bio Seaweed Gel in Peony Pink and OPI’s Black Onyx create the perfect gradient.
Spiderweb nail stickers: Whats Up Nails provides detailed web stickers that are easy to apply.
Fine detail brush: Kupa Nail Art Brush for any touch-ups on the web design.
Begin by creating a gradient from pink to black, curing after each layer. Once the gradient is fully set, carefully apply the spiderweb stickers, or hand-paint the webs using a fine brush. Seal with a glossy top coat to enhance the fade and protect the web design.
Chains and Flames
This almond-shaped nail design is a mix of punk and gothic elements, featuring black and pink flames intertwined with delicate chain patterns. The soft pink base contrasts sharply with the bold black and pink details, creating a look that’s both edgy and feminine. This design is perfect for those who want to mix classic gothic motifs with a touch of modern style.
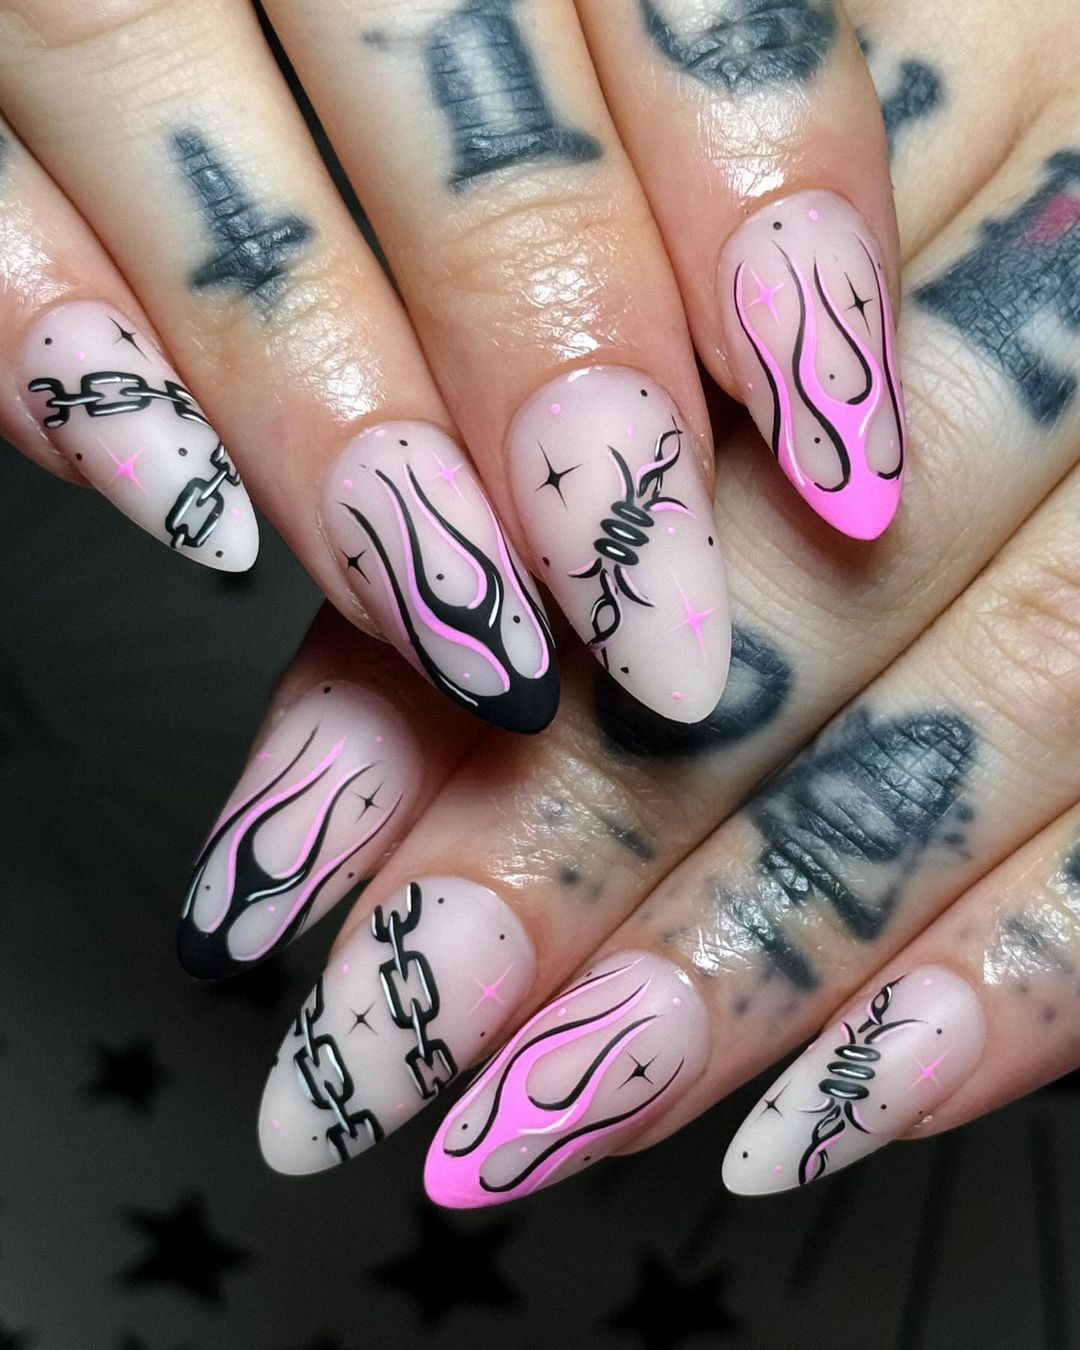
Pink and black gel polish: Essie’s Mod Square and Essie’s Licorice for the flames and chains.
Fine detail brush: Winstonia Fine Liner Brush is essential for creating the intricate flame and chain designs.
Nail decals: Born Pretty Chain Nail Stickers add extra detail and texture.
Apply a soft pink base, curing after each coat. Use a fine brush to paint black and pink flames on select nails, and chains on others, layering for depth. Finish with a glossy top coat to seal the design and add shine.
Red and Black Gothic Glam
This stiletto-shaped design is a glamorous take on gothic nail art, with a rich palette of red, black, and silver. The design features intricate crosses, bat silhouettes, and ruby-red gems, making it both luxurious and darkly elegant. This look is perfect for those who want to go all out with their gothic style, combining classic motifs with modern flair.
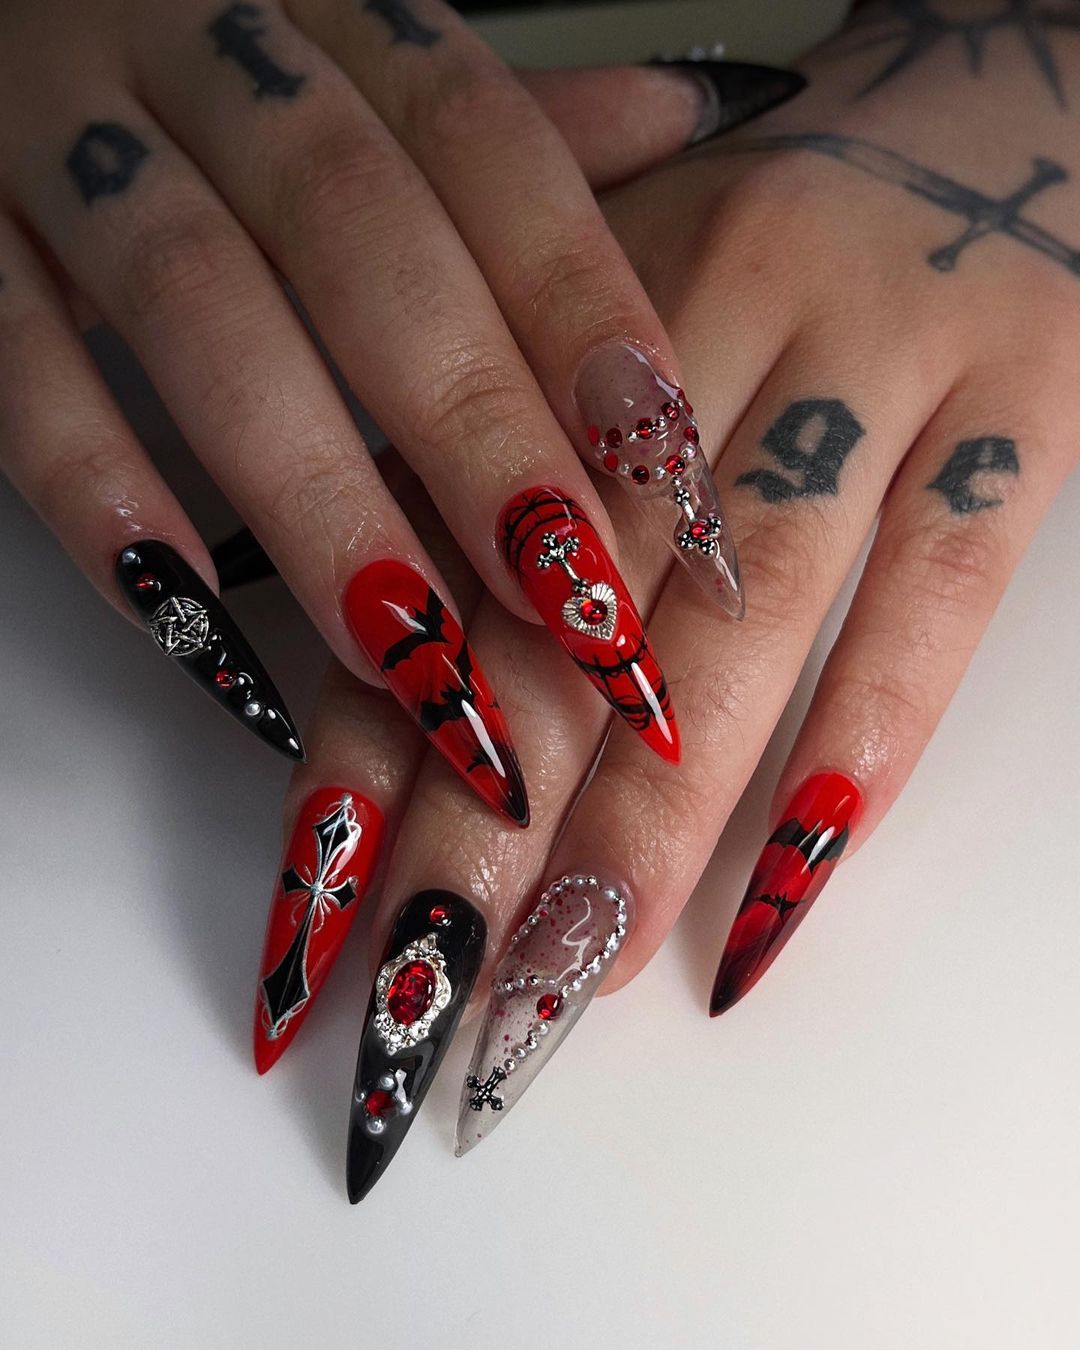
Red and black gel polish: CND Shellac in Wildfire and Gelish Black Shadow create the perfect base.
Silver nail charms: Daily Charme’s Gothic Crosses and Swarovski Flatback Crystals in red for the accents.
Nail glue: IBD Brush-On Glue ensures that all the embellishments stay securely in place.
Apply alternating layers of red and black polish on each nail, curing between coats. Carefully place the silver crosses and bat silhouettes on selected nails, using nail glue for secure attachment. Add the red crystals for a final touch of luxury, then seal with a high-gloss top coat.
Classic Gothic Contrast
This design embraces the classic combination of deep black and blood-red, creating a striking contrast that embodies the gothic aesthetic. The almond shape gives a sleek, elongated look to the nails, while the red tips add a vampiric touch, reminiscent of dripping blood. The high-gloss finish makes the colors pop, creating a bold and elegant statement perfect for the gothic season.
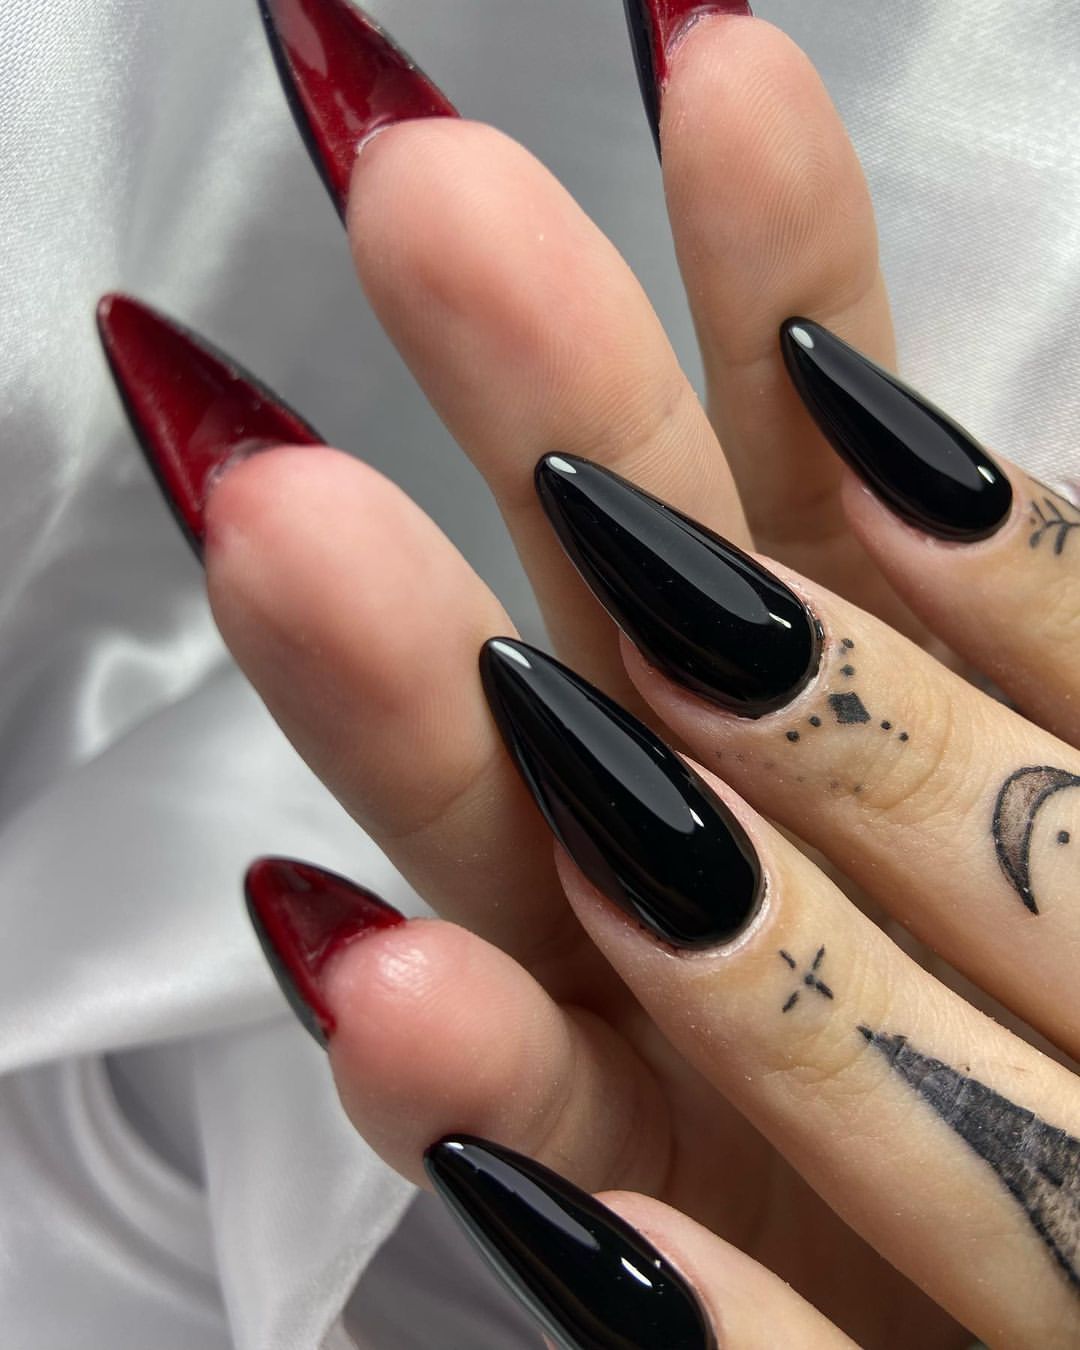
Black and red gel polish: OPI’s Black Onyx and CND Shellac in Wildfire provide the intense color needed.
Fine liner brush: Winstonia Fine Liner Brush helps achieve the precise lines for the red tips.
High-gloss top coat: Seche Vite Dry Fast Top Coat enhances the shine and longevity of the manicure.
Start by applying a base coat, followed by two coats of black gel polish, curing between each layer. Use a fine liner brush to carefully apply the red polish to the tips, creating a smooth, even transition. Finish with a high-gloss top coat to seal the design and give it a striking shine.
Lunar Eclipse Ombre
This stiletto-shaped design plays with the mystical elements of the night, featuring a gradient from nude to black, symbolizing the phases of a lunar eclipse. The addition of white moon and star decals adds an ethereal touch to the dark base, creating a balance between light and darkness. This look is ideal for those who want a gothic style with a celestial twist.
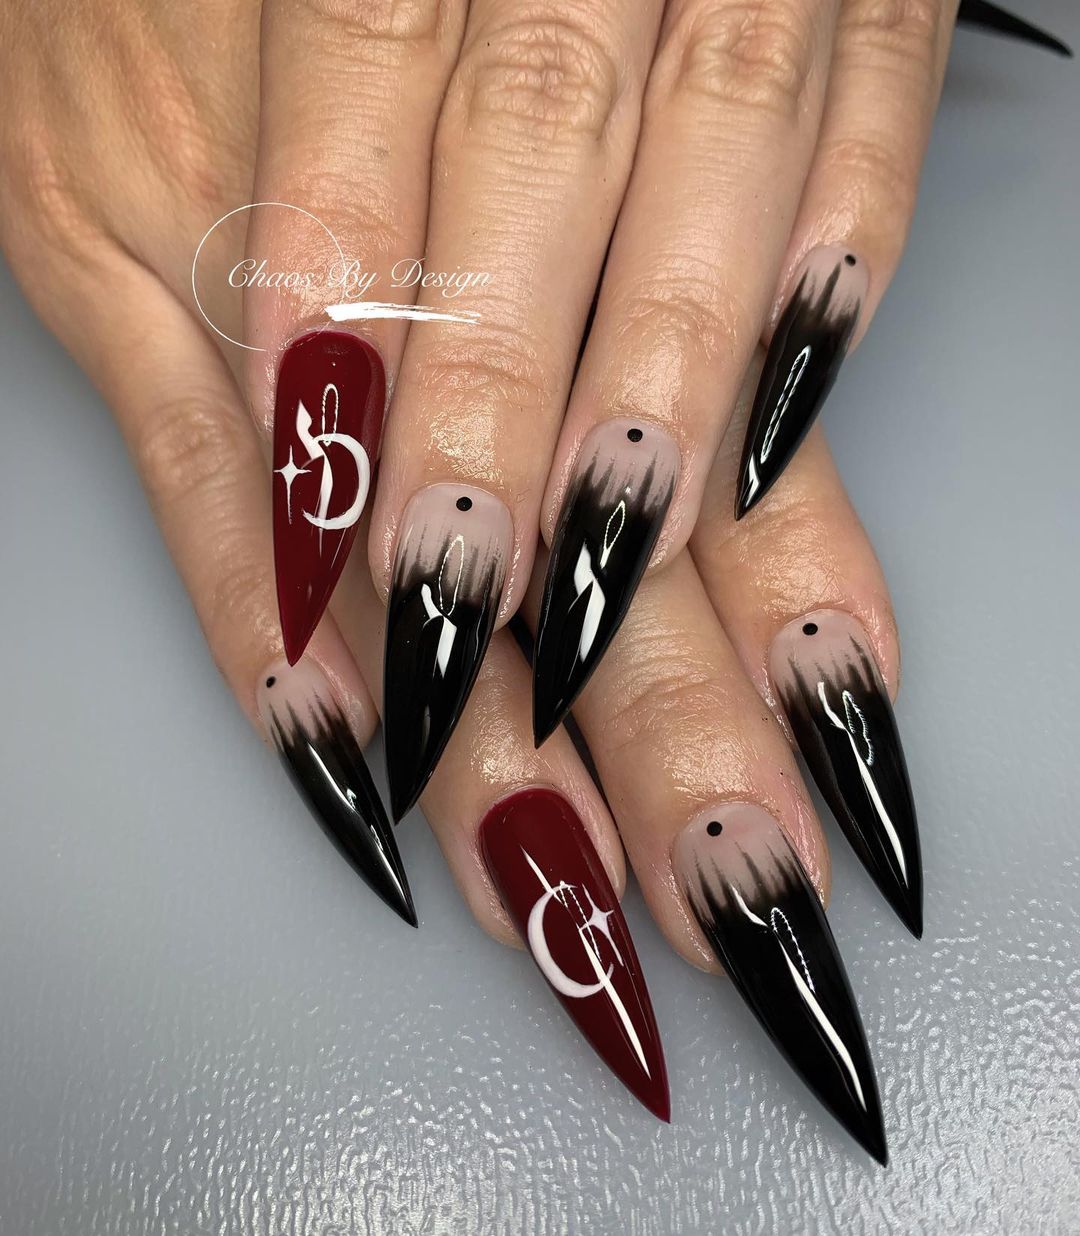
Nude, black, and red gel polish: Essie’s Ballet Slippers for the nude base, Gelish Black Shadow for the gradient, and CND Shellac in Wildfire for the red accents.
Moon and star decals: Daily Charme’s Celestial Decals are perfect for adding those delicate details.
Ombre sponge: Beauty Blender Mini can be used to create the smooth gradient effect.
Apply the nude polish as a base and cure. Using an ombre sponge, blend the black polish from the middle of the nail to the tip, creating a gradient effect. Apply the moon and star decals on selected nails, then finish with a glossy top coat to seal the design.
Gothic Hardware
This design combines the dark allure of black and red with metallic accents, resembling gothic jewelry. The coffin shape provides the perfect canvas for intricate designs, including crosses, chains, and studs. The mix of textures and metallic elements gives this manicure an industrial, yet luxurious feel, making it a standout choice for those who love bold, statement nails.
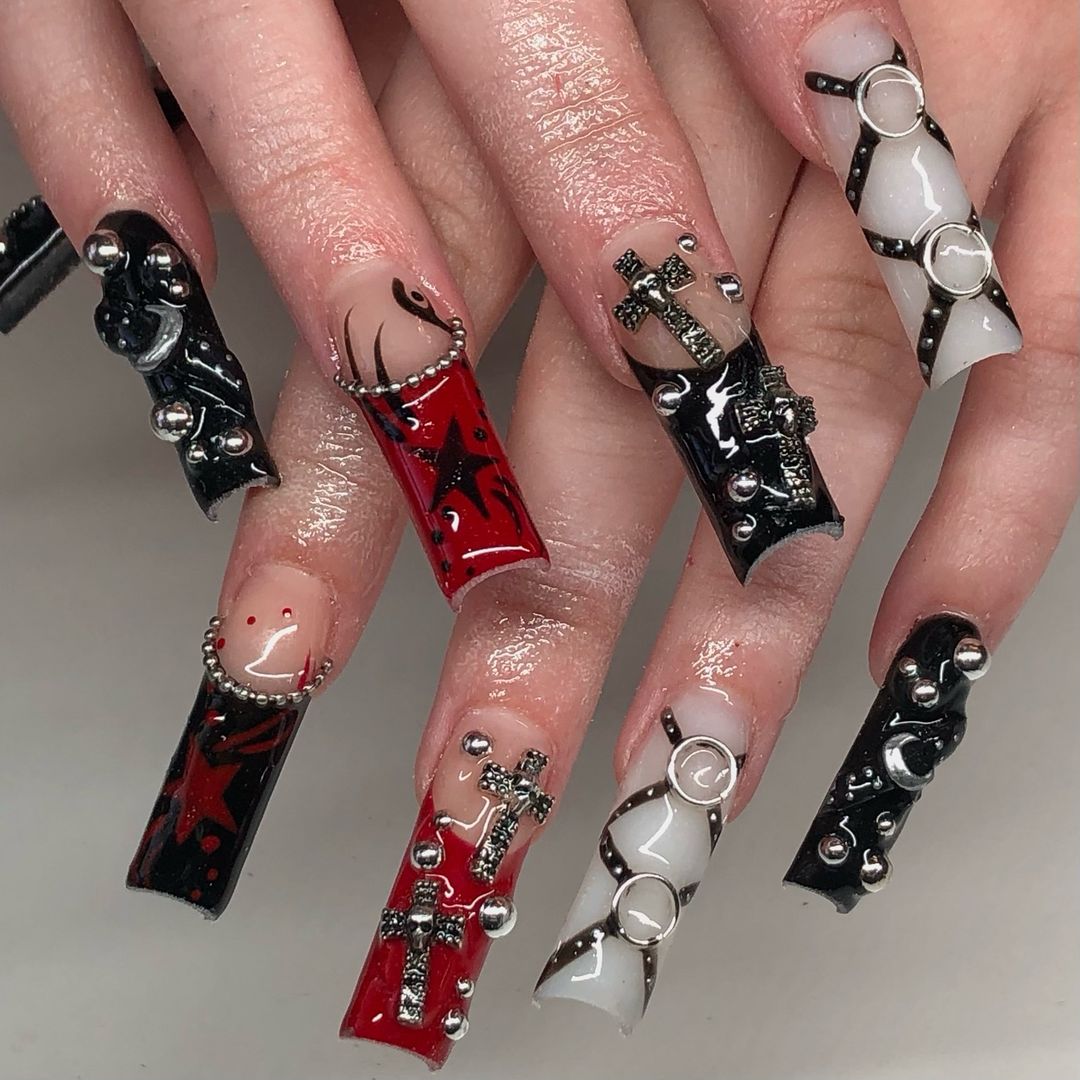
Black, red, and white gel polish: OPI’s Black Onyx, CND Shellac in Wildfire, and Gelish Arctic Freeze for the base colors.
Metallic studs and crosses: Born Pretty Metal Nail Charms for the 3D elements.
Nail glue: IBD Brush-On Glue to securely attach the metallic pieces.
Start with the base colors, alternating between black, red, and white on each nail, and cure. Carefully place the metallic studs, crosses, and chains onto the nails using nail glue, focusing on creating a balanced design. Seal with a high-gloss top coat to ensure all elements stay in place and shine.
Negative Space Gothic Chic
This almond-shaped nail design utilizes negative space to create a chic and modern gothic look. The black tips contrast sharply with the natural base, while small black dots add a minimalist touch. This design is perfect for those who prefer a more understated gothic style, with a focus on clean lines and simplicity.
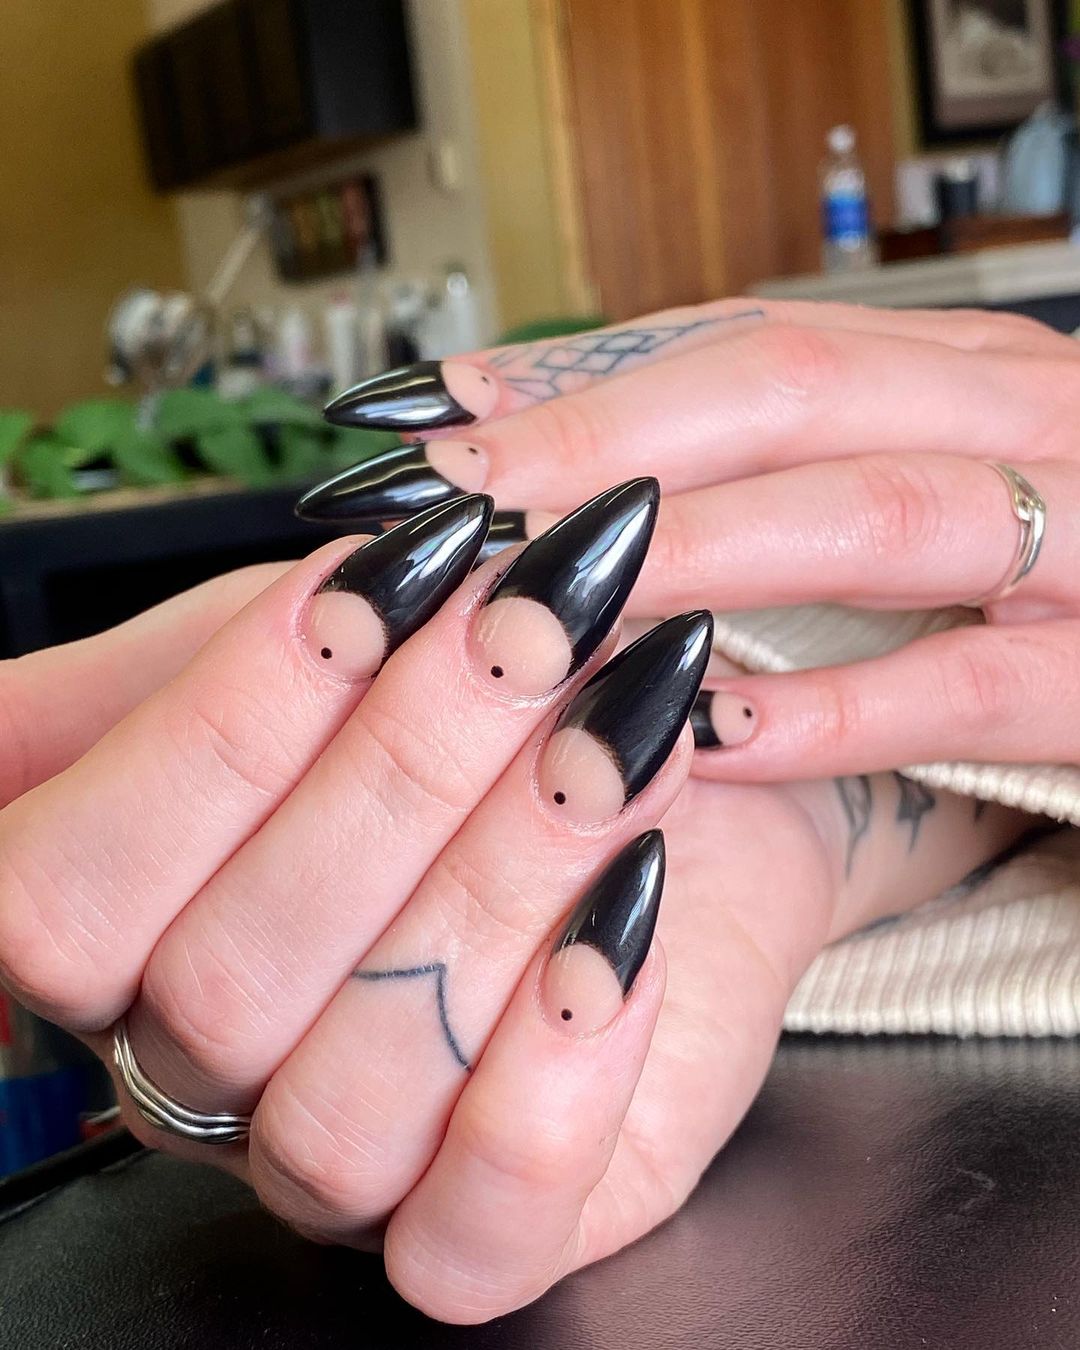
Nude and black gel polish: Essie’s Ballet Slippers for the base and OPI’s Black Onyx for the tips and dots.
Fine liner brush: Winstonia Fine Liner Brush for creating the precise tips and dots.
Matte top coat: OPI Matte Top Coat to give the design a soft, velvety finish.
Apply a nude base coat and cure. Using a fine liner brush, create the black tips, allowing some of the natural nail to show through as negative space. Add the small black dots near the cuticle line for a minimalist accent, then finish with a matte top coat.
Gradient Moonlight
This stiletto-shaped design features a sleek gradient from light gray to deep black, with crescent moon accents that give the design a mysterious and mystical vibe. The gradient effect creates depth, while the moon and white lines add a touch of elegance, making it a sophisticated choice for those who want to channel a more refined gothic aesthetic.
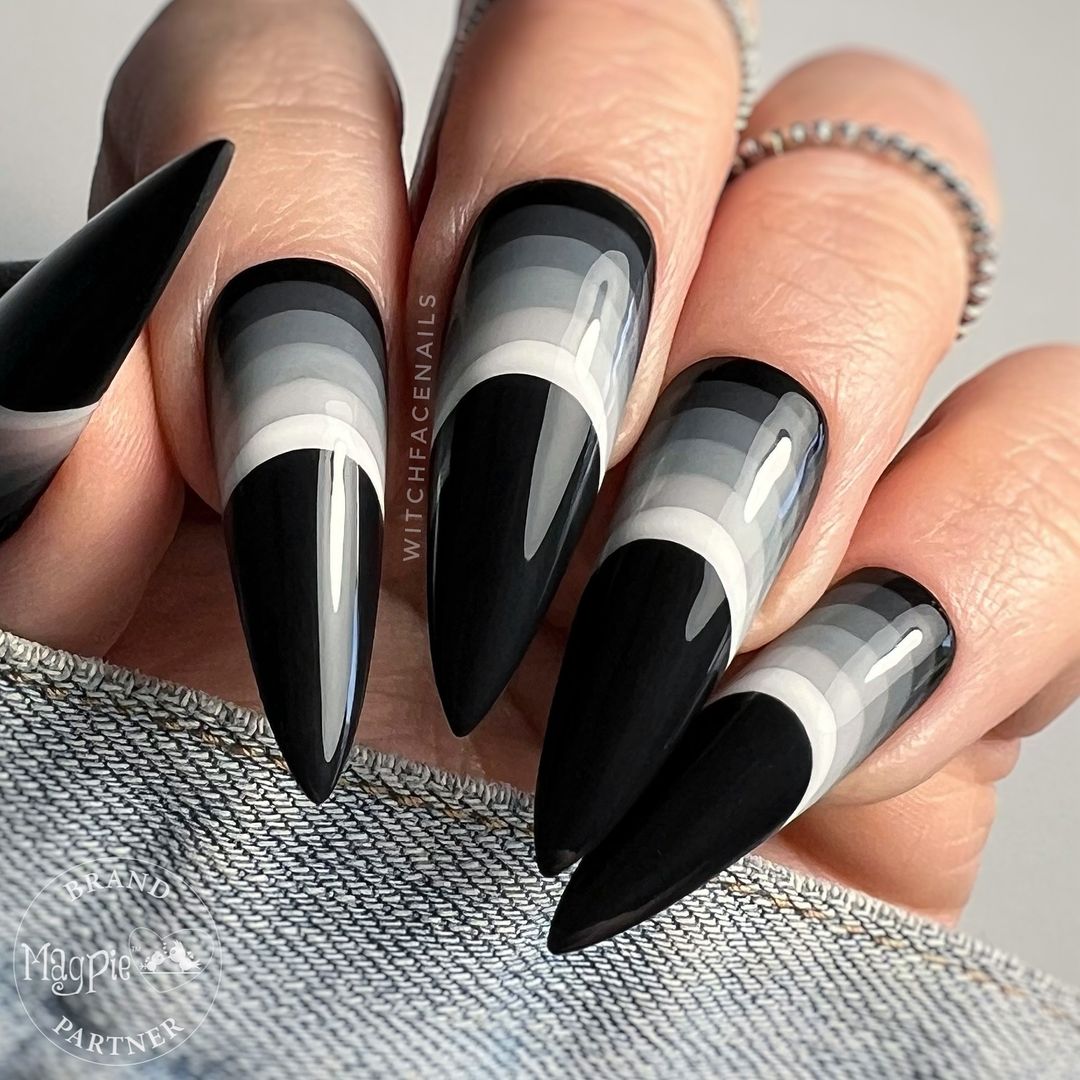
Gray and black gel polish: Gelish in I’m No Saint for the gray base and Essie’s Licorice for the black.
White nail art pen: The Fine Line Pen by Orly for the crescent moon details.
Ombre sponge: Beauty Blender Mini for the gradient effect.
Apply the gray polish as a base, curing each layer. Use an ombre sponge to blend the black polish into the gray, creating a smooth gradient. Draw the crescent moons and white lines with a nail art pen, then finish with a glossy top coat for a polished look.
Bloody Tips
This almond-shaped design features a haunting combination of black and blood-red, creating a look that’s both elegant and eerie. The black base transitions into blood-red tips, mimicking the look of blood dripping down the nails. This design is perfect for those who want to fully embrace the dark side of gothic fashion, with a manicure that’s both dramatic and captivating.
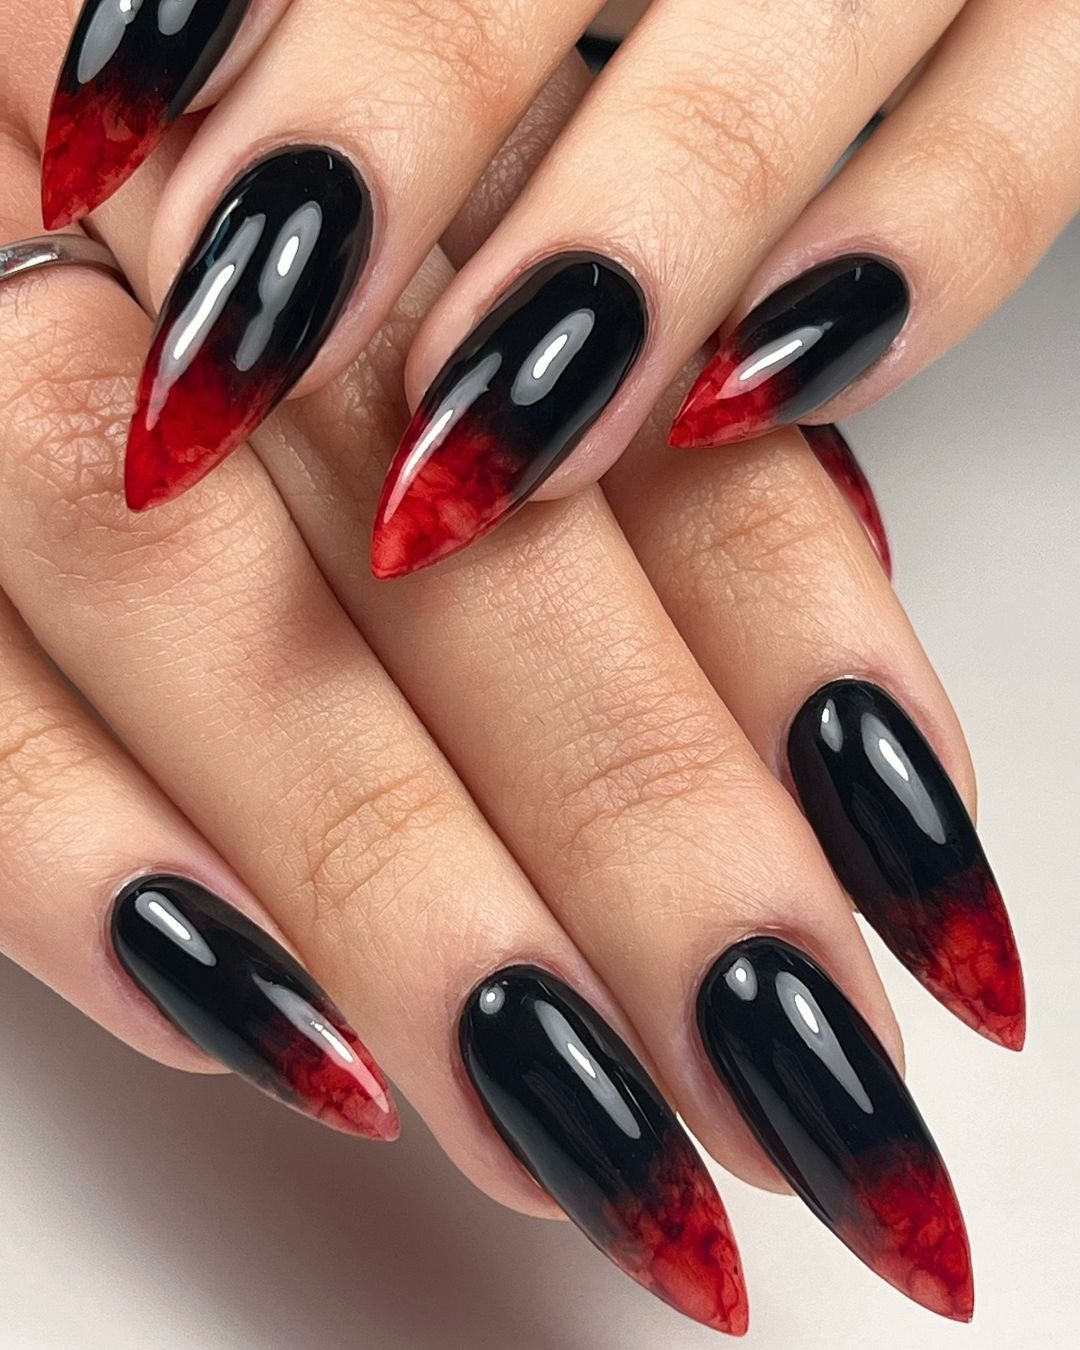
Black and red gel polish: OPI’s Black Onyx and CND Shellac in Wildfire for the base and tips.
Fine liner brush: Winstonia Fine Liner Brush for creating the smooth transition between black and red.
High-gloss top coat: Seche Vite Dry Fast Top Coat to seal the design and enhance the colors.
Start with a black base, applying two coats and curing between each layer. Use a fine liner brush to paint the red tips, blending them slightly into the black to create a seamless transition. Finish with a high-gloss top coat to give the design a wet, glossy appearance that enhances the blood-like effect.
Pink Gothic Mist
This almond-shaped design combines a soft pink base with ethereal black mist accents, creating a hauntingly beautiful look. The pink provides a delicate backdrop, while the black mist gives a mysterious and gothic twist, perfect for those who want a subtle yet striking design. The high-gloss finish enhances the contrast between the colors, making the mist effect stand out even more.
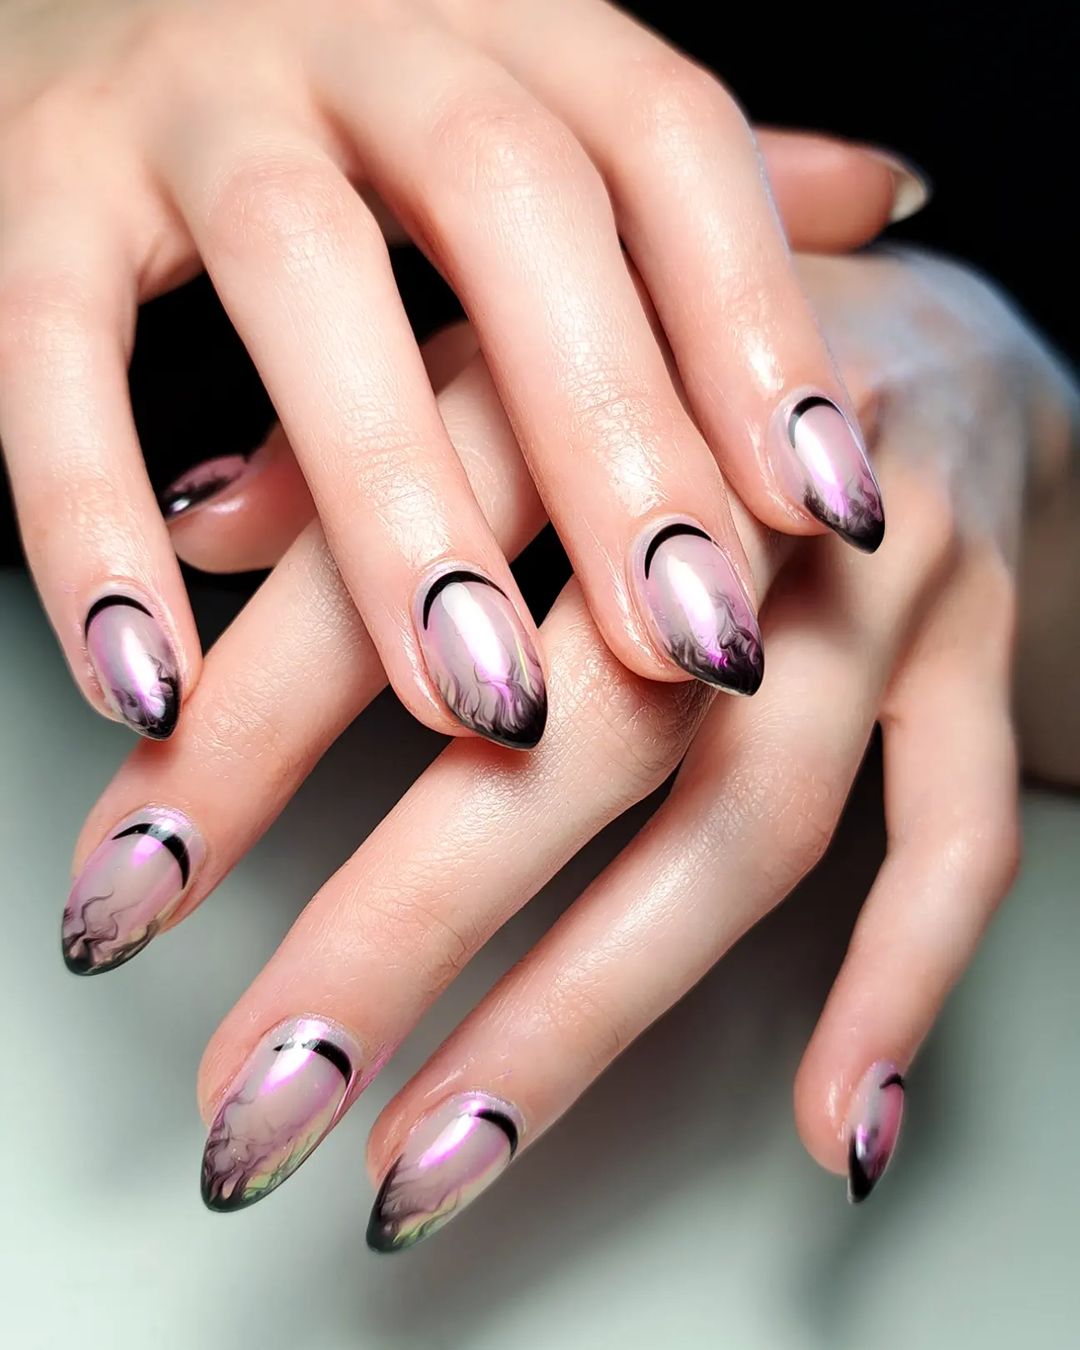
Pink and black gel polish: OPI’s Pink-ing of You for the base and Essie’s Licorice for the mist effect.
Fine detail brush: Kupa Nail Art Brush is essential for creating the misty, smoke-like patterns.
High-gloss top coat: Bio Seaweed Gel No-Wipe Top Coat for sealing the design and adding shine.
Apply the pink gel polish as the base and cure. Use a fine detail brush to create the black mist effect, starting from the tips and fading towards the center of the nail. Seal the design with a high-gloss top coat to enhance the contrast and protect the look.
Holographic Gothic Swirls
This stiletto-shaped design is all about the mesmerizing play of light and dark. The base features a holographic purple that shifts with every movement, while the black swirl patterns add a bold, gothic element. The combination of holographic effects and dark swirls creates a unique look that’s both modern and gothic, perfect for making a statement.
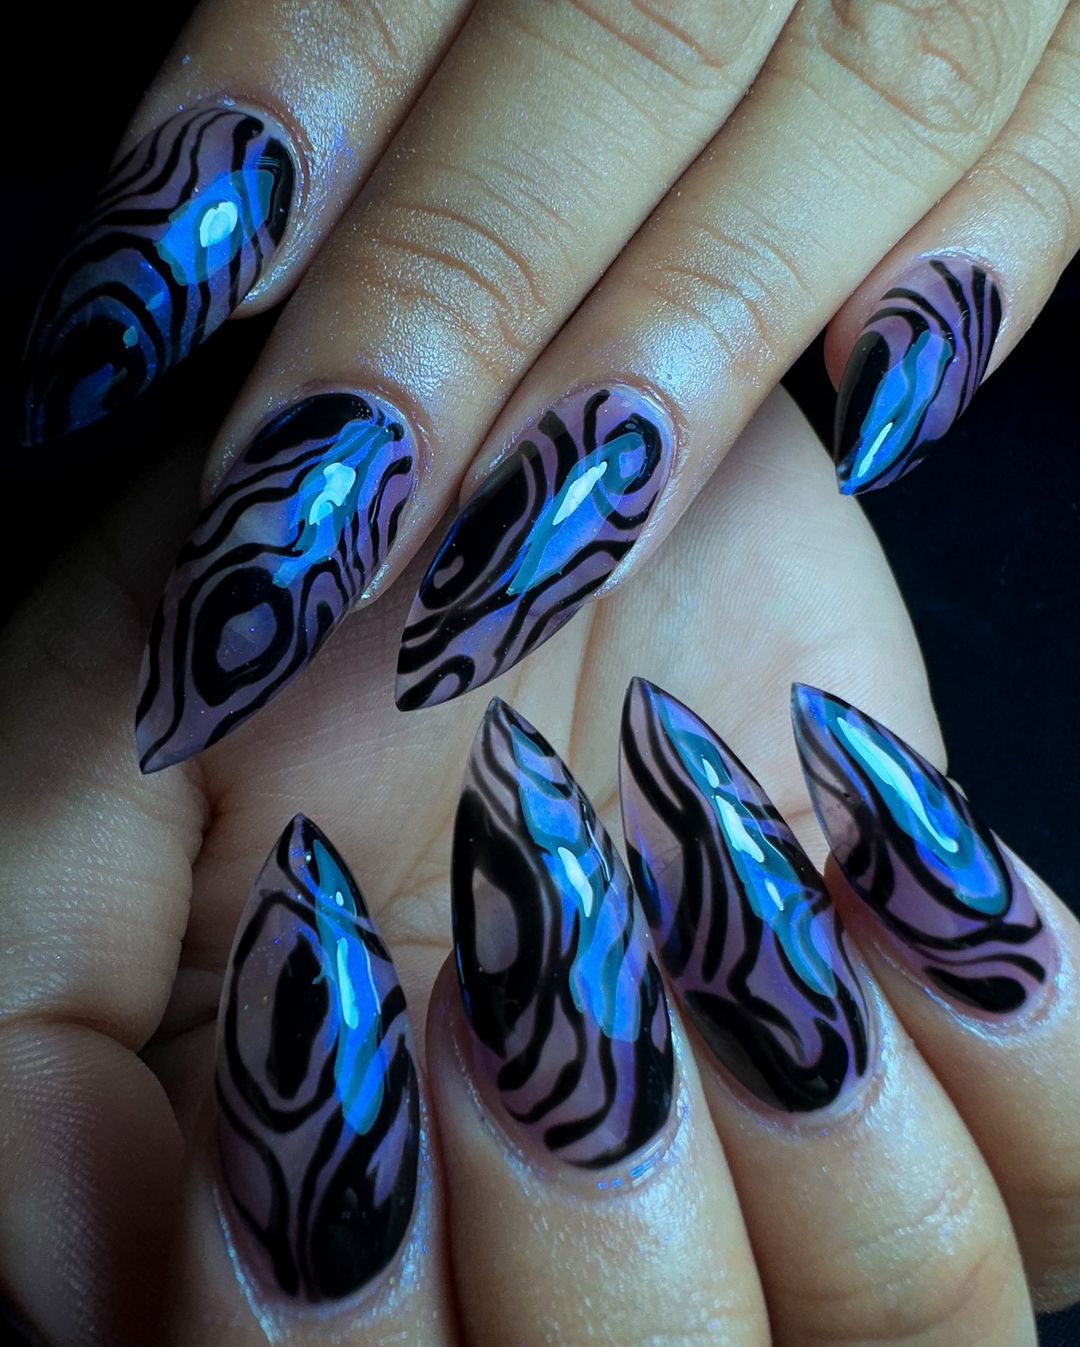
Holographic purple and black gel polish: Holo Taco in Purple Slushie and OPI’s Black Onyx for the swirls.
Swirl nail art pen: Orly’s The Fine Line Pen is perfect for creating precise, intricate swirls.
High-gloss top coat: Seche Vite Dry Fast Top Coat to enhance the holographic effect.
Start with the holographic purple base, applying two coats and curing between each layer. Use the nail art pen to draw black swirls on each nail, focusing on creating dynamic, flowing lines. Finish with a high-gloss top coat to bring out the holographic shimmer and seal the design.
Metallic Gothic Flames
This short nail design brings the heat with its metallic flames, combining silver, black, and hints of orange. The flames give a fierce and edgy vibe, while the metallic finish adds a touch of glamour. This look is perfect for those who love bold, eye-catching designs but prefer a shorter nail length.
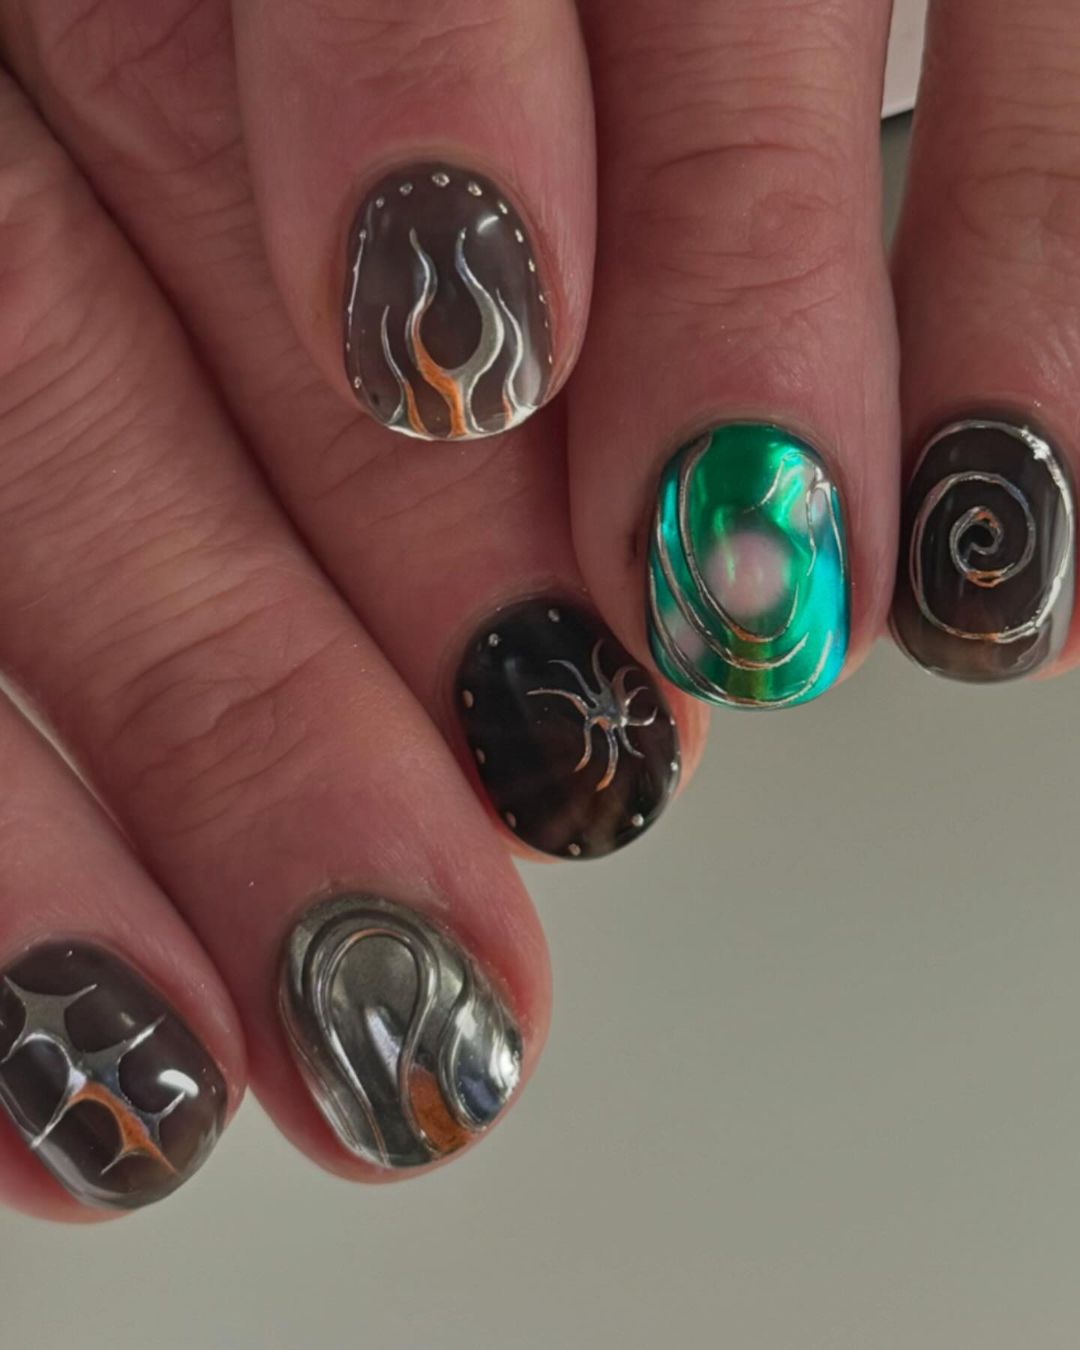
Silver, black, and orange gel polish: Gelish’s Arctic Freeze for the silver base, OPI’s Black Onyx for the flames, and Essie’s Meet Me At Sunset for the orange accents.
Fine liner brush: Winstonia Fine Liner Brush for precise flame details.
Metallic top coat: Essie’s No Place Like Chrome to enhance the metallic finish.
Apply the silver gel polish as the base and cure. Use the fine liner brush to paint black flames on the nails, adding orange accents for extra depth. Seal with a metallic top coat to give the flames a glossy, reflective finish.
Spiked Gothic Elegance
This stiletto-shaped design is a blend of elegance and edge, featuring black and white tones with 3D spikes and skull accents. The contrast between the soft white and the bold black makes the design stand out, while the spikes add a rebellious, punk-inspired touch. This look is ideal for those who want to combine gothic motifs with high-fashion elements.
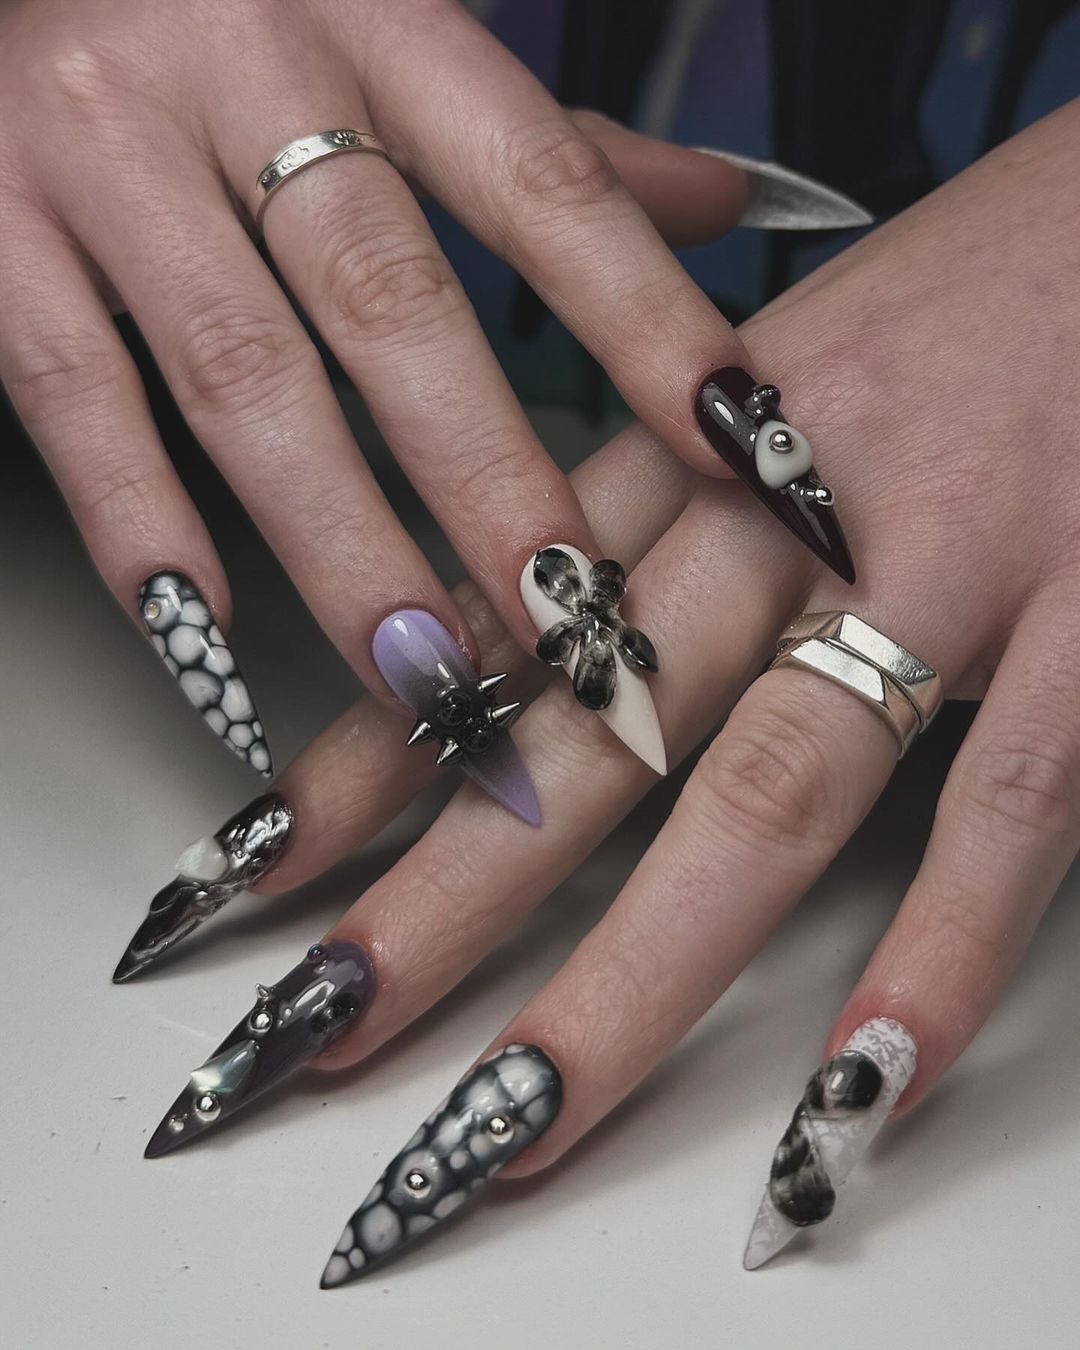
Black and white gel polish: OPI’s Black Onyx and Essie’s Blanc for the base colors.
3D spikes and skull accents: Born Pretty 3D Nail Charms for the gothic embellishments.
Nail glue: IBD Brush-On Glue to secure the 3D elements.
Apply the black and white gel polish on alternating nails, curing after each layer. Use nail glue to carefully attach the spikes and skull accents, focusing on balance and symmetry. Finish with a high-gloss top coat to seal the design and keep the 3D elements in place.
Crossed Gothic Flames
This almond-shaped design features soft nude bases with black flame accents and bold, metallic cross charms. The combination of delicate flames and striking crosses creates a look that’s both fierce and stylish, perfect for those who want to add a gothic touch to their everyday style. The nude base keeps the design versatile, while the flames and crosses add a unique edge.
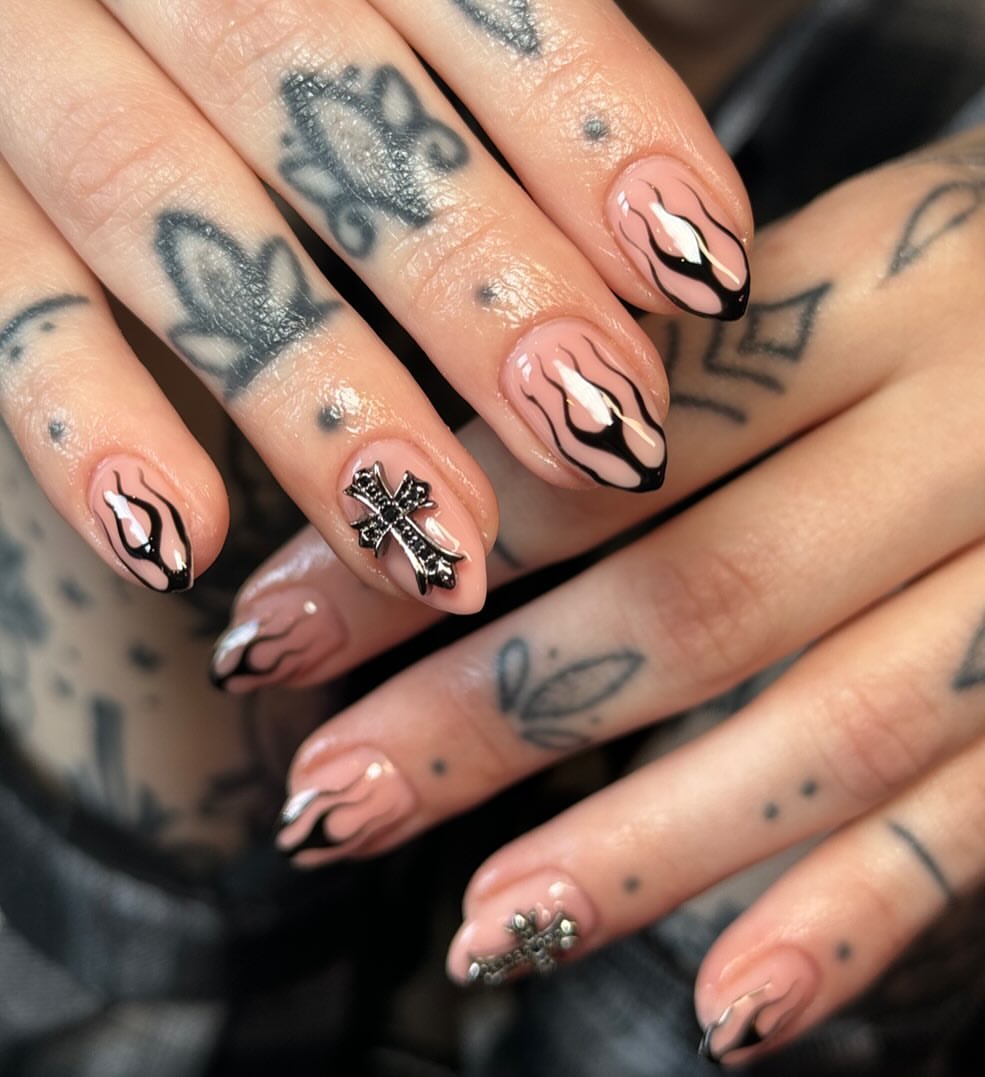
Nude and black gel polish: Essie’s Ballet Slippers for the base and OPI’s Black Onyx for the flames.
Metallic cross charms: Daily Charme Gothic Cross Charms for the 3D accents.
Fine liner brush: Winstonia Fine Liner Brush for the flame details.
Start with a nude base, applying two coats and curing between each layer. Use the fine liner brush to paint black flames on select nails, then attach the metallic crosses using nail glue. Seal with a high-gloss top coat to ensure longevity and shine.
Gothic Royalty
This stiletto-shaped design is the epitome of gothic luxury, featuring a combination of black and nude tones with intricate lace patterns, crystal embellishments, and metallic accents. The mix of textures and the detailed lacework give this design a regal, yet dark feel, making it perfect for a dramatic, high-fashion look.
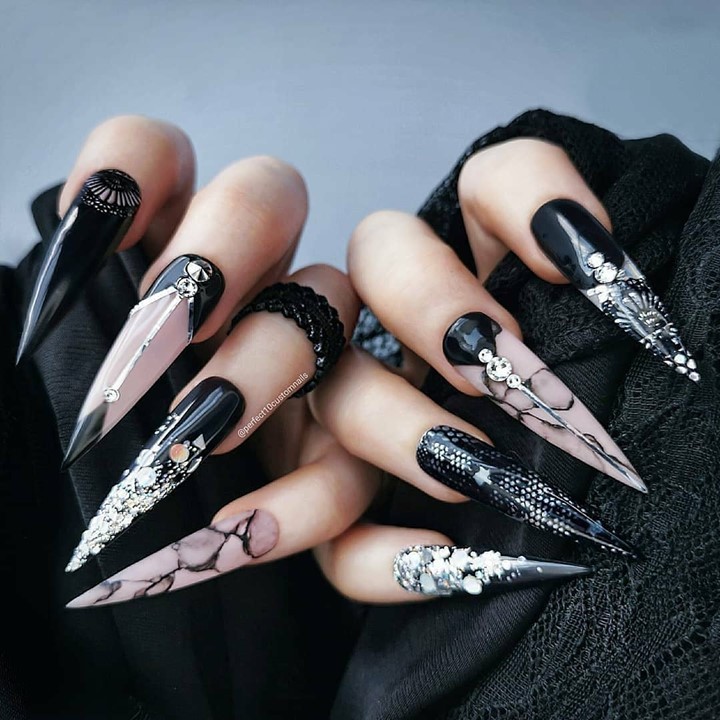
Black and nude gel polish: OPI’s Black Onyx and Essie’s Ballet Slippers for the base colors.
Lace nail stickers: Whats Up Nails Gothic Lace Stickers for intricate patterns.
Crystal embellishments: Swarovski Flatback Crystals for the added sparkle.
Nail glue: IBD Brush-On Glue to secure the crystals and metallic pieces.
Apply the black and nude gel polish on alternating nails, curing between each layer. Use lace nail stickers on select nails, and place crystal embellishments and metallic accents using nail glue. Finish with a high-gloss top coat to protect the design and add a luxurious shine.
Industrial Gothic Armor
This stiletto-shaped design is a masterpiece of industrial gothic art, featuring dark metallic tones and intricate 3D details that resemble pieces of armor. The design incorporates shades of green, gray, and silver, with elements like skull charms and metallic studs that add a rebellious edge. The textures and finishes make each nail look like a crafted piece of gothic armor, perfect for those who want to embrace the darker side of fashion.
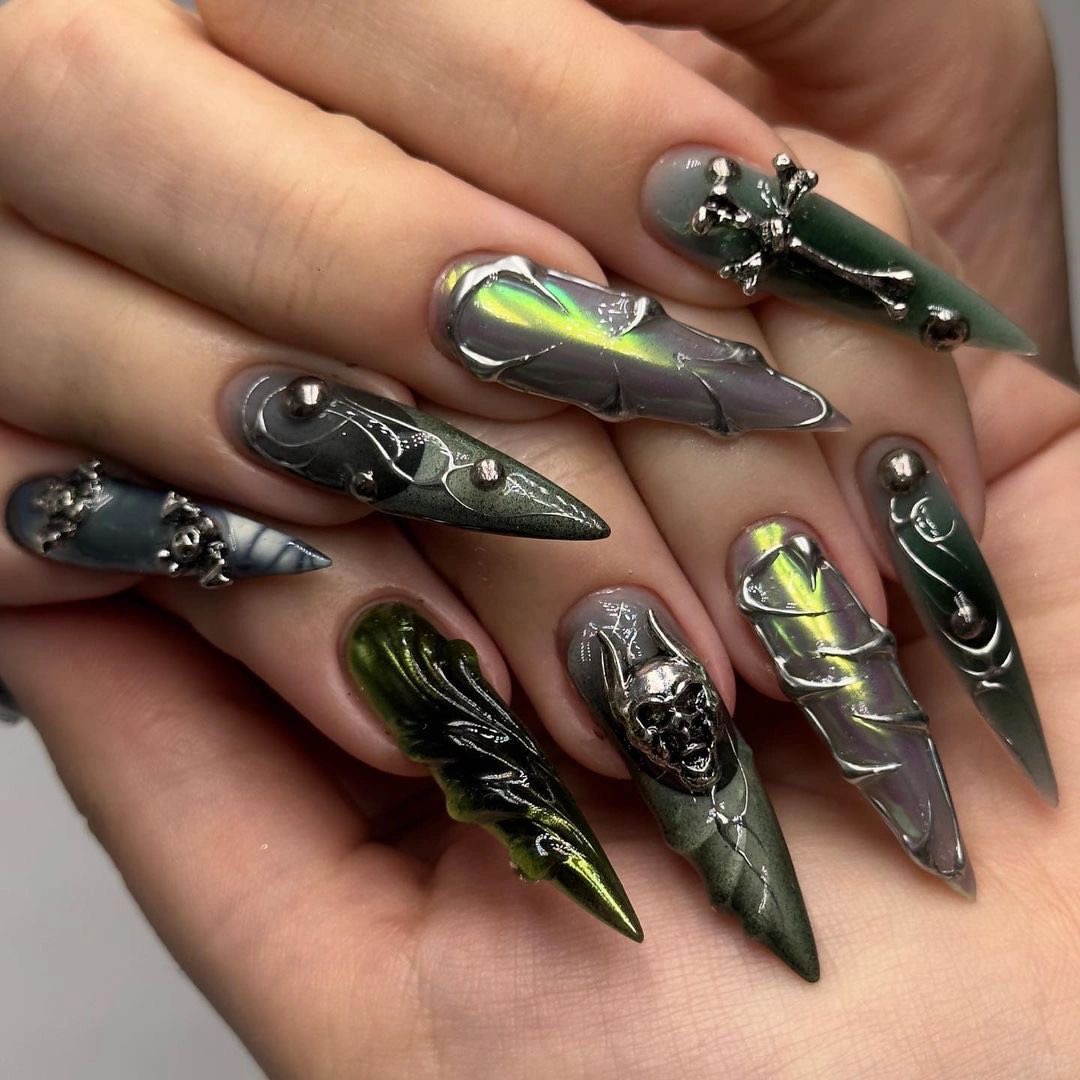
Green, gray, and silver gel polish: Gelish in Army Green and OPI’s Silver on Ice for the base colors.
3D skull charms and studs: Born Pretty 3D Nail Charms for the detailed embellishments.
Sculpting gel: Young Nails Synergy Gel to create the raised, armor-like textures.
Begin with the base colors, alternating between green, gray, and silver, curing between layers. Use sculpting gel to create the raised, armor-like textures on select nails, then attach the skull charms and metallic studs with nail glue. Seal the design with a high-gloss top coat to enhance the metallic finishes and protect the 3D elements.
Celestial Chains
This stiletto-shaped design captures the essence of the night sky, with a deep, starry base and black star patterns accented by delicate silver chains. The gradient from dark blue to black adds depth, making the stars seem to twinkle against the rich background. The silver chains add a touch of elegance, giving this design a celestial, yet gothic feel.
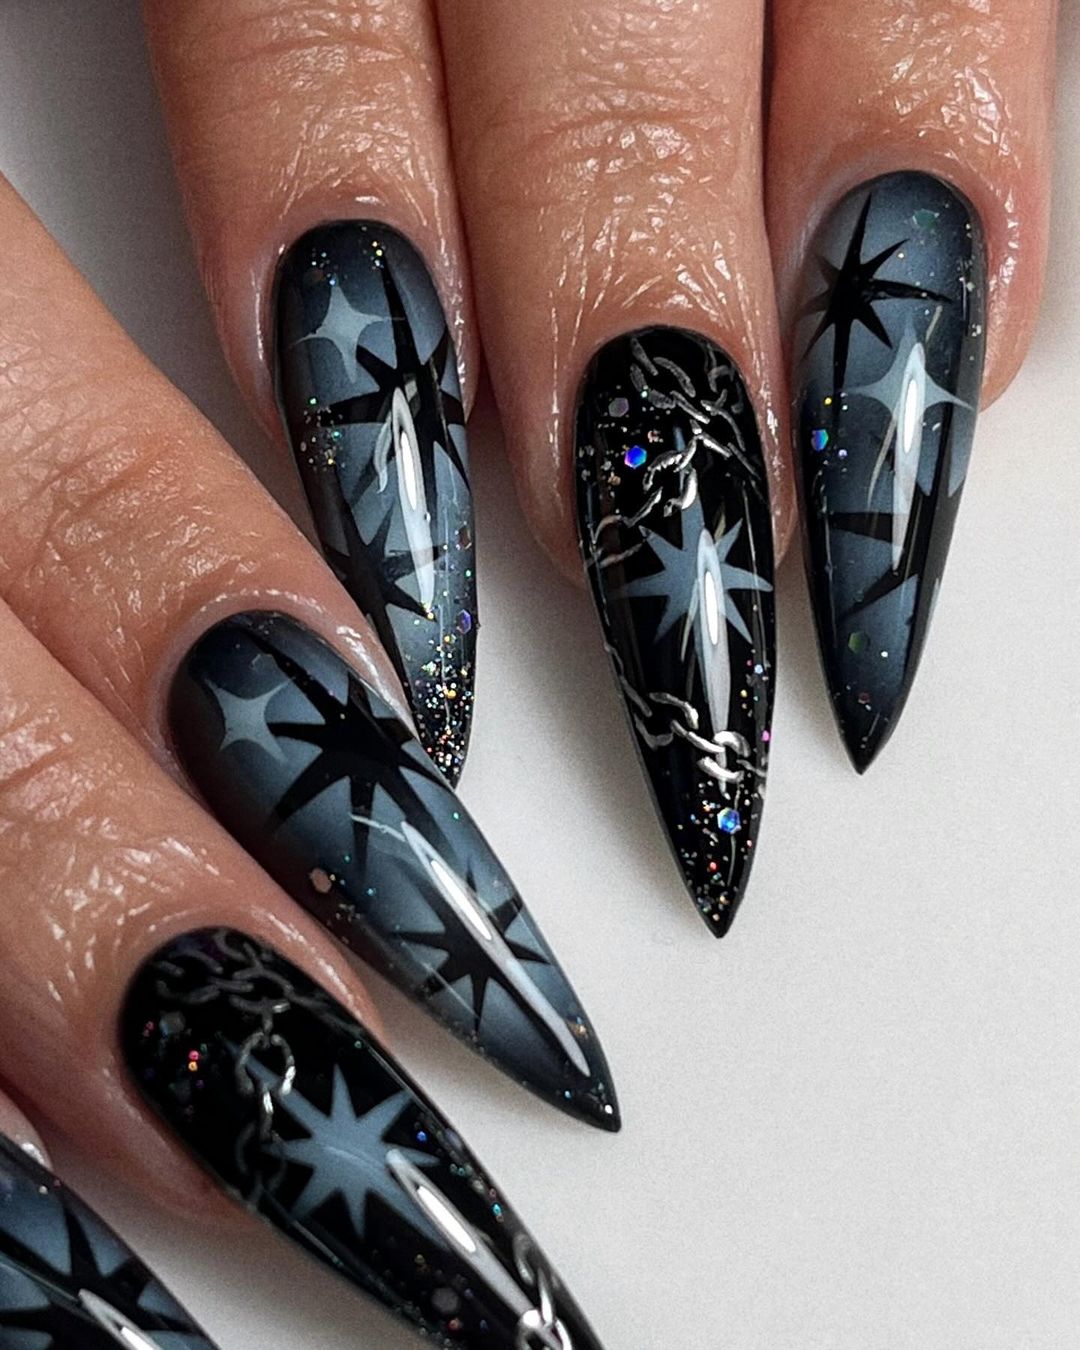
Dark blue and black gel polish: OPI’s Russian Navy and Essie’s Licorice for the gradient base.
Star nail stickers: Twinkled T Starry Night Decals for the star patterns.
Silver chain nail charms: Daily Charme Silver Chains for the delicate chain accents.
Apply the dark blue and black gel polish, creating a gradient effect that transitions smoothly from one color to the other. Use star nail stickers to add the celestial patterns on each nail, then carefully place the silver chains using nail glue. Finish with a glossy top coat to enhance the starry effect and secure the chains in place.
Mystic Moons
This stiletto-shaped design features a mystical, iridescent base with black crescent moon accents. The design captures the enchanting glow of the moonlight, with the base shifting in shades of purple and blue, while the black crescents add a gothic contrast. This look is perfect for those who want to channel the mysterious and otherworldly aspects of gothic style.
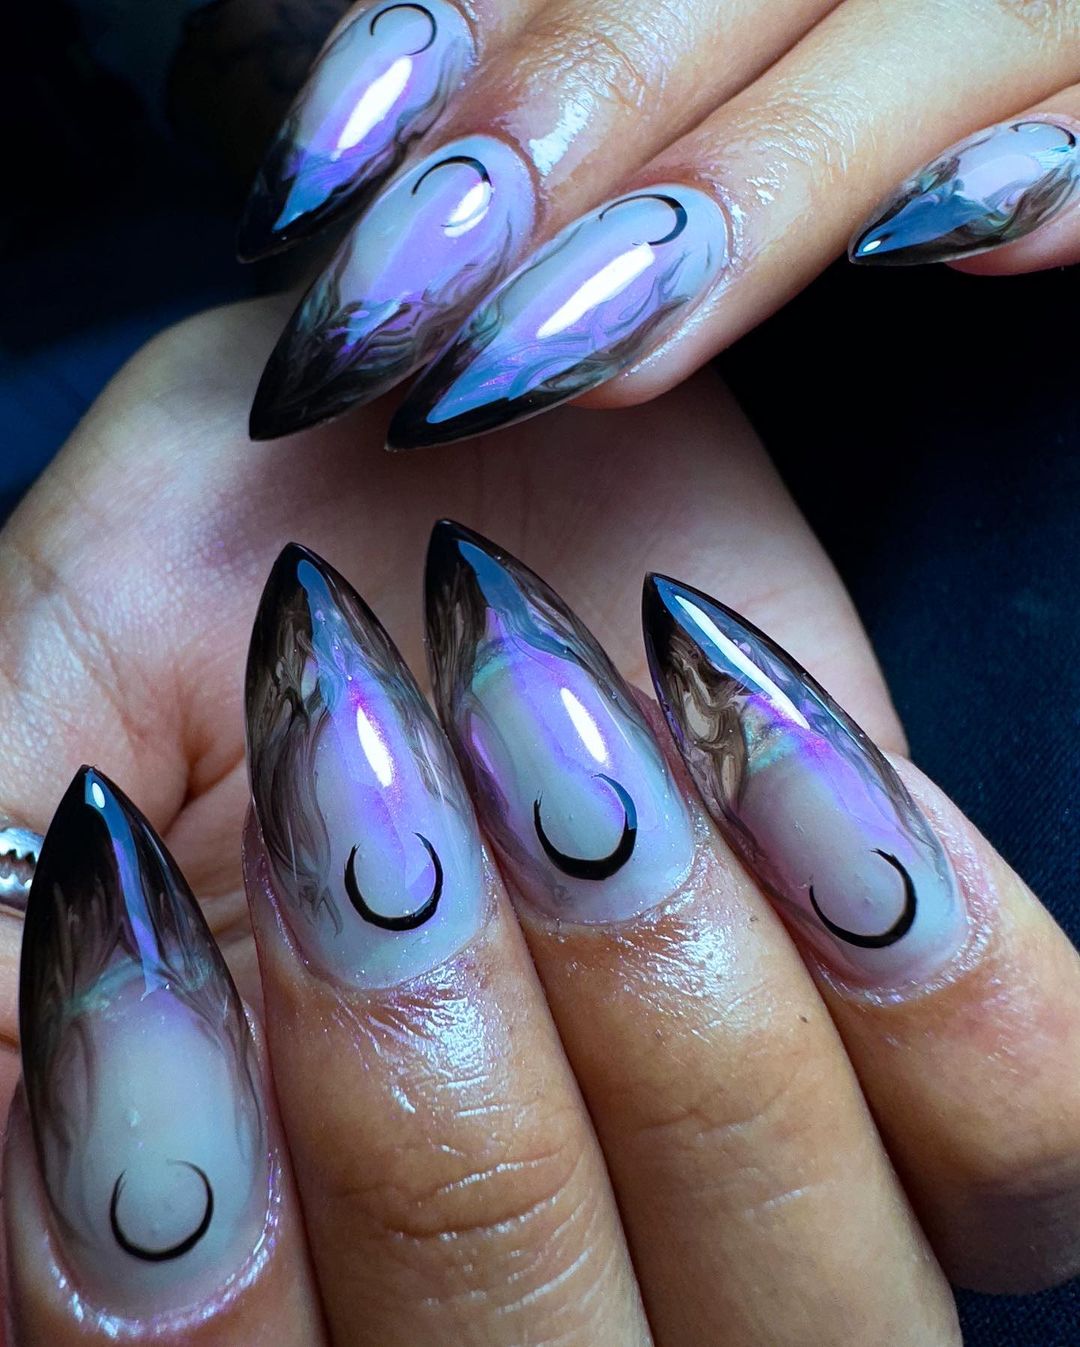
Iridescent purple and blue gel polish: Holo Taco in Purple Slushie for the shimmering base.
Black gel polish: Essie’s Licorice for the crescent moon accents.
Fine liner brush: Winstonia Fine Liner Brush for creating the precise crescent shapes.
Start with the iridescent base, applying two coats and curing between layers. Use a fine liner brush to paint black crescent moons at the base of each nail, creating a mystical, lunar effect. Seal with a high-gloss top coat to enhance the iridescent shine and protect the design.
FAQ
Q: How can I make my goth nails last longer? A: To prolong the life of your goth nails, always start with a high-quality base coat and finish with a durable top coat. Avoid soaking your hands in water for extended periods, and wear gloves when doing household chores.
Q: Are there any simple goth nail designs for beginners? A: Absolutely! A basic black matte nail with a single accent nail featuring a cross or a small star is easy to achieve and still very goth.
Q: What are the trending colors for goth fall nails 2024? A: Trending colors include deep blacks, purples, dark reds, and even muted tones like olive green and slate gray. These colors offer a modern twist on classic goth aesthetics.
Q: Can I create these designs on short nails? A: Yes, many of these designs can be adapted for short nails. Just scale down the details to fit the smaller canvas, and opt for simpler designs if you’re working with very short nails.
Save Pin

