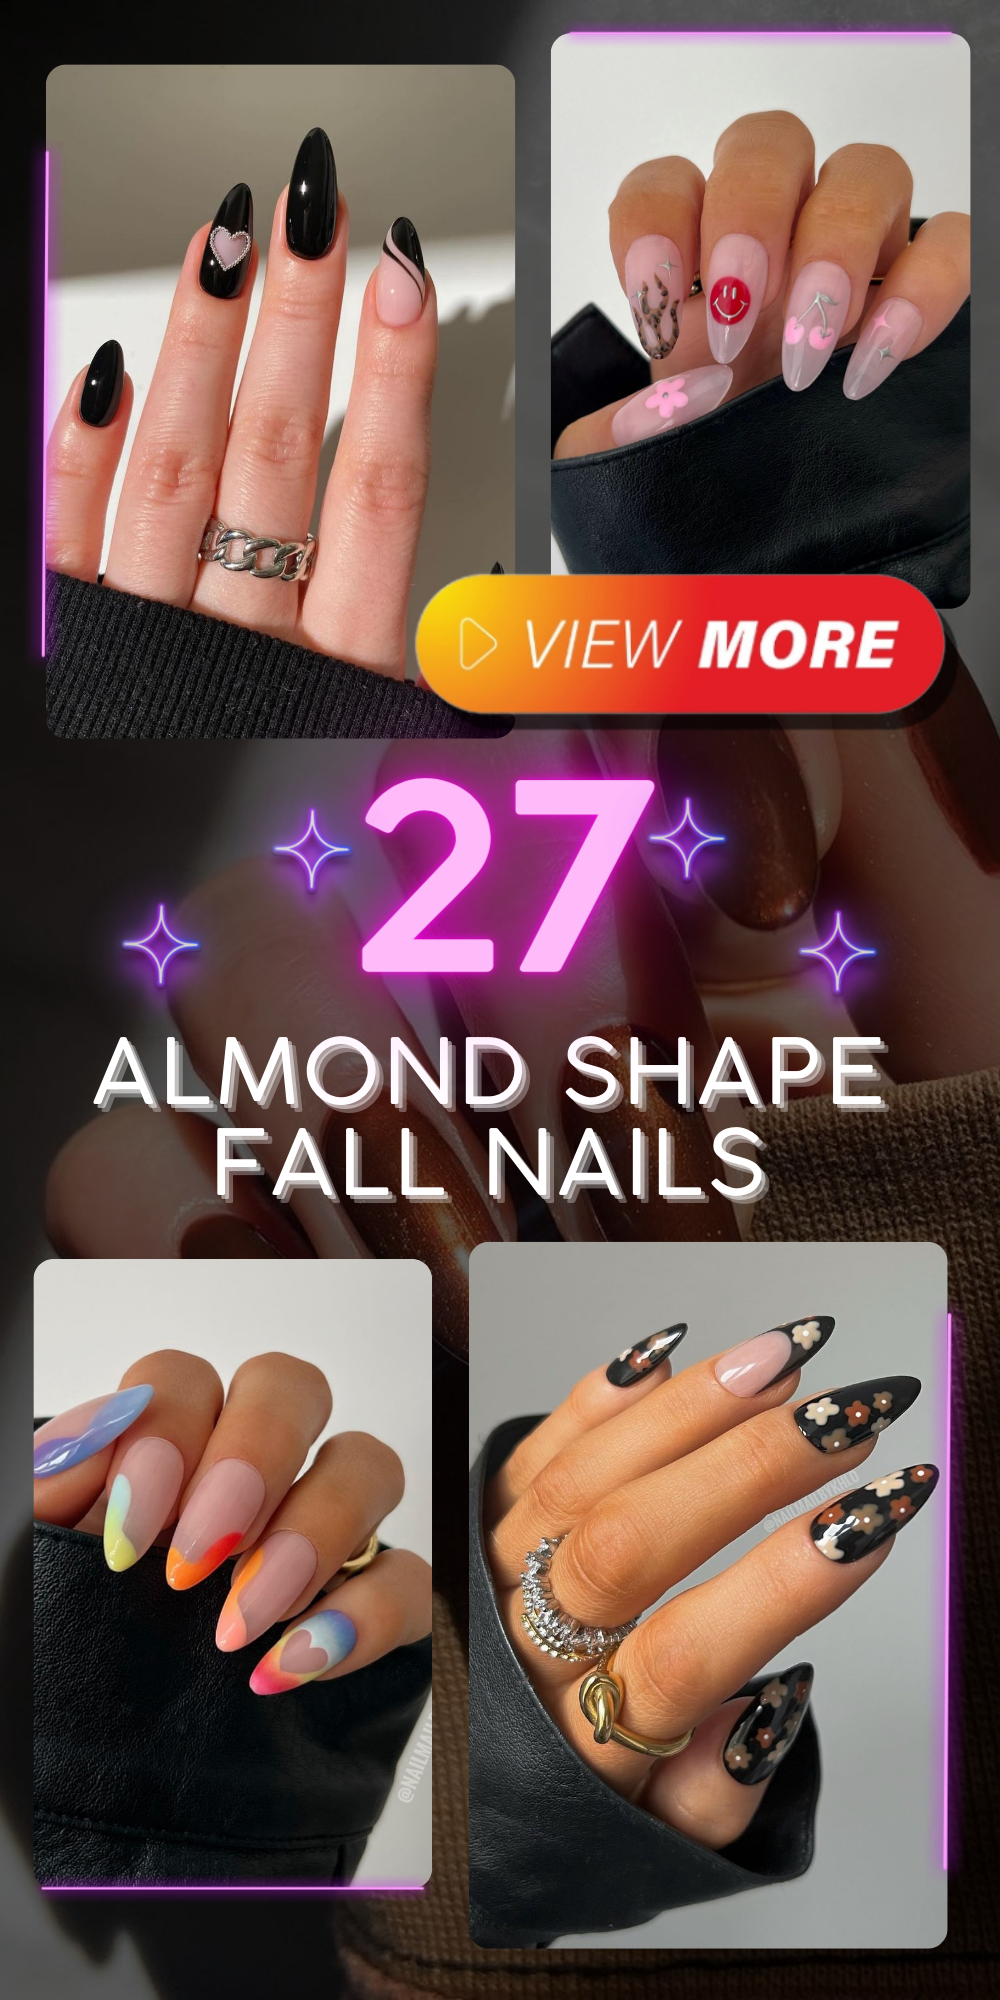
When it comes to fall nail trends, almond-shaped nails are a timeless classic that seamlessly blend elegance with modernity. Have you ever wondered how to achieve the perfect almond shape fall nails? This article will walk you through some of the most captivating nail designs for the season. From bold colors to simple, cute ideas, you’ll find plenty of inspo here. Let’s dive into the world of autumn nail art and discover some amazing designs.
Red and Gold Swirl Elegance
This stunning design features a sleek almond shape with a sophisticated red base. Each nail is adorned with an elegant gold swirl, adding a touch of luxury to the overall look.
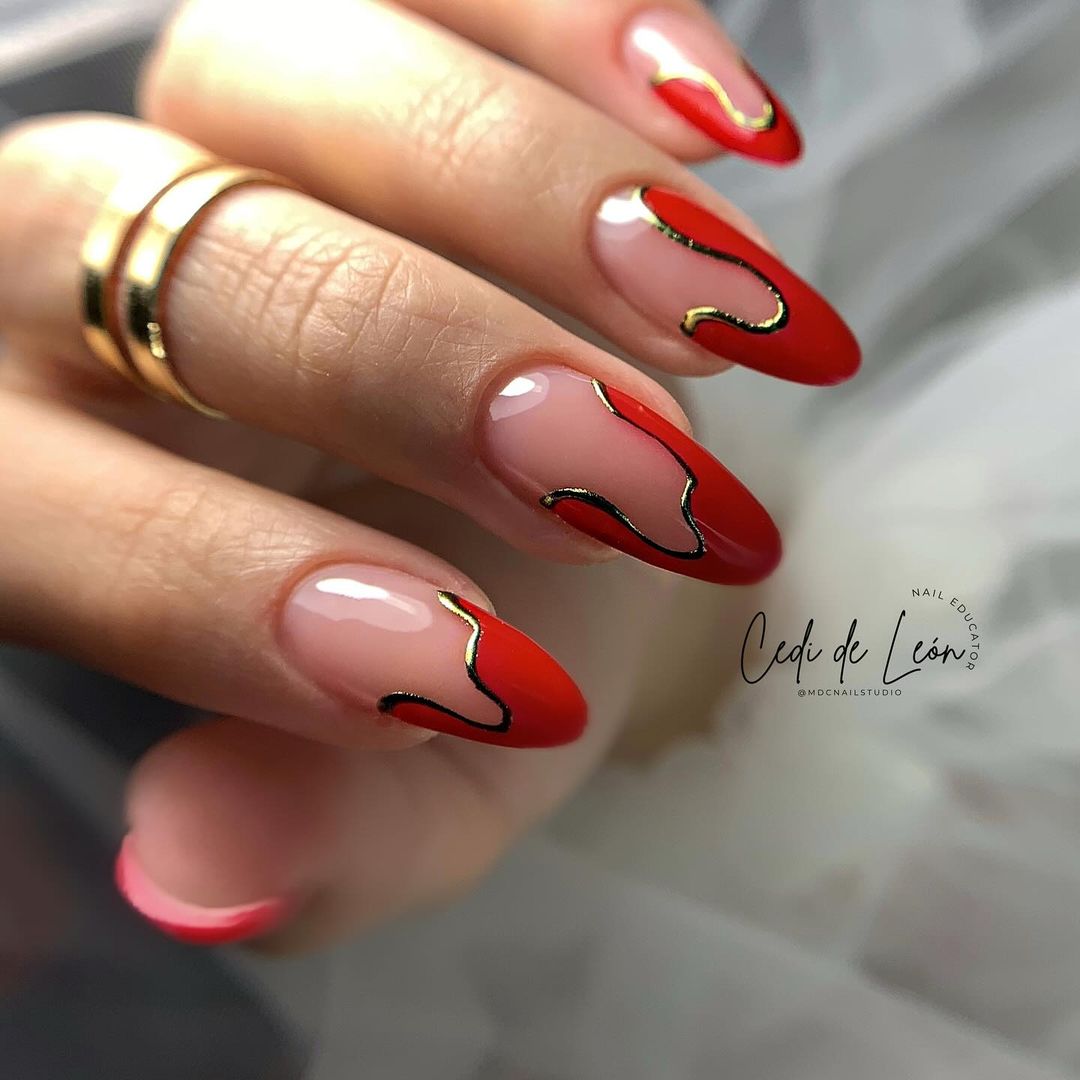
- Red nail polish (OPI Big Apple Red)
- Gold nail art tape (Art Deco Gold Foil)
- Base coat (Essie First Base)
- Top coat (Seche Vite Fast Dry Top Coat)
Application:
- Apply a base coat to all nails.
- Paint each nail with two coats of red polish, ensuring even coverage.
- Once dry, carefully apply the gold nail art tape in a swirl pattern on each nail.
- Finish with a top coat to seal and protect the design.
Green French Tips
This manicure features a modern twist on the classic French tip, using a muted green for the tips against a nude base. It’s a subtle yet sophisticated look that’s perfect for fall.
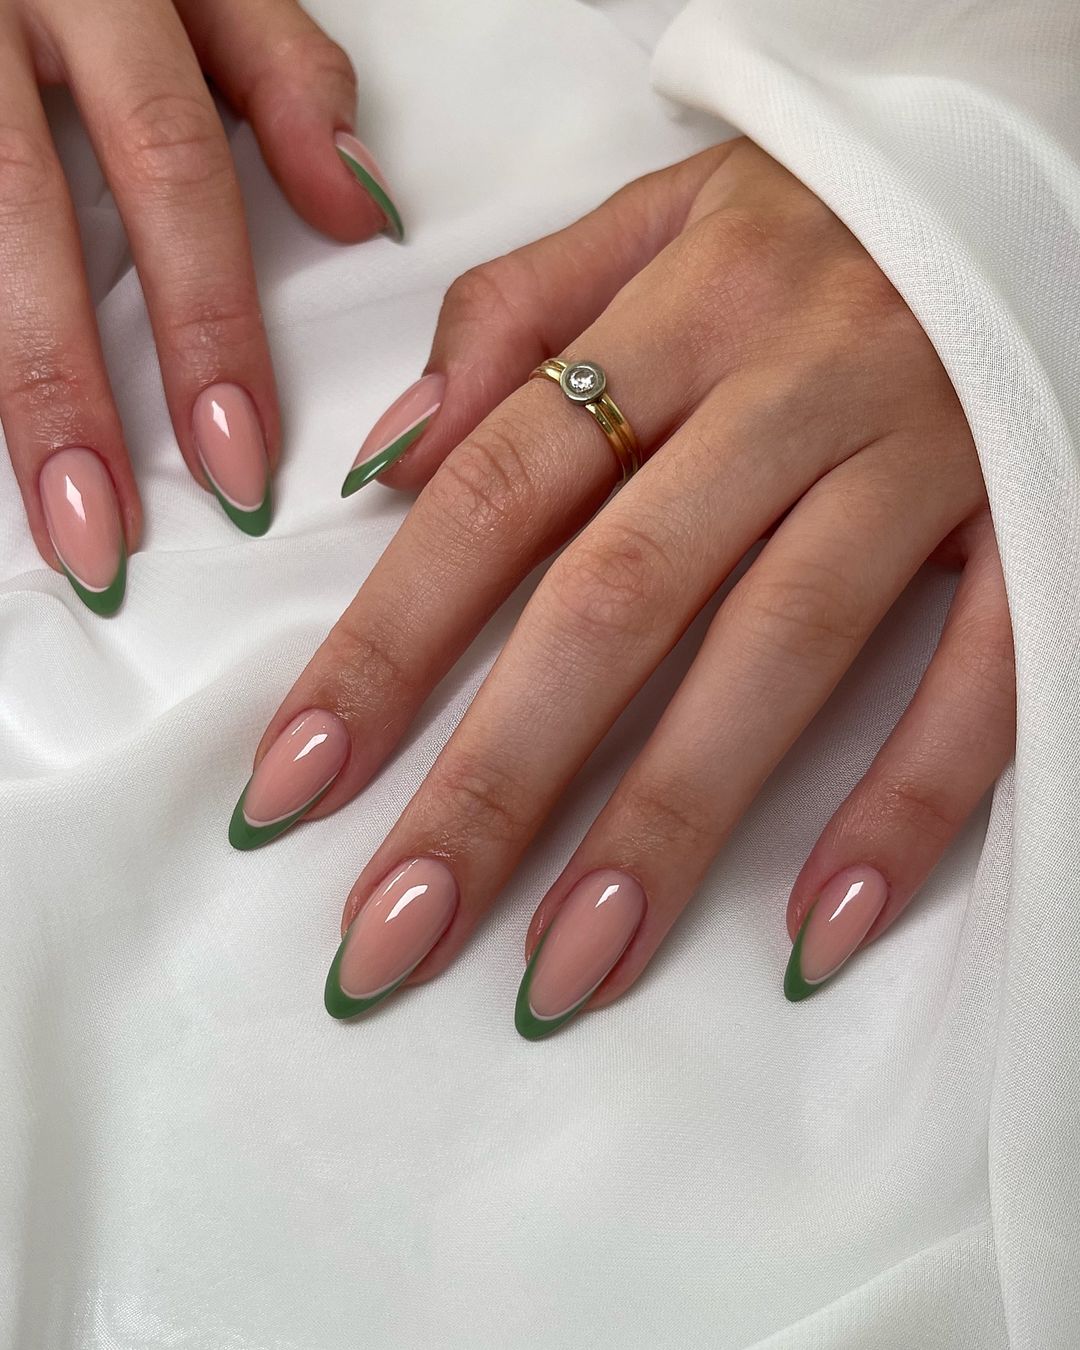
- Nude nail polish (Essie Ballet Slippers)
- Green nail polish (Essie Mint Candy Apple)
- Base coat (Sally Hansen Hard As Nails)
- Top coat (OPI Top Coat)
Application:
- Apply a base coat to all nails.
- Paint each nail with two coats of nude polish.
- Using a fine brush, carefully apply the green polish to the tips of each nail.
- Seal the design with a top coat.
Floral Fantasy
For a playful and vibrant look, this design features an array of bright floral accents on a clear base. Each flower is meticulously crafted, bringing a burst of color to the nails.
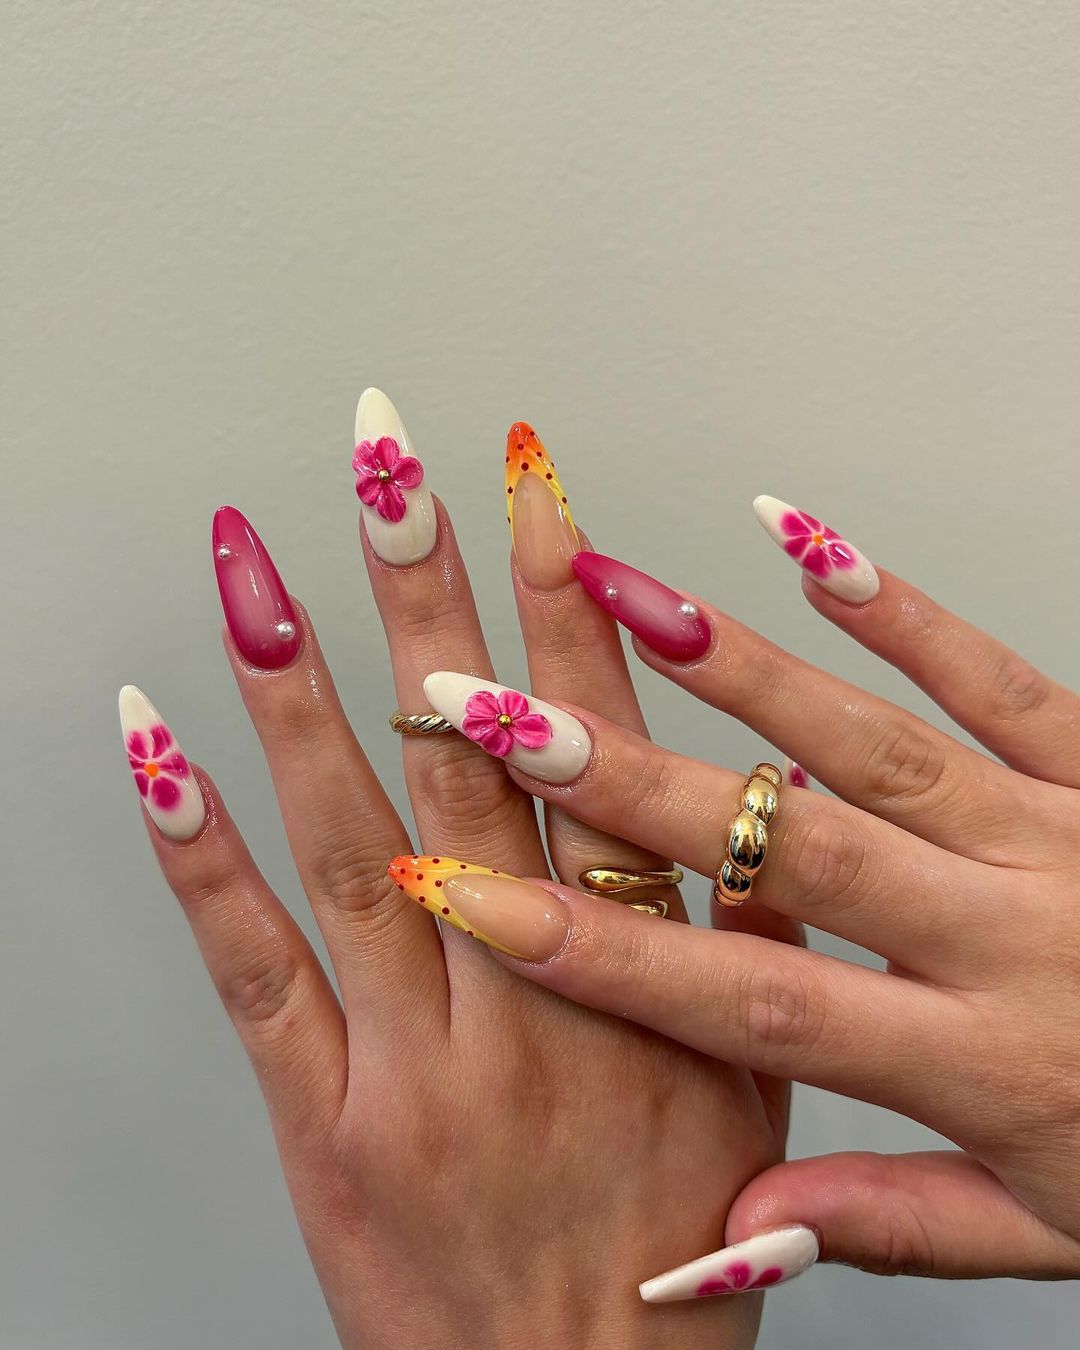
- Clear nail polish (Sally Hansen Clear’d for Takeoff)
- Assorted floral nail stickers (Deco Miami Floral Fantasy)
- Dotting tool (Beetles Nail Art Dotting Tools)
- Base coat (Orly Bonder)
- Top coat (Essie Good to Go)
Application:
- Apply a base coat to all nails.
- Paint each nail with a clear polish.
- Once dry, use the dotting tool to place floral stickers on each nail, arranging them as desired.
- Finish with a top coat to secure the stickers and add shine.
Cosmic Pink and Silver Stars
This design showcases almond-shaped nails with a pink base, complemented by intricate white starbursts and metallic silver tips. The unique combination of patterns and textures creates a cosmic, dreamy look that’s perfect for fall.
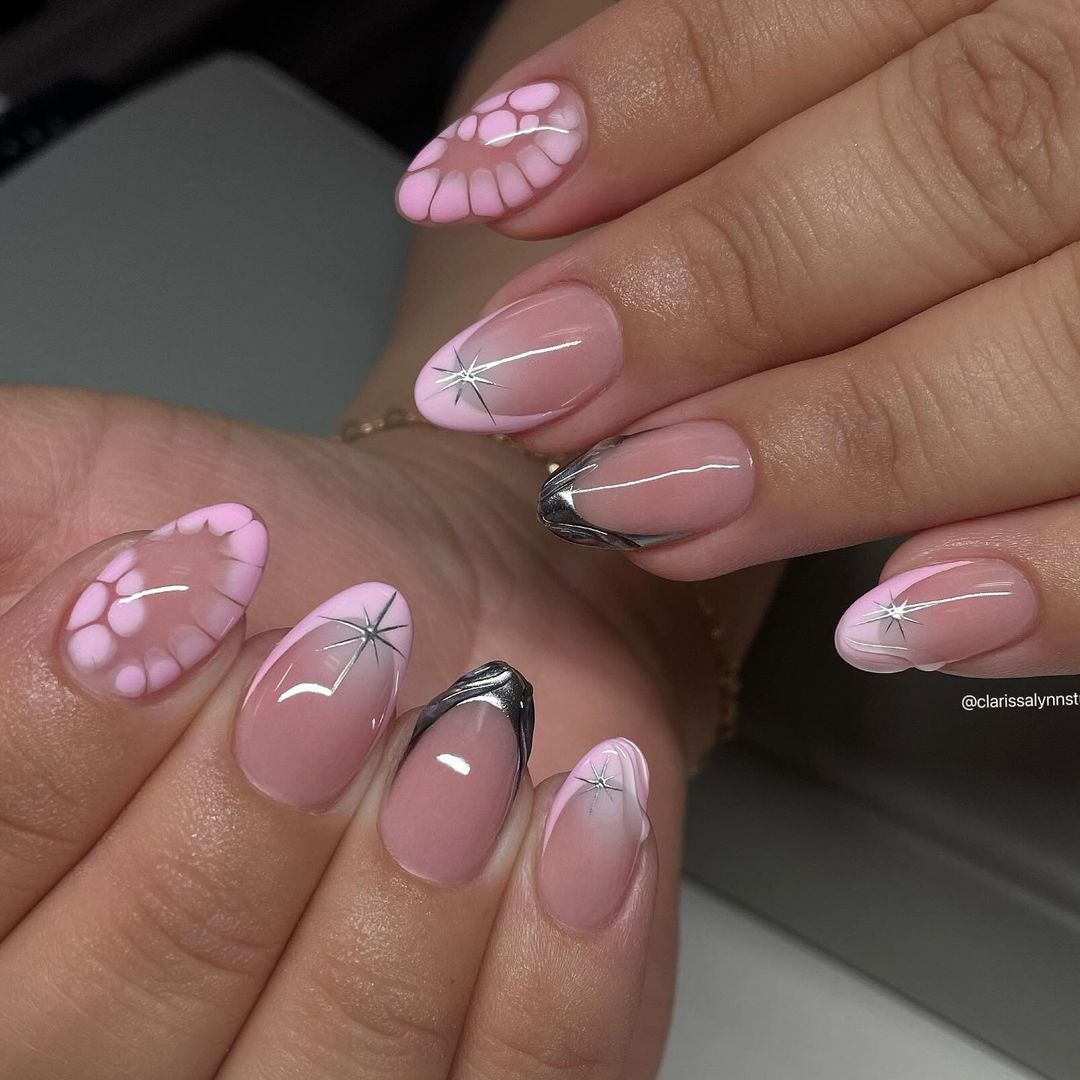
- Pink nail polish (Essie Fiji)
- White nail polish (OPI Alpine Snow)
- Silver chrome powder (Born Pretty Silver Mirror Powder)
- Star nail stickers (Whats Up Nails Starry Sky Stickers)
- Base coat (Orly Bonder)
- Top coat (Sally Hansen Miracle Gel)
Application:
- Apply a base coat to all nails to protect the natural nail.
- Paint each nail with two coats of pink polish, allowing each coat to dry thoroughly.
- Use a fine brush to apply white starbursts on several nails.
- Apply the silver chrome powder to the tips, blending slightly with the pink for a seamless transition.
- Secure the star stickers on the nails where the white starbursts are not applied.
- Seal the design with a top coat, ensuring a smooth and long-lasting finish.
Save Pin
Opulent Gold and Pearl White
This elegant manicure features almond-shaped nails with a luxurious blend of pearl white and gold accents. The use of gold foil and iridescent pieces adds a touch of opulence and sophistication.
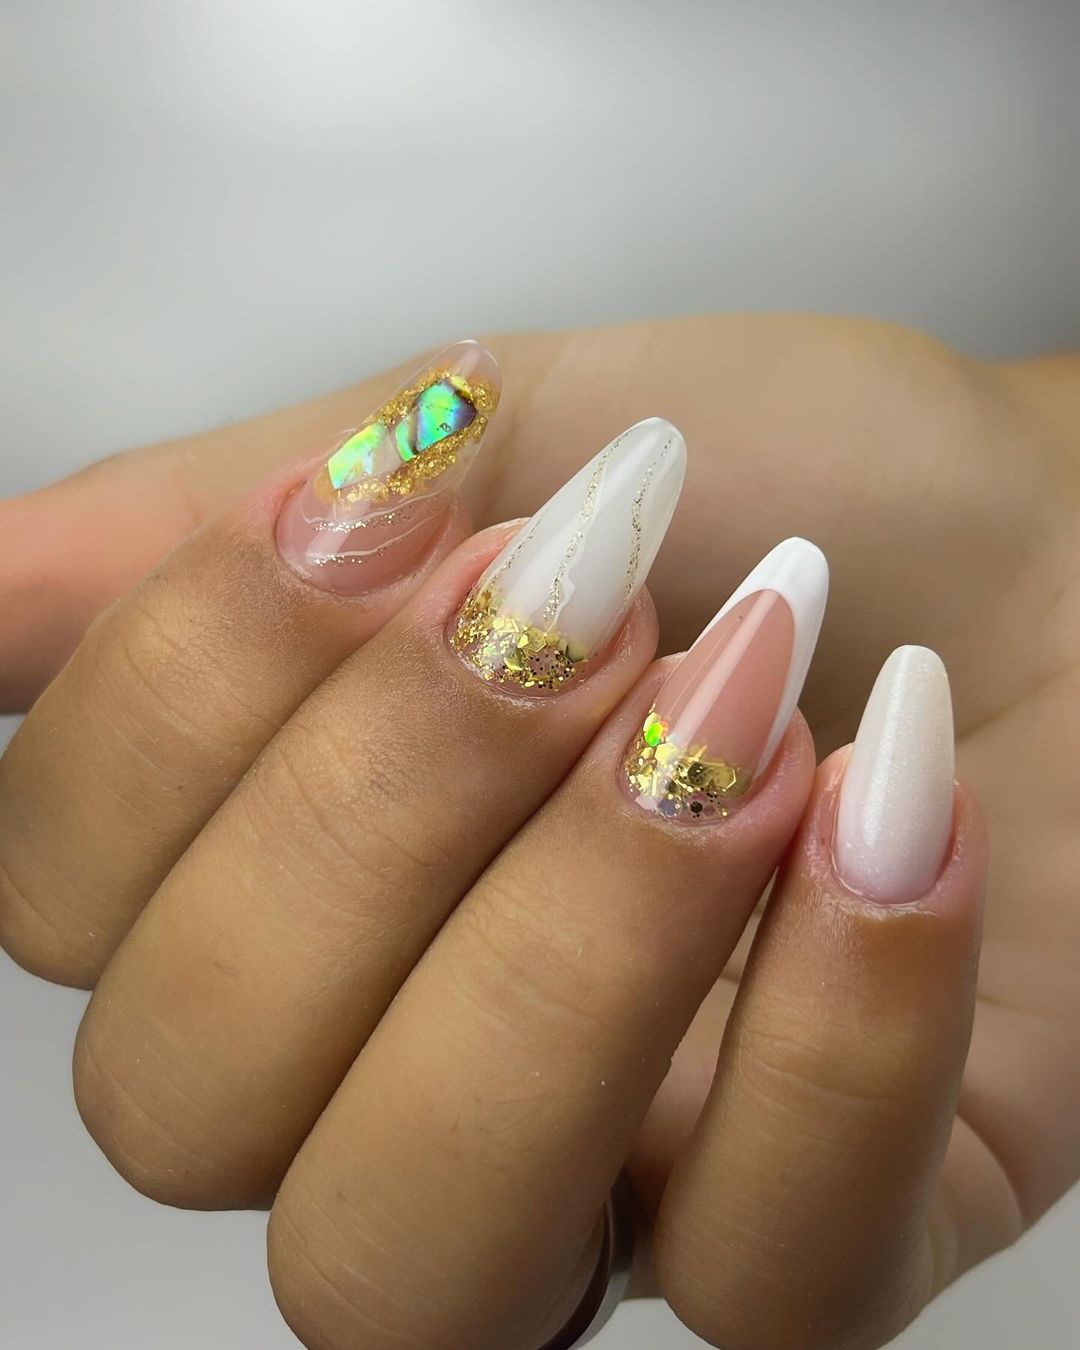
- Pearl white nail polish (OPI Kyoto Pearl)
- Gold foil flakes (Nicole Diary Gold Foil)
- Iridescent nail flakes (Holographic Nail Flakes)
- Clear builder gel (Ibd Hard Gel Clear)
- Base coat (CND Stickey Base Coat)
- Top coat (Glisten & Glow Top Coat)
Application:
- Start with a base coat to prepare the nails.
- Apply two coats of pearl white polish, allowing each coat to dry completely.
- Use a small brush to apply clear builder gel on the nails where you want the gold and iridescent flakes.
- Carefully place the gold and iridescent flakes on the gel, pressing them gently to secure.
- Cure the gel under a UV lamp for the recommended time.
- Apply a top coat to seal the design and provide a glossy finish.
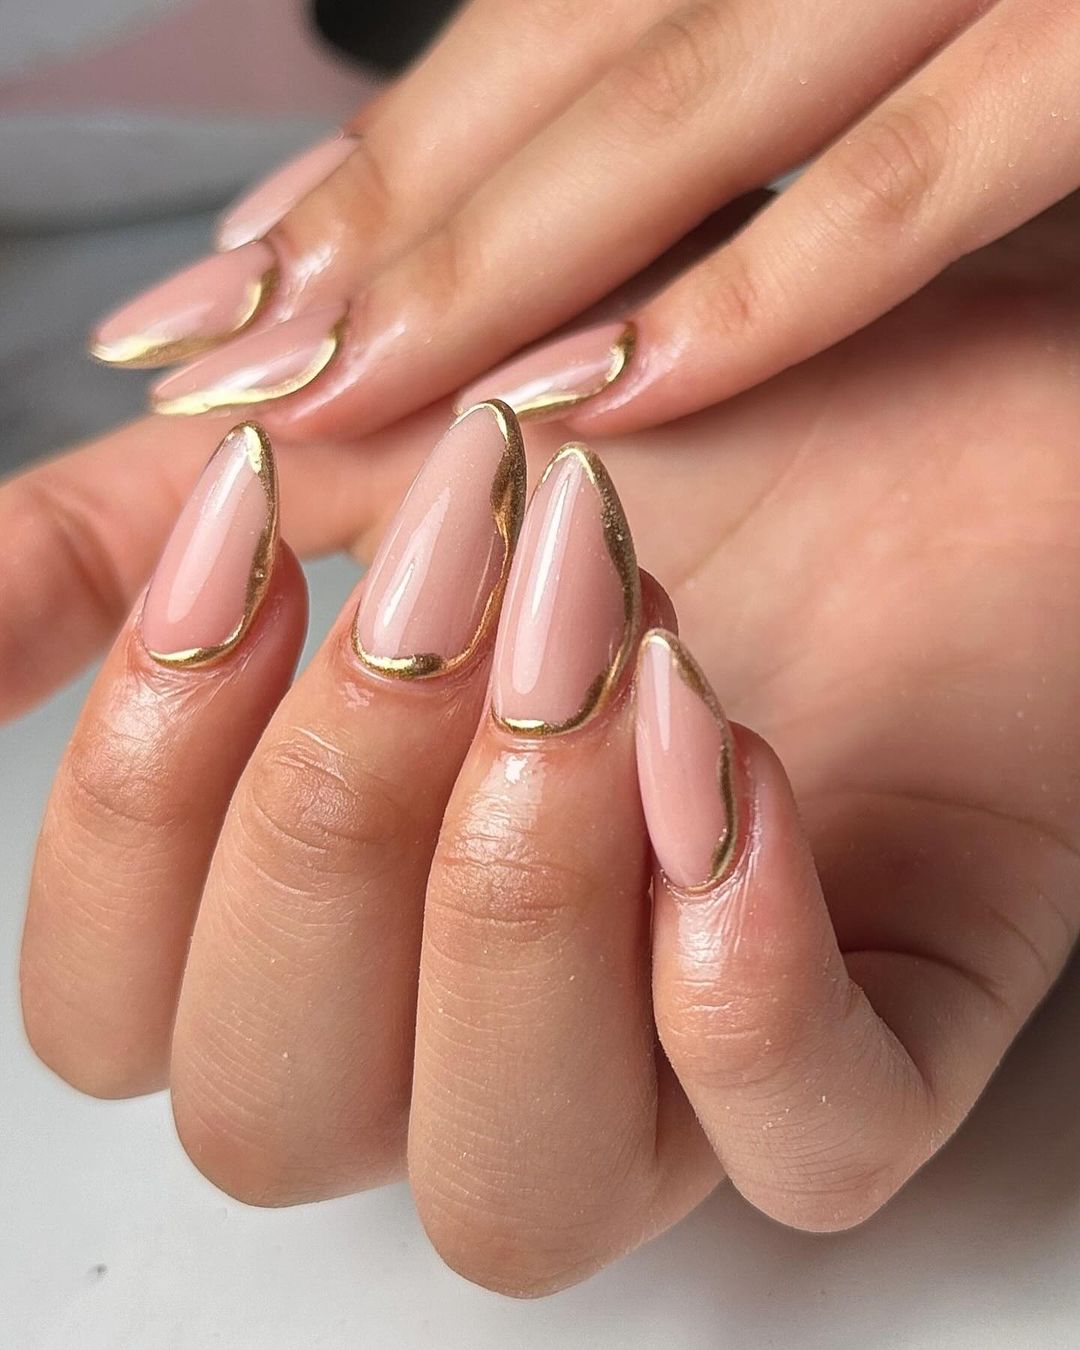
Elegant Gold-Tipped Almond Nails
This chic design features nude almond-shaped nails with sophisticated gold tips. The minimalist yet elegant look is perfect for those who appreciate understated glamour.
- Nude nail polish (Essie Mademoiselle)
- Gold nail polish (Sally Hansen Golden-I)
- Fine nail art brush (Makartt Nail Art Brushes)
- Base coat (Revlon Quick Dry Base Coat)
- Top coat (Butter London Hardwear Shine UV Topcoat)
Application:
- Apply a base coat to all nails to ensure longevity and protect the natural nail.
- Paint each nail with two coats of nude polish, allowing each coat to dry thoroughly.
- Using a fine nail art brush, apply gold polish to the tips of each nail, creating a delicate French tip.
- Ensure the gold tips are even and smooth, then allow them to dry.
- Finish with a top coat to seal the design and add shine.
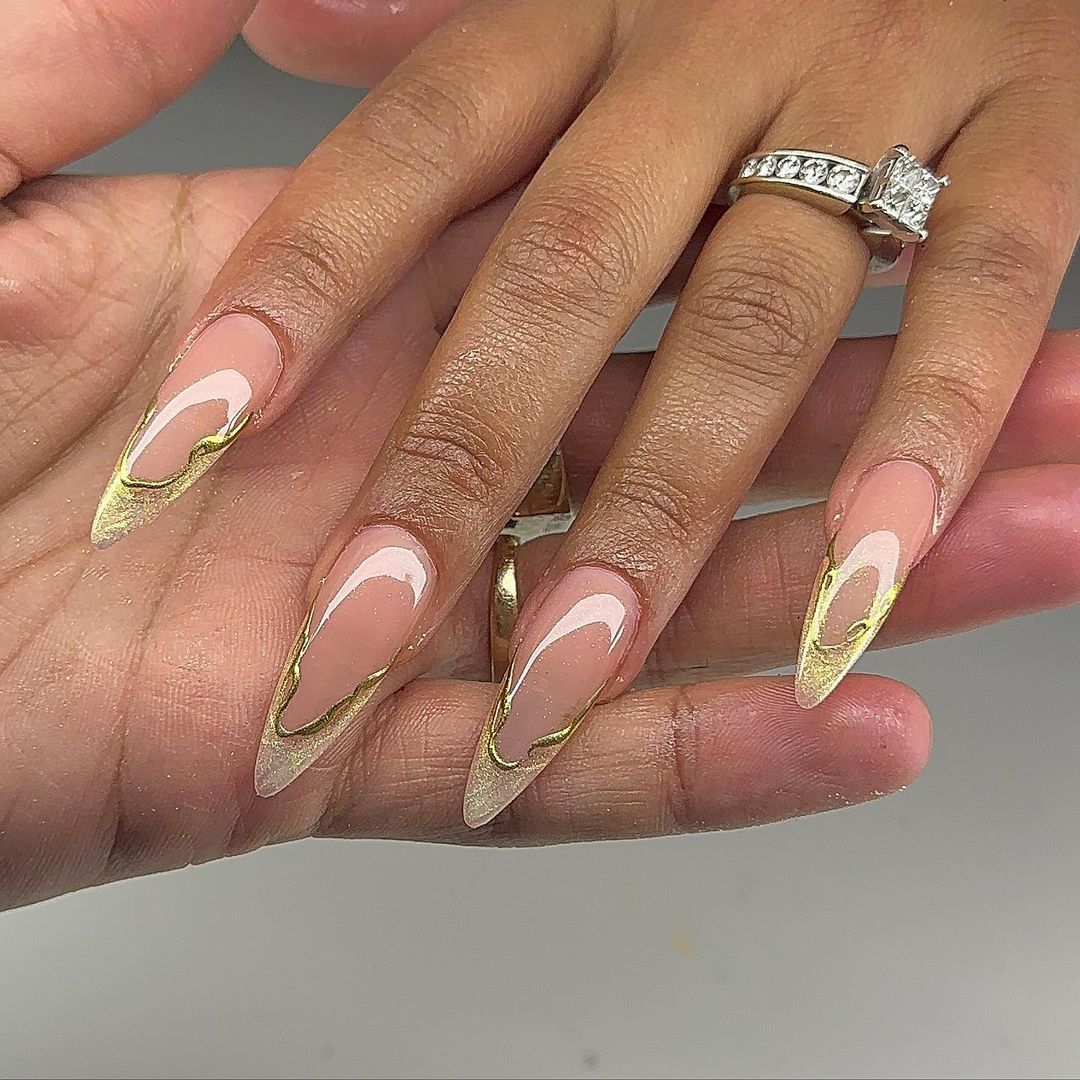
Golden Edge Elegance
This design features nude almond-shaped nails with delicate gold edges, creating a sophisticated and luxurious look perfect for any occasion. The gold accents add a touch of glamour while maintaining a minimalist aesthetic.
- Nude nail polish (Essie Ballet Slippers)
- Gold nail polish (Sally Hansen Golden-I)
- Fine nail art brush (Makartt Nail Art Brushes)
- Base coat (OPI Natural Nail Base Coat)
- Top coat (Seche Vite Dry Fast Top Coat)
Application:
- Start with a base coat to protect your nails.
- Apply two coats of nude polish, allowing each layer to dry thoroughly.
- Using a fine brush, carefully outline the edges of each nail with gold polish.
- Seal the design with a top coat for added shine and durability.
Celestial Dreams
This manicure showcases nude almond nails adorned with gold celestial designs, including stars, moons, and delicate dots. The combination of white and gold against the nude background creates a dreamy, ethereal effect.
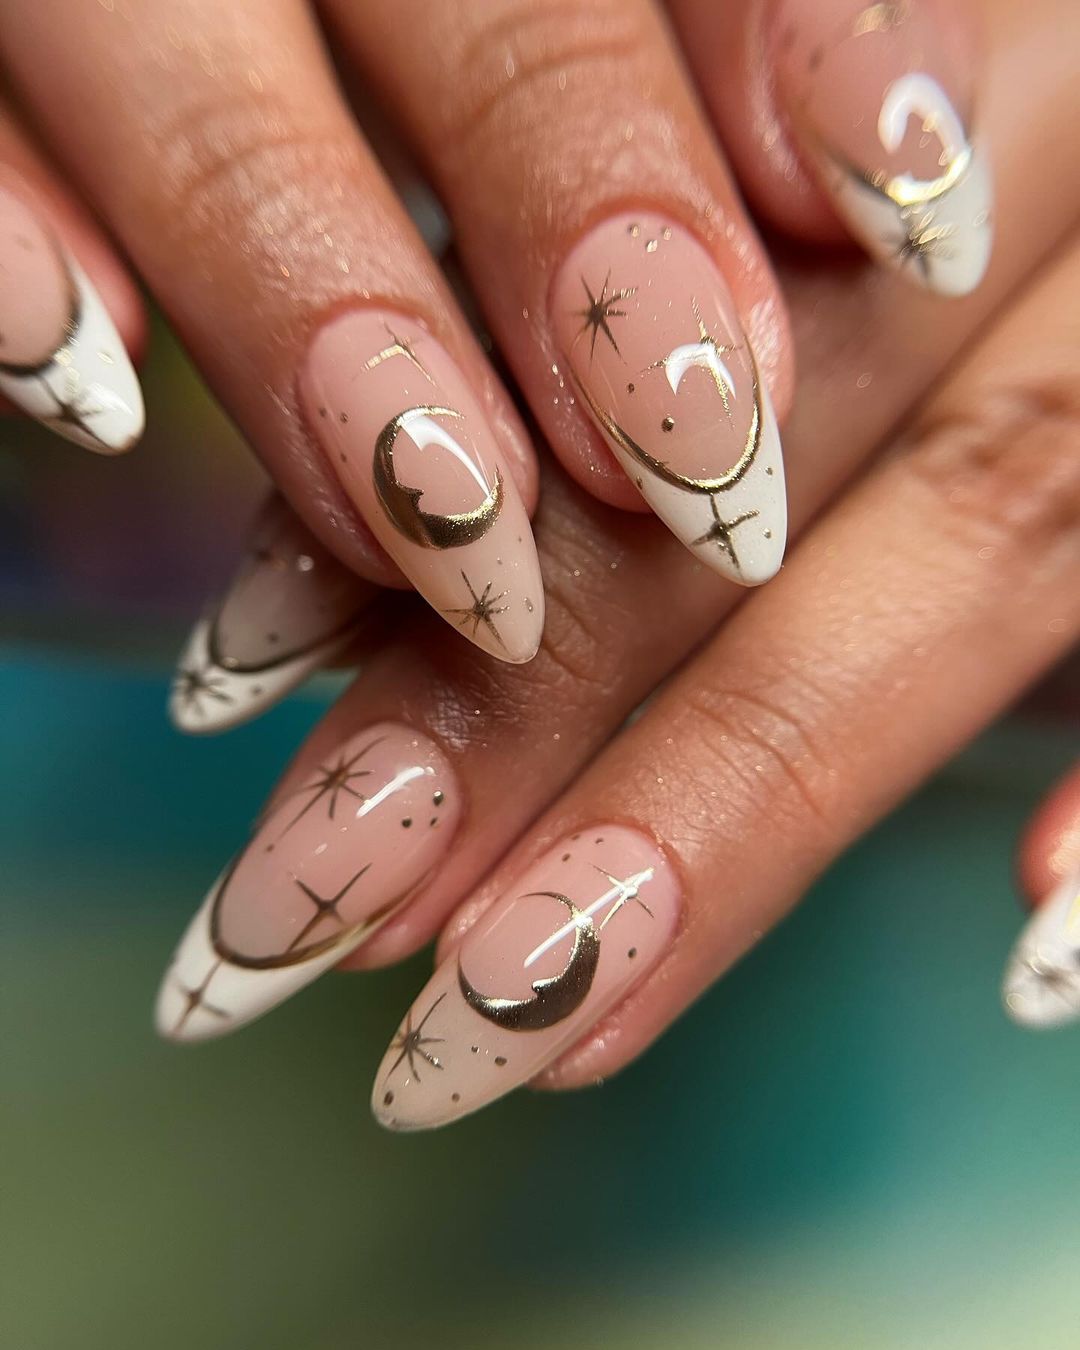
- Nude nail polish (OPI Bubble Bath)
- White nail polish (Essie Blanc)
- Gold nail polish (China Glaze Gold Digger)
- Fine nail art brush (Beetles Nail Art Brushes)
- Base coat (CND Stickey Base Coat)
- Top coat (Revlon Quick Dry Top Coat)
Application:
- Apply a base coat to all nails.
- Paint each nail with two coats of nude polish, letting each coat dry completely.
- Use a fine brush to draw stars, moons, and dots with white and gold polish.
- Finish with a top coat to protect the design and add a glossy finish.
Warm Brown Almonds
These almond-shaped nails feature a rich, warm brown color that’s perfect for fall. The simple, elegant look emphasizes the natural beauty of the nails and complements any autumn outfit.
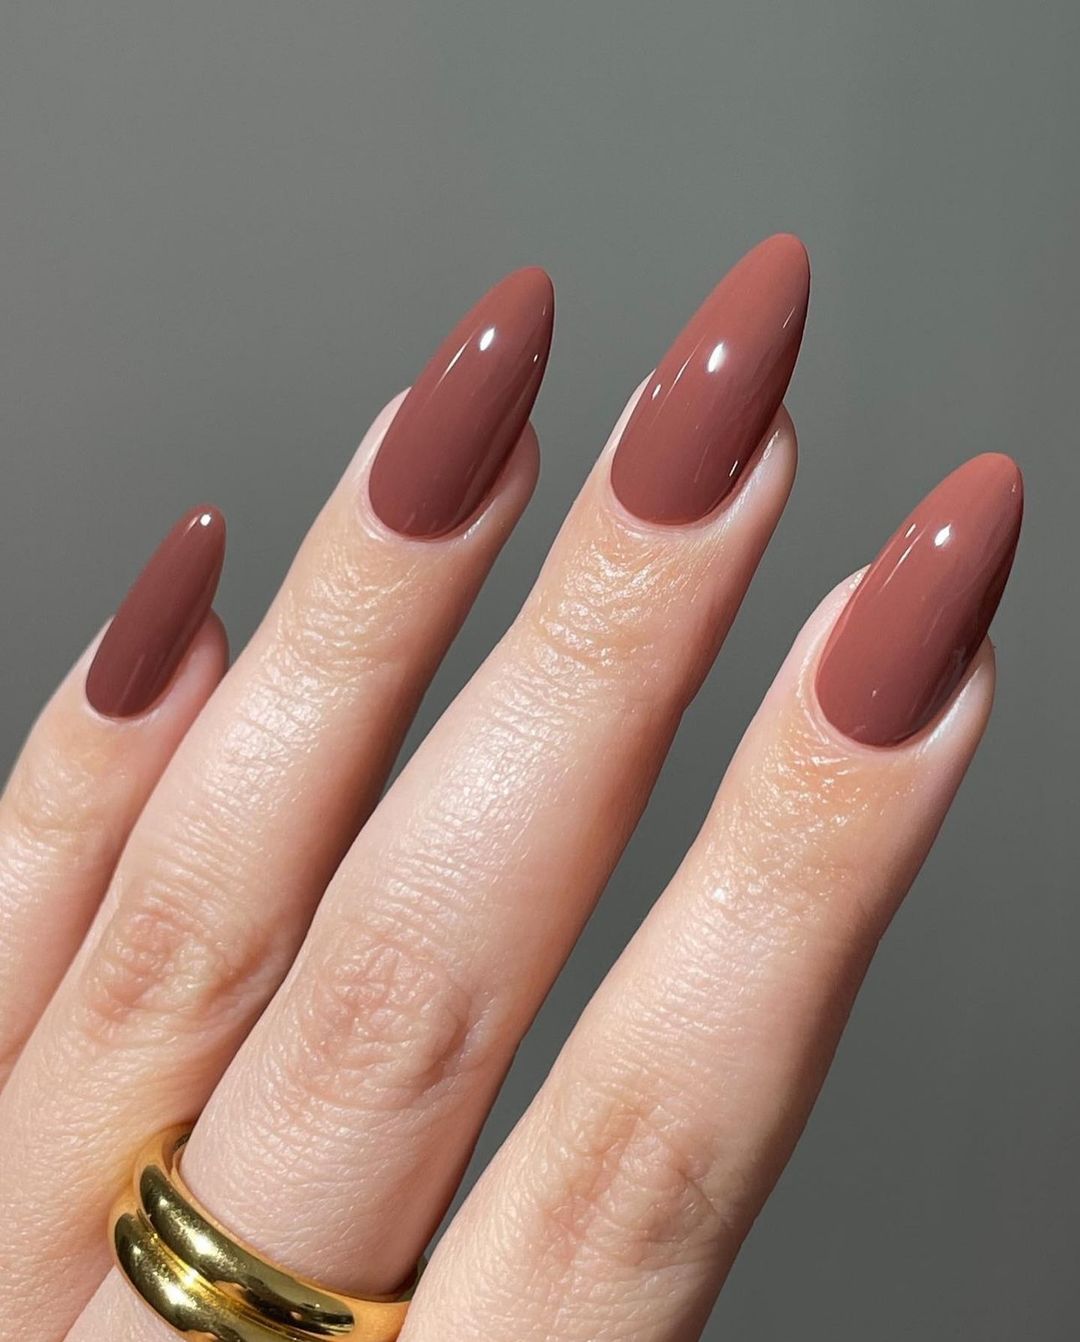
- Brown nail polish (Essie Angora Cardi)
- Base coat (Orly Bonder)
- Top coat (Zoya Armor Top Coat)
Application:
- Apply a base coat to prepare your nails.
- Paint each nail with two coats of brown polish, ensuring even coverage.
- Finish with a top coat to seal the color and provide a glossy finish.
Save Pin
Deep Burgundy Glamour
This striking design features deep burgundy almond-shaped nails that exude elegance and sophistication. The rich, dark color is perfect for the fall season, adding a touch of drama to your look.
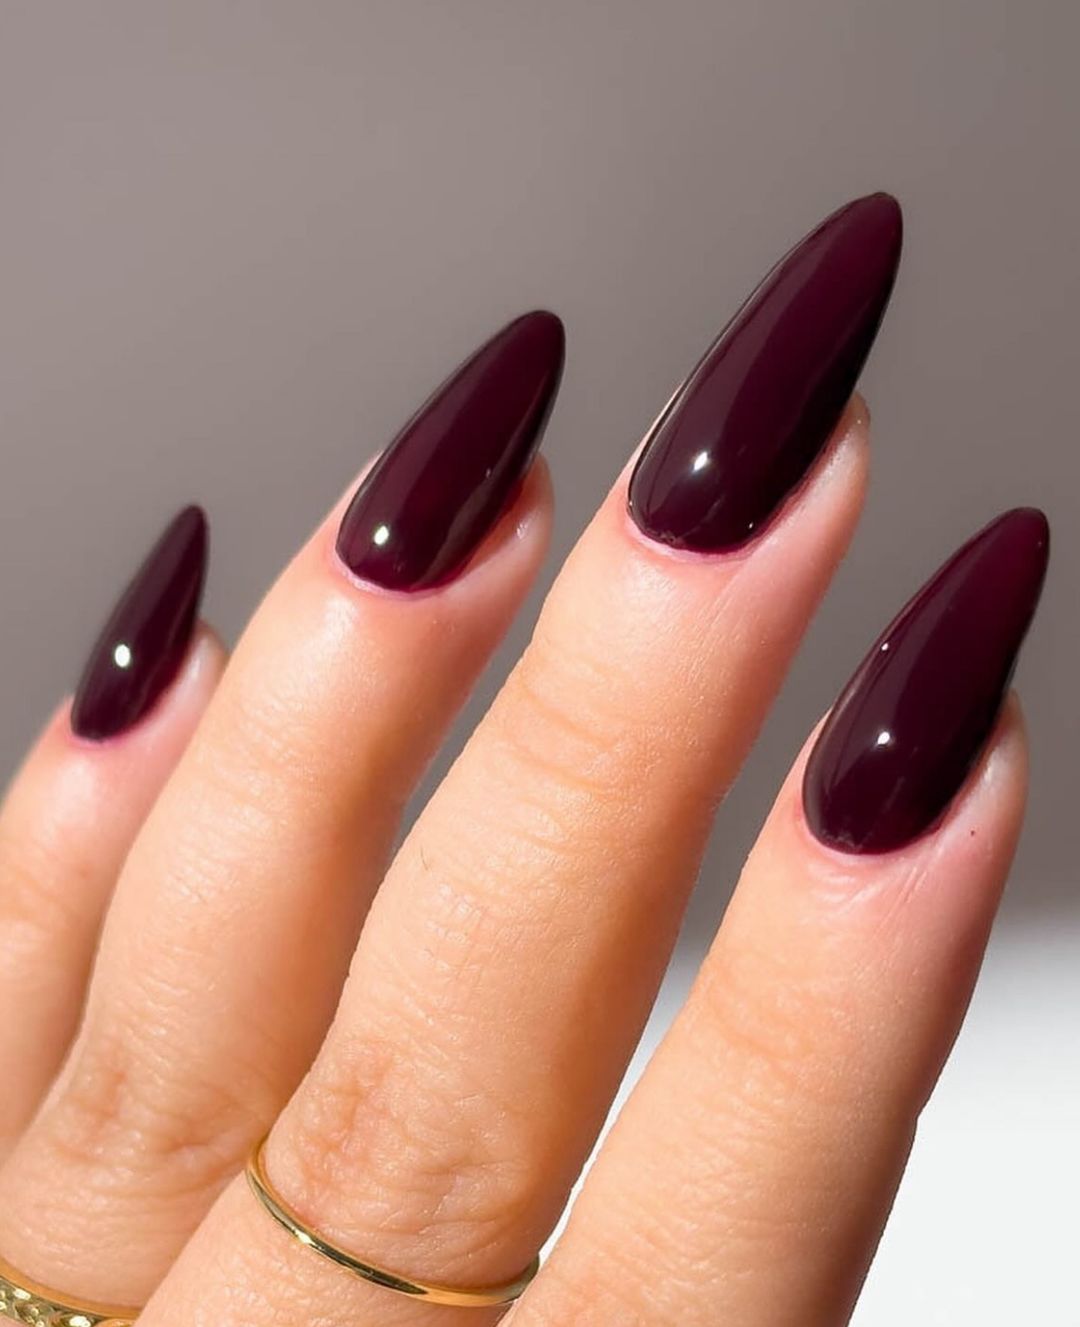
- Burgundy nail polish (OPI Malaga Wine)
- Base coat (Sally Hansen Double Duty)
- Top coat (Essie Gel Setter)
Application:
- Start with a base coat to protect your nails.
- Apply two coats of burgundy polish, allowing each layer to dry thoroughly.
- Finish with a top coat to seal the color and add shine.
Oceanic Gemstones
This design features almond-shaped nails with a marbled effect in shades of blue and green, resembling precious gemstones. The intricate, swirling patterns create a mesmerizing and unique look.
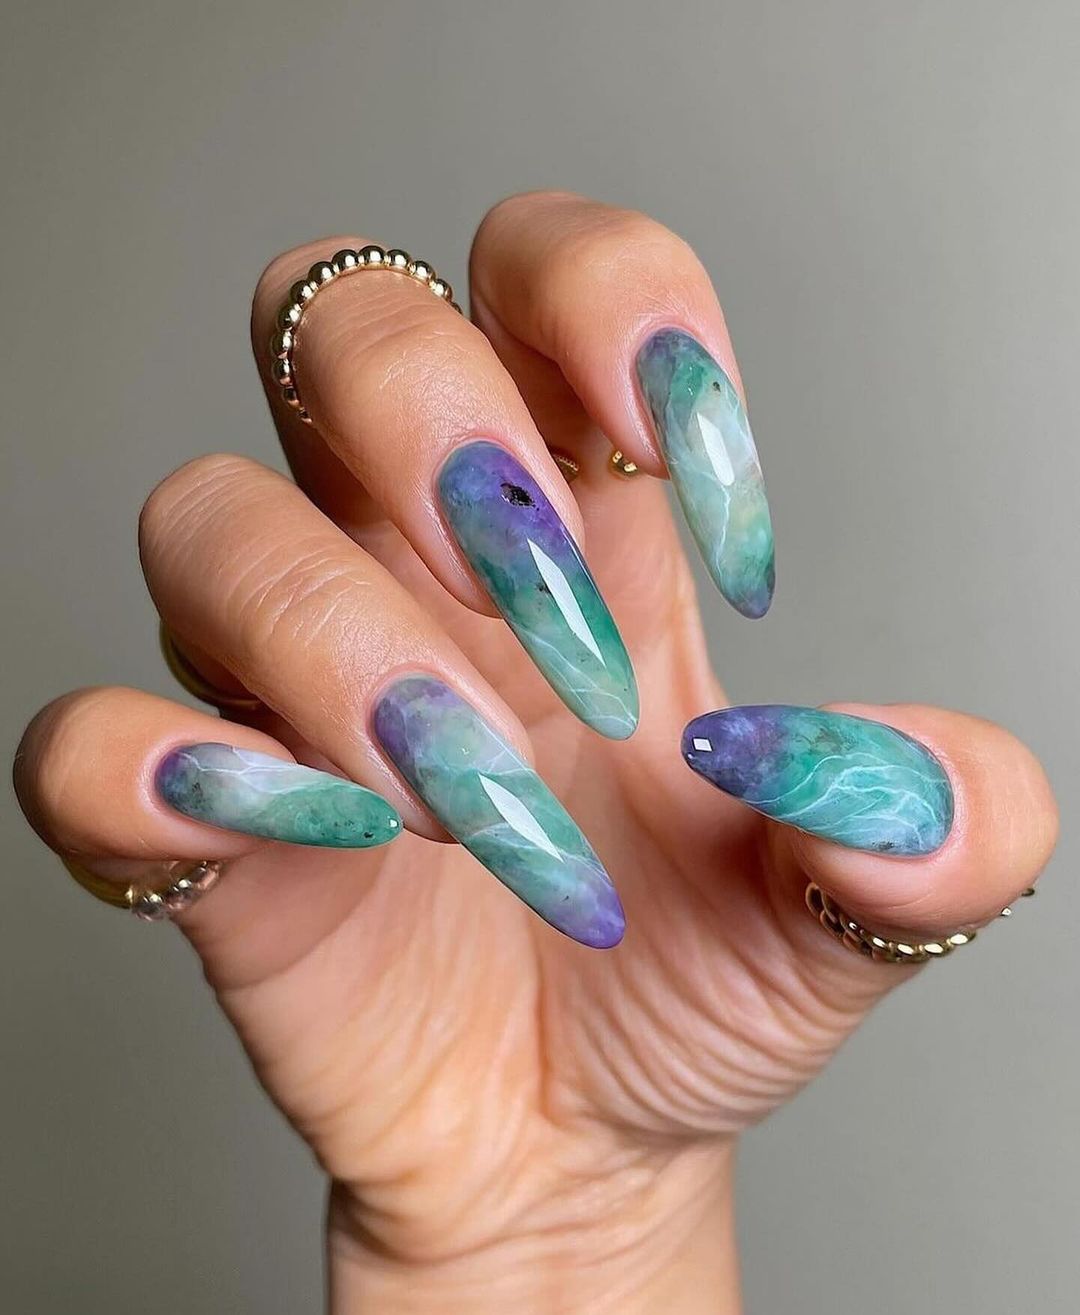
- Blue nail polish (Essie Aruba Blue)
- Green nail polish (China Glaze Turned Up Turquoise)
- White nail polish (OPI Alpine Snow)
- Fine nail art brush (Makartt Nail Art Brushes)
- Base coat (CND Stickey Base Coat)
- Top coat (Seche Vite Dry Fast Top Coat)
Application:
- Apply a base coat to all nails.
- Paint each nail with a base color of blue or green.
- Use a fine brush to create marbled patterns with white polish, blending the colors together.
- Seal the design with a top coat for added shine and durability.
Iridescent Cloudy Hues
This design features almond-shaped nails with an iridescent, cloudy effect in soft, pastel hues. The delicate, dreamy look is perfect for adding a subtle touch of color and shine to your nails.
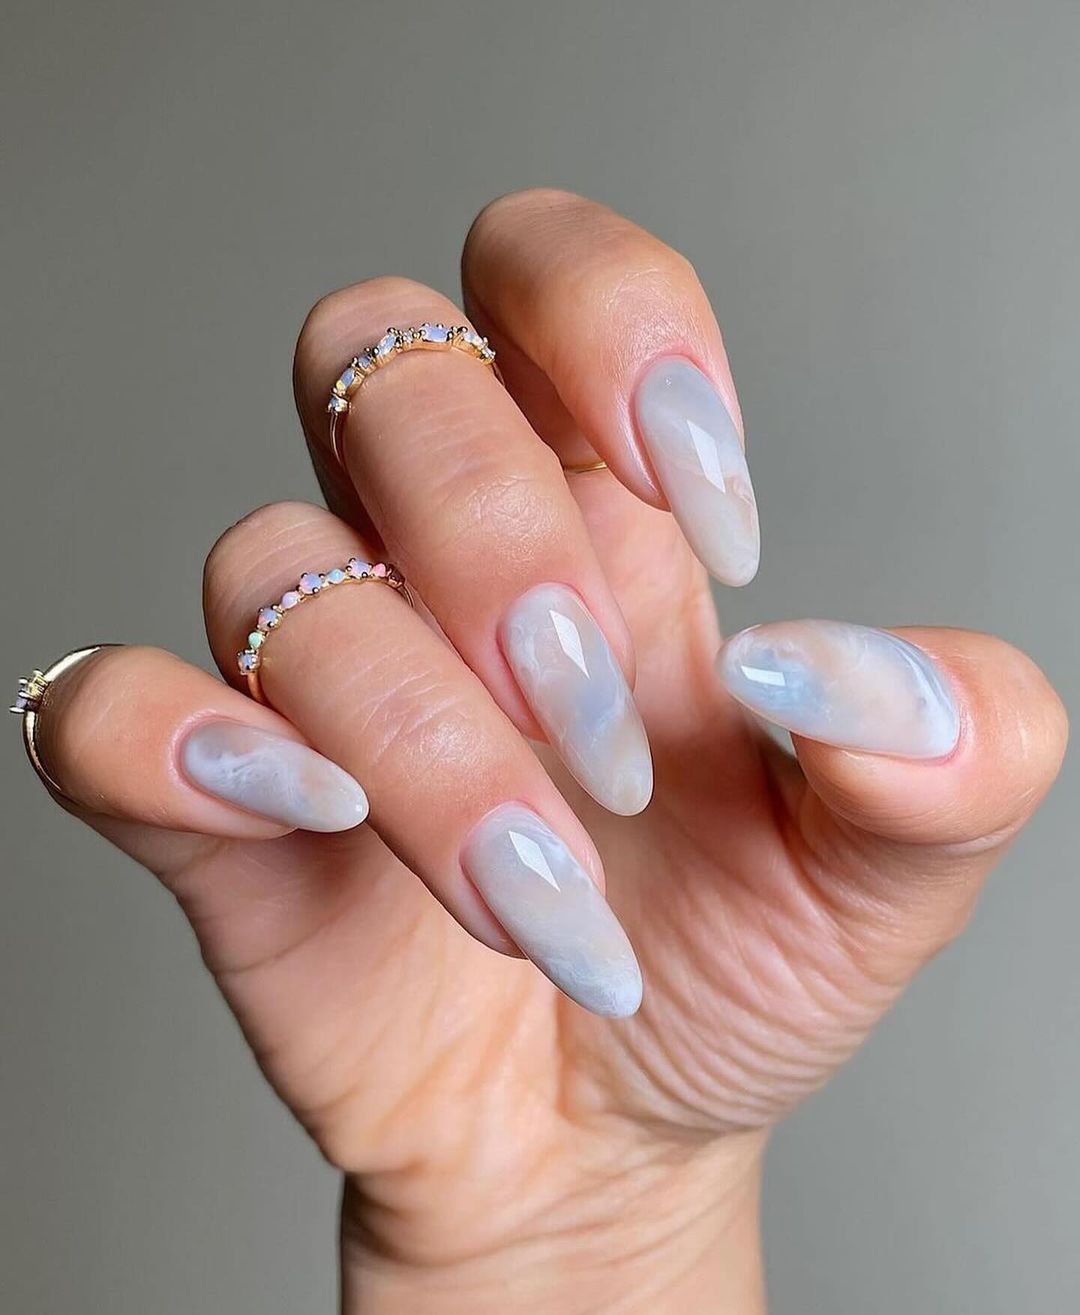
- Pastel nail polishes (Essie Mint Candy Apple, OPI Do You Lilac It?)
- Iridescent nail powder (Born Pretty Iridescent Powder)
- Fine nail art brush (Beetles Nail Art Brushes)
- Base coat (OPI Natural Nail Base Coat)
- Top coat (Seche Vite Dry Fast Top Coat)
Application:
- Apply a base coat to all nails.
- Paint each nail with a pastel base color, allowing each layer to dry completely.
- Use a fine brush to apply iridescent powder for a soft, cloudy effect.
- Finish with a top coat to protect the design and add a glossy finish.
Mystical Marble Blue
These almond-shaped nails feature a mesmerizing marbled design in various shades of blue, resembling swirling ocean waves or a stormy sky. The intricate patterns create a striking and unique look, perfect for adding a touch of mystery and elegance to your style.
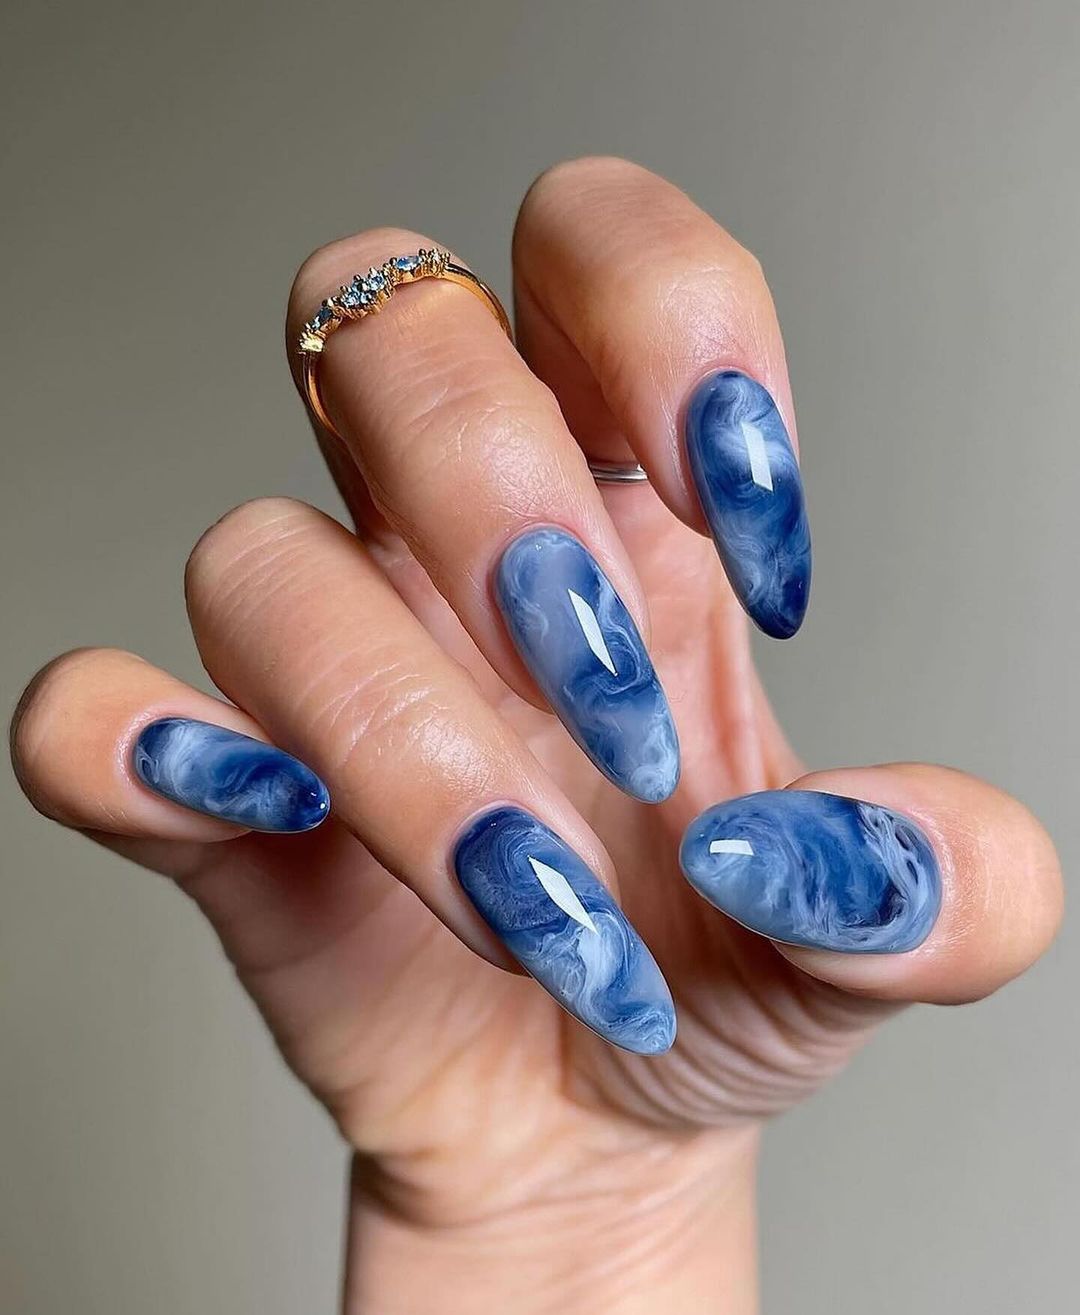
- Blue nail polish (Essie Aruba Blue)
- White nail polish (OPI Alpine Snow)
- Fine nail art brush (Makartt Nail Art Brushes)
- Nail polish remover (Zoya Remove+)
- Base coat (CND Stickey Base Coat)
- Top coat (Seche Vite Dry Fast Top Coat)
Application:
- Apply a base coat to all nails to protect and prepare them.
- Paint each nail with a base color of blue polish, allowing it to dry completely.
- Dip a fine brush into white polish and create swirling patterns over the blue base.
- Use a small amount of nail polish remover on a brush to soften the edges of the white swirls, blending them into the blue for a marbled effect.
- Seal the design with a top coat for a glossy finish and added durability.
Rich Chocolate Squares
This design features square-shaped nails painted in a deep, rich chocolate brown color. The simplicity and elegance of the dark hue make these nails a sophisticated choice for fall, offering a timeless and classy look.
- Brown nail polish (OPI Lincoln Park After Dark)
- Base coat (Sally Hansen Double Duty)
- Top coat (Essie Gel Setter)
Application:
- Start with a base coat to protect your nails.
- Apply two coats of brown polish, ensuring each layer is fully dry before applying the next.
- Finish with a top coat to seal the color and add shine.
Black Heart Accent
These almond-shaped nails feature a glossy black base with a cute pink heart accent on one nail. The combination of the dark, bold color and the delicate heart creates a playful yet sophisticated look.
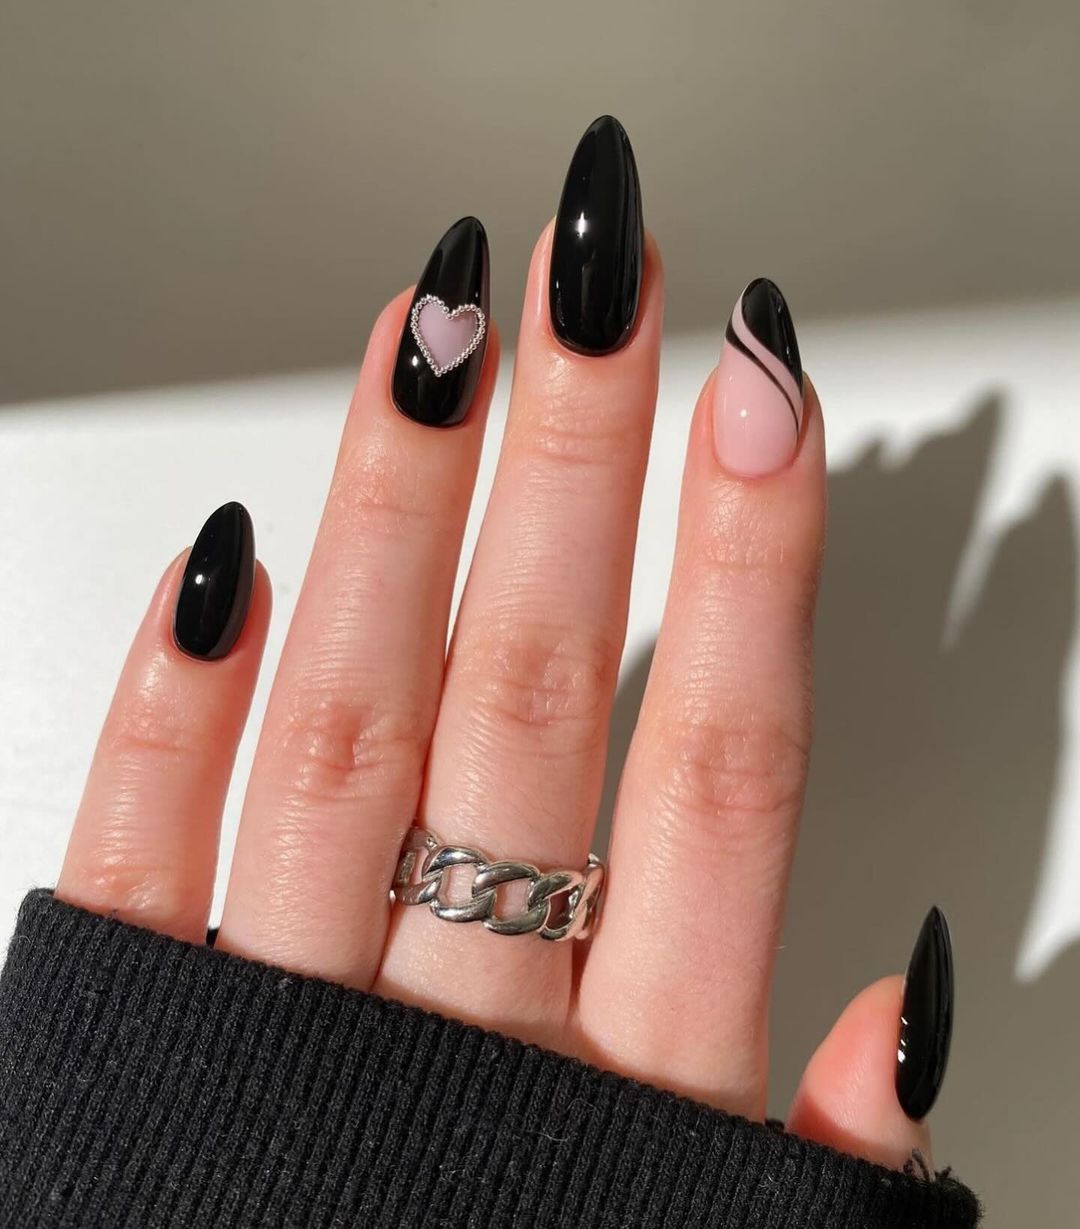
- Black nail polish (Essie Licorice)
- Pink nail polish (Essie Fiji)
- Nail art brush (Beetles Nail Art Brushes)
- Rhinestone heart sticker (Whats Up Nails Heart Rhinestones)
- Base coat (Orly Bonder)
- Top coat (Sally Hansen Miracle Gel)
Application:
- Apply a base coat to all nails.
- Paint each nail with two coats of black polish, allowing each coat to dry thoroughly.
- Use a nail art brush to apply the pink heart accent or place the rhinestone heart sticker on one nail.
- Seal the design with a top coat for added shine and protection.
Floral Black Chic
This design showcases almond-shaped nails with a black base adorned with delicate floral patterns in neutral tones. The combination of the dark background and soft floral accents creates a chic and trendy look.
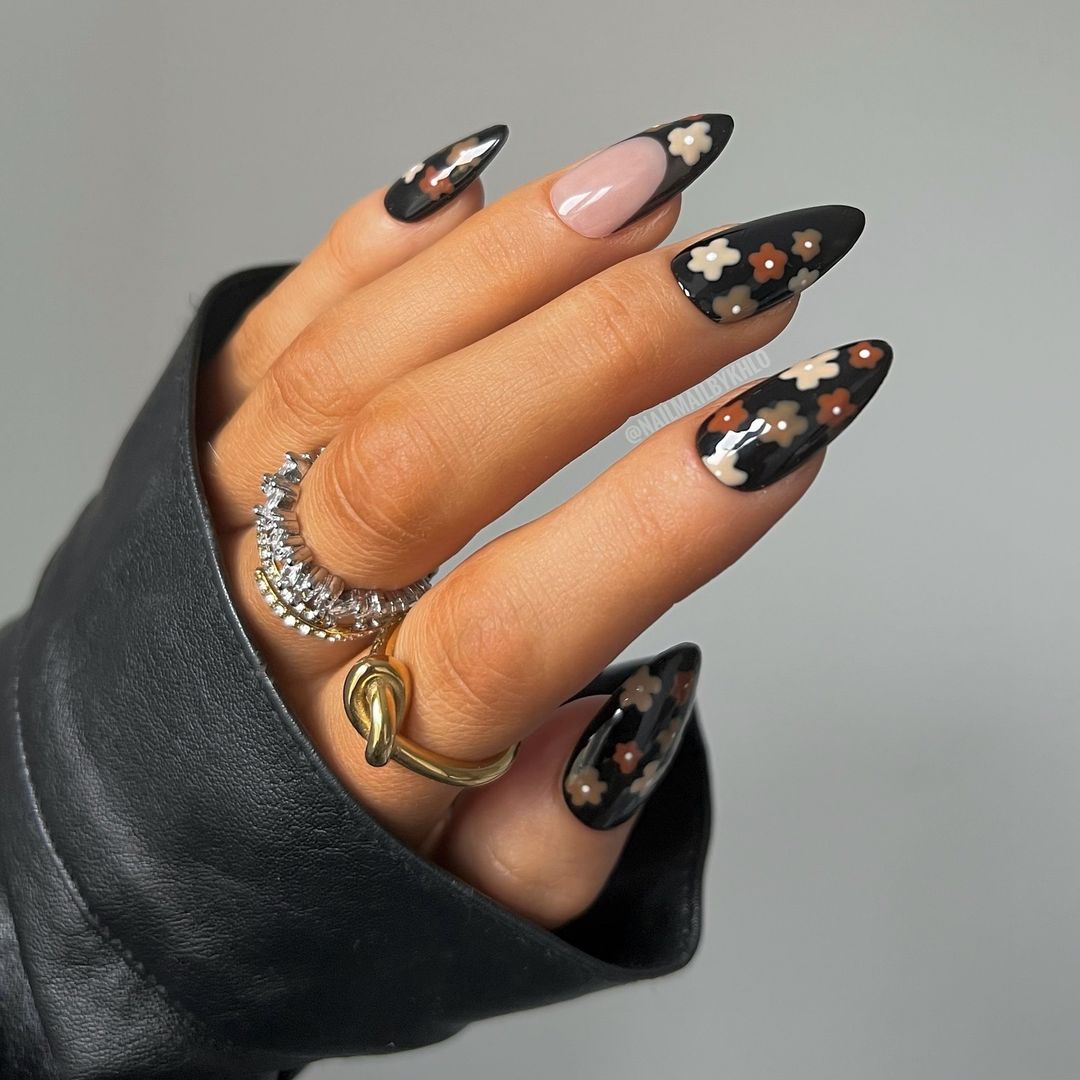
- Black nail polish (OPI Black Onyx)
- White nail polish (Essie Blanc)
- Beige nail polish (OPI Be There in a Prosecco)
- Fine nail art brush (Makartt Nail Art Brushes)
- Base coat (CND Stickey Base Coat)
- Top coat (Revlon Quick Dry Top Coat)
Application:
- Apply a base coat to all nails.
- Paint each nail with two coats of black polish, allowing each layer to dry.
- Use a fine brush to create small floral patterns with white and beige polish.
- Finish with a top coat to protect the design and add a glossy finish.
Fun and Funky Mix
These almond-shaped nails feature a playful mix of designs, including leopard print, smiley faces, cherries, and flowers. The combination of different elements creates a fun and quirky look that is sure to stand out.
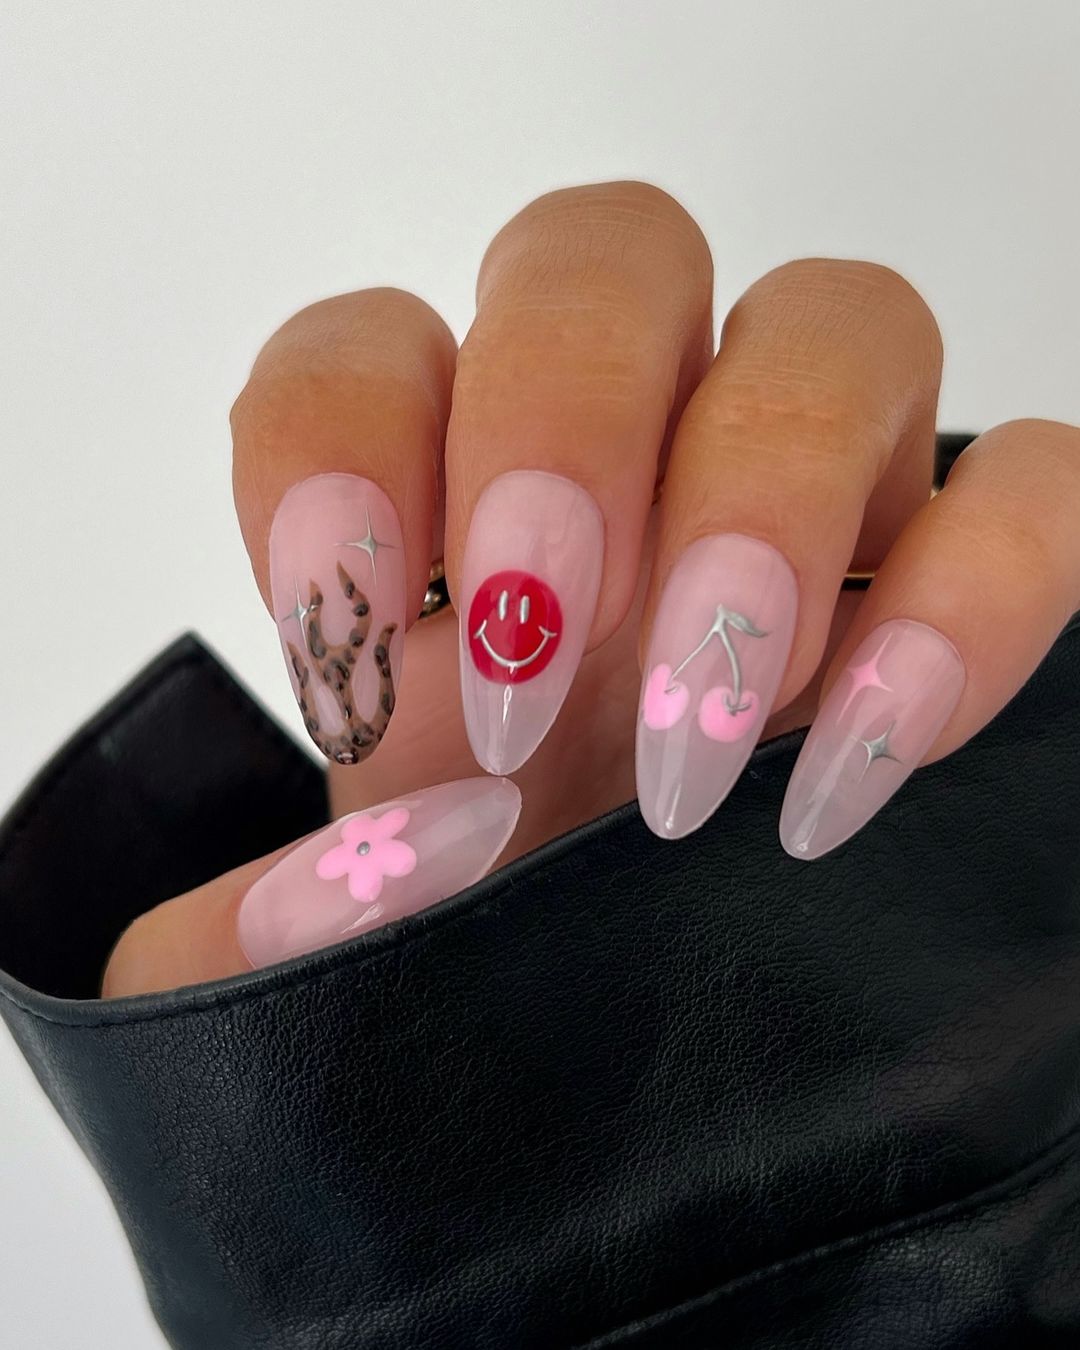
- Nude nail polish (OPI Bubble Bath)
- Red nail polish (Essie Geranium)
- Black nail polish (Sally Hansen Black Out)
- Pink nail polish (Essie Ballet Slippers)
- White nail polish (OPI Alpine Snow)
- Fine nail art brush (Beetles Nail Art Brushes)
- Base coat (Orly Bonder)
- Top coat (Seche Vite Dry Fast Top Coat)
Application:
- Apply a base coat to all nails.
- Paint each nail with a nude base color, allowing it to dry completely.
- Use a fine brush to create various designs, such as leopard print, smiley faces, cherries, and flowers, using different colors.
- Seal the designs with a top coat for a glossy finish and added protection.
Soft Pink Ombre with Hearts
These nails feature a soft pink ombre effect with small silver heart accents. The delicate gradient from light to darker pink creates a romantic and feminine look, perfect for any occasion.
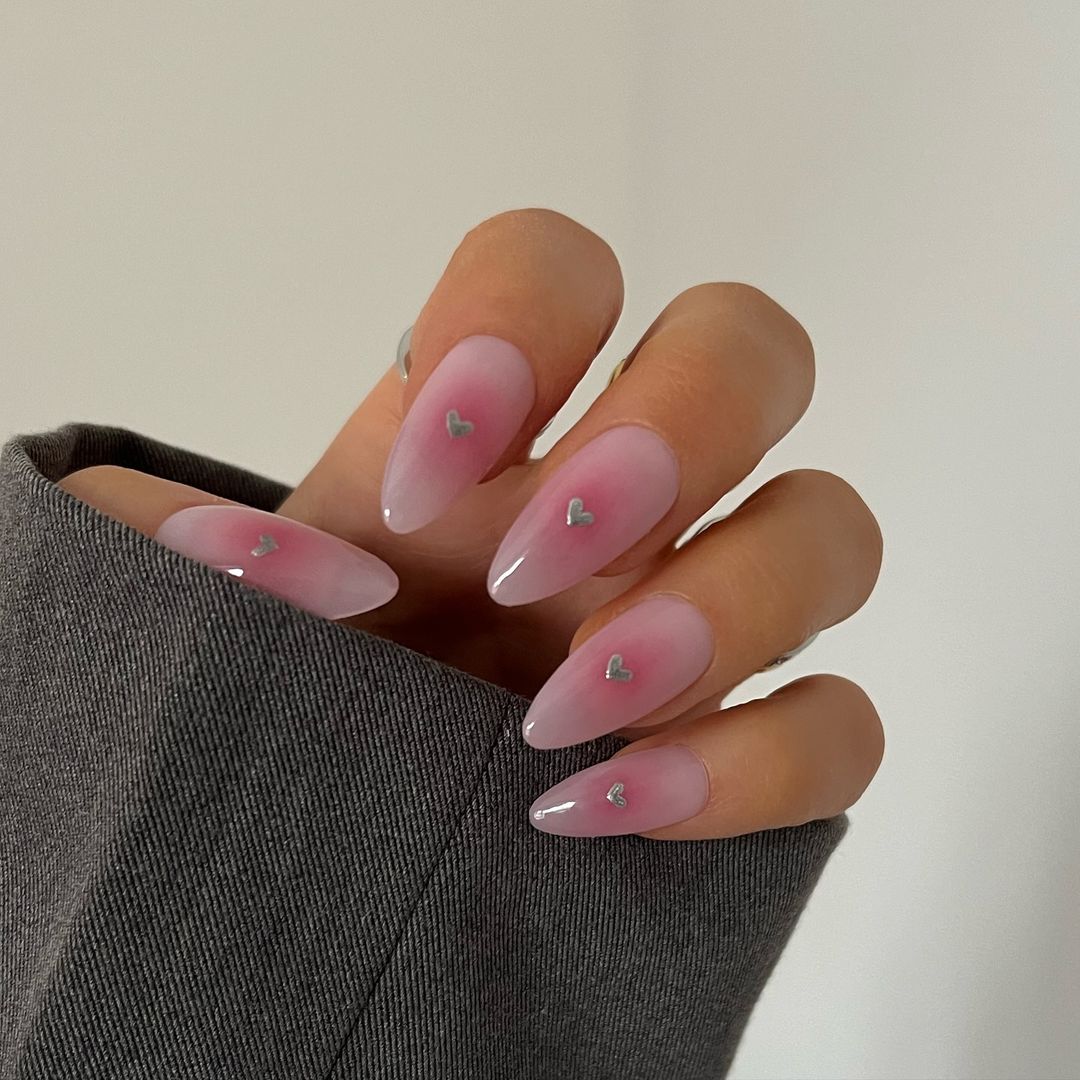
- Light pink nail polish (Essie Ballet Slippers)
- Dark pink nail polish (OPI Pink Flamenco)
- Silver heart stickers (Whats Up Nails Heart Stickers)
- Makeup sponge (Beetles Nail Art Sponge)
- Base coat (CND Stickey Base Coat)
- Top coat (Essie Gel Setter)
Application:
- Apply a base coat to all nails.
- Using a makeup sponge, create an ombre effect by blending light and dark pink polishes.
- Allow the gradient to dry completely before applying the silver heart stickers.
- Seal the design with a top coat for a glossy finish and added durability.
Glittering Glamour
This design showcases almond-shaped nails with a combination of glittery silver and glossy black, accented with soft pink. The mixture of textures and colors creates a dynamic and glamorous look that stands out.
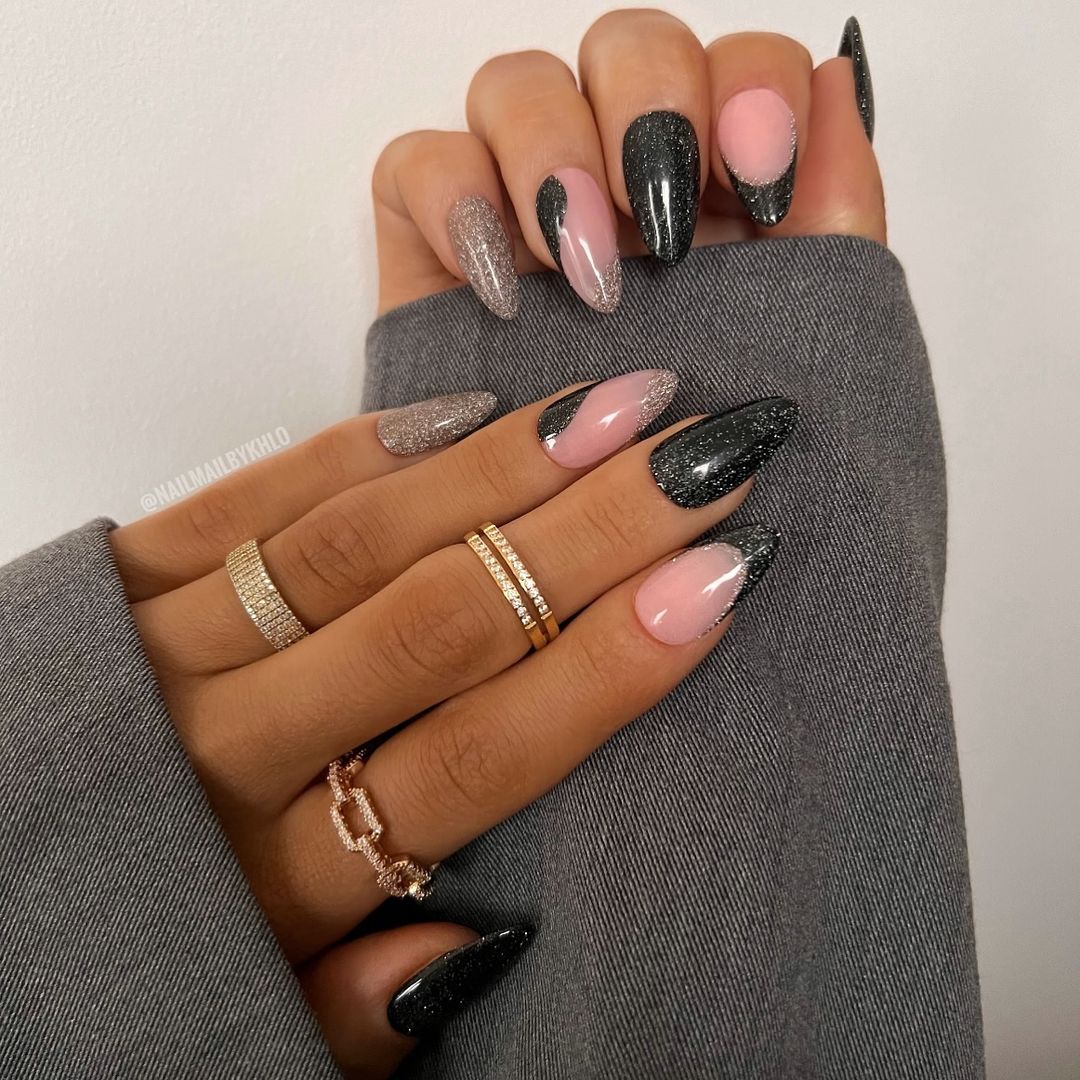
- Black nail polish (OPI Black Onyx)
- Silver glitter polish (China Glaze Glistening Snow)
- Pink nail polish (Essie Ballet Slippers)
- Nail art brush (Beetles Nail Art Brushes)
- Base coat (Sally Hansen Hard As Nails)
- Top coat (Seche Vite Dry Fast Top Coat)
Application:
- Apply a base coat to all nails to protect and prepare them.
- Paint different sections of each nail with black, silver glitter, and pink polish, creating a unique pattern.
- Use a nail art brush to blend the colors smoothly where they meet.
- Seal the design with a top coat for a glossy and long-lasting finish.
Rainbow Waves
These almond-shaped nails feature a vibrant design with wavy patterns in various rainbow colors over a nude base. The playful and colorful look is perfect for those who love to make a bold statement.
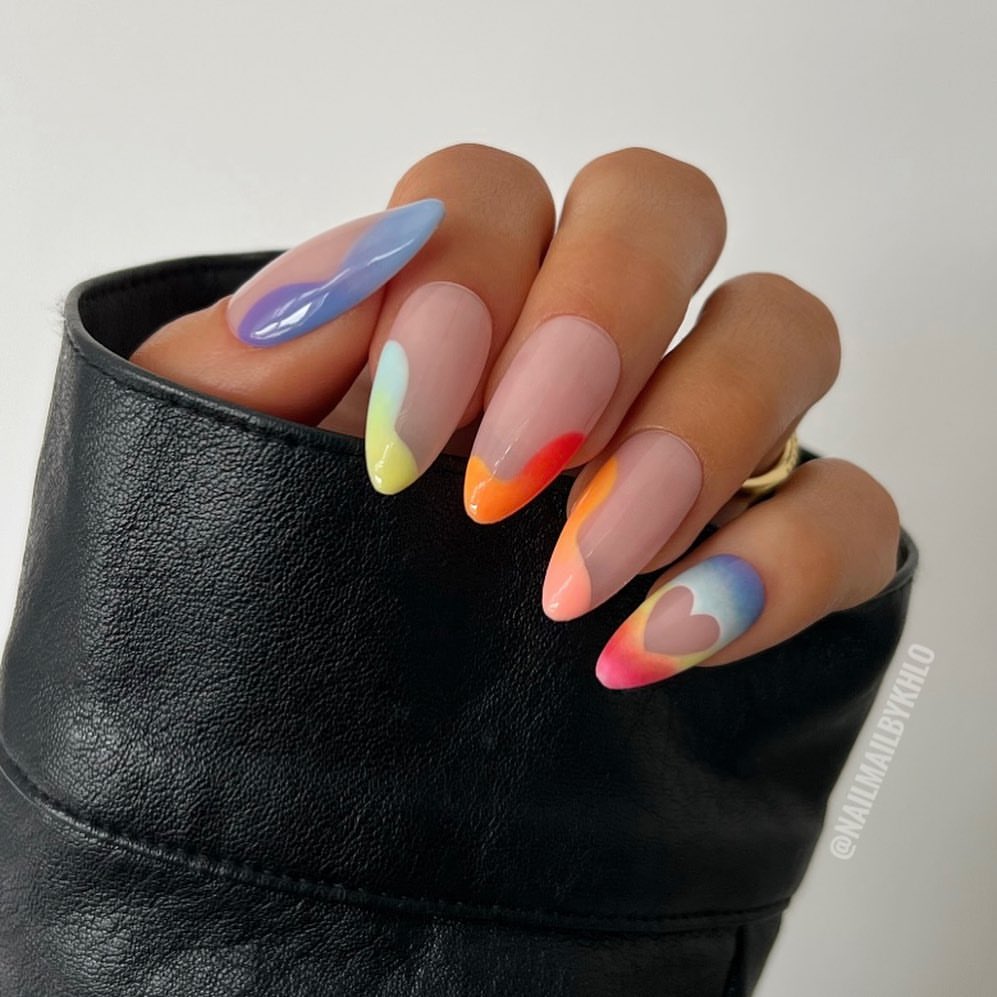
- Nude nail polish (OPI Bubble Bath)
- Rainbow nail polishes (Essie Play Date, OPI Got Myself into a Jam-balaya, Sally Hansen Mellow Yellow, China Glaze Aquadelic, Orly Purple Crush)
- Fine nail art brush (Makartt Nail Art Brushes)
- Base coat (CND Stickey Base Coat)
- Top coat (Essie Gel Setter)
Application:
- Apply a base coat to all nails.
- Paint each nail with a nude base color.
- Use a fine nail art brush to create wavy patterns with various rainbow colors on each nail.
- Seal the design with a top coat for a smooth and shiny finish.
Black and Glitter French Tips
This elegant design features almond-shaped nails with black French tips accented with a touch of silver glitter. The combination of black and glitter adds sophistication and a hint of sparkle to the classic French tip look.
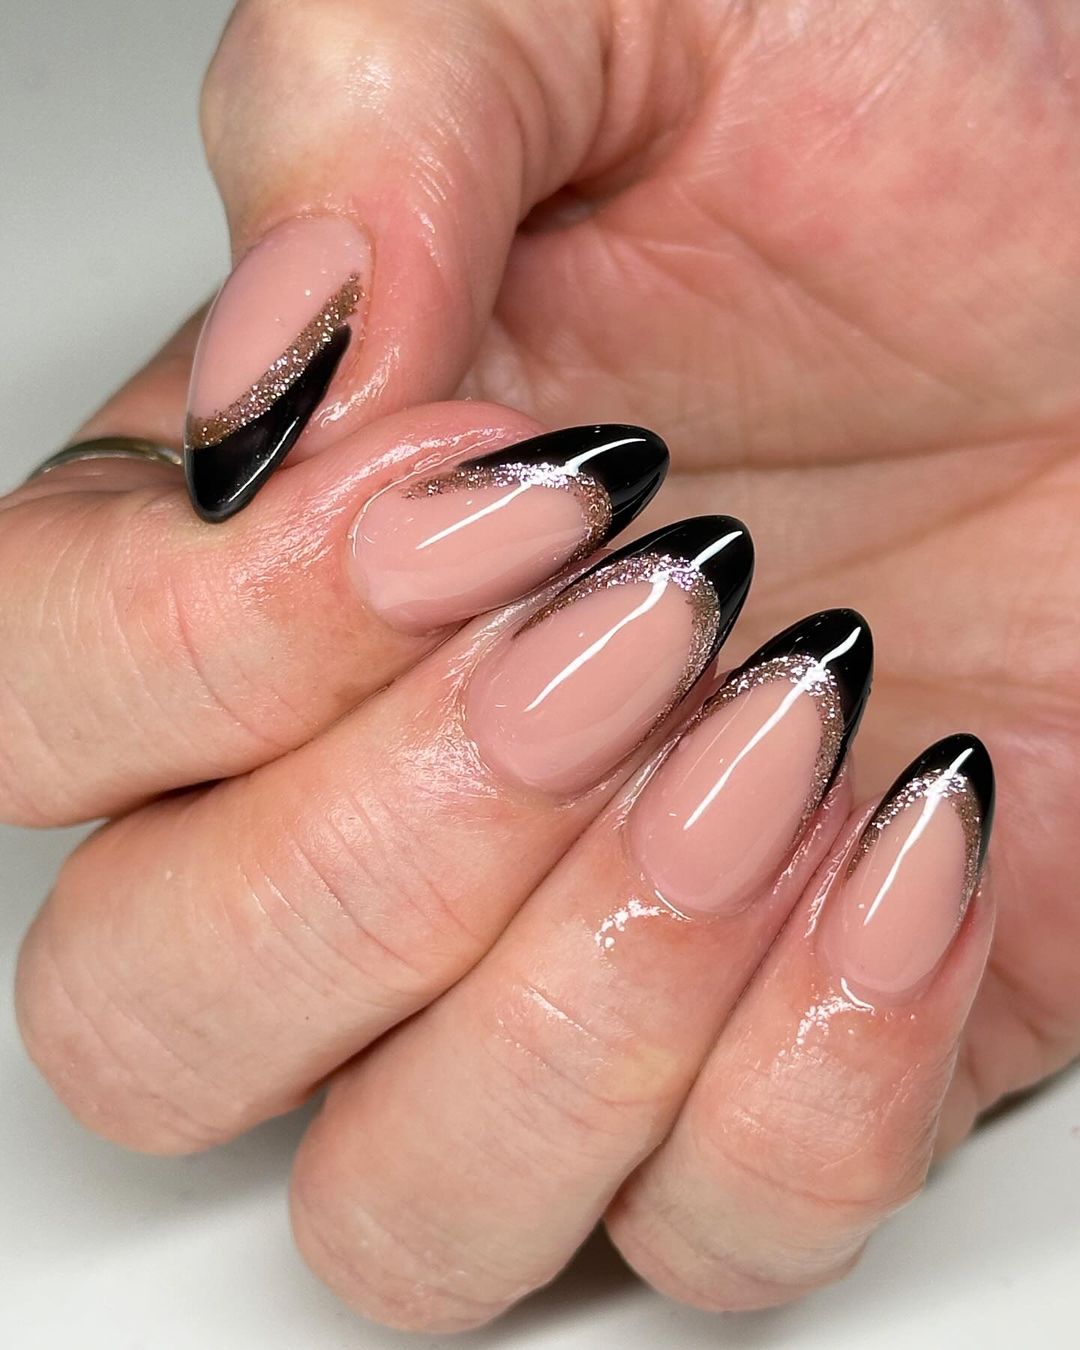
- Nude nail polish (Essie Mademoiselle)
- Black nail polish (OPI Black Onyx)
- Silver glitter polish (China Glaze Glistening Snow)
- Fine nail art brush (Beetles Nail Art Brushes)
- Base coat (Orly Bonder)
- Top coat (Seche Vite Dry Fast Top Coat)
Application:
- Apply a base coat to all nails.
- Paint each nail with a nude base color.
- Use a fine brush to create black French tips on each nail.
- Add a line of silver glitter just below the black tips.
- Finish with a top coat to protect the design and add shine.
Animal Print Chic
This design combines various animal prints on almond-shaped nails, featuring zebra stripes, leopard spots, and simple black lines on a nude base. The mix of patterns creates a bold and stylish look.
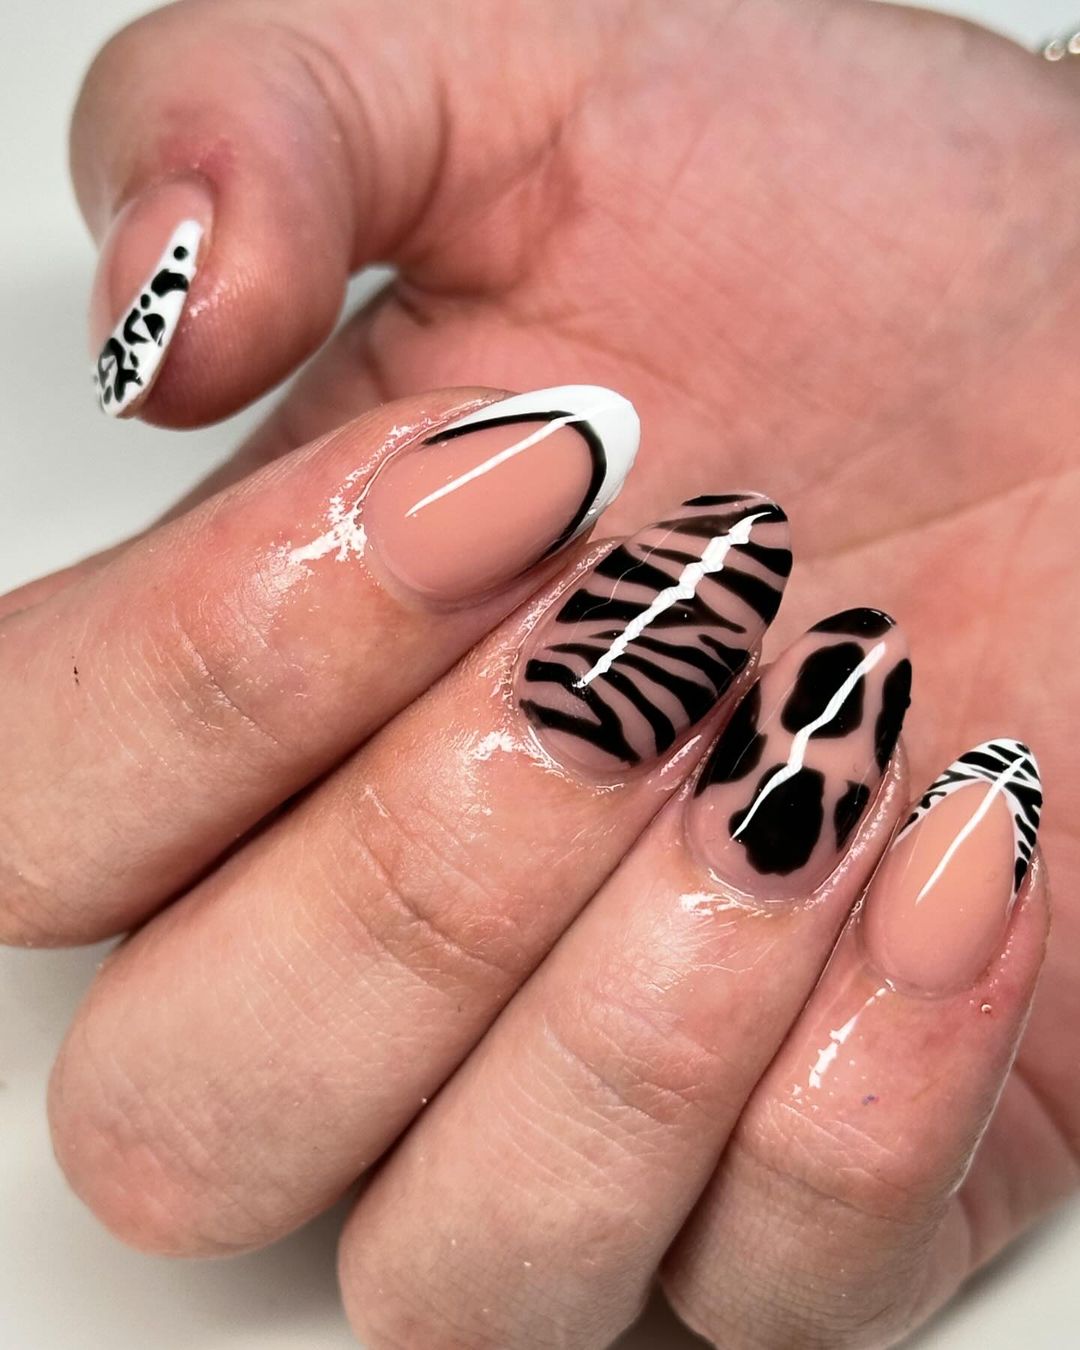
- Nude nail polish (OPI Bubble Bath)
- Black nail polish (Sally Hansen Black Out)
- White nail polish (Essie Blanc)
- Fine nail art brush (Makartt Nail Art Brushes)
- Base coat (CND Stickey Base Coat)
- Top coat (Revlon Quick Dry Top Coat)
Application:
- Apply a base coat to all nails.
- Paint each nail with a nude base color.
- Use a fine brush to create various animal prints, including zebra stripes and leopard spots, with black and white polish.
- Seal the design with a top coat for added shine and durability.
Nude Elegance
This simple yet elegant design features almond-shaped nails painted in a soft nude color. The minimalist look emphasizes the natural beauty of the nails, making them suitable for any occasion.
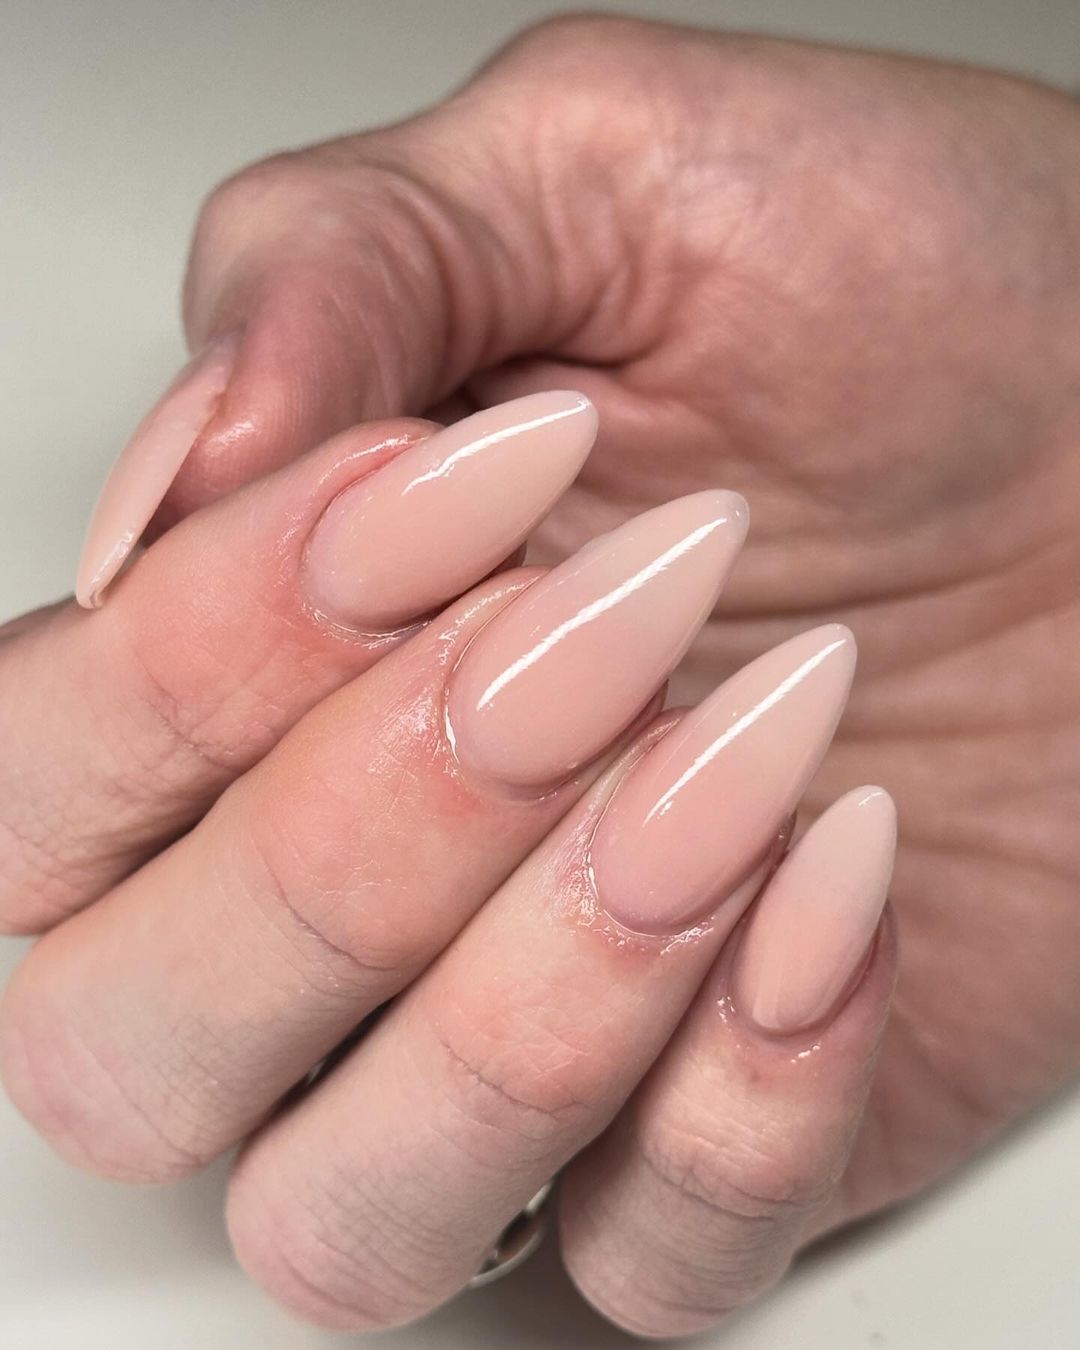
- Nude nail polish (Essie Ballet Slippers)
- Base coat (OPI Natural Nail Base Coat)
- Top coat (Sally Hansen Miracle Gel)
Application:
- Apply a base coat to all nails.
- Paint each nail with two coats of nude polish, ensuring even coverage.
- Finish with a top coat to seal the color and add a glossy finish.
Floral French Tips
These almond-shaped nails feature a unique twist on the classic French tip, with deep pink tips adorned with delicate white flowers. The floral accents add a playful and feminine touch to the elegant design.
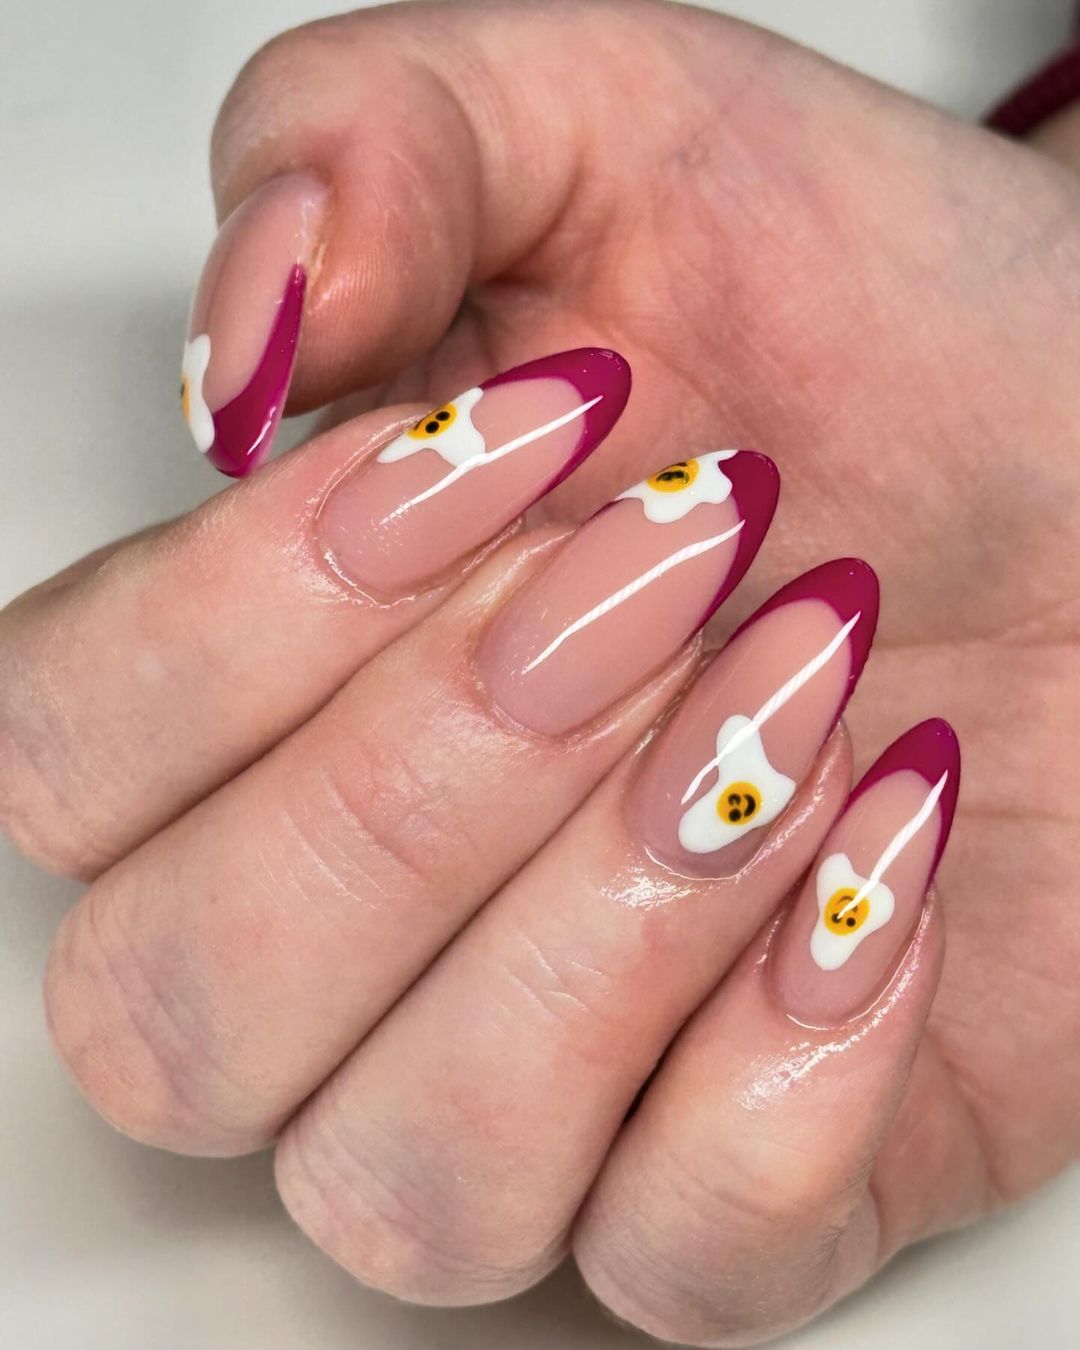
- Nude nail polish (Essie Ballet Slippers)
- Pink nail polish (OPI Kiss Me on My Tulips)
- White nail polish (OPI Alpine Snow)
- Fine nail art brush (Beetles Nail Art Brushes)
- Base coat (CND Stickey Base Coat)
- Top coat (Seche Vite Dry Fast Top Coat)
Application:
- Apply a base coat to all nails.
- Paint each nail with a nude base color.
- Use a fine brush to create deep pink French tips on each nail.
- Add delicate white flowers to the tips using a fine brush.
- Seal the design with a top coat for a smooth and glossy finish.
Earthy Tones Gradient
This design features almond-shaped nails painted in a gradient of earthy tones, ranging from deep taupe to soft beige. The subtle transition between colors creates a sophisticated and natural look, perfect for autumn.
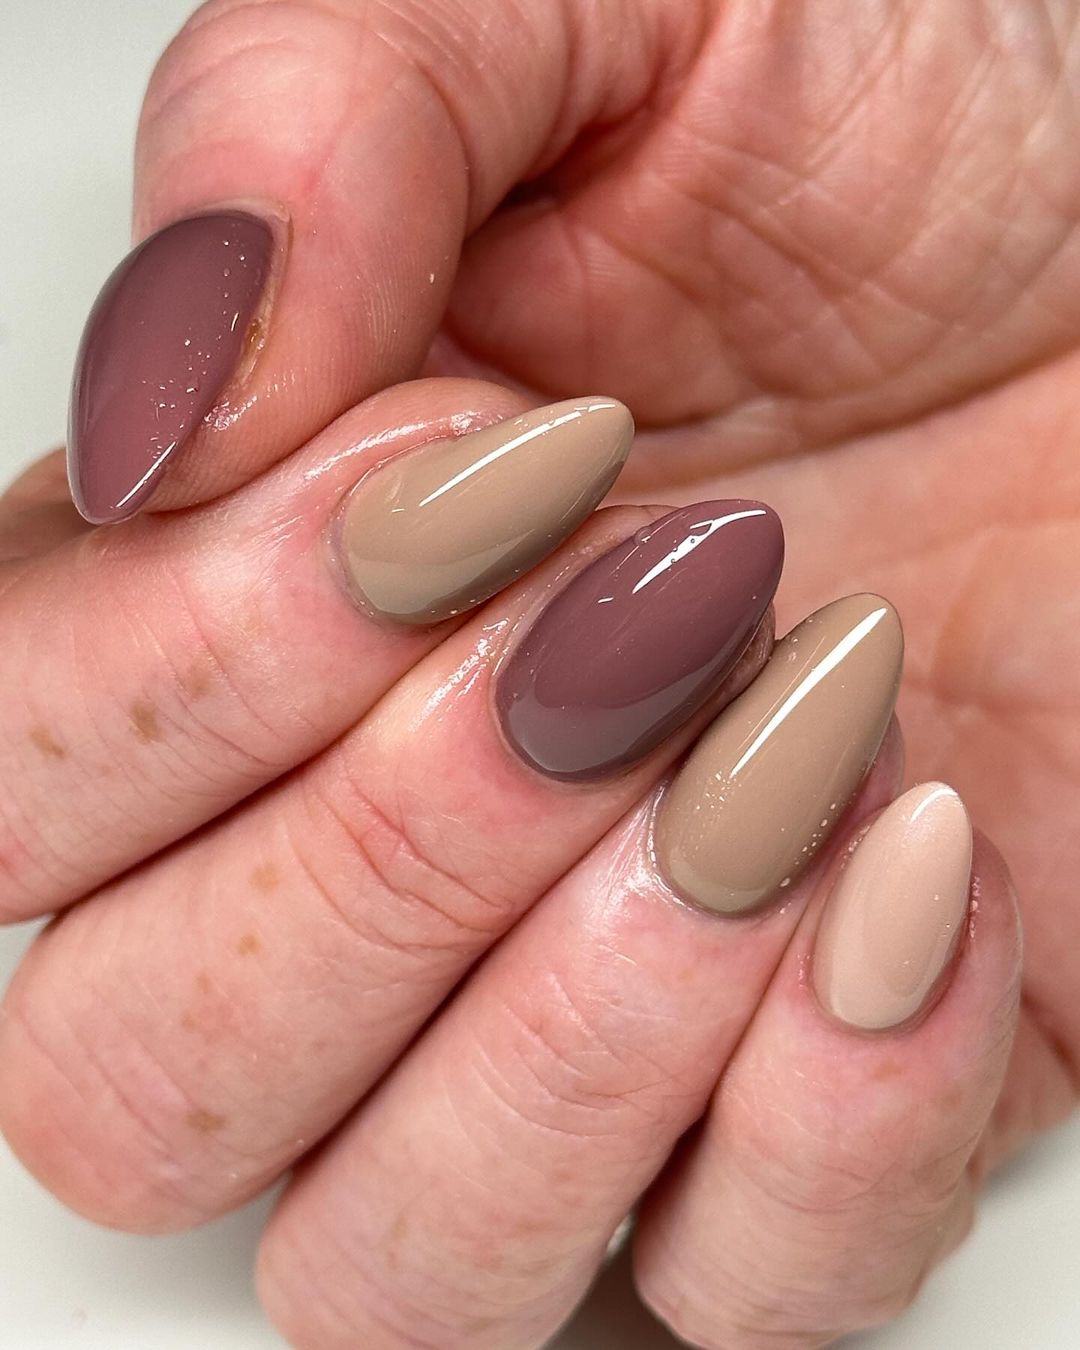
- Taupe nail polish (Essie Ladylike)
- Beige nail polish (OPI Samoan Sand)
- Nude nail polish (Zoya Avery)
- Base coat (CND Stickey Base Coat)
- Top coat (Sally Hansen Miracle Gel)
Application:
- Apply a base coat to all nails.
- Paint each nail with a different shade, transitioning from deep taupe to soft beige.
- Ensure each layer is fully dry before applying the next color.
- Finish with a top coat to seal the colors and add a glossy finish.
Pastel Rainbow French Tips
These almond-shaped nails feature pastel rainbow French tips over a nude base. The soft and colorful design adds a playful and modern twist to the classic French manicure.
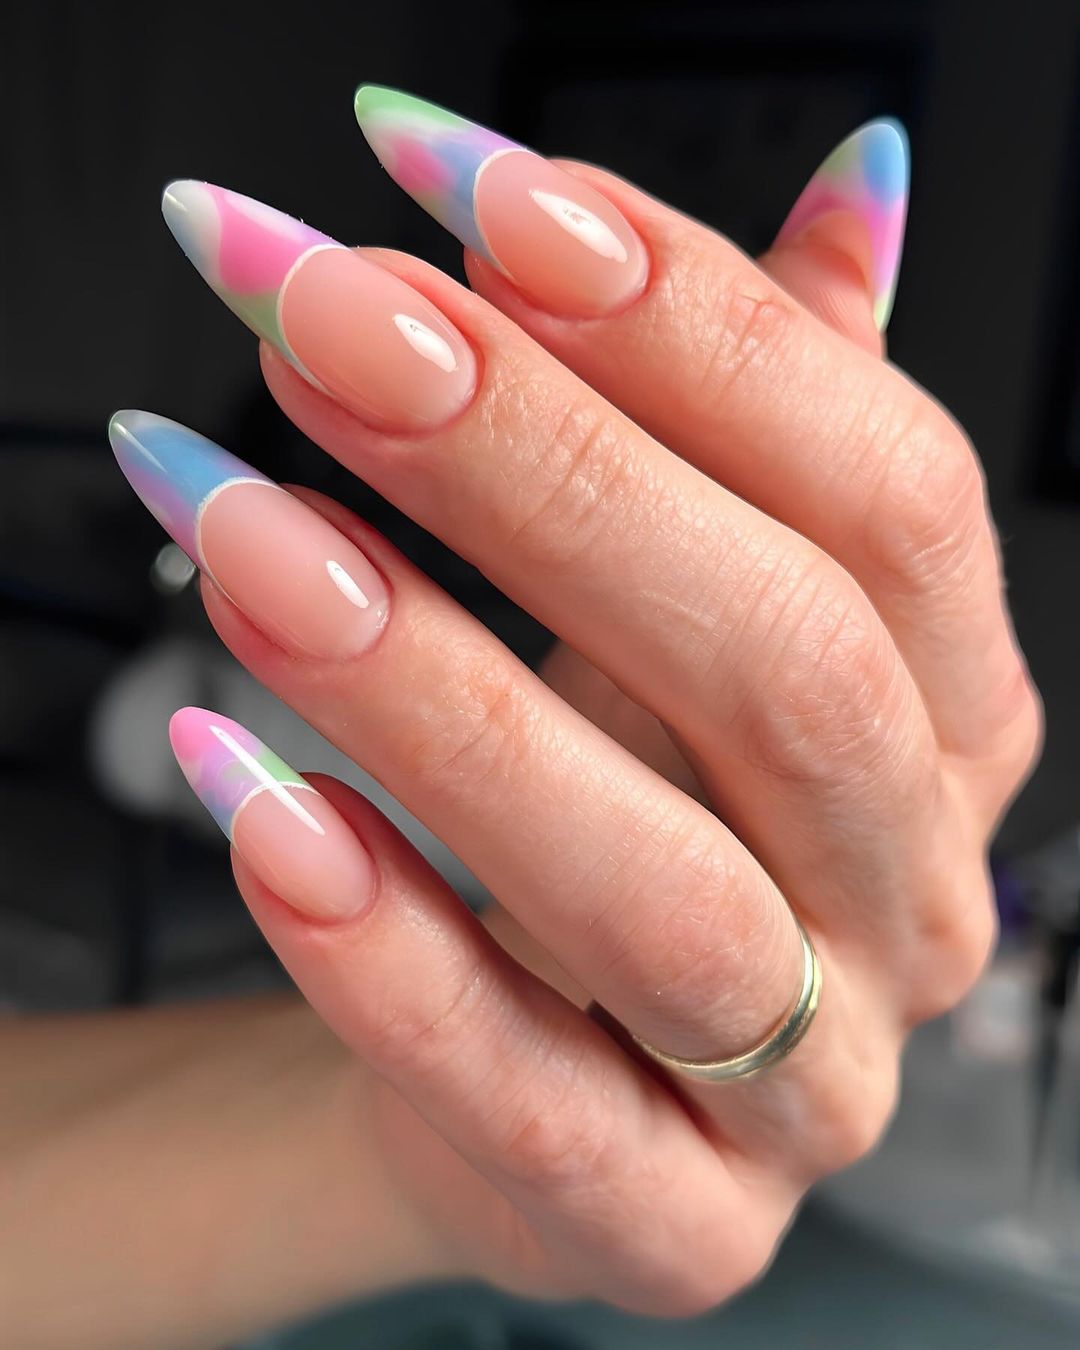
- Nude nail polish (Essie Ballet Slippers)
- Pastel nail polishes (China Glaze Pastel Palette)
- Fine nail art brush (Makartt Nail Art Brushes)
- Base coat (Orly Bonder)
- Top coat (Seche Vite Dry Fast Top Coat)
Application:
- Apply a base coat to all nails.
- Paint each nail with a nude base color.
- Use a fine brush to create French tips with various pastel colors, ensuring each color blends smoothly into the next.
- Seal the design with a top coat for a glossy and long-lasting finish.
Metallic Bronze
This design showcases almond-shaped nails painted in a rich, metallic bronze shade. The luxurious and shiny finish captures the essence of fall, making it a perfect choice for the season.
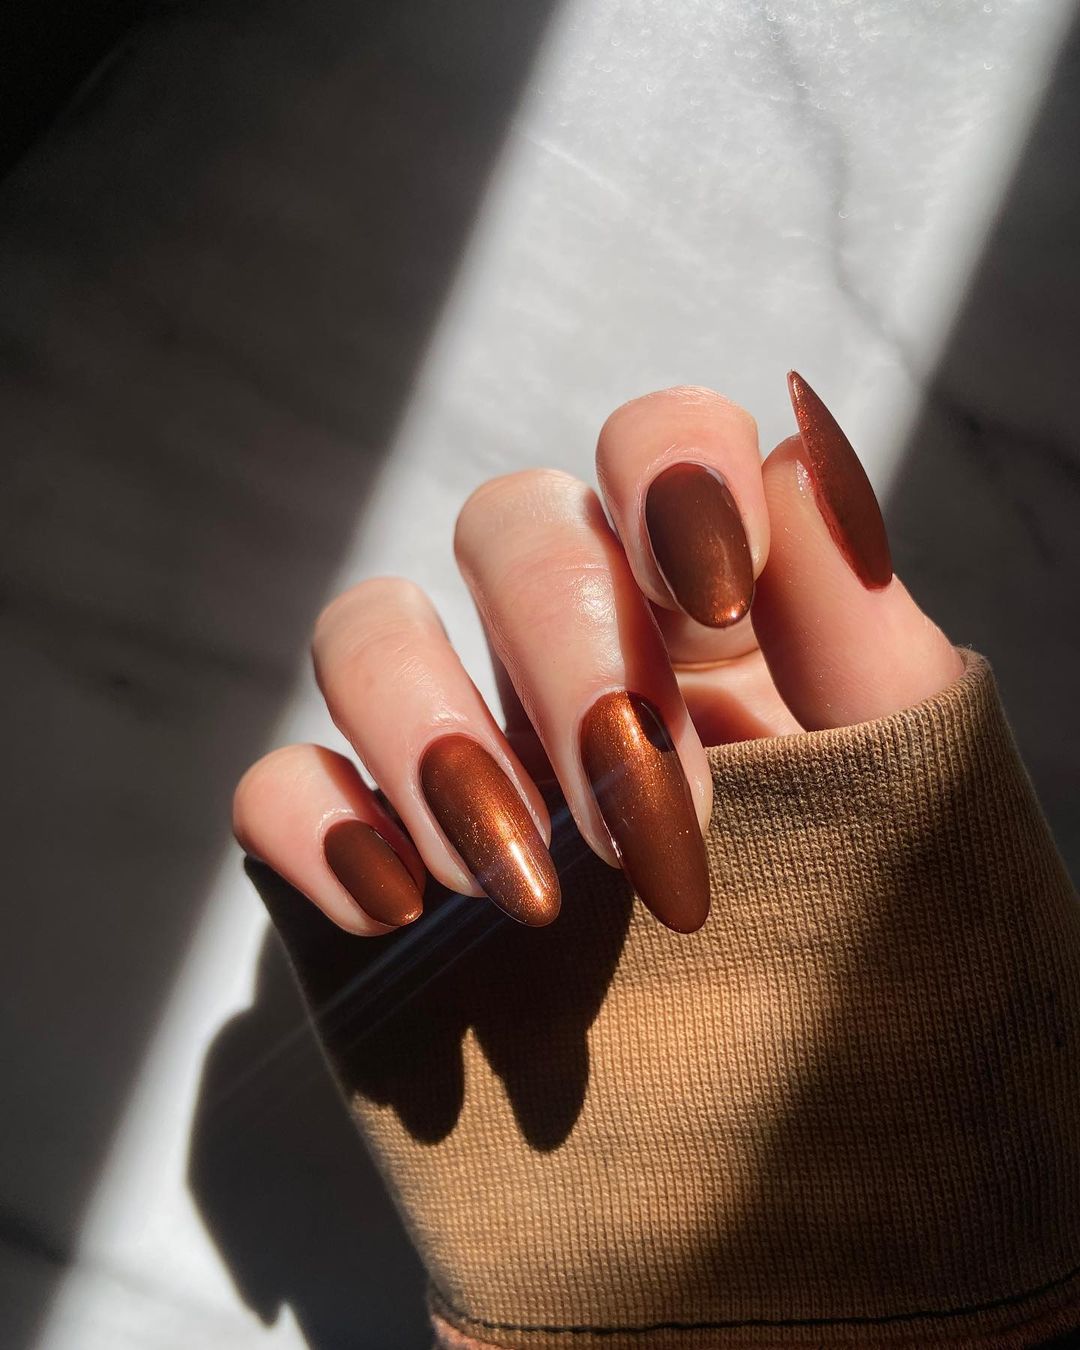
- Metallic bronze nail polish (OPI Espresso Your Inner Self)
- Base coat (Sally Hansen Double Duty)
- Top coat (Essie Gel Setter)
Application:
- Apply a base coat to all nails.
- Paint each nail with two coats of metallic bronze polish, allowing each layer to dry completely.
- Finish with a top coat to enhance the metallic shine and ensure durability.
FAQ
Q: How can I maintain almond shape fall nails? A: Regular filing and moisturizing your cuticles can keep your nails looking their best. Avoid using your nails as tools to prevent chipping.
Q: What is the best way to remove nail polish without damaging my nails? A: Use an acetone-free nail polish remover and soak your nails for a few minutes before gently wiping away the polish.
Q: How often should I change my nail design? A: It’s best to change your nail design every 1-2 weeks to keep your nails healthy and prevent damage from prolonged use of nail products.
With these detailed descriptions and instructions, you can easily recreate these stunning almond shape fall nails at home. Whether you prefer bold colors or simple designs, there’s something here for everyone to enjoy this fall.
Save Pin