When it comes to fall nail designs, the options are endless. From classic burgundy shades to trendy plaid patterns, autumn offers a rich palette of colors and styles to choose from. Whether you prefer short and cute nails or long and elegant designs, there’s something for everyone. Let’s explore some stunning fall nail designs that will keep your nails looking fabulous throughout the season.
Leopard Accent Nails
Embrace your wild side with this chic leopard accent nail design. The combination of neutral and nude tones with a bold leopard print creates a sophisticated yet playful look. Perfect for those who want to add a touch of fun to their fall manicure.
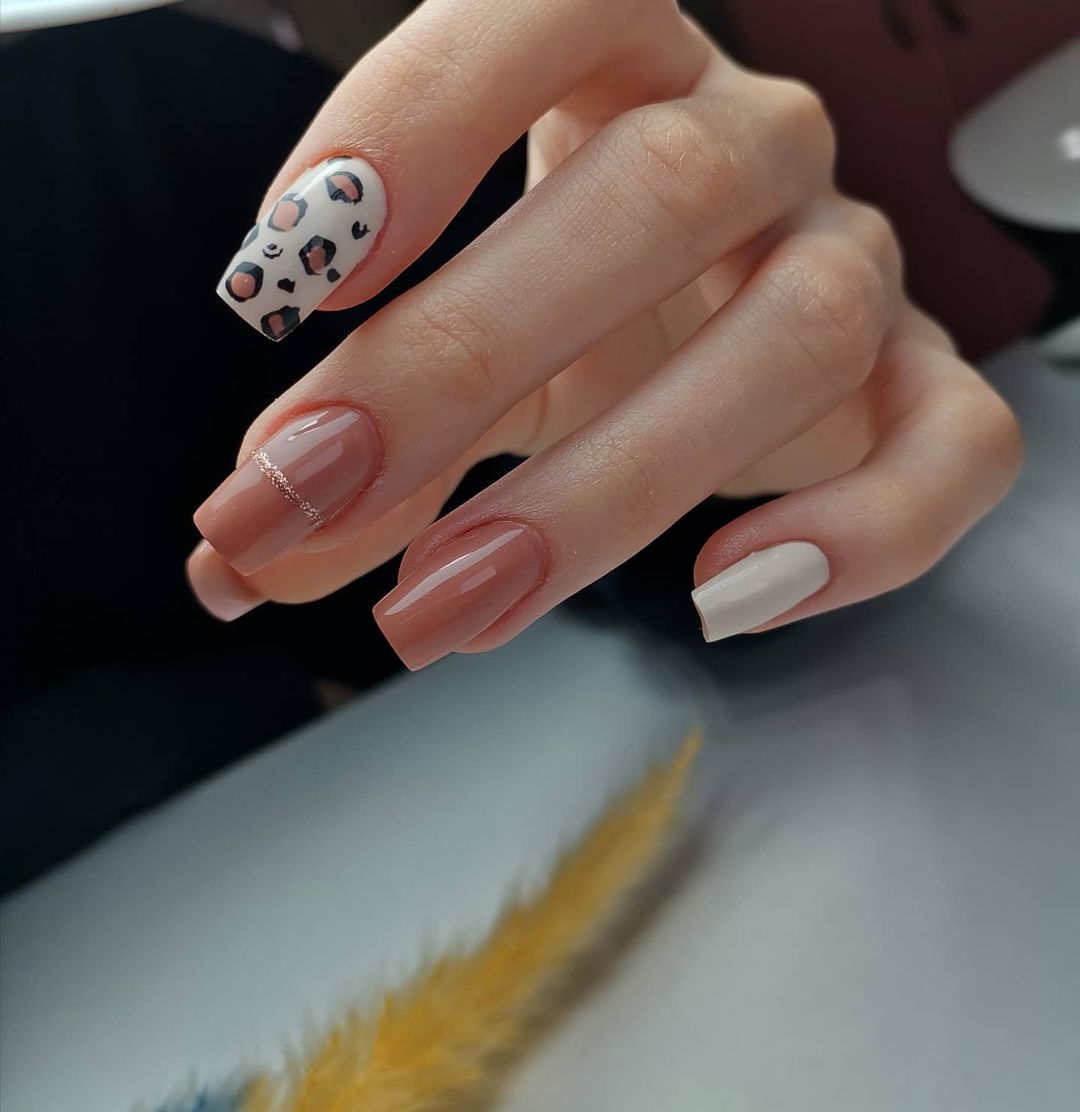
- Base coat: OPI Natural Nail Base Coat
- Nude polish: Essie “Bare With Me”
- White polish: Sally Hansen “White On”
- Leopard print: Black nail art pen or brush
- Top coat: Seche Vite Dry Fast Top Coat
Instructions:
- Apply a base coat to protect your nails.
- Paint your nails with the nude polish and let it dry completely.
- Use the white polish for the accent nail and create the leopard spots with the black nail art pen or brush.
- Seal the design with a top coat for a glossy finish.
Cozy Brown Ombre
This cozy brown ombre design is perfect for autumn. The gradient effect from dark to light brown creates a warm and elegant look, ideal for sweater weather.
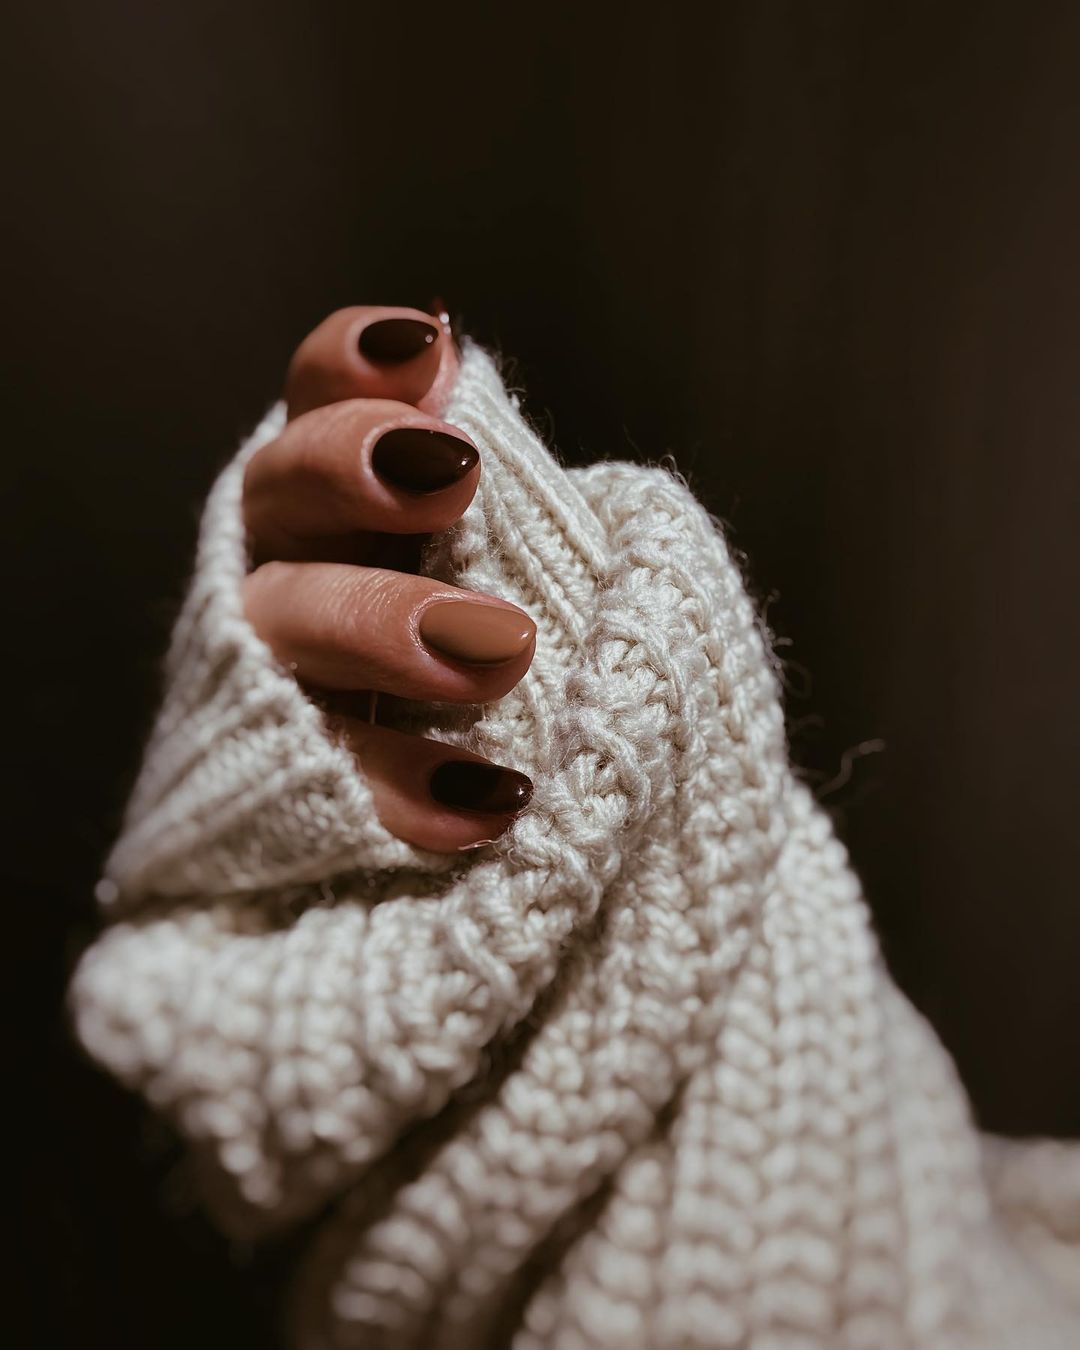
- Base coat: Zoya Anchor Base Coat
- Dark brown polish: OPI “Chocolate Moose”
- Light brown polish: Essie “Mochachino”
- Sponge for blending
- Top coat: Essie Gel Setter Top Coat
Instructions:
- Start with a base coat to ensure your polish lasts longer.
- Apply the dark brown polish to the top half of your nails and the light brown polish to the bottom half.
- Use a sponge to blend the two colors together, creating a seamless ombre effect.
- Finish with a top coat to protect your design.
Classic Black Glossy
Nothing says elegant quite like a classic black glossy manicure. This timeless look is perfect for any occasion, adding a touch of sophistication to your autumn style.
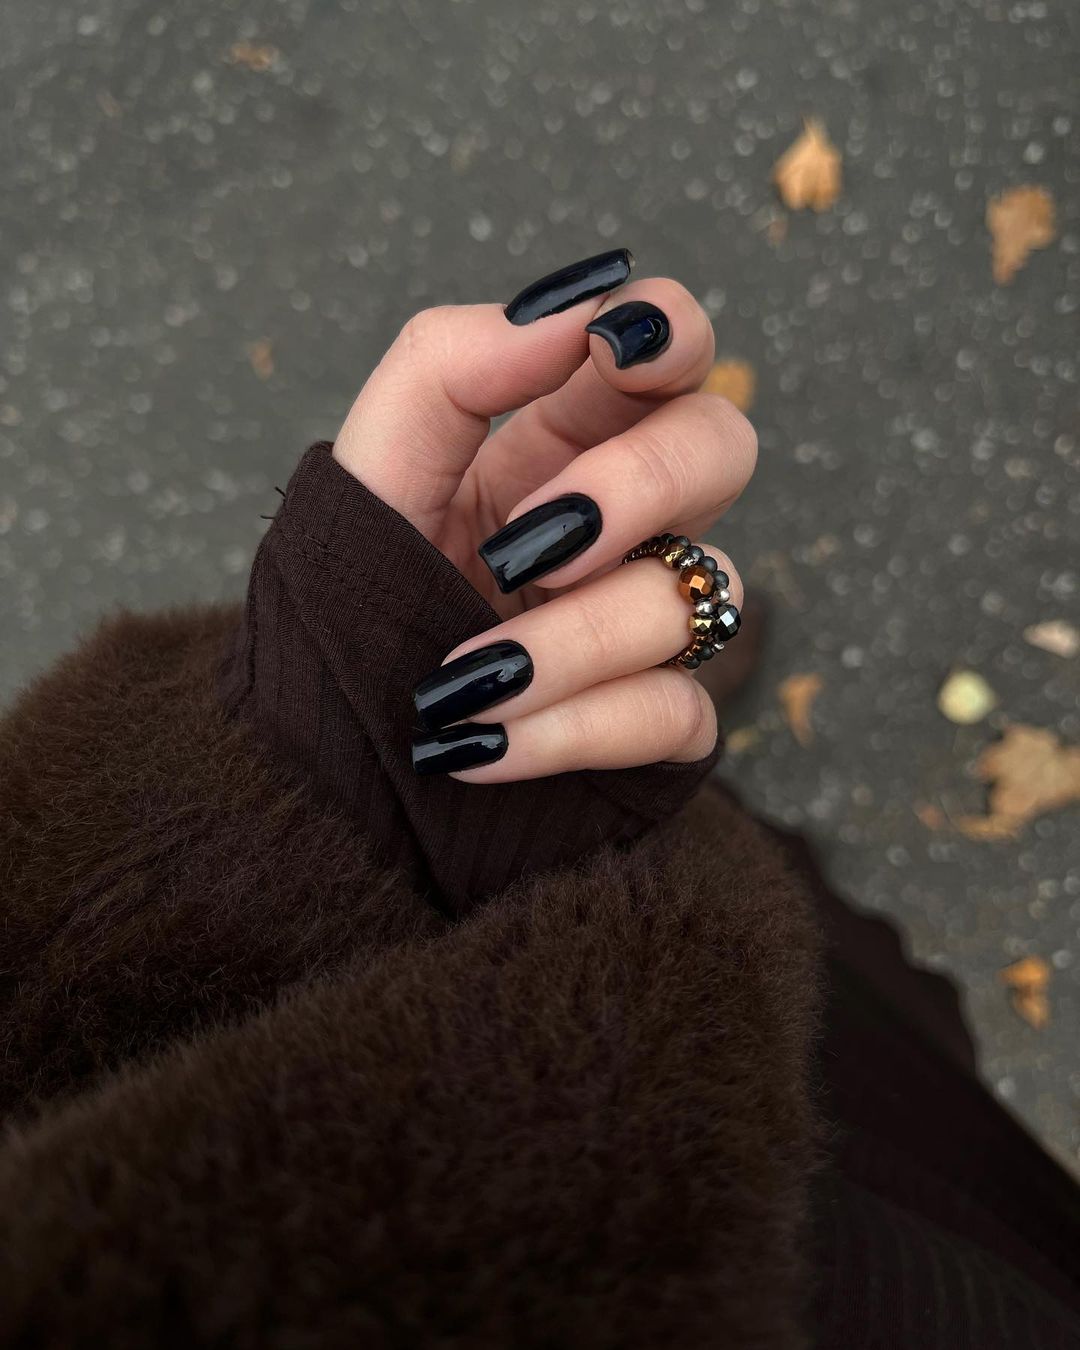
- Base coat: Deborah Lippmann Hard Rock Base and Top Coat
- Black polish: Essie “Licorice”
- Top coat: Seche Vite Dry Fast Top Coat
Instructions:
- Apply a base coat to prep your nails.
- Paint your nails with the black polish, making sure to apply two coats for full opacity.
- Seal with a top coat for a high-shine finish.
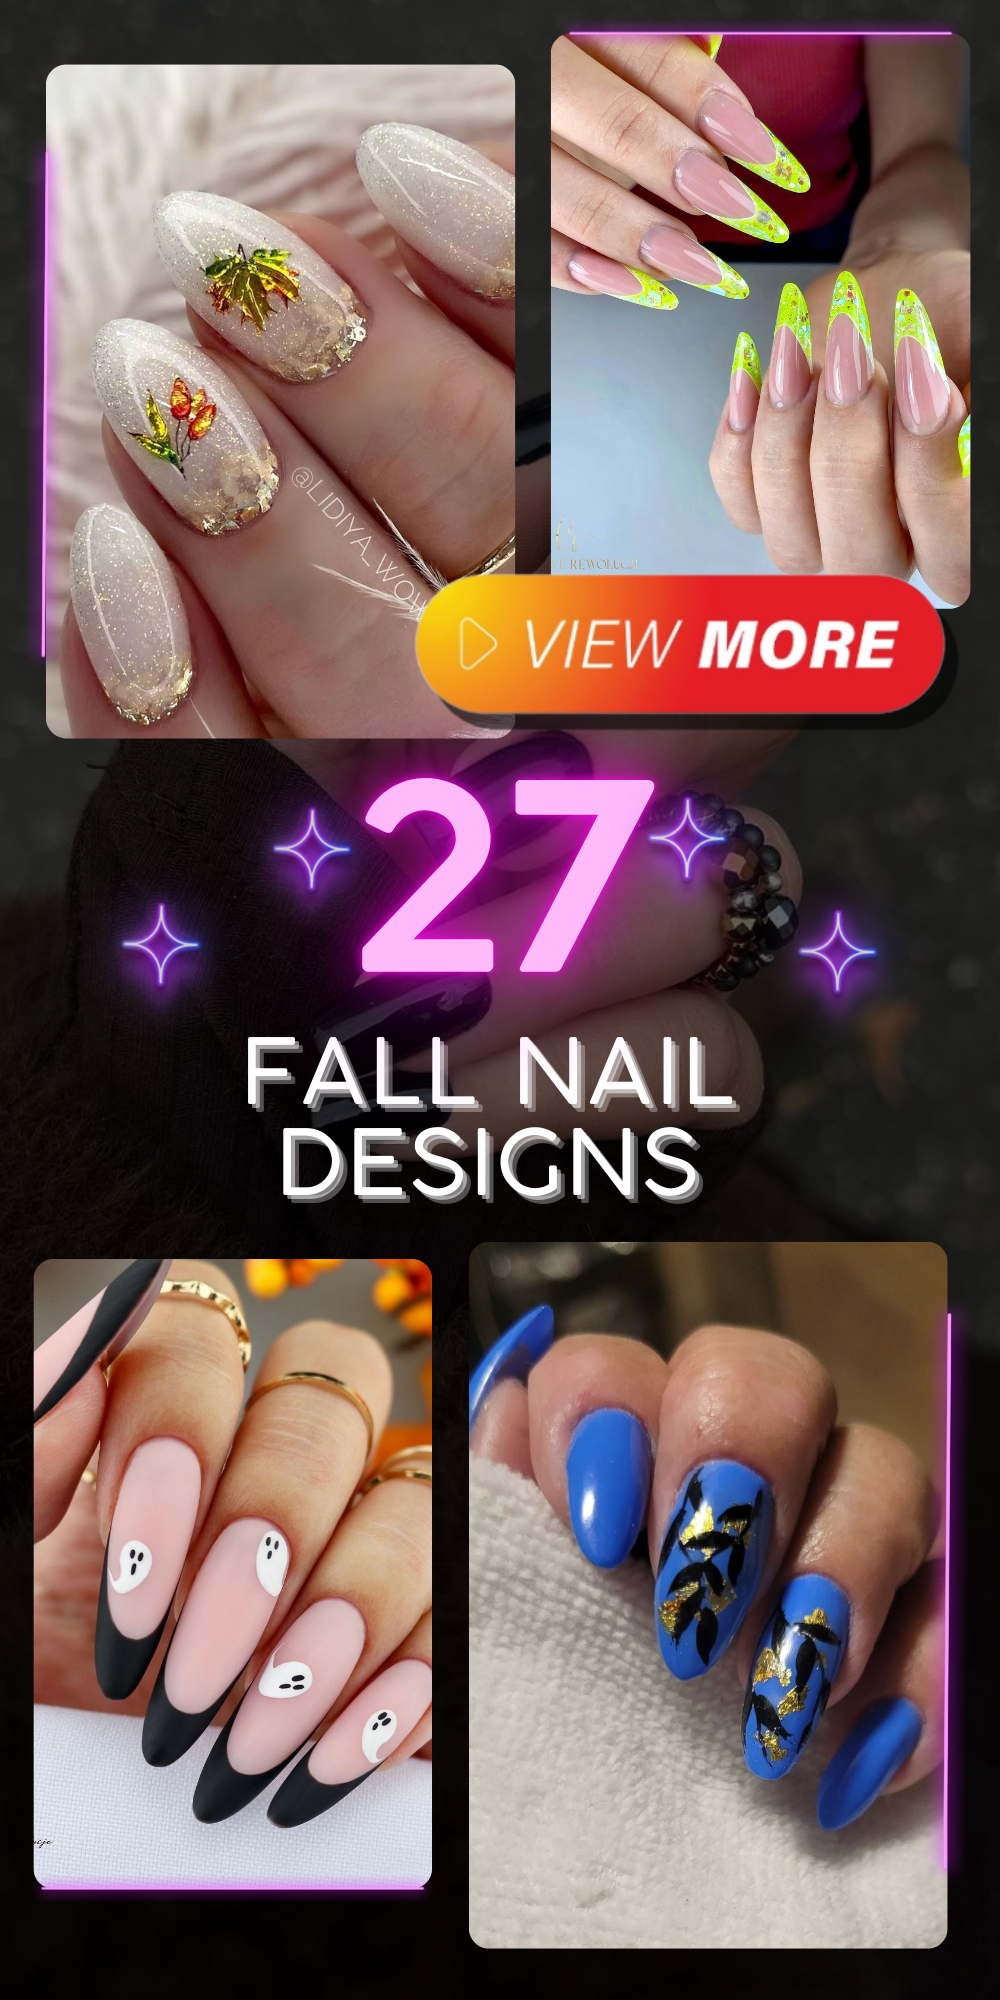
Sparkling Autumn Leaves
This enchanting design features a delicate white glitter base with intricately painted autumn leaves. The subtle sparkle adds a touch of magic, making these nails perfect for the fall season. The use of gold foil at the tips enhances the elegant look, giving a sophisticated finish to the manicure. The almond shape further accentuates the dainty and graceful design, making it a stunning choice for any autumn occasion.
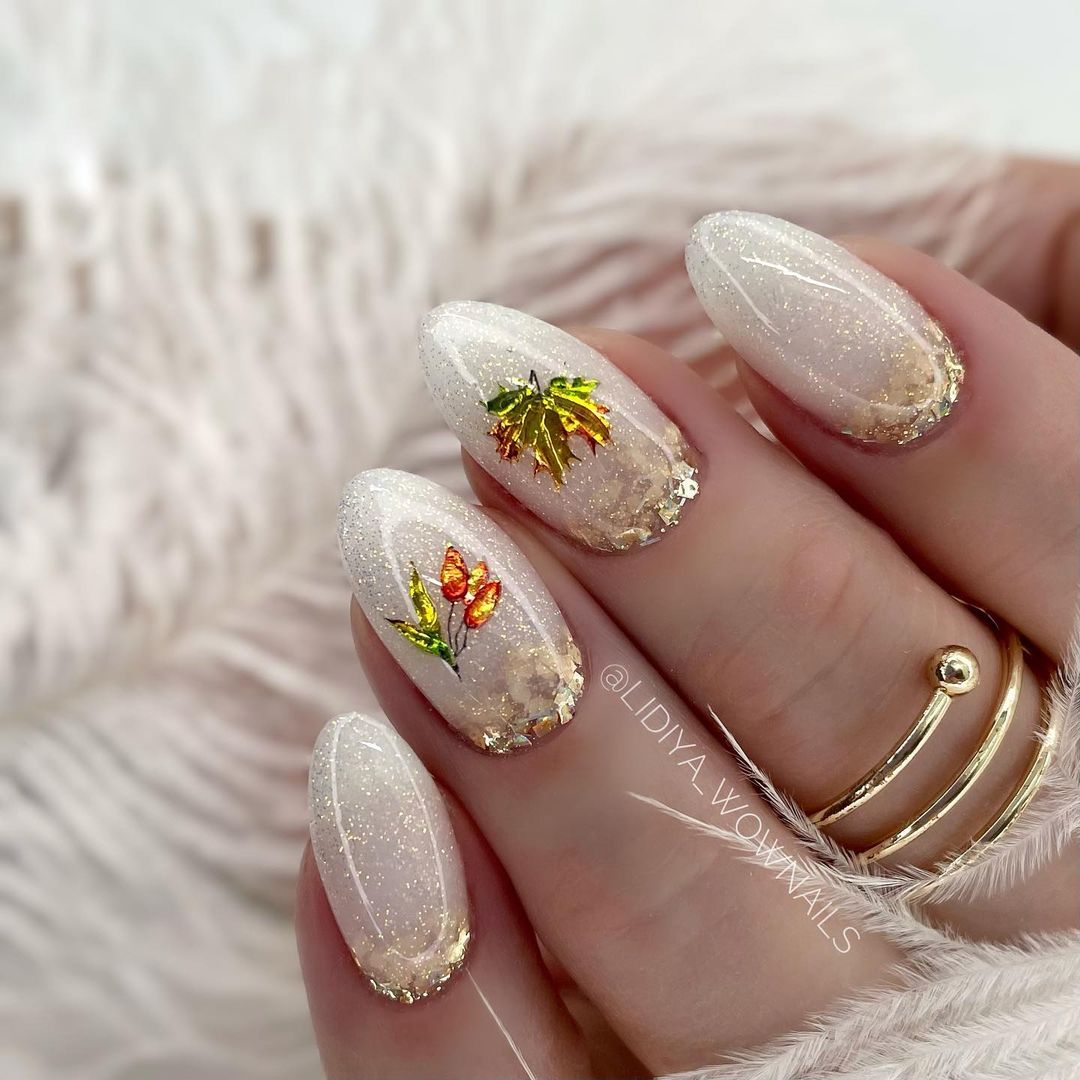
- Base coat: OPI Nail Envy Original
- White glitter polish: China Glaze “Diva Bride”
- Gold foil: Transfer Foil from Born Pretty Store
- Autumn leaf decals: Daily Charme Fall Leaf Stickers
- Top coat: Sally Hansen Miracle Gel Top Coat
Instructions:
- Apply the base coat to protect your nails.
- Use the white glitter polish to cover your nails entirely, letting each layer dry before applying the next.
- Apply the autumn leaf decals gently on the nail, positioning them as desired.
- Carefully add the gold foil to the tips using a nail adhesive.
- Finish with a top coat to seal the design and add shine.
Save Pin
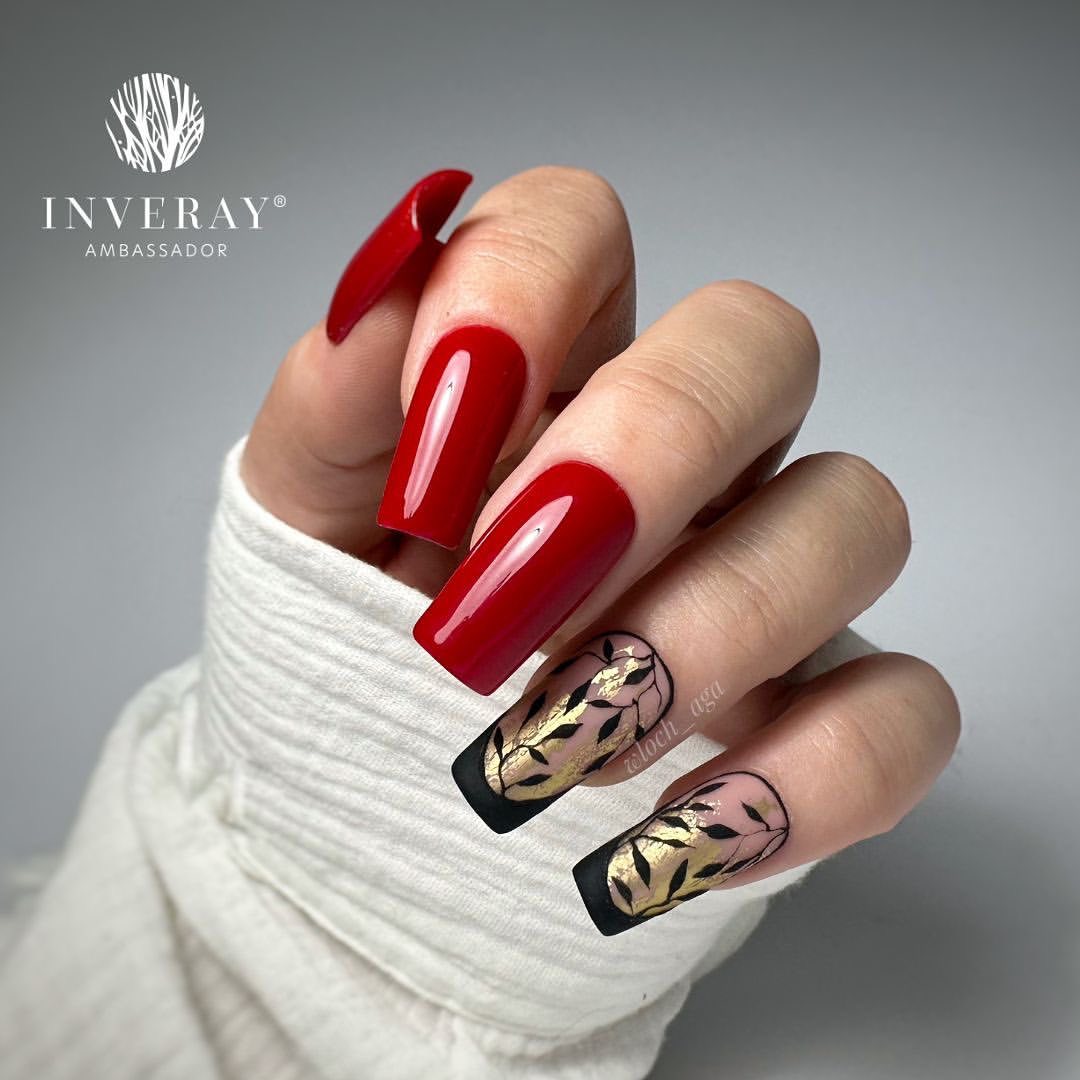
Elegant Burgundy and Gold
This elegant design combines the rich, deep hue of burgundy with a striking gold leaf pattern. The contrast between the bold burgundy and the delicate gold leaves creates a stunning visual effect that is both classy and trendy. The long, coffin-shaped nails add to the dramatic and sophisticated vibe, making this design a must-try for fall.
- Base coat: Essie All In One Base
- Burgundy polish: OPI “Malaga Wine”
- Gold leaf decals: Whats Up Nails Foil Decals
- Black polish: Essie “Licorice”
- Top coat: Seche Vite Dry Fast Top Coat
Instructions:
- Start with a base coat to prepare your nails.
- Apply the burgundy polish to most of your nails, except for the accent nails.
- On the accent nails, paint a black French tip and apply the gold leaf decals.
- Seal everything with a top coat to ensure longevity and a glossy finish.
Neutral Swirls with Gold Accents
This design features a neutral base with elegant swirls and gold accents, perfect for a sophisticated yet understated look. The almond shape enhances the elegance, while the intricate swirl patterns add a touch of artistry. The gold accents provide a hint of luxury, making these nails suitable for both casual and formal settings.
- Base coat: Orly Bonder Base Coat
- White polish: OPI “Alpine Snow”
- Neutral polish: Essie “Sand Tropez”
- Gold polish: Essie “Good As Gold”
- Nail art brush: Winstonia Nail Art Brush Set
- Top coat: Essie Gel Couture Top Coat
Instructions:
- Apply a base coat to protect your nails.
- Paint your nails with the white polish as a base.
- Use a nail art brush to create neutral swirls and patterns on the nails.
- Add gold accents to the design for an elegant touch.
- Finish with a top coat to seal the design and add shine.
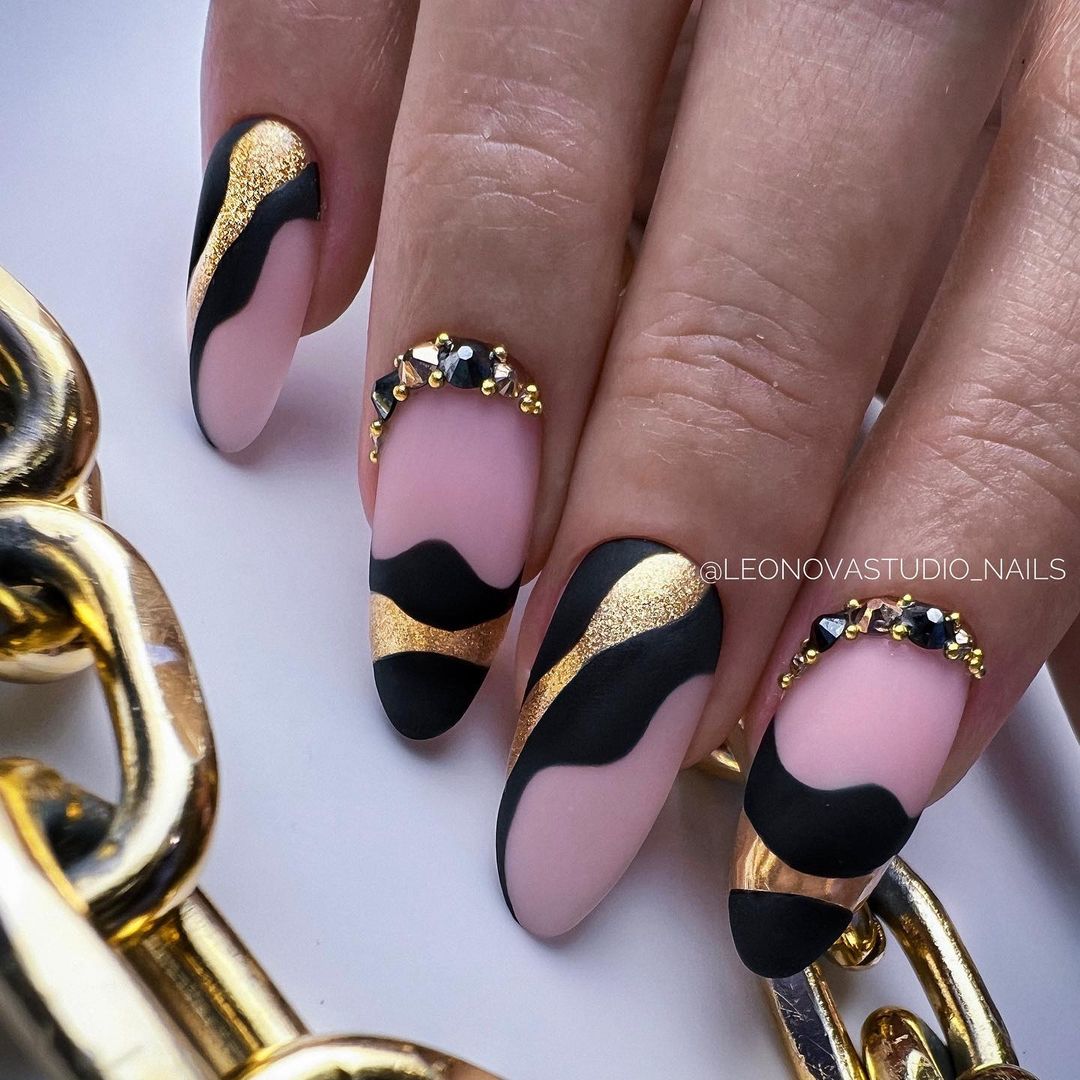
Luxe Black and Gold Waves
This luxurious design combines matte black, soft pink, and shimmering gold in a wavy pattern that exudes sophistication. The addition of black and gold gems near the cuticle adds a touch of glamour, making this look perfect for a chic evening out or a special event. The almond shape of the nails enhances the elegance and elongates the fingers beautifully.
- Base coat: Essie Strong Start Base Coat
- Matte black polish: OPI “Black Onyx” with a matte top coat
- Soft pink polish: Essie “Ballet Slippers”
- Gold polish: Sally Hansen “Golden-I”
- Gold and black gems: Swarovski Nail Crystals
- Nail glue: Kiss Precision Nail Glue
- Top coat: Essie Gel Couture Top Coat (for the non-matte parts)
Instructions:
- Apply the base coat to protect your nails.
- Paint the nails with the soft pink polish and let it dry.
- Use the matte black and gold polishes to create wavy patterns on each nail, alternating the colors as desired.
- Apply the gems near the cuticle with nail glue for added sparkle.
- Seal the non-matte parts with a glossy top coat for contrast.
Simple Green French Tips
This minimalist yet elegant design features classic French tips with a modern twist, using a deep green polish instead of the traditional white. The simplicity of this look makes it versatile and suitable for both everyday wear and special occasions. The almond shape complements the design, giving it a refined and polished finish.
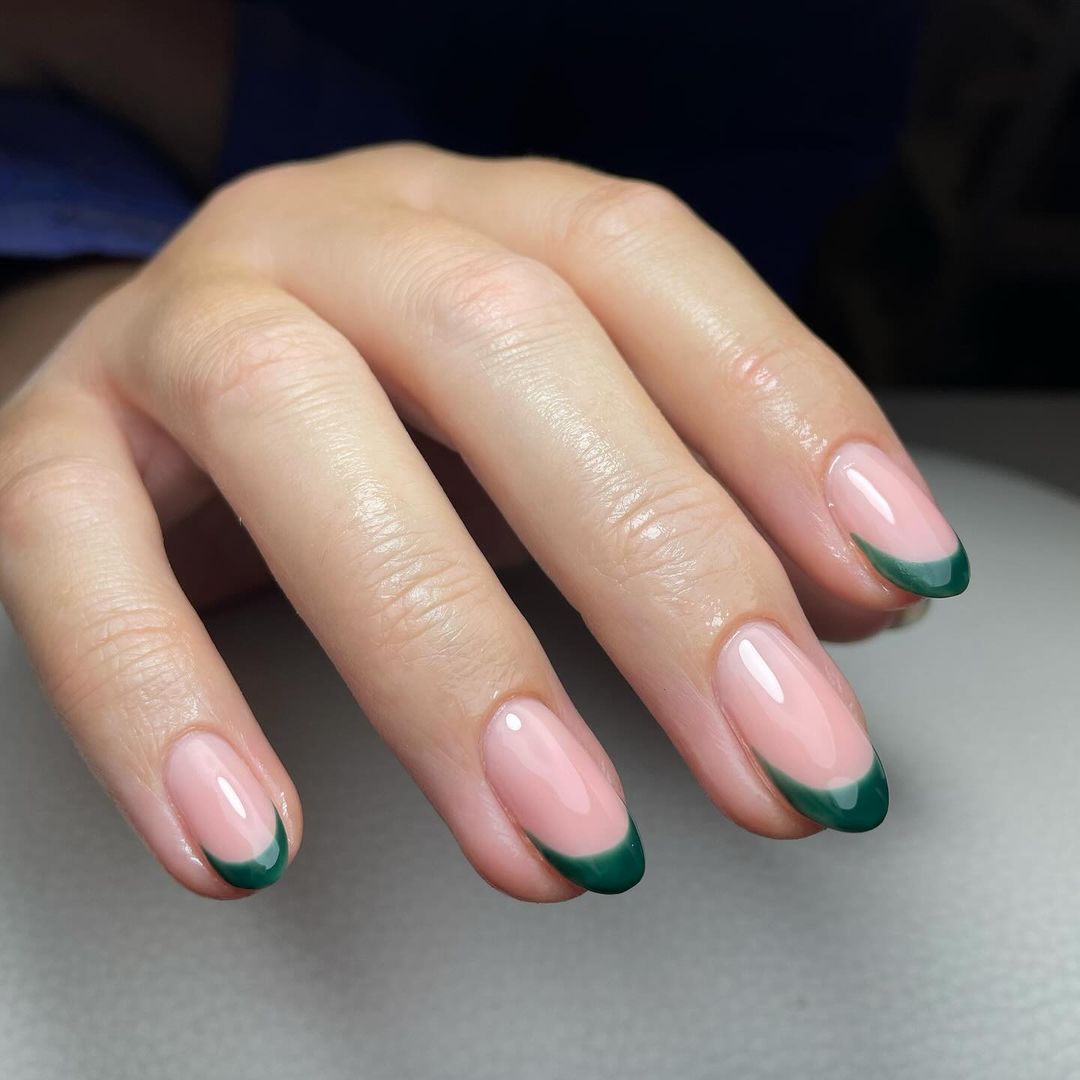
- Base coat: OPI Nail Envy Original
- Nude polish: Zoya “Jana”
- Green polish: Essie “Off Tropic”
- Top coat: Seche Vite Dry Fast Top Coat
Instructions:
- Start with a base coat to prep your nails.
- Apply the nude polish and let it dry completely.
- Carefully paint the tips of your nails with the green polish, creating a clean French tip.
- Finish with a top coat to seal the design and add shine.
Classic Black French Tips
This design is a timeless classic with a modern twist, featuring black French tips on a nude base. The sharp contrast between the nude and black creates a striking and sophisticated look that is both elegant and trendy. The long almond shape of the nails adds a touch of drama, making this design perfect for any formal event.
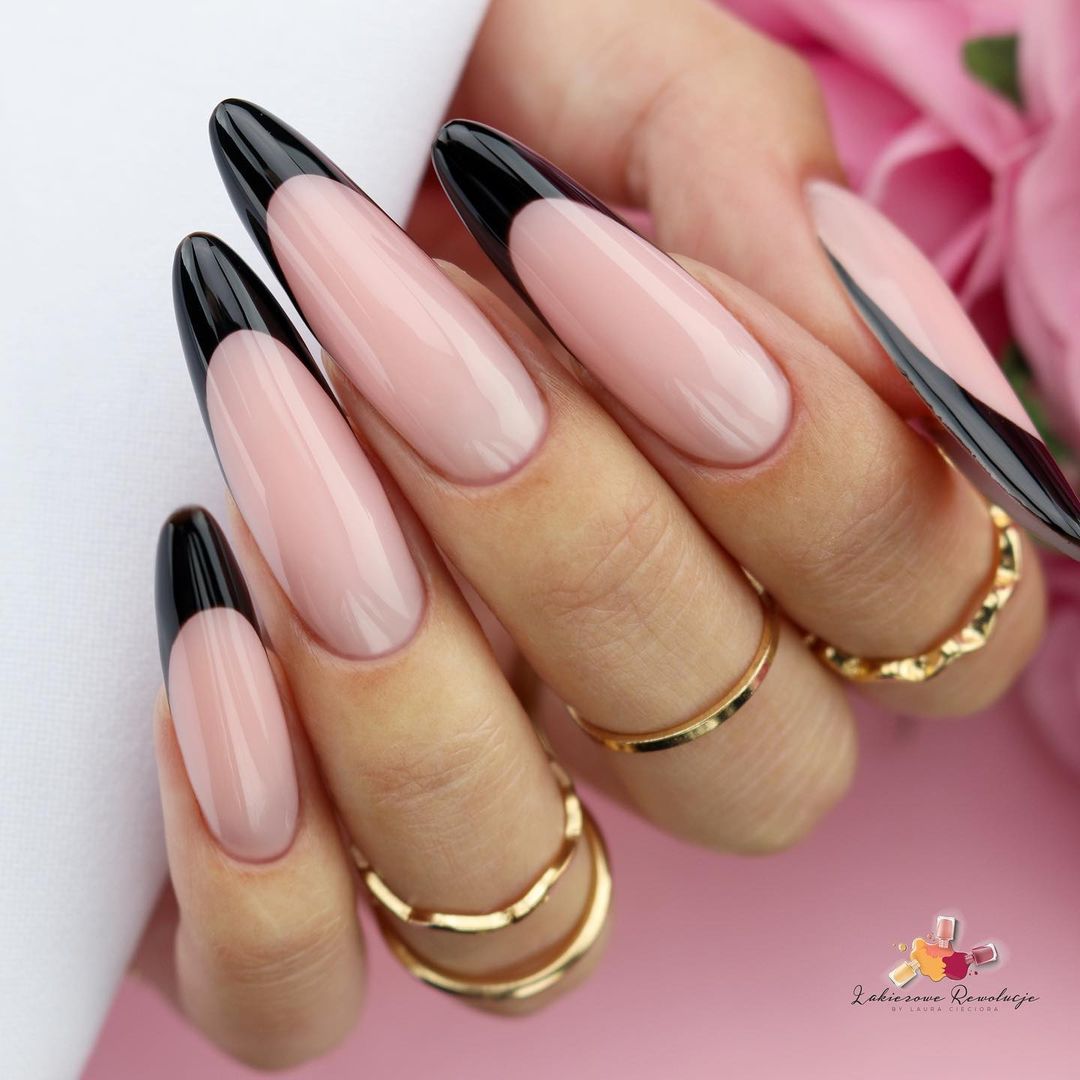
- Base coat: Orly Bonder Base Coat
- Nude polish: OPI “Samoan Sand”
- Black polish: Essie “Licorice”
- Top coat: Sally Hansen Miracle Gel Top Coat
Instructions:
- Apply the base coat to prepare your nails.
- Paint your nails with the nude polish and allow it to dry thoroughly.
- Use the black polish to create French tips, ensuring clean lines.
- Seal the design with a top coat for a glossy finish.
Save Pin
Bold Blue Glossy Nails
This bold design features a rich, glossy blue polish that is both striking and trendy. The vibrant color and high-shine finish make these nails a standout choice for the fall season. The short square shape keeps the look modern and manageable, perfect for those who want a stylish yet practical manicure.
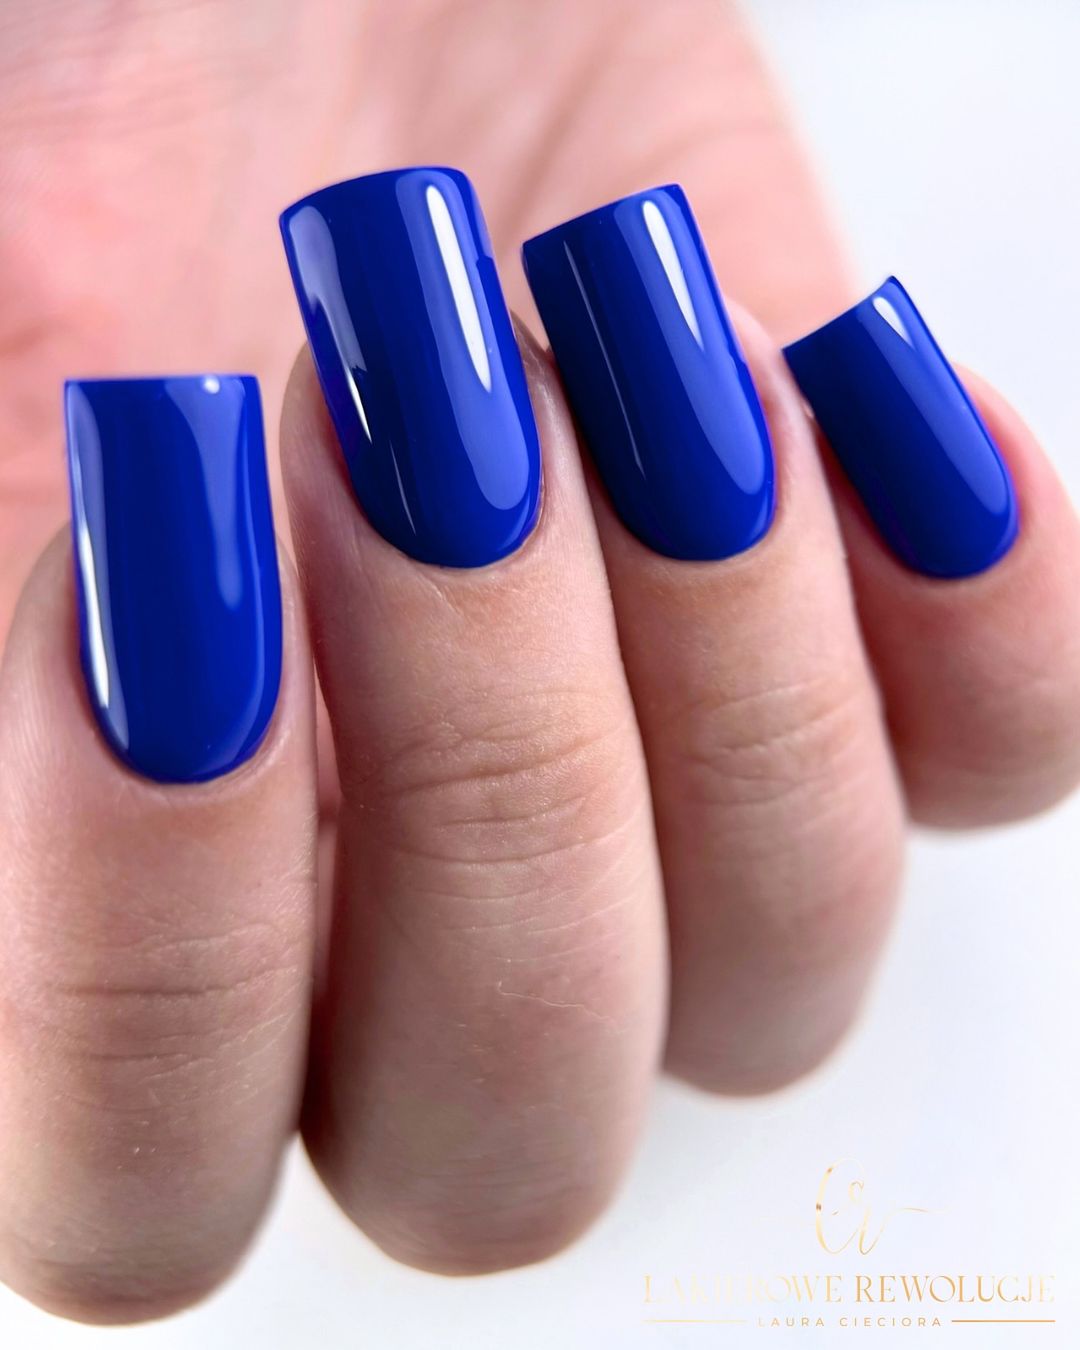
- Base coat: Deborah Lippmann Hard Rock Base and Top Coat
- Blue polish: OPI “Blue My Mind”
- Top coat: Seche Vite Dry Fast Top Coat
Instructions:
- Start with a base coat to protect your nails.
- Apply the blue polish, ensuring full coverage with two coats.
- Finish with a top coat to achieve a high-shine, glossy finish.
Soft Green Pastel Nails
This design features a soft green pastel polish that is both cute and understated, perfect for a simple yet elegant look. The short, rounded shape keeps the nails looking natural and neat, making this design ideal for everyday wear. The pastel green is a refreshing choice for fall, adding a touch of color without being overpowering.
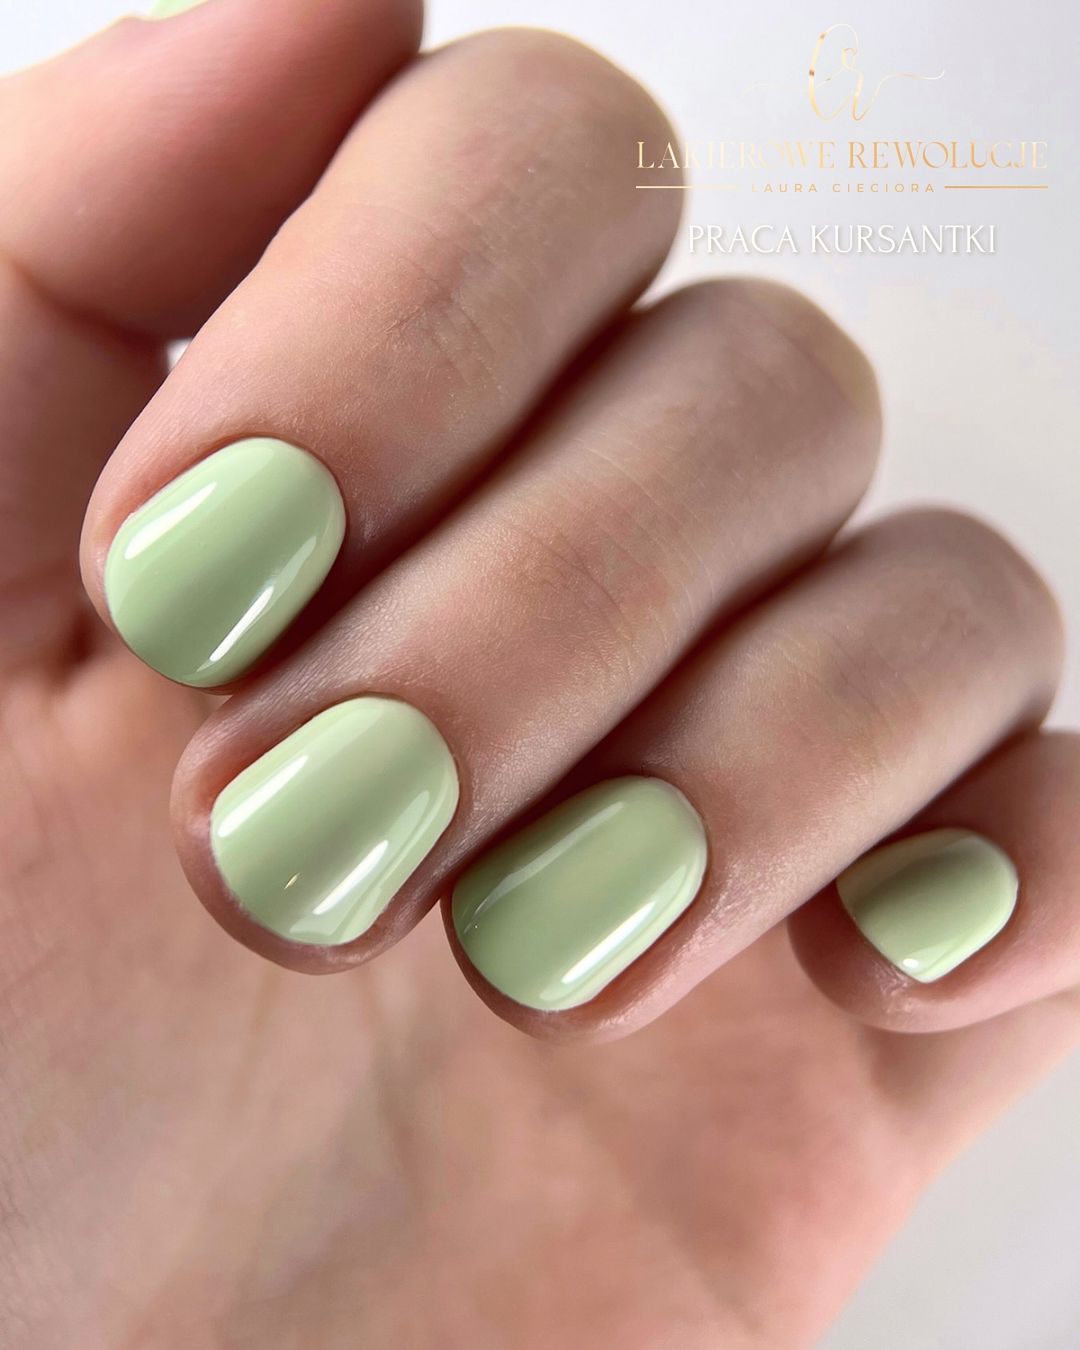
- Base coat: Essie All In One Base
- Green pastel polish: Essie “Mint Candy Apple”
- Top coat: Essie Gel Setter Top Coat
Instructions:
- Apply the base coat to prep your nails.
- Paint your nails with the green pastel polish, applying two coats for full opacity.
- Finish with a top coat to seal the design and add a glossy shine.
Gold Glitter French Tips
This elegant design features classic French tips adorned with gold glitter, adding a touch of sparkle to a timeless look. The nude base provides a clean canvas, allowing the gold glitter to shine and create a glamorous effect. The short, square shape makes this design practical and chic, perfect for both everyday wear and special occasions.
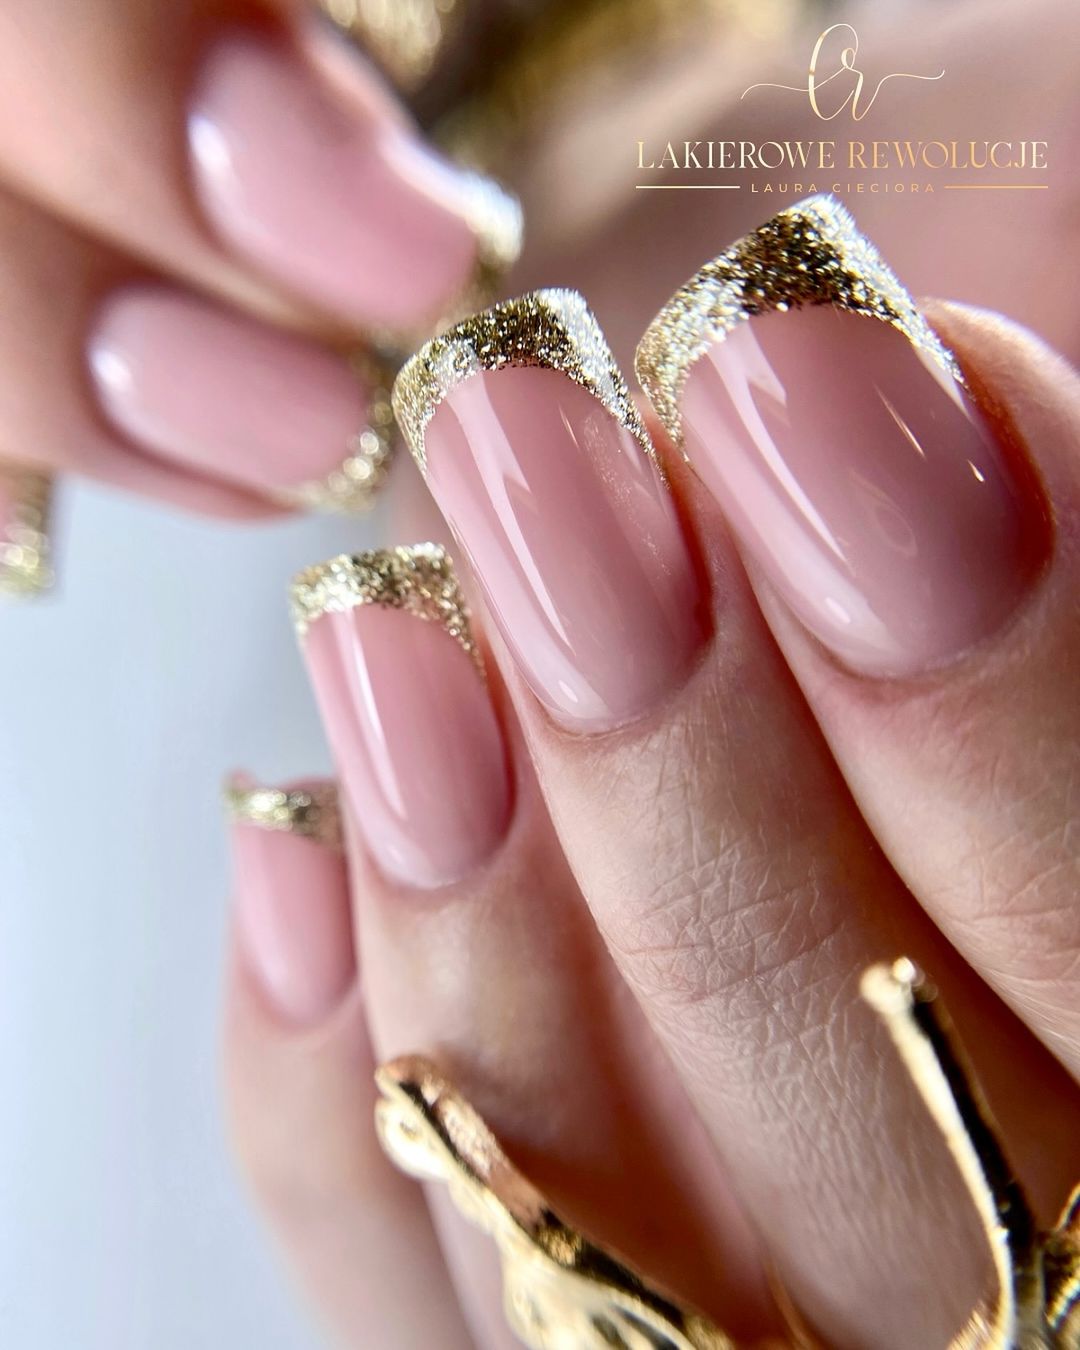
- Base coat: Zoya Anchor Base Coat
- Nude polish: Essie “Bare With Me”
- Gold glitter polish: China Glaze “Fairy Dust”
- Top coat: Seche Vite Dry Fast Top Coat
Instructions:
- Apply the base coat to protect your nails.
- Paint your nails with the nude polish and let it dry completely.
- Carefully apply the gold glitter polish to the tips, creating a French tip effect.
- Finish with a top coat to seal the design and add shine.
Deep Burgundy Elegance
This design features a deep burgundy polish that exudes elegance and sophistication. The rich, dark hue is perfect for autumn and complements a wide range of outfits and occasions. The glossy finish adds a luxurious touch, making your nails look polished and refined. The oval shape enhances the natural look, making this manicure both trendy and timeless.
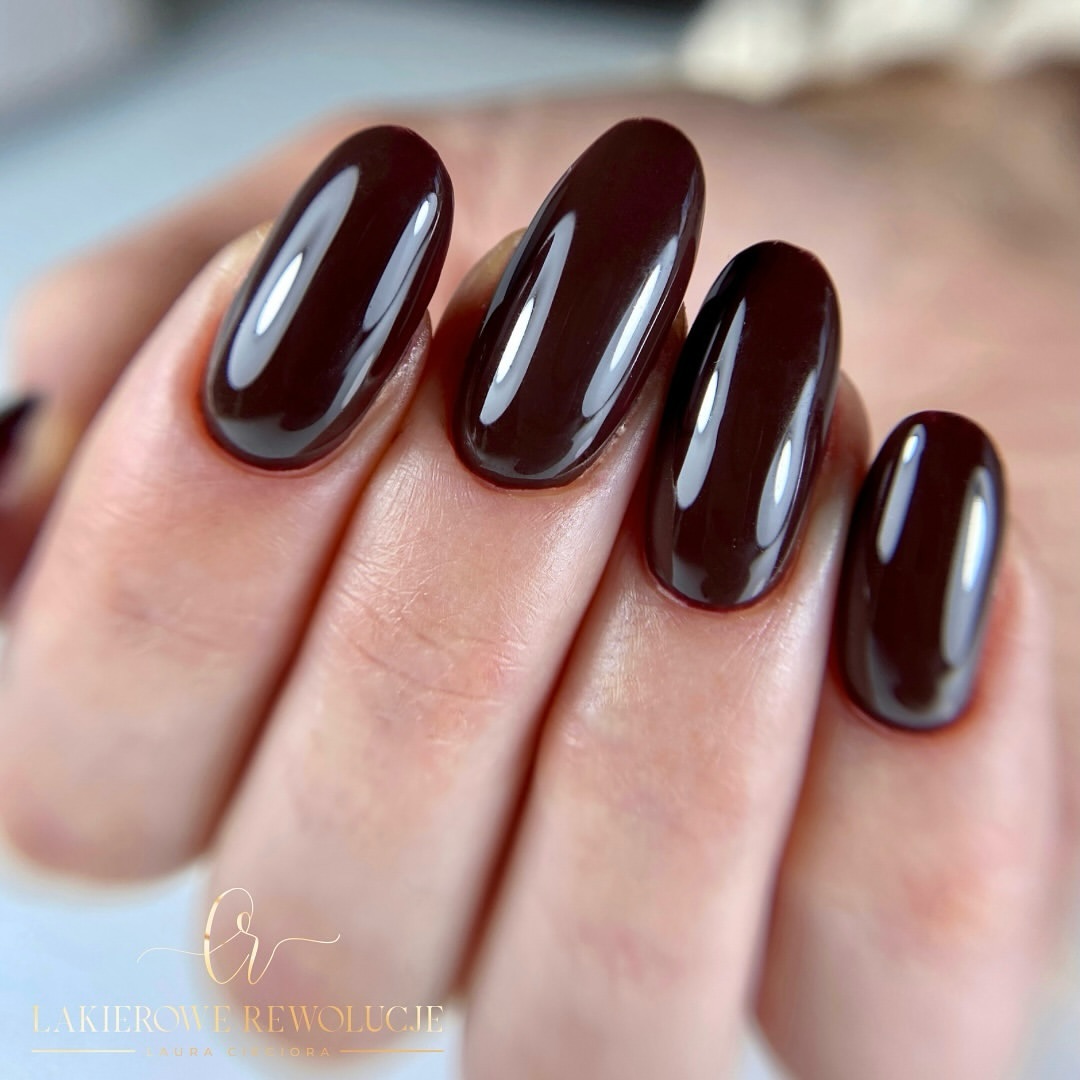
- Base coat: Orly Bonder Base Coat
- Burgundy polish: Essie “Bordeaux”
- Top coat: Sally Hansen Miracle Gel Top Coat
Instructions:
- Apply the base coat to protect your nails and ensure the polish adheres well.
- Paint your nails with the burgundy polish, applying two thin coats for an even finish.
- Seal with a top coat to add a glossy shine and prolong the wear of your manicure.
Neon Glitter French Tips
This striking design combines nude nails with neon glitter French tips, creating a bold and playful look. The neon tips are accented with glitter, adding a fun and vibrant touch that stands out. The stiletto shape adds drama and length to the nails, making this design perfect for those who love to make a statement.
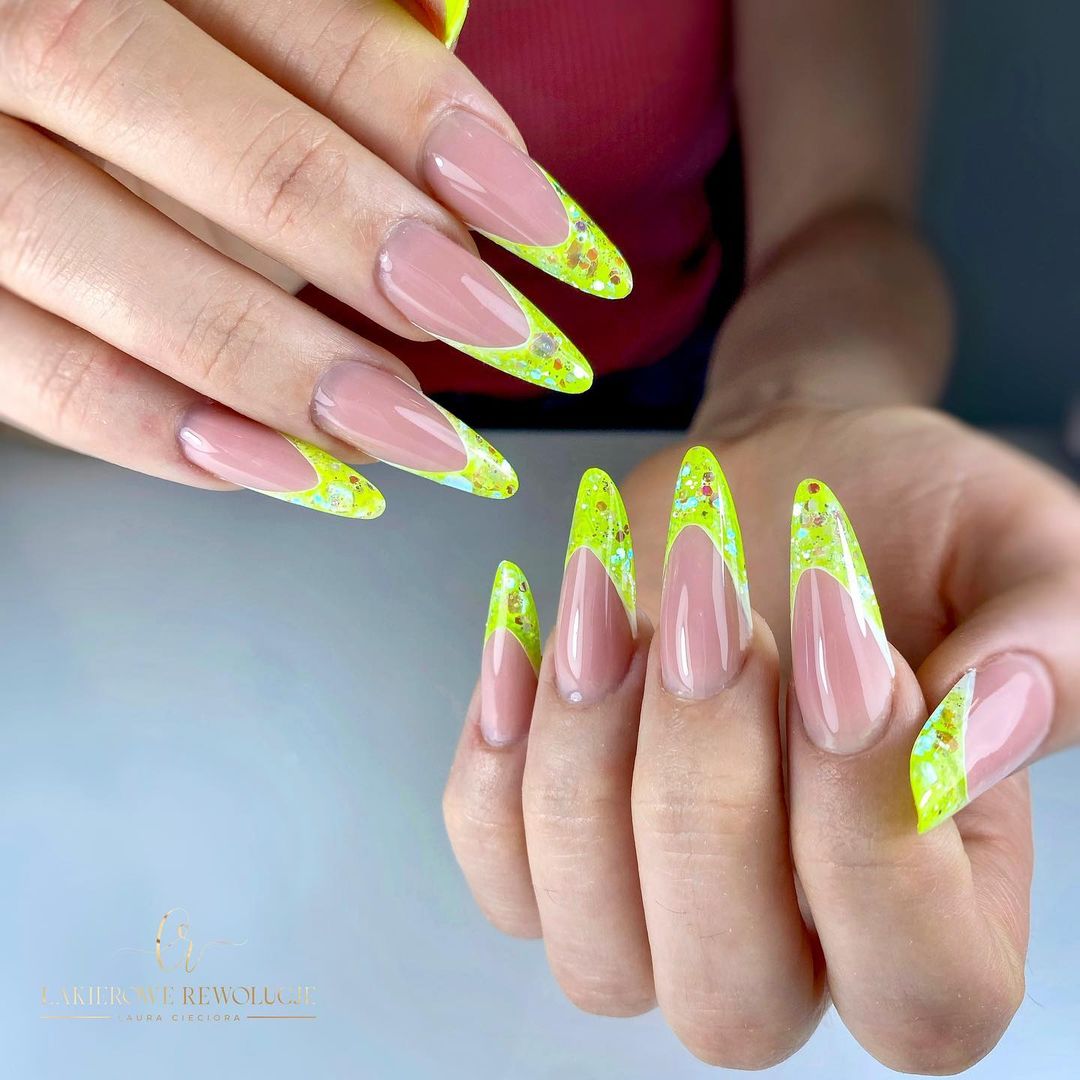
- Base coat: Deborah Lippmann Hard Rock Base and Top Coat
- Nude polish: OPI “Bubble Bath”
- Neon glitter polish: China Glaze “Lemon Fizz” with glitter top coat
- Top coat: Seche Vite Dry Fast Top Coat
Instructions:
- Start with a base coat to prepare your nails.
- Apply the nude polish as the base color and let it dry completely.
- Use the neon glitter polish to create French tips on each nail.
- Finish with a top coat to seal the design and add shine.
Autumn Orange Matte Nails
This autumn-inspired design features a vibrant orange matte polish with accent nails that include delicate white leaf patterns. The combination of matte and glossy finishes creates a visually appealing contrast. The addition of small rhinestones adds a touch of elegance and sparkle, making this design perfect for the fall season.
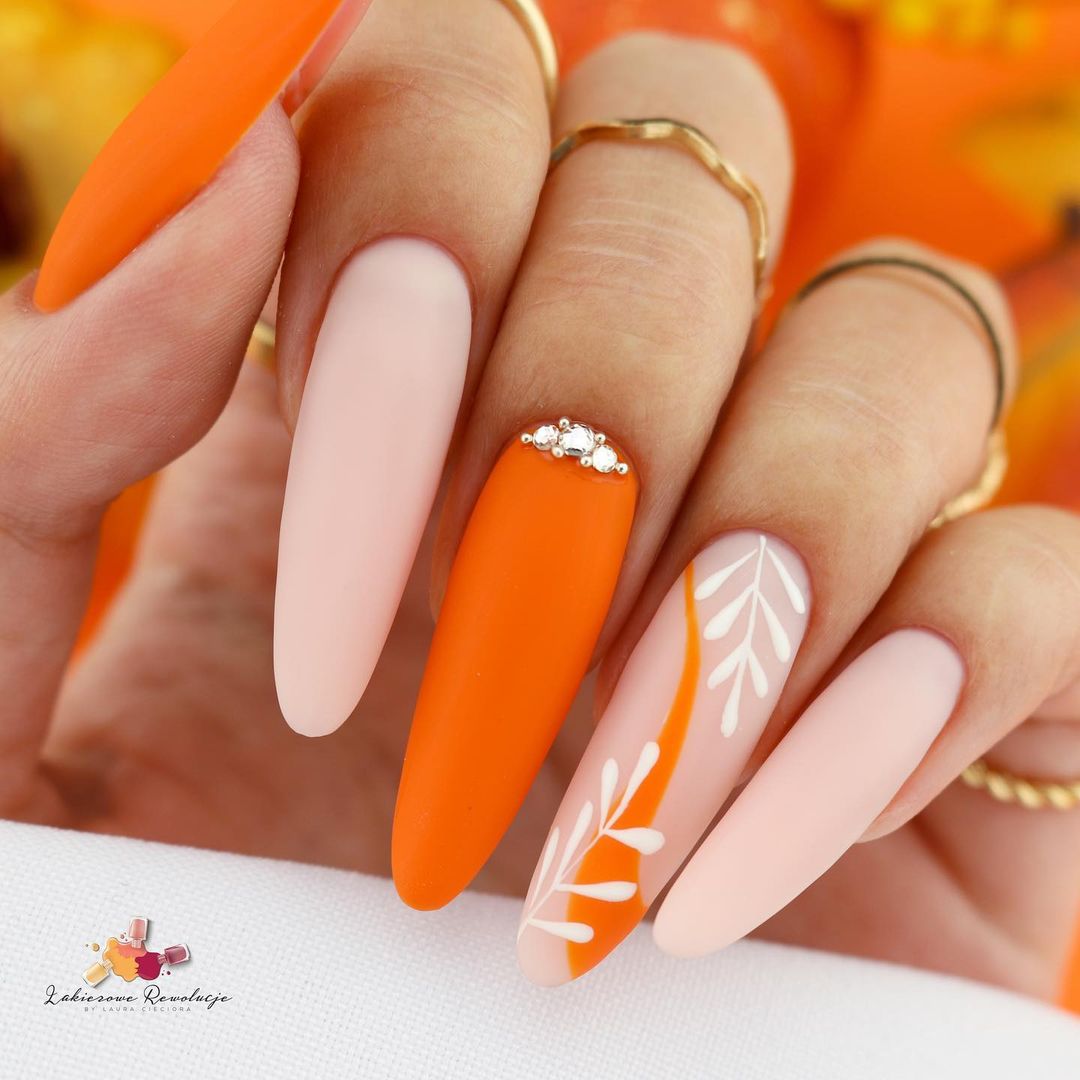
- Base coat: Essie All In One Base
- Matte orange polish: OPI “A Good Man-darin is Hard to Find”
- White polish: Essie “Blanc”
- Rhinestones: Swarovski Nail Crystals
- Top coat: Essie Matte About You
Instructions:
- Apply the base coat to protect your nails.
- Paint most of your nails with the matte orange polish.
- On the accent nails, use white polish to create leaf patterns.
- Add rhinestones near the cuticle with nail glue for added sparkle.
- Finish with a matte top coat to seal the design.
Spooky Ghost French Tips
This fun and festive design features black French tips with cute little ghost accents, perfect for Halloween. The nude base keeps the look chic and understated, while the ghost details add a playful and spooky touch. The long, almond shape enhances the overall elegance and makes this design stand out.
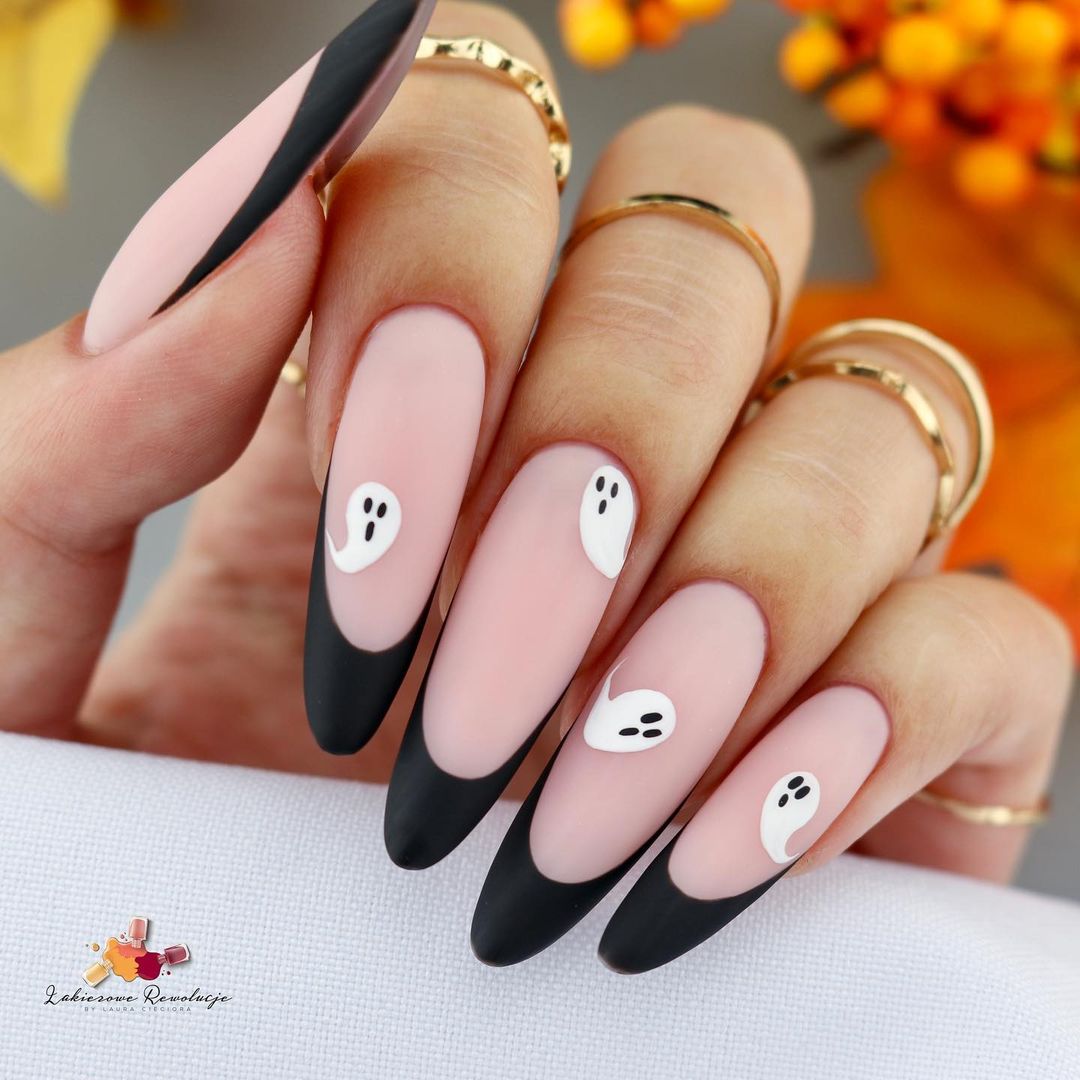
- Base coat: Zoya Anchor Base Coat
- Nude polish: OPI “Samoan Sand”
- Black polish: Essie “Licorice”
- White polish: Sally Hansen “White On”
- Top coat: Seche Vite Dry Fast Top Coat
Instructions:
- Apply the base coat to prep your nails.
- Paint your nails with the nude polish and let it dry.
- Create black French tips on each nail.
- Use white polish to paint small ghost shapes on the nails.
- Finish with a top coat to seal the design and add shine.
Pink Ombre with Spider Web
This spooky yet stylish design features a pink ombre base with a detailed spider web accent. The gradual transition from light to dark pink adds depth and dimension, while the spider web detail provides a Halloween touch. The long, almond shape makes the nails look elegant and elongates the fingers.
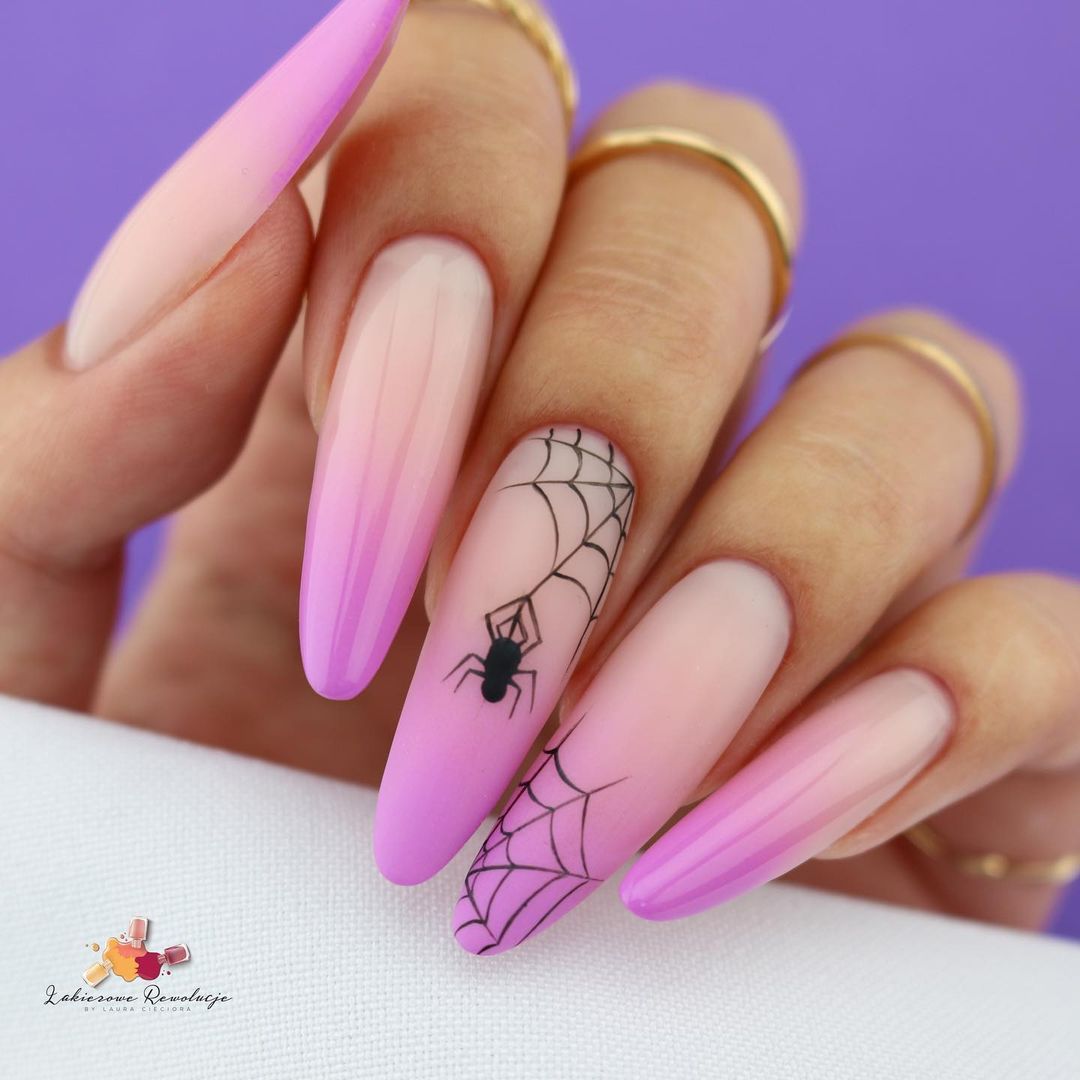
- Base coat: Orly Bonder Base Coat
- Light pink polish: Essie “Fiji”
- Dark pink polish: OPI “Pink Flamenco”
- Black polish: Essie “Licorice”
- Nail art brush: Winstonia Nail Art Brush Set
- Top coat: Essie Gel Couture Top Coat
Instructions:
- Apply the base coat to protect your nails.
- Create a pink ombre effect by blending the light and dark pink polishes with a sponge.
- Use a nail art brush to paint the spider web detail with black polish.
- Finish with a top coat to seal the design.
Bright Orange with Leaf Accents
This vibrant autumn design features bright orange nails with a delicate leaf pattern on the accent nail. The combination of bold color and intricate detail creates a stunning contrast that is perfect for the fall season. The long, stiletto shape adds drama and sophistication to the look.
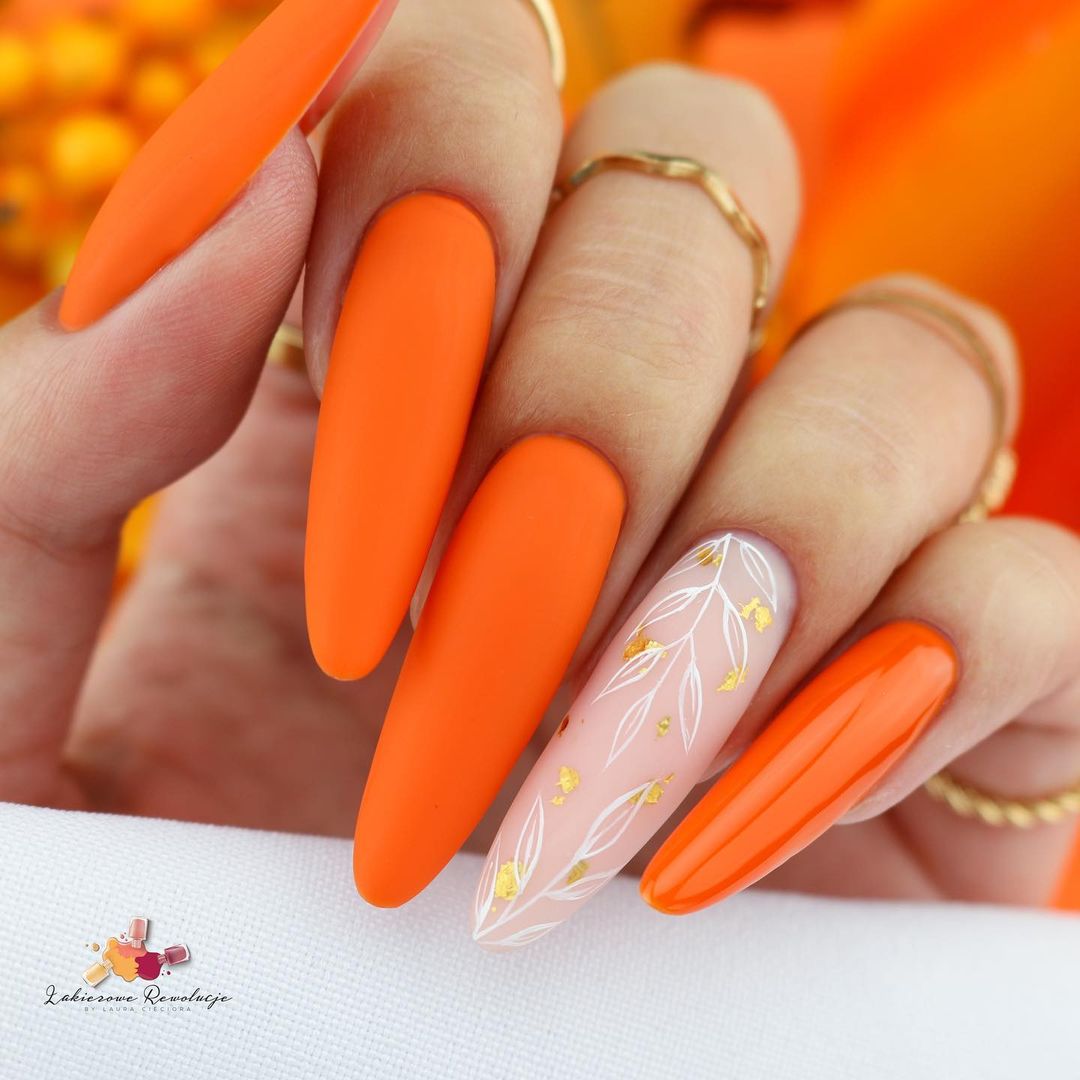
- Base coat: Essie Strong Start Base Coat
- Orange polish: OPI “A Good Man-darin is Hard to Find”
- White polish: Essie “Blanc”
- Gold foil: Transfer Foil from Born Pretty Store
- Top coat: Sally Hansen Miracle Gel Top Coat
Instructions:
- Apply the base coat to prep your nails.
- Paint most of your nails with the orange polish.
- On the accent nail, use white polish to create leaf patterns and add gold foil for extra detail.
- Finish with a top coat to seal the design and add shine.
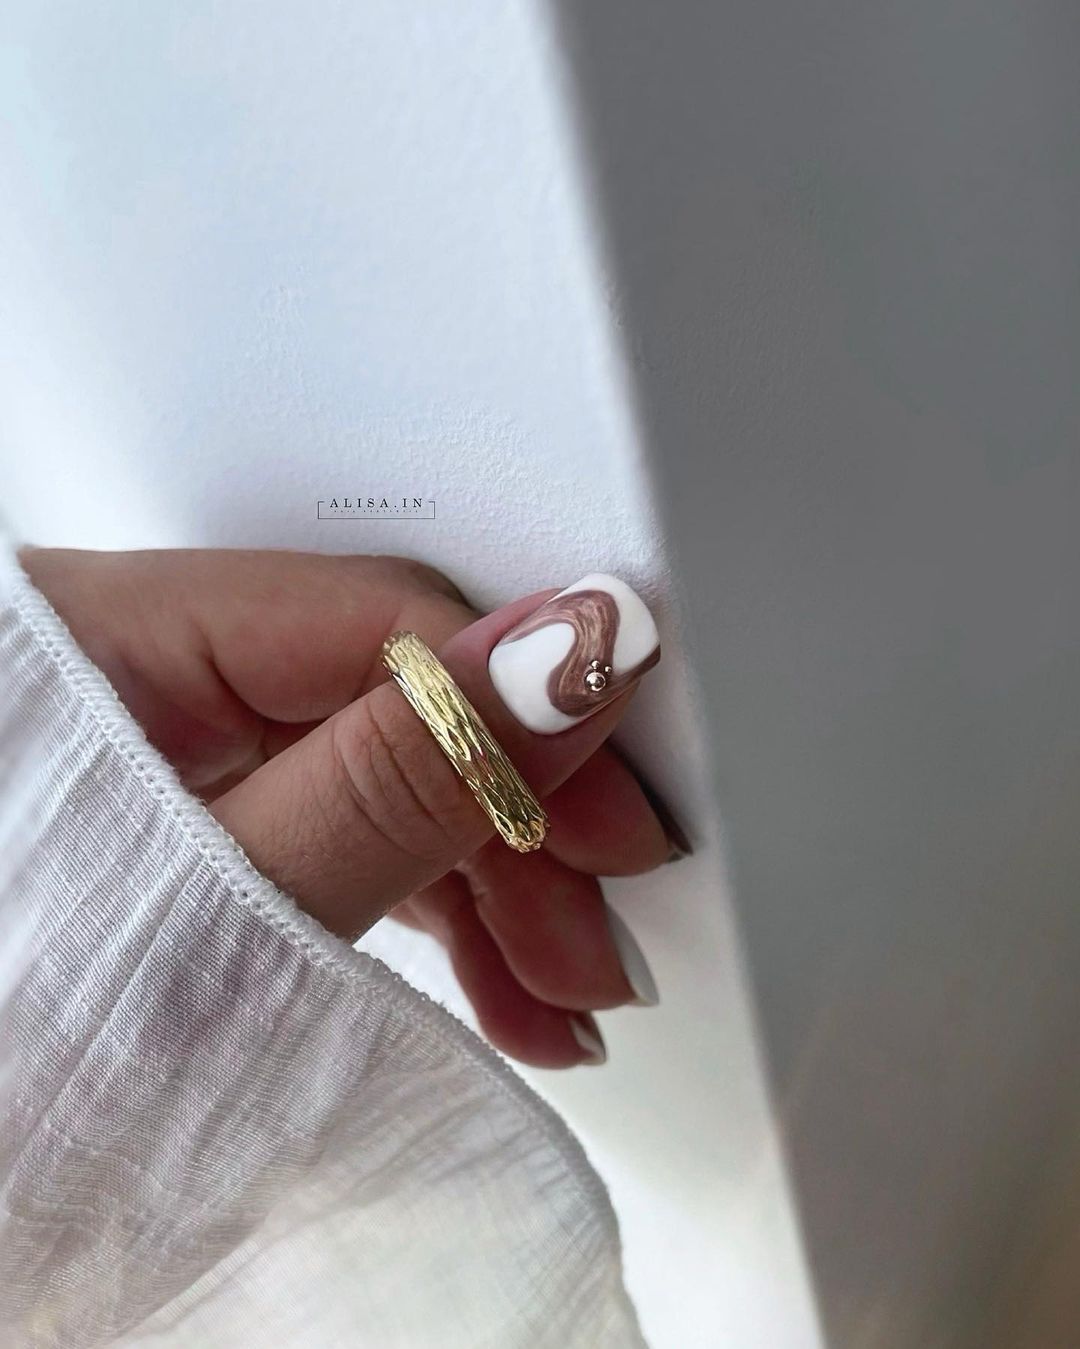
Nude and Brown Swirls
This design features a beautiful combination of nude and brown swirls, creating an elegant and sophisticated look. The varying shades of brown and nude seamlessly blend into each other, giving the nails a fluid and artistic appearance. The almond shape adds to the overall graceful look, making these nails perfect for any occasion.
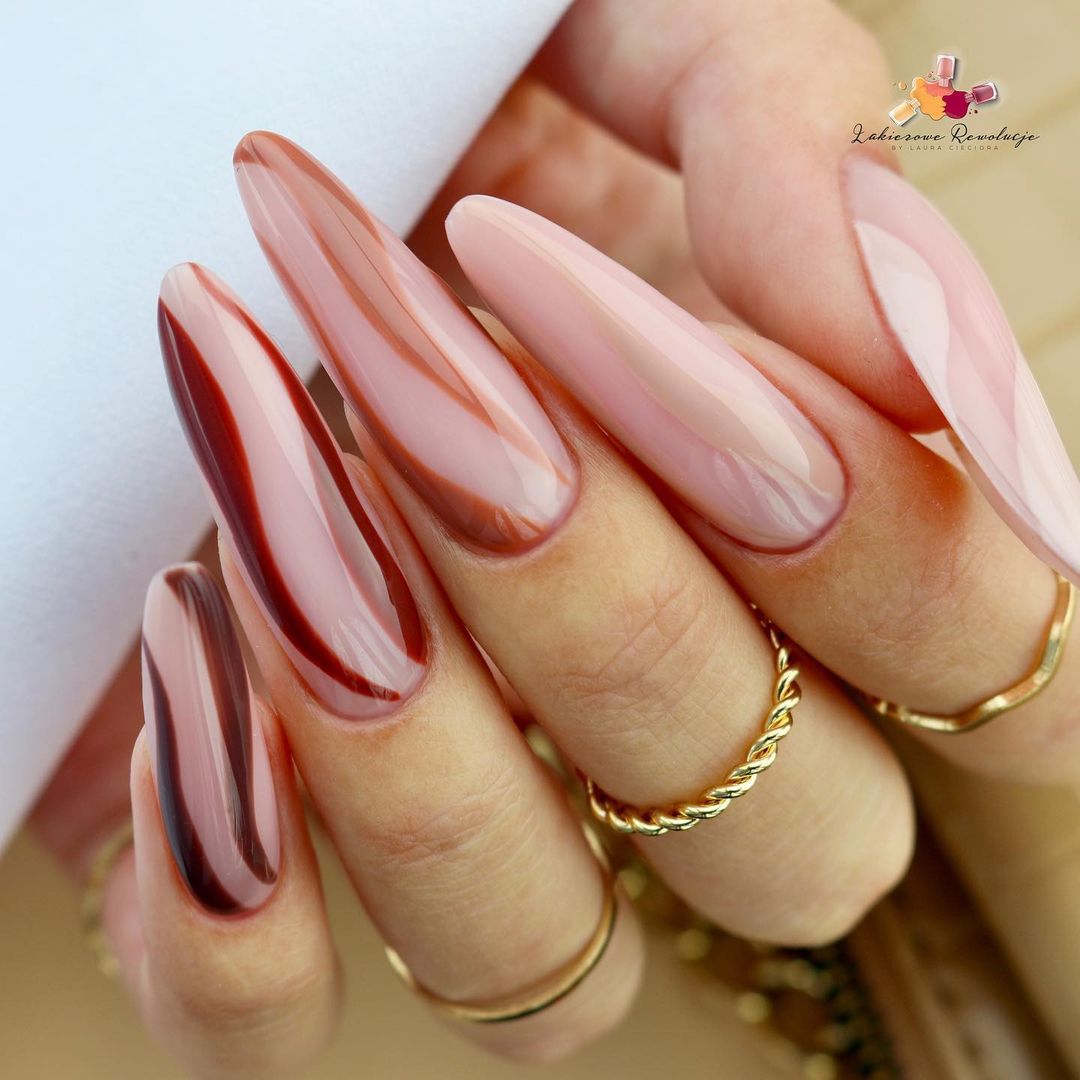
- Base coat: Orly Bonder Base Coat
- Nude polish: OPI “Be There in a Prosecco”
- Brown polish: Essie “Partner in Crime”
- Nail art brush: Winstonia Nail Art Brush Set
- Top coat: Sally Hansen Miracle Gel Top Coat
Instructions:
- Apply the base coat to protect your nails.
- Paint your nails with the nude polish and let it dry.
- Use the brown polish and a nail art brush to create swirls on each nail, blending the colors together.
- Finish with a top coat to seal the design and add shine.
Fuchsia and Gold Leaf
This striking design combines bold fuchsia nails with accent nails featuring gold leaf and black botanical patterns. The vibrant fuchsia color is eye-catching, while the gold leaf adds a touch of luxury. The black botanical accents bring an element of nature into the design, making these nails a perfect mix of bold and elegant.
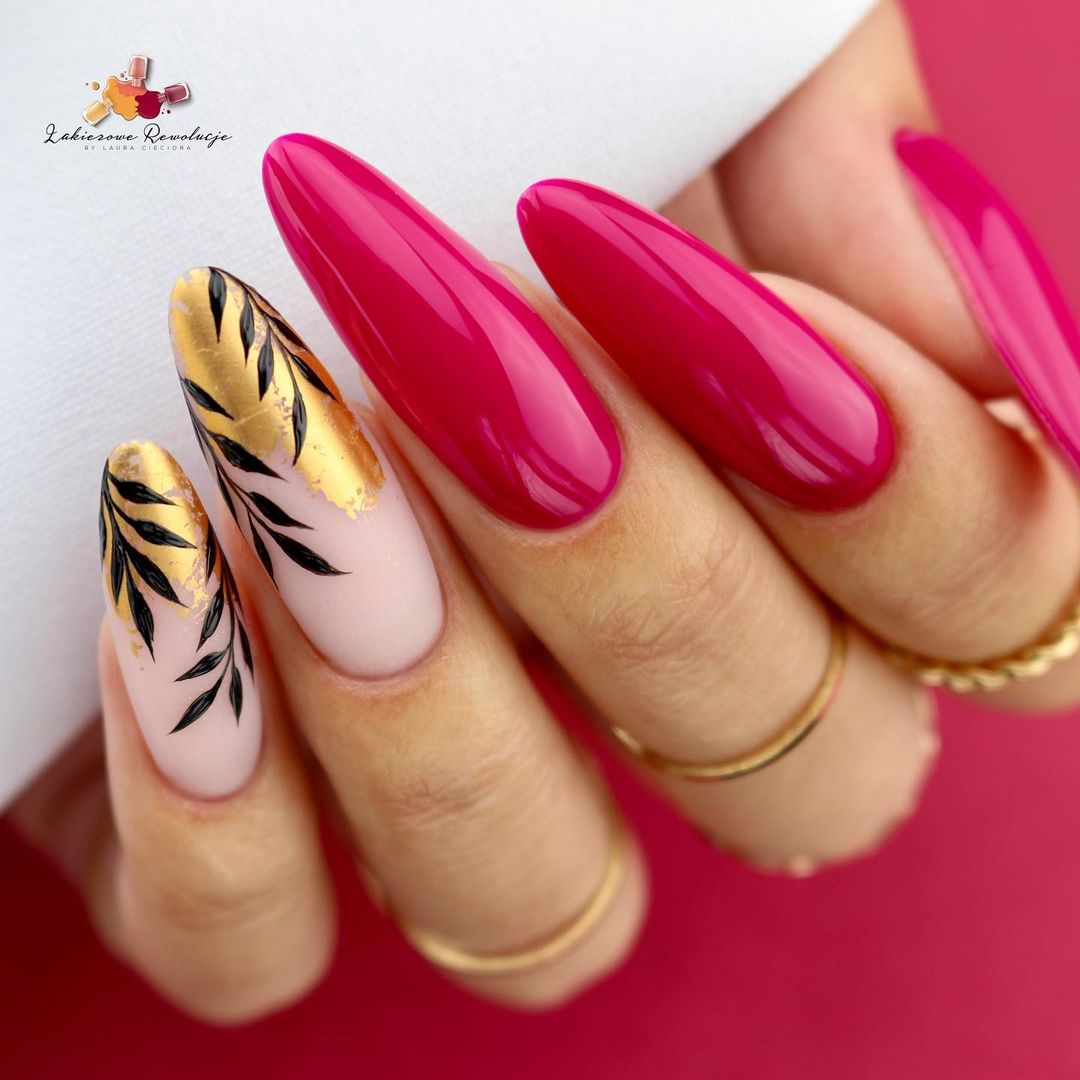
- Base coat: Essie Strong Start Base Coat
- Fuchsia polish: OPI “Pompeii Purple”
- Nude polish: OPI “Samoan Sand”
- Gold leaf: Whats Up Nails Foil Decals
- Black polish: Essie “Licorice”
- Top coat: Seche Vite Dry Fast Top Coat
Instructions:
- Apply the base coat to protect your nails.
- Paint most of your nails with the fuchsia polish.
- On the accent nails, use nude polish as the base, then apply gold leaf and paint black botanical patterns over it.
- Finish with a top coat to seal the design and add a glossy shine.
Red and Black Zebra Stripes
This bold and edgy design features red nails with black zebra stripes. The matte finish adds a modern twist to the classic animal print, making these nails a standout choice for those who love a daring look. The long, stiletto shape enhances the dramatic effect, perfect for making a statement.
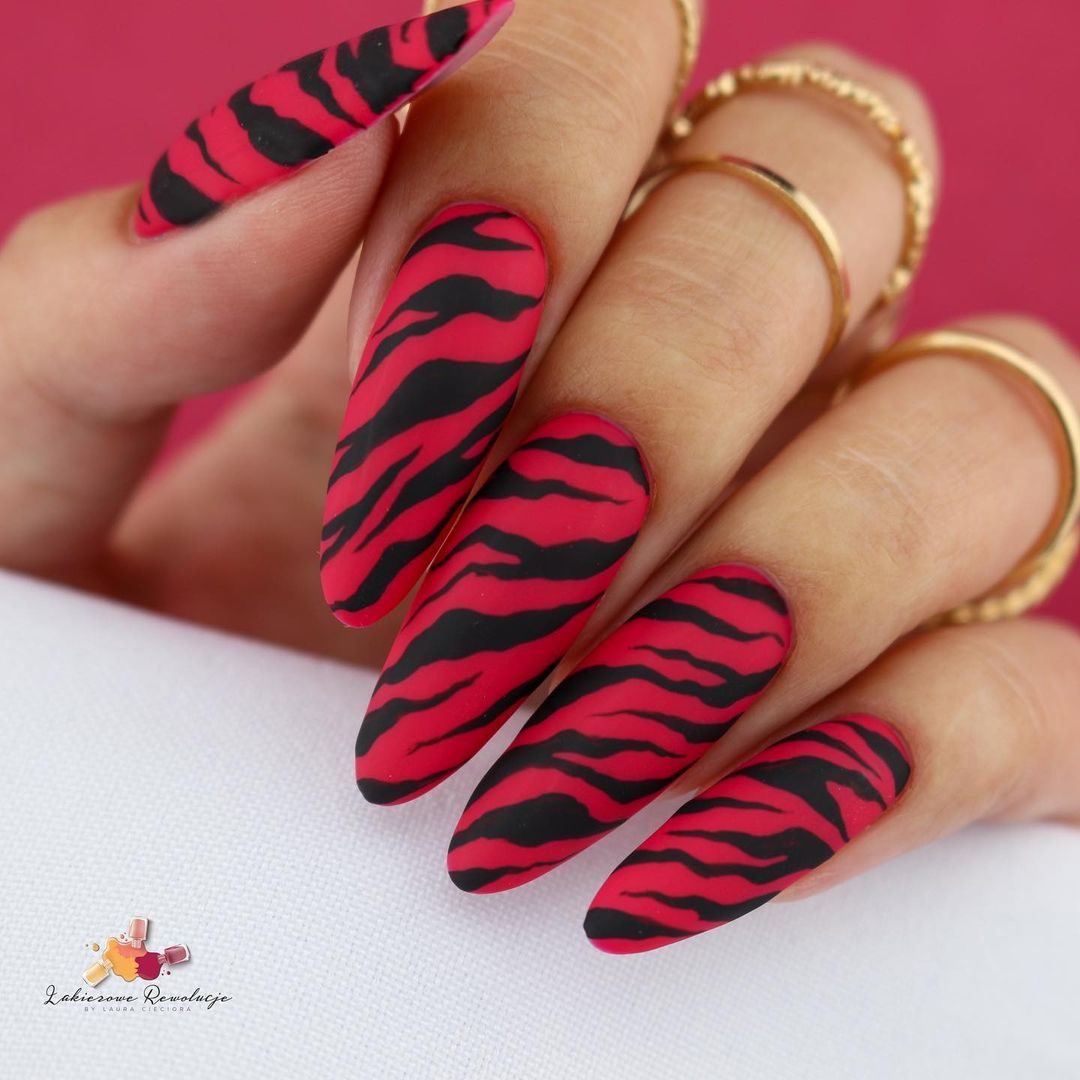
- Base coat: Deborah Lippmann Hard Rock Base and Top Coat
- Red polish: Essie “A-List”
- Black polish: Essie “Licorice”
- Matte top coat: OPI Matte Top Coat
- Nail art brush: Winstonia Nail Art Brush Set
Instructions:
- Apply the base coat to prep your nails.
- Paint your nails with the red polish and let it dry.
- Use the black polish and a nail art brush to create zebra stripes on each nail.
- Finish with a matte top coat to achieve the desired effect.
Sunset Ombre with Leaves
This vibrant design captures the essence of a sunset with its ombre effect transitioning from orange to pink. The delicate black leaf patterns add an artistic touch, while the gold foil accents provide a hint of luxury. The long, almond shape makes this design perfect for those who love to stand out.
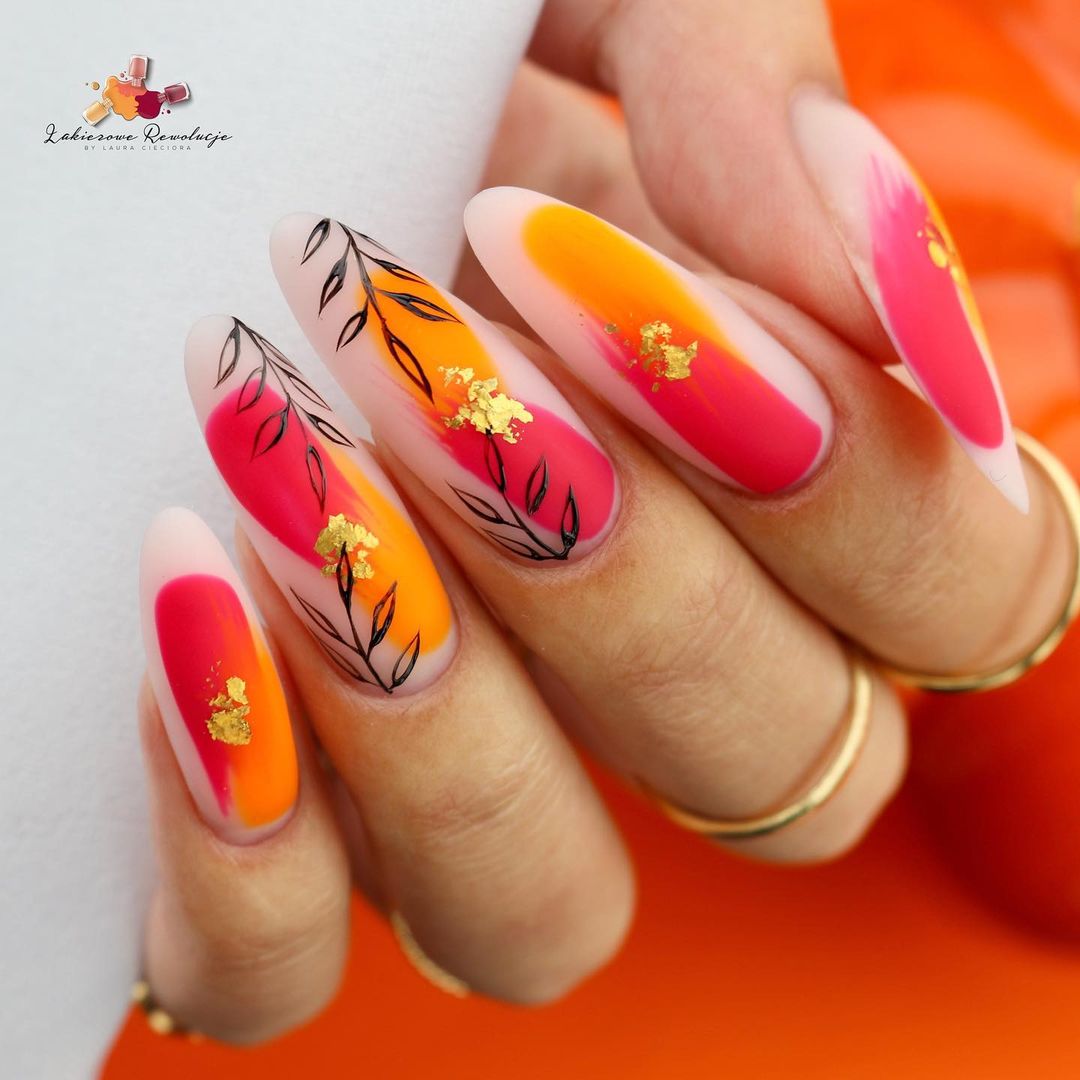
- Base coat: Orly Bonder Base Coat
- Orange polish: OPI “A Good Man-darin is Hard to Find”
- Pink polish: Essie “Mod Square”
- Black polish: Essie “Licorice”
- Gold foil: Transfer Foil from Born Pretty Store
- Nail art brush: Winstonia Nail Art Brush Set
- Top coat: Sally Hansen Miracle Gel Top Coat
Instructions:
- Apply the base coat to protect your nails.
- Create the ombre effect by blending the orange and pink polishes with a sponge.
- Use a nail art brush to paint the black leaf patterns and add gold foil accents.
- Finish with a top coat to seal the design.
Abstract Swirls
This artistic design features abstract swirls in various earthy tones, creating a unique and eye-catching look. The mix of colors and the fluid patterns give the nails a marbled effect, perfect for those who appreciate creative nail art. The rounded shape adds to the overall organic feel of the design.
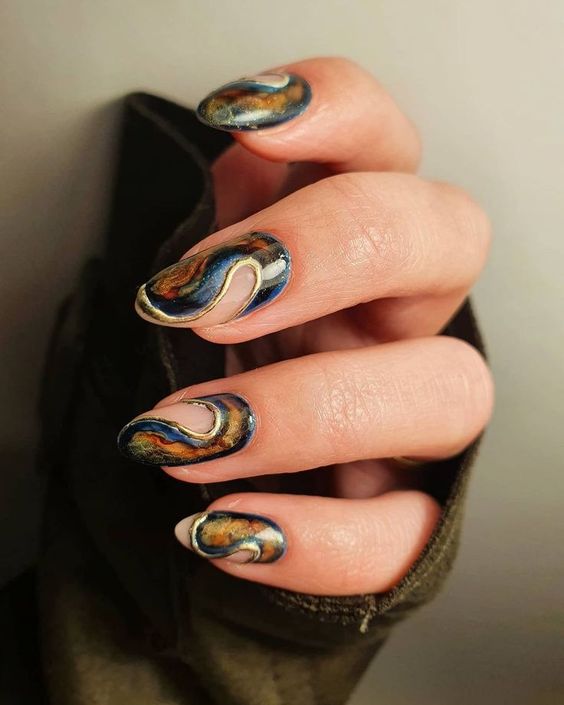
- Base coat: Zoya Anchor Base Coat
- Various polishes: Essie “Mink Muffs”, OPI “Lincoln Park After Dark”, China Glaze “Concrete Catwalk”
- Nail art brush: Winstonia Nail Art Brush Set
- Top coat: Seche Vite Dry Fast Top Coat
Instructions:
- Apply the base coat to protect your nails.
- Use the various polishes to create swirls and patterns on each nail, blending the colors together.
- Finish with a top coat to seal the design and add shine.
Neutral Browns with Leaf Accent
This sophisticated design features a range of neutral brown tones with an accent nail showcasing delicate black leaves. The combination of the glossy brown shades and the intricate leaf pattern creates a chic and elegant look. The long, square shape adds a modern touch, making this design perfect for any occasion.
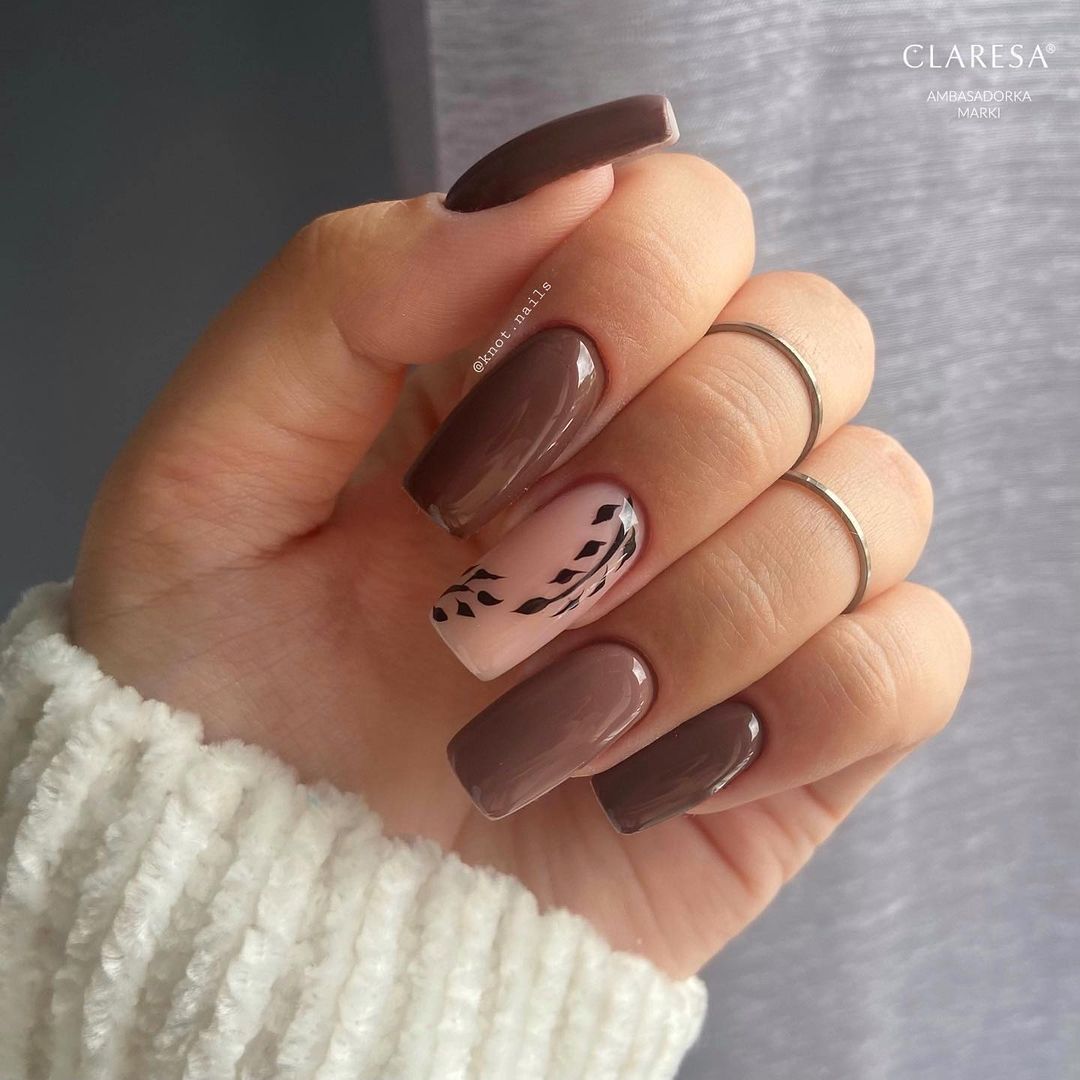
- Base coat: Essie All In One Base
- Various brown polishes: OPI “You Don’t Know Jacques!”, Essie “Glamour Purse”
- Black polish: Essie “Licorice”
- Nail art brush: Winstonia Nail Art Brush Set
- Top coat: Sally Hansen Miracle Gel Top Coat
Instructions:
- Apply the base coat to prep your nails.
- Paint your nails with the different brown polishes, using a different shade on each nail.
- On the accent nail, paint delicate black leaves using a nail art brush.
- Finish with a top coat to seal the design and add shine.
Bold Blue with Gold Accents
This stunning design features a vibrant blue base with striking black botanical patterns and gold foil accents. The combination of blue and gold creates a luxurious and eye-catching look, perfect for making a statement. The almond shape enhances the elegance of the design, making these nails a standout choice for any occasion.
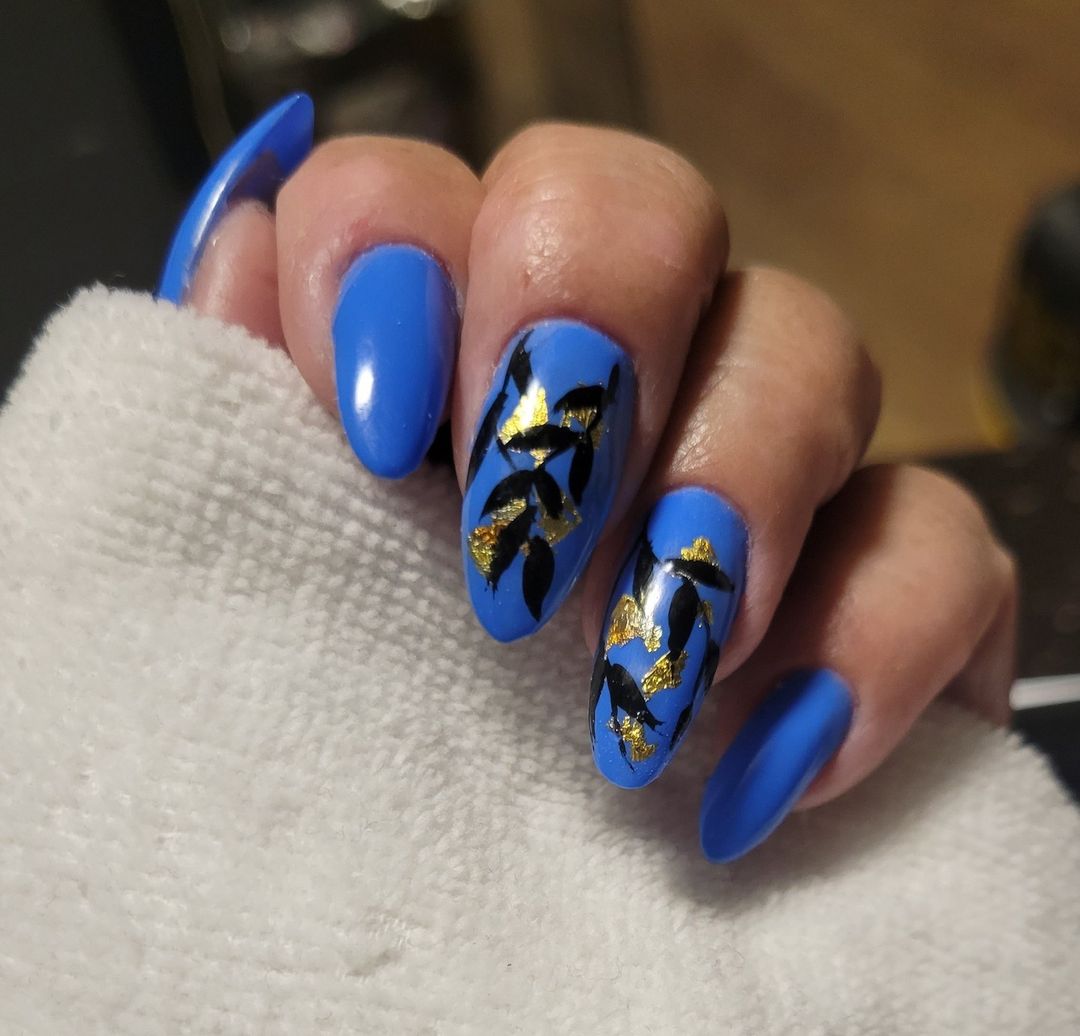
- Base coat: Orly Bonder Base Coat
- Blue polish: OPI “My Pal Joey”
- Black polish: Essie “Licorice”
- Gold foil: Whats Up Nails Foil Decals
- Nail art brush: Winstonia Nail Art Brush Set
- Top coat: Seche Vite Dry Fast Top Coat
Instructions:
- Apply the base coat to protect your nails.
- Paint your nails with the blue polish and let it dry.
- Use the black polish and a nail art brush to create botanical patterns on the accent nails.
- Add gold foil accents for a luxurious touch.
- Finish with a top coat to seal the design and add shine.
Rich Brown and Glitter
This design combines rich brown polish with glitter accents, creating a chic and elegant look. The contrast between the glossy brown and the sparkling glitter adds depth and dimension to the nails. The short square shape keeps the design modern and practical, perfect for everyday wear.
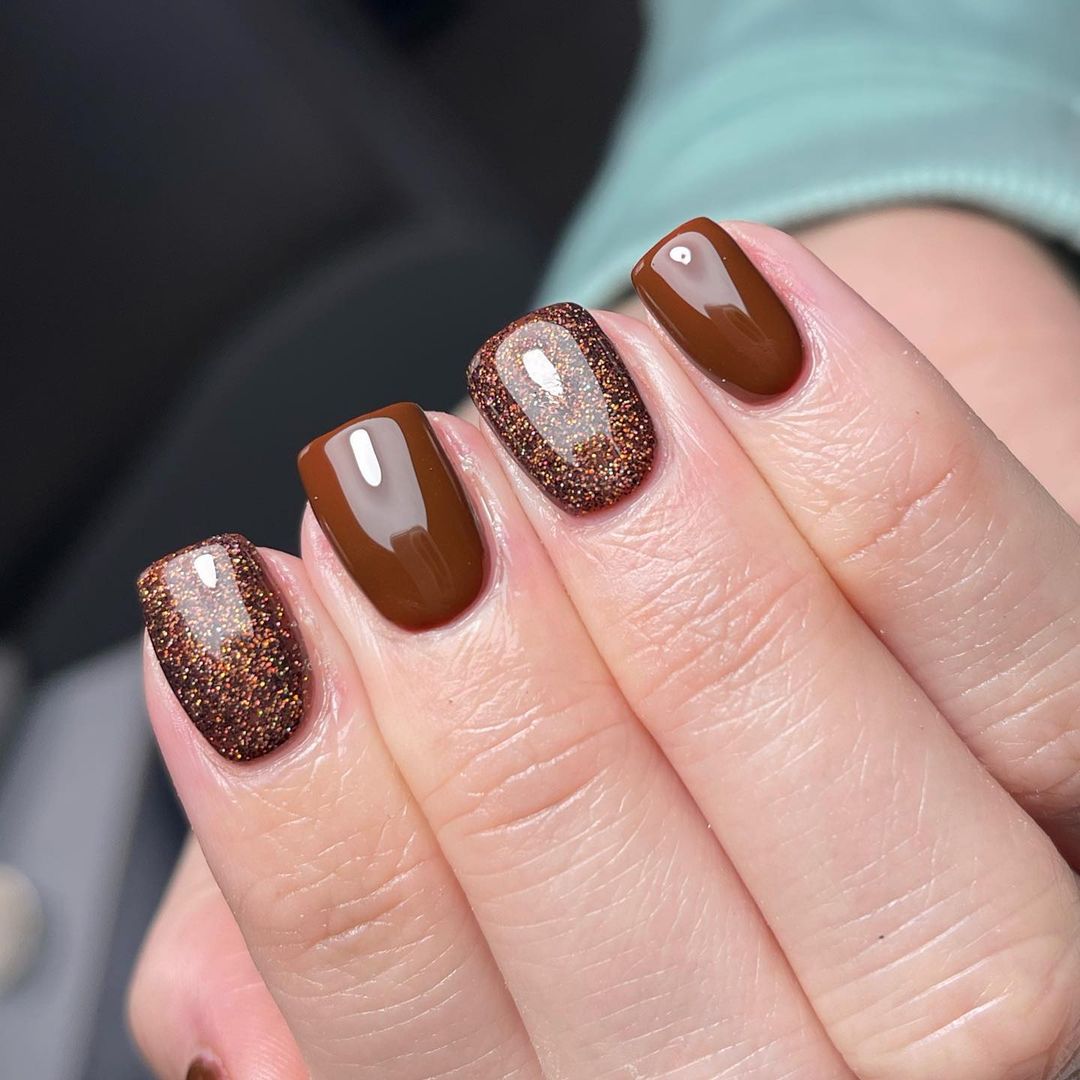
- Base coat: Essie All In One Base
- Brown polish: OPI “Chocolate Moose”
- Brown glitter polish: China Glaze “Mahogany Magic”
- Top coat: Sally Hansen Miracle Gel Top Coat
Instructions:
- Apply the base coat to protect your nails.
- Paint your nails with the brown polish, applying two coats for full coverage.
- On the accent nails, apply the brown glitter polish for a touch of sparkle.
- Finish with a top coat to seal the design and add a glossy finish.
Coral and Floral Elegance
This elegant design features a coral base with accent nails showcasing delicate black and white floral patterns. The combination of coral and floral accents creates a fresh and sophisticated look, perfect for spring and summer. The long almond shape adds to the elegance, making these nails ideal for special occasions.
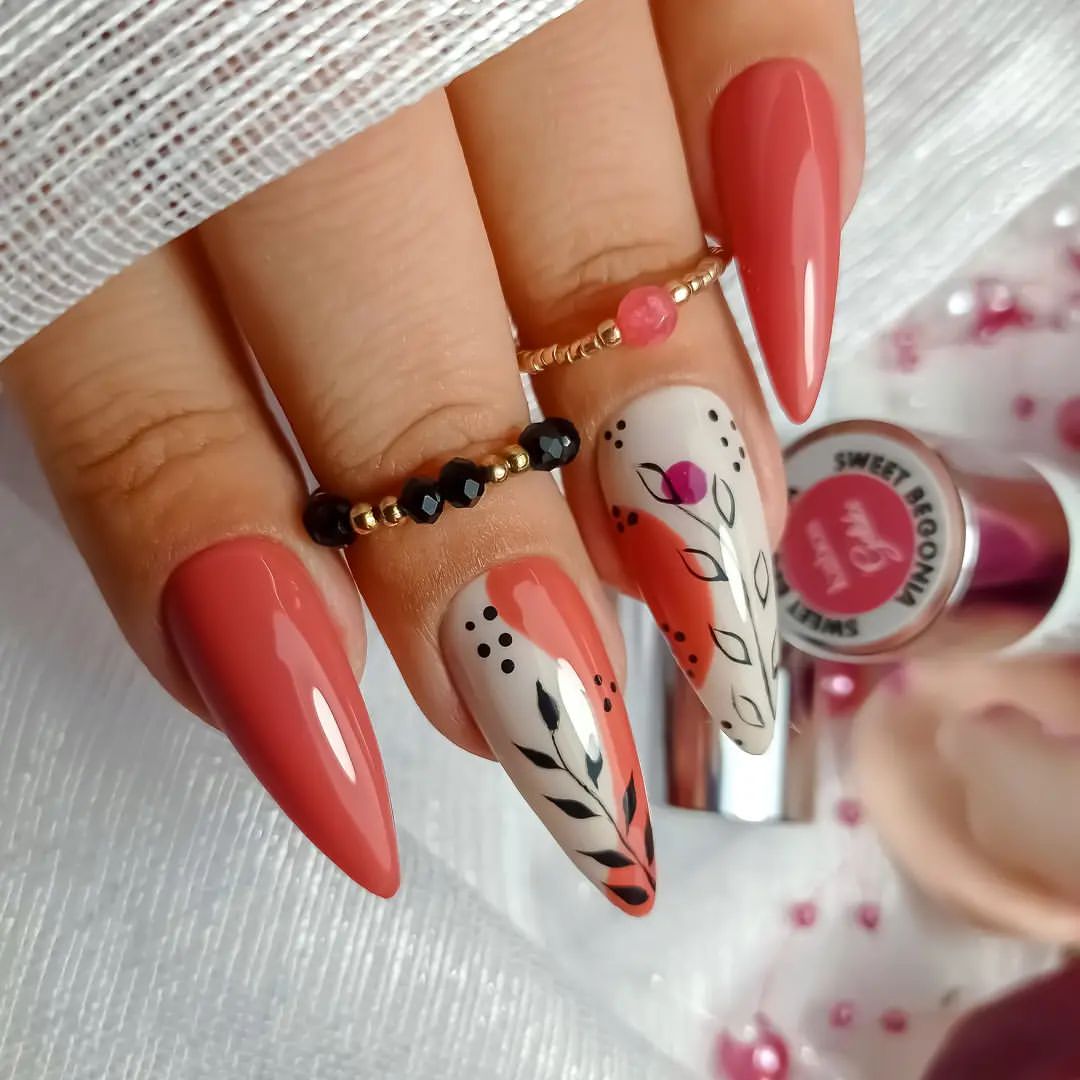
- Base coat: Orly Bonder Base Coat
- Coral polish: Essie “Cute As A Button”
- White polish: OPI “Alpine Snow”
- Black polish: Essie “Licorice”
- Nail art brush: Winstonia Nail Art Brush Set
- Top coat: Essie Gel Couture Top Coat
Instructions:
- Apply the base coat to protect your nails.
- Paint most of your nails with the coral polish and let it dry.
- On the accent nails, use white and black polish to create delicate floral patterns.
- Finish with a top coat to seal the design and add shine.
FAQ
Q: How can I make my manicure last longer? A: Use a good quality base and top coat, and apply thin layers of polish to prevent chipping.
Q: What are some popular fall nail shapes? A: Popular shapes include almond, square, stiletto, and coffin.
Q: Can I create these designs with gel polish? A: Absolutely! Gel polish will give you a longer-lasting finish and more vibrant colors.
These fall nail designs are not only stylish but also easy to recreate at home. Whether you’re a fan of bold patterns or prefer classic elegance, there’s a design here for everyone. So grab your polishes and get creative this autumn!
Save Pin