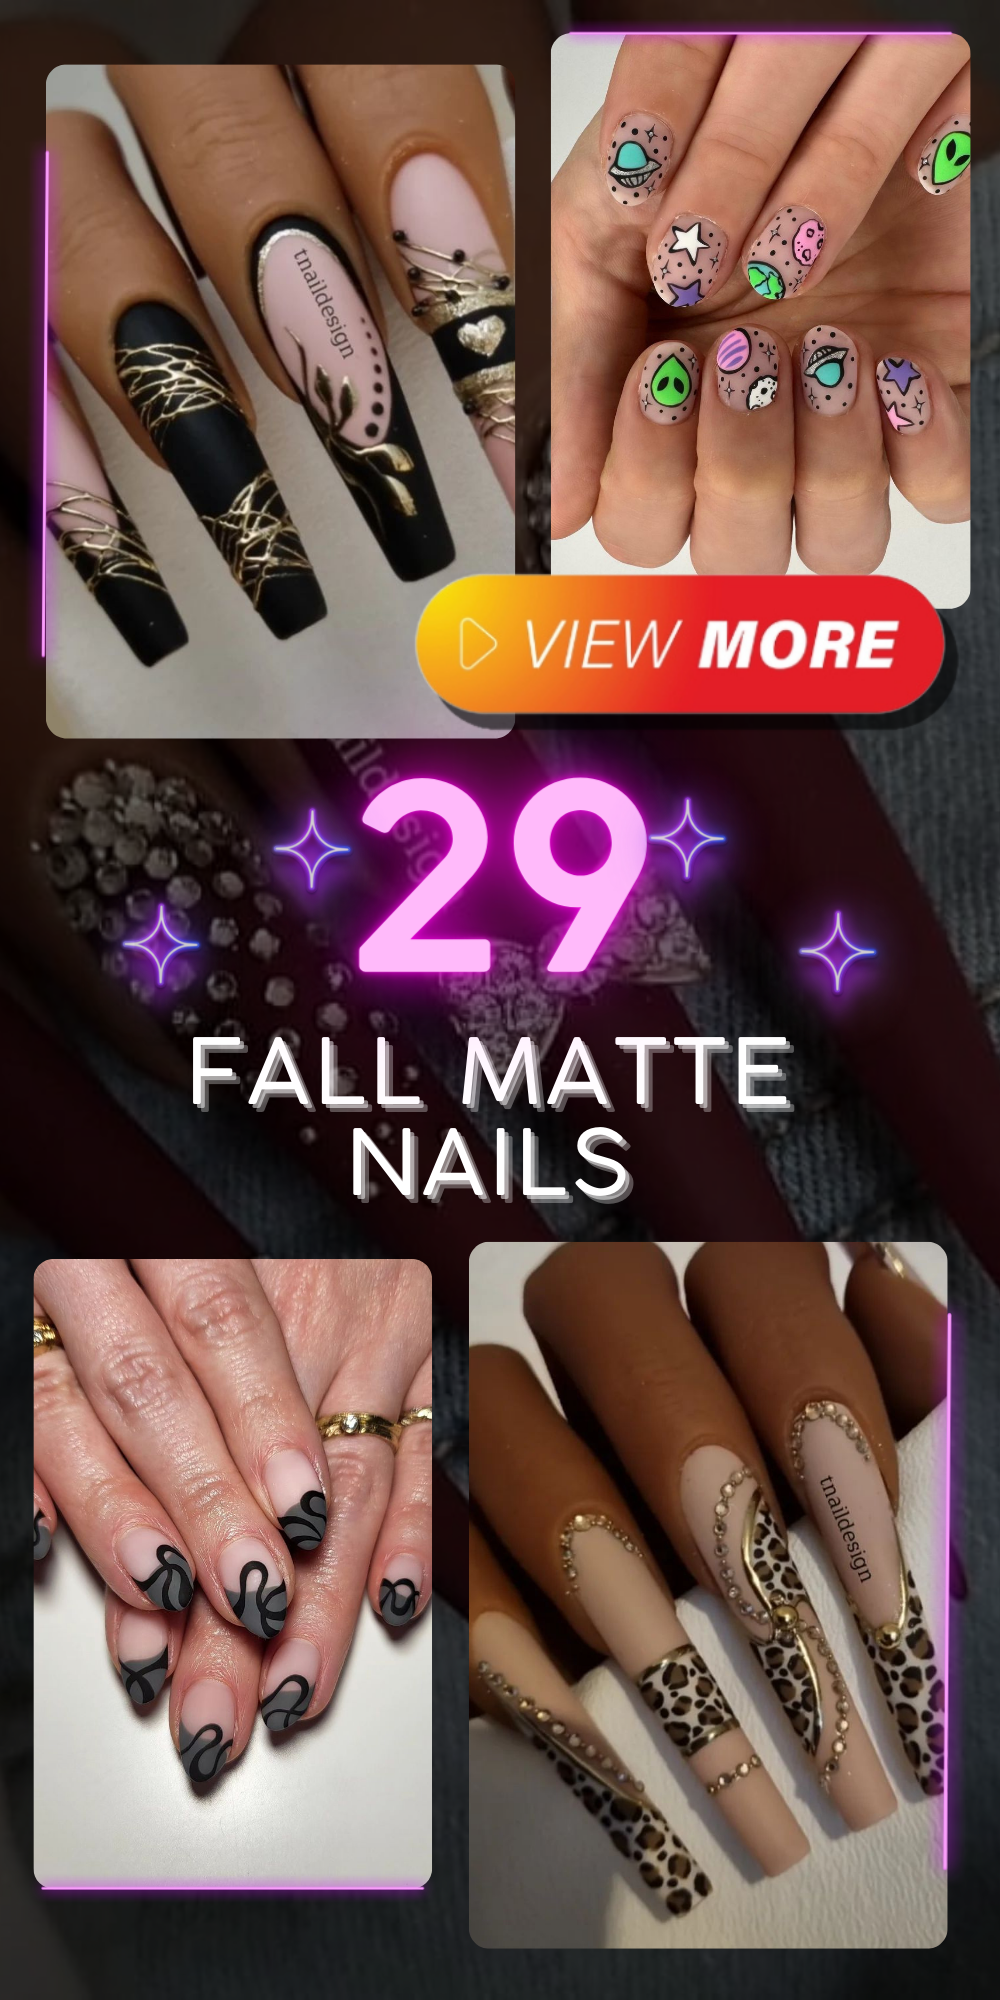
Fall is here, and with it comes a fresh wave of nail trends that are perfect for the autumn season. From fall matte nails to intricate designs, there’s something for everyone. In this guide, we’ll explore some of the best autumn nail ideas, giving you detailed descriptions, consumable lists, and step-by-step instructions for recreating these looks at home. Let’s dive into the chic world of fall matte nails.
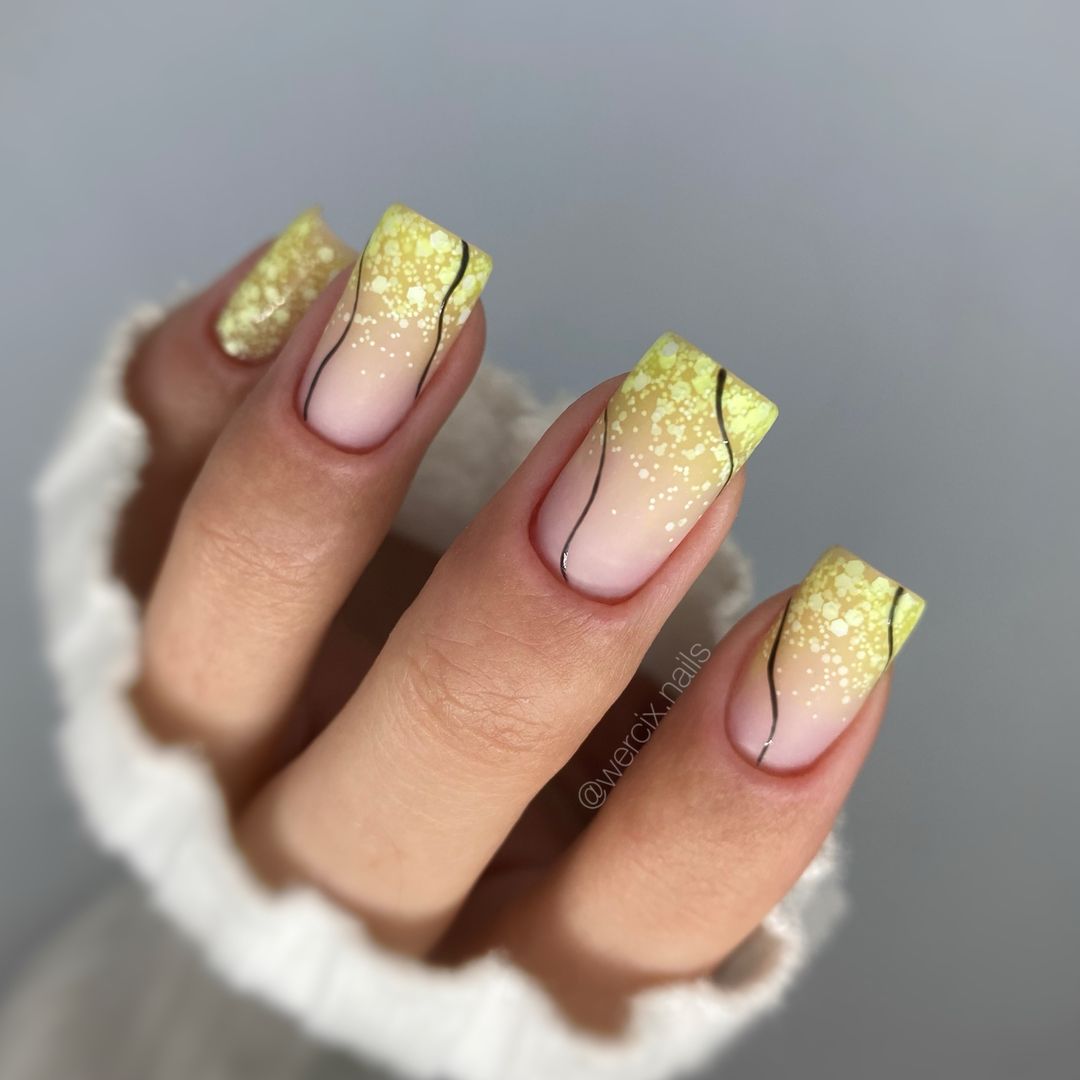
Fresh Lemonade Delight
When it comes to autumn nails, fall matte nails don’t have to be dull. This delightful design is like a refreshing glass of lemonade on a crisp fall day. The soft gradient from a milky white base to a fresh yellow tip, accentuated by delicate black lines, creates a look that is both elegant and eye-catching. This design is perfect for those who want to add a splash of color to their fall matte nails without going overboard.
-
- Milky white nail polish (OPI Alpine Snow)
- Yellow nail polish (Essie ‘Sunshine State of Mind’)
- Black nail art pen (Sally Hansen I Heart Nail Art Pen in Black)
- Matte top coat (Zoya Matte Velvet Top Coat)
Professional Tip: Start with a base coat to protect your nails. Apply the milky white polish, let it dry, and then carefully sponge the yellow polish onto the tips. Use the black nail art pen to draw the delicate lines, and finish with a matte top coat.
At-Home Instructions
- Prep Your Nails: Clean and shape your nails, pushing back cuticles.
- Apply Base Coat: This protects your nails and ensures longevity.
- Base Color: Apply two coats of milky white polish, allowing each layer to dry completely.
- Gradient Effect: Using a makeup sponge, dab the yellow polish onto the tips of your nails. Blend carefully for a smooth transition.
- Detailing: Use the black nail art pen to draw thin lines for added detail.
- Finish: Seal your design with a matte top coat to achieve that perfect matte finish.
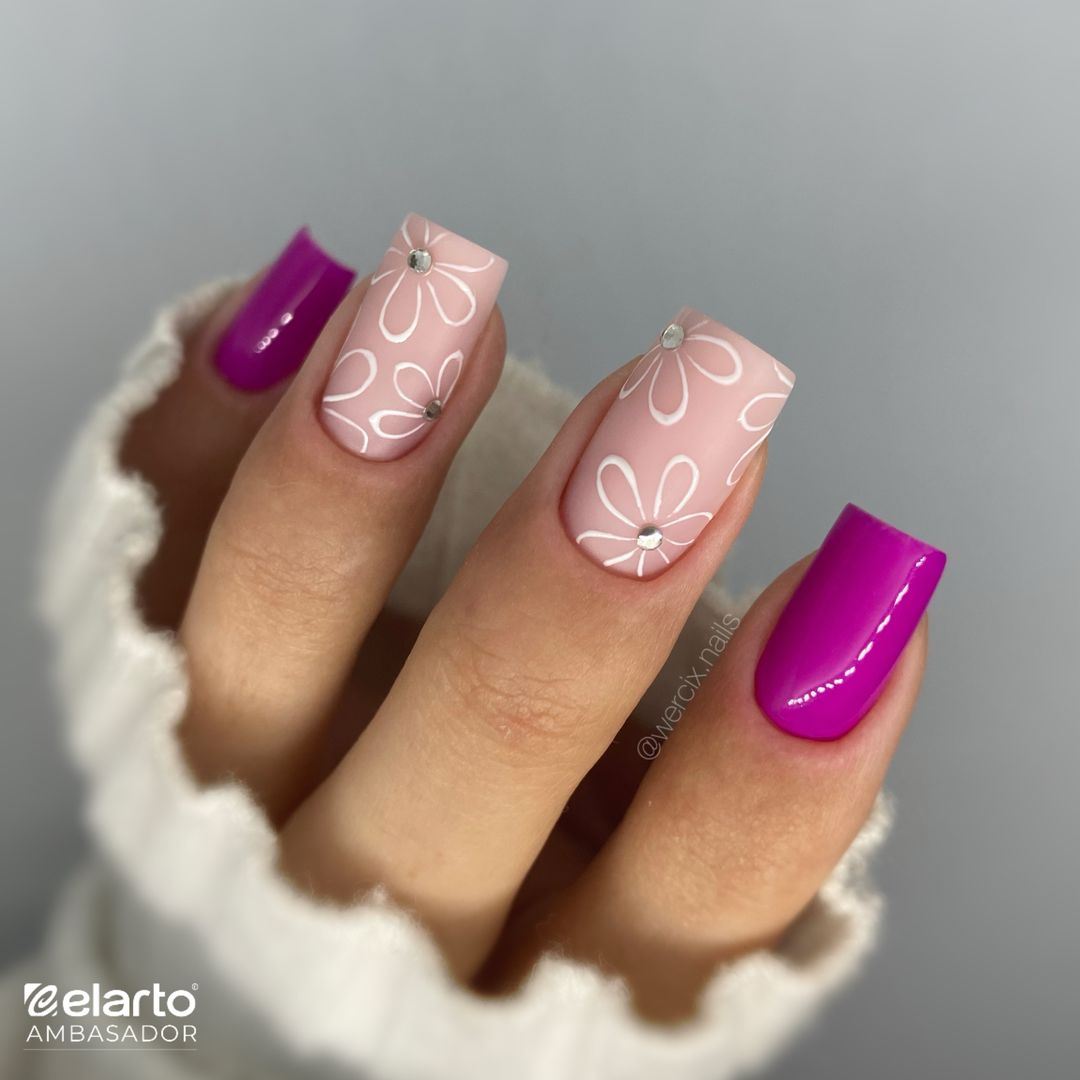
Daisy Daydream
Floral designs aren’t just for spring. This autumn daisy nail art brings a touch of whimsy to the fall matte nails trend. The nude base with white daisy designs, punctuated by a striking purple accent nail, creates a chic and modern look. This is perfect for anyone looking to blend simplicity with a touch of boldness.
-
- Nude nail polish (OPI ‘Samoan Sand’)
- White nail polish (Essie ‘Blanc’)
- Purple nail polish (OPI ‘Do You Lilac It?’)
- Rhinestones (Swarovski Flatback Crystals)
- Matte top coat (Zoya Matte Velvet Top Coat)
Professional Tip: Use a fine nail art brush to create the daisy petals, and place a tiny rhinestone in the center for an added sparkle. The purple accent nail adds a pop of color that ties the whole look together.
At-Home Instructions
- Prep Your Nails: Clean, shape, and buff your nails.
- Apply Base Coat: This helps in protecting the natural nail.
- Base Color: Apply two coats of nude polish on all nails except one, which will be painted purple.
- Daisy Design: Using a thin brush, paint the daisy petals with white polish. Add a small rhinestone in the center of each daisy.
- Finish: Apply a matte top coat to seal the design and give it a modern matte finish.
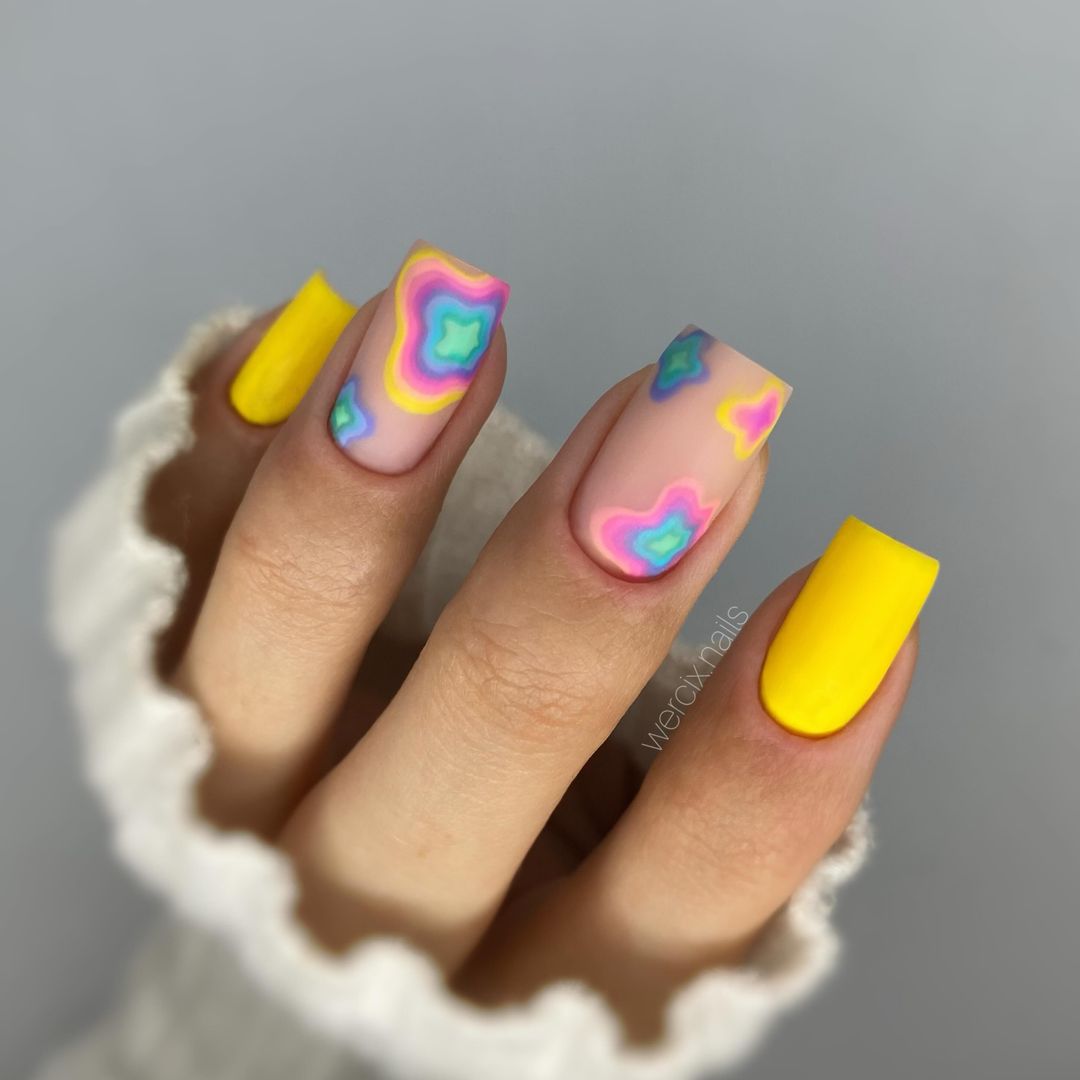
Psychedelic Swirls
Step into the psychedelic era with this vibrant nail design. The mix of yellow and colorful swirls creates a playful and eye-catching look. This autumn design is perfect for those who want their fall matte nails to stand out. The bright colors and unique patterns bring a burst of energy to any fall outfit.
-
- Yellow nail polish (China Glaze ‘Happy Go Lucky’)
- Assorted colored nail polishes (OPI, Essie in various shades)
- Nail art brushes
- Matte top coat (Zoya Matte Velvet Top Coat)
Professional Tip: Use a fine nail art brush to create the swirls and blend the colors seamlessly. A matte top coat will not only protect the design but also enhance the vibrant colors.
At-Home Instructions
- Prep Your Nails: Clean and shape your nails, and push back cuticles.
- Apply Base Coat: This ensures the longevity of your manicure.
- Base Color: Apply two coats of yellow polish to all nails.
- Psychedelic Swirls: Using a fine brush, create swirling patterns with different colored polishes. Let your creativity flow with the designs.
- Finish: Seal with a matte top coat to protect your intricate design.
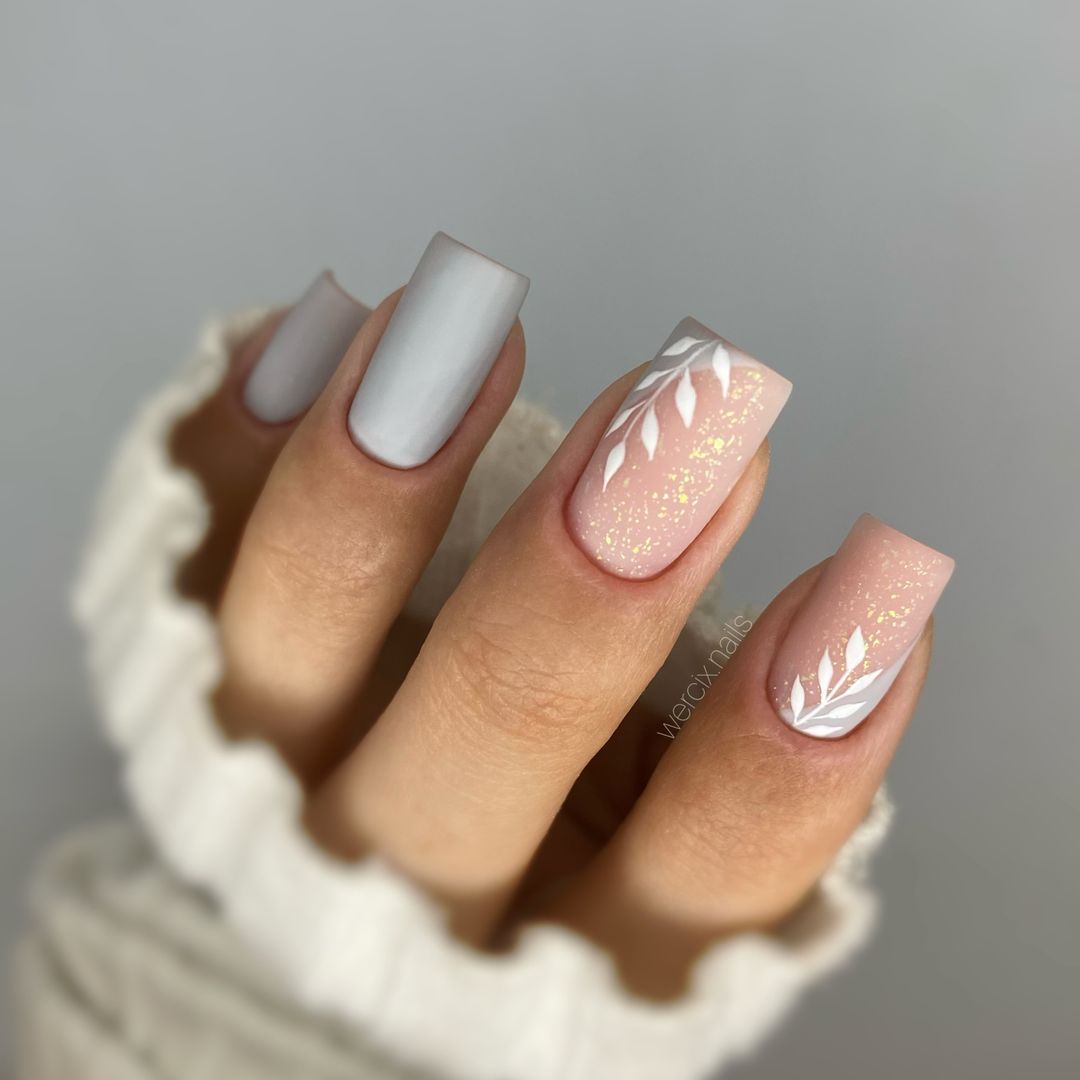
Graceful Greys and Shimmering Nude
This elegant design combines the sophistication of matte grey with the subtle glamour of a shimmering nude base. The accent nails, adorned with delicate white leaf patterns, add a touch of nature-inspired artistry to the look. The balance between the understated grey and the eye-catching glitter makes this a perfect choice for those seeking a refined yet stylish fall manicure.
-
- Grey nail polish (Essie ‘Master Plan’)
- Nude glitter polish (China Glaze ‘Fairy Dust’)
- White nail art paint (OPI Nail Art Paint)
- Matte top coat (OPI Matte Top Coat)
Professional Tip: To achieve the perfect leaf patterns, use a fine-tipped nail art brush and ensure your hand is steady. The glitter polish adds just the right amount of sparkle without overpowering the overall design.
At-Home Instructions
- Prep Your Nails: Clean, shape, and buff your nails, pushing back cuticles.
- Apply Base Coat: This protects your nails and ensures longevity.
- Base Color: Apply two coats of grey polish to two nails and nude glitter polish to the remaining nails.
- Leaf Design: Using a fine brush, paint delicate white leaves on the nude nails.
- Finish: Seal your design with a matte top coat for a chic, modern finish.
Save Pin
Lime Green Waves
Step into a wave of freshness with this lime green design. The combination of solid matte lime green and subtle wavy patterns creates a unique and trendy look. This design is ideal for those who want to make a statement with their nails while keeping it playful and contemporary.
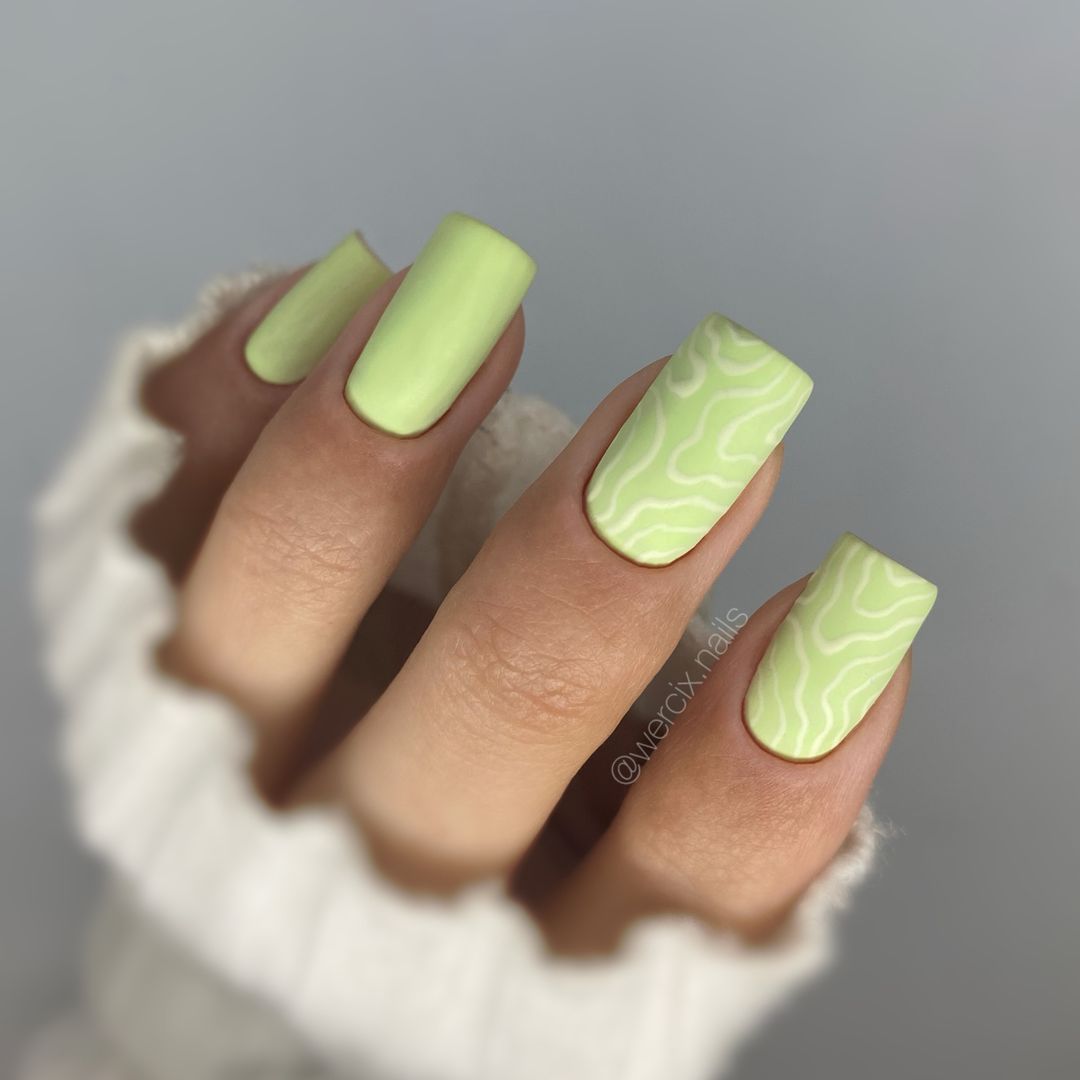
-
- Lime green nail polish (Sally Hansen ‘Lemon Shark’)
- White nail art pen (Sally Hansen I Heart Nail Art Pen in White)
- Matte top coat (Essie Matte About You)
Professional Tip: For the wavy pattern, use the white nail art pen to draw freeform waves on alternating nails. The contrast between the solid color and the wavy design adds depth and interest to the manicure.
At-Home Instructions
- Prep Your Nails: Clean, shape, and buff your nails.
- Apply Base Coat: Protect your natural nails with a base coat.
- Base Color: Apply two coats of lime green polish.
- Wave Design: Use the white nail art pen to draw wavy lines on alternating nails.
- Finish: Apply a matte top coat to seal and protect your design.
Pastel Abstract Art
Embrace the artistic side of autumn with this pastel abstract nail design. The blend of soft pastel colors with abstract patterns and fine black lines creates a look that is both modern and artistic. This design is perfect for those who appreciate a more creative and unconventional approach to fall matte nails.
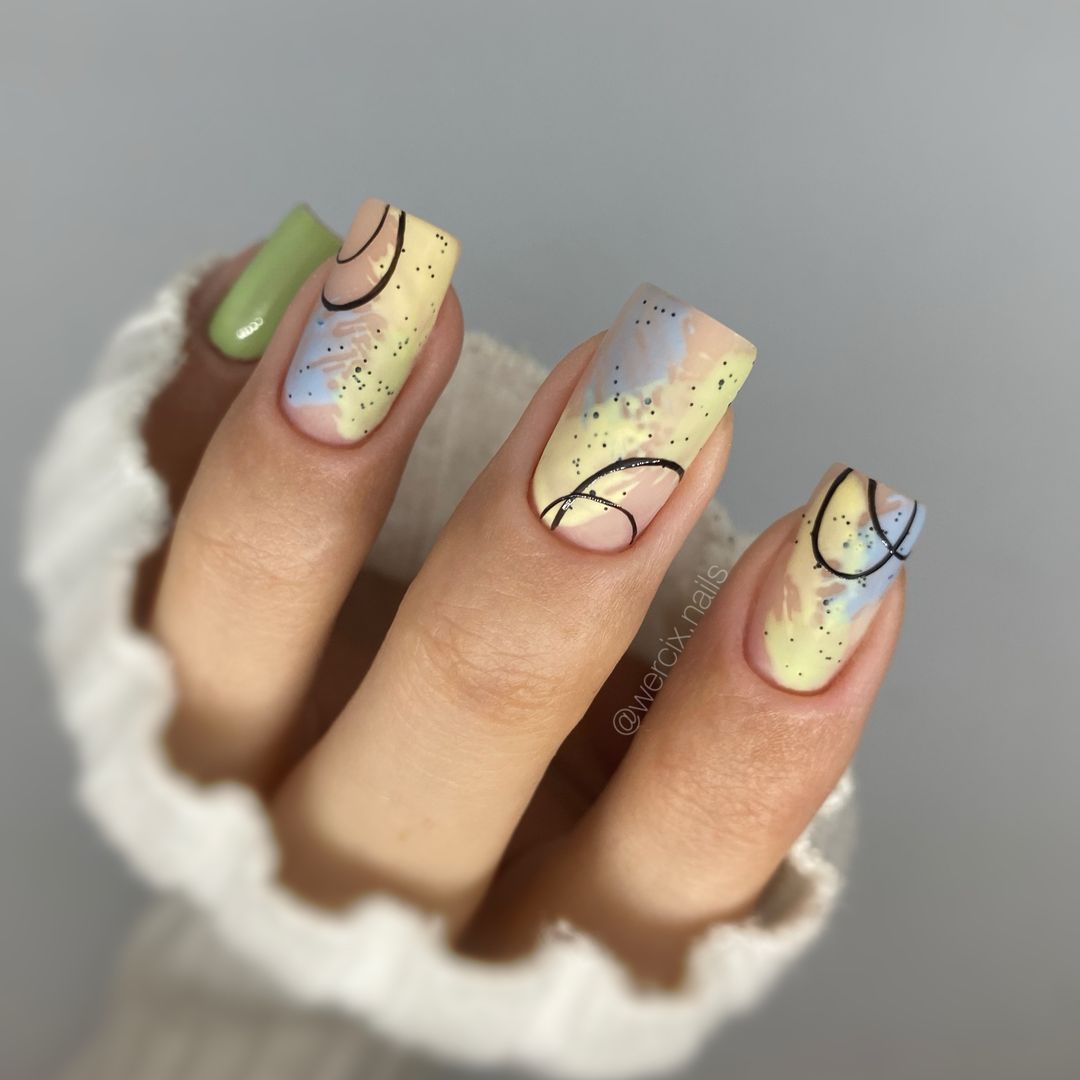
-
- Pastel nail polishes (OPI ‘Gelato on My Mind’, Essie ‘Ballet Slippers’, Zoya ‘Blu’)
- Black nail art pen (Kiss Nail Art Pen in Black)
- Matte top coat (Revlon Matte Top Coat)
Professional Tip: Use a sponge to dab the pastel colors onto the nails for a soft, blended effect. The black lines should be added sparingly to avoid overwhelming the delicate colors.
At-Home Instructions
- Prep Your Nails: Clean, shape, and buff your nails.
- Apply Base Coat: This helps your manicure last longer.
- Pastel Colors: Using a sponge, dab the pastel polishes onto your nails in an abstract pattern.
- Black Lines: Draw fine black lines across the nails using the nail art pen.
- Finish: Apply a matte top coat to protect your design and give it a sophisticated finish.
Pink Gradient Waves
The pink gradient nails with white wavy accents offer a perfect blend of soft femininity and modern chic. The smooth transition from a lighter pink at the tips to a darker hue at the base, complemented by delicate white waves, creates a dynamic yet subtle design. The addition of pink glitter on two nails adds just the right amount of sparkle for a playful touch.

-
- Light pink nail polish (Essie ‘Fiji’)
- Dark pink nail polish (OPI ‘Pink Flamenco’)
- White nail art pen (Kiss Nail Art Pen in White)
- Pink glitter polish (China Glaze ‘Fairy Dust’)
- Matte top coat (Essie Matte About You)
Professional Tip: Achieving a seamless gradient requires blending the two pink shades with a sponge. The white wavy lines should be thin and fluid to add a touch of elegance without overpowering the gradient effect.
At-Home Instructions
- Prep Your Nails: Clean, shape, and buff your nails, and push back cuticles.
- Apply Base Coat: Protect your nails with a base coat.
- Gradient Color: Using a makeup sponge, apply the light and dark pink polishes to create a gradient effect on all nails except two, which will have a solid pink glitter base.
- Wave Design: Draw thin white waves on the gradient nails using a fine brush or nail art pen.
- Finish: Apply a matte top coat to seal the design and give it a modern matte finish.
Minimalist Hearts
This minimalist design features tiny red hearts on a matte nude base, creating a look that is both understated and romantic. The simplicity of the design makes it perfect for everyday wear, while the red hearts add a sweet and subtle detail that stands out.
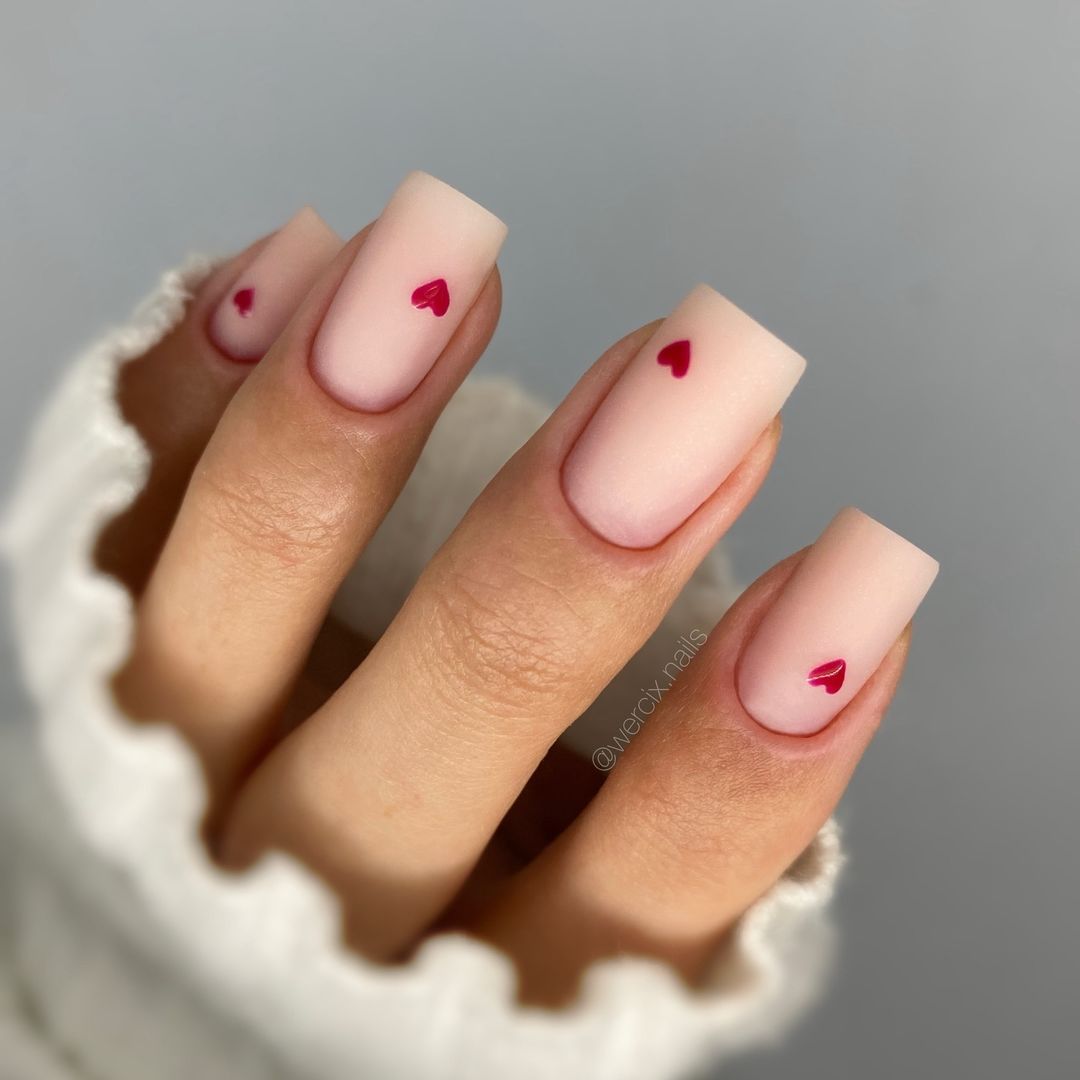
-
- Nude nail polish (OPI ‘Samoan Sand’)
- Red nail art pen (Sally Hansen I Heart Nail Art Pen in Red)
- Matte top coat (Zoya Matte Velvet Top Coat)
Professional Tip: Less is more with this design. The tiny hearts should be precisely placed in the center of each nail for a clean and balanced look.
At-Home Instructions
- Prep Your Nails: Clean, shape, and buff your nails.
- Apply Base Coat: Ensure a smooth base with a clear coat.
- Base Color: Apply two coats of nude polish.
- Heart Design: Use a red nail art pen to draw small hearts on each nail.
- Finish: Seal the design with a matte top coat for a chic, understated finish.
Monochrome Swirls
The monochrome swirls on a nude base create a sophisticated and edgy look. The black swirls are bold yet elegant, making this design perfect for a more dramatic autumn manicure. The matte finish enhances the chicness of the black and nude combination.
-
- Nude nail polish (Essie ‘Sand Tropez’)
- Black nail polish (OPI ‘Black Onyx’)
- Matte top coat (OPI Matte Top Coat)
- Fine nail art brush
Professional Tip: The key to this design is precision. Use a fine brush to create clean, smooth swirls, and make sure each swirl is distinct to avoid a cluttered look.
At-Home Instructions
- Prep Your Nails: Clean, shape, and buff your nails.
- Apply Base Coat: Start with a clear base coat.
- Base Color: Apply two coats of nude polish.
- Swirl Design: Using a fine brush, draw black swirls on each nail.
- Finish: Apply a matte top coat to complete the look and ensure longevity.
Save Pin

Playful Owls
This fun and quirky design features adorable owl illustrations on a soft pastel yellow base. The cute owls, combined with tiny stars, make this a delightful and eye-catching design perfect for adding a playful touch to your autumn look.
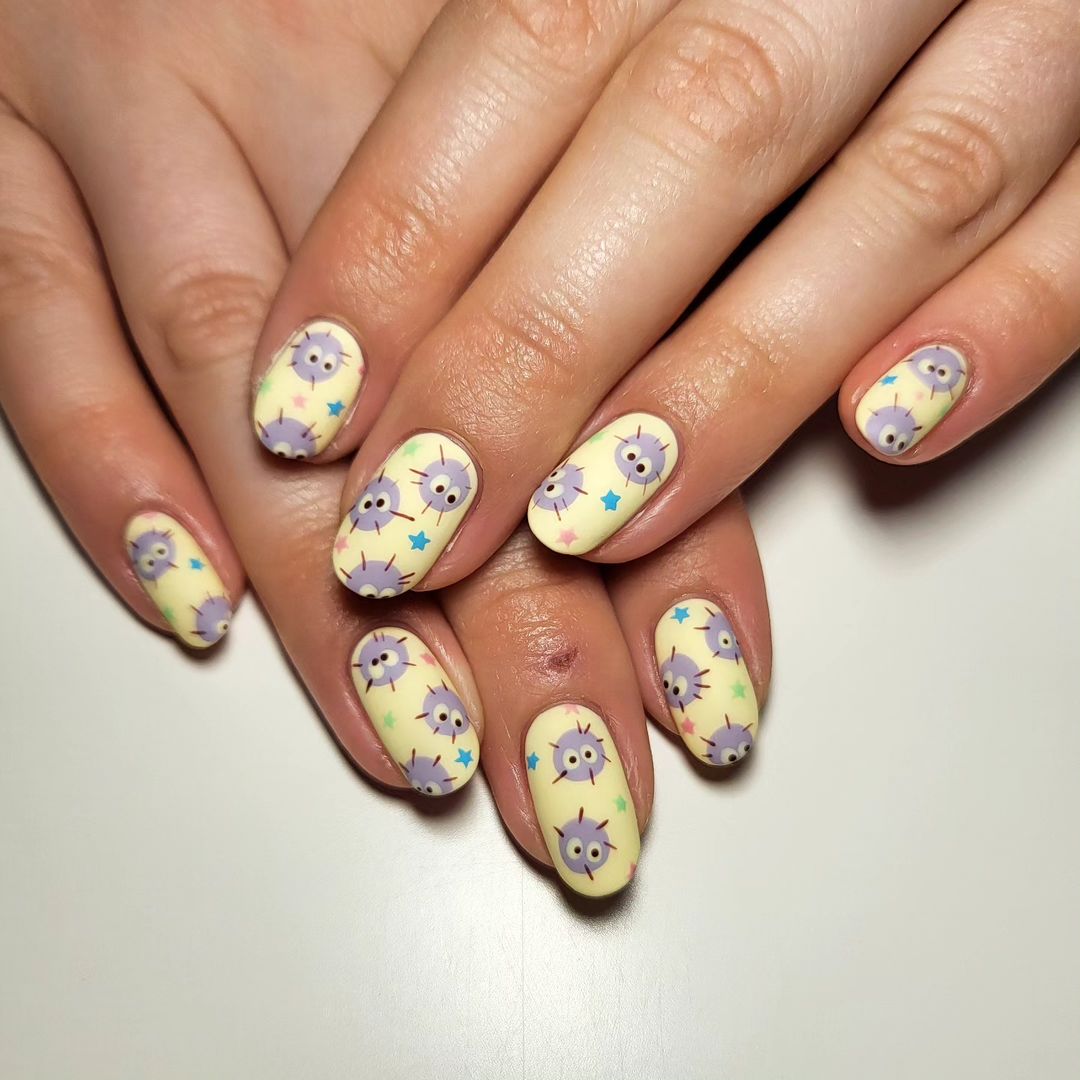
-
- Pastel yellow nail polish (China Glaze ‘Lemon Fizz’)
- Purple nail polish (OPI ‘Do You Lilac It?’)
- Blue nail polish (Essie ‘Bikini So Teeny’)
- Fine nail art brush
- Matte top coat (Revlon Matte Top Coat)
Professional Tip: To create the owl illustrations, use a fine brush and take your time with the details. The pastel colors should be applied in thin layers to avoid smudging.
At-Home Instructions
- Prep Your Nails: Clean, shape, and buff your nails.
- Apply Base Coat: Start with a base coat to protect your nails.
- Base Color: Apply two coats of pastel yellow polish.
- Owl Design: Using a fine brush, draw small owls and stars with the purple and blue polishes.
- Finish: Apply a matte top coat to seal the design and enhance its playful charm.
Earthy Botanical Art
This earthy botanical design features a variety of leaf patterns in different shades of green and beige, creating a natural and serene look. The intricate leaf details add a touch of elegance, making this a perfect design for those who appreciate nature-inspired art.
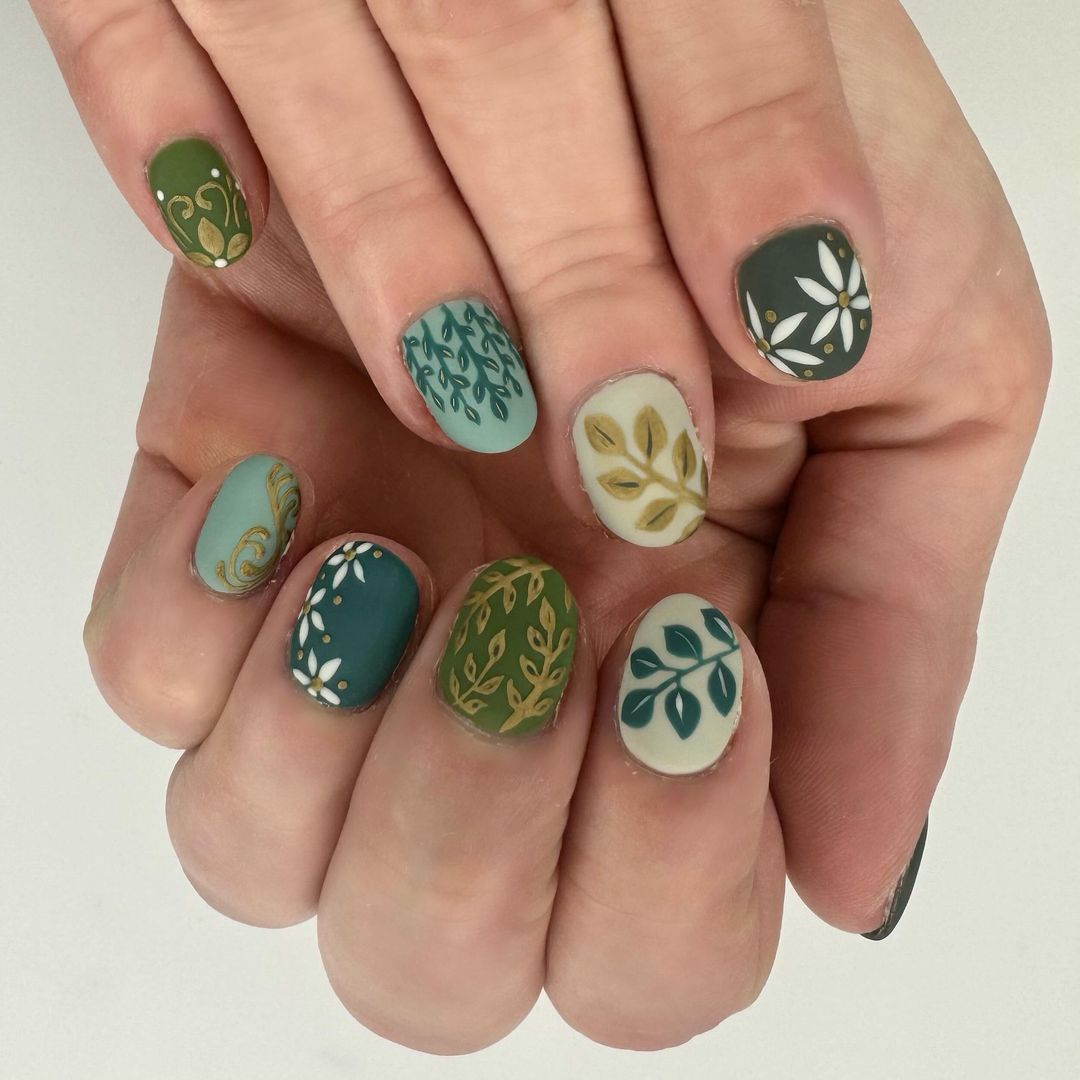
-
- Green nail polish (OPI ‘Greenwich Village’)
- Beige nail polish (Essie ‘Sand Tropez’)
- White nail art paint (OPI Nail Art Paint)
- Fine nail art brush
- Matte top coat (Zoya Matte Velvet Top Coat)
Professional Tip: Mix different shades of green to create depth and variety in the leaf patterns. Use a fine brush to achieve detailed and delicate leaf designs.
At-Home Instructions
- Prep Your Nails: Clean, shape, and buff your nails.
- Apply Base Coat: Protect your nails with a clear base coat.
- Base Color: Apply two coats of green and beige polishes on alternating nails.
- Leaf Design: Using a fine brush, draw various leaf patterns in white on the green nails and green on the beige nails.
- Finish: Seal the design with a matte top coat to enhance the earthy and natural look.
Blue Floral Elegance
The blue floral design is a perfect blend of elegance and simplicity. The deep blue base with delicate white floral patterns creates a striking contrast that is both bold and beautiful. This design is ideal for those who want to make a statement with their nails while keeping it sophisticated.
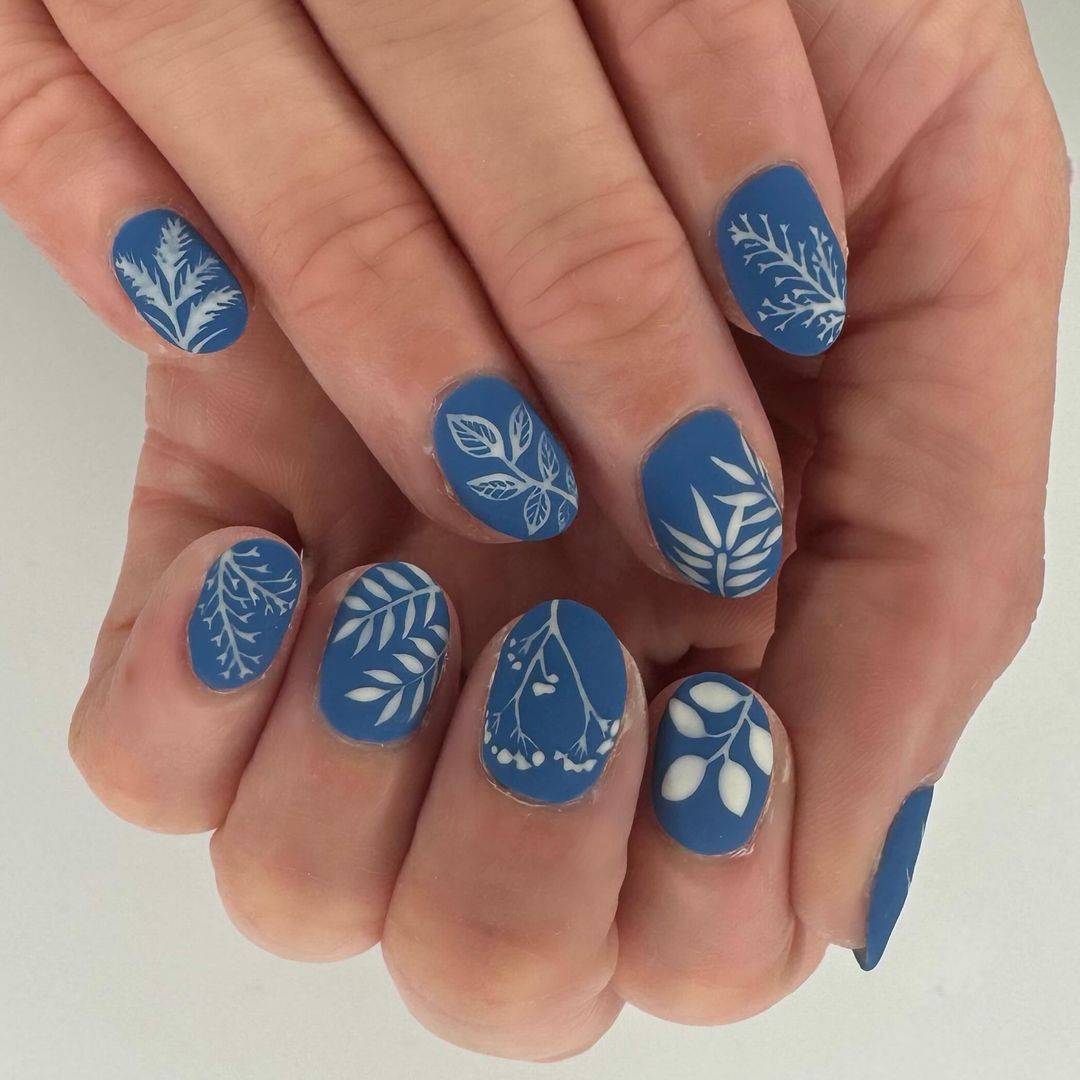
-
- Deep blue nail polish (Essie ‘Aruba Blue’)
- White nail art paint (Sally Hansen I Heart Nail Art Pen in White)
- Fine nail art brush
- Matte top coat (OPI Matte Top Coat)
Professional Tip: Ensure the blue base is completely dry before applying the white floral designs. The contrast between the deep blue and white will make the floral patterns pop beautifully.
At-Home Instructions
- Prep Your Nails: Clean, shape, and buff your nails.
- Apply Base Coat: Start with a clear base coat.
- Base Color: Apply two coats of deep blue polish.
- Floral Design: Using a fine brush, draw delicate white floral patterns on each nail.
- Finish: Apply a matte top coat to protect the design and give it a sophisticated matte finish.
Galactic Dream
Explore the cosmos with this out-of-this-world nail design featuring vibrant alien and space-themed illustrations. The nude base provides a perfect canvas for the colorful planets, stars, and UFOs. The playful use of neon colors brings the design to life, making it an eye-catching choice for those who love unique and adventurous nail art.
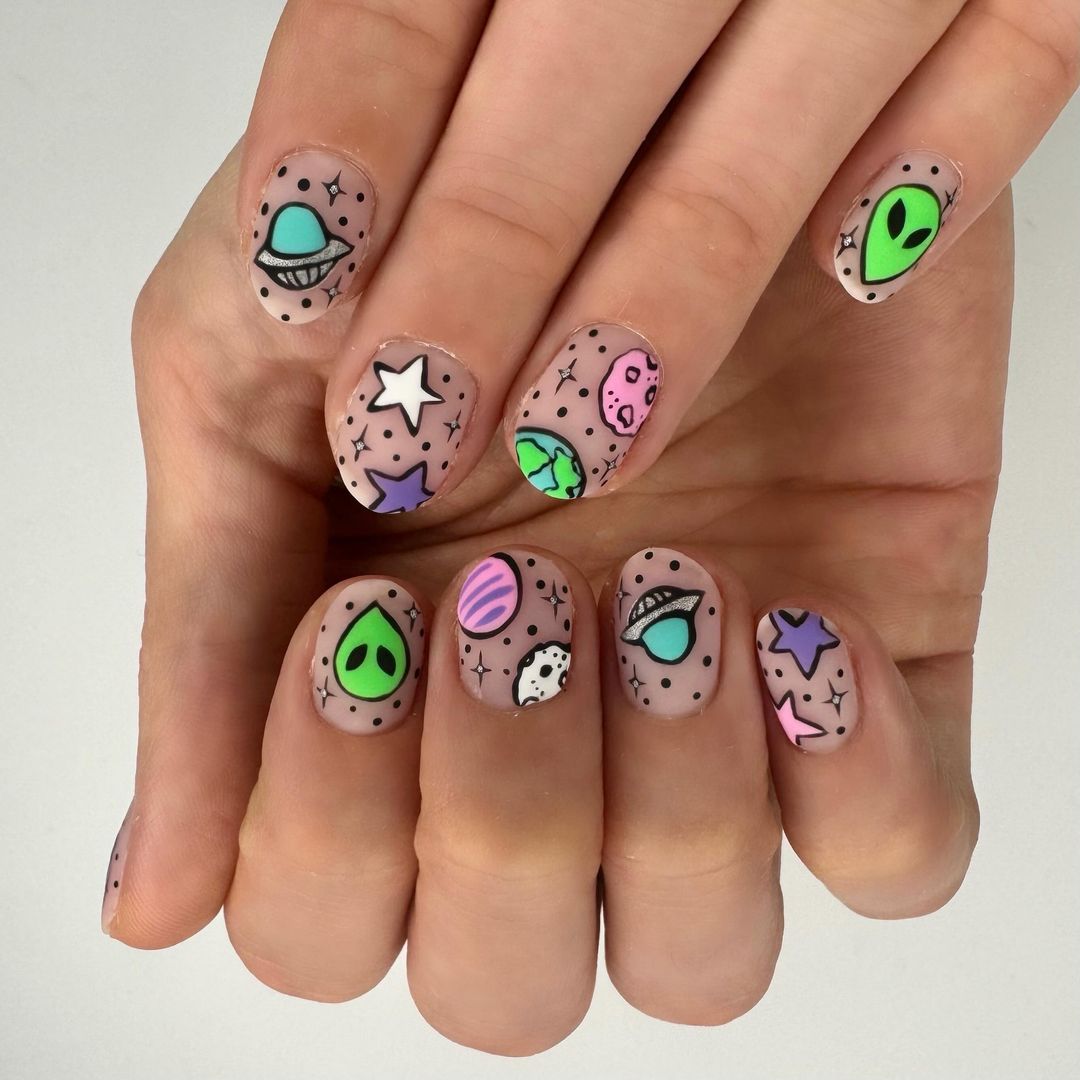
-
- Nude nail polish (Essie ‘Ballet Slippers’)
- Black nail polish (OPI ‘Black Onyx’)
- Neon green, pink, purple, and blue nail polishes (China Glaze ‘Pool Party’, Essie ‘Viva Antigua!’)
- Fine nail art brush and dotting tool
- Matte top coat (Zoya Matte Velvet Top Coat)
Professional Tip: To achieve the intricate details of the space-themed illustrations, use a fine nail art brush and take your time to ensure each element is clear and vibrant. The matte top coat will help the colors pop against the nude background.
At-Home Instructions
- Prep Your Nails: Clean, shape, and buff your nails.
- Apply Base Coat: Protect your natural nails with a clear base coat.
- Base Color: Apply two coats of nude polish.
- Space Design: Using a fine brush, draw the planets, stars, and UFOs with the neon colors. Add black outlines and dots for extra detail.
- Finish: Seal the design with a matte top coat to enhance the vibrant colors and protect the artwork.
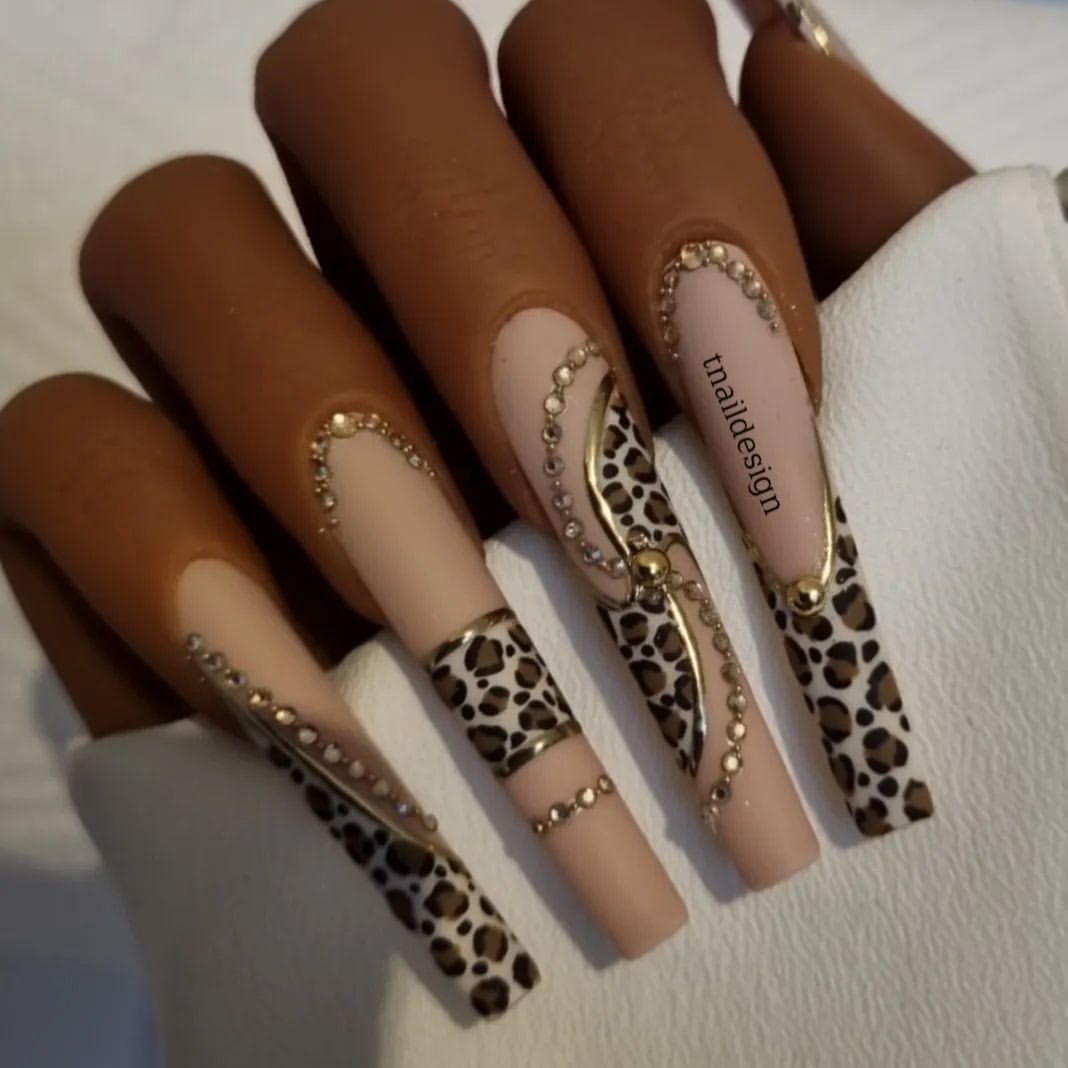
Pink Leopard Print
This bold and playful design combines the elegance of matte pink with the edginess of leopard print. The mix of solid pink nails and leopard-printed accent nails creates a dynamic and trendy look that is perfect for making a statement.
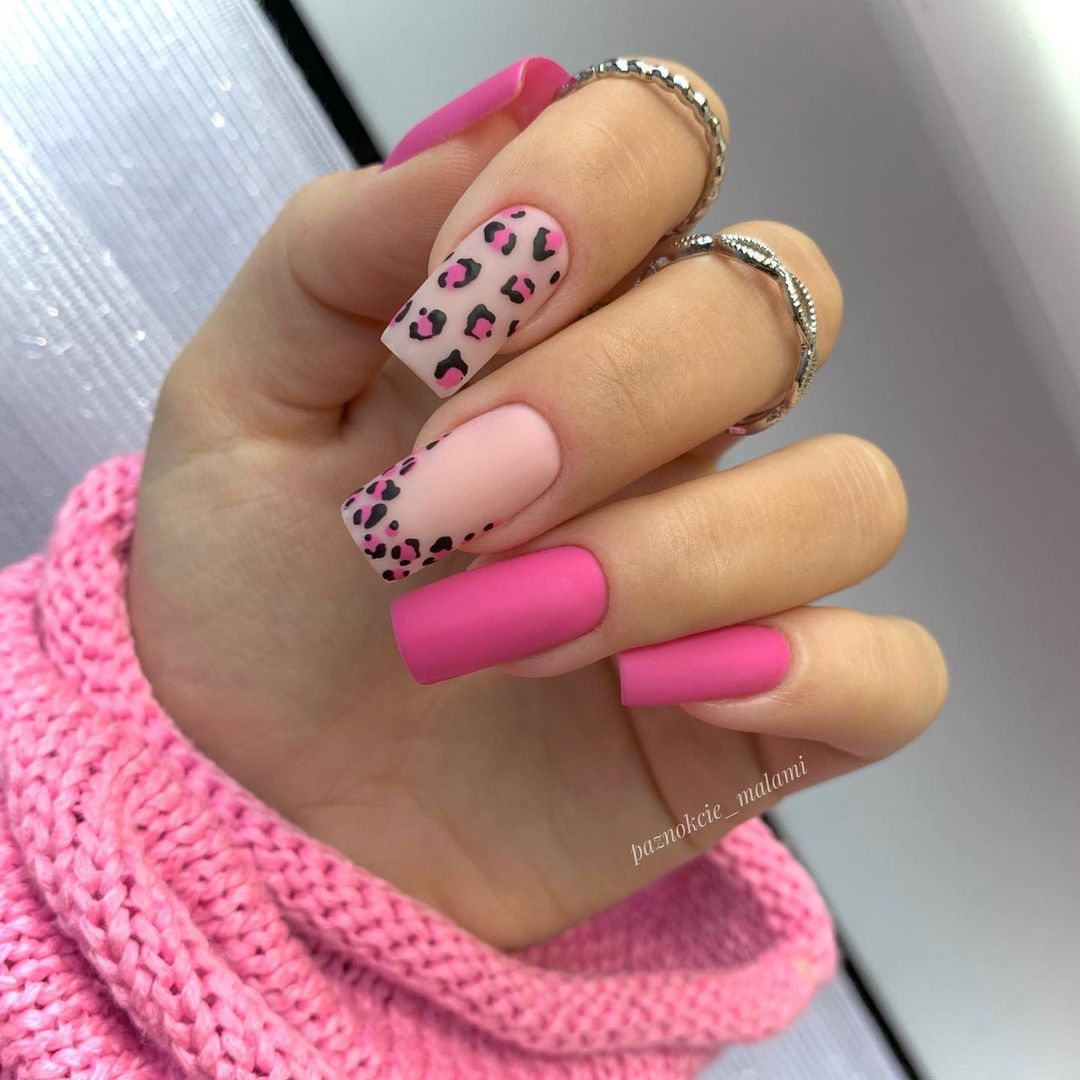
-
- Matte pink nail polish (OPI ‘Suzi Nails New Orleans’)
- Nude nail polish (Essie ‘Ballet Slippers’)
- Black and dark pink nail art pens (Kiss Nail Art Pen in Black and Dark Pink)
- Matte top coat (Essie Matte About You)
Professional Tip: For a crisp leopard print, use a dotting tool or nail art pen to create the spots. The matte pink polish adds a modern touch to the classic leopard design.
At-Home Instructions
- Prep Your Nails: Clean, shape, and buff your nails.
- Apply Base Coat: Apply a clear base coat to protect your nails.
- Base Color: Apply two coats of matte pink polish to most nails, and nude polish to the accent nails.
- Leopard Print: Use the black and dark pink nail art pens to create leopard spots on the accent nails.
- Finish: Apply a matte top coat to all nails to seal the design and ensure durability.
Shimmering Pastels
This delicate and elegant design features shimmering pastel shades that transition smoothly from one color to another. The subtle sparkle and soft gradient make this a perfect choice for those who prefer a sophisticated yet eye-catching manicure.
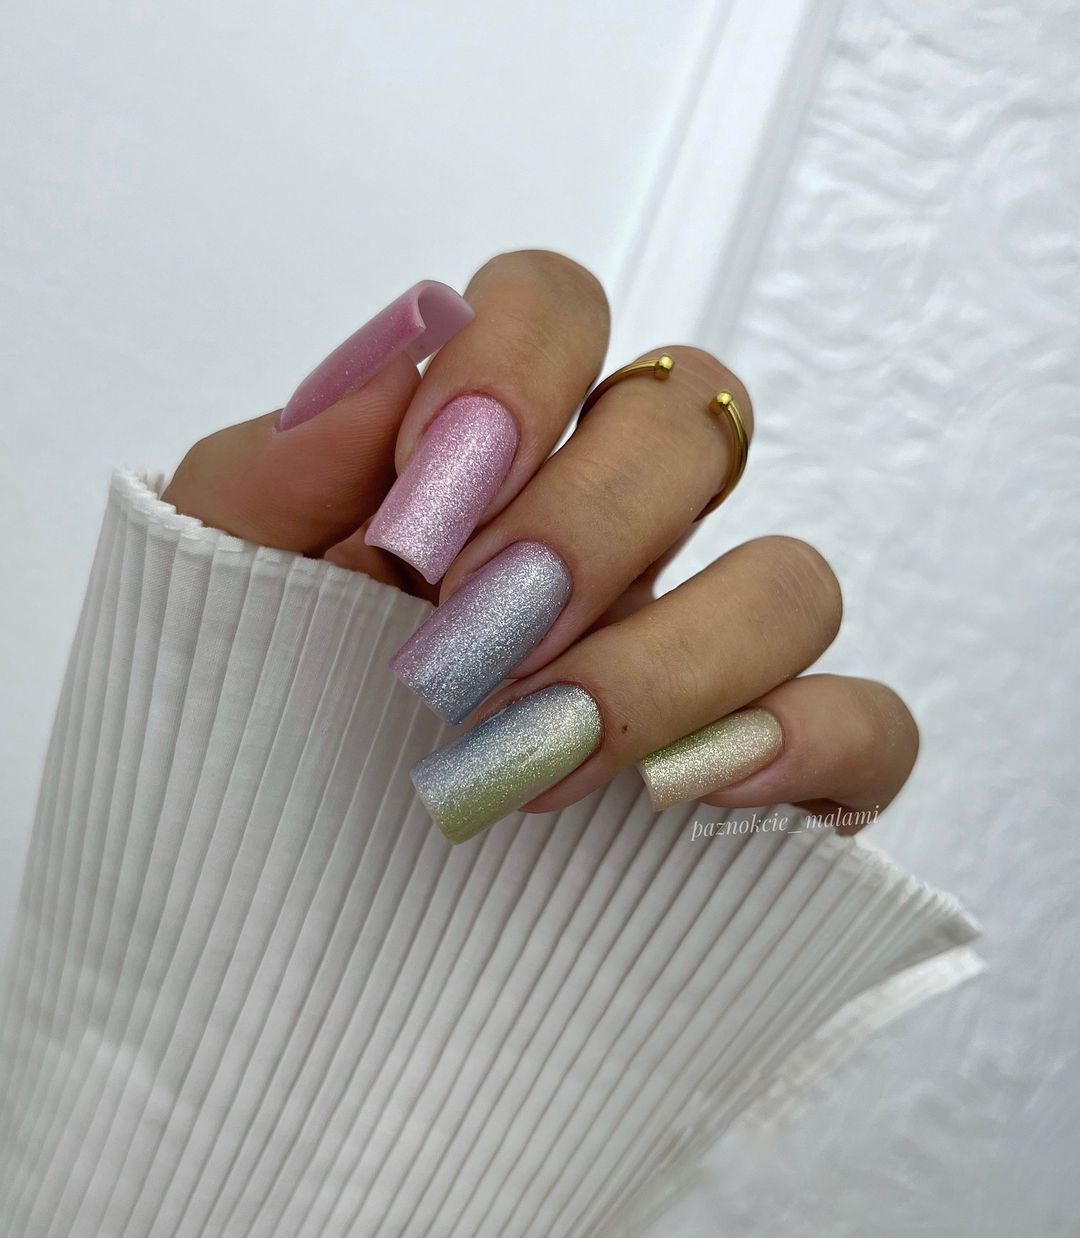
-
- Pastel pink, blue, and green nail polishes (Essie ‘Mint Candy Apple’, OPI ‘Bubble Bath’, China Glaze ‘For Audrey’)
- Glitter top coat (OPI ‘Pirouette My Whistle’)
- Sponge for gradient effect
- Matte top coat (Zoya Matte Velvet Top Coat)
Professional Tip: Use a sponge to blend the pastel colors seamlessly. The glitter top coat adds a subtle sparkle that enhances the gradient effect.
At-Home Instructions
- Prep Your Nails: Clean, shape, and buff your nails.
- Apply Base Coat: Start with a clear base coat.
- Gradient Color: Using a sponge, apply the pastel polishes to create a smooth gradient effect on each nail.
- Shimmer: Add a layer of glitter top coat for extra sparkle.
- Finish: Apply a matte top coat to give the design a modern, sophisticated finish.
Red Leopard Print
For those who love bold and daring designs, this red leopard print nail art is a perfect choice. The bright red base combined with black leopard spots creates a striking and fierce look that is sure to turn heads.
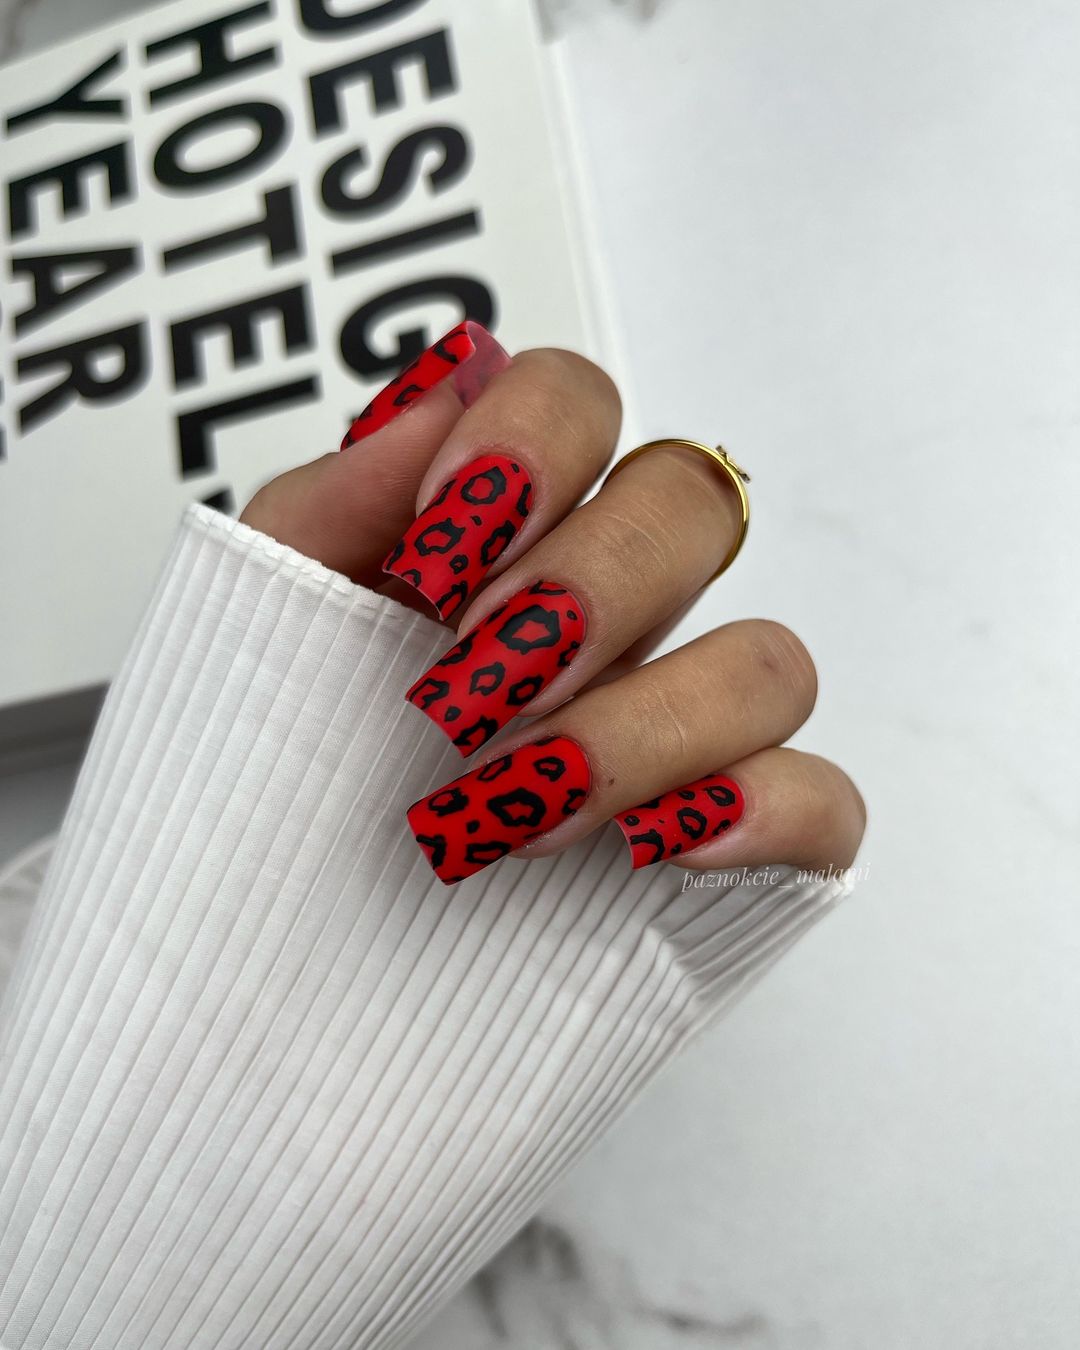
-
- Red nail polish (OPI ‘Big Apple Red’)
- Black nail art pen (Kiss Nail Art Pen in Black)
- Matte top coat (OPI Matte Top Coat)
Professional Tip: Use a dotting tool to create uniform leopard spots. The matte top coat will enhance the boldness of the red and black combination.
At-Home Instructions
- Prep Your Nails: Clean, shape, and buff your nails.
- Apply Base Coat: Protect your nails with a base coat.
- Base Color: Apply two coats of red polish.
- Leopard Print: Use the black nail art pen to create leopard spots on each nail.
- Finish: Seal the design with a matte top coat for a striking finish.
Luxe Black and Gold
This luxurious design features a combination of matte black and soft pink, accented with intricate gold details. The mix of textures and the elegant gold patterns create a high-end look that is perfect for special occasions.
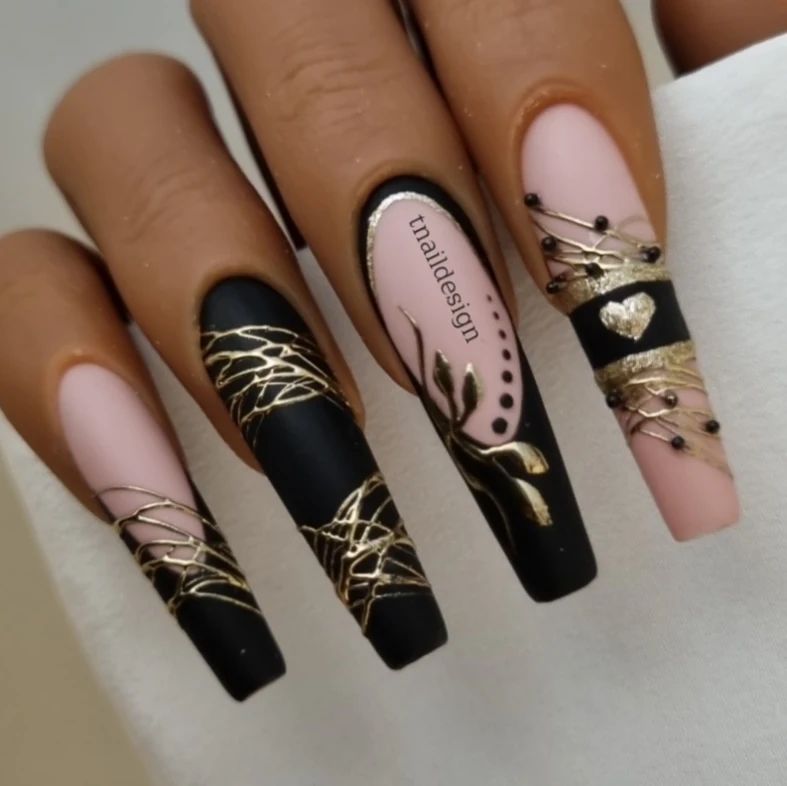
-
- Matte black nail polish (Zoya ‘Dovima’)
- Soft pink nail polish (Essie ‘Ballet Slippers’)
- Gold nail art paint (OPI Nail Art Paint in Gold)
- Fine nail art brush
- Matte top coat (Revlon Matte Top Coat)
Professional Tip: For the gold accents, use a fine brush to achieve precise and detailed patterns. The contrast between the matte black and gold creates a stunning effect.
At-Home Instructions
- Prep Your Nails: Clean, shape, and buff your nails.
- Apply Base Coat: Start with a clear base coat.
- Base Color: Apply two coats of matte black and soft pink polishes on alternating nails.
- Gold Details: Using a fine brush, draw intricate gold patterns on the black nails.
- Finish: Apply a matte top coat to enhance the luxurious look and protect the design.
Leopard Glam
This glamorous design combines nude and leopard print with a touch of gold. The nude base with leopard spots and gold accents creates a chic and fashionable look that is perfect for adding a bit of glam to your everyday style.
-
- Nude nail polish (OPI ‘Samoan Sand’)
- Black nail art pen (Kiss Nail Art Pen in Black)
- Gold nail art paint (Sally Hansen Nail Art Paint in Gold)
- Matte top coat (Zoya Matte Velvet Top Coat)
Professional Tip: Use gold accents sparingly to add just the right amount of glam without overwhelming the design. The matte top coat will give the manicure a sophisticated finish.
At-Home Instructions
- Prep Your Nails: Clean, shape, and buff your nails.
- Apply Base Coat: Protect your nails with a clear base coat.
- Base Color: Apply two coats of nude polish.
- Leopard Print: Use the black nail art pen to create leopard spots on each nail, adding gold accents for extra glam.
- Finish: Apply a matte top coat to seal the design and enhance its chic look.
Burgundy Elegance
This stunning design features deep burgundy nails adorned with sparkling rhinestones and a chic bow accent. The combination of matte burgundy and glitzy rhinestones creates a look that is both elegant and glamorous. The elongated stiletto shape adds a dramatic flair, making this design perfect for special occasions.
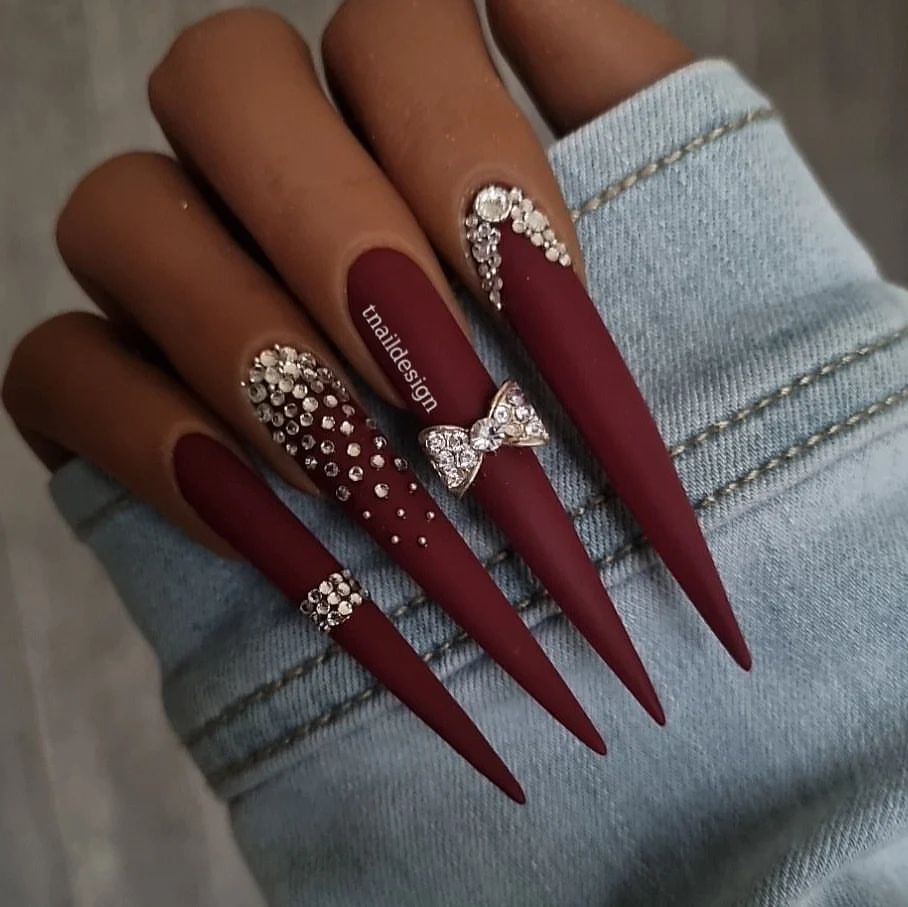
-
- Burgundy nail polish (OPI ‘Malaga Wine’)
- Rhinestones (Swarovski Flatback Crystals)
- Nail glue (Kiss Precision Nail Glue)
- Matte top coat (Essie Matte About You)
- Bow nail charms
Professional Tip: To achieve the perfect stiletto shape, file the nails into a sharp point. Use nail glue to secure the rhinestones and bow charm in place, and apply a matte top coat for a sophisticated finish.
At-Home Instructions
- Prep Your Nails: Clean, shape, and buff your nails into a stiletto shape.
- Apply Base Coat: Protect your nails with a clear base coat.
- Base Color: Apply two coats of burgundy polish.
- Rhinestone Placement: Use nail glue to place rhinestones in desired patterns. Add the bow charm to one nail.
- Finish: Seal the design with a matte top coat to enhance the elegance and durability.
Bold Halloween Vibes
Embrace the spirit of Halloween with this bold and edgy nail design. Featuring a mix of black matte nails, orange and black houndstooth patterns, and intricate web designs, this look is perfect for the spooky season. The addition of rhinestones adds a touch of glamour to the otherwise eerie theme.
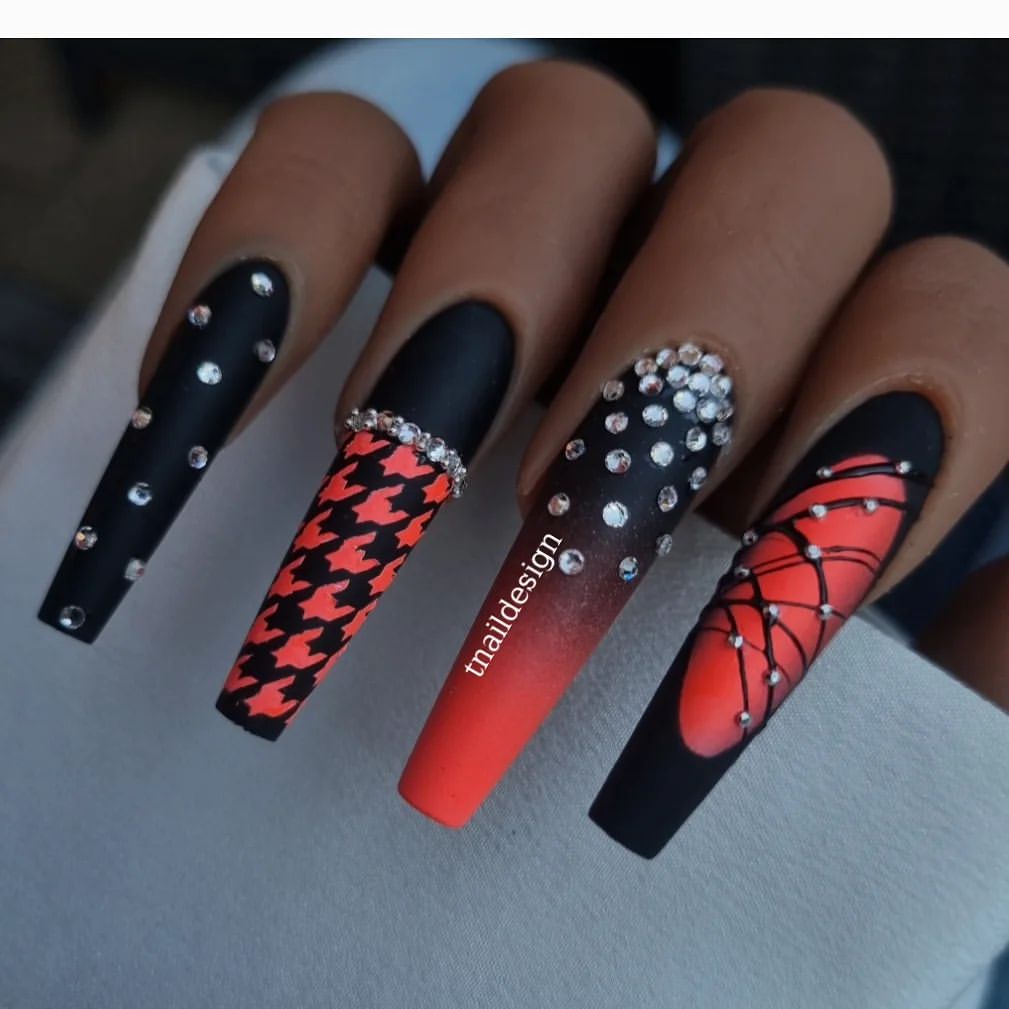
-
- Black nail polish (OPI ‘Black Onyx’)
- Orange nail polish (China Glaze ‘Orange Knockout’)
- Rhinestones (Swarovski Flatback Crystals)
- Nail art brush and dotting tool
- Matte top coat (Zoya Matte Velvet Top Coat)
Professional Tip: For the houndstooth pattern, use a fine nail art brush to carefully paint the design. The web design can be created using a dotting tool for precision.
At-Home Instructions
- Prep Your Nails: Clean, shape, and buff your nails.
- Apply Base Coat: Protect your nails with a base coat.
- Base Color: Apply two coats of black polish on some nails and orange on others.
- Houndstooth and Web Designs: Use a fine brush for the houndstooth pattern and a dotting tool for the web design. Add rhinestones for extra sparkle.
- Finish: Apply a matte top coat to seal the design and add durability.
Subtle Pink Splatter
For a subtle yet stylish look, try this pink splatter design. The light pink base with delicate pink speckles creates a soft and feminine manicure that is perfect for everyday wear. The matte finish adds a modern touch to this simple yet elegant design.
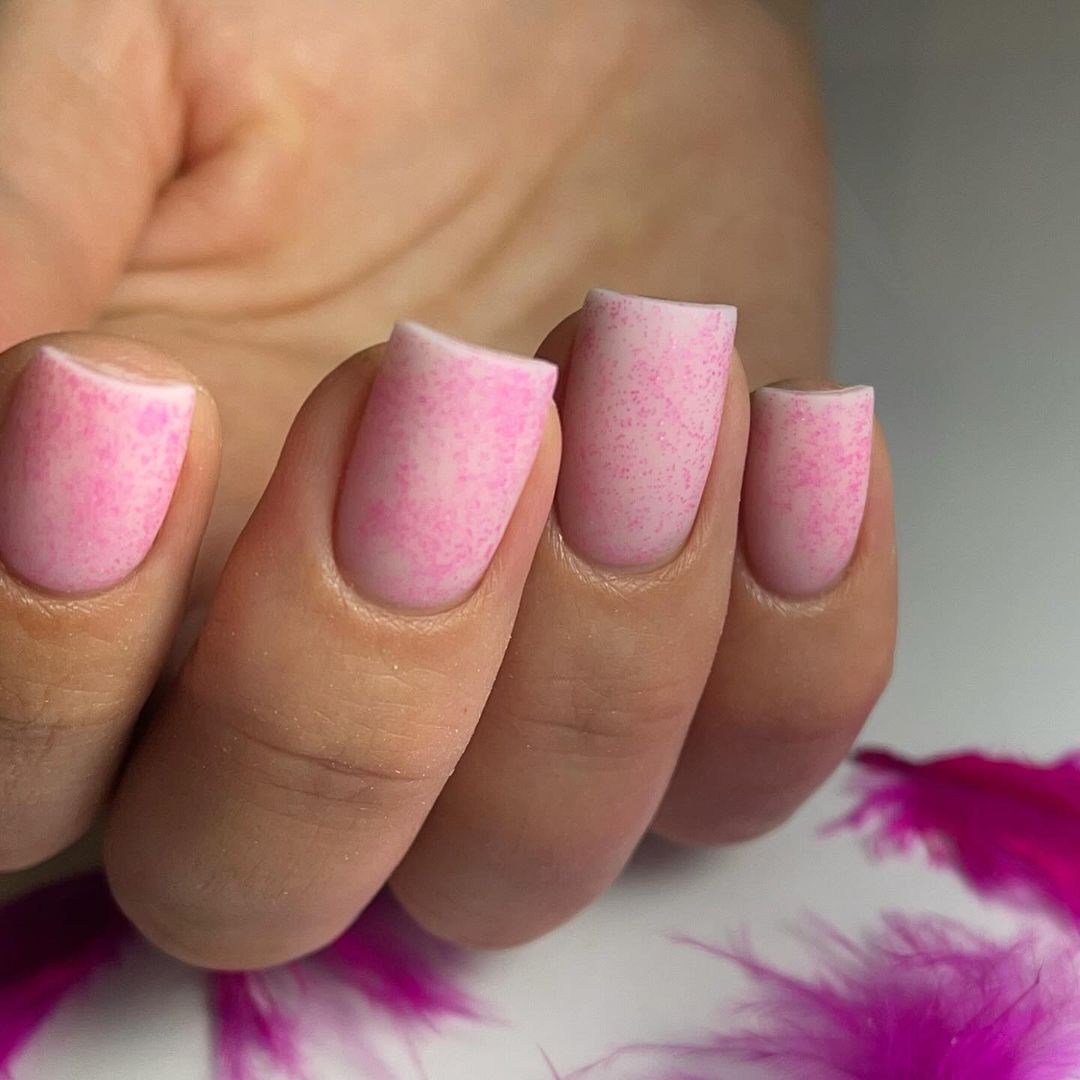
-
- Light pink nail polish (Essie ‘Ballet Slippers’)
- Dark pink nail polish (OPI ‘Pink Flamenco’)
- Sponge for splatter effect
- Matte top coat (Essie Matte About You)
Professional Tip: Use a sponge to gently dab the dark pink polish onto the light pink base to create the splatter effect. The key is to keep the speckles light and airy for a delicate look.
At-Home Instructions
- Prep Your Nails: Clean, shape, and buff your nails.
- Apply Base Coat: Start with a clear base coat.
- Base Color: Apply two coats of light pink polish.
- Splatter Effect: Dip a sponge into the dark pink polish and lightly dab it onto the nails to create the splatter effect.
- Finish: Apply a matte top coat to seal the design and add a modern finish.
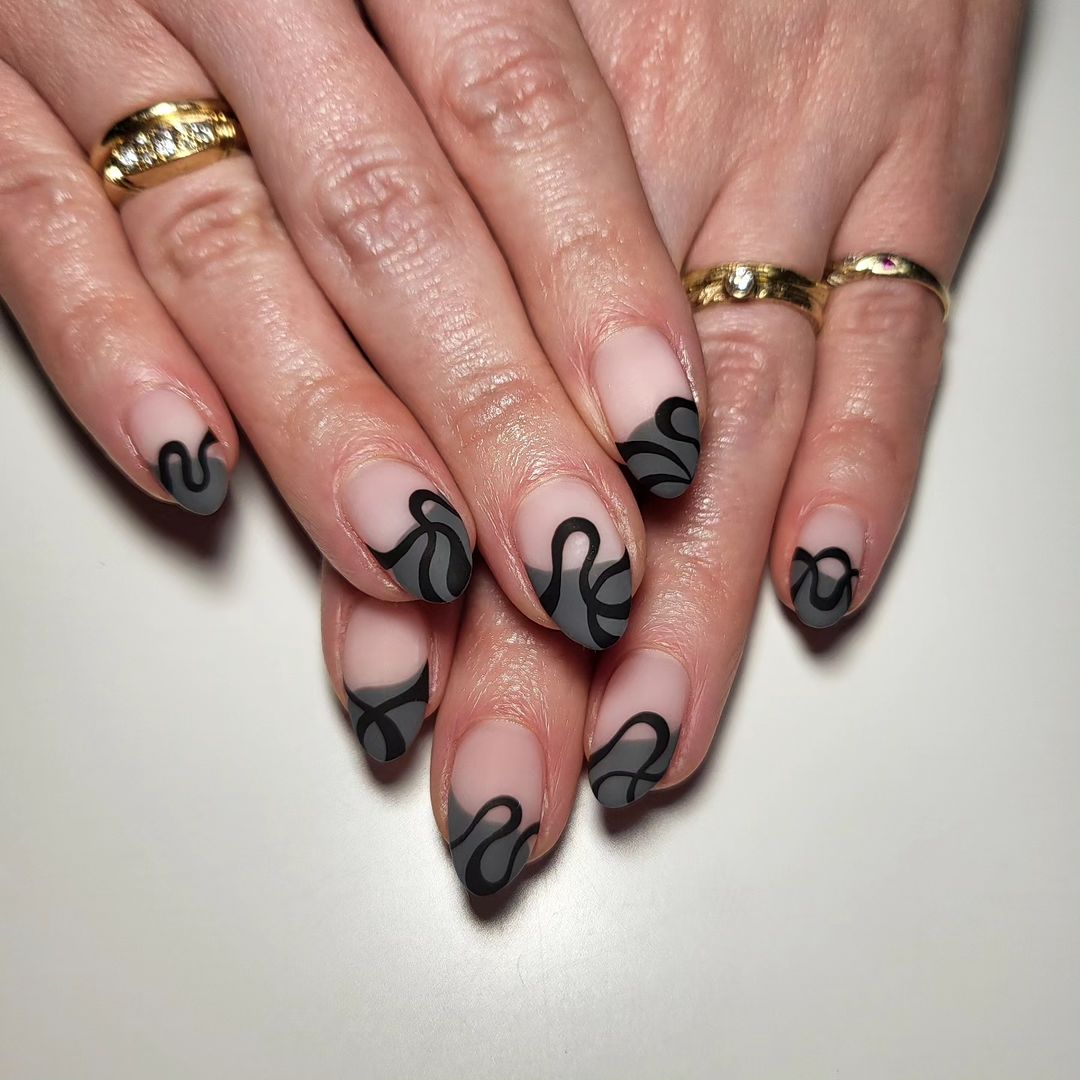
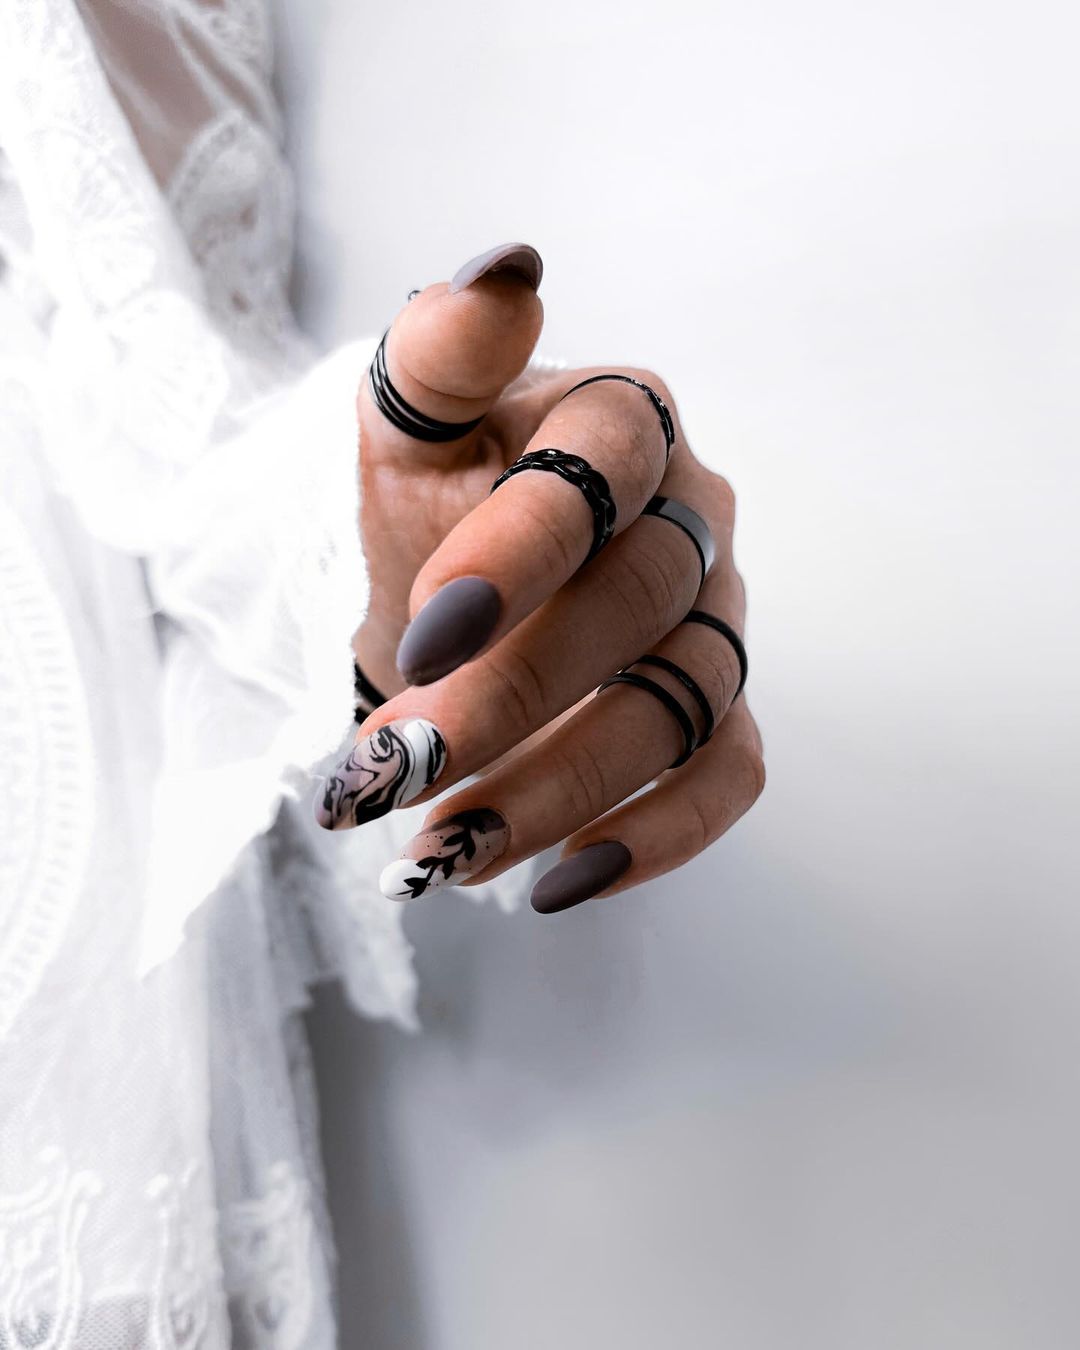
Gothic Black and Grey
This gothic-inspired design features a dramatic gradient from black to grey, accented with glossy black lines. The elongated coffin shape adds to the bold and edgy vibe of this manicure, making it perfect for those who love a darker aesthetic.
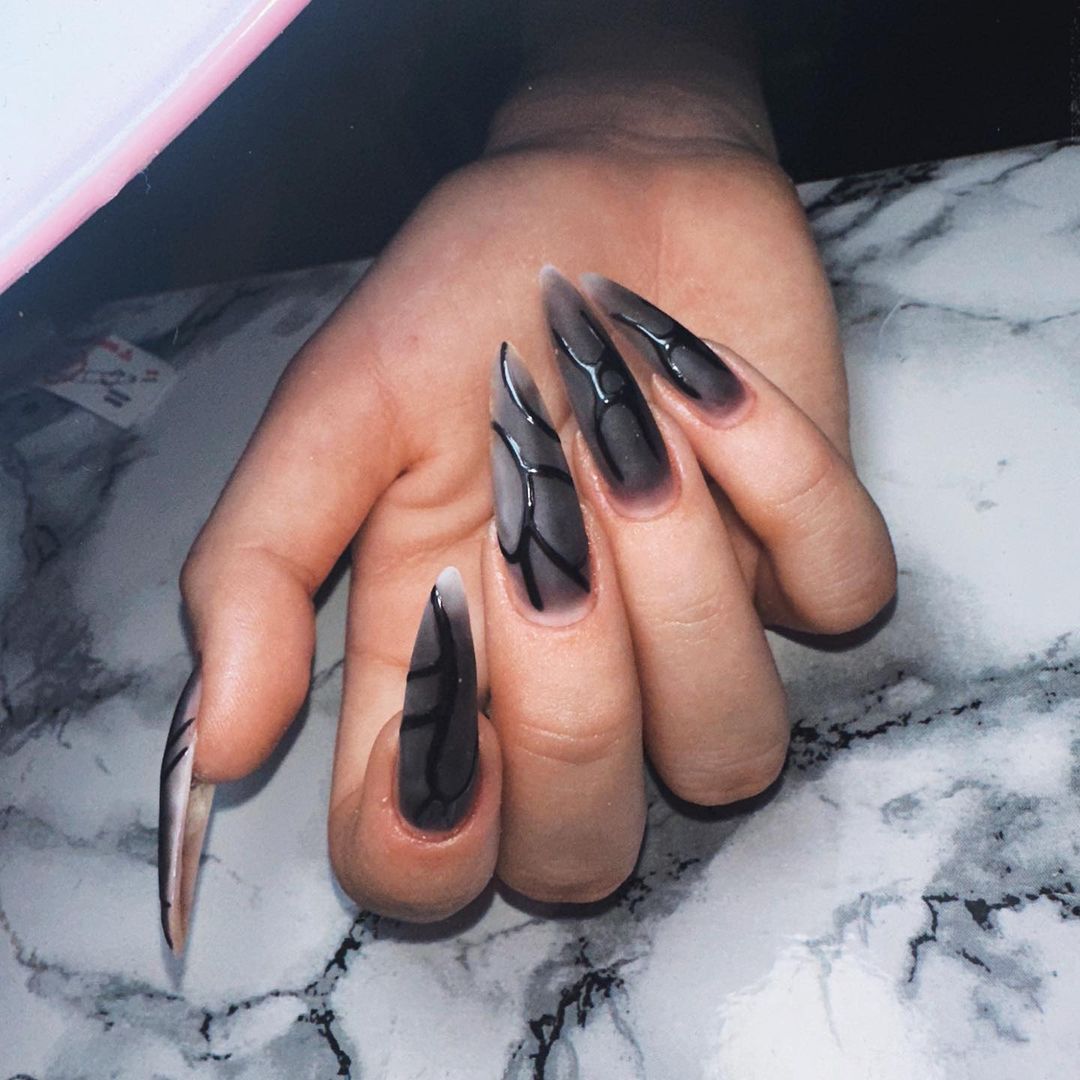
-
- Black nail polish (OPI ‘Black Onyx’)
- Grey nail polish (China Glaze ‘Recycle’)
- Glossy top coat (Seche Vite Dry Fast Top Coat)
- Fine nail art brush
- Matte top coat (OPI Matte Top Coat)
Professional Tip: Create a smooth gradient by blending the black and grey polishes with a sponge. Use a fine brush to add glossy black lines for contrast.
At-Home Instructions
- Prep Your Nails: Clean, shape, and buff your nails into a coffin shape.
- Apply Base Coat: Start with a clear base coat.
- Gradient Color: Using a sponge, blend black and grey polishes to create a gradient effect on each nail.
- Glossy Lines: Use a fine brush to paint glossy black lines on the gradient nails.
- Finish: Apply a matte top coat to seal the design and add durability.
Elegant Baby Blue
This elegant baby blue manicure is perfect for those who prefer a minimalist yet chic look. The smooth matte finish and almond shape give the nails a sophisticated and modern appearance. This design is versatile and suitable for any occasion.
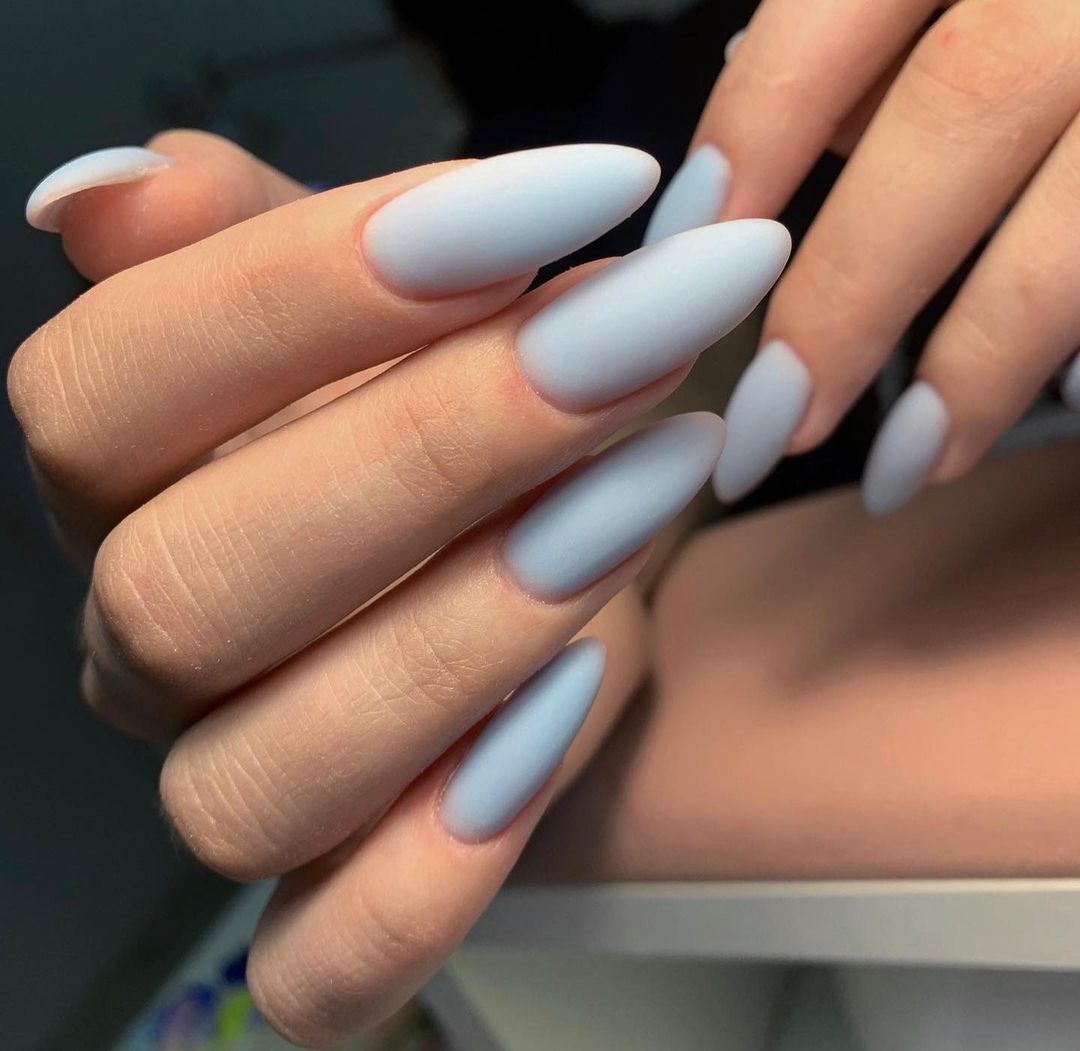
-
- Baby blue nail polish (Essie ‘Bikini So Teeny’)
- Matte top coat (Zoya Matte Velvet Top Coat)
Professional Tip: Ensure the baby blue polish is applied evenly for a smooth finish. The matte top coat will enhance the soft and elegant look.
At-Home Instructions
- Prep Your Nails: Clean, shape, and buff your nails into an almond shape.
- Apply Base Coat: Protect your nails with a base coat.
- Base Color: Apply two coats of baby blue polish.
- Finish: Apply a matte top coat to complete the look and add a sophisticated finish.
Gold Accents on Nude
This luxurious design features a nude base with bold gold accents. The gold embellishments add a touch of glamour and opulence to the simple nude backdrop, making this design perfect for special occasions or adding a bit of luxury to your everyday look.
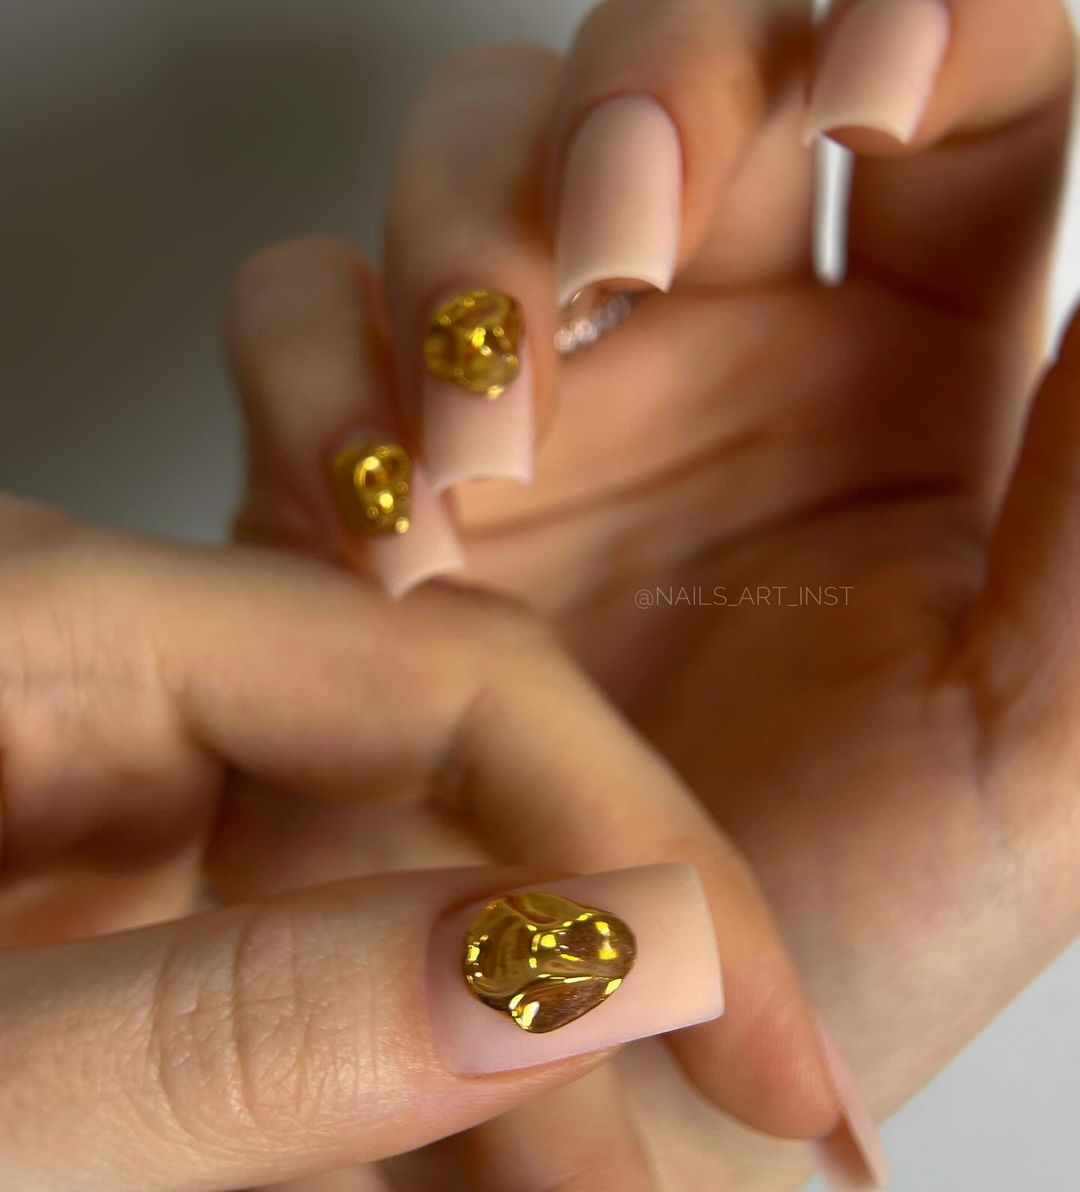
-
- Nude nail polish (OPI ‘Samoan Sand’)
- Gold nail embellishments (Swarovski Gold Flatback Crystals)
- Nail glue (Kiss Precision Nail Glue)
- Matte top coat (Essie Matte About You)
Professional Tip: Use nail glue to secure the gold embellishments firmly in place. The matte top coat will create a beautiful contrast with the shiny gold accents.
At-Home Instructions
- Prep Your Nails: Clean, shape, and buff your nails.
- Apply Base Coat: Start with a clear base coat.
- Base Color: Apply two coats of nude polish.
- Gold Accents: Use nail glue to place gold embellishments on each nail.
- Finish: Apply a matte top coat to seal the design and enhance the luxurious look.
Pink Gradient Hearts
This delightful design features a soft pink gradient as the base, adorned with small, glossy pink heart accents. The smooth transition from a pale pink at the cuticle to a deeper pink at the tips adds a romantic and whimsical touch to this manicure. The heart embellishments add a cute and playful element, perfect for expressing a sweet and loving vibe.
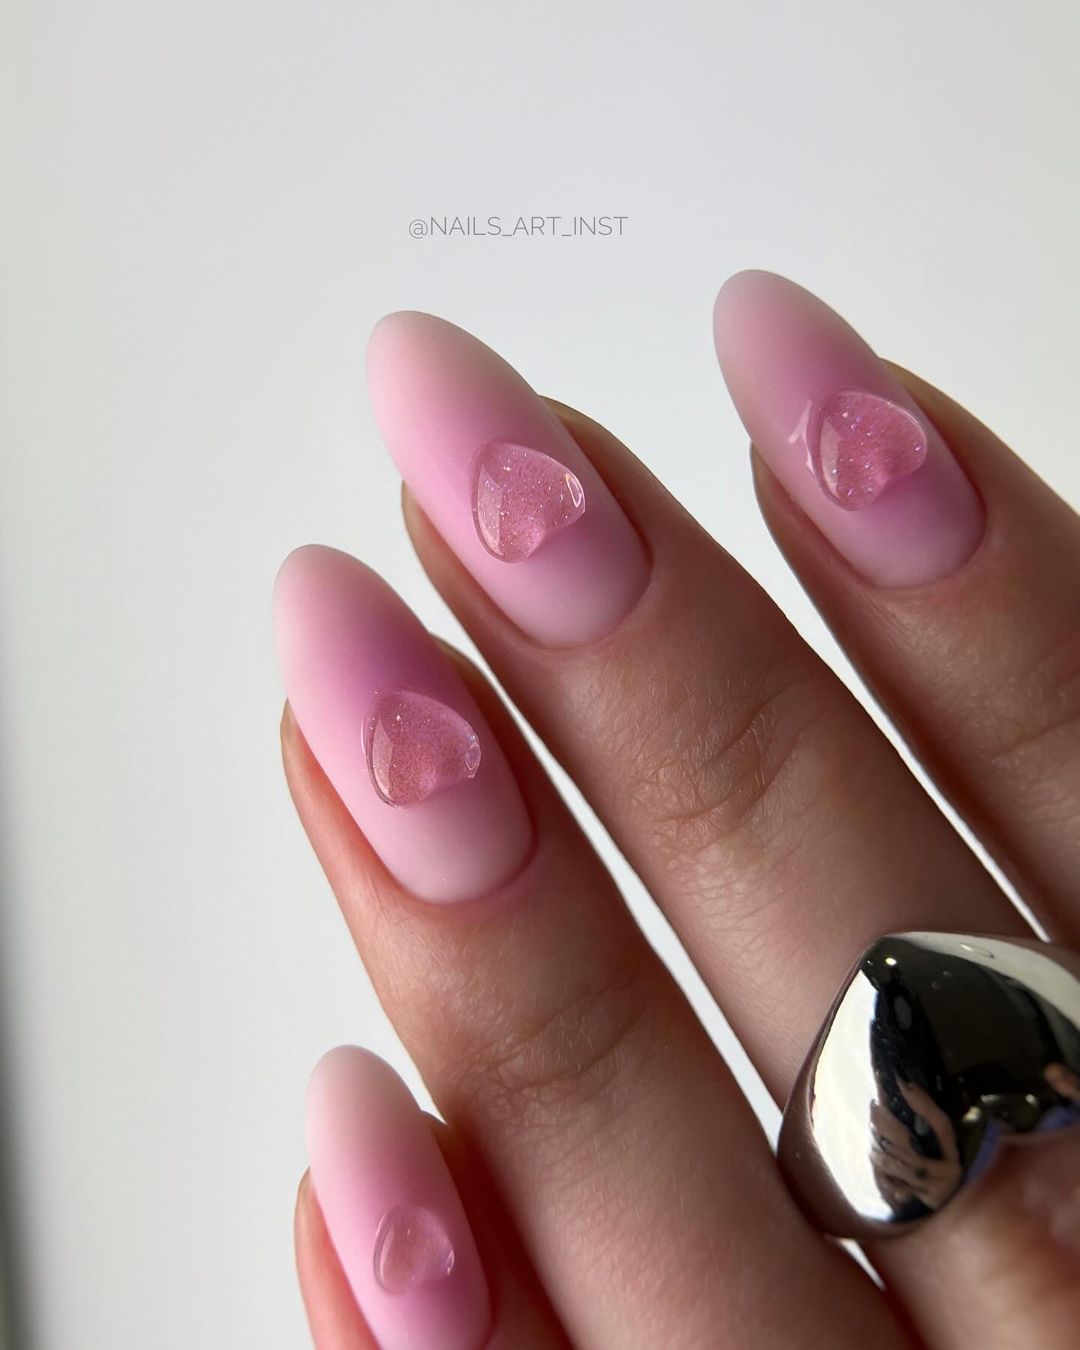
-
- Light pink nail polish (Essie ‘Fiji’)
- Dark pink nail polish (OPI ‘Pink Flamenco’)
- Heart-shaped nail charms
- Nail glue (Kiss Precision Nail Glue)
- Matte top coat (Essie Matte About You)
Professional Tip: Use a sponge to blend the light and dark pink polishes seamlessly. Apply the heart charms with a small amount of nail glue for a secure hold.
At-Home Instructions
- Prep Your Nails: Clean, shape, and buff your nails.
- Apply Base Coat: Protect your nails with a clear base coat.
- Gradient Color: Using a sponge, apply the light and dark pink polishes to create a gradient effect on each nail.
- Heart Accents: Use nail glue to attach the heart charms to each nail.
- Finish: Apply a matte top coat to seal the design and enhance the soft, romantic look.
Delicate Line Art
This sophisticated design features delicate black line art on a soft nude base. The intricate patterns of leaves and abstract shapes create a minimalistic yet elegant look, perfect for those who appreciate understated beauty. The matte finish adds a modern touch, making this manicure ideal for any occasion.
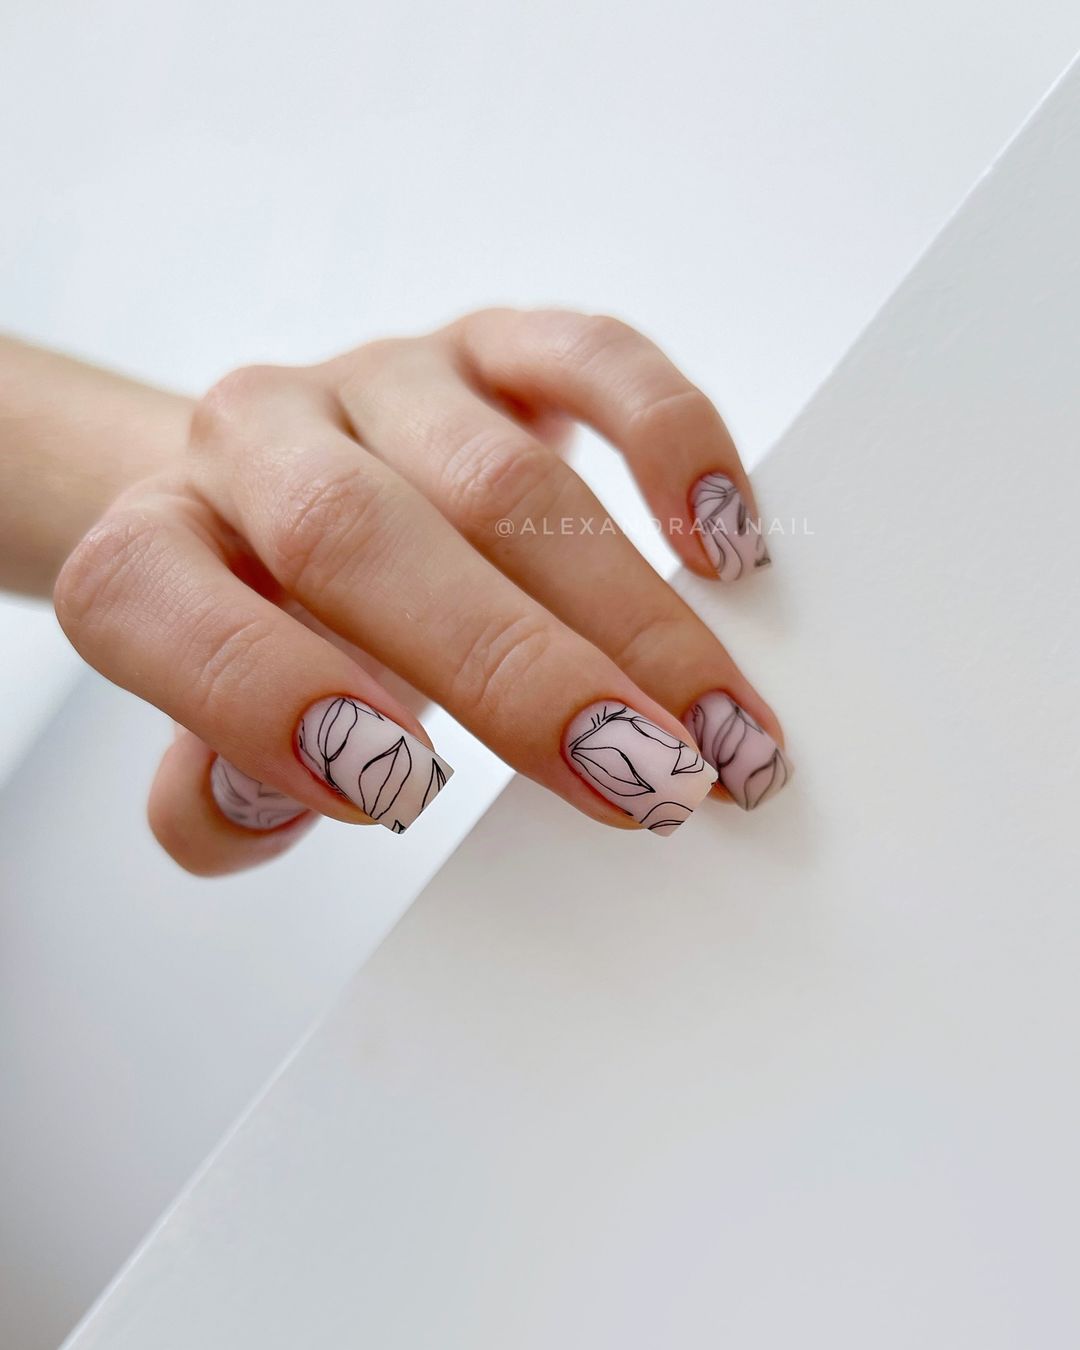
-
- Nude nail polish (OPI ‘Samoan Sand’)
- Black nail art pen (Kiss Nail Art Pen in Black)
- Matte top coat (Zoya Matte Velvet Top Coat)
Professional Tip: Use a fine nail art pen to create the detailed line art. The nude base should be applied evenly for a smooth canvas.
At-Home Instructions
- Prep Your Nails: Clean, shape, and buff your nails.
- Apply Base Coat: Start with a clear base coat.
- Base Color: Apply two coats of nude polish.
- Line Art: Use a fine nail art pen to draw delicate leaf patterns and abstract shapes on each nail.
- Finish: Apply a matte top coat to seal the design and add a sophisticated finish.
Matte Grey Elegance
This elegant design features matte grey nails with intricate black and white accent patterns. The contrast between the soft matte grey and the detailed black and white designs creates a striking and modern look. The almond shape adds a touch of sophistication, making this manicure perfect for those who love a chic and contemporary style.
-
- Matte grey nail polish (China Glaze ‘Recycle’)
- Black and white nail art pens (Kiss Nail Art Pen in Black and White)
- Matte top coat (Essie Matte About You)
Professional Tip: For a smooth matte finish, apply the grey polish evenly. Use fine nail art pens to create the intricate black and white patterns.
At-Home Instructions
- Prep Your Nails: Clean, shape, and buff your nails into an almond shape.
- Apply Base Coat: Start with a clear base coat.
- Base Color: Apply two coats of matte grey polish.
- Accent Patterns: Use black and white nail art pens to draw intricate designs on the accent nails.
- Finish: Apply a matte top coat to seal the design and enhance the elegant look.
Golden Peaks
This luxurious design features a nude base with black and gold accents, creating a chic and elegant manicure. The black and gold peaks add a touch of glamour and sophistication, making this design perfect for special occasions or adding a bit of luxury to your everyday look.
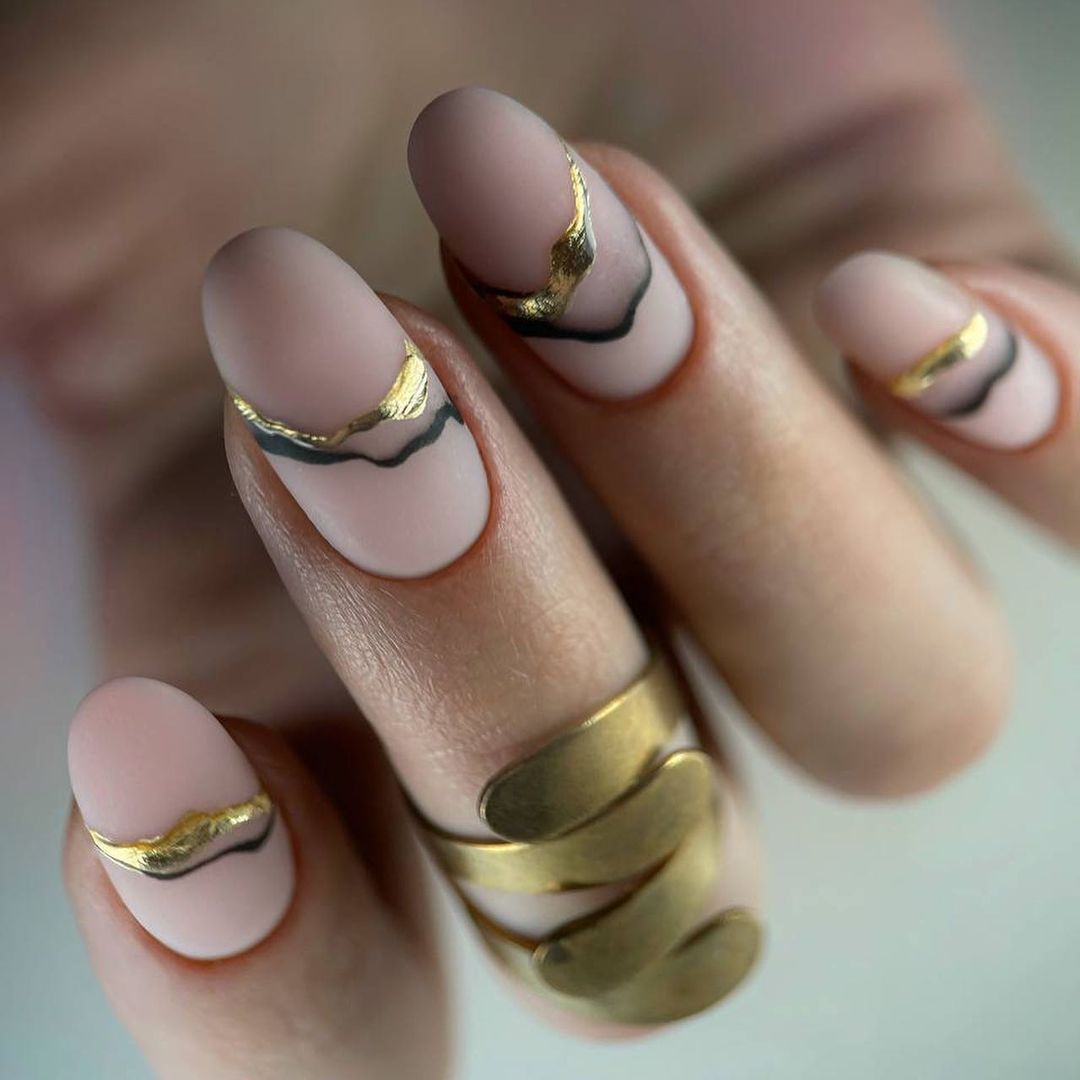
-
- Nude nail polish (OPI ‘Samoan Sand’)
- Black nail polish (OPI ‘Black Onyx’)
- Gold nail art paint (Sally Hansen Nail Art Paint in Gold)
- Fine nail art brush
- Matte top coat (Zoya Matte Velvet Top Coat)
Professional Tip: Use a fine brush to create precise black and gold peaks. The matte top coat will enhance the contrast and make the gold accents pop.
At-Home Instructions
- Prep Your Nails: Clean, shape, and buff your nails.
- Apply Base Coat: Start with a clear base coat.
- Base Color: Apply two coats of nude polish.
- Black and Gold Peaks: Use a fine brush to draw black and gold peaks on each nail.
- Finish: Apply a matte top coat to seal the design and enhance the luxurious look.
Soft Marble
This elegant marble design features soft pink and white swirls on a nude base, creating a delicate and sophisticated look. The subtle marble effect adds a touch of class, making this design perfect for those who love a refined and timeless manicure.
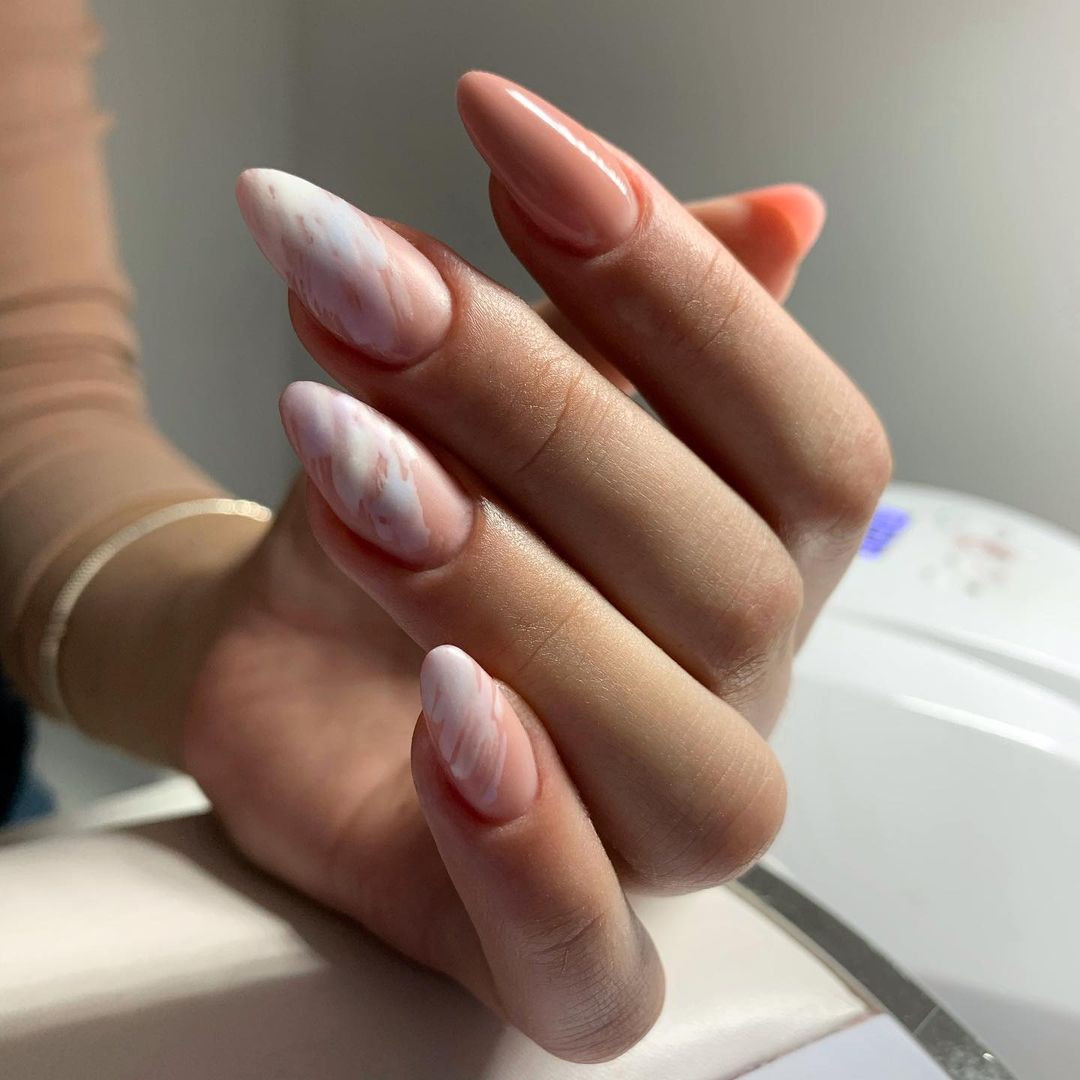
-
- Nude nail polish (Essie ‘Ballet Slippers’)
- White nail polish (OPI ‘Alpine Snow’)
- Fine nail art brush or a thin brush
- Matte top coat (Essie Matte About You)
Professional Tip: Use a fine brush to create soft, swirling marble patterns with the white polish over the nude base. The key is to keep the swirls light and natural-looking.
At-Home Instructions
- Prep Your Nails: Clean, shape, and buff your nails.
- Apply Base Coat: Protect your nails with a clear base coat.
- Base Color: Apply two coats of nude polish.
- Marble Effect: Use a fine brush to swirl white polish over the nude base, creating a marble effect.
- Finish: Apply a matte top coat to seal the design and enhance the elegant look.
FAQ
Q: How can I make my matte nails last longer? A: Ensure to apply a good quality base coat and top coat. Avoid using your nails as tools to prevent chipping.
Q: What is the best way to remove matte nail polish? A: Use an acetone-based remover and soak a cotton pad, placing it on your nail for a few seconds before wiping away.
Q: Can I add glossy tips to my matte nails? A: Absolutely! Glossy tips can add a chic contrast to your matte nails. Simply use a glossy top coat on the tips after applying the matte top coat.
Q: Are matte nails suitable for all nail shapes and lengths? A: Yes, matte nails can look fabulous on any nail shape and length, from short to long, square to almond.
This guide is your ultimate companion to achieving stunning fall matte nails this season. Whether you prefer a simple design or something more intricate, these ideas will keep your nails looking chic and stylish. Happy manicuring!
Save Pin