Fall is the perfect time to refresh your nail game with the latest trends and cute fall nails. Whether you’re looking for simple designs or something more intricate, this article will guide you through the best nail ideas for the season. From gel to acrylics, we’ve got you covered with trendy and fashion-forward looks that will make your nails the talk of every occasion. Ready to explore some fabulous nail designs? Let’s dive in!
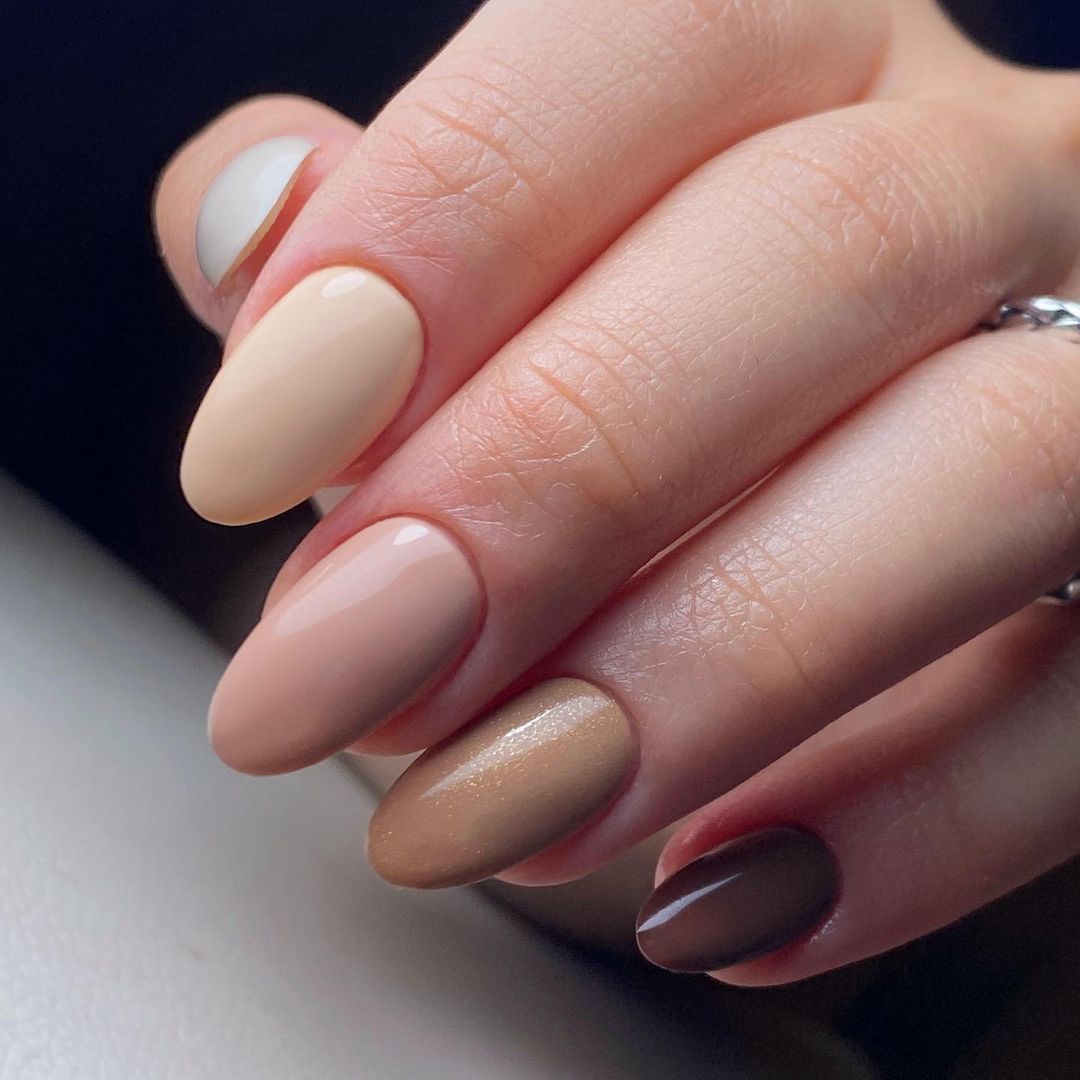
Classic Nude Elegance
Nude nails are a timeless choice that works for any occasion. This design features a gradient of soft beige tones, creating a sophisticated and elegant look. Perfect for those who prefer a minimalist style, this manicure is both super chic and easy to maintain.
-
- OPI Nail Lacquer in “Dulce de Leche”
- Essie Nail Polish in “Mademoiselle”
- Sally Hansen Miracle Gel in “Birthday Suit”
- Top coat: Seche Vite Dry Fast Top Nail Coat
DIY Instructions:
-
- Apply a base coat to protect your nails.
- Start with the lightest shade and paint all nails.
- Gradually apply darker shades from the base to the tips to create a gradient effect.
- Finish with a high-gloss top coat for a polished look.
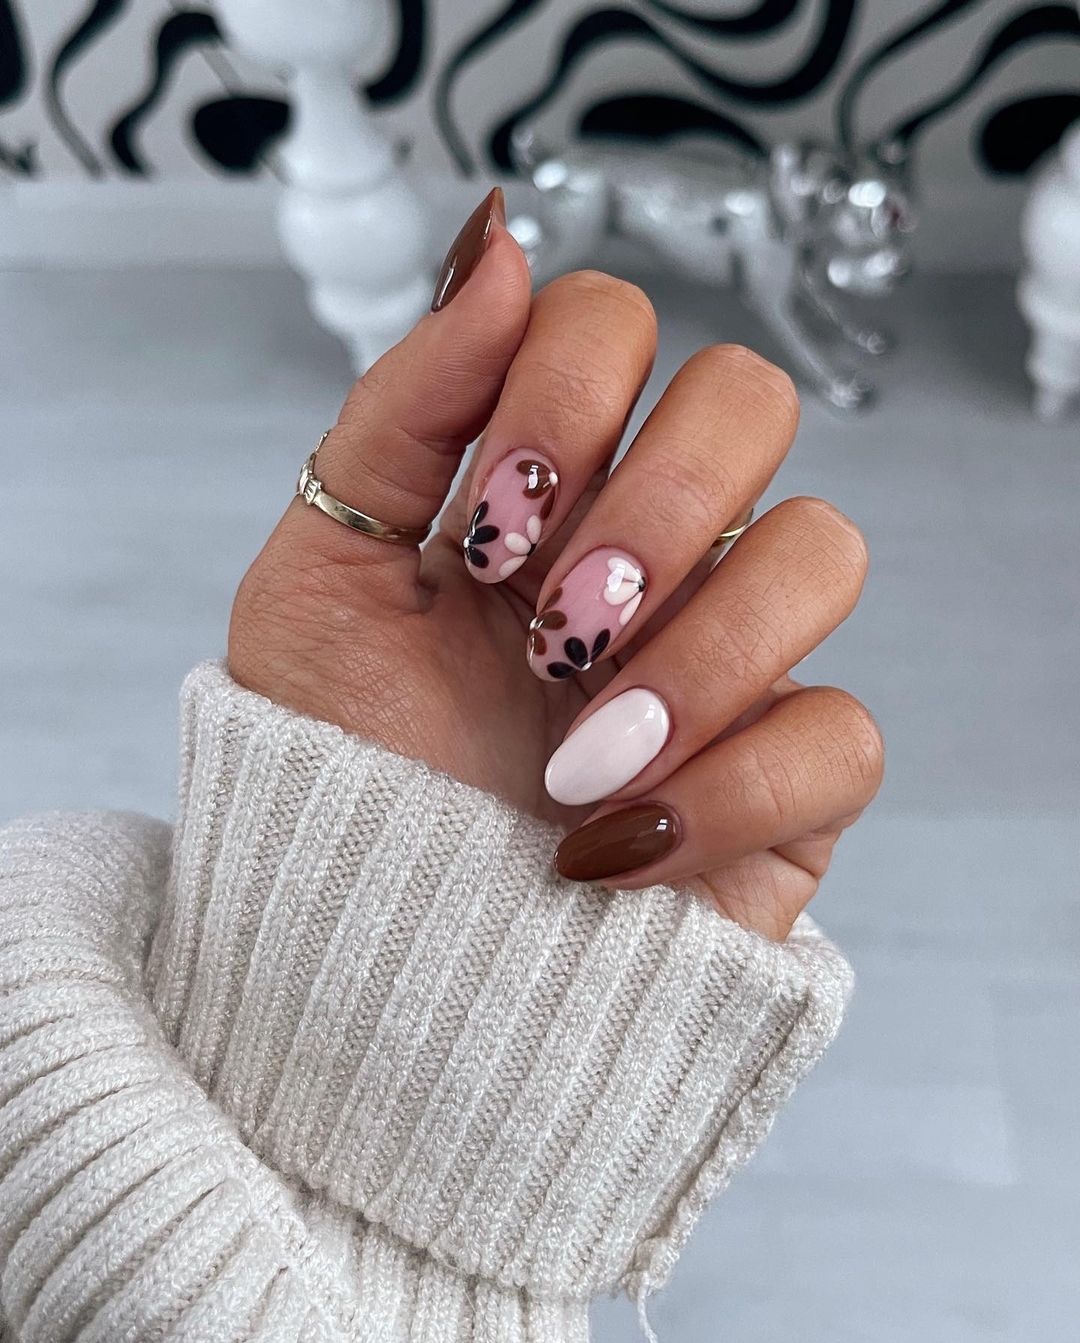
Fall Floral Fantasy
Florals aren’t just for spring! This cute fall nails design brings the beauty of autumn flowers to your fingertips. The mix of earthy browns and soft pinks, adorned with delicate floral patterns, makes this manicure a true statement piece.
-
- Base color: Zoya Nail Polish in “Rue”
- Flower designs: Nail art brushes, dotting tools
- Accent color: OPI Nail Lacquer in “Chocolate Moose”
- Top coat: CND Vinylux Weekly Top Coat
DIY Instructions:
-
- Apply the base color and let it dry completely.
- Use nail art brushes to paint floral designs with the accent color.
- Use a dotting tool for precise flower centers.
- Seal your design with a top coat for longevity.
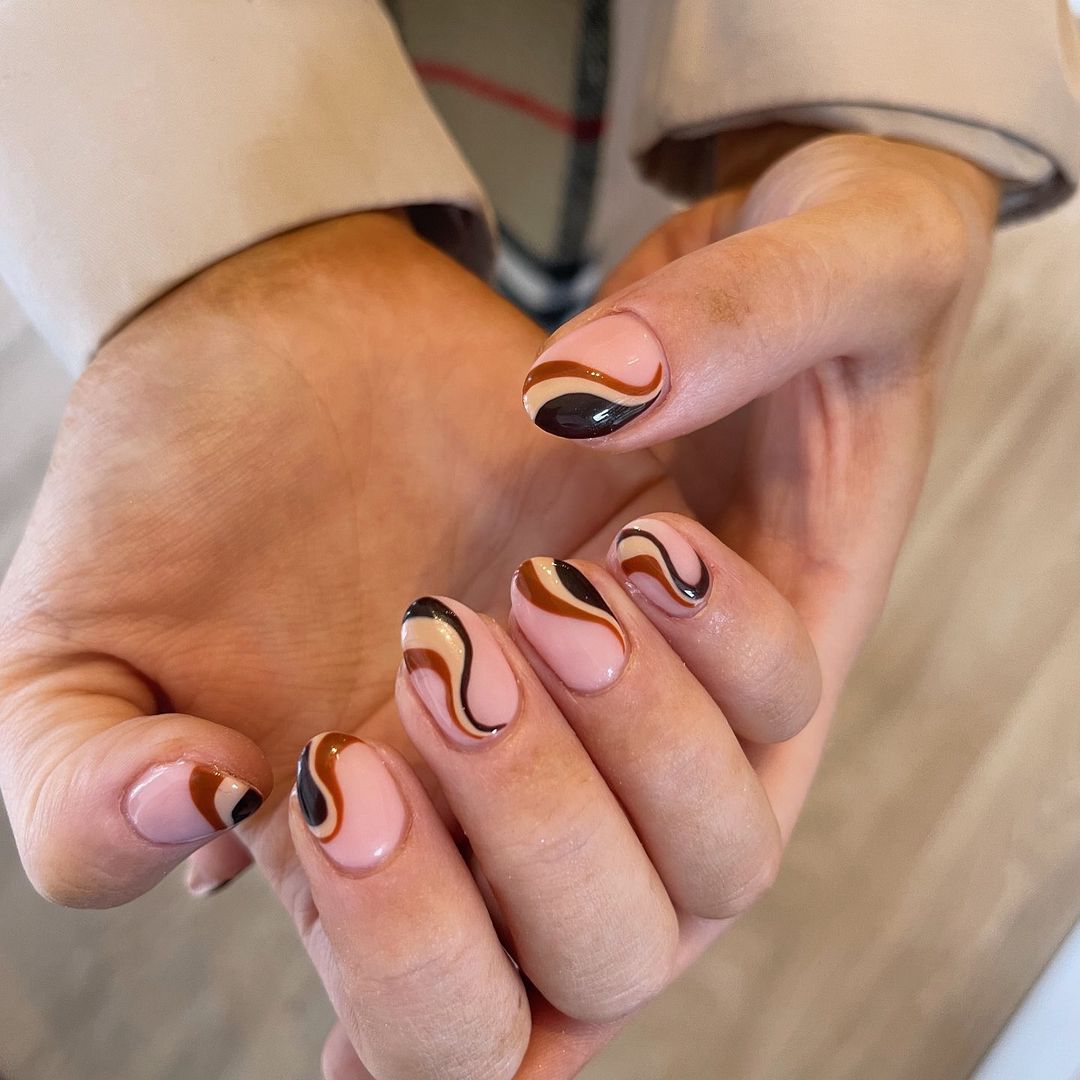
Groovy Autumn Waves
Embrace the retro vibes with these groovy autumn waves. This design combines soft pinks with bold brown swirls, creating a fun and trendy look. Perfect for those who love to stand out, this manicure is a fall favorite.
-
- Base color: Essie Nail Polish in “Ballet Slippers”
- Swirl colors: OPI Nail Lacquer in “Brown to Earth” and “Bare My Soul”
- Nail art brush
- Top coat: Sally Hansen Insta-Dri Top Coat
DIY Instructions:
-
- Apply the base color and allow it to dry.
- Use a fine nail art brush to create swirl designs with the chosen colors.
- Alternate colors for a dynamic look.
- Finish with a quick-drying top coat to protect your design.
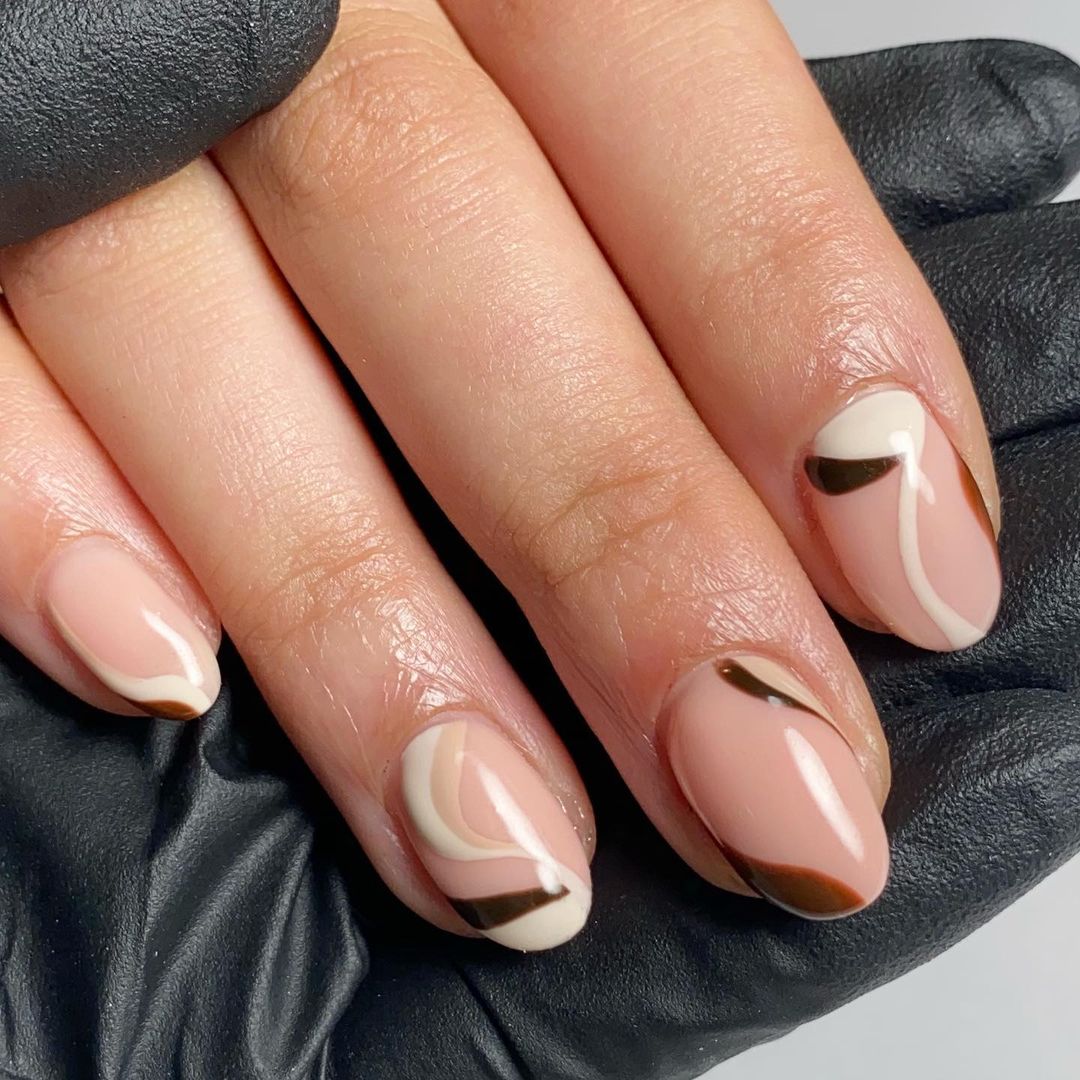
Swirling Autumn Elegance
This stunning nail design brings a modern twist to the classic fall palette. The soft pink base serves as the perfect canvas for the bold, swirling brown accents that create a mesmerizing visual flow. The sleek, almond shape enhances the overall sophistication of this look, making it ideal for both casual outings and more formal occasions.
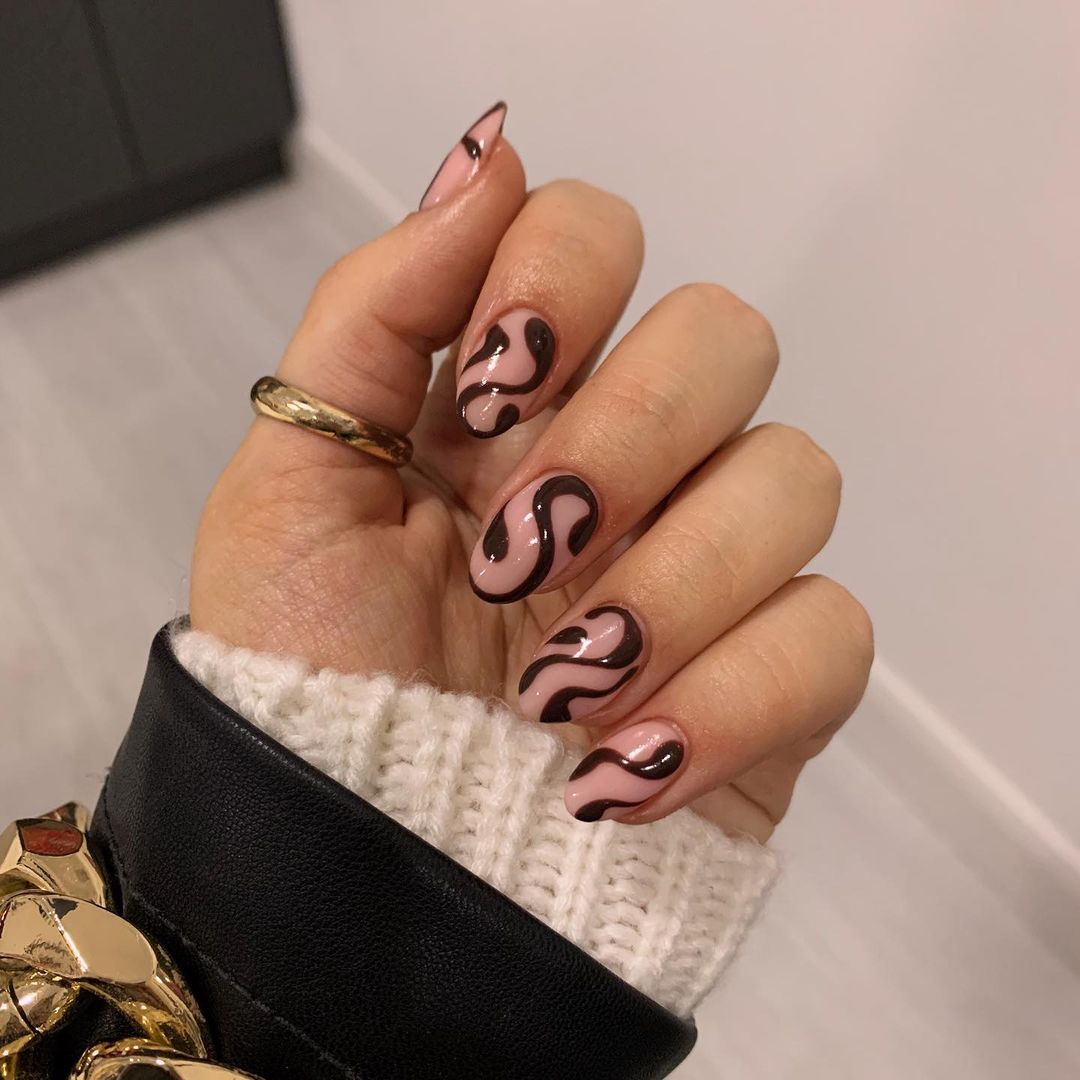
-
- Base color: Essie Nail Polish in “Ballet Slippers”
- Swirl colors: OPI Nail Lacquer in “Lincoln Park After Dark” and “Chocolate Moose”
- Nail art brushes for precision
- Top coat: Seche Vite Dry Fast Top Nail Coat
DIY Instructions:
-
- Start with a clear base coat to protect your natural nails.
- Apply two coats of the soft pink base color and let them dry completely.
- Use a fine nail art brush to create the brown swirls. Begin with the darker shade for depth, then add the lighter brown to highlight.
- Finish with a high-gloss top coat to seal in the design and add shine.
Save Pin
Botanical Bliss
Embrace the beauty of nature with this enchanting floral nail design. The light pink base is adorned with delicate black branches and vibrant red and blue flowers, capturing the essence of an autumn garden. This look is perfect for anyone who loves to incorporate a bit of whimsy into their style while keeping it classy and chic.
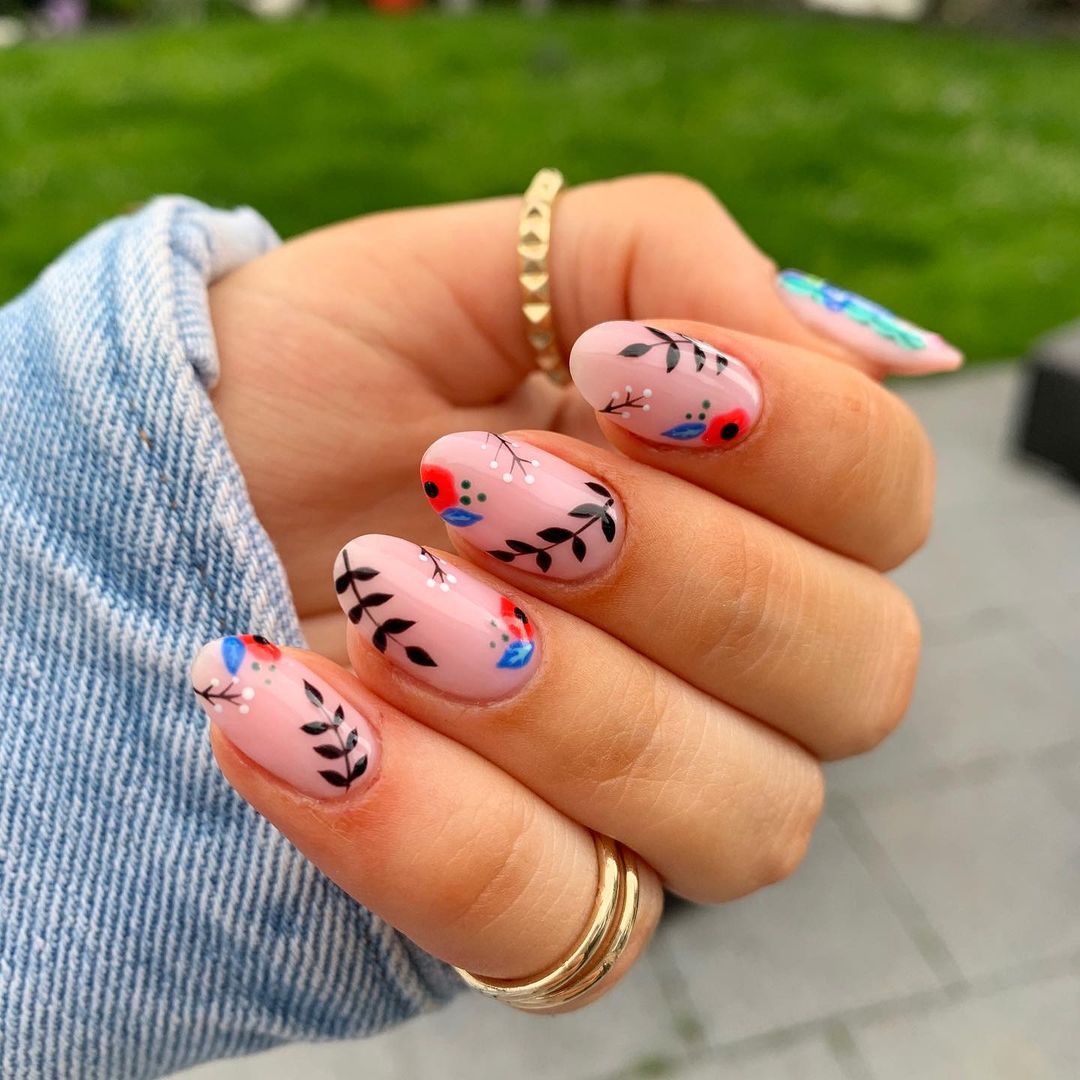
-
- Base color: OPI Nail Lacquer in “Bubble Bath”
- Floral designs: Nail art brushes, dotting tools
- Accent colors: Zoya Nail Polish in “Sia” (blue), “Carmen” (red), and “Willa” (black)
- Top coat: CND Vinylux Weekly Top Coat
DIY Instructions:
-
- Apply a base coat to all nails and let it dry.
- Paint your nails with the light pink base color.
- Use nail art brushes to draw thin black branches and add dots for flowers using the dotting tools.
- Finish the design with a top coat to protect your artwork and add a beautiful shine.
Tortoiseshell French Tips
For a modern and sophisticated look, these tortoiseshell French tips are the perfect choice. The soft pink base pairs beautifully with the intricate tortoiseshell pattern on the tips, creating a unique and fashionable manicure. This design is ideal for those who want a trendy yet polished appearance.
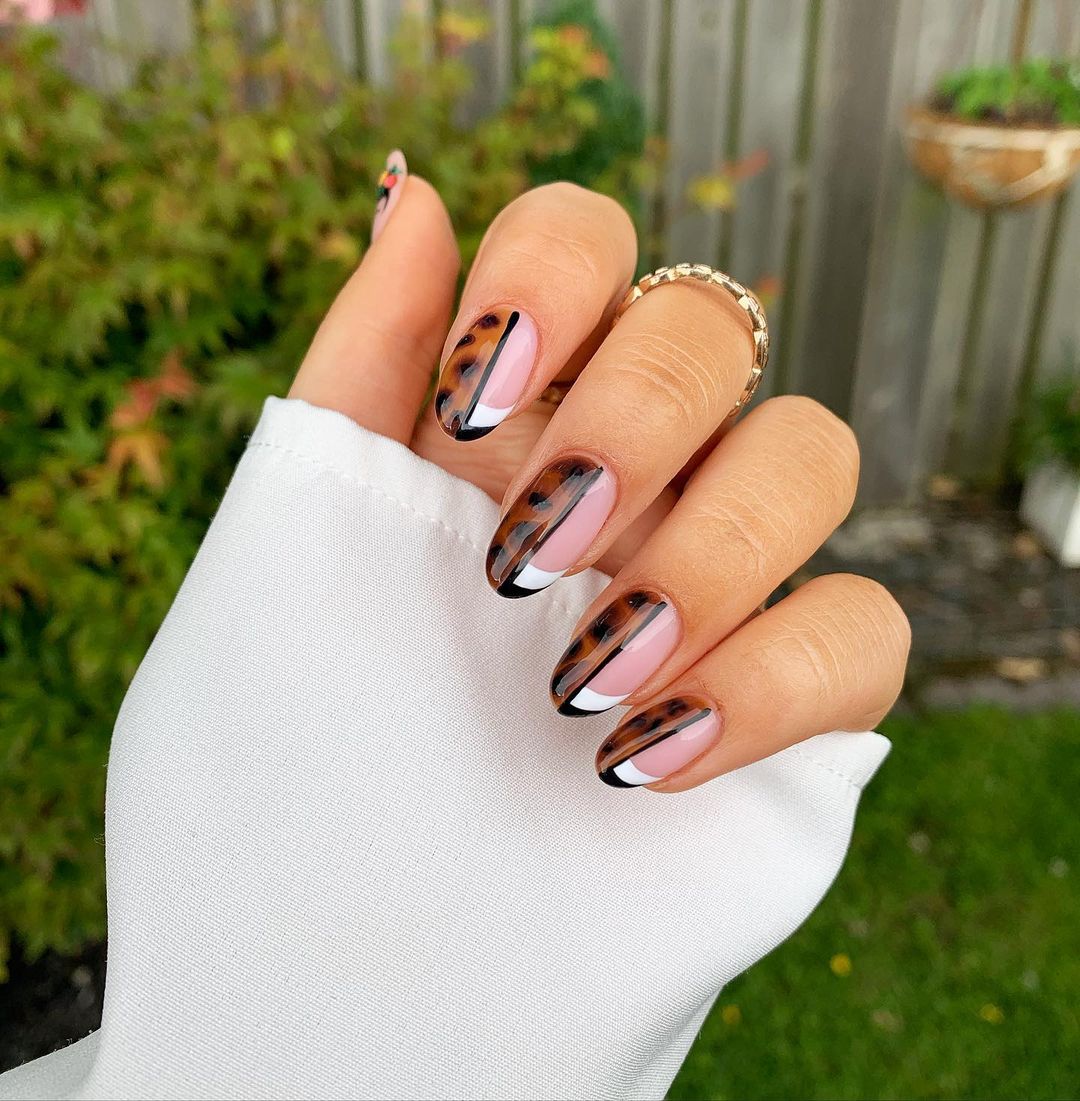
-
- Base color: Essie Nail Polish in “Mademoiselle”
- Tortoiseshell tips: OPI Nail Lacquer in “Suzi Needs a Loch-smith” (orange), “Good Girls Gone Plaid” (dark brown), and “Coconut Over OPI” (white)
- Nail art brush for detail work
- Top coat: Sally Hansen Miracle Gel Top Coat
DIY Instructions:
-
- Apply a base coat to protect your nails.
- Paint your nails with the soft pink base color and allow them to dry.
- Use a nail art brush to create the tortoiseshell pattern on the tips by layering the orange, dark brown, and white polishes in a random, organic pattern.
- Seal your design with a top coat to ensure it lasts and shines.
Floral French Tips
These charming floral French tips combine the classic elegance of a French manicure with the whimsical beauty of daisies. The soft pink base provides a delicate backdrop, while the brown and orange gradient tips add a warm, autumnal touch. Tiny white daisies are strategically placed to create a fresh, feminine look perfect for the season.
-
- Base color: OPI Nail Lacquer in “Bubble Bath”
- Gradient tips: Essie Nail Polish in “Playing Koi” (orange) and “Little Brown Dress” (brown)
- Flower designs: Nail art brushes, dotting tools, and white nail polish
- Top coat: Seche Vite Dry Fast Top Nail Coat
DIY Instructions:
-
- Apply a base coat followed by the soft pink base color and let it dry completely.
- Create the gradient effect on the tips using a makeup sponge and the brown and orange polishes.
- Use a dotting tool and white nail polish to paint tiny daisies along the tips.
- Finish with a top coat to seal the design and add shine.
Monochrome Madness
This bold black and white manicure is perfect for those who love a bit of drama in their nail art. Featuring a mix of patterns including checkerboards, swirls, and dots, this design is eye-catching and unique. The contrasting colors make each pattern pop, creating a striking look that’s perfect for making a statement.
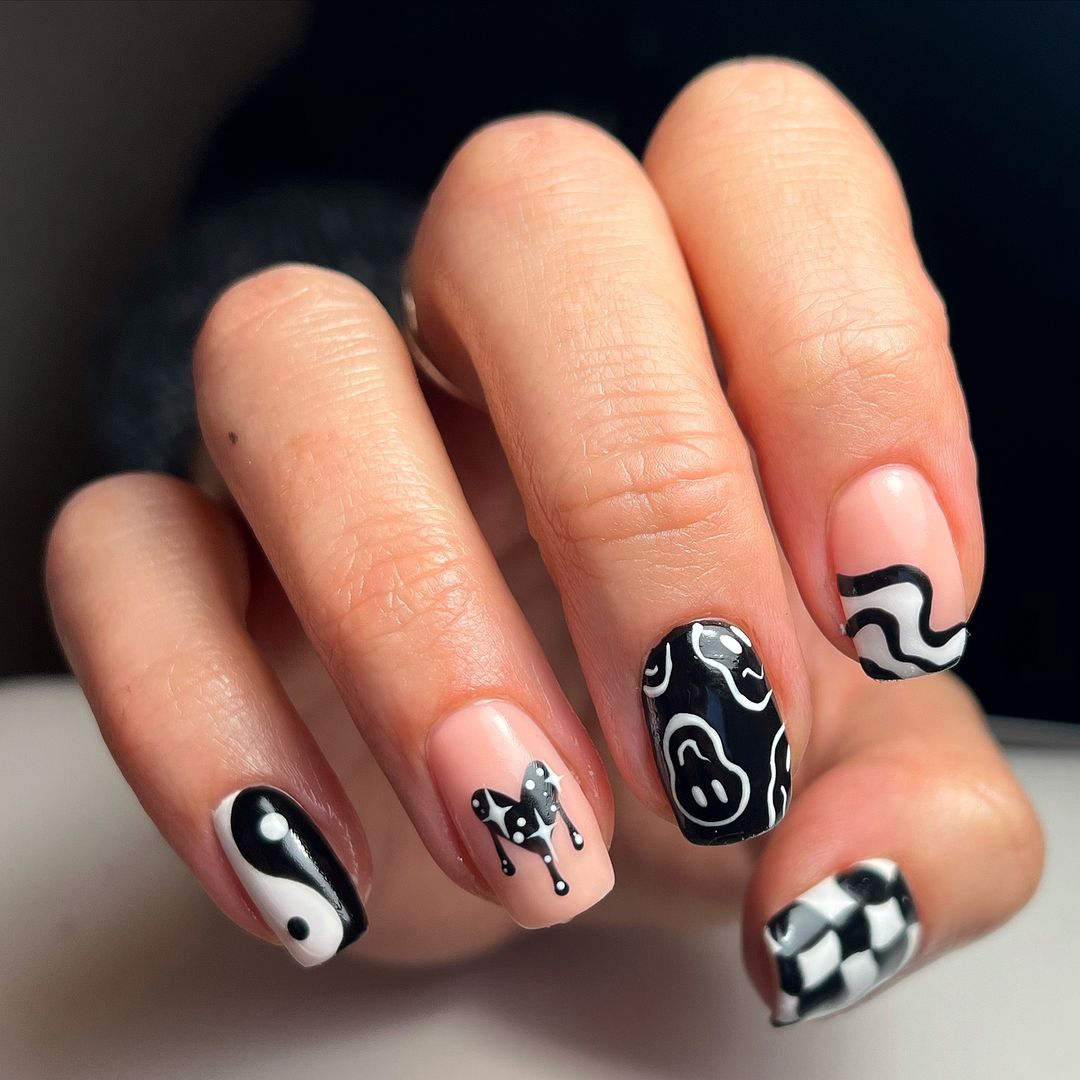
-
- Base color: Essie Nail Polish in “Blanc” (white) and “Licorice” (black)
- Nail art brushes for detailed work
- Top coat: CND Vinylux Weekly Top Coat
DIY Instructions:
-
- Apply a base coat to protect your nails.
- Alternate between the black and white base colors for each nail.
- Use nail art brushes to create the various patterns on each nail. Let your creativity flow with checkerboards, swirls, and dots.
- Seal the design with a top coat to ensure longevity and shine.
Green Geometric Delight
This playful green manicure features a variety of geometric patterns, including checkerboards and hearts, all in different shades of green. The intricate designs and the mix of light and dark greens create a fun and lively look, perfect for adding a pop of color to your fall wardrobe.

-
- Base color: OPI Nail Lacquer in “How Does Your Zen Garden Grow?” and “Stay Off the Lawn!”
- Geometric designs: Nail art brushes, dotting tools, and white nail polish
- Top coat: Sally Hansen Miracle Gel Top Coat
DIY Instructions:
-
- Apply a base coat followed by the light green base color and let it dry.
- Use nail art brushes to create the various geometric designs with the darker green and white polishes.
- Finish with a top coat to protect your designs and add a glossy finish.
Save Pin
Mushroom Magic
Bring a touch of magic to your nails with this enchanting mushroom design. The soft nude base is adorned with delicate, hand-painted mushrooms in shades of red, white, and green. This design is whimsical and perfect for those who love a bit of fantasy in their nail art.
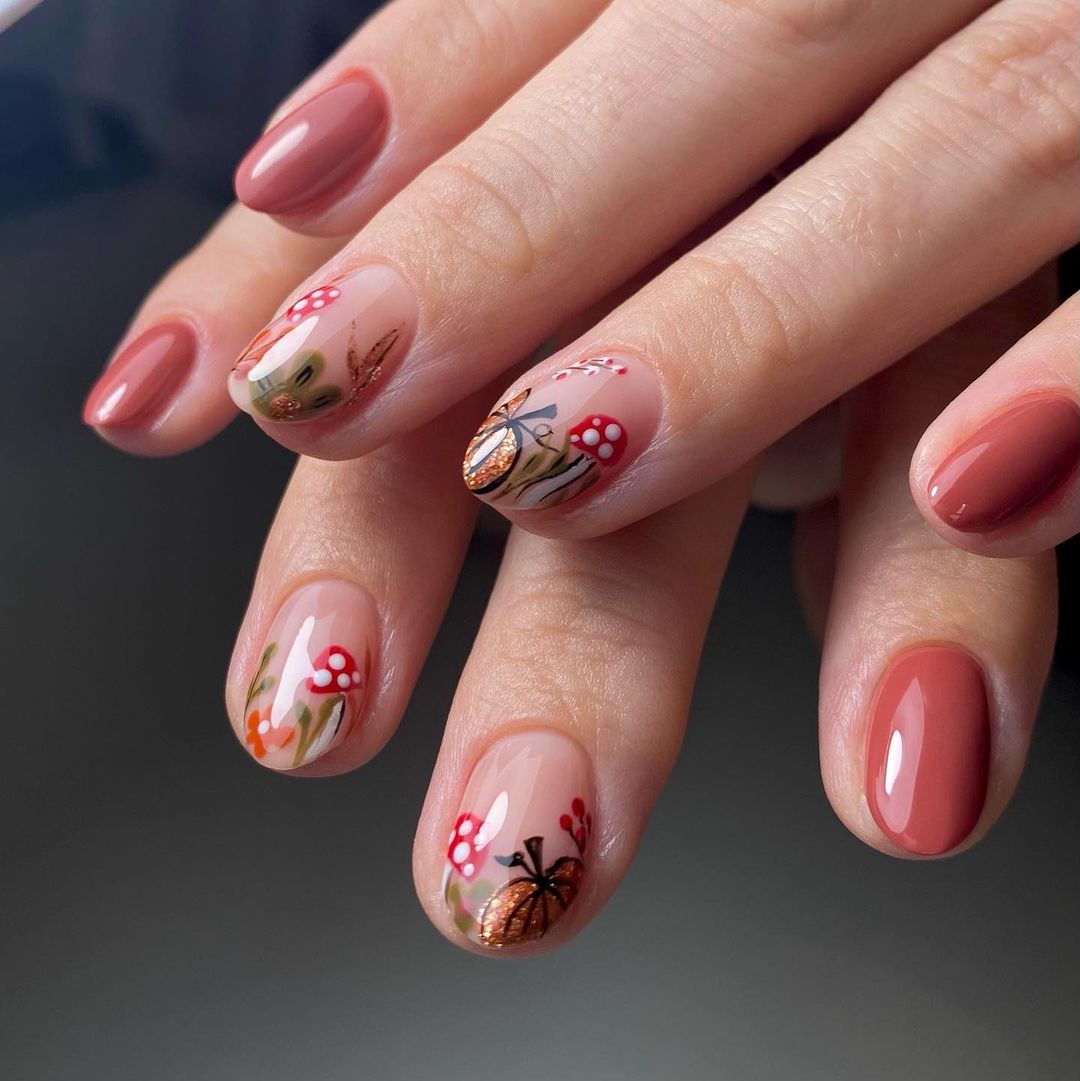
-
- Base color: Essie Nail Polish in “Ballet Slippers”
- Mushroom designs: Nail art brushes, dotting tools, red, white, and green nail polishes
- Top coat: Seche Vite Dry Fast Top Nail Coat
DIY Instructions:
-
- Apply a base coat to all nails and let it dry.
- Paint your nails with the soft nude base color.
- Use nail art brushes to carefully paint the mushroom designs on each nail. Add details with dotting tools.
- Seal your design with a top coat to ensure it lasts.
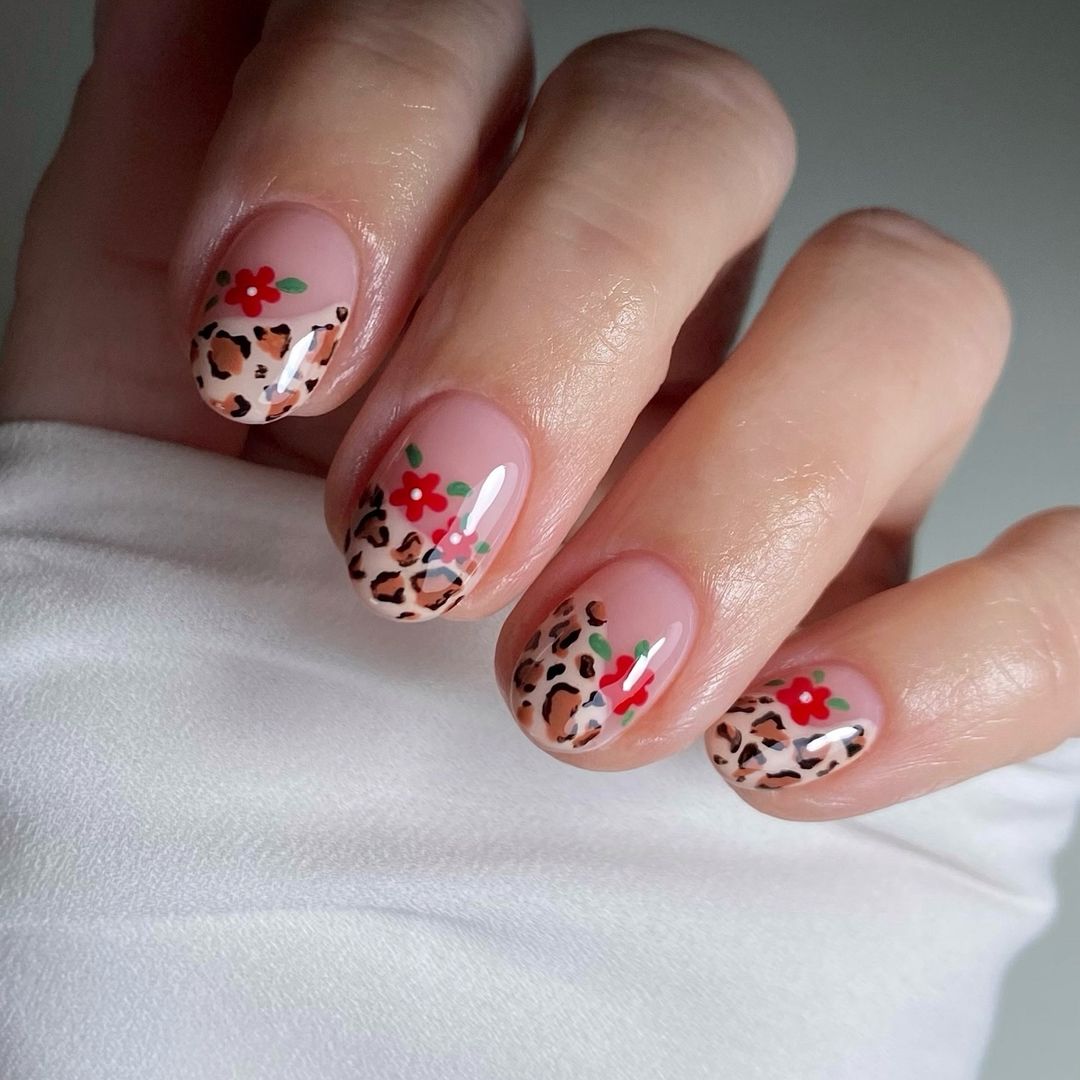
Leopard Floral Fusion
This unique design combines the wild allure of leopard print with the delicate beauty of small red flowers. The soft nude base is the perfect backdrop for the contrasting patterns, making this manicure both trendy and chic. It’s a bold look that’s sure to turn heads.
-
- Base color: OPI Nail Lacquer in “Samoan Sand”
- Leopard print: Black and brown nail polishes, nail art brushes
- Floral designs: Red and green nail polishes, dotting tools
- Top coat: CND Vinylux Weekly Top Coat
DIY Instructions:
-
- Apply a base coat followed by the nude base color.
- Use nail art brushes to create the leopard print spots with black and brown polishes.
- Add small red flowers with dotting tools and green leaves for accents.
- Finish with a top coat to seal in your design and add shine.
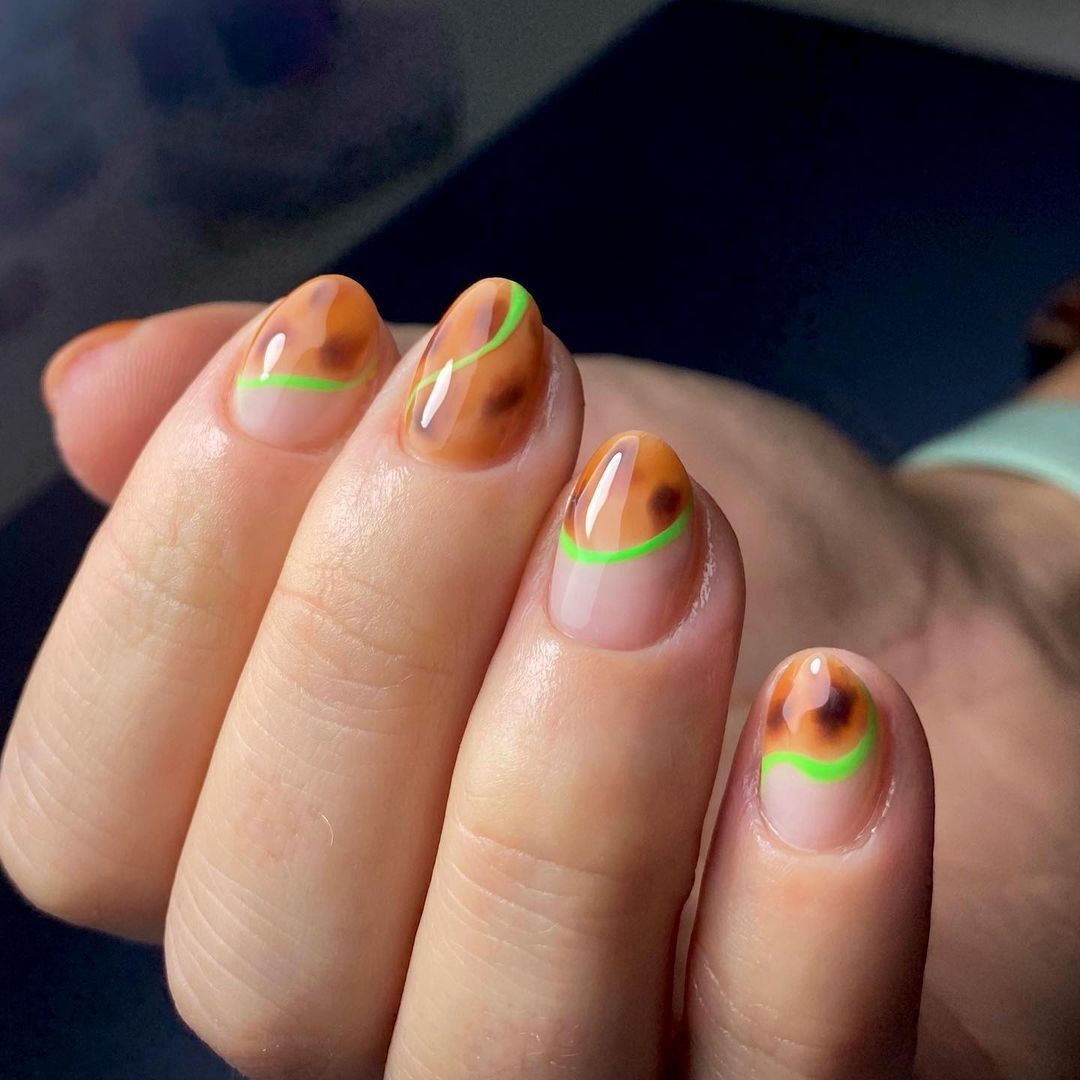
Neon Tortoiseshell
This funky design combines the classic tortoiseshell pattern with a modern neon twist. The transparent base lets your natural nails peek through, while the orange tortoiseshell pattern is accented with bright green lines. This look is perfect for those who love to experiment with their nails and stand out from the crowd.
-
- Base coat: Clear polish
- Tortoiseshell pattern: Orange and brown nail polishes, nail art brushes
- Neon accents: Bright green nail polish
- Top coat: Sally Hansen Insta-Dri Top Coat
DIY Instructions:
-
- Start with a clear base coat.
- Use nail art brushes to create the tortoiseshell pattern with orange and brown polishes.
- Add bright green lines for a neon accent.
- Finish with a top coat to protect your design and add a glossy finish.
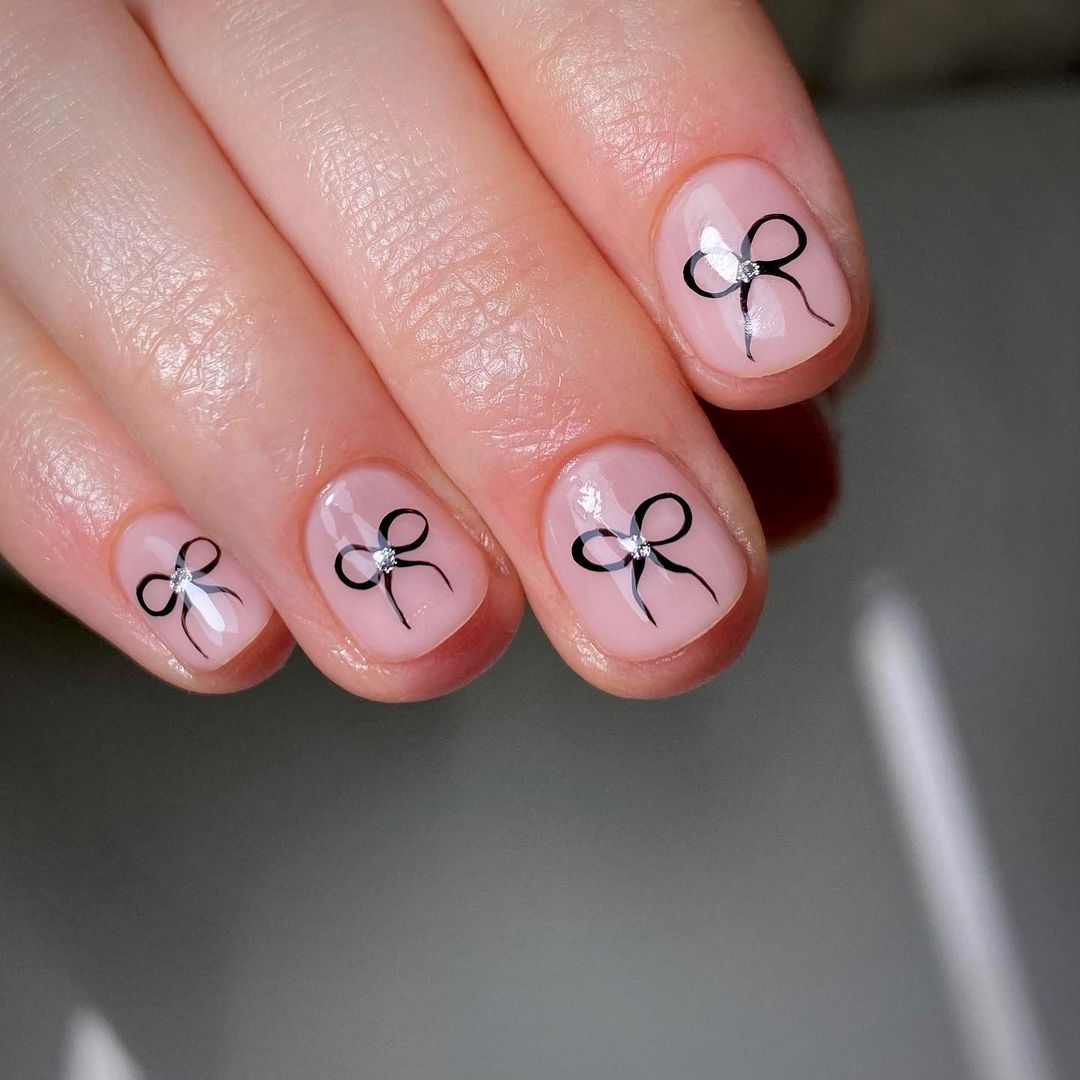
Elegant Bow Accents
This delicate nail design features simple yet elegant bows, making it perfect for those who prefer a minimalist aesthetic. The soft pink base complements the black bows, which are each adorned with a tiny rhinestone for a touch of sparkle. This look is understated yet chic, ideal for any occasion.
-
- Base color: OPI Nail Lacquer in “Bubble Bath”
- Bow designs: Black nail art pen or nail polish and thin brush
- Rhinestones for accents
- Top coat: Seche Vite Dry Fast Top Nail Coat
DIY Instructions:
-
- Apply a base coat to protect your nails.
- Paint your nails with the soft pink base color and let it dry completely.
- Use a black nail art pen or thin brush to draw the bow designs on each nail.
- Place a tiny rhinestone in the center of each bow for added sparkle.
- Finish with a top coat to seal the design and add shine.
Neon Watercolor Swirls
Add a pop of color to your nails with these vibrant neon watercolor swirls. This design features a mix of bright colors, including pink, blue, green, and purple, creating a fun and energetic look. The clear base allows the colors to stand out, making this manicure perfect for those who love bold, eye-catching designs.

-
- Base coat: Clear polish
- Neon colors: China Glaze Nail Polish in “Purple Panic,” “Celtic Sun,” “Flip Flop Fantasy,” and “I’m with the Lifeguard”
- Nail art brushes for creating swirls
- Top coat: CND Vinylux Weekly Top Coat
DIY Instructions:
-
- Apply a clear base coat to your nails.
- Use nail art brushes to apply the neon colors in a swirling pattern on each nail.
- Allow the colors to blend slightly for a watercolor effect.
- Finish with a top coat to protect your design and add a glossy finish.
Red Stripe Vibes
This striking red manicure features intricate stripes, creating a bold and stylish look. The vibrant red base is perfect for fall, while the white stripes add a touch of sophistication. This design is great for those who love a classic color with a modern twist.
-
- Base color: Essie Nail Polish in “Really Red”
- White stripes: Nail art tape or a thin brush with white nail polish
- Top coat: Sally Hansen Insta-Dri Top Coat
DIY Instructions:
-
- Apply a base coat to protect your nails.
- Paint your nails with the vibrant red base color and let them dry completely.
- Use nail art tape or a thin brush to create the white stripes on each nail.
- Seal your design with a top coat to ensure longevity and shine.
Iridescent Glow
This stunning nail design features a soft, iridescent glow that changes color depending on the light. The clear base allows the iridescent colors to shine, creating a magical and ethereal look. Perfect for those who love a subtle yet eye-catching manicure.
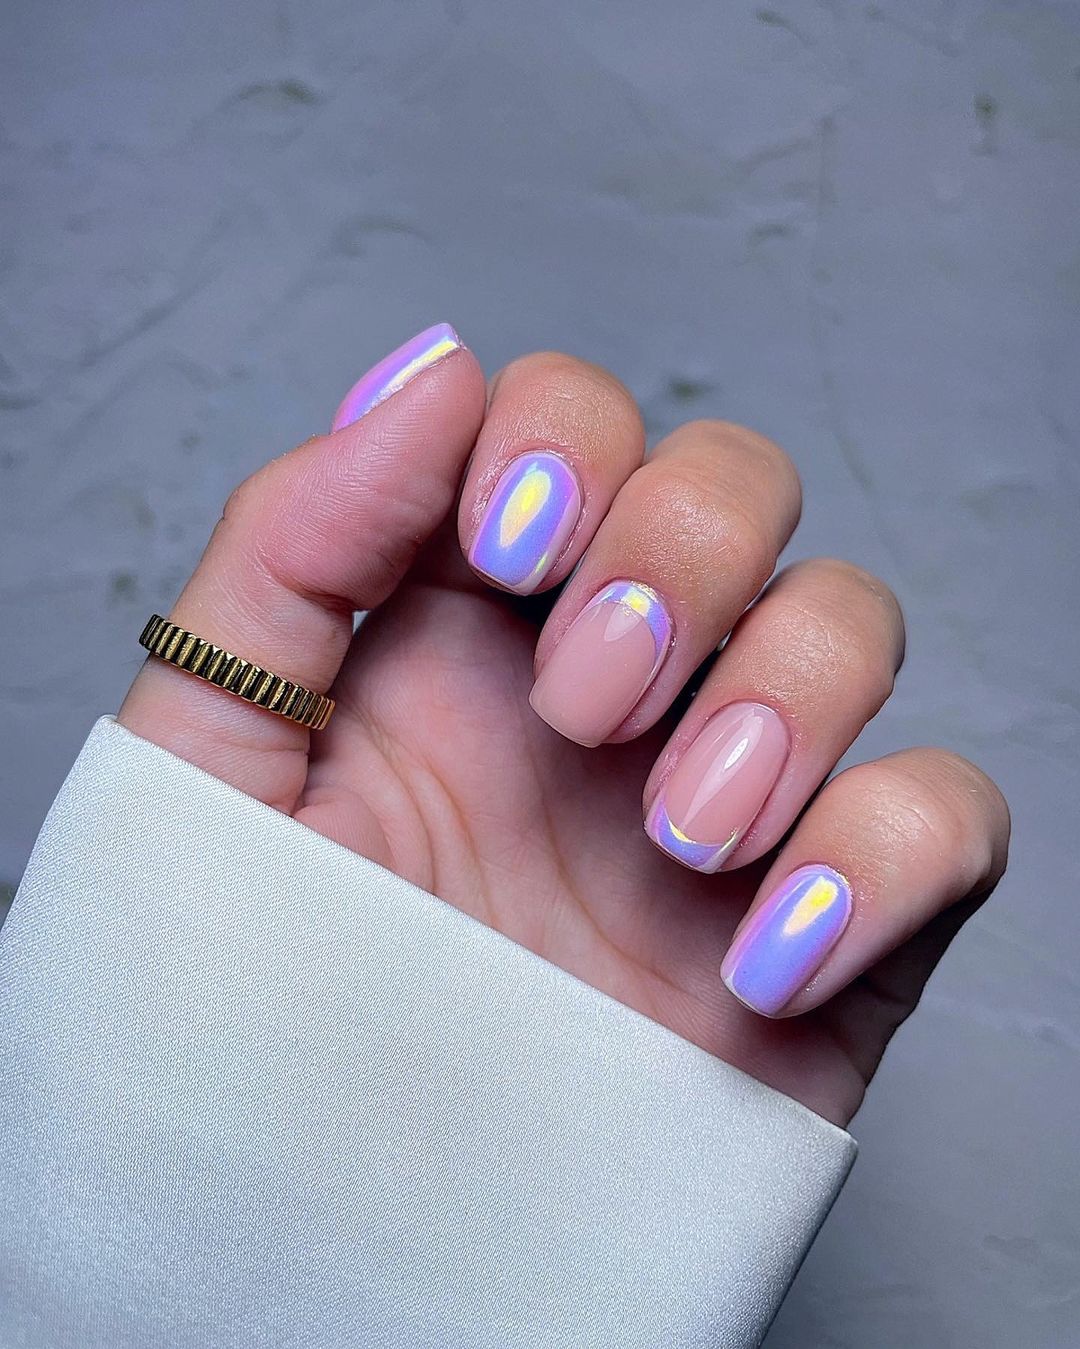
-
- Base coat: Clear polish
- Iridescent powder or nail polish: ILNP Nail Polish in “Valentina”
- Top coat: CND Vinylux Weekly Top Coat
DIY Instructions:
-
- Apply a clear base coat to protect your nails.
- Apply the iridescent powder or nail polish to each nail.
- Allow it to dry completely before applying a second coat if needed.
- Finish with a top coat to seal the design and add a glossy finish.
Starry Night Tips
This celestial-inspired manicure features delicate stars and evil eye symbols, combined with chic black tips. The soft nude base allows the detailed designs to stand out, creating a look that is both elegant and unique. Perfect for those who love a touch of mysticism in their nail art.
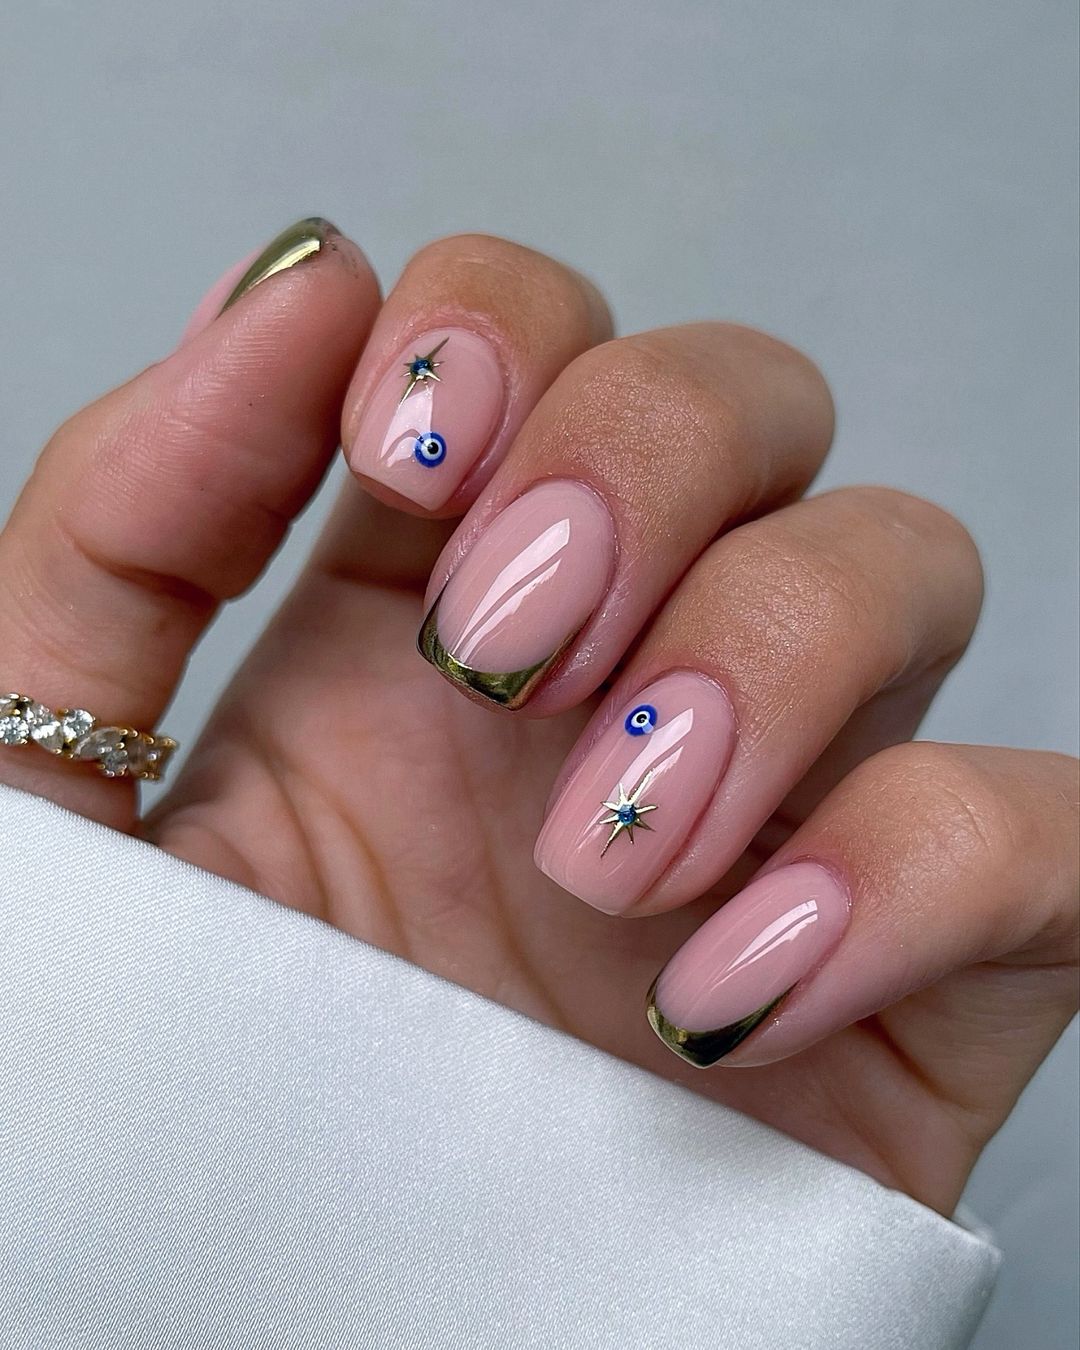
-
- Base color: OPI Nail Lacquer in “Samoan Sand”
- Black tips: Essie Nail Polish in “Licorice”
- Star and evil eye designs: Nail art stickers or hand-painted with a thin brush
- Top coat: Seche Vite Dry Fast Top Nail Coat
DIY Instructions:
-
- Apply a base coat to protect your nails.
- Paint your nails with the soft nude base color and let it dry.
- Create black tips using a thin brush or nail art stickers.
- Add the star and evil eye designs using stickers or by hand-painting them.
- Seal the design with a top coat to ensure it lasts.
Cloudy Daydreams
This dreamy nail design features soft, fluffy clouds on a shimmering iridescent base. The combination of pastel colors and ethereal clouds creates a whimsical look that is perfect for any time of year. This design is great for those who love a playful yet sophisticated manicure.
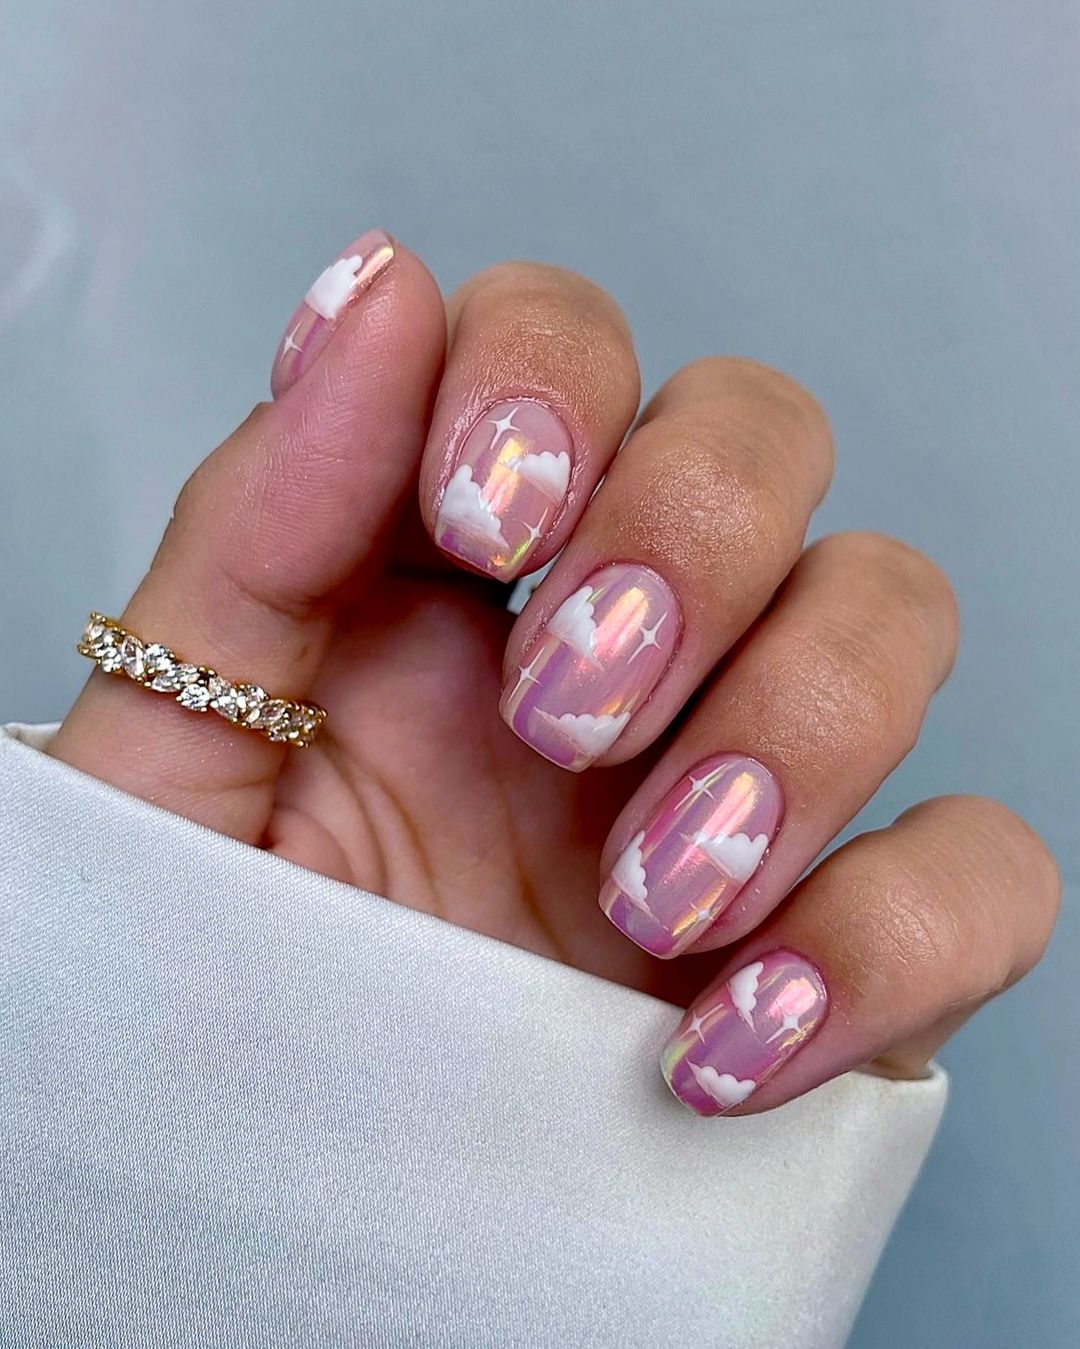
-
- Base color: OPI Nail Lacquer in “Kyoto Pearl”
- Cloud designs: White nail polish and a dotting tool or thin brush
- Top coat: CND Vinylux Weekly Top Coat
DIY Instructions:
-
- Apply a base coat to your nails.
- Paint your nails with the shimmering iridescent base color and let it dry completely.
- Use a dotting tool or thin brush to create the cloud designs with white nail polish.
- Finish with a top coat to seal the design and add shine.
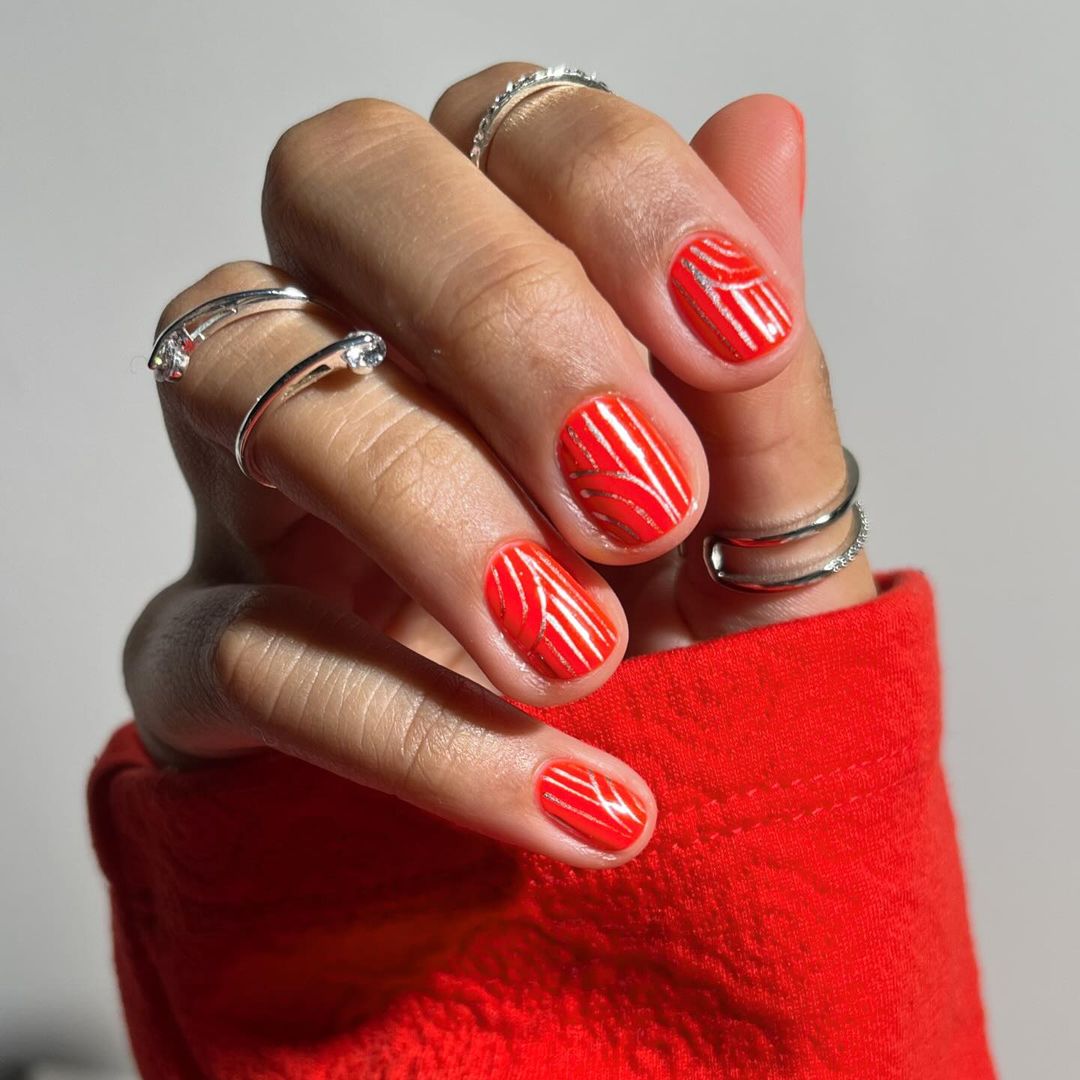
Fiery Red Florals
This bold nail design features a playful combination of red swirls and flower patterns. The clear base allows the vibrant red designs to stand out, creating a fun and energetic look perfect for any occasion. The intricate floral patterns add a touch of femininity to the overall bold aesthetic.
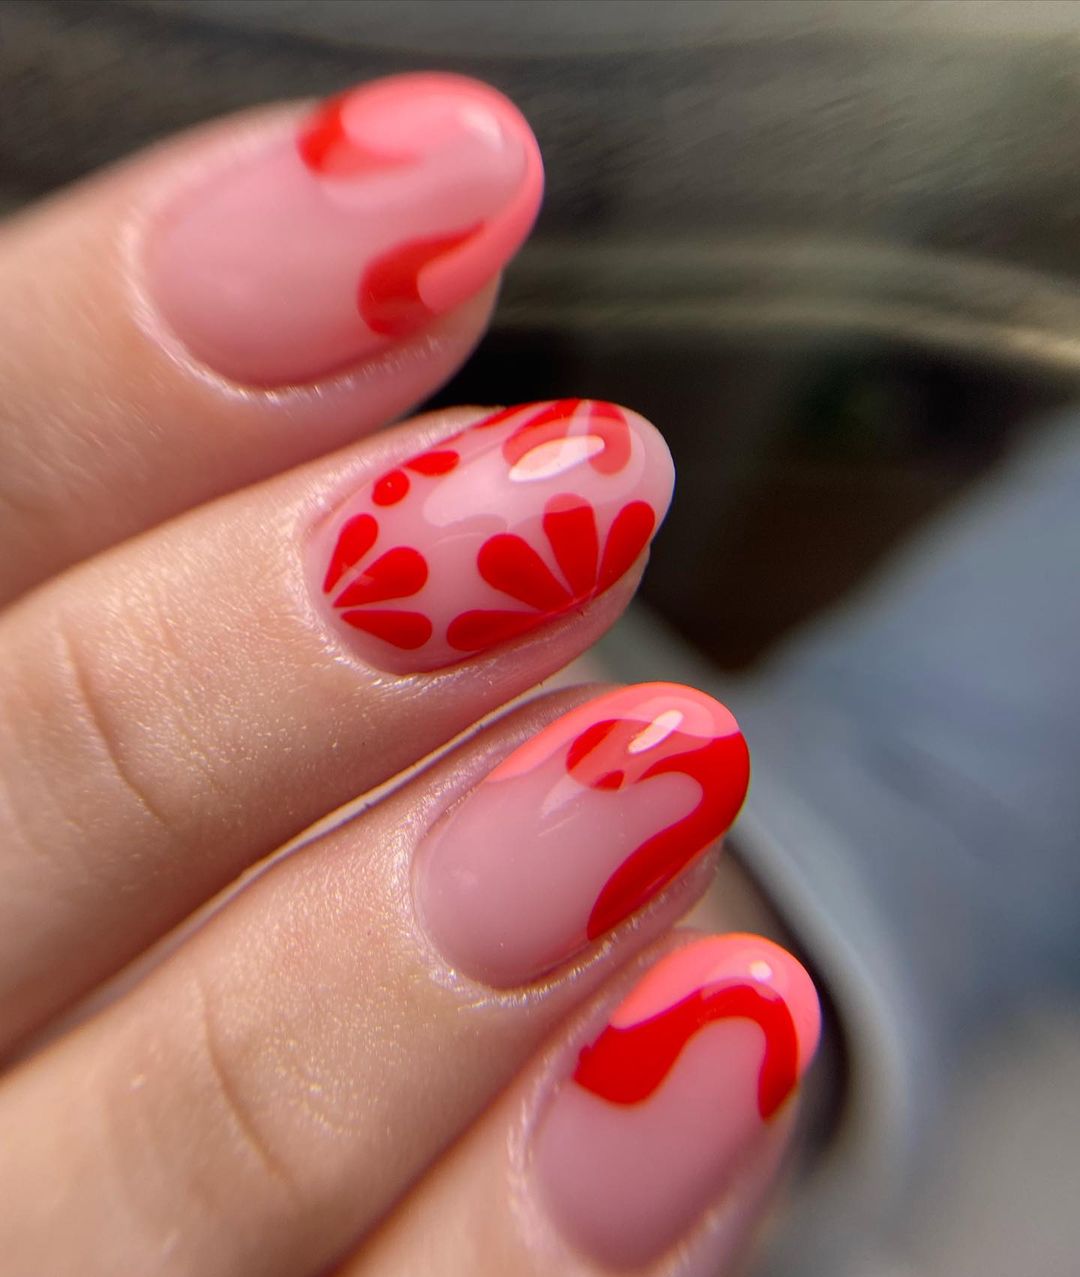
-
- Base coat: Clear polish
- Red nail polish: OPI Nail Lacquer in “Big Apple Red”
- Nail art brushes for creating swirls and flower patterns
- Top coat: Seche Vite Dry Fast Top Nail Coat
DIY Instructions:
-
- Apply a clear base coat to your nails.
- Use nail art brushes to create red swirls and flower patterns on each nail.
- Allow the designs to dry completely before applying a top coat.
- Finish with a top coat to protect your design and add a glossy finish.
Neutral Swirl Elegance
This elegant nail design combines neutral tones with delicate swirls, creating a sophisticated and modern look. The soft beige base is complemented by white and brown swirls, making this manicure perfect for any occasion. The subtle yet stylish design is ideal for those who prefer a more understated look.
-
- Base color: Essie Nail Polish in “Topless & Barefoot”
- Swirl colors: OPI Nail Lacquer in “Alpine Snow” (white) and “Espresso Your Style!” (brown)
- Nail art brushes for creating swirls
- Top coat: Sally Hansen Miracle Gel Top Coat
DIY Instructions:
-
- Apply a base coat followed by the soft beige base color.
- Use nail art brushes to create white and brown swirls on each nail.
- Allow the designs to dry completely before applying a top coat.
- Finish with a top coat to seal the design and add shine.
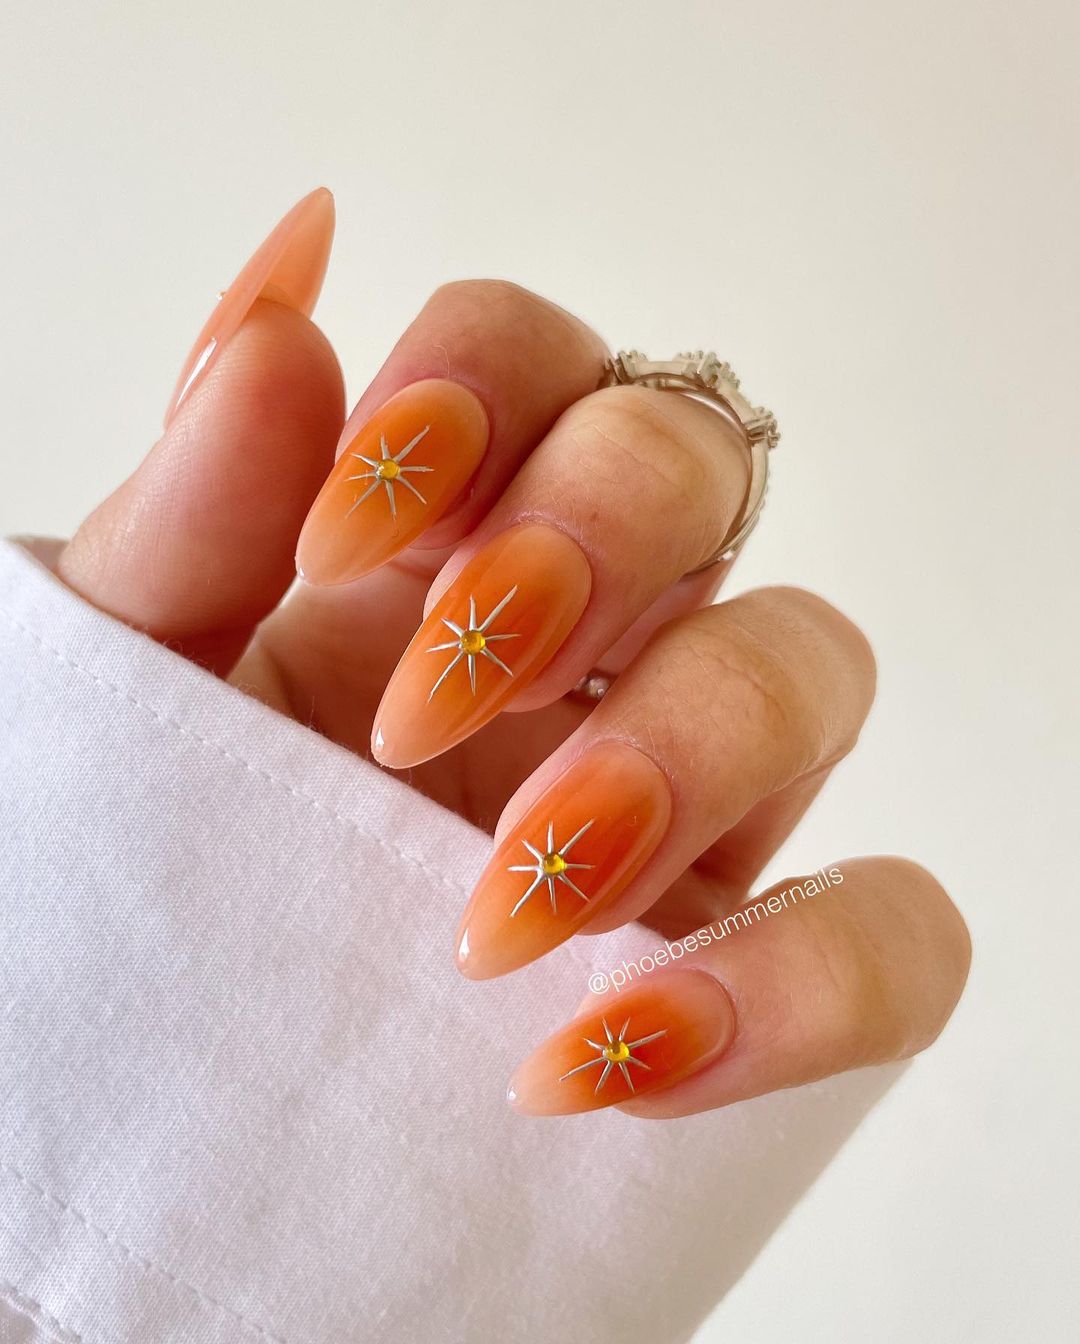
Starburst Orange
This vibrant nail design features a striking orange base with starburst accents. The bright orange color is perfect for the fall season, while the tiny starbursts add a touch of whimsy and sparkle. This manicure is great for those who love to stand out and embrace bold colors.
-
- Base color: OPI Nail Lacquer in “A Good Man-Darin is Hard to Find”
- Starburst accents: Nail art stickers or hand-painted with a thin brush
- Rhinestones for the center of the starbursts
- Top coat: CND Vinylux Weekly Top Coat
DIY Instructions:
-
- Apply a base coat followed by the vibrant orange base color.
- Use nail art stickers or a thin brush to create starburst designs on each nail.
- Place a rhinestone in the center of each starburst for added sparkle.
- Finish with a top coat to protect your design and add a glossy finish.
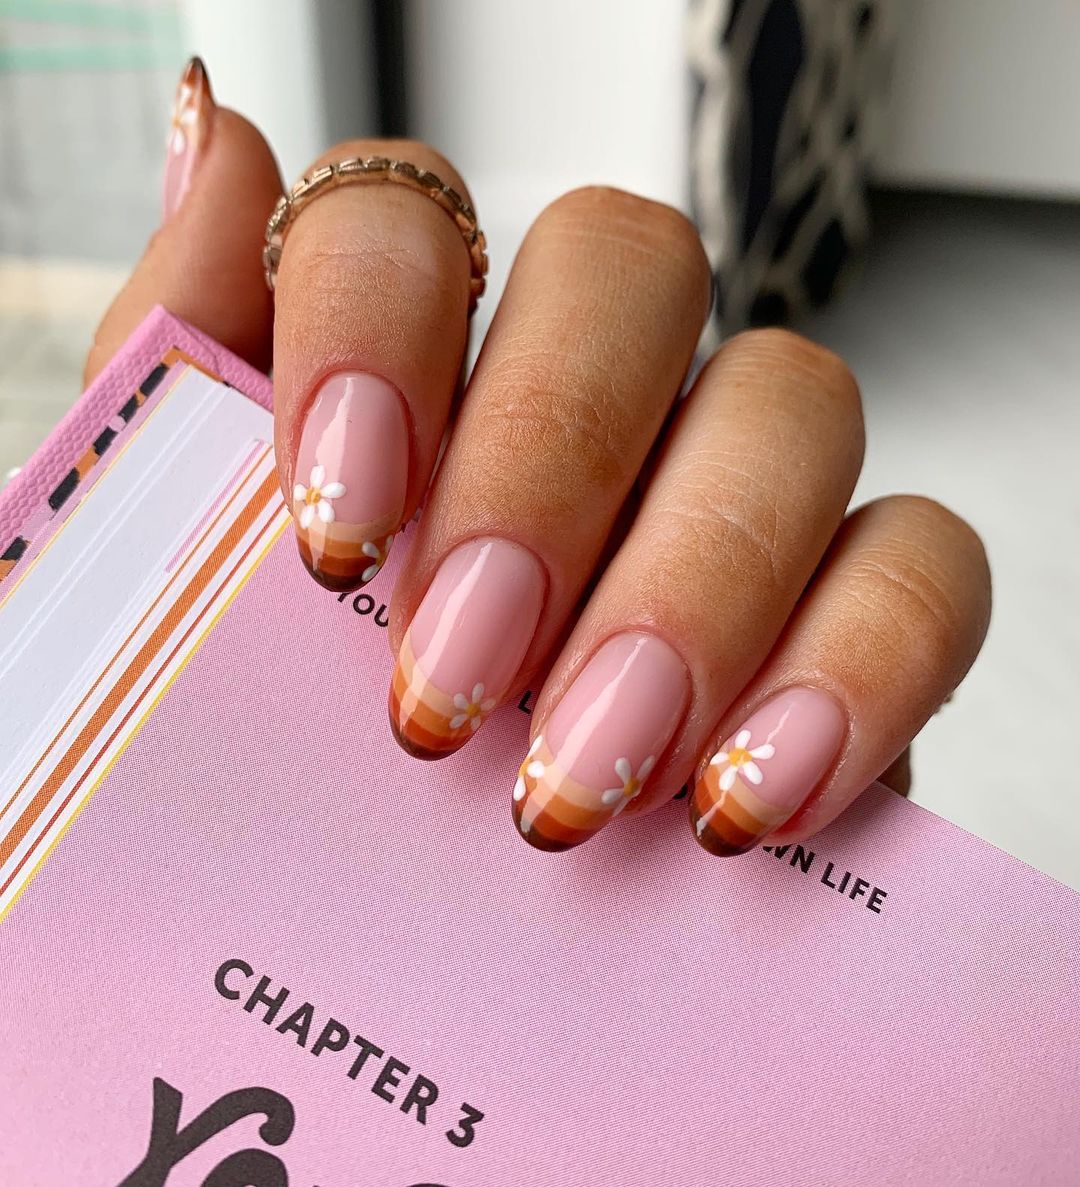
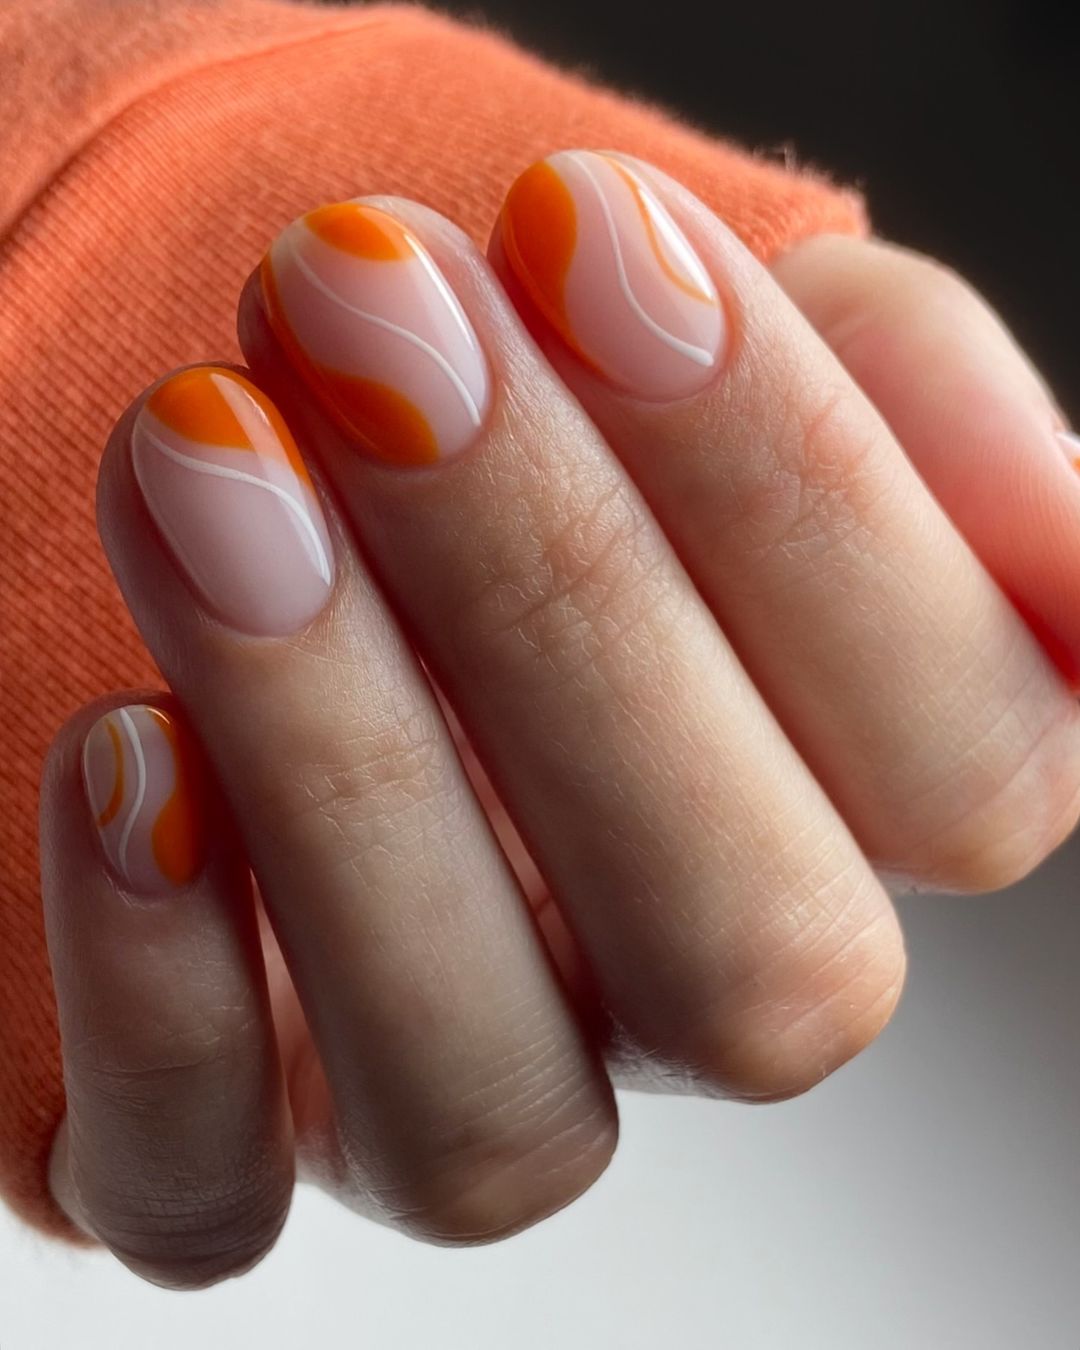
Retro Orange Waves
This playful nail design features retro-inspired orange waves on a soft pink base. The bright orange color is perfect for adding a pop of color to your fall wardrobe, while the wavy patterns add a fun and dynamic touch. This manicure is great for those who love a bold and playful look.
-
- Base color: OPI Nail Lacquer in “Bubble Bath”
- Wave color: Essie Nail Polish in “Meet Me at Sunset”
- Nail art brushes for creating wavy patterns
- Top coat: Seche Vite Dry Fast Top Nail Coat
DIY Instructions:
-
- Apply a base coat followed by the soft pink base color.
- Use nail art brushes to create wavy patterns with the orange nail polish.
- Allow the designs to dry completely before applying a top coat.
- Finish with a top coat to seal the design and add shine.
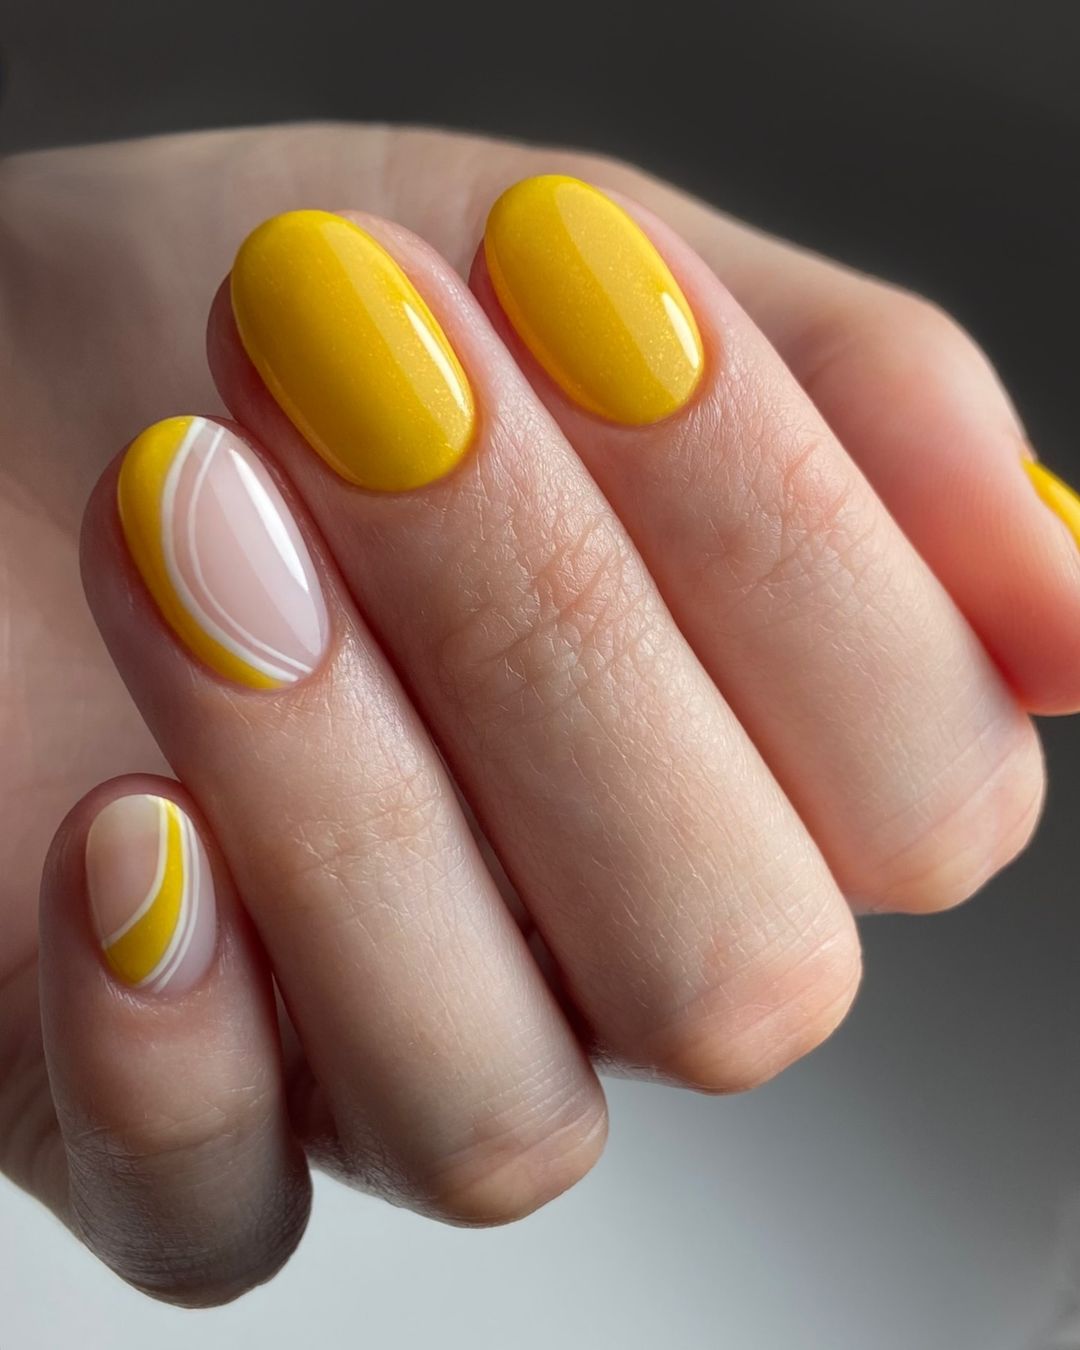
Sunny Yellow Accents
This bright and cheerful nail design features a mix of solid yellow and white accent nails with yellow swirls. The vibrant yellow color is perfect for brightening up any fall day, while the white accents add a touch of contrast and sophistication. This manicure is great for those who love a bold and sunny look.
-
- Base color: OPI Nail Lacquer in “Sun, Sea, and Sand in My Pants”
- Accent color: Essie Nail Polish in “Blanc”
- Swirl color: OPI Nail Lacquer in “Alpine Snow”
- Nail art brushes for creating swirls
- Top coat: Sally Hansen Insta-Dri Top Coat
DIY Instructions:
-
- Apply a base coat followed by the yellow base color on most nails and the white base color on accent nails.
- Use nail art brushes to create white swirls on the yellow nails.
- Allow the designs to dry completely before applying a top coat.
- Finish with a top coat to protect your design and add a glossy finish.
Abstract Leopard Print
This bold nail design combines the classic leopard print with a modern twist. The soft beige base is adorned with abstract black and orange leopard spots, creating a unique and trendy look. This manicure is perfect for those who love to experiment with their nail designs and embrace their wild side.
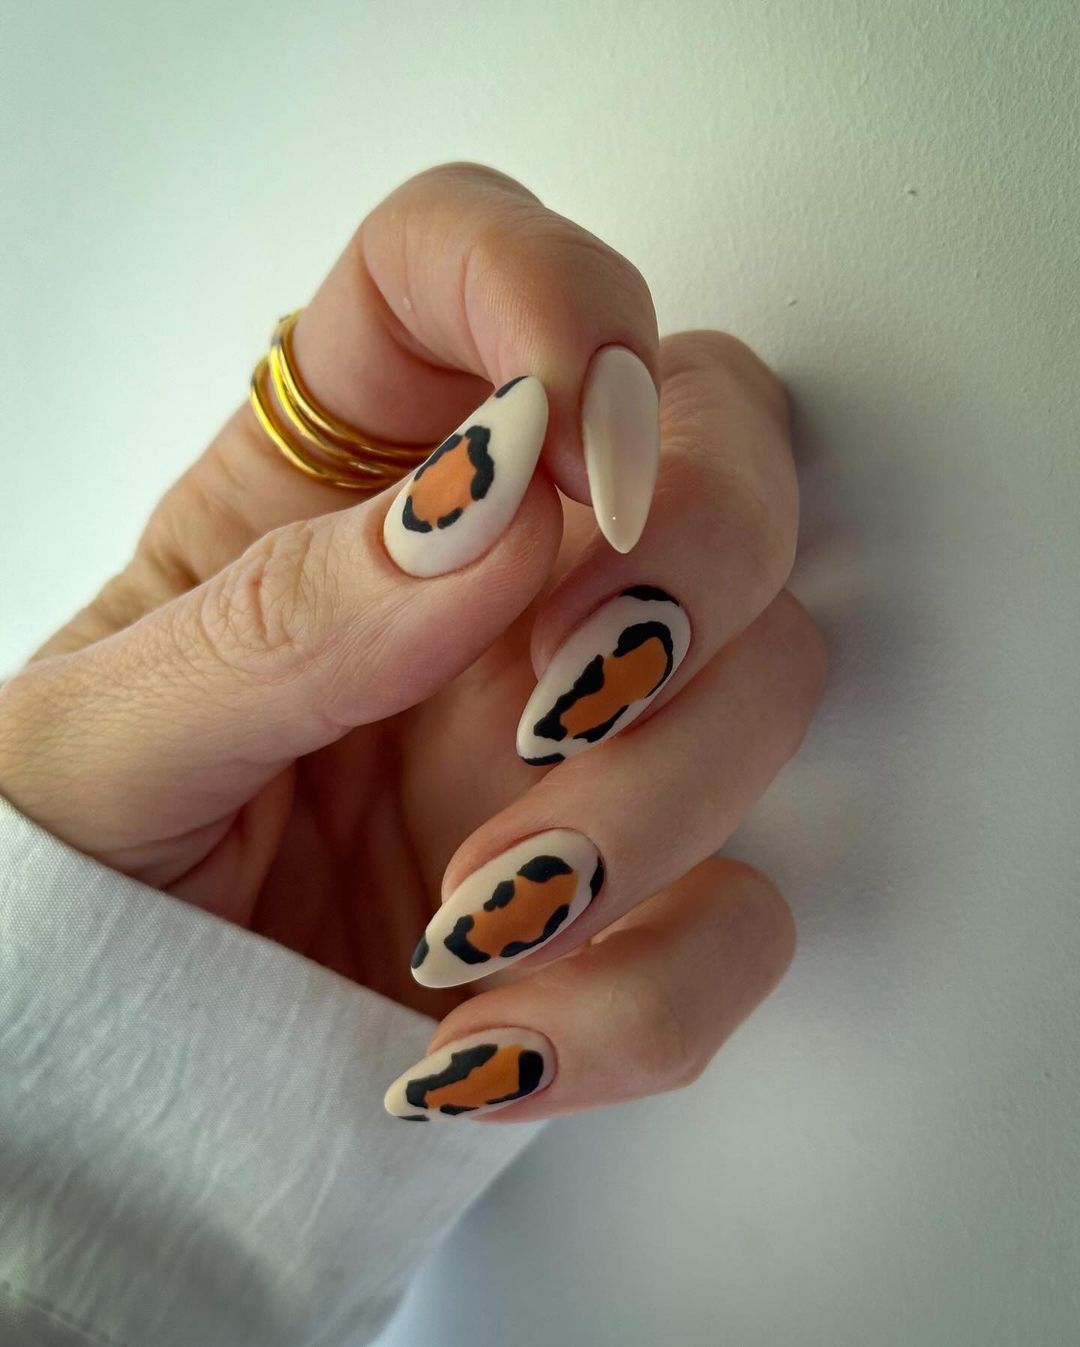
-
- Base color: Essie Nail Polish in “Sand Tropez”
- Leopard print: Black and orange nail polishes, nail art brushes
- Top coat: Seche Vite Dry Fast Top Nail Coat
DIY Instructions:
-
- Apply a base coat followed by the soft beige base color.
- Use nail art brushes to create abstract leopard spots with black and orange polishes.
- Allow the designs to dry completely before applying a top coat.
- Finish with a top coat to seal the design and add shine.
Crystal Daisy Delight
This stunning nail design combines delicate white daisies with shimmering crystals for a glamorous yet fresh look. The clear base highlights the intricate daisy patterns, each adorned with sparkling rhinestones, making this manicure perfect for both casual outings and special occasions.
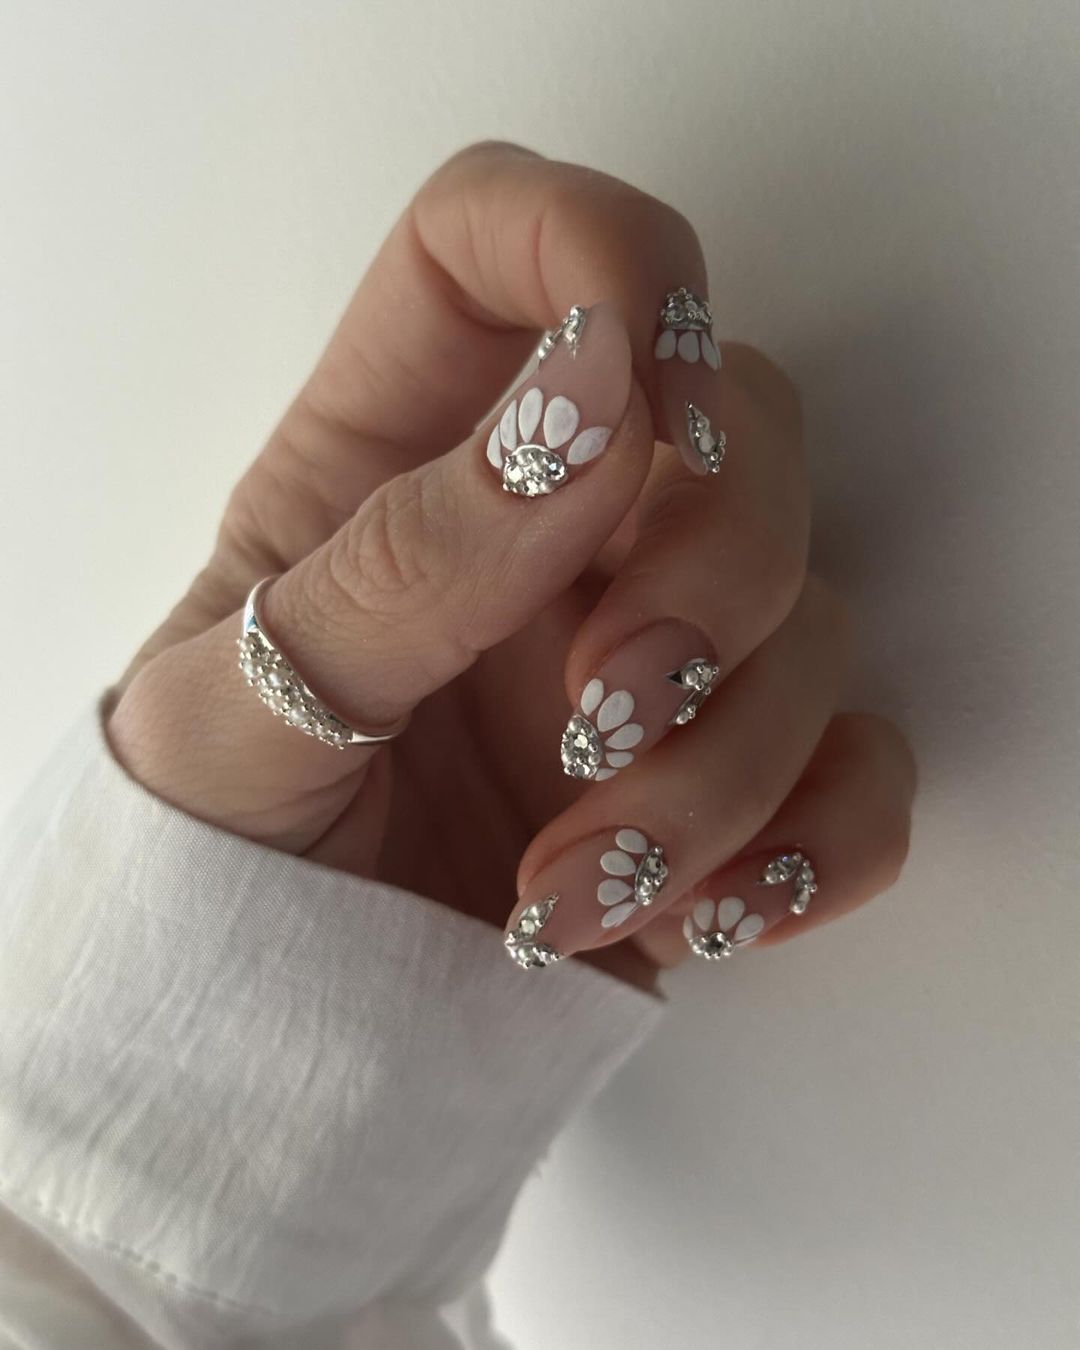
-
- Base coat: Clear polish
- Daisy petals: White nail polish and a thin brush
- Crystals for accents: Various sizes of rhinestones
- Top coat: Seche Vite Dry Fast Top Nail Coat
DIY Instructions:
-
- Apply a clear base coat to protect your nails.
- Use a thin brush to paint the white daisy petals on each nail.
- Place rhinestones at the center of each daisy for added sparkle.
- Finish with a top coat to seal the design and ensure longevity.
Golden Floral Elegance
This elegant manicure features delicate white flowers and golden accents on a soft beige base. The intricate floral patterns combined with golden swirls create a sophisticated and feminine look, ideal for any formal event or a stylish day out.
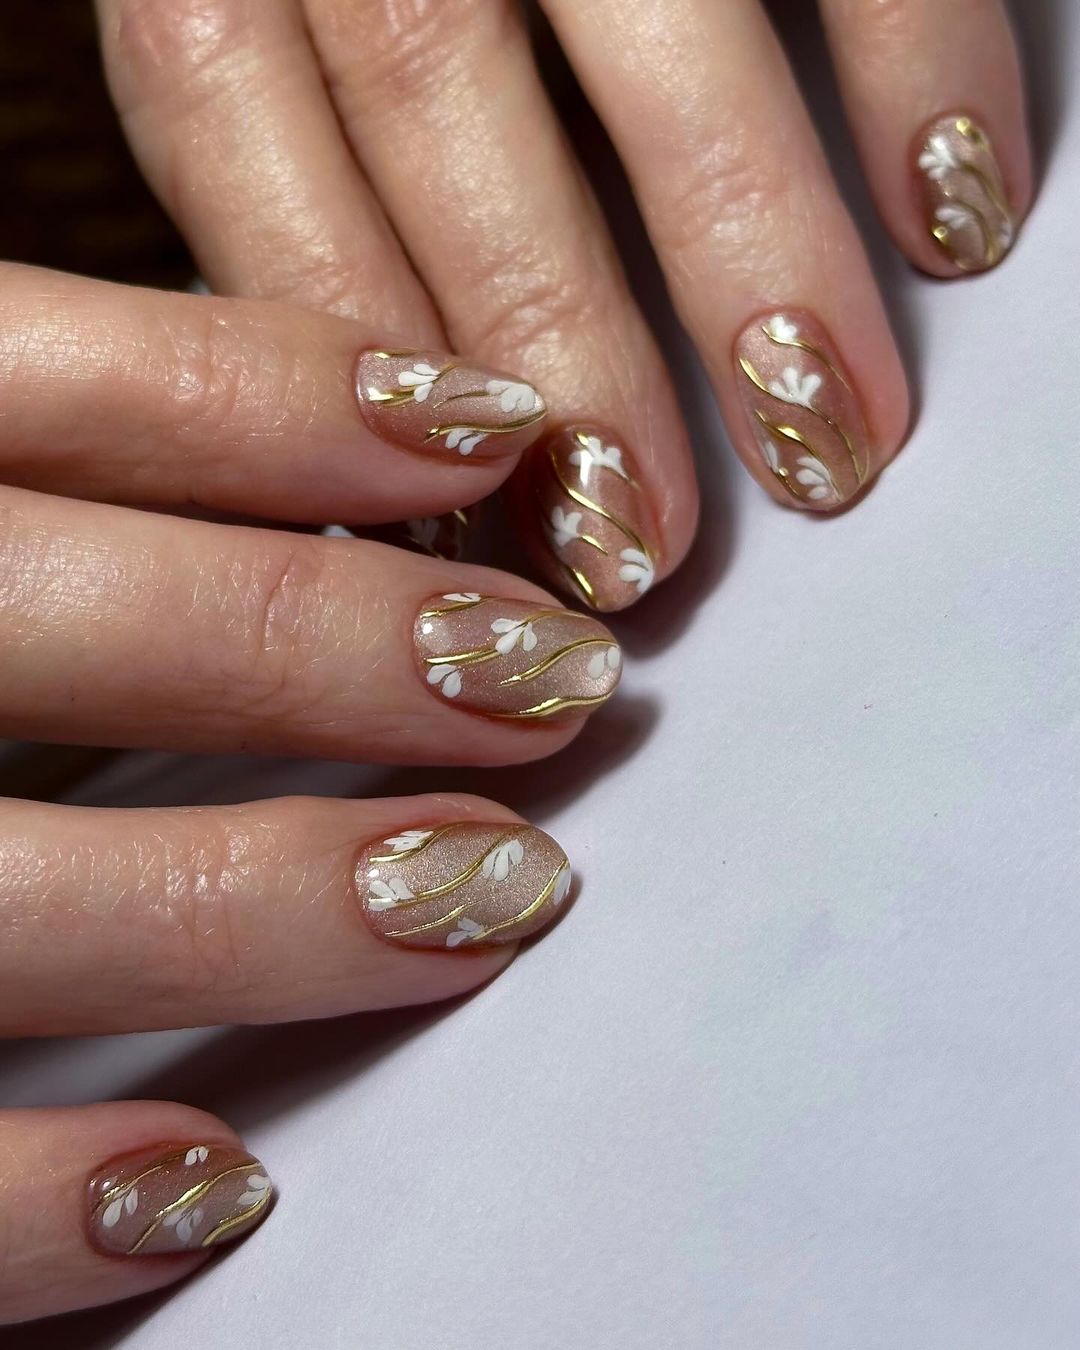
-
- Base color: OPI Nail Lacquer in “Be There in a Prosecco”
- Flower designs: White nail polish and a thin brush
- Golden accents: Gold nail art pen or polish
- Top coat: Sally Hansen Miracle Gel Top Coat
DIY Instructions:
-
- Apply a base coat followed by the soft beige base color.
- Use a thin brush to paint the white flowers and add golden swirls around them.
- Allow the design to dry completely before applying a top coat.
- Finish with a top coat to protect your design and add shine.
Gilded French Tips
This chic and modern take on the classic French manicure features gold accents at the base and tips of the nails. The soft nude base color allows the gold to stand out, creating a look that is both elegant and trendy. This design is perfect for those who love a subtle yet sophisticated manicure.
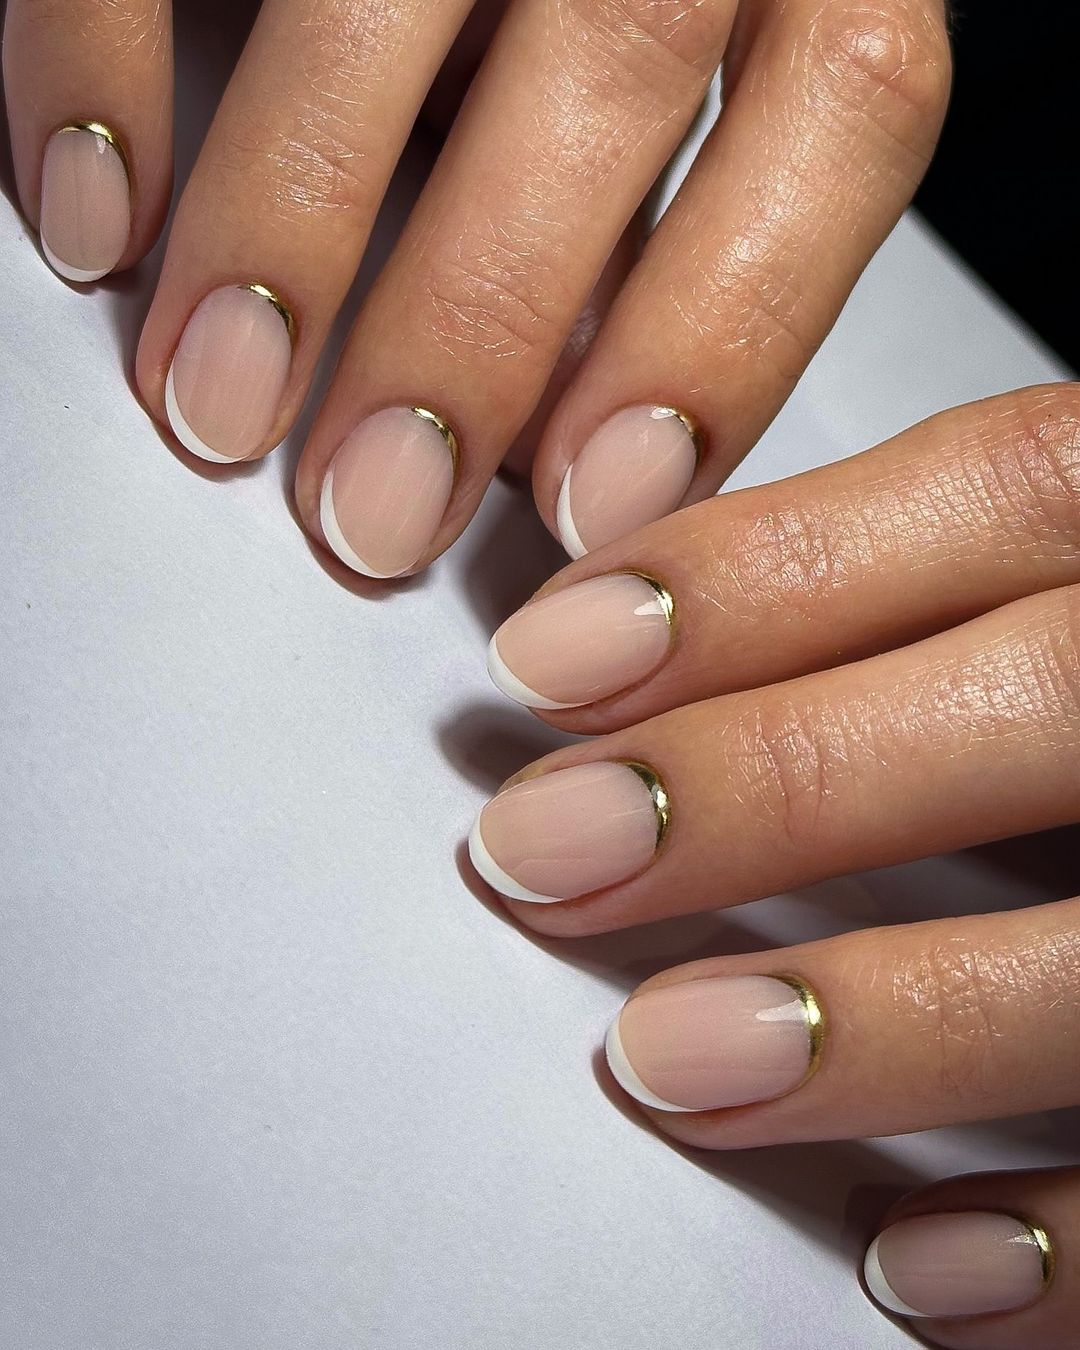
-
- Base color: Essie Nail Polish in “Mademoiselle”
- Gold accents: Gold nail polish and a thin brush
- Top coat: CND Vinylux Weekly Top Coat
DIY Instructions:
-
- Apply a base coat followed by the nude base color.
- Use a thin brush to add gold accents at the base and tips of each nail.
- Allow the design to dry completely before applying a top coat.
- Finish with a top coat to seal the design and add a glossy finish.
Intricate Red Lace
This bold and intricate nail design features red lace patterns on a soft nude base. The detailed lace designs add a touch of elegance and femininity, making this manicure perfect for a romantic evening or a special occasion.
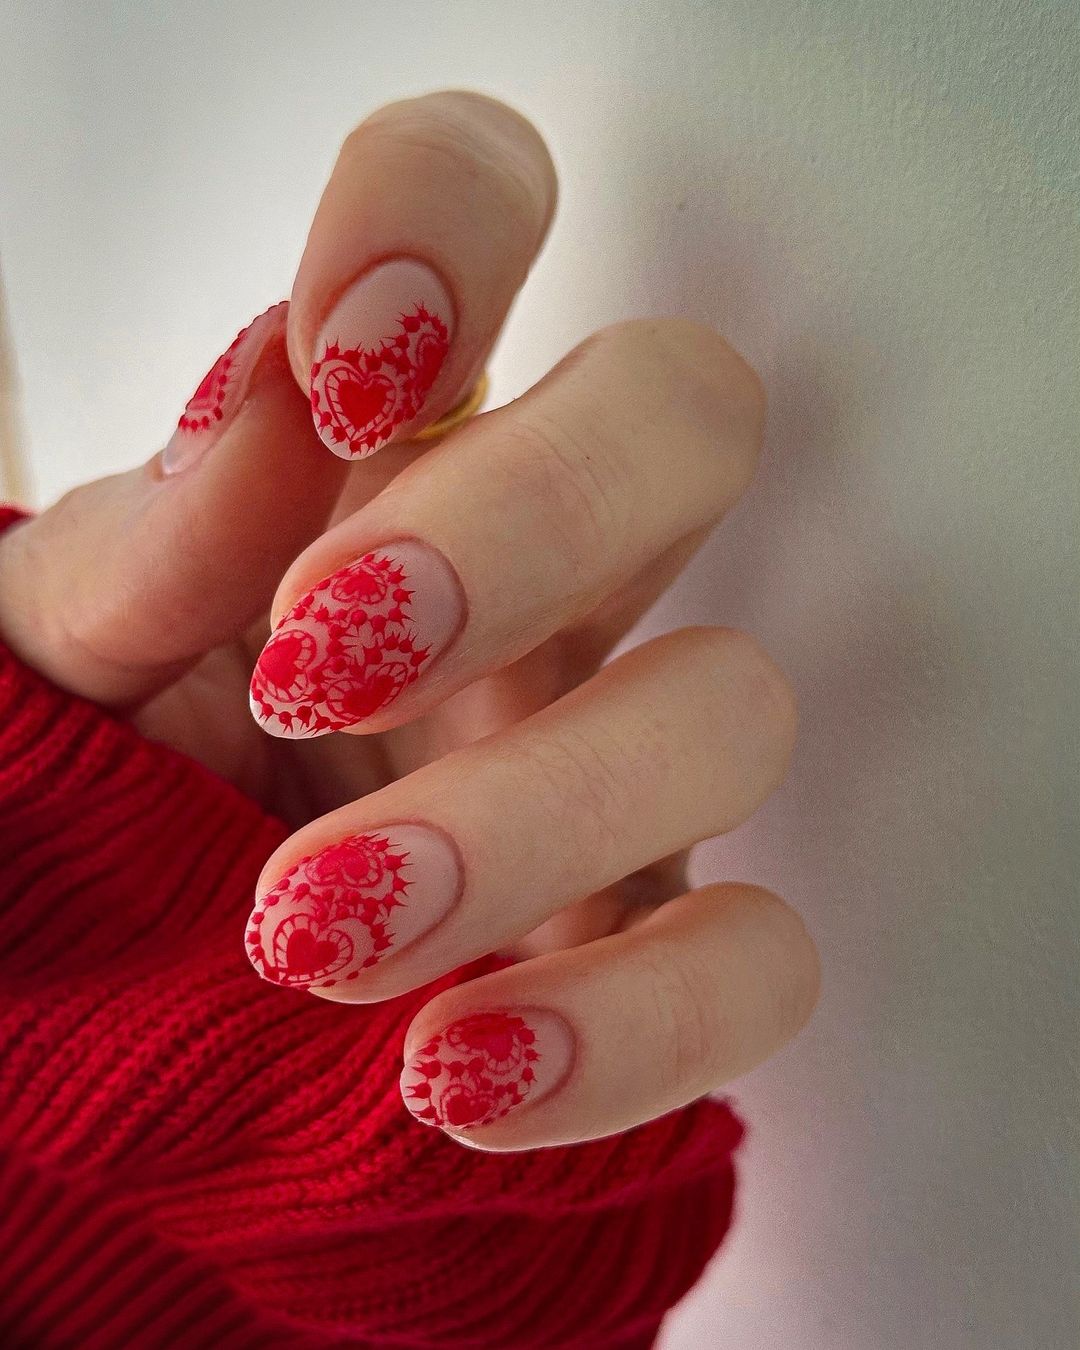
-
- Base color: OPI Nail Lacquer in “Bubble Bath”
- Lace designs: Red nail polish and a thin brush
- Top coat: Seche Vite Dry Fast Top Nail Coat
DIY Instructions:
-
- Apply a base coat followed by the nude base color.
- Use a thin brush to create the intricate lace designs with red nail polish.
- Allow the design to dry completely before applying a top coat.
- Finish with a top coat to protect your design and add a glossy finish.
Festive Floral Fusion
This festive nail design combines deep green and rich red hues with delicate floral patterns. The vibrant colors and intricate details create a look that is both bold and sophisticated, perfect for celebrating the holiday season in style.
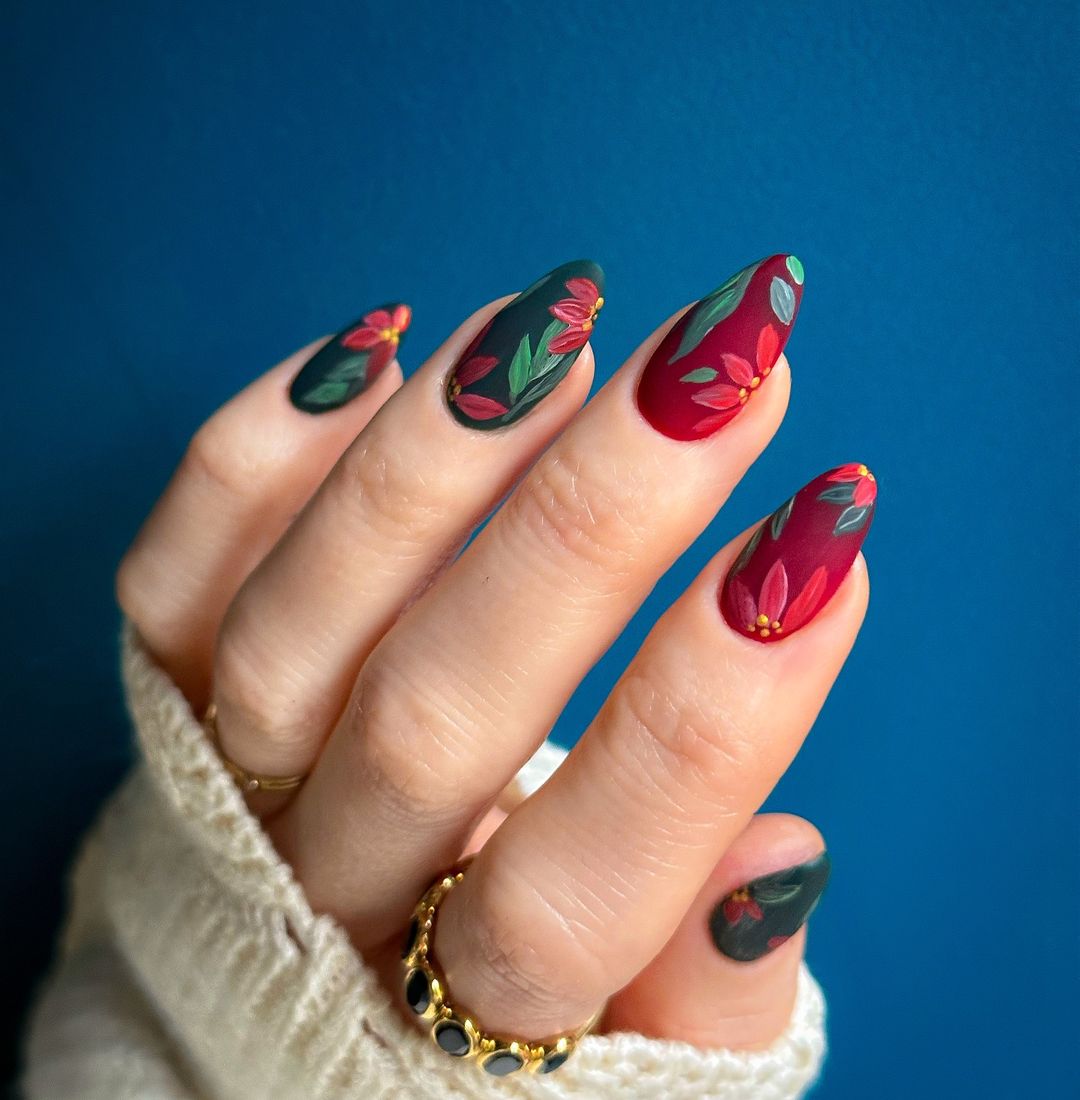
-
- Base colors: Essie Nail Polish in “Jungle” (green) and “Forever Yummy” (red)
- Floral designs: Various shades of red, green, and yellow nail polishes, and a thin brush
- Top coat: Sally Hansen Insta-Dri Top Coat
DIY Instructions:
-
- Apply a base coat followed by the deep green and rich red base colors on alternate nails.
- Use a thin brush to paint the floral patterns with various shades of red, green, and yellow.
- Allow the design to dry completely before applying a top coat.
- Finish with a top coat to seal the design and add a glossy finish.
FAQ
Q: How can I make my manicure last longer?
A: To extend the life of your manicure, always start with a clean nail surface, use a base coat, apply thin layers of polish, and finish with a quality top coat. Reapply the top coat every few days to maintain the shine and protection.
Q: Are there any tips for painting my nails at home?
A: Yes! Ensure you have good lighting, use quality tools, and be patient. Practice makes perfect. If you make a mistake, use a small brush dipped in polish remover to clean up the edges.
Q: What are some popular fall nail colors?
A: Popular fall colors include deep browns, rich oranges, earthy greens, and classic nudes. Experiment with different shades to find what suits you best.
With these cute fall nails ideas, you’re ready to embrace the season in style. Whether you prefer simple designs or more intricate patterns, there’s something for everyone. Happy nail painting!
Save Pin