29 Ideas for Fall Nail Designs 2024
As the leaves turn and the air gets crisper, it’s the perfect time to update your nail game with the latest fall nail designs 2024 has to offer. Are you ready to dive into the season’s top trends? From simple and chic to bold and dramatic, this article will cover a spectrum of designs that cater to all preferences. Whether you’re looking for something short and sweet or long and glamorous, we’ve got you covered. Let’s explore these stunning fall nail ideas together!
Elegant Olive and Cow Print
This unique design combines earthy olive green with a playful cow print, creating a striking contrast that is both trendy and sophisticated. The olive green nails provide a smooth, glossy finish, while the cow print nails add an element of fun and creativity. Perfect for someone looking to make a bold statement this fall.

- Olive green nail polish (e.g., OPI’s “Olive For Green”)
- Black and white nail polish for cow print (e.g., Sally Hansen’s “Black Out” and “White On”)
- Nail dotting tools or a fine brush for precision
- Top coat for a glossy finish (e.g., Seche Vite)
Practical Advice
- Prep Your Nails: Start with clean, shaped nails. Apply a base coat to protect your natural nails.
- Apply Olive Green: Paint all nails except the two accent nails with olive green polish. Allow them to dry completely.
- Create Cow Print: On the accent nails, apply a white base. Once dry, use a dotting tool or fine brush to create irregular black spots.
- Seal the Design: Finish with a high-quality top coat to seal and protect your design.
Sleek Black with Gold Accents
Black nails are always in style, but adding gold accents takes this classic look to a whole new level. This design features sleek, glossy black nails paired with a nude base adorned with abstract black lines and gold flakes. It’s a luxurious and chic look perfect for any fall occasion.

- Black nail polish (e.g., Essie’s “Licorice”)
- Nude nail polish for the base (e.g., OPI’s “Dulce de Leche”)
- Gold foil or flakes
- Fine nail art brush for detailing
- Top coat for shine and longevity
Practical Advice
- Base and Black Polish: Start with a base coat. Paint most nails with black polish, leaving the accent nails for the nude base.
- Detailing: Use a fine brush to create abstract black lines on the nude nails. Apply gold flakes for added glam.
- Finish with Top Coat: Ensure your design lasts by applying a durable top coat.
Glittering Green French Tips
This twist on the classic French manicure features glittering green tips paired with a nude base. The addition of gold glitter on some nails adds an extra layer of sparkle, making it a perfect choice for fall festivities. This design is both elegant and festive, ideal for those who love a bit of shimmer.

- Nude nail polish (e.g., Essie’s “Ballet Slippers”)
- Green glitter polish for tips (e.g., China Glaze’s “Emerald Sparkle”)
- Gold glitter polish (e.g., Zoya’s “Astra”)
- Nail striping tape for precise lines
- Top coat for a smooth finish
Practical Advice
- Prep and Base Coat: Apply a base coat to your nails. Follow with a nude polish as the base.
- Create Tips: Use striping tape to mark off the tips. Apply green glitter polish carefully.
- Add Gold Glitter: On selected nails, add gold glitter for extra sparkle.
- Seal It In: Apply a top coat to protect your design and give it a glossy finish.
Bold Autumn Hues with Glitter Accent
This vibrant fall nail design showcases a mix of bold hues, combining rich black, bright orange, and a stunning gold glitter accent. The glossy finish on each nail enhances the striking contrast between the colors, making this design perfect for those who want to stand out. The glitter accent nail adds a touch of glamour, making this look suitable for both casual and festive occasions.

- Black nail polish (e.g., OPI’s “Black Onyx”)
- Bright orange nail polish (e.g., Essie’s “Tangerine Tease”)
- Gold glitter polish (e.g., Zoya’s “Astra”)
- Top coat for a glossy finish (e.g., Seche Vite)
- Base coat to protect natural nails
Practical Advice
- Prep and Base Coat: Clean and shape your nails, then apply a base coat to protect them.
- Apply Colors: Paint your nails with black, orange, and glitter polishes as shown, allowing each layer to dry completely before applying the next.
- Seal with Top Coat: Apply a high-quality top coat to seal in the design and add a glossy finish, ensuring your nails remain chip-free for longer.
Save Pin

Matte Yellow with Fall Leaf Art
This design features a sophisticated matte yellow base with a striking accent nail showcasing delicate autumn leaves. The matte finish gives a modern twist to the bright yellow color, while the intricate leaf art on a black background adds a touch of seasonal elegance. This combination of vibrant and muted tones makes it a perfect fall nail design.

- Matte yellow nail polish (e.g., OPI’s “Exotic Birds Do Not Tweet” with a matte top coat)
- Black nail polish for the base of the accent nail (e.g., Essie’s “Licorice”)
- Acrylic paints or nail polish for leaf art (e.g., white, green, yellow)
- Fine nail art brush for detailing
- Matte top coat
Practical Advice
- Base and Matte Polish: After prepping your nails with a base coat, apply the matte yellow polish to most nails.
- Create Accent Nail: On the accent nail, apply black polish as a base. Once dry, use a fine brush to paint detailed leaves with acrylic paints or nail polishes.
- Seal with Matte Top Coat: Finish with a matte top coat to protect the design and maintain the matte effect.
Minimalist White with Gold Flakes
This elegant design features a minimalist white base adorned with delicate gold flakes. The simplicity of the white nails allows the gold flakes to shine, creating a sophisticated and chic look. This design is perfect for those who appreciate subtle elegance with a touch of luxury, making it an excellent choice for both everyday wear and special occasions.

- White nail polish (e.g., OPI’s “Alpine Snow”)
- Gold foil flakes
- Top coat for a glossy finish (e.g., Seche Vite)
- Base coat to protect natural nails
- Tweezers for placing gold flakes
Practical Advice
- Prep and Base Coat: Start with clean, shaped nails and apply a base coat to protect them.
- Apply White Polish: Paint your nails with a white polish, ensuring an even and opaque coverage.
- Add Gold Flakes: While the polish is still tacky, use tweezers to place gold flakes randomly on each nail.
- Seal the Design: Apply a top coat to secure the gold flakes and give your nails a glossy, finished look.
Delicate White with Autumn Berry Art
This charming design features a delicate white base with a subtle shimmer, complemented by a detailed autumn berry accent on the ring finger. The combination of soft, almost pearlescent white with the intricate red and gold berries creates a look that is both elegant and seasonally appropriate.

- White shimmer nail polish (e.g., Essie’s “Pearl Perfection”)
- Red and gold nail polish for the berries (e.g., OPI’s “Big Apple Red” and “GoldenEye”)
- Fine nail art brush for detailing
- Top coat for a glossy finish
- Base coat to protect natural nails
Practical Advice
- Prep and Base Coat: Start by cleaning and shaping your nails, then apply a base coat.
- Apply White Shimmer: Paint all nails with the white shimmer polish, allowing each layer to dry fully.
- Create Berry Accent: Using a fine brush, paint the red berries and add gold accents on the ring finger. Ensure each detail is dry before moving to the next.
- Seal the Design: Finish with a top coat to add shine and protect your intricate design.
Bold Blue and Black with Gold Accents
This striking design features a bold blue base with dramatic black swirls and gold flakes, creating a modern and artistic look. The contrast between the vibrant blue and deep black, highlighted by the luxurious gold flakes, makes this manicure a standout for any fall occasion.

- Blue nail polish (e.g., Essie’s “Butler Please”)
- Black nail polish for detailing (e.g., OPI’s “Black Onyx”)
- Gold foil flakes
- Fine nail art brush for detailing
- Top coat for shine and longevity
- Base coat to protect natural nails
Practical Advice
- Prep and Base Coat: Clean and shape your nails, then apply a base coat.
- Apply Blue Base: Paint your nails with the blue polish, allowing each layer to dry completely.
- Add Black Swirls and Gold Flakes: Use a fine brush to create black swirls on select nails and apply gold flakes while the polish is still tacky.
- Finish with Top Coat: Seal the design with a top coat to protect and add a glossy finish.
Autumn Leaves on Matte Yellow and Black
This playful design combines matte black and yellow nails with a beautiful autumn leaf accent on a white base. The matte finish adds a modern twist, while the leaf art provides a touch of seasonal charm, making it perfect for fall.

- Matte black nail polish (e.g., OPI’s “Black Onyx” with a matte top coat)
- Matte yellow nail polish (e.g., Essie’s “Sunshine State of Mind” with a matte top coat)
- White nail polish for the accent nails (e.g., OPI’s “Alpine Snow”)
- Acrylic paints or nail polish for the leaf art (e.g., orange, yellow, and brown)
- Fine nail art brush for detailing
- Matte top coat
Practical Advice
- Prep and Base Coat: Clean and shape your nails, then apply a base coat.
- Apply Matte Colors: Paint most nails with the matte black and yellow polishes, leaving some for the white base.
- Create Leaf Art: On the white base nails, use a fine brush to paint detailed autumn leaves with acrylic paints or nail polishes.
- Seal with Matte Top Coat: Apply a matte top coat to protect the design and maintain the matte effect.
Save Pin

Soft Peach with Leaf Accent
This soft and elegant design features a matte peach base with a delicate leaf accent on the ring finger. The warm peach tones are perfect for fall, and the simple leaf art adds a touch of nature-inspired beauty to the overall look.

- Matte peach nail polish (e.g., Essie’s “Peach Side Babe” with a matte top coat)
- Nude nail polish for the base of the accent nail (e.g., OPI’s “Be There in a Prosecco”)
- Acrylic paints or nail polish for the leaf art (e.g., black and orange)
- Fine nail art brush for detailing
- Matte top coat
Practical Advice
- Prep and Base Coat: Start with clean, shaped nails and apply a base coat.
- Apply Matte Peach: Paint most nails with the matte peach polish, leaving the ring finger for the nude base.
- Create Leaf Accent: On the ring finger, use a fine brush to paint a delicate leaf design with black and orange paints.
- Seal with Matte Top Coat: Finish with a matte top coat to protect the design and maintain the matte finish.
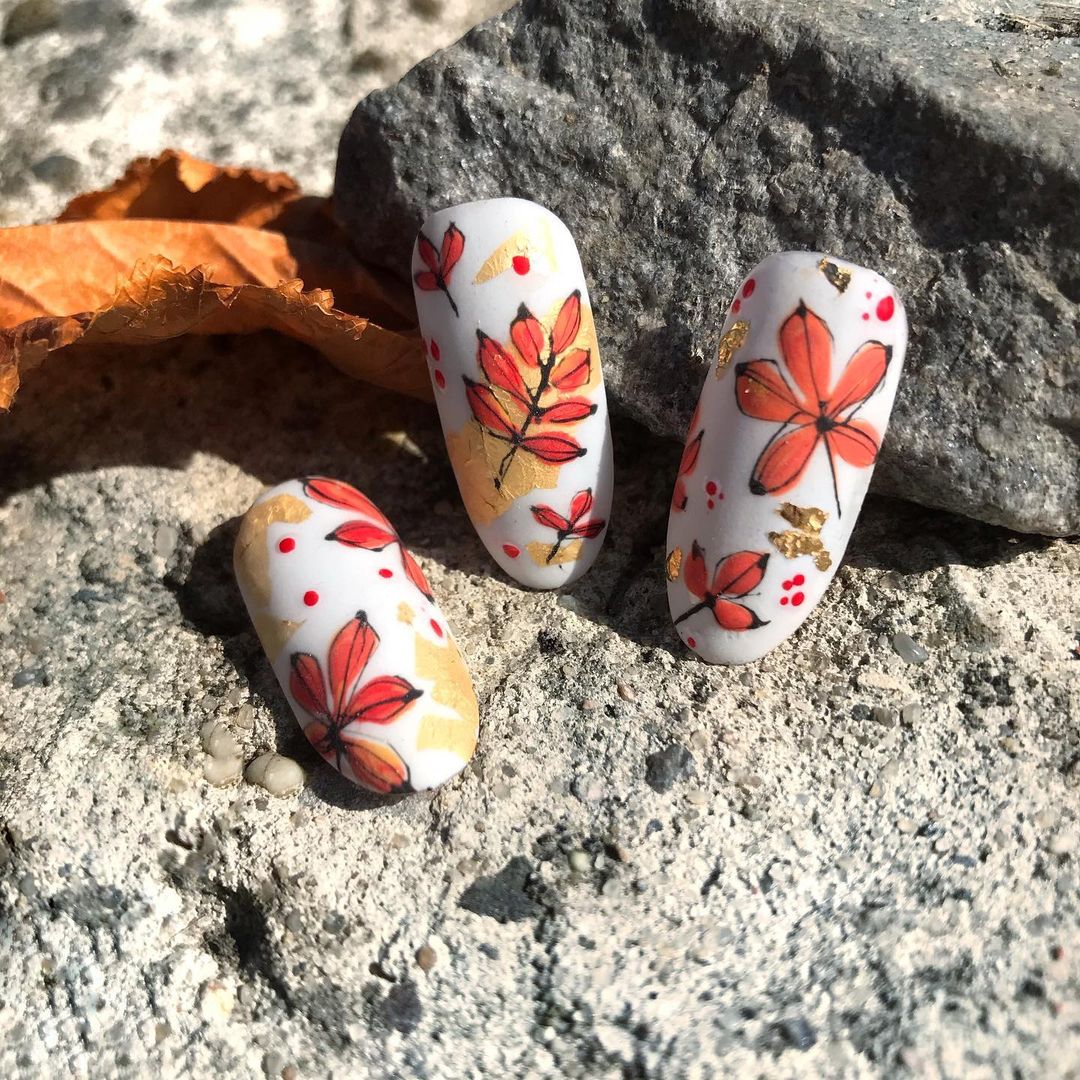
Vibrant Autumn Leaves on White
This vibrant fall nail design features a white base with bold autumn leaf art. The combination of bright red, orange, and yellow leaves against the crisp white background makes this design pop, capturing the essence of the season.
- White nail polish (e.g., Essie’s “Blanc”)
- Acrylic paints or nail polish for the leaf art (e.g., red, orange, and yellow)
- Fine nail art brush for detailing
- Top coat for a glossy finish
- Base coat to protect natural nails
Practical Advice
- Prep and Base Coat: Clean and shape your nails, then apply a base coat.
- Apply White Base: Paint your nails with the white polish, ensuring an even and opaque coverage.
- Add Leaf Art: Use a fine brush to paint detailed autumn leaves with red, orange, and yellow paints.
- Seal with Top Coat: Apply a top coat to protect the design and add a glossy finish.
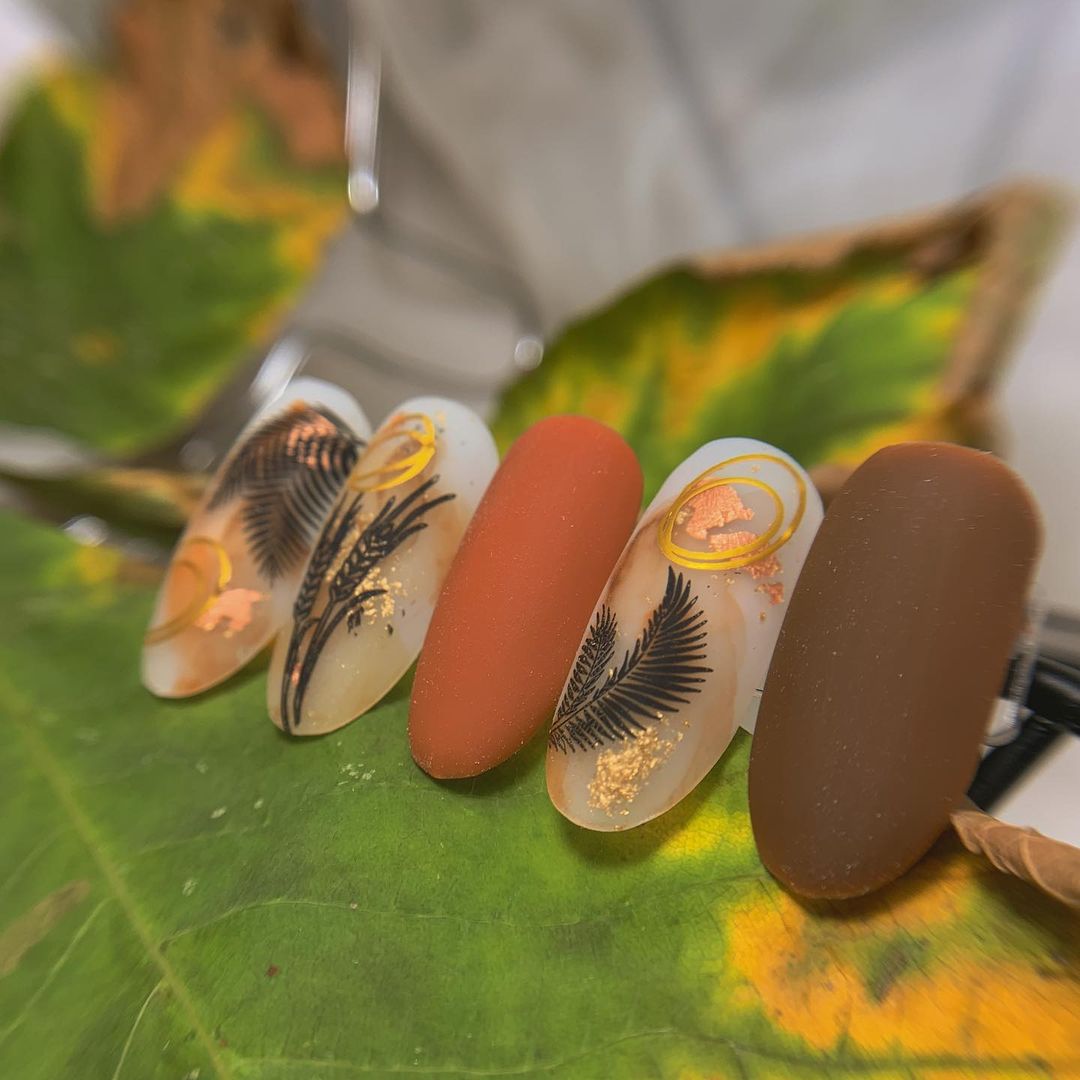
Earthy Tones with Leaf Detail
This earthy fall design features a mix of warm brown and burnt orange tones with delicate black leaf details. The combination of matte and glossy finishes adds depth and interest to the design, making it a perfect choice for the autumn season.
- Brown nail polish (e.g., Essie’s “Chocolate Cakes”)
- Burnt orange nail polish (e.g., OPI’s “It’s a Piazza Cake”)
- Nude nail polish for the base of the accent nails (e.g., Essie’s “Sand Tropez”)
- Black nail polish for the leaf detail (e.g., OPI’s “Black Onyx”)
- Fine nail art brush for detailing
- Top coat for a glossy finish
- Base coat to protect natural nails
Practical Advice
- Prep and Base Coat: Start with clean, shaped nails and apply a base coat.
- Apply Base Colors: Paint your nails with brown, burnt orange, and nude polishes as shown, allowing each layer to dry fully.
- Add Leaf Detail: On the nude base nails, use a fine brush to paint delicate black leaf details.
- Seal with Top Coat: Finish with a top coat to protect the design and add a glossy finish.
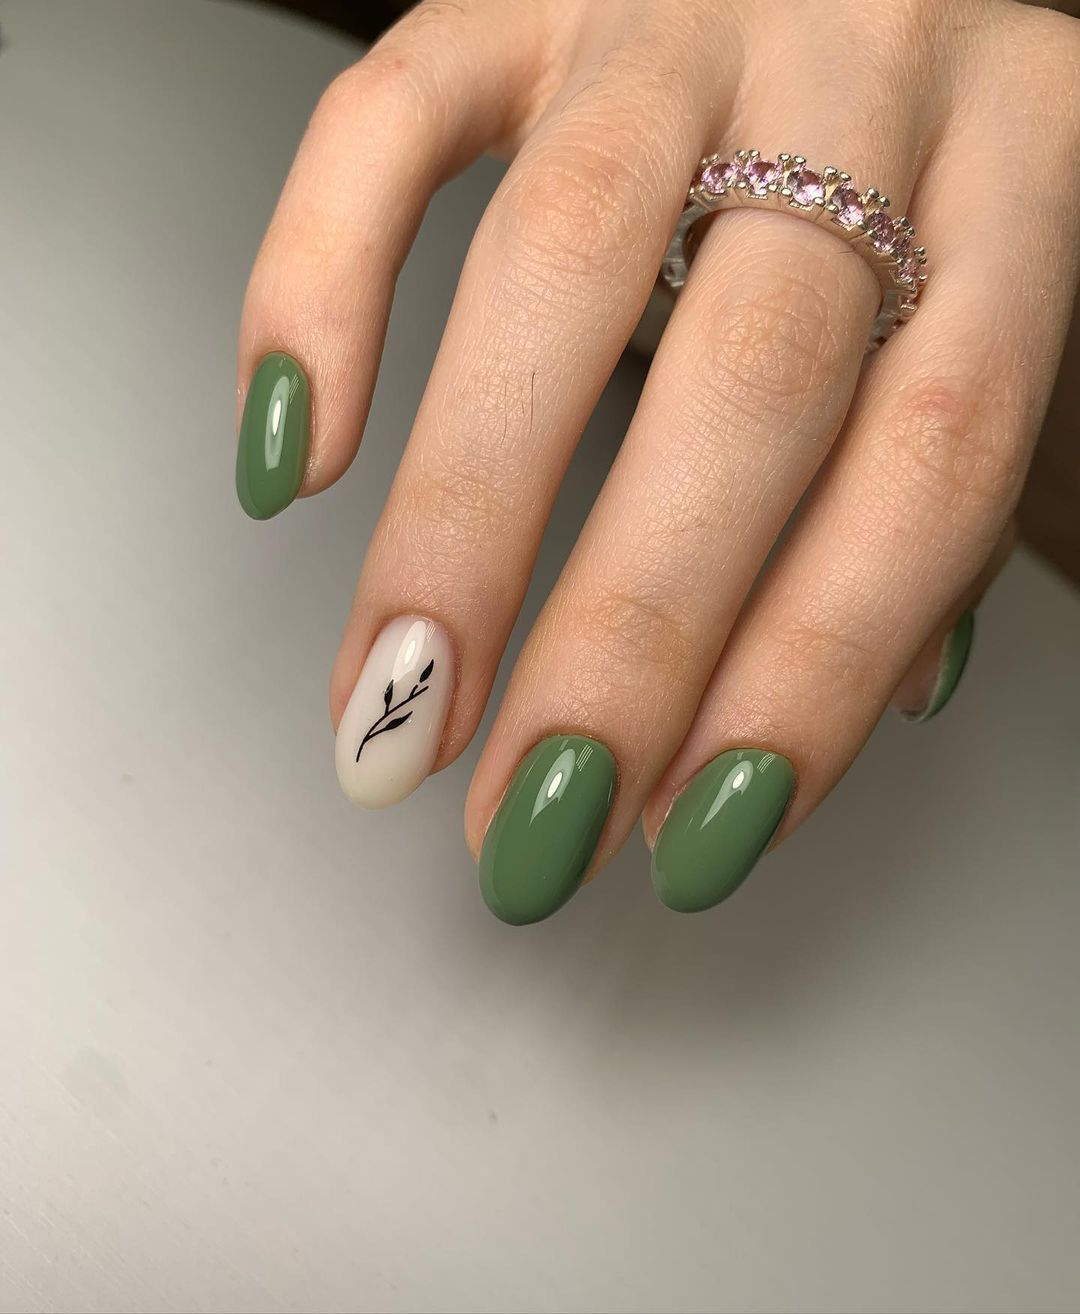
Simple Green with Minimalist Branch Accent
This elegant design features a simple yet sophisticated green base with a minimalist black branch accent on the ring finger. The clean lines and muted color palette make it perfect for those who prefer understated nail art that still makes a statement.
- Green nail polish (e.g., OPI’s “Stay Off the Lawn!”)
- Nude nail polish for the accent nail (e.g., Essie’s “Ballet Slippers”)
- Black nail polish for the branch detail (e.g., OPI’s “Black Onyx”)
- Fine nail art brush for detailing
- Top coat for a glossy finish
- Base coat to protect natural nails
Practical Advice
- Prep and Base Coat: Clean and shape your nails, then apply a base coat.
- Apply Green Base: Paint all nails except the ring finger with the green polish, allowing each layer to dry completely.
- Create Accent Nail: On the ring finger, apply a nude polish as the base. Once dry, use a fine brush to paint a simple black branch.
- Seal with Top Coat: Apply a top coat to protect the design and add a glossy finish.
Autumn Leaves and Umbrella Nail Art
This whimsical design combines rich green and orange nails with detailed autumn leaves and an umbrella on a nude base. The playful imagery of falling leaves and a small umbrella captures the essence of the fall season perfectly.

- Green nail polish (e.g., Essie’s “Off Tropic”)
- Orange nail polish (e.g., OPI’s “Orange You Glad It’s Fall?”)
- Nude nail polish for the base of the accent nails (e.g., Essie’s “Topless & Barefoot”)
- Acrylic paints or nail polish for the leaf and umbrella art (e.g., green, yellow, orange, and black)
- Fine nail art brush for detailing
- Top coat for a glossy finish
- Base coat to protect natural nails
Practical Advice
- Prep and Base Coat: Clean and shape your nails, then apply a base coat.
- Apply Green and Orange Base: Paint some nails with green and some with orange polish, allowing each layer to dry completely.
- Create Autumn Art: On the nude base nails, use a fine brush to paint detailed autumn leaves and an umbrella with acrylic paints or nail polishes.
- Seal with Top Coat: Finish with a top coat to protect the design and add a glossy finish.
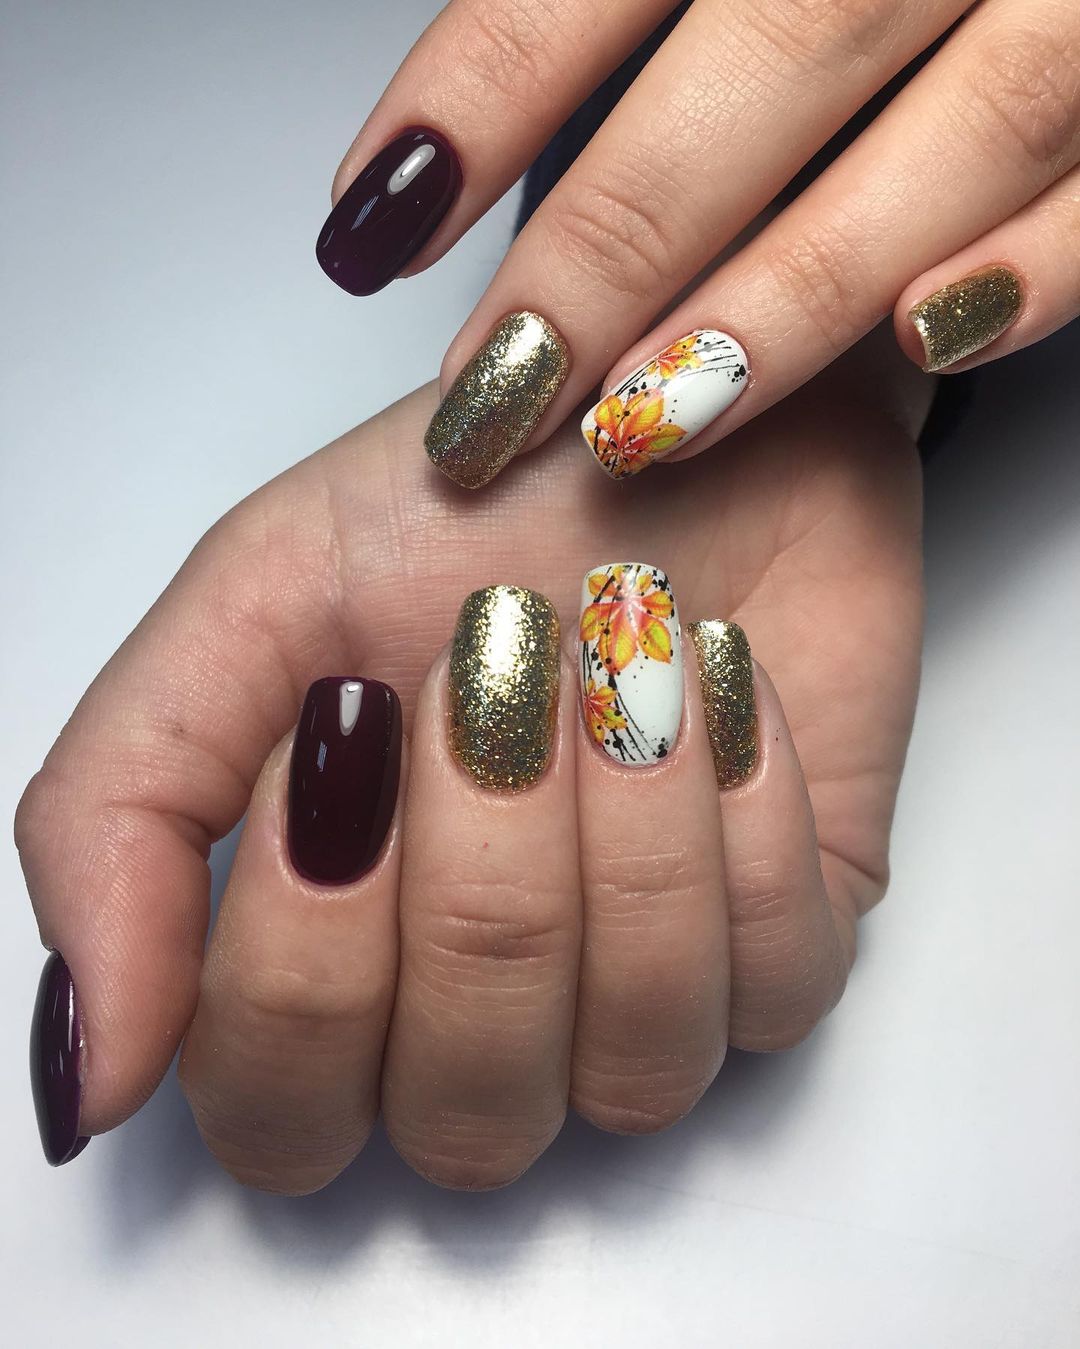
Glitter and Floral Elegance
This glamorous design combines deep maroon, gold glitter, and a floral accent on a white base. The rich colors and sparkly accents make this look perfect for fall celebrations and events.
- Maroon nail polish (e.g., Essie’s “Berry Naughty”)
- Gold glitter polish (e.g., Zoya’s “Tomoko”)
- White nail polish for the base of the accent nail (e.g., OPI’s “Alpine Snow”)
- Acrylic paints or nail polish for the floral art (e.g., orange, yellow, and black)
- Fine nail art brush for detailing
- Top coat for a glossy finish
- Base coat to protect natural nails
Practical Advice
- Prep and Base Coat: Start with clean, shaped nails and apply a base coat.
- Apply Maroon and Gold Glitter: Paint some nails with maroon and some with gold glitter polish, allowing each layer to dry fully.
- Create Floral Accent: On the white base nails, use a fine brush to paint detailed floral art with acrylic paints or nail polishes.
- Seal with Top Coat: Apply a top coat to protect the design and add a glossy finish.
Elegant Red and Black with Branch Detail
This chic design features a striking combination of red and black nails with a delicate branch accent on a nude base. The sophisticated color palette and minimalist art make it perfect for a refined, autumn-inspired look.
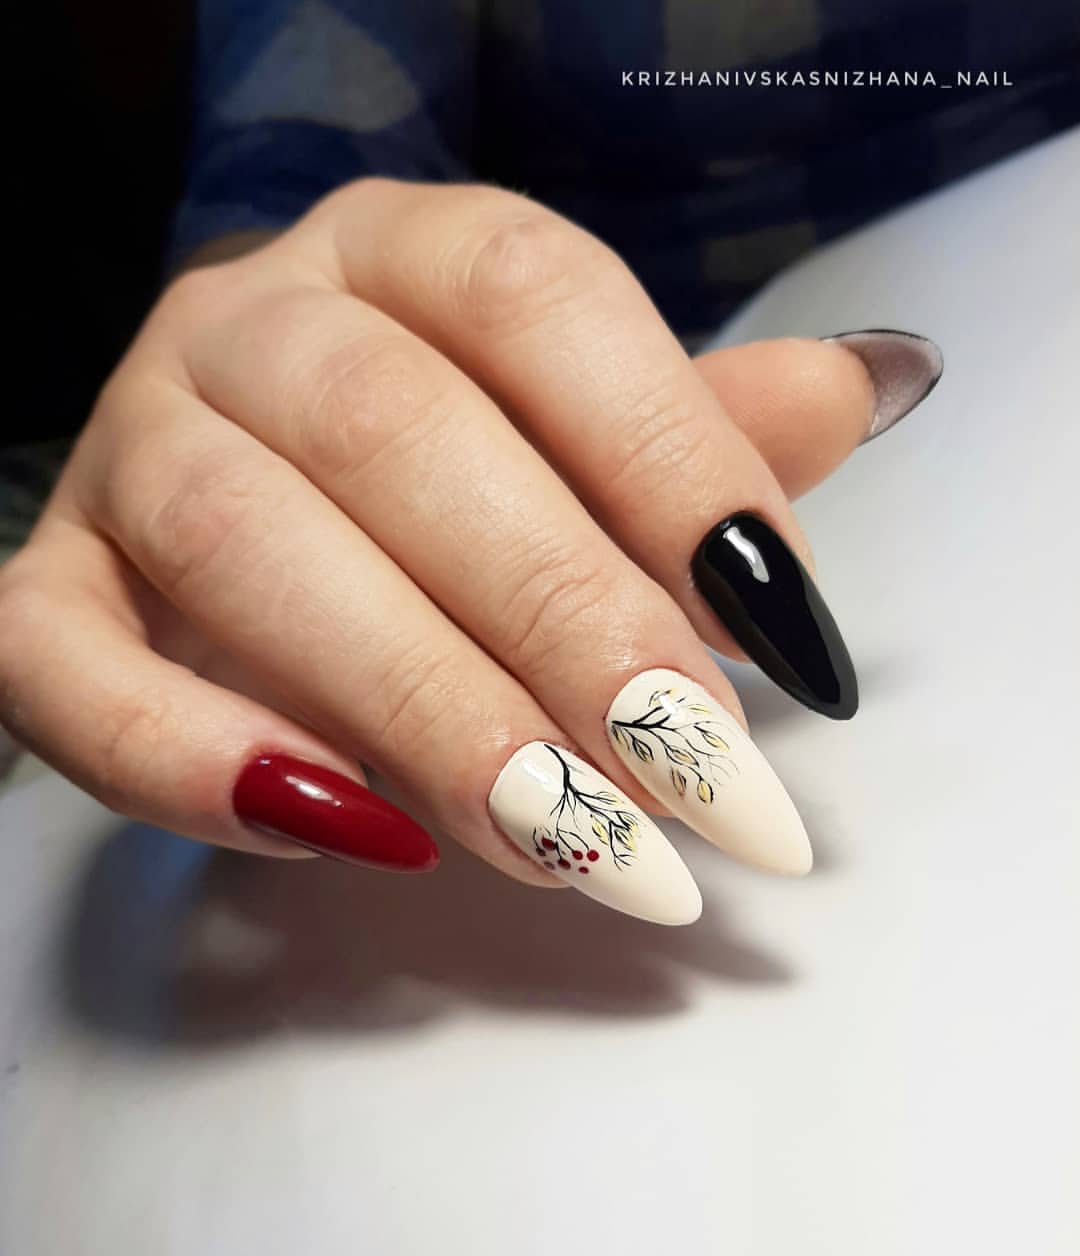
- Red nail polish (e.g., OPI’s “Big Apple Red”)
- Black nail polish (e.g., Essie’s “Licorice”)
- Nude nail polish for the base of the accent nail (e.g., OPI’s “Be There in a Prosecco”)
- Black nail polish for the branch detail (e.g., OPI’s “Black Onyx”)
- Fine nail art brush for detailing
- Top coat for a glossy finish
- Base coat to protect natural nails
Practical Advice
- Prep and Base Coat: Clean and shape your nails, then apply a base coat.
- Apply Red and Black Base: Paint your nails with red and black polish, leaving the ring finger for the nude base.
- Create Branch Accent: On the ring finger, use a fine brush to paint a delicate black branch with small leaves.
- Seal with Top Coat: Finish with a top coat to protect the design and add a glossy finish.
Green and Nude with Leaf Detail
This understated design features a harmonious combination of green and nude nails with a delicate leaf accent on the ring finger. The subtle colors and simple art make it perfect for everyday wear during the fall season.
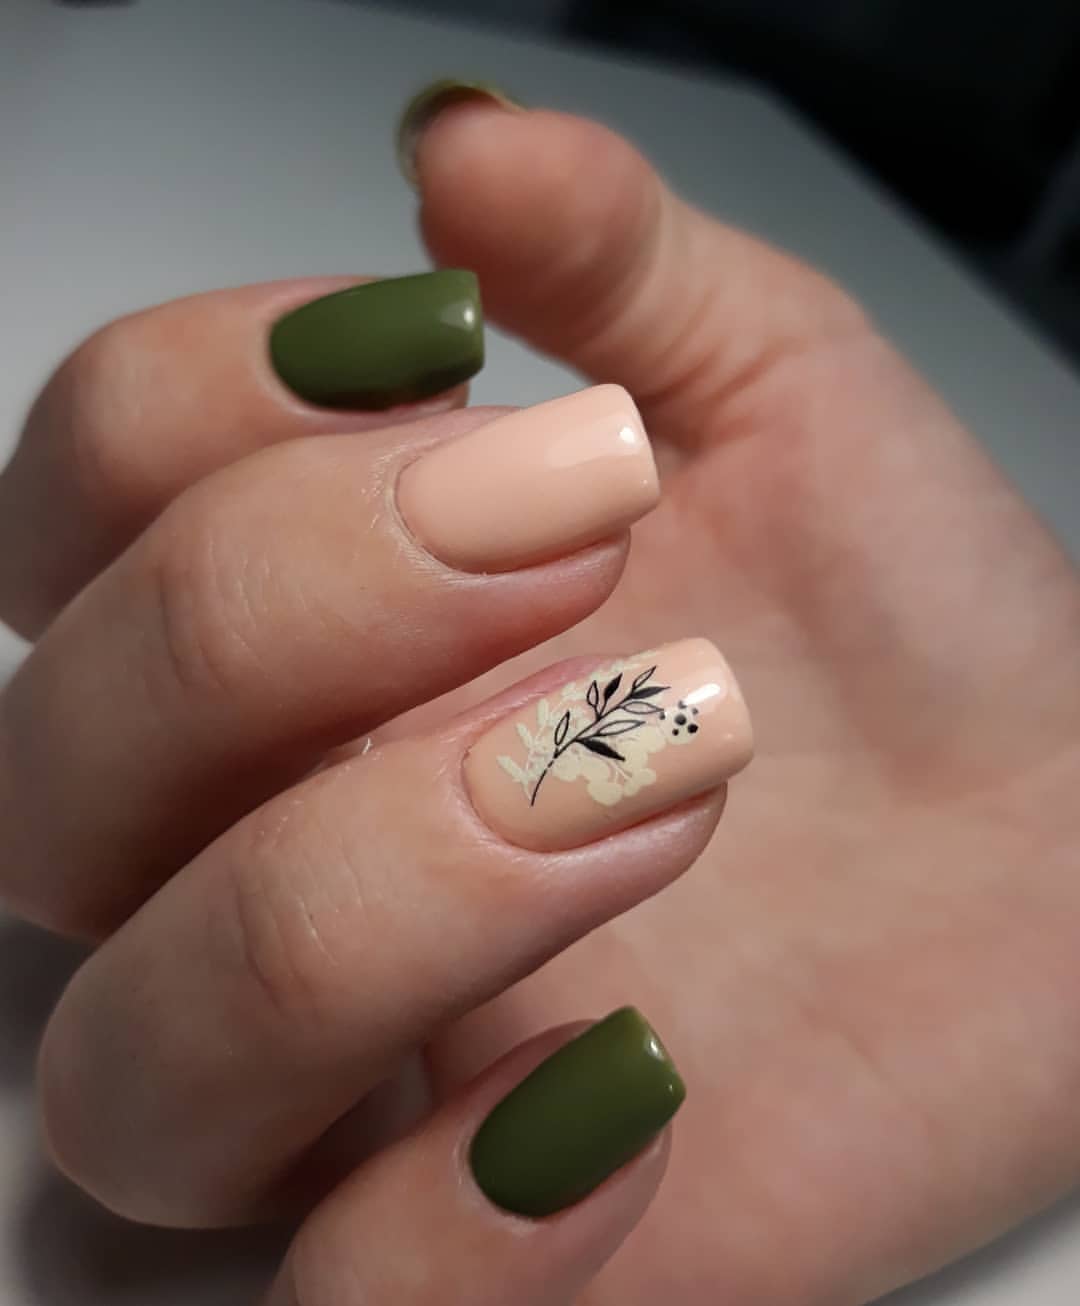
- Green nail polish (e.g., OPI’s “Stay Off the Lawn!”)
- Nude nail polish (e.g., Essie’s “Ballet Slippers”)
- Black nail polish for the leaf detail (e.g., OPI’s “Black Onyx”)
- Fine nail art brush for detailing
- Top coat for a glossy finish
- Base coat to protect natural nails
Practical Advice
- Prep and Base Coat: Start by cleaning and shaping your nails, then apply a base coat.
- Apply Green and Nude Base: Paint your nails with green and nude polishes as shown, allowing each layer to dry fully.
- Add Leaf Detail: On the nude base nails, use a fine brush to paint a delicate black leaf detail.
- Seal with Top Coat: Apply a top coat to protect the design and add a glossy finish.
Playful Autumn Nail Art
This fun and vibrant design features a collection of autumn-inspired elements such as leaves, mushrooms, and ladybugs on a nude base. The colorful and detailed art captures the whimsical spirit of fall perfectly.
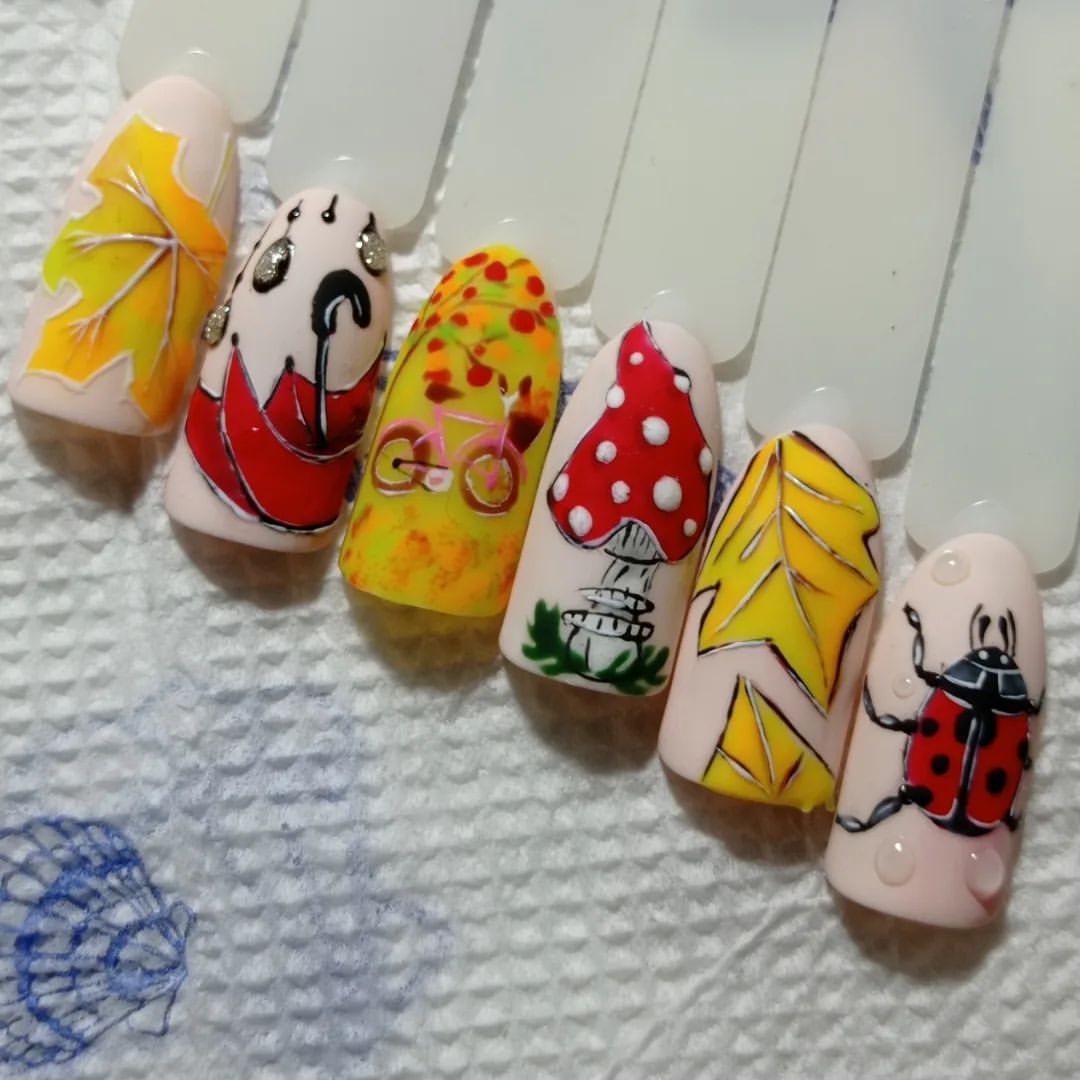
- Nude nail polish (e.g., Essie’s “Topless & Barefoot”)
- Acrylic paints or nail polish for the detailed art (e.g., red, yellow, orange, green, and black)
- Fine nail art brush for detailing
- Top coat for a glossy finish
- Base coat to protect natural nails
Practical Advice
- Prep and Base Coat: Clean and shape your nails, then apply a base coat.
- Apply Nude Base: Paint your nails with nude polish, ensuring an even and opaque coverage.
- Create Autumn Art: Use a fine brush to paint detailed autumn elements such as leaves, mushrooms, and ladybugs with acrylic paints or nail polishes.
- Seal with Top Coat: Finish with a top coat to protect the design and add a glossy finish.
Bright Orange with Leaf Accent
This eye-catching design features a bright orange base with a delicate autumn leaf accent on the ring finger. The vibrant orange color captures the essence of fall, while the leaf art adds a touch of nature-inspired charm.
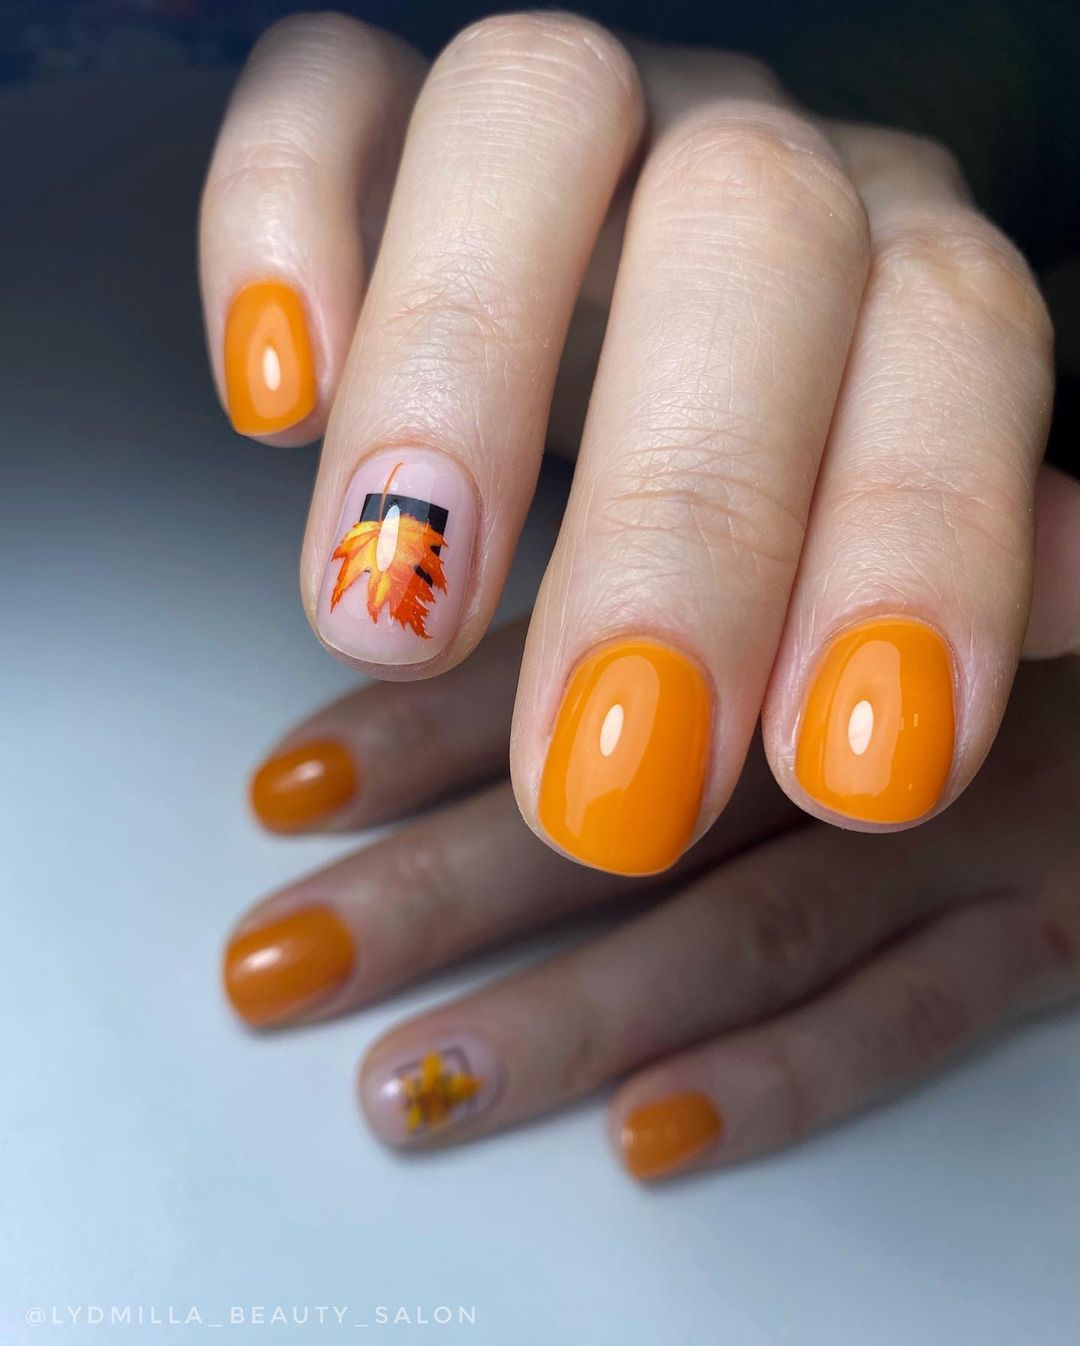
- Bright orange nail polish (e.g., Essie’s “Tangerine Tease”)
- Nude nail polish for the base of the accent nail (e.g., OPI’s “Be There in a Prosecco”)
- Acrylic paints or nail polish for the leaf art (e.g., orange, yellow, and red)
- Fine nail art brush for detailing
- Top coat for a glossy finish
- Base coat to protect natural nails
Practical Advice
- Prep and Base Coat: Clean and shape your nails, then apply a base coat.
- Apply Orange Base: Paint all nails except the ring finger with the bright orange polish, allowing each layer to dry completely.
- Create Leaf Accent: On the ring finger, apply a nude polish as the base. Once dry, use a fine brush to paint a delicate autumn leaf in orange, yellow, and red.
- Seal with Top Coat: Apply a top coat to protect the design and add a glossy finish.
Metallic Purple Chrome
This stunning design features a mesmerizing metallic purple chrome finish, giving your nails a futuristic and luxurious look. The high-shine, reflective surface is perfect for those who want a bold and glamorous manicure.
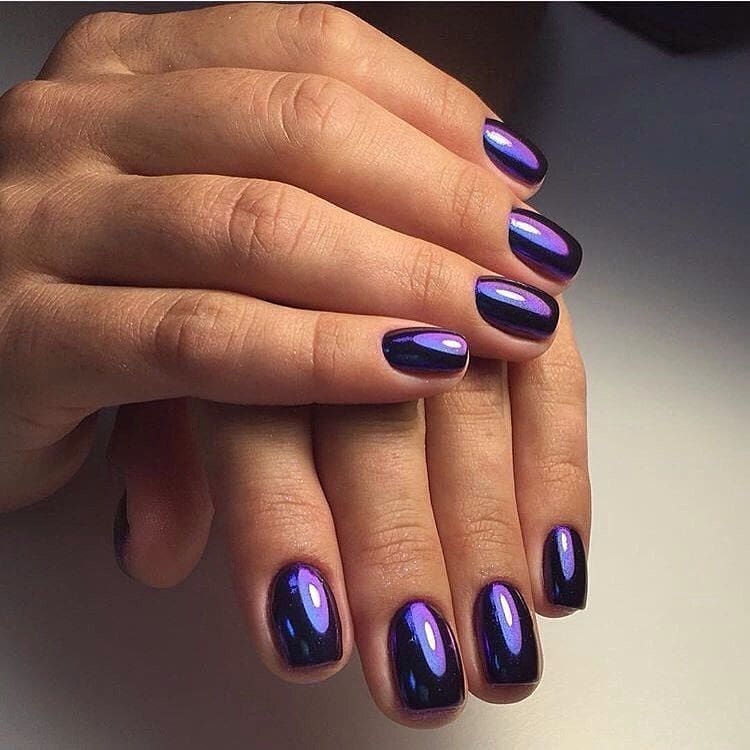
- Metallic purple chrome nail polish (e.g., Born Pretty’s “Purple Mirror Chrome”)
- Top coat for a glossy finish
- Base coat to protect natural nails
Practical Advice
- Prep and Base Coat: Clean and shape your nails, then apply a base coat.
- Apply Metallic Chrome: Paint your nails with the metallic purple chrome polish, ensuring an even and smooth coverage.
- Seal with Top Coat: Apply a top coat to protect the design and enhance the reflective finish.
Bold Red and Black with Gold Flakes
This bold design features striking red and black nails with a luxurious gold flake accent. The combination of vibrant red, deep black, and shimmering gold creates a dramatic and elegant look perfect for any special occasion.
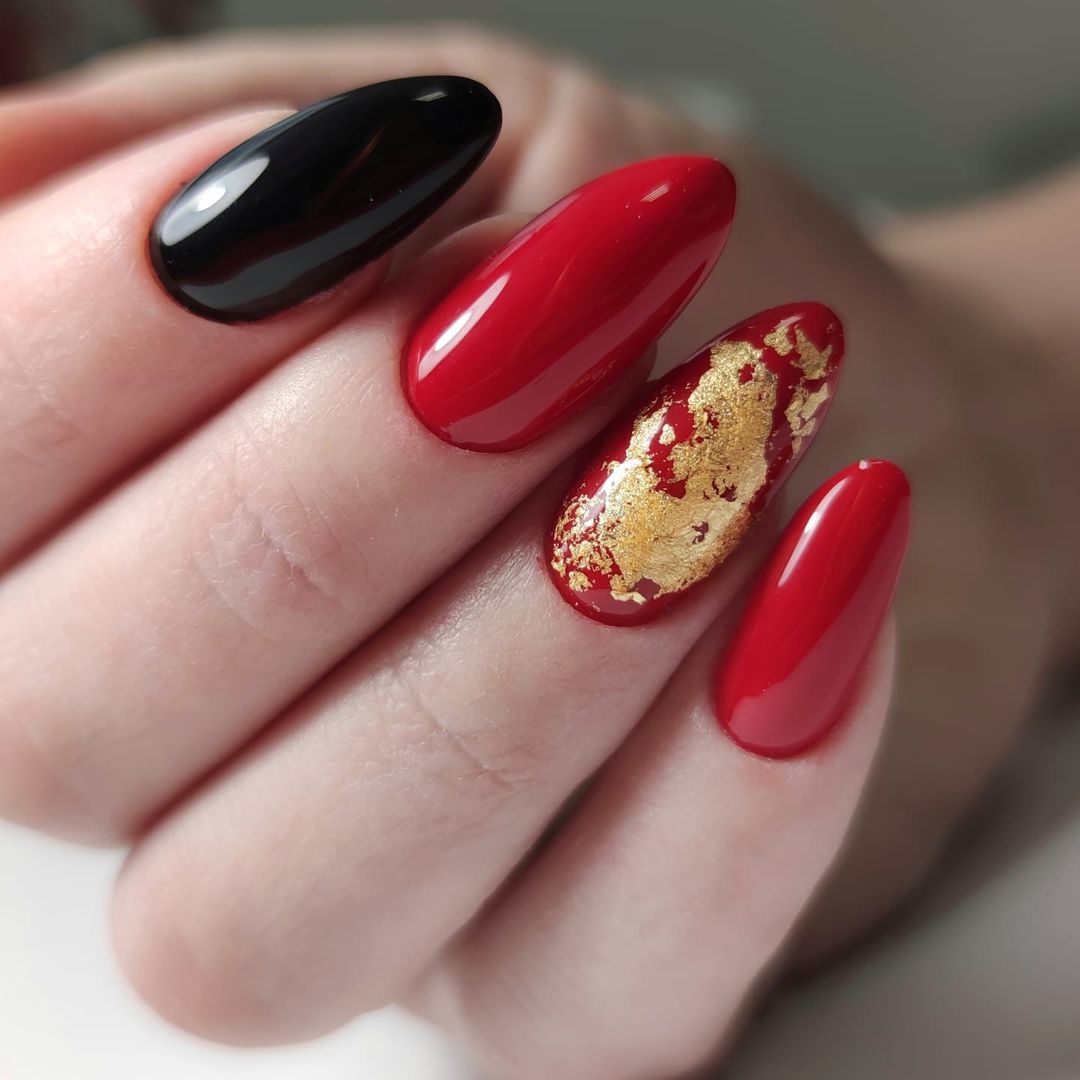
- Red nail polish (e.g., OPI’s “Big Apple Red”)
- Black nail polish (e.g., Essie’s “Licorice”)
- Gold foil flakes
- Top coat for a glossy finish
- Base coat to protect natural nails
Practical Advice
- Prep and Base Coat: Clean and shape your nails, then apply a base coat.
- Apply Red and Black Base: Paint your nails with red and black polish, leaving the ring finger for the gold flake accent.
- Add Gold Flakes: On the ring finger, apply gold flakes while the polish is still tacky.
- Seal with Top Coat: Apply a top coat to protect the design and add a glossy finish.
Gradient Purple Perfection
This elegant design features a gradient of purple shades, transitioning from light to dark with a touch of glitter. The combination of matte and glossy finishes adds depth and sophistication to the overall look.
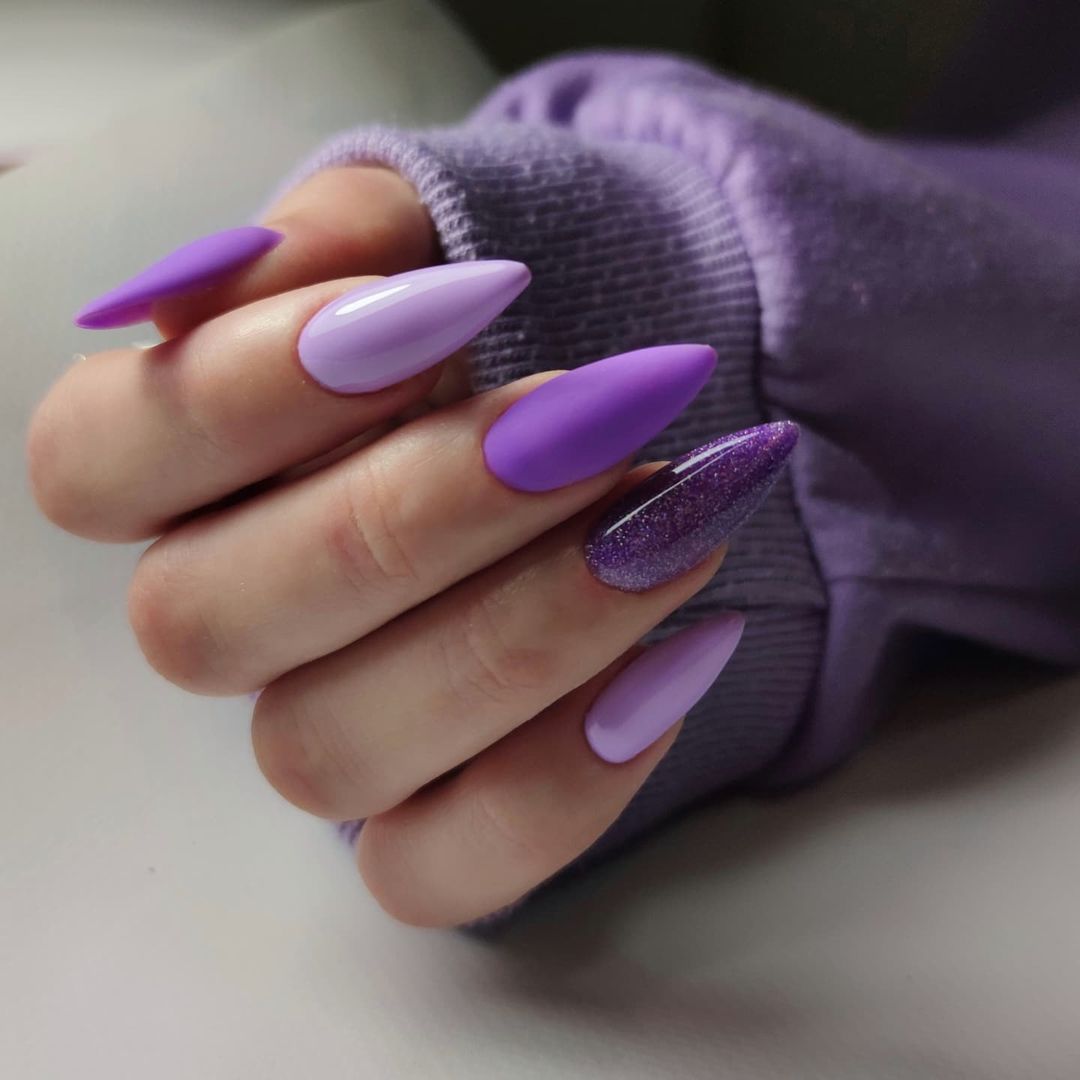
- Light purple nail polish (e.g., Essie’s “Lilacism”)
- Dark purple nail polish (e.g., OPI’s “Lincoln Park After Dark”)
- Purple glitter polish (e.g., Zoya’s “Aurora”)
- Matte top coat
- Glossy top coat
- Base coat to protect natural nails
Practical Advice
- Prep and Base Coat: Start by cleaning and shaping your nails, then apply a base coat.
- Create Gradient: Using a sponge, apply the light and dark purple polishes to create a gradient effect. Allow each layer to dry completely.
- Add Glitter: Apply purple glitter polish to the accent nails for a touch of sparkle.
- Seal with Top Coats: Finish with a matte top coat on some nails and a glossy top coat on others to add depth and interest.
Abstract Yellow and Black
This modern design features an abstract combination of yellow and black on a nude base. The geometric shapes and bold lines create a striking, contemporary look that is both playful and sophisticated.
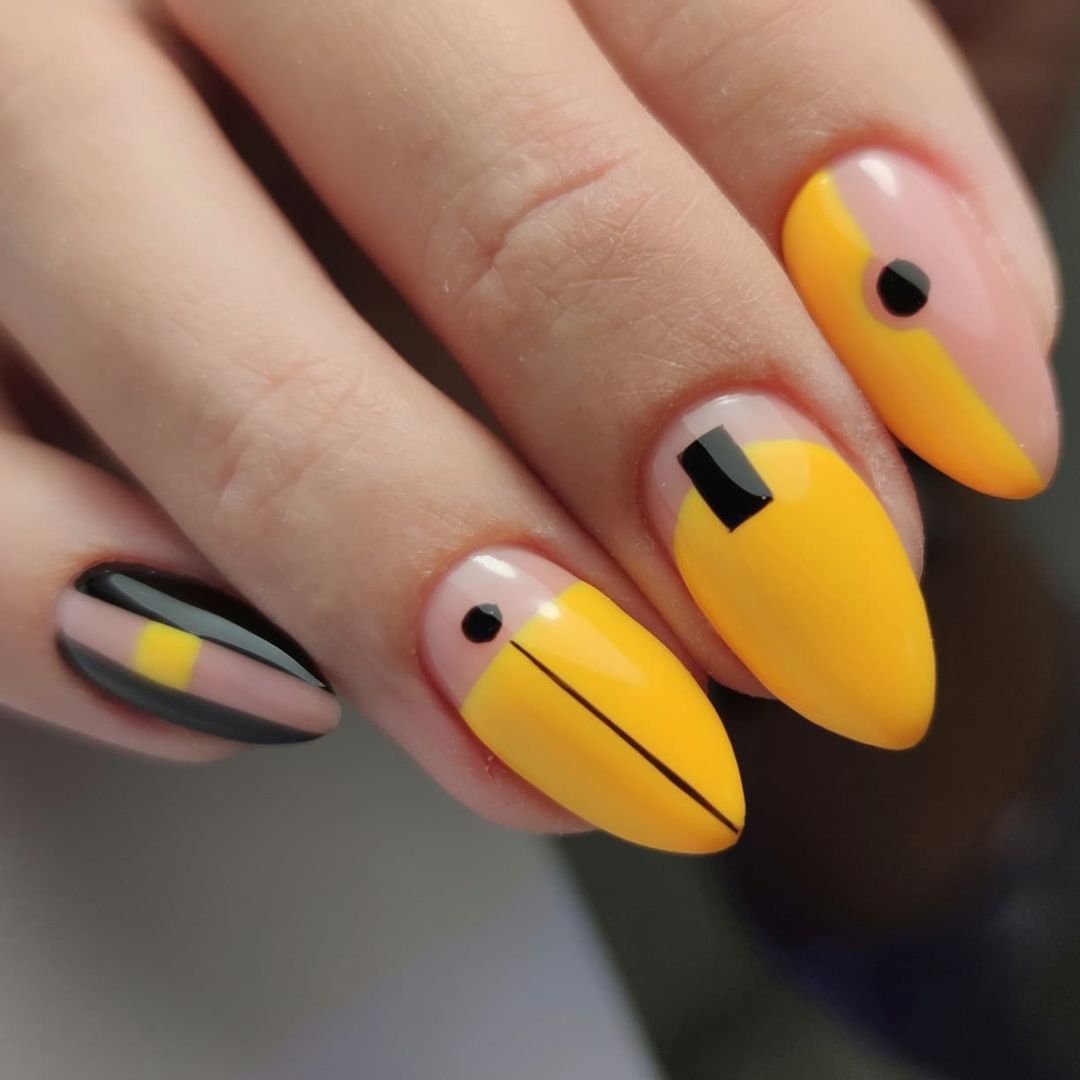
- Yellow nail polish (e.g., OPI’s “Sun, Sea, and Sand in My Pants”)
- Black nail polish (e.g., Essie’s “Licorice”)
- Nude nail polish for the base (e.g., Essie’s “Topless & Barefoot”)
- Fine nail art brush for detailing
- Top coat for a glossy finish
- Base coat to protect natural nails
Practical Advice
- Prep and Base Coat: Clean and shape your nails, then apply a base coat.
- Apply Base Colors: Paint your nails with the nude polish as a base, allowing each layer to dry completely.
- Create Abstract Design: Use a fine brush to paint bold yellow and black geometric shapes on each nail.
- Seal with Top Coat: Apply a top coat to protect the design and add a glossy finish.
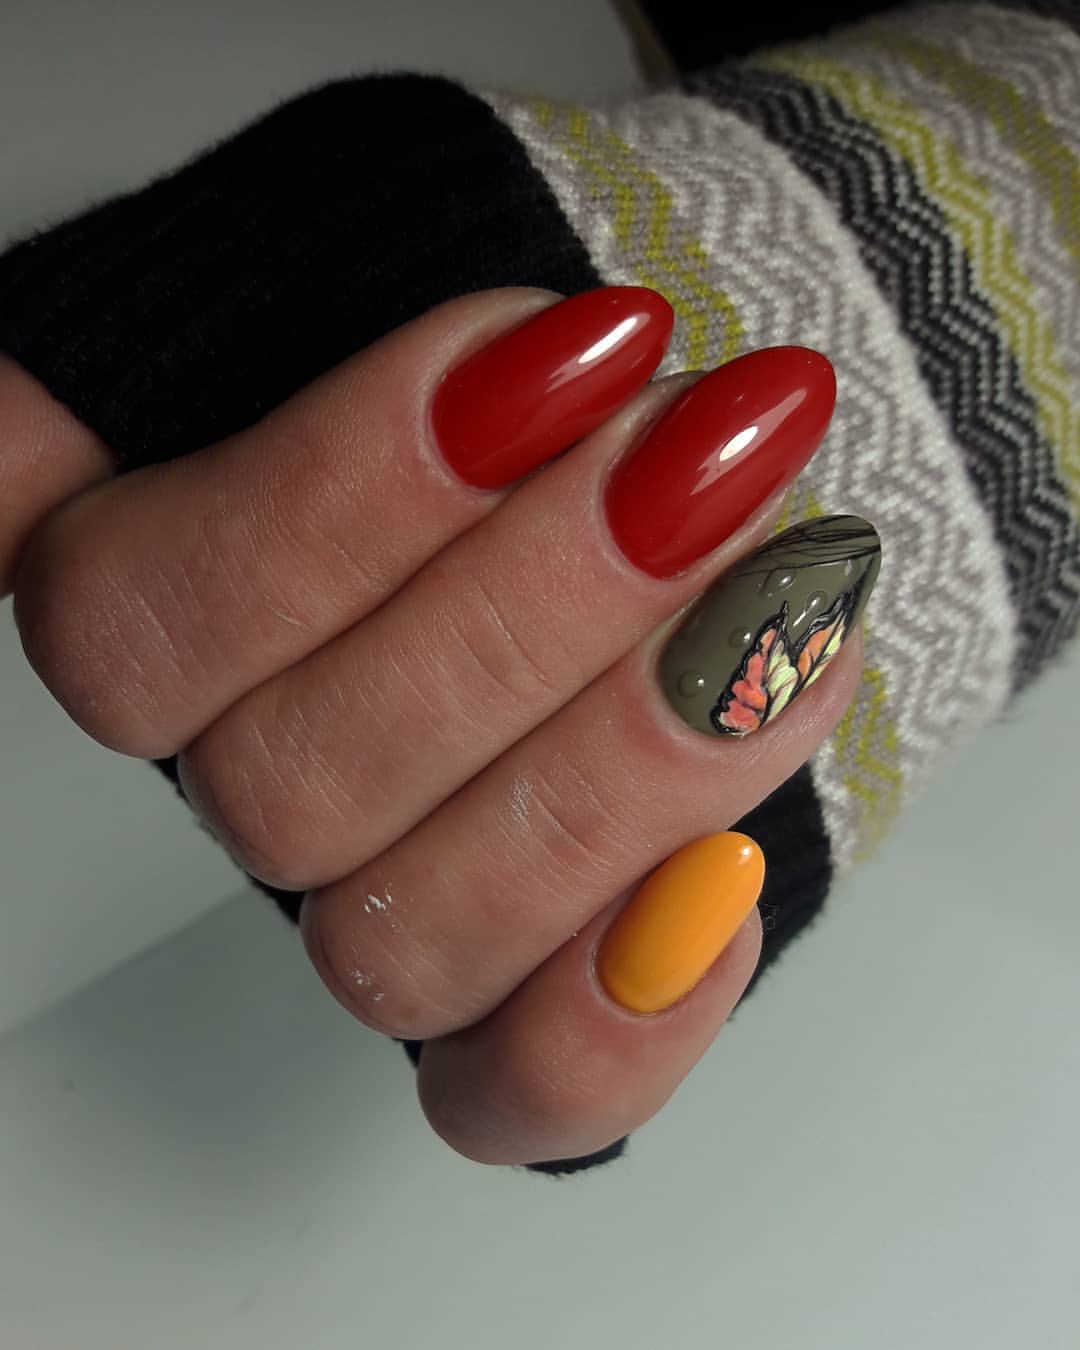
Festive Fall Leaves
This festive design features a mix of red, yellow, and green nails with a detailed fall leaf accent. The combination of warm and earthy tones captures the spirit of autumn, making it perfect for the season.
- Red nail polish (e.g., Essie’s “A List”)
- Yellow nail polish (e.g., OPI’s “Sun, Sea, and Sand in My Pants”)
- Green nail polish (e.g., Essie’s “Off Tropic”)
- Nude nail polish for the base of the accent nail (e.g., Essie’s “Ballet Slippers”)
- Acrylic paints or nail polish for the leaf art (e.g., red, yellow, and green)
- Fine nail art brush for detailing
- Top coat for a glossy finish
- Base coat to protect natural nails
Practical Advice
- Prep and Base Coat: Start by cleaning and shaping your nails, then apply a base coat.
- Apply Base Colors: Paint your nails with red, yellow, and green polishes as shown, allowing each layer to dry fully.
- Create Leaf Accent: On the nude base nails, use a fine brush to paint detailed fall leaves with red, yellow, and green paints.
- Seal with Top Coat: Apply a top coat to protect the design and add a glossy finish.
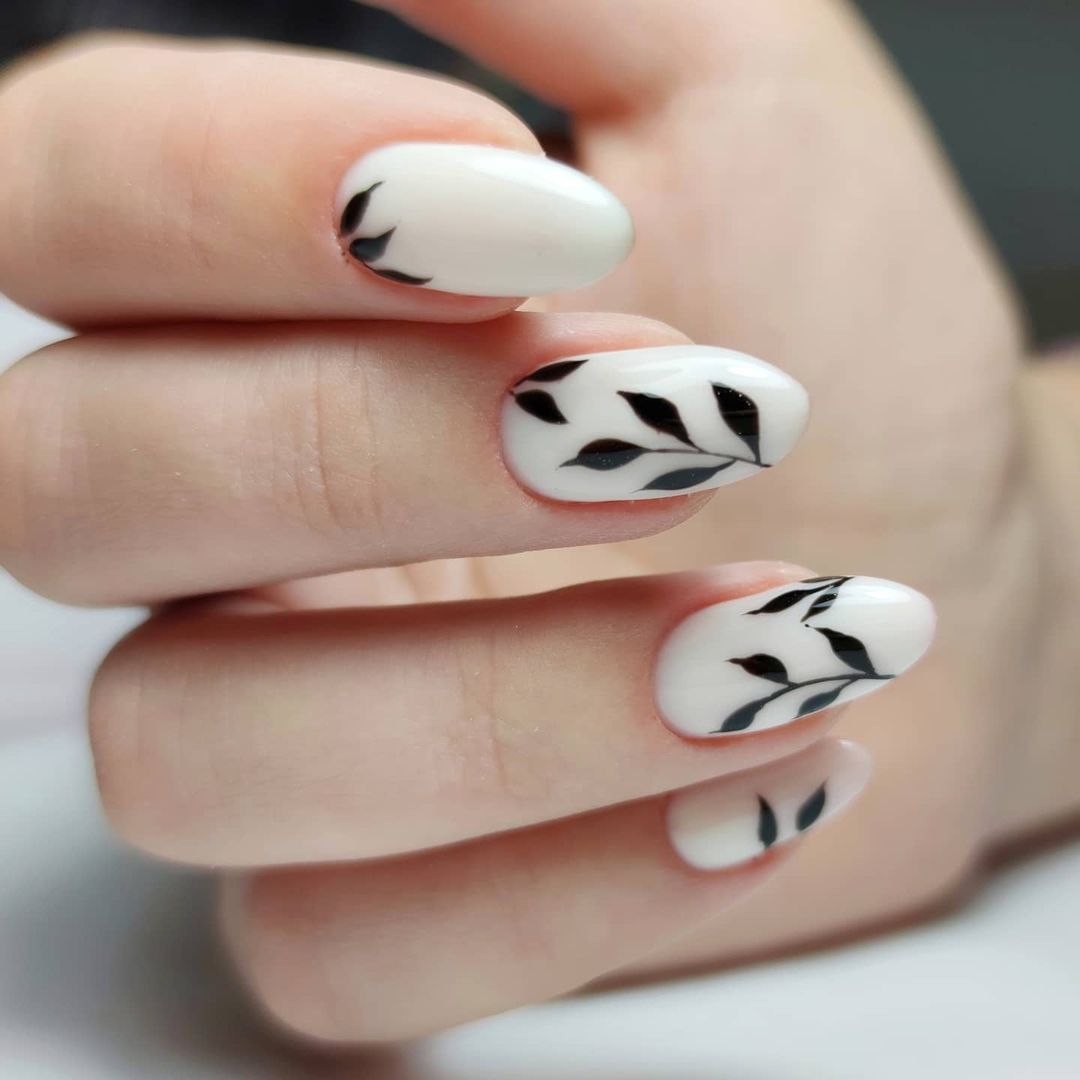
Minimalist Black Leaf on White
This minimalist design features a clean white base with simple black leaf accents on each nail. The monochromatic color scheme and delicate leaf details create a sophisticated and modern look that is perfect for any occasion.
- White nail polish (e.g., Essie’s “Blanc”)
- Black nail polish for the leaf details (e.g., OPI’s “Black Onyx”)
- Fine nail art brush for detailing
- Top coat for a glossy finish
- Base coat to protect natural nails
Practical Advice
- Prep and Base Coat: Clean and shape your nails, then apply a base coat.
- Apply White Base: Paint all nails with white polish, ensuring an even and opaque coverage.
- Add Black Leaf Details: Using a fine brush, paint small black leaf accents on each nail. Allow the design to dry completely.
- Seal with Top Coat: Apply a top coat to protect the design and add a glossy finish.
Autumn Glamour with Glitter and Plaid
This luxurious design combines warm autumn tones with glitter and plaid accents. The mix of gold glitter, rich brown, and plaid patterns gives this manicure a cozy yet glamorous feel, perfect for the fall season.

- Orange nail polish (e.g., Essie’s “Playing Koi”)
- Brown nail polish (e.g., OPI’s “Espresso Your Style”)
- Gold glitter polish (e.g., Zoya’s “Tomoko”)
- Nude nail polish for the base of the plaid nails (e.g., Essie’s “Topless & Barefoot”)
- Acrylic paints or nail polish for the plaid design (e.g., black, white, and brown)
- Fine nail art brush for detailing
- Top coat for a glossy finish
- Base coat to protect natural nails
Practical Advice
- Prep and Base Coat: Start by cleaning and shaping your nails, then apply a base coat.
- Apply Base Colors: Paint some nails with orange and brown polish, leaving others for the plaid design and gold glitter.
- Create Glitter and Plaid Accents: Apply gold glitter to one nail and use a fine brush to paint the plaid design on another nail.
- Seal with Top Coat: Finish with a top coat to protect the design and add a glossy finish.
Elegant Burgundy French Tips
This elegant design features a classic white base with deep burgundy French tips. The contrast between the crisp white and rich burgundy creates a timeless and sophisticated look that is perfect for any season.

- White nail polish (e.g., OPI’s “Alpine Snow”)
- Burgundy nail polish for the tips (e.g., Essie’s “Wicked”)
- French tip guides or tape for precision
- Top coat for a glossy finish
- Base coat to protect natural nails
Practical Advice
- Prep and Base Coat: Clean and shape your nails, then apply a base coat.
- Apply White Base: Paint all nails with white polish, ensuring an even and opaque coverage.
- Create Burgundy Tips: Use French tip guides or tape to paint the tips with burgundy polish. Allow the tips to dry completely before removing the guides.
- Seal with Top Coat: Apply a top coat to protect the design and add a glossy finish.
Delicate Floral Accents
This charming design features a soft white base with delicate floral accents. The intricate flowers and leaves, painted in light colors, add a touch of elegance and femininity to the overall look.

- White nail polish (e.g., Essie’s “Blanc”)
- Acrylic paints or nail polish for the floral art (e.g., green, orange, and yellow)
- Fine nail art brush for detailing
- Top coat for a glossy finish
- Base coat to protect natural nails
Practical Advice
- Prep and Base Coat: Clean and shape your nails, then apply a base coat.
- Apply White Base: Paint all nails with white polish, ensuring an even and opaque coverage.
- Add Floral Accents: Using a fine brush, paint delicate flowers and leaves with light colors on a few accent nails.
- Seal with Top Coat: Apply a top coat to protect the design and add a glossy finish.
Soft Peach Marble
This soft and elegant design features a nude peach base with subtle marble accents. The combination of peach and white swirls creates a delicate and sophisticated look that is perfect for any occasion.

- Peach nail polish (e.g., OPI’s “Samoan Sand”)
- White nail polish for the marble effect (e.g., Essie’s “Blanc”)
- Fine nail art brush for detailing
- Top coat for a glossy finish
- Base coat to protect natural nails
Practical Advice
- Prep and Base Coat: Start by cleaning and shaping your nails, then apply a base coat.
- Apply Peach Base: Paint all nails with peach polish, ensuring an even and opaque coverage.
- Create Marble Effect: Use a fine brush to add white swirls on a few nails to create a marble effect. Blend the colors gently for a natural look.
- Seal with Top Coat: Finish with a top coat to protect the design and add a glossy finish.
FAQ
Q: How do I make my manicure last longer? A: Always start with a base coat and finish with a top coat. Reapply the top coat every few days to maintain the shine and protection.
Q: Can I create these designs on short nails? A: Absolutely! Many of these designs look great on short nails. Just adjust the scale of the patterns accordingly.
Q: What is the best way to remove glitter polish? A: Soak a cotton ball in acetone, place it on your nail, and wrap it in aluminum foil for a few minutes. This method helps to easily lift off the glitter.
Q: Are there any alternatives to using a dotting tool for nail art? A: Yes, you can use household items like a bobby pin or the end of a makeup brush for dotting.
Ready to embrace the best fall nail designs of 2024? Whether you prefer simple elegance or bold statements, these ideas will keep your nails looking fabulous all season long. Happy polishing!
Save Pin

