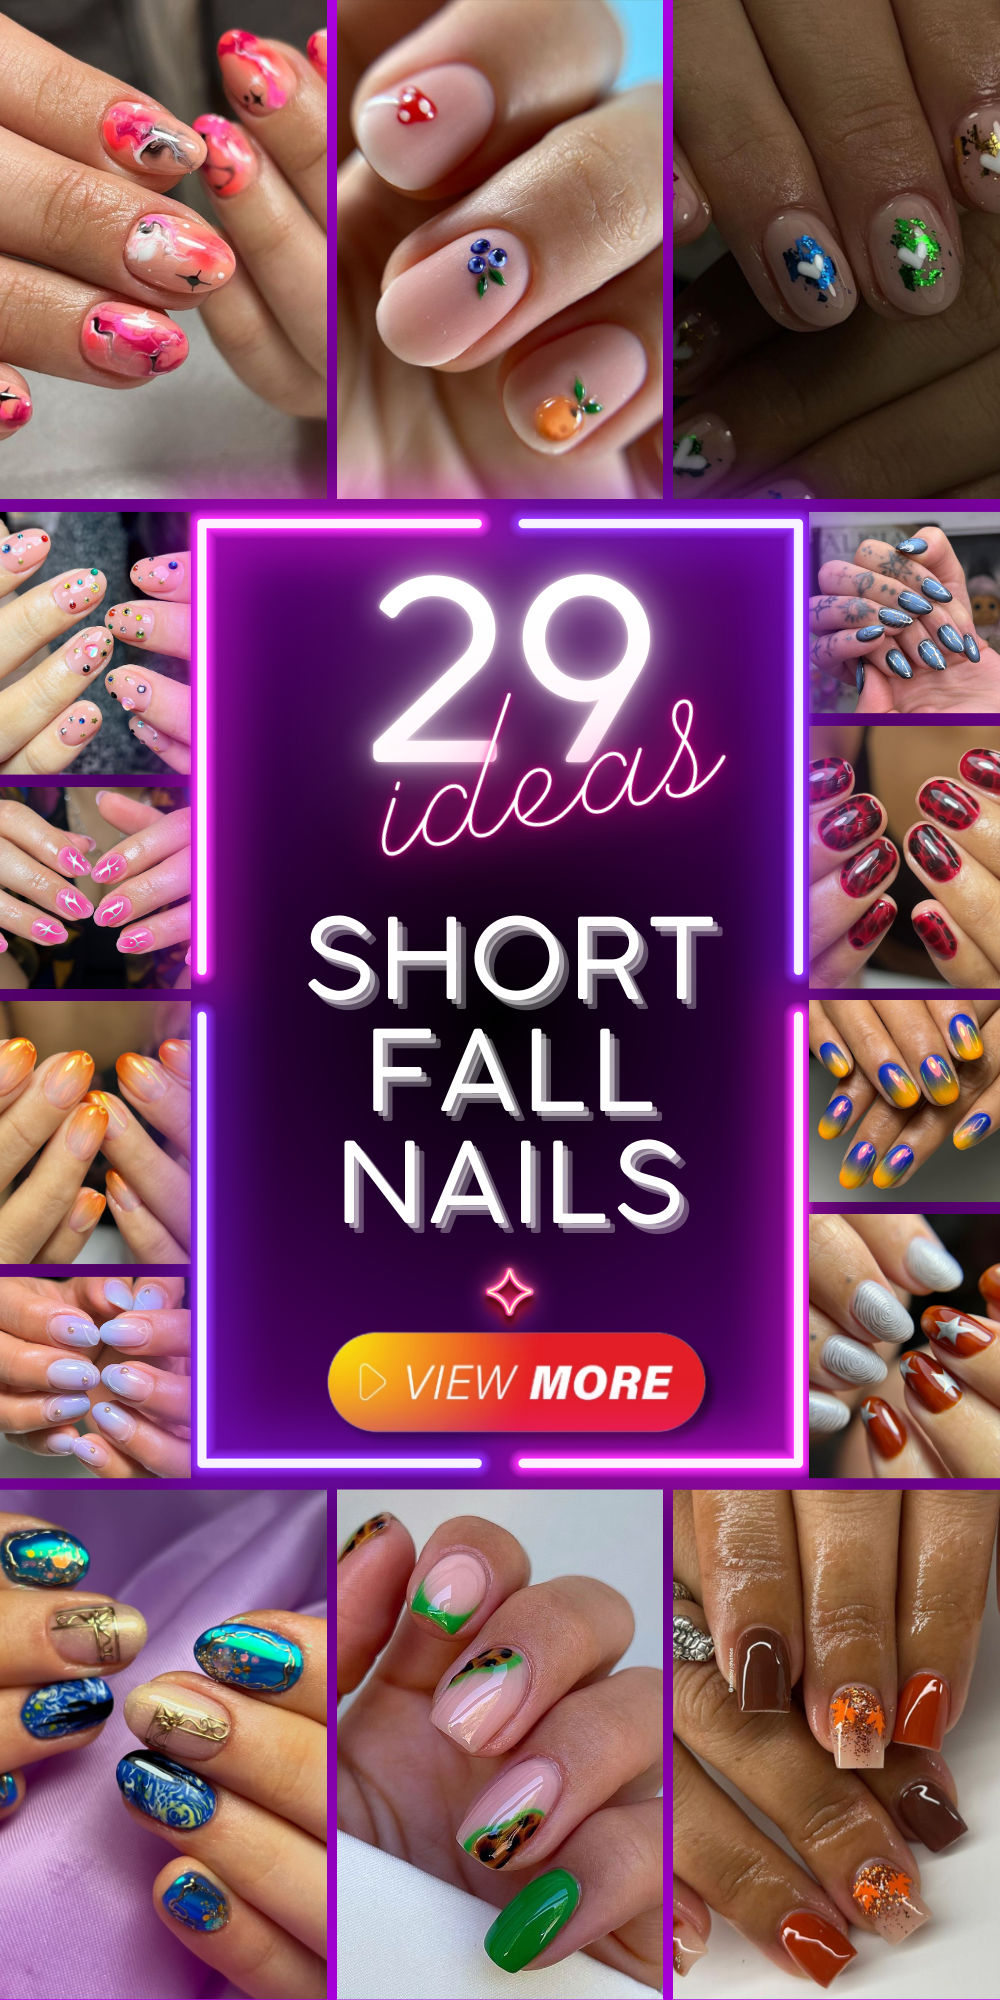
When it comes to nail designs for the fall, there’s no shortage of inspiration. From cozy autumnal colors to cute Halloween themes, short nails can carry the spirit of the season beautifully. Let’s dive into some fabulous nail ideas that will make your short fall nails stand out.
Pumpkin Spice Delight
Fall and pumpkins go hand in hand, and this nail design captures the essence perfectly. The combination of rich browns, vibrant oranges, and playful pumpkin accents create a delightful autumn aesthetic. The nails feature a mix of matte and glossy finishes, adding texture and depth to the overall look.
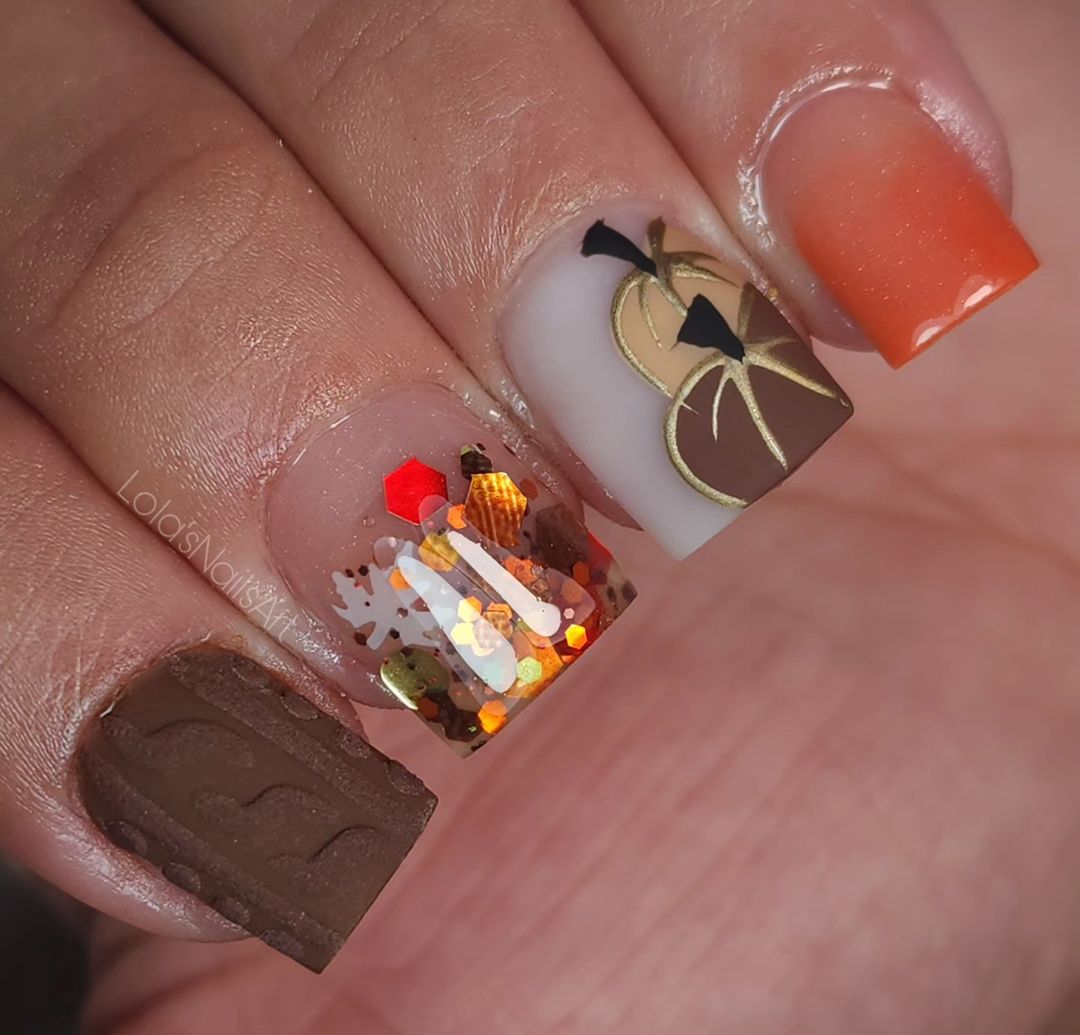
- Polish: Essie in “Playing Koi”
- Matte Top Coat: OPI Matte Top Coat
- Pumpkin Decals: KADS Nail Art Stickers
- Glitter: Holographic Gold Glitter by Born Pretty
Instructions:
- Start with a base coat to protect your natural nails.
- Apply two coats of the brown polish to the thumb and pinky nails.
- Use the orange polish for the index and ring fingers.
- Apply the pumpkin decals to the middle finger.
- Finish with a matte top coat on the brown nails and a glossy top coat on the orange nails and the accent nail.
Autumn Leaves Elegance
This design is perfect for those who want a touch of elegance with their fall nail art. The nails feature a stunning gradient of gold glitter and deep burgundy, adorned with delicate leaf accents. This look combines sophistication with a nod to the changing leaves of autumn.
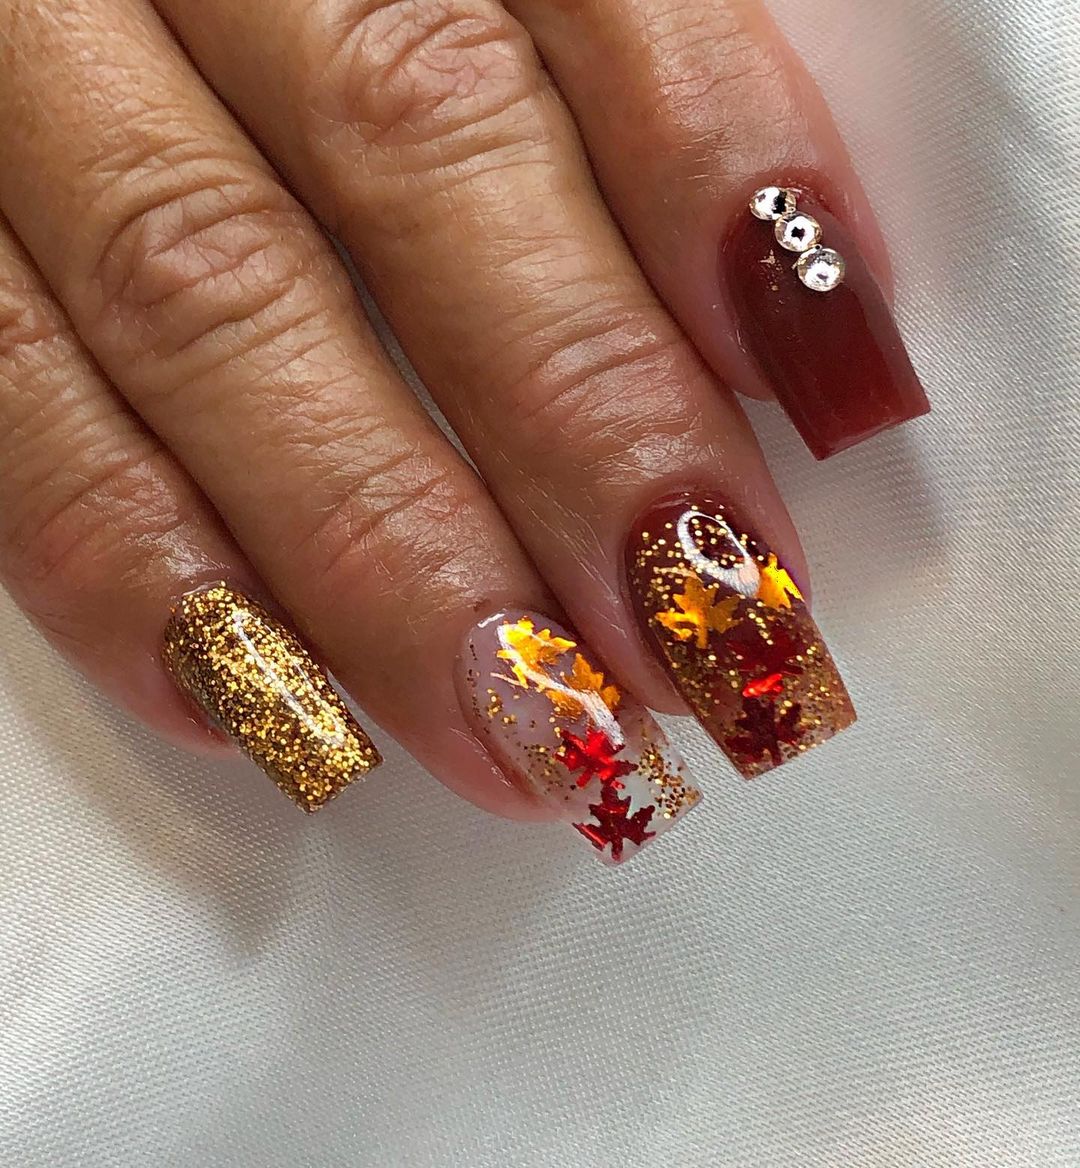
- Polish: Sally Hansen in “Wine Not”
- Glitter Polish: China Glaze in “Golden Enchantment”
- Leaf Decals: Whats Up Nails Maple Leaf Stencils
- Rhinestones: Swarovski Crystal Elements
Instructions:
- Apply a base coat.
- Paint the pinky and thumb nails with the glitter polish.
- Use the burgundy polish for the rest of the nails.
- Apply the leaf stencils to the middle and ring fingers and dab the glitter polish over them.
- Add rhinestones to the index finger for extra sparkle.
- Finish with a glossy top coat.
Orange Harvest Vibes
Brighten up your fall with these vibrant orange nails. The design features a mix of solid orange, glitter, and leaf accents, capturing the harvest season’s warmth and vibrancy. It’s a bold choice that brings a fun and festive feel to your nails.
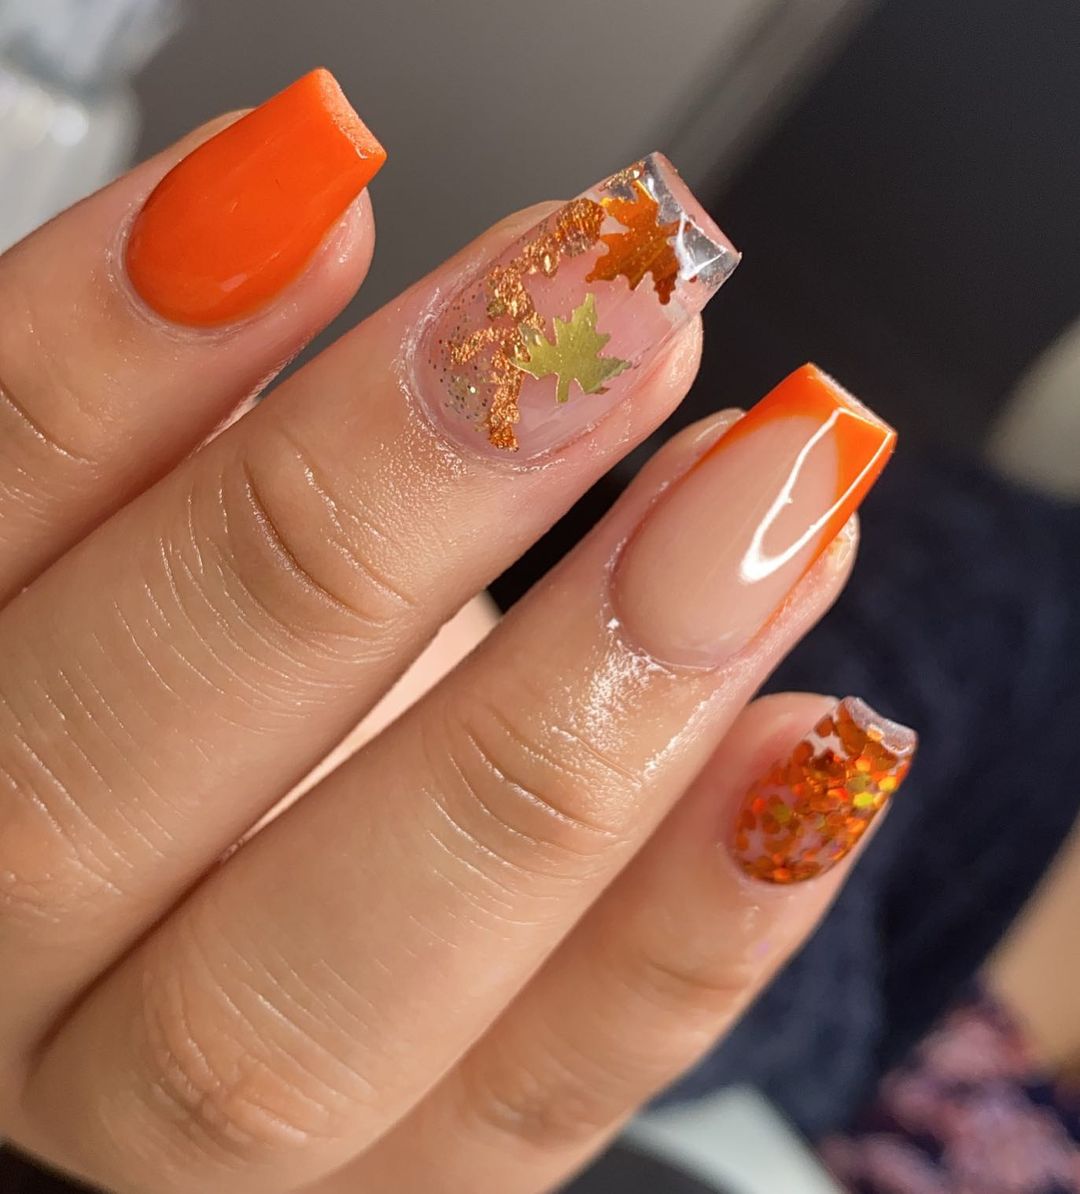
- Polish: Zoya in “Arizona”
- Glitter: NYK1 Glitter in “Autumn Mix”
- Leaf Decals: Biutee Fall Leaves Nail Art Stickers
Instructions:
- Start with a protective base coat.
- Apply two coats of orange polish to all nails.
- On the middle and ring fingers, apply a layer of glitter.
- Use leaf decals on the index finger for an accent.
- Seal with a glossy top coat for a vibrant finish.
Chic Green Tortoiseshell Accents
This nail design perfectly combines simplicity with a touch of boldness. The green tortoiseshell accents on a natural base give a sophisticated and stylish vibe, ideal for the fall season. The solid green nail adds a pop of color, making the design both trendy and elegant.
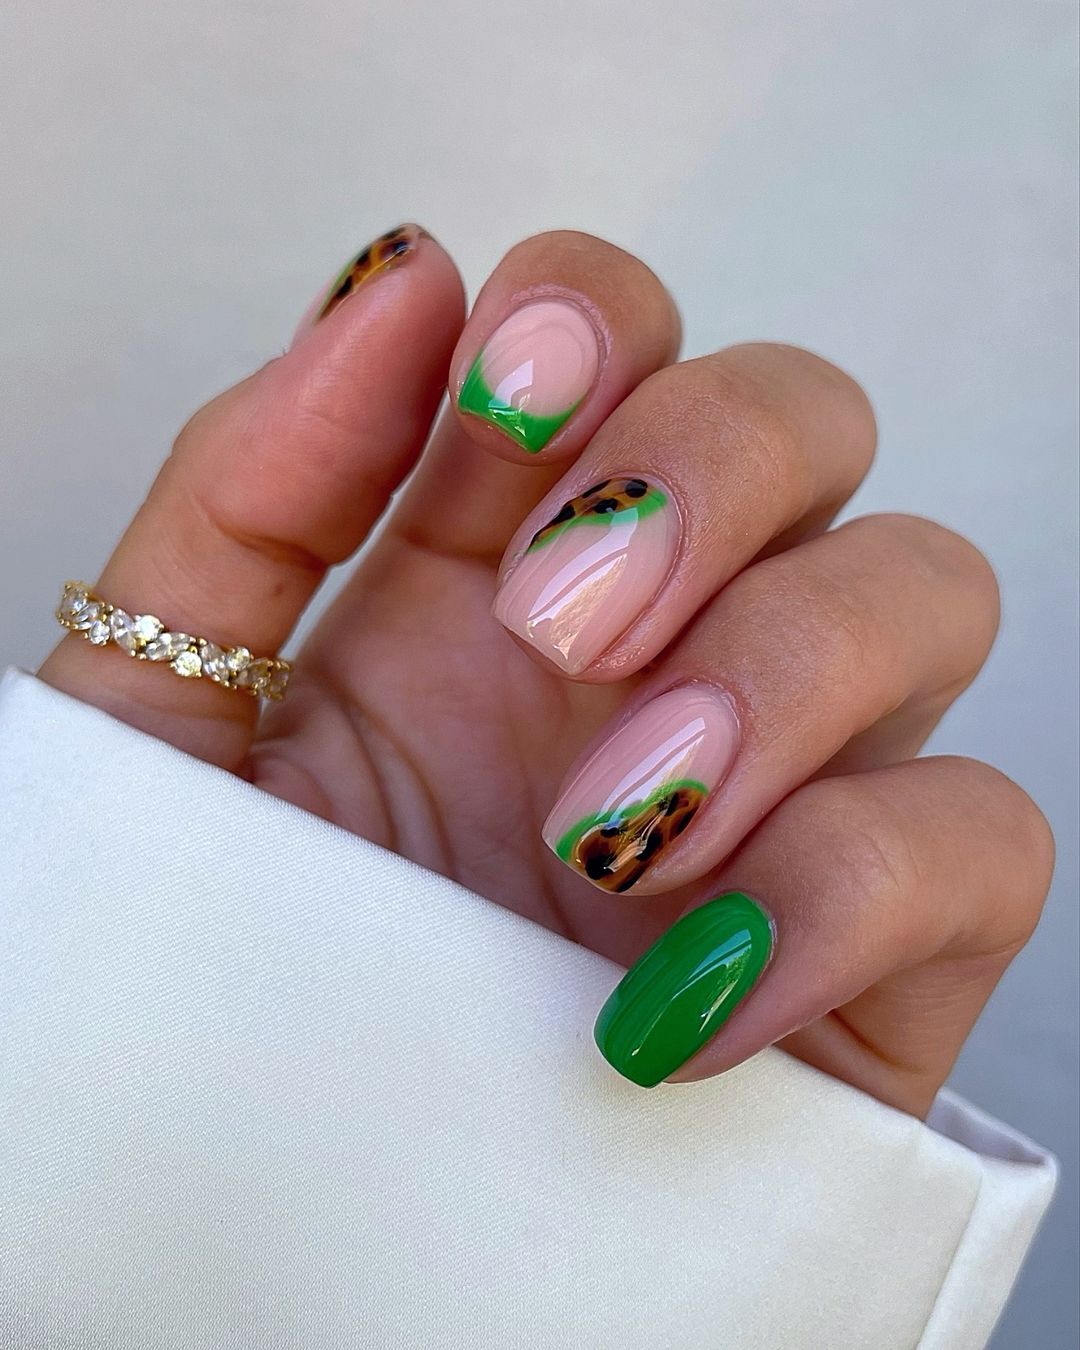
- Polish: OPI in “I’m Not Really a Waitress”
- Top Coat: Seche Vite Dry Fast Top Coat
- Tortoiseshell Decals: Nicole Diary Water Transfer Nail Stickers
- Green Polish: Essie in “Mojito Madness”
Instructions:
- Start with a clear base coat to protect your nails.
- Apply two coats of the natural polish on all nails except for the ring finger, which should be painted with the green polish.
- Add the tortoiseshell decals to the middle and index fingers.
- Finish with a top coat to seal the design and add shine.
Save Pin
Autumn Leaves and Glitter Glam
Embrace the fall season with this stunning leaves and glitter nail design. The combination of brown and orange hues with glitter and leaf accents brings out the beauty of autumn. This look is perfect for those who want to capture the essence of the season in their manicure.
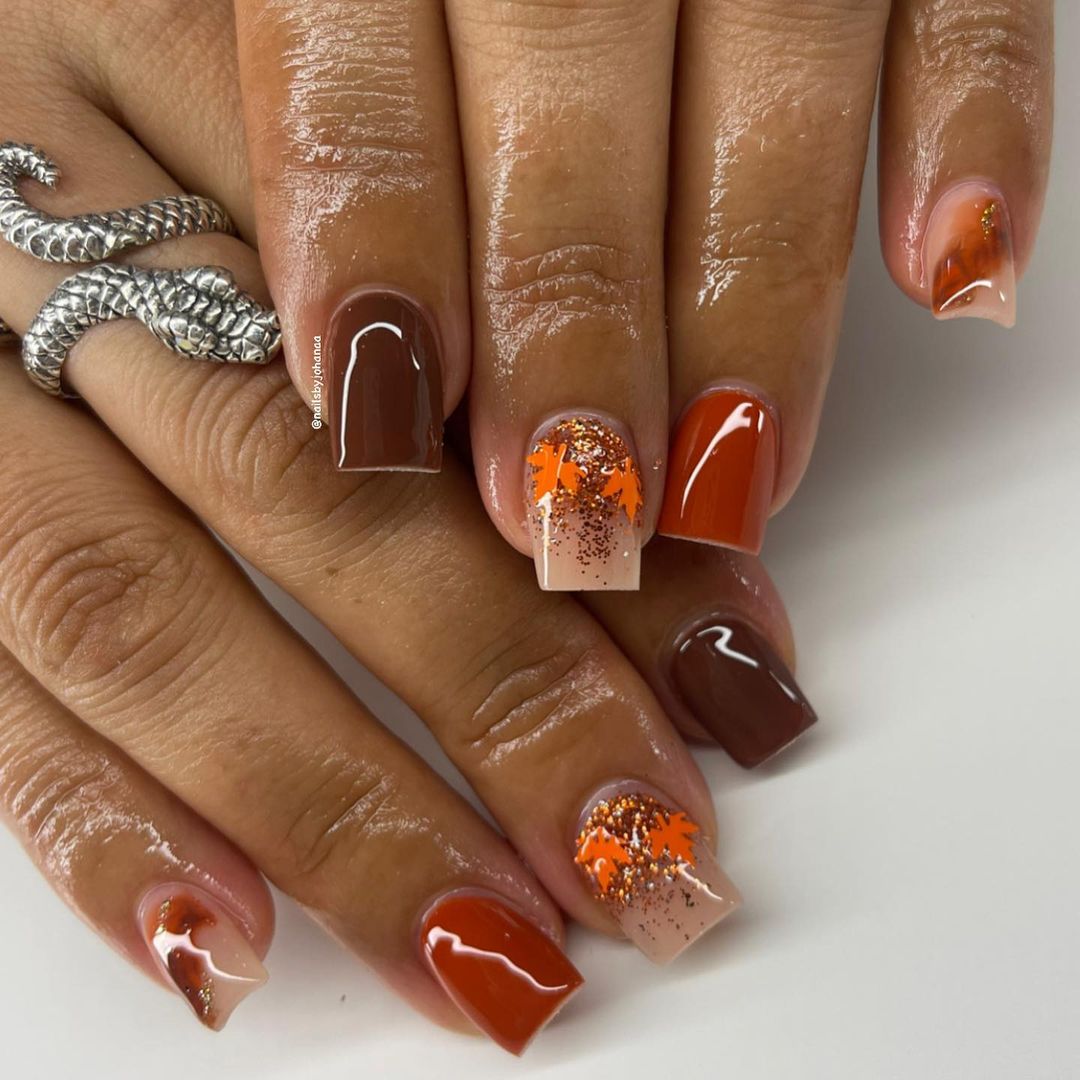
- Polish: Sally Hansen Miracle Gel in “Terra-Coppa”
- Glitter Polish: China Glaze in “Fairy Dust”
- Leaf Decals: Whats Up Nails Autumn Leaves Stencils
Instructions:
- Begin with a base coat to protect your nails.
- Apply two coats of brown polish to the thumb, index, and pinky fingers.
- Use the orange polish for the middle and ring fingers.
- Add the leaf decals to the ring finger and apply glitter polish over the decals.
- Finish with a glossy top coat for a polished look.
Elegant Brown Swirl Design
This elegant brown swirl design is perfect for those who love a chic and minimalist look. The mix of brown shades with delicate swirls creates a sophisticated and timeless manicure. Ideal for both everyday wear and special occasions, this design is versatile and stylish.
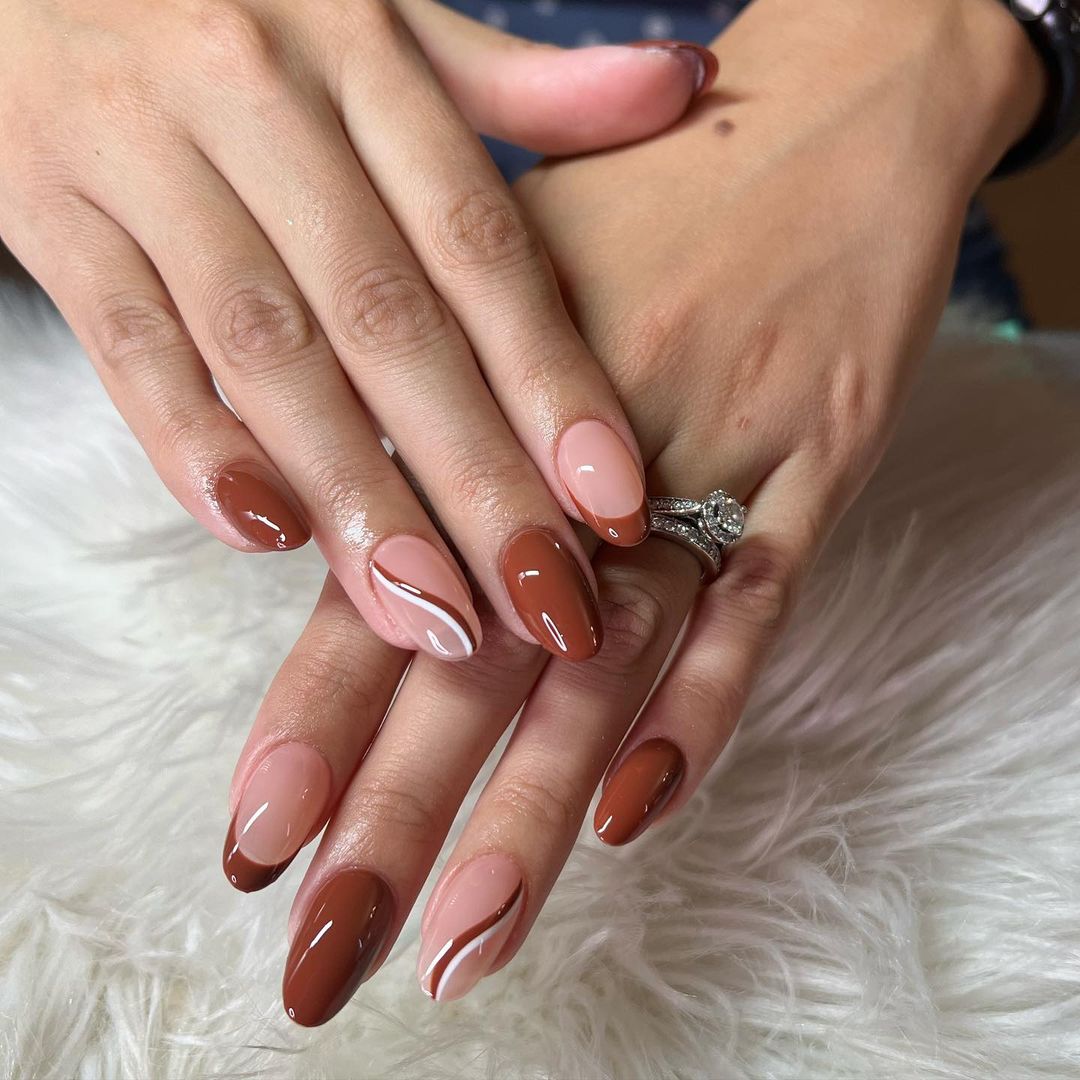
- Polish: OPI in “Chocolate Moose”
- Swirl Detail Brush: Winstonia Fine Line Nail Art Brush
- Top Coat: Essie Gel Couture Top Coat
Instructions:
- Apply a base coat to all nails.
- Paint the thumb, index, and pinky fingers with the lighter brown polish.
- Use the darker brown polish for the middle and ring fingers.
- With the fine line brush, create delicate swirls on the middle and ring fingers.
- Finish with a top coat to protect the design and add a glossy finish.
Blue and White Floral Elegance
This striking blue and white floral design brings a fresh and elegant look to your nails. The intricate floral patterns against a nude base make for a sophisticated and eye-catching manicure. The mix of blue and white adds a cool contrast, perfect for making a bold statement.
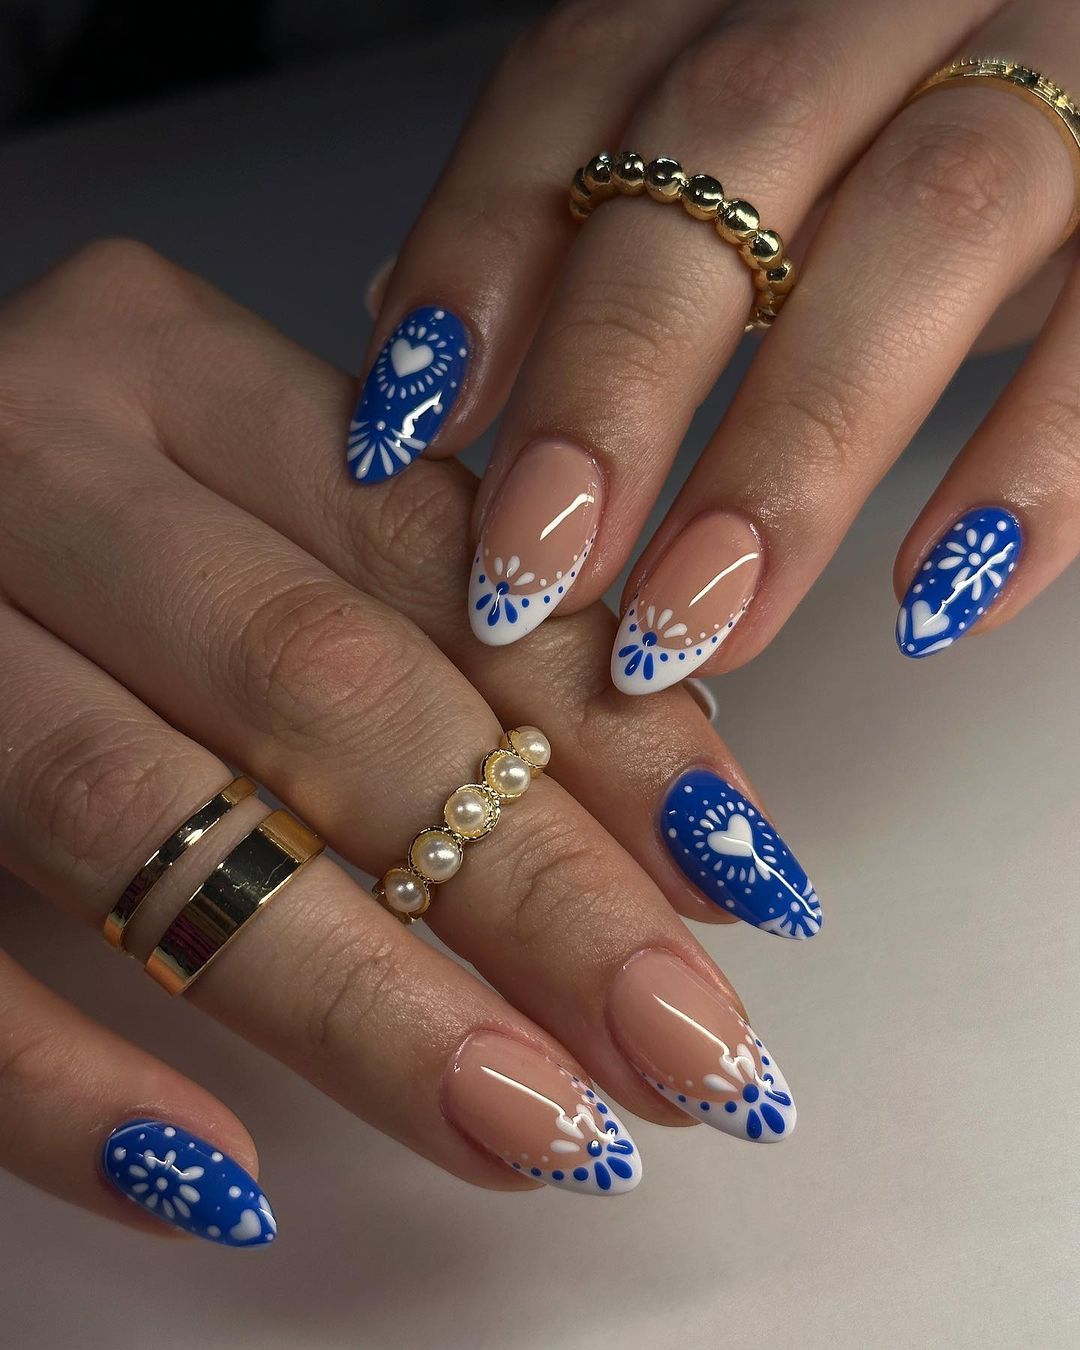
- Polish: OPI in “My Boyfriend Scales Walls”
- Detail Brush: Winstonia Nail Art Brush Set
- Blue Polish: Essie in “Butler Please”
- Top Coat: Seche Vite Dry Fast Top Coat
Instructions:
- Apply a clear base coat to all nails.
- Paint the thumb and pinky nails with the blue polish.
- On the rest of the nails, create a French tip using the white polish.
- Use the detail brush to add the floral designs in blue and white.
- Finish with a top coat to seal and protect the design.
Pumpkin Plaid Perfection
This playful pumpkin and plaid design combines the warmth of fall colors with a fun pattern. The green polish adds a pop of color, while the pumpkin and plaid accents bring a cozy autumn vibe to your manicure. It’s a perfect blend of festive and fashionable.
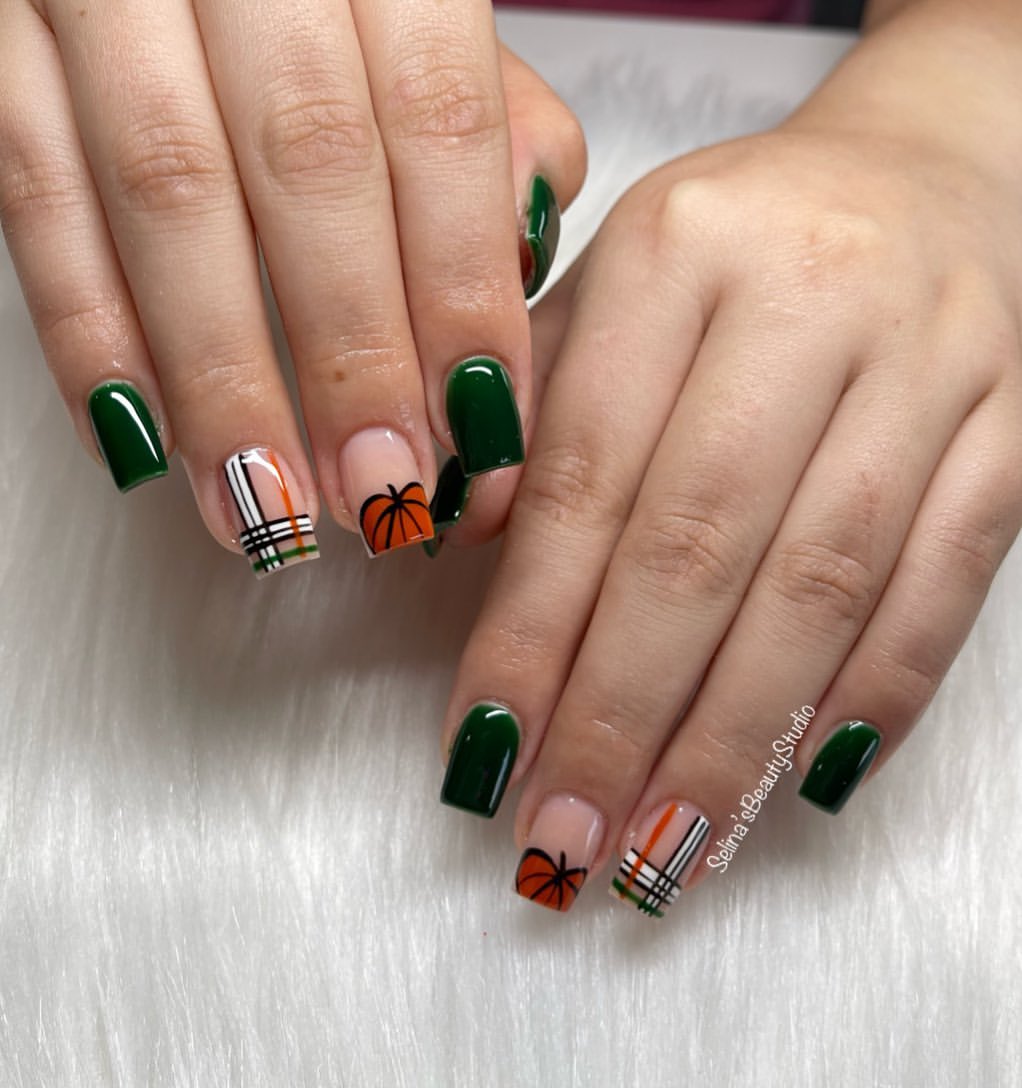
- Polish: Zoya in “Hunter”
- Orange Polish: Essie in “Playing Koi”
- Plaid Striping Tape: Born Pretty Striping Tape Set
- Pumpkin Decals: Nicole Diary Nail Art Stickers
Instructions:
- Start with a base coat to protect your nails.
- Apply two coats of green polish to all nails.
- On the ring finger, use the striping tape to create a plaid pattern with the orange polish.
- Add the pumpkin decals to the middle and index fingers.
- Finish with a glossy top coat for shine.
Teal Leafy Vibes
This teal leafy design is both vibrant and chic, perfect for a fresh autumn look. The combination of teal and beige creates a harmonious balance, while the leaf accents add a touch of nature-inspired beauty. It’s a modern twist on classic fall colors.
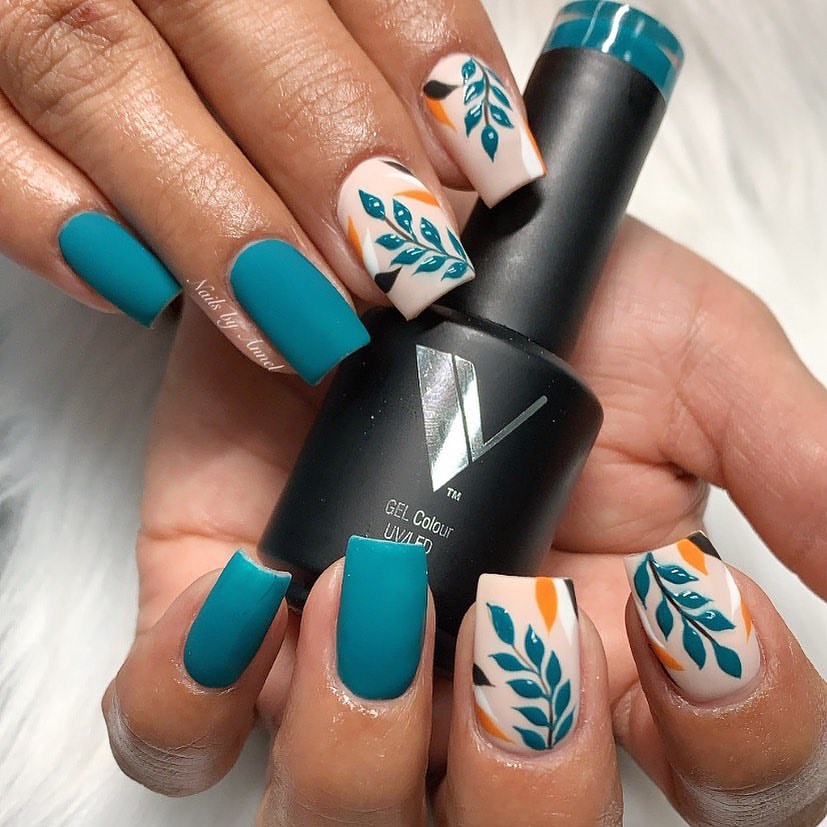
- Polish: OPI in “Suzi Says Feng Shui”
- Beige Polish: Essie in “Sand Tropez”
- Leaf Stencils: Whats Up Nails Leaf Stencils
- Top Coat: Essie Gel Couture Top Coat
Instructions:
- Apply a base coat to all nails.
- Paint the thumb and pinky nails with the teal polish.
- Use the beige polish on the rest of the nails.
- Apply the leaf stencils to the middle and ring fingers and paint over with teal polish.
- Seal the design with a top coat for durability.
Save Pin
Sunset Ombre Magic
Capture the beauty of a fall sunset with this stunning ombre design. The gradient from orange to blue mimics the colors of the sky at dusk, creating a dreamy and eye-catching effect. This design is perfect for those who love a bit of color and elegance.
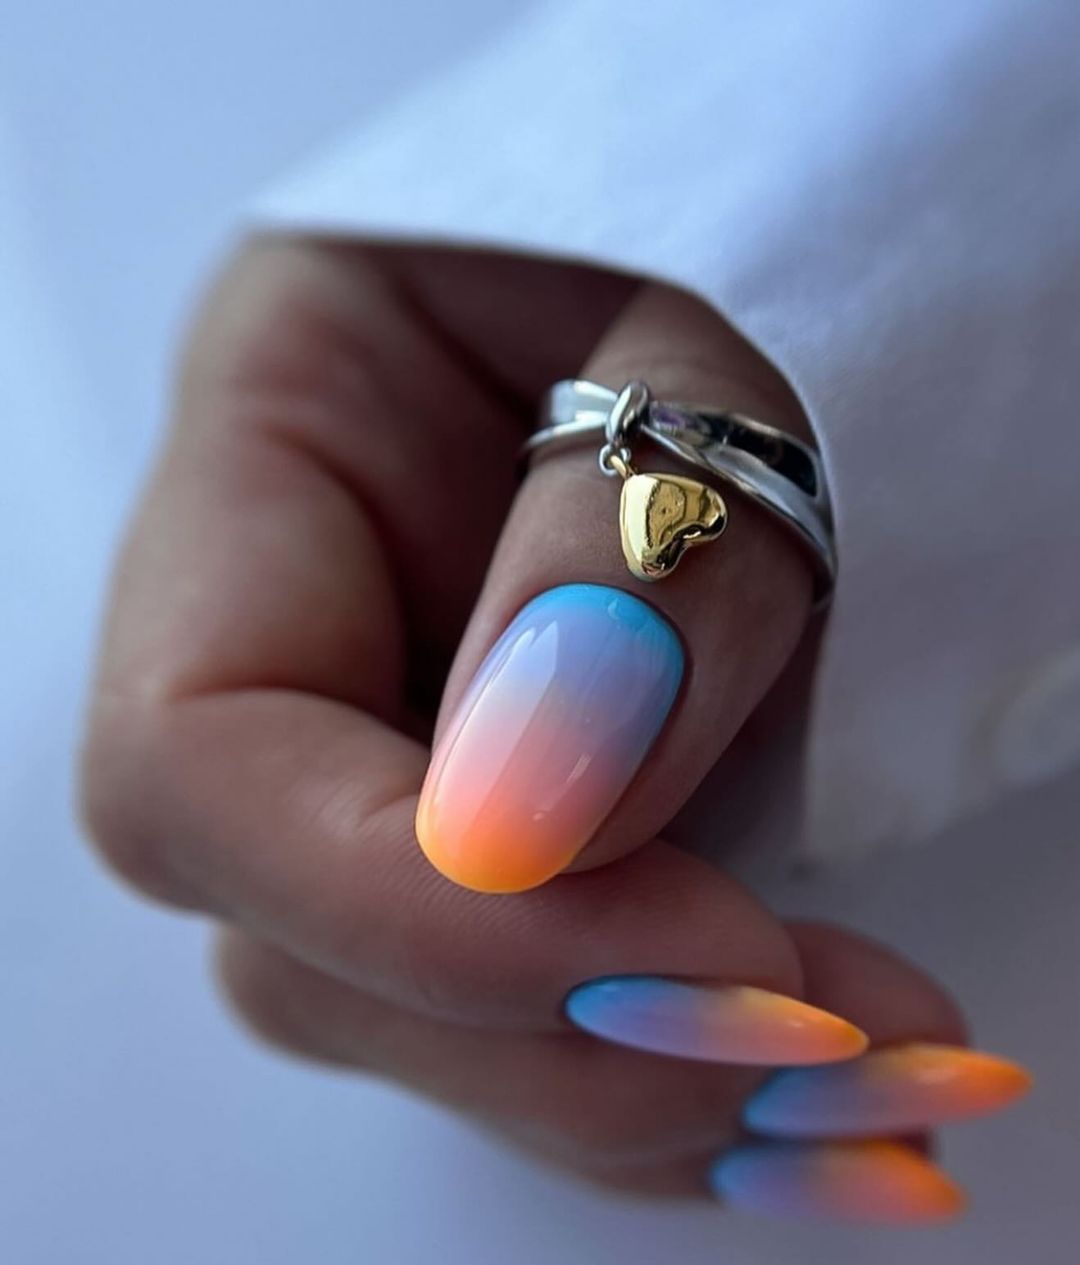
- Polish: OPI in “No Room for the Blues”
- Orange Polish: Essie in “Meet Me at Sunset”
- Makeup Sponge: Winstonia Makeup Sponge for Nail Art
- Top Coat: Seche Vite Dry Fast Top Coat
Instructions:
- Apply a clear base coat to all nails.
- Use the makeup sponge to create an ombre effect with the orange and blue polishes.
- Dab the sponge onto the nails until you achieve the desired gradient.
- Finish with a glossy top coat to blend the colors seamlessly and add shine.
Cute Fruit Accents
Add a touch of sweetness to your nails with these adorable fruit accents. The tiny fruit designs on a nude base create a playful and charming look. This design is perfect for those who want a subtle yet fun manicure that stands out.
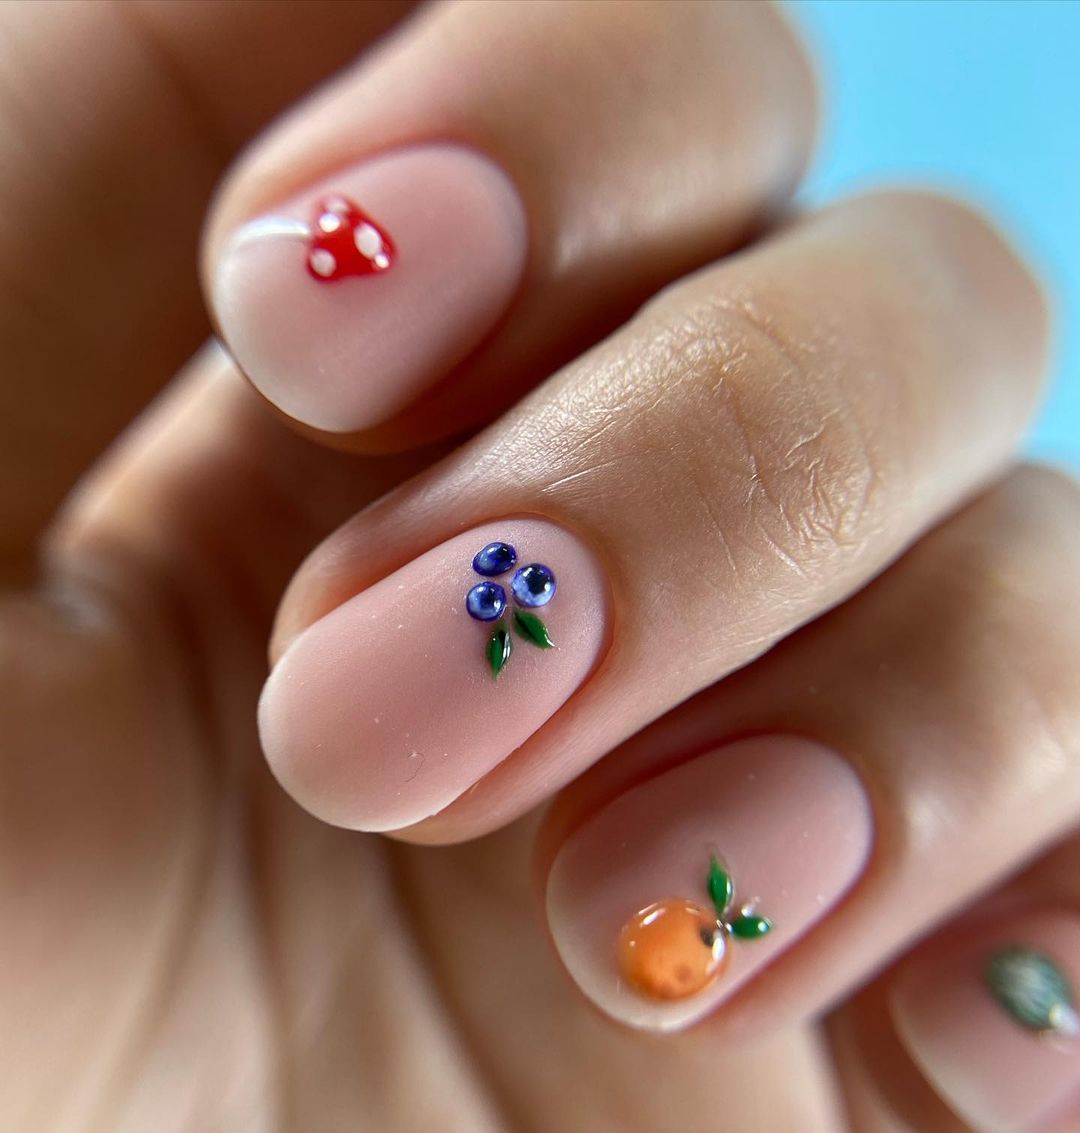
- Polish: Essie in “Mademoiselle”
- Fruit Decals: Born Pretty Fruit Nail Art Stickers
- Detail Brush: Winstonia Fine Detail Brush
- Top Coat: Seche Vite Dry Fast Top Coat
Instructions:
- Apply a base coat to protect your nails.
- Paint all nails with the nude polish.
- Use the detail brush to apply the fruit decals to the nails.
- Seal the design with a top coat for a polished finish.
Tortoiseshell Chic
Embrace the timeless elegance of tortoiseshell with this chic nail design. The warm brown tones and intricate patterns create a luxurious look that is perfect for the fall season. This design is both classic and trendy, making it a must-try.
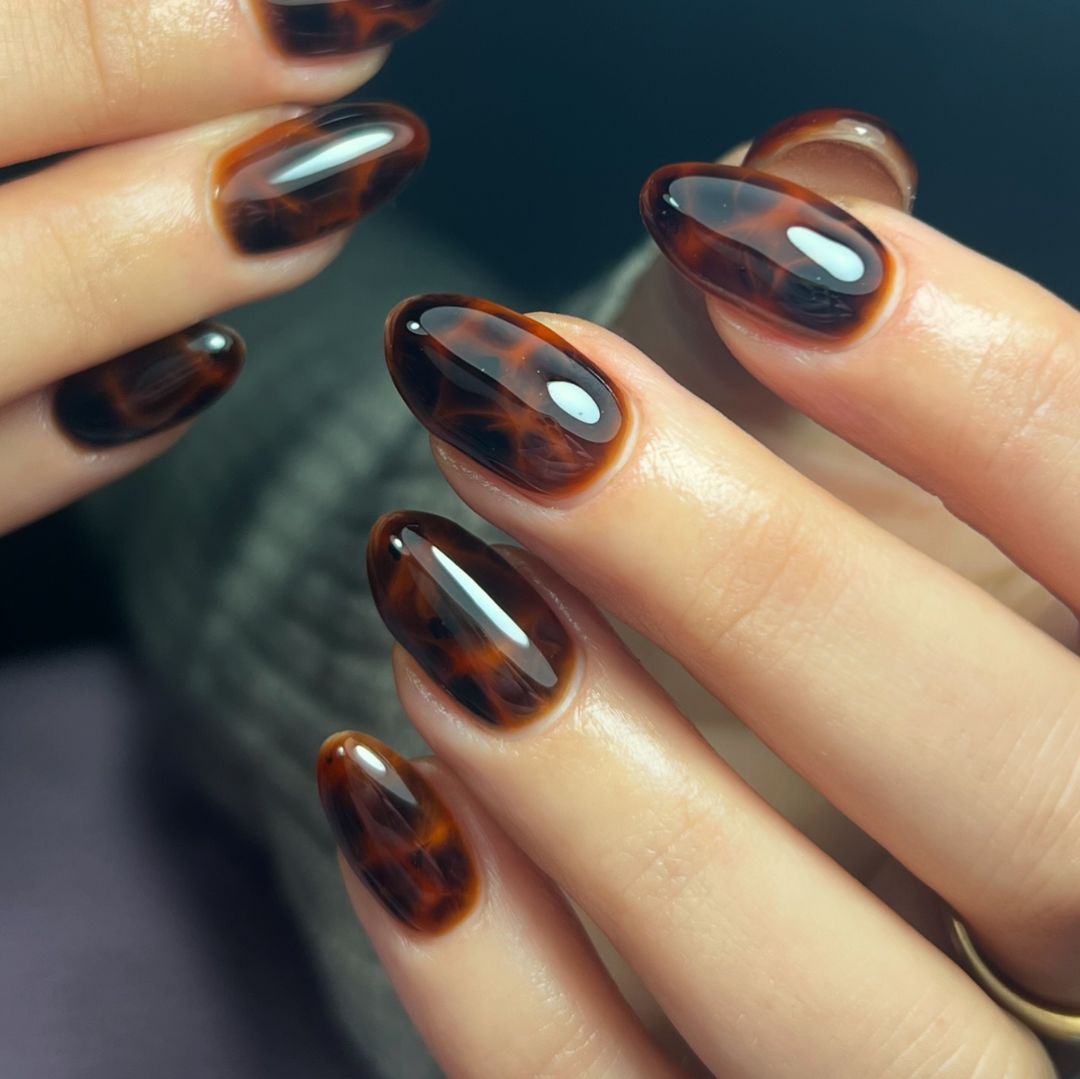
- Polish: OPI in “Espresso Your Style”
- Detail Brush: Winstonia Nail Art Brush Set
- Top Coat: Essie Gel Couture Top Coat
Instructions:
- Apply a clear base coat to all nails.
- Paint all nails with the base brown polish.
- Use the detail brush to create the tortoiseshell pattern with darker brown and black polishes.
- Finish with a top coat to protect the design and add a glossy finish.
Starry Gradient
This dreamy starry gradient design combines soft hues with delicate star accents for a magical look. The gradient transitions from a light, creamy base to a gentle green, with small silver stars adding a touch of whimsy. It’s a perfect blend of subtlety and sparkle, ideal for a charming autumn manicure.
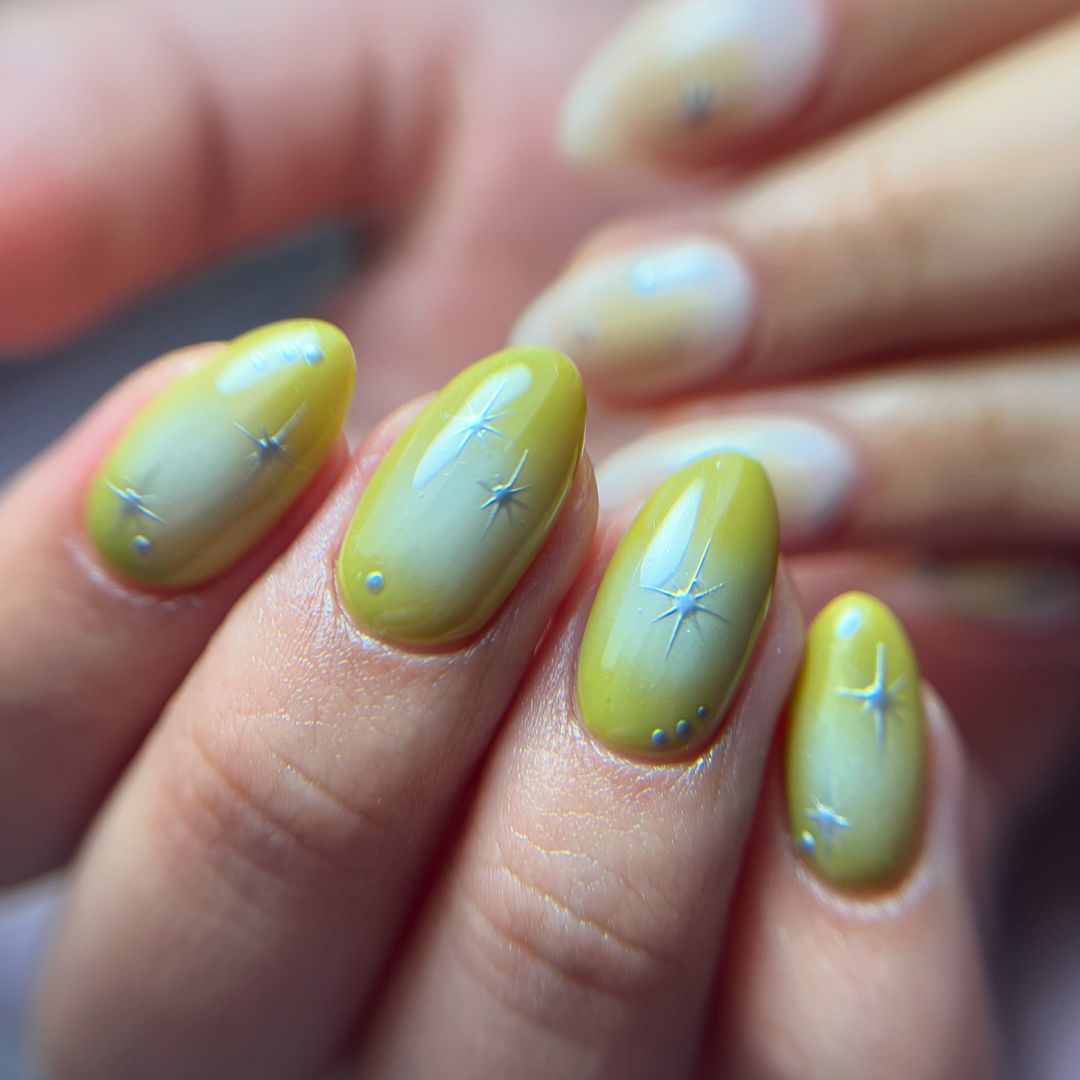
- Polish: Essie in “Mint Candy Apple”
- Gradient Sponge: Winstonia Gradient Sponge Set
- Star Stickers: Born Pretty Nail Art Stickers
- Top Coat: Seche Vite Dry Fast Top Coat
Instructions:
- Start with a base coat to protect your nails.
- Use the gradient sponge to blend the creamy base with the green polish.
- Apply the star stickers across the nails.
- Finish with a glossy top coat to seal the design and add shine.
Royal Blue and Gold Accents
This regal design features a stunning combination of royal blue and gold accents. The intricate patterns and metallic details create a luxurious look that is both bold and elegant. This manicure is perfect for making a statement during the fall season.
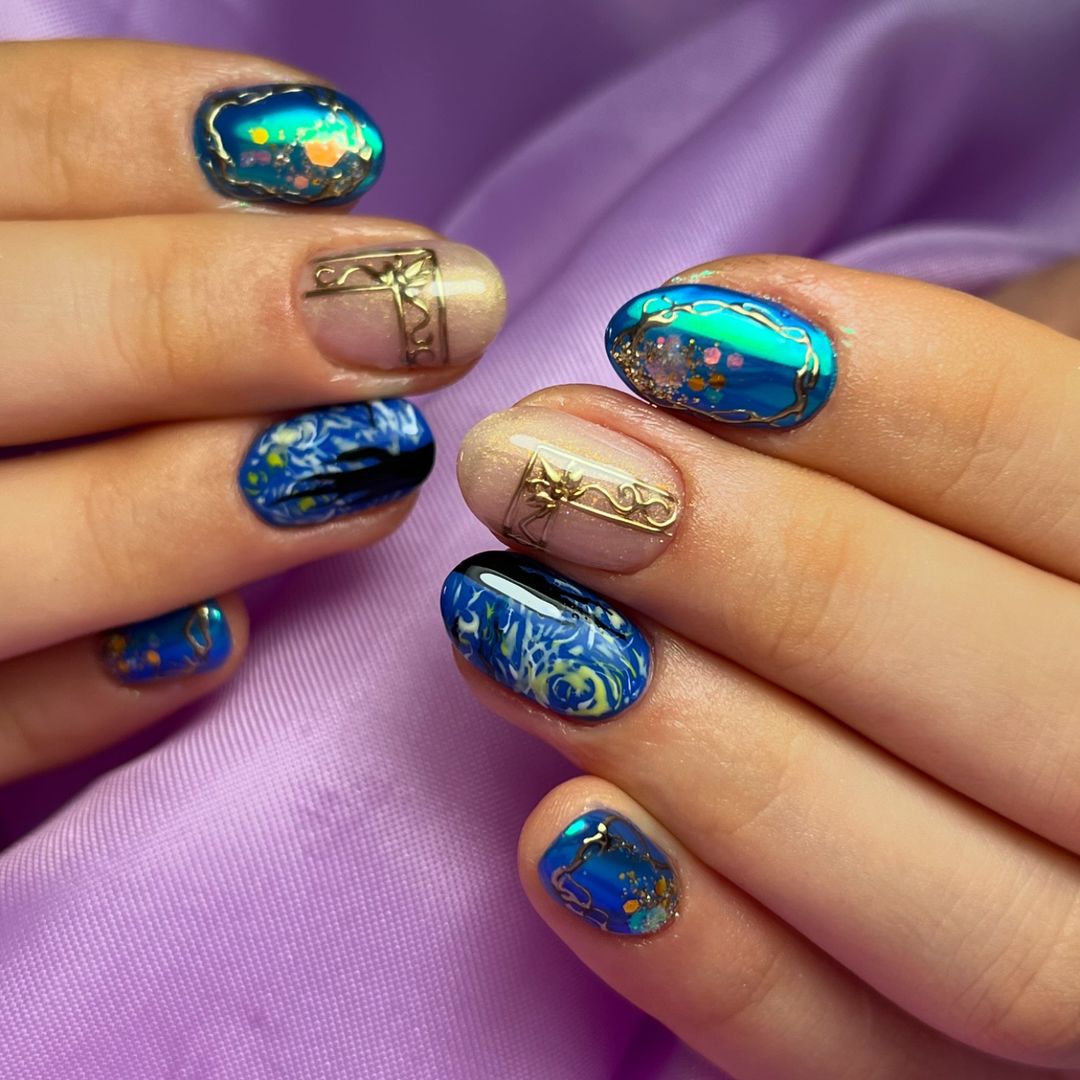
- Polish: OPI in “Yoga-ta Get This Blue”
- Gold Foil: Holographic Gold Foil by Born Pretty
- Detail Brush: Winstonia Nail Art Brush Set
- Top Coat: Essie Gel Couture Top Coat
Instructions:
- Apply a base coat to all nails.
- Paint the nails with the blue polish, leaving some accent nails with a nude base.
- Use the gold foil and detail brush to create intricate patterns on the accent nails.
- Finish with a top coat to protect the design and add a glossy finish.
Metallic Flames
This fierce design features metallic flames for a bold and edgy look. The black and silver flames create a striking contrast against a nude base, making this manicure a showstopper. It’s perfect for adding a bit of drama to your fall nail art.
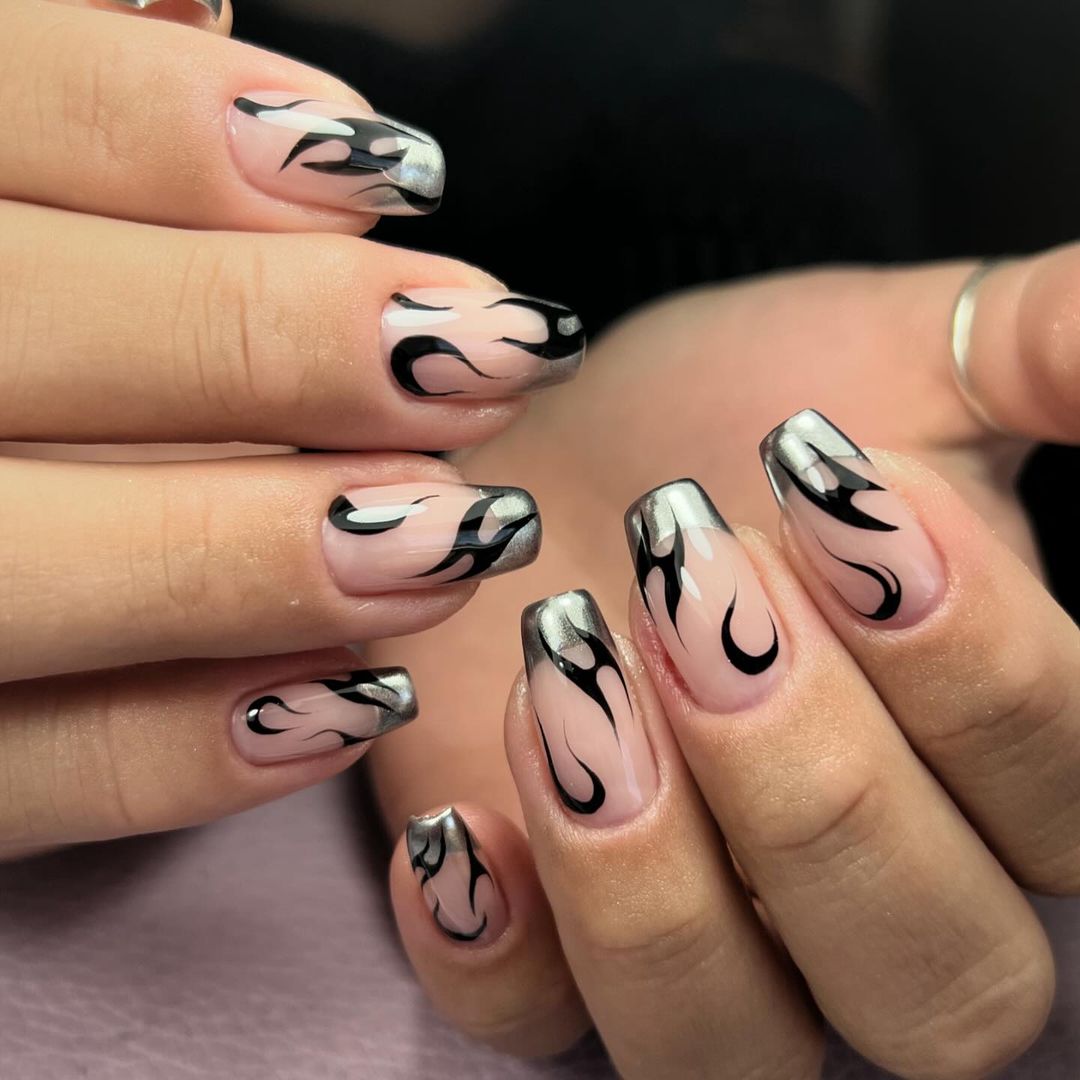
- Polish: Essie in “Licorice”
- Metallic Polish: OPI in “Turn on the Northern Lights!”
- Detail Brush: Winstonia Nail Art Brush Set
- Top Coat: Seche Vite Dry Fast Top Coat
Instructions:
- Apply a base coat to all nails.
- Paint the nails with a nude polish.
- Use the detail brush to create black and silver flames on each nail.
- Finish with a glossy top coat for added shine.
Neon Green Flames
This vibrant design features neon green flames for a fun and eye-catching manicure. The bright green contrasts beautifully with the soft base, creating a dynamic and energetic look. This design is perfect for those who love bold and playful nail art.
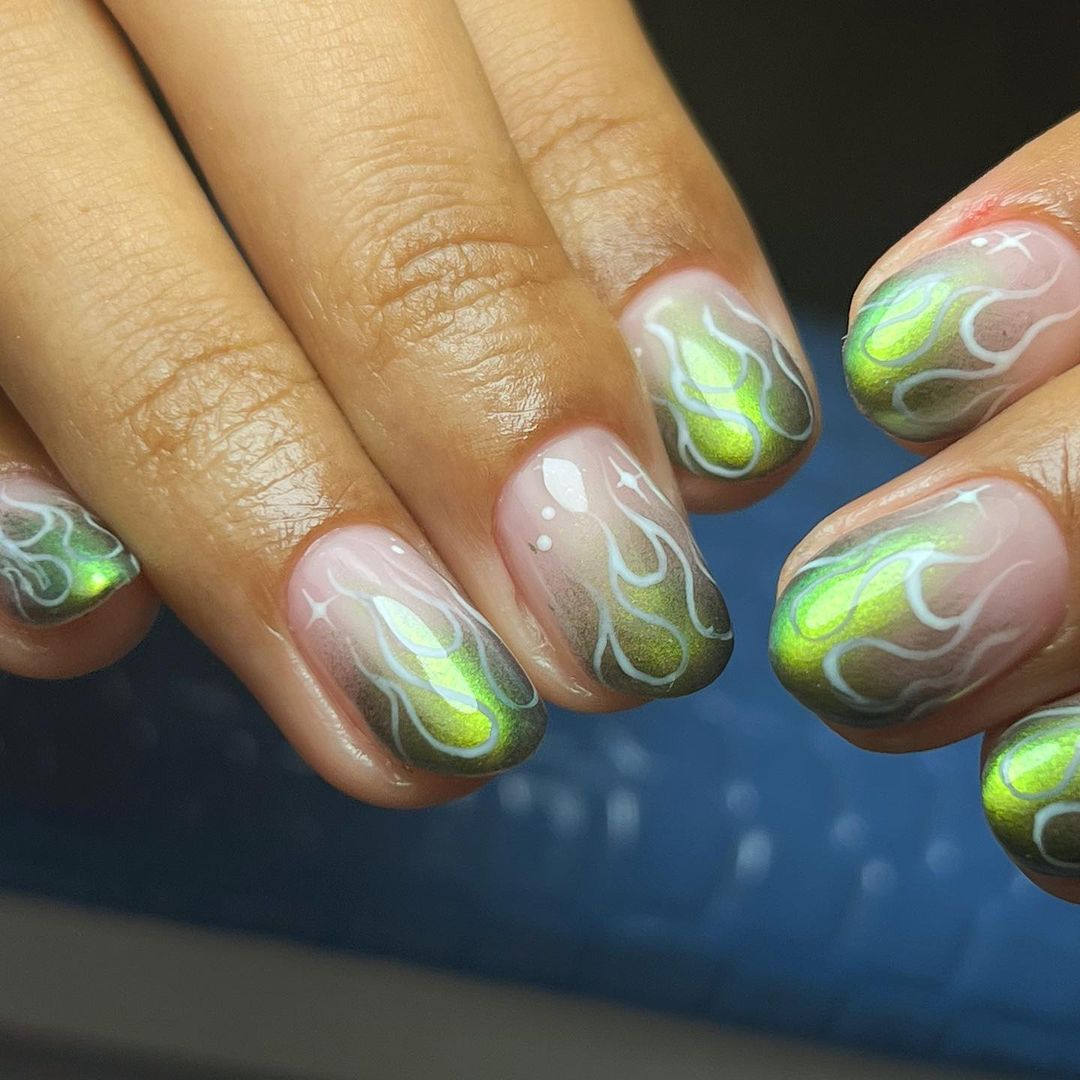
- Polish: China Glaze in “Celtic Sun”
- Gradient Sponge: Winstonia Gradient Sponge Set
- Detail Brush: Winstonia Nail Art Brush Set
- Top Coat: Essie Gel Couture Top Coat
Instructions:
- Apply a base coat to all nails.
- Use the gradient sponge to blend the soft base with the neon green polish.
- Create flame patterns with the detail brush in white and neon green.
- Seal the design with a glossy top coat.
Sparkly Heart Accents
Add a touch of sparkle to your nails with these adorable heart accents. The glittery hearts on a nude base create a playful and charming look, perfect for a whimsical fall manicure. This design is great for those who love a bit of sparkle and fun.
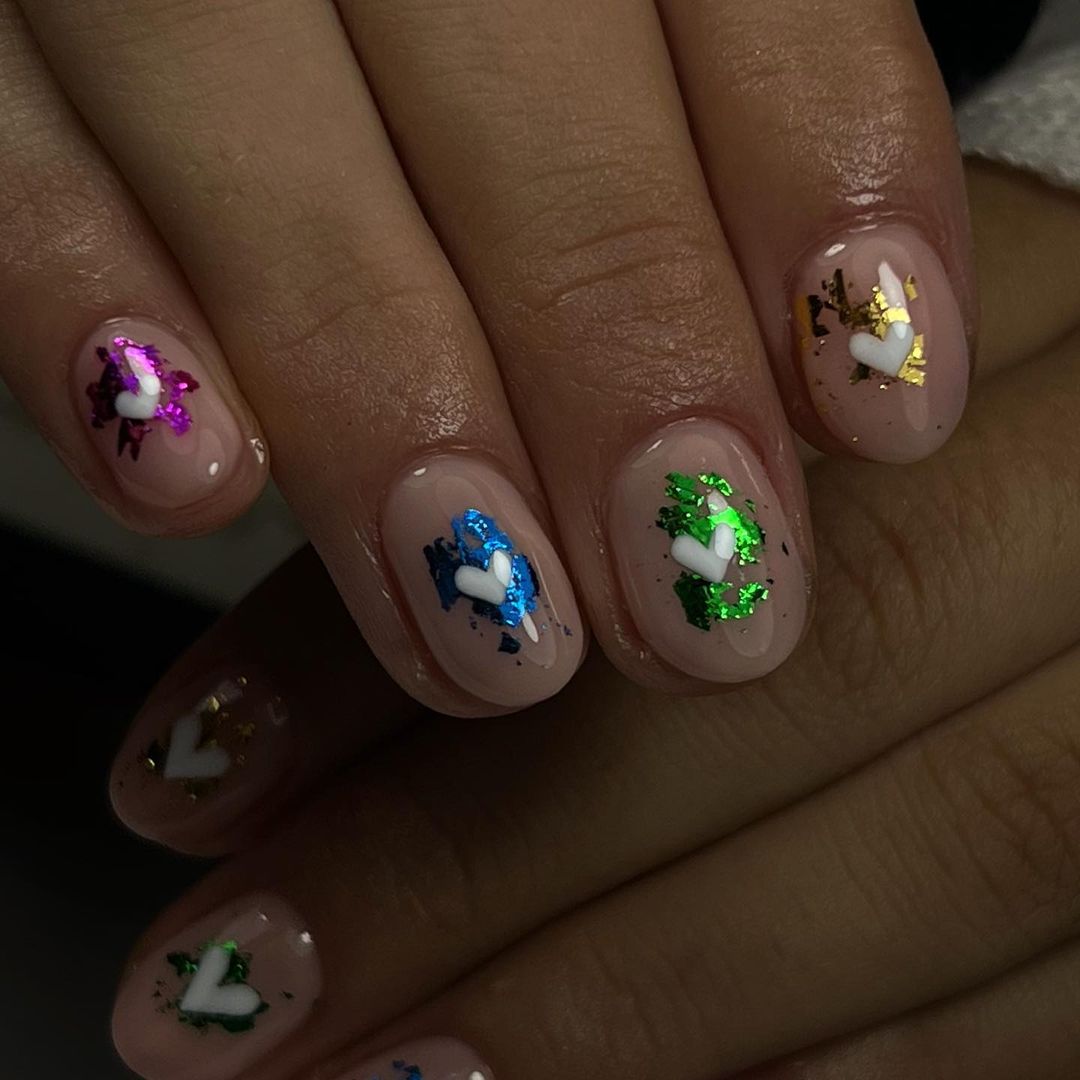
- Polish: OPI in “Bubble Bath”
- Glitter Polish: China Glaze in “Fairy Dust”
- Heart Stickers: Born Pretty Nail Art Stickers
- Top Coat: Seche Vite Dry Fast Top Coat
Instructions:
- Apply a base coat to all nails.
- Paint the nails with the nude polish.
- Apply the glitter polish to create a sparkly base.
- Add the heart stickers to each nail.
- Finish with a top coat to seal the design and add shine.
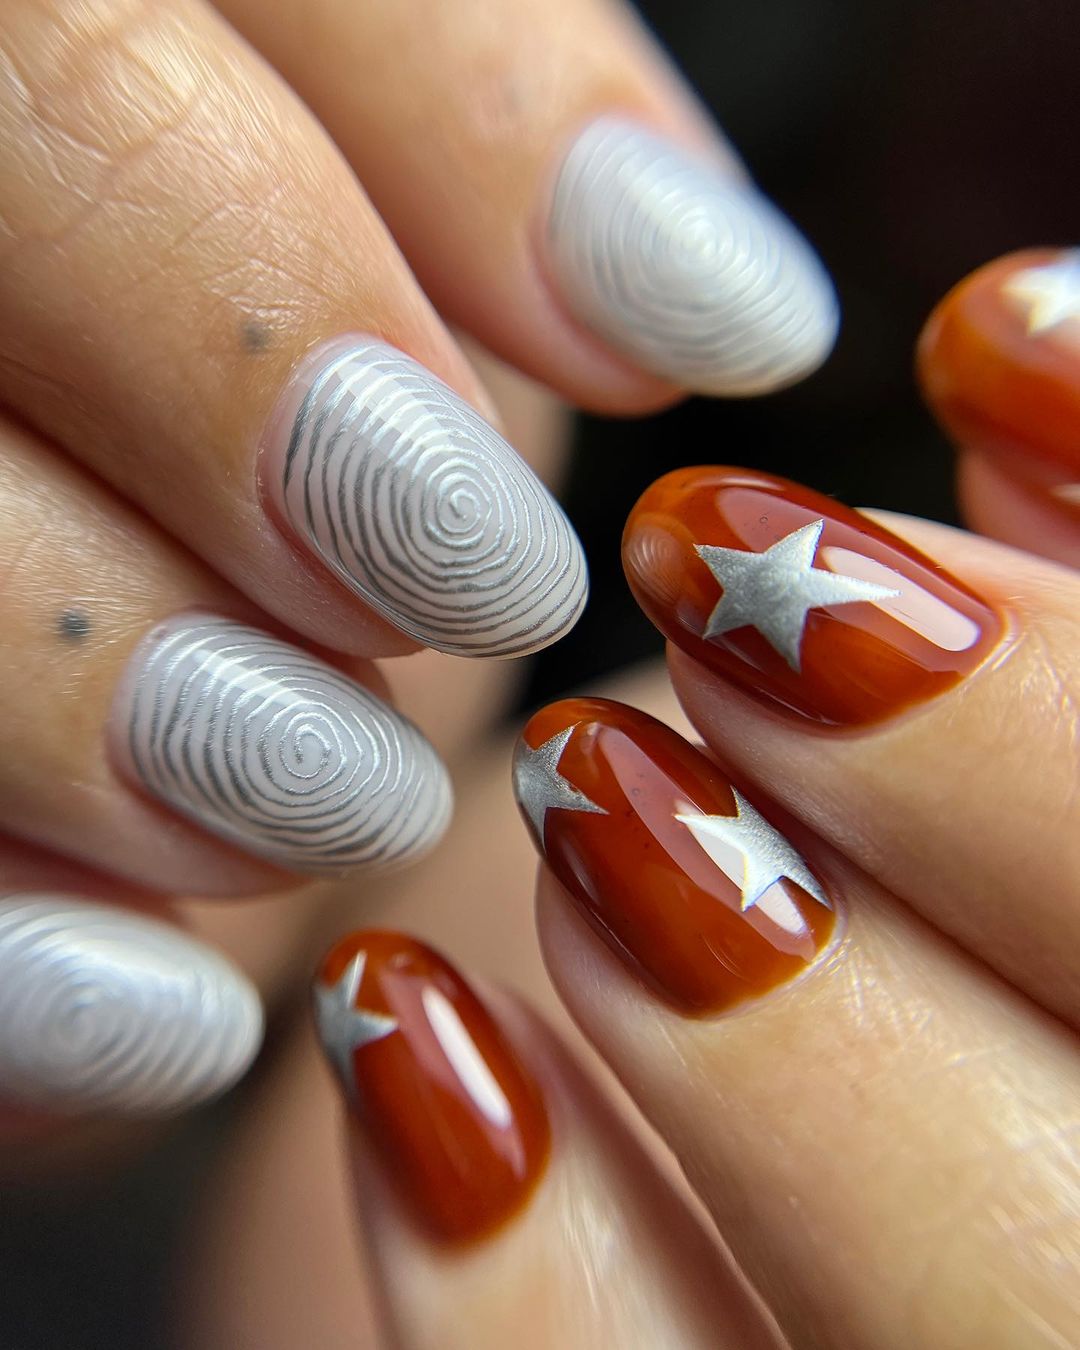
Leopard Print Tips
This chic design features leopard print tips for a trendy and stylish manicure. The nude base with black leopard spots creates a sophisticated yet playful look, perfect for adding a touch of wildness to your nails. This design is ideal for those who want a fashionable fall manicure.
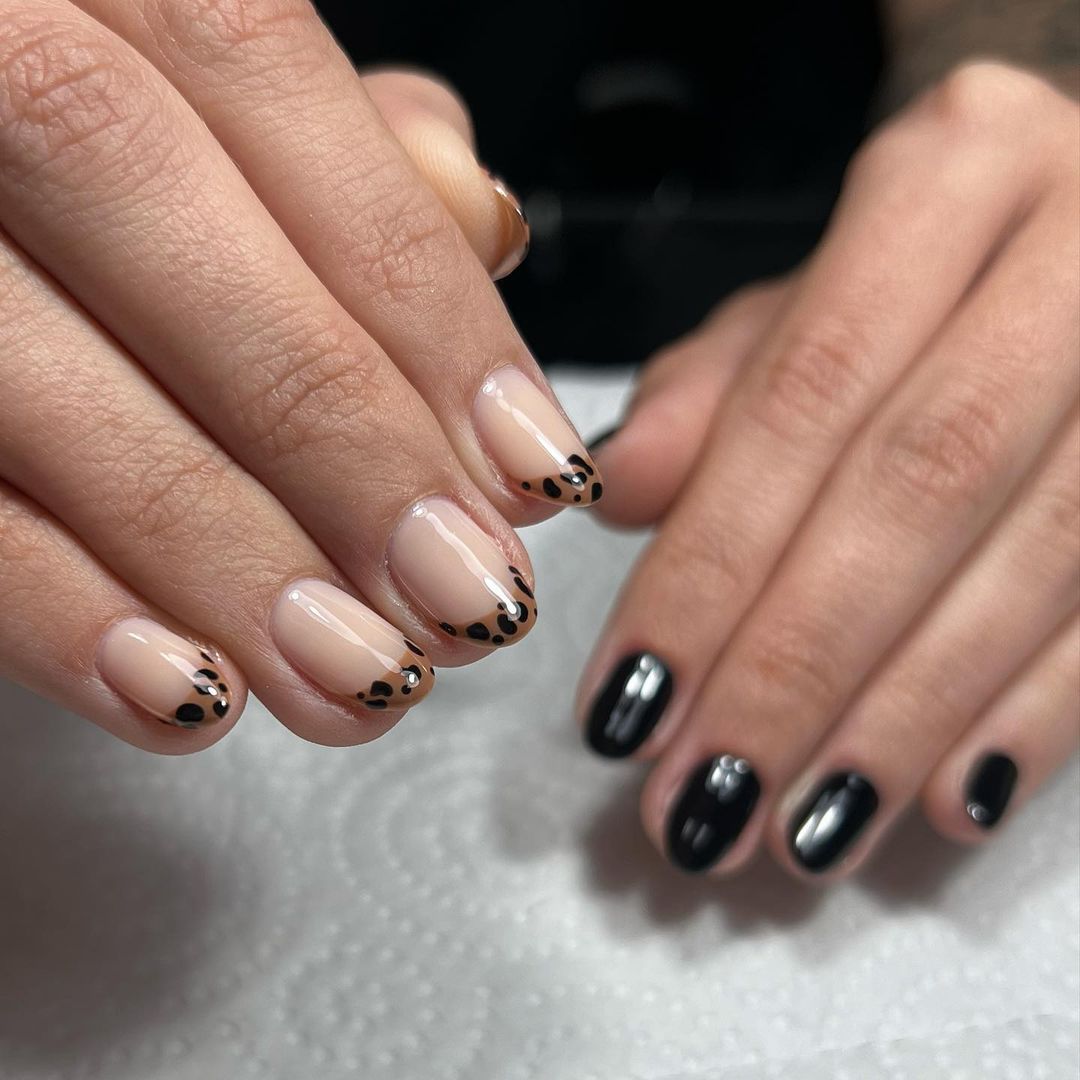
- Polish: Essie in “Mademoiselle”
- Black Polish: OPI in “Black Onyx”
- Detail Brush: Winstonia Nail Art Brush Set
- Top Coat: Essie Gel Couture Top Coat
Instructions:
- Apply a base coat to all nails.
- Paint the nails with the nude polish.
- Use the detail brush to create black leopard spots on the tips of each nail.
- Seal the design with a top coat for a polished finish.
Abstract Swirls
This artistic nail design features abstract swirls in neutral tones, creating a modern and chic look. The combination of black and beige with unique swirling patterns offers a sophisticated style that is perfect for any occasion. It’s a minimal yet eye-catching design that adds a touch of elegance to your nails.
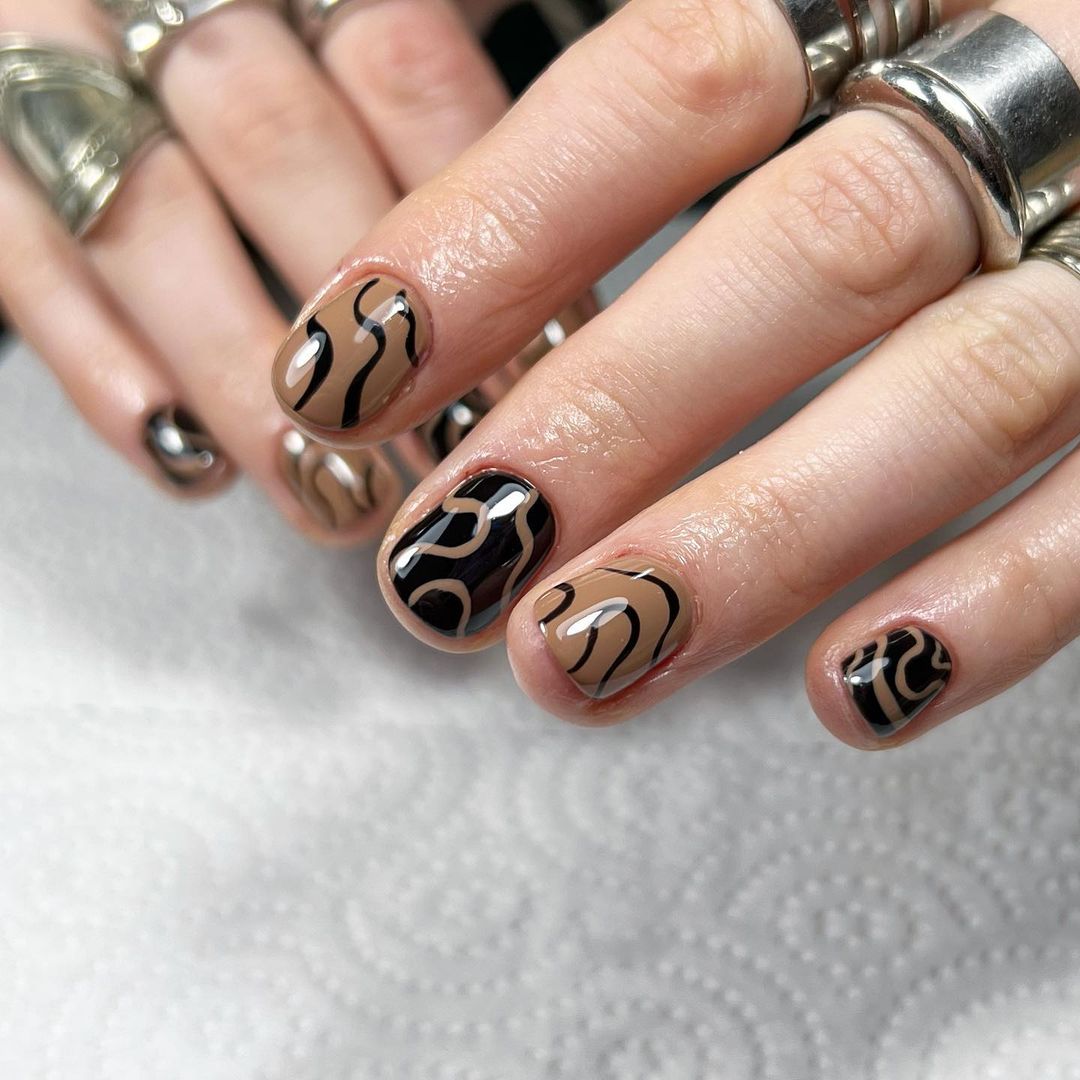
- Polish: OPI in “Berlin There Done That”
- Black Polish: Essie in “Licorice”
- Detail Brush: Winstonia Nail Art Brush Set
- Top Coat: Seche Vite Dry Fast Top Coat
Instructions:
- Apply a base coat to protect your nails.
- Paint your nails with the beige polish.
- Use the detail brush to create black abstract swirls on each nail.
- Finish with a top coat to seal the design and add shine.
Vibrant Pink Marble
This vibrant pink marble design is perfect for adding a pop of color to your fall nails. The mix of pink, white, and black creates a stunning marble effect that is both bold and stylish. This manicure is ideal for those who love bright and playful designs.
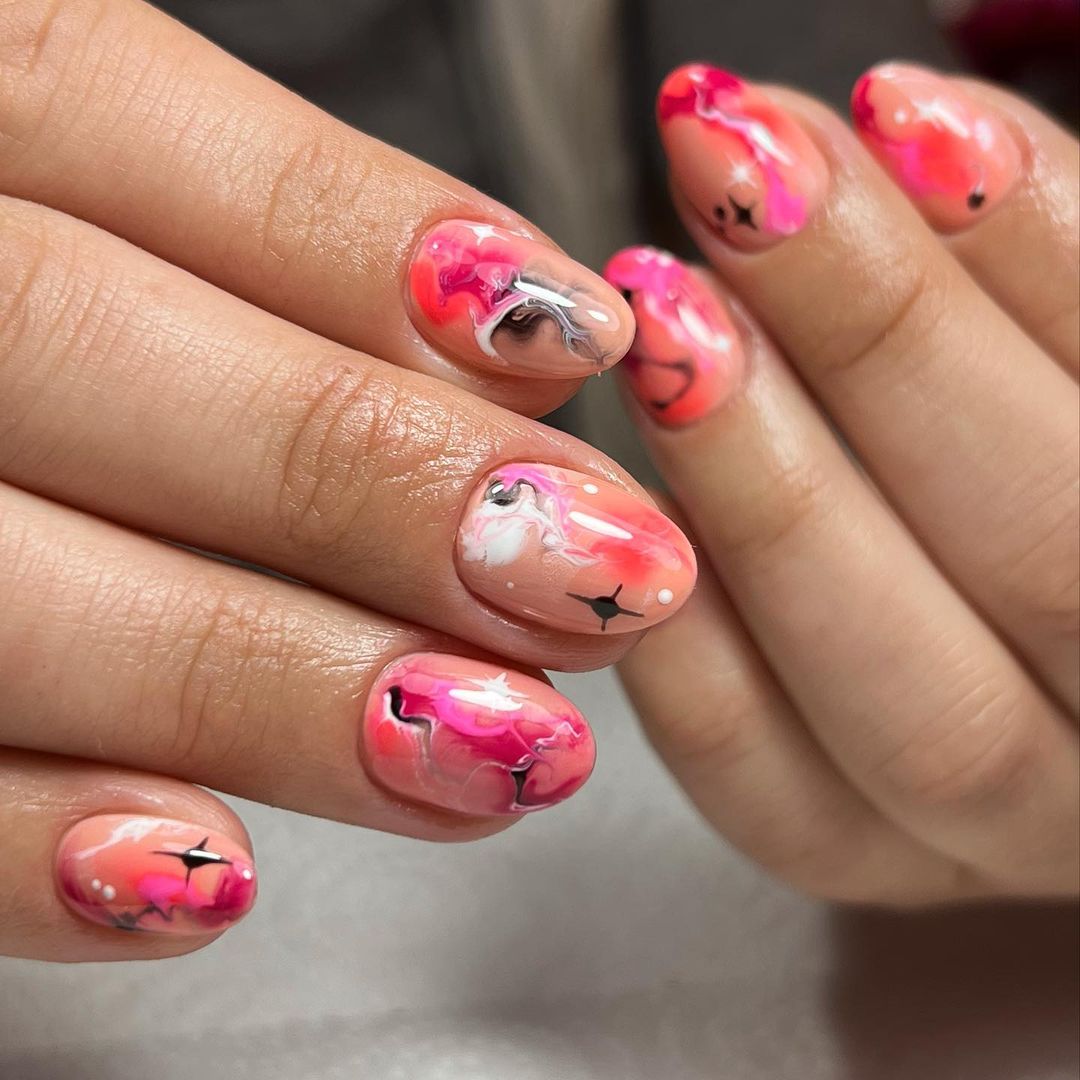
- Polish: OPI in “Pink Flamenco”
- White Polish: Essie in “Blanc”
- Black Polish: China Glaze in “Liquid Leather”
- Marble Tool: Winstonia Marble Nail Art Tool
Instructions:
- Apply a base coat to protect your nails.
- Use the pink polish as the base color.
- Apply drops of white and black polish on the nails and use the marble tool to create the marble effect.
- Finish with a top coat to protect the design and add shine.
Classic Blue Elegance
This classic blue nail design combines solid blue nails with elegant swirls for a sophisticated look. The royal blue polish adds a touch of class, while the swirls on nude nails create a modern and stylish contrast. This manicure is perfect for any occasion, from casual to formal.
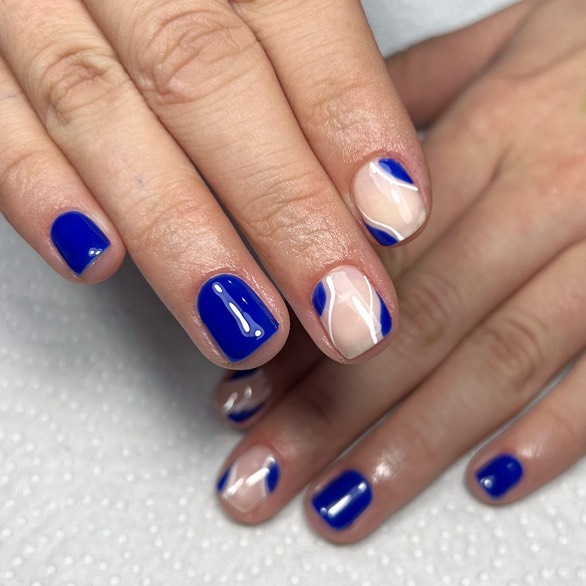
- Polish: OPI in “My Favorite Gal Pal”
- Nude Polish: Essie in “Ballet Slippers”
- Detail Brush: Winstonia Nail Art Brush Set
- Top Coat: Seche Vite Dry Fast Top Coat
Instructions:
- Apply a base coat to protect your nails.
- Paint the nails with the blue polish, leaving some accent nails nude.
- Use the detail brush to create blue swirls on the nude nails.
- Finish with a top coat to seal the design and add shine.
Soft Pastel Gradient
This soft pastel gradient design features a beautiful blend of lavender and pink, creating a dreamy and ethereal look. The addition of tiny gold beads adds a touch of elegance, making this manicure perfect for a subtle yet stunning fall look.
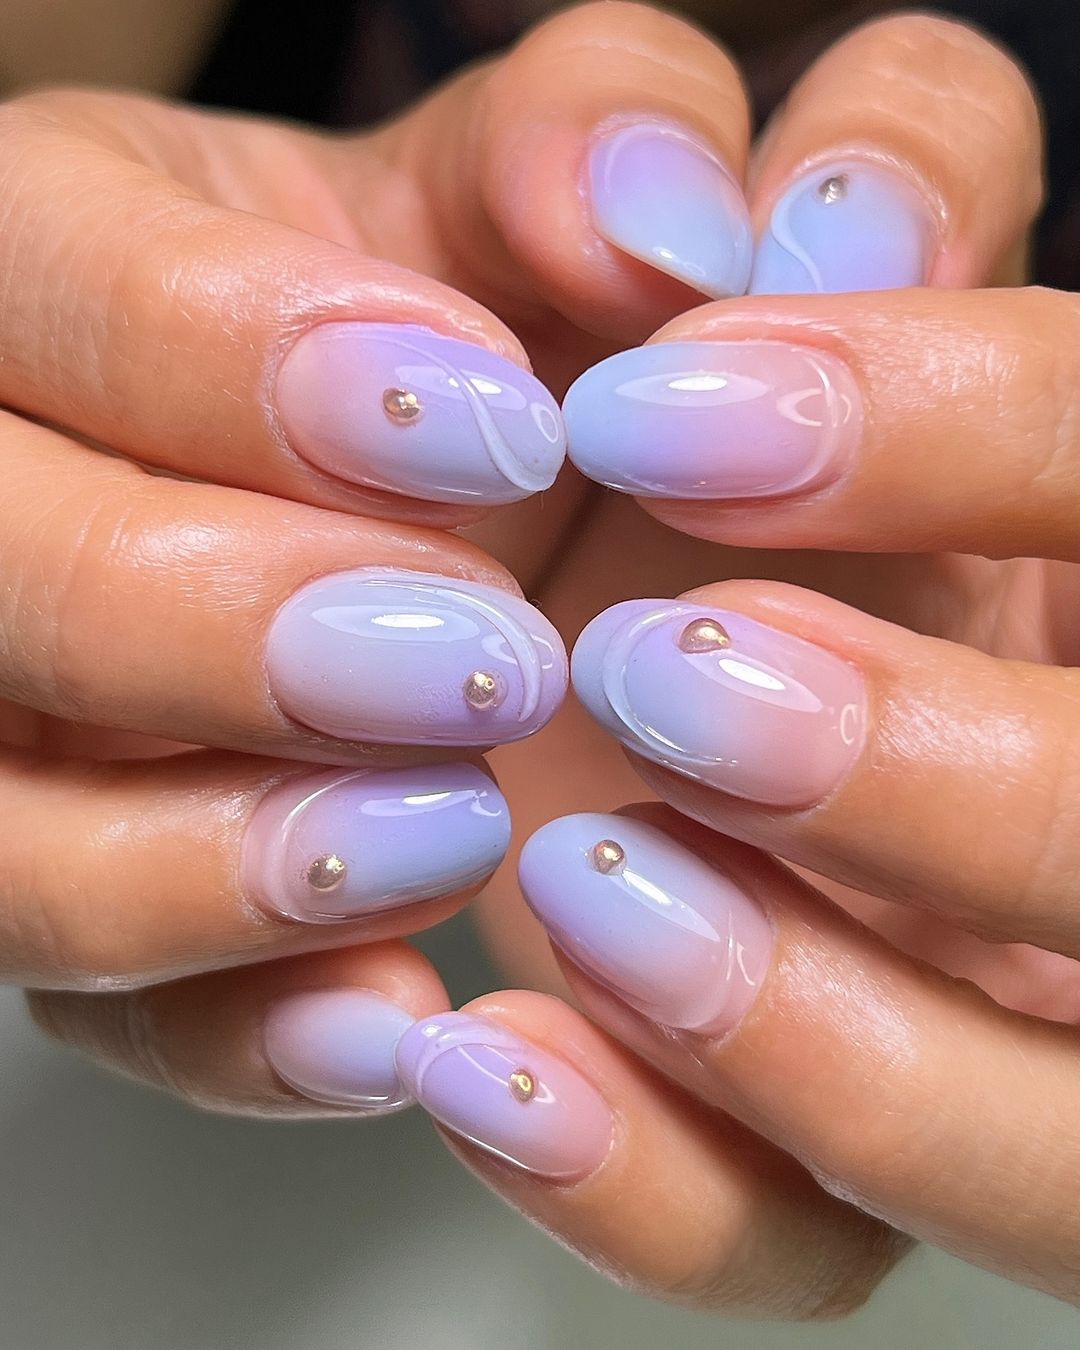
- Polish: Essie in “Lilacism”
- Pink Polish: OPI in “Mod About You”
- Gradient Sponge: Winstonia Gradient Sponge Set
- Gold Beads: Born Pretty Gold Nail Art Beads
- Top Coat: Essie Gel Couture Top Coat
Instructions:
- Apply a base coat to protect your nails.
- Use the gradient sponge to blend the lavender and pink polishes.
- Apply the gold beads on each nail for added detail.
- Finish with a top coat to seal the design and add shine.
Sunset Ombre Delight
Capture the beauty of a sunset with this vibrant ombre design. The gradient transition from blue to orange creates a mesmerizing effect, perfect for making a bold statement. This manicure is ideal for those who love colorful and dynamic nail art.
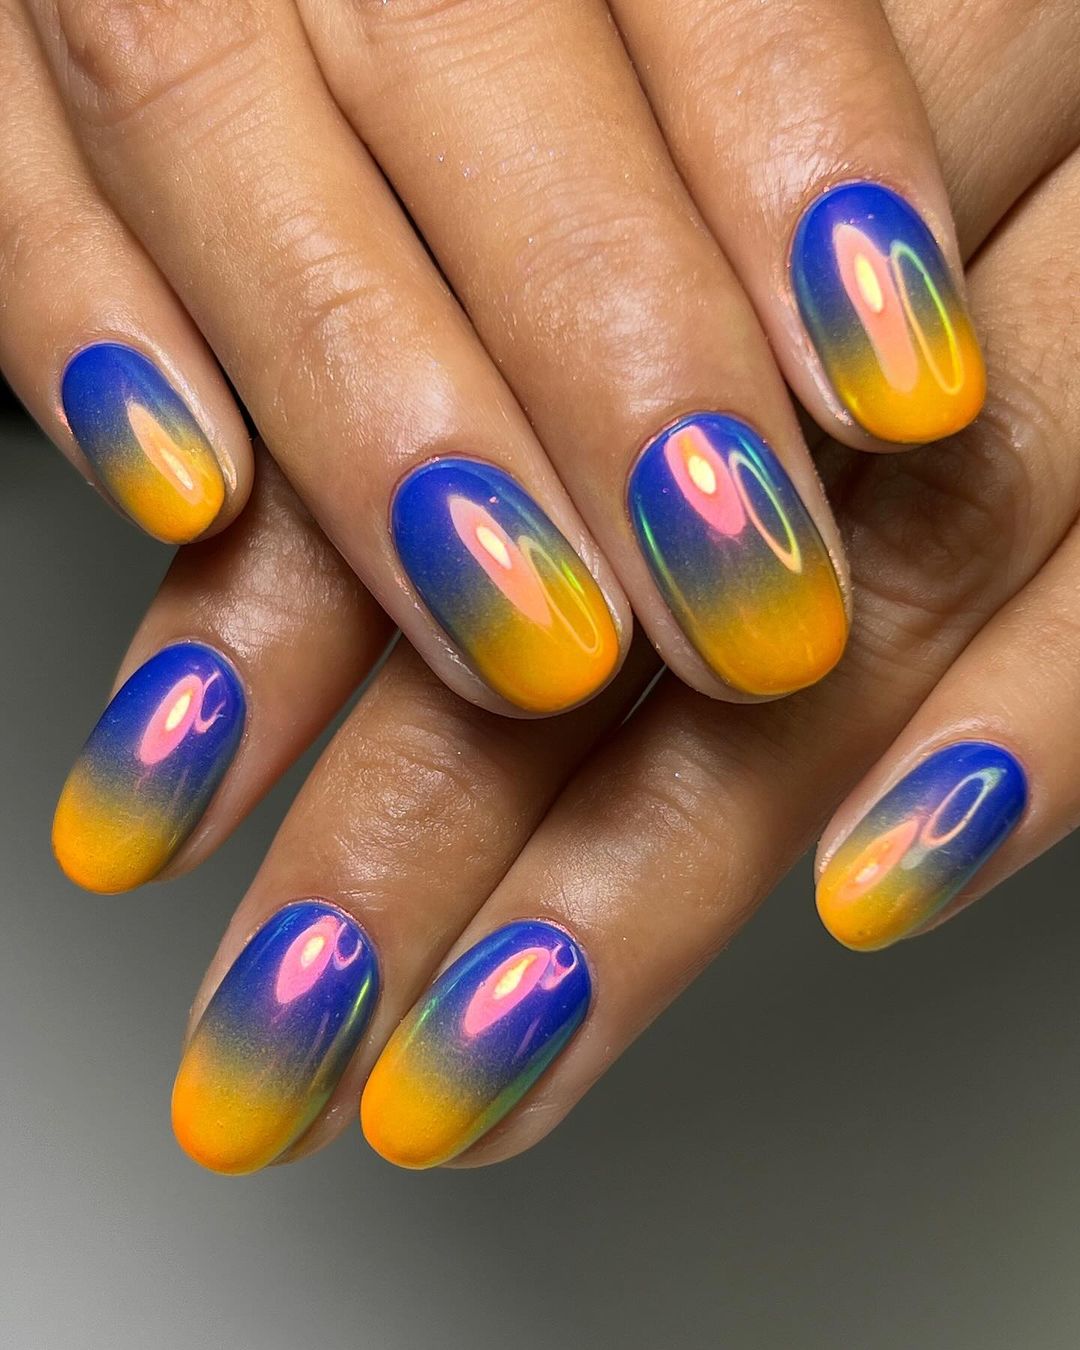
- Polish: OPI in “Can’t Find My Czechbook”
- Orange Polish: China Glaze in “Sun Worshiper”
- Gradient Sponge: Winstonia Gradient Sponge Set
- Top Coat: Seche Vite Dry Fast Top Coat
Instructions:
- Apply a base coat to protect your nails.
- Use the gradient sponge to blend the blue and orange polishes.
- Dab the sponge onto the nails until you achieve the desired gradient.
- Finish with a glossy top coat to blend the colors seamlessly and add shine.
Glowing Orange Tips
This glowing orange tips design is both simple and stunning, perfect for a modern fall look. The transparent base with neon orange tips creates a fresh and trendy style. It’s a subtle yet vibrant design that adds a pop of color to your nails.

- Polish: Essie in “Blanc”
- Orange Polish: China Glaze in “Japanese Koi”
- Detail Brush: Winstonia Nail Art Brush Set
- Top Coat: Seche Vite Dry Fast Top Coat
Instructions:
- Apply a base coat to protect your nails.
- Paint the tips of your nails with the neon orange polish.
- Use the detail brush to ensure clean and precise lines.
- Finish with a top coat to seal the design and add shine.
Bold Red Tortoiseshell
This bold red tortoiseshell design brings a fierce and modern twist to classic nail art. The deep red base combined with black tortoiseshell patterns creates a striking and luxurious look. This manicure is perfect for making a statement and adding a touch of drama to your fall nails.

- Polish: OPI in “Malaga Wine”
- Black Polish: Essie in “Licorice”
- Detail Brush: Winstonia Nail Art Brush Set
- Top Coat: Seche Vite Dry Fast Top Coat
Instructions:
- Apply a base coat to protect your nails.
- Paint your nails with the red polish.
- Use the detail brush to create black tortoiseshell patterns on each nail.
- Finish with a top coat to seal the design and add shine.
Silver Swirls and Stars
This unique design combines silver swirls with star accents for a captivating and whimsical look. The white base with intricate silver swirls creates a mesmerizing effect, while the bold orange nails with silver stars add a touch of fun and festivity. This manicure is perfect for those who love creative and eye-catching designs.
- Polish: Essie in “Blanc”
- Silver Polish: OPI in “Turn on the Northern Lights!”
- Orange Polish: China Glaze in “Japanese Koi”
- Detail Brush: Winstonia Nail Art Brush Set
- Star Stickers: Born Pretty Nail Art Stickers
- Top Coat: Seche Vite Dry Fast Top Coat
Instructions:
- Apply a base coat to protect your nails.
- Paint some nails with the white polish and others with the orange polish.
- Use the detail brush to create silver swirls on the white nails and add star stickers to the orange nails.
- Finish with a top coat to seal the design and add shine.
Blue Geometric Elegance
This geometric design in shades of blue offers a modern and sophisticated look. The mix of matte and glossy finishes, along with intricate line work, creates a unique and stylish manicure. This design is perfect for those who appreciate both elegance and creativity in their nail art.
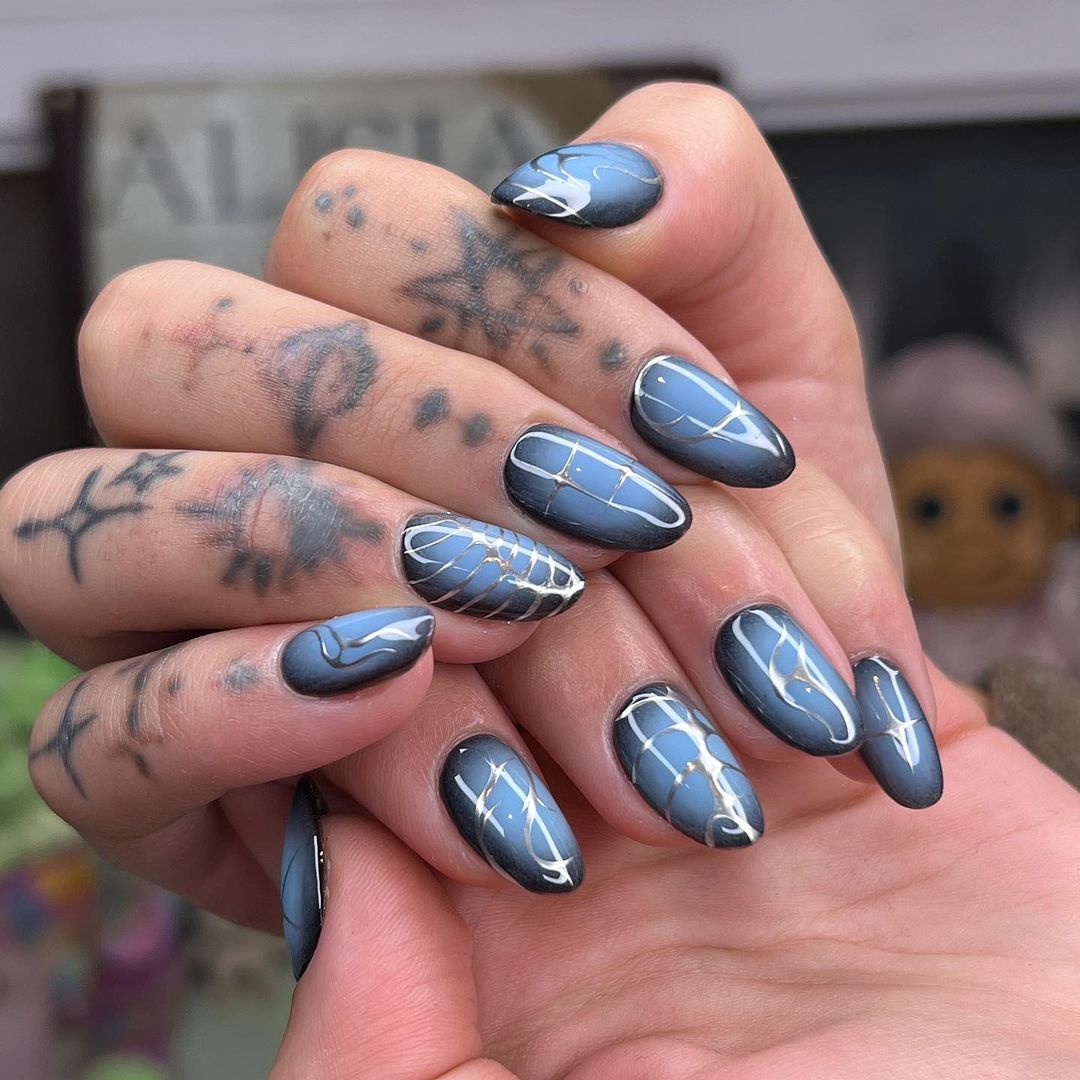
- Polish: OPI in “Russian Navy”
- Matte Top Coat: Essie Matte About You
- Detail Brush: Winstonia Nail Art Brush Set
- Top Coat: Seche Vite Dry Fast Top Coat
Instructions:
- Apply a base coat to protect your nails.
- Paint the nails with the blue polish.
- Use the detail brush to create geometric line patterns on the nails.
- Apply a matte top coat to some nails for a mixed finish.
- Finish with a glossy top coat on the remaining nails to seal the design and add shine.
Pink Flames
This playful pink flames design is perfect for adding a touch of fun to your nails. The vibrant pink base with silver flame accents creates a bold and dynamic look. This manicure is ideal for those who love to experiment with bright and unique designs.
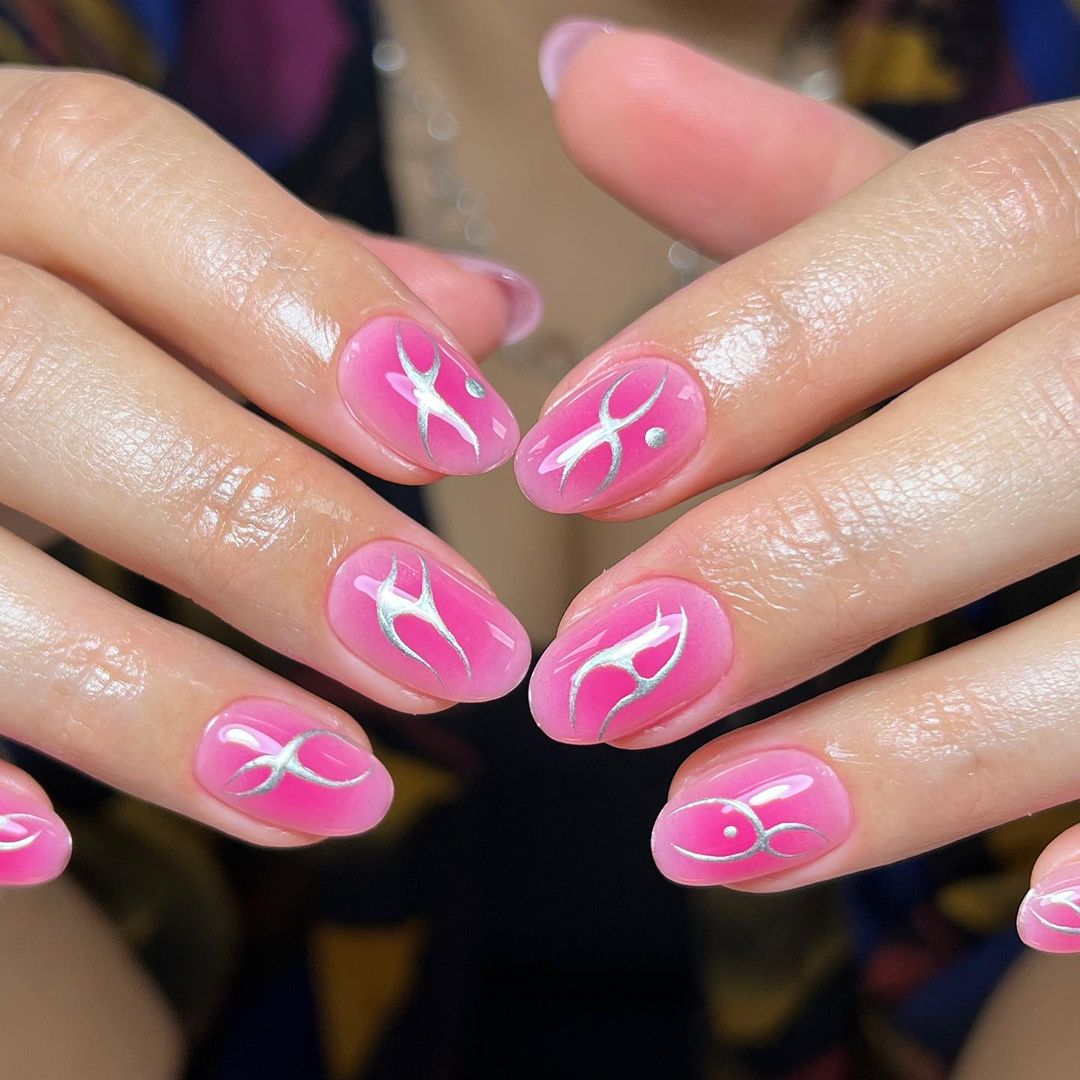
- Polish: OPI in “Pompeii Purple”
- Silver Polish: Essie in “No Place Like Chrome”
- Detail Brush: Winstonia Nail Art Brush Set
- Top Coat: Seche Vite Dry Fast Top Coat
Instructions:
- Apply a base coat to protect your nails.
- Paint the nails with the pink polish.
- Use the detail brush to create silver flame patterns on each nail.
- Finish with a top coat to seal the design and add shine.
Colorful Gem Accents
Add some sparkle to your nails with this colorful gem accents design. The nude base with multicolored gems creates a dazzling and festive look, perfect for any occasion. This manicure is great for those who love a bit of bling and want to make their nails stand out.

- Polish: Essie in “Mademoiselle”
- Gem Stones: Born Pretty Multicolored Nail Art Gems
- Top Coat: Seche Vite Dry Fast Top Coat
Instructions:
- Apply a base coat to protect your nails.
- Paint the nails with the nude polish.
- Apply the multicolored gems to each nail in a random pattern.
- Finish with a top coat to seal the design and ensure the gems stay in place.
FAQ
Q: How can I make my fall nail designs last longer? A: Always start with a good base coat and finish with a high-quality top coat. Avoid using your nails as tools and moisturize your cuticles regularly to prevent chipping.
Q: What are some trending colors for fall nails in 2024? A: Rich browns, deep burgundies, burnt oranges, and golds are all trending for fall 2024. These colors capture the essence of the season beautifully.
Q: Can I do these designs on short nails? A: Absolutely! These designs are specifically tailored for short nails and will look just as stunning as they would on longer nails.
Q: Are there any specific brands you recommend for fall gel nails? A: Brands like Essie, OPI, and Sally Hansen have fantastic fall collections. They offer a range of colors that are perfect for the season and have great staying power.
By following these ideas and tips, you can create beautiful short fall nails that celebrate the season in style. Whether you prefer simple designs or intricate art, there’s something here for everyone. Enjoy experimenting with these fall-inspired looks!
Save Pin