Fall is here, and it’s the perfect time to update your nail game with the latest trends and ideas. Brown fall nails are all the rage this season, and with good reason. They’re versatile, classy, and can be customized to fit any style or occasion. Whether you prefer short, simple designs or long, intricate sets, there’s a brown fall nail look for everyone. Let’s dive into some of the most stunning brown nail ideas for this season.
Classic Brown Nails
For those who love simplicity and elegance, classic brown nails are the way to go. This look features a rich, chocolate brown polish that is both timeless and sophisticated. As a professional manicurist, I can tell you that this nail design is perfect for any occasion. The deep brown color is both bold and neutral, making it versatile enough for both casual and formal settings. The glossy finish adds a touch of luxury, while the medium length keeps it practical.
-
- Chocolate brown nail polish (e.g., OPI’s “Chocolate Moose”)
- Glossy top coat (e.g., Seche Vite Dry Fast Top Coat)
- Base coat (e.g., Essie First Base)
- Nail file and buffer
- Cuticle oil (e.g., CND SolarOil)
DIY Instructions:
-
- Start by filing and buffing your nails to the desired shape.
- Apply a base coat to protect your natural nails.
- Apply two coats of chocolate brown nail polish, allowing each coat to dry fully.
- Finish with a glossy top coat for a high-shine finish.
- Hydrate your cuticles with cuticle oil.
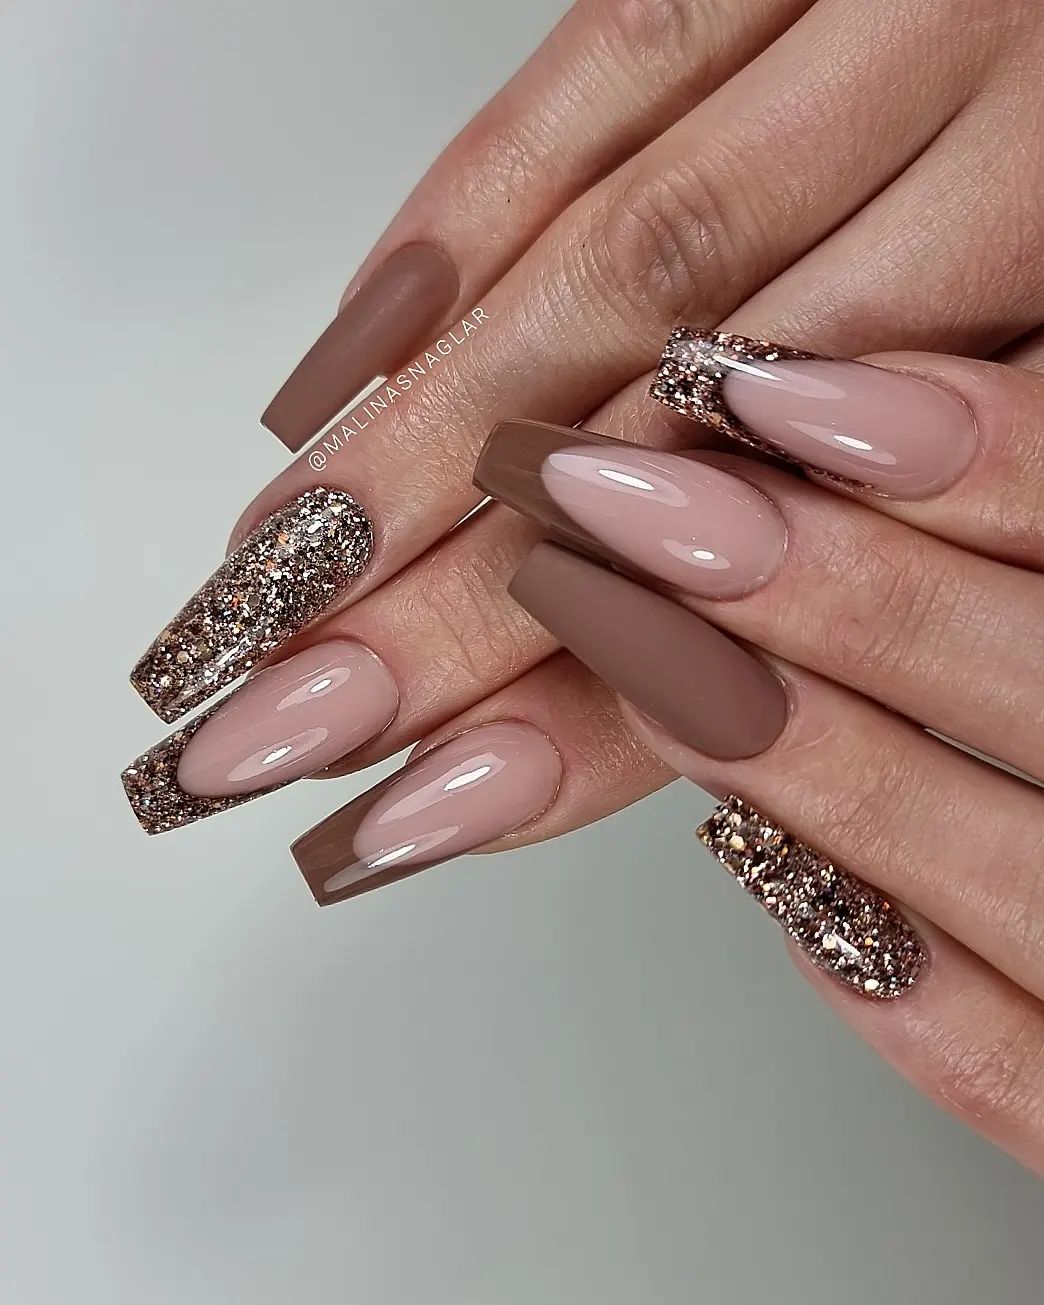
Glamorous Brown and Bling Nails
For those who want to add a bit of sparkle to their look, this glamorous brown and bling design is a must-try. Featuring rhinestones and a mix of matte and glossy finishes, this look is sure to turn heads. This nail design is perfect for special occasions or when you want to feel a little extra glamorous. The rhinestones add a touch of bling, while the combination of matte and glossy finishes creates a stunning contrast. The longer length is great for showcasing the intricate details.
-
- Brown nail polish (e.g., Essie’s “Playing Koi”)
- Matte top coat (e.g., OPI Matte Top Coat)
- Glossy top coat
- Rhinestones (e.g., Swarovski crystals)
- Nail glue
- Tweezers for applying rhinestones
- Base coat
DIY Instructions:
-
- File and shape your nails to the desired length.
- Apply a base coat to protect your nails.
- Paint your nails with two coats of brown polish, letting each coat dry.
- Apply a matte top coat to one half of your nails and a glossy top coat to the other half.
- Use nail glue and tweezers to apply rhinestones to the glossy section.
- Seal with an additional layer of top coat over the rhinestones.
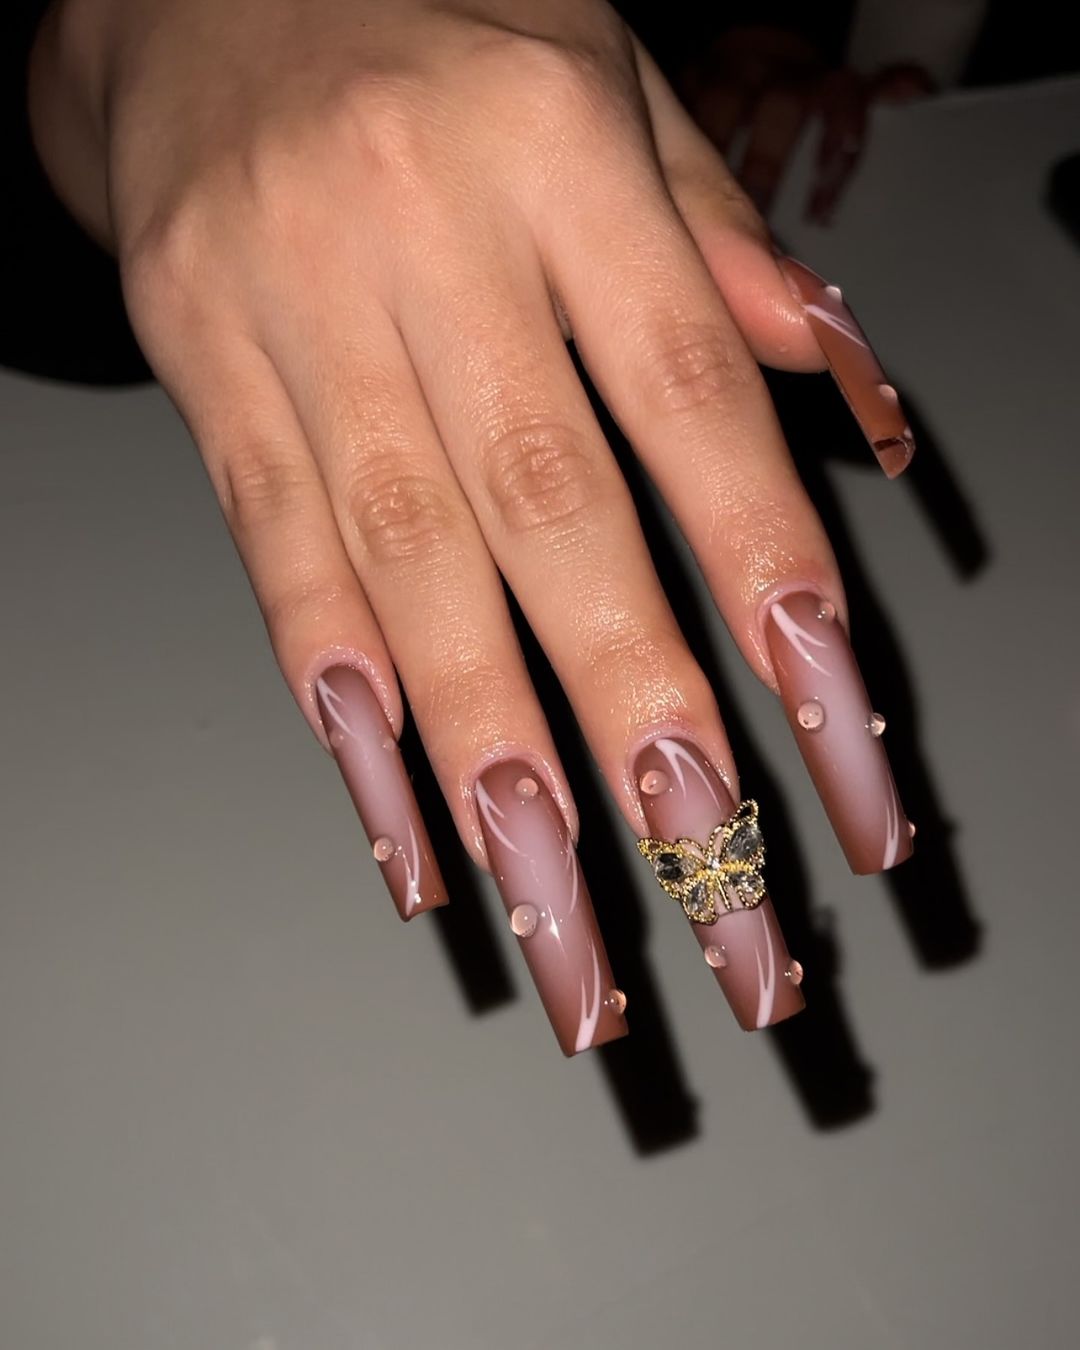
Artistic Brown and Beige Nails
For the artistic souls, this brown and beige nail design is a perfect blend of creativity and sophistication. With intricate patterns and a mix of different shades of brown, this look is both fun and stylish. This design is ideal for those who love to express their creativity through their nails. The mix of patterns and shades of brown creates a unique and eye-catching look. The almond shape is both trendy and flattering, elongating the fingers.
-
- Various shades of brown nail polish (e.g., Sally Hansen’s “Caramel Crush,” “Toasted Almond”)
- Nail art brushes
- Dotting tools
- Glossy top coat
- Base coat
- Nail file and buffer
DIY Instructions:
-
- Start by shaping and buffing your nails.
- Apply a base coat to protect your nails.
- Use nail art brushes and dotting tools to create different patterns with the various shades of brown.
- Let each layer dry before adding another to avoid smudging.
- Finish with a glossy top coat to seal the design.
Glittery Brown Coffin Nails
These nails are a stunning combination of different brown shades and glitter accents. The design features a mix of matte and glossy finishes, with one nail fully covered in glitter, creating a glamorous and eye-catching look. The contrast between the matte and glossy finishes on these brown coffin nails adds depth and dimension to the overall design. The glitter accent nail provides a touch of bling, making this set perfect for both everyday wear and special occasions. The coffin shape elongates the fingers, adding elegance to the look.
-
- Matte brown nail polish (e.g., Zoya’s “Spencer”)
- Glossy nude brown nail polish (e.g., OPI’s “Dulce de Leche”)
- Brown glitter nail polish (e.g., Sally Hansen’s “Big Glitter Top Coat”)
- Base coat (e.g., Orly Bonder)
- Top coat (e.g., Seche Vite Dry Fast Top Coat)
- Nail file and buffer
- Cuticle oil (e.g., CND SolarOil)
DIY Instructions:
-
- Start by shaping your nails into a coffin shape using a nail file.
- Apply a base coat to protect your natural nails.
- Paint three nails with the glossy nude brown polish, and one nail with the matte brown polish.
- Apply the brown glitter polish to the remaining nail.
- Finish the glossy nails with a top coat, and leave the matte nail as is.
- Hydrate your cuticles with cuticle oil to complete the look.
Save Pin
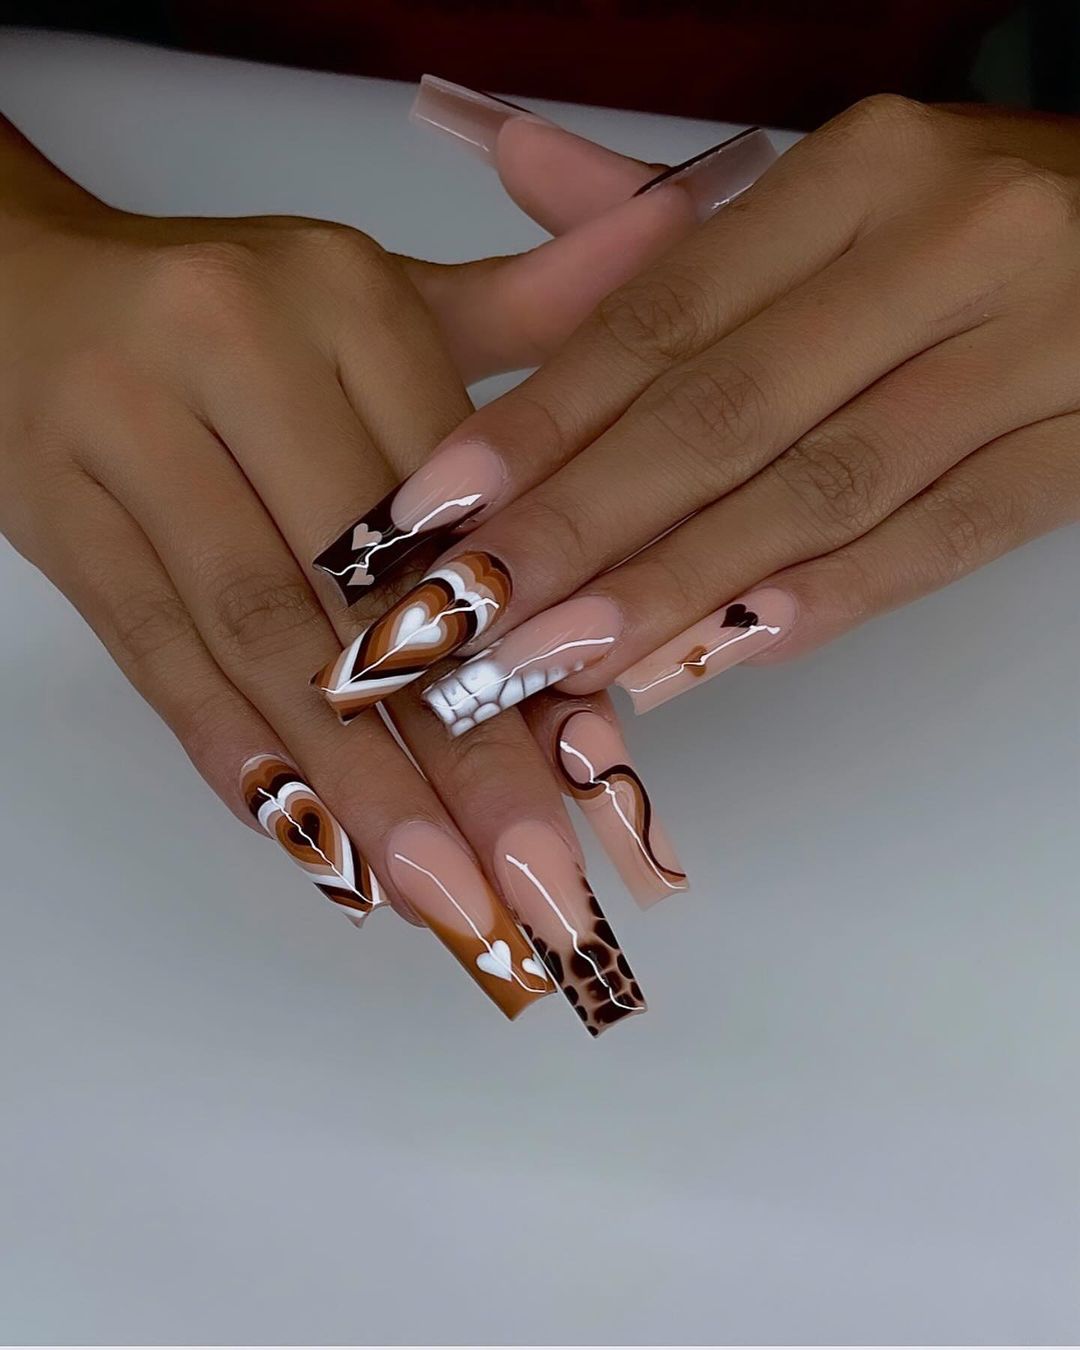
Artistic Brown and White Coffin Nails
This set features an artistic design with a mix of brown, white, and nude shades. Each nail has a unique pattern, including hearts, swirls, and geometric shapes, creating a visually striking and cohesive look. These nails are a work of art. The combination of brown and white tones creates a sophisticated yet playful aesthetic. The coffin shape is ideal for showcasing the detailed patterns, while the glossy finish adds a polished touch. This design is perfect for those who love to make a statement with their nails.
-
- Light brown nail polish (e.g., Essie’s “Wild Nude”)
- Dark brown nail polish (e.g., OPI’s “Chocolate Moose”)
- White nail polish (e.g., Essie’s “Blanc”)
- Nail art brushes and dotting tools
- Glossy top coat (e.g., Sally Hansen’s “Insta-Dri”)
- Base coat (e.g., Deborah Lippmann’s “Hard Rock”)
- Nail file and buffer
DIY Instructions:
-
- File your nails into a coffin shape and buff the surface.
- Apply a base coat to each nail.
- Use the light and dark brown polishes to create different patterns on each nail, incorporating white for contrast.
- Use nail art brushes and dotting tools for precise designs.
- Once dry, seal the design with a glossy top coat.
- Ensure your nails are dry before handling any objects to avoid smudging.
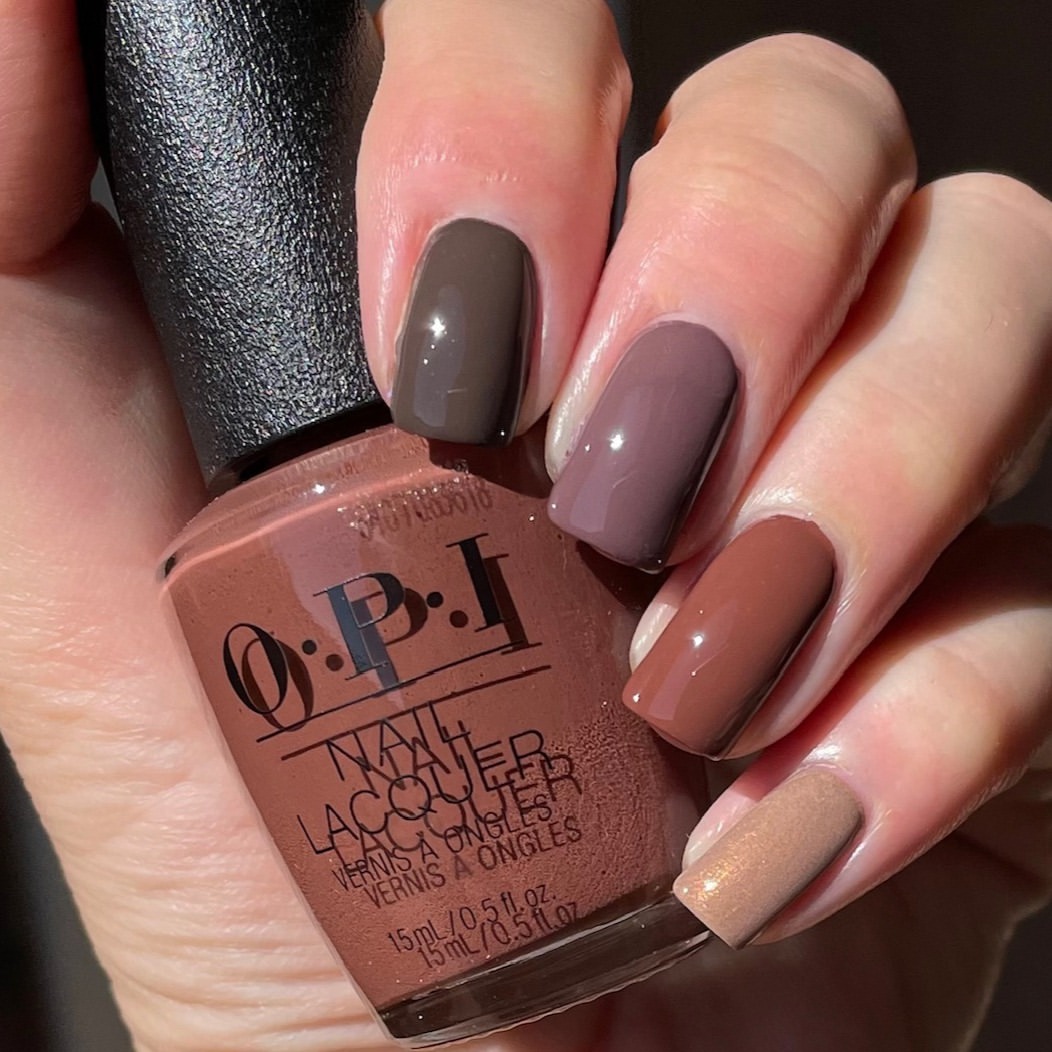
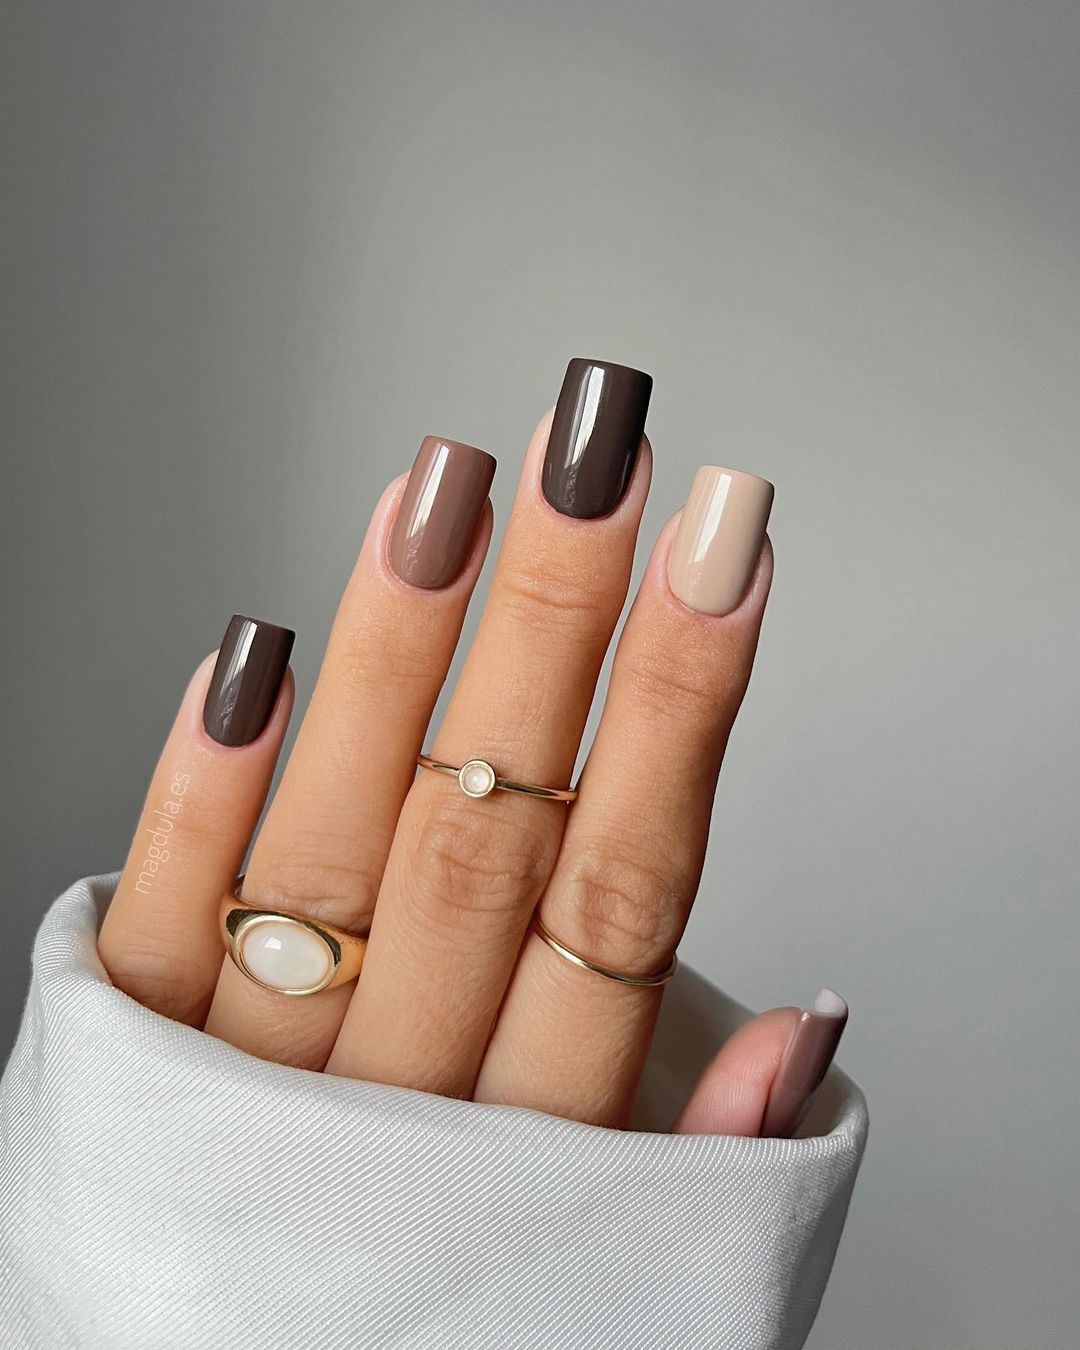
Multi-Toned Brown Nails
This look features a gradient of brown shades on each nail, creating a cohesive and modern appearance. The varying tones add depth and interest, making this a perfect fall manicure. This gradient design is a fantastic way to incorporate multiple shades of brown into one cohesive look. The varying tones give the nails a sophisticated and modern appearance. The glossy finish enhances the depth of each color, making this manicure ideal for both day and night.
-
- Various shades of brown nail polish (e.g., OPI’s “Samoan Sand,” “Chocolate Moose,” “Berlin There Done That”)
- Base coat (e.g., Zoya Anchor)
- Top coat (e.g., Essie Gel-Setter)
- Nail file and buffer
- Cuticle oil (e.g., Burt’s Bees Lemon Butter Cuticle Cream)
DIY Instructions:
-
- Shape and buff your nails, then apply a base coat.
- Select your brown shades and paint each nail with a different color, creating a gradient effect.
- Apply two coats of each color for full opacity, allowing each layer to dry.
- Seal with a glossy top coat to enhance the colors.
- Finish with cuticle oil to keep your nails looking healthy and polished.
Brown French Tips
This design features a modern twist on the classic French tip, using brown instead of the traditional white. The result is a chic and sophisticated look that’s perfect for fall. The brown French tips on these nails offer a subtle yet stylish update to a timeless design. The glossy nude base perfectly complements the rich brown tips, creating an elegant contrast. This nail shape, which is a short square, is practical for everyday wear while still looking polished and refined.

-
- Nude base polish (e.g., Essie’s “Ballet Slippers”)
- Brown polish for tips (e.g., OPI’s “I’ll Have a Gin & Tectonic”)
- Glossy top coat (e.g., Seche Vite)
- Base coat (e.g., Orly Bonder)
- Nail file and buffer
- Striping tape or French tip guides
DIY Instructions:
-
- Shape your nails into a short square using a nail file.
- Apply a base coat to protect your nails.
- Apply two coats of the nude base polish and let it dry.
- Use striping tape or French tip guides to create clean lines for the brown tips.
- Paint the tips with the brown polish and remove the guides carefully.
- Finish with a glossy top coat to seal and protect the design.
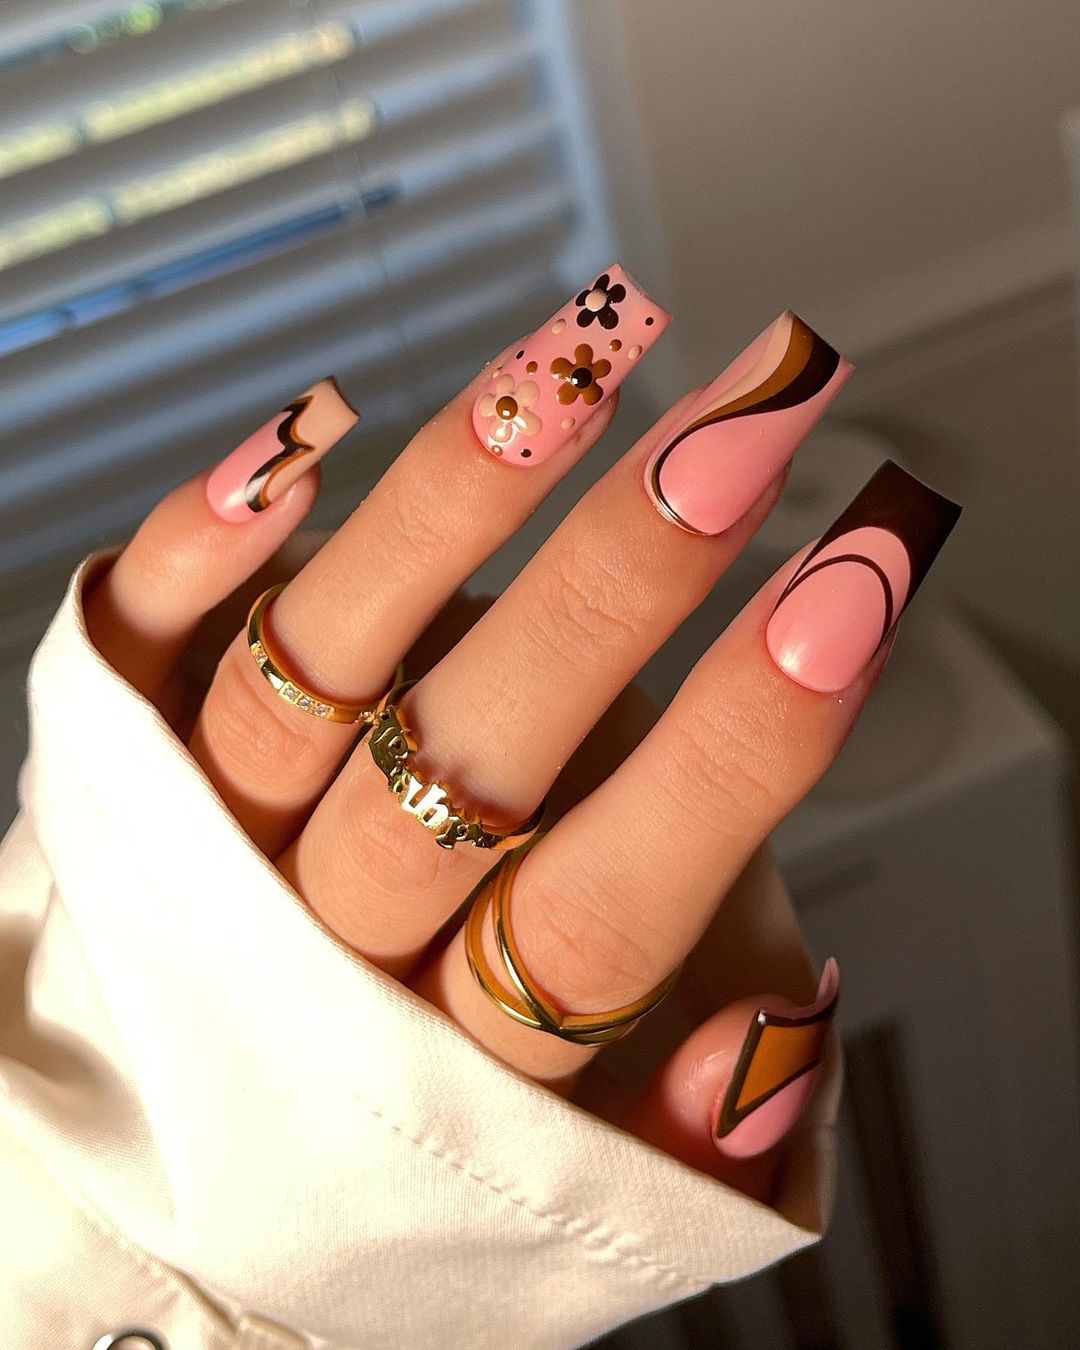
Pink and Brown Floral Coffin Nails
This set combines pink and brown tones with floral accents, creating a playful yet sophisticated look. The design includes intricate flowers and swirls, making it perfect for those who love detailed nail art. The combination of pink and brown with floral designs is both fun and elegant. The coffin shape allows for more surface area to showcase the intricate patterns and designs. The use of flowers and swirls adds a touch of femininity and creativity to the overall look.
-
- Pink nail polish (e.g., Sally Hansen’s “Pink Pong”)
- Brown nail polish (e.g., OPI’s “You Don’t Know Jacques”)
- Nail art brushes
- Dotting tools
- Glossy top coat (e.g., Essie Gel-Setter)
- Base coat (e.g., Zoya Anchor)
- Floral nail stickers or decals (optional)
DIY Instructions:
-
- File your nails into a coffin shape and buff the surface.
- Apply a base coat to each nail.
- Use the pink polish as the base color, applying two coats.
- Use the brown polish and nail art brushes to create floral patterns and swirls.
- If using stickers or decals, apply them carefully to the nails.
- Seal the design with a glossy top coat to ensure longevity.
Matte and Glossy Brown Nails
These nails feature a sophisticated combination of matte and glossy finishes in rich brown tones. The contrast between the two finishes adds depth and interest to the design. The contrast between matte and glossy finishes in this brown nail design creates a striking and elegant look. The varying textures add dimension and make the design more visually interesting. The long, almond shape is perfect for showing off the dual finishes and adds a touch of drama.
-
- Matte brown nail polish (e.g., Zoya’s “Desiree”)
- Glossy brown nail polish (e.g., Essie’s “Partner in Crime”)
- Matte top coat (e.g., OPI Matte Top Coat)
- Glossy top coat (e.g., Seche Vite)
- Base coat (e.g., Orly Bonder)
- Nail file and buffer
DIY Instructions:
-
- Shape your nails into a long, almond shape.
- Apply a base coat to protect your nails.
- Paint alternate nails with the matte and glossy brown polishes.
- Apply a matte top coat over the matte brown polish and a glossy top coat over the glossy brown polish.
- Allow your nails to dry completely before handling any objects.
Save Pin

Dark Brown Gel Almond Nails
This design features a dark brown shade on almond-shaped nails, creating a sleek and sophisticated look. The glossy finish adds a touch of luxury to the dark color. The dark brown color on these almond-shaped nails is perfect for a sleek and sophisticated look. The glossy finish enhances the richness of the color, making it ideal for both casual and formal occasions. The almond shape is very flattering and elongates the fingers beautifully.
-
- Dark brown gel polish (e.g., CND Shellac in “Fedora”)
- Glossy top coat (e.g., CND Shellac Top Coat)
- Base coat (e.g., CND Shellac Base Coat)
- UV or LED lamp
- Nail file and buffer
DIY Instructions:
-
- Shape your nails into an almond shape using a nail file.
- Apply a base coat and cure it under the UV/LED lamp.
- Apply two coats of the dark brown gel polish, curing each coat under the lamp.
- Finish with a glossy top coat and cure it under the lamp.
- Wipe off any sticky residue with a gel cleanser for a perfect finish.
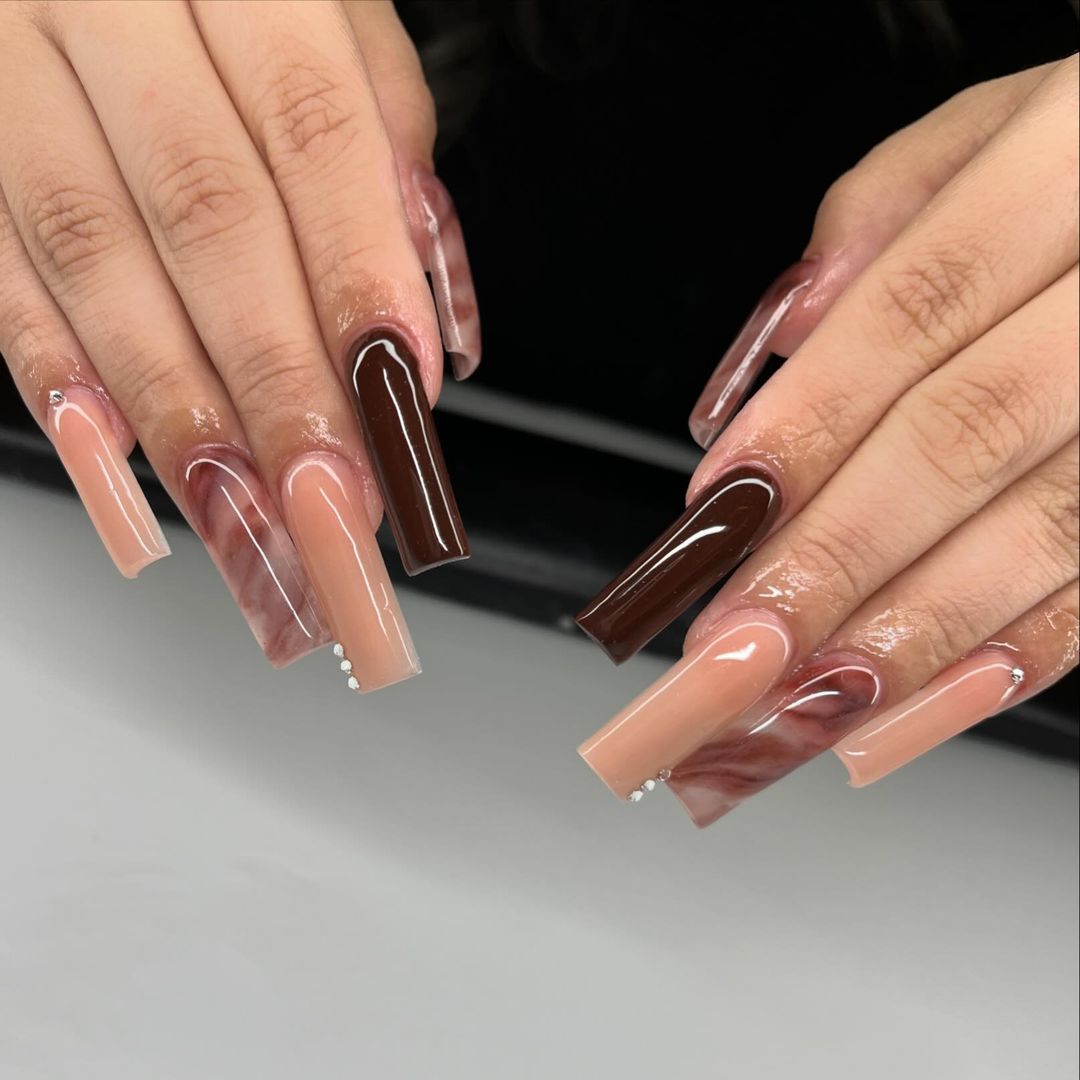
Nude and Brown Marble Nails
This set features a beautiful combination of nude and brown tones with a marble effect. The design is elegant and sophisticated, perfect for those who love intricate nail art. The marble effect on these nude and brown nails is both elegant and sophisticated. The mix of nude and brown tones creates a natural yet polished look. The long coffin shape is ideal for showcasing the intricate marble patterns and adding a touch of luxury.
-
- Nude nail polish (e.g., OPI’s “Samoan Sand”)
- Brown nail polish (e.g., Essie’s “Hot Cocoa”)
- Nail art brushes
- Glossy top coat (e.g., Seche Vite)
- Base coat (e.g., Deborah Lippmann’s “Hard Rock”)
- Nail file and buffer
- Rubbing alcohol and a small brush for marble effect
DIY Instructions:
-
- Shape your nails into a long coffin shape.
- Apply a base coat to protect your nails.
- Apply the nude polish as a base color.
- Use the brown polish and a small brush dipped in rubbing alcohol to create a marble effect.
- Allow the design to dry, then seal with a glossy top coat.
Brown French Coffin Nails
This design features a classic French manicure with a modern twist, using brown tips on coffin-shaped nails. The look is elegant and perfect for any occasion. The brown French tips on these coffin-shaped nails offer a modern take on a classic design. The rich brown color adds a touch of sophistication, while the glossy finish keeps the look polished. The coffin shape elongates the fingers and adds a contemporary feel to the traditional French manicure.
-
- Nude base polish (e.g., Essie’s “Ballet Slippers”)
- Brown polish for tips (e.g., OPI’s “You Don’t Know Jacques”)
- Glossy top coat (e.g., Seche Vite)
- Base coat (e.g., Orly Bonder)
- Nail file and buffer
- Striping tape or French tip guides
DIY Instructions:
-
- Shape your nails into a coffin shape using a nail file.
- Apply a base coat to protect your nails.
- Apply two coats of the nude base polish and let it dry.
- Use striping tape or French tip guides to create clean lines for the brown tips.
- Paint the tips with the brown polish and remove the guides carefully.
- Finish with a glossy top coat to seal and protect the design.
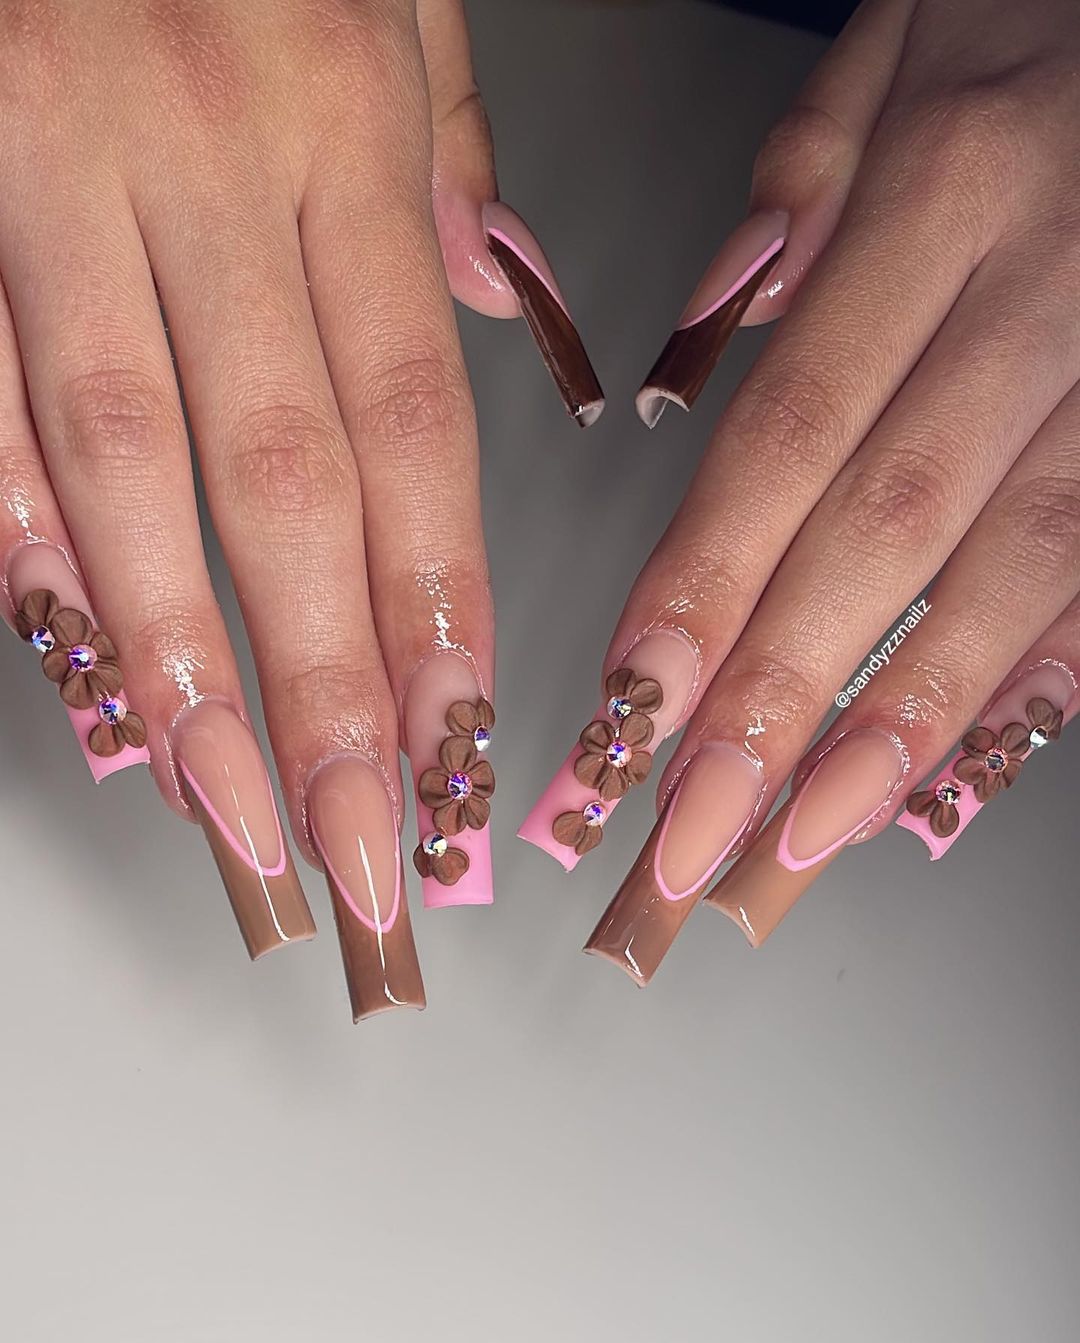
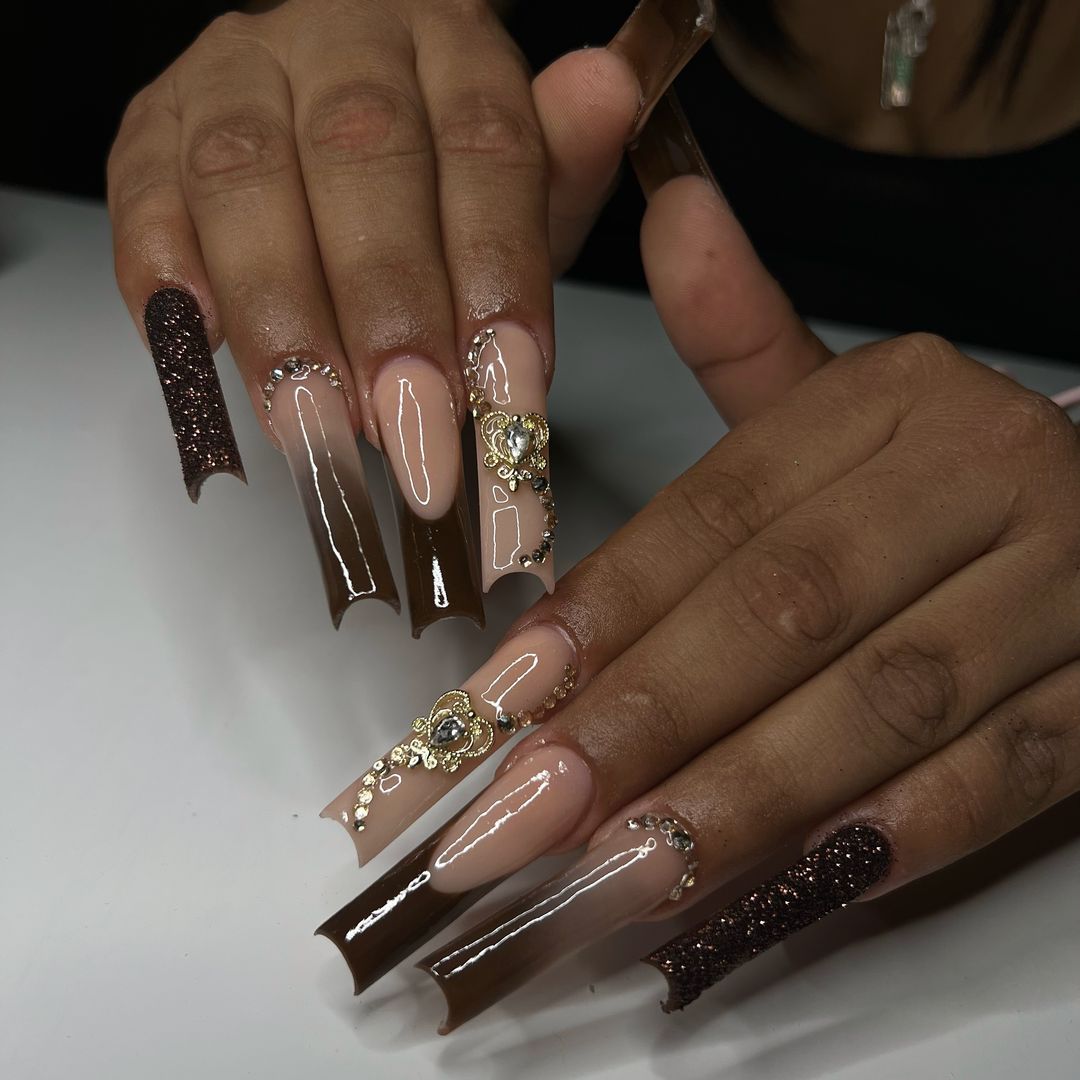
Pink and Brown Flower Coffin Nails
This design combines a soft pink base with brown French tips and intricate 3D floral accents. The addition of rhinestones gives the nails a touch of sparkle, making them perfect for special occasions. The blend of pink and brown in this design creates a beautiful contrast that is both feminine and sophisticated. The 3D flowers add a unique texture and depth to the nails, while the rhinestones provide an eye-catching sparkle. The long coffin shape is ideal for showcasing the detailed floral work and adds elegance to the overall look.
-
- Pink nail polish (e.g., Essie’s “Sugar Daddy”)
- Brown nail polish (e.g., OPI’s “Chocolate Moose”)
- 3D flower nail art decorations
- Rhinestones (e.g., Swarovski crystals)
- Nail glue
- Glossy top coat (e.g., Seche Vite)
- Base coat (e.g., Orly Bonder)
- Nail file and buffer
DIY Instructions:
-
- Shape your nails into a long coffin shape using a nail file.
- Apply a base coat to protect your nails.
- Paint the base of your nails with the pink polish and let it dry.
- Create French tips using the brown polish.
- Use nail glue to attach the 3D flowers and rhinestones strategically on the nails.
- Finish with a glossy top coat to seal and protect the design.
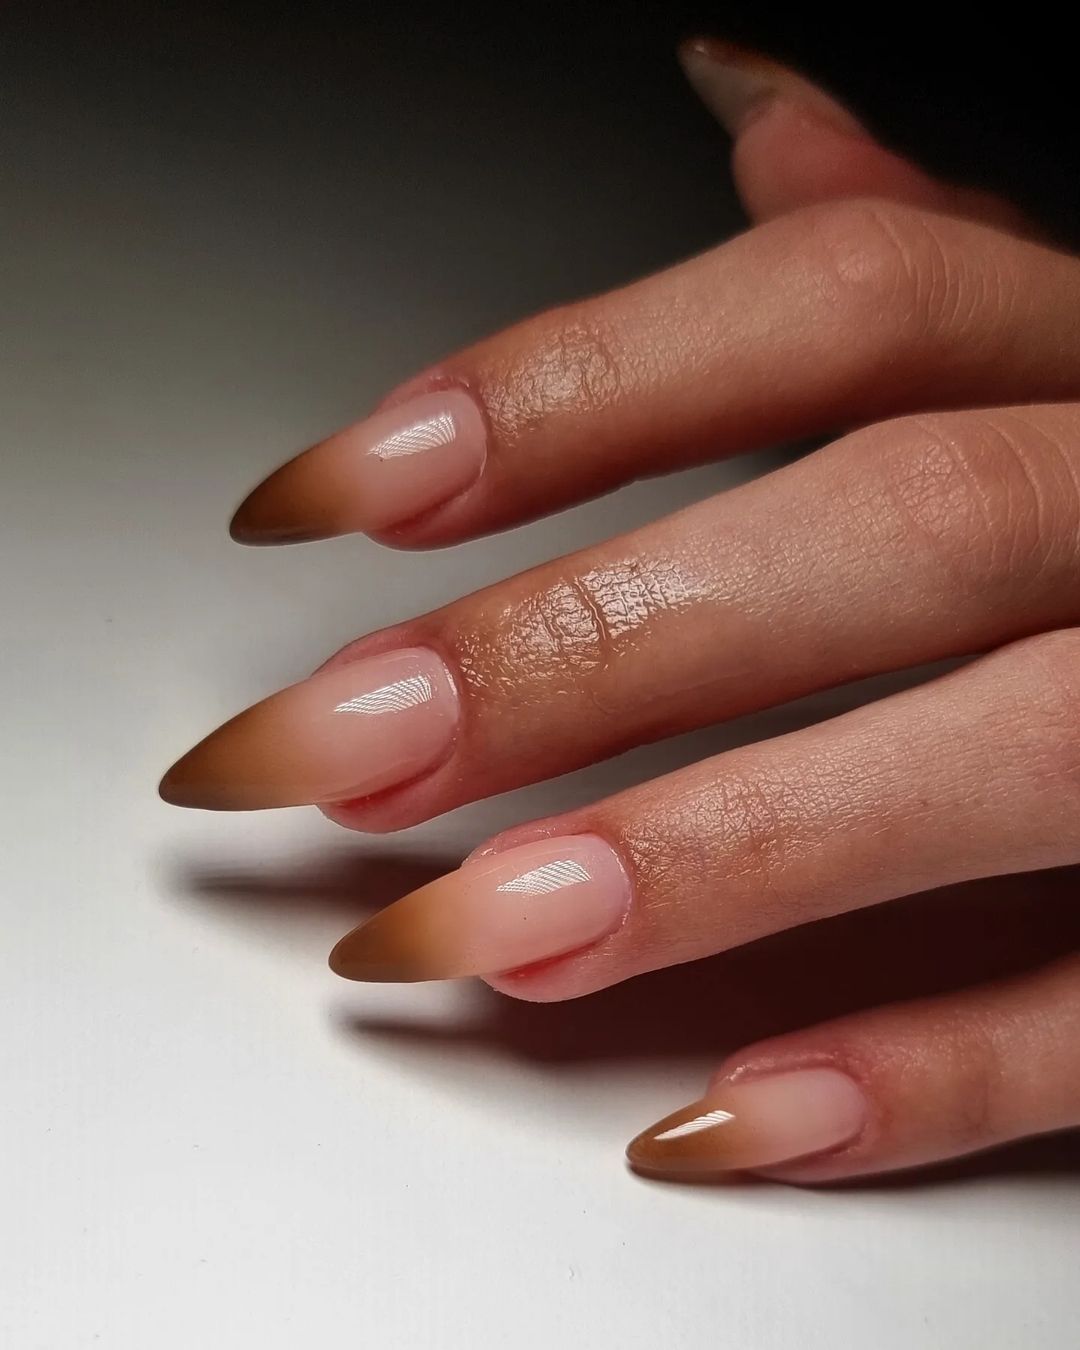
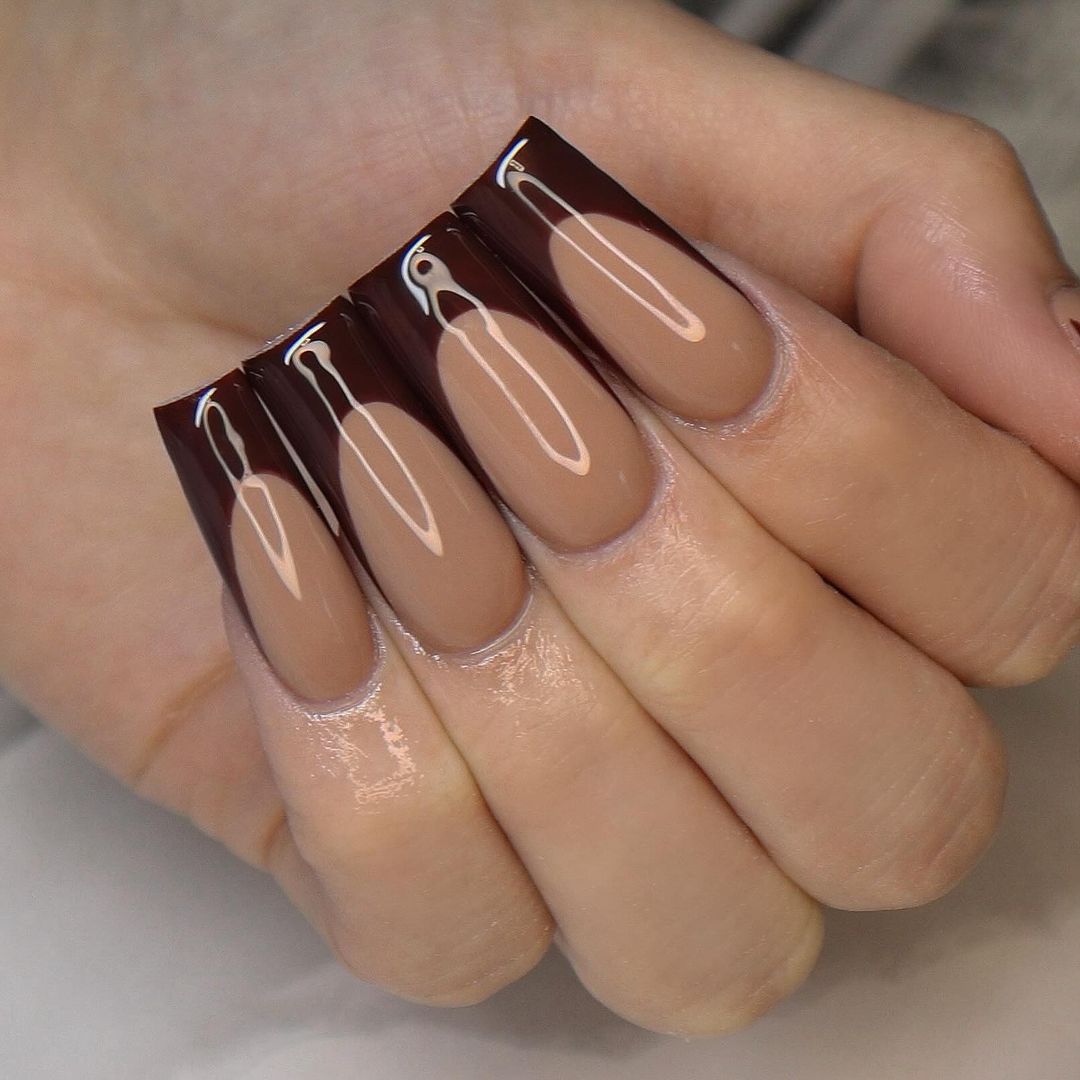
Brown Ombre Almond Nails
This elegant design features a smooth ombre transition from nude to brown, perfect for those who love a subtle yet sophisticated look. The almond shape adds to the overall elegance of the design. The brown ombre effect on these almond-shaped nails is both classy and chic. The gradient from a nude base to a rich brown tip creates a seamless and polished look. This design is versatile and suitable for both casual and formal settings, offering a refined aesthetic.
-
- Nude nail polish (e.g., OPI’s “Bubble Bath”)
- Brown nail polish (e.g., Essie’s “Chinchilly”)
- Makeup sponge for blending
- Glossy top coat (e.g., Essie Gel-Setter)
- Base coat (e.g., Zoya Anchor)
- Nail file and buffer
DIY Instructions:
-
- Shape your nails into an almond shape.
- Apply a base coat to protect your nails.
- Paint the entire nail with the nude polish and let it dry.
- Use a makeup sponge to dab the brown polish onto the tips, blending it into the nude polish to create the ombre effect.
- Repeat the sponging process until you achieve the desired gradient.
- Seal the design with a glossy top coat to enhance the ombre effect.
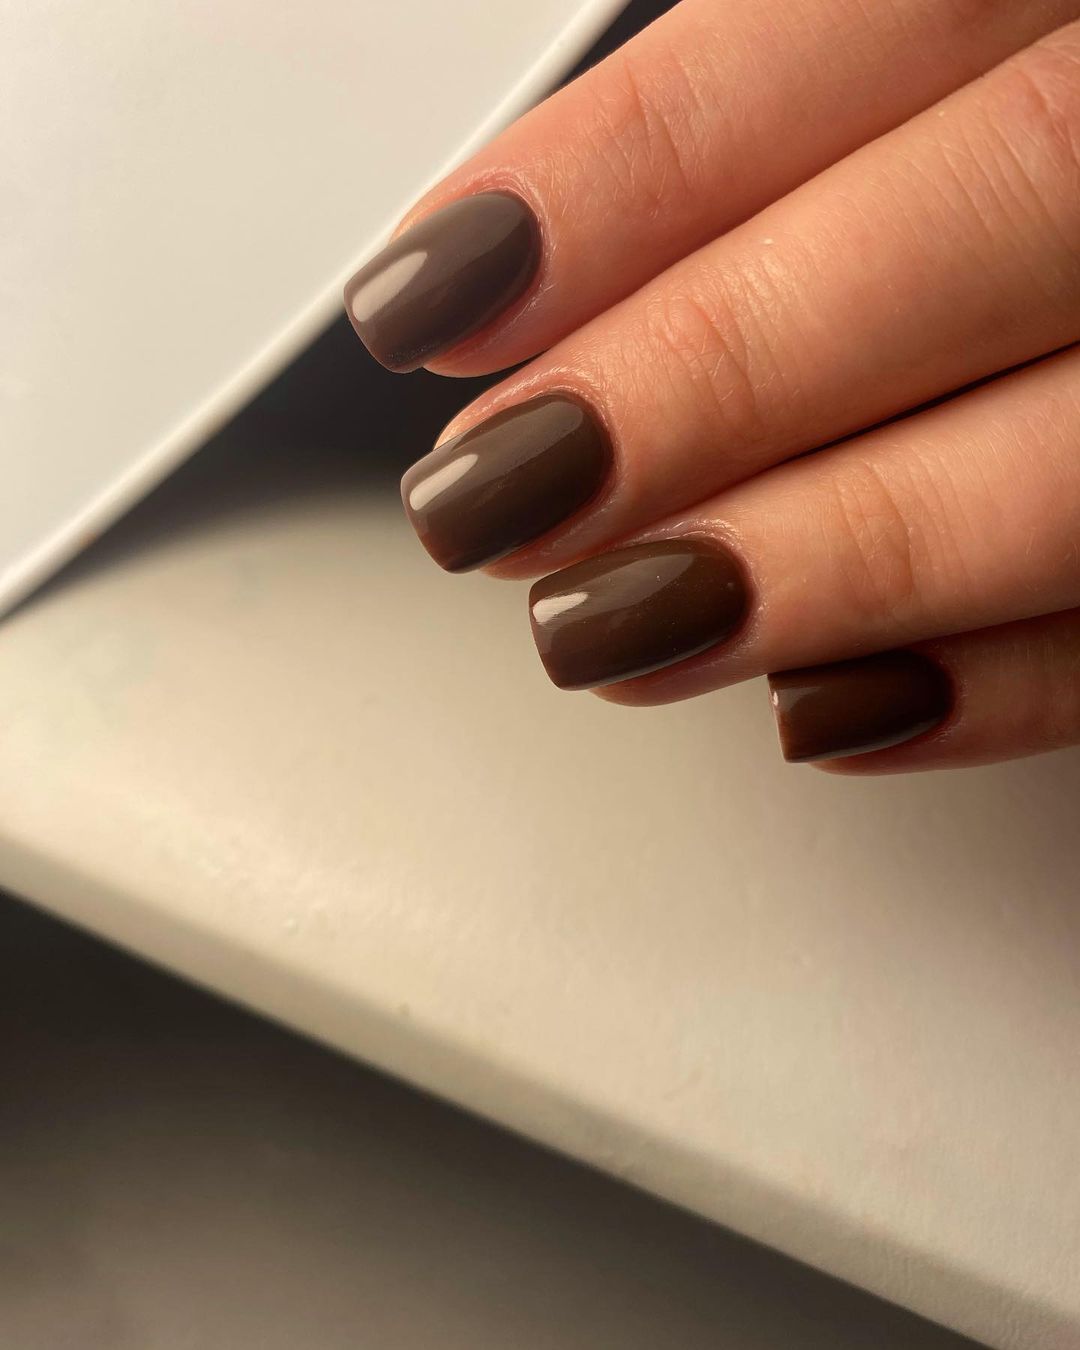
Brown French Tip Nails with Rhinestones
This design takes the classic French manicure and adds a modern twist with brown tips and rhinestone accents. The look is sophisticated and perfect for those who want a touch of glamour. The brown French tips combined with rhinestones create a glamorous and modern take on the traditional French manicure. The use of rhinestones adds a luxurious element, making this design perfect for special occasions. The glossy finish enhances the overall elegance of the look.
-
- Nude base polish (e.g., Essie’s “Ballet Slippers”)
- Brown polish for tips (e.g., OPI’s “You Don’t Know Jacques”)
- Rhinestones (e.g., Swarovski crystals)
- Nail glue
- Glossy top coat (e.g., Seche Vite)
- Base coat (e.g., Orly Bonder)
- Nail file and buffer
- Striping tape or French tip guides
DIY Instructions:
-
- Shape your nails into a long coffin shape using a nail file.
- Apply a base coat to protect your nails.
- Paint your nails with the nude base polish and let it dry.
- Use striping tape or French tip guides to create clean lines for the brown tips.
- Paint the tips with the brown polish and remove the guides carefully.
- Apply nail glue and attach rhinestones to the base of each nail.
- Finish with a glossy top coat to seal and protect the design.
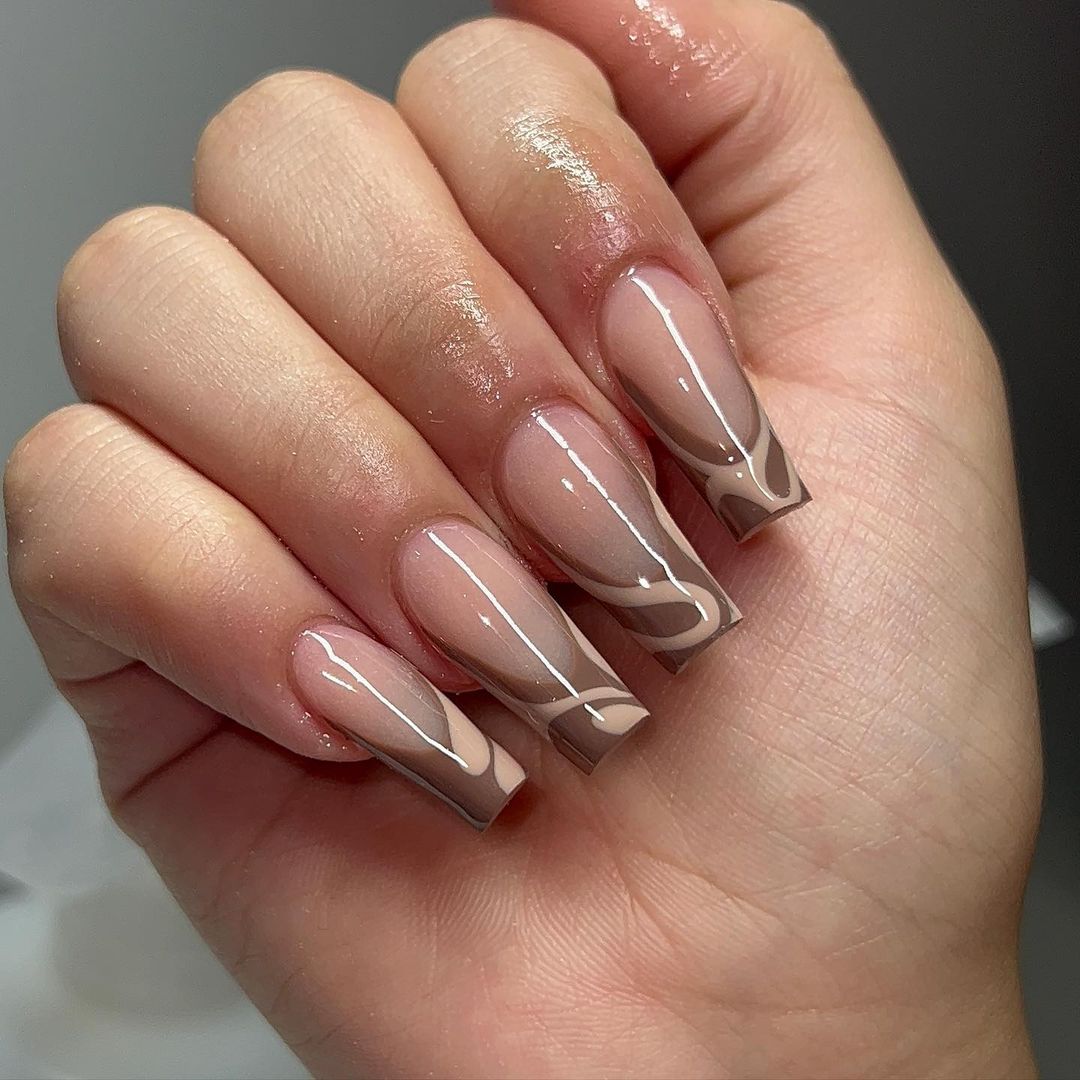
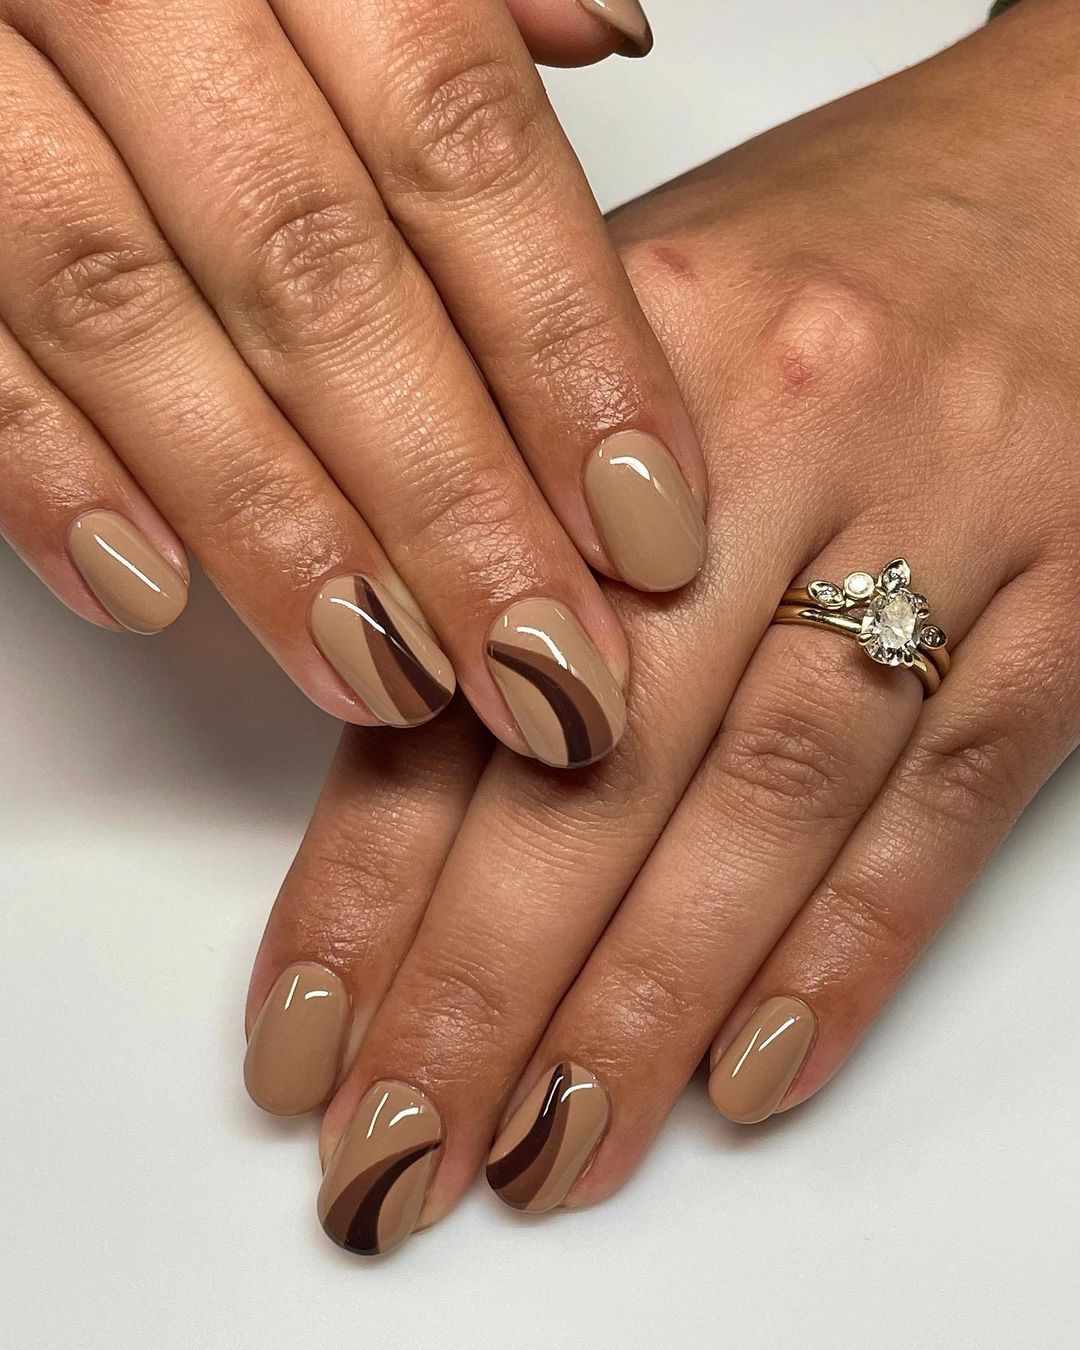
Nude and Brown Swirl Coffin Nails
This design features a nude base with intricate brown swirls, creating a modern and sophisticated look. The glossy finish adds a touch of elegance, making this design perfect for any occasion. The combination of nude and brown with intricate swirl patterns creates a sophisticated and eye-catching design. The long coffin shape provides ample space for the detailed artwork, while the glossy finish enhances the overall elegance. This design is perfect for those who appreciate detailed nail art and want a refined look.
-
- Nude nail polish (e.g., Essie’s “Topless & Barefoot”)
- Brown nail polish (e.g., OPI’s “Berlin There Done That”)
- Nail art brushes
- Glossy top coat (e.g., Seche Vite)
- Base coat (e.g., Deborah Lippmann’s “Hard Rock”)
- Nail file and buffer
DIY Instructions:
-
- Shape your nails into a long coffin shape.
- Apply a base coat to protect your nails.
- Paint the base of your nails with the nude polish and let it dry.
- Use the brown polish and nail art brushes to create intricate swirl patterns.
- Seal the design with a glossy top coat to ensure longevity and shine.
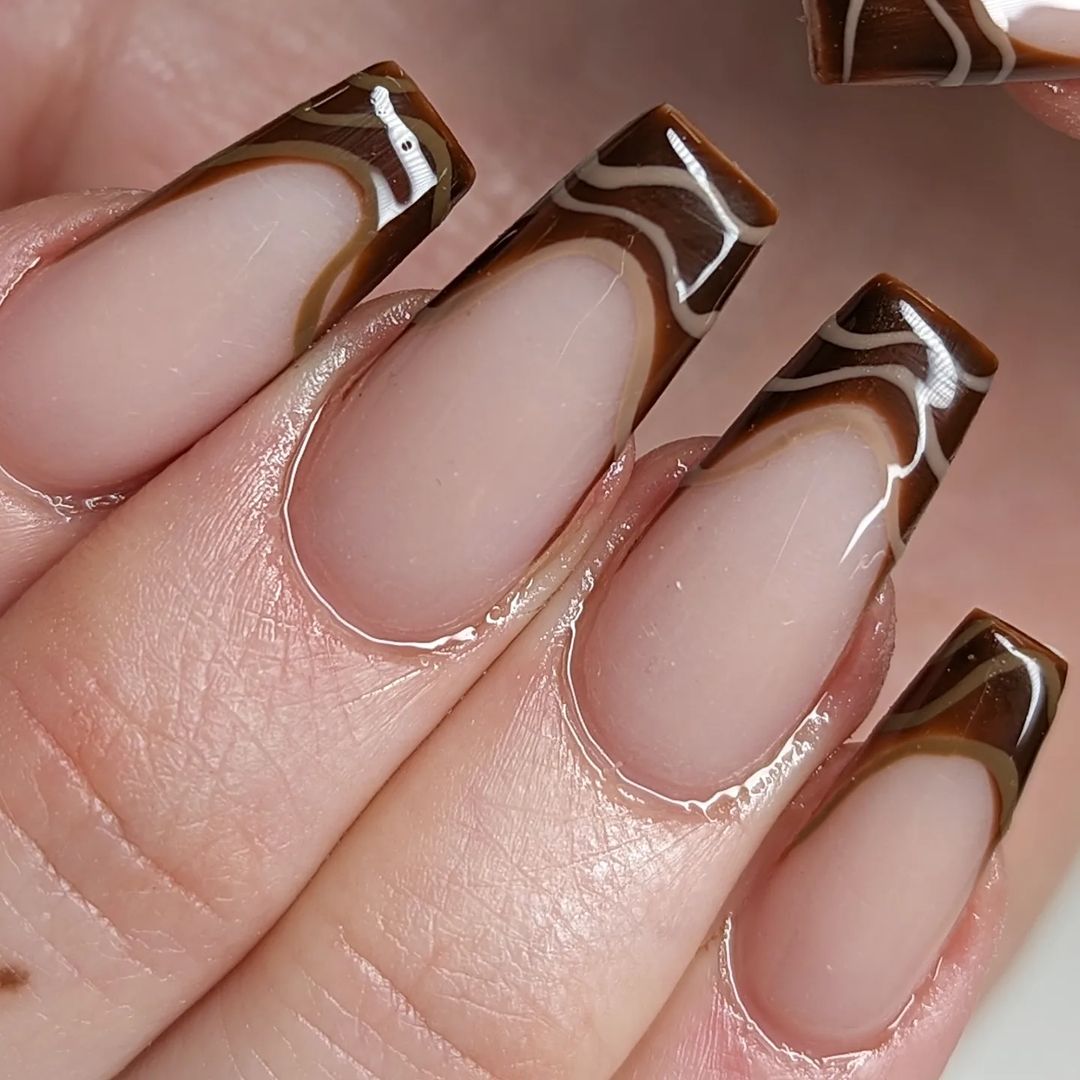
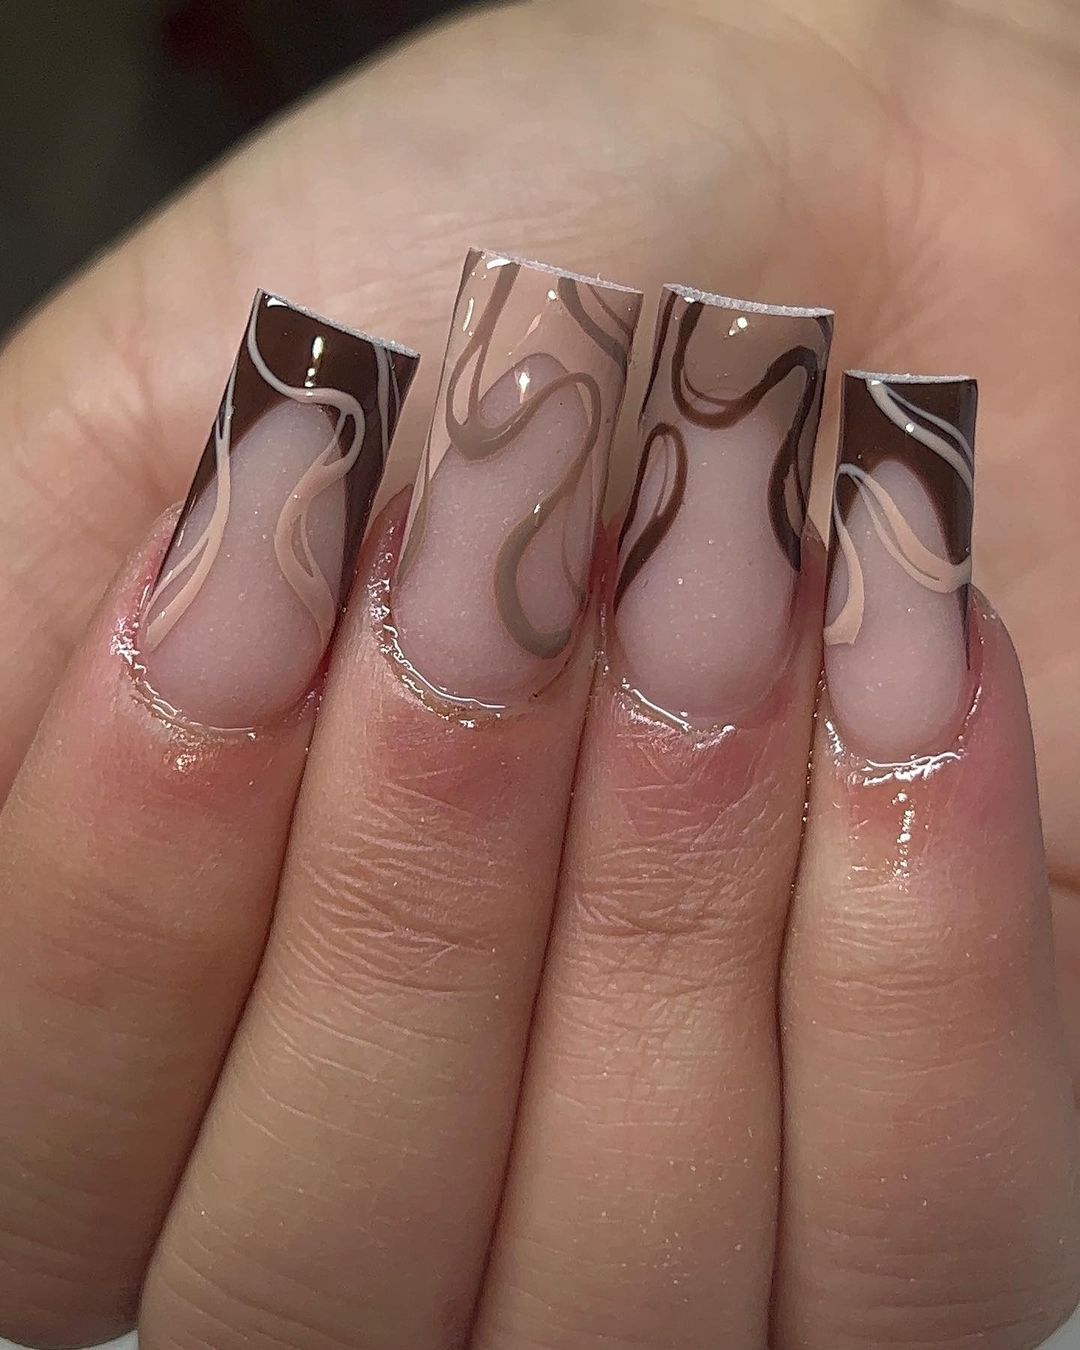
Abstract Brown Swirl Nails
This abstract design features a nude base with brown and white swirls, creating a unique and modern look. The glossy finish adds a touch of sophistication, making this design stand out. The abstract swirl design on these nails is both modern and artistic. The combination of brown and white swirls on a nude base creates a visually striking look that is perfect for those who want a unique and trendy manicure. The glossy finish enhances the intricate patterns and adds a polished touch.
-
- Nude nail polish (e.g., OPI’s “Samoan Sand”)
- Brown nail polish (e.g., Essie’s “Hot Cocoa”)
- White nail polish (e.g., Essie’s “Blanc”)
- Nail art brushes
- Glossy top coat (e.g., Seche Vite)
- Base coat (e.g., Orly Bonder)
- Nail file and buffer
DIY Instructions:
-
- Shape your nails into a long coffin shape using a nail file.
- Apply a base coat to protect your nails.
- Paint the base of your nails with the nude polish and let it dry.
- Use nail art brushes to create abstract swirl patterns with the brown and white polishes.
- Seal the design with a glossy top coat to protect the artwork and add shine.
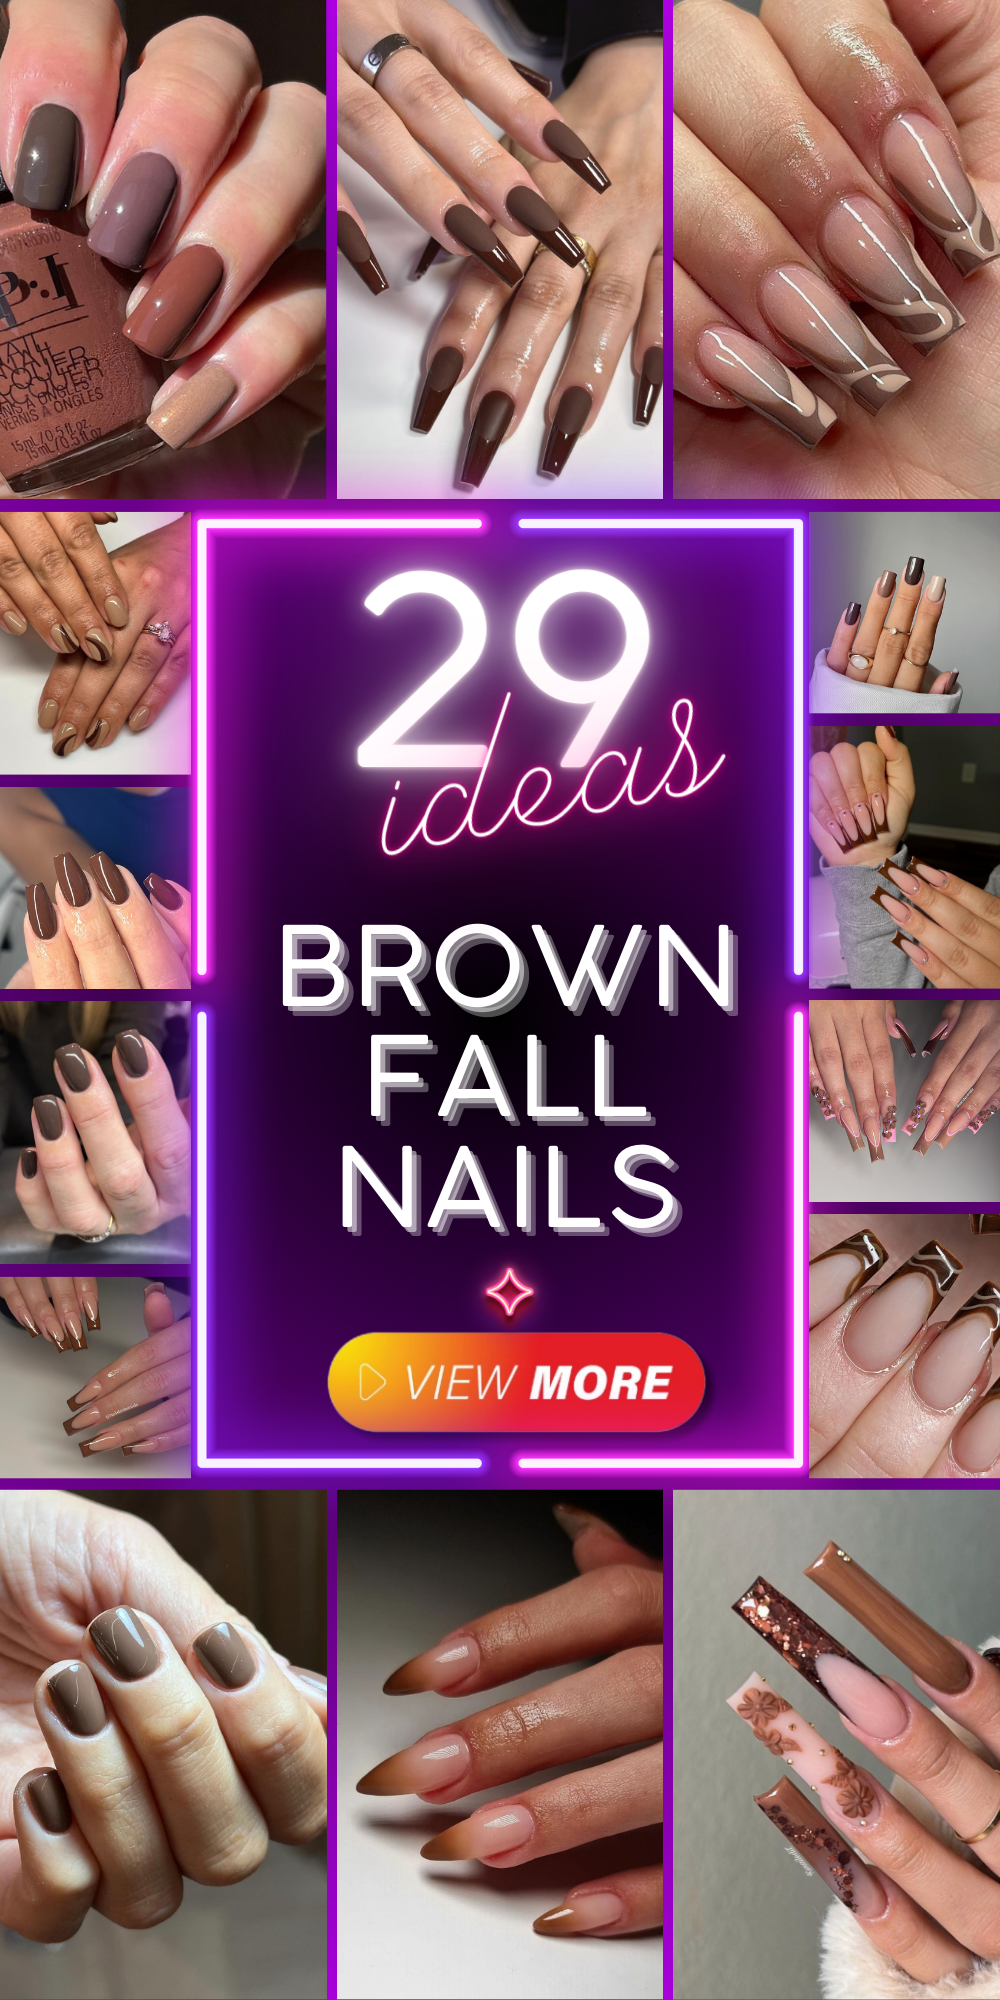
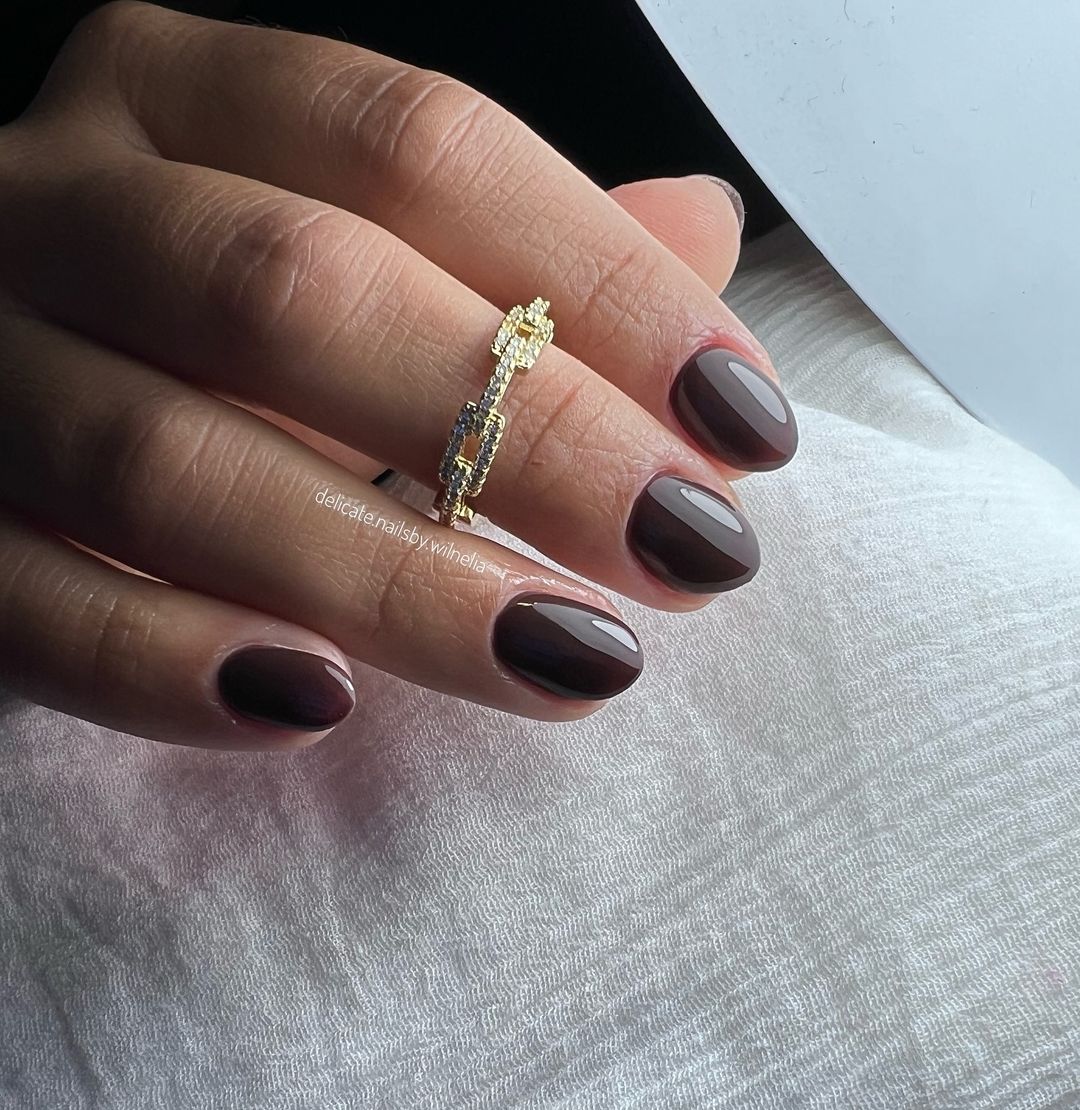
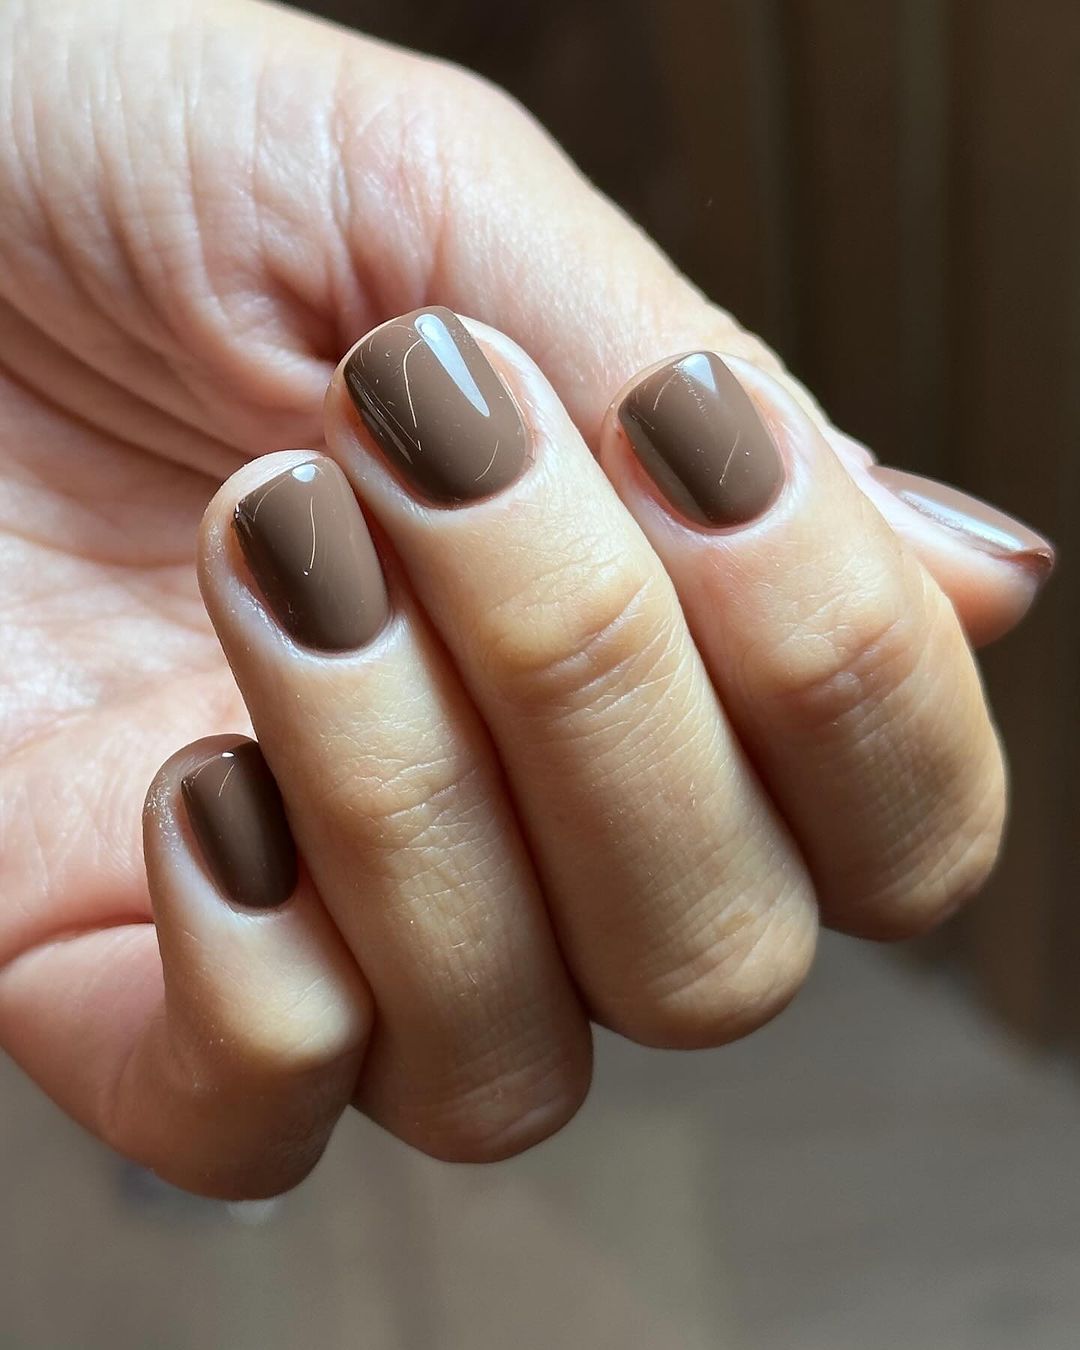
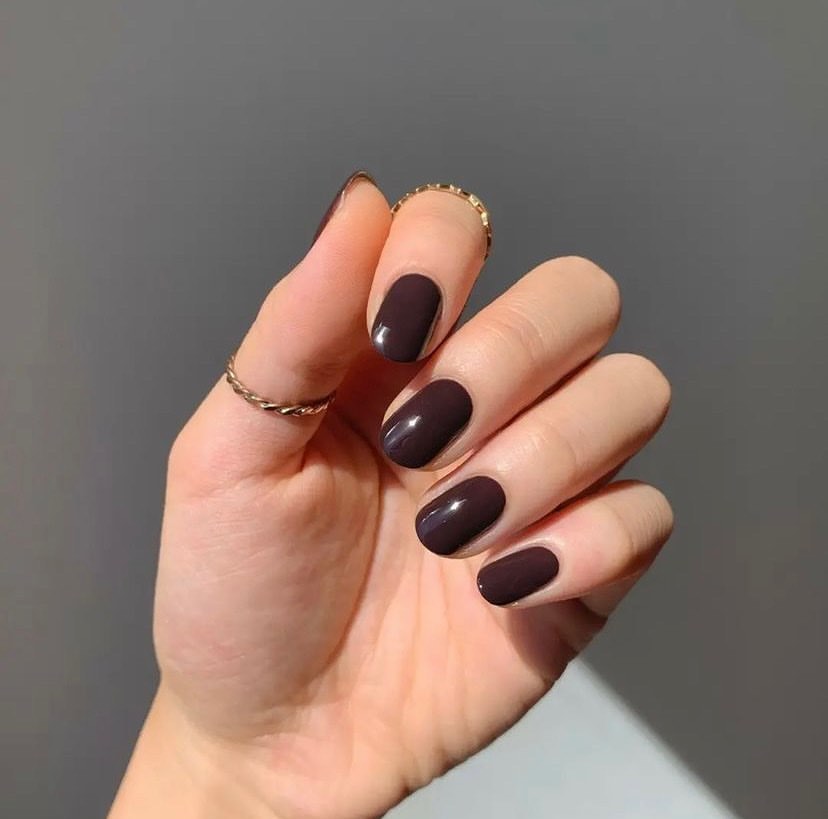
Dark Brown Short Nails
These short nails feature a rich, dark brown polish, creating a simple yet sophisticated look. The glossy finish adds depth and shine, making this design perfect for everyday wear. The dark brown polish on these short nails is both classy and understated. The rich color adds depth, while the glossy finish provides a polished and refined look. This design is perfect for those who prefer a minimalist approach but still want their nails to look elegant and stylish.
-
- Dark brown nail polish (e.g., OPI’s “Lincoln Park After Dark”)
- Glossy top coat (e.g., Seche Vite)
- Base coat (e.g., Zoya Anchor)
- Nail file and buffer
- Cuticle oil (e.g., Burt’s Bees Lemon Butter Cuticle Cream)
DIY Instructions:
-
- Shape your nails into a short square shape using a nail file.
- Apply a base coat to protect your nails.
- Apply two coats of the dark brown polish, allowing each coat to dry fully.
- Finish with a glossy top coat for a high-shine finish.
- Hydrate your cuticles with cuticle oil to keep your nails looking healthy and polished.
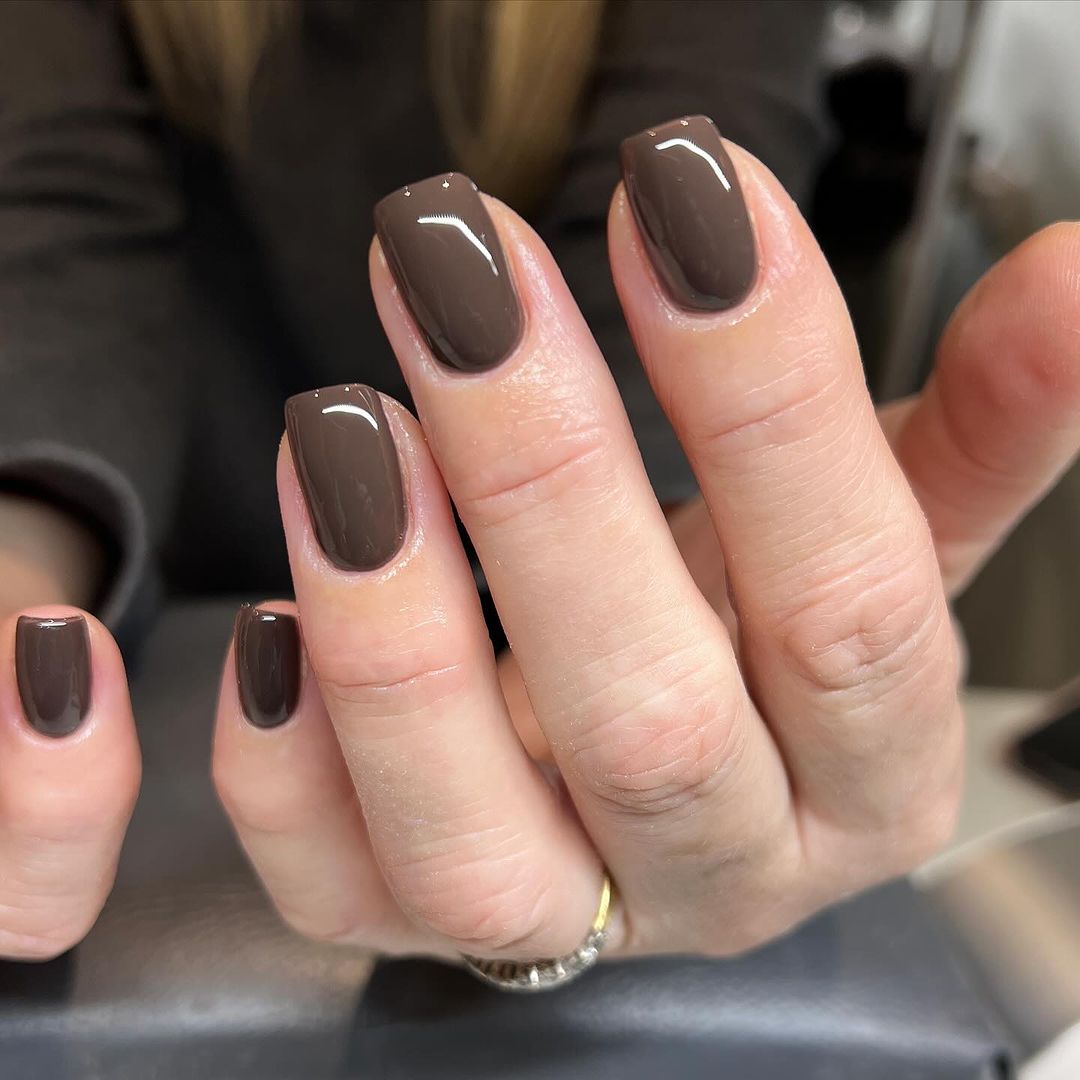
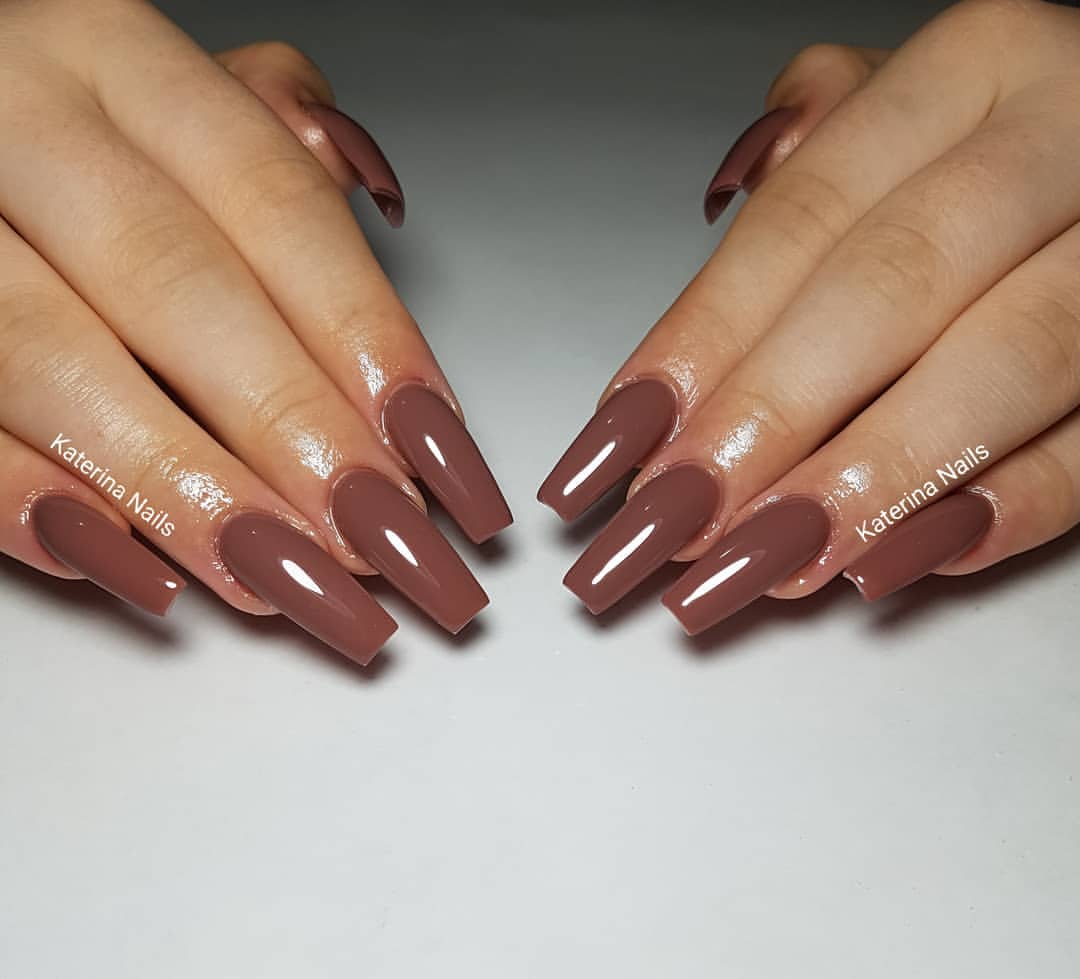
Glossy Brown Short Nails
These nails feature a rich, dark brown polish with a glossy finish, perfect for a sophisticated yet simple look. The short length makes them practical for everyday wear while still looking polished. The dark brown color on these short nails is both elegant and versatile, making it suitable for various occasions. The glossy finish enhances the richness of the color, adding depth and shine. The short length is practical and easy to maintain, providing a chic and polished appearance without the fuss.
-
- Dark brown nail polish (e.g., OPI’s “You Don’t Know Jacques”)
- Glossy top coat (e.g., Seche Vite Dry Fast Top Coat)
- Base coat (e.g., Orly Bonder)
- Nail file and buffer
- Cuticle oil (e.g., Burt’s Bees Lemon Butter Cuticle Cream)
DIY Instructions:
-
- Shape your nails into a short square using a nail file.
- Apply a base coat to protect your nails.
- Apply two coats of the dark brown polish, allowing each coat to dry fully.
- Finish with a glossy top coat for a high-shine finish.
- Hydrate your cuticles with cuticle oil to keep your nails looking healthy and polished.
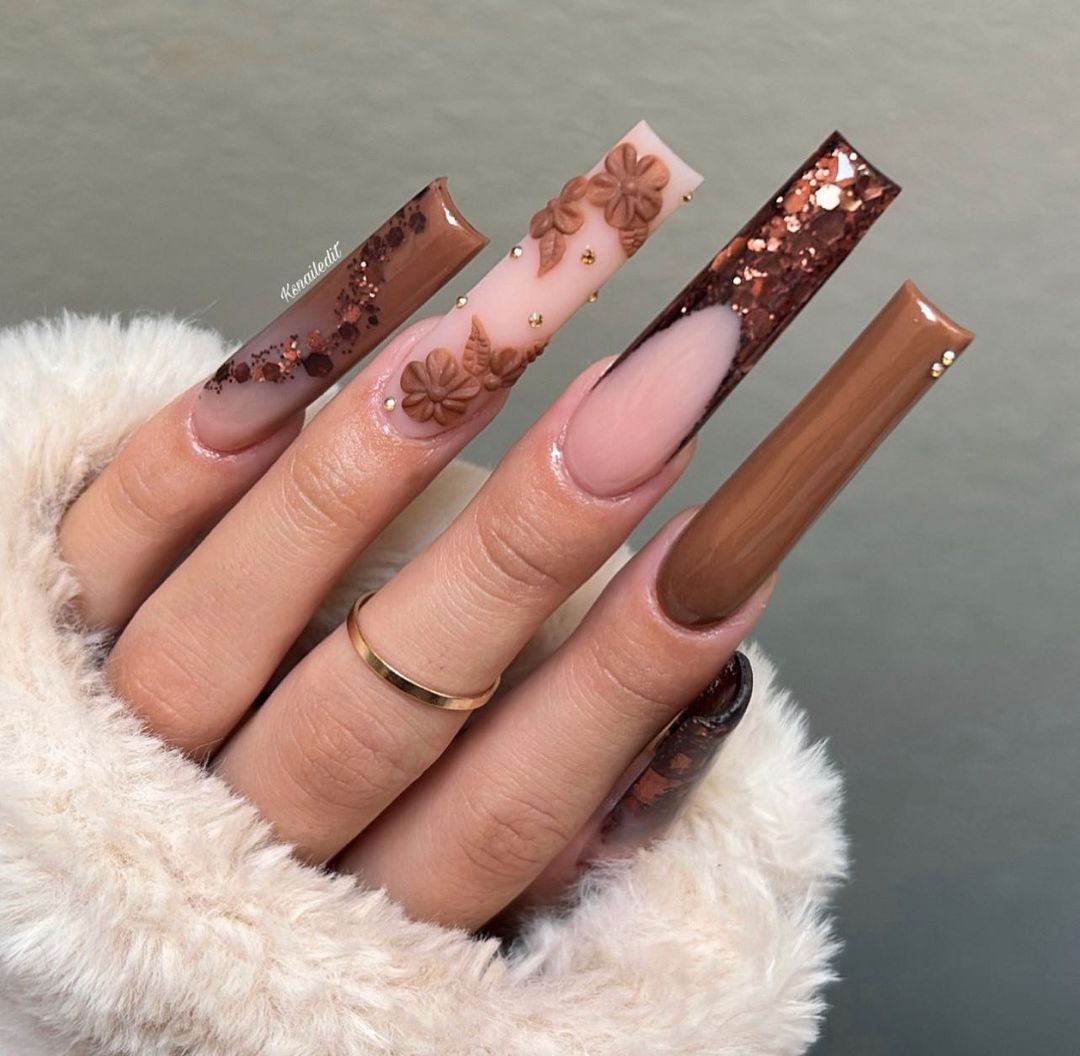
Glittery Brown Floral Nails
This design features a mix of brown shades with glitter and 3D floral accents, creating a stunning and detailed look. The long coffin shape provides ample space for the intricate designs and glitter. The combination of brown shades with glitter and 3D floral accents creates a luxurious and intricate design. The long coffin shape allows for detailed artwork and the use of different textures. The glitter adds a touch of glamour, while the 3D flowers provide depth and interest.
-
- Brown nail polish (e.g., Essie’s “Wicked”)
- Glitter nail polish (e.g., Sally Hansen’s “Big Glitter Top Coat”)
- 3D floral nail art decorations
- Nail glue
- Glossy top coat (e.g., Seche Vite Dry Fast Top Coat)
- Base coat (e.g., Orly Bonder)
- Nail file and buffer
DIY Instructions:
-
- Shape your nails into a long coffin shape using a nail file.
- Apply a base coat to protect your nails.
- Paint your nails with the brown polish and let it dry.
- Apply the glitter polish to selected nails for added sparkle.
- Use nail glue to attach the 3D floral decorations.
- Finish with a glossy top coat to seal and protect the design.
Dark Brown Gel Almond Nails
These nails feature a deep, dark brown gel polish on almond-shaped nails, creating a sleek and sophisticated look. The glossy finish adds a touch of luxury, making them perfect for any occasion. The deep brown color on these almond-shaped nails is both sleek and sophisticated. The glossy gel finish enhances the richness of the color, providing a luxurious look. The almond shape is flattering and elongates the fingers, making this design perfect for both everyday wear and special occasions.
-
- Dark brown gel polish (e.g., CND Shellac in “Fedora”)
- Glossy top coat (e.g., CND Shellac Top Coat)
- Base coat (e.g., CND Shellac Base Coat)
- UV or LED lamp
- Nail file and buffer
DIY Instructions:
-
- Shape your nails into an almond shape using a nail file.
- Apply a base coat and cure it under the UV/LED lamp.
- Apply two coats of the dark brown gel polish, curing each coat under the lamp.
- Finish with a glossy top coat and cure it under the lamp.
- Wipe off any sticky residue with a gel cleanser for a perfect finish.
Multi-Toned Brown Nails
This look features a gradient of brown shades on each nail, creating a cohesive and modern appearance. The varying tones add depth and interest, making this a perfect fall manicure. The gradient design on these nails is a fantastic way to incorporate multiple shades of brown into one cohesive look. The varying tones give the nails a sophisticated and modern appearance. The glossy finish enhances the depth of each color, making this manicure ideal for both day and night.
-
- Various shades of brown nail polish (e.g., OPI’s “Samoan Sand,” “Chocolate Moose,” “Berlin There Done That”)
- Base coat (e.g., Zoya Anchor)
- Top coat (e.g., Essie Gel-Setter)
- Nail file and buffer
- Cuticle oil (e.g., Burt’s Bees Lemon Butter Cuticle Cream)
DIY Instructions:
-
- Shape and buff your nails, then apply a base coat.
- Select your brown shades and paint each nail with a different color, creating a gradient effect.
- Apply two coats of each color for full opacity, allowing each layer to dry.
- Seal with a glossy top coat to enhance the colors.
- Finish with cuticle oil to keep your nails looking healthy and polished.
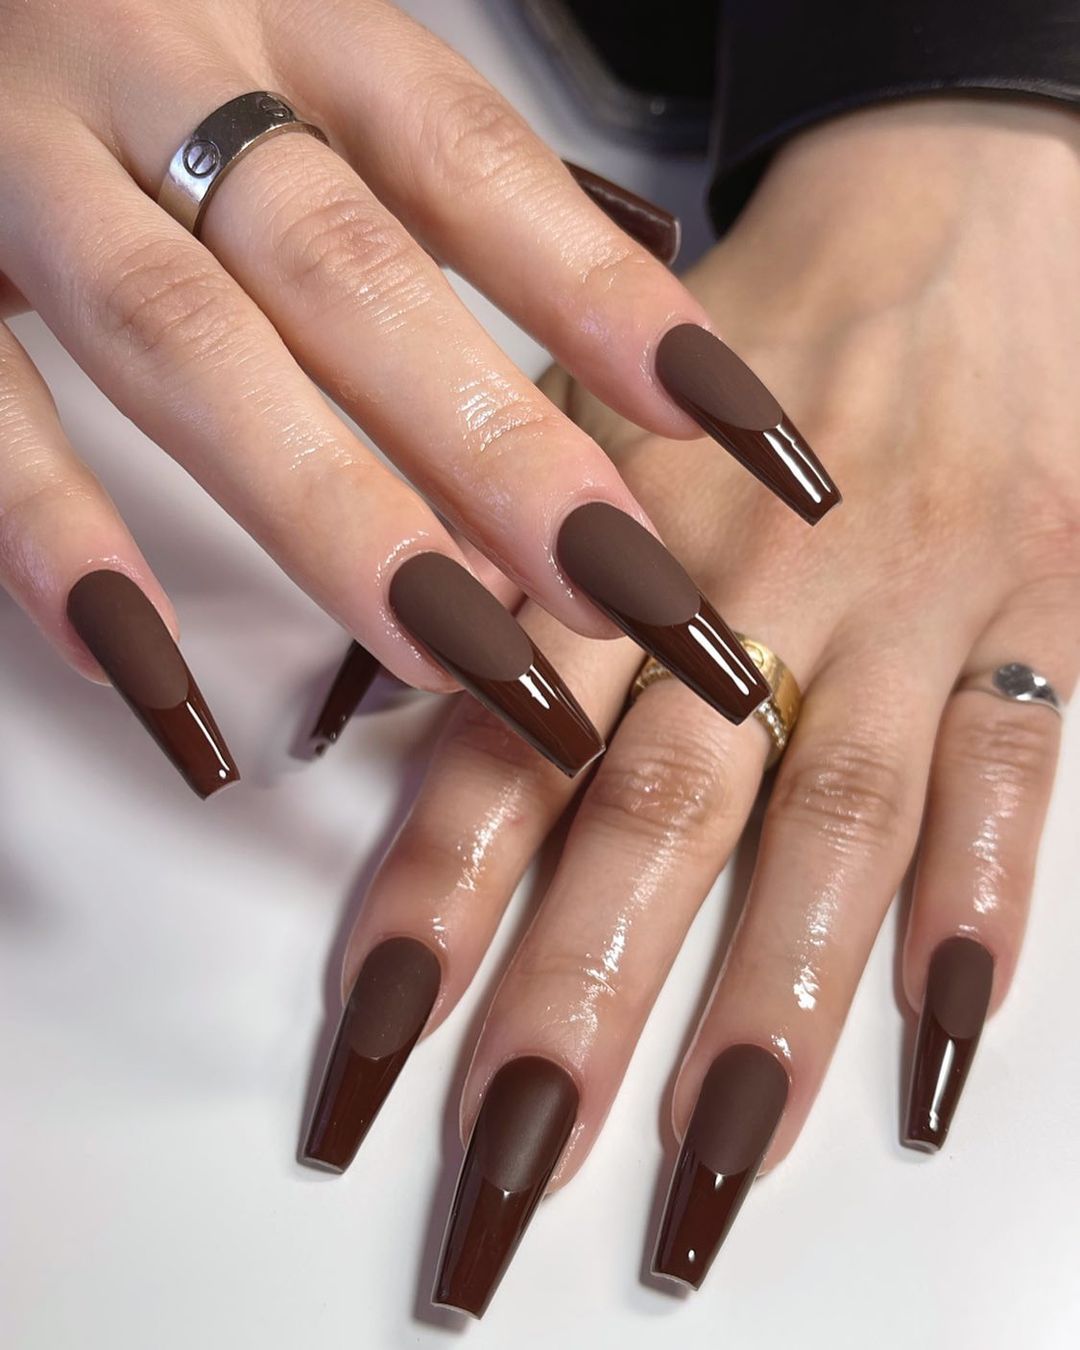
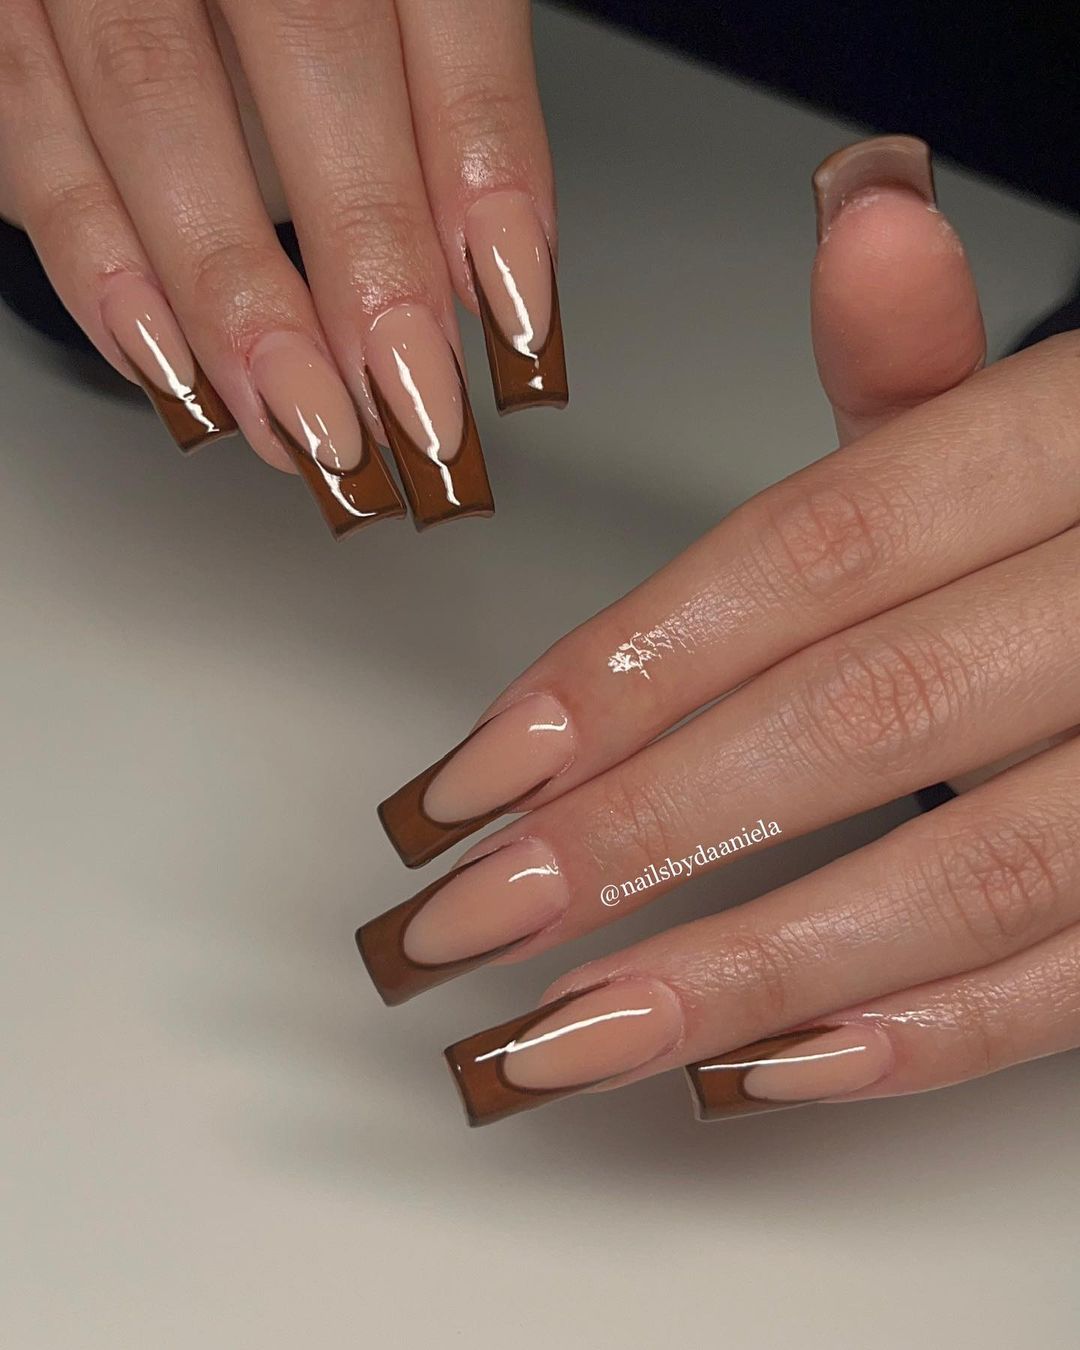
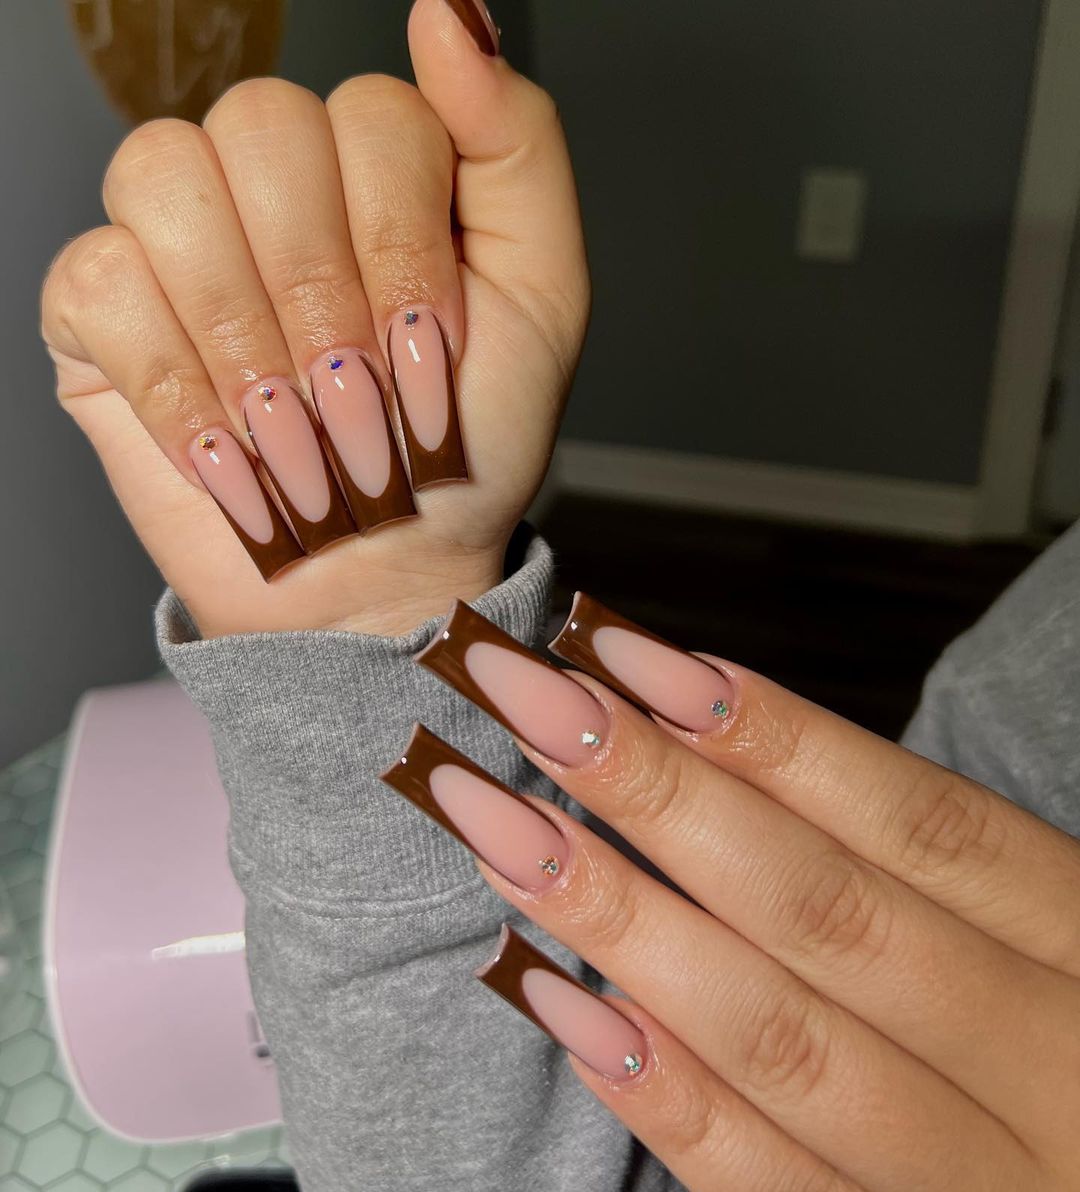
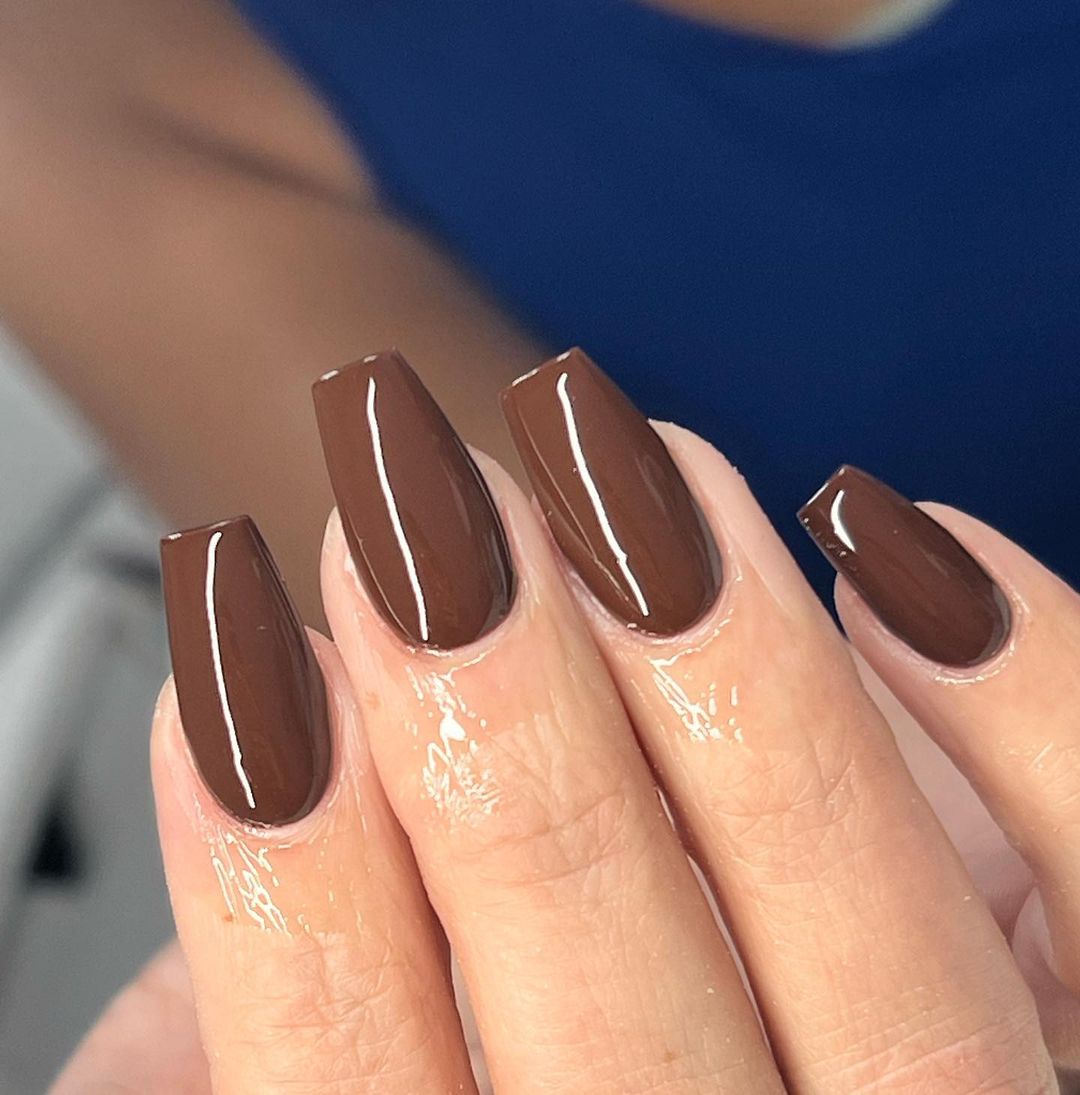
Glossy Brown Coffin Nails
These nails feature a rich, brown polish with a glossy finish on a long coffin shape, perfect for a sophisticated and bold look. The glossy finish adds depth and shine, making this design stand out. The rich brown color on these coffin-shaped nails is both bold and sophisticated. The glossy finish adds a luxurious touch, making the nails look polished and refined. The long coffin shape is ideal for those who want to make a statement with their manicure.
-
- Brown nail polish (e.g., Essie’s “Mink Muffs”)
- Glossy top coat (e.g., Seche Vite Dry Fast Top Coat)
- Base coat (e.g., Orly Bonder)
- Nail file and buffer
- Cuticle oil (e.g., Burt’s Bees Lemon Butter Cuticle Cream)
DIY Instructions:
-
- Shape your nails into a long coffin shape using a nail file.
- Apply a base coat to protect your nails.
- Apply two coats of the brown polish, allowing each coat to dry fully.
- Finish with a glossy top coat for a high-shine finish.
- Hydrate your cuticles with cuticle oil to keep your nails looking healthy and polished.
Nude and Brown Swirl Nails
This design features a nude base with intricate brown swirls, creating a modern and sophisticated look. The glossy finish adds a touch of elegance, making this design perfect for any occasion. The combination of nude and brown with intricate swirl patterns creates a sophisticated and eye-catching design. The long coffin shape provides ample space for the detailed artwork, while the glossy finish enhances the overall elegance. This design is perfect for those who appreciate detailed nail art and want a refined look.
-
- Nude nail polish (e.g., Essie’s “Topless & Barefoot”)
- Brown nail polish (e.g., OPI’s “Berlin There Done That”)
- Nail art brushes
- Glossy top coat (e.g., Seche Vite)
- Base coat (e.g., Deborah Lippmann’s “Hard Rock”)
- Nail file and buffer
DIY Instructions:
-
- Shape your nails into a long coffin shape.
- Apply a base coat to protect your nails.
- Paint the base of your nails with the nude polish and let it dry.
- Use the brown polish and nail art brushes to create intricate swirl patterns.
- Seal the design with a glossy top coat to ensure longevity and shine.
Abstract Brown and Nude Swirl Nails
This design features an abstract swirl pattern in shades of brown and nude, creating a visually dynamic and sophisticated look. The glossy finish enhances the intricate details, making this a standout manicure. The abstract swirl design on these nude and brown nails is both trendy and elegant. The combination of multiple brown shades with a nude base creates a harmonious yet striking contrast. The glossy finish adds depth and a polished touch, making this design perfect for those who appreciate detailed nail art.
-
- Nude nail polish (e.g., Essie’s “Topless & Barefoot”)
- Light brown nail polish (e.g., OPI’s “Berlin There Done That”)
- Dark brown nail polish (e.g., Essie’s “Wicked”)
- Nail art brushes
- Glossy top coat (e.g., Seche Vite)
- Base coat (e.g., Deborah Lippmann’s “Hard Rock”)
- Nail file and buffer
DIY Instructions:
-
- Shape your nails into a square shape.
- Apply a base coat to protect your nails.
- Paint the base of your nails with the nude polish and let it dry.
- Use nail art brushes to create swirl patterns with the light and dark brown polishes.
- Seal the design with a glossy top coat to ensure longevity and shine.
Glossy Brown Coffin Nails
These nails feature a rich, brown polish with a glossy finish on a long coffin shape, perfect for a sophisticated and bold look. The glossy finish adds depth and shine, making this design stand out. The rich brown color on these coffin-shaped nails is both bold and sophisticated. The glossy finish adds a luxurious touch, making the nails look polished and refined. The long coffin shape is ideal for those who want to make a statement with their manicure.
-
- Brown nail polish (e.g., Essie’s “Mink Muffs”)
- Glossy top coat (e.g., Seche Vite Dry Fast Top Coat)
- Base coat (e.g., Orly Bonder)
- Nail file and buffer
- Cuticle oil (e.g., Burt’s Bees Lemon Butter Cuticle Cream)
DIY Instructions:
-
- Shape your nails into a long coffin shape using a nail file.
- Apply a base coat to protect your nails.
- Apply two coats of the brown polish, allowing each coat to dry fully.
- Finish with a glossy top coat for a high-shine finish.
- Hydrate your cuticles with cuticle oil to keep your nails looking healthy and polished.
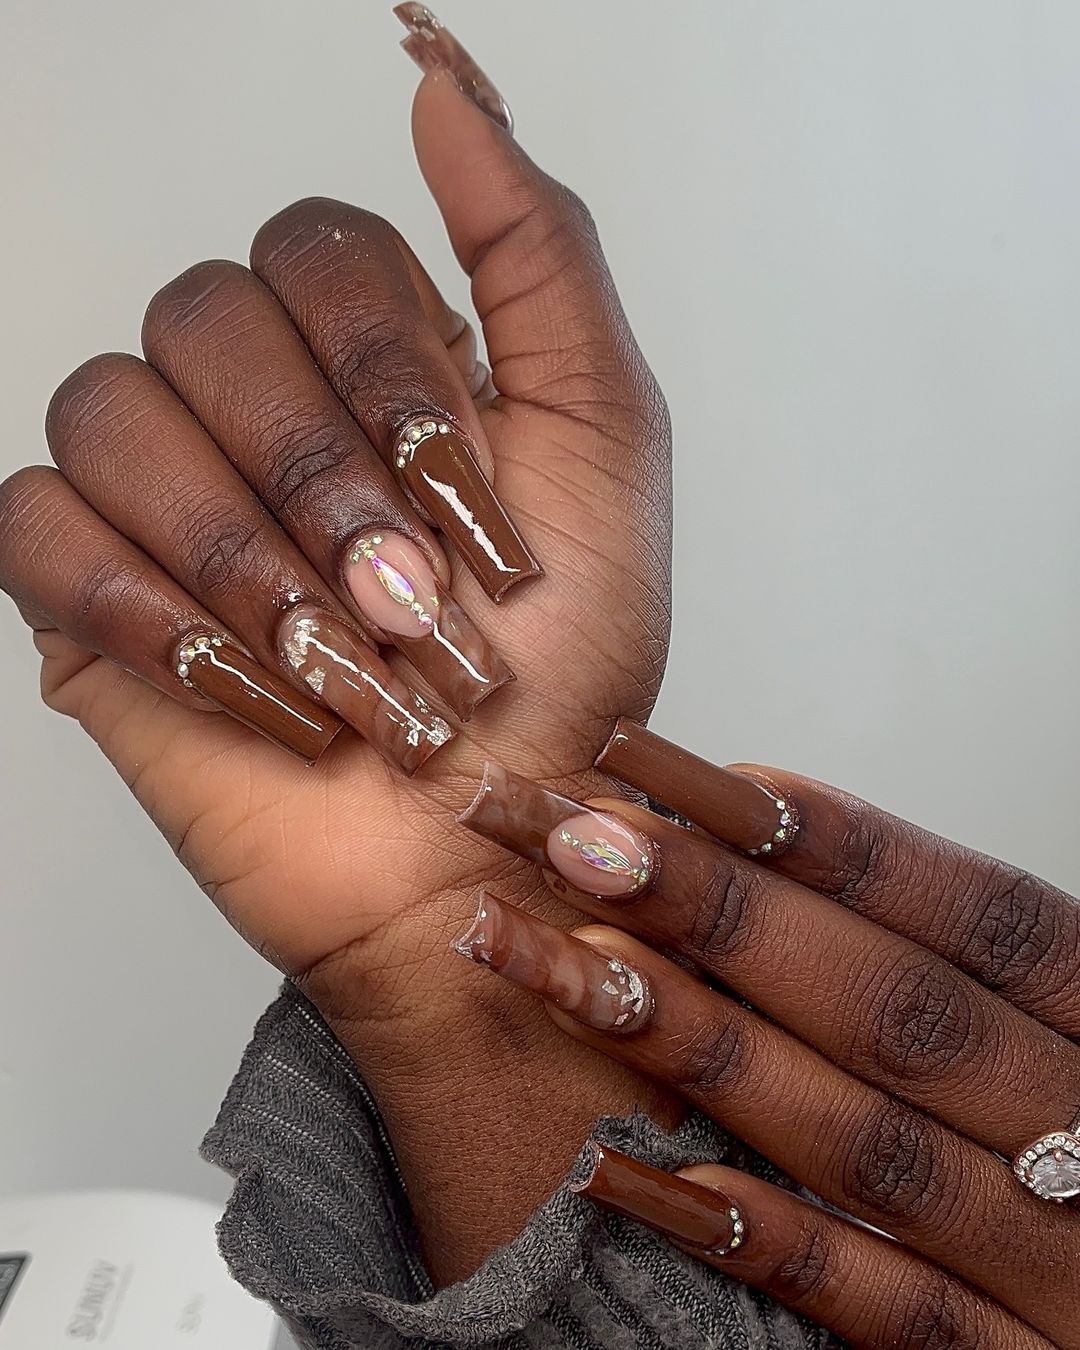
Brown Coffin Nails with Rhinestones
This design features a rich brown base with glossy rhinestones, creating a luxurious and glamorous look. The long coffin shape provides a perfect canvas for the rhinestone accents. The combination of a rich brown base with glossy rhinestones creates a luxurious and glamorous look. The rhinestones add a touch of bling, making this design perfect for special occasions. The long coffin shape is ideal for showcasing the sparkling accents and adds elegance to the overall look.
-
- Brown nail polish (e.g., OPI’s “Icelanded a Bottle of OPI”)
- Rhinestones (e.g., Swarovski crystals)
- Nail glue
- Glossy top coat (e.g., Seche Vite Dry Fast Top Coat)
- Base coat (e.g., Orly Bonder)
- Nail file and buffer
DIY Instructions:
-
- Shape your nails into a long coffin shape using a nail file.
- Apply a base coat to protect your nails.
- Paint your nails with the brown polish and let it dry.
- Use nail glue to attach the rhinestones strategically on the nails.
- Finish with a glossy top coat to seal and protect the design.
Brown and Nude French Tip Nails
This design features a modern twist on the classic French tip, using a combination of brown and nude shades. The glossy finish and precise lines make this look sophisticated and elegant. The brown and nude French tips on these nails offer a chic and contemporary take on a timeless design. The rich brown tips contrast beautifully with the nude base, creating an elegant and refined look. The glossy finish adds a polished touch, perfect for both casual and formal occasions.
-
- Nude base polish (e.g., Essie’s “Ballet Slippers”)
- Brown polish for tips (e.g., OPI’s “Chocolate Moose”)
- Glossy top coat (e.g., Seche Vite Dry Fast Top Coat)
- Base coat (e.g., Orly Bonder)
- Nail file and buffer
- Striping tape or French tip guides
DIY Instructions:
-
- Shape your nails into a long coffin shape using a nail file.
- Apply a base coat to protect your nails.
- Paint the base of your nails with the nude polish and let it dry.
- Use striping tape or French tip guides to create clean lines for the brown tips.
- Paint the tips with the brown polish and remove the guides carefully.
- Finish with a glossy top coat to seal and protect the design.
Brown Glitter and Rhinestone Nails
These nails feature a blend of brown shades with glitter and rhinestone accents, creating a stunning and luxurious look. The long coffin shape provides ample space for the detailed designs and sparkling elements. The mix of brown shades with glitter and rhinestones creates a luxurious and eye-catching design. The glitter adds a touch of glamour, while the rhinestones provide a sparkling accent. The long coffin shape is perfect for showcasing the detailed artwork and adding elegance to the overall look.
-
- Brown nail polish (e.g., Essie’s “Wicked”)
- Glitter nail polish (e.g., Sally Hansen’s “Big Glitter Top Coat”)
- Rhinestones (e.g., Swarovski crystals)
- Nail glue
- Glossy top coat (e.g., Seche Vite Dry Fast Top Coat)
- Base coat (e.g., Orly Bonder)
- Nail file and buffer
DIY Instructions:
-
- Shape your nails into a long coffin shape using a nail file.
- Apply a base coat to protect your nails.
- Paint your nails with the brown polish and let it dry.
- Apply the glitter polish to selected nails for added sparkle.
- Use nail glue to attach the rhinestones.
- Finish with a glossy top coat to seal and protect the design.
FAQ
Q: How can I make my brown fall nails last longer? A: To extend the life of your manicure, always use a high-quality base and top coat. Avoid using your nails as tools and wear gloves when doing chores.
Q: What nail shape works best for brown fall nails? A: Brown fall nails look great on any shape, but almond and square shapes are particularly flattering and trendy.
Q: Can I create these designs with gel polish? A: Absolutely! Gel polish is a great option for long-lasting manicures and can be used to create any of these designs.
Q: How do I remove rhinestones without damaging my nails? A: Soak your nails in warm, soapy water for a few minutes to loosen the glue, then gently lift the rhinestones with an orange stick.
With these stunning brown fall nail ideas, you’re sure to find a look that suits your style and taste. Whether you prefer classic simplicity or bold bling, there’s a design here for everyone. Happy painting!
Save Pin