Fall is here, and it’s the perfect time to revamp your nail game with some fabulous coffin nails. If you’re wondering what makes fall coffin nails so special and how you can achieve these stunning looks at home, you’re in the right place. In this guide, we’ll dive into various designs, ideas, and provide detailed descriptions of some stunning nail art to inspire your next manicure.
Modern Fall Chic
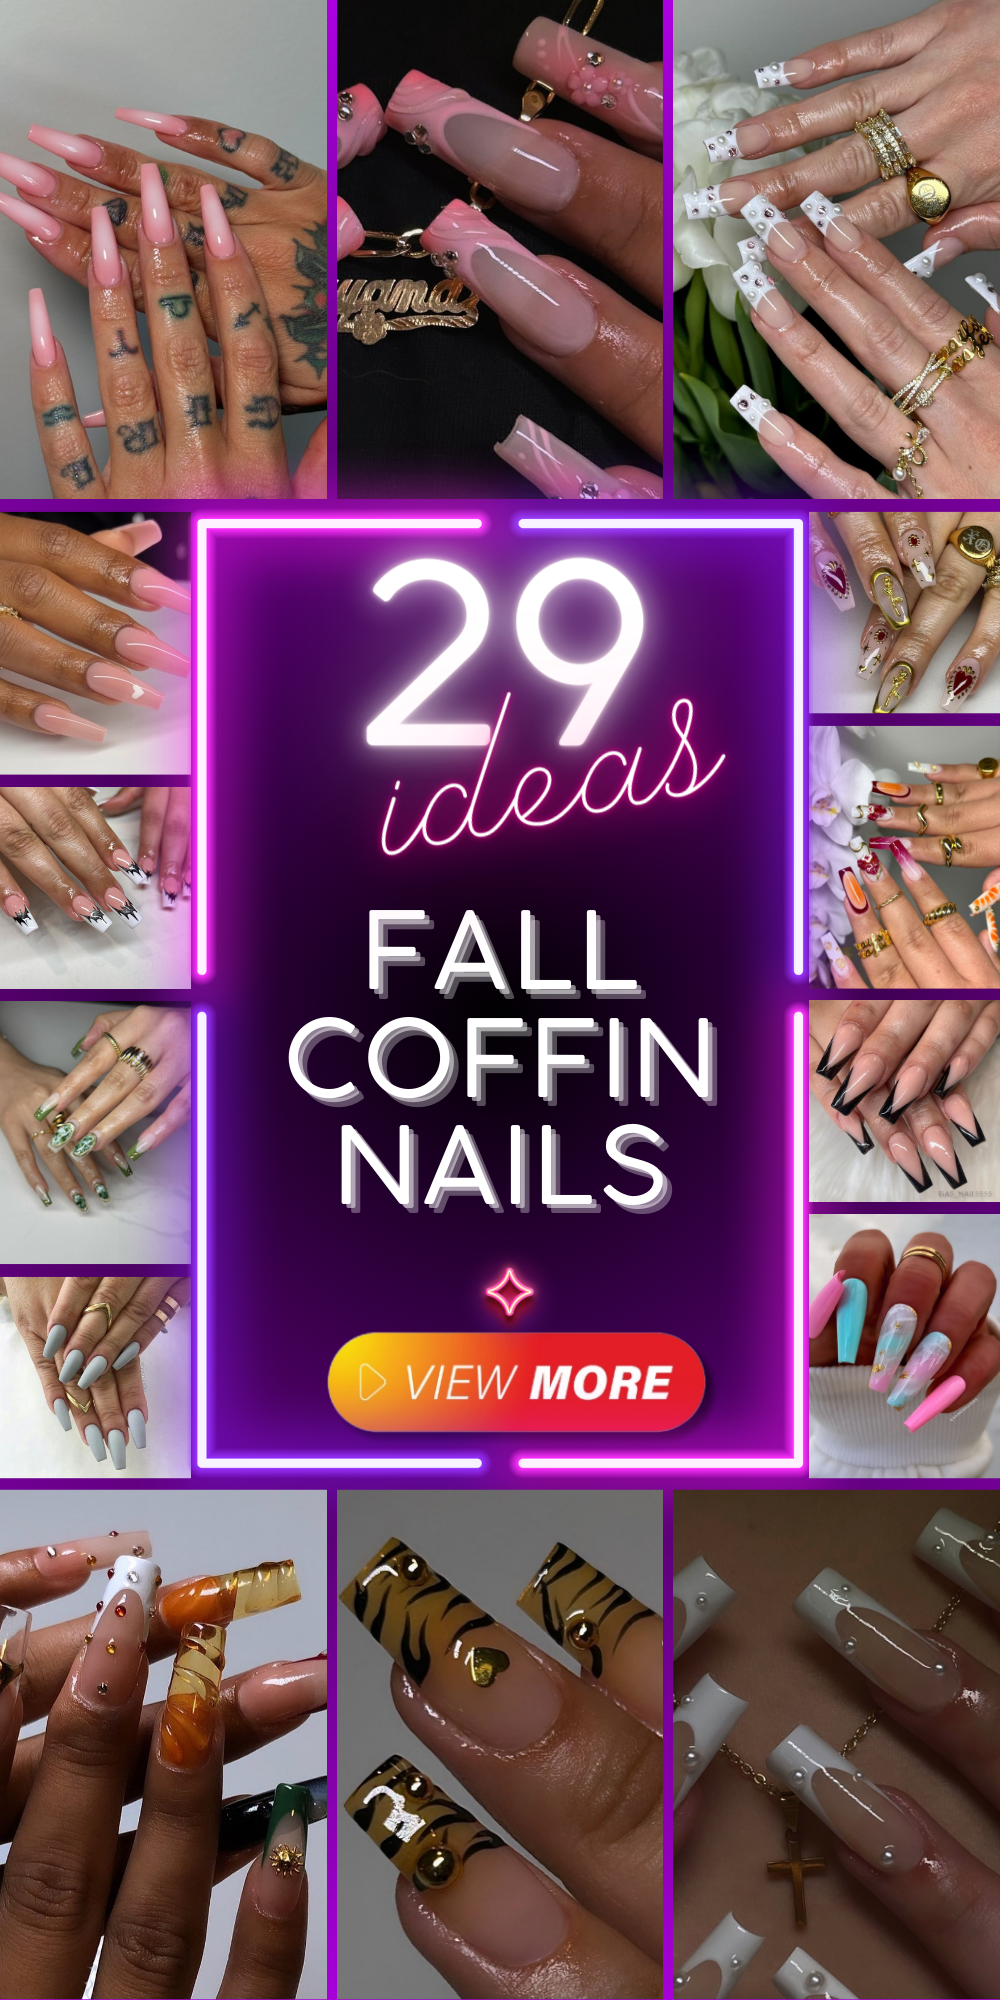
This set of nails is a perfect example of modern fall chic. The nails are long, coffin-shaped, and feature a sophisticated mix of brown tones and designs. The index finger showcases a trendy checkerboard pattern in brown and white, while the middle finger flaunts a stylish smiley face design on a brown base. The ring finger has an elegant abstract swirl pattern, and the pinky finger is adorned with small white hearts on a nude base. The thumb brings it all together with a beautiful brown floral design on a nude background.
- Brown and white gel polishes (e.g., OPI GelColor in Taupe-less Beach and Alpine Snow)
- Nude gel polish (e.g., Essie Gel Couture in Fairy Tailor)
- Fine detail brush (e.g., PANA Nail Art Brush)
- Smiley face stickers or decals
- Top coat for sealing the design (e.g., Seche Vite Dry Fast Top Coat)
- Nail file and buffer for shaping
DIY Instructions
- Preparation: Begin by filing your nails into the coffin shape and buffing the surface.
- Base Coat: Apply a base coat to protect your natural nails.
- Base Colors: Paint each nail with the appropriate base color (brown, white, or nude) and cure under a UV lamp.
- Design: Using a fine detail brush, create the checkerboard pattern on the index finger, the smiley face on the middle finger, the abstract swirl on the ring finger, and the hearts on the pinky. Apply floral decals or paint a floral design on the thumb.
- Top Coat: Seal your design with a top coat and cure under a UV lamp.
Golden Elegance
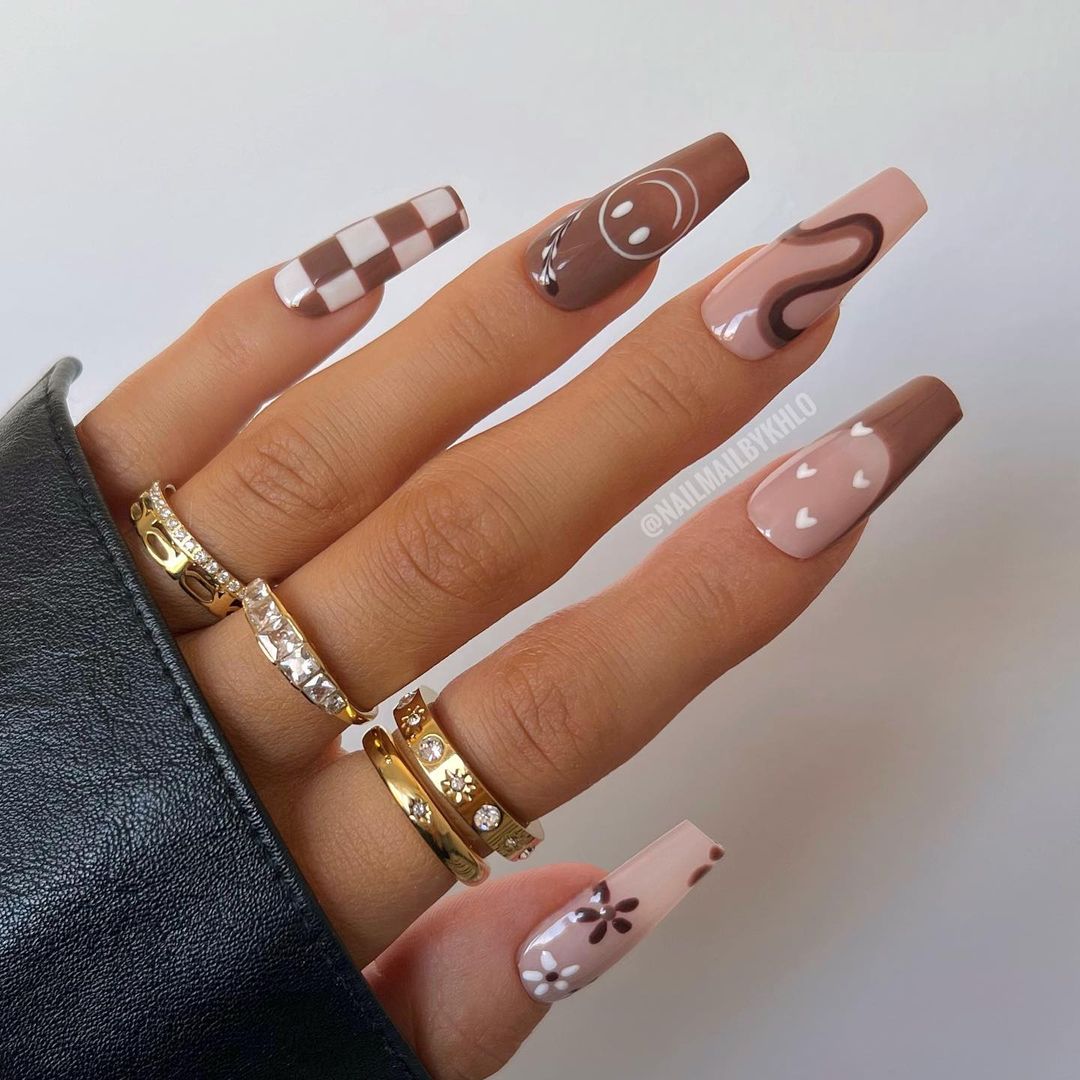
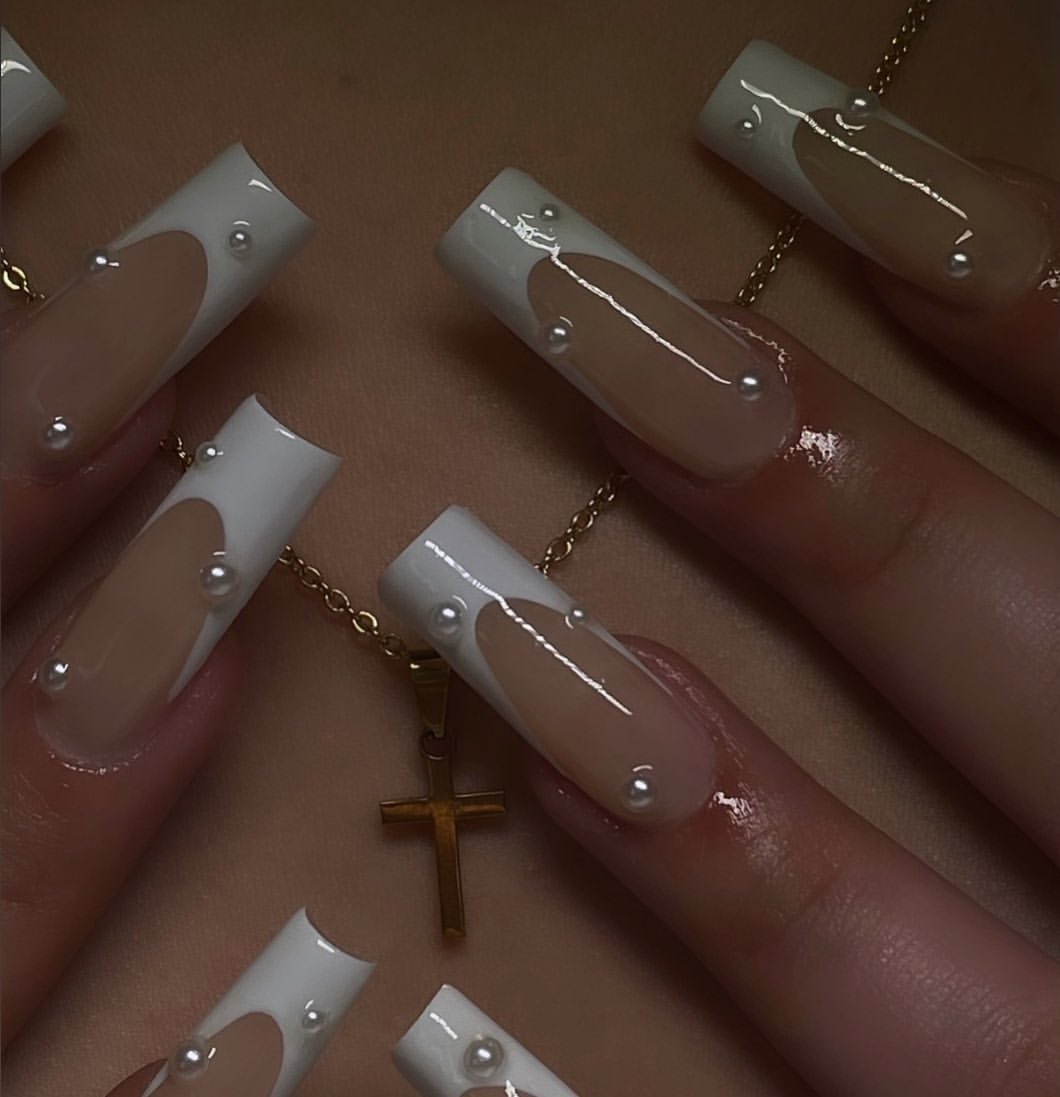
This nail design exudes elegance and sophistication, perfect for those who love a touch of luxury in their manicure. The nails are long and coffin-shaped, featuring a combination of white and gold accents. The index finger is decorated with a gold cross and tiny gemstones, while the middle and ring fingers have intricate gold leaf patterns on a nude base. The pinky and thumb nails showcase a stunning gold swirl design, adding a touch of glamour to the overall look.
- Nude and white gel polishes (e.g., Essie Gel Couture in Fairy Tailor and OPI GelColor in Alpine Snow)
- Gold leaf foil (e.g., Daily Charme Gold Foil)
- Gold cross stickers or decals
- Tiny gemstones or rhinestones (e.g., Swarovski Flat Back Crystals)
- Fine detail brush (e.g., Beetles Nail Art Brushes)
- Top coat for sealing the design (e.g., Sally Hansen Miracle Gel Top Coat)
DIY Instructions
- Preparation: Shape your nails into the coffin shape and buff the surface.
- Base Coat: Apply a base coat and cure under a UV lamp.
- Base Colors: Paint each nail with the nude and white gel polishes and cure under a UV lamp.
- Design: Use a fine detail brush to apply gold leaf patterns on the middle and ring fingers. Apply gold cross decals on the index finger and place tiny gemstones around it. Create gold swirl designs on the pinky and thumb.
- Top Coat: Apply a top coat to seal the designs and cure under a UV lamp.
Glamorous Gold Accents
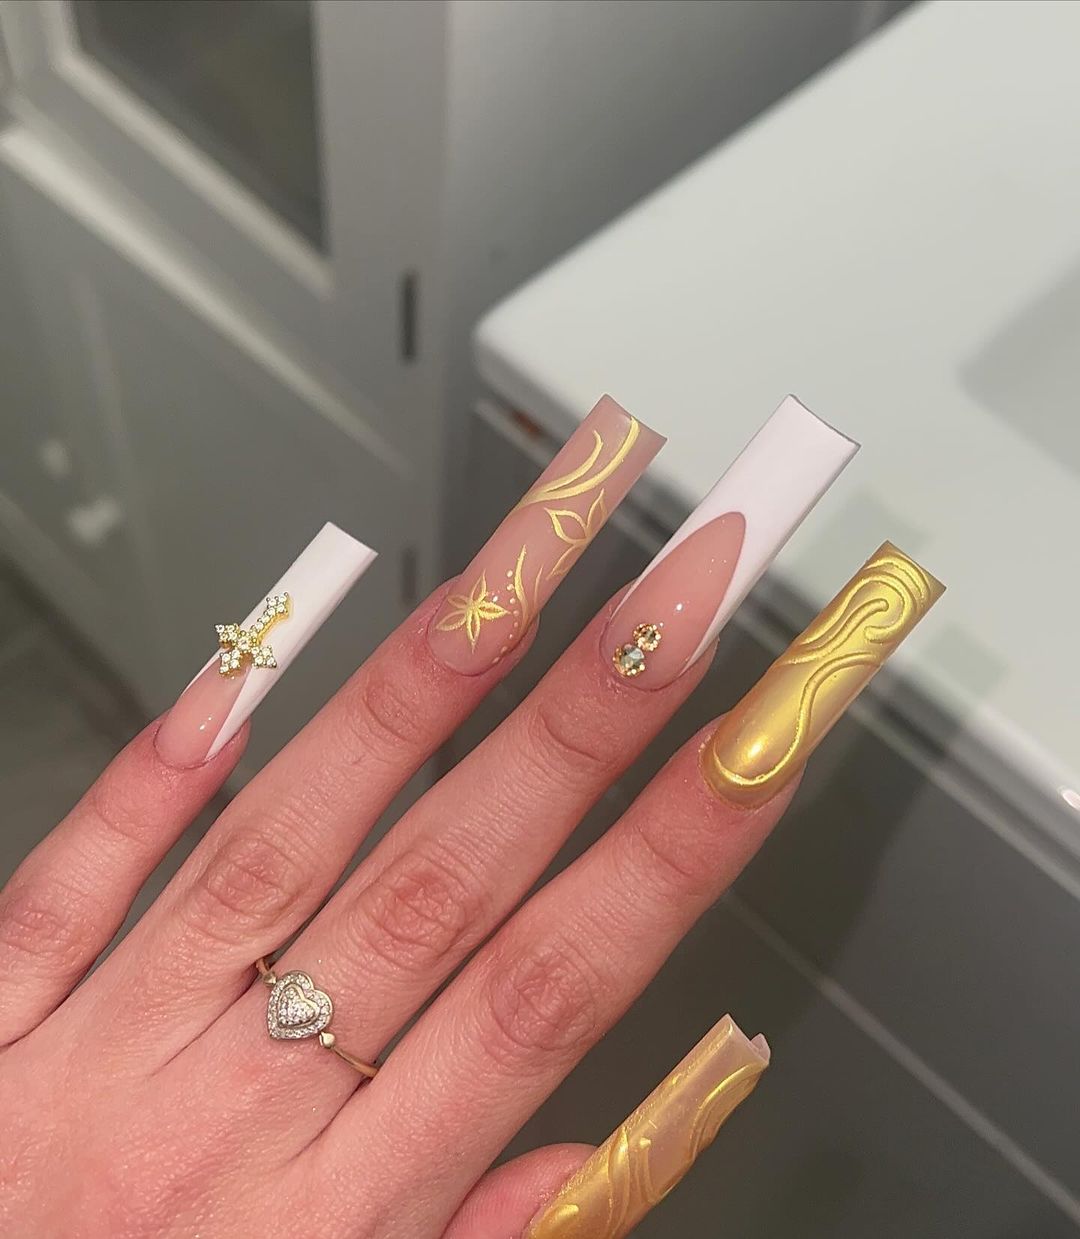
This nail design is all about glamour and opulence. The nails are long, coffin-shaped, and feature a luxurious mix of nude and gold. Each nail is adorned with gold accents, including sun and star charms, as well as gold outlines that create a striking contrast against the nude base. This design is perfect for those who want to make a statement with their nails.
- Nude gel polish (e.g., OPI GelColor in Bubble Bath)
- Gold charms (e.g., Daily Charme Gold Sun and Star Charms)
- Gold nail tape or striping tape (e.g., VAGA Gold Striping Tape)
- Top coat for sealing the design (e.g., CND Vinylux Long Wear Top Coat)
- Nail file and buffer for shaping
DIY Instructions
- Preparation: File your nails into the coffin shape and buff the surface.
- Base Coat: Apply a base coat to protect your natural nails.
- Base Color: Paint your nails with the nude gel polish and cure under a UV lamp.
- Design: Place the gold charms on the nails and use gold striping tape to create outlines and accents. Secure the charms and tape with a little nail glue if needed.
- Top Coat: Seal the design with a top coat and cure under a UV lamp.
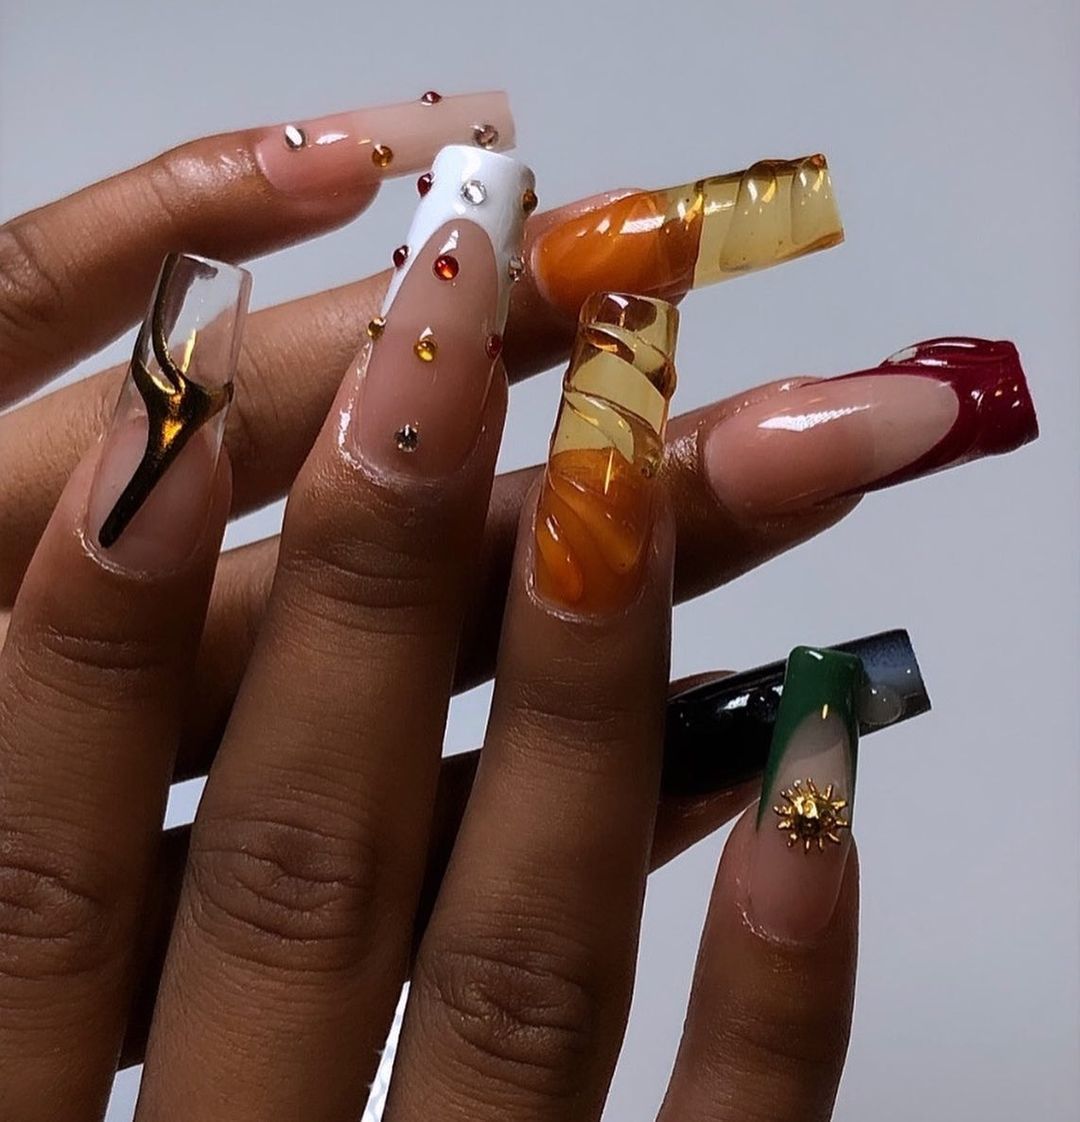
Vivid Fall Vibes
This nail design captures the vibrant essence of fall with a striking combination of bright colors and unique textures. The nails are long and coffin-shaped, featuring an eye-catching blend of orange, yellow, and blue. The index and pinky fingers display an abstract pattern of orange and blue, while the middle finger stands out with a bold, metallic, twisted design. The ring finger showcases a smooth gradient from yellow to orange, adding a warm, autumnal touch. The thumb nail completes the look with a glossy finish and delicate droplets for added texture.
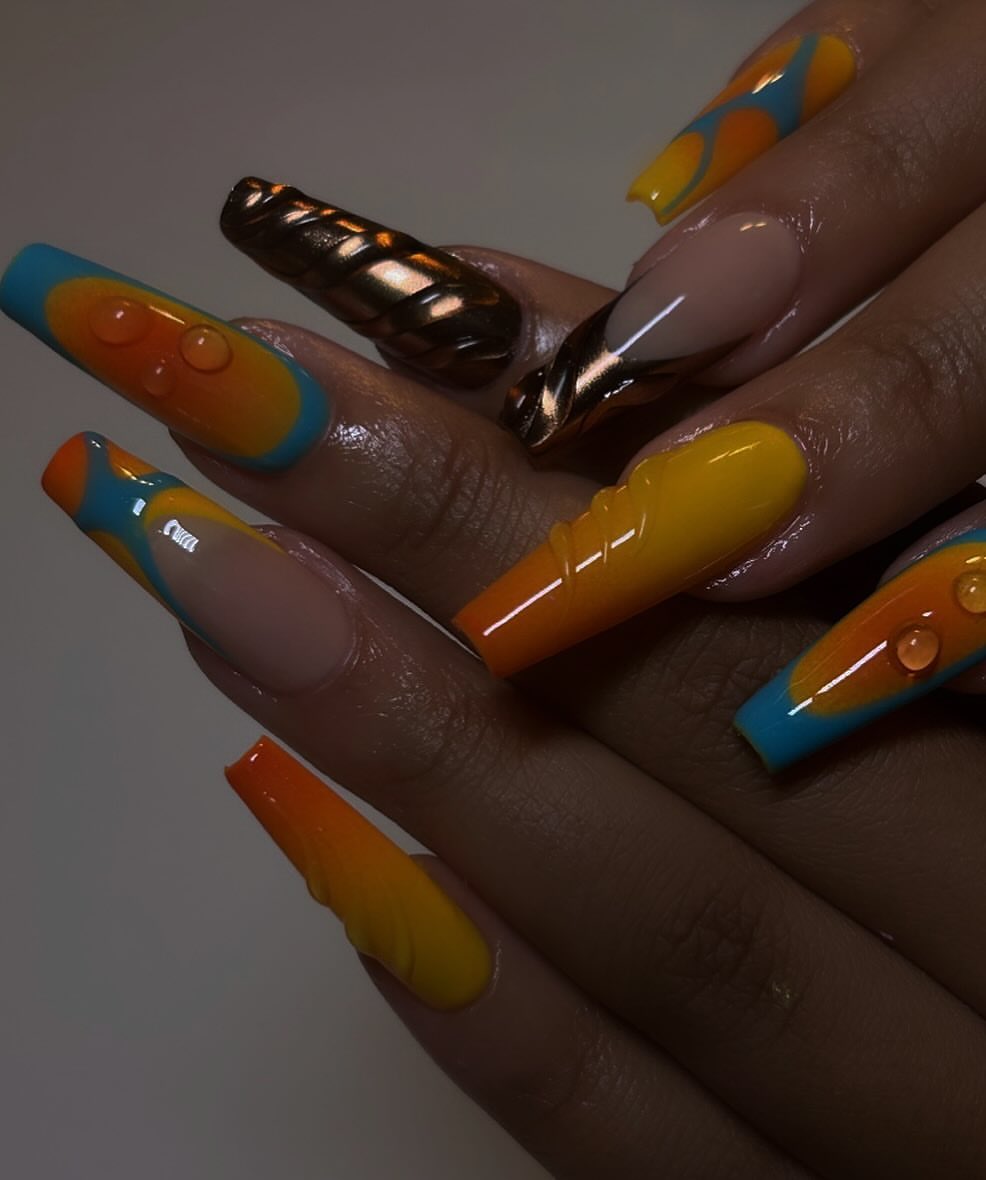
- Orange, yellow, and blue gel polishes (e.g., Gelish in Orange Cream Dream, Sally Hansen in Mellow Yellow, and Essie in Butler Please)
- Metallic gel polish for the twisted design (e.g., OPI GelColor in Chrome For It)
- Fine detail brush (e.g., PANA Nail Art Brush)
- Gradient sponge for smooth transitions
- Droplet effect gel or clear top coat for the thumb (e.g., CND Vinylux Long Wear Top Coat)
- Nail file and buffer for shaping
DIY Instructions
- Preparation: Start by filing your nails into the coffin shape and buffing the surface.
- Base Coat: Apply a base coat to protect your natural nails and cure under a UV lamp.
- Base Colors: Apply the orange, yellow, and blue gel polishes to the respective nails and cure under a UV lamp.
- Design: Use a fine detail brush to create the abstract patterns on the index and pinky fingers. Apply the metallic polish to the middle finger and use a twisting technique for texture. Create a gradient effect on the ring finger using a sponge. Add clear gel droplets to the thumb for a textured finish.
- Top Coat: Seal the design with a top coat and cure under a UV lamp.
Save Pin
Starry Night Elegance
This design exudes elegance and mystery, perfect for a sophisticated fall look. The nails are medium-length coffin-shaped, featuring a dramatic black and white color scheme. Each nail has a glossy black French tip adorned with delicate white lines and dots, creating a starry night effect. Silver star charms and small rhinestones add a touch of sparkle, making the nails stand out.
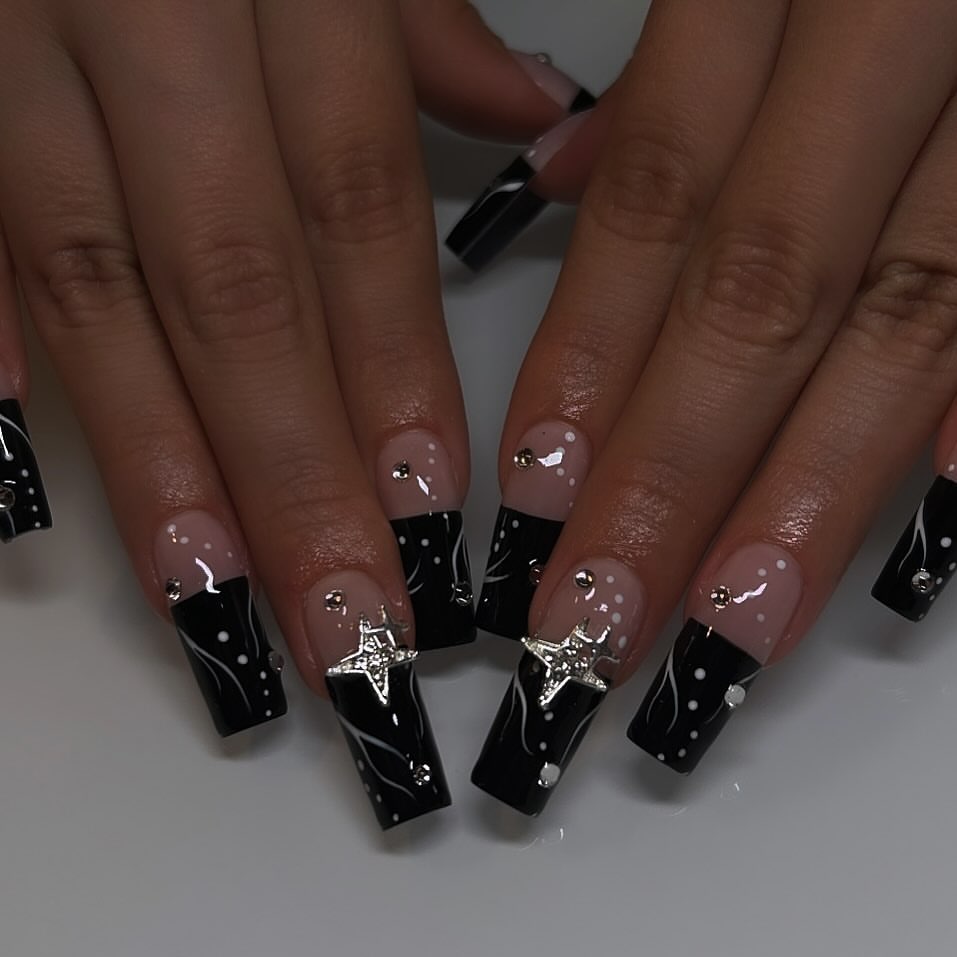
- Black and white gel polishes (e.g., Gelish in Black Shadow and OPI in Alpine Snow)
- Silver star charms (e.g., Daily Charme Silver Star Charms)
- Small rhinestones or crystals (e.g., Swarovski Flat Back Crystals)
- Fine detail brush for intricate designs (e.g., Beetles Nail Art Brushes)
- Top coat for sealing the design (e.g., Seche Vite Dry Fast Top Coat)
- Nail file and buffer for shaping
DIY Instructions
- Preparation: File your nails into the coffin shape and buff the surface.
- Base Coat: Apply a base coat and cure under a UV lamp.
- Base Colors: Paint each nail with the black and white gel polishes and cure under a UV lamp.
- Design: Use a fine detail brush to create the white lines and dots on the black tips, mimicking a starry night. Place the silver star charms and rhinestones strategically on each nail.
- Top Coat: Seal the design with a top coat and cure under a UV lamp.
Pink Perfection
This nail design is all about soft femininity and elegance. The long coffin-shaped nails feature a beautiful gradient of soft pink hues. The nails are decorated with intricate pink swirls and small rhinestones, adding a touch of sparkle and sophistication. The pinky and thumb nails are adorned with delicate pink flowers, creating a cohesive and charming look.
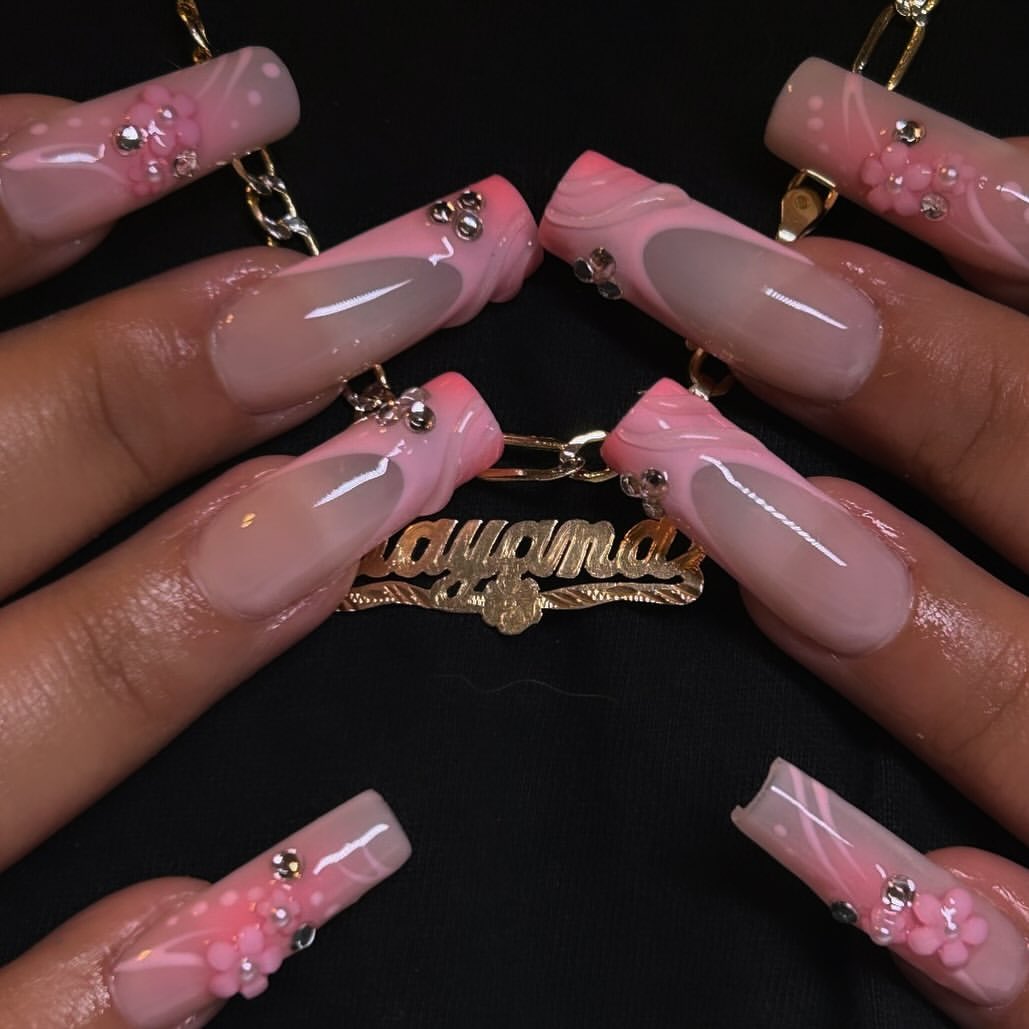
- Various shades of pink gel polishes (e.g., OPI GelColor in Mod About You, Bubble Bath, and Pink Flamenco)
- Pink flower decals or stickers (e.g., Makartt Nail Art Flowers)
- Small rhinestones (e.g., Swarovski Flat Back Crystals)
- Fine detail brush for swirls (e.g., PANA Nail Art Brush)
- Top coat for sealing the design (e.g., Sally Hansen Miracle Gel Top Coat)
- Nail file and buffer for shaping
DIY Instructions
- Preparation: File your nails into the coffin shape and buff the surface.
- Base Coat: Apply a base coat to protect your natural nails and cure under a UV lamp.
- Base Colors: Paint each nail with the various shades of pink gel polishes and cure under a UV lamp.
- Design: Use a fine detail brush to create intricate pink swirls on the nails. Apply pink flower decals to the pinky and thumb nails and place small rhinestones for added sparkle.
- Top Coat: Seal the design with a top coat and cure under a UV lamp.
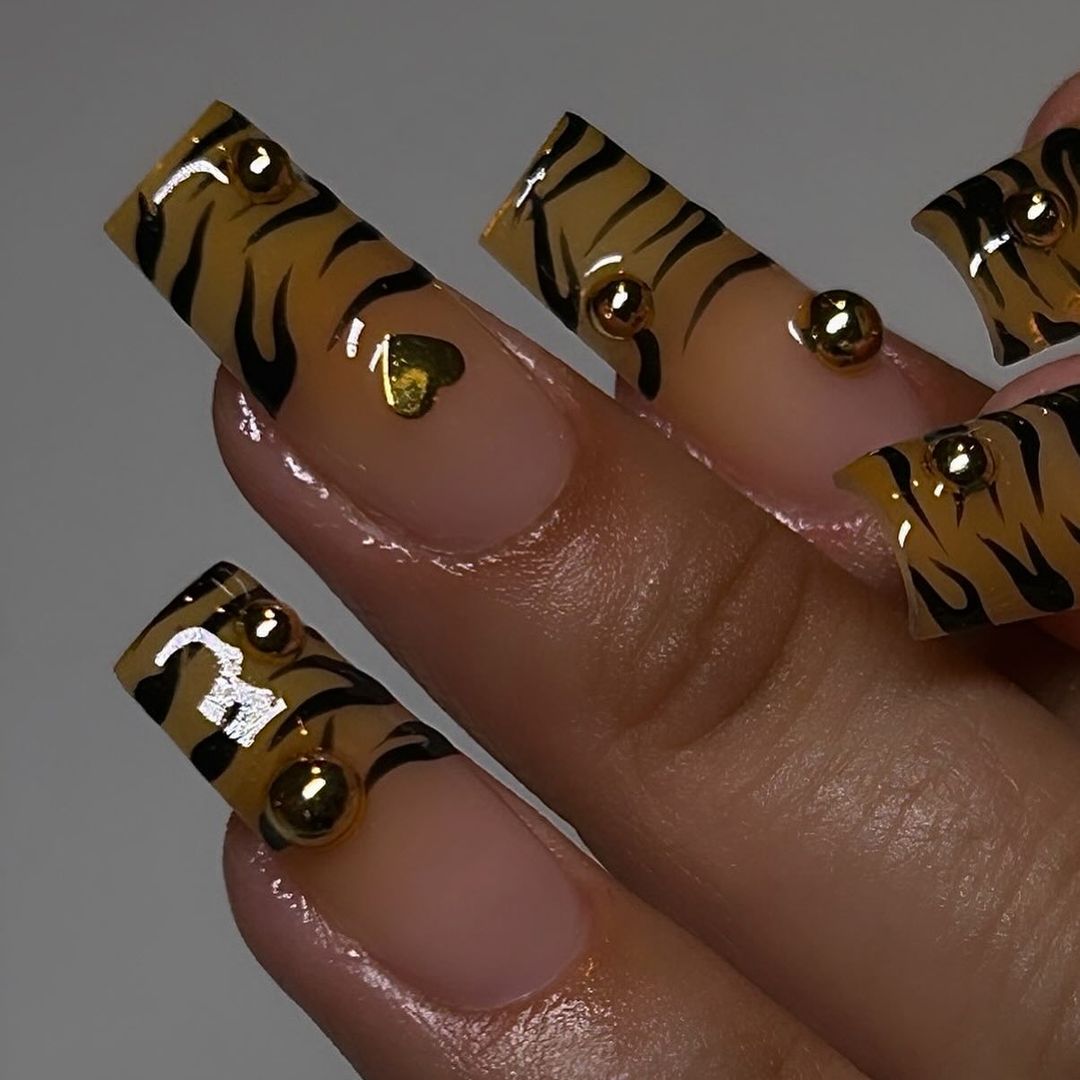
Wild Safari Glam
This nail design brings a touch of the wild to your fall look with a fierce and glamorous animal print. The long, coffin-shaped nails feature a bold tiger stripe pattern in black on a golden-yellow background. Each nail is accentuated with gold beads and a central gold heart, adding a touch of elegance to the otherwise wild design. The glossy finish enhances the overall sophisticated and exotic appeal of the manicure.
- Black and golden-yellow gel polishes (e.g., Gelish in Black Shadow and Essie in Go for Gold)
- Gold beads and heart charms (e.g., Daily Charme Gold Beads and Charms)
- Fine detail brush for the tiger stripes (e.g., Beetles Nail Art Brushes)
- Top coat for a glossy finish (e.g., Seche Vite Dry Fast Top Coat)
- Nail file and buffer for shaping
DIY Instructions
- Preparation: Shape your nails into the coffin shape and buff the surface.
- Base Coat: Apply a base coat to protect your natural nails and cure under a UV lamp.
- Base Color: Paint each nail with the golden-yellow gel polish and cure under a UV lamp.
- Design: Use a fine detail brush to create the black tiger stripe pattern on each nail. Apply gold beads and a gold heart charm to accentuate the design.
- Top Coat: Seal the design with a top coat and cure under a UV lamp.
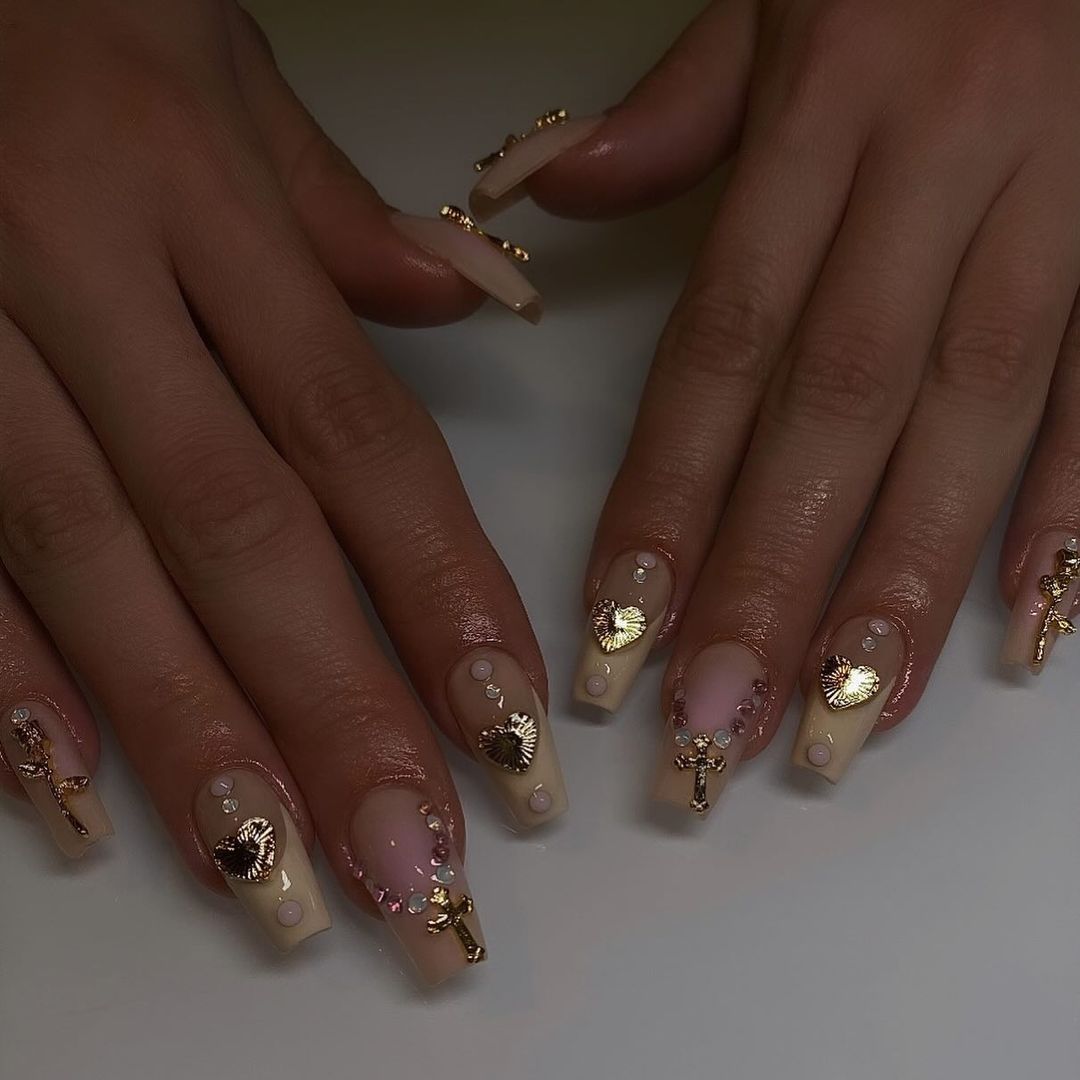
Elegant Gold Accents
This design is the epitome of elegance with its neutral tones and luxurious gold accents. The medium-length coffin-shaped nails feature a delicate nude base with intricate gold details, including heart charms, crosses, and subtle pink rhinestones. The combination of gold and nude creates a refined and sophisticated look, perfect for any fall occasion.
- Nude gel polish (e.g., OPI GelColor in Bubble Bath)
- Gold charms and crosses (e.g., Daily Charme Gold Charms)
- Pink rhinestones (e.g., Swarovski Flat Back Crystals)
- Fine detail brush for precise application (e.g., PANA Nail Art Brush)
- Top coat for sealing the design (e.g., Sally Hansen Miracle Gel Top Coat)
- Nail file and buffer for shaping
DIY Instructions
- Preparation: File your nails into the coffin shape and buff the surface.
- Base Coat: Apply a base coat and cure under a UV lamp.
- Base Color: Paint each nail with the nude gel polish and cure under a UV lamp.
- Design: Place the gold heart charms, crosses, and pink rhinestones strategically on each nail using a fine detail brush for precise placement.
- Top Coat: Seal the design with a top coat and cure under a UV lamp.
Autumn Mosaic
This nail design celebrates the rich colors of autumn with a stunning mosaic effect. The long coffin-shaped nails feature a variety of autumnal shades, including deep red, forest green, and vibrant orange. Each nail is uniquely decorated with metallic accents, adding depth and dimension to the overall look. The intricate patterns and the glossy finish make this design perfect for embracing the fall season in style.
- Deep red, forest green, and vibrant orange gel polishes (e.g., OPI GelColor in Malaga Wine, Essie in Off Tropic, and Sally Hansen in Mellow Yellow)
- Metallic gel polish for accents (e.g., OPI GelColor in Chrome For It)
- Fine detail brush for intricate patterns (e.g., Beetles Nail Art Brushes)
- Top coat for a glossy finish (e.g., Seche Vite Dry Fast Top Coat)
- Nail file and buffer for shaping
DIY Instructions
- Preparation: Shape your nails into the coffin shape and buff the surface.
- Base Coat: Apply a base coat to protect your natural nails and cure under a UV lamp.
- Base Colors: Paint each nail with a different autumnal shade and cure under a UV lamp.
- Design: Use a fine detail brush to create metallic accents and intricate patterns on each nail.
- Top Coat: Seal the design with a top coat and cure under a UV lamp.
Save Pin
Pearl Elegance
This nail design is a timeless classic, combining the elegance of pearls with a modern French twist. The long coffin-shaped nails feature a nude base with white tips, adorned with small pearls. The glossy finish enhances the sophisticated and clean look, making it suitable for both everyday wear and special occasions. The pearls add a touch of luxury and refinement to the classic French manicure.
- Nude and white gel polishes (e.g., OPI GelColor in Bubble Bath and Alpine Snow)
- Small pearls (e.g., Daily Charme Mini Pearls)
- Fine detail brush for precise application (e.g., PANA Nail Art Brush)
- Top coat for a glossy finish (e.g., Sally Hansen Miracle Gel Top Coat)
- Nail file and buffer for shaping
DIY Instructions
- Preparation: File your nails into the coffin shape and buff the surface.
- Base Coat: Apply a base coat to protect your natural nails and cure under a UV lamp.
- Base Color: Paint each nail with the nude gel polish and cure under a UV lamp. Apply white gel polish to the tips for a French manicure effect.
- Design: Place small pearls along the base of the white tips using a fine detail brush for precise placement.
- Top Coat: Seal the design with a top coat and cure under a UV lamp.
Blushing Pink
This design is all about soft, feminine charm with a touch of elegance. The medium-length coffin-shaped nails feature a delicate gradient of soft pink shades. Each nail is perfectly polished to create a seamless transition from a nude base to a blush pink tip. The glossy finish enhances the overall subtle and sophisticated appeal, making it perfect for any occasion, from casual to formal.
- Various shades of pink gel polishes (e.g., OPI GelColor in Mod About You and Bubble Bath)
- Gradient sponge for smooth transitions
- Top coat for a glossy finish (e.g., Seche Vite Dry Fast Top Coat)
- Nail file and buffer for shaping
DIY Instructions
- Preparation: Shape your nails into the coffin shape and buff the surface.
- Base Coat: Apply a base coat to protect your natural nails and cure under a UV lamp.
- Base Colors: Apply the nude gel polish as the base color and cure under a UV lamp. Use a gradient sponge to apply the blush pink shade, creating a seamless transition, and cure again.
- Top Coat: Seal the design with a top coat and cure under a UV lamp.
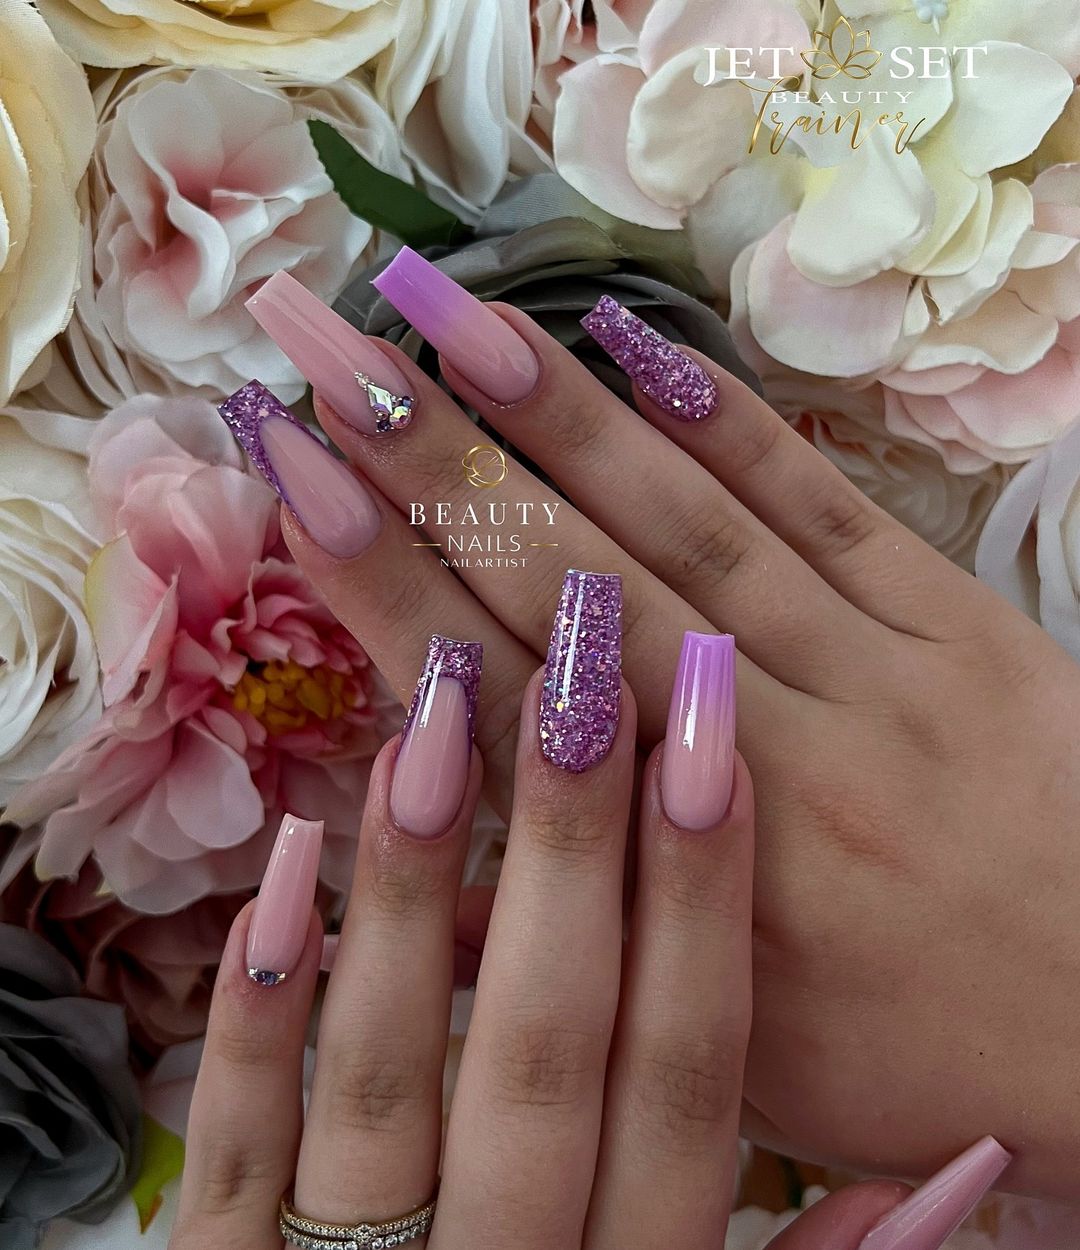
Sparkling Lavender
This nail design is a sparkling vision of lavender, combining glitter and pastel shades for a dazzling effect. The long coffin-shaped nails feature a mix of solid lavender polish and glittery accents. Some nails are entirely covered in lavender glitter, while others have a gradient effect or are decorated with rhinestones. The glossy finish and sparkling details make this design perfect for adding a touch of glamour to any look.
- Lavender gel polish (e.g., Essie Gel Couture in Touch Up)
- Lavender glitter polish (e.g., Sally Hansen in Glitter Glam)
- Rhinestones for added sparkle (e.g., Swarovski Flat Back Crystals)
- Fine detail brush for precise application (e.g., Beetles Nail Art Brushes)
- Top coat for a glossy finish (e.g., Seche Vite Dry Fast Top Coat)
- Nail file and buffer for shaping
DIY Instructions
- Preparation: Shape your nails into the coffin shape and buff the surface.
- Base Coat: Apply a base coat to protect your natural nails and cure under a UV lamp.
- Base Colors: Paint some nails with the solid lavender gel polish and others with the lavender glitter polish. Cure under a UV lamp.
- Design: Apply a gradient effect on some nails using a sponge and add rhinestones for extra sparkle. Use a fine detail brush for precise placement.
- Top Coat: Seal the design with a top coat and cure under a UV lamp.
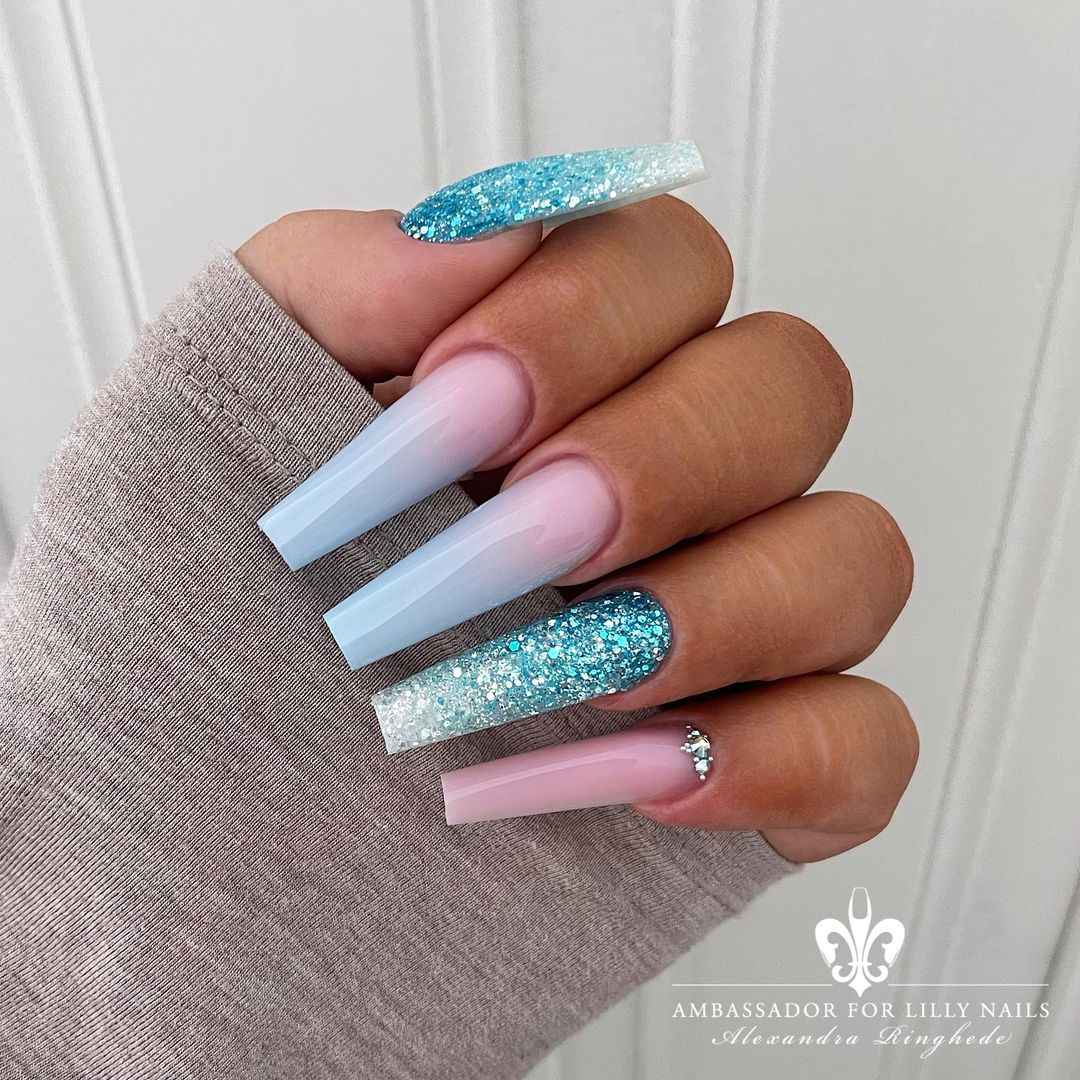
Icy Blue Gradient
This nail design is a captivating blend of soft blue gradients and sparkling glitter, perfect for a cool and fresh autumn look. The long coffin-shaped nails start with a soft, gradient transition from a pale pink at the cuticle to a vibrant blue at the tips. Two nails feature a dazzling glitter overlay, adding an extra touch of glam to the overall design. The ring finger is adorned with a delicate rhinestone at the base, enhancing the icy effect.
- Pale pink and blue gel polishes (e.g., OPI GelColor in Baby, Take a Vow and It’s a Boy)
- Blue glitter polish (e.g., Essie in Set in Stones)
- Rhinestones (e.g., Swarovski Flat Back Crystals)
- Gradient sponge for smooth transitions
- Fine detail brush for precise application (e.g., Beetles Nail Art Brushes)
- Top coat for a glossy finish (e.g., Seche Vite Dry Fast Top Coat)
- Nail file and buffer for shaping
DIY Instructions
- Preparation: Shape your nails into the coffin shape and buff the surface.
- Base Coat: Apply a base coat to protect your natural nails and cure under a UV lamp.
- Base Colors: Apply the pale pink gel polish at the cuticle and the blue gel polish at the tips. Use a gradient sponge to blend the colors smoothly, and cure under a UV lamp.
- Design: Apply the blue glitter polish to the selected nails and place the rhinestone at the base of the ring finger using a fine detail brush for precise placement.
- Top Coat: Seal the design with a top coat and cure under a UV lamp.
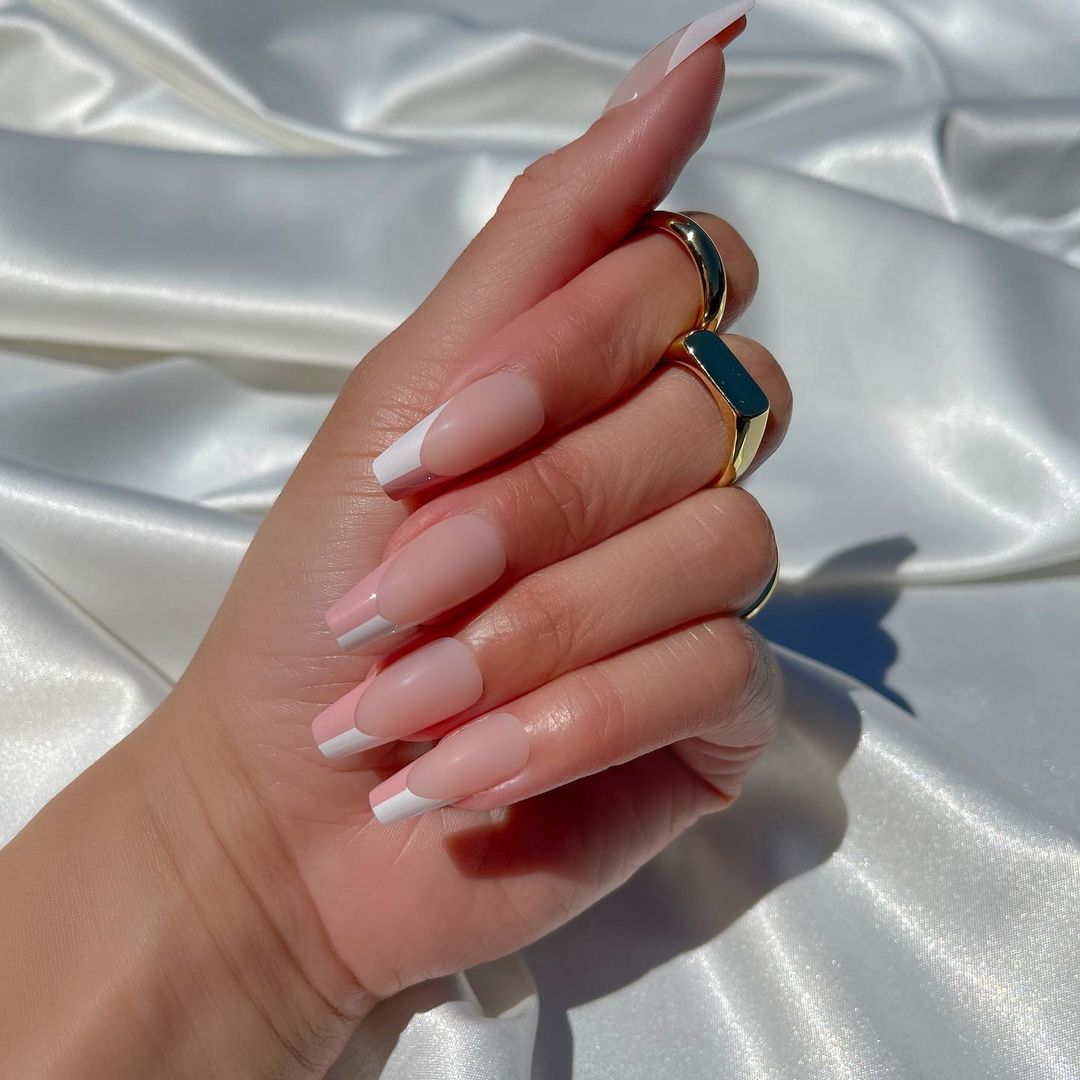
Classic French with a Twist
This design offers a modern take on the classic French manicure, featuring a soft nude base with crisp white tips. The almond-shaped nails are perfectly polished, creating a sophisticated and timeless look. The white tips are slightly angled, adding a contemporary twist to the traditional French design. This manicure is ideal for both everyday wear and special occasions, providing a chic and clean aesthetic.
- Nude and white gel polishes (e.g., OPI GelColor in Bubble Bath and Alpine Snow)
- Fine detail brush for creating precise white tips (e.g., PANA Nail Art Brush)
- Top coat for a glossy finish (e.g., Sally Hansen Miracle Gel Top Coat)
- Nail file and buffer for shaping
DIY Instructions
- Preparation: Shape your nails into the almond shape and buff the surface.
- Base Coat: Apply a base coat to protect your natural nails and cure under a UV lamp.
- Base Color: Paint each nail with the nude gel polish and cure under a UV lamp.
- Design: Use a fine detail brush to apply the white gel polish to the tips of each nail, creating a crisp, angled French tip. Cure under a UV lamp.
- Top Coat: Seal the design with a top coat and cure under a UV lamp.
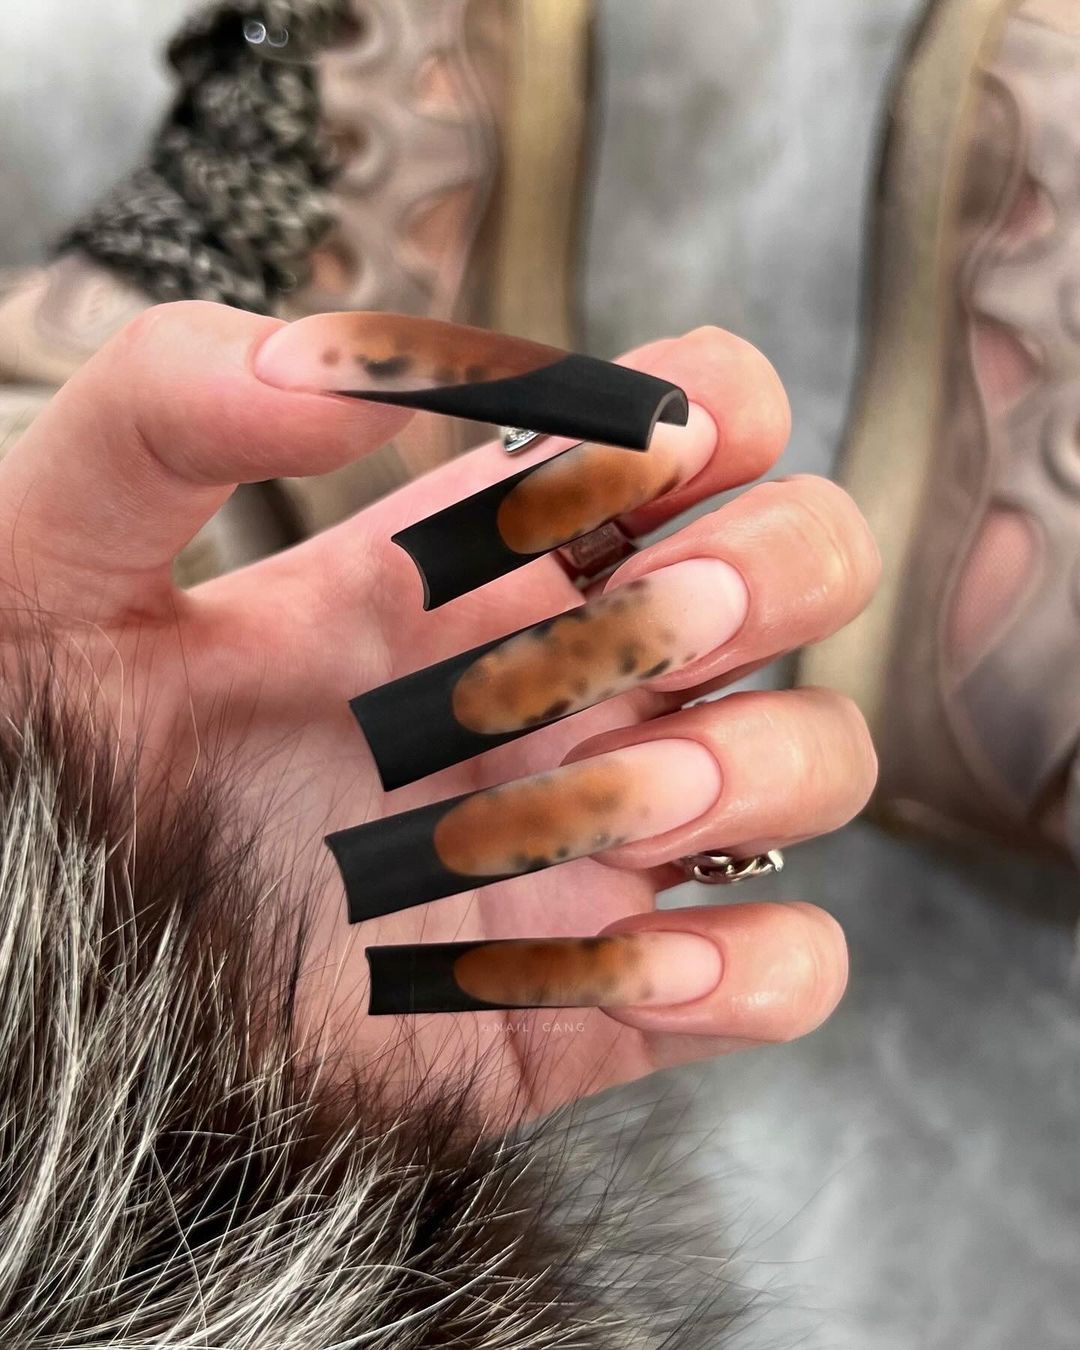
Tortoiseshell Tips
This nail design is a unique blend of tortoiseshell patterns and matte black tips, perfect for a stylish and edgy autumn look. The long coffin-shaped nails feature a nude base with bold tortoiseshell designs at the tips. The combination of warm brown tones and matte black creates a striking contrast, making this manicure a statement piece. The glossy finish on the tortoiseshell patterns enhances the overall sophisticated and modern appeal.
- Nude and matte black gel polishes (e.g., OPI GelColor in Bubble Bath and Essie in Licorice)
- Brown and black gel polishes for tortoiseshell patterns (e.g., Sally Hansen in Sheer Ecstasy and Black to Black)
- Fine detail brush for creating intricate patterns (e.g., Beetles Nail Art Brushes)
- Top coat for a glossy finish on tortoiseshell patterns (e.g., Seche Vite Dry Fast Top Coat)
- Nail file and buffer for shaping
DIY Instructions
- Preparation: Shape your nails into the coffin shape and buff the surface.
- Base Coat: Apply a base coat to protect your natural nails and cure under a UV lamp.
- Base Colors: Paint the nails with the nude gel polish and cure under a UV lamp.
- Design: Use a fine detail brush to create the tortoiseshell patterns on the tips with brown and black gel polishes. Apply the matte black gel polish to the remaining parts of the tips. Cure under a UV lamp.
- Top Coat: Apply a glossy top coat to the tortoiseshell patterns and cure under a UV lamp.
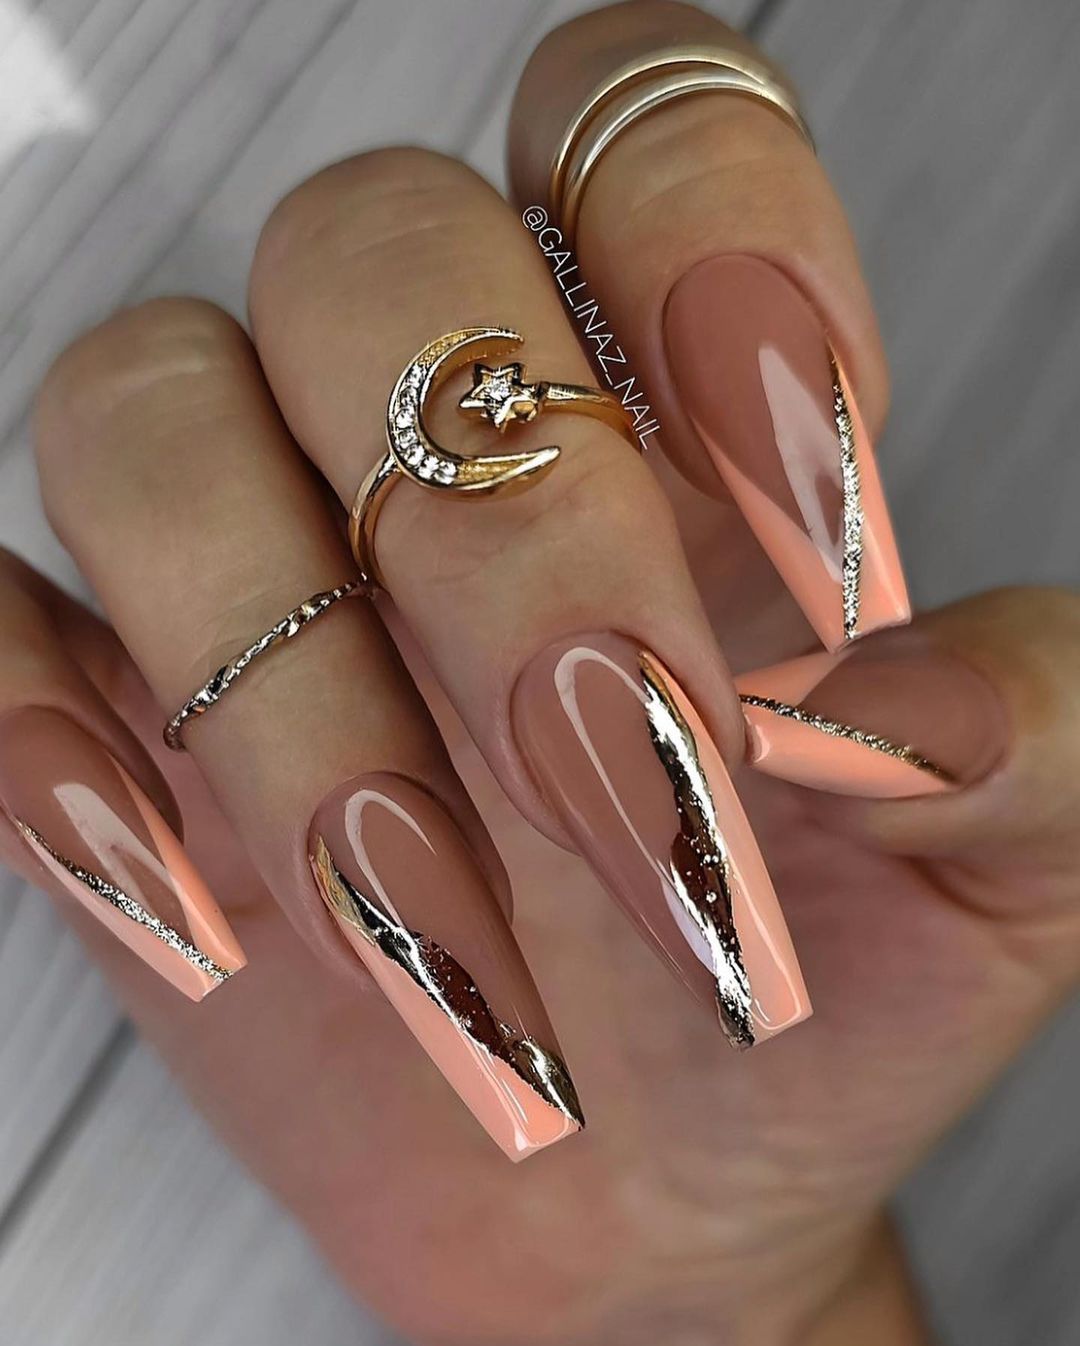
Rose Gold Elegance
This nail design exudes elegance and sophistication with its beautiful blend of rose gold and nude tones. The long coffin-shaped nails feature a nude base with delicate rose gold metallic accents. Each nail is adorned with a diagonal stripe of rose gold, creating a chic and refined look. The metallic accents catch the light beautifully, making this design perfect for both day and night events.
- Nude gel polish (e.g., OPI GelColor in Bubble Bath)
- Rose gold metallic gel polish (e.g., Essie in Penny Talk)
- Fine detail brush for precise application (e.g., PANA Nail Art Brush)
- Top coat for a glossy finish (e.g., Sally Hansen Miracle Gel Top Coat)
- Nail file and buffer for shaping
DIY Instructions
- Preparation: Shape your nails into the coffin shape and buff the surface.
- Base Coat: Apply a base coat to protect your natural nails and cure under a UV lamp.
- Base Color: Paint each nail with the nude gel polish and cure under a UV lamp.
- Design: Use a fine detail brush to apply the rose gold metallic gel polish in diagonal stripes across each nail. Cure under a UV lamp.
- Top Coat: Seal the design with a top coat and cure under a UV lamp.
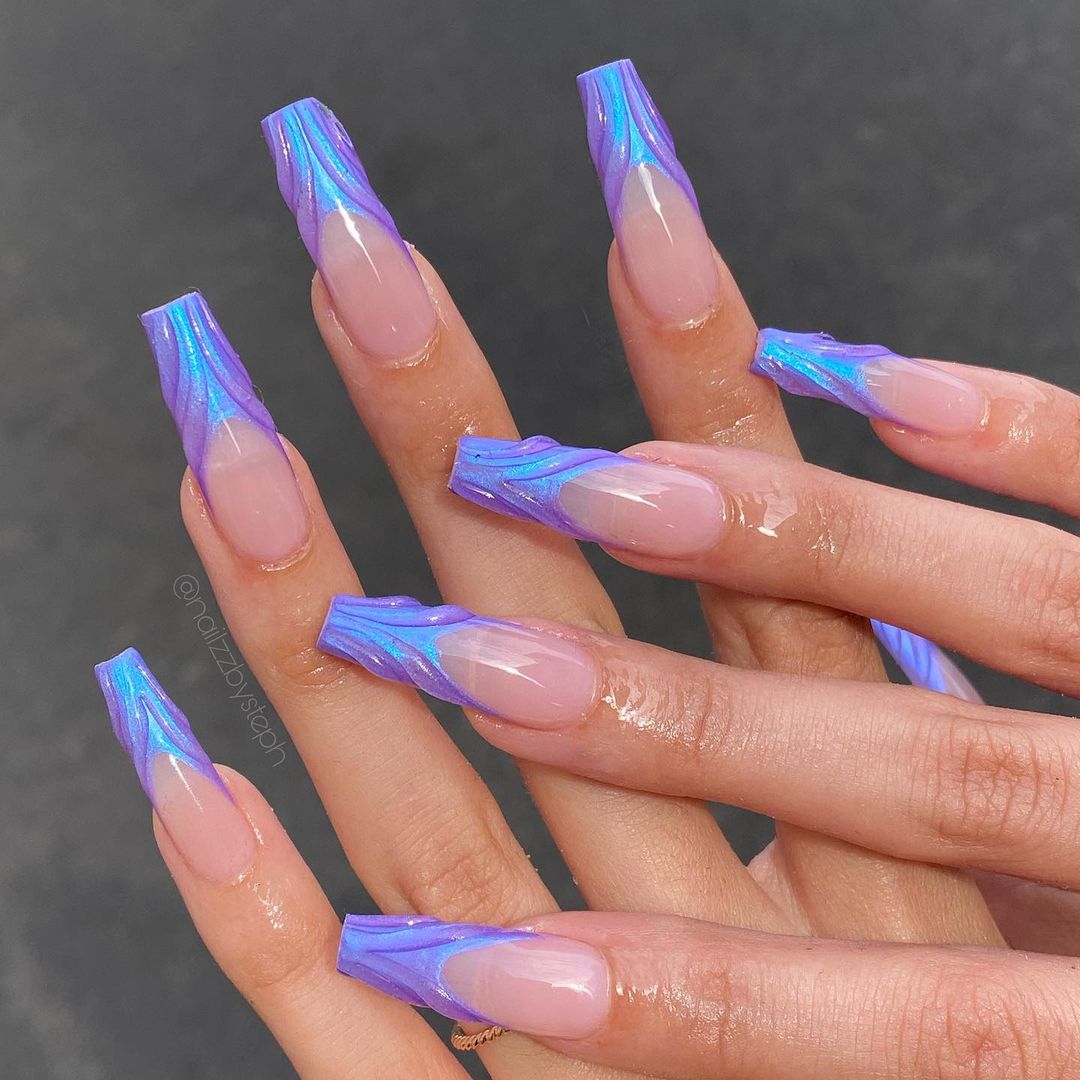
Holographic Waves
This nail design is a mesmerizing display of holographic waves, perfect for making a bold statement. The long coffin-shaped nails feature a nude base with vibrant holographic blue and purple swirls at the tips. The holographic effect catches the light and creates a stunning, shifting color palette that changes with every movement. This manicure is ideal for those who love to stand out with their nail art.
- Nude gel polish (e.g., OPI GelColor in Bubble Bath)
- Holographic blue and purple gel polishes (e.g., Sally Hansen in Mermaid’s Tale and Essie in Disco Doll)
- Fine detail brush for creating swirls (e.g., Beetles Nail Art Brushes)
- Top coat for a glossy finish (e.g., Seche Vite Dry Fast Top Coat)
- Nail file and buffer for shaping
DIY Instructions
- Preparation: Shape your nails into the coffin shape and buff the surface.
- Base Coat: Apply a base coat to protect your natural nails and cure under a UV lamp.
- Base Color: Paint each nail with the nude gel polish and cure under a UV lamp.
- Design: Use a fine detail brush to apply the holographic blue and purple gel polishes in swirling patterns at the tips of each nail. Cure under a UV lamp.
- Top Coat: Seal the design with a top coat and cure under a UV lamp.
Romantic Hearts
This nail design is perfect for adding a touch of romance to your look with its soft pink tones and delicate heart motifs. The long coffin-shaped nails feature a nude base with blush pink tips, adorned with white heart outlines. The glossy finish enhances the sweet and feminine appeal, making this design perfect for date nights or special occasions. The combination of blush pink and white creates a charming and romantic look.
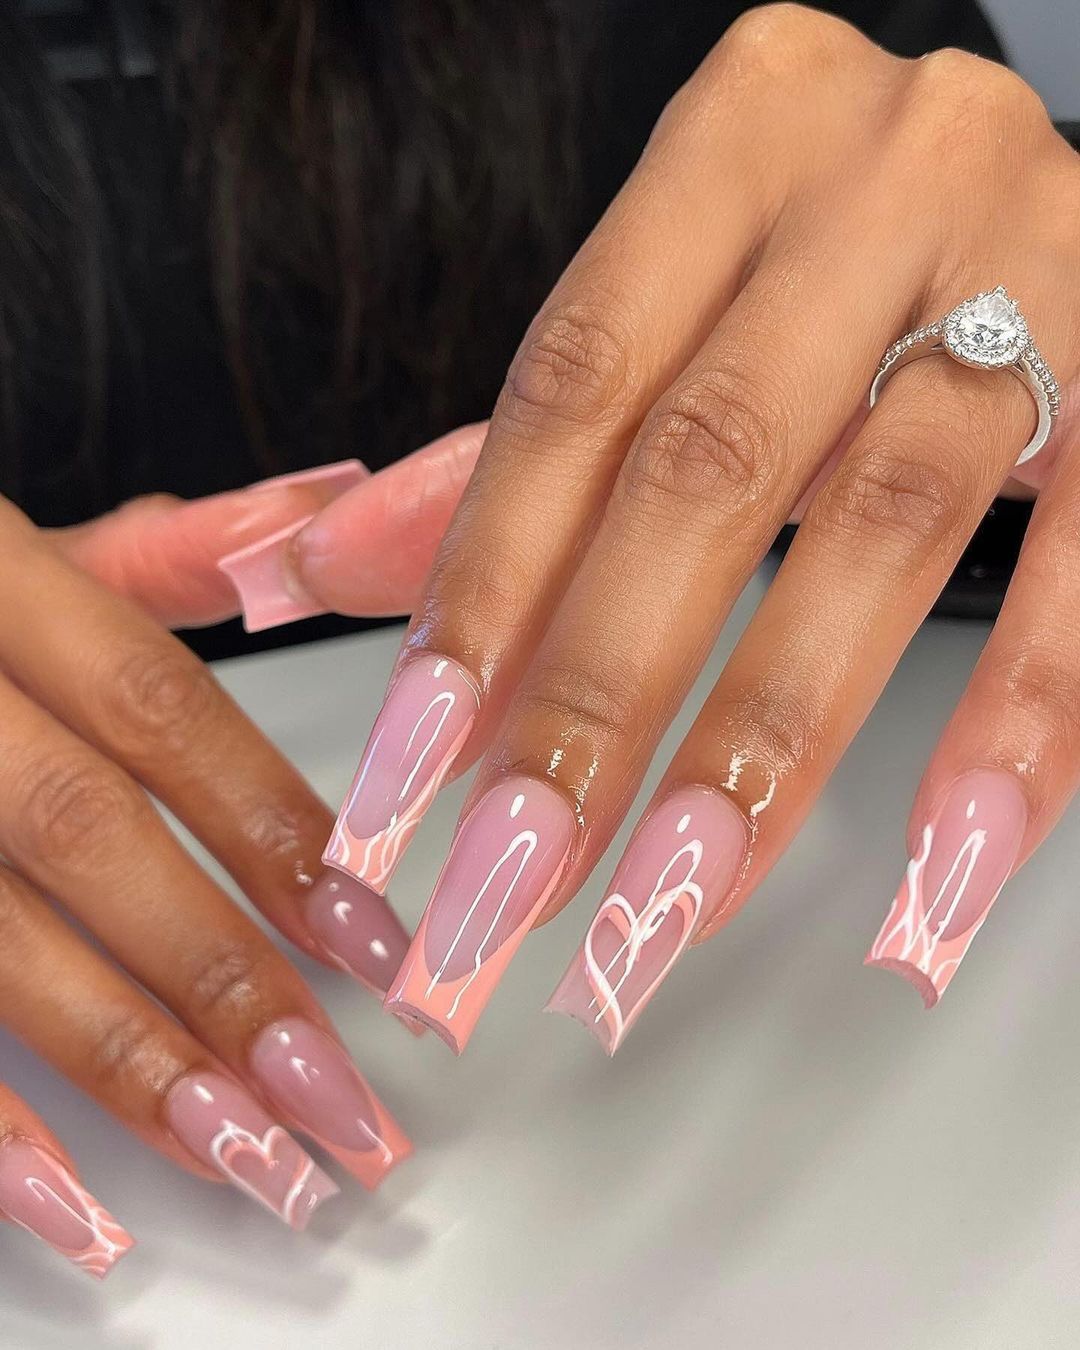
- Nude and blush pink gel polishes (e.g., OPI GelColor in Bubble Bath and Mod About You)
- White gel polish for heart outlines (e.g., Essie in Blanc)
- Fine detail brush for creating heart motifs (e.g., PANA Nail Art Brush)
- Top coat for a glossy finish (e.g., Sally Hansen Miracle Gel Top Coat)
- Nail file and buffer for shaping
DIY Instructions
- Preparation: Shape your nails into the coffin shape and buff the surface.
- Base Coat: Apply a base coat to protect your natural nails and cure under a UV lamp.
- Base Colors: Paint each nail with the nude gel polish and apply blush pink gel polish to the tips. Cure under a UV lamp.
- Design: Use a fine detail brush to create white heart outlines on each nail. Cure under a UV lamp.
- Top Coat: Seal the design with a top coat and cure under a UV lamp.
Pastel Dream
This nail design is a dreamy blend of pastel hues and delicate gold foil accents. The long coffin-shaped nails feature a beautiful combination of soft pink, blue, and white, creating a watercolor effect. Each nail is adorned with gold foil flakes that add a touch of luxury and sophistication to the overall look. The glossy finish enhances the ethereal and whimsical appeal of this design, making it perfect for a light and airy fall aesthetic.
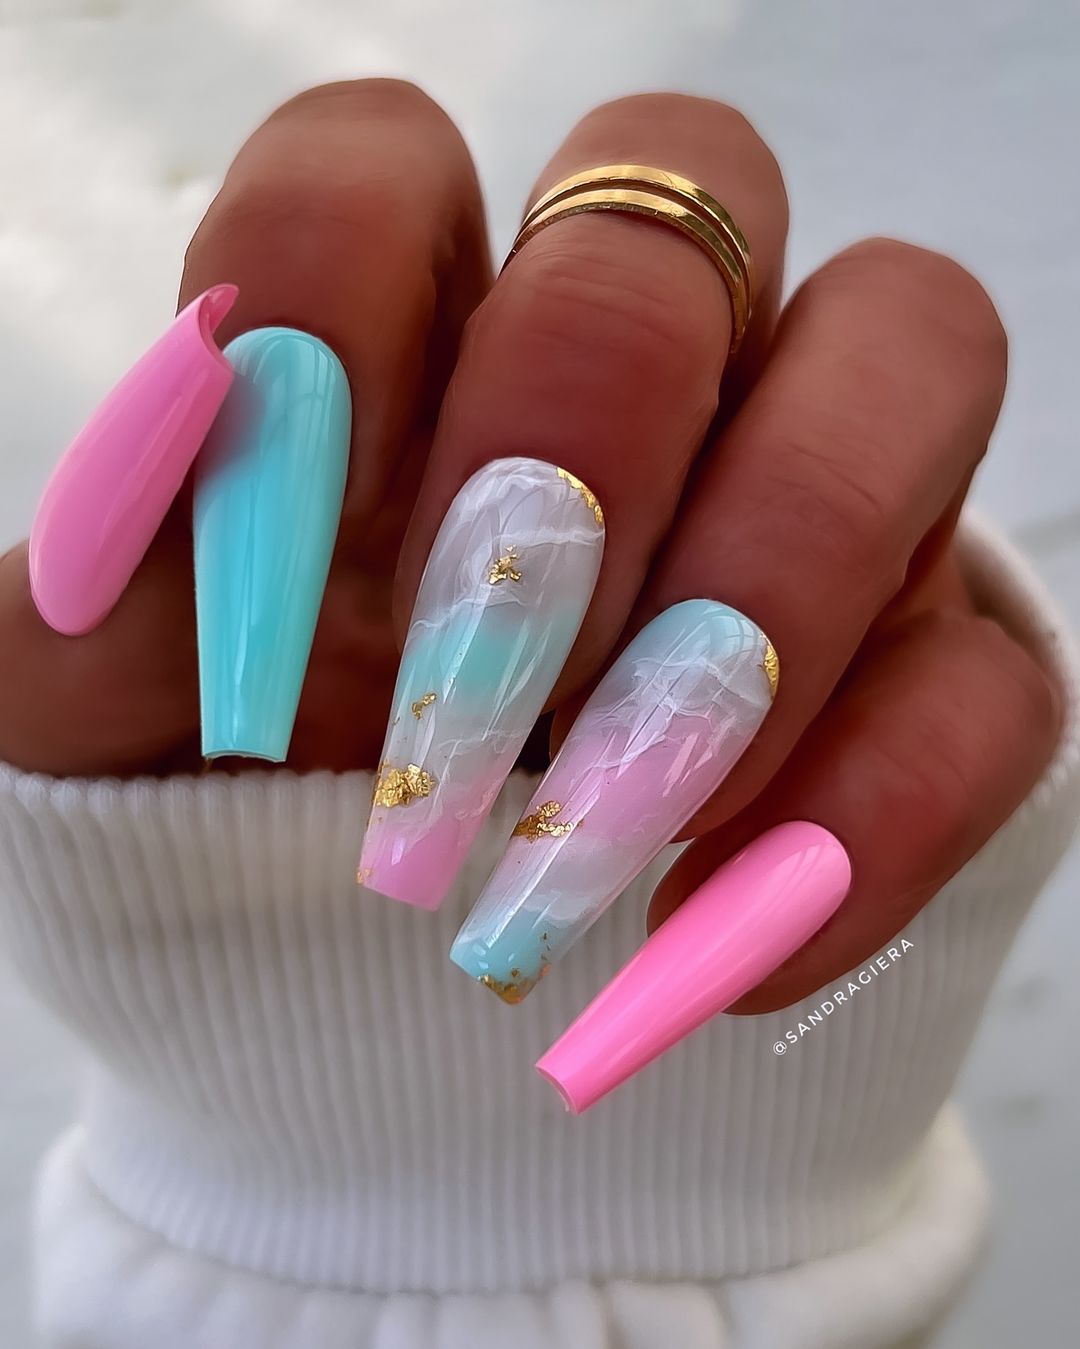
- Soft pink, blue, and white gel polishes (e.g., OPI GelColor in Mod About You, Essie in Butler Please, and Gelish in Sheek White)
- Gold foil flakes (e.g., Daily Charme Gold Foil)
- Fine detail brush for creating the watercolor effect (e.g., PANA Nail Art Brush)
- Top coat for a glossy finish (e.g., Seche Vite Dry Fast Top Coat)
- Nail file and buffer for shaping
DIY Instructions
- Preparation: Shape your nails into the coffin shape and buff the surface.
- Base Coat: Apply a base coat to protect your natural nails and cure under a UV lamp.
- Base Colors: Apply the pink, blue, and white gel polishes in a random pattern on each nail. Use a fine detail brush to blend the colors and create a watercolor effect. Cure under a UV lamp.
- Design: Apply the gold foil flakes to the nails while the polish is still tacky, then cure under a UV lamp.
- Top Coat: Seal the design with a top coat and cure under a UV lamp.
Matte Gray Elegance
This design showcases the simplicity and elegance of matte gray nails. The long coffin-shaped nails are coated with a smooth matte gray polish, creating a chic and understated look. The matte finish gives the nails a modern and sophisticated appearance, making this design perfect for any occasion. The minimalist style highlights the beauty of the matte effect and complements any outfit effortlessly.
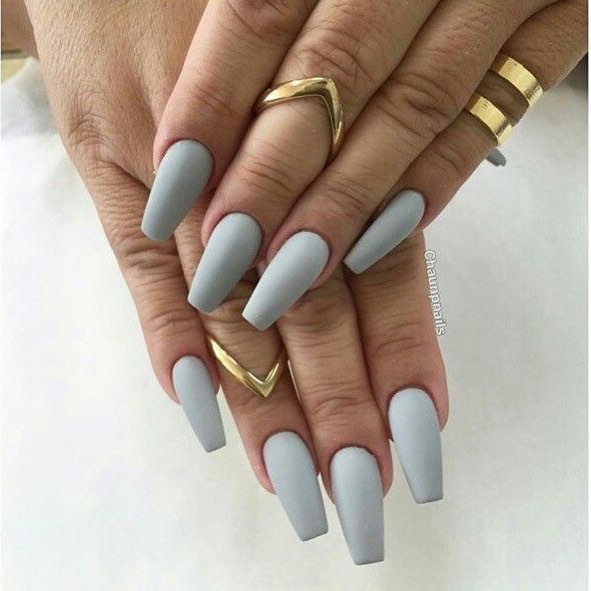
- Matte gray gel polish (e.g., OPI GelColor in Suzi & the Arctic Fox)
- Matte top coat (e.g., Essie Matte About You Top Coat)
- Nail file and buffer for shaping
DIY Instructions
- Preparation: Shape your nails into the coffin shape and buff the surface.
- Base Coat: Apply a base coat to protect your natural nails and cure under a UV lamp.
- Base Color: Paint each nail with the matte gray gel polish and cure under a UV lamp.
- Top Coat: Apply a matte top coat to achieve the smooth matte finish and cure under a UV lamp.
Neon Pop
This nail design is a vibrant and playful mix of neon colors and fun embellishments. The long coffin-shaped nails feature a clear base with neon dots and rhinestones scattered across each nail. The neon colors include bright pink, yellow, and blue, creating a lively and eye-catching look. The addition of tiny charms and rhinestones adds a touch of sparkle, making this design perfect for those who love bold and fun nail art.
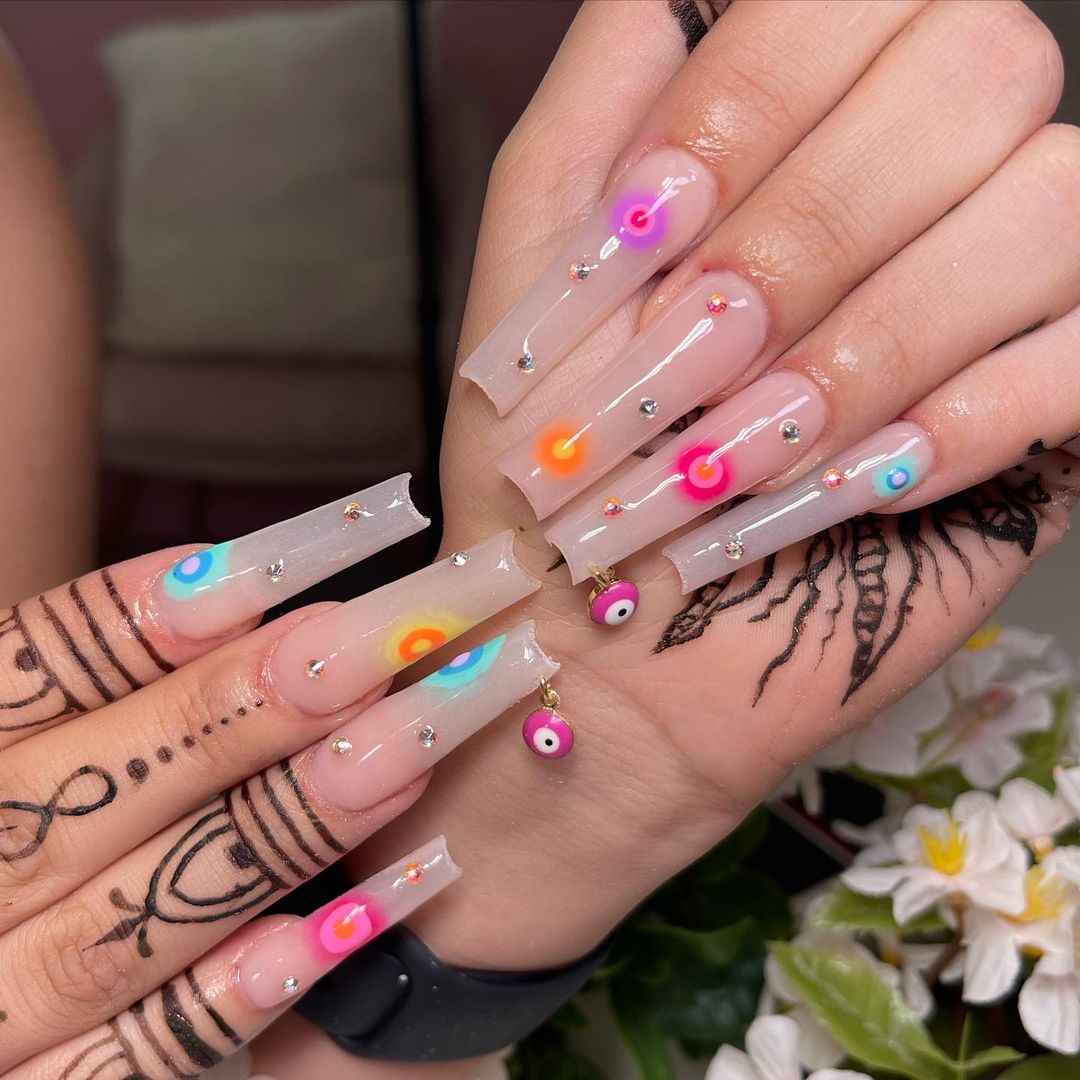
- Clear gel polish (e.g., Gelish in Clear as Day)
- Neon gel polishes (e.g., Sally Hansen in Fuchsia Power, Yellow Kitty, and Blue Me Away)
- Rhinestones and tiny charms (e.g., Swarovski Flat Back Crystals and Daily Charme Charms)
- Fine detail brush for precise application (e.g., Beetles Nail Art Brushes)
- Top coat for sealing the design (e.g., Seche Vite Dry Fast Top Coat)
- Nail file and buffer for shaping
DIY Instructions
- Preparation: Shape your nails into the coffin shape and buff the surface.
- Base Coat: Apply a base coat to protect your natural nails and cure under a UV lamp.
- Base Color: Apply the clear gel polish and cure under a UV lamp.
- Design: Use a fine detail brush to apply the neon gel polishes in dot patterns on each nail. Place the rhinestones and tiny charms strategically on the nails. Cure under a UV lamp.
- Top Coat: Seal the design with a top coat and cure under a UV lamp.
Black French Tips
This design is a sleek and modern take on the classic French manicure, featuring bold black tips on a nude base. The long coffin-shaped nails are polished with a nude gel and finished with sharp, angled black tips. The glossy finish enhances the edgy and stylish look, making this manicure perfect for a sophisticated yet contemporary style. The high-contrast black and nude combination is both striking and elegant.
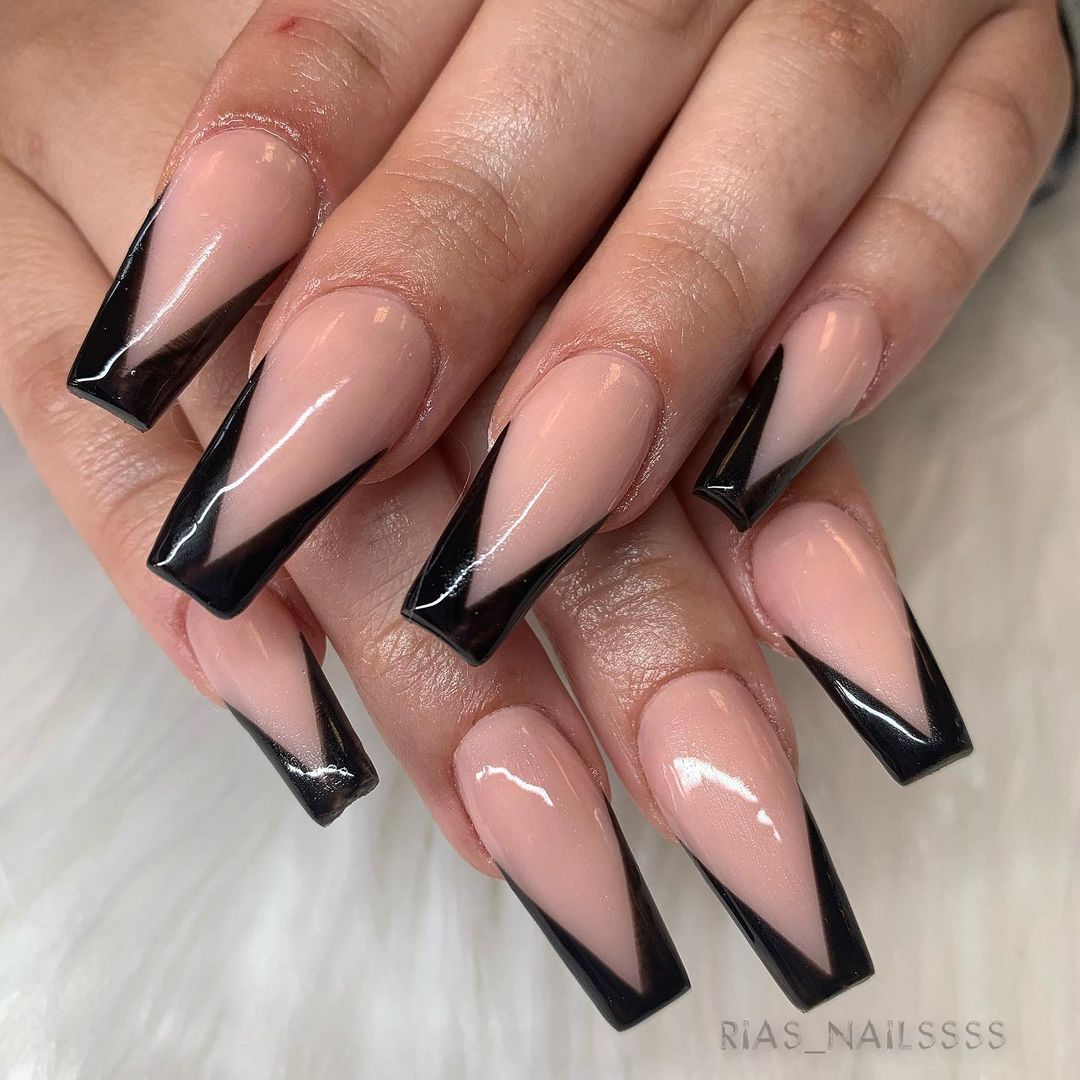
- Nude and black gel polishes (e.g., OPI GelColor in Bubble Bath and Essie in Licorice)
- Fine detail brush for creating precise black tips (e.g., PANA Nail Art Brush)
- Top coat for a glossy finish (e.g., Sally Hansen Miracle Gel Top Coat)
- Nail file and buffer for shaping
DIY Instructions
- Preparation: Shape your nails into the coffin shape and buff the surface.
- Base Coat: Apply a base coat to protect your natural nails and cure under a UV lamp.
- Base Color: Paint each nail with the nude gel polish and cure under a UV lamp.
- Design: Use a fine detail brush to apply the black gel polish to the tips of each nail, creating sharp, angled French tips. Cure under a UV lamp.
- Top Coat: Seal the design with a top coat and cure under a UV lamp.
Blush Pink Simplicity
This nail design is the epitome of simple elegance, featuring long coffin-shaped nails in a soft blush pink shade. Each nail is polished to perfection with a glossy finish, creating a clean and sophisticated look. The minimalist style is complemented by a single white heart on the ring finger, adding a subtle yet charming detail. This design is perfect for those who appreciate understated beauty and timeless elegance.
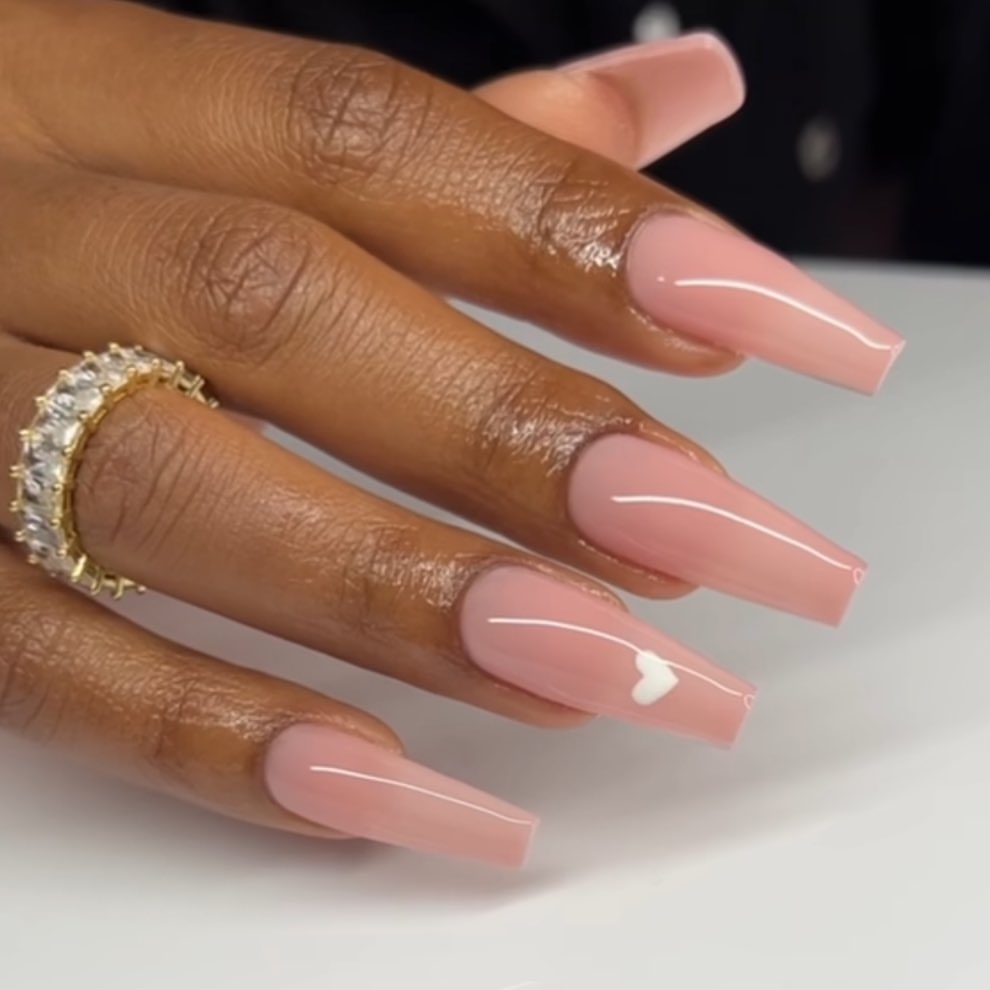
- Blush pink gel polish (e.g., OPI GelColor in Mod About You)
- White gel polish for the heart (e.g., Essie in Blanc)
- Fine detail brush for precise application (e.g., Beetles Nail Art Brushes)
- Top coat for a glossy finish (e.g., Seche Vite Dry Fast Top Coat)
- Nail file and buffer for shaping
DIY Instructions
- Preparation: Shape your nails into the coffin shape and buff the surface.
- Base Coat: Apply a base coat to protect your natural nails and cure under a UV lamp.
- Base Color: Paint each nail with the blush pink gel polish and cure under a UV lamp.
- Design: Use a fine detail brush to apply the white gel polish in a heart shape on the ring finger. Cure under a UV lamp.
- Top Coat: Seal the design with a top coat and cure under a UV lamp.
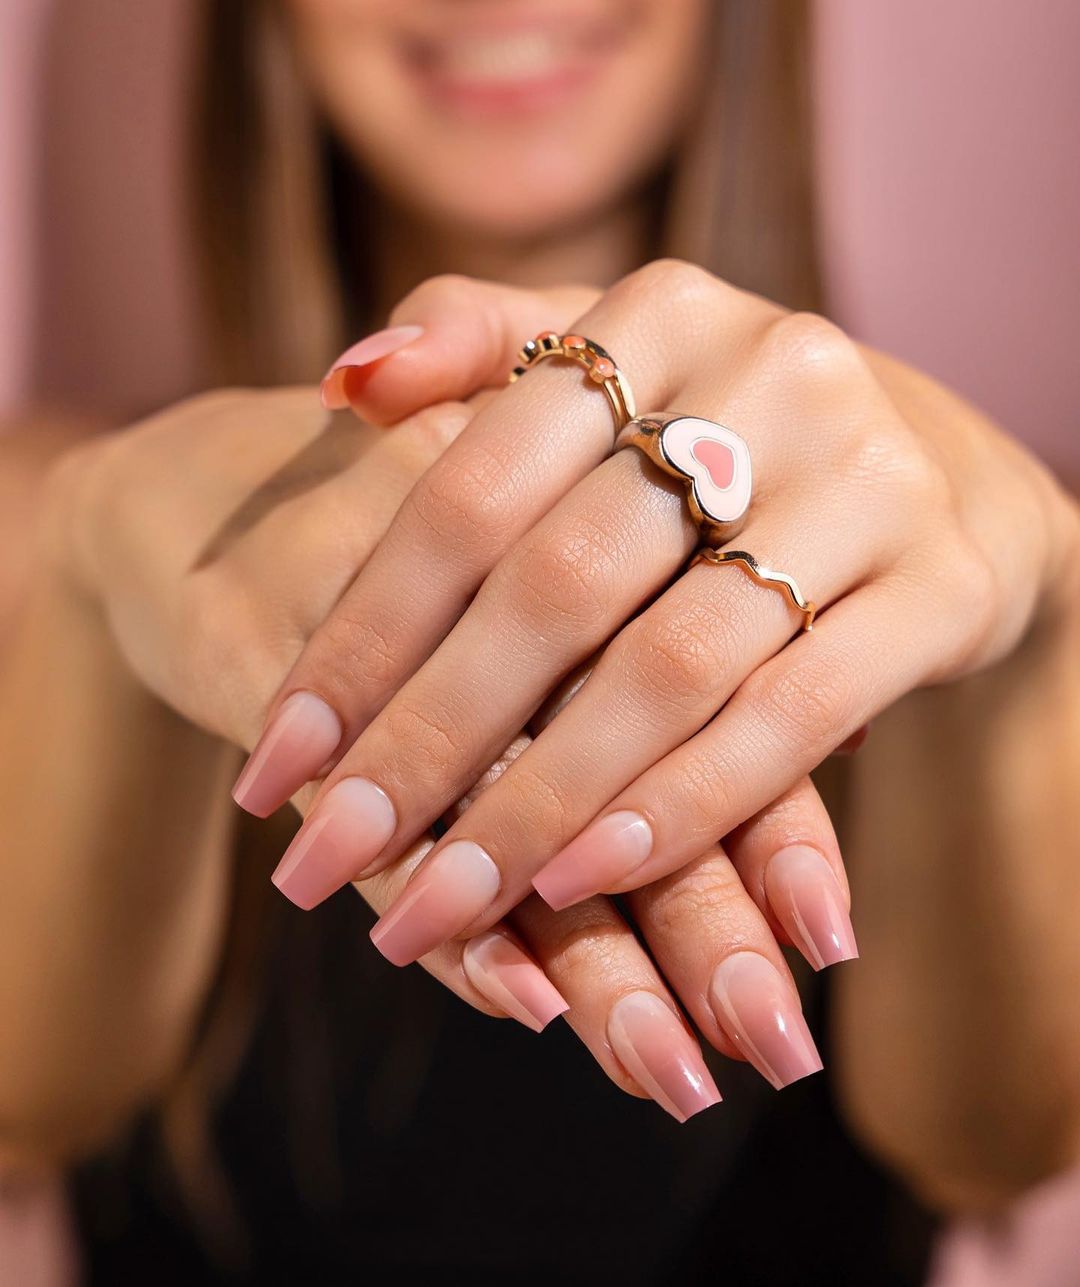
Pastel Ombré Perfection
This nail design is a flawless blend of pastel hues in an ombré effect. The long coffin-shaped nails feature a seamless transition from a soft pink at the base to a delicate pastel yellow at the tips. The glossy finish enhances the smooth gradient, creating a soft and dreamy look. This design is perfect for those who love subtle yet stylish nail art, ideal for both everyday wear and special occasions.
- Soft pink and pastel yellow gel polishes (e.g., OPI GelColor in Mod About You and Essie in Sweet Soufflé)
- Gradient sponge for smooth transitions
- Top coat for a glossy finish (e.g., Seche Vite Dry Fast Top Coat)
- Nail file and buffer for shaping
DIY Instructions
- Preparation: Shape your nails into the coffin shape and buff the surface.
- Base Coat: Apply a base coat to protect your natural nails and cure under a UV lamp.
- Base Colors: Apply the soft pink gel polish at the base of each nail. Use a gradient sponge to apply the pastel yellow gel polish at the tips, blending smoothly. Cure under a UV lamp.
- Top Coat: Seal the design with a top coat and cure under a UV lamp.
Floral Fusion
This nail design is a vibrant mix of floral patterns and bold colors, perfect for making a statement this fall. The long coffin-shaped nails showcase a variety of designs, including bright orange ombré, deep burgundy tips, and intricate 3D flower accents. The combination of clear, white, and bold colors creates a dynamic and eye-catching look. The gold embellishments add a touch of luxury, making this manicure stand out with its unique and artistic flair.
- Bright orange, deep burgundy, and white gel polishes (e.g., OPI GelColor in Where Did Suzi’s Man-go?, Malaga Wine, and Alpine Snow)
- 3D flower nail art decorations (e.g., Daily Charme 3D Flowers)
- Gold nail art foils and embellishments (e.g., Daily Charme Gold Foil)
- Fine detail brush for precise application (e.g., Beetles Nail Art Brushes)
- Top coat for a glossy finish (e.g., Seche Vite Dry Fast Top Coat)
- Nail file and buffer for shaping
DIY Instructions
- Preparation: Shape your nails into the coffin shape and buff the surface.
- Base Coat: Apply a base coat to protect your natural nails and cure under a UV lamp.
- Base Colors: Paint each nail with the chosen gel polish colors, creating a mix of bright orange ombré, deep burgundy tips, and clear bases. Cure under a UV lamp.
- Design: Apply the 3D flower decorations and gold embellishments to the nails. Use a fine detail brush for precise placement. Cure under a UV lamp.
- Top Coat: Seal the design with a top coat and cure under a UV lamp.
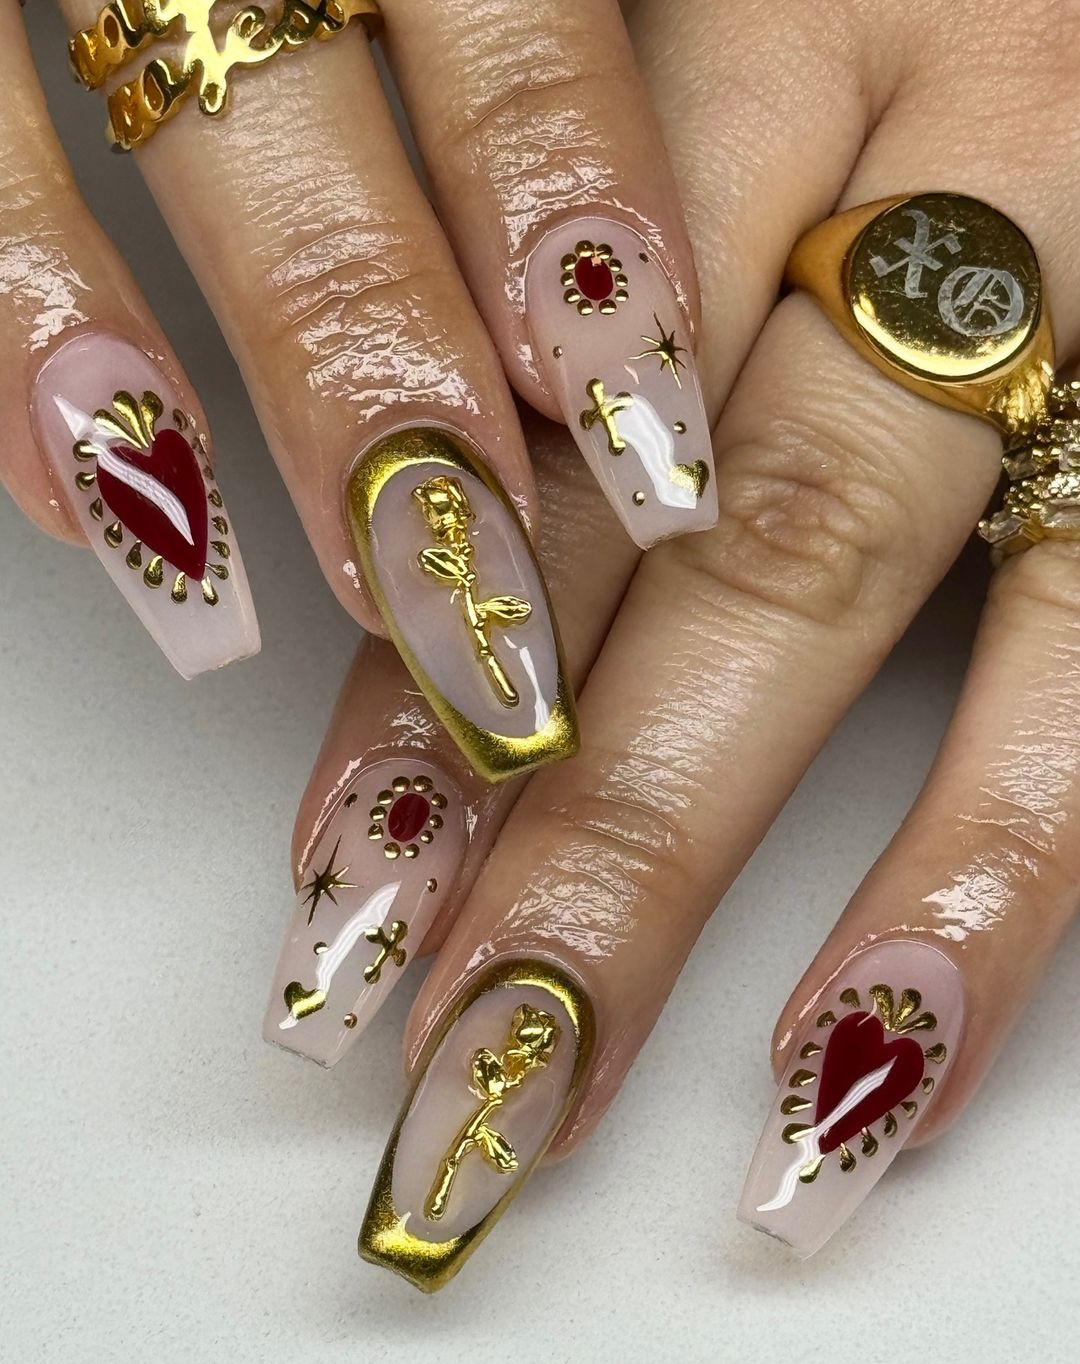
Gilded Romance
This nail design exudes elegance and romance with its rich gold accents and deep red details. The long coffin-shaped nails feature a nude base adorned with intricate gold designs and heart motifs. Each nail is a work of art, with elements like gold roses, hearts, and embellishments creating a luxurious and sophisticated look. This design is perfect for special occasions or when you want to add a touch of opulence to your style.
- Nude gel polish (e.g., OPI GelColor in Bubble Bath)
- Gold gel polish for accents (e.g., Essie in Good as Gold)
- Deep red gel polish for details (e.g., Sally Hansen in Red My Lips)
- Gold nail art foils and embellishments (e.g., Daily Charme Gold Foil)
- Fine detail brush for precise application (e.g., PANA Nail Art Brush)
- Top coat for a glossy finish (e.g., Sally Hansen Miracle Gel Top Coat)
- Nail file and buffer for shaping
DIY Instructions
- Preparation: Shape your nails into the coffin shape and buff the surface.
- Base Coat: Apply a base coat to protect your natural nails and cure under a UV lamp.
- Base Color: Paint each nail with the nude gel polish and cure under a UV lamp.
- Design: Use a fine detail brush to apply the gold gel polish in intricate designs, adding hearts, roses, and other embellishments. Add the deep red details and cure under a UV lamp.
- Top Coat: Seal the design with a top coat and cure under a UV lamp.
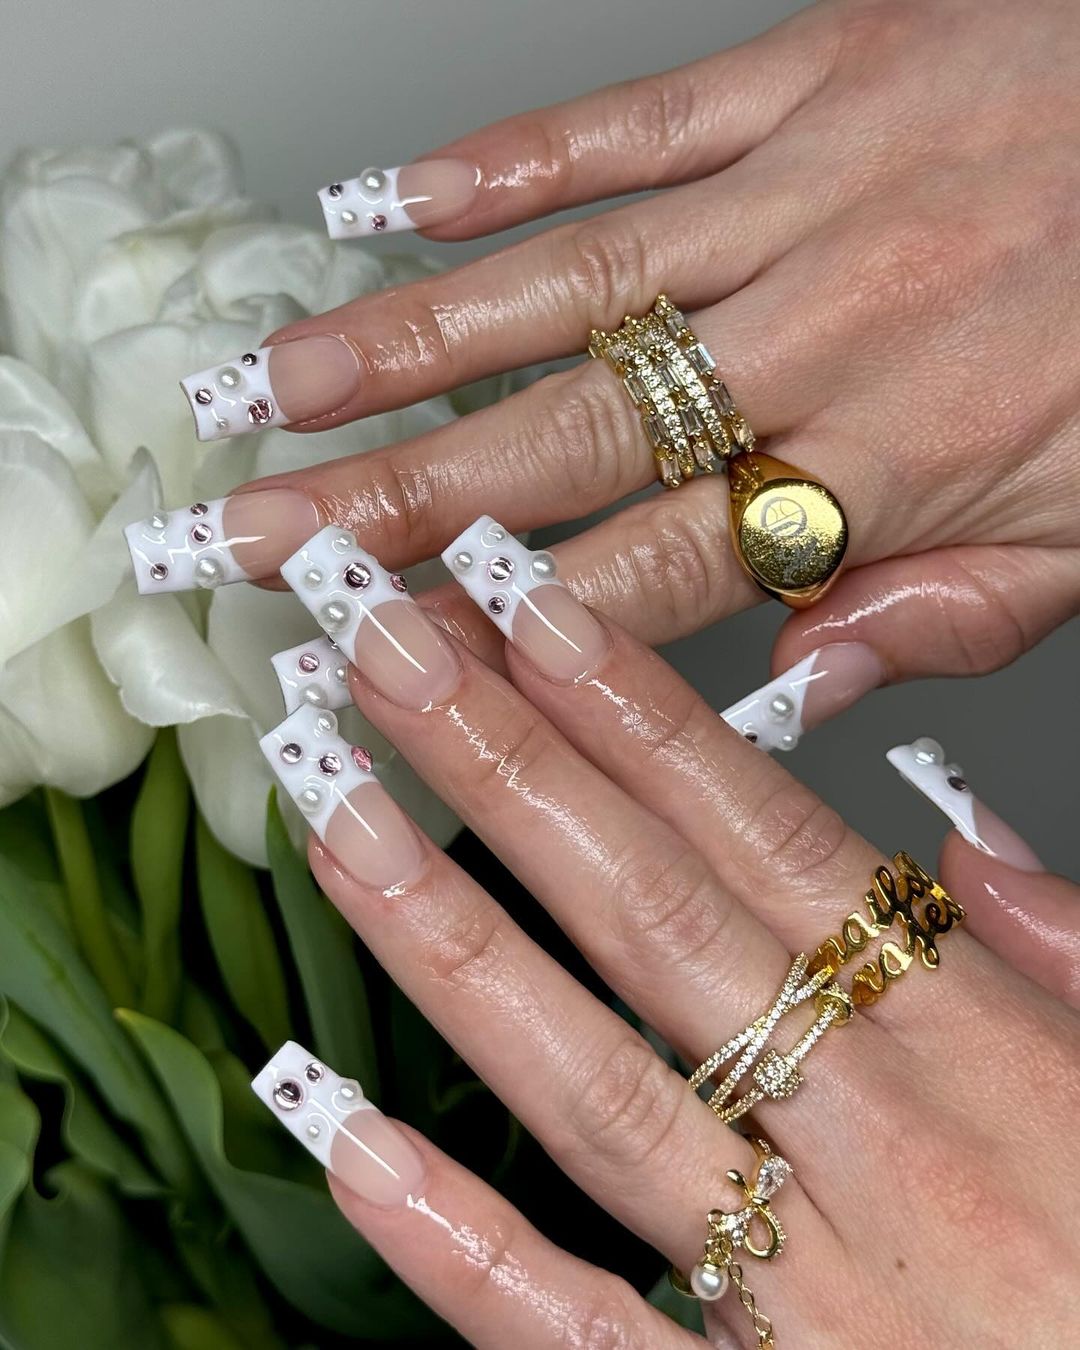
Pearl Elegance
This nail design combines the classic French manicure with modern elegance, featuring pearl and rhinestone embellishments. The long coffin-shaped nails are polished with a nude base and white tips, adorned with various sizes of pearls and rhinestones. The glossy finish enhances the luxurious appeal, making this design perfect for weddings, parties, or any special event. The addition of pearls adds a touch of sophistication and timeless beauty.
- Nude and white gel polishes (e.g., OPI GelColor in Bubble Bath and Alpine Snow)
- Pearls and rhinestones of various sizes (e.g., Swarovski Flat Back Pearls and Crystals)
- Fine detail brush for precise application (e.g., Beetles Nail Art Brushes)
- Top coat for a glossy finish (e.g., Seche Vite Dry Fast Top Coat)
- Nail file and buffer for shaping
DIY Instructions
- Preparation: Shape your nails into the coffin shape and buff the surface.
- Base Coat: Apply a base coat to protect your natural nails and cure under a UV lamp.
- Base Color: Paint each nail with the nude gel polish and apply white gel polish to the tips, creating a French manicure. Cure under a UV lamp.
- Design: Use a fine detail brush to apply pearls and rhinestones to the nails, arranging them in a decorative pattern. Cure under a UV lamp.
- Top Coat: Seal the design with a top coat and cure under a UV lamp.
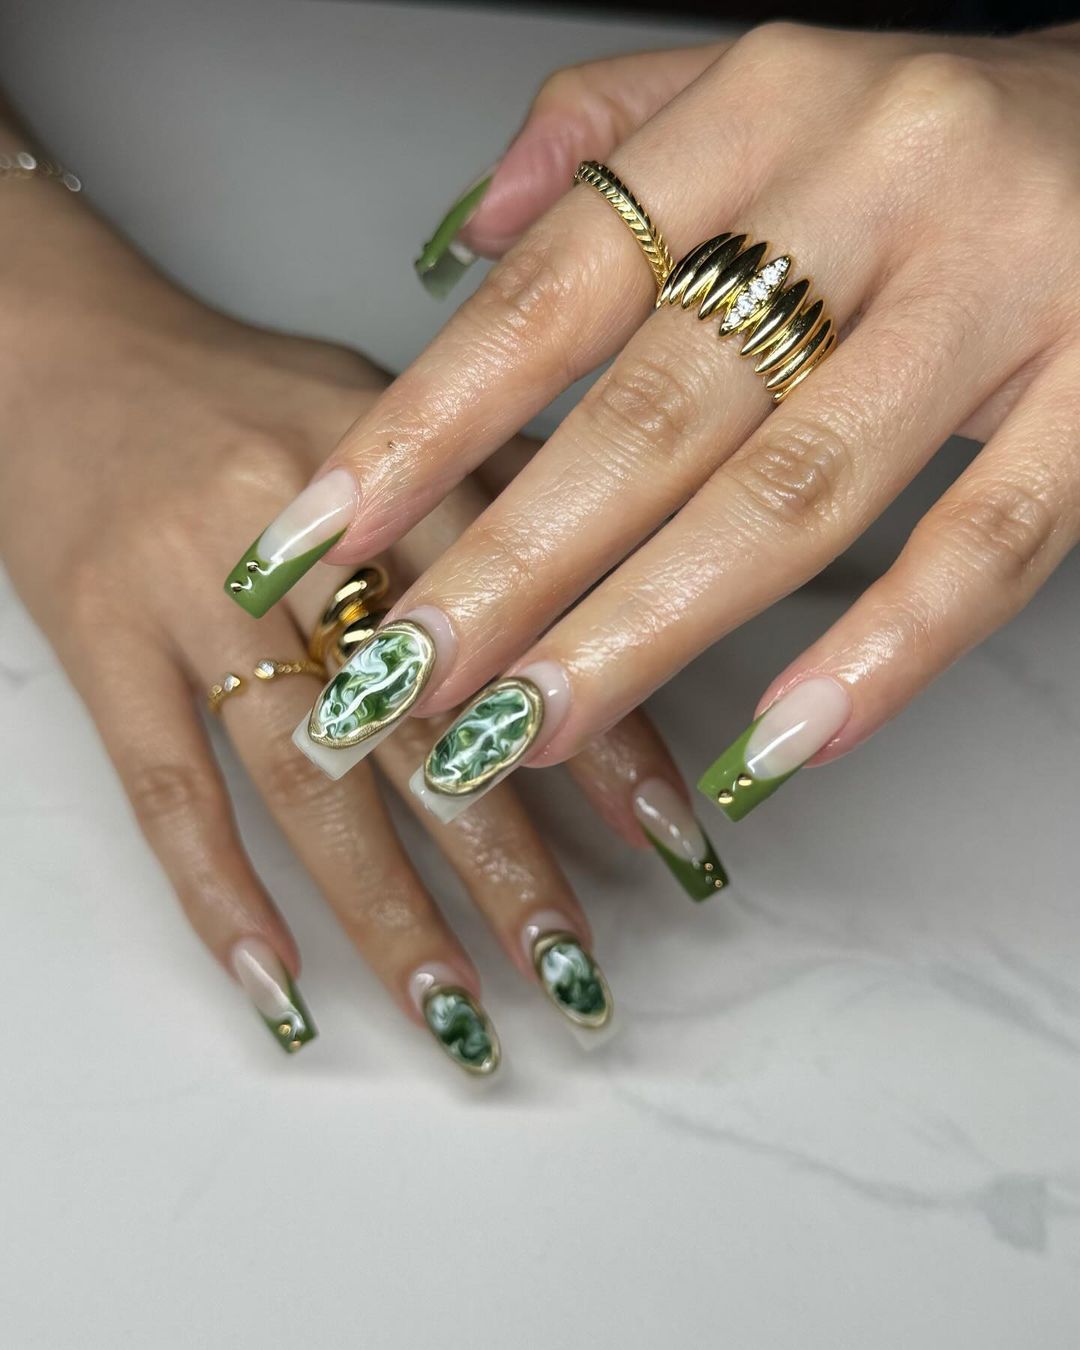
Marble Green
This nail design features a stunning combination of green marble effects and solid green French tips. The long coffin-shaped nails showcase a mix of marbleized patterns and crisp green tips, creating a sophisticated and modern look. The marble effect adds a touch of artistry and elegance, while the green tips bring a fresh and vibrant element to the design. This manicure is perfect for those who love unique and stylish nail art.
- Nude and green gel polishes (e.g., OPI GelColor in Bubble Bath and Amazon Amazoff)
- White gel polish for marble effect (e.g., Essie in Blanc)
- Fine detail brush for creating marble patterns (e.g., PANA Nail Art Brush)
- Top coat for a glossy finish (e.g., Sally Hansen Miracle Gel Top Coat)
- Nail file and buffer for shaping
DIY Instructions
- Preparation: Shape your nails into the coffin shape and buff the surface.
- Base Coat: Apply a base coat to protect your natural nails and cure under a UV lamp.
- Base Colors: Paint each nail with the nude gel polish and cure under a UV lamp.
- Design: Use a fine detail brush to create the marble effect with white and green gel polishes on selected nails. Apply solid green gel polish to the tips of the other nails. Cure under a UV lamp.
- Top Coat: Seal the design with a top coat and cure under a UV lamp.
Bat Tips
This nail design is perfect for the fall season with its edgy and playful bat wing tips. The long coffin-shaped nails feature a nude base with sharp black and white bat wing designs at the tips. The combination of nude, black, and white creates a high-contrast and eye-catching look. This design is ideal for Halloween or any time you want to add a bit of spookiness to your style.

- Nude, black, and white gel polishes (e.g., OPI GelColor in Bubble Bath, Essie in Licorice, and Alpine Snow)
- Fine detail brush for creating precise bat wing designs (e.g., Beetles Nail Art Brushes)
- Top coat for a glossy finish (e.g., Seche Vite Dry Fast Top Coat)
- Nail file and buffer for shaping
DIY Instructions
- Preparation: Shape your nails into the coffin shape and buff the surface.
- Base Coat: Apply a base coat to protect your natural nails and cure under a UV lamp.
- Base Color: Paint each nail with the nude gel polish and cure under a UV lamp.
- Design: Use a fine detail brush to apply the black and white gel polishes in bat wing patterns at the tips of each nail. Cure under a UV lamp.
- Top Coat: Seal the design with a top coat and cure under a UV lamp.
FAQ
- What are coffin nails?
Coffin nails, also known as ballerina nails, are shaped like a coffin or ballerina slipper. They are long with a flat tip, providing a large canvas for intricate designs and nail art.
- How can I make my nail polish last longer?
To make your nail polish last longer, ensure you prep your nails properly by cleaning and buffing them. Apply a base coat before the color and finish with a top coat to seal the design. Avoid exposing your nails to water or harsh chemicals without protection.
- Are coffin nails suitable for everyday wear?
Yes, coffin nails can be suitable for everyday wear, but it depends on your lifestyle. They are long and may require more maintenance compared to shorter styles. However, with the right care, they can look stunning and last longer.
- What colors are popular for fall nail designs?
Popular colors for fall nail designs include shades of brown, orange, green, red, and neutral tones. These colors reflect the autumn season and can be incorporated into various nail art designs for a chic and seasonal look.
Save Pin