
As the leaves start to fall and the weather cools, it’s the perfect time to refresh your manicure with some seasonal flair. Are you looking for long fall nails inspiration? Want to discover some cute and trendy nail designs for the autumn season? Whether you’re a fan of simple elegance or love to go all out with rhinestones and extra details, I’ve got some fantastic ideas to share. From classic brown and red shades to gel almond and gel long square shapes, there’s something for everyone. Let’s dive into these fabulous nail ideas and get your autumn look on point.
Golden Elegance
The first design is a stunning combination of gold accents and soft pink base, creating a luxurious and elegant look. These long fall nails feature intricate gold detailing that adds a touch of sophistication to the manicure. The mix of cute floral designs and bold gold elements make these nails perfect for both casual and formal occasions. The inspo behind this design is the golden hues of autumn leaves, capturing the essence of the season beautifully.

-
- Base coat: OPI Natural Nail Base Coat
- Pink polish: Essie Ballet Slippers
- Gold detailing: OPI Gold Digger
- Top coat: Seche Vite Dry Fast Top Nail Coat
- Nail art brush: Beetles Nail Art Brushes
Creating the Look:
-
- Start with a base coat to protect your nails.
- Apply two coats of the pink polish and let it dry completely.
- Use the nail art brush to carefully apply the gold detailing, creating delicate patterns.
- Finish with a top coat to seal and protect your design.
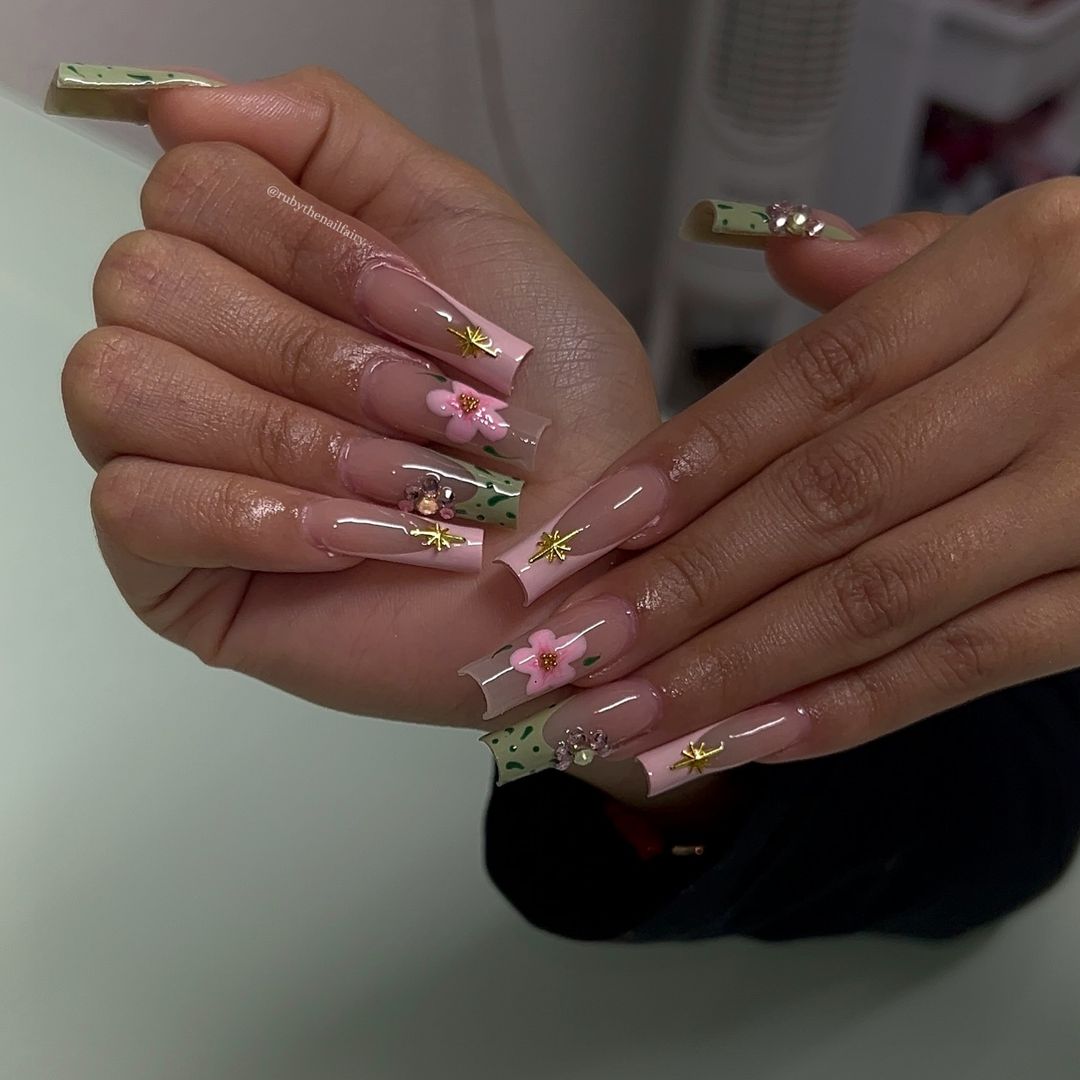
Floral Accents
Next, we have a delicate floral design that combines soft pinks and greens with intricate flower accents. This design is perfect for those who love pretty and classy nails. The use of small rhinestones adds a touch of glamour without being too overwhelming. The inspiration comes from autumn gardens, where the last blooms of the season are still visible.
-
- Base coat: Sally Hansen Double Duty Base & Top Coat
- Pink polish: Zoya Portia
- Green polish: Essie Mojito Madness
- Rhinestones: Swarovski Nail Crystals
- Top coat: Essie Good To Go
Creating the Look:
-
- Apply a base coat to start.
- Paint your nails with the pink polish, and let it dry.
- Use the green polish to create leaf patterns using a thin brush.
- Place the rhinestones on top of the pink polish to add sparkle.
- Seal everything with a top coat.
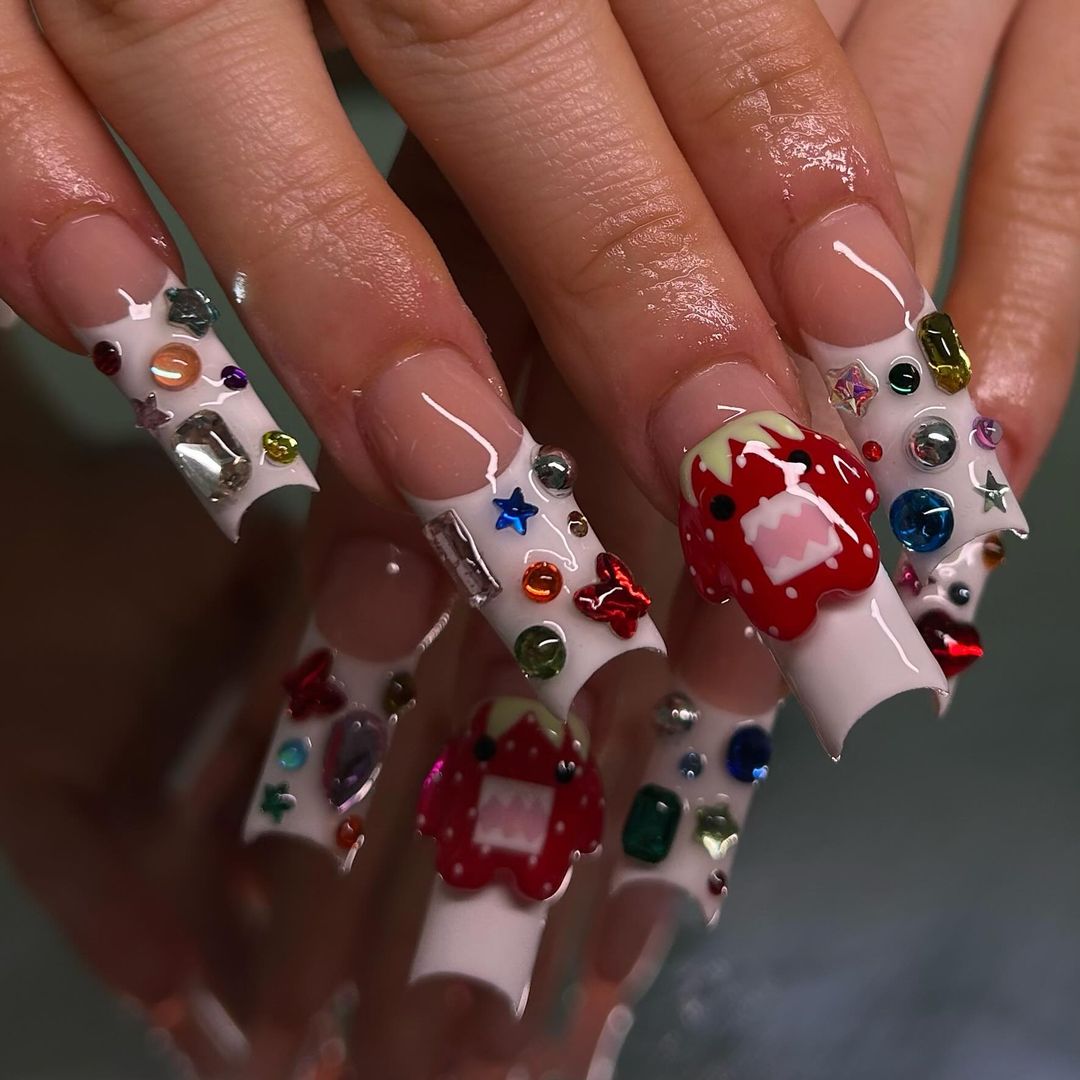
Playful Gems
For those who love a bit of fun and whimsy, this design is perfect. Featuring bold colors and playful gem accents, these extra nails are sure to stand out. The mix of bright reds, blues, and greens with various shapes and sizes of gems makes this design eye-catching and unique. This look is inspired by the vibrant colors of fall festivals and fairs.
-
- Base coat: Deborah Lippmann Hard Rock Base & Top Coat
- White polish: OPI Alpine Snow
- Various colored gems: Born Pretty Nail Art Decorations
- Top coat: Glisten & Glow Top Coat
Creating the Look:
-
- Apply a base coat to your nails.
- Paint your nails with the white polish, allowing it to dry thoroughly.
- Use nail glue to attach the various colored gems in a random pattern.
- Finish with a top coat to secure the gems in place.
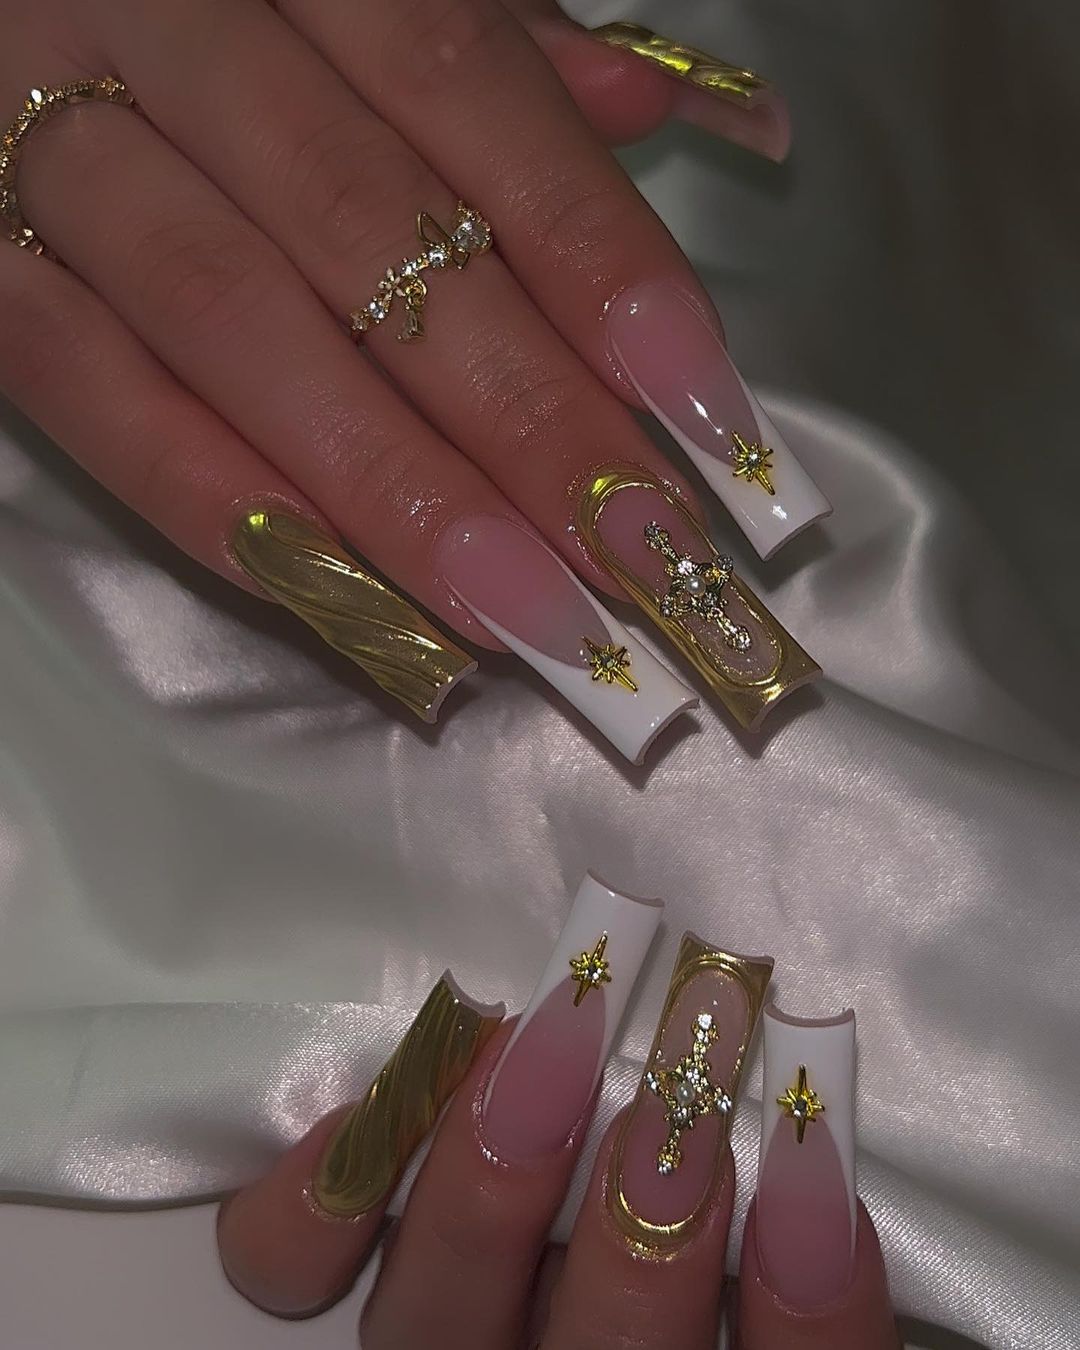
Golden Star Elegance
This exquisite nail design combines a nude and white base with luxurious gold accents, creating an elegant and sophisticated look. The nails are adorned with gold stars and intricate detailing, giving them a celestial feel that’s perfect for fall. The long, square shape adds to the glamour, making these nails a standout for any occasion.
-
- Base coat: OPI Natural Nail Base Coat
- Nude polish: Essie Ballet Slippers
- White polish: OPI Alpine Snow
- Gold detailing: OPI Gold Digger
- Star decals: Born Pretty Nail Art Stickers
- Top coat: Seche Vite Dry Fast Top Nail Coat
- Nail art brush: Beetles Nail Art Brushes
Creating the Look:
-
- Start with a base coat to protect your nails.
- Apply the nude polish on the nail bed and the white polish on the tips, creating a French manicure look.
- Use the nail art brush to add the gold detailing around the nail and place the star decals strategically.
- Seal the design with a top coat to protect and add shine.
Save Pin
Fiery Autumn Vibes
This bold and vibrant design features a mix of orange and red hues with unique geometric patterns, embodying the spirit of autumn. The coffin shape adds a modern twist, while the glossy finish ensures the colors pop. The intricate line work and subtle metallic accents make this design both striking and trendy.
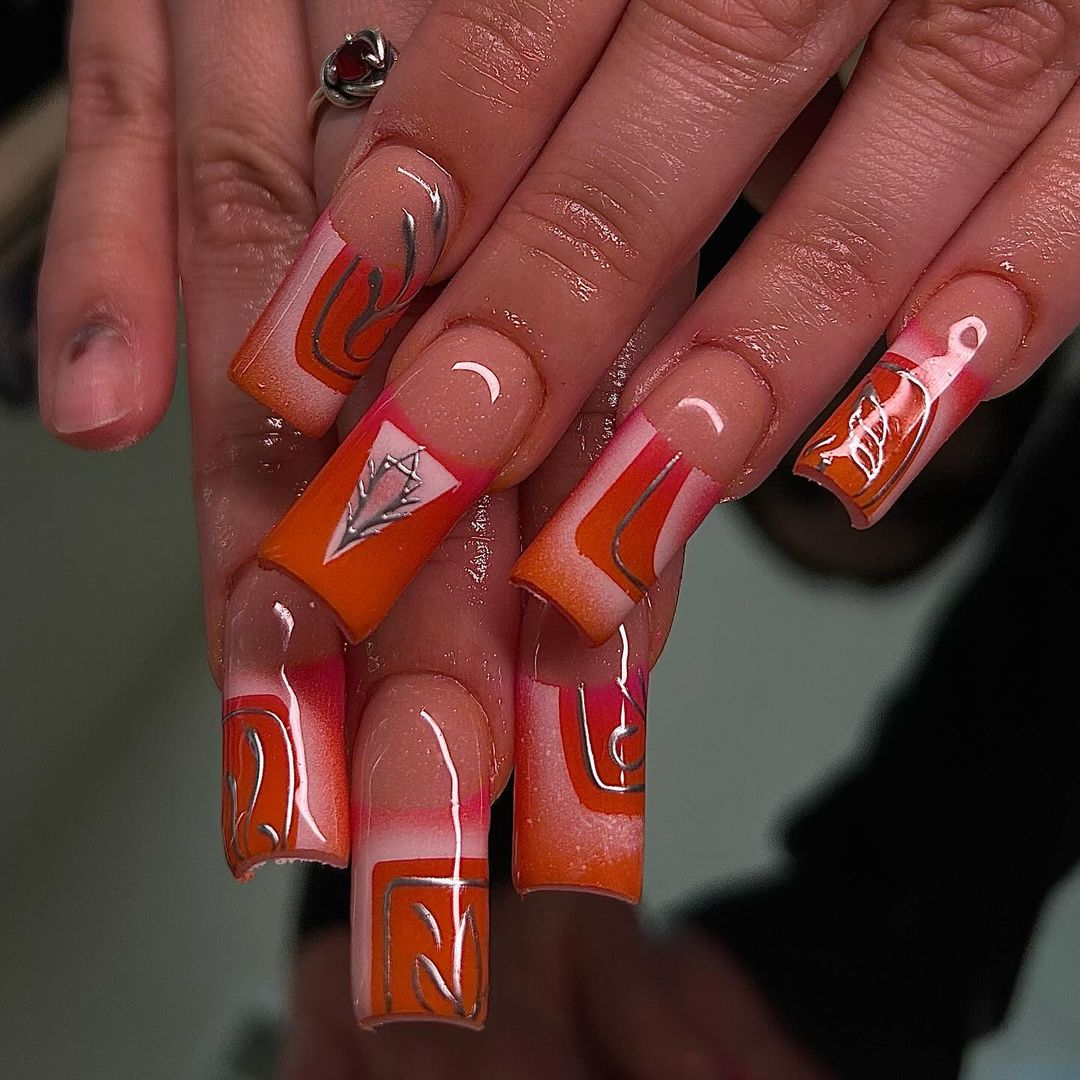
-
- Base coat: Sally Hansen Double Duty Base & Top Coat
- Orange polish: Essie Fear & Desire
- Red polish: OPI Big Apple Red
- Metallic detailing: Zoya Trixie
- Top coat: Essie Good To Go
- Nail art brush: Winstonia Fine Liner Brushes
Creating the Look:
-
- Apply a base coat to start.
- Paint the nails with the orange polish, allowing it to dry completely.
- Use the nail art brush to add red and metallic geometric patterns on each nail.
- Finish with a top coat to protect the design and add a glossy finish.
Regal Red and Gold
These nails exude luxury with a rich red base and opulent gold accents. The intricate designs include heart and cross motifs, adding a regal touch to the manicure. The long, stiletto shape enhances the dramatic effect, making these nails perfect for those who love to make a statement.
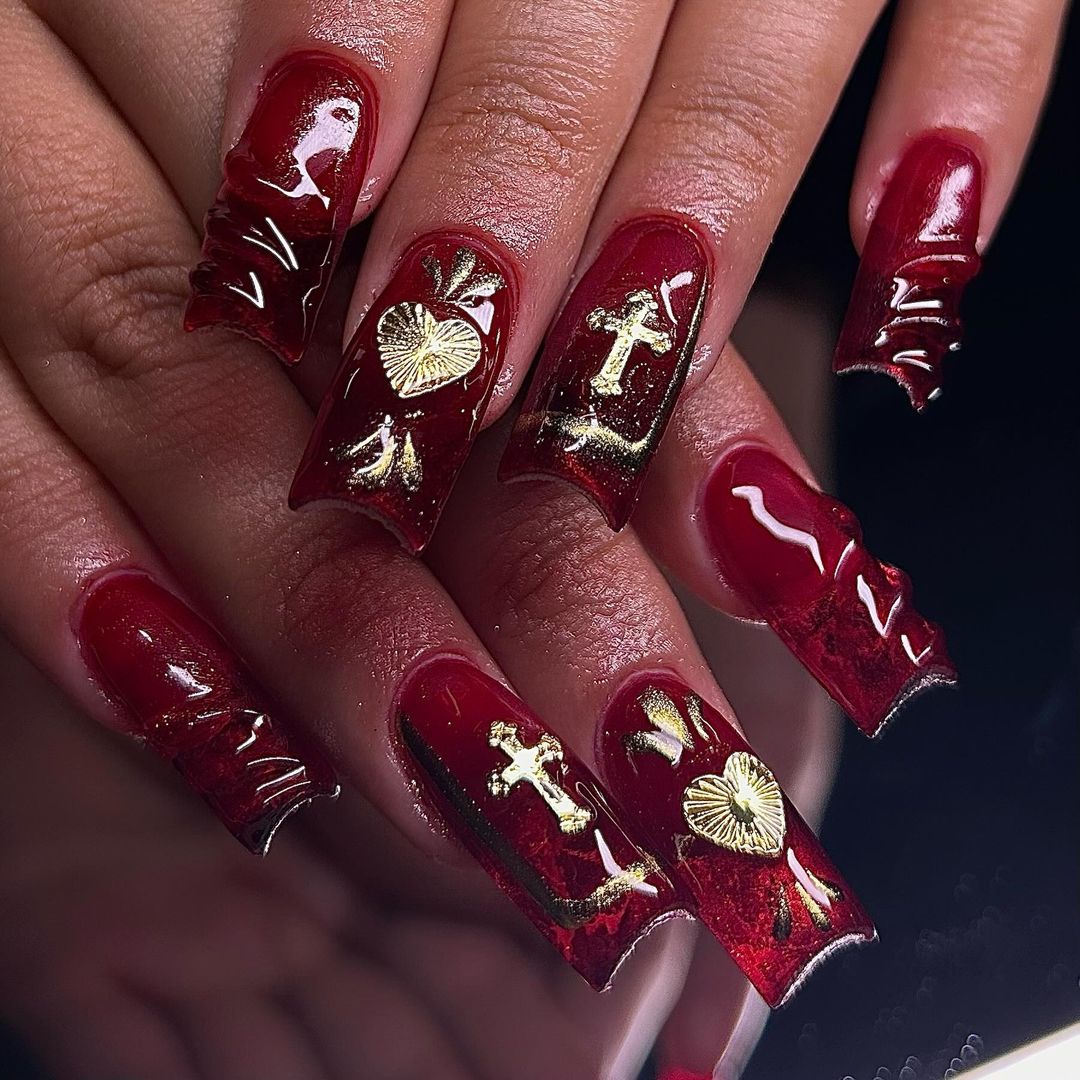
-
- Base coat: Deborah Lippmann Hard Rock Base & Top Coat
- Red polish: Essie A List
- Gold detailing: OPI Gold Digger
- Heart and cross decals: Born Pretty Nail Art Decorations
- Top coat: Glisten & Glow Top Coat
- Nail art brush: Beetles Nail Art Brushes
Creating the Look:
-
- Apply a base coat to your nails.
- Paint your nails with the red polish, allowing it to dry thoroughly.
- Use the nail art brush to add the gold detailing and apply the heart and cross decals.
- Finish with a top coat to secure the decals and add shine to the nails.
Black and White Artistry
These long square nails feature a stunning black and white artistic design, adorned with delicate line drawings and rhinestones. The monochrome palette is both striking and elegant, making these nails perfect for those who appreciate a refined yet bold look. The black detailing against the white background creates a dramatic contrast, while the rhinestones add a touch of sparkle.
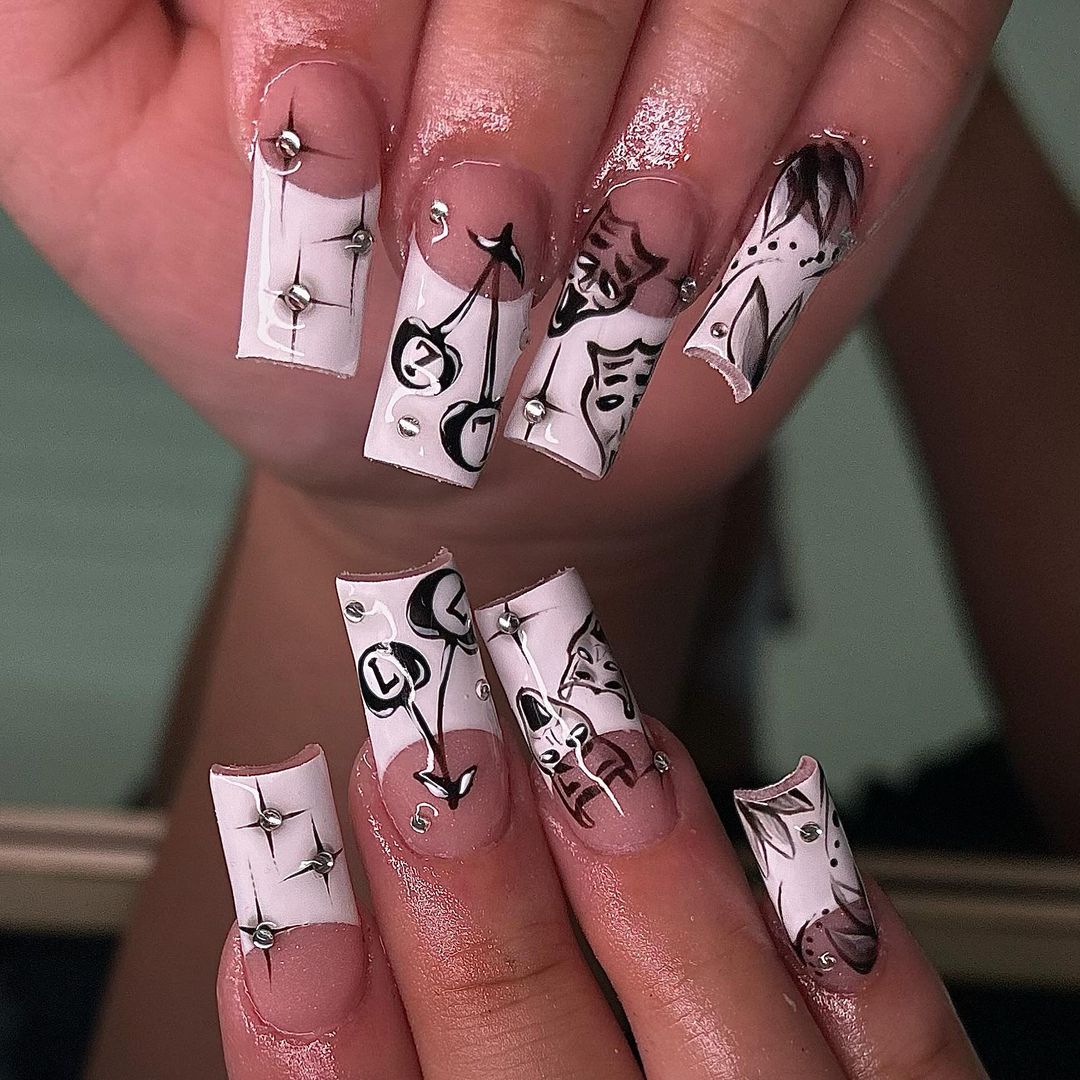
-
- Base coat: OPI Natural Nail Base Coat
- White polish: OPI Alpine Snow
- Black detailing: Sally Hansen Black Out
- Rhinestones: Swarovski Nail Crystals
- Top coat: Seche Vite Dry Fast Top Nail Coat
- Nail art brush: Beetles Nail Art Brushes
Creating the Look:
-
- Apply a base coat to protect your nails.
- Paint your nails with the white polish and let it dry completely.
- Use the nail art brush to create black line drawings on each nail, incorporating various shapes and patterns.
- Place rhinestones strategically on each nail for added sparkle.
- Finish with a top coat to secure the design and add a glossy finish.
Sweet Treats
This playful design features a mix of white and colorful accents, resembling various sweet treats. The long coffin shape adds to the modern and trendy vibe, while the glossy finish ensures the colors stand out. The design includes heart-shaped accents and whimsical patterns, making these nails perfect for those who love a fun and creative look.
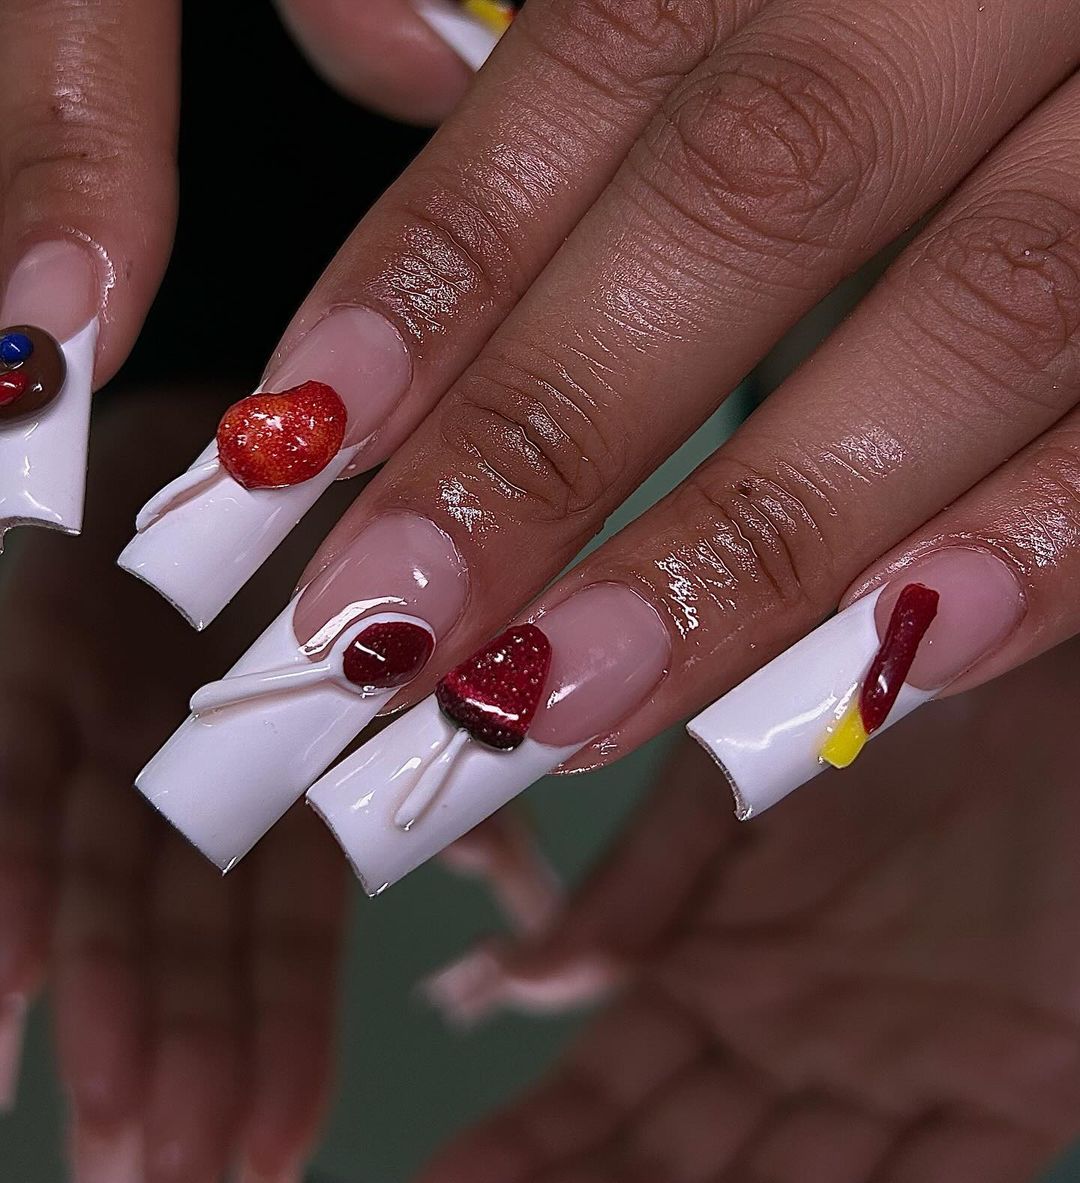
-
- Base coat: Sally Hansen Double Duty Base & Top Coat
- White polish: OPI Alpine Snow
- Colored accents: Essie Forever Yummy, OPI My Chihuahua Bites
- Top coat: Essie Good To Go
- Nail art brush: Winstonia Fine Liner Brushes
Creating the Look:
-
- Start with a base coat to protect your nails.
- Paint your nails with the white polish, allowing it to dry completely.
- Use the nail art brush to add colorful accents in the shape of hearts and other patterns.
- Finish with a top coat to protect the design and add a glossy finish.
Animal Print Glam
These nails feature a bold animal print design in a monochrome palette, combined with silver accents and rhinestones. The long, square shape adds to the dramatic effect, while the intricate patterns and embellishments make these nails a true statement piece. The mix of zebra and leopard prints creates a unique and eye-catching look.
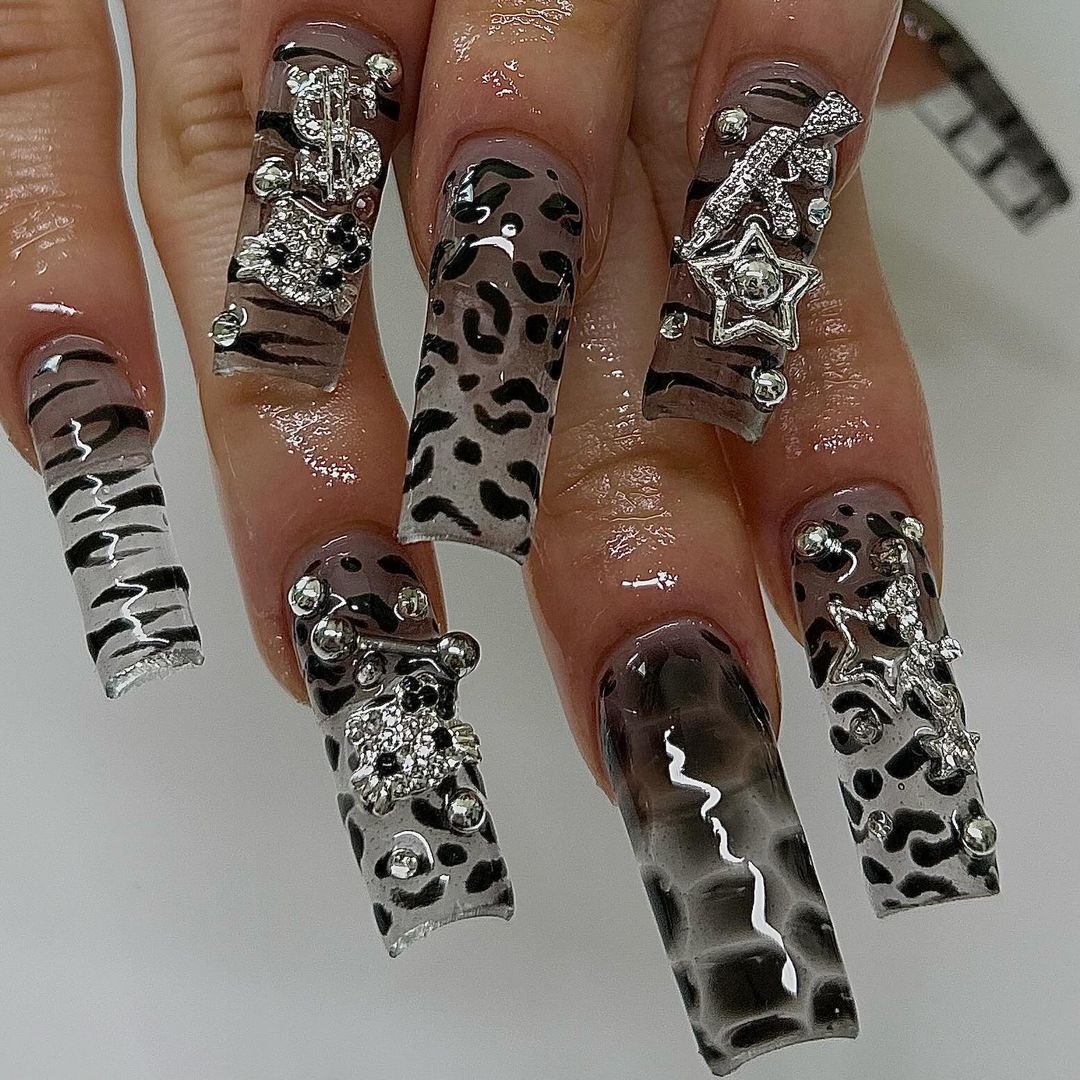
-
- Base coat: Deborah Lippmann Hard Rock Base & Top Coat
- Black polish: Essie Licorice
- White polish: OPI Alpine Snow
- Silver detailing: Zoya Trixie
- Rhinestones: Swarovski Nail Crystals
- Top coat: Glisten & Glow Top Coat
- Nail art brush: Beetles Nail Art Brushes
Creating the Look:
-
- Apply a base coat to your nails.
- Paint your nails with the white polish and let it dry thoroughly.
- Use the nail art brush to create animal print patterns in black and silver.
- Place rhinestones strategically for added glamour.
- Finish with a top coat to secure the design and add shine.
Save Pin
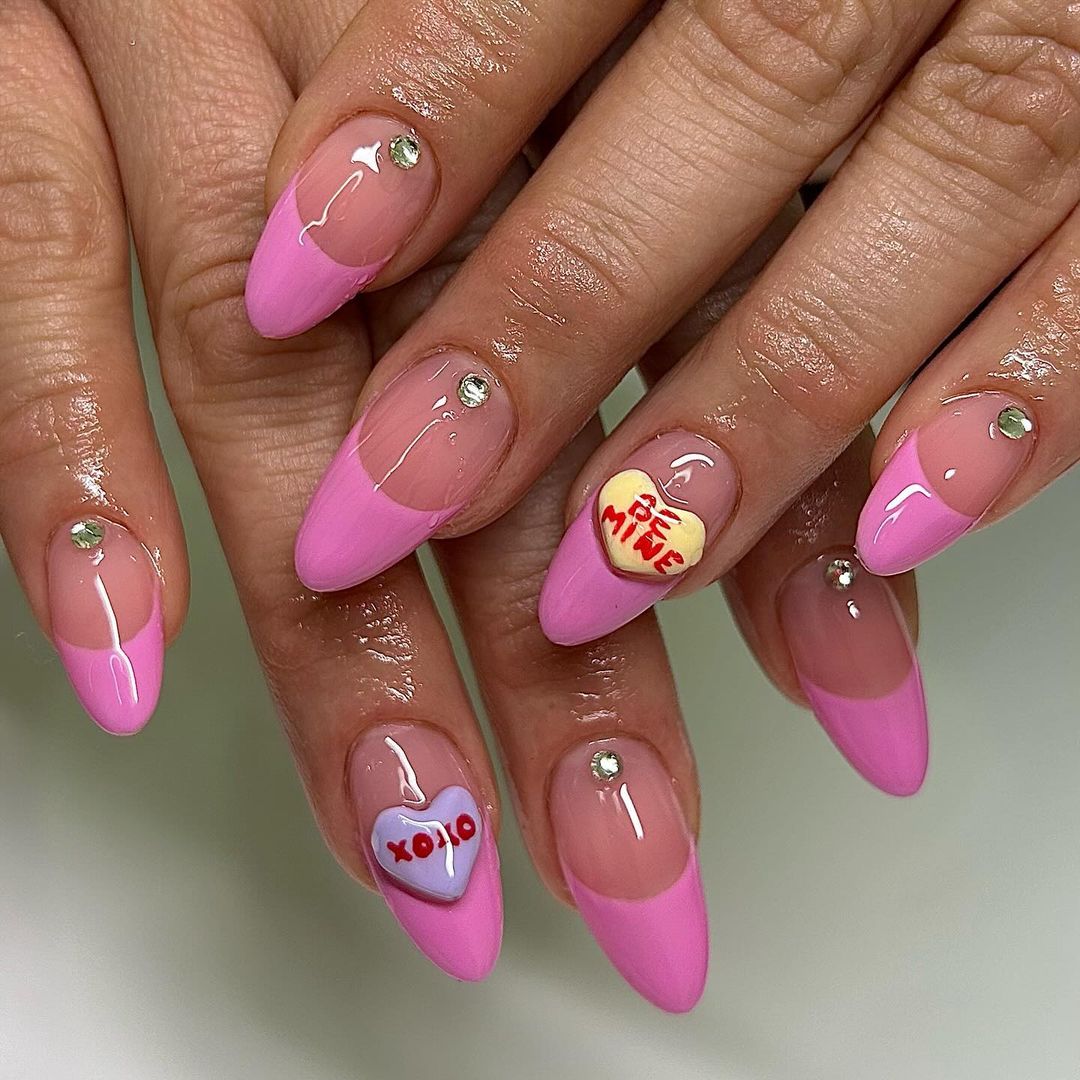
Pink Valentine
These adorable nails feature a cute Valentine’s Day theme with pink French tips and heart-shaped accents. The almond shape adds a touch of elegance, while the rhinestones provide a bit of sparkle. The design is both playful and romantic, making it perfect for a special occasion or just to show some love.
-
- Base coat: OPI Natural Nail Base Coat
- Pink polish: Essie Muchi Muchi
- White polish: OPI Alpine Snow
- Heart decals: Born Pretty Nail Art Stickers
- Rhinestones: Swarovski Nail Crystals
- Top coat: Seche Vite Dry Fast Top Nail Coat
- Nail art brush: Beetles Nail Art Brushes
Creating the Look:
-
- Start with a base coat to protect your nails.
- Apply the pink polish to create French tips on each nail.
- Use the nail art brush to add heart decals and place rhinestones for added sparkle.
- Finish with a top coat to seal the design and add shine.
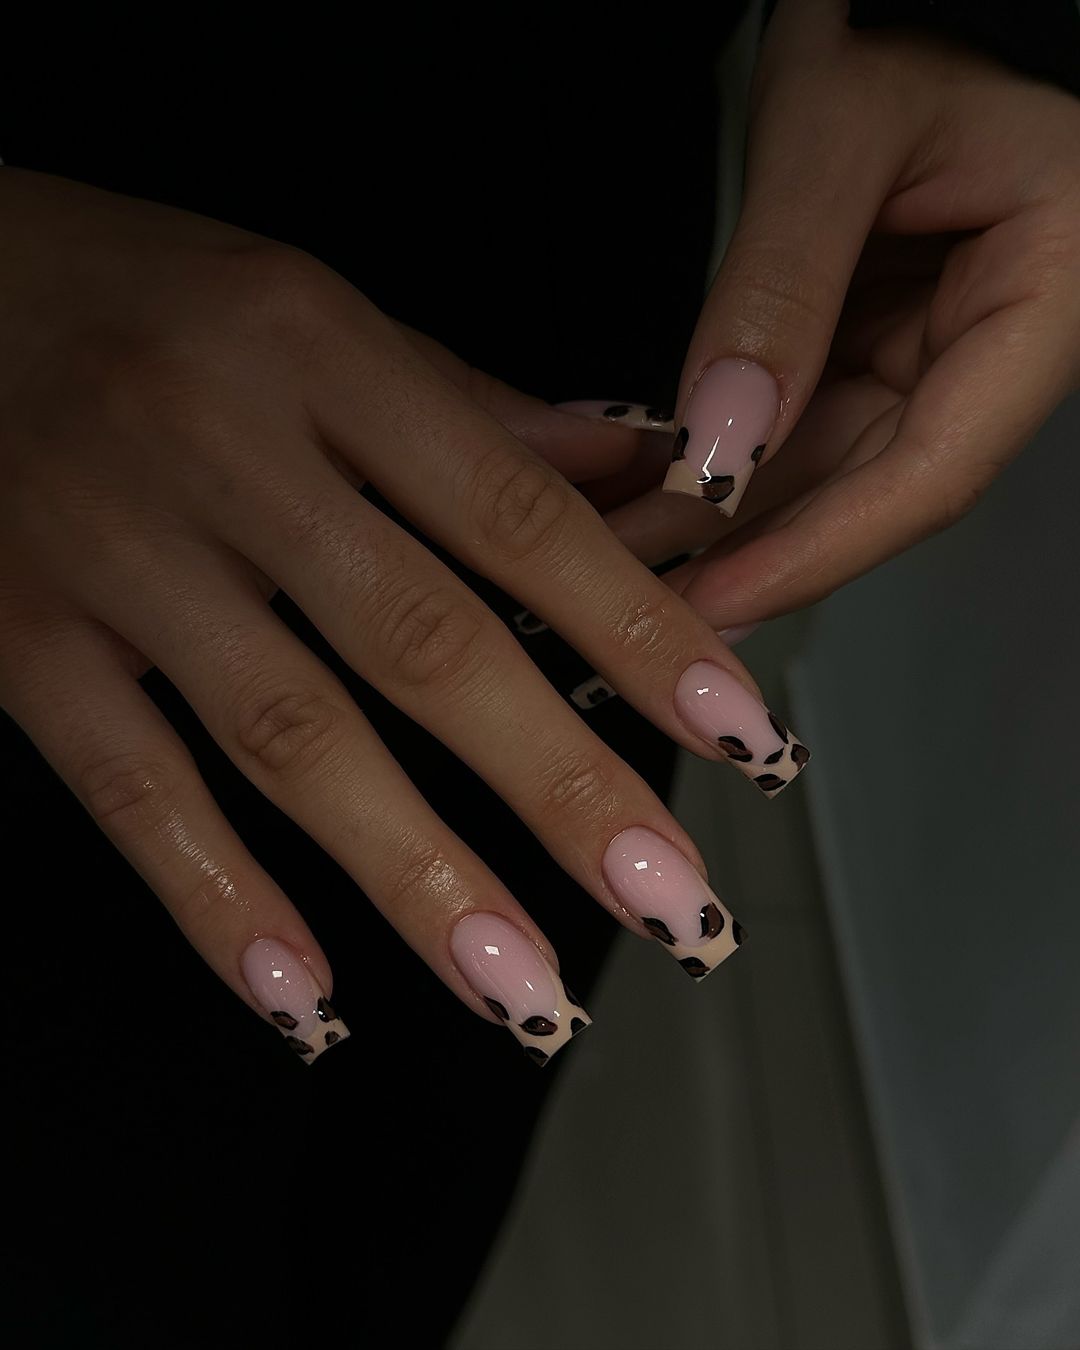
Leopard French Tips
These chic nails feature a modern twist on the classic French manicure with leopard print tips. The combination of nude and black creates a sophisticated look, while the square shape keeps it contemporary. The design is perfect for those who love a subtle yet stylish manicure.
-
- Base coat: Sally Hansen Double Duty Base & Top Coat
- Nude polish: OPI Bubble Bath
- Black polish: Essie Licorice
- Top coat: Essie Good To Go
- Nail art brush: Winstonia Fine Liner Brushes
Creating the Look:
-
- Apply a base coat to start.
- Paint your nails with the nude polish, allowing it to dry completely.
- Use the nail art brush to create leopard print tips with black polish.
- Finish with a top coat to protect the design and add a glossy finish.
Pink Waves
These elegant nails feature a gradient of pink shades with wave patterns, creating a serene and beautiful look. The long, square shape adds to the overall sophistication, while the glossy finish enhances the colors. The design is perfect for those who love a soft and feminine manicure.
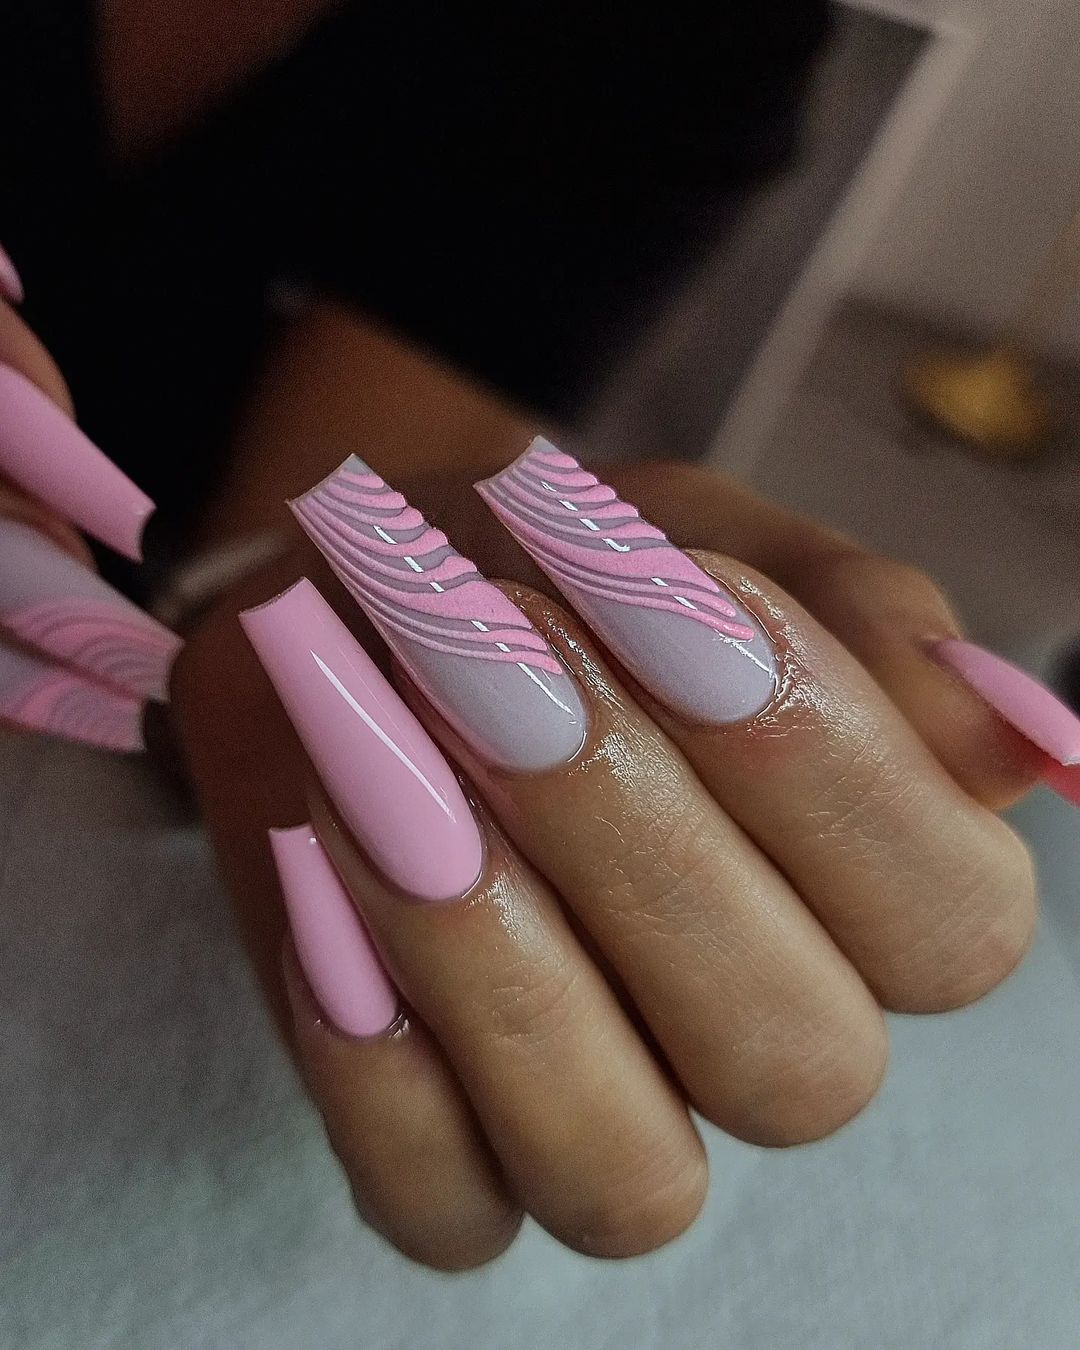
-
- Base coat: Deborah Lippmann Hard Rock Base & Top Coat
- Light pink polish: Essie Ballet Slippers
- Dark pink polish: OPI Strawberry Margarita
- Top coat: Glisten & Glow Top Coat
- Nail art brush: Beetles Nail Art Brushes
Creating the Look:
-
- Apply a base coat to your nails.
- Paint your nails with the light pink polish and let it dry thoroughly.
- Use the nail art brush to create wave patterns with the dark pink polish.
- Finish with a top coat to secure the design and add shine.
Tortoiseshell Tips
This elegant design features tortoiseshell tips with a nude base, creating a sophisticated and trendy look. The long square shape enhances the overall style, while the addition of small gold accents provides a touch of glamour. This combination of neutral and bold patterns makes these nails perfect for both casual and formal occasions.
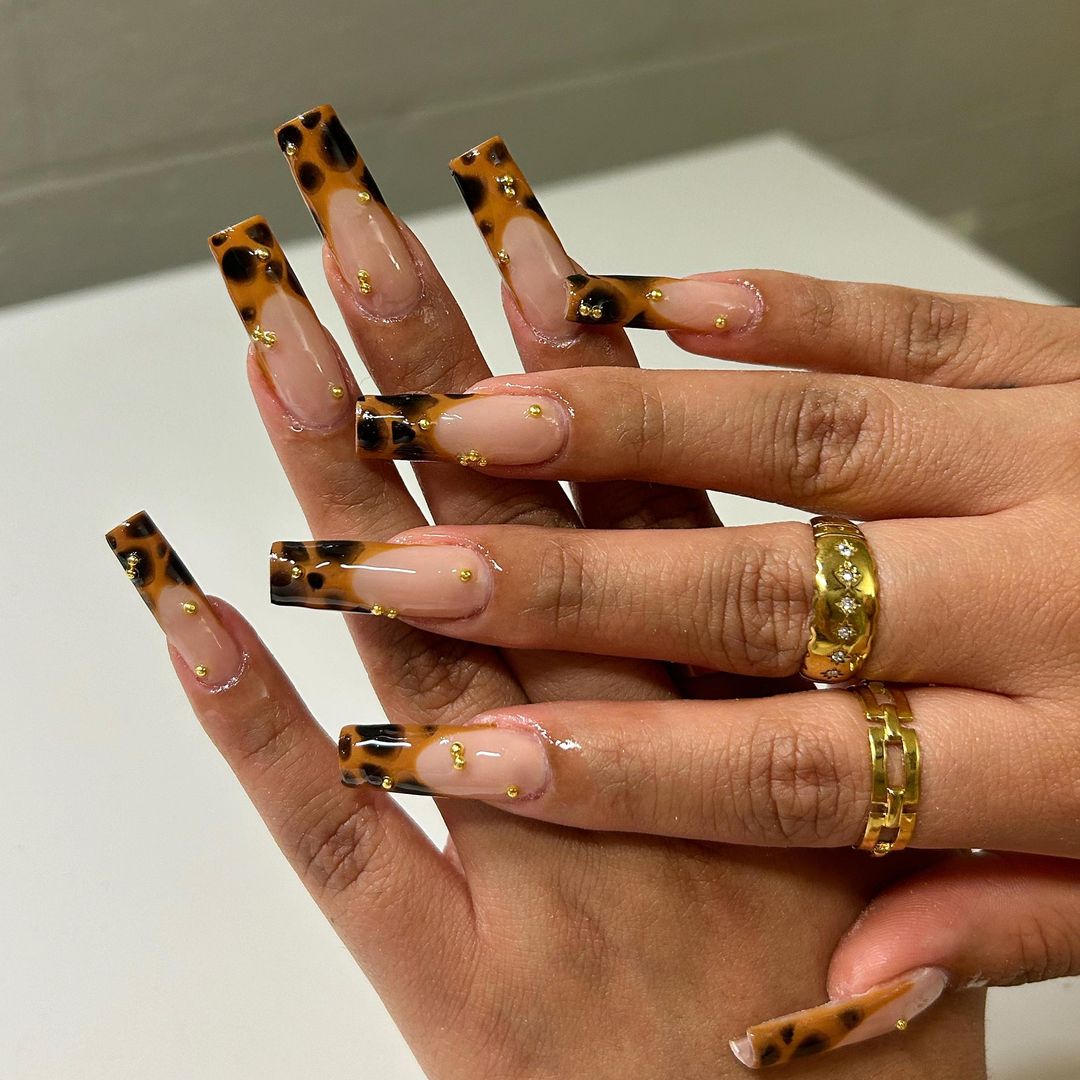
-
- Base coat: OPI Natural Nail Base Coat
- Nude polish: Essie Ballet Slippers
- Tortoiseshell polish: OPI Amber Tortoise
- Gold accents: Born Pretty Nail Art Decoration
- Top coat: Seche Vite Dry Fast Top Nail Coat
- Nail art brush: Beetles Nail Art Brushes
Creating the Look:
-
- Apply a base coat to protect your nails.
- Paint your nails with the nude polish and let it dry completely.
- Use the nail art brush to create the tortoiseshell pattern on the tips.
- Add small gold accents to the nails for extra detail.
- Finish with a top coat to seal and protect the design.
Floral 3D White
This intricate design showcases 3D white floral details on a soft pink base, creating a stunning and delicate look. The long coffin shape is perfect for this elaborate design, which features raised flower petals and rhinestones for added dimension and sparkle. This design is ideal for special occasions and those who love a touch of elegance.
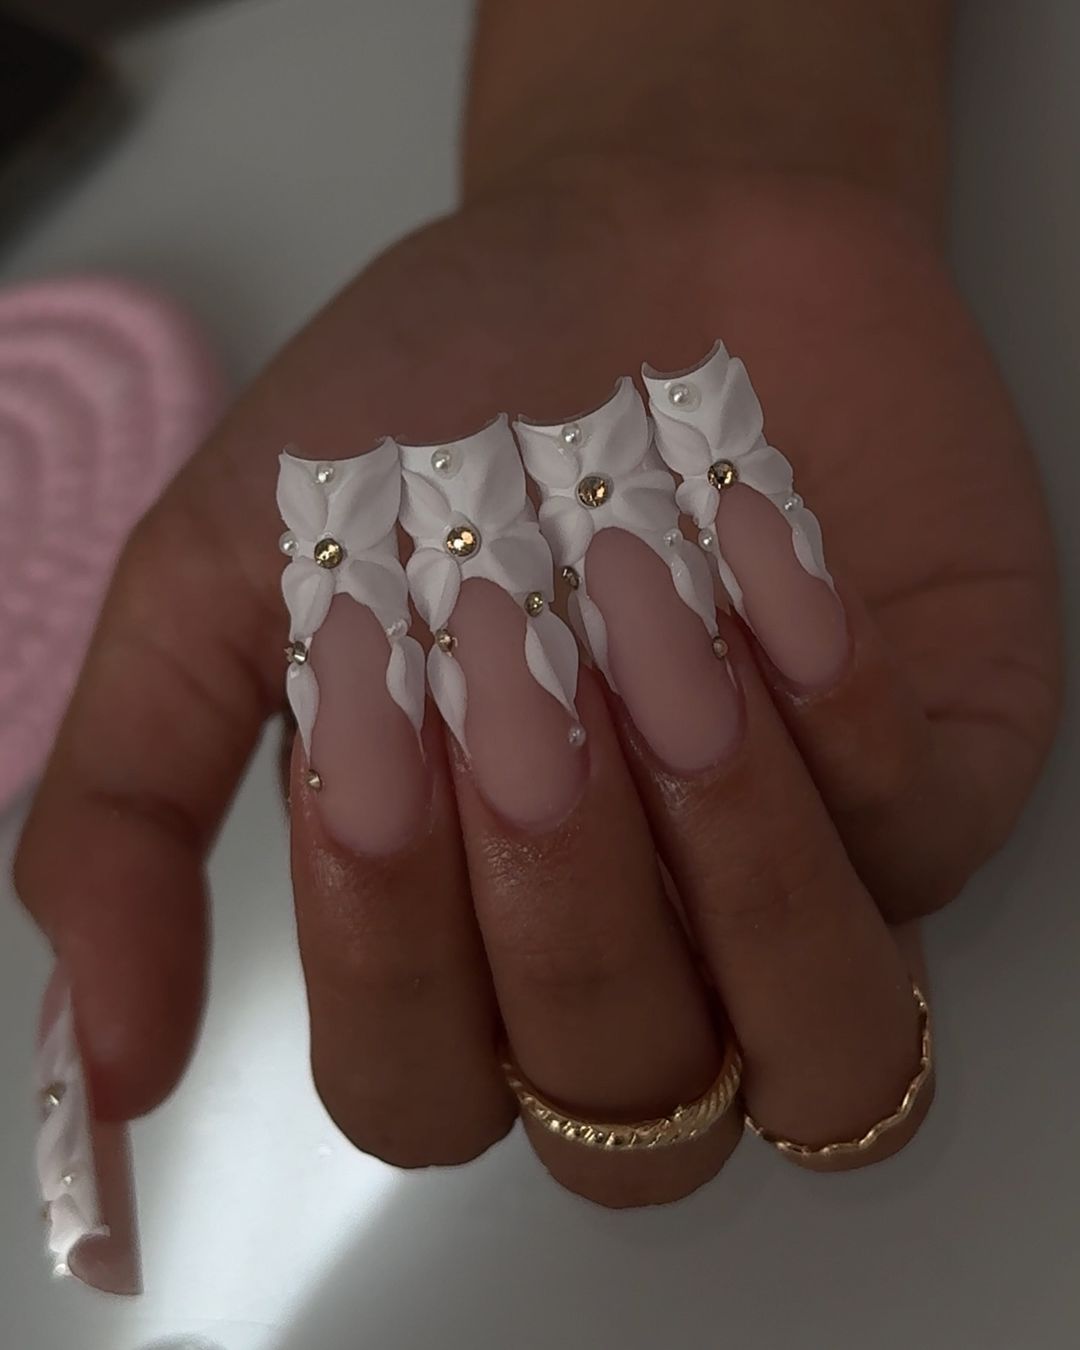
-
- Base coat: Sally Hansen Double Duty Base & Top Coat
- Pink polish: OPI Bubble Bath
- White 3D gel: IBD Hard Gel White
- Rhinestones: Swarovski Nail Crystals
- Top coat: Essie Good To Go
- Nail art brush: Winstonia Fine Liner Brushes
Creating the Look:
-
- Start with a base coat to protect your nails.
- Apply the pink polish and let it dry completely.
- Use the 3D gel to create floral designs on each nail, using a brush to shape the petals.
- Add rhinestones to the center of the flowers for a touch of sparkle.
- Finish with a top coat to secure the design and add shine.
Golden Frames
These nails feature a nude base with striking gold frames, creating a modern and luxurious look. The long coffin shape adds to the elegance, while the glossy finish ensures the gold accents stand out. This design is perfect for those who appreciate minimalist yet bold styles.
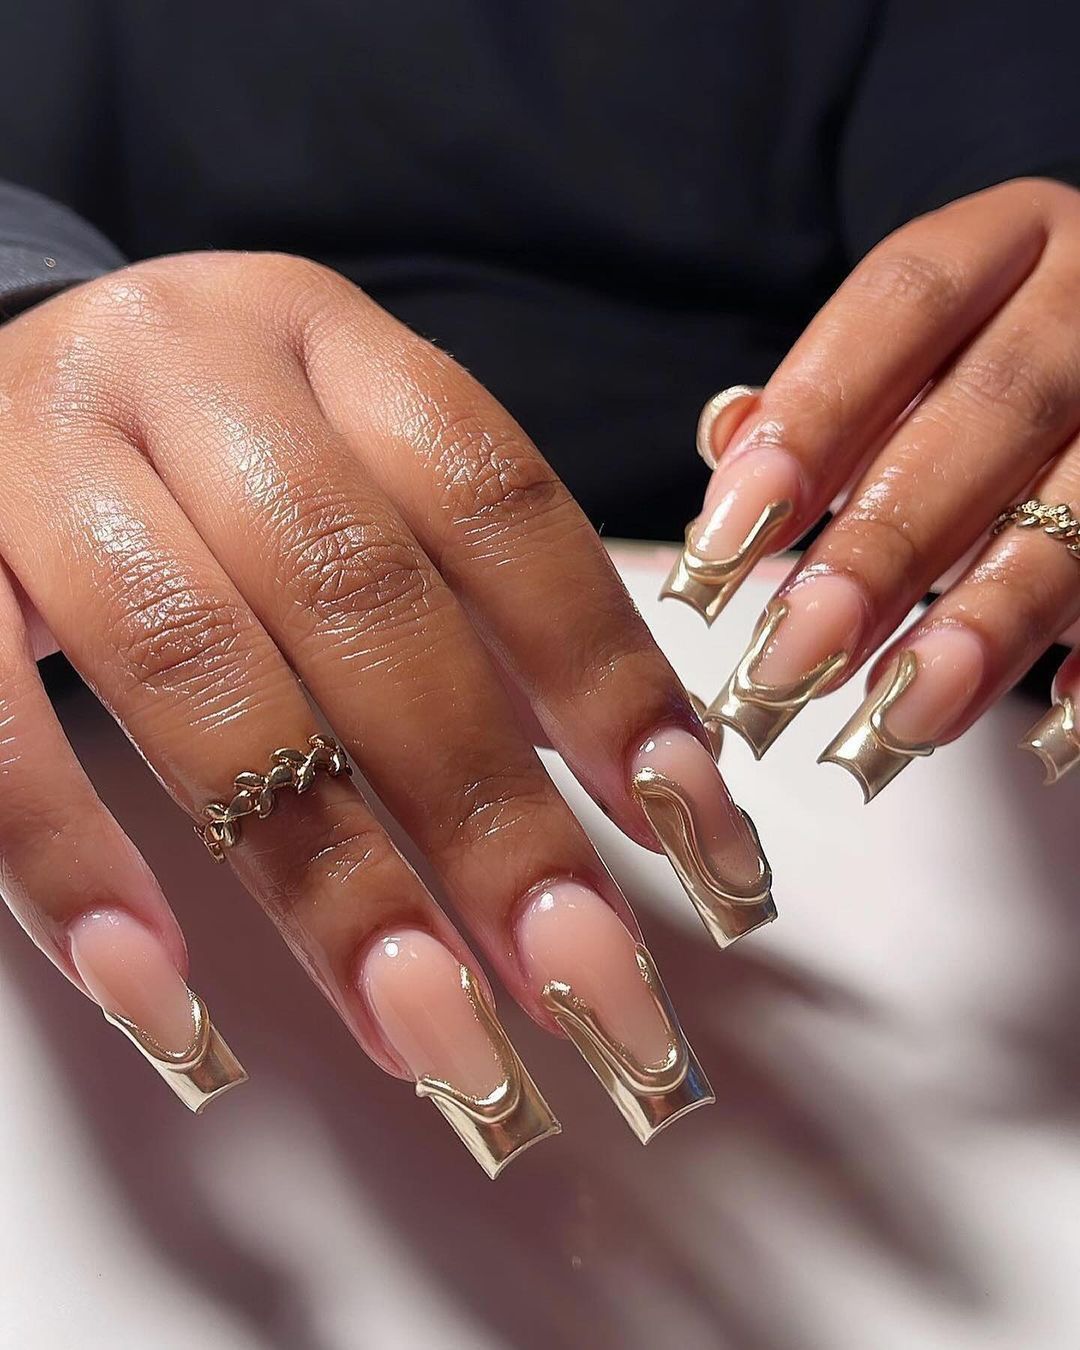
-
- Base coat: Deborah Lippmann Hard Rock Base & Top Coat
- Nude polish: Essie Mademoiselle
- Gold detailing: OPI Gold Digger
- Top coat: Glisten & Glow Top Coat
- Nail art brush: Beetles Nail Art Brushes
Creating the Look:
-
- Apply a base coat to your nails.
- Paint your nails with the nude polish and let it dry thoroughly.
- Use the nail art brush to outline the nails with gold detailing.
- Finish with a top coat to secure the design and add a glossy finish.
Geometric Chic
This stylish design features geometric patterns in shades of brown and nude, with added rhinestones for a touch of sparkle. The long coffin shape and intricate patterns make these nails a standout choice for those who love unique and detailed designs. The mix of lines and dots creates a modern and trendy look.
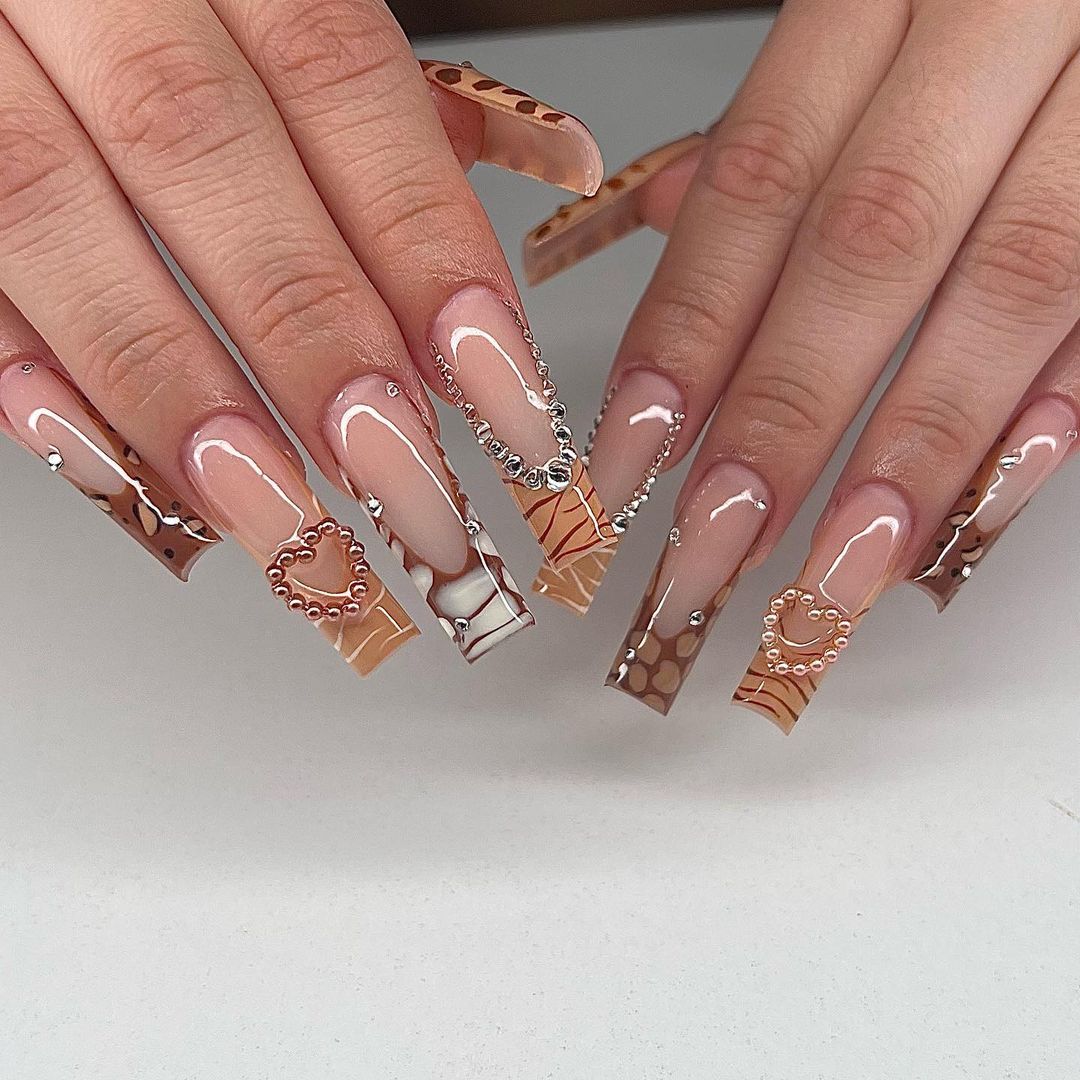
-
- Base coat: OPI Natural Nail Base Coat
- Nude polish: OPI Bubble Bath
- Brown polish: Essie Mink Muffs
- Rhinestones: Swarovski Nail Crystals
- Top coat: Seche Vite Dry Fast Top Nail Coat
- Nail art brush: Beetles Nail Art Brushes
Creating the Look:
-
- Apply a base coat to protect your nails.
- Paint your nails with the nude polish and let it dry completely.
- Use the nail art brush to create geometric patterns with the brown polish.
- Add rhinestones to enhance the design.
- Finish with a top coat to secure the design and add shine.
Soft Marble
These nails feature a soft marble effect in shades of pink and white, creating a subtle and elegant look. The long, coffin shape enhances the delicate design, making it perfect for those who love a refined and understated manicure. The combination of soft colors and glossy finish adds a touch of sophistication.
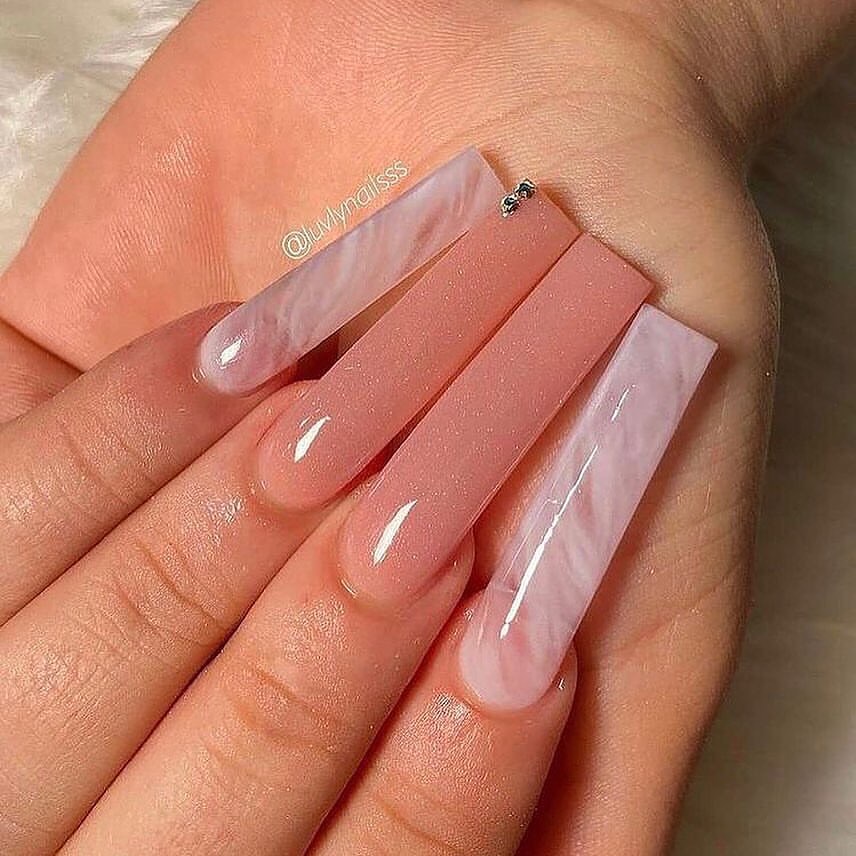
-
- Base coat: Sally Hansen Double Duty Base & Top Coat
- Pink polish: Essie Ballet Slippers
- White polish: OPI Alpine Snow
- Top coat: Essie Good To Go
- Nail art brush: Winstonia Fine Liner Brushes
Creating the Look:
-
- Apply a base coat to start.
- Paint your nails with the pink polish, allowing it to dry completely.
- Use the nail art brush to create a marble effect with the white polish.
- Finish with a top coat to protect the design and add a glossy finish.
Lime Fresh
This vibrant design features a lime theme with green and white accents, creating a fresh and playful look. The long, square shape is perfect for showcasing the detailed lime slices and leaves. This design is ideal for those who love bold and colorful manicures.
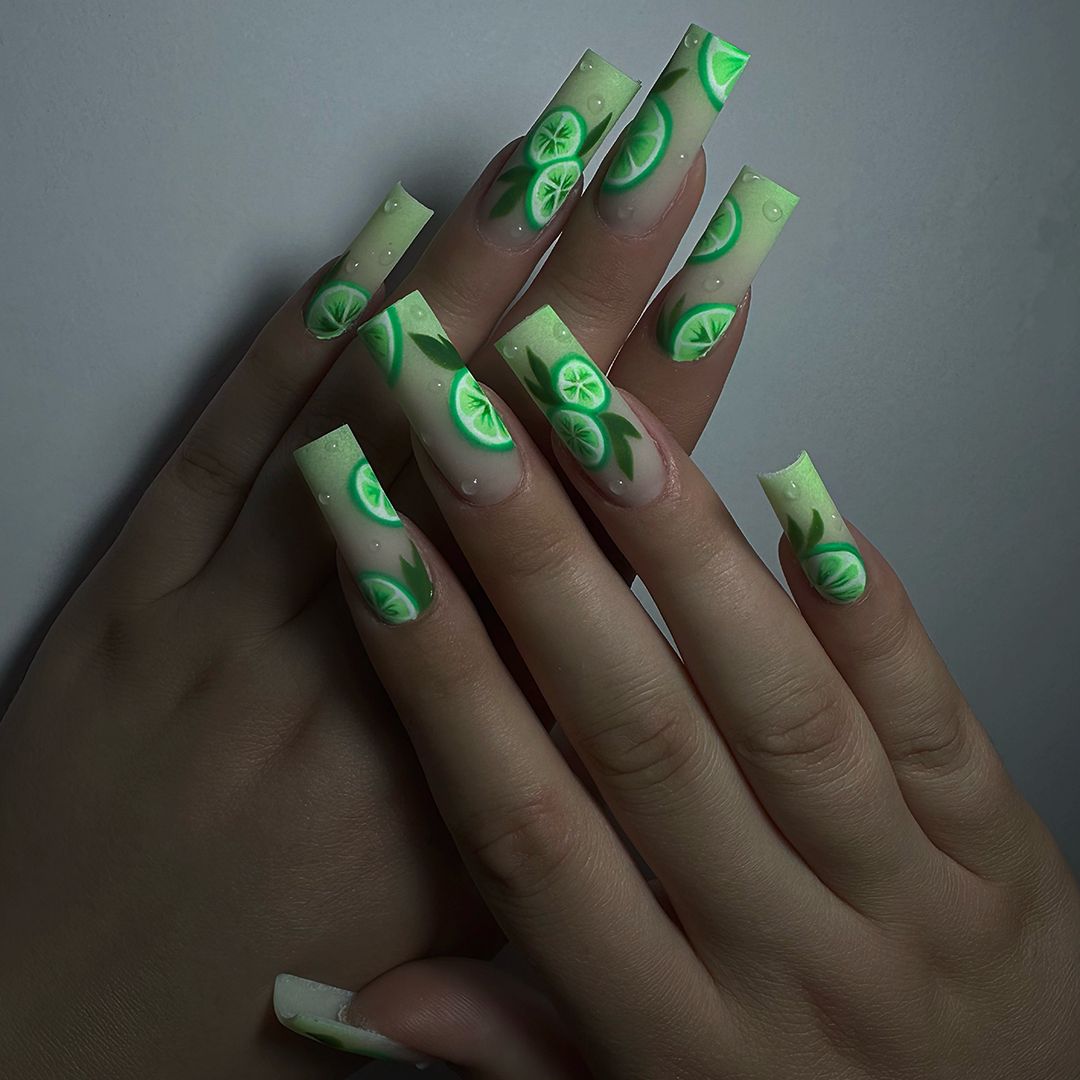
-
- Base coat: Deborah Lippmann Hard Rock Base & Top Coat
- Green polish: Essie Mojito Madness
- White polish: OPI Alpine Snow
- Top coat: Glisten & Glow Top Coat
- Nail art brush: Beetles Nail Art Brushes
Creating the Look:
-
- Apply a base coat to your nails.
- Paint your nails with the green polish and let it dry thoroughly.
- Use the nail art brush to add lime slices and leaf patterns with the white polish.
- Finish with a top coat to secure the design and add a glossy finish.
Elegant Black Bows
This chic design features a nude base with black French tips, accented by delicate black bows and rhinestones. The long square shape adds to the elegance, while the 3D bows provide a unique and stylish touch. This manicure is perfect for those who love a sophisticated look with a bit of flair.
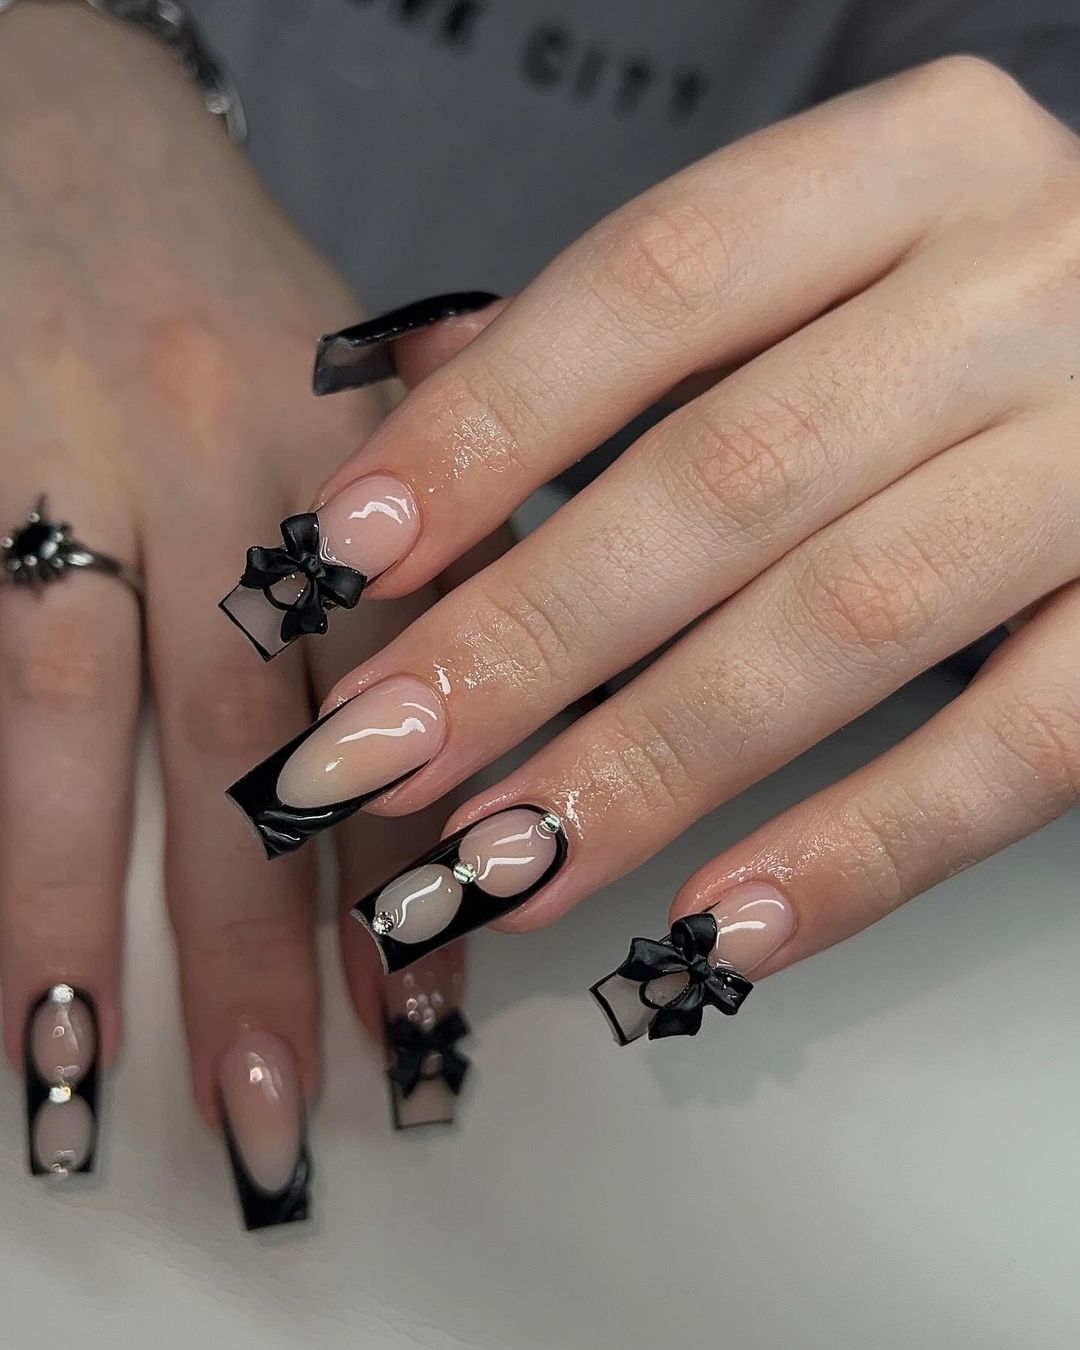
-
- Base coat: OPI Natural Nail Base Coat
- Nude polish: Essie Ballet Slippers
- Black polish: OPI Black Onyx
- Rhinestones: Swarovski Nail Crystals
- 3D bows: Born Pretty Nail Art Decorations
- Top coat: Seche Vite Dry Fast Top Nail Coat
- Nail art brush: Beetles Nail Art Brushes
Creating the Look:
-
- Apply a base coat to protect your nails.
- Paint your nails with the nude polish and let it dry completely.
- Use the black polish to create French tips.
- Attach the 3D bows and rhinestones using nail glue.
- Finish with a top coat to secure the design and add shine.
Holographic Vibes
These nails feature a stunning holographic effect on a soft pink base, creating a mesmerizing and modern look. The long coffin shape enhances the holographic shine, making these nails perfect for those who love to stand out. The subtle yet striking design is both elegant and trendy.
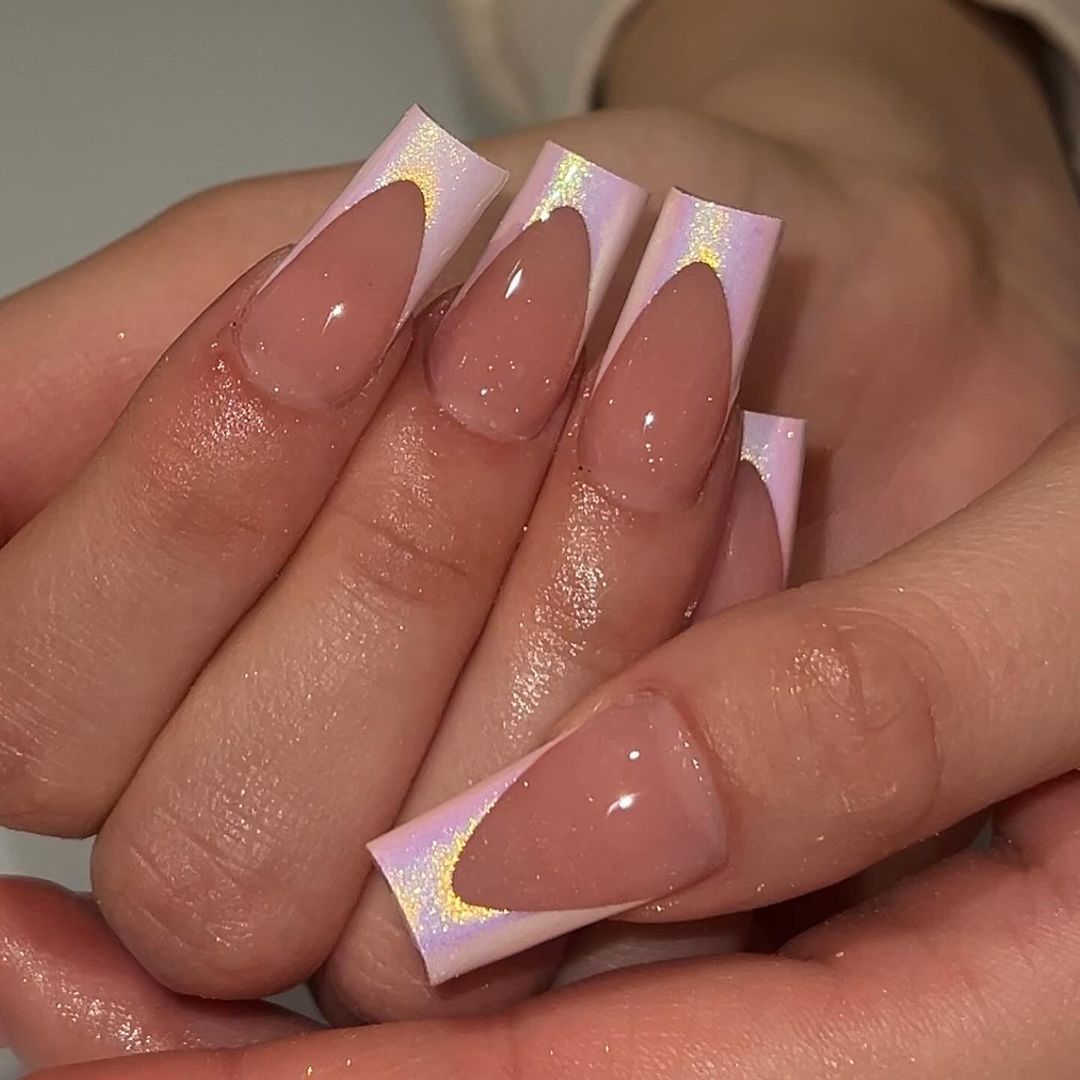
-
- Base coat: Sally Hansen Double Duty Base & Top Coat
- Pink polish: OPI Bubble Bath
- Holographic powder: Born Pretty Holographic Nail Powder
- Top coat: Essie Good To Go
- Nail art brush: Winstonia Fine Liner Brushes
Creating the Look:
-
- Start with a base coat to protect your nails.
- Apply the pink polish and let it dry completely.
- Use a sponge applicator to dab holographic powder onto the nails.
- Finish with a top coat to seal the design and add shine.
Floral Elegance
This beautiful design combines delicate floral patterns with bold color accents, creating a unique and eye-catching look. The long coffin shape is perfect for showcasing the intricate details, while the combination of white, pink, and burgundy makes these nails truly stand out.
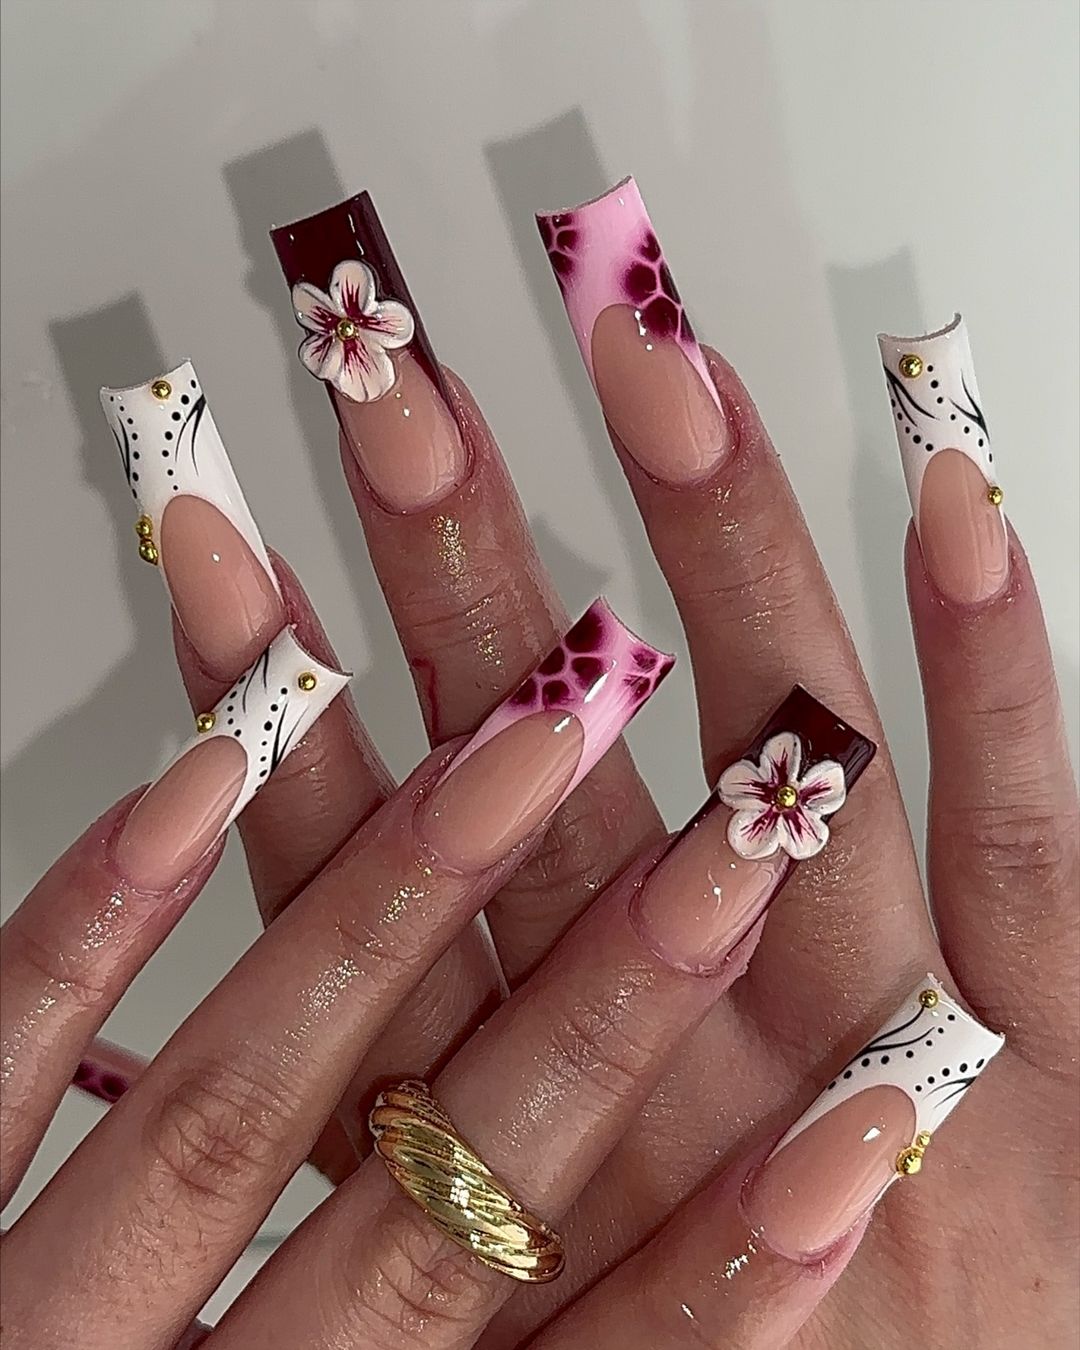
-
- Base coat: OPI Natural Nail Base Coat
- Nude polish: Essie Ballet Slippers
- White polish: OPI Alpine Snow
- Pink polish: Essie Muchi Muchi
- Burgundy polish: OPI Malaga Wine
- Rhinestones: Swarovski Nail Crystals
- Floral decals: Born Pretty Nail Art Stickers
- Top coat: Seche Vite Dry Fast Top Nail Coat
- Nail art brush: Beetles Nail Art Brushes
Creating the Look:
-
- Apply a base coat to protect your nails.
- Paint your nails with the nude polish and let it dry completely.
- Use the other polishes to create floral patterns and accents.
- Add rhinestones and floral decals for extra detail.
- Finish with a top coat to secure the design and add shine.
Glitter Hearts
These nails feature clear tips with embedded glitter hearts, creating a playful and romantic look. The long, coffin shape adds to the drama, while the glitter provides a sparkling touch. This design is perfect for those who love a fun and whimsical manicure.
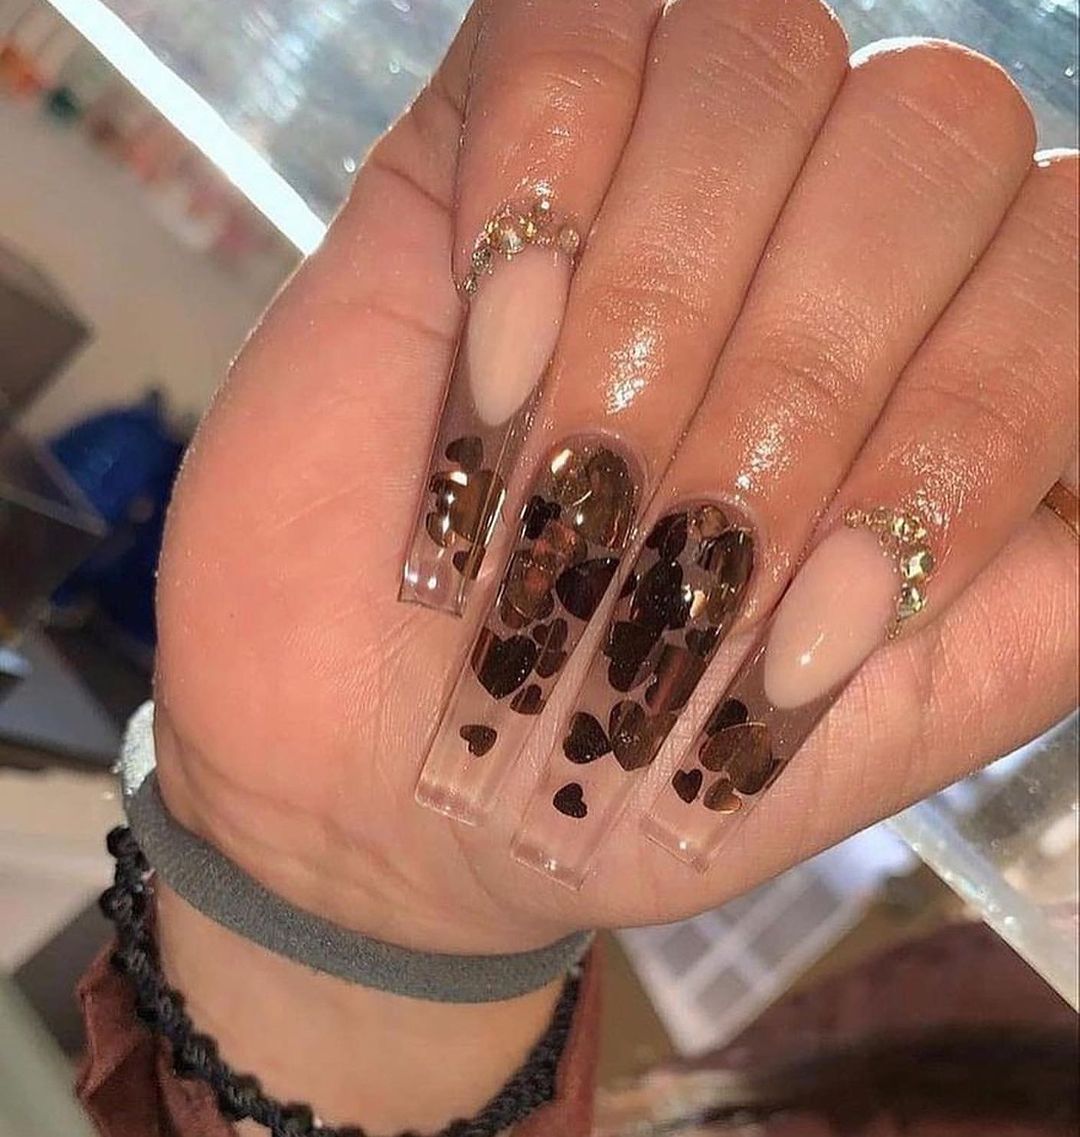
-
- Base coat: Sally Hansen Double Duty Base & Top Coat
- Clear polish: OPI Clear Top Coat
- Nude polish: Essie Ballet Slippers
- Glitter hearts: Born Pretty Nail Art Decorations
- Top coat: Essie Good To Go
- Nail art brush: Winstonia Fine Liner Brushes
Creating the Look:
-
- Apply a base coat to protect your nails.
- Paint your nails with the nude polish and let it dry completely.
- Use clear polish to attach the glitter hearts to the tips of the nails.
- Finish with a top coat to seal the design and add shine.
Autumn Leaves
This autumn-inspired design features rich brown tones and glittery accents, with clear tips adorned with delicate leaf patterns. The long, square shape is perfect for showcasing the fall-themed design, making these nails ideal for the season.
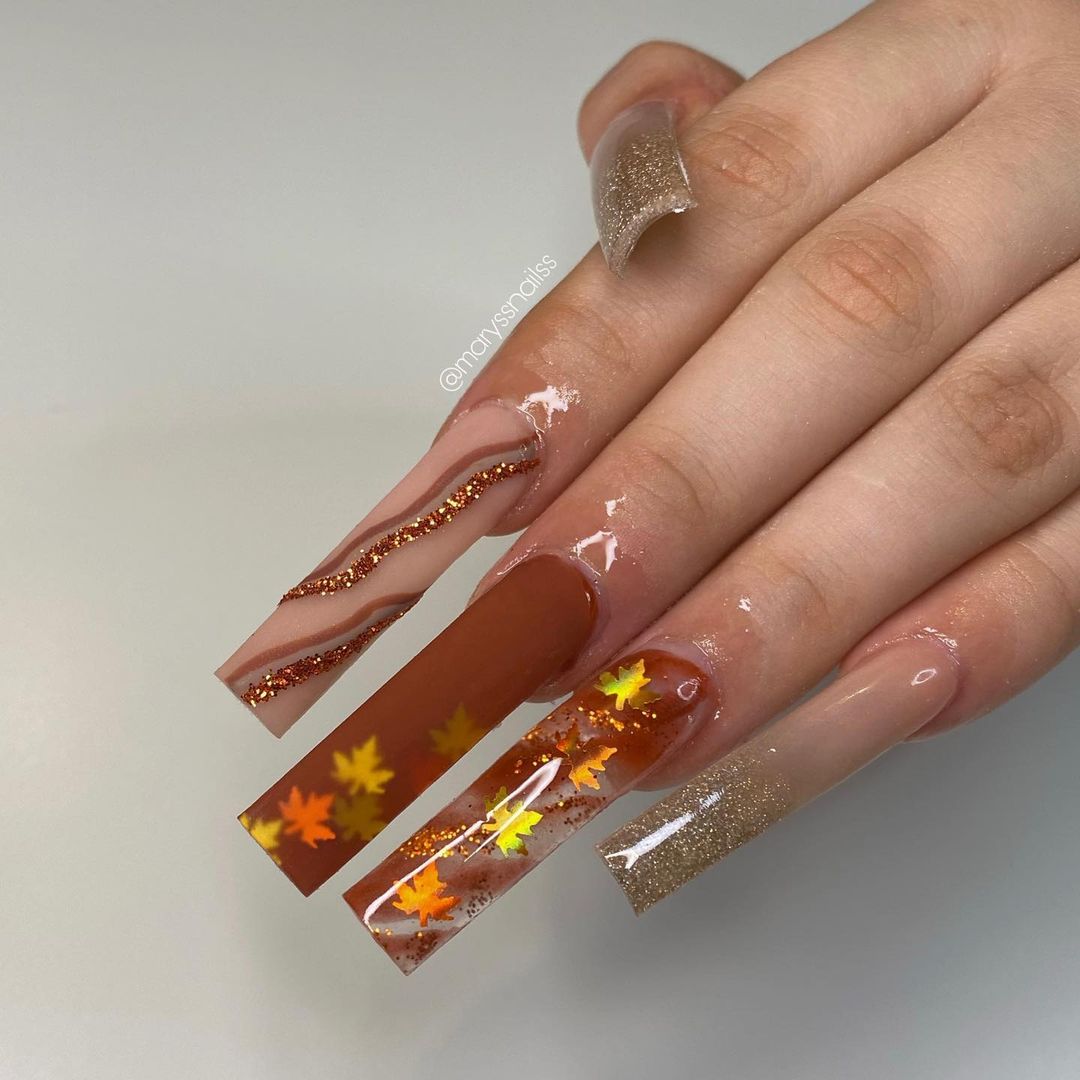
-
- Base coat: Deborah Lippmann Hard Rock Base & Top Coat
- Brown polish: Essie Mink Muffs
- Glitter polish: Zoya Trixie
- Leaf decals: Born Pretty Nail Art Stickers
- Top coat: Glisten & Glow Top Coat
- Nail art brush: Beetles Nail Art Brushes
Creating the Look:
-
- Apply a base coat to your nails.
- Paint your nails with the brown polish and let it dry thoroughly.
- Use the nail art brush to add glitter accents and attach leaf decals to the clear tips.
- Finish with a top coat to secure the design and add a glossy finish.
Pastel Perfection
These nails feature a mix of pastel colors with gold accents, creating a fresh and modern look. The long, coffin shape enhances the vibrant colors, making this design perfect for spring or any time you want a pop of color.
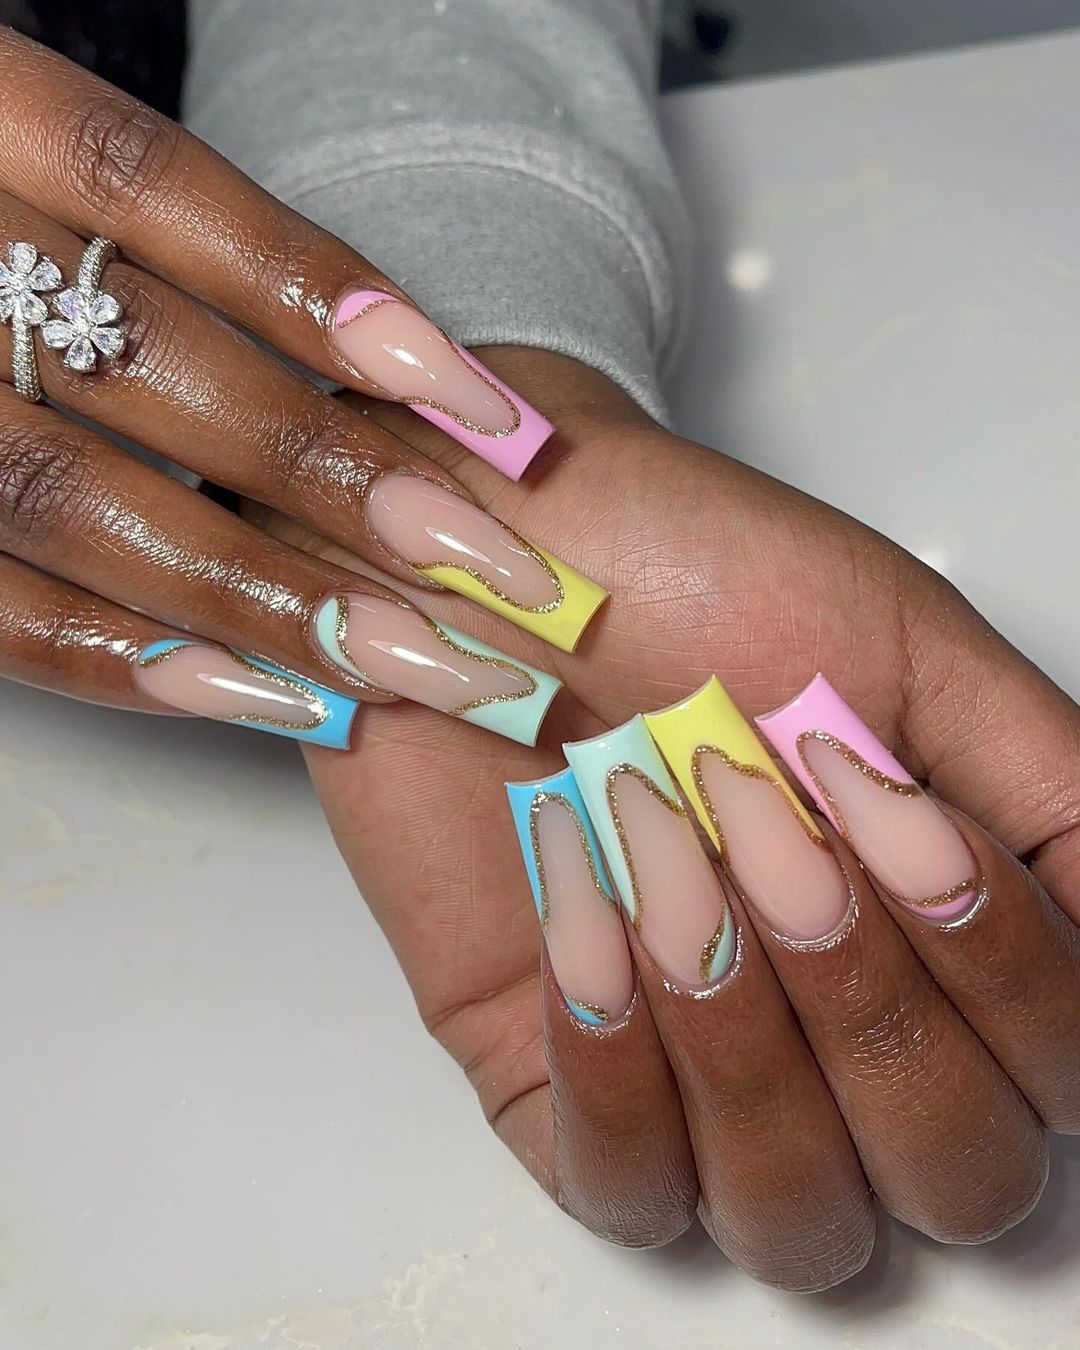
-
- Base coat: OPI Natural Nail Base Coat
- Pastel polishes: Essie Mint Candy Apple, Essie Lilacism, Essie Fiji
- Gold detailing: OPI Gold Digger
- Top coat: Seche Vite Dry Fast Top Nail Coat
- Nail art brush: Beetles Nail Art Brushes
Creating the Look:
-
- Apply a base coat to protect your nails.
- Paint your nails with the pastel polishes, using different colors for each nail.
- Use the nail art brush to add gold detailing around the edges.
- Finish with a top coat to seal the design and add shine.
Pink Elegance with Gold Accents
These nails feature a sophisticated design with a nude pink base and elegant gold accents. The long square shape adds to the elegance, while the intricate gold detailing on the accent nails creates a luxurious look. This manicure is perfect for those who love a refined and polished appearance.
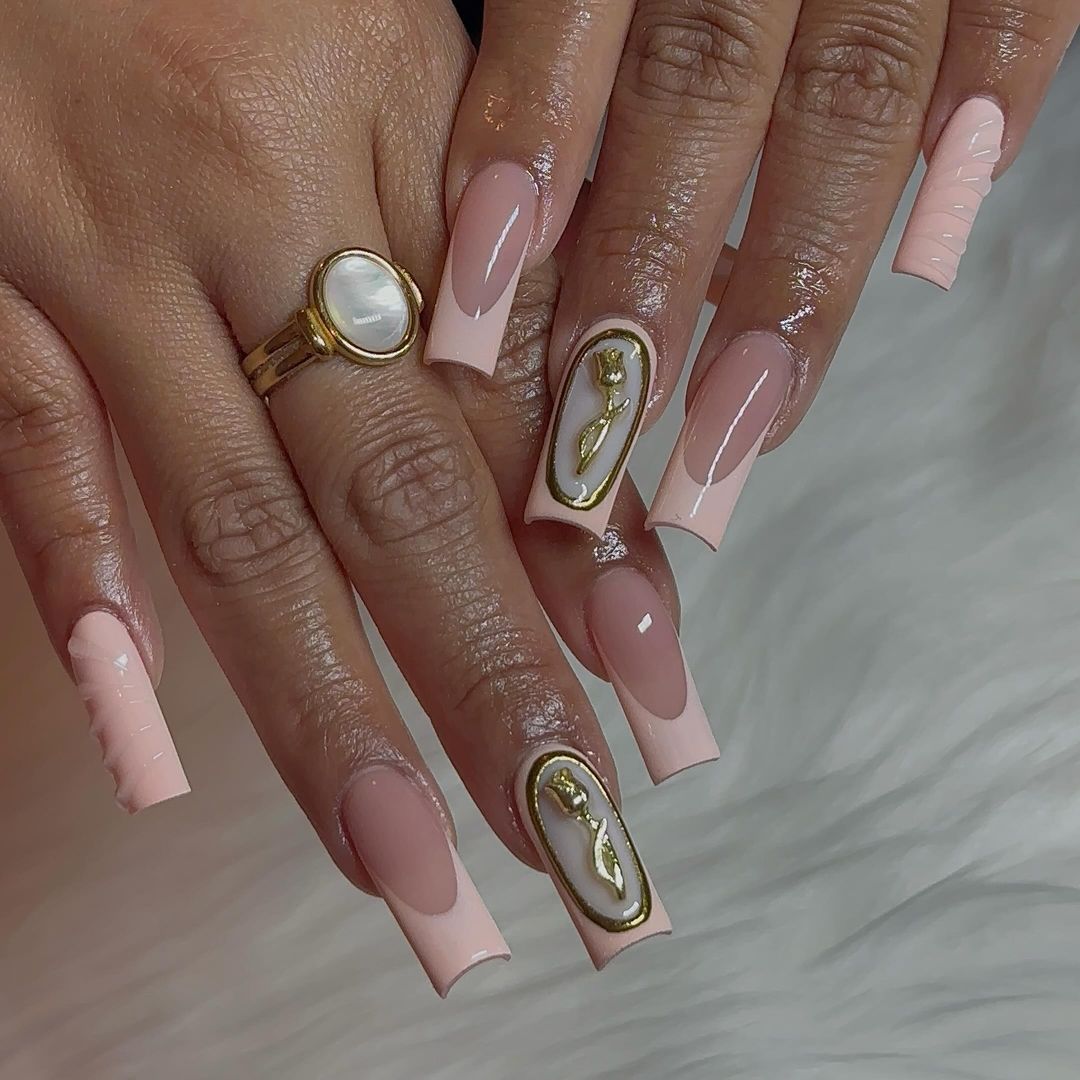
-
- Base coat: OPI Natural Nail Base Coat
- Nude pink polish: Essie Ballet Slippers
- Gold detailing: OPI Gold Digger
- Top coat: Seche Vite Dry Fast Top Nail Coat
- Nail art brush: Beetles Nail Art Brushes
Creating the Look:
-
- Apply a base coat to protect your nails.
- Paint your nails with the nude pink polish and let it dry completely.
- Use the gold polish to create the detailed accents on the ring fingers.
- Finish with a top coat to seal the design and add a glossy finish.
Green Clover Charm
These playful nails feature a nude base with vibrant green clover accents, giving a fresh and charming look. The long square shape is ideal for showcasing the detailed clover designs, which are outlined with delicate gold borders. This design is perfect for adding a pop of color and whimsy to your manicure.
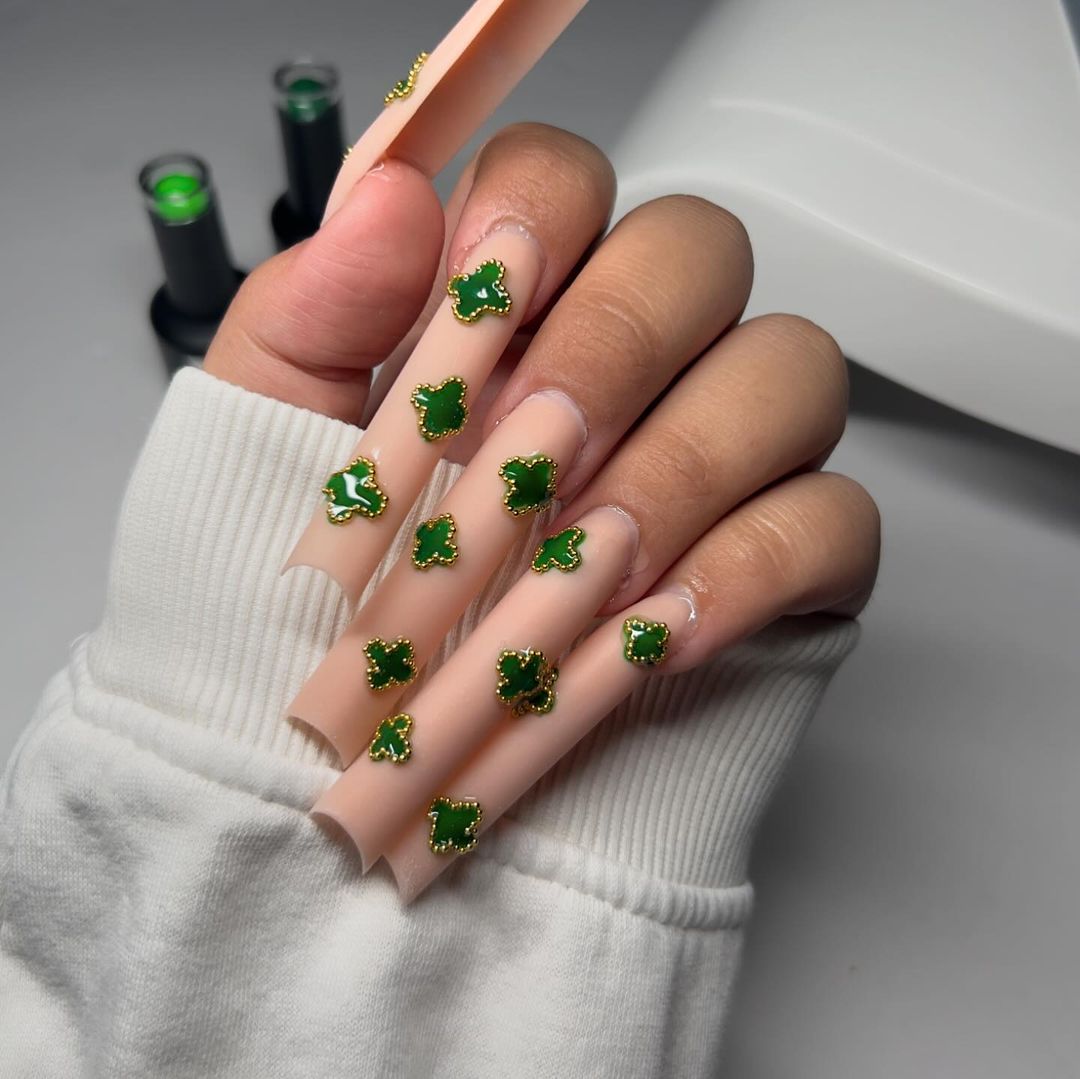
-
- Base coat: Sally Hansen Double Duty Base & Top Coat
- Nude polish: OPI Bubble Bath
- Green polish: Essie Mojito Madness
- Gold detailing: Born Pretty Nail Art Decoration
- Top coat: Essie Good To Go
- Nail art brush: Winstonia Fine Liner Brushes
Creating the Look:
-
- Start with a base coat to protect your nails.
- Apply the nude polish and let it dry completely.
- Use the green polish and nail art brush to create clover shapes on each nail.
- Outline the clovers with gold detailing for added elegance.
- Finish with a top coat to seal the design and add shine.
Gold Leaf Glamour
This luxurious design features a nude base with gold leaf accents and a mix of clear tips with gold detailing. The long coffin shape enhances the opulent look, making these nails perfect for special occasions. The combination of nude and gold creates a sophisticated and glamorous appearance.
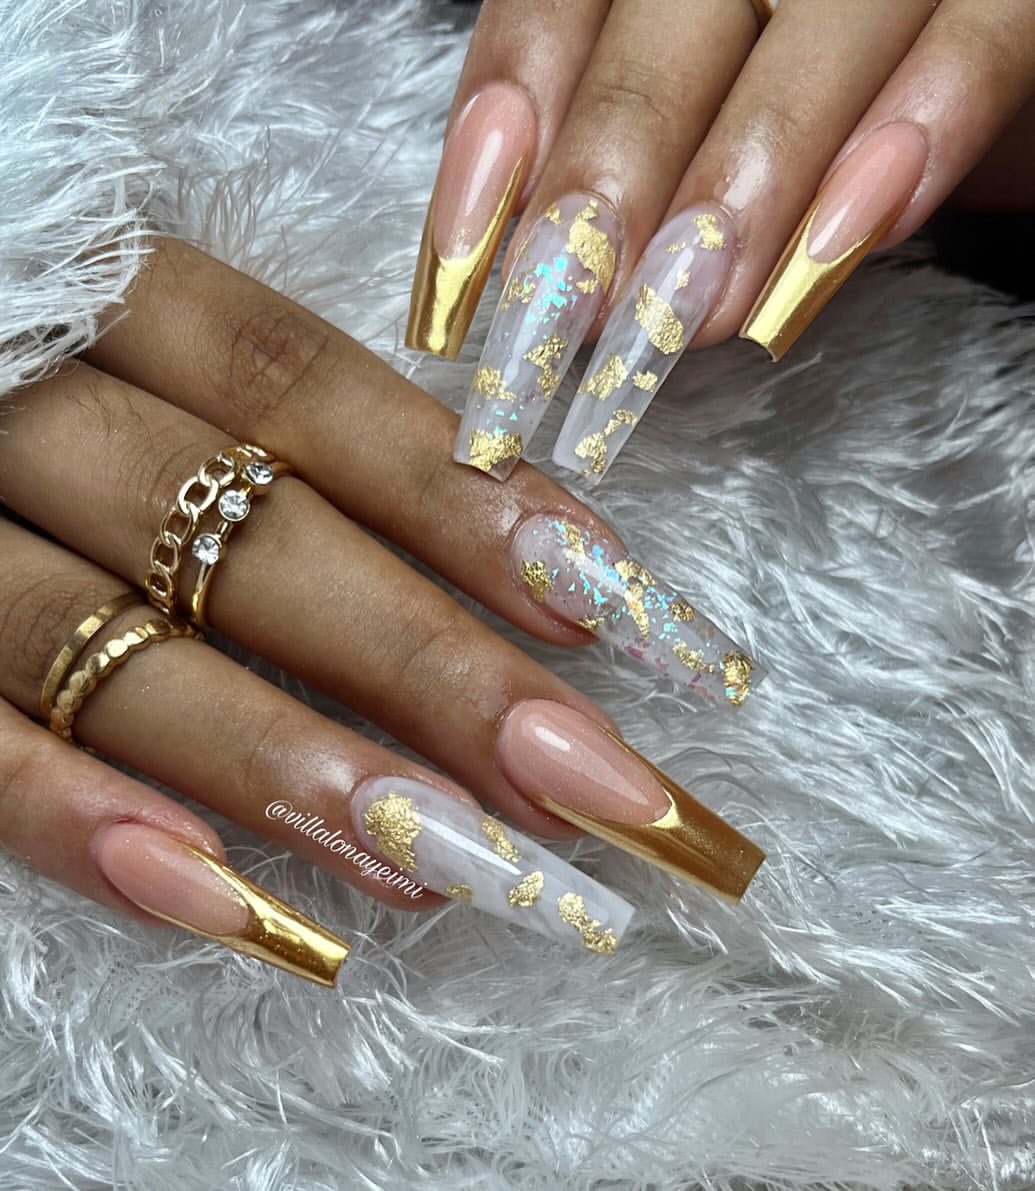
-
- Base coat: Deborah Lippmann Hard Rock Base & Top Coat
- Nude polish: Essie Mademoiselle
- Gold leaf: Born Pretty Nail Art Decorations
- Clear polish: OPI Clear Top Coat
- Top coat: Glisten & Glow Top Coat
- Nail art brush: Beetles Nail Art Brushes
Creating the Look:
-
- Apply a base coat to your nails.
- Paint your nails with the nude polish and let it dry thoroughly.
- Apply the gold leaf to the nails, using clear polish to help it adhere.
- Add gold detailing to the clear tips for a cohesive look.
- Finish with a top coat to secure the design and add a glossy finish.
FAQ
Q: How long should my nails be for these designs? A: These designs are best suited for long or very long nails to showcase the intricate details and accents. However, they can be adapted for medium or even short lengths with some modifications.
Q: Can I do these designs on gel nails? A: Absolutely! All these designs can be applied to gel, gel almond, gel long almond, gel long square, and other gel shapes.
Q: What if I want a more simple look? A: For a more minimalist approach, you can simplify the designs by using fewer accents and sticking to basic colors.
Q: Are these designs suitable for everyday wear? A: Yes, while some designs are more elaborate, they can be worn daily. Adjust the level of detail based on your personal preference and daily activities.
Ready to embrace the autumn season with these fabulous nail designs? Whether you opt for pretty, classy, or extra looks, your nails will be the talk of the season.
Save Pin
