As the leaves change and the air grows crisp, our nails deserve a seasonal update that reflects the beauty and sophistication of fall. If you’re seeking inspiration for classy fall nails 2024, you’re in the right place. From subtle hues to bold designs, we’ve got you covered. Let’s dive into the top trends and ideas for the upcoming season, complete with professional tips and tricks to achieve these stunning looks at home.
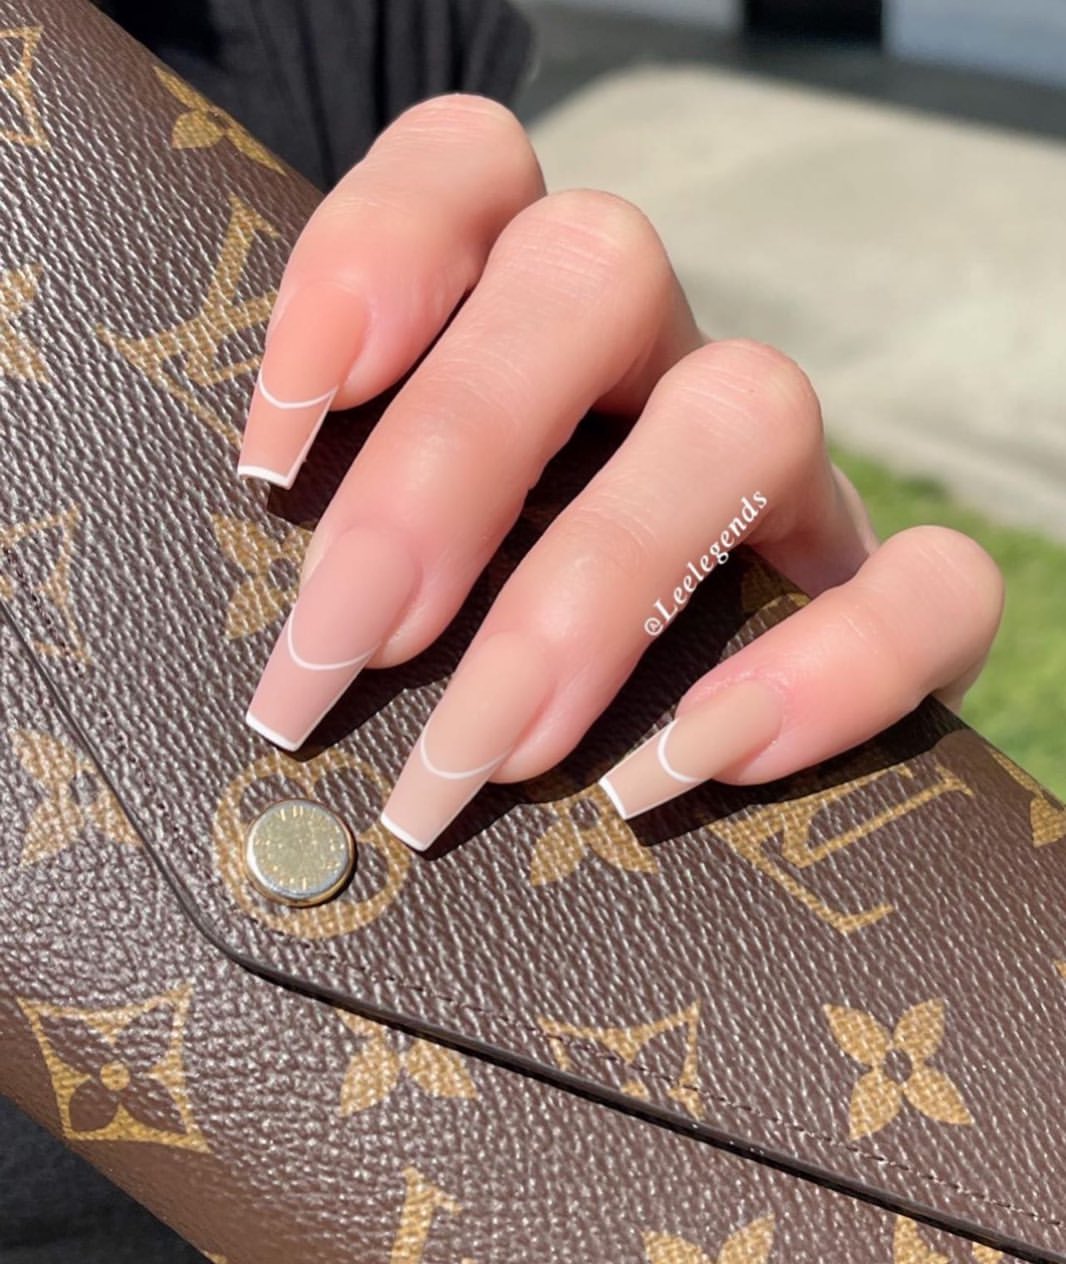
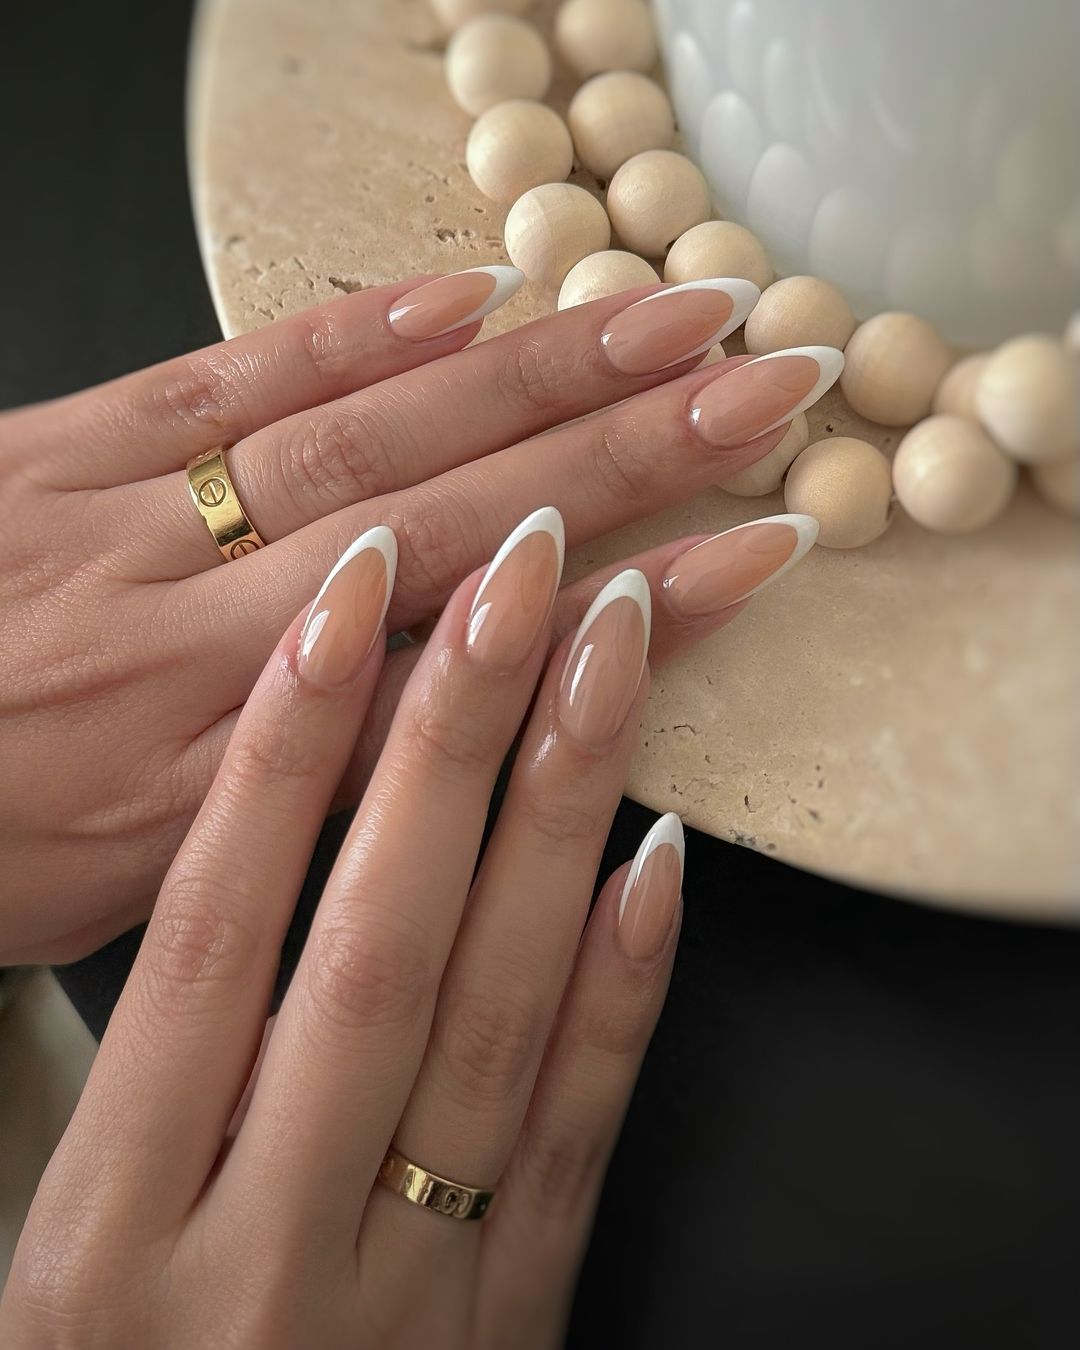
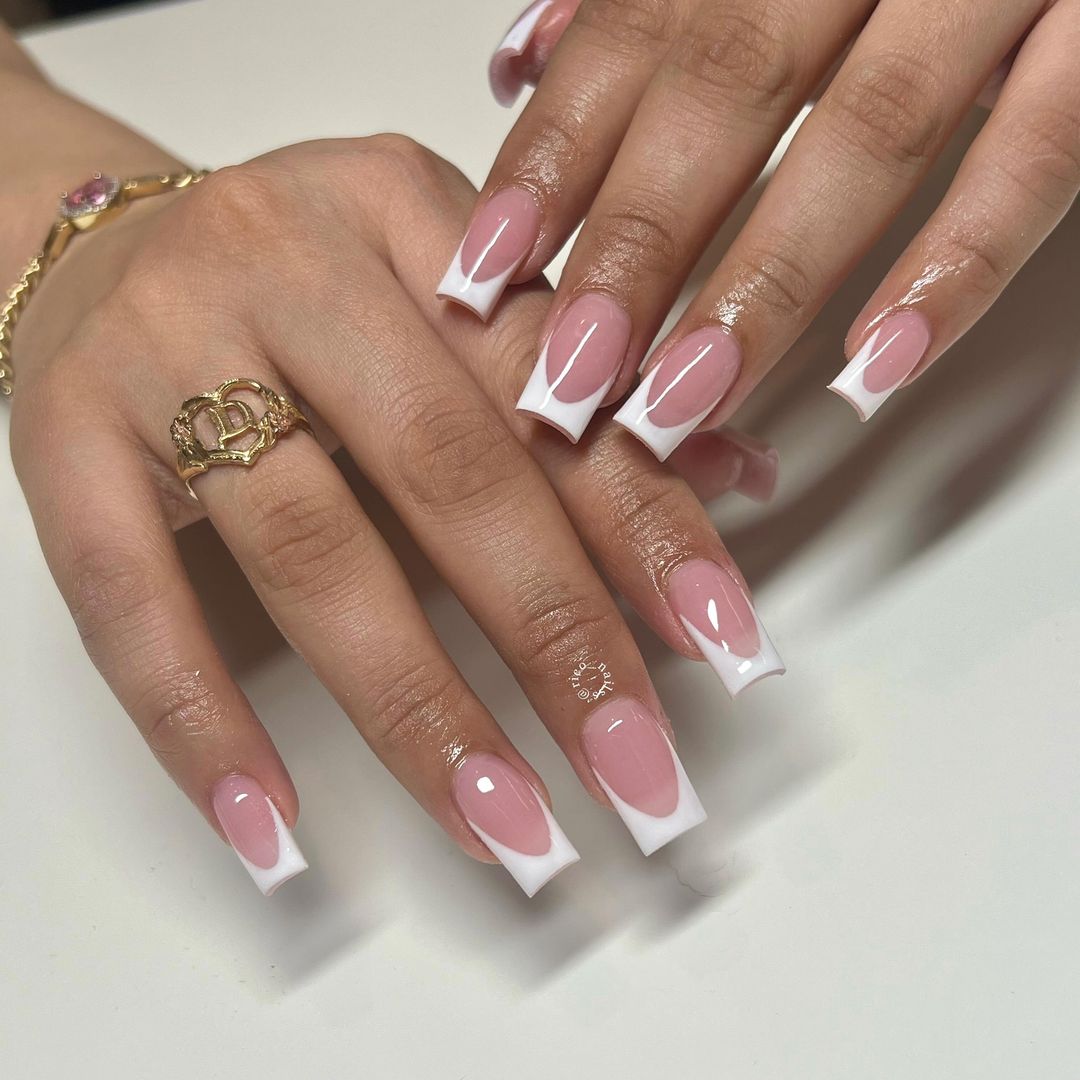
Elegant French Tips with a Twist
French tips are a classic choice, but this design takes it up a notch with a modern twist. The nails feature a soft nude base with crisp white tips, accented by a delicate outline that adds sophistication. This design exudes elegance and is perfect for both everyday wear and special occasions. The subtle contrast between the base and the tips makes it versatile and universally flattering.
Consumables
- Nude base polish (e.g., OPI’s “Bubble Bath”)
- White tip polish (e.g., Essie’s “Blanc”)
- Thin nail art brush
- Clear top coat (e.g., Seche Vite Dry Fast Top Coat)
Practical Advice
- Prepare Your Nails: Start with clean, shaped nails. Apply a base coat to protect your natural nails.
- Apply the Nude Base: Apply two coats of the nude polish and let it dry completely.
- Create the French Tips: Using the white polish, carefully paint the tips of your nails. For the outline, use a thin nail art brush dipped in white polish.
- Seal the Design: Finish with a clear top coat to ensure longevity and shine.
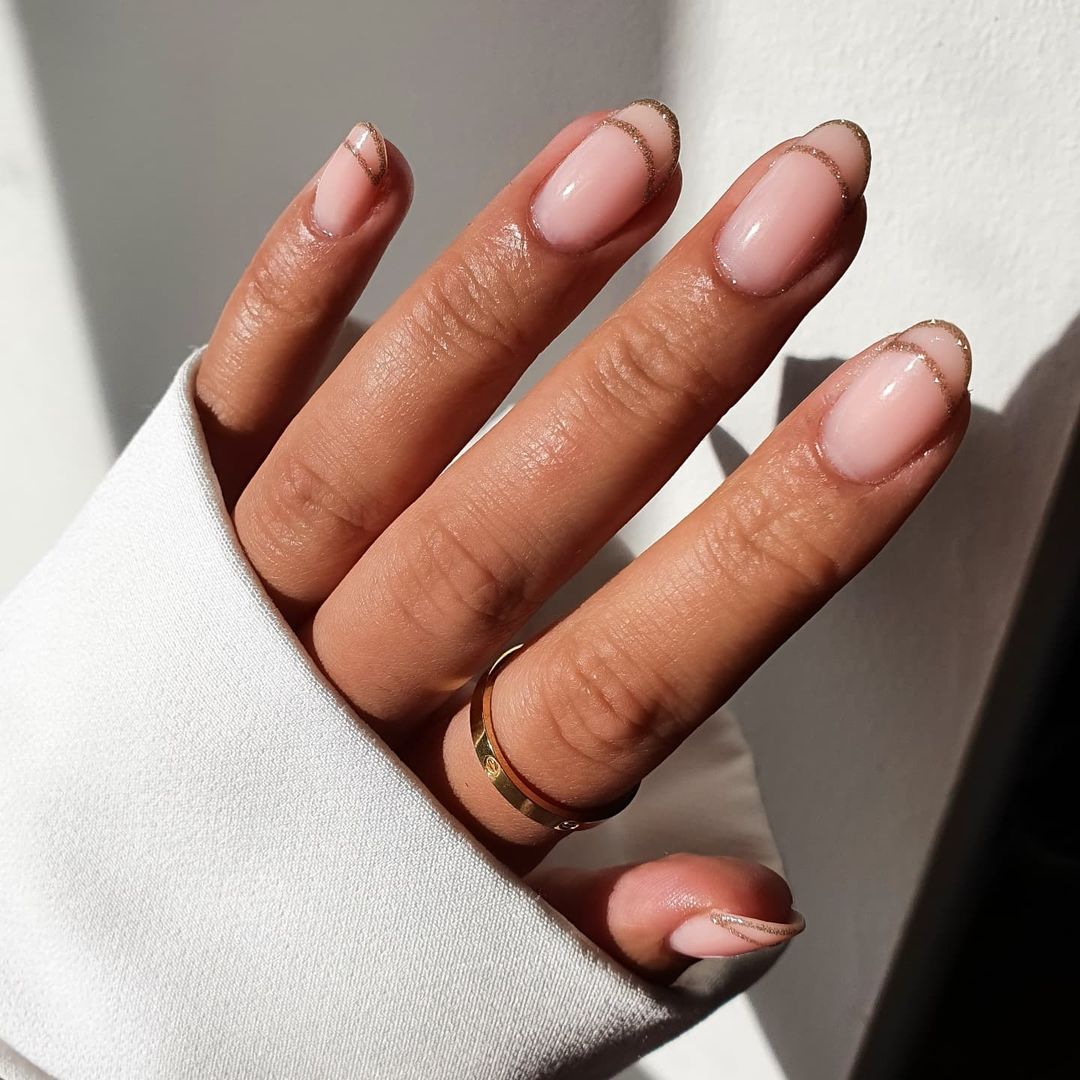
Minimalist Gold Accent Nails
For those who prefer a minimalist yet chic look, these nails are perfect. The design features a nude base with a thin gold line following the natural curve of the nails. It’s understated yet sophisticated, making it ideal for any occasion. The gold accent adds a touch of luxury without being overpowering, fitting seamlessly into the classy fall nails 2024 trend.
Consumables
- Nude base polish (e.g., Zoya’s “Chantal”)
- Gold nail art tape or gold polish (e.g., Sally Hansen’s “Golden-I”)
- Clear top coat (e.g., Essie’s “Good to Go”)
Practical Advice
- Prepare Your Nails: Clean and shape your nails, then apply a base coat.
- Apply the Nude Base: Apply two coats of nude polish and let it dry.
- Add the Gold Accent: Use gold nail art tape or a thin brush dipped in gold polish to create the accent line.
- Seal the Design: Apply a clear top coat to protect the design and add shine.
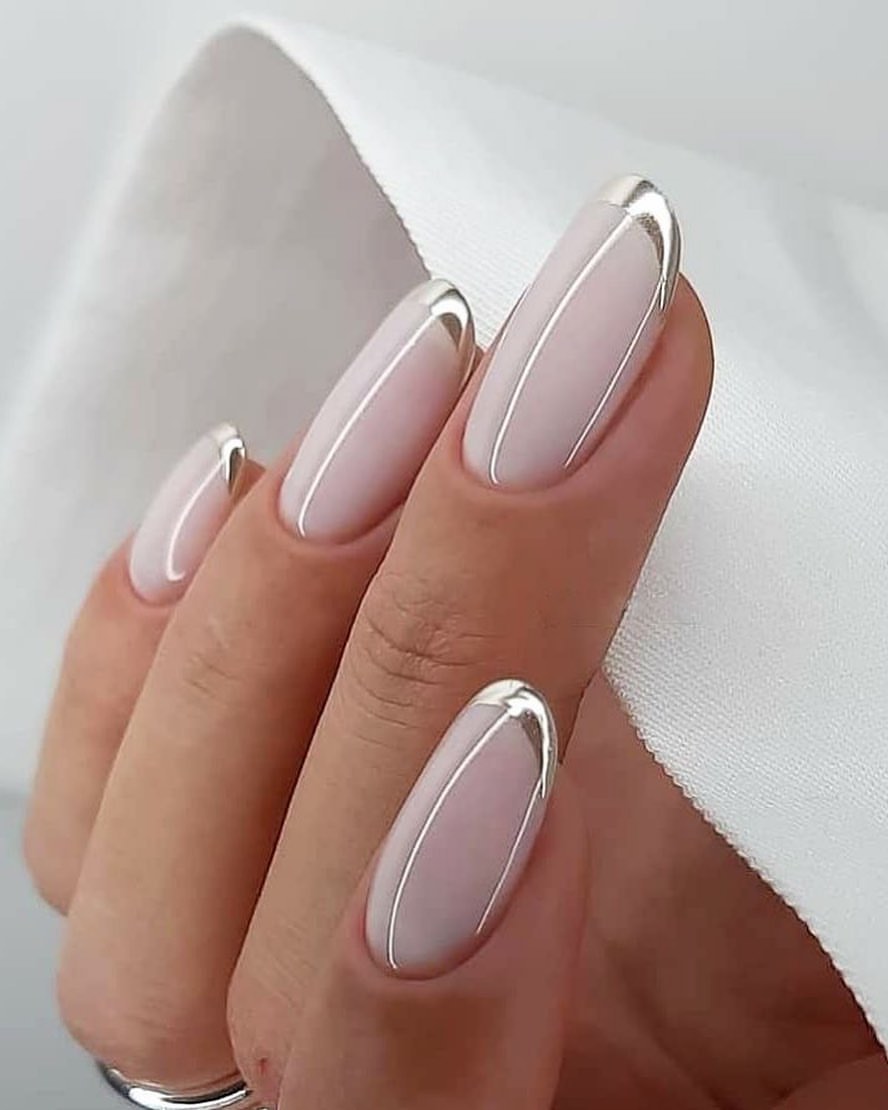
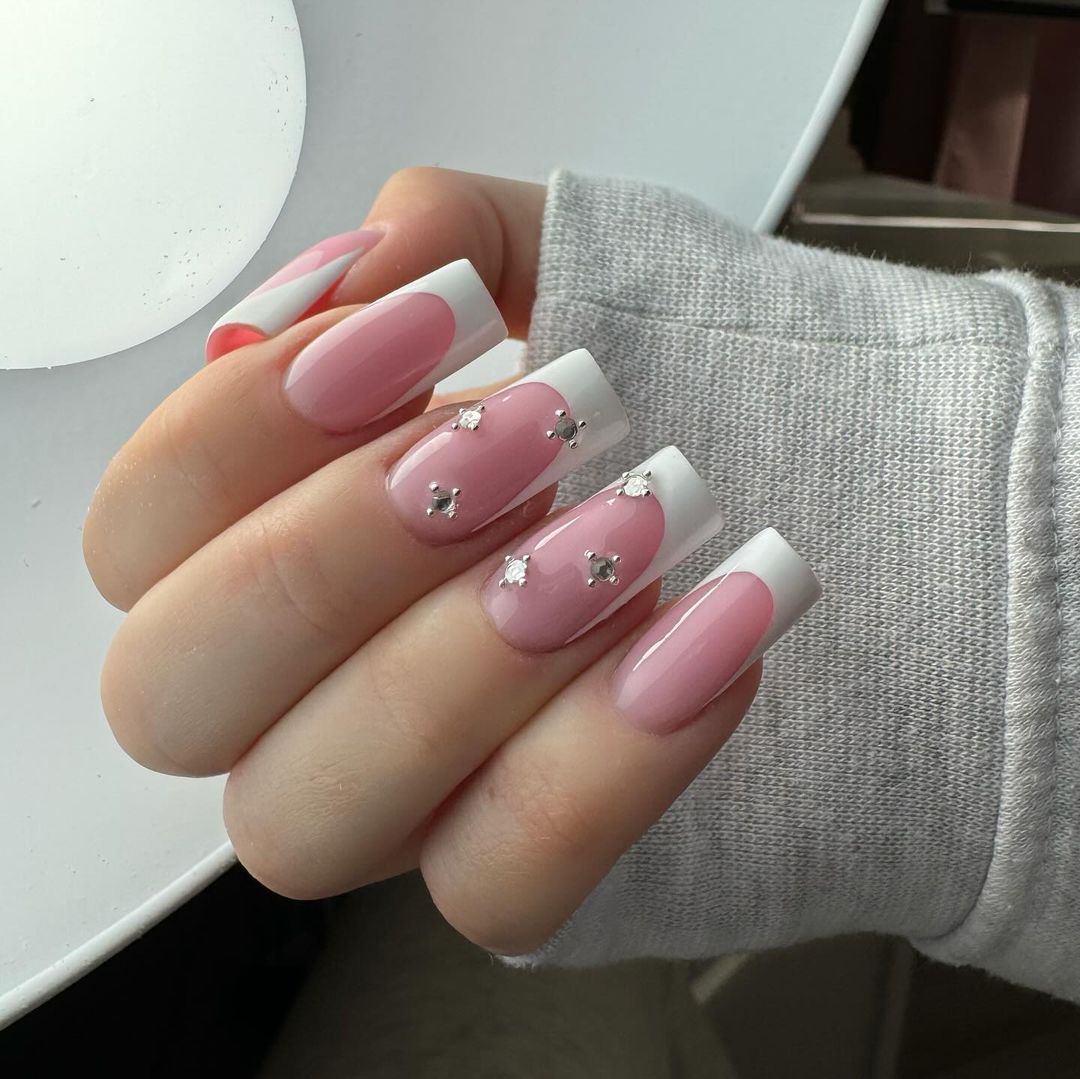
Silver Edged Nails
These nails are all about subtle elegance with a touch of glamour. The design features a pale pink base with metallic silver edges, giving a refined and polished look. The silver edge is both modern and classic, making it a versatile choice for the season. This design is particularly stunning in the classy fall nails 2024 lineup, offering a chic option for those who want to stand out without being too bold.
Consumables
- Pale pink base polish (e.g., Essie’s “Ballet Slippers”)
- Silver nail polish (e.g., OPI’s “Silver on Ice”)
- Thin nail art brush
- Clear top coat (e.g., CND Vinylux Weekly Top Coat)
Practical Advice
- Prepare Your Nails: Start with clean, shaped nails and apply a base coat.
- Apply the Pink Base: Apply two coats of the pale pink polish and let it dry.
- Create the Silver Edge: Use a thin nail art brush to paint the silver edges around your nails.
- Seal the Design: Finish with a clear top coat to ensure durability and a glossy finish.
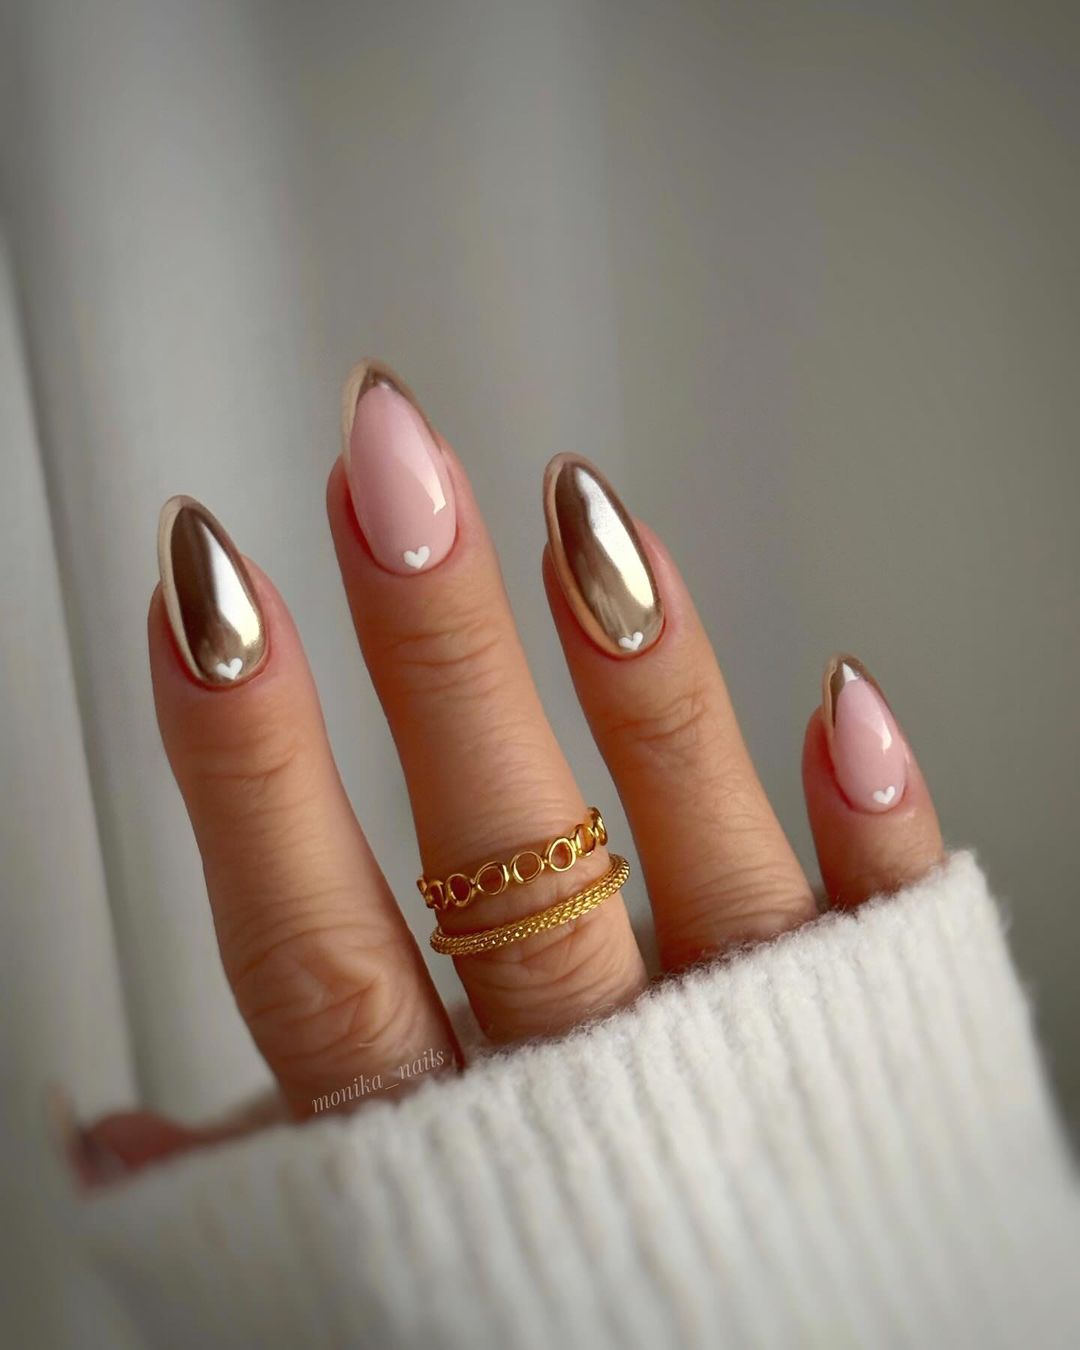
Rose Gold Elegance
This design captures the essence of elegance with a rose gold metallic finish combined with soft pink accents. The almond shape of the nails adds to the overall sophisticated look. The rose gold gives a luxurious feel, perfect for those who want to make a subtle yet impactful statement. The addition of tiny heart details at the cuticle brings a cute and personalized touch, making this a versatile look suitable for various occasions.
Consumables
- Pale pink base polish (e.g., OPI’s “Mod About You”)
- Rose gold chrome powder (e.g., Born Pretty Rose Gold Chrome Powder)
- Clear top coat (e.g., Seche Vite Dry Fast Top Coat)
- Nail art brush for heart details
- LED/UV lamp for curing (if using gel polish)
Practical Advice
- Prepare Your Nails: Clean and shape your nails, then apply a base coat.
- Apply the Base: Use two coats of the pale pink polish and cure if using gel.
- Add Chrome Powder: Apply the rose gold chrome powder to the nails, buffing it in for a smooth finish.
- Heart Details: Use a fine nail art brush to add the small heart details at the cuticle.
- Seal the Design: Finish with a clear top coat to ensure a lasting shine and protect the design.
Save Pin

Classic French Tips with a Modern Twist
French tips are a timeless design, but this version adds a modern twist with elongated almond-shaped nails. The classic white tips beautifully contrast against the natural nude base, creating a sleek and elegant look. This manicure is perfect for those who appreciate the beauty of simplicity and the elegance of traditional styles with a contemporary update.
Consumables
- Nude base polish (e.g., Essie’s “Mademoiselle”)
- White tip polish (e.g., Sally Hansen’s “White On”)
- Clear top coat (e.g., OPI’s Top Coat)
- French tip guides or nail art brush
Practical Advice
- Prepare Your Nails: Start with clean, shaped nails and apply a base coat.
- Apply the Nude Base: Paint two coats of the nude polish and let them dry completely.
- Create French Tips: Use French tip guides or a steady hand with a nail art brush to paint the white tips.
- Seal the Design: Apply a clear top coat to protect the design and add shine.
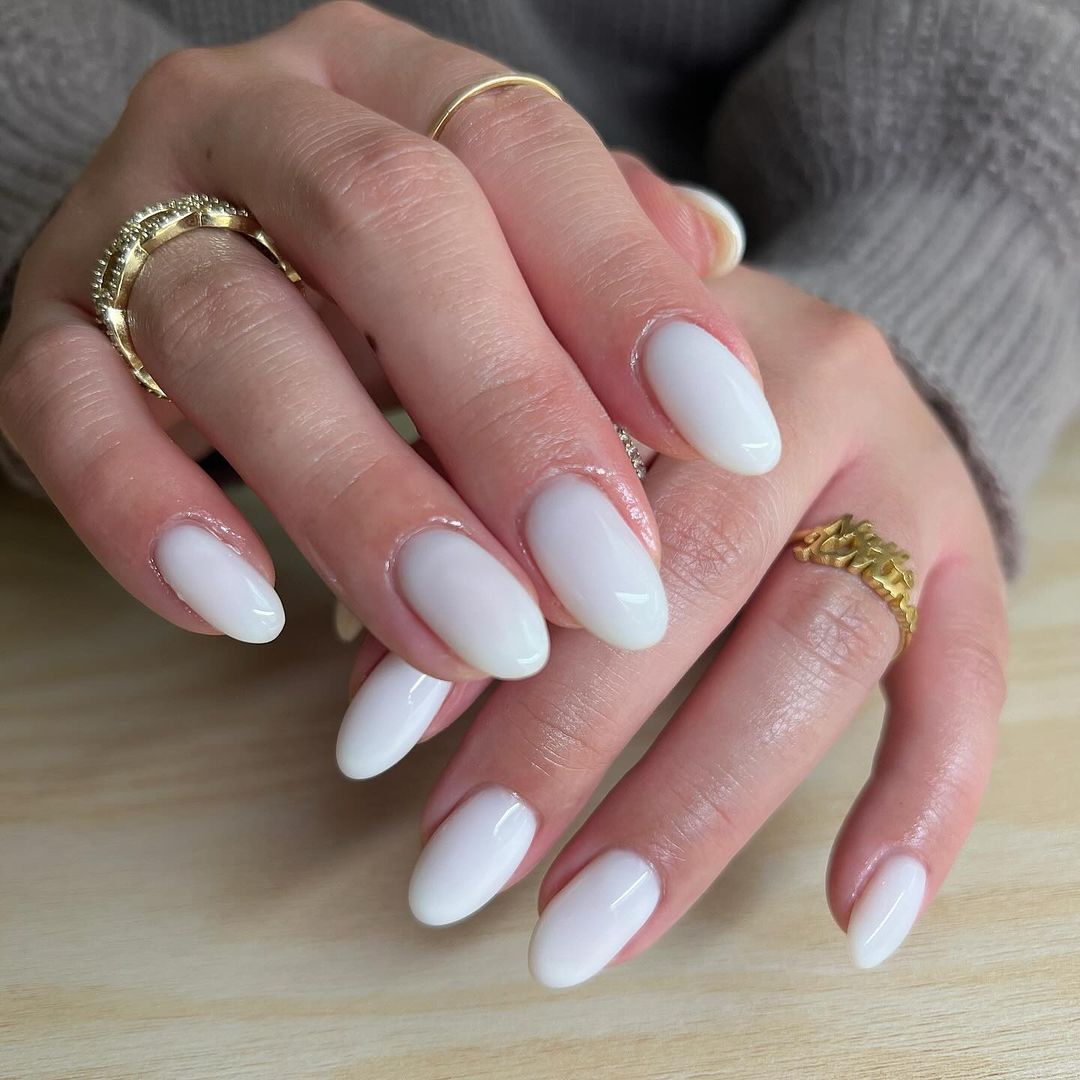
Pure White Perfection
A pure white manicure is both classic and contemporary, offering a clean and polished look. The almond shape enhances the elegance of this design, making it suitable for both casual and formal settings. White nails are versatile, complementing any outfit while providing a sophisticated, minimalist aesthetic that aligns perfectly with classy fall nails 2024.
Consumables
- White polish (e.g., Essie’s “Blanc”)
- Clear top coat (e.g., CND Vinylux Weekly Top Coat)
Practical Advice
- Prepare Your Nails: Clean and shape your nails, then apply a base coat.
- Apply the White Polish: Apply two to three coats of white polish for full coverage, allowing each coat to dry thoroughly.
- Seal the Design: Finish with a clear top coat to ensure the polish stays chip-free and shiny.
Silver Lined French Tips
This design elevates the classic French tip with a touch of glamour. The square nails feature a nude base with traditional white tips, accented by elegant silver lines that add a modern twist. The silver detailing creates a sophisticated and chic look, perfect for those who love to combine timeless elegance with contemporary flair. This style is ideal for both everyday wear and special occasions, offering a refined and polished appearance.
Consumables
- Nude base polish (e.g., OPI’s “Samoan Sand”)
- White tip polish (e.g., Essie’s “Blanc”)
- Silver glitter polish or nail art tape (e.g., Sally Hansen’s “Strobe Light”)
- Clear top coat (e.g., Seche Vite Dry Fast Top Coat)
- Thin nail art brush
Practical Advice
- Prepare Your Nails: Clean and shape your nails, then apply a base coat.
- Apply the Nude Base: Apply two coats of nude polish and let it dry completely.
- Create French Tips: Use the white polish to paint the tips of your nails. For the silver lines, use a thin brush dipped in silver glitter polish or apply silver nail art tape.
- Seal the Design: Finish with a clear top coat to protect the design and add shine.
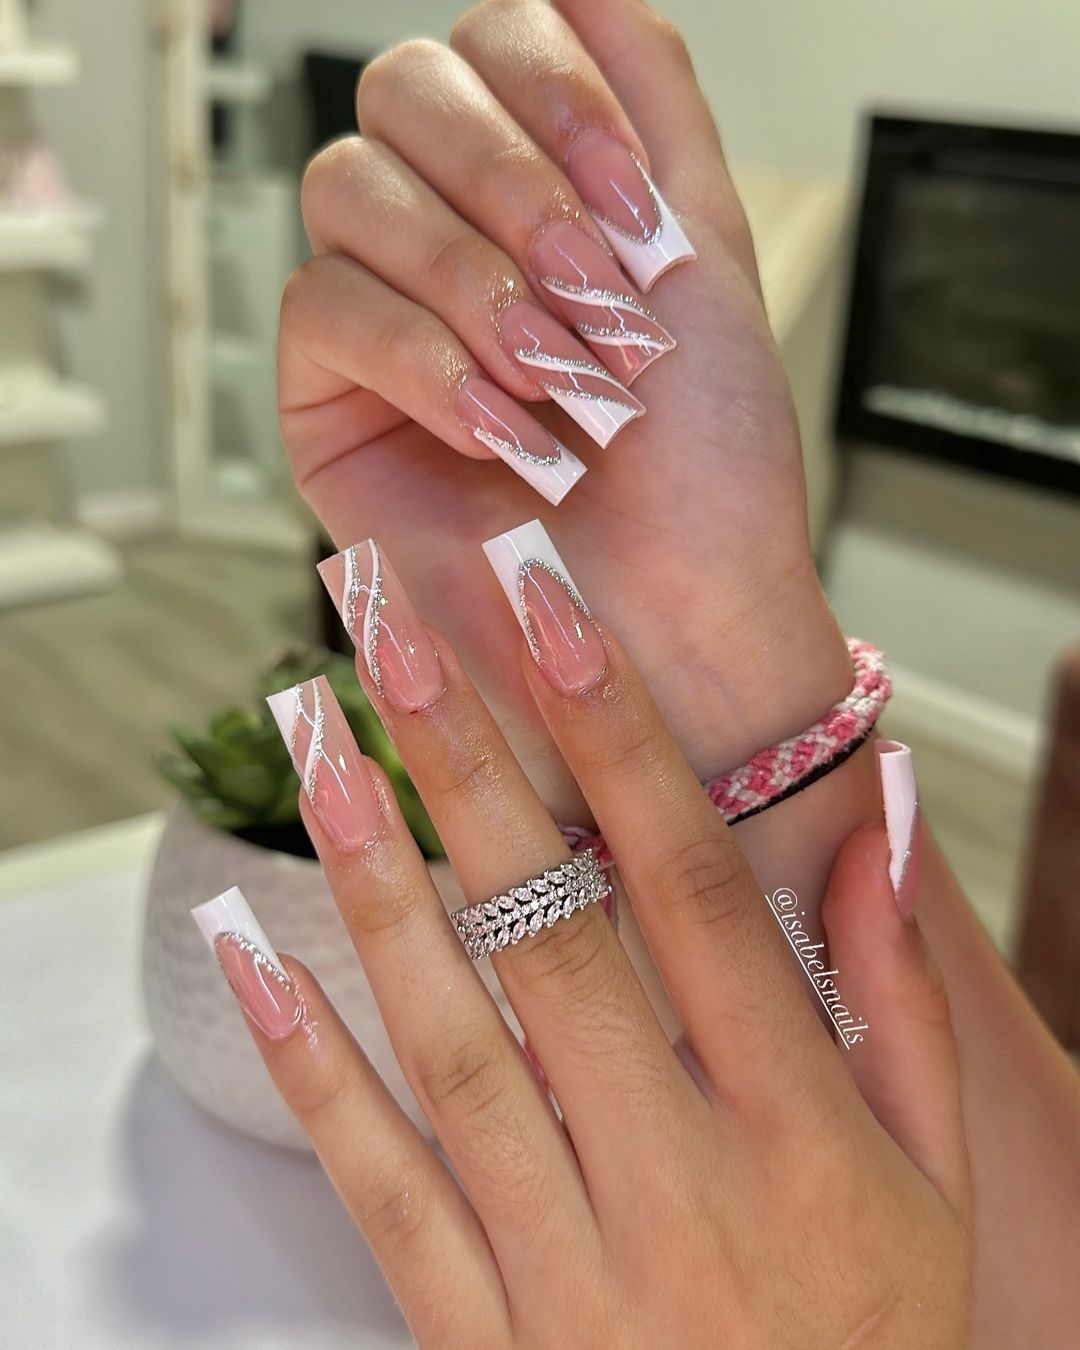
Pink and Gold Glam
This glamorous design features a nude pink base with intricate gold accents. The almond-shaped nails are decorated with swirling gold lines, creating a luxurious and eye-catching effect. The combination of soft pink and rich gold makes this manicure perfect for those who want to make a bold yet elegant statement. It’s a stunning choice for evening events or any occasion where you want to showcase your sophisticated style.
Consumables
- Nude pink base polish (e.g., Zoya’s “Rue”)
- Gold glitter polish (e.g., OPI’s “GoldenEye”)
- Clear top coat (e.g., Essie’s “Good to Go”)
- Thin nail art brush
Practical Advice
- Prepare Your Nails: Clean and shape your nails, then apply a base coat.
- Apply the Pink Base: Apply two coats of nude pink polish and let it dry.
- Add Gold Accents: Use a thin nail art brush to create swirling gold lines on each nail.
- Seal the Design: Apply a clear top coat to ensure the design lasts and maintains its shine.
Pearlescent Pink
This design exudes femininity and elegance with a pearlescent pink base and delicate pearl accents. The square-shaped nails are adorned with small pearls, adding a touch of sophistication and charm. This manicure is perfect for special occasions such as weddings or formal events, offering a refined and classy look that will undoubtedly impress.
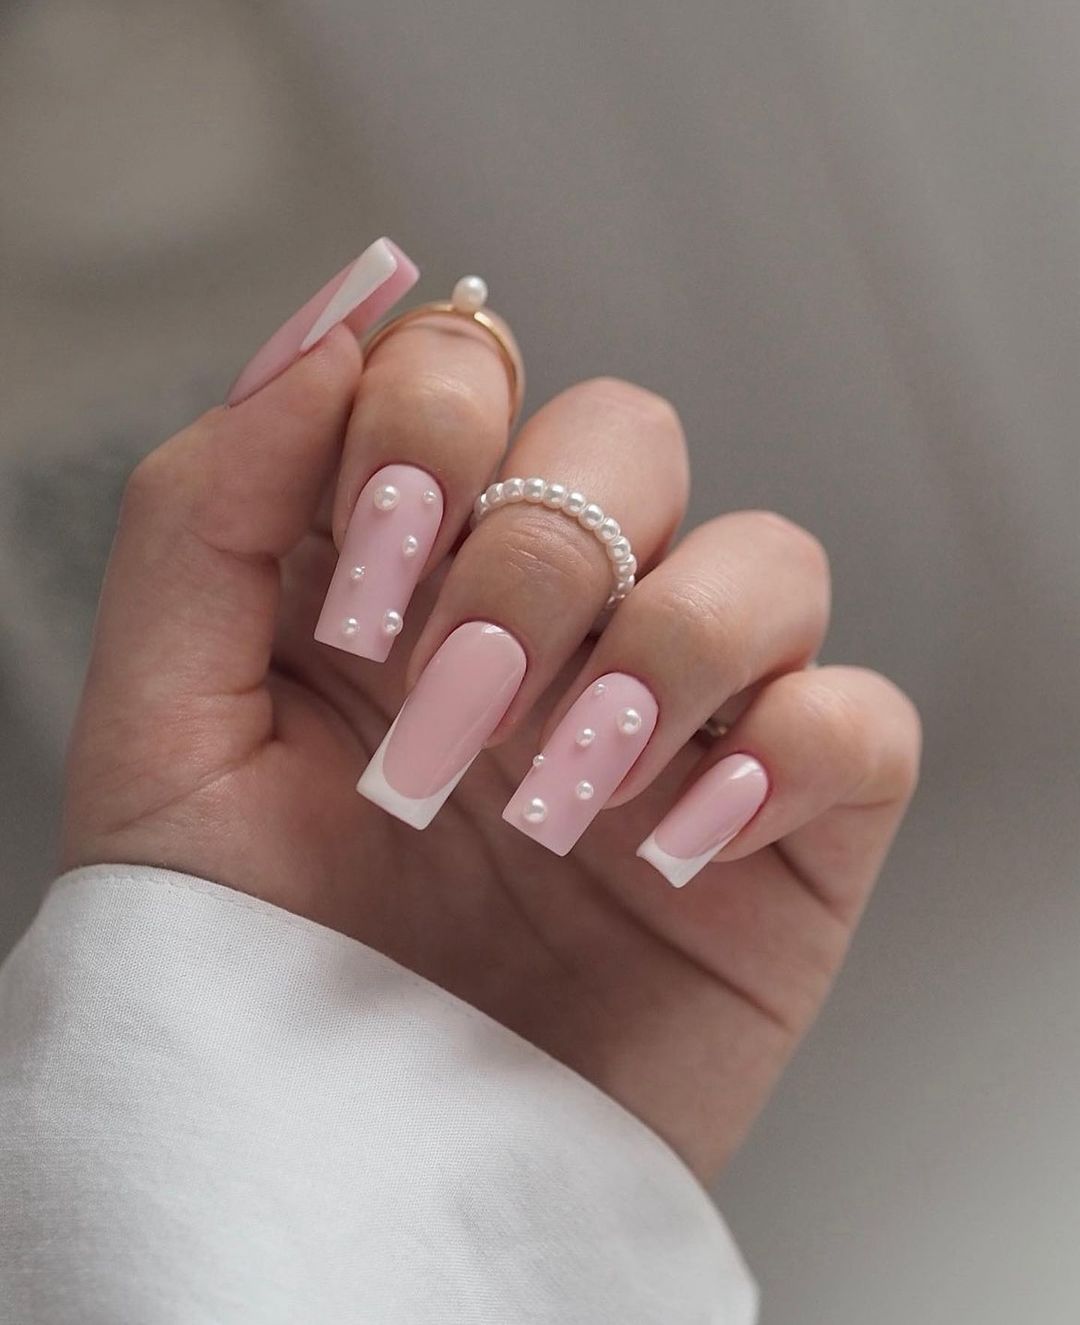
Consumables
- Pearlescent pink polish (e.g., Essie’s “Sugar Daddy”)
- Small nail pearls
- Clear top coat (e.g., CND Vinylux Weekly Top Coat)
- Nail glue or top coat to adhere pearls
Practical Advice
- Prepare Your Nails: Clean and shape your nails, then apply a base coat.
- Apply the Pink Base: Apply two to three coats of pearlescent pink polish, allowing each coat to dry thoroughly.
- Add Pearl Accents: Use nail glue or a clear top coat to adhere the small pearls to your nails.
- Seal the Design: Finish with a clear top coat to secure the pearls and add a glossy finish.
Save Pin
Heart Accent French Tips
This playful and romantic design features a classic French tip with a twist. The square nails have a soft pink base with white tips, accented by a heart-shaped arrangement of tiny pearls on one nail. This manicure combines the timeless elegance of French tips with a cute and personalized touch, making it perfect for those who love a mix of classic and modern styles.
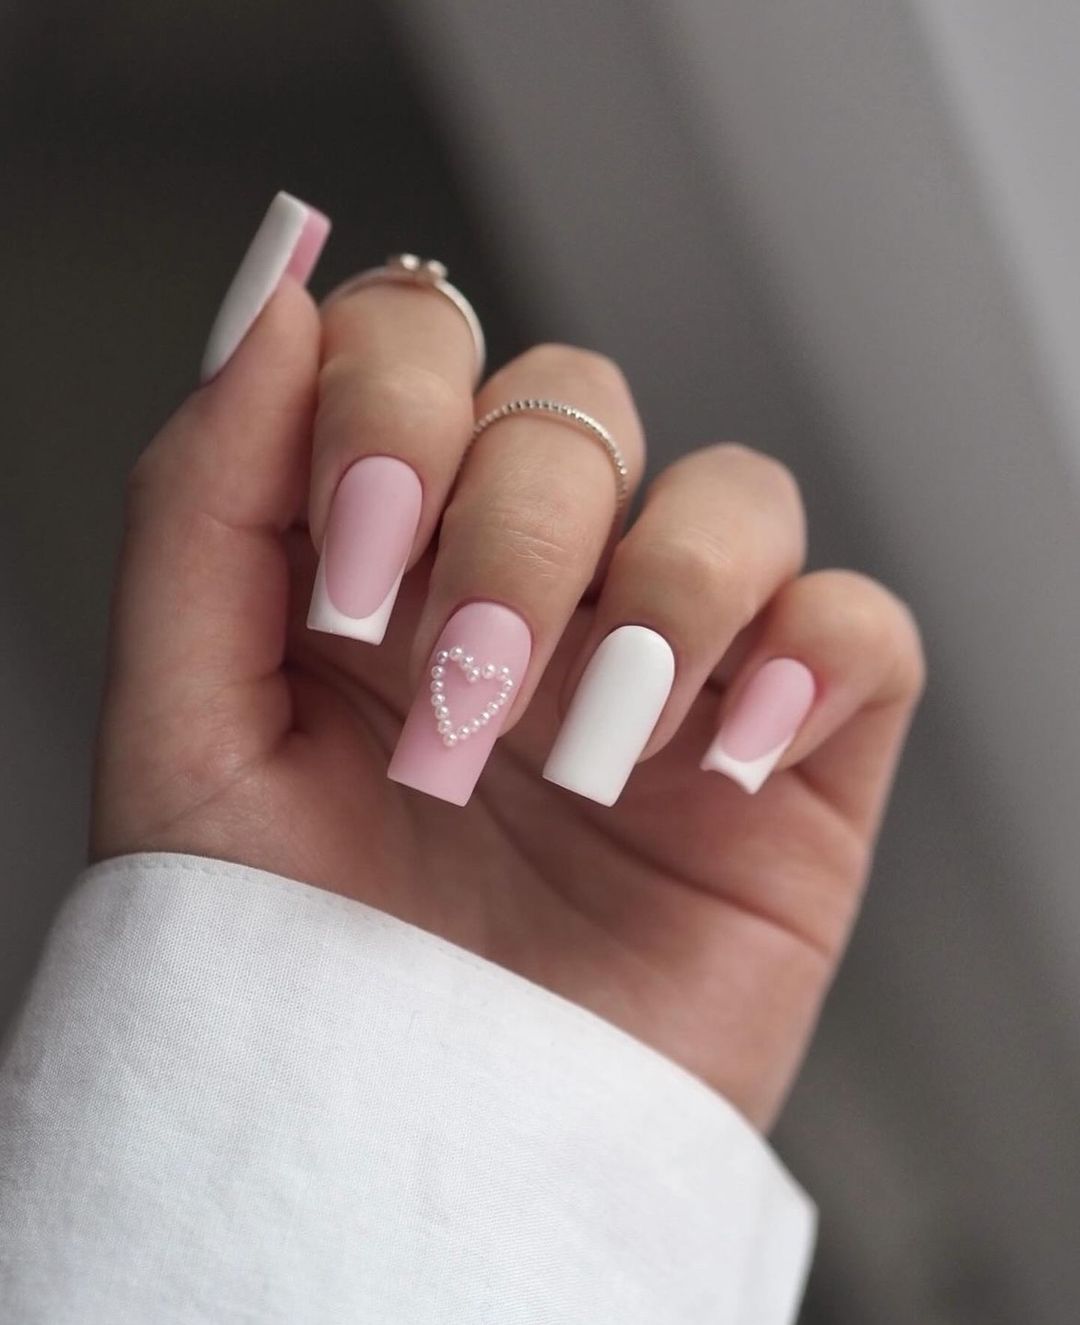
Consumables
- Soft pink base polish (e.g., OPI’s “Bubble Bath”)
- White tip polish (e.g., Sally Hansen’s “White On”)
- Small nail pearls
- Clear top coat (e.g., Essie’s “Good to Go”)
- Nail glue or top coat to adhere pearls
Practical Advice
- Prepare Your Nails: Clean and shape your nails, then apply a base coat.
- Apply the Pink Base: Paint two coats of soft pink polish and let them dry.
- Create French Tips: Use the white polish to paint the tips of your nails.
- Add Heart Accent: Arrange small pearls in a heart shape on one nail using nail glue or a clear top coat.
- Seal the Design: Finish with a clear top coat to protect the design and ensure longevity.
Classic French on Dark Skin
This design showcases the timeless beauty of French tips on dark skin tones. The almond-shaped nails feature a nude base with crisp white tips, highlighting the elegant contrast and enhancing the overall sophistication. This manicure is perfect for those who appreciate classic and understated designs that never go out of style. The simplicity and elegance of this look make it suitable for any occasion.
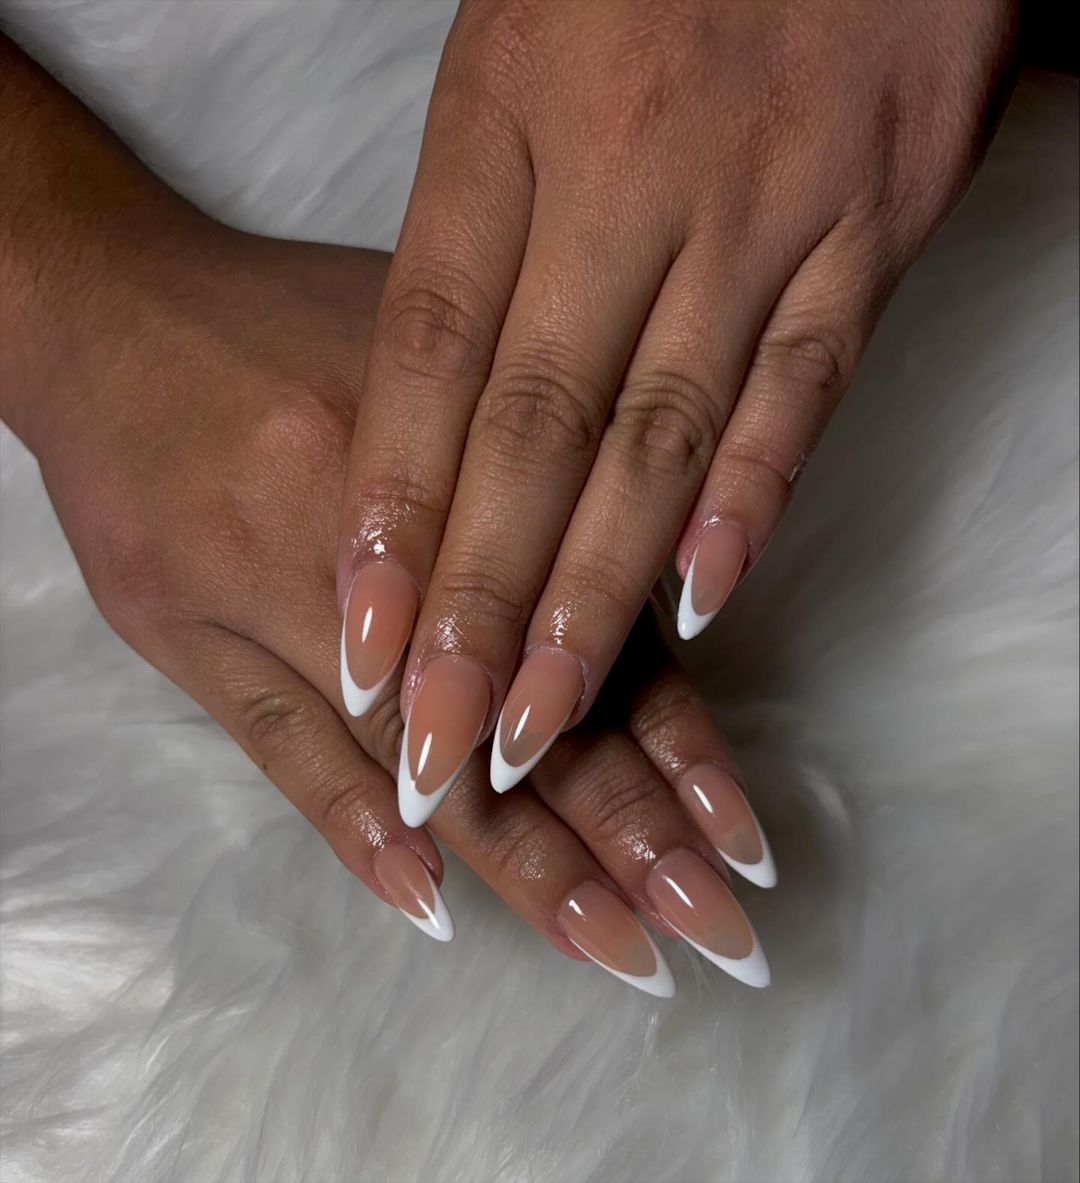
Consumables
- Nude base polish (e.g., Essie’s “Ballet Slippers”)
- White tip polish (e.g., OPI’s “Alpine Snow”)
- Clear top coat (e.g., CND Vinylux Weekly Top Coat)
- French tip guides or nail art brush
Practical Advice
- Prepare Your Nails: Clean and shape your nails, then apply a base coat.
- Apply the Nude Base: Apply two coats of nude polish and let it dry completely.
- Create French Tips: Use French tip guides or a nail art brush to paint the white tips.
- Seal the Design: Finish with a clear top coat to ensure durability and shine.
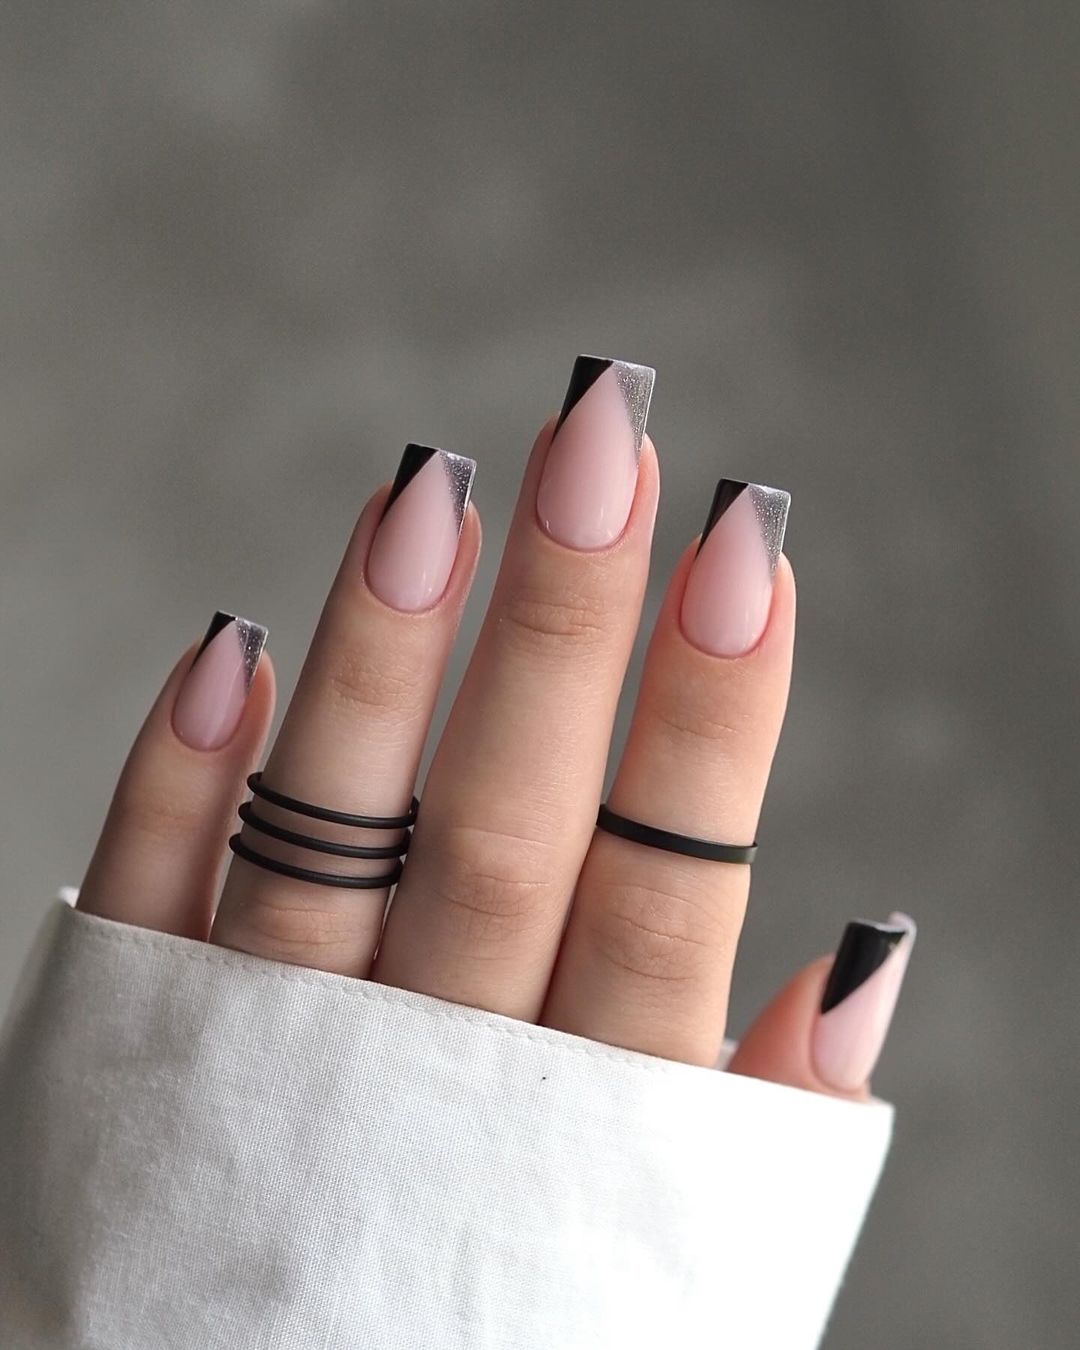
Black and Silver Geometric Tips
This edgy and modern design features a nude base with sharp black and silver geometric tips. The square-shaped nails create a bold and striking look, perfect for those who love to experiment with contemporary styles. The contrast between the nude base and the metallic accents adds a unique and fashionable touch, making this manicure a standout choice for the season.
Consumables
- Nude base polish (e.g., OPI’s “Dulce de Leche”)
- Black polish (e.g., Essie’s “Licorice”)
- Silver glitter polish (e.g., China Glaze’s “Glistening Snow”)
- Clear top coat (e.g., Seche Vite Dry Fast Top Coat)
- Thin nail art brush or nail tape
Practical Advice
- Prepare Your Nails: Clean and shape your nails, then apply a base coat.
- Apply the Nude Base: Apply two coats of nude polish and let it dry.
- Create Geometric Tips: Use a thin nail art brush or nail tape to paint the black and silver geometric tips.
- Seal the Design: Finish with a clear top coat to protect the design and add shine.
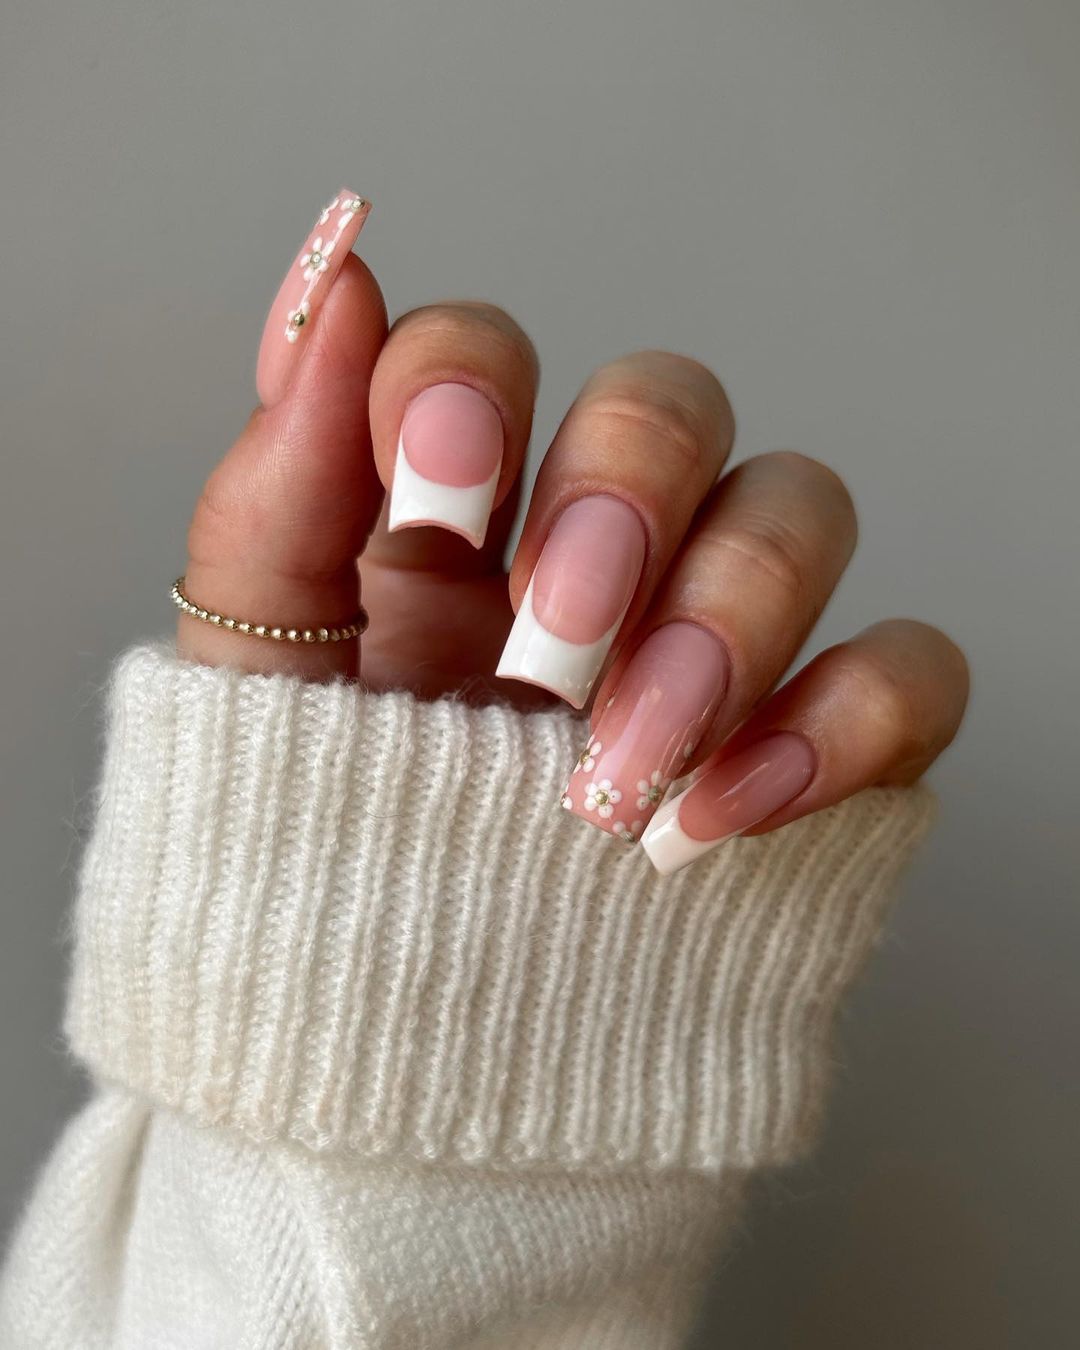
Delicate Floral French Tips
This design combines classic French tips with delicate floral accents for a soft and elegant look. The nails feature a soft pink base with crisp white tips, adorned with tiny white flowers and pearl centers. This combination creates a sophisticated yet charming appearance, perfect for those who love a feminine touch to their manicure. The floral details add a subtle yet beautiful element, making this design ideal for weddings, special occasions, or everyday elegance.
Consumables
- Soft pink base polish (e.g., Essie’s “Mademoiselle”)
- White tip polish (e.g., OPI’s “Alpine Snow”)
- White nail art flowers
- Small pearl embellishments
- Clear top coat (e.g., Seche Vite Dry Fast Top Coat)
- Nail glue or top coat to adhere the embellishments
Practical Advice
- Prepare Your Nails: Clean and shape your nails, then apply a base coat.
- Apply the Pink Base: Paint two coats of soft pink polish and let them dry.
- Create French Tips: Use the white polish to paint the tips of your nails.
- Add Floral Accents: Adhere the white flowers and pearl centers using nail glue or a clear top coat.
- Seal the Design: Finish with a clear top coat to secure the embellishments and add a glossy finish.
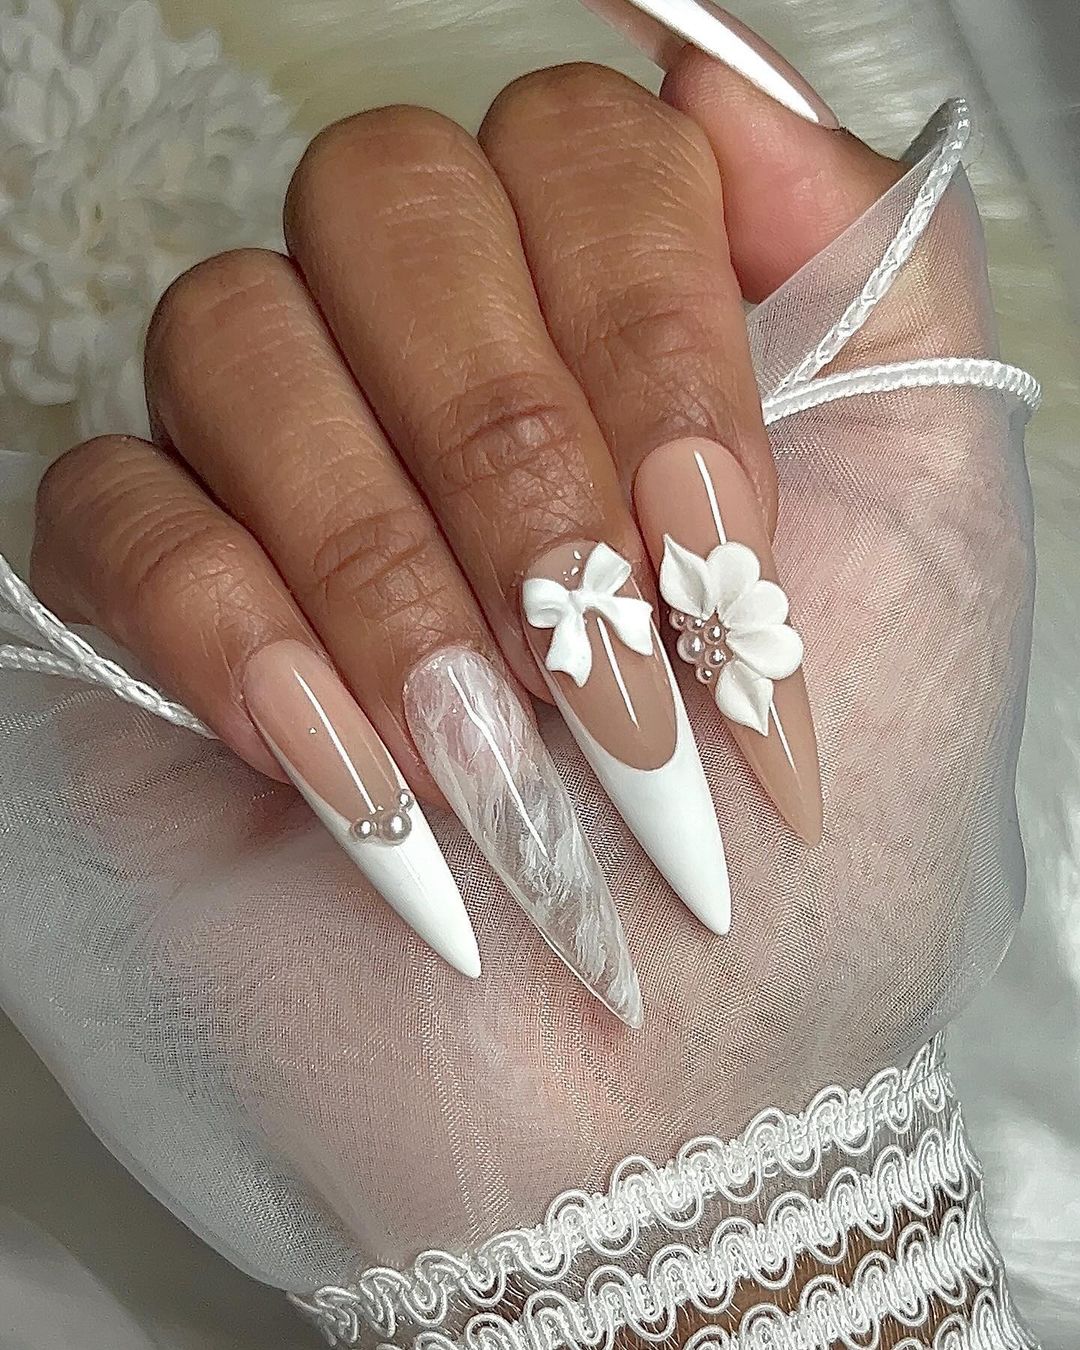
Extravagant Floral and Pearl Stilettos
This extravagant design features stiletto nails with a mix of nude and white bases, adorned with 3D floral and pearl accents. The intricate detailing and bold shape make this a statement manicure perfect for special occasions or those who love to showcase unique nail art. The combination of 3D flowers, pearls, and a touch of shimmer adds depth and dimension, making these nails a true work of art.
Consumables
- Nude base polish (e.g., Zoya’s “Chantal”)
- White polish (e.g., Essie’s “Blanc”)
- 3D nail art flowers
- Pearl embellishments
- Clear top coat (e.g., CND Vinylux Weekly Top Coat)
- Nail glue or top coat to adhere the embellishments
Practical Advice
- Prepare Your Nails: Clean and shape your nails, then apply a base coat.
- Apply the Base Colors: Alternate between nude and white polish for each nail, applying two coats of each and letting them dry.
- Add 3D Accents: Adhere the 3D flowers and pearl embellishments using nail glue or a clear top coat.
- Seal the Design: Finish with a clear top coat to secure the embellishments and add shine.
Minimalist Dot and Line Design
This minimalist design features a nude base with simple black dots and lines for a chic and understated look. The almond-shaped nails create an elegant canvas for the minimalist art, making this design perfect for those who appreciate simplicity and sophistication. The clean lines and small dots add a touch of modern elegance, ideal for both casual and formal settings.

Consumables
- Nude base polish (e.g., OPI’s “Dulce de Leche”)
- Black nail art polish or pen (e.g., Sally Hansen’s “Black Heart”)
- Clear top coat (e.g., Essie’s “Good to Go”)
- Thin nail art brush or dotting tool
Practical Advice
- Prepare Your Nails: Clean and shape your nails, then apply a base coat.
- Apply the Nude Base: Paint two coats of nude polish and let them dry.
- Create Minimalist Art: Use a thin nail art brush or dotting tool to add black dots and lines to each nail.
- Seal the Design: Finish with a clear top coat to protect the design and add shine.
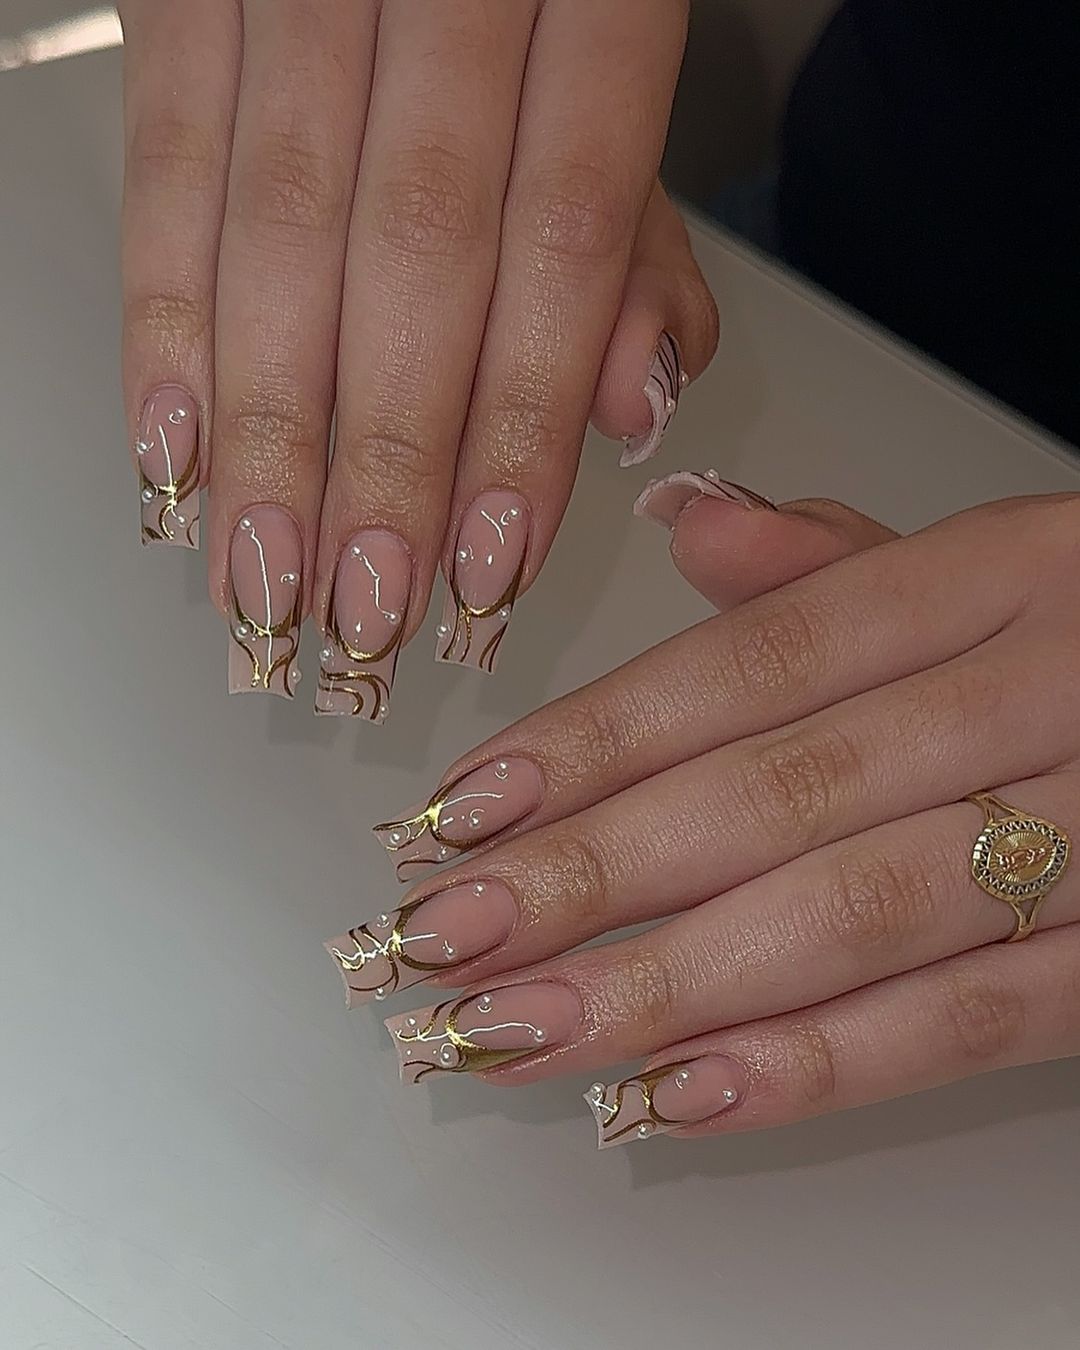
Marbled Gold Accents
This sophisticated design features clear nails with marbled gold accents and subtle pearl details. The square-shaped nails create a perfect backdrop for the intricate gold marbling, which adds a touch of luxury and elegance. The pearls enhance the overall look, making it ideal for special events or those who love to add a bit of glamour to their nails. This design combines modern art with classic elegance, offering a unique and stylish manicure.
Consumables
- Clear base polish (e.g., Essie’s “Allure”)
- Gold nail art polish or foil (e.g., OPI’s “Gold to My Heart”)
- Small pearl embellishments
- Clear top coat (e.g., Seche Vite Dry Fast Top Coat)
- Nail glue or top coat to adhere the pearls
Practical Advice
- Prepare Your Nails: Clean and shape your nails, then apply a base coat.
- Create Marbled Effect: Apply clear polish and use gold nail art polish or foil to create a marbled effect.
- Add Pearl Details: Adhere small pearl embellishments using nail glue or a clear top coat.
- Seal the Design: Finish with a clear top coat to secure the embellishments and add shine.
Sparkling Pink French Tips
This elegant design features classic French tips with a sparkling twist. The square nails have a soft pink base with white tips, accented by small rhinestones for a touch of glamour. The combination of pink, white, and sparkling accents makes this design both timeless and modern, perfect for those who want a bit of sparkle in their classic manicure. This look is ideal for weddings, parties, or any occasion where you want to shine.
Consumables
- Soft pink base polish (e.g., Essie’s “Ballet Slippers”)
- White tip polish (e.g., OPI’s “Alpine Snow”)
- Small rhinestones
- Clear top coat (e.g., CND Vinylux Weekly Top Coat)
- Nail glue or top coat to adhere the rhinestones
Practical Advice
- Prepare Your Nails: Clean and shape your nails, then apply a base coat.
- Apply the Pink Base: Paint two coats of soft pink polish and let them dry.
- Create French Tips: Use the white polish to paint the tips of your nails.
- Add Rhinestones: Adhere small rhinestones using nail glue or a clear top coat.
- Seal the Design: Finish with a clear top coat to secure the rhinestones and add a glossy finish.
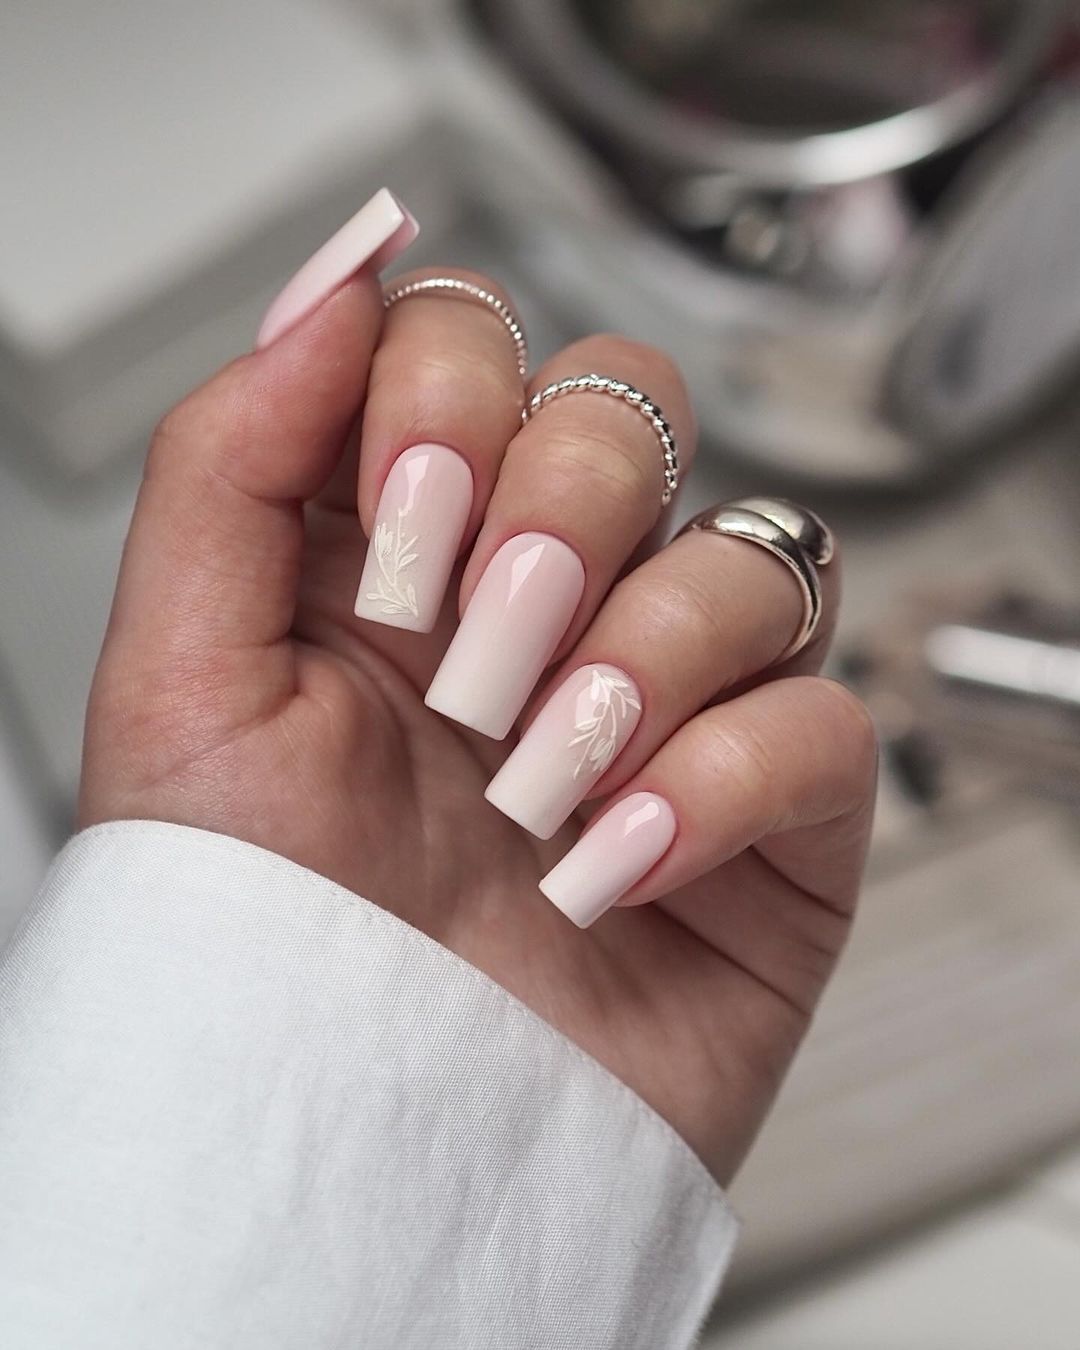
Elegant White Leaf Accents
This design features soft pink nails with elegant white leaf accents, creating a delicate and sophisticated look. The square nails provide a classic shape, while the white leaf details add a modern touch of nature-inspired art. This manicure is perfect for those who love subtle elegance with a hint of creativity, making it suitable for both everyday wear and special occasions.
Consumables
- Soft pink base polish (e.g., OPI’s “Bubble Bath”)
- White nail art polish or pen (e.g., Sally Hansen’s “White On”)
- Clear top coat (e.g., Seche Vite Dry Fast Top Coat)
- Thin nail art brush or pen for leaf design
Practical Advice
- Prepare Your Nails: Clean and shape your nails, then apply a base coat.
- Apply the Pink Base: Paint two coats of soft pink polish and let them dry.
- Add Leaf Accents: Use a thin nail art brush or pen to draw white leaf designs on each nail.
- Seal the Design: Finish with a clear top coat to protect the design and add shine.
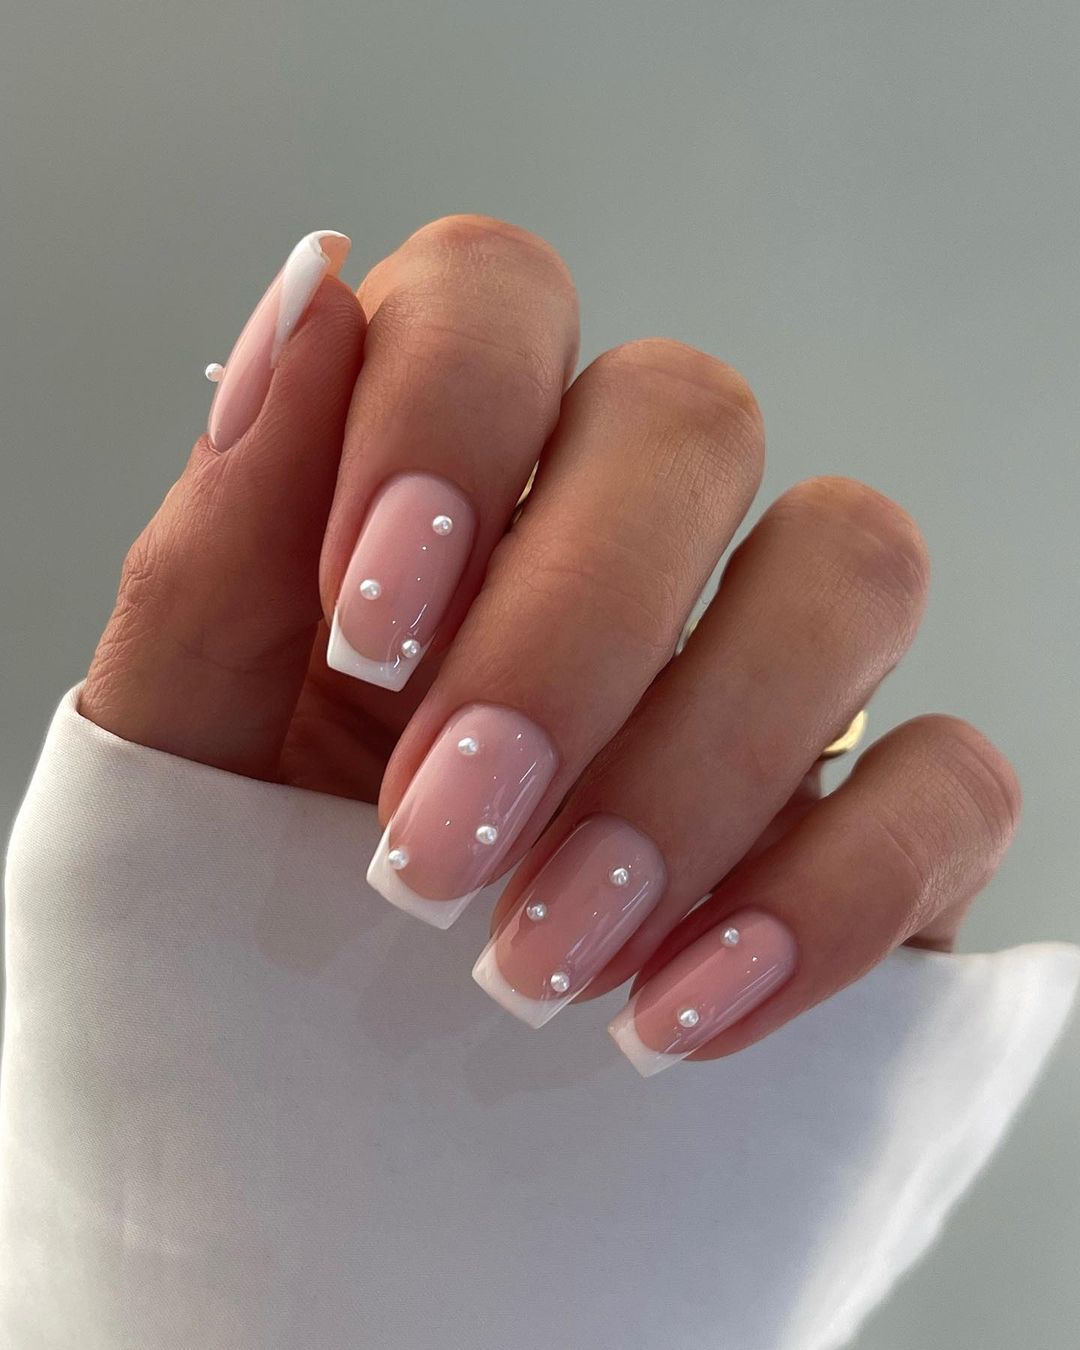
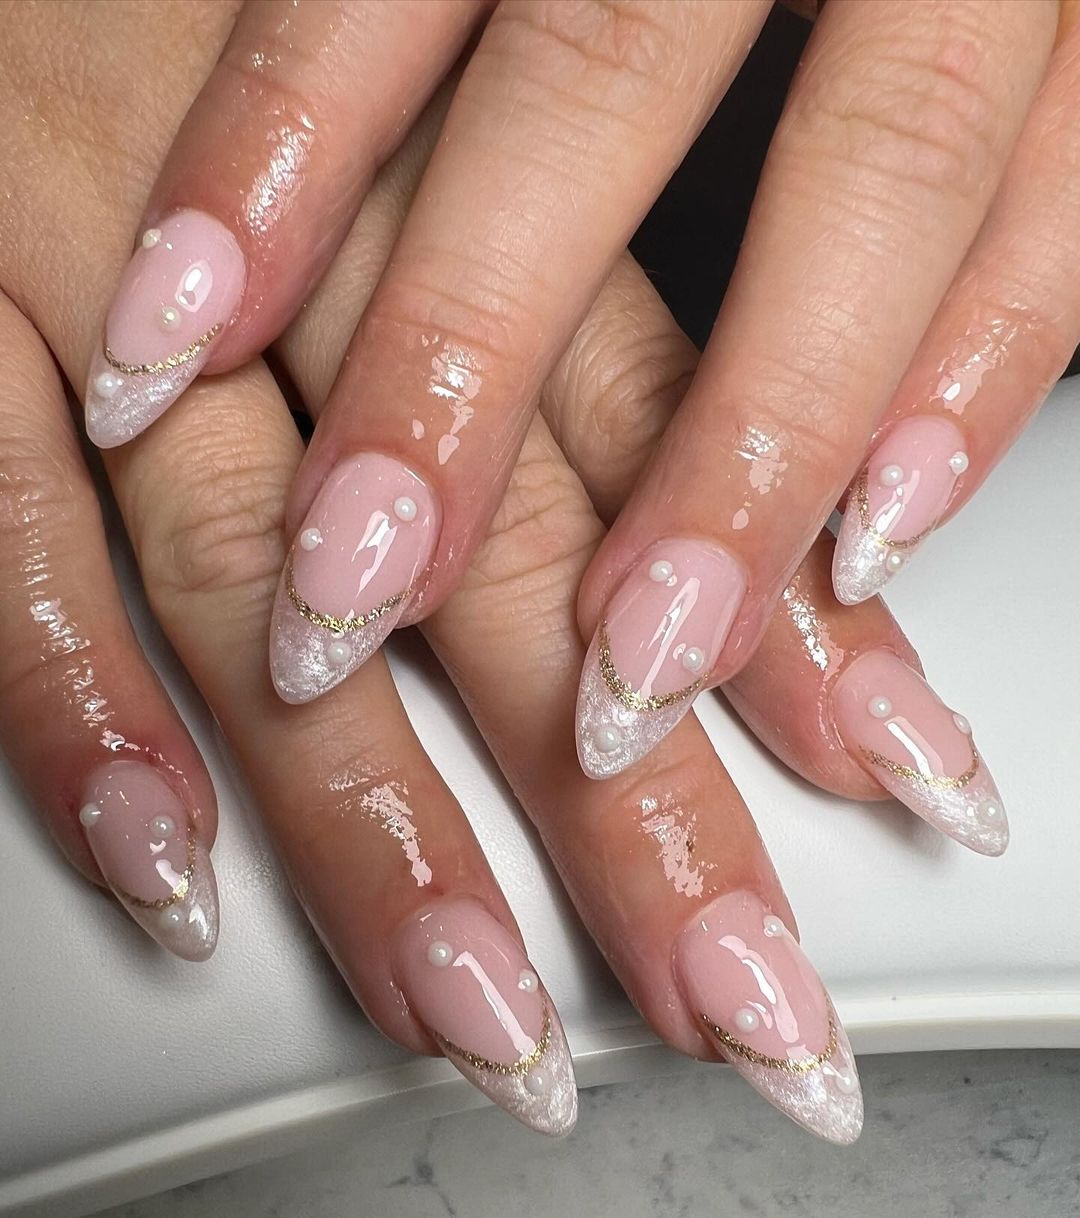
Pearlescent French Tips
This elegant design combines the classic French tip with delicate pearl accents. The soft pink base and crisp white tips create a timeless look, while the small pearls add a touch of sophistication and glamour. This manicure is perfect for special occasions or for those who appreciate a refined and classy appearance.
Consumables
- Soft pink base polish (e.g., Essie’s “Ballet Slippers”)
- White tip polish (e.g., OPI’s “Alpine Snow”)
- Small pearl embellishments
- Clear top coat (e.g., Seche Vite Dry Fast Top Coat)
- Nail glue or top coat to adhere pearls
Practical Advice
- Prepare Your Nails: Clean and shape your nails, then apply a base coat.
- Apply the Pink Base: Paint two coats of soft pink polish and let them dry.
- Create French Tips: Use white polish to paint the tips of your nails.
- Add Pearl Accents: Adhere small pearl embellishments using nail glue or a clear top coat.
- Seal the Design: Finish with a clear top coat to secure the pearls and add shine.
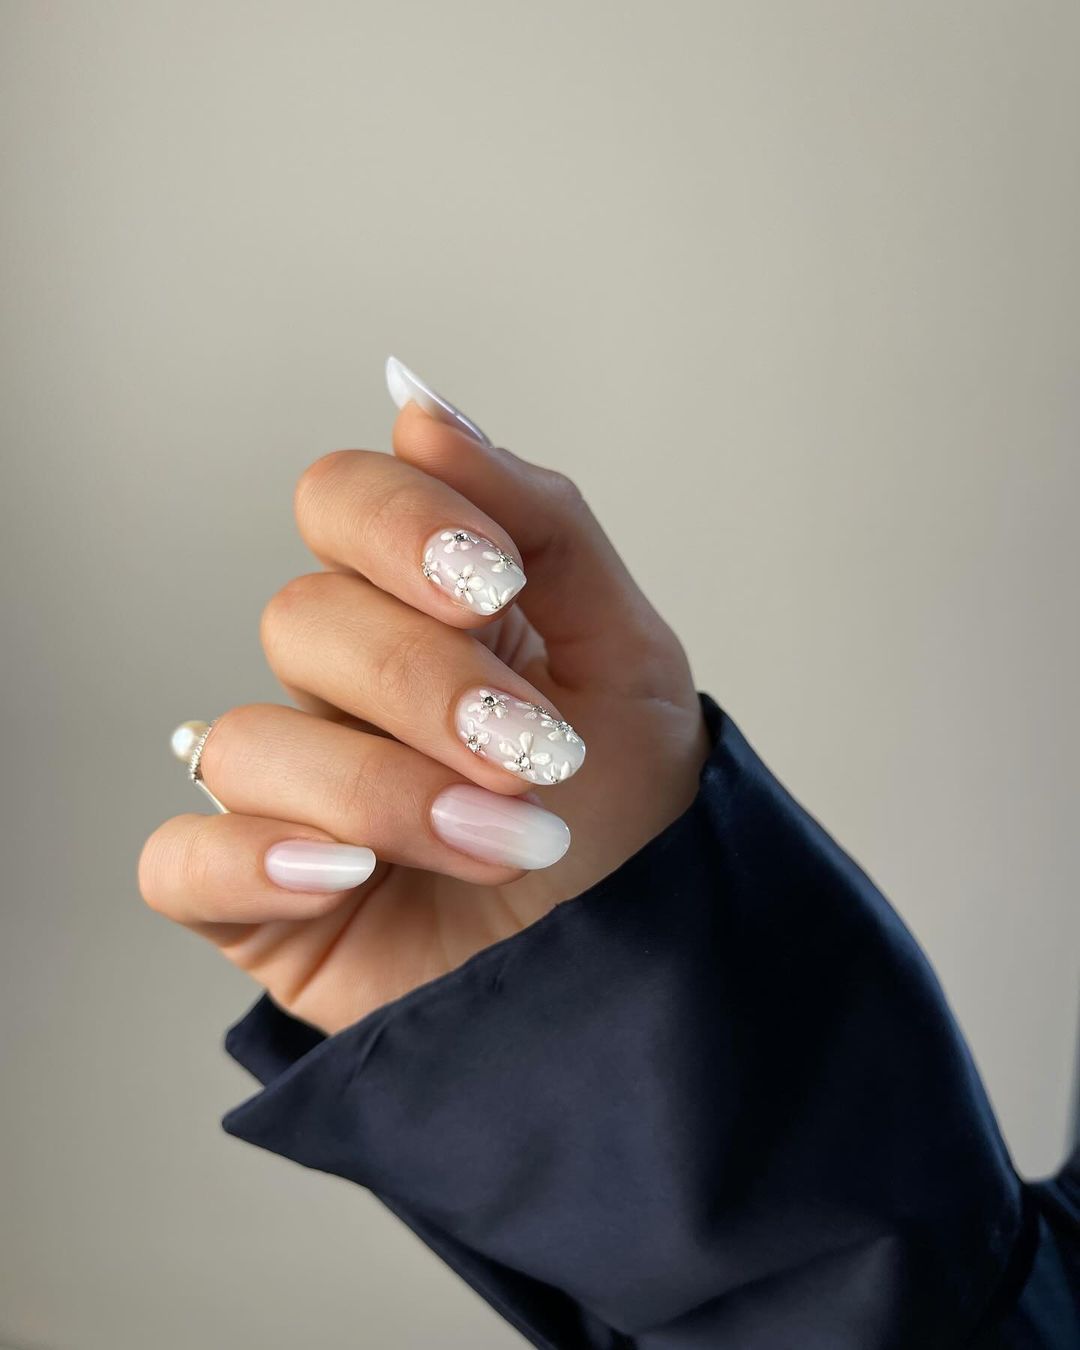
3D Floral Elegance
This stunning design features a nude pink base with intricate 3D floral accents on the ring finger. The combination of the ombre effect and the delicate white flowers creates a feminine and elegant look. The addition of tiny rhinestones in the center of the flowers adds a touch of sparkle, making this design perfect for weddings or special events.
Consumables
- Nude pink base polish (e.g., Zoya’s “Rue”)
- White polish for flowers (e.g., Essie’s “Blanc”)
- Tiny rhinestones
- Clear top coat (e.g., Essie’s “Good to Go”)
- Nail art brush for detailing
- Nail glue or top coat to adhere rhinestones
Practical Advice
- Prepare Your Nails: Clean and shape your nails, then apply a base coat.
- Apply the Nude Base: Paint two coats of nude pink polish and let them dry.
- Add 3D Flowers: Use white polish and a nail art brush to create the floral designs.
- Add Rhinestones: Place tiny rhinestones in the center of the flowers using nail glue or a clear top coat.
- Seal the Design: Finish with a clear top coat to protect the design and add a glossy finish.
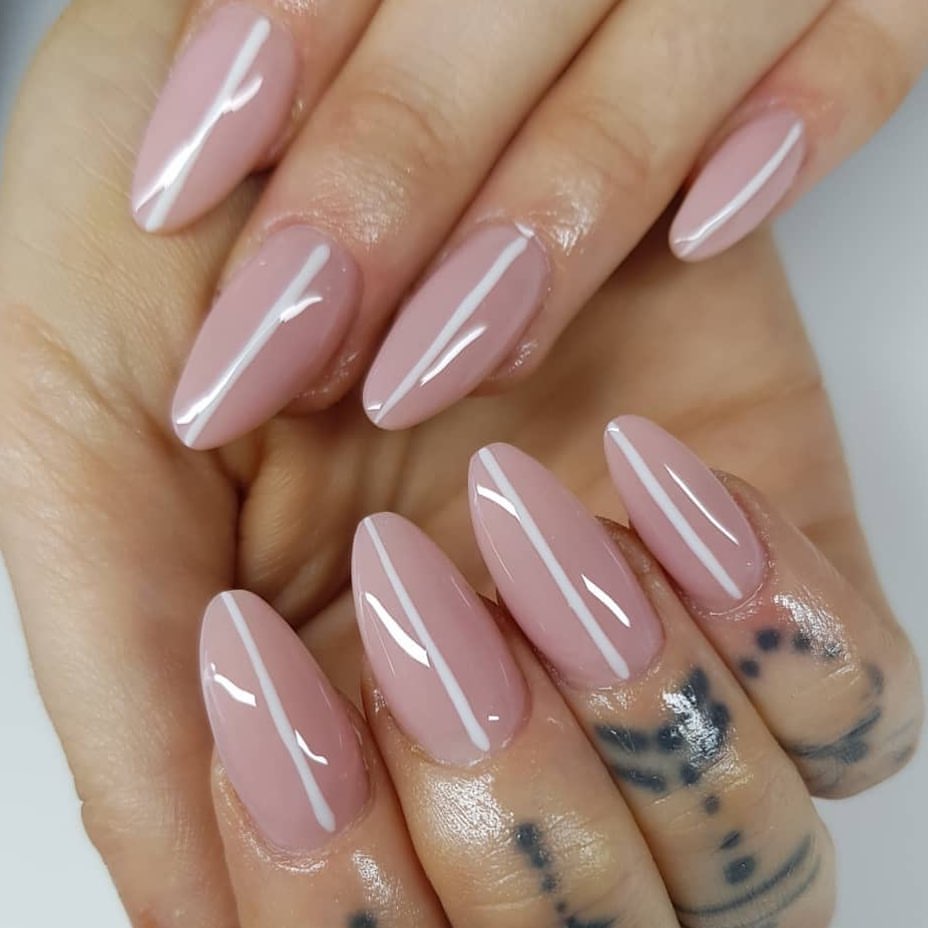
Chic Stripes
This minimalist design features a soft pink base with thin white stripes down the center of each nail. The almond-shaped nails enhance the overall elegance of this look, making it a perfect choice for those who appreciate simplicity with a touch of sophistication. The clean lines and soft colors create a modern and chic appearance.
Consumables
- Soft pink base polish (e.g., OPI’s “Bubble Bath”)
- White nail art polish or pen (e.g., Sally Hansen’s “White On”)
- Clear top coat (e.g., Seche Vite Dry Fast Top Coat)
- Thin nail art brush or striping tape
Practical Advice
- Prepare Your Nails: Clean and shape your nails, then apply a base coat.
- Apply the Pink Base: Paint two coats of soft pink polish and let them dry.
- Add White Stripes: Use a thin nail art brush or striping tape to create vertical white stripes down the center of each nail.
- Seal the Design: Finish with a clear top coat to protect the design and add shine.
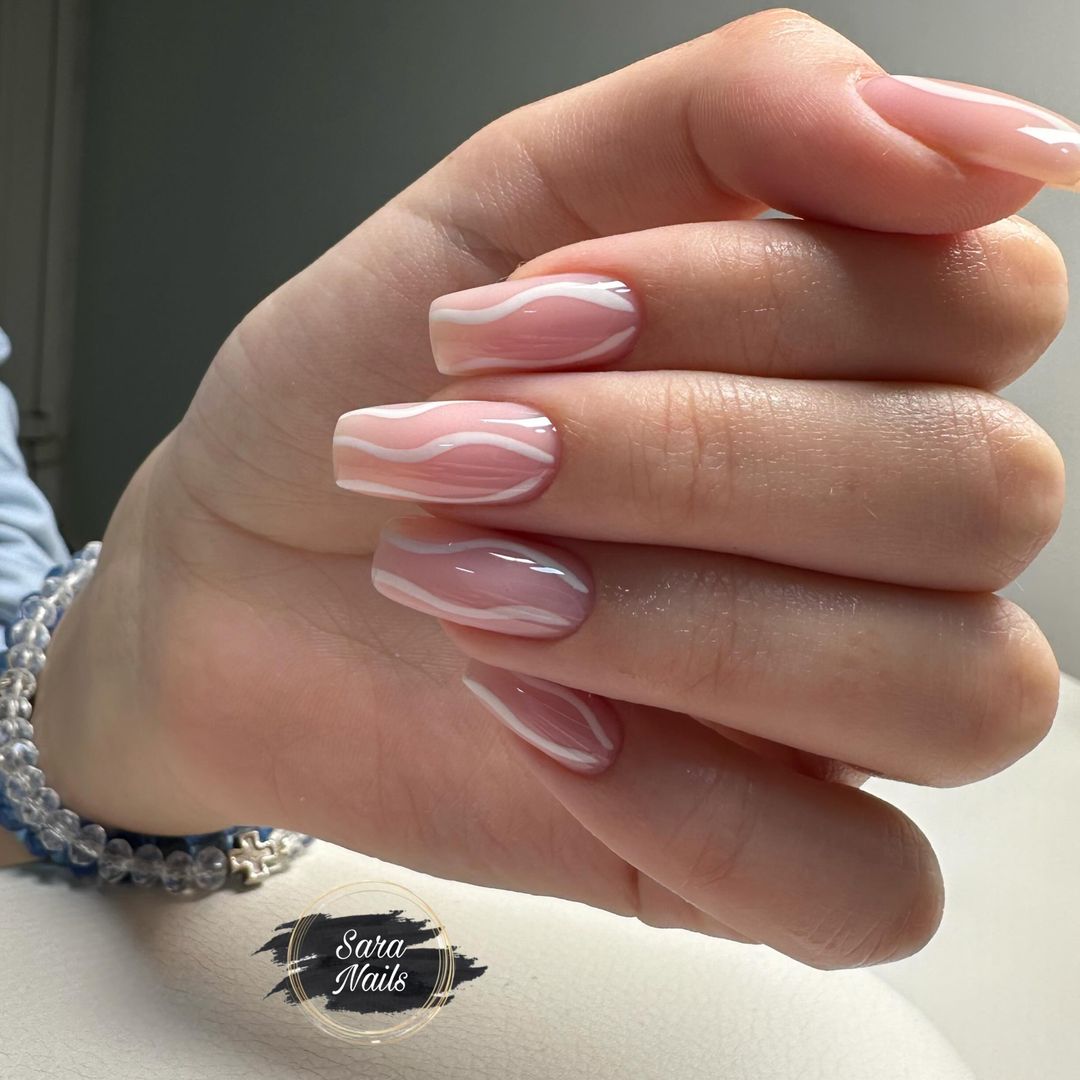
Wavy Elegance
This design features soft pink nails with elegant white wavy lines, creating a sophisticated and modern look. The square shape of the nails provides a clean canvas for the wavy designs, which add a touch of creativity and style. This manicure is perfect for those who enjoy unique and trendy nail art that remains classy and elegant.
Consumables
- Soft pink base polish (e.g., Essie’s “Ballet Slippers”)
- White nail art polish or pen (e.g., OPI’s “Alpine Snow”)
- Clear top coat (e.g., Essie’s “Good to Go”)
- Thin nail art brush for wavy lines
Practical Advice
- Prepare Your Nails: Clean and shape your nails, then apply a base coat.
- Apply the Pink Base: Paint two coats of soft pink polish and let them dry.
- Create Wavy Lines: Use a thin nail art brush to draw white wavy lines on each nail.
- Seal the Design: Finish with a clear top coat to protect the design and add shine.
Elegant French Almond Tips
This sophisticated design features almond-shaped nails with a nude pink base and white French tips. The clean lines and classic color combination create a timeless and elegant look. This manicure is ideal for any occasion, offering a refined and polished appearance that complements any outfit.

Consumables
- Nude pink base polish (e.g., Zoya’s “Rue”)
- White tip polish (e.g., Essie’s “Blanc”)
- Clear top coat (e.g., Seche Vite Dry Fast Top Coat)
- French tip guides or a nail art brush
Practical Advice
- Prepare Your Nails: Clean and shape your nails, then apply a base coat.
- Apply the Nude Base: Paint two coats of nude pink polish and let them dry.
- Create French Tips: Use French tip guides or a nail art brush to paint white tips on each nail.
- Seal the Design: Finish with a clear top coat to protect the design and add shine.
Classic French Coffin Tips
This design showcases the classic French tip on coffin-shaped nails, featuring a soft pink base and crisp white tips. The elongated shape of the nails adds a modern twist to this timeless style, making it perfect for those who love a blend of classic and contemporary. This look is versatile and elegant, suitable for both everyday wear and special occasions.
Consumables
- Soft pink base polish (e.g., OPI’s “Bubble Bath”)
- White tip polish (e.g., OPI’s “Alpine Snow”)
- Clear top coat (e.g., CND Vinylux Weekly Top Coat)
- French tip guides or a nail art brush
Practical Advice
- Prepare Your Nails: Clean and shape your nails into a coffin shape, then apply a base coat.
- Apply the Pink Base: Paint two coats of soft pink polish and let them dry.
- Create French Tips: Use French tip guides or a nail art brush to paint white tips on each nail.
- Seal the Design: Finish with a clear top coat to protect the design and add shine.
Sparkling Gem French Tips
This stunning design combines classic French tips with a touch of glamour through the use of sparkling gems. The nails feature a soft pink base with white tips, accented with small, multi-colored gems on the ring fingers. This look is perfect for those who want to elevate their traditional French manicure with a bit of bling, making it ideal for special occasions or simply adding a dash of sparkle to everyday wear.
Consumables
- Soft pink base polish (e.g., Essie’s “Ballet Slippers”)
- White tip polish (e.g., OPI’s “Alpine Snow”)
- Multi-colored nail gems
- Clear top coat (e.g., Seche Vite Dry Fast Top Coat)
- Nail glue or top coat to adhere gems
Practical Advice
- Prepare Your Nails: Clean and shape your nails, then apply a base coat.
- Apply the Pink Base: Paint two coats of soft pink polish and let them dry.
- Create French Tips: Use white polish to paint the tips of your nails.
- Add Gem Accents: Adhere multi-colored gems to the ring fingers using nail glue or a clear top coat.
- Seal the Design: Finish with a clear top coat to secure the gems and add shine.
Pearl Shine
This elegant design features nails coated in a pearl shine polish, creating a sophisticated and timeless look. The nails are shaped in a soft almond style, enhancing the delicate and feminine appeal of the design. This look is perfect for formal events, weddings, or any occasion where you want to exude elegance and grace.

Consumables
- Pearl shine polish (e.g., Zoya’s “Leia”)
- Clear top coat (e.g., Essie’s “Good to Go”)
Practical Advice
- Prepare Your Nails: Clean and shape your nails into a soft almond shape, then apply a base coat.
- Apply the Pearl Shine: Paint two coats of pearl shine polish and let them dry.
- Seal the Design: Finish with a clear top coat to enhance the shine and protect the polish.
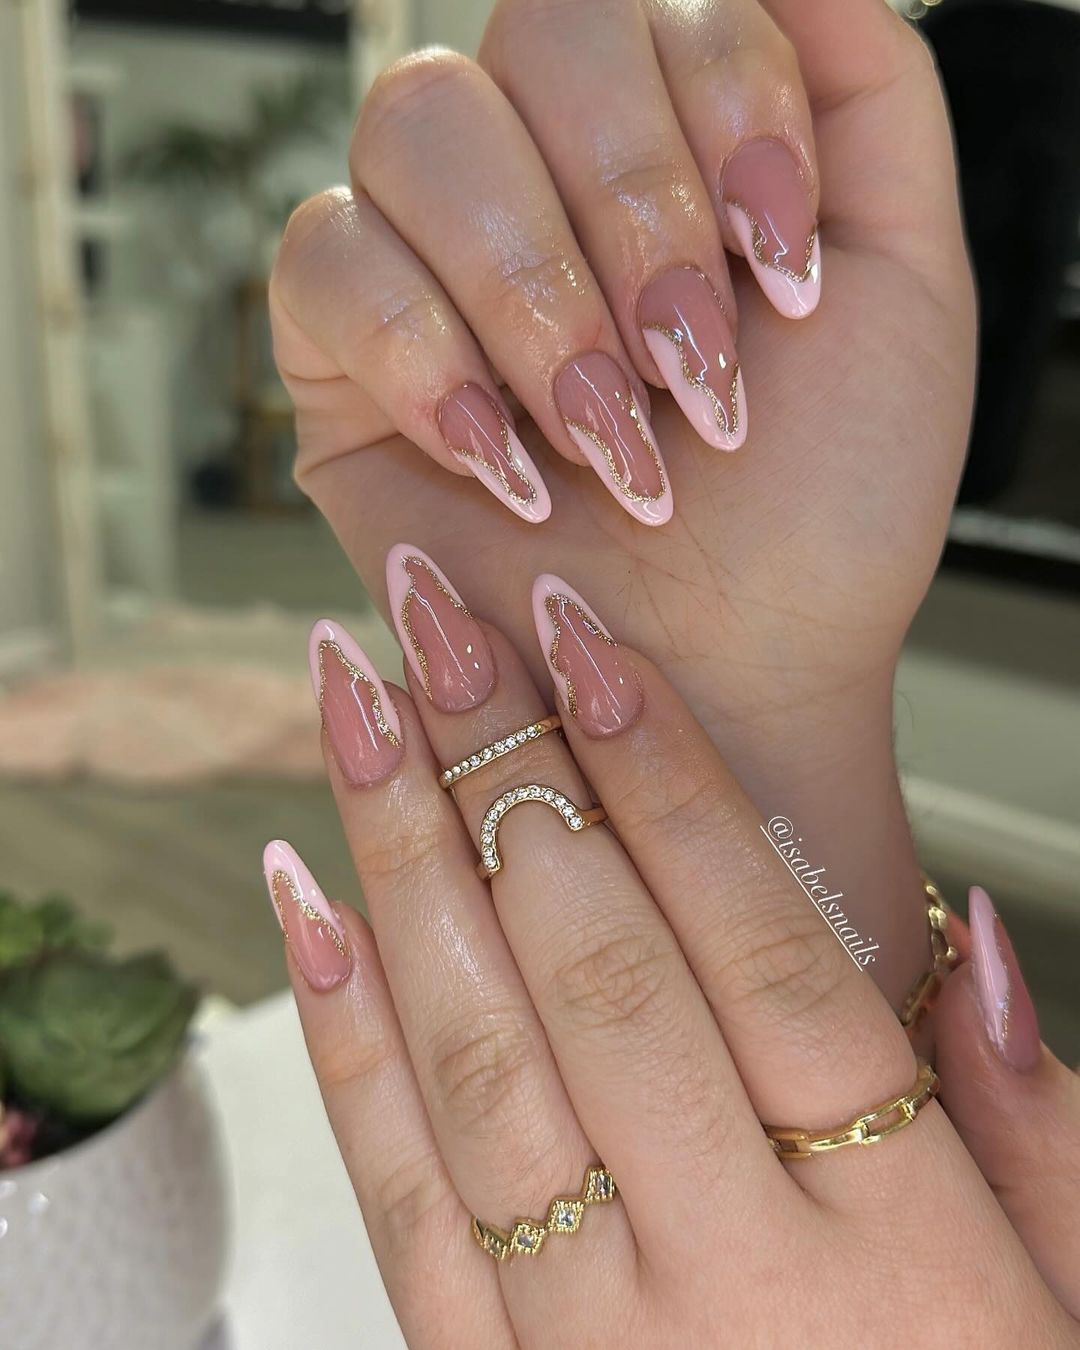
Pink Ribbon Accents
This playful design features coffin-shaped nails with a nude pink base and pink ribbon accents on the ring fingers. The ribbons add a whimsical and charming touch to the manicure, making it perfect for those who enjoy fun and creative nail art. The combination of the pink base and ribbon details creates a cohesive and stylish look.
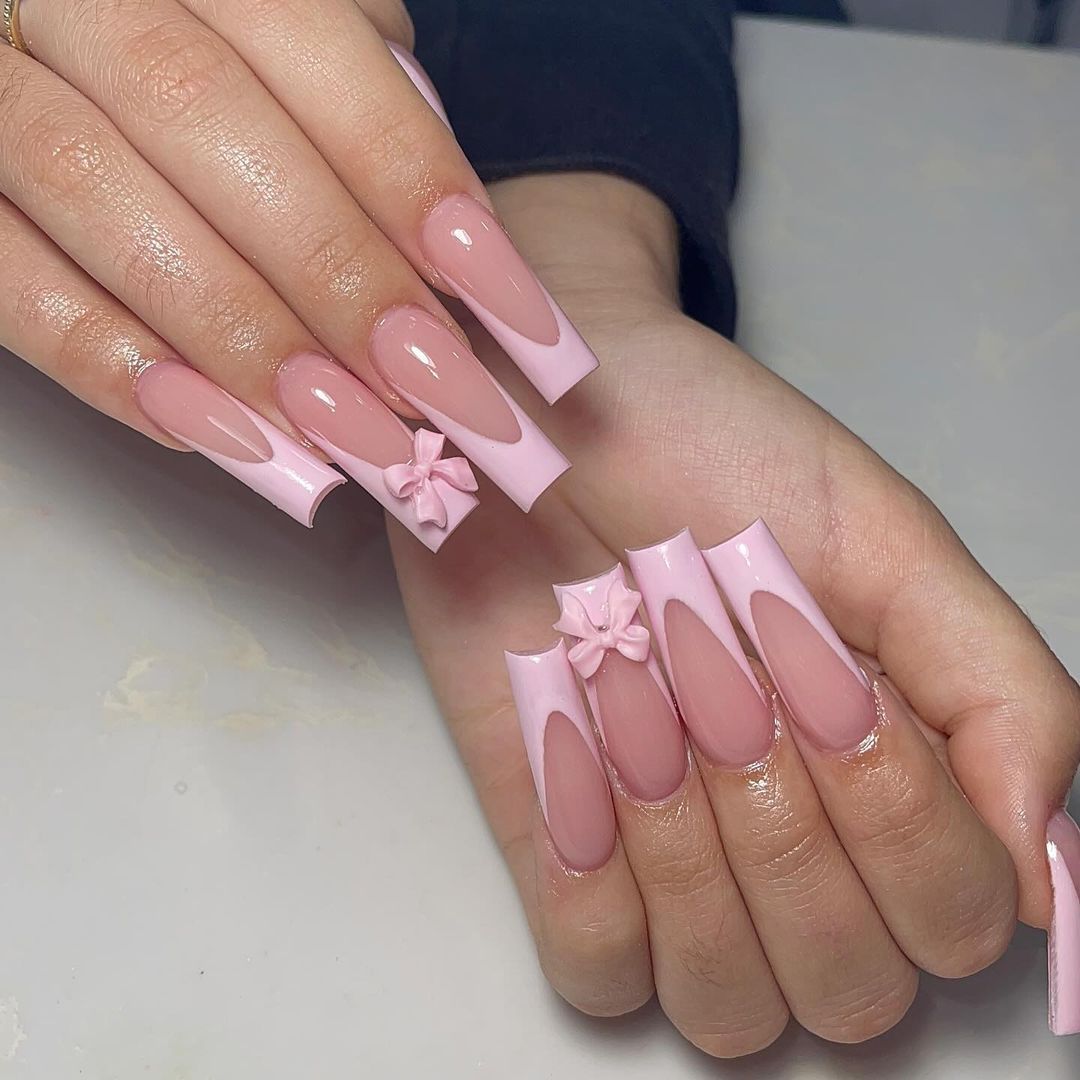
Consumables
- Nude pink base polish (e.g., OPI’s “Bubble Bath”)
- Pink polish for ribbons (e.g., Essie’s “Fiji”)
- Clear top coat (e.g., Seche Vite Dry Fast Top Coat)
- Nail glue or top coat to adhere ribbon accents
Practical Advice
- Prepare Your Nails: Clean and shape your nails into a coffin shape, then apply a base coat.
- Apply the Pink Base: Paint two coats of nude pink polish and let them dry.
- Add Ribbon Accents: Use pink polish to create ribbon designs on the ring fingers.
- Seal the Design: Finish with a clear top coat to protect the ribbons and add shine.
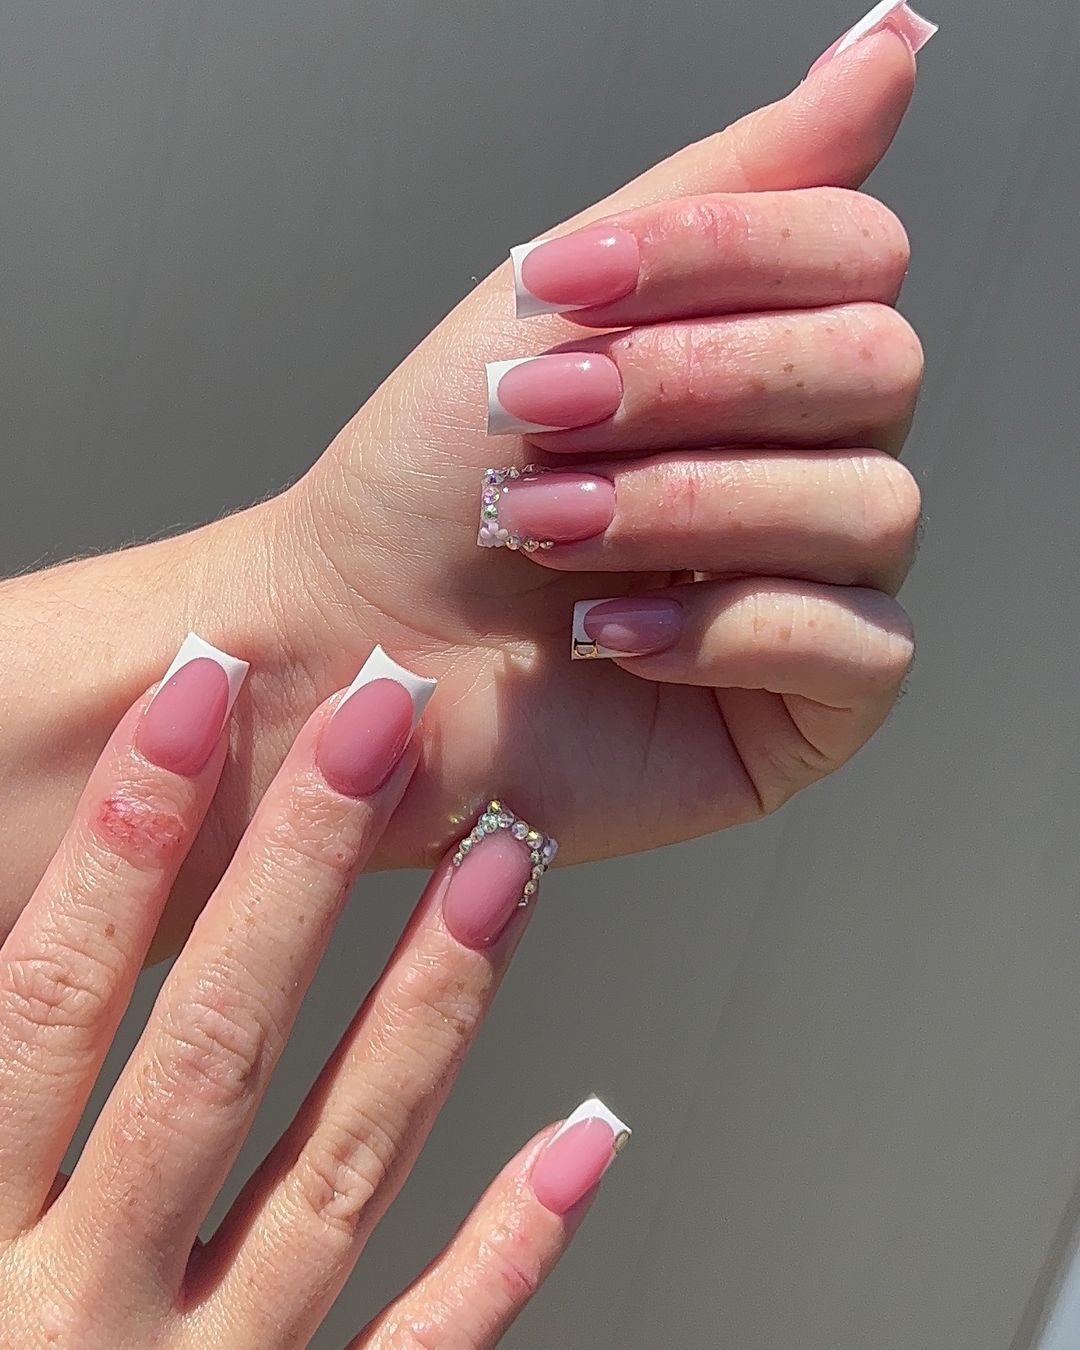
Elegant Gem-Studded French Tips
This design combines classic French tips with a unique twist of gem-studded accents. The coffin-shaped nails feature a nude pink base with white tips, adorned with small, colorful gems on each nail. The added gems create a luxurious and eye-catching effect, perfect for those who love to make a statement with their nails.
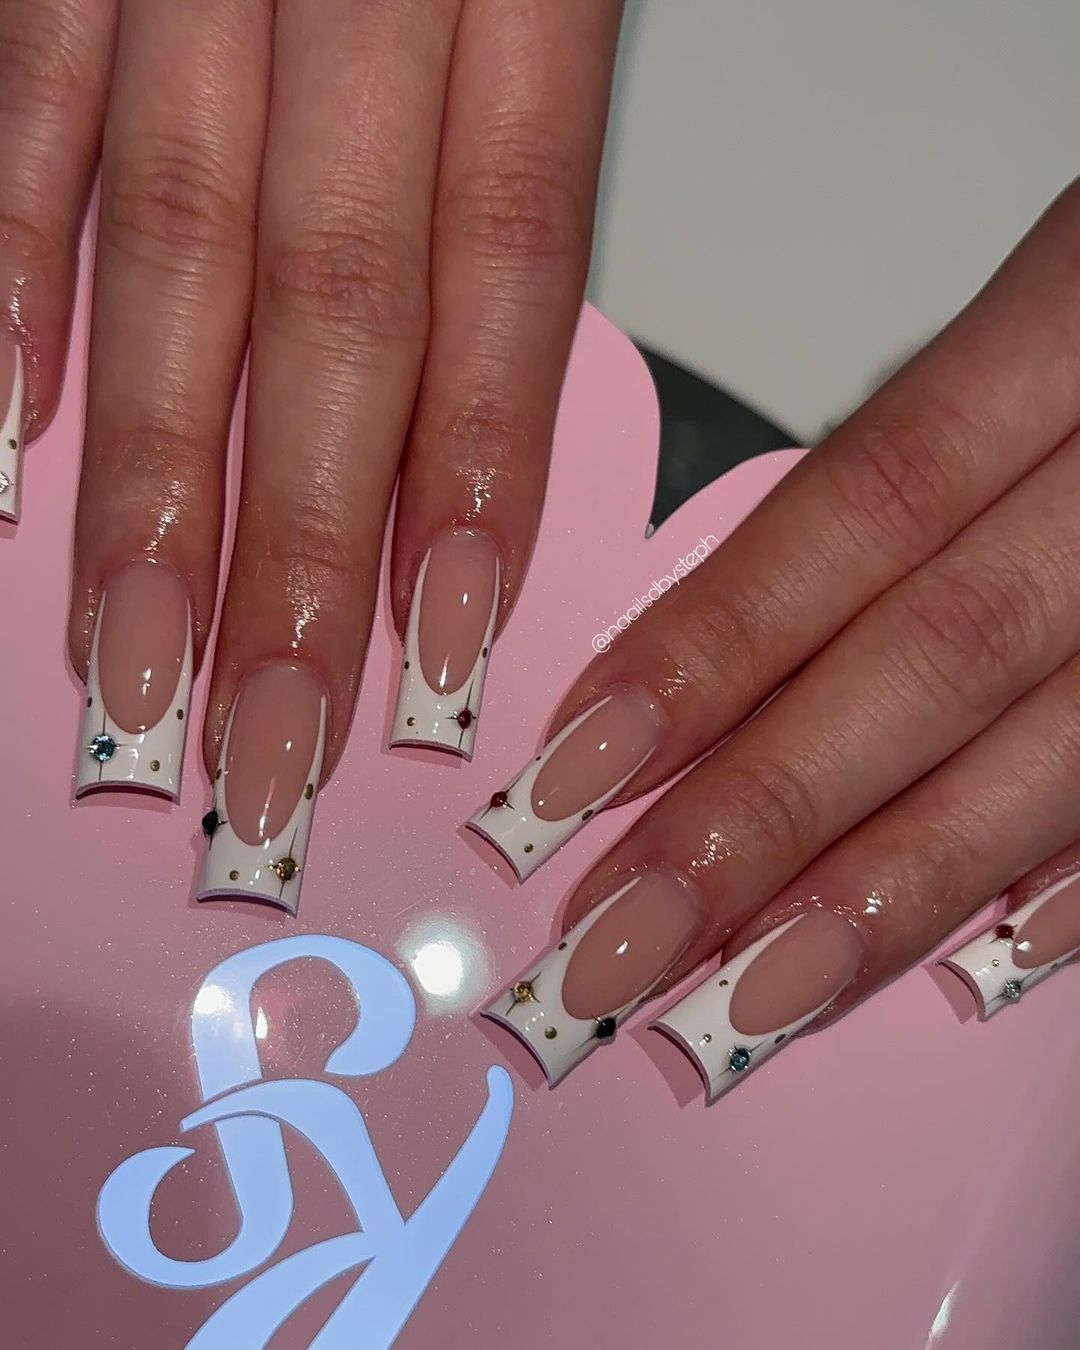
Consumables
- Nude pink base polish (e.g., Zoya’s “Rue”)
- White tip polish (e.g., OPI’s “Alpine Snow”)
- Small colorful nail gems
- Clear top coat (e.g., Essie’s “Good to Go”)
- Nail glue or top coat to adhere gems
Practical Advice
- Prepare Your Nails: Clean and shape your nails into a coffin shape, then apply a base coat.
- Apply the Pink Base: Paint two coats of nude pink polish and let them dry.
- Create French Tips: Use white polish to paint the tips of your nails.
- Add Gem Accents: Adhere small colorful gems using nail glue or a clear top coat.
- Seal the Design: Finish with a clear top coat to secure the gems and add a glossy finish.
Pearlescent Stiletto Tips
This glamorous design features stiletto nails with a pearlescent base and elegant gold accents. The combination of the pearlescent polish and gold detailing creates a luxurious and sophisticated look, perfect for those who want to make a bold and stylish statement. The added pearl embellishments enhance the overall elegance, making this design ideal for special events or formal occasions.
Consumables
- Pearlescent base polish (e.g., Essie’s “Pearly White”)
- Gold nail art polish or foil (e.g., OPI’s “Gold to My Heart”)
- Small pearl embellishments
- Clear top coat (e.g., Seche Vite Dry Fast Top Coat)
- Nail glue or top coat to adhere pearls
Practical Advice
- Prepare Your Nails: Clean and shape your nails into a stiletto shape, then apply a base coat.
- Apply the Pearlescent Base: Paint two coats of pearlescent polish and let them dry.
- Add Gold Accents: Use gold polish or foil to create elegant designs on each nail.
- Add Pearl Embellishments: Adhere small pearls using nail glue or a clear top coat.
- Seal the Design: Finish with a clear top coat to protect the design and add a glossy finish.
FAQ
Q: How long do these nail designs typically last? A: With proper care and the right top coat, these designs can last up to two weeks. Avoid using your nails as tools and apply cuticle oil regularly to keep them looking fresh.
Q: Can I achieve these looks with gel polish? A: Absolutely! Gel polish can enhance the durability and shine of these designs. Just ensure you have the necessary UV/LED lamp for curing the gel polish.
Q: What if I’m not confident in my nail art skills? A: Practice makes perfect! Start with simpler designs and gradually work your way up. There are also numerous nail art tools and stencils available that can help you achieve professional-looking designs at home.
Save Pin