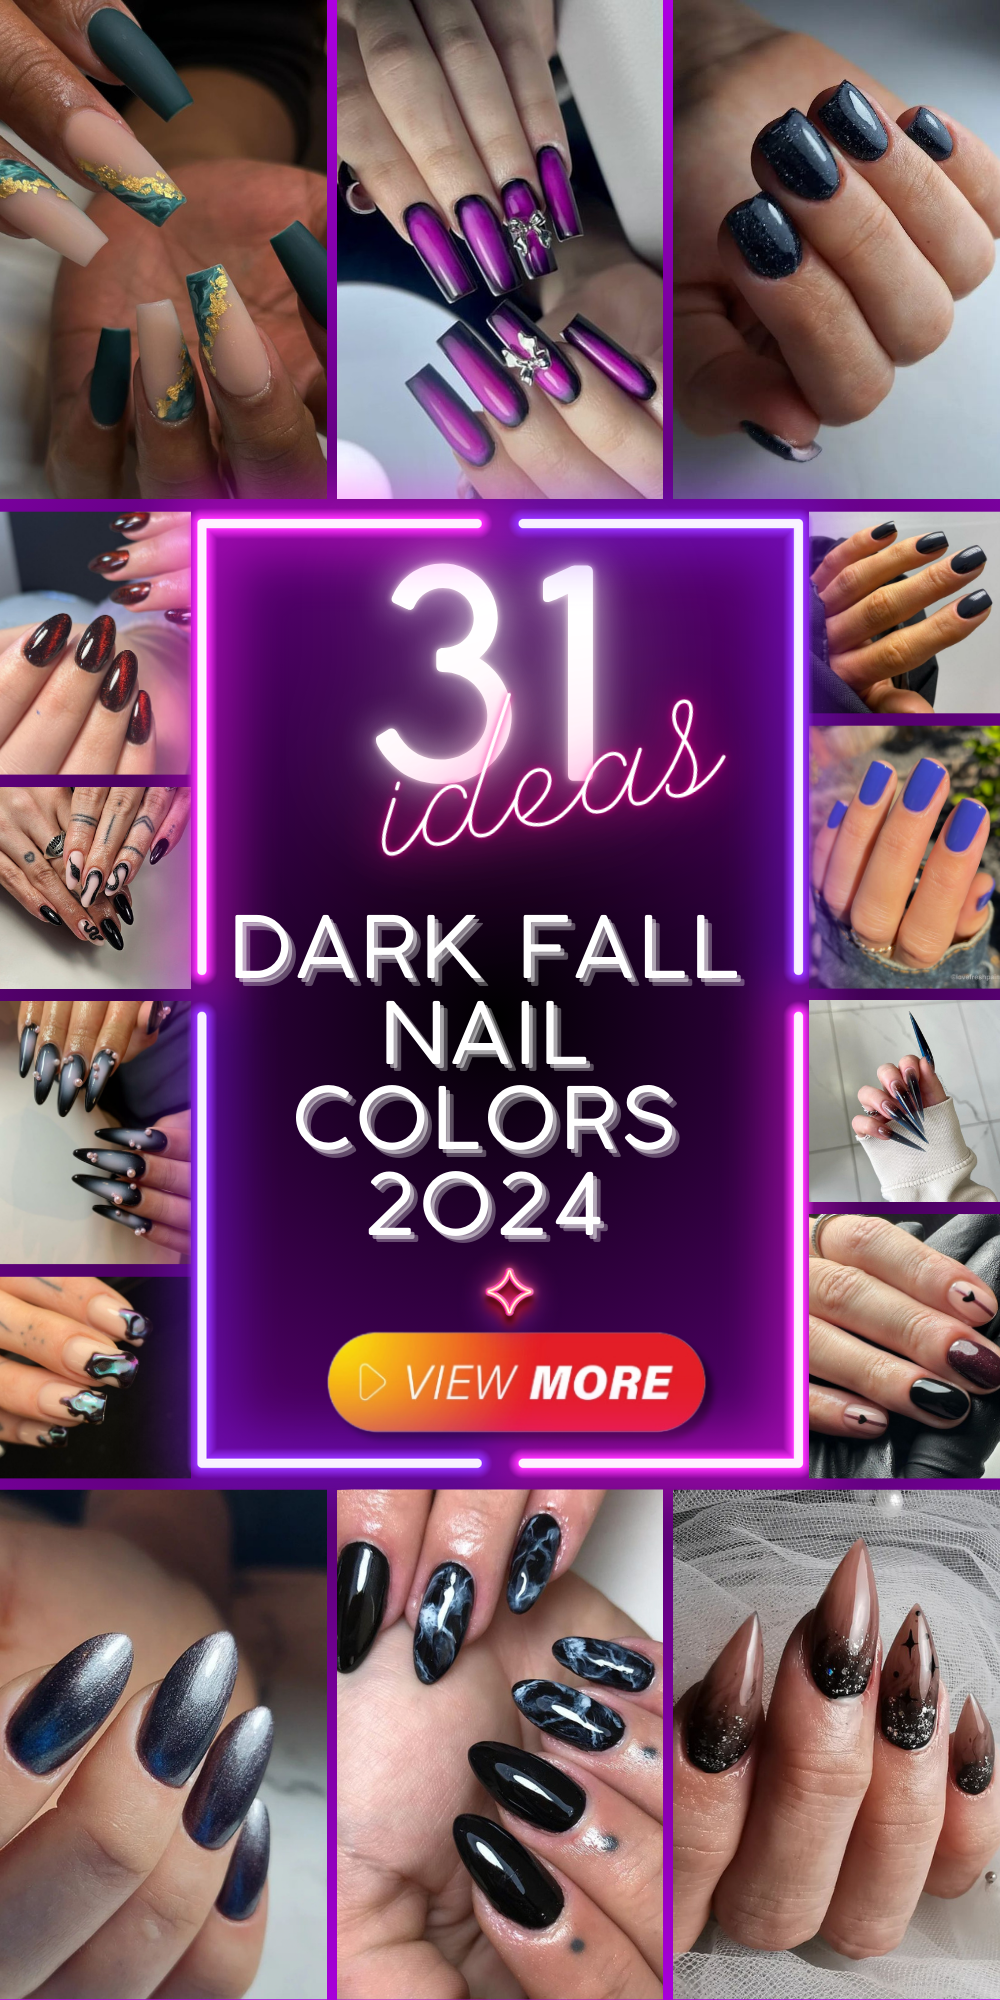
As the leaves turn golden and the air becomes crisp, our nail colors transform to reflect the rich and moody palette of fall. This season, dark fall nail colors 2024 are making a bold statement, from elegant burgundies to mysterious greens. Whether you’re a fan of classic shades or looking for something more avant-garde, these ideas will inspire your next manicure.
Enchanted Emeralds
These stiletto nails are a work of art, showcasing a stunning combination of emerald green and iridescent accents. The dark, glossy base is accentuated with intricate black veining and shimmering flakes that catch the light beautifully. This design is perfect for those who want their nails to stand out with a touch of gothic elegance.
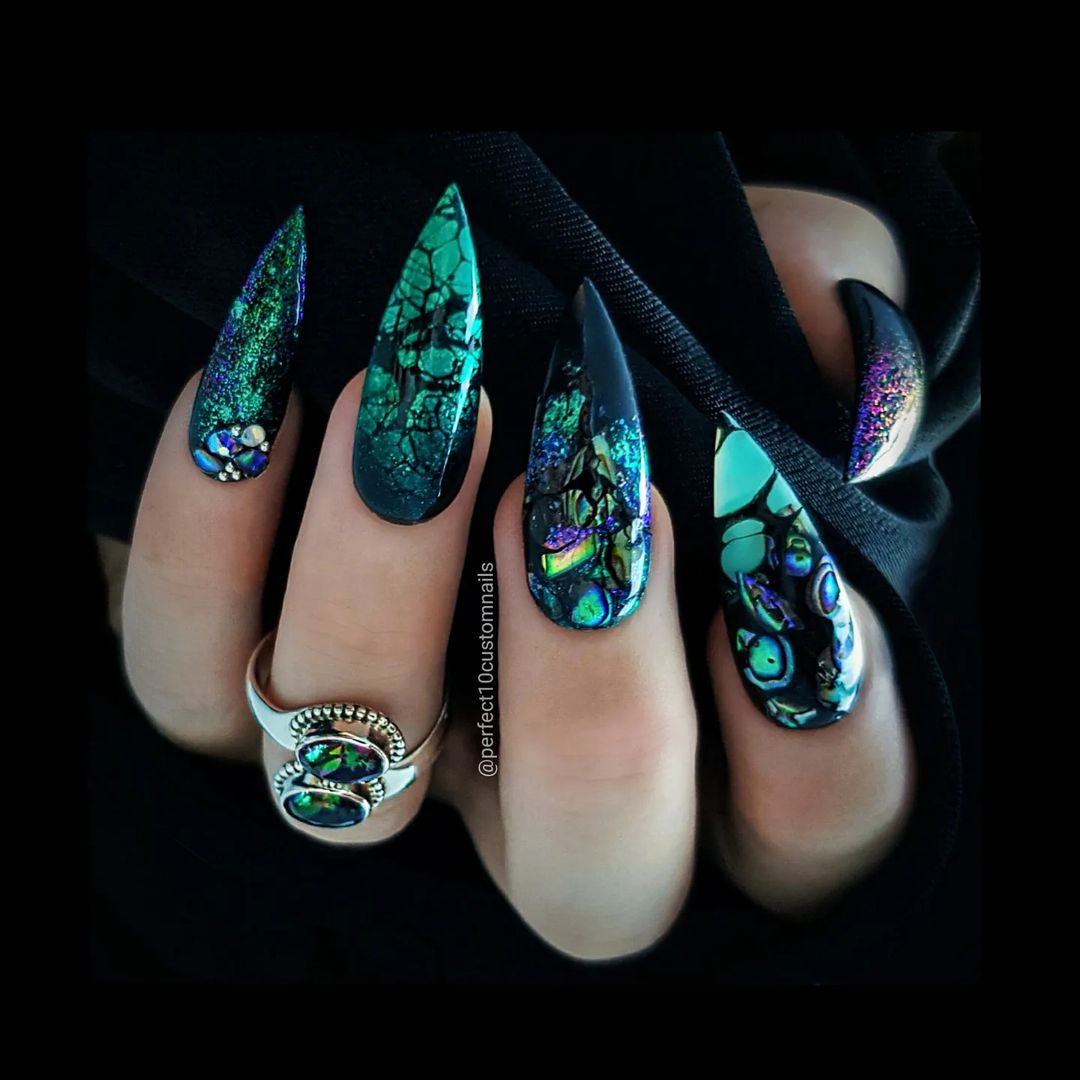
Consumables:
- OPI Nail Lacquer in “Stay Off the Lawn!”
- Black nail art pen
- Iridescent nail flakes
- OPI Top Coat
- Nail file and buffer
Practical Advice: To achieve this look, start with a base coat of emerald green. Once dry, use the black nail art pen to draw delicate veining patterns. Apply iridescent flakes on top for a magical touch, then seal everything with a top coat to ensure longevity. This design requires a bit of patience and a steady hand, but the result is well worth the effort.
Marble Magic
These nails exude sophistication with their deep green and white marble effect. The sleek almond shape adds a classy touch, while the marble design keeps things interesting. This look is versatile enough to be worn both casually and for more formal occasions, making it a fantastic option for fall.
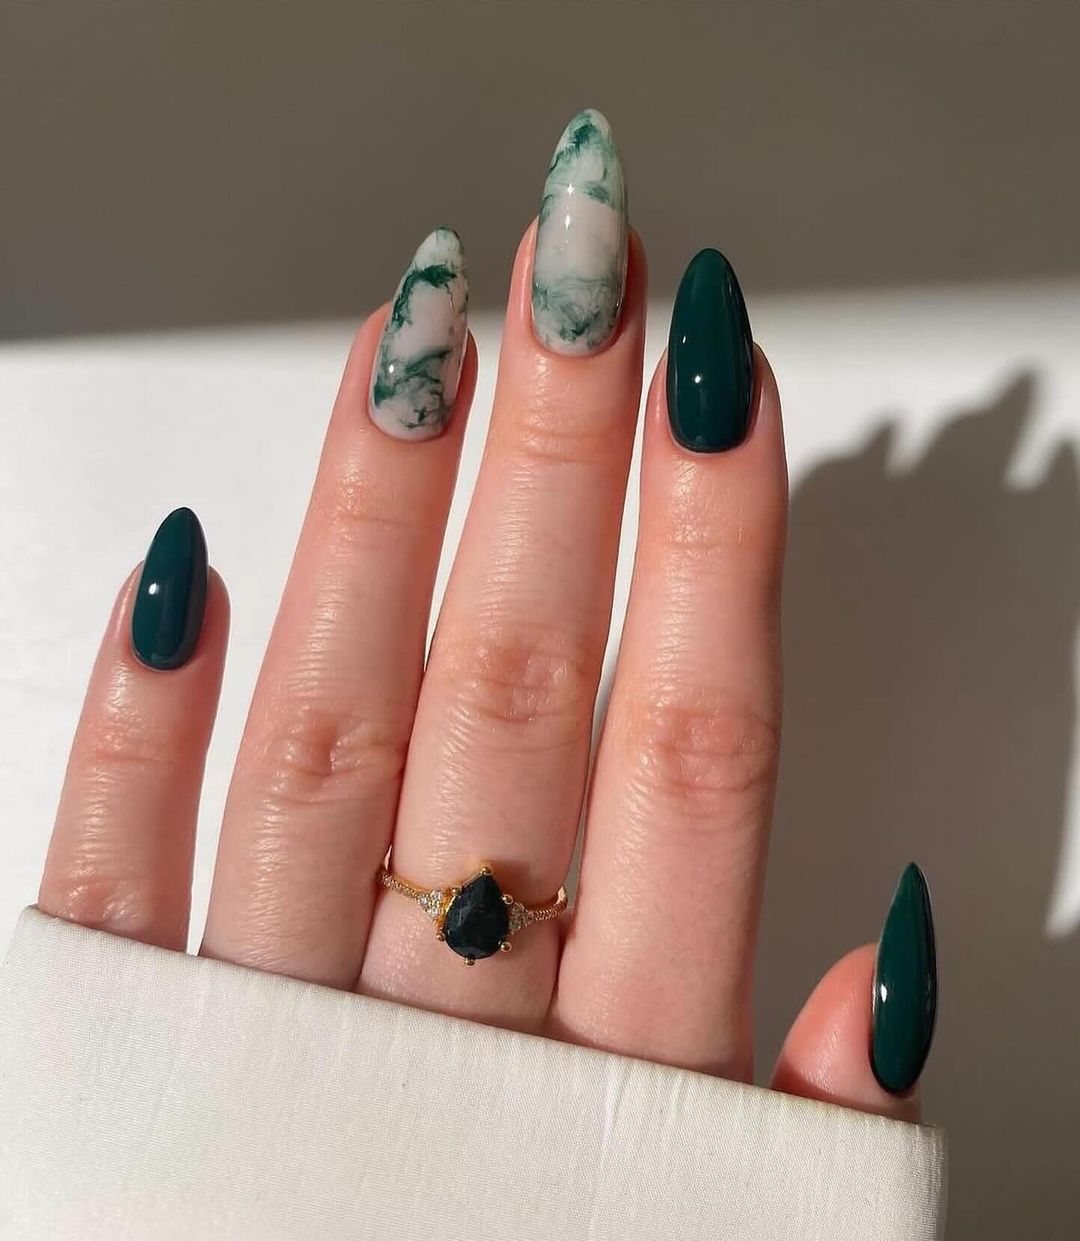
Consumables:
- OPI Nail Lacquer in “My Studio’s on Spring”
- White nail polish
- Nail art brush
- OPI Top Coat
- Nail file and buffer
Practical Advice: Begin by applying the deep green polish to some nails and the white polish to others. Use a nail art brush to swirl the green polish over the white, creating a marbled effect. Finish with a top coat to protect your design and add a glossy finish. This method is relatively simple but yields an impressive result.
Fiery Flames
For those who love a bit of edge, these fiery nails are the way to go. The black base is the perfect canvas for the bold orange flames, creating a look that’s both trendy and eye-catching. This design screams confidence and is ideal for making a statement this fall.
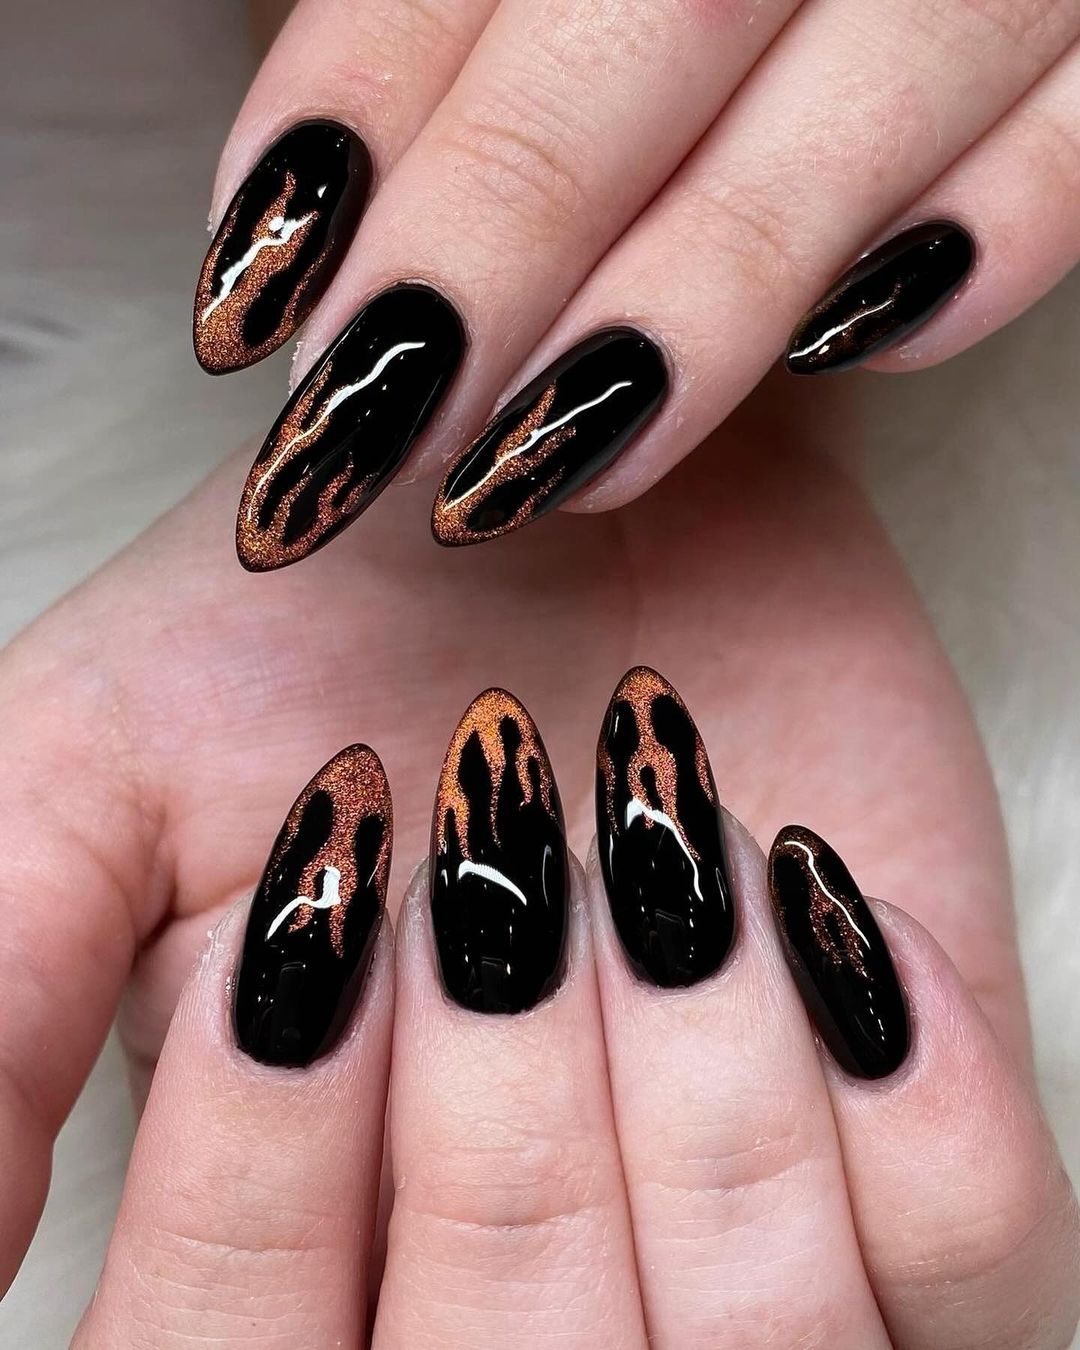
Consumables:
- OPI Nail Lacquer in “Black Onyx”
- Orange nail polish
- Fine nail art brush
- OPI Top Coat
- Nail file and buffer
Practical Advice: Start with a black base coat. Once dry, use a fine nail art brush to paint the flames with orange polish. Begin at the tip of the nail and work your way down, varying the height of the flames for a natural look. Top it off with a shiny top coat to keep your flames burning bright.
Winter Navy Blue Chic
The deep, rich hue of winter navy blue is perfect for fall, offering a striking yet elegant look. This simple yet impactful design features a glossy finish that highlights the smooth texture of the nails. The squared-off tips add a modern twist to the classic color, making it versatile enough for both casual and formal occasions. This shade works beautifully for pale skin tones, providing a stark, classy contrast that is both pretty and bold.
Consumables:
- OPI Nail Lacquer in “Russian Navy”
- OPI Top Coat
- Nail file and buffer
Practical Advice: Start with a clean, dry nail. Apply a base coat to protect your nails, followed by two coats of the winter navy blue polish. Make sure each layer is dry before applying the next. Finish with a top coat to seal in the color and add shine. For an extra touch of elegance, you can add a tiny rhinestone at the base of each nail. This design is best suited for short to medium-length nails to maintain its sophisticated appeal.
Save Pin
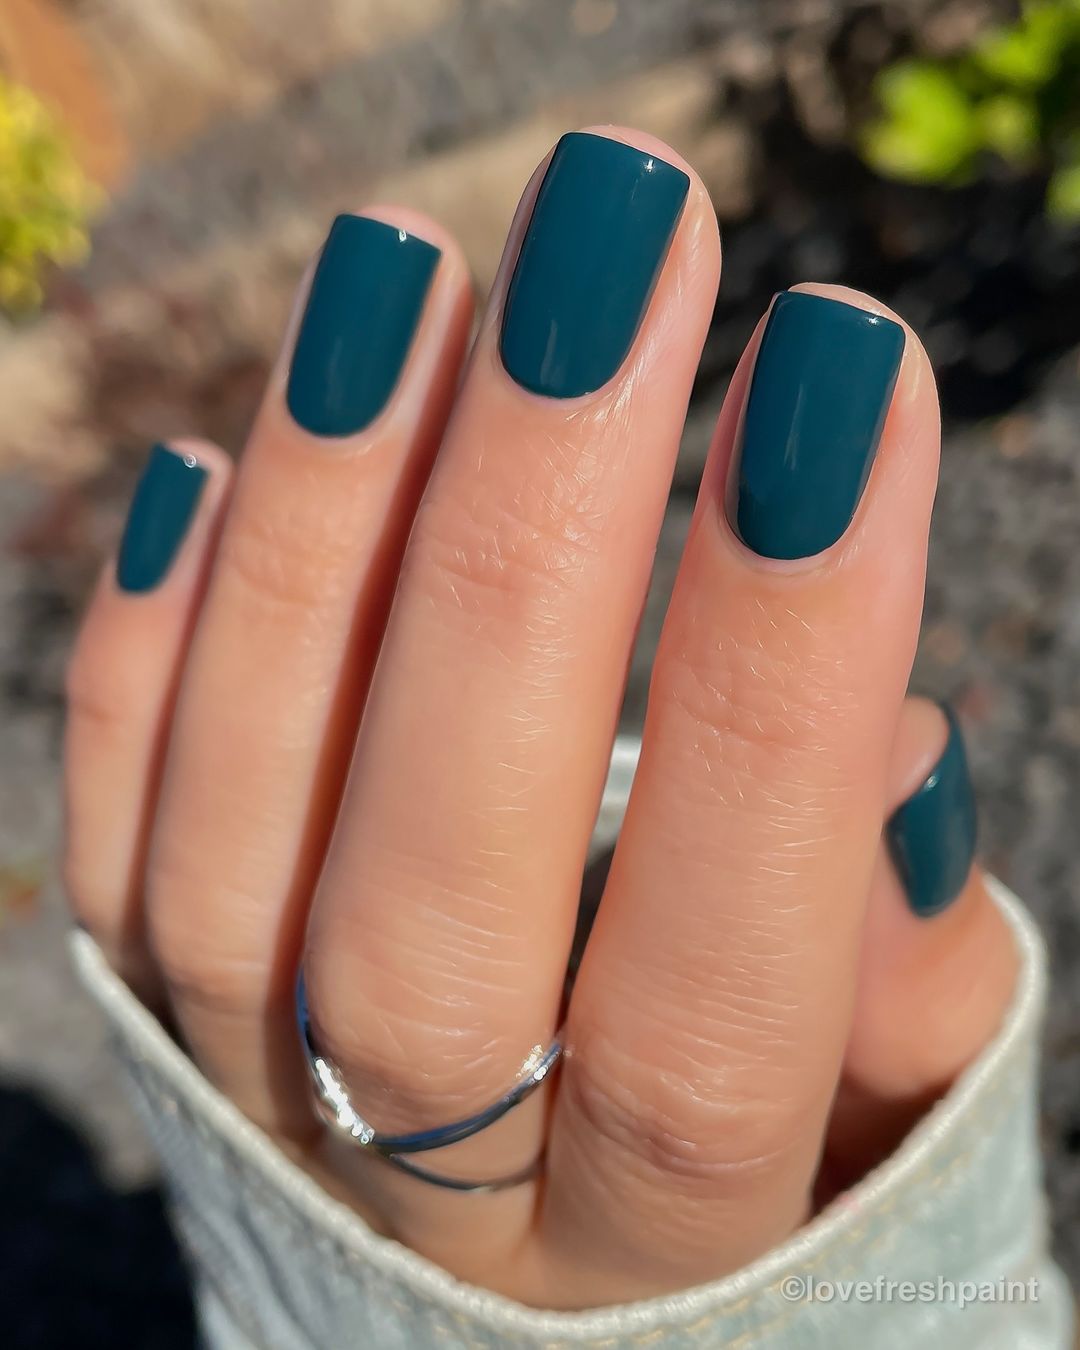
Teal Elegance
This beautiful teal shade is a standout for the fall season. The glossy finish enhances the depth of the color, giving it a rich and luxurious look. The short square shape is not only trendy but also practical, making it ideal for everyday wear. The simplicity of the design allows the bold color to shine, making it a perfect choice for those who love minimalist yet impactful nail art.
Consumables:
- OPI Nail Lacquer in “Amazon…Amazoff”
- OPI Top Coat
- Nail file and buffer
Practical Advice: To recreate this look, start with a base coat to protect your nails. Apply two coats of the teal polish, allowing each coat to dry completely before applying the next. Finish with a top coat to give your nails a high-shine finish. This look is easy to achieve at home and is perfect for anyone looking to add a pop of color to their fall wardrobe. For a bit of variety, consider adding a matte top coat on one or two nails to create a contrasting texture.
Modern Goth Mix
This eclectic mix of colors combines shades of taupe, dark grey, and black to create a modern gothic aesthetic. The alternating colors add depth and interest, while the glossy finish keeps the look polished and refined. This design is versatile and can be dressed up or down, making it a great choice for those who like to experiment with different styles. The combination of colors is perfect for fall and complements various skin tones beautifully.

Consumables:
- OPI Nail Lacquer in “Berlin There Done That” (taupe)
- OPI Nail Lacquer in “Suzi & the Arctic Fox” (dark grey)
- OPI Nail Lacquer in “Black Onyx”
- OPI Top Coat
- Nail file and buffer
Practical Advice: Start with a base coat to protect your nails. Apply two coats of the taupe polish on one nail, the dark grey on another, and the black on the remaining nails. Allow each coat to dry completely before applying the next. Finish with a top coat to seal in the color and add shine. This design is great for those who want to try something different without being too flashy. For an added touch, you can incorporate some subtle nail art designs gothic, like thin silver lines or small black dots on the taupe nails.
Midnight Teal
This rich, dark teal shade is perfect for fall, offering a sophisticated and chic look. The glossy finish enhances the depth of the color, making it ideal for both everyday wear and special occasions. The short, square shape is modern and practical, making it a favorite among many.
Consumables:
- OPI Nail Lacquer in “Stay Off the Lawn!”
- OPI Top Coat
- Nail file and buffer
Practical Advice: Begin with a base coat to protect your nails. Apply two coats of the dark teal polish, allowing each layer to dry completely. Finish with a top coat to add shine and protect the color. This look is easy to achieve at home and is perfect for those who prefer a bold yet understated manicure.
Bold Plum
This bold plum shade is an excellent choice for fall, offering a vibrant yet deep color that stands out. The glossy finish gives it a polished and sophisticated look, making it suitable for both day and night. This color works wonderfully on all nail lengths and shapes.
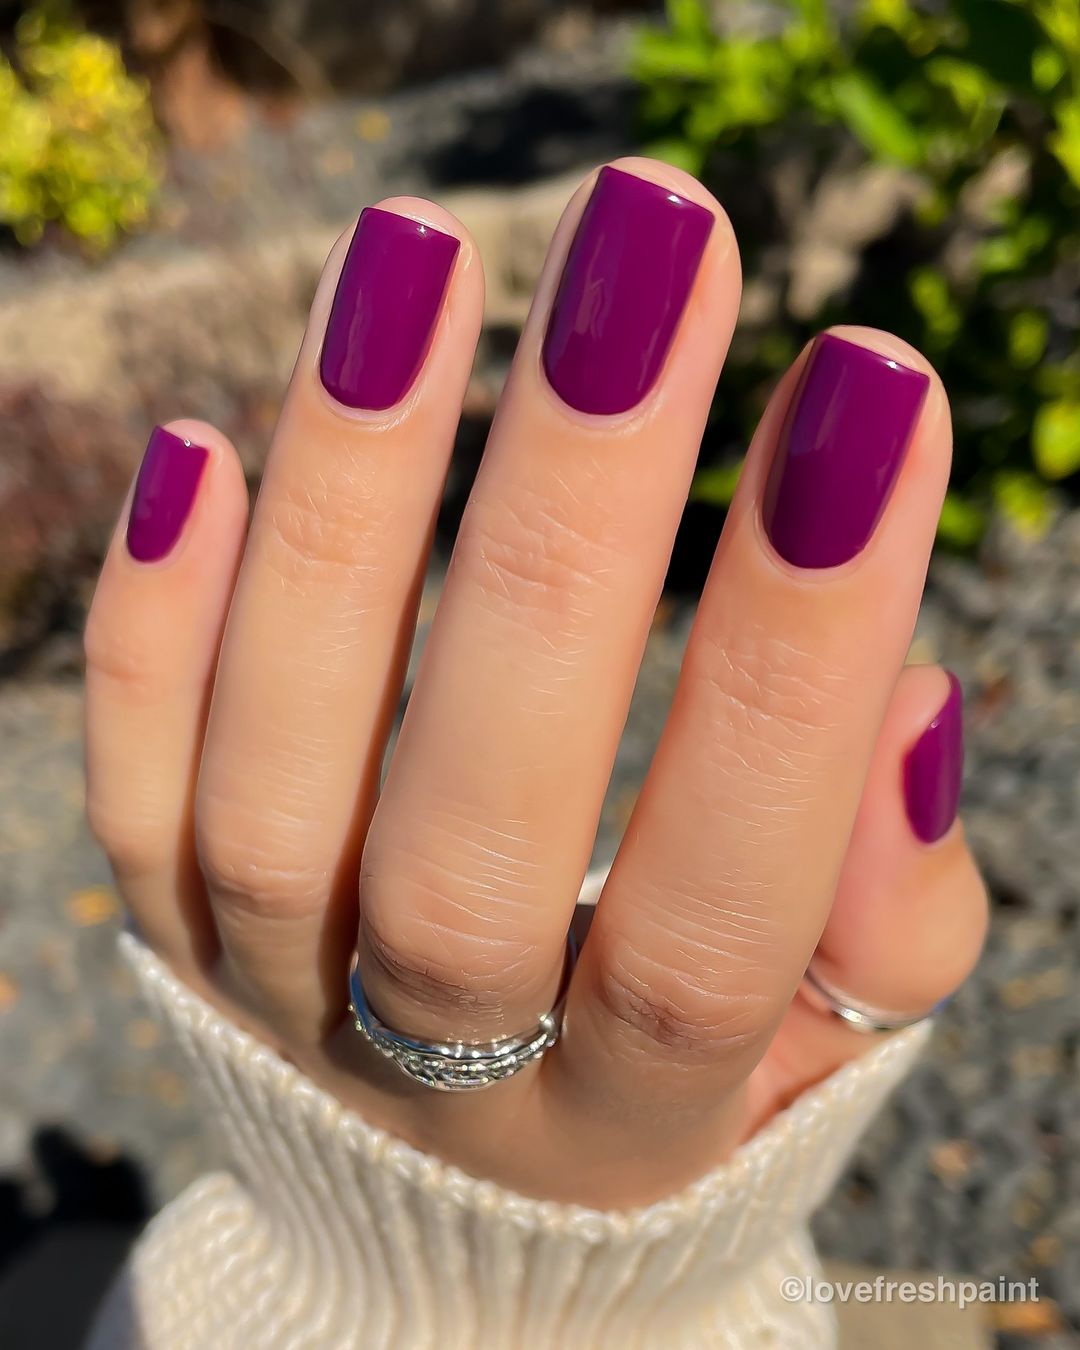
Consumables:
- OPI Nail Lacquer in “Purple Palazzo Pants”
- OPI Top Coat
- Nail file and buffer
Practical Advice: Start with a base coat to protect your nails. Apply two coats of the plum polish, ensuring each coat is dry before applying the next. Finish with a top coat for a high-shine finish. This look is versatile and can be paired with various outfits, making it a great addition to your fall nail collection.
Elegant Burgundy
Burgundy is a classic fall color, and this shade is no exception. Its rich, deep hue exudes elegance and sophistication, making it perfect for any occasion. The glossy finish adds a touch of luxury, while the short, square shape keeps it modern and stylish.
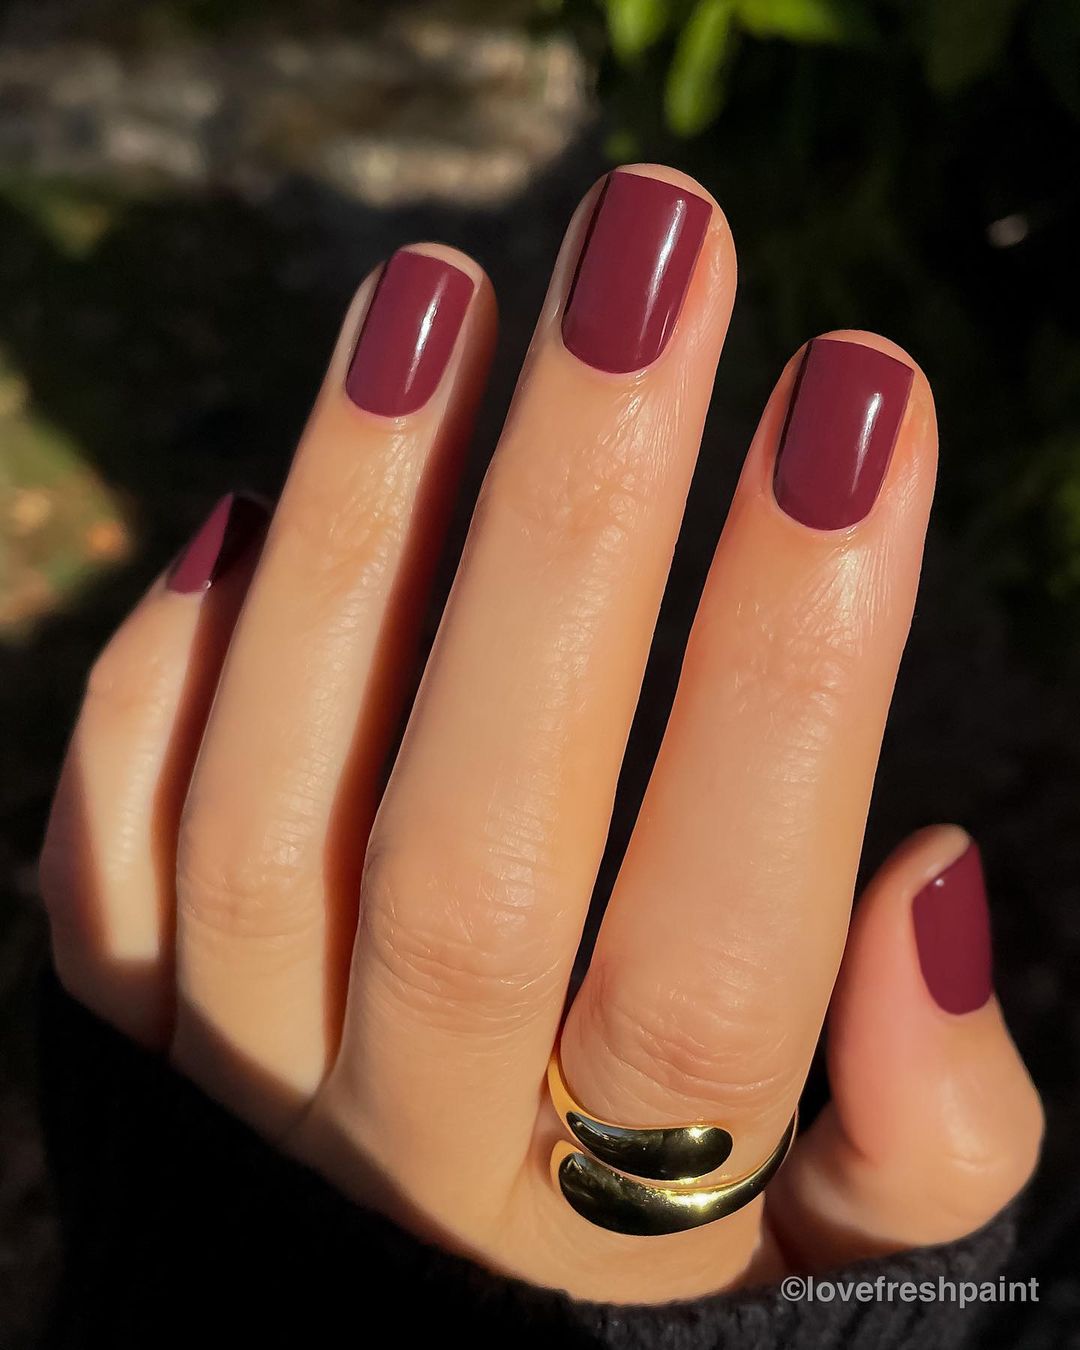
Consumables:
- OPI Nail Lacquer in “Malaga Wine”
- OPI Top Coat
- Nail file and buffer
Practical Advice: To achieve this look, start with a base coat. Apply two coats of the burgundy polish, allowing each layer to dry completely. Finish with a top coat to seal in the color and add shine. This classic color is timeless and always in style, making it a must-have for your fall nail repertoire.
Save Pin
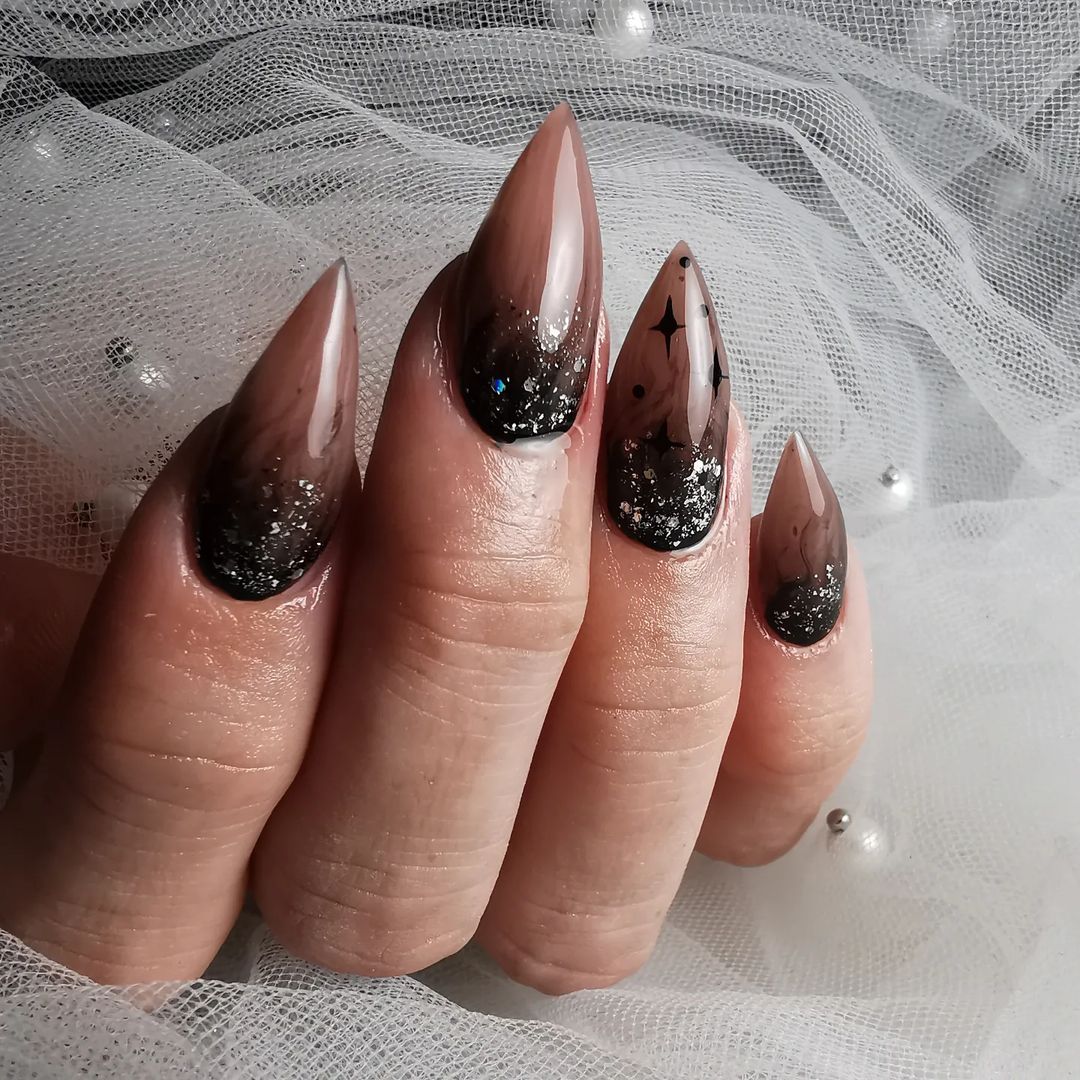
Chocolate Truffle
This deep, chocolatey shade is perfect for those who love a rich, dark nail color. The glossy finish makes the color pop, giving it a luxurious feel. This color is versatile and can be worn with both casual and formal outfits, making it a great choice for fall.
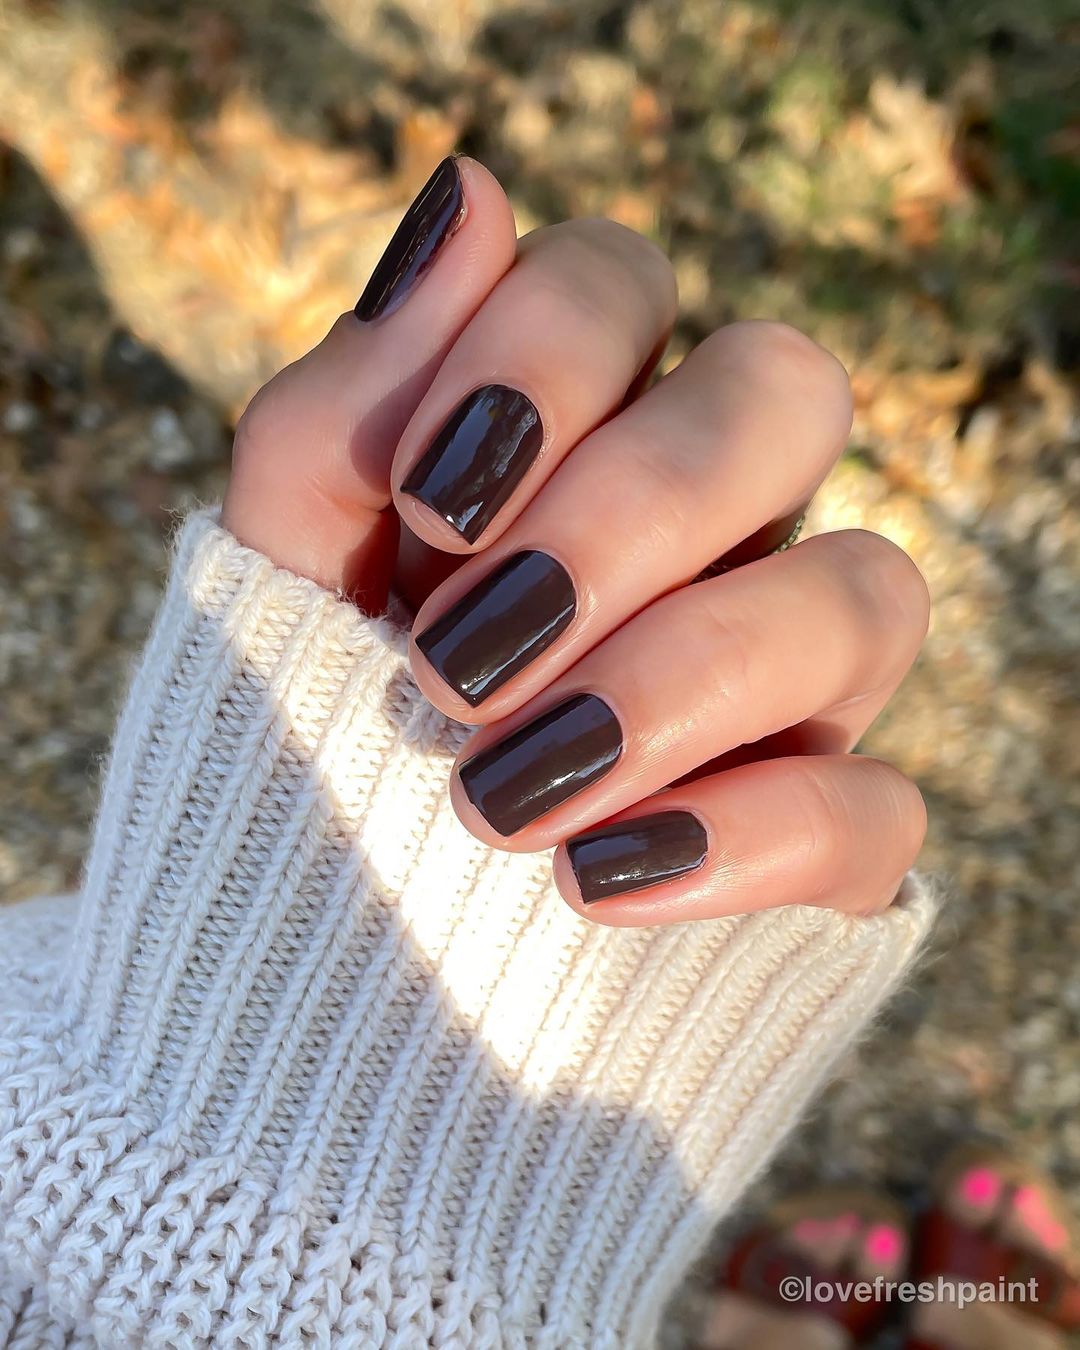
Consumables:
- OPI Nail Lacquer in “Chocolate Moose”
- OPI Top Coat
- Nail file and buffer
Practical Advice: Start with a base coat to protect your nails. Apply two coats of the chocolate polish, allowing each coat to dry before applying the next. Finish with a top coat for a shiny finish. This color is perfect for those who want a dark yet warm nail color for fall.
Gold-Leaf Teal Marble
This design combines the elegance of teal with the luxury of gold leaf, creating a stunning marble effect. The matte finish of the teal contrasts beautifully with the glossy gold, making this design perfect for special occasions or when you want to add a touch of glamour to your look.
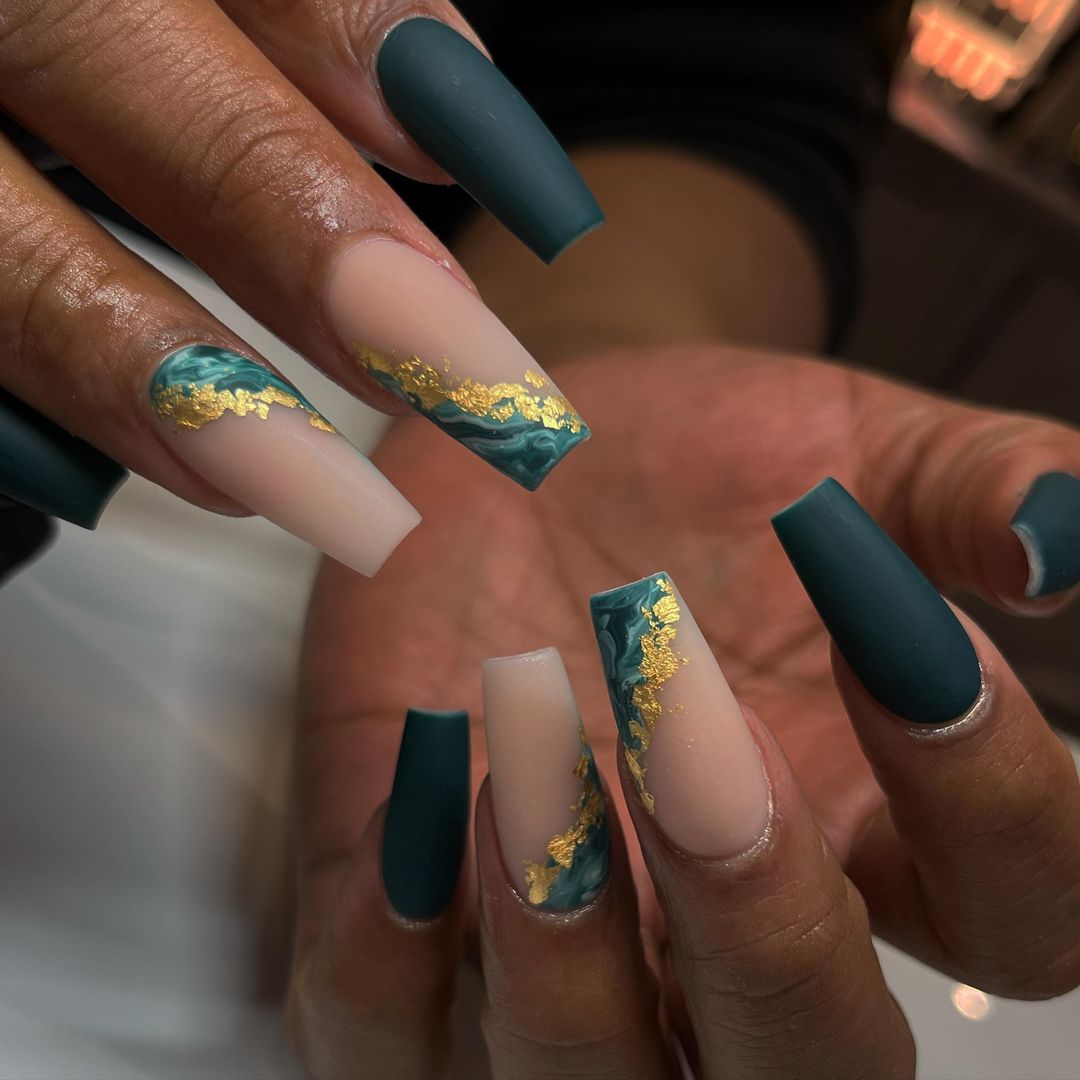
Consumables:
- Teal matte nail polish
- Clear polish
- Gold leaf flakes
- Nail art brush
- Nail file and buffer
Practical Advice: Apply a base coat, then paint your nails with the teal matte polish. Once dry, use a clear polish to adhere the gold leaf flakes, creating a marble effect. Seal everything with another layer of clear polish to protect the design. This look requires some patience and precision, but the result is truly breathtaking.
Classic Red
A timeless classic, red nails are always in style. This vibrant shade is perfect for fall, offering a bold and confident look. The glossy finish adds to the appeal, making your nails look polished and elegant. This color is versatile and suits all nail shapes and lengths.
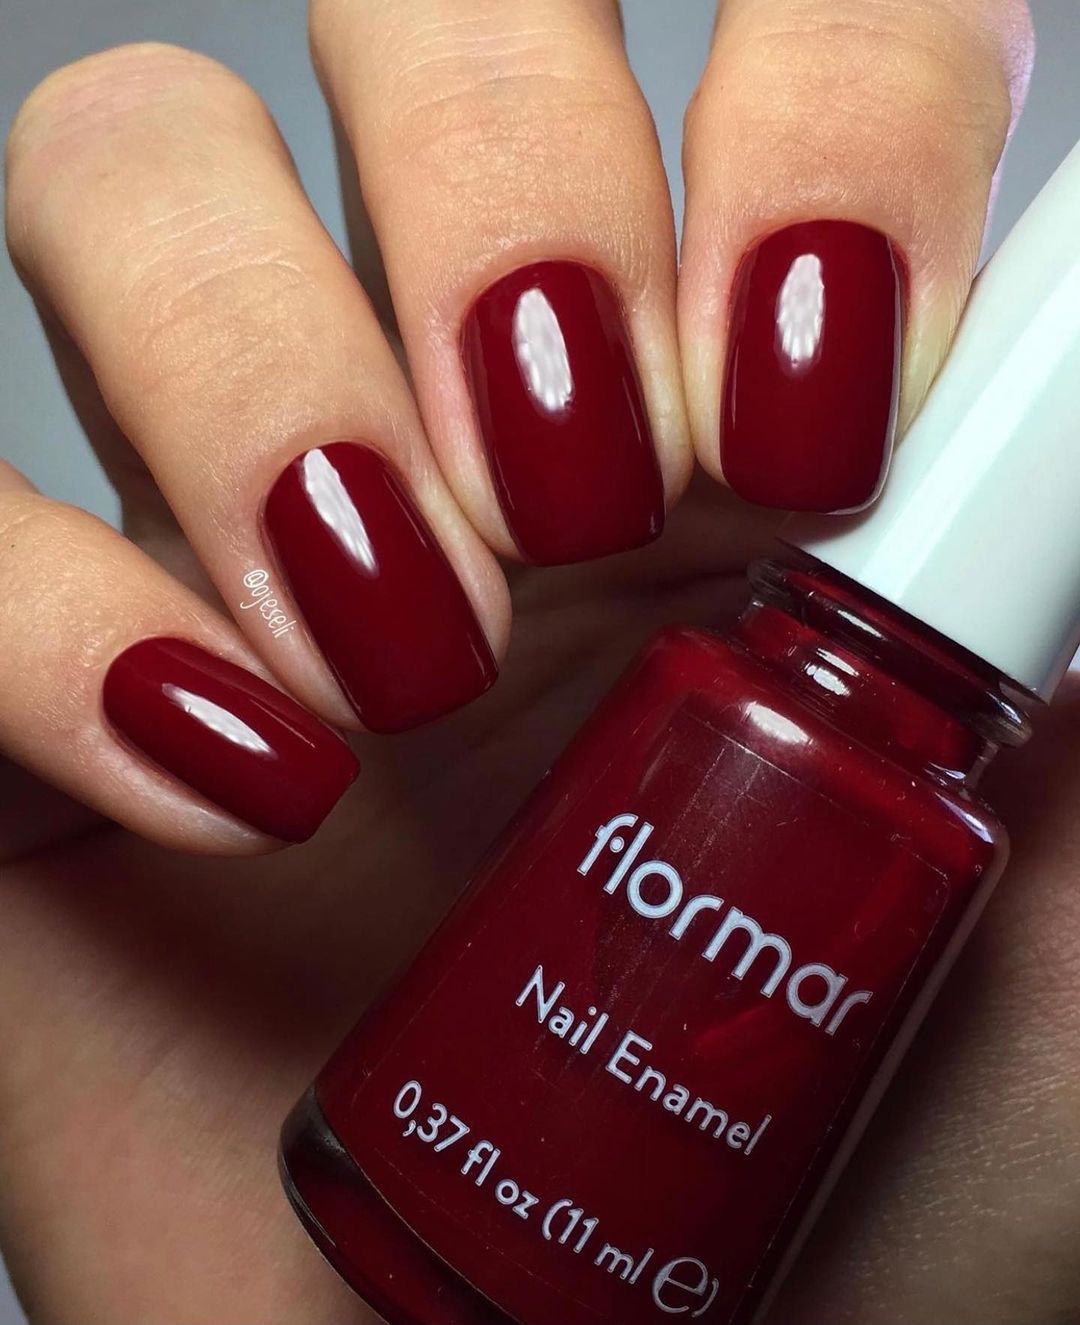
Consumables:
- Flormar Nail Enamel in “Classic Red”
- OPI Top Coat
- Nail file and buffer
Practical Advice: Start with a base coat to protect your nails. Apply two coats of the red polish, allowing each coat to dry completely. Finish with a top coat for a high-shine finish. This classic color is always a great choice, adding a touch of sophistication to any look.
Cosmic Night
These dark nails are reminiscent of a starry night sky. The glossy black base is adorned with tiny glitter particles that shimmer like distant stars. This design is perfect for those who love a bit of celestial magic in their manicure.
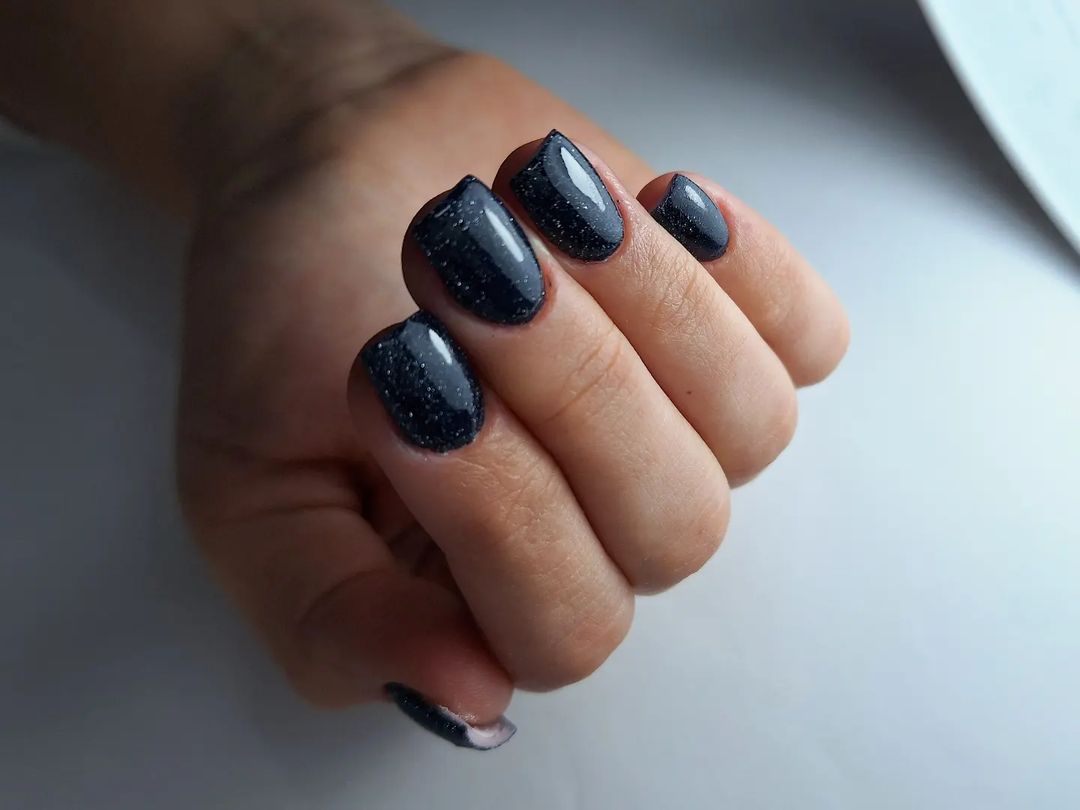
Consumables:
- OPI Nail Lacquer in “Black Onyx”
- Fine glitter in silver or holographic
- OPI Top Coat
- Nail file and buffer
Practical Advice: Start with a base coat to protect your nails. Apply two coats of the black polish, allowing each layer to dry. Sprinkle the fine glitter onto the wet polish or use a glitter polish for easier application. Seal with a top coat to ensure the glitter stays in place and add a glossy finish. This look is great for short nails, adding a bit of sparkle without overwhelming the design.
Electric Orchid
These long, stiletto nails feature a vibrant, electric orchid shade with a glossy finish. The accent nails are adorned with silver butterflies, adding a whimsical touch to this bold design. Perfect for making a statement, this look is sure to turn heads.
Consumables:
- OPI Nail Lacquer in “Do You Lilac It?”
- Silver butterfly nail charms
- Nail glue
- OPI Top Coat
- Nail file and buffer
Practical Advice: Begin with a base coat. Apply two coats of the electric orchid polish, letting each layer dry completely. Attach the silver butterfly charms using nail glue and finish with a top coat to secure the design. This look is best suited for long nails to showcase the vibrant color and intricate details.
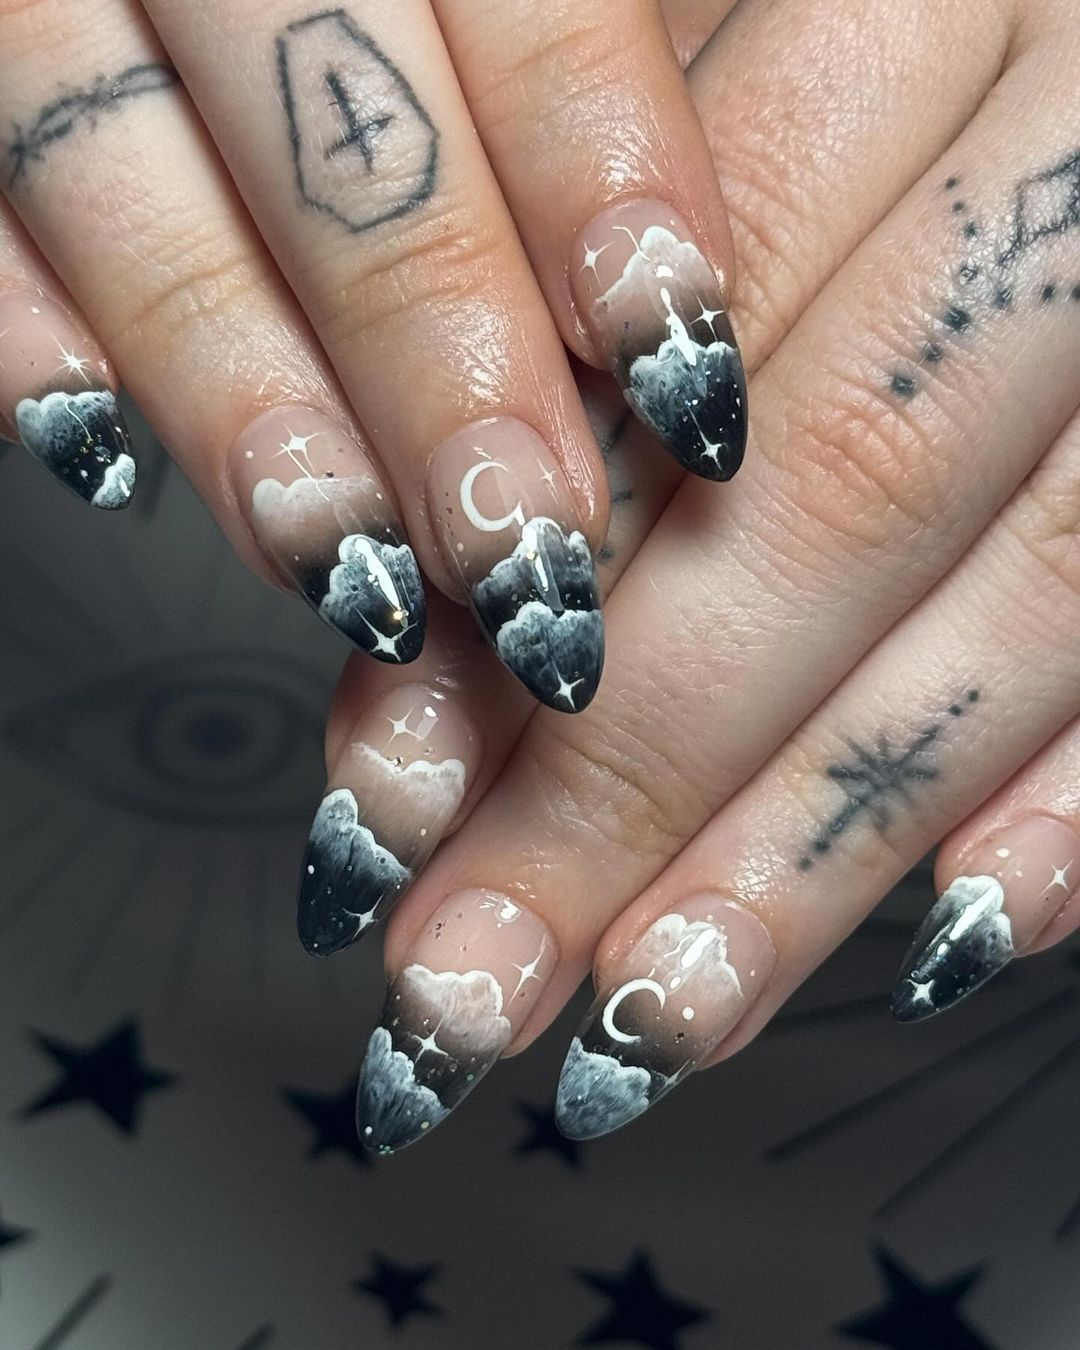
Lunar Landscape
This celestial nail design features a gradient from black to clear, adorned with delicate clouds, moons, and stars. The stiletto shape adds an edgy feel to this otherwise dreamy design, making it perfect for those who love a bit of whimsy.
Consumables:
- OPI Nail Lacquer in “Black Onyx”
- White nail polish for clouds and details
- Fine nail art brush
- OPI Top Coat
- Nail file and buffer
Practical Advice: Start with a base coat. Create a gradient effect by blending the black polish from the tip towards the middle of the nail. Use a fine brush to paint the clouds, moons, and stars in white. Finish with a top coat to protect the design. This look requires a steady hand and patience, but the result is a stunning, celestial-inspired manicure.
Starry Ombre
This design combines a nude base with a black ombre effect, sprinkled with glitter to mimic a starry night. The stiletto shape enhances the dramatic effect, making this a perfect choice for those who love a bit of glam in their nails.
Consumables:
- OPI Nail Lacquer in “Bubble Bath” for the base
- OPI Nail Lacquer in “Black Onyx” for the tips
- Silver glitter
- OPI Top Coat
- Nail file and buffer
Practical Advice: Begin with a base coat. Apply the nude polish and let it dry. Create the ombre effect by lightly sponging the black polish onto the tips. Add a sprinkle of silver glitter while the polish is still wet. Finish with a top coat to seal the design. This look is elegant and dramatic, perfect for evening events.
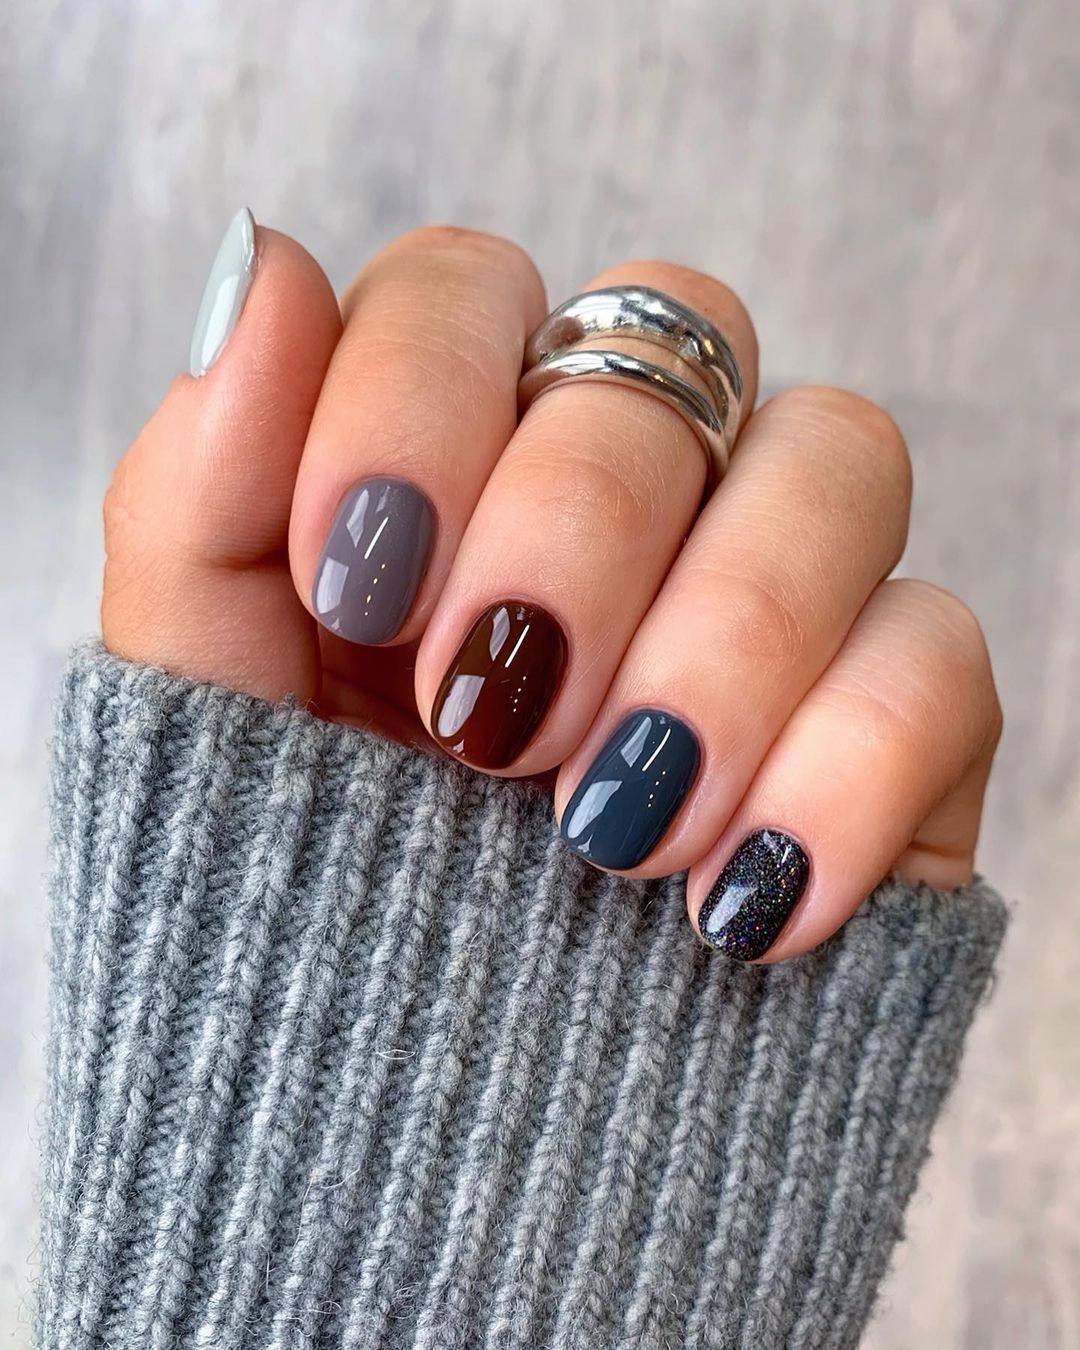
Moody Mix
This manicure features a mix of earthy tones, from soft grey to deep brown, accented with a dark blue and glitter nail. The short, rounded shape makes this design versatile and easy to wear, adding a bit of sophistication to any outfit.
Consumables:
- OPI Nail Lacquer in “Icelanded a Bottle of OPI” (grey)
- OPI Nail Lacquer in “Espresso Your Style” (brown)
- OPI Nail Lacquer in “Less is Norse” (blue)
- Silver glitter polish
- OPI Top Coat
- Nail file and buffer
Practical Advice: Apply a base coat to start. Paint each nail a different color, following the earthy palette. Add glitter to one of the nails for an accent. Finish with a top coat to protect the design and add shine. This look is easy to achieve and perfect for those who like a bit of variety in their manicure.
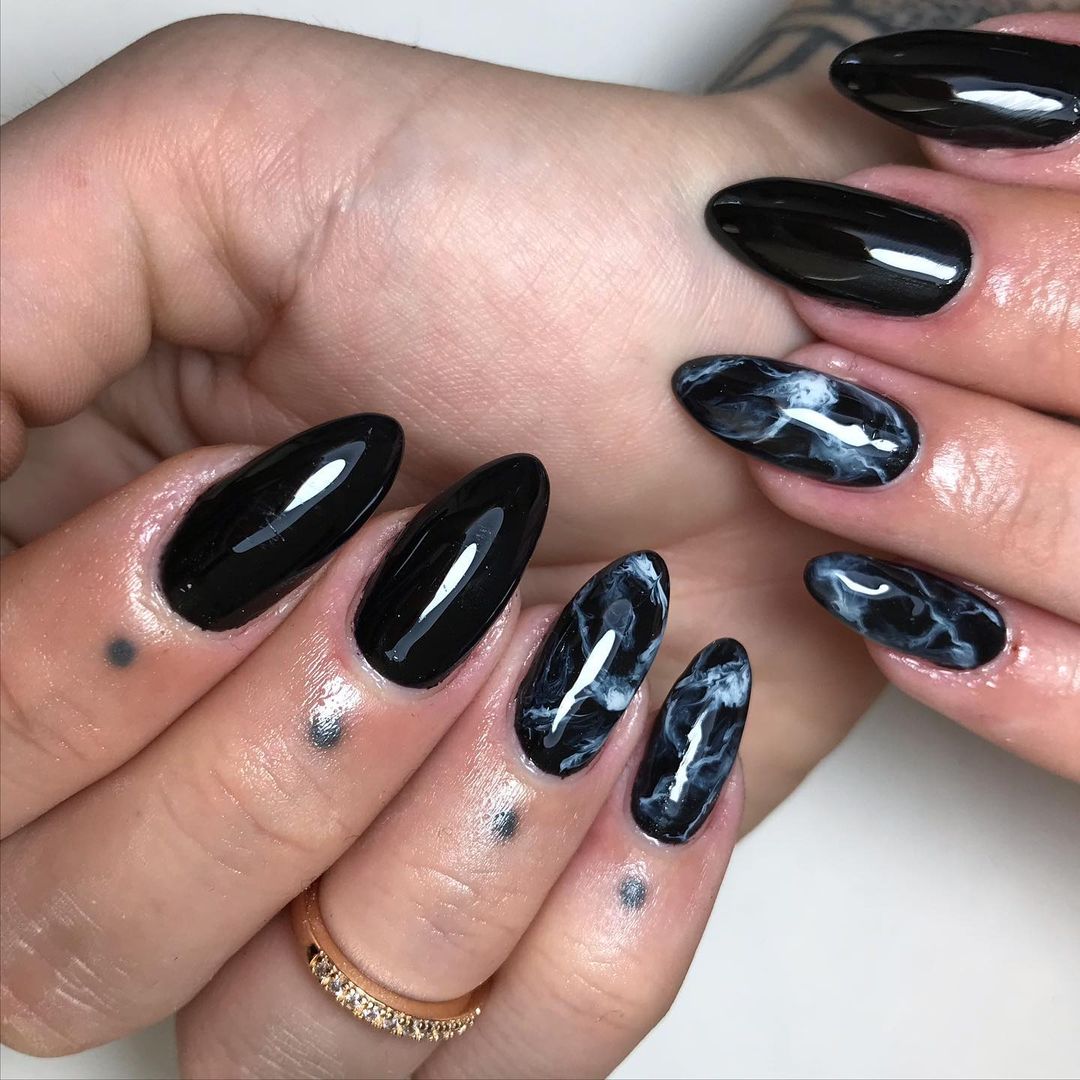
Marble Midnight
This design features a stunning black marble effect, combining glossy black with white marbling. The almond shape adds elegance to this bold design, making it a perfect choice for a sophisticated yet edgy look.
Consumables:
- OPI Nail Lacquer in “Black Onyx”
- White nail polish for marbling
- Fine nail art brush or marbling tool
- OPI Top Coat
- Nail file and buffer
Practical Advice: Start with a base coat. Apply two coats of the black polish, letting each layer dry. Use a fine brush or marbling tool to create the white marble effect, adding thin, random lines and swirls. Finish with a top coat to seal the design. This look requires a bit of practice to perfect, but the result is a chic and modern manicure.
Love and Glitter
This charming manicure features a mix of dark hues and a touch of glitter. The design includes a glossy black nail, a deep burgundy glitter nail, and a nude base with a delicate black heart and a thin stripe. This look combines elegance with a hint of playfulness, making it a versatile choice for fall.
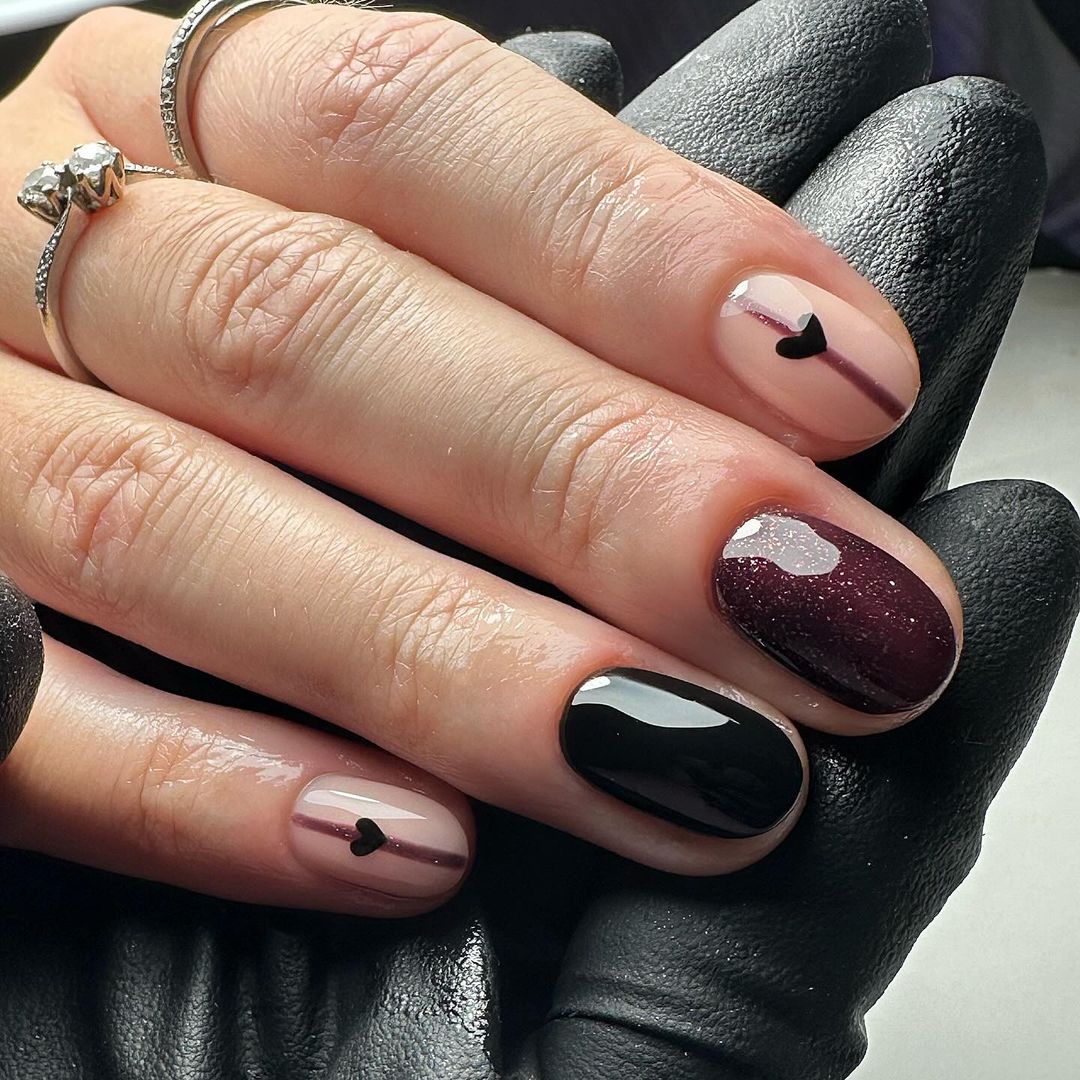
Consumables:
- OPI Nail Lacquer in “Black Onyx”
- OPI Nail Lacquer in “Lincoln Park After Dark” for the glitter nail
- Nude nail polish
- Black nail art pen or polish for the heart and stripe
- OPI Top Coat
- Nail file and buffer
Practical Advice: Start with a base coat to protect your nails. Apply the nude polish on the nails where you plan to add the heart and stripe design. Use the black polish for the remaining nails and the glitter polish for the accent nail. Once the base colors are dry, use a nail art pen to draw a thin stripe and a small heart on the nude nails. Seal everything with a top coat to ensure durability and shine.
Metallic Magic
This stunning manicure features a metallic gradient that shimmers in various shades of grey and blue. The sleek, almond-shaped nails enhance the futuristic look of this design, making it perfect for those who love a bit of edge in their style.
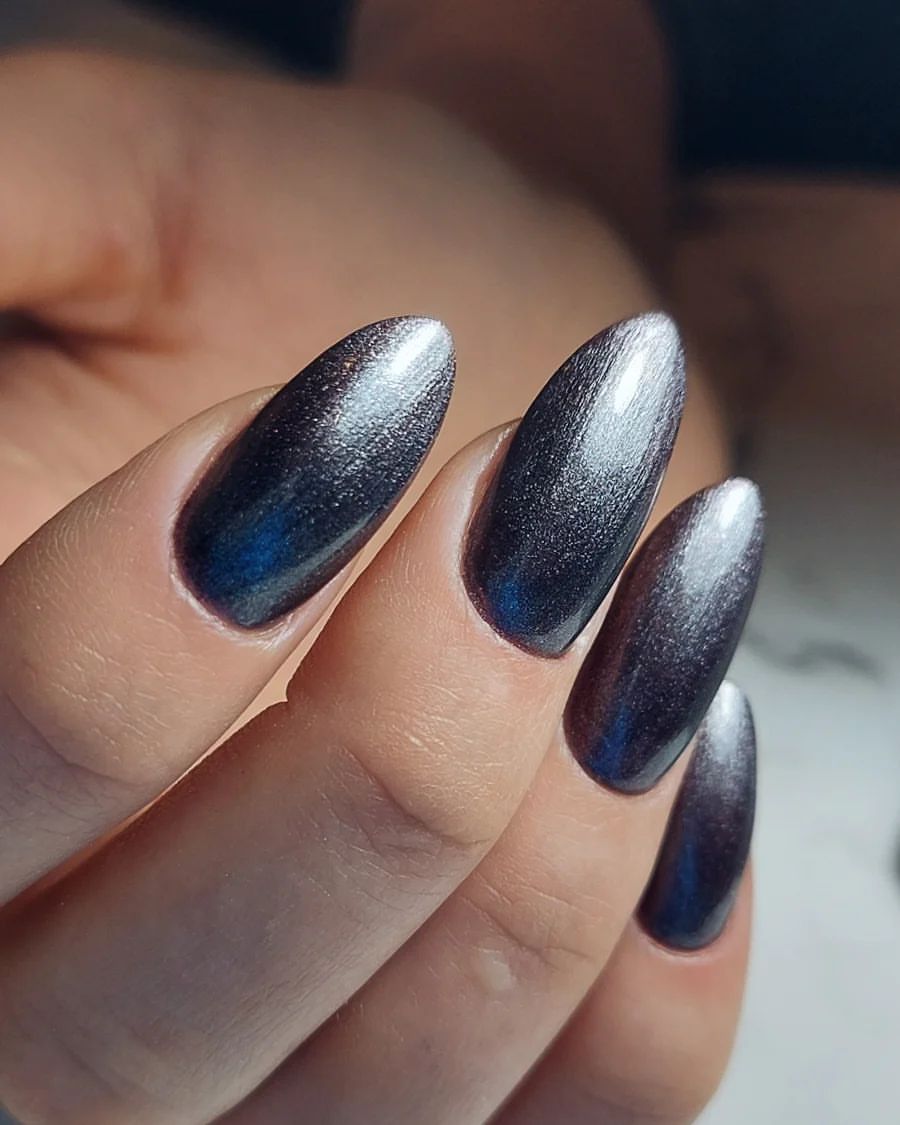
Consumables:
- OPI Nail Lacquer in “Turn on the Northern Lights!”
- Metallic powder in silver or grey
- OPI Top Coat
- Nail file and buffer
Practical Advice: Apply a base coat to start. Use the dark blue polish as a base, then apply the metallic powder over it while it’s still tacky to create the gradient effect. Use a soft brush to blend the powder smoothly. Finish with a top coat to seal the metallic look and add a glossy finish. This design requires some practice to perfect the gradient, but the result is worth the effort.
Iridescent Lava
This unique design features a nude base with black iridescent blobs that resemble flowing lava. The glossy finish and 3D effect make this manicure stand out, perfect for those who want something bold and different.
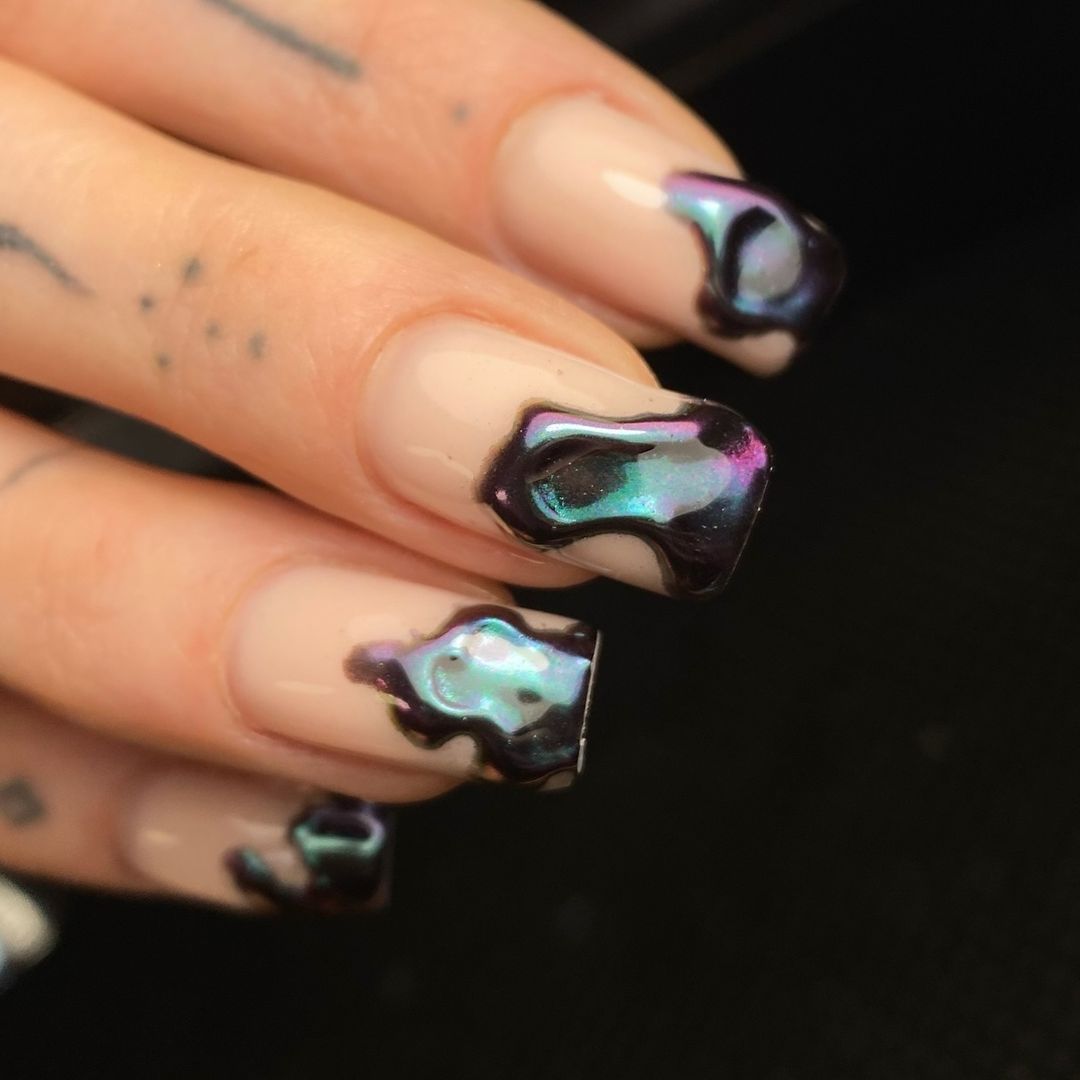
Consumables:
- Nude nail polish
- Black iridescent polish or gel
- Nail art brush
- OPI Top Coat
- Nail file and buffer
Practical Advice: Start with a base coat to protect your nails. Apply the nude polish and let it dry completely. Use the nail art brush to create irregular blobs with the black iridescent polish, giving a lava-like effect. Add more layers to create a 3D effect if desired. Seal the design with a top coat to ensure the blobs stay in place and the nails have a high-shine finish.
Glossy Onyx
This simple yet striking manicure features a glossy black polish on short, rounded nails. The high-shine finish makes this look timeless and elegant, suitable for any occasion.
Consumables:
- OPI Nail Lacquer in “Black Onyx”
- OPI Top Coat
- Nail file and buffer
Practical Advice: Begin with a base coat to protect your nails. Apply two coats of the black polish, allowing each layer to dry completely. Finish with a top coat for a glossy, high-shine finish. This look is straightforward but makes a bold statement, perfect for those who prefer classic, elegant nails.
Serpent’s Charm
This edgy design features a combination of glossy black and nude nails with intricate black snake patterns. The almond shape adds to the fierce look, making this manicure a great choice for those who love gothic art designs.
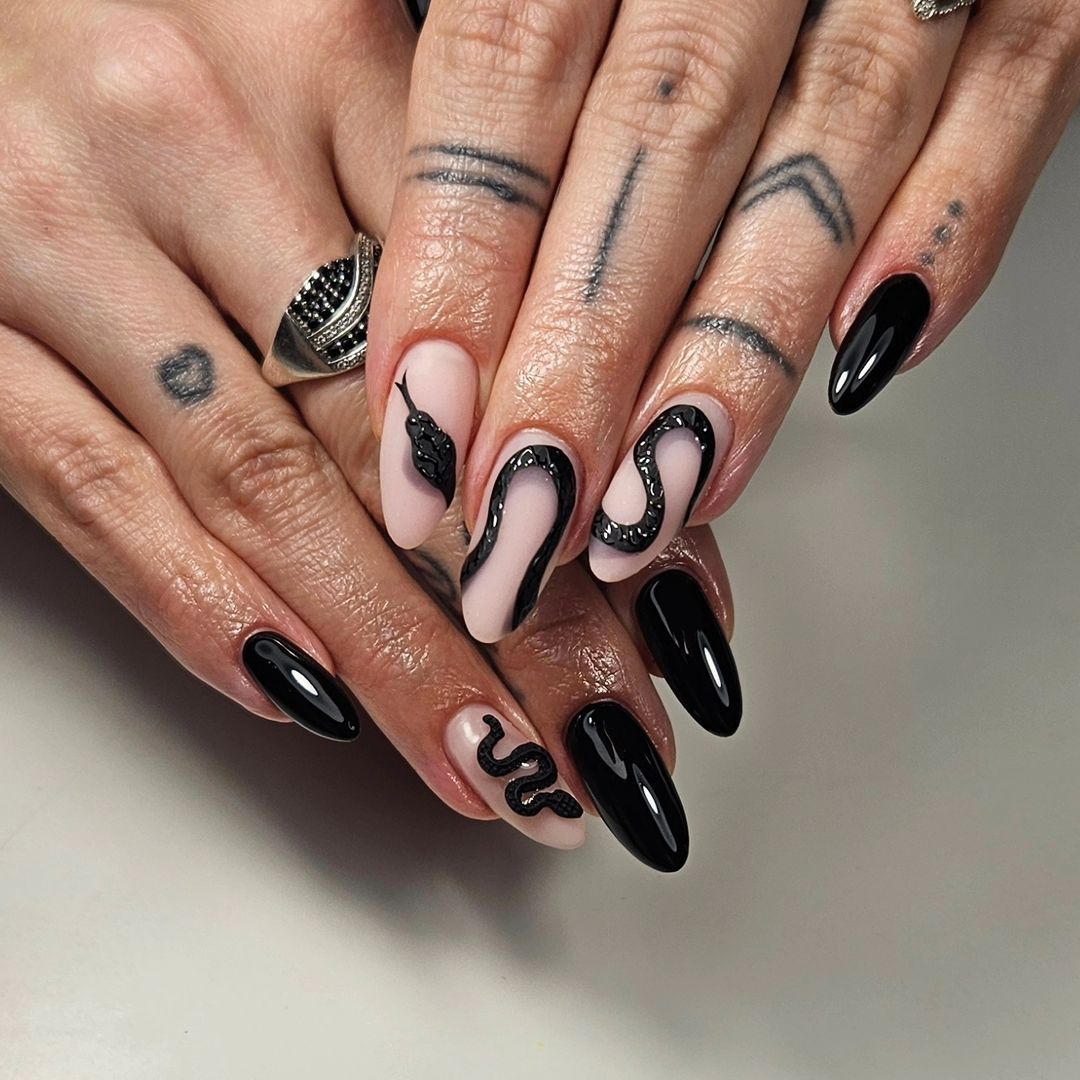
Consumables:
- OPI Nail Lacquer in “Black Onyx”
- Nude nail polish
- Black nail art pen or polish for the snake design
- OPI Top Coat
- Nail file and buffer
Practical Advice: Start with a base coat. Apply the nude polish to the nails where you plan to add the snake design and black polish to the rest. Use the nail art pen to draw the snake patterns on the nude nails. You can add some texture by using glitter or rhinestones along the snake’s body. Finish with a top coat to protect the design and add shine. This look is intricate and may require some practice to perfect the snake design.
Pearly Ombre
This elegant design features a black to grey ombre effect adorned with delicate pink pearls. The long, stiletto shape adds to the sophisticated look, making this manicure perfect for special occasions.
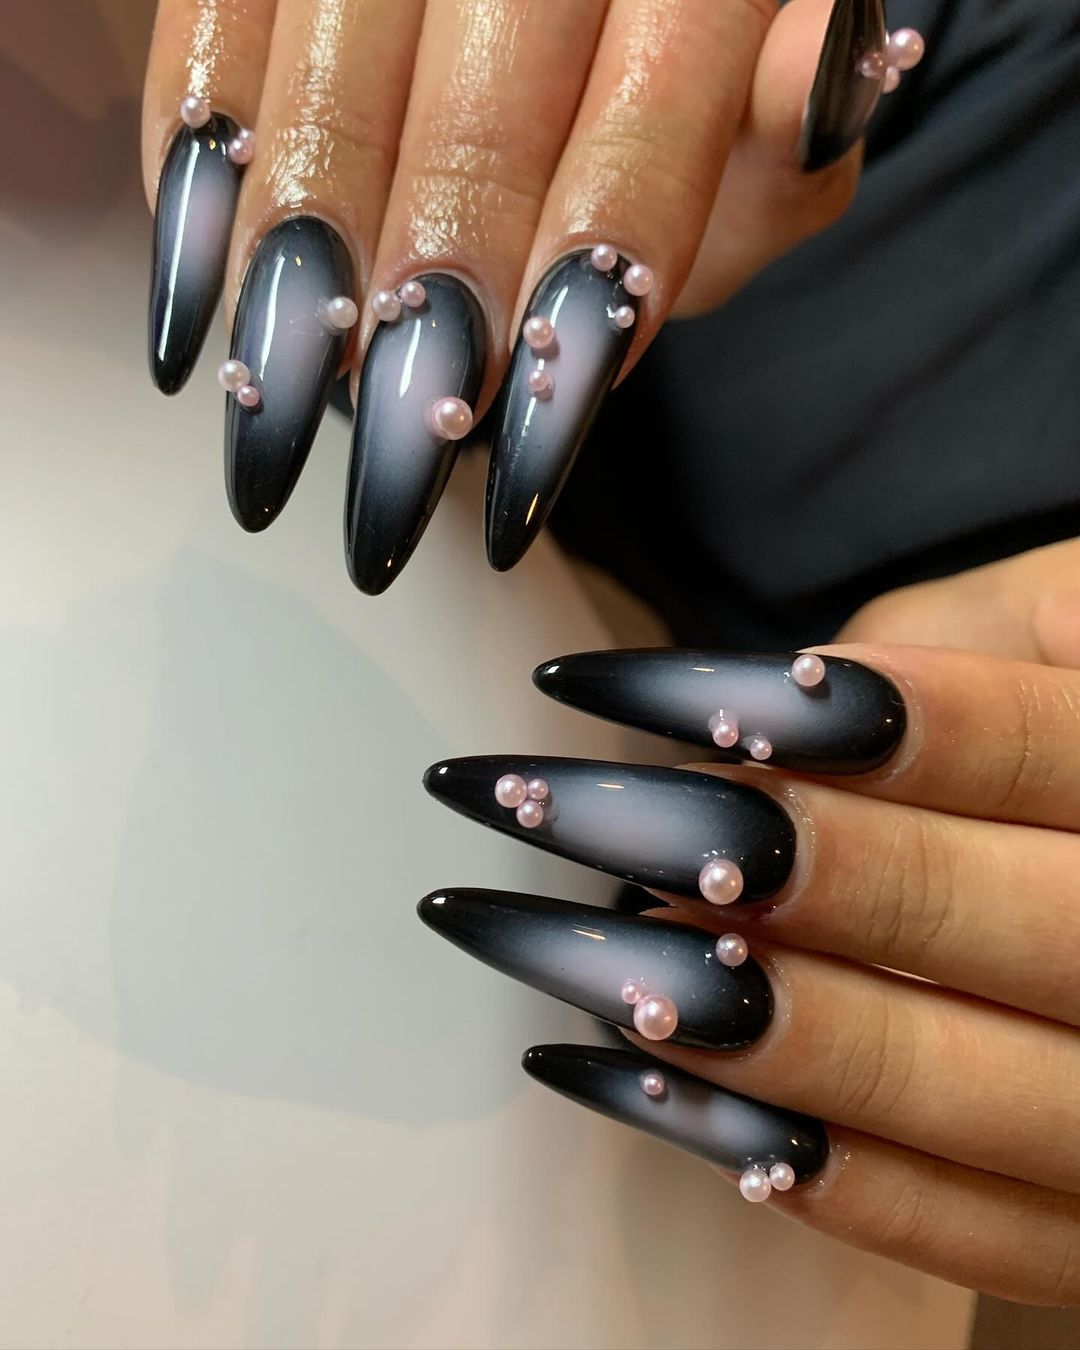
Consumables:
- OPI Nail Lacquer in “Black Onyx”
- Grey nail polish
- Pink pearl nail decorations
- Nail glue
- OPI Top Coat
- Nail file and buffer
Practical Advice: Apply a base coat to protect your nails. Create the ombre effect by blending the black polish with the grey polish using a sponge. Allow the gradient to dry completely. Use nail glue to attach the pink pearls in a scattered pattern across the nails. Finish with a top coat to seal the design and add a glossy finish. This look is sophisticated and requires a bit of patience to place the pearls perfectly.
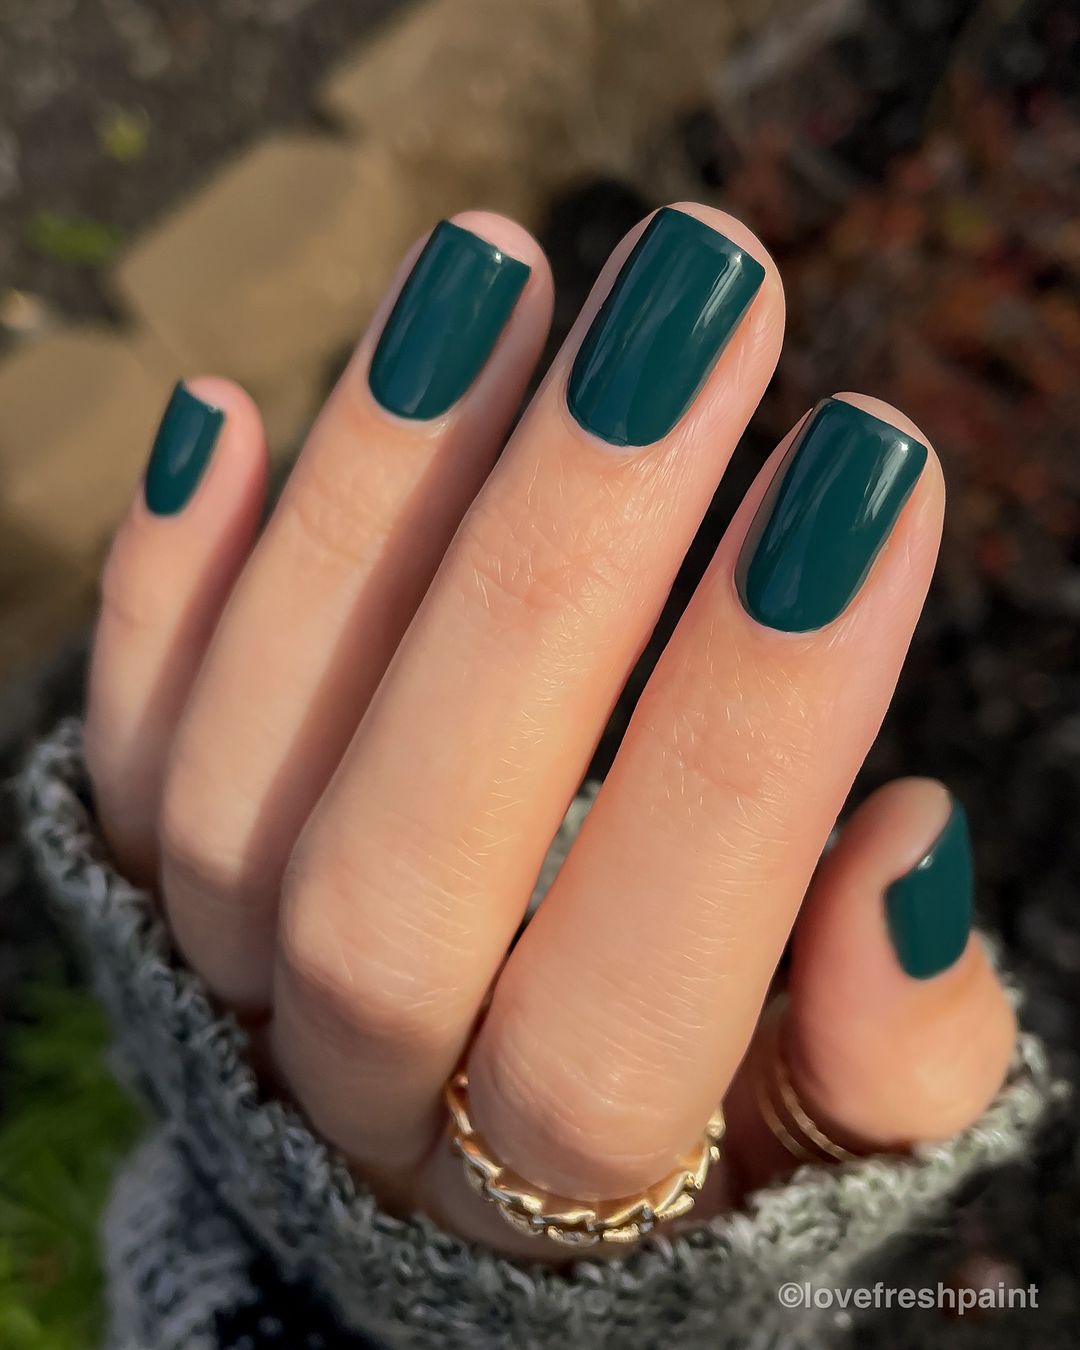
Deep Forest Green
This manicure showcases a rich forest green, perfect for fall. The deep, glossy finish adds sophistication and pairs well with cozy, autumn outfits. Short and rounded nails make this look versatile and practical.

Consumables:
- OPI Nail Lacquer in “Stay Off the Lawn!”
- OPI Top Coat
- Nail file and buffer
Practical Advice: Start with a base coat to protect your nails. Apply two coats of the green polish, allowing each coat to dry completely. Finish with a top coat for a glossy, high-shine finish. This look is simple yet elegant, ideal for everyday wear or special occasions.
Glittering Ember
This stunning manicure features a black base with red glitter, resembling glowing embers. The oval shape enhances the fiery effect, making this design perfect for those who love bold, eye-catching nails.
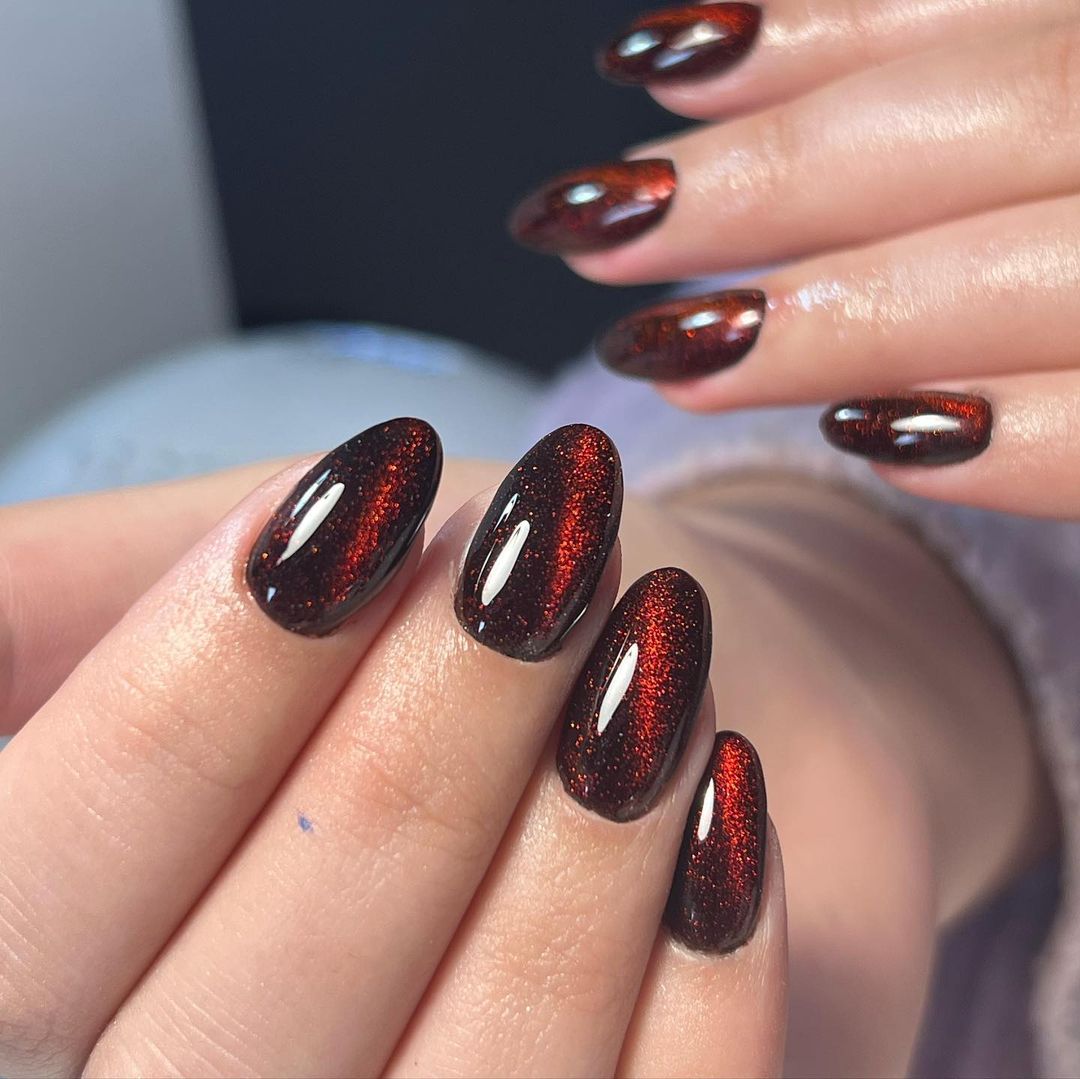
Consumables:
- OPI Nail Lacquer in “Black Onyx”
- Red glitter polish or loose red glitter
- OPI Top Coat
- Nail file and buffer
Practical Advice: Begin with a base coat. Apply two coats of the black polish, allowing each layer to dry. Add the red glitter polish or sprinkle loose red glitter on the wet black polish. Finish with a top coat to seal the glitter and add a glossy finish. This look requires patience for applying the glitter evenly but results in a dazzling manicure.
Midnight Stiletto
This dramatic design features a gradient from clear to dark blue, ending in sharp stiletto tips. The transparent base adds a modern twist, making this manicure perfect for those who love to make a statement.
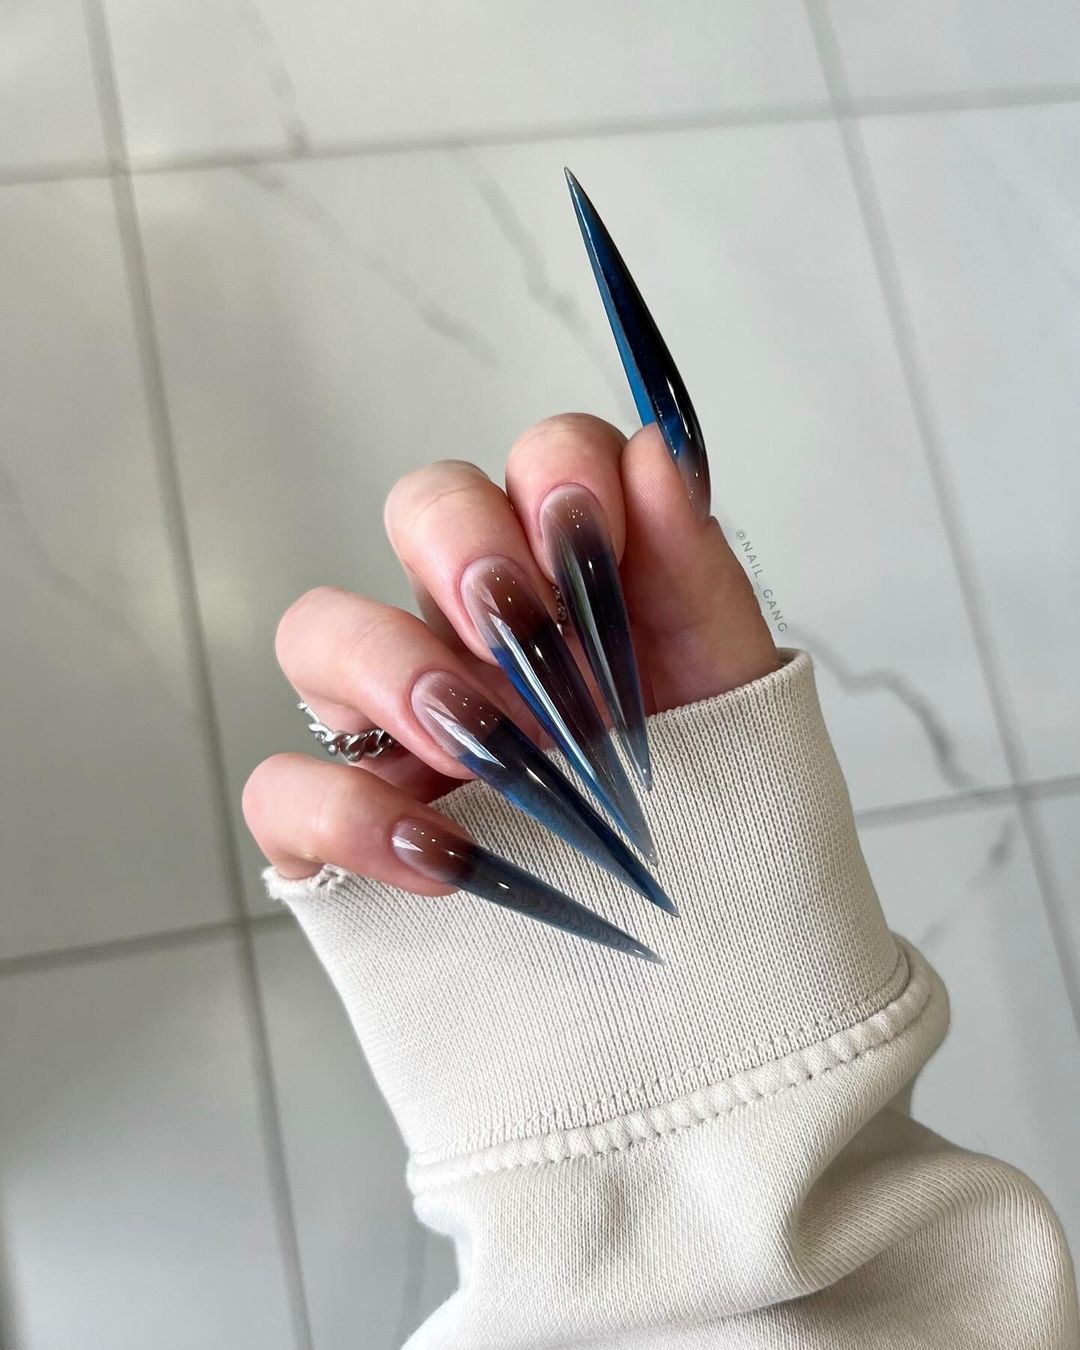
Consumables:
- Clear base polish
- Dark blue polish
- Sponge for gradient effect
- OPI Top Coat
- Nail file and buffer
Practical Advice: Apply a base coat to protect your nails. Use a sponge to create a gradient effect, starting with clear polish at the base and blending into the dark blue polish at the tips. Allow the gradient to dry completely. Finish with a top coat to add shine and protect the design. This look requires a bit of practice to perfect the gradient but is well worth the effort for its striking appearance.
Fiery Flames
This bold manicure features black flames over a nude base, accented with a line of rhinestones. The square shape enhances the edgy look, making this design perfect for those who love a bit of glam and drama.
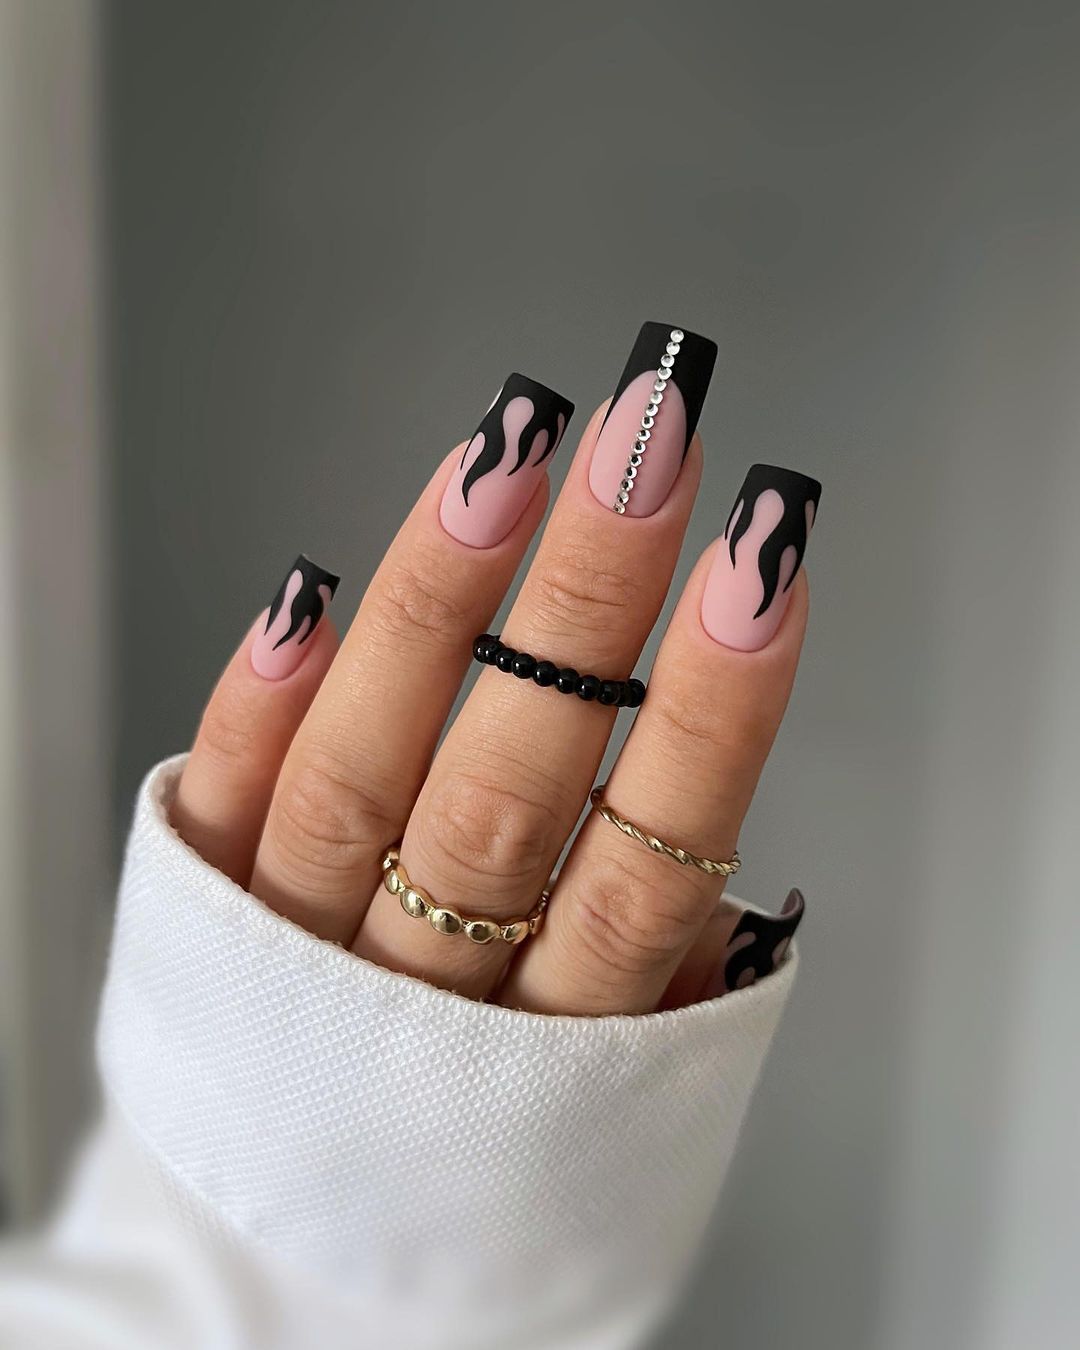
Consumables:
- Nude nail polish
- Black nail art pen or polish for the flames
- Rhinestones
- Nail glue
- OPI Top Coat
- Nail file and buffer
Practical Advice: Start with a base coat. Apply the nude polish and let it dry completely. Use a nail art pen to draw black flames on the tips of the nails. Attach the rhinestones along the center of one nail using nail glue. Finish with a top coat to seal the design and add shine. This look is intricate and may require some practice to perfect the flames and rhinestone placement.
Chocolate Delight
This sophisticated design features various shades of brown, combined with a nude base and a touch of gold glitter. The square shape adds a modern twist, making this manicure perfect for those who love neutral tones with a bit of sparkle.
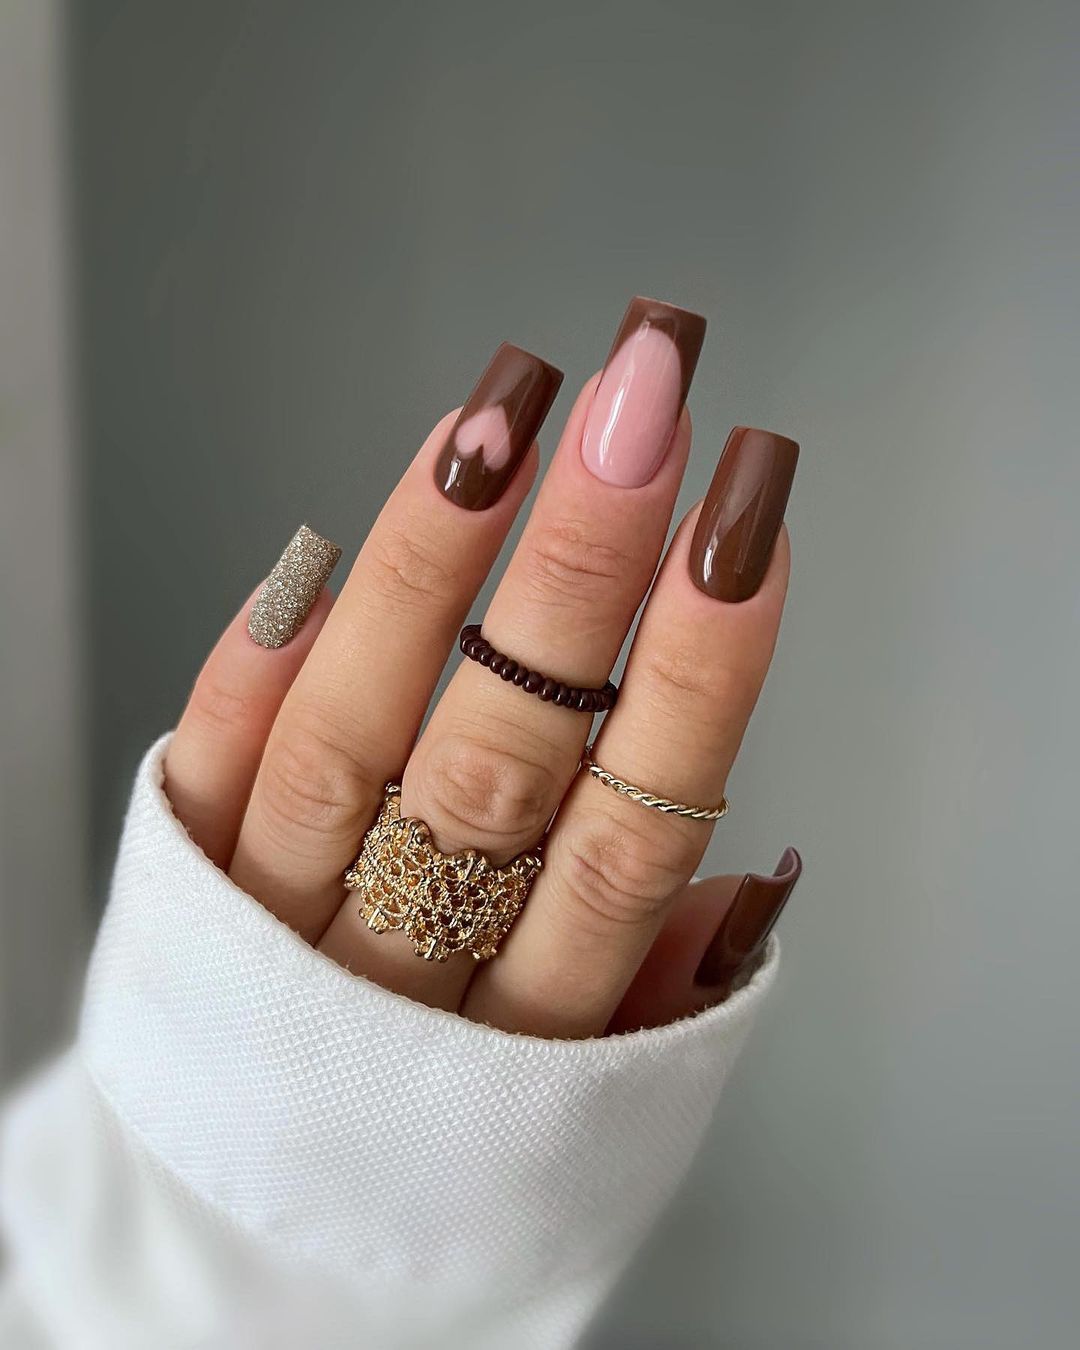
Consumables:
- OPI Nail Lacquer in “Chocolate Moose”
- Nude nail polish
- Gold glitter polish
- OPI Top Coat
- Nail file and buffer
Practical Advice: Apply a base coat to protect your nails. Paint each nail a different shade of brown, leaving one nail with a nude base. Add a gold glitter accent to one of the brown nails. Finish with a top coat to seal the design and add a glossy finish. This look is versatile and perfect for fall, adding warmth and elegance to your style.
Glittery French Twist
This design features a modern take on the classic French manicure with black and glitter accents. The short square shape keeps it chic and practical, making it perfect for any occasion.
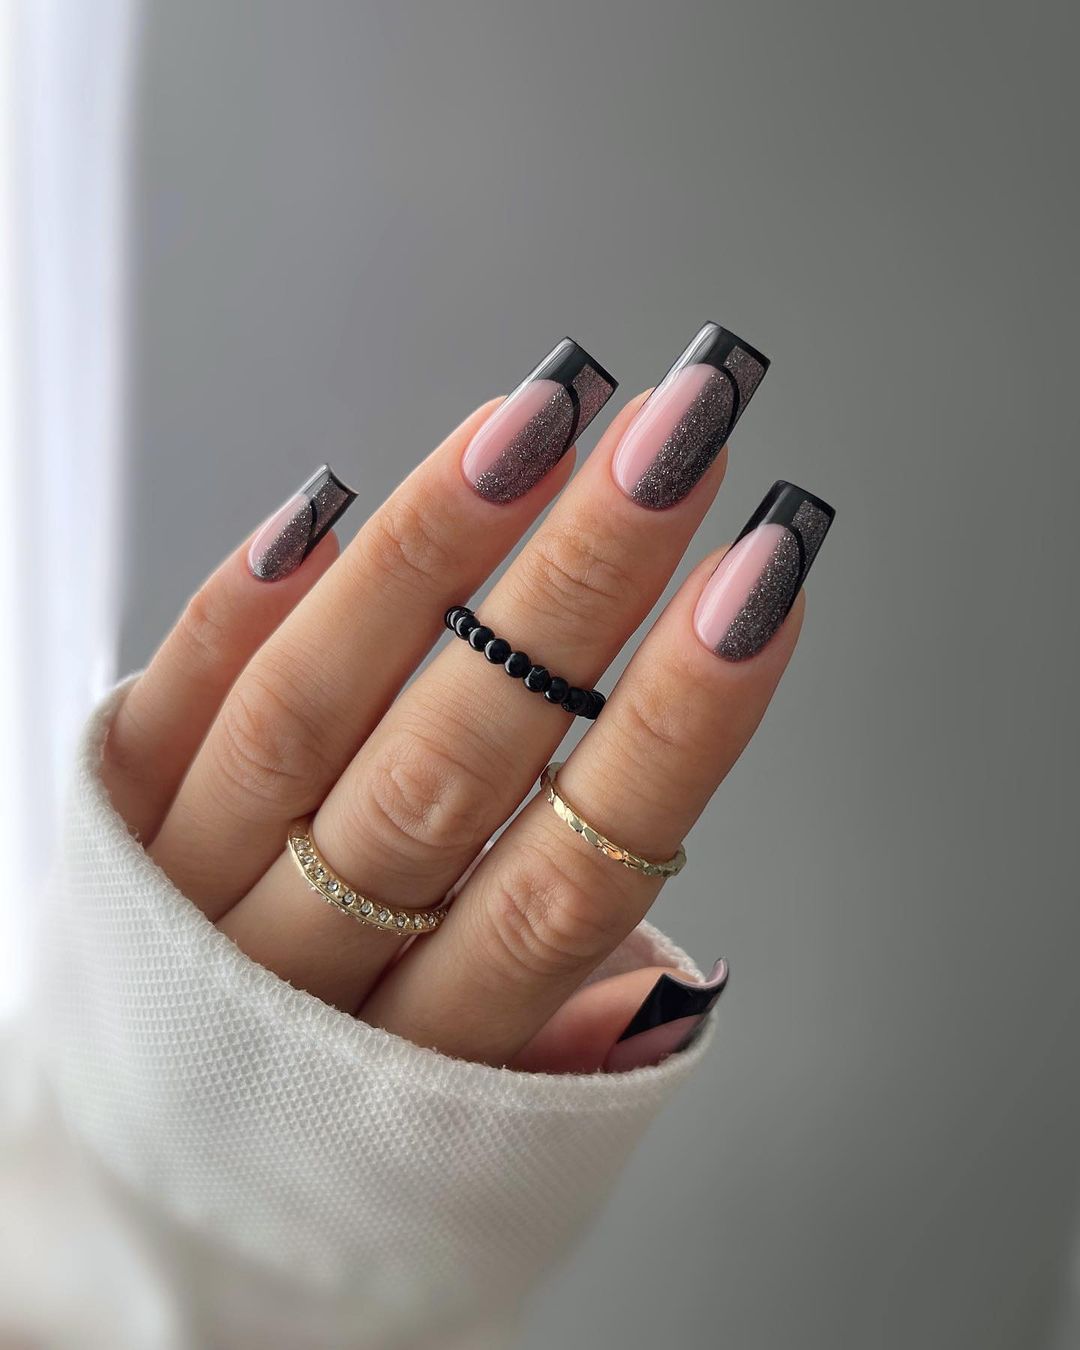
Consumables:
- Nude nail polish
- Black polish for the tips
- Silver glitter polish
- OPI Top Coat
- Nail file and buffer
Practical Advice: Start with a base coat. Apply the nude polish and let it dry completely. Use black polish to create French tips, adding a twist by painting one half of the tip with silver glitter. Finish with a top coat to seal the design and add a glossy finish. This look is elegant and easy to achieve, offering a modern twist on a classic style.
Floral Elegance
This elegant manicure features a combination of burgundy, white, and nude shades with black floral accents. The square shape adds sophistication, making this design perfect for those who love detailed and artistic nails.
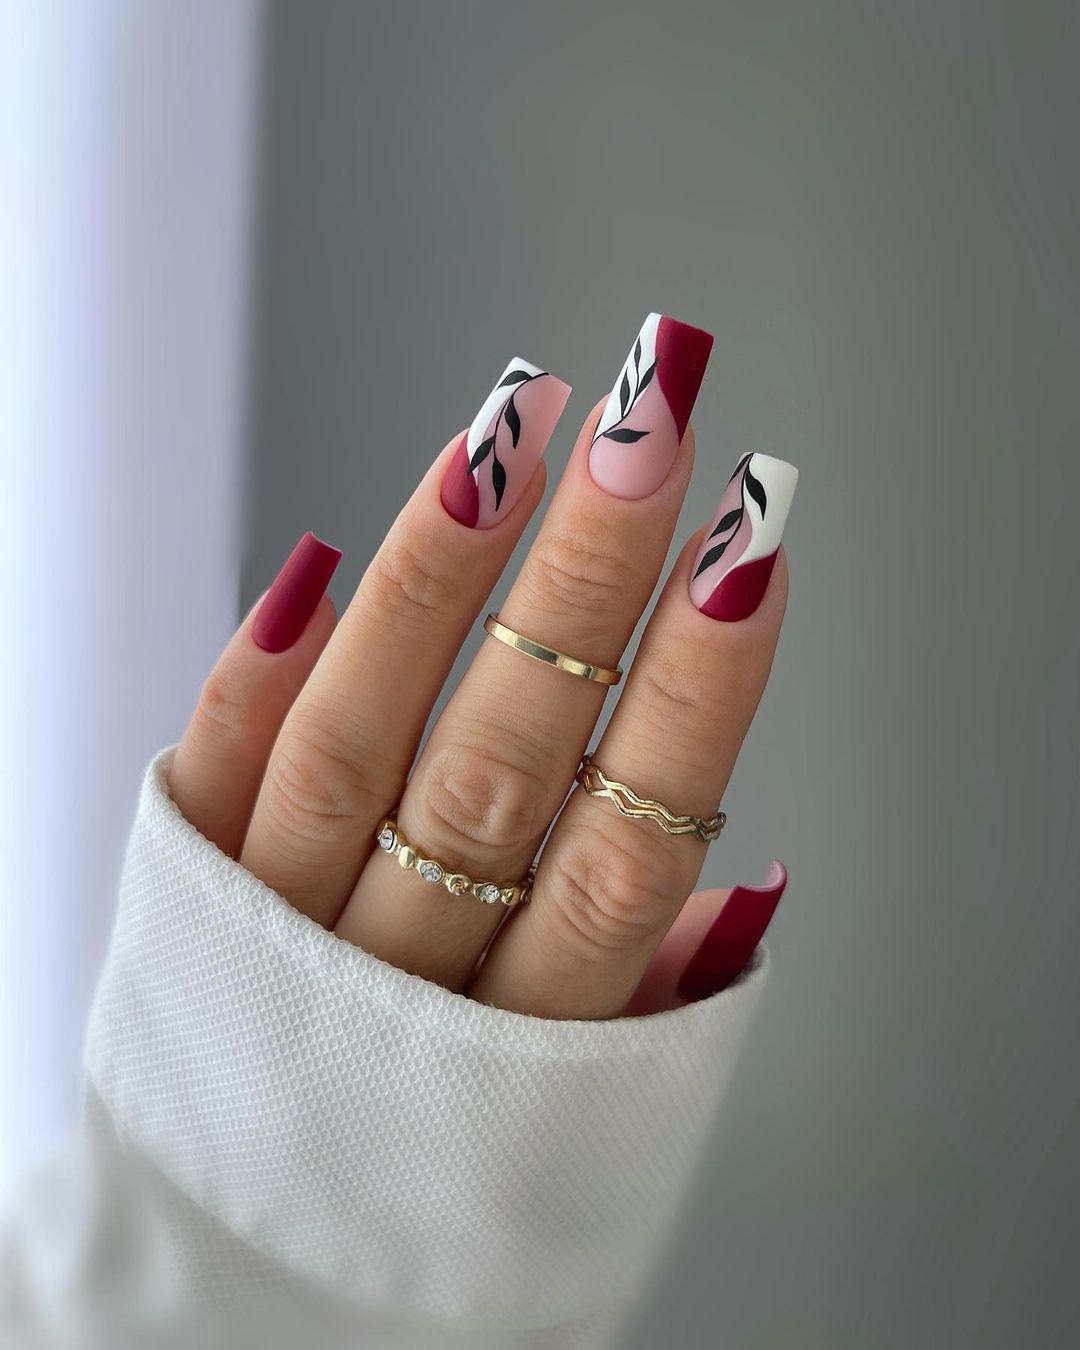
Consumables:
- OPI Nail Lacquer in “Got the Blues for Red”
- White nail polish
- Nude nail polish
- Black nail art pen for floral design
- OPI Top Coat
- Nail file and buffer
Practical Advice: Apply a base coat to protect your nails. Paint each nail a different base color, alternating between burgundy, white, and nude. Use the nail art pen to draw black floral designs on the nails with a white base. Finish with a top coat to seal the design and add a glossy finish. This look is intricate and may require some practice to perfect the floral details, but it results in a stunning and elegant manicure.
FAQs
Q: How can I make my nail polish last longer? A: Always start with a clean, dry nail. Apply a base coat before your color polish and finish with a top coat. Avoid hot water and wear gloves when doing chores to prevent chipping.
Q: Can these designs be done on short nails? A: Absolutely! While they might look different, each of these designs can be adapted for shorter nails by adjusting the scale of the patterns and shapes.
Q: What if I don’t have a steady hand for nail art? A: Practice is key, but you can also use nail stencils or stickers to help guide your designs. Alternatively, visiting a professional nail artist can ensure a flawless result.
Save Pin