Fall Burnt Orange Nail Designs 2024: 25 Trendy Ideas
As the leaves begin to turn and the air grows crisp, it’s the perfect time to refresh your nail game with some cozy autumn vibes. Fall 2024 is all about embracing rich, warm hues that echo the beauty of the season, and there’s no color more fitting than burnt orange. Whether you’re looking for something simple and elegant or bold and creative, burnt orange nails can capture the essence of autumn in a way that’s both trendy and timeless. From glittering glam to matte sophistication, these burnt orange nail designs are set to be the must-have accessory for every fall look. Get ready to be inspired and fall in love with the season’s hottest nail trends!
Fall Burnt Orange Perfection
Burnt orange is the quintessential fall shade, embodying the warmth and richness of the season. The nail design in the photo showcases short, rounded nails adorned with a glossy burnt orange hue. This vibrant color not only screams autumn but also adds a pop of color that’s both bold and elegant. Perfect for those who love to keep it simple yet stylish, this manicure is a true testament to the beauty of autumnal shades.

- Burnt orange gel polish: I recommend the OPI GelColor in “It’s a Piazza Cake” for a similar deep orange shade.
- Base coat: CND Stickey Base Coat is ideal for long-lasting adhesion.
- Top coat: Seche Vite Dry Fast Top Coat to seal in the color and add an extra glossy finish.
At-Home Instructions:
- Start with clean, filed nails. Apply a base coat to ensure the polish adheres well.
- Apply two coats of burnt orange gel polish, allowing each coat to cure under a UV lamp for 60 seconds.
- Finish with a top coat to lock in the color and give your nails that glossy shine. Cure under the UV lamp for an additional 60 seconds.
- For a more vibrant look, you can add a matte top coat to create a velvety finish that’s perfect for fall.
Burnt Orange with a Twist
This design takes burnt orange to the next level by combining it with bold, contrasting elements. The square nails feature a mix of glossy burnt orange, gold chrome accents, and abstract art swirls in white and orange. This manicure is ideal for those who love a bit of drama and flair. The design’s combination of bold colors and sleek lines makes it perfect for fall events, especially if you’re looking to make a statement.

- Burnt orange gel polish: Essie Gel Couture in “Playing Koi” offers a vibrant orange hue.
- Gold chrome powder: Born Pretty Mirror Effect Nail Powder for that high-shine metallic finish.
- White gel polish: OPI GelColor in “Alpine Snow” for the abstract lines.
- Detail brush: Beetles Nail Art Brush Set for creating precise lines and swirls.
At-Home Instructions:
- Prep your nails with a base coat, then apply two coats of burnt orange gel polish, curing between each coat.
- Using a detail brush, create abstract swirls with white gel polish on select nails. Cure under a UV lamp.
- Apply the gold chrome powder to accent nails using an applicator, then seal it with a top coat. Cure again under the UV lamp.
- Finish by applying a glossy top coat to all nails for a cohesive, high-shine look.
Subtle Burnt Orange Elegance
For those who prefer a more understated look, this almond-shaped manicure in a muted burnt orange shade is a perfect choice. The soft, rounded edges of the nails add a touch of elegance, making this design versatile for both casual and formal occasions. The subtlety of the burnt orange color is perfect for fall and pairs well with any outfit, making it a timeless addition to your autumn nail repertoire.

- Burnt orange polish: Zoya Nail Polish in “Autumn” for a soft yet striking orange.
- Base coat: Essie Here to Stay Base Coat to protect your nails and ensure longevity.
- Top coat: Sally Hansen Miracle Gel Top Coat for a durable, long-lasting finish.
At-Home Instructions:
- Begin with a base coat to protect your natural nails. Let it dry completely.
- Apply two even coats of burnt orange polish, allowing each to dry fully between applications.
- Seal your manicure with a top coat, making sure to cover the edges of your nails to prevent chipping.
- For added strength, consider applying a second layer of top coat a few days after your initial manicure.
Autumn Leaves Delight
This design captures the essence of fall with a vibrant burnt orange paired with clear tips that feature delicate autumn leaf accents. The combination of orange and translucent sections creates a striking contrast, making the leaf details pop beautifully. The nails are square-shaped, offering a clean and modern look, while the burnt orange adds warmth and depth to the overall design. This look is perfect for anyone who wants to celebrate the season with a playful yet sophisticated manicure.

- Burnt orange gel polish: Kiara Sky Gel Polish in “Fireball” for a rich, warm orange hue.
- Clear builder gel: Young Nails Clear Sculptor Gel to create the clear tips.
- Autumn leaf nail decals: Whats Up Nails “Autumn Leaf Confetti” for easy application.
- Top coat: Gelish Top It Off to seal in the design and add shine.
At-Home Instructions:
- Apply a base coat to clean, prepped nails and cure under a UV lamp.
- Apply the burnt orange gel polish on the nails, leaving a few tips clear. Cure under the lamp.
- Carefully place the autumn leaf decals onto the clear sections of the nails, pressing them into the gel.
- Seal the entire design with a clear builder gel, focusing on the clear tips, and cure again.
- Finish with a top coat to protect the design and give it a glossy finish. Cure once more for a durable, long-lasting manicure.
Save Pin

Burnt Orange Speckle Art
This manicure features a playful mix of burnt orange and a speckled mustard yellow, paired with a statement white nail adorned with black abstract dots. The combination of these colors creates a modern, eye-catching look that’s both fun and versatile. The varied designs on each nail add an artistic flair, making this manicure perfect for those who love to experiment with color and pattern.

- Burnt orange polish: OPI Nail Lacquer in “It’s a Piazza Cake” for a vibrant orange.
- Mustard yellow polish: Zoya Nail Polish in “Jancyn” for the perfect autumn yellow.
- White polish: Essie Nail Polish in “Blanc” as a crisp base for the black dots.
- Black nail art pen: Sally Hansen I Heart Nail Art Pen in black for easy dotting.
- Top coat: INM Out The Door Topcoat for a quick-dry, high-shine finish.
At-Home Instructions:
- Start with a base coat to protect your nails, then apply the burnt orange polish to two nails, the mustard yellow to one, and the white to another. Allow each layer to dry thoroughly.
- Use the black nail art pen to create abstract dots on the white nail. Let it dry completely.
- Apply a speckled top coat or use a small brush to add black speckles to the mustard yellow nail for added texture.
- Seal the entire look with a top coat, ensuring all nails are evenly coated for durability and shine.
Classic Burnt Orange Simplicity
This design showcases the timeless elegance of a classic burnt orange manicure. The short, rounded nails are coated in a glossy burnt orange that perfectly captures the essence of fall. The simplicity of this design makes it versatile and suitable for any occasion, whether you’re dressing up for an event or keeping it casual. The glossy finish adds a luxurious touch, making your nails stand out effortlessly.

- Burnt orange gel polish: CND Shellac in “Tropix” for a deep, saturated orange.
- Base coat: Essie Here to Stay Base Coat to ensure the polish adheres well.
- Top coat: Seche Vite Dry Fast Top Coat to give the nails a high-gloss finish and protect the polish.
At-Home Instructions:
- Begin by applying a base coat to clean, prepped nails to prevent staining and improve polish longevity.
- Apply two coats of burnt orange gel polish, curing each layer under a UV lamp for 60 seconds.
- Finish with a top coat, making sure to cap the edges of your nails to prevent chipping. Cure under the UV lamp for a final 60 seconds.
- For a salon-like finish, apply a nourishing cuticle oil around the nails to keep your cuticles hydrated and healthy.
Glossy Burnt Orange Coffin Nails
These glossy coffin-shaped nails exude sophistication and style with their rich burnt orange color. The long, sleek shape elongates the fingers, while the high-shine finish enhances the boldness of the orange. This design is perfect for those who love a polished look that stands out.

- Burnt orange gel polish: DND Gel & Lacquer Duo in “Pumpkin Spice” for a deep, glossy finish.
- Base coat: Beetles Gel Polish Foundation Base Gel to protect the natural nails.
- Top coat: Glossy Gel Top Coat by Gelish for an ultra-shiny finish.
At-Home Instructions:
- Start with a base coat to protect your nails and ensure longevity. Cure under a UV lamp.
- Apply two coats of burnt orange gel polish, curing each layer under the UV lamp.
- Finish with a top coat for that high-gloss effect, and cure again.
- For added strength and durability, consider applying a second layer of top coat.
Fall-Inspired Heart Accent Nails
This fun and playful manicure combines fall colors with a charming heart design. The mix of burnt orange, white, and teal green creates a vibrant, seasonal palette. The little white hearts on the orange nails add a cute touch, making this design perfect for autumn festivities.

- Burnt orange polish: Sally Hansen Miracle Gel in “Pumpkin King” for a vibrant hue.
- White polish: OPI Nail Lacquer in “Alpine Snow” for crisp accents.
- Teal green polish: Essie Nail Polish in “Mindful Meditation” for a cool contrast.
- Nail art brush or dotting tool: Beetles Nail Art Brush Set for creating heart shapes.
At-Home Instructions:
- Apply a base coat to clean, prepped nails and let it dry completely.
- Paint two nails with burnt orange polish, one with teal green, and one with white. Allow each coat to dry.
- Using a nail art brush or dotting tool, create small heart shapes on the orange nails with white polish.
- Seal with a top coat to protect the design and add shine.
Red and Nude Almond Nails
This chic manicure features a striking combination of red and nude tones. The almond-shaped nails are painted in a sophisticated red with a touch of nude for balance. The mix of colors adds depth and dimension, making this design perfect for both everyday wear and special occasions.
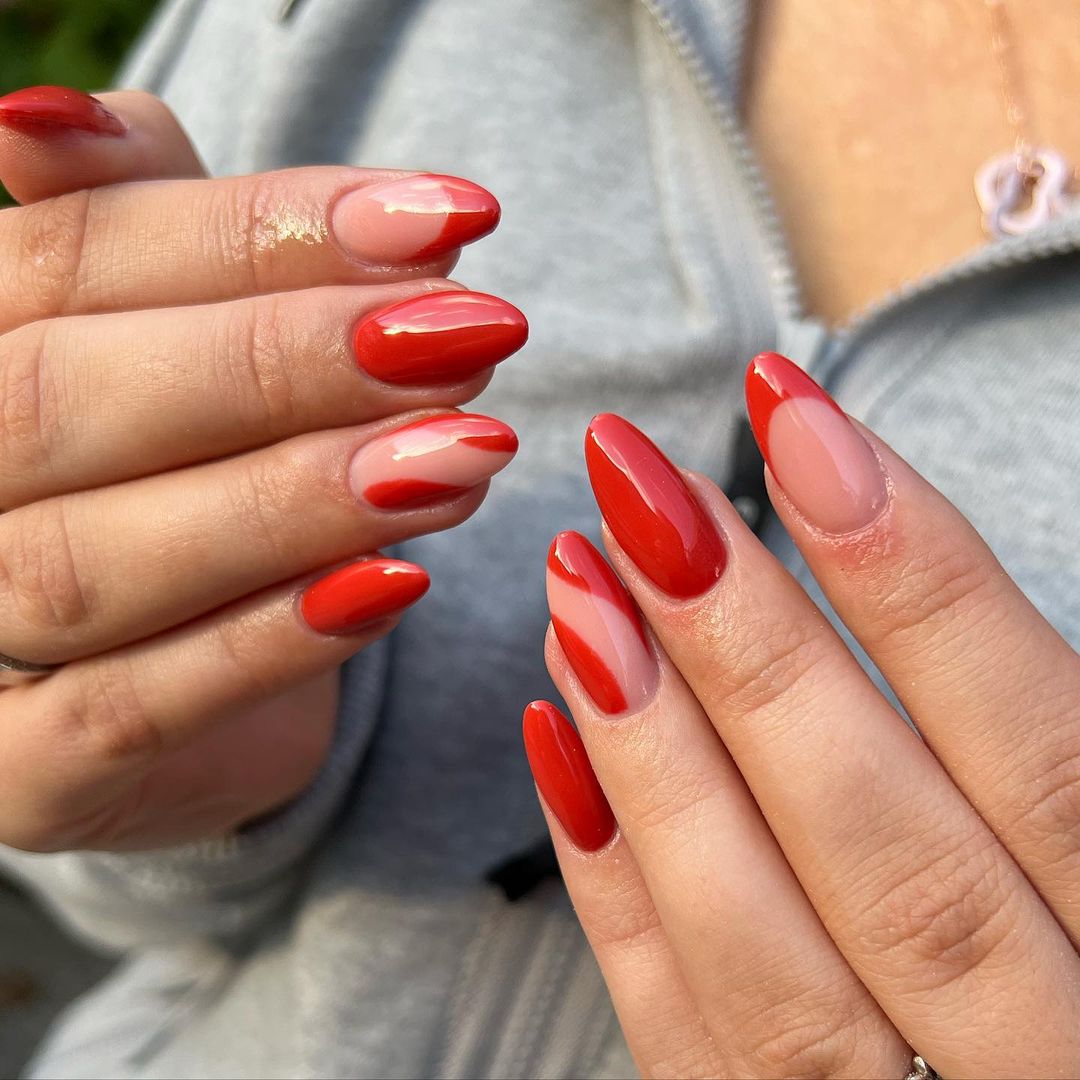
- Red gel polish: CND Vinylux Long Wear Polish in “Rouge Red” for a rich, classic red.
- Nude gel polish: OPI GelColor in “Bare My Soul” for a subtle, nude finish.
- Base coat: Essie Here to Stay Base Coat to ensure the polish adheres well.
- Top coat: Sally Hansen Miracle Gel Top Coat for a long-lasting finish.
At-Home Instructions:
- Start with a base coat to protect your natural nails.
- Apply the red gel polish to most of the nails, leaving one or two for the nude polish. Cure each layer under a UV lamp.
- Add a second coat for more opacity, curing again.
- Finish with a top coat to seal the colors and provide a glossy finish. Cure one last time under the UV lamp.
Save Pin

Matte Burnt Orange with Celestial Designs
These nails bring a touch of magic with their matte burnt orange base adorned with black celestial designs. The almond-shaped nails are perfect for showcasing the intricate star and moon patterns. The matte finish gives a modern twist, making this design both mystical and stylish.
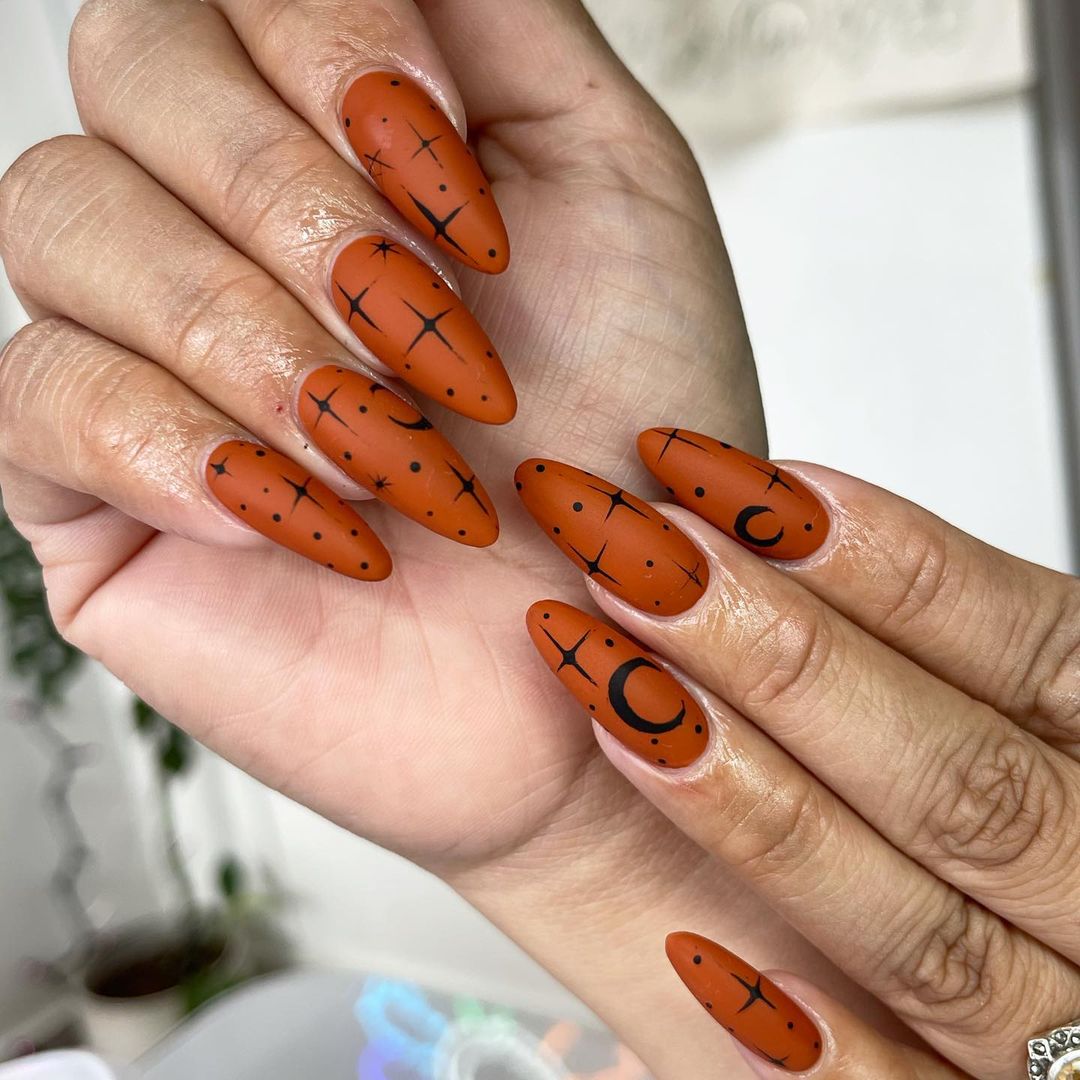
- Burnt orange matte polish: Zoya Matte Velvet Lacquer in “Amal” for a rich, matte look.
- Black nail art pen: Sally Hansen I Heart Nail Art Pen in black for detailed designs.
- Base coat: Orly Bonder Basecoat to ensure the polish adheres well.
- Matte top coat: OPI Matte Top Coat to maintain the matte finish.
At-Home Instructions:
- Begin with a base coat to protect your nails and enhance polish longevity.
- Apply two coats of the burnt orange matte polish, allowing each to dry completely.
- Use the black nail art pen to draw celestial designs on the nails. Let the designs dry thoroughly.
- Finish with a matte top coat to seal the design and keep the matte effect.
Burnt Orange and Brown Abstract Nails
This nail design combines burnt orange with brown and white abstract swirls for a sophisticated and artistic look. The square-shaped nails provide a perfect canvas for the intricate patterns, creating a modern and stylish manicure suitable for any occasion.
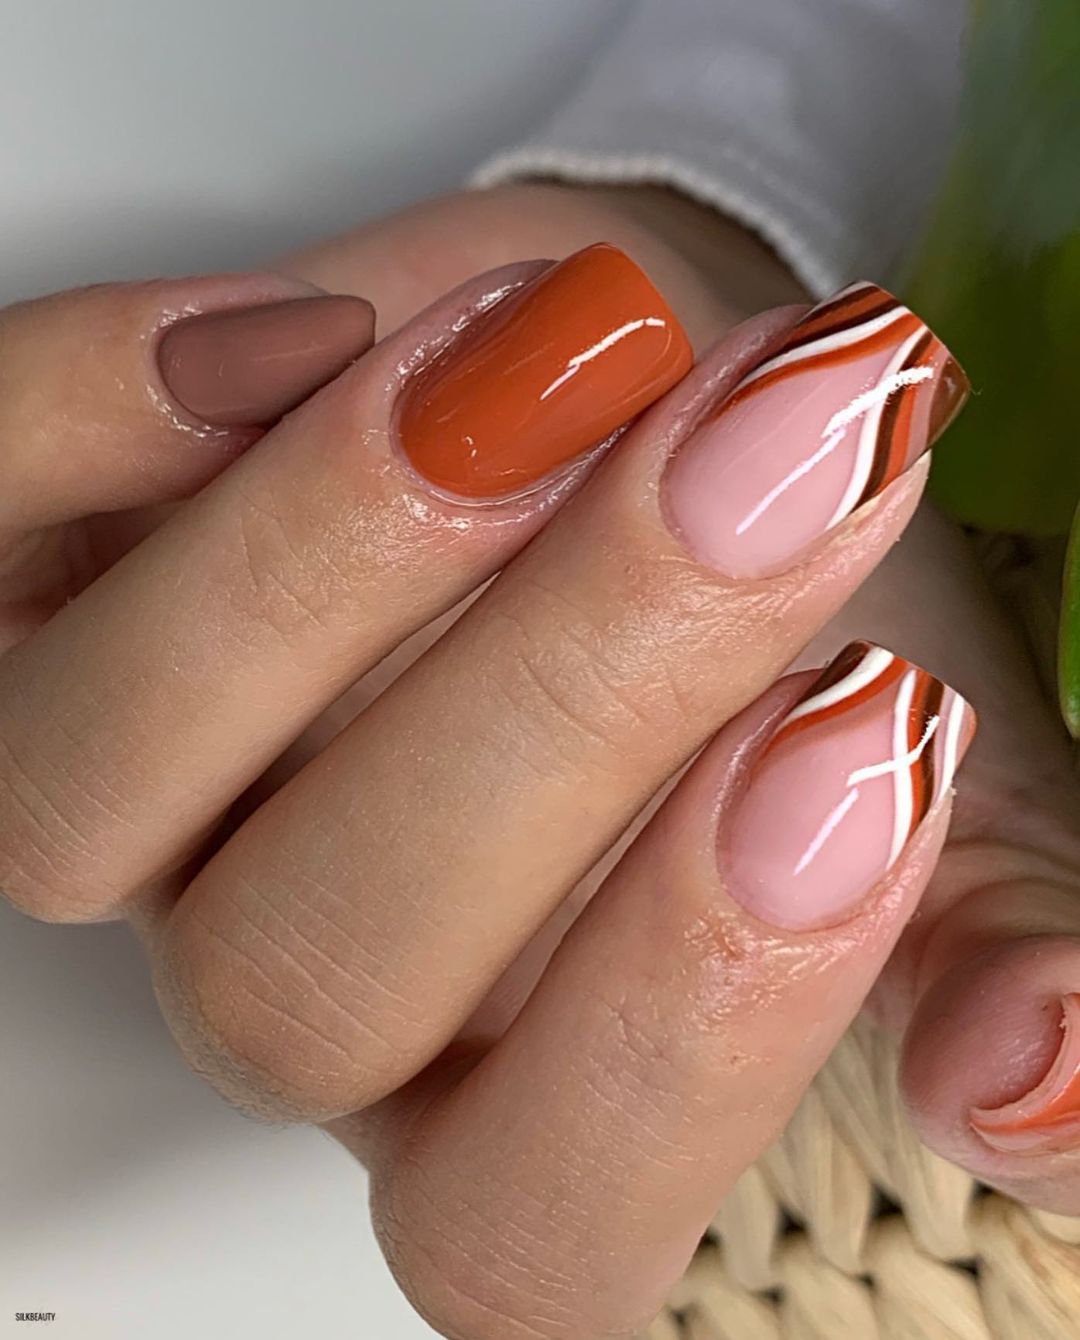
- Burnt orange polish: China Glaze Nail Lacquer in “Autumns Up” for a bold, orange shade.
- Brown polish: Zoya Nail Polish in “Spencer” for a warm, earthy tone.
- White polish: OPI Nail Lacquer in “Funny Bunny” for clean, crisp lines.
- Nail art brush: Winstonia Professional Nail Art Brush Set for detailed swirling patterns.
At-Home Instructions:
- Apply a base coat to clean, dry nails and let it dry.
- Paint most of the nails with burnt orange polish, leaving one or two for the abstract design.
- Using the nail art brush, create swirling patterns with brown and white polishes on the accent nails.
- Finish with a top coat to protect the design and add shine.
Long Burnt Orange Elegance
These long, square-shaped nails are painted in a rich burnt orange, exuding elegance and sophistication. The glossy finish enhances the depth of the color, making it perfect for a bold, statement look. This design is ideal for those who love long nails and want to embrace the fall season with style.
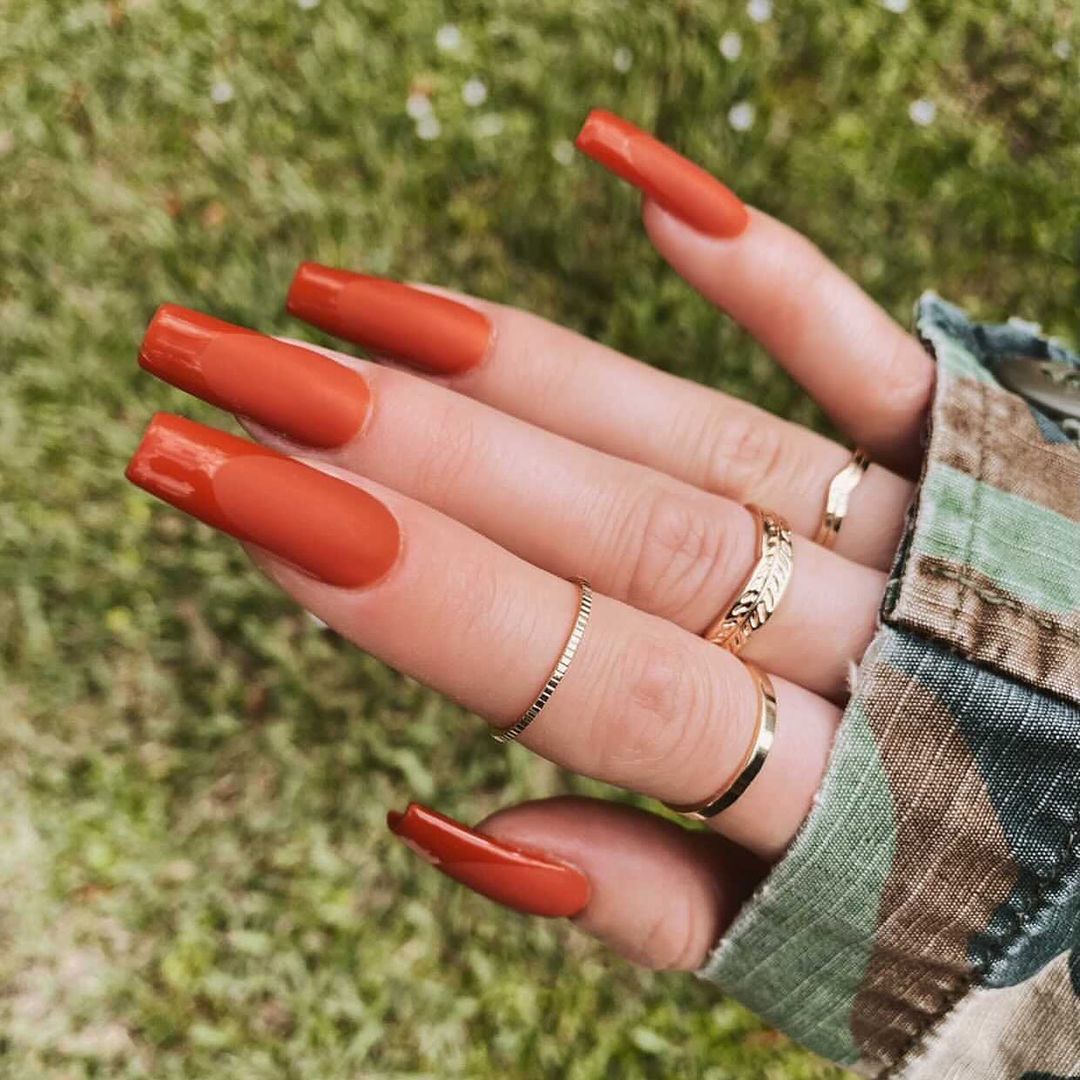
- Burnt orange gel polish: LeChat Perfect Match Gel Polish in “Burnt Cinnamon” for a deep, rich hue.
- Base coat: Gelish Foundation Base Gel to protect the natural nails.
- Top coat: Gelish Top It Off Top Coat for a high-shine, durable finish.
At-Home Instructions:
- Start with a base coat to protect your nails and ensure the polish adheres well.
- Apply two coats of burnt orange gel polish, curing each layer under a UV lamp.
- Finish with a top coat for that glossy, salon-quality finish. Cure again under the UV lamp.
- For added strength, apply a second layer of top coat, ensuring all edges are sealed to prevent chipping.
Glossy Burnt Orange Short Nails
These short, rounded nails showcase a classic burnt orange color with a high-gloss finish. The simplicity of the design combined with the vibrant color makes it a versatile choice for any fall occasion. The glossy finish adds a sleek and polished look, perfect for those who prefer a minimalist yet stylish manicure.
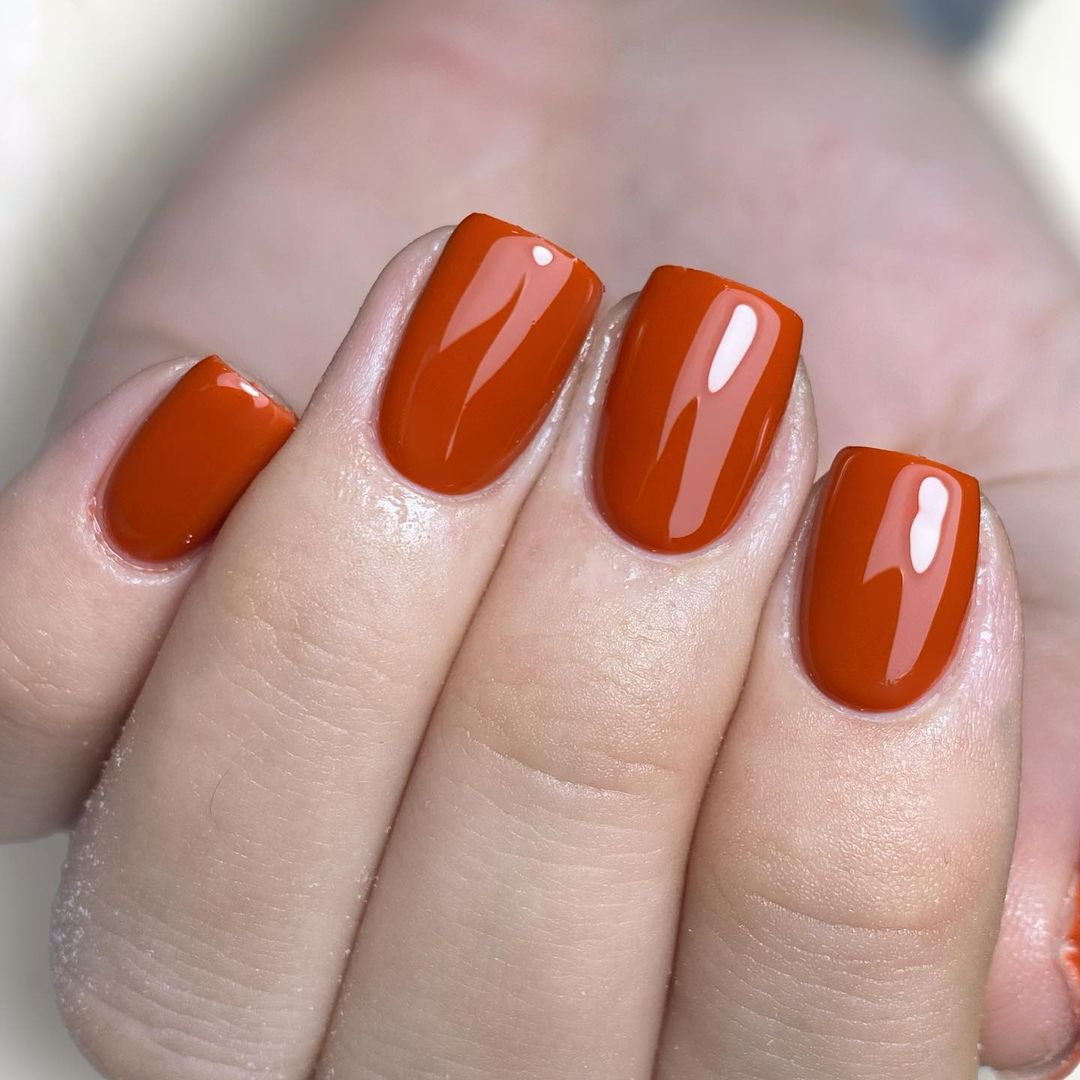
- Burnt orange gel polish: OPI GelColor in “My Italian is a Little Rusty” for a rich, shiny finish.
- Base coat: CND Stickey Base Coat for long-lasting wear.
- Top coat: Seche Vite Dry Fast Top Coat to seal in the color and add shine.
At-Home Instructions:
- Begin with a base coat to protect your natural nails and ensure the polish adheres well.
- Apply two coats of burnt orange gel polish, curing each layer under a UV lamp.
- Finish with a top coat to achieve a high-gloss finish, curing under the UV lamp for a final touch.
- Apply cuticle oil around your nails for added hydration and shine.
Stiletto Burnt Orange Nails
These long, stiletto-shaped nails are painted in a striking burnt orange shade, making a bold statement. The sharp, elongated tips are ideal for those who love a daring and edgy look. The glossy finish enhances the intensity of the color, making the nails pop with a vibrant fall vibe.
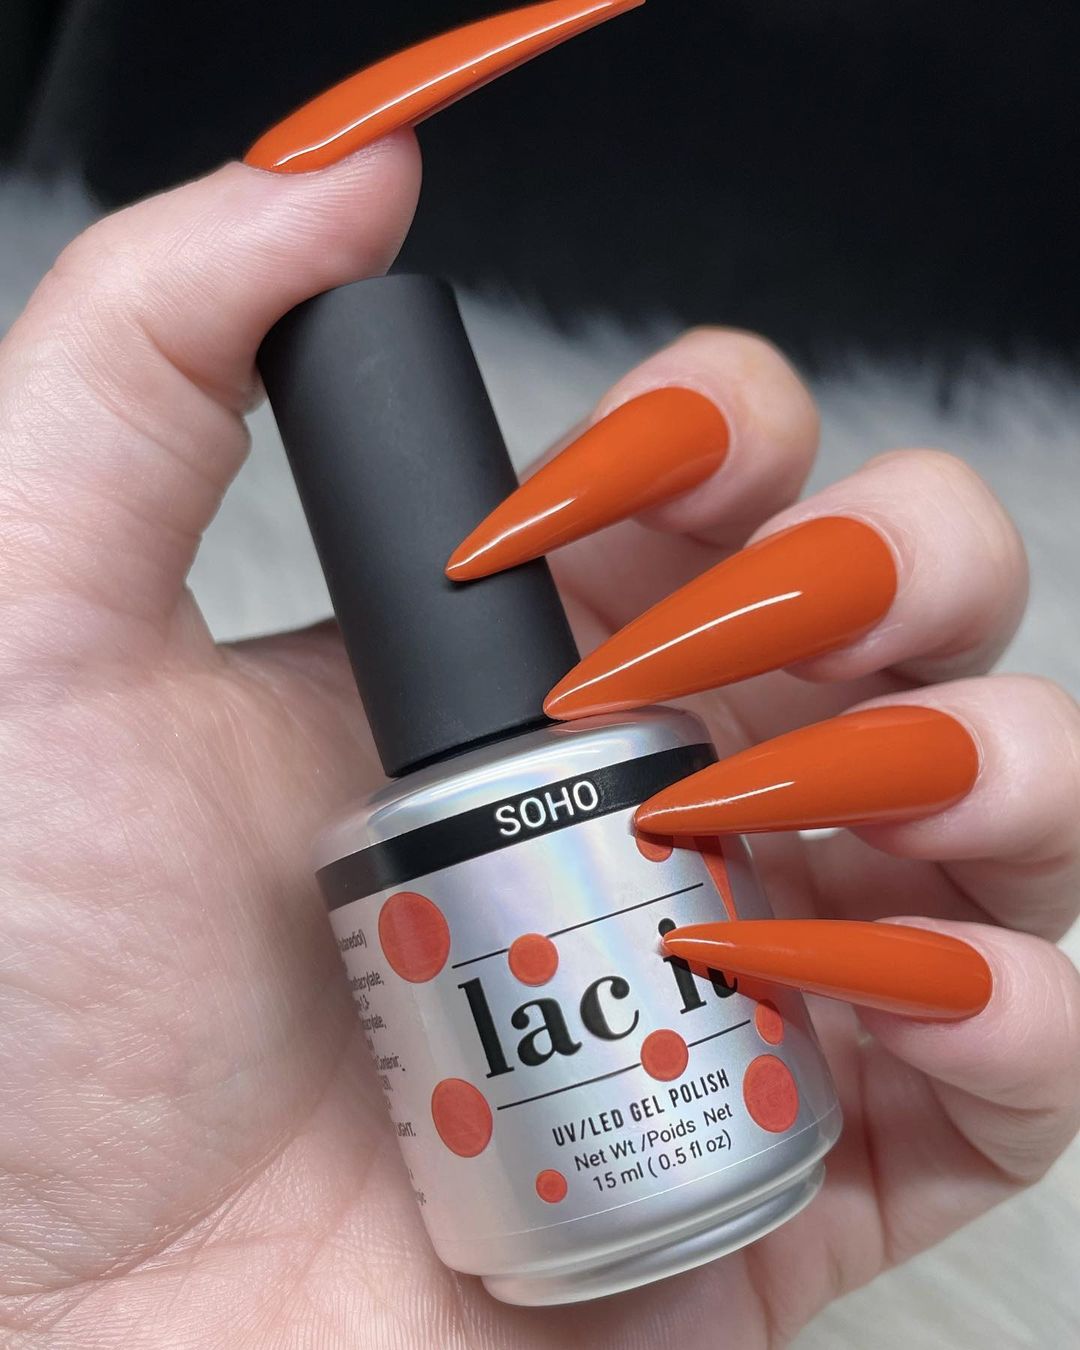
- Burnt orange gel polish: Lac It! Gel Polish in “Soho” for a glossy, vibrant finish.
- Base coat: Orly Bonder Rubberized Basecoat to ensure lasting adhesion.
- Top coat: Gelish Top It Off Top Coat for a protective, glossy finish.
At-Home Instructions:
- Prep your nails with a base coat and cure under a UV lamp.
- Apply two coats of burnt orange gel polish, ensuring even coverage and curing each layer under a UV lamp.
- Finish with a top coat to seal the polish and add a glossy finish. Cure once more.
- File the edges gently to maintain the sharp stiletto shape.
Metallic Burnt Orange Nails
This design features a stunning metallic burnt orange shade on almond-shaped nails. The metallic finish adds a touch of shimmer and elegance, perfect for autumn evenings. The rich color combined with the glossy shine makes these nails a showstopper, ideal for those who love a bit of glam.
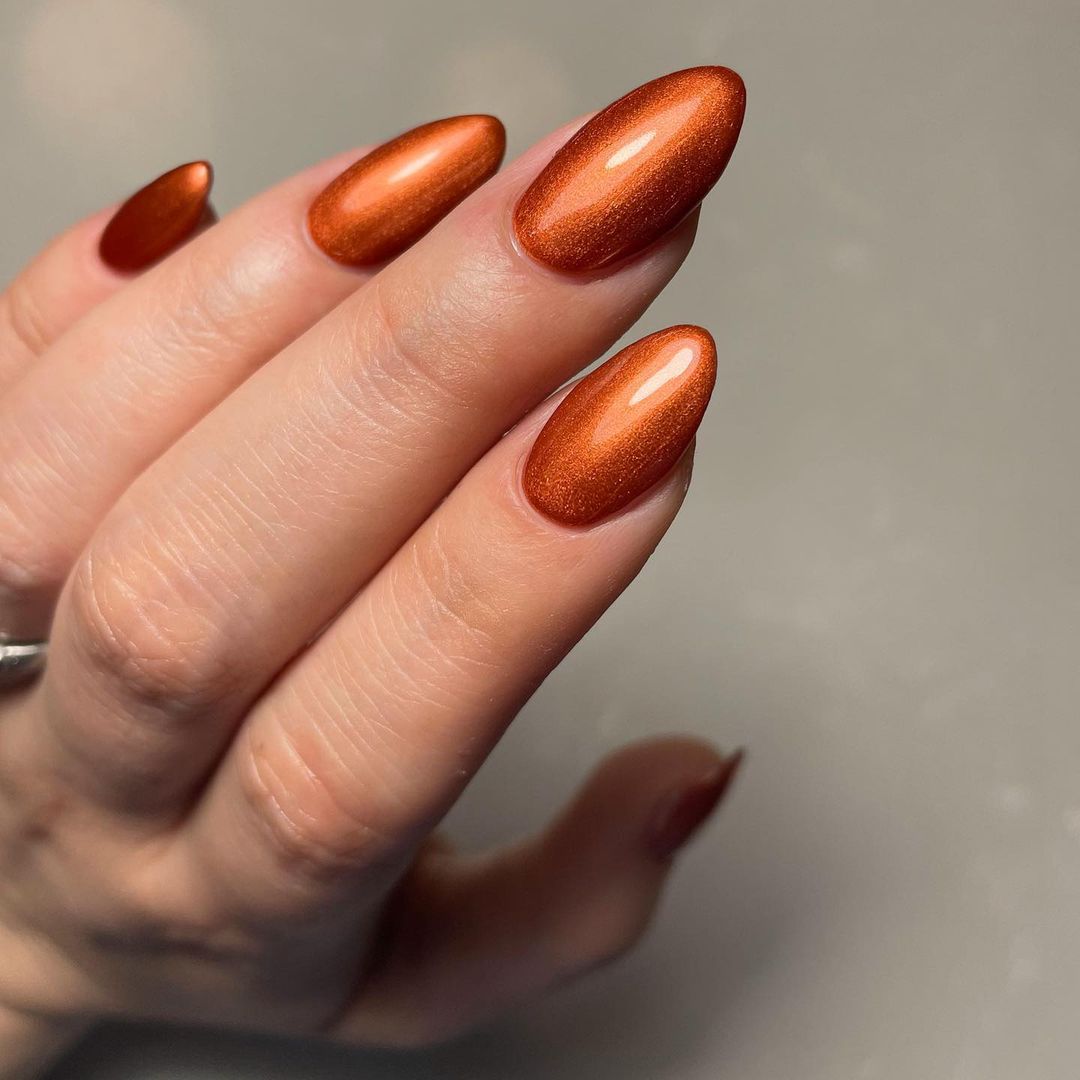
- Burnt orange metallic polish: ILNP Nail Polish in “Atomic Sherbet” for a shimmering, metallic finish.
- Base coat: Zoya Anchor Base Coat to protect your nails and enhance polish longevity.
- Top coat: Sally Hansen Miracle Gel Top Coat for a durable, glossy finish.
At-Home Instructions:
- Apply a base coat to your clean, prepped nails and allow it to dry completely.
- Apply two coats of metallic burnt orange polish, letting each coat dry fully.
- Finish with a top coat to seal in the color and add extra shine and durability.
- Consider using a cuticle oil to keep your nails and surrounding skin hydrated.
Matte Burnt Orange with Dalmatian Dots
These long, almond-shaped nails combine a matte burnt orange with playful black and white Dalmatian dots for a fun, stylish look. The matte finish gives a modern twist to the classic burnt orange, while the black and white accents add a trendy, artistic flair.
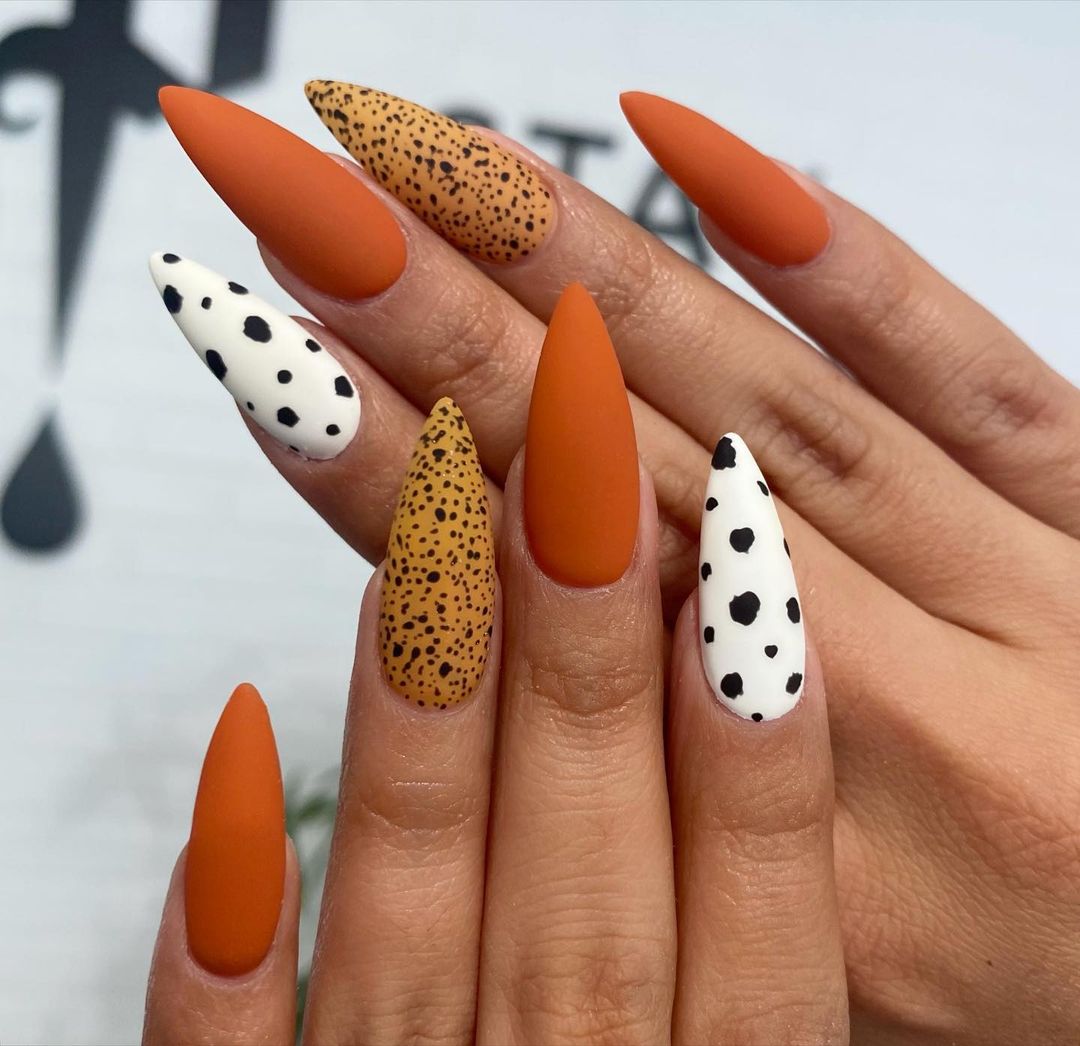
- Burnt orange matte polish: Essie Matte About You Top Coat over burnt orange polish for a matte effect.
- White polish: OPI Nail Lacquer in “Alpine Snow” for a crisp base.
- Black polish: Essie Nail Polish in “Licorice” for the dots.
- Dotting tool: Beetles Nail Art Dotting Tool Set for creating precise dots.
At-Home Instructions:
- Start with a base coat to protect your nails, followed by a layer of burnt orange polish.
- Apply a matte top coat to achieve the desired matte finish.
- Use a dotting tool to create black and white dots on select nails, allowing them to dry completely.
- Seal with a matte top coat to maintain the matte effect and protect the design.
Celestial Red Nails
These nails feature a rich red base with delicate celestial designs in gold foil. The almond-shaped nails provide a perfect canvas for the star and moon accents, making this design both elegant and whimsical. The glossy finish enhances the depth of the red, while the gold details add a touch of magic.
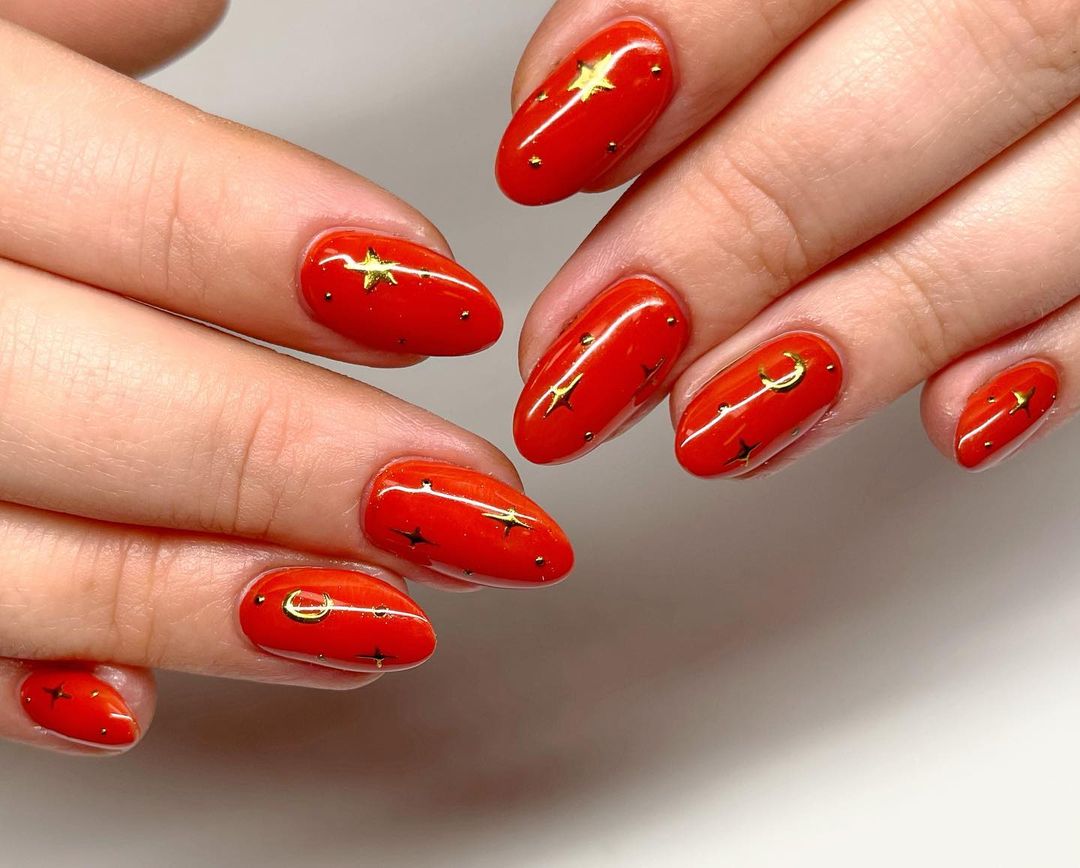
- Red polish: Chanel Le Vernis in “Rouge Essentiel” for a deep, vibrant red.
- Gold foil: Whats Up Nails Gold Foil Nail Art for the celestial accents.
- Top coat: Essie Gel Couture Top Coat for a long-lasting, glossy finish.
At-Home Instructions:
- Apply a base coat to your nails, then follow with two coats of red polish, allowing each to dry.
- Carefully apply the gold foil in the shape of stars and moons to the red nails.
- Seal the design with a top coat to protect the foil and add shine.
- Cure under a UV lamp if using gel polish for extra durability.
Marble Burnt Orange Nails
This design showcases a creative marble effect with burnt orange and nude tones, accented with subtle gold flakes. The short, square-shaped nails are perfect for those who love a blend of artistic design with autumnal colors. The marble pattern adds texture and visual interest, making this manicure both trendy and elegant.
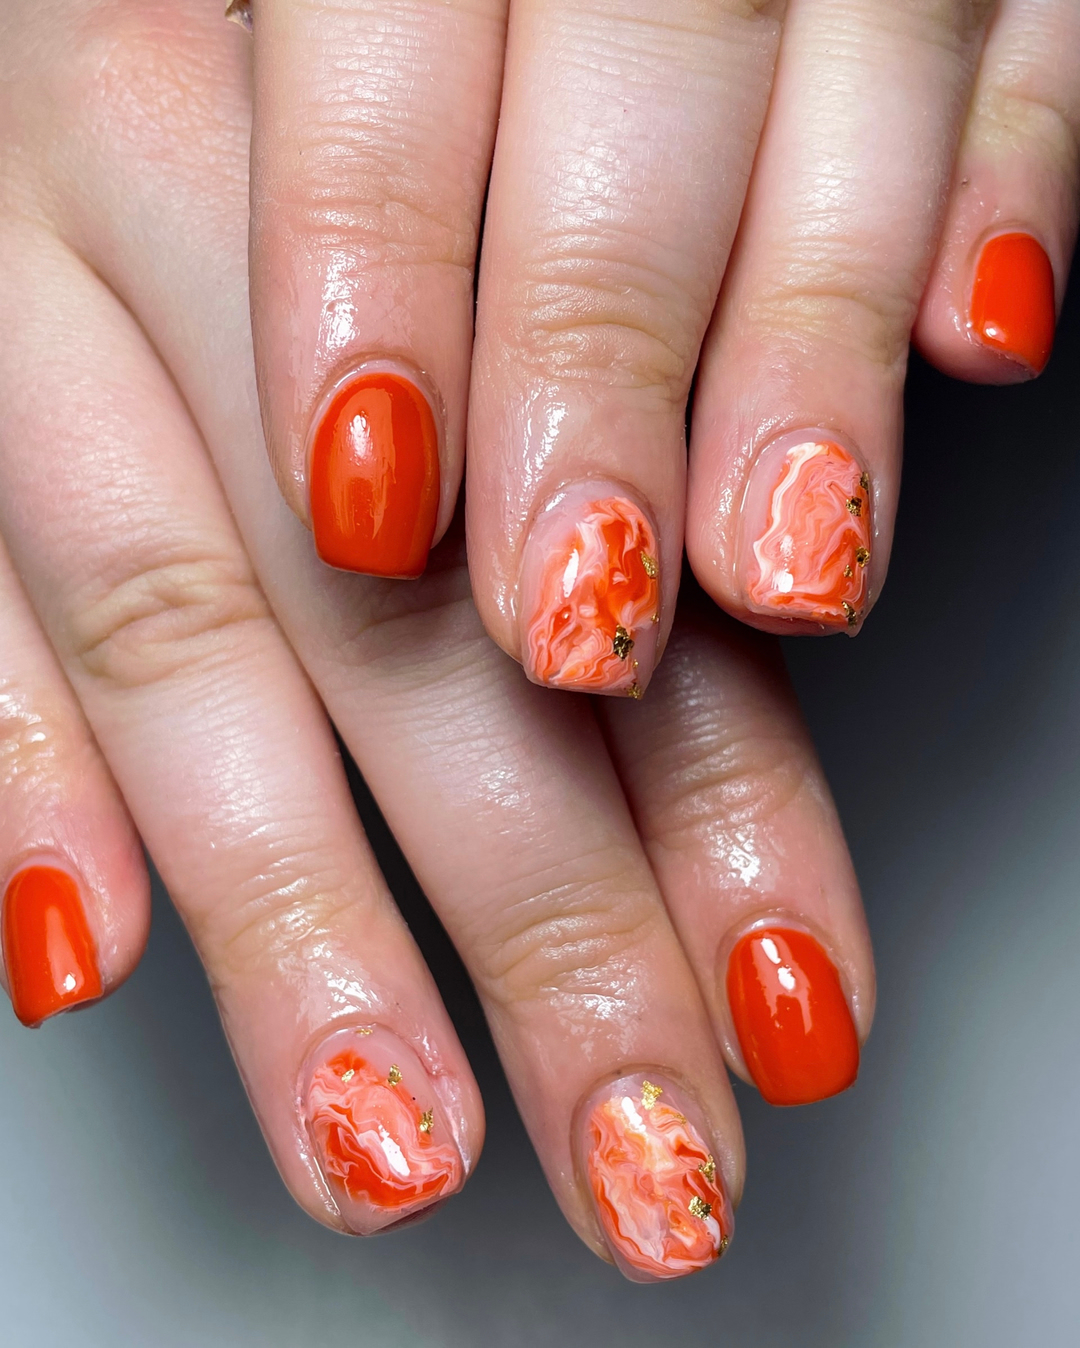
- Burnt orange polish: Zoya Nail Polish in “Spice” for a warm, rich color.
- Nude polish: OPI Nail Lacquer in “Samoan Sand” for a soft, neutral base.
- Gold flakes: Gold Foil Nail Art Flakes by Whats Up Nails for delicate accents.
- Nail art brush: Winstonia Professional Nail Art Brush Set for creating the marble effect.
At-Home Instructions:
- Apply a base coat to clean nails and allow it to dry completely.
- Paint two nails with burnt orange polish and two with nude polish.
- Use a thin brush to swirl the colors together on one or two accent nails, creating a marble effect.
- Add gold flakes for a touch of shimmer, then seal the design with a top coat for a glossy finish.
Sparkling Burnt Orange Glitter Nails
These stunning glitter nails are a perfect blend of boldness and sparkle. The burnt orange base is enhanced with a generous dusting of glitter, creating a dazzling effect that’s perfect for both day and night. The long coffin shape adds to the glam factor, making this design ideal for those who love to shine.
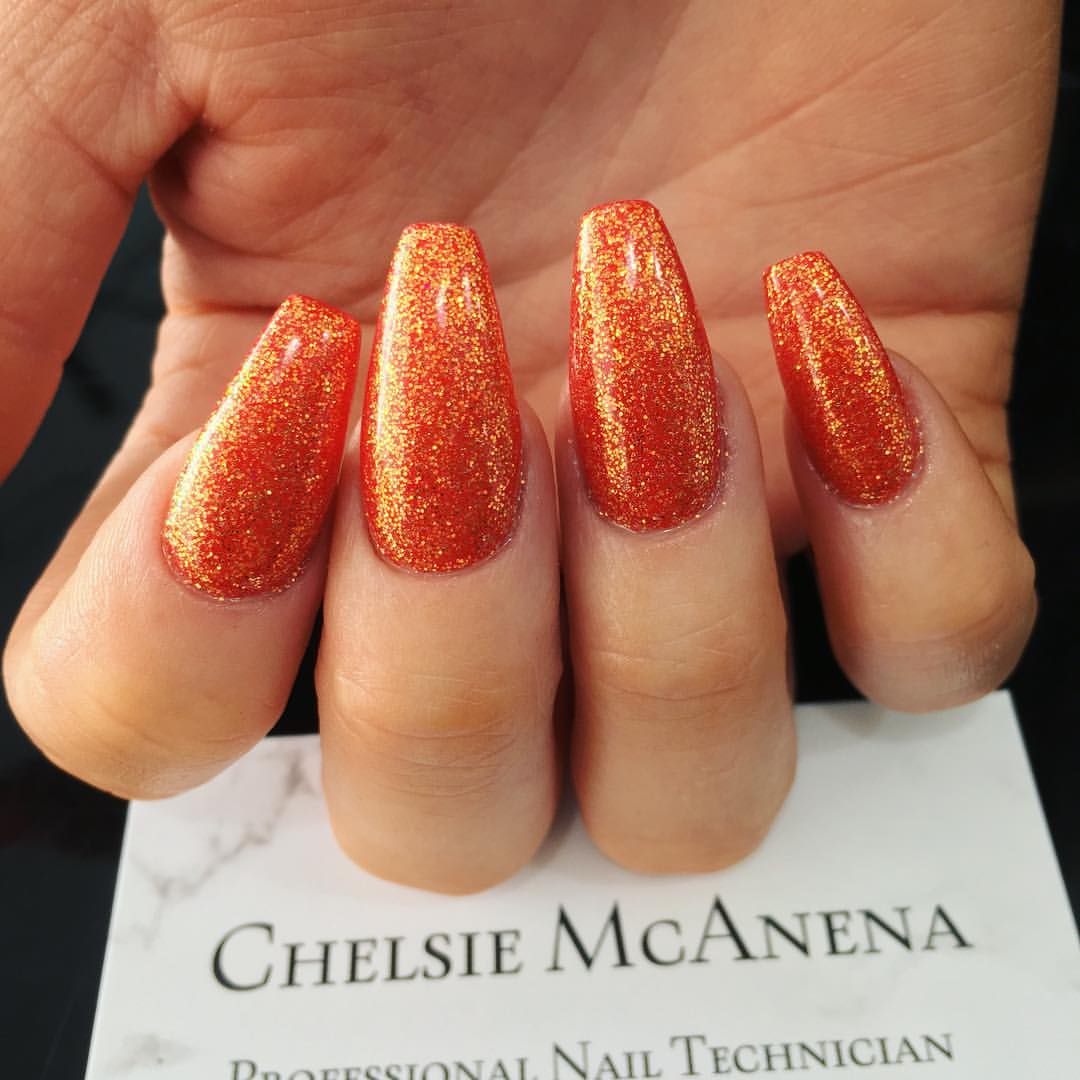
- Burnt orange glitter gel polish: Gelish Gel Polish in “Tigress Knows Best” for a vibrant, sparkling finish.
- Base coat: CND Stickey Base Coat to ensure long-lasting wear.
- Top coat: INM Out The Door Topcoat to seal the glitter and add extra shine.
At-Home Instructions:
- Begin with a base coat to protect your natural nails and enhance the longevity of the polish.
- Apply two coats of burnt orange glitter gel polish, curing each layer under a UV lamp.
- Finish with a top coat to lock in the glitter and provide a smooth, glossy finish.
- Apply cuticle oil around your nails for added hydration and shine.
Classic Red Stiletto Nails
These classic red stiletto nails are the epitome of elegance and boldness. The deep red color, paired with the sharp, elongated shape, creates a look that’s both daring and timeless. This design is perfect for those who want to make a powerful statement with their nails.
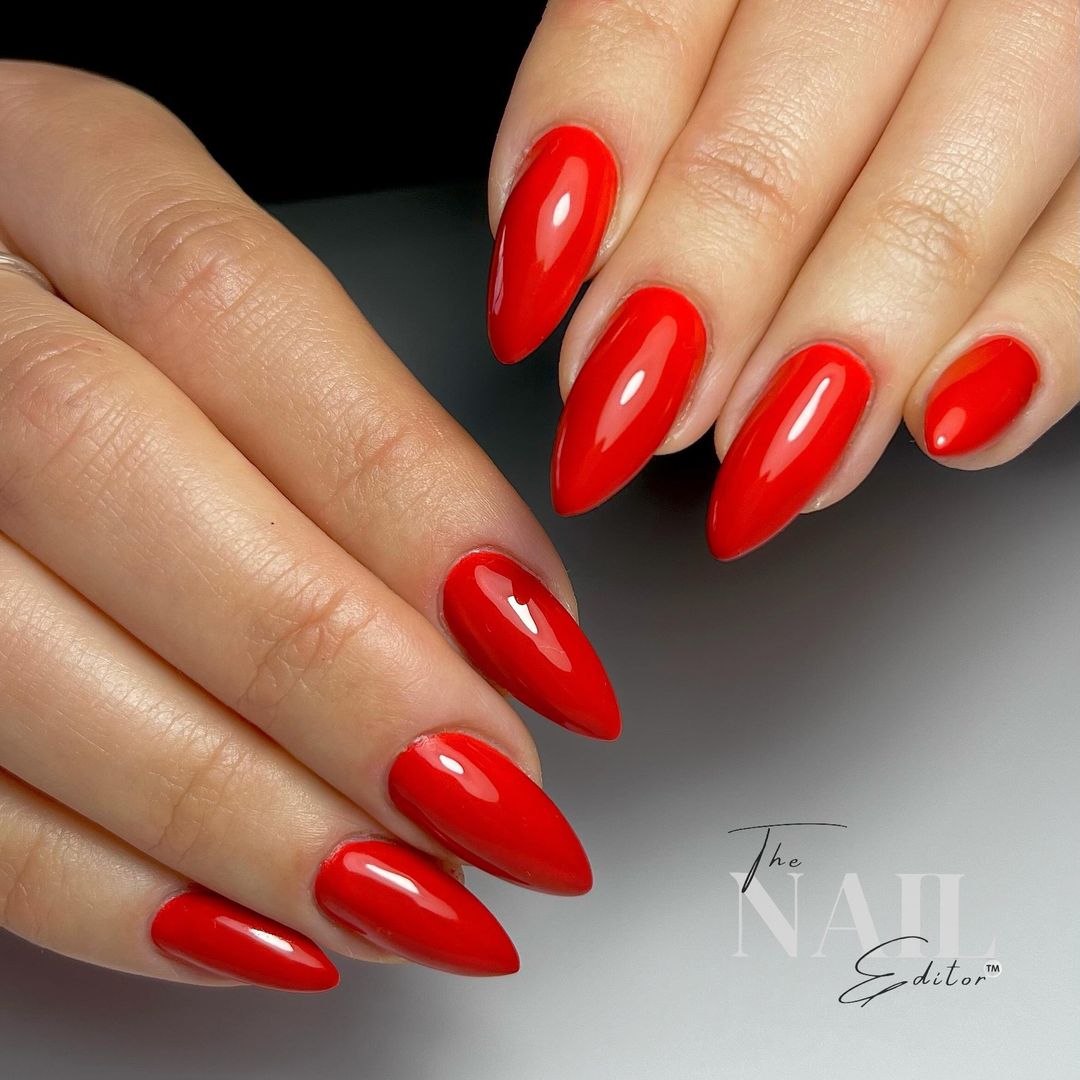
- Red gel polish: CND Vinylux Long Wear Polish in “Wildfire” for a deep, classic red.
- Base coat: Orly Bonder Rubberized Basecoat to ensure lasting adhesion.
- Top coat: Seche Vite Dry Fast Top Coat for a high-shine, durable finish.
At-Home Instructions:
- Start with a base coat to protect your nails and ensure the polish adheres well.
- Apply two coats of red gel polish, curing each layer under a UV lamp.
- Finish with a top coat for that high-gloss effect, curing under the UV lamp for a final touch.
- File the edges gently to maintain the sharp stiletto shape.
Abstract Burnt Orange Art Nails
This design combines burnt orange with abstract geometric patterns in vibrant shades of pink, purple, and black. The long, almond-shaped nails provide the perfect canvas for this artistic design, which adds a modern, colorful twist to the classic burnt orange manicure.
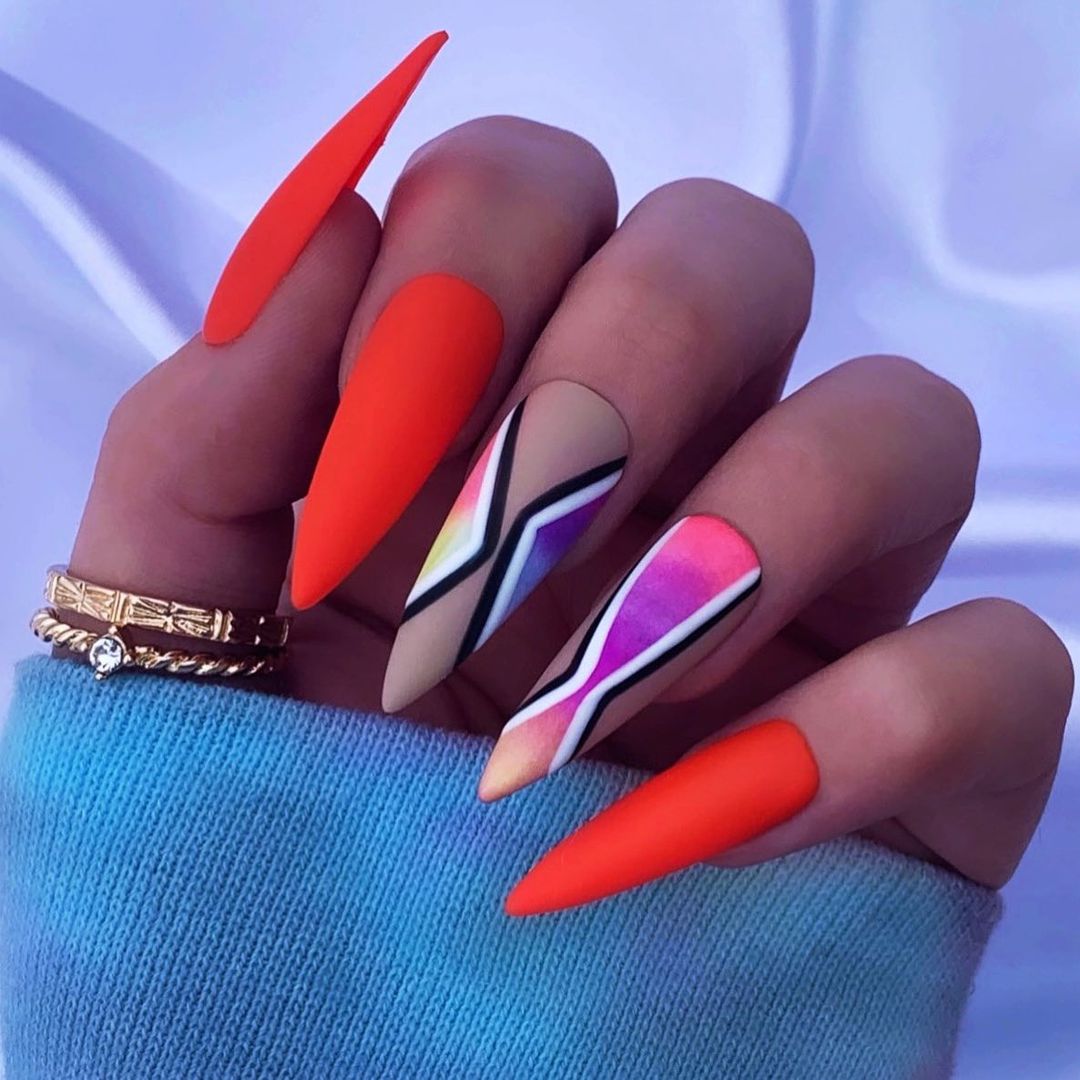
- Burnt orange matte polish: Essie Matte About You Top Coat over burnt orange polish for a matte effect.
- Colorful nail art pens: Sally Hansen I Heart Nail Art Pens in various colors for the abstract designs.
- Base coat: OPI Nail Lacquer Base Coat to protect the natural nails.
- Matte top coat: OPI Matte Top Coat to maintain the matte finish.
At-Home Instructions:
- Apply a base coat to your clean, prepped nails and let it dry completely.
- Paint most of the nails with burnt orange polish, allowing them to dry before applying a matte top coat.
- Use nail art pens to create abstract geometric designs on accent nails, adding a burst of color.
- Seal with a matte top coat to protect the design and maintain the matte finish.
Sunset Gradient Short Nails
This design features a stunning gradient effect that transitions from burnt orange to red, mimicking the colors of a beautiful sunset. The short, rounded nails are perfect for showcasing this smooth gradient, making this design both stylish and versatile for any occasion.
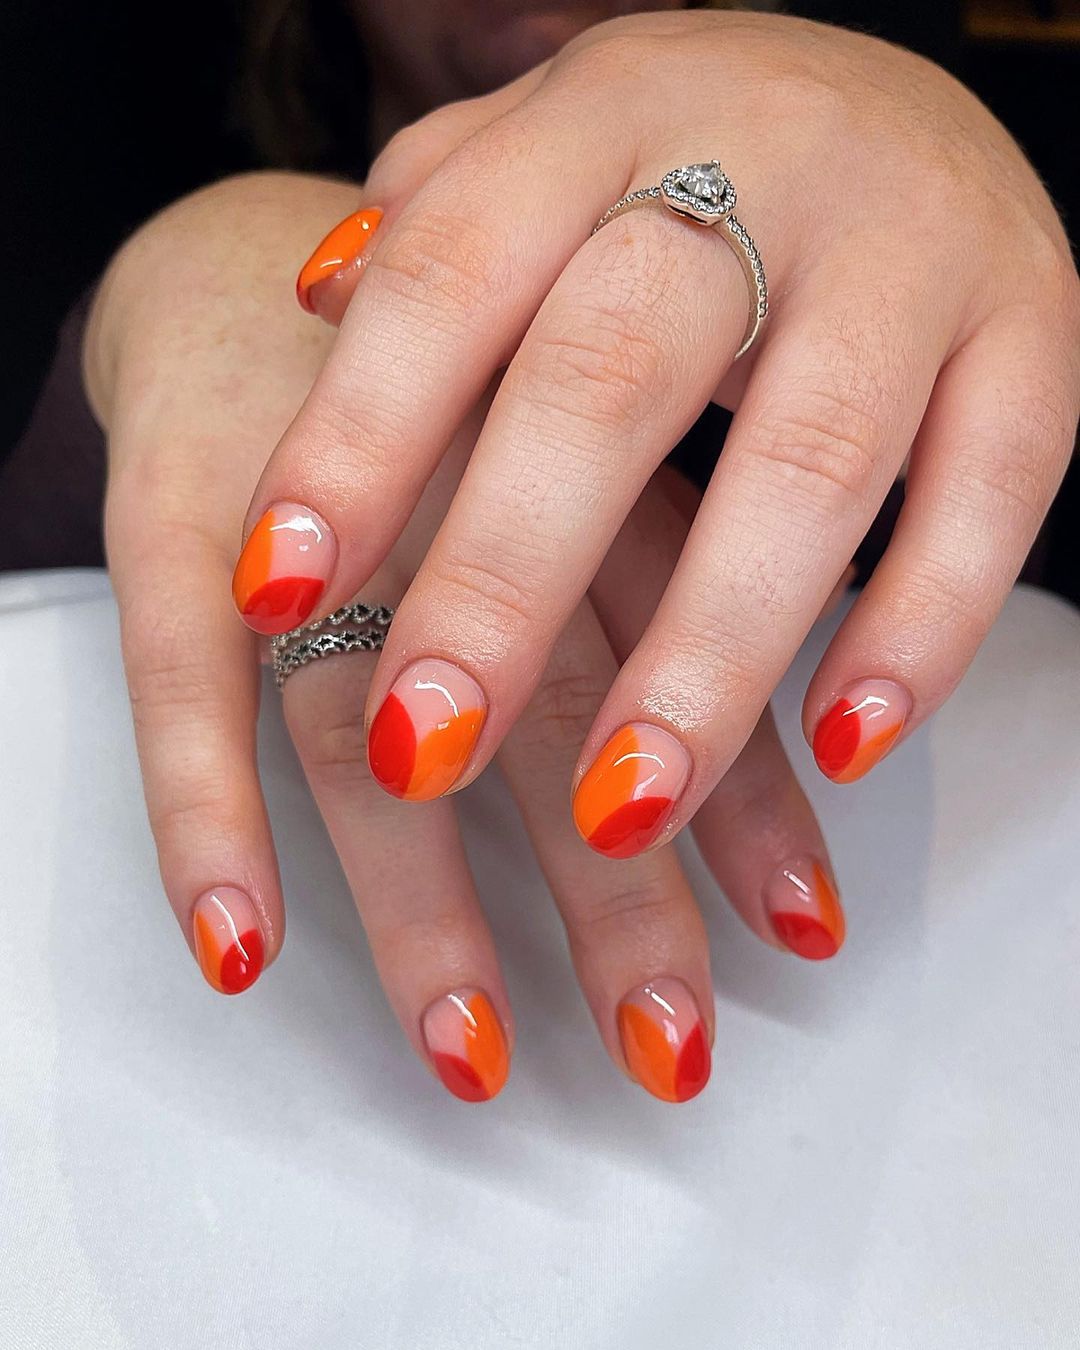
- Burnt orange polish: China Glaze Nail Lacquer in “Autumns Up” for the warm base.
- Red polish: Essie Nail Polish in “Really Red” for the gradient effect.
- Makeup sponge: e.l.f. Precision Blending Sponge for creating the gradient.
- Top coat: Gelish Top It Off Top Coat for a high-gloss, durable finish.
At-Home Instructions:
- Start with a base coat to protect your natural nails and ensure the polish adheres well.
- Apply a layer of burnt orange polish as the base color, allowing it to dry completely.
- Use a makeup sponge to dab on the red polish at the tips, blending it with the burnt orange to create a smooth gradient.
- Finish with a top coat to seal the gradient and add a glossy finish.
Autumnal Color Block Nails
This manicure features a variety of autumn shades, including burnt orange, brown, and shades of yellow, each painted on a separate nail in a color block style. The short, square-shaped nails allow the colors to pop, making this design perfect for those who want to embrace the full spectrum of fall colors.
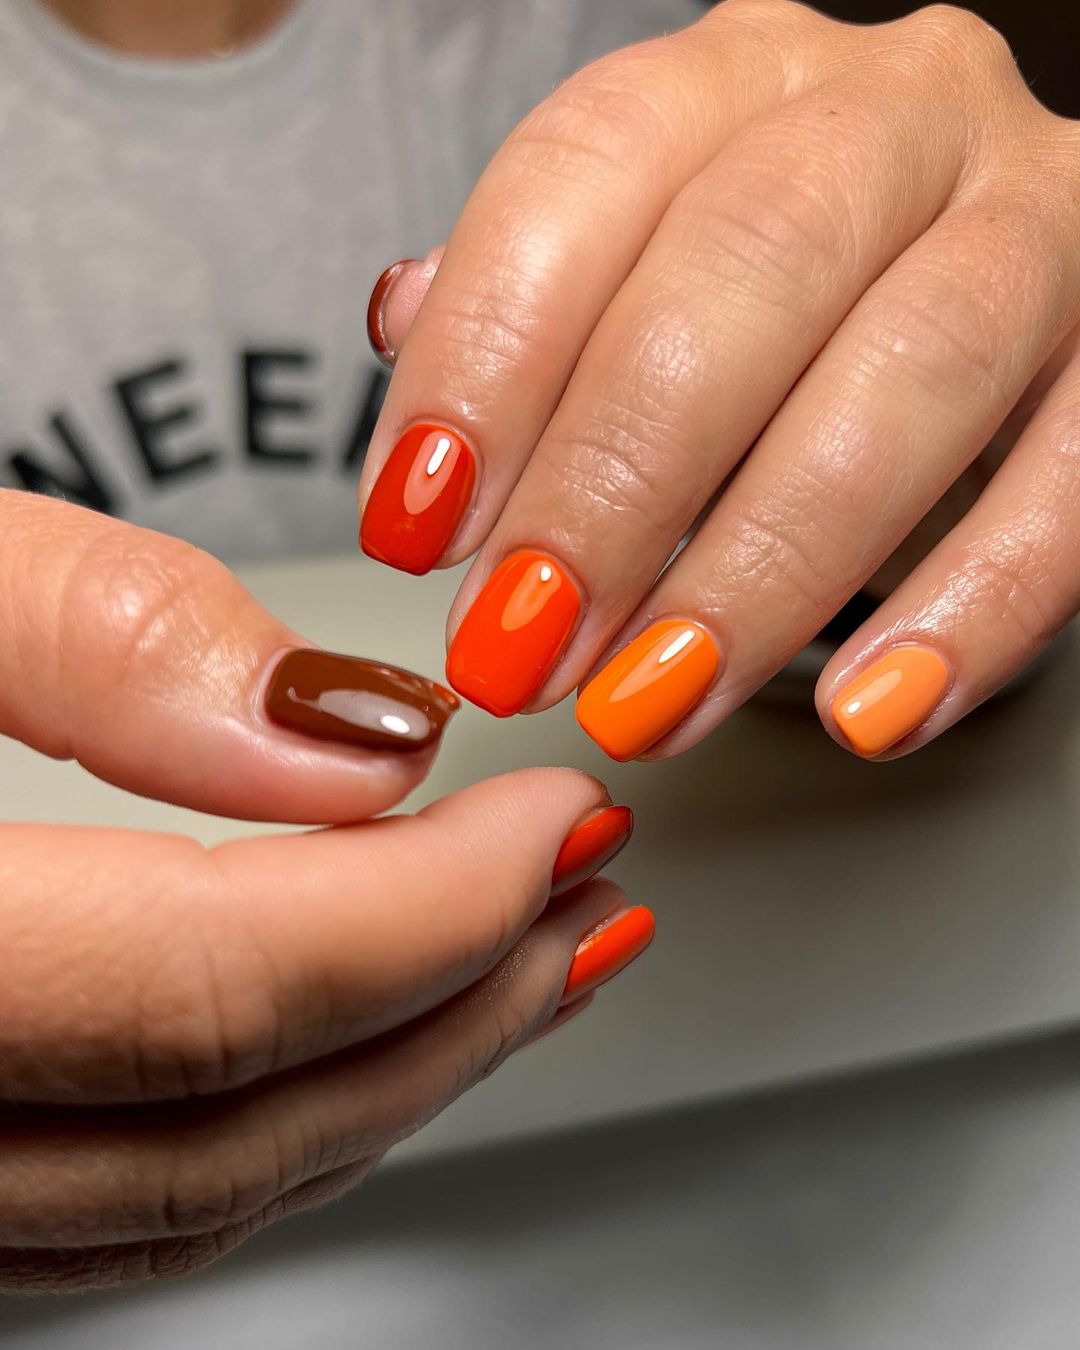
- Burnt orange polish: OPI Nail Lacquer in “It’s a Piazza Cake” for the main color.
- Brown polish: Zoya Nail Polish in “Spencer” for a warm, earthy tone.
- Yellow polish: Essie Nail Polish in “Fall for NYC” for a bright, sunny shade.
- Base coat: Essie Here to Stay Base Coat to ensure the polish adheres well.
- Top coat: Sally Hansen Miracle Gel Top Coat for a long-lasting finish.
At-Home Instructions:
- Begin by applying a base coat to clean, prepped nails.
- Paint each nail a different color, allowing each coat to dry thoroughly before applying the next.
- Finish with a top coat to seal the colors and provide a glossy finish.
- Consider applying a second layer of top coat a few days after your initial manicure for added strength.
Celestial Burnt Orange Coffin Nails
These celestial nails combine a burnt orange base with intricate black designs of moons, stars, and abstract lines. The clear sections of the coffin-shaped nails add depth and dimension to the design, making this manicure both mystical and modern.
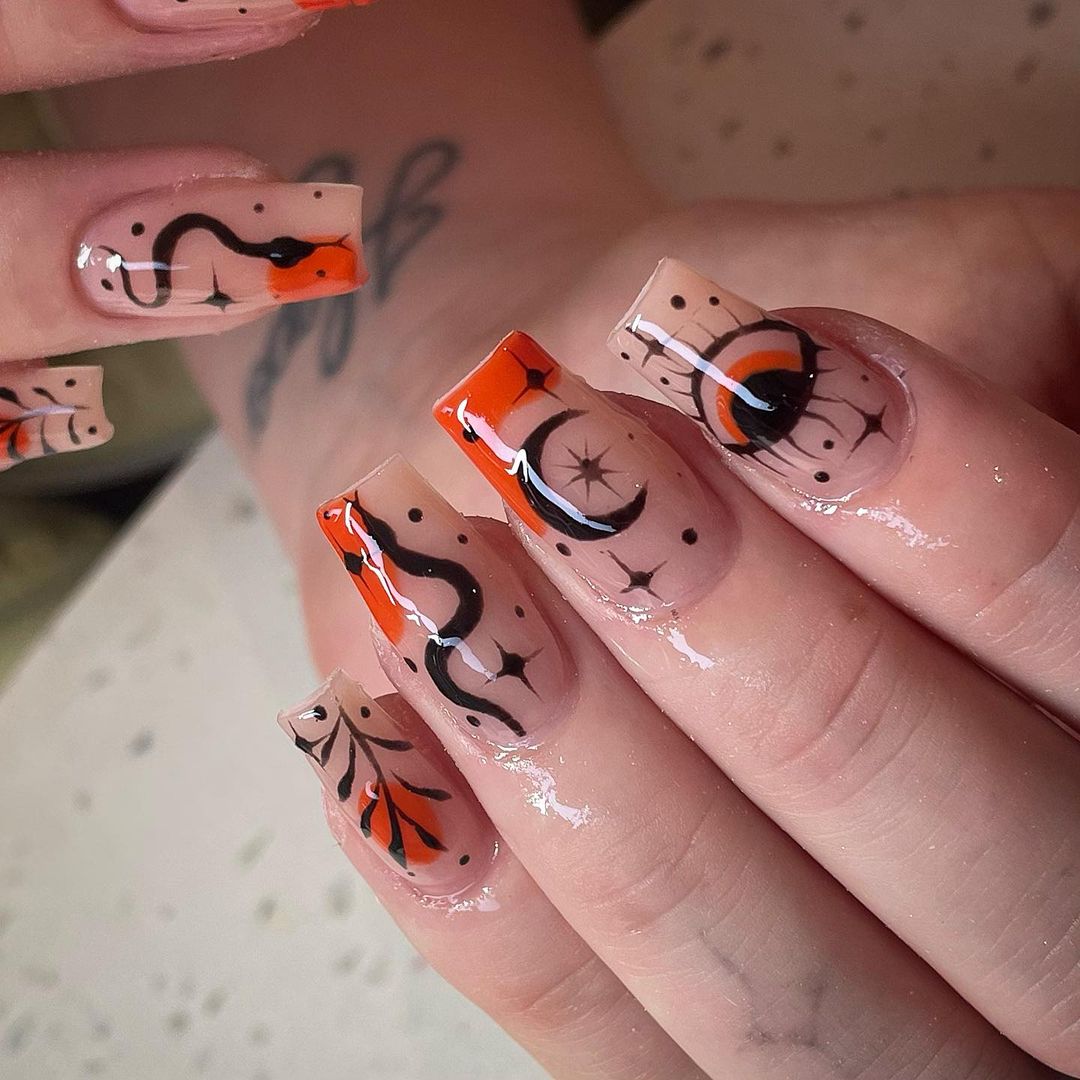
- Burnt orange gel polish: LeChat Perfect Match Gel Polish in “Burnt Cinnamon” for a rich, burnt orange hue.
- Black nail art pen: Sally Hansen I Heart Nail Art Pen in black for detailed designs.
- Base coat: Gelish Foundation Base Gel to protect the natural nails.
- Top coat: Seche Vite Dry Fast Top Coat to seal the design and add shine.
At-Home Instructions:
- Apply a base coat to your nails, then follow with two coats of burnt orange polish, allowing each to dry.
- Use a nail art pen to draw celestial designs on the nails, letting them dry completely.
- Seal with a top coat to protect the design and provide a glossy finish.
- Cure under a UV lamp if using gel polish for extra durability.
Burnt Orange Fall Leaves Nails
These short nails are adorned with delicate fall leaf designs over a burnt orange base. The intricate leaf patterns in various autumn colors add a playful and festive touch to the manicure, making it perfect for celebrating the fall season.
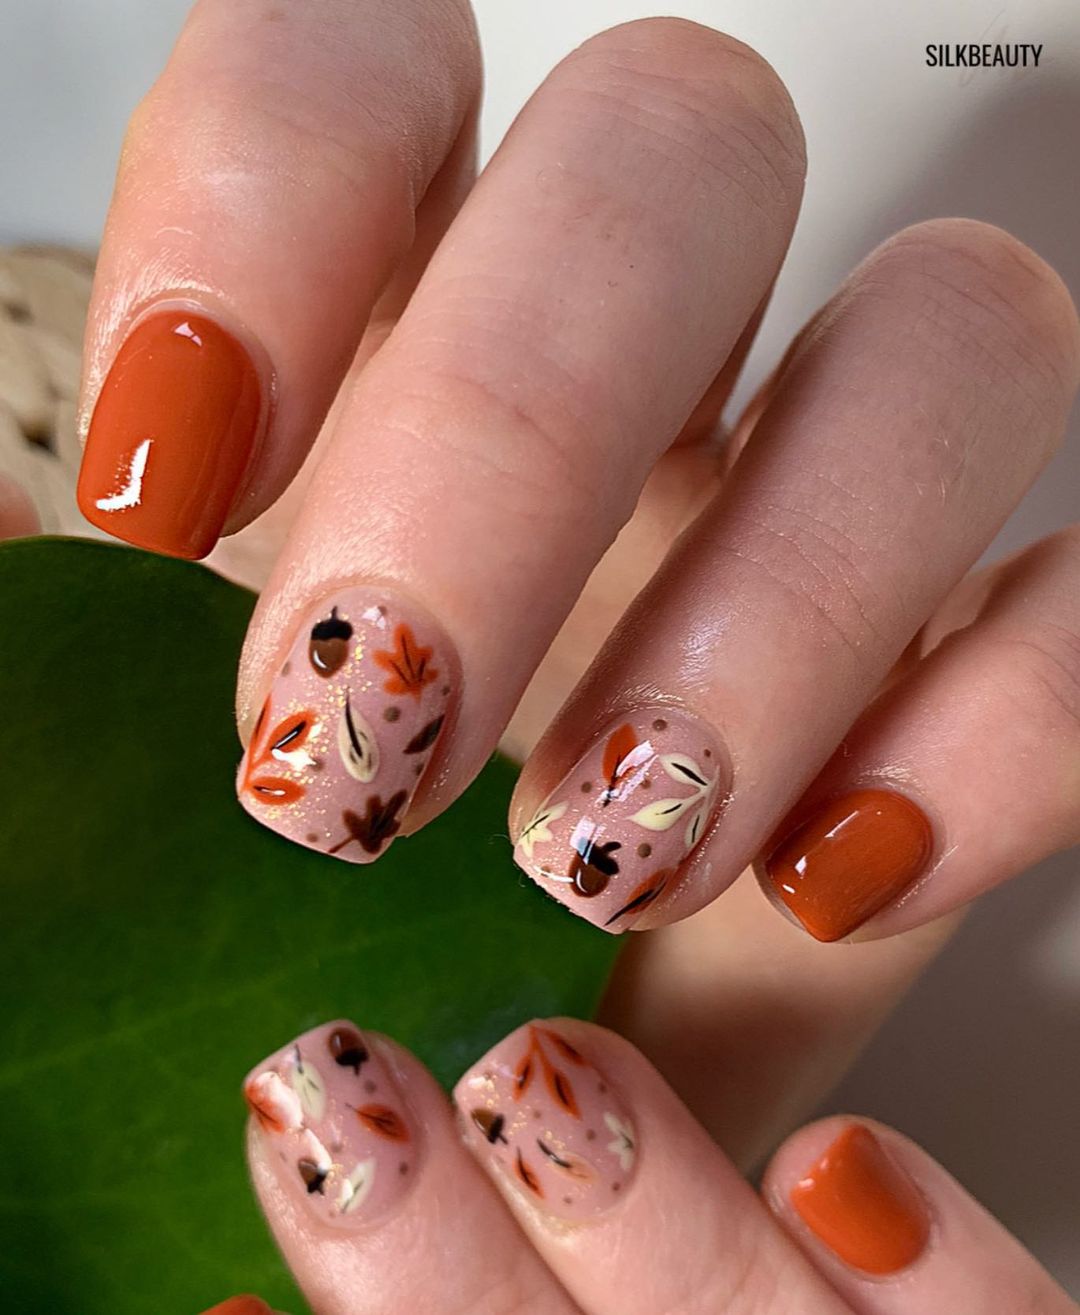
- Burnt orange polish: Zoya Nail Polish in “Autumn” for the warm base color.
- Nail decals: Whats Up Nails “Fall Leaves Nail Art Stickers” for easy application.
- Base coat: CND Stickey Base Coat to ensure long-lasting wear.
- Top coat: INM Out The Door Topcoat to seal the decals and add shine.
At-Home Instructions:
- Begin with a base coat to protect your nails and ensure the polish adheres well.
- Apply two coats of burnt orange polish, allowing each to dry thoroughly.
- Carefully place the fall leaf decals onto the nails, pressing them into the polish.
- Finish with a top coat to seal the design and add a glossy finish.
FAQ
Q: How do I make my burnt orange nails last longer? A: Ensure that you start with a clean, dry nail bed. Apply a base coat, two coats of polish, and a top coat, curing under a UV lamp if using gel polish. Avoid submerging your hands in water for long periods, and reapply top coat every few days.
Q: Can I mix burnt orange with other fall colors? A: Absolutely! Burnt orange pairs beautifully with colors like deep browns, reds, and even navy blue. These combinations can add depth and variety to your manicure.
Q: What nail shapes work best with burnt orange? A: Burnt orange looks great on all nail shapes, but it particularly stands out on almond, square, and oval shapes. The shape you choose can influence the overall vibe of your manicure, from chic and elegant to bold and edgy.
Save Pin

