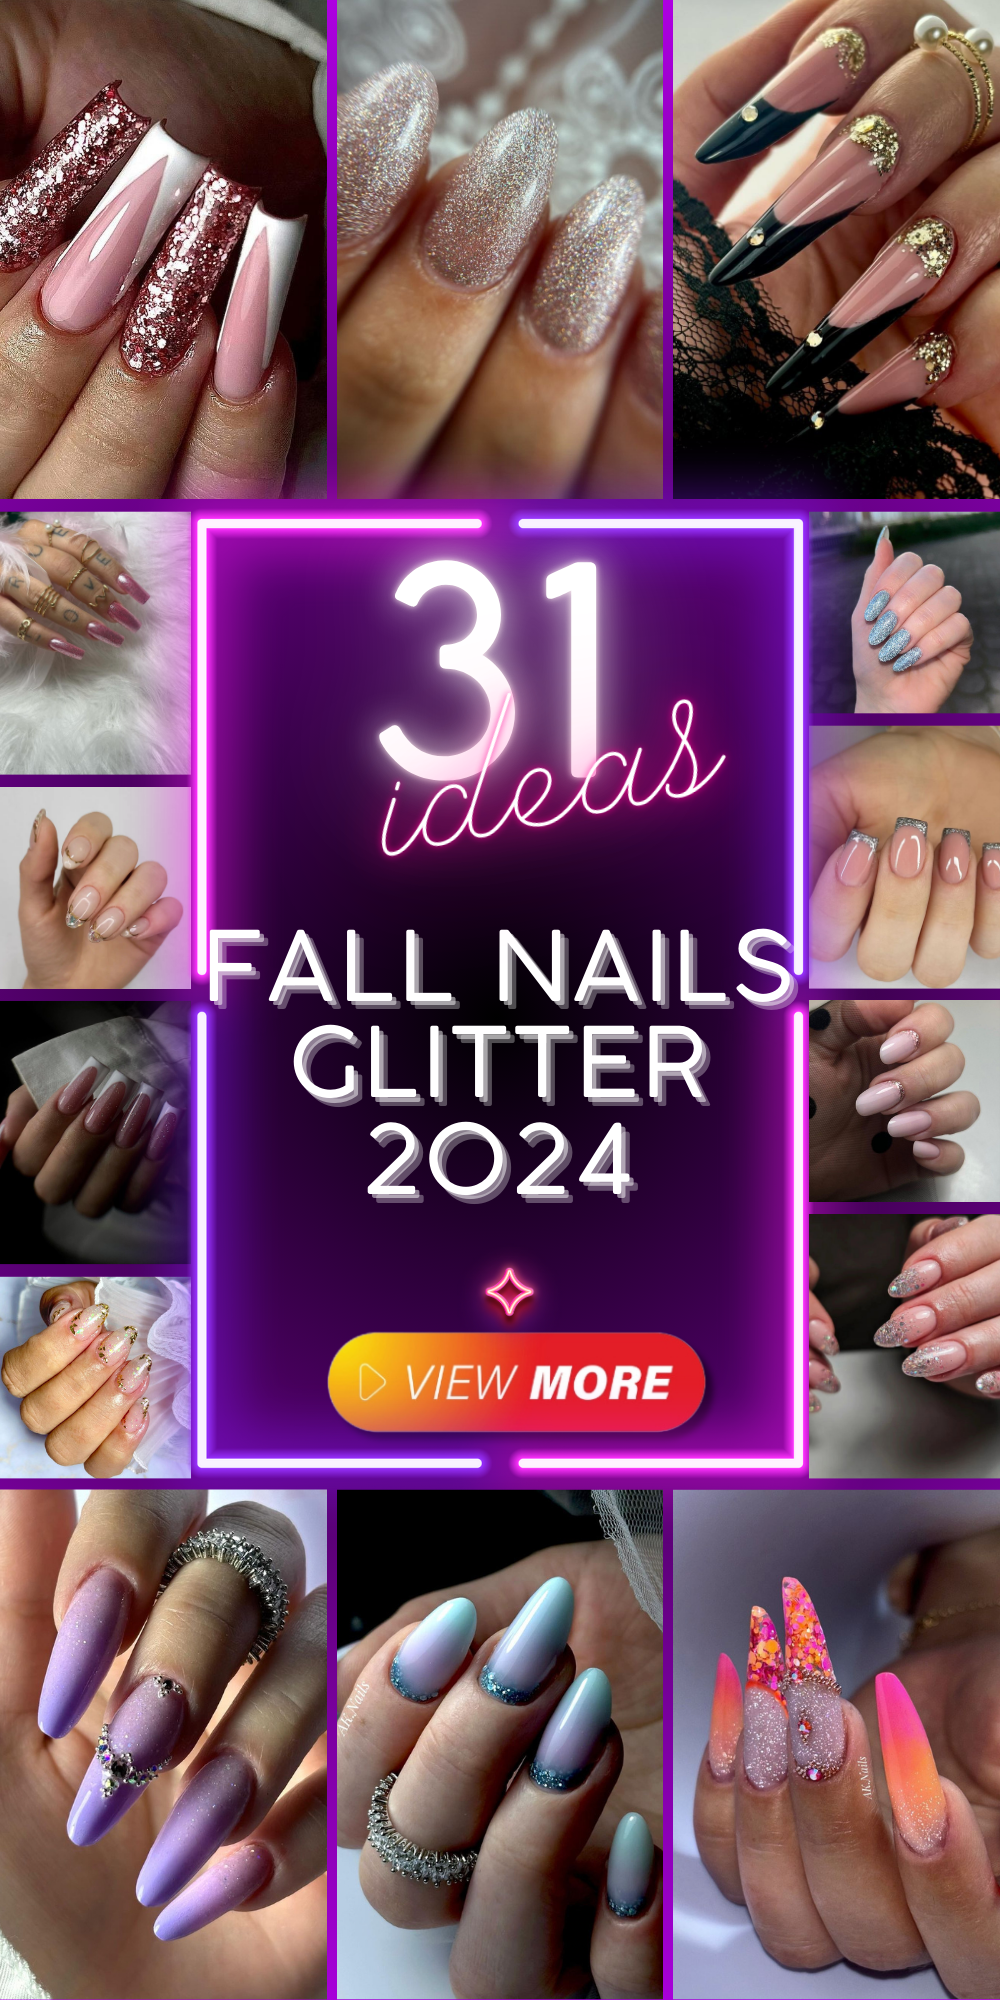
As the leaves turn and the air grows crisp, it’s the perfect time to let your nails shine with fall-inspired glitter designs. From trendy ombre looks to cute accent nails, we’ve got the best fall nails glitter 2024 ideas to keep your manicure game strong. Ready to dive into a world of shimmer and sparkle? Let’s get started.
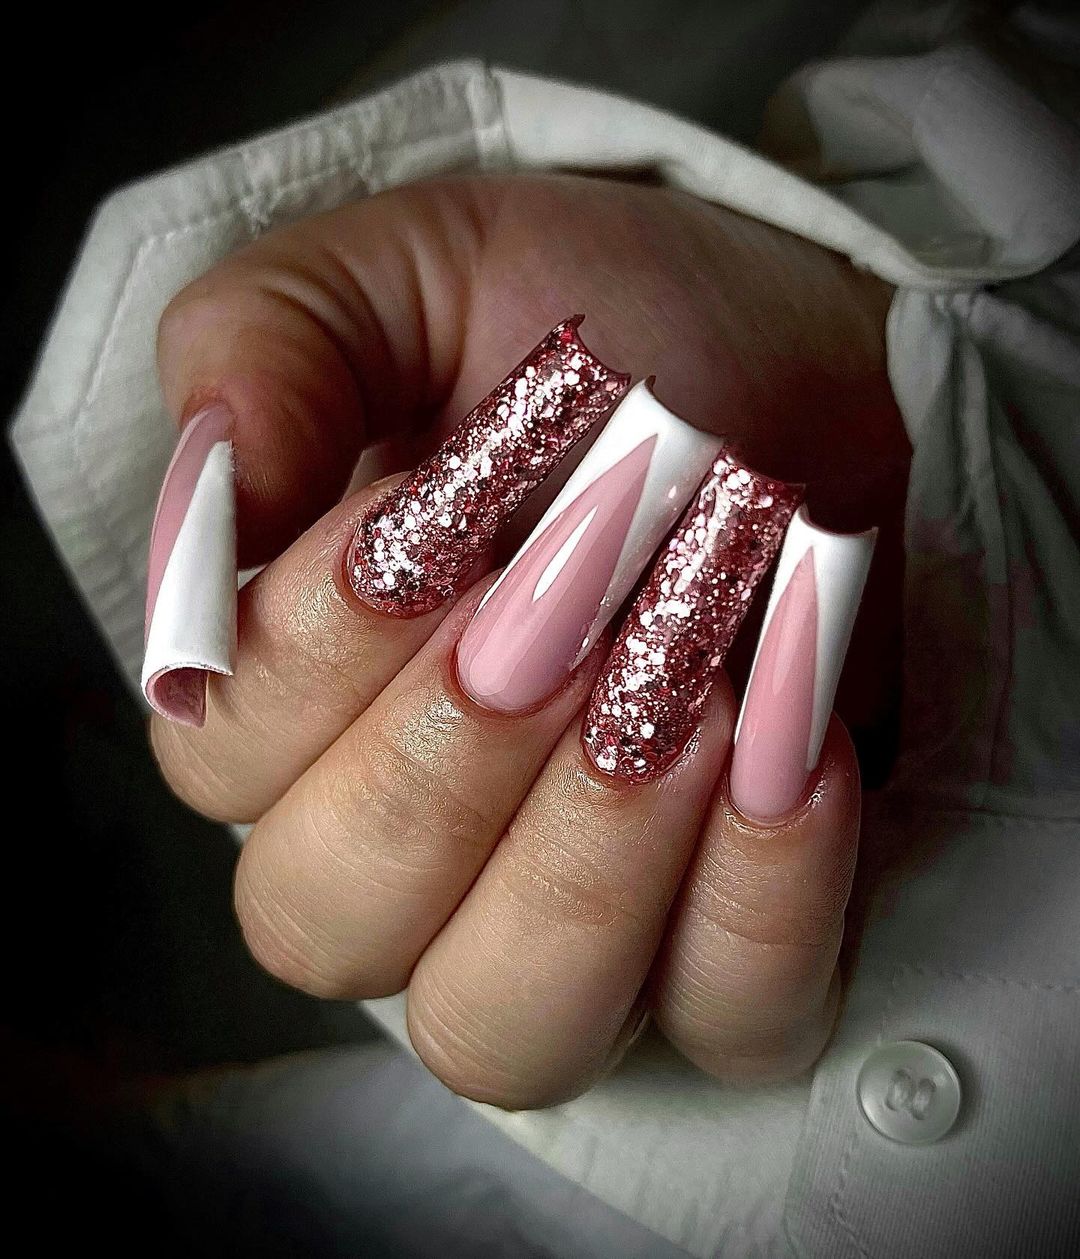
Dazzling Nude Glitter Nails
These nude glitter nails bring a sophisticated sparkle to a classic design. The nude base color creates a neutral backdrop that lets the glitter shine without overpowering the overall look. The fine glitter is evenly spread across the nails, creating a shiny and elegant finish that’s perfect for any occasion, from casual outings to formal events. The short almond shape adds a modern touch, making these nails both practical and stylish.
- Nude base polish: OPI Nail Lacquer in “Samoan Sand”
- Fine glitter top coat: Essie Luxeffects in “Set in Stones”
- Base coat: Orly Bonder Rubberized Basecoat
- Top coat: Seche Vite Dry Fast Top Coat
Start with a base coat to protect your natural nails. Apply two coats of nude polish, allowing each to dry thoroughly. Add a layer of fine glitter top coat, ensuring even coverage. Seal the design with a high-gloss top coat for a lasting shine.
Glamorous Pink and White Glitter French Tips
These nails take the classic French manicure to the next level with glamorous pink and white glitter tips. The contrast between the soft pink base and the striking white glitter tips creates a trendy and eye-catching design. The glitter adds a touch of luxury, making these nails perfect for both everyday wear and special occasions. The square shape enhances the elegance of the design, offering a polished and refined look.
- Pink base polish: Essie Gel Couture in “Sheer Fantasy”
- White glitter polish: China Glaze in “White on White”
- Base coat: CND Stickey Base Coat
- Top coat: Sally Hansen Miracle Gel Top Coat
Apply a base coat to prep your nails. Paint two coats of the pink base polish, letting each layer dry. Use the white glitter polish to create the French tips. A nail guide can help achieve a perfect line. Finish with a top coat to seal and protect the design.
Silver and White Geometric Glitter Nails
These geometric nails are a chic blend of silver and white, creating a trendy and sophisticated look. The white base with silver glitter accents adds a modern twist, while the shiny finish ensures your nails catch the light beautifully. This fall nails glitter 2024 design is perfect for those who love a minimalist yet striking manicure. The almond shape adds elegance, making these nails suitable for any occasion.
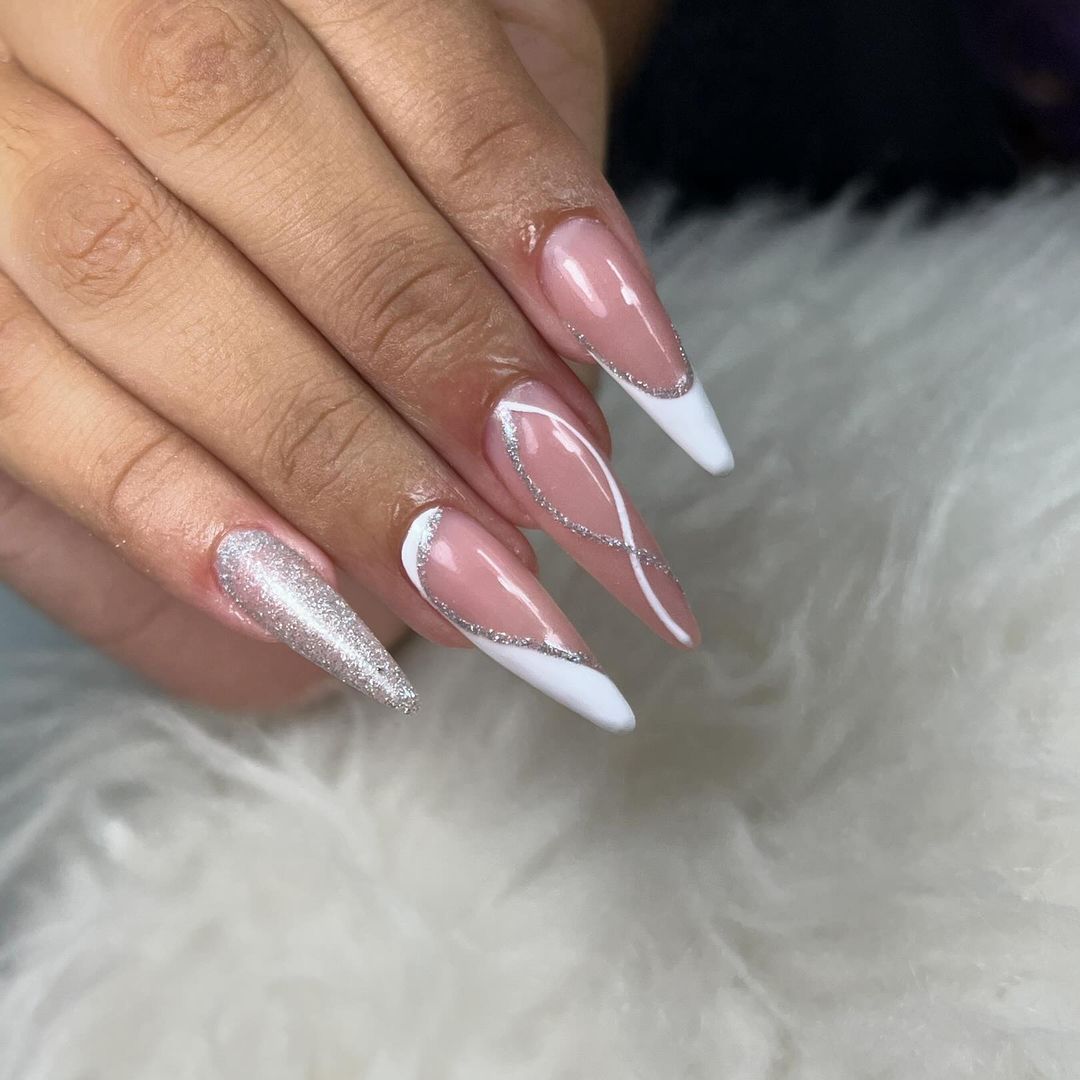
- White base polish: Zoya Nail Polish in “Purity”
- Silver glitter polish: Butter London Glazen Nail Lacquer in “Disco Nap”
- Striping tape for geometric design
- Base coat: Deborah Lippmann Hard Rock Nail Hardener
- Top coat: OPI Top Coat
Begin with a base coat to protect your nails. Apply two coats of the white base polish and let dry. Use striping tape to create geometric patterns, then apply the silver glitter polish over the tape. Remove the tape carefully and seal with a top coat for a professional finish.
Elegant Pink Glitter French Tips
These nails offer a delightful twist on the classic French manicure with a pretty pink base and shiny glitter tips. The soft pink base color creates a cute and feminine look, while the glitter tips add a touch of sparkle and elegance. The square shape enhances the clean and polished appearance of the design, making it perfect for any occasion, from everyday wear to special events.
- Pink base polish: Essie Gel Couture in “Sheer Fantasy”
- Pink glitter polish: China Glaze in “Fairy Dust”
- Base coat: OPI Natural Nail Base Coat
- Top coat: Seche Vite Dry Fast Top Coat
Start with a base coat to protect your nails. Apply two coats of the pink base polish, letting each layer dry thoroughly. Use the pink glitter polish to create the French tips. You can use a nail guide for precision. Finish with a top coat to seal and protect the design, ensuring a long-lasting shine.
Save Pin
Vibrant Orange and Pink Glitter Ombre
These nails are a burst of vibrant colors with a striking ombre effect that transitions from orange to pink. The glitter accents add a trendy and festive touch, making this design perfect for fall. The almond shape adds a touch of elegance and elongates the fingers, creating a stunning and trendy look. This fall nails glitter 2024 design is ideal for those who love bold and bright colors.
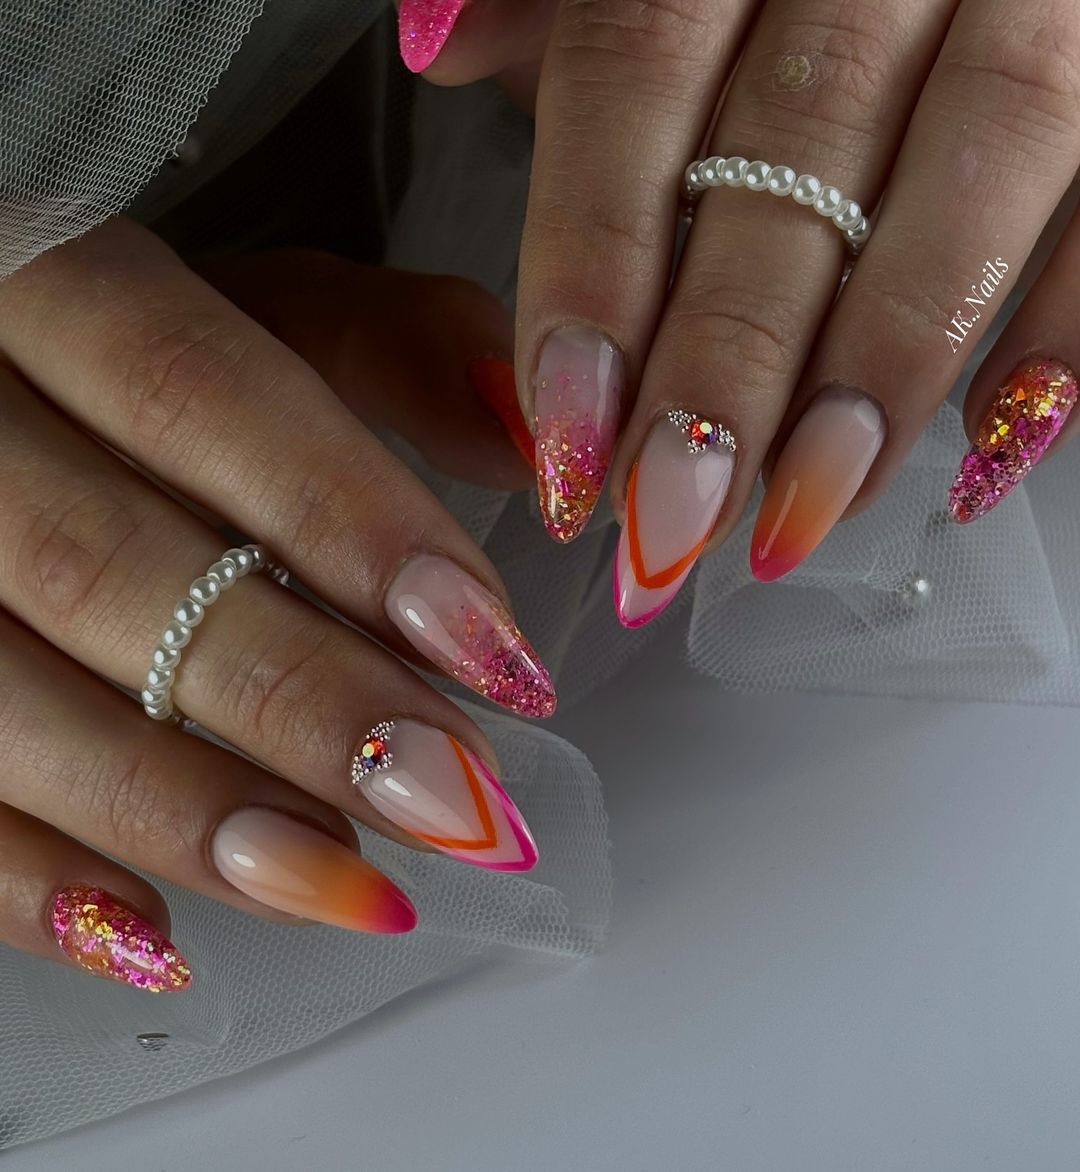
- Orange base polish: OPI Nail Lacquer in “A Good Man-darin is Hard to Find”
- Pink glitter polish: Zoya Nail Polish in “Gilda”
- Rhinestones for accents
- Base coat: CND Stickey Base Coat
- Top coat: Sally Hansen Miracle Gel Top Coat
Begin with a base coat to protect your nails. Apply the orange base polish to the lower half of your nails. Using a makeup sponge, blend the pink glitter polish from the tips towards the middle to create the ombre effect. Add rhinestones for extra sparkle and finish with a top coat to seal the design and add shine.
Neon Pink and Orange Glitter Stiletto Nails
These nails feature a bold combination of neon pink and orange with sparkling glitter accents. The stiletto shape adds drama and flair, making this design perfect for those who love to stand out. The glitter adds a shiny and festive touch, perfect for fall celebrations and parties. This fall nails glitter 2024 design is all about making a statement.
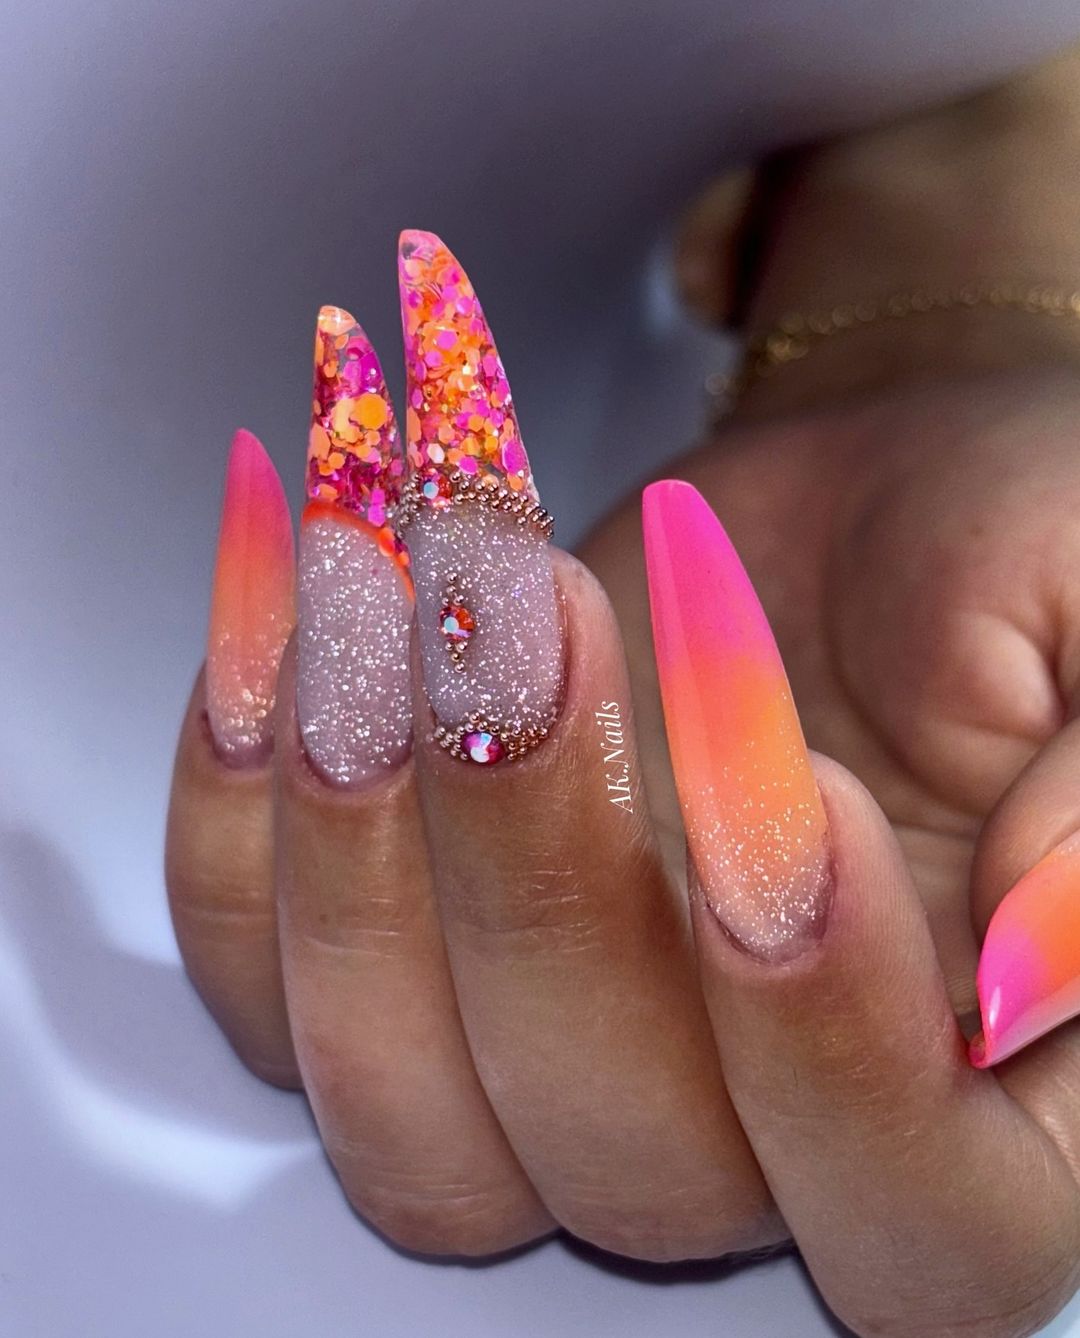
- Neon pink base polish: China Glaze Nail Lacquer in “Shocking Pink”
- Orange glitter polish: Essie Nail Polish in “Tart Deco”
- Chunky glitter for accents
- Base coat: Orly Bonder Rubberized Basecoat
- Top coat: OPI Top Coat
Start with a base coat to protect your nails. Apply the neon pink base polish, letting each coat dry thoroughly. Add the orange glitter polish to the tips and blend it towards the middle of the nail. For added drama, use chunky glitter on accent nails. Finish with a top coat to seal the design and ensure a long-lasting shine.
Rainbow Pastel Ombre Nails
These nails are a delightful blend of pastel colors, creating a soft ombre effect. The transition from one color to another is smooth and seamless, giving the nails a dreamy and ethereal appearance. The stiletto shape adds a touch of drama and elegance, making these nails perfect for those who love to stand out with trendy designs. The clear tips with embedded patterns add an extra layer of uniqueness and creativity.
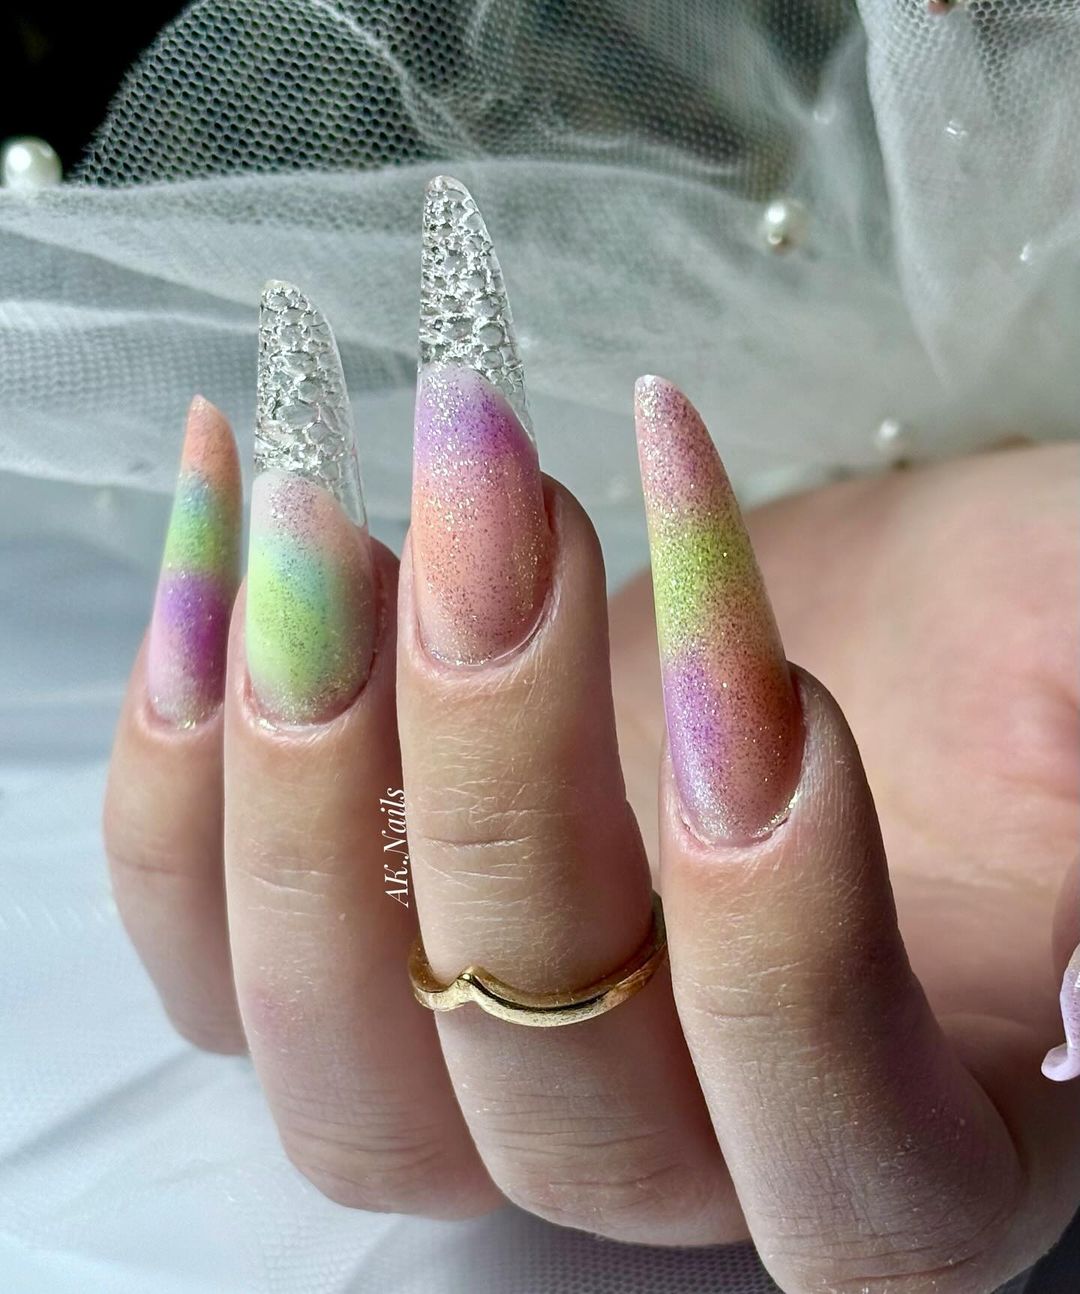
- Pastel polishes: Essie in “Mint Candy Apple”, OPI in “Do You Lilac It?”, and China Glaze in “Lemon Fizz”
- Clear polish for tips: Sally Hansen Hard as Nails
- Fine glitter: Butter London Glazen Nail Lacquer in “Disco Nap”
- Base coat: CND Stickey Base Coat
- Top coat: Seche Vite Dry Fast Top Coat
Start with a base coat to protect your nails. Apply the pastel polishes in sections on a makeup sponge and dab them onto the nails to create the ombre effect. Use the clear polish to cover the tips and add a layer of fine glitter for extra sparkle. Finish with a top coat to seal the design and add shine.
Chic Black and White Animal Print Nails
These nails combine the timeless elegance of black and white with a fun animal print accent. The cute and trendy design features alternating black and white nails, with one nail showcasing a bold leopard print. The addition of gold foil accents adds a touch of luxury and sophistication. The square shape enhances the overall clean and polished look.
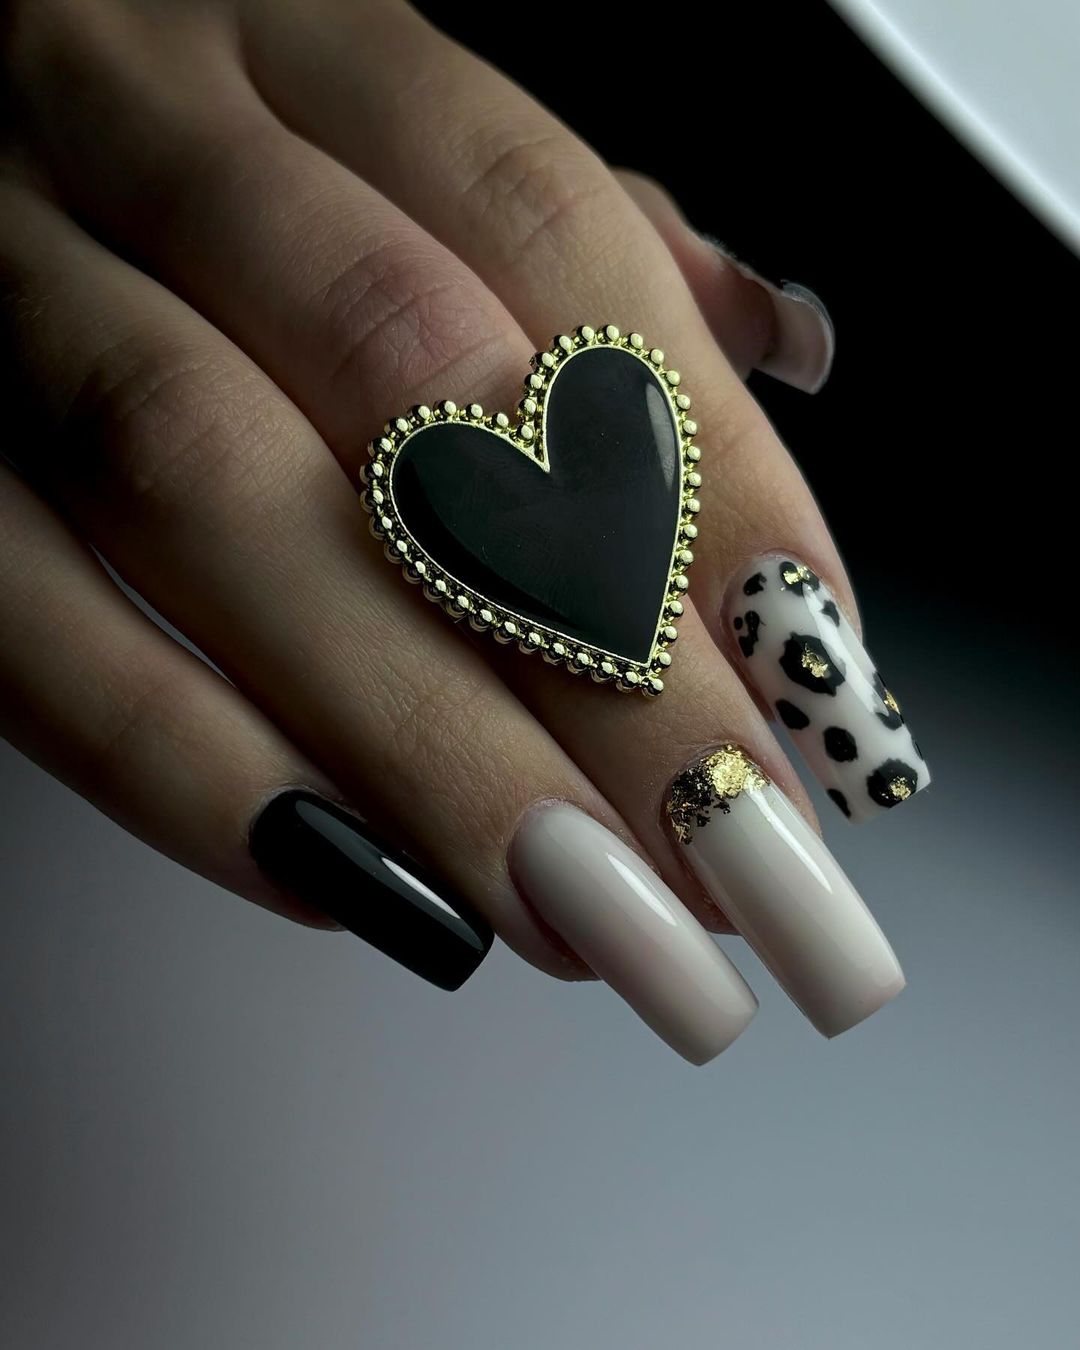
- Black polish: OPI Nail Lacquer in “Black Onyx”
- White polish: Essie Nail Polish in “Blanc”
- Gold foil: Nail Art Gold Foil Flakes
- Base coat: Deborah Lippmann Hard Rock Nail Hardener
- Top coat: OPI Top Coat
Apply a base coat to protect your nails. Paint alternating nails with the black and white polish, allowing each coat to dry thoroughly. Use a dotting tool to create the leopard print on one accent nail, and add gold foil accents for extra glamour. Seal the design with a top coat to ensure it lasts.
Elegant Lavender Glitter Nails
These nails feature a stunning lavender hue with a subtle gradient and glitter accents. The soft color is perfect for fall, adding a touch of elegance and shine. The accent nail with rhinestones enhances the shiny look, making these nails perfect for special occasions or adding a bit of glamour to everyday wear. The almond shape is both stylish and practical.
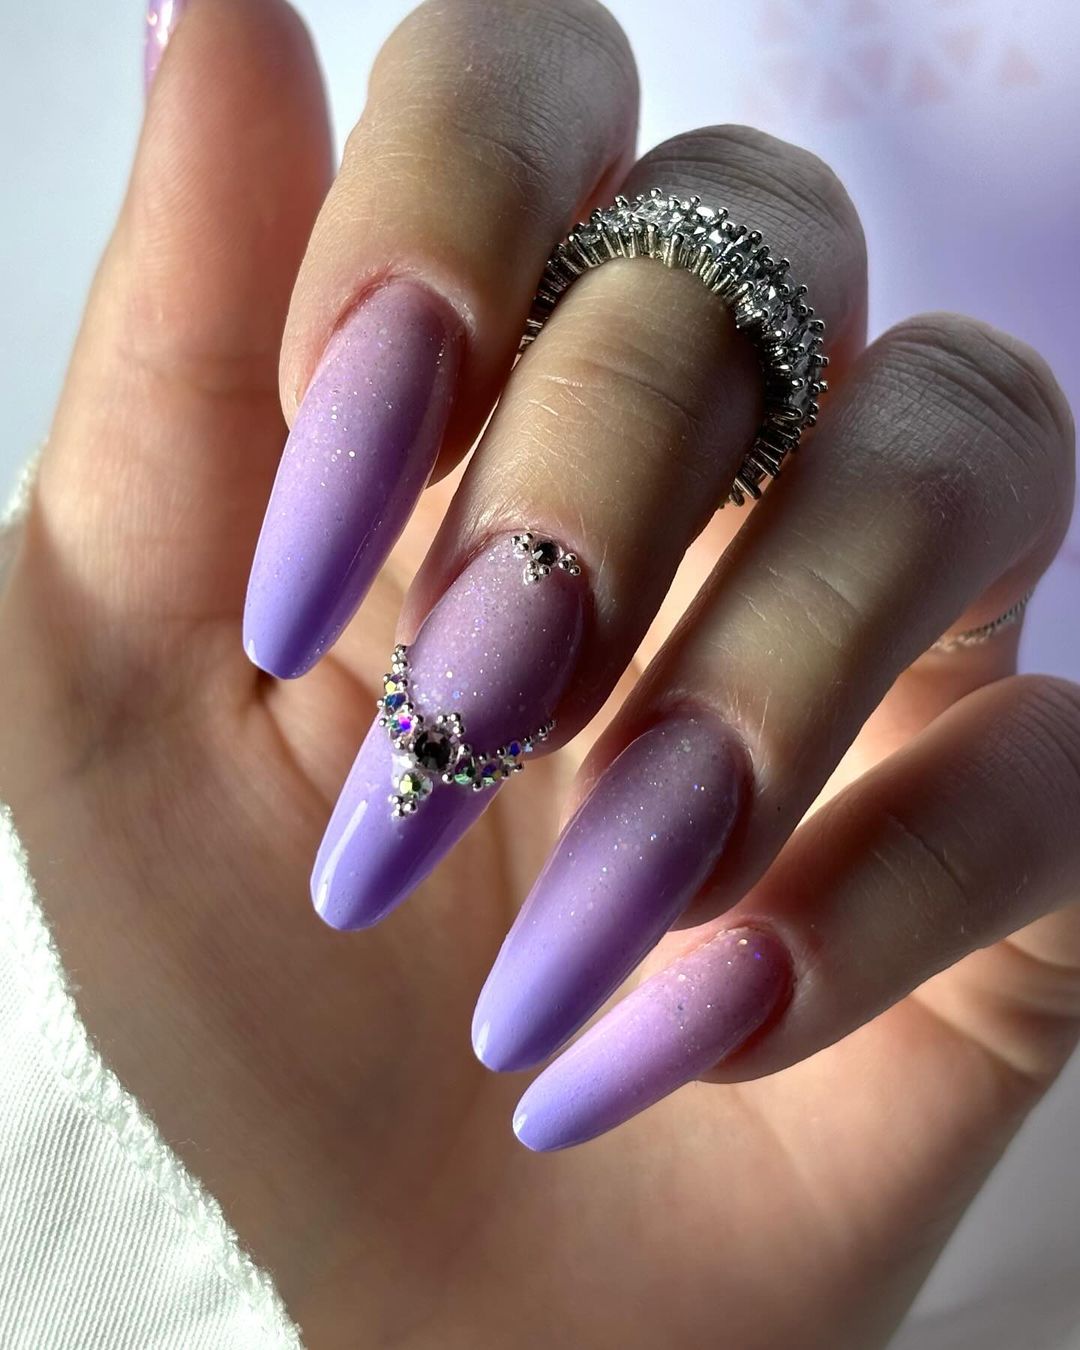
- Lavender polish: Zoya Nail Polish in “Violette”
- Glitter polish: China Glaze in “Fairy Dust”
- Rhinestones for accents
- Base coat: Orly Bonder Rubberized Basecoat
- Top coat: Sally Hansen Miracle Gel Top Coat
Begin with a base coat to protect your nails. Apply two coats of the lavender polish, letting each layer dry thoroughly. Add a gradient effect with the glitter polish, focusing on the tips. Place rhinestones on the accent nail and finish with a top coat to seal the design and add shine.
Save Pin
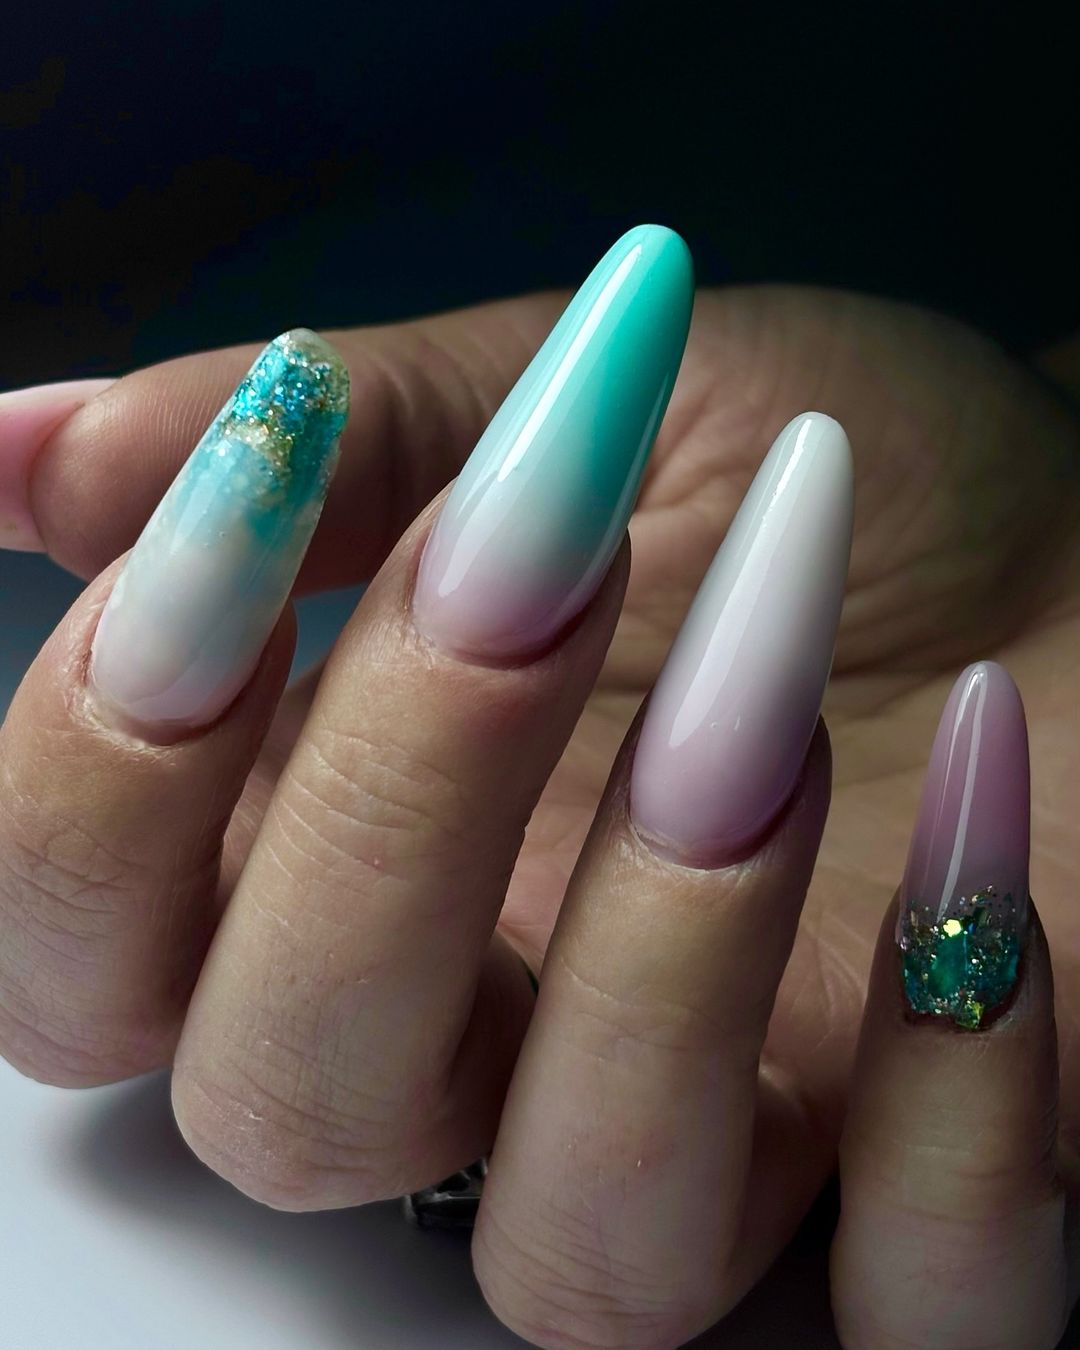
Pastel Blue and Purple Ombre Nails
These nails feature a delicate blend of pastel blue and purple, creating a soft and dreamy ombre effect. The glitter accents along the cuticles add a touch of sparkle and elegance, making this design perfect for both everyday wear and special occasions. The almond shape enhances the feminine and graceful appearance of the nails.
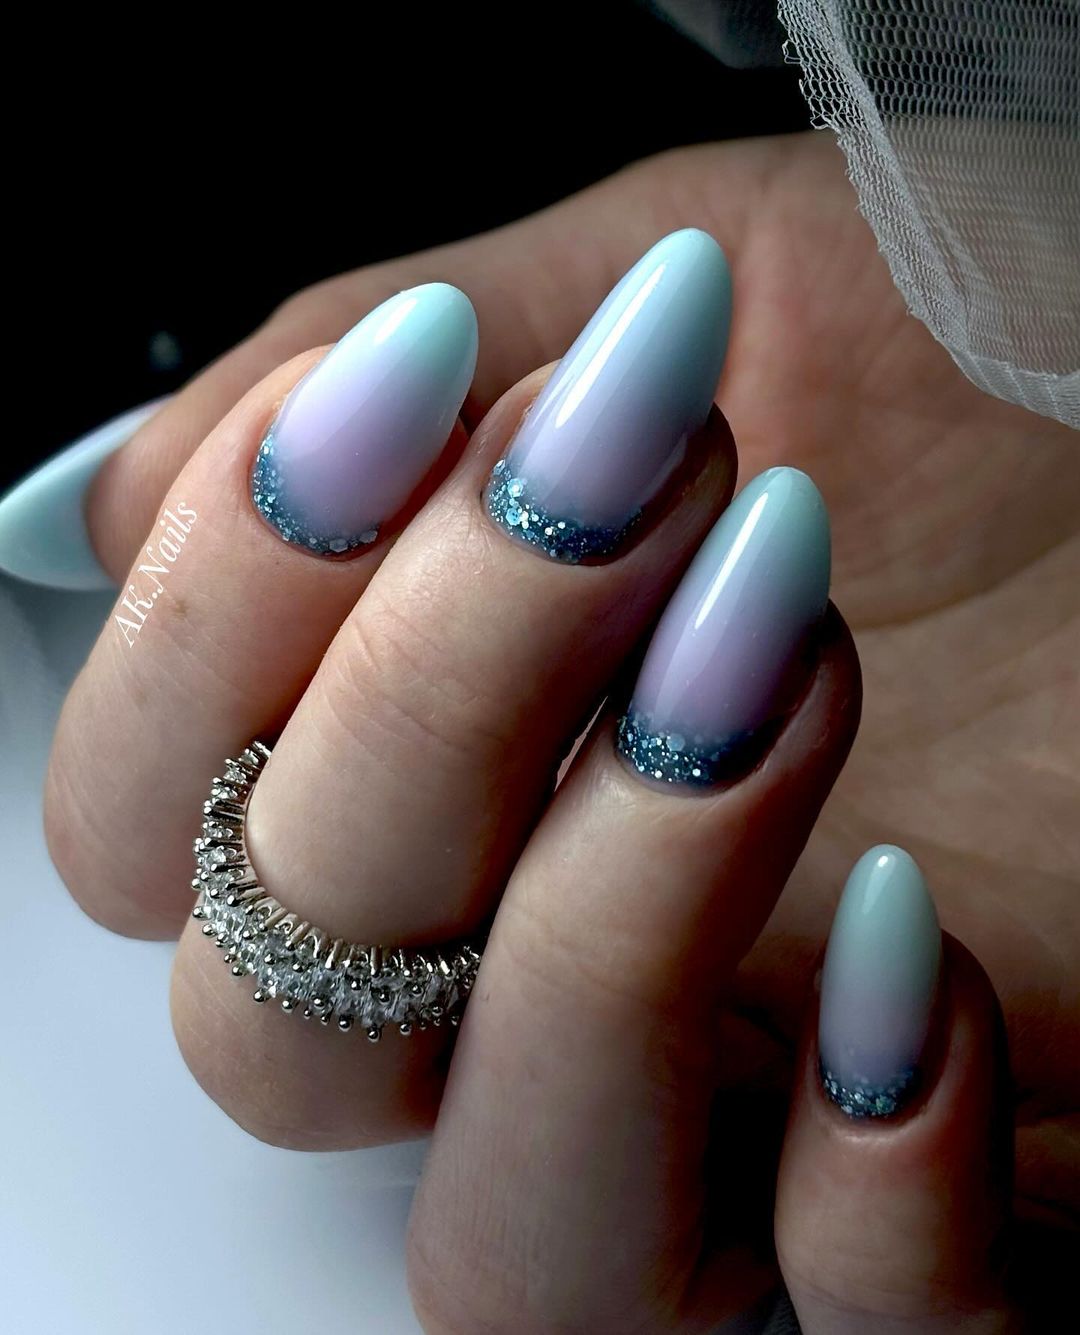
- Pastel blue polish: OPI Nail Lacquer in “I’m Gown for Anything!”
- Pastel purple polish: Essie Nail Polish in “Lilacism”
- Glitter for accents: NYX Face and Body Glitter in “Blue”
- Base coat: CND Stickey Base Coat
- Top coat: Seche Vite Dry Fast Top Coat
Start with a base coat to protect your nails. Apply the pastel blue polish to the lower half of the nails and the pastel purple to the tips, blending them together with a makeup sponge for a seamless ombre effect. Add glitter accents along the cuticles for extra sparkle and finish with a top coat to seal the design.
Mint Green and Pink Gradient Nails
These nails showcase a beautiful gradient from mint green to pink, creating a refreshing and stylish look. The accent nails with gold and green foil add a touch of luxury and uniqueness to the design. The almond shape is perfect for elongating the fingers and adding a touch of sophistication.
- Mint green polish: Essie Nail Polish in “Mint Candy Apple”
- Pink polish: OPI Nail Lacquer in “Mod About You”
- Gold and green foil for accents: Nail Art Foil Flakes
- Base coat: Deborah Lippmann Hard Rock Nail Hardener
- Top coat: Sally Hansen Miracle Gel Top Coat
Begin with a base coat to protect your nails. Apply the mint green polish to the lower half of the nails and the pink polish to the tips, blending them with a makeup sponge for a smooth gradient. Add gold and green foil to the accent nails for extra flair and finish with a top coat to seal the design.
Pink and Gold Glitter French Tips
These nails are a sophisticated take on the classic French manicure with a soft pink base and gold glitter tips. The subtle yet shiny design adds a touch of elegance and glamour, making it perfect for any occasion. The almond shape enhances the delicate and feminine appearance of the nails.
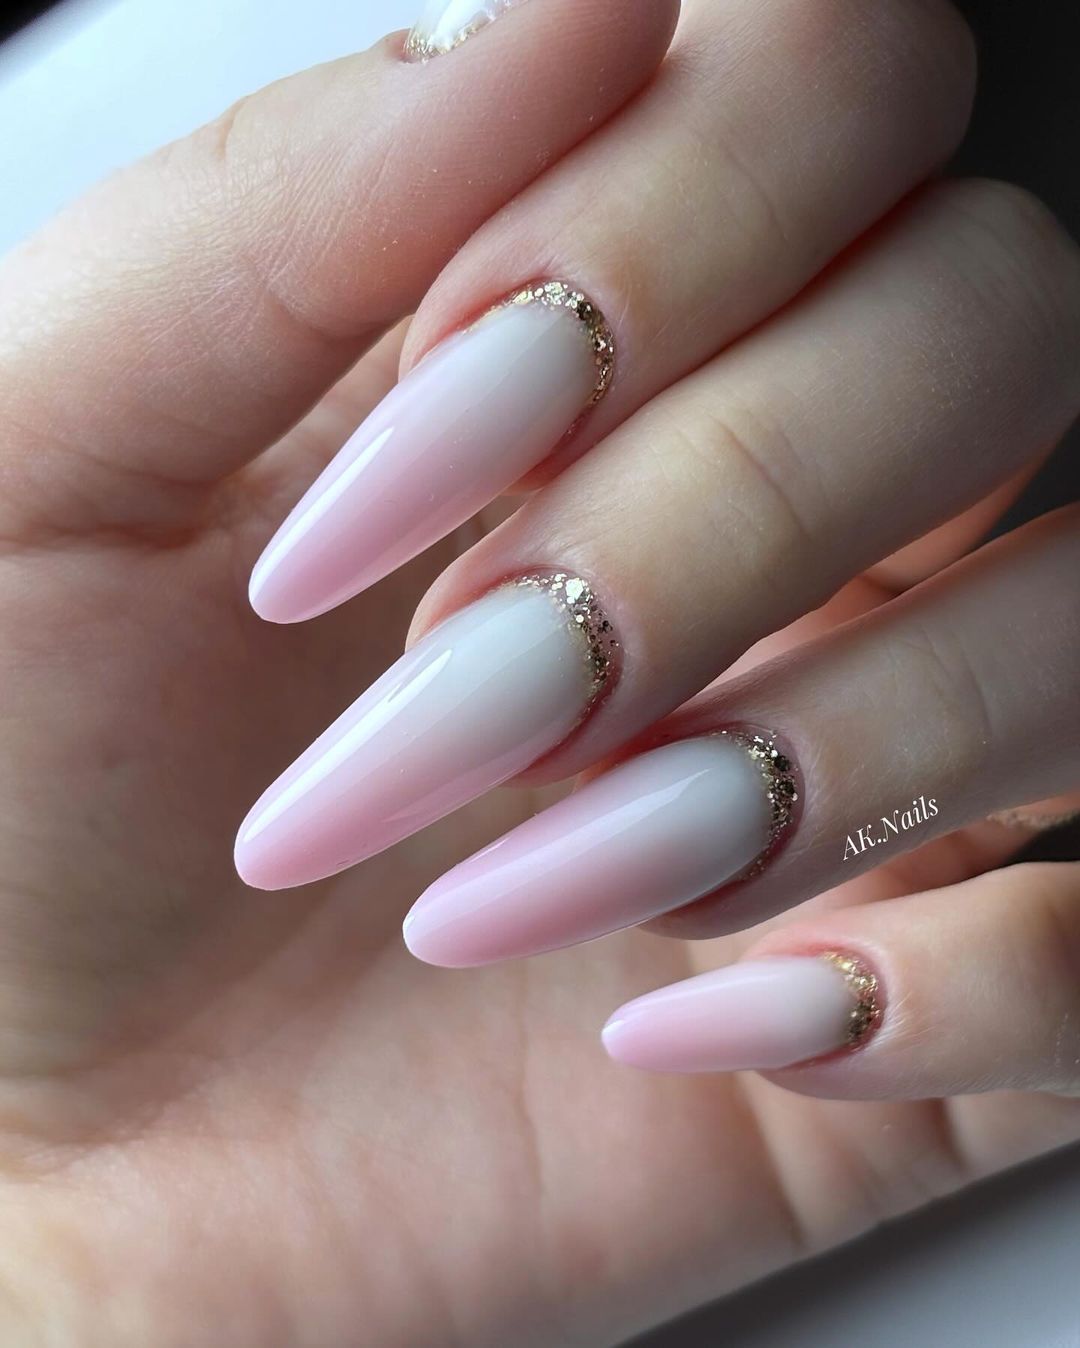
- Pink base polish: OPI Nail Lacquer in “Bubble Bath”
- Gold glitter polish: Essie Luxeffects in “Summit of Style”
- Base coat: Orly Bonder Rubberized Basecoat
- Top coat: Seche Vite Dry Fast Top Coat
Start with a base coat to protect your nails. Apply two coats of the pink base polish, allowing each to dry thoroughly. Use the gold glitter polish to create the French tips, ensuring even coverage. Finish with a top coat to seal the design and add a lasting shine.
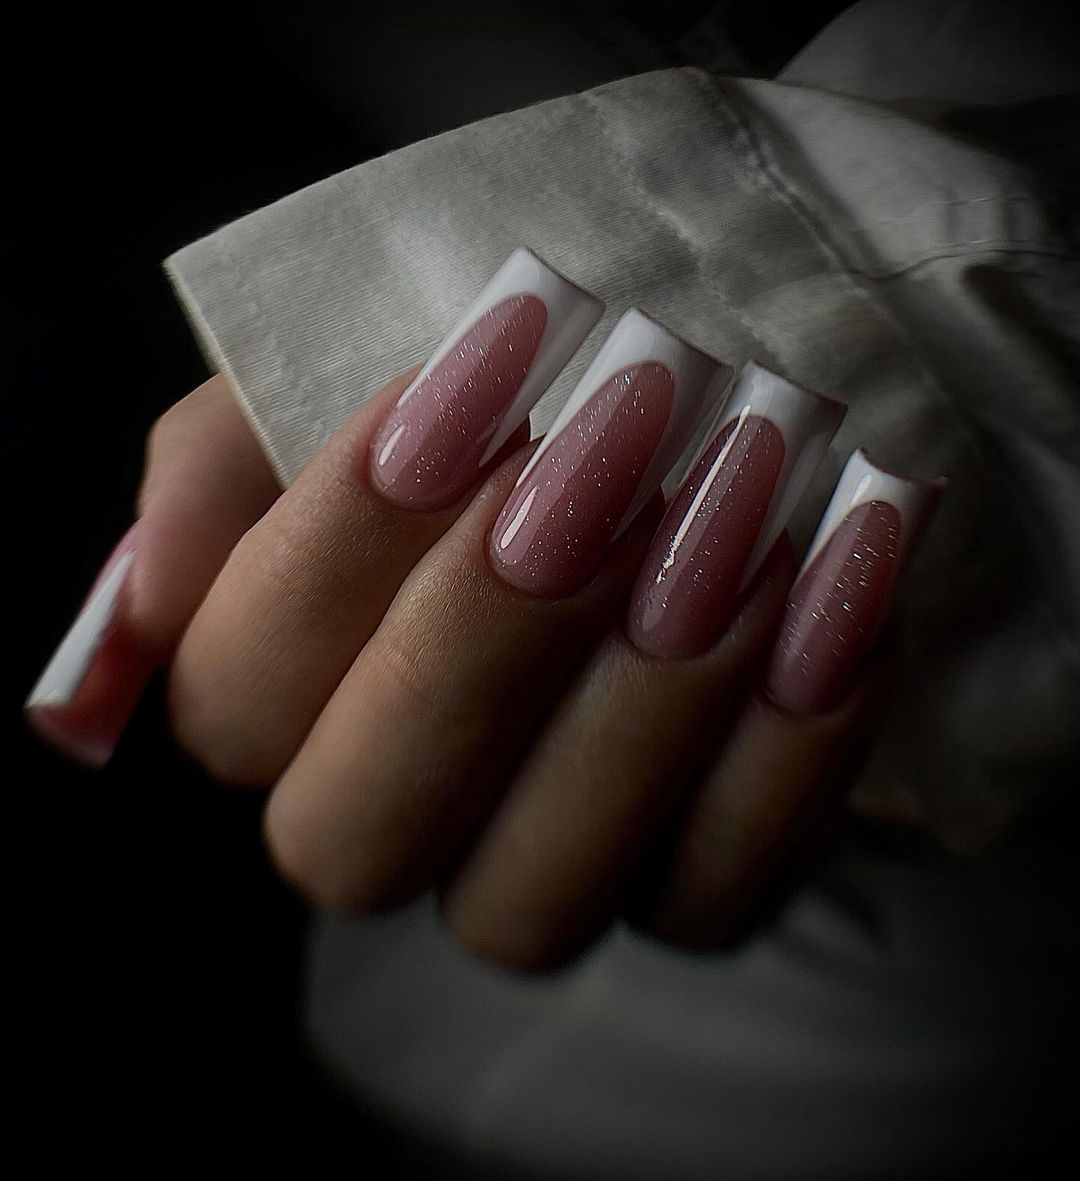
Nude and Glitter Stiletto Nails
These nails feature a stunning nude base with a variety of glitter accents, creating a luxurious and trendy look. The stiletto shape adds drama and sophistication, making these nails perfect for special occasions. The mix of fine and chunky glitter, along with rhinestone embellishments, adds depth and sparkle, making this design truly eye-catching.
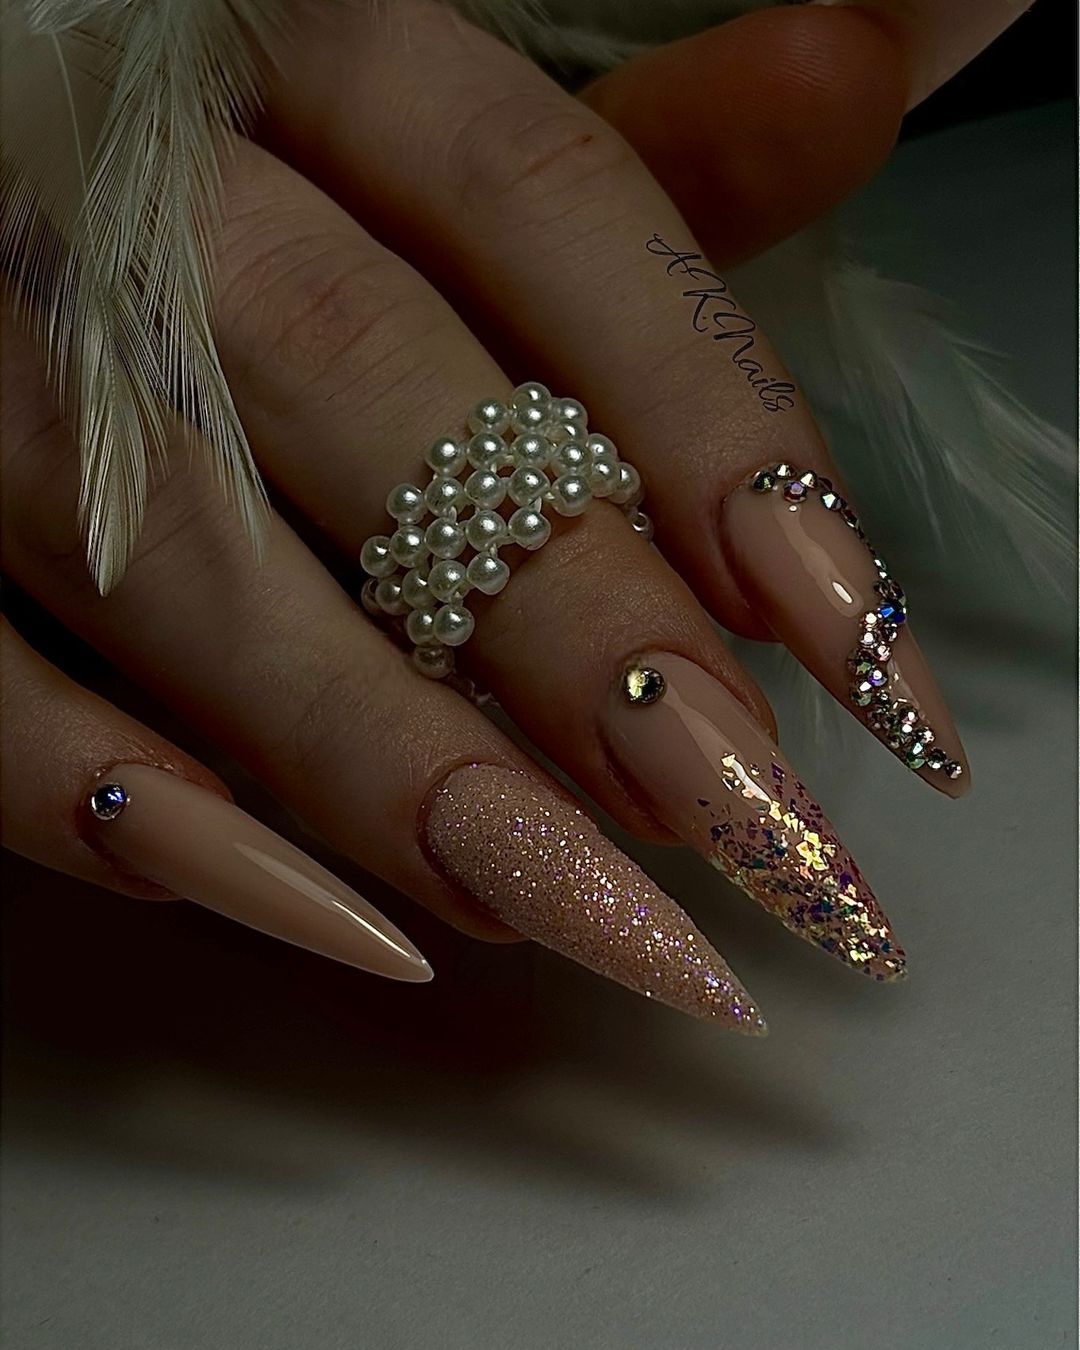
- Nude base polish: OPI Nail Lacquer in “Samoan Sand”
- Fine glitter: Essie Luxeffects in “Set in Stones”
- Chunky glitter: China Glaze in “Pizzazz”
- Rhinestones: Swarovski Flatback Crystals
- Base coat: Orly Bonder Rubberized Basecoat
- Top coat: Seche Vite Dry Fast Top Coat
Start with a base coat to protect your nails. Apply two coats of the nude polish, allowing each to dry thoroughly. Use fine and chunky glitter to create an accent on one nail and add rhinestones for extra sparkle. Finish with a top coat to seal the design and add shine.
Black and Gold Glitter Almond Nails
These nails feature a sophisticated combination of black and gold, perfect for those who love a bold and elegant look. The black base is enhanced with gold glitter accents, creating a shiny and luxurious appearance. The almond shape adds a touch of refinement, making this design suitable for any occasion.
- Black polish: OPI Nail Lacquer in “Black Onyx”
- Gold glitter polish: Essie Luxeffects in “Summit of Style”
- Gold foil: Nail Art Gold Foil Flakes
- Base coat: CND Stickey Base Coat
- Top coat: Sally Hansen Miracle Gel Top Coat
Begin with a base coat to protect your nails. Apply two coats of the black polish, letting each layer dry. Add gold glitter accents along the cuticles and use gold foil for extra glamour. Seal the design with a top coat to ensure it lasts.
Pink and White Winter Nails
These nails are perfect for the winter season, featuring a mix of pink and white with glitter accents and winter-themed designs. The combination of different textures and patterns, including glitter, stripes, and sweater-like designs, adds depth and interest to the manicure. The almond shape is both stylish and practical.
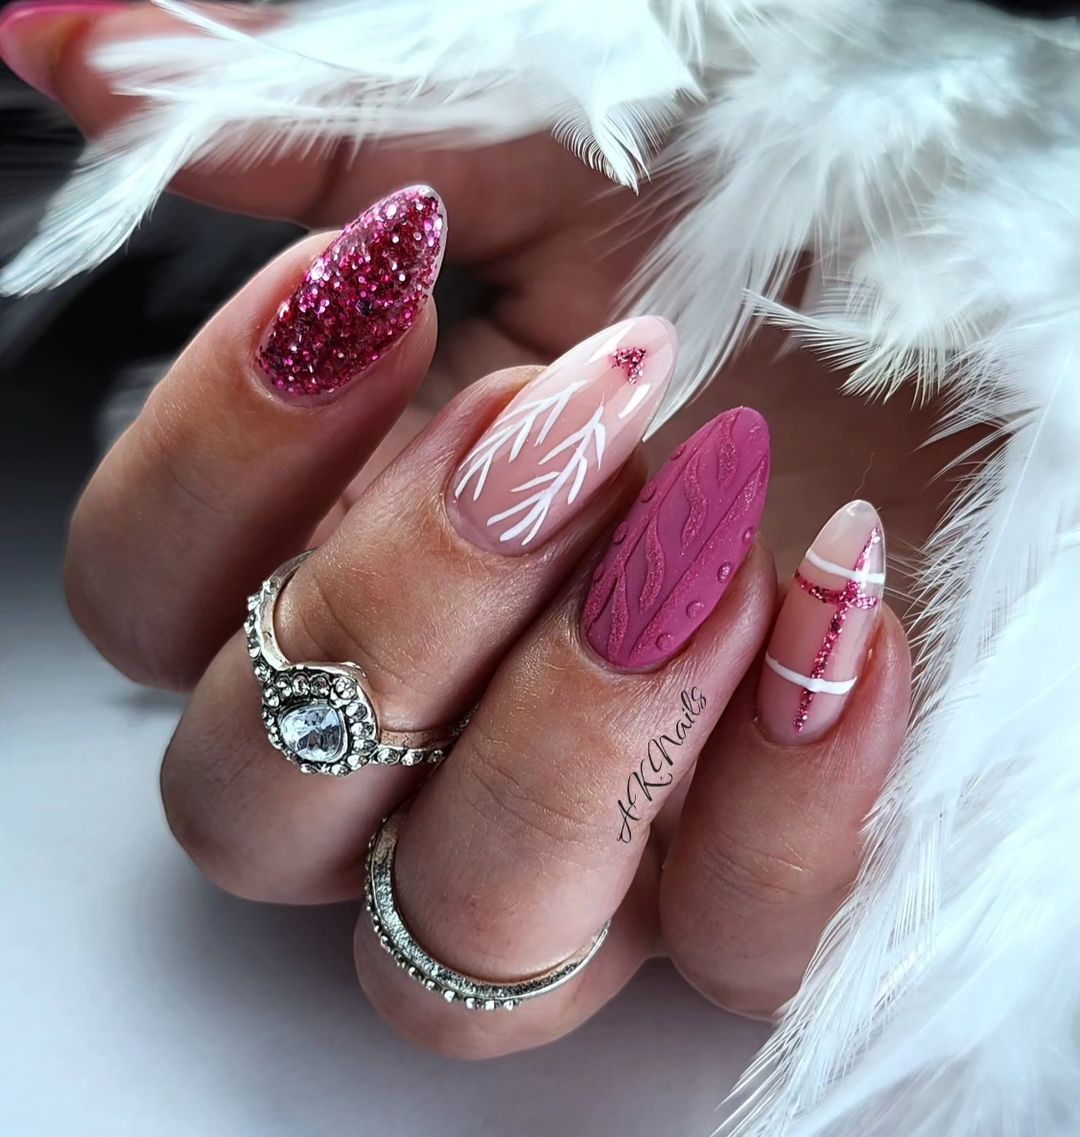
- Pink polish: Essie Nail Polish in “Fiji”
- White polish: OPI Nail Lacquer in “Alpine Snow”
- Pink glitter: China Glaze in “Pom Pom”
- White nail art pen for designs
- Base coat: Deborah Lippmann Hard Rock Nail Hardener
- Top coat: Seche Vite Dry Fast Top Coat
Start with a base coat to protect your nails. Apply the pink polish to the majority of the nails and the white polish to the accent nails. Use the white nail art pen to create winter designs and add glitter accents. Finish with a top coat to seal the design.
Green and Gold Festive Nails
These nails are perfect for the festive season, featuring a combination of green and gold with glitter and rhinestone accents. The square shape adds a modern touch, while the green and gold color scheme exudes luxury and elegance. This design is ideal for holiday parties and special occasions.
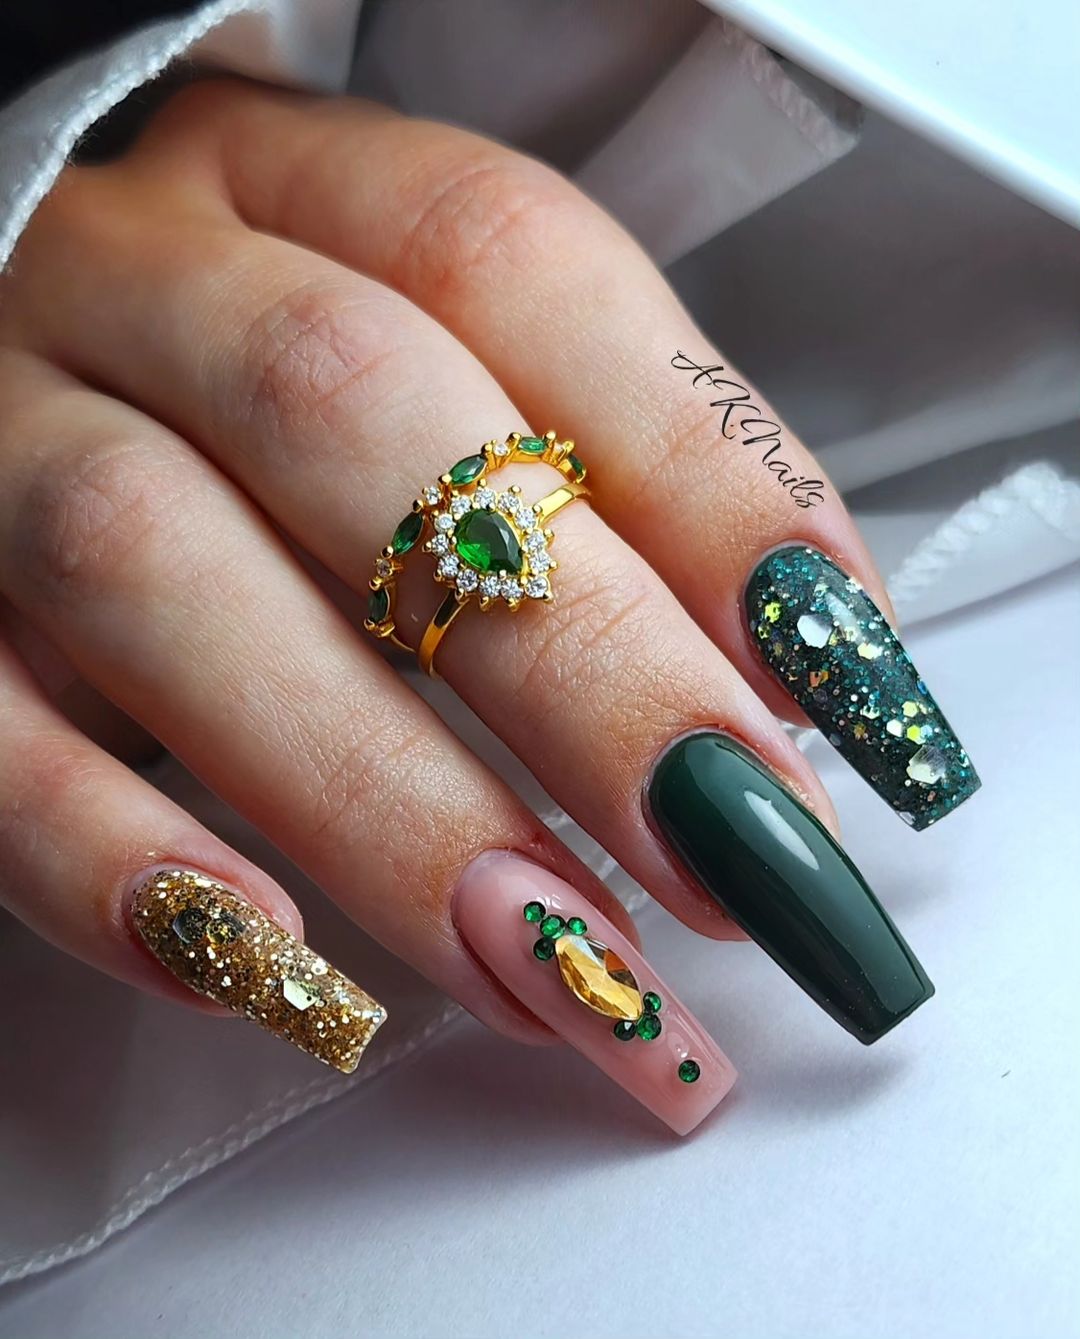
- Green polish: Essie Nail Polish in “Off Tropic”
- Gold glitter polish: OPI Nail Lacquer in “Golden Eye”
- Green and gold rhinestones: Swarovski Flatback Crystals
- Base coat: Orly Bonder Rubberized Basecoat
- Top coat: Sally Hansen Miracle Gel Top Coat
Begin with a base coat to protect your nails. Apply the green polish to the majority of the nails and the gold glitter polish to the accent nails. Add rhinestones for extra sparkle and finish with a top coat to seal the design.
Pink and White Glitter French Nails
These nails offer a sophisticated twist on the classic French manicure, featuring a soft pink base with white glitter tips. The addition of pearls and rhinestones adds a touch of elegance and shine, making this design perfect for weddings or other formal events. The coffin shape adds a modern and stylish element.
- Pink base polish: OPI Nail Lacquer in “Bubble Bath”
- White glitter polish: China Glaze in “White on White”
- Pearls and rhinestones for accents
- Base coat: CND Stickey Base Coat
- Top coat: Seche Vite Dry Fast Top Coat
Start with a base coat to protect your nails. Apply two coats of the pink base polish, letting each layer dry. Use the white glitter polish to create the French tips and add pearls and rhinestones for added elegance. Finish with a top coat to seal the design.
Pink and Silver Marble Nails
These nails feature a beautiful pink base with silver glitter accents, creating a marble-like effect that is both elegant and trendy. The combination of soft pink and shimmering silver makes this design perfect for any season, adding a touch of luxury and sophistication. The square shape enhances the clean and polished look.
- Pink polish: Essie Nail Polish in “Fiji”
- Silver glitter polish: Essie Luxeffects in “Set in Stones”
- White nail art pen for marble effect
- Base coat: Deborah Lippmann Hard Rock Nail Hardener
- Top coat: OPI Top Coat
Begin with a base coat to protect your nails. Apply two coats of the pink polish, allowing each to dry thoroughly. Use the white nail art pen to create marble-like lines and add silver glitter accents for extra sparkle. Finish with a top coat to seal the design.
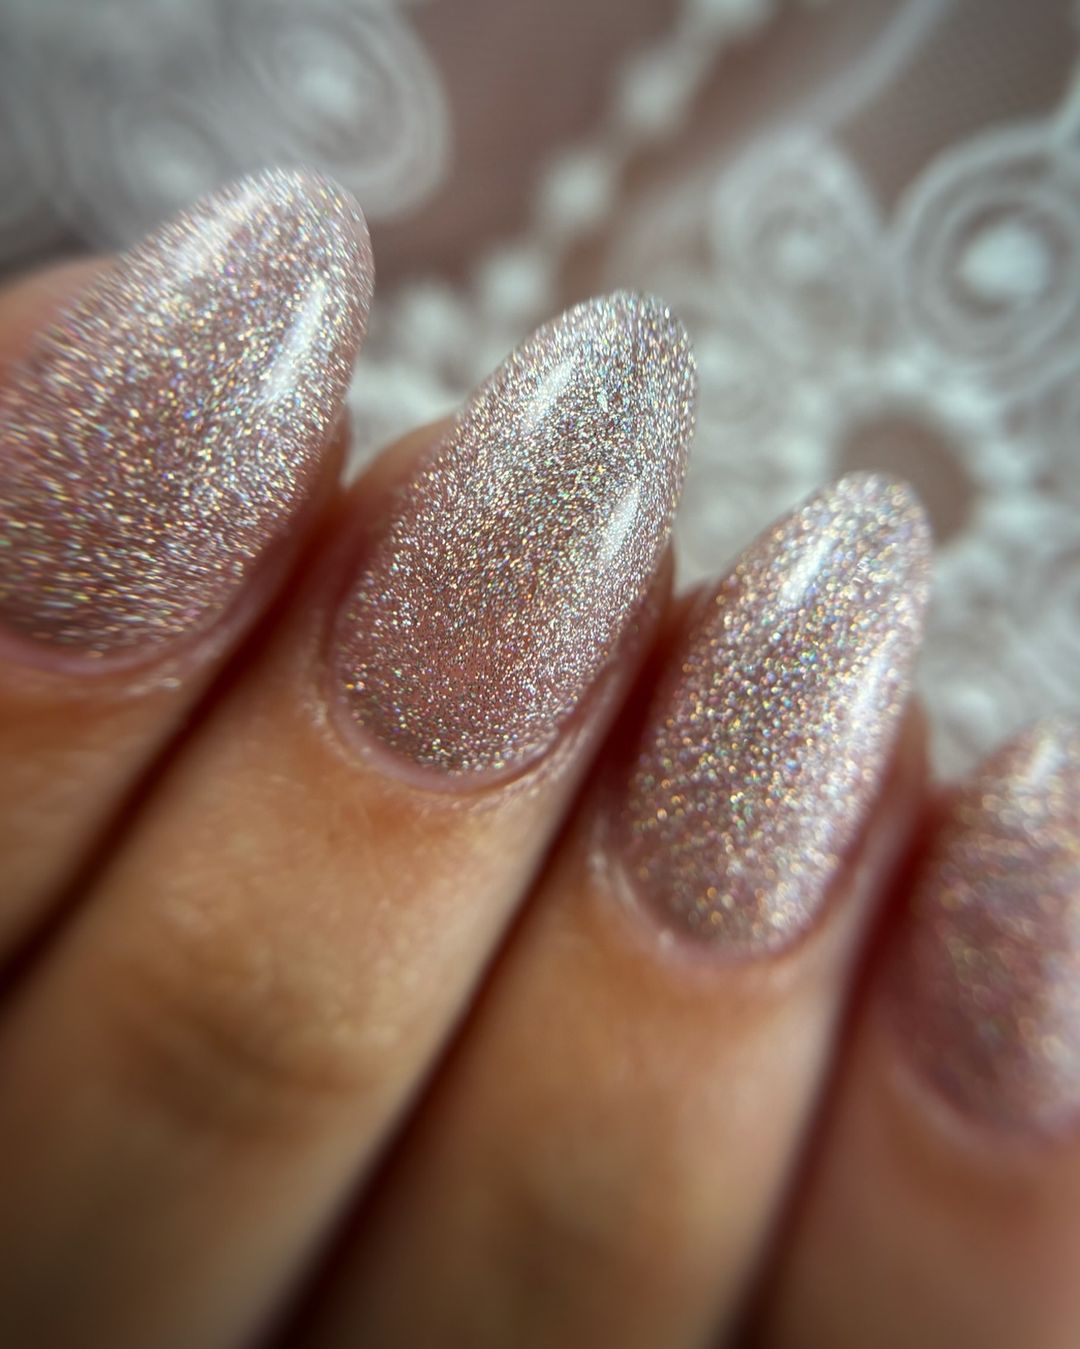
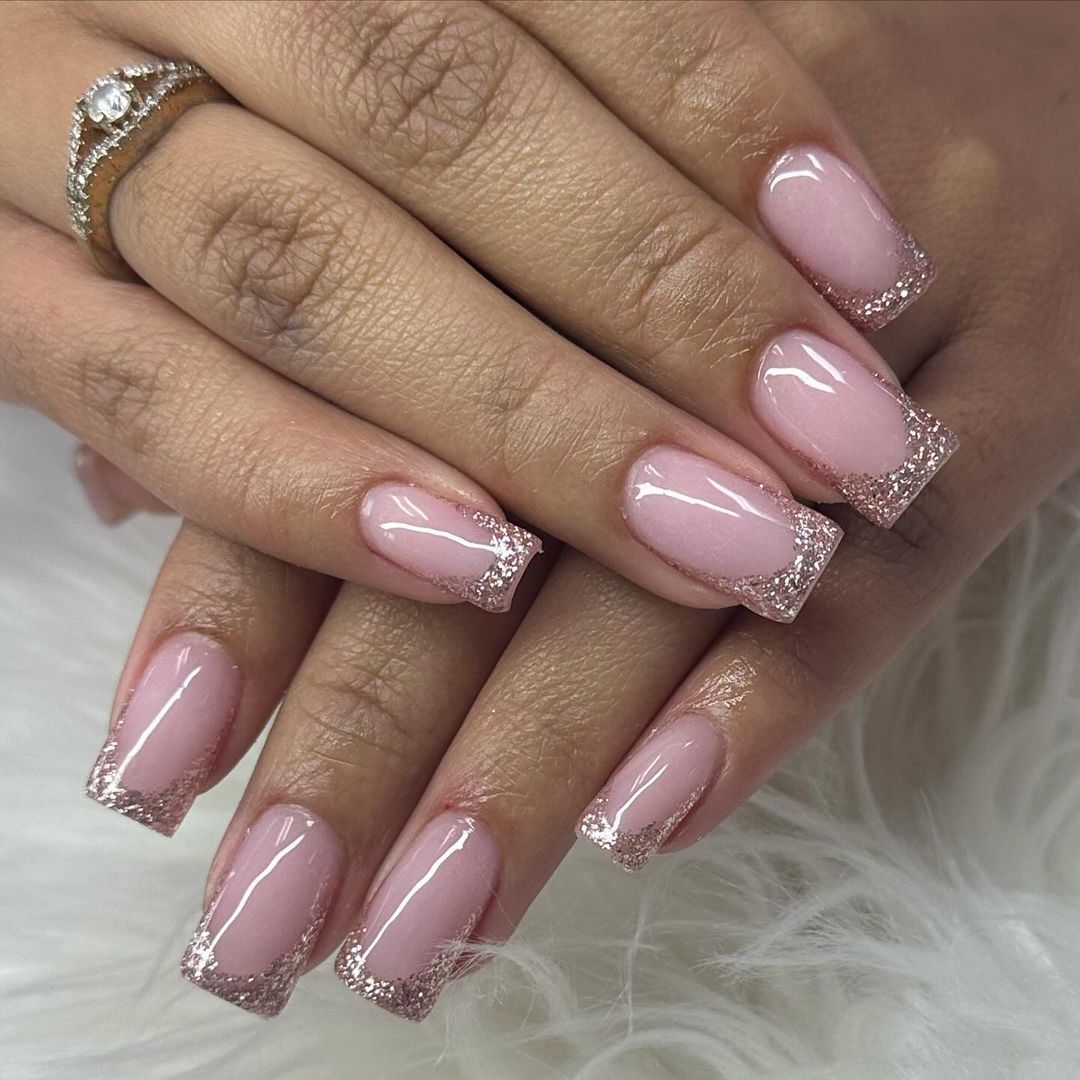
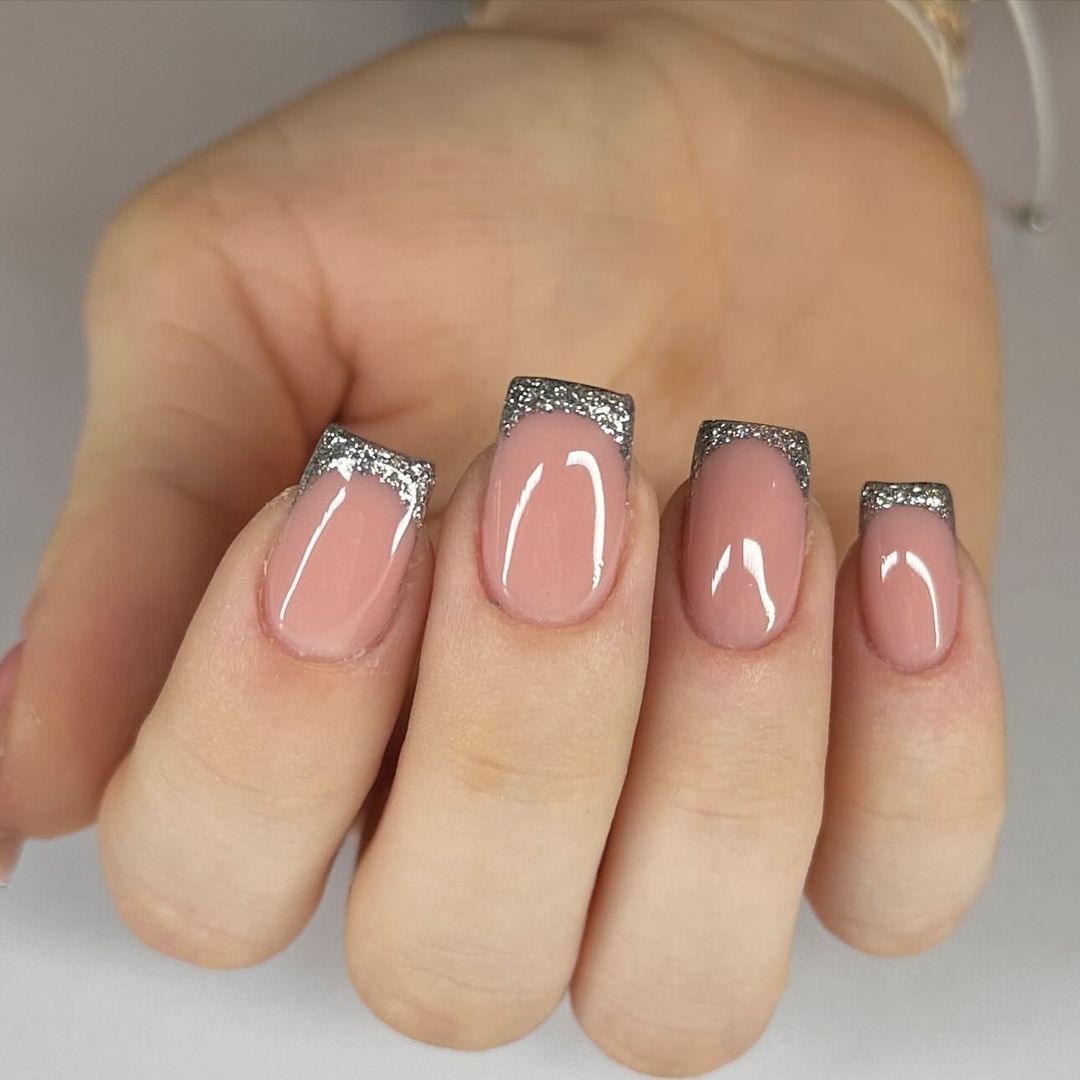
Sparkling Silver Glitter Nails
These nails feature a delicate nude base with a cascade of silver glitter, creating a shiny and trendy look. The almond shape adds a touch of elegance and elongates the fingers, making these nails perfect for both everyday wear and special occasions. The glitter placement creates a gradient effect, adding depth and dimension to the design.
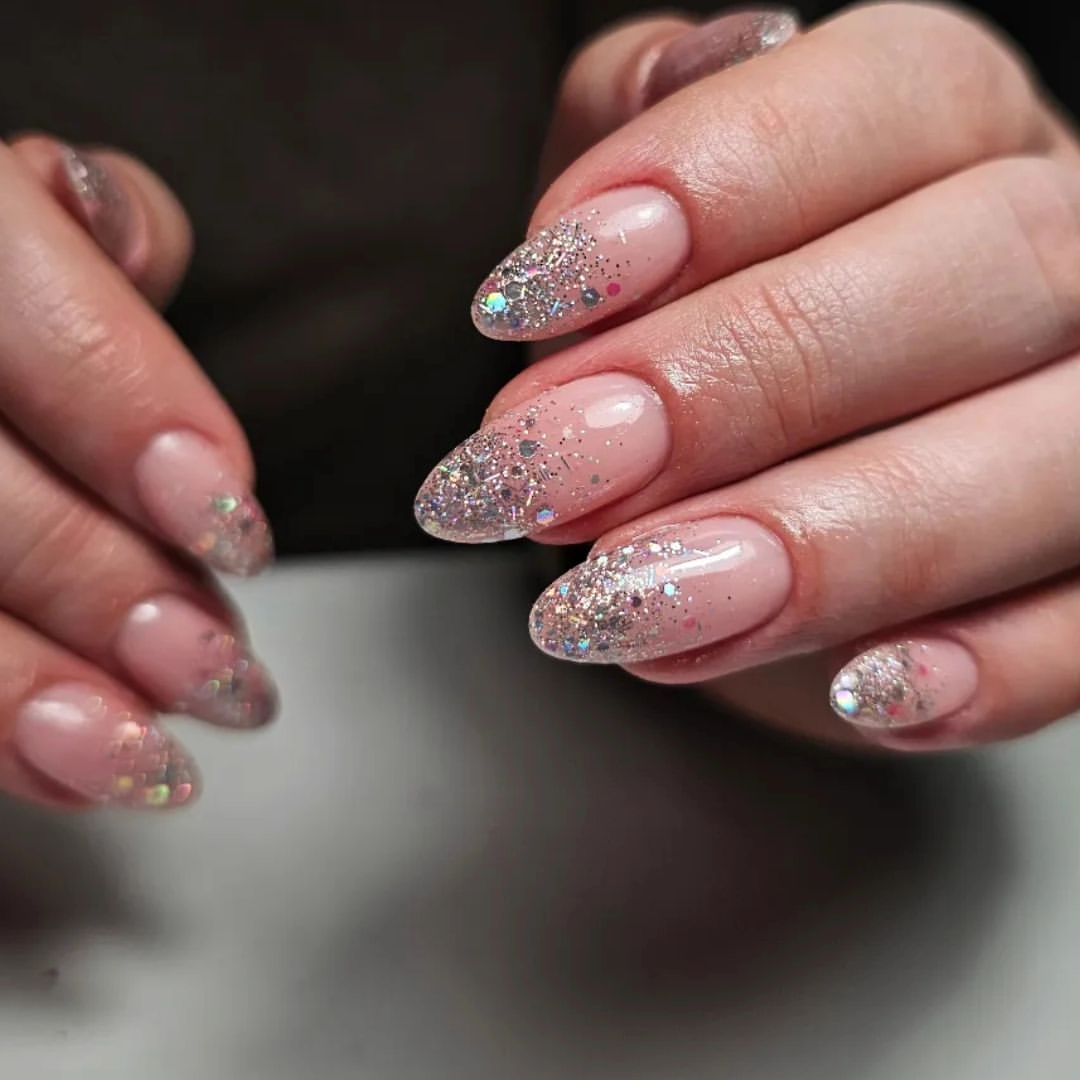
- Nude base polish: OPI Nail Lacquer in “Bubble Bath”
- Silver glitter polish: Essie Luxeffects in “Set in Stones”
- Base coat: Orly Bonder Rubberized Basecoat
- Top coat: Seche Vite Dry Fast Top Coat
Begin with a base coat to protect your nails. Apply two coats of the nude polish, allowing each to dry thoroughly. Add the silver glitter polish, starting at the tips and blending downward to create a gradient effect. Finish with a top coat to seal the design and ensure a long-lasting shine.
Pink Glitter French Tips with Bow Accent
These nails offer a playful twist on the classic French manicure with pink glitter tips and a cute bow accent. The combination of the nude base and glitter tips creates a pretty pink look that is both fun and elegant. The almond shape enhances the femininity of the design, making it perfect for those who love a touch of whimsy.

- Nude base polish: Essie Nail Polish in “Mademoiselle”
- Pink glitter polish: China Glaze in “Pom Pom”
- Bow accent: 3D nail art bow
- Base coat: CND Stickey Base Coat
- Top coat: Sally Hansen Miracle Gel Top Coat
Start with a base coat to protect your nails. Apply two coats of the nude polish, letting each layer dry. Use the pink glitter polish to create the French tips. Attach the 3D bow accent with a bit of nail glue, and finish with a top coat to seal the design and add a lasting shine.
Gold Leaf Glitter Nails
These nails combine a nude base with gold leaf glitter accents, creating a luxurious and shiny look perfect for special occasions. The almond shape adds sophistication and elegance, making this design both trendy and timeless. The gold leaf pieces add a touch of glamour, making these nails stand out.
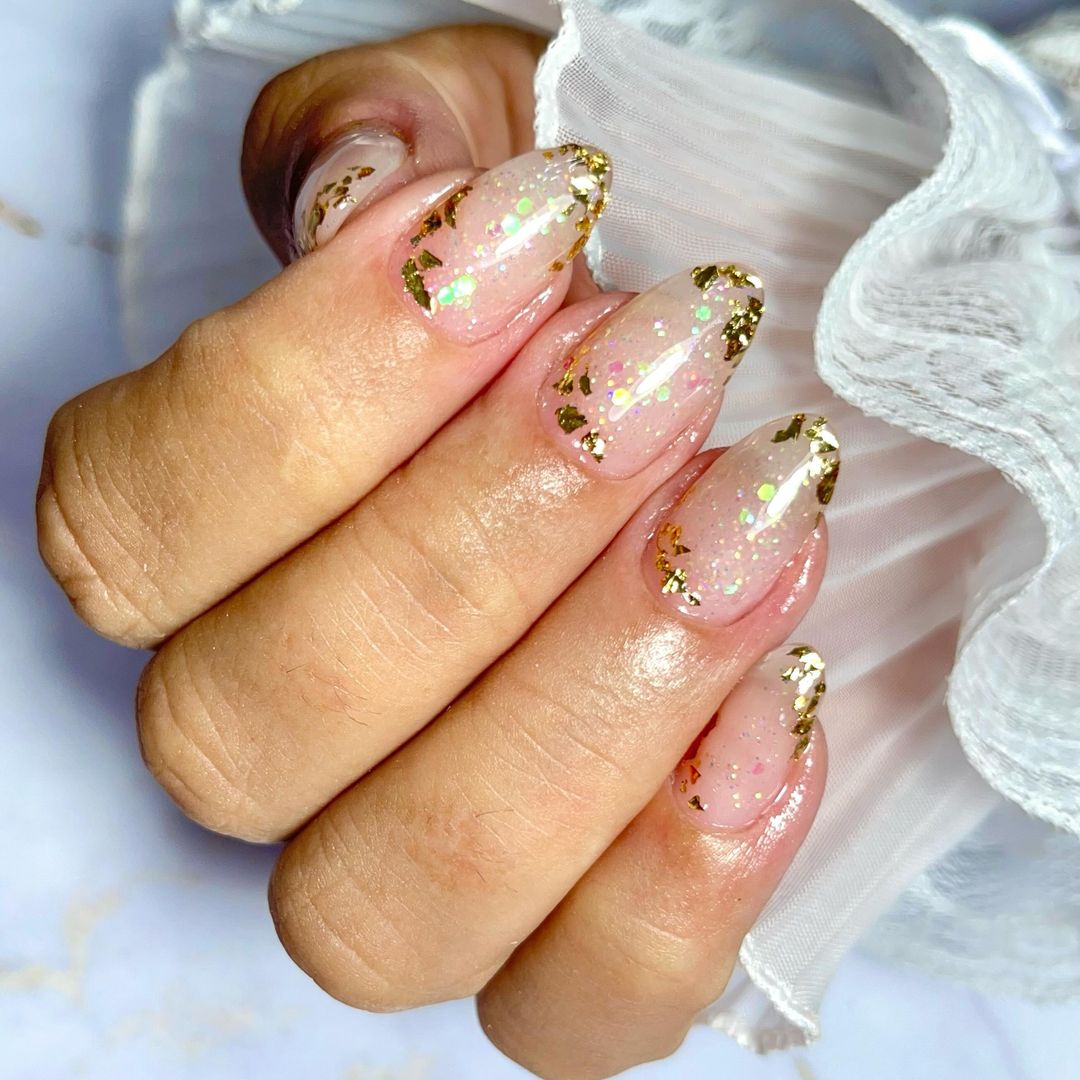
- Nude base polish: OPI Nail Lacquer in “Samoan Sand”
- Gold leaf: Nail Art Gold Leaf Flakes
- Base coat: Deborah Lippmann Hard Rock Nail Hardener
- Top coat: Seche Vite Dry Fast Top Coat
Begin with a base coat to protect your nails. Apply two coats of the nude polish, allowing each to dry thoroughly. Apply the gold leaf pieces randomly on the nails while the polish is still tacky. Press gently to ensure they stick, and finish with a top coat to seal the design and add shine.
Subtle Gold Glitter Gradient Nails
These nails feature a soft nude base with a subtle gold glitter gradient, creating an elegant and understated look. The short and simple design makes these nails perfect for everyday wear, while the gold glitter adds a touch of sparkle. The gradient effect adds depth and dimension to the nails.
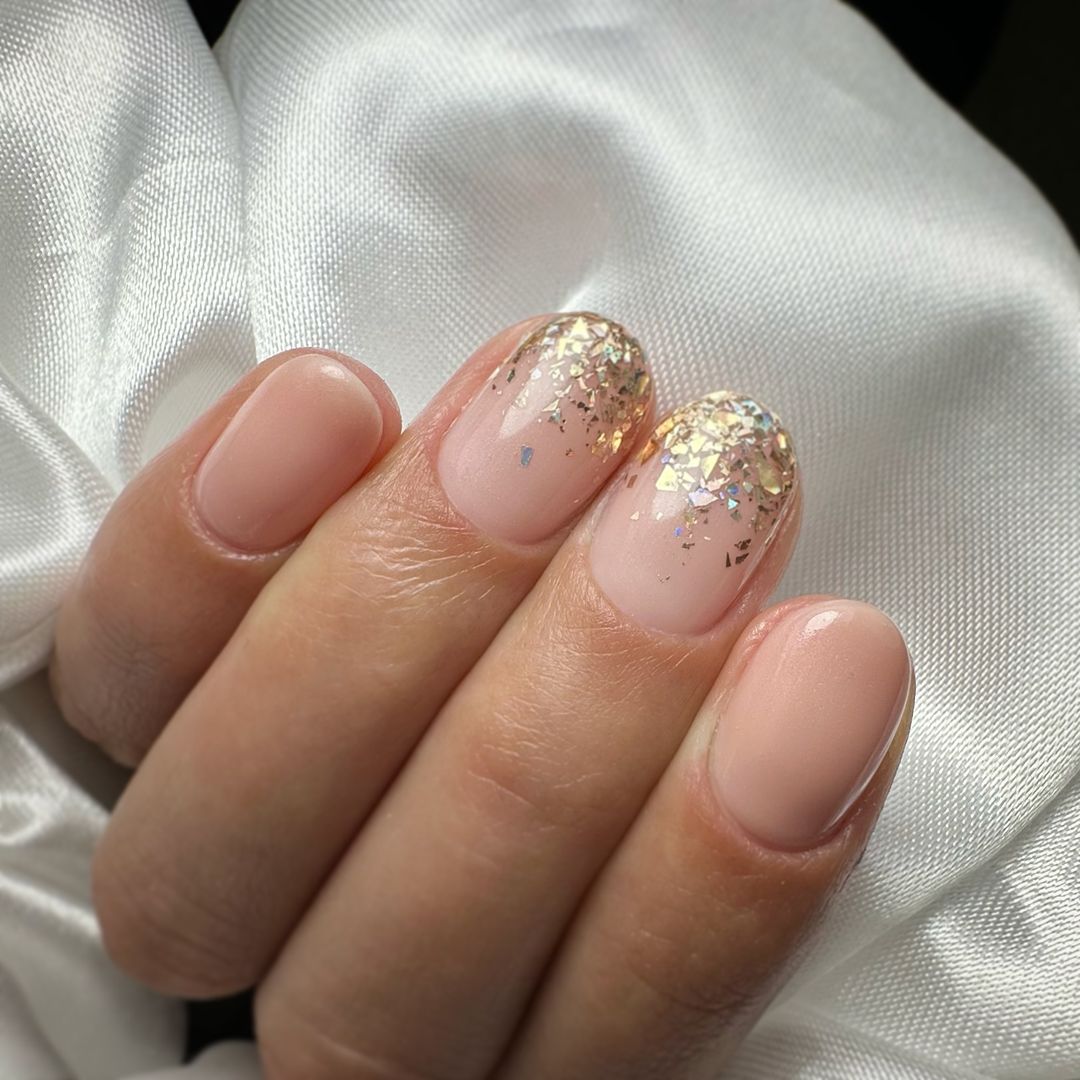
- Nude base polish: Essie Nail Polish in “Ballet Slippers”
- Gold glitter polish: Essie Luxeffects in “Summit of Style”
- Base coat: CND Stickey Base Coat
- Top coat: Sally Hansen Miracle Gel Top Coat
Start with a base coat to protect your nails. Apply two coats of the nude polish, letting each layer dry. Add the gold glitter polish starting at the cuticle and blending upward to create a gradient effect. Finish with a top coat to seal the design and ensure a long-lasting shine.
Pastel and Glitter Nails with Floral Accents
These nails feature a beautiful combination of pastel colors and glitter, creating a fresh and trendy look. The addition of floral accents adds a touch of whimsy and elegance, making these nails perfect for spring or summer. The square shape enhances the modern and stylish appearance of the design.
- Pastel polishes: OPI Nail Lacquer in “Do You Lilac It?” and Essie Nail Polish in “Mint Candy Apple”
- Glitter polish: China Glaze in “Fairy Dust”
- Floral nail stickers
- Base coat: Orly Bonder Rubberized Basecoat
- Top coat: Seche Vite Dry Fast Top Coat
Begin with a base coat to protect your nails. Apply the pastel polishes on different nails, creating a varied look. Add the glitter polish on top for extra sparkle. Apply the floral nail stickers to accent nails and finish with a top coat to seal the design and add a lasting shine.
Elegant White and Pink French Nails
These nails offer a sophisticated and modern take on the French manicure with a combination of white and pink. The coffin shape adds a trendy touch, making this design perfect for both casual and formal occasions. The clean lines and glossy finish create an elegant and polished look.
- White polish: OPI Nail Lacquer in “Alpine Snow”
- Pink polish: Essie Gel Couture in “Sheer Fantasy”
- Base coat: Deborah Lippmann Hard Rock Nail Hardener
- Top coat: Sally Hansen Miracle Gel Top Coat
Start with a base coat to protect your nails. Apply the pink polish to the entire nail, letting each layer dry thoroughly. Use the white polish to create the French tips, ensuring clean and precise lines. Finish with a top coat to seal the design and add a lasting shine.
Delicate Pink Glitter Cuticle Nails
These nails feature a soft pink base with a delicate glitter accent at the cuticles. The subtle sparkle adds a touch of elegance and shine without overwhelming the overall look. The oval shape is both classic and practical, making this design suitable for everyday wear while still being special enough for more formal occasions.
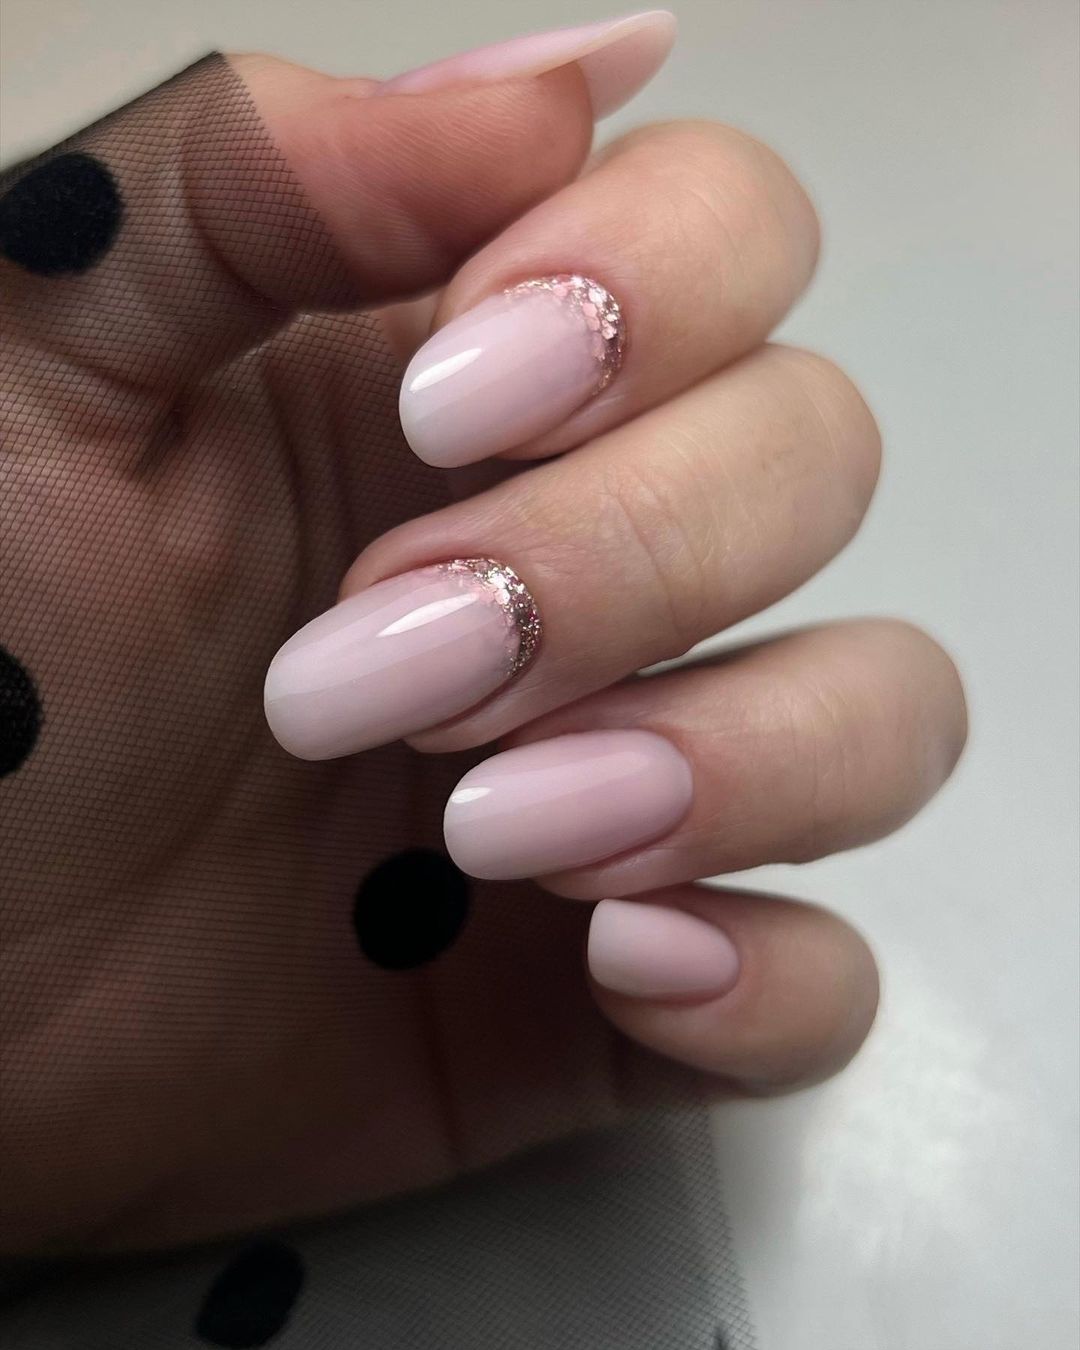
- Pink base polish: OPI Nail Lacquer in “Bubble Bath”
- Pink glitter: Essie Luxeffects in “A Cut Above”
- Base coat: Orly Bonder Rubberized Basecoat
- Top coat: Seche Vite Dry Fast Top Coat
Start with a base coat to protect your nails. Apply two coats of the pink polish, letting each layer dry thoroughly. Use the pink glitter polish to create a glitter accent at the cuticles, blending it slightly upward for a gradient effect. Finish with a top coat to seal the design and add a lasting shine.
Pink and Black Leaf Design Nails
These nails feature a soft pink base with black leaf designs and glitter accents, creating a unique and trendy look. The combination of the soft pink with the bold black designs adds a sophisticated touch, while the glitter accent nail provides a bit of sparkle. The round shape enhances the overall elegance of the design.
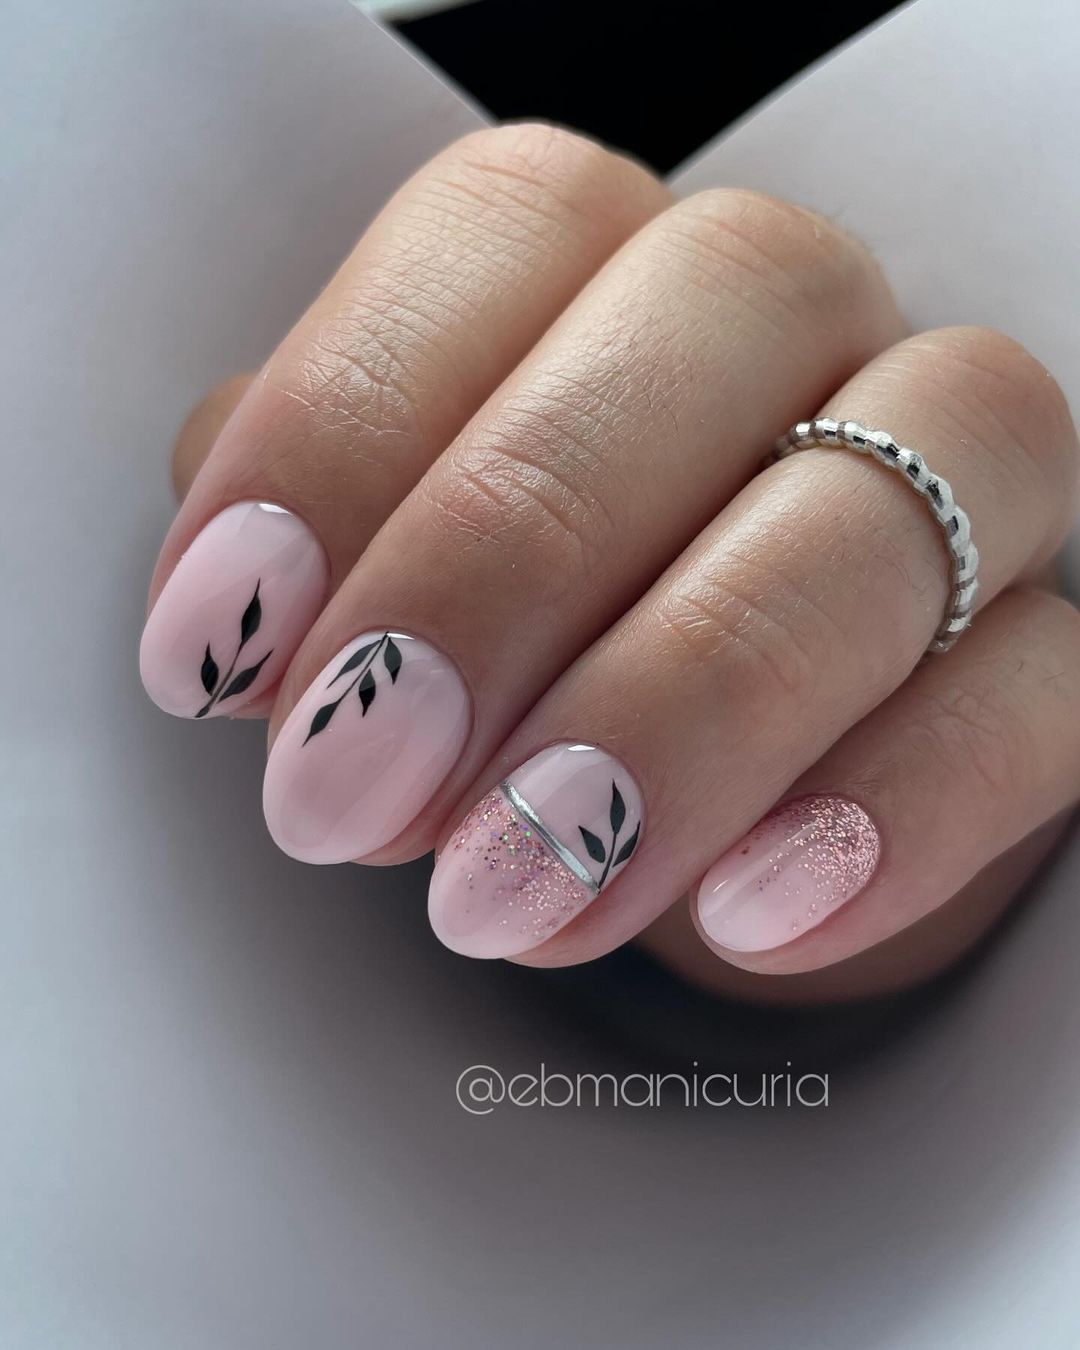
- Pink base polish: Essie Nail Polish in “Ballet Slippers”
- Black nail art pen for leaf designs
- Pink glitter: China Glaze in “Fairy Dust”
- Base coat: Deborah Lippmann Hard Rock Nail Hardener
- Top coat: Sally Hansen Miracle Gel Top Coat
Begin with a base coat to protect your nails. Apply two coats of the pink polish, allowing each to dry thoroughly. Use the black nail art pen to draw leaf designs on a few accent nails. Apply the pink glitter polish to one nail for a bit of sparkle. Finish with a top coat to seal the design and ensure a long-lasting finish.
Gold and Crystal French Tip Nails
These nails feature a nude base with gold and crystal accents on the tips, creating a luxurious and elegant look. The combination of the gold and crystals adds a touch of glamour, making these nails perfect for special occasions. The almond shape adds sophistication and enhances the overall look.
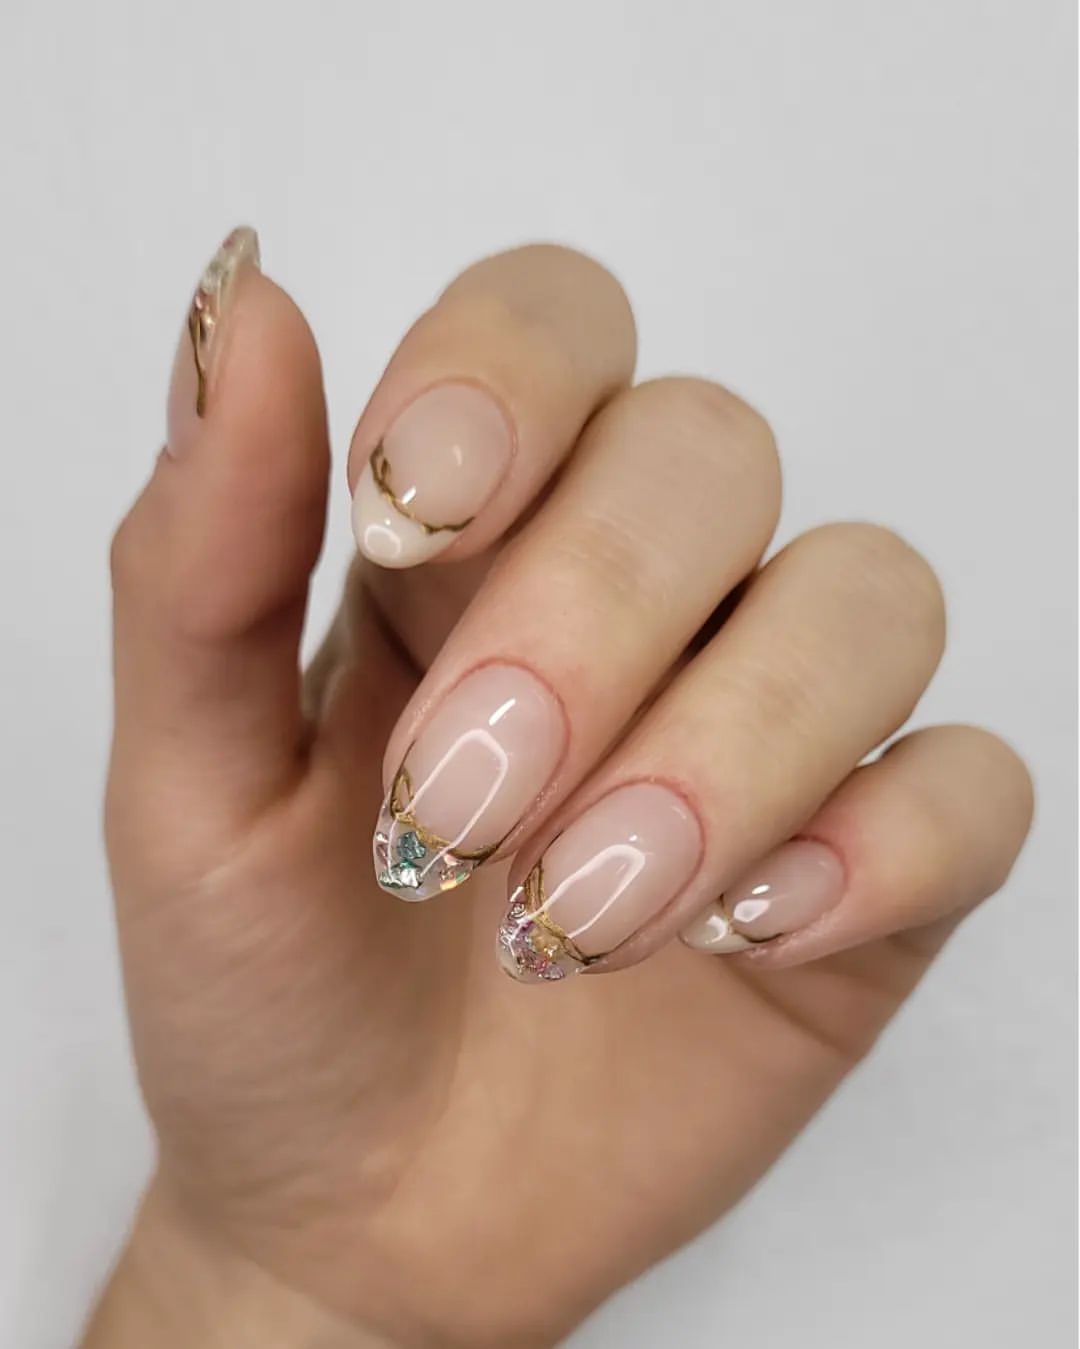
- Nude base polish: OPI Nail Lacquer in “Samoan Sand”
- Gold polish: Essie Nail Polish in “Good as Gold”
- Crystals: Swarovski Flatback Crystals
- Base coat: CND Stickey Base Coat
- Top coat: Seche Vite Dry Fast Top Coat
Start with a base coat to protect your nails. Apply two coats of the nude polish, allowing each to dry thoroughly. Use the gold polish to create French tips and add crystals for extra glamour. Finish with a top coat to seal the design and ensure a long-lasting shine.
Silver Glitter French Tip Nails
These nails feature a nude base with silver glitter French tips, creating a modern and elegant look. The square shape adds a contemporary touch, making this design perfect for both casual and formal occasions. The silver glitter adds a bit of sparkle, making the nails stand out without being overly flashy.
- Nude base polish: Essie Nail Polish in “Mademoiselle”
- Silver glitter polish: OPI Nail Lacquer in “Snow Globetrotter”
- Base coat: Orly Bonder Rubberized Basecoat
- Top coat: Sally Hansen Miracle Gel Top Coat
Begin with a base coat to protect your nails. Apply two coats of the nude polish, letting each layer dry. Use the silver glitter polish to create French tips. Finish with a top coat to seal the design and add a lasting shine.
Lavender Glitter Nails
These nails feature a beautiful lavender base with a subtle glitter overlay, creating a soft and trendy look. The combination of the pastel color and the glitter adds a touch of whimsy and elegance. The round shape is both stylish and practical, making this design suitable for everyday wear.

- Lavender polish: OPI Nail Lacquer in “Do You Lilac It?”
- Subtle glitter: Essie Luxeffects in “Pure Pearlfection”
- Base coat: Deborah Lippmann Hard Rock Nail Hardener
- Top coat: Seche Vite Dry Fast Top Coat
Start with a base coat to protect your nails. Apply two coats of the lavender polish, letting each layer dry thoroughly. Add a layer of subtle glitter for a bit of sparkle. Finish with a top coat to seal the design and ensure a long-lasting shine.
Silver Glitter Ombre Nails
These nails feature a stunning silver glitter ombre effect, creating a bold and shiny look perfect for any occasion. The oval shape adds elegance and sophistication, making this design both trendy and timeless. The gradient effect adds depth and dimension, making the nails stand out.
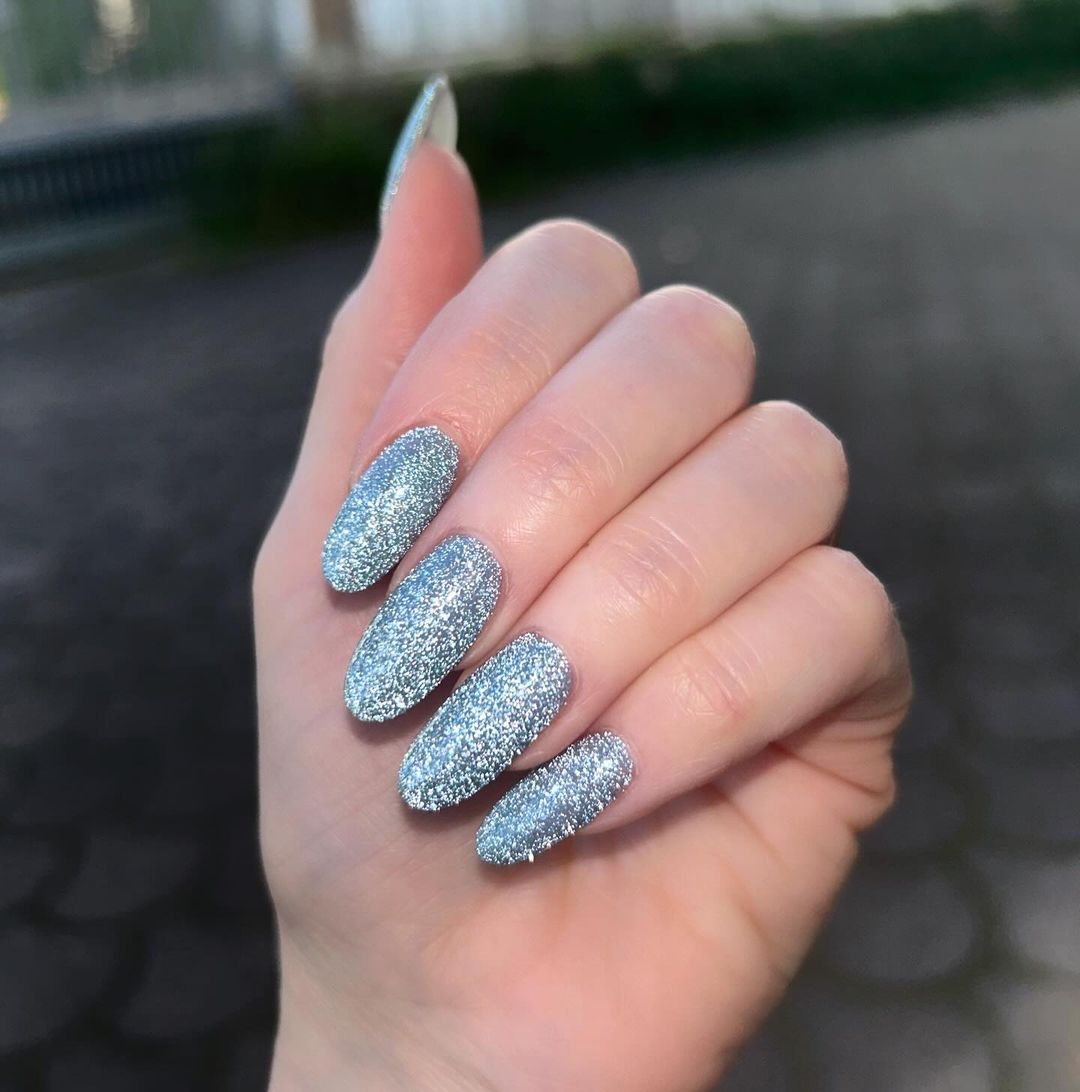
- Silver base polish: OPI Nail Lacquer in “This Silver’s Mine!”
- Silver glitter polish: China Glaze in “Glistening Snow”
- Base coat: CND Stickey Base Coat
- Top coat: Sally Hansen Miracle Gel Top Coat
Begin with a base coat to protect your nails. Apply the silver base polish and let it dry thoroughly. Use the silver glitter polish to create a gradient effect, starting at the tips and blending downward. Finish with a top coat to seal the design and add a lasting shine.
Pink Glitter Coffin Nails
These nails feature a vibrant pink base with a glitter overlay, creating a bold and trendy look. The coffin shape adds a modern and stylish touch, making these nails perfect for those who love to make a statement. The glitter adds a bit of sparkle, making the nails stand out even more.

- Pink base polish: Essie Nail Polish in “Mod Square”
- Pink glitter polish: China Glaze in “Pink Voltage”
- Base coat: Orly Bonder Rubberized Basecoat
- Top coat: Seche Vite Dry Fast Top Coat
Start with a base coat to protect your nails. Apply two coats of the pink polish, letting each layer dry thoroughly. Add a layer of pink glitter polish for extra sparkle. Finish with a top coat to seal the design and ensure a long-lasting shine.
FAQs
Q1: How can I make my glitter nails last longer? A1: To make your glitter nails last longer, always start with a strong base coat, apply thin layers of polish, and finish with a high-quality top coat. Avoid using your nails as tools and wear gloves when doing chores.
Q2: What’s the best way to remove glitter polish? A2: Soak a cotton ball in acetone, place it on your nail, and wrap it with aluminum foil. Let it sit for about 10-15 minutes, then gently slide off the polish. This method reduces damage to your nails.
Q3: Can I mix different types of glitter in one manicure? A3: Absolutely! Mixing fine and chunky glitters can create a unique and textured look. Just ensure the base color complements the glitter shades for a cohesive design.
These fall nails glitter 2024 ideas are sure to inspire your next manicure. Whether you prefer simple and chic or bold and sparkling designs, there’s something for everyone. Happy nail painting!
Save Pin