Fall is here, and what better way to embrace the season than with some stunning pumpkin nail art? From glittery accents to elegant designs, pumpkin-themed nails are perfect for adding a festive touch to your look. Whether you’re gearing up for Halloween or simply love the autumn aesthetic, these nail designs will have you covered. Let’s explore some of the cutest and trendiest pumpkin nail ideas for 2024 that you can try at home.
Fall Pumpkin Patch Nails
When it comes to fall nails, nothing says “autumn” quite like a pumpkin patch design. This nail art features a mix of cute pumpkin drawings and patchwork patterns in rich autumnal colors like orange, brown, and yellow. The neutral base color ensures the pumpkin designs pop, making them the star of the show. The detailed accents, such as the tiny stars and patches, add a whimsical touch to the overall look, making it perfect for the fall season.
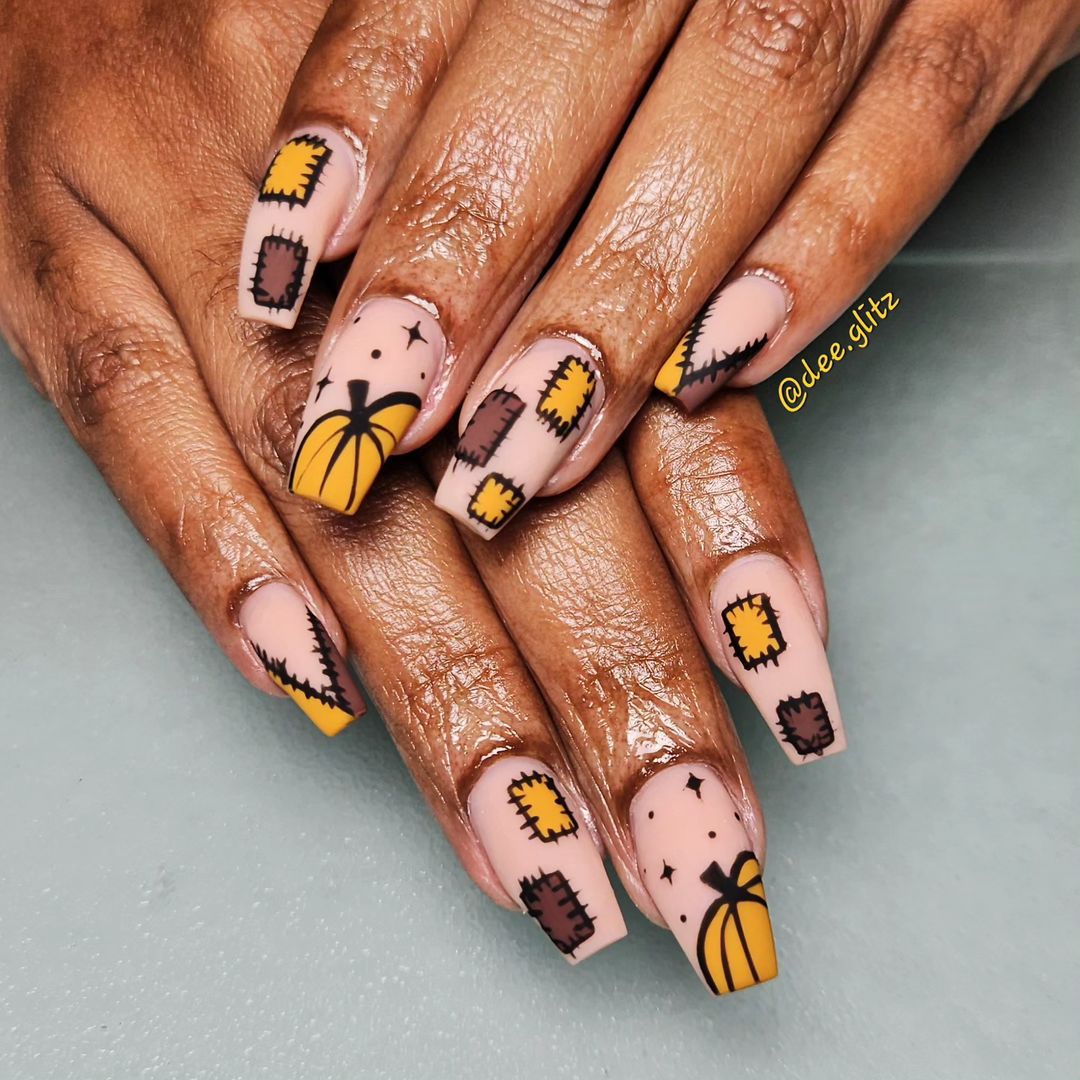
Consumables:
- Neutral nail polish base (e.g., OPI in “Be There in a Prosecco”)
- Orange, brown, and yellow nail polishes for the pumpkins and patches (e.g., Essie in “Playing Koi”, “Sole Mate”, and “Sunny Daze”)
- Black and white nail art pens for detailing (e.g., Sally Hansen I Heart Nail Art Pens)
- Top coat for a glossy finish (e.g., Seche Vite Dry Fast Top Coat)
Creating the Look at Home:
- Start with a neutral base coat to allow the pumpkin and patch designs to stand out.
- Use the orange, brown, and yellow polishes to create the pumpkin shapes and patch designs. Use a fine nail art brush or a nail art pen for precision.
- Add details like the pumpkin stems and patch stitches with black and white nail art pens.
- Finish with a top coat to seal in your design and add shine.
Glitter Pumpkin Glam
This design takes the classic pumpkin theme and adds a touch of glam with glittery accents. The pumpkins are filled with sparkly orange glitter, making them stand out against the nude base. The glitter catches the light beautifully, giving your nails a festive and eye-catching look. This design is perfect for those who love a bit of sparkle and want their fall nails to shine.
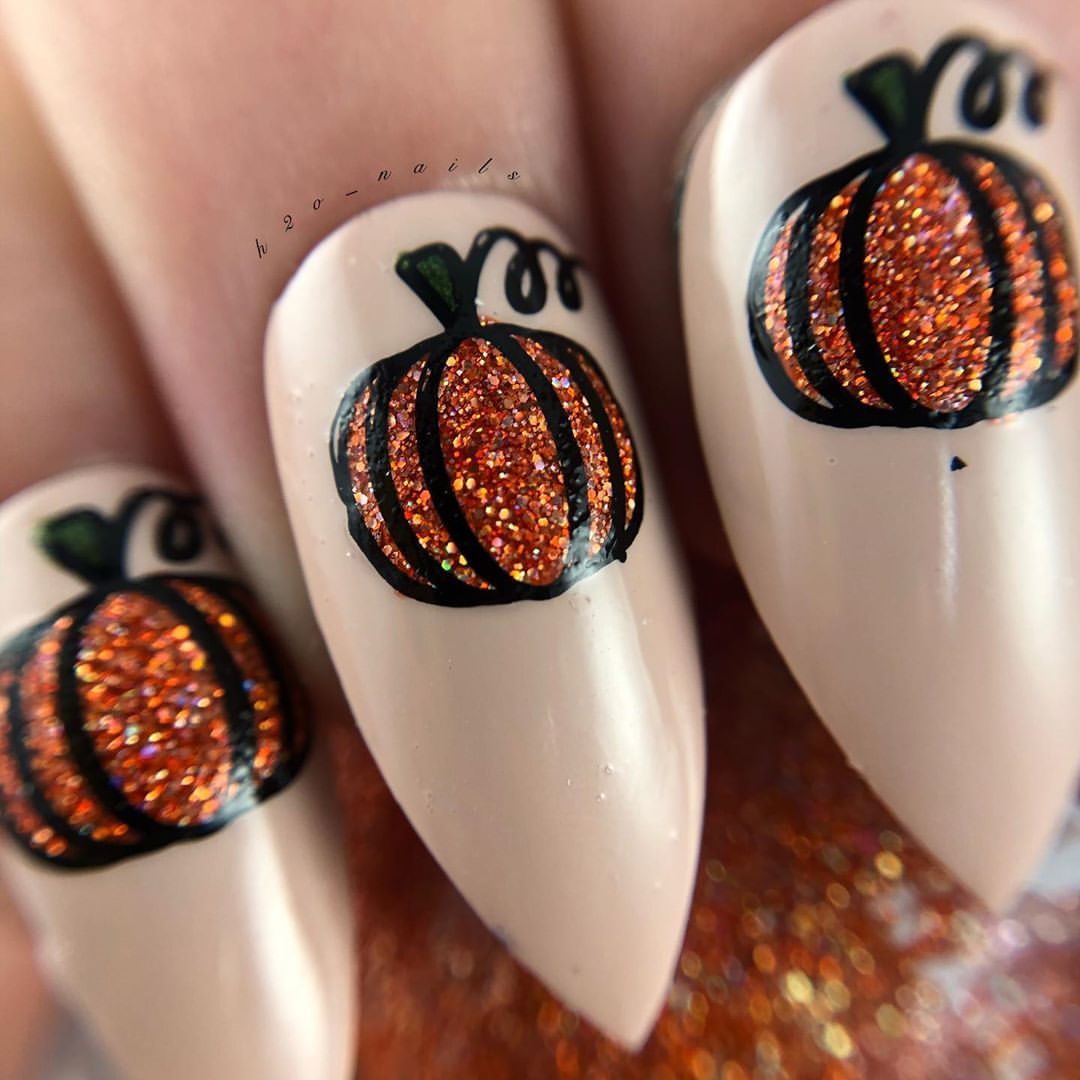
Consumables:
- Nude nail polish base (e.g., Essie in “Topless & Barefoot”)
- Orange glitter polish for the pumpkins (e.g., China Glaze in “I’m Not Lion”)
- Black nail art pen for outlining the pumpkins (e.g., Sally Hansen I Heart Nail Art Pens)
- Top coat to lock in the glitter (e.g., Seche Vite Dry Fast Top Coat)
Creating the Look at Home:
- Apply a nude base coat and let it dry completely.
- Create the pumpkin shapes using the orange glitter polish. For a more precise application, use a thin nail art brush.
- Outline the pumpkins with a black nail art pen to define the shapes.
- Apply a top coat to secure the glitter and add a glossy finish.
Vintage Fall Truck Nails
This adorable design features a vintage truck loaded with pumpkins, surrounded by fall leaves. The bright blue of the truck contrasts beautifully with the autumnal colors of the pumpkins and leaves. The mix of solid orange nails adds balance to the intricate design, making it both playful and elegant. This design captures the essence of a cozy fall day and is sure to get compliments.

Consumables:
- White nail polish base (e.g., OPI in “Alpine Snow”)
- Orange nail polish for the solid color nails (e.g., Essie in “Clambake”)
- Blue, green, and orange nail polishes for the truck and pumpkins (e.g., OPI in “My Chihuahua Doesn’t Bite
- Anymore”, “Suzi Says Feng Shui”, and “Don’t Talk Bach To Me”)
- Nail art brushes for detailed painting
- Top coat for durability (e.g., Essie Gel Setter Top Coat)
Creating the Look at Home:
- Start with a white base coat for the accent nails and orange for the solid nails.
- Paint the vintage truck using a fine nail art brush, starting with the outline and filling in the details.
- Add the pumpkins and leaves around the truck, using vibrant autumn colors.
- Finish with a top coat to protect your design and add shine.
Classy Pumpkin Plaid Nails
These nails combine a sophisticated plaid design with the playful pumpkin theme. The black, grey, and white color palette with orange accents creates a chic yet festive look. The plaid pattern adds a touch of elegance, while the pumpkins inject a bit of fun, making it perfect for both casual outings and formal events during the fall season.
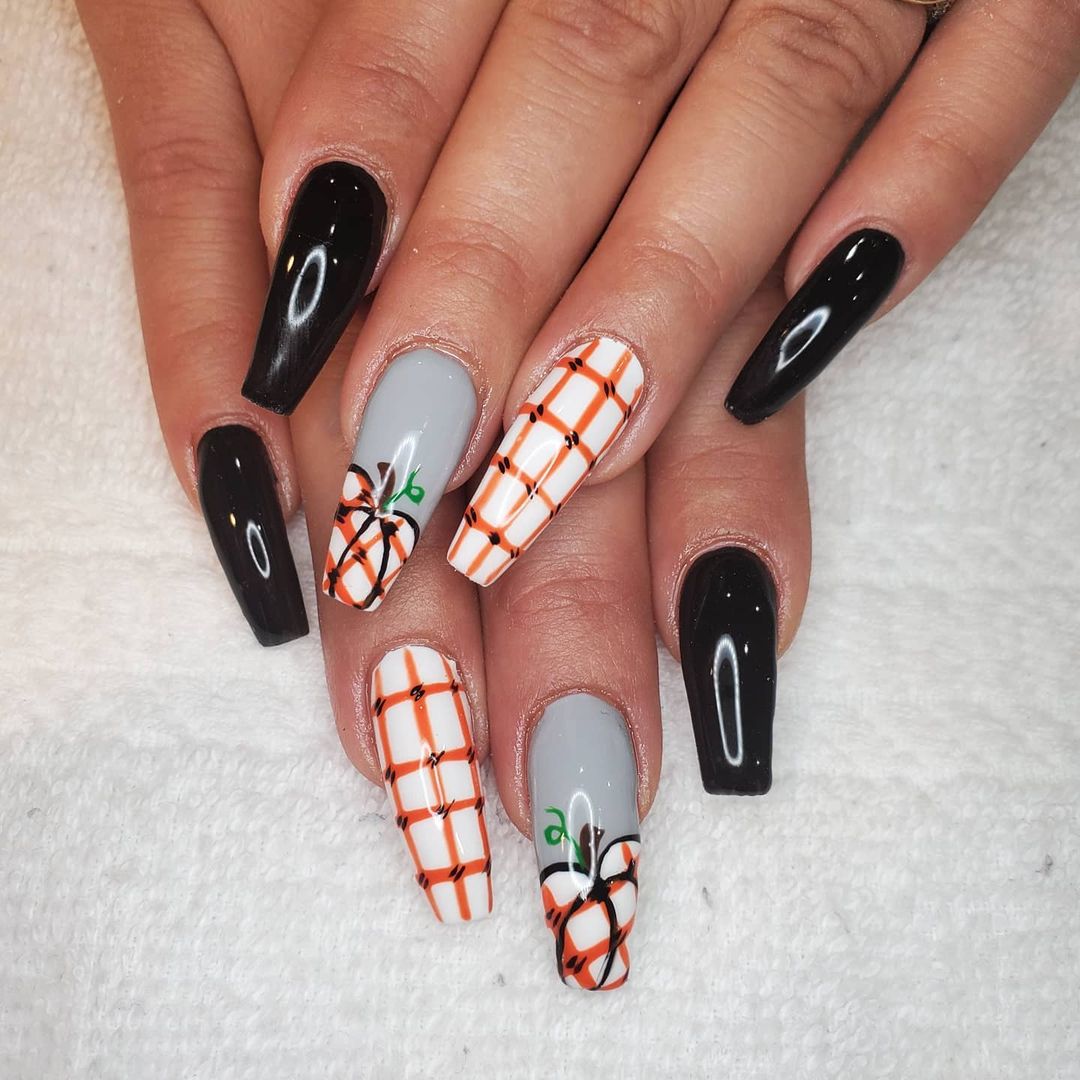
Consumables:
- Black nail polish for solid nails (e.g., OPI in “Black Onyx”)
- Grey nail polish for the base of the plaid nails (e.g., Essie in “Petal Pushers”)
- White nail polish for the plaid lines (e.g., OPI in “Alpine Snow”)
- Orange nail polish for the pumpkins (e.g., Essie in “Playing Koi”)
- Green nail art pen for pumpkin stems (e.g., Sally Hansen I Heart Nail Art Pens)
- Top coat for a glossy finish (e.g., Seche Vite Dry Fast Top Coat)
Creating the Look at Home:
- Apply the black polish to some nails and grey polish to the others as a base.
- Use a fine nail art brush to create white plaid lines on the grey nails.
- Paint small pumpkins on the plaid nails with orange polish and add stems using a green nail art pen.
- Finish with a top coat to protect the design and add shine.
Save Pin
Matte Pumpkin and Gold Stripes
This nail design features matte black nails paired with accent nails that showcase pumpkins and gold stripes. The matte finish contrasts beautifully with the shiny gold, making the pumpkins stand out. This design is perfect for those who love a mix of subtlety and sparkle, ideal for fall festivities.
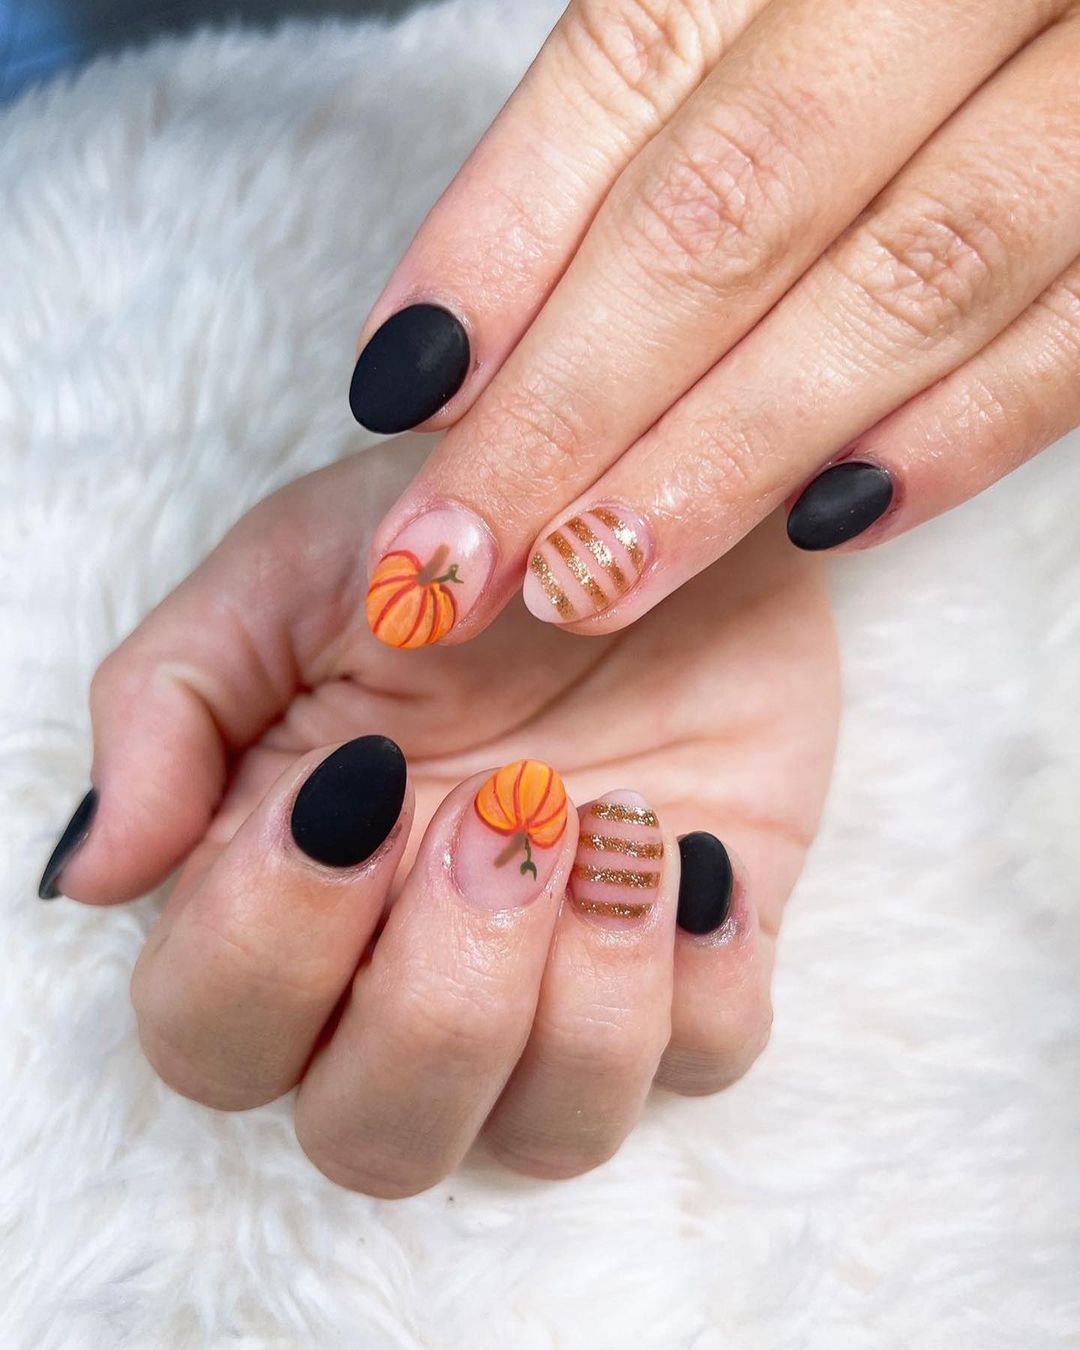
Consumables:
- Matte black nail polish (e.g., OPI in “Black Onyx” with a matte top coat)
- Clear nail polish for the base of accent nails (e.g., Essie in “Ballet Slippers”)
- Orange nail polish for pumpkins (e.g., Essie in “Clambake”)
- Gold glitter polish for stripes (e.g., China Glaze in “Golden Enchantment”)
- Green nail art pen for pumpkin stems (e.g., Sally Hansen I Heart Nail Art Pens)
- Matte top coat for the black nails (e.g., OPI Matte Top Coat)
Creating the Look at Home:
- Apply matte black polish to most nails and clear polish to accent nails.
- Paint small pumpkins on the accent nails using orange polish and add green stems.
- Create gold stripes on the accent nails using a fine nail art brush or striping tape.
- Apply a matte top coat to the black nails and a regular top coat to the accent nails for added durability.
Orange and Gold Swirls
This elegant nail design features vibrant orange and gold swirls on a clear base. The swirls create a dynamic and eye-catching effect, perfect for those who want a bold yet refined look for the fall season. The combination of bright orange and glittery gold makes these nails a standout choice for any autumn occasion.
Consumables:
- Clear nail polish for the base (e.g., Essie in “Ballet Slippers”)
- Orange nail polish for swirls (e.g., OPI in “A Good Man-darin is Hard to Find”)
- Gold glitter polish for swirls (e.g., China Glaze in “Golden Enchantment”)
- Fine nail art brush for creating swirls
- Top coat for a glossy finish (e.g., Seche Vite Dry Fast Top Coat)
Creating the Look at Home:
- Apply a clear base coat and let it dry completely.
- Use a fine nail art brush to create swirling patterns with orange polish on each nail.
- Add gold glitter swirls alongside the orange for a dazzling effect.
- Finish with a top coat to protect the design and add shine.
Glitter Pumpkin Delight
This nail design combines the sparkle of green glitter with the festive charm of pumpkins. The white speckled base adds a whimsical touch, while the vibrant orange pumpkin brings in the autumn vibes. This design is perfect for those who love a bit of glitter and a playful yet sophisticated look for fall.
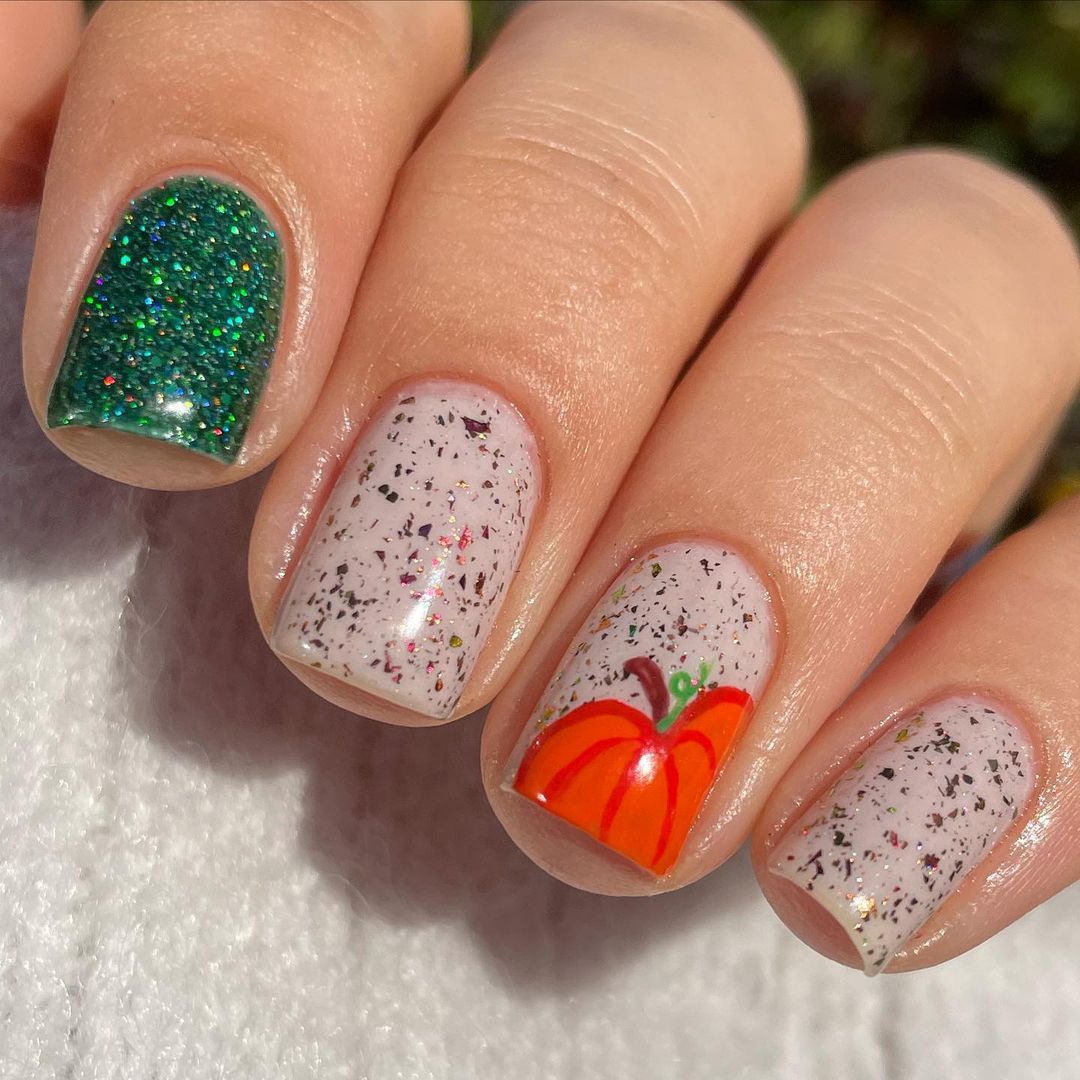
Consumables:
- Green glitter nail polish (e.g., OPI in “Fresh Frog of Bel Air”)
- White speckled polish for the base (e.g., KBShimmer in “Shell Shock”)
- Orange nail polish for the pumpkin (e.g., Essie in “Playing Koi”)
- Green and brown nail art pens for detailing (e.g., Sally Hansen I Heart Nail Art Pens)
- Top coat for durability and shine (e.g., Seche Vite Dry Fast Top Coat)
Creating the Look at Home:
- Apply the green glitter polish to the accent nails and the white speckled polish to the rest.
- Use the orange polish to paint a small pumpkin on one of the speckled nails.
- Add details to the pumpkin with green and brown nail art pens for the stem and vines.
- Finish with a top coat to protect the design and add a glossy finish.
Plaid and Pumpkins
This design features a mix of autumnal plaid and pumpkin accents on short nails. The combination of plaid patterns, ombre effects, and pumpkin motifs creates a cozy, seasonal look. The earthy tones of orange, black, and brown make this design perfect for fall.
Consumables:
- Orange, black, and white nail polishes for plaid and ombre effects (e.g., Essie in “Clambake”, OPI in “Black Onyx”, and Essie in “Blanc”)
- Black nail art pen for plaid lines and pumpkin details (e.g., Sally Hansen I Heart Nail Art Pens)
- Top coat for a long-lasting finish (e.g., Seche Vite Dry Fast Top Coat)
Creating the Look at Home:
- Apply the base colors: orange for ombre, black for solid, and white for plaid nails.
- Use a fine nail art brush or pen to create the plaid pattern with black and white lines on the accent nails.
- Paint small pumpkins on one of the plaid nails using orange polish and a black nail art pen for details.
- Seal the design with a top coat for extra shine and protection.
Elegant Pumpkin Glam
This nail design combines elegance and festive charm with long, coffin-shaped nails adorned with plaid patterns, glitter, and 3D pumpkin accents. The intricate details and luxurious gold accents make this design perfect for special fall events and Halloween parties.
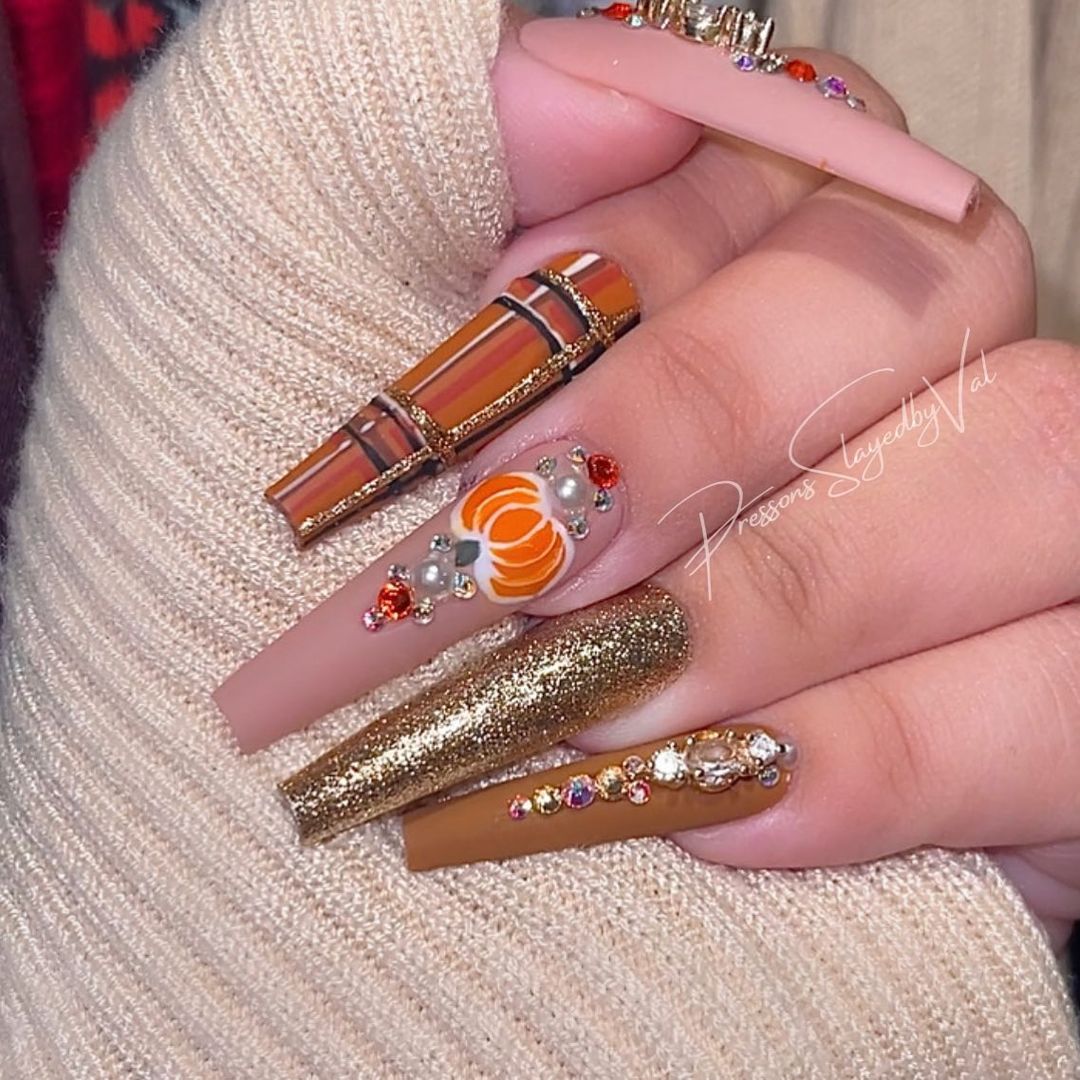
Consumables:
- Nude nail polish for the base (e.g., Essie in “Ballet Slippers”)
- Orange, brown, and gold polishes for plaid and glitter accents (e.g., OPI in “A Good Man-darin is Hard to Find”, Essie in “Playing Koi”, and China Glaze in “Golden Enchantment”)
- 3D nail art decorations, including pumpkins and rhinestones (e.g., Kiss Salon Secrets Nail Art Starter Kit)
- Top coat to lock in the design (e.g., Seche Vite Dry Fast Top Coat)
Creating the Look at Home:
- Apply a nude base coat to all nails and let it dry completely.
- Use orange, brown, and gold polishes to create plaid patterns on some nails and glitter accents on others.
- Add 3D pumpkins and rhinestones using nail glue for a luxurious finish.
- Apply a top coat to secure the decorations and add a glossy finish.
Save Pin

Subtle Pumpkin Chic
This nail design is all about subtle elegance with a hint of festive flair. The neutral grey base is complemented by delicate black pumpkin outlines and cable knit patterns. This design is perfect for those who prefer a more understated look while still embracing the autumn spirit.
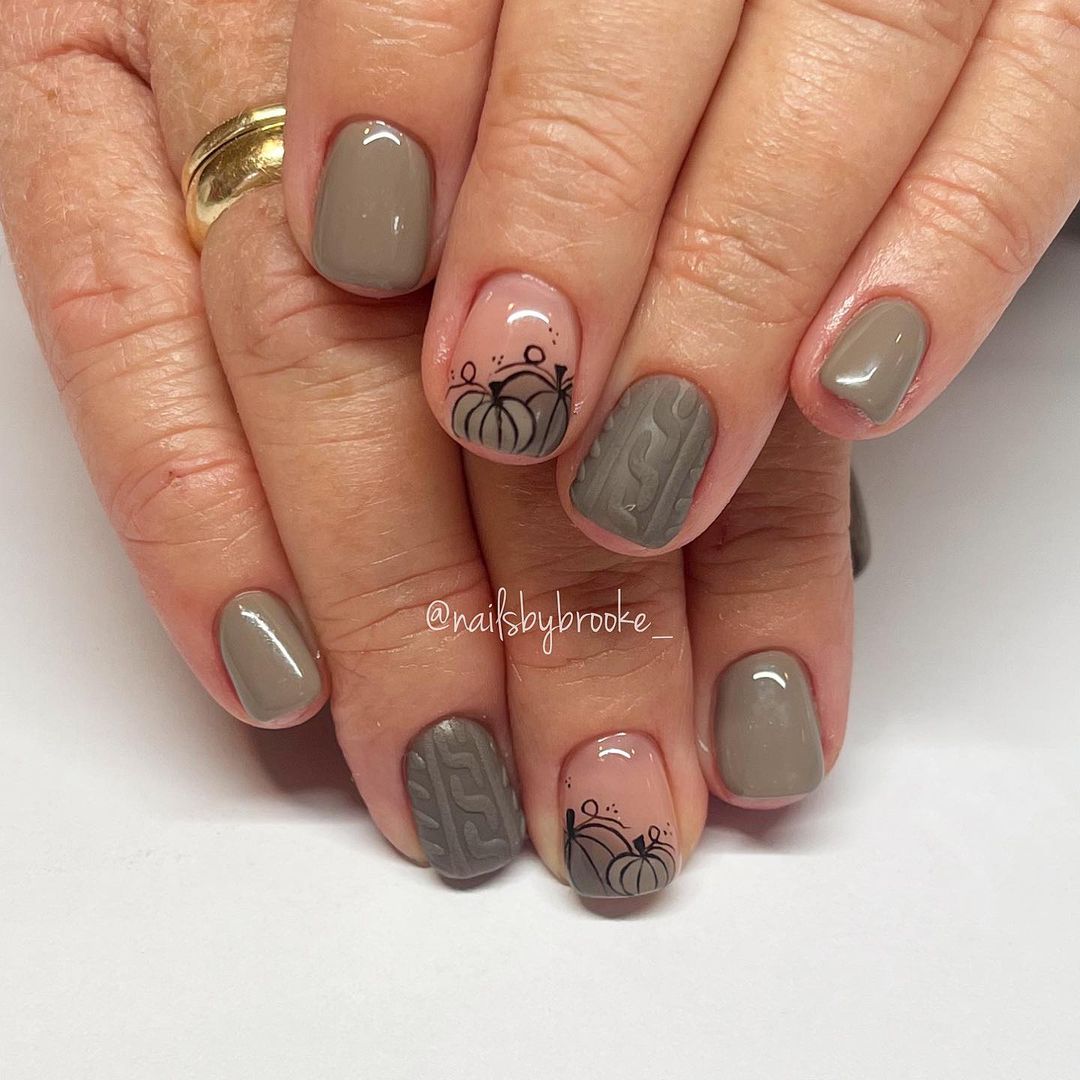
Consumables:
- Grey nail polish for the base (e.g., OPI in “I Can Never Hut Up”)
- Black nail art pen for pumpkin outlines and detailing (e.g., Sally Hansen I Heart Nail Art Pens)
- Top coat for a smooth finish (e.g., Seche Vite Dry Fast Top Coat)
Creating the Look at Home:
- Apply the grey nail polish as the base color and let it dry completely.
- Use a black nail art pen to draw delicate pumpkin outlines on one or two accent nails.
- Add cable knit patterns to some nails for a cozy, fall-inspired look.
- Seal the design with a top coat for added durability and shine.
Halloween Pumpkin Party
This fun and playful design features bright orange nails with cute black pumpkin and polka dot accents. The contrast between the vibrant orange and the black details creates a striking look, perfect for Halloween parties and autumn celebrations.
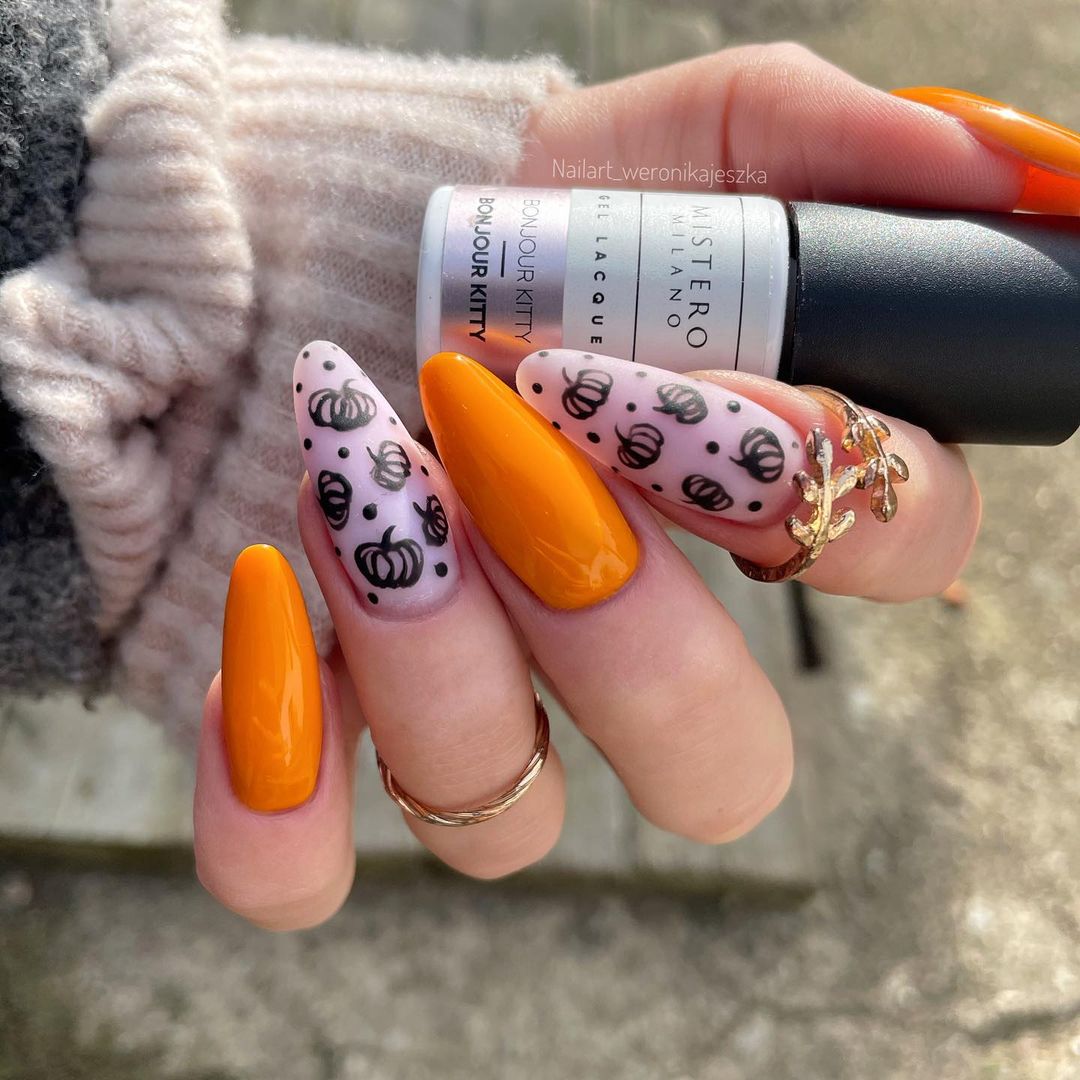
Consumables:
- Orange nail polish for the base (e.g., OPI in “A Good Man-darin is Hard to Find”)
- Black nail art pen for pumpkin and polka dot details (e.g., Sally Hansen I Heart Nail Art Pens)
- Top coat for a glossy finish (e.g., Seche Vite Dry Fast Top Coat)
Creating the Look at Home:
- Apply the orange nail polish to all nails and let it dry completely.
- Use a black nail art pen to draw pumpkins and polka dots on each nail.
- Finish with a top coat to protect the design and add a shiny finish.
Autumn Latte Nails
These nails bring together all the cozy vibes of fall with a mix of pumpkin, latte, and autumn leaf designs. The soft pastel colors and playful motifs make this design perfect for those who love everything about the fall season, from pumpkin spice lattes to falling leaves.
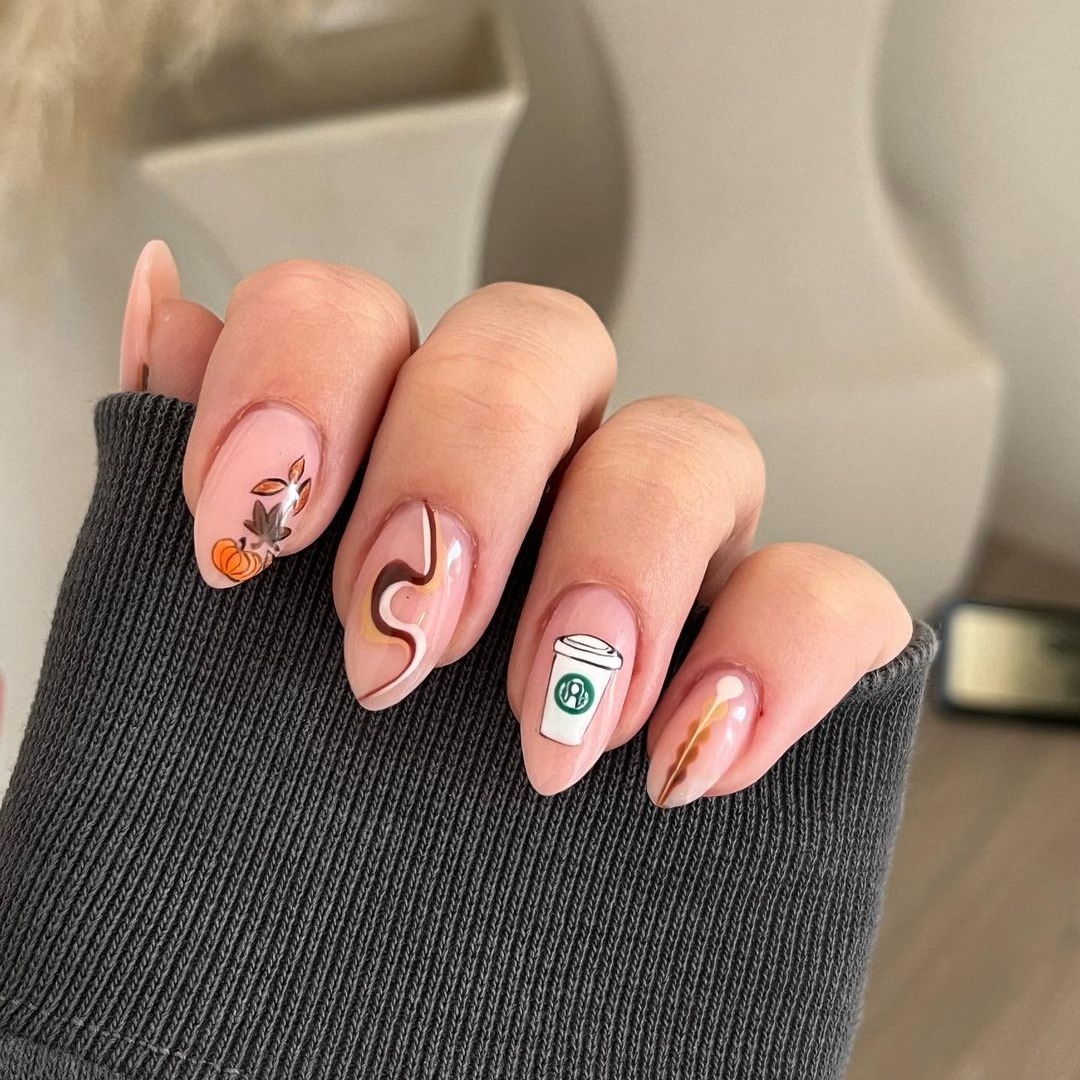
Consumables:
- Pastel nail polishes for the base colors (e.g., Essie in “Vanity Fairest” and “Fiji”)
- Brown, orange, and green nail polishes for the details (e.g., OPI in “Suzi Loves Cowboys”, Essie in “Playing Koi”, and Essie in “Mojito Madness”)
- Nail art brushes for detailed painting
- Top coat for a polished finish (e.g., Seche Vite Dry Fast Top Coat)
Creating the Look at Home:
- Apply the pastel base colors to each nail and let them dry completely.
- Use nail art brushes to paint pumpkins, latte cups, and autumn leaves on each nail.
- Add details with brown, orange, and green polishes to enhance the designs.
- Finish with a top coat to protect the artwork and add a glossy finish.
Burnt Orange and Copper Stiletto Nails
These striking stiletto nails feature a bold combination of burnt orange, copper chrome, and matte brown finishes. The sharp, elongated shape adds drama, while the autumn-inspired colors make a statement. This design is perfect for those who want to embrace fall with a touch of sophistication and edge.
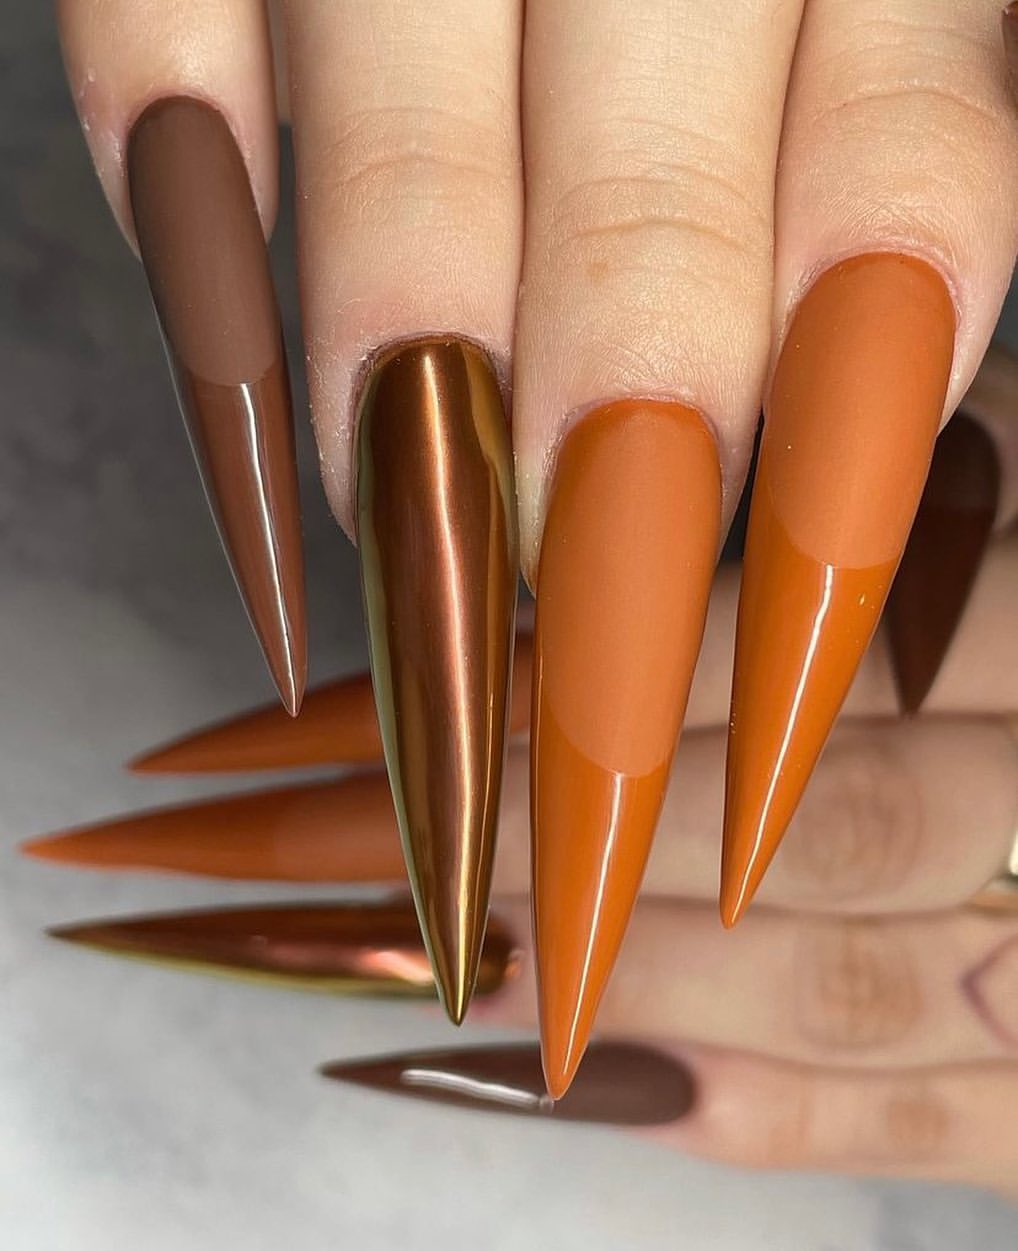
Consumables:
- Burnt orange nail polish (e.g., OPI in “It’s a Piazza Cake”)
- Copper chrome nail polish (e.g., Essie in “Penny Talk”)
- Matte brown nail polish (e.g., Zoya in “Louise” with a matte top coat)
- Top coat for a long-lasting finish (e.g., Seche Vite Dry Fast Top Coat)
Creating the Look at Home:
- Apply the burnt orange polish to some nails and copper chrome to others.
- Use the matte brown polish on a few nails, finishing with a matte top coat for the desired effect.
- Let each layer dry thoroughly before applying the next to ensure a smooth finish.
- Seal with a top coat on the non-matte nails for extra shine and durability.
Floral Pumpkin Bliss
This design features delicate hand-painted pumpkins and flowers on a clear base. The soft, pastel colors create a whimsical, feminine look perfect for the fall season. This design is ideal for those who love intricate nail art that captures the essence of autumn.
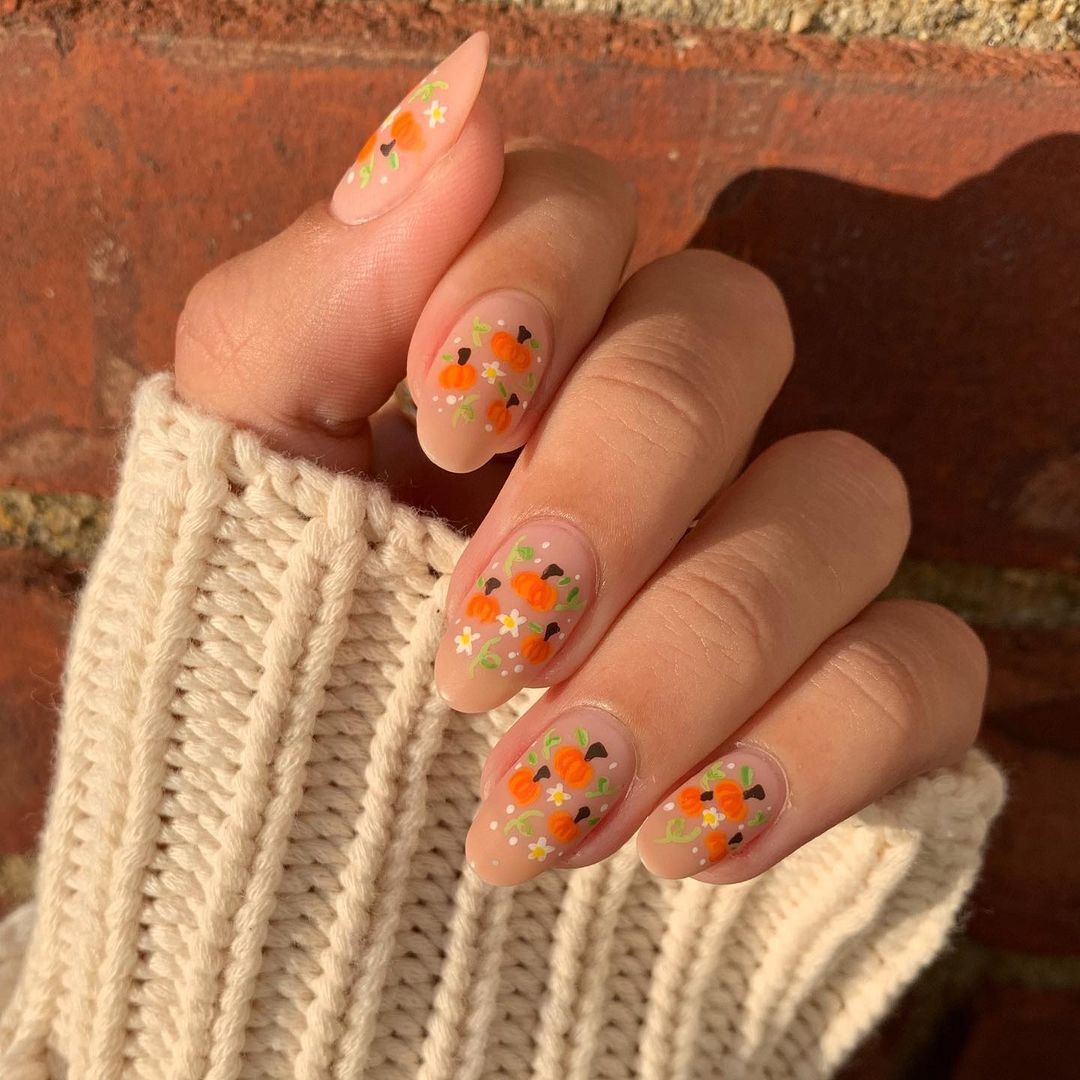
Consumables:
- Clear base polish (e.g., Essie in “Ballet Slippers”)
- Pastel orange, green, and white polishes for the pumpkins and flowers (e.g., OPI in “Crawfishin’ for a Compliment”, Essie in “Mint Candy Apple”, and OPI in “Alpine Snow”)
- Nail art brushes for detailed painting
- Top coat for protection (e.g., Seche Vite Dry Fast Top Coat)
Creating the Look at Home:
- Apply the clear base coat and let it dry.
- Use fine nail art brushes to paint small pumpkins and flowers in pastel colors.
- Add details with green and white polish for leaves and flower accents.
- Finish with a top coat to protect the design and add shine.
Spooky Pumpkin Webs
This Halloween-inspired design features a mix of spider webs, pumpkins, and glitter accents on coffin-shaped nails. The vibrant orange and black color scheme, combined with intricate white spider web designs, creates a spooky yet stylish look perfect for the Halloween season.
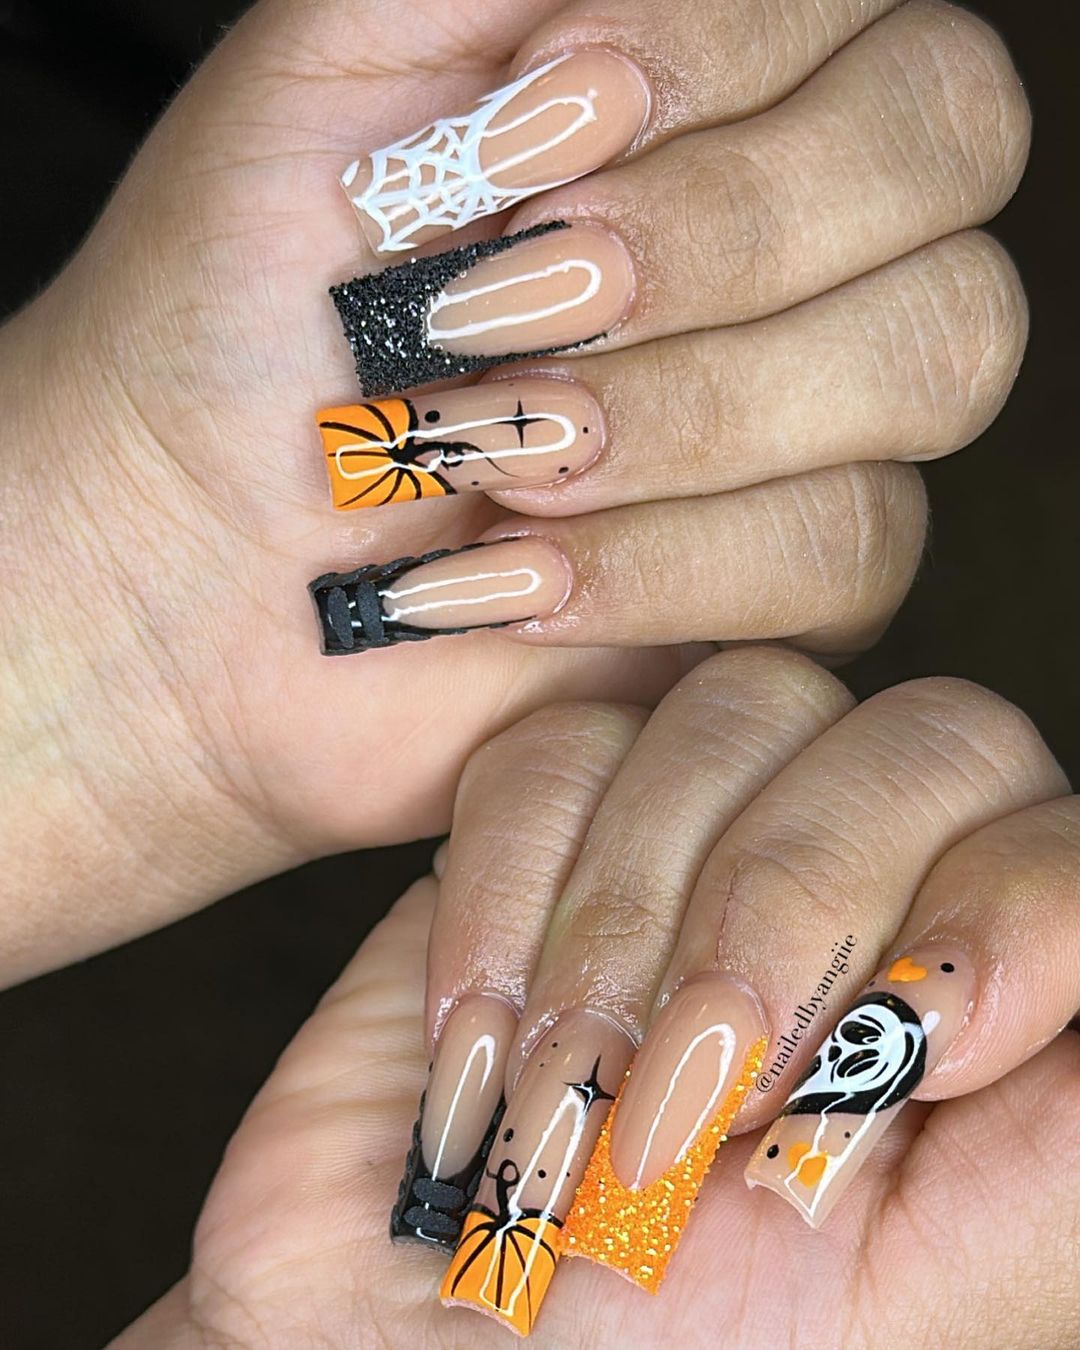
Consumables:
- Nude nail polish for the base (e.g., OPI in “Samoan Sand”)
- Black and orange nail polishes for the designs (e.g., Essie in “Licorice” and OPI in “It’s a Piazza Cake”)
- White nail art pen for spider webs (e.g., Sally Hansen I Heart Nail Art Pens)
- Black glitter polish for accent nails (e.g., China Glaze in “Some Like It Haute”)
- Top coat for durability (e.g., Seche Vite Dry Fast Top Coat)
Creating the Look at Home:
- Apply the nude base coat and let it dry.
- Use black and orange polishes to paint pumpkins and other Halloween motifs.
- Add white spider webs using a nail art pen for precision.
- Apply black glitter polish to some nails for added sparkle.
- Finish with a top coat to protect the design.
Glitter Pumpkin Sparkle
These nails are all about the glitter and glam. Featuring bright orange glitter polish and detailed pumpkin designs, this look is perfect for those who want to add some sparkle to their fall manicure. The combination of glitter and hand-painted pumpkins creates a festive, eye-catching design.
Consumables:
- Orange glitter nail polish (e.g., China Glaze in “I’m Not Lion”)
- Nude base polish for accent nails (e.g., Essie in “Ballet Slippers”)
- Orange and green nail polishes for pumpkins (e.g., OPI in “A Good Man-darin is Hard to Find” and Essie in “Mojito Madness”)
- Top coat for a shiny finish (e.g., Seche Vite Dry Fast Top Coat)
Creating the Look at Home:
- Apply the orange glitter polish to most nails and a nude base to accent nails.
- Use orange and green polishes to paint small pumpkins on the accent nails.
- Add details with a fine brush for a more refined look.
- Finish with a top coat to seal in the glitter and protect the design.
Multicolored Pumpkin Tips
This unique design features multicolored pumpkin tips on a nude base. The vibrant colors of orange, yellow, red, and purple create a playful and colorful look, perfect for celebrating the fall season. This design is great for those who love bold, artistic nail art.
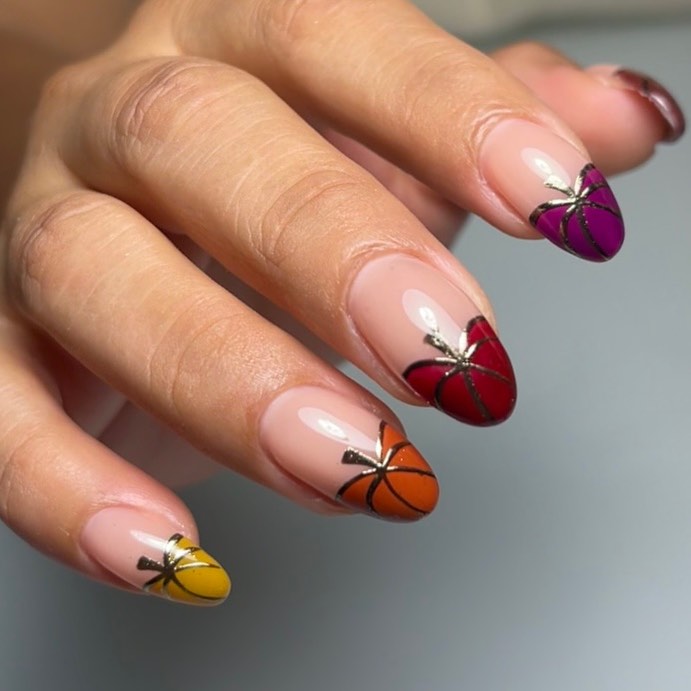
Consumables:
- Nude nail polish for the base (e.g., Essie in “Ballet Slippers”)
- Orange, yellow, red, and purple nail polishes for pumpkin tips (e.g., OPI in “A Good Man-darin is Hard to Find”, Essie in “Sole Mate”, OPI in “Big Apple Red”, and Essie in “Flowerista”)
- Black nail art pen for pumpkin outlines (e.g., Sally Hansen I Heart Nail Art Pens)
- Top coat for protection (e.g., Seche Vite Dry Fast Top Coat)
Creating the Look at Home:
- Apply the nude base coat and let it dry.
- Use various colored polishes to paint pumpkin tips on each nail.
- Outline the pumpkins with a black nail art pen for definition.
- Finish with a top coat to protect the design and add shine.
Golden Pumpkin Glam
This elegant design features golden pumpkin motifs on a white base, accented with sparkling rhinestones and glitter. The combination of gold, white, and orange creates a luxurious and festive look, perfect for special fall occasions.
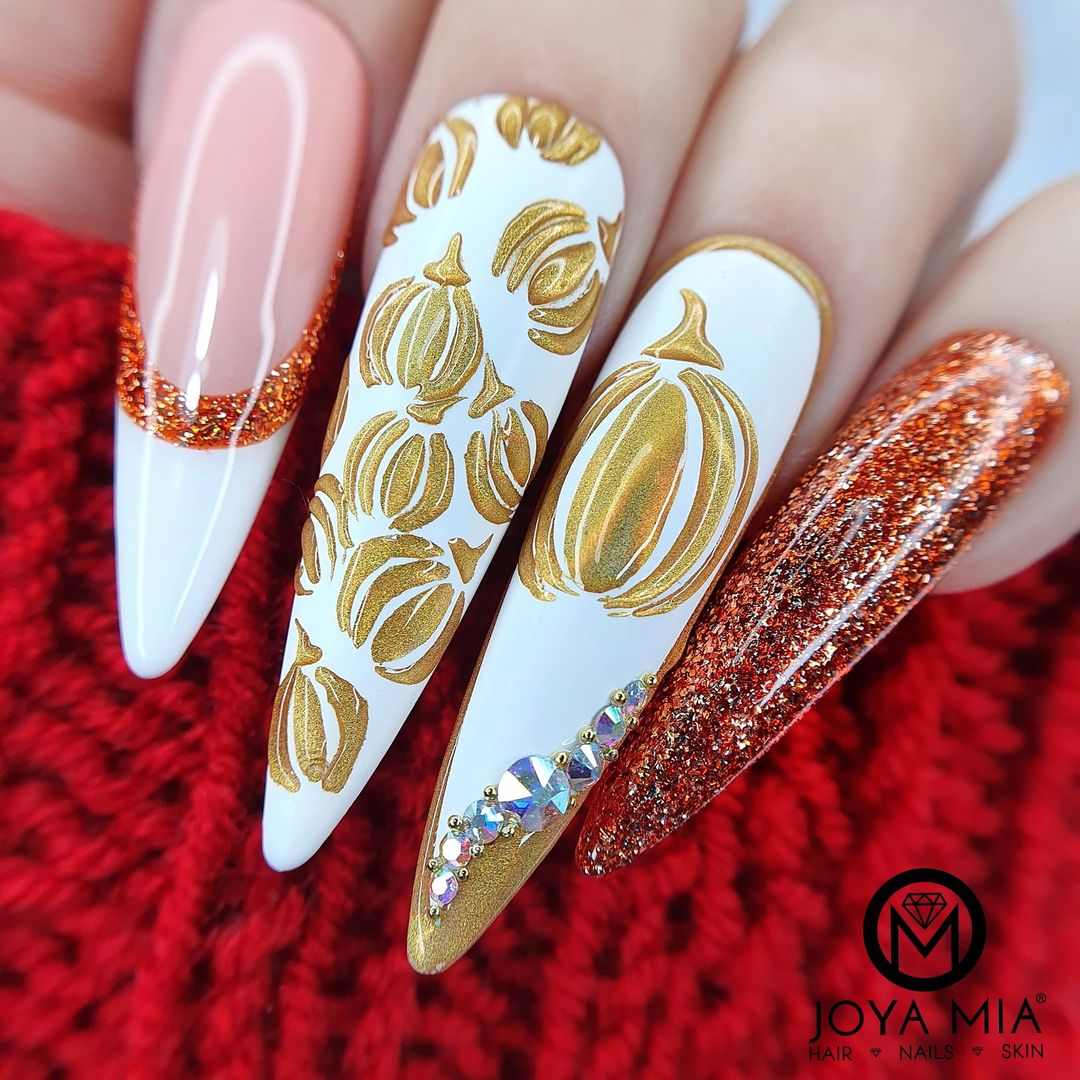
Consumables:
- White nail polish for the base (e.g., OPI in “Alpine Snow”)
- Gold nail polish for pumpkins (e.g., Essie in “Good as Gold”)
- Orange glitter polish for accents (e.g., China Glaze in “I’m Not Lion”)
- Rhinestones for extra sparkle (e.g., Kiss Salon Secrets Nail Art Starter Kit)
- Top coat for durability (e.g., Seche Vite Dry Fast Top Coat)
Creating the Look at Home:
- Apply the white base coat and let it dry.
- Use gold polish to paint pumpkins and add orange glitter accents.
- Apply rhinestones to some nails using nail glue for extra sparkle.
- Finish with a top coat to secure the design and add shine.
Pumpkin Glitter Tips
These adorable pumpkin glitter tips are perfect for adding a festive touch to your fall manicure. The design features cute pumpkins painted on the tips of each nail with a glittery orange finish, creating a playful and seasonal look. The clear base enhances the vibrant pumpkin designs, making them stand out beautifully.
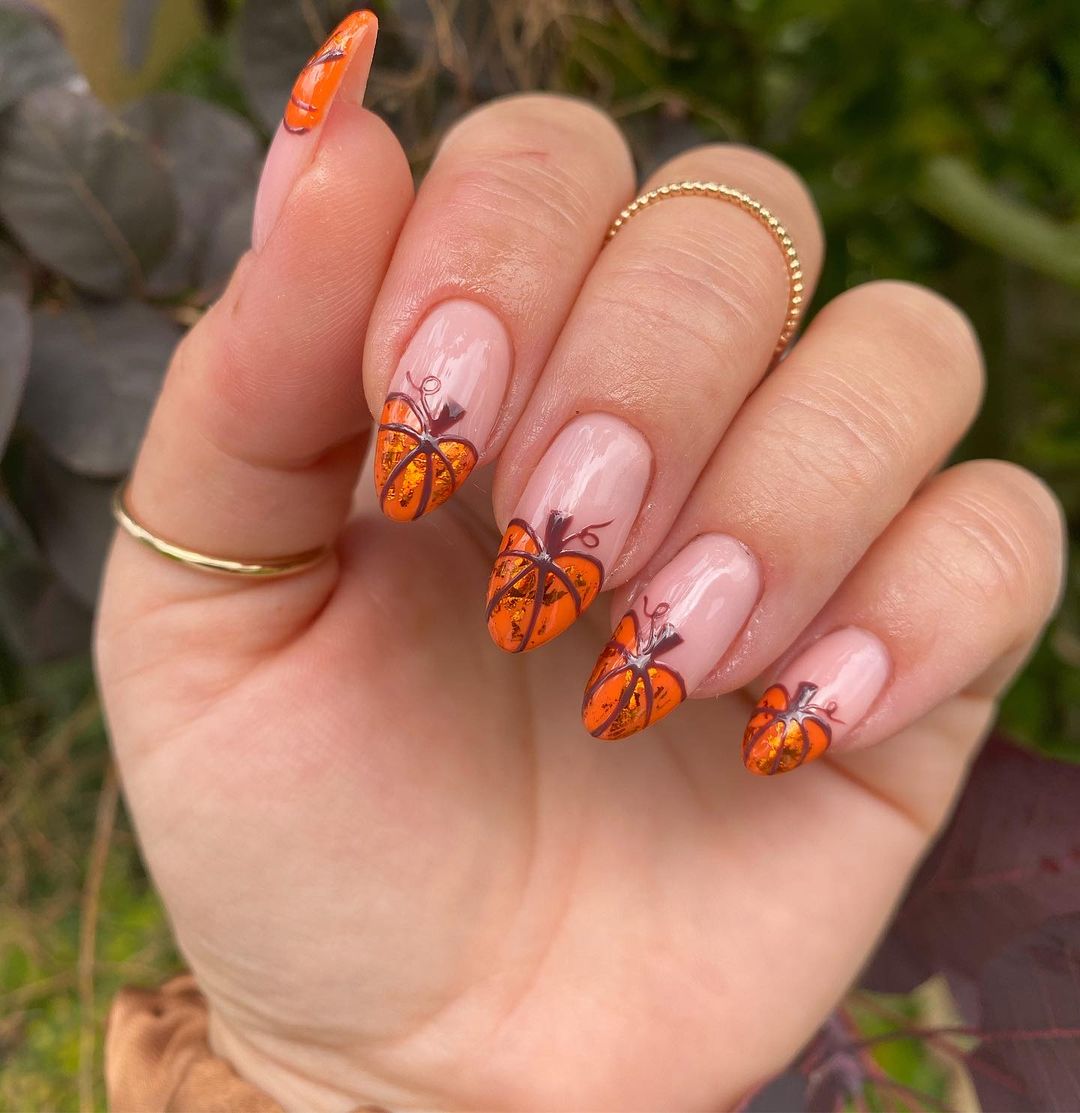
Consumables:
- Clear base polish (e.g., Essie in “Ballet Slippers”)
- Orange glitter polish for pumpkin tips (e.g., China Glaze in “I’m Not Lion”)
- Black and green nail art pens for outlining and detailing pumpkins (e.g., Sally Hansen I Heart Nail Art Pens)
- Top coat for a shiny finish (e.g., Seche Vite Dry Fast Top Coat)
Creating the Look at Home:
- Apply a clear base coat to all nails and let it dry.
- Use orange glitter polish to paint pumpkin tips on each nail.
- Outline the pumpkins with a black nail art pen and add green stems.
- Finish with a top coat to protect the design and add shine.
Elegant Gold Pumpkin French Tips
This elegant nail design features a sophisticated twist on the classic French tip with gold pumpkin accents. The nude base combined with gold detailing and plaid patterns adds a touch of luxury, perfect for fall events or a chic everyday look.
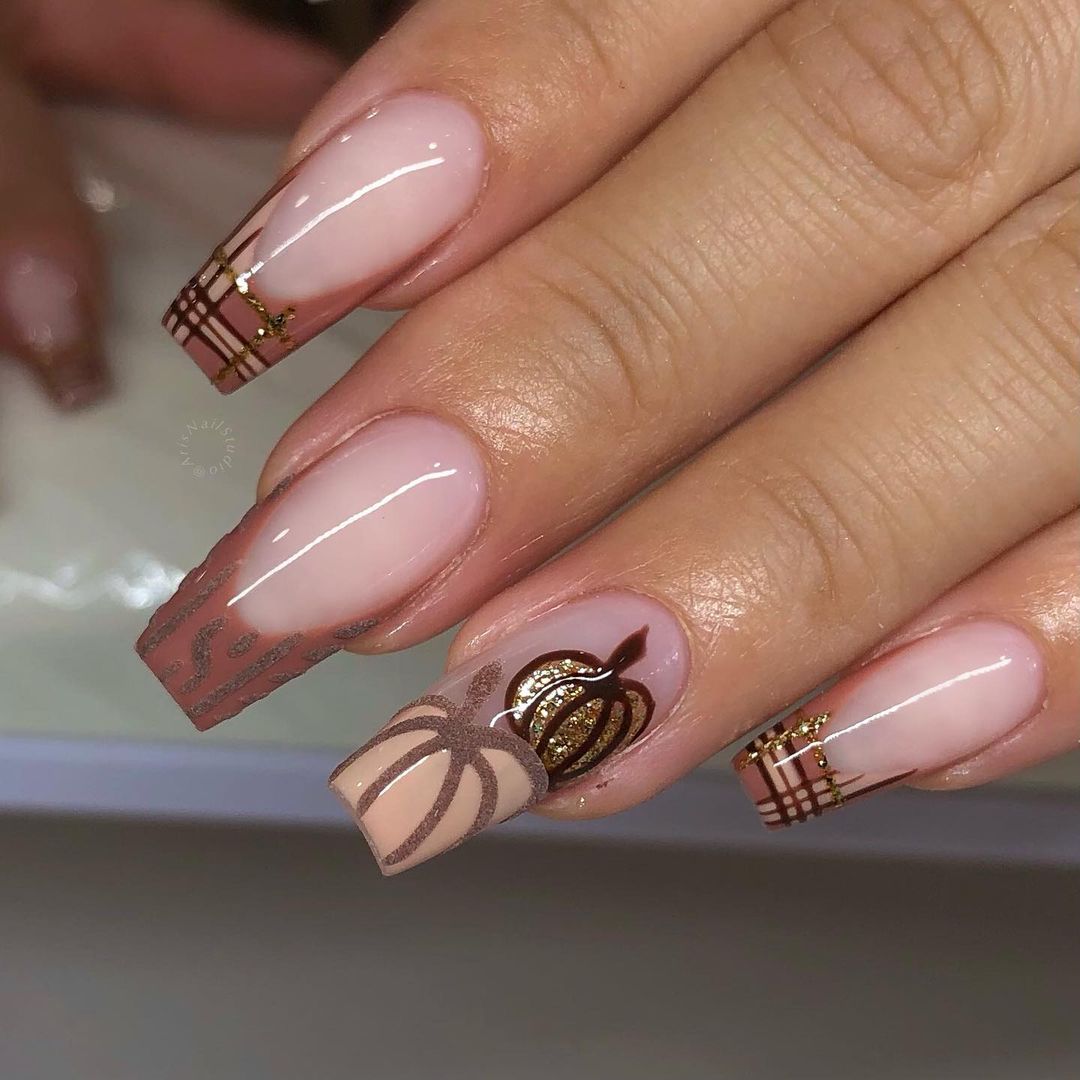
Consumables:
- Nude nail polish for the base (e.g., Essie in “Ballet Slippers”)
- Gold nail polish for pumpkin accents (e.g., Essie in “Good as Gold”)
- Brown nail polish for plaid patterns (e.g., OPI in “Chocolate Moose”)
- Top coat for durability (e.g., Seche Vite Dry Fast Top Coat)
Creating the Look at Home:
- Apply the nude base coat and let it dry.
- Use gold polish to paint pumpkins on the tips and brown polish for plaid patterns.
- Add details with a fine nail art brush for precision.
- Finish with a top coat to protect the design and add a glossy finish.
Bold Pumpkin and Plaid Combo
This striking design features a bold combination of pumpkin motifs and plaid patterns in vibrant orange and blue. The mix of colors and patterns creates a playful and eye-catching look, perfect for those who love to make a statement with their nails.
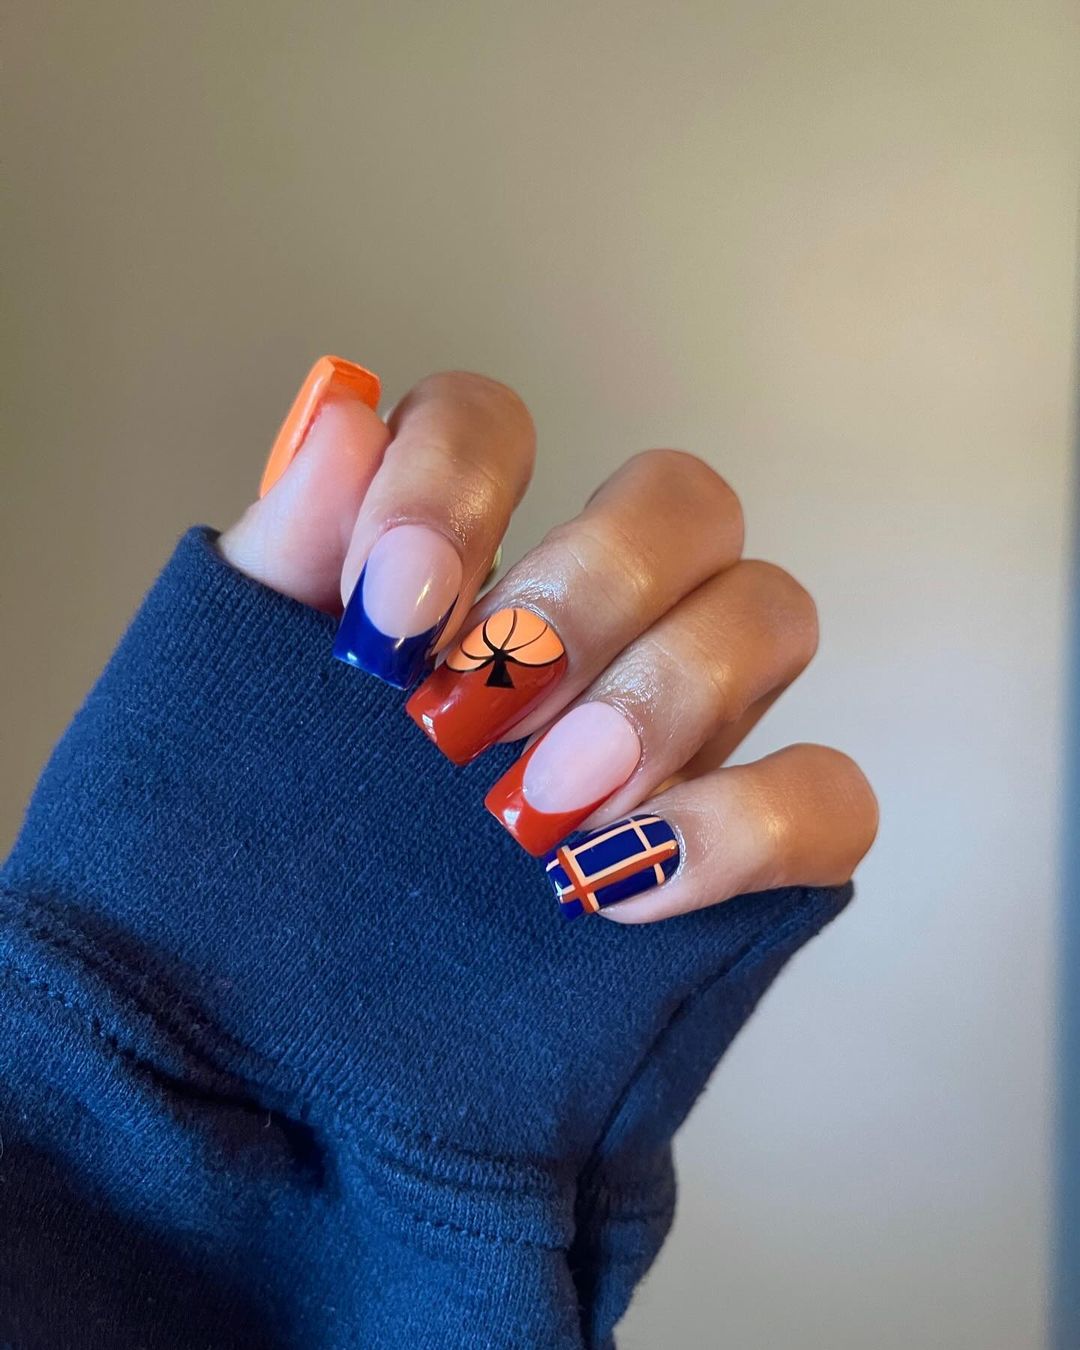
Consumables:
- Nude nail polish for the base (e.g., Essie in “Ballet Slippers”)
- Orange and blue nail polishes for designs (e.g., Essie in “Clambake” and OPI in “My Favorite Gal Pal”)
- Black nail art pen for pumpkin outlines (e.g., Sally Hansen I Heart Nail Art Pens)
- Top coat for protection (e.g., Seche Vite Dry Fast Top Coat)
Creating the Look at Home:
- Apply the nude base coat and let it dry.
- Use orange and blue polishes to paint pumpkins and plaid patterns on each nail.
- Outline the pumpkins with a black nail art pen for definition.
- Finish with a top coat to protect the design and add shine.
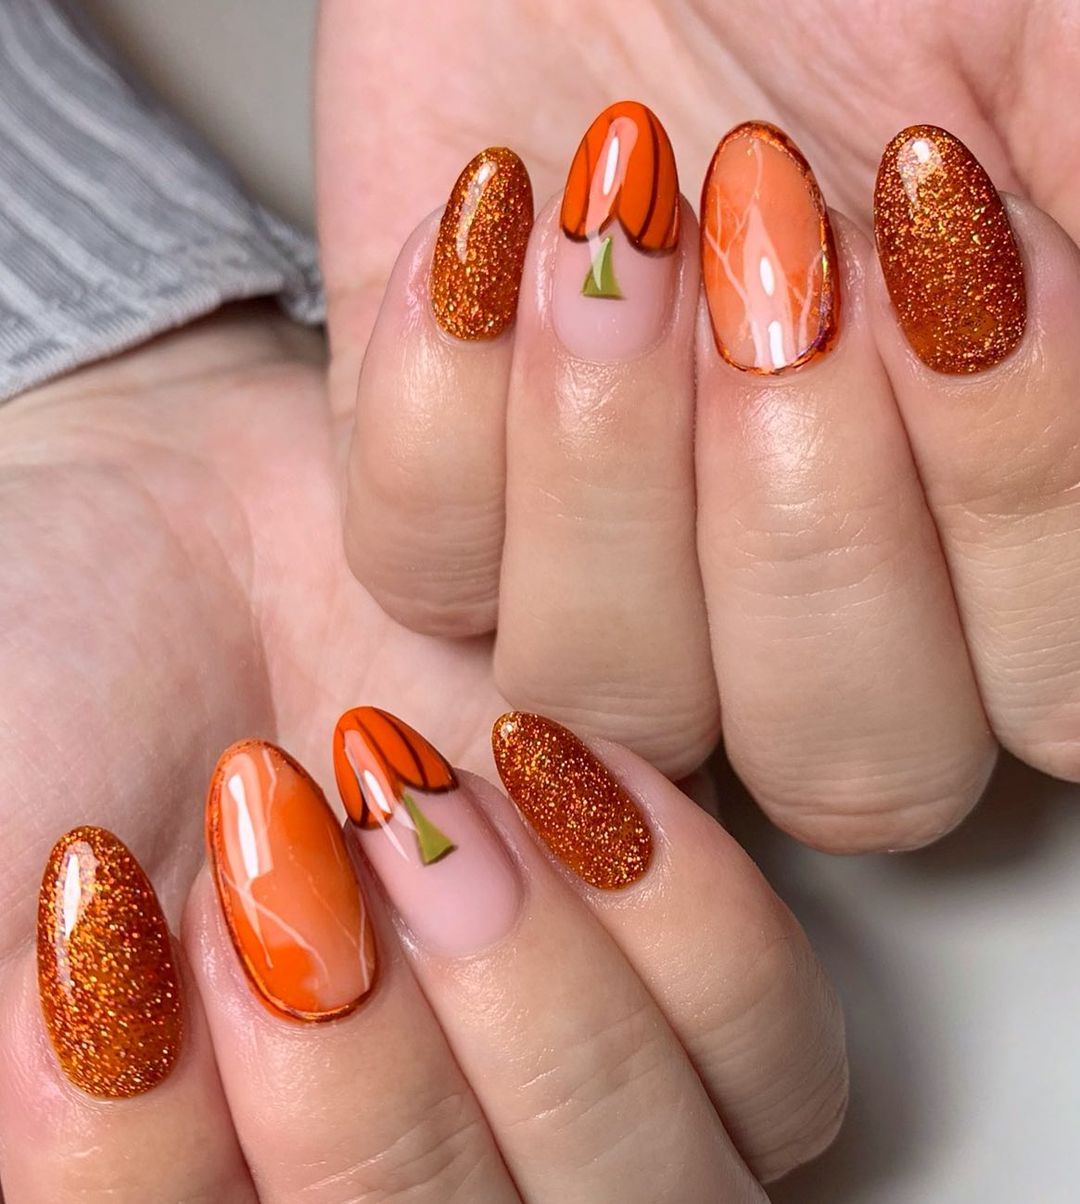
Orange and Gold Marble Nails
These nails feature a stunning mix of orange polish with gold marble accents. The combination of bright orange and delicate gold veining creates a luxurious and festive look, perfect for fall celebrations.
Consumables:
- Orange nail polish for the base (e.g., OPI in “A Good Man-darin is Hard to Find”)
- Gold nail polish for marble accents (e.g., Essie in “Good as Gold”)
- Clear base polish for the marble effect (e.g., Essie in “Ballet Slippers”)
- Top coat for durability (e.g., Seche Vite Dry Fast Top Coat)
Creating the Look at Home:
- Apply the orange base coat and let it dry.
- Use gold polish and a thin brush to create marble veining on some nails.
- Apply a clear base polish over the gold accents to blend them in.
- Finish with a top coat to seal the design and add a glossy finish.
Fall Harvest Nails
This playful design showcases a mix of autumn icons, including pumpkins, apples, acorns, and warm drinks. The matte finish gives the nails a cozy, fall-inspired look perfect for celebrating the season.
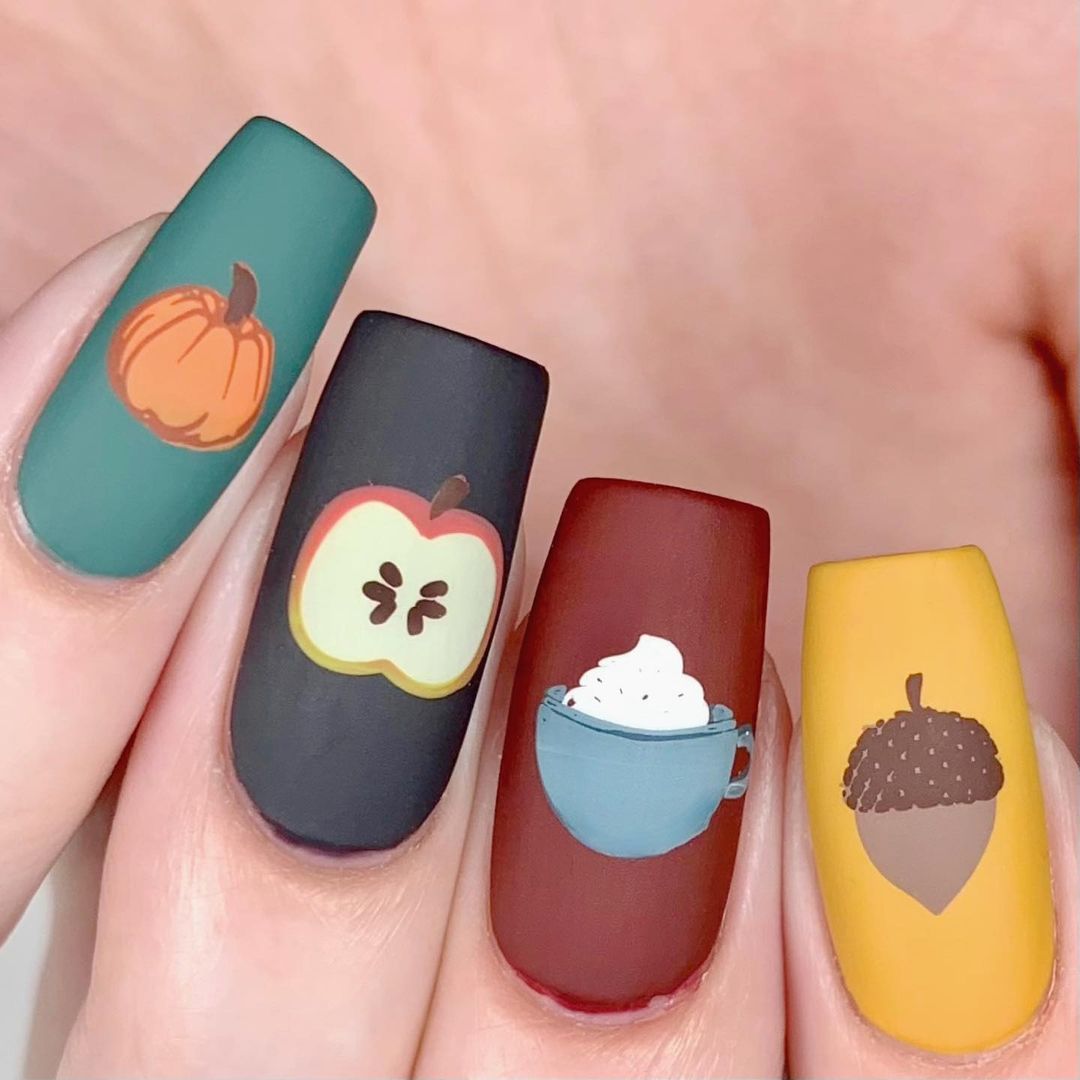
Consumables:
- Matte top coat for a smooth finish (e.g., OPI Matte Top Coat)
- Green, black, red, brown, and yellow polishes for designs (e.g., Essie in “Off Tropic”, “Licorice”, “Fifth Avenue”, “Chocolate Cakes”, and “Sunshine State of Mind”)
- Nail art brushes for detailed painting
- Top coat for protection (e.g., Seche Vite Dry Fast Top Coat)
Creating the Look at Home:
- Apply the matte top coat to all nails and let it dry.
- Use different colored polishes to paint pumpkins, apples, acorns, and warm drinks on each nail.
- Add details with a fine nail art brush for precision.
- Finish with a matte top coat to protect the design.
Ombre Pumpkin Nails
These vibrant ombre nails transition from deep brown to bright orange, capturing the essence of fall colors. The smooth gradient effect paired with a glossy finish makes this design stand out, perfect for autumn.
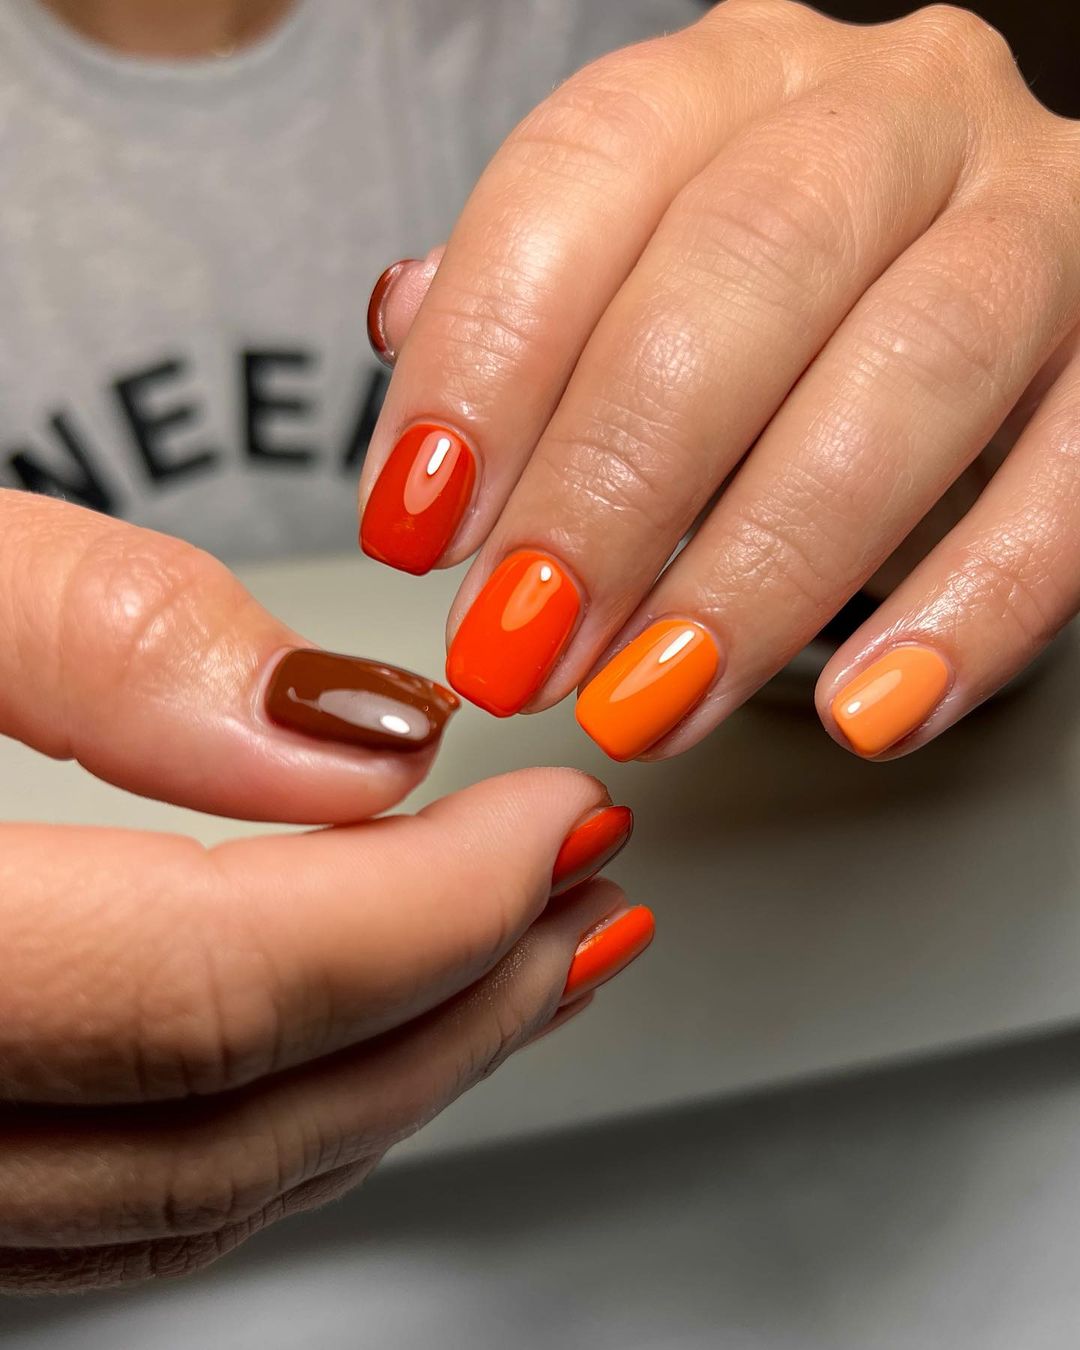
Consumables:
- Brown, orange, and yellow nail polishes for the ombre effect (e.g., OPI in “Suzi Loves Cowboys”, Essie in “Playing Koi”, and “Sunshine State of Mind”)
- Sponge for blending colors
- Top coat for a glossy finish (e.g., Seche Vite Dry Fast Top Coat)
Creating the Look at Home:
- Apply the brown polish as the base color and let it dry.
- Use a sponge to blend the orange and yellow polishes into the brown for a gradient effect.
- Repeat the sponging until the desired ombre effect is achieved.
- Finish with a top coat to protect the design and add shine.
Golden Pumpkin Accent Nails
These nails feature a bright orange base with detailed pumpkin and leaf accents on one nail. The intricate design and bold colors make this manicure perfect for autumn, adding a festive touch to any look.
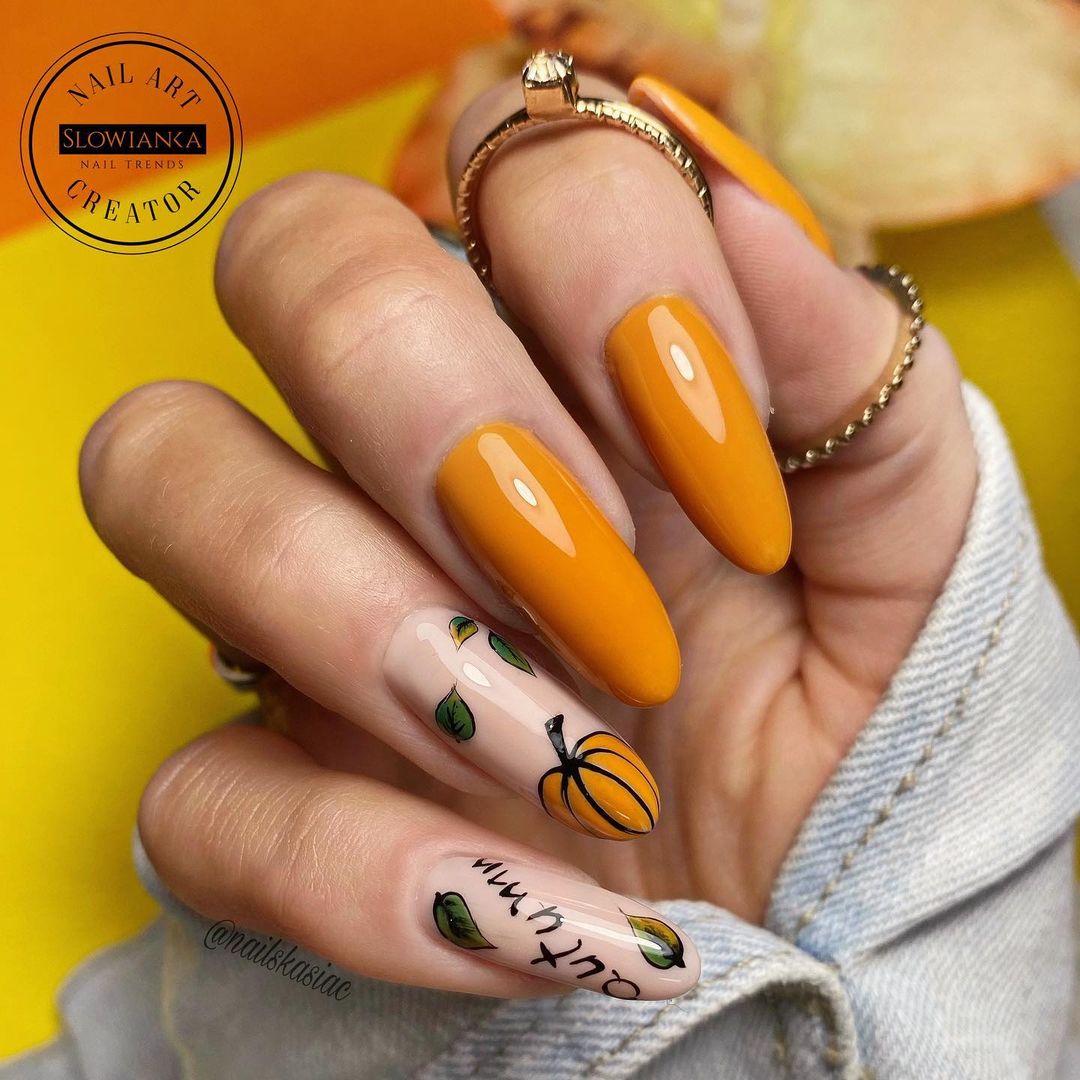
Consumables:
- Orange nail polish for the base (e.g., OPI in “A Good Man-darin is Hard to Find”)
- Black and green nail art pens for pumpkin and leaf details (e.g., Sally Hansen I Heart Nail Art Pens)
- Top coat for a shiny finish (e.g., Seche Vite Dry Fast Top Coat)
Creating the Look at Home:
- Apply the orange base coat to all nails and let it dry.
- Use black and green nail art pens to paint pumpkins and leaves on one accent nail.
- Add details with a fine brush for a more refined look.
- Finish with a top coat to protect the design and add shine.
FAQ
Q: How can I make my nail designs last longer?
A: To extend the life of your nail art, always use a high-quality base coat and top coat. Avoid exposing your nails to harsh chemicals and wear gloves when doing chores.
Q: Can I use regular nail polish for detailed designs?
A: Yes, but for more precise and intricate designs, nail art pens or brushes can be more effective.
Q: How do I remove glitter nail polish without damaging my nails?
A: Soak a cotton ball in acetone-based nail polish remover, place it on your nail, and wrap it with aluminum foil. Leave it for a few minutes before gently removing the foil and polish.
By following these tips and tricks, you can create stunning fall pumpkin nail designs that capture the essence of autumn. Whether you prefer a subtle look or something more glamorous, there’s a design here to suit every style. Happy painting!
Save Pin