Fall Season Nails 2024: 27 Stunning Ideas
The fall season is a perfect time to switch up your nail game with new and trendy designs. As the leaves change color, so too should your manicure, reflecting the vibrant and cozy vibes of autumn. Ready to get inspired for fall season nails 2024? Let’s dive into the latest trends and ideas that will keep your nails looking fabulous all season long.
Golden Glamour
When it comes to making a statement, nothing beats a touch of gold. This manicure combines elegant almond-shaped nails with a luxurious blend of nude and gold accents, creating a sophisticated look perfect for any fall event. The glossy finish adds a final touch of glamour that is hard to ignore.

- Nude base coat: OPI Nail Lacquer in “Samoan Sand”
- Gold striping tape: Born Pretty Gold Nail Art Striping Tape
- Glossy top coat: Essie Gel Setter Top Coat
- Nail file: OPI Crystal Nail File
- Nail art brush: Beetles Gel Polish Nail Art Brush Set
How to Create at Home:
- Start with a clean, dry nail. Apply a base coat to protect your natural nails.
- Apply two coats of nude polish, letting each coat dry completely.
- Use gold striping tape to create diagonal lines across the nails.
- Seal the design with a glossy top coat and let it dry thoroughly.
Heartfelt Blue
This design is all about the delicate balance between simplicity and charm. Featuring a classic French tip with a twist, this look incorporates blue glitter and tiny heart accents for a playful yet elegant finish. Perfect for those who love to keep their nails stylish yet understated.

- Nude base coat: Sally Hansen Color Therapy in “Re-Nude”
- Blue glitter polish: China Glaze Nail Lacquer in “Dorothy Who?”
- Heart decals: Mefun Nail Art Heart Stickers
- Top coat: Seche Vite Dry Fast Top Coat
- Nail file: Revlon Compact Nail File Set
- Dotting tool: PUEEN 5Pcs Nail Art Dotting Painting Drawing Pen
How to Create at Home:
- Begin with clean, dry nails. Apply a base coat to each nail.
- Paint a thin line of blue glitter polish along the tip of each nail for a French tip effect.
- Use a dotting tool to place heart decals on the nails.
- Apply a top coat to seal the design and ensure longevity.
Dreamy Marble
Embrace the ethereal beauty of marble nails with this stunning blue and white design. The soft blend of colors creates a dreamy effect, reminiscent of a serene autumn sky. This look is both elegant and unique, making it a standout choice for the season.

- Base coat: Orly Bonder Base Coat
- White polish: Zoya Nail Polish in “Purity”
- Blue polish: Essie Nail Polish in “Butler Please”
- Nail art brush: Makartt Nail Art Brushes Set
- Top coat: INM Out The Door Top Coat
- Nail file: Tweezerman Neon Filemates
- Dotting tool: KADS Nail Art Dotting Pen
How to Create at Home:
- Start with clean nails and apply a base coat.
- Apply a coat of white polish and let it dry completely.
- Using a nail art brush, apply small dots of blue polish on each nail.
- Blend the blue and white polish with a dotting tool to create a marble effect.
- Finish with a top coat to seal your design and add a glossy finish.
Artistic Waves
This artistic wave design is a true masterpiece, blending a spectrum of colors in a mesmerizing pattern. The square shape of the nails provides a perfect canvas for the intricate details. The combination of turquoise, yellow, and white swirls creates a striking and vibrant look, ideal for making a statement this fall.

- Nude base coat: Essie Nail Polish in “Ballet Slippers”
- Turquoise polish: Sally Hansen Miracle Gel in “Sugar Fix”
- Yellow polish: OPI Nail Lacquer in “Sun, Sea, and Sand in My Pants”
- White polish: Orly Nail Lacquer in “White Tips”
- Top coat: Seche Vite Dry Fast Top Coat
- Nail art brush: Winstonia Fine Liner Nail Art Brush
How to Create at Home:
- Start with clean, dry nails. Apply a nude base coat to each nail and let it dry completely.
- Use a fine nail art brush to create wave patterns with turquoise, yellow, and white polishes.
- Blend the colors gently to achieve a smooth gradient effect.
- Seal the design with a top coat to protect your artwork and add shine.
Save Pin

Pink Elegance
This design features a striking combination of matte and glossy finishes, with a vibrant pink accent nail and intricate rhinestone detailing. The almond shape adds a touch of elegance, while the different textures make this manicure stand out.

- Nude matte polish: OPI Matte Top Coat over any nude polish
- Pink polish: Essie Nail Polish in “Mod Square”
- Rhinestones: Swarovski Flat Back Crystals
- Nail glue: KDS Nail Tip Glue
- Top coat: INM Out The Door Top Coat
- Nail file: Tweezerman Neon Filemates
How to Create at Home:
- Begin with clean, dry nails. Apply a nude polish, then a matte top coat to achieve the desired finish.
- Apply two coats of pink polish to the accent nail and let it dry completely.
- Use nail glue to place rhinestones on the desired nails, creating a sophisticated design.
- Seal the rhinestones with a top coat to ensure they stay in place.
Icy Blue Ombre
This icy blue ombre design is both cool and chic, featuring a subtle gradient from white to blue with a touch of glitter. The square shape and glossy finish give this look a modern edge, perfect for the fall season.

- Base coat: Orly Bonder Base Coat
- White polish: Zoya Nail Polish in “Purity”
- Blue polish: Essie Nail Polish in “Butler Please”
- Glitter polish: China Glaze Nail Lacquer in “Fairy Dust”
- Top coat: Seche Vite Dry Fast Top Coat
- Makeup sponge: Beauty Blender Makeup Sponge
How to Create at Home:
- Start with a clean base and apply a base coat to protect your nails.
- Apply a coat of white polish and let it dry completely.
- Using a makeup sponge, dab blue polish onto the tips of the nails, blending it towards the middle to create an ombre effect.
- Add a touch of glitter polish over the gradient for a sparkling finish.
- Seal the design with a top coat to protect and add shine.
Elegant Grey and Pink
This sophisticated nail design features a combination of matte grey and soft pink tips, enhanced by intricate rhinestone detailing. The coffin shape adds a dramatic flair, making this manicure perfect for a stylish and elegant look.

- Matte grey polish: OPI Nail Lacquer in “Suzi Talks with Her Hands”
- Pink polish: Essie Nail Polish in “Fiji”
- Rhinestones: Swarovski Flat Back Crystals
- Nail glue: KDS Nail Tip Glue
- Top coat: INM Out The Door Top Coat
- Nail file: Revlon Compact Nail File Set
How to Create at Home:
- Start with clean, dry nails. Apply a matte grey polish to each nail.
- Once the grey polish is dry, carefully apply the pink polish to the tips of the nails.
- Use nail glue to place rhinestones on the nails, creating an intricate design.
- Seal the entire design with a top coat to ensure longevity.
Bold Black and Rhinestones
This striking design combines the elegance of matte black with the sparkle of rhinestones, creating a bold and luxurious look. The coffin shape adds to the overall drama, making this manicure a true statement piece.

- Matte black polish: Sally Hansen Miracle Gel in “Blacky O”
- Clear polish for base: OPI Nail Lacquer in “Alpine Snow”
- Rhinestones: Swarovski Flat Back Crystals
- Nail glue: KDS Nail Tip Glue
- Top coat: Essie Gel Setter Top Coat
- Nail file: Tweezerman Neon Filemates
How to Create at Home:
- Begin with clean, dry nails. Apply a clear base coat to each nail.
- Apply matte black polish to the tips of the nails, creating a French tip effect.
- Use nail glue to attach rhinestones along the line where the black and clear polish meet.
- Seal with a top coat to protect your design and add shine.
Cosmic Dreams
This dreamy design features a vibrant blend of purples, pinks, and oranges, creating a cosmic-inspired look. The rounded shape adds a softer, more delicate touch, perfect for a whimsical fall manicure.

- Base coat: Orly Bonder Base Coat
- Purple polish: Zoya Nail Polish in “Perrie”
- Pink polish: Essie Nail Polish in “Mod Square”
- Orange polish: OPI Nail Lacquer in “Sun, Sea, and Sand in My Pants”
- Top coat: Seche Vite Dry Fast Top Coat
- Nail art brush: Winstonia Fine Liner Nail Art Brush
How to Create at Home:
- Start with a clean base and apply a base coat.
- Use a nail art brush to create swirls and dots with the purple, pink, and orange polishes.
- Blend the colors gently to achieve a seamless look.
- Finish with a top coat to protect and add a glossy finish.
Save Pin

Retro Waves
This fun and colorful design features a retro-inspired wave pattern in shades of green, orange, and blue. The oval shape complements the playful design, making this manicure perfect for adding a pop of color to your fall look.
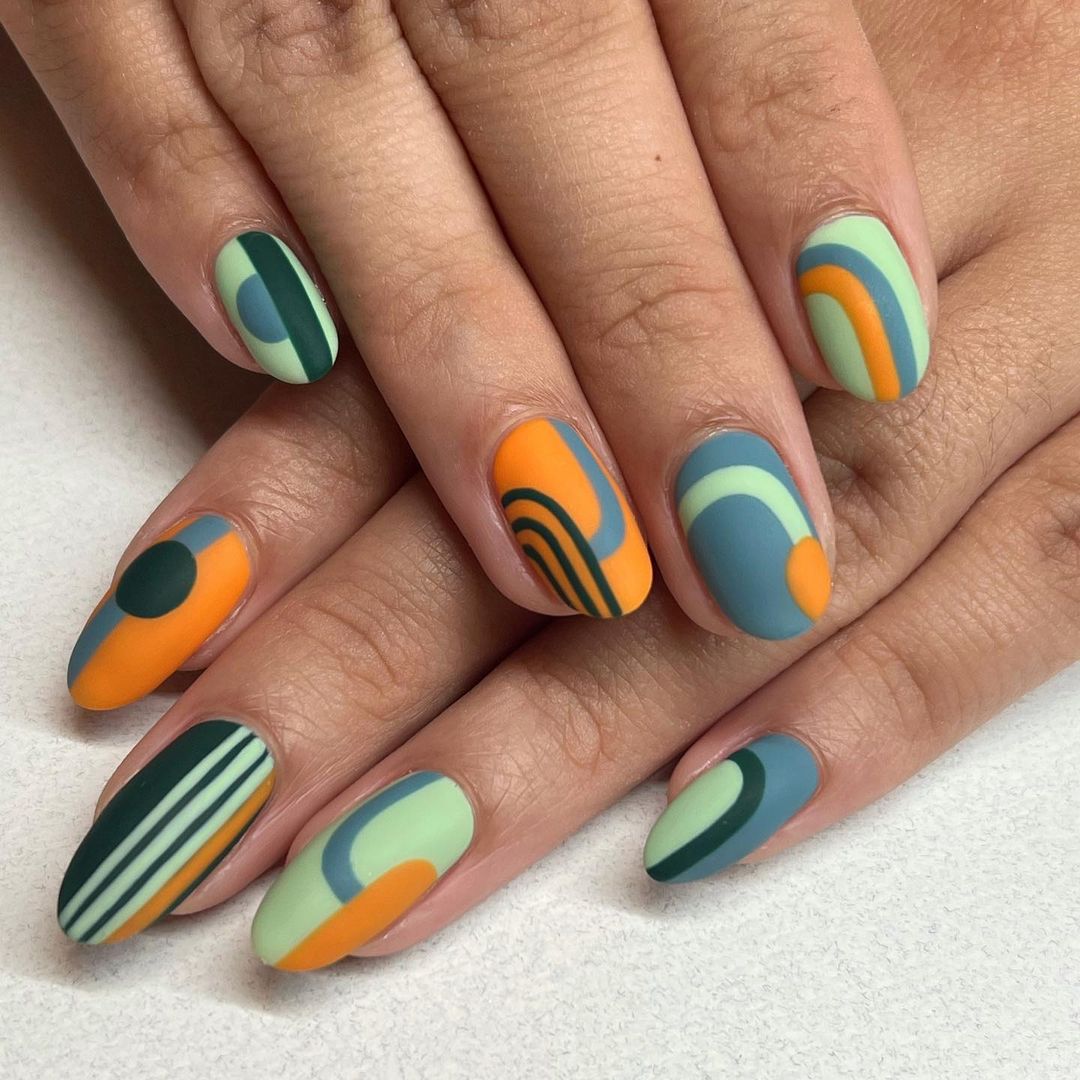
- Nude base coat: Essie Nail Polish in “Ballet Slippers”
- Green polish: Sally Hansen Miracle Gel in “Jaded”
- Orange polish: OPI Nail Lacquer in “Sun, Sea, and Sand in My Pants”
- Blue polish: Essie Nail Polish in “Butler Please”
- Top coat: INM Out The Door Top Coat
- Nail art brush: Makartt Nail Art Brushes Set
How to Create at Home:
- Start with clean, dry nails. Apply a nude base coat to each nail and let it dry completely.
- Use a fine nail art brush to create wave patterns with green, orange, and blue polishes.
- Blend the colors gently to achieve a smooth gradient effect.
- Seal the design with a top coat to protect your artwork and add shine.
Neon Geometry
This vibrant and geometric nail design combines neon yellow and blue with a nude base, creating a striking and modern look. The almond shape adds an elegant touch, making this manicure a standout choice for the fall season.
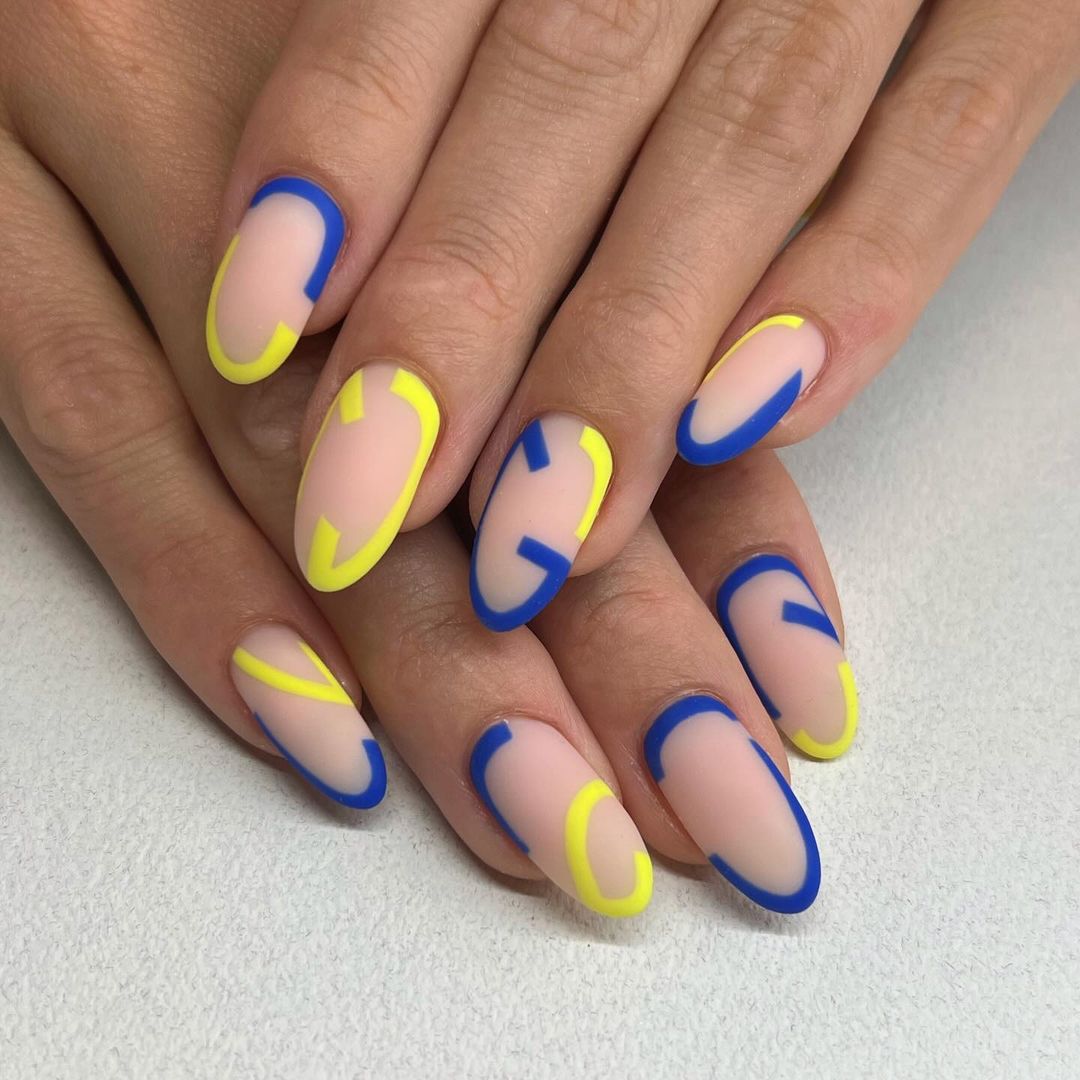
- Nude base coat: OPI Nail Lacquer in “Samoan Sand”
- Neon yellow polish: China Glaze Nail Lacquer in “Celtic Sun”
- Blue polish: Essie Nail Polish in “Butler Please”
- Top coat: Seche Vite Dry Fast Top Coat
- Nail art brush: Beetles Gel Polish Nail Art Brush Set
How to Create at Home:
- Begin with clean, dry nails. Apply a nude base coat to each nail.
- Use a fine nail art brush to create geometric patterns with neon yellow and blue polishes.
- Ensure each layer is dry before adding more details to prevent smudging.
- Finish with a top coat to seal and protect the design.
Golden Feathers
This luxurious design features a golden feather pattern on a matte background, creating a sophisticated and elegant look. The almond shape adds to the overall elegance, making this manicure perfect for special occasions.
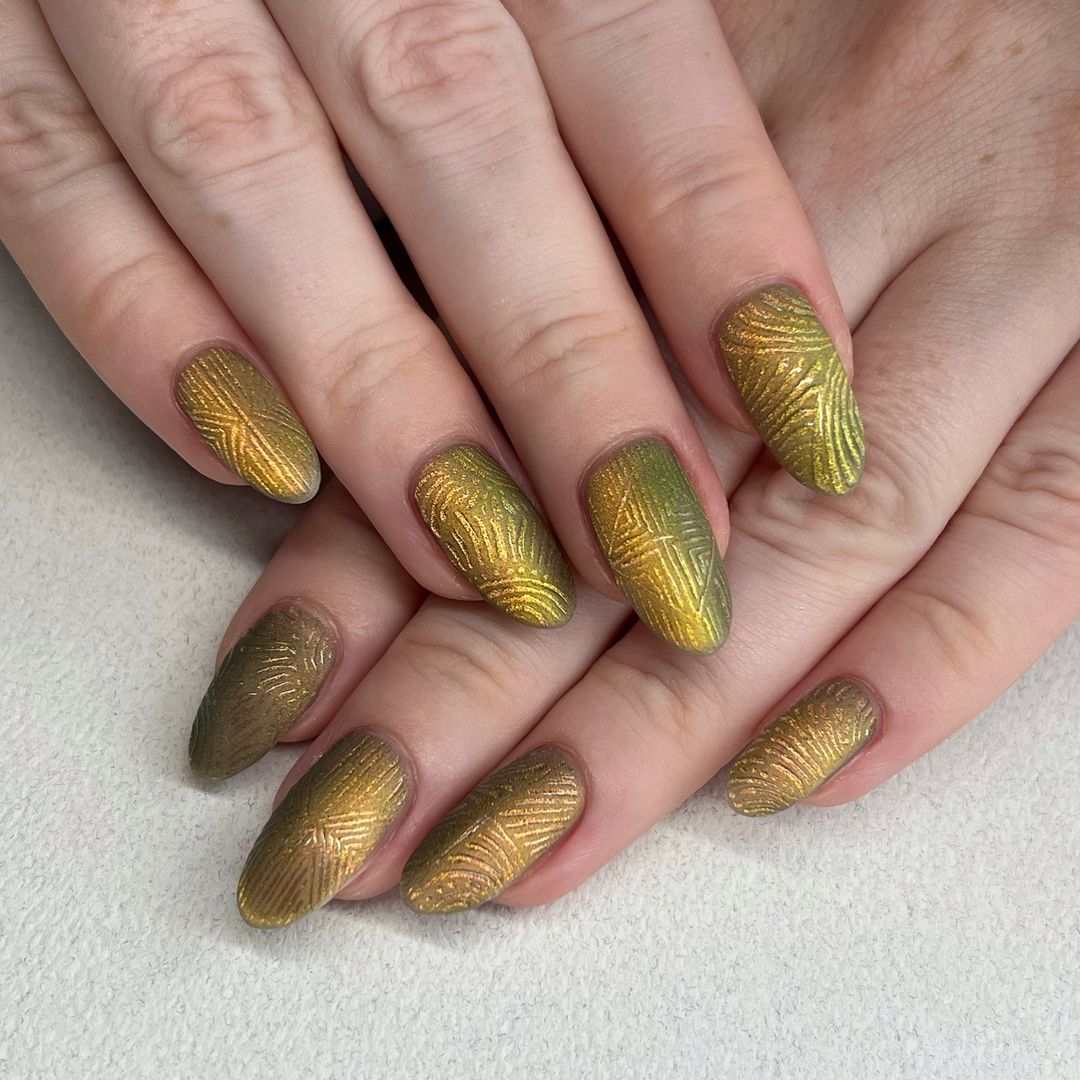
- Matte base coat: Sally Hansen Miracle Gel in “Matte Top Coat”
- Gold polish: Essie Nail Polish in “Good as Gold”
- Nail art brush: Winstonia Fine Liner Nail Art Brush
- Top coat: INM Out The Door Top Coat
- Nail file: Tweezerman Neon Filemates
How to Create at Home:
- Start with clean, dry nails. Apply a matte base coat to each nail.
- Use a fine nail art brush to create feather patterns with gold polish.
- Ensure the design is dry before applying a top coat to prevent smudging.
- Seal with a top coat to protect your design and add a subtle shine.
Webbed Elegance
This intricate design features a black web pattern over a nude matte base, creating a sophisticated and edgy look. The almond shape adds a touch of elegance, making this manicure perfect for fall events.
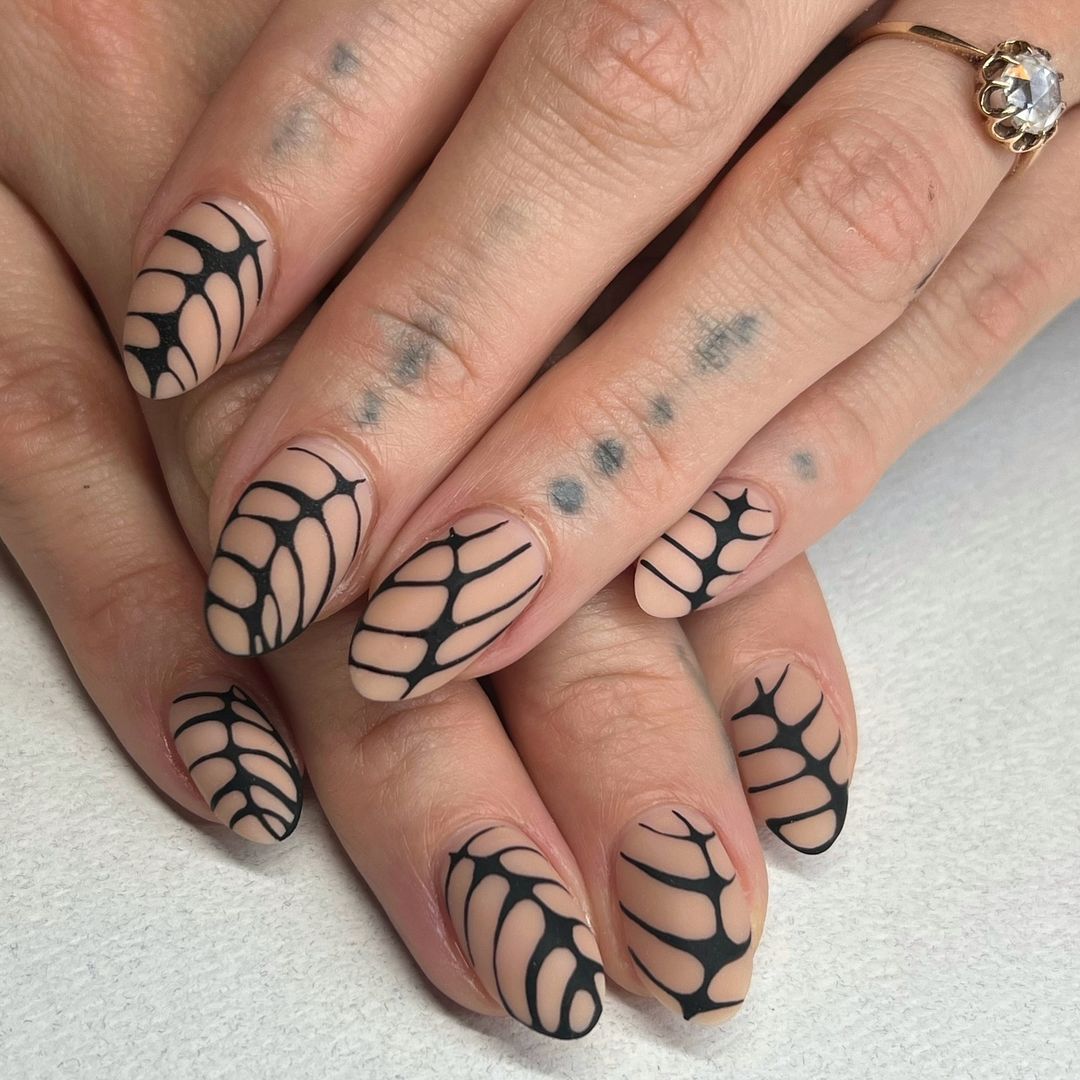
- Nude matte polish: OPI Nail Lacquer in “Be There in a Prosecco”
- Black polish: Sally Hansen Miracle Gel in “Blacky O”
- Top coat: INM Out The Door Top Coat
- Nail art brush: Winstonia Fine Liner Nail Art Brush
How to Create at Home:
- Start with clean, dry nails. Apply a nude matte polish to each nail and let it dry completely.
- Use a fine nail art brush to create web patterns with black polish.
- Seal the design with a top coat to protect your artwork and add a subtle shine.
Psychedelic Swirls
This vibrant and colorful design features swirling patterns in shades of green, orange, and blue. The short, rounded nails give a playful and artistic vibe, making this manicure perfect for those who love bold designs.
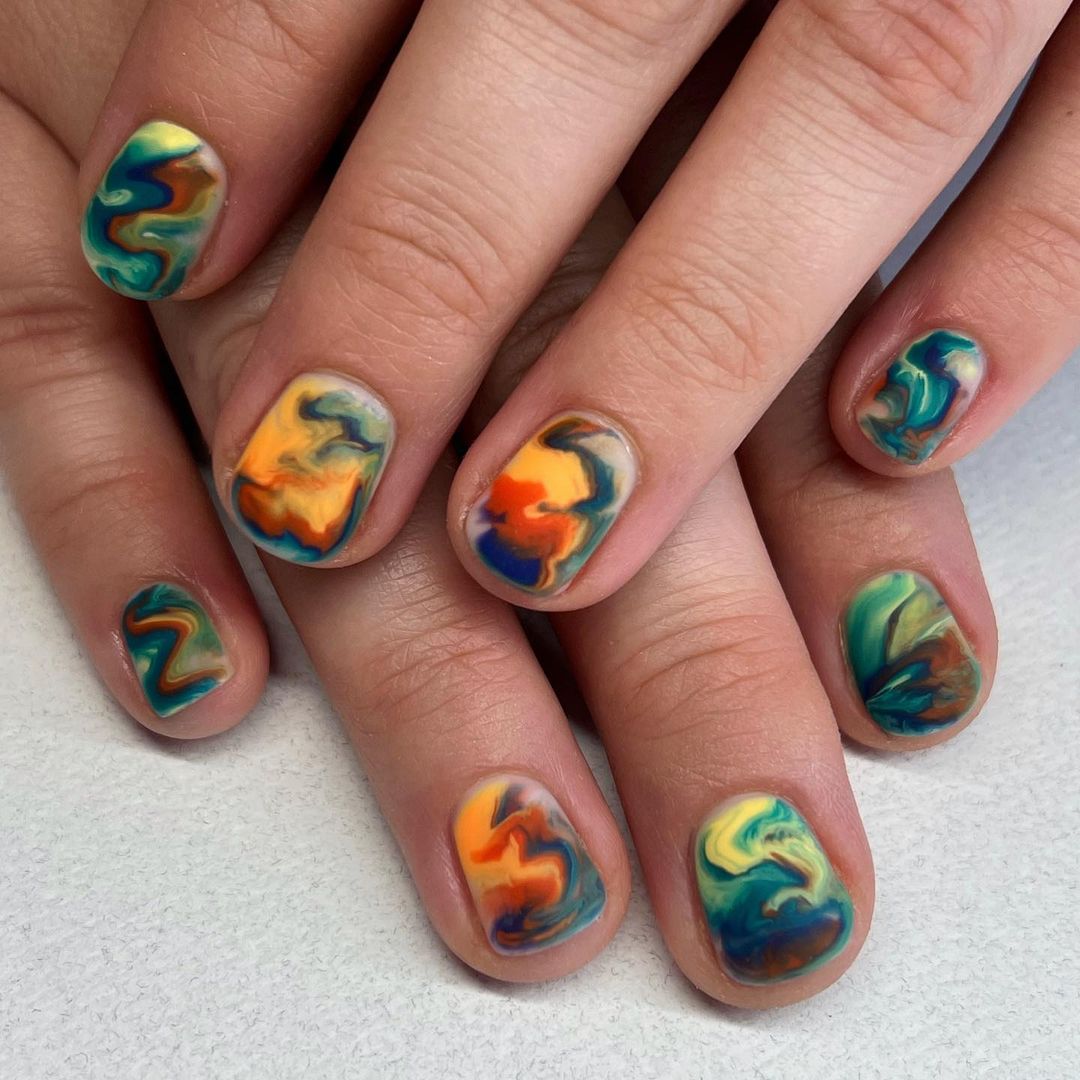
- Nude base coat: Essie Nail Polish in “Ballet Slippers”
- Green polish: Sally Hansen Miracle Gel in “Jaded”
- Orange polish: OPI Nail Lacquer in “Sun, Sea, and Sand in My Pants”
- Blue polish: Essie Nail Polish in “Butler Please”
- Top coat: Seche Vite Dry Fast Top Coat
- Nail art brush: Makartt Nail Art Brushes Set
How to Create at Home:
- Start with clean, dry nails. Apply a nude base coat to each nail.
- Use a fine nail art brush to create swirling patterns with green, orange, and blue polishes.
- Blend the colors gently to achieve a seamless look.
- Finish with a top coat to protect and add a glossy finish.
Cozy Cable Knit
This cozy nail design mimics the texture of a cable knit sweater, featuring warm tones of brown and yellow. The short, oval shape adds to the overall cozy and comfortable vibe, perfect for the fall season.
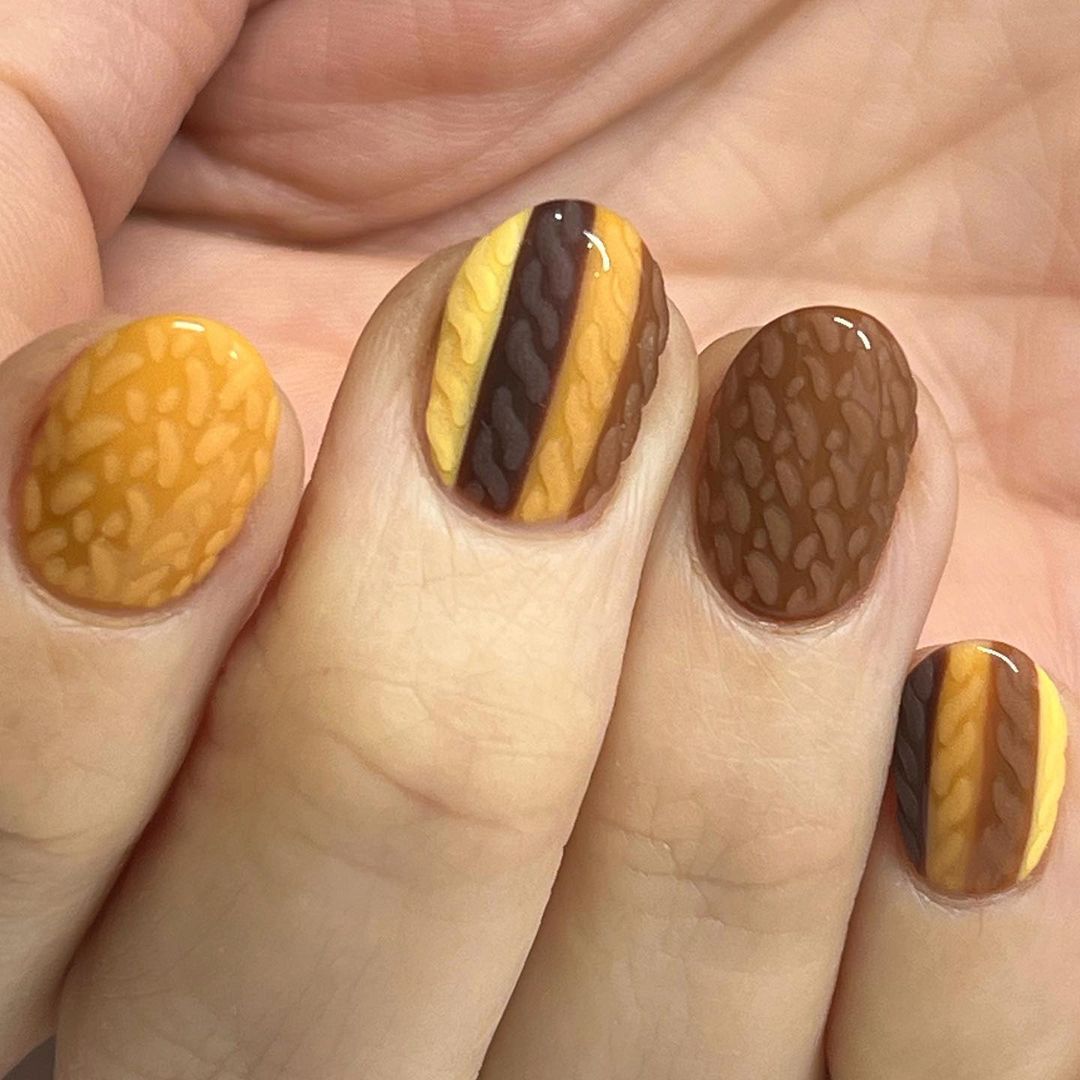
- Nude base coat: OPI Nail Lacquer in “Samoan Sand”
- Brown polish: Essie Nail Polish in “Mink Muffs”
- Yellow polish: China Glaze Nail Lacquer in “Sun’s Up, Top Down”
- Top coat: Seche Vite Dry Fast Top Coat
- Nail art brush: Beetles Gel Polish Nail Art Brush Set
How to Create at Home:
- Begin with clean, dry nails. Apply a nude base coat to each nail.
- Use a fine nail art brush to create cable knit patterns with brown and yellow polishes.
- Ensure each layer is dry before adding more details to prevent smudging.
- Seal the design with a top coat to protect and add a glossy finish.
Monochrome Chic
This black and white design features a chic and modern pattern, perfect for a stylish and edgy look. The coffin shape adds a dramatic flair, making this manicure a true statement piece.
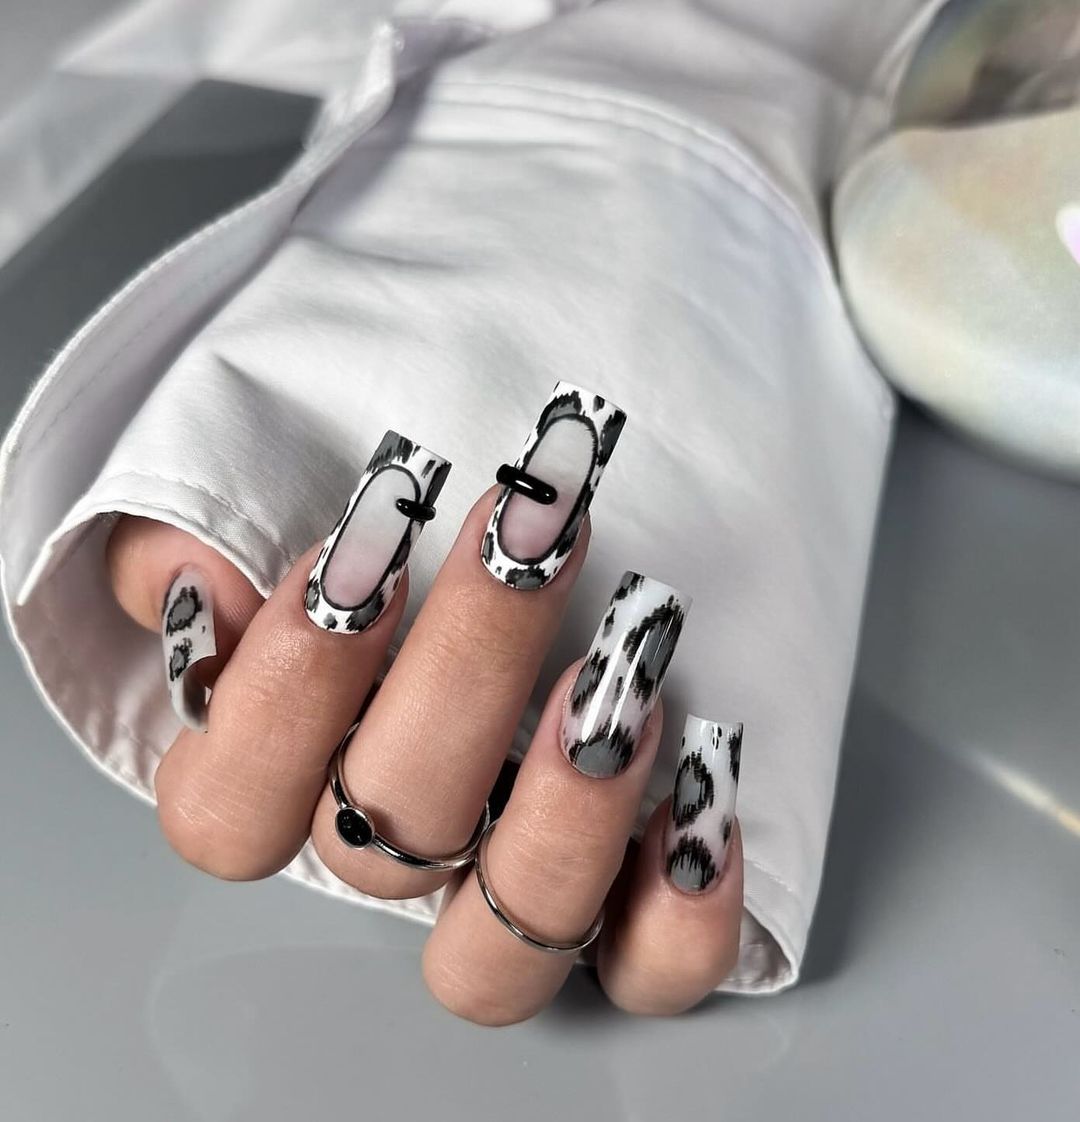
- White polish: OPI Nail Lacquer in “Alpine Snow”
- Black polish: Sally Hansen Miracle Gel in “Blacky O”
- Top coat: Essie Gel Setter Top Coat
- Nail art brush: Winstonia Fine Liner Nail Art Brush
How to Create at Home:
- Start with clean, dry nails. Apply a white polish to each nail and let it dry completely.
- Use a fine nail art brush to create patterns with black polish.
- Seal the design with a top coat to protect your artwork and add a glossy finish.
Textured Purple Delight
This delightful design features a mix of textures with a vibrant purple hue, creating a unique and eye-catching look. The almond shape adds elegance, making this manicure perfect for those who love to experiment with textures.
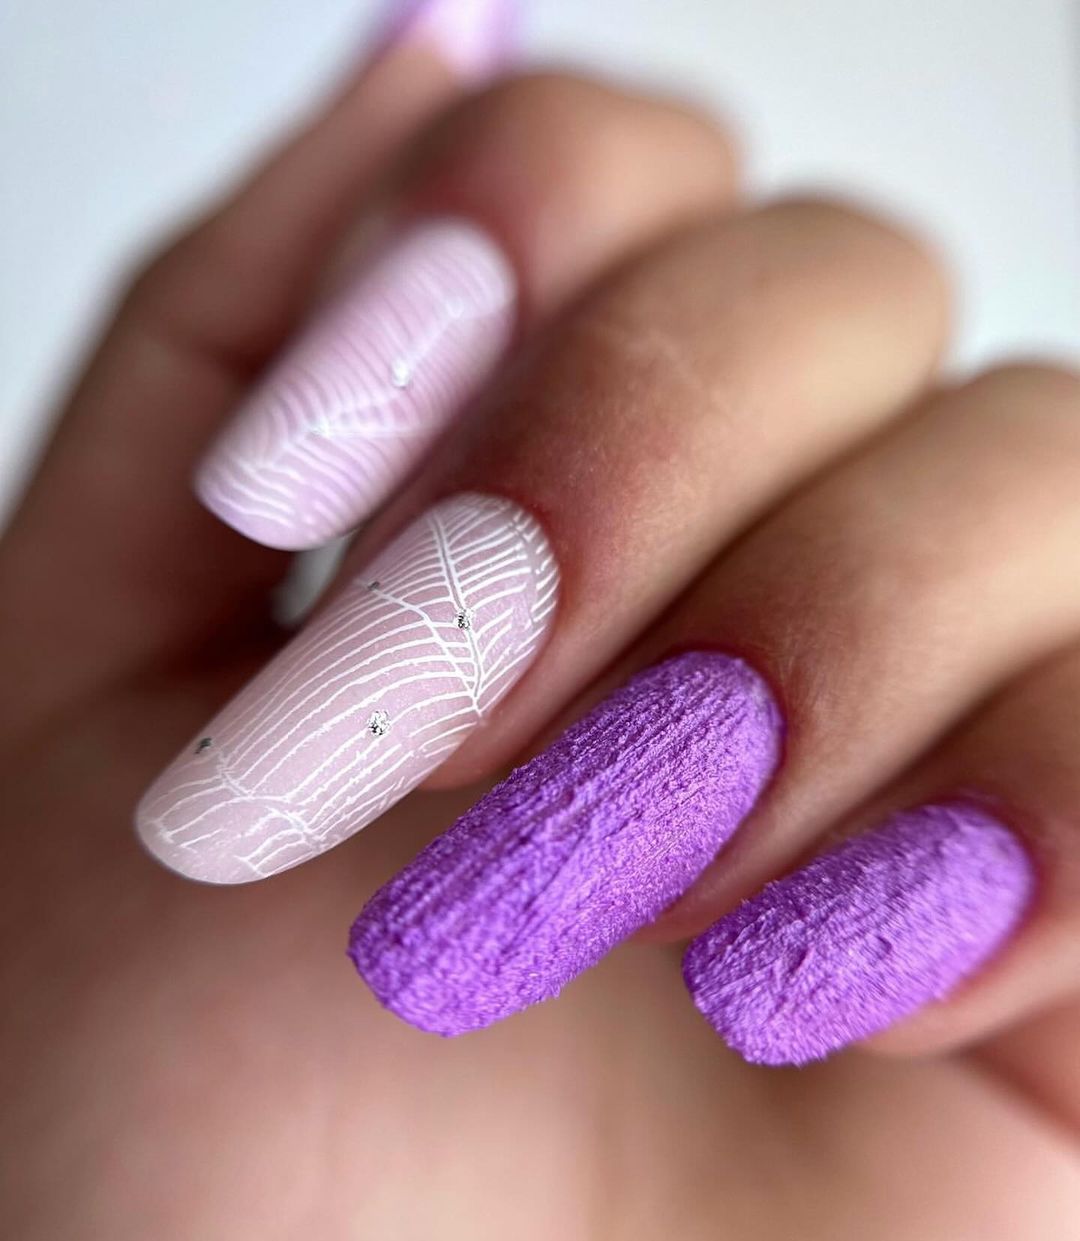
- Base coat: Orly Bonder Base Coat
- Purple polish: Essie Nail Polish in “Play Date”
- White polish: Zoya Nail Polish in “Purity”
- Top coat: INM Out The Door Top Coat
- Textured polish: Sally Hansen Sugar Coat in “Lick-O-Rich”
How to Create at Home:
- Begin with clean, dry nails. Apply a base coat to each nail.
- Apply purple polish to the desired nails, leaving some nails for white polish with texture.
- Use a fine nail art brush to create patterns with white polish and add textured polish to specific nails.
- Finish with a top coat to seal and protect the design.
Gradient Netting
This gradient design combines shades of pink and purple with a delicate netting pattern, creating a soft and feminine look. The almond shape adds to the overall elegance, making this manicure perfect for a subtle yet stylish appearance.
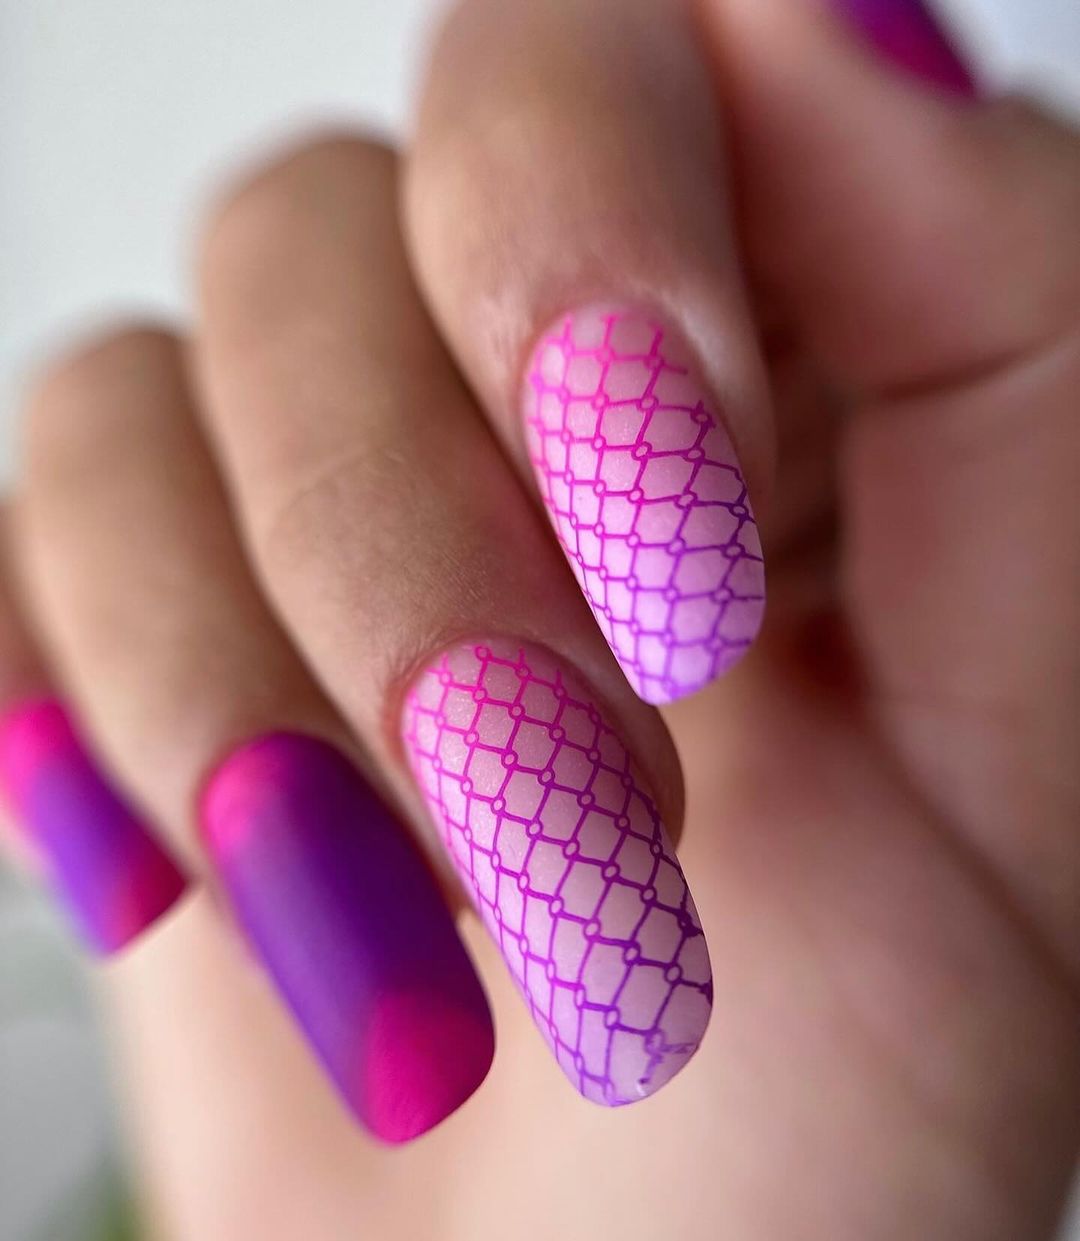
- Nude base coat: Essie Nail Polish in “Ballet Slippers”
- Pink polish: OPI Nail Lacquer in “Kiss Me on My Tulips”
- Purple polish: Essie Nail Polish in “Play Date”
- Top coat: Seche Vite Dry Fast Top Coat
- Nail art brush: Makartt Nail Art Brushes Set
How to Create at Home:
- Start with clean, dry nails. Apply a nude base coat to each nail.
- Use a fine nail art brush to create gradient patterns with pink and purple polishes.
- Add a netting pattern with a nail art brush for a delicate finish.
- Seal with a top coat to protect your design and add shine.
Colorful Flames
This vibrant nail design features a mix of bold colors like white, pink, and orange, with intricate flame patterns adding a dynamic touch. The square shape provides a modern canvas for this eye-catching art, making it a perfect choice for those who love bold and playful designs.
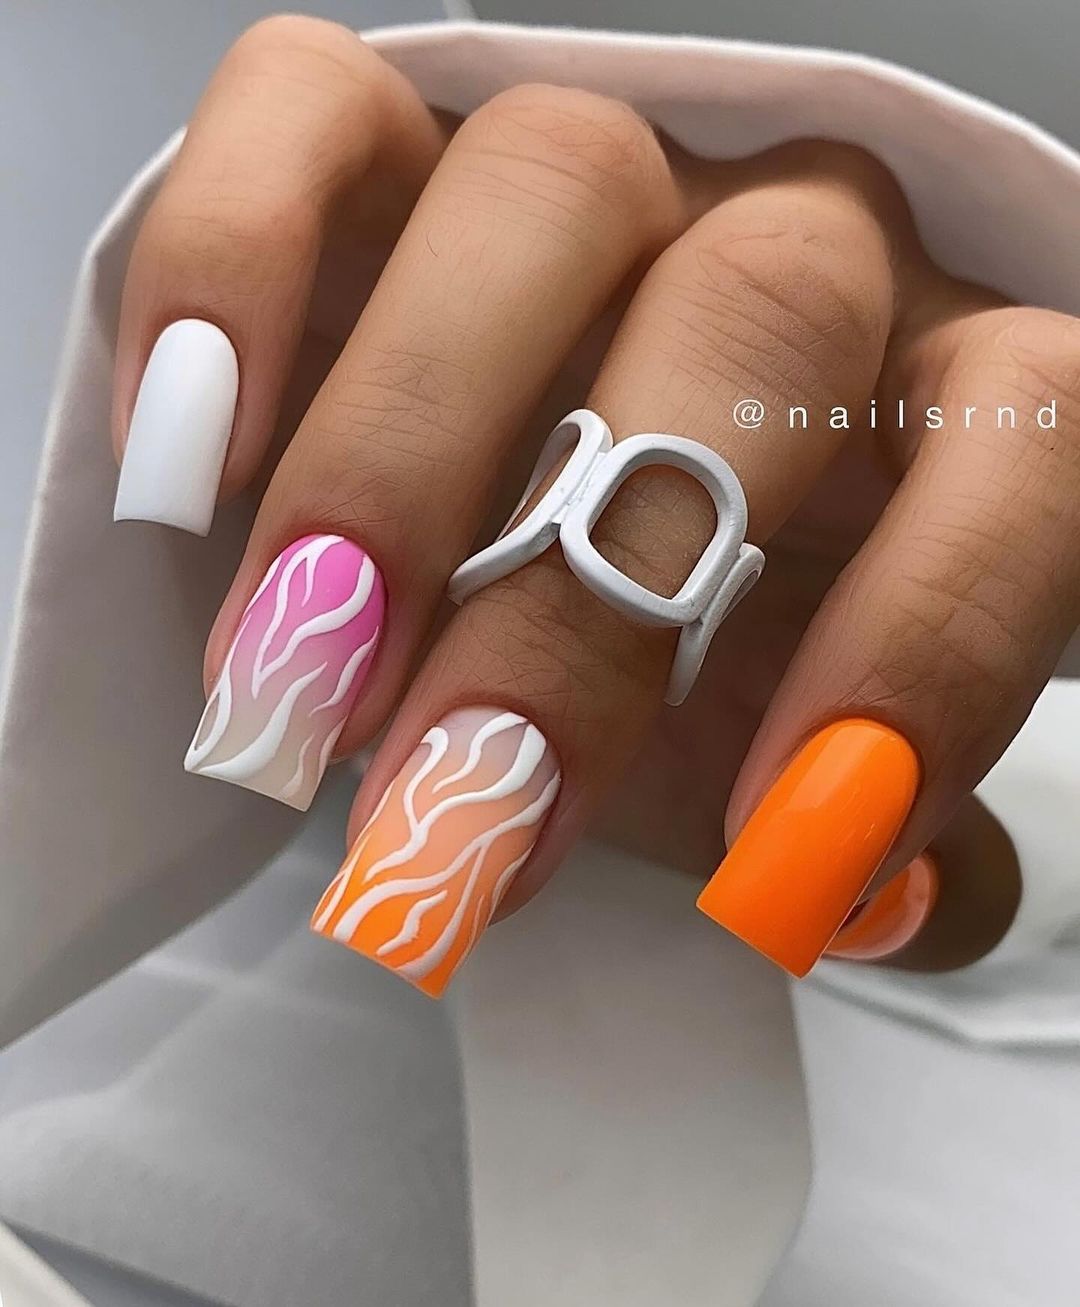
- White polish: OPI Nail Lacquer in “Alpine Snow”
- Pink polish: Essie Nail Polish in “Mod Square”
- Orange polish: China Glaze Nail Lacquer in “Orange Knockout”
- Top coat: Seche Vite Dry Fast Top Coat
- Nail art brush: Winstonia Fine Liner Nail Art Brush
How to Create at Home:
- Start with clean, dry nails. Apply a white base coat to the nails you want to add flame patterns.
- Use a fine nail art brush to create flame patterns with pink and orange polishes on the selected nails.
- Apply a solid color polish to the remaining nails.
- Seal the design with a top coat to protect your artwork and add shine.
Subtle Ombré French
This subtle ombré French manicure is a timeless and elegant look. The soft gradient from nude to white on a square shape nail creates a delicate and sophisticated appearance, perfect for any occasion.
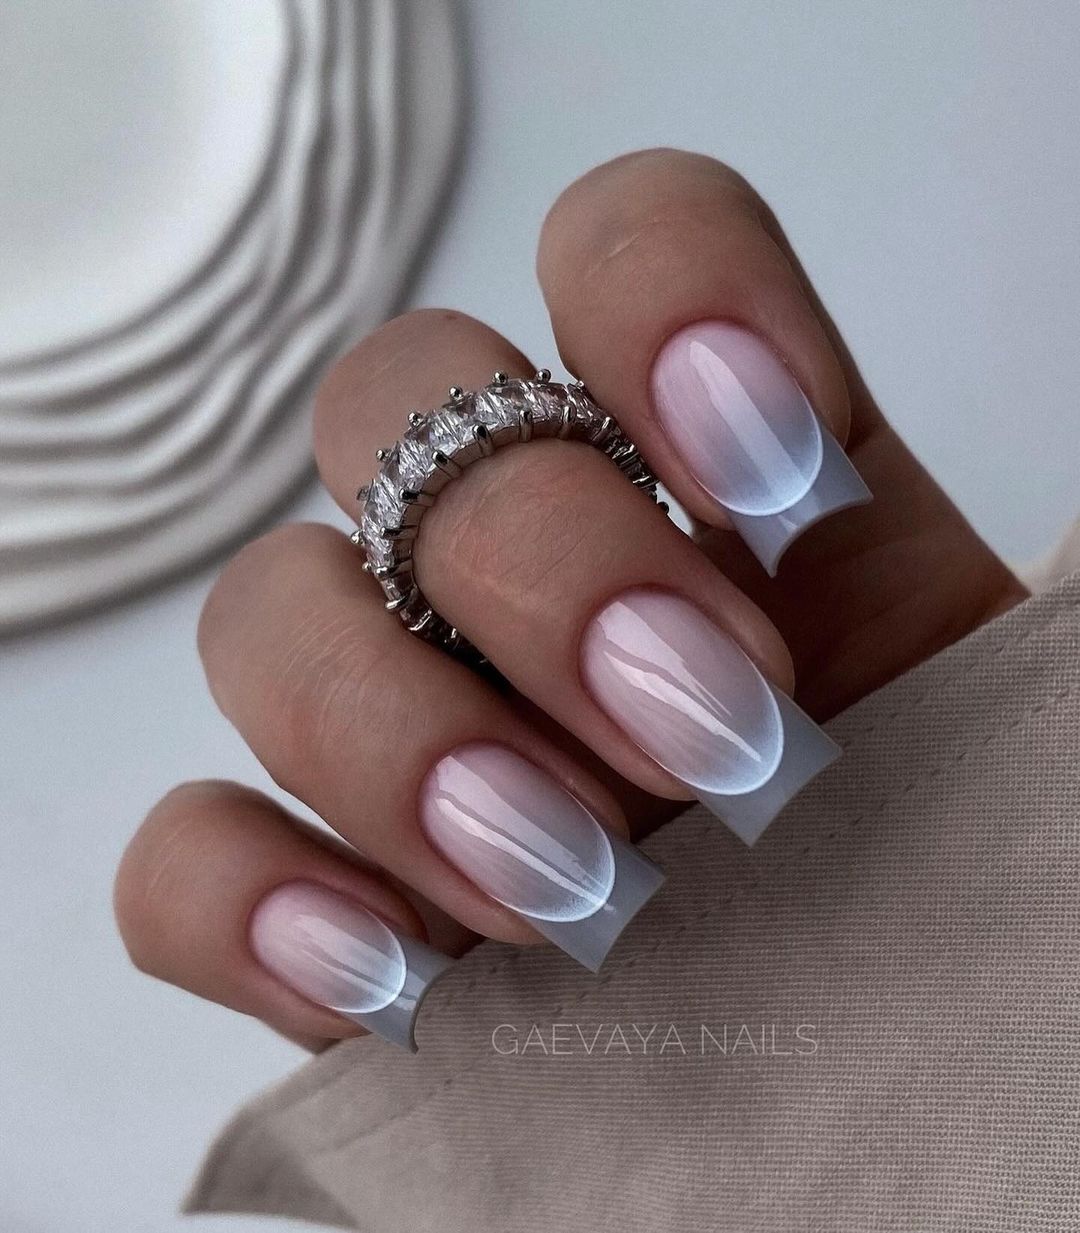
- Nude base coat: Essie Nail Polish in “Ballet Slippers”
- White polish: Zoya Nail Polish in “Purity”
- Top coat: INM Out The Door Top Coat
- Nail file: Tweezerman Neon Filemates
- Makeup sponge: Beauty Blender Makeup Sponge
How to Create at Home:
- Start with clean, dry nails. Apply a nude base coat to each nail.
- Using a makeup sponge, dab white polish on the tips of the nails, blending it towards the middle to create an ombré effect.
- Apply a top coat to seal the design and add a glossy finish.
Magical Gradient
This magical gradient design features a beautiful blend of green, purple, and silver glitter, creating an enchanting and mystical look. The short, square shape enhances the vibrant colors and makes this manicure perfect for a playful yet elegant appearance.
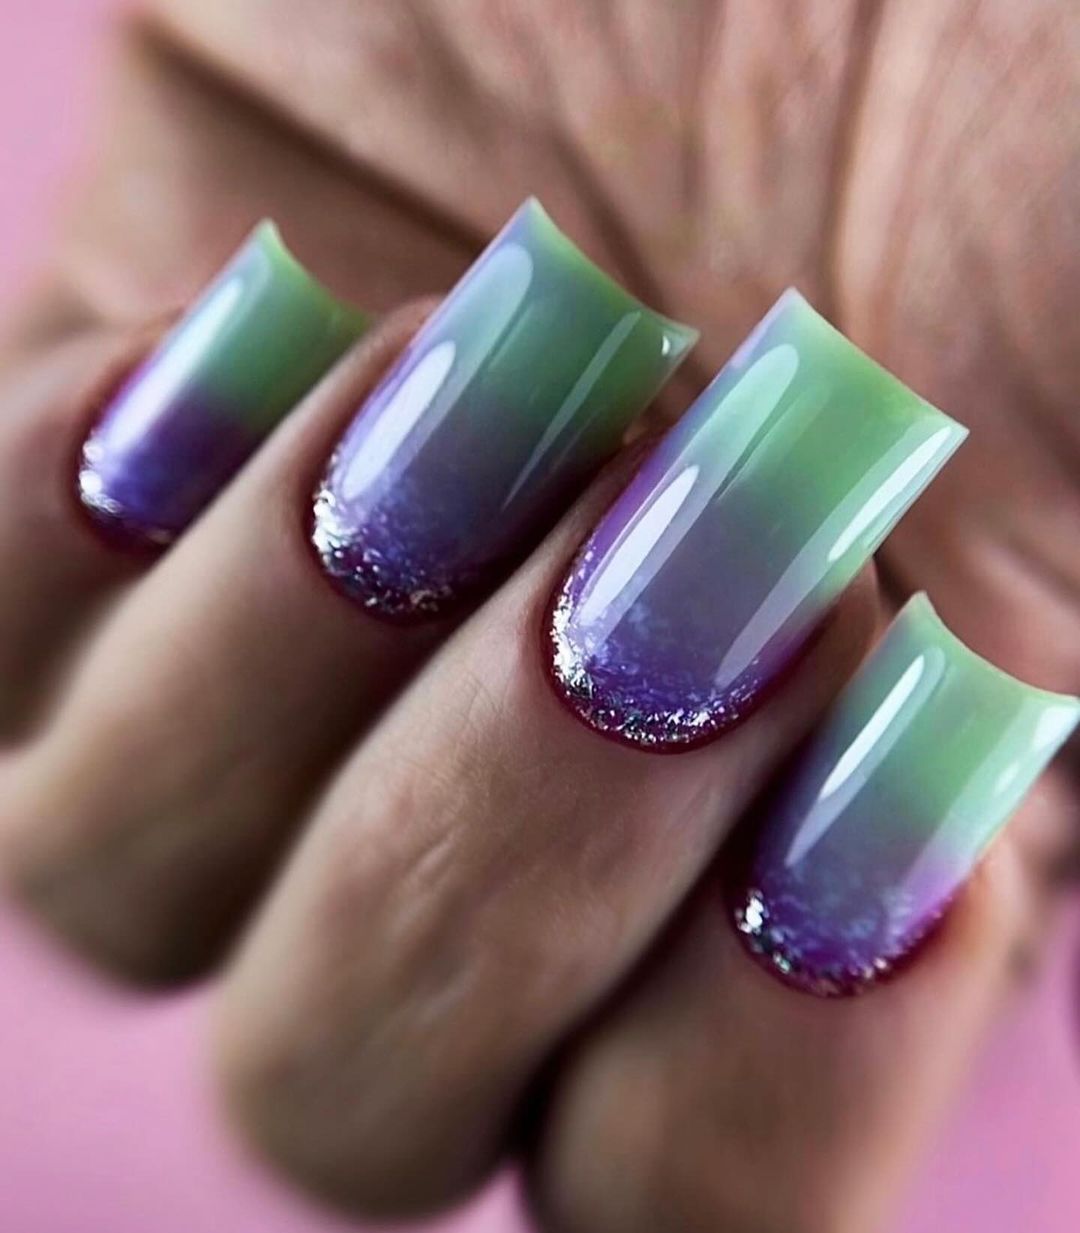
- Green polish: OPI Nail Lacquer in “Green-Wich Village”
- Purple polish: Essie Nail Polish in “Play Date”
- Silver glitter polish: China Glaze Nail Lacquer in “Fairy Dust”
- Top coat: Seche Vite Dry Fast Top Coat
- Nail art brush: Makartt Nail Art Brushes Set
How to Create at Home:
- Begin with clean, dry nails. Apply a base coat to each nail.
- Use a fine nail art brush to create a gradient effect with green and purple polishes.
- Add silver glitter polish to the tips for a sparkling finish.
- Seal the design with a top coat to protect and add shine.
Neon Flames
This striking design features bright neon flames outlined in gold, creating a bold and dynamic look. The stiletto shape adds an extra edge to this vibrant manicure, making it a perfect choice for those who love to stand out.
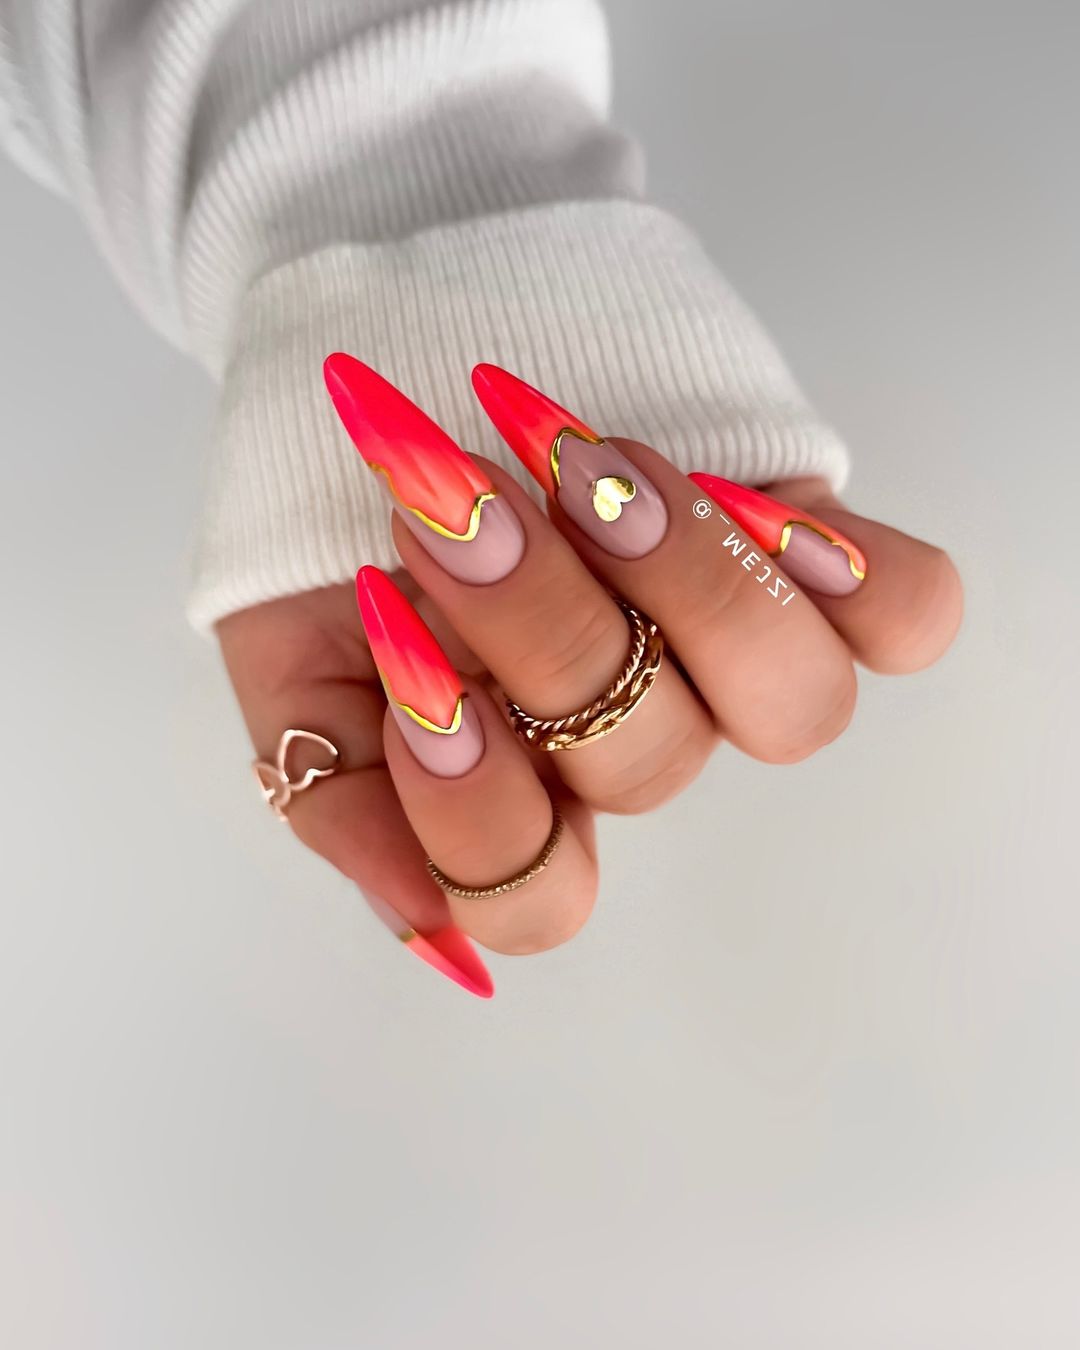
- Nude base coat: OPI Nail Lacquer in “Samoan Sand”
- Neon pink polish: China Glaze Nail Lacquer in “Flip Flop Fantasy”
- Gold polish: Essie Nail Polish in “Good as Gold”
- Top coat: INM Out The Door Top Coat
- Nail art brush: Beetles Gel Polish Nail Art Brush Set
How to Create at Home:
- Start with clean, dry nails. Apply a nude base coat to each nail.
- Use a fine nail art brush to create neon flame patterns with pink polish.
- Outline the flames with gold polish for an added touch of luxury.
- Seal the design with a top coat to protect your artwork and add shine.
Delicate Floral Accents
This delicate design features small blue flowers with green leaves on a white base, creating a fresh and elegant look. The square shape provides a perfect canvas for this intricate floral art, making it an excellent choice for those who love detailed and refined designs.
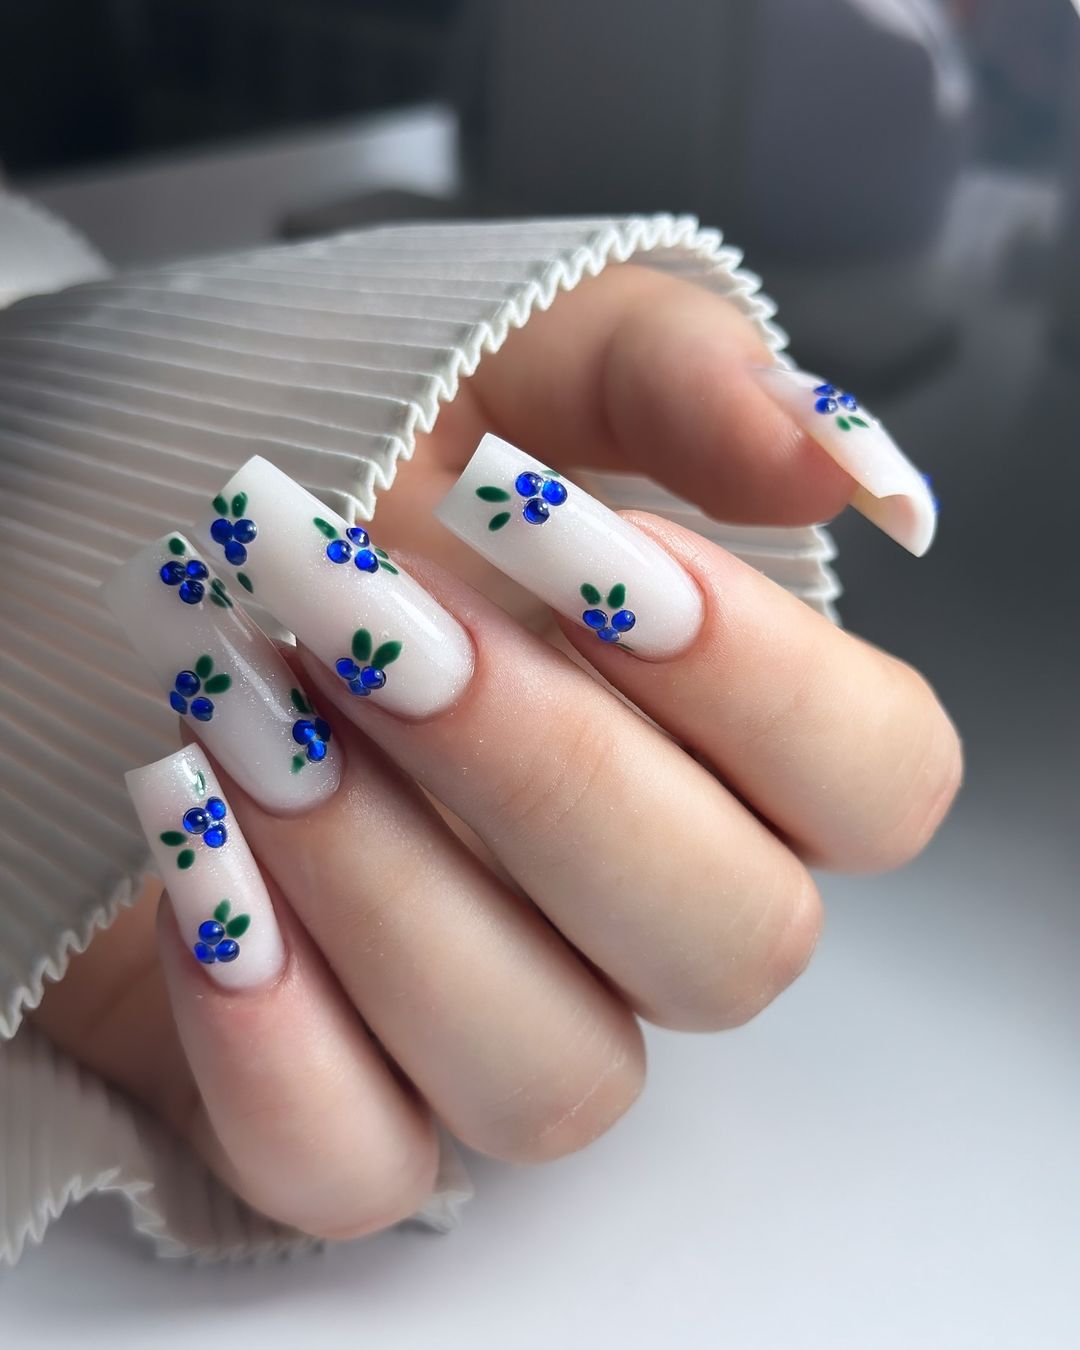
- White polish: OPI Nail Lacquer in “Alpine Snow”
- Blue polish: Essie Nail Polish in “Butler Please”
- Green polish: Sally Hansen Miracle Gel in “Jaded”
- Top coat: Seche Vite Dry Fast Top Coat
- Nail art brush: Winstonia Fine Liner Nail Art Brush
How to Create at Home:
- Begin with clean, dry nails. Apply a white base coat to each nail.
- Use a fine nail art brush to create small blue flowers and green leaves on the nails.
- Seal the design with a top coat to protect your artwork and add shine.
Olive Branch Elegance
This elegant design features delicate olive branches on a nude base, creating a sophisticated and minimalist look. The short, rounded nails enhance the simplicity and elegance of this manicure, making it perfect for a refined appearance.
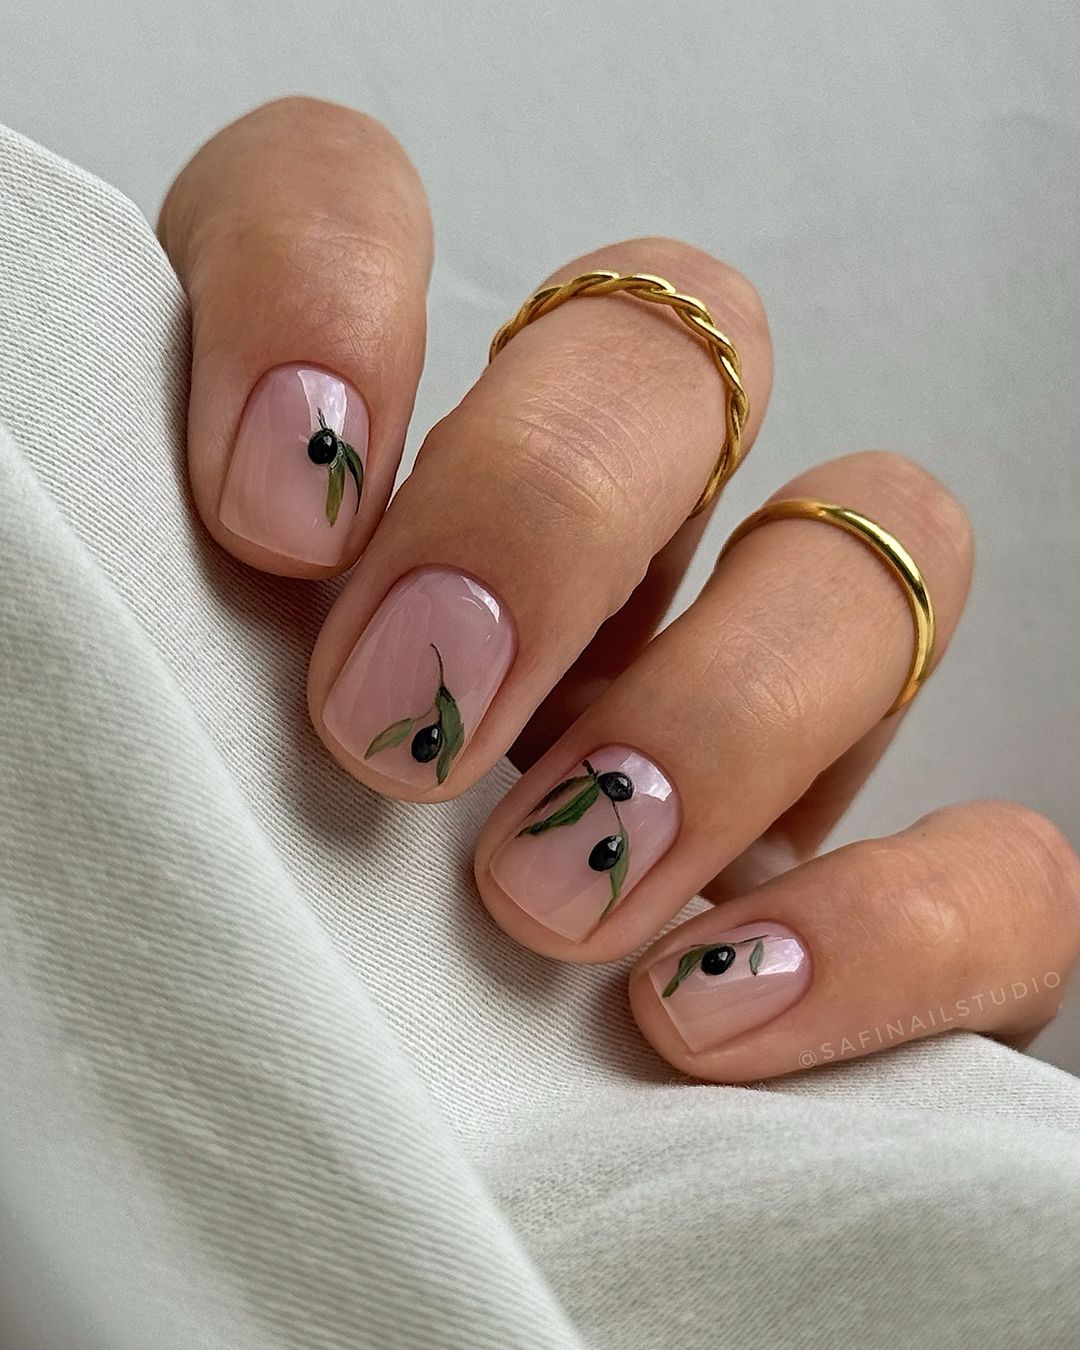
- Nude base coat: Essie Nail Polish in “Ballet Slippers”
- Green polish: OPI Nail Lacquer in “Stay Off the Lawn!”
- Black polish: Sally Hansen Miracle Gel in “Blacky O”
- Top coat: INM Out The Door Top Coat
- Nail art brush: Makartt Nail Art Brushes Set
How to Create at Home:
- Start with clean, dry nails. Apply a nude base coat to each nail.
- Use a fine nail art brush to create olive branch patterns with green and black polishes.
- Seal the design with a top coat to protect your artwork and add a glossy finish.
Wild Leopard Print
This bold nail design features a classic leopard print pattern with a modern twist. The matte nude base and black spots create a timeless look, while the bright red tips add a pop of color and contemporary flair. The short, square shape makes this design practical yet stylish.
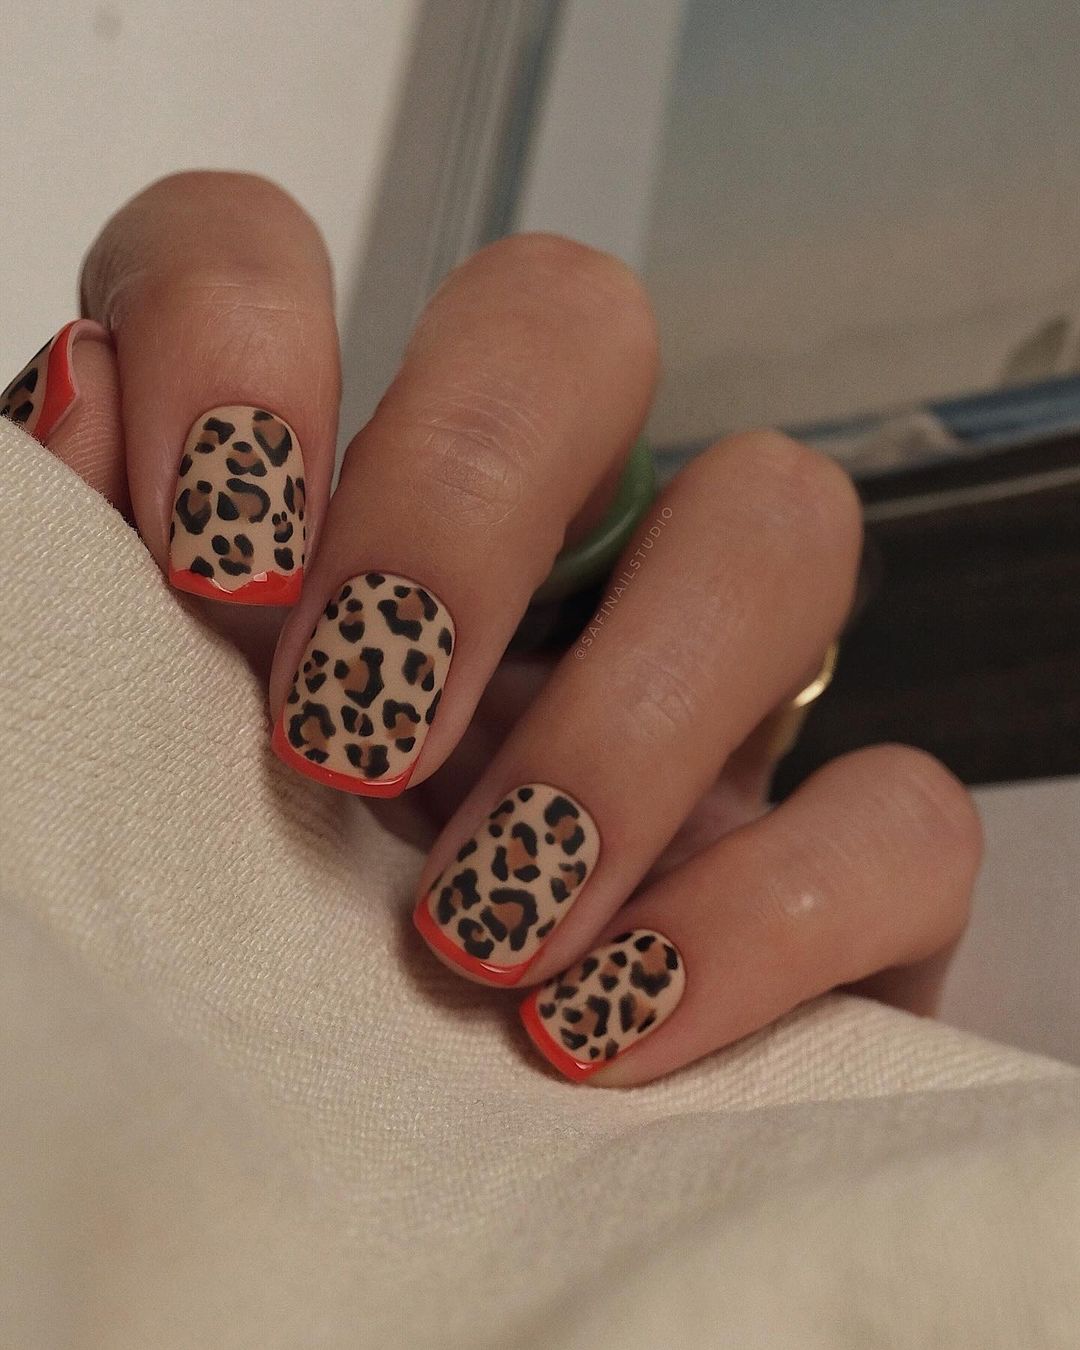
- Nude matte polish: OPI Nail Lacquer in “Be There in a Prosecco”
- Black polish: Sally Hansen Miracle Gel in “Blacky O”
- Red polish: China Glaze Nail Lacquer in “Flame-Boyant”
- Top coat: INM Out The Door Top Coat
- Nail art brush: Winstonia Fine Liner Nail Art Brush
How to Create at Home:
- Start with clean, dry nails. Apply a nude matte polish to each nail.
- Use a fine nail art brush to create leopard spots with black polish.
- Apply red polish to the tips of the nails for a vibrant touch.
- Seal the design with a top coat to protect your artwork and add a subtle shine.
Neon Yellow French
This chic nail design combines a classic French manicure with a modern twist. The nude base and neon yellow tips create a fresh and vibrant look, perfect for adding a pop of color to your fall wardrobe. The short, square shape makes this design both stylish and practical.
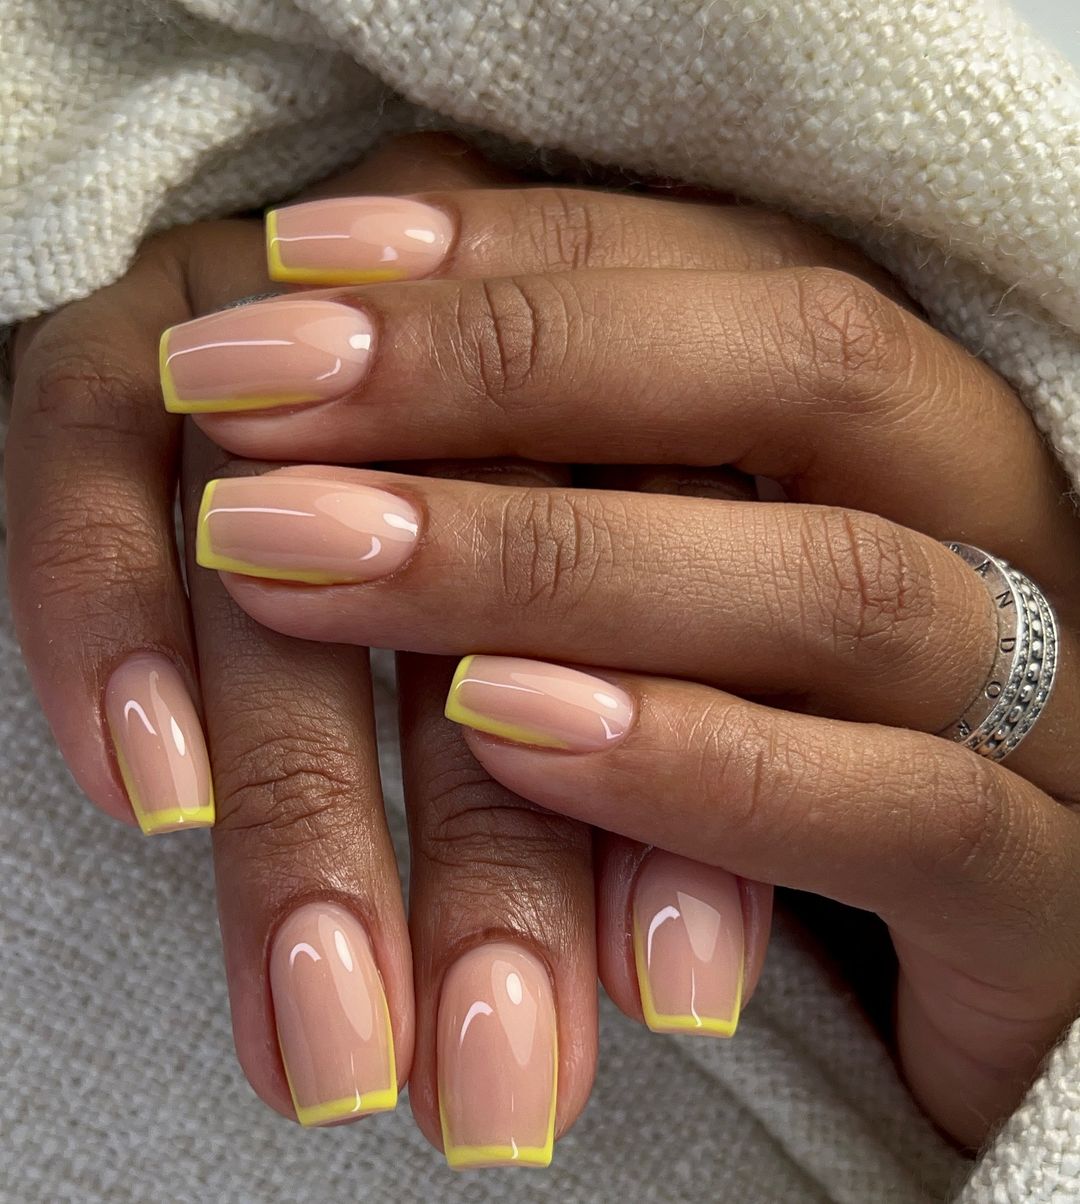
- Nude base coat: Essie Nail Polish in “Ballet Slippers”
- Neon yellow polish: China Glaze Nail Lacquer in “Celtic Sun”
- Top coat: Seche Vite Dry Fast Top Coat
- Nail file: Tweezerman Neon Filemates
How to Create at Home:
- Begin with clean, dry nails. Apply a nude base coat to each nail.
- Use a fine nail art brush to apply neon yellow polish to the tips of the nails.
- Ensure each layer is dry before adding more details to prevent smudging.
- Finish with a top coat to seal and protect the design.
Bold Red Texture
This striking design features bold red textured tips on a nude base, creating a dramatic and eye-catching look. The almond shape adds a touch of elegance, making this manicure perfect for those who love to make a statement.
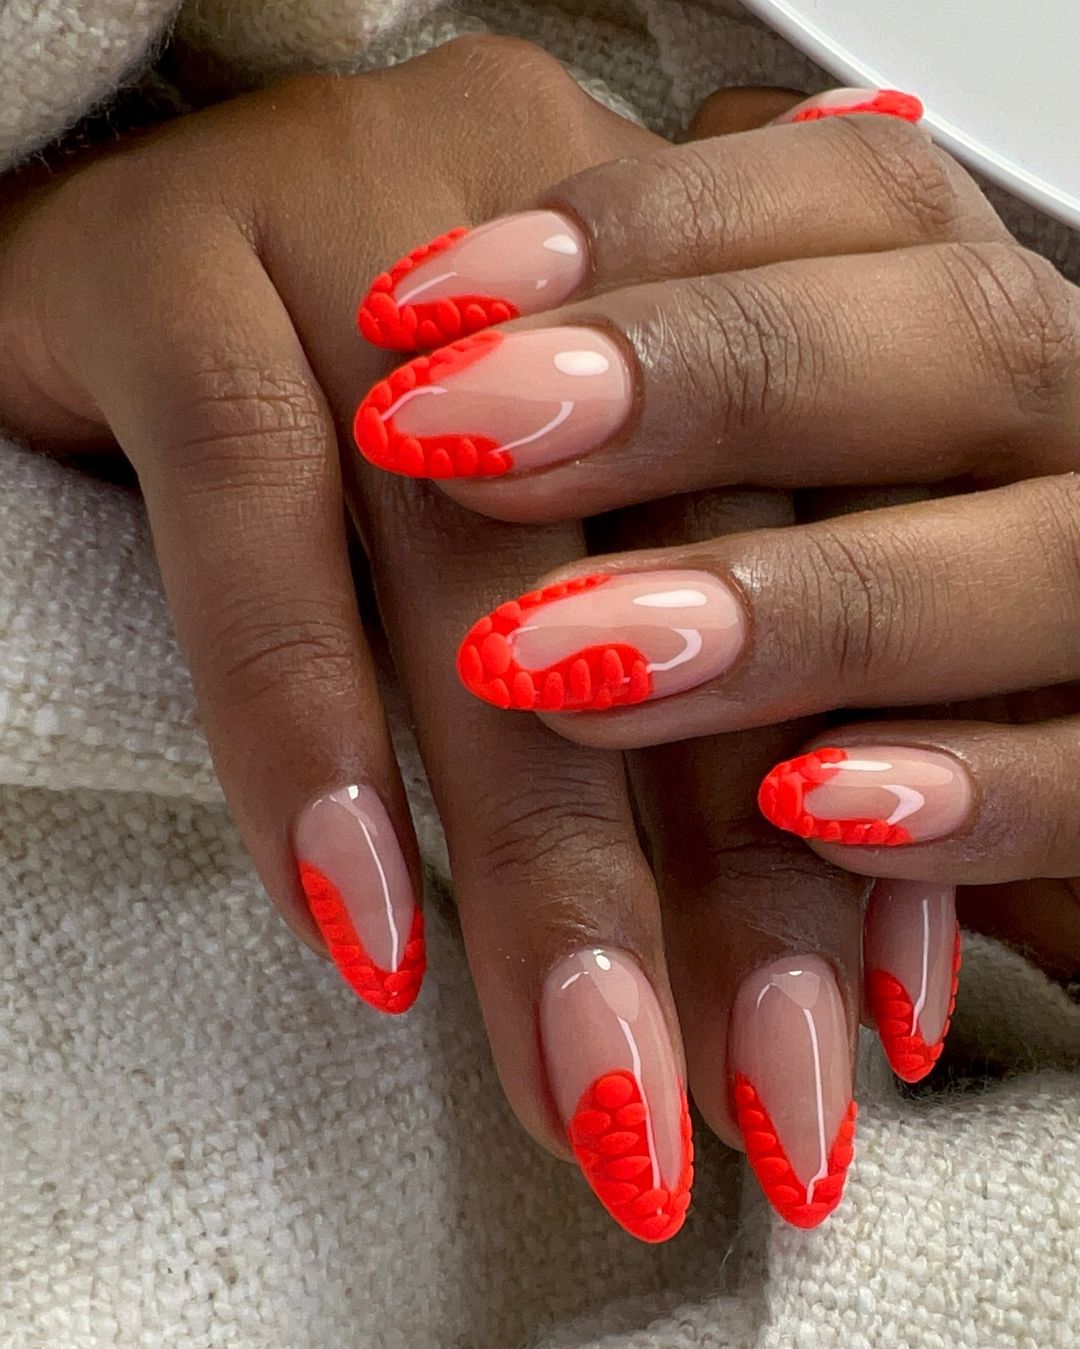
- Nude base coat: OPI Nail Lacquer in “Samoan Sand”
- Red polish: Essie Nail Polish in “Fifth Avenue”
- Textured polish: Sally Hansen Sugar Coat in “Red Velvet”
- Top coat: INM Out The Door Top Coat
- Nail art brush: Beetles Gel Polish Nail Art Brush Set
How to Create at Home:
- Start with clean, dry nails. Apply a nude base coat to each nail.
- Use a fine nail art brush to apply red textured polish to the tips of the nails.
- Ensure each layer is dry before adding more details to prevent smudging.
- Seal with a top coat to protect your design and add a glossy finish.
FAQ
Q: How long do dip powder nails last? A: Dip powder nails can last up to four weeks with proper care and maintenance. They are durable and chip-resistant, making them an excellent choice for long-lasting manicures.
Q: Can I do gel nails at home? A: Yes, you can do gel nails at home with a UV or LED lamp and the right products. Make sure to follow the instructions carefully and use high-quality gel polishes for the best results.
Q: What are the trending nail shapes for fall 2024? A: The trending nail shapes for fall 2024 include almond, coffin, and stiletto. These shapes offer a mix of elegance and edge, perfect for the autumn season.
Q: How can I keep my nails healthy with frequent manicures? A: To keep your nails healthy, moisturize your cuticles regularly, avoid over-filing, and give your nails a break between manicures. Use strengthening treatments to maintain nail health.
With these stunning fall season nails 2024 ideas, you’re ready to embrace the season with style. Whether you prefer simple designs or intricate art, there’s something for everyone this autumn. Happy nail designing!
Save Pin

