Fall is a time for cozy sweaters, pumpkin spice lattes, and beautiful, seasonal nail art. Whether you’re looking to try something new or want to perfect your fall nail game, I’ve got you covered. Let’s dive into some stunning fall themed nails ideas that will have you excited to show off your manicure all season long.
Gorgeous Pumpkin and Leaves Nail Art
Fall is synonymous with pumpkins and leaves, and this nail design encapsulates that perfectly. The combination of matte orange nails, glitter accents, and detailed leaf and pumpkin art creates a vibrant and festive look. This design is perfect for those who love to embrace the full essence of autumn with their nails.
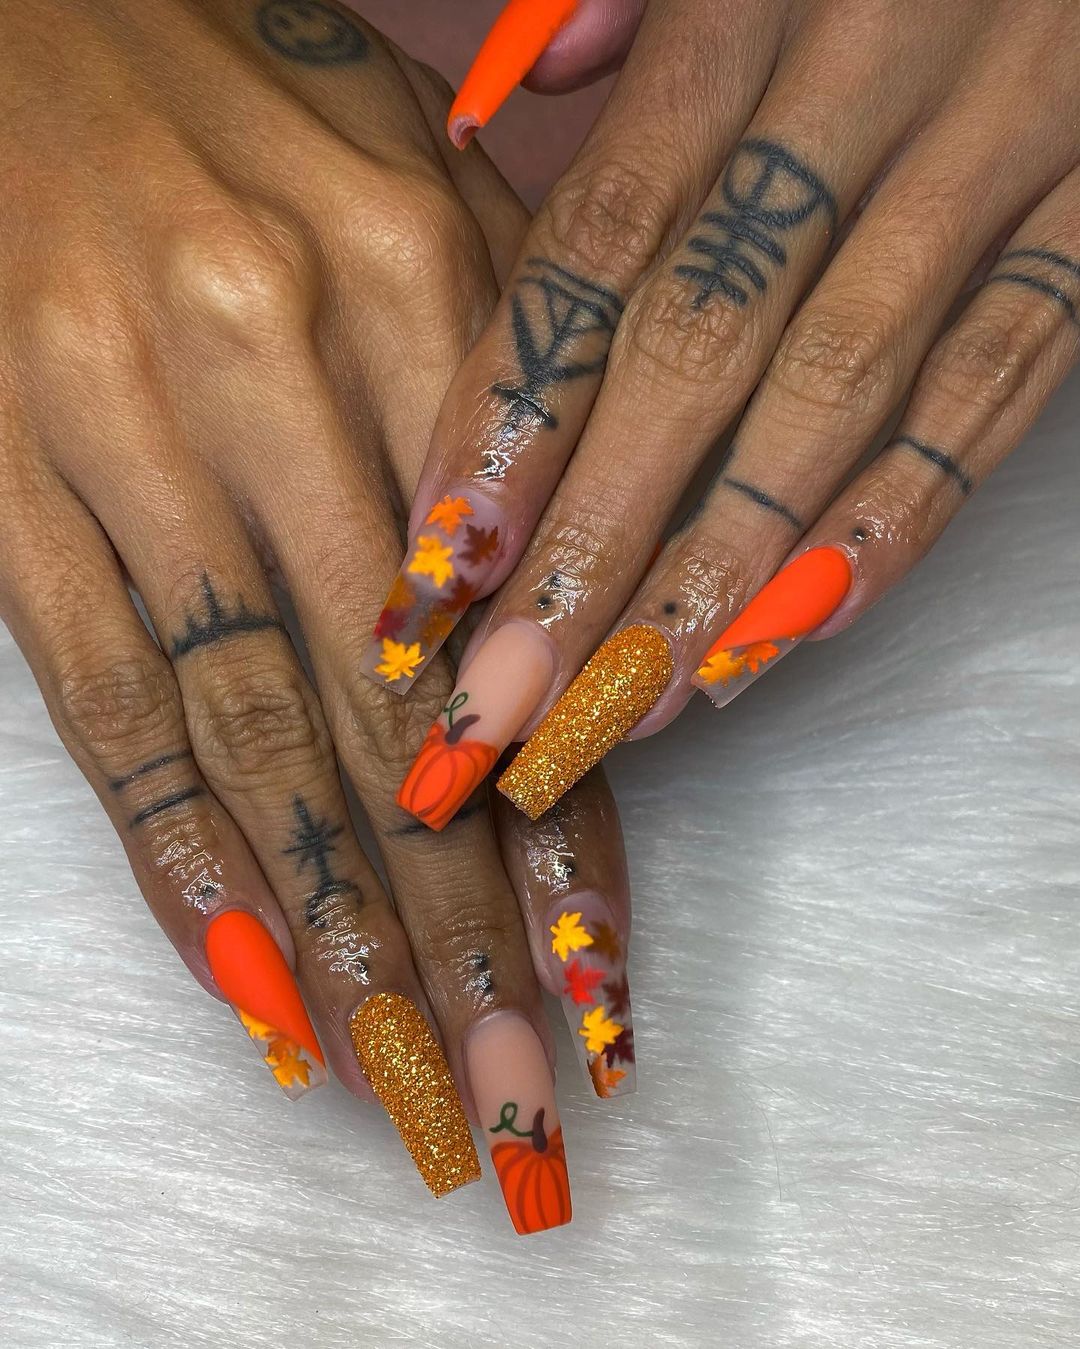
- Matte orange nail polish (OPI “It’s a Piazza Cake”)
- Gold glitter polish (Essie “Rock at the Top”)
- Nail art brushes for detailing
- Leaf and pumpkin nail decals
- Top coat (Seche Vite Dry Fast Top Coat)
Instructions:
- Apply a base coat to protect your nails.
- Paint the nails with the matte orange polish, leaving one or two nails for the glitter accent.
- Apply the gold glitter polish on the accent nails.
- Use nail art brushes to paint the leaves and pumpkins, or apply decals for an easier option.
- Seal the design with a top coat to ensure longevity.
Elegant Gold and Clear Nail Design
For a more sophisticated look, this gold and clear nail design is perfect. The mix of clear nails with gold foil accents adds a touch of elegance and luxury, making it ideal for any special occasion this fall.

- Clear gel polish (Gelish “Simple Sheer”)
- Gold foil flakes
- UV/LED nail lamp
- Nail art tweezers
- Top coat (Gelish Top It Off)
Instructions:
- Apply a clear base coat and cure under the UV/LED lamp.
- Carefully place the gold foil flakes onto the nails using tweezers.
- Apply a clear gel polish over the foil and cure again.
- Finish with a top coat to seal the design and add shine.
Fun Halloween-Themed Nails
Halloween is a big part of fall, and these fun and spooky nails are perfect for celebrating. Featuring pumpkins, ghosts, and vibrant orange tones, this design is playful and festive.

- Orange nail polish (Essie “Playing Koi”)
- Black and white nail polishes for detailing
- Nail art brushes
- Top coat (Sally Hansen Miracle Gel Top Coat)
Instructions:
- Start with a base coat to protect your nails.
- Apply the orange polish on all nails.
- Use the nail art brushes to paint ghosts, pumpkins, and other Halloween designs with black and white polishes.
- Apply a top coat to protect your design and add shine.
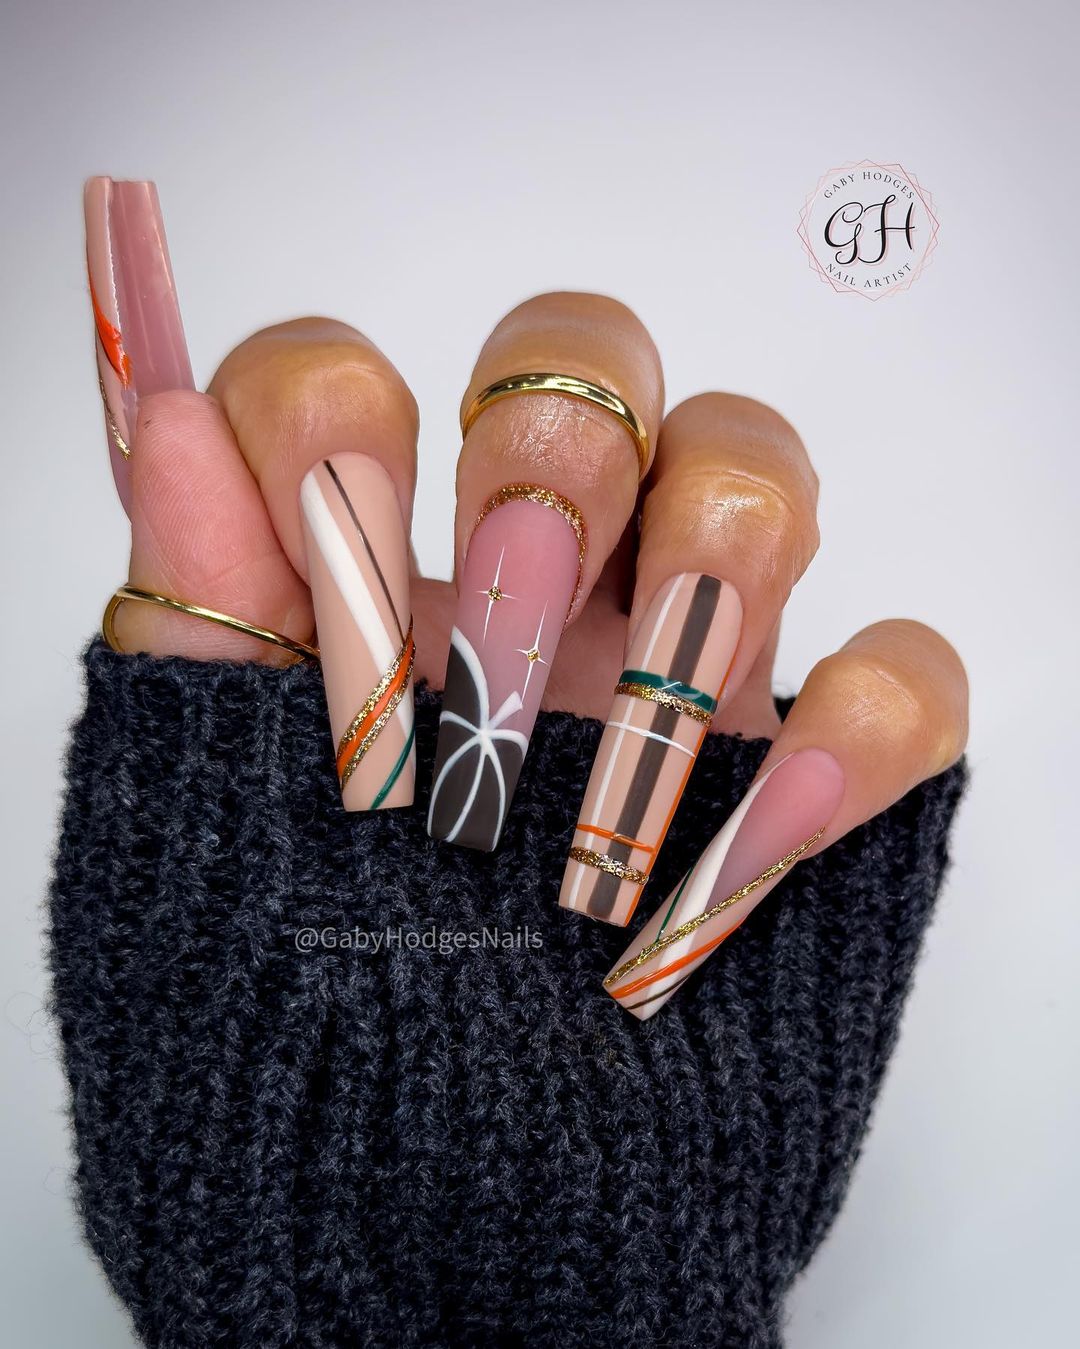
Chic Plaid and Glitter Fall Nails
This nail design is a perfect mix of classic and trendy elements. The plaid pattern, reminiscent of cozy fall flannels, is paired with glitter accents and delicate leaf details, making it a standout style for autumn. The rich browns and golds evoke the essence of the season, creating a look that is both stylish and festive.

- Brown glitter polish (China Glaze “Golden Enchantment”)
- Nude base polish (Essie “Ballet Slippers”)
- Black and white striping polishes for the plaid pattern
- Gold leaf decals
- Nail art brushes
- Top coat (OPI Top Coat)
Instructions:
- Apply a nude base coat to all nails.
- On selected nails, use the black and white striping polishes to create the plaid pattern. A steady hand or striping tape can help achieve clean lines.
- Apply the brown glitter polish to the accent nails.
- Add gold leaf decals to the desired nails for a touch of elegance.
- Finish with a top coat to seal the design and add shine.
Save Pin
Cozy Sweater-Inspired Nails
This design brings the warmth of a cozy sweater to your nails. The combination of matte finishes, knitted patterns, and autumn colors makes this a perfect fall manicure. The mustard yellow, deep red, and brown hues are complemented by floral accents, making it a versatile and chic choice.
- Matte top coat (Zoya Matte Velvet Top Coat)
- Mustard yellow polish (Sally Hansen “Mellow Yellow”)
- Deep red polish (OPI “Malaga Wine”)
- Brown polish (Essie “Wicked”)
- White polish for floral patterns (OPI “Alpine Snow”)
- Nail art brushes
- 3D knitting pattern stickers or tools
Instructions:
- Apply a matte base coat to all nails.
- Paint each nail with the selected autumn colors, alternating between mustard yellow, deep red, and brown.
- Use nail art brushes to create floral patterns on the white nails.
- Apply 3D knitting pattern stickers or use a thin brush to create the knitted effect on the mustard yellow nails.
- Seal with a matte top coat to keep the cozy look intact.
Delicate Floral Encased Nails
This elegant design features delicate floral elements encased in clear polish, giving the nails a sophisticated and ethereal look. The soft peach tones and clear tips with embedded flowers make this a subtle yet striking manicure perfect for any fall occasion.
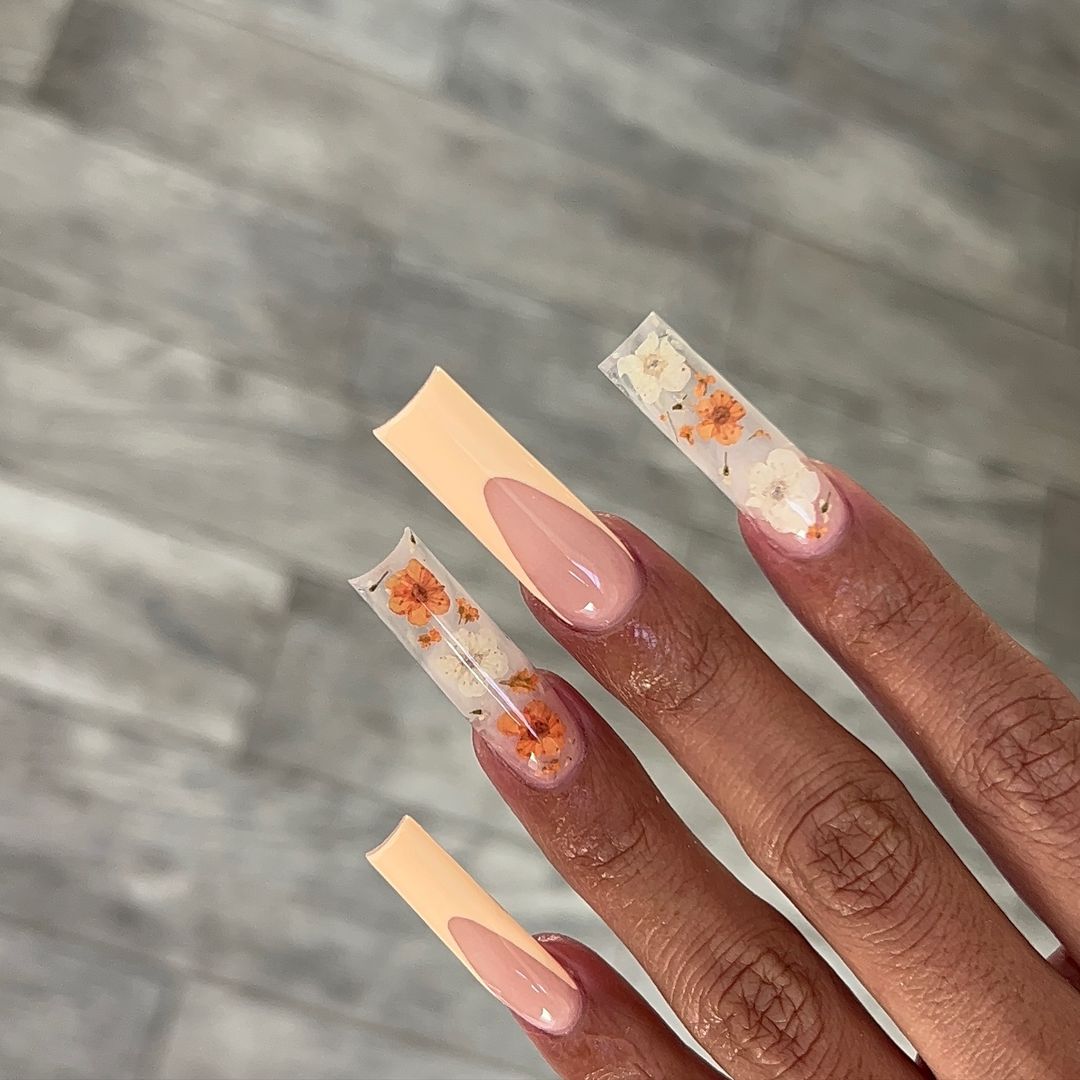
- Clear builder gel (IBD Builder Gel)
- Soft peach polish (OPI “Crawfishin’ for a Compliment”)
- Dried flowers for nail art
- UV/LED nail lamp
- Nail art tweezers
- Top coat (CND Super Shiney Top Coat)
Instructions:
- Apply a clear builder gel as a base and cure under a UV/LED lamp.
- Paint the peach polish on the nails, leaving the tips clear.
- Use tweezers to place dried flowers onto the clear tips, arranging them as desired.
- Apply another layer of clear builder gel over the flowers and cure again.
- Finish with a top coat to protect the design and add a glossy finish.
Warm Autumn Tones and Floral Accents
This manicure captures the essence of autumn with its warm hues and delicate floral accents. The rich, glossy brown and orange nails are complemented by a nude base adorned with tiny fall leaves, making this design both elegant and seasonally appropriate.
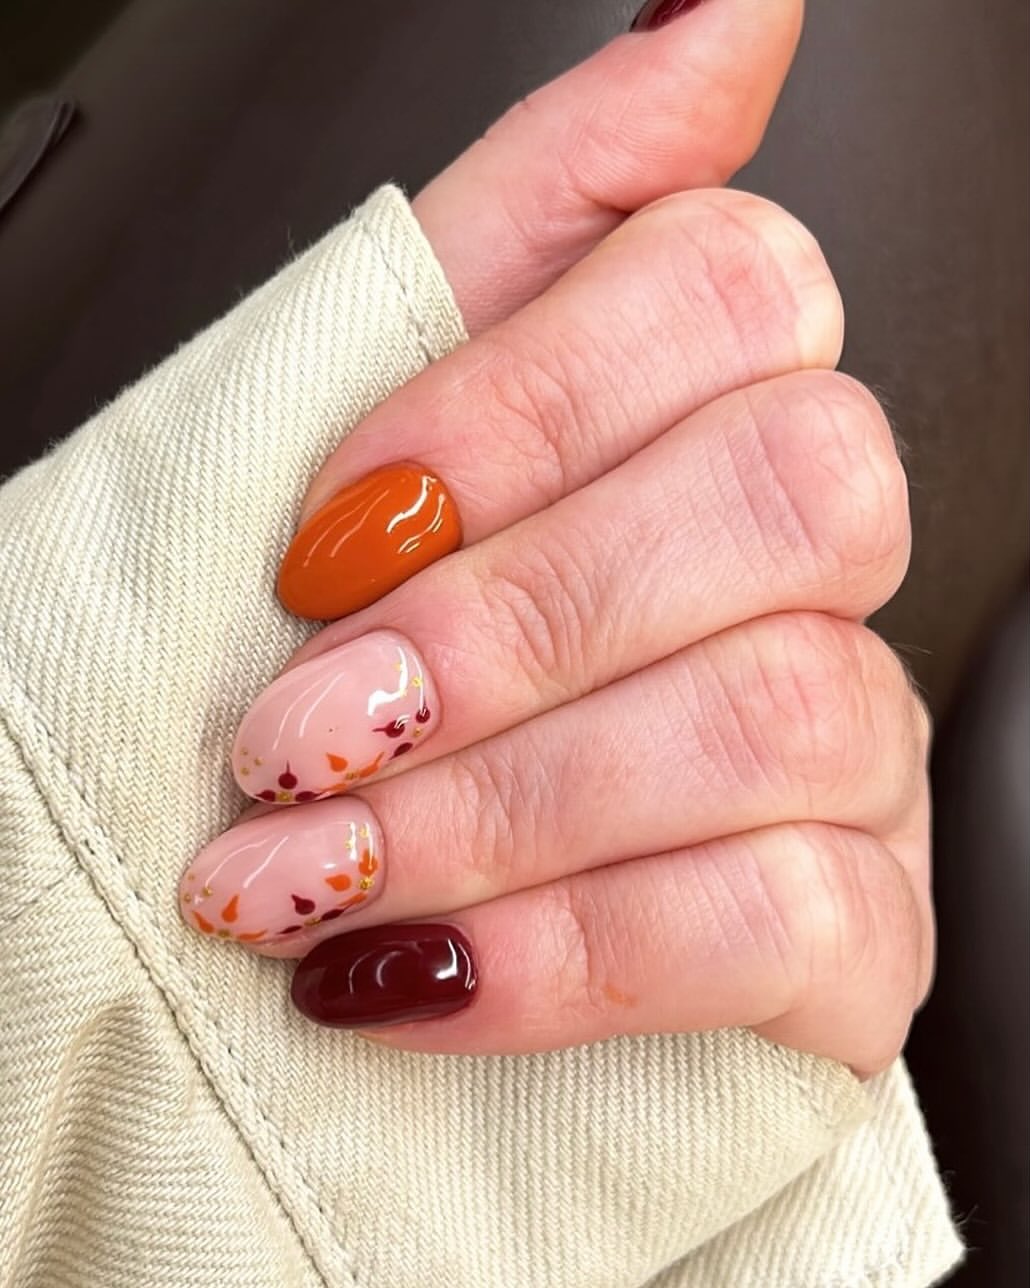
- Burnt orange polish (OPI “Rust & Relaxation”)
- Deep red polish (Essie “Bordeaux”)
- Nude base polish (Sally Hansen “Bare It All”)
- Tiny leaf nail decals or confetti
- Nail art brushes
- Top coat (Seche Vite Dry Fast Top Coat)
Instructions:
- Apply a base coat to protect your nails.
- Paint the nails with burnt orange and deep red polishes, alternating as desired.
- Use the nude base polish for the accent nails.
- Apply tiny leaf decals onto the nude nails, arranging them to create a scattered effect.
- Seal the design with a top coat to ensure the decals stay in place and to add shine.
Mesmerizing Marbled Galaxy Nails
This design features a stunning blend of marbled colors with a galaxy-like effect. The deep purples, golds, and glitter accents make this manicure a showstopper, perfect for adding a touch of cosmic beauty to your look.
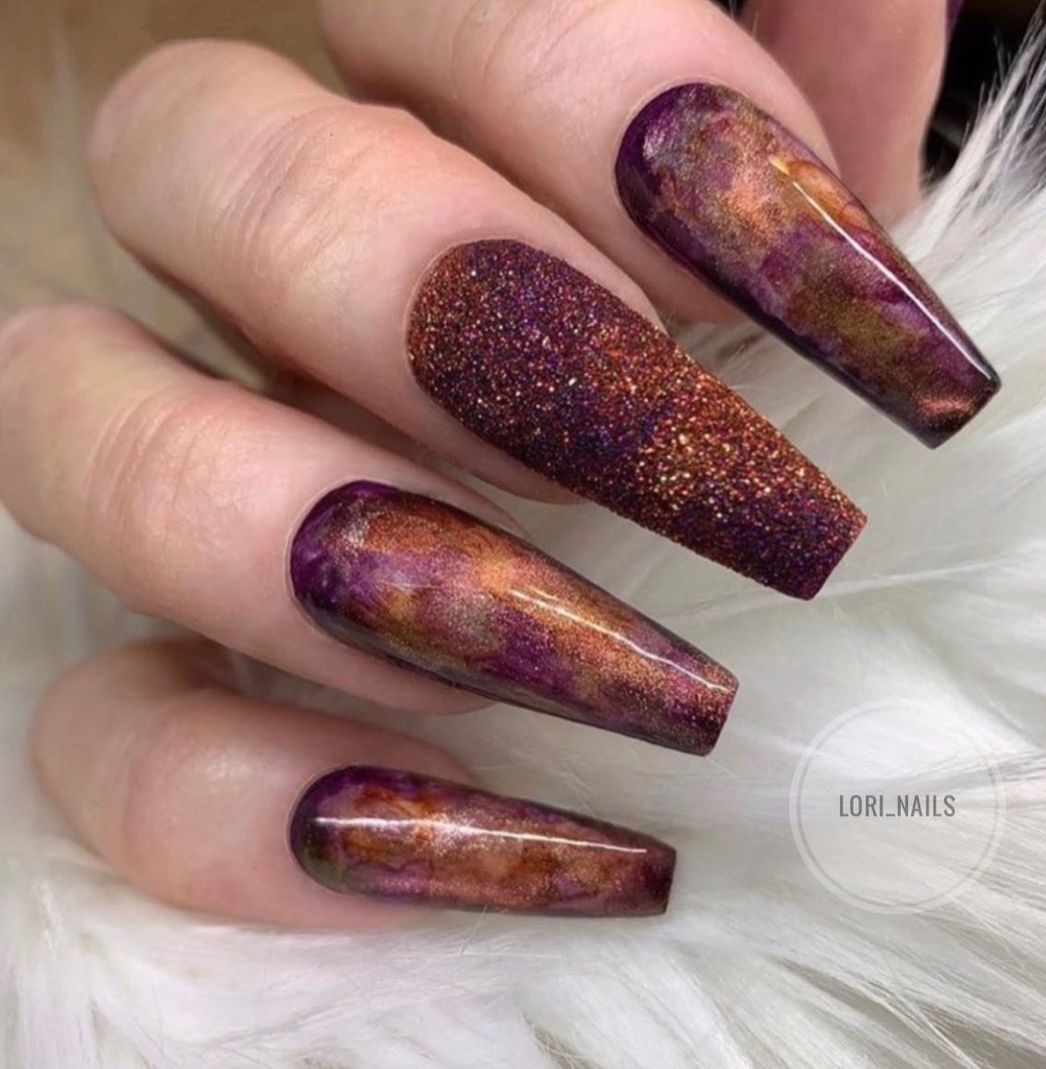
- Deep purple polish (China Glaze “Dusk till Dawn”)
- Gold glitter polish (Zoya “Solange”)
- Clear base polish (OPI “Natural Nail Base Coat”)
- Nail art sponges and brushes
- Top coat (Sally Hansen Miracle Gel Top Coat)
Instructions:
- Apply a clear base coat to all nails.
- Use a makeup sponge to dab deep purple polish onto the nails, creating a marbled effect.
- Add gold glitter polish sporadically to enhance the galaxy appearance.
- Blend the colors with a nail art brush to soften any harsh lines.
- Seal the design with a top coat to protect and add a glossy finish.
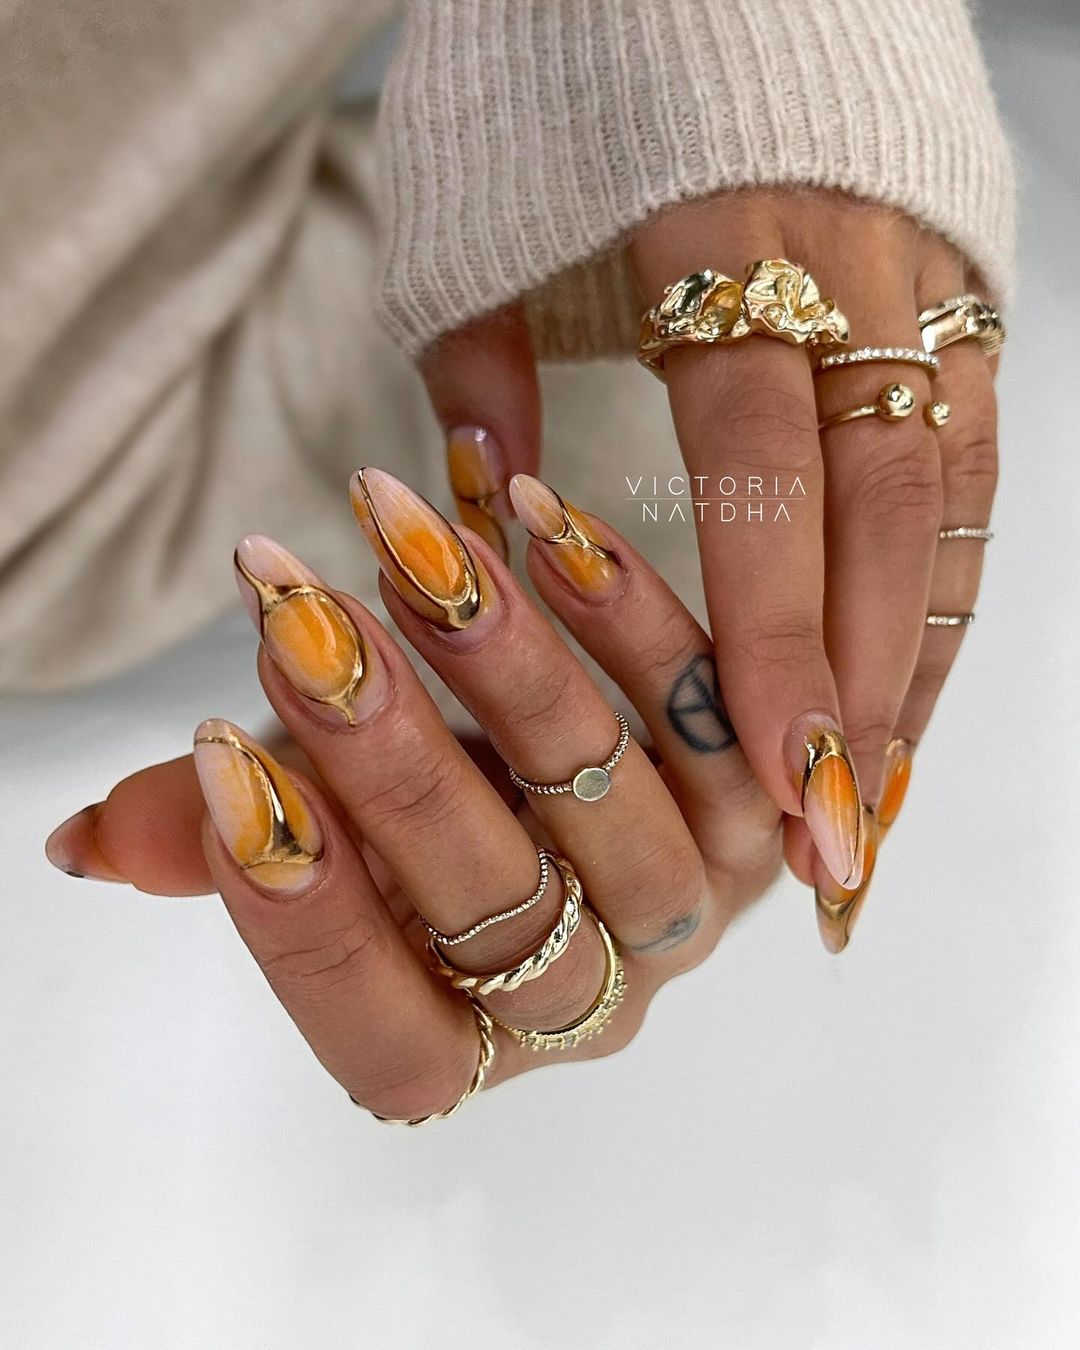
Nude Elegance with Gold Leaf Accents
This sophisticated nail design combines nude shades with delicate gold leaf accents, creating a timeless and elegant look. Perfect for any occasion, this manicure exudes understated luxury and style.
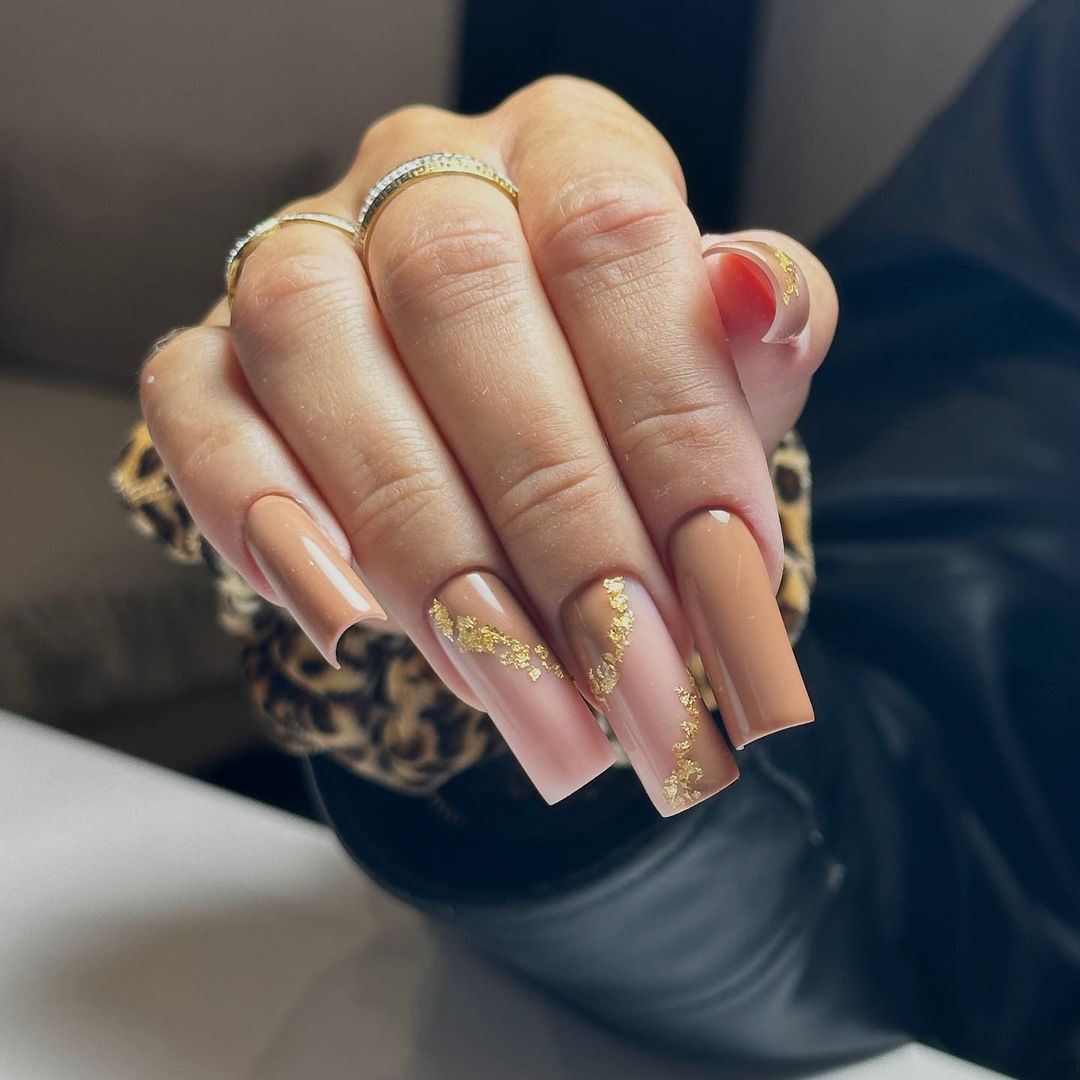
- Nude polish (OPI “Dulce de Leche”)
- Gold leaf flakes
- Clear builder gel (Gelish Hard Gel)
- UV/LED nail lamp
- Nail art tweezers
- Top coat (CND Super Shiney Top Coat)
Instructions:
- Apply a nude base coat to all nails and cure under a UV/LED lamp.
- Carefully place gold leaf flakes onto the nails using tweezers, arranging them as desired.
- Apply a layer of clear builder gel over the gold leaf and cure again.
- Finish with a top coat to seal the design and add shine.
Save Pin
Emerald and Autumn Glitter Mix
This bold and vibrant design features a mix of emerald green and autumn-themed glitter. The addition of gemstones and intricate details makes this manicure stand out, perfect for those who love a bit of sparkle.
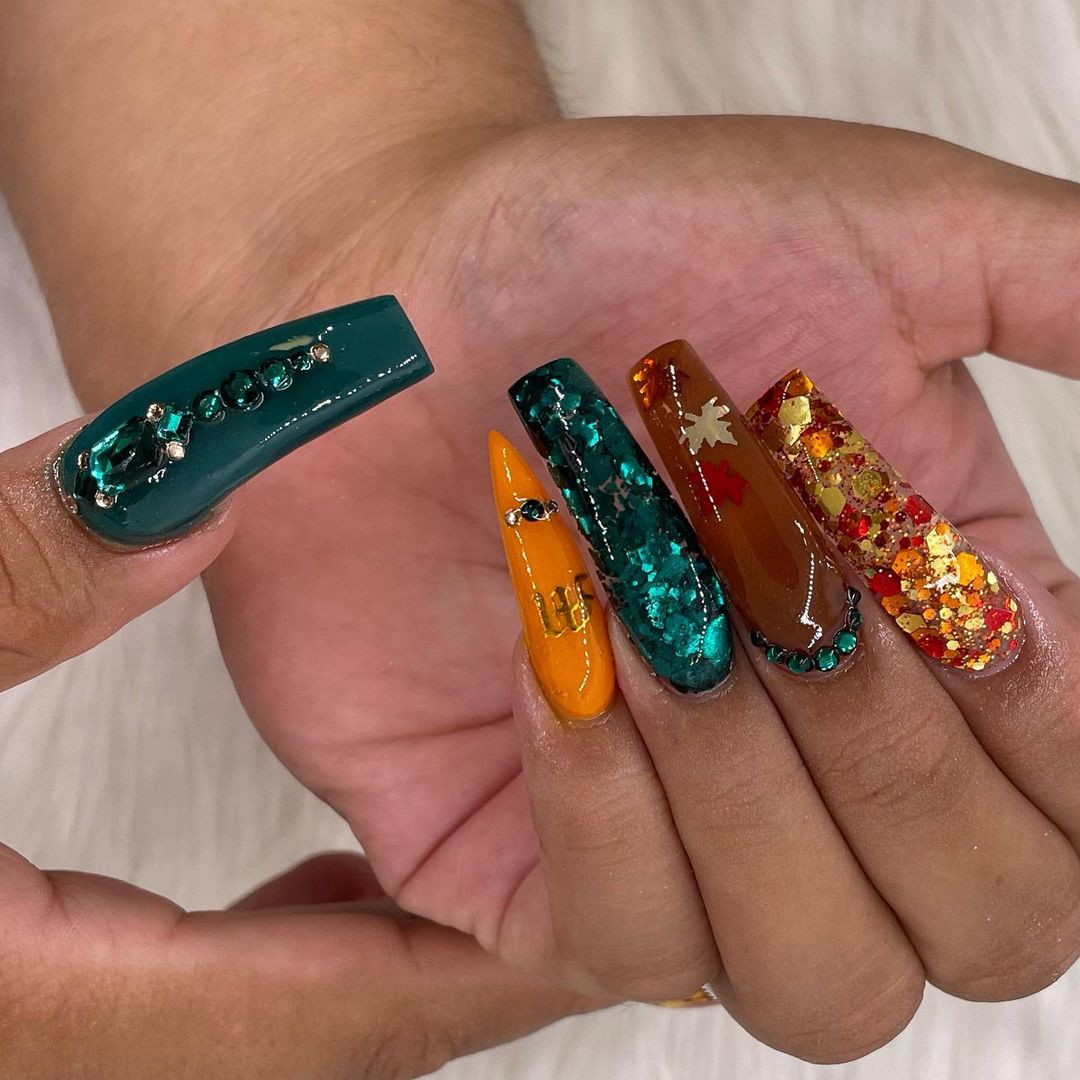
- Emerald green polish (Essie “Going Incognito”)
- Gold and red glitter polish (OPI “Golden Eye” and China Glaze “Ruby Pumps”)
- Nail art gemstones
- Nail art brushes and tweezers
- Top coat (Sally Hansen Miracle Gel Top Coat)
Instructions:
- Apply a base coat to protect your nails.
- Paint the nails with emerald green polish.
- Use gold and red glitter polishes on selected nails for a glittery effect.
- Add gemstones to enhance the design using nail art brushes and tweezers.
- Seal with a top coat to ensure the gemstones stay in place and to add shine.
Autumn Marble and Gold Nails
This artistic nail design features a blend of autumn marbled colors with gold accents. The combination of warm oranges and yellows with a touch of gold creates a stunning and sophisticated look.
- Orange and yellow polishes (China Glaze “Sunset Glow” and Essie “Hay There”)
- Gold polish (OPI “Glitzerland”)
- Nail art brushes and sponges
- Top coat (CND Super Shiney Top Coat)
Instructions:
- Apply a base coat to protect your nails.
- Use a makeup sponge to dab orange and yellow polishes onto the nails, creating a marbled effect.
- Add gold polish accents to enhance the design.
- Blend the colors with a nail art brush for a smooth transition.
- Finish with a top coat to seal the design and add shine.
Retro Fall Flower Power
This playful and retro design brings back the flower power vibes with a modern twist. The combination of mustard yellows, browns, and white floral patterns makes this manicure perfect for a fun autumn look.
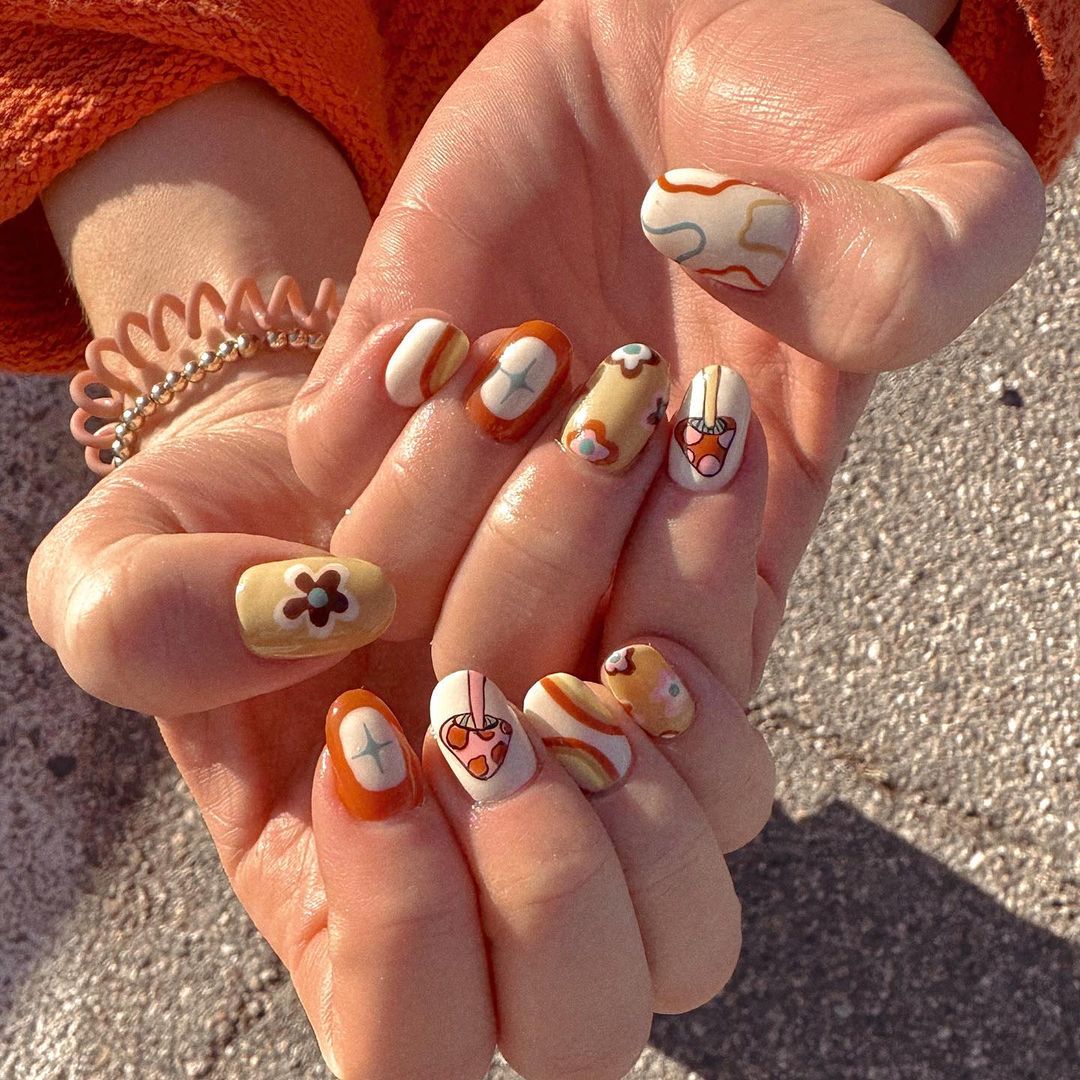
- Mustard yellow polish (OPI “Sun, Sea and Sand in My Pants”)
- Brown polish (Essie “Wicked”)
- White polish (Sally Hansen “White On”)
- Nail art brushes
- Top coat (Seche Vite Dry Fast Top Coat)
Instructions:
- Apply a base coat to protect your nails.
- Paint the nails with mustard yellow and brown polishes, alternating as desired.
- Use white polish and nail art brushes to create retro floral patterns on selected nails.
- Seal the design with a top coat to protect and add shine.
Glamorous Glitter and Heart Accents
This nail design features a chic combination of nude shades, glitter, and heart accents. The plaid pattern and heart shapes add a touch of sophistication and sweetness, making it perfect for a romantic autumn look. The glitter adds just the right amount of sparkle to this elegant design.
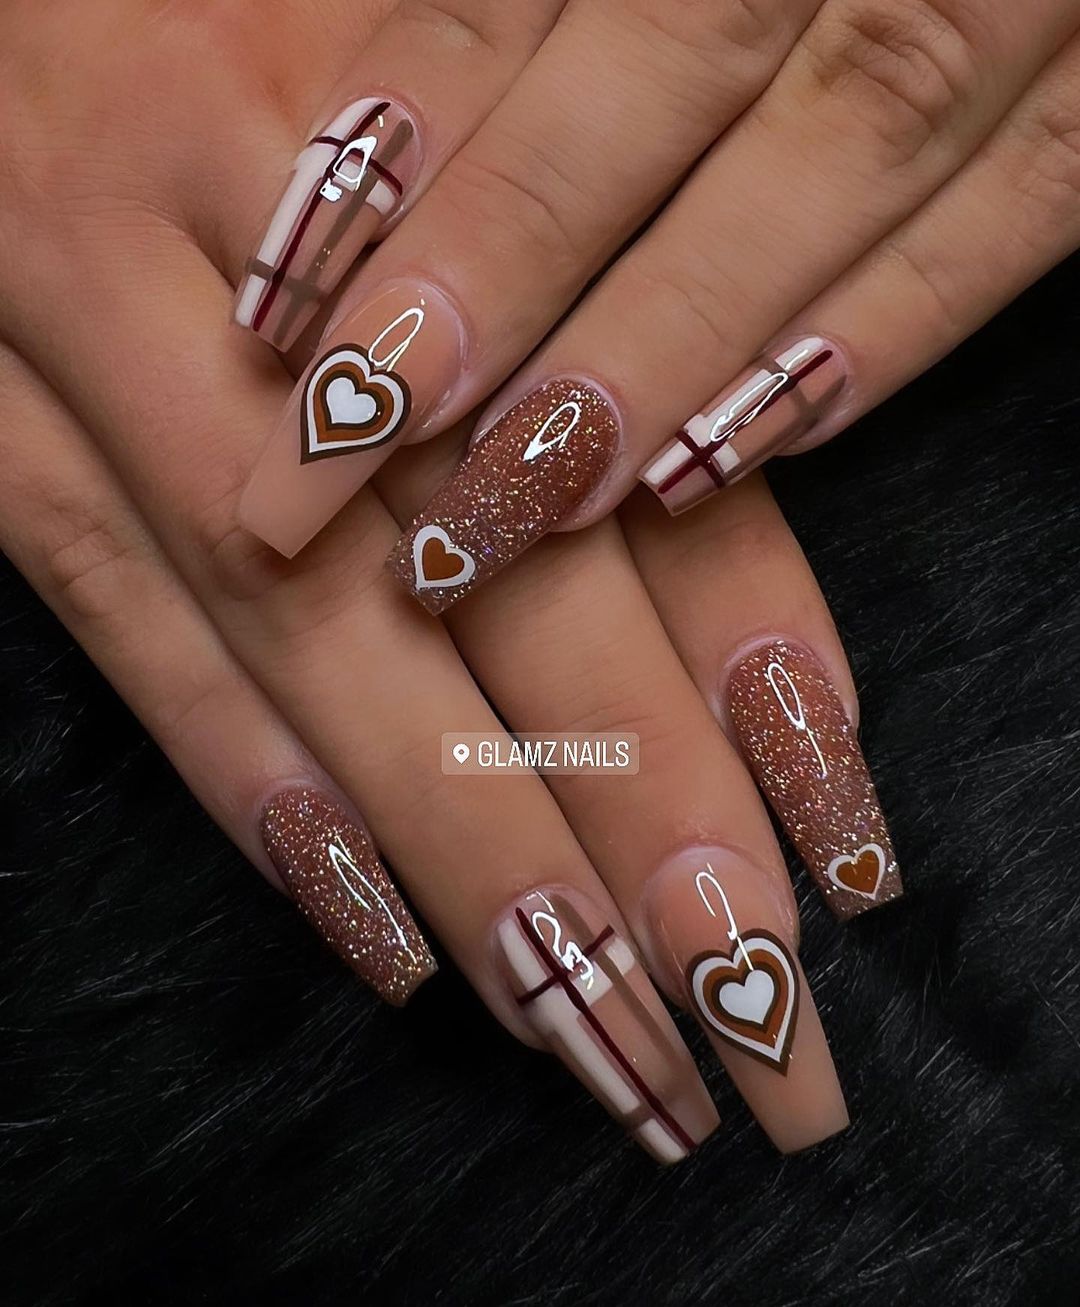
- Nude base polish (OPI “Bubble Bath”)
- Brown glitter polish (China Glaze “Golden Enchantment”)
- White and brown striping polishes
- Heart-shaped nail decals
- Nail art brushes
- Top coat (Essie Gel Couture Top Coat)
Instructions:
- Apply a nude base coat to all nails.
- Create a plaid pattern on selected nails using white and brown striping polishes.
- Apply the brown glitter polish on accent nails.
- Add heart-shaped nail decals to enhance the romantic theme.
- Seal the design with a top coat to ensure durability and shine.
Tortoiseshell French Tips with Star Accents
This unique design combines the elegance of French tips with a trendy tortoiseshell pattern. The addition of small gold star accents adds a touch of whimsy to this sophisticated look, perfect for fall.
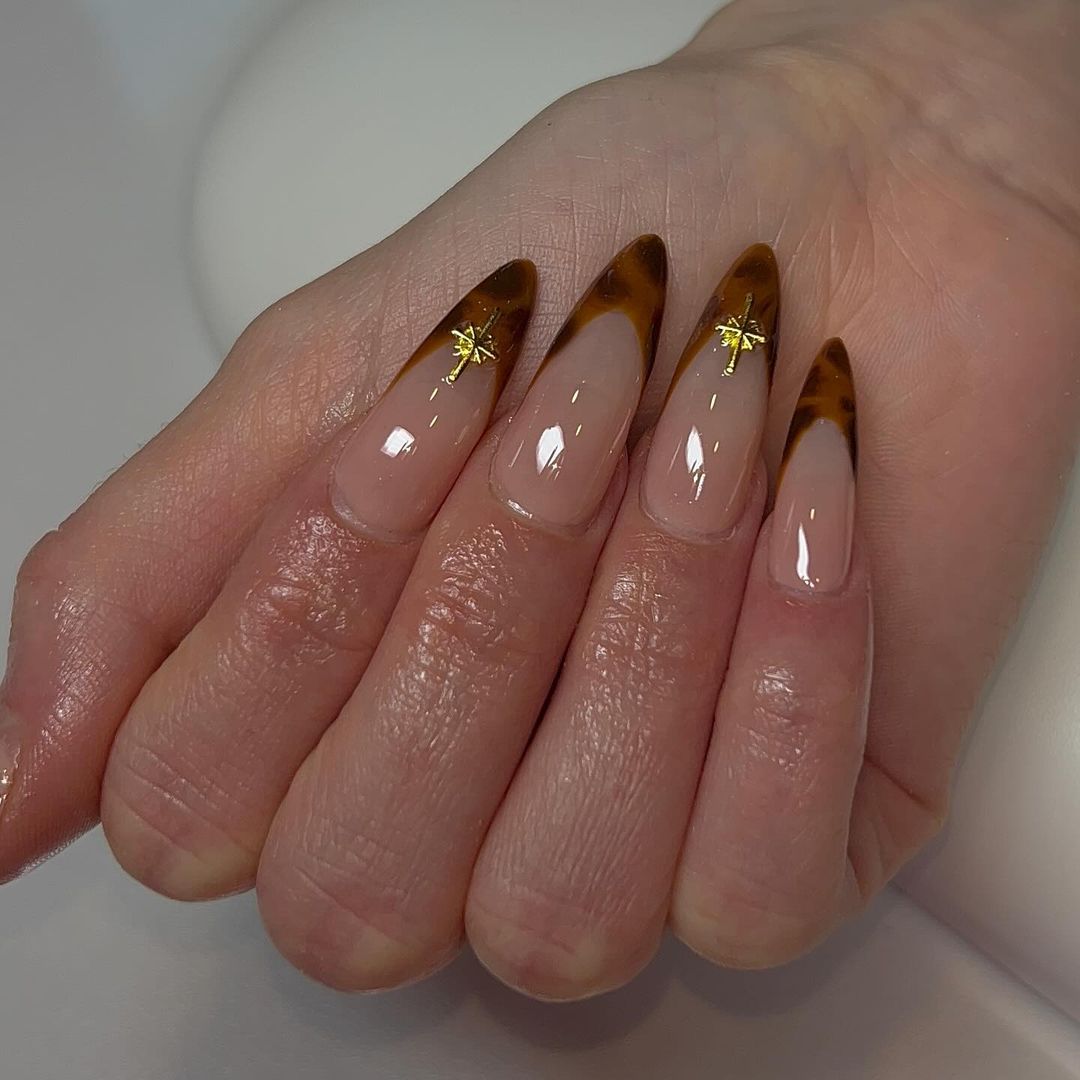
- Nude base polish (Sally Hansen “Bare It All”)
- Brown and black polishes for tortoiseshell effect (Essie “Licorice” and “Little Brown Dress”)
- Gold star nail decals
- Nail art brushes
- Top coat (OPI Top Coat)
Instructions:
- Apply a nude base coat to all nails.
- Create the tortoiseshell effect on the tips using brown and black polishes, blending with a nail art brush.
- Add gold star decals to the tortoiseshell tips.
- Seal the design with a top coat for a glossy finish and to secure the decals.
Striped Elegance with Metallic Touches
This design features elegant stripes in neutral tones with metallic gold accents. The combination of beige, brown, and white stripes with gold adds a modern and luxurious feel to the nails, making it perfect for any stylish fall event.
- Beige polish (OPI “Don’t Bossa Nova Me Around”)
- Brown polish (Essie “Wicked”)
- White polish (Sally Hansen “White On”)
- Gold polish (Zoya “Goldie”)
- Nail art brushes and striping tape
- Top coat (Seche Vite Dry Fast Top Coat)
Instructions:
- Apply a beige base coat to all nails.
- Use striping tape and nail art brushes to create stripes with brown, white, and gold polishes.
- Add metallic gold accents to enhance the design.
- Seal the design with a top coat to protect the stripes and add shine.
Patchwork Pumpkin Nails
This playful and colorful design features a patchwork pattern with autumn colors and a cute pumpkin accent. The mix of orange, green, and gold with the patchwork pattern makes it perfect for a fun fall manicure.
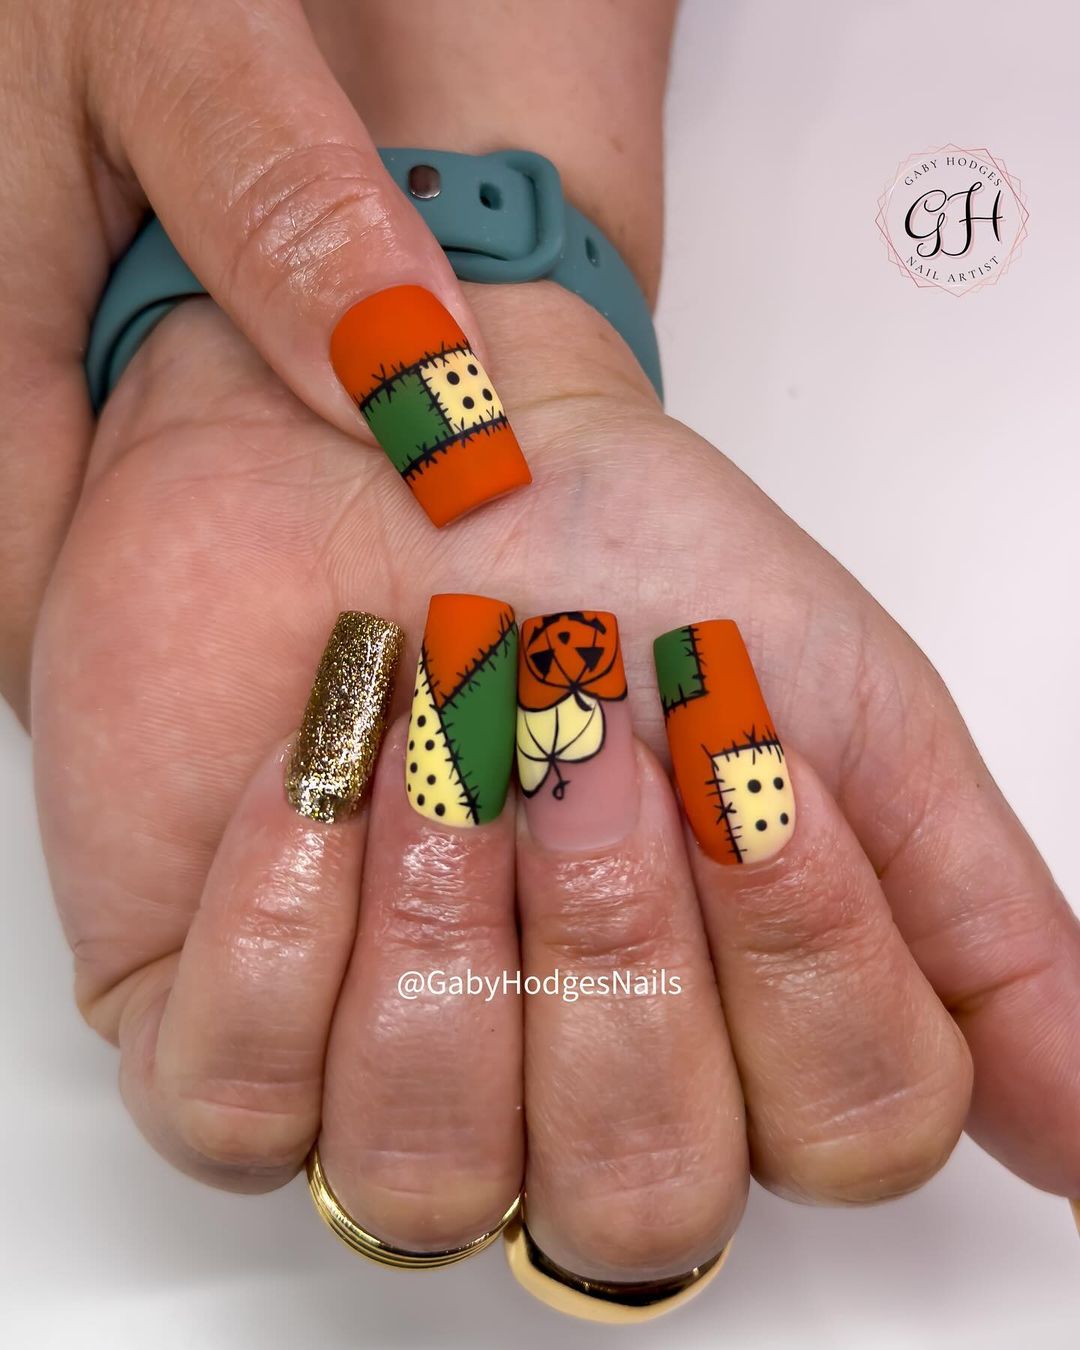
- Orange polish (OPI “A Good Man-darin is Hard to Find”)
- Green polish (Essie “Mojito Madness”)
- Gold glitter polish (China Glaze “Golden Enchantment”)
- Black polish for outlining (Sally Hansen “Black Out”)
- Nail art brushes
- Top coat (CND Super Shiney Top Coat)
Instructions:
- Apply a base coat to protect your nails.
- Paint the nails with orange and green polishes, alternating as desired.
- Use black polish and a nail art brush to create the patchwork pattern.
- Add a pumpkin accent to one of the nails for a festive touch.
- Seal the design with a top coat to protect the pattern and add shine.
Colorful Floral French Tips
This design combines the classic French tip with colorful floral accents. The nude base and brown tips are beautifully complemented by vibrant flowers, making this a cheerful and stylish choice for fall.
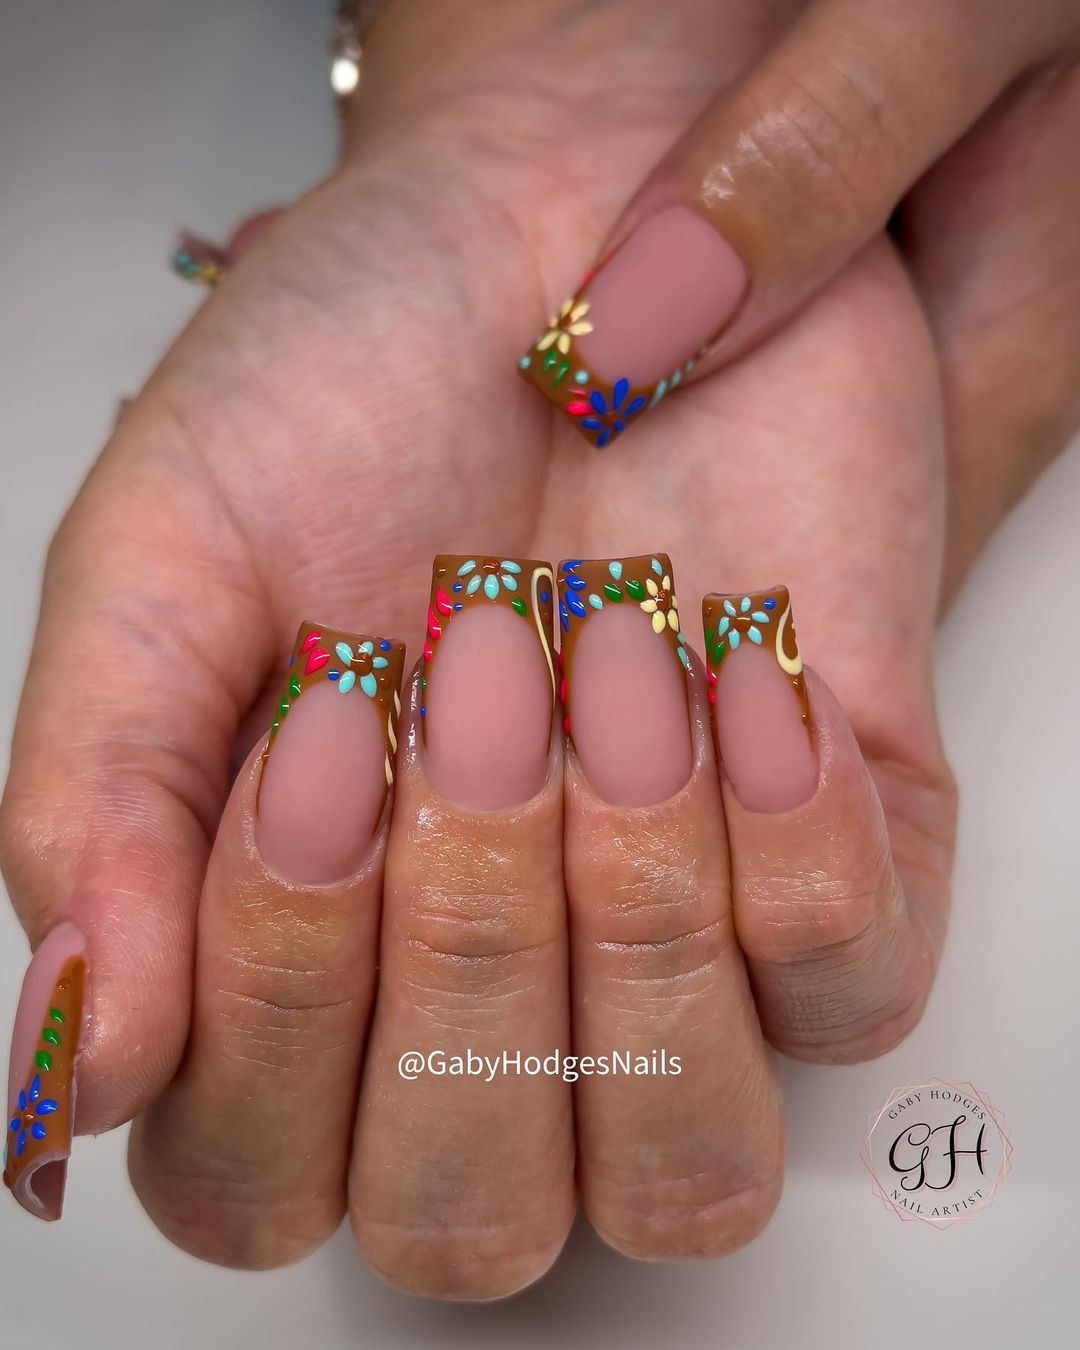
- Nude base polish (Essie “Ballet Slippers”)
- Brown polish for French tips (OPI “You Don’t Know Jacques”)
- Various bright polishes for flowers (OPI “Can’t Find My Czechbook,” “Big Apple Red,” “Sun, Sea and Sand in My Pants”)
- Nail art brushes
- Top coat (Sally Hansen Miracle Gel Top Coat)
Instructions:
- Apply a nude base coat to all nails.
- Paint the tips with brown polish to create the French tip look.
- Use nail art brushes to paint small flowers on the tips with various bright polishes.
- Seal the design with a top coat to protect the floral accents and add shine.
Textured Neutral Tones
This elegant design features a mix of neutral tones with textured patterns. The combination of matte and glossy finishes, along with intricate textures, creates a sophisticated and stylish look perfect for fall.
- Nude polish (OPI “Samoan Sand”)
- Brown polish (Essie “Mink Muffs”)
- White polish for texture (Sally Hansen “White On”)
- Matte top coat (Zoya Matte Velvet Top Coat)
- Nail art brushes and 3D texture tools
- Top coat (OPI Top Coat)
Instructions:
- Apply a base coat to all nails.
- Paint each nail with different neutral tones, alternating between nude and brown.
- Use white polish and nail art tools to create textured patterns on some nails.
- Apply a matte top coat on selected nails to enhance the textured look.
- Finish with a glossy top coat on the remaining nails to create a contrast.
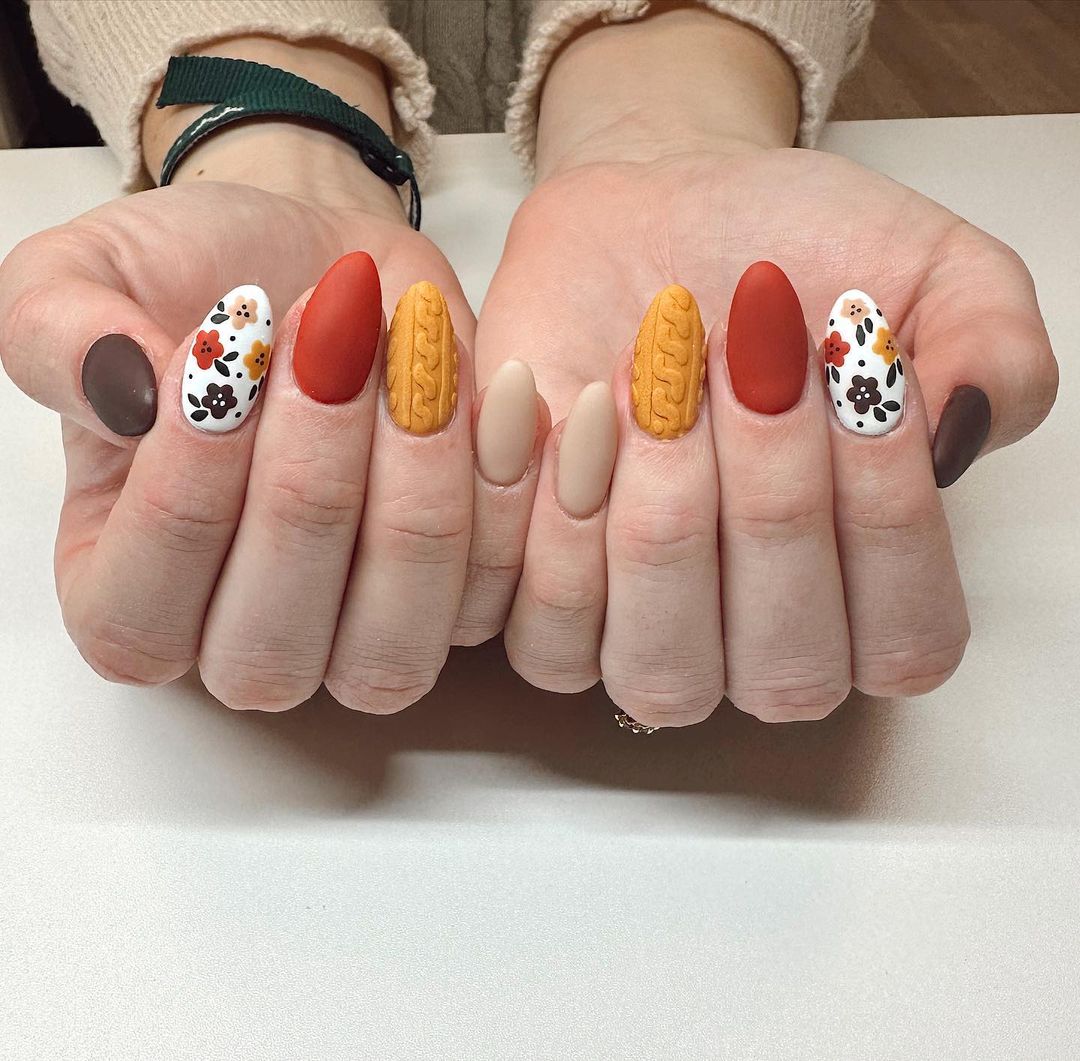
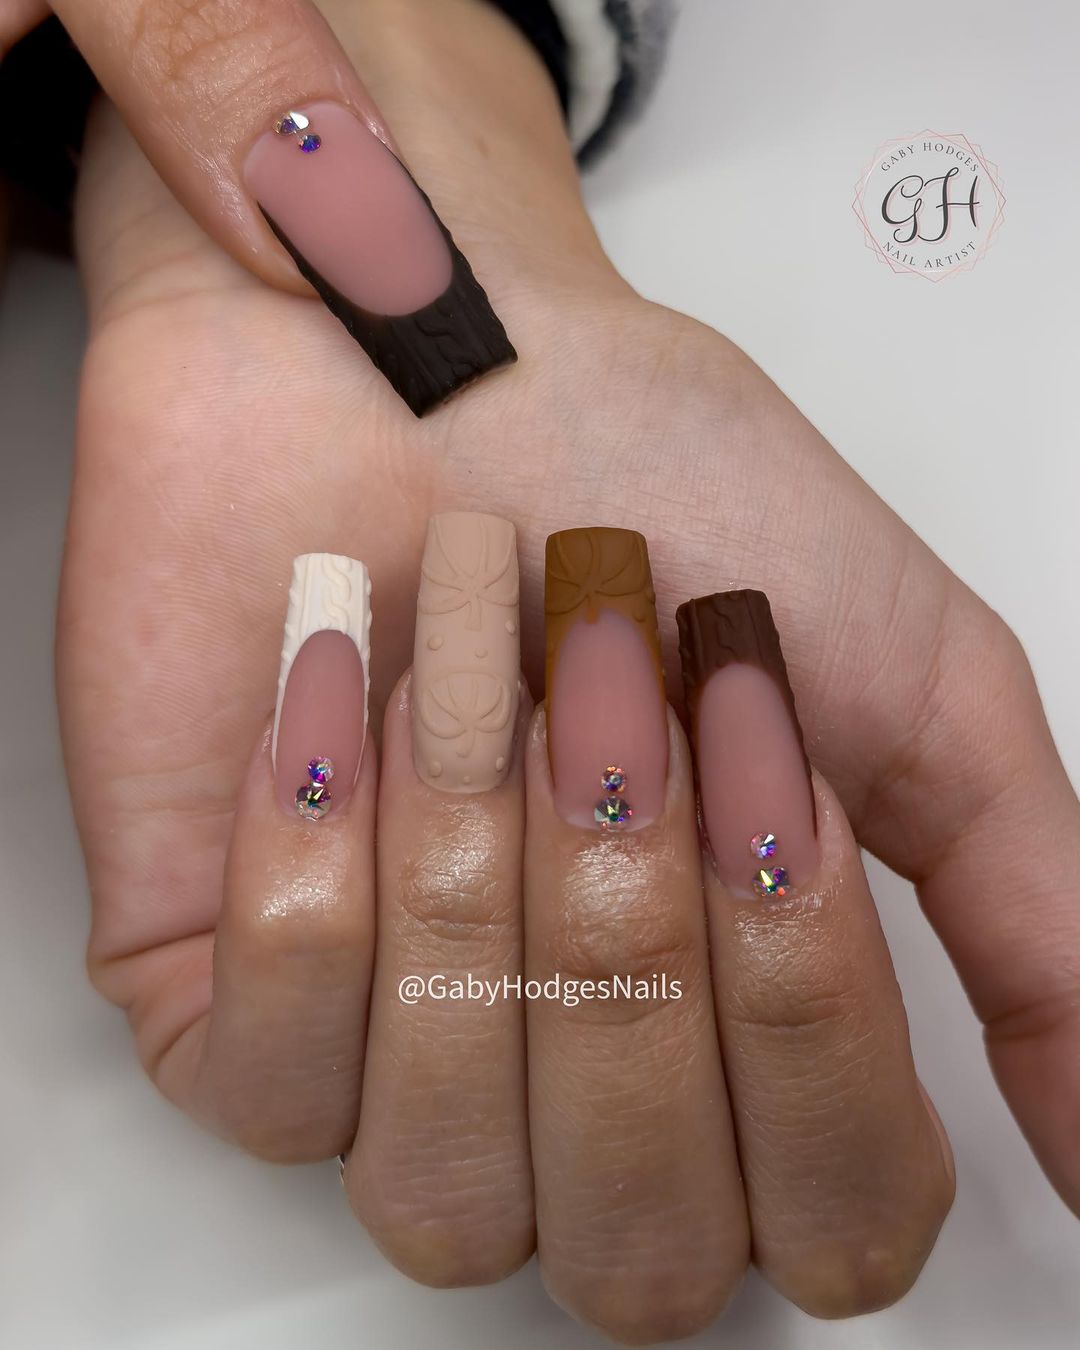
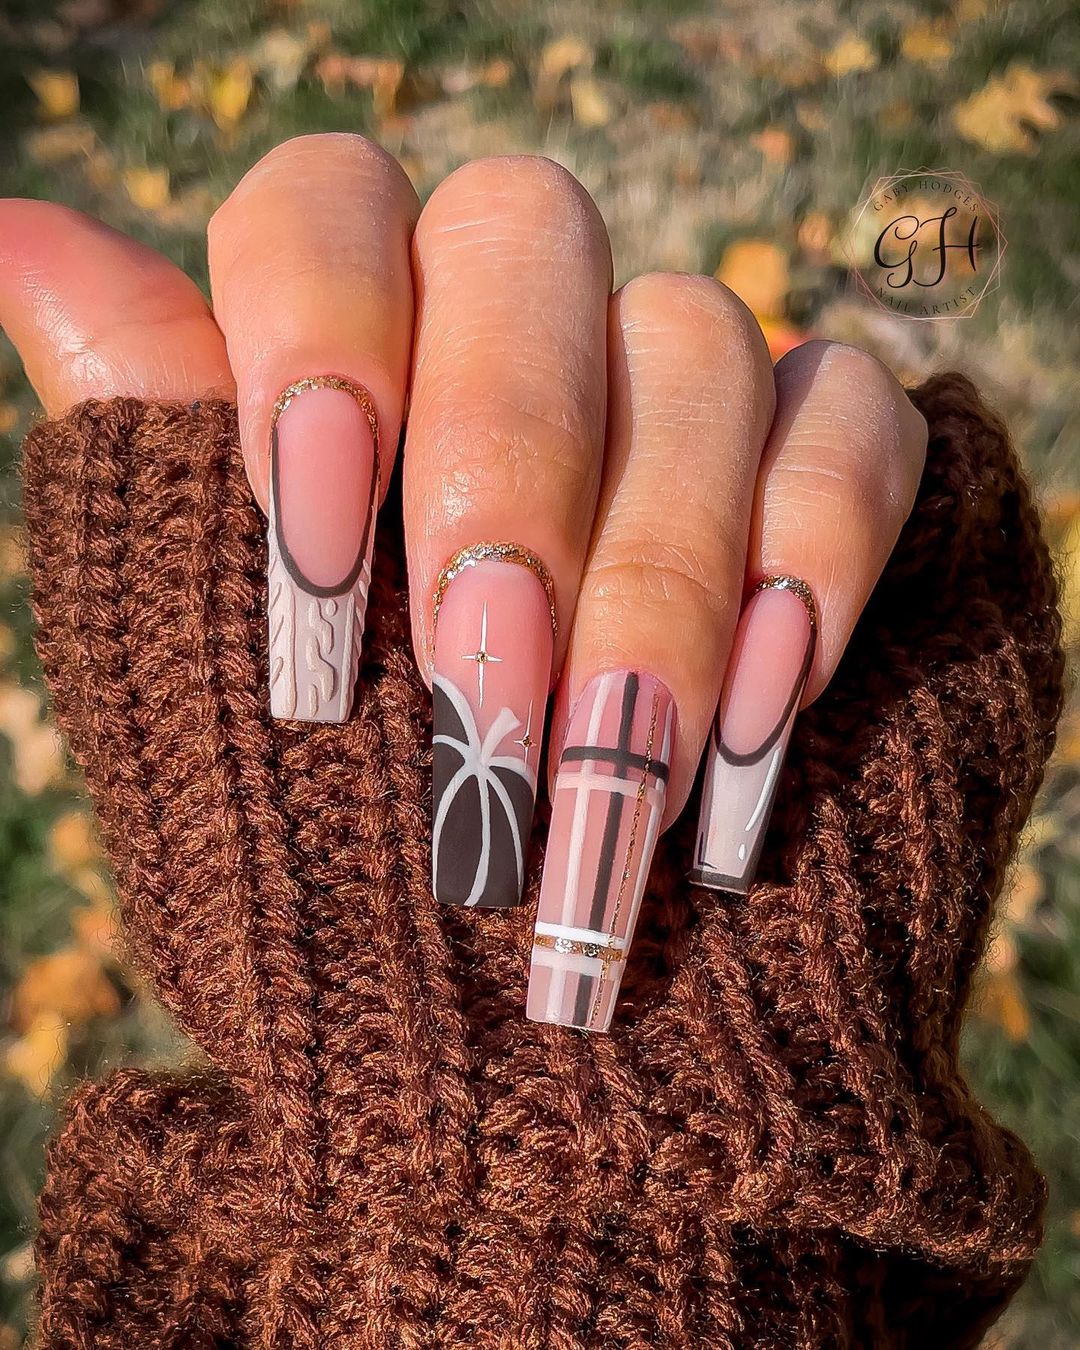
Cozy Cable Knit Nails
This nail design features a variety of autumn shades with a cozy cable knit pattern, perfect for sweater weather. The warm tones of brown, orange, and cream create a snug and inviting look, reminiscent of your favorite fall sweaters.
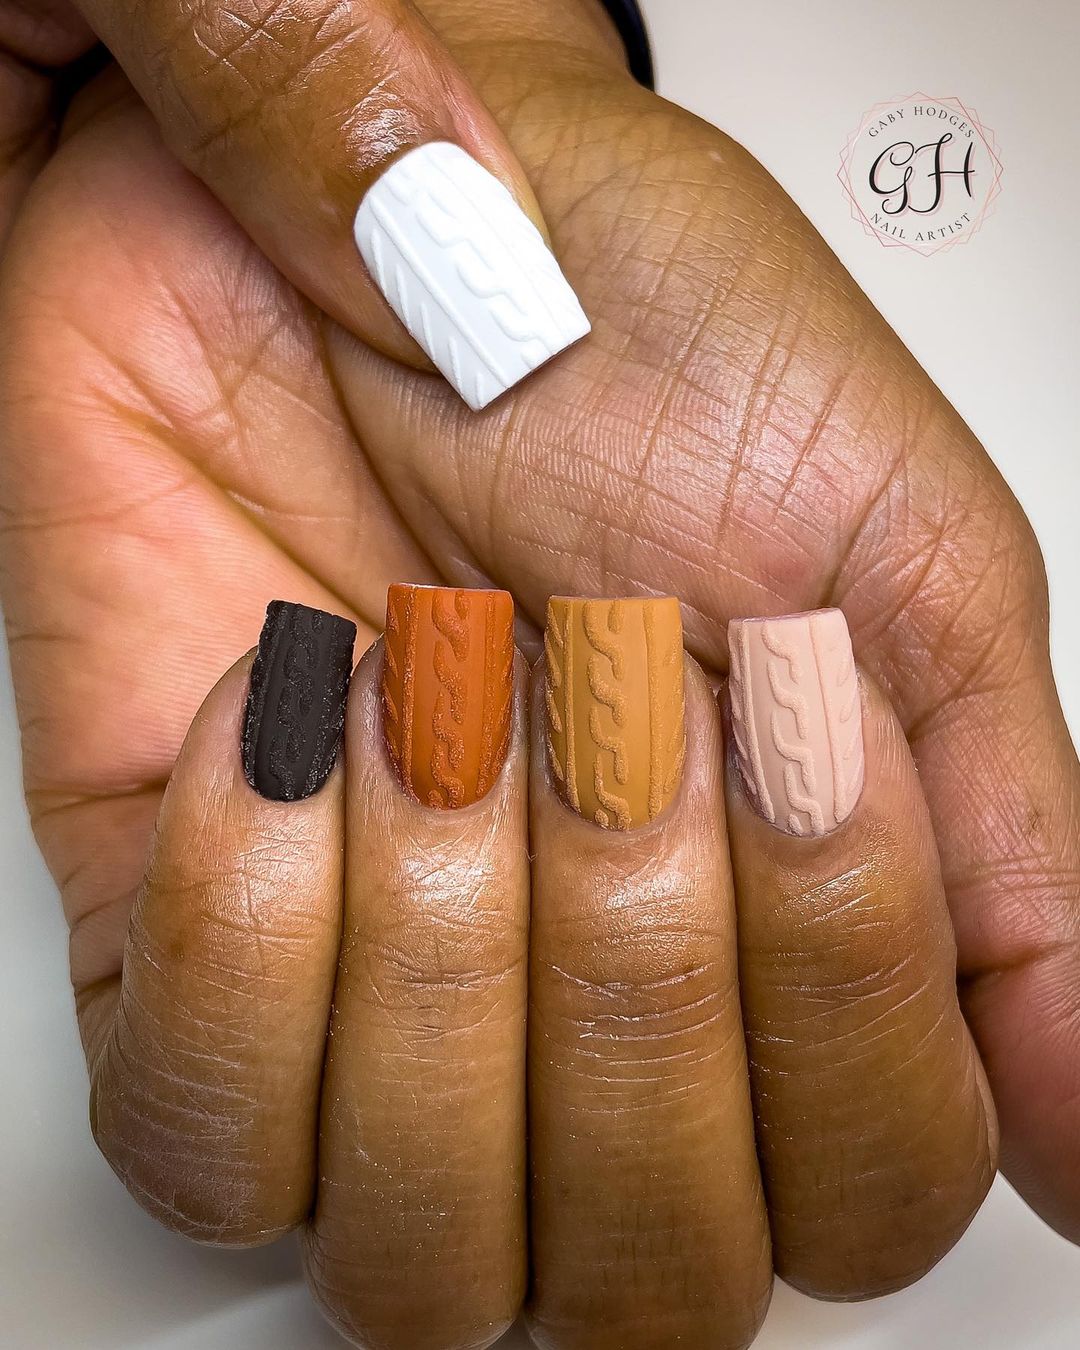
- Dark brown polish (OPI “Chocolate Moose”)
- Rust orange polish (Essie “Playing Koi”)
- Mustard yellow polish (China Glaze “Mustard the Courage”)
- Nude polish (Sally Hansen “Bare It All”)
- White polish (OPI “Alpine Snow”)
- Cable knit nail decals or 3D gel for texture
- Top coat (Essie Gel Couture Top Coat)
Instructions:
- Apply a base coat to all nails.
- Paint each nail with a different autumn shade, alternating between dark brown, rust orange, mustard yellow, nude, and white.
- Use cable knit nail decals or 3D gel to create the textured pattern on each nail.
- Seal the design with a top coat to ensure longevity and shine.
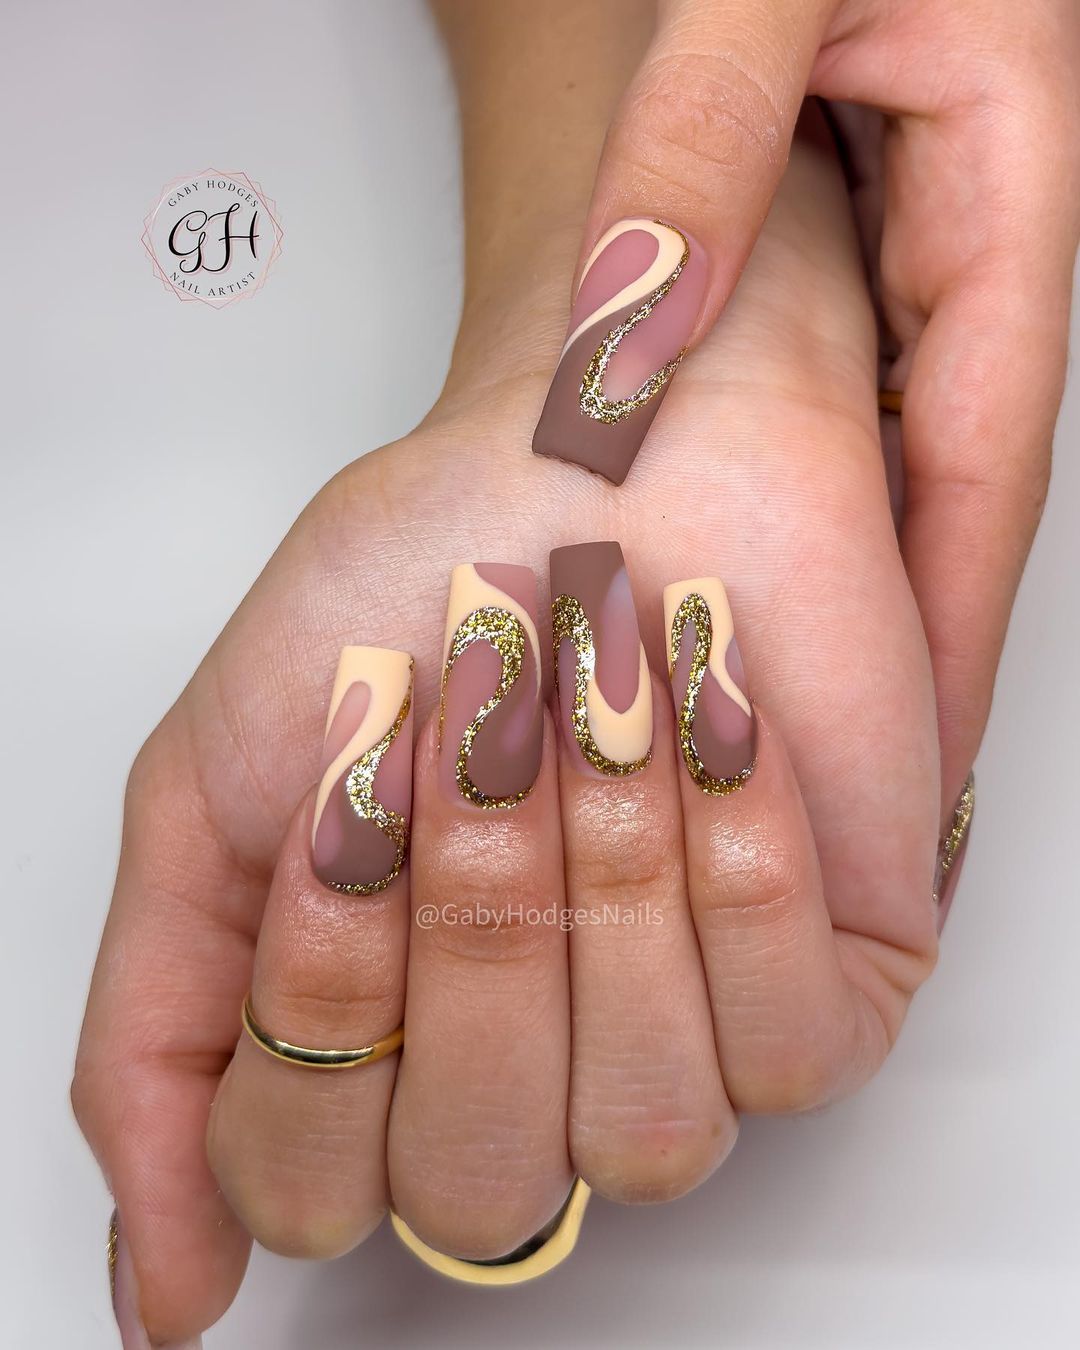
Glittery Pumpkin Patch Nails
This fun and festive design incorporates glitter, pumpkins, and wavy patterns for a playful autumn look. The combination of gold glitter and earthy tones makes it perfect for any fall occasion.
- Nude base polish (OPI “Samoan Sand”)
- Gold glitter polish (China Glaze “Golden Enchantment”)
- Brown and beige polishes (Essie “Mink Muffs” and “Ballet Slippers”)
- Nail art brushes
- Pumpkin nail decals
- Top coat (Seche Vite Dry Fast Top Coat)
Instructions:
- Apply a nude base coat to all nails.
- Create wavy patterns with brown and beige polishes using nail art brushes.
- Apply gold glitter polish to selected nails for a sparkling effect.
- Add pumpkin nail decals to enhance the autumn theme.
- Seal the design with a top coat to protect and add shine.
Spooky Halloween Patch Nails
This Halloween-inspired design features patchwork patterns with spooky elements like pumpkins and stitching. The mix of orange, yellow, and black creates a fun and eerie look perfect for the spooky season.
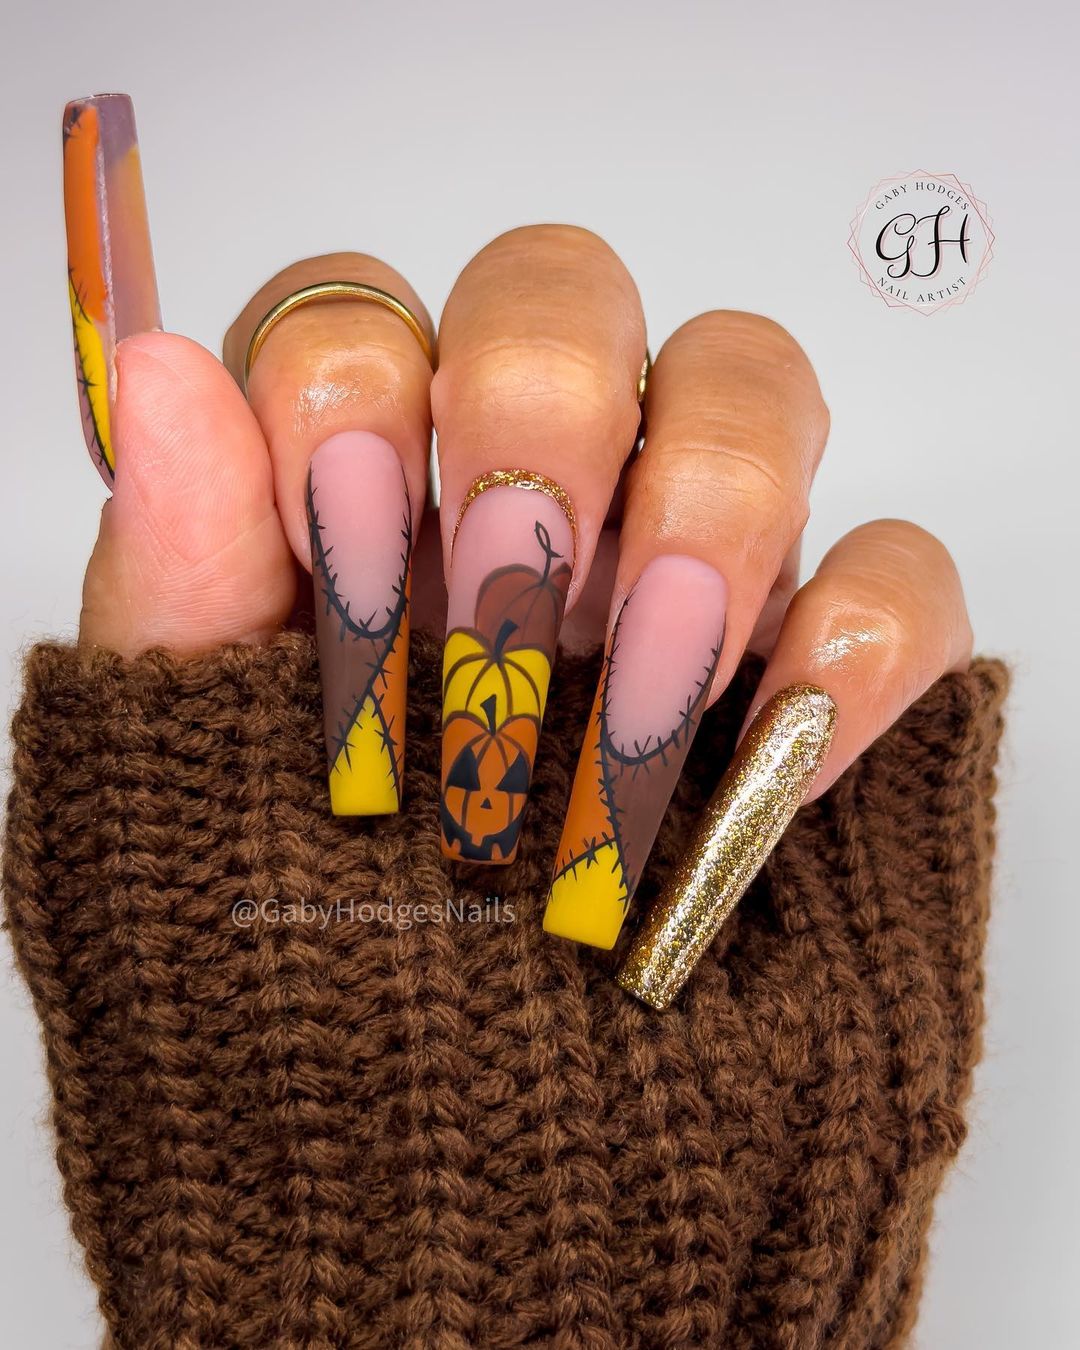
- Orange polish (OPI “A Good Man-darin is Hard to Find”)
- Yellow polish (Essie “Hay There”)
- Black polish for outlining (Sally Hansen “Black Out”)
- Gold glitter polish (Zoya “Solange”)
- Nail art brushes
- Top coat (CND Super Shiney Top Coat)
Instructions:
- Apply a base coat to protect your nails.
- Paint the nails with orange and yellow polishes, alternating as desired.
- Use black polish and a nail art brush to create the patchwork pattern and add spooky elements like pumpkins and stitching.
- Apply gold glitter polish to one of the nails for a touch of sparkle.
- Seal the design with a top coat to protect the pattern and add shine.
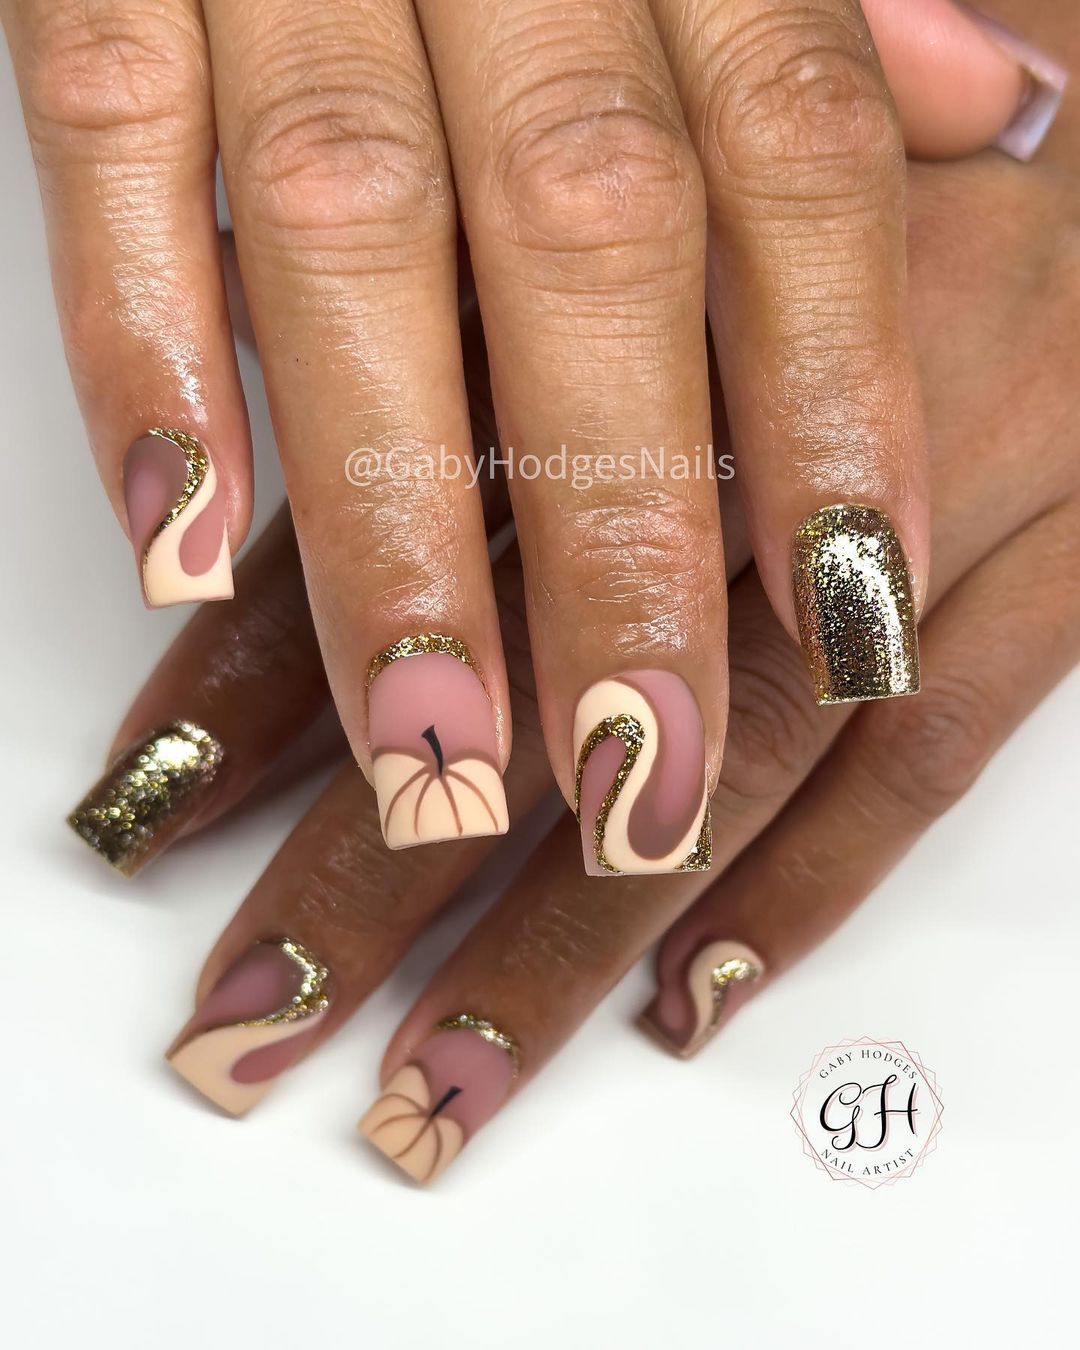
Elegant Gold Swirls and Beige
This elegant nail design features sophisticated gold swirls over a beige base. The combination of matte and glitter finishes creates a chic and luxurious look suitable for any fall event.
- Beige polish (OPI “Don’t Bossa Nova Me Around”)
- Gold glitter polish (China Glaze “Golden Enchantment”)
- Nail art brushes for swirling
- Matte top coat (Zoya Matte Velvet Top Coat)
- Top coat (Essie Gel Couture Top Coat)
Instructions:
- Apply a beige base coat to all nails.
- Use a nail art brush to create gold swirls on each nail.
- Apply a matte top coat to selected nails to enhance the elegant look.
- Finish with a glossy top coat on the remaining nails to create a contrast.
Chic Plaid and Glitter Accent
This design combines classic plaid patterns with glitter accents for a sophisticated and stylish fall look. The mix of pink, brown, and gold creates a harmonious and elegant design.
- Pink base polish (Essie “Ballet Slippers”)
- Brown polish (OPI “You Don’t Know Jacques”)
- Gold glitter polish (China Glaze “Golden Enchantment”)
- White striping polish
- Nail art brushes
- Top coat (Sally Hansen Miracle Gel Top Coat)
Instructions:
- Apply a pink base coat to all nails.
- Use striping polish and nail art brushes to create plaid patterns with brown and white polishes.
- Apply gold glitter polish to accent nails.
- Seal the design with a top coat to protect and add shine.
Minimalist Halloween French Tips
This minimalist design features nude nails with black outlined French tips and subtle Halloween accents. The combination of simplicity and spooky elements makes it perfect for a chic Halloween manicure.
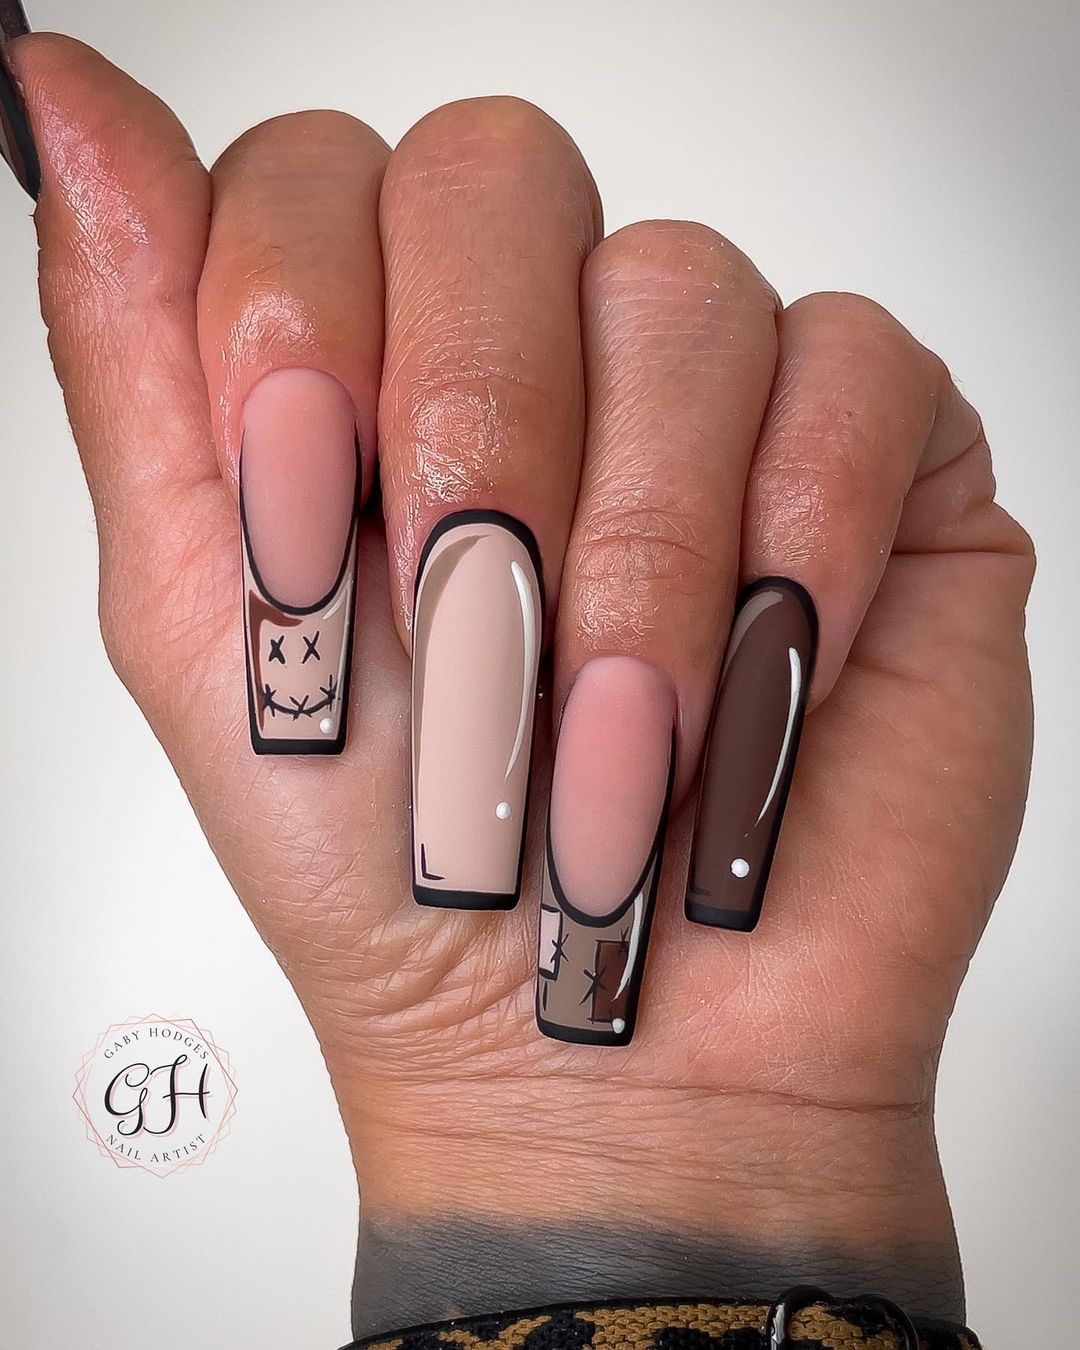
- Nude base polish (Sally Hansen “Bare It All”)
- Black polish for outlining (Essie “Licorice”)
- Nail art brushes
- Top coat (OPI Top Coat)
Instructions:
- Apply a nude base coat to all nails.
- Use black polish and a nail art brush to outline the French tips on each nail.
- Add subtle Halloween accents like stitches and Xs for a spooky touch.
- Seal the design with a top coat to ensure durability and shine.
Knitted Pattern and Glitter Accents
This cozy design features a mix of knitted patterns and glitter accents in warm autumn shades. The combination of textures and colors creates a snug and stylish look perfect for the fall season.

- Nude base polish (OPI “Samoan Sand”)
- Brown and beige polishes (Essie “Mink Muffs” and “Ballet Slippers”)
- Gold glitter polish (China Glaze “Golden Enchantment”)
- Cable knit nail decals or 3D gel for texture
- Top coat (Seche Vite Dry Fast Top Coat)
Instructions:
- Apply a nude base coat to all nails.
- Use cable knit nail decals or 3D gel to create the knitted pattern on some nails.
- Apply brown and beige polishes to alternating nails.
- Add gold glitter polish to accent nails for a touch of sparkle.
- Seal the design with a top coat to ensure longevity and shine.
FAQ
Q: How long does it take for these nail designs to dry? A: Depending on the type of polish used, it can take anywhere from a few minutes for quick-dry polishes to about 15-20 minutes for standard ones. Gel polishes will need to be cured under a UV/LED lamp.
Q: Can I use regular polish instead of gel for these designs? A: Yes, you can use regular polish, but gel polish tends to last longer and provides a more durable finish.
Q: What if I don’t have a steady hand for detailed nail art? A: Nail decals and stickers are great alternatives for intricate designs. They are easy to apply and can give you a professional look without the hassle.
Q: How often should I redo my manicure? A: Typically, a manicure lasts about one to two weeks. However, this can vary based on your nail growth rate and the type of polish used.
Save Pin