As the leaves start to change and the air gets crisper, it’s the perfect time to update your nail game with some of the trendiest and most fun fall nail designs for 2024. From bold colors to whimsical patterns, there’s no shortage of inspiration to make your nails stand out this autumn. Whether you’re looking for a playful twist on classic fall colors or a completely unique design, these nail art ideas will have you covered. Get ready to dive into a world of vibrant hues, intricate details, and creative concepts that will keep your nails looking fabulous all season long
Vibrant Fall Abstract Nails
When it comes to fun fall nails 2024, this design is a standout. The vibrant mix of orange, red, and black hues creates a striking contrast against the natural nude base. Each nail features an abstract, asymmetrical pattern that gives a unique and modern twist to the classic French tip. The sharp, almond shape adds to the elegance, making this manicure perfect for those who love bold yet sophisticated looks.
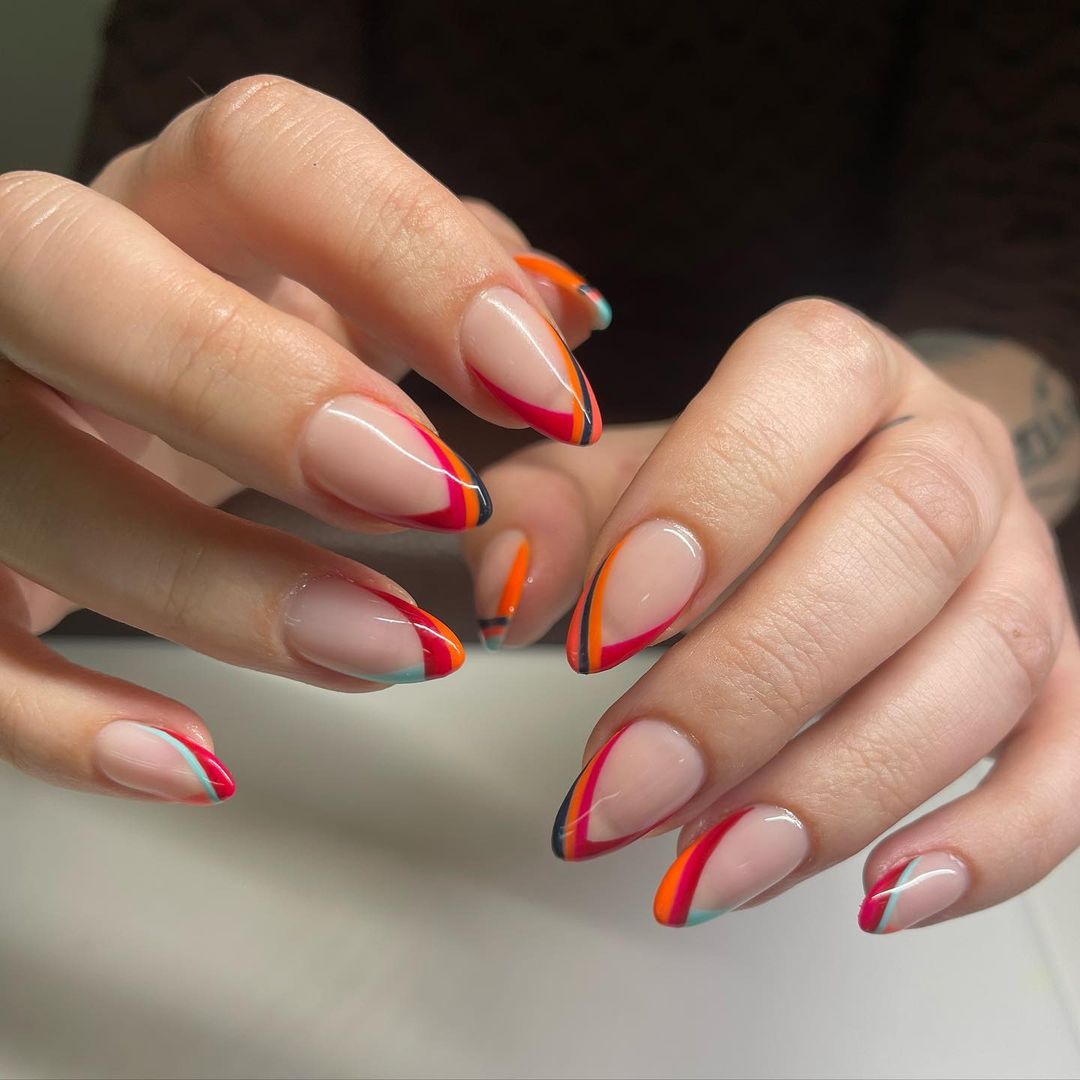
Consumables:
- Base coat: OPI Natural Nail Base Coat
- Nude polish: Essie Ballet Slippers
- Orange, red, and black polishes: Sally Hansen Insta-Dri in shades Orange Zest, Red-ical, and Black to Black
- Fine nail art brush: Winstonia Fine Line Brush
- Top coat: Seche Vite Dry Fast Top Coat
Step-by-Step Instructions:
- Start with a base coat to protect your nails.
- Apply two coats of nude polish and let it dry completely.
- Using a fine nail art brush, paint asymmetrical lines with the orange, red, and black polishes.
- Finish with a top coat for a glossy finish.
Elegant Pink Marble Nails
These pink marble nails are an excellent choice for those seeking a blend of elegance and fun. The subtle marble effect, achieved with varying shades of pink, adds depth and texture to the manicure. The almond shape enhances the overall feminine appeal, making it perfect for any occasion.
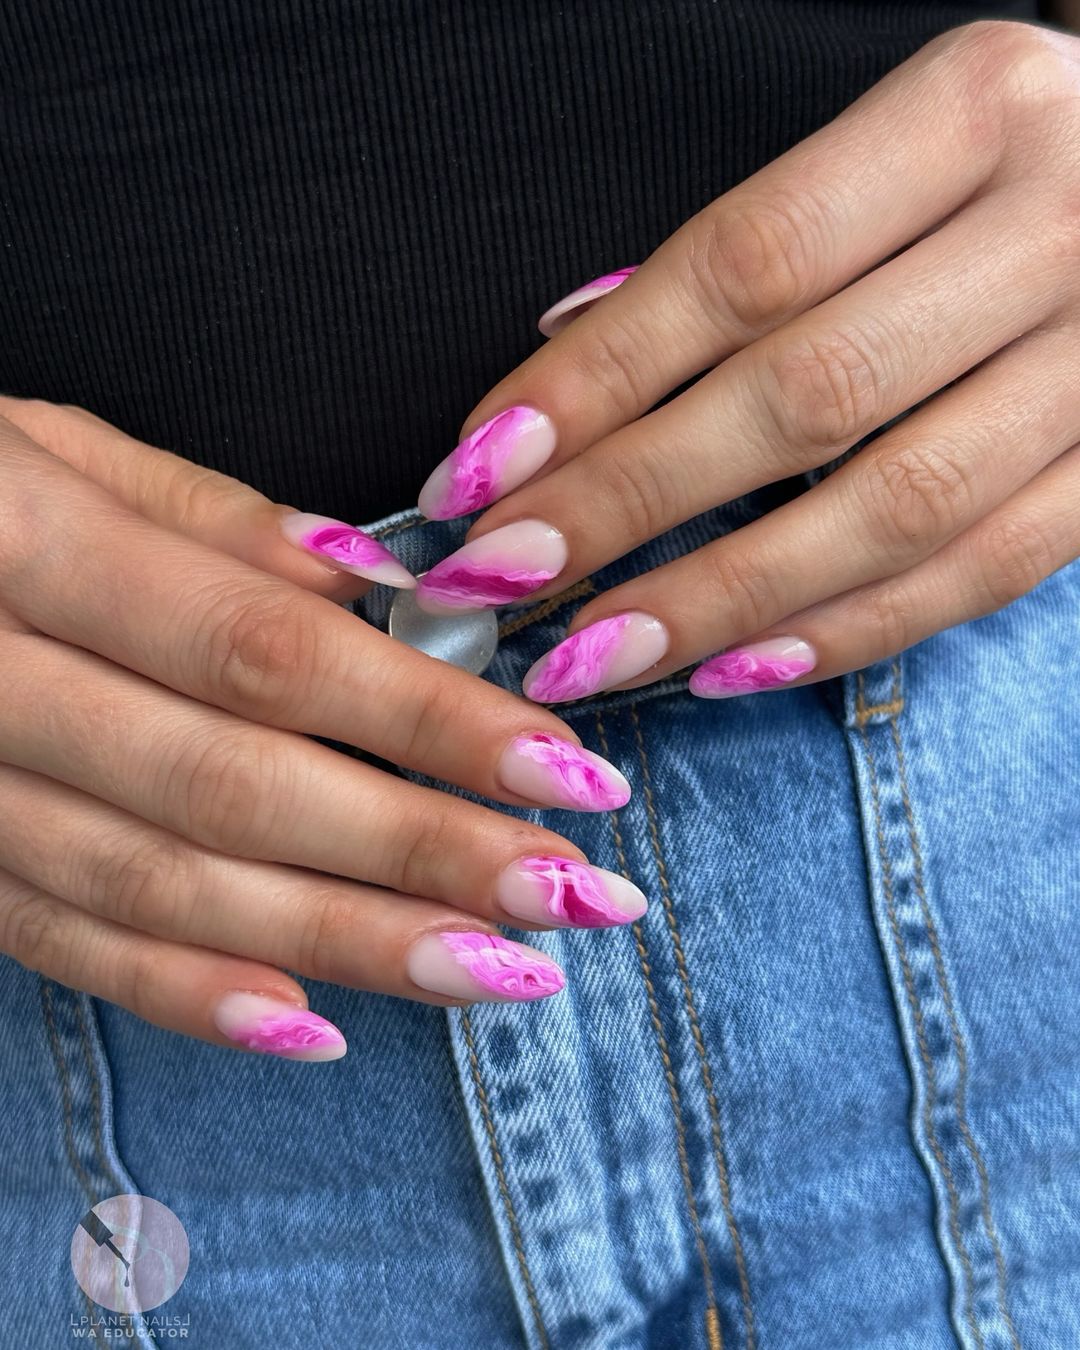
Consumables:
- Base coat: Orly Bonder Base Coat
- Light pink polish: Zoya Jordan
- Dark pink polish: OPI Strawberry Margarita
- White polish: China Glaze White on White
- Thin nail art brush: Pueen Precision Brush
- Top coat: Sally Hansen Miracle Gel Top Coat
Step-by-Step Instructions:
- Apply a base coat to your nails.
- Paint your nails with two coats of light pink polish and let it dry.
- Dip the thin nail art brush in the dark pink polish and create random swirls on the nails.
- Add a few white swirls to enhance the marble effect.
- Seal the design with a top coat for durability.
Playful 8-Ball Nail Art
For those who love quirky and fun nail art, these playful designs are a must-try. Featuring a mix of 8-ball motifs, stars, hearts, and smiley faces, this manicure is a perfect example of creative designs for fall. The combination of black, red, and nude colors makes it both eye-catching and versatile.
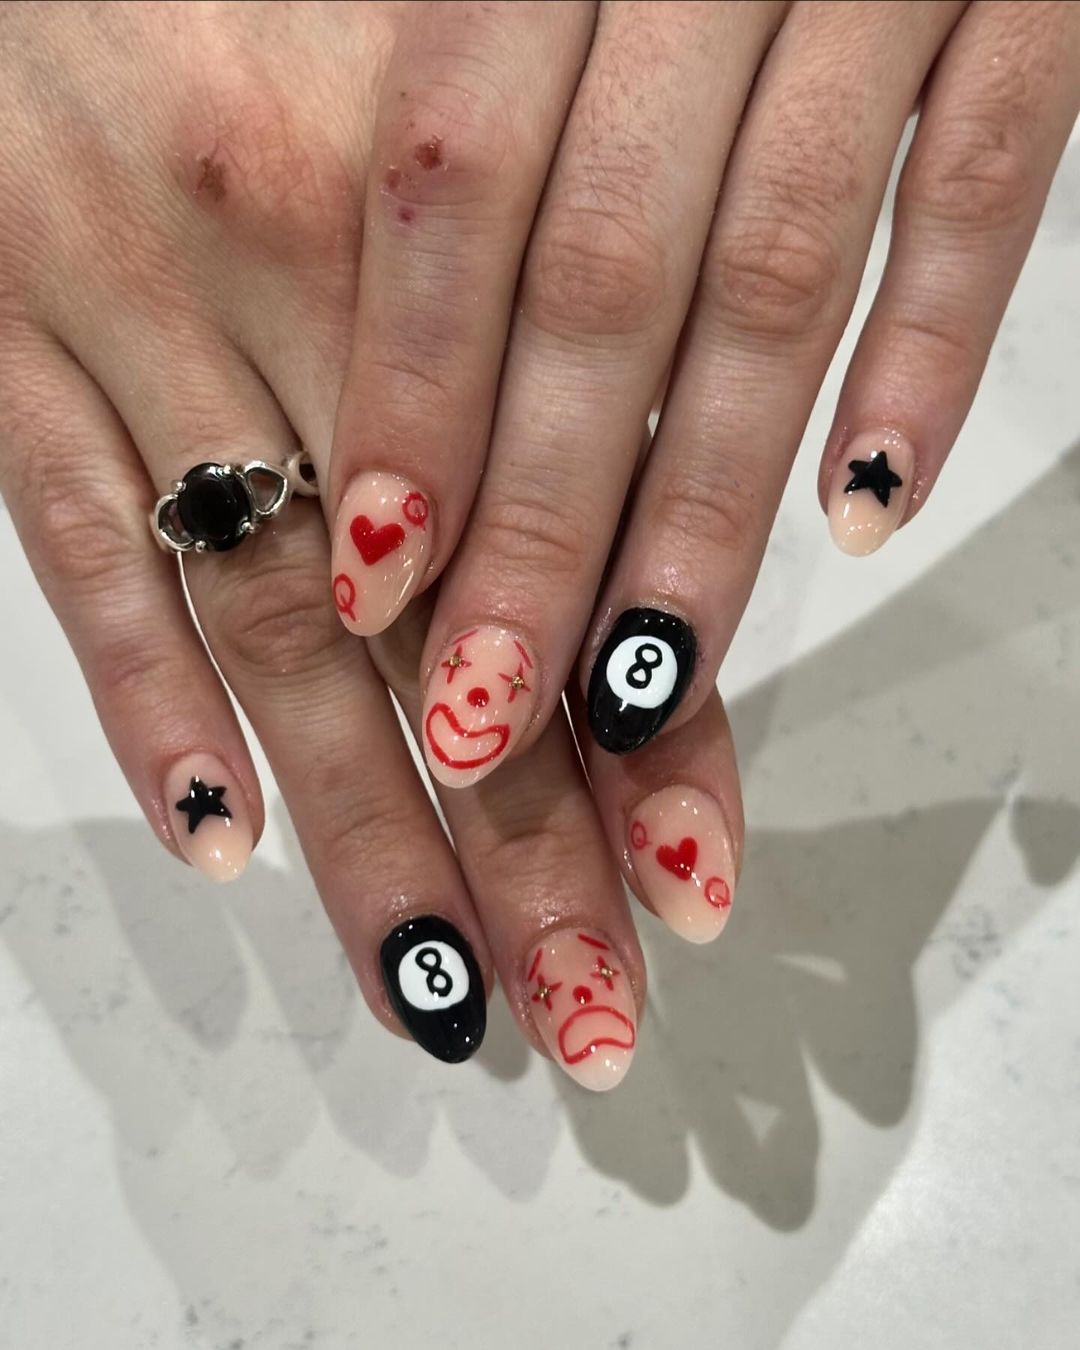
Consumables:
- Base coat: Deborah Lippmann Hard Rock Base Coat
- Nude polish: Essie Topless & Barefoot
- Black and red polishes: China Glaze Liquid Leather and China Glaze Salsa
- Dotting tool: Makartt Dotting Tools
- Nail art stickers: Born Pretty Store Nail Art Stickers
- Top coat: CND Vinylux Weekly Top Coat
Step-by-Step Instructions:
- Apply a base coat to protect your nails.
- Paint your nails with two coats of nude polish.
- Use the dotting tool and black polish to create 8-ball designs.
- Apply red polish with a fine brush to draw stars, hearts, and smiley faces.
- Place nail art stickers as desired for additional flair.
- Finish with a top coat to seal the designs.
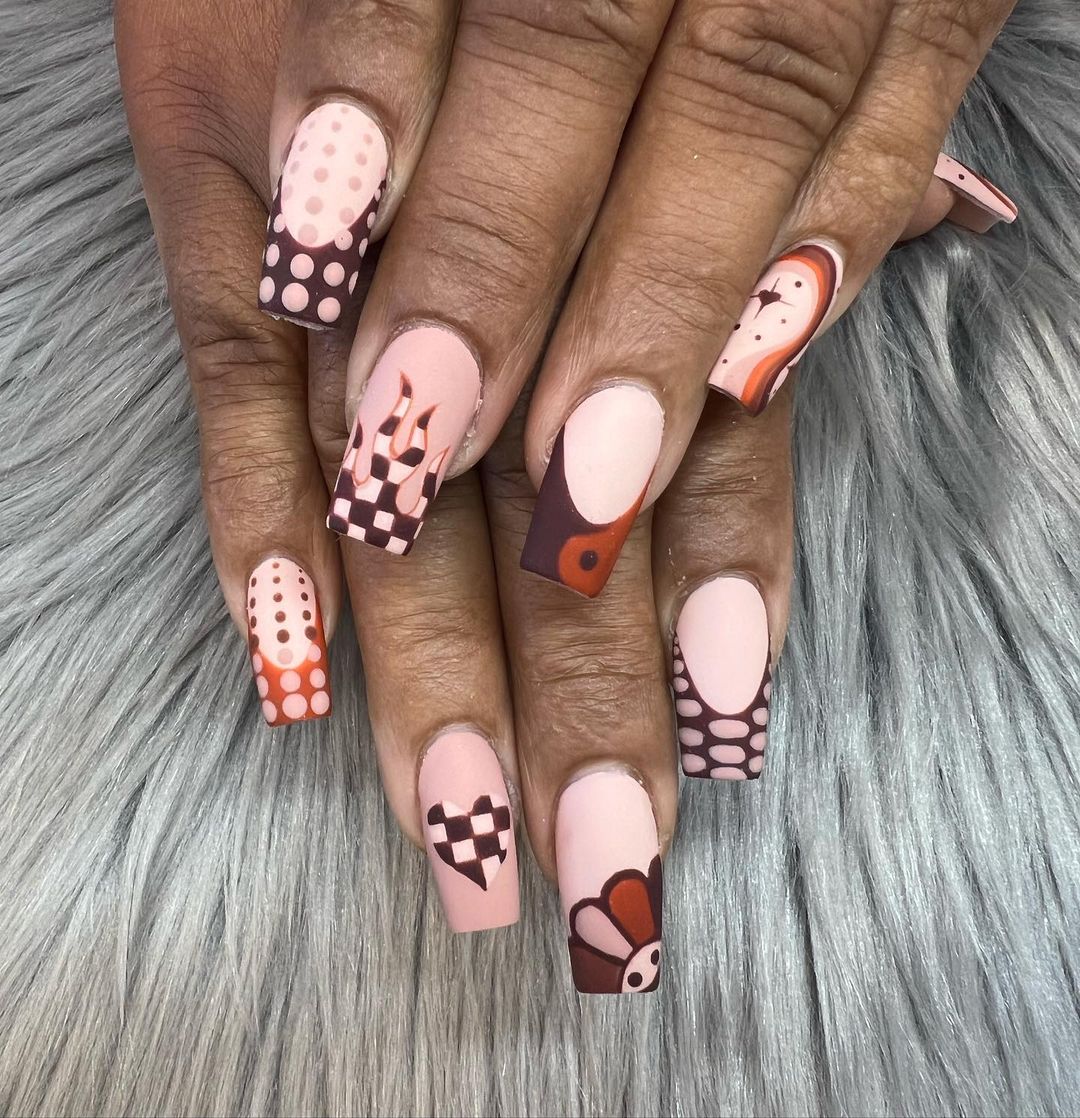
Retro Fall Nail Art
This fun fall nails 2024 design is a retro-inspired masterpiece. The use of orange and brown shades combined with unique patterns like polka dots, flames, and checkerboards creates an eye-catching and nostalgic look. The coffin shape of the nails enhances the vintage vibe, making this manicure a perfect choice for those who appreciate a blend of classic and contemporary styles.
Consumables:
- Base coat: Orly Bonder Base Coat
- Nude polish: Essie Topless & Barefoot
- Orange and brown polishes: OPI A Good Man-darin is Hard to Find and OPI That’s What Friends Are Thor
- Fine nail art brushes: Beetles Nail Art Brushes Set
- Top coat: Seche Vite Dry Fast Top Coat
Step-by-Step Instructions:
- Apply a base coat to your nails to ensure longevity.
- Paint your nails with two coats of nude polish and let it dry thoroughly.
- Use fine nail art brushes to create the polka dots, flames, and checkerboard patterns with the orange and brown polishes.
- Seal your design with a top coat to add shine and protection.
Save Pin

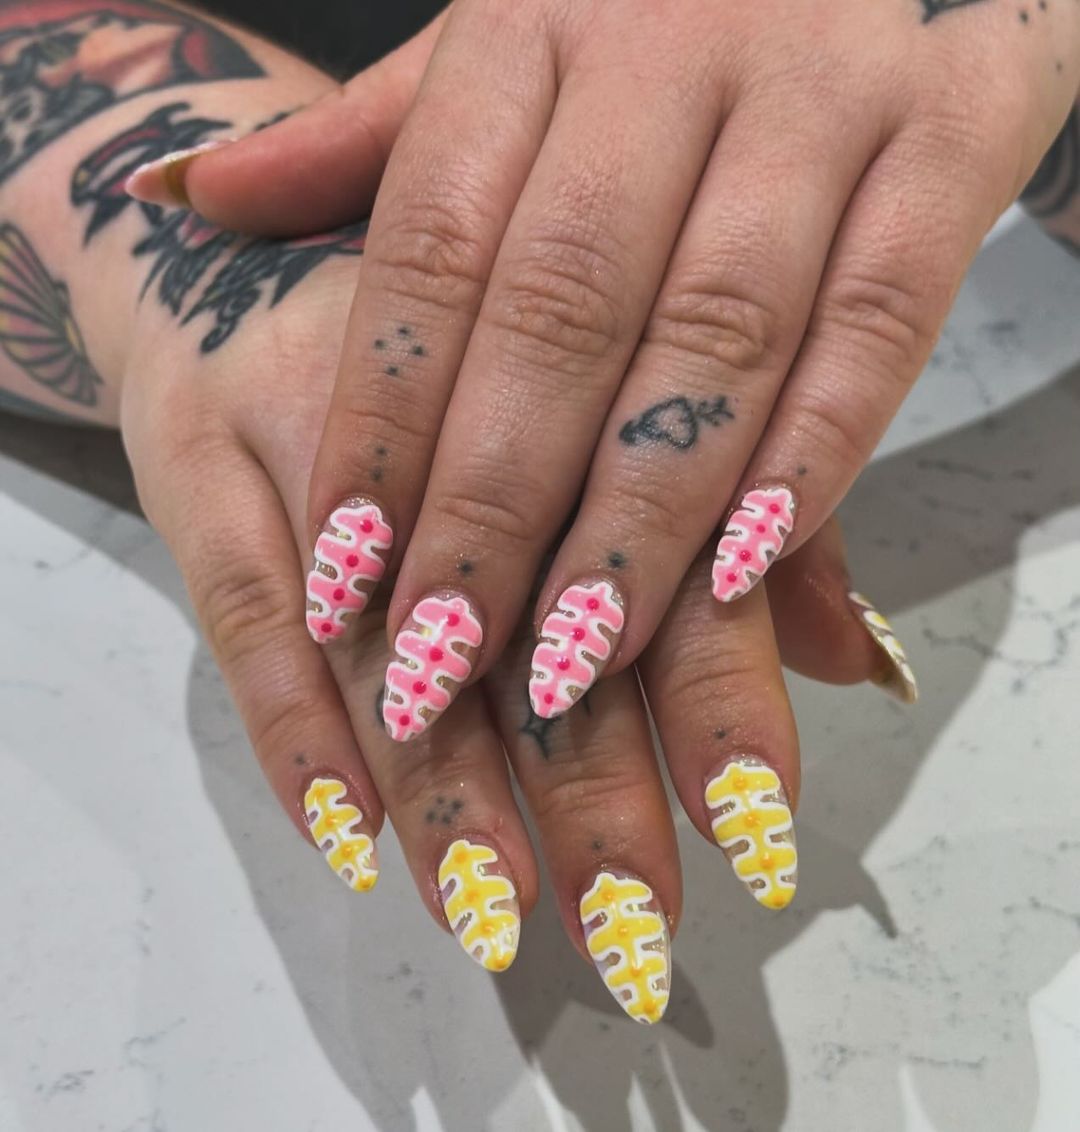
Fun and Funky Pink and Yellow Nails
This design showcases a playful mix of pink and yellow hues with a funky, wavy pattern that adds a fun twist to your fall manicure. The stiletto shape gives these nails an edgy and modern look, perfect for making a bold fashion statement this season.
Consumables:
- Base coat: Deborah Lippmann Hard Rock Base Coat
- Pink and yellow polishes: Essie Mod Squad and Essie Sunshine State of Mind
- White polish: China Glaze White on White
- Fine nail art brush: Winstonia Fine Line Brush
- Top coat: Sally Hansen Miracle Gel Top Coat
Step-by-Step Instructions:
- Start with a base coat to protect your natural nails.
- Apply two coats of pink polish to half of your nails and yellow polish to the other half.
- Use a fine nail art brush dipped in white polish to create the wavy patterns on each nail.
- Finish with a top coat to ensure a long-lasting and glossy finish.
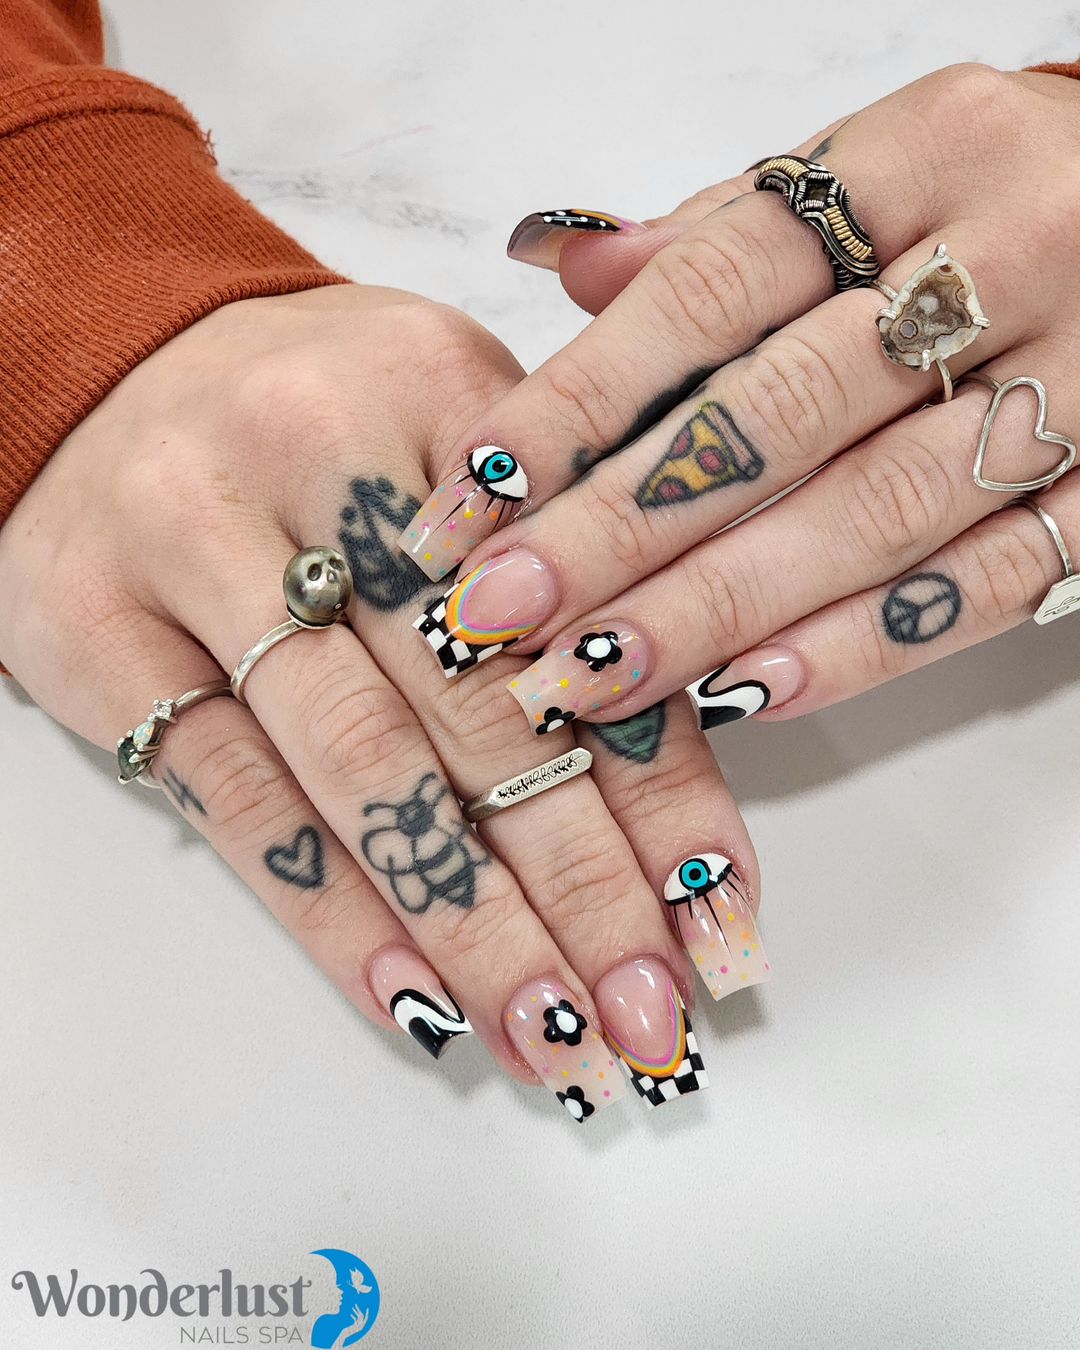
Eclectic and Artistic Fall Nails
This eclectic nail design features a variety of artistic elements, including eyes, flowers, and abstract patterns in black, white, and colorful hues. The combination of different shapes and symbols creates a visually stimulating and unique manicure, ideal for those who love creative designs and self-expression through nail art.
Consumables:
- Base coat: OPI Natural Nail Base Coat
- Nude polish: Essie Ballet Slippers
- Black and white polishes: OPI Black Onyx and OPI Alpine Snow
- Assorted colorful polishes: Sally Hansen Insta-Dri in various shades
- Nail art stickers: Born Pretty Store Nail Art Stickers
- Fine nail art brushes: Beetles Nail Art Brushes Set
- Top coat: CND Vinylux Weekly Top Coat
Step-by-Step Instructions:
- Apply a base coat to your nails.
- Paint your nails with two coats of nude polish and let them dry.
- Use fine nail art brushes to create the eye, flower, and abstract patterns with black, white, and colorful polishes.
- Add nail art stickers for additional details and flair.
- Seal your designs with a top coat to protect and enhance the artwork.
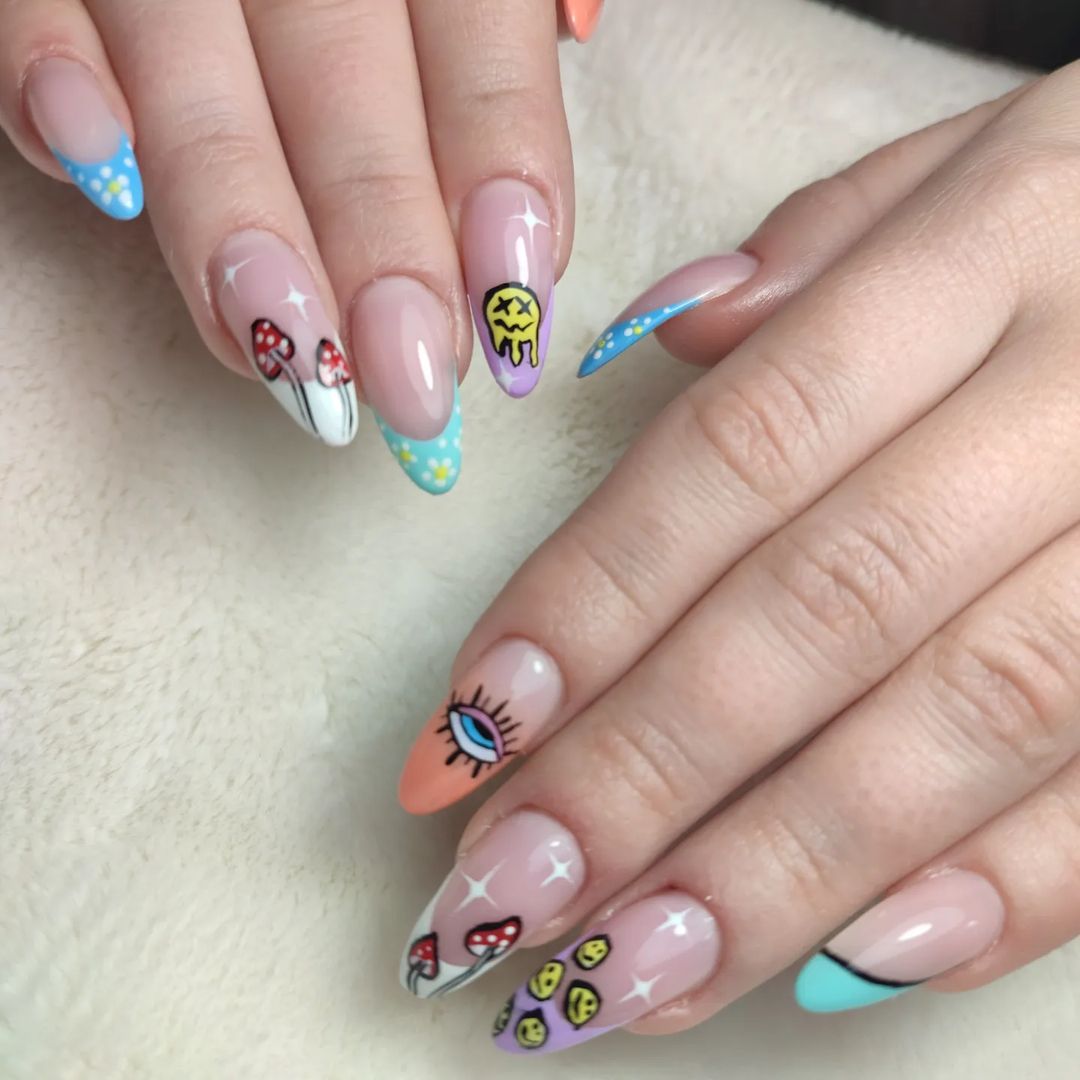
Whimsical Forest Nails
This fun fall nails 2024 design captures the essence of a whimsical forest with its adorable mushroom and eye motifs. The pastel blue and peach tips, adorned with tiny daisies, add a playful touch to the almond-shaped nails. The combination of different elements creates a unique and enchanting look that’s perfect for the autumn season.
Consumables:
- Base coat: OPI Natural Nail Base Coat
- Nude polish: Essie Ballet Slippers
- Blue and peach polishes: Essie Aruba Blue and Essie Peach Side Babe
- Nail art brushes: Winstonia Fine Line Brush Set
- Nail stickers: Born Pretty Store Daisy Stickers
- Top coat: Seche Vite Dry Fast Top Coat
Step-by-Step Instructions:
- Apply a base coat to your nails.
- Paint your nails with two coats of nude polish and let them dry.
- Use a nail art brush to create the mushroom and eye designs with various polishes.
- Apply daisy stickers to the tips of your nails.
- Finish with a top coat to protect and seal the design.
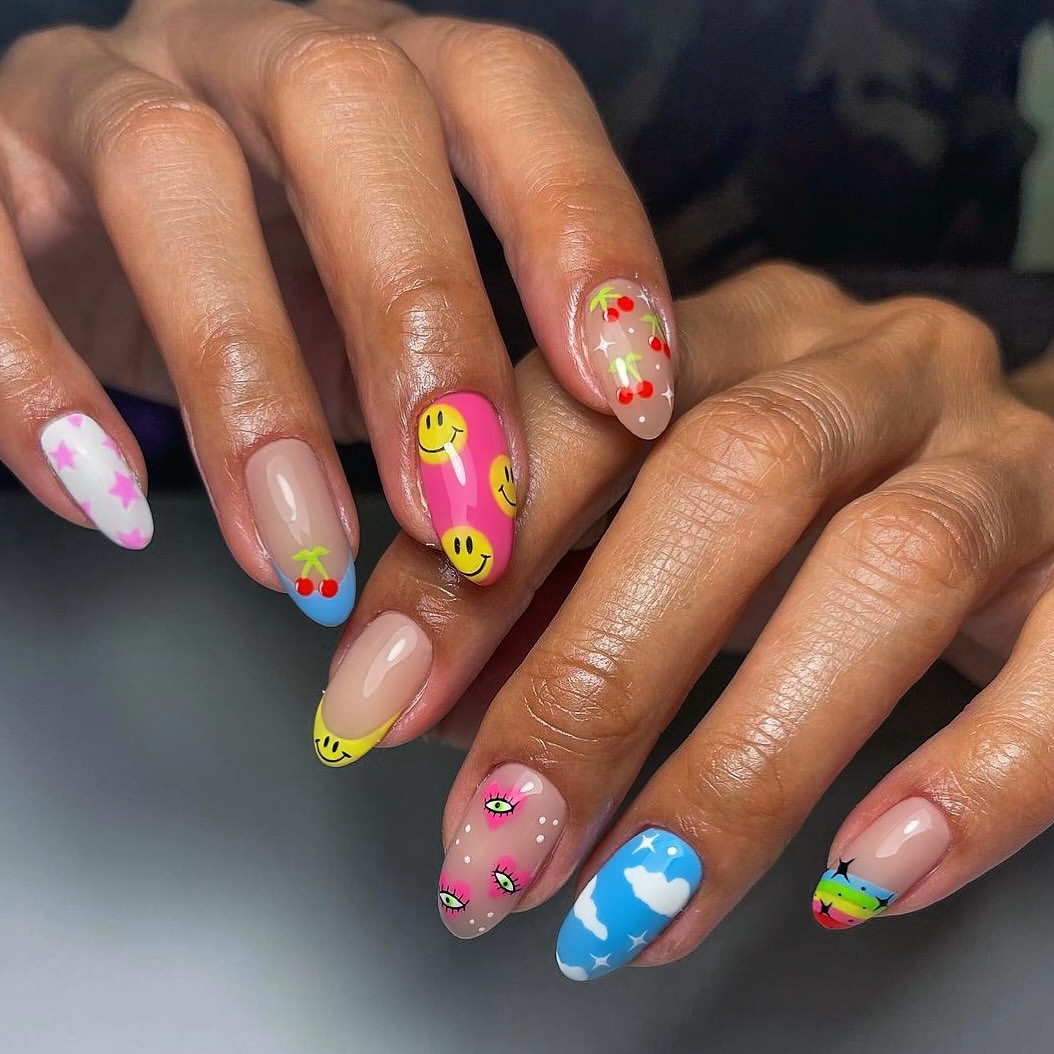
Cheerful Smiley and Cherry Nails
These vibrant nails are a burst of joy with their smiley faces, cherries, and colorful backgrounds. The combination of pink, yellow, and blue hues on almond-shaped nails creates a cheerful and eye-catching look. This design is perfect for those who love playful and lively nail art.
Consumables:
- Base coat: Orly Bonder Base Coat
- Nude polish: Essie Topless & Barefoot
- Pink, yellow, and blue polishes: OPI Pink Flamenco, OPI I Just Can’t Cope-acabana, and OPI Rich Girls & Po-Boys
- Nail art brushes: Pueen Precision Brush Set
- Top coat: Sally Hansen Miracle Gel Top Coat
Step-by-Step Instructions:
- Start with a base coat to protect your nails.
- Apply two coats of nude polish and let it dry completely.
- Use nail art brushes to paint smiley faces, cherries, and other patterns with the various polishes.
- Seal the design with a top coat for a glossy finish.
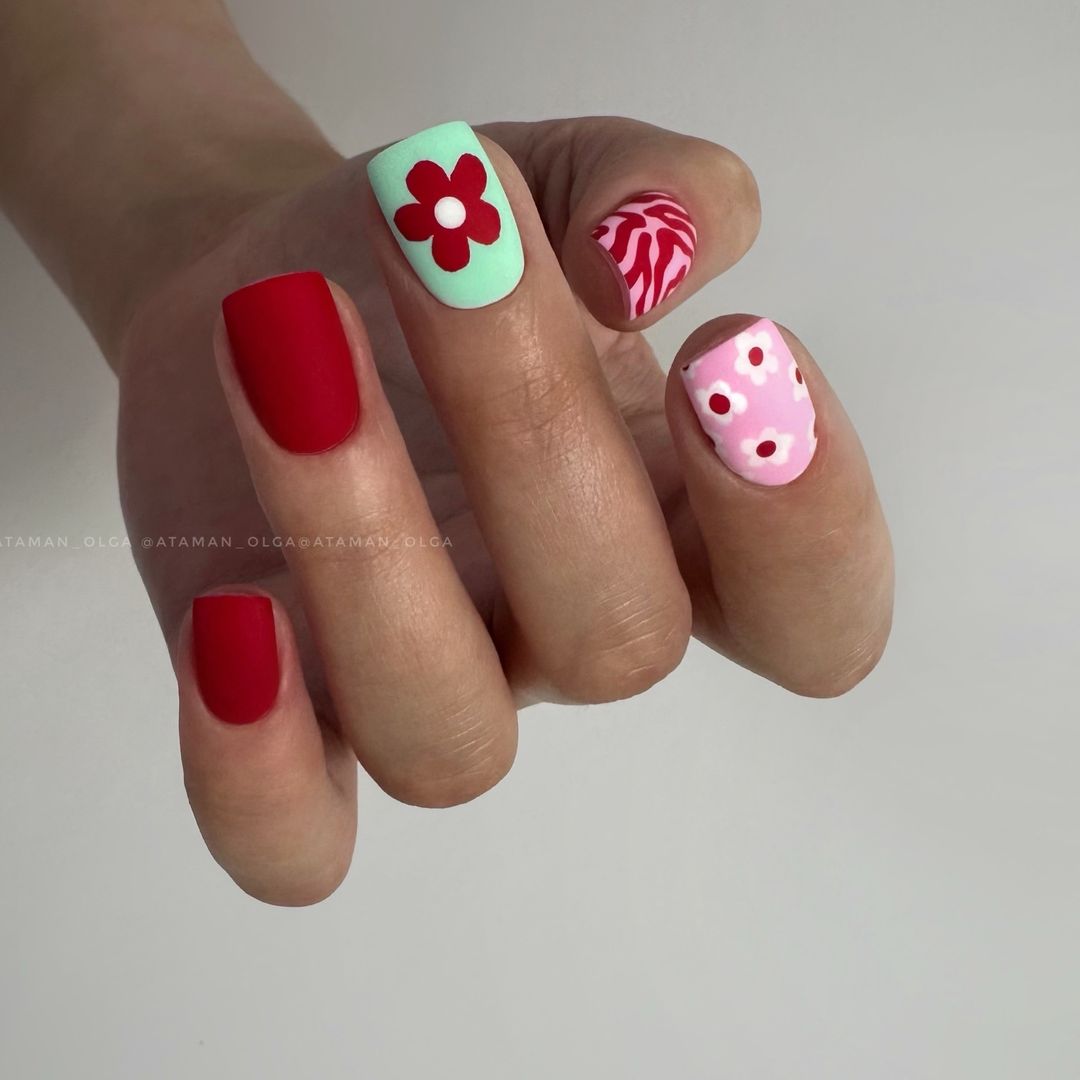
Bold Retro Flower Nails
This retro-inspired nail design features bold red flowers on a mint green background, along with a mix of red and pink accents. The square-shaped nails add a modern twist to this vintage look, making it a perfect choice for those who appreciate a blend of classic and contemporary styles.
Consumables:
- Base coat: Deborah Lippmann Hard Rock Base Coat
- Red, mint green, and pink polishes: Essie Really Red, Essie Mint Candy Apple, and Essie Fiji
- Dotting tools: Makartt Dotting Tools Set
- Nail art brushes: Beetles Nail Art Brushes Set
- Top coat: CND Vinylux Weekly Top Coat
Step-by-Step Instructions:
- Apply a base coat to your nails.
- Paint your nails with two coats of the base color (mint green, red, or pink) and let them dry.
- Use dotting tools and nail art brushes to create the flower patterns.
- Finish with a top coat to protect and add shine.
Save Pin
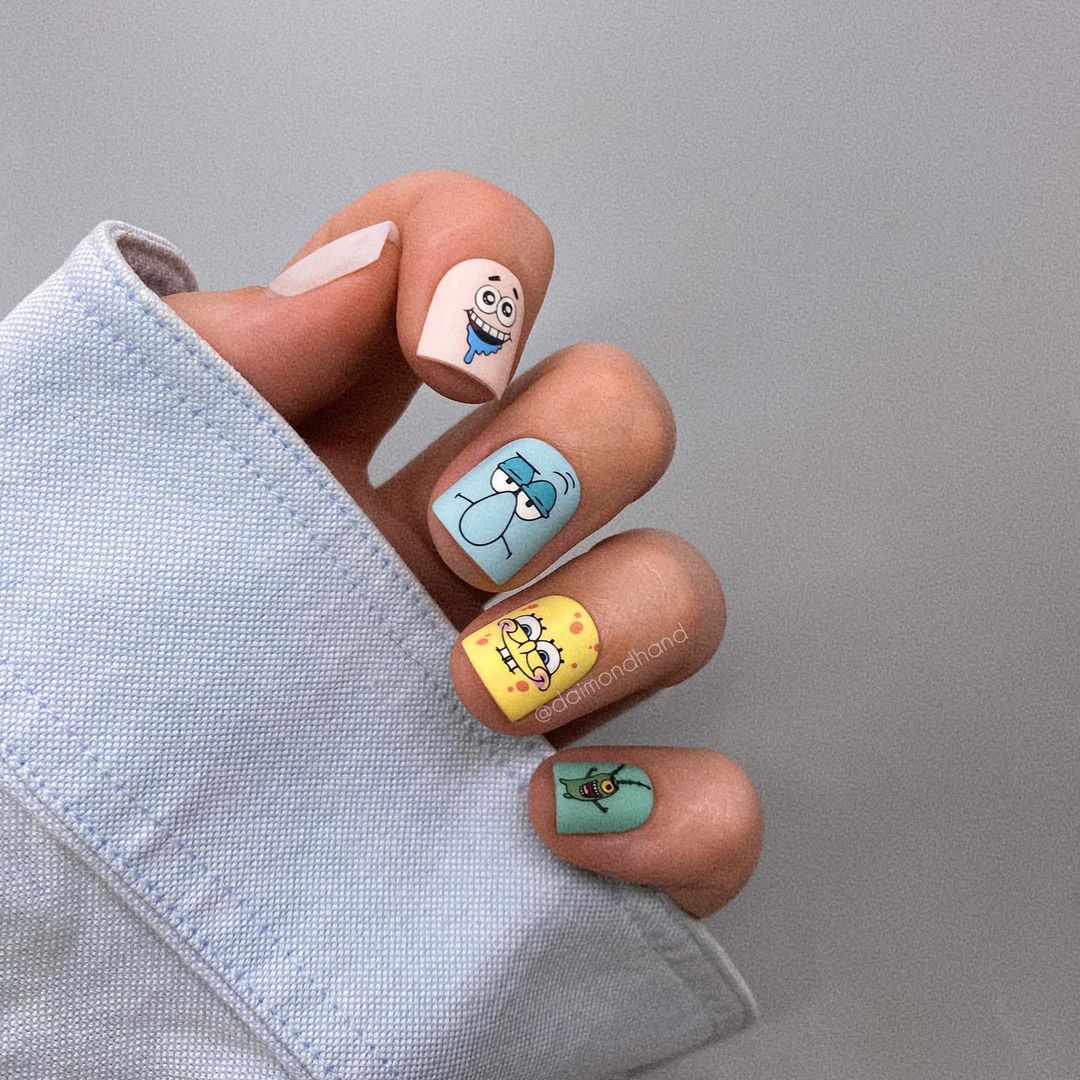
Cute Cartoon Nails
These adorable nails feature cartoon characters on a pastel-colored background, creating a fun and whimsical look. The square-shaped nails are perfect for showcasing detailed designs, making this manicure ideal for those who love playful and creative nail art.
Consumables:
- Base coat: OPI Natural Nail Base Coat
- Pastel polishes: Essie Mint Candy Apple, Essie Lilacism, and Essie Fiji
- Nail art brushes: Winstonia Fine Line Brush Set
- Top coat: Seche Vite Dry Fast Top Coat
Step-by-Step Instructions:
- Start with a base coat to protect your nails.
- Apply two coats of pastel polish and let it dry.
- Use nail art brushes to paint the cartoon characters.
- Seal the design with a top coat for durability.
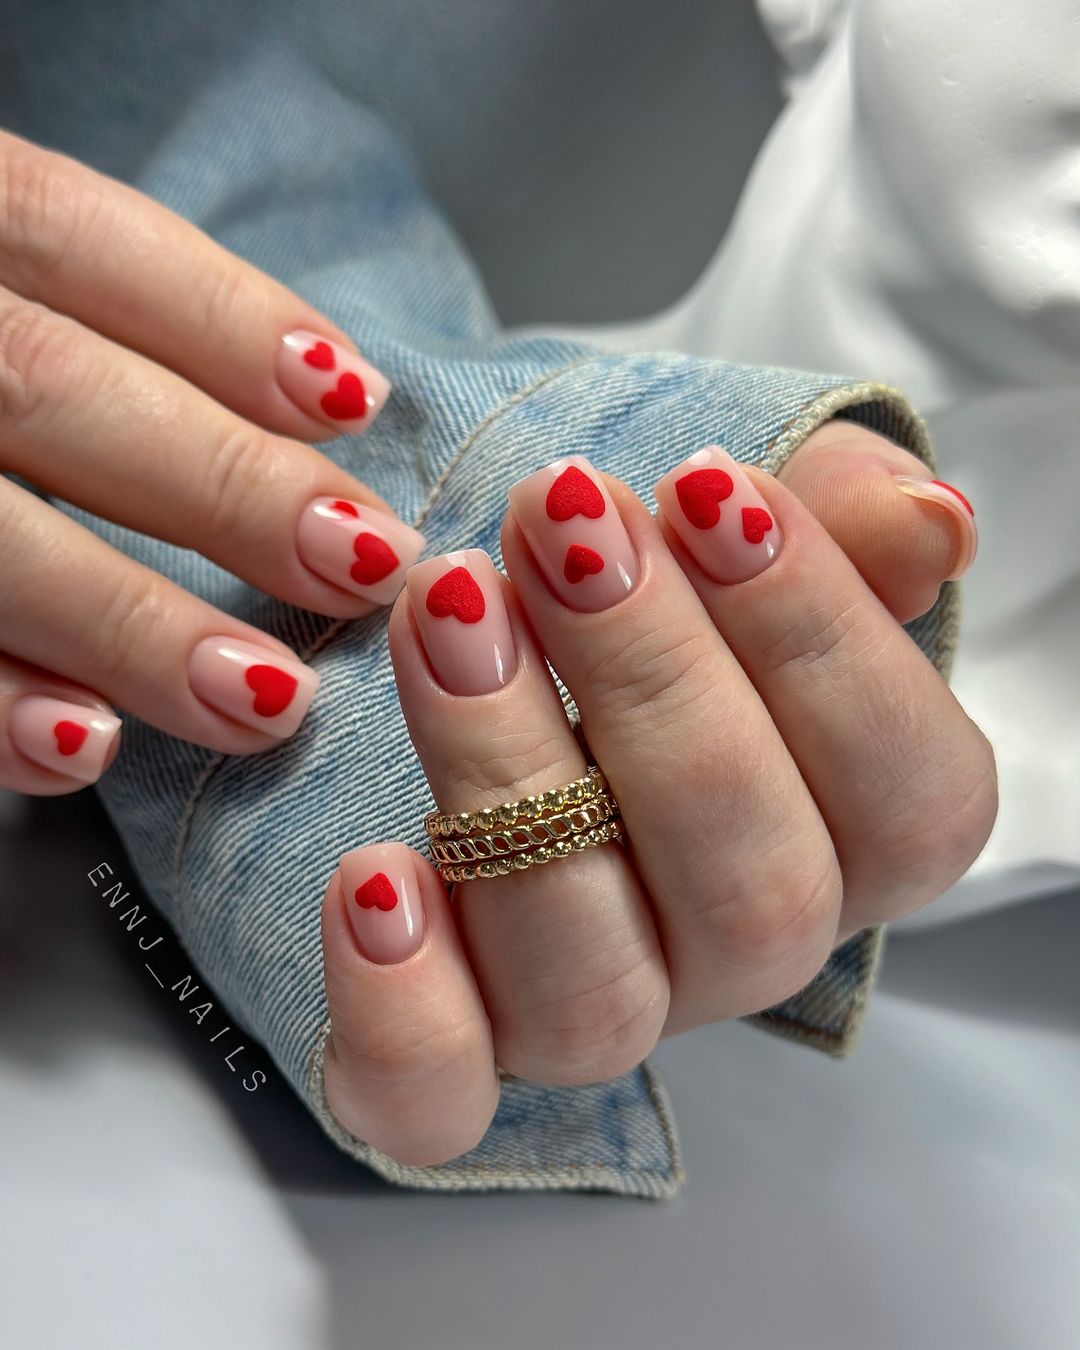
Sweetheart Nails
These nails are simple yet charming, featuring tiny red hearts on a nude base. The short, square shape adds a neat and polished look, making this manicure perfect for any occasion. This design is great for those who prefer understated yet adorable nail art.
Consumables:
- Base coat: Orly Bonder Base Coat
- Nude polish: Essie Topless & Barefoot
- Red polish: OPI Big Apple Red
- Dotting tools: Makartt Dotting Tools Set
- Top coat: Sally Hansen Miracle Gel Top Coat
Step-by-Step Instructions:
- Apply a base coat to your nails.
- Paint your nails with two coats of nude polish and let them dry.
- Use dotting tools to create tiny red hearts on each nail.
- Finish with a top coat to protect the design.
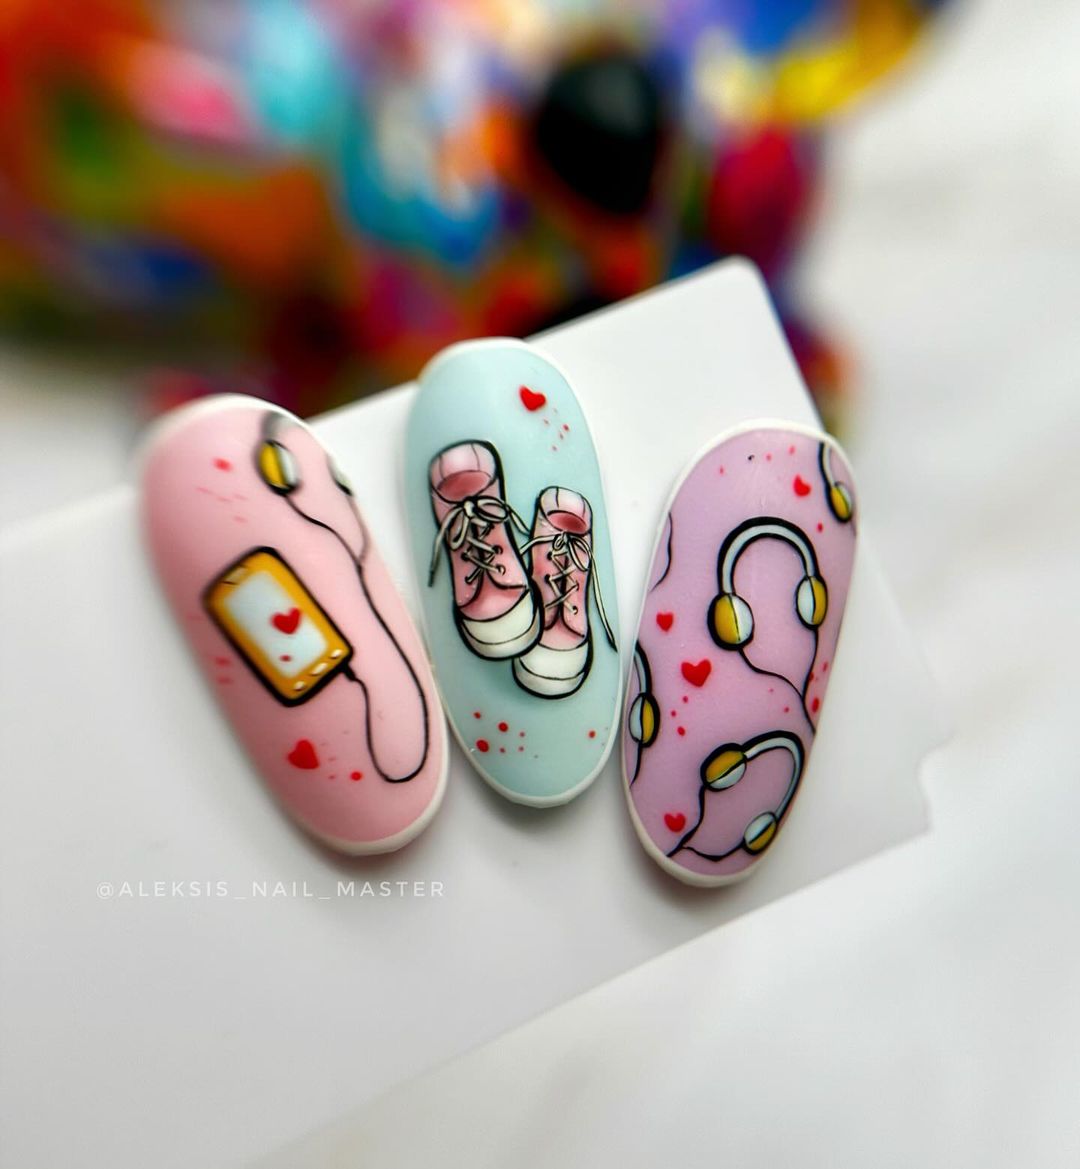
Fun and Quirky Sneakers and Headphones Nails
This unique nail design features cute sneakers and headphones motifs, perfect for those who love quirky and fun nail art. The pastel background adds a soft and playful touch, making these nails a great choice for expressing your creative side.
Consumables:
- Base coat: Deborah Lippmann Hard Rock Base Coat
- Pastel polishes: Essie Mint Candy Apple, Essie Lilacism, and Essie Fiji
- Nail art brushes: Pueen Precision Brush Set
- Top coat: CND Vinylux Weekly Top Coat
Step-by-Step Instructions:
- Start with a base coat to protect your nails.
- Apply two coats of pastel polish and let it dry.
- Use nail art brushes to paint the sneakers and headphones designs.
- Seal the design with a top coat for a glossy finish.
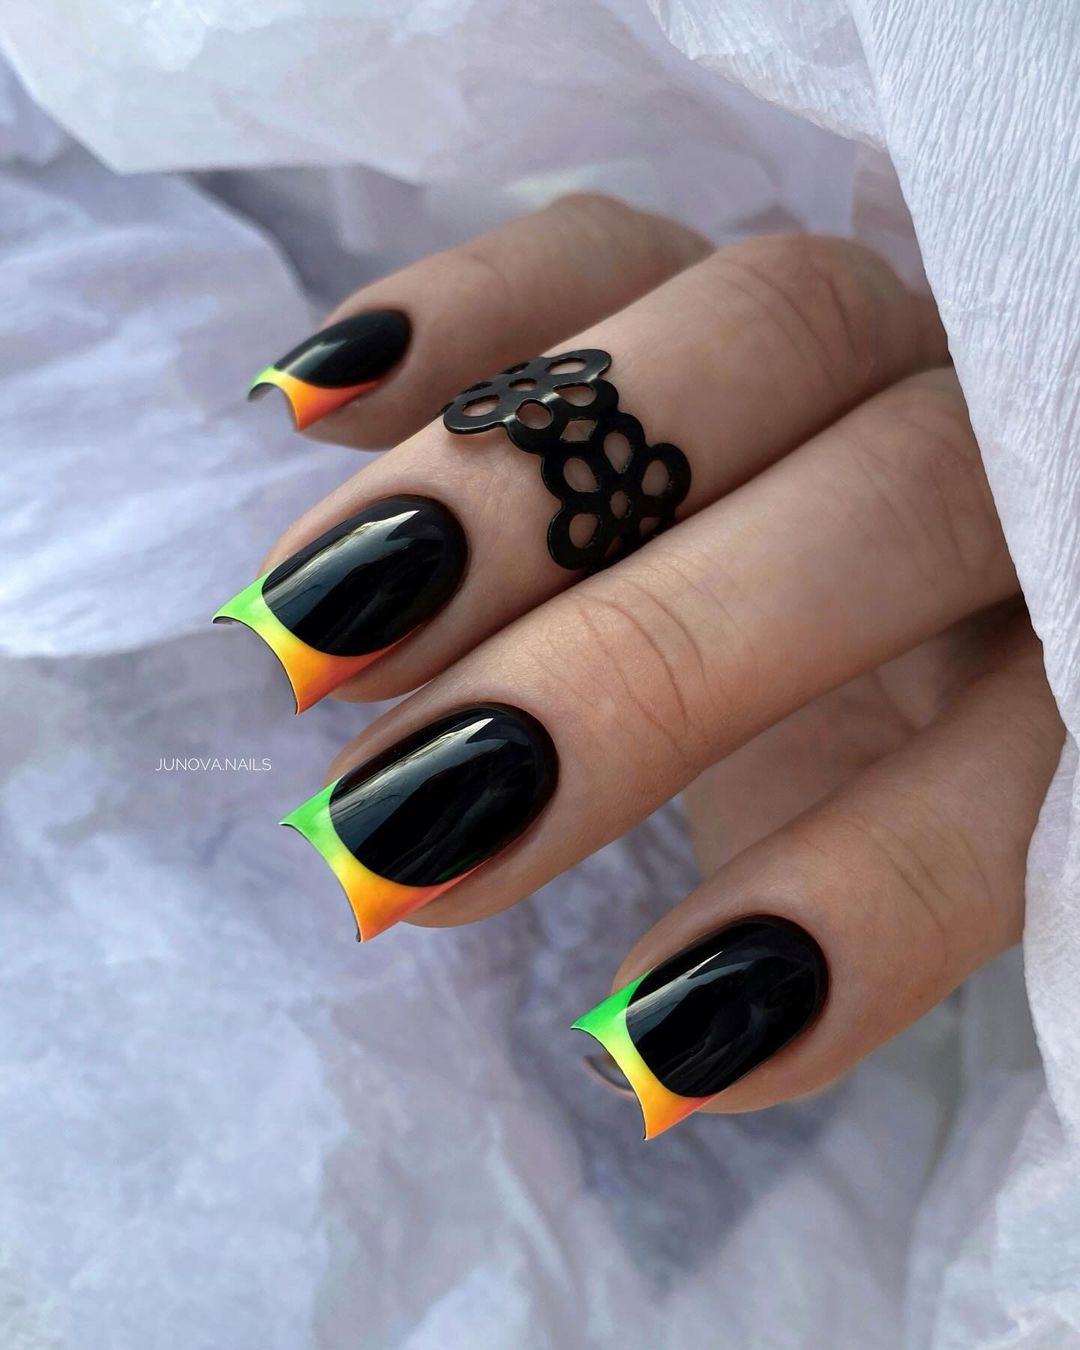
Neon Tipped Dark Nails
This bold and edgy design features a black base with neon tips in green and orange hues. The square shape adds a sharp and modern touch, making these nails perfect for those who love a striking and high-contrast look. The neon tips bring a vibrant twist to the dark base, ideal for making a statement.
Consumables:
- Base coat: OPI Natural Nail Base Coat
- Black polish: Essie Licorice
- Neon green and neon orange polishes: China Glaze Celtic Sun and China Glaze Orange Knockout
- Fine nail art brush: Winstonia Fine Line Brush
- Top coat: Seche Vite Dry Fast Top Coat
Step-by-Step Instructions:
- Apply a base coat to protect your nails.
- Paint your nails with two coats of black polish and let them dry completely.
- Use a fine nail art brush to apply the neon green and neon orange tips.
- Seal the design with a top coat for a glossy finish.
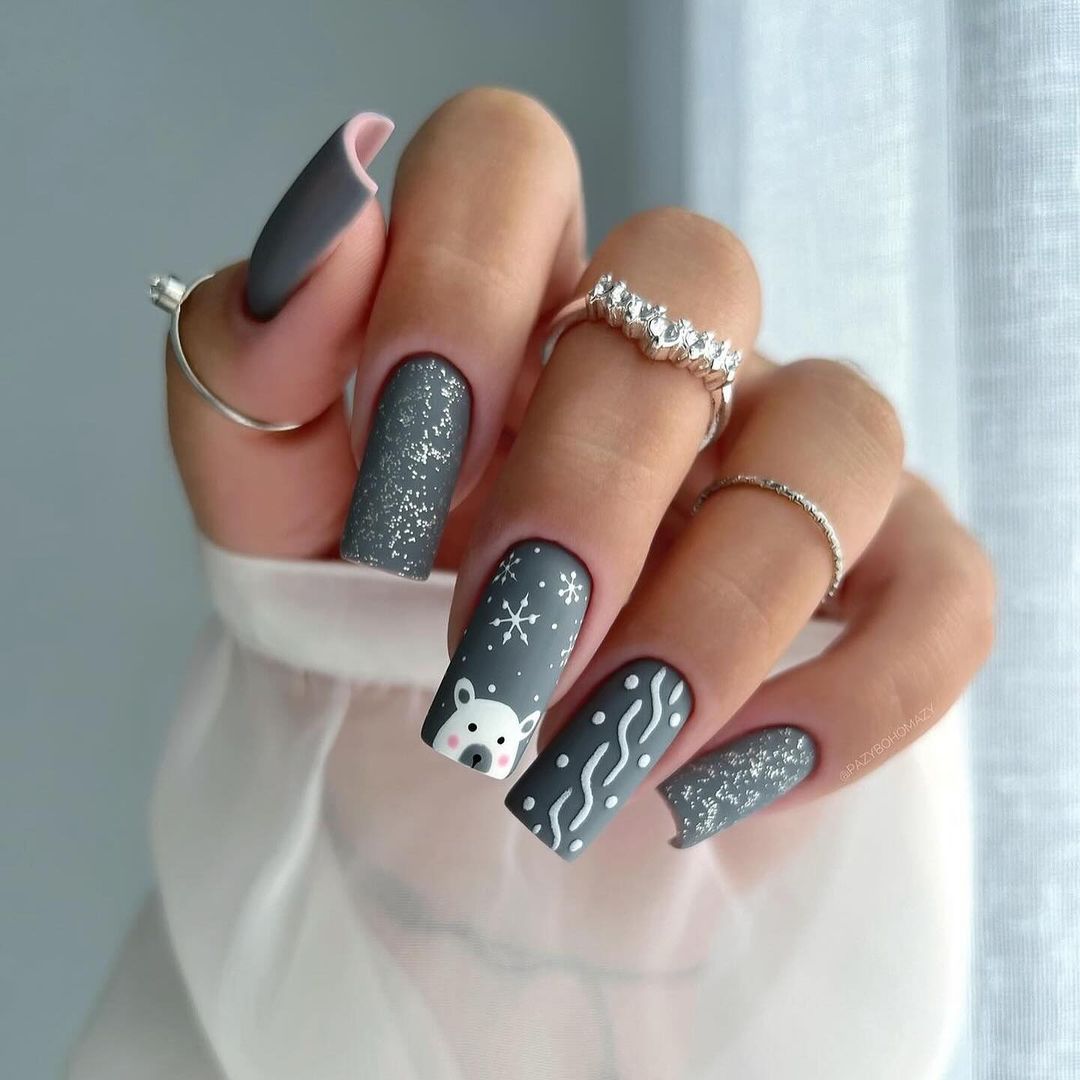
Winter Wonderland Nails
This charming winter-themed nail design features a grey base with snowflakes, a cute polar bear, and wavy patterns. The coffin shape and matte finish add a sophisticated touch, perfect for the winter season. The intricate designs bring a playful yet elegant vibe to your manicure.
Consumables:
- Base coat: Orly Bonder Base Coat
- Grey polish: OPI Suzi & the Arctic Fox
- White polish: China Glaze White on White
- Fine nail art brushes: Pueen Precision Brush Set
- Matte top coat: Essie Matte About You
Step-by-Step Instructions:
- Apply a base coat to your nails.
- Paint your nails with two coats of grey polish and let them dry.
- Use fine nail art brushes to create the snowflakes, polar bear, and wavy patterns with white polish.
- Finish with a matte top coat to protect the design and add a matte finish.
Cozy Pink Sweater Nails
These adorable pink sweater nails feature a mix of textures and patterns, including a cute hedgehog and snowflakes. The matte finish and almond shape create a cozy and stylish look, perfect for the colder months. The combination of different shades of pink and intricate designs makes this manicure both fun and fashionable.
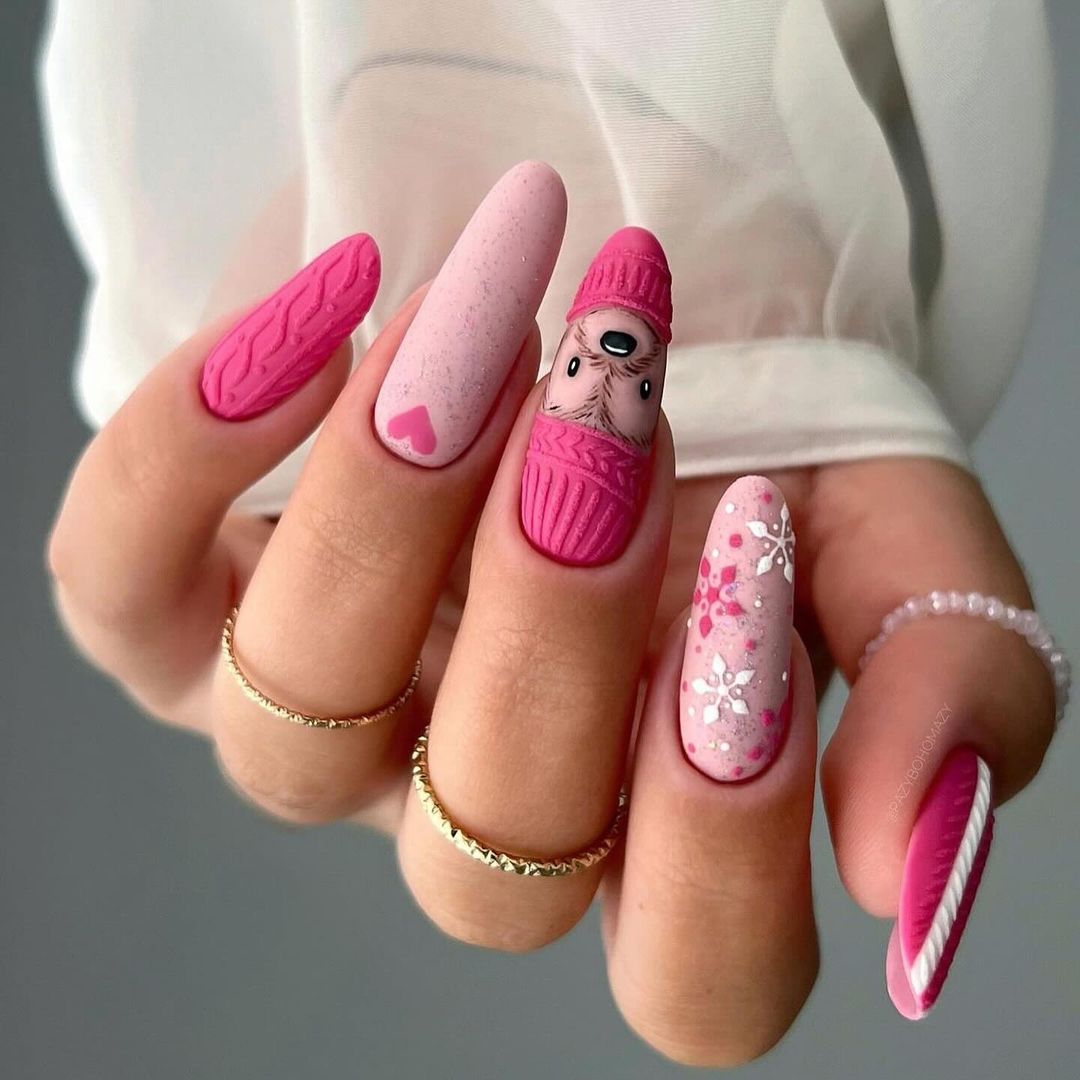
Consumables:
- Base coat: Deborah Lippmann Hard Rock Base Coat
- Various shades of pink polishes: Essie Fiji, Essie Mod Squad, and Essie Madison Ave-Hue
- Fine nail art brushes: Beetles Nail Art Brushes Set
- Matte top coat: Sally Hansen Miracle Gel Matte Top Coat
Step-by-Step Instructions:
- Apply a base coat to your nails.
- Paint your nails with different shades of pink polish and let them dry.
- Use fine nail art brushes to create the sweater patterns, hedgehog, and snowflakes.
- Seal the design with a matte top coat for a soft and cozy finish.
Sheep Pattern Nails
These cute and whimsical nails feature an adorable sheep pattern on a nude base. The short, square shape makes this design neat and practical, while the playful sheep add a fun and unique touch. This manicure is perfect for those who love quirky and charming nail art.
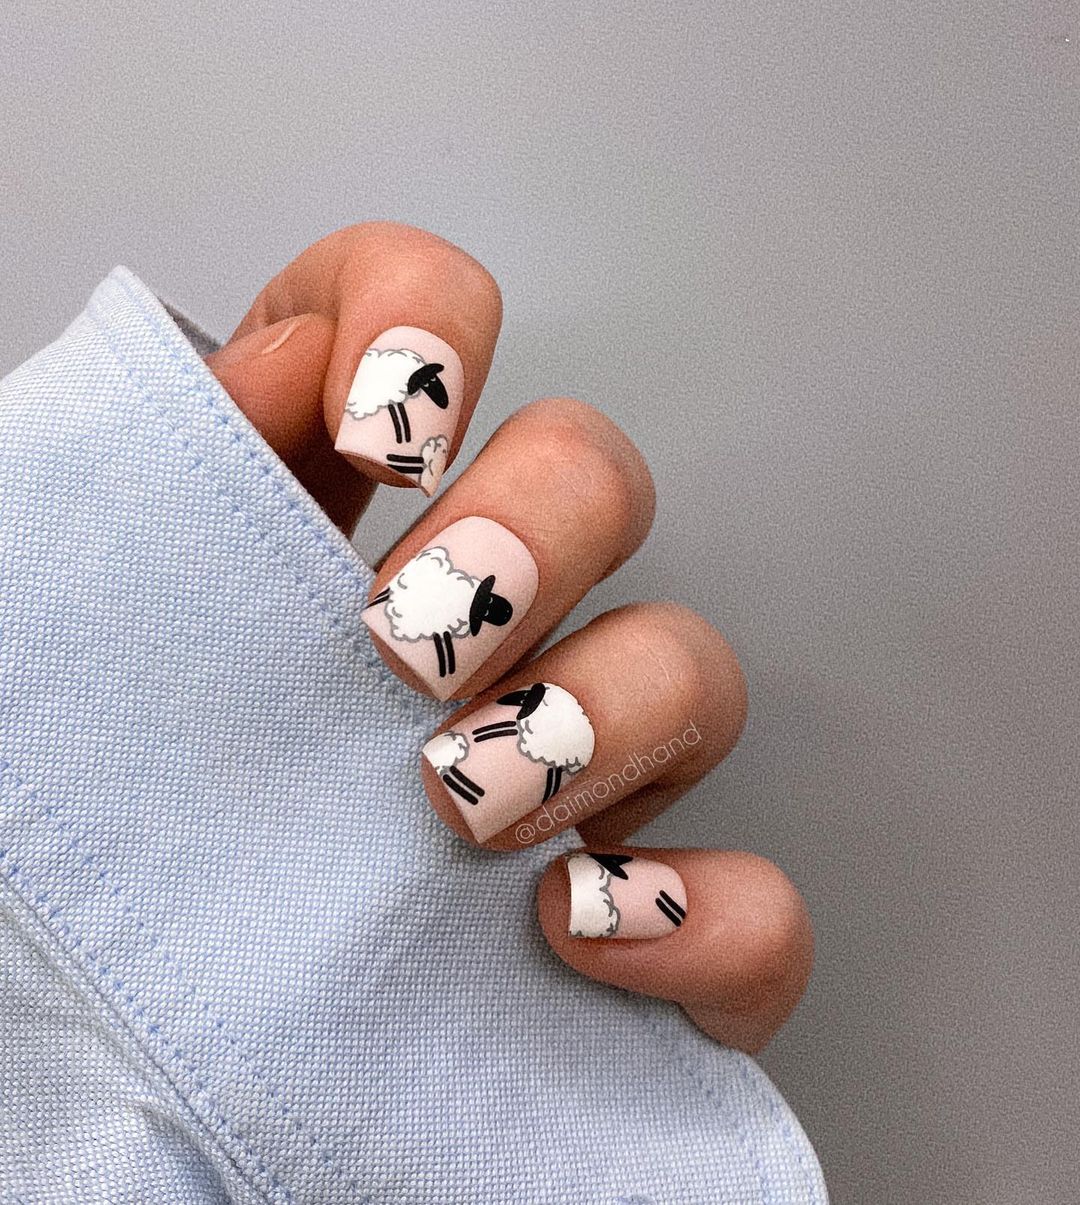
Consumables:
- Base coat: OPI Natural Nail Base Coat
- Nude polish: Essie Topless & Barefoot
- Black and white polishes: OPI Black Onyx and OPI Alpine Snow
- Fine nail art brushes: Winstonia Fine Line Brush Set
- Top coat: Seche Vite Dry Fast Top Coat
Step-by-Step Instructions:
- Start with a base coat to protect your nails.
- Apply two coats of nude polish and let them dry.
- Use fine nail art brushes to paint the sheep patterns with black and white polishes.
- Finish with a top coat to protect the design and add shine.
Pink Hearts on Black Nails
This striking design features pink hearts outlined on a black matte base. The almond shape and contrast between the black and pink create a bold and romantic look. This manicure is perfect for those who love a touch of romance with a modern twist.
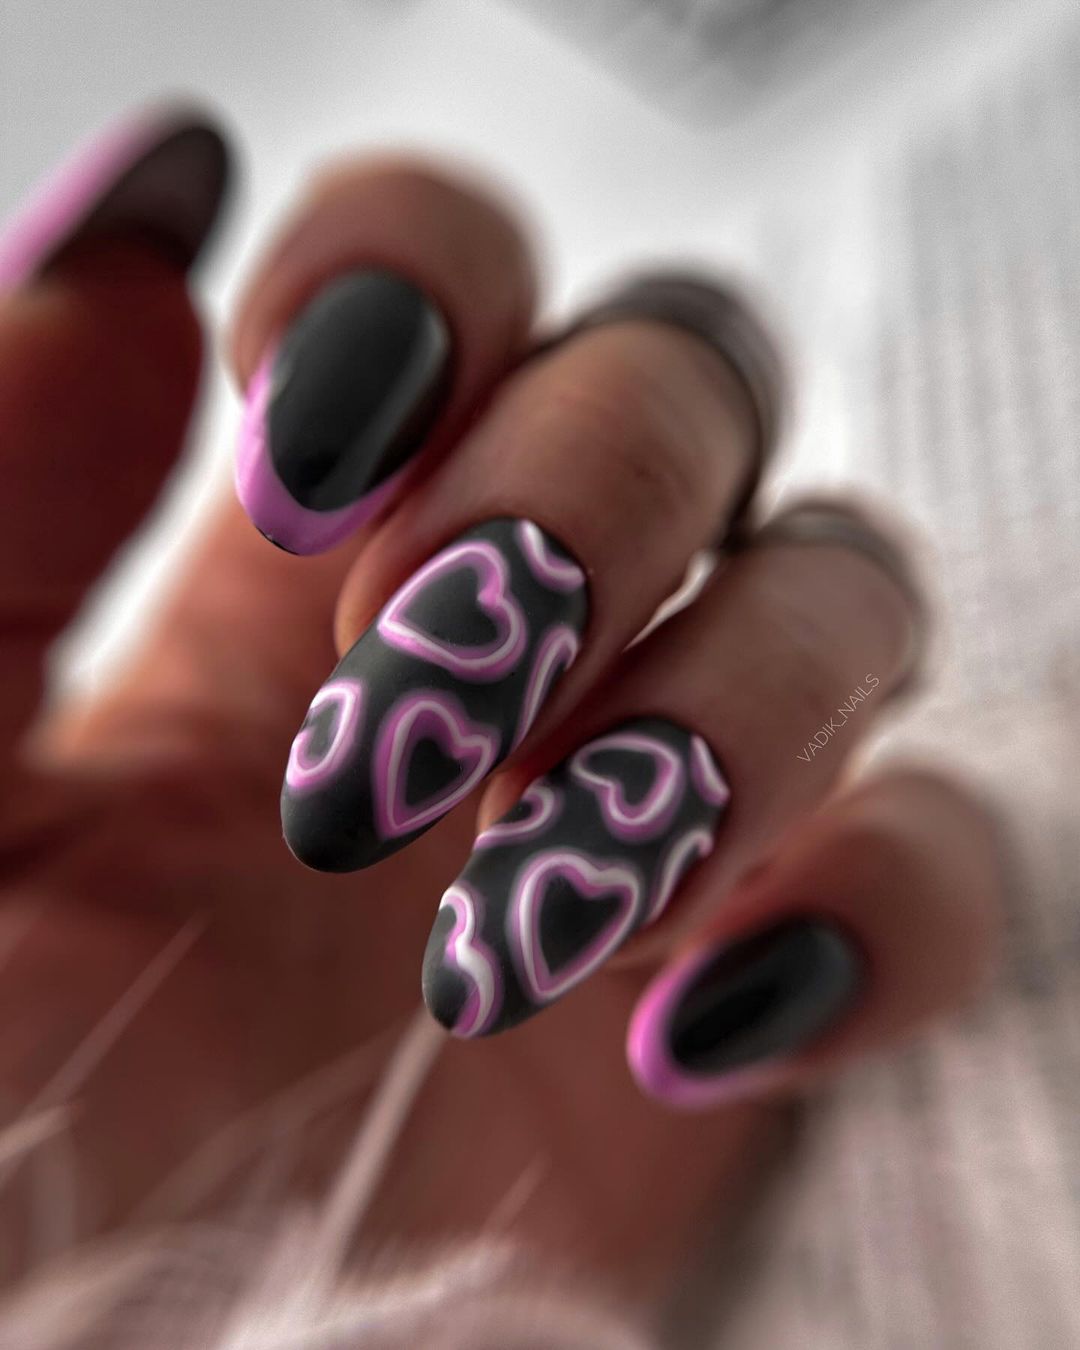
Consumables:
- Base coat: Orly Bonder Base Coat
- Black polish: Essie Licorice
- Pink polish: OPI Pink Flamenco
- Fine nail art brush: Beetles Nail Art Brushes Set
- Matte top coat: Essie Matte About You
Step-by-Step Instructions:
- Apply a base coat to your nails.
- Paint your nails with two coats of black polish and let them dry.
- Use a fine nail art brush to outline pink hearts on each nail.
- Seal the design with a matte top coat for a sophisticated finish.
Minimalist Blue and Black French Tips
This minimalist nail design features a nude base with blue and black French tips. The short, square shape adds a modern and clean look, perfect for those who prefer a simple yet stylish manicure. The contrast between the blue and black tips creates a chic and understated elegance.
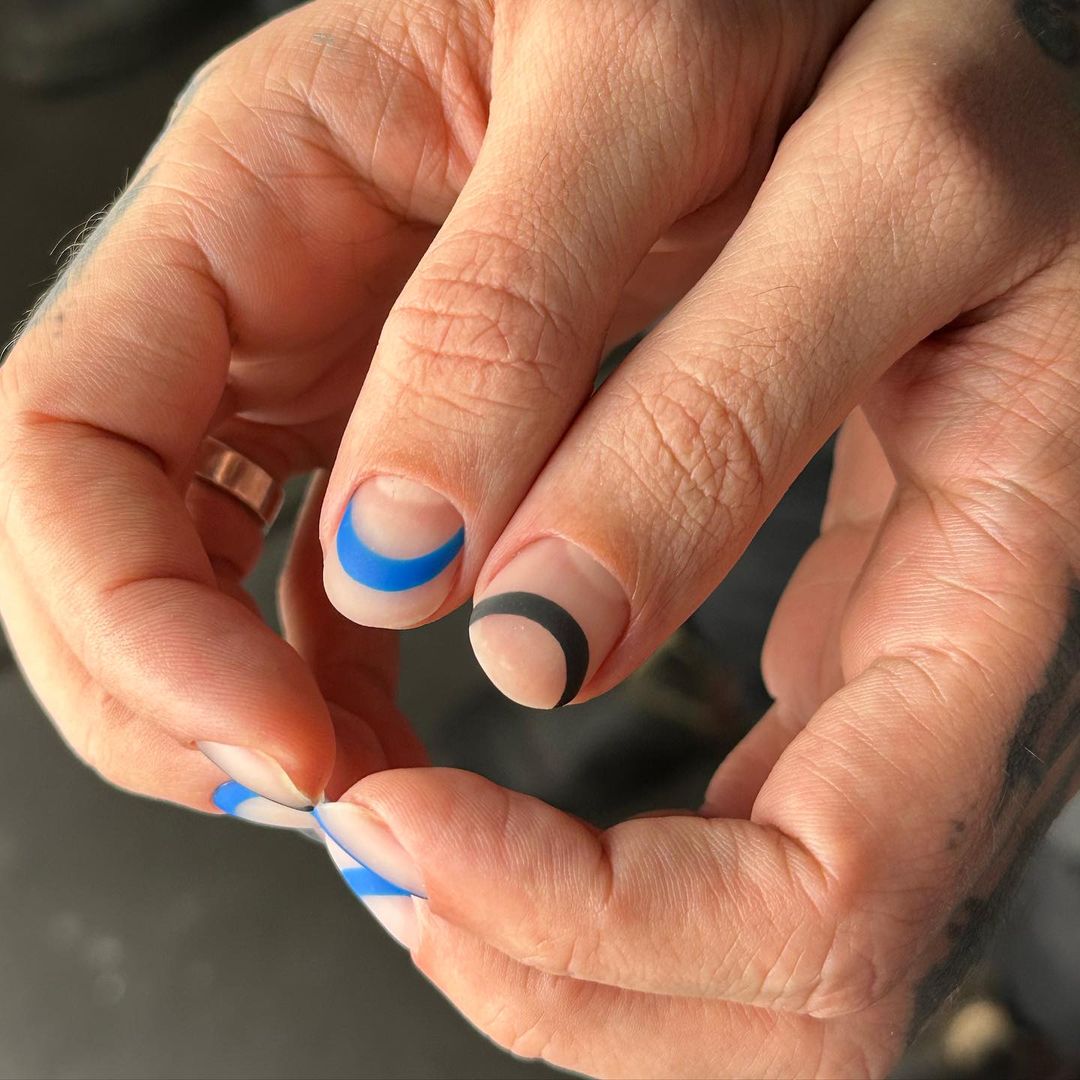
Consumables:
- Base coat: Deborah Lippmann Hard Rock Base Coat
- Nude polish: Essie Ballet Slippers
- Blue and black polishes: Essie Butler Please and Essie Licorice
- Fine nail art brush: Pueen Precision Brush Set
- Top coat: Sally Hansen Miracle Gel Top Coat
Step-by-Step Instructions:
- Start with a base coat to protect your nails.
- Apply two coats of nude polish and let them dry.
- Use a fine nail art brush to create blue and black French tips on each nail.
- Finish with a top coat to protect the design and add shine.
Playful Green and Purple Floral Nails
This vibrant design features a lime green base adorned with playful purple and yellow floral patterns. The short, round shape adds a neat and tidy look, making this manicure perfect for those who love a burst of color and fun. The combination of green and purple flowers gives off a cheerful and lively vibe.

Consumables:
- Base coat: OPI Natural Nail Base Coat
- Lime green polish: Essie The More the Merrier
- Purple polish: OPI Do You Lilac It?
- Yellow polish: Essie Sunny Business
- Dotting tools: Makartt Dotting Tools Set
- Top coat: Seche Vite Dry Fast Top Coat
Step-by-Step Instructions:
- Apply a base coat to your nails.
- Paint your nails with two coats of lime green polish and let them dry.
- Use dotting tools to create purple flowers with yellow centers on each nail.
- Finish with a top coat to protect the design and add shine.
Colorful Abstract Nails
This eye-catching design features a variety of abstract shapes and colors on a nude base. The combination of pink, blue, green, and orange creates a dynamic and artistic look. The long, square shape enhances the boldness of this manicure, perfect for those who love creative and unique nail art.
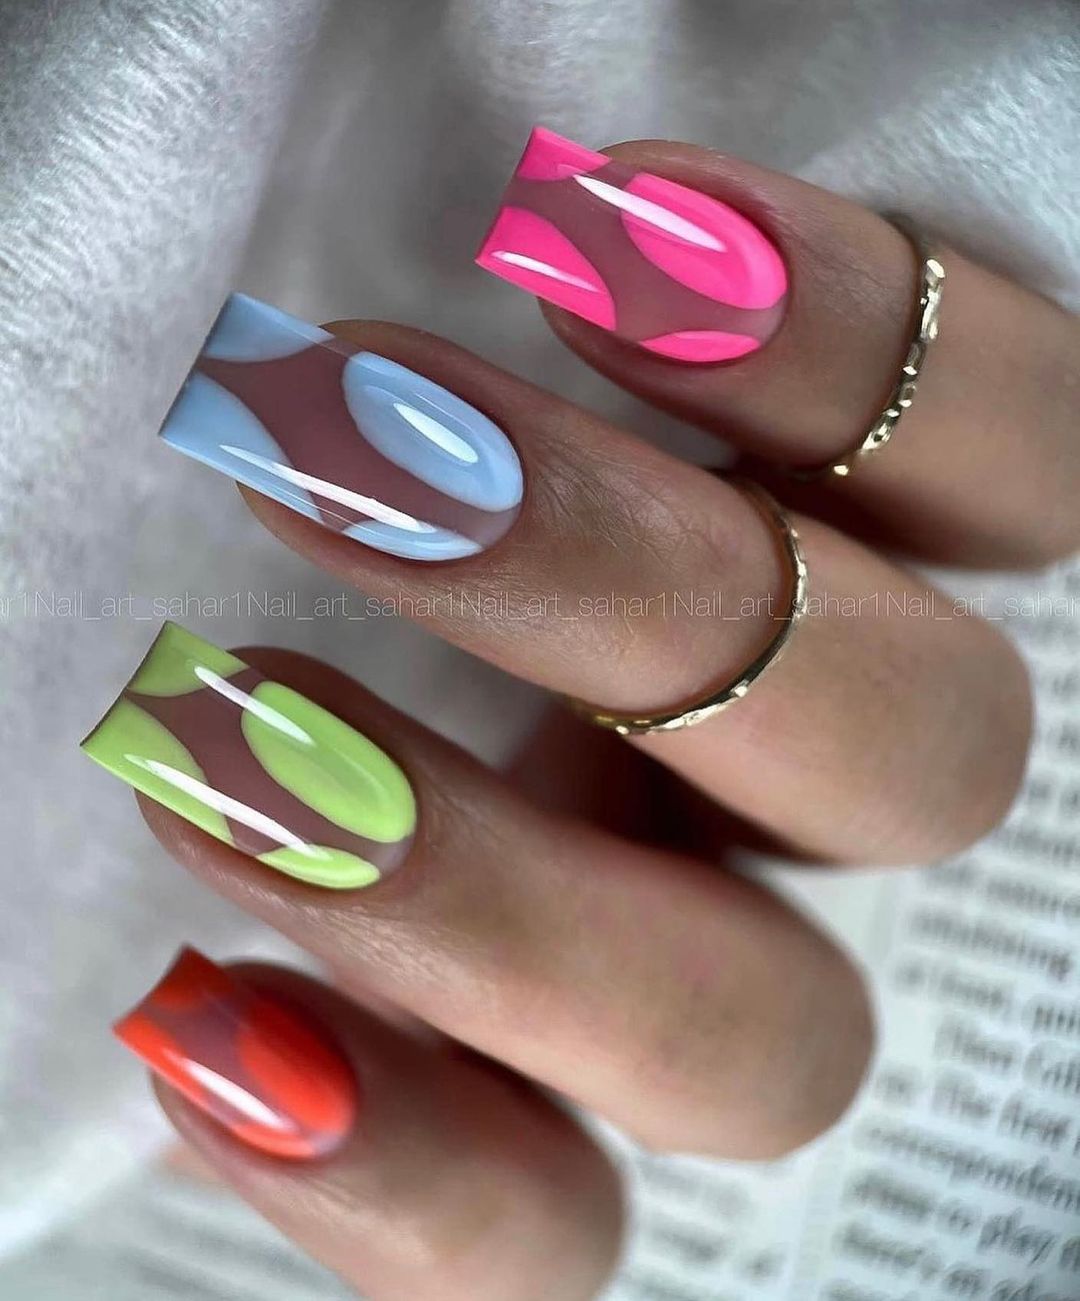
Consumables:
- Base coat: Orly Bonder Base Coat
- Nude polish: Essie Topless & Barefoot
- Pink, blue, green, and orange polishes: OPI Pink Flamenco, Essie Butler Please, OPI My Dogsled is a Hybrid, and China Glaze Orange Knockout
- Fine nail art brushes: Beetles Nail Art Brushes Set
- Top coat: Sally Hansen Miracle Gel Top Coat
Step-by-Step Instructions:
- Apply a base coat to your nails.
- Paint your nails with two coats of nude polish and let them dry.
- Use fine nail art brushes to create abstract shapes with the different colored polishes.
- Seal the design with a top coat for a glossy finish.
Glossy Red Dot Nails
These glossy red dot nails feature a clear base with raised red dots, creating a unique and tactile design. The short, square shape keeps the look neat and practical while adding an element of fun and texture. This manicure is perfect for those who love minimalist yet distinctive nail art.
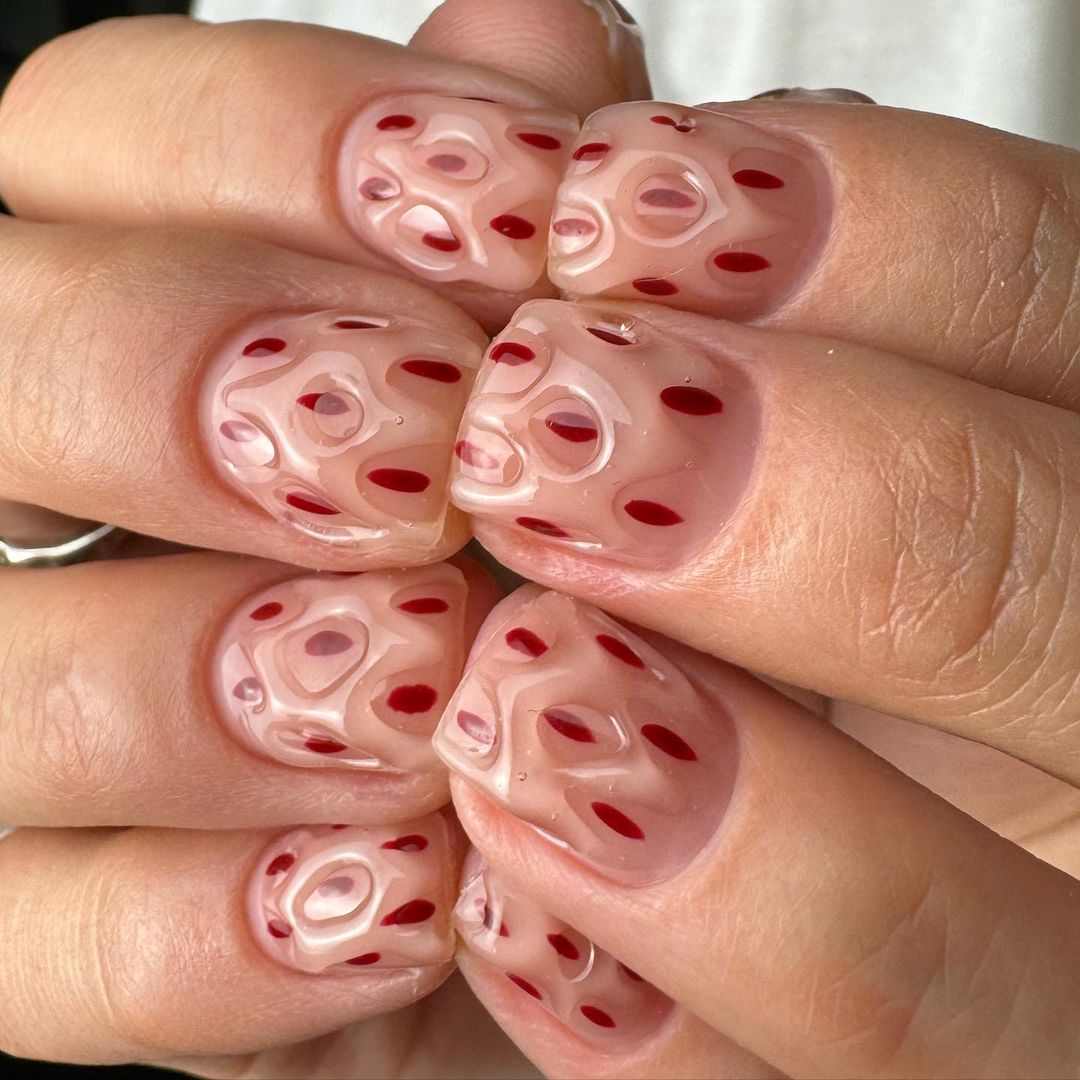
Consumables:
- Base coat: OPI Natural Nail Base Coat
- Clear polish: Essie Gel Couture Top Coat
- Red polish: OPI Big Apple Red
- Dotting tools: Makartt Dotting Tools Set
- Top coat: Seche Vite Dry Fast Top Coat
Step-by-Step Instructions:
- Apply a base coat to your nails.
- Paint your nails with a clear polish and let them dry.
- Use dotting tools to create raised red dots on each nail.
- Finish with a top coat to seal the design and add shine.
Yellow and Blue Swirl Nails
This bold design features yellow and blue swirls on a matte base, creating a striking contrast. The long, coffin shape adds a dramatic touch, making these nails perfect for those who love bold and vibrant looks. The swirling pattern adds a dynamic and eye-catching element to the manicure.
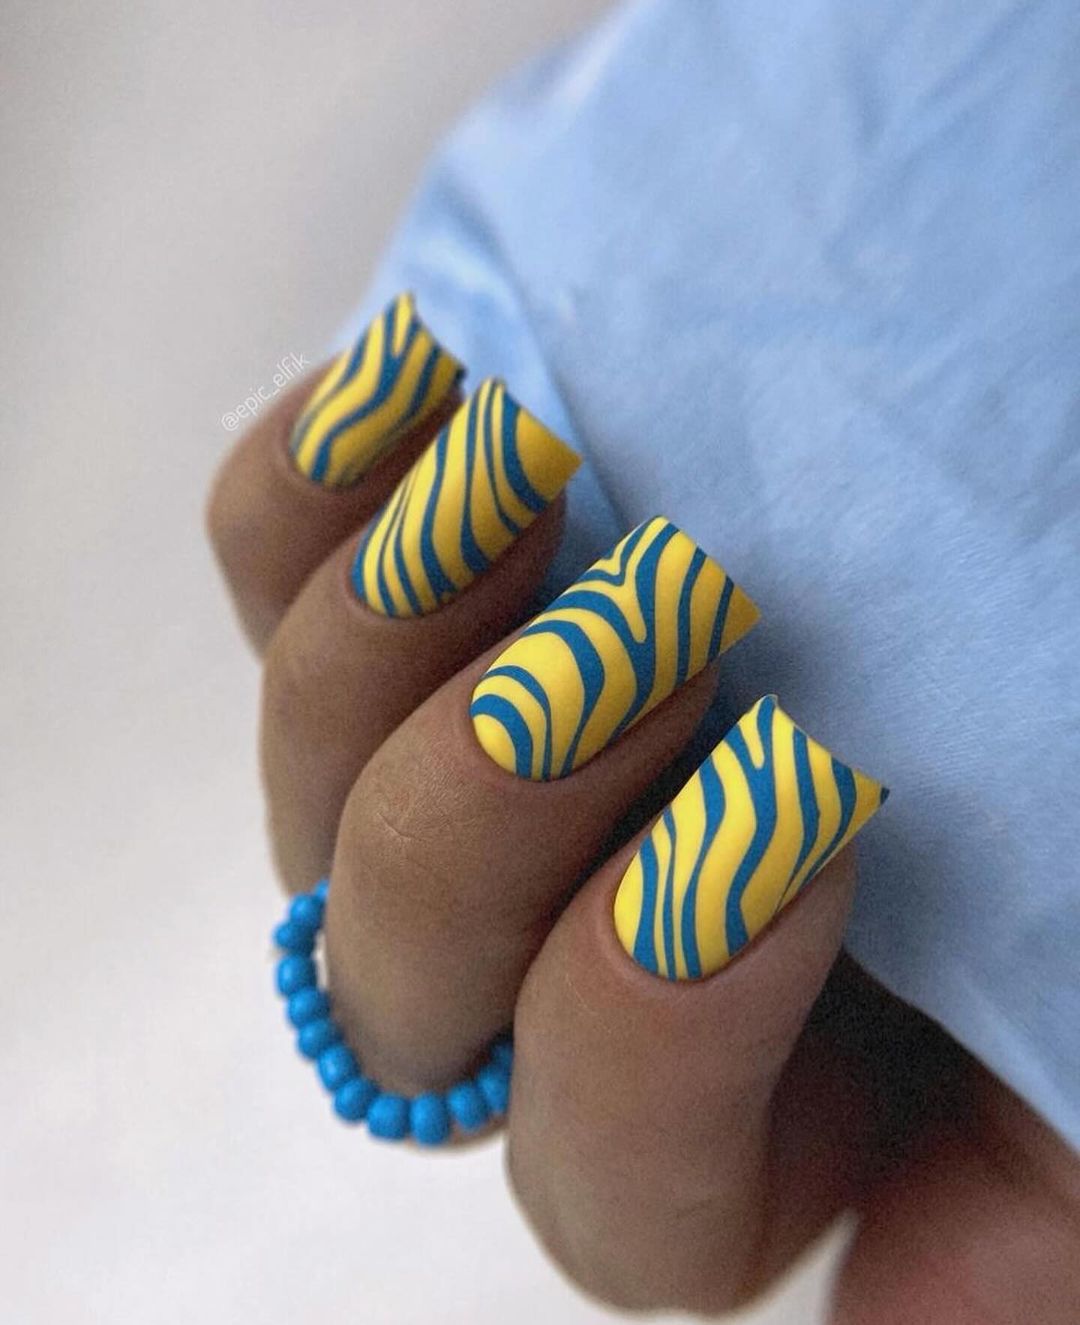
Consumables:
- Base coat: Orly Bonder Base Coat
- Yellow polish: Essie Sunshine State of Mind
- Blue polish: Essie Butler Please
- Fine nail art brushes: Pueen Precision Brush Set
- Matte top coat: Essie Matte About You
Step-by-Step Instructions:
- Apply a base coat to your nails.
- Paint your nails with two coats of yellow polish and let them dry.
- Use fine nail art brushes to create blue swirls on each nail.
- Seal the design with a matte top coat for a soft finish.
Cow Print and Gold Nails
This chic design features a mix of cow print and gold accents on a nude base. The combination of black, white, and gold creates a stylish and trendy look. The short, square shape keeps the manicure modern and sophisticated, perfect for those who love a mix of classic and contemporary styles.
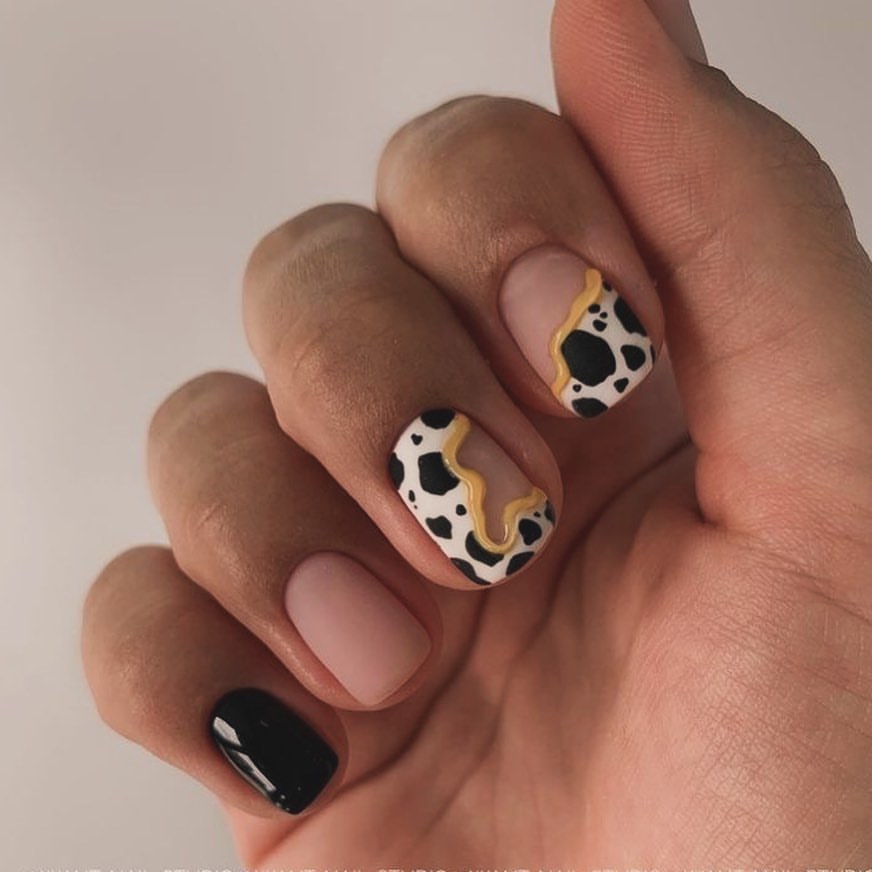
Consumables:
- Base coat: Deborah Lippmann Hard Rock Base Coat
- Nude polish: Essie Topless & Barefoot
- Black and white polishes: OPI Black Onyx and OPI Alpine Snow
- Gold polish: Essie Good as Gold
- Fine nail art brushes: Beetles Nail Art Brushes Set
- Top coat: Sally Hansen Miracle Gel Top Coat
Step-by-Step Instructions:
- Apply a base coat to your nails.
- Paint your nails with two coats of nude polish and let them dry.
- Use fine nail art brushes to create cow print and gold accent designs.
- Finish with a top coat to protect the design and add shine.
Festive Sweater Nails
These festive sweater nails feature a red and white Nordic pattern, perfect for the holiday season. The long, square shape adds a classic touch, while the intricate designs bring a cozy and festive vibe to your manicure. This look is perfect for celebrating the winter holidays in style.
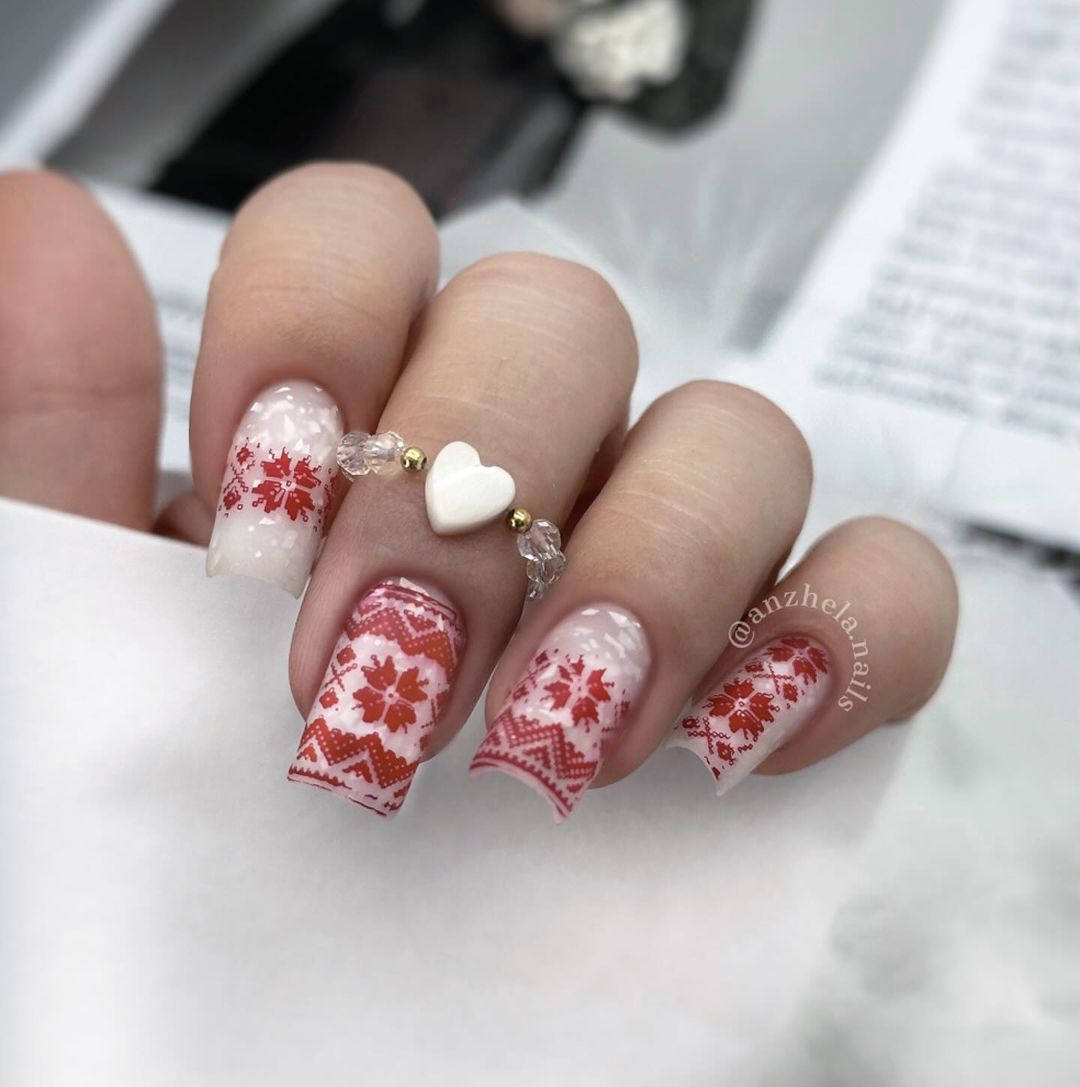
Consumables:
- Base coat: OPI Natural Nail Base Coat
- Red and white polishes: OPI Big Apple Red and China Glaze White on White
- Nail art brushes: Winstonia Fine Line Brush Set
- Top coat: Seche Vite Dry Fast Top Coat
Step-by-Step Instructions:
- Apply a base coat to your nails.
- Paint your nails with alternating coats of red and white polish and let them dry.
- Use nail art brushes to create the Nordic sweater pattern with the contrasting colors.
- Seal the design with a top coat for a glossy finish.
Mickey Mouse Nails
These fun and playful Mickey Mouse nails feature vibrant red and nude colors with Mickey Mouse designs. The long, almond shape adds a whimsical touch, making these nails perfect for Disney fans. The combination of bright colors and cute characters brings a cheerful and nostalgic vibe to the manicure.
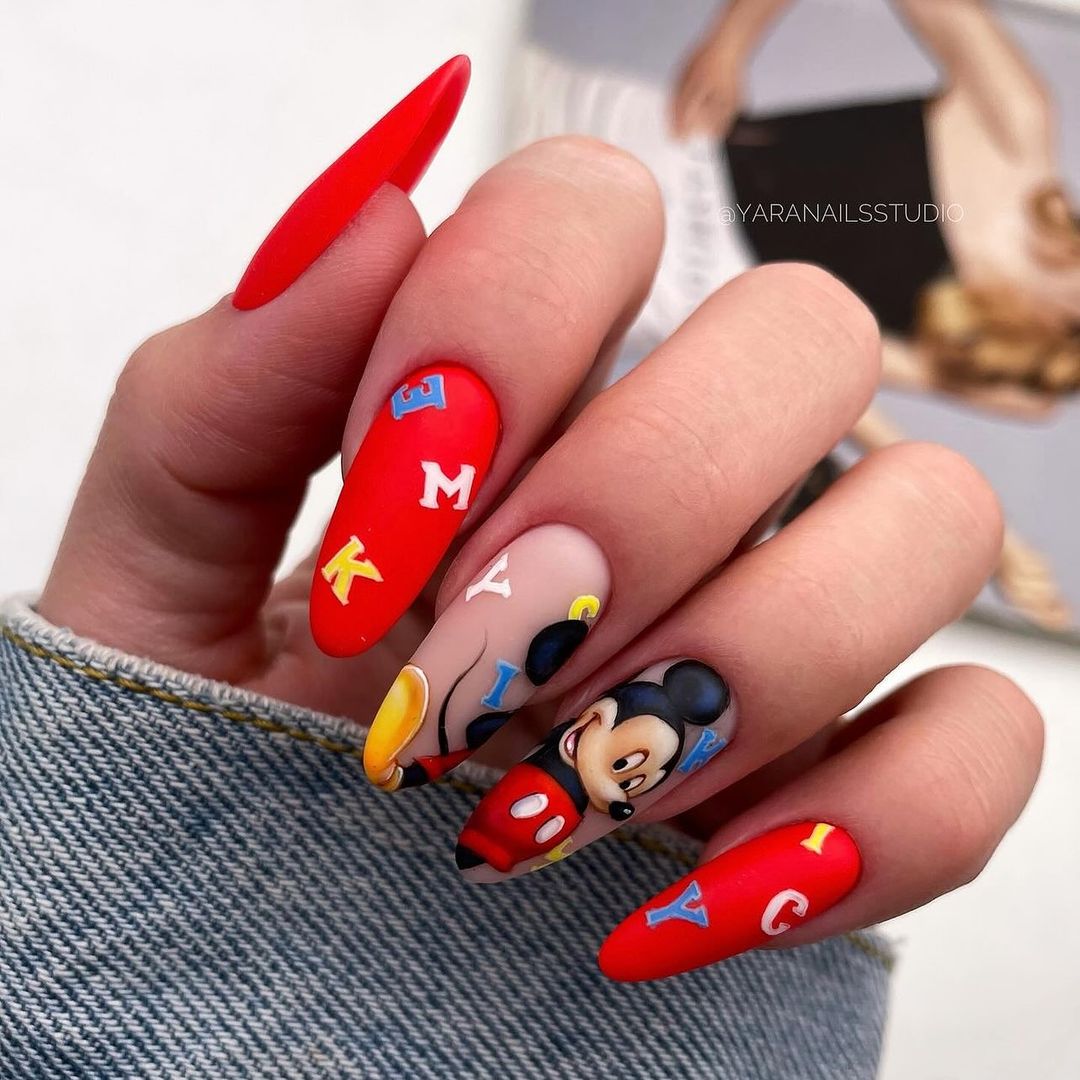
Consumables:
- Base coat: Orly Bonder Base Coat
- Red and nude polishes: OPI Red Hot Rio and Essie Ballet Slippers
- Black, white, yellow, and blue polishes: OPI Black Onyx, OPI Alpine Snow, OPI Need Sunglasses?, and OPI Rich Girls & Po-Boys
- Fine nail art brushes: Pueen Precision Brush Set
- Top coat: Sally Hansen Miracle Gel Top Coat
Step-by-Step Instructions:
- Apply a base coat to your nails.
- Paint your nails with alternating coats of red and nude polish and let them dry.
- Use fine nail art brushes to paint Mickey Mouse designs with the various colored polishes.
- Finish with a top coat to protect the design and add shine.
FAQ
Q1: How do I make my nail polish last longer? A: Always start with a good base coat and finish with a top coat. Make sure your nails are clean and dry before applying polish. Reapply the top coat every few days to maintain the shine and prevent chipping.
Q2: What should I do if my nail art designs smudge? A: Allow each layer of polish to dry completely before applying the next. Use a quick-dry top coat to help set the design faster. If smudging occurs, you can clean up the edges with a small brush dipped in nail polish remover.
Q3: Can I achieve these designs on short nails? A: Absolutely! These designs can be adapted to any nail length. Simply adjust the size and placement of the designs to suit your nail size.
By following these tips and ideas, you can create stunning fun fall nails 2024 at home. Experiment with colors, patterns, and shapes to find the perfect nail art that expresses your style.
Save Pin