Are your toes beach-ready? Or are you looking to add a splash of color to your summer wardrobe with a stylish pedicure? From vibrant neon colors to elegant French nails for your feet, summer is the perfect time to explore a variety of pedicure designs. What shades and styles are trending this year? How can you achieve these fashionable looks at home? We’ll explore stunning summer pedicure designs ranging from simple elegance to dazzling bling. Ready to step up your nail game? Let’s uncover the hottest toenails trends for your next sandal-season statement!
Vibrant Blue and Intricate Black Designs
This pedicure is a bold choice for anyone looking to make a statement. The interplay of blue and black with added glitter on the largest toenail is eye-catching. The geometric patterns provide a modern twist, while the glitter adds a playful touch, suitable for both day-to-day wear and special occasions.

- Base coat – Essential for protecting the nail
- Blue and black nail polish – High-pigment shades for a vivid look
- Top coat – To protect the design and enhance shine
- Glitter polish – For a sparkling touch
- Detailing brush – For precise pattern application
- Nail tape – For creating clean lines
DIY Instructions:
- Begin with clean, dry feet. Apply a base coat to protect the nails.
- Apply glitter polish to the largest toenail and allow it to dry completely.
- Paint the remaining toenails blue as the base color.
- Once dry, use nail tape to create geometric patterns, then paint over the tape with black polish.
- Remove the tape carefully while the polish is still tacky to maintain sharp lines.
- Finish with a layer of glossy top coat for a durable finish.
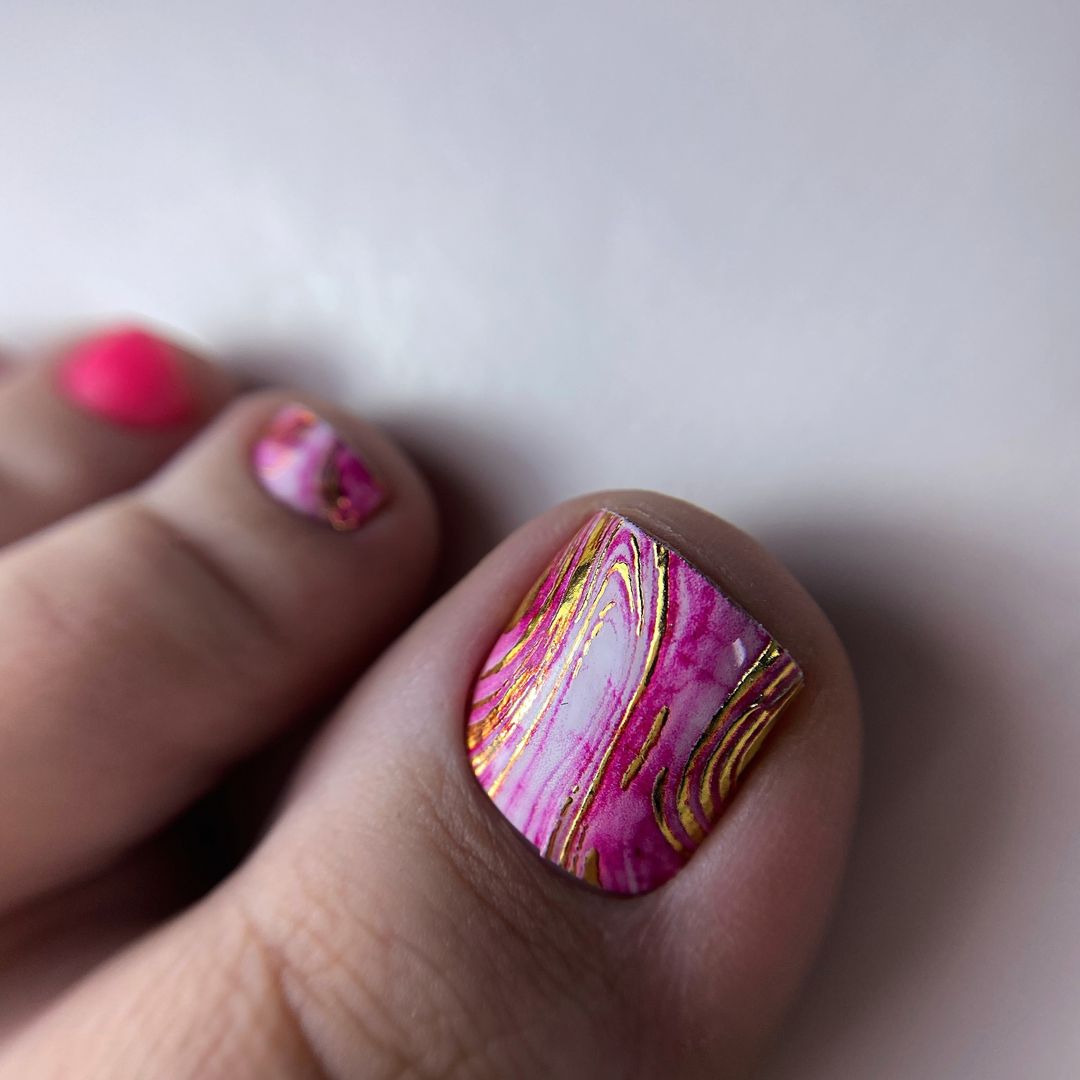
Marbleized Pink with Golden Swirls
This pedicure design combines a soft pink base with bold golden swirls, creating a luxurious yet playful appearance. The marble effect is sophisticated and perfectly suited for summer outings or special events. The golden accents catch the light beautifully, adding an extra dimension of elegance to the simple pink background.
- Pink nail polish – Choose a pastel shade for a soft background
- Gold nail polish – Metallic for the swirling accents
- Marbling tool or a fine brush – To create the swirling designs
- Top coat – For a glossy finish that enhances durability
DIY Instructions:
- Paint your toenails with a base coat to protect them and ensure a smooth polish application.
- Apply two coats of pink nail polish as the base color.
- While the second coat is still wet, lightly drizzle gold polish over the top and use a marbling tool or fine brush to swirl the colors together.
- Allow the design to set briefly before applying a clear top coat for protection and shine.
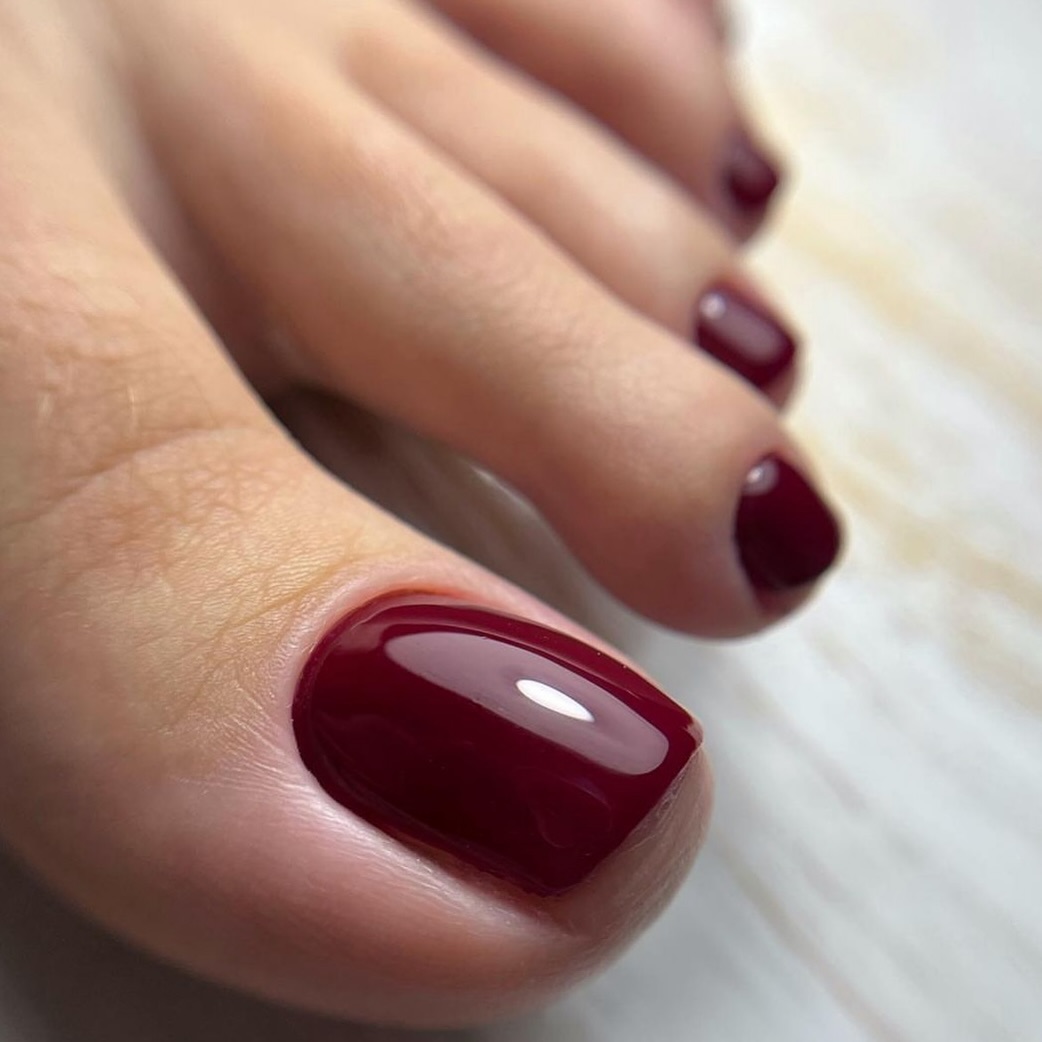
Classic Rich Red
Embodying timeless beauty, this rich red pedicure is both bold and elegant. Perfect for any season, it especially stands out in the summer when paired with open-toed shoes or sandals. The deep red provides a stunning contrast against lighter summer fabrics and skin tones, making it a popular choice for both daytime and evening looks.
- Base coat – To protect the nail from staining
- Deep red nail polish – A high-quality formula for even, opaque coverage
- Top coat – To seal in color and prevent chipping
DIY Instructions:
- Start with a clean, dry foot and apply a base coat to each toenail.
- Apply two coats of deep red nail polish, allowing each coat to dry completely between applications.
- Finish with a clear top coat to add gloss and extend the life of your pedicure.
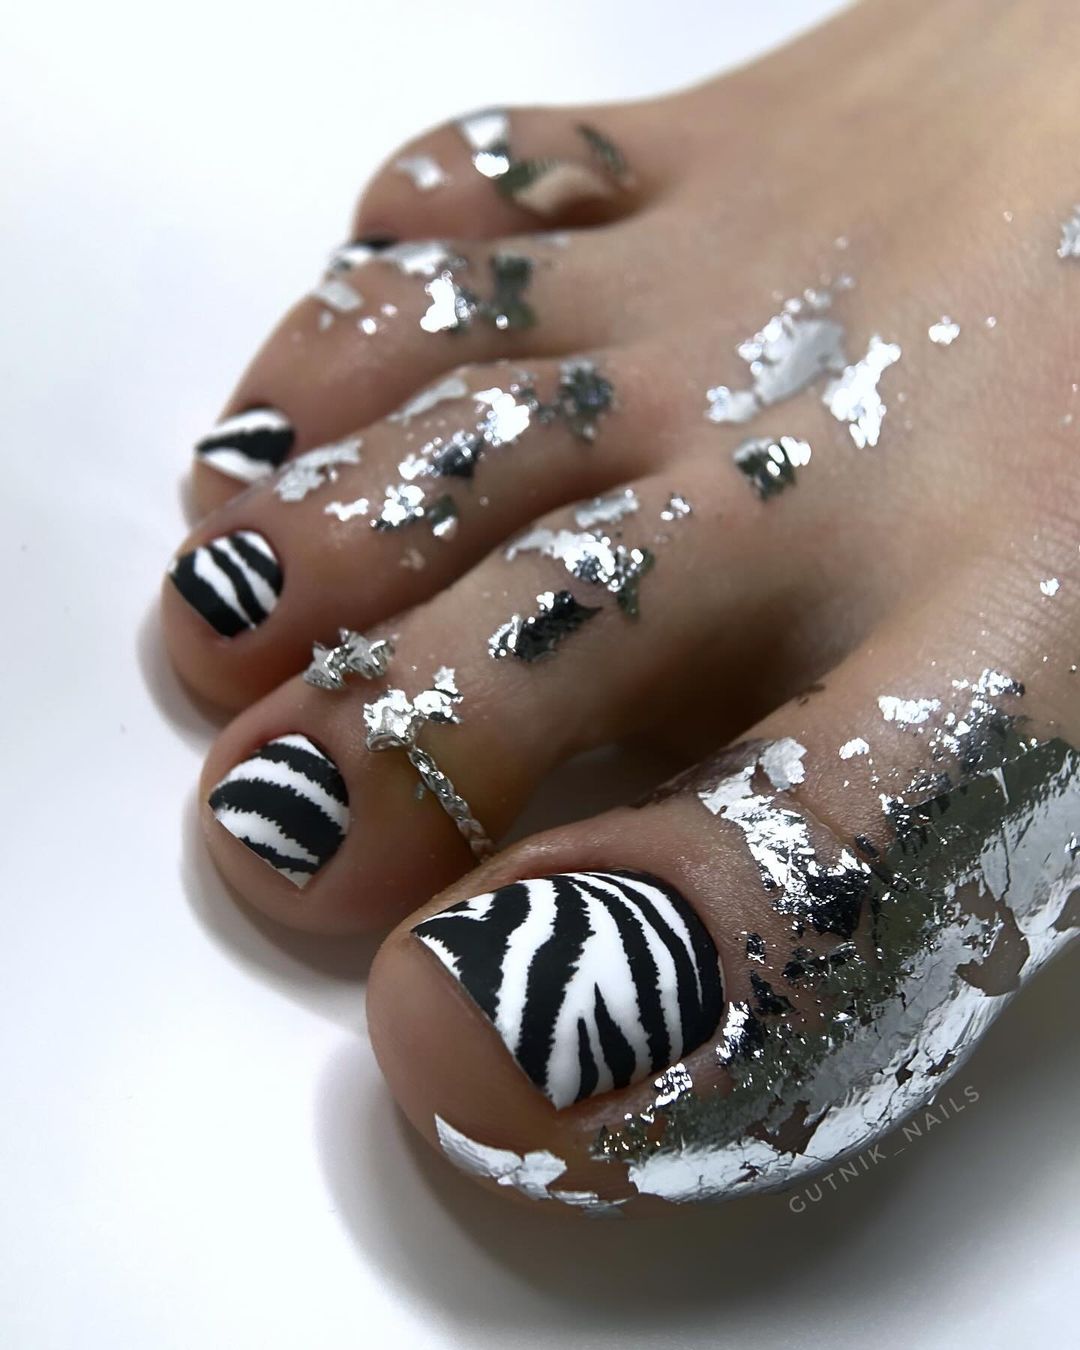
Zebra Stripes
This design combines bold zebra stripes with shimmering silver flakes scattered over the skin and nails. The contrast between the stark black and white stripes with the silver creates a stunning visual effect that’s both modern and glamorous. This look is perfect for those who want to stand out at any summer party or event.
- Base coat – To protect the nail
- White nail polish – For the base stripes
- Black nail polish – For the zebra pattern
- Silver leaf flakes – For a touch of glamour
- Top coat – To seal everything in for durability
DIY Instructions:
- Apply a base coat to protect your nails.
- Paint the nails white and let them dry completely.
- Using a thin brush, draw zebra stripes with black nail polish.
- Before the black polish dries, carefully place silver leaf flakes on the nails and press gently.
- Seal the design with a top coat for a glossy finish and added protection.
Save Pin

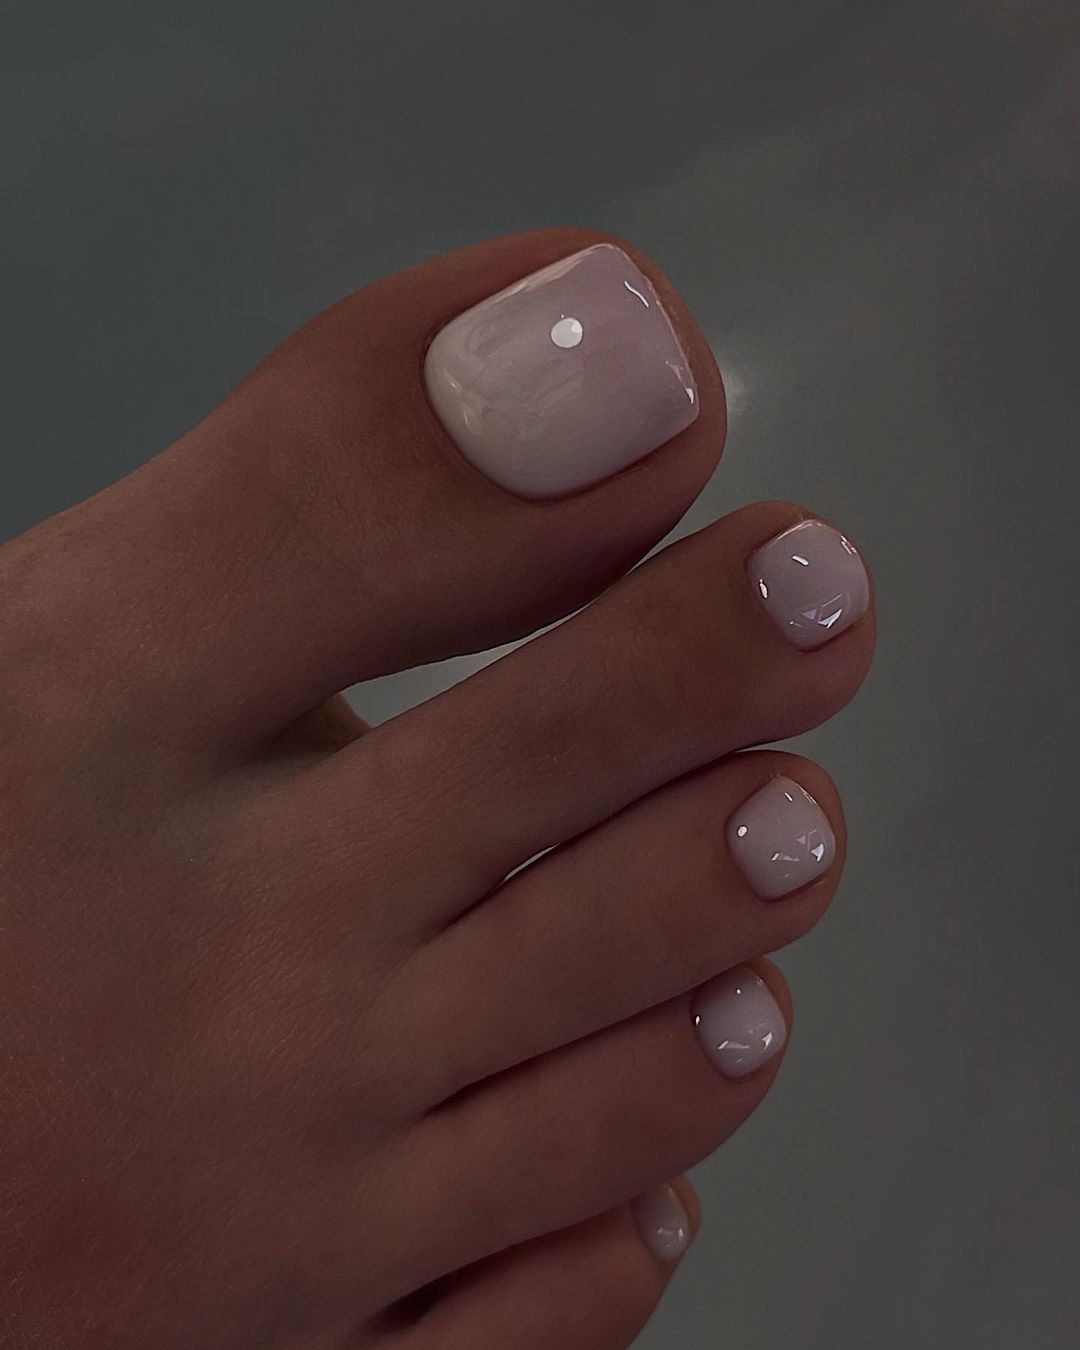
Subtle Pink
This pedicure features a delicate lavender shade that’s perfect for those who prefer a subtler look. The minimalist design is accented with tiny white dots that add a touch of whimsy without overpowering the soft purple base. Ideal for everyday wear, it’s a wonderful choice for anyone who appreciates understated elegance.
- Lavender nail polish – A soft, pastel color
- White nail polish – For the dots
- Dotting tool – To create perfect dots
- Top coat – To enhance shine and prolong wear
DIY Instructions:
- Begin by applying a base coat to protect the nails.
- Paint all nails with a lavender polish as the foundation.
- Use a dotting tool to apply small white dots in a scattered pattern across each nail.
- Finish with a clear top coat to protect your design and add a glossy sheen.
Chic Snake Print
Snake print is a trend that continues to make waves in the fashion world, and it’s just as striking on nails. This pedicure uses a combination of greyscale snake patterns to create a sophisticated and edgy look. The print is detailed and realistic, making it a fantastic option for fashion-forward individuals.
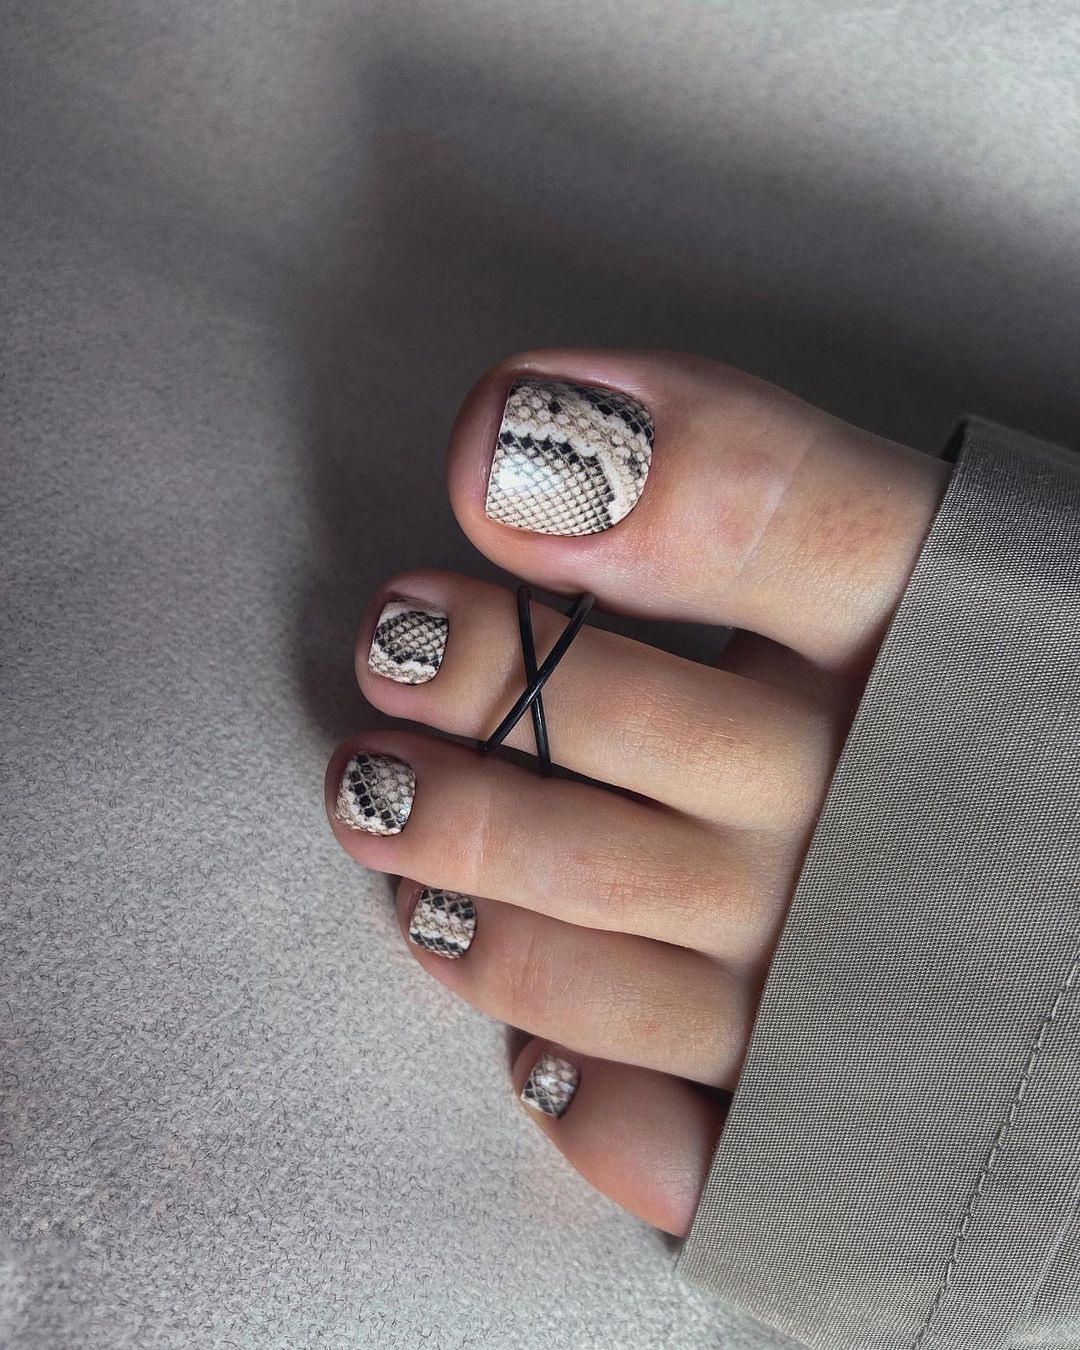
- Base coat – For nail protection
- Greyscale snake print decals or stickers – For the detailed pattern
- Top coat – To secure the decals and add a finish
DIY Instructions:
- Apply a base coat to each toenail to start.
- Once dry, apply the snake print decals carefully, smoothing out any bubbles or wrinkles.
- Seal the decals with a top coat to ensure they stay in place and to add a smooth, finished look.
Neon Graffiti Art
This pedicure design features a dynamic neon yellow base with black graffiti-like art, creating a look that’s both edgy and vibrant. The scribbles and markings mimic urban street art, making it ideal for someone who loves a bold, unconventional style. This design stands out magnificently, particularly in the summer light.
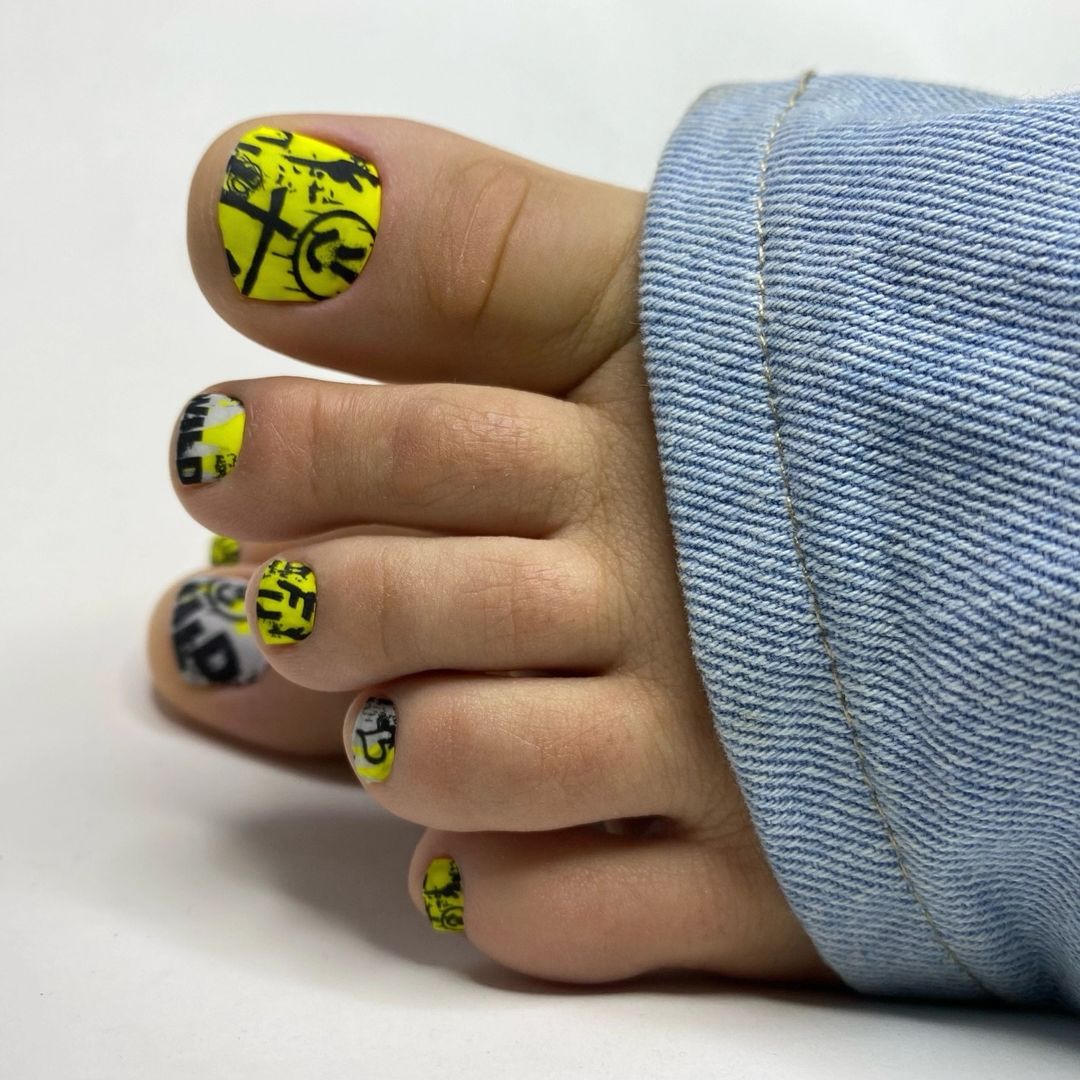
- Neon yellow nail polish – Bright and vivid
- Black nail art pen – For detailed graffiti designs
- Top coat – To protect the design and enhance durability
DIY Instructions:
- Apply a base coat to protect your nails.
- Paint the toenails with a neon yellow polish as the base color.
- Use a black nail art pen to create random graffiti patterns over each nail.
- Seal with a top coat to maintain the brightness of the yellow and ensure the longevity of your artwork.
Elegant Black and White Leaves
This sophisticated design uses a white base with black leaf patterns that exude a chic and stylish look. The contrast of black and white gives it a classic feel, while the leaf motifs add a touch of nature-inspired elegance. Perfect for formal occasions or for anyone preferring a more refined aesthetic.

- White nail polish – For a clean, crisp base
- Black nail polish – To draw the leaf patterns
- Fine brush – For precision in detailing
- Top coat – Adds a glossy finish and extends wear
DIY Instructions:
- Begin with a base coat to protect the nails.
- Apply two coats of white nail polish, letting it dry completely.
- Using a fine brush, paint black leaf patterns on each nail.
- Finish with a top coat for a smooth, protective layer over the art.
Leopard Print in Pastel
Leopard print is a timeless pattern that continues to be a staple in fashion. This pedicure updates the classic look with a soft pastel green base and gold accents, offering a fresh and modern twist. The combination of subtle color with the bold pattern makes it uniquely stylish and suitable for both casual and dressy settings.

- Pastel green nail polish – Soft and subtle
- Black and gold nail polish – For the leopard spots
- Dotting tool – To perfectly place the spots
- Top coat – To ensure durability and add shine
DIY Instructions:
- Start with a base coat to protect your nails.
- Paint all toenails with pastel green as the base color.
- Use a dotting tool to add black and gold spots in the leopard print pattern.
- Complete the look with a clear top coat to protect your design and enhance the colors.
Save Pin
Floral Charm on Pastels
This design is a delightful display of femininity and artistic flair. A pastel pink base provides the perfect canvas for intricate black and white floral patterns. Each toe features a unique design, creating a cohesive yet varied look that’s both elegant and playful.
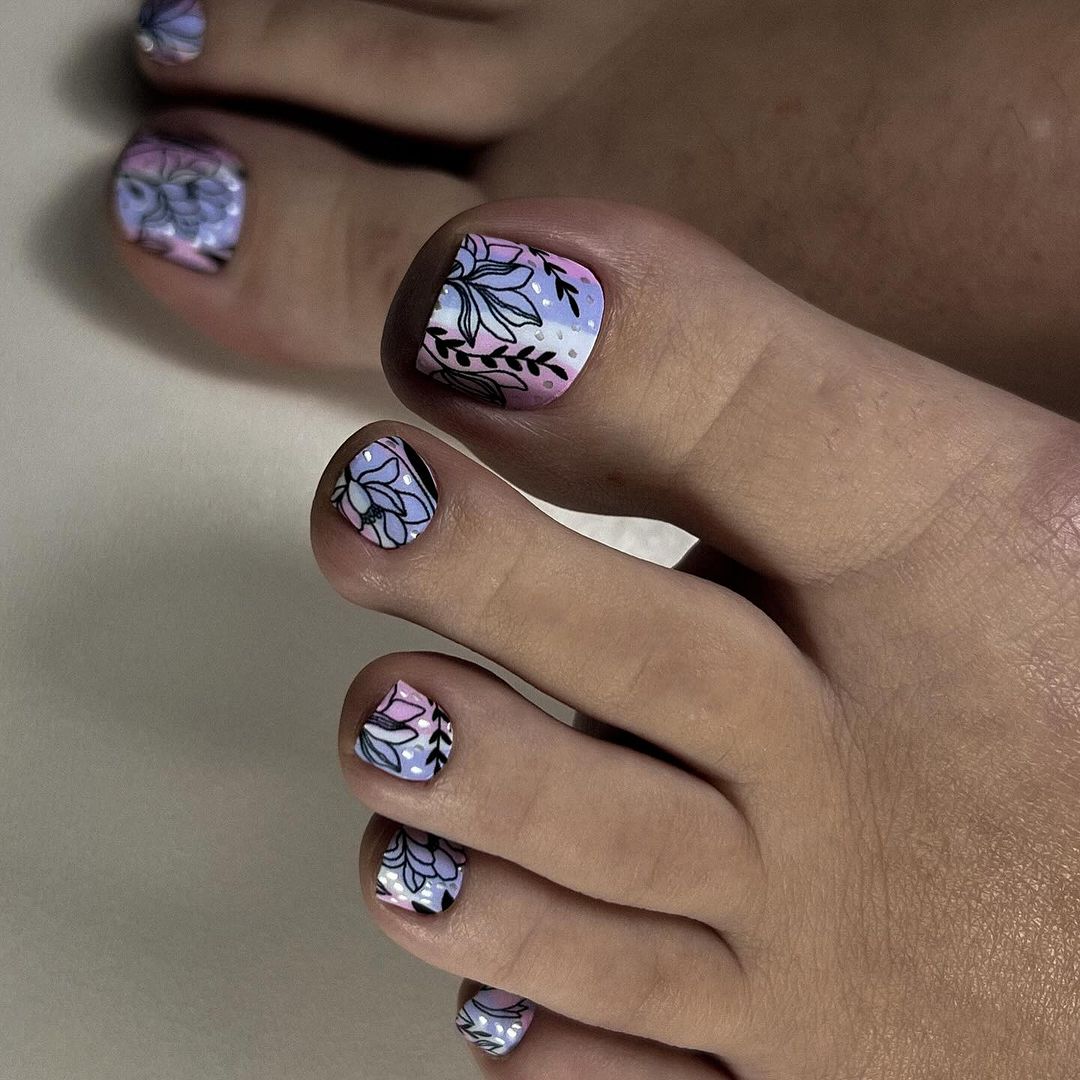
- Pastel pink nail polish – Soft and subtle
- Black and white nail art pens – For detailed floral designs
- Top coat – To protect and enhance the artwork
DIY Instructions:
- Begin with a base coat to protect your nails.
- Apply two coats of pastel pink polish, letting each layer dry thoroughly.
- Use black and white nail art pens to draw detailed floral patterns on each toenail.
- Finish with a clear top coat to protect the design and add a glossy sheen.
Bold Purple Florals
Vibrant purple serves as the backdrop for stunning white and yellow floral designs in this eye-catching pedicure. The bold color choice paired with the delicate flower outlines gives this look a dynamic yet sophisticated vibe, suitable for any summer event.
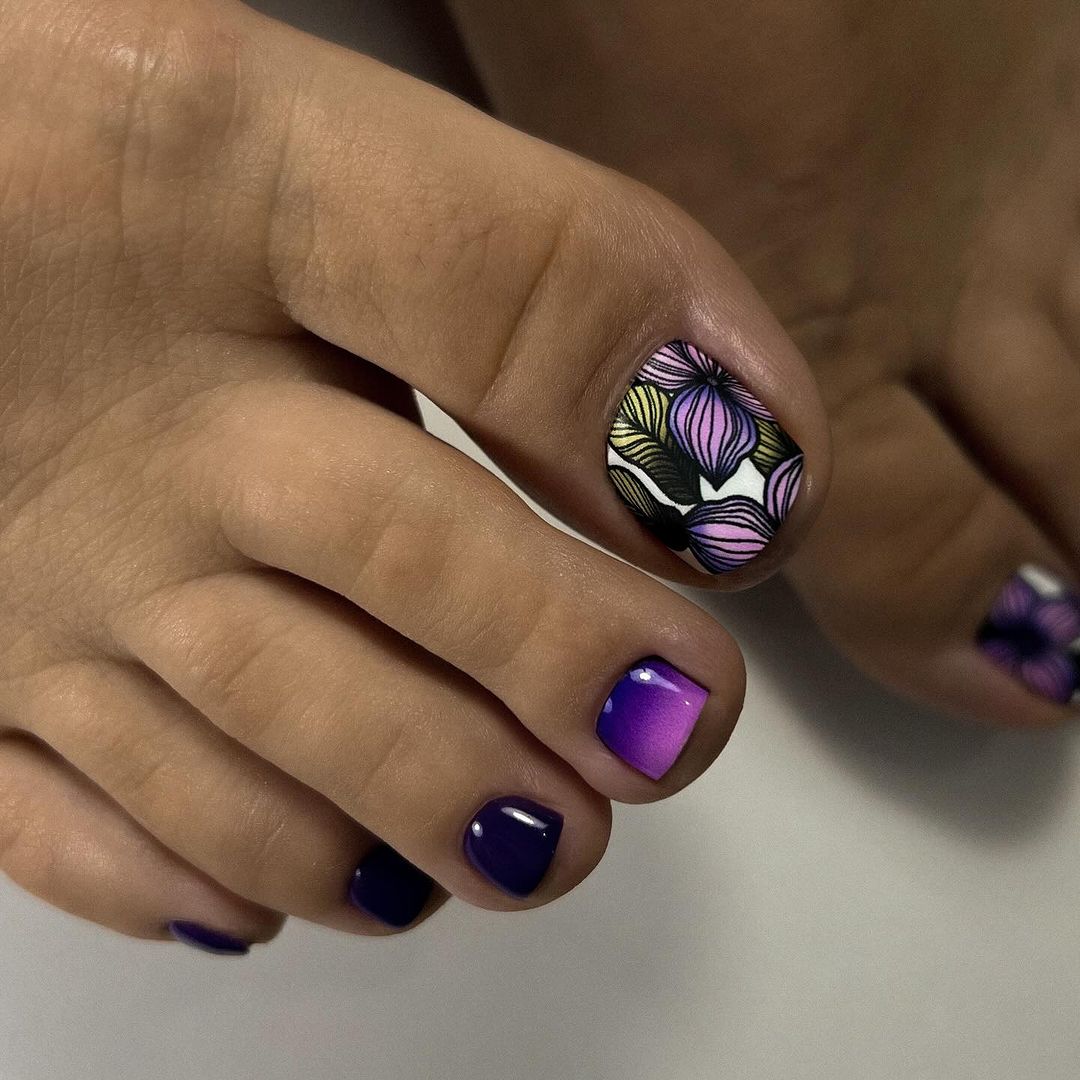
- Deep purple nail polish – Rich and striking
- White and yellow nail art pens – For the floral details
- Top coat – For lasting wear and shine
DIY Instructions:
- Apply a base coat to protect the nails.
- Paint each toenail with a deep purple polish as the base.
- Create floral patterns using white and yellow nail art pens.
- Apply a top coat to seal in the design and ensure its durability.
Neon Green with Marble Accents
This pedicure combines a neon green color with swirling marble accents, creating a bold and modern look. The marble effect adds a touch of luxury and uniqueness, making this design ideal for those looking to make a statement with their summer style.

- Neon green nail polish – Bright and attention-grabbing
- White and black nail polish – For the marble effect
- Marbling tool or a fine brush – To create the swirls
- Top coat – To secure the design and add gloss
DIY Instructions:
- Start with a clean base coat to protect your nails.
- Apply two coats of neon green polish as the base color.
- Drop small dots of white and black polish onto the wet green base and use a marbling tool to swirl the colors together.
- Finish with a top coat to enhance the design’s vibrancy and longevity.
Classic White Elegance
This pedicure design exemplifies timeless elegance with its flawless white polish. The glossy finish gives a luxurious look that pairs perfectly with any outfit, making it a versatile choice for both everyday elegance and special occasions.
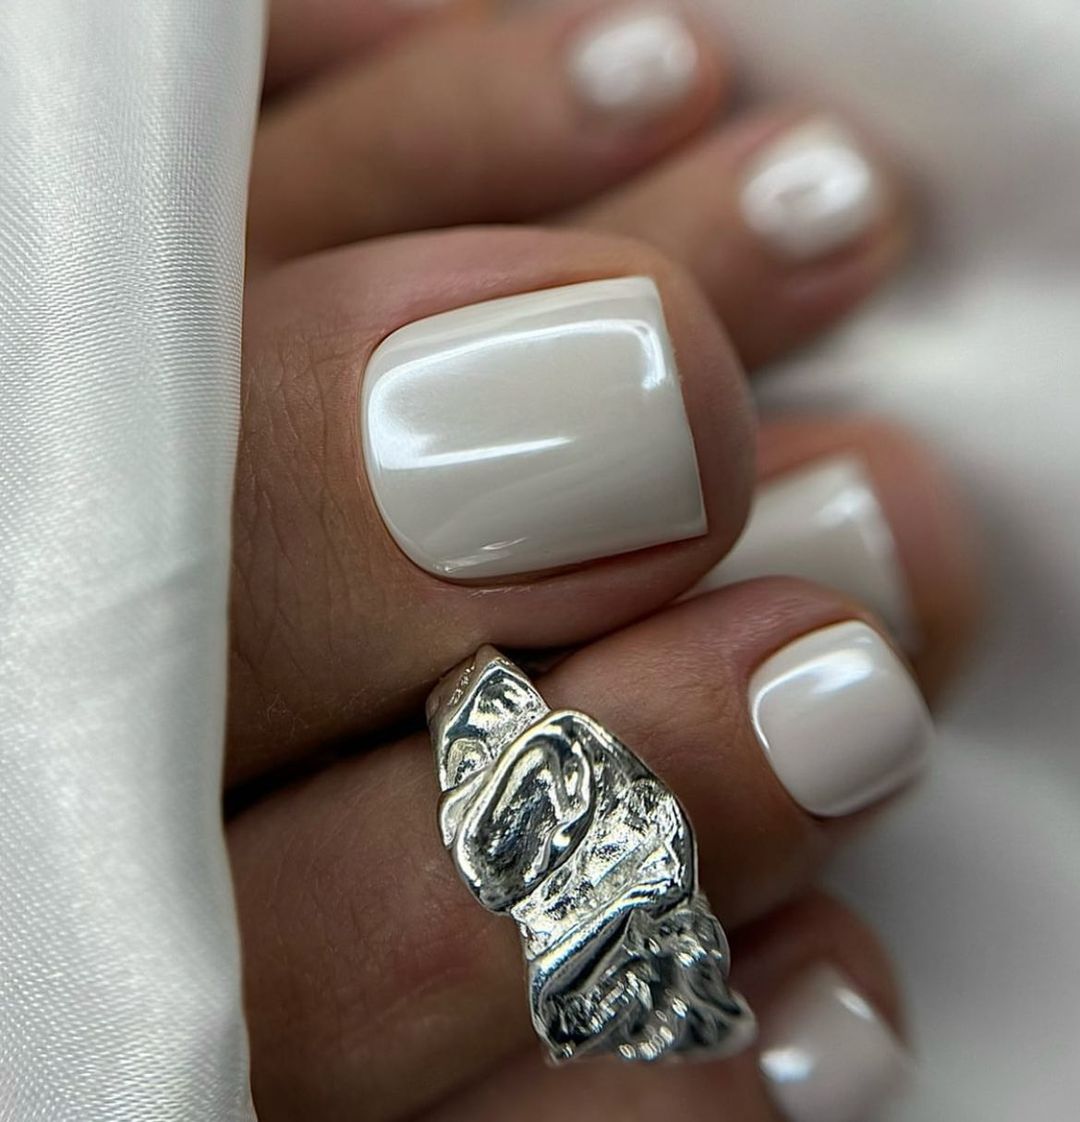
- White nail polish – High-gloss for that immaculate finish
- Base coat – To prevent staining and improve polish adherence
- Top coat – For extra shine and durability
DIY Instructions:
- Apply a base coat to protect the nails and create a smooth surface.
- Paint two coats of white nail polish, allowing thorough drying between coats.
- Finish with a top coat to enhance the glossy sheen and extend the wear of the polish.
Soft Pink with Holographic Glitter
This playful yet subtle pedicure features a soft pink base enhanced with holographic glitter. The sparkle catches light beautifully, adding a magical touch to the delicate pink hue, ideal for adding a bit of fun to your summer looks.
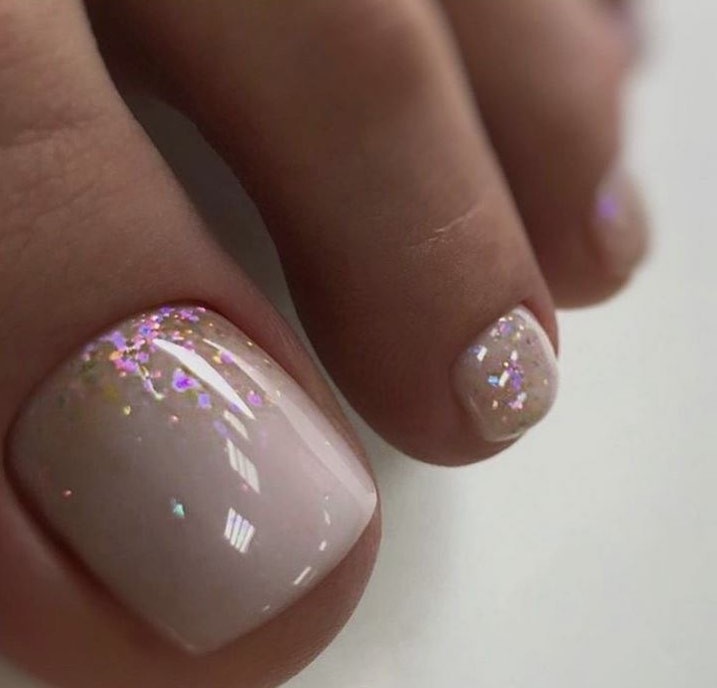
- Soft pink nail polish – A gentle, feminine base color
- Holographic glitter top coat – To add sparkle and dimension
- Base coat and top coat – For longevity and protection
DIY Instructions:
- Begin with a base coat to protect your nails.
- Apply a layer of soft pink nail polish and let it dry completely.
- Add a top layer of holographic glitter for a sparkling effect.
- Seal everything with a clear top coat for lasting durability and extra gloss.
Pastel Yellow Ombre
A bright and sunny pedicure perfect for summer, this design transitions from a translucent white at the cuticle to a vibrant pastel yellow at the tip, creating a cheerful ombre effect. This look is especially great for beach days and summer outings.
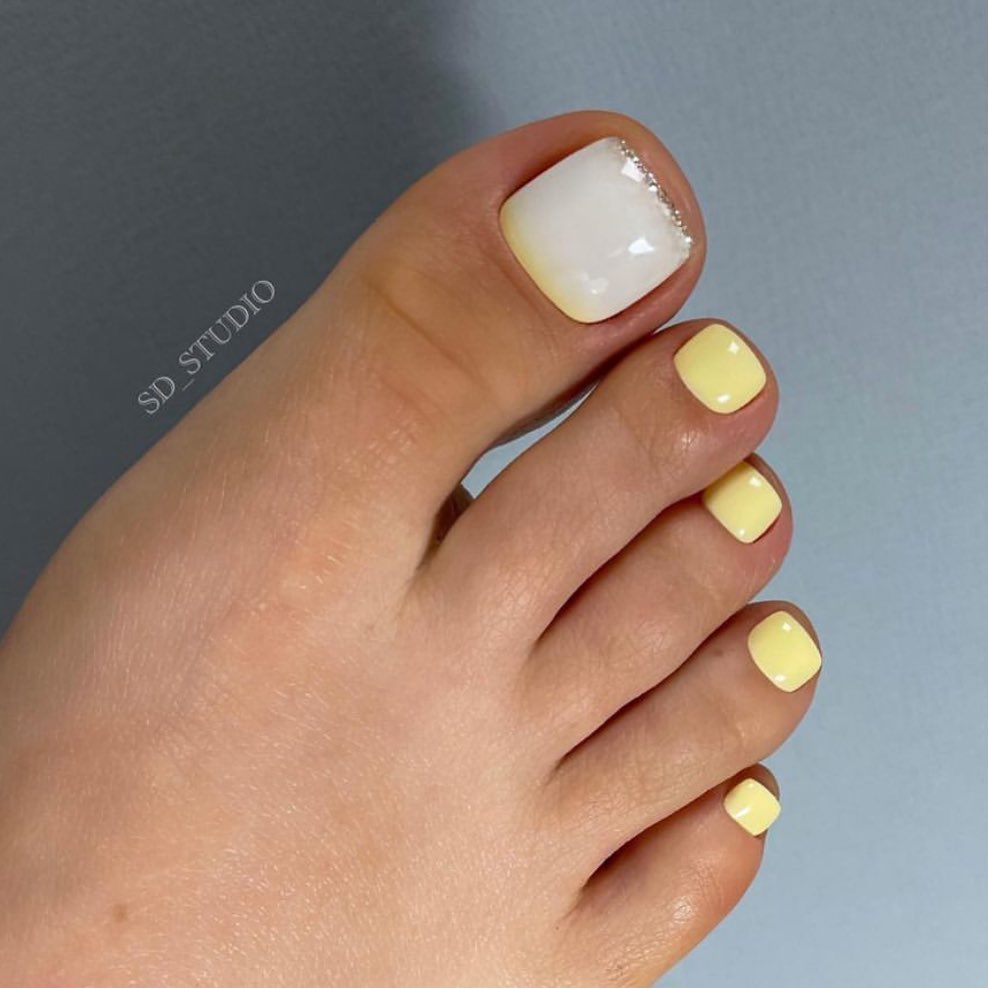
- Pastel yellow nail polish – Bright and summery
- White nail polish – For the ombre base
- Sponge – To blend the ombre effect smoothly
- Top coat – To seal the design and enhance durability
DIY Instructions:
- Start with a base coat to protect your nails.
- Apply a white base layer and let it dry.
- Dab pastel yellow polish onto a sponge and lightly press it onto the tip of each nail, blending upwards to create the ombre effect.
- Finish with a top coat for a smooth, long-lasting finish.
Vivid Orange with Gold Accents
This pedicure is a show-stopper with its radiant orange hue accented by intricate gold leaf designs. The gold detailing adds a luxurious touch to the bold orange, perfect for summer festivals or a beach getaway. It’s a vibrant look that pairs beautifully with sun-kissed skin.
- Bright orange nail polish – For a bold base
- Gold leaf – For decorative accents
- Black nail art pen – To outline the gold leaf
- Top coat – To seal the design and add shine
DIY Instructions:
- Apply a base coat to protect your nails.
- Paint the nails with a bright orange polish as the base.
- Carefully apply small pieces of gold leaf to the nails.
- Use a black nail art pen to add elegant outlines around the gold leaf.
- Seal everything with a top coat for lasting wear and extra gloss.
Pastel Leopard Print
This pedicure takes a classic print and gives it a gentle twist with pastel shades, creating a soft but striking appearance. The subtle leopard spots provide a touch of wilderness while remaining elegant and suitable for everyday wear.
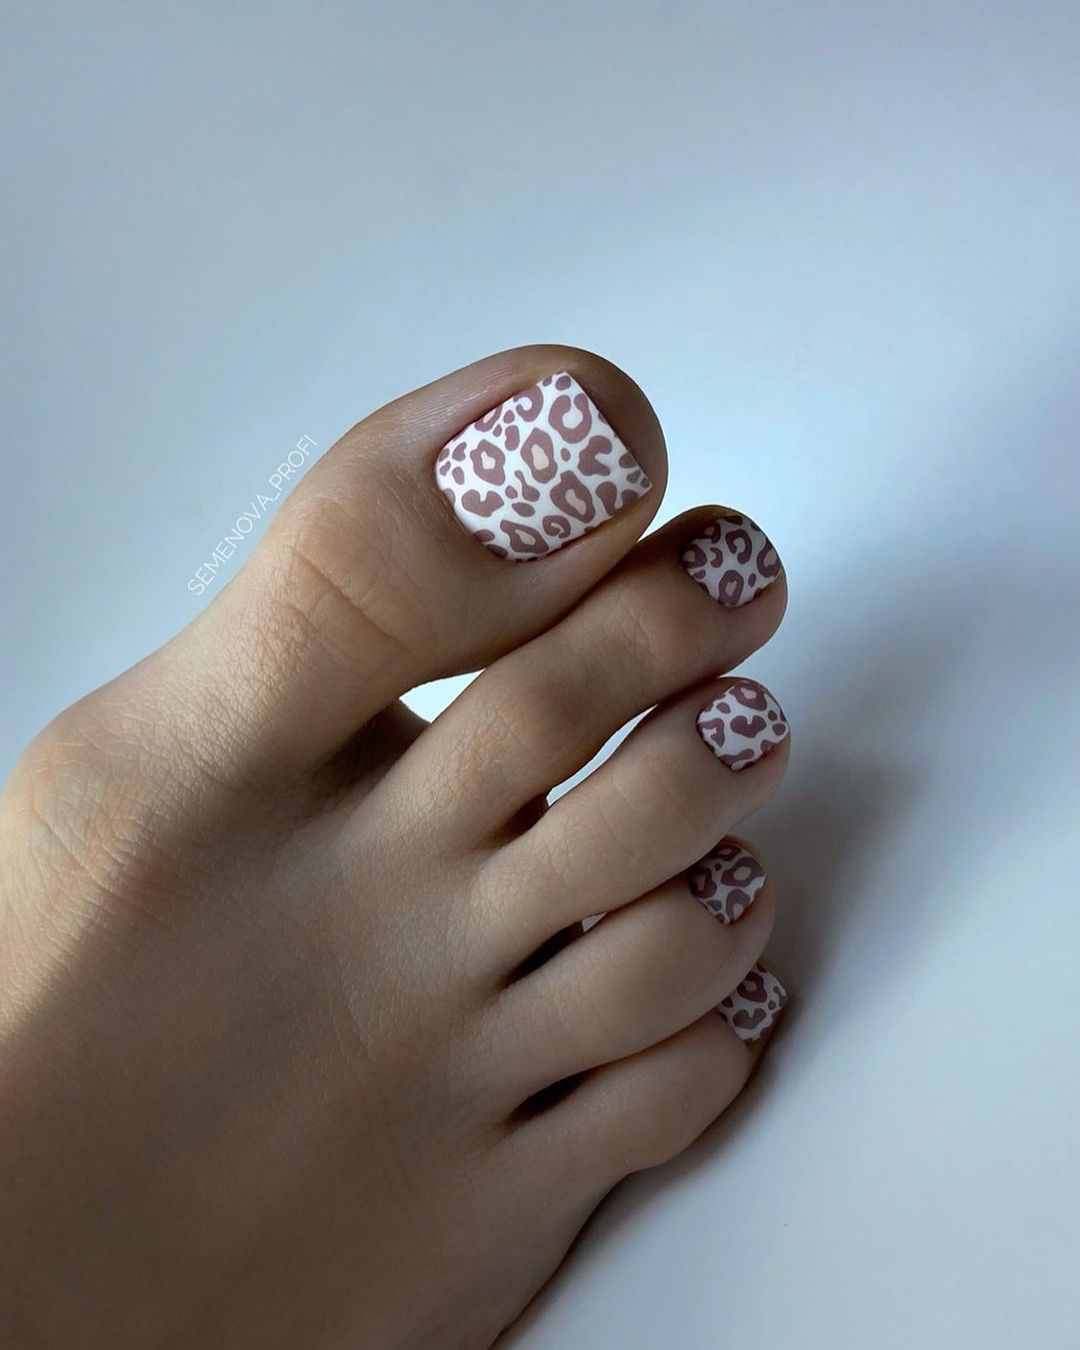
- Pastel base nail polish – Light and airy
- Darker shade for spots – To create the leopard effect
- Top coat – For durability and shine
DIY Instructions:
- Start with a pastel base coat on each nail.
- Use a darker shade to dab on spots in a random pattern.
- Apply a top coat to protect the design and ensure it lasts through your summer adventures.
Pink and White Stripes
Bold and playful, this pedicure features crisp white and vivid pink stripes that make a fresh and fashionable statement. This striped design is perfect for those looking to add a fun pop of color to their summer wardrobe.

- White and pink nail polish – For the base and stripes
- Tape or striping tool – For precise lines
- Top coat – To maintain the look and enhance durability
DIY Instructions:
- Apply a white base coat to all nails.
- Once dry, use tape or a striping tool to create even pink stripes.
- Carefully paint pink polish over the tape.
- Remove the tape while the polish is still slightly wet to ensure clean lines.
- Finish with a top coat for a smooth, long-lasting finish.
Psychedelic Wave Patterns
This eye-catching pedicure features a kaleidoscope of colors, forming wave patterns that exude a psychedelic vibe. The playful interaction of blues and yellows makes it a perfect choice for lively summer activities and music festivals.
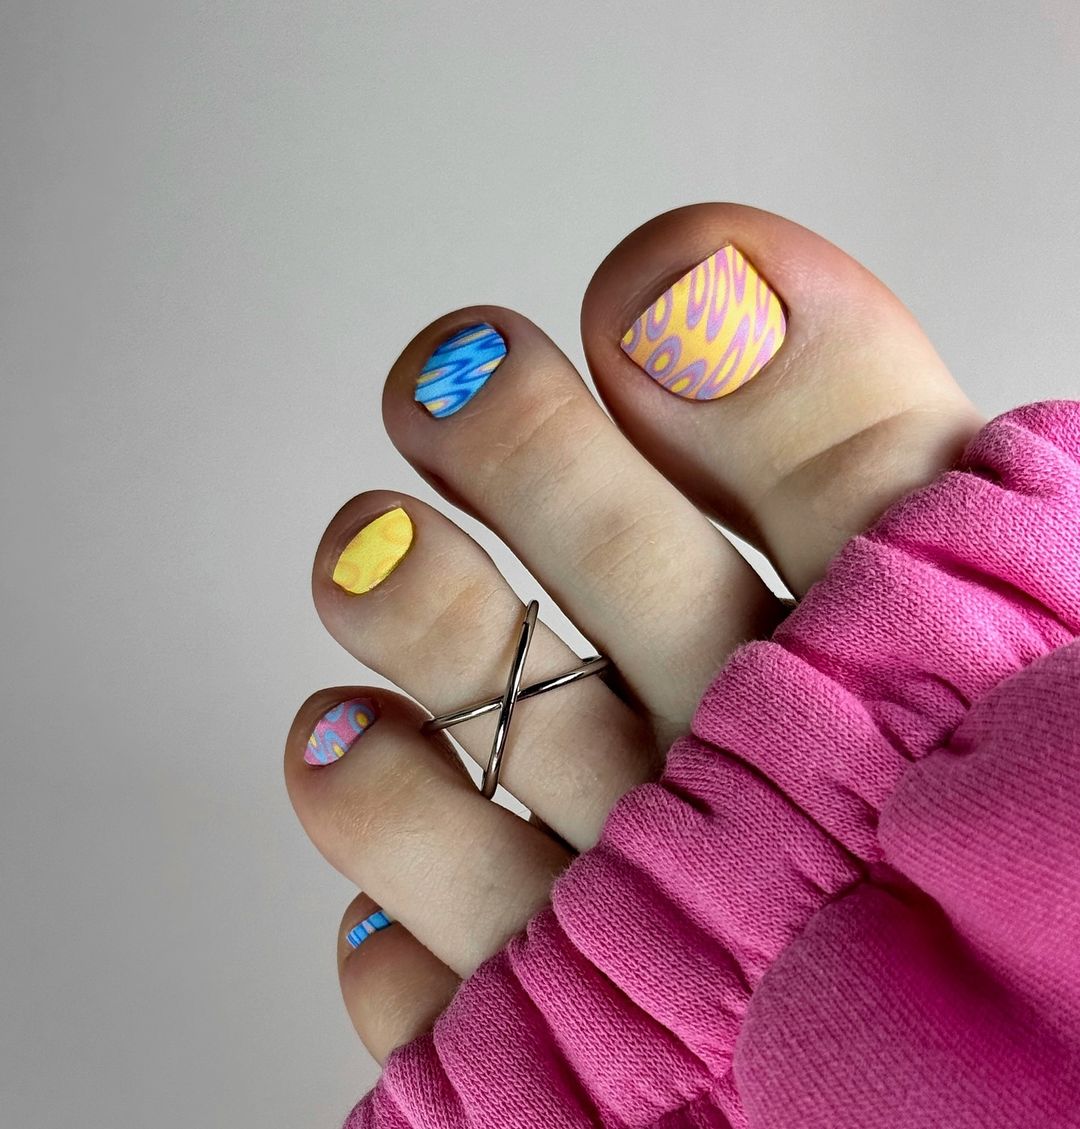
- Base coat – To protect the nail
- Blue and yellow nail polish – Vibrant colors for the wave design
- Detailing brush – For precise wave patterns
- Top coat – To seal in the design and add shine
DIY Instructions:
- Start with a base coat to protect your nails.
- Apply a light base color, such as pale blue.
- Once dry, use a detailing brush to add wavy lines with yellow polish, creating a contrast.
- Add a few touches of a darker blue to enhance the depth of the waves.
- Finish with a top coat for a glossy, enduring look.
Soft Floral Patterns on Pastel Pink
This design showcases delicate floral patterns over a pastel pink base, giving it a soft, romantic touch. The intricate flowers in white and soft purple add a sophisticated and feminine flair, perfect for a summer wedding or a picnic in the park.
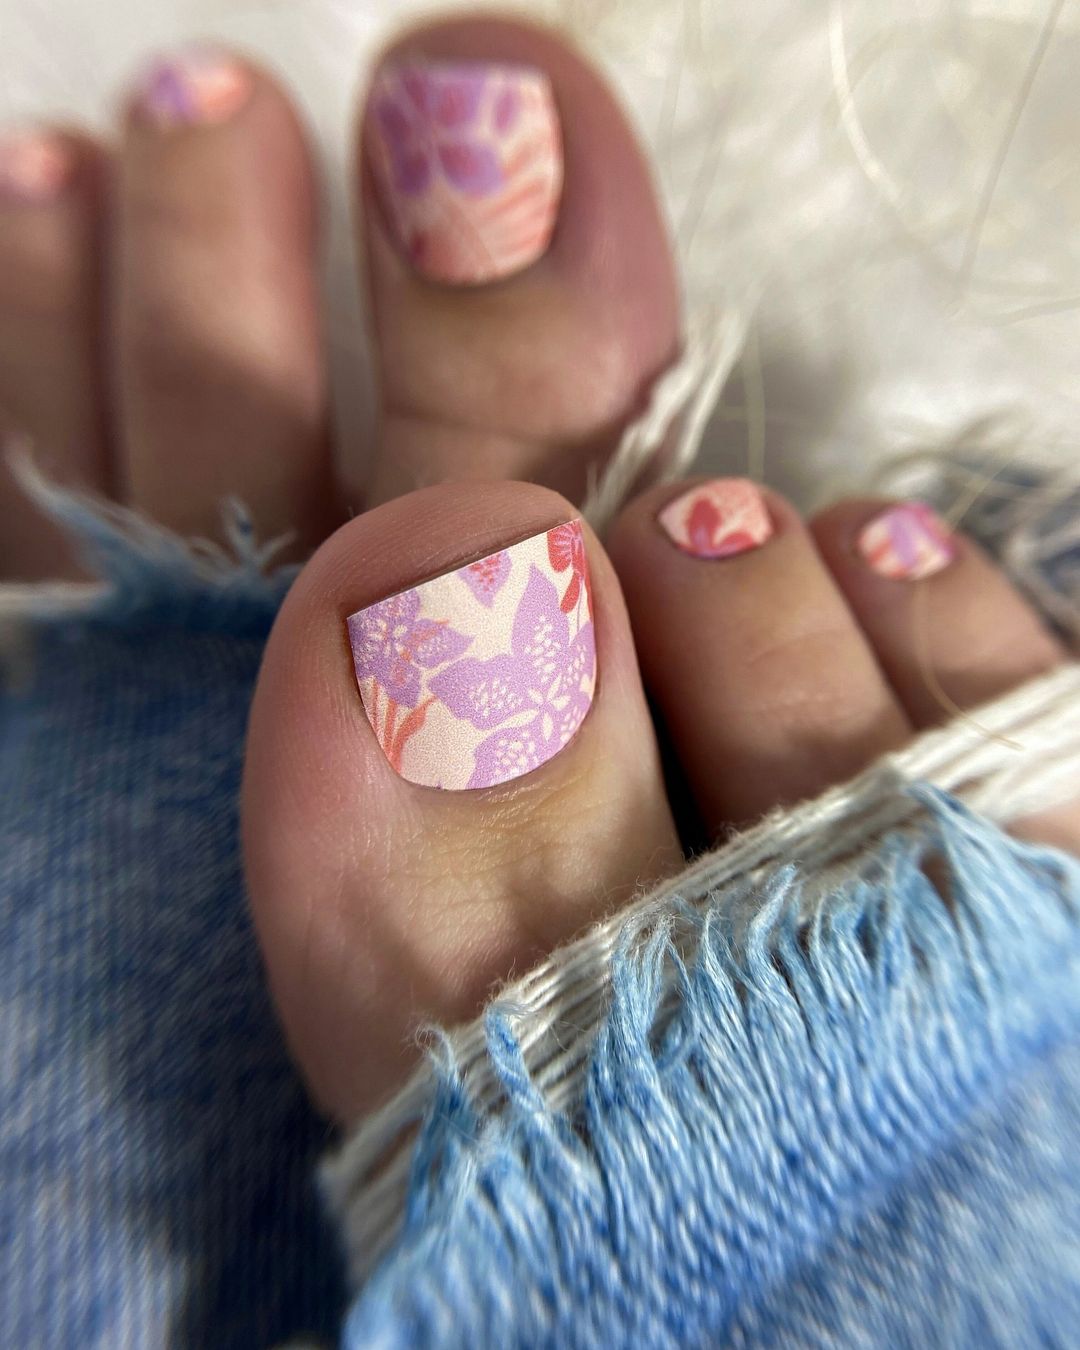
- Pastel pink nail polish – For a gentle, feminine base
- White and purple nail art pens – For the detailed floral design
- Top coat – To protect and enhance the artwork
DIY Instructions:
- Apply a base coat for nail protection.
- Paint the nails with a pastel pink base.
- Use nail art pens to draw delicate floral patterns in white and purple.
- Seal the design with a top coat for durability and a polished finish.
Neon Lightning Bolts
Vivid and striking, this pedicure design uses bright pink and yellow to create dynamic lightning bolts over a light pink base. This bold pattern is energetic and fun, making it a fantastic choice for someone who loves to stand out.
- Light pink nail polish – As the base color
- Neon pink and yellow nail polish – For the lightning bolts
- Tape or freehand tool – For sharp, clean lines
- Top coat – For lasting wear and added gloss
DIY Instructions:
- Start with a base coat to protect your nails.
- Apply a light pink polish as the base.
- Use tape or a freehand tool to design lightning bolts with neon pink and then outline or accent with yellow.
- Finish with a top coat to ensure the design stays vibrant and protected.
Soft Pink with Floral Accents
This elegant pedicure combines a soft pink base with delicate floral accents, adding a subtle yet beautiful embellishment. The light pink hue provides a perfect backdrop for the pink blooms and tiny gems at the center, which catch the light and add a touch of sparkle.

- Soft pink nail polish – For a gentle, feminine base
- Pink acrylic paint – For the flowers
- Small gems – For the center of the flowers
- Top coat – To secure the gems and enhance the overall finish
DIY Instructions:
- Apply a base coat to protect your nails.
- Paint all nails with a soft pink polish.
- Once dry, use a fine brush and pink acrylic paint to add floral designs.
- Place a small gem at the center of each flower while the paint is still tacky.
- Seal everything with a top coat for durability and a glossy finish.
Classic French Tip
A timeless choice, this pedicure features the classic French tip with a glossy pink base and crisp white tips. It’s a chic and polished look that’s perfect for both casual and formal occasions, offering a clean and sophisticated style.

- Light pink nail polish – For the base
- White nail polish – For the tips
- Top coat – For a smooth, protective finish
DIY Instructions:
- Start with a base coat to protect the nails.
- Apply a light pink polish as the base color.
- Carefully paint the tips with white polish.
- Finish with a top coat to enhance the shine and ensure longevity.
Pastel Pink with Cherry Blossoms
Inspired by the beauty of spring, this pedicure showcases a pastel pink base adorned with delicate cherry blossom designs. The small red and green accents on the blossoms add a pop of color, making it a playful yet refined choice for the season.
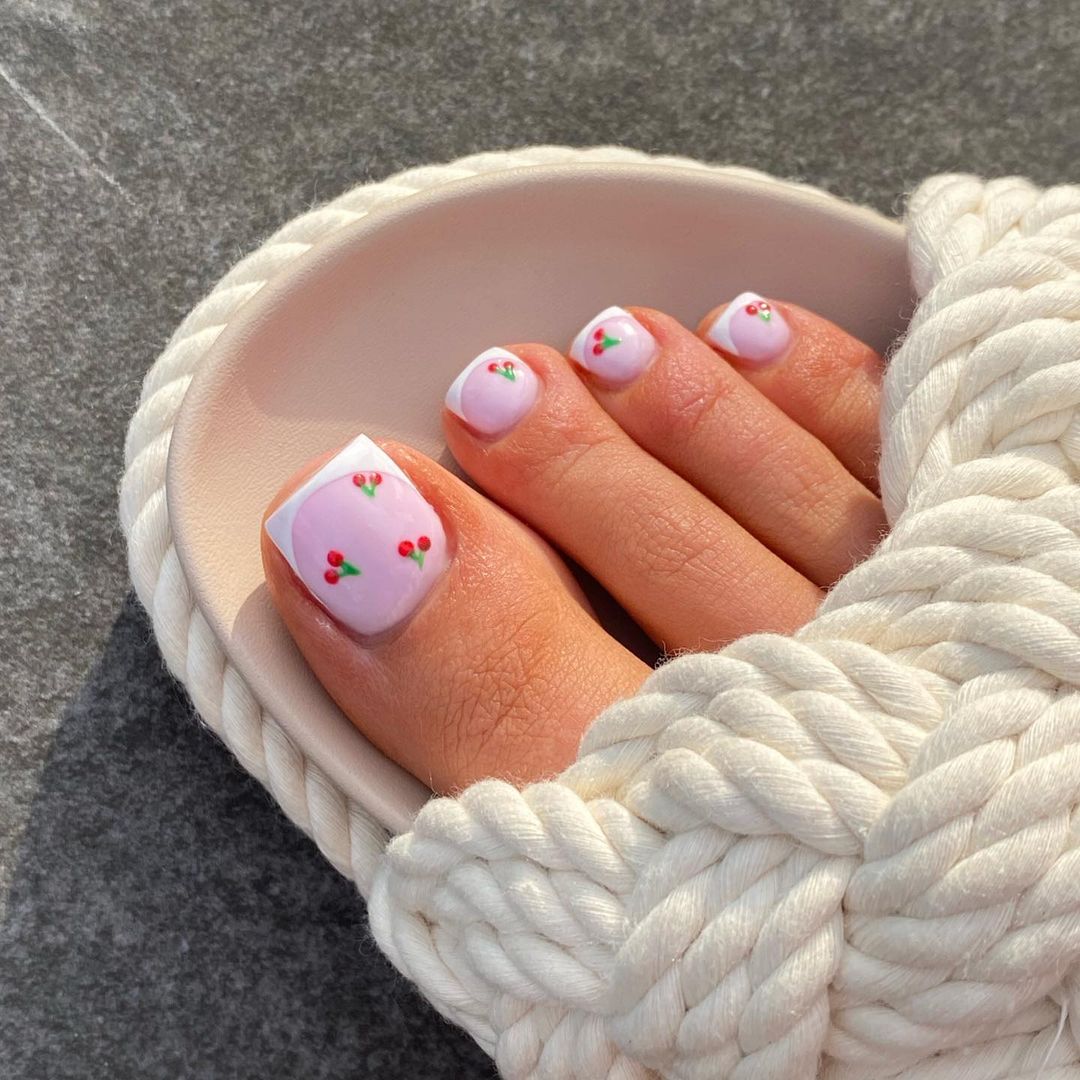
- Pastel pink nail polish – As the base color
- Red and green nail art pens – For the cherry blossoms
- Top coat – To protect the design
DIY Instructions:
- Apply a base coat to protect the nails.
- Paint the nails with a pastel pink polish.
- Use red and green nail art pens to draw cherry blossom patterns on each nail.
- Seal the design with a top coat for durability and a polished look.
Refined French Tips with Rhinestones
This design elevates the classic French tip with the addition of small rhinestones along the smile line. It combines elegance with a hint of glamour, making it suitable for both formal events and everyday chic.

- Light pink nail polish – For the base
- White nail polish – For the tips
- Rhinestones – Small size for subtle sparkle
- Top coat – To secure the rhinestones and enhance durability
DIY Instructions:
- Apply a base coat to protect your nails.
- Paint the nails with a light pink polish.
- Once dry, carefully paint the tips with white polish.
- While the tips are still tacky, place rhinestones along the smile line.
- Seal with a top coat to ensure the rhinestones stay in place and to add a glossy finish.
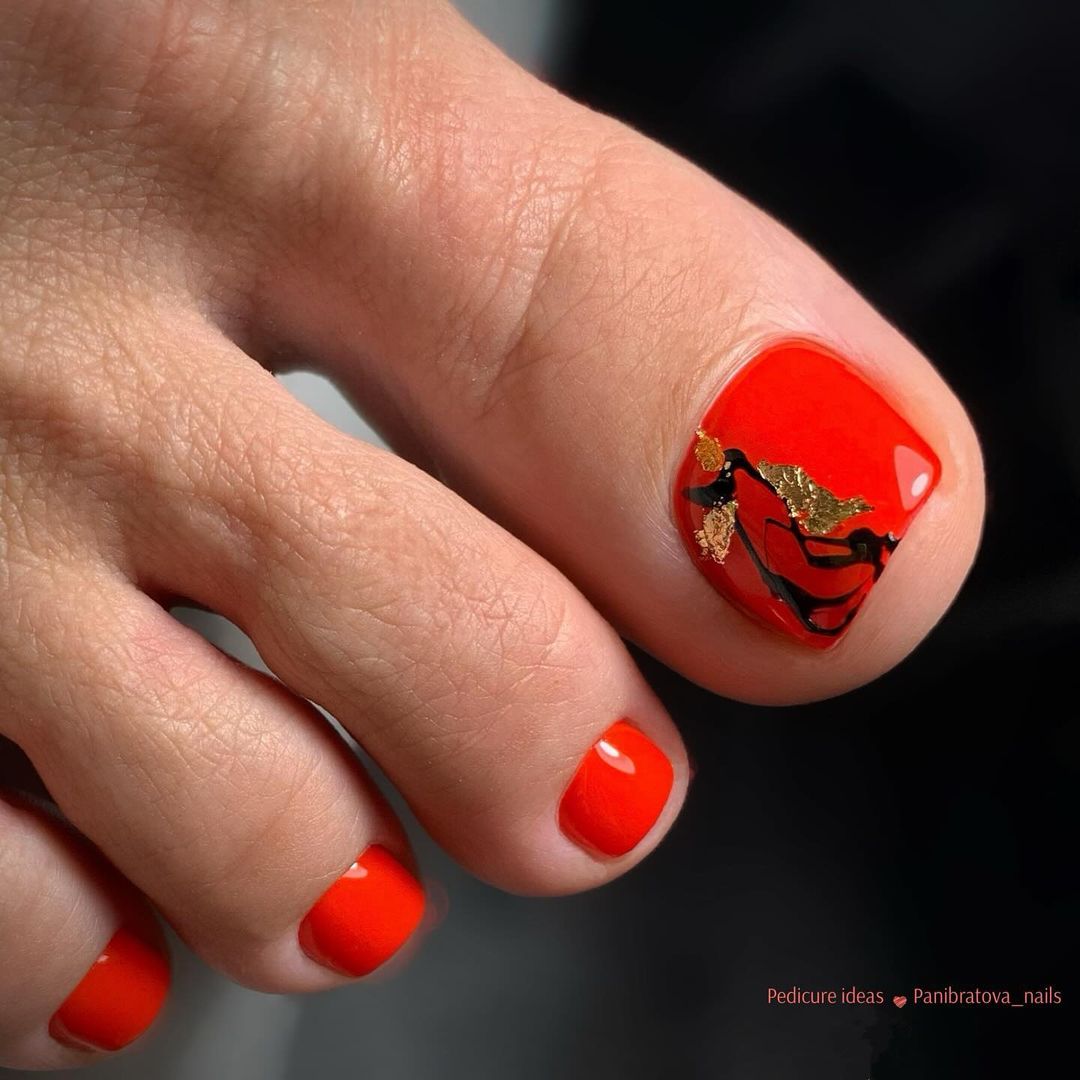
Bold Red with Golden Embellishments
This pedicure features a vibrant red color accented with gold charms and edging, creating a striking and opulent look. The bold red evokes energy and passion, while the gold adds a luxurious touch, perfect for making a statement at any summer gathering.
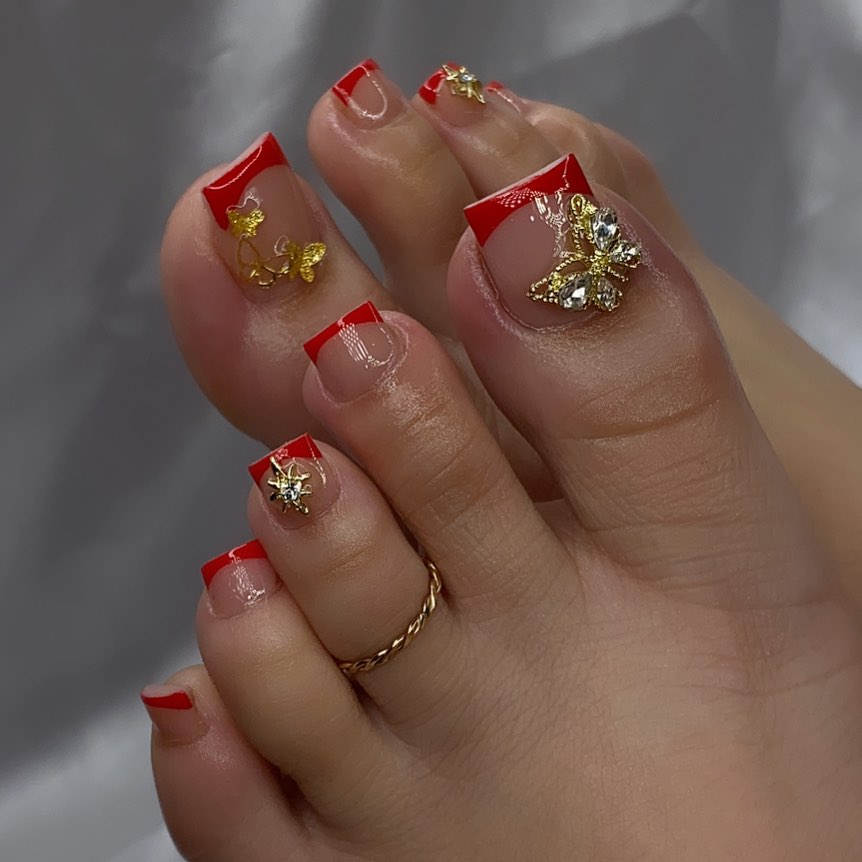
- Bright red nail polish – For a striking base
- Gold charms and striping tape – For decoration
- Top coat – To attach the decorations and provide a protective shine
DIY Instructions:
- Begin with a base coat to protect the nails.
- Apply two coats of bright red polish.
- Once dry, apply gold striping tape at the tips and add gold charms as desired.
- Seal with a top coat to secure the decorations and add a smooth, glossy finish.
Vibrant Summer Vibes
A playful mix of bright pink, orange, and patterns, this pedicure is all about expressing summer fun. It includes varied designs like stripes and color blocks, accented with small gemstones for a festive, eye-catching look.

- Multiple nail polishes (pink, orange, white) – For the colorful base and designs
- Small gemstones – For a pop of sparkle
- Top coat – To seal in the designs and secure the gemstones
DIY Instructions:
- Start with a base coat for protection.
- Paint each nail in a different bright color or pattern, using tape where necessary for clean lines.
- Apply small gemstones on select nails for accent.
- Finish with a top coat to ensure longevity and enhance the overall shine.
FAQ
Q: How long should a pedicure last?
A: A well-applied pedicure can last between three to four weeks. The longevity can vary based on the type of polish used, the thoroughness of application, and how much your feet are exposed to elements that can cause wear.
Q: Can I do intricate pedicure designs at home?
A: Absolutely! With the right tools, such as detail brushes, dotting tools, and striping tape, you can create beautiful designs at home. Start with simpler patterns and as you gain confidence, you can attempt more complex designs.
Q: How can I make my pedicure more durable?
A: To extend the life of your pedicure, apply a base coat to protect your nails, use quality polish, and seal the design with a strong top coat. Also, wearing socks and shoes that don’t rub against your toes will help preserve your pedicure.
Q: What are the best colors for a summer pedicure?
A: Bright and vibrant colors like pink, coral, teal, and neon shades are perfect for summer. These colors look great with sandals and tend to complement sun-kissed skin.
Q: How do I prevent my pedicure from chipping?
A: Aside from using a durable top coat, make sure each layer of polish is completely dry before applying the next. Avoid soaking your feet for too long even in the shower, as prolonged water exposure can soften nail polish and lead to chips.
Q: What are some quick fix tips if I damage my pedicure?
A: For minor chips, you can touch up the spot with the same color polish and reapply the top coat. For larger damages, adding a small design like a dot or a stripe over the chip can conceal the flaw while adding to your design.
Q: Are there any health benefits to getting a pedicure?
A: Yes, pedicures not only make your feet look attractive but also include cleaning that removes dead skin cells and bacteria, which can prevent nail diseases and foot odors. It also includes massage which can help with blood circulation.
Q: How often should I get a new pedicure?
A: It depends on your personal needs and how quickly your nails grow. Generally, getting a new pedicure every three to four weeks is recommended to keep your feet fresh and maintain healthy nails.
Save Pin