

Almond nails have that rare ability to make a manicure feel polished without looking predictable. For 2027, I keep coming back to the shape because it works beautifully with everything from soft milky pinks to dramatic red, black, brown, and playful multicolor details. But which almond nail ideas actually feel fresh, and how can I make the shape work for my own style?
What I love most is the flexibility. Short almond nails can look clean and natural, while longer, sharper versions create room for intricate nail art. From delicate French tips to rich autumn shades and playful polka dots, these designs show just how far almond nails can go.
Colorful Graphic French Almond Nails
I love how these long almond nails turn a familiar French manicure into something much more expressive. The base is a glossy milky pink nude, while the pointed tips are built from sweeping layers of hot pink, creamy white, pale blue-gray, and black. Instead of placing one neat line across the edge, the colors curve and overlap, following the almond shape and making the tips look almost painted in motion. It is a clever choice for anyone searching for almond nails 2027 that feel artistic without covering the entire nail in decoration.
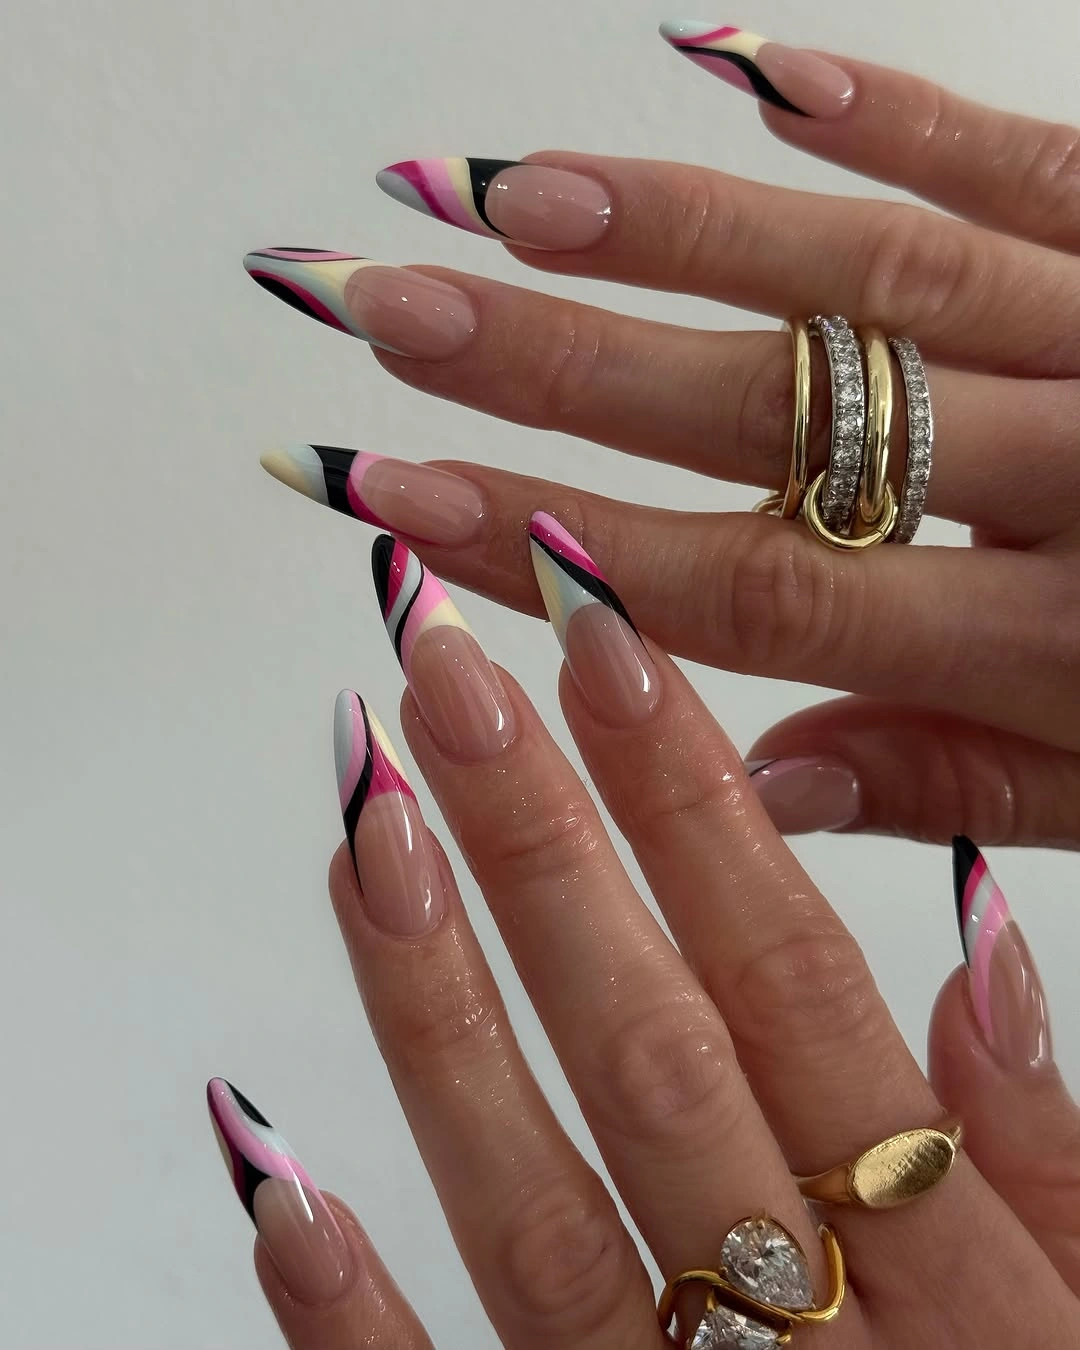
To recreate this manicure, I would start with a sheer pink or milky nude gel such as OPI GelColor Put It In Neutral or a similar builder-gel shade. For the tips, I would choose a vivid fuchsia, soft ivory, muted icy blue, and deep black. A very fine nail-art brush makes the curved lines much easier to control, especially on a long almond nail where symmetry matters. I would finish with a high-shine top coat to keep those contrasting colors looking crisp.
I would build the design one color at a time rather than trying to paint all the curves at once. After curing the nude base, I would sketch the widest pink section first, then add the ivory and blue details, leaving the black line for last because it gives the entire tip definition. The trick is to keep the negative space near the cuticle completely clean. That little pause between the nude base and colorful tip is what keeps the manicure sophisticated.
For me, this is the kind of manicure that makes even a simple outfit feel styled. I could wear it with denim and a white shirt during the day, then let the pink and black details work with a dress at night. It is playful, yes, but the glossy nude base keeps everything grounded.
Playful Polka Dot Almond Nails
This manicure takes almond nails in a completely different direction, pairing a softly sculpted shape with a playful mix of creamy white, burgundy, and black. The white nails are covered with tiny red and black dots, while the darker nails use delicate white dots for contrast. I especially like the way the design changes from nail to nail rather than repeating exactly the same pattern. The almond silhouette keeps the manicure elegant even when the colors become a little cheeky.
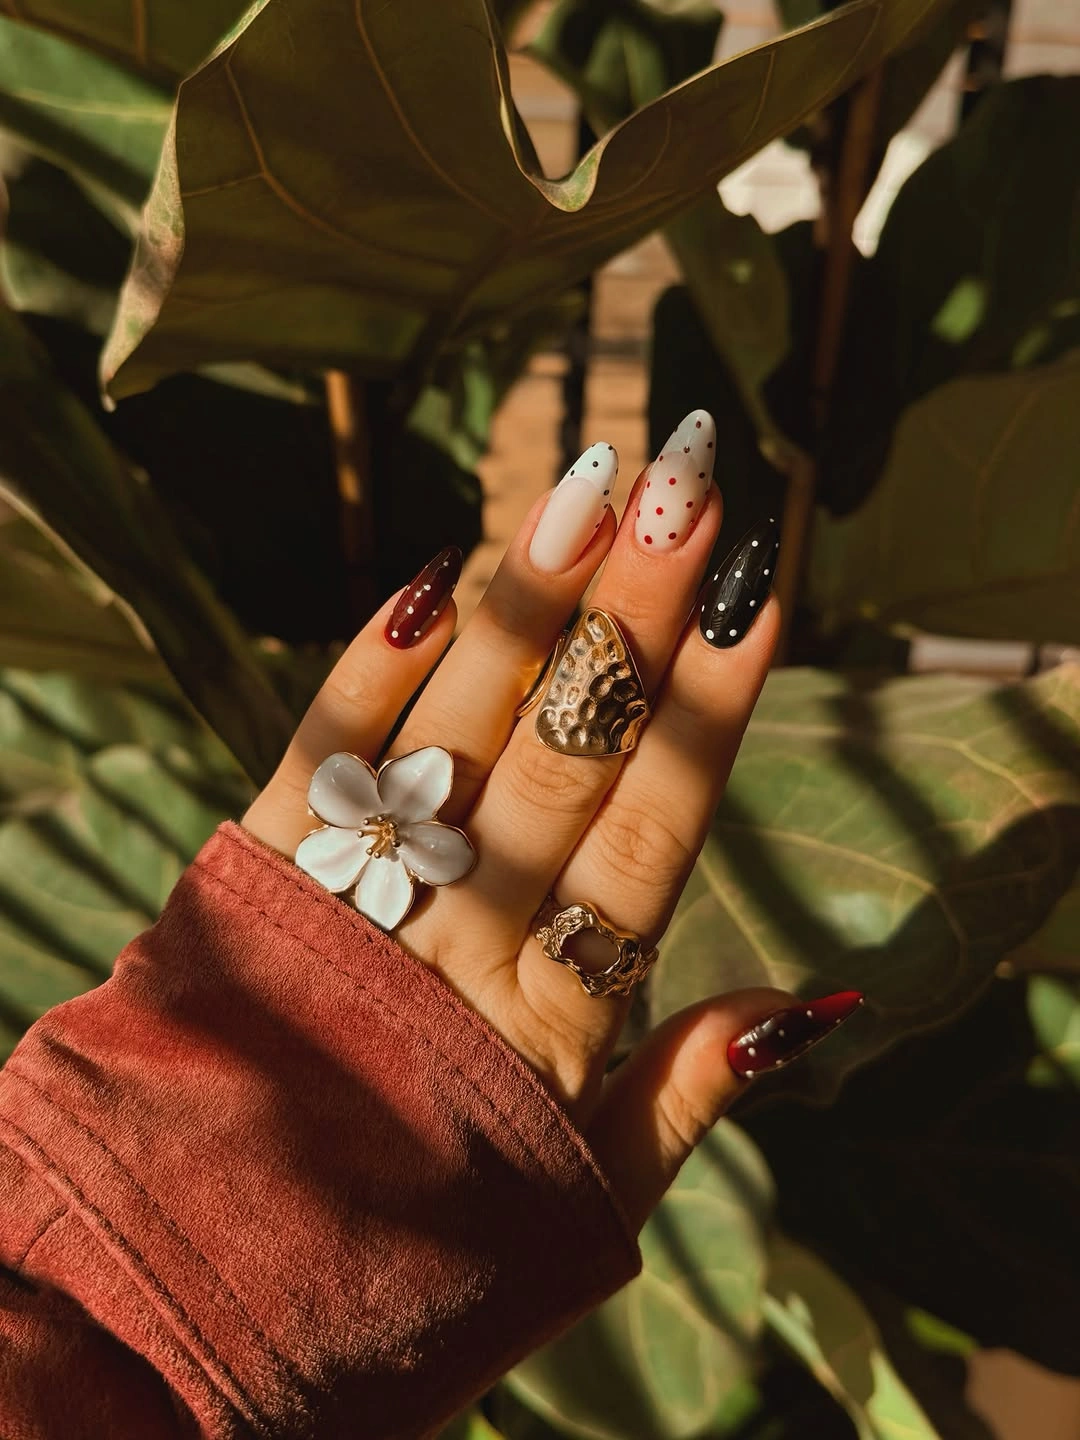
I would use a soft ivory polish as the light base and deep burgundy and glossy black for the darker nails. A dotting tool is essential here, although the rounded end of a fine nail-art brush can work in a pinch. For the dots themselves, I would use a classic bright white and a warm red rather than a neon shade. A thick glossy top coat brings out the contrast and makes the little dots look almost dimensional.
The easiest way I find to create this kind of nail art is to establish the background colors first and let them cure completely. Then I would place dots in slightly irregular rows instead of forcing them into perfect symmetry. That tiny bit of imperfection gives the manicure its charm. I would keep the dots smaller toward the edges so the almond shape remains visually light.
This is one of those cute almond nail ideas I would save for a weekend, a dinner date, or simply a day when I want my manicure to do more of the talking. Add a warm jacket, gold jewelry, and a glossy lip, and suddenly the burgundy and cream palette feels very intentional.
Red Tortoiseshell Almond Nails
If I wanted a manicure with more attitude, I would look straight at this combination of bright red and tortoiseshell. The long almond shape gives the design a dramatic silhouette, while the translucent brown-and-black tortoiseshell sections create depth against the vivid red. Thin metallic gold accents add another layer without overwhelming the pattern. The result feels rich, slightly retro, and incredibly polished.
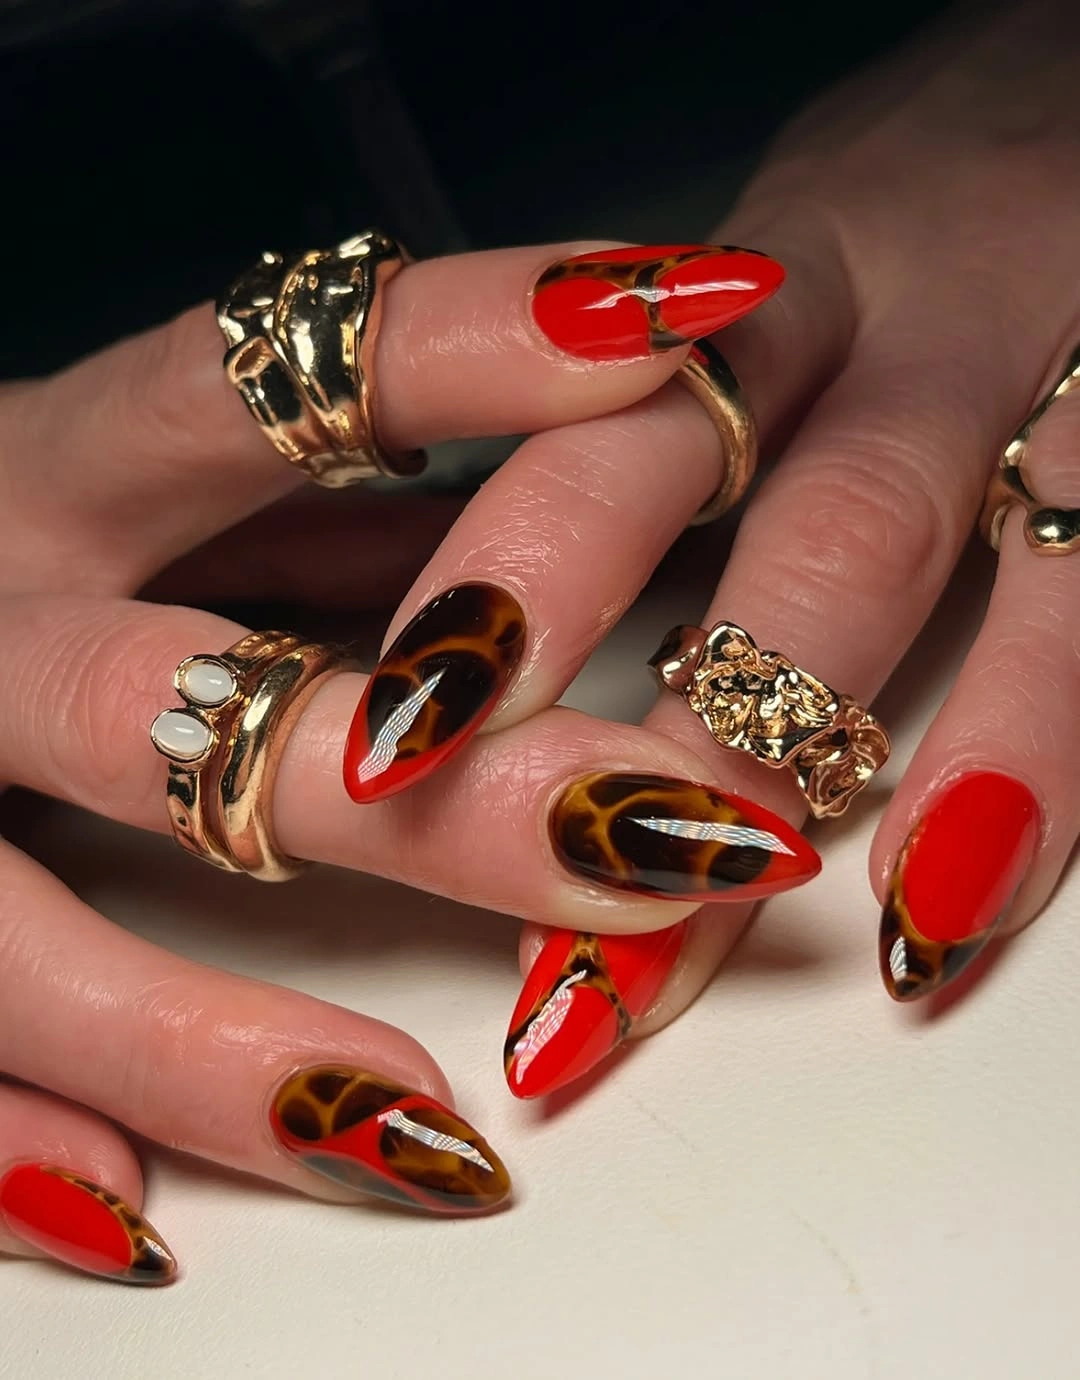
For this look, I would reach for a saturated cherry red, a translucent amber-brown, chocolate brown, and black. A sheer jelly base is particularly useful for tortoiseshell because it allows the colors to overlap naturally. I would also keep a metallic gold striping polish nearby for the fine borders. A glossy top coat is non-negotiable for me here because the entire design depends on that lacquered, glass-like finish.
I would begin with the red sections, allowing some nails to remain entirely red while reserving others for the tortoiseshell effect. For the patterned areas, I would layer irregular amber patches, add small touches of brown and black, and soften them slightly before curing. The gold detail comes last. I would avoid making every patch identical – tortoiseshell looks much more convincing when the shapes vary naturally.
I keep thinking of this as a manicure for someone who normally wears neutral clothes but wants one unmistakable statement detail. The red gives it energy, while the brown pattern makes it feel sophisticated rather than simply bright. With gold rings and a black blazer, I think it would look especially striking.
Soft Summer Almond Nails With Colorful Details
These medium almond nails have a completely different mood. I see a translucent milky white base with tiny abstract bursts of blue, green, yellow, pink, and red concentrated near the tips. Small metallic accents add a subtle sparkle, while the soft background keeps the colors from becoming overwhelming. This is exactly the kind of simple almond manicure I like when I want something colorful but still easy to wear.
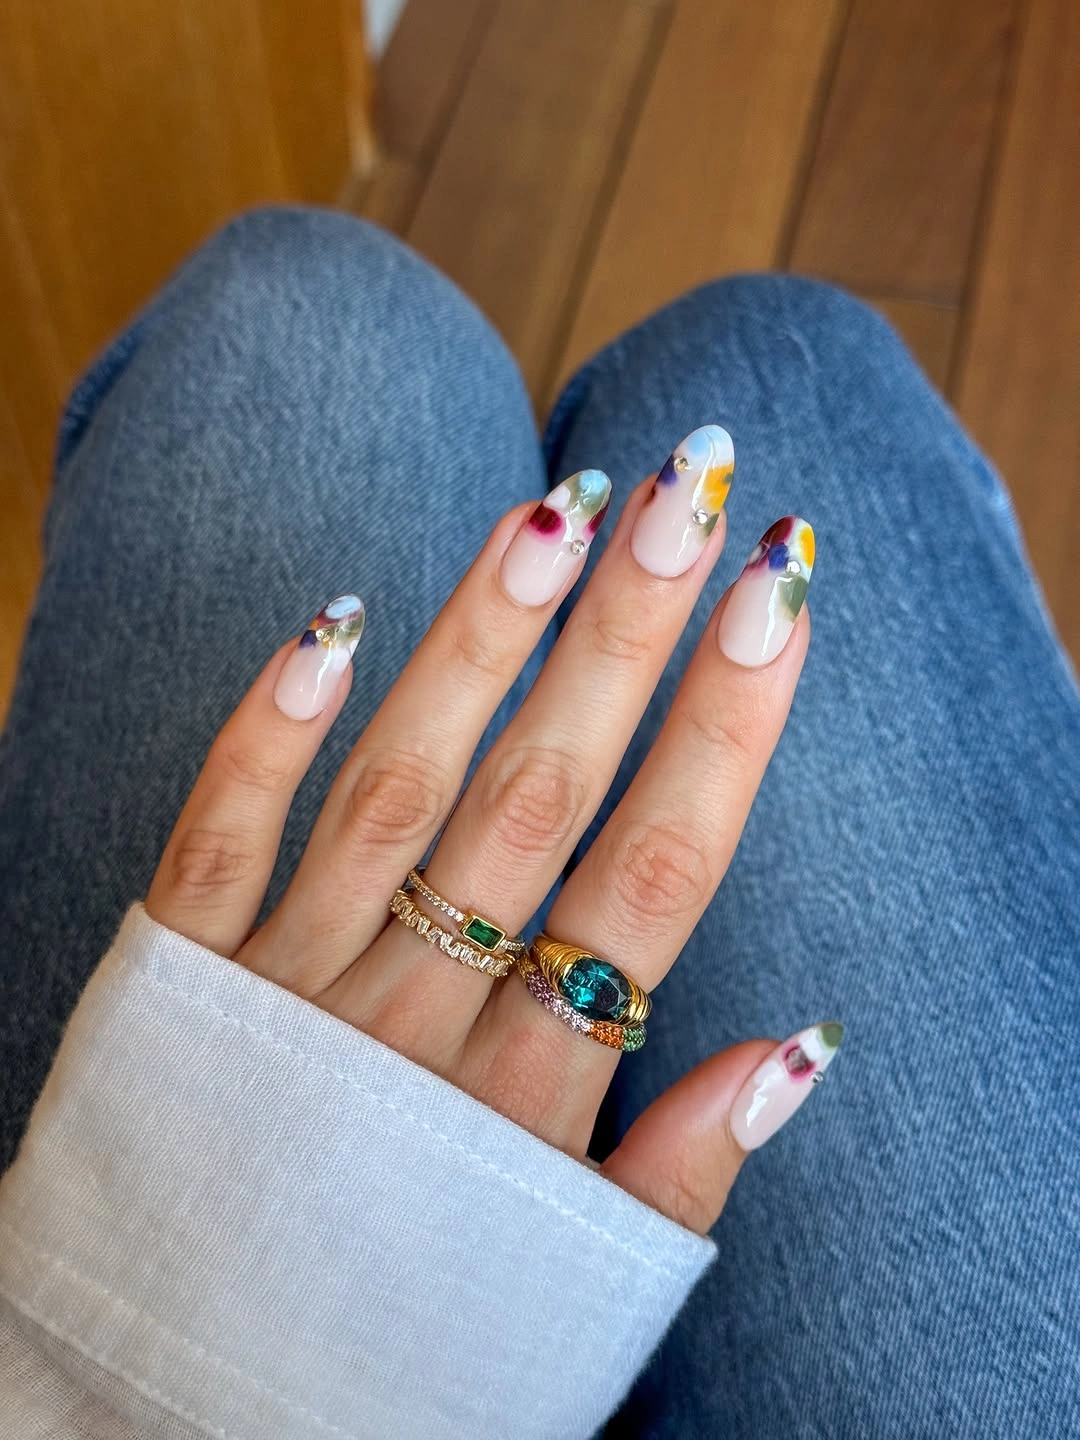
I would use a sheer milky white gel as the foundation and then choose a small palette of bright but slightly softened colors – sky blue, sunny yellow, leafy green, pink, and a touch of berry. Tiny gold or silver studs can be added if I want more dimension. Because the base is so light, I would keep the top coat crystal clear and glossy rather than using anything matte.
At home, I would first shape the nails into a balanced almond, paying attention to keeping both sides visually even. After applying the milky base, I would place small irregular color patches near the tips and overlap a few of them slightly. I would cure between layers if the gel starts to move. The little metallic details should be sparse – one or two per nail is enough to create that polished finish.
I think this design is made for summer plans, from a white linen outfit to jeans and a loose cotton shirt. It feels cheerful without demanding a particular wardrobe. And if I were tired of completely plain neutral nails, this would be my gentle way back into color.
Brown Almond Nails With Delicate Dot Details
Brown almond nails can look incredibly elegant, especially when the color is layered with tiny white details. Here, the manicure moves through deep chocolate, warm caramel, and cinnamon-brown shades, with delicate white dots and fine curved lines creating a pattern across the surface. The almond shape gives the darker palette a graceful finish, while the tiny dots keep it from feeling too heavy.
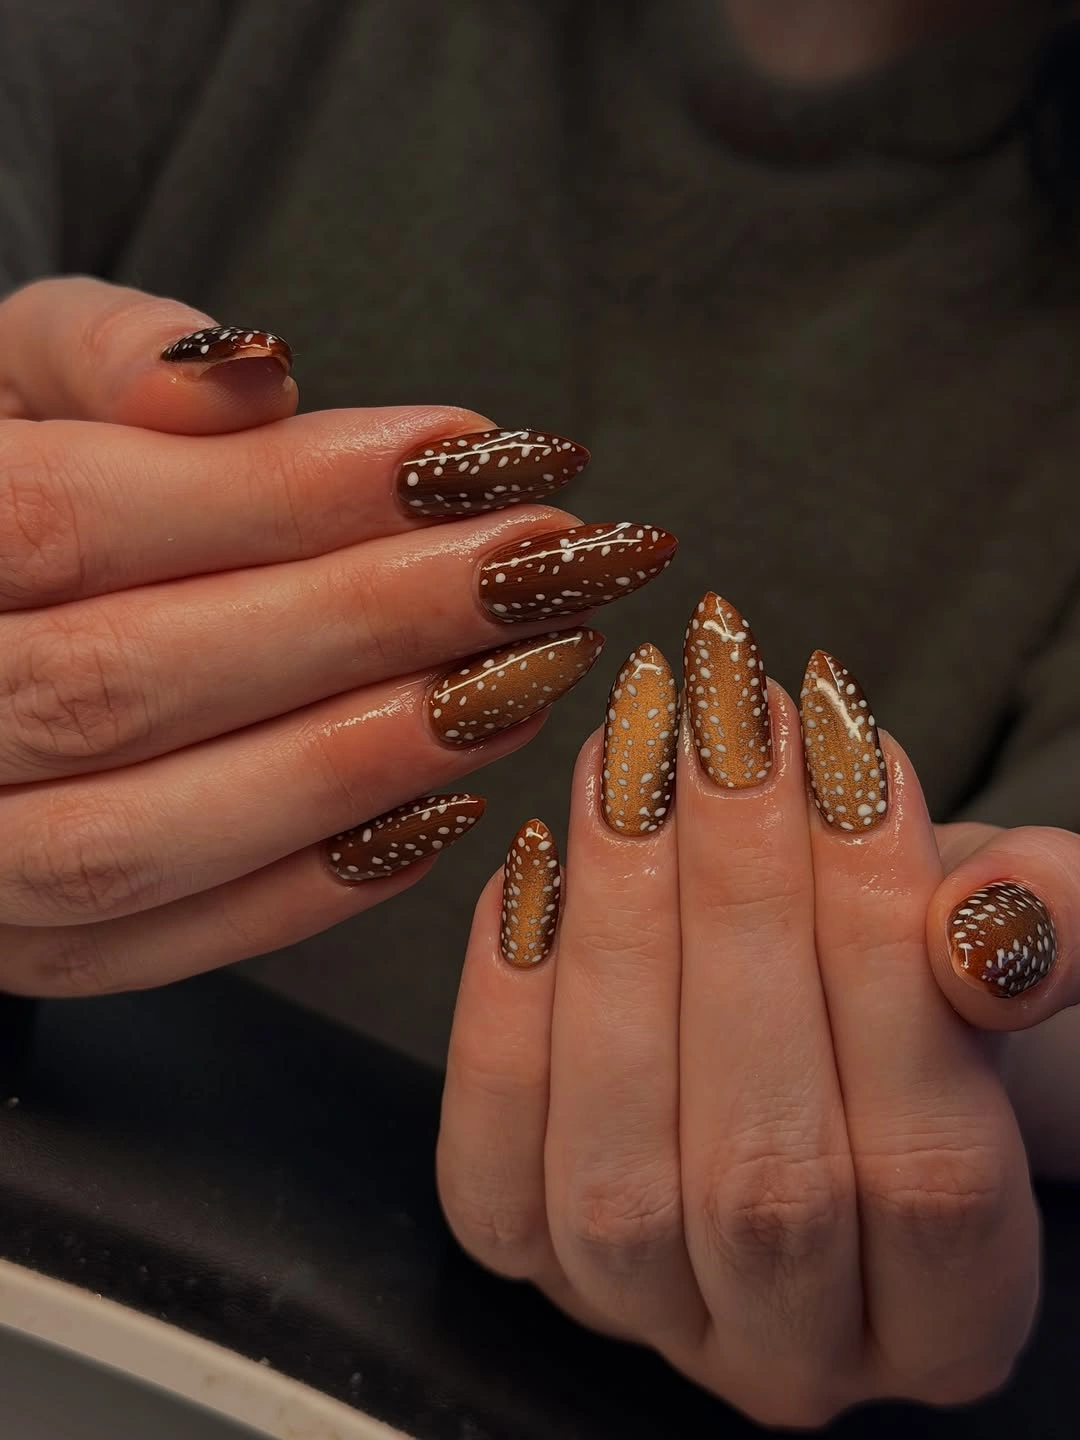
For this design, I would choose several brown tones rather than relying on one polish. A dark chocolate gel, warm caramel, and medium chestnut create the depth, while an opaque white nail-art polish provides the contrast. I would use a fine detail brush for the long curved lines and a small dotting tool for the repeated white accents. The final glossy layer is what pulls the whole palette together.
I would paint each nail in its brown base first and let it cure before beginning the decoration. Then I would draw one or two fine white lines through the center and add small dots along them, varying their size slightly. I would not try to make the pattern mathematically perfect. The handmade quality is part of what makes this almond nail design feel warm and interesting.
Playful Multicolor Almond Tips
I love how these long almond nails turn a soft milky pink base into a playful burst of color. Each pointed tip uses a different combination of red, yellow, blue, green, white, and brown, with tiny rounded accents that almost look like colorful beads. The clean base keeps the manicure fresh while the sharp almond shape gives every detail plenty of space to stand out.
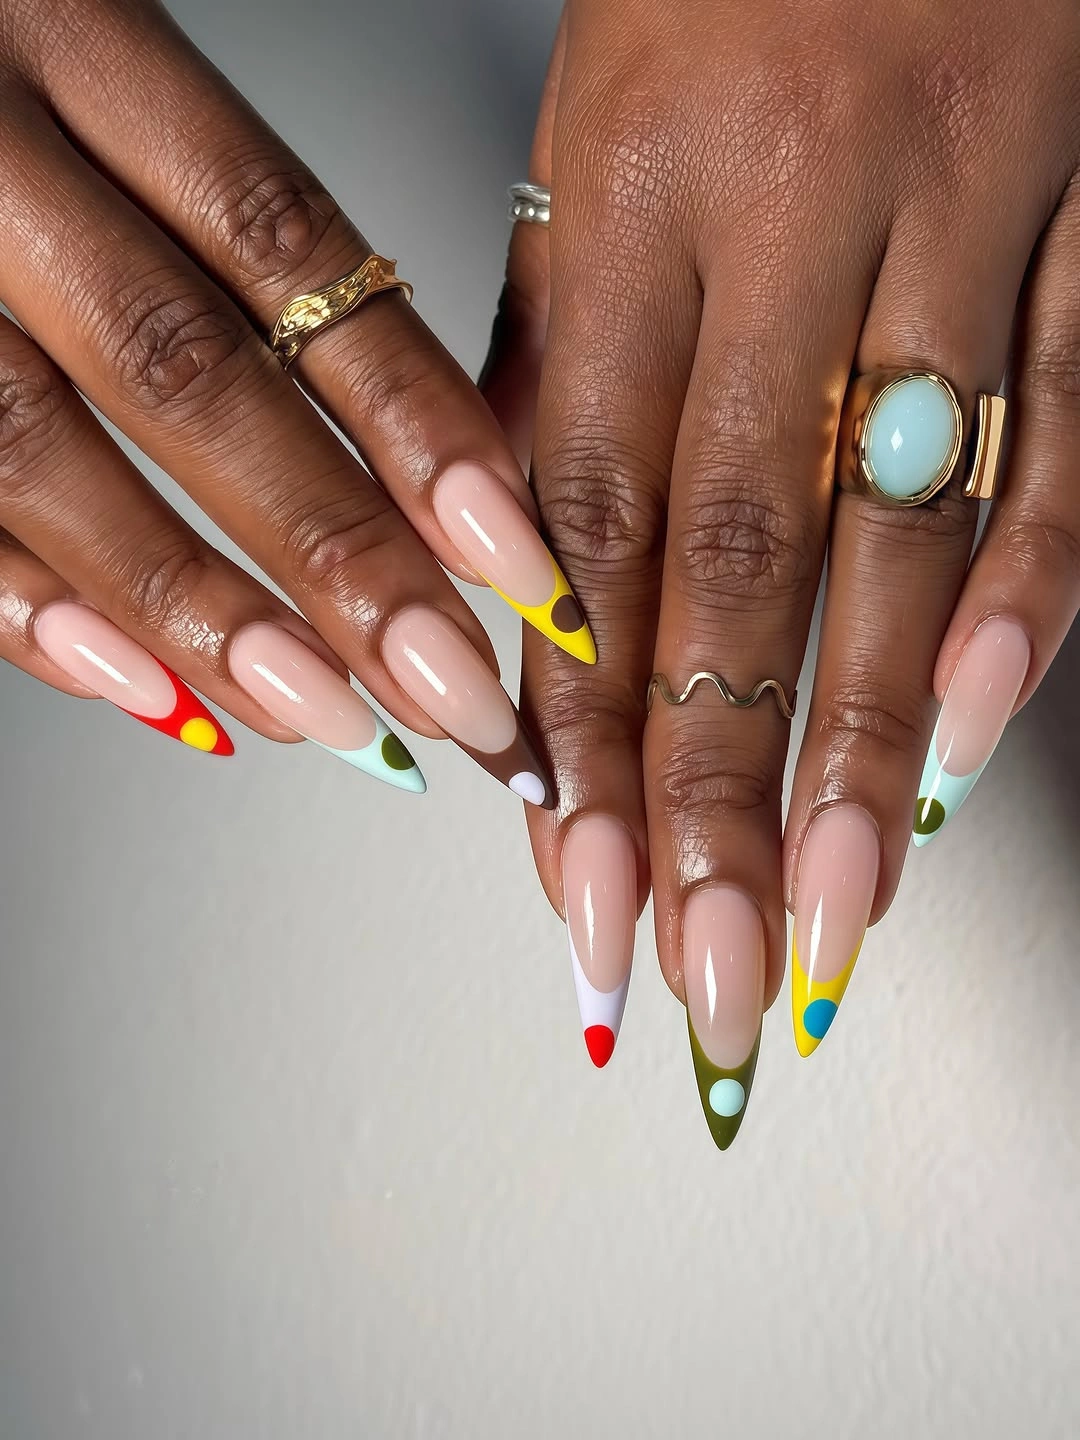
I would use a sheer milky pink gel, then choose highly pigmented red, lemon yellow, olive green, turquoise blue, white, and chocolate brown polishes. A fine liner brush and small dotting tool would be enough to create the curved tips and rounded details. I would finish with a glossy top coat to make the colors look especially crisp.
I would keep the base thin and even before building each colorful tip separately. I like letting every nail have its own combination rather than copying one pattern across the whole hand. The result feels spontaneous, which is exactly what makes these cute almond nails so fun for summer.
Sunny Yellow Almond Nails With Gold Details
Soft yellow meets creamy white in this elegant almond manicure, with delicate gold outlines creating a warm, almost celestial effect. Some nails feature tiny sun-inspired motifs, while others carry subtle framed details and pale yellow tips. The long almond shape makes the decoration look elongated and graceful rather than overly busy.
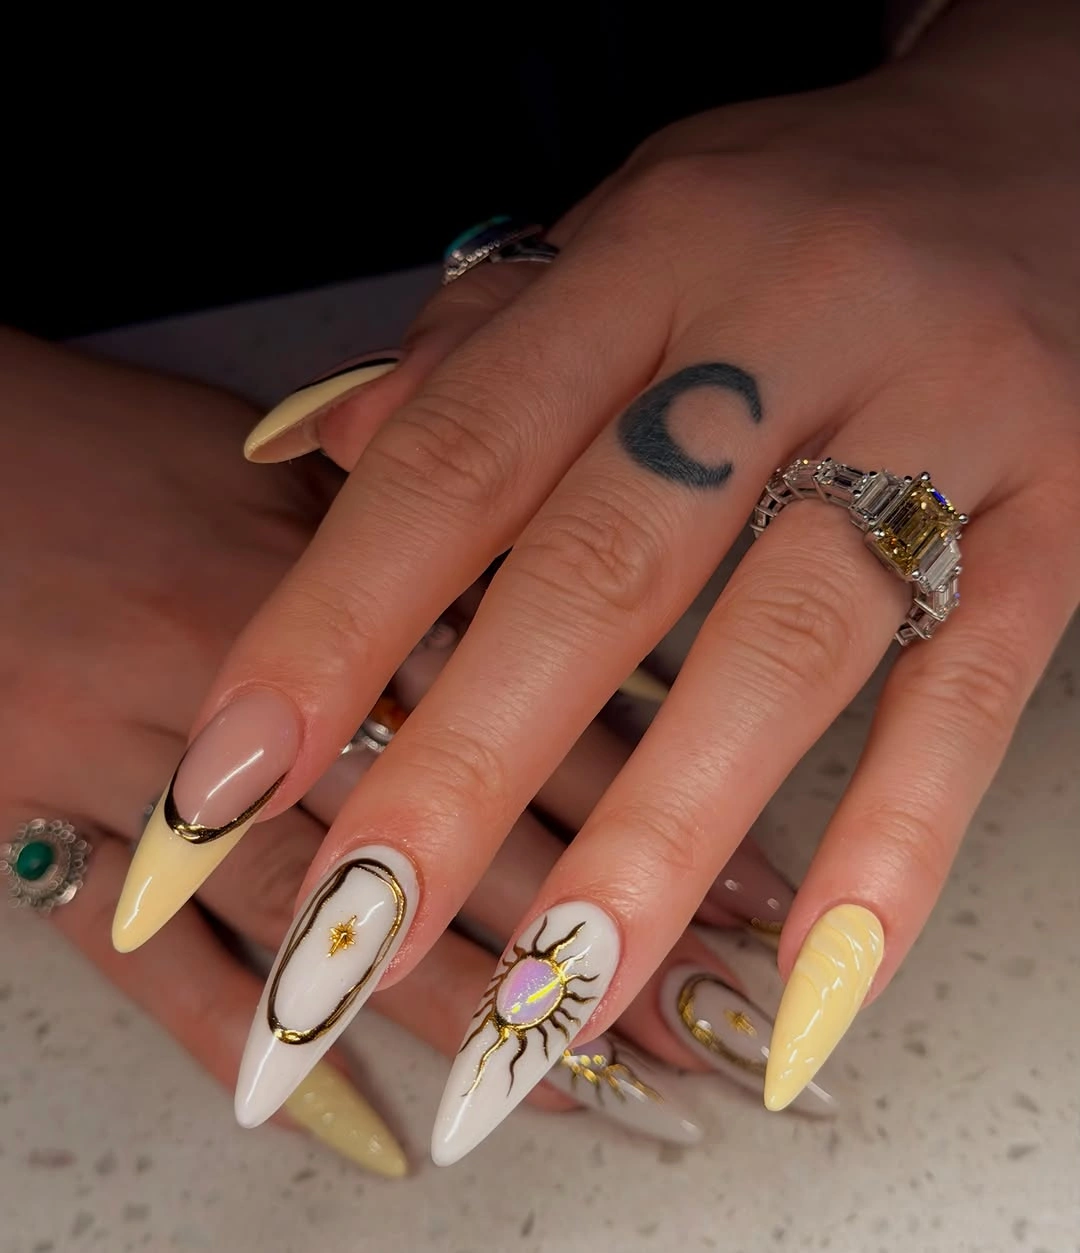
For this look, I would reach for pastel yellow, milky white, sheer nude, and metallic gold gel polish. A very fine detail brush is important for the thin gold lines and small rays. I would also keep a glossy top coat nearby because the combination of translucent nude and metallic accents looks best with plenty of shine.
I would alternate the solid yellow nails with decorated white and nude nails so the manicure has room to breathe. The sun motifs can be painted with small curved strokes, while gold outlining gives the designs a refined finish. I would not make every detail perfectly identical – a little variation makes the set feel more handmade.
This is one of my favorite almond nail ideas for warm weather because it feels bright without becoming neon. I can easily see it with linen, gold jewelry, or a simple white dress. It has that little bit of sunshine built right in.
Brown And White Almond French Tips
This set takes the French tip somewhere much richer with chocolate brown, creamy white, and soft pink. Some nails have classic white tips, while others feature brown sections decorated with tiny irregular white shapes. Small gold embellishments add sparkle without taking away from the almond silhouette.
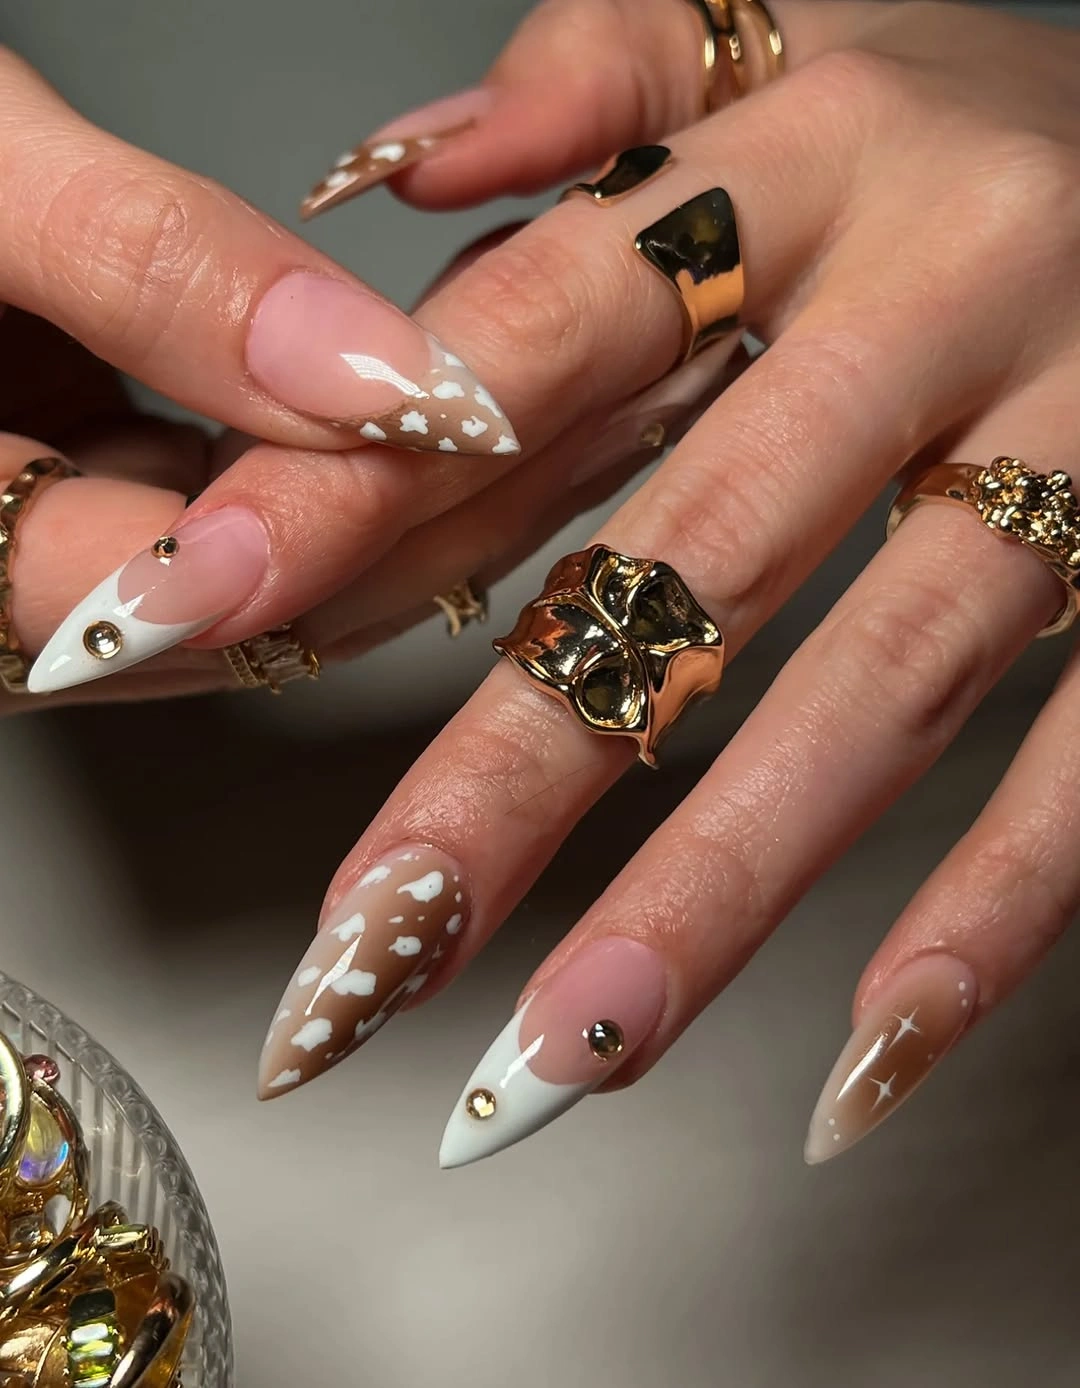
I would use a sheer pink nude base, opaque white, warm chocolate brown, and a few small gold studs. A fine brush would help create the crisp French curves, while a dotting tool makes the tiny white accents much easier. For me, this palette works particularly well with a high-gloss finish.
I would begin with the nude base and create the French tips once it is completely cured. On the brown sections, I would add small white organic shapes rather than perfect dots, then place a few gold details on selected nails. Keeping the decoration concentrated toward the tips helps preserve the elegant look.
I could wear this manicure almost anywhere. The brown gives it an autumn feeling, but the soft pink and white prevent it from becoming too heavy. Add a cream sweater and gold rings, and suddenly these almond nails feel effortlessly chic.
Soft Taupe Almond Nails With White Dots
Here, the almond shape is shorter and softer, making the manicure feel especially wearable. A translucent taupe-beige color covers the nails, while small white dots and delicate curved marks create a scattered pattern. I like that the decoration follows the natural length of each nail instead of trying to dominate it.
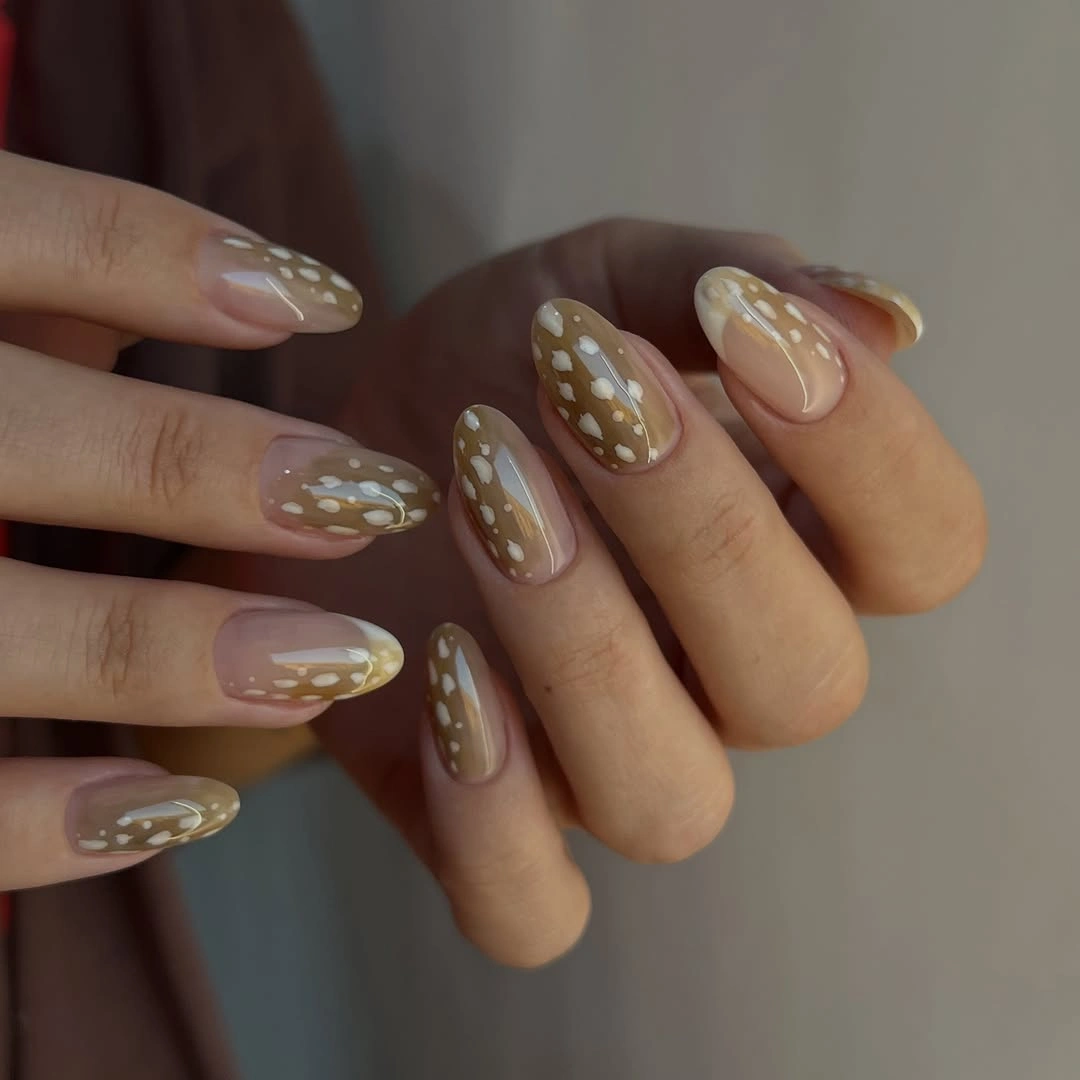
I would choose a sheer beige or taupe gel, an opaque white nail-art polish, and a glossy top coat. This is a design where I would keep the materials simple because the beauty comes from the subtle contrast. A tiny dotting tool is really all I need for the pattern.
I would apply the taupe shade in a thin layer, cure it, and then place small white dots in loose clusters. I would vary their size and spacing slightly so the design does not look stamped on. A final layer of glossy top coat smooths everything together.
For everyday wear, this might be my pick from the set. It is cute enough to feel special but neutral enough for work, errands, and weekends. Sometimes the most successful almond nails are the ones that whisper rather than shout.
Elegant Milky Pink Almond Nails
These long almond nails are all about subtle luxury. The sheer milky pink base keeps the nails looking natural, while delicate taupe-brown lines sweep around the tips in layered curves. The lines create an almost sculptural effect, emphasizing the pointed almond shape without covering the soft base.
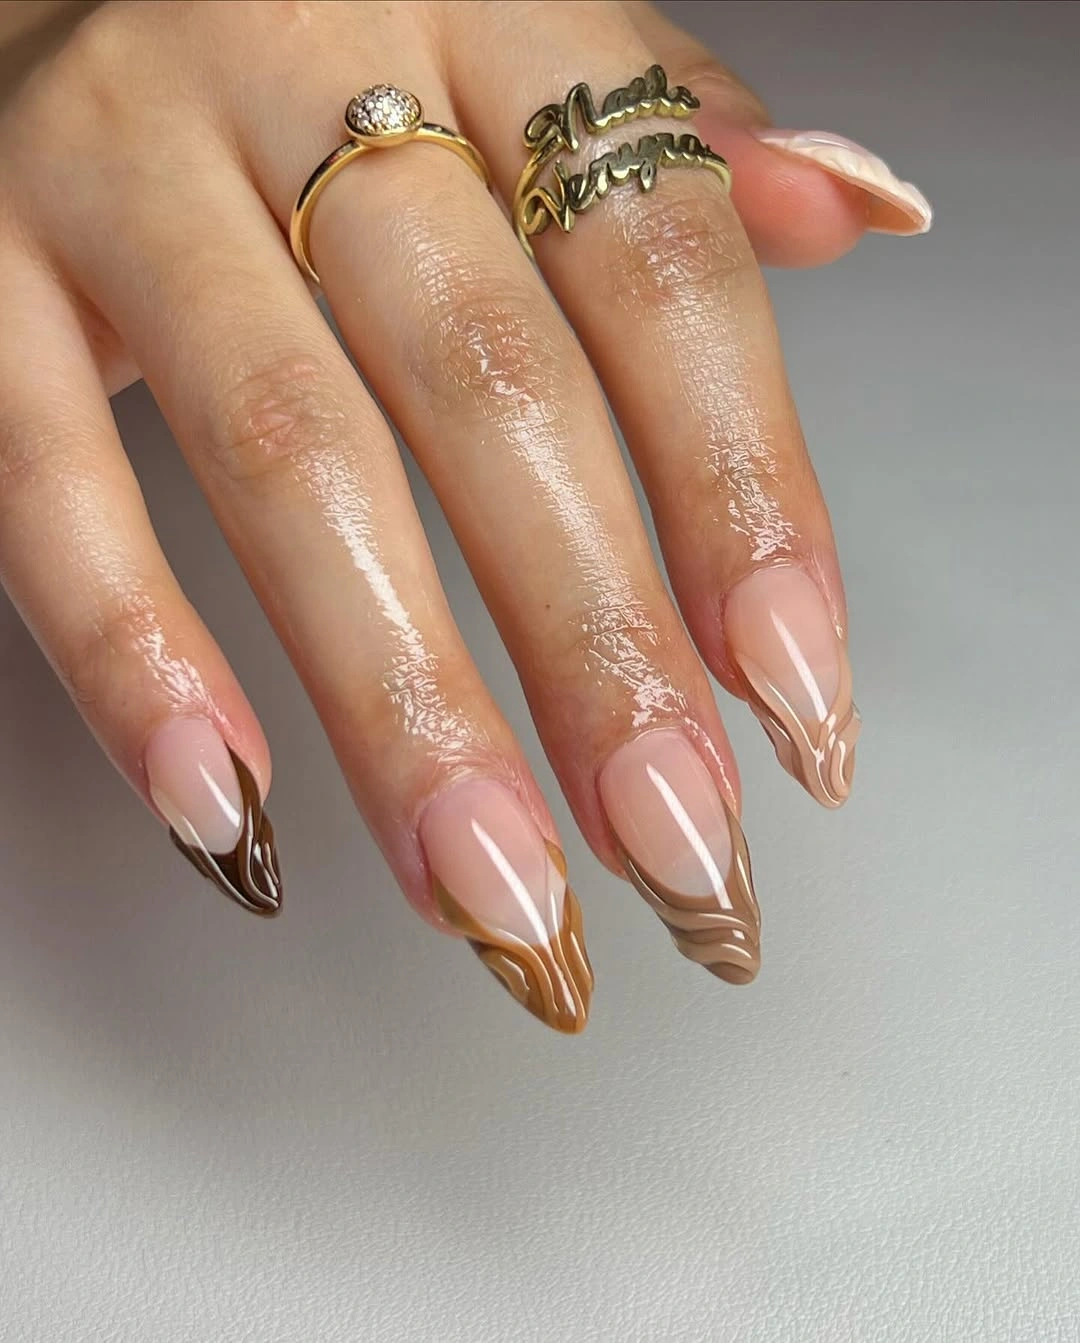
I would use a translucent milky pink gel and a warm taupe or caramel-brown liner color. A very fine nail-art brush is essential for keeping the curved lines thin and controlled. I would finish with a glassy top coat so the nude base stays luminous.
I would first perfect the almond shape, because the entire design depends on those clean, elongated sides. After applying the milky pink base, I would draw several curved lines toward the tips, gradually following the natural point of each nail. I would keep the strokes delicate rather than filling the entire tip.
This is the kind of simple almond manicure I would save when I want my nails to look expensive without obvious decoration. The neutral colors make it incredibly versatile, while the flowing lines add just enough personality. Quietly beautiful – and that is sometimes exactly the mood I want.
Milky Pink Almond Nails With Silver Details
I love the futuristic touch these long almond nails get from delicate silver framing. The base stays soft and milky pink, while metallic silver curves trace the tips and several nails feature tiny eye-inspired details in silver, white, and deep jewel tones. The contrast is unexpected but still elegant.
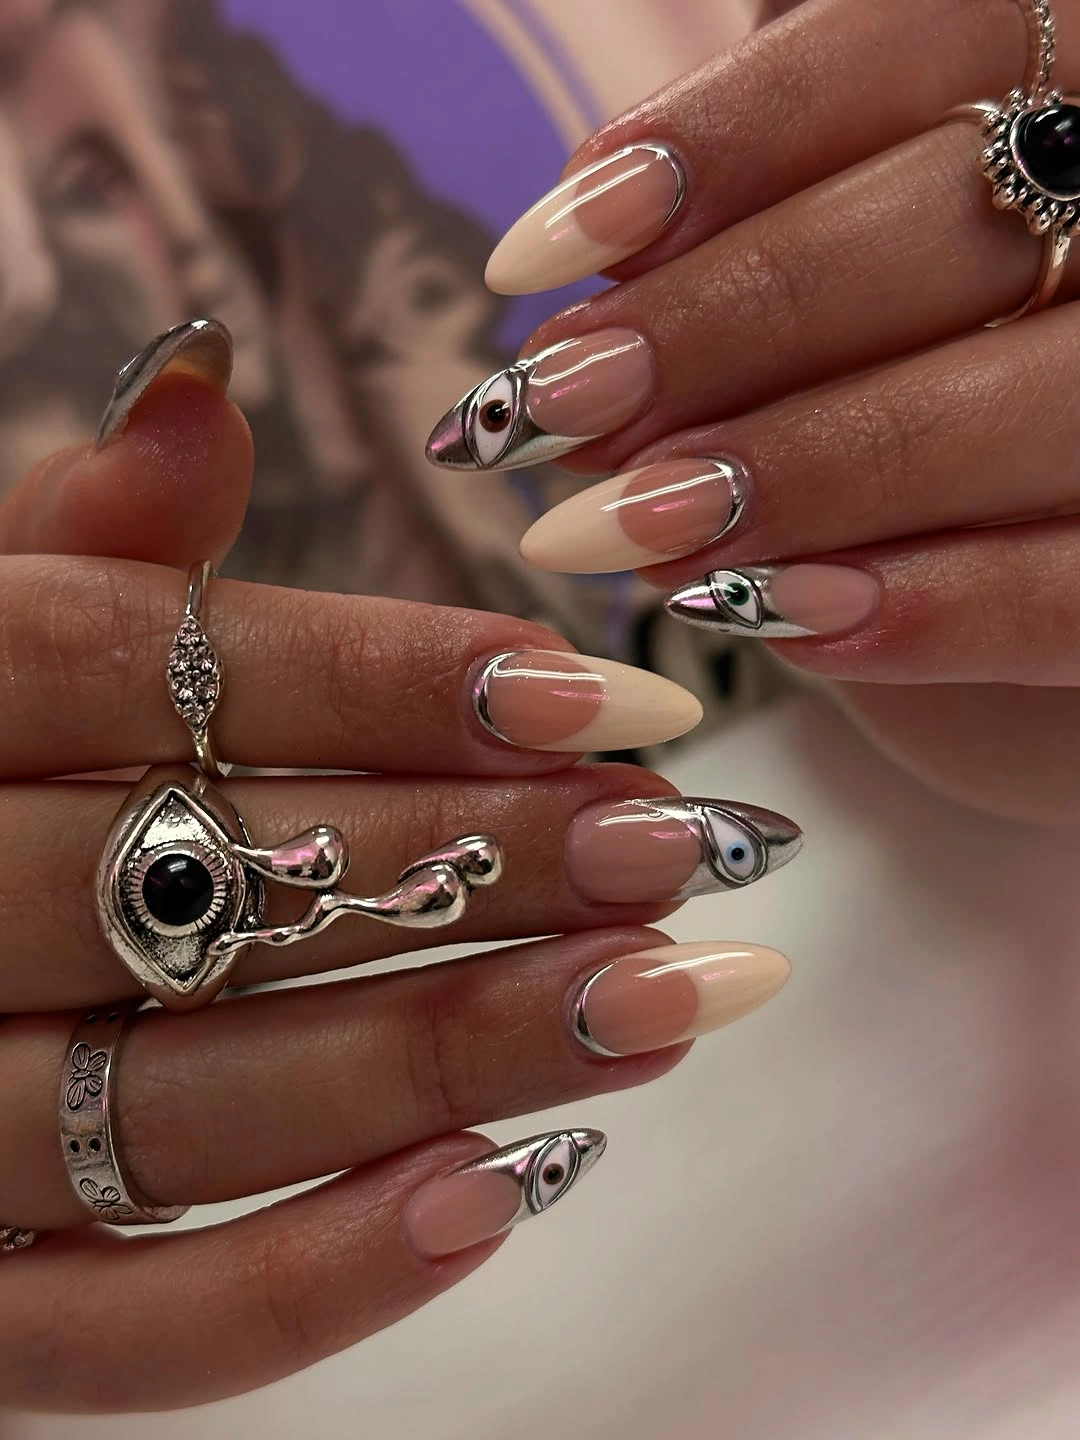
I would use a sheer pink nude, creamy ivory, metallic silver, and a few small colored gel details. A fine liner brush is essential for the thin silver outlines. I would keep the finish glossy so the metallic accents catch the light.
I would shape the nails into a balanced almond first, then apply the sheer base. After curing, I would outline selected tips with silver and build the tiny eye motifs with short, controlled strokes. I would keep some nails completely simple so the detailed ones remain the focus.
For me, this is a great choice when classic nude nails feel a little too quiet. The silver makes them feel modern, while the pink base keeps them wearable with both casual clothes and evening jewelry.
Orange Floral Almond Nails
These long almond nails bring a warm, playful mood with translucent pink bases and bright orange details. Several tips feature tiny burgundy dots, while one nail carries a dimensional orange flower that immediately becomes the centerpiece. The combination feels especially fresh for summer.
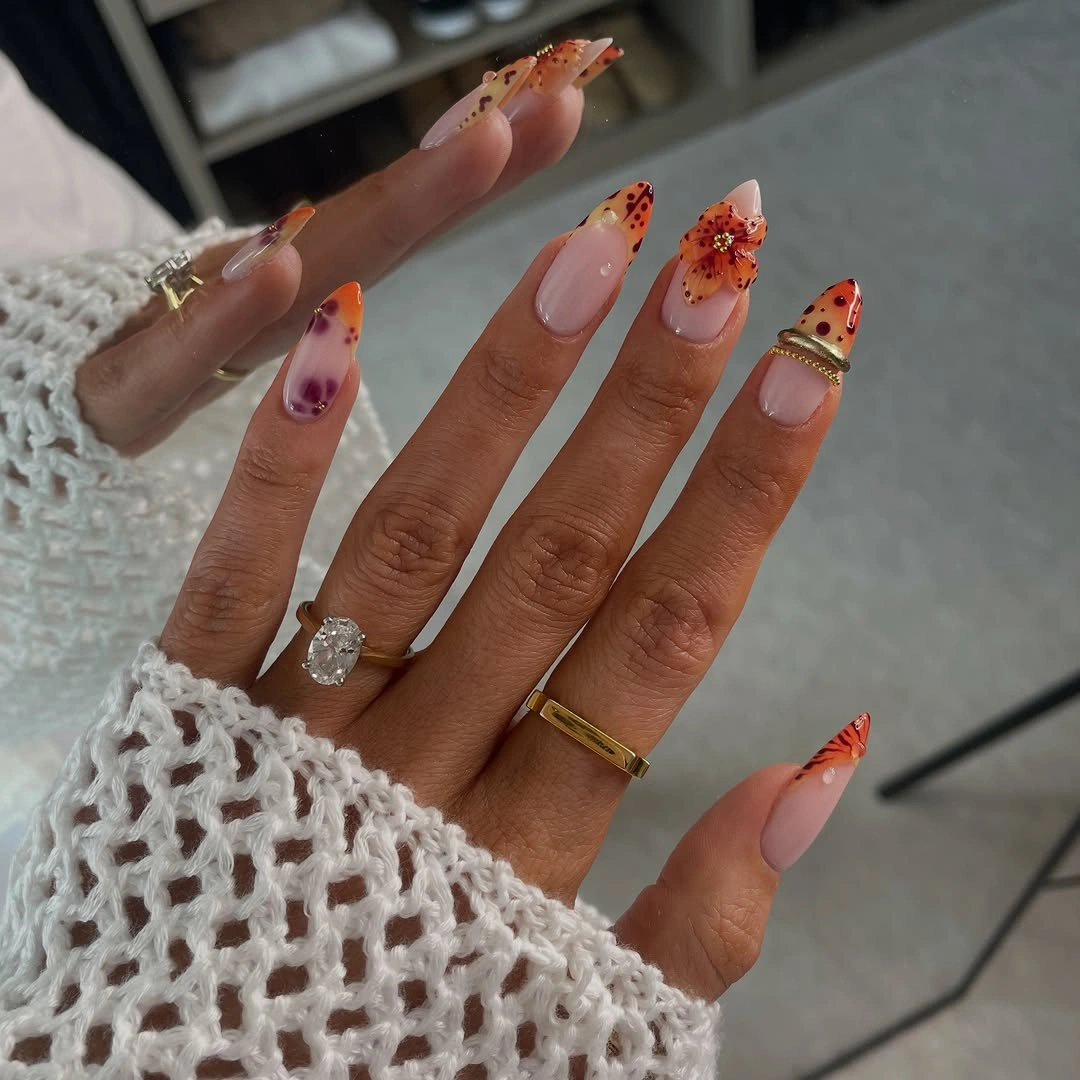
I would use a sheer blush pink, vibrant orange, deep reddish-brown, and a little gold for the flower center. A fine brush handles the tiny dots, while a small detail brush or 3D gel can create the raised floral effect. A glossy top coat keeps the colors juicy.
I would begin with the pink base, then add orange French-style tips and small burgundy dots. For the floral nail, I would build the petals individually and cure between layers if using 3D gel. The key is restraint – one dimensional flower is enough.
I would save this manicure for sunny days, vacations, and anything involving linen or crochet. It feels feminine without being overly sweet, and the orange gives the whole set a little spark.
Black And White Almond Nails With Gold Accents
These sharp almond nails mix creamy white, glossy black, and soft nude with several different textures. Some nails have raised white details, others feature black polka dots, and tiny gold studs add a polished finish. It is bold, but the limited color palette keeps everything cohesive.
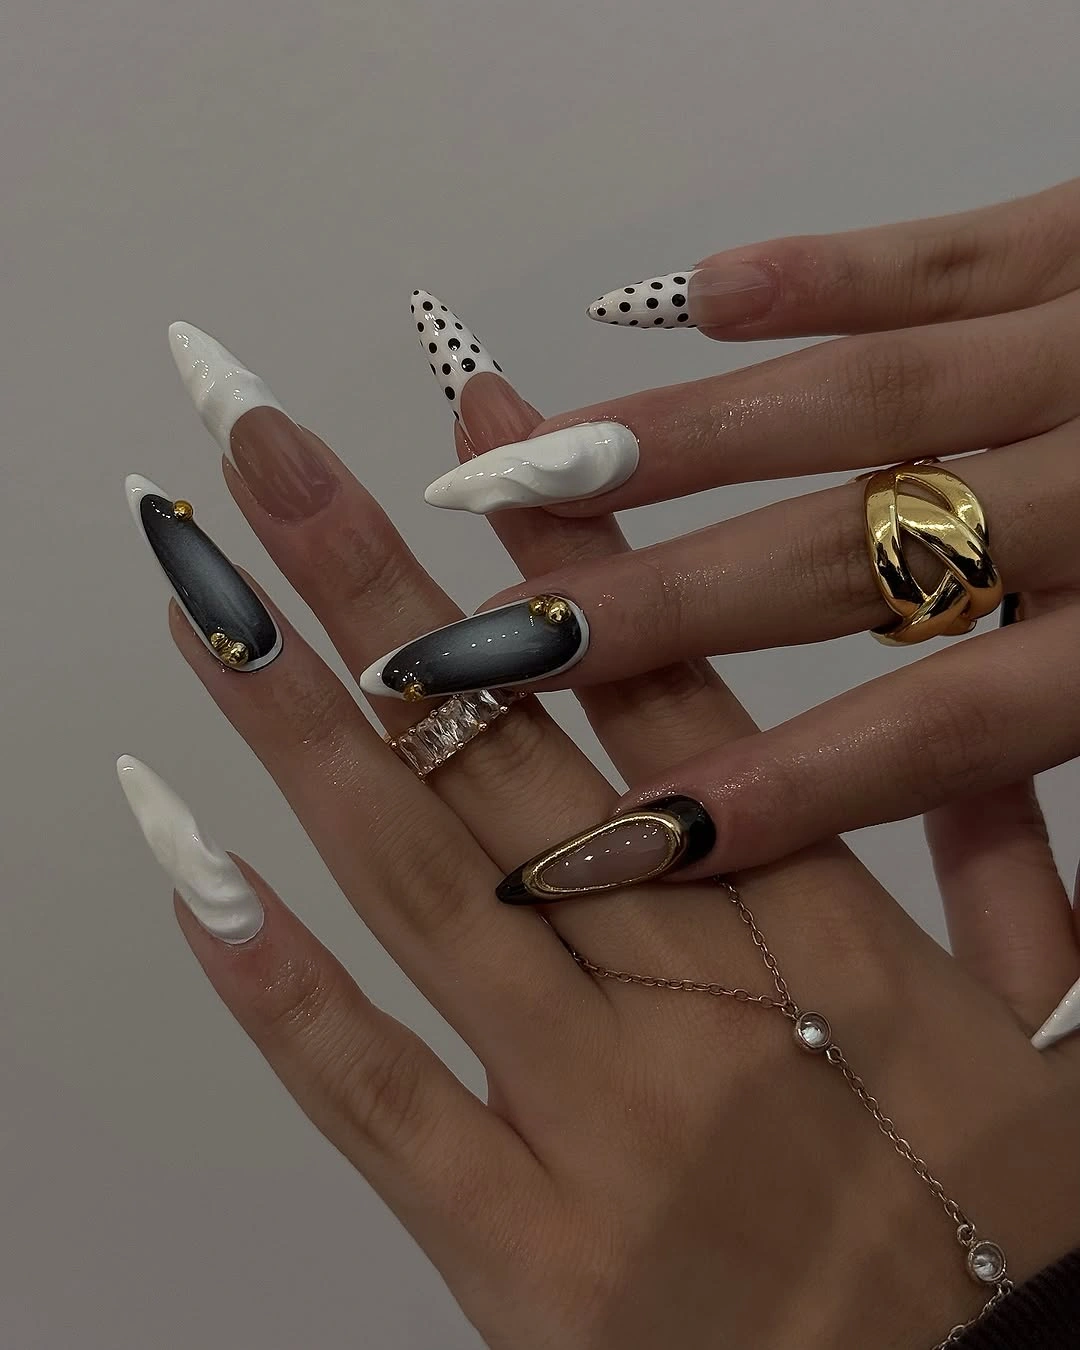
I would use sheer nude, pure white, deep black, and metallic gold. For the raised elements, a thicker white gel works better than ordinary polish, while small gold studs provide the jewelry-like accents. I would finish selected nails with a high-gloss top coat.
I would alternate the black, white, and nude sections rather than repeating one design on every nail. The raised white shapes should be applied carefully so they remain smooth at the edges, while the black dots can be added with a small dotting tool.
This feels like an evening manicure to me. I could easily pair it with a black dress, gold jewelry, and a structured handbag. Dramatic, yes, but still beautifully controlled.
Pink And Brown Almond Nails With Playful Tips
Soft pink meets warm brown and pale mint in this long almond manicure. The nails use creamy French-style tips, tiny brown polka dots, and one especially playful mint-and-brown swirl. The mix feels youthful without losing the elegant quality of the almond shape.
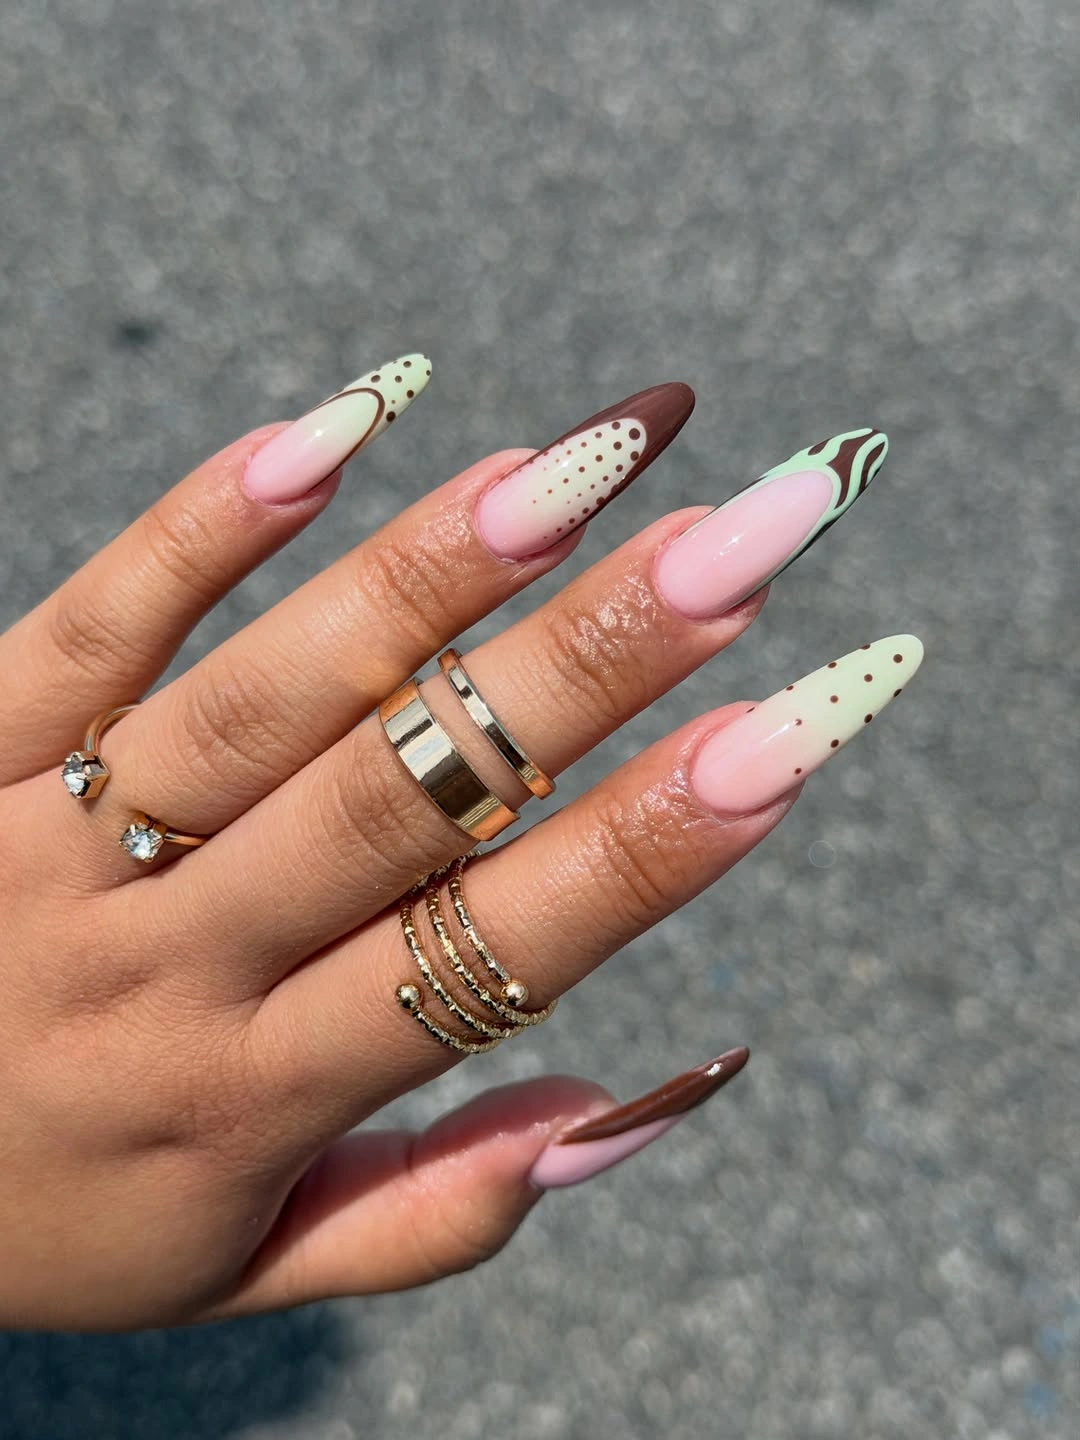
I would choose a translucent pink base, creamy ivory, chocolate brown, and soft mint green. A fine liner brush makes the curved swirl much easier to create, while a dotting tool handles the tiny brown spots. A glossy finish works beautifully with these creamy colors.
I would paint the French tips first, then add the dots in loose patterns rather than perfect rows. On the statement nail, I would draw the brown and mint curves slowly from the side toward the point. Keeping the base sheer gives the design plenty of breathing room.
I think this is one of those cute almond nail ideas that works particularly well for transitional weather. The pink keeps it light, while the brown gives it enough warmth for early fall outfits.
Sheer Polka Dot Almond Nails
These almond nails keep things beautifully simple with a sheer pink base, a subtle pearly shimmer, and evenly scattered black dots. The medium length makes the design feel practical, while the tiny dots add just enough personality. Nothing is overworked here – and that is the charm.
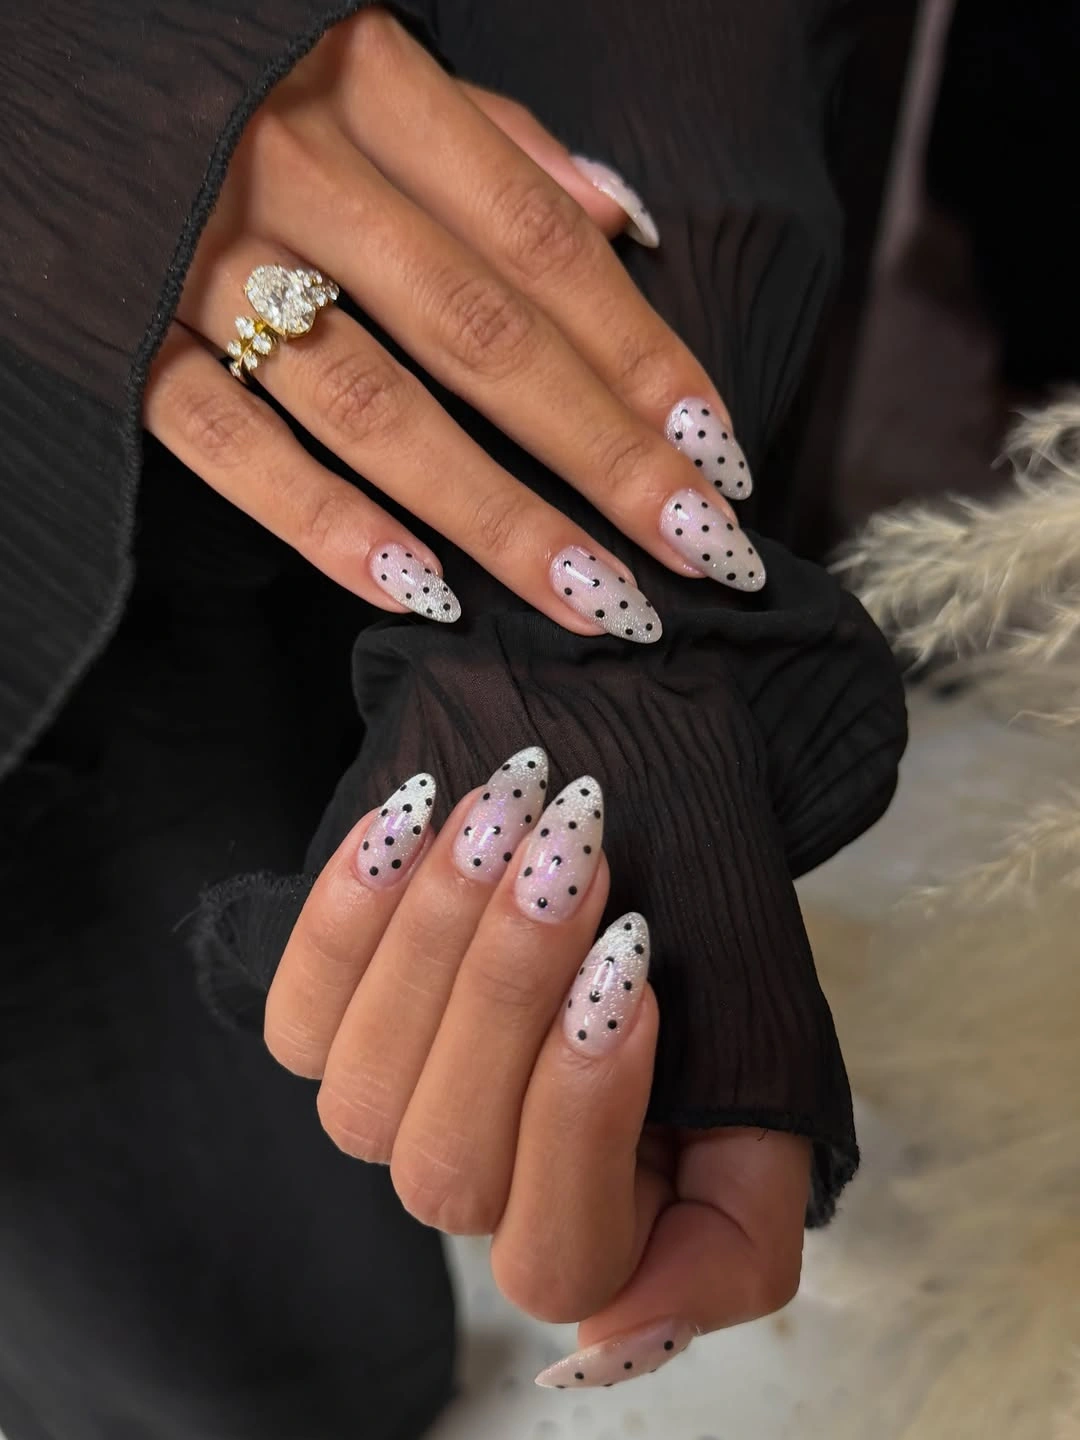
I would use a sheer pink or milky nude gel, a soft pearl shimmer, and opaque black nail-art polish. A small dotting tool is all I need for the pattern. I would choose a glossy top coat to preserve the delicate shine.
After applying the sheer base, I would add the shimmer very lightly before placing the black dots. I prefer varying their spacing slightly so the manicure feels relaxed rather than overly geometric. The final glossy layer brings everything together.
This is probably the easiest design for me to wear every day. It has the clean feeling of natural almond nails but still gives me that little detail that makes a manicure feel finished. Sometimes, simple really does win.
Soft Pink Almond Nails With Crystal Accents
These medium almond nails keep the design beautifully minimal with a sheer milky pink finish and one tiny crystal placed near the base of each nail. The glossy surface makes the pale color look fresh and clean, while the rhinestones add just enough sparkle to catch the light.
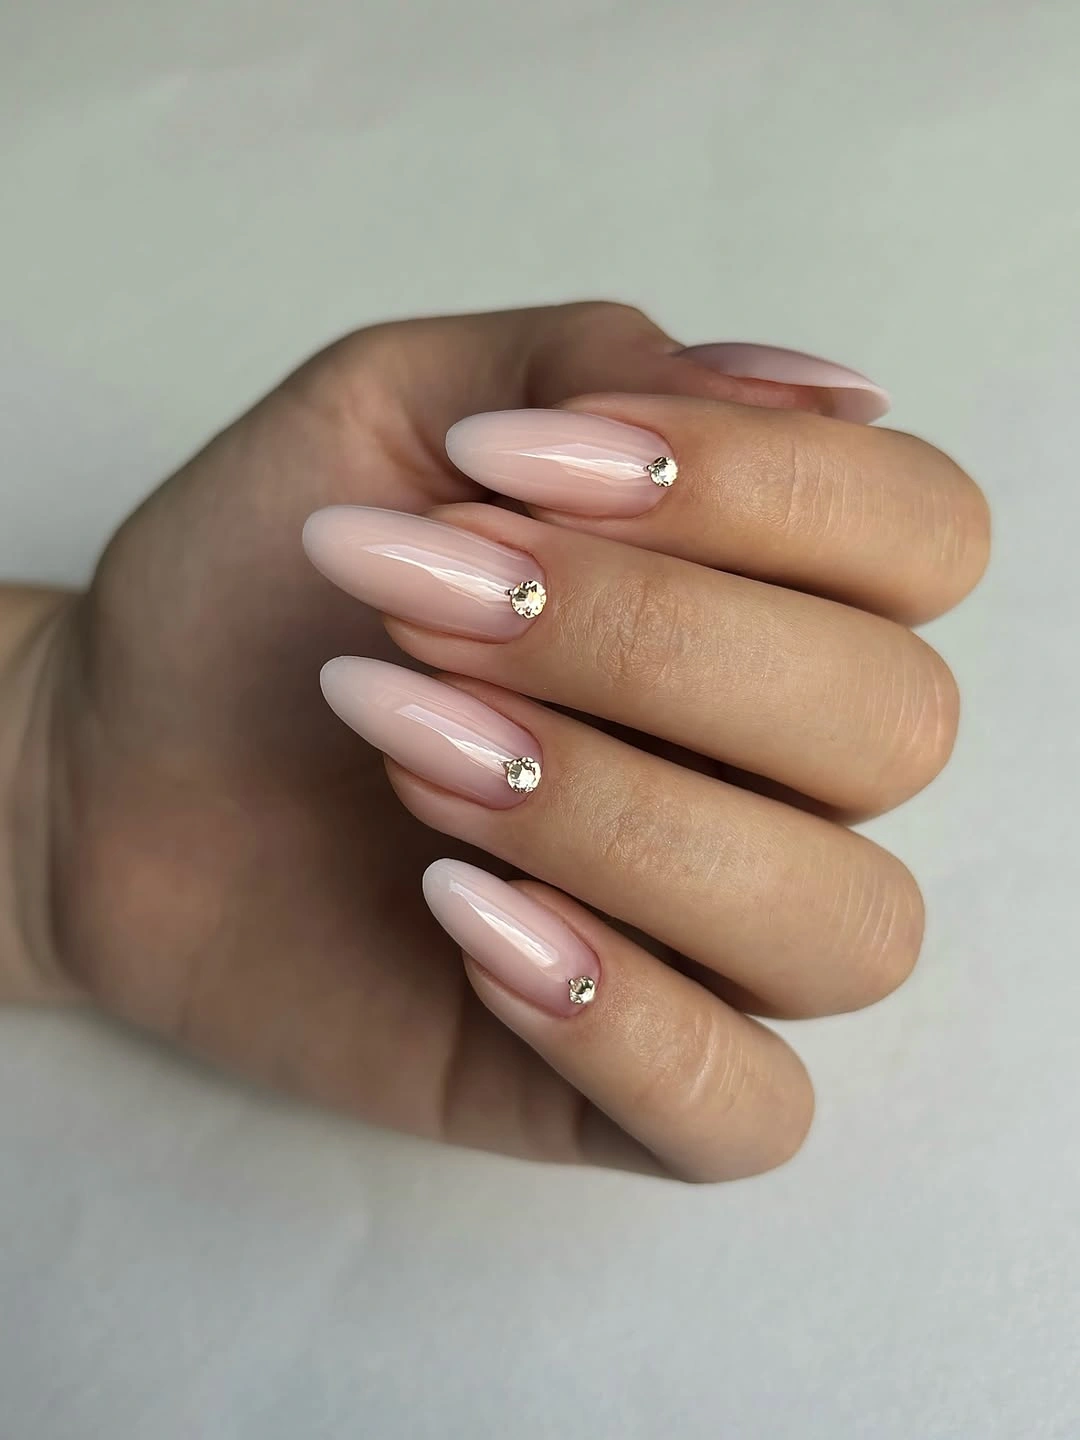
I would use a sheer blush-pink gel, such as a milky nude shade, plus small clear crystals and nail adhesive gel. I would keep the finish glossy rather than matte because the shine is a big part of this simple manicure.
After shaping the nails into a smooth almond, I would apply two thin layers of the pink base and cure each layer. Then I would place one crystal near the lower side of each nail before sealing carefully with top coat, avoiding the stone itself.
This is my idea of quiet luxury for everyday wear. It would work just as well with a white shirt and jeans as it would with an evening dress, and the tiny crystals make the manicure feel special without becoming fussy.
Chocolate Almond Nails With Tortoiseshell Details
Here I get a much richer mood from a combination of soft pink, creamy white, deep chocolate, and translucent tortoiseshell. Polka dots, fine brown lines, small rhinestones, and glossy dark accents give the medium almond shape plenty of personality without losing its polished finish.
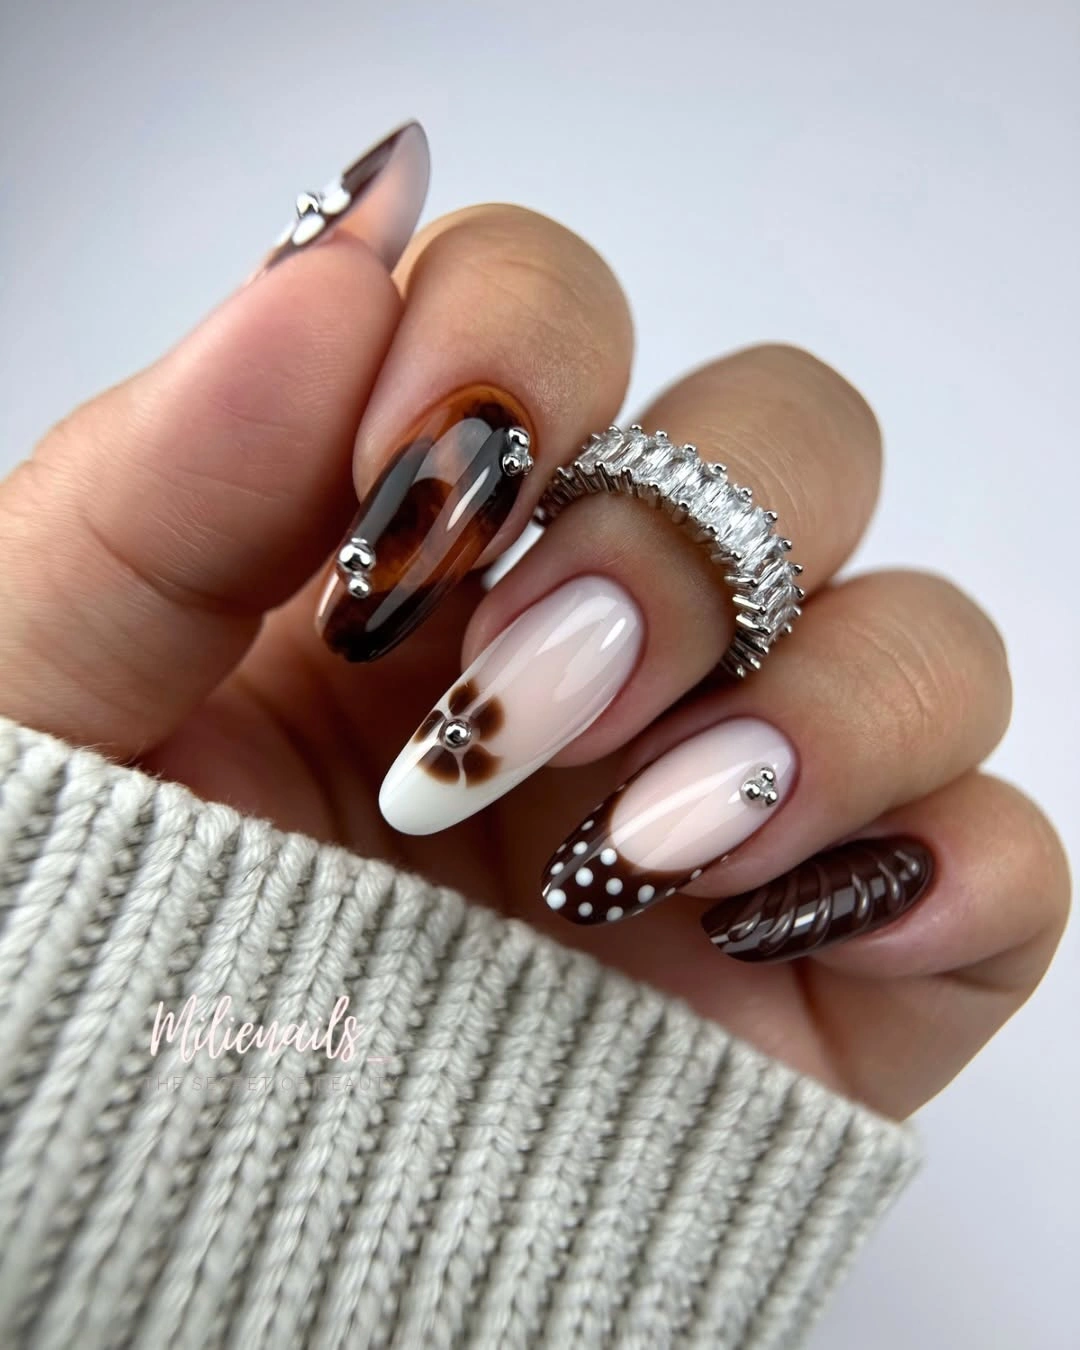
I would use a sheer pink nude, warm chocolate brown, creamy white, and a translucent amber-brown for the tortoiseshell effect. Small silver or clear crystals complete the look. A fine liner brush and dotting tool would be my essentials.
I would create the nude base first, then alternate the chocolate and white details across the nails. For tortoiseshell, I would layer amber, brown, and darker patches instead of trying to make a uniform pattern. A few rhinestones placed afterward add a polished finish.
I especially like this style for fall because the chocolate palette feels naturally cozy. With knitwear, a cream coat, and silver jewelry, these almond nails would look rich without needing a traditional seasonal motif.
Sunny Yellow And Orange Almond Tips
These long almond nails bring a bright summer feeling through yellow and orange French-style tips over a sheer pink base. A few nails feature organic white and yellow shapes, while tiny gold embellishments add a delicate sparkle. The pointed silhouette makes the warm colors look especially elongated.
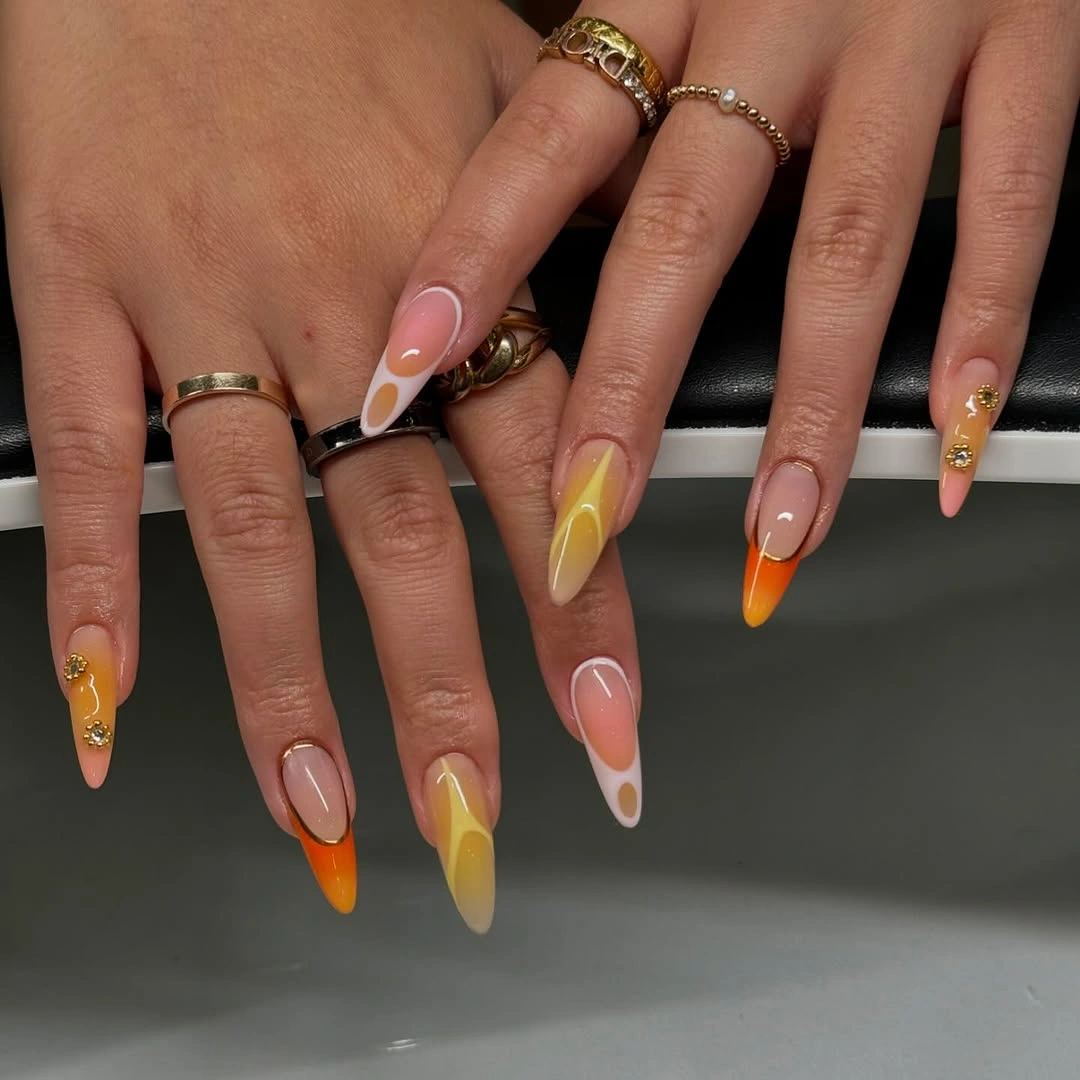
I would choose sheer pink, sunny yellow, vibrant orange, creamy white, and small gold crystals. A fine detail brush helps create the curved French tips and irregular shapes, while a glossy top coat keeps the manicure looking juicy and bright.
I would start with the sheer pink base and build the yellow and orange tips one nail at a time. On the accent nails, I would add simple organic shapes rather than complicated artwork. The gold details should stay minimal so the colors remain the stars.
For summer, this feels like an easy mood booster. I could wear it with denim, white linen, or a simple sundress and let the manicure bring all the color.
Deep Berry Almond Nails With Glossy Dimension
These shorter almond nails make a statement through a rich berry-plum shade with a reflective metallic finish. Darker circular accents create a subtle patterned effect across each nail, while soft white highlights give the surface a glassy, almost liquid appearance.
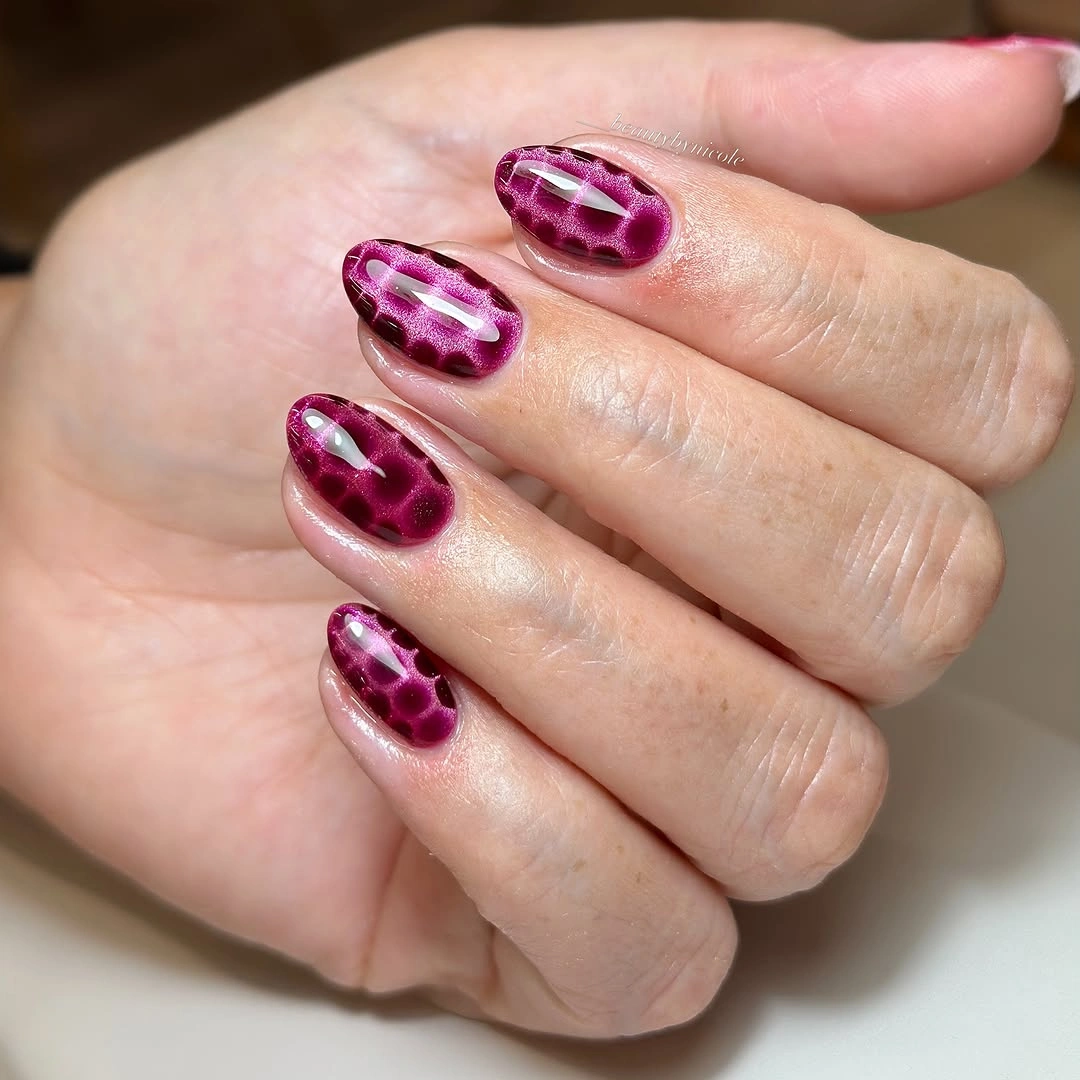
I would use a deep burgundy or berry gel with a metallic shimmer, plus a darker wine shade for the rounded details. A sheer white gel can create the elongated reflective accents. I would finish with an ultra-glossy top coat.
I would apply the berry base evenly, then layer the darker shapes around the surface in an irregular pattern. The white highlights should be very thin and carefully placed so they look like reflections rather than stripes.
This is the kind of almond manicure I would choose when I want something dramatic but still wearable. The shorter length keeps it practical, while the deep berry color gives it that gorgeous late-fall and winter feeling.