As we approach the 4th of July, the excitement isn’t just about fireworks and barbecues, but also about showcasing our patriotic spirit right down to our fingertips. Whether you’re attending a festive party or simply enjoying the day with family and friends, why not let your nails be a part of the celebration? Here, I will walk you through some stunning 4th of July nails ideas that are as vibrant as the fireworks lighting up the summer sky.
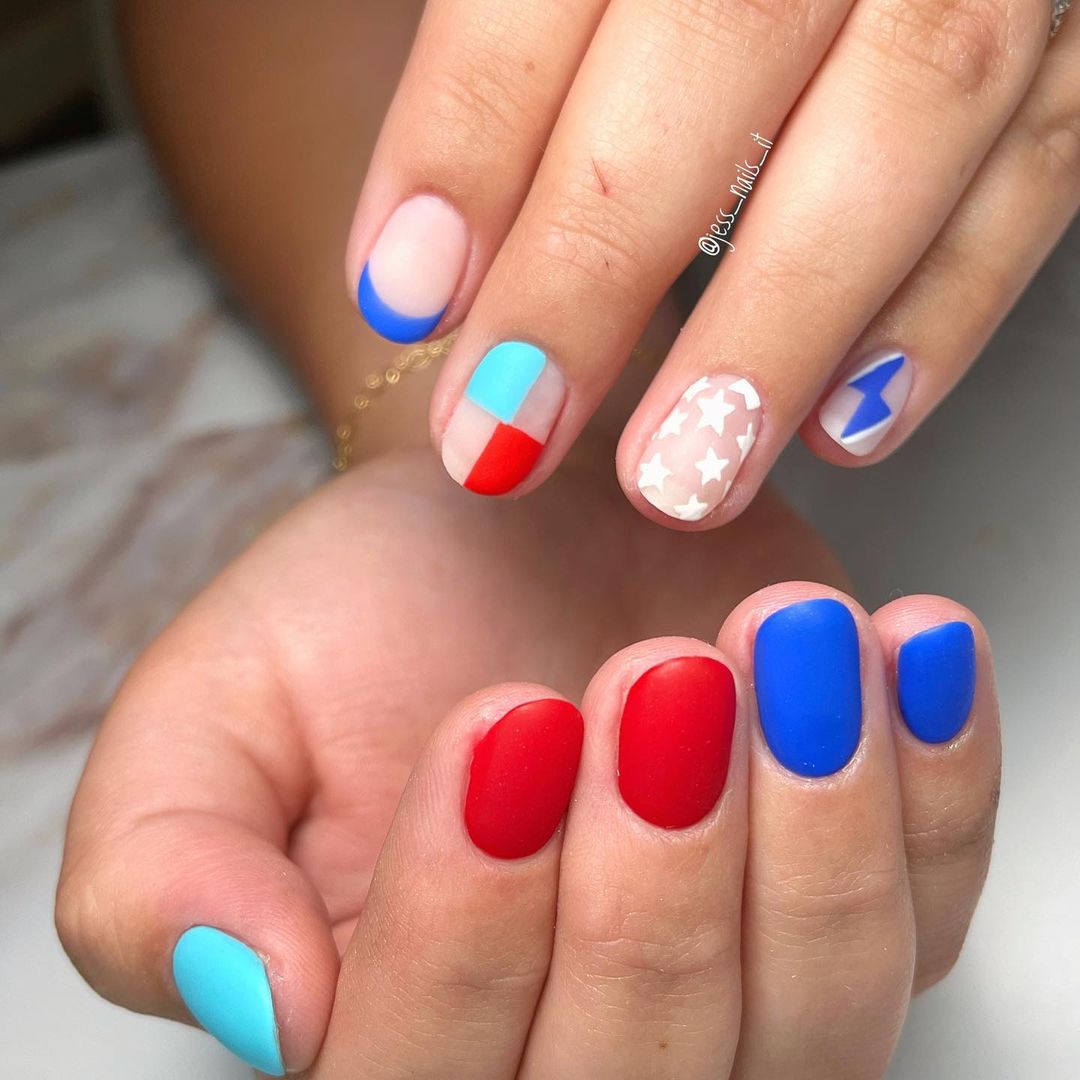
Festive Variety: A Canvas of Patriotism
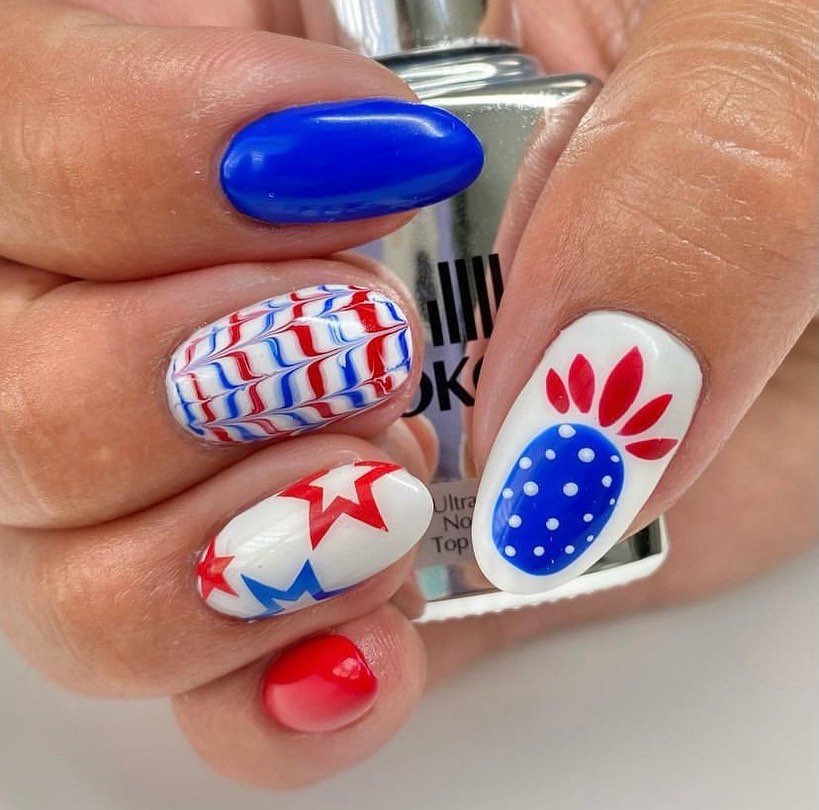
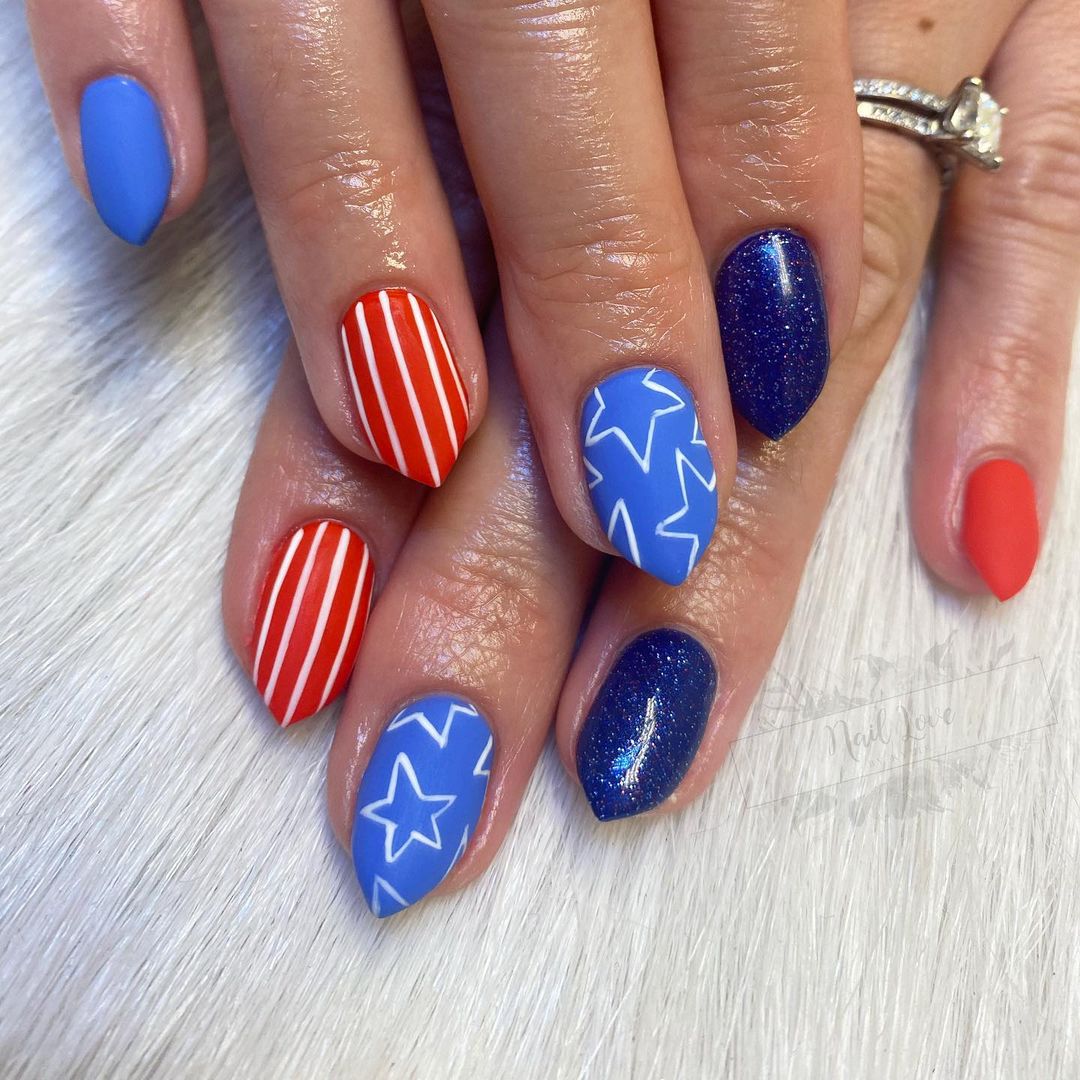
This nail design captures the essence of the 4th of July with a playful and artistic arrangement of colors and patterns. The brilliant blue almond-shaped nail stands out with its deep and glossy finish, symbolizing the vast American sky. The adjacent nails feature intricate designs: one with a dynamic zigzag pattern mimicking the stripes of the flag, and others adorned with stars and simple yet elegant dots that echo the starry night of Independence Day.
Consumables Needed
- Base Coat: Opt for a strong adhesive base like OPI Natural Nail Base Coat.
- Polishes: Use Sally Hansen’s Red My Lips, CND’s Vinylux in Creekside, and Essie’s Blanc.
- Top Coat: Seche Vite Dry Fast Top Coat for a glossy finish.
- Tools: Detailing brush and dotting tool for precision.
DIY Instructions
- Preparation: Start with a clean, buffed nail surface and apply a base coat.
- Base Colors: Apply two coats of white polish on all nails, allowing them to dry completely.
- Patterns: Use a thin brush to create stripes and star patterns. For the blue nail, apply two coats of blue polish.
- Finishing Touches: Add a top coat for a lasting glossy finish.
Starry Night: Subtle and Sparkly
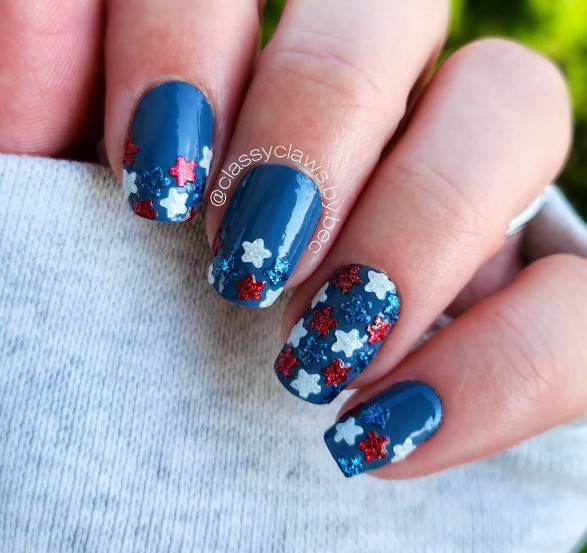
These nails flaunt a subtle yet sparkly homage to the 4th of July with a deep navy base scattered with glittering stars. This design is perfect for those who prefer a hint of festivity without overt extravagance. The matte finish on the navy backdrop gives a modern twist to the traditional 4th of July theme, making it not only suitable for the holiday but also as a chic everyday look during the summer season.
Consumables Needed
- Base Coat: Start with Essie’s Here to Stay.
- Navy Polish: OPI’s Yoga-ta Get This Blue (matte finish).
- Glitter: Use Sally Hansen’s Set in Stones.
- Top Coat: Matte top coat for a refined finish.
- Tools: Small sponge and tweezers for glitter application.
DIY Instructions
- Base Preparation: Apply a base coat to protect your natural nails.
- Color and Texture: Apply two coats of the navy polish. Wait for it to dry, then dab the matte top coat.
- Glitter Placement: While the top coat is tacky, use tweezers to place glitter stars strategically.
- Seal the Design: Once satisfied, seal everything with another layer of matte top coat.
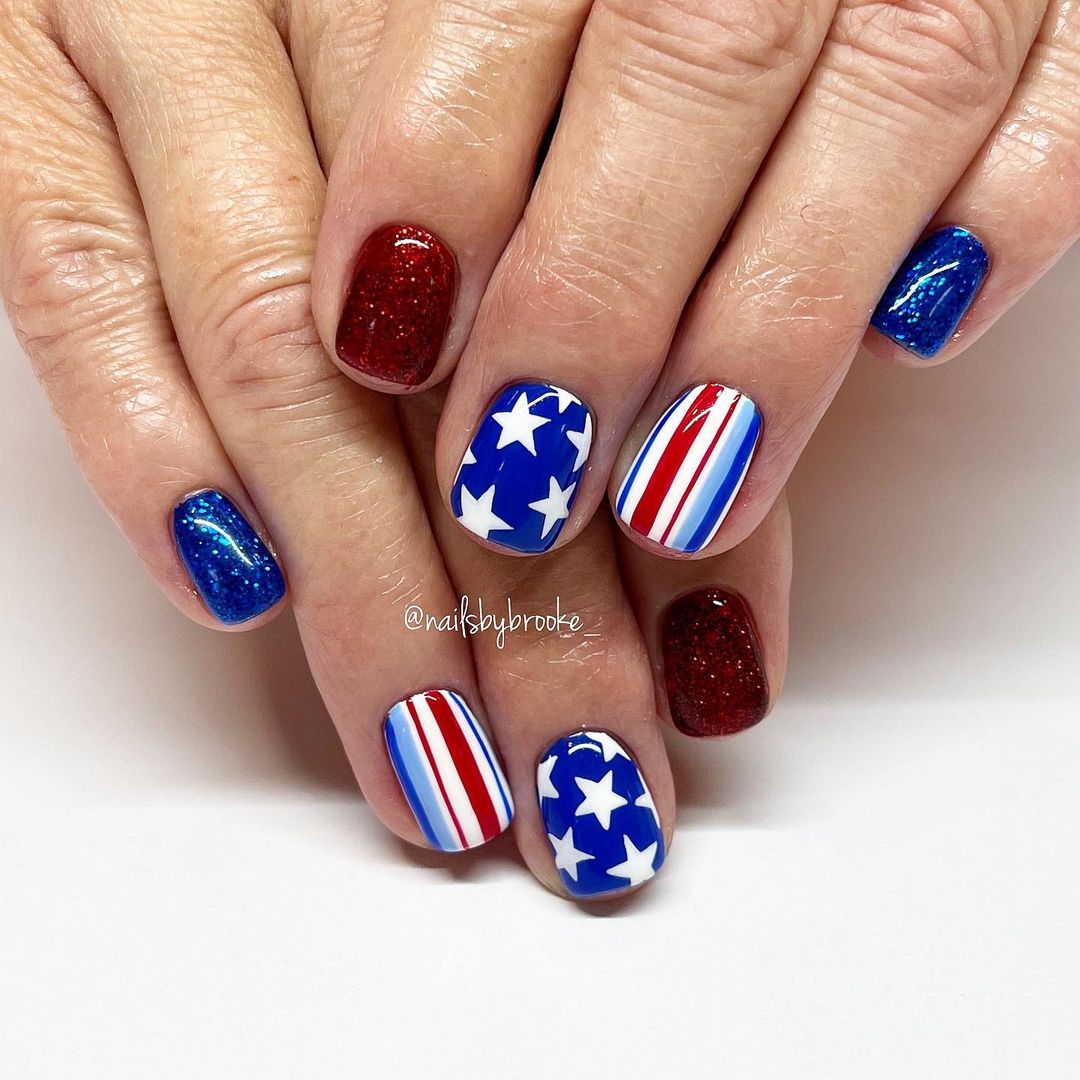
Classic Red, White, and Blue: Bold and Beautiful
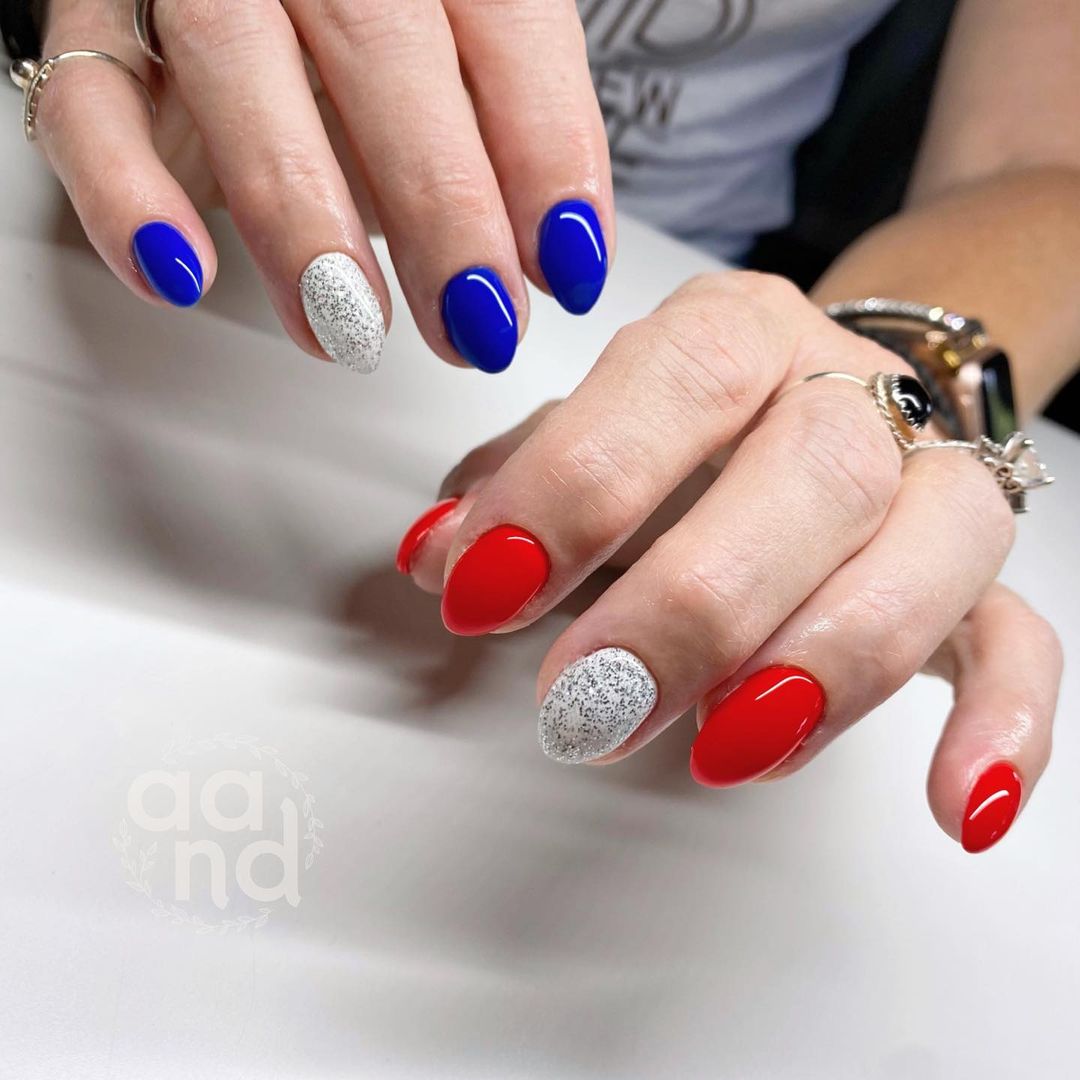
This design is a quintessential representation of 4th of July nails, featuring bold red, brilliant white, and vibrant blue. The look combines glossy and glitter textures, providing a visual contrast that is both striking and celebratory. It’s an easy and impactful way to express patriotism, perfect for any Independence Day event.
Consumables Needed
- Base Coat: Sally Hansen Double Duty.
- Colors: Use CND Vinylux in Lobster Roll, OPI Alpine Snow, and Revlon’s Royal.
- Glitter Polish: Essie’s Sparkle On Top.
- Top Coat: A high-gloss top coat for durability and shine.
- Tools: Striping tape for clean lines.
DIY Instructions
- Base Layer: Apply your base coat to protect and smooth.
- Apply Colors: Paint each nail in one of the three colors. Use tape for precise lines.
- Glitter Touch: Add glitter over the white for a sparkling effect.
- Finish: Apply a high-gloss top coat to enhance the colors and ensure longevity.
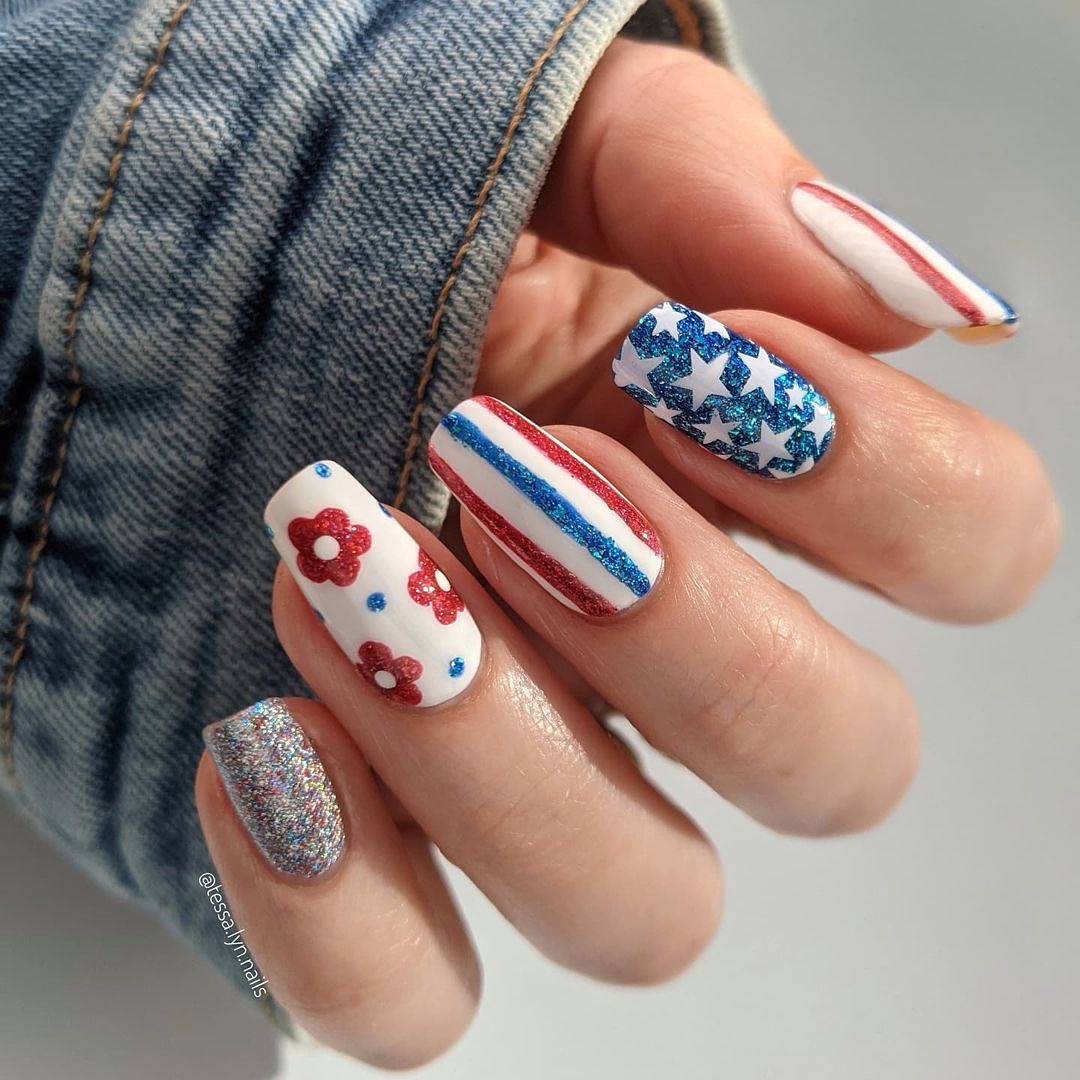
Delicate Artistry: Floral and Striped Splendor
This nail ensemble showcases a delightful mix of summer styles perfect for the 4th of July. A brilliant arrangement of floral and striped patterns in red, white, and blue captures the patriotic spirit. The floral designs, paired with sparkling glitter accents, provide a feminine touch, while the crisp stripes offer a nod to the traditional American flag. The additional glitter-coated nail adds a sparkly finish, enhancing the festive look.
Consumables Needed
- Base Coat: Essie First Base
- Polishes: OPI’s Alpine Snow, Big Apple Red, and Keeping Suzi at Bay
- Glitter Polish: OPI’s Starlight Collection – Is This Star Taken?
- Top Coat: Sally Hansen Insta-Dri Anti-Chip
- Tools: Fine-tipped brushes for detailed floral art
DIY Instructions
- Base Prep: Apply a smooth layer of base coat.
- Polish Application: Paint the base colors—white for the floral and striped nails, and blue for the glitter accent nail.
- Design Creation: Use a fine brush to add floral patterns and stripes.
- Glitter Addition: Apply glitter polish on one nail for a standout look.
- Seal and Protect: Finish with a top coat to ensure longevity and gloss.
Save Pin
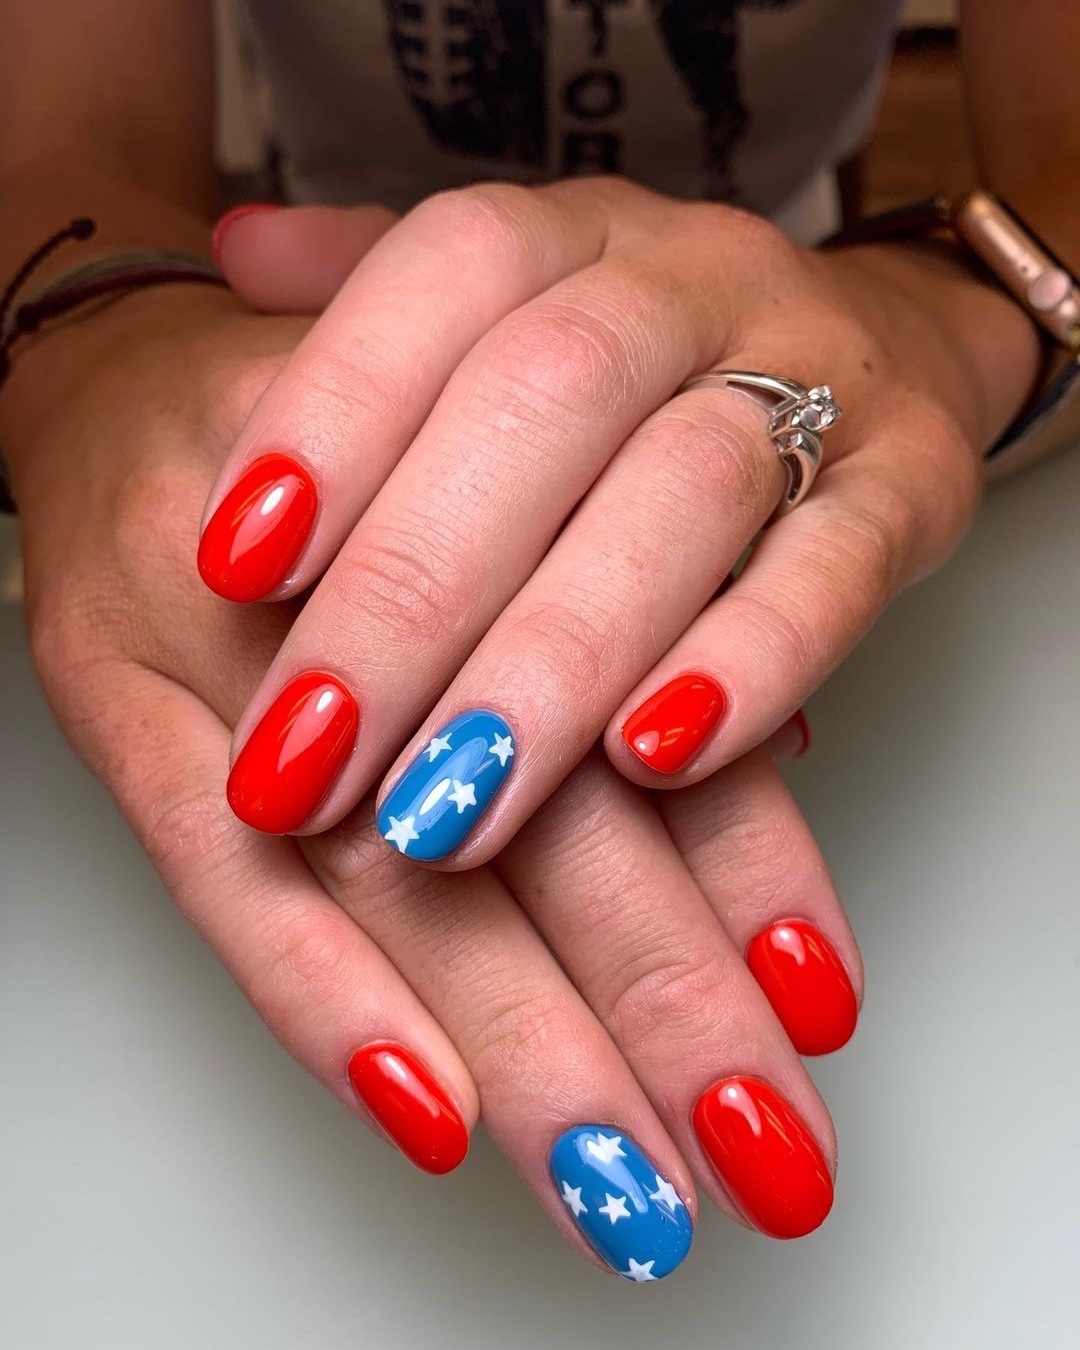
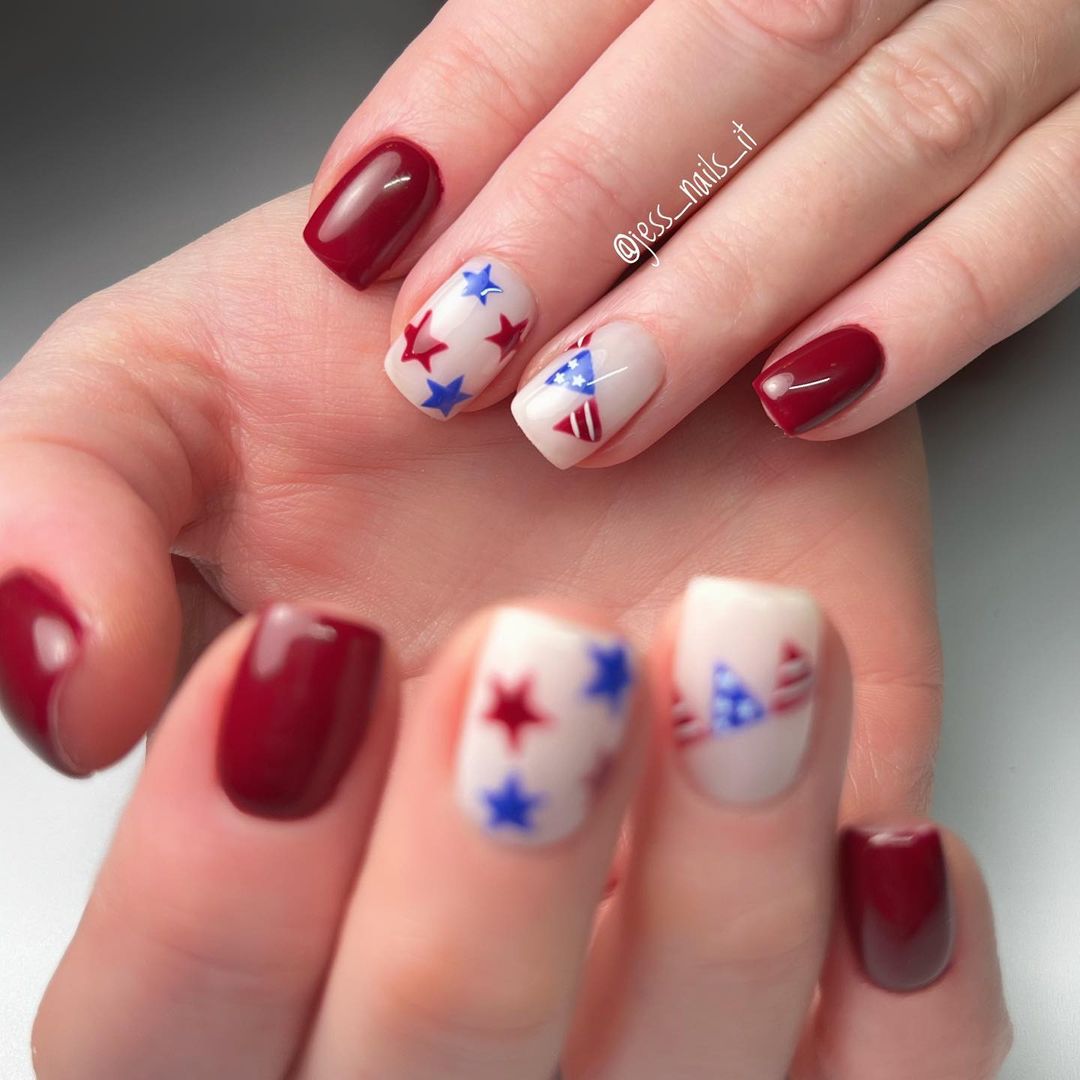
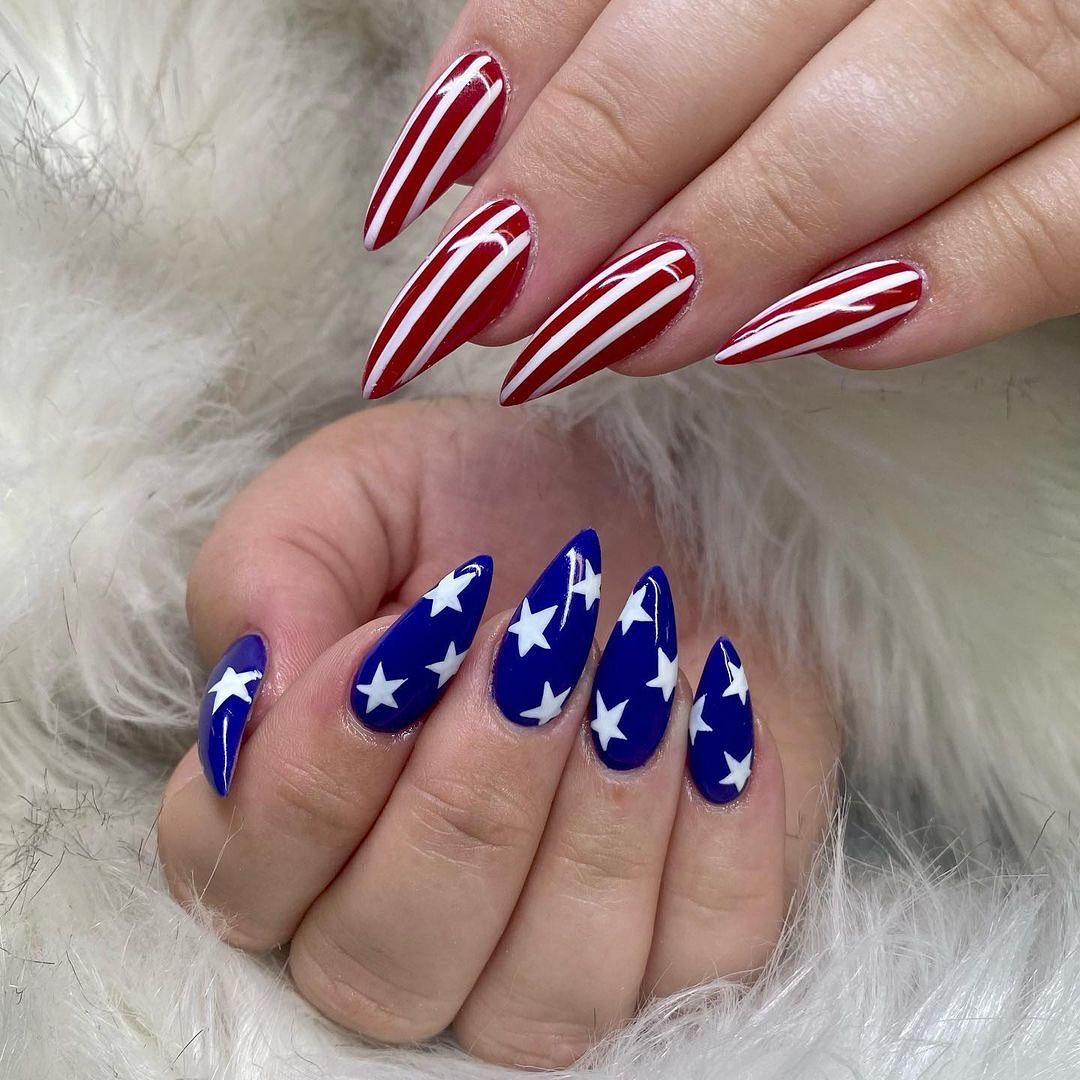
Elegant Simplicity: Classic Stars and Stripes
Embrace a classic look with this elegant and simple design featuring bright red nails interspersed with blue nails adorned with white stars. This style is ideal for anyone looking for a straightforward yet impactful way to celebrate Independence Day. The glossy finish on the red enhances its vibrancy, while the matte stars add a contemporary edge.
Consumables Needed
- Base Coat: Revlon Quick Dry Base Coat
- Polishes: Revlon Red and OPI Eurso Euro
- Matte Top Coat: Matte Finisher by NYX
- Top Coat: Revlon Extra Life No Chip Top Coat
- Tools: Star-shaped stickers or stencils
DIY Instructions
- Base Application: Start with a base coat to protect your nails.
- Color Coating: Apply two coats of red on the majority of nails, blue on the accent nails.
- Star Design: Place star stickers on blue nails and paint over them. Remove stickers once dry.
- Finish: Apply a matte top coat over the blue nails and a glossy top coat over the red nails.
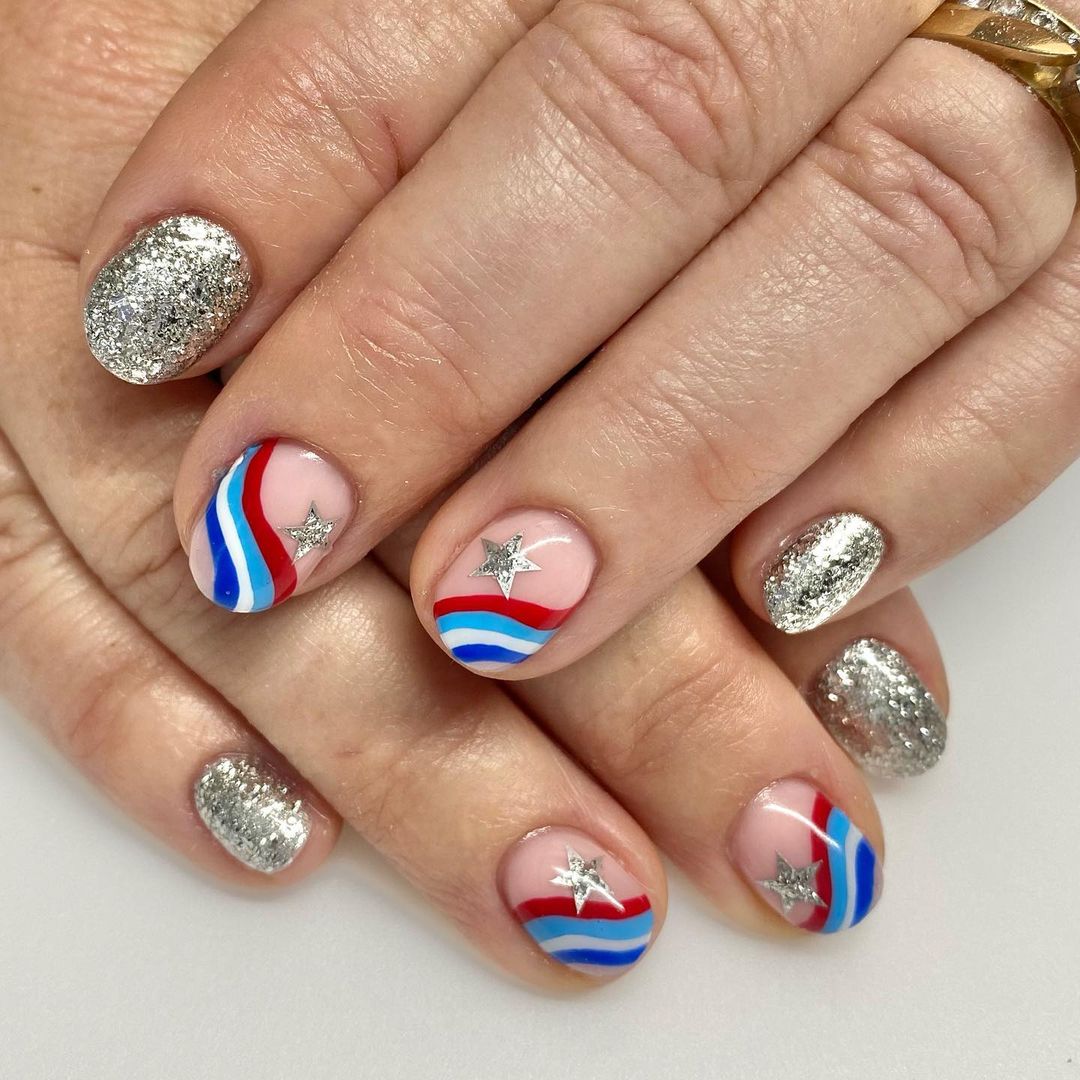
Modern Metallics: Silver and Striped Spectacle
This set of nails combines the traditional 4th of July colors with a modern twist using chrome and sparkly silver. The combination of red and blue stripes against a soft pink background offers a fresh take on patriotic themes, while the silver nails provide a mirror-like finish that catches the light beautifully, perfect for both daytime celebrations and evening fireworks.
Consumables Needed
- Base Coat: OPI Natural Nail Base Coat
- Polishes: Essie’s Penny Talk and Blanc, plus a custom-mixed light pink
- Glitter: Silver glitter polish
- Top Coat: High-gloss top coat for enhanced shine
- Tools: Striping tape for perfect lines
DIY Instructions
- Base Prep: Apply base coat for smooth polish application.
- Polish and Design: Paint pink as the base, then use tape to create stripes with red and blue.
- Silver Nails: Apply two coats of chrome polish on designated nails.
- Details and Finish: Remove the tape, apply silver glitter accents, and finish with a high-gloss top coat.
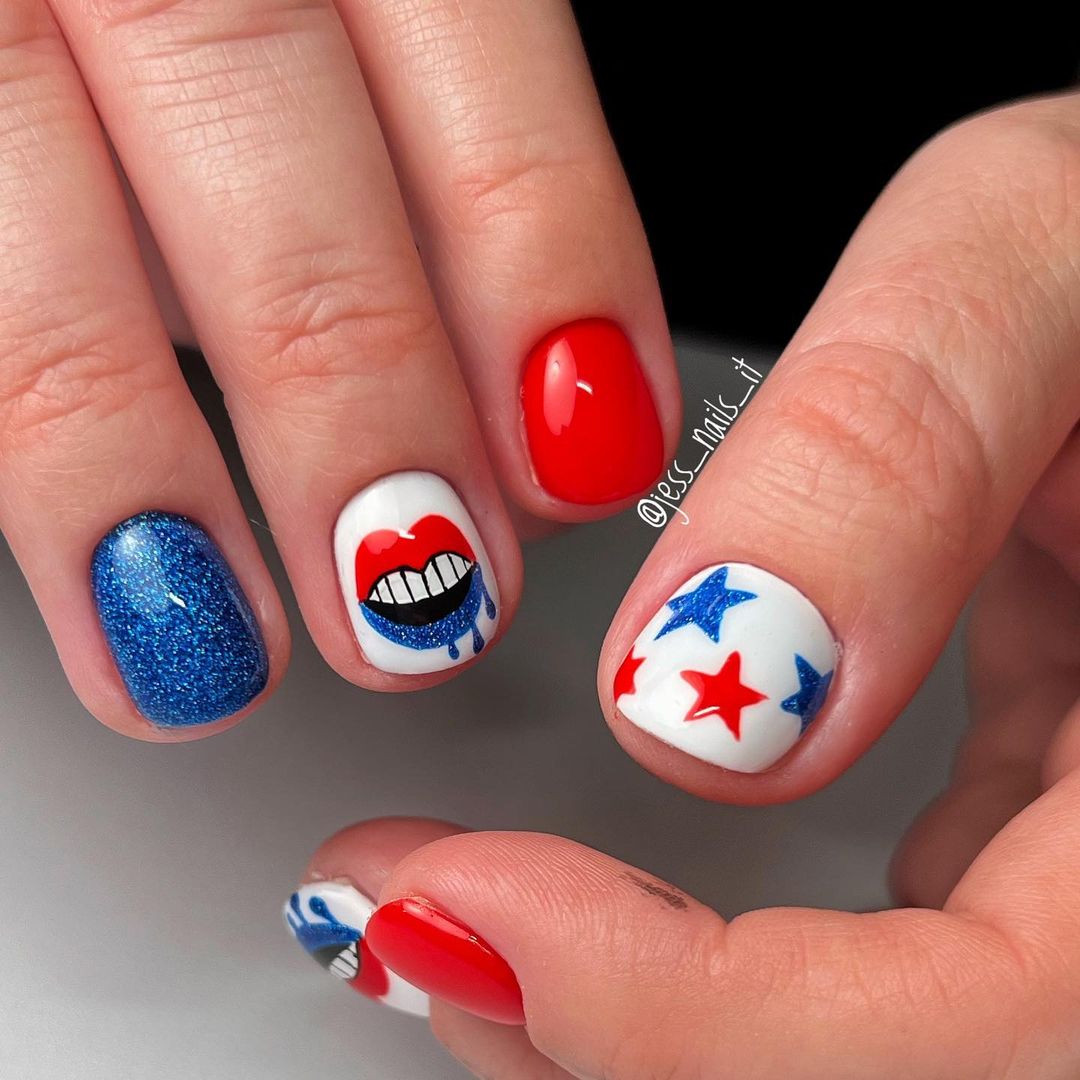
Playful Pop Art: Bold and Expressive
This design takes a fun and bold approach to 4th of July nails with a pop art-inspired aesthetic. The array includes a glossy solid red and a vibrant blue with a glitter finish, complemented by white nails featuring quirky pop art designs, including lips and stars. This artistic expression not only celebrates Independence Day but also showcases personality and creativity.
Consumables Needed
- Base Coat: Start with a clear base coat for protection.
- Polishes: Red (Essie’s Really Red), white (OPI’s Alpine Snow), and blue glitter (Zoya’s Liberty).
- Art Supplies: Black detailing pen for outlines and acrylic paint for white nail art.
- Top Coat: A glossy top coat to seal the designs and enhance durability.
- Tools: Detailing brushes for intricate designs.
DIY Instructions
- Base Layer: Apply base coat on all nails.
- Color Application: Paint the red and blue nails, two coats each for opacity.
- Artwork: On the white nails, use a fine brush and black paint to outline and fill pop art designs.
- Glitter and Finish: Add blue glitter polish on one of the nails. Finish all nails with a high-gloss top coat for shine and protection.
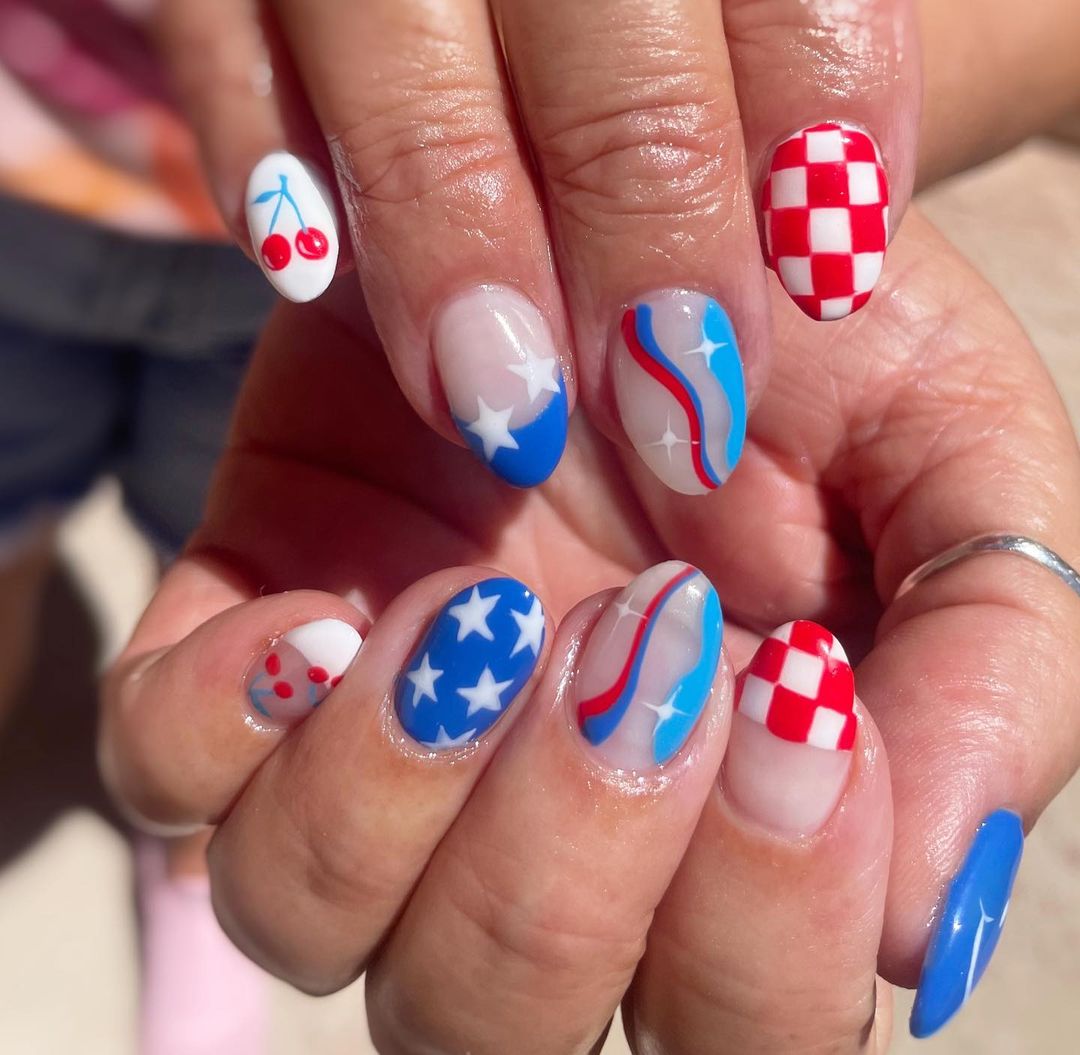
Summer Picnic: Cheery and Festive
Celebrate 4th of July with a picnic-inspired design, featuring playful checkered patterns, stripes, and cherry motifs that are perfect for a summer day out. The design integrates red, white, and blue in a variety of styles on each nail, creating a cute and cohesive look that’s both stylish and patriotic.
Consumables Needed
- Base Coat: Protective base coat.
- Polishes: White (OPI’s Alpine Snow), red (Sally Hansen’s Red My Lips), and blue (Essie’s Butler Please).
- Top Coat: Glossy top coat for a vibrant finish.
- Tools: Striping tape for precise lines and a dotting tool for cherries.
DIY Instructions
- Prep and Base: Start with a base coat to protect your nails.
- Designs: Use striping tape to create clean lines for checkered and striped patterns.
- Detailing: Paint cherries using a dotting tool for the red and green polish.
- Sealing: Apply a glossy top coat to all nails for a durable and shiny finish.
Save Pin
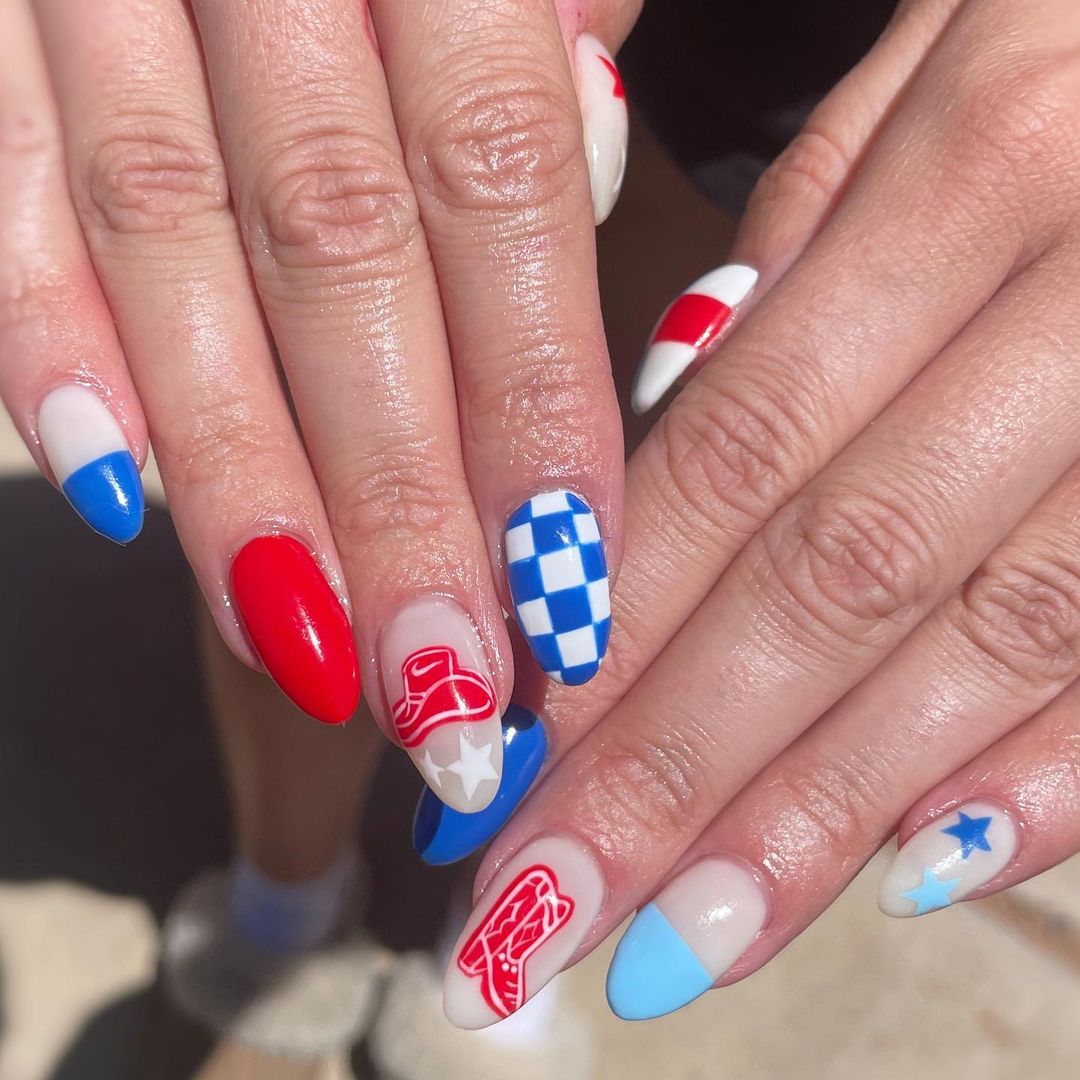
Refined Elegance: Mixed Patterns with a Modern Twist
This sophisticated set of 4th of July nails features a mix of geometric and organic patterns, including stars, stripes, and checkered designs, all in a classy matte finish. The combination of glossy and matte textures along with varied designs offers a contemporary and refined aesthetic, ideal for a stylish 4th of July celebration.
Consumables Needed
- Base Coat: Long-lasting base coat.
- Polishes: Red (CND Vinylux in Hollywood), blue (OPI’s Eurso Euro), and white (Essie’s Blanc).
- Matte Top Coat: Matte finish top coat to contrast the glossy bases.
- Top Coat: Use a high-gloss top coat for selected nails to add texture contrast.
- Tools: Precision brushes and masking tape for crisp lines.
DIY Instructions
- Foundation: Apply a base coat to each nail.
- Apply Colors and Patterns: Use masking tape and precision brushes to apply geometric patterns and color blocks.
- Matte and Gloss Finish: Apply a matte top coat on some nails and a glossy top coat on others to create a mixed-texture look.
- Complete the Look: Remove any tape and touch up edges, then finish with the respective top coats for protection and effect.
Daring Points: Stiletto Stars and Stripes
Embrace the bold and striking look of stiletto nails this 4th of July. This design features alternating patterns of solid colors and intricate details, including a glittery blue and classic stripes that mimic the American flag. The white nails decorated with tiny stars enhance the patriotic flair, making this style both daring and festive.

Consumables Needed
- Base Coat: A strong base to support the stiletto shape.
- Polishes: Bright red (China Glaze’s Igniting Love), navy blue (Essie’s After School Boy Blazer), and pure white (OPI’s Alpine Snow).
- Glitter: Blue glitter polish for the sparkling effect.
- Top Coat: A durable top coat to protect your nail art.
- Tools: Detail brushes and striping tape for precise designs.
DIY Instructions
- Prepare the Base: Apply a base coat to strengthen your nails.
- Color Application: Paint each nail in the base colors, using two coats for full opacity.
- Detail Work: Use striping tape to create clean lines for the stripes and a fine brush for the stars.
- Glitter Application: Add a coat of blue glitter polish on designated nails.
- Seal the Design: Finish with a strong top coat for a lasting glossy look.
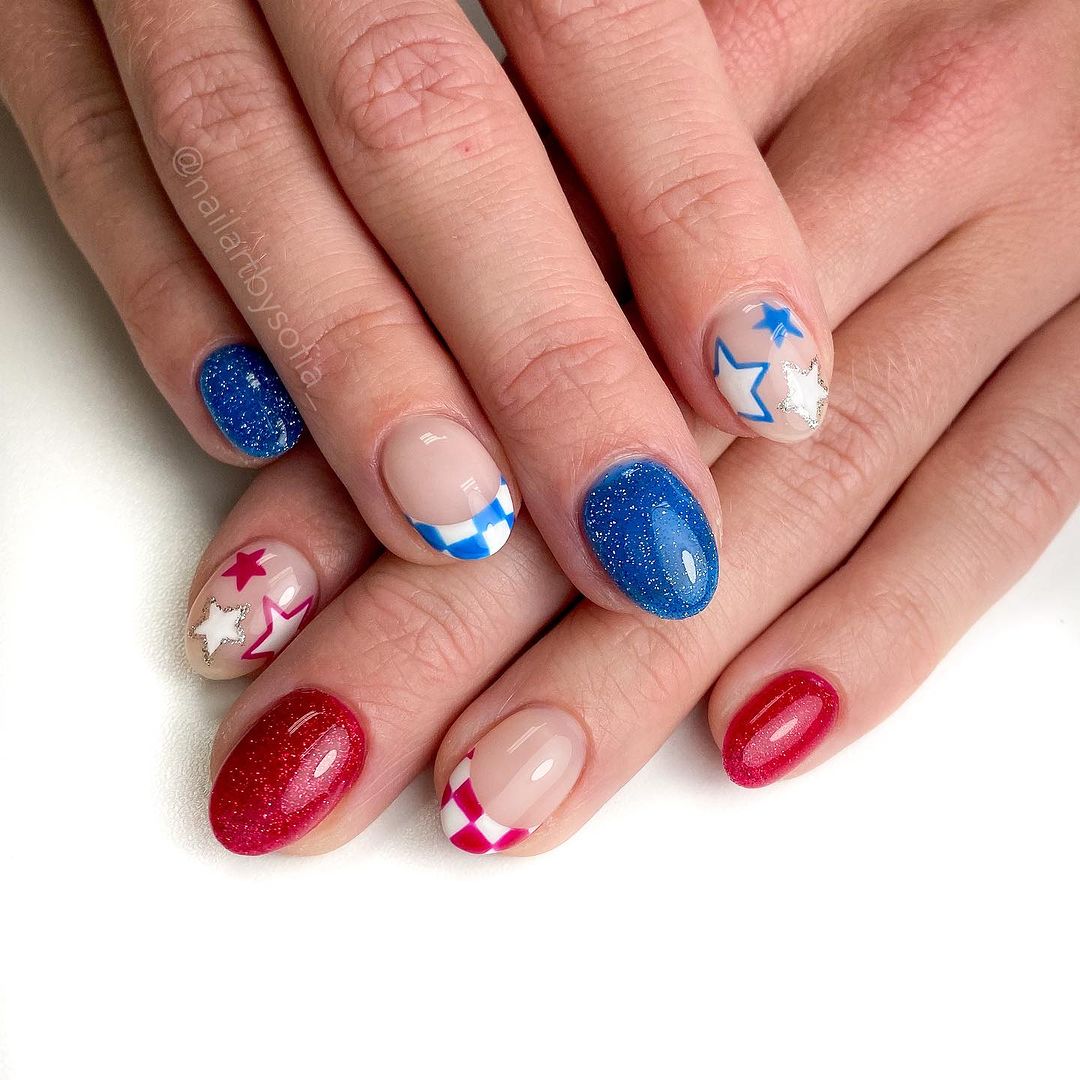
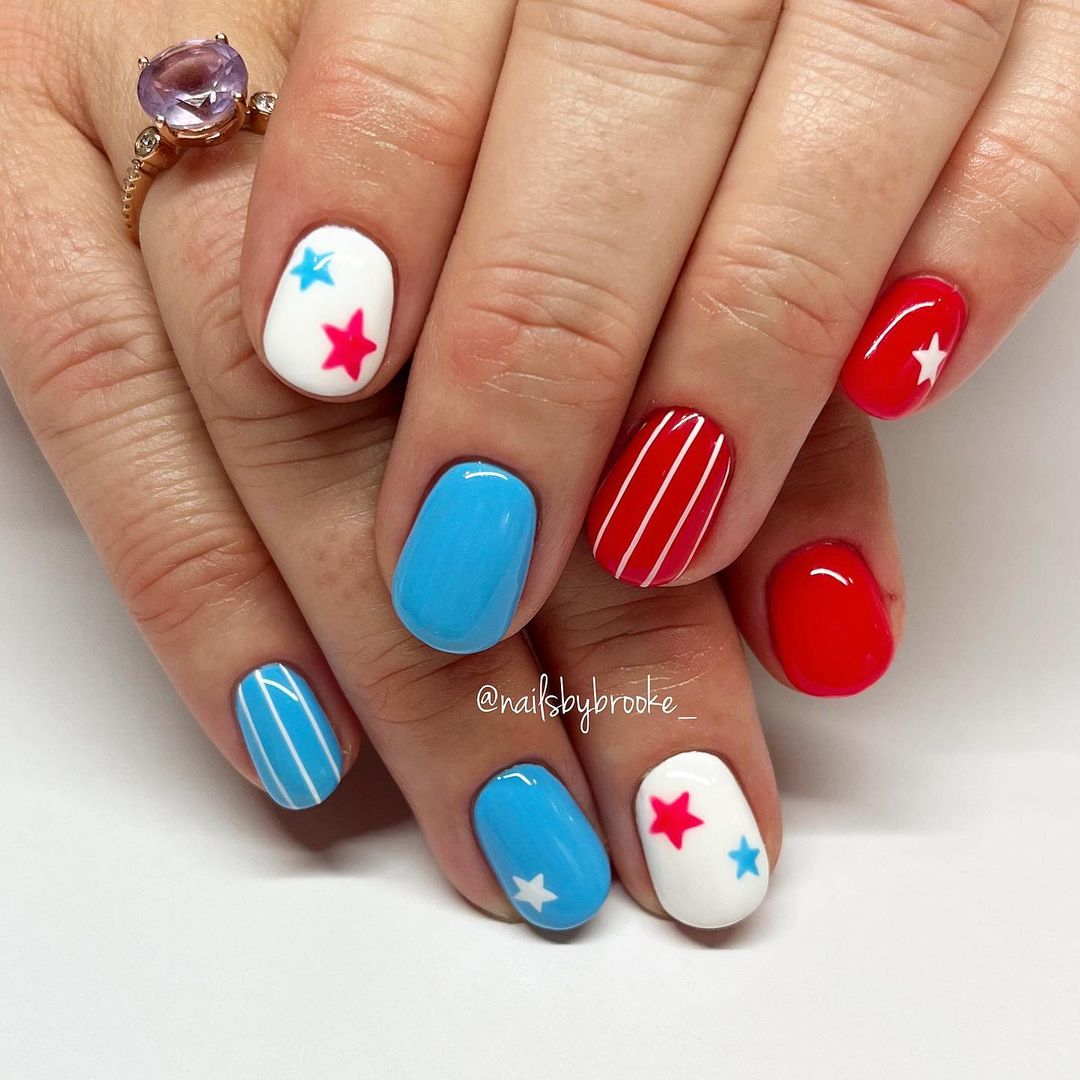
Playful and Sweet: Simple Charm
This set is perfect for those who adore simplicity with a touch of charm. Featuring a mix of solid colors, simple stripes, and adorable stars, these nails are cute and easy to match with any 4th of July outfit. The clear blue and vibrant red pop against the white background, offering a fresh and clean look.
Consumables Needed
- Base Coat: Start with a hydrating base coat.
- Polishes: Sky blue (Sally Hansen’s Blue Me Away!), bright red (Revlon’s Revlon Red), and white (OPI’s Alpine Snow).
- Top Coat: A quick-dry top coat for a swift finish.
- Tools: Striping brush for fine lines and a dotting tool for stars.
DIY Instructions
- Base Prep: Apply a base coat to each nail for smooth application.
- Paint Base Colors: Use two coats of each color on alternating nails for vibrant hues.
- Create Designs: With a striping brush, add thin lines and with a dotting tool, place stars.
- Final Touches: Apply a quick-dry top coat to seal in the design and add shine.
Sweet Summer: Candy Stripes and Polka Dots
These nails mix playful candy stripes and delicate polka dots for a fun and stylish 4th of July celebration. The soft pastel tones give a unique twist to the traditional red, white, and blue, making it suitable for both the holiday and everyday summer wear. This design is sparkly and elegant, yet maintains a youthful energy.

Consumables Needed
- Base Coat: A nourishing base coat for protection.
- Polishes: Pastel blue (Essie’s Salt Water Happy), soft red (OPI’s She’s a Bad Muffuletta!), and white (Essie’s Private Weekend).
- Top Coat: High-gloss top coat for a candy-like finish.
- Tools: Striping tape for stripes and a small dotting tool for polka dots.
DIY Instructions
- Start with a Base Coat: Protect your natural nails with a base layer.
- Apply Colors: Paint each nail with the chosen colors, using two layers for depth.
- Add Details: Use striping tape for precise stripes and a dotting tool for evenly spaced dots.
- Finish Up: Apply a layer of high-gloss top coat to protect and enhance the designs.
Festive Fingers: Varied Visions of Patriotism
This nail design showcases an eclectic mix of 4th of July themes with a variety of patterns that include crisp white stripes, plaid, and iconic pop culture motifs such as soda and ice cream. Each nail offers a unique canvas celebrating American culture in a playful and stylish manner. The use of bold red, white, and blue ensures each design pops, perfect for any patriotic celebration.
Consumables Needed
- Base Coat: Strengthening base coat for nail protection.
- Polishes: Classic red (Essie’s Geranium), royal blue (OPI’s Big Apple), and crisp white (Sally Hansen’s White On).
- Special Effects: Tiny decals or stickers for detailed pop culture icons.
- Top Coat: Quick-dry top coat for a lasting finish.
- Tools: Striping tape for precise lines and a detail brush for intricate designs.
DIY Instructions
- Foundation Preparation: Start with a base coat to protect the nails.
- Color Base: Apply base colors as per the design requirements on each nail.
- Detailing: Use striping tape for geometric patterns and a detail brush for free-hand designs like plaid.
- Decoration: Apply decals or stickers where necessary.
- Finishing Touches: Seal everything with a quick-dry top coat for durability and shine.
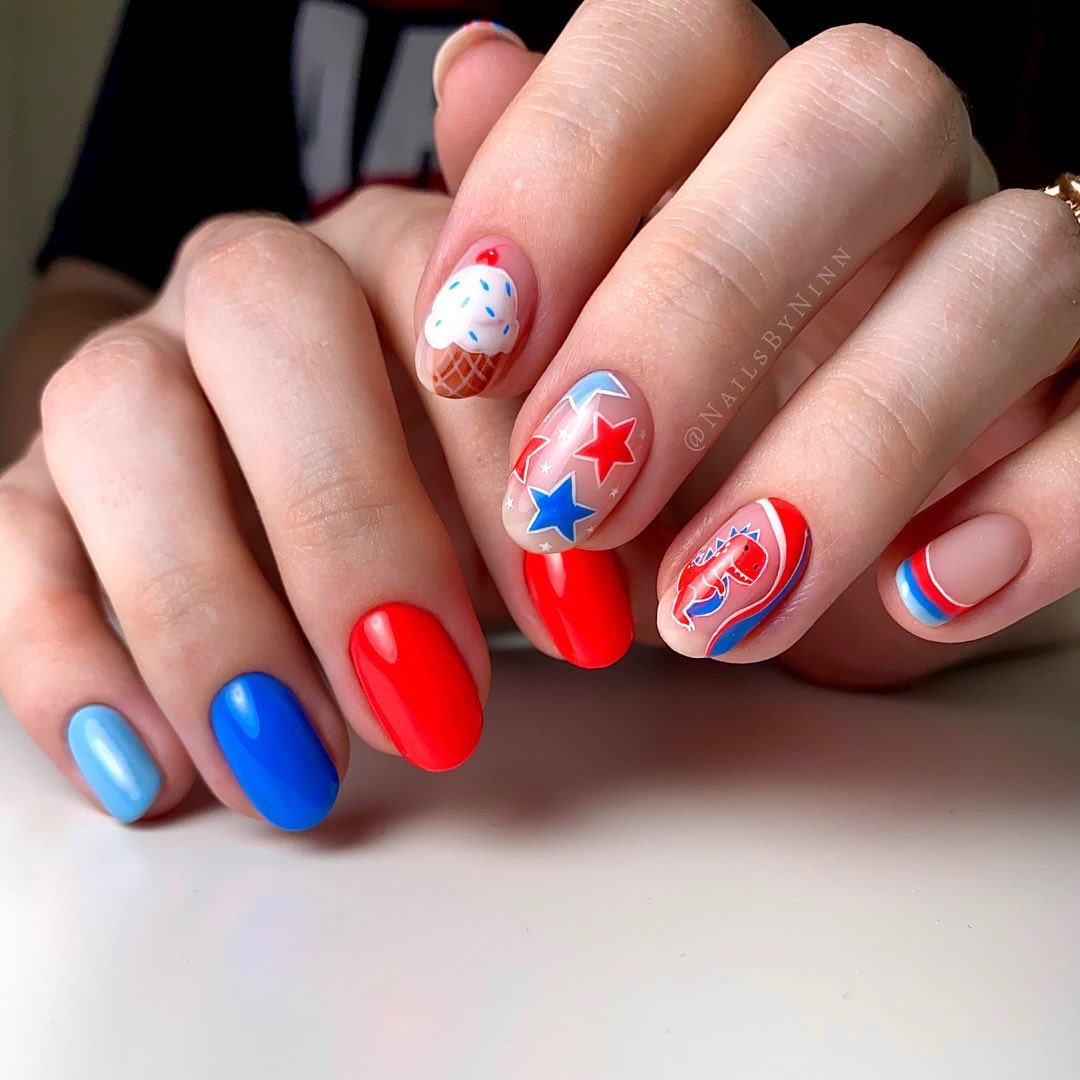
Cool Treats: Sweet Summer Vibes
Nothing says summer like ice cream, and these nails bring that fun element into 4th of July celebrations. The design incorporates classic summer shades with a whimsical touch of ice cream and soda can motifs, set against a backdrop of stars and stripes, making them both cute and patriotic.
Consumables Needed
- Base Coat: Long-lasting base coat.
- Polishes: Vibrant red (Revlon’s Ravishing), sky blue (China Glaze’s Bahamian Escape), and pure white (OPI’s Alpine Snow).
- Art Supplies: Nail stickers for easy applique of detailed designs.
- Top Coat: High gloss top coat to enhance the vibrant colors.
- Tools: Fine-tipped art brush for precision.
DIY Instructions
- Base Application: Coat nails with a base to prevent staining.
- Apply Colors: Use vibrant polishes as the backdrop for artwork.
- Add Motifs: Place stickers or hand-paint designs such as ice cream and soda cans.
- Detailing: Add additional stars or stripes as needed.
- Protective Finish: Apply a glossy top coat for a smooth, lasting finish.
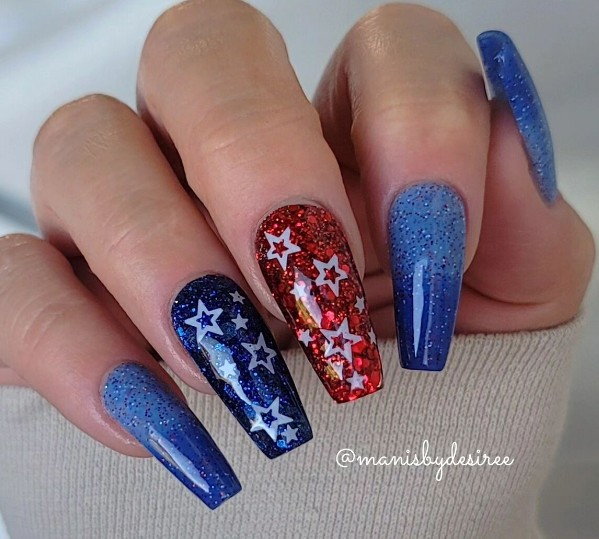
Glitter and Glam: Sparkling Stars
For those looking to sparkle this 4th of July, these nails blend glittering red, white, and blue with bold star patterns. The design is perfect for those who want to make a statement at any festive event, combining the sparkly allure of glitter with the symbolic power of stars.
Consumables Needed
- Base Coat: Protective base coat for nail health.
- Polishes: Glitter red (Essie’s Leading Lady), glitter blue (OPI’s Get Your Number), and a solid white for the base under stars.
- Top Coat: Glossy top coat to seal in the glitter and prevent chipping.
- Tools: Star stencils or stickers for perfect star shapes.
DIY Instructions
- Prepare the Base: Apply a protective base coat to each nail.
- Glitter Application: Paint nails with glitter polishes, layering to achieve desired sparkle.
- Star Creation: Use stencils or stickers to create star shapes on selected nails.
- Final Coating: Add a layer of glossy top coat for extra shine and protection.
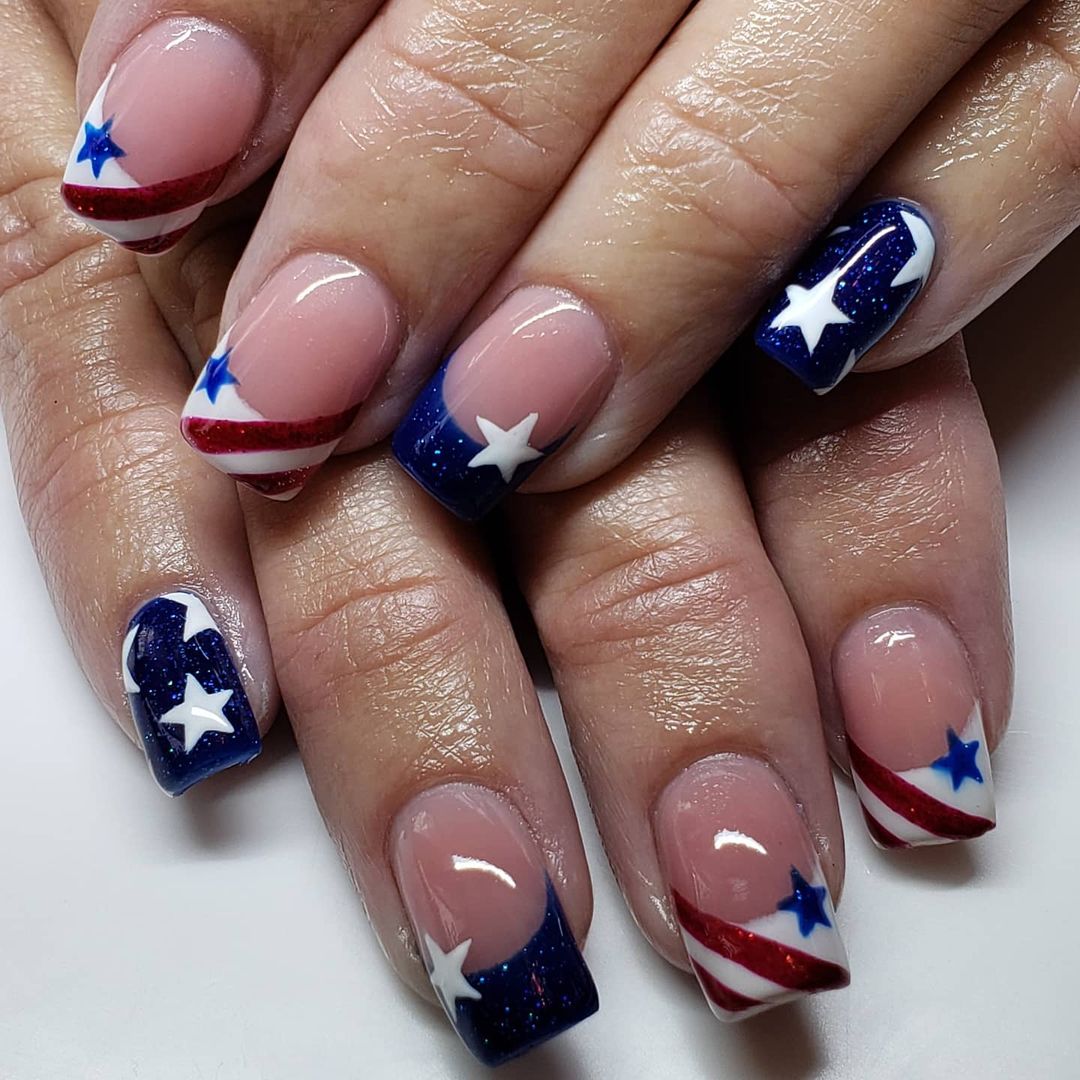
Star-Spangled Banner: A Tribute in Nails
Celebrating the 4th of July, these nail designs perfectly encapsulate the spirit of the holiday. Featuring a vibrant palette of red, white, and blue, each nail is a mini canvas displaying elements of the American flag, from bold stripes to sparkling stars. This style is a classy way to show patriotism while keeping your look festive and fashionable.
Consumables Needed
- Base Coat: High-adhesion base coat for longevity.
- Polishes: Glossy red (Essie’s A-List), deep blue (OPI’s Midnight in Moscow), and crisp white (Sally Hansen’s White On).
- Special Effects: Silver glitter for added sparkle.
- Top Coat: Quick-dry top coat for a protective finish.
- Tools: Striping tape for precise lines and a fine detail brush for stars.
DIY Instructions
- Base Application: Apply a base coat to protect the nails and improve polish adherence.
- Color Application: Paint the nails in base colors. Use striping tape to create clean lines for the American flag stripes.
- Star Application: With a fine brush, add stars on blue-painted nails.
- Glitter Details: Add a touch of glitter to the blue nails for a starry night effect.
- Finish with Top Coat: Apply a top coat for shine and durability.
Modern Minimalism: Sleek and Simple
This nail design takes a minimalistic approach with sleek lines and color blocking that merge the iconic red, white, and blue in a modern aesthetic. The design is perfect for those who prefer a more subtle celebration of 4th of July, emphasizing elegance and simplicity.
Consumables Needed
- Base Coat: Smoothing base coat.
- Polishes: Bright red (China Glaze’s Red Pearl), matte white (Essie’s Matte About You), and glossy blue (Revlon’s Urban Blue).
- Top Coat: Matte top coat for a contemporary finish.
- Tools: Striping tape for geometric precision.
DIY Instructions
- Prepare the Base: Start with a base coat to ensure smooth application.
- Apply Colors: Use the three colors to create bold, blocked patterns on each nail.
- Detailing: Employ striping tape to achieve sharp lines.
- Finishing Touches: Choose a matte finish for a modern look, applying a matte top coat over the design.
Elegant Festivity: Classic and Contemporary
Blending traditional motifs with contemporary design, these nails feature classic stars and bold stripes alongside modern art styles, providing a sophisticated yet sparkly celebration of 4th of July. The use of translucent overlays and subtle color gradients adds depth and interest, making it a standout choice for any festive gathering.
Consumables Needed
- Base Coat: Strengthening base coat.
- Polishes: Transparent pink (OPI’s Bubble Bath), classic red (Essie’s Forever Yummy), and navy blue (Sally Hansen’s Navy Fleet).
- Top Coat: High-gloss top coat for a gleaming finish.
- Tools: Star decals and sponge for gradient effect.
DIY Instructions
- Base Coat Application: Protect nails with a base coat.
- Color and Gradient Application: Apply the base shades, then use a sponge for a soft gradient on selected nails.
- Star and Stripe Design: Apply star decals and use tape for stripes.
- Top Coat for Protection: Finish with a glossy top coat for durability and shine.
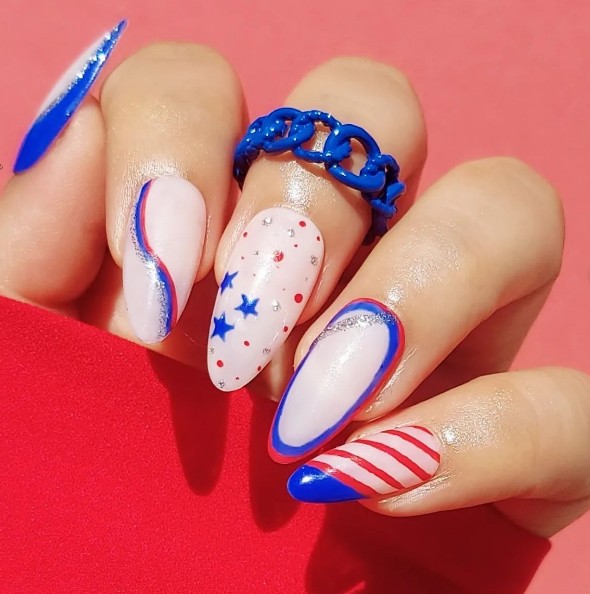
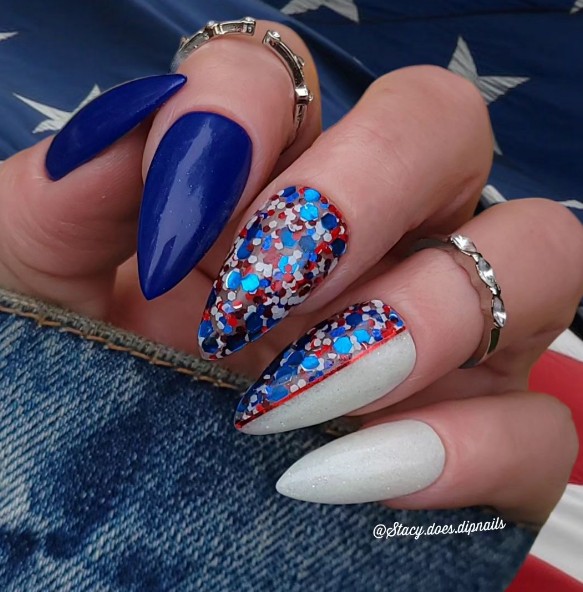
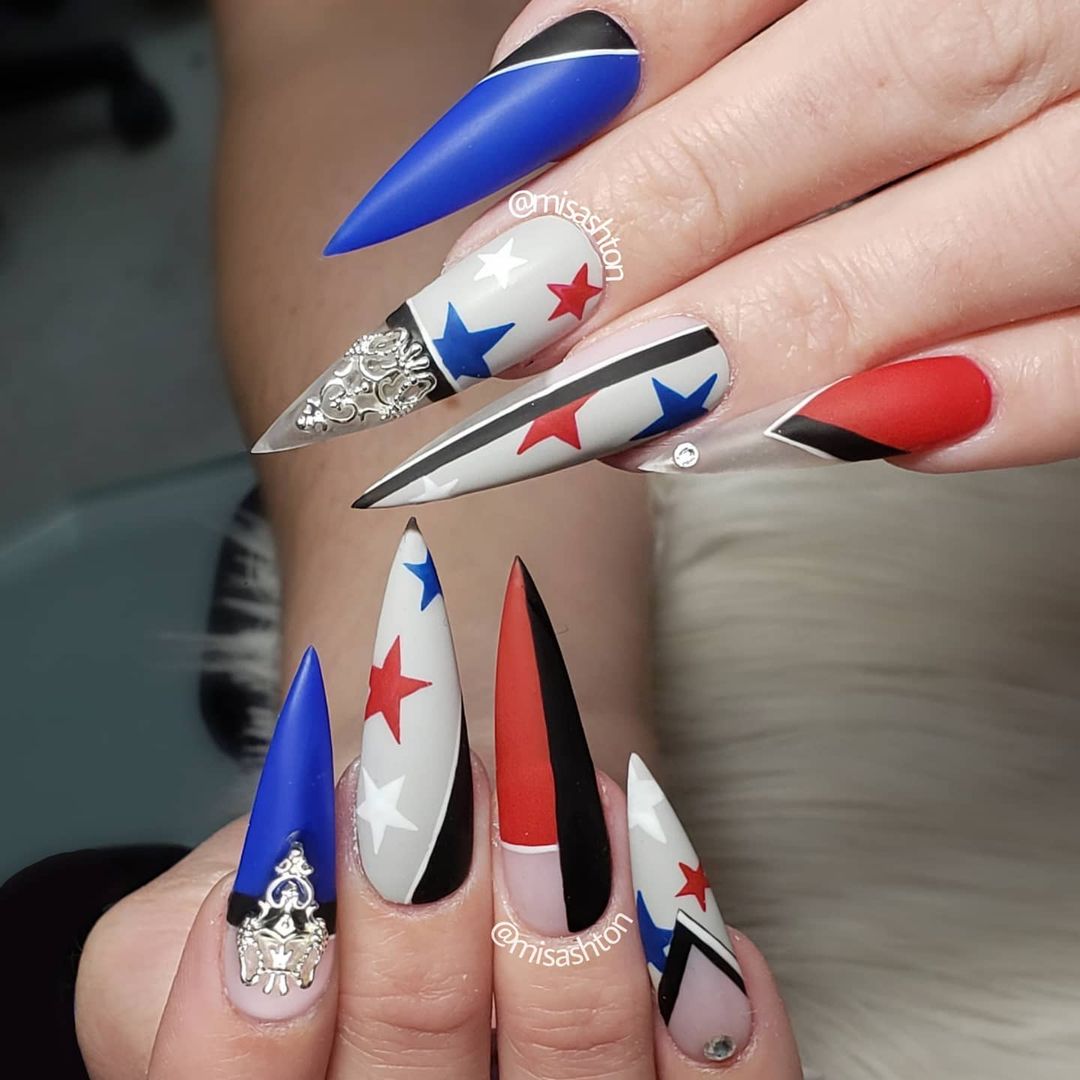
Vibrant Visions: Artistic Expression of Freedom
This set of nails is a true celebration of artistic expression and Independence. Each nail is meticulously designed with elements symbolizing American freedom, from sparkling stars to bold stripes, all wrapped in the traditional red, white, and blue. The incorporation of intricate details and a 3D chain element further enhances the theme, making these nails a centerpiece for any 4th of July celebration.
Consumables Needed
- Base Coat: Strong foundation base coat.
- Polishes: Vibrant red (Essie’s Really Red), deep blue (OPI’s Eurso Euro), and pure white (China Glaze’s White on White).
- Special Effects: Blue and silver glitter, plus 3D nail jewelry for the chain.
- Top Coat: A durable glossy top coat.
- Tools: Detail brushes for intricate designs, and adhesive for 3D elements.
DIY Instructions
- Base Layer: Start with a base coat to protect the nails.
- Design Implementation: Paint the base colors on each nail, using tape for stripes and a fine brush for stars.
- Adding Details: Apply glitter on selected areas to add sparkle.
- 3D Element: Carefully attach the 3D chain element using nail adhesive.
- Final Sealing: Apply a glossy top coat for a long-lasting finish.
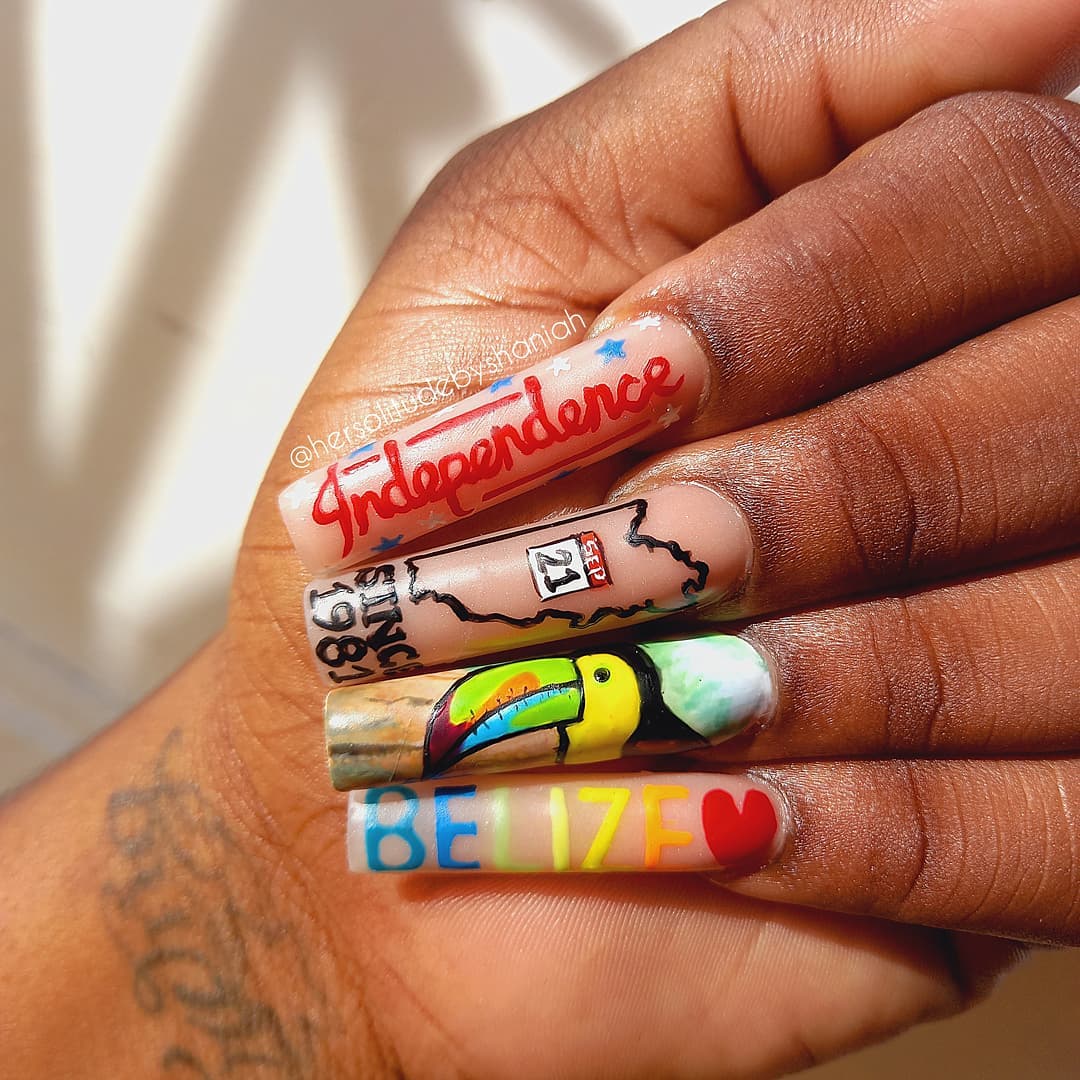
Expressive and Bold: Narrative Nails
These nails tell a story of independence and creativity, featuring hand-painted motifs that celebrate freedom. From state outlines to iconic symbols and words, these designs are as expressive as they are meaningful, offering a unique way to commemorate the 4th of July with a personal touch.
Consumables Needed
- Base Coat: Hydrating base coat to prevent nail damage.
- Polishes: Nude base (OPI’s Samoan Sand), black for detailing (Sally Hansen’s Black Out).
- Art Supplies: Miniature paint for detailed art and decals.
- Top Coat: Matte top coat for a modern finish.
- Tools: Ultra-fine detail brush for precise artwork.
DIY Instructions
- Base Preparation: Apply a base coat to each nail.
- Color Base: Paint a nude base color as the canvas for detailed work.
- Artistic Detailing: Hand-paint each design using a fine brush, applying state outlines, iconic symbols, and inspirational words.
- Apply Decals: Add any decals as needed to enhance the theme.
- Protective Finish: Seal with a matte top coat for a flat and contemporary look.
Classic Yet Daring: Stars and Stripes Forever
Embrace the classic theme of the 4th of July with these strikingly bold nails featuring stars and stripes in vivid blue and radiant red. The designs are both traditional and daring, using glossy finishes to catch the light and draw attention. This look is perfect for anyone wanting to celebrate with iconic American flair.
Consumables Needed
- Base Coat: Strengthening base coat.
- Polishes: Glossy red (China Glaze’s Red Pearl), and blue (Essie’s Butler Please).
- Top Coat: High-gloss top coat for a vibrant finish.
- Tools: Stencils for stars, striping tape for clean lines.
DIY Instructions
- Base Application: Apply a base coat to protect the nails.
- Color and Design: Use the polishes to create the base colors. Apply striping tape for precise stripes and stencils for stars.
- Detailing and Finishing: Remove tape and stencils, then apply a glossy top coat to enhance the colors and ensure durability.
Dynamic Duo: Stars and Stripes with a Twist
These nails perfectly combine classic 4th of July themes with modern design elements. The first set features an engaging combination of stripes and stars against a backdrop of vibrant blue and sparkling red. The varied patterns on each nail create a dynamic look that’s both patriotic and stylish.
Consumables Needed
- Base Coat: Start with a protective base coat.
- Polishes: Red (OPI’s Big Apple Red), blue (Essie’s Butler Please), and white (Sally Hansen’s White On).
- Special Effects: Red and blue glitter for added sparkle.
- Top Coat: A durable high-gloss top coat.
- Tools: Striping tape for precise lines and stencils for stars.
DIY Instructions
- Base Preparation: Apply base coat to protect the nails.
- Color Application: Paint base colors on each nail, alternating between solid colors and designs.
- Pattern Creation: Use striping tape and stencils to create detailed patterns and designs.
- Adding Sparkle: Apply glitter polish over the blue for a shimmering effect.
- Finish: Seal with a top coat for shine and durability.
Glitter and Glamour: Celebration in Sequins
This set transforms traditional 4th of July colors into a dazzling display of sequins and sparkle. The design uses a mix of large sequins and glitter to create a bold, festive look that’s perfect for celebrating in style.
Consumables Needed
- Base Coat: Strengthening base coat.
- Polishes: Blue (Revlon’s Royal), red (China Glaze’s Red Pearl), and white (OPI’s Alpine Snow).
- Glitter and Sequins: Blue and red sequins mixed with fine glitter.
- Top Coat: Glossy top coat to encase the sequins and glitter.
- Tools: Tweezers and a brush for precise sequin placement.
DIY Instructions
- Base Layer: Apply a base coat to each nail.
- Sequin Application: Start with a base color, then while still tacky, place sequins using tweezers.
- Glitter Addition: Mix in fine glitter around the sequins for extra sparkle.
- Protective Top Coat: Cover with a thick layer of glossy top coat to smooth out the surface and ensure longevity.
Sophisticated Stars: A Modern Take on Patriotism
Offering a sophisticated twist on the classic patriotic theme, these nails feature stars on a gradient of navy to clear, with subtle red tips. The design is elegant and modern, perfect for those seeking a less conventional but equally festive 4th of July look.
Consumables Needed
- Base Coat: Base coat for protection and adhesion.
- Polishes: Navy blue (Sally Hansen’s Navy Fleet), clear polish, and red (Essie’s Really Red).
- Top Coat: Matte top coat for a contemporary finish.
- Tools: Sponge for gradient effect and star stickers or stencils.
DIY Instructions
- Base Application: Apply a base coat for nail protection.
- Gradient Effect: Use a sponge to create a gradient from navy at the base to clear at the tip.
- Star Application: Place star stickers or use stencils and paint in stars with white polish.
- Adding Red Tips: Paint the tips red for a subtle yet striking effect.
- Finish with Matte Top Coat: Apply a matte top coat to unify the design with a modern matte finish.
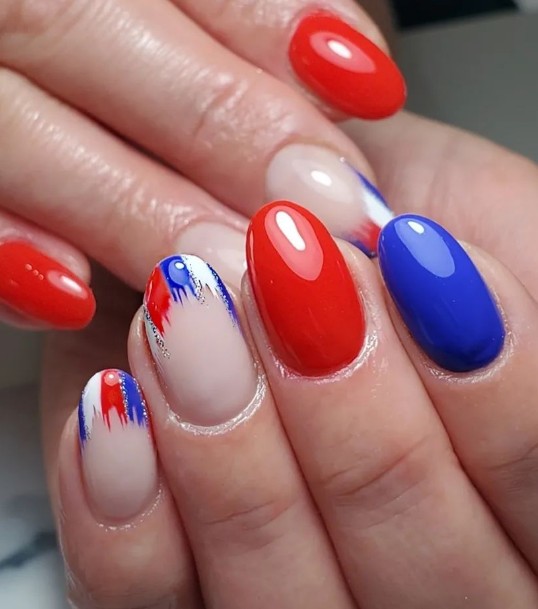
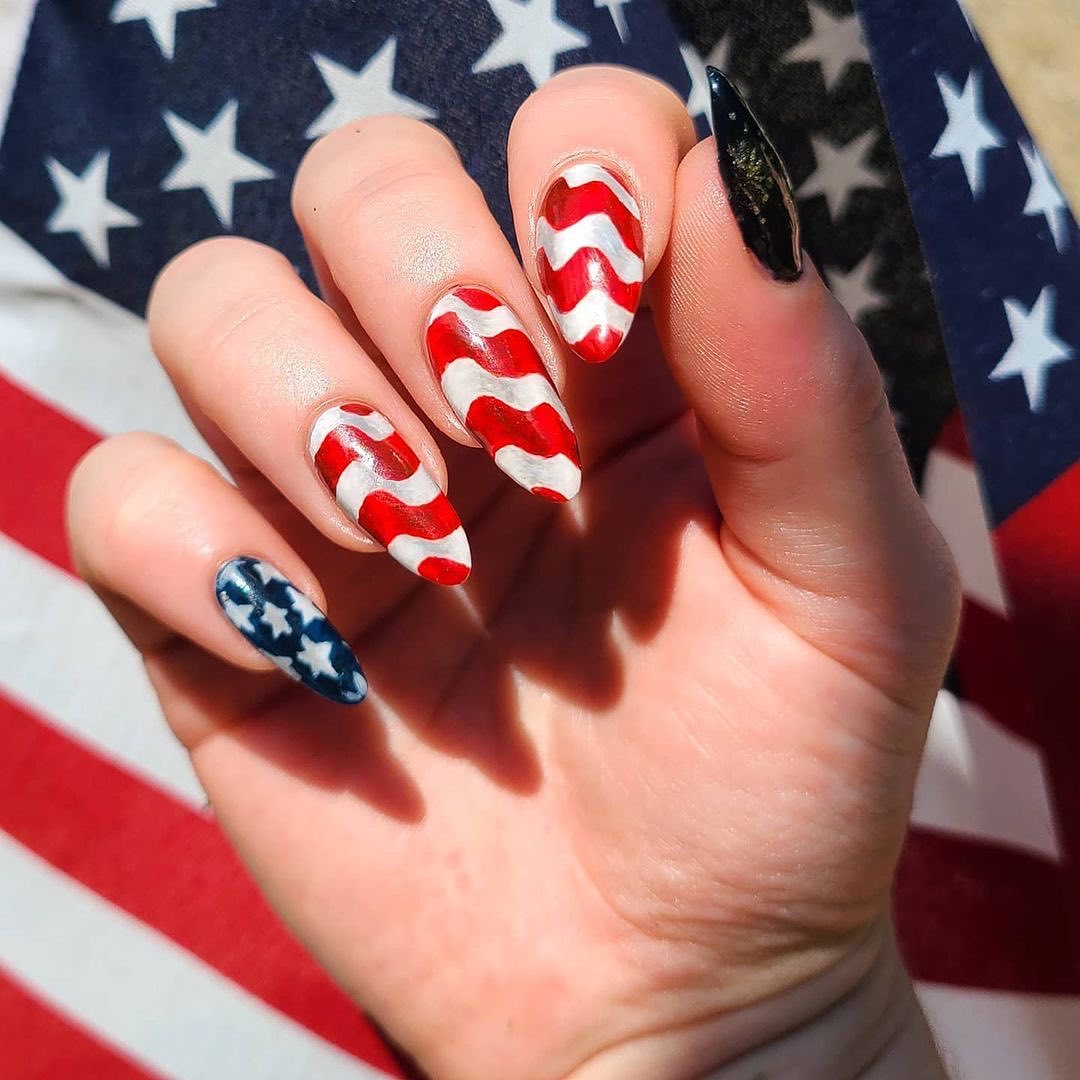
Cascading Waves: Flowing Stripes and Stars
This design captures the essence of the 4th of July with its cascading stripes resembling waves and a solitary star-adorned nail, embodying the flowing freedom of the American spirit. The white waves on a background of red create a dynamic movement, making each nail a statement of patriotism and style.
Consumables Needed
- Base Coat: Start with a strong base coat for durability.
- Polishes: Vibrant red (Essie’s Really Red), pure white (OPI’s Alpine Snow).
- Top Coat: High-gloss top coat for a shimmering finish.
- Tools: Detailing brush for precise wave patterns.
DIY Instructions
- Base Application: Begin with a base coat to protect the nails.
- Red Base: Apply a red polish as the base color on all nails.
- Wave Patterns: Use a fine detailing brush to paint white waves on the red base.
- Star Accent: On the blue nail, use a small brush to add white stars.
- Finish: Apply a glossy top coat to seal and enhance the design.
Contemporary Geometry: Bold and Abstract
Featuring a modern approach to 4th of July themes, this nail design combines geometric blocks and stripes with a playful use of the American colors. The design is perfect for those who prefer a contemporary look while celebrating national pride.
Consumables Needed
- Base Coat: A protective base coat to prevent staining.
- Polishes: Matte red (Essie’s Matte About You), glossy blue (Revlon’s Royal), and white (Sally Hansen’s White On).
- Top Coat: Matte top coat for a modern finish.
- Tools: Tape for clean geometric lines.
DIY Instructions
- Base Coat Application: Apply a base coat to each nail for protection.
- Color Blocks: Paint each nail with a base color. Use tape to section off areas for different colors.
- Geometric Design: Fill in the sections with contrasting colors using the tape as guides.
- Detailing: Add small details or accents as desired.
- Matte Finish: Apply a matte top coat to unify the design with a contemporary look.
Sharp Elegance: Stars, Stripes, and Splendor
This design elevates the classic 4th of July theme with sharp, pointed shapes and elegant detailing. Featuring stars and stripes in a crisp layout, the nails are a testament to refined tastes with a nod to national pride, enhanced with small jewel embellishments for a luxurious touch.
Consumables Needed
- Base Coat: Strengthening base coat for longevity.
- Polishes: Glossy red (China Glaze’s Red Pearl), deep blue (OPI’s Eurso Euro), and stark white (Essie’s Blanc).
- Special Effects: Small rhinestones or jewels for embellishment.
- Top Coat: High-gloss top coat for a protective shine.
- Tools: Precision brushes and rhinestone picker.
DIY Instructions
- Preparation: Start with a base coat to protect the nails.
- Base Colors: Apply base colors, planning the design for stripes and areas for stars.
- Detailing: Use precision brushes to add stars and stripes, ensuring crisp lines.
- Embellishments: Carefully place rhinestones or jewels on designated nails.
- Protective Top Coat: Finish with a high-gloss top coat to seal the design and add shine.
FAQ
Q: What are the best colors for 4th of July nail art?
A: The most traditional colors are red, white, and blue. These colors can be used in a variety of designs to express patriotism and celebration of Independence Day.
Q: How can I make my 4th of July nails last longer?
A: To extend the life of your nail art, start with a good base coat to protect your nails. Use high-quality polishes and finish with a strong top coat to seal in the design. Avoid water and harsh chemicals without gloves.
Q: Are there any quick designs for 4th of July nails?
A: Yes! A simple design could involve painting your nails with a solid base color and adding stickers or decals that have 4th of July themes, such as stars or stripes.
Q: Can I achieve professional-looking nails at home?
A: Absolutely! With the right tools, such as fine brushes and striping tape, you can create detailed and professional-looking designs. There are also plenty of tutorials online that can guide you step-by-step.
Q: What are some creative ways to use glitter on my 4th of July nails?
A: You can use glitter polishes as a top coat over your base colors or create a glitter gradient effect. Another option is to apply glitter to just one or two accent nails as a highlight.
Q: How do I prevent my nail art from chipping?
A: Apply thin, even coats of polish and allow each coat to dry completely before applying the next. A durable top coat is crucial for protecting your design and preventing chips.
Q: What are some trendy nail shapes for the 4th of July?
A: While classic round and square shapes always work, trendy stiletto or almond shapes can make your patriotic designs look even more striking.
Q: How can I incorporate stars into my nail design without it looking too busy?
A: Use a small dotting tool or a fine brush to create small stars. Placing a few stars on one or two accent nails can add a festive touch without overwhelming your design.
Save Pin