Are you ready to dip your toes into the vibrant world of summer pedicure designs? As the sun begins to shine brighter and sandals become the go-to footwear, there’s no better time to explore the latest trends in toenail art. Whether you prefer subtle elegance or bold statements, this summer offers a plethora of designs to make your feet stand out. Wondering what the season’s top trends are? Let’s dive into some fresh and fabulous summer pedicure ideas that will turn heads!
Matte Grey Elegance
Professional Opinion and Description The matte grey polish showcased in this pedicure stands as a testament to understated elegance, providing a soft yet impactful visual contrast against the vivid purple flowers. The rounded toenails are impeccably covered in a uniform matte finish, which pairs wonderfully with the delicate blossoms resting on the toes. This color choice not only speaks of class but also offers a versatile foundation that complements a wide array of summer outfits.
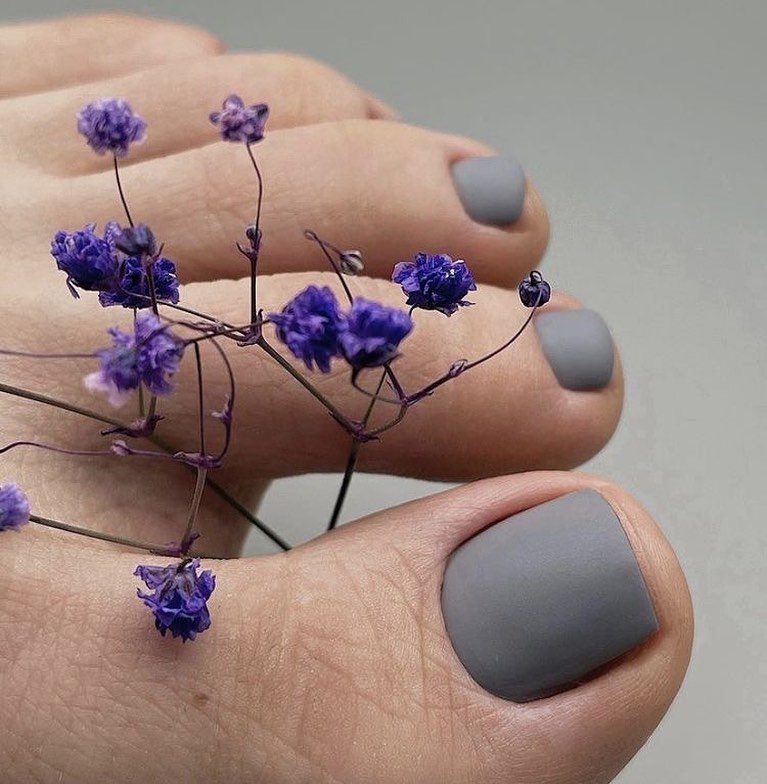
- Matte grey nail polish
- Matte top coat for a flawless finish
- Small floral decals or real miniature flowers for decoration
Each of these products can be found at your local beauty stores or online. I recommend using a high-quality matte top coat to ensure long-lasting wear and to prevent chipping.
DIY Instructions
- Apply a base coat to clean, dry nails to protect your natural nails and improve polish adherence.
- Once the base coat is dry, apply two coats of matte grey nail polish. Allow each coat to dry completely.
- Seal the polish with a matte top coat for a smooth, even texture.
- For the floral detail, you can either use tiny floral stickers or real flowers if you’re feeling adventurous. Place them gently on the wet top coat and seal with another layer of top coat to ensure they stay in place.
Sparkling Pink Sugar Crush
Professional Opinion and Description This pedicure features a dazzling sugar-textured pink polish that screams fun and festive. The textured speckles create a mesmerizing effect, resembling a candy-coated fantasy perfect for summer parties or beach outings. The vibrant pink shade paired with the unique sugar effect adds a playful twist to your traditional pedicure, making it a standout choice for those looking to add a bit of sparkle to their step.
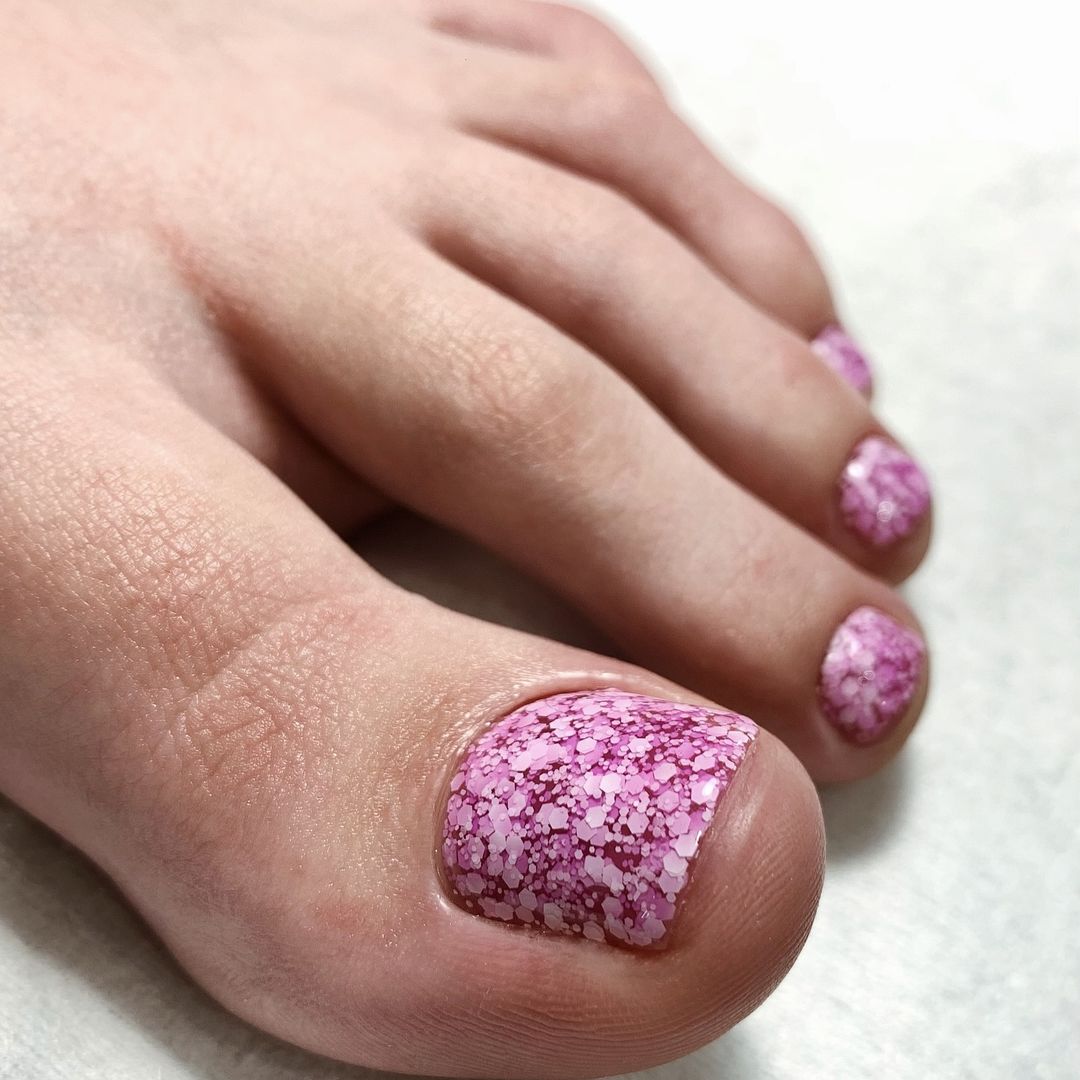
- Pink sugar effect nail polish
- Base coat and top coat for durability
- Optional: Additional fine glitter for extra sparkle
I suggest choosing a sugar effect polish specifically designed for its long-lasting qualities and brilliant finish.
DIY Instructions
- Begin with a base coat to protect your nails.
- Apply two coats of the pink sugar effect polish, allowing for thorough drying between coats.
- If desired, sprinkle a bit of fine glitter over the wet second coat for added brilliance.
- Finish with a high-quality top coat to seal in the design and enhance the textured look.
Soft Pink Simplicity
Professional Opinion and Description This design epitomizes the beauty of simplicity with its soft pink shade that offers a fresh, clean look ideal for any summer occasion. The glossy finish adds a touch of sophistication, making it a versatile choice that pairs beautifully with both casual and more formal wear. The uniform color and high-gloss finish reflect meticulous care and professional application.

- Soft pink gel nail polish
- Glossy top coat for a radiant shine
- LED or UV lamp to cure the gel polish
For the best results, choose a gel polish for its long-lasting properties and superb gloss.
DIY Instructions
- Apply a thin layer of base coat and cure under an LED or UV lamp as directed.
- Follow with two coats of soft pink gel polish, curing each coat under the lamp.
- Finish with a glossy top coat and cure for the final touch to achieve a smooth, durable finish.
Lime Green Confetti Splash
Professional Opinion and Description This vibrant design is a true celebration of summer. The lime green base is electrifying and the large confetti flecks add a playful, party-like feel. The confetti’s varied shapes and sizes mimic the spontaneity of a joyful summer festival. This design is perfect for those who love to express their dynamic personality through their toenails.

- Lime green nail polish
- Large confetti glitter in multiple colors
- Clear top coat to seal the design
The key here is to choose a high-pigment lime green polish to ensure the color pops as vibrantly as it should under the summer sun.
DIY Instructions
- Start with a base coat to protect your nails.
- Apply two coats of lime green nail polish, letting each coat dry thoroughly.
- While the second coat is still tacky, sprinkle the confetti glitter over your nails.
- Seal everything with a thick layer of clear top coat to smooth out the texture and lock the confetti in place.
Save Pin
Chic Camouflage
Professional Opinion and Description The camouflage design on the toenails is a sophisticated twist on a typically rugged pattern. By using shades of navy, mustard, and burnt sienna, this look becomes refined and fashion-forward. It’s an unexpected choice for a pedicure but stands out as a stylish statement, particularly suitable for beach outings or summer evening events.
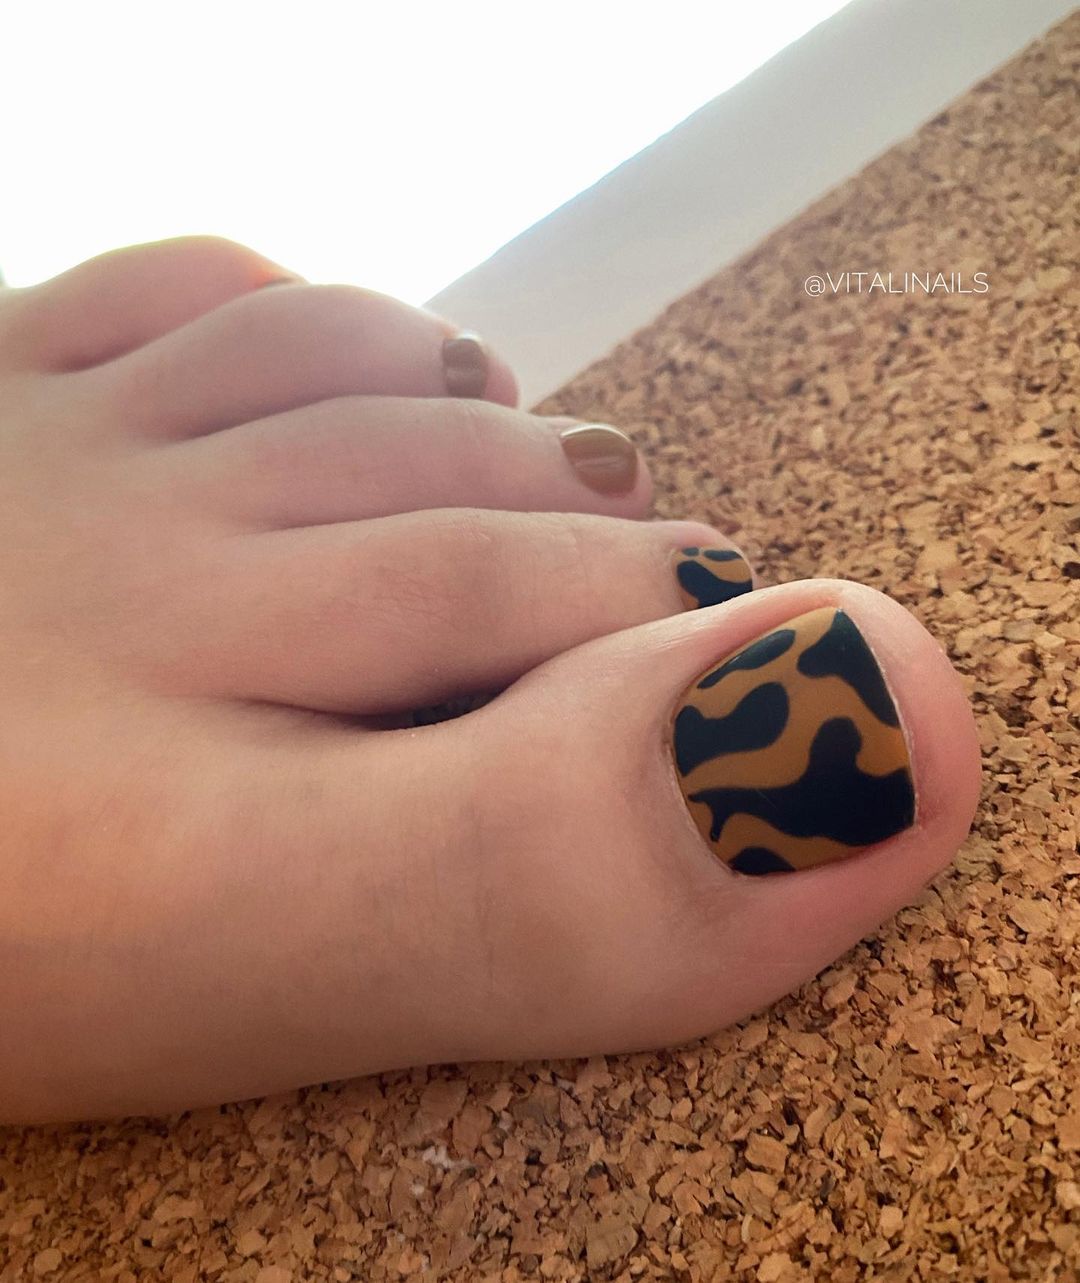
- Navy, mustard, and burnt sienna nail polishes
- Detailing brush for precise pattern work
- Matte or glossy top coat, depending on preference
For a modern take, I recommend a matte finish which enhances the camouflage effect dramatically.
DIY Instructions
- Apply a base coat to protect the nails.
- Paint a base layer in the lightest color (mustard). Let it dry.
- Use a detailing brush to add patches of the next shade (burnt sienna), then the darkest shade (navy).
- Blend slightly where the colors meet for a seamless camouflage effect.
- Finish with your choice of matte or glossy top coat.
Fresh Mint
Professional Opinion and Description The fresh mint pedicure offers a burst of freshness that is as cool as it is chic. The glossy finish on these rounded toenails enhances the depth and vibrancy of the mint shade, making it a perfect pick for those who prefer a minimalist yet striking pedicure. This look is not only refreshing but also pairs beautifully with airy, light summer attire.
- Mint green gel polish
- High-gloss top coat
- UV or LED lamp for curing gel polish
Opting for a gel polish in this instance ensures durability throughout your summer adventures.
DIY Instructions
- Begin with a base coat and cure it under a UV or LED lamp.
- Apply two coats of mint green gel polish, curing each layer.
- Finish with a high-gloss top coat for a shiny, eye-catching appearance.
Sleek Noir with Artistic Flair
Professional Opinion and Description This pedicure design combines the timeless appeal of glossy black with a single accent nail featuring intricate silver zebra stripes. The black polish is slick and provides a perfect backdrop for the detailed art on the big toe, which captures attention without overwhelming the simplicity of the other toes. It’s an excellent choice for evening wear or formal occasions where a touch of unique style is desired.
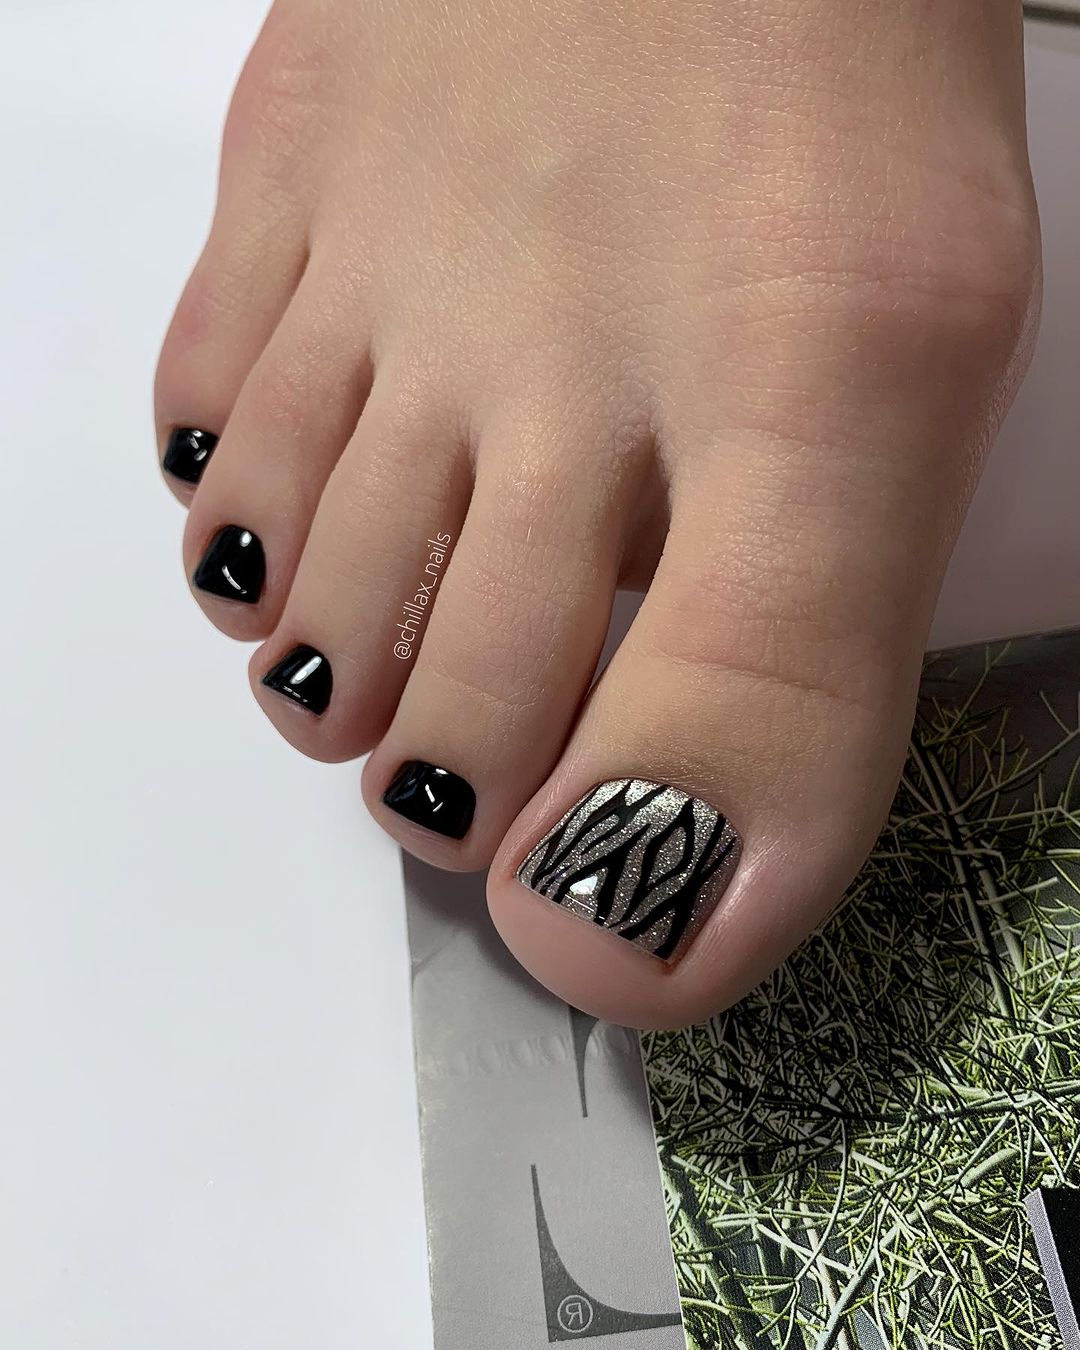
- High-gloss black nail polish
- Silver nail art polish or thin nail art pen
- Top coat for a seamless finish
Black and silver are classic choices that suggest sophistication; selecting a durable, high-gloss formula will help maintain the sheen and art detail.
DIY Instructions
- Apply a base coat to all the toes to protect your nails.
- Paint all the toes except the big toe with two coats of glossy black nail polish.
- For the big toe, apply a base coat of black. Once dry, use a silver nail art pen to draw zebra stripes.
- Seal all nails with a top coat to enhance the gloss and protect the artwork.
Vivid Pink Leopard Print
Professional Opinion and Description This bold and playful design uses a vivid pink base with black leopard spots on the big toe, making it a fun choice for summer outings or casual gatherings. The leopard print is whimsical yet fashionable, adding a wild touch to the otherwise simple pink toenails. It’s a fantastic way to express personality through your pedicure.

- Vivid pink nail polish
- Black nail art pen or polish for the spots
- Clear top coat
Choosing a vibrant pink as the base will draw the eye, while the black adds a dramatic contrast that’s sure to stand out.
DIY Instructions
- Begin with a base coat on all toes to ensure longevity.
- Paint all toes with vivid pink nail polish, applying two coats for opacity.
- On the big toe, use a black nail art pen to create random leopard spots.
- Finish with a clear top coat to protect your design and add shine.
Marbled Elegance
Professional Opinion and Description This sophisticated design features a white base with delicate gold and grey marbling, perfect for those who prefer a subtle yet elegant look. The white polish makes it a versatile choice for any outfit, while the marbling adds an artistic touch that elevates the overall design. This pedicure is ideal for weddings or special events where a refined aesthetic is desired.
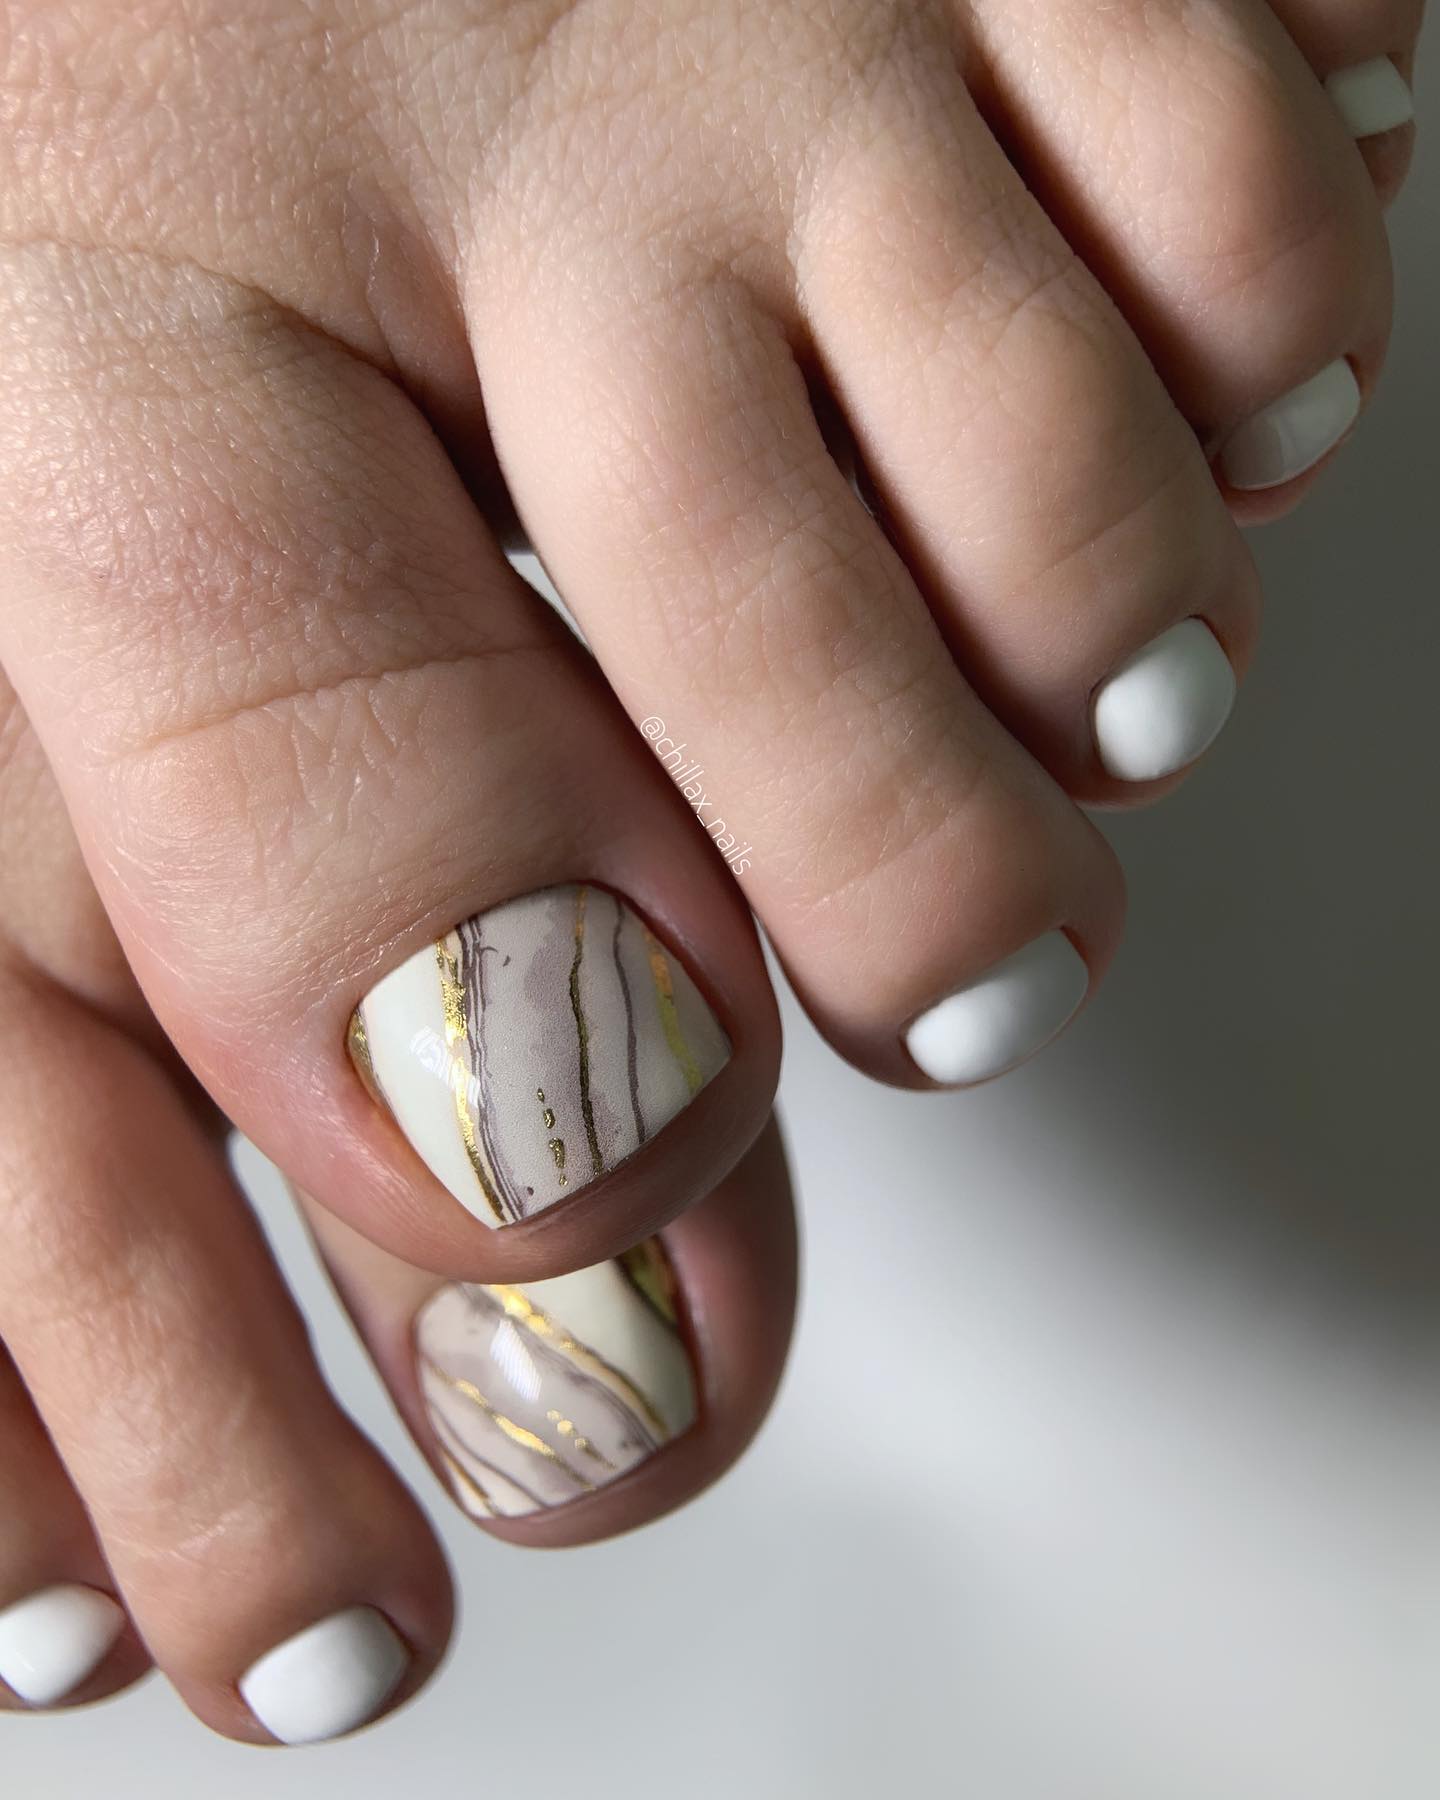
- White nail polish
- Gold and grey nail polish for marbling
- Thin detailing brush
- Top coat for a smooth finish
Marbling requires a bit of practice to perfect, but the result is a stunningly unique nail design.
DIY Instructions
- Apply a white base coat to all the toes.
- Mix a little grey and gold polish on a palette. Using a detail brush, lightly drag the colors over the wet white base to create a marble effect.
- Allow everything to dry thoroughly before applying a top coat for protection and shine.
Save Pin

Playful Pink with Glitter Accent
Professional Opinion and Description This pedicure exudes a youthful charm with its striking neon pink base and a dazzling glitter accent on the big toe. The contrast between the vibrant pink and the multicolored glitter creates a playful yet glamorous look, perfect for summer festivals or a fun day out with friends. It’s a great way to add a pop of color and sparkle to your summer wardrobe.

- Neon pink nail polish
- Multicolored glitter polish
- High-gloss top coat
Using a high-quality neon polish will ensure the color remains vibrant longer under the summer sun.
DIY Instructions
- Apply a base coat to protect your nails.
- Paint all toes with neon pink, applying two coats for full opacity.
- Apply the glitter polish to the big toe only, adding multiple layers until you achieve the desired sparkle.
- Seal all the nails with a high-gloss top coat to enhance the shine and prolong the wear.
Classic Milky French Pedicure
Professional Opinion and Description This pedicure offers a timeless elegance with a modern twist on the classic French tip. The milky pink base is soft and feminine, while the crisp white tips give a clean and polished finish. It’s perfect for those seeking a more subtle and refined look, suitable for both casual and formal summer events.

- Milky pink polish
- White tip polish
- Top coat for a smooth, lasting finish
This design calls for precise application, especially for the white tips, to maintain a neat and professional appearance.
DIY Instructions
- Start with a base coat to protect and smooth your nails.
- Apply two coats of milky pink polish over the entire nail.
- Carefully paint the tips with white polish, using a steady hand or tip guides for precision.
- Finish with a clear top coat to seal and shine.
Pure White Minimalism
Professional Opinion and Description Pure white polish on these pedicured toes provides a stark, minimalist look that’s both striking and surprisingly versatile. The glossy finish enhances the simplicity and elegance of the white, making it a fantastic option for beach vacations or as a statement contrast against tanned skin. This pedicure is all about celebrating summer with a clean, fresh vibe.

- High-gloss white nail polish
- Base coat
- Top coat for durability and shine
Opt for a polish with a high opacity to avoid streaks and ensure a smooth, even application.
DIY Instructions
- Apply a base coat to protect the nails from staining.
- Paint two to three layers of white polish, allowing each to dry thoroughly.
- Finish with a high-shine top coat to maximize the gloss and extend the life of your pedicure.
Abstract Black with Matte Finish
Professional Opinion and Description This design offers a sleek and modern look, featuring matte black as the predominant color complemented by an accent nail with abstract white and black patterns. This style speaks to those who appreciate a bold, artistic statement on their toes, perfect for making a fashionable impact at any summer night event.

- Matte black nail polish
- White nail polish for the pattern
- Matte top coat
- Fine detail brush
Matte finishes are excellent for a contemporary look, and using a fine detail brush helps achieve precise and intricate designs.
DIY Instructions
- Start by applying a matte base coat to protect your nails.
- Paint all toes in matte black, except for the accent nail.
- On the accent nail, use a fine brush to create abstract patterns with white polish.
- Finish with a matte top coat to ensure durability and enhance the matte effect.
Classic Red Sophistication
Professional Opinion and Description Nothing says classic elegance quite like a glossy red pedicure. This design features deep, vibrant red polish that provides a striking look. It’s a timeless choice that pairs beautifully with any outfit and is especially fitting for formal gatherings or romantic summer dinners.
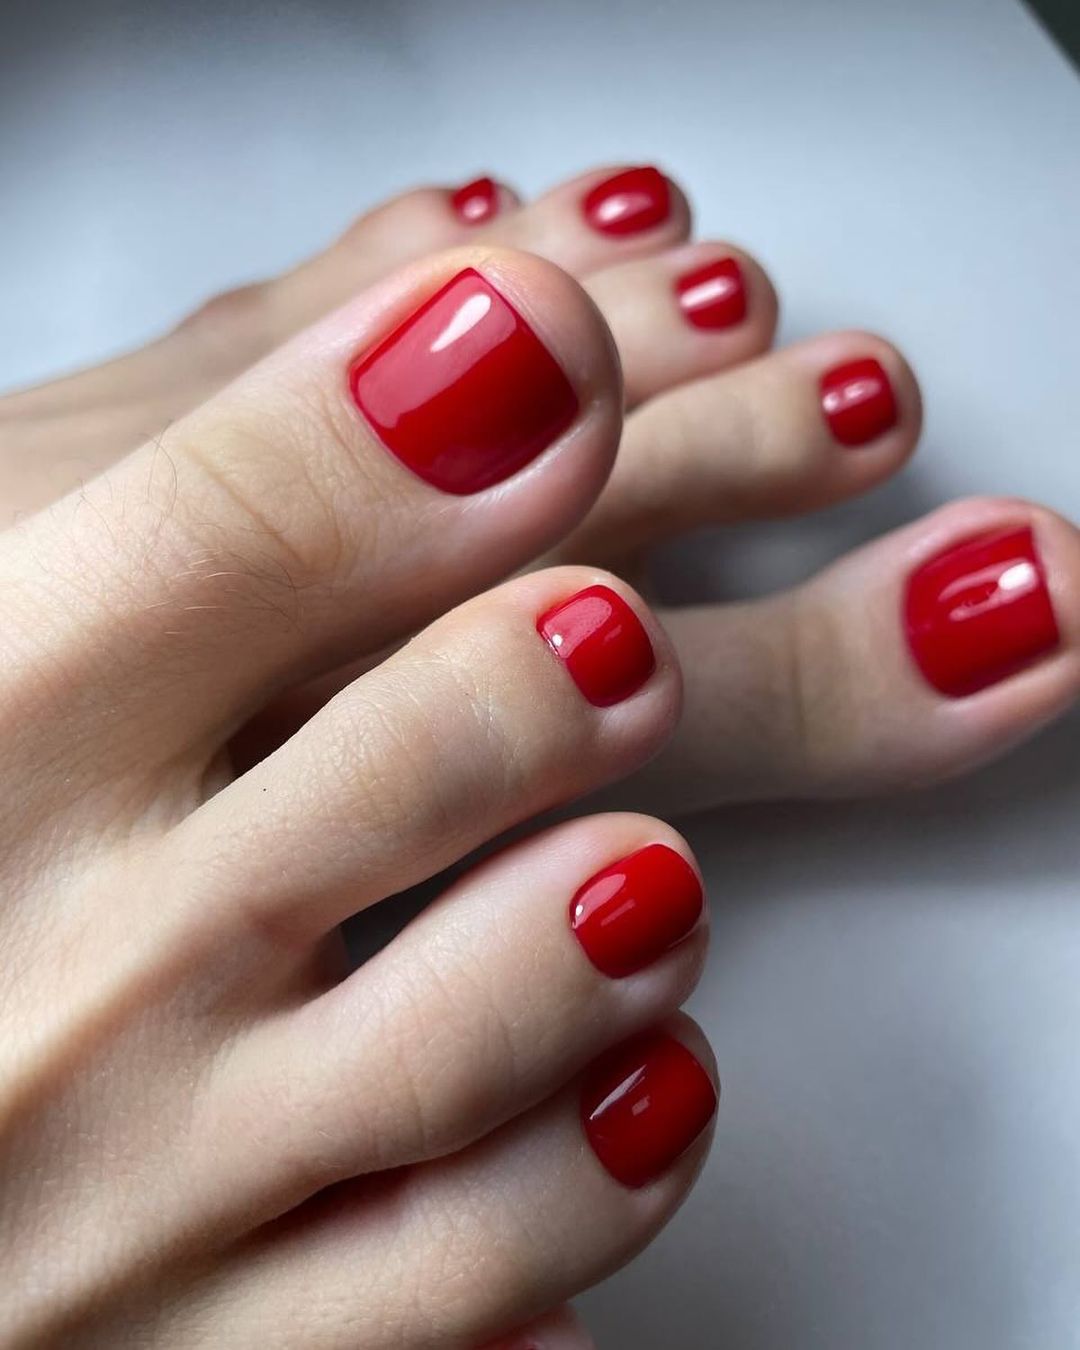
- High-gloss red nail polish
- Base coat
- Top coat for a shiny, protective finish
A high-quality red polish is crucial for achieving a deep, rich color and a glossy finish that lasts.
DIY Instructions
- Apply a base coat to protect your nails from staining.
- Paint two coats of red nail polish, allowing for complete drying between coats.
- Finish with a glossy top coat to add shine and prolong the pedicure’s life.
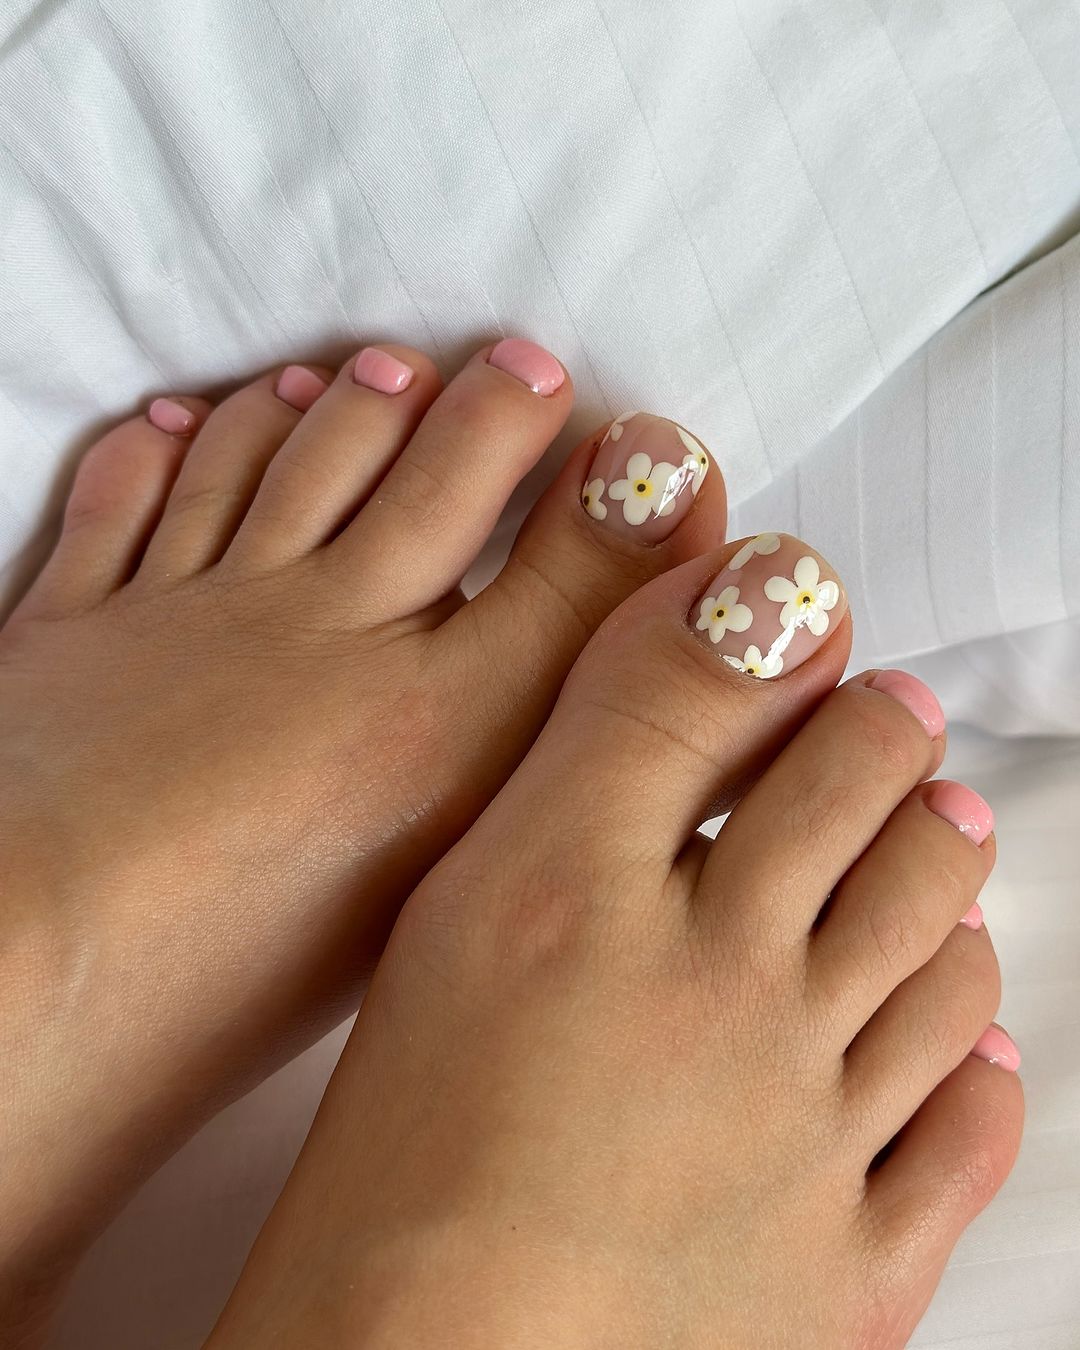
Delicate Floral on Pink Base
Professional Opinion and Description This charming pedicure combines a soft pink base with delicate white floral designs on the accent nails, creating a sweet and feminine look. It’s perfect for daytime events like garden parties or casual brunches. The floral patterns add a touch of nature-inspired beauty, enhancing the overall whimsy of the design.
- Soft pink nail polish
- White nail polish for floral designs
- Top coat for a smooth finish
- Detailing brush
For the floral designs, precision is key. A fine detailing brush will help achieve the delicate lines and curves of the flowers.
DIY Instructions
- Apply a base coat to protect the nails.
- Cover all nails with a soft pink polish. Allow it to dry.
- Use a white polish with a detailing brush to paint small flowers on the accent nails.
- Apply a clear top coat to seal the design and ensure it lasts through your summer activities.
Deep Forest Green
Professional Opinion and Description This pedicure showcases a rich forest green, offering a deep and sophisticated look. The matte finish provides a modern twist, making it an elegant choice for those who appreciate a more subdued yet striking nail color. This color is especially suitable for outdoor events and complements natural earth tones perfectly.

- Forest green matte nail polish
- Matte top coat
Using a matte top coat is essential to achieve the chic, non-glossy finish that sets this style apart.
DIY Instructions
- Apply a base coat to protect the nail.
- Paint two coats of forest green matte polish, allowing each coat to dry completely.
- Finish with a matte top coat to enhance the texture and ensure durability.
Glossy Jet Black
Professional Opinion and Description Glossy black toenails are all about bold sophistication. This pedicure exudes a sleek, powerful vibe, making it a great choice for formal evenings or to add a dramatic flair to your everyday style. The high gloss finish ensures that the black color looks deep and luxurious.

- High-gloss black nail polish
- Top coat for extra shine
The high-gloss finish is crucial for achieving that wet look that truly makes the black pop.
DIY Instructions
- Start with a base coat to protect your nails from staining.
- Apply two layers of black nail polish for a rich, opaque finish.
- Add a top coat for that ultimate shiny, sleek appearance.
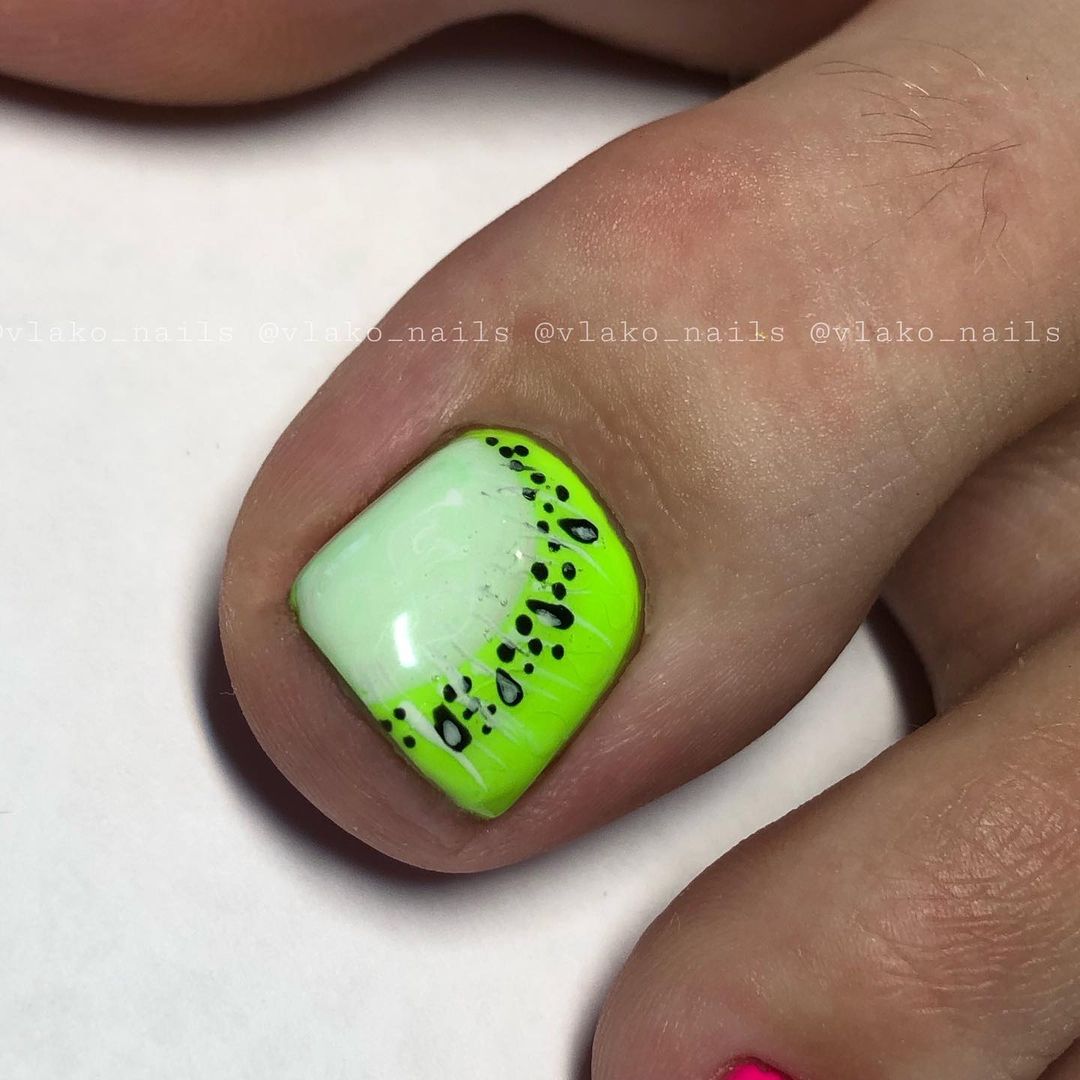
Neon Green with Black Dots
Professional Opinion and Description This playful pedicure combines a bright neon green base with black polka dots for a fun and eye-catching look. It’s perfect for summer parties or as a vibrant pick-me-up during the warmer months. The neon green is sure to stand out, while the black dots add a whimsical, artistic touch.
- Neon green nail polish
- Black nail polish for dots
- A dotting tool or a bobby pin
This design is great for those who like to express their playful side through their pedicure.
DIY Instructions
- Apply a base coat to protect the nails.
- Paint the nails with neon green polish. Let it dry completely.
- Dip a dotting tool or the tip of a bobby pin into black nail polish and create small dots over the neon green base.
- Seal with a top coat to protect the design and enhance durability.
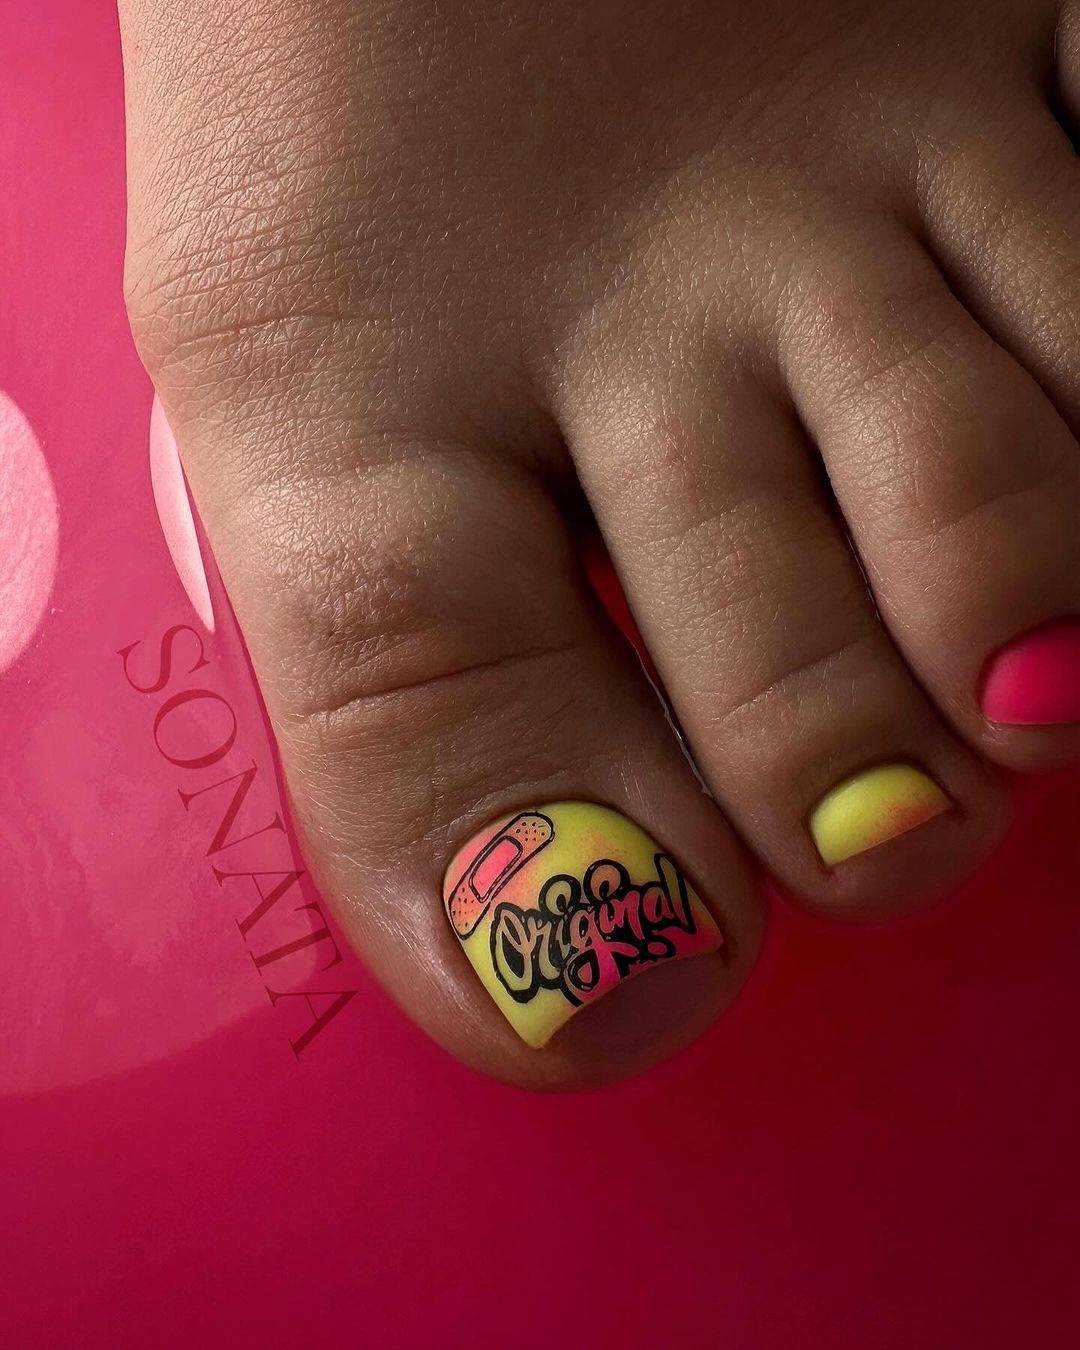
Vibrant Pop Art Pedicure
Professional Opinion and Description This pedicure is a true work of art, featuring a vivid pop art design with a comic-style “Original” badge in bright colors. The use of a sunny yellow gradient as the background enhances the vibrancy of the design. This bold and creative approach is perfect for those who love to stand out with their style, adding a fun and quirky twist to their summer look.
- Bright yellow nail polish for the base
- Black, pink, and white polishes for the pop art details
- A fine brush for detailed art work
- Top coat for a glossy finish
Such designs require steady hands and patience to meticulously add each detail, making every toe a mini-canvas.
DIY Instructions
- Begin with a base coat to protect your nails.
- Apply a bright yellow polish as the base. You might need several coats to achieve a vibrant look.
- Use a fine brush to add the “Original” badge and other pop art details using black, pink, and white.
- Seal the design with a glossy top coat to protect your artwork and enhance the colors.
Abstract Art and Grid Designs
Professional Opinion and Description This pedicure mixes abstract art with geometric grid patterns, creating a sophisticated and artistic style. The combination of soft pink hues with dramatic black grid lines offers a modern aesthetic, ideal for those who appreciate a blend of simplicity and creativity in their nail art.

- Soft pink nail polish as the base color
- Black nail polish for the grid and abstract lines
- A very thin brush or nail art pen for precision
- Clear top coat to seal the designs
This style appeals to a refined taste, requiring precision in the execution of the grid lines and abstract shapes.
DIY Instructions
- Apply a base coat to all nails for protection.
- Paint a soft pink base on all toes.
- Use a black polish with a thin brush or nail art pen to create grid patterns and abstract designs.
- Finish with a clear top coat for a smooth, protective layer over your designs.
Chic Pedicure with Accents
Professional Opinion and Description Enhancing the classic French pedicure, this design incorporates a twist with delicate floral accents on a translucent pink base. The addition of golden elements and soft pink flowers introduces a touch of romance and femininity, making it perfect for wedding events or a classy summer garden party.

- Translucent pink nail polish for the base
- White polish for the tips
- Thin brushes for delicate floral artwork
- Gold leaf or polish for accents
- Top coat for durability and shine
This design is about elegance and subtlety, focusing on small, detailed art to create a significant impact.
DIY Instructions
- Start with a base coat to protect and smooth the nails.
- Apply a translucent pink polish as the base.
- Paint the tips with white polish for the classic French look.
- Use a thin brush to add delicate floral designs and golden accents.
- Complete the pedicure with a top coat to seal in the design and add a glossy finish.
Speckled Pink Delight
Professional Opinion and Description This pedicure presents a charmingly whimsical look with a soft pink base speckled with bright red flecks. The design resembles a sweet strawberry ice cream, making it a playful choice for summer. It’s subtle yet fun, perfect for casual outings or a relaxing day at the beach.

- Soft pink nail polish
- Red speckle polish or red nail polish for creating specks
- Top coat for a smooth finish
This design is simple to achieve yet provides a unique and eye-catching look.
DIY Instructions
- Apply a base coat to protect your nails.
- Paint all nails with a soft pink polish as the base.
- Dot the red polish lightly with a brush or use a speckled polish over the pink base.
- Finish with a top coat to seal in the design and ensure longevity.
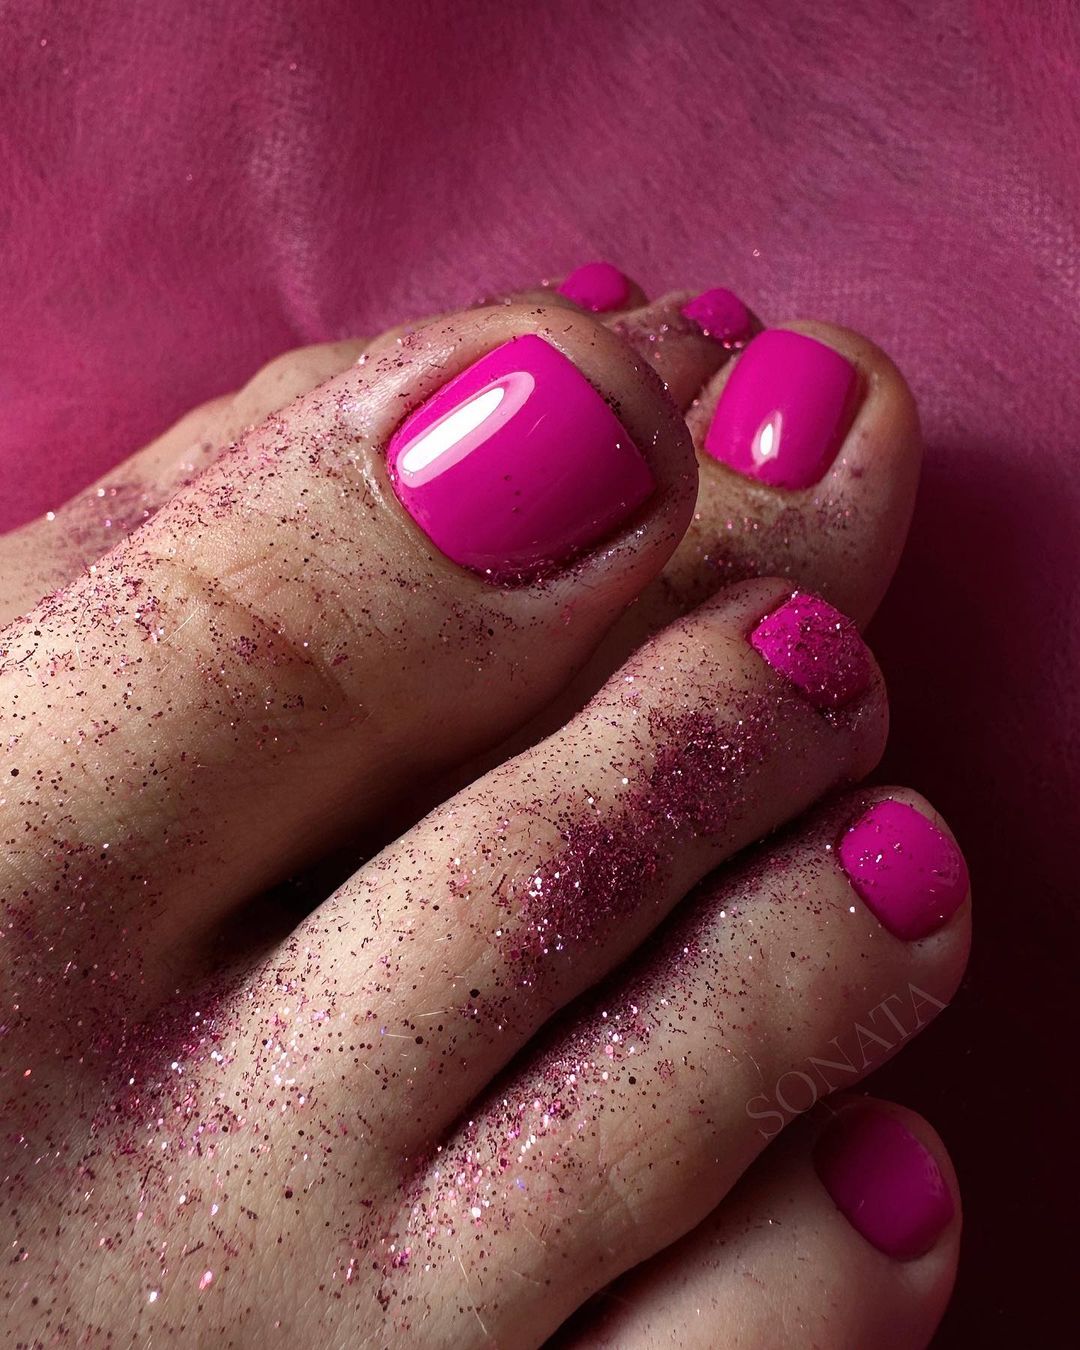
Vibrant Pink with Glitter Overload
Professional Opinion and Description This bold pedicure uses a vibrant pink polish as a base with a heavy application of glitter on the toes, creating a dazzling effect. The look is perfect for those who love to sparkle and stand out at any summer party or night out.
- Vibrant pink nail polish
- Coarse pink glitter
- Top coat to encapsulate the glitter
Ideal for those looking to make a statement, this design is both striking and festive.
DIY Instructions
- Start with a base coat to protect the nails.
- Apply two coats of vibrant pink polish.
- While the second coat is still tacky, sprinkle pink glitter over the nails, focusing more on the tips for a gradient effect.
- Seal everything with a heavy-duty top coat to keep the glitter in place.
Elegant Nude with Subtle Charms
Professional Opinion and Description This sophisticated pedicure features a nude polish accented with subtle charms and minimalistic designs. The elegance of the nude tone combined with the unique charm makes it suitable for formal events or as a refined everyday look.
- Nude nail polish
- Small nail charms or decals
- Top coat for a polished finish
This pedicure style is all about understated elegance, perfect for enhancing natural beauty with a touch of glamour.
DIY Instructions
- Apply a base coat to all nails.
- Paint the nails with a nude polish for a clean, polished look.
- Carefully place nail charms on the accent nails while the polish is still tacky.
- Finish with a top coat to secure the charms and add a glossy sheen.
Chameleon Shine Pedicure
Professional Opinion and Description This pedicure boasts a mesmerizing chameleon polish that shifts color from teal to blue depending on the light and angle. The rich, deep colors provide a sophisticated yet intriguing look, perfect for those who love a bit of mystery and elegance in their style. It’s particularly suitable for evening events where the dynamic shift in hues can truly shine.
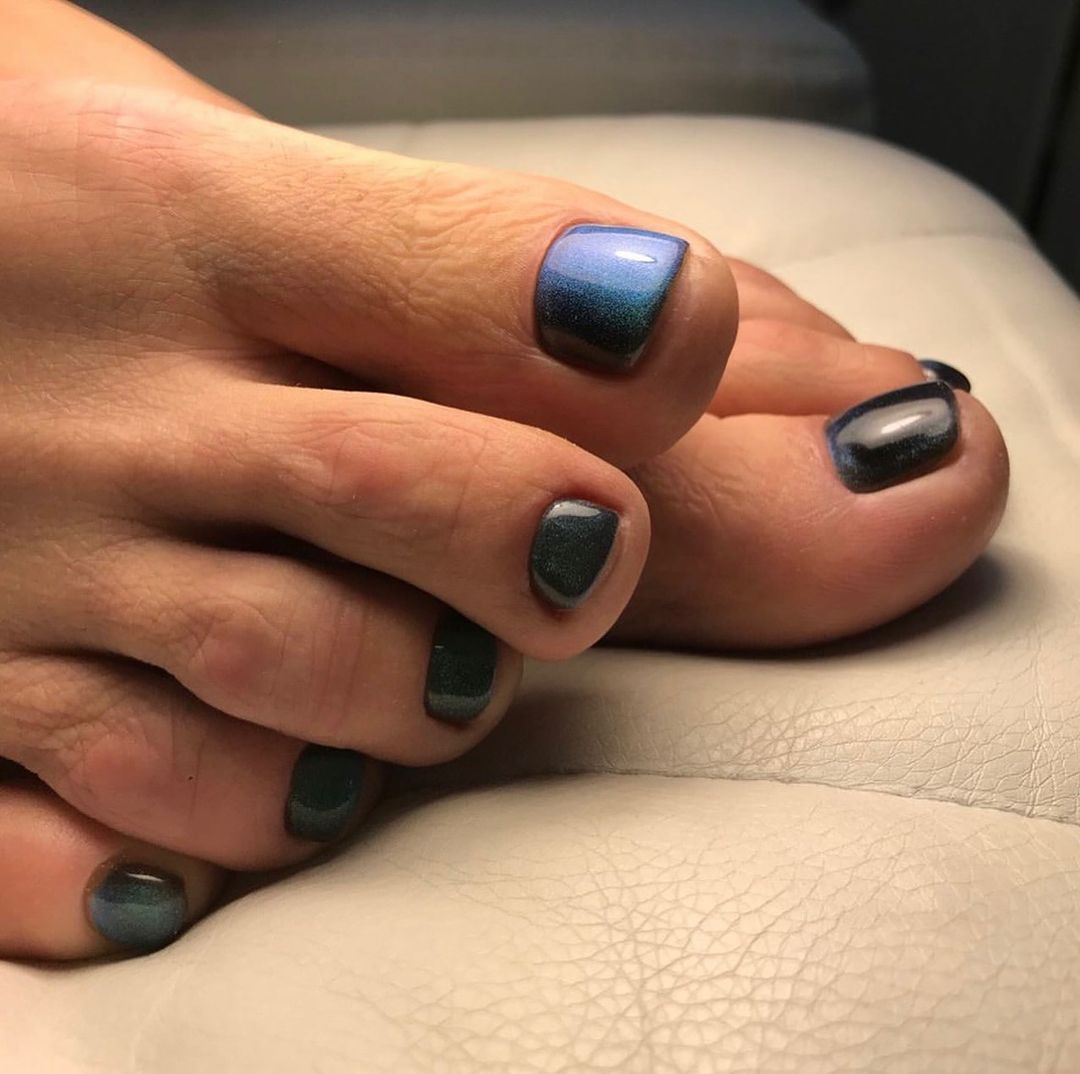
- Chameleon nail polish
- Base coat
- Top coat for a glossy finish
This type of polish is a fantastic choice for someone who wants their pedicure to be a conversation starter.
DIY Instructions
- Apply a base coat to protect your nails and enhance the polish adherence.
- Paint two coats of the chameleon nail polish, letting each coat dry thoroughly.
- Finish with a glossy top coat to enhance the color shift effect and add durability.
Subtle Sparkle Pedicure
Professional Opinion and Description Featuring a delicate and subtle sparkle, this pedicure is ideal for those who prefer a hint of shine. The soft, translucent base infused with fine glitter adds a touch of elegance without overwhelming, making it a great choice for day-to-day wear or special occasions where understated beauty is desired.

- Translucent glitter nail polish
- Base coat
- Top coat for a smooth, lasting finish
This look is all about adding a discreet sparkle that catches the light beautifully without being too bold.
DIY Instructions
- Begin with a base coat to protect the nails.
- Apply two coats of the translucent glitter polish for a subtle shine.
- Seal with a top coat to maintain the sparkle and prevent chips.
Classic French with a Pink Twist
Professional Opinion and Description This pedicure updates the classic French tip with a soft pink twist. The bright pink tips on a clean, white base provide a fresh and youthful take on the traditional French pedicure. This design is versatile, perfect for both casual and more formal settings where a touch of color is appreciated.

- White nail polish for the base
- Bright pink nail polish for the tips
- Top coat for gloss and protection
This pedicure style is for those who love classic looks but want to add a personal touch with color.
DIY Instructions
- Apply a base coat to protect and smooth the nails.
- Paint the nails with a white base coat.
- Carefully apply bright pink polish on the tips. You may use tip guides to ensure a clean line.
- Finish with a top coat to enhance the shine and ensure longevity.
FAQ
Q: How long does a typical pedicure last?
A: A professional pedicure can last anywhere from three to four weeks, depending on the type of polish used and how well you maintain it. Gel pedicures tend to last longer than regular polish due to their durable nature.
Q: What can I do to make my pedicure last longer?
A: To extend the life of your pedicure, apply a top coat every few days to add an extra layer of protection against chips and scuffs. Additionally, keep your feet moisturized, and avoid exposing your nails to harsh chemicals.
Q: Are there any quick fixes for a chipped pedicure?
A: Yes, for minor chips, you can apply a dab of the same color polish over the chip and seal it with a clear top coat. For larger chips, gently buff the area to smooth any rough edges before applying new polish and a top coat.
Q: How often should I change my pedicure polish?
A: It’s recommended to change your pedicure polish every three to four weeks, either due to growth or wear. Regular updates help prevent nail damage and keep your feet looking their best.
Q: Is it safe to get a pedicure at a salon during COVID-19?
A: Yes, most salons have implemented stringent health and safety protocols to protect clients and staff, including mask requirements, sanitizing stations, and social distancing measures. Always check with your local salon to ensure they follow the recommended guidelines.
Q: What are some trendy pedicure colors for this season?
A: This season, popular pedicure colors include vibrant shades like neon green, deep blues, and classic nudes with shimmer. Color-shifting polishes and matte finishes are also trendy, offering a modern twist on traditional colors.
Q: Can pedicures help with foot health?
A: Absolutely, regular pedicures can improve foot health by keeping nails trimmed, skin moisturized, and removing dead skin cells through exfoliation. This can prevent common issues such as ingrown toenails and fungal infections.
Save Pin