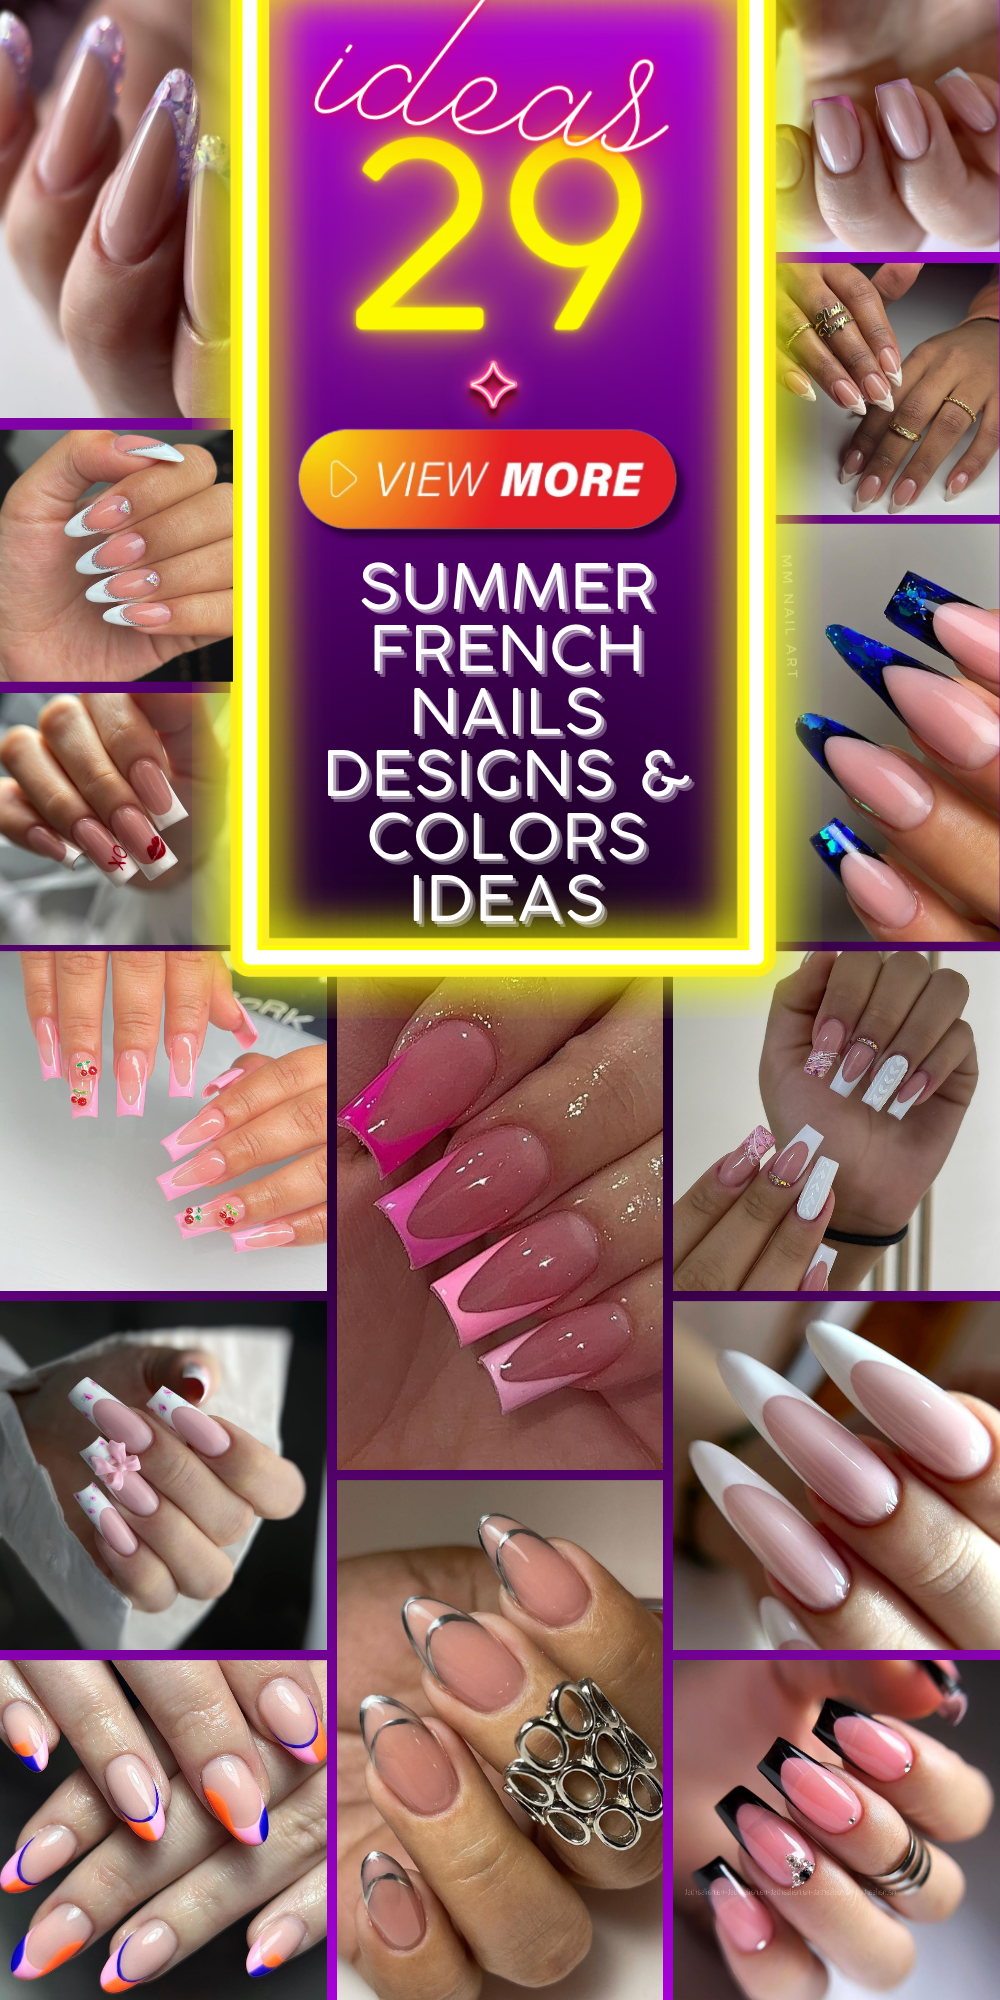
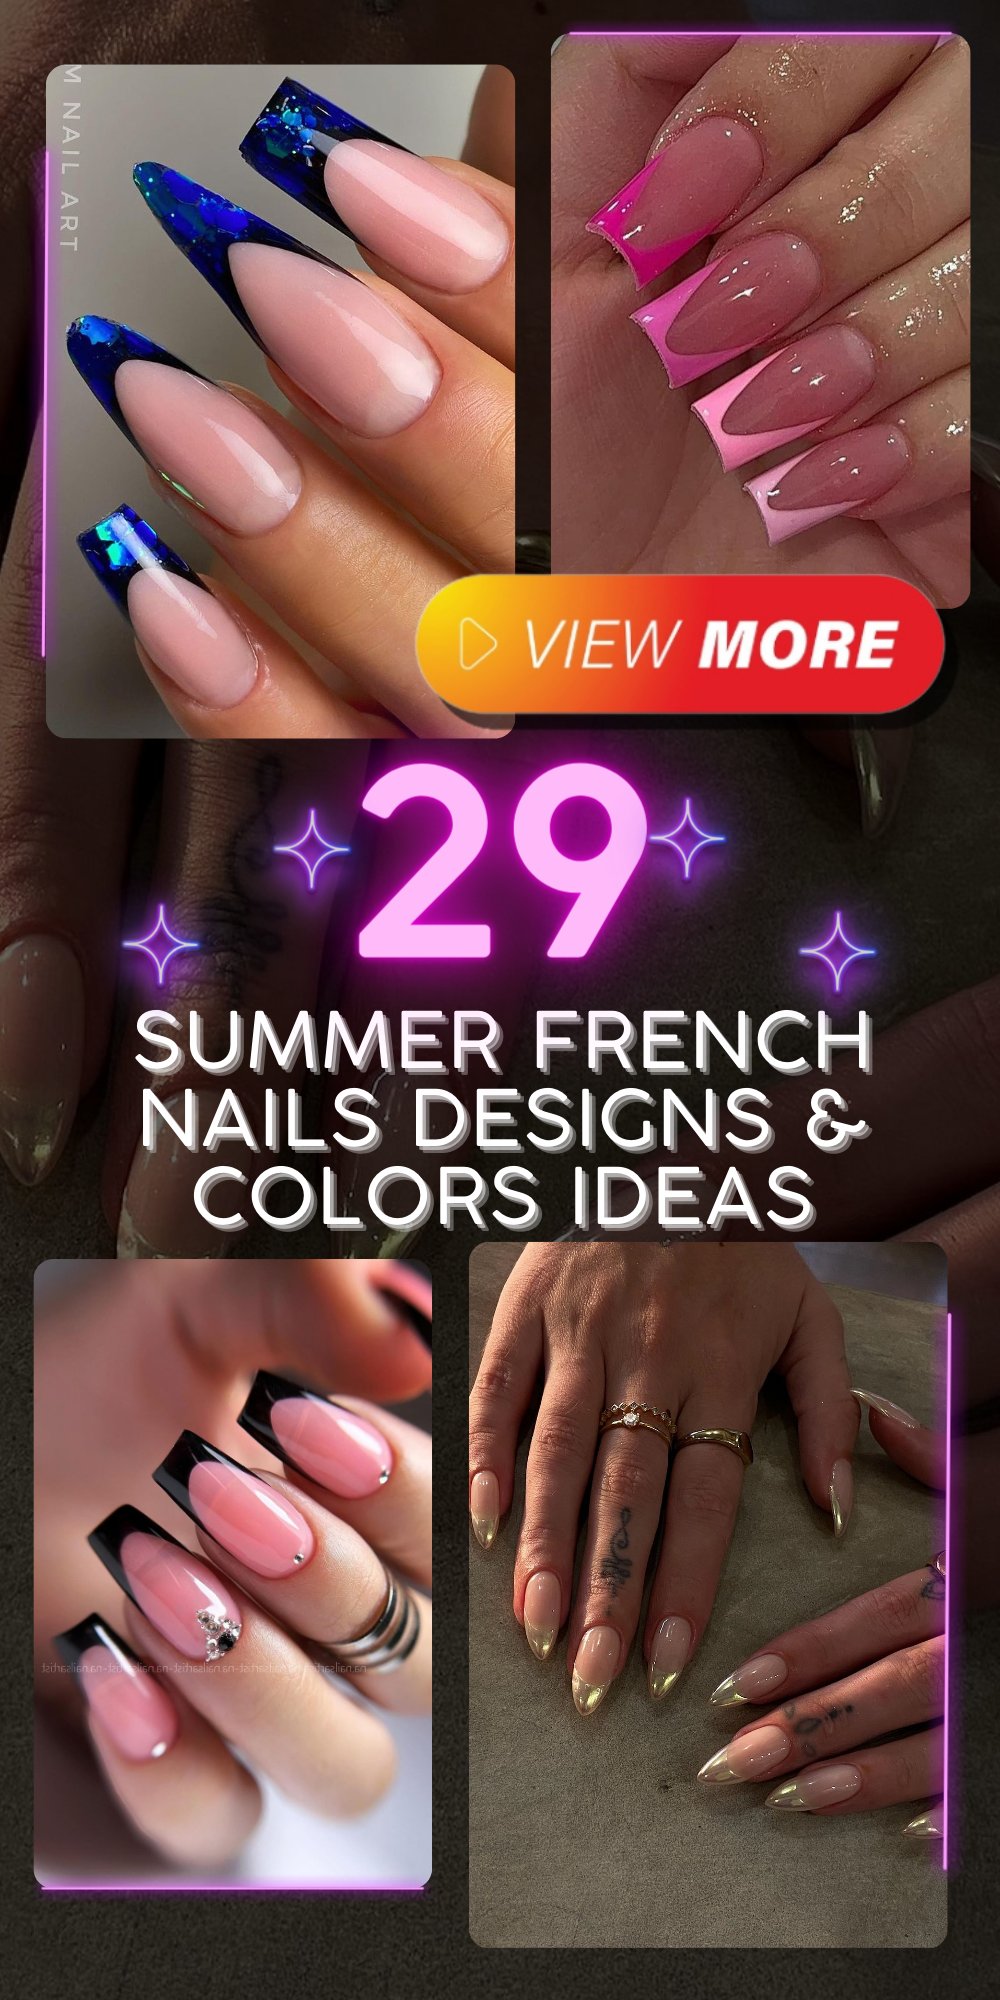
Shouldn’t our nails be as vivacious as the summer sun that shines even brighter and our sleeves being rolled up a bit shorter? This season, it is all about having fun with your manicures when talking about summer french nails designs & colors ideas. However, how do we mix flashy colors and stylish executions? Here are some tips to make sure your nails are ready for the summer without wasting much time!
Elevated Elegance with a Twist of Summer
If you fancy a summer manicure that has the elegance of sophistication, this is where to go. The very first design we see here does just that. These nails speak elegantly with a dainty white tip that effortlessly changes into pink at the bottom. But what makes it more fun is the pair of cherries sitting cutely by the cuticle, evoking memories of summer picnics.
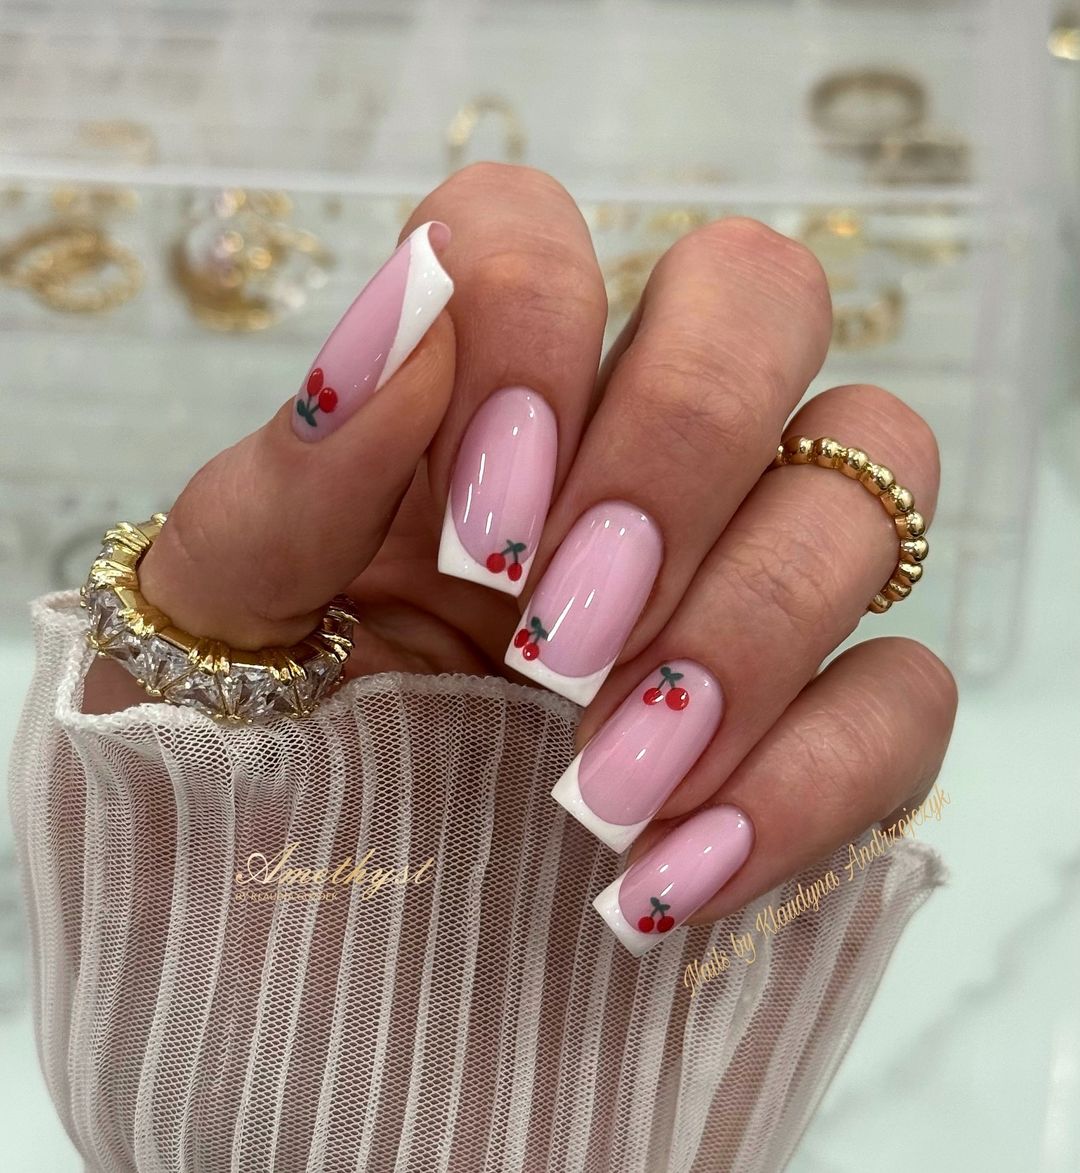
- Base Coat: Lustré Lacquer Long-Wear Foundation
- Pink Polish: Rosy Retreat by Essie
- White Tip: Alpine Snow by OPI
- Cherry Accents: Apple Red and Jet Black by Sally Hansen
- Top Coat: Seche Vite Dry Fast Top Coat
This design requires careful control and an attention to detail when creating it at home. Start with a pink base, clean white tips, and after they have become dry, add cherry accents. A dotting tool can assist in achieving the perfect shape of fruit while a thin brush will put on stem very accurately.
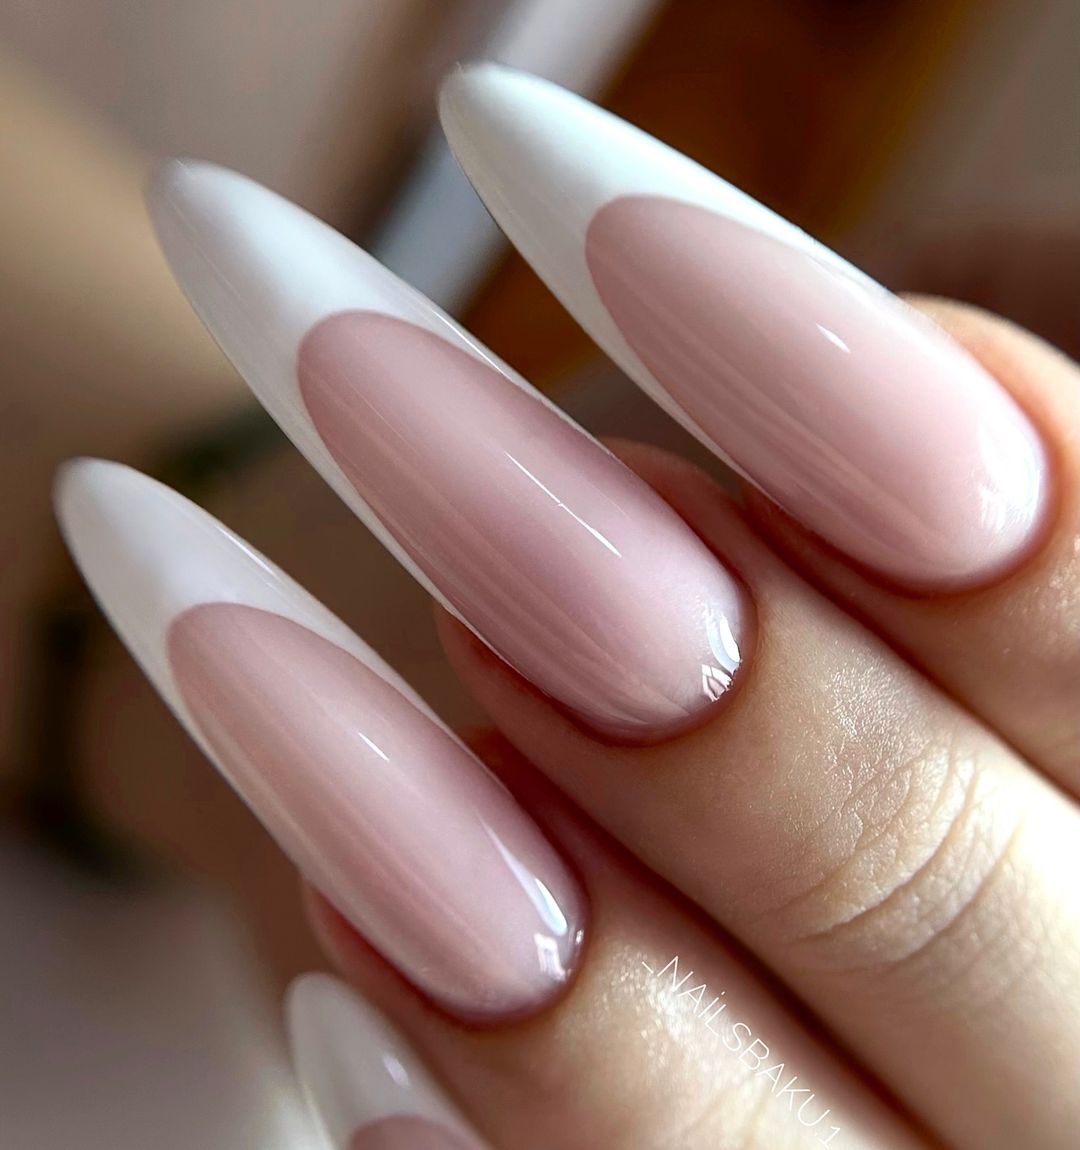
The Classic Reimagined: Classy and Long
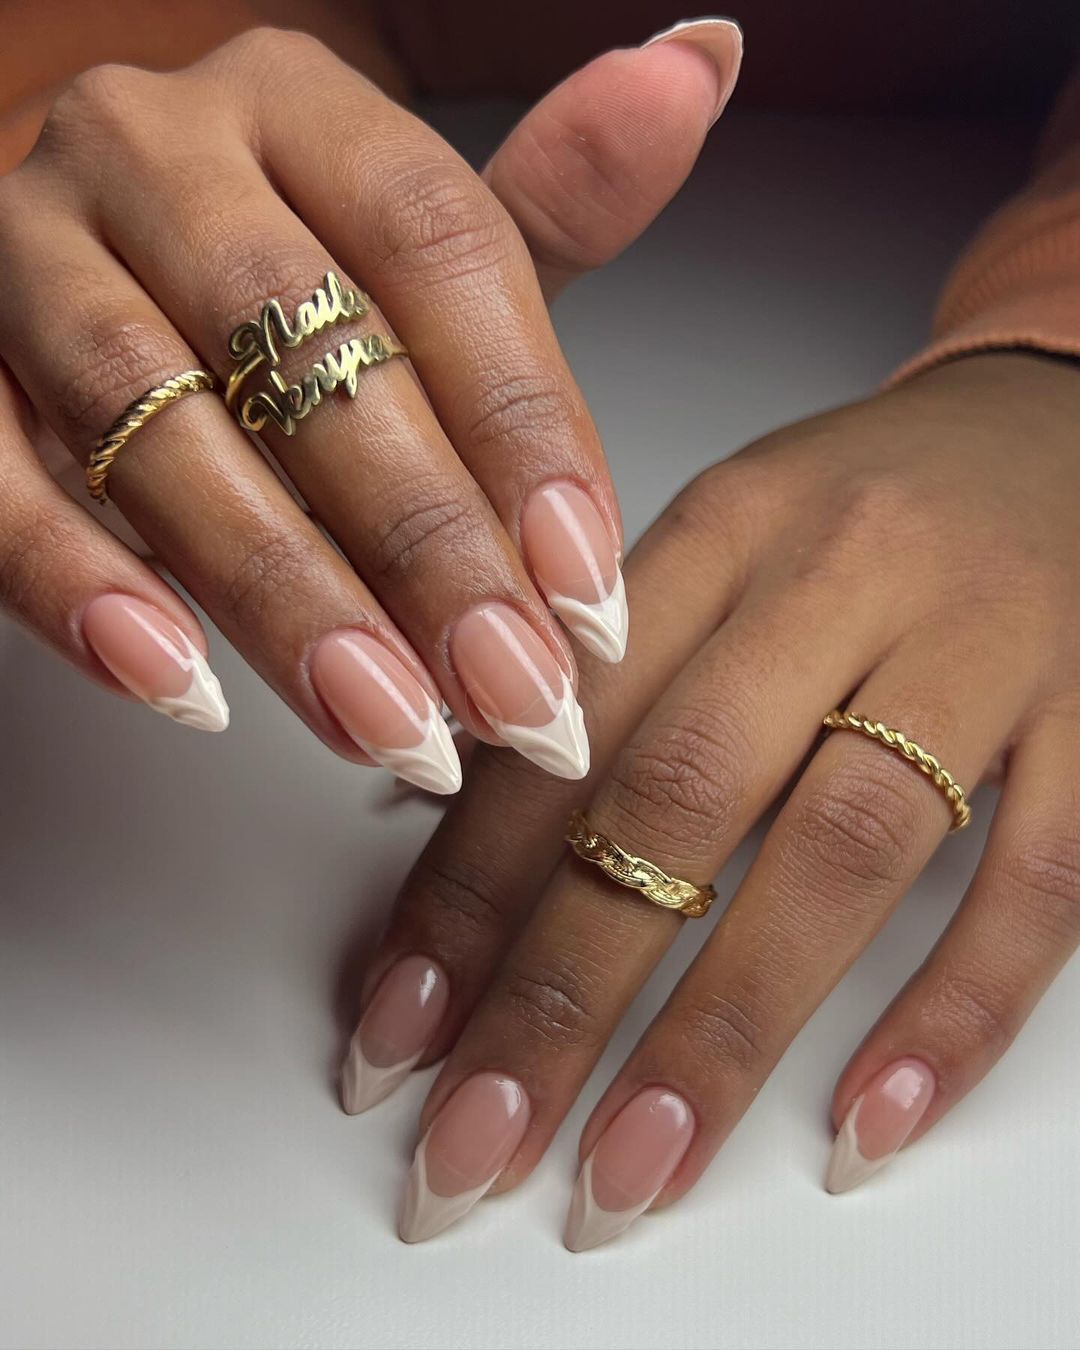
Paying homage to the timeless French tip, this design was created for people who prefer elongated nails. Its almond shape adds a degree of enigma, having the tips painted stark white against a sheer pink base. It is so simple but speaks loudly enough, allowing it to be worn with flip-flops on the beach or high heeled shoes at a summer soirée.
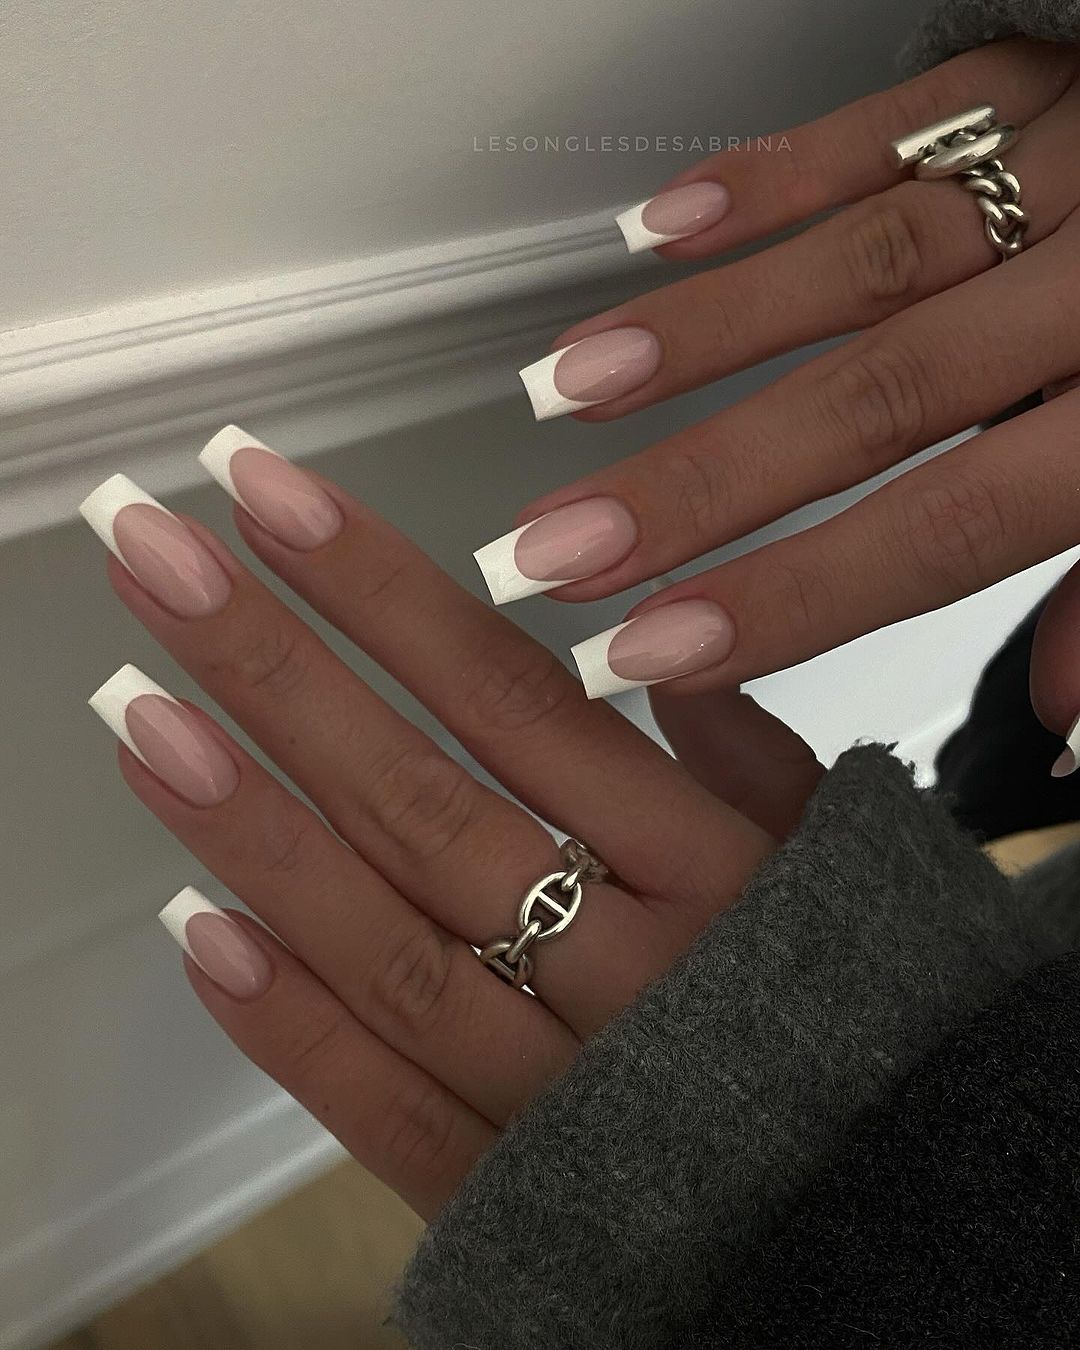
- Base Coat: OPI Natural Nail Base Coat
- Pink Sheer Polish: Essie’s Ballet Slippers
- White Tip: Essie’s Blanc
- Top Coat: Gel Couture Top Coat by Essie
To get this look, start off by applying thin base coat and follow up with the sheer pink polish. The best way to get perfect white tips is to use guiding stencil or tape. Finally, apply a shiny top coat that seals your beautifully painted tips in a gel-like luster.
Summer Skies and Ocean Vibes
A funny thought can be expressed on short nails. Such kind of nails are coated with gentle pastel pink background and decorated with attractive blue designs which look like beautiful summer sky. The design is plain but it has a little twist that blue color adds to it, making it more stylish for a light summer outfit.
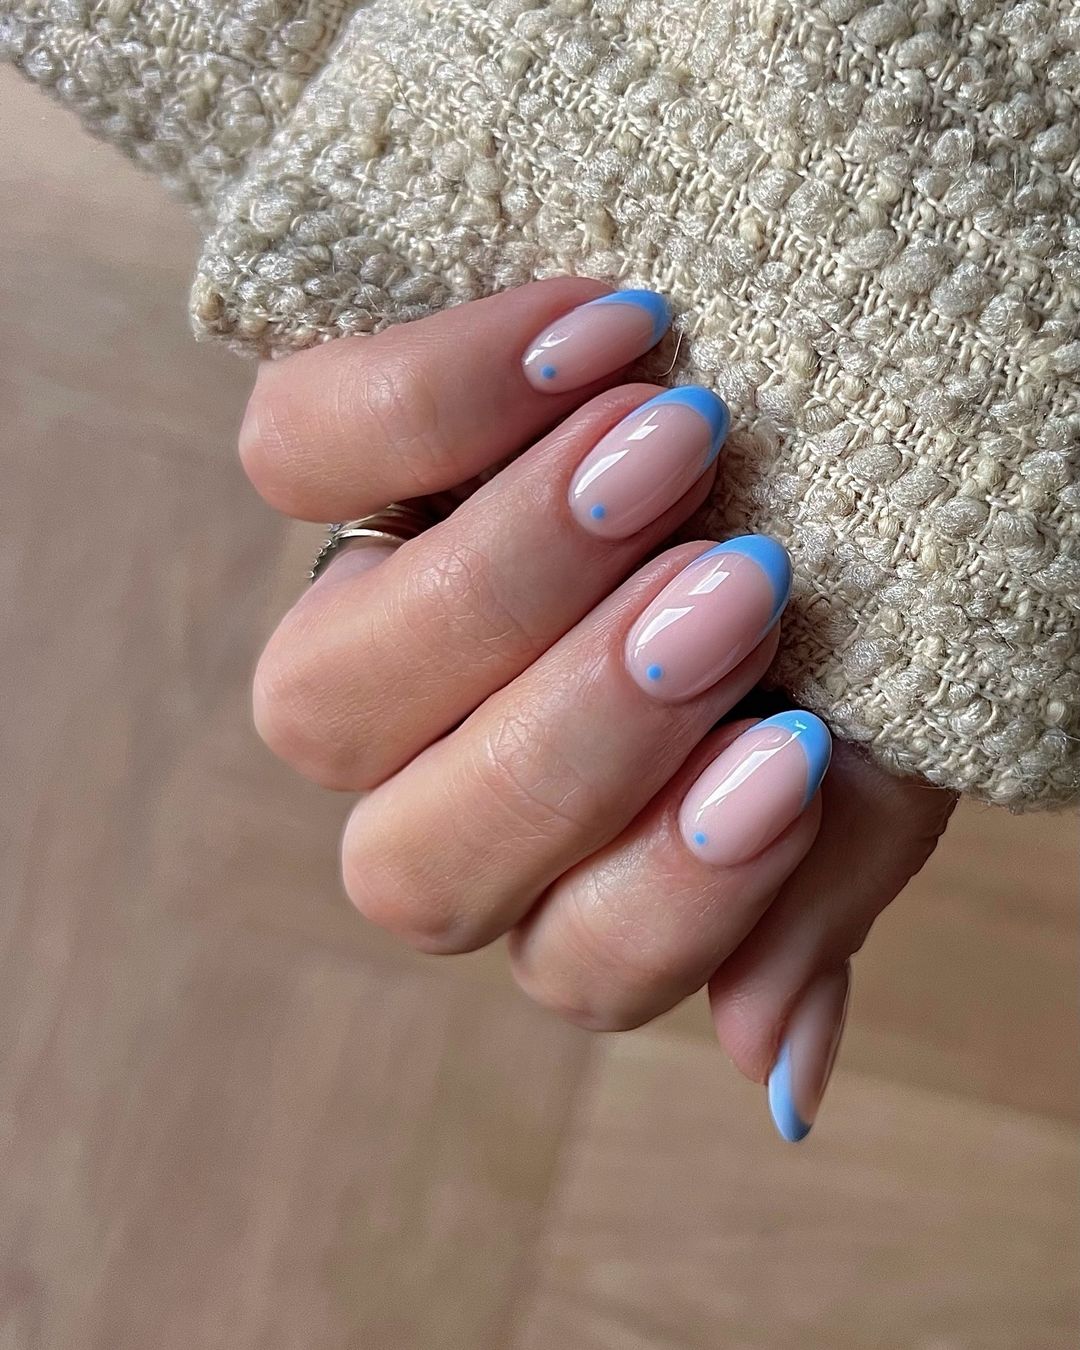
- Sticky Base Coat: CND Stickey Base Coat
- Pastel Pink Nail Polish: Muchi, Muchi by Essie
- Butler Please by Essie (Blue Accent)
- Dotting Tool
- Rapidry Top Coat by OPI (Top Coat)
The secret to getting this right is in the precision of the blue accentuation. Start off with a base coat of pastel pink and when dry, add some blue detailing using a dotting tool. Lastly, apply top coat promptly allowing your miniaturist artwork not to be smudged.
Gleaming Gold for the Bold
Sophisticated and daring, this picture has nails that are both daring and fearless. Long nails with a dramatic point at the end covered in a see-through pink shade and polished with gold on top are statement look at the same time classic but cheerful for this summer season.
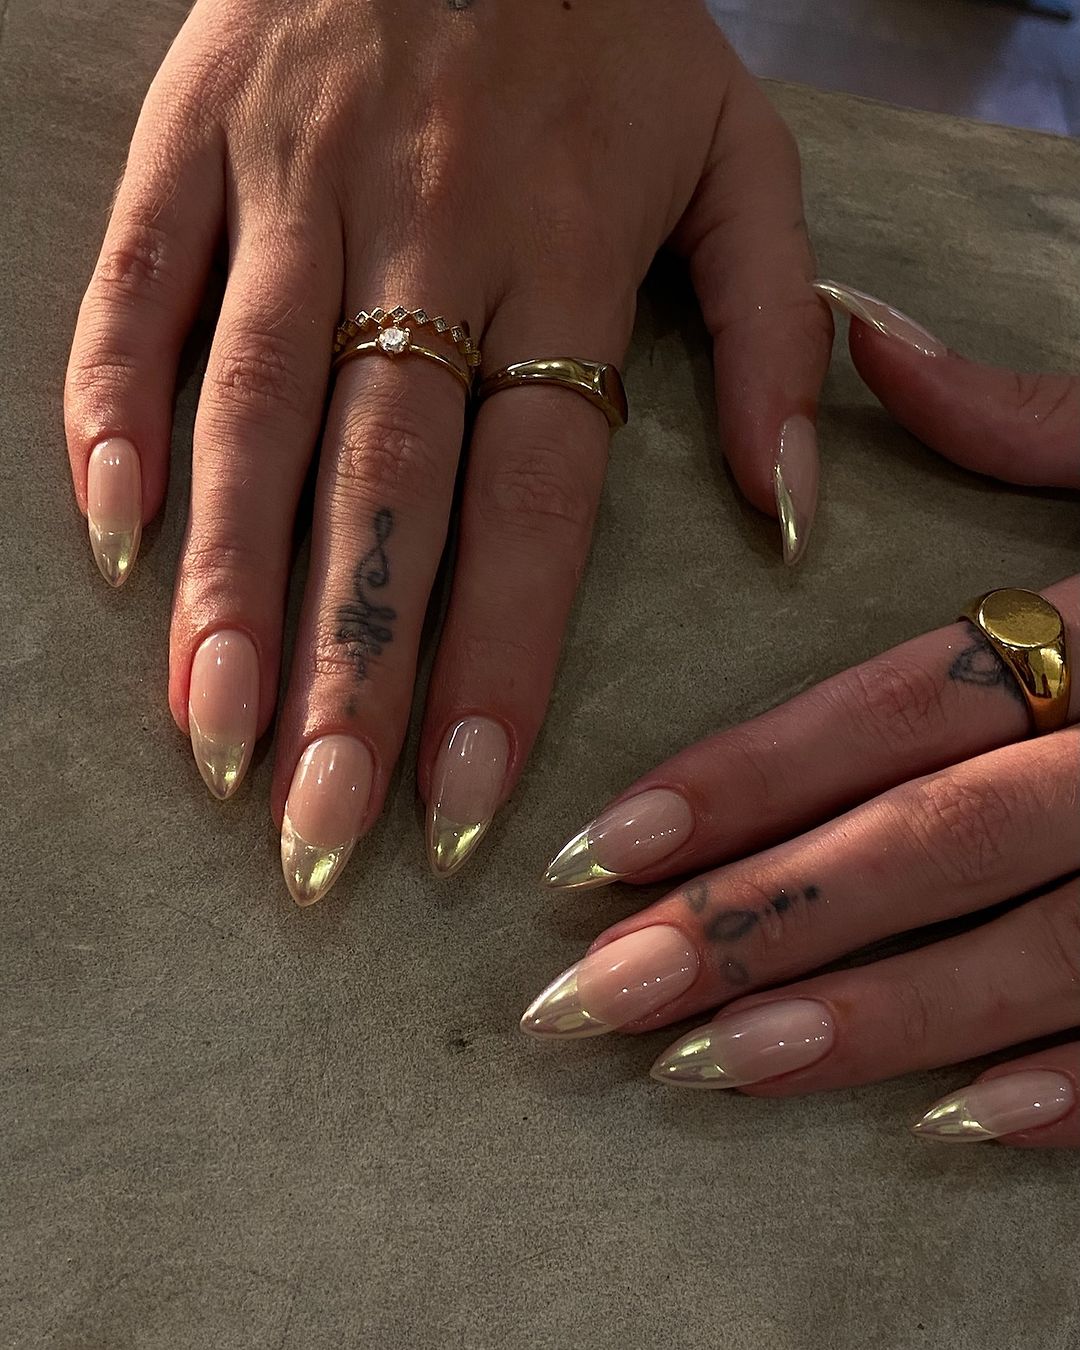
- Essential Base Coat: Elite99 Strengthening Base
- Transparent Pink Polish: CND Shellac Romantique
- Golden Tip: Sally Hansen Golden-I
- Glossy Topper: OPI Glossy Top Coat
To emulate this luxurious look, apply a sheer pink base before using tape to guide your hand as you paint the tip with gold. Finish off by applying top coat to achieve that glass-like sheen. Remember that the more pointed they are, and then you will stand out more.
Save Pin
Lavender Dreams with a Holographic Sheen
These nails are designed to take us to a summer evening in a dream with long almond shaped nails that have French tips painted in lavender color and sprinkled with holographic glitters. This ethereal appearance is an ideal blend of sophistication and playfulness, making it perfect for those wanting to add a sense of whimsy to their manicure.
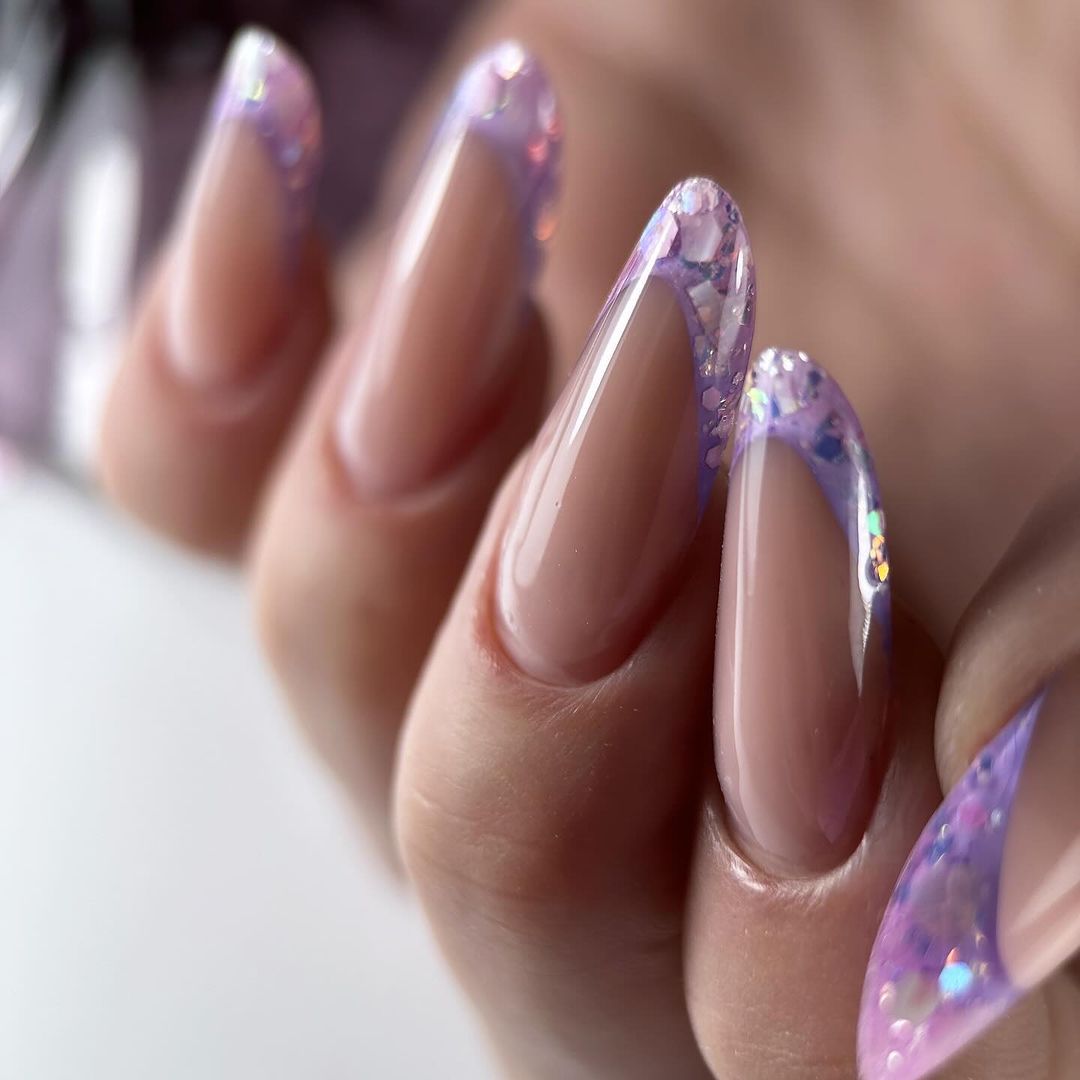
- Bottom coat: Butter London Nail Foundation
- Light Pink Sheer Polish: Essie Mademoiselle
- Lavender Glitter: Color Club Harp On It
- Holographic Glitter: INM Northern Lights
- Top coat: Seche Vite Dry Fast
The first step in creating this design is applying a light pink base. Wait until it dries then use purple glitter polish on the edge of your nails and blot while still wet with shimmering rainbows. Lastly, put a top coat on top that dries quickly so as to seal in the magic.
The Fiery Flair of Floral Art
In line with summer’s vibrant spirit, this design has a soft pink background but with burning floral art at the tips. Rich reds and yellows form a complex design that mimics a warm beach sunset. It illustrates how unique artwork can be etched on one’s fingernails.
- Essie Grow Stronger Base Coat
- OPI Bubble Bath (Pink Polish)
- China Glaze Red-Y To Rave (Red Art Polish)
- Orly Luxe (Gold Accent Polish)
- Detailing Brush
- CND Vinylux Long Wear Top Coat / Top Coat
Start by applying a sheer pink color for a DIY approach. With an extremely narrow pen paint brush, make flower outlines in burgundy and block it golden patches inside them. It calls for steady hands plus some patience, yet the outcome is truly heated up painting.
Colorful Tips for a Playful Summer
There’s nothing fun in the sun like a splash of colour and this is what these nails do with their pink base that has bright tips. For summer outings, you can get the best experience with something that adds a unique touch without becoming overwhelming; for instance, one can try different shades of pastel enamel on each finger.
- Base Coat: Zoya Anchor
- Pink Polish: OPI Mod About You
- Tip Colors: various ones from OPI Pastel Collection
- Top Coat: Essie Gel Setter Top Coat
Begin by applying a clean coat of pink polish at home. Then dab each tip with a pastel color strip using masking tape to make neat lines. What do you get? A simple yet elegant multi-coloured masterpiece.
Safari Chic with a French Twist
Go animalistic by wearing these lengthy nails with their almond-shaped tips that will make you think of a safari on your fingertips. It is a design that combines art and fashion, which are both bold and elegant.
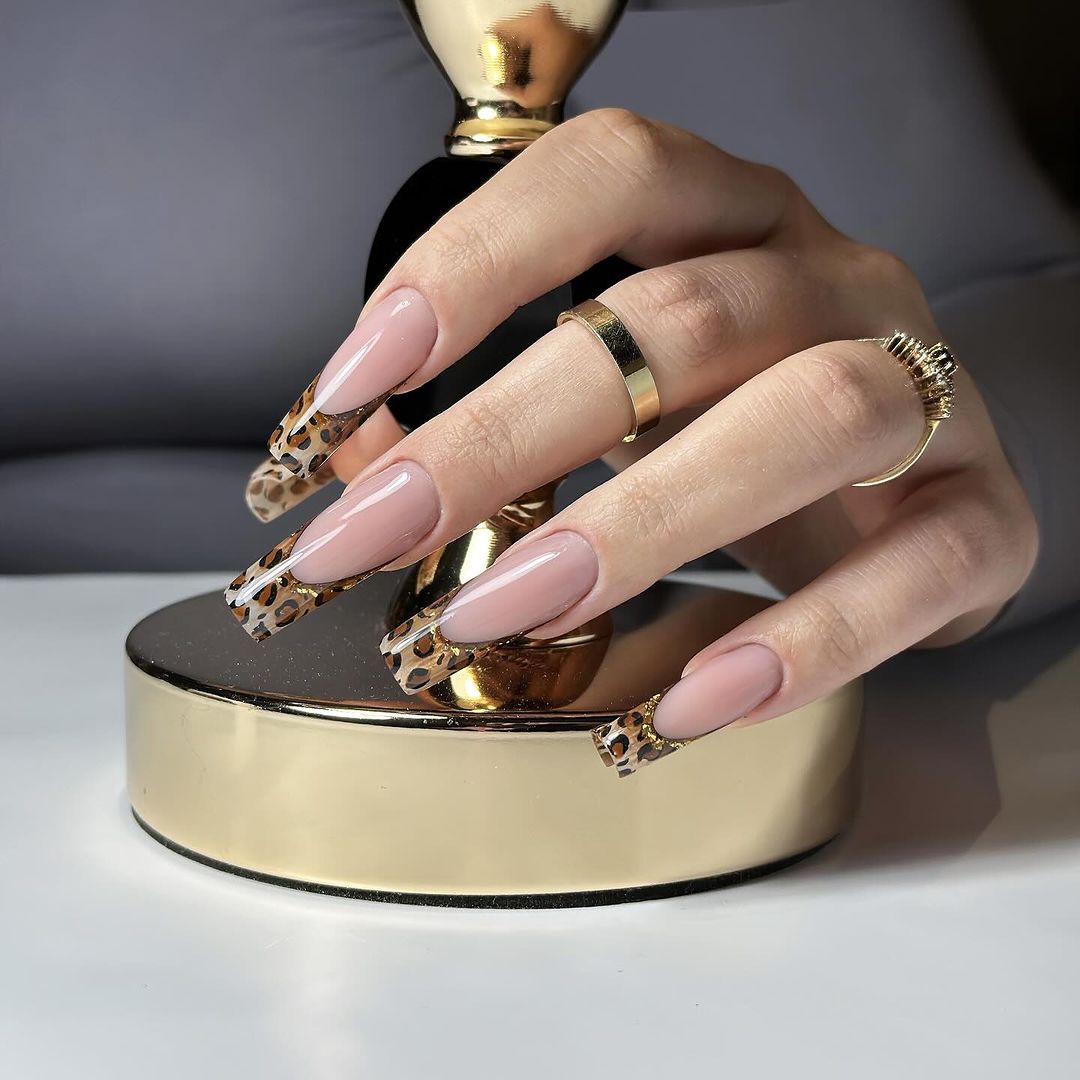
- Base Coat: Nails Inc. Nailkale Superfood Base Coat
- Pink Polish: Wet n Wild Tickled Pink
- Leopard Print Polish: Don’t Pretzel My Buttons by OPI (base) and Black Acrylic Paint for spots
- Top Coat: Glisten & Glow Top Coat.
Start the process off by putting on the pink base color. Then take a sponge and dab it onto the leopard print using beige as your base coat then paint on black spots. To add some more interest, outline some of the black dots in gold. With this manicure, classiness oozes from it as well as being a good conversation starter.
Glittering Lilac Edges
These short acrylic nails are sophisticated, having a pink shimmering base with lilac French tips. The design unites the softness of pastels and the glitteriness of the shiny things resulting to something elegant and classy that is perfect for a sunny playful summer day or a night of glamour.
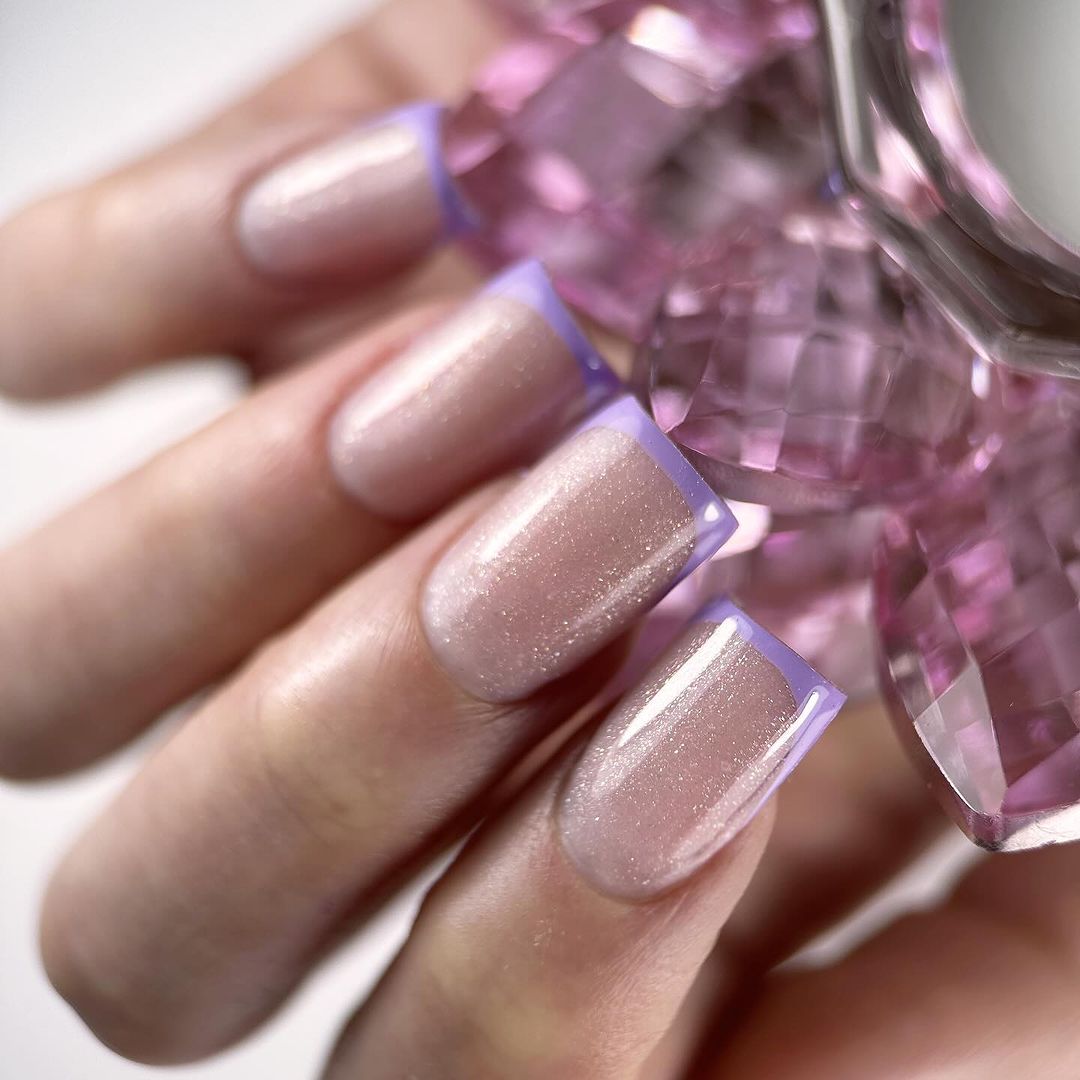
- The base coat used is called Deborah Lippmann All About That Base
- Nail Polish Shade: Princesses Rule by OPI
- Lilac Tip: A Grape Fit! by OPI (including some Diamond Dust from Twinkled T)
- Top Coat Used: INM Out The Door Fast Drying Top Coat
To get this look right, blend the shimmering polish into the bottom color before applying with precision the lilac tip. It is an easy but stunning design which encompasses the magic of paint trends in pastel shades.
Save Pin
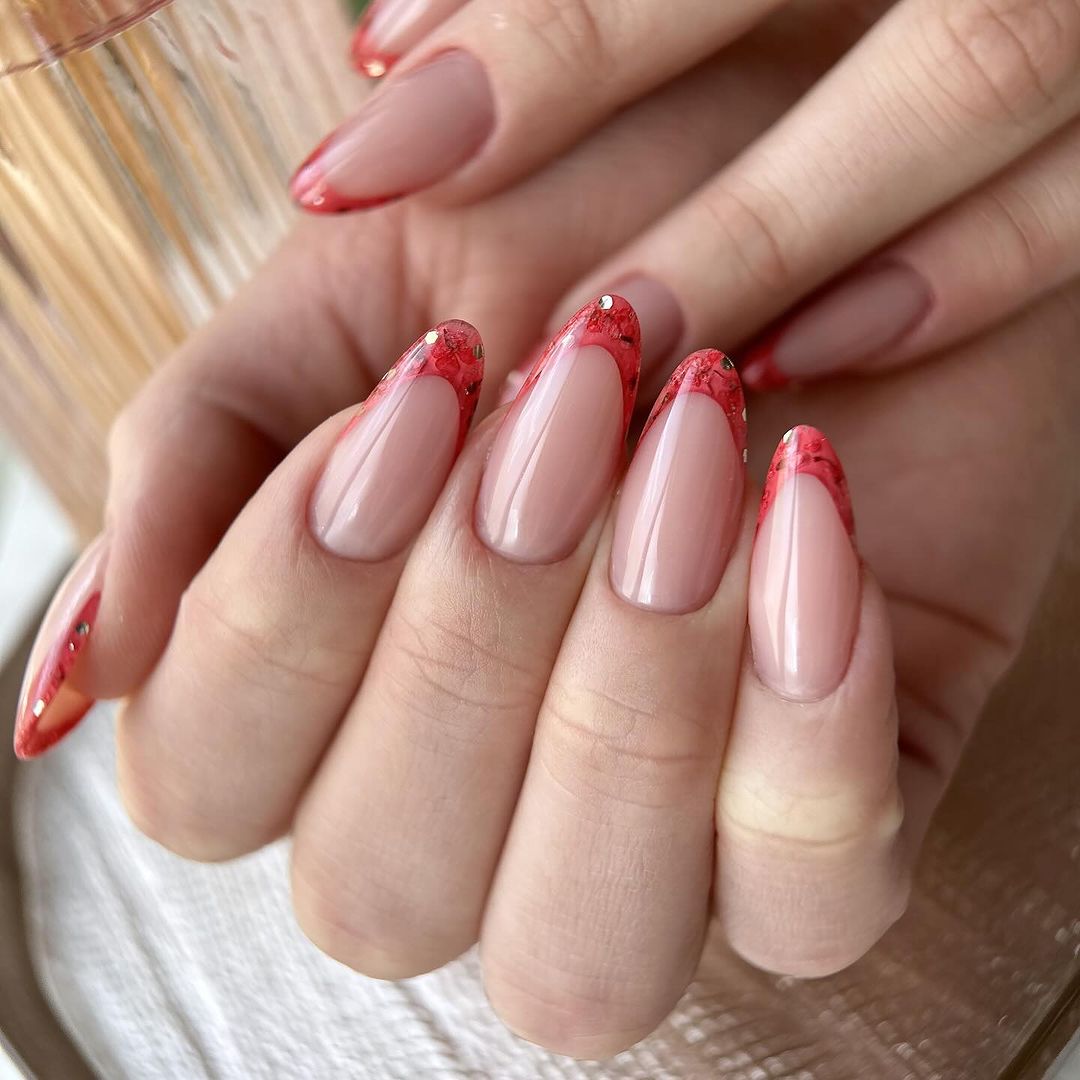
Romance in Red: A Heartfelt Expression
These nails are very romantic. They are short, with bright red French tips that have tiny heart decorations on them. It is a playful interpretation of traditional French, which adds fun and love to an untangled design. They are great for anyone who would rather put their hearts on their nails instead of their sleeves.
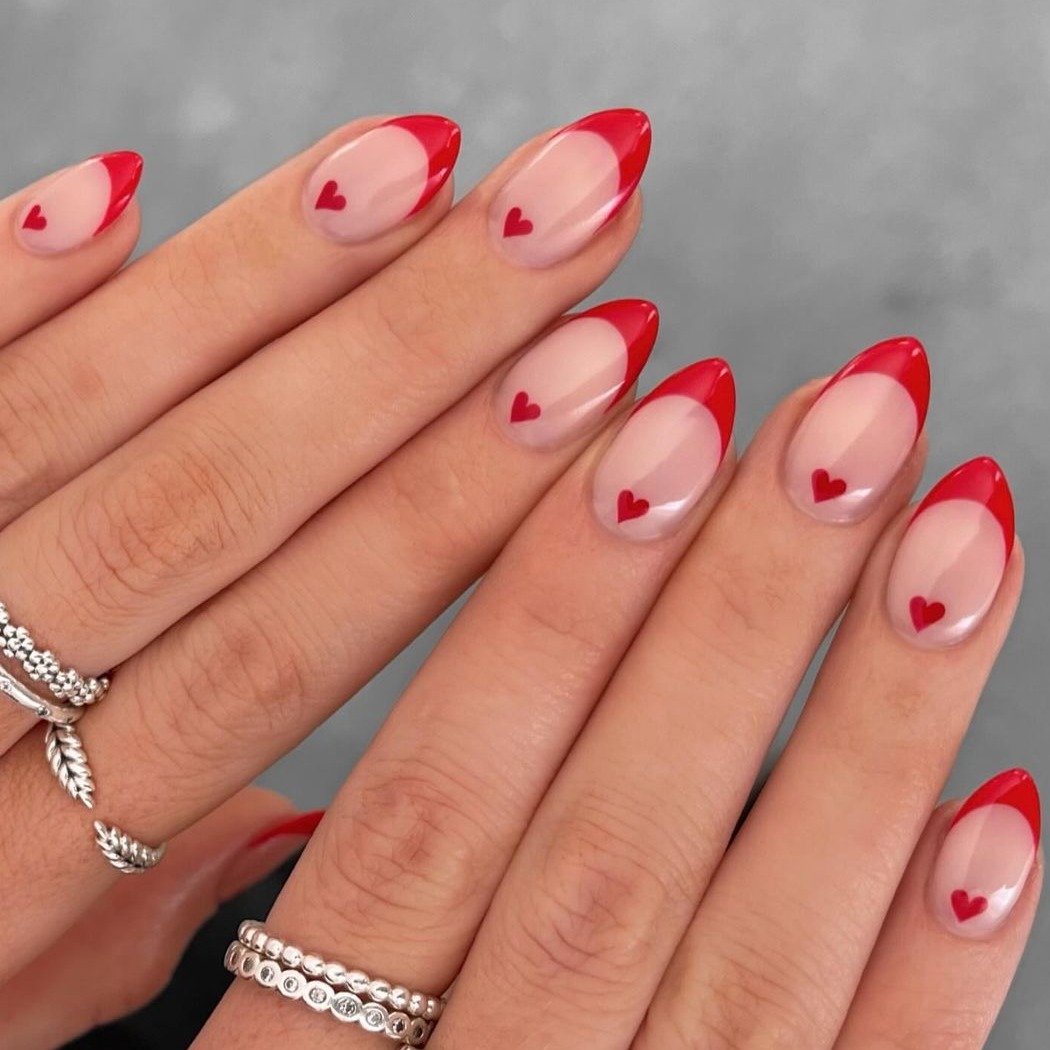
- Base Coat: OPI Natural Base Coat
- Sheer Pink: Essie’s Sugar Daddy
- Red for Tips and Hearts: Big Apple Red by OPI
- Detailing Tool for Hearts
- Top Coat: Good To Go by Essie
For the DIY enthusiast start with a base coat before applying a sheer pink. Paint your red tips meticulously, and then use a detailing tool to add the hearts. Finally, seal it off with a top coat to protect your little passion-shaped hearts.
Pink Elegance with Glittering Accents
This nail design takes elegance to new heights, with long pink nails boasting white French tips edged with a line of glitter. The subtle addition of glitter adds a touch of unique glam, making these nails a classy choice for those special summer nights.
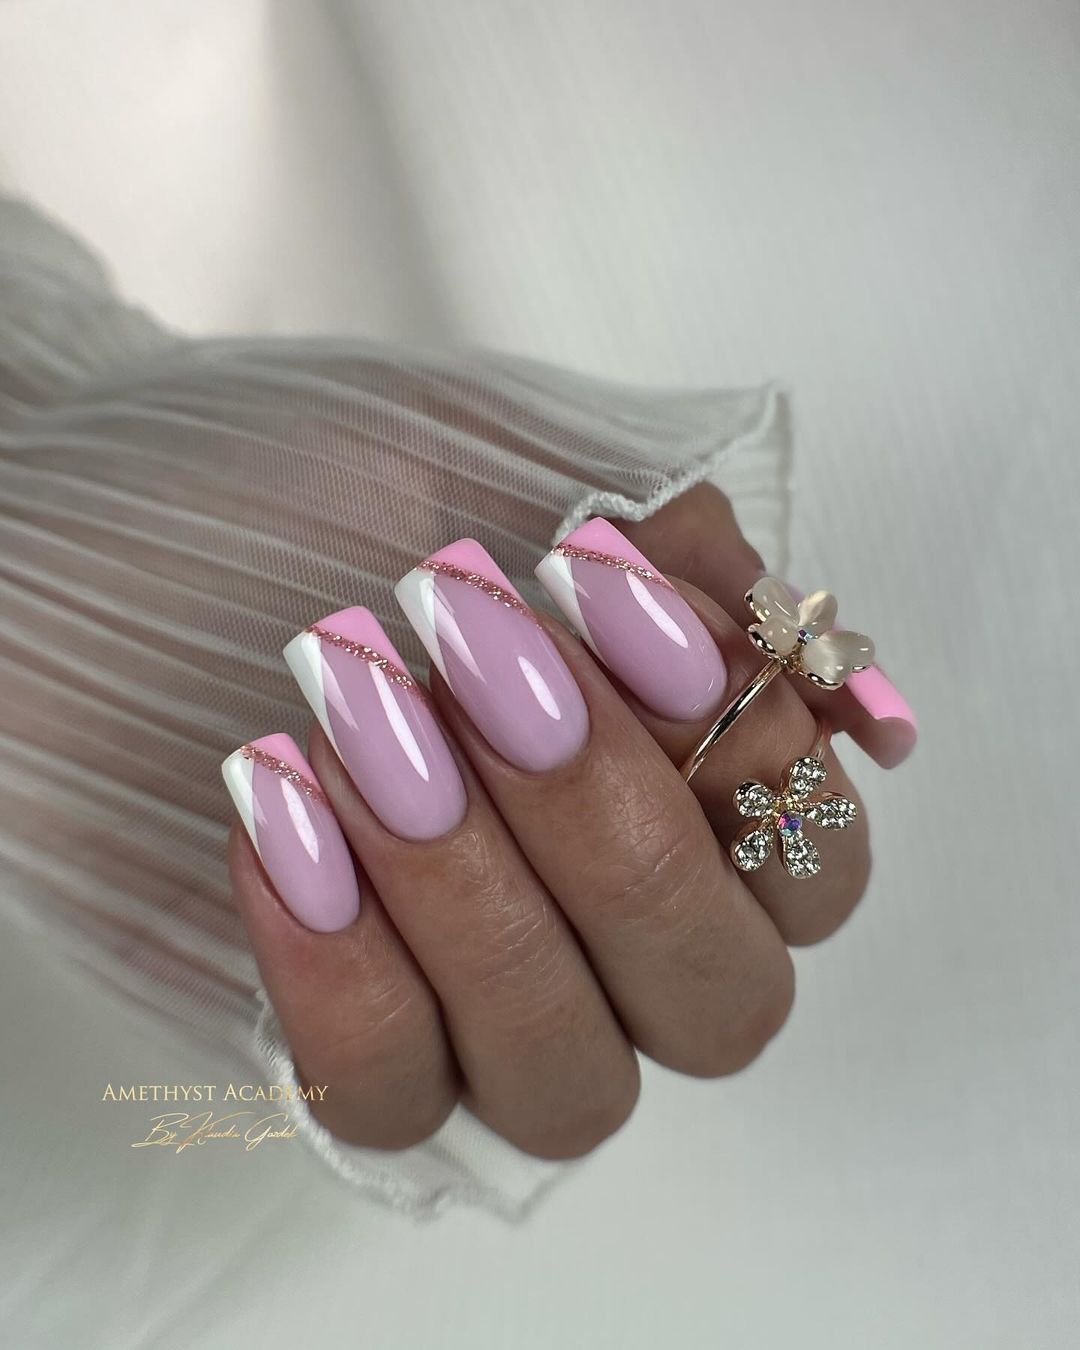
- China Glaze Strong Adhesion Base Coat
- Let’s Be Friends! OPI Pink Polish
- Alpine Snow by OPI White for Tips
- Essie Gold Glitter Line
- Glisten & Glow’s Top Coat Top Coat
Apply the pink polish as your base, follow with white tips, and add a precise line of glitter for a sparkling edge. This combination of pink and white is timelessly elegant with just the right amount of sparkle.
The Quintessential Summer French Manicure
This design, the ultimate summer French manicure, is timeless and sophisticated. The white tips on a pink base are neat and sharp. It is a classic style that never goes out of fashion, and can be worn both at work and special events.
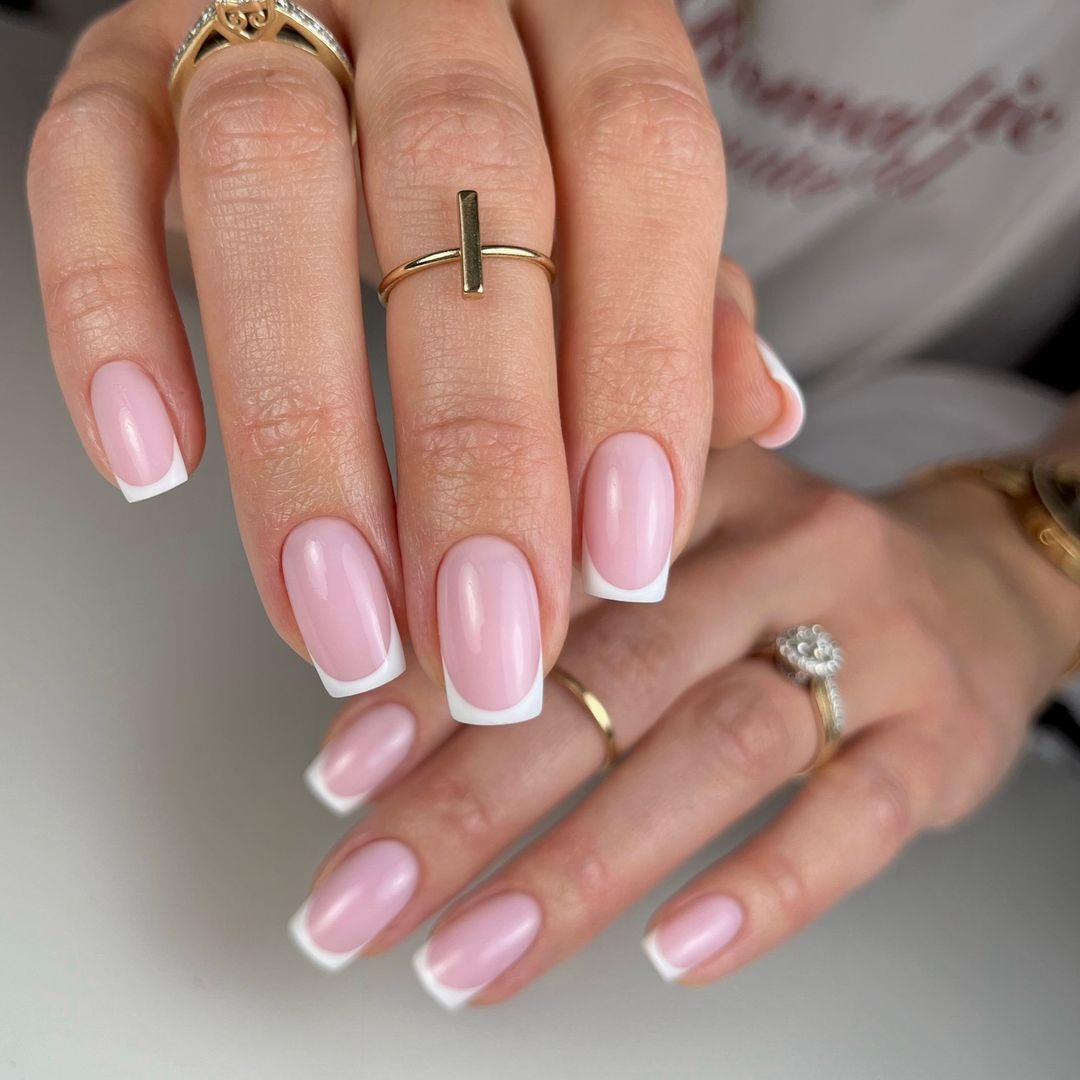
- Base Coat : Sally Hansen Double Duty
- Pink Polish: Bubble Bath by OPI
- White for Tips: French Tip by Color Club
- Top Coat: Revlon Extra Life No Chip Top Coat
Get smooth pink base done and let it dry. Use steady hands to draw white tips finally seal in with a tough top coat for longevity.
Silvery Swirls and Sparkling Gems
This design is full of elegance with a twist. White tips are painted with silver shiny swirls, and each nail is bedecked with a gemstone glittering with brilliance. It’s very sophisticated, intricate look that speaks volumes about the wearer’s good taste and love for art.
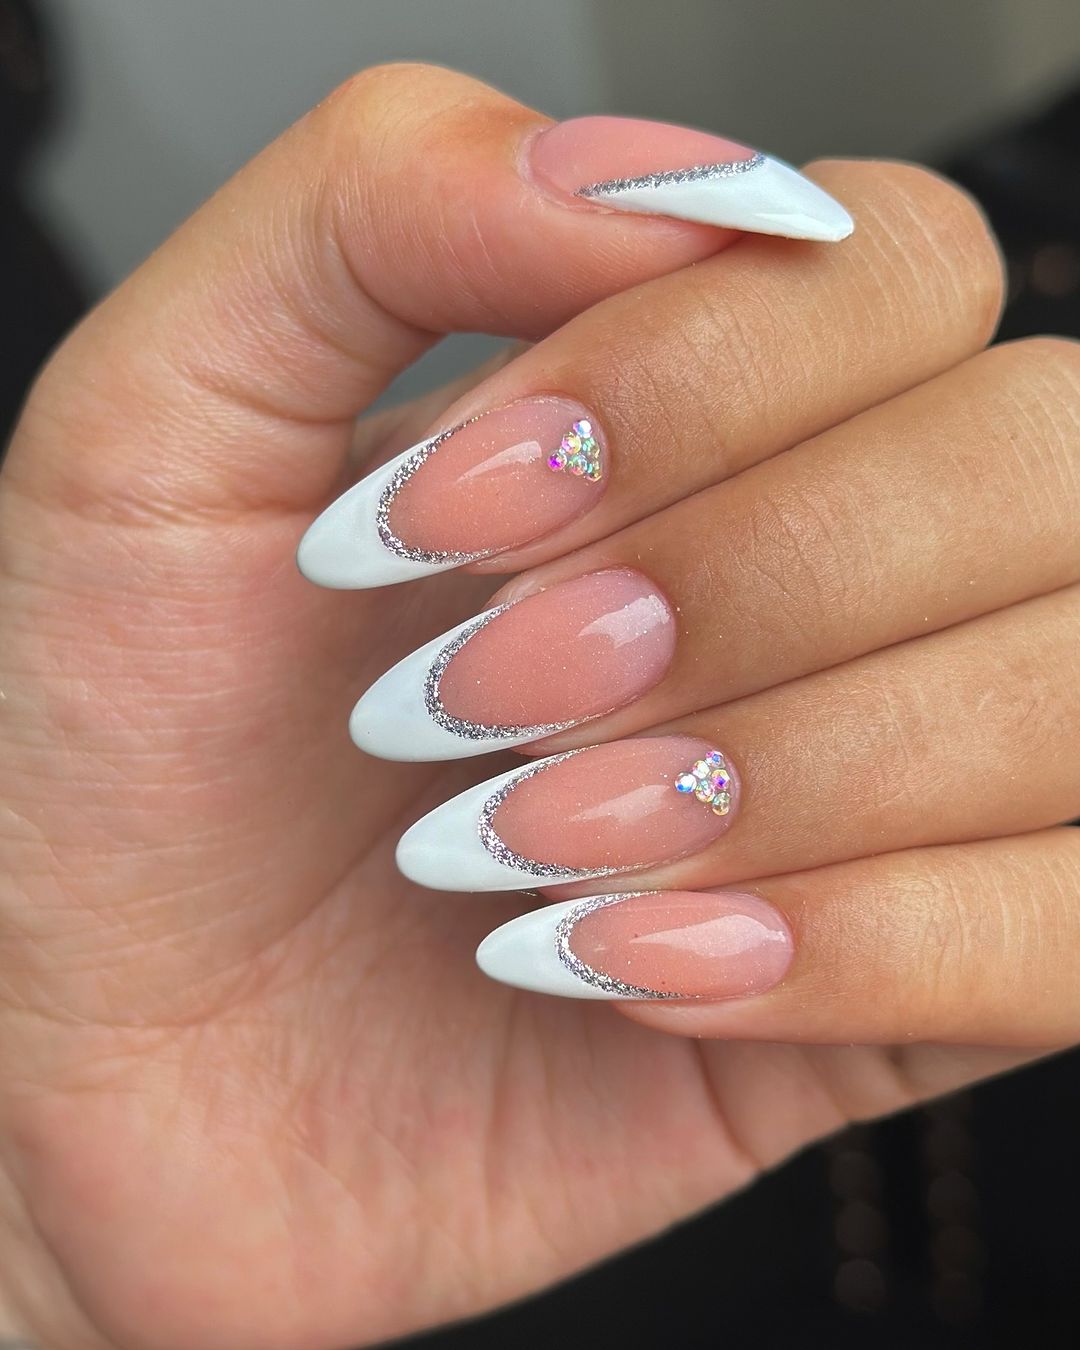
- Base Coat: OPI Natural Nail Base Coat
- Sheer Pink Polish: OPI Bubble Bath
- White Tip: Alpine Snow by OPI
- Silver Glitter Liner: Sally Hansen Diamond Strength
- Rhinestones: Swarovski Crystal Assortment
- Top Coat: Seche Vite Dry Fast Top Coat
For those who like doing their own nails at home, use the base of sheer pink and add white tips. With a fine-tipped brush create silver twirls and while the polish is still wet put a stone on top. Finish it off with a coat of top for strength and glossiness.
Soft Marble Elegance
The barely visible veins that appear like a thin layer of white on pink nail base is what makes this design so delicate and individual. This marble effect borrowed from the softness of marbles in combination with the gentleness of pink brings about a sophisticated manicure, which is all-seasoned and can be worn during any summer event.
- Base Coat: Butter London Nail Foundation
- Pink Polish: OPI’s Put it in Neutral
- White Marble: OPI’s Alpine Snow with a Marbling Tool
- Top Coat: China Glaze Fast Forward Top Coat
This process needs to be done with care because if it’s not, it won’t come out right. Apply your pink base coat, place some white polish drops and then use a marbling tool to gently mix them up. Use a top coat for smoothening out any rough edges there may be.
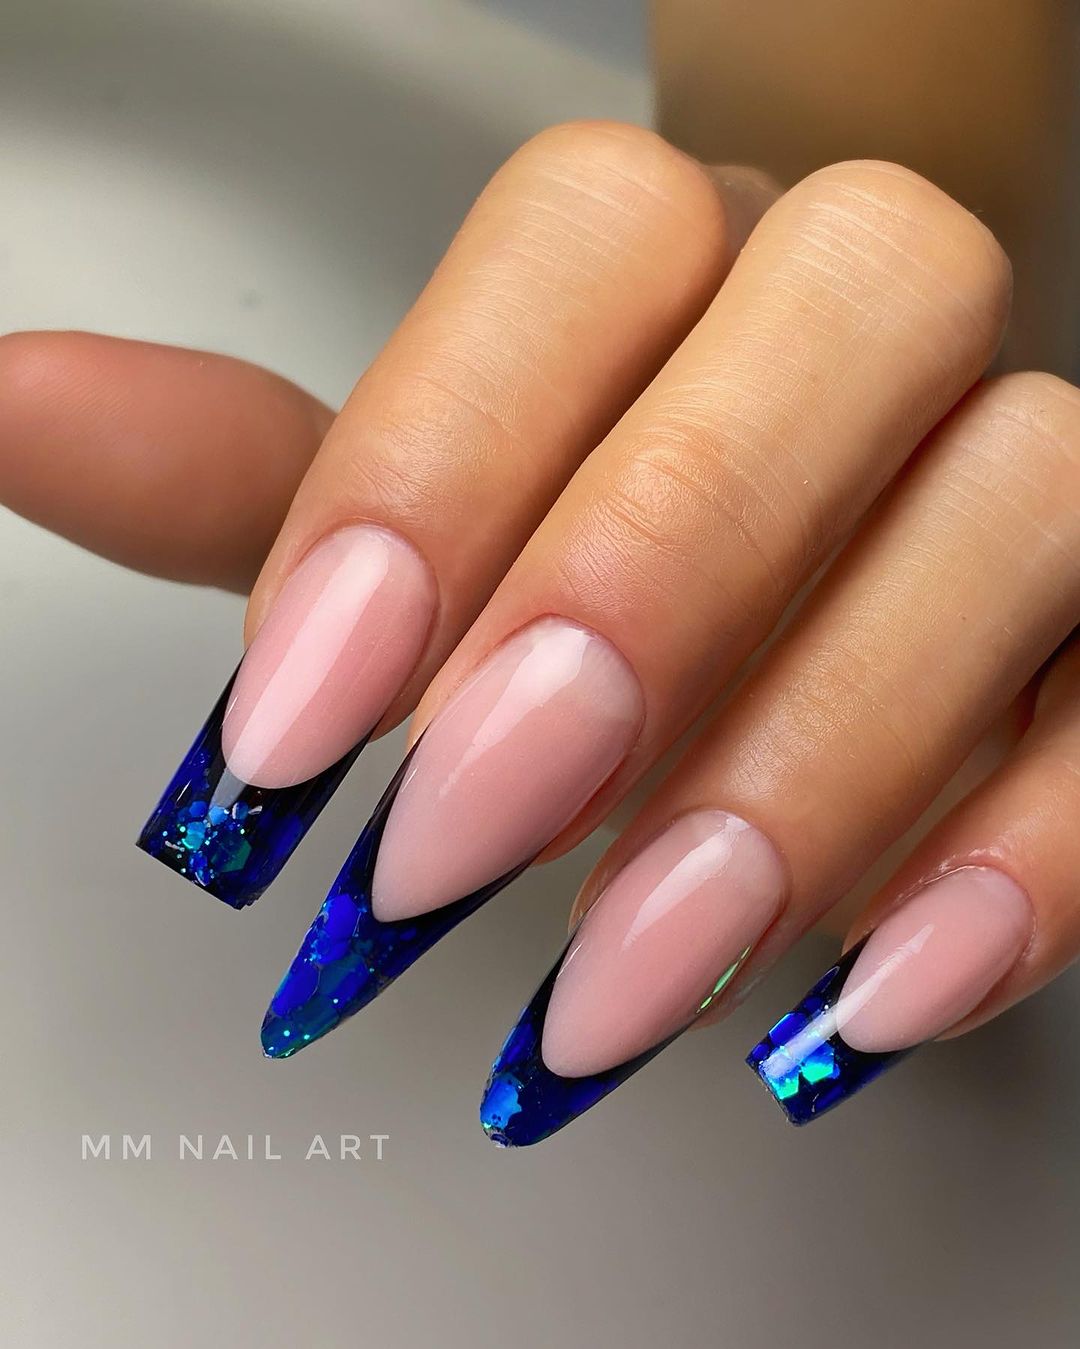
Sleek and Modern: Silver-Edged Transparency
The French tip is given a modern twist in this transparent nail design which has black edges, giving it a sleek and contemporary look. It’s a daring statement that blends minimalism with a hint of elegance.
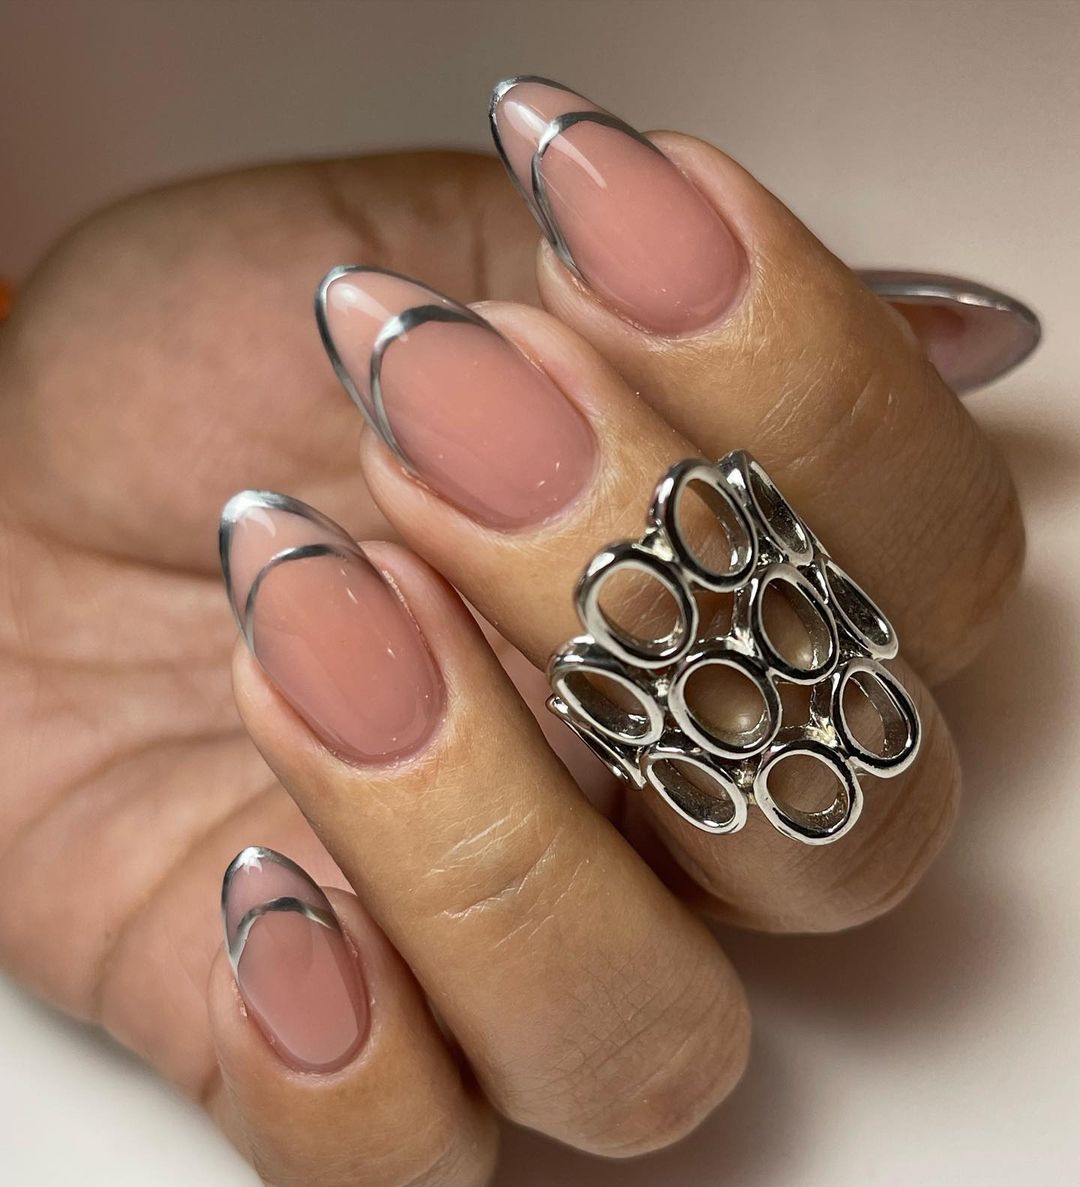
- All in One Base Coat: Essie
- Sugar Daddy Clear Polish: Essie (pink hue)
- Licorice Black Polish: Essie
- Out The Door Top Coat; INM
To pull off this minimalist look, you must first apply a base coat then follow it up by light pink hue. Finally, paint the tips carefully black and set it off with fast dry top coat to encapsulate the design’s classy aesthetic.
Swirling Sophistication
Design-wise, this is where art’s fluidity meets the elegance of a classic French manicure. Atop a clear base, white spirals prance around, enhancing the pink hue in the nails. It’s a contemporary take on the traditional style done in such a way that it’s perfect for those who want to be unique somehow without abandoning their classic tastes.
- OPI Natural Base Coat: To be applied first
- Essie’s Sugar Daddy (Pink Sheer Polish)
- Sally Hansen’s White On (White Nail Color)
- A brush used for nail painting (swirling design)
- Sally Hansen Miracle Gel Top Coat
To replicate this look, put on sheer pink polish as your base and then with an ultra-thin brush paint out white swirls. The top coat will add a glossy appearance to it.
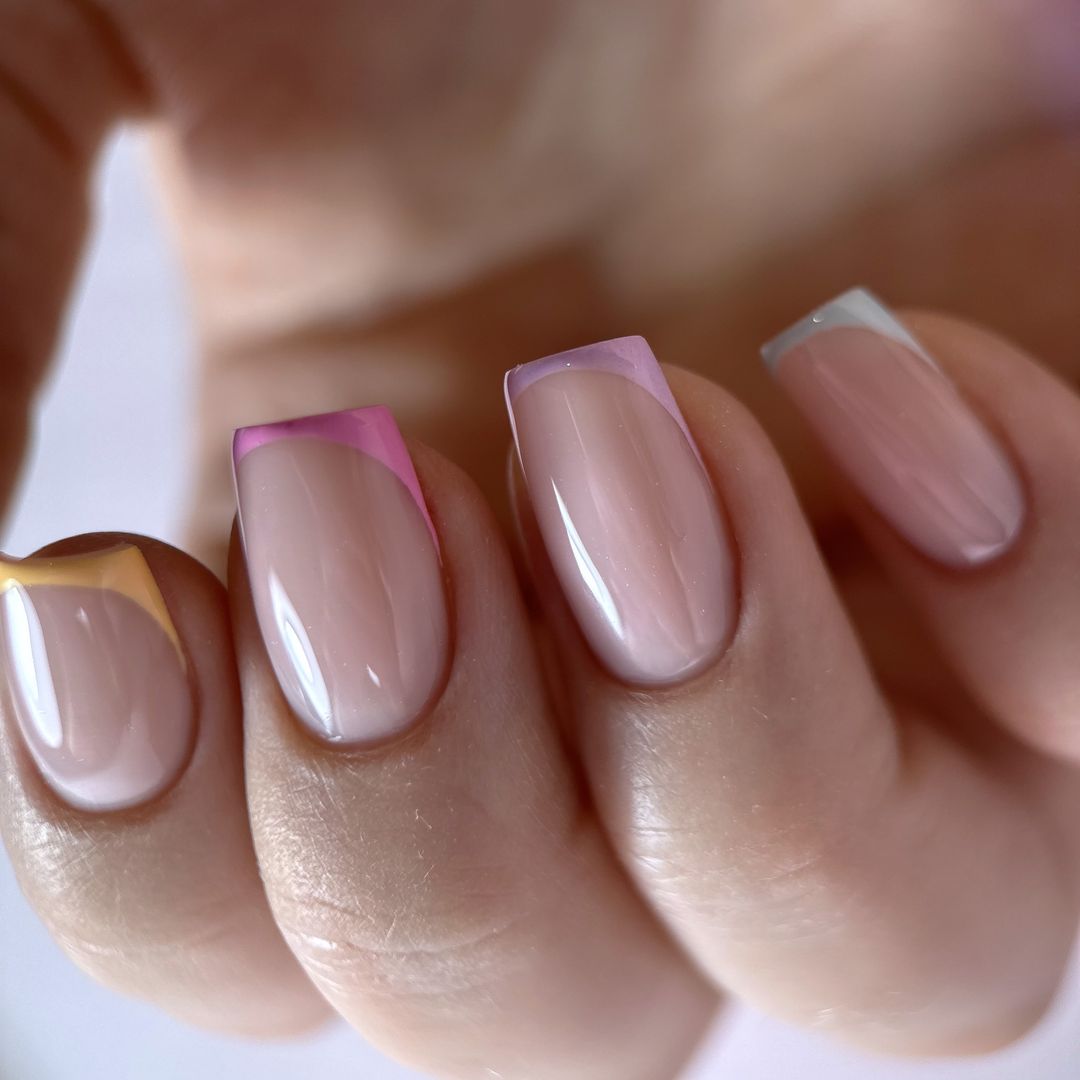
Pastel Perfection with a Modern Edge
The combination of pastel softness and a color blocking approach with modernity are all evident in this appearance. The other nails have been painted with different shades of pastel at the tips, resulting into an uncomplicated yet playful nail design. This design is perfect for those who enjoy a cheerful, flamboyant summer look on their nails.
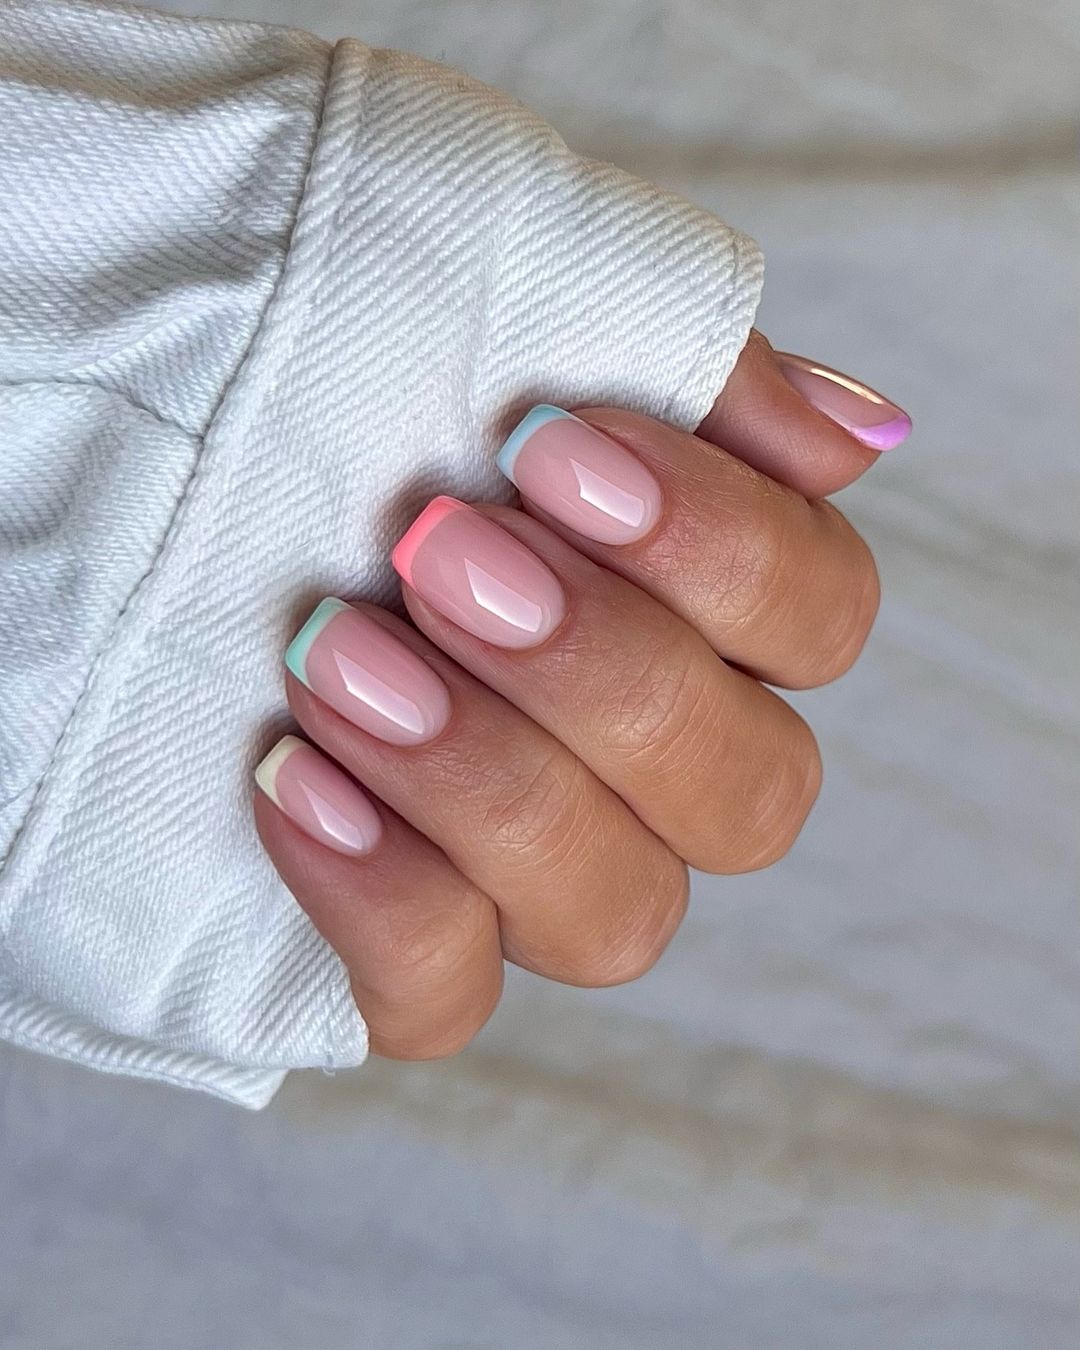
- Base Coat: Essie Here To Stay Base Coat
- Pastel Polishes: Any pastel shade from OPI’s Pastel Collection
- Top Coat: Essie Good To Go Top Coat
Start by applying a thin layer of pink polish as the base and then apply some pastels onto each tip. When doing so, you should ensure that you have got steady hands as well as some patience before sealing it with your favorite top coat.
Neon Nights
These nails are made striking by the liveliness of neon bright pink. They have a playful and unrepentant audacity that makes them appropriate for summer carnivals and nights out on town. It is fun with a difference; it would definitely get other people’s attention.
- Base Coat: Orly Bonder Rubberised Base Coat
- Pink Sheer Polish: Essie’s Ballet Slippers
- Neon Pink for Tips: China Glaze’s Pool Party
- Top Coat: Seche Vite Dry Fast Top Coat
First, one should apply a sheer base coat. Then, one can paint the neon tips slowly. Finally, end by putting a quick-dry topcoat to make it glow like neon forever.
Starry Night Tips
This design captures the hypnotic gist of a starry night sky. The long nails start with a pink sheer base that fades into a deep blue with specks of glitter like remote stars. It is an elegant and unique look- one that is sure to please anyone who wants to wear the night.
- Base coat: Essie Strong Start
- Pink Opaque Polish: Essie’s Sugar Daddy
- Blue Glitter Polish: China Glaze’s Blue Sparrow
- Starry Glitter: scattered glitters in different shapes and sizes
- Topcoat: Seche Vite Dry Fast Top Coat
Start by applying a foundation followed by coating the tips in light pink polish before sponging on the blue glitter polish. Add loose glitters for a starry effect and then apply a top coat for shine and durability.
Candy Pink and Cherry Blossoms
These pink nails are like a playful, candy-coated feel which has lively tips and cute cherry designs. It is a fun, bright look for the summertime’s happy vibes. It is unique with a touch of whimsy for those who have a sweet tooth.
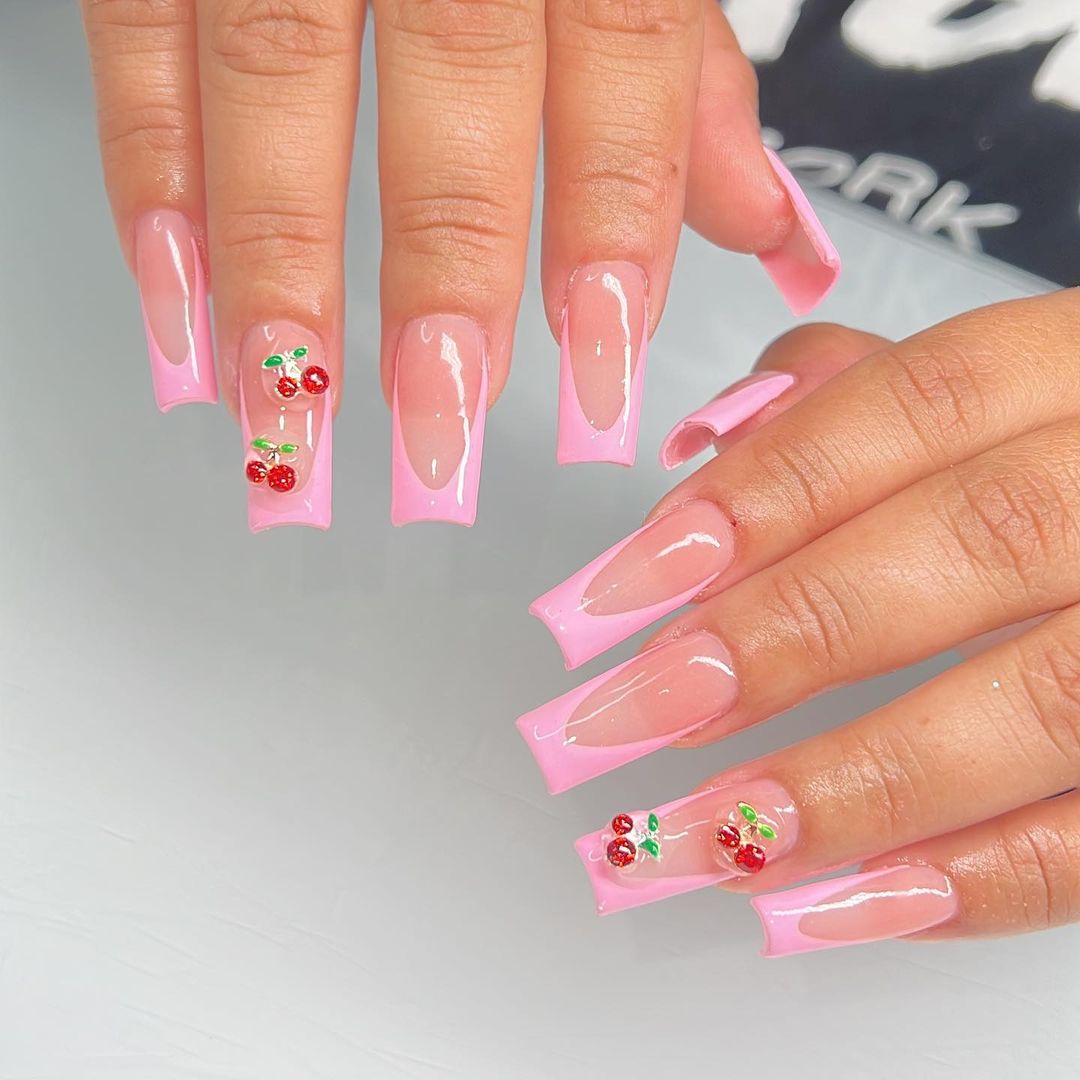
- Base Coat: OPI Natural Nail Base Coat
- Sheer Pink Polish: Essie’s Muchi, Muchi
- Neon Pink: Essie’s Mod Square
- Cherry Design: Red and Green Acrylic Paint
- Top Coat: OPI Top Coat
Use a sheer pink base to achieve this look before ending up with neon pink tips. For the cherries use a detail brush allowing each layer to dry before making another one. Finish with shiny top coat
Sophisticated Wine Dip
These short nails with a red wine dip are a combination of class and modern art. It is an uncomplicated yet striking look suitable for someone who likes minimalism and bright color.
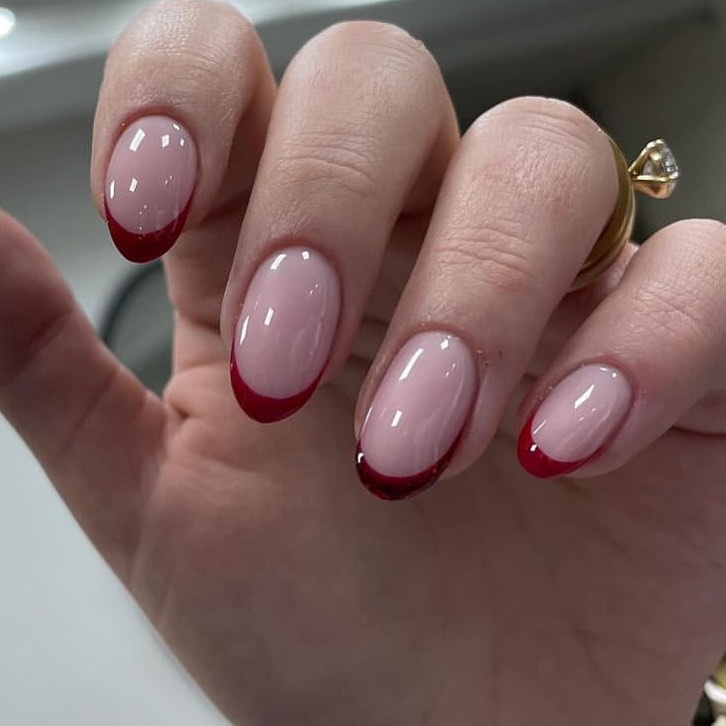
- Basic Polish: Orly Bonder Rubberized Base Coat
- Sheer Pink Polish: OPI’s Put it in Neutral
- Red Polish: OPI’s Malaga Wine
- Finishing Dries: INM Out The Door
Apply your base coat, put on a sheer neutral shade, and when it has dried up, tip the nail ends with red varnish which will follow the cuticle line swoop of each finger. Finally apply top coat to make the nails glossier and longer lasting.
Blossom Elegance
Long, pink nails with a mix of bold patterns and glittering accents create a unique and eye-catching design. The artistic blend of white accents and glitter convey a dreamy yet modern nail art look.
-
- Base Coat: OPI Natural Nail Base Coat
- Pink Polish: OPI’s Let’s Be Friends!
- White Accent Polish: Alpine Snow by OPI
- Glitter Polish for Accent Nail: Disco Doll by China Glaze
- Rhinestones and Decals for Embellishments
- Top Coat: INM Out The Door Top Coat
Apply the base and pink color, then freehand or use decals for white patterns. One accent nail can be given a full glitter coat or a glitter ombré effect, and the look can be completed with a top coat for lasting wear.
Whimsical Love Notes
In this cheerful design a white French tip on a romantic background of “XO” and red kiss is used. It is like a love letter right at your fingertips with a fun touch of romance.
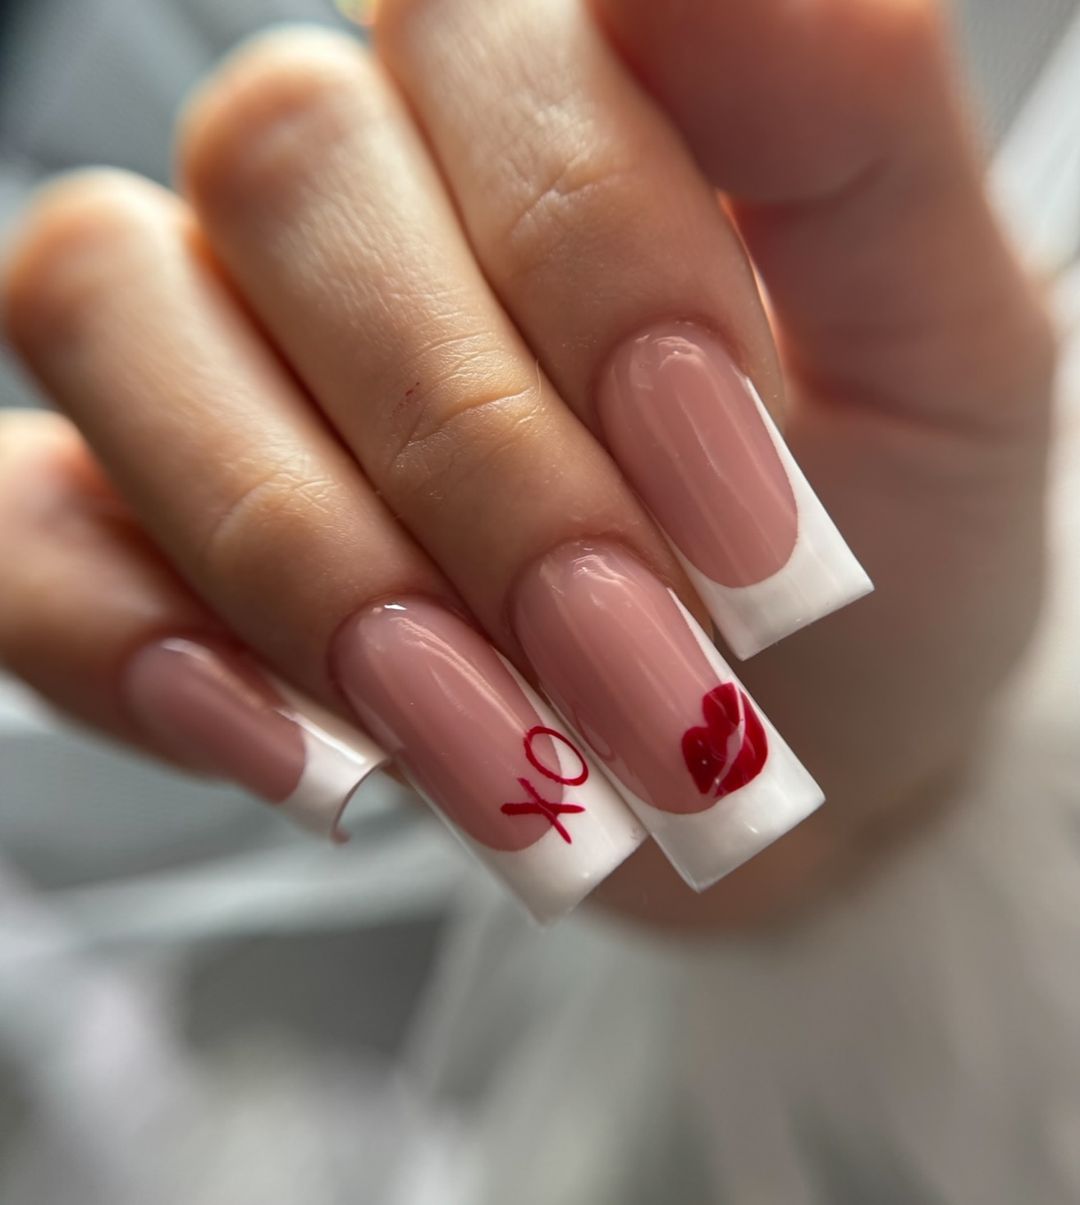
- Undercoat: Deborah Lippmann Gel Lab Pro
- Pale Pink: Essie’s Sugar Daddy
- White Tips: Color Club’s French Tip
- Red for “XO” and Heart: OPI Big Apple Red
- Top Coat: Butter London P.D. Quick Dry Conditioning Drops
To achieve this playful look, first paint your base color and then the tips, and with a fine brush or dotting tool, outline the heart as well as an ‘XO.’
Pink Dreams and Glitter Streams
A design that is stunningly different can be created by wearing long, pink nails with striking patterns and sparkling decorations. These nail art designs look fine because of the white accents mixed up artistically with glitter.
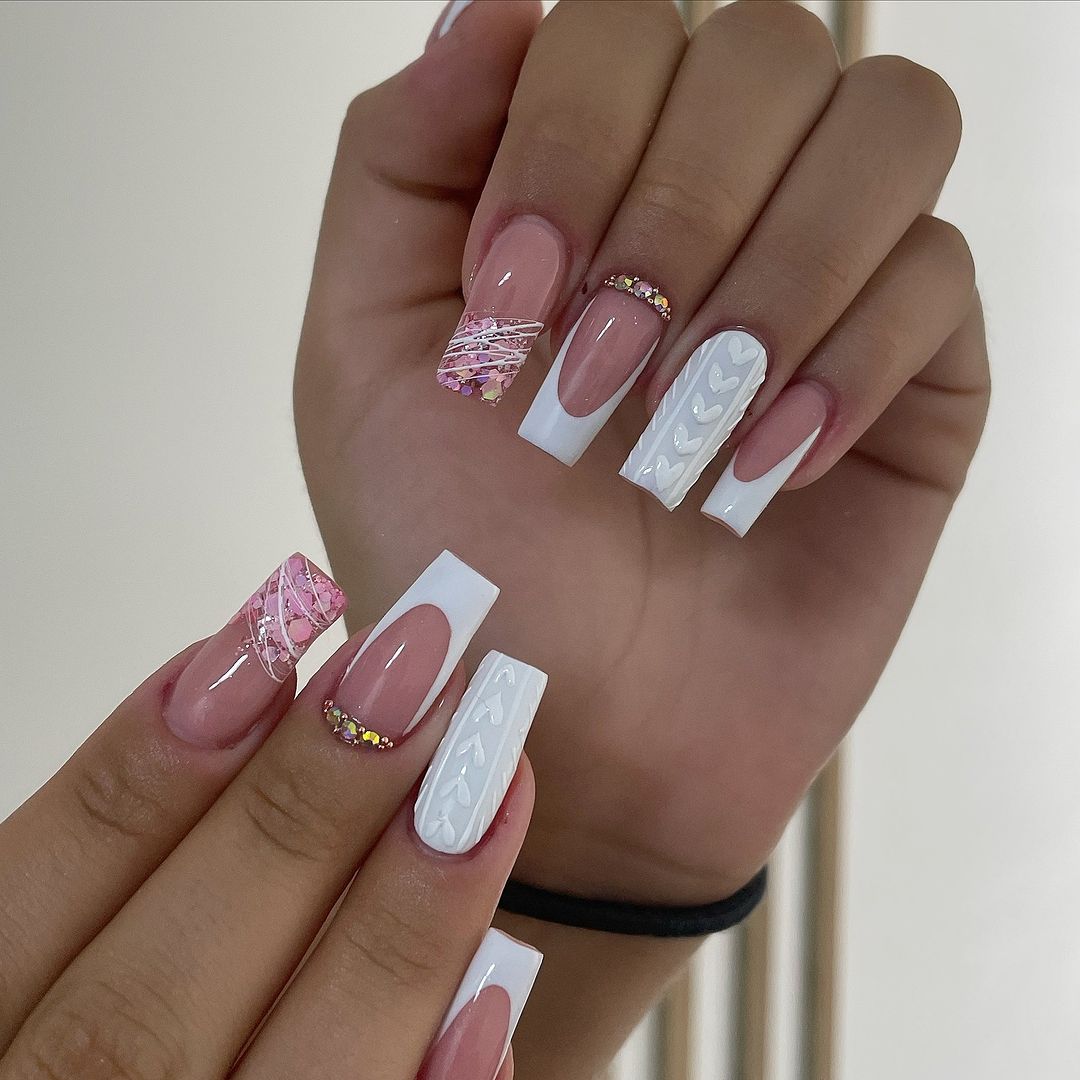
- Base coat: OPI Natural Nail Base Coat
- Pink polish: Let’s Be Friends! By OPI
- White accent polish: Alpine Snow by OPI
- Glitter polish for accent nail: Disco Doll by China Glaze
- Rhinestones and Decals for Embellishments
- Top coat: INM Out The Door Top Coat.
First apply base and pink, then freehand draw or use decals for white. Glitter can cover one nail entirely or ombre effect and the final touch may depend on top coat to ensure it lasts long
Neon Elegance
The design incorporates a dynamic duo of neon orange and purple as it gives a bold twist on the classic French tip. The result is an exceptional piece of fun, unique and interesting statement jewelry for day activities or night out.
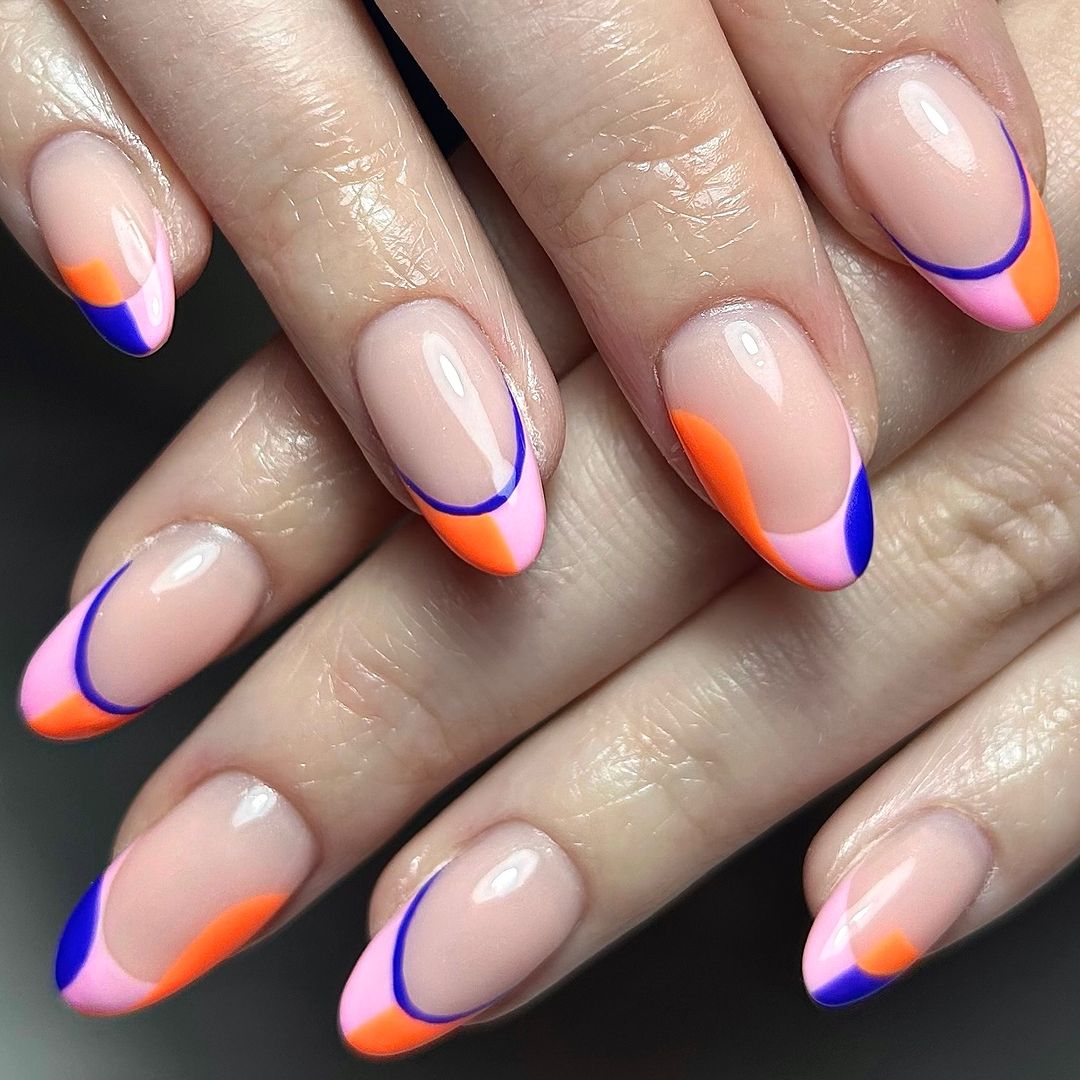
- Base Coat: OPI Natural Nail Base Coat
- Sheer Pink Polish: Essie’s Sugar Daddy
- Neon Orange Polish: Essie’s Serial Shopper
- Neon Purple Polish: China Glaze’s Purple Panic
- Top Coat: Seche Vite Dry Fast Top Coat
Start with a natural base coat, followed by sheer pink polish. Then apply the neon colours carefully to create the French tip, adding in a creative curve for a modern look. Finally, seal with top coat for durability.
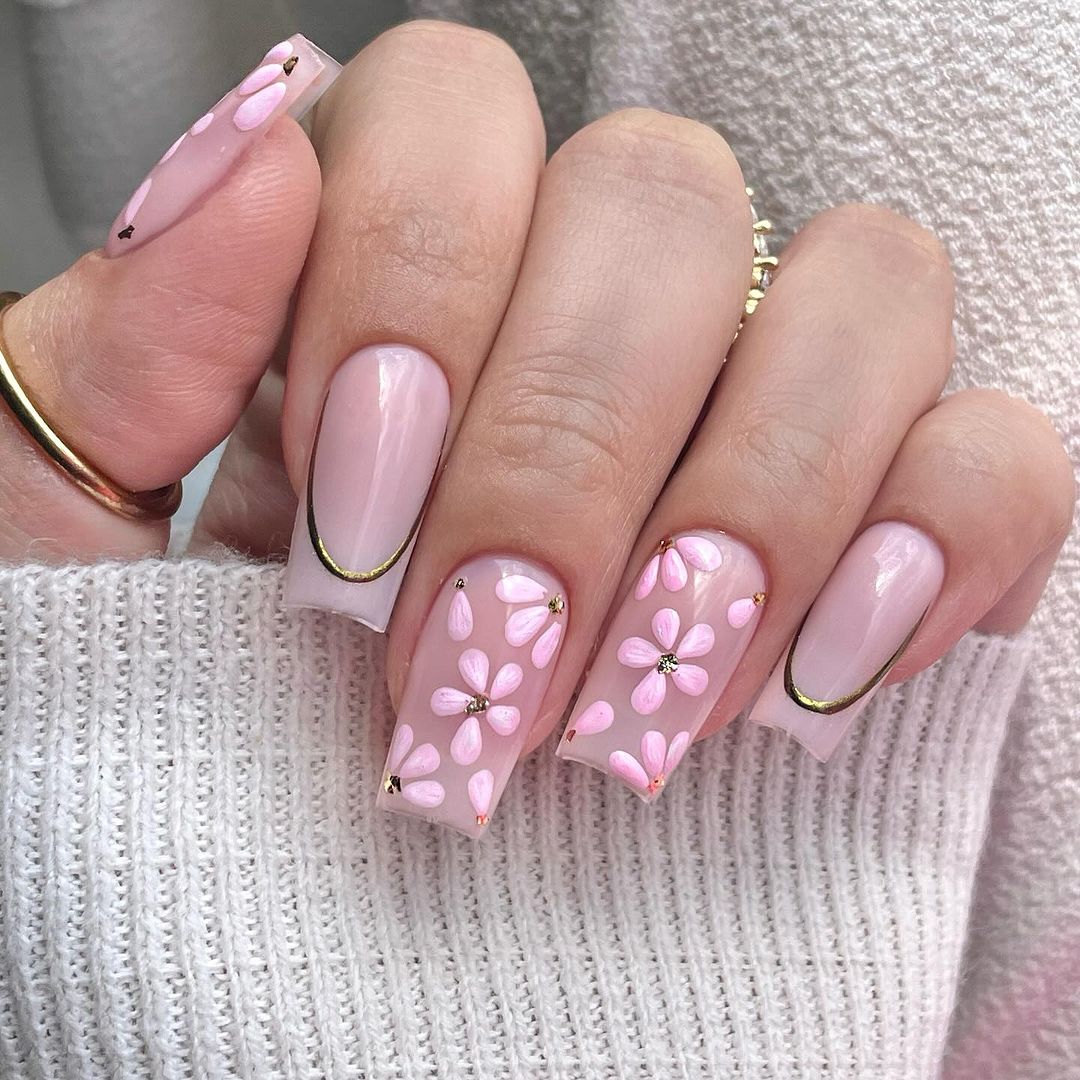
Blossom Charm
This nail art embraces the loveliness of spring and has delicate cherry blossoms on a background that is pink and sheer that is detailed with tiny ribbons and gold accents. It is sweetly unique with a touch of sophistication, which makes it ideal for any fun spring or summer event.
- Essie All-in-One Base – Base Coat
- Essie’s Ballet Slippers – Sheer Pink Polish
- White and Pink Blossoms Acrylic Paints
- Gold Stripes and Bow Stickers
- Sally Hansen Insta-Dri Top Coat – Top Coat
Once you have applied the base coat and sheer color, paint the cherry blossoms by hand or apply decals. Ornament with stripes made of gold then finish up with a bow sticker on accent nails.
Classic Chic
Any look that is desired on any occasion, whether for a chic business meeting or an elegant dinner.
- Base Coat: CND Stickey Base Coat
- Sheer Pink Polish: OPI’s Bubble Bath
- White Polish: Essie’s Blanc for Tips
- Top Coat: OPI Glossy Top Coat
To get this done use base coat and then sheer pink polish. Add precision white tips and finish off with glossy top coat so as to give it some shine as well as protection.
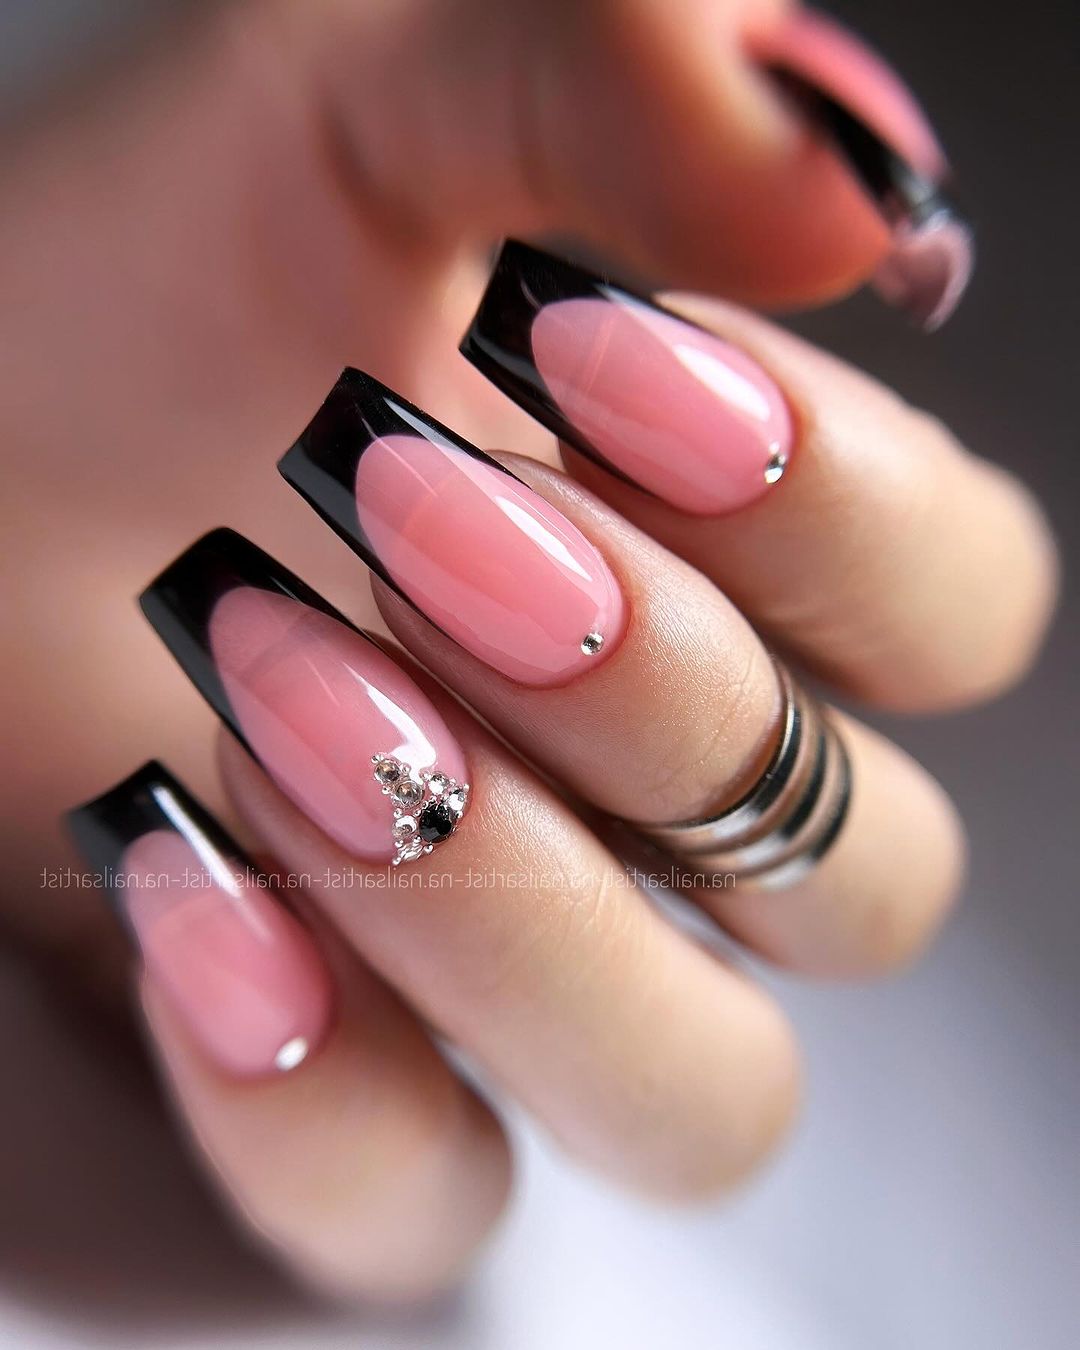
Bold Contrast with a Touch of Sparkle
Characterized by a bold contrast of black against soft pink sheer, adorned with a daring pointed shape. It is an audacious yet refined selection that becomes even more opulent by one rhinestone on each alternate nail.
- Foundation Paint: OPI Natural Nail Base Coat
- Transparent Pink Polish: Essie Sugar Daddy
- Jet Black Nail Varnish: China Glaze Liquid Leather
- Rhinestones: Silver nail art gems
- Top Layer Paint: Seche Vite Dry Fast Top Coat
Apply the foundation paint and then apply the transparent pink polish. When it is dry, carefully paint the tips black and add one gem to make it sparkle slightly. Finish it off with a top layer for sealing purposes.
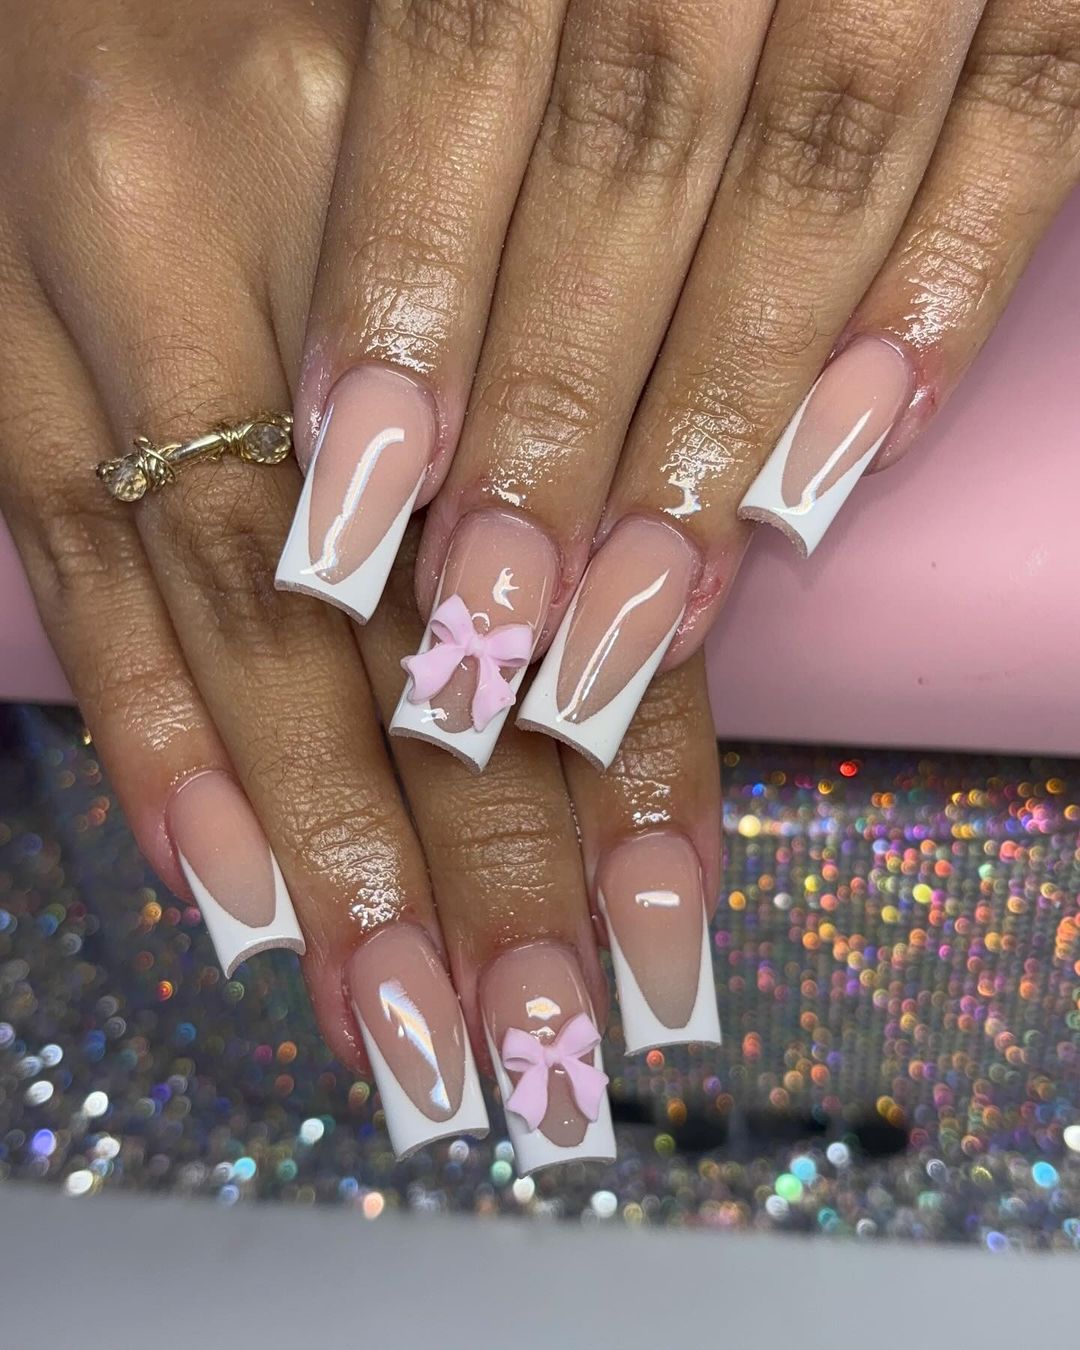
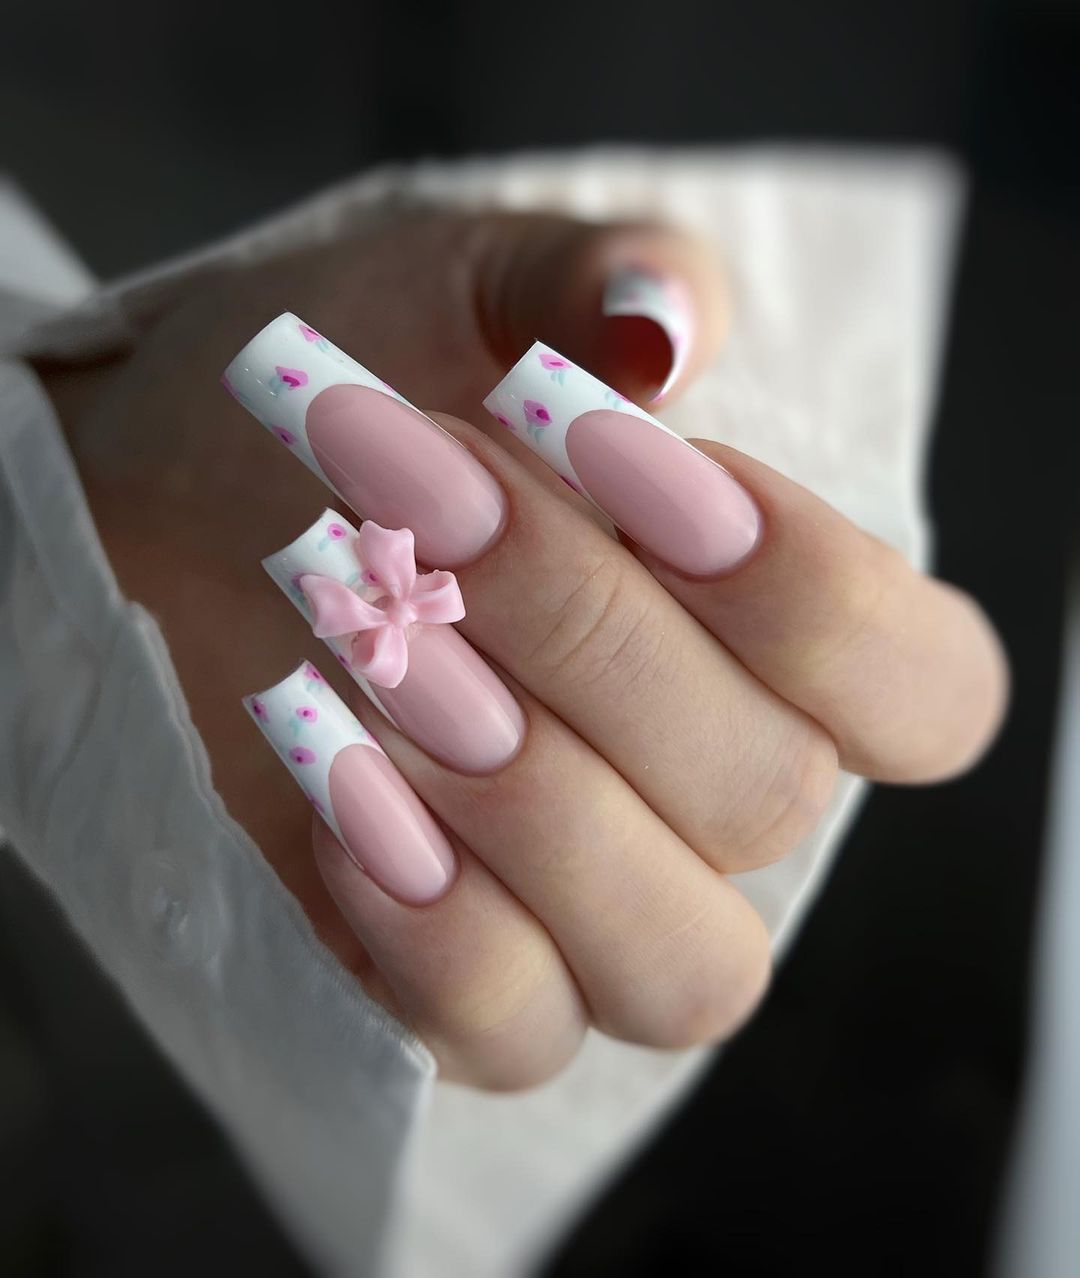
Sweet Pink with Whimsical Accents
To perfectly embody the playful charm, these nails combine a fragile pink base with fancy white tips embellished with small pink hearts and a three dimension bow. It is just ideal for those who adore girly touch and fun details.
- Base Coat: Sally Hansen Double Duty Base & Top Coat
- Pink Polish: OPI’s Mod About You
- White Polish: OPI’s Alpine Snow (tips and hearts)
- Pink Acrylic or Gel for 3D Bow
- Top Coat: Sally Hansen Insta-Dri Top Coat
Start off by putting the base coat then apply the pink polish. Use white to create a tip and include heart decoration. Form a tiny bow using acrylic or gel, put it on the nail and finally seal everything with top coat.
FAQs on Nail Designs
Q: What are the best nail shapes for French manicures?
A: French manicures look great on all nail shapes! The classic style pairs well with rounded or square tips, but it can also look modern and edgy on stiletto or almond-shaped nails.
Q: How long do nail art designs typically last?
A: Depending on the type of polish used and the application technique, nail art can last anywhere from one to three weeks. Using a good base and top coat, avoiding harsh chemicals, and wearing gloves when cleaning can help extend the life of your nail art.
Q: Are 3D nail art designs practical for everyday wear?
A: 3D nail art designs can be suitable for daily wear if they are secured properly and if the size of the embellishments is manageable. However, for practicality, smaller and flatter designs are often recommended.
Q: Can I achieve professional-looking nail art at home?
A: Yes, with the right tools and a bit of practice, you can create professional-looking nail art at home. Start with simple designs and gradually work your way up to more intricate patterns.
Q: How can I prevent my nail art from chipping?
A: To prevent chipping, apply thin, even layers of polish, allow each layer to dry completely before applying the next, and seal your design with a quality top coat. Avoid using your nails as tools to prolong the design’s longevity.
Q: Is it necessary to use a base coat before applying nail polish?
A: Yes, a base coat is crucial. It helps to protect your natural nails from staining, smooths out any ridges, and ensures better polish adhesion for a longer-lasting manicure.
Q: What is the safest way to remove nail art, especially with glitter or 3D elements?
A: For glitter or 3D elements, soak a cotton pad in nail polish remover (preferably acetone-based for stubborn glitter), place it over the nail, wrap it with foil, and let it sit for a few minutes before gently rubbing off the elements. For 3D elements that are large or strongly adhered, gently lift them off with a manicure stick after soaking.
Q: How often should I give my nails a break from polish?
A: It’s healthy to give your nails a break from polish every few weeks, especially if you wear gel or acrylics regularly. This allows your nails to breathe and recover, maintaining their strength and integrity.
Q: Can nail art damage my natural nails?
A: Nail art itself doesn’t damage nails, but improper application or removal, such as peeling off polish or overfiling, can. Always follow best practices for application and removal to keep your nails healthy.
Q: Are there any nail art trends that are particularly popular this season?
A: Nail art trends are constantly changing, but some popular themes include minimalist designs, negative space art, neon colors, and pastel hues for the season. For the latest trends, it’s best to check recent fashion shows, social media, or consult with a professional nail artist.
Save Pin