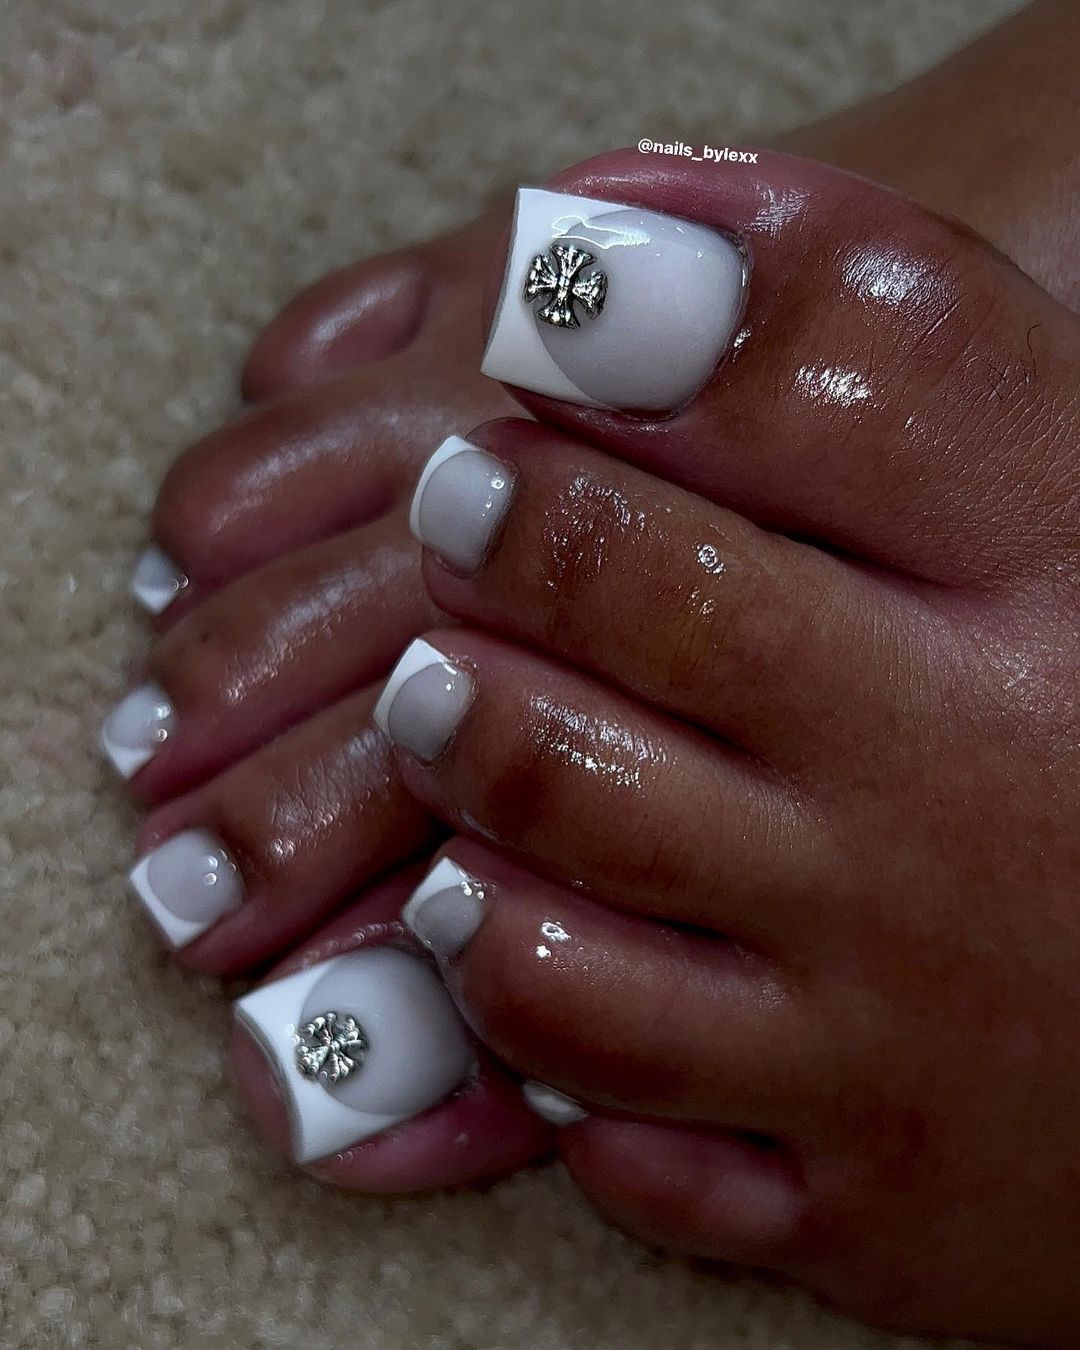
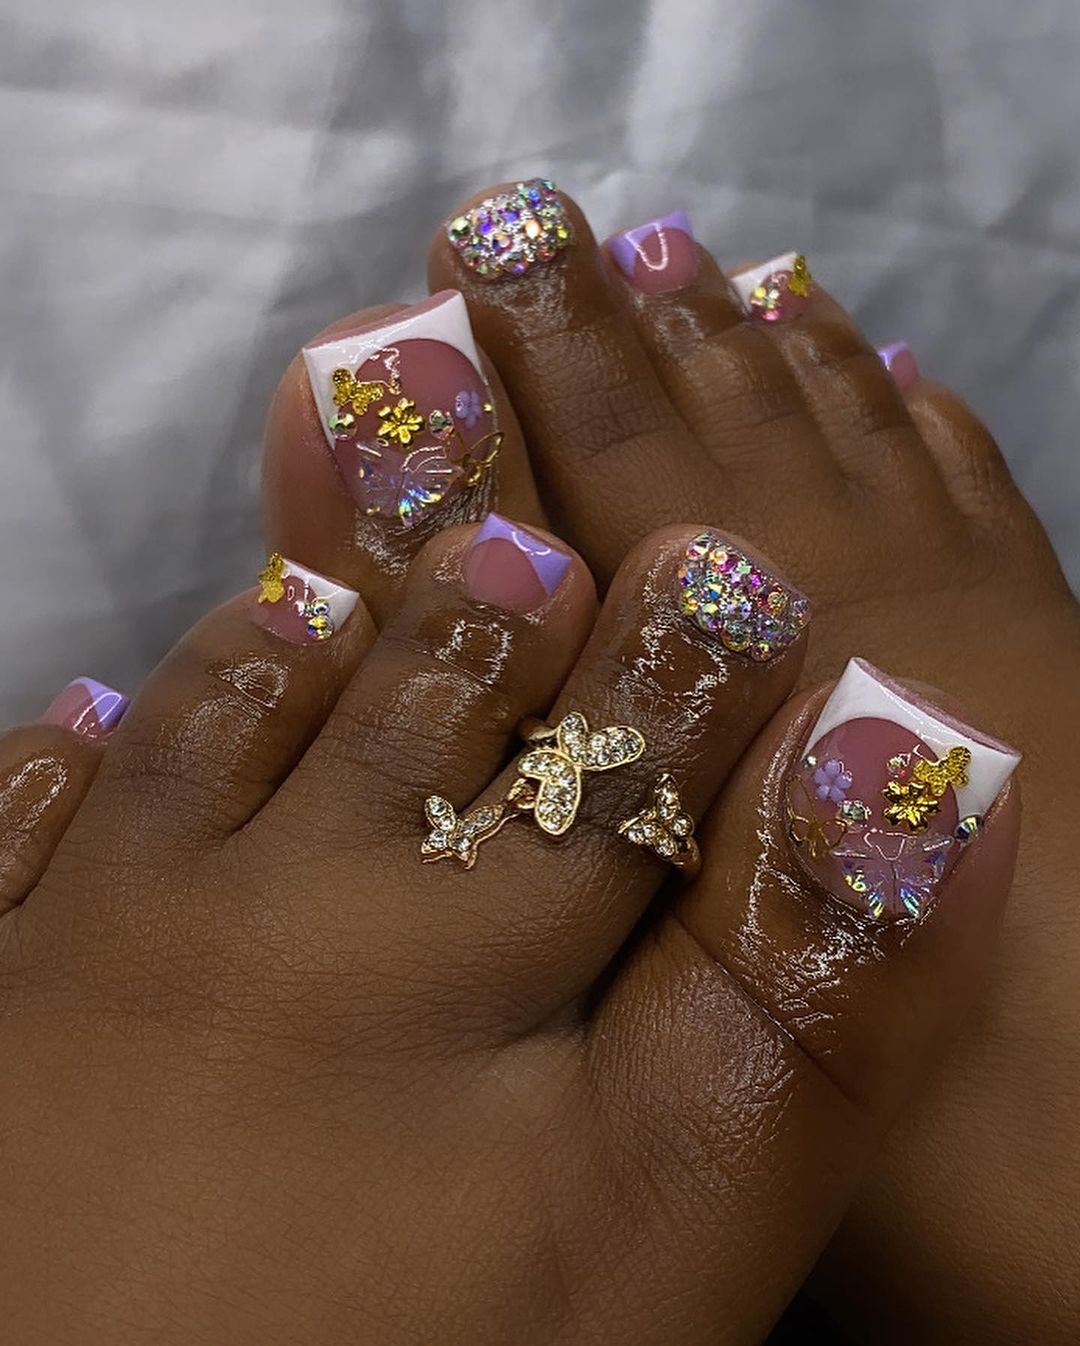
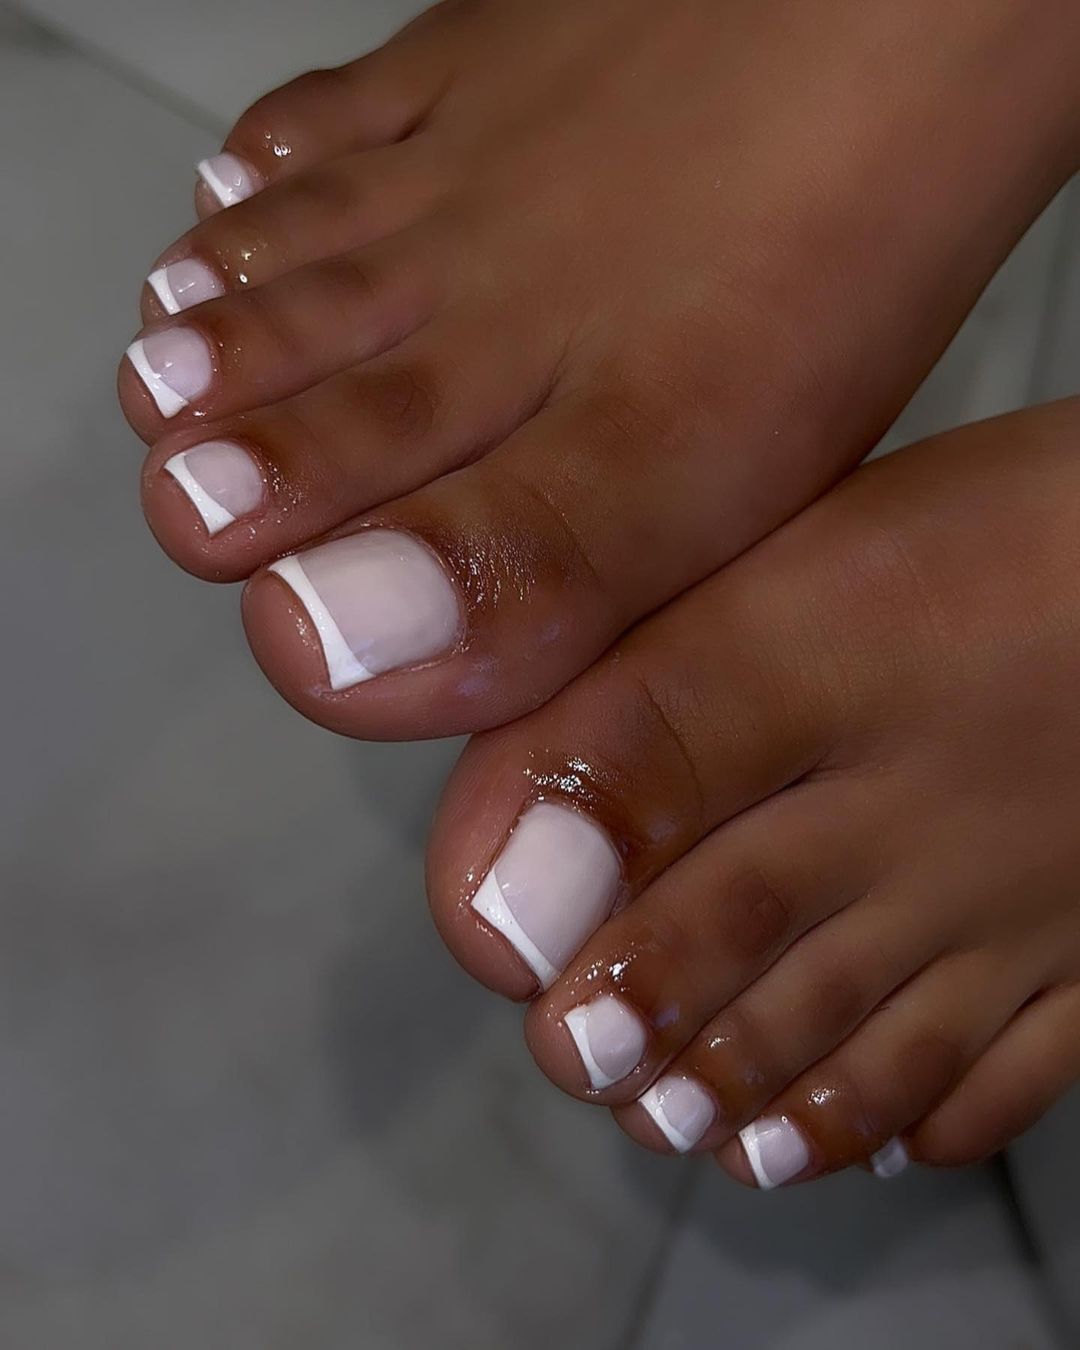
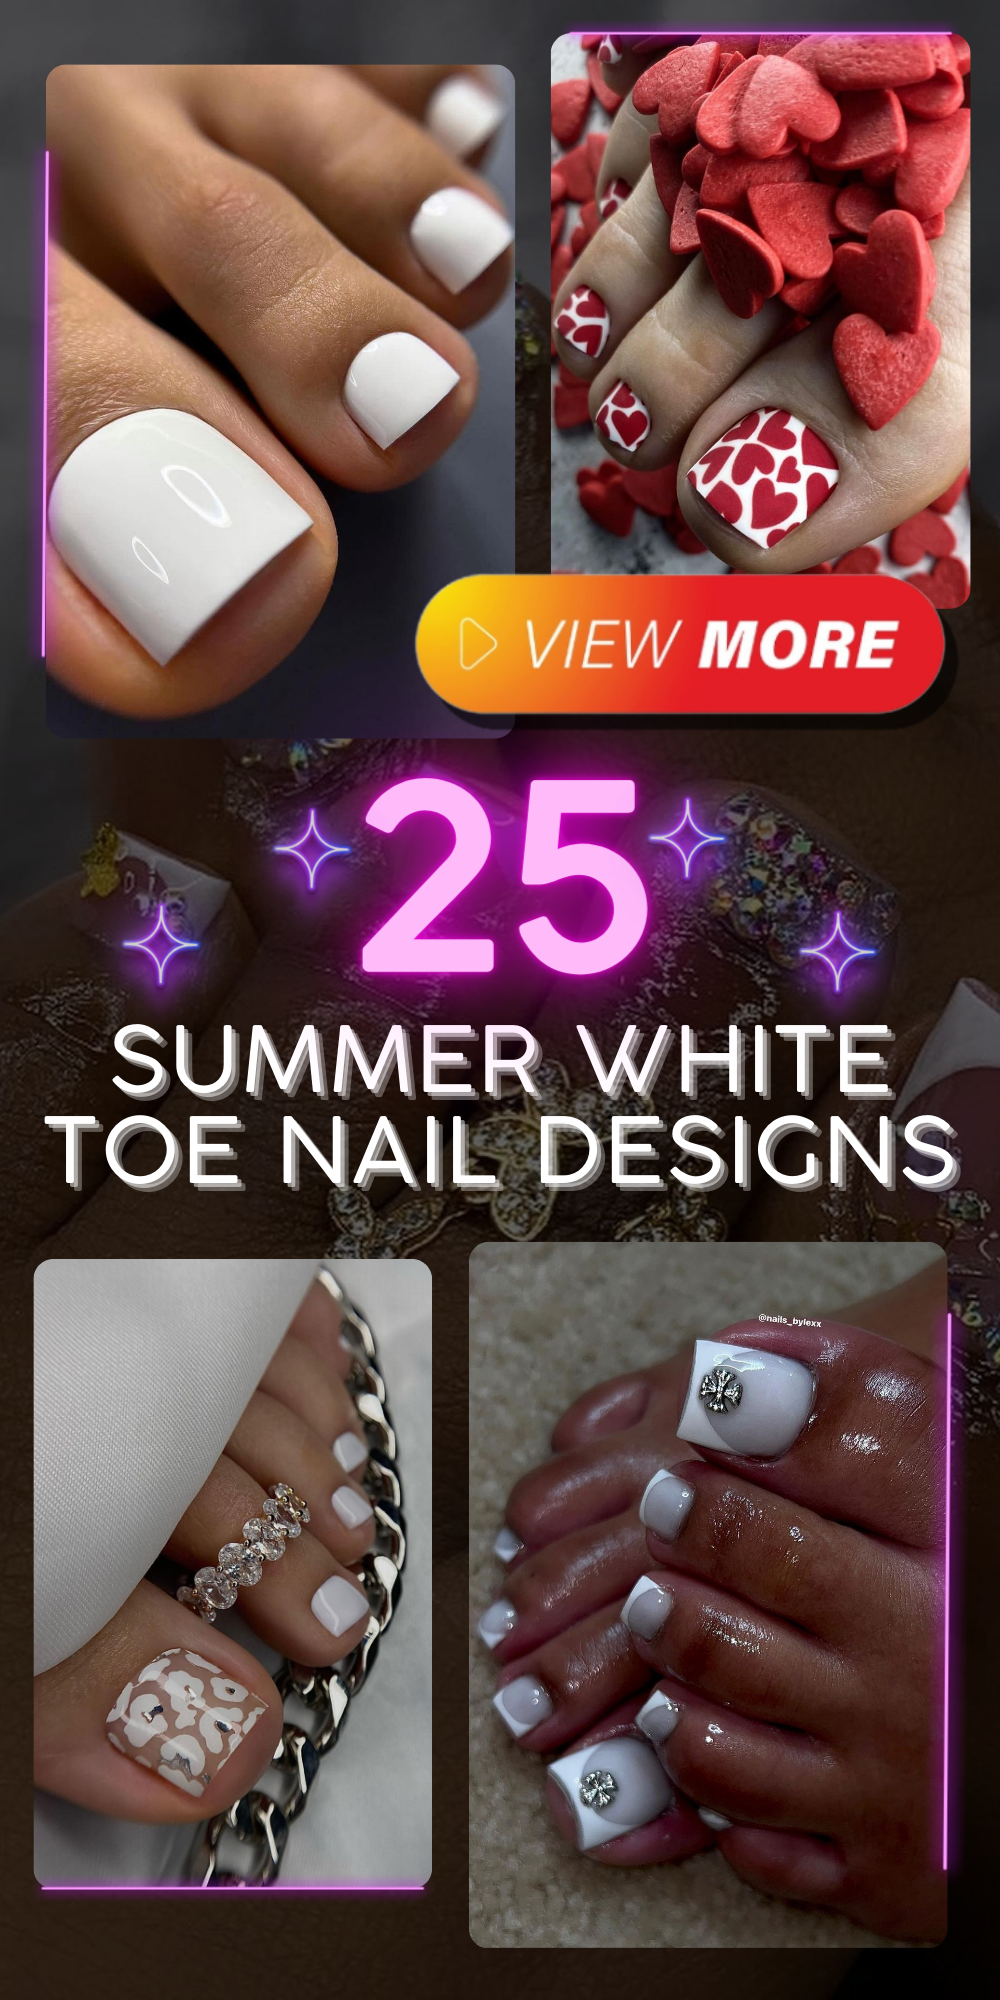
Do you wish to explore the world of trendy and stylish summer white toenail designs? Why are they perfect for your summer adventures? White toenails are not just a clean and sharp look but also an outlet for imagination whether you spend your days by the pool or stroll along sun-soaked streets. However, what is the right way to combine simplicity with elegance? What should you do to have a resistant fashionable pedicure when it’s hot outside in summer time? Let’s dive into these glowing designs that will make your summertime appear like no other.
Summer White Toe Nail Designs: A Symphony in White
The modest beauty of summer white toenail designs can be seen in their elegance and versatility. This design, in particular, emphasizes the clean charm of white polish combined with soft, creamy shades. Toes are shaped into a soft almond shape that indicates a preference for natural and elegant nails. Without overpowering the design, the big toe is subtly given an exclusive touch with one sparkly element. It is a perfect combination of simplicity and allure for those who love minimalistic but stylish beauty.
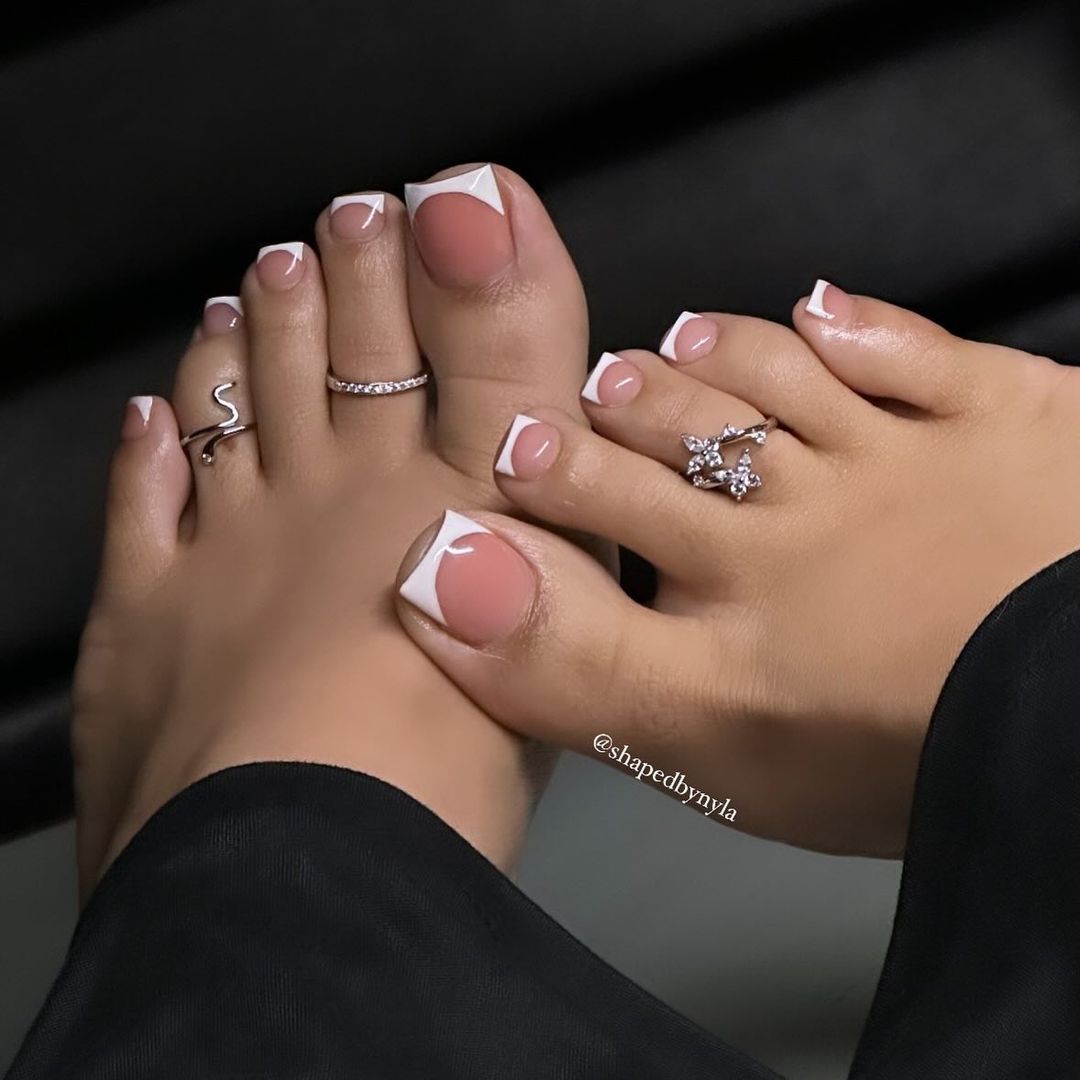
- Essie Here To Stay – base coat
- OPI Alpine Snow – white polish
- Seche Vite Dry Fast – top coat
- Swarovski Crystal Pixie – accent stone
- Dotting pen – design tool
According to me, if you want to achieve this look; it’s all about how good your white polish is. You should try OPI’s Alpine Snow which is a true opaque white color that covers evenly without streaking lighter shades typically do.
To create this look yourself, you will need patience and precision as well as some basic supplies like a dotting pen or toothpick for creating dots with polish etcetera.. Start by prepping your toenails so they are smooth and filing them into an almond shape using nail file or buffing block . Apply base coat over whole nail then paint two coats of Alpine Snow on each toe / finger etcetera.. While topcoat is tacky place one Swarovski crystal onto big toe only rest bare then finish off with quick dry topcoat from seche vite etcetera..
Enigmatic Elegance: White Charisma
The outcome of merging black and white in nail art is eternal. This photo displays an ivory base that warms things up a bit, with sleek black lines for a graphic touch. It’s for the daring among us — those who want their pedicures to say something. The toenails are cut clean and square, giving off more modern vibes, while the black accents are placed just so to create maximum contrast.
- CND Stickey Base Coat
- Zoya Snow White
- Sally Hansen Black Out
- CND Vinylux Long Wear Top Coat
- Fine-tip nail art brush
The key to recreating this mani successfully is all in the contrast. Zoya’s Snow White has a creamy off-white finish that lets you etch on ultra-sharp lines with Sally Hansen’s Black Out using a fine-tip nail art brush
After your base coat, apply two layers of Zoya Snow White. Use a fine brush dipped in Sally Hansen Black Out to etch the designs, keeping your hands steady and applying light pressure. This might take some practice, so don’t rush it. Seal in your pattern with a long-wearing top coat for extra shine.
A Gilded Touch: Golden Summer Dreams
Summertime is all about glitz and glam, and this nail design is the epitome of that. The base is a creamy white with a touch of pink and golden undertones that softly catch the sun. Each toe has a different pattern, featuring gold accents for an extravagant look. The nails are kept short and square, which creates a modern backdrop for these elaborate gel designs. This pedicure uses rhinestones and gold flakes to illustrate how important small features are in creating beauty. It’s perfect for warm summer nights or an upscale beach wedding.
- Base coat: Priming Basecoat by Butter London Nail Foundation
- White gel polish: Arctic Freeze by Gelish
- Gold foil: Rio Professional Nail Art Foil Kit
- Rhinestones: Gold Micro Beads
- Top coat: OPI GelColor Top Coat
In this instance, Gelish Arctic Freeze works well as it provides an immaculate white color for building upon. For a variety of vibrant golden effects I recommend the Rio foil kit, while micro beads can be used to add texture and dimension.
Start with a priming base coat so that your polish adheres smoothly. Apply Gelish Arctic Freeze and cure under UV light for long-lasting wear. To achieve the golden accents, press the foil onto the tacky layer of cured gel polish – then place rhinestones as desired using tweezers. Finish off with sealing everything using top coat so it stays glossy and lasts longer.
Classic Simplicity: Soft Milky Whites
A classic summer white toe nail design is a testament to timeless taste, and this rendition is no exception. The toes exhibit a flawless application of a soft, milky white polish that speaks to purity and elegance. What’s compelling about this design is its understated sophistication; it’s a reminder that sometimes less truly is more. The nail shape here is short and square, practical for summer activities while still maintaining a polished appearance.
- Base coat: Deborah Lippmann All About That Base
- White polish: Chanel Le Vernis in Pure White
- Top coat: ORLY Glosser Topcoat
For its better pigmentation and smoothness when applying it, I strongly recommend Chanel’s Pure White as the best shade for people who want an immaculate but warm white hue which goes with any complexion.
Ensure your nails are clean and filed into an even square shape. Apply one layer of base coat to protect them followed by two coats of Chanel Le Vernis in Pure White. Take your time while applying the polish so that it can be spread uniformly without forming streaks. After drying up, lock the color with ORLY Glosser Topcoat which will give it a brilliant finish lasting long on nails.
Save Pin
Artistic Flair
Patterns for summer commonly include excitement and originality, like these marbled white toes. The artistic and fashionable nature of this item is created by the swirled mixture of white, black, and gray that gives it an illusion-like quality. The design on the big toe is more abstract than that on any other part which makes it a central point while the rest are done in less complex but equally elegant finishes. It is therefore well-balanced eye-catching design perfect for anyone who wants to infuse some art into their summer pedicure.
- Base coat: OPI Natural Nail Base Coat
- White polish: Essie Blanc
- Marble effect colors: Essie Licorice and Essie Master Plan
- Top coat: INM Out The Door Top Coat
- Detailing tool: Needlepoint dotting tool
When you want to create marble effect go for Essie shades since they blend well with each other. What will make your marbles look real are those fine natural looking swirls which can only be achieved using needlepoint dotting tool.
Start off by painting your nails with Essie Blanc as base. While the polish is still wet, add small dots of Licorice and Master Plan then gently swirl them around using a dotting tool. Ensure that you work fast enough so that blending can take place while polishes remain wet before finally sealing everything with top coat.
Creamy Perfection: Subtle Sophistication
It takes creamy whites to another level here in this design. Opacity and gloss of the polish used in this case suggests a gel-based formula, giving a soft yet solid color payoff that is equivalent to luxury. It is a summery look that is versatile and vogue; these nails will serve you for high-end events as well as casual beach trips. The square shape of the nail pays homage to the conventional while the faultless finish reflects professionalism.
- Base coat: Gelish Foundation Base Gel
- Creamy white gel polish: Bio Seaweed Gel in White
- Top coat: Gelish Top It Off Sealer Gel
Bio Seaweed Gel in White is a great choice when you want an opaque look that does not yellow with time, keeping your toenails perfectly chic all season long.
After applying the base gel, cure under UV lamp. Then apply two coats of Bio Seaweed Gel and cure after each application. Don’t forget to cap free edge to avoid chipping. Seal with the sealer gel from Gelish for glossy, strong pedicure before finishing it up.
Verdant Allure: Botanical Bliss
This complex design represents the newness of a summer garden. A pearly white background sets off the green plant print. It is a design for nature lovers and fashionistas, combining bright summer colors with elegance. The shiny finish suggests that a gel polish was used because it makes the look more three-dimensional and transparent. Neatness and functionality are achieved through short nail length.
- Base coat: Glisten & Glow Base Coat
- White gel polish: DND Daisy Gel in Pure White
- Botanical nail stickers: Born Pretty Green Leaf Series
- Top coat: DND Daisy Gel Top Coat
When I want a botanical print that looks very clean like this one, I usually go for nail stickers because they give a detailed finish that seems professional without all the effort of freehand painting.
Apply one coat of base coat to prep nails followed by two coats of Pure White gel polish, curing between each layer. Next, choose any type of botanical sticker you like and stick it on making sure it lays flat against your nail bed as possible then seal everything together with another layer of topcoat but this time use Gel version so you get that extra shiny effect which will also make your manicure last longer.
Playful Sprinkles: Sweet Summer Confetti
Like a summer party or ice-cream sprinkles, this design is celebratory and fun. To create a lively contrast on a white base, different colored confetti dots were used. This makes it perfect for any informal get-together during the summer. A square shape was chosen to provide enough room for speckles. Such an appearance will definitely bring happiness and bright colors into your everyday life this season.
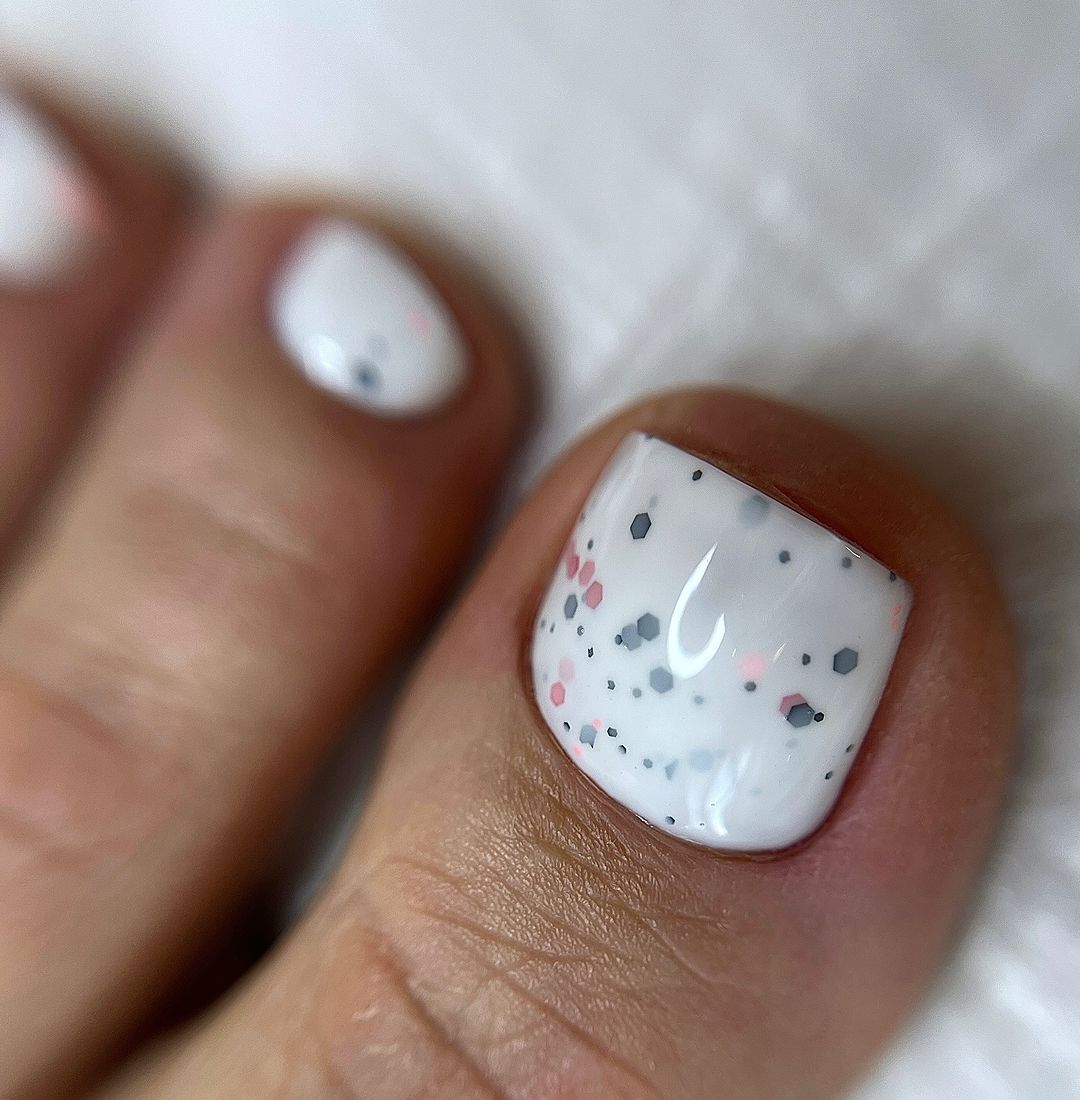
- Base coat: ORLY Bonder Rubberized Basecoat
- White polish: Essie Blanc
- Colored dot polish: Various shades from the China Glaze Brights collection
- Dotting tool: Dual-sized dotting tool
- Top coat: Essie Gel Setter Top Coat
The use of a dotting tool is crucial in achieving diverse sizes of dots needed while applying the polishes; on the other hand, Essie’s plump and glossy finish that comes with its Gel Setter top coat makes colors pop.
Start with a base coat for longevity. Two coats of Essie Blanc should be applied before using a dotting tool to apply brightly colored polishes of your choice. Do not worry too much about where they are placed as randomness adds charm! Finish off by protecting this cheerful masterpiece with gel-like top coat that will also enhance its design.
Lovestruck Toes: Hearts Aflutter
This particular design is intended for the romantics among us, with a soft white base covered in cute little black hearts. It’s a candy-coated twist on summer’s white toenail designs – soft and dreamy but still graphic. Some of the hearts are strategically placed as full shapes, while others only peek half onto the nail, like a whimsical nod to love’s unpredictability. The shape is square but softened at the edges, continuing the theme of sweet affection.
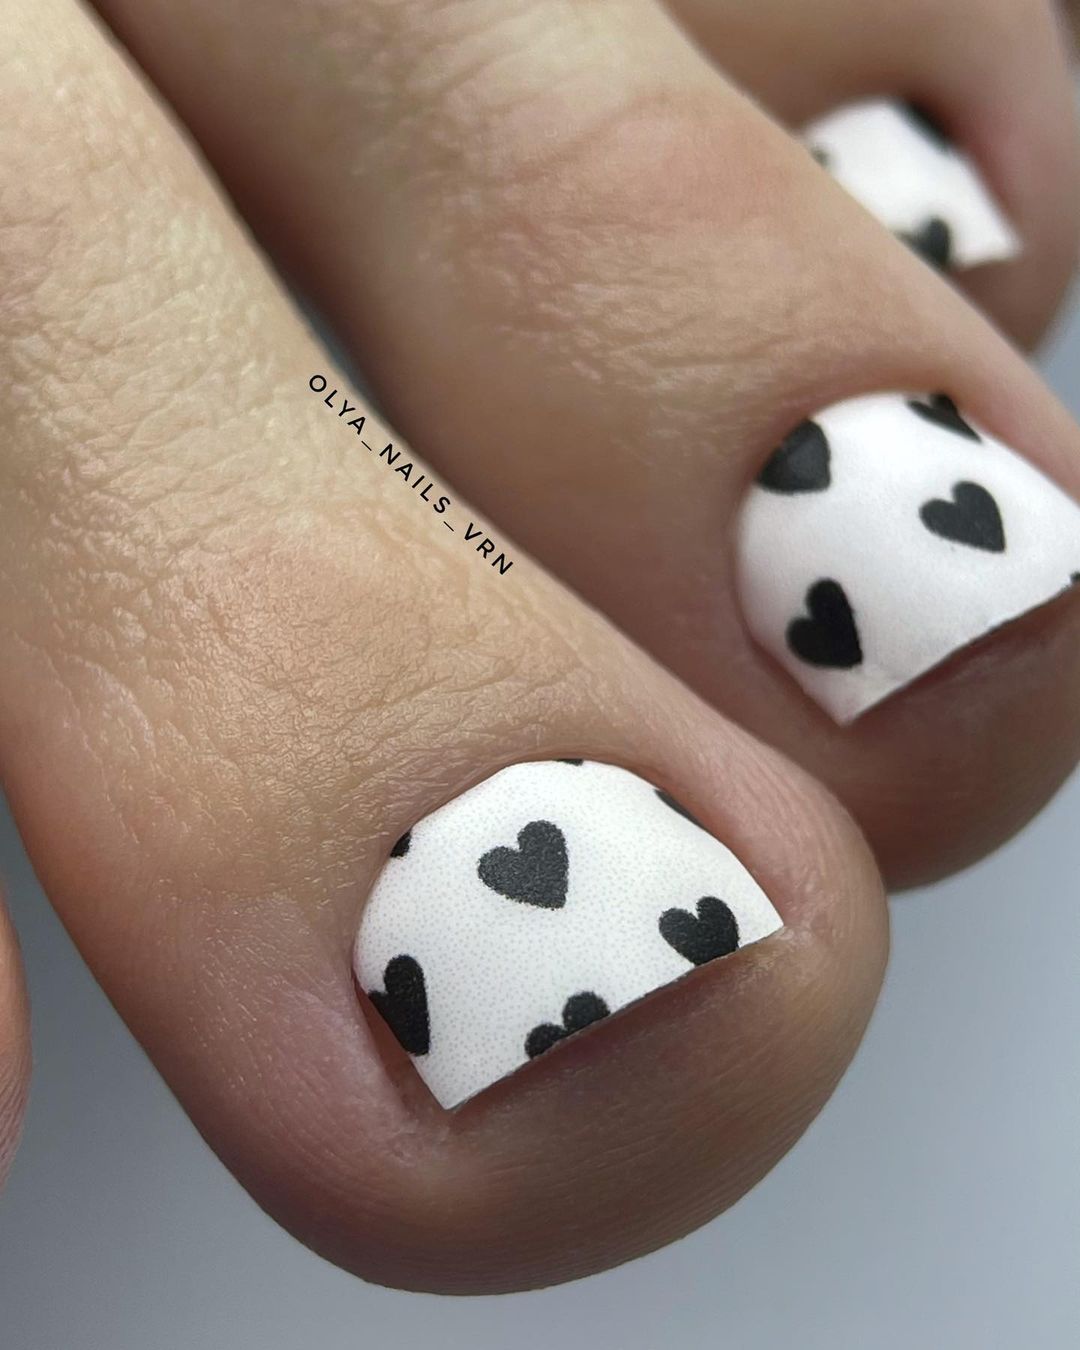
- Zoya Anchor Base Coat
- OPI Funny Bunny
- Konad Stamping Nail Art Polish – Black
- Sally Hansen Insta-Dri Anti-Chip Top Coat
For most precise heart shapes, use stamping tools or hand-paint with a very fine brush if you’ve got a steady hand. Konad’s black polish is specially made for stamping so it gives crisp lines and solid color.
Add hearts after applying base + white polish with either stamps or fine brushes. When freehanding, make two dots side by side and drag each down at an angle to meet at a point. Finish with fast-drying top coat over your design to prevent smudging!
Save Pin

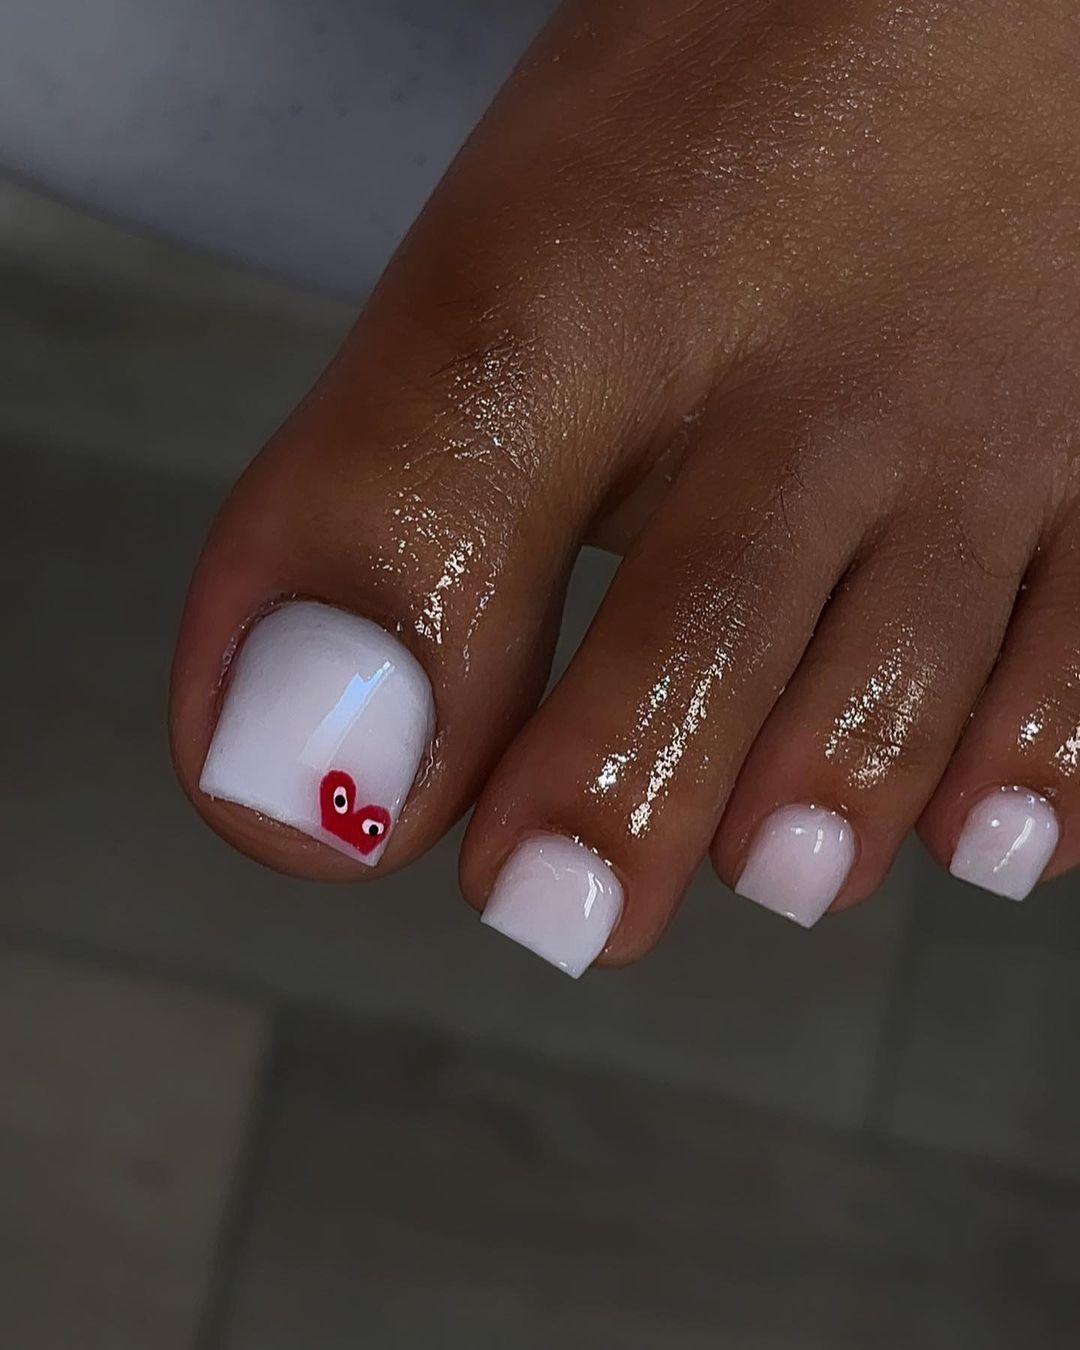
Love-Intense Toes: Amorous Patterns
Just like the fierce emotions of summer romance, these toes boast a design of red hearts on a white background. This is both playful and passionate; it’s a love letter that is as lively as it is charming. Each heart jumps out because of the difference between red and white, so that everyone’s eyes are glued to your feet. Mixing full heart shapes with heart outlines was a nice idea – it made the pattern more interesting.
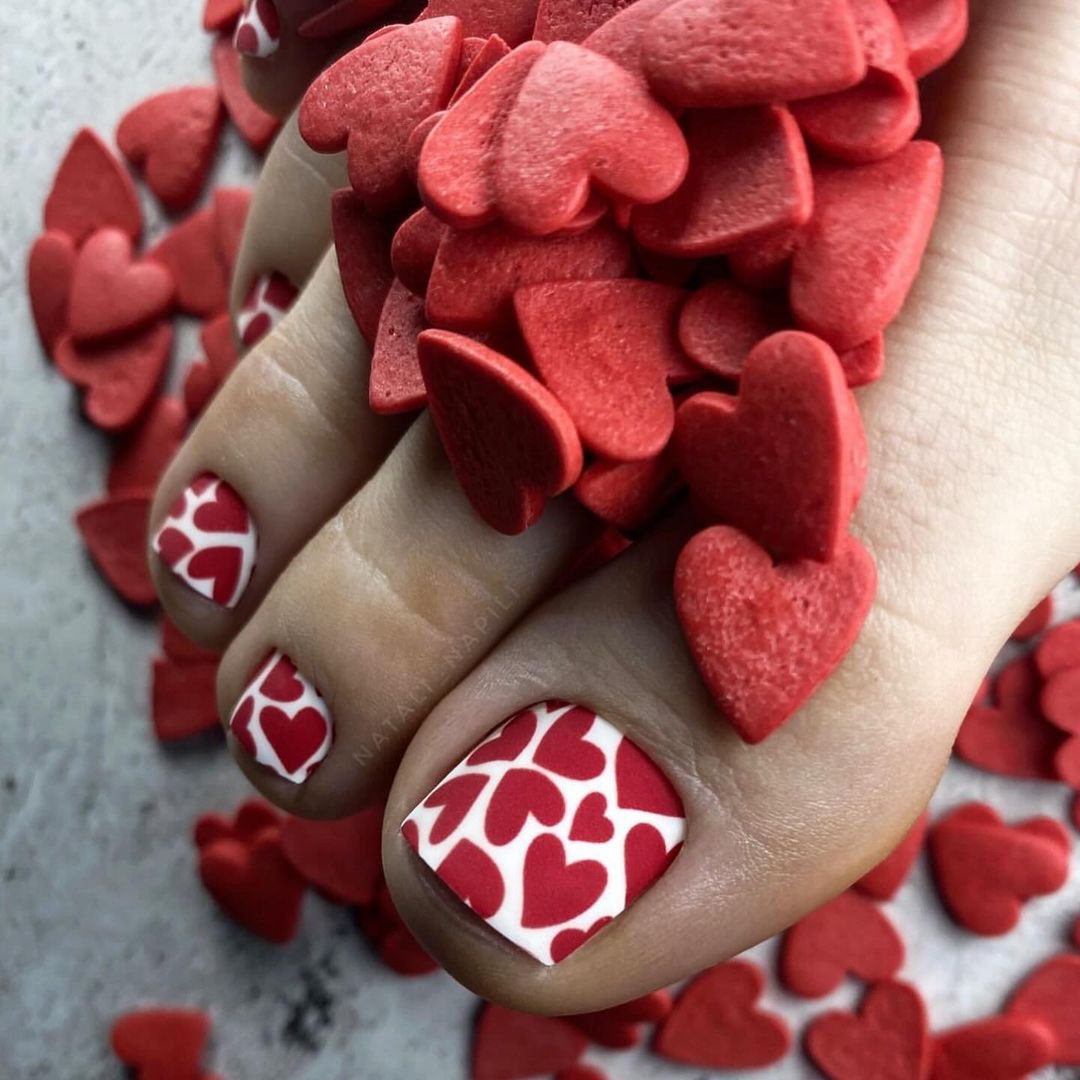
- Base coat: Essie First Base
- White polish: China Glaze White on White
- Red polish for hearts: OPI Big Apple Red
- Top coat: Revlon Extra Life No Chip Top Coat
Personally I find that using OPI’s Big Apple Red (or any other bright true red shade) really helps those hearts pop against the white base more vividly.
Apply base coat followed by two coats of bright white polish. Once dry, take a fine-tip brush and paint on hearts in chosen red shade. Use a steady hand and even pressure for heart outlines. Finish with chip-resistant top coat to keep your mani looking fresh through all your summer adventures!
Glitter Gradient: Sparkle Meets Simplicity
Summer is best represented by the shine of sparkles under the sun, which precisely describes this design feet. Over a see through milky white base, the glitters slowly change color and this reminds people of soft twinkle of sands when they reflect sunlight. While being fashionable, this pattern also keeps its freshness and lightness. The shape of nails in this case is a square one but with conservative features that allow it to be used for any casual or official summer event.
- CND Sticky Base – Base Coat
- Essie Tuck It In My Tux – Milky White Polish
- Sally Hansen Xtreme Wear in Disco Ball – Glitter Polish
- INM Out The Door – Top Coat
Disco Ball from Sally Hansen has dense distribution of glitter which makes gradient effect creation almost effortless.
Do your base coat first then put on sheer layer of Essie Tuck It In My Tux so that you can give them a soft white glow. Apply Disco Ball around middle part of each nail starting from tip and fading towards it for glitter gradient. Use sponge if you want more clear difference between two adjacent areas where colors are changing gradually from darker shade into lighter one until complete disappearance at certain point on each side (left or right). Have fun sealing everything off with fast drying top coat to add some more sparkles!
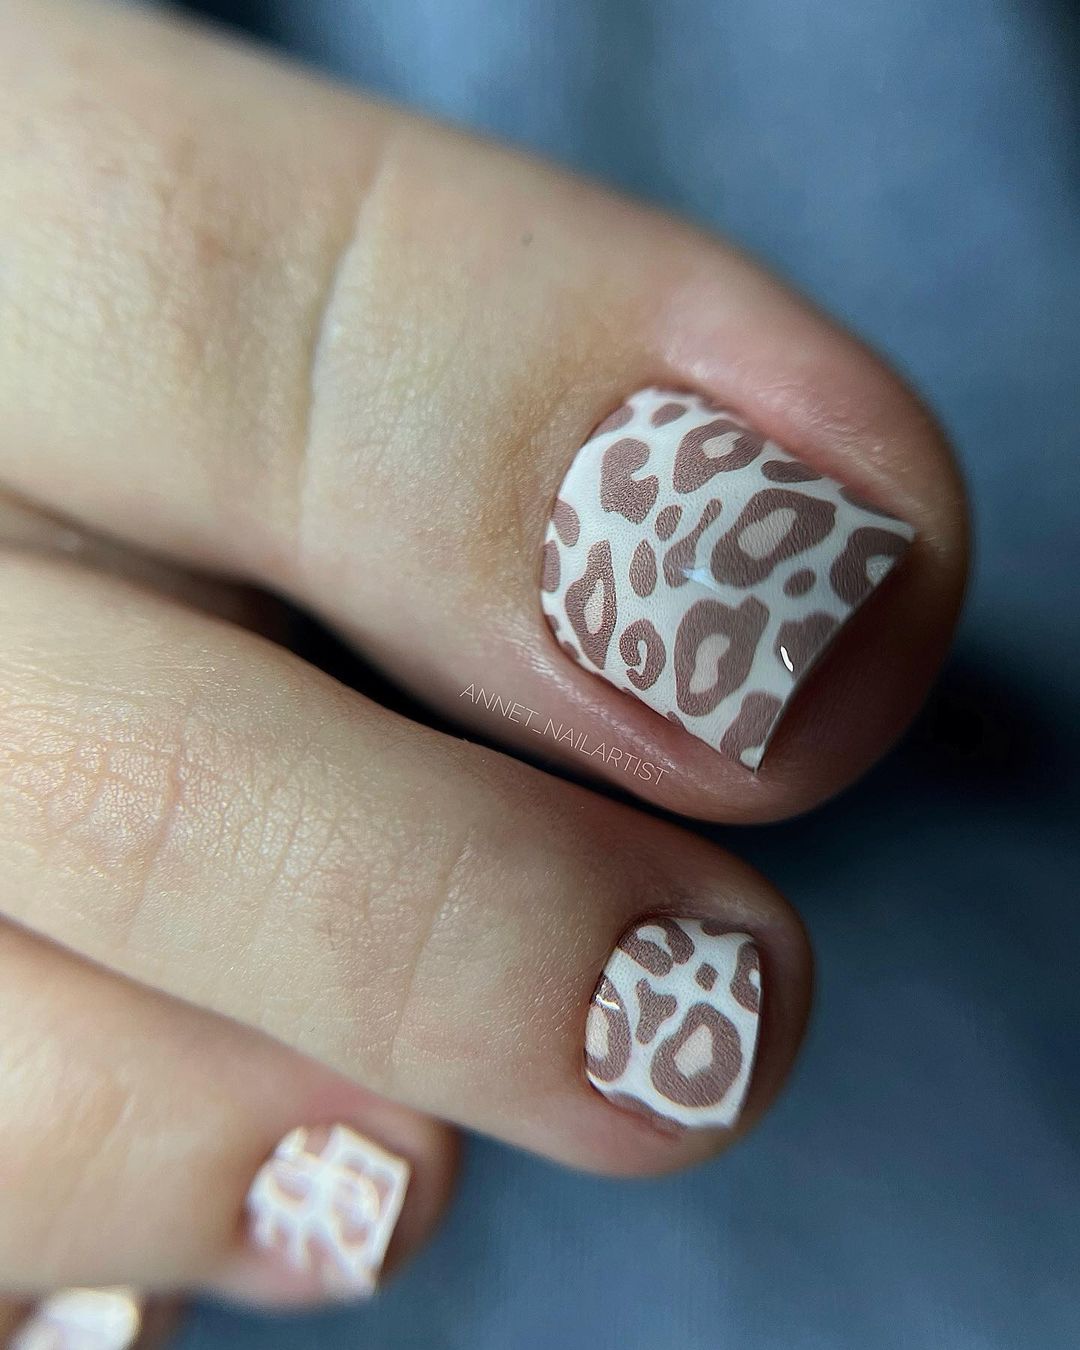
Elegant Whimsy: Modern Animal Print
This sophisticated toe design takes a walk on the wild side with a modern twist on animal print; a neutral creamy white base is an artist’s canvas for the gentle and abstract pattern of animals, finished off with small silver surprise and whimsy. A timeless yet trendy design for this summer’s fashion-forward individual. Thus contemporary and chic look is preserved through square shaped toenails.
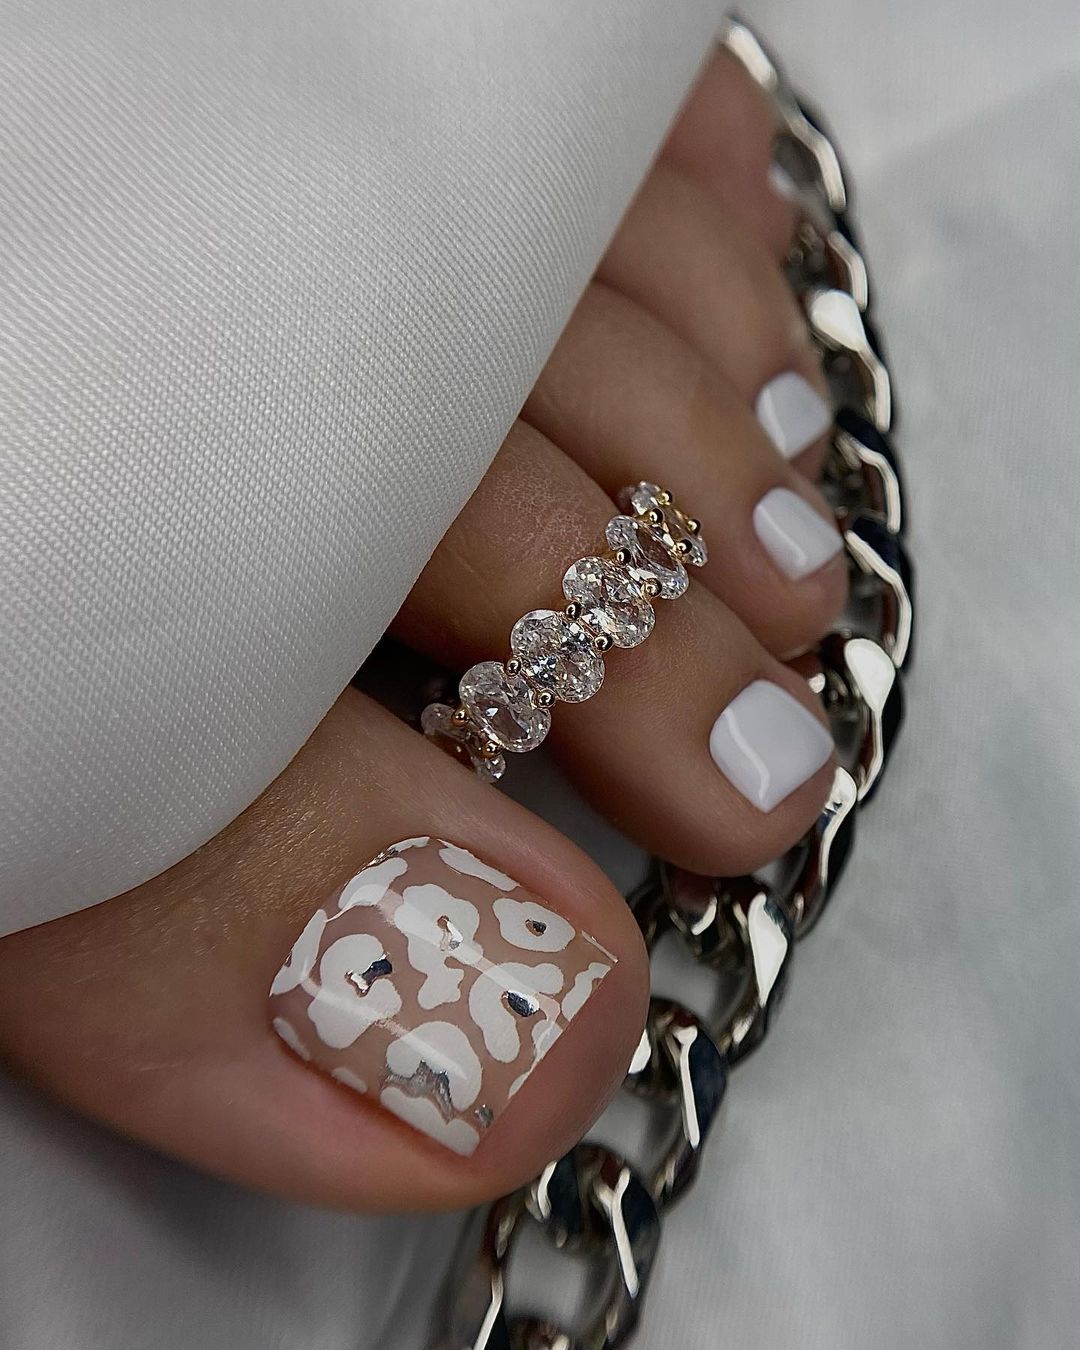
- Base coat: OPI Natural Nail Base Coat
- Creamy white polish: Smith & Cult in Paper Doll
- Animal print polish: Zoya in Louise
- Silver accents: Nail Art Rhinestones
- Top coat: Seche Vive Gel Effect Top Coat
While Smith & Cult’s Paper Doll has provided a rich solid base, Zoya’s Louise is ideal for achieving soft delicate print details.
Start with a base coat, then apply two coats of Paper Doll to get that opaque milky appearance. Using Louise, delicately draw the animal prints by use of thin brush only. Put several rhinestones carefully to represent shining fur of animals. Apply gel effect top coat for extra shine and durability.
Pink Whimsy: Candy Stripes and Hearts
Revelling in summer fun, this design combines pink and white stripes with cute little pink hearts on a white base. These various designs suggest a happy-go-lucky attitude perfect for summer celebrations. The pink and white together give a traditional clean white look an unexpected twist of color that would be adorable as a statement piece for any outfit.
- Base coat: Smith & Cult Base Coat
- White polish: ILNP Whiteout
- Pink striper & heart polish: OPI Pink Flamenco
- Top coat: KBShimmer Clearly On Top Quick Dry Top Coat
Using a bright, opaque pink like OPI’s Pink Flamenco makes the candy cane effect really bold and sugary sweet– who could resist it?
Apply your base coat followed by two coats of ILNP Whiteout for a crisp canvas. For the stripes, use striping tape to ensure clean lines, then fill in alternating stripes with Pink Flamenco. Use a small dotting tool to add heart shapes. Finish with top coat to protect your playful artwork!
Gilded Sophistication: Luxe Animal Print
This plan raises the white nail to a level of luxurious splendor by means of sumptuous animal print set off with gold touches. The use of creamy white and translucent areas creates an uncommon depth, so that three-dimensional effect is achieved by almost any gold foil. It’s contemporary and classic at once – perfect for this summer’s fashion-forward individual who wants to make a statement.
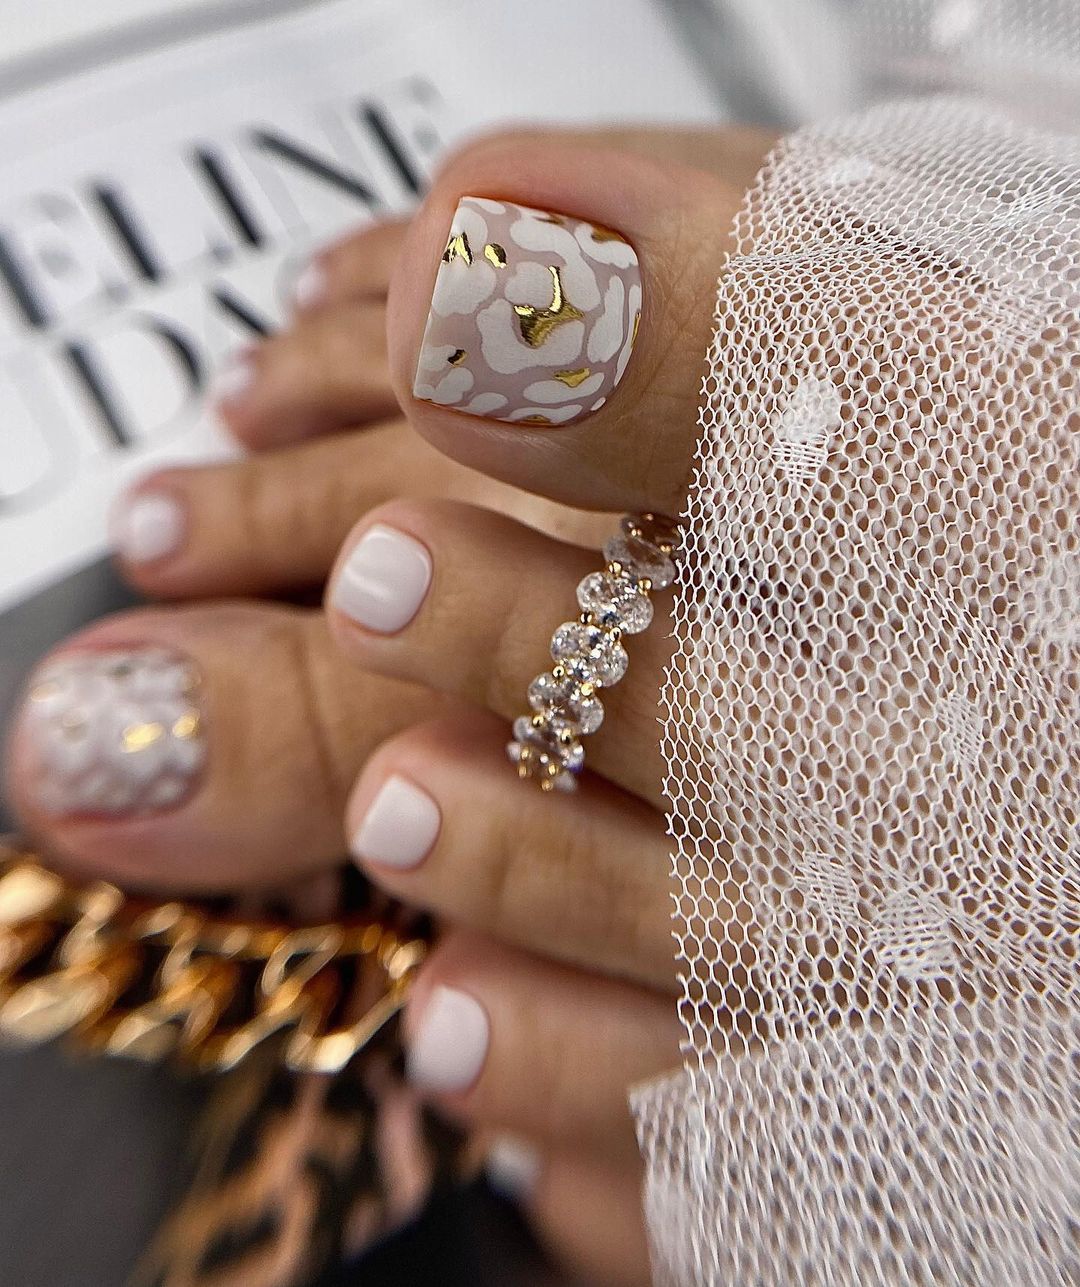
- Base Coat: Cirque Colors Holdfast Base Coat
- White Polish: Zoya Purity
- Gold Foil: Gold Leaf Sheets
- Top Coat: Essie Gel.Setter Top Coat
To create more dazzling shine than traditional metallic polishes can offer, consider using real gold leaf in your design.
After applying your base coat, put on two thin coats of Zoya Purity. Once it dries out completely, press some pieces of gold leaf onto the nail bed gently; keep in mind that you should concentrate mainly on making an animal print pattern here. Finally seal all this luxury with thick gel-like topcoat which not only makes everything shiny but also ensures better endurance!
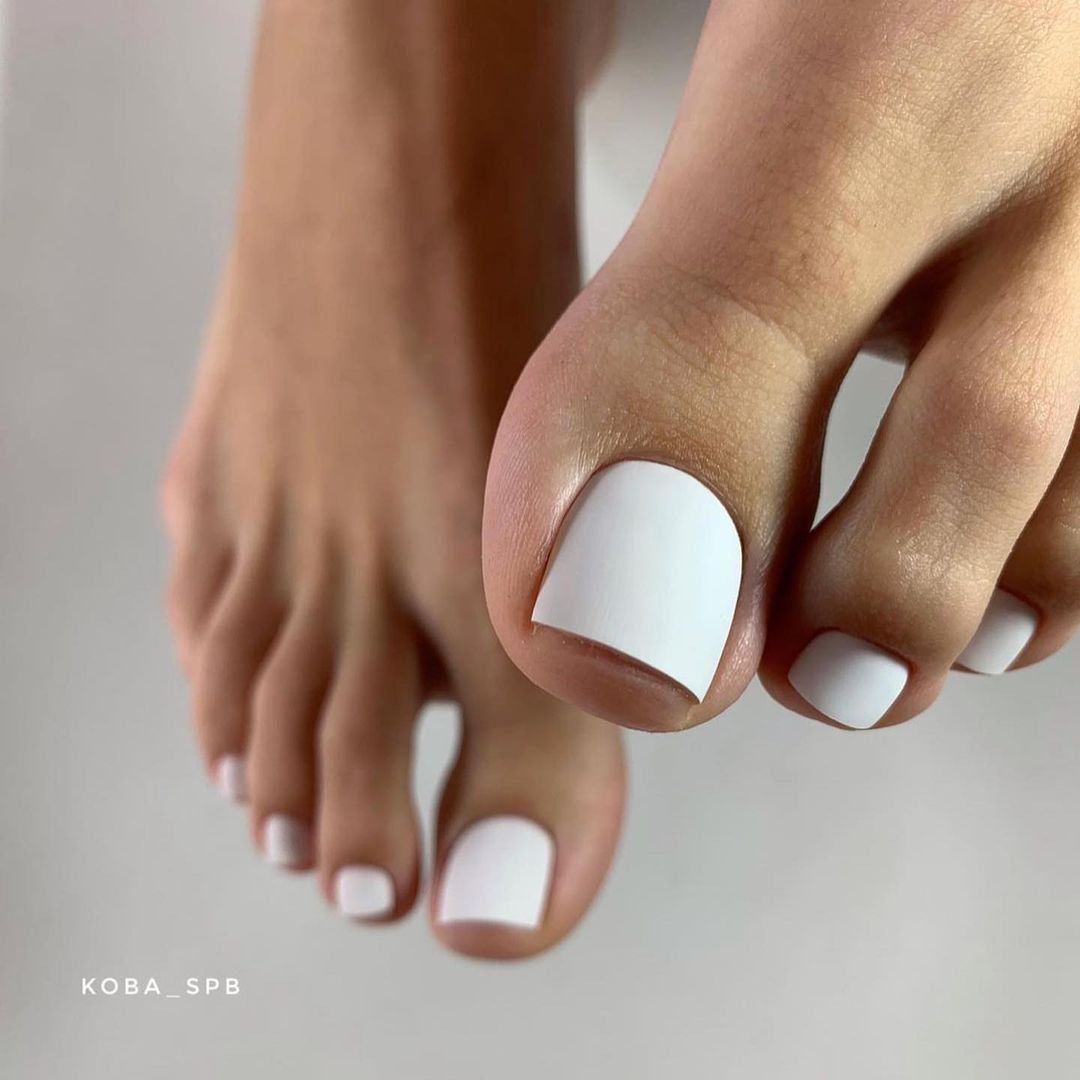
Minimalist Chic: Pure White Elegance
The minimalist design of this summer theme uses white polish without any other decorations. This appearance appreciates plainness by following the idea of minimalism during the summer season. They shape nails into a modern square which suggests low maintenance beauty while still being stylish and easy to do at home or elsewhere. It is an all-purpose style that could go well with any outfit for the summer.
- Base coat: Chanel La Base
- White polish: Sally Hansen Insta-Dri in White on Time
- Top coat: Chanel Le Gel Coat Longwear Top Coat
Sally Hansen’s Insta-Dri in White on Time is my favorite because it dries quickly, covers completely in one stroke, and doesn’t leave streaks.
Apply a protective base coat before applying two coats of White on Time for that perfect opaque white look. Use enough pressure when painting each nail so that the polish spreads out smoothly over them. Finish off your long-lasting topcoat to keep them looking fresh throughout all your summertime adventures!
Untamed Elegance: Chic Leopard Print
With a wild and elegant charm, this leopard print design has been created on a base of milky white color which is daring as well as stylish. The spots placed carefully make it look real and fashionable too; fierce enough for those who want to bring some wildlife into their summer fashion.
- Base coat: Orly Bonder Rubberized Basecoat
- Milky white polish: OPI Don’t Touch My Tutu!
- Brown polish for spots: Essie Mink Muffs
- Black polish for accents: Sinful Colors Black on Black
- Top coat: Seche Vite Dry Fast Top Coat
Use Essie Mink Muffs to get that perfect shade of brown for the leopard spots, and Sinful Colors Black on Black to outline them sharply.
Apply a base coat and two coats of the milky white polish. Use the brown polish to create spots in the shape of leopards then with a fine brush apply black nail paint around irregular outlines near these spots. Do not outline each spot completely so that it looks natural. Finish off your wild design by sealing it with quick drying top coat for long lasting duration.
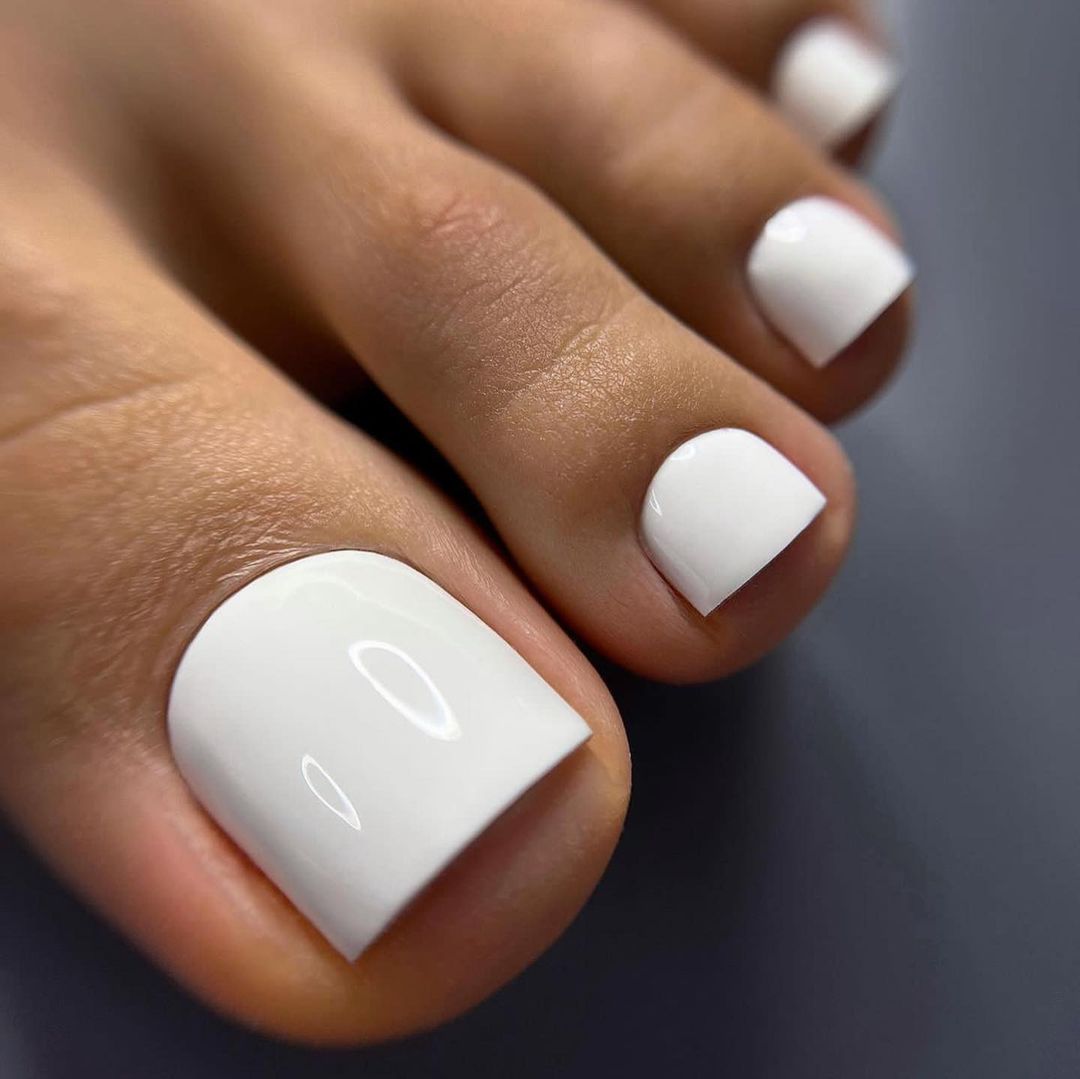
Pristine Minimalism: Pure White Squares
In this clean design it is white that is wholly pure and that commands attention with its neatness and straight lines, while at the same time being perfect. The nails’ form which is square gives a modern twist to an old favorite – classic white; therefore, making it suitable for any summer activity from beach events to formal dinners.
- Base coat: Deborah Lippmann Gel Lab Pro Base Coat
- White polish: Sally Hansen White On
- Top coat: Deborah Lippmann Gel Lab Pro Top Coat
Sally Hansen’s White On provides both excellent coverage and a very bright white finish if you want your nails to look dazzlingly snowy.
Apply two coats of White On after using a base coat so that everything sticks properly and there are no bumps. Make sure you do every side equally if not the sides might become uneven thus spoiling the square shape. Then finish off with top coat which will give shine plus make your polish last longer.
Spirited Swirls: Candy Cane Twist
This is a merry design that talks about the fun part of summer with its lively pink swirls on soft pink base, speckled with glitter. It’s a vibrant and happy appearance meant for sunny days and warm nights; it is best suited when you need to add some fun to your summer look.
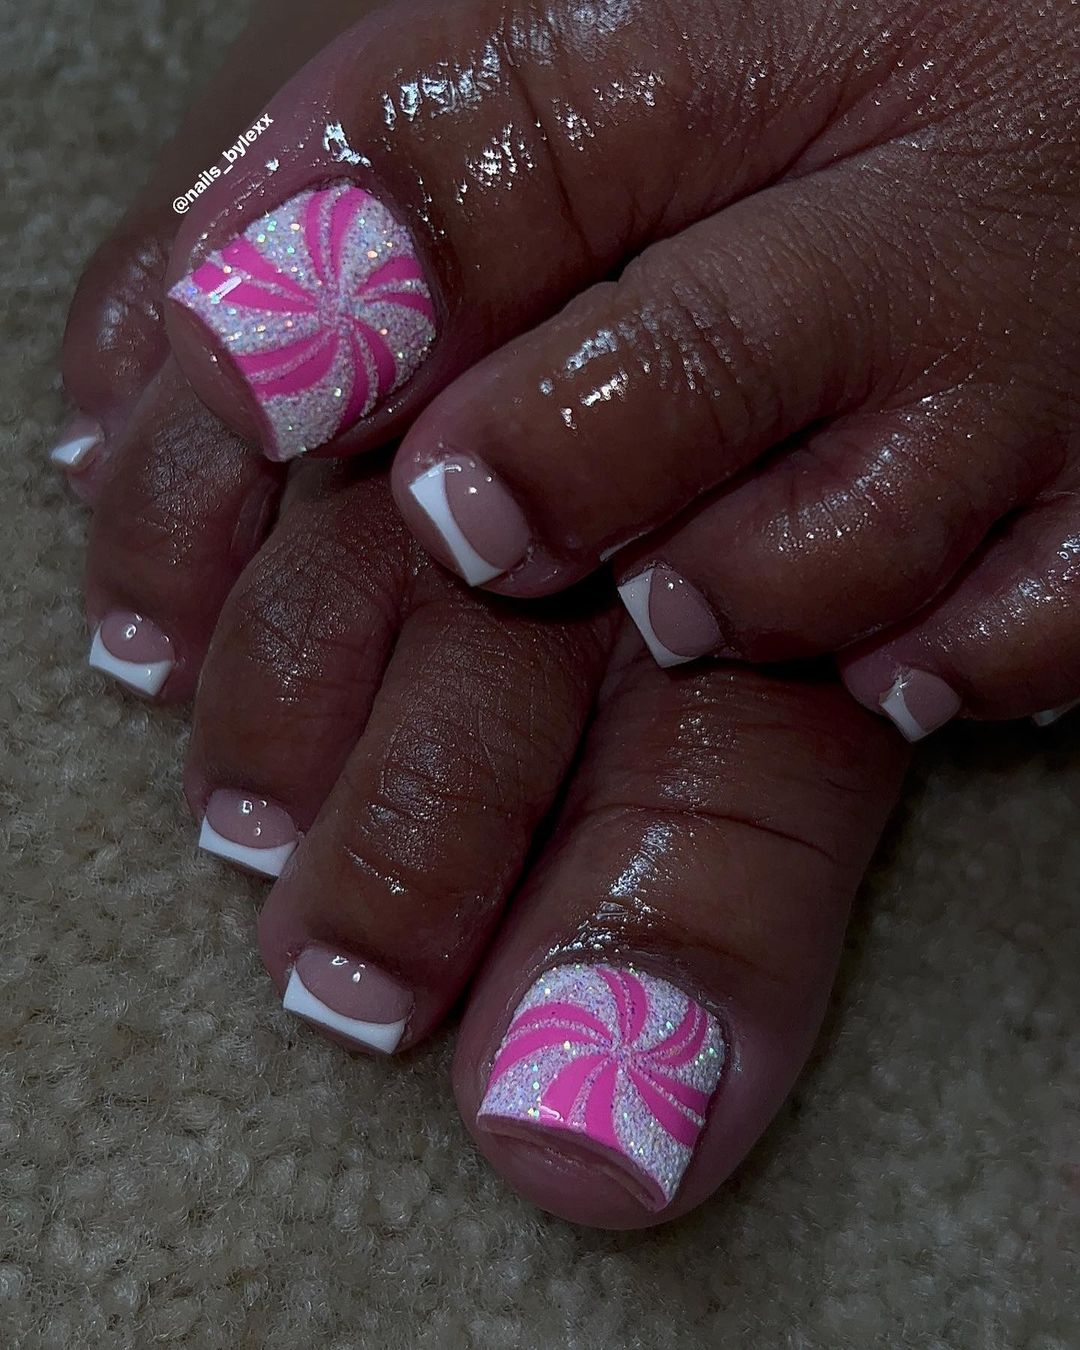
- Base coat: Ella+Mila All About the Base
- Soft pink polish: Essie Fiji
- Pink polish for swirls: Essie Watermelon
- Glitter polish: China Glaze Fairy Dust
- Top coat: INM Out The Door Top Coat
China Glaze Fairy Dust has this wonderful brush stroke which can be sprinkled onto nails at the end in order to add a magical touch of glitter.
Apply your base coat and two coats of Essie Fiji for a subtle pink backdrop. Use a detail brush and Essie Watermelon nail polish for making the swirls. While the wetness of the swirl polish hasn’t completely dried yet, dust on some Fairy Dust for shine. Finally, apply a thin layer of fast-drying top coat for your summer activities to secure everything together.
Bows and Bling
This captivating pattern is reminiscent of a garden, with small white flowers that have rhinestones in the middle. The background is a soft pink which is almost see-through and makes it look light and new while the sparkle from the crystals adds a bit of luxury so it’s perfect for an outdoor marriage ceremony during summertime or other fancy events held in gardens.
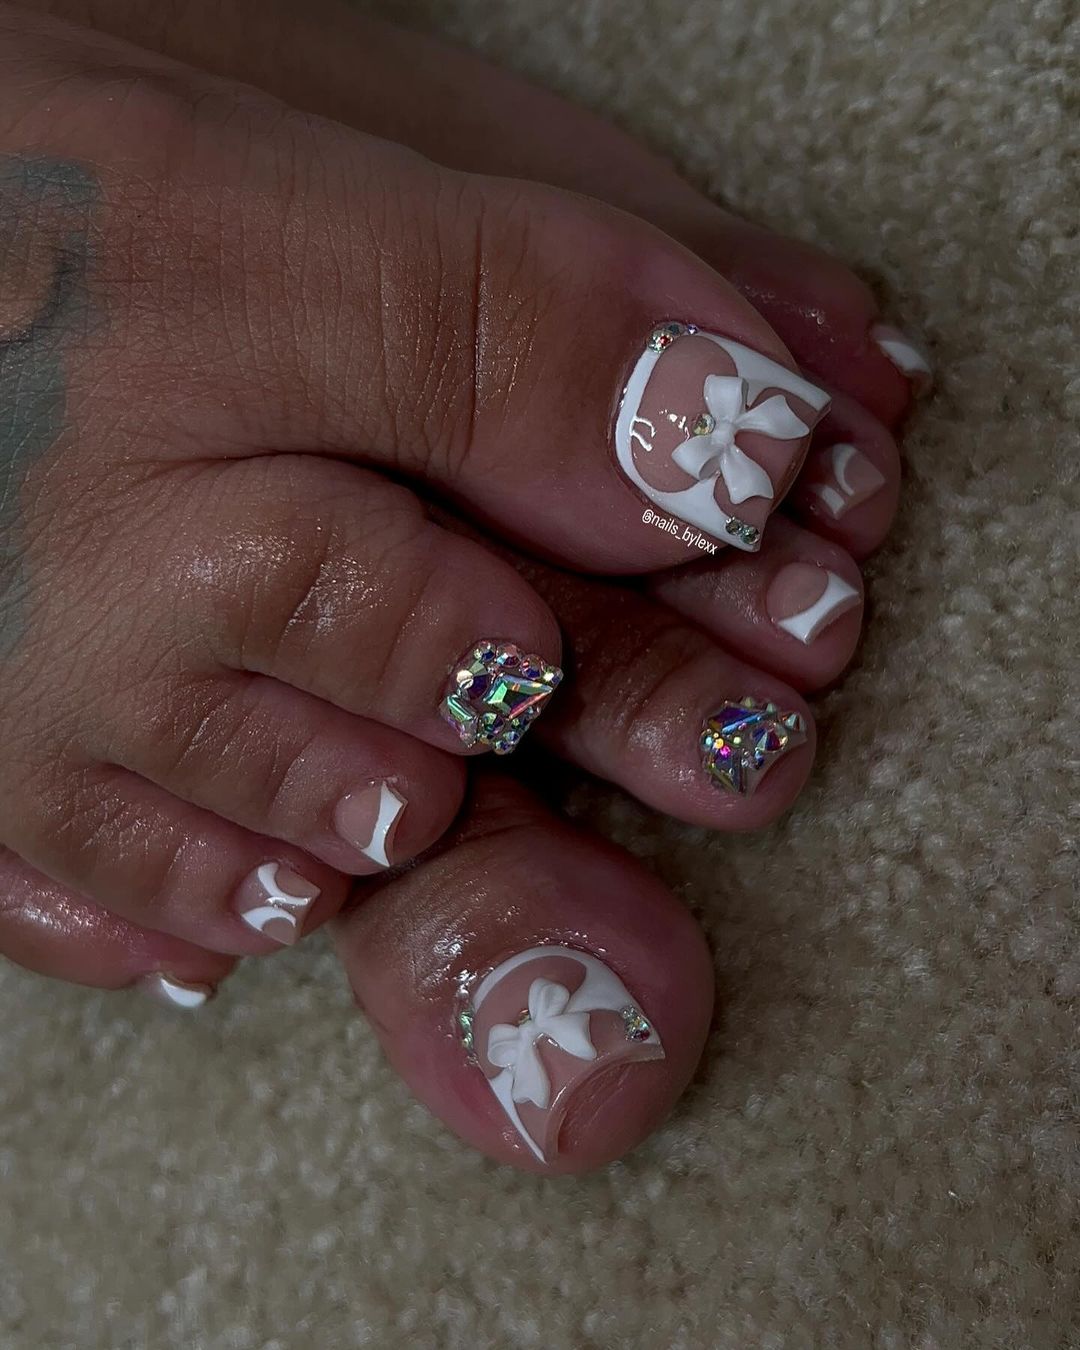
- Zoya Anchor Base Coat
- OPI Bubble Bath (sheer polish)
- Sally Hansen White On (white polish for flowers)
- Swarovski Clear Crystal Flatbacks (rhinestones)
- Glisten & Glow Top Coat
A detail brush can be used to paint on delicate petals for the flower design, and Swarovski crystals provide just enough shine.
Apply sheer layer of OPI Bubble Baths to give nails hint of pink. Using fine details brush paint strokes for each petal with Sally Hansens White On then place one rhinestone at center while wet. Once everything sets apply glossy top coat over floral design to seal them in.
Classic with a Twist
A fun spin on the traditional French tip, this design still keeps the well-known white tip but adds a cute touch with two little red dots. It’s a look that’s fresh and timeless yet playful—and it introduces just enough color to make people smile (and compliment you).
- Base coat: Sally Hansen Double Duty
- White polish for tips: French Tip Dip White
- Red nail polish for dots: Essie Russian Roulette
- Top coat: OPI Top Coat
You’ll need a dotting tool to achieve those crisp red dots on the classic white tips.
Begin by applying your base coat to create an even surface. Use French Tip Dip or tape to get a clean line for your white tip; then, use a dotting tool with Essie Russian Roulette to create two dots. Finish with a clear top coat to seal in your fun French manicure.
Kitty Cuteness: Adorable Animal Art
If you’re a person who loves to have some personality on your nails, this design puts an adorable cat face onto a classic white tip. The simple design with pastel polka dots is a sweet and playful look for summer that’s purr-fect for animal lovers or anyone who likes a little quirkiness in their style.
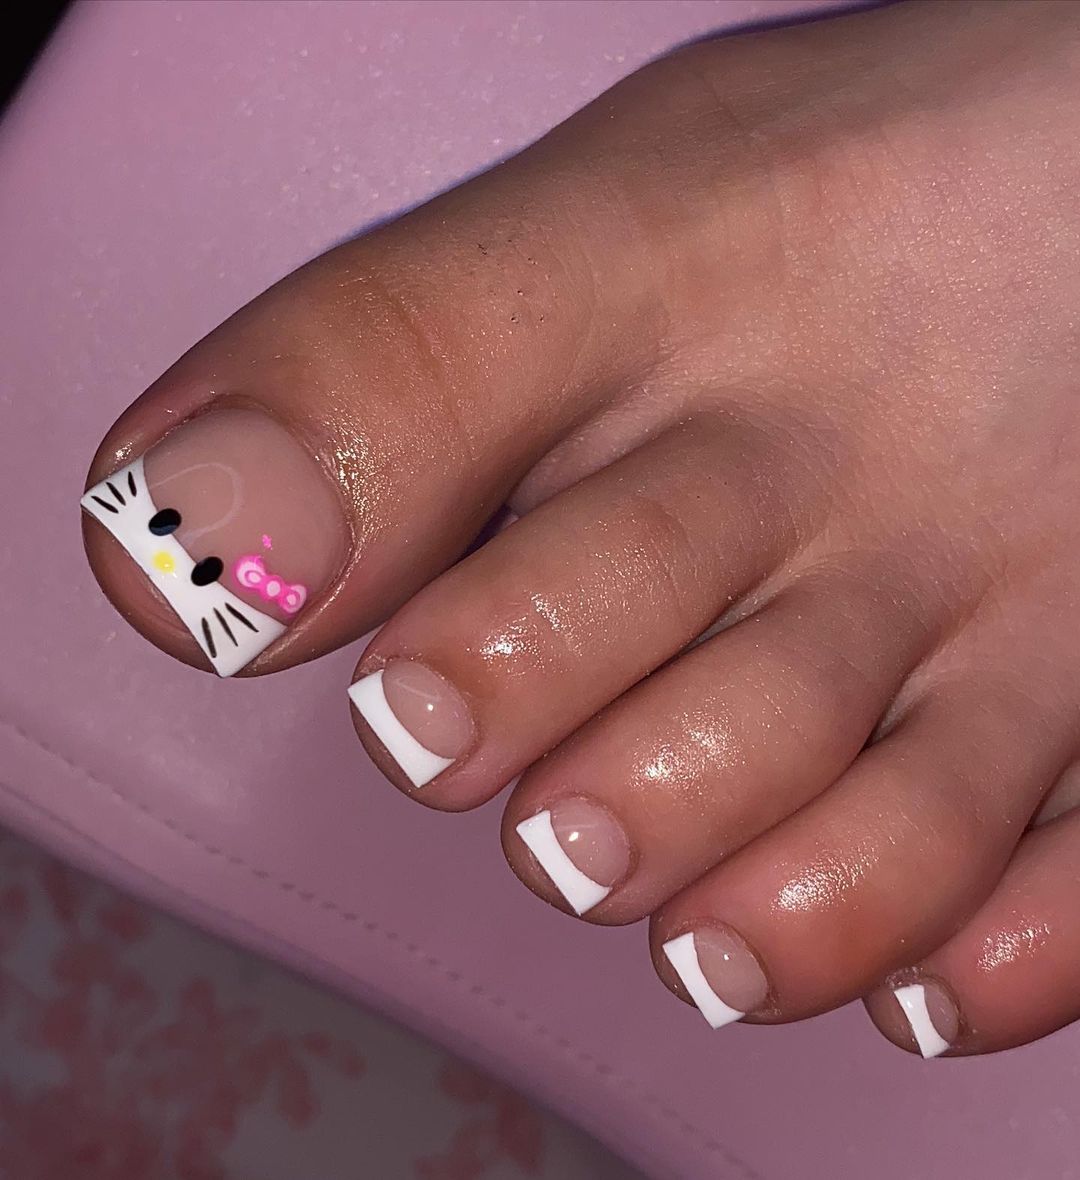
- Base coat: Butter London Nail Foundation
- White polish for tips: Orly White Tips
- Black polish for whiskers: China Glaze Liquid Leather
- Pastel polishes for dots: OPI Pastel Collection
- Top coat: CND Vinylux Long Wear Top Coat
Use a fine-tip brush for the kitty’s features and a small dotting tool for the pastel accents.
Apply your base coat, then paint on the white tips using Orly White Tips. Use black polish and a fine brush to draw on the kitty face and whiskers. Add some pastel dots for fun. Finish with a top coat that will go the distance.
Abstract Artistry: Modern Brushstrokes
This design, inspired by art that is contemporary, combines abstractness with colourfulness to create a piece of wearable art which is genuinely one-off. Strokes of orange, navy and pale peach were done on top of an artist’s brush like white base. These summer nails are modern and trendy.
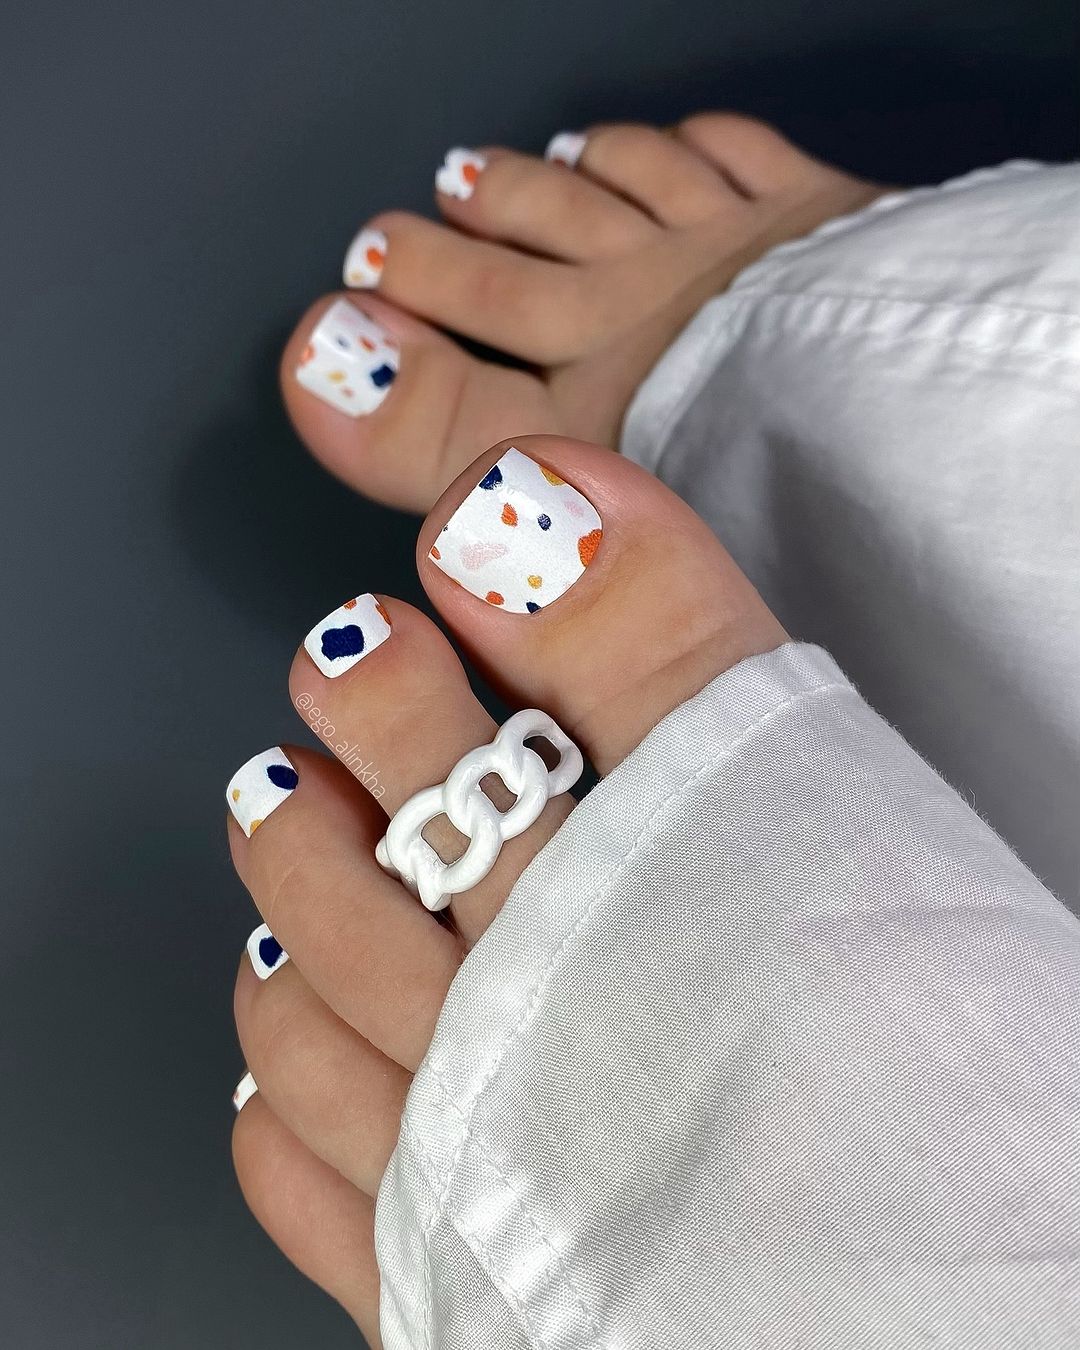
- OPI Natural Base Coat (Base coat)
- Sinful Colors Snow Me White (White polish)
- Essie Saturday Disco Fever (Orange polish)
- Essie After School Boy Blazer (Navy polish)
- Essie Peach Side Babe (Peach polish)
- Sally Hansen Miracle Gel Top Coat (Top coat)
A small brush will help you make fine strokes when painting the abstract pattern.
Apply white polish as background after base coat. Use thin brush to apply coloured polishes for the abstract design. Don’t try too hard – unevenness has its own appeal. To get shiny finish that lasts, apply gel top coat over it.
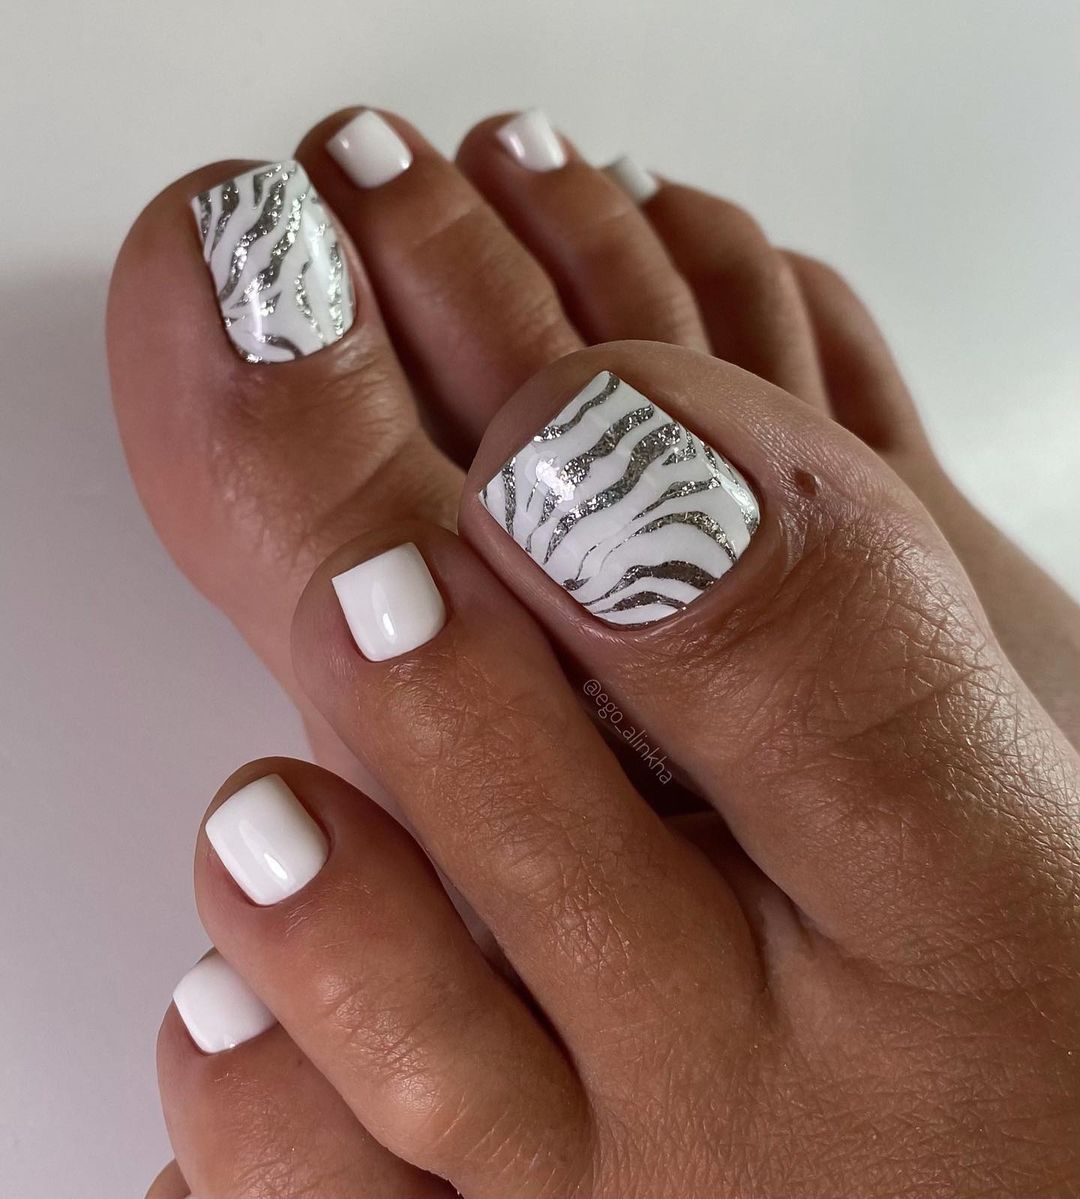
Wild Strokes: Zebra-Inspired Elegance
Animal prints are still very much in fashion, and this design that imitates the skin of a zebra is a wonderful example of it. The strong contrast between white and black is both daring and sophisticated; every stripe has been painted with care to mimic the irregular patterns seen in wild animals’ coats. This style is for those who like to take risks with their outfits – it works particularly well when combined with a minimalist or monochrome summer wardrobe.
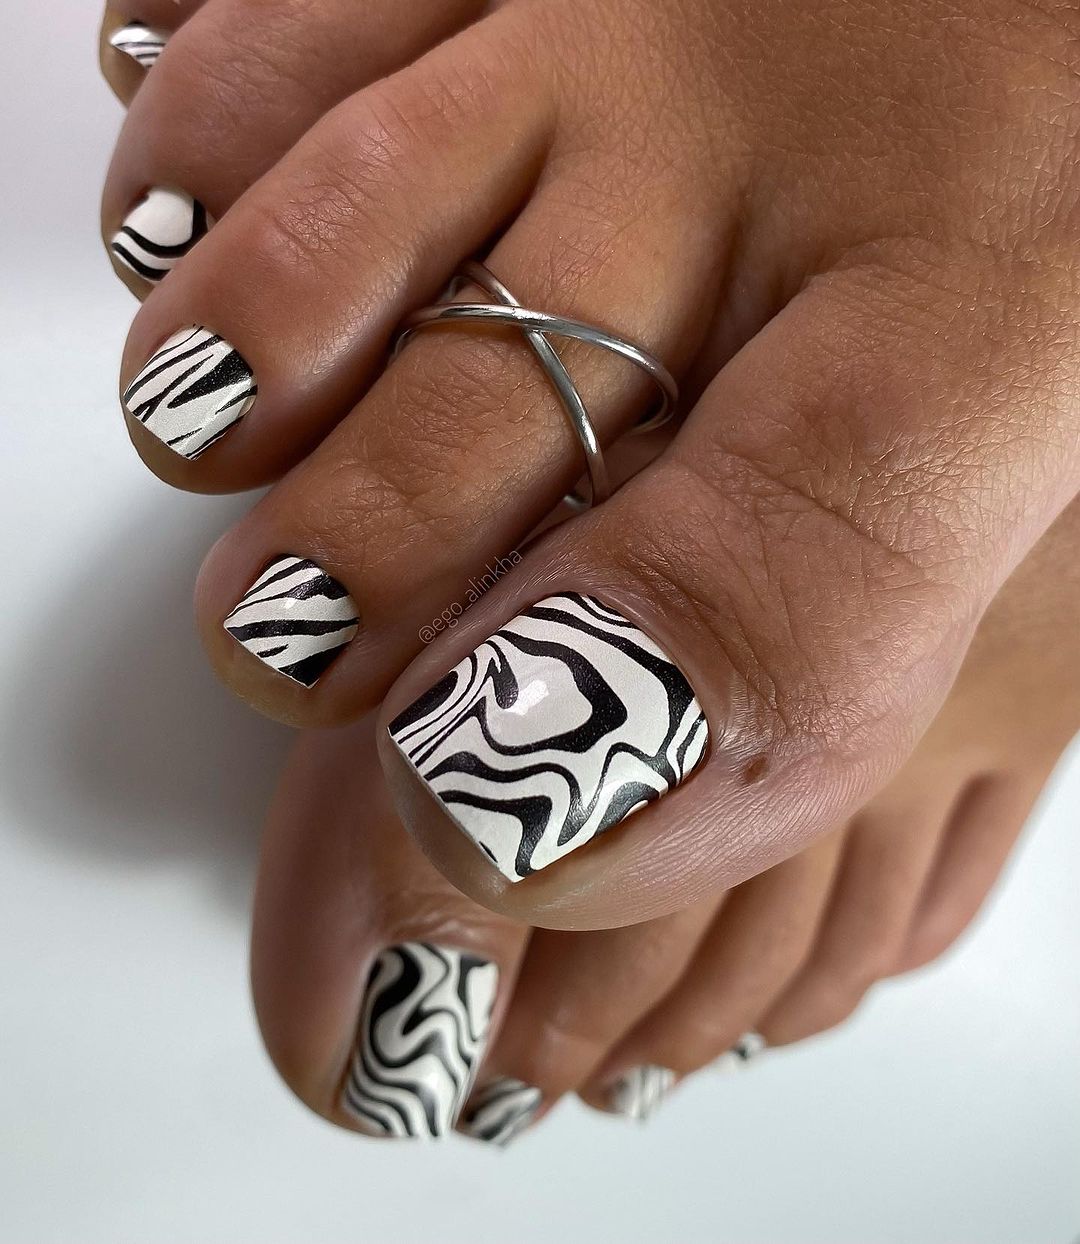
- Base coat: Essie Grow Stronger Base Coat
- White nail polish: China Glaze White on White
- Black nail polish (for stripes): Orly Liquid Vinyl
- Top coat: Seche Vite Dry Fast Top Coat
For thin stripes that resemble those on zebras, you will need a striping brush that allows for precision and fluidity.
Apply a solid base coat to protect your nails. Paint two coats of China Glaze White on White as the background color, then use Orly Liquid Vinyl applied with a striping brush to create the zebra pattern. Add variation by changing the width or angle of some lines so they look more organic. Finish off your design with Seche Vite top coat for extra shine and durability.
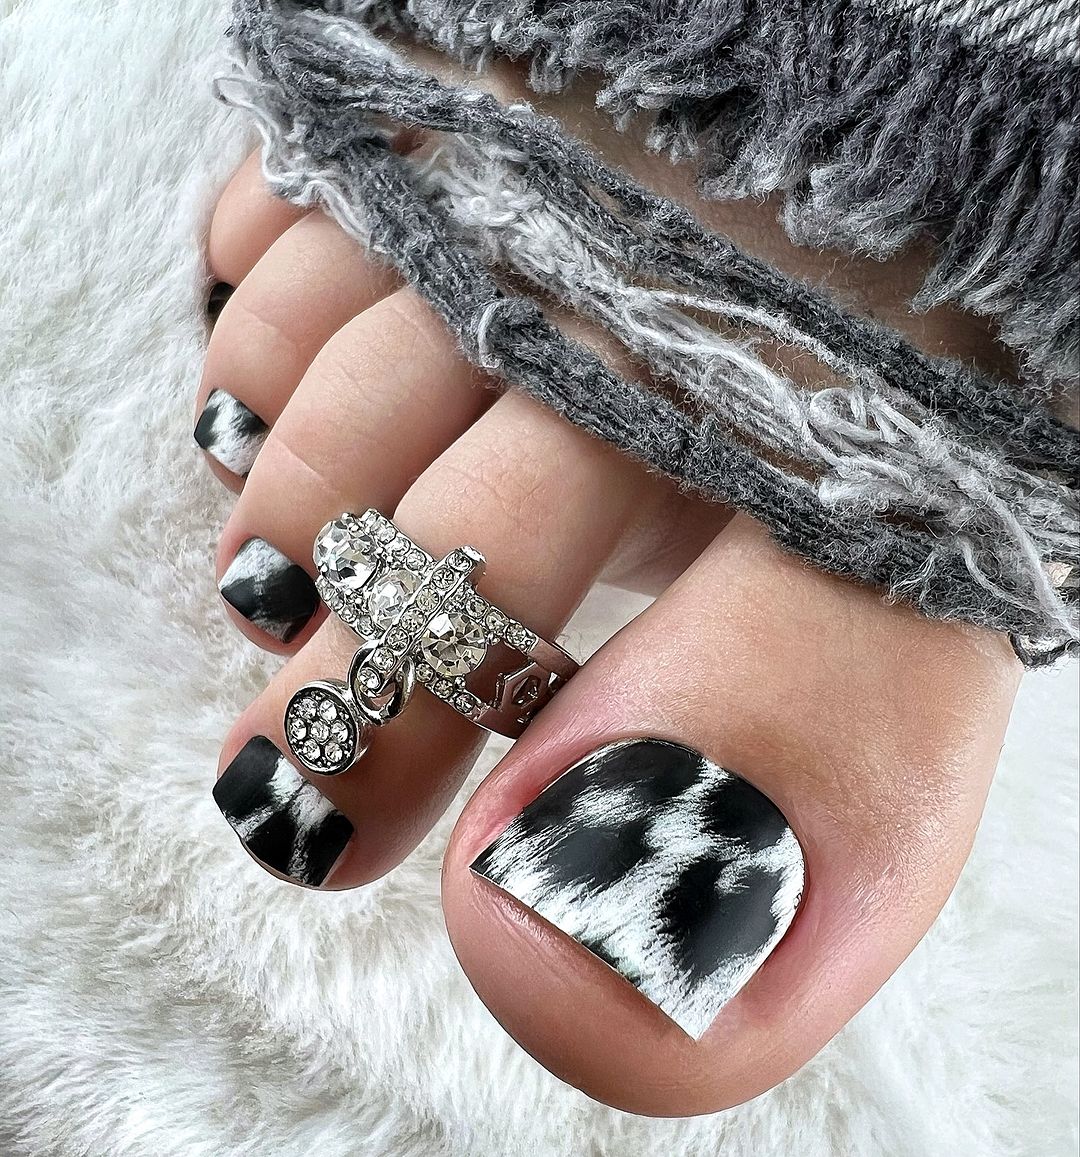
The Timeless Tale of Black and White
Black and white provide the purest sense of elegance. The monochromatic trend is given a stylish and exotic twist with these zebra stripes on white, which would appeal to people who love simple yet fashionable designs.
- White nail polish
- Black acrylic paint pen
- Top coat that dries shiny for long lasting effect
The “Snow White” gel provides a good backdrop whereas “Noir Script” nail art pen is perfect for those striped details.
Start by putting on a layer of white gel polish as your base. Once dry, use the nail art pen to draw thin, undulating stripes like those of zebras. Finish with a glossy top coat to give your artwork depth and protect it from damage.
A Fusion of Glamour and Mystery
Marble-like smoky pattern created by blending silver with black that represents elegance and mystery. This design can be worn to a glamorous evening or an informal daytime event.
- Silver and black gel polishes
- Marbling sponge
- Top coat for high shine finish
This is achieved by combining the ‘Midnight Mist’ dark allure with the sparkle of ‘Liquid Silver’ then sealing it all off with “Shine Sealant” so that it doesn’t fade away quickly.
First apply base coat of black polish. Then lightly dab sponge coated in silver onto nails to achieve marbling effect. Finally, seal them with top coat for added shine and longlastingness of style.
FAQ
Q: About how long do these types of designs for toe nails last in the summer?
A: When applied properly and with a top coat of high quality, such designs can stay intact for 2-3 weeks. Standard reapplications to the top coat will make them last longer.
Q: Can I use regular polish to get these designs or do I need gel polish?
A: Most of them can be achieved using regular polish although a longer lasting shinier look can be obtained by using gel polish.
Q: Are these designs good for any nail shape or size?
A: Yes! Whether wide and flat or long and narrow, any shape or size of nail can work with these designs.
Q: How do I prevent my nail designs from chipping?
A: Start out with a good base coat, apply thin layers of polish, finish with a durable top coat and avoid using your nails as tools so they don’t wear off easily.
Q: What’s the best way to take off these nail designs, especially when there is glitter or rhinestones involved?
A: Use a cotton ball soaked in nail polish remover, place it on the nail then wrap in foil and let it sit for awhile. This should help dissolve the polish making it easier to remove. For rhinestones or stubborn glitter gently file off the top layer then soak.
Q: Can I do these myself at home?
A: Yes with patience and the right tools you can definitely recreate these at home. Don’t be afraid to practice; that’s what makes it fun!
Q: How can I make my toe nail designs more durable during beach visits or pool days?
A: Apply a waterproof/water-resistant top coat and try not to keep them submerged in water for extended periods. Rinse feet with fresh water after swimming and reapply top coat every few days.
Q: What if I mess up while painting my nails?
A: Use a small brush dipped in nail polish remover to correct any errors. If it’s on a detailed design let it dry completely before trying to fix.
Q: How can I add my own personal touch to these designs?
A: Feel free to play around with different color combos, add your own unique patterns or try out new textures like matte or chrome finishes.
Q: Are there eco-friendly polish options for these designs?
A: Yes! There are several brands that offer eco-friendly non toxic polishes which you can use to create these designs in a more sustainable way.
Save Pin