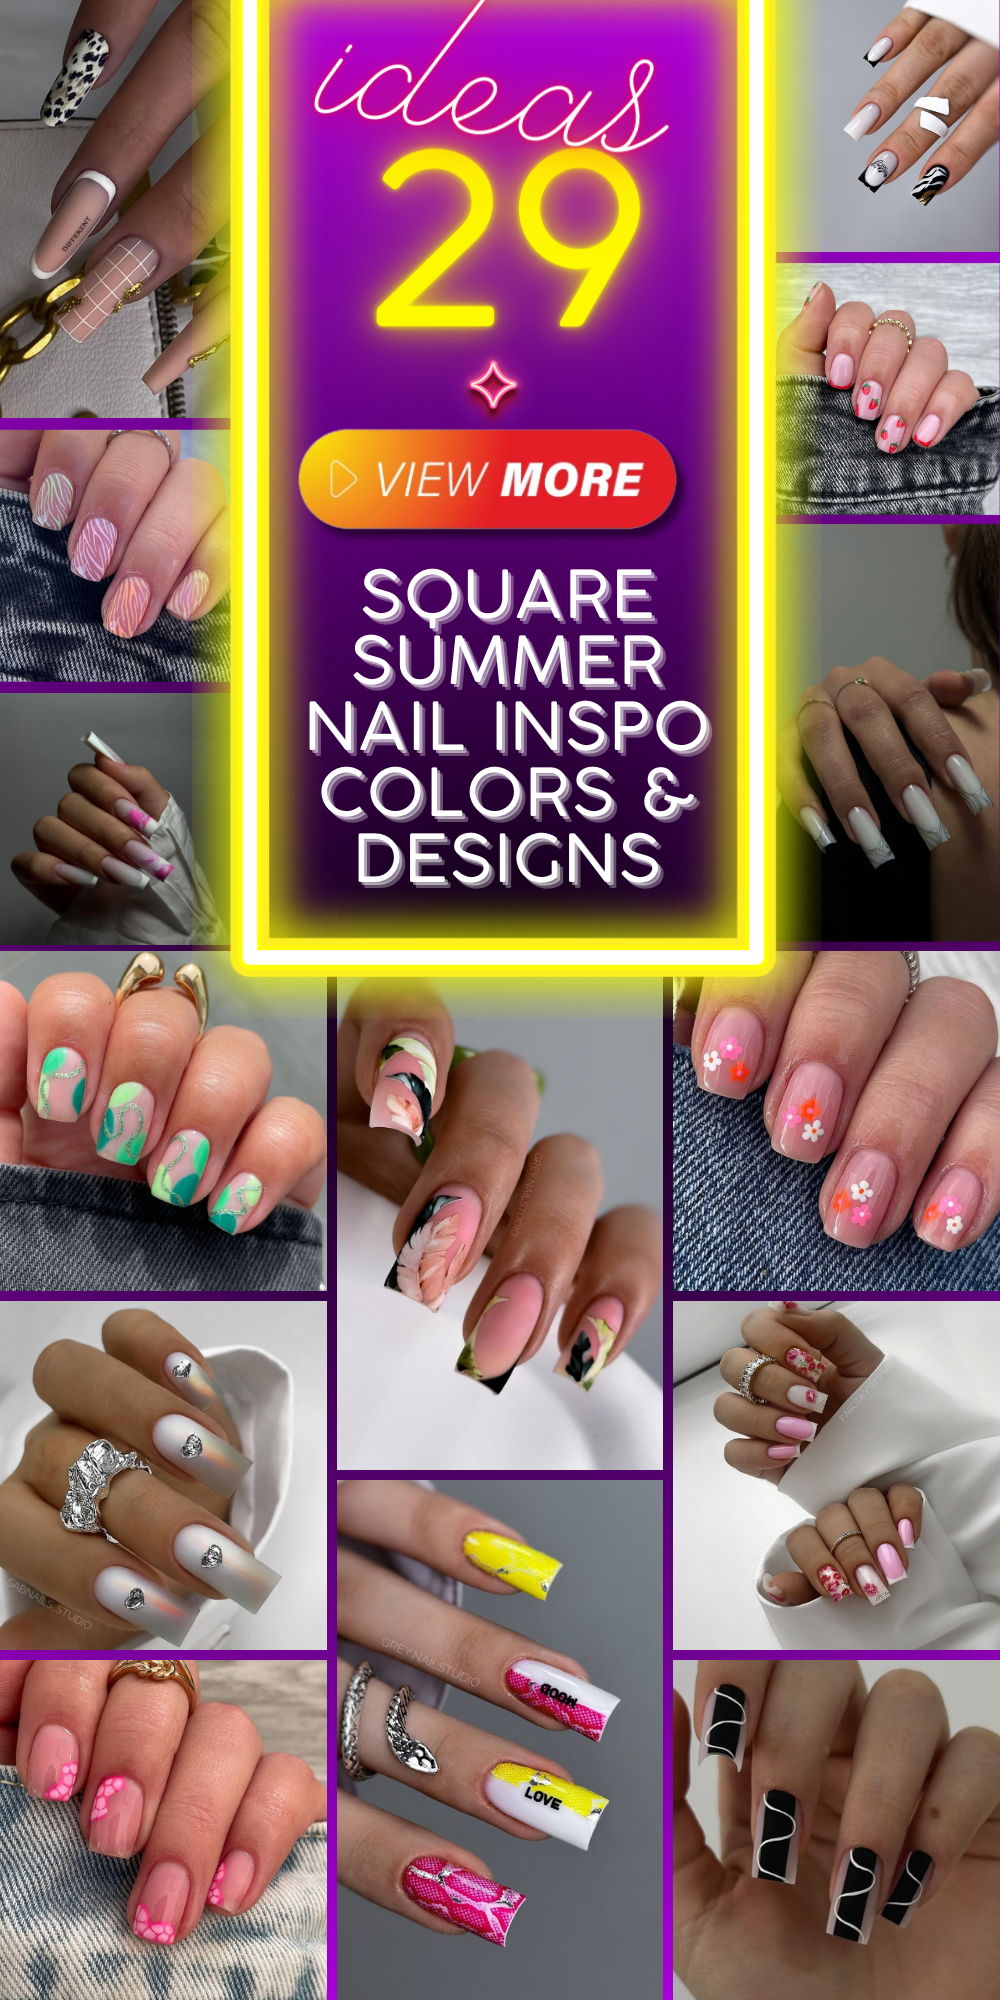
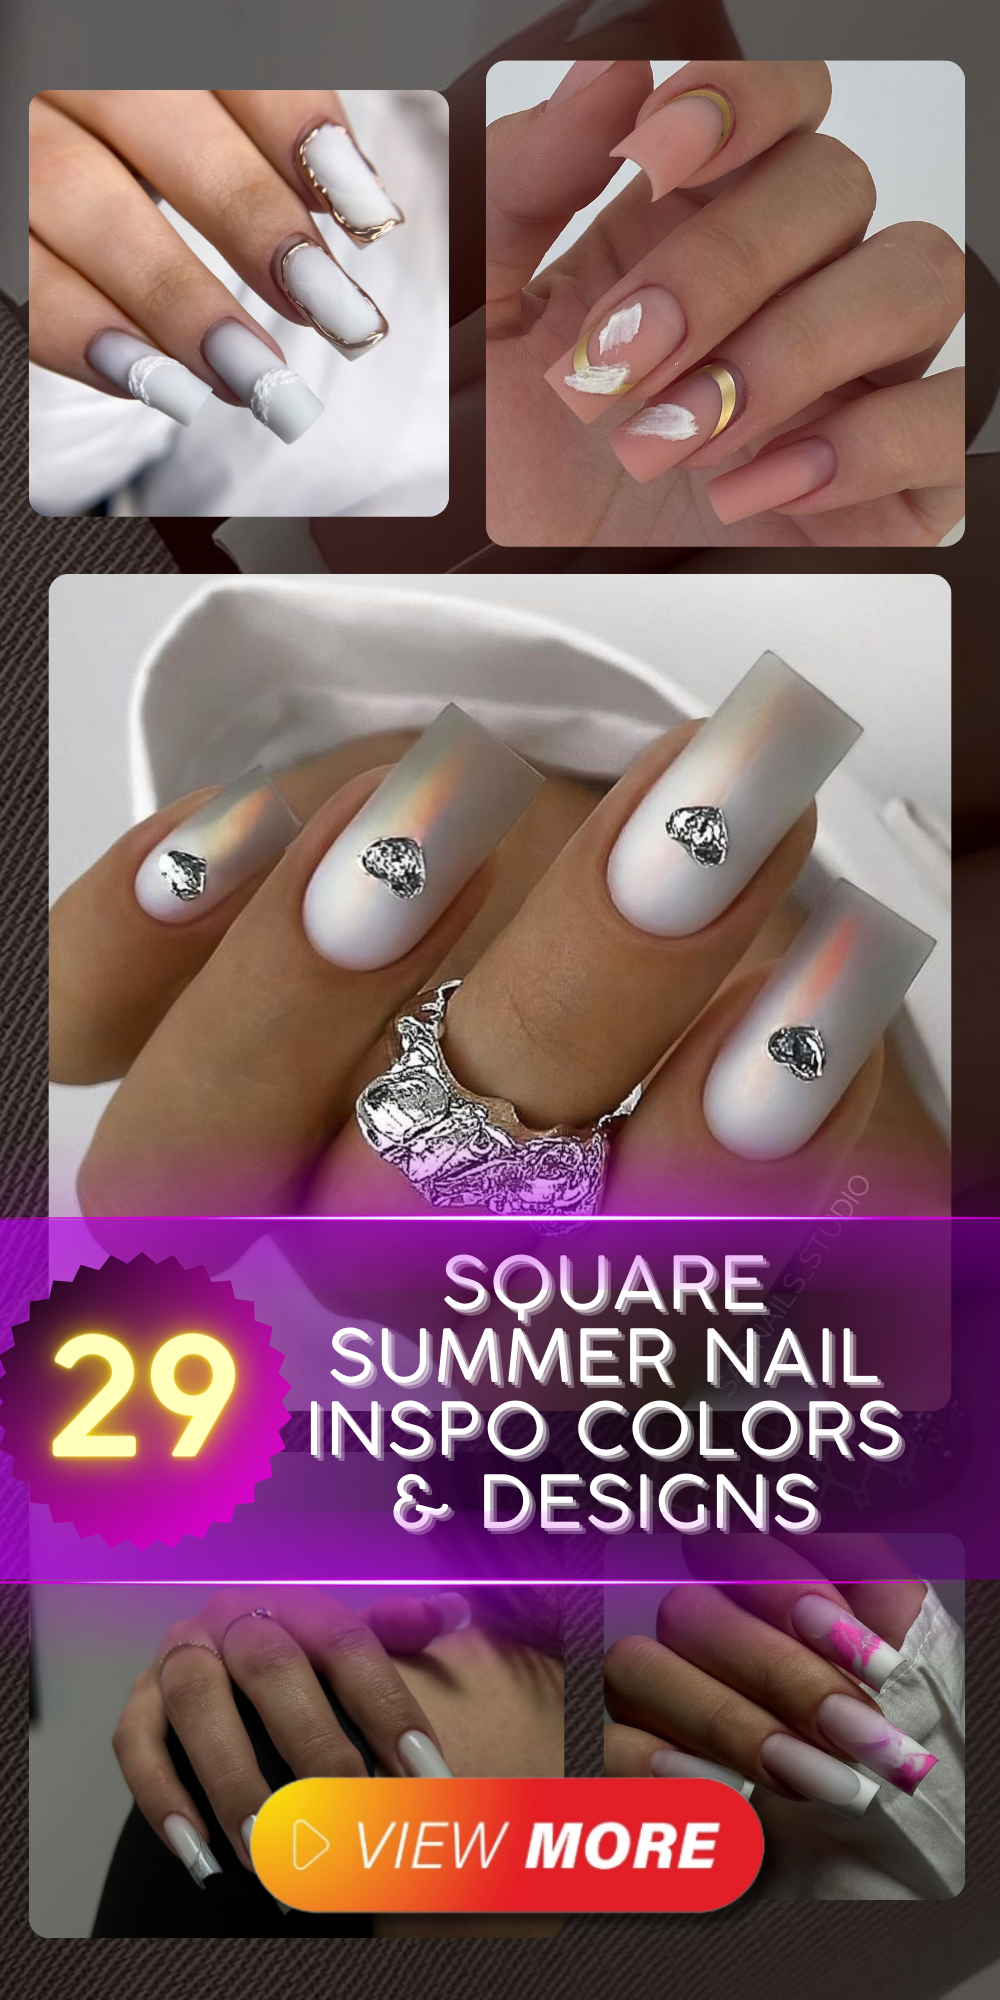
Are your nails ready to flaunt the summer’s vibe with shades and styles that scream fun in the sun? Whether it’s a chic French tip with a twist or a preppy statement with flair, let’s explore a palette of square summer nail inspo colors & designs that’s as refreshing as a seaside breeze. Prepare to be dazzled by simple yet unique designs, from the understated short and sweet to the bold long acrylic creations.
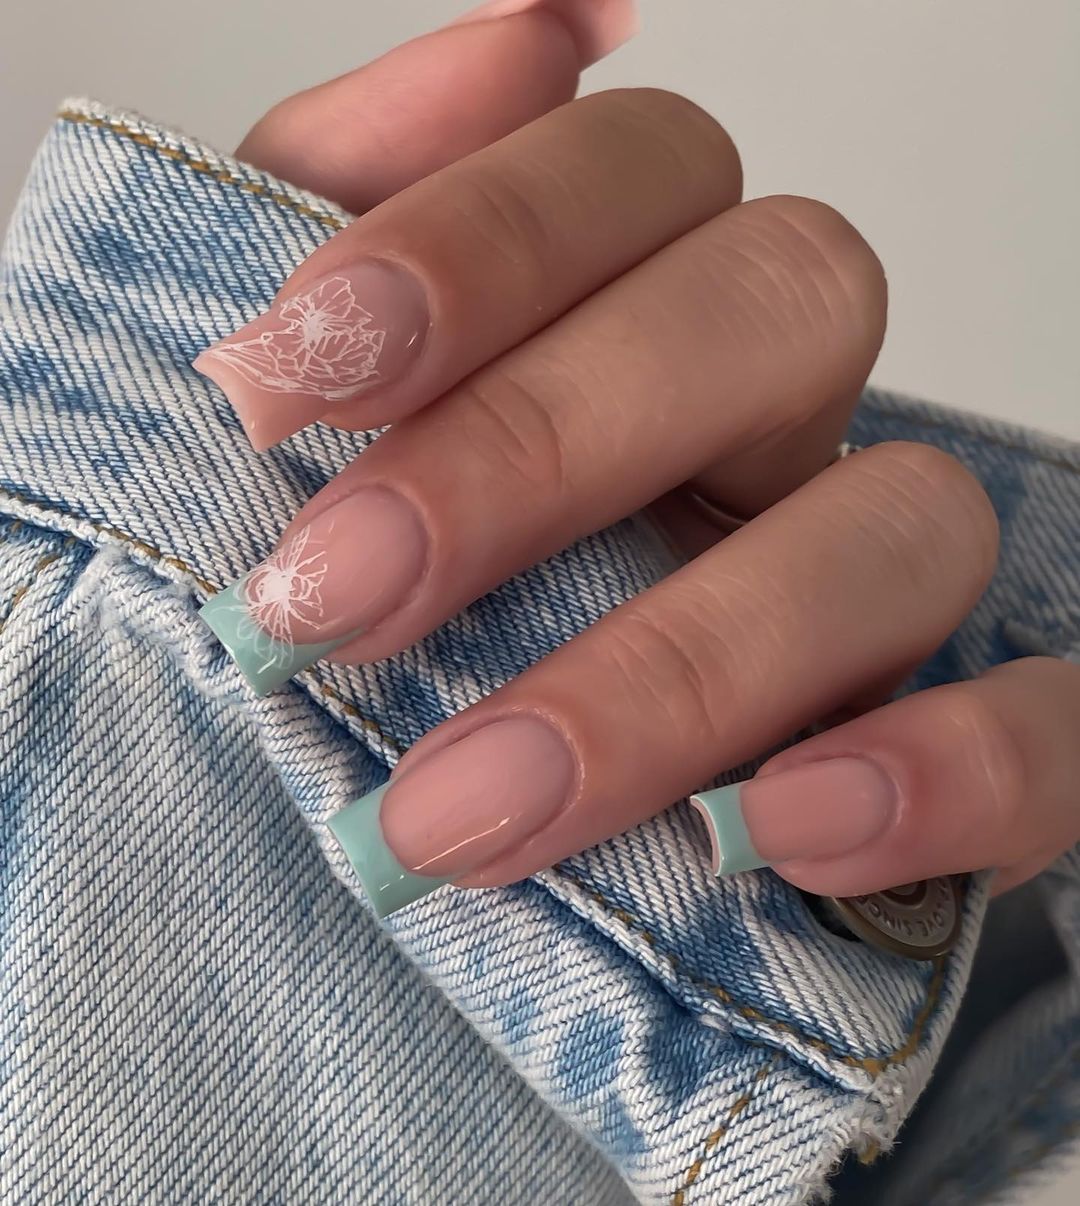
The Sophisticated Reimagined
A contemporary spin on the classic tip, this design melds tradition with modern-day minimalism.

Professional Viewpoint
Reimagining the French tip for an era that adores understatement, this look pairs beige and white to craft an aesthetic that’s both simple and sophisticated. A perfect choice for those who love their nails short and sweet, it marries convenience with style.
Consumables Needed
- Nude polish: ‘Elegance by Essie’
- White detail polish: ‘Alpine Snow’ by OPI
- High-gloss topcoat: ‘Seche Vite Dry Fast’
My Recommendation: Use a striping brush to achieve those crisp white lines. Patience is your friend here.
DIY Steps
- Apply your nude base and wait for it to dry.
- Paint the white details carefully with a striping brush.
- Add a topcoat for a durable, glossy finish.
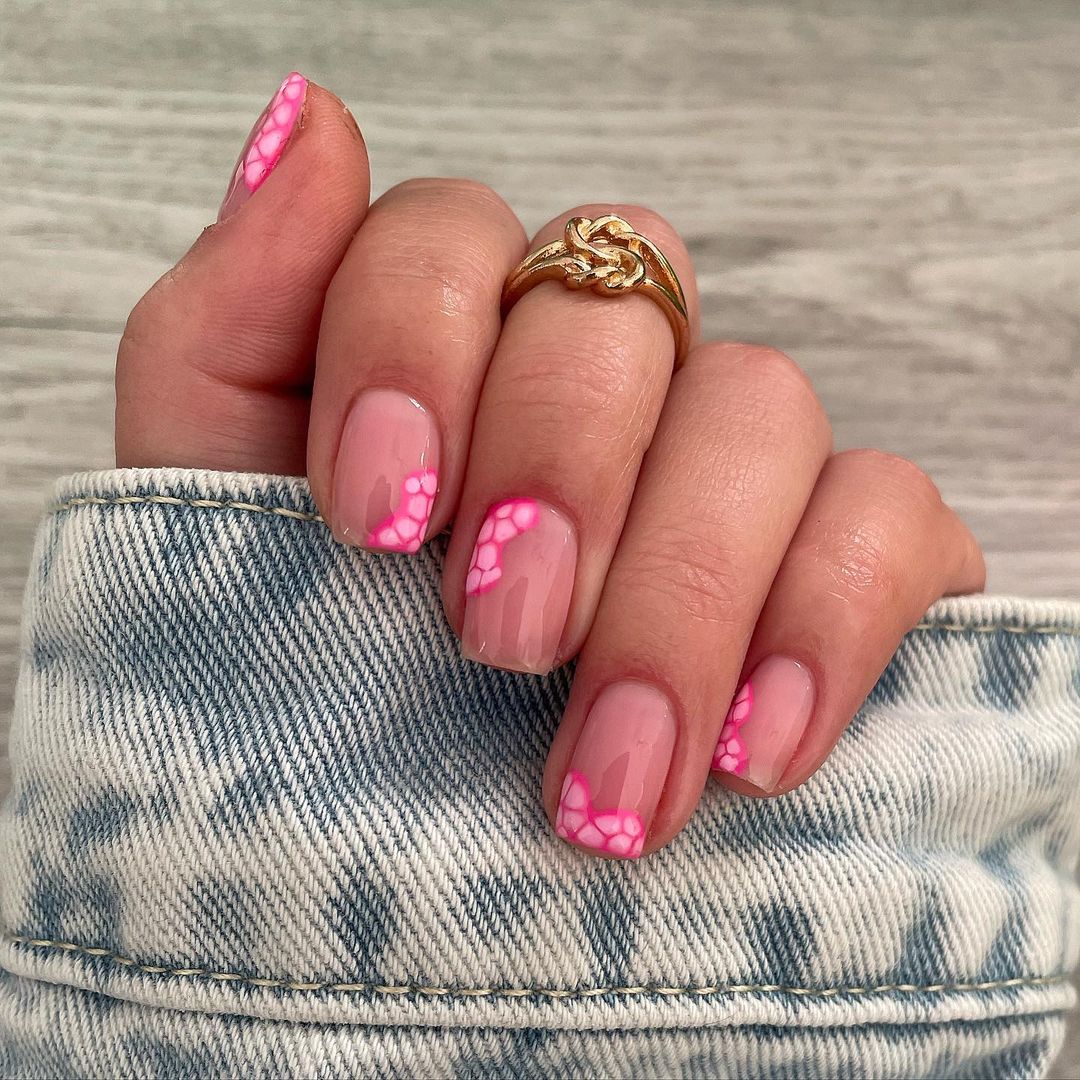
Playful Preppy Pink
Who knew preppy could be so spirited? This design with strawberries offers a juicy twist on spring/summer trends.
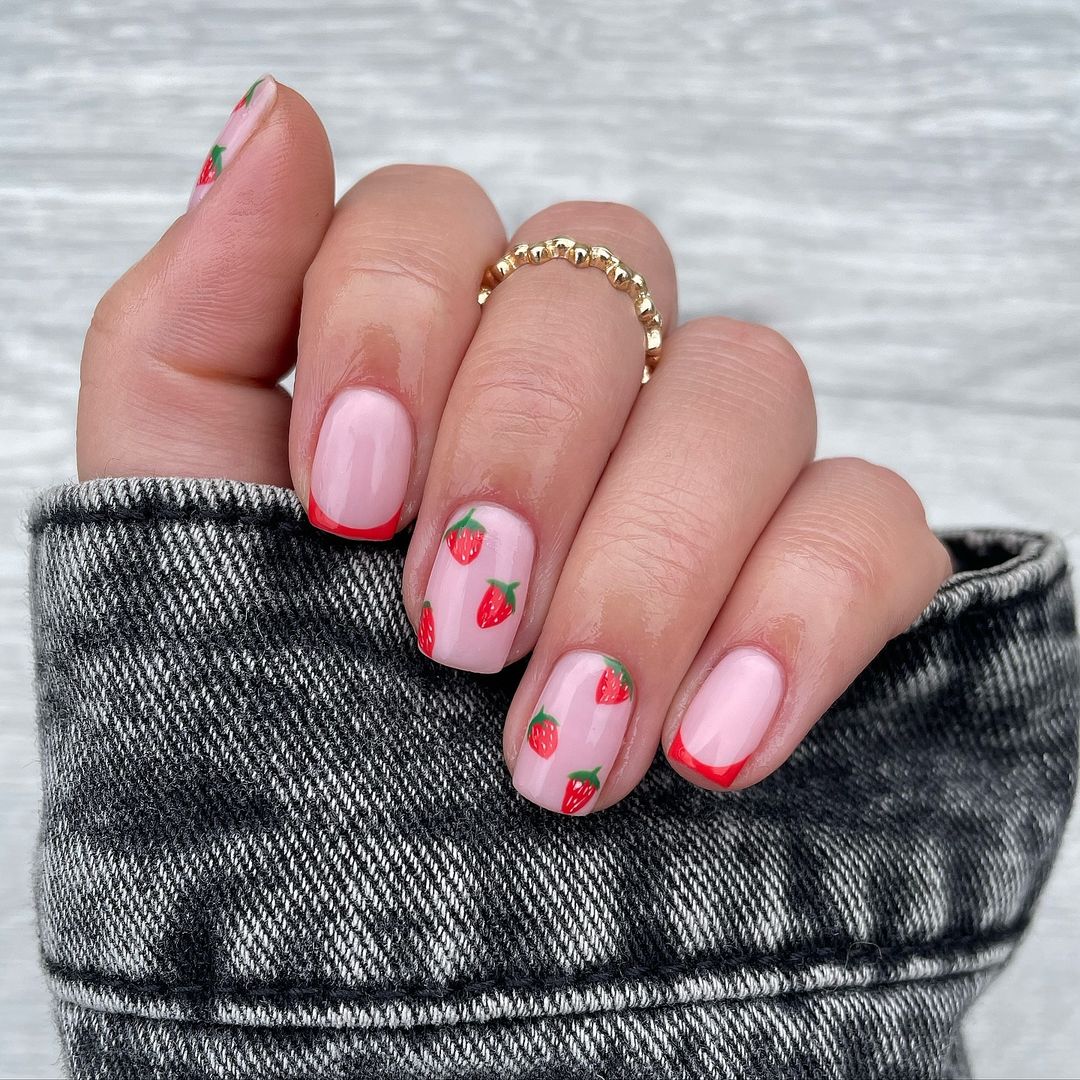
Professional Viewpoint
These short nails are a canvas for creativity, combining a soft pink base with delightful strawberry accents. The round edges give them a youthful, approachable look, perfect for a casual holiday or everyday chic.
Consumables Needed
- Pink base polish: ‘Mod About You’ by OPI
- Red and green for strawberries: ‘Red Heads Ahead’ and ‘Stay Off the Lawn!!’ by OPI
- Durable topcoat: ‘Good to Go’ by Essie
My Recommendation: Get yourself a dotting tool kit. It’s a game-changer for creating those tiny strawberry seeds.
DIY Steps
- Begin with a pink base layer.
- Paint your strawberries using the dotting tool.
- Apply a topcoat to protect your fruity design.
Edgy Elegance
Bold, contrasting, and utterly funky – this design brings an edgy elegance that’s unmissable.
Professional Viewpoint
The juxtaposition of matte and gloss, monochrome with a dash of gold, transforms these long acrylic nails into a statement piece. It’s a look that’s not just trendy 2024 but timeless in its boldness.
Consumables Needed
- Matte black polish: ‘Matte is Murder’ by Manic Panic
- White polish for details: ‘White Knight’ by Butter London
- Gold leaf sheets
- Matte topcoat: ‘Matte Finisher’ by NYX
My Recommendation: Approach the gold leaf with tweezers and a light touch – it’s delicate but well worth the effort.
DIY Steps
- Paint your nails with a matte black polish.
- Add white details and gold leaf on the accent nail.
- Finish with a matte topcoat on the black nails and a glossy coat over the white and gold details.
Pop Art Pizazz
Dive into a world where fashion meets bold expression with nails that look like they’ve leaped right out of a comic strip.
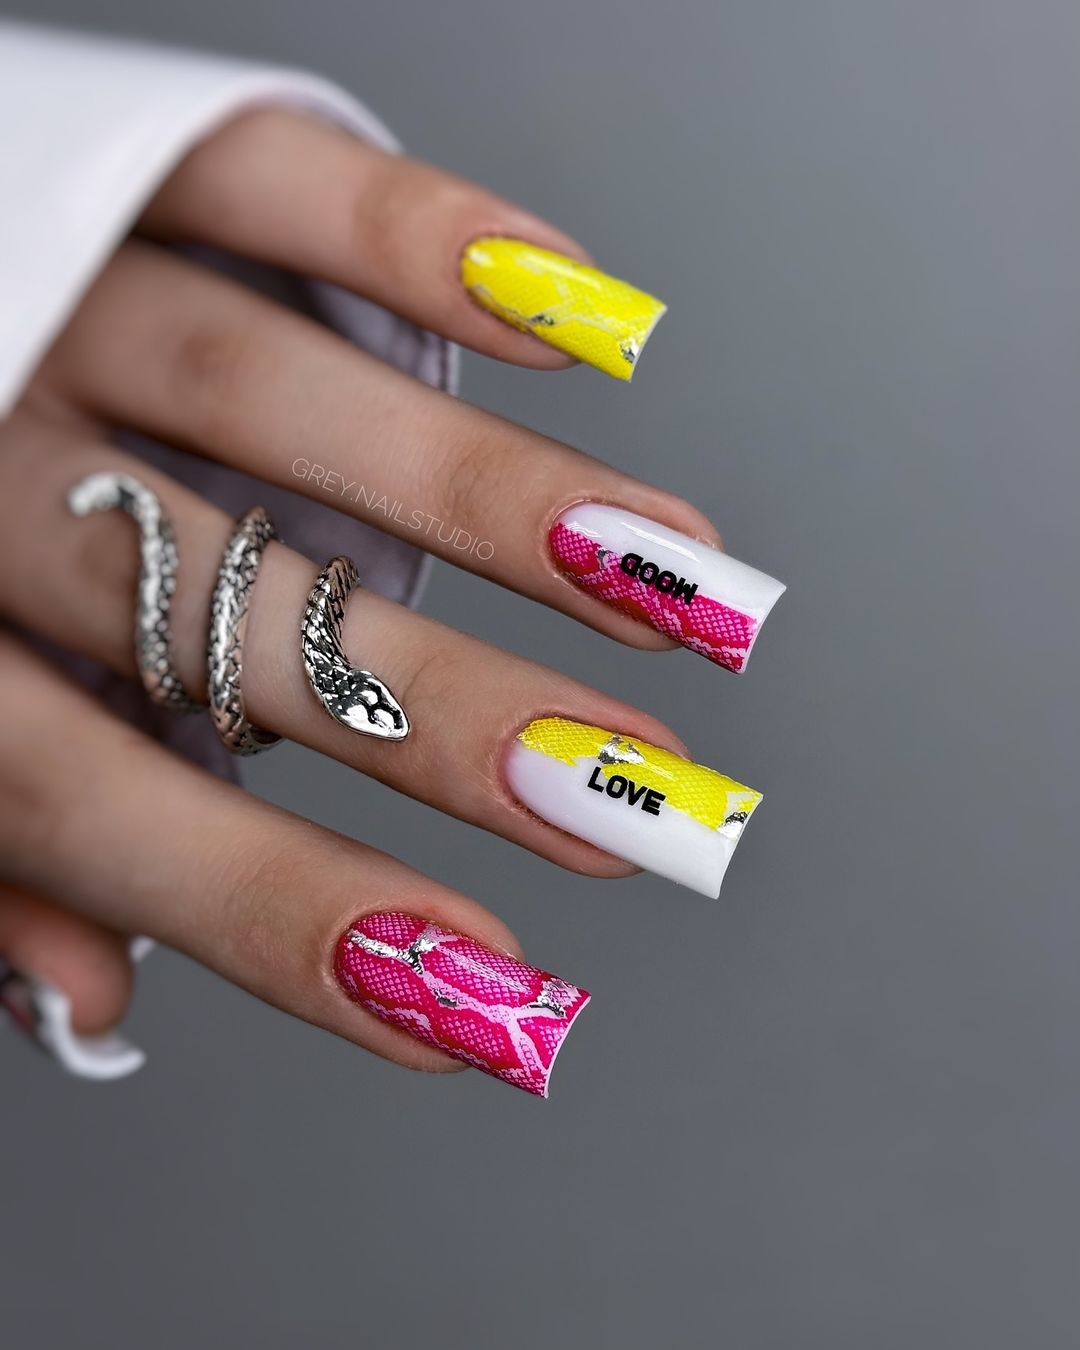
Professional Viewpoint
This design is a fearless fusion of funky and artistic, with its vivid yellow and magenta hues forming the perfect backdrop for pop art-inspired prints. The elongated square shape provides an ample canvas for the unique graphics, making them a statement piece for any trendy 2024 summer event.
Consumables Needed
- Bright yellow polish: ‘Mellow Yellow’ by Sally Hansen
- Vivid magenta polish: ‘Electric Pink’ by Orly
- Black detail polish: ‘Black Onyx’ by OPI
- Glossy topcoat: ‘No Chips Ahead’ by Essie
My Recommendation: When tackling the text and imagery, consider using nail stickers or decals to achieve that crisp, professional look.
DIY Steps
- Paint your base colors—yellow for the text and magenta for the fishnet.
- Apply nail stickers or hand-paint the designs using a detail brush.
- Seal your artwork with a glossy topcoat for lasting impact.
Save Pin
Tropical Twist
Embrace the call of the tropics with a manicure that’s a lush retreat for your nails.
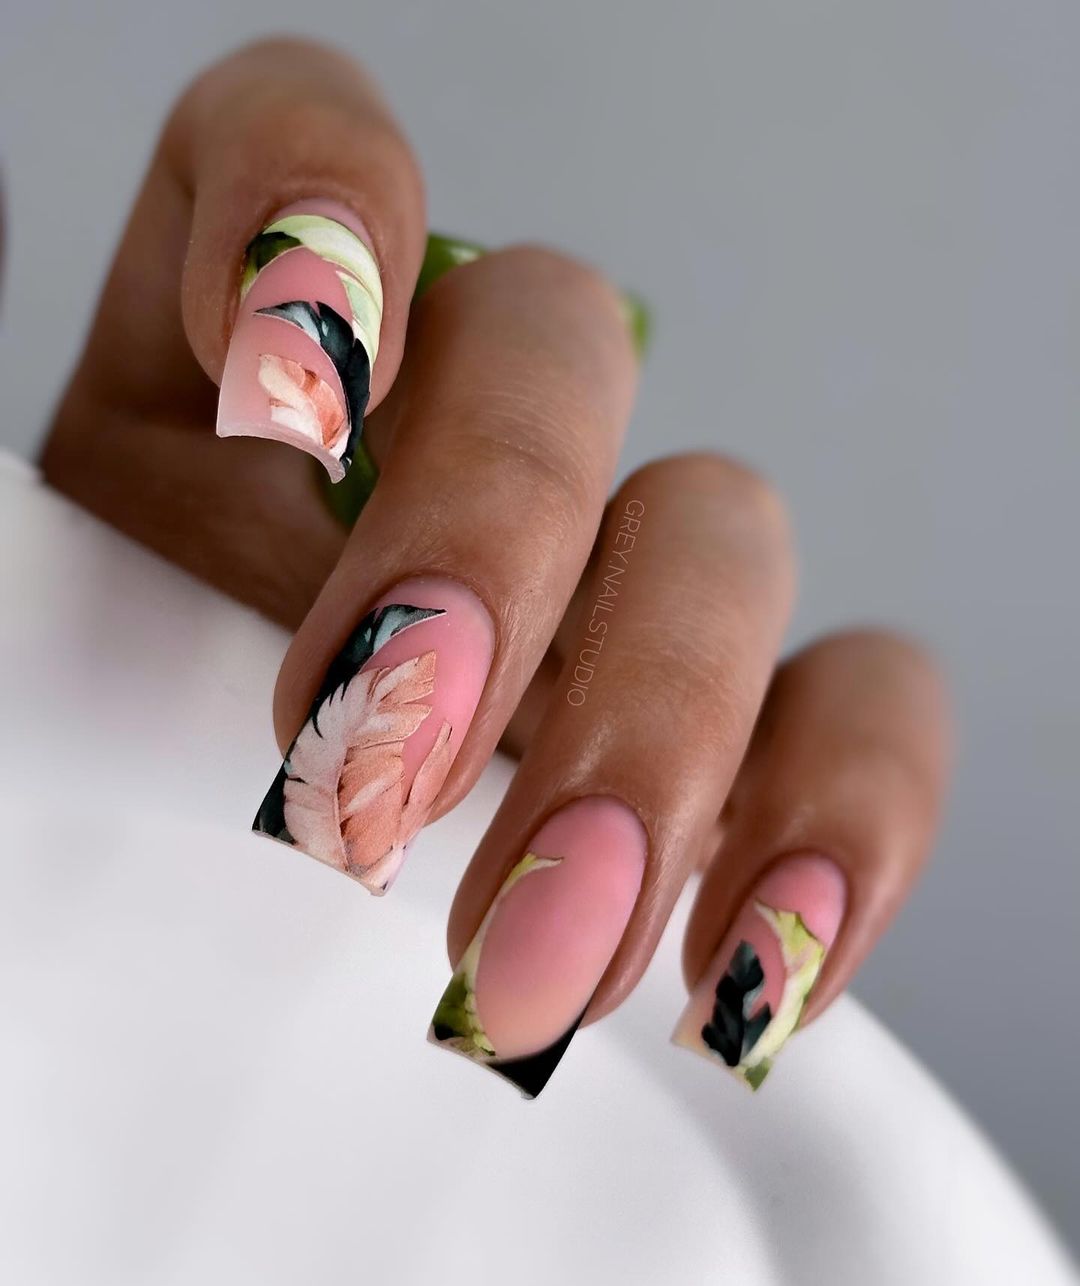
Professional Viewpoint
Here, a matte peach base is accented with intricate botanical designs, creating a sophisticated juxtaposition of simple and complex. This design speaks to a holiday mood, where the beauty of nature meets the art of manicure.
Consumables Needed
- Peach matte polish: ‘Peachy Keen’ by China Glaze
- Nail art stickers or water decals
- Matte topcoat: ‘Matte About You’ by Essie
My Recommendation: For an authentic beachy look, pair this design with tropical-inspired rings or bracelets.
DIY Steps
- Apply the matte peach polish as a serene base.
- Position your botanical decals with tweezers for precision.
- Finish with a matte topcoat to protect the design and enhance the texture.
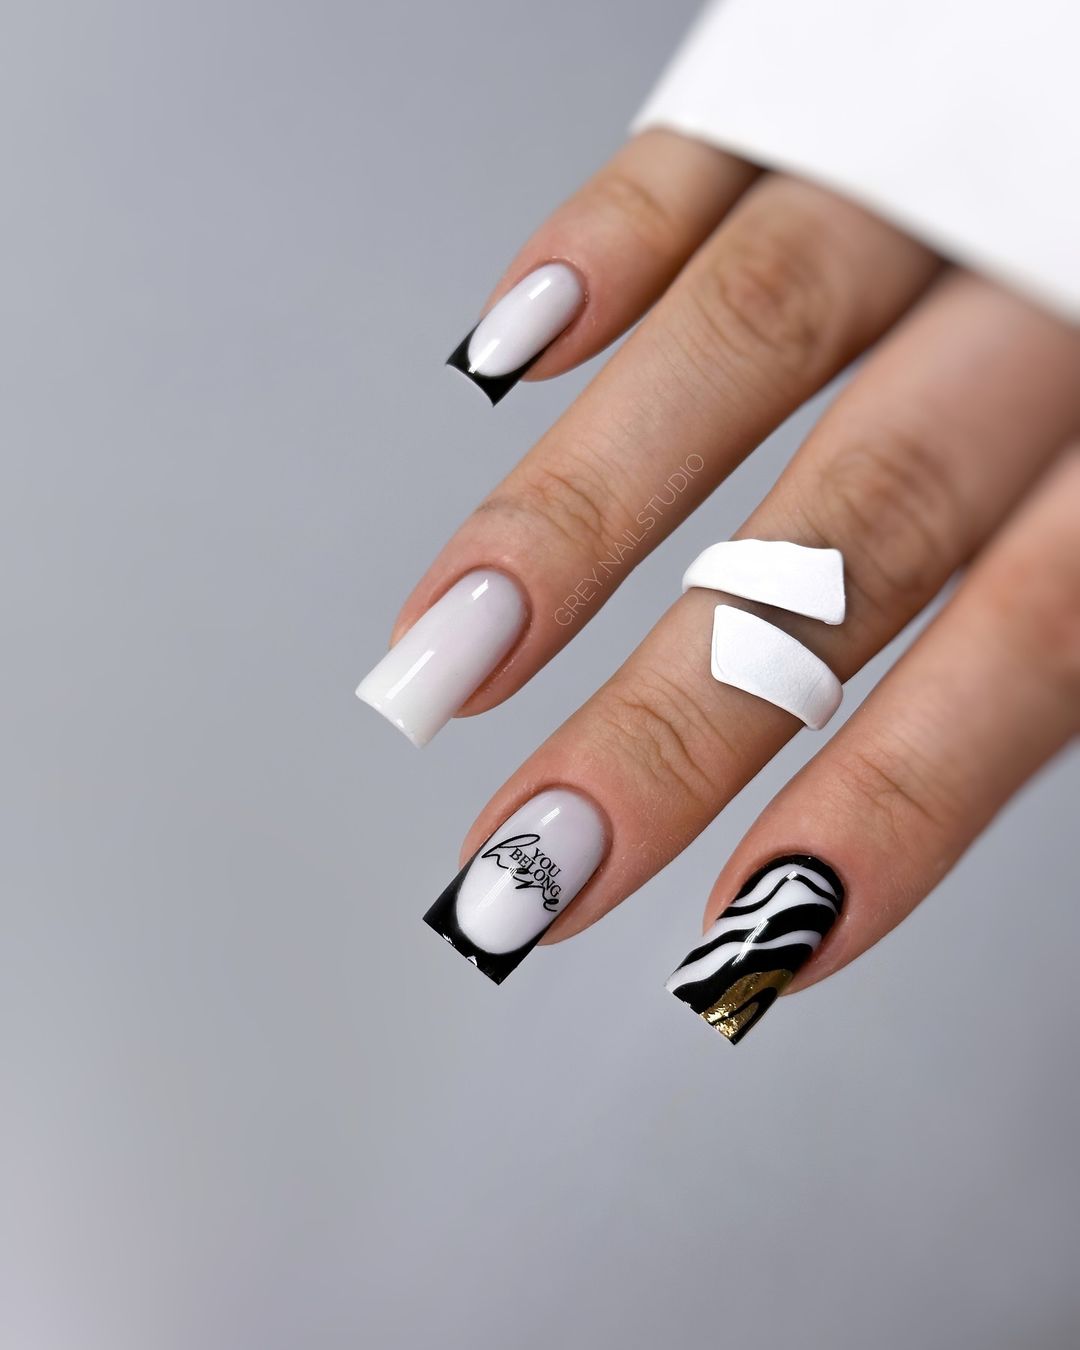
Zebra Whispers
Safari-inspired motifs take a simple turn with this understated yet unique approach to animal print.
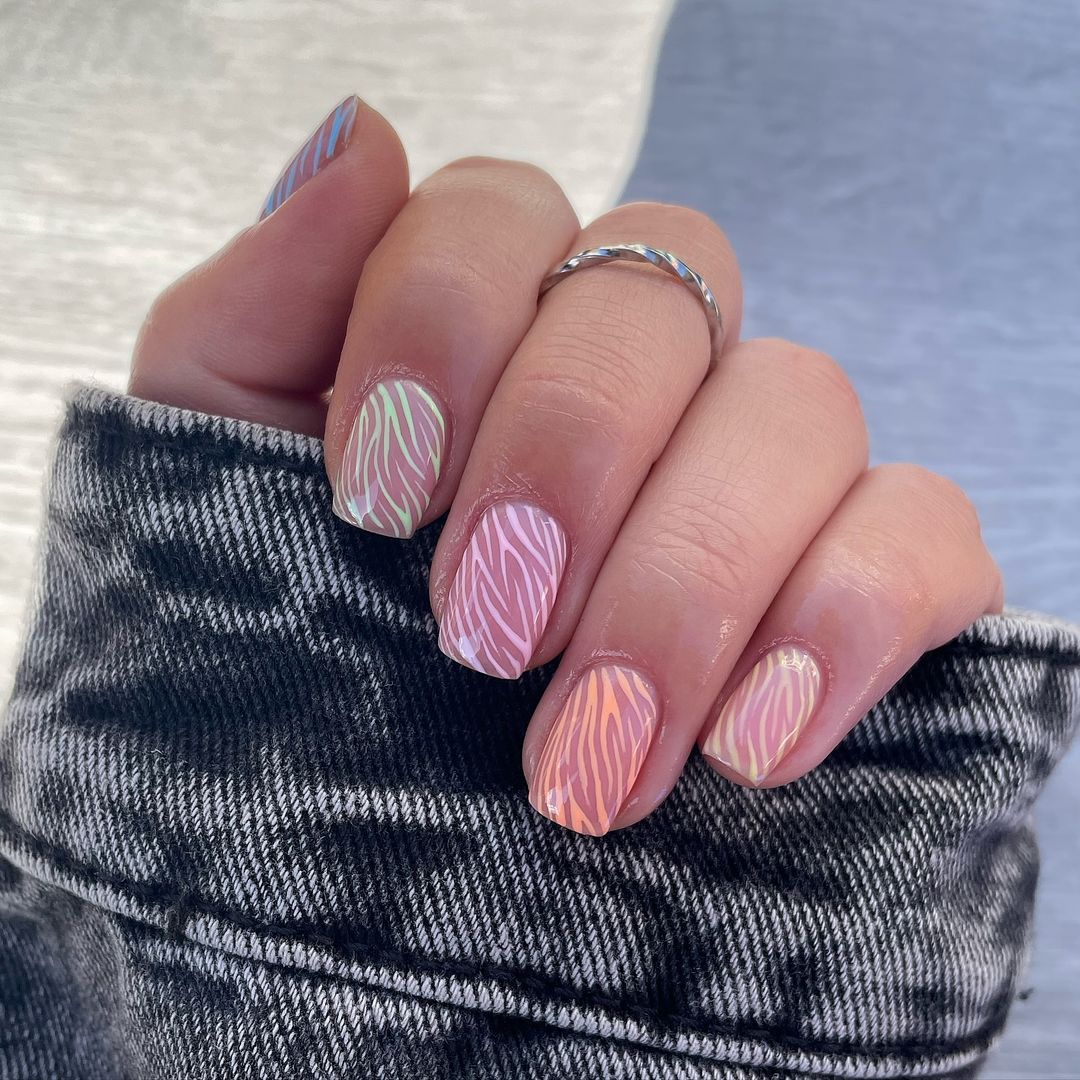
Professional Viewpoint
These nails celebrate the timeless appeal of animal prints through a delicate zebra pattern over a sheer base. The color transitions from a gentle blush to a daring peach, echoing the vibrant spring/summer sunset skies.
Consumables Needed
- Sheer blush polish: ‘Ballet Slippers’ by Essie
- Peach gradient polish: ‘Sunrise Sunset’ by OPI
- White striping polish: ‘French White Creme’ by Wet n Wild
- Quick-dry topcoat: ‘Insta-Dri’ by Sally Hansen
My Recommendation: For a simple yet funky vibe, the zebra pattern should be hand-painted with a thin brush for that authentic, wavy look.
DIY Steps
-
- Begin with a base coat of sheer blush.
- Sponge on the peach gradient polish for a soft sunset effect.
- Hand-paint the zebra stripes, then apply a quick-dry topcoat for a smooth, long-lasting finish.
Serpentine Shimmer
Discover the allure of curves and sparkles with a manicure that’s reminiscent of ocean waves and glistening sands.
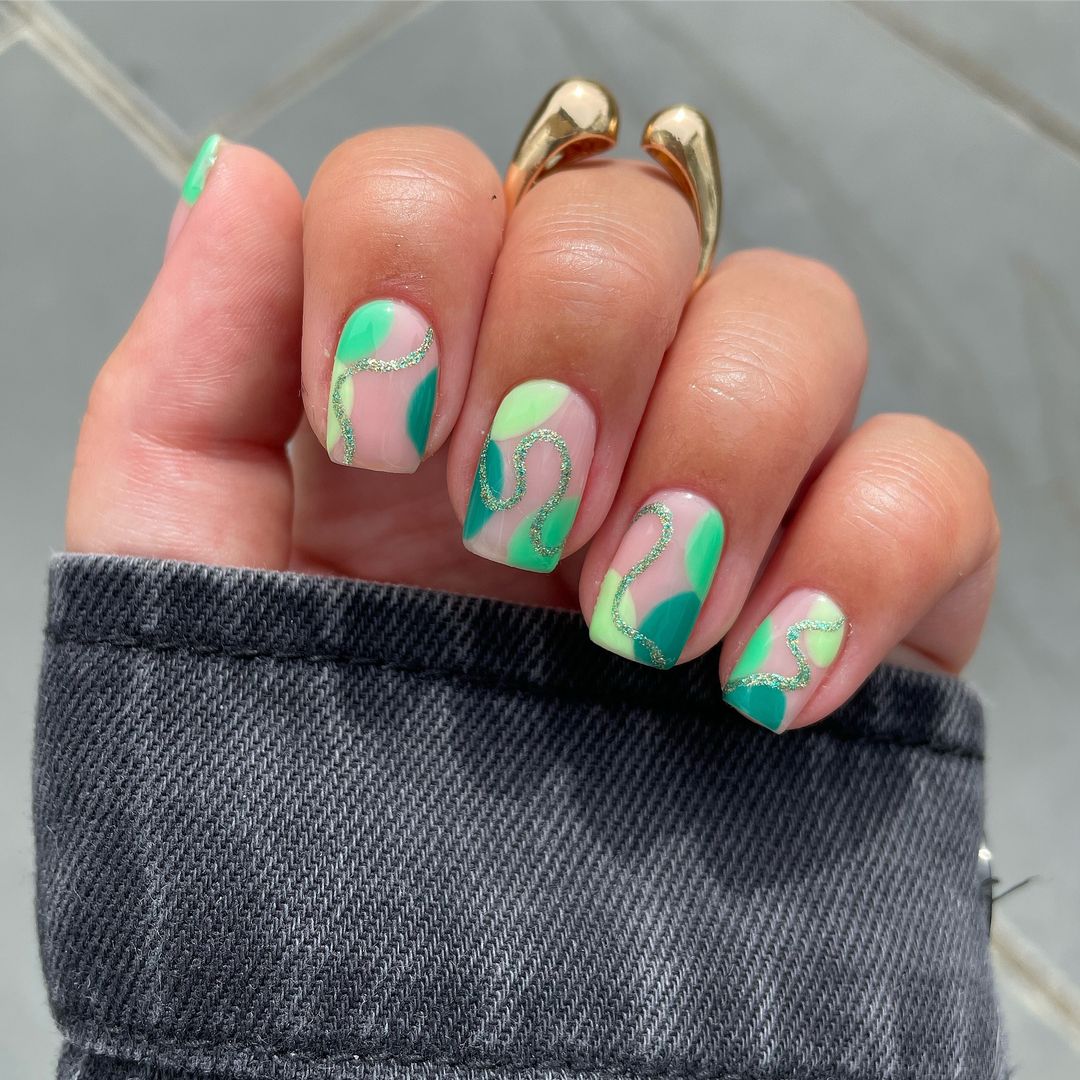
Professional Viewpoint
This design celebrates the fresh mint green with a twist of silver, winding like a serene river across each nail. Perfect for those craving a hint of sparkle on their short nails, it’s an elegant choice for both daily wear and special summer nights out.
Consumables Needed
- Mint green polish: ‘Mint Candy Apple’ by Essie
- Silver glitter striping polish: ‘Silver Stunner’ by Models Own
- Topcoat: ‘Out the Door’ by INM
My Recommendation: For the silver lines, steady hands are a must. If needed, use a guiding stick-on stencil to maintain the serpentine shape.
DIY Steps
- Begin with two coats of mint green polish as your base.
- Carefully draw the silver glitter lines, allowing your artistry to shine.
- Finish with a fast-drying topcoat to keep everything in place.
Pink Petal Play
Embrace a softer side of summer with nails that bloom with the sweetness of petals in the morning light.
Professional Viewpoint
These simple nails are adorned with delicate pink petal designs, evoking a gentle spring/summer garden. The subtle use of shades creates a unique and romantic aesthetic ideal for any dreamy summer day or a casual beach outing.
Consumables Needed
- Sheer pink polish: ‘Princesses Rule!’ by OPI
- Pink detail polish for petals: ‘Pink Flamenco’ by OPI
- Topcoat: ‘Weekly Topcoat’ by CND Vinylux
My Recommendation: Use a fine detailing brush to paint the petals, and don’t rush the strokes; let each petal tell its own story.
DIY Steps
- Apply the sheer pink polish to give a natural, healthy nail glow.
- With a fine brush, add the petal details in a bolder pink.
- A topcoat will ensure the design lasts as long as the summer days.
Floral Whispers
Simple and sweet, these nails beckon memories of meadows touched by summer’s hand.
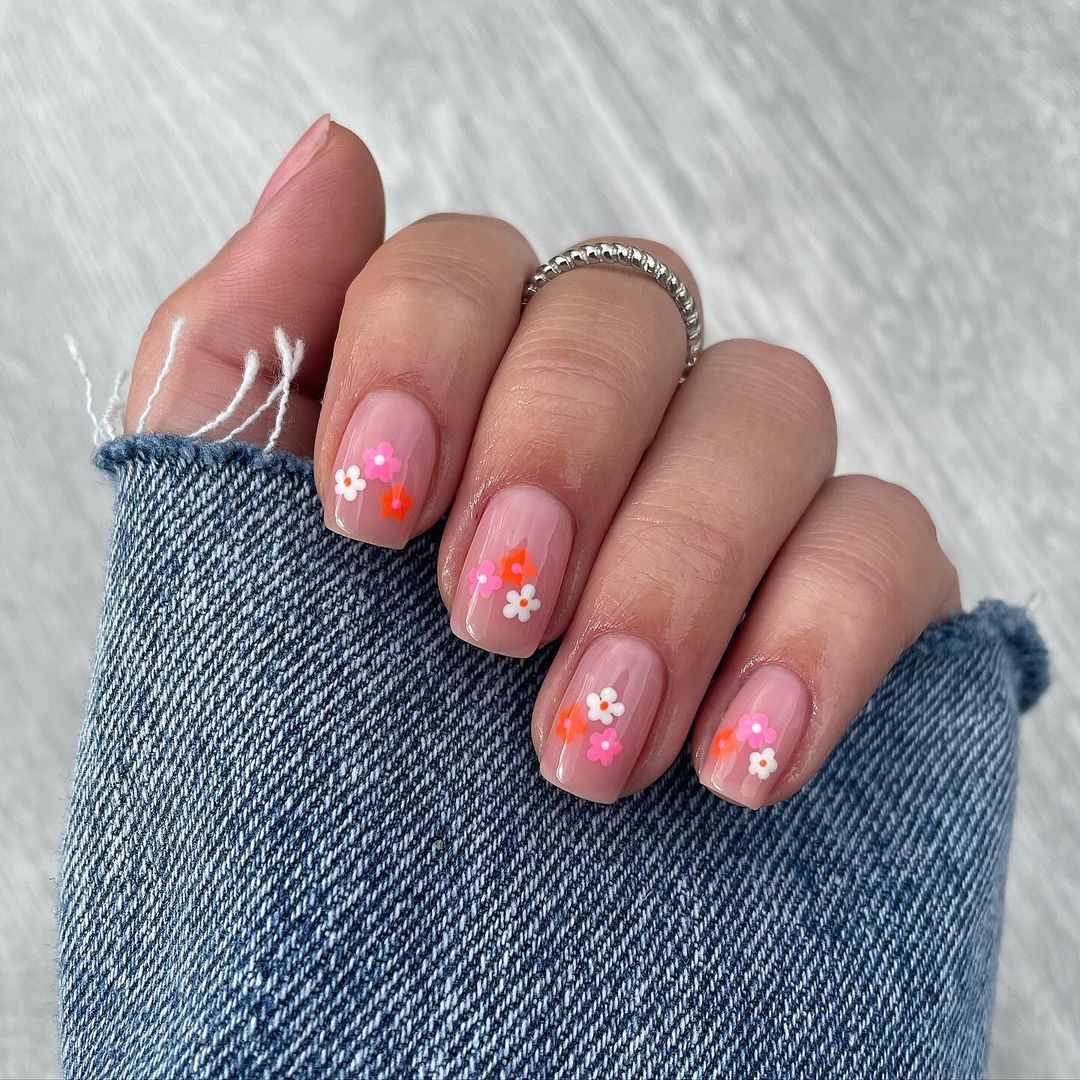
Professional Viewpoint
This simple and endearing design is an ode to summer’s floral tapestry. Almond short nails serve as the canvas for tiny flowers, each a delicate splash of color and joy. It’s a unique look that’s both trendy 2024 and timelessly charming.
Consumables Needed
- Sheer pink polish: ‘Mademoiselle’ by Essie
- Multi-colored polishes for flowers: ‘Cajun Shrimp’, ‘Alpine Snow’, and ‘No Room for the Blues’ by OPI
- Topcoat: ‘SolarOil’ by CND
My Recommendation: Keep the flower designs simple; a dotting tool can be your best friend to create the center of the flowers with ease.
DIY Steps
- Paint your nails with the sheer base.
- Dot on your flowers, using a light touch for the petals.
- A nourishing topcoat will add shine and longevity to your floral creation.
Save Pin
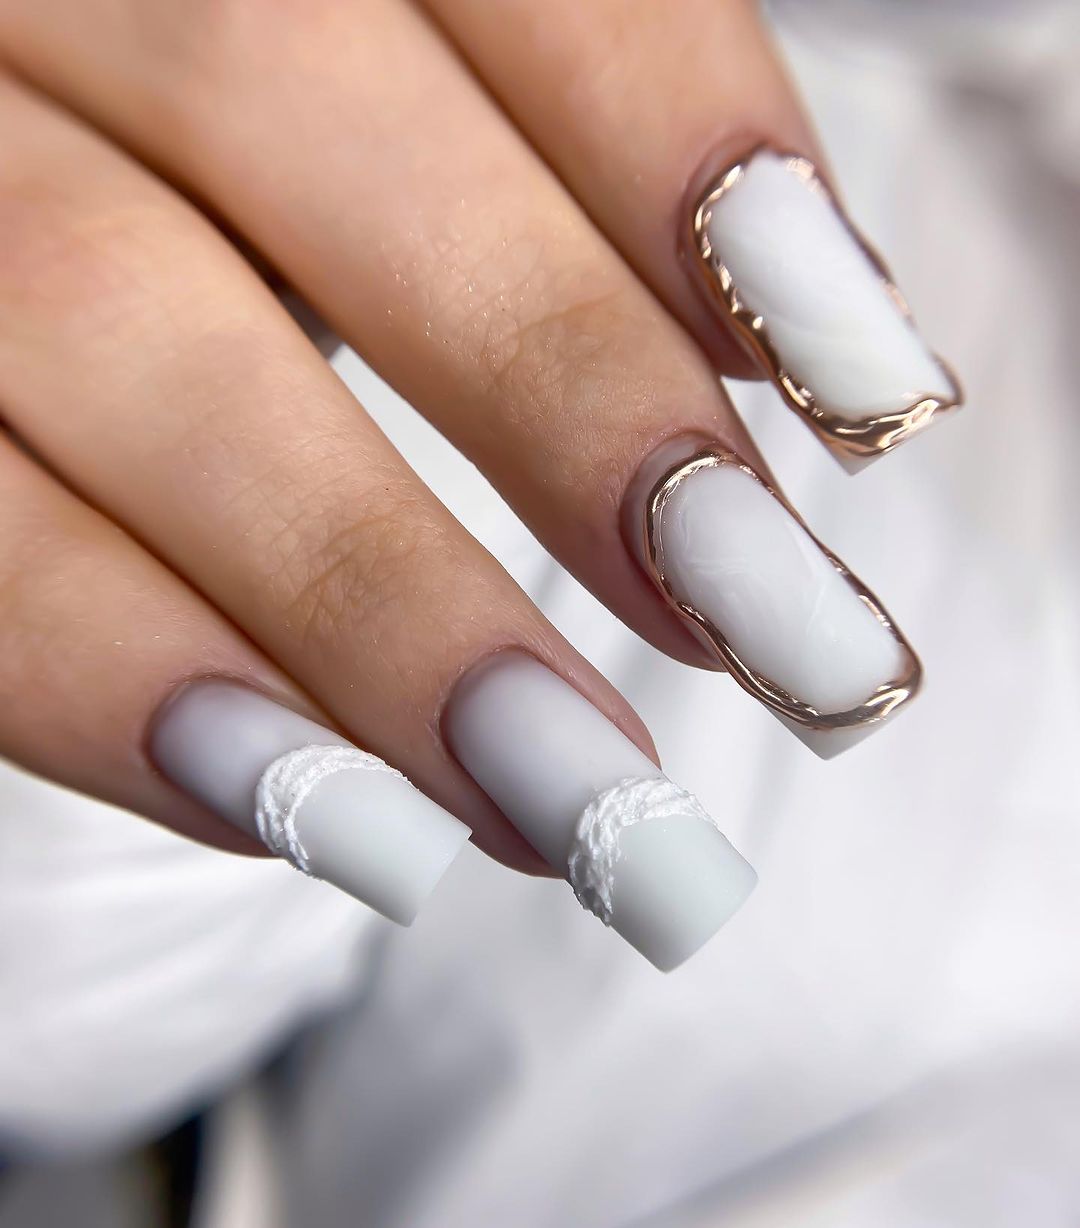
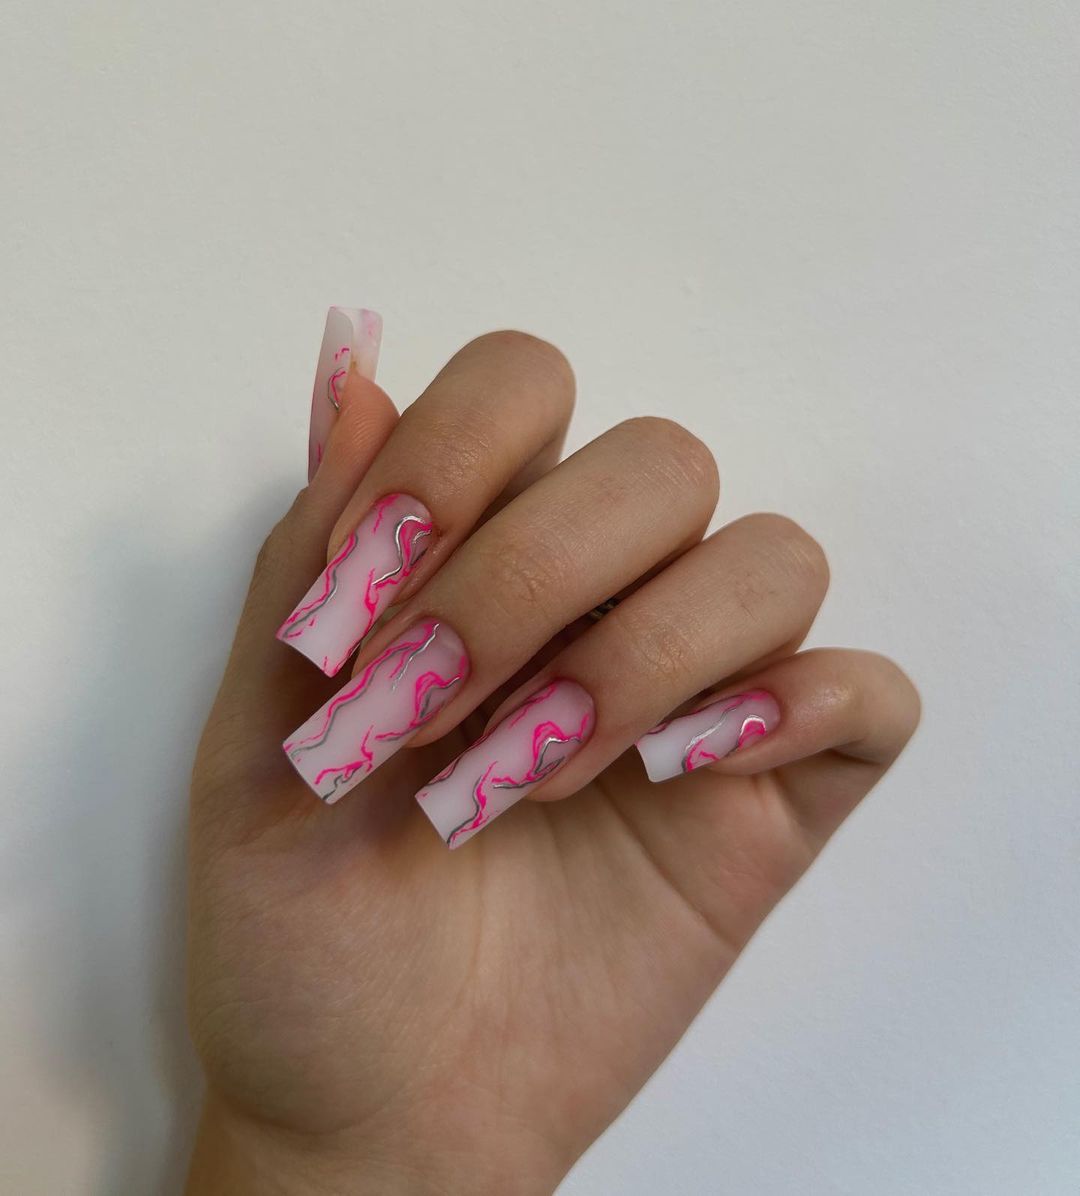
Modern Marble Elegance
Embrace the luxury of marbled pink set against a pristine white backdrop, an embodiment of modern sophistication on your fingertips.
Professional Viewpoint
This long extension offers a playground for a pink marbled effect, which flows effortlessly on the French-tipped canvas, reminiscent of a whimsical aesthetic. It’s a harmonious balance for those who adore the dramatic flair of length without compromising on elegance.
Consumables Needed
- White polish for the base: ‘Blanc’ by Essie
- Marbling colors: ‘Strawberry Margarita’ and ‘Mod About You’ by OPI
- Detail brush for marbling effects
- Topcoat: ‘Gel Setter’ by Essie
My Recommendation: Use the drag-and-pull technique with the detail brush to blend your marbling colors naturally.
DIY Steps
- Apply a white polish as a base for the tips.
- While the white is still tacky, dot on your pink shades and use the brush to marble them together.
- Seal the design with a topcoat to give it a gel-like finish and durability.
Silver Swirls on White
Silver swirls dance on a canvas of white, creating an ethereal and minimalist look that’s alluring in its simplicity.
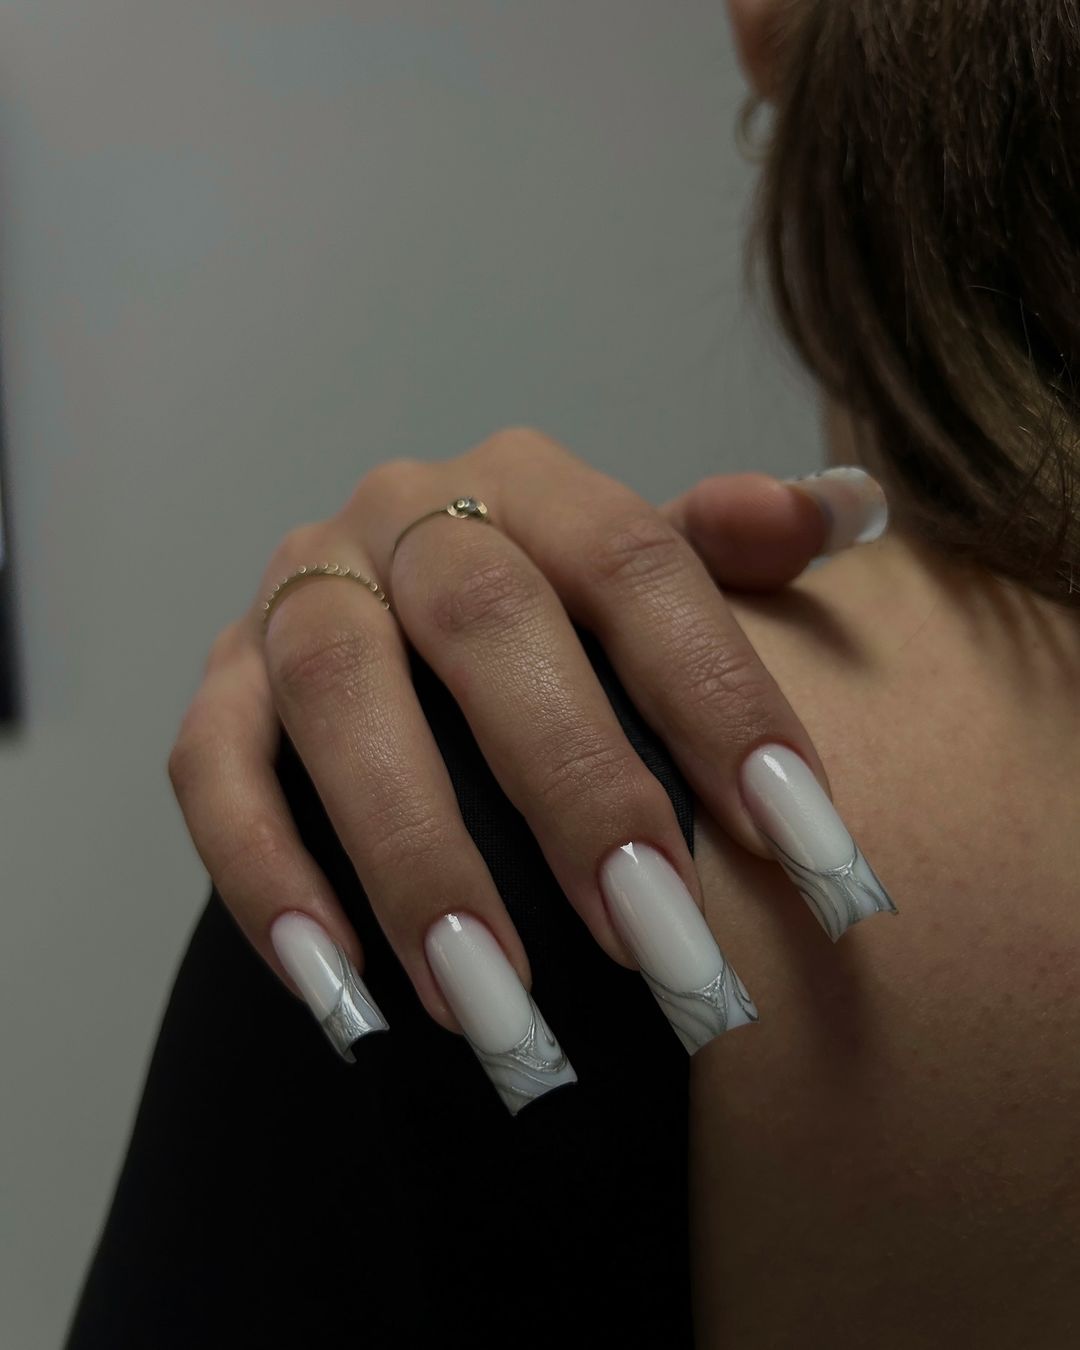
Professional Viewpoint
This design is a testament to the beauty that lies in simplicity. The long acrylic nails are adorned with silver swirls, evoking the image of delicate silver jewelry. It’s a versatile look that can take you from a day in the office to an evening gala.
Consumables Needed
- White polish for the base: ‘Alpine Snow’ by OPI
- Silver striping polish: ‘No Place Like Chrome’ by Essie
- Thin striping brush for detailed swirls
- Topcoat: ‘Good To Go’ by Essie
My Recommendation: For the swirls, keep a light touch and allow the curves to flow naturally, much like you would with ink on paper.
DIY Steps
- Start with a white polish as the perfect blank slate.
- Using a striping brush, create the silver swirls in one fluid motion for each nail.
- Complete the design with a quick-drying topcoat for a glossy, protective finish.
Geometric Contrast
Bold black and stark white collide in a geometric dance, making a statement that is both simple and dramatic.
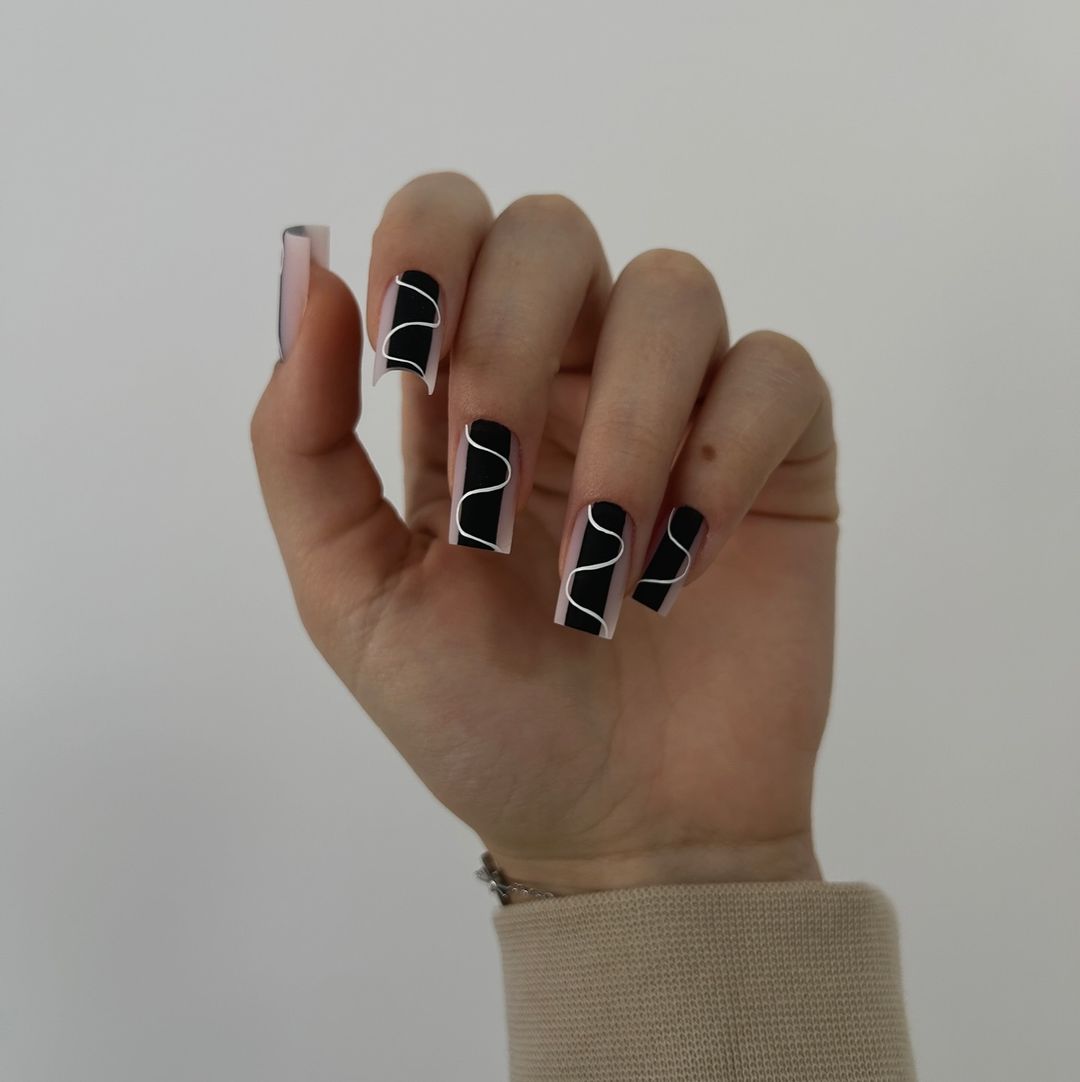
Professional Viewpoint
These long nails serve as a canvas for abstract art, where black geometric shapes create a stark contrast against a white background. It’s a style that exudes confidence and is unafraid to be the center of attention.
Consumables Needed
- White polish for the base: ‘Private Weekend’ by Essie
- Black polish for designs: ‘Licorice’ by Essie
- Precision tip brush for geometric shapes
- Topcoat: ‘Super Stay’ by Maybelline
My Recommendation: Precision is key for geometric shapes. Consider using striping tape to achieve clean lines.
DIY Steps
- Lay down your white base and let it dry completely.
- Plan out your geometric patterns and use striping tape if necessary.
- Fill in the shapes with black polish, remove the tape while it’s wet, and then let it dry.
- Apply a topcoat for a flawless, high-shine finish.
Holographic Heart Accents
Step into a futuristic romance with these nails, where holographic sheen meets the timeless symbol of love.
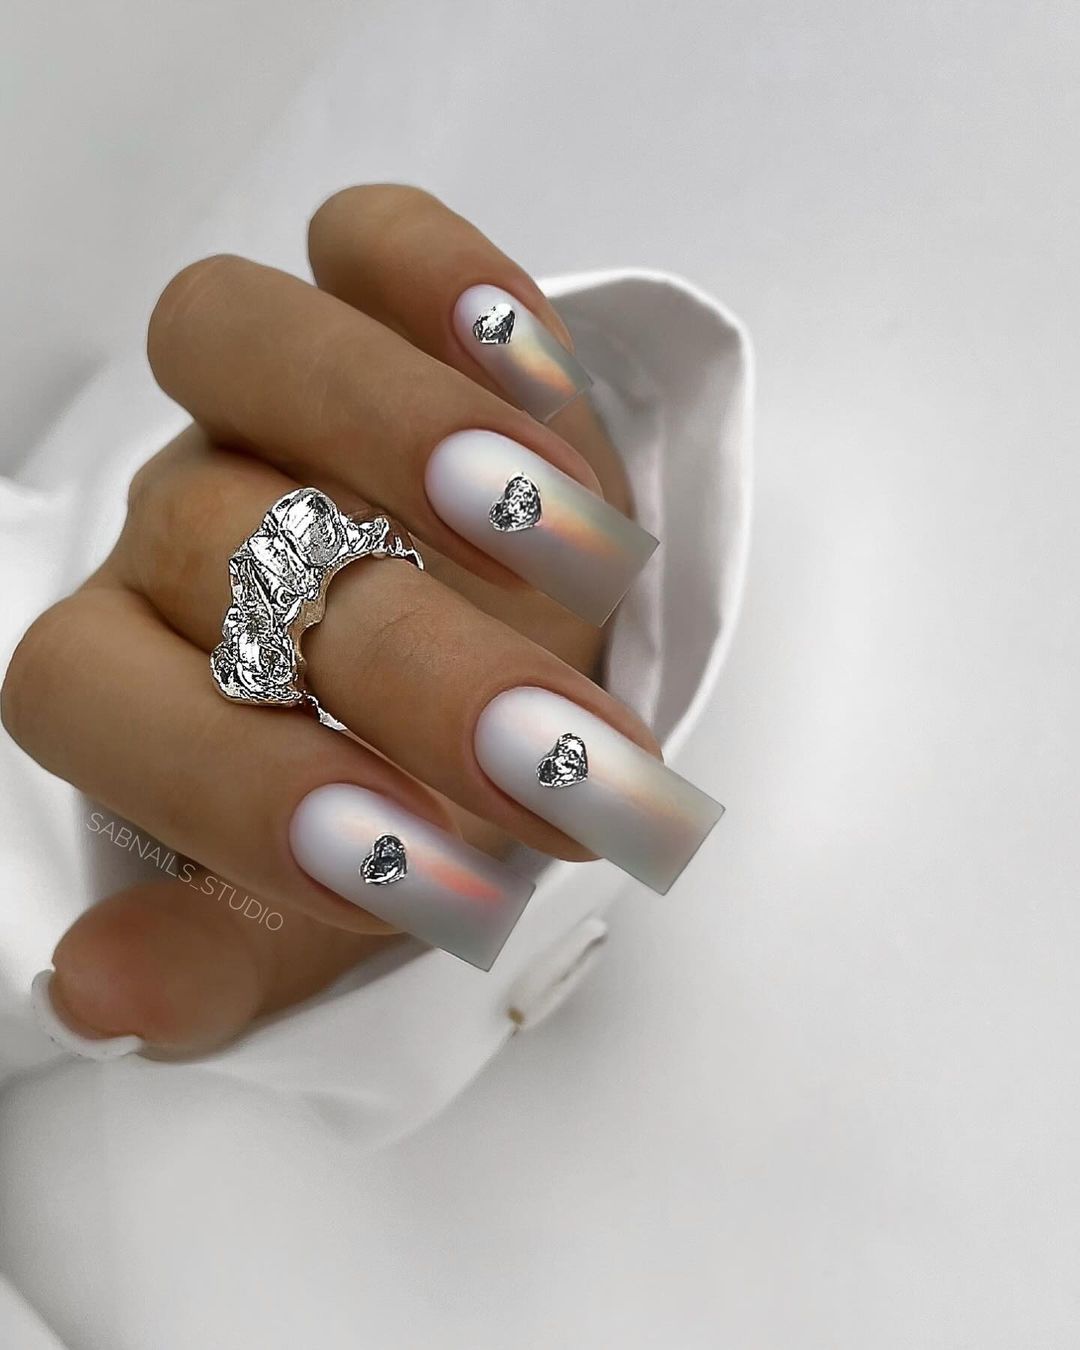
Professional Viewpoint
This design takes the classic French manicure to the next level with its long and ethereal holographic fade, crowned with delicate silver hearts. It’s perfect for those who wish to wear their hearts not on their sleeves, but at their fingertips, making it a unique choice for both aesthetic appeal and a touch of romance.
Consumables Needed
- Holographic topcoat: ‘Holo Taco’ by Simply Nailogical
- Silver heart stickers or decals
- French tip guides for a precise edge
- Strong-hold base coat and topcoat to seal in the design
My Recommendation: Apply the holographic topcoat over a white or pale pink base to truly capture the light and create that mesmerizing effect.
DIY Steps
- Start with a strong base, followed by your white or pink polish.
- Once dry, apply the holographic topcoat for that multi-dimensional shine.
- Place the heart decals at the center of the nail for a sweet, focused effect.
- Finish with a topcoat to ensure your hearts stay put.
Pink Fantasy
Enchant your onlookers with a dreamy bouquet at your fingertips, marrying soft pink with vibrant art.
Professional Viewpoint
The long pink base on these nails provides a canvas for stunning, lifelike floral artwork, reminiscent of a blooming garden. With roses as the star, this manicure is a celebration of femininity and the beauty of nature, suitable for any holiday or special spring/summer occasion.
Consumables Needed
- Soft pink polish: ‘Muchi, Muchi’ by Essie
- Fine detail brush for intricate floral designs
- Acrylic paints or multi-colored polishes for the floral art
- Glossy topcoat: ‘Shine of the Times’ by Essie
My Recommendation: Take your time with the floral details, using a picture of real roses as a reference to capture their natural beauty.
DIY Steps
- Lay down your pink base color.
- Hand-paint the roses using your fine brush, layering colors to add depth.
- Once the art is dry, apply a glossy topcoat for a protective, high-gloss finish.
Pearl Embellished Pink
Indulge in the classic charm of pearls with nails that offer a delicate and sophisticated twist to the French manicure.
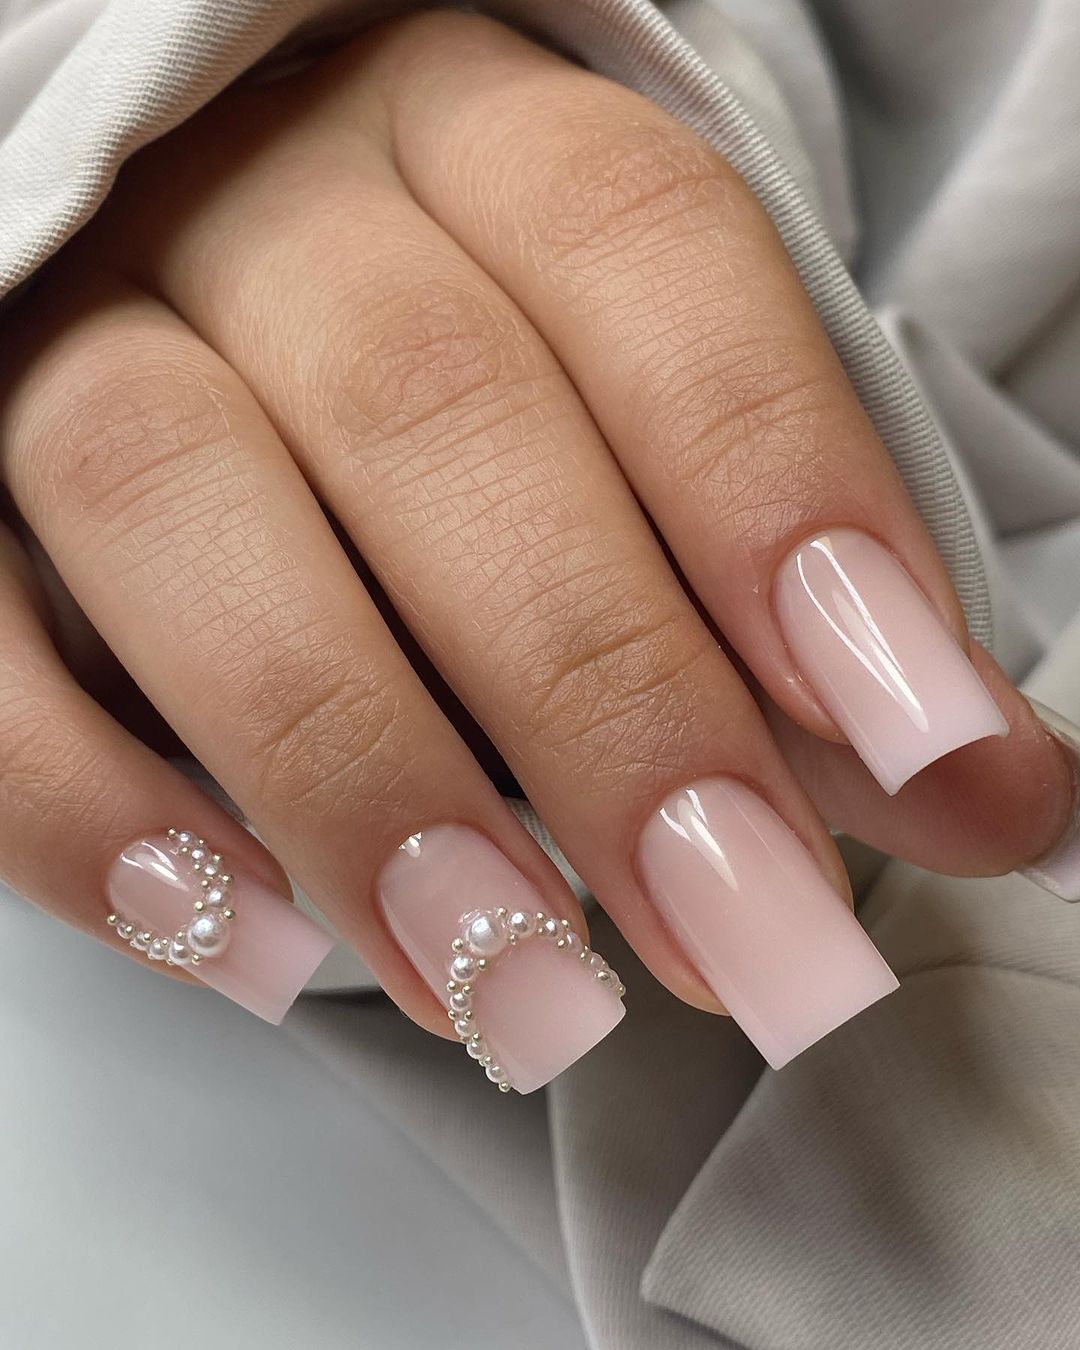
Professional Viewpoint
This simple yet elegant design adds a touch of luxe to the traditional French tips with the addition of tiny pearls. It’s an almond short style that exudes class and suits every occasion, from a day at work to an evening soirée.
Consumables Needed
- Sheer pink polish: ‘Ballet Slippers’ by Essie
- Assorted sizes of flat-back pearls
- Nail glue for a secure application of embellishments
- Topcoat: ‘Rock Topcoat’ by Zoya
My Recommendation: Apply the pearls with precision using a wax pencil, and ensure each is secured with a dot of nail glue.
DIY Steps
- Paint your nails with the sheer pink polish for a clean, natural look.
- Arrange the pearls along the tip or as you like, securing each with nail glue.
- Seal the design with a topcoat, being careful not to dull the pearls’ luster.
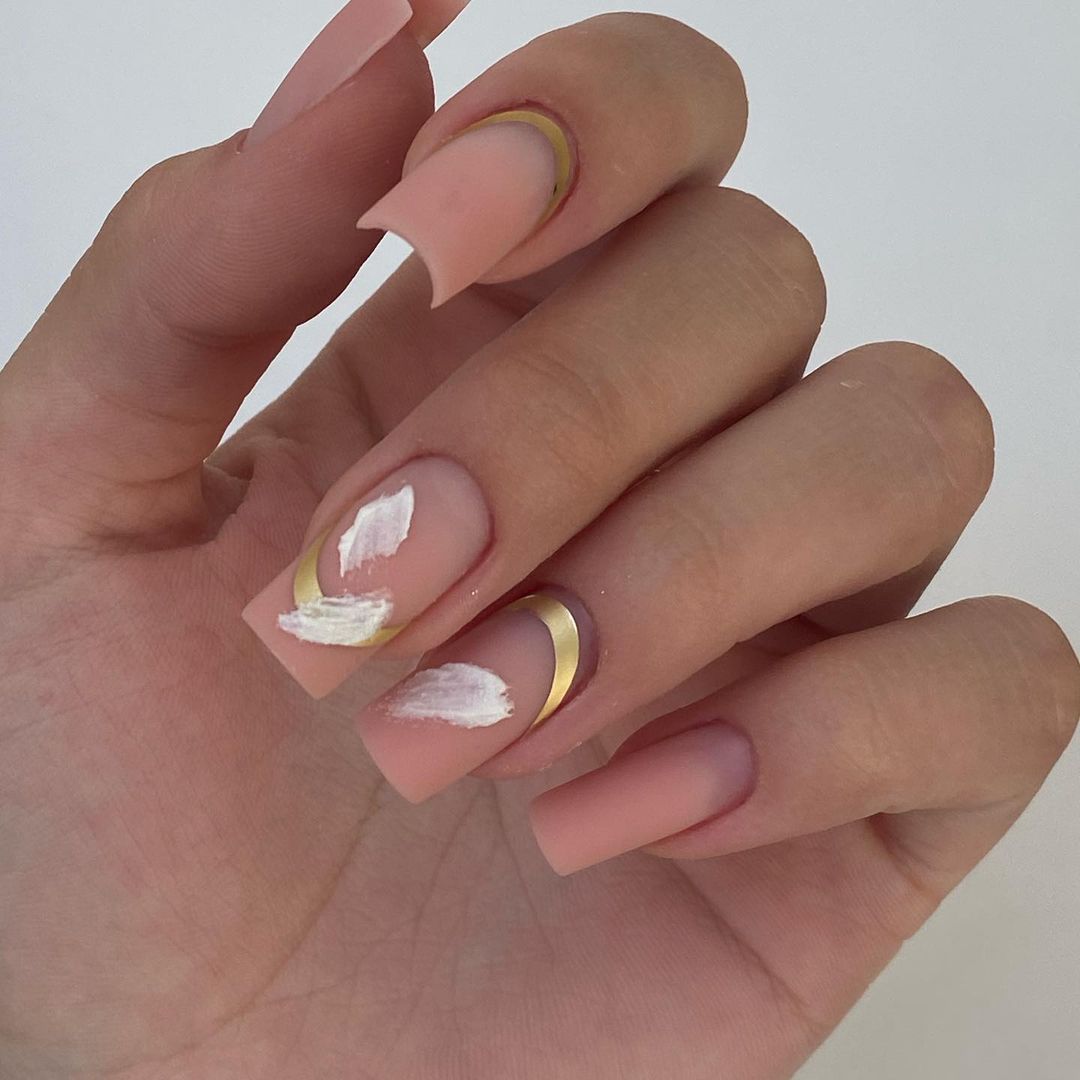
Elegance with a Golden Edge
Bring a touch of opulence to your fingertips with these chic nails, where minimalism meets luxury in the most exquisite way.
Professional Viewpoint
This long nail design is all about refinement, showcasing a soft pink base complemented by strategic golden embellishments. It’s the perfect marriage of simple beauty and upscale design, ideal for anyone looking to add a subtle yet unique statement to their look.
Consumables Needed
- Soft pink polish: ‘Pale to the Chief’ by OPI
- Gold chain decals or stickers
- Nail adhesive for secure embellishment placement
- High-gloss topcoat: ‘Plumping Topcoat’ by Nails Inc.
My Recommendation: For a seamless application, use tweezers to place the gold chain decals precisely where you want them on the nail.
DIY Steps
- Apply two coats of the soft pink polish for an even, opaque base.
- Affix the gold chain decals along the curvature of the nail or as desired.
- Use a topcoat to not only protect the polish but also to ensure the decals stay in place.
Modern Artistry
Experience the fusion of art and fashion with these modern nails that are a canvas for creativity.
Professional Viewpoint
A contemporary twist on the classic French manicure, this design boasts crisp white tips framed by abstract copper lines. It’s a bold and trendy 2024 style that makes a statement without saying a word, suitable for the modern fashionista.
Consumables Needed
- White polish: ‘Snow Me White’ by Sinful Colors
- Copper striping tape or thin copper polish: ‘Take Me to Your Chateau’ by Color Club
- Smoothing base coat to create a perfect canvas
- Topcoat: ‘Rapidry’ by OPI
My Recommendation: Apply the copper elements with a steady hand, or use striping tape for ultra-clean lines.
DIY Steps
- Begin with a base coat to smooth out any imperfections.
- Apply the white tips with precision and patience.
- Add the copper lines using tape or freehand with a thin brush for a touch of modern elegance.
- Seal the design with a topcoat for a long-lasting, glossy finish.
Pattern Play
Turn heads with a daring combination of patterns and textures, perfect for anyone who loves to push the boundaries of traditional nail art.
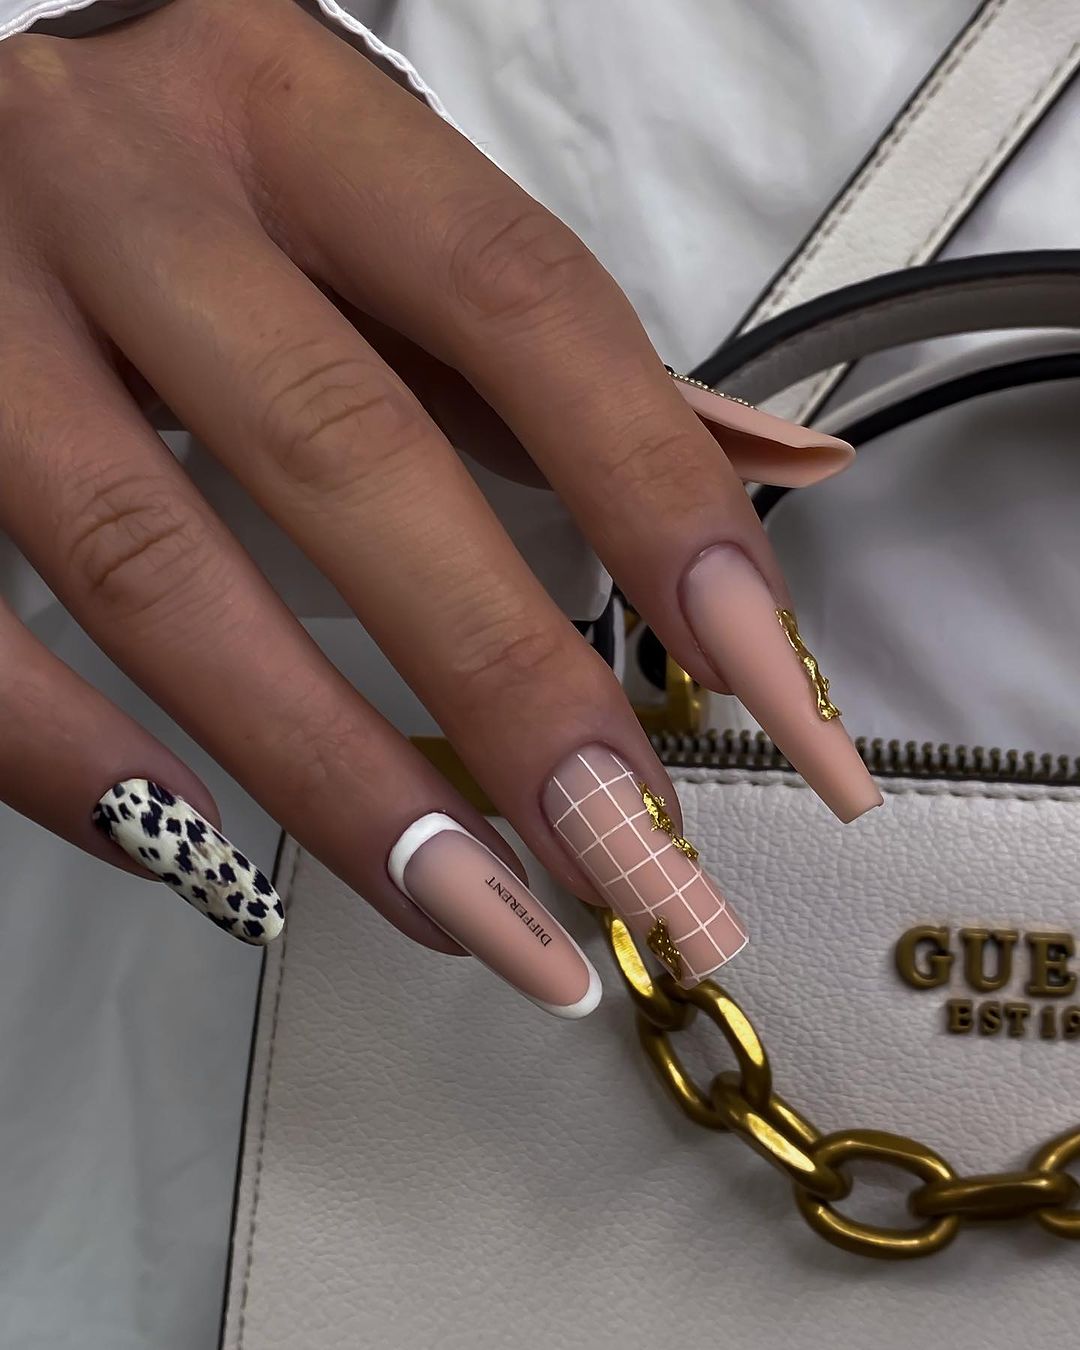
Professional Viewpoint
In this long nail design, a muted background serves as the foundation for bold pattern play, with each nail featuring a different but complementary design. From animal prints to geometric grids, these nails are for those who love variety and a funky twist on their manicure.
Consumables Needed
- Neutral polish: ‘Topless and Barefoot’ by Essie
- Black and gold polishes for detailing
- Nail art brushes for precision work
- Matte topcoat: ‘Matte Velvet’ by Zoya
My Recommendation: Alternate patterns between nails to keep the look cohesive yet exciting. Use a thin art brush for the intricate details.
DIY Steps
- Paint each nail with the neutral base color.
- Decide on a pattern for each nail and carefully create the design with your art brushes.
- Apply a matte topcoat to enhance the textures and add a contemporary feel.
Abstract Gold Strokes
A minimalist approach with a luxurious twist—ideal for those who adore the simple elegance of French manicure but desire a dash of opulence.
Professional Viewpoint
This design features a clean, pink base accented by abstract gold strokes—modern art at your fingertips. The long nails allow for a spacious backdrop to the metallic detail, perfect for adding a unique and creative touch to a classic style.
Consumables Needed
- Sheer pink polish: ‘Rose Quartz’ by ILNP
- Gold leaf or gold foil
- Nail glue or a sticky base coat for gold leaf application
- Topcoat: ‘Clearly On Top’ by KBShimmer for a glass-like finish
My Recommendation: Apply the gold leaf in small, torn pieces to create a more organic, abstract effect.
DIY Steps
- Apply two coats of your chosen sheer pink polish.
- Place gold leaf pieces sporadically or in a pattern you love using nail glue or a sticky base.
- Seal the look with a topcoat for a smooth, glossy overlay that will keep every piece in place.
Vibrant Florals and Sheer Pink
Dive into a vivid fantasy garden with these nails, where every stroke of the brush brings a petal to life.
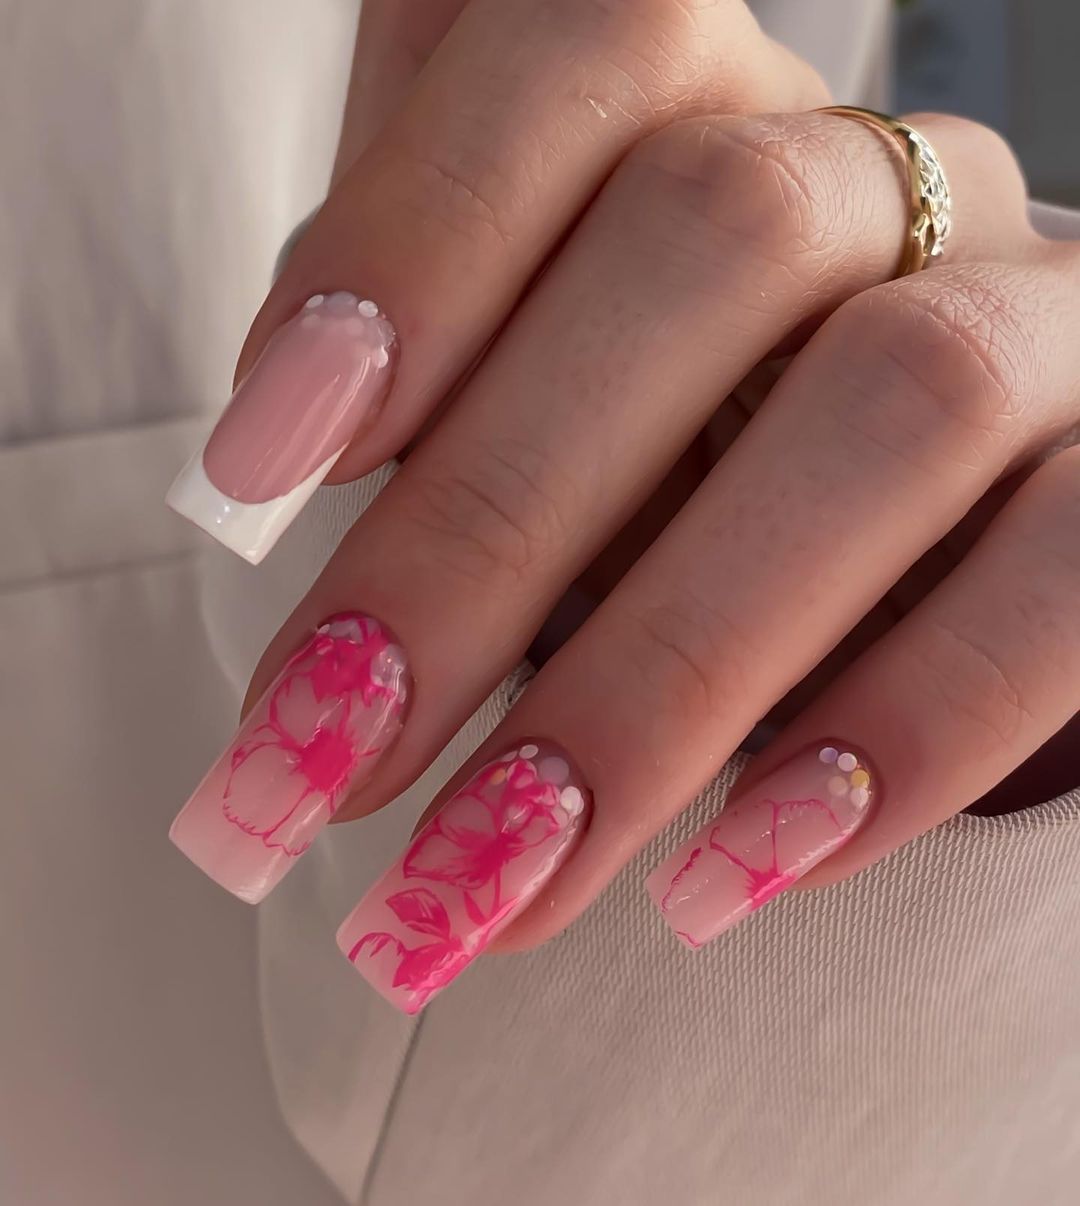
Professional Viewpoint
Long nails become a canvas for the romantic and whimsical with hand-painted flowers cascading over a sheer pink background. It’s a design that speaks of spring/summer days and carefree joy, making it an ideal choice for a holiday or weekend getaway.
Consumables Needed
- Sheer pink polish: ‘Minimalistic’ by Essie
- Acrylic paint or nail polish in various shades for the floral art
- Detailing brush for painting delicate flowers
- Topcoat: ‘Looking Glass’ by Cirque Colors for lasting shine
My Recommendation: Practice your flower designs on paper first to perfect your technique before taking it to the nail.
DIY Steps
- Begin with a sheer pink base, letting it dry completely.
- Use your detailing brush to paint flowers, starting with the base color and adding highlights and shadows.
- Once dry, apply a topcoat to protect your art and add a beautiful shine.
Oceanic Tips
Capture the underwater allure of coral reefs with these French tips, perfect for those who seek a serene yet trendy 2024 look.
Professional Viewpoint
The tranquil hues of ocean blue and soft coral dance on the tips of these almond short nails, while a delicate white coral design rests on a clear base. It’s a nod to the beauty of the sea, tailored for the simple but stylish individual.
Consumables Needed
- Blue and coral polishes: ‘Bikini So Teeny’ and ‘Tart Deco’ by Essie
- White polish for the coral design: ‘Snow Me White’ by Sinful Colors
- Thin detailing brush for precise coral artwork
- Topcoat: ‘Ultra Glossy Seal’ by ILNP for a water-like shine
My Recommendation: Keep the coral designs subtle; let the colors do the talking by creating a smooth gradient on the tips.
DIY Steps
- Paint a clear base coat and let it dry.
- Apply the blue and coral polish to the tips, blending for a gradient effect.
- Use a fine brush to paint the white coral design over the clear base.
- Complete the look with a shiny topcoat to enhance the depth of the oceanic colors.
Gilded Geometry
A sophisticated affair of French design and geometric glam, perfect for the contemporary spirit who loves a twist of drama.
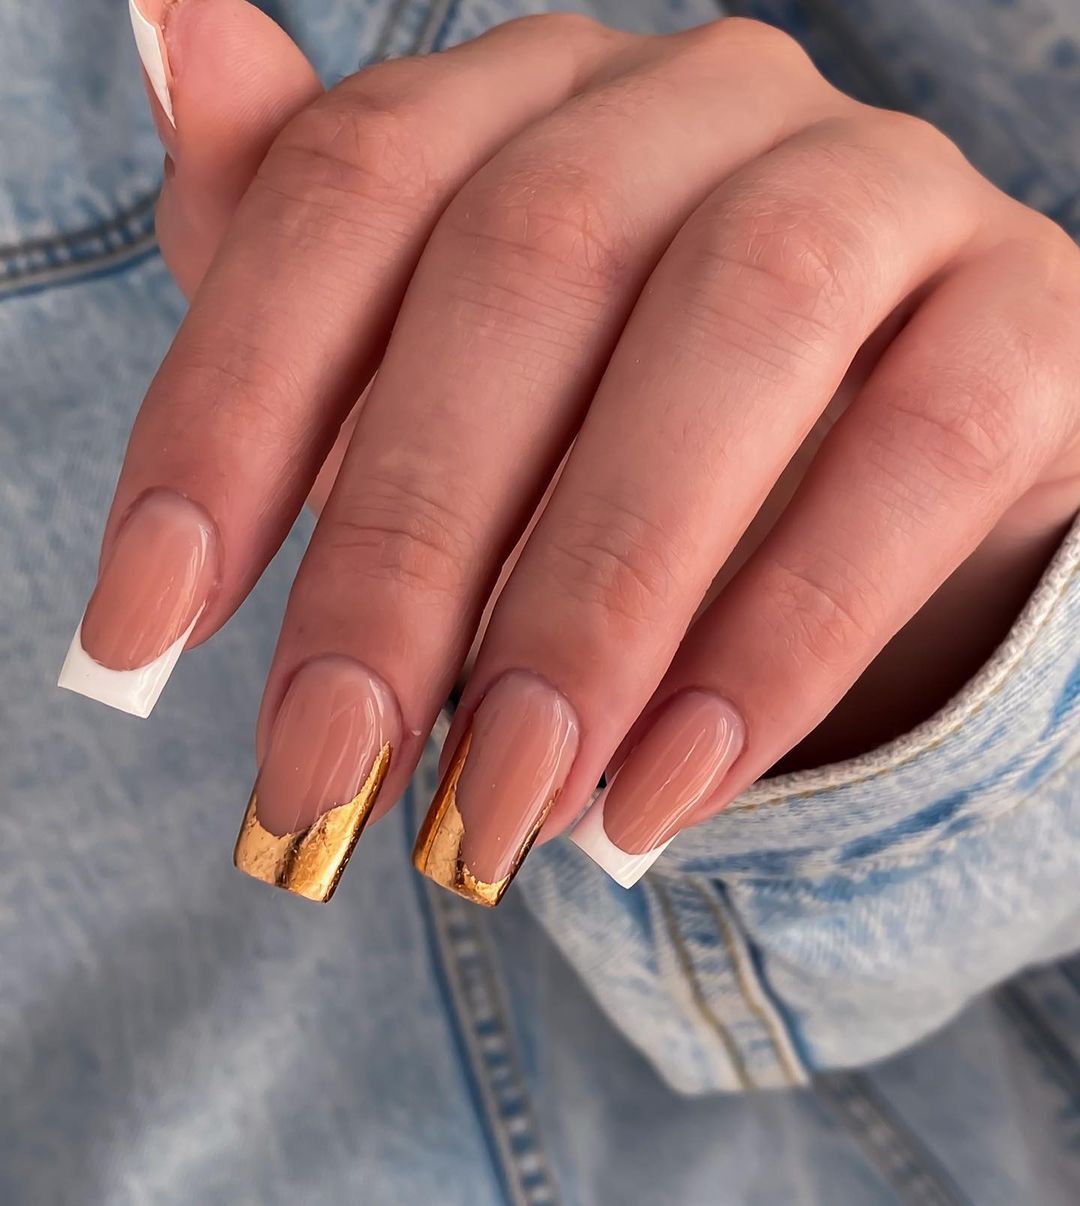
Professional Viewpoint
This long nail design features crisp French tips accented with bold gold foil, striking a balance between elegance and edginess. It’s a powerful statement for those who prefer their style with a side of unique modernity.
Consumables Needed
- Nude polish: ‘Bare With Me’ by Essie
- Gold leaf or high-shine gold foil
- Clear adhesive for foil application
- Topcoat: ‘Ultra Glossy Seal’ by ILNP
My Recommendation: Apply the gold foil in angular, geometric shapes to add sharp, reflective contrasts.
DIY Steps
- Paint a smooth nude base and let it dry thoroughly.
- Cut the gold foil into desired geometric shapes.
- Use a clear adhesive to place the gold foil on the nail tips.
- Finish with a layer of topcoat to secure the foil and add a lustrous shine.
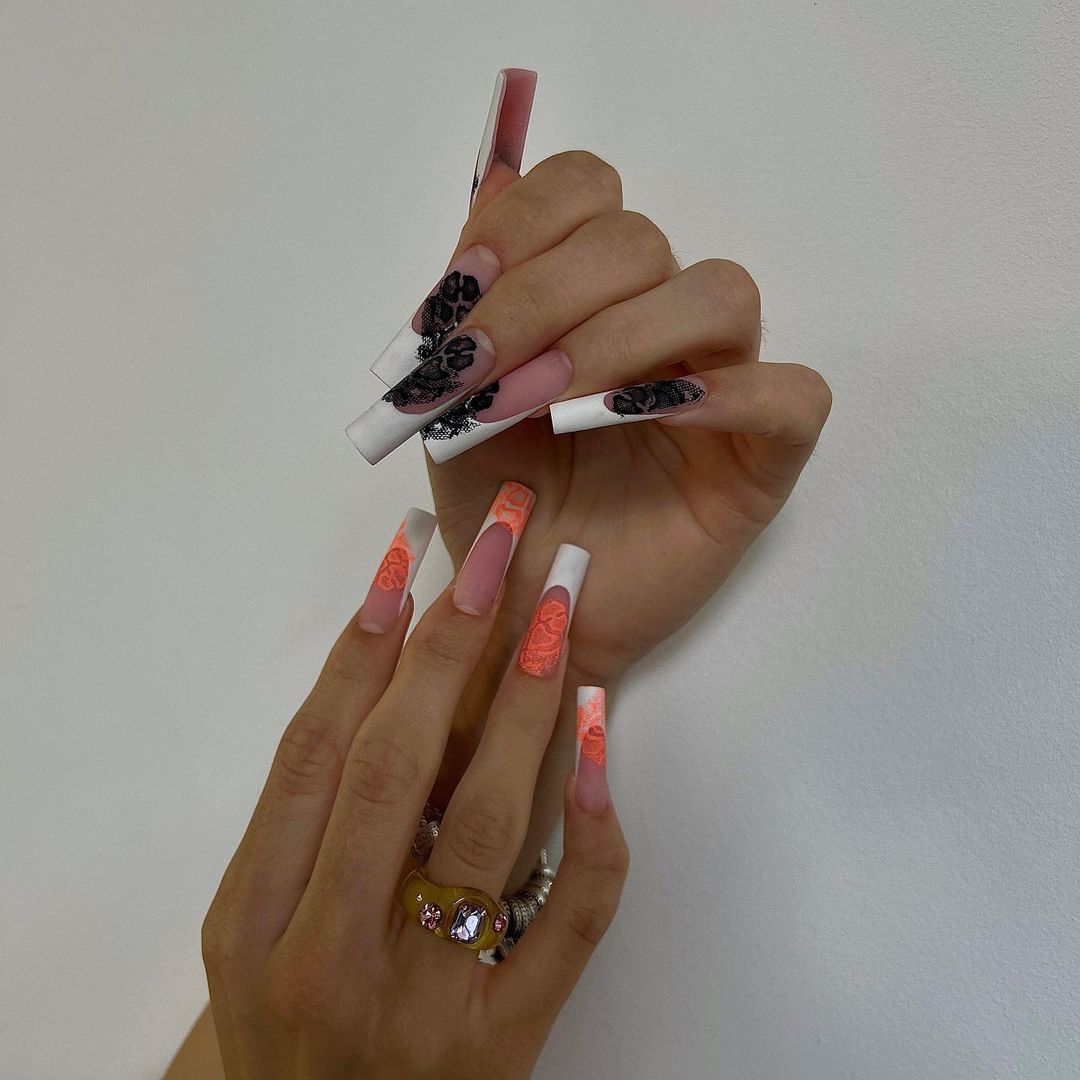
Fishnet Elegance
For those who command attention subtly, these nails blend French tips with a touch of textured allure.
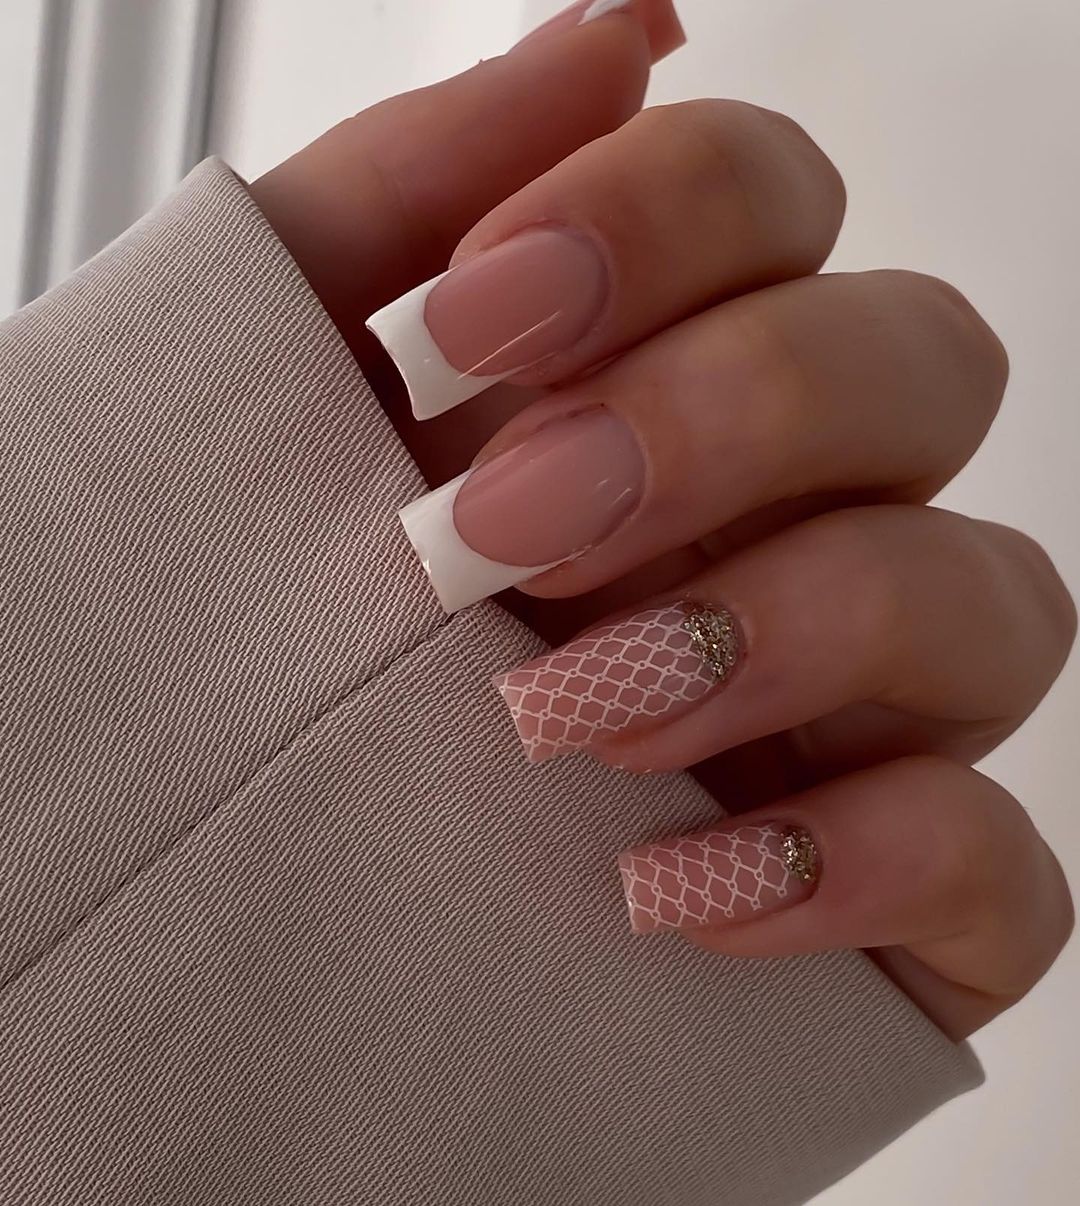
Professional Viewpoint
The classic French manicure is reinvented with an overlay of fishnet designs on select fingers. It’s a nod to unique textures and patterns, adding a funky yet sophisticated twist to a timeless look.
Consumables Needed
- Sheer pink polish: ‘Baby’s Breath’ by OPI
- Fishnet nail stencils or decals
- White polish for fishnet effect: ‘White On Time’ by Sally Hansen
- Topcoat: ‘Diamond Flash’ by Maybelline
My Recommendation: Use fishnet stencils for a precise and uniform pattern over the French tips.
DIY Steps
- Begin with a sheer pink base to enhance the natural nail color.
- Position the fishnet stencil over the tip and apply white polish.
- Carefully remove the stencil before the polish dries.
- Apply a fast-drying topcoat to protect the design and add shine.
Artistic Bliss
Invoking the sweetness of summer, these nails are a canvas for delicate fruit-inspired art, ideal for the whimsical at heart.

Professional Viewpoint
French tips get a refreshing summer update with hand-painted blueberries and tiny dots. This design captures the essence of a summer picnic, complete with a dose of artistic charm and country-chic vibes.
Consumables Needed
- White polish for the base: ‘Private Weekend’ by Essie
- Acrylic paints for the blueberry art
- Dotting tools for precision
- Topcoat: ‘Speed Setter’ by Essie
My Recommendation: Practice the blueberry designs on a flat surface before taking the brush to the nail for confidence in your strokes.
DIY Steps
- Apply a white polish to mimic the creamy backdrop of a summer sky.
- Paint on blueberries and accent dots using a fine brush and dotting tools.
- Once the art dries, seal it with a topcoat for a long-lasting, glossy manicure.
Sparkling Confetti and Pearls
These nails offer the perfect blend of subtlety and celebration, ideal for anyone who adores a touch of sparkle.
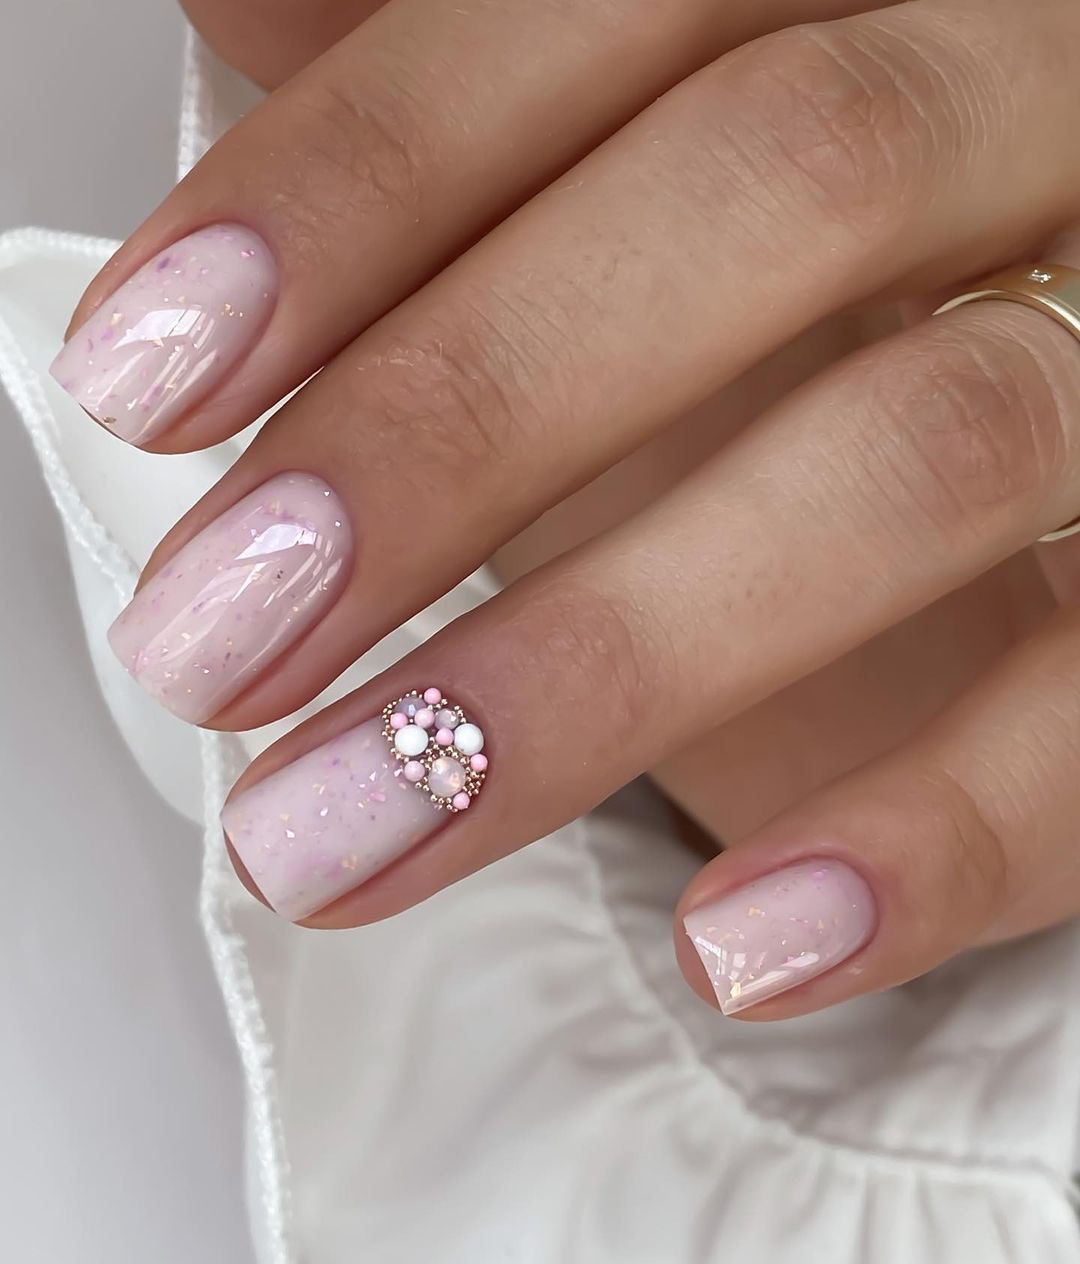
Professional Viewpoint
Adorned with delicate pearl clusters and flecks of glitter that catch the light like confetti, this design is reminiscent of a festive soirée. The sheer pink base keeps the overall look refined, making it a unique choice for both daytime charm and evening elegance.
Consumables Needed
- Sheer pink polish: ‘Romantique’ by CND
- Glitter topcoat for a confetti effect
- Small pearls and a gem applicator tool
- Nail adhesive for a secure pearl application
- Topcoat: ‘Hard As Nails’ by Sally Hansen for a durable finish
My Recommendation: Arrange the pearls carefully to create a symmetrical design that complements the natural curvature of the nail.
DIY Steps
- Apply a coat of sheer pink polish for a barely-there blush tint.
- Add a layer of glitter topcoat for that sparkling confetti look.
- Use a gem applicator to carefully place pearls in a cluster or pattern.
- Secure the design with a topcoat, taking care not to dislodge the pearls.
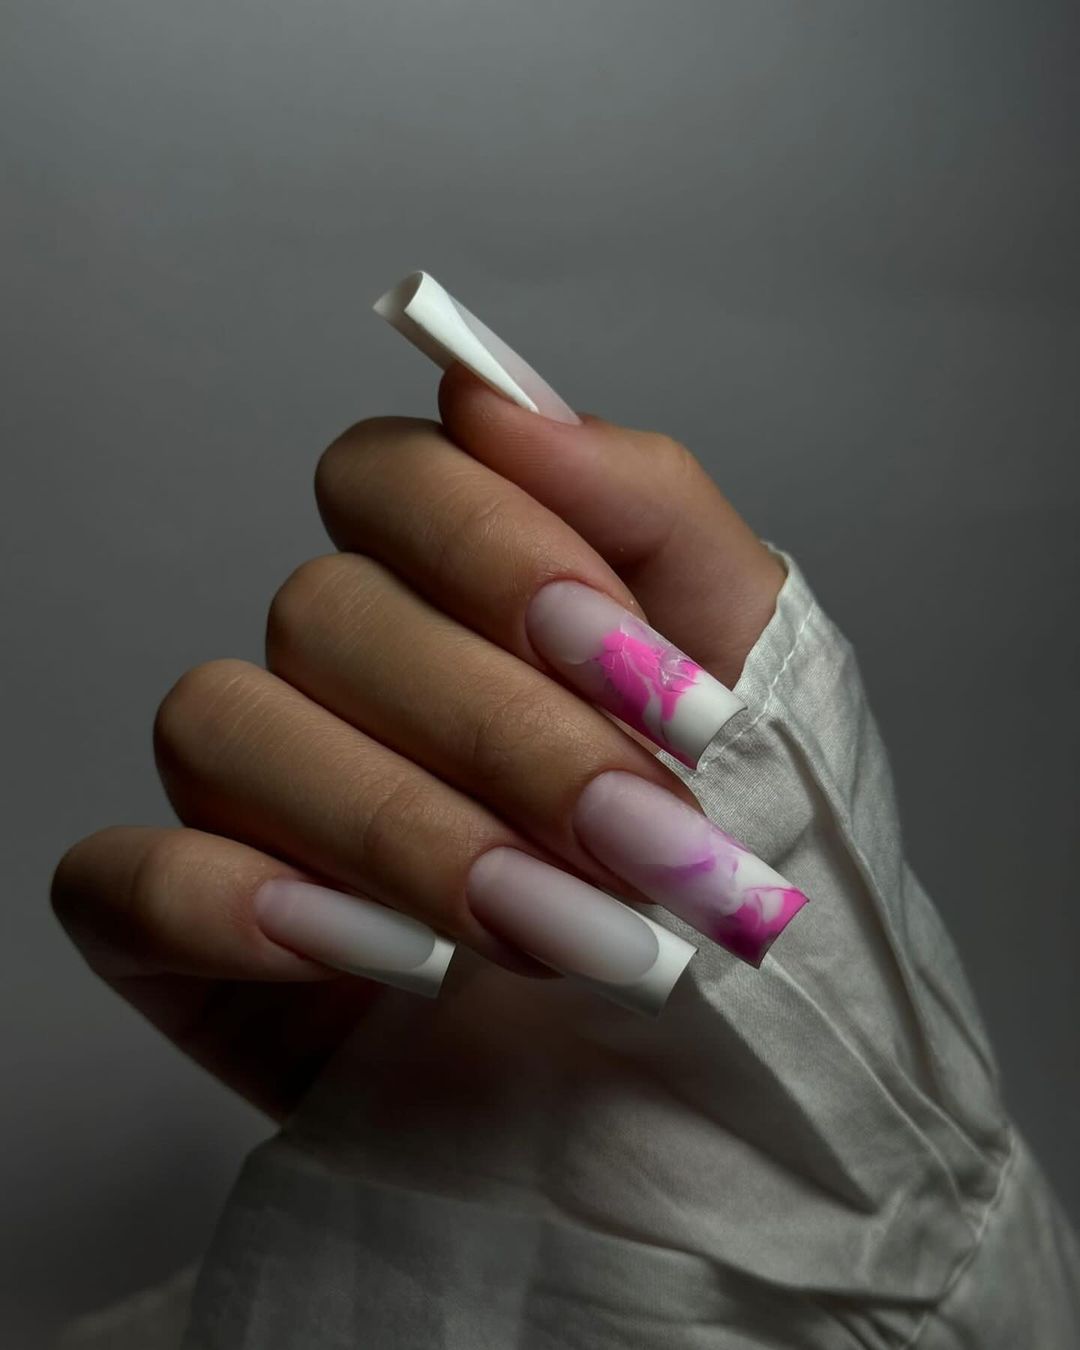
Fluid Pink Marble
Immerse yourself in the mesmerizing swirls of pink marble, crafted for those who love to make an artistic statement.
Professional Viewpoint
Long nails become a canvas for fluid art, featuring wisps of pink that ebb and flow like ink in water. The white backdrop accentuates the vibrant pink, giving this French manicure a twist that’s both funky and sophisticated.
Consumables Needed
- White polish for the base: ‘White Hot’ by Orly
- Pink polish for marbling: ‘Fuschia Power’ by China Glaze
- Detailing brush or a needle for marbling technique
- Topcoat: ‘Glossy Seal’ by JINsoon for a high-gloss finish
My Recommendation: Drag and swirl the pink polish while still wet to achieve a natural, marbled effect.
DIY Steps
- Paint a white base and wait until it’s almost dry.
- Add drops of pink polish and use the brush or needle to marble the colors.
- Finish with a layer of topcoat to add shine and protect the marble design.
Lace Accents on Classic French
These nails are a nod to timeless grace, featuring a classic French tip complemented by intricate lace detailing.
Professional Viewpoint
Subtly detailed with lace patterns, these long nails capture the romance and delicacy of vintage fabric. The French manicure base provides a neutral stage for the detailed work, making it suitable for brides or anyone wishing to add a touch of vintage charm to their ensemble.
Consumables Needed
- Sheer pink polish: ‘Ballet Slippers’ by Essie
- White polish for lace detail: ‘White On Time’ by Sally Hansen
- Detailing brush for fine lacework
- Topcoat: ‘RapiDry’ by OPI
My Recommendation: Practice the lace patterns on paper first to ensure your hand is steady for the intricate design.
DIY Steps
- Apply the sheer pink base coat, followed by the white for the tips.
- Once dry, use a fine brush to hand-paint the lace details onto one or two accent nails.
- Complete the look with a topcoat for a lasting, flawless finish.
Sunset Flow
This nail design encapsulates the fluid beauty of a sunset with a sleek, modern interpretation.
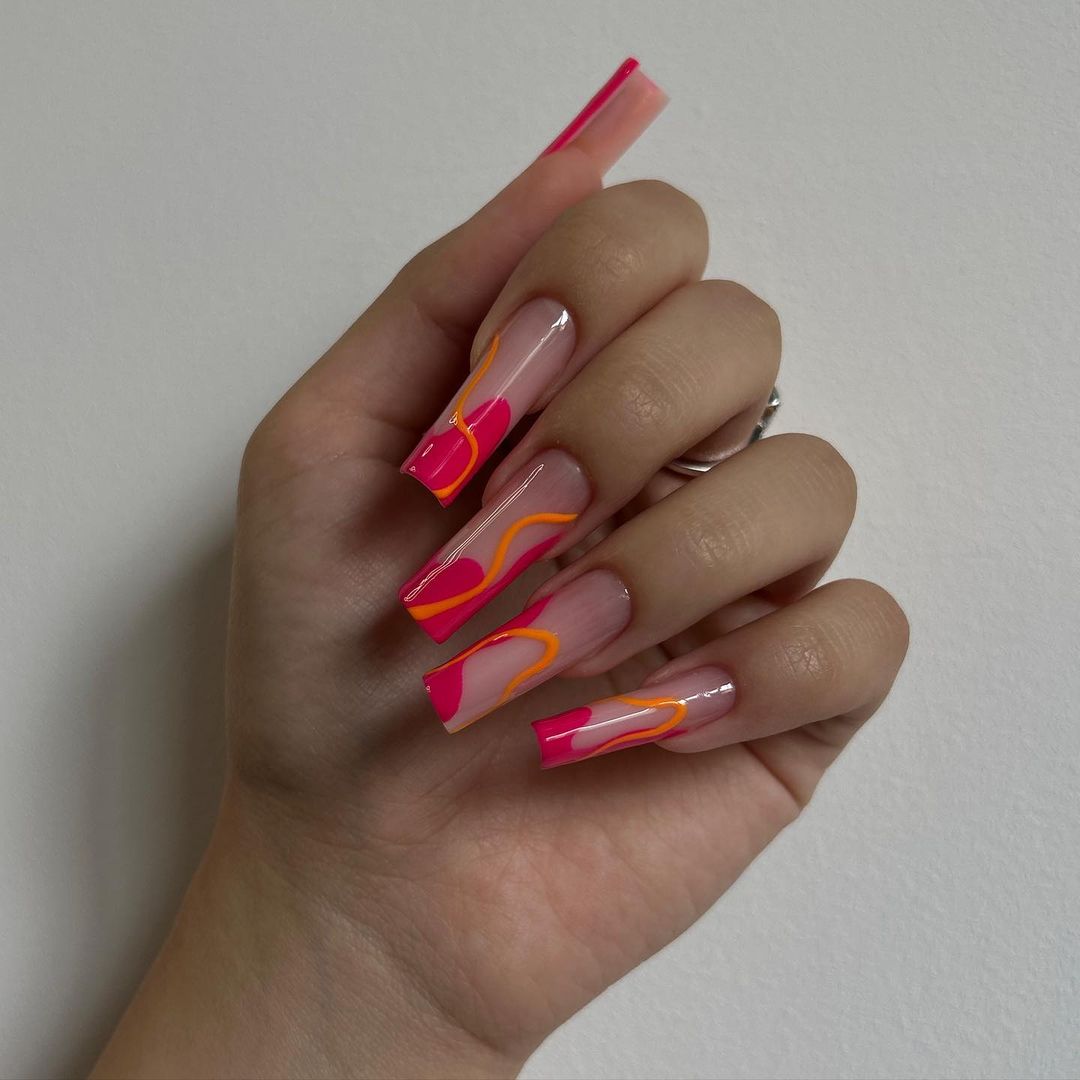
Professional Viewpoint
The long and clean silhouettes of these nails provide the perfect backdrop for the flowing hues of pink and orange, mimicking the mesmerizing colors of a sunset. It’s an artful representation that’s both striking and trendy 2024, sure to captivate onlookers with its smooth transitions and bold color choices.
Consumables Needed
- A neutral base polish
- Pink and orange polishes for the gradient
- A thin brush for detail work or a sponge for gradient effect
- A glossy topcoat for a seamless finish
DIY Steps
- Apply a neutral base and allow it to dry fully.
- Use a sponge to dab on the pink and orange polishes, blending where they meet to create a smooth gradient reminiscent of a sunset.
- Clean up any excess polish from the skin around the nails.
- Seal the design with a glossy topcoat for added shine and protection.
Floral Encapsulation
An elegant take on the French manicure that incorporates natural beauty within a stylish framework.
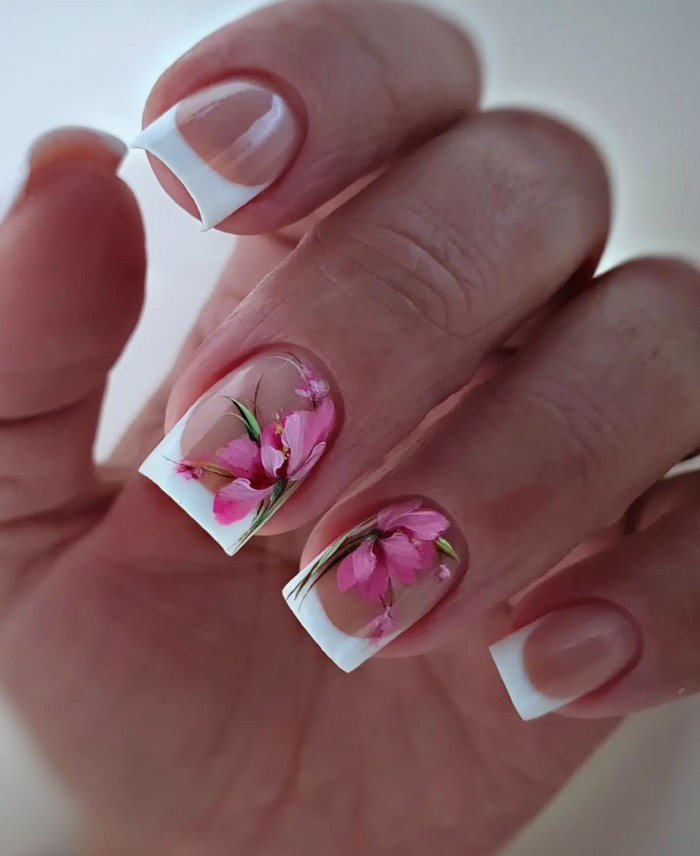
Professional Viewpoint
The transparency of the nail tips serves as a window into a miniature world of pink flowers, encased as if suspended in time. It’s a delicate and romantic approach that brings a botanical twist to the classic French manicure, ideal for those who appreciate the allure of nature’s intricate designs.
Consumables Needed
- A clear polish for the encapsulation
- Real dried flowers or high-quality decals
- White polish for the tips
- A topcoat to preserve the floral detail and enhance the French tips’ brightness
DIY Steps
- Apply a clear polish as a base to mimic the natural nail.
- Carefully place the dried flowers or decals on the tips.
- Use white polish to create a clean French tip above the floral design.
- Finish with a topcoat, ensuring the flowers are fully encapsulated and the tips are crisp.
By bringing these square summer nail inspo colors & designs to life, you’re not only keeping up with the latest trends but also adding your personal touch to each creation. Whether you prefer a bold pop art statement or a tranquil tropical scene, there’s a nail design here to suit your summer mood. And with a bit of practice, these ideas can go from your inspiration board to your fingertips. Now, go ahead and give your nails the summer makeover they deserve!
Save Pin