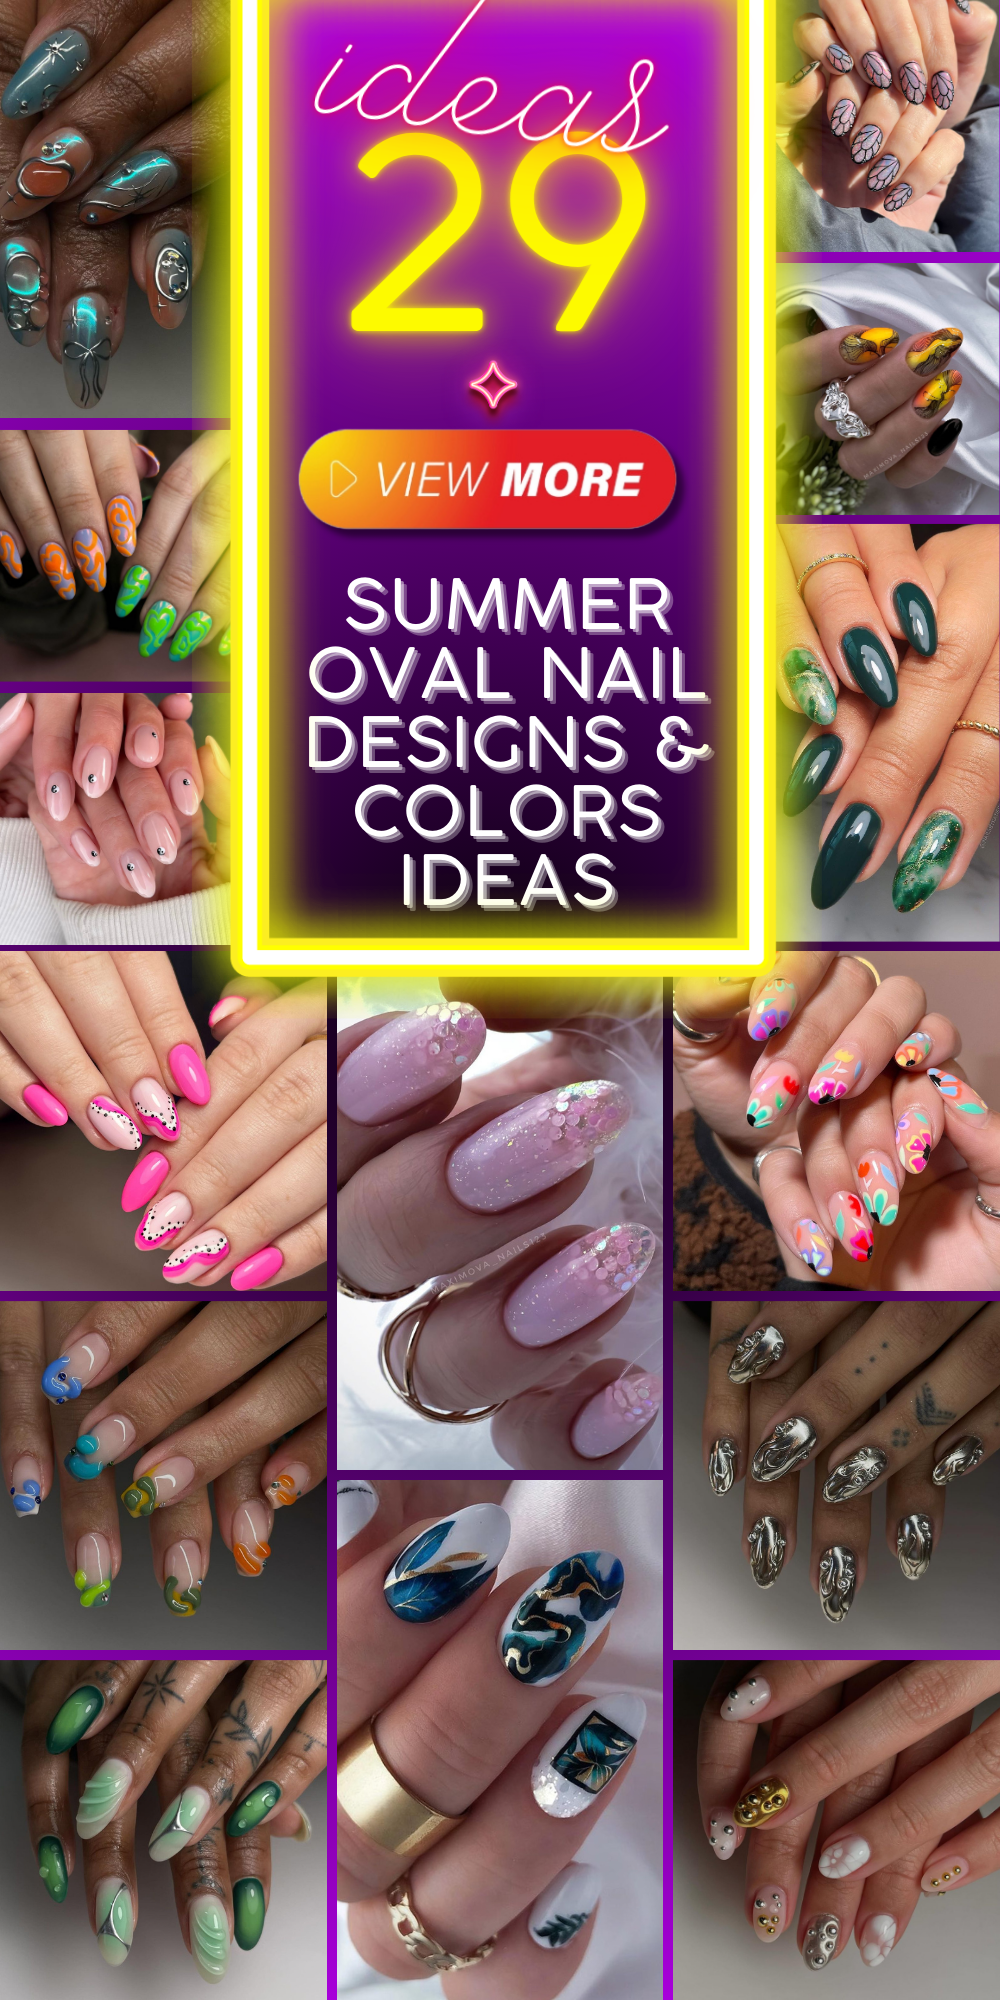
When the temperature rises and beach calls, it’s time to wear your flip-flops. But wait, aren’t we forgetting that one thing which is a must for summer? Yes! Your nails! However, what can make your hands look stand out in summer while holding an ice-cold lemonade? Let us take a look at some hot designs that are suitable for the summer season.
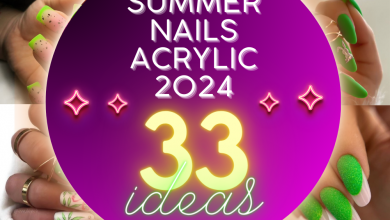
Electric Blue Elegance
These nails are oval in shape and offer a classic background for the audacious blue polish. Its breathtaking colour is the same as a clear summer’s sky or deep ocean, hence appropriate to spend at beach or pool parties. The high gloss finish makes them unique and sophisticated options for those who want to create an impression this summer.
- Foundation: OPI Natural Nail Base Coat
- Polish: Essie Butler Please
- Finishing coat: Seche Vite Dry Fast Top Coat
The reason behind choosing these products is that they have long lasting attributes and possess deep color tones that make your manicure last throughout all the summer adventures.
Start by cleaning your nails and trimming them with a nail file. Apply base coat for nail protection and smooth surface. After it dries, apply two coats of Essie’s Butler Please, giving each layer enough time to dry completely. Finally, cover your nails with top coat to give them shiny look and protect them from damage! Voilà! Your summer ready nails are ready
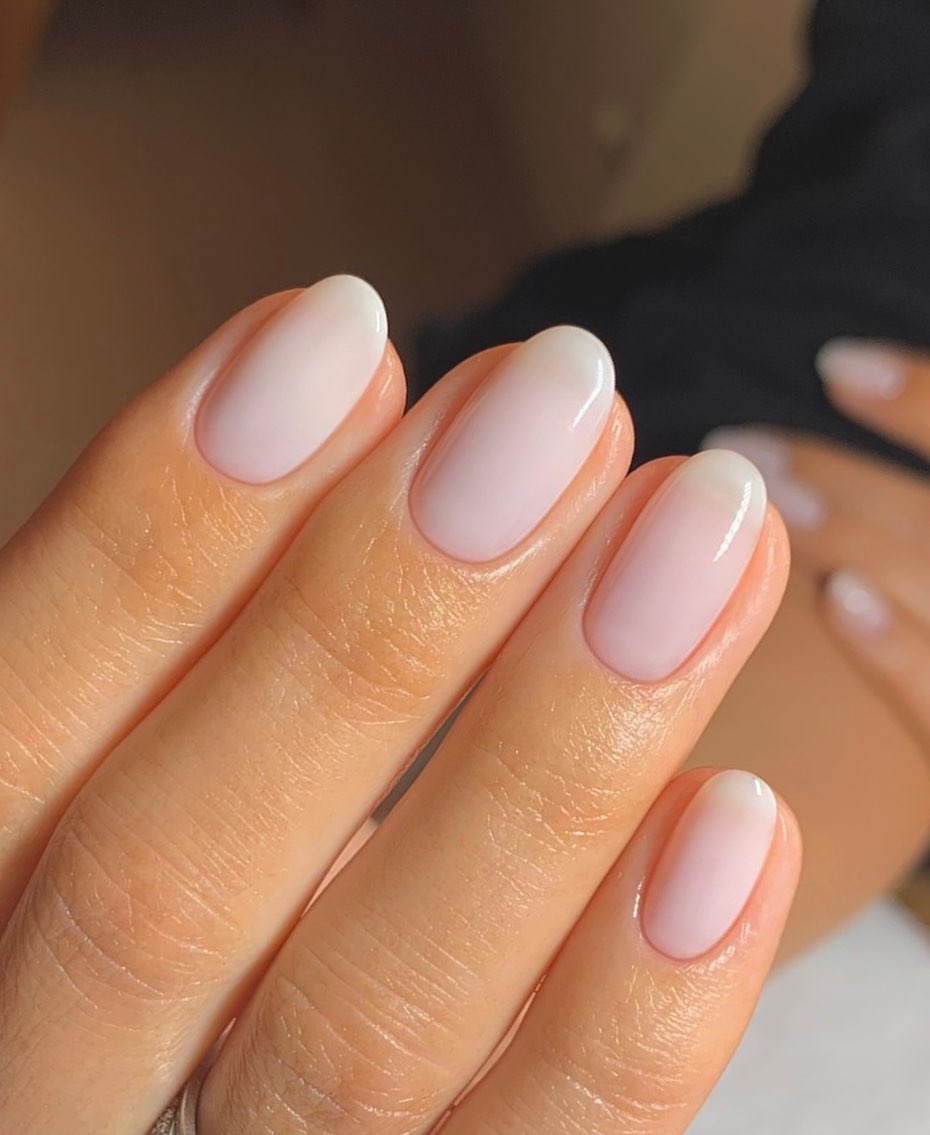
Subtle Pink Sophistication
This nail design is the ultimate in unobtrusive sophistication. The light pink shade blends very well with a neutral palette, which makes it suitable for any summer dress. It is simply pretty and demonstrates the saying “less is more”. The oval shape gives it a feminine touch that is both contemporary and timeless.
- Base Coat: CND Sticky Base Coat
- Polish: OPI Bubble Bath
- Top Coat: Sally Hansen Insta-Dri Anti Chip Top Coat
This mix will give you a matte finish that will have just enough shine to last through summer nights out or casual brunches with your friends.
To make sure that your manicure lasts long, use base coat on your nails first. Apply two thin coats of OPI Bubble Bath for even coverage without streaks. Finally, seal it with a top coat for glossy sheen until next time you do another manicure. Just take your time, lest you mess up everything by smudging them!
Neon Orange Flair
The transition from a gentle peach to a blazing neon orange closely simulates the impressive sundown of summer. The ombre effect is playful but elegant and can serve as an amazing talking point in any summer party. This glossiness gives it a juicy look, one that resembles the ripe fruit ready to be devoured on a hot summer day.
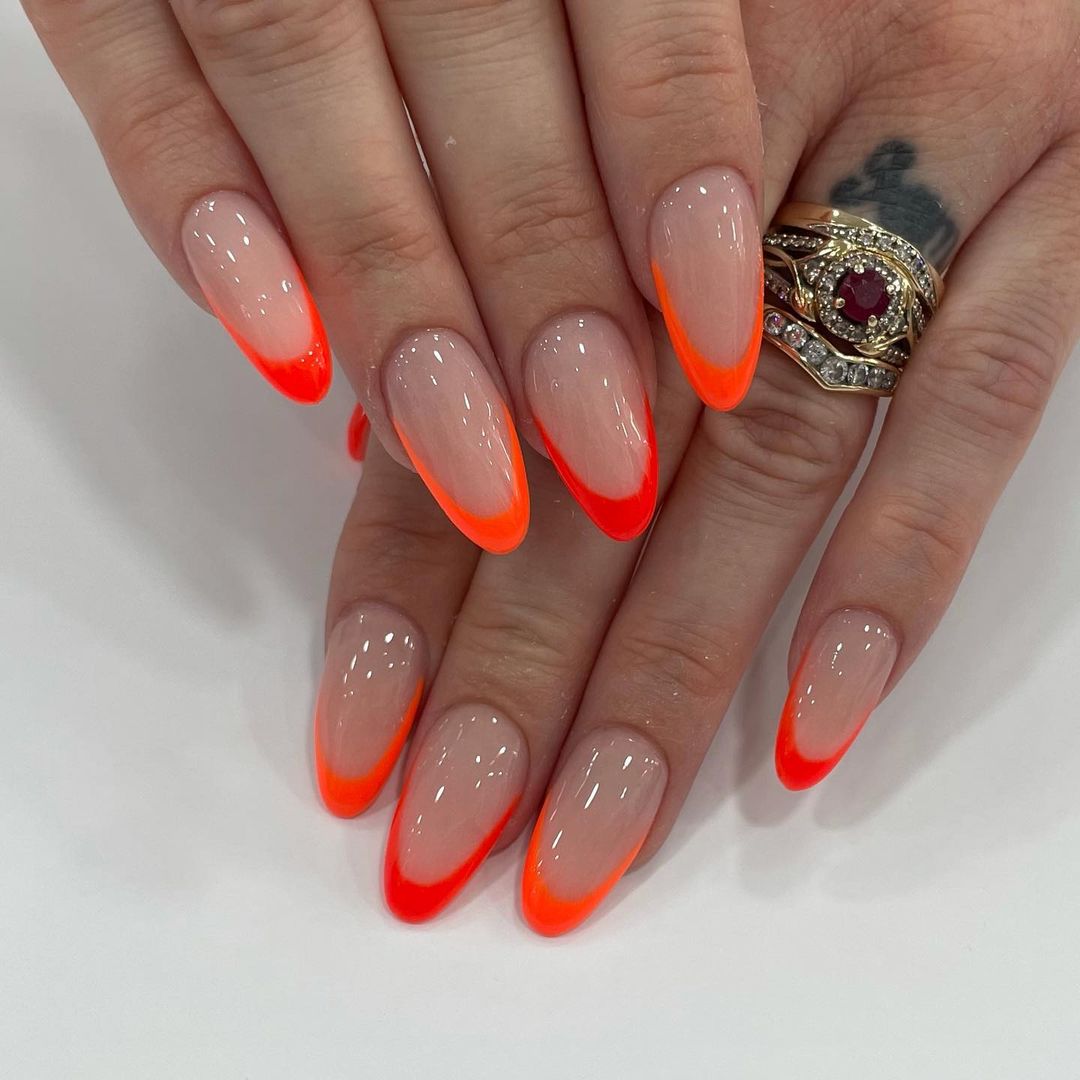
- Base Coat: Orly Bonder Rubberized Basecoat
- Polish: China Glaze Flip Flop Fantasy & Orly White Tips
- Top Coat: Essie Gel Setter Top Coat
The gel setter top coat gives the durability of a gel with the ease of use like any other normal polish.
Start with the white nail polish under your other colors to make them “pop.” When dry, sponge on bright orange mixed with just enough white for gradient effect. Finish off by applying generous amount of top coat for that perfect summer shine.
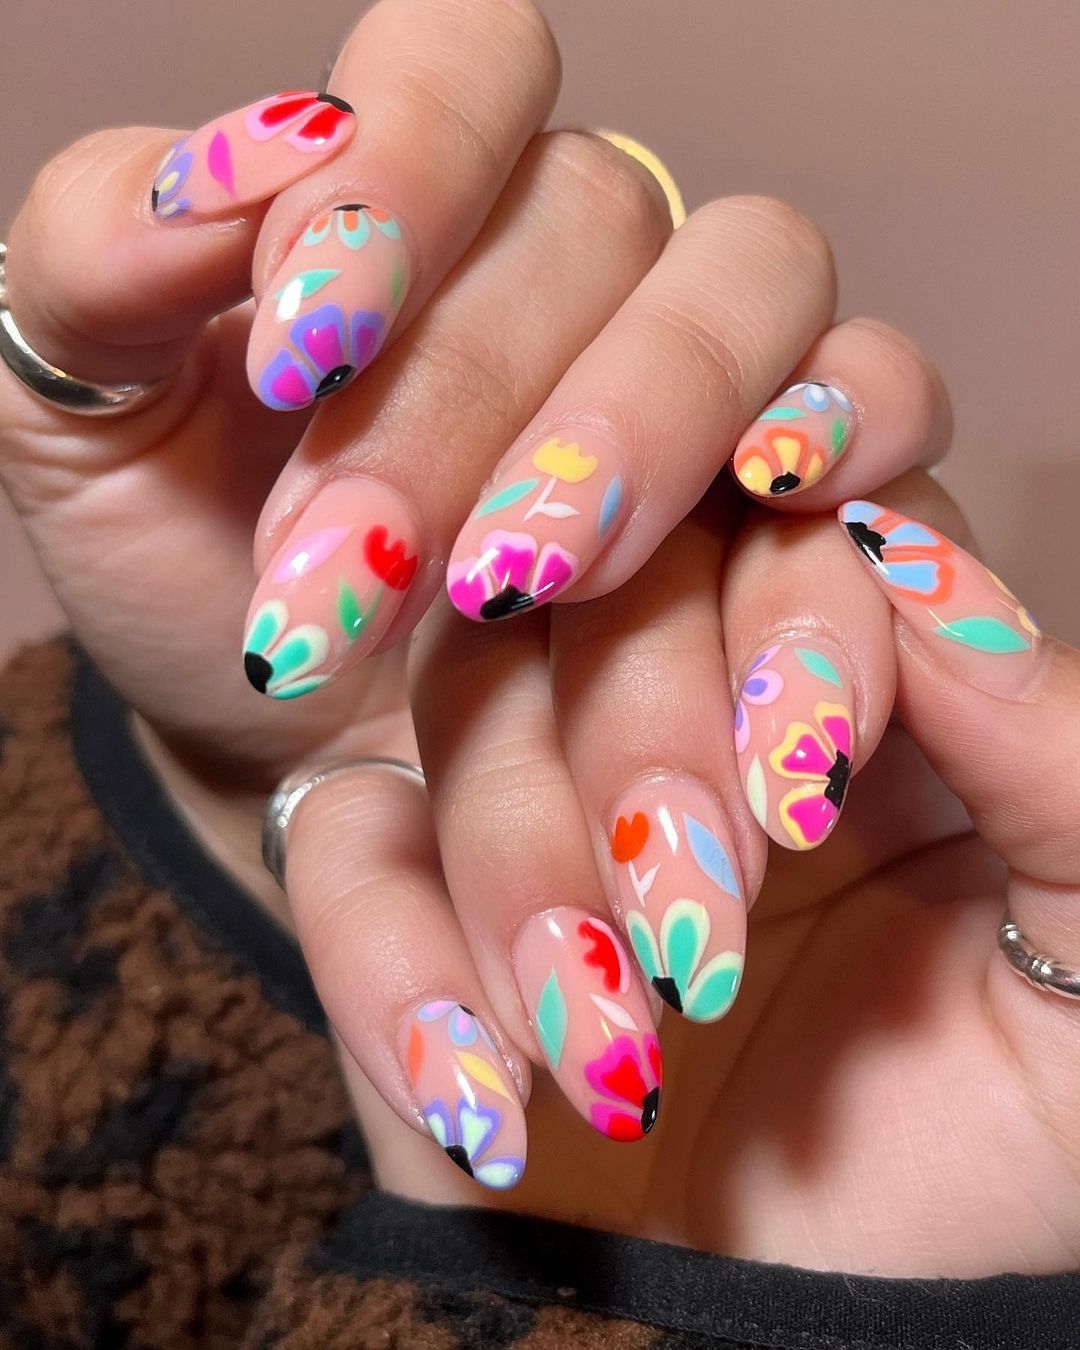
Artistic Multi-Design Medley
A variety of designs have been used to display a vibrant and diversified approach towards nail art which perfectly captures the essence of a playful summer. Starting from bright green with specks to creative wave patterns and pink with minimal artistic detail, all the nails are one piece each that creates a three-dimensional, fun set of manicure when put together.
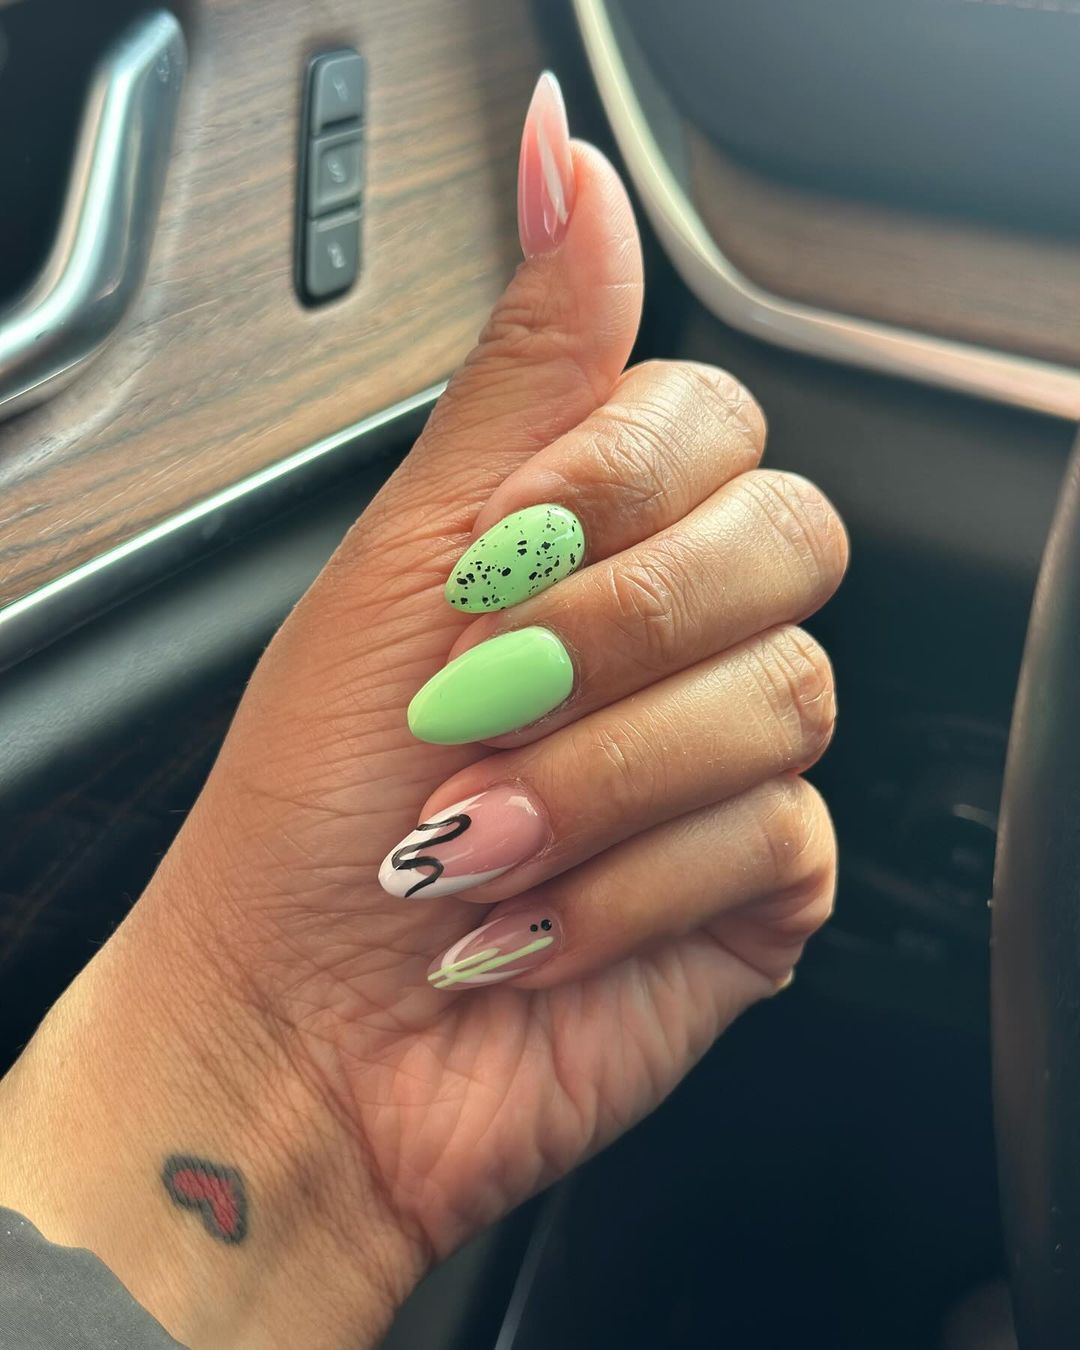
- Essie Here To Stay Base Coat: Base coat
- OPI Gargantuan Green Grape: Green polish
- Sally Hansen Big Matte Top Coat with OPI Black Onyx dots: Black speckle top coat
- OPI Pink-ing Of You: Pink polish
- Fine-tip brushes and dotting tools: Detailing tools
The selected polishes give colorful shades, while the topcoat and the detailing tools help in creating this look with accuracy.
Apply base coat before painting each nail in specific color. For speckled nail take a thin brush and apply some black enamel gently. Use thin brush for waves and detailed art or use something else to make circles. Finish off by using your preferred glossy or matte coating.
Save Pin

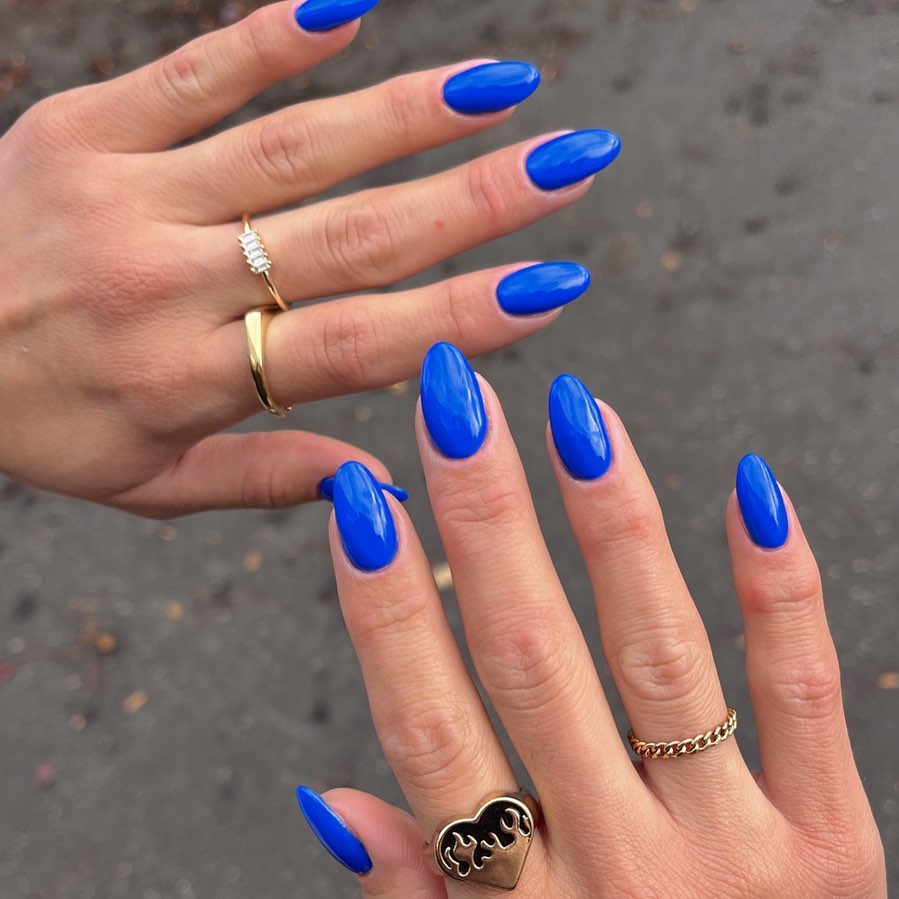
Classic French Fade
Here, the white tips of a French manicure melt into the natural pink base. This design is not difficult but it looks so nice, ideal for both a casual summer day and going out to dinner on fancy occasions. This shine increases the neutral tone of the design, making it look classier and more elegant.
- Base Coat: Deborah Lippmann All About That Base
- White Polish: China Glaze White on White
- Pink Polish: OPI Bubble Bath
- Top Coat: INM Out The Door Top Coat
The products make a perfect combination for creating an easy blend that has a high-gloss finish and dries quickly.
Apply the base coat followed by pink polish thinly. Using sponge dab on the tips with white polish gently blending it into pink for ombre effect. Finish with top coat for smooth shiny surface.
Lavender Luxe with Gold Accents
This design takes summer oval nail designs & colors ideas to a completely new level. The lavender base is calming, and looks great on neutral skin, with gold highlights giving it a luxurious touch. It strikes the right balance between understatement and glamor for the summer.
- ORLY Bonder Base Coat
- Essie Go Ginza – Lavender Polish
- Kiss Gold Stripe Nail Art – Gold Stripe Stickers
China Glaze No Chip Top Coat – Top Coat This combination ensures that your pastel base and gold accents remain intact whether you are going to the beach or enjoying a summer night out with friends.
Two coats of the lavender polish should be applied after applying a base coat. When dry, place gold stripe stickers onto nails or use a thin brush to apply gold polish if desired. To ensure long lasting glossy finish; apply top coat as directed above to seal in design.
Deep Plum Brilliance
The rich, dark plum shade is associated with sophistication and mystery. A new twist on the traditional deep shade with a shiny finish that makes it modern and gives those who love daring colors a chance to express themselves. Worn in summer, this colour contrast beautifully with brighter hues and becomes a unique choice that stands out.
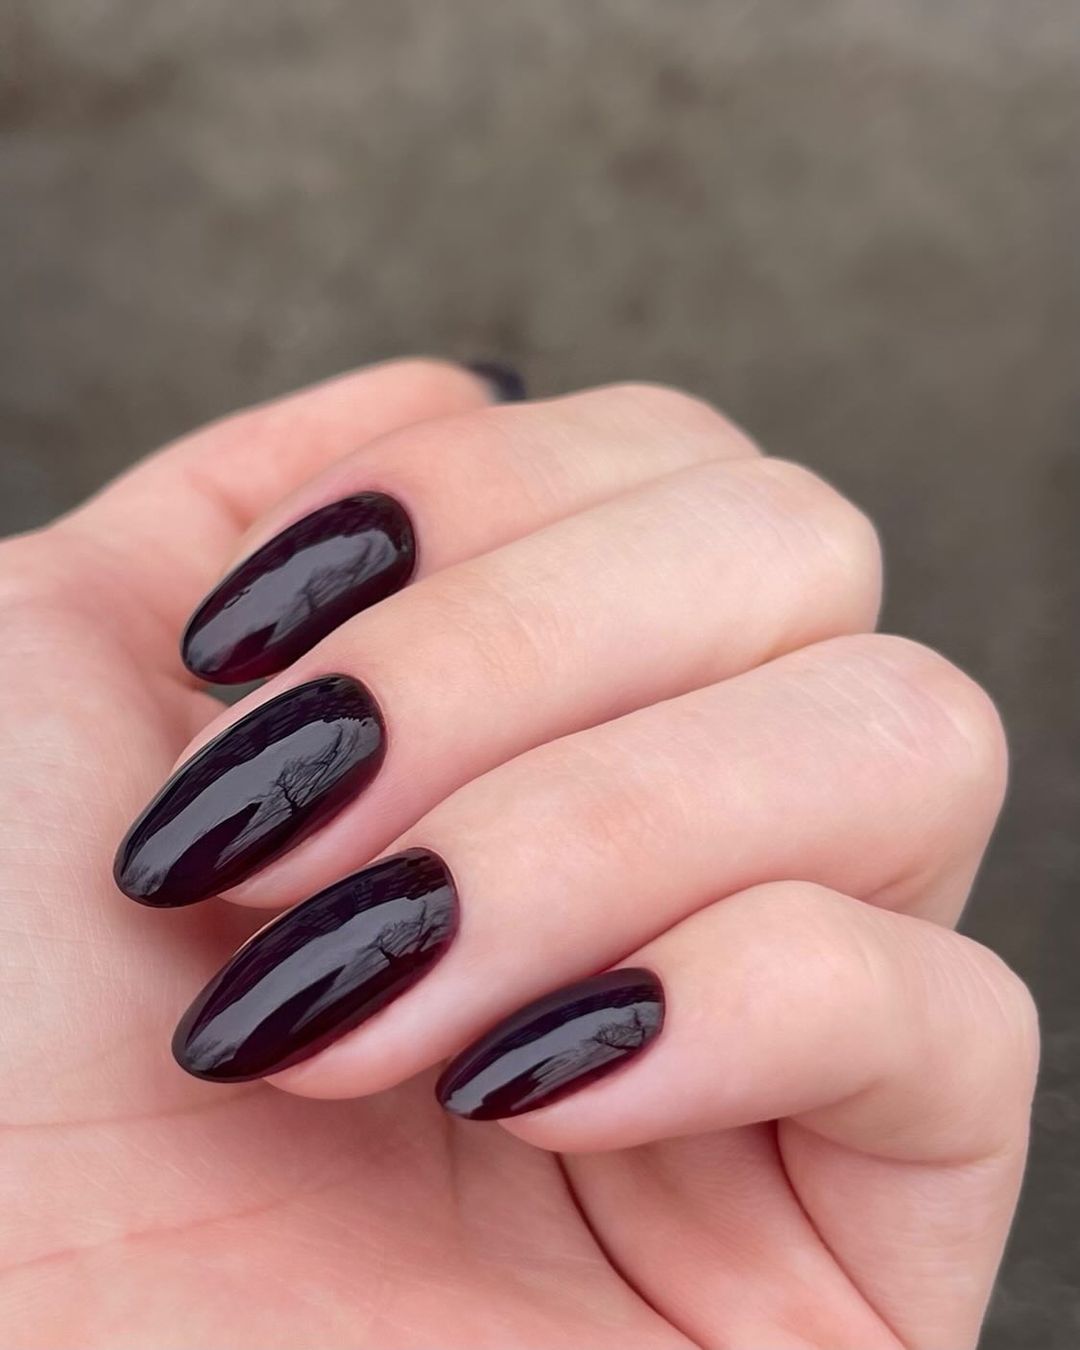
- Base coat: OPI Natural Nail Base Coat
- Plum Polish: Bahama mama by Essie
- Top coat: Sally Hansen Insta-Dri Top Coat
With this option, you do not have to worry about color fading as it will last throughout the hot summer months.
To safeguard your nails start with a solid base coat. Apply two coats of plum polish allowing them time to dry between each application. Finally, put on fast drying topcoat to create a strong glossy surface which is as durable as it is stunning.
Crisp White Charm
The white shade is calm but it’s also elegant. As a summer must-have, goes well with any colors of your hot weather clothes. The oval shape and its short length make the design practical to wear on a summer break—easy maintenance and always trendy.
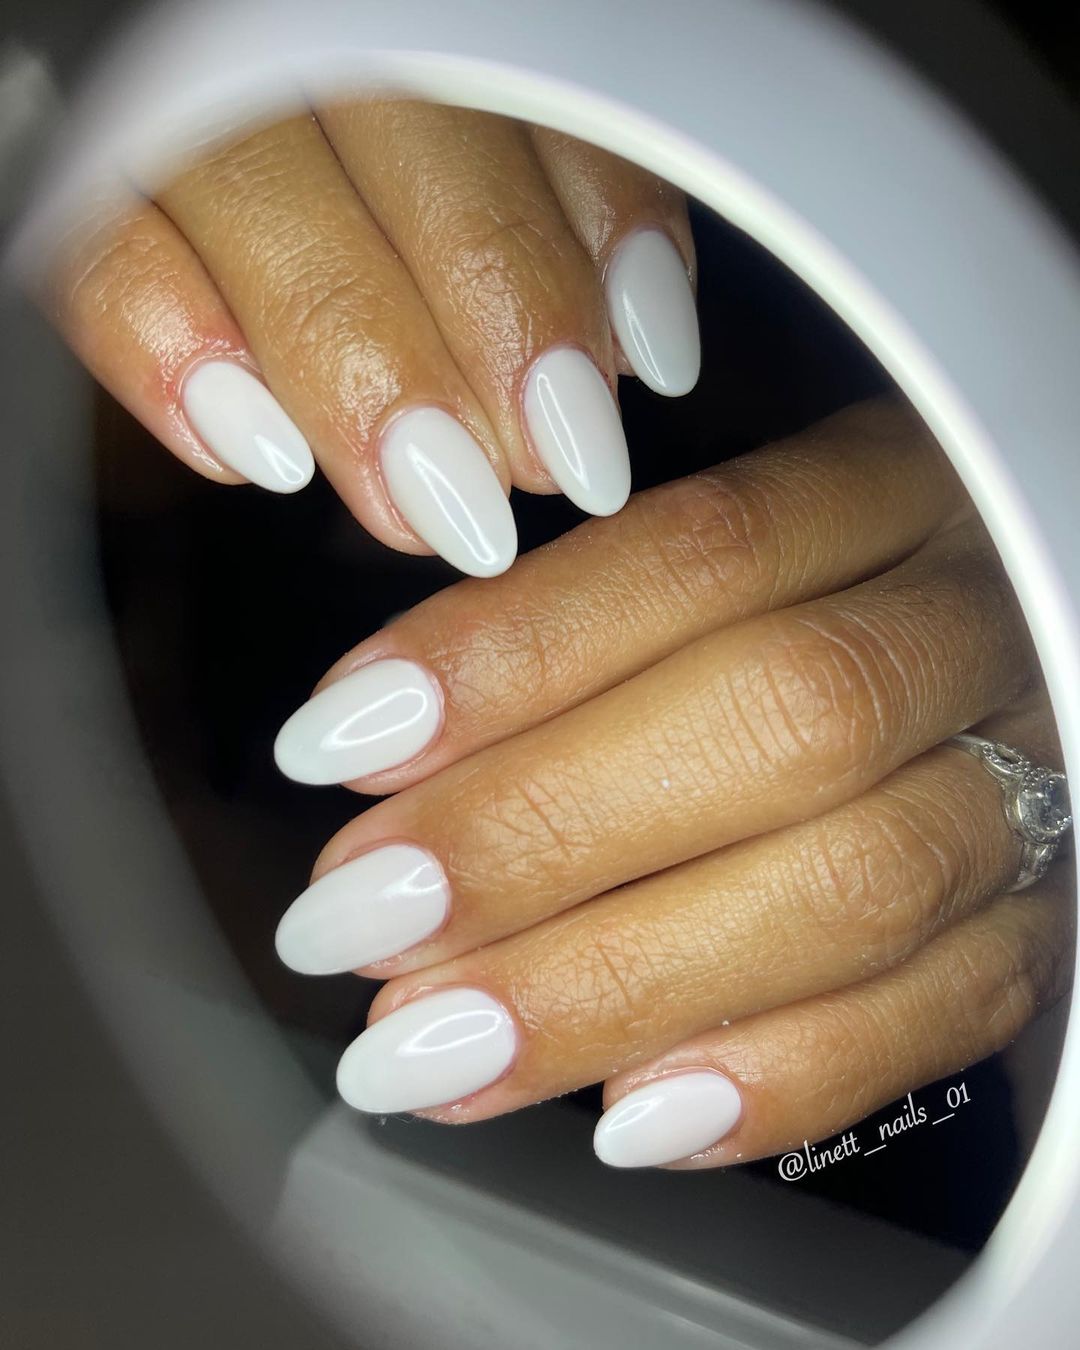
- Bottom Layer: Zoya Anchor Bottom Layer
- White Polish: OPI Alpine Snow
- Cover Coat: Essie Gel Setter Cover Coat
These products were selected based on their pure white color and durability, meaning that they will not chip off easily.
Start off by applying Zoya anchor base coat on clean, filed nails. Apply two coats of OPI Alpine Snow for an opaque white finish and once dry, seal it with Essie Gel Setter for a glossy yet tough look.
Romantic Rose Gold
For those who like to mix a bit of love into their style, this design is the best. The neutral nail color with rose gold leaf and a few tiny red gems is both exclusive, elegant and reflects the warm golden light at dusk on the beach. This is a choice that’s sophisticated yet simple and says it all in its quietness.
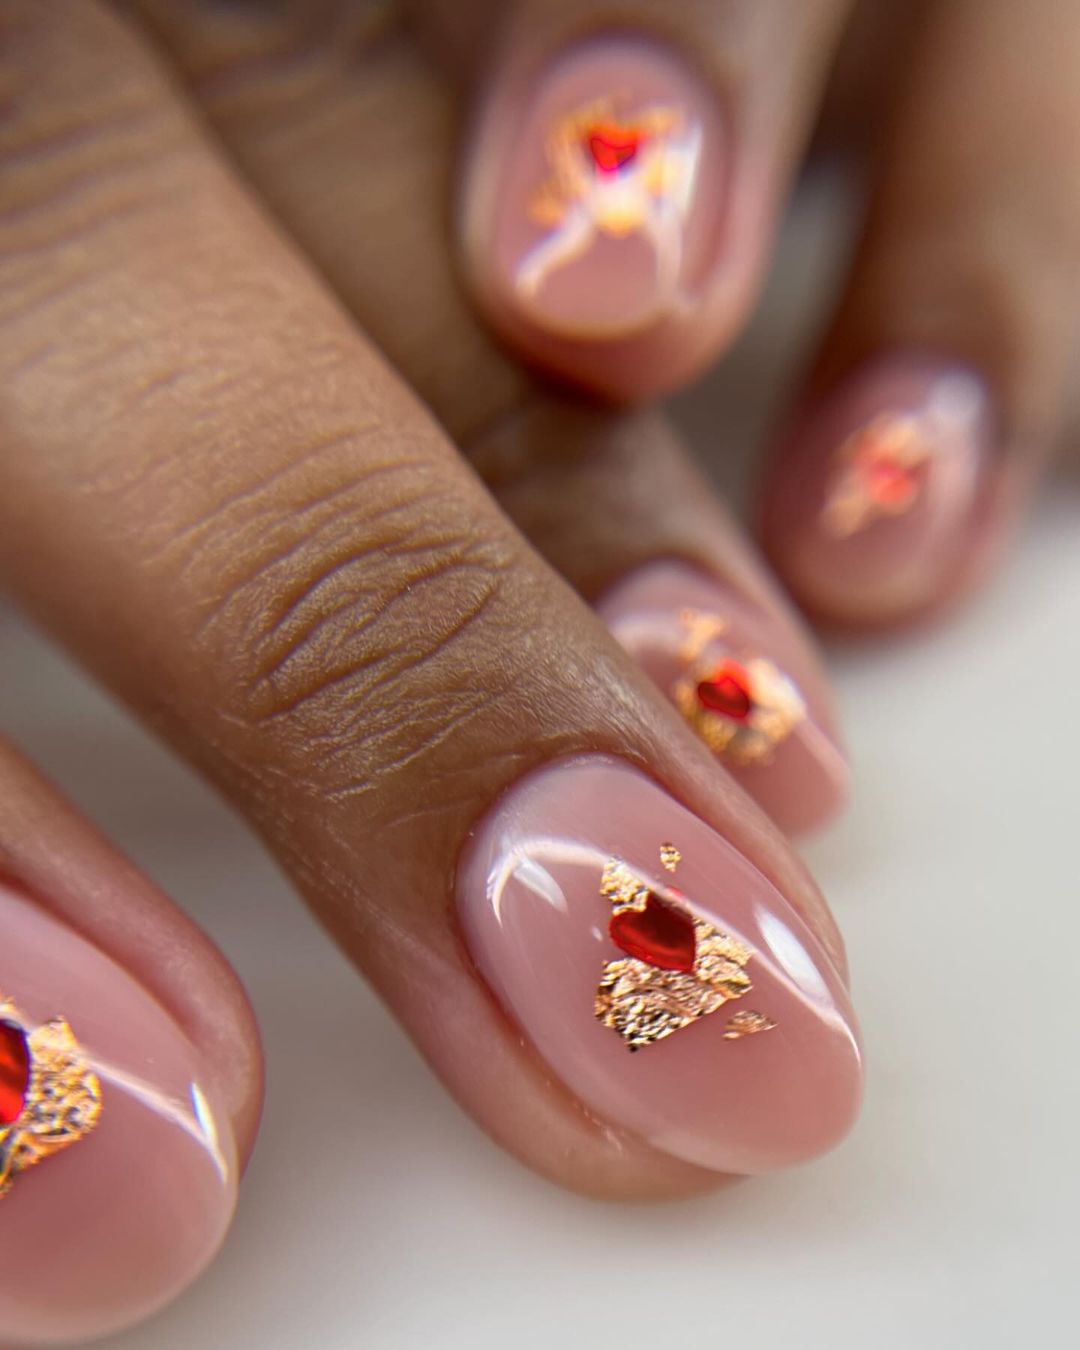
- Butter London Nail Foundation Priming Basecoat (Base Coat)
- OPI Samoan Sand (Nude Polish)
- Artisan Gilding Flakes (Rose Gold Leaf)
- Swarovski Tiny Gems (Red Rhinestones)
- CND Vinylux Weekly Top Coat (Top Coat)
Chosen for their excellent quality and staying power, these materials create a delicate nail design that’s just as tough as it looks.
Firstly apply your base coat for an even surface. Put on two thin coats of OPI Samoan Sand. When the second coat is still wet, put rhinestones and rose gold leaf flakes wherever you would like them to be. Finally add a top coat so that your decorations do not fall off easily but instead shine for long time.
Save Pin
Psychedelic Swirls
This design is a happy tribute to summer’s wildness; it includes the mix of purple and turquoise colors with a smooth black line surrounding it for definition and depth. It is an amazing choice for those people who like being unique and creative.
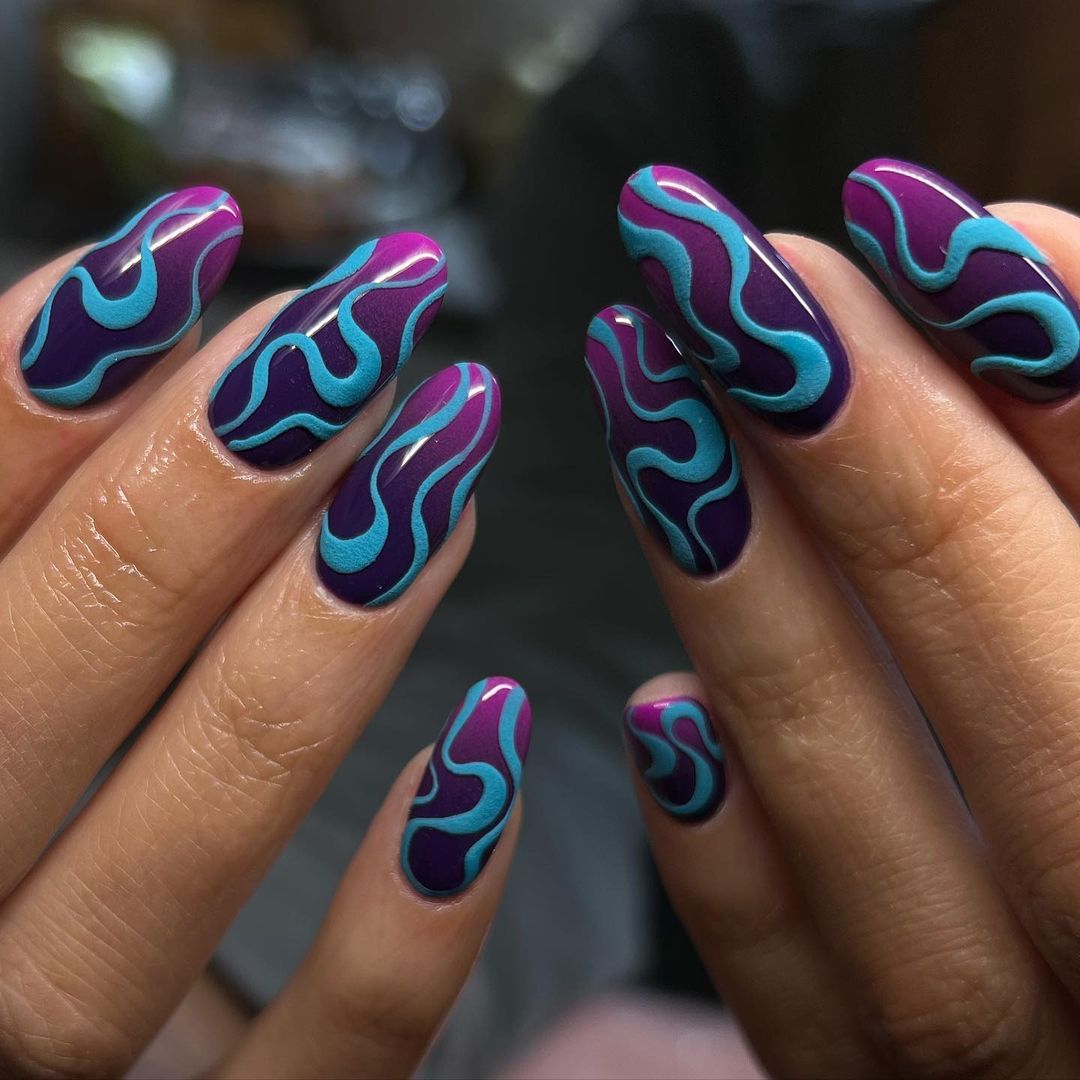
- Base Coat: ORLY Bonder Rubberized Base Coat
- Purple Polish: Zoya Charisma
- Turquoise Polish: China Glaze Too Yacht to Handle
- Black Detailing Polish: Sally Hansen Nail Art Pen in Black
- Top Coat: Glisten & Glow Top Coat
The colors are vibrant, staying longer during the summer season, which is why this aesthetics panel was arranged.
Use your base coat first before applying purple polish as your background. Once dry, apply swirling turquoise and carefully outline them using the nail art pen. Lock in your artwork with a top coat so that it lasts many days.
Groovy Tangerine Waves
Your nails will take on a retro feel with the combination of soft lavender and neon orange in a wave-like design. This kind of manicure is ideal for issuing statements and radiating summer vibes. It’s practical because it is short but also playful due to these bright colors.
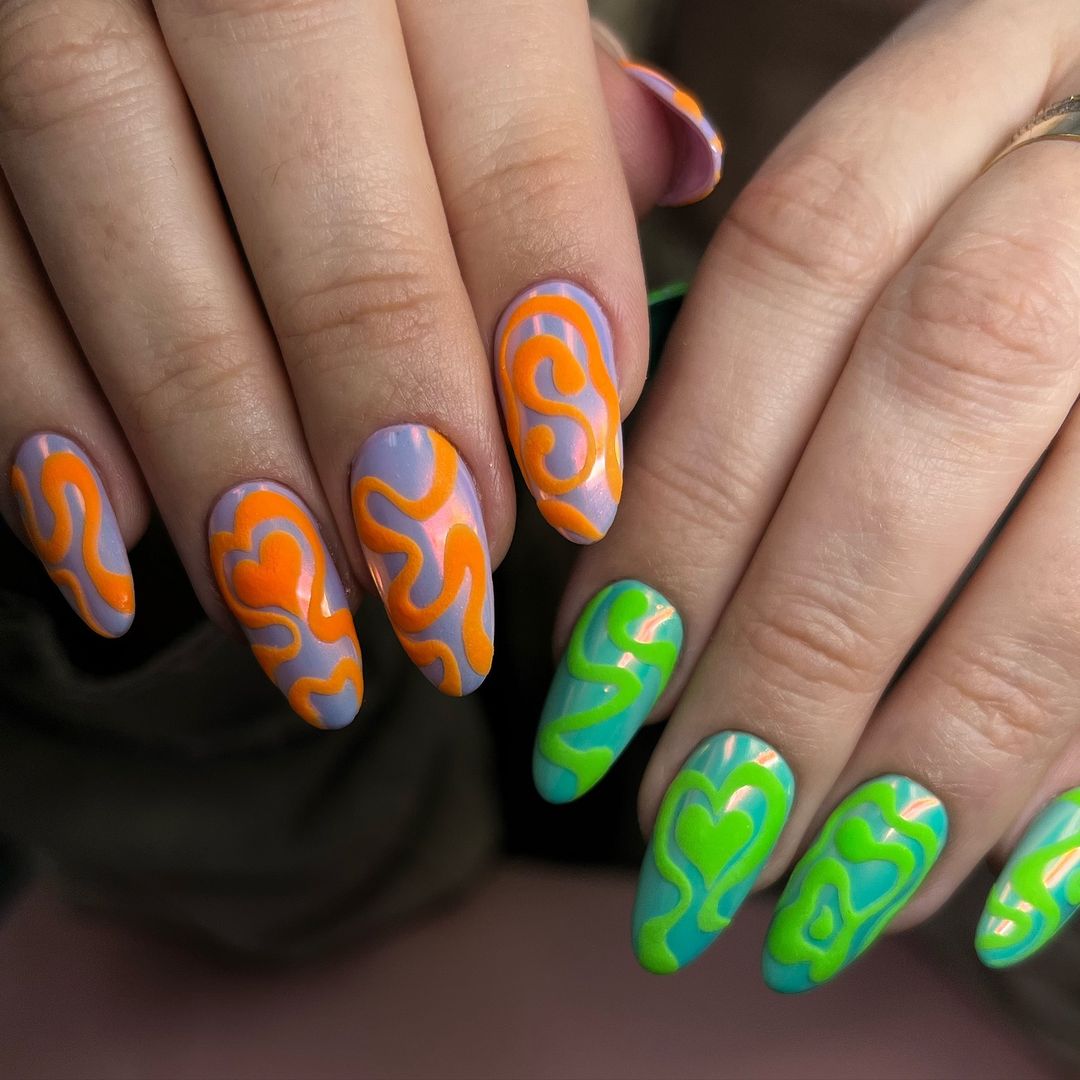
- Essie First Base Base Coat
- OPI Do You Lilac It?
- Essie’s Tangerine Tease
- Revlon Extra Life No Chip Top Coat
These selections are good for applying smoothly and ending with a lustrous shine that is perfect for the summer holidays.
Apply base coat, follow it up with a single layer of purple polish. Then when dry, use other nail polish to draw the wavy lines freehand or using stencils. Add final cover of clear top coat to make your nails last longer.
Chrome Water Droplets
An impressive interpretation of a gel innovation in those nails is done through this hard gel. The base coat, which is silver chrome, reflects summer sun while the 3D water droplet effect adds an element of surprise and sophistication. It has been adorned with small beads and stars for a different look that is perfect for night time summer parties.
- Base Coat: Deborah Lippmann Gel Lab Pro Base Coat
- Chrome Polish: Layla Mirror Effect Nail Polish
- 3D Gel: Young Nails Synergy Gel
- Embellishments: Micro-beads and star decals
- Top Coat: INM Out The Door Super Fast Drying Top Coat
Thanks to this high-tech combination, the final result is a solid gel finish that is multi-dimensional and attracts attention because it sparkles when light strikes it.
Put on the base coat then follow it up with chrome polish to create a reflective backing. Using 3D gel create droplet effects on your nail while still wet carefully place bead as well as star decals over them. Cure under UV light before finally good sealing using top coat for durability and shine.
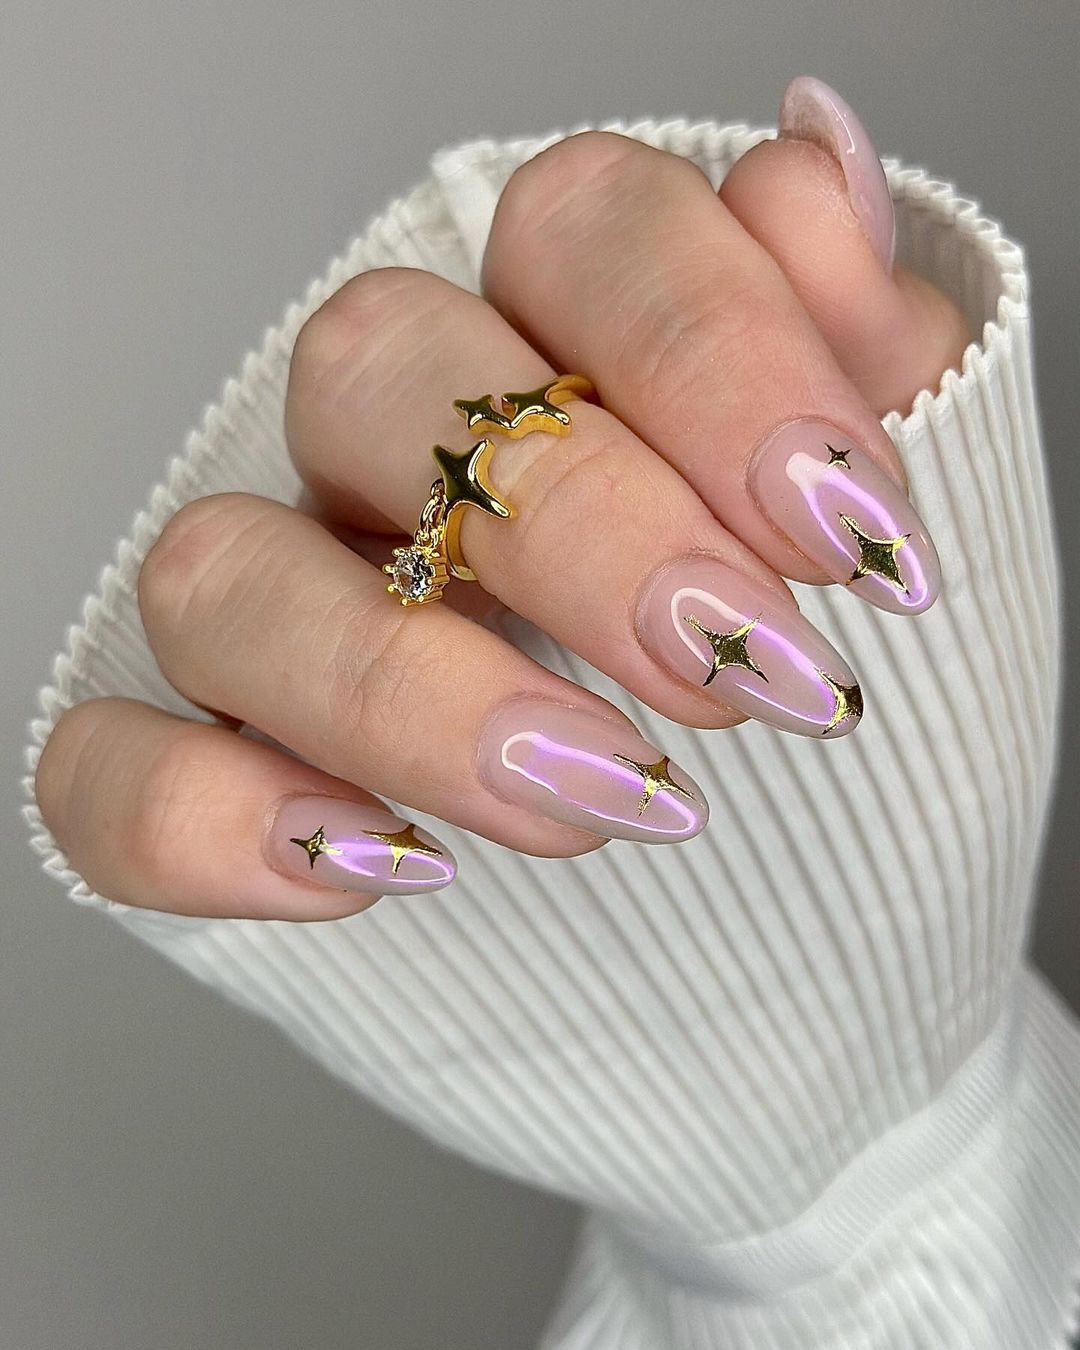
Sunset Aura
These nails, with their sun-like color changes and a multi-dimensional look that is both mystical and elegant, suggest the shimmering color of sunset. An ombre effect is created by employing warm colors ranging from vibrant orange to soft lilac that are ideal for golden hour.
- 1st coat: Zoya anchor base coat
- 2nd coat: ILNP boutique nail polish in sunset aura
- 3rd coat: ILNP ultra glossy seal
These items have been selected because they are exceptional at reflecting light while changing color so as to add some magical touch on your nails.
Begin by applying a base coat to safeguard your natural nails; once it dries, apply two coats of the changing color polish making sure each one is dry before you begin the next. For the last stage, wrap your nails in ultra-glossy seal which portrays an image of summer’s beauty at dusk.
Playful Pink Waves
Showing off a playful wave pattern with a hot pink base that is as clear as the sky, they strike an excellent balance between strength and elegance by adding some black and white. It is whimsical and colorful, making it perfect for your summer outfit that you want to add a touch of neon fun to.
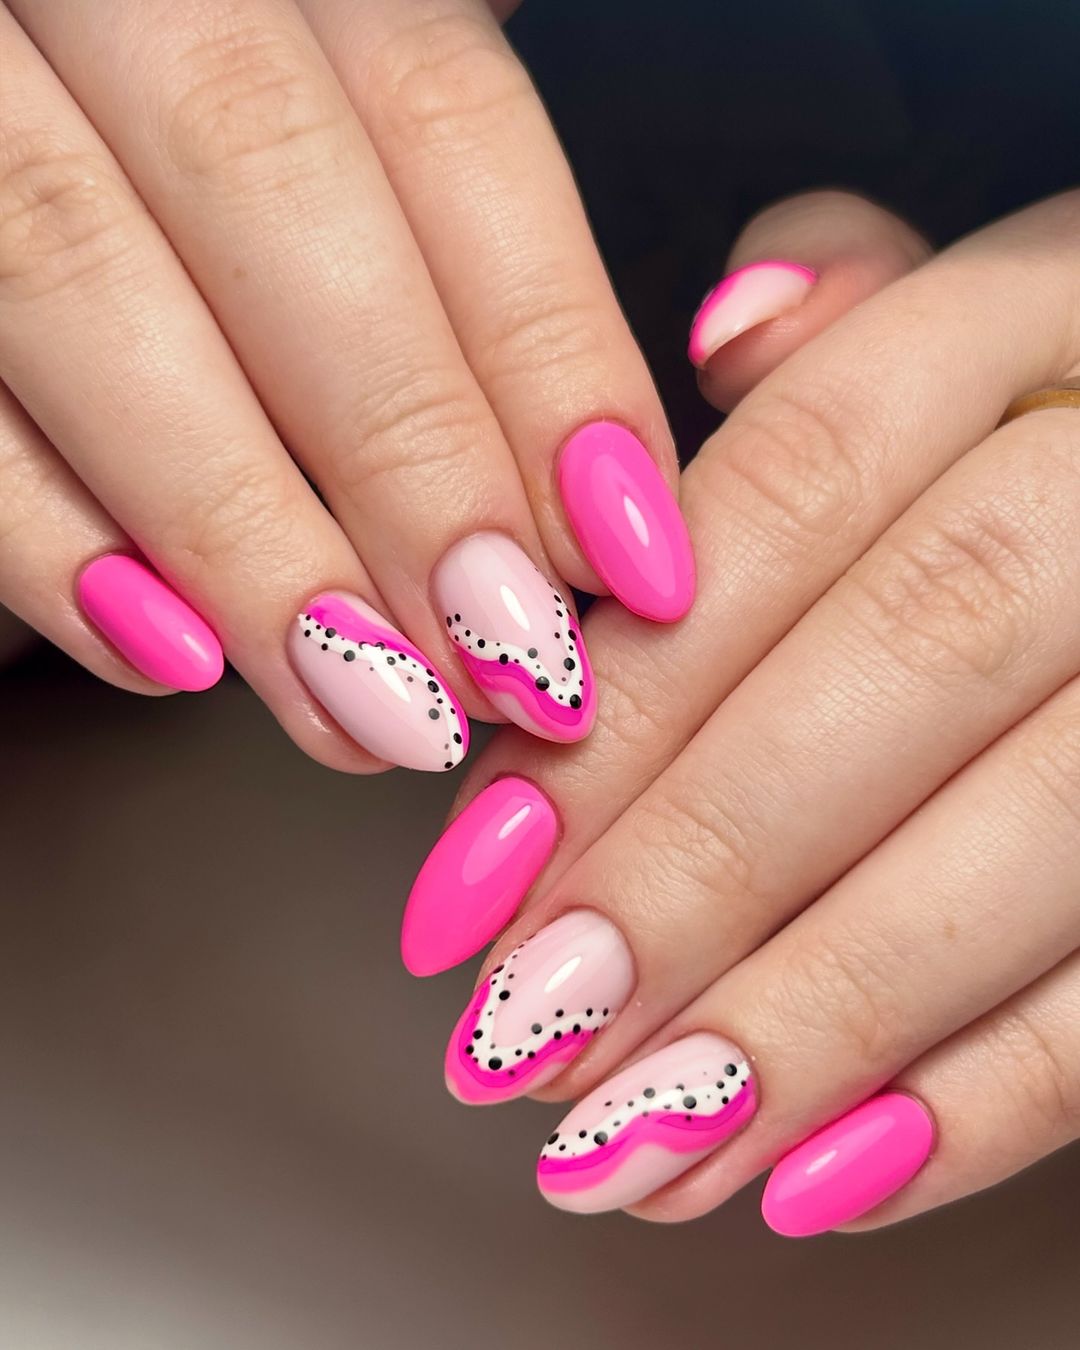
- OPI Nail Base Coat
- China Glaze Polish in Shocking Pink
- Sally Hansen Nail Art Pens in Black and White for Detailing
- Seche Vite Fast Dry Top Coat
With these products applied accurately, your nails will stay playful all throughout the summer because they have neat separations and long wearing ability.
Start off with applying a base coat so that you have smooth canvas. Use hot pink polish for the base layer. When it sets, draw wavy lines on top using nail art pens. Let it dry completely and then finish it by covering with fast drying top coat which gives shine that lasts forever.
Enchanted Emerald
The beautiful dark green polish paired with marbling on it, creates a special and attractive appearance. In addition, gold leaf flakes are scattered over this design to add some luxury and evoke the buried treasures of the sea.
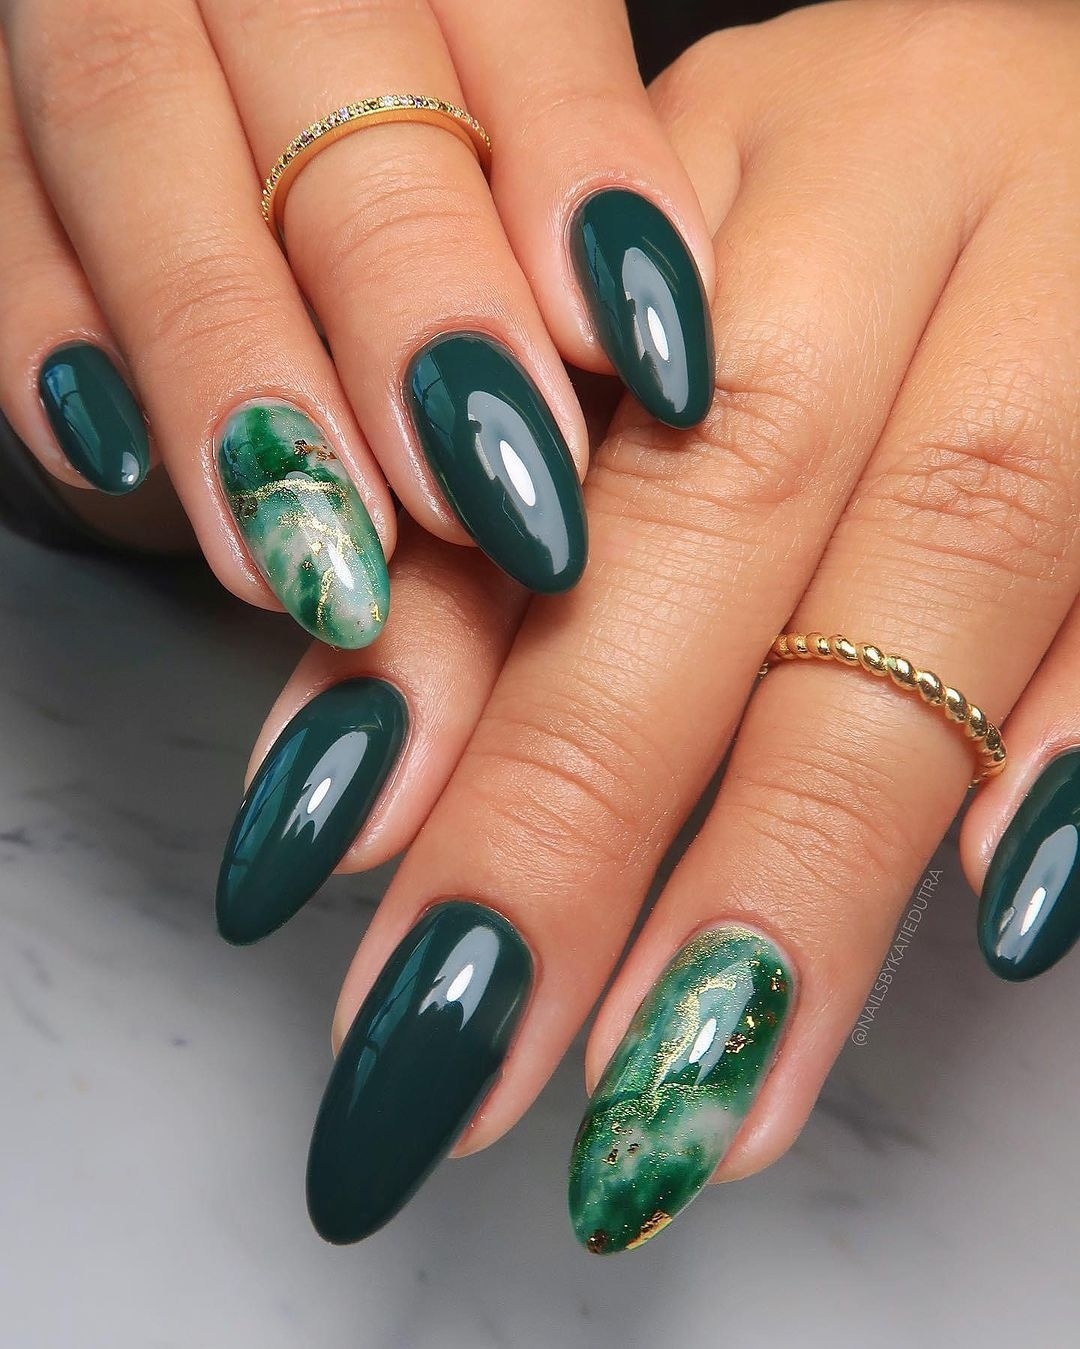
- CND Stickey Base Coat – base coating
- Essie Off Tropic – dark-green-polishing
- Elite99 Color Gel – gel for marbling
- Gold Leaf Gilding Flakes – gold leaf flakes
- OPI GelColor Top Coat – top coat.
This selection will enable you to achieve a hard gel-like finish without using a lamp thus making your nails as bright and colourful as they are strong enough.
On first, apply the base coat on your nails before painting them dark green for that mysterious background. Secondly, create patches of marble by dabbing it in places then use toothpick to mix the paint colors together. Before drying completely, this should be complete while still sticky so that gold leaf flakes can be sprinkled all over it. Lastly, put on a top coat which will lock the mesmerizing oceanic effect inside.
Golden Sunset Lines
This design is true artistic expression, conveyed through swishing curves and bright colors that imitate the evening sky painted with sunset colouring. The solid black nails provide a striking contrast making golden and orange highlights pop with a twist.
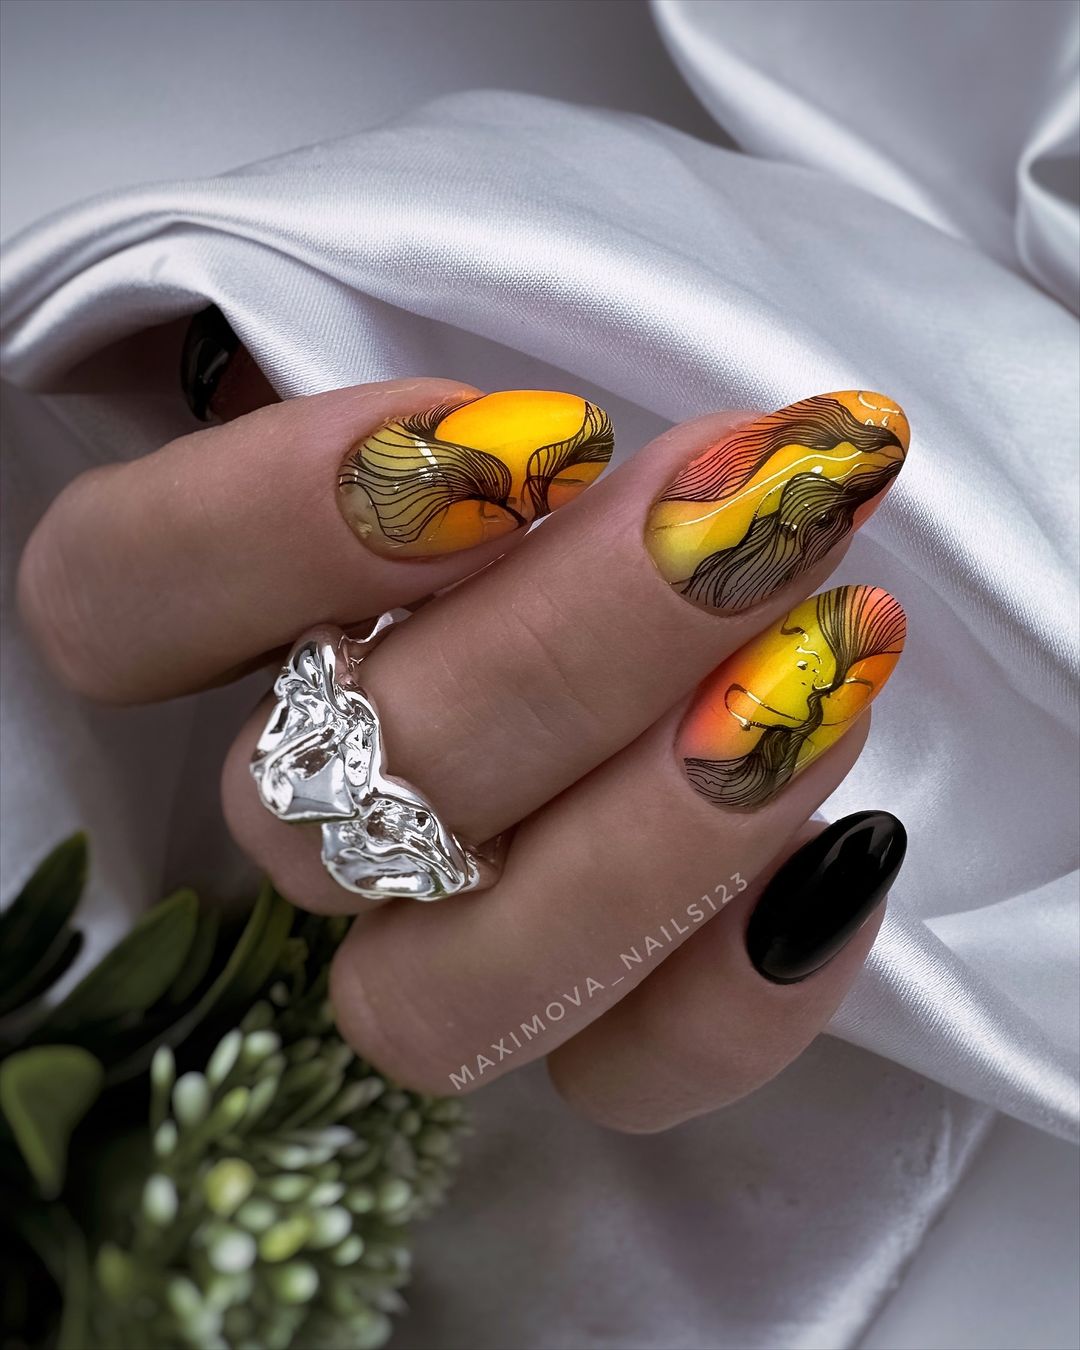
- ORLY Bonder Rubberized Base Coat: Base Coat
- OPI Black Onyx: Black Polish
- Playing Koi and Hay There by Essie: Orange and Yellow Polishes
- Gold Nail Art Pen by Sally Hansen : Gold Detailing
- Seche Vite Dry Fast Top Coat: Top Coat
They are selected for high pigmentation levels required for delicate designs.
Apply the base coat first, then alternate between painting your nails black and drawing the sunset picture. Blend orange and yellow polishes on a sponge as you dab them on your nail for the design. After drying, apply fine lines using gold nail art pen. Shine over everything using a top coat to make it last long.
Feathered Elegance
Neutral with soft white feather designs and bold statements of colour, this nail design is accented by small gold flecks. This is a simple way that speaks sophistication while still maintaining a touch of playfulness.
- Base coat: Smith & Cult Basis of Everything Base Coat
- White polish for feathers: China Glaze White on White
- Gold leaf flakes: Nail Artisan Gold Leaf Flakes
- Color polishes: Various shades for accents
- Topcoat – Butter London Hardwear Shine UV Topcoat
These products bring out the subtleties and intricacies in a gentle yet powerful nail design.
Prepare your nails with base coat. Apply neutral polish as a base color then carefully paint feather patterns on top. For extra opulence, add some colors and gold leaf flakes to accentuate the look. Smooth, long-lasting manicure can be achieved by applying top coat at the end.
Pearlescent Lace
This design has a solid gel look with a soft pastel color that is adorned with lace-like details and beaded embellishments. It speaks to a timeless elegance, but there is an infusion of modernity through the use of metal accents.
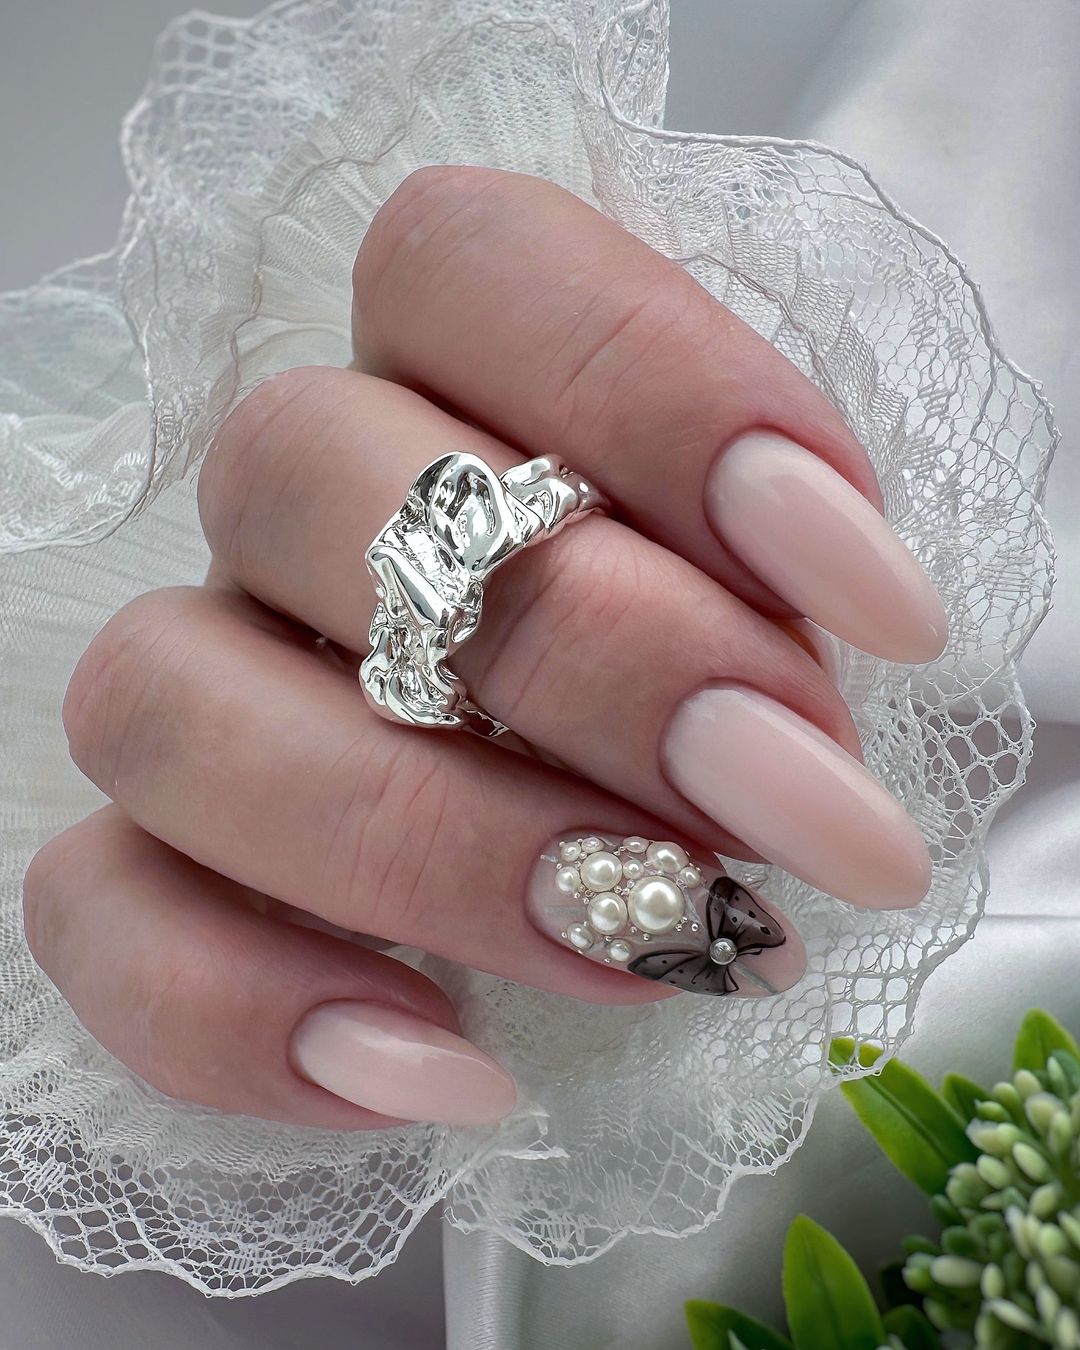
- Base Coat: CND Shellac Base Coat
- Pastel Polish: Essie’s Muchi, Muchi
- Lace Stickers: Elegant Touch House of Holland Nails
- Pearl Embellishments: Swarovski Crystal Pearls
- Top Coat: CND Shellac Top Coat
These materials were selected because they add class to your nails without compromising on their resilience.
Start by applying the base coat followed by two layers of any preferred pastel polish. After it dries, place lace stickers and put pearl embossments carefully on accent nails. Finally, secure all these elements using a top coat for a shiny finish that will protect as well as last long.
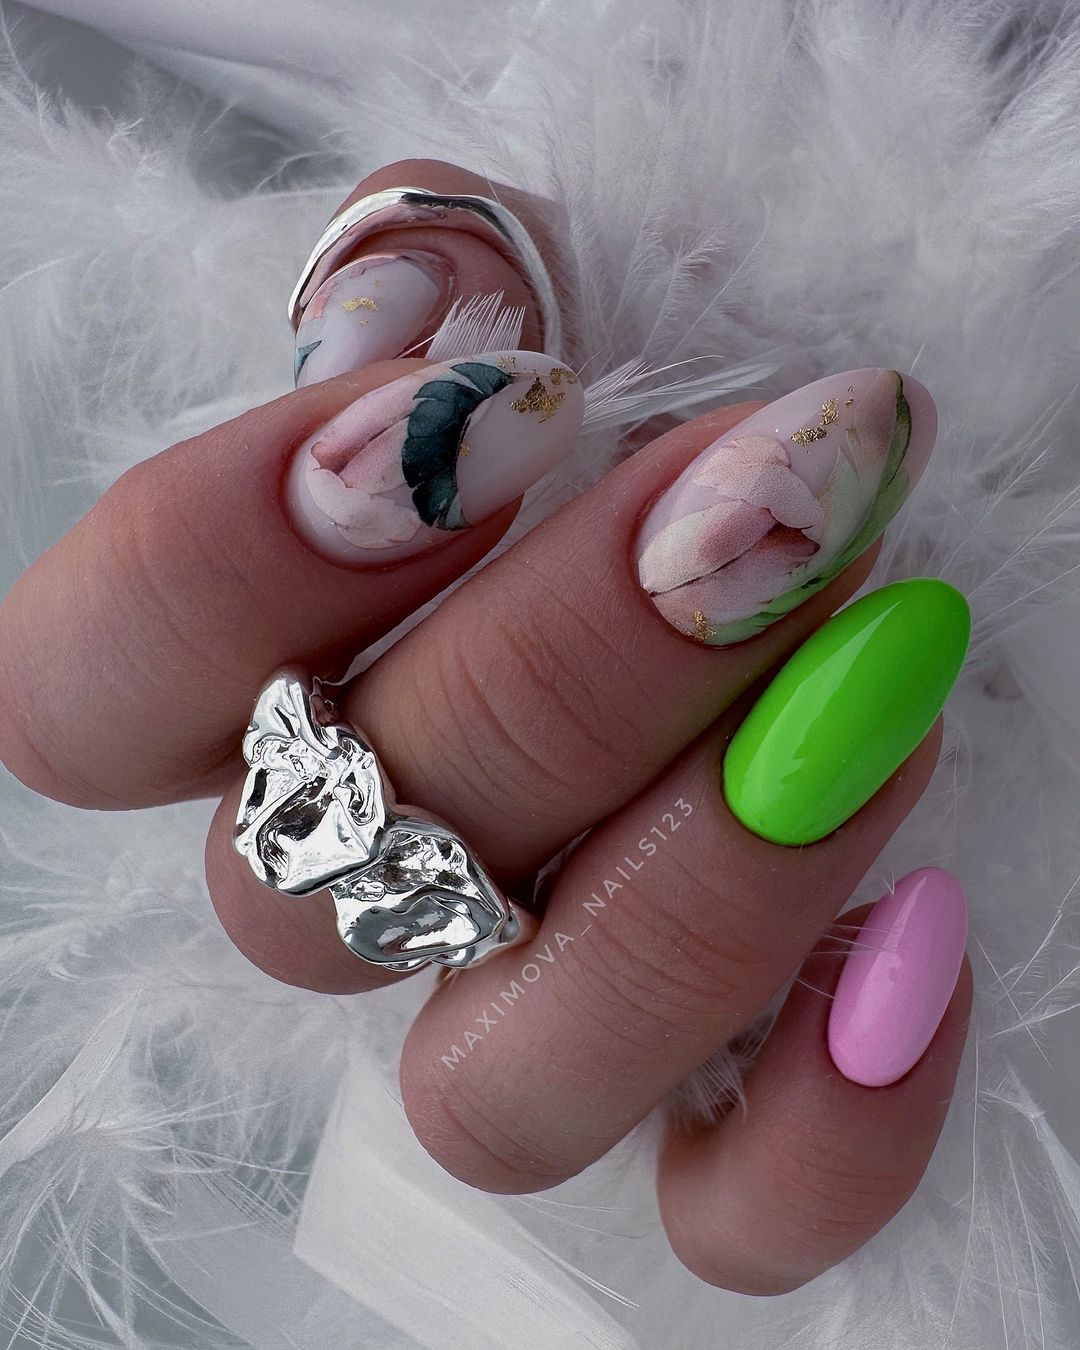
Floral Fantasy
This design blends a bright pink base with delicate floral prints, bringing some of the beauty of nature to your fingertips. It’s a rich summer party that would be incomplete without golden decorations. Every nail is artistically done in its own way.

- OPI Natural Nail Base Coat: Undercoat
- Essie’s “Fiesta”: Pink Polish
- Floral Stickers or Hand-Painted Using Acrylic Paints
- Imitation Gold Leaf Sheets: Gold Leaf
- Seche Vite Dry Fast Top Coat: Overcoat
These selections mean to have textures and three-dimensionality for a long-lasting, feel good floral arrangement.
First apply the natural nail base coat and then the bright pink polish. For individuality try using floral stickers or hand painted flowers. The gold leaf should be applied as small patches for a luxurious effect. To protect it well and make the design look better finish with a top coat.
Glittering Pink Sequins
Those who shine can have a manicure like this. A base coat in pastel shade is made to stand out with beads of various sizes scattered all over it, creating a mix of elegance and fun. This creates the ultimate playful but sophisticated look that catches light and the eyes of everyone.
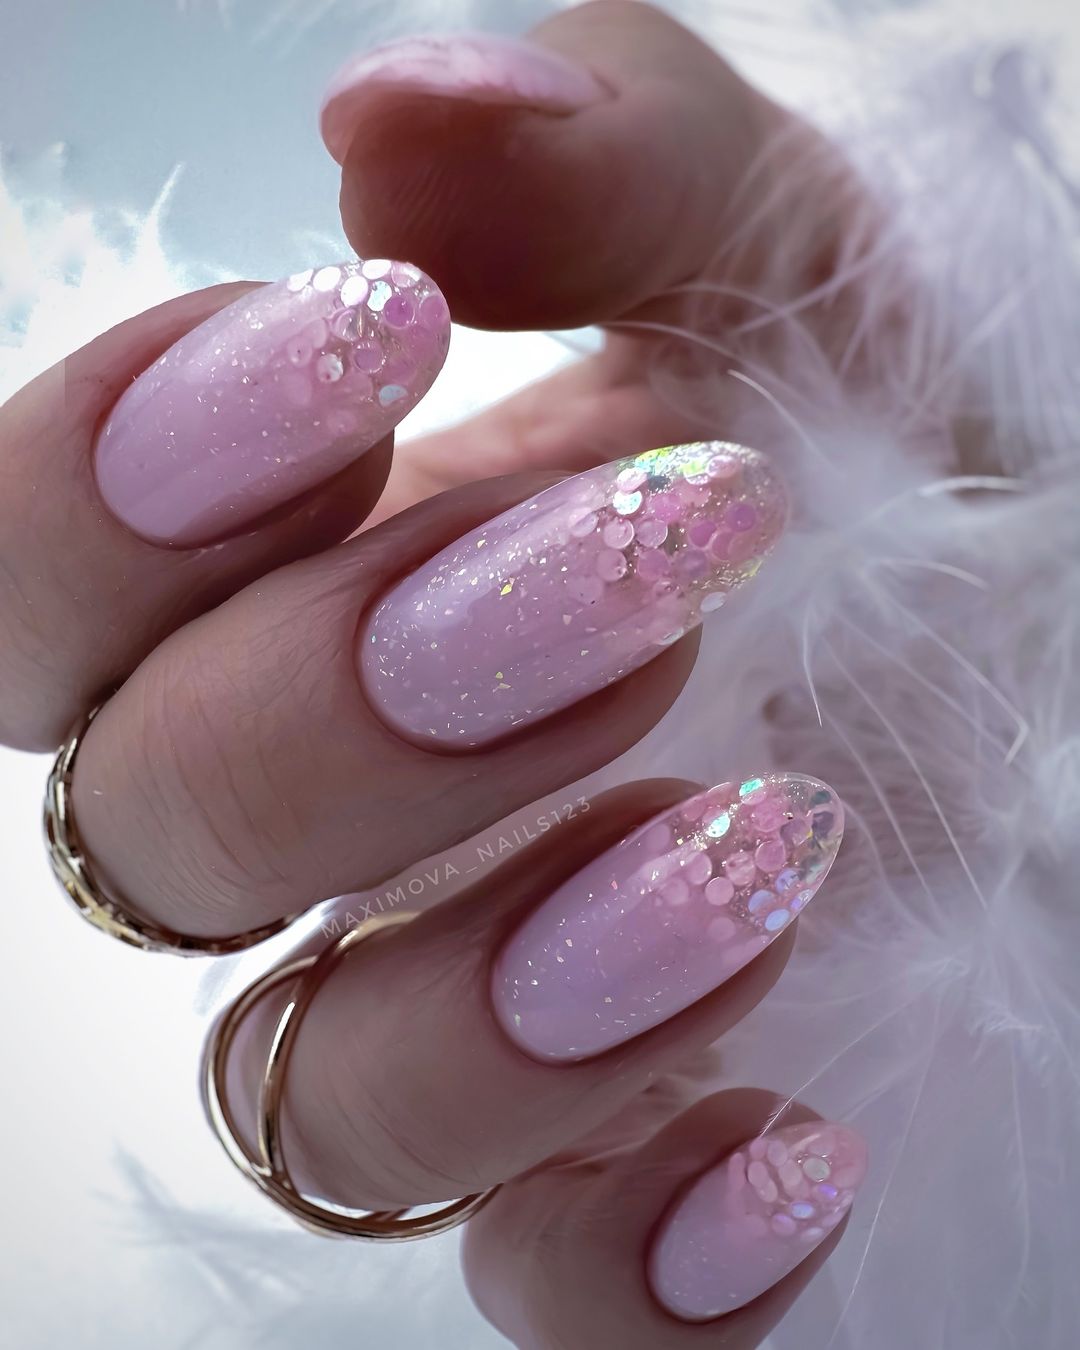
- Base Coat: Deborah Lippmann All About That Base
- Pastel Pink Gel Polish: Gelish Pink Smoothie
- Sequins: Mixed Sizes Pink Sequins
- Top Coat: INM Out the Door Top Coat
This combination makes sure your nails look like gel and will last for long with glitters.
Apply the gel polish after applying the base coat then cure under a lamp. Apply sequins before adding top coat for desired glitter effect. After curing, one more time you need to seal sequins on top for dazzling finish.
Geometric Dream
A blue base of vibrant color overlaid with varied geometric patterns in contrasting colors- this is a nail design for the audacious and the fashion-forward. It combines colorfulness and modern art, perfect for style setters and trend lovers.
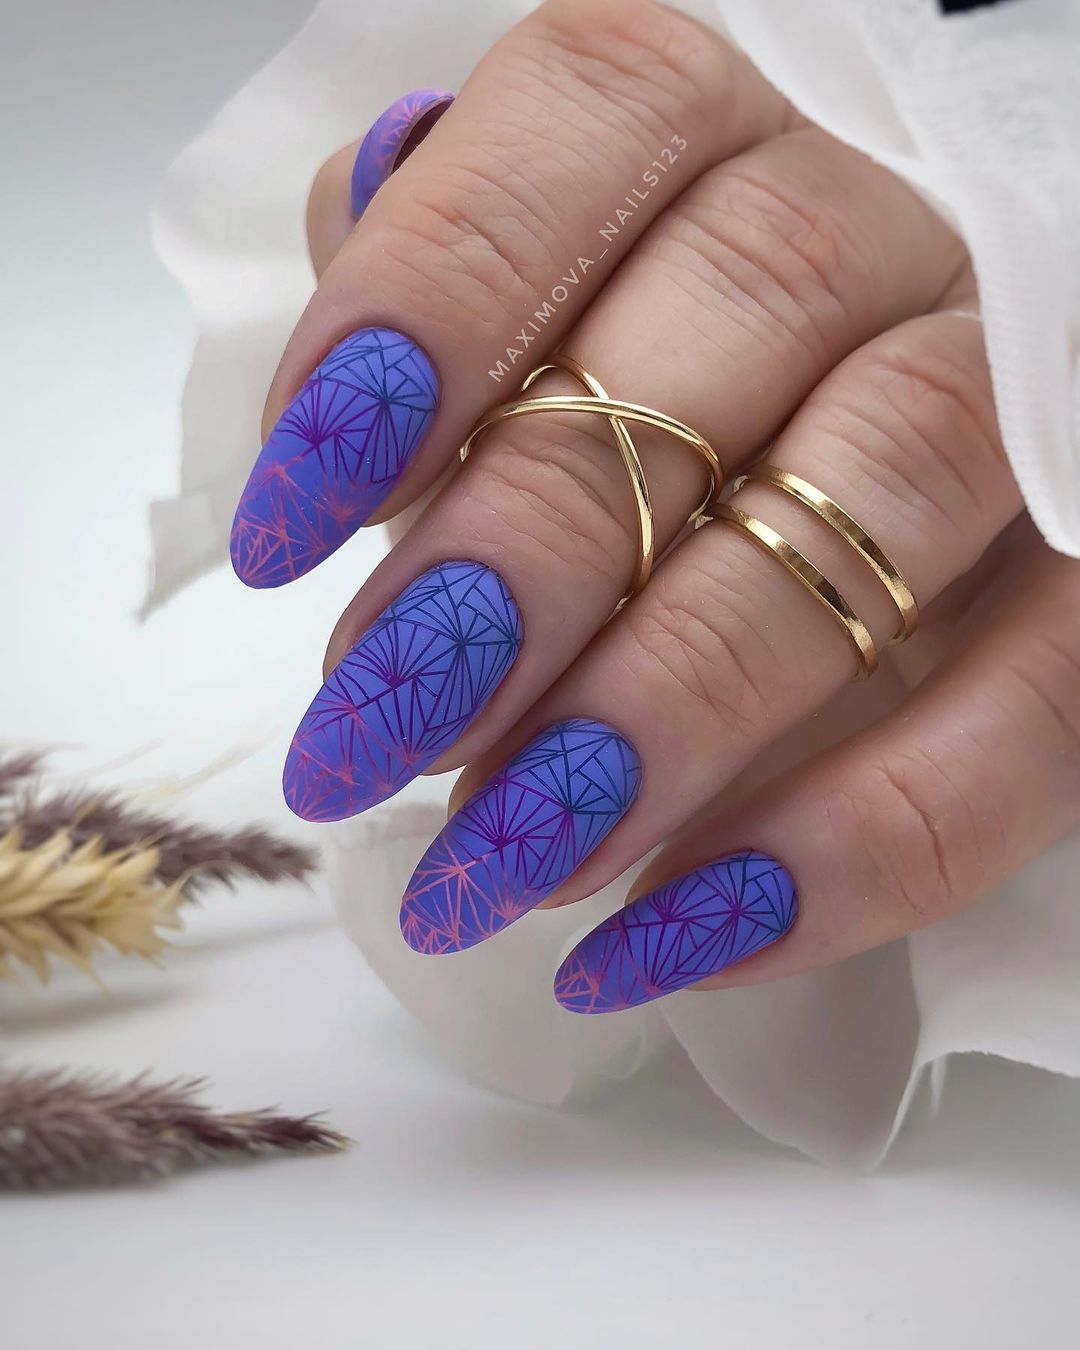
- Base Coat: CND Stickey Base Coat
- Blue Polish: Sally Hansen Insta-Dri in Set Sail
- Detailing with Acrylic Paints or Nail Art Pens in Various Colors
- Top Coat: Essie Good To Go Top Coat
These products’ composition assists to make precise designs are long-lasting.
Start with a base coat to prepare the nail. Apply your blue polish as such backdrop. With acrylic paints or nail art pens, carefully draw geometrical designs. Once dry, apply the top coat for added shine and protection on your geometric masterpiece.
Opulent Oceanic Flair
The design is a sophisticated one that uses hard gel marbling in deep blue and teal with bold white and gold leaf accents. Contrastingly, the black solid color on the design together with the use of negative space adds drama to it thus suits those who would like to make a unique and elegant statement regarding their summer nail art.
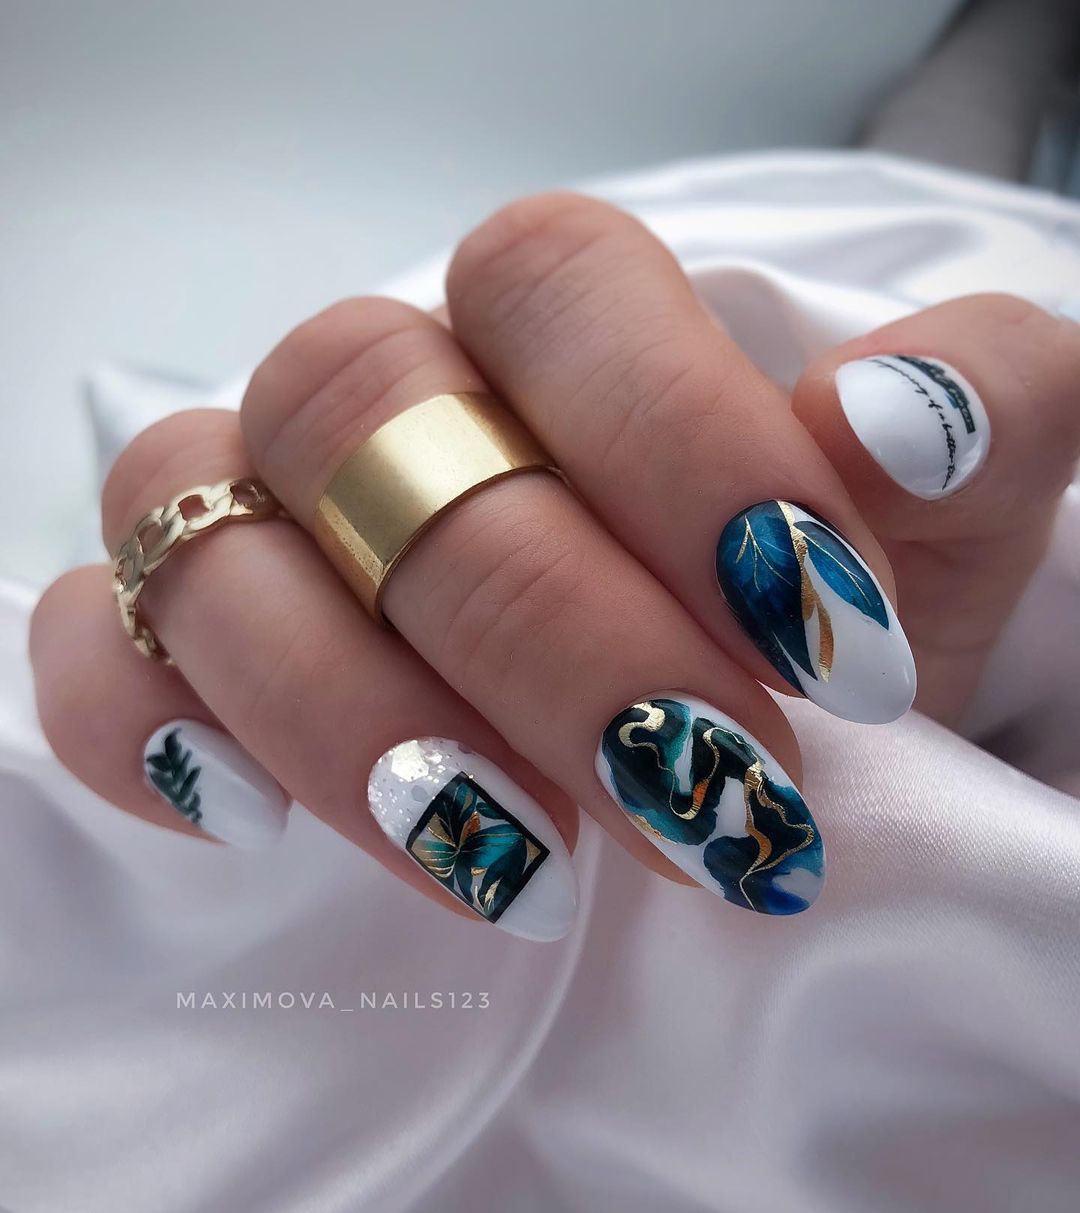
- Base Coat: OPI Natural Nail Base Coat
- Black Gel Polish: Gelish Black Shadow
- Blue and Teal Gel Polish for Marbling: Gelish Caution and Gelish Mermaid
- Gold Leaf: Imitation Gold Leaf Sheets
- White Nail Art Pen: Sally Hansen Nail Art Pen in White
- Top Coat: CND Shellac Top Coat
These particular products are purposely selected because of their quality characteristics associated with solid looking gel and also for being highly detailed.
Start by applying the base coat, then paint some nails black using the gel polish, curing them under a lamp. Where there is marble effect, mix blue and teal shades on a palette before swirling them together on your nail using a fine brush; after that, cure. Add some gold leaf accents as well as using the white nail art pen to highlight some details in them. Finally, seal this off with a top coat to give it an astonishing shiny finish.
Sage Serenity
This report focuses on sage and mint green gels blended together to achieve an elegant, uncomplicated yet sophisticated look. Additionally, the inclusion of 3D gel droplets pays tribute to a lively summer while the different shades reflect the multi-dimensional colors of a luxurious summer.
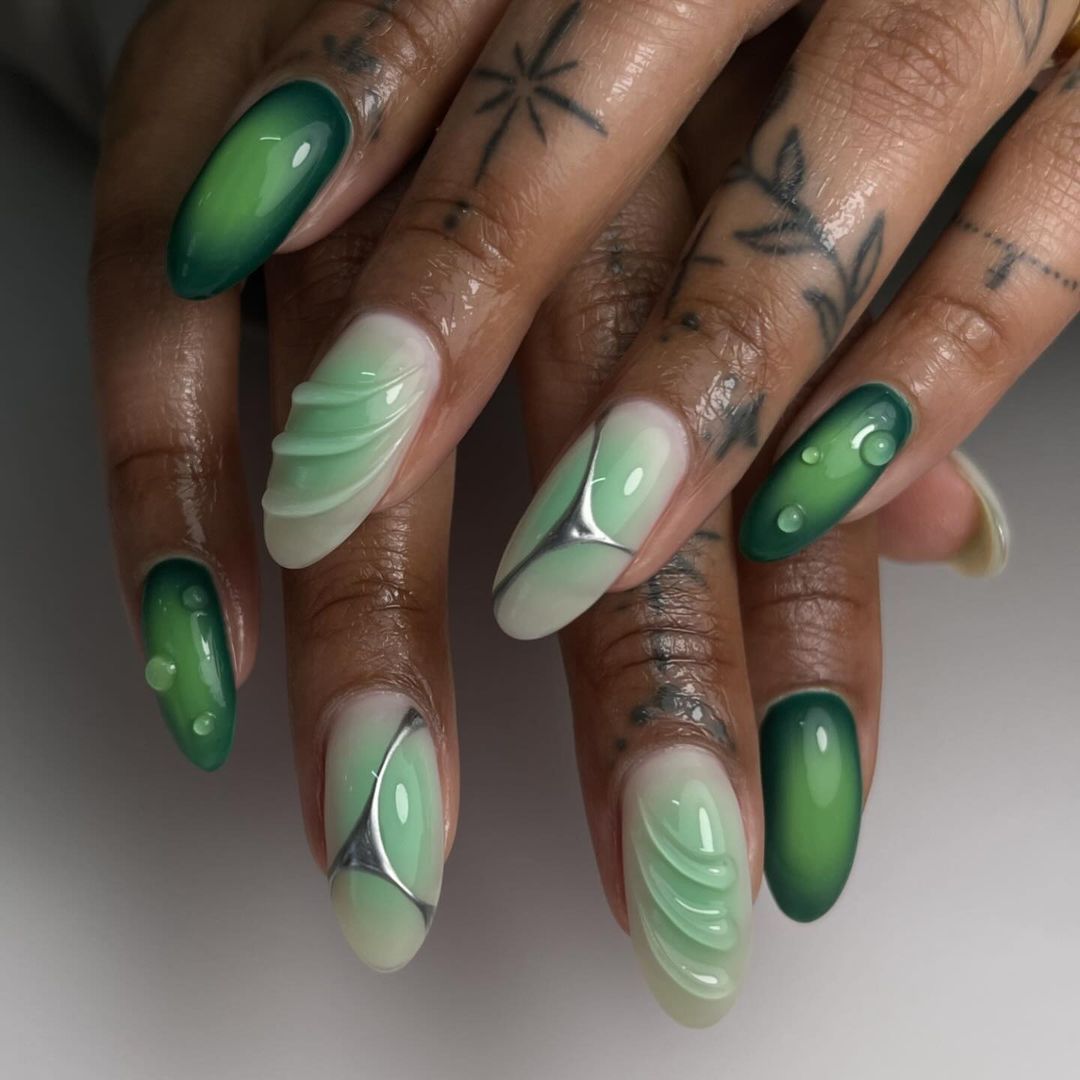
- Essie Here to Stay Base Coat
- OPI Stay Off the Lawn: Sage Green Gel Polish!
- OPI That’s Hula-rious!: Mint Green Gel Polish!
- Young Nails Synergy Gel: 3D Gel for Droplets!
- OPI GelColor Top Coat: Top Coat!
These gels and top coat were chosen because they could add depth and texture to make your design long-lasting and eye-catching.
Soft gradient using sage and mint green gels with base coat applied. Cure under lamp after adding an interesting textural element like 3D gel droplets. To keep your nails inspired by nature looking tranquil top coat it over.
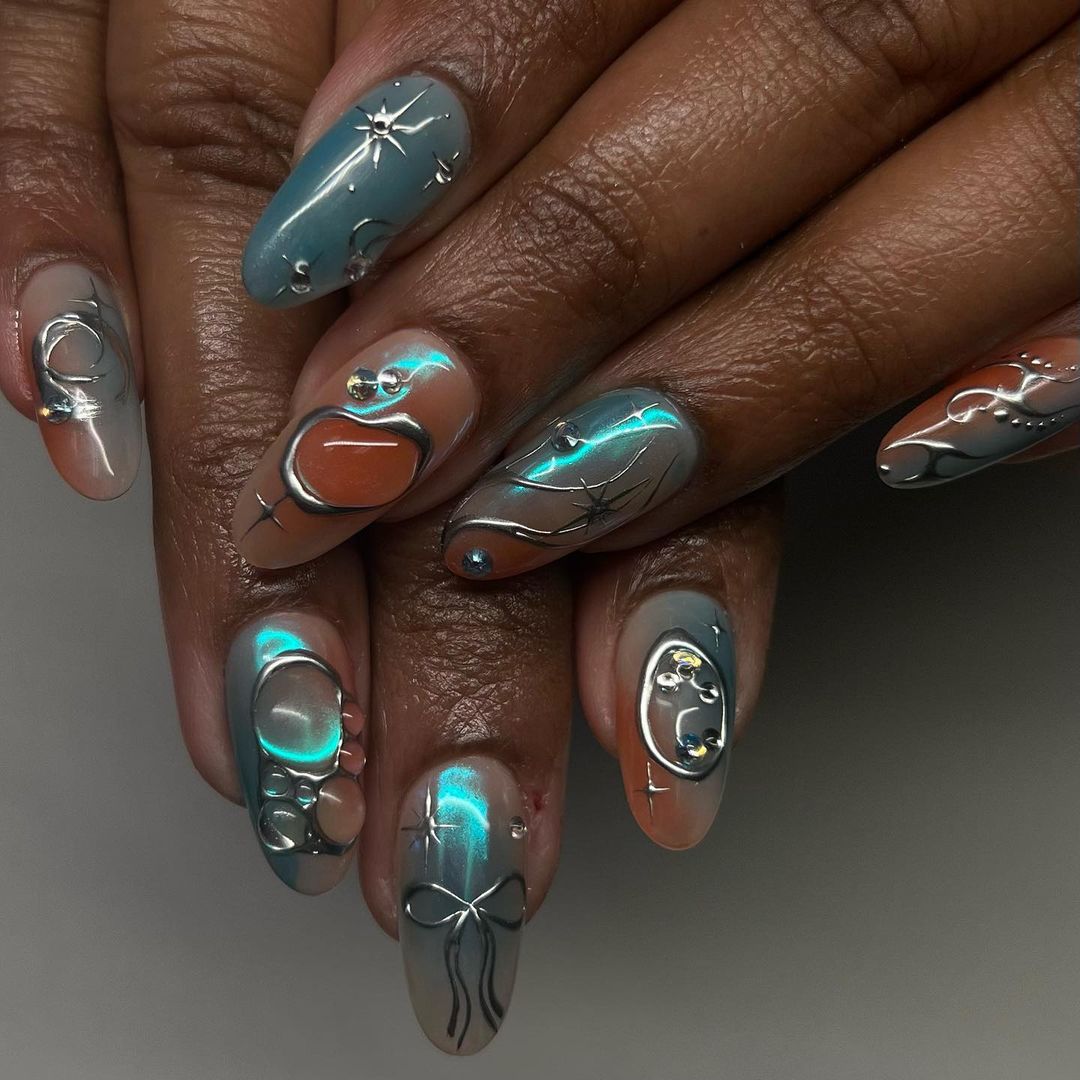
Geometric Pearls and Metals
Combining softness of neutral shades with hard contrast of geometric shapes and metal studs is the objective of this design. The touch of Pearlescent white hints at luxury and beauty while golden decorations add an exciting colorful sophisticated look.
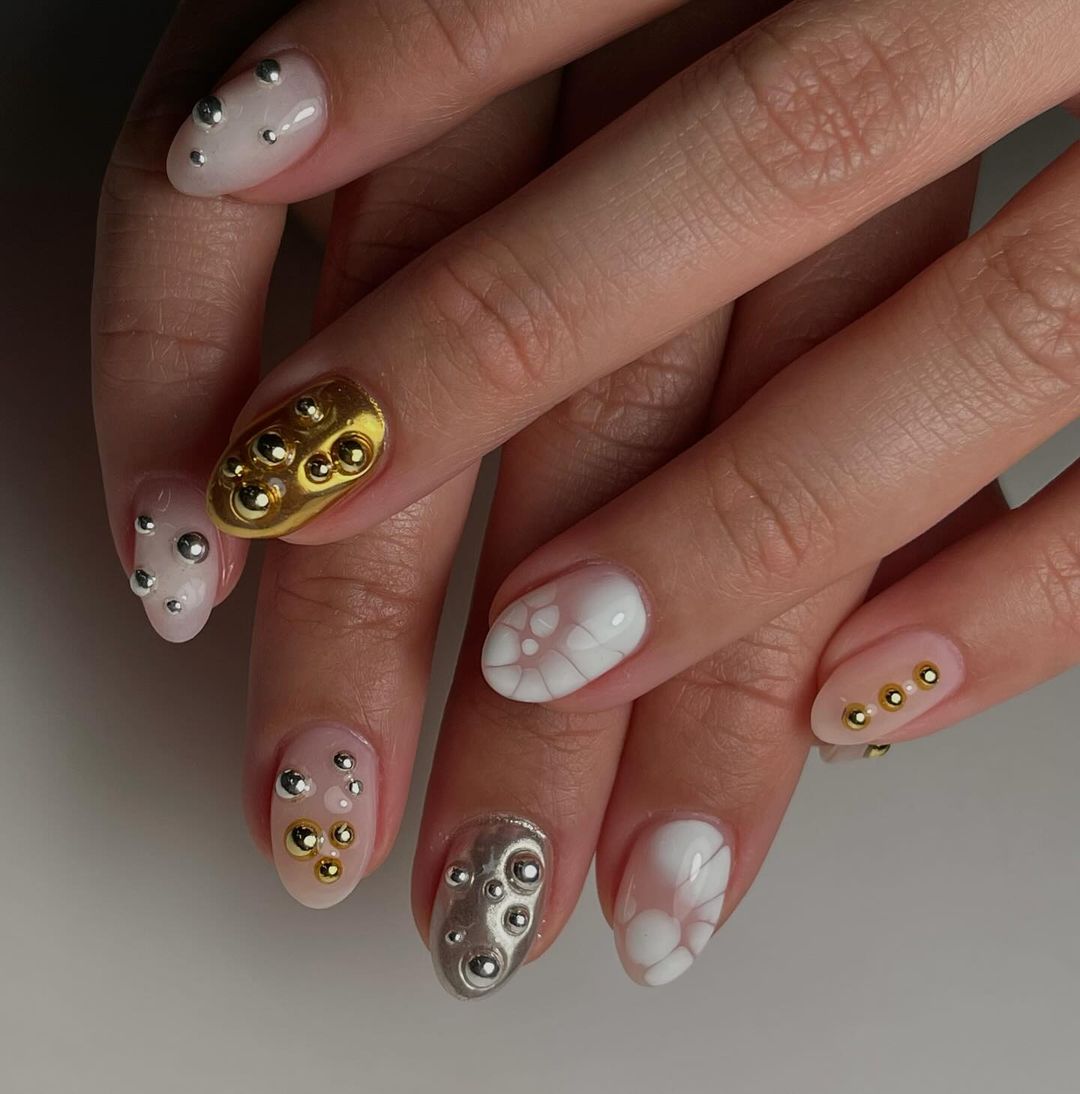
- Base Coat: Deborah Lippmann All About That Base.
- Neutral Gel Polish: Bio Seaweed Gel in Creme.
- White Nail Art Paint: Acrylic or Gel Paints.
- Metallic Studs: Gold and Silver Studs for Nail Arts.
- Top Coat: Deborah Lippmann Gel Lab Pro Top Coat.
The selection of these products was based on their high quality that serves as a good foundation for decorating and makes them durable.
First, apply a base coat to protect the nails. Then put on the neutral gel polish in cream as your initial layer then make use of white paint for geometrical drawings. While your design is still wet, press into it the metallic studs. Give your nails a lasting effect by applying a top coat to finish off this elegant look.
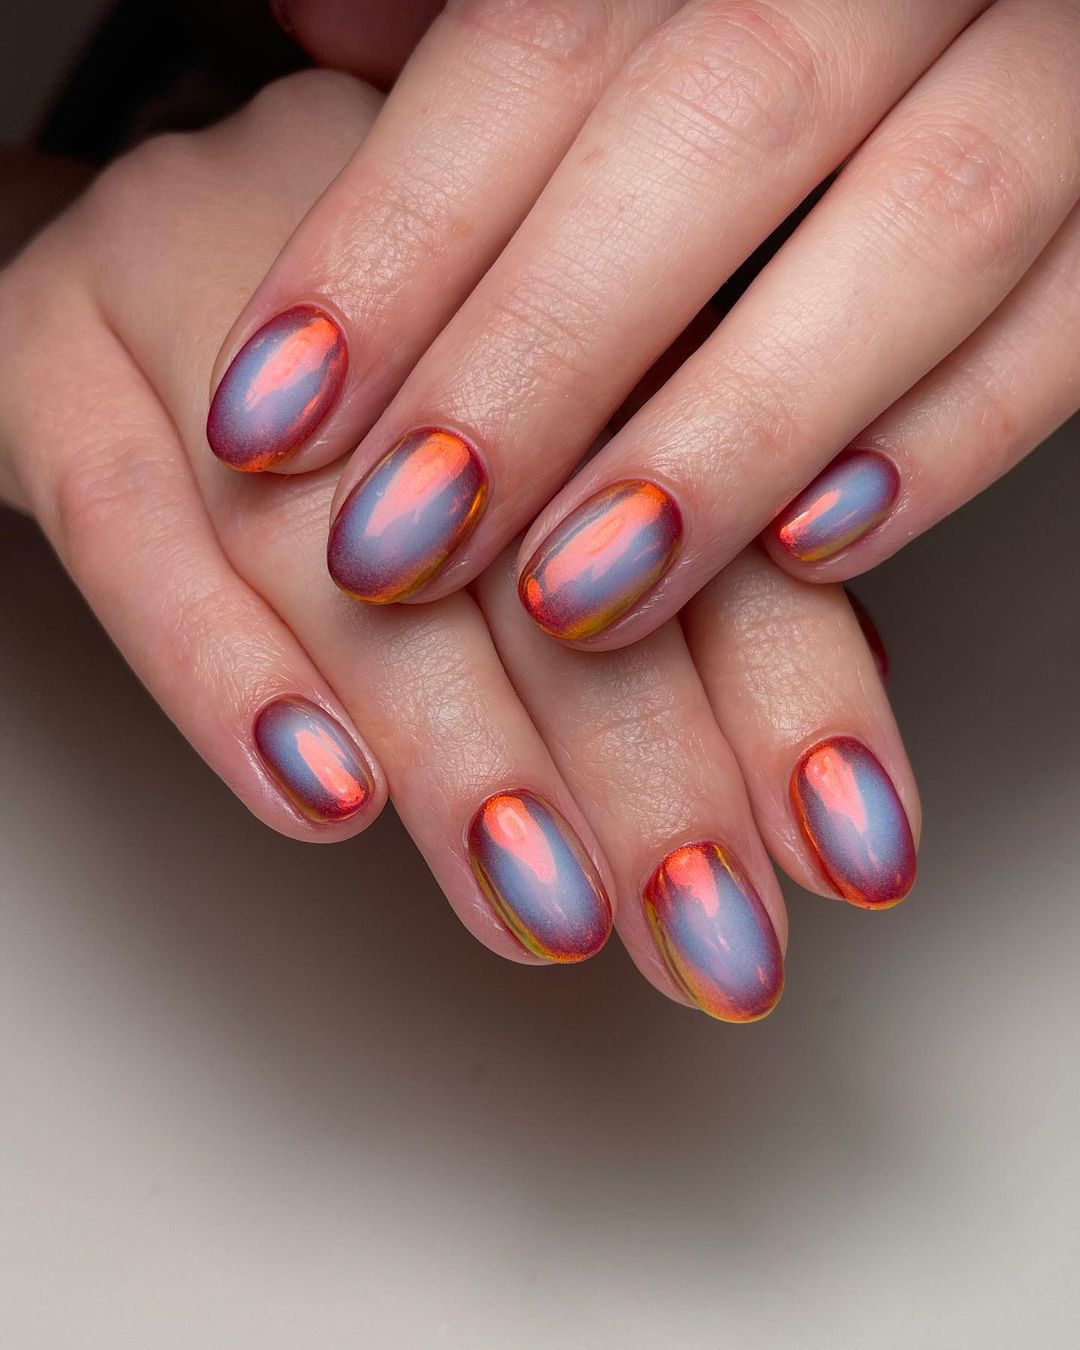
Metallic Flow
The shining silver polish has a reflective nature in this design that is so striking with a bold, modern, mirror-like finish that is glamorous. This is the idea of motion conveyed by the whirling, almost liquid pattern of the varnish and therefore makes it an ideal choice for those who wish to stand out.
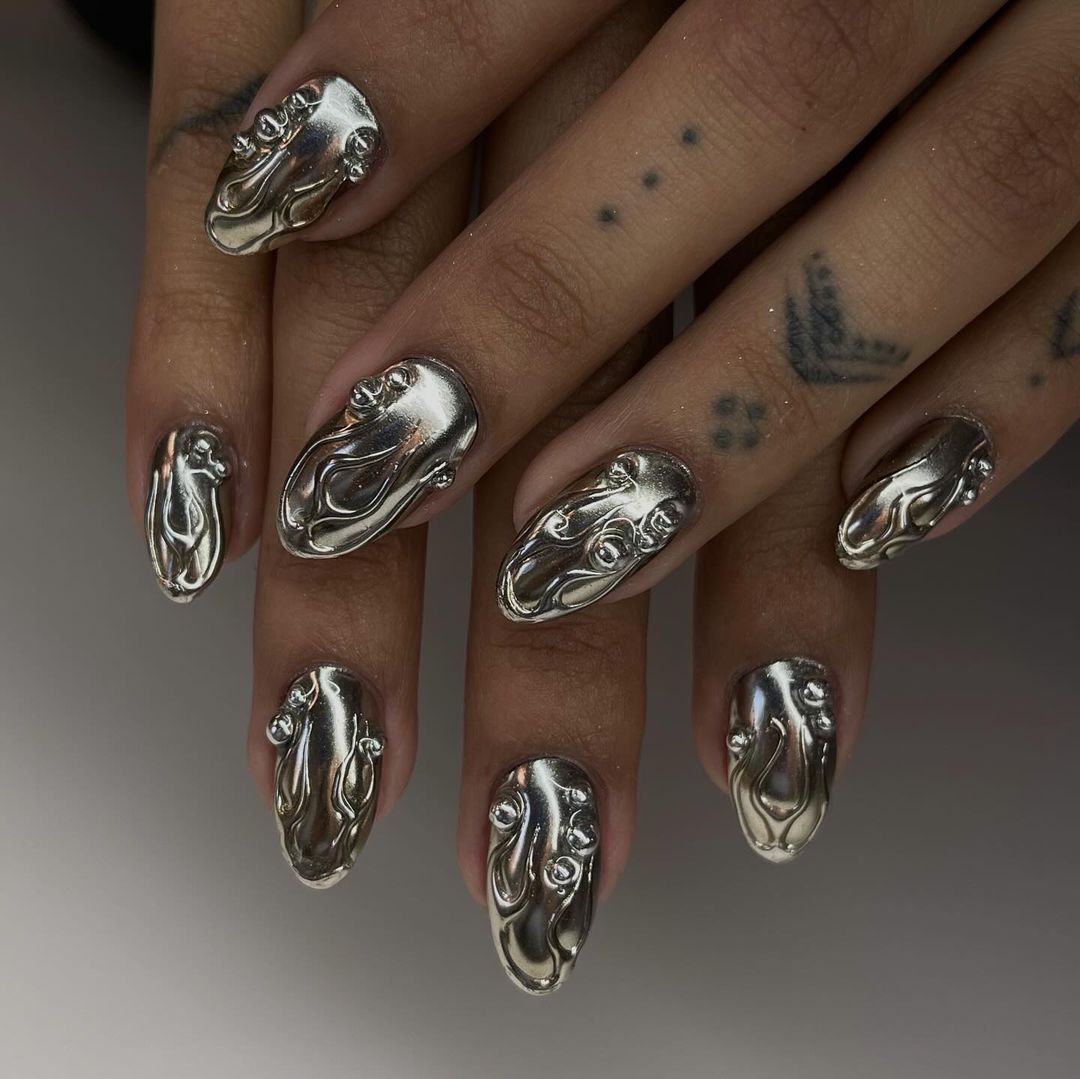
- Base coat: Essie Strong Start Base Coat
- Silver Metallic Polish: OPI Push and Shove
- Black Detailing Gel: Sally Hansen Salon Gel Polish in Black Tie
- Top Coat: Seche Vite Dry Fast Top Coat
This combination delivers a high-gloss, durable finish which simulates molten metal.
Apply the base coat evenly all over your nail surface. Then, while the silver polish is wet, use black detailing gel to create swirls. Use thin brush to mix black color into silver then seal it with any topcoat for durability and shine.
Color Droplet Contour
The design is perfect for those warm summer days when you are in a relaxed mood. The clear gel base has been applied with bright, colorful droplets of various shades that give it a cool and playful look. This simple but efficient way adds color to your everyday style.
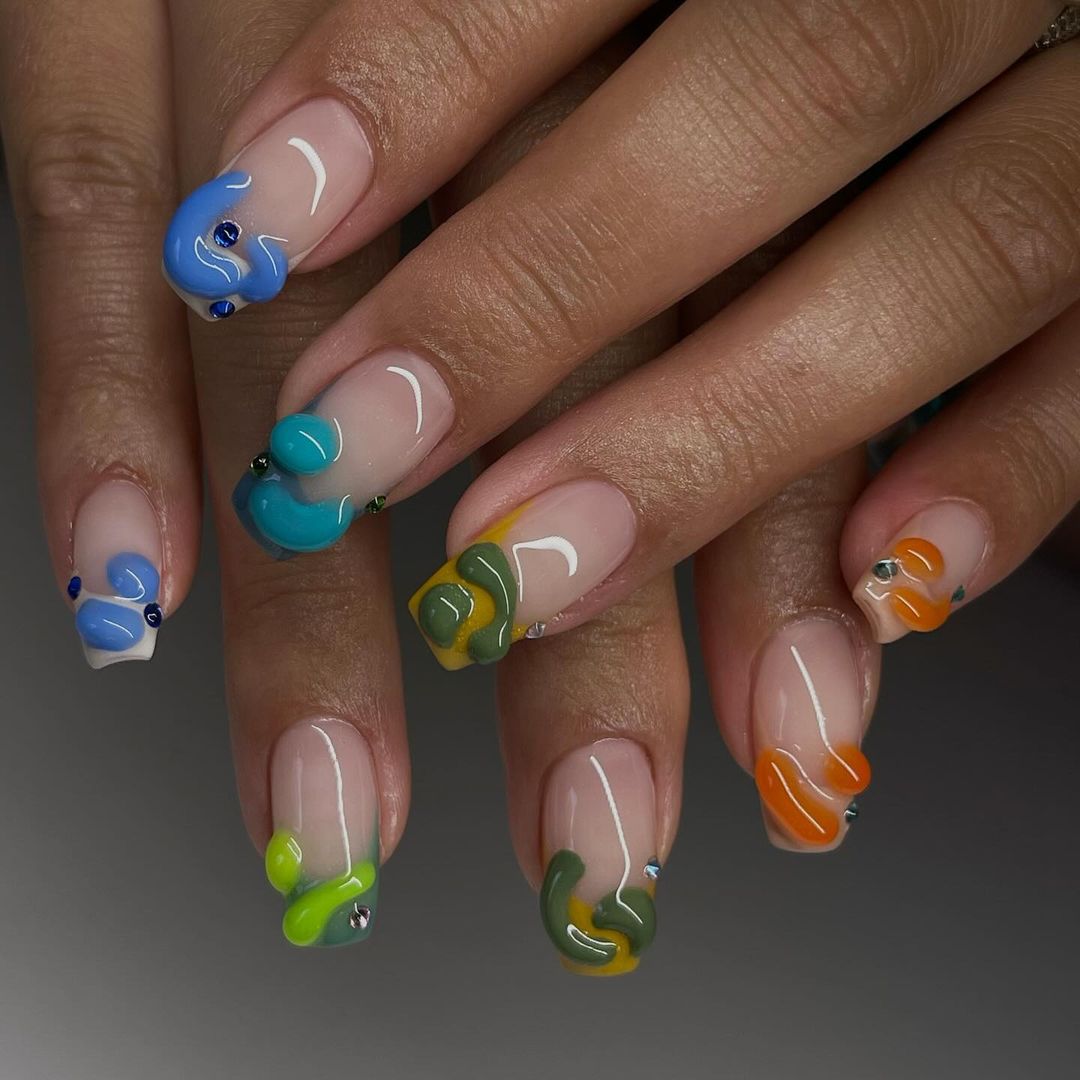
- Base Coat: OPI GelColor Base Coat
- Clear Gel: Bio Seaweed Gel – No-Wipe Top Coat
- Colored Gels: Assortment of gels for the droplets
- Top Coat: OPI GelColor Top Coat
The clear gel base acts as a canvas for the vibrant colored gels, which are chosen based on their pigmentation and staying power.
Start by applying the base coat. Apply the clear gel then drop the colored gels onto the nails in droplet patterns. Then cure under lamp and apply top coat to achieve glossy finishes and protect designs.
Abstract Floral Mosaic
An abstract feel reminiscent of a modern art piece is created by the pastel base with free-form shapes and floral accents. The vivid colours against a soft backdrop make this design suitable for those who want to approach nail art from a more artistic and individual angle.
- Sally Hansen Miracle Gel Base Coat: Base
- Pastel Polishes: Various shades for the background as well as floral accents
- Black Nail Art Pen: Shape definition and outlines
- Sally Hansen Miracle Gel Top Coat: Top coat
The nail polish provides a muted background to these bright flower accents, while the black nail pen is used to make those variable forms come alive.
Put on light pastel polish after applying base coat. Make various abstract floral shapes with multiple brighter hues. For clear lines, define edges with black nail art pen and then apply top coat over your drawing in order to seal it in place and give it some shine.
Yin Yang Harmony
These Nails Celebrate the Simplicity and Elegance of a Neutrally Coloured Palette, Enhanced with a Tiny but Influential Yin Yang Symbol. It is quite simple yet elegant design that contains some depth to it, this design can be appropriate for those who like being unique in their personal philosophy.
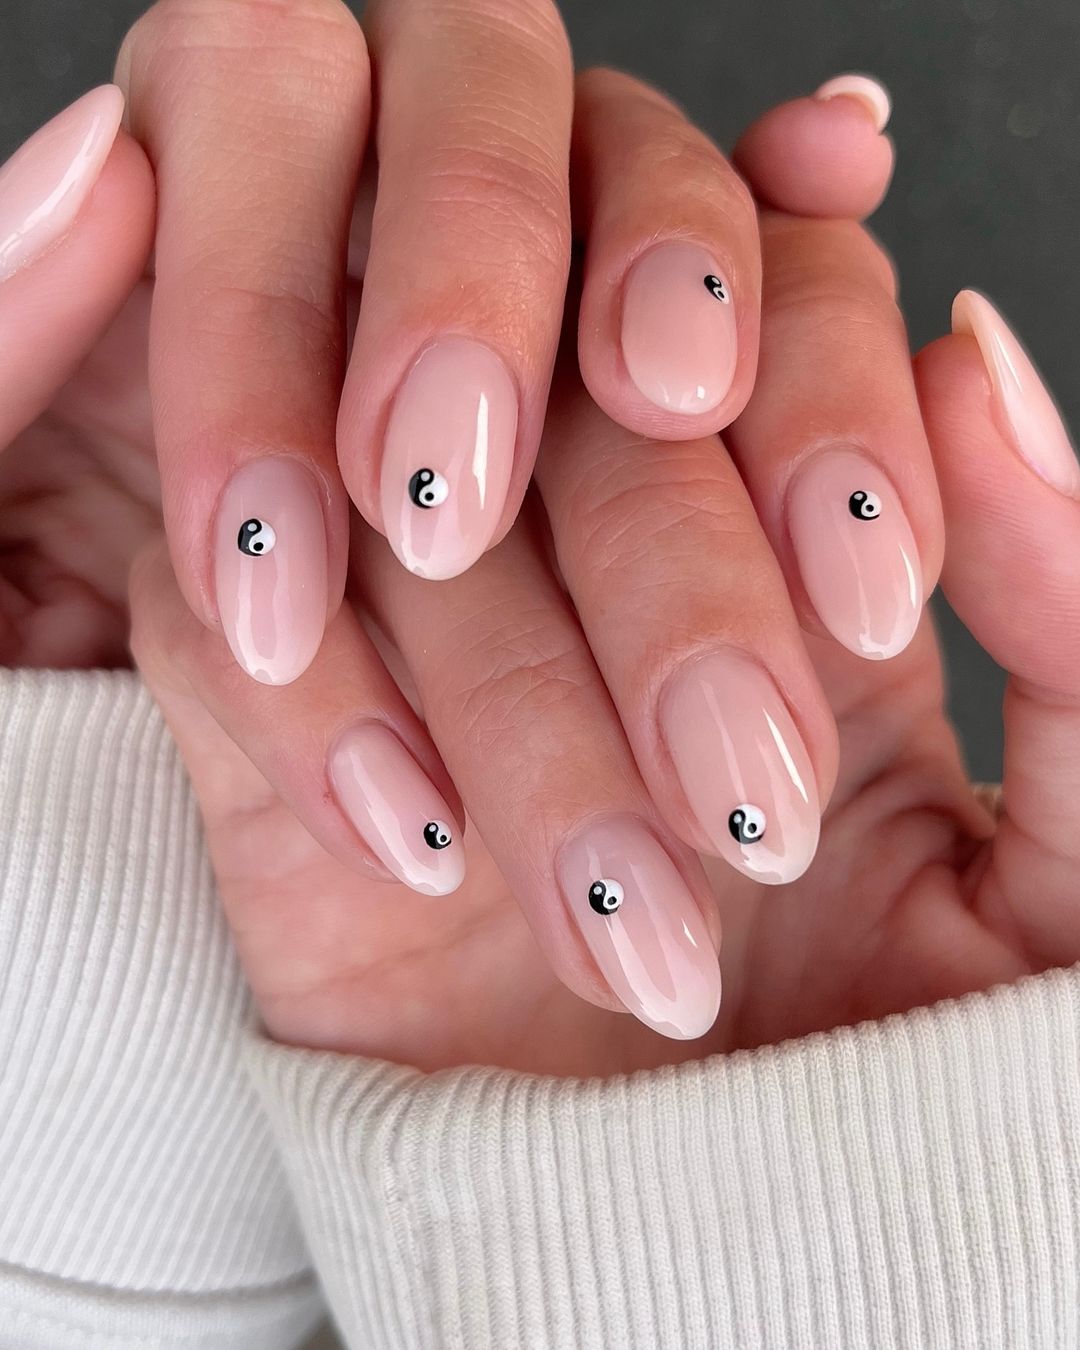
- Base Coat: Chanel La Base
- Neutral Polish: OPI Bubble Bath
- Black and White Polish for Yin Yang Detail: Essie Licorice and Blanc
- Dotting Tool: For precise yin yang symbols
- Top Coat: Essie Gel.Setter Top Coat
This Collection is Geared towards Delivering Pure, Boldness with a Minute yet Firm Element that Lasts all through the Days of Summer.
Start by applying the base coat then follow up with neutral polish as a gentle backdrop. Carry out dotting tool in black and white nail polish to create yin yang symbol. Apply top coat after the dots have dried for a glossy finish that will last longer.
Stained Glass Intricacy
This nail design appears like a work of stained glass artist with its multi-colored, glittering divisions defined by bold black lines. It is an exclusive and vibrant new way to bring traditional art’s elegance into the realm of modern fashion.
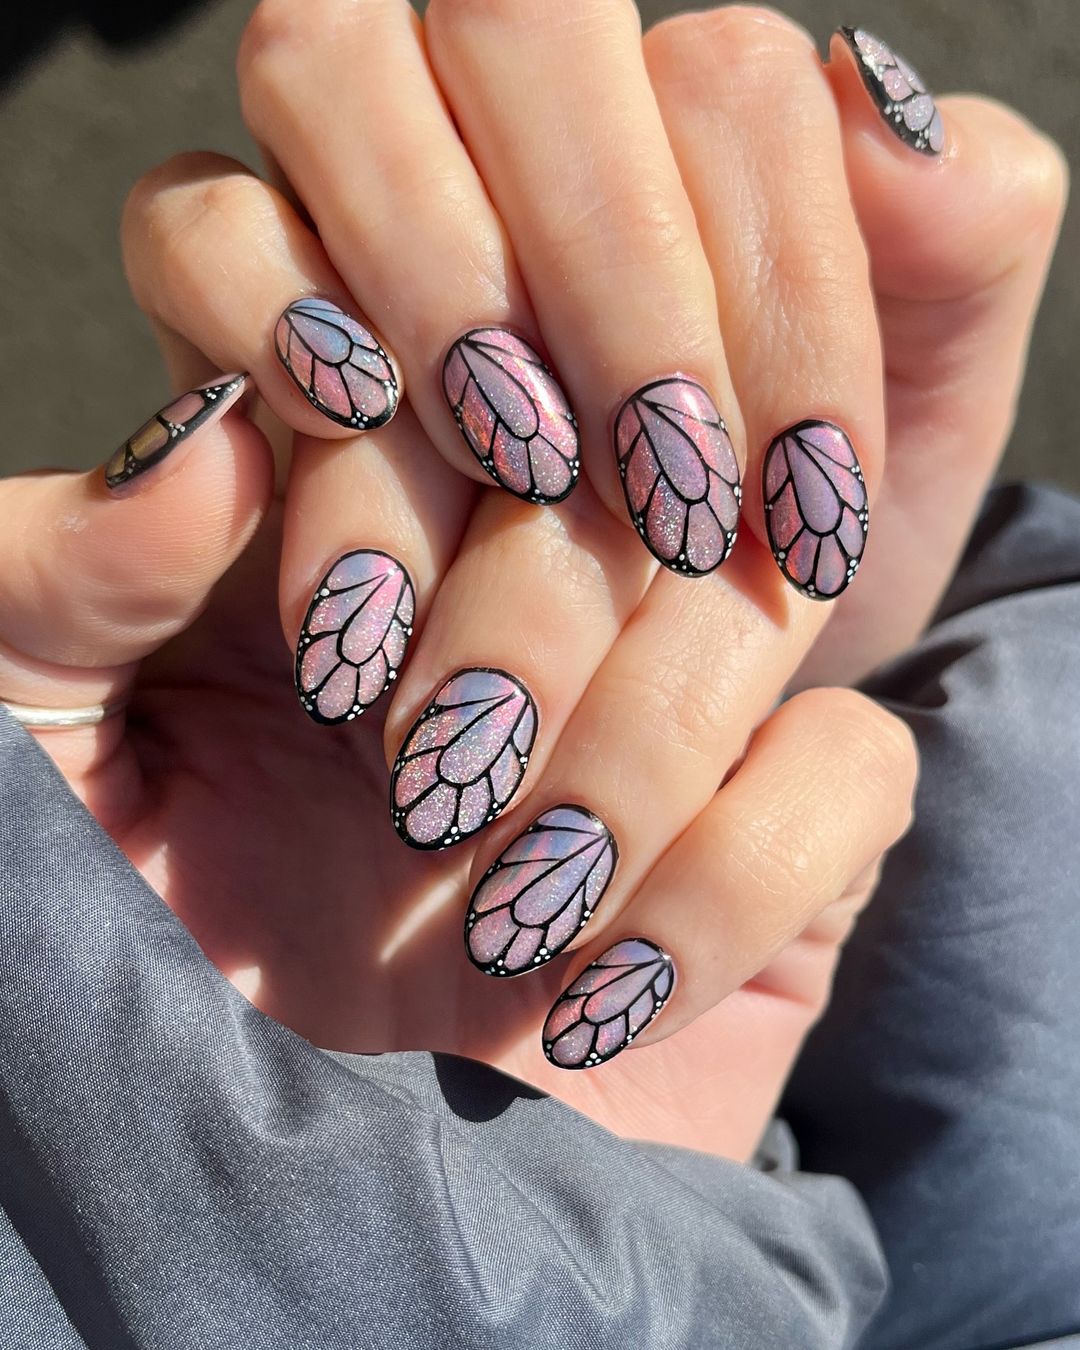
- Base Coat: OPI Natural Nail Base Coat
- Holographic Polishes: Several shades for stained glass effect
- Black Detailing Paint: boundaries for stained glasses
- Glitter Top Coat: To up the shine on the design
- Top Coat: Seche Vite Dry Fast Top Coat
These products were selected based on their ability to create a shiny, intricate layout that catches light just as real stained glass does.
First coat the nails with base coat and then fill sections of your nail with different holographic polishes. Once it dries, outline every section using black outlining paint making it look like stained glasses. Finally put some topcoat containing glitter for shine and complete with quick drying top coat to seal in the design.
FAQ
Q: How long can gel nail designs last?
A: Gel nail designs can last for two weeks or more with proper application and aftercare. It is important to avoid harsh chemicals on the nails and wear gloves whenever necessary to extend the life of your gel manicure.
Q: Can I do these nail designs at home, or do I need to go to a salon?
A: Many nail designs can be done at home with the right tools and steady hands. However, some intricate designs or those requiring UV curing (like gel) may be best left for salons, especially if you want a professional finish.
Q: Is nail art harmful to my natural nails?
A: Nail art itself does not harm nails but wrong removal of products such as gel polish does. Always follow the correct procedures for applying and removing them in order to have healthy nails.
Q: What should I do when my nail polish chips?
A: In case your nail polish chips, you can gently file the chip until it smoothes out at the edge then apply a thin layer of top coat on it so that it gets sealed back into place. In case of bigger chips, re-touching using similar color polish maybe required before putting on a top coat.
Q: How do I make my nail polish dry faster?
A: To make your nail polish dry faster put some thin layers of polish, use quick-dry top coats or dip them in cold water after painting. Alternatively, there are fast drying sprays that speed up this process.
Q: Are there any green options for environmentally friendly nail polishes?
A: Definitely there are several brands that provide eco-friendly non-toxic polishes packed in environmentally conscious bottles. Just look through different labels saying “5-free” or “7-free” meaning they don’t have certain toxic substances.
Q: How do I keep up with summer trends without changing my nails very often?
A”: To keep pace with trends without frequent changes, choose a design that has neutral base and can easily be dressed up with fashionable colours or patterns.
Save Pin