Have you ever thought about why summertime nails can make all of us so happy almost instantly? What’s up with the random colors on our fingertips that make us feel like it’s vacation? Today, we explore the world of summer ombre nails — a trend that is taking over every beach towel and boardwalk. Will these hot designs come and go like a summer fling, or are they the key to keeping an endless summer spirit going?
A Fresh Take on Summer Classics
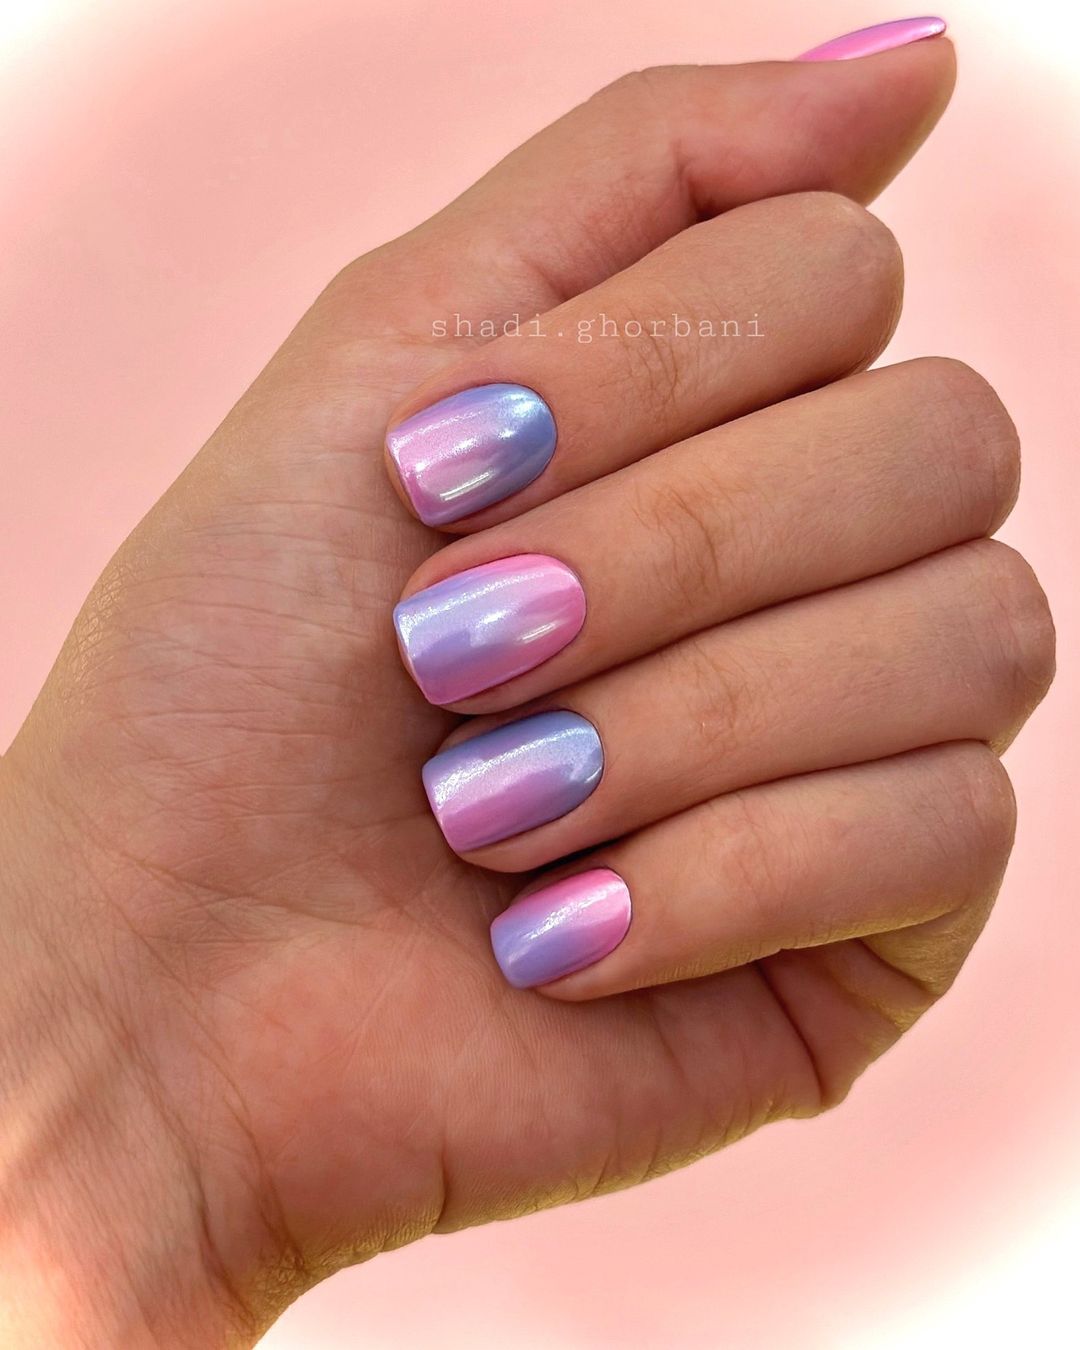
The first of this summer’s lineup is like a ray of sunshine. It has a sleek almond shape that’ll make your fingers look long and elegant. The colors it features transition from soft mint to lilac, making me think about eating sorbet on the beach. This manicure says “summer” with every stroke.
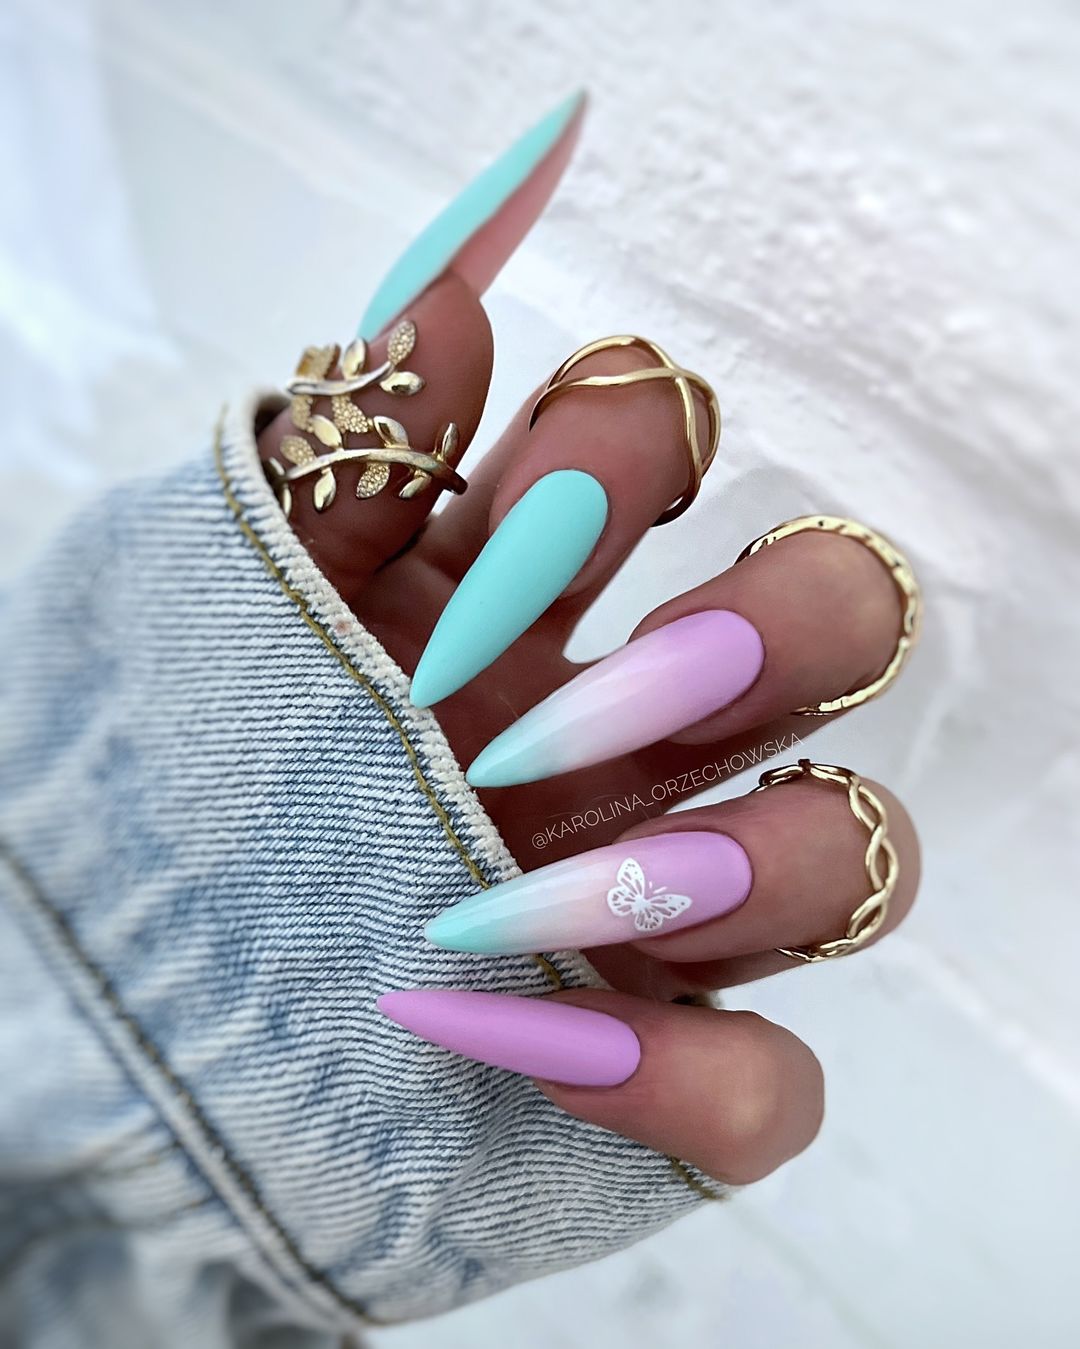
- Professional Opinion: With its perfect mix of cool tones, this look strikes the right balance between playfulness and elegance.
- Accents: I added silver embellishments to give it some sparkle, so they could catch the light in all those pretty pink and purple ways.
- Manicure details: I took my time applying it—working each color into the other to create an ombre effect that feels magical.
Items you need:
- Ombre sponge
- Base coat – ‘Everlasting Base’ by EternaPro
- Mint polish – ‘Minty Freshness’ by Lacquer Lust
- Lilac polish – ‘Lilac Leisure’ by Color Carnival
- Silver studs – ‘Tiny Ice’ collection by Bling Factor
- Top coat – ‘Gloss Boss’ by Shiny Tops
Professional Recommendation: If you’re trying to recreate this stunning summer manicure at home, stick with polishes from Lacquer Lust. They have the best blending capabilities, which are crucial when perfecting a flawless ombre.
DIY Steps:
- Apply base coat and mint base layer.
- Use sponge to dab on lilac starting at tip and blending down.
- Finish with studs applied using dotting tool for precision; finish off with top coat.
The Edgy Summer Glam
Whoever said short, compact gel nails can’t have a lot going on? Here’s a fresh and modern twist to your classic French manicure that’ll leave you allured by its mesmerizing metallic glimmer. This sleek design is ideal for someone who teeters between professionalism and creativity.
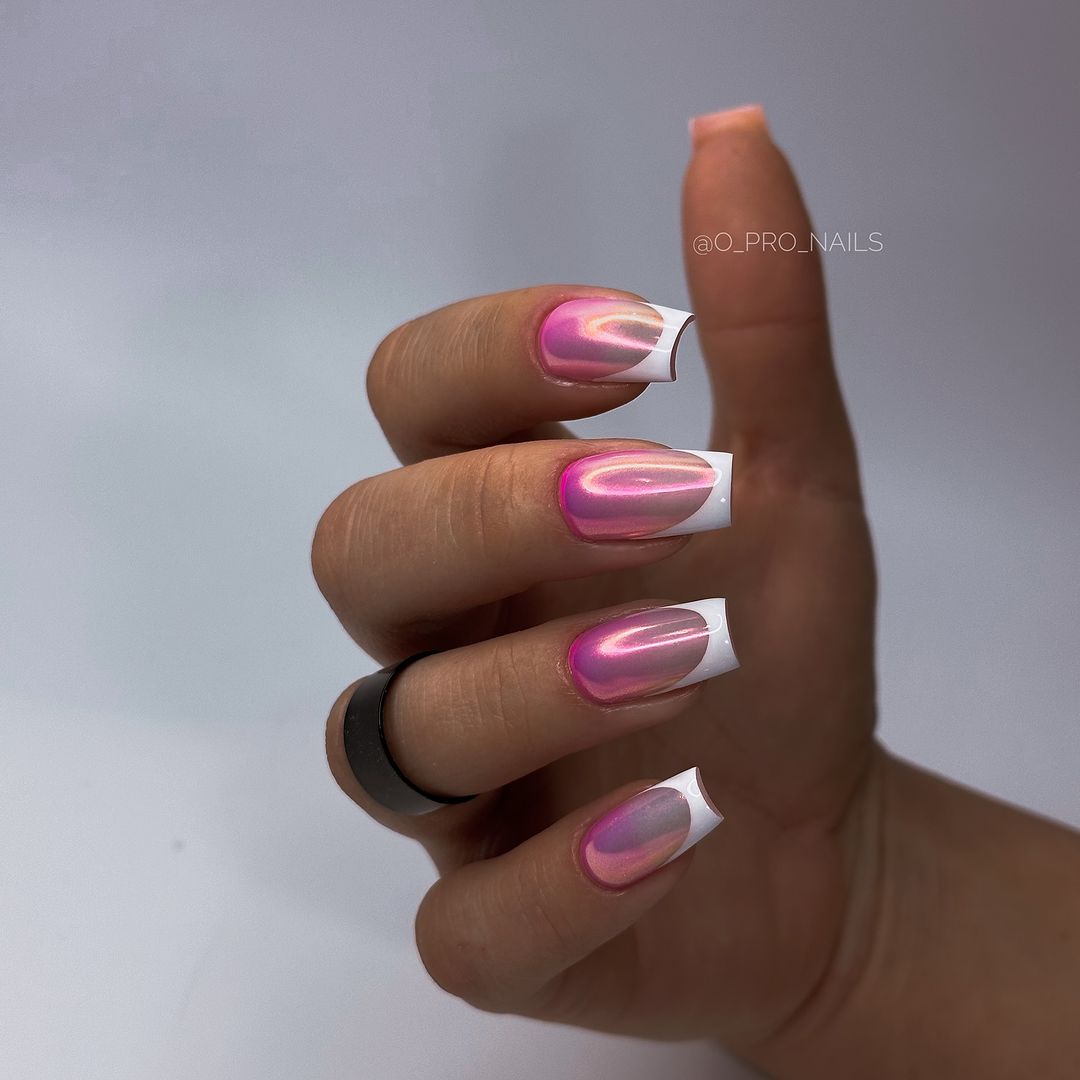
- Professional Opinion: This bold statement with hints of traditional elegance is absolutely perfect for those who wish to add some flare to their summer style.
- Accents: The pink chrome polish gives it an almost futuristic look while the clean white tips keep it rooted in tradition.
- Manicure details: It’s all about precision here; each line should be sharp enough to slice through the summer heat.
Required supplies:
- Nail tape
- Base coat – ‘Foundation’ by NailEdIt
- White polish – ‘Snow Queen’ by FrostyTips
- Metallic pink polish – ‘Chrome Pink’ by MirrorMagic
- Top coat – ‘Seal the Deal’ by Lasting Shine
Professional Recommendation: The base coat ‘Foundation’ from NailEdIt will provide the perfect backdrop for the white and chrome colors to fully shine (literally).
DIY Steps
- Start by applying a clear base coat.
- Place nail tapes strategically as guides for your desired tip shape and thickness.
- Paint one side of your nails with white polish while painting the other side with pink chrome color.
- Peel off tapes immediately afterwards before the paint dries up completely, then finish it off with a strong top coat.
The Regal Summer Touch
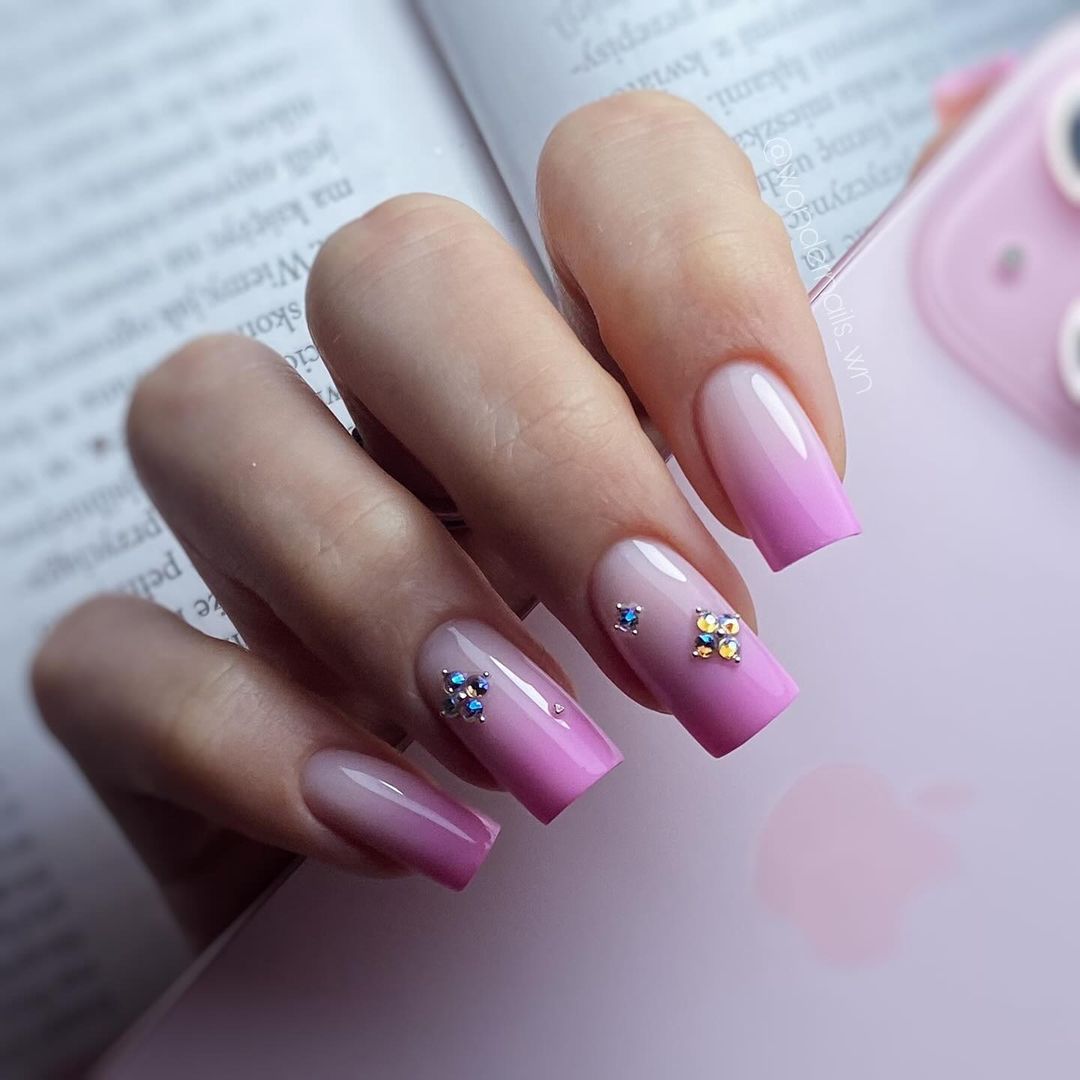
This here is what you’d call the epitome of luxury nail fashion. These are square nails displaying a sophisticated pink french design, with gold accents to make it all the more regal.
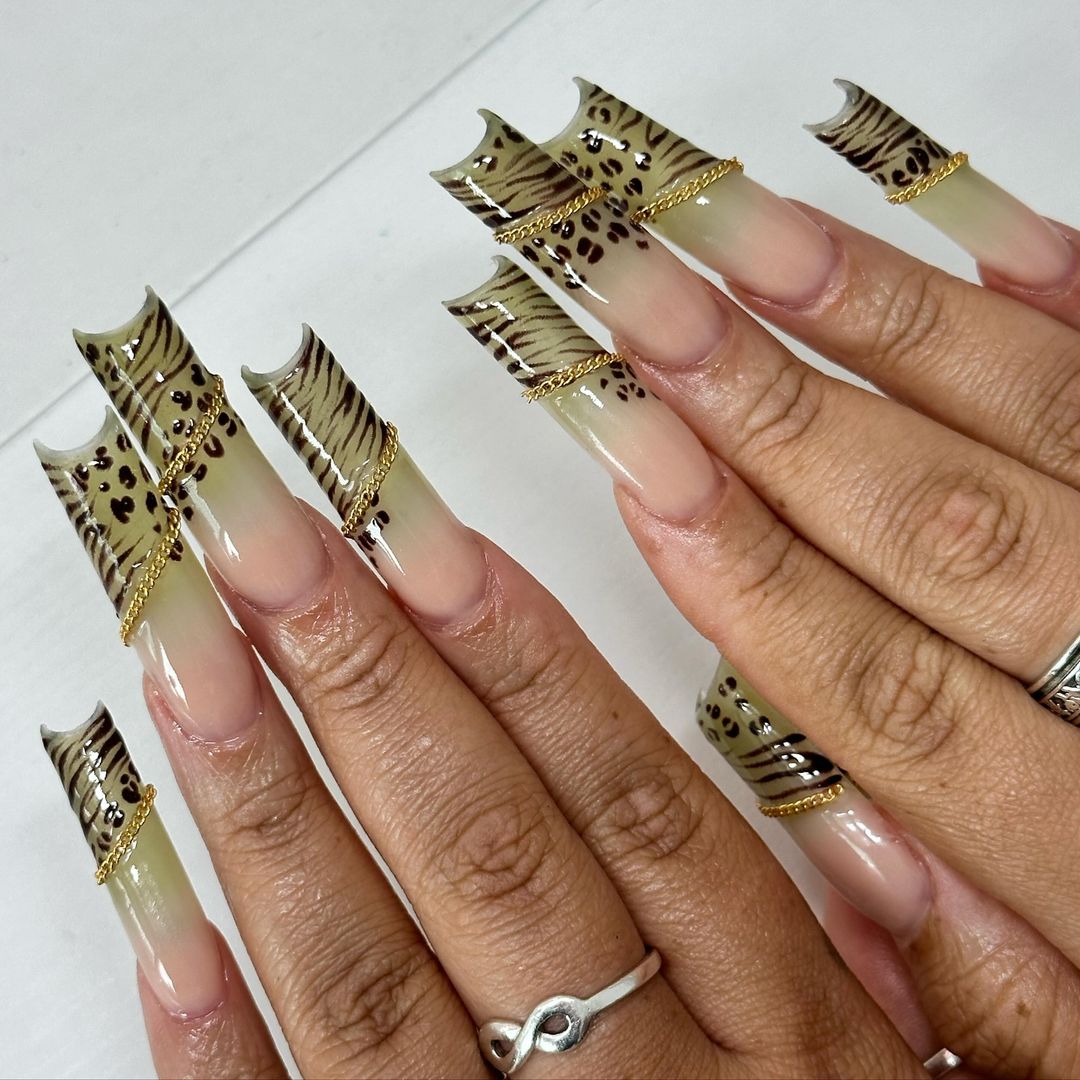
- Expert Opinion: For those who want a taste of drama, this barbie look with its glitter and rhinestones is your spirit animal for summer.
- Accents: Gold bands and animal print decals make a fierce statement.
- Manicure details: The masterful execution showcases an expert in intricate designs.
Tools:
- Thin brush
- PrimeLock’s ‘Pure Adhesion’ base coat
- Fantasia’s ‘Barbie Dream’ pink polish
- Gold striping tape
- DecoArt’s ‘Wild Side’ animal print decals
- GemGlam’s ‘Crystal Clear’ rhinestones
- EverGleam’s ‘Diamond Finish’ top coat
Professional Recommendation: DecoArt’s ‘Wild Side’ decals are unmatched in their authenticity and ease of application.
DIY Steps:
- Apply base coat, then pink polish.
- Stick on gold tape at tips/edges.
- Apply decals meticulously using tweezers.
- Add rhinestones for sparkle, finish with a durable top coat.
Whimsical Waves of Summer
A blue and green ombre slapping against your nails. That’s what this design is. Glossy and full of summer luxury.
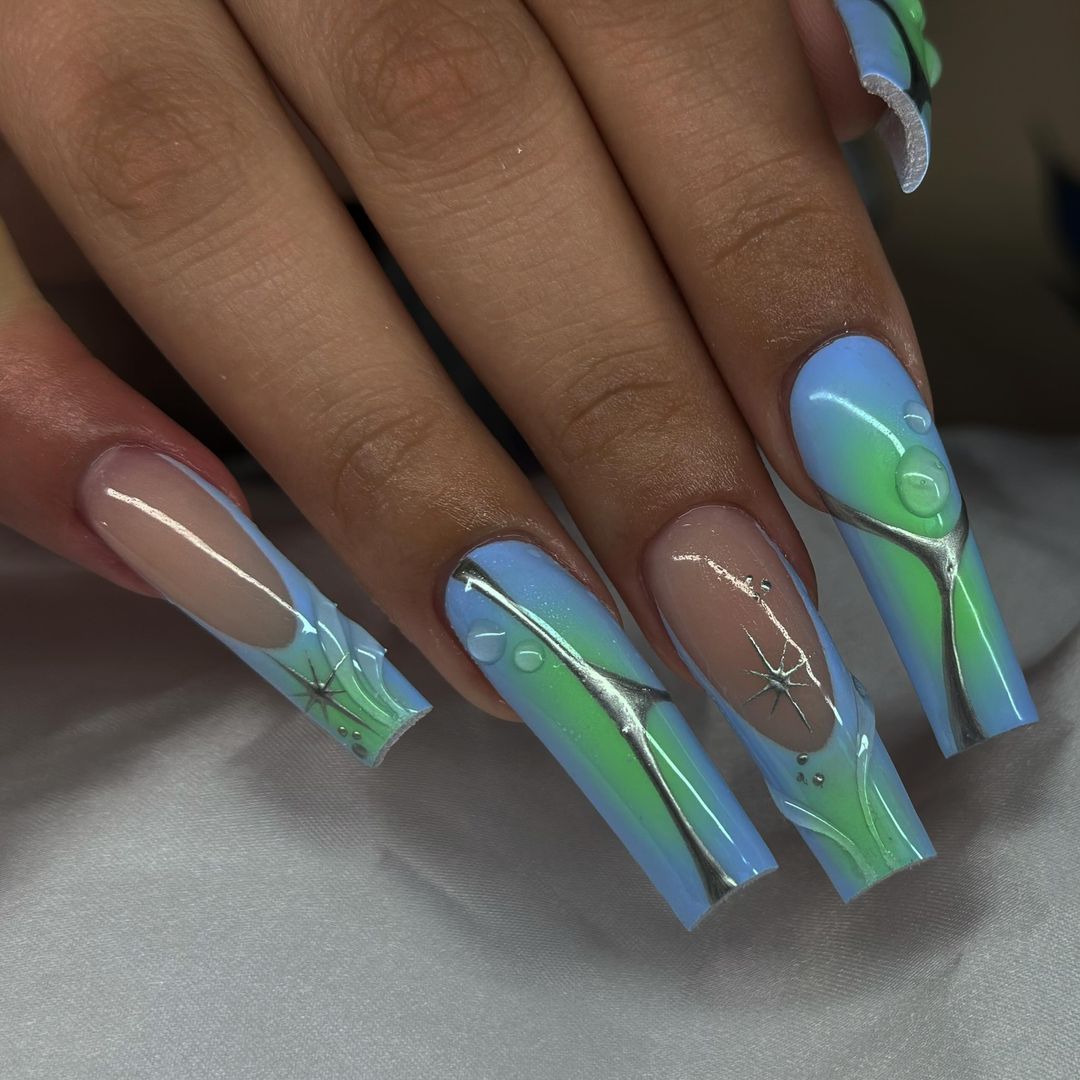
- Professional Opinion: The design is a reference to the sea, with its soothing gradient in the ocean. It also adds that touch of sparkle with the silver droplets.
- Accents: Swirls and water trails are made with silver glitter
- Manicure details: A seamless ombre under a sparkle that catches the light beautifully.
Supplies:
- Ombre brush
- Base coat – ‘Anchor Hold’ by ManiMasters
- Blue polish – ‘Ocean’s Call’ by Aquatica
- Green polish – ‘Seafoam’ by Nature’s Palette
- Silver glitter polish – ‘Stardust’ by GlitzGlams
- Top coat – ‘Glassy Gloss’ by SheenSheer
Professional Recommendation: Use a top coat that doesn’t take away from the silver droplets but instead enhances them like ‘Glassy Gloss’ by SheenSheer.
DIY Steps:
- You first want to start with a base coat, that way you can protect your natural nail while working on this beautiful piece.
- Paint one half of your nail blue and paint the other side green so they blend in together in the middle. Make sure to use an ombre brush to make it smoother for you.
- Now it’s time to add some sparkle. Put droplets of silver glitter onto your nails as well as drawing some swirls on there too.
- Lastly, seal it off with a top coat so that it stays pretty for longer!
Save Pin
Soft Summer Elegance
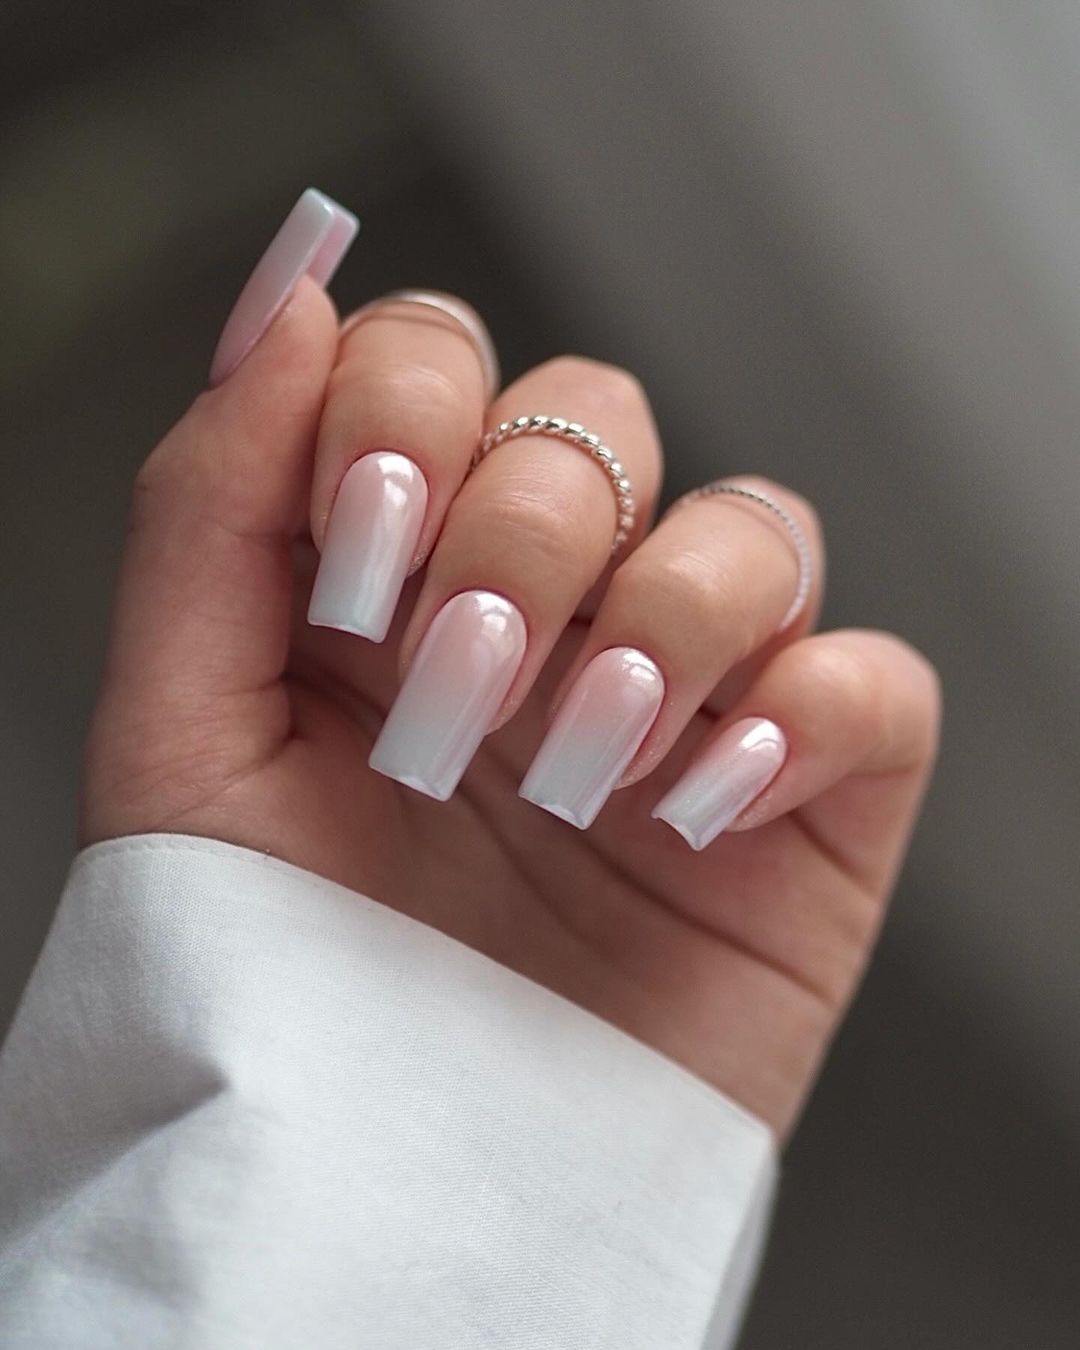
A small, square acrylic canvas delivers a new take on the classic pink and white manicure. The typical french style is transformed into an eye-catching look with a soft, frosted pink merging into a crisp white strip that pops with sparkles. It’s lowkey and super pretty.
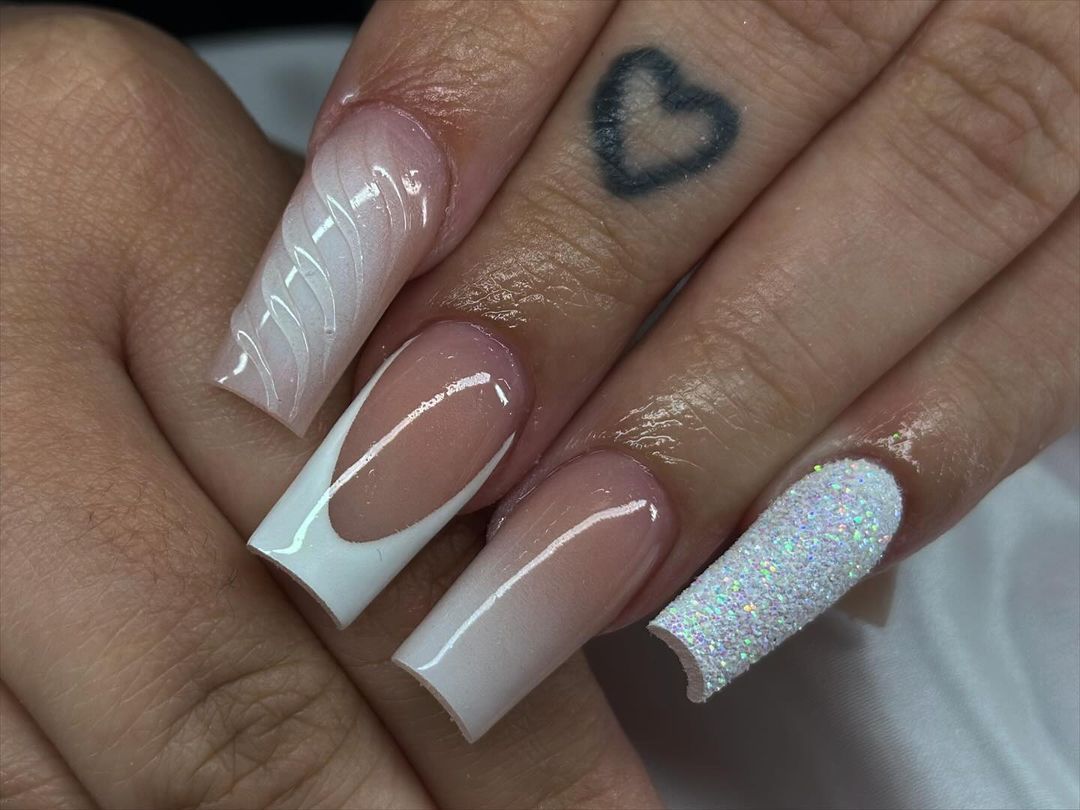
- Professional Opinion: This simple yet elegant mani really gives off lowkey glam vibes. The matte finish combined with the short square acrylic nails adds a modern twist to the summery aesthetic.
- Accents: We wanted to create balance between textures and shines.
- Manicure details: They took their time with these bad boys, focusing on the matte-gloss contrast.
Products:
- Matte top coat – ‘Velvet Touch’ by Matteify
- White polish – ‘Whitehaven’ by PureStrokes
- Pink polish – ‘Blush’ by Pastelle
- Glitter overlay – ‘Diamond Dust’ by SparkleLayer
- Top coat – ‘Seal & Shine’ by ProtecNails
Professional Recommendation: If you’re going for that ethereal glitter look, “Diamond Dust” by SparkleLayer is just what you need for those summer nights!
DIY Steps:
- Apply one layer of pink base coat and let dry completely.
- Next apply a white stripe at the tips of your nails. Blend slightly into pink to get that ombre effect we all love!
- For your accent nail, apply a glitter overlay over the pink stripe.
- Alternate between matte and glossy top coats for each nail.
A Manicure of Celestial Dreams
These nails have embraced a vibrant design that pairs sky blue with a soft blush. The color has been used to create an alternating pattern on each nail, with the former hue appearing deep and confident, while the latter is serene and muted.
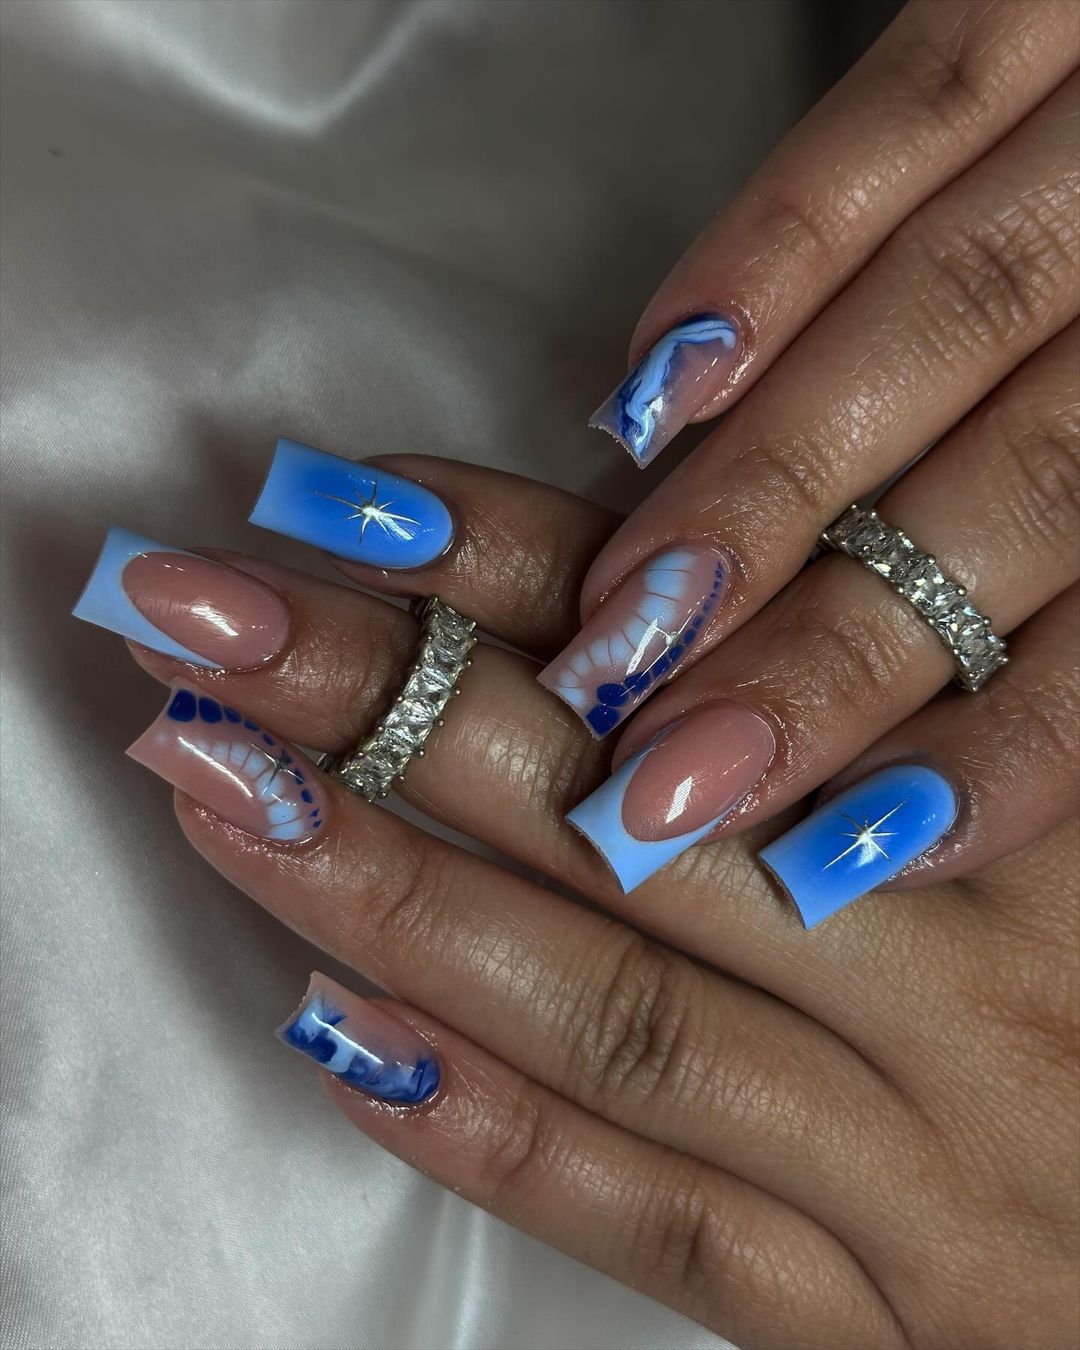
- Professional Opinion: This design is full of energy inspired by summer days, and calmness inspired by summer nights. it’s perfect for people who appreciate both adventurous moments and tranquility.
- Accents: White detailing has also been added to this dynamic design, as well as sparkling accents. The latter have been placed in strategic areas to imitate stars or the glimmer of early morning light.
- Manicure details: Precision was everything when executing this design. The French tip was given a modern edge, while all other embellishments were placed perfectly with an artist’s touch.
Products:
- Sky blue polish – ‘Azure Adventure’ by HorizonLine
- Soft blush polish – ‘Whispering Rose’ by GentleGlow
- White detailing polish – ‘Snowline’ by ArcticWhite
- Star-like rhinestones – ‘Celestial Spark’ by SkyJewels
- Top coat – ‘EverGleam’ by HighShine
Professional Recommendation: For this look, I would recommend using ‘Azure Adventure’ because of its bold blue color. However, if you’re looking for something more understated then ‘Whispering Rose’ will be your best bet.
DIY Steps
- Apply a base coat first to protect the natural nail.
- Paint nails different alternating colors using ‘Azure Adventure’ and ‘Whispering Rose.’
- Use ‘Snowline’ to introduce fine details and highlights into the design.
- Place ‘Celestial Spark’ rhinestones neatly at specific points on each nail to give them a starry effect.
- Finish things off with ‘EverGleam.’ It’ll leave nails high glossed and covered in a seal that lasts long.
Celestial Shimmer: A Summer’s Dream
Gazing at these nails is like peering through a telescope into a galaxy far, far away. These almond-shaped nails are painted in a gradient from the sky blue to soft pink, and sprinkled with sparkle like stars in the distance.

- Professional Opinion: This design captures the magic of a starry summer night sky. The glitter flecks add depth, making the nails look as though they hold the universe within them—a true pink summer spectacle.
- Accents: The delicate transition of colors paired with the glitter creates a cosmic dance on your nails.
- Manicure details: The ombre effect is achieved flawlessly, with each speck of glitter strategically placed to mimic the stars.
Consumables:
- Gradient sponge
- Base coat – ‘Infinity Base’ by NailSpace
- Sky blue polish – ‘Horizon’s Blue’ by Skyline Shades
- Soft pink polish – ‘Whisper Pink’ by Quiet Tones
- Glitter top coat – ‘Starry Eyed’ by CosmosGlitz
- Top coat – ‘Everlast Shine’ by Enduring Sheen
Professional Recommendation: To achieve that mesmerizing celestial effect, you’ll want to get your hands on ‘Starry Eyed’ by CosmosGlitz.
DIY Steps
- Apply base coat for protection.
- Use sponge to apply blue and pink polishes for gradient base.
- After dry, sweep over with glitter top coat for star-like shimmer.
- Finish with clear top coat for durable glossy shine and let your summer nights shine bright on your fingertips.
Pink Perfection: Soft and Sophisticated
Picture a pink that blushes with the summer breeze. These short gel nails have a soft gradient of pink and white to embody that image, with one nail featuring a small rhinestone for just a touch of glamour.
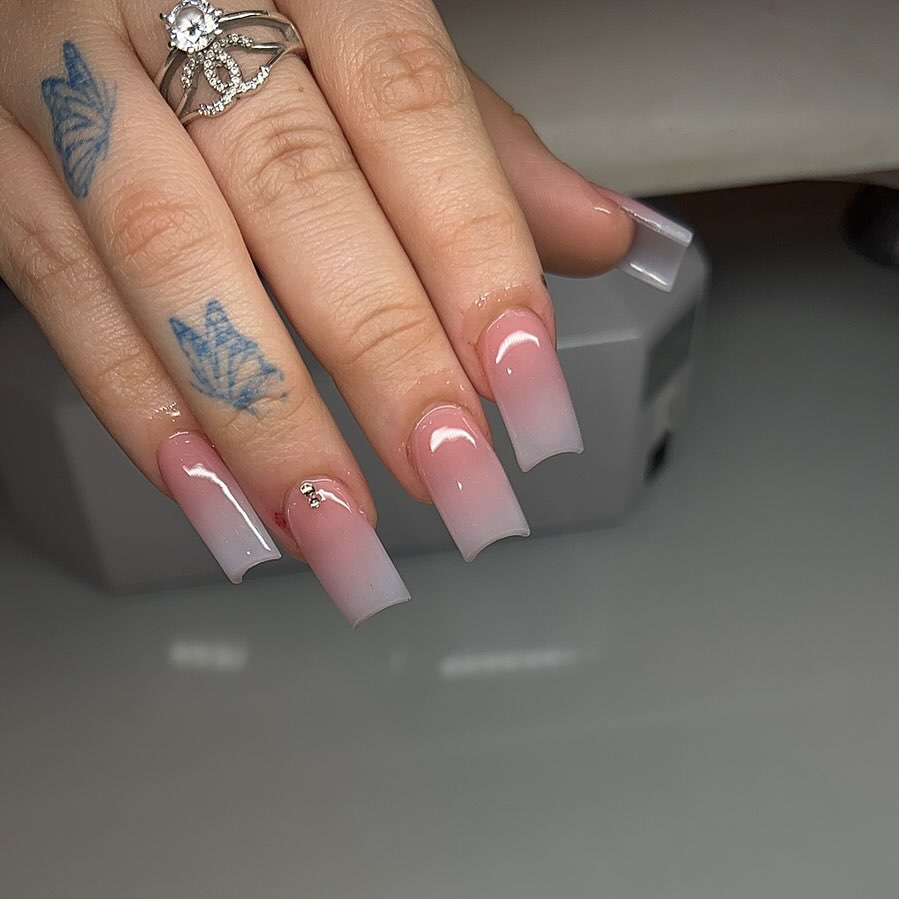
- Professional Opinion: This shade of pink is so subtle, but when paired with the clean white tip, it screams summer sophistication. The rhinestone looks a drop of morning dew – tiny but impactful.
- Highlight: The French tip and the single rhinestone give these nails an elegant minimalism.
- Manicure details: The nails are sculpted to perfection and the gradients is as smooth as day turning into night.
What you’ll need:
- Buffer
- Base coat – ‘Smooth Beginnings’ by NailStart
- Pink gel – ‘Dawn Blush’ by Gelique
- White builder gel – ‘Snowcap’ by StrongBase
- Rhinestones – ‘Petite Elegance’ by JewelNails
- Top coat – ‘Ultra Gel Shine’ by Glossify
Professional Recommendation: For such a subtle gradient, Gelique’s ‘Dawn Blush’ has just the right translucency that makes blending very easy.
Steps to DIY:
- Shape your nails into your desired short gel shape and buff them until they’re smooth.
- Apply your pink gel and fade it into your natural nail color.
- Apply your white builder gel at your tips and blend it into where it meets the pink on your nail bed.
- Use a dotting tool or other adhesive method to place one rhinestone directly in the center of the accent nail – this will be its feature!
- Finish off with a top coat to seal everything in place and protect your lovely new summer manicure.
Vibrant Vibes: The Art of Summer
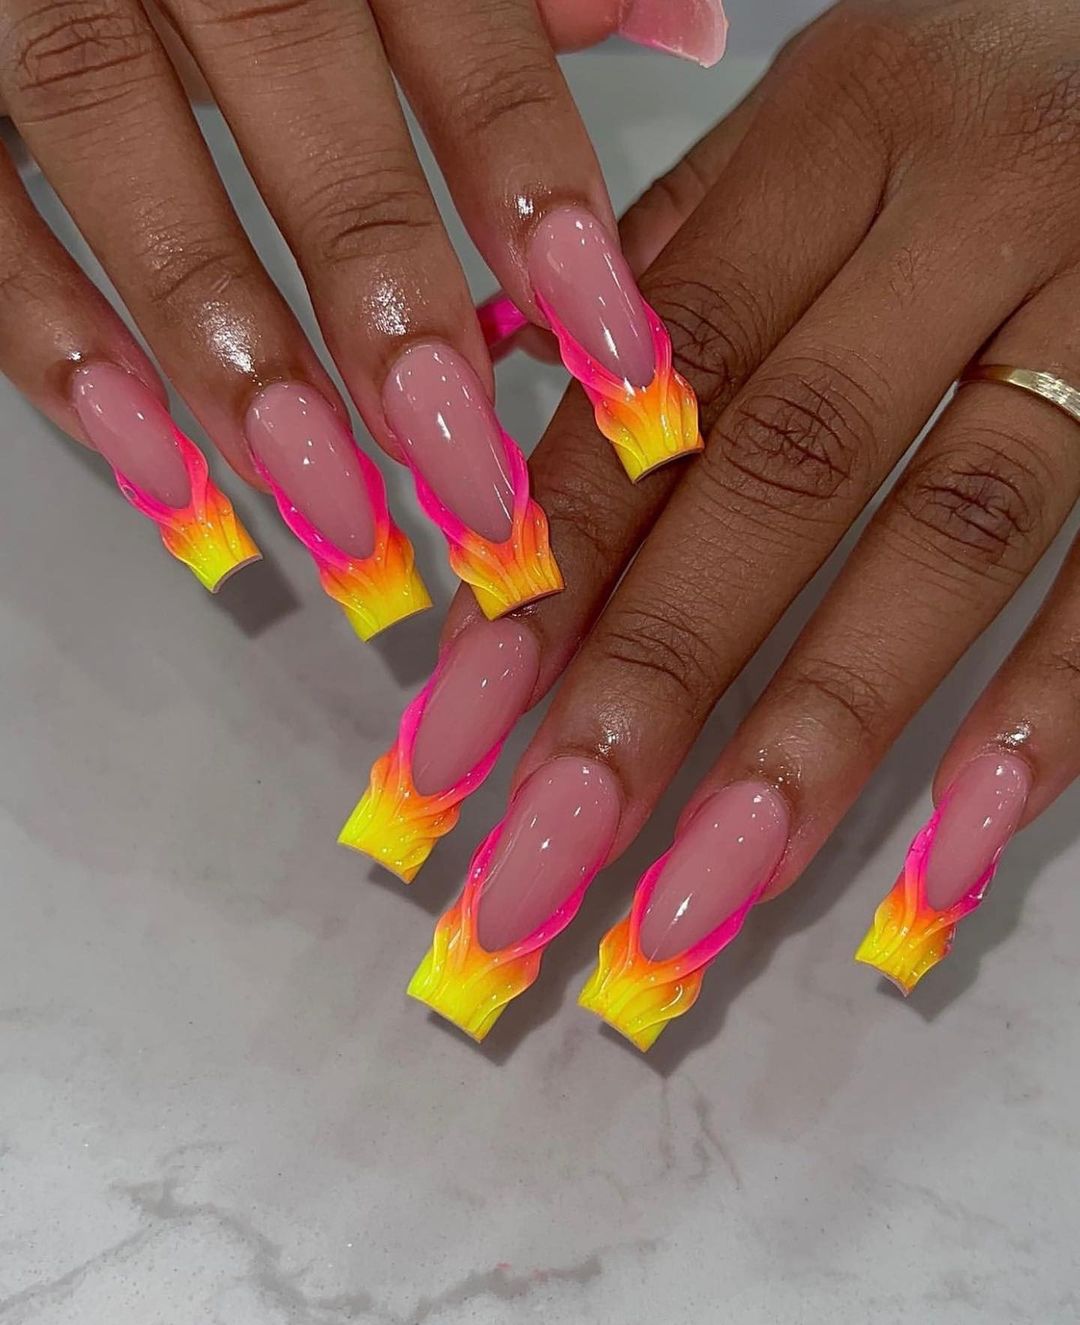
Bold, bright, and totally unapologetic, these nails scream summer fun. A bold pink and yellow ombre is given an extra boost with a striking black line design that’s as eye-catching as it is pretty.
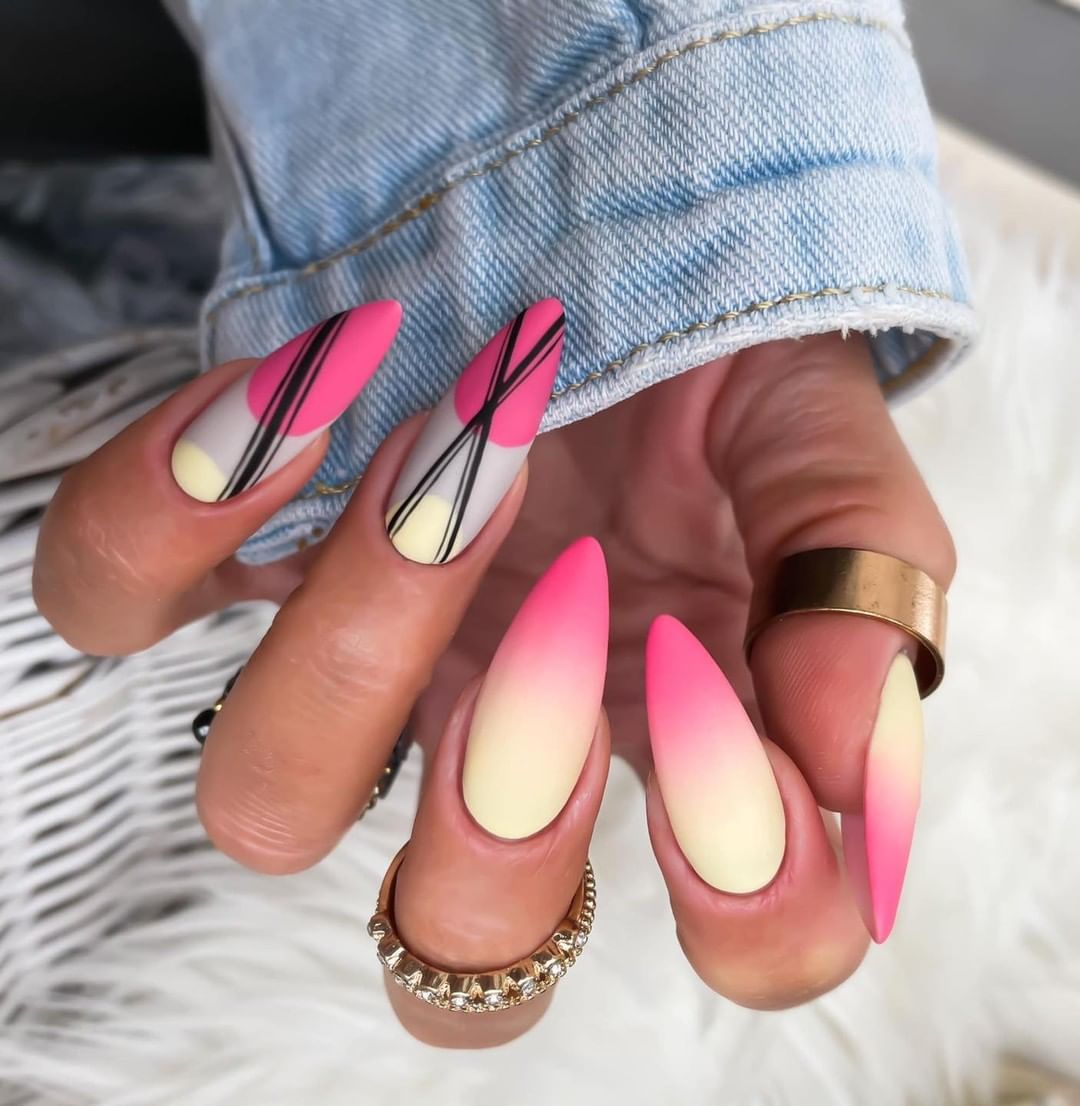
Celebrity nail artist, Betina Goldstein says: “Not everyone can rock this kind of look. It’s for the bold and the fashion forward. This is all about making a statement.”
The illusion of almond nails are created by sharp straight lines in the design
A perfectly executed ombre base allows the black accents to pop
- What you’ll need:
- A detailing brush
- Base coat – Armor Coat by Durability
- Yellow polish – Sunrise Burst by DayGlow
- Pink polish – Flamingo Dance by TropicTones
- Black polish – Jet Set by DarkMatters
- Top coat – Mirror Finish by ReflectiveShine
Pro Tip: Betina Goldstein recommends using Jet Set by DarkMatters for those sharp lines that make the whole look.
Save Pin
Metallic Whispers: A Subtle Summer Spark
These nails have a beautiful and delicate fusion of pink and white, with the whole thing having a bit of a metallic shine that whispers. If you look closer at the design, you’ll notice that there’s one nail towards the end that has a bunch of rhinestones on it. It seems like an understatement, but it doesn’t take much to make something sophisticated or perfect for summer evenings.
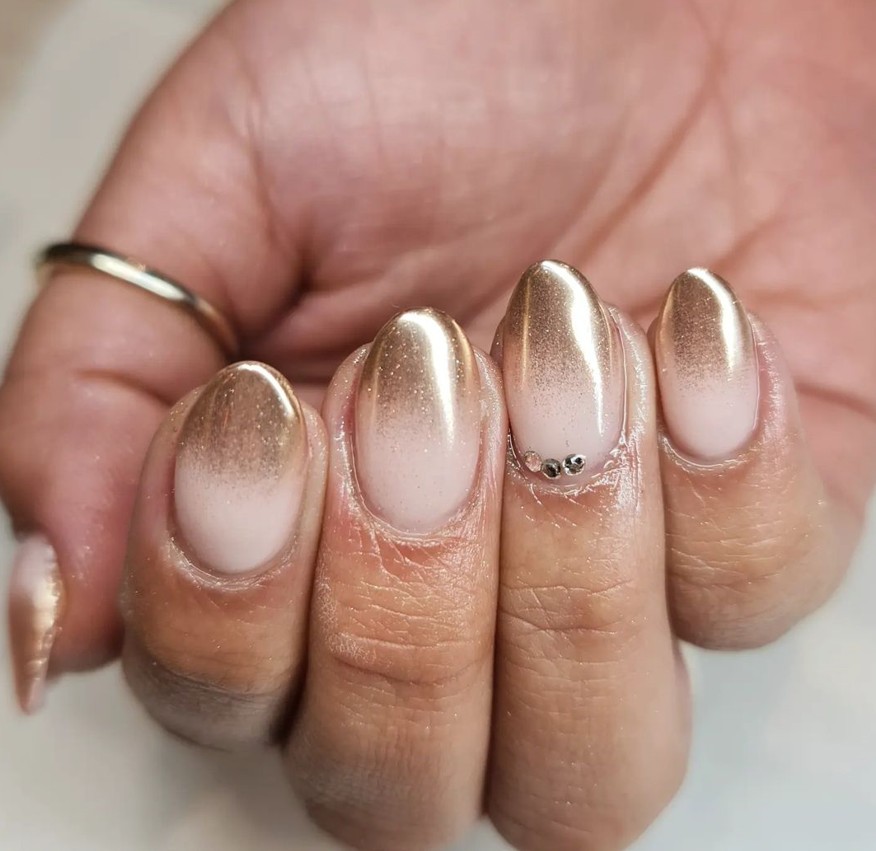
- What professionals think: The way this almond shaped nail is designed is what I would call elegant, where less really does mean more. If you’re the type who loves a subtle sparkle, then I think this is a chic choice.
- Accents: The rhinestones on the feature nail act as a focal point, drawing the eye without overwhelming the design’s gentle nature.
- Manicure details: The metallic gradient is applied with a soft touch, creating a pink summer dream.
Consumables:
- Metallic polish – ‘Gilded Rose’ by LuxeNail
- Base coat – ‘Fortify’ by NailArmor
- White polish – ‘Pearl Essence’ by WhiteOut
- Pink polish – ‘Ballet Slipper’ by PastelPretties
- Rhinestones – ‘Mini Dazzle’ set by SparkleCraft
- Top coat – ‘Crystal Clear’ by GlossWorks
Professional Recommendation: When I saw ‘Gilded Rose’ from LuxeNail I knew immediately that it had just right amount of metallic sheen to catch light without overshadowing your natural beauty.
DIY Steps
- Coat the nails with ‘Fortify’ to create a smooth base.
- Apply ‘Ballet Slipper’ as the foundation color.
- Gradually layer on ‘Pearl Essence’ and ‘Gilded Rose’ for a smooth gradient effect.
- Embellish one nail with a delicate constellation of ‘Mini Dazzle’ rhinestones.
- Finish with ‘Crystal Clear’ for a durable and protective shine.
Pastel Playground: Summer’s Soft Symphony
A sweet swirl of pastel pink and lavender with a silvery flair makes for a lovely summer melody on these short nails. There’s no need to hesitate between pastel and metallic, when you can have both in one design.
- Pro Tip: This is proof that a good color combo can make any manicure sing.
- Accent Work: The metallic just as well acts as a highlighter, adding a modern touch to the classic pastel look.
- Manicure Specs: The gradient isn’t stark enough to be called an ombré but it offers an effect that resembles a light summer breeze nonetheless—a pleasant sight through and through.
Consumables:
- Nail Polish
- Sponge for gradient
- Base Coat – ‘Silk Foundation’ by BaseCoatLeaders
- Pastel Pink – ‘Cotton Candy’ by SweetLacquers
- Lavender – ‘Lavender Whisper’ by GentleHues
- Silver Metallic – ‘QuickSilver’ by Metallica
- Top Coat – ‘Everlasting’ by DuraShine
Pro Recommendation: When it comes to metallics, go for something like ‘QuickSilver’ by Metallica since it gives off enough shine without covering up the softness of your lighter colors.
DIY Steps:
- Apply your base coat using “Silk Foundation” to get your nails ready for the design.
- Dab “Cotton Candy” and “Lavender Whisper” onto your sponge and press it onto each nail carefully until you’ve covered them entirely. This will give you the gradient look you’re going for.
- Add some silver along the tips or even try adding it within the middle of your gradient if you’re feeling extra creative!
- Seal everything off with “Everlasting” so that this look will last all day long.
Fiery Finesse: A Flaming Summer Trend
Bring the summer spirit to life with these flaming pink nails. The intense ombre effect transitions into a fiery yellow. A pink and orange design is the perfect embodiment of a summer sunset, colorful and full of energy.
- A professional’s opinion: This one is not for the faint of heart. If you want to capture everything that summer stands for, then this hot design is the one for you.
- Accents: By transitioning each color from dark to light, it creates an illusion that flames lick at each nail tip.
- Manicure details: The colors bleed into one another just like day turns into night.
What you’ll need:
- Detailing sponge
- Base coat – ‘Adhesion Expert’ by GripGlue
- Pink polish – ‘Neon Blaze’ by FluoFever
- Orange polish – ‘Citrus Spark’ by VividShades
- Yellow polish – ‘Solar Flare’ by LuminousColors
- Top coat – ‘Shine For Days’ by LastLustre
A professional’s recommendation: To make sure your nails are as bright as fire, try out ‘Solar Flare’ from LuminousColors.
How it’s done
- Begin with a base coat of adhesive using the glue-like formula in “Adhesion Expert”.
- Use a sponge to apply neon pink at the bottom of your nail bed. Then blend in neon orange, followed by solar flare yellow at the tips of your nails.
- Layer each color carefully so they melt effortlessly together, like when day turns into night on a sunset horizon.
- Finally, lock in all that vibrant color and stay power with “Shine For Days”.
Enchanted Elegance: Pink Whisper & Bow Delights
Romance is plastered all over this design. The soft pink ombre that fades into transparency looks like it was painted with a cloud, but it’s the bow and rhinestones that float on the nails with no apparent support. All these elements combined create a manicure of grace and finesse, perfect for a summer date night.
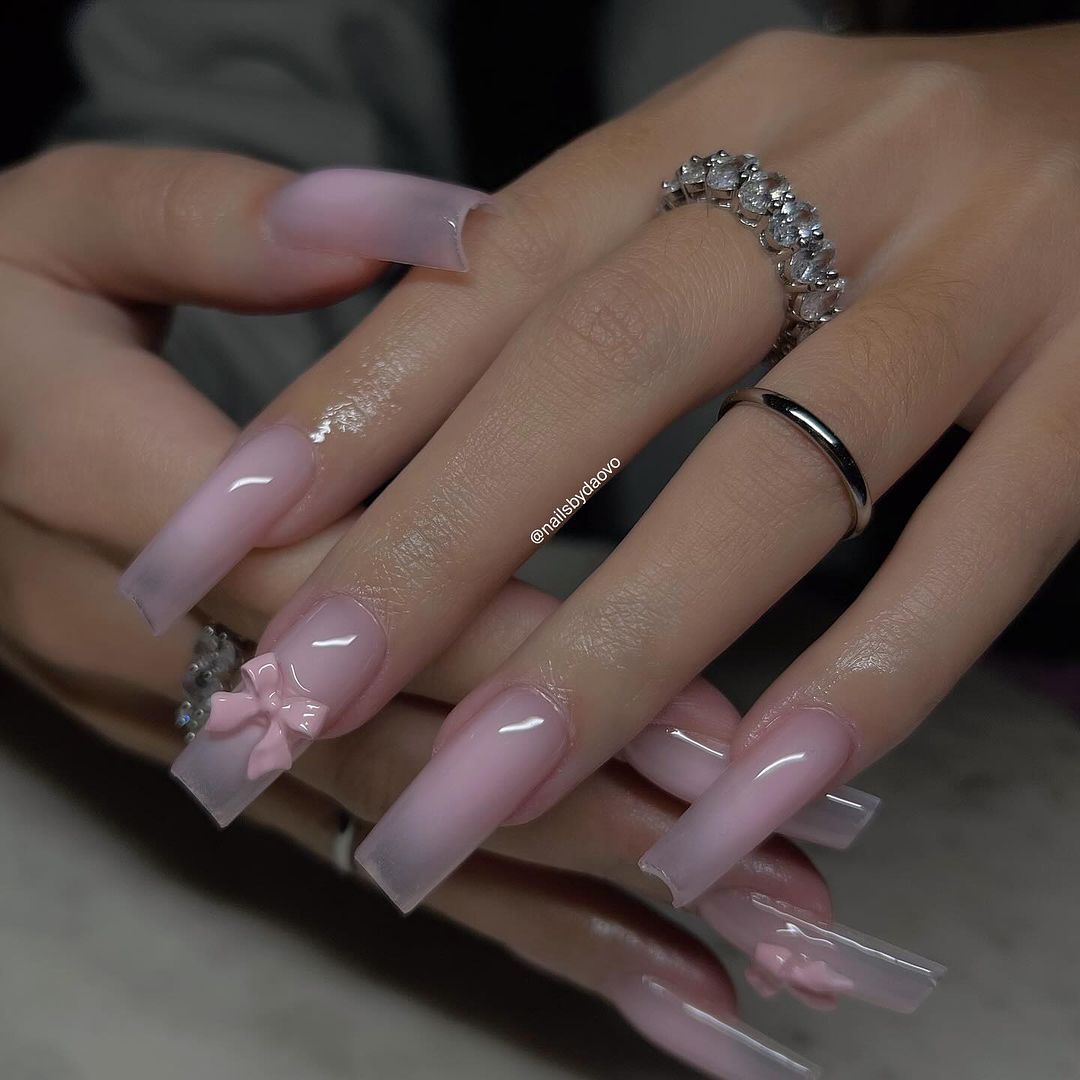
- Opinion: It’s the epitome of pink summer with a sprinkle of fairy dust. The kind of nails people will look at and start daydreaming about timeless love and sophistication.
- Accent Pieces: Each rhinestone has its own place in telling the story. Placed like notes in a symphony, they delicately create an equilibrium.
- Manicure Details: The softness of the ombre transition is as gentle as a whisper. Adding tiny bows sculpted on each nail adds to their charm by making them textured and touchable.
Materials:
- Ombre sponge
- Base coat – ‘Silken Base’ by NailTreats
- Pink gel polish – ‘Hush Blush’ by TenderTones
- Clear gel for sculpting – ‘Crystal Sculpt’ by GelArt
- Mini rhinestones – ‘Tiny Twinkles’ by GemGlisten
- Top coat – ‘Shine Supreme’ by LastingLuxe
Professional Recommendation: For those glass-like 3D effects like the bow on this design, I’d recommend using ‘Crystal Sculpt’ because it provides amazing clarity.
Steps To Do It Yourself (DIY)
- Use ‘Silken Base’ to protect your natural nails.
- Sponge in ‘Hush Blush’ for the ombre effect, fading into clear tip.
- Create a tiny bow with ‘Crystal Sculpt’ gel and cure under UV light.
Playful Heart Accents
Why wait until February? With these pink nails, adorned in white and red hearts, everyday can be Valentine’s Day. Whether it’s a bright and sunny day or a gloomy winter one, these playful polka-dots will keep you in the loving spirit all year long. And if you’re wondering about your toes, don’t worry! This design works just as well on fingernails as it does on toenails.

- Professional Opinion: A professional nail technician praised this bubbly approach to Valentine’s Day for its fun and energetic vibe that is so perfectly suited for summer.
- Accents: The heart accents are more than just an accent; they are each painted by hand with love.
- Manicure details: The short square acrylic base provides the perfect foundation for the bright and bubbly heart motif.
Consumables:
- Dotting tool
- Base coat – HeartWorks ‘Love Base’
- Pink polish – ValentineVarnish ‘Cupid’s Arrow’
- White polish – PureLines ‘White Whispers’
- Red polish – FieryHues ‘Passion Play’
- Top coat – EternalGloss ‘Endless Shine’
Professional Recommendation: The popular shade of pink is achieved through two coats of ValentineVarnish ‘Cupid’s Arrow’, which is said to provide a rich pink background that won’t dull or chip too easily.
DIY Steps
- Prepare the nail with a layer of ‘Love Base’ for an even foundation to work from.
- Apply two coats of ‘Cupid’s Arrow’ to get the bold pink tone – feel free to add more if necessary!
- Use your dotting tool to create hearts using the white and red polishes mentioned above.
- Once you’re happy with your design (and have let it dry), seal everything in using a layer of ‘Endless Shine’.
Citrus Splash: Zesty Lime & Pink Soda Pop
Immerse yourself with a burst of summer with these bubbly pink and green nails that is sure to quench your style thirst! These long nails take the soda pop effect and make it even more fun for summer’s excitement and energy—a design that’s sweet and lively.
- Pro Opinion: This juicy design is perfect for people who love an extra splash of playfulness in their summer style. It feels like a tall glass of pink lemonade on a hot day!
- Accents: The bubbles and flowers are meant to represent youthfulness, life, effervescence, and blooms of summertime.
- Manicure details: The colors are as bright as the season itself. With the sparkles representing the shimmering liquid surface of a cold drink.
Materials:
- Nail art brushes
- Base coat – ‘Fresh Start’ by VitaNail
- Pink gel polish – ‘Berry Fizz’ by FruityGel
- Lime green gel polish – ‘Lime Zest’ by CitrusGloss
- Clear builder gel – ‘Glass Effect’ by SeeThruNails
- Top coat – ‘Ultra Gloss’ by ShineMax
Pro Recommendation: ‘Glass Effect’ gives them an ultra-clear bubble-like appearance to help them stand out with personality!
DIY Steps:
- Start off with ‘Fresh Start’ so your colors will stick well.
- Put on ‘Berry Fizz’ and then ‘Lime Zest’ in alternating sections.
- Use ‘Glass Effect’ to add bubbles designs, along with 3D floral components.
- Finish it off with a layer of ‘Ultra Gloss’.
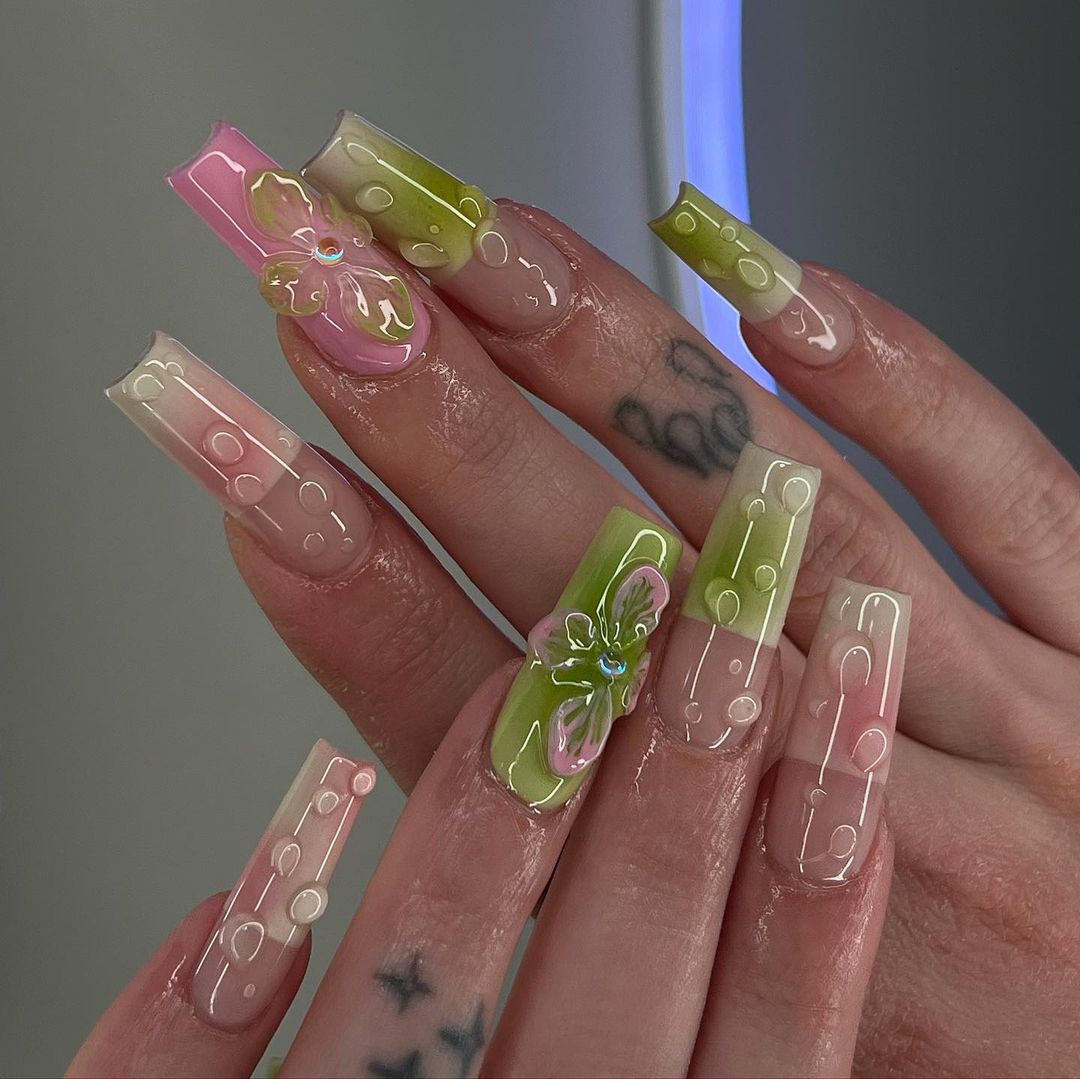
Summer Meadows on Your Fingertips
These nails were inspired by springtime, with translucent tips that give the illusion of a flower blooming into soft greenery. The bubbles make me think of dew on the grass in the morning—a refreshing twist to a pink summer look, with a touch of nature’s serenity.
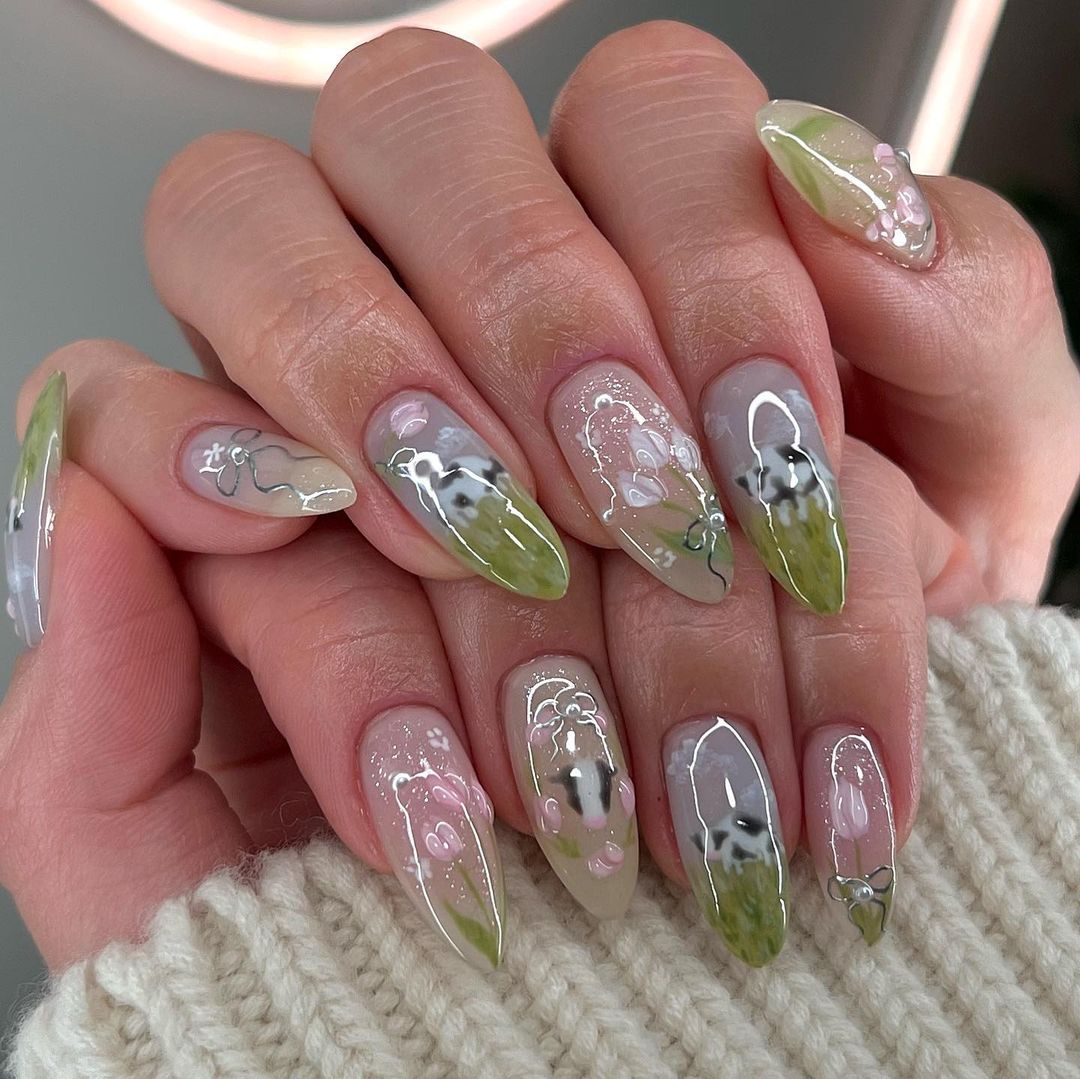
- Professional Opinion: It’s a perfect blend of art and illusion, where the nails become an extension of nature’s own beauty—a gentle nod to green landscapes wrapped in summer haze.
- Accents: The silver line work and whimsical bubbles add a touch of magic, as if fairies danced across these tips.
- Manicure details: The clear-to-green ombre is light and breathy, while the artistic embellishments lend depth and texture.
Products:
- Clear builder gel – ‘Nature’s Veil’ by TranslucentTrends
- Green polish – ‘Meadow Mist’ by EarthyEnamels
- Silver line polish – ‘Silvery Stream’ by LiquidMetals
- Bubble effect top coat – ‘Morning Dew’ by LacquerLuxe
- Top coat – ‘Nature’s Gloss’ by BioShine
Professional Recommendation: For this specific set, I used ‘Nature’s Veil’ by TranslucentTrends to create the glass-like clarity that worked perfectly as my botanical canvas.
DIY Steps
- Apply base using ‘Nature’s Veil’ to create a clear foundation.
- Sponge ‘Meadow Mist’ at the tips, blending upward for a soft ombre effect.
- With ‘Silvery Stream,’ draw fine line work to mimic wild grass growing out from under the nail bed.
- Dot ‘Morning Dew’ on for bubble-like texture, adding dimension.
- Seal with ‘Nature’s Gloss’ for shine and protection that lasts.
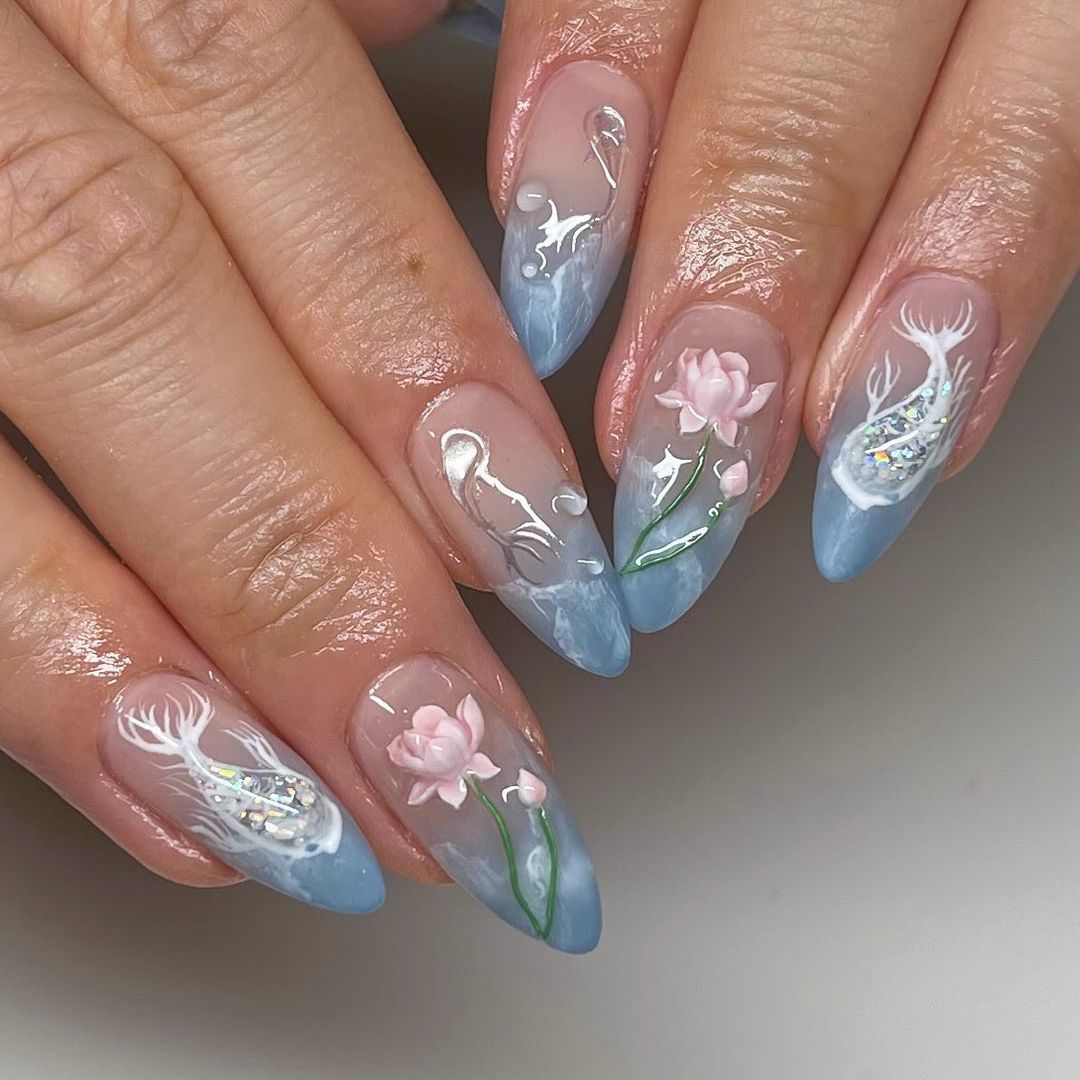
Blossoms and Koi Harmony
These nails should be like a bowl of soup, full of intricate drawings of cherry blossoms and koi — the perfect food for summer’s more thoughtful moments.
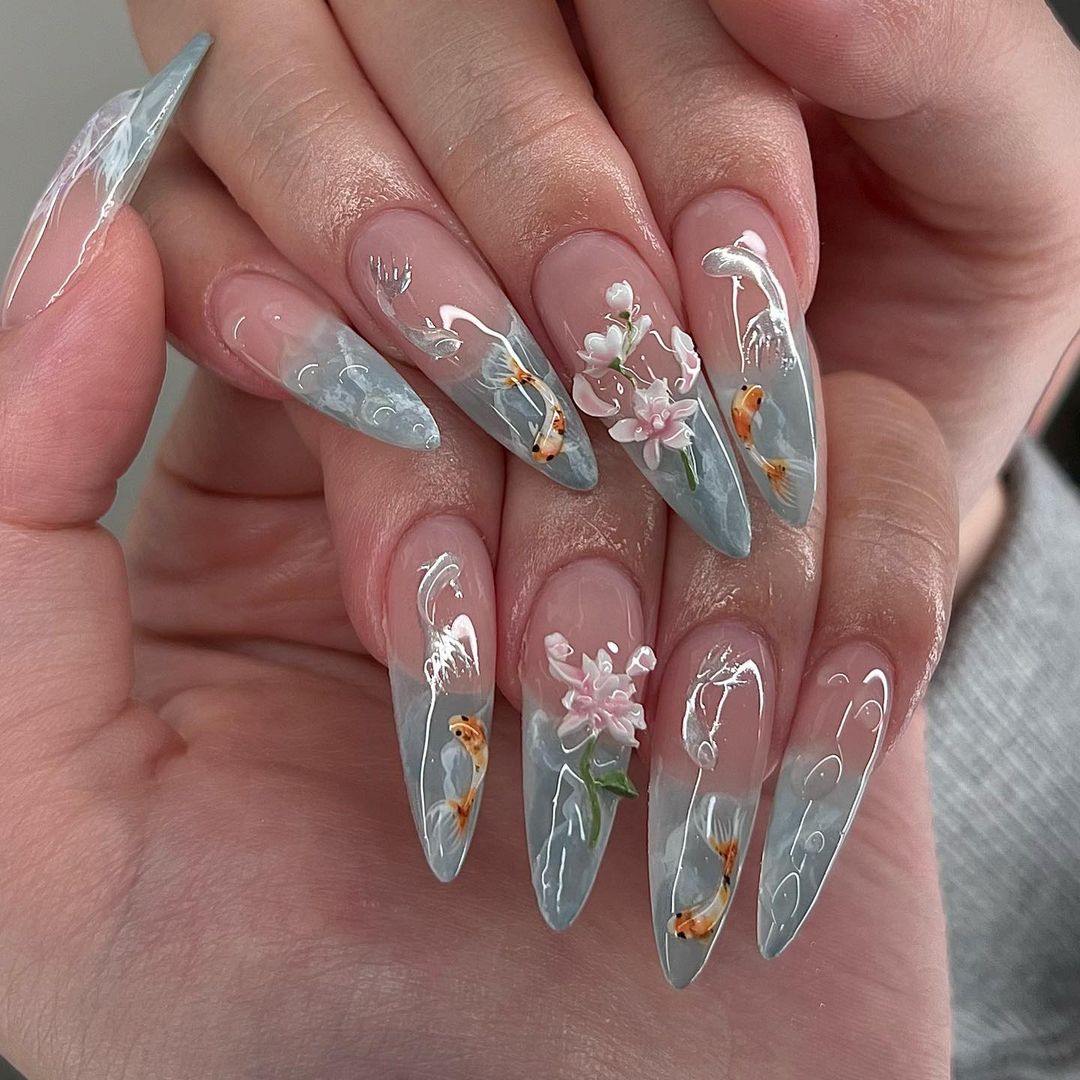
- Professional Opinion: This design takes you to a peaceful Japanese garden where every stroke is carefully painted into art. It is the most peaceful and reflective summer.
- Accent: Koi and flowers are symmetrical in soft colors and smooth lines, slowly floating on the nails with elegant ease.
- Manicure details: The blue background is beautifully set in watercolor style, which is perfect for plant animals and artwork.
Raw materials:
- Gel polish – “Sky Reflection” by SereneScapes
- White, pink and orange gels – “Pet Palette” by SakuraSwirls
- Brush with fine bristles
- Top coat – “Glossy Tranquility” by CalmCoat
Professional Recommendation: SakuraSwirl’s ‘Pet Palette’ has the right consistency for sophisticated nail art projects. Make sure your design is as soft as it looks!
DIY steps:
- Put down ‘Sky Reflection’ to keep calm with water blue color scheme effects.
- Using ‘Petal Palette’ acrylic paints and fine brushes to draw cherry blossoms and koi sauce respectively required brush strokes.
- Each brush stroke was applied carefully, layering them to add depth and realism.
- Finally, use ‘Glossy Tranquility’ as a finishing touch to make all scenes shine.
Candy Swirl Fantasy: A Whimsical Pink Parade
This statement is like a parade on your nails, a pink dream that swirls and twists to create something whimsical. It’s fun and bright, but not the kind of thing you’d see at any party. The design is more inspired by candy lace.
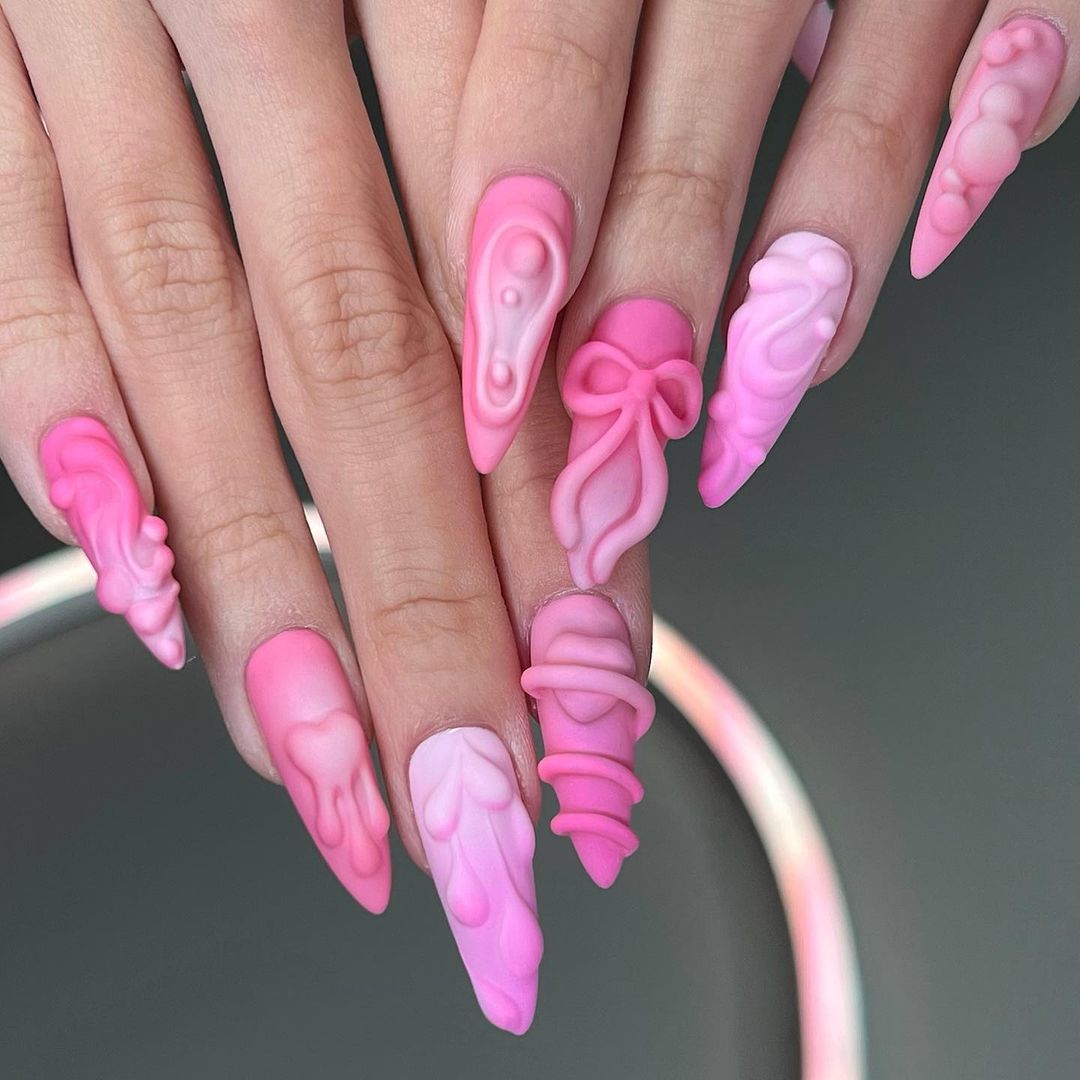
- The professional says: “These look like they belong in a scene from Willy Wonka’s Chocolate Factory. They’re playful, sweet and definitely not for the faint of heart.”
- Like ribbons on a cake: Each nail encases a different shape, all with candy-like curves and loops. It’s very similar to the frosting on top of cupcakes.
- The manicure details: The texture is very much tangible — which makes it look 3D in person as well.
Items used:
- Pink sculpting gel – ‘Frosted Fantasy’ by SweetSculpt
- Silicone shaping tools
- Base coat – ‘Sticky Base’ by HoldFast
- Matte top coat – ‘Velvet Matte’ by MatteMax
- Glossy top coat – ‘Super Shine’ by ReflectoGloss
According to the professional: “‘Frosted Fantasy’ works beautifully with these designs because it’s so easy to mold into shapes without cracking or chipping. Plus it dries down matte!”
Steps to recreate at home:
- Paint on a base coat using ‘Sticky Base.’
- Use the ‘Frosted Fantasy’ sculpting gel to create swirls and other abstract pieces.
- Perfect each shape with your silicone tools before moving onto the next one.
- Apply ‘Velvet Matte’ to some areas (like some swirls) and then apply ‘Super Shine’ in others (such as some loops).
- Now you’ve got fancy nails that kind of remind us of Malibu Barbie! Enjoy them this summer while you can.
Artistic Aura: Ethereal Line Work & Sparkles
Introducing an otherworldly collection of line art against soft shades, these nails are a creative and dreamy piece. It’s embellished with gentle sparkles and metallic hints that capture the supernatural feeling of summer time.
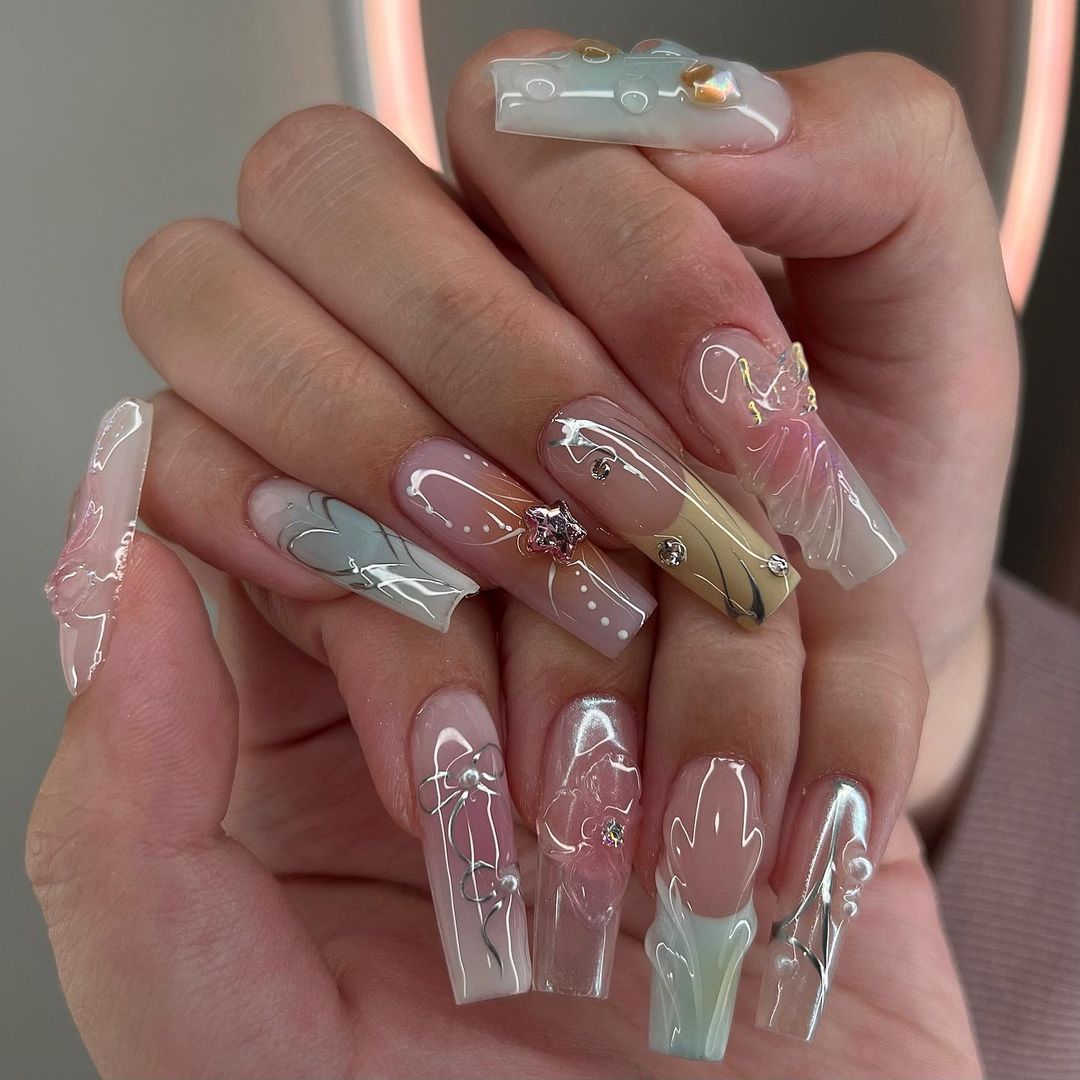
- Pro Tip: These nails act as a modern day art canvas. The pink and white contrast each other well to create a subtle yet effective visual statement.
- Accents: One starry diamond adds a sprinkle of drama into this minimalist design, it tells its own story of quiet enchantment.
- Manicure details: Every line is precisely crafted and the sparkles seem to appear almost magically.
Consumables:
- Nail art striping brush
- Base coat – ‘Ethereal Essence’ by SheerElegance
- Pink gel polish – ‘Whimsical Wish’ by DreamyHues
- White gel polish – ‘Milky Way’ by CosmicPolish
- Metallic accents – ‘Golden Threads’ by GildedGrace
- Rhinestone – ‘Lone Star’ by GemJewels
- Top coat – ‘Lustrous Veil’ by ShineSheild
Professional Recommendation: Use ‘Milky Way’ by CosmicPolish for a dream-like touch to your whites, they’ll blend right into your pinks flawlessly to give off that perfect summer feeling.
DIY Steps
- Start with a sheer base using ‘Ethereal Essence’.
- Blend ‘Whimsical Wish’ and ‘Milky Way’ to create your gradient effect.
- Precisely add lines with ‘Golden Threads’ for a luxurious touch.
- Place one rhinestone in the center as the focal point.
- Finish everything off with ‘Lustrous Veil’ for durability and shine.
Pink Precision: Geometric Elegance
These pink nails are a standout statement with their sharp lines and geometric precision. Each nail offers a contemporary art piece of its own due to the edgy cut-outs and diamond-like rhinestones that put summer’s playful side on full display.

- Professional Opinion: This look is for the bold trendsetters who want to bring a fresh take on pink summer fashion.
- Accents: There’s something about strategically placed rhinestones that just screams high-fashion allure.
- Manicure details: The crisp lines and architectural shapes put this design in line with modern trends.
Consumables:
- Stencils for geometric shapes
- Pink polish – ‘Modern Muse’ by ChicCanvas
- Clear gel for structure – ‘Architect Gel’ by StructureLine
- Rhinestones – ‘Precision Cuts’ by CrystalCraft
- Top coat – ‘Hard As Nails’ by ToughShine
Professional Recommendation: ‘Architect Gel’ by StructureLine is going to be your best friend when it comes to those clear cut-outs. It’ll let you get creative with negative space without sacrificing nail strength.
DIY Steps
- Coat the nails with ‘Modern Muse’ for a solid pink base.
- Use stencils and ‘Architect Gel’ to create the cutouts, then cure them under UV light.
- Add on the ‘Precision Cuts’ rhinestones for a diamond-like effect.
- Seal everything up with ‘Hard As Nails’ so all your hard work stays intact.
Sweet Simplicity: Pink Tips & Crystal Blossoms
Become one with the simple and sweet nature of these pink tipped nails. Each finger is garnished with a fragile crystal flower which is meant to give you a gentle reminder of the sight of flower blooming during the summer.
- Professional Opinion: It’s an old classic, but with a new twist— the addition of crystals gives it an element that elegant and adorable at the same time.
- Accents: Each nail has its own garden attached to it. The flowers are meant to show how beautiful summer really is.
- Manicure details: The pink tips are forever in style, but modernized when paired with crystal art.
Consumables:
- Pink polish – ‘Blossom Tip’ by PetalPaints
- Nail glue
- Crystal flowers – ‘Tiny Gardens’ by BlingFlora
- Top coat – ‘Seal in Style’ by LastFinish
Professional Recommendation: ‘Tiny Gardens’ by BlingFlora offers exquisite detail, allowing for intricate designs without overwhelming the nail’s natural beauty.
DIY Steps
- Apply ‘Blossom Tip’ for a clean, pink tipped look.
- Use nail glue to carefully place ‘Tiny Gardens’ crystal flowers.
- Apply ‘Seal in Style’ to protect your design and add shine.
Timeless French with a Twist
A new take on the classic French manicure, these nails combine a pure pink polish with a bright white tip. They’re both traditional and modern, making them great for summer events.
- Professional Opinion: These are really versatile nails. You could wear them to a wedding or to the office. You can dress them up or down and they’ll still look great.
- Accents: Add just a bit of shine near your cuticle for an extra dash of glam that won’t distract from the rest of the manicure.
- Manicure details: The transculent extensions are what gives this design its twist.
You’ll Need:
- Base coat – ‘Classic Base’ by FoundationFusion
- Pink polish – ‘Soft Whisper’ by PastelPalette
- Clear extension gel – ‘Crystal Extend’ by SheerLux
- Sparkle accents – ‘Subtle Shine’ by GlitterGlam
- Top coat – ‘Timeless Shine’ by DurableGloss
Professional Recommendation: Use ‘Crystal Extend’ with the soft pink shade if you want your nails to look longer than they actually are.
DIY Steps
- Apply one layer of ‘Classic Base.’
- Starting at the base of your nail, paint on ‘Soft Whisper,’ blending it into the clear extension.
- Using ‘Subtle Shine,’ add a hint of sparkle closer towards your actual finger.
- Finish with one layer of ‘Timeless Shine.’
Underwater Fantasy: Aquatic Elegance
Take a deep dive into elegance with these water-themed nails that shimmer like the sea. With lovingly created aquatic plants and tiny pearls, they’re a journey to the serene side of summer.
- Professional Opinion: These nails are like having a portable fish tank; each time you look at them, you’ll be transported to the calm of open water—a refreshing burst of creativity for any summer escapade.
- Accents: The 3D pearls are little beads of liquid that reflect light and bring an extra dimension to the underwater tale.
- Manicure details: The colors graduate just like the ocean’s layers, giving your nail artist plenty of room to paint corals and seaweed.
Consumables:
- Gradient polish set – ‘Ocean’s Depth’ by DeepSeaColors
- Detailing brushes
- White paint for flora – ‘Seafoam White’ by AquaArt
- Pearlescent embellishments – ‘Ocean Pearls’ by MarineBling
- Top coat – ‘Seal of the Sea’ by WatertightFinish
Professional Recommendation: ‘Ocean’s Depth’ by DeepSeaColors has all the blues you need to recreate this gradient. And for fine detailing, I’d go with ‘Seafoam White.’
DIY Steps
- Start your nail art journey with a gradient using ‘Ocean’s Depth’.
- Use white paint and detailing brushes to craft delicate flora.
- Place pearl embellishments in random patterns throughout your design for an organic feel.
- Finish off with top coat to make sure everything stays where it should while swimming.
Blossoming Beauty: Vivid Pink Ombre and Floral Art
Celebrate summer with these radiant almond nails, painted in a bright pink color. This set features an ombre design and hand-painted flowers for an extra touch of elegance. The design is dedicated to the beauty of nature and the vibrant colors that come with the season.
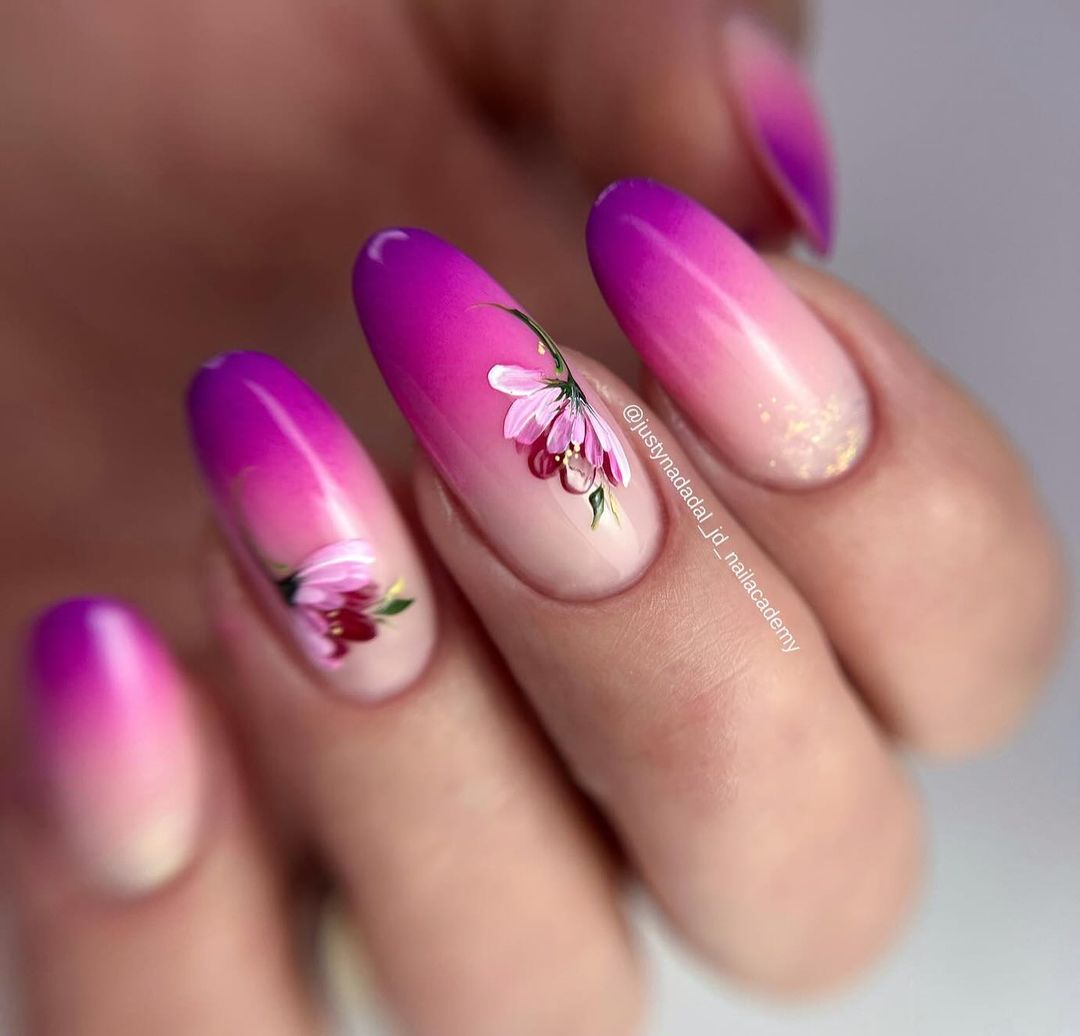
- Professional Opinion: These bold pink hues combined with such intricate floral artistry make this set the perfect match for summertime.
- Accents: A little bit of sparkle goes a long way, which is why we added small golden flakes throughout.
- Manicure details: The background of each nail has been painted in such a way that it serves as its own miniature masterpiece.
Items Used:
- Pink ombre polish kit – ‘Sunset Blooms’ by VibrantVarnish
- Detailing brushes
- Floral art paints – ‘Petal Paints’ collection
- Gold leaf flakes – ‘Gilded Touch’ by PreciousPieces
- Top coat – ‘Lasting Radiance’ by EternalShine
Professional Recommendation: For lifelike flowers like this, use a mix of colors from the ‘Petal Paints’ collection. If you want an extravagant finish touch, sprinkle some gold flakes from ‘Gilded Touch.’
DIY Steps
- Start by applying the lighter shade of pink at the base, then transition into darker shades towards the tip.
- Use fine brushes and your choice of colors to paint each flower individually.
- Accentuate your design with gold leaf shards for an opulent effect.
- Seal off your creation while adding shine using top coat.
Sunny Splendor: Warm Yellow Ombre and Daisy Accents
This vivid design is a burst of sunshine on your nails, featuring a warm ombre that fades into a sparkly celebration. It’s just as bright and jubilant as a summer day with cute daisy accents to freshen up the look.
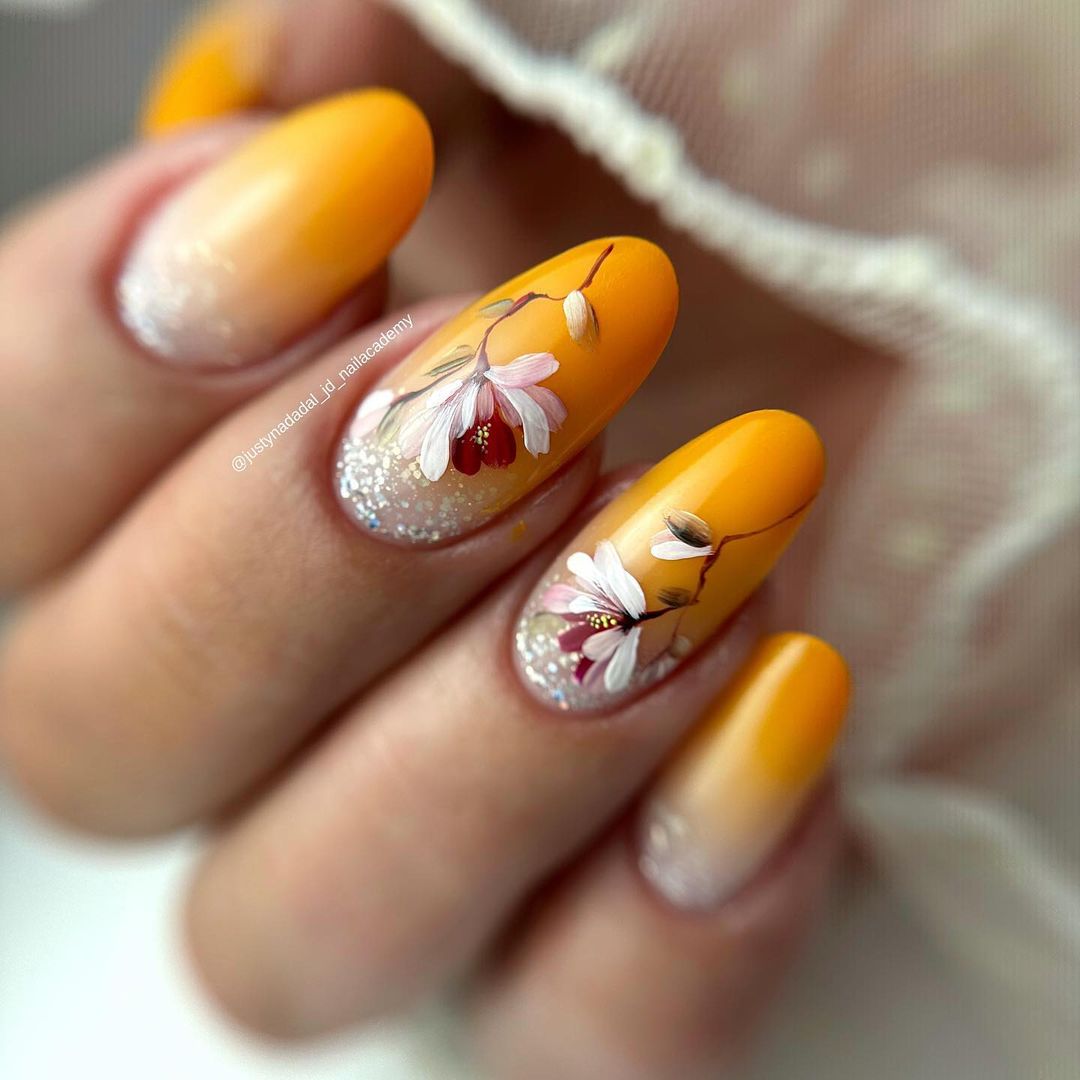
- Pro Tip: The sunny color palette radiates joy and good vibes, making it perfect for boosting spirits and matching your sun-kissed skin.
- Accents: Whimsical daisies give these nails an element of playful charm, like running through fields on a warm day.
- Manicure details: The ombre is blended so seamlessly that you’ll feel as though you’re watching the sunrise right from your fingertips.
Materials:
- Yellow ombre polish set – ‘Solar Flare’ by DaylightDew
- White and brown art paints – ‘Daisy Duo’ by FloralFancies
- Glitter top coat – ‘Stardust Sprinkle’ by TwinkleTips
- Top coat – ‘Sunbeam Seal’ by SummerShine
Pro Recommendation: For the perfect blend of sunlight colors in this sun-kissed ombre, try out ‘Solar Flare’ from DaylightDew. And if you want to add some sparkle that looks just like sunshine reflecting off your nails, use ‘Stardust Sprinkle’.
DIY Steps:
- Blend the yellow shades from the ‘Solar Flare’ set for an ultra-sunshine yellow that fades perfectly across your fingers.
- Paint whimsical daisies on each nail using white and brown paint from the ‘Daisy Duo’ kit. This will add fun dimension to each finger.
- Add some sparkle with a light dusting of ‘Stardust Sprinkle’. You’ll be shining brighter than ever before!
- Protect your work with ‘Sunbeam Seal.’ You don’t want anything ruining this beautiful manicure that looks just like summer.
FAQs
Q: Can I achieve these designs with short square acrylic nails?
A: Absolutely! While length offers more canvas, these designs are adaptable to shorter lengths, giving a chic and modern look.
Q: How do I prevent my ombre from looking muddy?
A: The key is to use a light hand when blending and clean the sponge between applications to keep colors true and vivid.
Q: Are there any designs that work well with toenails beach vibes?
A: Try a simple pink and blue sparkle ombre with a French tip. It’s easy, breezy, and beach-ready.
Save Pin